
INSTRUCTION MANUAL
WARNING!! Before installing, thoroughly read this manual that is an integral part of this Kit.
QUIKO declines any responsabilità in the event curret stadards in the country of installation are not
comlplied with.
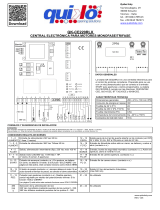
Control Board with Inverter
For Industrial automation
230Vac single phase power supply
230Vac three-phase motor output
QK-CE220RLINV
V02/2019
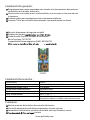
IMPORTANT NOTICE:
In case of connection of
230V single phase motor,
the motor must be connected
without capacitor.
IMPORTANT NOTICE:
In case of connection of
230V three phase motor,
the motor must be connected
with DELTA connection.

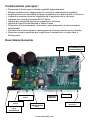
Main features:
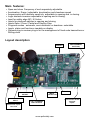
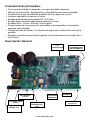
Layout description
ü Open and close Frequency of work separately adjustable
ü Acceleration Ramp / adjustable deceleration and slowdown speed
ü Amperometric with obstacle sensitivity adjustable in opening and in closing
ü Logic obstacle inversion adjustable in opening and in closing.
ü Input for safety edge NC / 8.2 kohm
ü Inputs for photocell-safeties in opening and closing
ü Inputs Open / Close / Partial and Step-by-Step
ü Programs modes : automatic, semi-automatic or deadman selectable
ü Inputs status and functions viewable on display
ü Optional plug-in receiver plug-in for the management of fixed code transmitters or
Rolling-code
PLACEMENT/
PROGRAMMING
BUTTONS
DISPLAY
230 Vac line
INPUT
Power side input
fuse 10A
TRIPHASE MOTOR
OUTPUT
230 V FLASHING
LIGHT OUTPUT
IMPUT
STATUS LED
IMPUTS
Accessorizes 24 Vac
Terminal
Inputs
www.quikoitaly.com

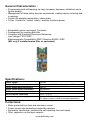
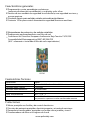
General Characteristics :
Programming and self-learning via keys (increase, decrease, validation) and a
figures display
Management of three safety devices as photocell, a safety device inclosing and
in opening.
Contact for signaling automation / alarm state
12Vac Contact for control safety / auxiliary functions power
Extractable power and signal Terminals
Predisposed for coupling with filter
Complies with European Directives Reference:
Low Voltage 73/23 / EEC
Electromagnetic Compatibility (EMC) Directive 89/336 / EEC
(NB: only if installed mains filter or equivalent)
FILTER
Specifications:
Power supply 230Vac
Output Motor Three phase230 VAC – Single phase 230 Vac
Three phase motor connection DELTA
Single phase motor connection No capacitor
Motor power 2HP
Environmental conditions -20°C / + 55 °C
Accessories power supply 12-24 VDC/AC – 4 Watt
For higher powers, install an external transformer
Protections:
Motor protected by a fuse and electronic control
Power circuits electronically protected by varistors.
Secondary transformer, protected by self-resetting fuse and transil.
Filter capacitors on the input network
www.quikoitaly.com

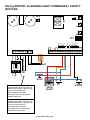
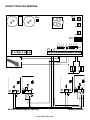
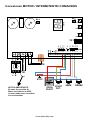
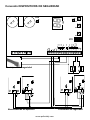
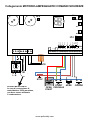
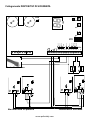
FLASHING LIGHT
M
L N
STOP
CLOSE
OPEN
START
Wiring MOTOR / FLASHING LIGHT/ COMMANDS / SAFETY
DEVICES
ON
1 2 3 4
SW1
P1
P2
P3
1 2 3 4 5 6 7 8
10 11 12 13 14 15 16 17 18 19 20 21 22 23 24 25 26 27 28 29
DL1
DL0
DL2
DL3
DL4
DL5
DL6
DL7
DL8
DL9
DL10
DL11
IN 2
IN 3
IN 4
IN 5
COM +
IN 6
IN 7
IN 8
IN 9
IN 10
IN 11
COM +
12V DC
DS1
- +
24Vdc
www.quikoitaly.com
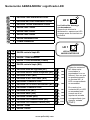
IMPORTANT NOTICE:
In case of connection of
230V single phase motor,
the motor must be connected
without capacitor.
IMPORTANT NOTICE:
In case of connection of
230V three phase motor,
the motor must be connected
with DELTA connection.

F
C
A
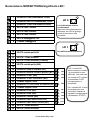
Safety edge F
C
C
SAFETY DEVICES WIRINGS
Barrier/Safety edge in opening Safety photocell
ON
1 2 3 4
SW1
P1
P2
P3
1 2 3 4 5 6 7 8
10 11 12 13 14 15 16 17 18 19 20 21 22 23 24 25 26 27 28 29
DL1
DL0
DL2
DL3
DL4
DL5
DL6
DL7
DL8
DL9
DL10
DL11
IN 2
IN 3
IN 4
IN 5
COM +
IN 6
IN 7
IN 8
IN 9
IN 10
IN 11
COM +
12V DC
88
DS1
- +
24Vdc
www.quikoitaly.com

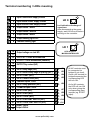
Terminal numbering / LEDs meaning
1Input Phase Power Supply 230Vac
2Input Neutral Power Supply 230Vac
3Input Ground Power Supply 230Vac
4Output Phase 1 motor
5Output Phase 2 motore
6Output Phase 3 motor
7Output flashing light 230V
8Common flashing light
10 Output voltage con tact NO
11
12 OUTPUT-12Vdc accessoires
13 OUTPUT +12Vdc accessoires (common)
14
OUTPUT Dry contact (NO)
15
16
INPUT safety edge (NC)
LD2
17
INPUT barrier/safety edge in opening (NC)
LD3
18
INPUT START (NO)
LD4
19
INPUT PEDESTRIAN (NO)
LD5
20 Common inputs 12Vdc
21
INPUT safety photocell (NC)
LD6
22 COMMON inputs 12Vdc
23
INPUT STOP (NC)
LD7
24
INPUT OPEN (NO)
LD8
25
INPUT CLOSE (NO)
LD9
26
INPUT OPEN LIMIT SWITCH (NC)
LD10
27
INPUT CLOSE LIMIT SWITCH (NC)
LD11
28
29
LD 0
Led indication discharge of
capacitors.
After disconnecting the power
supply, wait LD0 turns off before
working on the controller.
LD 1
LED ACTIVITY
MICROCONTROLLER
Output - 24Vdc
Output +24Vdc
www.quikoitaly.com
All NC contacts must
be connected (or
bridged if not used).
Once a NC terminal is
bridged/connected the
corresponding LED
will turn ON.
As for NO contacts,
the LED will turn ON
only when giving the
corresponding input
impulse (eg. START
input).

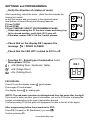
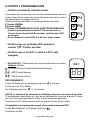
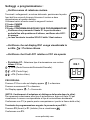
SETTINGS and PROGRAMMING
Verify the direction of rotation of motor
After connecting, unlock the motor , place the door outside the
closing limit switch,
re-lock the engine and give power to the electrical panel.
Use buttons on board having the following features:
P1 key CLOSE
P2 key OPEN
P3 key CONFIRM / SELECT PROGRAMMING PHASE
Check that pressing the P1 the door closes and bring it up
to the closed position, verify that LD11 goes off.
Otherwise reverse ONLY 2 of the 3 motor phases.
Check that on the display DS1 appears the
message =DOOR CLOSED
Check that the LED LD11 related to FCC is off
ü Function 01 - Select type of automation motor
three-phase 230Vac
=PS (Sliding Door / Sectional / Gate).
=PF (Fridge Door).
=PL (Folding Door).
P1
P2
P3
88
DS 1
PROCEDURE:
Press P3 until the display shows and release.
Press again P3 and release.
The display shows = sliding gate.
(NOTE: The sub-menu selection is distinguished from the point after the digit).
If you need to select another type of automation, act on the P2 button to display the
number corresponding to the type of automation desired.
Confirm pressing P3 (at this point will disappear the dots to the left of the digits).
After programming follow the procedure for ESC:
Press P2 (Forward) or P1 (Backward) l you see
Confirm pressing P3.
www.quikoitaly.com

PL
30Hz
Function 02 - Select type of automation motor single-phase 230Vac
=PS (Sliding Door / Sectional / Gate).
=PF (Fridge door).
=PL (Folding door).
PROCEDURE:
Press P3 until appears on the display, then release.
Press P2 (Forward) appears
Press again P3 and release.
On Display appears .= Sliding door.
(NOTE: The sub-menu selection is distinguished from the point after the digit).
If you need to select another type of automation press the P2 button to display the
number corresponding to the type of automation desired.
Confirm with P3.
After programming follow the procedure for ESC:
Press P2 (Forward) or P1 (Backward) until you see
Confirm pressing P3.
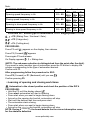
Learning of opening and closing work times
Automation in the closed position and check the position of the DIP 4
PROCEDURE:
ü Hold the P3 until the display shows
ü Press start: automation will start in opening
ü Press start when you want to begin slowing down.
ü Arrived on the opening limit switch, automation will stop.
ü Wait until the desired wait time and press start.
ü The automation starts closing.
ü Press start when you want to begin slowing down.
ü Arrived on the opening limit switch, automation will stop.
NOTE: During this phase, the board detects the the current absorption curve,
for the obstacle detection.
PL
30Hz
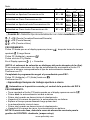
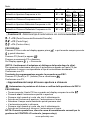
Closing in slow speed frequency in Hz
PL
50Hz
Opening in slow speed frequency in Hz
PL
50Hz
Closing speed frequency in Hz
Note:
FACTORY SETTING Min/Max Pre-set
Opening speed frequency in Hz 01 ÷99 PS
50Hz
PF
25Hz
01 ÷99 PS
50Hz
PF
25Hz
01 ÷99 PS
25Hz
PF
15Hz
01 ÷99 PS
25Hz
PF
15Hz
.
.
.
www.quikoitaly.com

Select type of logic for START input with DIP 4
This type of logic is to be selected after the Learning-Phase
ü DIP4 in OFF : The input-Start Open, assumes the function of
the Start. So button connected to this input will function either
by command that opens and closes.
ü DIP4 in ON : The entrance Start-Open, assumes the function
of command opens both impulsive or dead man. So, the button
connected to this input, it will work just as command opens. In
this case, will have to be used the Command Closes, (Close)
for the reclosing.
ON
1 2 3 4
SW1
ON
OFF
ü Place the automation in closed position
ü Hold the P3 until the display shows
ü Press pedestrian start: automation will start in opening
ü Press pedestrian start when you want the automation to stop.
ü Wait until the desired wait time and press pedestrian start.
ü The automation starts closing.
ü Arrived on the opening limit switch, automation will stop.
ü Learning partial working time (Pedestrian)
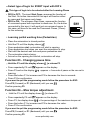
Function 03 - Changing pause time
Hold the P3 until the display shows e release P3
ü Press repeatedly P2 until appears on the display.
ü Press P3 and on the display .
appears = 4 seconds of pause or the one set in
learning.
ü Press the button P1 to increase and P2 to decrease the time in seconds
ü Press P3 for confirmation
If you want to quit the programming mode follow the procedure for ESC:
Press P2 (Forward) or P1 (Backward) until you see
Confirm pressing P3.
Function 04 – Max torque adjustment.
ü Hold the P3 until the display shows e release P3
ü Press repeatedly P2 until appears on the display.
ü Press P3, the display show . = the percentage of the maximum torque set.
ü Press the button P1 to increase and P2 to decrease the value.
ü Press P3 for confirmation
If you want to quit the programming mode follow the procedure for ESC:
Press P2 (Forward) or P1 (Backward) until you see
Confirm pressing P3.
www.quikoitaly.com

PL
30Hz
Closing in slow speed frequency in Hz PL
30Hz
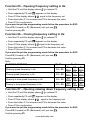
Function 07 – Opening slowing down frequency setting in Hz
.
ü Hold the P3 until the display shows e release P3
ü Press repeatedly P2 until appears on the display
ü Press P3 the display shows . equal to the frequency set.
ü Press the button P1 to increase and P2 to decrease the value
ü Press P3 for confirmation.
If you want to quit the programming mode follow the procedure for ESC:
Press P2 (Forward) or P1 (Backward) until you see
Confirm pressing P3.
PL
50Hz
Opening in slow speed frequency in Hz 01 ÷99 PS
25Hz
PL
50Hz
Closing speed frequency in Hz
Function 05 – Opening frequency setting in Hz
ü Hold the P3 until the display shows e release P3
ü Press repeatedly P2 until appears on the display
ü Press P3 the display shows .equal to the frequency set.
ü Press the button P1 to increase and P2 to decrease the value
ü Press P3 for confirmation.
If you want to quit the programming mode follow the procedure for ESC:
Press P2 (Forward) or P1 (Backward) until you see
Confirm pressing P3.
Function 06 – Closing frequency setting in Hz
ü Hold the P3 until the display shows e release P3
ü Press repeatedly P2 until appears on the display
ü Press P3 the display shows . equal to the frequency set.
ü Press the button P1 to increase and P2 to decrease the value
ü Press P3 for confirmation.
If you want to quit the programming mode follow the procedure for ESC:
Press P2 (Forward) or P1 (Backward) until you see
Confirm pressing P3.
Note:
FACTORY SETTINGS Min/Max Pre-Set
Opening speed frequency in Hz 01 ÷99 PS
50Hz
PF
25Hz
01 ÷99 PS
50Hz
PF
25Hz
PF
15Hz
01 ÷99 PS
25Hz
PF
15Hz
www.quikoitaly.com

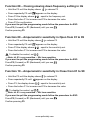
Function 08 – Closing slowing down frequency setting in Hz
ü Hold the P3 until the display shows e release P3
ü Press repeatedly P2 until appears on the display
ü Press P3 the display shows . equal to the frequency set.
ü Press the button P1 to increase and P2 to decrease the value
ü Press P3 for confirmation.
If you want to quit the programming mode follow the procedure for ESC:
Press P2 (Forward) or P1 (Backward) until you see
Confirm pressing P3.
Function 09 – Amperometric sensitivity in Open from 01 to 99
ü Hold the P3 until the display shows e release P3
ü Press repeatedly P2 until appears on the display
ü Press P3 the display shows . equal to the sensitivity set.
ü Press the button P1 to increase and P2 to decrease the value
To disable the control, set .
Note: id. 01= very sensitive – 99= less sensitive.
If you want to quit the programming mode follow the procedure for ESC:
Press P2 (Forward) or P1 (Backward) until you see
Confirm pressing P3.
Function 10 – Amperometric sensitivity in Close from 01 to 99
ü Hold the P3 until the display shows e release P3
ü Press repeatedly P2 until appears on the display
ü Press P3, the display shows . equal to the sensitivity set.
ü Press the button P1 to increase and P2 to decrease the value
To disable the control, set .
Note: id. 01= very sensitive – 99= less sensitive.
If you want to quit the programming mode follow the procedure for ESC:
Press P2 (Forward) or P1 (Backward) until you see
Confirm pressing P3.
www.quikoitaly.com

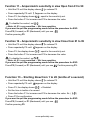
Function 11 – Amperometric sensitivity in slow Open from 01 to 99
ü Hold the P3 until the display shows e release P3
ü Press repeatedly P2 until appears on the display
ü Press P3, the display shows . equal to the sensitivity set.
ü Press the button P1 to increase and P2 to decrease the value
To disable the control, set .
Note: id. 01= very sensitive – 99= less sensitive.
If you want to quit the programming mode follow the procedure for ESC:
Press P2 (Forward) or P1 (Backward) until you see
Confirm pressing P3.
Function 12 – Amperometric sensitivity in slow Close from 01 to 99
ü Hold the P3 until the display shows e release P3
ü Press repeatedly P2 until appears on the display
ü Press P3, the display shows . equal to the sensitivity set.
ü Press the button P1 to increase and P2 to decrease the value
To disable the control, set .
Note: id. 01= very sensitive – 99= less sensitive.
If you want to quit the programming mode follow the procedure for ESC:
Press P2 (Forward) or P1 (Backward) until you see Confirm pressing P3.
Function 13 – Starting blow from 1 to 20 (tenths of a second)
ü Hold the P3 until the display shows e release P3
ü Press repeatedly P2 until appears on the display
ü Press P3, the display shows . = Disabled.
ü Set the time in tenths of a second
ü Press the button P1 to increase and P2 to decrease the value. Ex. ( . )
ü Press P3 for confirmation
If you want to quit the programming mode follow the procedure for ESC:
Press P2 (Forward) or P1 (Backward) until you see
Confirm pressing P3.
www.quikoitaly.com

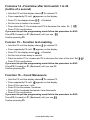
Funzione 14 –Final blow after limit switch 1 to 20
(tenths of a second)
ü Hold the P3 until the display shows e release P3
ü Press repeatedly P2 until appears on the display
ü Press P3, the display shows . = Disabled.
ü Set the time in tenths of a second
ü Press the button P1 to increase and P2 to decrease the value. Ex. ( . )
ü Press P3 for confirmation
If you want to quit the programming mode follow the procedure for ESC:
Press P2 (Forward) or P1 (Backward) until you see
Confirm pressing P3.
Funcion 15 – Function test enabling
ü Hold the P3 until the display shows e release P3
ü Press repeatedly P2 until appears on the display
ü Press P3, the display shows . = Disabled.
ü Set the time of start delay in second
ü
Press the button P1 to increase and P2 to decrease the value of the start. Ex.(
.
)
ü Press P3 for confirmation.
If you want to quit the programming mode follow the procedure for ESC:
Press P2 (Forward) or P1 (Backward) until you see ES
Confirm pressing P3.
Function 16 – Count Maneuvers.
ü Hold the P3 until the display shows e release P3.
ü Press repeatedly P2 until appears on the display
ü Press P3 to view tens / units
ü Press P2 for thousands / hundreds
ü Press P2 for hundreds-thousands / tens-thousands
ü Press P3 for confirmation.
If you want to quit the programming mode follow the procedure for ESC:
Press P2 (Forward) or P1 (Backward) until you see
Confirm pressing P3.
www.quikoitaly.com

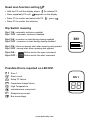
Dead man function setting
ü Hold the P3 until the display shows e release P3.
ü Press repeatedly P2 until appears on the display
ü Press P3 to confirm and select with P2 yes or
ü Press P3 to confirm the selection
Dip Switch meaning
ON
1 2 3 4
SW1
ON
OFF
Dip 1 ON : automatic reclosure enabled
Dip 1 OFF : automatic reclosure disabled
Dip 2 ON : inversion on start during closing enabled
Dip 2 OFF : inversion on start during closing disabled
Dip 3 ON : does not accept start when opening and opened
Dip 3 OFF : accept start when opening and opened
Dip 4 ON : Button works like open command
Dip 4 OFF : Button works like start command
Possible Errors reported on LED DS1
88
DS 1
Error 1.
Short circuit.
Setup FF failure.
Capacitors charge failure.
High Temperature.
Instantaneous overcurrent.
Delayed overcurrent..
Bus overvoltage.
www.quikoitaly.com

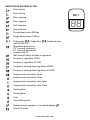
INDICATIONS ON DISPLAY DS1
88
DS 1
Door closed.
Door closing.
Door opening.
Door opened.
Self -learning.
Stop pressed.
Three-phase motor 230Vac
Single-phase motor 230Vac
. . Sliding gate . . Fridge door . . Sectional door;
confirm with P3.
Regulation pause time:
P2 1 second increment,
P1 1 second decrement,
Confirm with P3.
Max torque Display number of operation.
Frequency regulation OPEN
Frequency regulation CLOSE
Frequency slowing down regulation OPEN
Frequency slowing down regulation CLOSE
Amperometric sensitivity Open
Amperometric sensitivity Close
Amperometric sensitivity slow Open
Amperometric sensitivity slow Close
Starting blow.
Closing blow.
Test.
Count Maneuvers.
Deadman only operation. If activated display .
Press P3 to exit.
www.quikoitaly.com

|
DECLARATION OF CONFORMITY
The manufacturer claims that the device complies with the essential safety requirements of the
directives:
ü Radio equipment - 1999/5 / EC;
ü Low Voltage - 73/23 / EEC, 93/68 / EEC (EN 60335-1 (1998));
ü Electromagnetic Compatibility - 89/336 / EEC, 93/68 / EEC, 98/37 / EC (EN 50081-1, EN
50081-2, EN 61000-3-2, EN 61000-3-2 / A1, EN 61000-3-2 / A2, EN 61000-3- 2 / A14,
EN61000-3-3, EN 61000-6-2, ETSI EN 300220-3, ETSI EN 301489-3, ETSI EN 301489-1)
As well as their changes and updates, and the provisions that implement their assimilation within
the National Legal System of the country of destination and use of the car.
The data and images are purely indicative reserves the right to modify at any time characteristics
of the products described in its sole discretion, without notice.
www.quikoitaly.com
QUIKO ITALY
Via Seccalegno, 19
36040 Sossano (VI) - Italy
Tel. +39 0444 785513
Fax +39 0444 782371
info@quiko.biz
www.quikoitaly.com

QK-CE220RLINV
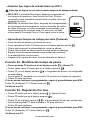
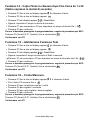
¡ATTENCIÓN!! Antes de efectuar la instalacion, lea attentamente el presente manual.
La Empresa QUIKO no asumirà responsabilidad alguna en caso de inobservancia de las normas
vigentes en el pais donde se lleva a cabo la installacion
Control automatizaciones
a INVERTER
para automatizaciones Industriales
alimentaciòn monofàsica 230Vac
salida motor trifàsica 230Vac
V01/2019

ü Frecuencia de trabajo en apertura y en cierre ajustable separado
ü Rampa de aceleración / deceleración y velocidad del paro suave ajustable
ü Amperométrica con sensibilidad ajustable tanto en apertura y cierre
ü Inversión regulable en apertura y cierre.
ü Entrada para banda de seguridad NC / 8,2 kohm
ü Entrada para fotocélula-seguridad en apertura y cierre
ü Entradas Abrir / Cerrar / Parcial y Paso a paso
ü Programación de funcionamento: automático, semiautomático o de hombre
presente seleccionable
ü Visualiciaciones de estado, y la función de asignación a través del menú de la
pantalla
ü Receptor enchufe opcional para la gestión de los transmisores de código fijo o
Rollin-code
Características principales:
Descripciòn General
BOTONES
PROGRAMACION/
EMPLAZAMIENTO
LCD
VISUALIZACION
ENTRADA LINEA
230Vac
FUSIBLE 10A
SALIDA Motor
Trifàsico
SALIDA
INTERMITENTE
230V
LED ESTADO
ENTRADAS
ENTRADAS
Abrasaderas 24Vdc
Accesorios
www.quikoitaly.com

Caracteristicas generales
Programaciòn y auto aprendizaje con botones
(aumento,disminuciòn,convalidaciòn) y un display a dos cifras
Gestiòn de tres medidas de seguridad: una fotocèlula, una seguridad en cierre y
una en apertura.
Contacto limpio para slar estado automatizaciòn/alarme
Contacto 12Vac para control alimentaciòn seguridad/funciones auxiliares
Abrasaderas de potencia y de sle extraibles
Predispuesta para acoplamiento con ltro de red
Conforme a las Directivas Europeas d referencia: Baja Tensiòn 73/23/CEE
Compatibilidad Eletromagnetica (EMC) 89/336/CEE
(N.B. : solamente si instalado el ltro de red o equivalentes)
Carateristicas Tecnicas
Alimentaciòn 230Vac
Salida motor Trifàsico 230 VAC – Monofàsico 230 Vac
Conexiòn motor Trifàsico A Triàngulo
Conexiòn motor Monofàsico No condensador
Potencia motor 2HP
Temp. funcionamiento -20°C / + 55 °C
Alimentaciòn accesorios 12-24 VDC/AC – 4 Watt
Para potencias superiores instalar transformador externo
Protecciones
Motor protejido con fusible y de control electrònico
Circuitos de potencia protejidos electrònicamente y a travèz de varistores.
Secundario transformador, protejido con fusible auto ajustable y transil.
Condensadores de ltro en el ingreso de la red.
www.quikoitaly.com
FILTRO

INTERMITENTE
M
L N
STOP
CIERRE
OPEN
START
Conexiones MOTOR / INTERMITENTE/ COMANDOS
START
PET.
ABRE
ON
1 2 3 4
SW1
P1
P2
P3
1 2 3 4 5 6 7 8
10 11 12 13 14 15 16 17 18 19 20 21 22 23 24 25 26 27 28 29
DL1
DL0
DL2
DL3
DL4
DL5
DL6
DL7
DL8
DL9
DL10
DL11
IN 2
IN 3
IN 4
IN 5
COM +
IN 6
IN 7
IN 8
IN 9
IN 10
IN 11
COM +
12V DC
88
DS1
- +
24Vdc
www.quikoitaly.com
NOTICIA IMPORTANTE:
En caso de conexión de
Motor monofásico de 230V,
el motor debe estar conectado
sin condensador

F
C
A
Borde/perfil de seguridad
F
C
C
Conexiòn DISPOSITIVOS DE SEGURIDAD
Barrera/Borde en apertura Fotocèlula de seguridad
ON
1 2 3 4
SW1
P1
P2
P3
1 2 3 4 5 6 7 8
10 11 12 13 14 15 16 17 18 19 20 21 22 23 24 25 26 27 28 29
DL1
DL0
DL2
DL3
DL4
DL5
DL6
DL7
DL8
DL9
DL10
DL11
IN 2
IN 3
IN 4
IN 5
COM +
IN 6
IN 7
IN 8
IN 9
IN 10
IN 11
COM +
12V DC
88
DS1
- +
24Vdc
www.quikoitaly.com

Numeraciòn ABRASADERA \ significado LED
1
ENTRADA FASE Alimentaciòn 230Vac
2
ENTRADA NEUTRAL Alimentaciòn 230Vac
3
ENTRADA TIERRA Alimentaciòn 230Vac
4
SALIDA FASE 1 motor
5
SALIDA FASE 2 motor
6
SALIDA FASE 3 motor
7
SALIDA lntermitente 230V
8
COMUN lntermitente
10
SALIDA contacto limpio NA
11
12
SALIDA - 12Vdc accesorios
13
SALIDA + 12Vdc accesorios (COMUN)
14
SALIDA contacto limpio (NA)
15
16
ENTRADA borde de seguridad (NC)
LD2
17
ENTRADA barrera / Bordo en apertura (NC)
LD3
18
ENTRADA START (NA)
LD4
19
ENTRADA START PEATONAL (NA)
LD5
20
ENTRADAS COMUNES 12Vdc
21
ENTRADA FOTOCELULA SEGURIDAD (NC)
LD6
22
ENTRADAS COMUNES 12Vdc
23
ENTRADA STOP (NC)
LD7
24
ENTRADA ABRE (NA)
LD8
25
ENTRADA CIERRE (NA)
LD9
26
ENTRADA FIN-CARRERA ABRE (NC)
LD10
27
ENTRADA FIN-CARRERA CIERRE (NC)
LD11
28
SALIDA - 24Vdc
29
SALIDA + 24Vdc
LD 0
Led indicaciòn descarga
condensadores.
Despuès de eliminar la
alimentaciòn, esperar que LD0
si apage antes de intervenir en
la central.
LD 1
LED ACTIVIDAD
MICROCONTROLOR
www.quikoitaly.com
Todos los contactos
NC deben estar
conectados (o
puenteados si no se
utilizan). Una vez que
se puentea/conecta
un terminal NC, el
LED correspondiente
se encenderá.
En cuanto a los
contactos NA, el LED
se encenderá solo
cuando se dé el
impulso de entrada
correspondiente (por
ejemplo, entrada
START).

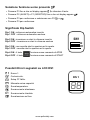
AJUSTES Y PROGRAMACION
Verificar sentido de rotaciòn motor
Terminadas las conexiones, con el motor desbloqueado, poner la
puerta fuera del fin-carrera de cierre, bloquear otra vèz el motor y
dar alimentaciòn al cuadro elèctrico.
Usar los botones del tablero con las siguientes funciones:
P1 botòn CIERRA
P2 botòn ABRE
P3 botòn CONFIRMA/SELECCION FASE PROGRAMACION
Verificar que pulsando el botòn P1 la puerta cierre y
llevarla hasta la posiciòn de cerrado, verificar que LD11
se apague.
De lo contrario invertir SOLO 2 de las 3 fases motor.
Verificar que en el display DS1 aparezca
escrito = Portòn cerrado
Verificar que el led LD11 relativo a FCC este
apagado
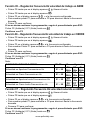
üFunciòn 01 - Seleccionar tipo de automatizaciòn con motor
trifàsico 230Vac
.=PS (Puerta Corrediza/Seccional/Cancela).
.=PF (Puerta Nevera).
.=PL (Puerta a Libro).
P1
P2
P3
88
DS 1
PROCEDIMIENTO:
Pulsar P3 hasta que en el display aparezca y liberar.
Pulsar otra vèz P3 y liberar.
En el Display aparezca . = Corrediza.
(NOTA: el submenù de selecciòn se distingue del punto despuès de la cifra).
Si es necesario seleccionar otro tipo de automatizaciòn, accionar el botòn P2 para
ver el nùmero correspondiente al tipo di automatizaciòn deseada.
Confirmar con P3 (ahora apareceràn los puntos al lado del las cifras).
Completada la programaciòn seguir el procedimiento para ESC:
Pulsar P2 (Adelante) o P1 (Atràs) hasta ver
Confirmar con P3.
www.quikoitaly.com

Nota:
CONFIGURACION DE FABRICA
Min/Max
Pre-configurado
Velocidad en Apertura Frecuencia en Hz 01 ÷99
PS
50Hz
PF
25Hz
PL
50Hz
Velocidad en Cierre Frecuencia en Hz 01 ÷99
PS
50Hz
PF
25Hz
PL
50Hz
Velocidad en Apertura Lenta Frecuencia en Hz 01÷99
PS
25Hz
PF
15Hz
PL
30Hz
Velocidad en Cierre Lenta Frecuencia en Hz 01 ÷99
PS
25Hz
PF
15Hz
PL
30Hz
Funciòn 02 -
Selecciòn tipo de automatizaciòn con motor
monofàsico
230Vac
.=PS (Puerta Corrediza/Seccional/Cancela).
.=PF (Puerta Nevera).
.=PL (Puerta a Libro).
PROCEDIMIENTO:
Pulsar P3 hasta que en el display aparece primero despuès teniendo siempre
apretado ,luego liberar.
Pulsar P2 (Adelante) y aparece
Pulsar otra vèz P3 y liberar.
En el Display aparece .= Corrediza.
(NOTA: el submenù de selecciòn se distingue del punto despuès de la cifra).
Si es necesario seleccionar otro tipo de automatizaciòn accionando el botòn P2
para ver el nùmero correspondiente al tipo de automatizaciòn deseada.
Confirmar con P3.
Completada la programaciòn seguir el procedimieto para ESC:
Pulsar P2 (Adelante) o P1 (Atràs) hasta ver
Confirmar con P3
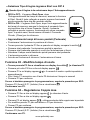
Aprendizaje tiempos de trabajo apertura a cierre
Automation en la posición cerrada y el control de la posición del DIP 4
PROCEDIMIENTO:
üTener apretado el botòn P3 hasta quando en el display aparezca escrito
ü Pulsar start: la automatizaciòn iniciarà a abrirse
ü Pulsar start quando se desea iniciar el ralentamiento.
ü Llegada al fin-carrera de apertura, la automatizaciòn se detiene.
ü Esperar el tiempo pausa deseado luego pulsar start.
ü La automatizaciòn inicia el cierre.
ü Pulsar start quando se desea iniciar el ralentamiento.
ü Llegada al fin-carrera de cierre, la automatizaciòn se detiene.
NOTA: Durante esta fase, detecta la curva de absorciòn corriente para la
gestiòn del CONTROL obstàculo, (ampero-stop).
www.quikoitaly.com

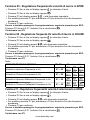
Seleción tipo lógica de entrada Start con DIP 4
Esto tipo de lógica es ser seleccionado después de autoaprendizaje
üDIP 4 OFF: La entrada Start-Open, después de aprender de
los tiempos de operación, tiene función de Start. El botón
conectado a esta entrada funcionará tanto controlar Abrir que
comando de cierre.
üDIP4 ON: La entrada Start-Open, después de autoaprendizaje
de los tiempos de funcionamento, asume la función de control
de Open. Entonces, el botón conectado a esta entrada, que
funcionará igual de comando Abre. En este caso, se debe
utilizar para el Comando Cierra, (Close) para volver a cerrar.
ON
1 2 3 4
SW1
ON
OFF
ü Poner la automatizaciòn en posiciòn de cierre.
ü Tener apretado el botòn P3 hasta que en el display aparece escrito
ü Pulsar start peatonal: la automatizaciòn iniciarà a abrirse.
ü Pulsar start quando se desea que la automatizaciòn se detenga.
ü Esperar el tiempo pausa deseado luego pulsar start peatonal.
ü La automatizaciòn inicia el cierre.
ü Llegada al fin-carrera de cierre, la automatizaciòn se detiene.
üAprendizaje tiempos de trabajo parciales (Peatonal)
Funciòn 03 - Modificaciòn tiempo de pausa
Tener apretado P3 hasta ver en el display escrito y liberar P3
üPulsar varias veces P2 hasta que en el display aparece .
ü Pulsar P3 y en el display aparece . = 4 segundos de pausa o la configurada
en aprendizaje.
ü Con el botòn P1 aumenta y con el botòn P2 se reduce el tiempo en segundos.
ü Pulsar P3 para confirmar
Si no se desea continuar la programaciòn, seguir el procedimiento para ESC:
Pulsar P2 (Adelante) 0 P1 (Atràs) hasta ver
Confirmar con P3
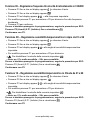
Funciòn 04 - Regulaciòn Par max.
üPulsar P3 hasta que en el display apace y liberar el botòn
üPulsar P2 hasta que en el display aparece
ü
Pulsar P3 en el display aparece .
=
a la porcentual del par max configurado.
ü Para cambiar pulsar P1 para aumentar o P2 para disminuir.
ü Pulsar P3 para confirmar
Si no se desea continuar la programaciòn, seguir el procedimiento para ESC:
Pulsar P2 (Adelante) 0 P1 (Aràs) hasta ver
Confirmar con P3
www.quikoitaly.com

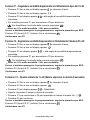
Funciòn 05 – Regulaciòn frecuencia Hz velocidad de trabajo en ABRE
üPulsar P3 hasta que en el display aparece y liberar el botòn
üPulsar P2 hasta que en el display aparece
üPulsar P3 en el display aparece .= a la frecuencia configurada.
ü Para cambiar pulsar P1 para aumentar o P2 para disminuir hasta la frecuencia
deseada
ü Pulsar P3 para confirmar.
Si no se desea continuar la programaciòn, seguir el procedimiento para ESC:
Pulsar P2 (Adelante) 0 P1 (Atràs) hasta ver
Confirmar con P3
Funciòn 06 – Regulaciòn frecuencia Hz velocidad de trabajo en CIERRE
üPulsar P3 hasta que en el display aparece y liberar el botòn
üPulsar P2 hasta que en el display aparece
ü Pulsar P3 en el display aparece . = a la frecuencia configurada.
ü Para cambiar Pulsar P1 para aumentar o P2 para disminuir hasta la frecuencia
deseada
ü Pulsar P3 para confirmar.
Si no se desea continuar la programaciòn, seguir el procedimiento para ESC:
Pulsar P2 (Adelante) 0 P1 (Atràs) hasta ver
Confirmar con P3
Nota:
CONFIGURACION DE FABRICA
Min/Max
Pre-configurado
Velocidad en Apertura Frecuencia en Hz 01 ÷99
PS
50Hz
PF
25Hz
PL
50Hz
Velocidad en Cierre Frecuencia en Hz 01 ÷99
PS
50Hz
PF
25Hz
PL
50Hz
Velocidad en Apertura Lenta Frecuencia en Hz 01 ÷99
PS
25Hz
PF
15Hz
PL
30Hz
Velocidad en Cierre Lenta Frecuencia en Hz 01 ÷99
PS
25Hz
PF
15Hz
PL
30Hz
Funciòn 07 – Regulaciòn frecuencia Hz velocidad reducida en ABRE.
üPulsar P3 hasta que en el display aparece y liberar el botòn
üPulsar P2 hasta que en el display aparece
üPulsar P3 en el display aparece . = a la frecuencia configurada.
ü Para cambiar pulsar P1 para aumentar o P2 para disminuir hasta la frecuencia
deseada
ü Premere P3 para confirmar.
Si no se desea continuar la programaciòn, seguir el procedimiento para ESC:
Pulsar P2 (Adelante) 0 P1 (Atràs) hasta ver
Confirmar con P3
www.quikoitaly.com

Funciòn 08 – Regulaciòn frecuencia Hz velocidad reducida en CIERRE
üPulsar P3 hasta que en el display aparece y liberar el botòn
üPulsar P2 hasta que en el display aparece
üPulsar P3 en el display aparece .= a la frecuencia configurada.
ü Para cambiar pulsar P1 para aumentar o P2 para disminuir hasta la frecuencia
deseada
ü Premere P3 para confirmar.
Si no se desea continuar la programaciòn, seguir el procedimiento para ESC:
Pulsar P2 (Adelante) 0 P1 (Atràs) hasta ver
Confirmar con P3
Funciòn 09 – Regulaciòn sensibilidad Amperometrica en Abre de 01 a 99
üPulsar P3 hasta que en el display aparece y liberar el botòn
üPulsar P2 hasta que en el display aparece
üPulsar P3 en el display aparece . = al lìmite d sensibilidad amperometrica
configurada.
ü Para cambiar Pulsar P1 para aumentar o P2 para disminuir
Para inhabilitar el control de la corriente, configurar .
Nota: es. 01= muy sensible – 99= poco sensible
Si no se desea continuar la programaciòn, seguir el procedimiento para ESC:
Pulsar P2 (Adelante) 0 P1 (Atràs) hasta ver
Confirmar con P3
Funciòn 10 – Regulaciòn sensibilidad Amperometrica en Cierre de 01 a 99
üPulsar P3 hasta que en el display aparece y liberar el botòn
üPulsar P2 hasta que en el display aparece
üPulsar P3 en el display aparece . = al lìmite d sensibilidad amperometrica
configurada.
ü Para cambiar Pulsar P1 para aumentar o P2 para disminuir
Para inhabilitar el control de la corriente, configurar .
Nota: es. 01= muy sensible – 99= poco sensible
Si no se desea continuar la programaciòn, seguir el procedimiento para ESC:
Pulsar P2 (Adelante) 0 P1 (Atràs) hasta ver
Confirmar con P3
www.quikoitaly.com

Funciòn 11 – Regulaciòn sensibilidad Amperometrica en paro suave Abre de 01 a 99
üPulsar P3 hasta que en el display aparece y liberar el botòn
üPulsar P2 hasta que en el display aparece
üPulsar P3 en el display aparece . = al lìmite d sensibilidad amperometrica
configurada.
ü Para cambiar Pulsar P1 para aumentar o P2 para disminuir
Inhabilitar el control de la corriente, configurar
Nota: es. 01= muy sensible – 99= poco sensible
Si no se desea continuar la programaciòn, seguir el procedimiento para ESC:
Pulsar P2 (Adelante) 0 P1 (Atràs) hasta ver
Confirmar con P3
Funciòn 12 – Regulaciòn sensibilidad Amperometrica en paro suave en Cierre de 01 a 99
üPulsar P3 hasta que en el display aparece y liberar el botòn
üPulsar P2 hasta que en el display aparece
üPulsar P3 en el display aparece . = al lìmite d sensibilidad amperometrica
configurada.
ü Para cambiar Pulsar P1 para aumentar o P2 para disminuir
Inhabilitar el control de la corriente, configurar
Nota: es. 01= muy sensible – 99= poco sensible
Si no se desea continuar la programaciòn, seguir el procedimiento para ESC:
Pulsar P2 (Adelante) 0 P1 (Atràs) hasta ver
Confirmar con P3
Funcion 13 – Fuerza inicial de 1 a 20 (Valor expresado en decimas de segundos)
üPulsar P3 hasta que en el display aparece y suelte el boton
üPulsar P2 hasta que en el display aparece
üPulsar P3 en el display aparece . = Discapacitados
ü O establecer el tiempo en decimas de segundo
Pulsar P1 para aumentar o P2 para etablecer un tiempo de duracion. Para exp
.
ü Pulsar P3 para confirmar.
Si no se desea continuar la programaciòn, seguir el procedimiento para ESC:
Pulsar P2 (Adelante) 0 P1 (Atràs) hasta ver
Confirmar con P3
www.quikoitaly.com

Funcion 14 – Fuerza en final de cierre de 1 a 20
(Valor expresado en decimas de segundos
)
üPulsar P3 hasta que en el display aparece y liberar el botòn
üPulsar P2 hasta que en el display aparece
üPulsar P3 en el display aparece . = Discapacitados
ü O establecer el tiempo en decimas de segundo
Pulsar P1 para aumentar o P2 para etablecer un tiempo de duracion. Para exp
.
ü Pulsar P3 para confirmar.
Si no se desea continuar la programaciòn, seguir el procedimiento para ESC:
Pulsar P2 (Adelante) 0 P1 (Atràs) hasta ver
Confirmar con P3
Funcion 15 – Habilitation funcion de test
üPulsar P3 hasta que en el display aparece y liberar el botòn
üPulsar P2 hasta que en el display aparece
üPulsar P3 en el display aparece . = Discapacitados
ü Establecer el intervalo de tiempo de START en segundos
Pulsar P1 para aumentar o P2 para etablecer un tiempo de duracion. Para exp
.
ü Pulsar P3 para confirmar.
Si no se desea continuar la programaciòn, seguir el procedimiento para ESC:
Pulsar P2 (Adelante) 0 P1 (Atràs) hasta ver
Confirmar con P3
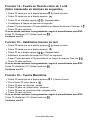
Funciòn 16 – Cuenta Maniobras.
üPulsar P3 hasta que en el display aparece y liberar el botòn.
üCon el botòn P2 correr hasta a
ü Pulsar P3 para ver decenas / unidad
ü Pulsar P2 para ver unidad-millar / centenas
ü Pulsar P2 para ver centenas-millar / decenas-millar
ü Pulsar P3 para confirmar
Si no se desea continuar la programaciòn, seguir el procedimiento para ESC:
Pulsar P2 (Adelante) 0 P1 (Atràs) hasta ver
Confirmar con P3
www.quikoitaly.com

Selecciòn funciòn hombre presente
üPulsar P3 hasta que en el display aparece y liberar el botòn
ü Pulsar P2 (ADELANTE) o P1 (ATRÁS) hasta que en el display aparece
üPulsar P3 para confirmar selecciòn con el boton P2 o
ü Premere P3 para confirmar.
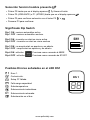
Significado Dip Switch
ON
1 2 3 4
SW1
ON
OFF
Dip 1 ON : recierre automàtico activo
Dip 1 OFF : recierre automàtico excluso
Dip 2 ON : inversiòn en start en cierre activa
Dip 2 OFF : inversiòn en start en cierre exclusa
Dip 3 ON : no acepta start en apertura y en abierto
Dip 3 OFF : acepta start en apertura y en abierto
Dip 4 ON : el botòn Funciona como comando d ABRE
Dip 4 OFF : el botòn Funciona como comando de START
88
DS 1
Error 1.
Cortocircuito.
Setup FF fallada.
Falta carga capacidad.
Sobratemperatura.
Sobracorriente instantànea.
Sobracorriente retrasada.
Sobratensiòn en el bus.
www.quikoitaly.com

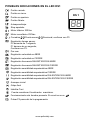
POSIBLES INDICACIONES EN EL LED DS1
88
DS 1
Portòn cerrado.
Portòn en cierre.
Portòn en apertura.
Portòn Abierto.
Autoaprendizaje.
Stop apretado.
Motor trifàsico 230Vac
Motor monofàsico 230Vac
.Corrediza . Puerta nevera . Seccional; confirmar con P3
Regulaciòn tiempo pausa:
P2 aumenta de 1 segundo,
P1 decrece de un segundo,
Confrmar con P3.
Par max
Regulaciòn velocidad en ABRE
Regulaciòn velocidad en CIERRE
Regulaciòn frecuencia RALENTIZACION ABRE
Regulaciòn frecuencia RALENTIZACION CIERRE
Regulaciòn sensibilidad amperimètrica ABRE
Regulaciòn sensibilidad amperimètrica CIERRE
Regulaciòn sensibilidad amperimètrica RALENTIZACION ABRE
Regulaciòn sensibilidad amperimètrica RALENTIZACION CIERRE
Arranque inicial
Golpe final
Habilitar Test
Cuenta maniobras-Visualizaciòn maniobras.
Funcionamiento solo hombre presente. Si es activo se ve
Pulsar P3 para salir de la programaciòn
www.quikoitaly.com

|
DECLARACIÓN DE CONFORMIDAD
El fabricante asegura que el dispositivo cumple con los requisitos esenciales de seguridad de las directivas
:
ü
Los equipos de radio - 1999/5 / CE;
ü Baja Tensión - 73/23 / CEE, 93/68 / CEE del Consejo (EN 60335-1 (1998));
ü
Compatibilidad electromagnética - 89/336 / CEE, 93/68 / CEE, 98/37 / CE (EN 50081-1,
EN 50081-2, EN 61000-3-2, EN 61000-3-2 / A1, EN 61000- 3-2 / A2, EN 61000-3- 2 / A14,
EN61000-3-3, EN 61000-6-2, ETSI EN 300220-3, ETSI EN 301.489-3, ETSI EN 301489 hasta 1)
Así como sus modificaciones y actualizaciones, así como las disposiciones que implementan su
asimilación en el sistema jurídico nacional del país de destino y la utilización del coche.
www.quikoitaly.com
QUIKO ITALY
Via Seccalegno, 19
36040 Sossano (VI) - Italy
Tel. +39 0444 785513
Fax +39 0444 782371
info@quiko.biz
www.quikoitaly.com

QK-CE220RLINV
ATTENZIONE!!
Prima di eettuare l’installazione, leggere attentamente questo manuale. La
QUIKO declina ogni responsabilità in caso di non osservanza delle normative vigenti.
Apparecchiatura di comando
ad INVERTER
Per automazioni Industriali
Alimentazione monofase 230Vac
Uscita motore trifase 230Vac
V01/2019
AVVISO IMPORTANTE:
In caso di connessione motore
230V mono fase, il motore
deve essere usato senza condensatore.
-
In caso di connessione motore
230V trifase, il motore deve essere
collegato a triangolo.

ü Frequenza di lavoro apre e chiude regolabili separatamente
ü Rampa accelerazione/ decelerazione e velocità in rallentamento regolabili
ü Amperometrica con sensibilità ostacolo regolabile sia in apertura che in chiusura
ü Logica di inversione ostacolo regolabile sia in apertura che in chiusura.
ü Ingresso per costa di sicurezza NC/8.2 kohm
ü Ingressi per fotocellula-sicurezza in apertura e chiusura
ü Ingressi di Apre/Chiude/Parziale e Passo-Passo
ü Programmi di funzionamento: automatico, semi-automatico o uomo presente
selezionabili
ü Visualizzazione stato ingressi e assegnazione funzione tramite menu a display
ü Ricevitore innesto opzionale per la gestione di trasmettitori a codice fisso o
Rolling-code
Caratteristiche principali :
Descrizione Generale
PULSANTI
PROGRAMMAZIONE/
POSIZIONAMENTO
DISPLAY
INGRESSO LINEA
230Vac
Fusibile INGRESSO
LATO
POTENZA 10A
USCITA Motore
Trifase
USCITA
LAMPEGGIANTE
230V
LED STATO
INGRESSI
INGRESSI
Morsettiera 24Vdc
Accessori
www.quikoitaly.com

Caratteristiche generali :
Programmazione e auto apprendimento tramite tasti (incremento, decremento,
convalida) ed un display a due cifre
Gestione di tre sicurezze di cui: una fotocellula, una sicurezza in chiusura ed una
in apertura.
Contatto pulito per segnalazione stato automazione/allarme
Contatto 12Vac per controllo alimentazione sicurezze/funzioni ausiliarie
Morsetti di potenza e di segnale estraibili
Predisposta per acc
Conforme alle Direttive Europee di riferimento:
Bassa Tensione 73/23/CEE
Compatibilità Elettromagnetica (EMC) 89/336/CEE
FILTRO
Caratteristiche tecniche :
Alimentazione 230Vac
Uscita motore Trifase 230 VAC – Monofase 230 Vac
Collegamento motore Trifase A Triangolo
Collegamento motore Monofase No condensatore
Potenza motore 2HP
Temp. funzionamento -20°C / + 55 °C
Alimentazione accessori 12-24 VDC/AC – 4 Watt
Per potenze superiori installare trasformatore esterno
Protezioni :
Motore protetto da fusibile e da controllo elettronico
Circuiti di potenza protetti elettronicamente e tramite varistori.
Secondario trasformatore, protetto da fusibile auto ripristinante e transil.
sso rete
www.quikoitaly.com

LAMPEGGIANTE
M
L N
STOP
CHIUDE
OPEN
START
Collegamento MOTORE/LAMPEGGIANTE/ COMANDI SICUREZZE
APRE
START
PEDONALE
ON
1 2 3 4
SW1
P1
P2
P3
1 2 3 4 5 6 7 8
10 11 12 13 14 15 16 17 18 19 20 21 22 23 24 25 26 27 28 29
DL1
DL0
DL2
DL3
DL4
DL5
DL6
DL7
DL8
DL9
DL10
DL11
IN 2
IN 3
IN 4
IN 5
COM +
IN 6
IN 7
IN 8
IN 9
IN 10
IN 11
COM +
12V DC
88
DS1
- +
24Vdc
www.quikoitaly.com
AVVISO IMPORTANTE:
In caso di connessione di
motoriduttore 230V monofase,
non deve essere utilizzato
il condensatore.

ON
1 2 3 4
SW1
P1
P2
P3
1 2 3 4 5 6 7 8
10 11 12 13 14 15 16 17 18 19 20 21 22 23 24 25 26 27 28 29
DL1
DL0
DL2
DL3
DL4
DL5
DL6
DL7
DL8
DL9
DL10
DL11
IN 2
IN 3
IN 4
IN 5
COM +
IN 6
IN 7
IN 8
IN 9
IN 10
IN 11
COM +
12V DC
88
DS1
F
C
A
Costa di sicurezza
F
C
C
Collegamento DISPOSITIVI DI SICUREZZA
Barriera/Costa in apertura Fotocellula di sicurezza
- +
24Vdc
www.quikoitaly.com

Numerazione MORSETTIERA/significato LED :
1
INGRESSO FASE Alimentazione 230Vac
2
INGRESSO NEUTRO Alimentazione 230Vac
3
INGRESSO TERRA Alimentazione 230Vac
4
USCITA FASE 1 motore
5
USCITA FASE 2 motore
6
USCITA FASE 3 motore
7
USCITA lampeggiante 230V
8
COMUNE lampeggiante
10
USCITA contatto pulito NA
11
12
USCITA - 12Vdc accessori
13
USCITA + 12Vdc accessori (COMUNE)
14
USCITA contatto pulito (NA)
15
16
INGRESSO costa di sicurezza (NC)
LD2
17
INGRESSO barriera / costa in apertura (NC)
LD3
18
INGRESSO START (NA)
LD4
19
INGRESSO START PEDONALE (NA)
LD5
20
COMUNE ingressi 12Vdc
21
INGRESSO FOTOCELLULA SICUREZZA
(NC)
LD6
22
COMUNE ingressi 12Vdc
23
INGRESSO STOP (NC)
LD7
24
INGRESSO APRE (NA)
LD8
25
INGRESSO CHIUDE (NA)
LD9
26
INGRESSO FINECORSA APRE (NC)
LD10
27
INGRESSO FINECORSA CHIUDE (NC)
LD11
28
USCITA - 24Vdc accessori
29
USCITA + 24Vdc accessori
LD 0
Led indicazione scarica
condensatori.
Dopo aver tolto alimentazione,
attendere che LD0 si spenga
prima di intervenire sulla
centralina.
LD 1
Led attività microcontrollore
www.quikoitaly.com
Tutti i contatti NC
devone essere connessi
( o ponticellati se non
utilizzati). Una volta che
un contatto NC è chiuso
o ponticellato il LED
corrispondente si
accenderà.
Per i contatti NA, il led si
accenderà solo una
volta dato l'impulso di
ingresso corrispondente
(ad esempio: START).

Settaggi e programmazione :
Verifica senso di rotazione motore
Terminati i collegamenti, a motore sbloccato, posizionare la porta
fuori dal fine corsa di chiusura, bloccare il motore e dare
alimentazione al quadro elettrico.
Utilizzare tastini a bordo aventi le seguenti funzioni:
P1 tasto CHIUDE
P2 tasto APRE
P3 tasto CONFERMA/SELEZIONE FASE PROGRAMMAZIONE
Verificare che premendo il tasto P1 la porta chiuda e
portarla fino alla posizione di chiuso, verificare che LD11
si spenga.
In caso contrario invertire SOLO 2 delle 3 fasi motore.
Verificare che sul display DS1 venga visualizzata la
scritta = Portone chiuso
Verificare che il led LD11 relativo a FCC sia spento
üFunzione 01 - Selezione tipo di automazione con motore
trifase 230Vac
.=PS (Porta Scorrevole/Sezionale/Cancello).
.=PF (Porta Frigo).
.=PL (Porta a Libro).
P1
P2
P3
88
DS 1
PROCEDURA:
Premere P3 fino a che sul display appare e rilasciare.
Premere nuovamente P3 e rilasciare.
Sul Display appare . = Scorrevole.
(NOTA: il sottomenù di selezione si distingue dal punto dopo la cifra).
Se necessario selezionare altro tipo di automazione, agire sul tasto P2 per
visualizzare il numero corrispondente al tipo di automazione desiderata.
Confermare con P3 (a questo punto scompariranno i puntini a fianco delle cifre).
Terminata la programmazione seguire la procedura per ESC:
Premere P2 (Avanti) o P1 (Indietro) fino a visualizzare
Confermare con P3.
www.quikoitaly.com

Nota:
IMPOSTAZIONE DI FABBRICA
Min/Max
Pre-impostato
Velocità in Apertura Frequenza in Hz 01 ÷99
PS
50Hz
PF
25Hz
PL
50Hz
Velocità in Chiusura Frequenza in Hz 01 ÷99
PS
50Hz
PF
25Hz
PL
50Hz
Velocità in Apertura Rallentata Frequenza in Hz 01 ÷99
PS
25Hz
PF
15Hz
PL
30Hz
Velocità in Chiusura Rallentata Frequenza in Hz 01 ÷99
PS
25Hz
PF
15Hz
PL
30Hz
Funzione 02 -
Selezione tipo di automazione con motore
monofase
230Vac
.=PS (Porta Scorrevole/Sezionale/Cancello).
.=PF (Porta Frigo).
.=PL (Porta a Libro).
PROCEDURA:
Premere P3 fino a che sul display appare prima e poi tenendo sempre premuto
,quindi rilasciare.
Premere P2 (Avanti) e appare
Premere nuovamente P3 e rilasciare.
Sul Display appare .= Scorrevole.
(NOTA: il sottomenù di selezione si distingue dal punto dopo la cifra).
Se necessario selezionare altro tipo di automazione agendo sul tasto P2 per
visualizzare il numero corrispondente al tipo di automazione desiderata.
Confermare con P3.
Terminata la programmazione seguire la procedura per ESC:
Premere P2 (Avanti) o P1 (Indietro) fino a visualizzare
Confermare con P3.
Apprendimento tempi di lavoro apertura a chiusura
Automazione in posizione di chiuso e verifica della posizione del DIP 4
PROCEDURA:
ü Tenere premuto il tasto P3 fino a quando sul display compare la scritta
ü Premere start: l’automazione partirà in apertura
ü Premere start quando si vuole che inizi il rallentamento.
ü Arrivata sul finecorsa di apertura, l’automazione si ferma.
ü Attendere il tempo sosta desiderato quindi premere start.
ü L’automazione parte in chiusura.
ü Premere start quando si vuole che inizi il rallentamento.
ü Arrivata sul finecorsa di chiusura, l’automazione si ferma.
NOTA: Durante questa fase, rileva la curva di assorbimento correnti per la
gestione del CONTROLLO ostacolo, (ampero-stop).
www.quikoitaly.com

Selezione Tipo di logica ingresso Start con DIP 4
Questo tipo di logica è da selezionare dopo l’Autoapprendimento
üDIP4 in OFF : L’ingresso Start-Open, dopo
l’Autopprendimento dei tempi di manovra, assume la funzione
di Start. Qundi il tasto collegato a questo ingresso funzionerà
sia da comando Apre che da comando chiude.
üDIP4 in ON : L’ingresso Sart-Open, dopo l’auto apprendimento
dei tempi di manovra, assume la funzione di comando Apre,
sia impulsivo che a Uomo Presente. Quindi, il pulsante
collegato a questo ingresso, funzionerà solo come comando
Apre. In questo caso, dovrà essere utilizzato il Comando
Chiude, (Close) per la richiusura.
ON
1 2 3 4
SW1
ON
OFF
ü Posizionare l’automazione in posizione di chiuso.
ü Tenere premuto il pulsante P3 fino a quando sul display compare la scritta
ü Premere start pedonale: l’automazione partirà in apertura.
ü Premere start pedonale quando si vuole che l’automazione si fermi.
ü Attendere il tempo sosta desiderato quindi premere start pedonale.
ü L’automazione parte in chiusura.
ü Arrivata sul finecorsa di chiusura, l’automazione si ferma.
üApprendimento tempi di lavoro parziali (Pedonale)
Funzione 03 - Modifica tempo di sosta
Tenere premuto P3 fino a visualizzare su display la scritta e rilasciare P3
ü Premere più volte P2 fino a che sul display appare .
ü Premere P3 e sul display appare . = 4 secondi di sosta o quella impostata in
apprendimento.
ü Con il tasto P1 aumenta e con il tasto P2 diminuisce il tempo in secondi
ü Premere P3 per conferma
Se non si desidera proseguire la programmazione, seguire la procedura per ESC:
Premere P2 (Avanti) 0 P1 (Indietro) fino a visualizzare
Confermare con P3.
Funzione 04 – Regolazione Coppia max.
ü Premere P3 fino a che sul display appare e rilasciare il tasto
ü Premere P2 fino a che sul display appare
ü
Premere P3 sul display appare
.
= alla percentuale della coppia max impostata.
ü Per modifica premer P1 per aumentare o P2 per diminuire.
ü Premer P3 per conferma
Se non si desidera proseguire la programmazione, seguire la procedura per ESC:
Premere P2 (Avanti) 0 P1 (Indietro) fino a visualizzare
Confermare con P3.
www.quikoitaly.com

Funzione 05 - Regolazione frequenza Hz velocità di lavoro in APRE
ü Premere P3 fino a che sul display appare e rilasciare il tasto
ü Premere P2 fino a che sul display appare
ü Premere P3 sul display appare .= alla frequenza impostata.
ü Per modifica premere P1 per aumentare o P2 per diminuire fino alla frequenza
desiderata
ü Premere P3 per conferma.
Se non si desidera proseguire la programmazione, seguire la procedura per ESC:
Premere P2 (Avanti) 0 P1 (Indietro) fino a visualizzare
Confermare con P3.
Funzione 06 - Regolazione frequenza Hz velocità di lavoro in CHIUDE
ü Premere P3 fino a che sul display appare e rilasciare il tasto
ü Premere P2 fino a che sul display appare
ü Premere P3 sul display appare . = alla frequenza impostata.
ü Per modifica premere P1 per aumentare o P2 per diminuire fino alla frequenza
desiderata
ü Premere P3 per conferma.
Se non si desidera proseguire la programmazione, seguire la procedura per ESC:
Premere P2 (Avanti) 0 P1 (Indietro) fino a visualizzare
Confermare con P3.
Nota:
IMPOSTAZIONE DI FABBRICA
Min/Max
Pre-impostato
Velocità in Apertura Frequenza in Hz 01 ÷99
PS
50Hz
PF
25Hz
PL
50Hz
Velocità in Chiusura Frequenza in Hz 01 ÷99
PS
50Hz
PF
25Hz
PL
50Hz
Velocità in Apertura Rallentata Frequenza in Hz 01 ÷99
PS
25Hz
PF
15Hz
PL
30Hz
Velocità in Chiusura Rallentata Frequenza in Hz 01 ÷99
PS
25Hz
PF
15Hz
PL
30Hz
Funzione 07 – Regolazione frequenza Hz velocità di rallentamento in APRE.
ü Premere P3 fino a che sul display appare e rilasciare il tasto
ü Premere P2 fino a che sul display appare
ü Premere P3 sul display appare . = alla frequenza impostata.
ü Per modifica premere P1 per aumentare o P2 per diminuire fino alla frequenza
desiderata
ü Premere P3 per conferma.
Se non si desidera proseguire la programmazione, seguire la procedura per ESC:
Premere P2 (Avanti) 0 P1 (Indietro) fino a visualizzare
Confermare con P3
www.quikoitaly.com

Funzione 08 – Regolazione frequenza Hz velocità di rallentamento in CHIUDE
ü Premere P3 fino a che sul display appare e rilasciare il tasto
ü Premere P2 fino a che sul display appare
ü Premere P3 sul display appare .= alla frequenza impostata.
ü Per modifica premere P1 per aumentare o P2 per diminuire fino alla frequenza
desiderata
ü Premere P3 per conferma.
Se non si desidera proseguire la programmazione, seguire la procedura per ESC:
Premere P2 (Avanti) 0 P1 (Indietro) fino a visualizzare
Confermare con P3.
Funzione 09 – Regolazione sensibilità Amperometrica in Apre da 01 a 99
ü Premere P3 fino a che sul display appare e rilasciare il tasto
ü Premere P2 fino a che sul display appare
ü Premere P3 sul display appare . = alla soglia di sensibilità amperometrica
impostata.
ü Per modifica premere P1 per aumentare o P2 per diminuire
Per disabilitare il controllo della corrente,impostare
Nota: es. 01= molto sensibile – 99= poco sensibile.
Se non si desidera proseguire la programmazione, seguire la procedura per ESC:
Premere P2 (Avanti) 0 P1 (Indietro) fino a visualizzare
Confermare con P3
Funzione 10 – Regolazione sensibilità Amperometrica in Chiude da 01 a 99
ü Premere P3 fino a che sul display appare e rilasciare il tasto
ü Premere P2 fino a che sul display appare
ü Premere P3 sul display appare . = alla soglia di sensibilità amperometrica
impostata.
ü Per modifica premere P1 per aumentare o P2 per diminuire
Per disabilitare il controllo della corrente,impostare
Nota: es. 01= molto sensibile – 99= poco sensibile.
Se non si desidera proseguire la programmazione, seguire la procedura per ESC:
Premere P2 (Avanti) 0 P1 (Indietro) fino a visualizzare
Confermare con P3
www.quikoitaly.com

Funzione 11 – Regolazione sensibilità Amperometrica in Rallentamento Apre da 01 a 99
ü Premere P3 fino a che sul display appare e rilasciare il tasto
ü Premere P2 fino a che sul display appare
ü Premere P3 sul display appare . = alla soglia di sensibilità amperometrica
impostata.
ü Per modifica premere P1 per aumentare o P2 per diminuire
Per disabilitare il controllo della corrente,impostare
Nota: es. 01= molto sensibile – 99= poco sensibile.
Se non si desidera proseguire la programmazione, seguire la procedura per ESC:
Premere P2 (Avanti) 0 P1 (Indietro) fino a visualizzare
Confermare con P3
Funzione 12 – Regolazione sensibilità Amperometrica in Rallentamento Chiude da 01 a 99
ü Premere P3 fino a che sul display appare e rilasciare il tasto
ü Premere P2 fino a che sul display appare
ü Premere P3 sul display appare .= alla soglia di sensibilità amperometrica
impostata.
ü Per modifica premere P1 per aumentare o P2 per diminuire
Per disabilitare il controllo della corrente,impostare
Nota: es. 01= molto sensibile – 99= poco sensibile.
Se non si desidera proseguire la programmazione, seguire la procedura per ESC:
Premere P2 (Avanti) 0 P1 (Indietro) fino a visualizzare
Confermare con P3
Funzione 13 – Spunto Iniziale da 1 a 20 (Valore espresso in decimi di secondo)
ü Premere P3 fino a che sul display appare e rilasciare il tasto
ü Premere P2 fino a che sul display appare
ü Premere P3 sul display appare . = Disabilitato.
ü Oppure, impostare il tempo in decimi di secondo
ü Premere P1 per aumentare o P2 per impostare un tempo di durata. Es. ( .)
ü Premere P3 per conferma.
Se non si desidera proseguire la programmazione, seguire la procedura per ESC:
Premere P2 (Avanti) 0 P1 (Indietro) fino a visualizzare
Confermare con P3
www.quikoitaly.com

Funzione 14 – Colpo Finale in chiusura dopo Fine Corsa da 1 a 20
(Valore espresso in decimi di secondo)
ü Premere P3 fino a che sul display appare e rilasciare il tasto
ü Premere P2 fino a che sul display appare
ü Premere P3 sul display appare . = Disabilitato.
ü Oppure, impostare il tempo in decimi di secondo
ü Premere P1 per aumentare o P2 per impostare un tempo di durata. Es. ( .)
ü Premere P3 per conferma.
Se non si desidera proseguire la programmazione, seguire la procedura per ESC:
Premere P2 (Avanti) 0 P1 (Indietro) fino a visualizzare
Confermare con P3
Funzione 15 – Abilitazione Funzione Test
ü Premere P3 fino a che sul display appare e rilasciare il tasto
ü Premere P2 fino a che sul display appare
ü Premere P3 sul display appare . = Disabilitato.
ü Oppure, impostare il tempo di intervallo di Start in secondi
Premere P1 per aumentare o P2 per impostare un tempo di intervallo start. Es. (
.
)
ü Premere P3 per conferma.
Se non si desidera proseguire la programmazione, seguire la procedura per ESC:
Premere P2 (Avanti) 0 P1 (Indietro) fino a visualizzare
Confermare con P3
Funzione 16 – Conta Manovre.
ü Premere P3 fino a che sul display appare e rilasciare il tasto.
ü Con il tasto P2 scorrere fino a
ü Premere P3 per visualizzare decine / unità
ü Premere P2 per migliaia / centinaia
ü Premere P2 per centi-migliaia / decine-migliaia
ü Premere P3 per conferma
Se non si desidera proseguire la programmazione, seguire la procedura per ESC:
Premere P2 (Avanti) 0 P1 (Indietro) fino a visualizzare
Confermare con P3
www.quikoitaly.com

Selezione funzione uomo presente
ü Premere P3 fino a che sul display appare e rilasciare il tasto.
ü Premere P2 (AVANTI) o P1 (INDIETRO) fino a che sul display appare
ü Premere P3 per confermare e selezionare con P2 o
ü Premere P3 per confermare.
Significato Dip Switch
ON
1 2 3 4
SW1
ON
OFF
Dip 1 ON : richiusura automatica inserita
Dip 1 OFF : richiusura automatica esclusa
Dip 2 ON : inversione su start in chiusura inserita
Dip 2 OFF : inversione su start in chiusura esclusa
Dip 3 ON : non accetta start in apertura ed in aperto
Dip 3 OFF : accetta start in apertura ed in aperto
Dip 4 ON : il tasto Funziona come comando di APRE
Dip 4 OFF : il tasto Funziona come comando di START
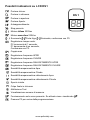
Possibili Errori segnalati su LCD DS1
88
DS 1
Errore 1.
Cortocircuito.
Setup FF fallito.
Mancata carica capacità.
Sovratemperatura.
Sovracorrente istantanea.
Sovracorrente ritardata.
Sovratensione sul bus.
www.quikoitaly.com

Possibili indicazioni su LCD DS1
88
DS 1
Portone chiuso.
Portone in chiusura.
Portone in apertura.
Portone Aperto.
Autoapprendimento.
Stop premuto.
Motore trifase 230Vac
Motore monofase 230Vac
.Scorrevole . Porta frigo . Sezionale; confermare con P3.
Regolazione tempo sosta:
P2 incrementa di 1 secondo,
P1 decrementa di un secondo,
Confermare con P3.
Coppia max
Regolazione frequenza APRE
Regolazione frequenza CHIUDE
Regolazione frequenza RALLENTAMENTO APRE
Regolazione frequenza RALLENTAMENTO CHIUDE
Sensibilità amperometrica Apre
Sensibilità amperometrica Chiude
Sensibilità amperometrica rallentamento Apre
Sensibilità amperometrica rallentamento Chiude
Spunto inziale
Colpo finale in chiusura
Abilitazione Test
Visualizzazione numero di manovre
Funzionamento solo uomo presente. Se attivato viene visualizzato .
Premere P3 per uscire dalla programmazione.
www.quikoitaly.com

DICHIARAZIONE DI CONFORMITA
Il costruttore dichiara che il dispositivo è conforme ai requisiti essenziali di sicurezza delle direttive:
ü Apparecchiature Radio - 1999/5/CE;
ü Bassa Tensione - 73/23/CEE, 93/68/CEE (EN 60335-1 (1998));
ü Compatibilità Elettromagnetica - 89/336/CEE, 93/68/CEE, 98/37/CE (EN 50081-1,
EN 50081-2, EN 61000-3-2, EN 61000-3-2/A1, EN 61000-3-2/A2, EN 61000-3- 2/A14,
EN61000-3-3, EN 61000-6-2, ETSI EN 300220-3, ETSI EN 301489-3, ETSI EN 301489-1),
nonché alle loro modificazioni e aggiornamenti, e alle disposizioni che ne attuano il recepimento
all’interno dell’Ordinamento Legislativo Nazionale del paese di destinazione e utilizzo della
macchina.
|
QUIKO ITALY
Via Seccalegno, 19
36040 Sossano (VI) - Italy
Tel. +39 0444 785513
Fax +39 0444 782371
info@quiko.biz
www.quikoitaly.com
-
 1
1
-
 2
2
-
 3
3
-
 4
4
-
 5
5
-
 6
6
-
 7
7
-
 8
8
-
 9
9
-
 10
10
-
 11
11
-
 12
12
-
 13
13
-
 14
14
-
 15
15
-
 16
16
-
 17
17
-
 18
18
-
 19
19
-
 20
20
-
 21
21
-
 22
22
-
 23
23
-
 24
24
-
 25
25
-
 26
26
-
 27
27
-
 28
28
-
 29
29
-
 30
30
-
 31
31
-
 32
32
-
 33
33
-
 34
34
-
 35
35
-
 36
36
-
 37
37
-
 38
38
-
 39
39
-
 40
40
-
 41
41
-
 42
42
-
 43
43
-
 44
44
-
 45
45
-
 46
46
-
 47
47
-
 48
48


en otros idiomas
- italiano: quiko QK-CE220RLINV Manuale utente
- English: quiko QK-CE220RLINV User manual
Artículos relacionados


Otros documentos
-
 Beninca DA.BA Operating Instructions Manual
-
SEA Gate 2 DG R1B El manual del propietario
-
-
V2 Elettronica V2 Forteco 2500-I El manual del propietario
-
V2 V2 Zariss El manual del propietario
-
-
 Beninca CP.B24ESA Manual de usuario
-
VDS Euro24M2 El manual del propietario
-
Genius Brain 15 Instrucciones de operación
-

