
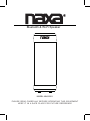
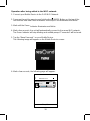
Bluetooth & Wi-Fi Speaker
PLEASE READ CAREFULLY BEFORE OPERATING THIS EQUIPMENT
KEEP IT IN A SAFE PLACE FOR FUTURE REFERENCE
MODEL:NAS-5003

2
DANGEROUS VOLTAGE:The lighting flash with arrowhead symbol within
an equilateral triangle is intended to alert the user to the presence of
uninsulated “dangerous voltage” within the product’s enclosure that may
be of sufficient magnitude to constitute a risk of electric shock to persons.
ATTENTION:The exclamation point within an equilateral triangle is intended to
alert the user to the presence of important operating and maintenance
(servicing) instructions in the literature accompanying the appliance.
WARNING:TO PREVENT FIRE OR SHOCK HAZARD, DO NOT EXPOSE
THIS UNIT TO RAIN OR MOISTURE.
WARNING: USE UNDER SUPERVISION OF AN ADULT DUE TO LONG
CORD This unit has a long cord that can be easily tripped on or pulled on,
causing injury. Please make sure it is arranged so that it will not drape over a
tabletop, etc. Where it can be pulled on by children or tripped over accidentally.
FCC STATEMENT:
This device complies with part 15 of the FCC Rules. Operation is subject to the
following two conditions:
(1)This device may not cause harmful interference, and
(2)This device must accept any interference received, including interference
that may cause undesired operation.
CAUTION: TO REDUCE THE ELECTRIC SHOCK, DO NOT REMOVE THE
COVER (OR BACK). NO USER SERVICEABLE PART INSIDE, REFER
SERVICING TO QUALIFIED SERVICE PERSONNEL.
CAUTION
RISK OF ELECTRIC SHOCK
DO NOT OPEN

This equipment has been tested and found to comply with the limits for a Class
B digital device, pursuant to Part 15 of the FCC Rules. These limits are
designed to provide reasonable protection against harmful interference in a
residential installation. This equipment generates, uses and can radiate radio
frequency energy and, if not installed and used in accordance with the
instructions, may cause harmful interference to radio communications.
However, there is no guarantee that interference will not occur in a particular
installation. If this equipment does cause harmful interference to radio or
television reception, which can be determined by turning the equipment off and
on, the user is encouraged to try to correct the interference by one or more of
the following measures:
●Reorient or relocate the receiving antenna.
●Increase the separation between the equipment and receiver.
●Connect the equipment into an outlet on a circuit different from that to which
the receiver is connected.
●Consult the dealer or an experienced radio/TV technician for help.
FCC WARNING:
To assure continued operation, follow the attached installation instructions and
use only shield cables when connecting to other devices. Changes or
modifications not expressly approved by the party responsible for compliance
could void the user's authority to operate the equipment.
Before using the unit, be sure to read all operating instruction carefully, please
note that these are general precautions and may not pertain to your unit. For
example, this unit may not have the capability to be connected to an outdoor
antenna.
1. Read these instructions
All the safety and operating instructions should be read before the appliance is
operated.
2. Keep these instructions
The safety and operating instructions should be kept for future reference.
3. Heed all warnings
All warnings on the appliance and in the operating instructions should be
adhered to.
4. Follow all instructions
All operation and use instructions should be followed.
FCC NOTICE:
5. Do not use this apparatus near water
The appliance should not be used near water; for example, near a bath tub,
3

4
washbowl, kitchen sink, laundry tub, in a wet basement, or near a swimming
pool.
6. Clean only with dry cloth
The appliance should be cleaned only as recommended by the manufacturer.
7. Do not block any ventilation openings. Install in accordance with the
manufacturer’s instructions.
Slots and openings in the cabinet and in the back or bottom are provided for
ventilation, to ensure reliable operation of the product and to protect it from
overheating. These openings must not be blocked or covered. The openings
should never be blocked by placing the product on a bed, sofa, rug, or similar
surface. This product should never be placed near or over a radiator or heat
source. This product should not be placed in a built-in installation, such as a
bookcase or rack unless proper ventilation is provided or the manufacturer’s
instructions have been adhered to.
8. Do not install near any heat sources such as radiators, heat registers,
stoves, or other apparatus (including amplifiers) that produce heat.
9. Do not defeat the safety purpose of the polarized or grounding-type
plug. A polarized plug has two blades with one wider than the other. A
grounding type plug has two blades and a third grounding prong. The
wide or the third prong are provided for your safety. If the provided plug
does not fit into your outlet, consult an electrician for replacement of the
obsolete outlet.
10. Protect the power cord from being walked on or pinched particularly
at plugs, convenience receptacles, and the point where they exit from the
apparatus.
11. Only use attachments / accessories specified by the manufacturer.
12. Use only with a cart, stand, tripod, bracket, or table
specified by the manufacturer, or sold with the apparatus.
When a cart is used, use caution when moving the
cart/apparatus combination to avoid injury
from tip-over.
An appliance and cart combination should be moved with care. Quick stop,
excessive fore and uneven surfaces may cause the appliance and cart
combination to overturn.
13. Unplug this apparatus during lightning storms or when unused for
long periods of time.
To protect your product from a lightning storm, or when it is left unattended and
unused for long periods of time, unplug it from the wall outlet and disconnect
the antenna or cable system. This will prevent damage to the product due to
lightning and power-line surges.
14. Refer all servicing to qualified service personnel. Servicing is
required when the apparatus has been damaged in any way, such as
power-supply cord or plug is damaged, liquid has been spilled or objects
have fallen into the apparatus, the apparatus has been exposed to rain or

moisture, does not operate normally, or has been dropped.
15. Power source
This product should be operated only from the type of power source indicated
on the marking label. If you are not sure of the type of power supply to your
home, consult your appliance dealer or local power company. For products
intended to operate from battery power, or other source, refer to the operation
instructions.
16. Power lines
An outside antenna system should not be located in the vicinity of overhead
power lines or other electric light or power circuits, or where it can fall into such
power lines or circuits. When installing an outside antenna system, extreme
care should be taken to keep from touching such power lines or circuits as
contact with them might be fatal.
17. Overloading
Do not overload wall outlets and extension cords as this can result in a risk of
fire or electric shock.
18. Object and liquid entry
Never push objects of any kind into the product through openings as they may
touch dangerous voltage points or short out parts that could result in fire or
electric shock. Never spill or spray any type of liquid on the product.
19. Outdoor antenna grounding
If an outside antenna is connected to the product, be sure the antenna system
is grounded so as to provide some protection against voltage surges and built
up static charges. Section 810 of the National Electric Code ANSI/ NFPA 70
provides information with respect to proper grounding of the mast and
supporting structure, grounding of the lead- in wire to an antenna discharge
product, size of grounding conductors, location of antenna- discharge product,
connection to grounding electrodes and requirements for the grounding
electrodes.
5

20. Service
Do not attempt to service this product yourself as opening or removing covers
may expose you to dangerous voltage or other hazards. Refer all servicing to
qualified service personnel.
b)If liquid has been spilled or objects have fallen into the product.
c)If the product has been exposed to rain or water.
d)If the product does not operate normally by following the operating
instructions. Adjust only those controls that are covered by the operating
instructions, as an adjustment of other controls may result in damage and will
require extensive work by a qualified technician to restore the product to its
normal operation.
e)If the product has been dropped or the cabinet has been damaged.
f)When the product exhibits a distinct change in performance- this indicates a
need for service.
25. Note to CATV system installer
This reminder is provided to call the CATV system installer' s attention to
Article 820- 40 of the NEC that provides guidelines for proper grounding and,
in particular, specifies that the cable ground shall be connected to the
grounding system of the building, as close to the point of cable entry as
practical.
NOTE: Refer all servicing to qualified service personnel. Servicing is
required when the unit has been damaged in any way such as the
following: the power-supply cord or plug has been damaged, liquid has
been spilled into unit, the unit has been exposed to rain or moisture, the
unit has been dropped or the unit does not operate normally.
21. Replacement parts
When replacement parts are required, be sure the service technician uses
replacement parts specified by the manufacturer or those that have the same
characteristics as the original parts. Unauthorized substitutions may result in
fire or electric shock or other hazards.
22. Safety check
Upon completion of any service or repairs to this product, ask the service
technician to perform safety checks to determine that the product is in proper
operating condition.
23. Wall or ceiling mounting
The product should be mounted to a wall or ceiling only as recommended by
the manufacturer.
24. Damage requiring service
Unplug this product from the wall outlet and refer service to qualified service
personnel under the following conditions.
a)When the power- supply cord or plug is damaged.
6

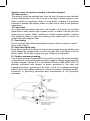
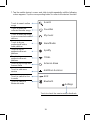
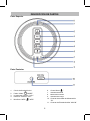
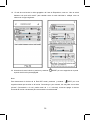
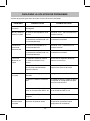
PROdUCT OvERvIEW
7
AUX IN
DC 5V
TOP VIEW
REAR VIEW
1
2
3
4
5
6
7
8
9
10
11
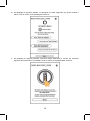
1. LED Light Ring
4. VOL- Button
2. Power On/Off, MODE Button
3. VOL+ Button
7. Mode Indicator
8. Built-in Microphone
9. Charge Indicator
11. AUX IN Jack
10. DC IN Jack
6. Alexa Control Button
8
5. Microphone On-Off/WPS Button

POWER SOURCE:
There is a built in Li-ion rechargeable battery
, recharge it if the battery is low.
1. Connect the Micro USB Plug from the supplied USB Connection Cable to the Micro
USB Port on the rear of unit.
2. Connect the full sized USB Plug from the supplied USB Connection Cable to the
USB Port on the USB Charger (During
When finished, it will turn off).
charging, the charge indicator on the top of
unit will turn RED,
through the microphone on
NOTES:
Your battery will last longer if you're following these simple guidelines for
charging
and storing:
A.
Before first time use, charge it approximately
hours until the unit is fully
charged.
B.
Recharge and store the unit within the temperature range of 5°C~35°C
(40°F~95°F).
C.
Do not charge longer than 24 hours. Excessive charging or running the
unit until battery fully drains will damage battery. Battery life will be
extended
if you keep the battery fully charged.
D.
Battery life naturally shortens slowly over time.
E.
The rechargeable battery incorporated in this product is not user
replaceable.
4
8
AUX IN:
To listen from an external Audio Player such as a MP3 Player, Discman …etc.
1. Connect one end of the Audio Connection Cable to the AUX Out/Line Out/Phone
Jack on the external Audio Player.
2. Connect the other end of the cable to the AUX IN Jack on the rear of the unit.
3. Play the music on the connected Player as usual.
Press and hold the MODE button to power on the unit, wait the mode indicator
blinks green only, press the MODE
button repeatedly until the Mode Indicator
will turn INDIGO.

BLUETOOTH OPERATION:
4. Play a track on your paired audio player or phone as normal.
bluetooth device list, select it and make connection.
3. After successful connection, the unit will send a tone and the indicator stays lit.
device and speaker are activated and
the pairing name
try to search the speaker,
"NAXA NAS-5003" will appear on
with the device last
paired when the bluetooth of the
NOTE:
After first time pairing, the unit will be automatically connect
2. Activate the bluetooth menu on the
device you wish to connect to the speaker,
During playing:
in range.
9
1. Press and hold the MODE button to power on the unit, wait the mode indicator
blinks green only, press the MODE
button repeatedly until the Mode Indicator
will turn BLUE and blinks.
Press the VOL+ or VOL- button to adjust volume.

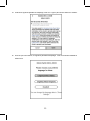
SETUP
CONNECTION
desired WiFi network (router).
Connect your iOS or Android device to the
2. Turn on the WiFi on your iOS or Android device(smart phone or tablet with WiFi function),
3. Tap the Naxa Resound icon on your iOS or
Read the screen instructions and tap the
to continue.
10
The following operation base on iOS system. The operation of Android is similar.
NOTE:
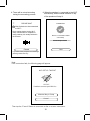
Naxa Resound
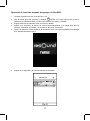
The App icon will appear as the figure on right after successful installation.
APP dOWNLOAd ANd INSTALLATION
Download the Naxa Resound from Apple App store for iOS devies.
Or, download from Google Play store for Android devices.
1. Press and hold the MODE button to power on the unit, wait the mode indicator blinks
green only, now it is WiFi mode.
NAXA Wireless
Please make sure your device is powered
up. Your phone is connected to XXXX,
please make sure your device is connected
to the same network.
Android device. The following picture will appear.
Experiencing any problems? Give us your feedback>>

Make sure your phone is
connected to 2.4G Wi-Fi,
not 5G.
YOUR WIRELESS-2.4G
YOUR WIRELESS-5G
Not sure what you're currently
using? Refer to your router's user
guide for more info.
Next
4. Read the instructions on screen and tap
to continue.
5. Tap the column to select the desired
NAS-5000
Please select
your device
Next
Next
2
on top of the speaker.
6. Tap the Password column to input the
password to make the speaker to connect
to Wi-Fi network(router), tap
to continue.
Next
Tap
Next
to continue.
Press and hold the WPS key on
device to put the device into
network setup mode.
Then click the "Next" button to
continue.
7.
11
Press and hold the WPS
button
CONNECT SPEAKER
device NAS-5003. Then tap the
CONNECT SPEAKER
to continue.
WIFI INFO
1
Please enter Wi-Fi password:
<
Next
Password:
Please enter Wi-Fi password
Wi-Fi:
XXXX
<
PRESS TO ENTER SETUP M...

during the connecting process.
PLEASE WAIT
3
Wait for device to be connected
<
Cancel
to Wi-Fi...
Don't operate device during Wi-Fi
setup. Please wait for compltion of
setup patiently. It's usually finished in
60 seconds.
If you hear voice prompt for erro message.
please go back and retry
CONNECTED
Device is connected to XXXX
successfully
Current Wi-Fi strength of device:100%
Next
8. There will be voice instructing
9. When the speaker is connected to the Wi-Fi
successfully, and the Mode Indicator on top
of the speaker will stay lit.
12
Note:
WI-FI SETUP TIMEOUT
UH OH!
Unable to connect your NAXA s...
Alternate Way to Setup
Cancel
the "Cancel" Button
If the connection fails, the following page will appear.
Then tap
to reconnect as the on screen
instructions.

13
<
AMAZON LOGIN
Sign in to NAS-5003 using your Amazon
account
Email (phone for mobile accounts)
Amazon password
Show password
Keep me signed in. Details
Sign in
New to Amazon?
Create a new Amazon account
Sign in
Forgot password?
<
AMAZON LOGIN
Create Account
Name
Your email address
Create a password
Show password
Create your Amazon account
By create an account, you agree to Amazon's
Conditions of Use and Privacy Notice.
Already have an account?
Sign in now
13. If you do not have an Amazon
on screen instructions.
account, then
tap "Create a new Amazon account" to start
registration and create a new Amazon
account as the
"Sign in" Button on the screen to log on.
12. The following page will appear, input the
account and password and tap the
<
Custom...
NAXA NAS-5003_xxxx
Bathroom
Bed Room
10.
Dining Room
Den
Family Room
Foyer
Garage
After connected, the following screen
will appear, tap Custom...to set a new
desired location name, or tap one in
the name list as the selected
location.
NAME DEVICE
Garden
Next
11. The following page will appear.
If you
already have an account, then tap
"Sign in with Amazon" Button on the
following screen.
Sign in with Amazon
Cancel
Your device includes acess to Alexa.
Connect your Amazon account to
access personalized features.
Alexa allows you to use your voice to play music
and get news, sports scores, weather and more-
all hands-free.
All you have to do is ask Alexa.
NAXA NAS-5003_xxxx

Please choose your prefered
Deutsch
language for Alexa.
English(United States)
English(United Kingdom)
You can change the language later in "Alexa
Settings".
<
AMAZON LOGIN
We will provide NAS-5003:
Connectivity to Alexa so that you can
interact with it using your voice.
Alexa processes and retains audio and other
information in the cloud to provide and improve
our services, and may exchange information
with third party services to fulfill your requests.
voice using your default payment and shipping
settings. You can require a speakable
confirmation code, turn purchaing off, and see
product and order details in your Alexa App.
cloud to protect your purchases.
You also accept All Amazon terms found here
Learn more. Alexa also allows purchasing by
Learn more. Your music will be saved to the
Cancel
I agree
15. After log in, the following page will appear, tap the language to set the desired
language.
14
14. When the following page appears, tap the "I agree" Button to log in Amazon.
NAS-5003
NAXA NAS-5003_XXXX

Here are some of the many things
you can ask Alexa.
Alexa, what's the weather?
Alexa, play my Flash Briefing.
Alexa, what are some top-
rated Indian restaurants?
Alexa, set a timer for 20 minis.
Next
Alexa is ready
16. The following page will appear, tap the "Next" Button on the screen.
Next
We value your privacy, so you can
disable your microphone as shown in
the image above.
To learn more and acess additional
features, download the Alexa App.
17. The following page will appear. Then you can mute the microphone function following
15
the on screen instructions or tap the "Next" button to continue.
NAXA NAS-5003_XXXX
NAXA NAS-5003_XXXX

16
Tap the " " to add more units
to the network, repeat the procedure above
and make connection as the on
screen instructions.
Tap the " " to rename the unit,
check the unit info or reset to the factory
setting, check the preset content, and set or reset the Alexa settings.
Tap the " " to change the audio
mode to L (left channel), R (right channel)
LR
and LR (stereo).
<
DEVICE LIST
LR
LR
...............................................
How to switch between solo and multi mode?
Bed Room
Pause All
You belong with me.
Bathroom
I got it!
18. Tap "I got it!" to continue. Then the DEVICE LIST will appear.
<
DEVICE LIST
LR
No song
Play All
NAXA NAS-5003_XXXX
50%
On DEVICE LIST:

“ ”
R
You Belong with me
Bedroom
....................................................
R
Bathroom
R
Bathroom
Because of you
....................................................
R
You Belong with me
Bedroom
Multi Mode: Press and hold device icon and
drag towards another device to pair devices.
Solo Mode: Press and hold device icon and
drag down past dotted line.
<
DEVICE LIST
LR
LR
...............................................
How to switch between solo and multi mode?
No song
Play All
Bedroom
19. If more than one unit has been added into the DEVICE LIST, you can tap the
instruction
to learn
how to switch solo and multi mode as below:
17
20. When finished, shut off the unit by pressing and holding the /MODE button
on top of the unit.
Notes:
To disconnect the unit from the current Wi-Fi network, press and hold the
previously instructed.
minutes” is heard
then power off the unit. Power on the unit again then reconnect to
desired Wi-Fi network as the
/WPS
Button until audible prompt “Connecting to your network, this may take one to three
How to switch between solo and multi mode?
NAXA NAS-5003_XXXX
50%
60%

<
DEVICE LIST
LR
No song
Play All
50%
18
Operation after being added to the Wi-Fi network:
1. Connect your Mobile Device to the 2.4G Wi-Fi Network.
2. Power on the unit by pressing and holding the /MODE Button on the top of the
unit until the Blue and Green Indicators on the top of unit
illuminates and blinks.
3. Wait until the Green
Indicator illuminates and blinks.
4. Wait a few seconds, the unit will automatically connect to the same Wi-Fi network.
The Green Indicator will stop blinking and audible
prompt "Connected" will be heard.
5. Tap the "Naxa Resound " on your Mobile Device.
The following image will appear on the Mobile Device's screen:
6. Wait a few seconds, the following page will appear:
NAXA NAS-5003_XXXX

19
7. Tap the mobile device's screen and
slide to right repeatedly until the following
screen appears.
enter to the desired function:
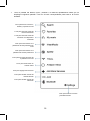
Tap the corresponding button to
Touch to check the version and/or feedback
Touch to search online
songs
Touch to listen the
collected favorite songs
Touch to listen the music
in your connected mobile
Touch to log on
professional online
radio platform
Touch to log on
professional music
platform
Touch to log in/Sign out
Touch to add more
service
Touch to switch to Aux
In mode
Touch to switch to
Bluetooth mode
Amzon Alexa
devices
Search
Favorites
My music
iHeartRadio
Spotify
Amazon Alexa
Add More Services
AUX
Bluetooth
Settings
TIDAL
Touch to log on
professional music
platform

1. Tap "Spotify" on the home screen.
2. Input your account and password to log in.
3. Open the Spotify on your phone, tablet or PC, and play any song.
4. Tap the connect icon .
5. Pick your device from the list.
Before use, you have to create an spotify premium account for log in.
Before use, you have to create an iHeartradio account for log in.
Before use, you have to create a TIDAL account for log in.
1. Tap "iHeartradio" on the home screen.
2. Input your account and password to log in.
3. Select the desired song and play.
1. Tap "TIDAL" on the home screen.
2. Input your account and password to log in.
3. Select the desired song and play.
Licenses
The Spotify Software is subject to third party licenses found here:
www.spotify.com/connect/third-party-licenses.
SPOTIFY OPERATION
IHEARTRADIO OPERATION
TIDAL OPERATION
20

AMAZON ALEXA VOICE CONTROL
21
Voice Control of Amazon Alexa:
1. Speak “Alexa” to the built-in microphone. The color of the Decorative Ring will turn to
Blue. Then you can ask your question through the built-in microphone. The unit will
answer you by audible reply. The typical question and answer will be:
2. Or, press the Button on the top of unit, the color of the Decorative Ring will turn to
Blue. Then you can ask your question through the built-in microphone. The unit will
answer you by audible reply. The typical question and answer will be:
Q: Alexa --- what's the time now?
A: It's XX (XX=Current time) o'clock now.
Q: Alexa --- what's the weather like?
A: The weather is not so cold.
Q: What's the time now?
Q: What's the weather like?
A: The weather is not so cold.
Q: Alexa --- what day is today?
A: Today is XXXXX (XXXXX=Current day).
Q: Alexa --- what's the news today?
A: Here is the flash briefing.
Q: Alexa --- who is the president in USA?
A: The USA president is XX (XX=Name of USA president).
Q: Alexa --- what's the capital in USA?
A: The United States' capital is Washington D.C.
Q: What day is today?
Q: What's the news today?
A: Here is the flash briefing.
Q: Who is the president in USA?
Q: What's the capital in USA?
A: The United States' capital is Washington D.C.
A: It's XX (XX=Current time) o'clock now.
A: Today is XXXXX (XXXXX=Current day).
A: The USA president is XX (XX=Name of USA president).

4. To turn off the microphone. Press the /WPS Button, the color of the Decorative
3. During Amazon Alexa operation, you can use the following voice command to control
the unit:
Ring will turn to Red. To turn on again, press the button again. The color of the
Decorative Ring will turn to White.
22
Voice command: (Alexa) --- pause/stop the song!
Action: The song will be paused or stopped.
Voice command: (Alexa) --- volume up!
Action: The volume will increase.
Voice command: (Alexa)---play the song <XX> (XX=Name of the desired song)!
Action: The song will be played.
Voice command: (Alexa) --- volume down!
Action: The volume will decrease.
Voice command: (Alexa) --- fastforward!
Action: The track will be fastwarded.
Voice command: (Alexa) --- rewind!
Action: The track will rewind.
Voice command: (Alexa) --- previous!
Action: The track will skip to previous track.
Voice command: (Alexa) --- next!
Action: The track will skip to next track.
Voice command: (Alexa) --- continue to play!
Action: The song will continue to play.

23
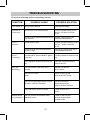
TROUBLESHOOTING
Check the following before requesting service:
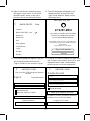
SYMPTOM POSSIBLE CAUSE POSSIBLE SOLUTION
Can’t power on Built in battery drained Recharge the battery
Volume level of paired/connected device
is in low level
Rise the volume level of the
paired/connected device
Volume level of the connected/paired
device too high
Reduce the volume level of the
connected/paired device
BT not
unctioning
The external BT device had NOT paired
to
the unit
Pair the external BT device to the
unit
The external BT device too far from the
unit
Place the external BT device
close to the unit
f
No sound or
sound weak
Sound
distortion
Wi-Fi not
functioning
The unit had NOT add in
the Wi-Fi
network
Add the unit into the
Wi-Fi network
The unit not in Wi-Fi
mode
Power on the unit and
enter to the Wi-Fi mode
The unit and the mobile
device is not in
the same
2.4G Wi-Fi network
Set the unit and the
mobile device in the
same 2.4G Wi-Fi network
The router was Power on your Wi-Fi
router
Amazon Alexa
not
functioning
The unit is not in the
Amazon Alexa
operation
mode
Power on the unit and
enter to Amazon Alexa
operate mode
Volume level in minimum position
Rise the volume level by press
the VOL + Button on the top
of unit
Volume level too high
Reduce the volume level by press
the VOL - Button on the top
of unit
in power off mode

SPECIFICATTIONS
Power source:Built-in DC
Battery,
Recharge by DC
5V through Micro
USB Port
BT Version: 4.1
BT Operation Distance: 32 Feet in open area
PACKAGE INCLUDES
1 x Us ’s Manual
1 x USB Connection Cable (For Charging Only)
1 x Audio Connection Cables with 3.5mm Plugs
SPECIFICATIONS AND ACCESSORIES ARE SUBJECT TO CHANGE
WITHOUT NOTICE
er
Wifi Operation Distance:
Feet in open area96about
about
3.7V,2500mAh(9.2WH rechargeable Li-ion)
24

Bocina Bluetooth y WiFi
Modelo: NAS-5003
Manual de Operación
FAVOR DE LEER COMPLETAMENTE EL MANUAL ANTES DE OPERAR ESTE PRODUCTO.
CONSERVAR EL MANUAL PARA FUTURAS REFERENCIAS

2
IMPORTANTES INSTRUCCIONES DE SEGURIDAD
PRECAUCION: PARA REDUCIR EL RIESGO DE CHOQUE ELÉCTRICO NO REMOVER LA
CUBIERTA (O TAPA), DENTRO DE ESTE APARATO NO HAY PARTES QUE EL USUARIO
PUEDA DARLE SERVICIO, ACUDIR A UN CENTRO DE SERVICIO AUTORIZADO O CON
PERSONAL CALIFICADO.
El símbolo del relámpago con punta de flecha dentro de un triángulo, es
diseñado para advertir al usuario de VOLTAJES PELIGROSOS no
aislados dentro del aparato que pueden ser de magnitud suficiente para
constituir riesgo de fuego o choque eléctrico para las persona.
El símbolo de exclamación dentro de un triángulo, es para alertar al
usuario de la presencia de instrucciones importantes de operación,
mantenimiento y servicio que se encuentran dentro de este instructivo
ADVERTENCIA: PARA PREVENIR RIESGO DE FUEGO O CHOQUE ELECTRICO, NO
EXPONER ESTE PRODUCTO AL GOTEO O SALPICADURA DE AGUA, A LA LLUVIA O
HUMEDAD.
ADVERTENCIA: USAR BAJO LA SUPERVISIÓN DE UN ADULTO DEBIDO AL LARGO DEL
CORDÓN DE ALIMENTACIÓN Esta unidad tiene un cordón de alimentación largo que puede
enredarse o ser jalado fácilmente, causando lesiones. Favor, de asegurarse que el cordón de
alimentación este colocado de manera que no cuelgue de la mesa, escritorio, etc. de manera que
no pueda ser jalado por los niños o que las personas se tropiecen accidentalmente con el mismo.
DECLARACION FCC
Este producto cumple con la parte 15 de las reglas FCC. La operación del producto está sujeta a
las dos siguientes condiciones:
1) Este producto no puede causar interferencia perjudicial y
2) Este producto debe aceptar cualquier interferencia recibida, incluyendo interferencias que
puedan causar un funcionamiento no deseado. La(s) antena(s) usadas por este transmisor
deben instalarse para tener una distancia de separación de al menos 20 cm de las personas y
no debe situarse u operarse en conjunto con cualquier otra antena o transmisor.

NOTICIA FCC
Este producto ha sido probado y cumple con las limitaciones de un equipo digital Clase B, de
acuerdo con la Parte 15 de las Normas FCC. Estos límites están diseñados para permitir una
protección razonable contra interferencia dañina en una instalación residencial. Este producto
genera, usa y puede emitir energía de frecuencia radial y, de no ser instalado y utilizado de
acuerdo con las instrucciones, puede causar interferencia dañina a las comunicaciones radiales.
Sin embargo, no existe garantía de que la interferencia no pueda ocurrir en una instalación
particular. Si este producto causa una interferencia dañina a la recepción de la radio o la televisión,
lo cual se puede determinar encendiendo y apagando el equipo, se recomienda al usuario tratar de
corregir la interferencia mediante una o más de las siguientes medidas:
• Orientar nuevamente o reubicar la antena receptora.
• Aumentar la separación entre el producto y el receptor.
• Conectar el equipo a una salida de un circuito diferente al receptor.
• Consultar a su proveedor o a un técnico de Radio y televisión.
ADVERTENCIA FCC
Para asegurar el funcionamiento continuo, seguir las instrucciones de instalación y usar sólo cables
blindados al conectar a otros productos. Cambios o modificaciones no aprobadas expresamente
por la parte responsable del cumplimiento puede anular la autoridad del usuario para operar el
equipo.
IMPORTANTES INSTRUCCIONES DE SEGURIDAD
Antes de usar el reproductor, asegurarse de leer todas las instrucciones de operación
cuidadosamente. Favor de observar que estas son precauciones generales y algunas pueden no
ser aplicables al reproductor.
Por ejemplo, el reproductor puede no tener la capacidad para ser conectado a una antena exterior.
1. Leer las instrucciones
Deben leerse todas las instrucciones de operación y de seguridad antes de operar este producto.
2. Conservar las instrucciones
Deben conservarse las instrucciones de operación y seguridad para futuras referencias.
3. Poner atención a las advertencias
Todas las advertencias en el aparato y las instrucciones de operación y seguridad deben de
respetarse.
4. Seguir las instrucciones
Deben seguirse todas las instrucciones de uso y operación.
5. Agua y humedad
No usar este aparato cerca del agua, por ejemplo cerca de una bañera, lavabo, fregadero de
cocina o de lavar, sótanos húmedos o cerca de una piscina.
6. Limpiar solo con una tela seca
Desconectar el reproductor del tomacorriente antes de darle mantenimiento o limpieza. No usar
limpiadores líquidos o en aerosol. Para limpiar el reproductor usar una tela suave, limpia y seca.
7. Ventilación
Las ranuras y aberturas en la parte posterior y posterior del gabinete son provistas para la
ventilación y asegurar la buena operación del reproductor y protegerlo del sobrecalentamiento. No
deben bloquearse o taparse estas aberturas, colocando el aparato sobre una cama, sofá alfombra
u otra superficie similar. El reproductor no debe colocarse cerca o sobre un radiador o fuentes de
calor. El reproductor no debe colocarse en un librero o estante que impida el flujo del aire a través
de las ranuras de ventilación.
8. Calor
El reproductor debe colocarse lejos de fuentes de calor como radiadores, registros de calor,
estufas u otros productos que producen calor (incluso amplificadores).
3

9. Terminal de tierra y polarización
No eliminar la característica de seguridad de una clavija polarizada o clavija con terminal a tierra,
esta es una medida de seguridad. Una clavija polarizada cuanta con dos terminales con una
terminal más ancha que la otra. Una clavija con terminal a tierra cuenta con dos terminales con una
tercera terminal con conexión a tierra. Si la clavija no entra completamente la clavija en el
tomacorriente, intentar meterla de nuevo volteando la clavija; si tampoco la clavija entra
completamente consultar a un electricista o personal calificado para reemplazar el tomacorriente
obsoleto.
10. Protección del cordón de alimentación
El cordón de alimentación debe colocarse de forma tal que no exista probabilidad de pisarlo o
apretarlo sobre los lugares donde será colocado o contra el aparato mismo. Poner atención
particular en el cordón, la clavija, el tomacorriente y en los puntos en donde estos salen del aparato.
11. Usar solo accesorios o refacciones recomendados por el fabricante.
12. Manejo y desplazamiento
No colocar este aparato en un carrito, plataforma, repisa o mesa inestables, el
aparato puede caerse generando serias lesiones y daños a las personas y/o al
aparato.
Usar este aparato solo con el carrito, plataforma, repisa o mesa recomendado
por el fabricante o vendido con el aparato. La combinación del aparato y de un
carrito debe moverse con cuidado. Las paradas repentinas, fuerza excesiva y las superficies
desniveladas pueden generar que el aparato y el carrito se vuelquen.
13. Tormentas eléctricas o periodos sin uso
Desconectar el reproductor del tomacorriente durante tormentas eléctricas o cuando no va ser
usado por un periodo largo de tiempo para protegerlo. También desconectar la antena exterior o el
sistema de cable. Esto protege al reproductor de daños debido a los rayos o sobre líneas de poder.
14. Referir todo Servicio
Referir todo servicio a un centro de servicio autorizado o con personal calificado. El servicio es
requerido cuando el aparato ha sido dañado de alguna manera, como el cordón de alimentación o
clavija dañada, ha sido derramado líquido o han caído objetos en el interior del aparato, el aparato
ha sido expuesto a la lluvia o humedad, el aparato no opera normalmente o se ha dejado caer.
15. Fuentes de alimentación
Este aparato debe ser operado solo con los tipos de fuentes de alimentación indicados en la
etiqueta de marcado, si no está seguro del tipo de la fuente de poder de su casa, consultar con su
proveedor o con la compañía de electricidad local. Para aparato diseñados para operar con
baterías u otras fuentes, referirse al manual de operación.
16. Líneas de poder
No debe de colocarse un sistema de antena exterior cerca de las líneas eléctricas aéreas, luces o
circuitos eléctricos, o en donde pueda caer sobre dichas líneas eléctricas o circuitos. Al instalar un
sistema de antena exterior, tener cuidado extremo de no tocar las líneas o circuitos eléctricos, el
contacto con ellos puede resultar fatal.
17. Sobrecarga
No sobrecargar los tomacorrientes, cordones de extensión y los receptáculos ya que pueden
generar riesgo de fuego o choque eléctrico.
18. Entrada de objetos y líquidos
No introducir objetos de cualquier tipo dentro de este aparato a través de las ranuras o aberturas,
estos pueden llegar a tocar puntos de voltaje peligroso o salidas que pueden resultar en riesgo de
fuego o choque eléctrico. No derramar o rociar cualquier tipo de líquido sobre las ranuras de
ventilación del aparato.
19. Antena exterior
4

Si una antena exterior es conectada en el
aparato, asegurar de que el sistema de antena
es puesto a tierra para proveer protección contra
sobre voltaje y cargas de corriente estática
acumulada. La sección 810 del NEC (National
Electrical Code), ANSI/NFPA 70, Provee
información respecto a la apropiada puesta a
tierra del poste y la estructura de soporte, cables
principales, productos de descarga de la antena,
tipos de conductores a tierra, localización de los
puntos de descarga de la tierra, conexión a tierra
de los electrodos y los requisitos de los
electrodos de conexión a tierra.
20. Servicio
No intentar dar servicio usted mismo a este
aparato, abriendo o removiendo las cubiertas, puede exponerse a voltajes peligrosos u otros
riesgos.
21. Reemplazo de partes
Cuando es necesario el reemplazo de partes, asegurarse que el servicio técnico use partes
especificadas por el fabricante o que tengan las mismas características que las partes originales. El
reemplazo de partes no autorizadas puede resultar en fuego, choque eléctrico u otros riesgos.
22. Verificar las medidas de seguridad
Una vez que se ha completado cualquier tipo de servicio o reparación a este aparato, solicitar al
técnico de servicio que realice las pruebas de seguridad para poder determinar que el aparato está
en condiciones apropiadas de operación.
23. Colocación en la pared o techo
El aparato debe de colocarse en la pared o techo de acuerdo a como lo especifica el fabricante.
24. Daños que requieren servicio
Desconectar el aparato del tomacorriente de pared y acudir a un centro de servicio autorizado o
con personal calificado bajo las siguientes condiciones
a) Cuando la clavija o el cordón de alimentación estén dañados.
b) Cuando ha sido derramado liquido o han caído objetos en el interior del aparato.
c) Si el aparato ha sido expuesto a la lluvia o agua.
d) Si el aparato no opera adecuadamente siguiendo las instrucciones de operación. Ajustar solo
los controles que son indicados en este manual de operación. El ajuste de otros controles
puede ocasionar daños y a menudo se requiere de trabajo excesivo del servicio técnico para
restablecer la operación normal del aparato.
e) Si el aparato se ha caído o golpeado o si la cubierta está dañada.
f) Si el aparato exhibe cambios en su funcionamiento normal.
Todo lo anterior indica la necesidad de darle servicio al aparato.
25. Instalación del sistema de cable
Este recordatorio se proporciona para llamar la atención respecto al artículo 820-40 del NEC de la
instalación del sistema de cable que proporciona las pautas para la adecuada conexión a tierra y,
en particular, en los puntos específicos en el que cable a tierra debe ser conectado al sistema de
tierra del edificio, tan cerca del punto de entrada del cable como sea práctico.
NOTA: Referir todo servicio al centro de servicio autorizado. El servicio es requerido cuando
el producto ha sido dañado de cualquier forma, si la clavija o cordón de alimentación están
dañados, se ha derramado líquido o han caído objetos en el interior del producto, el
producto ha sido expuesto a la lluvia o humedad, el producto no opera normalmente o se ha
caído.
5

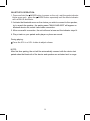
DESCRIPCIÓN DE PARTES
Parte Superior
Parte Posterior
1. Circulo de iluminación led
2. Poder / Modo “ / MODE”
3. Incrementar Volumen “VOL+”
4. Disminuir Volumen “VOL-“
5. Micrófono / WPS “ / WPS”
6. Control Alexa “ ”
7. Indicador de Modo
8. Micrófonos Internos
9. Indicador de Carga
10. Conector de entrada de Alimentación
“5V”
11. Conector de Entrada Auxiliar “AUX IN”
6

FUENTE DE ALIMENTACION
La bocina opera con una batería interna recargable de Ion de Litio, recargar la bocina
inmediatamente si la carga de la batería esta baja.
1. Insertar el conector micro USB del cable USB incluido al conector de entrada de alimentación
“5 V” localizado en la parte posterior de la bocina.
2. Insertar el puerto estándar USB del cable al puerto USB del cargador USB (conectar el
adaptador USB al tomacorriente) o computadora (la computadora debe estar encendida).
Durante el proceso de carga de la batería, el indicador de carga en la parte superior de la
bocina se enciende en Rojo; cuando la batería se carga completamente, el indicador se apaga.
Notas:
El tiempo de vida de la batería dura más siguiendo las instrucciones de carga y almacenamiento:
A. Antes de usar la bocina por primera vez, cargar la batería 4 horas aproximadamente hasta
que la bocina este completamente cargada.
B. Recargar la batería y almacenar la bocina en una temperatura ambiente de 5 °C a 35 °C
C. No cargar la batería por más de 24 horas. La carga excesiva o la operación de la bocina hasta
que la batería se descargue completamente, generan daños a la batería. La vida de la batería
se extenderá si esta se mantiene completamente cargada.
D. La vida de la batería se acorta de forma natural con el tiempo y uso.
E. La batería recargable interna en la bocina no puede ser reemplazad por el usuario.
ENTRADA AUXILIAR
Para escuchar la reproducción de un Reproductor de Audio Externo a través de la bocina, por
ejemplo un Reproductor MP3, Reproductor de Disco Compacto, etc.
1. Insertar el conector de un extremo del cable de audio al conector de salida de audio del
Reproductor de Audio Externo.
2. Insertar el otro extremo del cable de audio al conector de Entrada Auxiliar “AUX IN” en la parte
posterior de la bocina. Presionar y sostener “ /MODE” para encender la bocina, esperar a
que el Indicador de Modo destelle en Verde solamente, presionar “ /MODE” repetidamente
hasta que el Indicador de Modo cambia a color Azul.
3. Reproducir los archivos de audio en el Reproductor de Audio Externo como lo hace de forma
normal, para reproducirlo a través de la bocina.
7

OPERACIÓN BLUETOOTH
1. Presionar y sostener “ /MODE” para encender la bocina, esperar a que el Indicador de
Modo destelle únicamente en Verde, presionar “ /MODE” repetidamente hasta que el
indicador de modo cambie a color Azul y destella.
2. Activar el menú de Bluetooth en el dispositivo Bluetooth que desea conectar a la bocina, se
activa el modo de búsqueda de la bocina para sincronizarse, el nombre de sincronía de la
bocina “NAXA NAS-5003” se despliega en la lista de dispositivos Bluetooth localizados,
seleccionar el nombre de la bocina y hacer la conexión.
3. Después de que la conexión es exitosa, la bocina emite un tono y el indicador de modo
permanece encendido.
4. Reproducir un archivo de audio en el dispositivo sincronizado para reproducirlo a través de la
bocina.
Durante la Reproducción:
Ajustar el volumen al nivel deseado a través del dispositivo Bluetooth externo conectado.
Nota:
Después de sincronizar por primera vez el dispositivo Bluetooth y la bocina, estos se sincronizan
automáticamente al estar encendidos y se encuentren dentro del rango de operación Bluetooth.
8

AJUSTES
DESCARGA E INSTALACION DE LA APLICACIÓN
Antes de conectar algún dispositivo a la Bocina
Descargar la aplicación “Naxa Resound” de Apple App Store para
dispositivos iOS
Descargar la aplicación “Naxa Resound” de Google Play Store para
dispositivos Android.
Después de que la instalación es exitosa, el icono de la aplicación se
despliega como se observa en la figura de la derecha.
Nota:
Las siguientes operaciones están basadas en un sistema operativo IOS, la operación para los
sistemas operativos Android es similar.
CONEXIÓN
1. Presionar y sostener “ /MODE” para encender la bocina, esperar a que el Indicador de
Modo destelle únicamente en Verde, ahora está en el modo de WiFi
2. Activar la función de WiFi en el Dispositivo iOS o Android (Teléfono inteligente, Tableta, etc.),
conectar el Dispositivo iOS o Android a la Red WiFi (Router) deseada.
3. Tocar en el icono “NAXA RESOUND” en el Dispositivo iOS o Android. La imagen siguiente se
despliega. Leer las instrucciones en la pantalla y tocar en “WiFi Setup Wizard” para continuar.
9

4. Leer las instrucciones en la pantalla y
tocar en “Next” para continuar
5. Tocar en la columna para seleccionar
NAS-5003
6. Tocar en “Password” e ingresar la
contraseña de WiFi para que la bocina se
conecte a la Red WiFi (Router). Tocar en
“Next” para continuar.
7. Presionar y sostener “ /WPS” en la
parte superior de la bocina. Tocar en
“Next” para continuar
10

8. Escuchara las instrucciones de voz
durante el proceso de conexión.
9. Cuando la bocina es conectada a la red
WiFi (router) exitosamente, el Indicador
de Modo en la parte superior de la bocina
permanece encendido.
Nota:
Si la conexión falla, se despliega la pantalla siguiente.
Tocar en “Cancel” e intentar conectar nuevamente siguiendo los pasos de conexión indicados
anteriormente.
11

10. Cuando la bocina está conectada, se
despliega la siguiente pantalla. Tocar en
“CUSTOM” para cambiar el nombre de la
ubicación deseada o tocar en uno de los
nombres enlistados abajo.
11. Se despliega la siguiente pantalla. Si
tiene una cuenta, tocar en “Sign in with
Amazon” para iniciar sesión en Amazon.
12. Se despliega la siguiente pantalla,
ingresar la información de la cuenta y
tocar en “Sign in” en la pantalla para
ingresar a la cuenta.
13. Si no tiene cuenta en Amazon, tocar en
“Create a new Amazon account” para
iniciar el proceso de registro y crear una
cuenta.
12

14. Cuando la siguiente pantalla se despliega, tocar en “I agree” para iniciar sesión en Amazon.
15. Una vez que inicia sesión, la siguiente pantalla se despliega. Tocar en el Idioma deseado a
seleccionar.
13

16. Se despliega la siguiente pantalla con ejemplos de varias preguntas que puede realizar a
Alexa. Tocar en “Next” en la pantalla para continuar.
17. Se despliega la siguiente pantalla. Entonces puede desactivar la función del micrófono
siguiendo las instrucciones en pantalla o tocar en “Next” en la pantalla para continuar.
14

18. Tocar en “I got it” para continuar. Entonces se despliega la lista de dispositivos.
EN LA LISTA DE DISPOSITIVOS
Tocar en “+” para agregar más bocinas a la red. Repetir los pasos anteriores para realizar la
conexión y seguir las instrucciones en pantalla.
Tocar en “ ” para renombrar la bocina, verificar la información de la bocina o restablecer los
ajustes de fábrica, verificar el contenido programado y ajustar o restablecer los ajustes de
Alexa.
Tocar en “ ” para seleccionar el modo de audio de Canal Izquierdo “L”, Canal Derecho “R” o
Estéreo “LR”
15

19. Si más de una bocina ha sido agregada a la Lista de Dispositivos, tocar en “How to switch
between solo and multi mode?” para cambiar entre el modo individual o múltiple como se
observa en la figura siguiente:
20. Al terminar de usar la bocina, presionar y sostener “ /MODE” por unos segundos en la parte
superior de la bocina para apagarla.
Nota:
Para desconectar la bocina de la Red WiFi actual, presionar y sostener “ /WPS” por unos
segundos hasta que escucha en la bocina “Connecting to your network, this may take one to three
minutes” (Conectando a la red, puede tomar de 1 a 3 minutos), entonces apagar la bocina.
Encender la bocina nuevamente para reconectarla a la red deseada.
16

Operación de la bocina después de agregar a la Red WiFi:
1. Conectar el teléfono móvil a la red WiFi de 2.4 G
2. Para encender la bocina, presionar y sostener “ /MODE” en la parte superior de la bocina
hasta que los indicadores Azul y Verde en la bocina se encienden y destellan.
3. Esperar hasta que el indicador Verde se ilumina y destella.
4. Espera unos segundos, la bocina se conecta automáticamente a la misma Red Wifi. El
indicador Verde deja de destella y se escucha en la bocina “Connected”.
5. Tocar a la aplicación “Naxa Resound” en el teléfono móvil. La siguiente pantalla se despliega
en la pantalla del teléfono móvil.
6. Esperar unos segundos y la siguiente pantalla se despliega.
17

7. Tocar la pantalla del teléfono móvil y deslizar a la derecha repetidamente hasta que se
despliega la siguiente pantalla. Tocar en el botón correspondiente para entrar a la función
deseada.
Tocar para buscar canciones,
artistas y carpetas en línea
Tocar para escuchar la lista de
canciones favoritas
Tocar para escuchar la lista de
canciones en el dispositivo
conectado
Tocar para iniciar sesión en la
plataforma de radio profesional en
línea
Tocar para iniciar sesión en la
plataforma de música profesional
Tocar para escuchar canciones de
la plataforma en línea
Tocar para iniciar sesión en
Amazon Alexa
Tocar para agregar más servicios
Tocar para cambiar al modo de
Entrada Auxiliar
Tocar para cambiar al modo de
Bluetooth
Tocar para verificar la versión
y retroalimentación
18

OPERACIÓN SPOTIFY
Antes de usar Spotify, debe crear una cuenta Premium de Spotify para iniciar sesión.
1. Tocar en “Spotify” en la página de inicio de NAXA RESOUND.
2. Ingresar la cuenta y contraseña para iniciar sesión.
3. Abrir la aplicación “Spotify” en el teléfono, tableta o computadora y reproducir cualquier
canción.
4. Tocar en el icono
5. Elegir el dispositivo de la lista para empezar a escuchar la reproducción de la música a través
de la bocina.
Licencias:
Los programas de Spotify están sujetos a licencias de terceras partes encontradas en:
www.spotify.com/connect/third-part-licenses.
OPERACIÓN iHEARTRADIO
Antes de usar iHeartRadio, debe crear una cuenta iHeartRadio para iniciar sesión.
1. Tocar en “iHeartRadio” en la página de inicio de NAXA RESOUND.
2. Ingresar la cuenta y contraseña para iniciar sesión.
3. Seleccionar la canción deseada e iniciar la reproducción.
OPERACIÓN TIDAL
Antes de usar Tidal, debe crear una cuenta Tidal para iniciar sesión.
1. Tocar en “Tidal” en la página de inicio de NAXA RESOUND.
2. Ingresar la cuenta y contraseña para iniciar sesión.
3. Seleccionar la canción deseada e iniciar la reproducción.
19

CONTROL DE VOZ AMAZON ALEXA
1. Decir “Alexa” en el micrófono incorporado en la bocina. El cirulo de iluminación led se
enciende en Azul. Entonces puede hablar a través del micrófono en la bocina para realizar
una cuestión o requerimiento (comando). La bocina dará la respuesta al cuestionamiento o
requerimiento. Las típicas preguntas y respuestas son:
P: Alexa - - - ¿Qué hora es?
R: “Son las XX en punto” (XX = Hora actual)
P: Alexa - - - ¿Cómo será el clima hoy?
R: “El clima no será demasiado frío”
P: Alexa - - - ¿Qué día es hoy?
R: “Hoy es XXXXX” (XXXXX = Día actual)
P: Alexa - - - ¿Cuál es la noticia de hoy?
R: “Esta es la información al momento”
P: Alexa - - - ¿Quién es el presidente de USA?
R: “El presidente de USA es XXXX” (XXXX = Nombre del presidente)
P: Alexa - - - ¿Cuál es la capital de USA?
R: “La capital de USA es XXXX” (XXXX = Nombre de la capital)
2. O presionar “ ” en la parte superior de la bocina. El cirulo de iluminación led se enciende en
Azul. Entonces puede hablar a través del micrófono en la bocina para realizar una cuestión o
requerimiento (comando). La bocina dará la respuesta al cuestionamiento o requerimiento.
Las típicas preguntas y respuestas son:
P: Alexa - - - ¿Qué hora es?
R: “Son las XX en punto” (XX = Hora actual)
P: Alexa - - - ¿Cómo será el clima hoy?
R: “El clima no será demasiado frío”
P: Alexa - - - ¿Qué día es hoy?
R: “Hoy es XXXXX” (XXXXX = Día actual)
P: Alexa - - - ¿Cuál es la noticia de hoy?
R: “Esta es la información al momento”
P: Alexa - - - ¿Quién es el presidente de USA?
R: “El presidente de USA es XXXX” (XXXX = Nombre del presidente)
P: Alexa - - - ¿Cuál es la capital de USA?
R: “La capital de USA es XXXX” (XXXX = Nombre de la capital)
20

3. Durante la operación de Amazon Alexa, puede usar las siguientes voces de comando para
controlar la bocina.
Voz de comando (Alexa) - - - Reproducir la pista XX (XX numero de pista deseada)
Acción: La pista XX es reproducida.
Voz de comando (Alexa) - - - Pausar / Detener la reproducción.
Acción: La reproducción se pausa o detiene.
Voz de comando (Alexa) - - - Continuar la reproducción.
Acción: La reproducción se reanuda.
Voz de comando (Alexa) - - - Incrementar volumen.
Acción: El volumen de salida se incrementa.
Voz de comando (Alexa) - - - Disminuir volumen.
Acción: El volumen de salida se disminuye.
Voz de comando (Alexa) - - - Avance rápido.
Acción: La pista se reproduce hacia adelante a velocidad rápida.
Voz de comando (Alexa) - - - Regreso rápido.
Acción: La pista se reproduce hacia atrás a velocidad rápida.
Voz de comando (Alexa) - - - Anterior.
Acción: La bocina salta a la pista anterior.
Voz de comando (Alexa) - - - Siguiente.
Acción: La bocina salta a la pista siguiente.
4. Si desea detener los requerimientos o cuestiones (comandos) en la bocina o evitar
interferencia de voces externas. Presionar y sostener “ /WPS” para desactivar el micrófono
(modo de comunicación), El cirulo de iluminación led cambia a Rojo. Para encender el
micrófono de nuevo, presionar “
” nuevamente, El cirulo de iluminación led cambia a Blanco
21

GUIA PARA LA SOLUCION DE PROBLEMAS
Verificar la siguiente guía antes de acudir al centro de servicio autorizado.
PROBLEMA POSIBLE CAUSA POSIBLE SOLUCIÓN
La bocina no
enciende
La batería interna esta
descargada
Recargar la batería
No hay salida de
audio o es débil
El volumen está ajustado al nivel
mínimo
Presionar “VOL+” para incrementar el
nivel del volumen
El volumen del dispositivo
conectado/sincronizado está a un
nivel demasiado bajo
Aumentar el volumen del dispositivo
conectado/sincronizado
La salida de
audio esta
distorsionada
El volumen está ajustado a un
nivel demasiado alto
Presionar “VOL-” para disminuir el
nivel del volumen
El volumen del dispositivo
conectado/sincronizado está a un
nivel demasiado alto
Disminuir el volumen del dispositivo
conectado/sincronizado
La función
Bluetooth no
opera
El dispositivo Bluetooth externo
no está sincronizado con la
bocina
Sincronizar el dispositivo Bluetooth
externo con la bocina
El dispositivo Bluetooth externo
sincronizado está demasiado
lejos de la bocina
Colocar el dispositivo Bluetooth
externo más cerca de la bocina
La función WiFi
no opera
La bocina no está agregada a la
Red WiFi
Agregar la bocina a la Red WiFi
La bocina no está en el modo de
WiFi
Encender la bocina y esperar a que la
luz destelle en Verde solamente para
entrar al modo de Wi Fi
La bocina y el teléfono móvil no
están en la misma Red WiFi 2.4G
Conectar la bocina y el teléfono móvil
en la misma Red WiFi 2.4 G
El Router (Red WiFi) está
apagado
Encender el Router
La función de
Amazon Alexa
no opera
La bocina no está en el modo de
operación de Amazon Alexa
Encender la bocina y entrar al modo
de operación de Amazon Alexa
(asegurarse de conectarse)
22

ESPECIFICACIONES
Fuente de alimentación: Batería recargable interna de Ion de Litio de
3.7 V
2500 mAh (9.2 Wh)
Puerto de carga: micro USB de 5 V
Versión de Bluetooth: 4.1
Distancia de operación Bluetooth: 10 metros aproximadamente en área abierta
Distancia de operación WiFi: 30 metros aproximadamente en área abierta
CONTENIDO
Manual de Operación
Cable USB (para cargar la batería únicamente)
Cable de Audio con conectores estéreo de Ø 3.5 mm
LAS ESPECIFICACIONES Y EL DISEÑO DE ESTE PRODUCTO Y SUS ACCESORIOS ESTAN
SUJETOS A CAMBIOS SIN PREVIO AVISO PARA MEJORAS DE LOS MISMOS.
23

LIMITED WARRANTY
NAXA LIMITED WARRANTY (“Warranty”)
— For Product Categories Listed in Chart Below (as applicable, “Product”).
Before returning your Pro
duct for service under this Warranty, please read the instruction manual carefully and visit our website at
www.naxa.com for product updates and extended support documentation (e.g., Frequently Asked Questions, Common
Troubleshooting Guides, etc …). If you are still having trouble with your Product, please contact Naxa Customer Support.
Warning: Some P
roducts may contain components that are small enough to be swallowed. Please keep out of reach of children.
Subject to the
terms and conditions herein, Naxa Electronics, Inc. (herein after called “Naxa”) warrants to the original purchaser of the
Product (“Customer”) that the Product will be free from defects in material or workmanship under normal, non-commercial use
(“Defects”) for the applicable Warranty Period listed below.
Warranty
Period encompasses separate “Coverage Periods” for Parts and Labor as listed in the table below. Each Coverage Period
begins from the original date of Customer purchase. If Customer returns a defective Product (or any component thereof) during the
applicable Coverage Period, Naxa will, at its option: (1) repair the Product (or any component thereof) or; (2) replace the Product (or
any component thereof) with a new or refurbished Product (or any component thereof), in either case free of charge to Customer for
Parts and/or Labor during the specified Coverage Period only, and excluding the applicable shipping charges noted below for which the
Customer is responsible. The foregoing states the Customer’s exclusive remedy and Naxa’s sole liability for breach of the limited
warranty contained herein.
This warr
anty specifically excludes any product that has been subject to or has defects resulting from:(a)any neglect or misuse by a
Customer; (b) an accident, improper application, violation of operating instructions for the Product, or any other Customer-induced
damage; (c) the alteration or removal of any Product serial number; (d) any modification or repair to Product (or any component
thereof) by any party other than Naxa or a party authorized in writing by Naxa; (e) any damage to
Product due to power surges,
incorrect electrical voltage, misconnection to any device, or malfunction of any device used with the Product (or, as applicable, any
component thereof); (f) cosmetic damage to the Product caused by normal wear and tear; (g) shipping damage that occurs while the
Product is in transit; (h) damage caused by heat sources, sunlight, electromagnetic conditions, or other climatic conditions; or (i) any
acts of God. Refurbished products are not covered by this Warranty.
Product is sold to Custome
r for per
sonal, non-commercial use only. Product is not warranted for commercial or rental use. In addition,
Product is not warranted against failure, and should not be used by Customer for any application where there is a risk that any data
stored on Product will be breached or otherwise compromised, or the data stored on Product is relied upon for medical or lifesaving
applications. Naxa disclaims any Warranty for any of the foregoing uses to the fullest extent permitted by law. Customer assumes any
and all risks associated with such uses of Product, and agrees to indemnify Naxa for any damages claimed for such uses.
EXCEPT FOR THE EXPRESS WARRANTIES STATED ABOVE AND TO THE MAXIMUM EXTENT P
ERMITTED BY LAW, ALL PRODUCTS ARE
PROVIDED “AS IS”, AND NAXA DISCLAIMS ALL OTHER WARRANTIES, INCLUDING WITHOUT LIMITATION ANY IMPLIED WARRANTY OF (I)
MERCHANTABILITY; (II) FITNESS FOR A PARTICULAR PURPOSE, OR; (III) NON-INFRINGEMENT OF THIRD PARTY RIGHTS. TO THE
MAXIMUM EXTENT PERMITTED BY APPLICABLE LAW, IN NO EVENT WILL NAXA BE LIABLE TO CUSTOMER OR ANY THIRD
PARTY FOR
ANY INDIRECT, SPECIAL, INCIDENTAL, CONSEQUENTIAL, EXEMPLARY OR PUNITIVE DAMAGES, INCLUDING, WITHOUT LIMITATION, ANY
LOST PROFITS OR REVENUES, LOSS OR INACCURACY OF ANY DATA, OR COST OF SUBSTITUTE GOODS, REGARDLESS OF THE THEORY OF
LIABILITY (INCLUDING NEGLIGENCE) AND EVEN IF NAXA HAS BEEN ADVISED OF THE POSSBILITY OF SUCH DAMAGES, NAXA’S
AGGREGATE LIABILITY TO CUSTOMER FOR ACTUAL DIRECT DAMAGES FOR ANY CAUSE WHATSOEVER SHALL BE LIMITED TO THE
C
UMULATIVE PRODUCT FEES PAID BY THAT CUSTOMER FOR THE PRODUCTS CAUSING THE DAMAGES, IF ANY.
This Warranty giv
es Customer specific rights, and Customer may also have other rights that vary from jurisdiction to jurisdiction.
All warr
anty returns must have an RMA number provided by Naxa Customer Support. An RMA number can be obtained by contacting
Naxa Customer Support by phone, email, or online by using the RMA ticketing system at www.naxa.com.
Naxa Electronics, Inc.
RMA Processing / Customer Suppor
t
2320 E. 49th St., Vernon, CA 90058
Email: support@naxa.com
Phone: (
866) 411-6292
Web: www.naxa.com
Hours of Operation:
Monda
y – Friday
10:00 AM to 5:00 PM PST
-
 1
1
-
 2
2
-
 3
3
-
 4
4
-
 5
5
-
 6
6
-
 7
7
-
 8
8
-
 9
9
-
 10
10
-
 11
11
-
 12
12
-
 13
13
-
 14
14
-
 15
15
-
 16
16
-
 17
17
-
 18
18
-
 19
19
-
 20
20
-
 21
21
-
 22
22
-
 23
23
-
 24
24
-
 25
25
-
 26
26
-
 27
27
-
 28
28
-
 29
29
-
 30
30
-
 31
31
-
 32
32
-
 33
33
-
 34
34
-
 35
35
-
 36
36
-
 37
37
-
 38
38
-
 39
39
-
 40
40
-
 41
41
-
 42
42
-
 43
43
-
 44
44
-
 45
45
-
 46
46
-
 47
47
-
 48
48


en otros idiomas
- English: Naxa NAS-5003 Owner's manual
Artículos relacionados
-
Naxa NAS-5001 El manual del propietario
-
Naxa NAS-5000 El manual del propietario
-
Naxa NHS-5002 El manual del propietario
-
Naxa NAS-4000 Manual de usuario
-
Naxa NSH-1000 El manual del propietario
-
-
-
-
-
Otros documentos
-
JAM HX-W09901 Instruction book
-
QFX BT-101 Manual de usuario
-
Jensen JSB-550 Manual de usuario
-
Tivoli Audio Music System Home El manual del propietario
-
Samsung HW-NW700 Manual de usuario
-
HOMEWERKS 7148-01-AX Guía del usuario
-
Whirlpool WHSS90F El manual del propietario
-
iLuv Aud Click Guía de inicio rápido
-
-
 myTouchSmart 40572 Manual de usuario
