La página se está cargando...

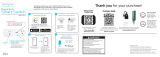
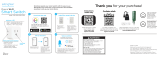
READ IT OR WATCH IT
Read instructions or watch easy-to-follow video.
Scan QR code or visit goo.gl/6om2jy
40572 v5
08/29/19
39845
Wi-Fi Simple-Set
Outdoor Smart Plug
40794
Wi-Fi In-Wall
Smart Dimmer
40792
Wi-Fi In-Wall
Smart Switch
40795
Wi-Fi In-Wall
Smart Outlet
Visit mytouchsmart.com for other myTS
Wi-Fi products
Visite mytouchsmart.com para conocer otros productos
wifi de myTS
• Type “myts” into the search bar, press the myTS icon, then
follow the prompts to complete setup
• To add devices after initial setup, say, “Okay, Google, sync my
devices”
Cómo emparejar el dispositivo con Google Home
• Abra la aplicación Google Home
• Toque el icono Home (Inicio)
• Toque el icono Add (Agregar) y luego “Set up device” (“Configurar
dispositivo”)
• Toque “Have something already set up?” (“¿Ya has configurado un
dispositivo?”)
• Escriba “myts” en la barra de búsqueda, pulse el icono myTS y luego siga
las indicaciones para completar la configuración.
• Para agregar nuevos dispositivos después de la configuración inicial,
diga “Okay, Google, sync my devices” (Ok, Google, sincroniza mis
dispositivos”)
For additional information, view the support tab in the
myTS app.
Para obtener información adicional, consulte la pestaña de ayuda en la
aplicación myTS.
Pair with Amazon Alexa
• Open the Amazon Alexa app
• Enable the myTS skill
• Ask Alexa to “Find new devices” to link to
myTS devices
• To add devices after initial setup, say, “Alexa, find
new devices”
Como emparejar el dispositivo con Alexa de Amazon
• Abra la aplicación Alexa de Amazon
• Habilite la funcionalidad myTS
• Pídale a Alexa que encuentre nuevos dispositivos para enlazar con los
dispositivos myTS
• Para agregar dispositivos adicionales después de la configuración
adicional, diga “Alexa, find new devices” (“Alexa, encuentra nuevos
dispositivos”)
Pair with Google Home
• Open the Google Home app
• Tap the Home icon
• Touch the Add icon followed by “Set up device”
• Tap “Have something already set up?”
Voice control
Control de voz
Group your devices
Agrupe sus dispositivos
Add devices to a group to easily control and set programs for
multiple lights. Connected devices must be turned on to be
controlled by the app.
Agregue dispositivos a un grupo para controlarlos fácilmente y
establecer programas para luces múltiples. Los dispositivos conectados
deben encenderse para que puedan ser controlados por la aplicación.
+
Add Group
Groups
Turn device ON/OFF remotely
Apague o encienda el dispositivo de forma remota
Edit device name and picture
Edite el nombre y la imagen del dispositivo
Set ON/OFF timer programs
Establezca los programas del temporizador para encender y apagar
el dispositivo
Getting to know your app
Conozca su aplicación
FCC Statement
This device complies with part 15 of the FCC and Industry Canada
license-exempt RSS standards. Operation is subject to the following two
conditions: (1) this device may not cause harmful interference, and (2) this
device must accept any interference received, including interference that may
cause undesired operation.
FCC NOTE: The manufacturer is not responsible for any radio or TV interference
caused by unauthorized modifications to this equipment. Such modifications
could void the user’s authority to operate the equipment.
NOTE: This equipment has been tested and found to comply with the limits
for a Class B digital device, pursuant to part 15 of the FCC Rules. These limits
are designed to provide reasonable protection against harmful interference
in a residential installation. This equipment generates, uses and can radiate
radio frequency energy, and if not installed and used in accordance with
the instructions, may cause harmful interference to radio communications.
However, there is no guarantee interference will not occur in a particular
installation.
If this equipment does cause harmful interference to radio or television
reception, which can be determined by turning the equipment off and on, the
user is encouraged to try to correct the interference by one or more of the
following measures:
• Reorient or relocate the receiving antenna.
• Increase the separation between the equipment and receiver.
• Connect the equipment into an outlet on a circuit different to which the
receiver is connected.
• Consult the dealer or an experienced radio/TV technician for help.
CAN ICES-3(B)/NMB-3(B)
Declaración de la FCC:
Este dispositivo cumple con el apartado 15 de las normas FCC. El funcionamiento
está sujeto a las siguientes dos condiciones:
este dispositivo (1) puede causar interferencia perjudicial y (2) debe aceptar
cualquier interferencia recibida, incluidas las interferencias que puedan causar
un funcionamiento no deseado.
NOTA DE LA FCC: El fabricante no es responsable de las interferencias de radio
o televisión causadas por modificaciones no autorizadas al equipo. Dichas
modificaciones podrían anular la autoridad del usuario para usar el equipo.
NOTA: Este equipo se probó y se determinó que cumple con los límites de
un dispositivo digital de clase B, conforme al apartado 15 de las normas
FCC. Estos límites están diseñados para brindar protección razonable contra
interferencias perjudiciales en una instalación residencial. Este equipo genera,
usa y puede irradiar energía de radiofrecuencia y, si no se instala y usa según las
instrucciones, puede causar interferencia perjudicial a las radiocomunicaciones.
Sin embargo, no puede garantizarse que no se producirán interferencias en una
instalación dada. Si este equipo provoca interferencia perjudicial a la recepción
de radio o televisión, lo que puede determinarse encendiendo y apagando el
equipo, se recomienda que el usuario intente corregir la interferencia por medio
de la implementación de una o más de las siguientes medidas:
• Reorientar o reubicar la antena receptora.
• Incrementar la separación entre el equipo y el receptor.
• Conectar el equipo a un tomacorriente de un circuito diferente del circuito al
que está conectado el receptor.
• Consultar al distribuidor o a un técnico con experiencia en radio/televisión para
solicitar asistencia.
CAN ICES-3(B)/NMB-3(B)

Download the myTS app from the Apple® App Store or
Google Play Store by searching “myTS” or “myTouchSmart.”
Descargue la aplicación myTS de la App Store de Apple® o de Google
Play Store buscando “myTS” o “myTouchSmart.”
Enter your email address and create a password.
Note: Be sure to read and agree to terms of service.
Ingrese su dirección de correo electrónico y cree
una contraseña.
Nota: Recuerde leer y aceptar los términos de servicio.
Create new account >
Email
Password
Confirm Password
Agree
Note: If the LED is flashing slowly, press the button for 10
seconds to reset device. The LED flashes solid for 3 seconds
and begins flashing quickly. The device is reset.
Once connected to the router network, the button can turn
the connected light on or off.
Instale el interruptor inteligente con wifi en la ubicación deseada.
La luz LED azul parpadeará rápidamente para indicar que el dispositivo
está listo para agregarse a la red de su enrutador.
Nota: Si el LED emite destellos lentos, presione el botón durante 10
segundos para reiniciar el dispositivo. La luz LED se encenderá sin
parpadear durante 3 segundos y luego comenzará a parpadear
rápidamente. El dispositivo se ha reiniciado.
Una vez lograda la conexión a la red del enrutador, el botón puede
encender o apagar la luz conectada.
Install the Wi-Fi smart switch in
desired outlet.
The blue LED will blink quickly to
indicate the device is ready to be added
to your router network.
4
Find new device
Cómo buscar un nuevo dispositivo
Tap “Find New Device” in myTS app to connect your new
Wi-Fi device.
Pulse “Find New Device” (buscar nuevo dispositivo) en la aplicación
myTS para conectar su nuevo dispositivo wifi.
5
Wi-Fi connection
Conexión wifi
myTS Wi-Fi
Network
Password
The app displays the phone’s Wi-Fi network connection – must
be a 2.4GHz network. Enter password for the Wi-Fi network
and select “OK.”
La aplicación muestra la conexión de red wifi del teléfono. La red debe
ser de 2.4GHz. Ingrese la contraseña para la red wifi y seleccione “OK.”
+
Find New Device
1
Download myTS app
Cómo descargar la aplicación myTS
2
Create account
Cómo crear una cuenta
3
Install device
Instalar dispositivo
6
Adding device
Agregar dispositivo
Once the device is discovered,
select and press “Connect.”
If the device is not discovered,
the app displays “No new
devices found,” verify your
Wi-Fi password, the switch’s LED is blinking quickly and the
Wi-Fi network is 2.4GHz. Select “OK” and repeat step 5.
For info about your Wi-Fi network, check your router markings
or contact the service provider.
Further assistance is available in the FAQs ( ) or by calling our
U.S.-based Consumer Care at 1-800-654-8483.
Una vez detectado el dispositivo, seleccione y presione
“Connect” (conectar).
Si no se detecta el dispositivo, la aplicación mostrará “No new devices
found” (no se encontraron nuevos dispositivos). Verifique su contraseña
de wifi, que la luz LED del interruptor parpadee rápidamente y que la red
wifi sea de 2.4GHz. Seleccione “OK” y repita el paso 5.
Para obtener información acerca de la red wifi, verifique las indicaciones
en el enrutador o comuníquese con el proveedor de servicios.
Encontrará ayuda adicional en las preguntas más frecuentes (FAQs) ( ) o
al comunicarse con nuestro Centro de atención al cliente con sede en EE.
UU. al 1-800-654-8483.
7
Manual setup
Configuración manual
If the connection fails, the app prompts for manual setup. Tap
“Manual” and follow the instructions. Refer to step 3 if the blue
LED is not blinking quickly. When the device is reset and the
LED flashes rapidly, follow the app’s prompts for the specific
button press process. The LED will flash in groups of three to
indicate the device is in manual setup mode.
Si la conexión falla, la aplicación solicita que la configuración se realice
manualmente.Pulse “Manual” y siga las instrucciones.Consulte el paso 3
si el LED azul no emite destellos rápidos.Cuando el dispositivo se reinicia
y el LED emite destellos rápidos, siga las indicaciones de la aplicación
para el proceso de presionar los botones específicos.El LED emitirá
destellos en grupos de tres para indicar que el dispositivo está en el
modo de configuración manual.
Searching for new device
Plug-in On/O Switch
Patent Pending
MADE IN CHINA
Distributed by Jasco Products Company LLC,
10 E. Memorial Rd., Oklahoma City, OK 73114.
This Jasco product comes with a 1-year limited warranty.
Visit www.byjasco.com for warranty details.
Questions? Contact our U.S.-based Consumer
Care at 1-800-654-8483 between 7AM—8PM CST.
MTS5402
Specifications:
125VAC 60Hz
15A 1875W general
purpose/resistive
10A 1250W tungsten
1/2HP 2.4GHz
Works with LED, CFL
and incandescent.
WARNING
RISK OF ELECTRIC SHOCK
• PLUG DIRECTLY INTO AN ELECTRICAL OUTLET
• DO NOT USE IN WET LOCATIONS
• FULLY INSERT PLUG
• USE INDOORS ONLY
• UNPLUG SWITCH BEFORE CLEANING
• KEEP CHILDREN AWAY
RISK OF FIRE
• DO NOT USE TO CONTROL DEVICES WHERE
IMPROPER OPERATION CAN CAUSE
UNSAFE CONDITIONS
• DO NOT EXCEED ELECTRICAL RATINGS
• DO NOT USE WITH EXTENSION CORDS
• NOT FOR USE WITH MEDICAL OR LIFE-SUPPORT
EQUIPMENT
Patente pendiente
HECHO EN CHINA
Distribuido por Jasco Products Company LLC,
10 E Memorial Rd., Oklahoma City, Oklahoma 73114.
Este producto de Jasco tiene una garantía limitada de 1 año.
Visite www.byjasco.com para obtener detalles de la
garantía y registrar el producto.
¿Preguntas? Comuníquese al
1-800-654-8483 entre las 7:00 a. m. y las
8:00 p. m. CST (hora central estándar).
MTS5402
Especificación:
125VAC 60HZ
15A 1875W fines
generales/carga resistiva
10A 1250W tungsteno
1/2HP 2.4 GHz
Funciona con luces LED,
CFL e incandescentes.
RIESGO DE DESCARGA ELÉCTRICA
• CONECTE DIRECTAMENTE A UNA
TOMA ELÉCTRICA
• USE SOLAMENTE EN ESPACIOS INTERIORES
• INSERTE COMPLETAMENTE EL ENCHUFE
• USE SOLAMENTE EN ESPACIOS INTERIORES
• DESCONECTE EL INTERRUPTOR ANTES
DE LIMPIAR
• MANTENGA ALEJADOS A LOS NIÑOS
RIESGO DE INCENDIO
• NO LO UTILICE PARA CONTROLAR
DISPOSITIVOS EN AQUELLOS CASOS EN
LOS QUE UNA OPERACIÓN INADECUADA
PUEDA RESULTAR INSEGURA.
• NO EXCEDA LAS ESPECIFICACIONES
ELÉCTRICAS LÍMITE
• NO USE CON CORDONES DE EXTENSIÓN
• SE PROHÍBE SU EMPLEO EN EQUIPO
MÉDICO O EQUIPO PARA EL
MANTENIMIENTO DE LAS FUNCIONES
VITALES
ADVERTENCIA
Try Again
Manual
Setup
Contact Us
1/2