
Homewerks.com
BATHROOM VENTILATION FAN
WITH ALEXA BUILT-IN, LED LIGHT,
AND BLUETOOTH® SPEAKERS
MODEL 7148-01-AX
Español p. 16
3/4/2021
Questions, problems, missing parts? Before returning to your retailer, call our customer service department
at 1-877-319-3757, 7:30 a.m. - 4:30 p.m., CST, Monday - Friday.
READ AND SAVE THESE INSTRUCTIONS
Amazon, Alexa and all related logos are trademarks of Amazon.com, Inc. or its afliates.
The Bluetooth word mark and logos are owned by Bluetooth SIG, Inc. Other third-party brands and names are the property of their respective owners.
Homewerks, Homewerks Worldwide, the Homewerks house design, and all related logos are trademarks owned by Homewerks Worldwide, LLC
U.S. Pat. No. 9,398,357

2Homewerks.com
TABLE OF CONTENTS
Product Specications ........................................................................................................................2
FCC Compliance ................................................................................................................................2
Package Contents ..............................................................................................................................3
Hardware Included .............................................................................................................................3
Safety Information ..............................................................................................................................4
Preparation .........................................................................................................................................4
Installation Instructions .......................................................................................................................6
Wall Switch Operation ........................................................................................................................9
Setting Up and Pairing Your Alexa Bath Fan to the Homewerks Connect App .................................9
Operating the Bath Fan Using Alexa Commands .............................................................................10
Connecting your BLUETOOTH® Device to the Speaker ..................................................................10
Additional Functions ......................................................................................................................... 11
Care and Cleaning............................................................................................................................ 11
Troubleshooting ................................................................................................................................ 12
Warranty ...........................................................................................................................................14
PRODUCT SPECIFICATIONS
Airow: 110 CFM LED light power consumption: 18W
120V, 60Hz LED light brightness: 800 lumens
Duct diameter: 4 in. LED light color (CCT): 2200K Warm White / 3000K
Soft White / 4000K Cool White / 5000K Daylight
Sound output: 1.5 Sones
Total power consumption: 50W Night light color (CCT): 2200K Warm White
Fan power consumption: 28W Weight: 12.8 lbs.
Exhaust fan speed: 920 RPM
FCC COMPLIANCE
NOTICE: This equipment has been tested and found to comply with the
limits for a Class B digital device, pursuant to part 15 of the FCC Rules.
These limits are designed to provide reasonable protection against
harmful interference in a residential installation.
This equipment generates, uses, and can radiate radio frequency energy
and, if not installed and used in accordance with the instructions, may
cause harmful interference to radio communications. However, there is
no guarantee that interference will not occur in a particular installation.
If this equipment does cause harmful interference to radio or television
reception, which can be determined by turning the equipment off and on,
the user is encouraged to try to correct the interference by one or more
of the following measures:
– Reorient or relocate the receiving antenna.
– Increase the separation between the equipment and receiver.
– Connect the equipment into an outlet on a circuit different from that
to which the receiver is connected.
– Consult the dealer or an experienced radio/TV technician for help.
Changes or modications made to this equipment not expressly approved
by the party responsible for compliance could void the user's authority
to operate the equipment.
Federal Communication Commission (FCC) Radiation Exposure Statement:
When using the product, maintain a distance of 20cm from the body to
ensure compliance with RF exposure requirements.
This device complies with part 15 of the FCC rules. Operation is subject to
the following two conditions:
(1) this device may not cause harmful interference, and
(2) this device must accept any interference received, including interfer-
ence that may cause undesired operation.
NOTE: The manufacturer is not responsible for any radio or TV interfer-
ence caused by unauthorized modications or changes to this equipment.
Such modications or changes could void the user’s authority to operate
the equipment.
FCC ID:2AW5J-7148-01-AX

3
Homewerks.com
PACKAGE CONTENTS
A
B
G
C
D
E
F
PART DESCRIPTION QTY PART DESCRIPTION QTY
AFan Housing with BLUETOOTH®
Speakers 1D Suspension Bracket 1
E Suspension Bracket 1
BGrille with Amazon Alexa
and LED Light 1F 4 in. Duct Adapter 1
G Wall Switch 1
C Suspension Bracket 1
HARDWARE CONTENTS (not actual size)
AA BB
Wood Screw
M4 x 30 Machine Screw
M4 x 10
Qty. 9 Qty. 4

4Homewerks.com
SAFETY INFORMATION
Please read and understand this entire manual before attempting to assemble, operate or install
the product.
• Always disconnect the power supply prior to servicing
the fan, motor or junction box.
• Follow all local building, safety and electrical codes
as well as NEC (National Electrical Code) and OSHA
(Occupational Safety and Health Act).
• Electric Service supply must be 120 volts, 60 hertz.
• This product must properly connect to the grounding
conductor of the supply circuit.
• Do not bend or kink the power wires.
• Do not use this fan with any solid state control device,
such as a remote control, dimmer switch, or certain
timers. Mechanical timers are not solid state devices.
• Do not install in a ceiling with insulation greater than
R40.
• Duct work should be installed in a straight line with
minimal bends.
• Duct work size must be the same size as the discharge
and should not be reduced. Reducing the duct size
may increase fan noise.
WARNING: To reduce the risk of re, electric shock,
or injury to persons, observe the following:
1. Use this unit in the manner intended by the manufac-
turer. If you have any questions, please call customer
service.
2. Before servicing or cleaning unit, switch power off at
service panel and lock the service disconnecting means
to prevent power from being switched on accidentally.
When the service disconnecting means cannot be
locked, securely fasten a prominent warning device,
such as a tag, to the service panel.
3. Installation work and electrical wiring must be done by
a qualied person(s) in accordance with all applicable
codes and standards, including re-rated construction.
4. Sufcient air is needed for proper combustion and
exhausting of gases through the ue (chimney) of fuel
burning equipment to prevent backdrafting. Follow the
heating equipment manufacturer´s guideline and safety
standards such as those published by the National Fire
Protection Association (NFPA), and the American Society
for Heating, Refrigeration and Air Conditioning Engineers
(ASHRAE) and local code authorities.
5. When cutting or drilling into the wall or ceiling, do not
damage electrical wiring and other hidden utilities.
6. Ducted fans must always be vented to the outdoors.
7. If this unit is to be installed over a tub or shower, it must
be marked as appropriate for the application and be
connected to a GFCI (Ground Fault Circuit Interrupter) –
protected branch circuit.
8. This ventilation fan is intended to be installed at least
3.28 ft. (1 m) from the showerhead when installing over
a bathtub or shower. Installation within a shower stall
is not recommended for this unit, unless the 3.28 ft.
(1 m) distance can be met.
CAUTION
• For general ventilating use only. Do not use to
exhaust hazardous or explosive materials and
vapors.
• Not for use in kitchens.
• To reduce the risk of injury to persons, install
the fan at least 7 feet (2.1 m) above the oor.
CAUTION: Installation of this unit requires the power to be OFF until installation is complete. If you encounter issues
with the unit not powering up, please review the troubleshooting section of the instruction manual. If you require additional
assistance, please call 1-877-319-3757, 7:30 a.m. - 4:30 p.m., CST, Monday - Friday. DO NOT RETURN TO STORE.
PREPARATION
Before beginning assembly of product, make sure all parts are present. Compare parts with package contents list and
hardware contents. If any part is missing or damaged, do not attempt to assemble the product. Contact customer service
for replacement parts at 1-877-319-3757, 7:30 a.m. - 4:30 p.m., CST, Monday - Friday.
Tools Required for Assembly (not included): Hammer, Flathead Screwdriver, Wire Connectors, Nails, Duct Tape, Phillips
Screwdriver, Electrical Tape, and Utility Knife or Drywall Saw.
Helpful Tools (not included): Electric Drill, Drill Bits
IMPORTANT: 2.4 GHz Wi-Fi connection and Amazon Alexa account are required for full functionality.

5
Homewerks.com
PREPARATION (Continued)
WARNING: RISK OF ELECTRIC SHOCK! Ensure the electricity to the wires you are working on
is shut off. Either remove the fuse or turn off the circuit breaker before removing the existing
bath fan or installing the new one.
Before removing your current ventilation fan, verify the wall switch box has the required wires necessary
for this installation. These wires are power (black) and neutral (white), as shown in the wiring diagram
below. If you do not see both of these wires, consult a licensed electrician.
Check area above installation location to be sure that wiring can run to the planned location and that
duct work can be run and the area is sufcient for proper ventilation.
Inspect duct work and wiring before proceeding with installation.
Before installation, provide inspection and future maintenance access at a location that will not interfere
with installation work.
You may need the help of a second person to install this fan; one person on the attic side and one on
the room side.
Installation may vary depending on how the previous bath fan was installed. Supplies necessary for
the installation of your bath fan are not all included; however, most are available at your local
home improvement or hardware store.
DIMENSIONS
Ceiling
Opening (L)
Ceiling
Opening (W)
Ceiling
Opening (H)
Housing
Dimension (L)
Housing
Dimension (W)
Housing
Dimension (H)
9-1/4 in. 9-1/4 in. 5-29/32 in. 9 in. 9 in. 5-25/32 in.
IMPORTANT: ATTIC ACCESS IS REQUIRED FOR PROPER INSTALLATION.
WIRING
All wiring must be connected for full functionality. The grille must be connected to the fan housing before
supplying power to the fan in order for the LED Touchpad Wall Switch to pair with the fan properly. Turning
on the power supply before connecting the grille to the fan housing will interfere with the pairing process.
Do not use metal wall plate with switch.

6Homewerks.com
INSTALLATION INSTRUCTIONS
BEFORE INSTALLATION
WARNING: RISK OF ELECTRIC SHOCK! Ensure the electricity
to the wires you are working on is shut off. Either remove the
fuse or turn off the circuit breaker before removing the existing
bath fan or installing the new one.
1. Remove existing fan.
If you are not replacing an existing fan, skip to step 7.
1
2. Measure the opening to ensure it is large enough to
accommodate the 9 in. x 9 in. dimensions of the new
fan housing (A).
2
3. If this fan is not replacing an old fan, be sure to cut a
9-1/4 in. x 9-1/4 in. opening for the fan housing (A). 3
9-1/4"
9-1/4"
4. Bend the tabs (4.1) on the sides of the fan housing (A) down
90° using a screwdriver. 4
A
4.1

7
Homewerks.com
INSTALLATION INSTRUCTIONS (Continued)
5. The tabs (5.1) will help hold the fan housing (A) in place in the
ceiling opening while installing the suspension brackets. 5
5.1
A
6. Insert suspension bracket (C) into the rails on the fan
housing (A) on the side with the duct opening. Insert
suspension bracket (D) into the rails on the opposite side of
the fan housing (A) and then slide suspension bracket (E)
into suspension bracket (D). A
C
ED
6
7. Insert the fan housing (A) into the opening in the ceiling. 7
8. Position the fan housing (A) so the bottom edge of the fan
housing (A) is ush with the ceiling board. Do not the ush
mount the fan housing (A) to the joist.
Attach the end of each of the suspension brackets (C, D, E)
to the ceiling joists using wood screws (AA).
8
AA
AA
AA
A
C
D
E
9. Secure the suspension brackets (C, D, E) to the fan housing (A)
using machine screws (BB). 9
BB
BB
A
C
D
E
A
Attic-side existing construction installation
9-1/4"
9-1/4"
Room-side new construction installation
A

8Homewerks.com
INSTALLATION INSTRUCTIONS (Continued)
10. Slide the duct connector (F) into the tabs on the fan housing
(A) until the duct connector (F) snaps rmly into place over
the opening in the fan housing (A).
NOTE: Remove the protective tape on the duct adapter (F)
ap.
10
A
F
11. Install the wall switch according to the wiring diagram on page 5.
Remove the wiring box cover from the fan housing (A). Pull the
house wires through the hole in the wiring box cover. Using the
quick connectors, connect the house wiring to the wall switch
(G) and fan housing (A). 14 AWG is the smallest conductor
that should be used for branch circuit wiring. Please refer to
the wiring diagram on page 5 to ensure proper wire connections
are made. Carefully push the wire connections into the wiring
box and reattach the wiring box cover.
NOTE: When wiring the wall switch (G), do not use metal wall
plate as it may cause interference with the fan operation.
CAUTION: The switch included with this ventilation fan requires
a neutral wire connection. If a neutral line is not present, one
must be run by a qualied electrician. If you require assistance,
please call 1-877-319-3757 before attempting switch installation.
CAUTION: This switch is intended to only operate with this
bath fan. Connections to other electrical xtures are prohibited
and could cause electrical issues.
IMPORTANT: Do not turn on the power supply to the fan until
Step 14 or the wall switch will not pair to the fan or function
properly.
11
A
Quick
connector
12. Connect a 4 in. circular duct to the fan housing (A), securing
it with duct tape or a clamp. Vent the duct to the outside. 12
A
13. Join the connectors from the fan housing (A) to the grille (B).
IMPORTANT: The grille (B) must be connected BEFORE
turning on power to the fan.
13
A
B
3-hole 4-hole 5-hole
14. Attach the grille (B) by pinching the mounting springs and
inserting them into the narrow rectangular slots in the fan
housing (A).
Restore the power supply to the wall switch and fan by turning
on the circuit breaker or re-inserting the fuse. Turn on the fan.
Test the unit.
14
Slots in fan
housing
Mounting
springs
A
B

9
Homewerks.com
WALL SWITCH OPERATION
Button Action
• Short press to turn light ON/OFF
• Long press for 8 seconds to initiate the switch pairing process
• Short press to adjust brightness
• Short press to mute Alexa microphone ON/OFF
• Long press for 5 seconds to activate BLUETOOTH® pairing
• Short press to activate Alexa
• Long press for 5 seconds to start or restart the Wi-Fi pairing process
• Short press to turn fan ON/OFF
• Long press for 8 seconds to activate a factory reset
• Short press to turn light and fan ON/OFF together
• Long press for 3 seconds to power ON/OFF
CAUTION: If you long press the ( ) button on the LED wall switch, you will need to repeat the setup process.
NOTE: If the wall switch does not work with the bath fan, press the ( ) button on the wall switch for 8 seconds
to initiate the switch pairing process.
SETTING UP AND PAIRING YOUR ALEXA BATH FAN TO THE HOMEWERKS CONNECT APP
Occasionally, there are updates to the app which may change the steps below. If you are having any difculty with the steps below,
please go to Homewerks.com/HomewerksConnectApp to check for updates.
1. Connect your phone or smart device to a steady 2.4 GHz Wi-Fi connection that can be accessed where your bath fan will be
installed.
2. Download the Homewerks Connect app from your smart device compatible app store. If you don’t have
an Amazon Alexa account, download the Amazon Alexa app from the app store and choose “Create a
new account”.
3. If using IOS, open the Amazon Alexa app and log in to your Amazon Alexa account with your User ID and Password, then click
“Sign In”. IMPORTANT: If using Android, this step is not needed.
4. Turn on the bath fan at the LED wall switch by pressing the ( ) button for at least 3 seconds, until you hear a click. The bath fan
grille will light up. If you've more than one devices in the same building, please turn off the power to other devices before starting
this step.
5. The bath fan speaker will say “Now in set-up mode”. If you do not hear “Now in set-up mode”, long press the ( ) button on the
LED wall switch for 5 seconds to enter set-up mode.
6. Open the Homewerks Connect app on your smart device and follow the instructions provided in the app.
7. In the Homewerks Connect app, select “Add device” and then “Next.”
8. Click “Indicator is Blinking” and the app will search for the bath fan. Once the app has discovered the bath fan, identied as
BATHROOM, click “Set up this device”.
9. Set up Wi-Fi for the bath fan by entering the password for the same 2.4 GHz Wi-Fi signal your smart device is connected to and click
“Next”. The app will then connect the bath fan to Wi-Fi. Once the bath fan is connected to Wi-Fi, click “Next”.
10. The Homewerks Connect app will now search for and install the latest version of the rmware. Please be patient while the rmware is
updated to provide you with the best experience.
11. A list of available names will appear in the app and BATHROOM will be selected as the default setting. Click “Next”
in the upper right corner of the app screen to proceed to the next step.
12. Now the Homewerks Connect app will need you to log in to your Amazon Alexa account. Click “Get Started,” then enter the User
ID and Password for your Amazon account. Select “Keep me signed in” and then click “Sign In”.
13. After logging in to Amazon, choose your preferred language.
14. When the next Amazon Alexa screen says “Alexa is ready”, click “Next” and then “Next” again to initiate the pairing process.
15. After pairing the bath fan to the app, the commands in this step will activate the special skills needed to control additional functions of
the bath fan. Click “Connect” on the next screen. Connect the Homewerks Smart Fan skills by clicking “Link”. Then click “Link” again. To
nish the process, click “Done” and “Done” again. IMPORTANT FOR ANDROID USERS: After clicking “Connect” and “Link”, the app will
need you to log in to your Amazon Alexa account again.
You have successfully completed the set-up process and your Homewerks SmartVent fan is ready for use. You can now speak your com-
mands or questions to Alexa, control the fan via the Homewerks Connect app, or use the included wall switch!
Additional Fan Set-Up
If you have more than one device in the same building to set up, turn off the power of this device completely before starting Step #4 on the
2nd device. When 2nd device set up completed, the 1st device can be turned on for normal operation. This is to avoid signal mixing up below
devices during their set up so we need to pay attention to set up them individually.

10 Homewerks.com
SETTING UP AND PAIRING YOUR ALEXA BATH FAN TO THE HOMEWERKS CONNECT APP (Continued)
IMPORTANT: To operate the bath fan using standard Alexa commands, Step 14 must be completed successfully. To activate the
special skills needed to control additional functions of the bath fan, please complete all 15 steps. If the set-up process fails for any
reason after Step 14, click the Gear icon ( ) next to BATHROOM in the Homewerks Connect app. Then click “Amazon Alexa
Settings” and select “Link skill”. Continue to pair the Homewerks Connect app to your Amazon Alexa in Step 15. Please
follow the Homewerks Connect app instructions until the Amazon log in and pairing process are complete.
OPERATING THE BATH FAN USING ALEXA COMMANDS
The following commands can be used with Alexa in your bath fan:
- Alexa, turn on BATHROOM light.
- Alexa, turn off BATHROOM light.
- Alexa, dim BATHROOM light.
- Alexa, brighten BATHROOM light.
- Alexa, change BATHROOM light to daylight.
- Alexa, change BATHROOM light to cool white.
- Alexa, change BATHROOM light to soft white.
- Alexa, change BATHROOM light to warm white.
- Alexa, turn on BATHROOM night light.
- Alexa, turn off BATHROOM night light.
- Alexa, turn on BATHROOM fan.
- Alexa, turn off BATHROOM fan.
- Alexa, ask smartfan to run for “x” minutes on BATHROOM.
IMPORTANT: If you rename the bath fan from BATHROOM to a custom name, your Alexa commands will need to be
directed to the new name. For example, if you renamed the fan as BATH, your command would be “Alexa, turn on the
BATH light” or “Alexa, turn off the BATH fan”.
You can also ask Alexa to do other things for you in addition to operating the bath fan. Examples include:
- Alexa, play music.
- Alexa, play Amazon music.
- Alexa, play Spotify.
- Alexa, turn up the volume.
- Alexa, turn down the volume.
- Alexa, order more shampoo.
- Alexa, what is the trafc on the way to work?
- Alexa, what is the temperature outside?
CONNECTING YOUR BLUETOOTH® DEVICE TO THE BATH FAN SPEAKER
1. To play your personal music les, you need a wireless BLUETOOTH® device. After the rmware upgrade is completed
during the initial set-up and pairing, you will be able to connect your BLUETOOTH® device directly to the bath fan
speaker.
2. Set your device to a midrange volume level before connecting to the bath fan speakers.
• The optimal volume setting for the BLUETOOTH® speakers is 70% or lower. Settings higher than 70% may cause
sound distortion.
3. Long press the ( ) button on the LED wall switch to activate BLUETOOTH® ( ).
4. From the Home screen on your smart device, choose Settings > BLUETOOTH®, to search for BATHROOM.
NOTE: While your device can maintain multiple pairing records, it can only connect to one accessory at
a time. This prevents your device from sending your data to the wrong BLUETOOTH® accessory.
5. Select BATHROOM from the list of available BLUETOOTH device options. If BATHROOM does not appear on the list,
speak “Alexa, Bluetooth Mode” and then “BATHROOM”.
6. When pairing is complete, use the bath fan’s BLUETOOTH® speakers to play audio from your device.
7. If preferred, you can also connect to your BLUETOOTH® device via the Homewerks Connect app. Download and open
the Homewerks Connect app and follow the steps in the prior section to pair your Alexa bath fan to the Homewerks
Connect app.
8. To switch to a Wi-Fi connection, just speak “Alexa.....” and the device will automatically switch back to a Wi-Fi
connection.
9. To switch back from a Wi-Fi connection to BLUETOOTH®, press play from your BLUETOOTH® device.

11
Homewerks.com
SPOTIFY CONNECT
Use your phone, tablet, or computer as a remote control for Spotify.
Go to spotify.com/connect to learn how.
To enable and link Spotify:
1. Open the Amazon Alexa app and click . Select “Skills & Games.” Search for “Spotify” and click “Enable the skill”.
2. Follow the pop-up page to enter your Spotify user name and password to link it to your Amazon account.
After completing these two steps, you can speak the command “Alexa, play music on Spotify”.
ADDITIONAL FUNCTIONS
RENAMING A BATH FAN
1. If you have purchased more than one Homewerks Alexa bath fan, you will need to change the name of the second fan
to avoid duplication. You can also choose to change the name of a Homewerks Alexa bath fan from BATHROOM to
a customized name, if that is your preference.
2. From the Device List screen in your Homewerks Connect app, click the Gear icon ( ) and choose “Rename”.
3. Select from the list of options on the screen or select “Custom” to create your own name. Once you have chosen the
new name for your bath fan, click “Finish” in the top right corner.
4. Please allow 20 seconds for the bath fan to refresh with the new name before using commands.
UPGRADING THE FIRMWARE
Periodically a new rmware version will be released and your Homewerks bath fan will need to be updated for maximum
functionality and security. From the pop-up window, click “Upgrade”. Do not turn off the power to the bath fan while the rmware
is updated via Wi-Fi.
CARE AND CLEANING
CAUTION: Before attempting to clean the xture, disconnect the power to the xture by turning the breaker
off or removing the fuse from the fuse box.
• See safety information before proceeding. Routine maintenance should be done at least once a year.
• Never use solvents, thinner or harsh chemicals for cleaning the fan.
• Do not allow water to enter the motor.
• Do not immerse metal parts in water.
• Do not immerse resin parts in water more than 140°F.
• Do not immerse speakers in water.
BEFORE CLEANING
WARNING: RISK OF ELECTRIC SHOCK! Ensure the electricity is
shut off at the main breaker box. Either remove the fuse or turn
off the circuit breaker before cleaning.
1. Remove the grille (B) by squeezing the mounting springs and
pulling the grille (B) down from the fan housing (A). Disconnect
the electrical connections from the fan housing (A) to the
grille (B) by pulling the connectors apart. Wipe grille (B) with
a damp cloth.
CAUTION: Do not immerse grille in water.
1A
B
3-hole 4-hole 5-hole

12 Homewerks.com
CARE AND CLEANING (Continued)
2. Remove dust and dirt from the fan housing (A) with a vacuum
cleaner. 2
3. Wipe the fan housing (A) with a damp cloth and wipe dry. 3
4. Join the connectors from the fan housing (A) to the grille (B). Attach
the grille (B) by pinching the mounting springs and inserting them
into the narrow rectangular slots in the fan housing (A).
Turn on the power source.
4A
B
3-hole 4-hole 5-hole
TROUBLESHOOTING
PROBLEM POSSIBLE CAUSE SOLUTION
The fan seems louder than
it should be.
The CFM is too great for the space. Be sure the CFM rating on the fan matches the
square footage of your room.
The damper is damaged or not working properly.
Check the damper to ensure it is opening and
closing properly. If the damper has become
damaged, please call Customer Service.
The bend in the duct is too close to the fan
discharge.
Be sure you do not have any sharp bends in the
duct within 18 in. of the fan discharge.
The fan discharge is reduced to t a smaller duct. Use the recommended size ducting to reduce fan
noise.
The fan body is not attached securely. Be sure the fan is securely attached to the ceiling
joists.
The fan is not clearing the
humidity from the room.
There is insufcient airow intake in the room.
Be sure a door or window is slightly ajar or open to
allow airow. The fan is not able to draw air out of
the room without enough airow.
There is insufcient CFM.
NOTE: Using a tissue is not the correct method for
determining if the fan is operating properly. If the fan
clears steam from the room within approximately
15 minutes of completing your shower, then the
fan is operating properly.
Be sure the CFM rating of the fan matches the
square footage of your room.

13
Homewerks.com
TROUBLESHOOTING (Continued)
PROBLEM POSSIBLE CAUSE SOLUTION
The BLUETOOTH® device
will not pair with the fan. Another device is already paired. Make sure BLUETOOTH® signal is turned off on
other devices.
The switch will not power up. There is a wiring issue at the switch, or the power
is not turned on at the fuse box or circuit breaker.
Check the wiring diagram on page 5 and conrm
wiring is correct. Verify the power is turned on.
The switch has power, but
the fan does not.
The grille is not receiving a signal from the switch.
Turn off power. Disconnect the grille for 5 seconds,
then reconnect the grille and test. Repeat as
necessary.
Long press the ( ) button for 8 seconds to
enable the switch pairing process.
The speaker and the smart device are not
connected to the same Wi-Fi network.
Ensure your smart device is connected to the
same Wi-Fi network that the speaker was
congured to.
Neutral wire connection from the switch to the fan
is not engaging.
Run a dedicated neutral wire from the switch to the
fan. Consult an electrician if necessary.
The wall switch does not
work with the bath fan. Wall switch is not paired to the bath fan. Press the ( ) button on the wall switch for 5
seconds to initiate the switch pairing process.
The Homewerks fan
cannot be discovered by
the Homewerks Connect
app.
The fan is not in set-up mode.
Long press the ( ) button on the LED wall switch
for 5 seconds to enter set-up mode. The bath fan
speaker will say “Now in set-up mode”. Follow the
steps in the Pairing your Alexa Bath Fan to the
Homewerks Connect App section on page 9.
The fan and the mobile device are not connected
to the same Wi-Fi network.
Ensure that your mobile device is connected to the
same Wi-Fi network that the fan was congured on.
Alexa is not responding to
your commands.
The microphone on the bath fan is muted.
If the red LED indicator is illuminated on the fan,
the microphone is muted. Press the ( ) button on
the wall switch to unmute the microphone. The red
LED indicator on the fan will turn off.
The bath fan may have lost the Wi-Fi signal or the
bath fan is not paired to your Amazon account or to
the Homewerks Connect app.
Follow all of the steps in the Pairing your Alexa
Bath Fan to the Homewerks Connect App section
on page 9.
The Amazon Alexa and Homewerks Connect apps
are logged into different accounts.
Sign out of the Amazon Alexa and Homewerks
Connect apps. Sign into each again using the
same account.
You are installing two or more SmartVent bath fans
at the same time.
Fully power down both fans by long pressing the
power button on the wall switch. Once both units
are powered down, close the Homewerks Connect
app and take the following steps:
• Long press the ( ) button on the rst bath fan
until you hear a click.
• Long press the ( ) button for 8 seconds to initiate
the pairing process of the switch to the fan.
• Long press the ( ) button for 8 seconds to
activate the factory reset until you hear “factory
reset successful.”
• If you do not hear the command “Now in Set Up
Mode”, long press the ( ) button for 5 seconds
until you hear “Now In Set Up Mode.”
• Open the Homewerks Connect app and go
through the pairing process.
• Once the rst fan has been set-up and all commands
are working properly, long press the ( ) button
on the wall switch to turn OFF this fan.
• Complete steps 1 – 5 above to set-up the second
fan, but during the pairing process change the name
of the fan from BATHROOM to another name.
We suggest changing the name to BATH.
• Once both fans have been set-up in this manner,
you can turn ON the power to the rst fan again.
Both bath fans will work independently.

14 Homewerks.com
TROUBLESHOOTING (Continued)
PROBLEM POSSIBLE CAUSE SOLUTION
There is no sound coming
from the speaker.
A software problem has occurred.
Press the ( ) button on the wall switch for 3 seconds
to turn the power off. Then press the ( )button on
the wall switch again for 3 seconds to turn the
power back on.
Perform a factory reset by pressing the ( )
button for 8 seconds. NOTE: This will delete
all user settings. After the factory reset, the speaker
will need to be set up again. Follow the instructions
on page 9.
Volume is turned down or off. Turn up or turn on the volume.
The bath fan is having
Wi-Fi connectivity issues.
There is an unsteady network connection. Make sure that your bath fan is within range of
your Wi-Fi router and has a strong and stable
connection.
Other devices are causing interference. Check that your bath fan is away from any other
devices that cause interference, such as microwaves,
baby monitors, or other electronic devices.
Wi-Fi is not connected because the password
was entered incorrectly.
Verify you have the correct Wi-Fi password. If your
Wi-Fi password recently changed, update your
device's Wi-Fi settings.
Network congestion is causing poor signal
strength.
If you have several devices connected to your Wi-Fi
network, try removing some of them to reduce
congestion.
No Wi-Fi signal is being received. The fan is 2.4GHz Wi-Fi compatible. Please make
sure your smart device and bath fan are connected
to 2.4GHz.
FAN – LIMITED 3-YEAR WARRANTY
If the fan fails due to a defect in materials or workmanship at any time during the rst THREE years of ownership, the manufacturer will
replace it free of charge, postage-paid at their option. This warranty does not cover products that have been abused, altered, damaged,
misused, cut or worn. This warranty does not cover use in commercial applications. Use only manufacturer-supplied genuine warranty
repair replacement parts to repair this fan. Use of non-genuine repair parts will void your warranty. The manufacturer DISCLAIMS all
other implied or express warranties including all warranties of merchantability and/or tness for a particular purpose. As some states do
not allow exclusions or limitations on an implied warranty, the above exclusions and limitations may not apply. This warranty gives
you specic legal rights, and you may have other rights that vary from state to state.
This warranty is limited to the replacement of defective parts only. Labor charges and/or damage incurred during installation, repair,
replacement as well as incidental and consequential damages connected with the above are excluded. Any damage to this product
as a result of neglect, misuse, accident, improper installation or use other than the purpose SHALL VOID THIS WARRANTY.
Shipping costs for return product as part of a claim on the warranty must be paid for by the customer.
Inquiries regarding warranty claims can be directed to 1-877-319-3757, 7:30 a.m. - 4:30 p.m., CST, Monday - Friday.
BLUETOOTH® SPEAKER – LIMITED 1-YEAR WARRANTY
If the BLUETOOTH® speaker fails due to a defect in materials or workmanship at any time during the rst year of ownership, the
manufacturer will replace it free of charge, postage-paid at their option. This warranty does not cover products that have been abused,
altered, damaged, misused, cut or worn. This warranty does not cover use in commercial applications. Use only manufacturer-supplied
genuine warranty repair replacement parts to repair this fan. Use of non-genuine repair parts will void your warranty. The manufacturer
DISCLAIMS all other implied or express warranties including all warranties of merchantability and/or tness for a particular purpose. As
some states do not allow exclusions or limitations on an implied warranty, the above exclusions and limitations may not apply. This
warranty gives you specic legal rights, and you may have other rights that vary from state to state.
This warranty is limited to the replacement of defective parts only. Labor charges and/or damage incurred during installation, repair,
replacement
as well as incidental and consequential damages connected with the above are excluded. Any damage to this product as a result of
neglect, misuse, accident, improper installation or use other than the purpose SHALL VOID THIS WARRANTY.
Shipping costs for return product as part of a claim on the warranty must be paid for by the customer.
Inquiries regarding warranty claims can be directed to 1-877-319-3757, 7:30 a.m. - 4:30 p.m., CST, Monday - Friday.

15
Homewerks.com
AMAZON ALEXA – LIMITED 1-YEAR WARRANTY
Products covered by this warranty are identied at https://www.amazon.com/devicewarranty
If you purchased your Amazon Device or Accessory (the “Device”) from Amazon.com or from authorized resellers located in the United States,
the Warranty for the Device is provided by Amazon.com Services LLC, 410 Terry Ave. North, Seattle, WA 98109-5210, United States. If you
purchased your Device from any other Amazon website or from authorized resellers located in other countries, the warranty for the Device is
provided by the entity identied at https://www.amazon.com/devicewarrantyprovider. The provider of this warranty is sometimes referred to
herein as “we.”
When you purchase a new or Certied Refurbished Device , we warrant the Device against defects in materials and workmanship under
ordinary consumer use for one year from the date of original retail purchase. During this warranty period, if a defect arises in the Device,
and you follow the instructions for returning the Device, we will at our option, to the extent permitted by law, either (i) repair the Device
using either new or refurbished parts, (ii) replace the Device with a new or refurbished Device that is equivalent to the Device to be
replaced, or (iii) refund to you all or part of the purchase price of the Device. This limited warranty applies, to the extent permitted by
law, to any repair, replacement part or replacement device for the remainder of the original warranty period or for ninety days, whichever
period is longer. All replaced parts and Devices for which a refund is given shall become our property. This limited warranty applies only
to hardware components of the Device that are not subject to accident, misuse, neglect, re or damage from other external causes,
alteration, repair, or commercial use.
INSTRUCTIONS: For specic instructions about how to obtain warranty service for your Device, please contact Customer Service using
the contact information on the left side of this page. In general, you will need to deliver your Device in either its original packaging or in
equally protective packaging to the address specied by Customer Service. Before you deliver your Device for warranty service, it is
your responsibility to remove any removable storage media and back up any data, software, or other materials you may have stored
or preserved on your Device. It is possible that such storage media, data, software or other materials will be destroyed, lost or reformatted
during service, and we will not be responsible for any such damage or loss.
LIMITATION: TO THE EXTENT PERMITTED BY LAW, THE WARRANTY AND REMEDIES SET FORTH ABOVE ARE EXCLUSIVE
AND IN LIEU OF ALL OTHER WARRANTIES AND REMEDIES, AND WE SPECIFICALLY DISCLAIM ALL STATUTORY OR IMPLIED
WARRANTIES, INCLUDING, BUT NOT LIMITED TO, WARRANTIES OF MERCHANTABILITY, FITNESS FOR A PARTICULAR PURPOSE
AND AGAINST HIDDEN OR LATENT DEFECTS. IF WE CANNOT LAWFULLY DISCLAIM STATUTORY OR IMPLIED WARRANTIES,
THEN TO THE EXTENT PERMITTED BY LAW, ALL SUCH WARRANTIES SHALL BE LIMITED IN DURATION TO THE DURATION
OF THIS EXPRESS LIMITED WARRANTY AND TO REPAIR OR REPLACEMENT SERVICE.
SOME JURISDICTIONS DO NOT ALLOW LIMITATIONS ON HOW LONG A STATUTORY OR IMPLIED WARRANTY LASTS, SO
THE ABOVE LIMITATION MAY NOT APPLY TO YOU. WE ARE NOT RESPONSIBLE FOR DIRECT, SPECIAL, INCIDENTAL OR
CONSEQUENTIAL DAMAGES RESULTING FROM ANY BREACH OF WARRANTY OR UNDER ANY OTHER LEGAL THEORY. IN
SOME JURISDICTIONS THE FOREGOING LIMITATION DOES NOT APPLY TO DEATH OR PERSONAL INJURY CLAIMS, OR ANY
STATUTORY LIABILITY FOR INTENTIONAL AND GROSS NEGLIGENT ACTS AND/OR OMISSIONS, SO THE ABOVE EXCLUSION
OR LIMITATION MAY NOT APPLY TO YOU. SOME JURISDICTIONS DO NOT ALLOW THE EXCLUSION OR LIMITATION OF DIRECT,
INCIDENTAL OR CONSEQUENTIAL DAMAGES, SO THE ABOVE EXCLUSION OR LIMITATION MAY NOT APPLY TO YOU. THIS
“LIMITATIONS” SECTION DOES NOT APPLY TO CUSTOMERS IN THE EUROPEAN UNION.
This limited warranty gives you specic rights. You may have additional rights under applicable law, and this limited warranty does not
affect such rights.
You can nd the Customer Service contact information and other applicable terms and Device information (including in other languages)
at https://www.amazon.com/devicesupport.

16 Homewerks.com
VENTILADOR DE BAÑO
CON ALEXA INTEGRADO,
LUZ LED Y ALTAVOCES
BLUETOOTH®
MODELO 7148-01-AX
¿Tiene preguntas, problemas, o faltan piezas? Antes de regresar a la tienda, llame al Servicio al Cliente,
1-877-319-3757, de lunes a viernes de 7:30 a.m. a 4:30 p.m., hora estándar central.
CONSERVE ESTE MANUAL PARA USO FUTURO
Amazon, Alexa y todos los logotipos relacionados son marcas comerciales de Amazon.com, Inc. o sus aliados.
La palabra y logotipos de BLUETOOTH® son propiedad de Bluetooth SIG, Inc. Otras marcas y nombres de terceros son propiedad de sus respectivos dueños.
Homewerks, Homewerks Worldwide, el diseño de la casa Homewerks y todos los logotipos relacionados son marcas comerciales propiedad de Homewerks
Worldwide, LLC.
Número de patente de EE.UU. 9,398,357

17
Homewerks.com
TABLA DE CONTENIDO
Especicaciones del producto ......................................................................................................... 17
Cumplimiento de la normas FCC ....................................................................................................17
Contenido del paquete ....................................................................................................................18
Materiales incluidos ..........................................................................................................................18
Información sobre seguridad ...........................................................................................................19
Preparación .....................................................................................................................................19
Instrucciones de installación ............................................................................................................21
Funcionamiento del interruptor de pared..........................................................................................24
Conguración y emparejamiento del ventilador Alexa con la aplicación Homewerks Connect ...........24
Funcionamiento del ventilador con los comandos de Alexa .............................................................25
Conexión de su dispositivo BLUETOOTH® a los altavoces .............................................................26
Funciones adicionales ......................................................................................................................26
Cuidado y limpieza ..........................................................................................................................26
Solución de problemas .....................................................................................................................28
Garantía............................................................................................................................................30
ESPECIFICACIONES DEL PRODUCTO
Flujo de aire: 110 CFM Consumo eléctrico del LED: 18 W
120 V, 60Hz Brillo del LED: 800 lumenes
Diámetro del conducto: 4 pulg Color de luz LED (CCT): 2200K Blanco cálido /
3000K Blanco suave / 4000K Blanco frío / 5000K
Luz diurna
Volumen sonoro: 1,5 sone
Consumo de energía total: 50 W
Consumo de energía del ventilador: 28 W Color de la luz nocturna: 2200K Blanco cálido
Velocidad del ventilador: 920 RPM Peso: 5,8 kg
CUMPLIMIENTO DE LA NORMAS FCC
AVISO: este equipo ha sido sometido a prueba y se halló que cumple con los
límites establecidos para la clase B de dispositivos digitales, conforme a la
Parte 15 de las Normas de FCC. Estos límites se establecen para brindar
protección razonable contra interferencia dañina en una instalación
residencial.
Este equipo genera, utiliza y puede irradiar energía de frecuencias de radio
y, si no se instala conforme a las instrucciones, puede provocar interferencia
dañina a las comunicaciones de radio. A pesar de esto, no existe garantía de
que la interferencia no se produzca en una instalación en particular.
Si este equipo produce interferencia dañina a la recepción de radio o televisión,
lo que puede determinarse encendiendo y apagando el equipo, se insta al
usuario a intentar corregir la interferencia mediante uno de los siguientes
métodos:
– Cambie la orientación o ubicación de la antena receptora.
– Aumente la separación entre el equipo y el receptor.
– Conecte el equipo en un enchufe que esté en un circuito diferente al
cual está conectado el receptor.
– Consulte con el representante o con un técnico perimentado en radio y
relecisión para solicitar asistencia.
Los cambios o modicaciones que on estén expresamente aprobados
por la parte responsable del cumplimiento anulan la autoridad del usuario
de operar el equipo.
Declaración de exposición a la radiación de la Comisión Federal de
Comunicaciones (FCC):
Cuando utilice el producto, mantenga una distancia de 20 cm del cuerpo para
garantizar el cumplimiento de los requisitos de exposición a RF.
Este dispositivo cumple con la parte 15 de las reglas de la FCC. La operación
está sujeta a las siguientes dos condiciones:
(1) este dispositivo no puede causar interferencias dañinas y
(2) este dispositivo debe aceptar cualquier interferencia recibida, incluida la
interferencia que pueda causar un funcionamiento no deseado.
NOTA: el fabricante no es responsable de ninguna interferencia de radio o
televisión causada por modicaciones o cambios no autorizados en este
equipo. Tales modicaciones o cambios podrían anular la autoridad del
usuario para operar el equipo.
Identicación de la FCC: 2AW5J-7148-01-AX

18 Homewerks.com
CONTENIDO DEL PAQUETE
A
B
G
C
D
E
F
PIEZA DESCRIPCIÓN CANTIDAD PIEZA DESCRIPCIÓN CANTIDAD
ACarcasa del ventilador con
altavoz BLUETOOTH® 1D Soporte de suspensión 1
E Soporte de suspensión 1
BRejilla con Amazon Alexa
y luz LED 1FAdaptador de conducto
de 4 pulg. 1
G Interruptor de pared 1
C Soporte de suspensión 1
MATERIALES INCLUIDOS (no se ilustran en tamaño real)
AA BB
Tornillo para
madera
M4 x 30mm
Tornillo para
metales
M4 x 10mm
Cantidad 9 Cantidad 4

19
Homewerks.com
INFORMACIÓN SOBRE SEGURIDAD
Por favor, lea y comprenda este manual en su totalidad antes de intentar de ensamblar, operar o instalar el producto.
• Siempre desconecte la fuente de alimentación antes de
darle servicio al ventilador, motor o caja eléctrica.
• Siga todos los codigos locales de construccion,
de seguridad y electricos asi como el NEC (Codigo
Electrico Nacional) y OSHA (Ley de Salud y
Seguridad Ocupacional).
• El suministro del servicio electrico debe ser de
120 voltios, 60 hertz.
• Este producto debe estar correctamente conectado al
conductor de conexion a tierra del circuito de
alimentacion.
• No doble ni retuerza los cables de energia.
• No use este ventilador con ningún dispositivo de control
de estado sólido, como un control remoto, interruptor de
atenuación o ciertos temporizadores. Los
temporizadores mecánicos no son dispositivos de
estado sólido.
• No instale en un techo con aislamiento mayor de R40.
• Conductos se deben instalar en una línea recta con
curvas mínimas.
• El tamaño del conducto debe ser de mismo tamaño
que la descarga y no debe ser reducido. Reducir el
tamaño del conducto puede aumentar el ruido del
ventilador.
ADVERTENCIA: para reducir el riesgo de incendio,
choque eléctrico o lesiones a las personas, respete
lo siguiente:
1. Use esta unidad en la manera prevista por el fabrican-
te. Si tiene alguna pregunta, por favor llame al Servi-
cio al Cliente.
2. Antes de dar servicio o limpiar esta unidad apague la
fuente de alimentación en el panel y bloquélo para evitar
que se encendia la alimentación accidentalmente. Si
no puede bloquear el panel, marque claramente el panel
con una etiqueta de advertencia para evitar que se
encienda la alimentación.
3. El trabajo de instalación y el cableado eléctrico debe
ser hecho por una persona calicada, de acuerdo con
todos los códigos y normas aplicables, incluyendo la
construcción con clasicación ignífuga.
4. Se necesita suciente aire para una combustión apro-
piada y el escape de los gases a través del conducto
(chimenea) del equipo que quema combustible para
evitar contratiraje. Siga las guias del fabricante de
equipo de calefacción y las normas de seguridad como
las publicadas de la Asociación Nacional de Protección
contra Incendios (NFPA), y de la Sociedad Estadouni-
dense de Ingenieros en Calefacción, Refrigeración y
Aire Acondicionado (ASHRAE), y las autoridades de
código local.
5. Cuando corte o perfore en la pared o techo, no dañe
el cableado eléctrico u otros servicios ocultos.
6. Los ventiladores con conductos siempre deben ser
ventilados al exterior.
7. Si esta unidad se va a instalar sobre una bañera o
ducha, se debe marcar según sea apropiado para la
aplicación y conectarse a un circuito de derivación
protegido GFCI (Interruptor de circuito de falla a tierra).
8. Este ventilador está diseñado para instalarse por lo
menos a 1 m del cabezal de la ducha cuando se
instala sobre una bañera o ducha. La instalación
dentro de una cabina de ducha no se recomienda a
menos que se pueda alcanzar la distancia de 1 m.
PRECAUCIÓN
• Para uso de ventilación general solamente. No
lo use para desalojar materiales y vapores
peligrosos o explosivos.
• No debe usarse en cocina.
• Para reducir el riesgo de lesiones a las personas,
instale el ventilador al menos a 7 pies (2.1m)
sobre el piso.
PRECAUCIÓN: la instalación de esta unidad requiere que la energía esté apagada hasta que se complete la instalación.
Si encuentra problemas con la unidad que no se enciende, revise la sección de solución de problemas del manual de
instrucciones. Si necesita asistencia adicional, llame al 1-877-319-3757, de 7:30 a.m. a 4:30 p.m., HCE, de lunes a viernes.
NO REGRESE A LA TIENDA.
PREPARACIÓN
Antes de comenzar a ensamblar este producto, asegurese de que todas las piezas esten presentes. Compare las piezas con
la lista de contenido del paquete y herraje incluido. Si hace falta alguna pieza o se encuentra danada, no intente ensamblar
el producto. Pongase en contacto con el Servicio al Cliente para piezas de repuesto 1-877-319-3757, de 7:30 a. m. a 4:30 p. m.,
hora central estándar, de lunes a viernes.
Herramientas necesarias para armar (no incluidas): martillo, destornillador de cabeza plana, conectores de cables, clavos,
cinta adhesiva, destornillador de estrella, cinta aislante y cuchillo multiuso o sierra para paneles de yeso.
Herramientas útiles (no incluidas): taladro eléctrico, brocas de taladro

20 Homewerks.com
PREPARACIÓN (Continuación)
IMPORTANTE: se requiere una conexión Wi-Fi de 2.4 GHz y una cuenta de Amazon Alexa para una funcionalidad
completa.
ADVERTENCIA: RIESGO DE DESCARGA ELECTRICA. Asegurese de cortar el suministro electrico en los cables
con los que trabajara. Extraiga los fusibles o apague el cortacircuitos antes de quitar el ventilador de baño
existente o instalar uno nuevo.
Antes de quitar su ventilador actual, verique que su caja de interruptores en la pared tenga los cables de
suministro necesarios para esta instalación. Estos cables de alimentación (negro) y neutro (blanco) como
se muestra en el diagrama de cableado a continuación. Si no ve estos dos cables, consulte a un electricista
autorizado.
Compruebe el área sobre la ubicación de instalación para asegurarse de que el cableado puede correr a la ubicación
prevista y que los conductos se puede correr y el área es suciente para una ventilación adecuada
Inspeccione los conductos y el cableado antes de proceder con la instalación.
Antes de la instalación, proporcione acceso para la inspección y el mantenimiento en un lugar que no interera con el
trabajo de instalación.
Es posible que necesite la ayuda de una segunda persona para instalar este ventilador; una en el lado del ático y otra en
el lado de la habitación.
La instalacion puede variar dependiendo de cómo se instaló el ventilador anterior. Los suministros necesarios para la
instalación de su ventilador de baño no están todos incluidos; sin embargo, la mayoría están disponibles en su tienda de
artículos del hogar o ferretería local.
DIMENSIONES
Aperturo
de techo (La) Aperturo
de techo (An) Aperturo
de techo (Al) Dimensiones
de caja (La) Dimensiones
de caja (An) Dimensiones
de caja (Al)
23,5 cm 23,5 cm 15,0 cm 22,9 cm 22,9 cm 14,7 cm
IMPORTANTE: SE REQUIERE ACCESO AL ÁTICO PARA UNA INSTALACIÓN ADECUADA.
CABLEADO
Todo el cableado debe estar conectada a la funcionalidad completa. La rejilla debe estar conectada a la carcasa del ventilador
antes de suministrar energía al ventilador para que el interruptor de pared con panel táctil LED se empareje correctamente con
el ventilador. Encender la fuente de alimentación antes de conectar la rejilla a la carcasa del ventilador interferirá con el
proceso de emparejamiento. No use una placa de pared de metal con el interruptor.

21
Homewerks.com
INSTRUCCIONES DE INSTALACIÓN
PREVIO A LA INSTALACIÓN
ADVERTENCIA: ¡RIESGO DE DESCARGA ELECTRICA!
Asegurese de cortar el suministro electrico en los cables con los
que trabajara. Extraiga los fusibles o apague el cortacircuitos
antes de quitar el ventilador de baño existente o instalar uno
nuevo.
1. Retire el ventilador existente.
Si no está reemplazando un ventilador existente,
vaya al paso 7.
1
2. Mida la abertura para asegurarse de que sea lo
sucientemente grande para acomodar las dimensiones
de 22,9 cm x 22,9 cm de la carcasa del nuevo ventilador (A).
2
3. Si este ventilador no reemplaza a uno viejo, asegúrese de
cortar una abertura de 23,5 cm x 23,5 cm para la carcasa del
ventilador (A).
3
23,5 cm
23,5 cm
4. Doble las pestañas (4.1) a los lados de la carcasa del
ventilador (A) hacia abajo 90 ° con un destornillador. 4
A
4.1

22 Homewerks.com
INSTRUCCIONES DE INSTALACIÓN (Continuación)
5. Las pestañas (5.1) ayudarán a mantener la carcasa del
ventilador (A) en su lugar en la abertura del techo mientras se
instalan los soportes de suspensión.
5
5.1
A
6. Inserte el soporte de suspensión (C) en los rieles de la
carcasa del ventilador (A) en el lado con la abertura del
conducto. Inserte el soporte de suspensión (D) en los rieles
en el lado opuesto de la carcasa del ventilador (A) y luego
deslice el soporte de suspensión (E) en el soporte de
suspensión (D). A
C
ED
6
7. Inserte la carcasa del ventilador (A) en la abertura en el
techo. 7
8. Coloque la carcasa del ventilador (A) de modo que el borde
inferior de la carcasa del ventilador (A) quede al ras con la
placa del techo. No monte al ras la carcasa del ventilador (A)
en la viga.
Fije el extremo de cada uno de los soportes de suspensión
(C, D, E) a las vigas del techo con tornillos para madera (AA).
8
AA
AA
AA
A
C
D
E
9. Fije los soportes de suspensión (C, D, E) a la carcasa del
ventilador (A) utilizando tornillos para metales (BB). 9
BB
BB
A
C
D
E
A
9-1/4"
9-1/4"
A
Instalación del lado del ático
para existente construcción
Instalación del lado de la habitación
para nueva construcción

23
Homewerks.com
INSTRUCCIONES DE INSTALACIÓN (Continuación)
10. Deslice el conector del conducto (F) en las pestañas de la
carcasa del ventilador (A) hasta que el conector del
conducto (F) encaje rmemente en su lugar sobre la
abertura de la carcasa del ventilador (A).
NOTA: retire la cinta protectora de la aleta del adaptador de
conducto (F).
10
A
F
11. Instale el interruptor de pared de acuerdo con el diagrama de
cableado en la página 20. Retire la cubierta de la caja eléctrica
de la carcasa del ventilador (A). Tire de los cables de la casa
a través de la tapa la caja eléctrica. Usando los conectores
rápidos, conecte el cableado de la casa al interruptor de
pared LED (F) y la carcasa del ventilador (A). 14 AWG es el
conductor más pequeño que debe usarse para el cableado
del circuito derivado. Consulte el diagrama de cableado en
la página 20 para asegurarse de que se están realizando las
conexiones de cables correctas. Empuje con cuidado las
conexiones de cables en la caja eléctrica y vuelva a colocar
la tapa de la caja eléctrica.
NOTA: no utilice una placa de pared de metal con el interruptor
(F), ya que puede causar interferencias en el funcionamiento
del ventilador.
PRECAUCIÓN: el interruptor incluido con este ventilador
requiere una conexión de cable neutro. Si no hay un cable
neutro, uno debe ser ejecutado por un electricista calicado.
Si necesita ayuda ,por favor llame al 1-877-319-3757 antes
de intentar instalar el interruptor.
PRECAUCIÓN: este interruptor está diseñado para funcio-
nar solo con este ventilador de baño. Las conexiones a otros
accesorios eléctricos están prohibidas y podrían causar
problemas eléctricos.
IMPORTANTE: no encienda la fuente de alimentación del
ventilador hasta el paso 14 o el interruptor de pared LED no
se emparejará con el ventilador ni funcionará correctamente.
11
12. Conecte un conducto circular de 4 pulg y ventile hacia el
fuera. Asegure con cinta adhesiva o abrazadera. 12
A
13. Une los conectores de la carcasa del ventilador (A) a la rejilla
(B). La rejilla (B) debe estar conectada ANTES de encender el
ventilador.
IMPORTANTE: la rejilla (B) debe estar conectada ANTES de
encender la fuente de alimentación del ventilador.
13 A
B

24 Homewerks.com
INSTRUCCIONES DE INSTALACIÓN (Continuación)
14. Coloque la rejilla (B) pellizcando resortes de montaje y se
insertan en ranuras rectangulares estrechas en la carcasa del
ventilador (A).
Restaure la fuente de alimentación al interruptor de pared y al
ventilador encendiendo el disyuntor o volviendo a colocar el
fusible. Encienda el ventilador y pruebe la unidad.
14
Ranuras
en el caja
Resortas de
montaje
A
B
FUNCIONAMIENTO EL INTERRUPTOR DE PARED
Botón Acción
• Pulse brevemente para encender / apagar la luz
• Mantenga pulsado durante 8 segundos para iniciar el emparejamiento del
interruptor
• Pulse brevemente para ajustar el brillo
• Pulse brevemente para silenciar o no el micrófono Alexa
• Mantenga pulsado durante 5 segundos para activar el emparejamiento
BLUETOOTH®
• Pulse brevemente para iniciar Alexa
• Mantenga pulsado durante 5 segundos para iniciar o reiniciar el
emparejamiento Wi-Fi
• Presione brevemente para encender / apagar el ventilador.
• Mantenga pulsado durante 8 segundos para activar un restablecimiento
de fábrica
• Pulse brevemente para encender / apagar la luz y el ventilador juntos
• Mantenga pulsado durante 3 segundos para encender / apagar
PRECAUCIÓN: si mantiene pulsado el botón ( ) en el interruptor de pared LED, deberá repetir el proceso de conguración.
NOTA: si el interruptor de pared no funciona con el ventilador de bañera, presione el botón ( ) en el interruptor de pared durante 8
segundos para iniciar el proceso de emparejamiento del interruptor.
CONFIGURACIÓN Y EMPAREJAMIENTO DEL VENTILADOR ALEXA CON LA APLICACIÓN
HOMEWERKS CONNECT
Ocasionalmente, hay actualizaciones de la aplicación que pueden cambiar los pasos a continuación. Si tiene alguna dicultad con los
pasos a continuación, vaya a Homewerks.com/HomewerksConnectApp para buscar actualizaciones.
1. Conecte su teléfono o dispositivo inteligente a una conexión Wi-Fi estable de 2.4 GHz a la que se pueda acceder donde se instalará
su ventilador de baño.
2. Descargue la aplicación Homewerks Connect de la tienda de aplicaciones compatible con su dispositivo inteligente. Si no tiene una
cuenta de Amazon Alexa, descargue la aplicación Amazon Alexa de la tienda de aplicaciones y elija “Create a new account” (Crea
una cuenta nueva).
3. Si usa IOS, abra la aplicación Amazon Alexa e inicie sesión en su cuenta de Amazon Alexa con su ID de usuario y contraseña, luego
haga clic en “Sign In” (Iniciar sesión). IMPORTANTE: si usa Android, este paso no es necesario.
4. Encienda el ventilador en el interruptor de pared LED pulsando el botón ( ) durante al menos 3 segundos, hasta que escuche un
clic. La rejilla del ventilador se iluminará.
5. El altavoz del ventilador dirá “Now in set-up mode” (Ahora en modo de conguración). Si no escuchas “Now in set-up mode” (Ahora
en modo de conguración), mantenga pulsado el botón ( ) en el interruptor de pared LED durante 5 segundos para ingresar al
modo de conguración.
6. Abra la aplicación Homewerks Connect en su dispositivo inteligente y siga las instrucciones proporcionadas en la aplicación.
7. En la aplicación Homewerks Connect, seleccione “Add device” (Agregar dispositivo) y luego “Next” (Siguiente).
8. Haga clic en “Indicator is Blinking” (El indicador parpadea) y la aplicación buscará el ventilador. Una vez que la aplicación haya
descubierto el ventilador, identicado como BATHROOM (BAÑO), haga clic en “Set up this device” (Congurar este dispositivo).
9. Congure Wi-Fi para el ventilador introduciendo la contraseña para la misma señal Wi-Fi de 2,4 GHz a la que está conectado su
dispositivo inteligente y haga clic en “Next” (Siguiente). La aplicación luego conectará el ventilador a Wi-Fi. Una vez que el ventilador
esté conectado a Wi-Fi, haga clic en “Next” (Siguiente).

25
Homewerks.com
CONFIGURACIÓN Y EMPAREJAMIENTO DEL VENTILADOR ALEXA CON LA APLICACIÓN
HOMEWERKS CONNECT (Continuación)
10. La aplicación Homewerks Connect ahora buscará e instalará la última versión del rmware. Tenga paciencia mientras se actualiza el
rmware para brindarle la mejor experiencia.
11. Aparecerá una lista de nombres disponibles en la aplicación y se seleccionará BATHROOM (BAÑO) como la conguración predeter-
minada. Haga clic en “Next” (Siguiente) en la esquina superior derecha de la pantalla de la aplicación para continuar
con el siguiente paso.
12. Ahora, la aplicación Homewerks Connect necesitará que inicie sesión en su cuenta de Amazon Alexa. Haga clic en “Get
started” (Empezar), luego ingrese el ID de usuario y la contraseña para su cuenta de Amazon. Seleccione “Keep me signed in”
(Mantener registro) y haga clic en “Sign In” (Iniciar sesión).
13. Después de iniciar sesión en Amazon, elija su idioma preferido.
14. Cuando la siguiente pantalla de Amazon Alexa diga “Alexa is ready” (Alexa está lista), haga clic en “Next” (Siguiente) y luego en
“Next” (Siguiente) nuevamente para iniciar el proceso de emparejamiento.
15. Después de emparejar el ventilador con la aplicación, los comandos de este paso activarán las habilidades especiales necesarias
para controlar todas las funciones del ventilador. Haga clic en “Connect” (Conectar) en la siguiente pantalla. Conecte las habilidades
de Smart Fan de Homewerks haciendo clic en “Link” (Enlace) y luego en “Link” (Enlace) nuevamente. Para nalizar el proceso, haga
clic en “Done” (Listo) y luego en “Done” (Listo) nuevamente. IMPORTANTE PARA LOS USUARIOS DE ANDROID: Después de
hacer clic en "Conectar" y "Vincular", la aplicación necesitará que inicie sesión en su cuenta de Amazon Alexa nuevamente.
Ha completado con éxito el proceso de conguración y su ventilador Homewerks SmartVent está listo para usar. ¡Ahora puede decirle sus
comandos o preguntas a Alexa, controlar el ventilador a través de la aplicación Homewerks Connect o usar el interruptor de pared incluido!
IMPORTANTE: para operar el ventilador de bañera con los comandos estándar de Alexa, el paso 14 debe completarse correctamente. Para
activar las habilidades especiales necesarias para controlar funciones adicionales del ventilador de bañera, complete todos los 15 pasos. Si el
proceso de conguración falla por cualquier motivo después del paso 14, haga clic en el ícono de engranaje ( ) junto a BATHROOM (BAÑERA)
en la aplicación Homewerks Connect. Luego haga clic en “Amazon Alexa Settings” (Conguración de Amazon Alexa) y seleccione “Link
skill” (Habilidad de enlace). Continúe emparejando la aplicación Homewerks Connect con su cuenta de Amazon Alexa desde en el paso 15.
Siga las instrucciones de la aplicación Homewerks Connect hasta que se complete el proceso de inicio de sesión y emparejamiento de
Amazon.
NOTA: si desea congurar y emparejar un segundo ventilador de bañera Alexa, mantenga presionado el botón ( ) en el interruptor de pared
para apagar el primer ventilador antes de congurar y emparejar el segundo ventilador.
FUNCIONAMIENTO DEL VENTILADOR CON LOS COMANDOS DE ALEXA
Los siguientes comandos se pueden usar con Alexa en su ventilador:
- Alexa, turn on BATHROOM light.
(Alexa, enciende la luz del baño)
- Alexa, turn off BATHROOM light.
(Alexa, apaga la luz del baño)
- Alexa, dim BATHROOM light.
(Alexa, tenue luz del baño)
- Alexa, brighten BATHROOM light.
(Alexa, ilumina la luz del baño)
- Alexa, change BATHROOM light to daylight.
(Alexa, cambia la luz del baño a la luz diurna)
- Alexa, change BATHROOM light to daylight.
(Alexa, cambia la luz del baño a la luz diurna)
- Alexa, change BATHROOM light to soft white.
(Alexa, cambia la luz del baño a blanco suave)
- Alexa, change BATHROOM light to warm white.
(Alexa, cambia la luz del baño a blanco cálida)
- Alexa, turn on BATHROOM night light.
(Alexa, enciende la luz nocturna del baño)
- Alexa, turn off BATHROOM night light.
(Alexa, apaga la luz nocturna del baño)
- Alexa, turn on BATHROOM fan.
(Alexa, enciende el ventilador)
- Alexa, turn off BATHROOM fan.
(Alexa, apaga el ventilador)
- Alexa, ask smartfan to run for “x” minutes on BATHROOM.
(Alexa, pídele a Smartfan que corra “x” minutos en BAÑO.)
IMPORTANTE: si cambia el nombre del ventilador de BATHROOM (BAÑO) a un nombre personalizado, sus comandos de Alexa deberán
dirigirse al nuevo nombre. Por ejemplo, si cambió el nombre del ventilador a BATH (BAÑERA), su comando sería “Alexa, turn on the
BATH light” (Alexa, enciende la luz de la BAÑERA) o “Alexa, turn on the BATH fan” (Alexa, apaga el ventilador de la BAÑERA).
También puede pedir a Alexa para hacer otras cosas para que además de operar el ventilador. Ejemplos incluyen:
- Alexa, play music. (Alexa, reproducir música)
- Alexa, play Amazon music. (Alexa, reproducir música de Amazon)
- Alexa, play Spotify. (Alexa, reproducir Spotify)
- Alexa, turn up the volume. (Alexa, sube el volumen)
- Alexa, turn down the volume. (Alexa, baje el volumen)
- Alexa, order more shampoo. (Alexa, pide más champú)
- Alexa, what is the trafc on the way to work? (Alexa, ¿cuál es el tráco en el camino al trabajo?)
- Alexa, what is the temperature outside? (Alexa, ¿cuál es la temperatura afuera?)

26 Homewerks.com
REGISTRAR SU DISPOSITIVO BLUETOOTH® AL ALTAVOZ
1. Para reproducir sus archivos de música personales, necesita un dispositivo inalámbrico BLUETOOTH®. Una vez
completada la actualización del rmware durante la conguración inicial y el emparejamiento, podrá conectar su dis-
positivo BLUETOOTH® directamente al altavoz del ventilador de la bañera.
2. Congure su dispositivo en un nivel de volumen de rango medio antes de conectarlo a los altavoces del ventilador.
• El ajuste de volumen óptimo para los altavoces BLUETOOTH® es del 70% o inferior. Los ajustes
superiores al 70% pueden causar distorsión del sonido.
3. Mantenga pulsado el botón ( ) en el interruptor LED de pared para activar BLUETOOTH® ( ).
4. Desde la pantalla de inicio en su dispositivo inteligente, elija Conguración> BLUETOOTH®, para buscar BATHROOM
(BAÑO). NOTA: Si bien el dispositivo puede mantener múltiples registros de emparejamiento, sólo puede conectarse
a un accesorio a la vez. Esto evita que su dispositivo envíe sus datos al accesorio BLUETOOTH® incorrecto.
5. Seleccione BATHROOM (BAÑO) de la lista de opciones de dispositivo BLUETOOTH® disponibles. Si BATHROOM
(BAÑO) no aparece en la lista, diga “Alexa, Modo BLUETOOTH®” y luego “BATHROOM”.
6. Cuando se complete el emparejamiento, use los altavoces BLUETOOTH® del ventilador para reproducir audio desde
su dispositivo.
7. Si lo preere, también puede conectarse a su dispositivo BLUETOOTH® a través de la aplicación Homewerks Connect.
Descargue y abra la aplicación Homewerks Connect y siga los pasos de la sección anterior para emparejar su ventilador
Alexa con la aplicación Homewerks Connect.
8. Para cambiar a una conexión Wi-Fi, solo diga “Alexa .....” y el dispositivo cambiará automáticamente a una conexión Wi-Fi.
9. Para volver de una conexión Wi-Fi a BLUETOOTH®, pulse “play" (reproducir) desde su dispositivo BLUETOOTH®.
SPOTIFY CONNECT
Use su teléfono, tableta o computadora como control remoto para Spotify. Vaya a spotify.com/connect
para aprender cómo.
Para permitar y enlazar a Spotify:
1. Abra la aplicación Amazon Alexa y haga clic en . Seleccione "Skills & Games” (Habilidades y juegos). Busque "Spotify" y haga clic
en "Enable the skill” (Permitar la habilidad).
2. Siga la página emergente para ingresar su nombre de usuario y contraseña de Spotify para enlazarlo a su cuenta de Amazon.
Después de completar estos dos pasos, puede hablas el comando “Alexa, play music on Spotify” (Alexa, reproduce música en Spotify).
FUNCIONES ADICIONALES
CAMBIAR EL NOMBRE DE UN VENTILADOR
1. Si ha comprado más de un ventilador Homewerks Alexa, deberá cambiar el nombre del segundo ventilador para evitar la duplicación.
También puede optar por cambiar el nombre de un ventilador Homewerks Alexa de BATHROOM (BAÑO) a un nombre
personalizado, si así lo preere.
2. En la pantalla Lista de dispositivos de la aplicación Homewerks Connect, haga clic en el icono de engranaje ( ) y seleccione
“Rename” (Cambiar nombre).
3. Seleccione de la lista de opciones en la pantalla o seleccione “Custom” (Personalizado) para crear su propio nombre. Una vez
que haya elegido el nuevo nombre para su ventilador, haga clic en “Finish” (Finalizar) en la esquina superior derecha.
4. Espere 20 segundos para que el ventilador de la bañera se actualice con el nuevo nombre antes de usar los comandos.
ACTUALIZAR EL FIRMWARE
Periódicamente se lanzará una nueva versión de rmware y su ventilador Homewerks deberá actualizarse para obtener la
máxima funcionalidad y seguridad. En la ventana emergente, haga clic en “Upgrade” (Actualizar). No apague el ventilador
mientras el rmware se actualiza a través de Wi-Fi.
CUIDADO Y LIMPIEZA
PRECAUCIÓN: antes de limpiar el aparato, desconecte el suministro electrico hacia este apagando el cortacircuitos
o extrayendo el fusible de la caja de fusibles.
Consulte informacion sobre seguridad antes de proceder. Se debe hacer mantenimiento de rutina al menos una vez al ano.
• Nunca use solventes, diluyentes o productos quimicos fuertes para limpiar el ventilador.
• No permita que entre agua al motor.
• No sumerja las piezas de metal en agua.
• No sumerja las piezas de plástico en agua a más de 140 ° F.
• No sumerja el altavoz BLUETOOTH® en agua.

27
Homewerks.com
ANTES DE LIMPIAR
ADVERTENCIA: ¡RIESGO DE DESCARGA ELECTRICA!
Asegúrese de que la energía esté apagada. Quite el fusible
o apague el disyuntor antes de limpiarlo.
1. Apriete los resortes de montaje y tire la rejilla (B) hacia abajo la
carcasa del ventilador (A). Desconecte los conectores para qui-
tar la rejilla (B) de la carcasa del ventilador (A). Recuerde girar
los extremos de los pequeños conectores grises y negros para
desbloquearlos antes de separarlos. Limpie la rejilla (B) con
un paño húmedo.
PRECAUCIÓN: no sumerja los altavoces en agua.
1A
B
2. Use una aspiradora para eliminar el polvo y la suciedad de la
carcasa del ventilador (A). 2
3. Limpie la carcasa del ventilador (A) con un paño húmedo y
seque con un paño. 3
4. Una los conectores de la carcasa del ventilador (A) a la rejilla
(B). Sujete la rejilla (B) presionando los resortes de montaje e
insértelos en las ranuras rectangulares estrechas en la carcasa
del ventilador (A).
Apague la fuente de alimentación.
4A
B
CUIDADO Y LIMPIEZA (Continuación)

28 Homewerks.com
SOLUCIÓN DE PROBLEMAS
PROBLEMA CAUSA POSIBLE SOLUCIÓN
El ventilador parece más
fuerte de lo que debería ser.
Los pies cubicos por minuto (CFM) son demasiado
grandes.
Asegúrese de que la calicación CFM del ventilador
coincide con el tamaño de su habitación.
El regulador de tiro esta danado o no esta funcionando
adecuadamente.
Compruebe amortiguador para asegurarse de que se está
abriendo y cerrando correctamente. Si el amortiguador
se ha dañado, por favor llame a Servicio al Cliente
La curva en el conducto esta demasiado cerca de la
descarga del ventilador
Asegúrese de que usted no tiene ningún doblez en cerca
del conducto de 18 pulgadas a la descarga del ventilador.
Descarga del ventilador reducida para que quepa más
pequeño conducto.
Use el tamaño recomendado conductos para reducir el
ruido del ventilador.
La carcasa del ventilador no esta instalada de forma
segura.
Asegúrese de que el ventilador está bien conectado a las
vigas del techo.
El ventilador no está
despejando la habitación.
No hay suciente ujo de aire de admision en la
habitacion.
Asegúrese de una puerta o ventana está entreabierta o
abierta para permitir el ujo de aire. El ventilador no es
capaz de extraer el aire de la habitación sin ujo de aire
suciente para aprovechar.
Los CFM no son sucientes.
NOTA: El uso de un panuelo no es el metodo correcto
para determinar si el ventilador esta funcionando adecua-
damente. Si el ventilador despeja vapor de la habitacion
en aproximadamente 15 minutos despues de terminar
con su ducha, entonces el ventilador esta funcionando
adecuadamente.
Asegurese de que la capacidad nominal de CFM en el
ventilador coincida con la supercie de su habitacion.
El dispositivo
BLUETOOTH® no se
empareja con el ventilador.
Otro dispositivo ya está emparejado. Asegúrese de que la señal BLUETOOTH® esté desactivada
en otros dispositivos.
El interruptor no se enciende. Problema de cableado en el interruptor o la alimentación
no está encendida en la caja de fusibles.
Verique el diagrama de cableado en la página 20 y
conrme que el cableado sea correcto. Verique que la
corriente esté encendida.
El interruptor se enciende,
pero el ventilador no.
La rejilla no recibe señal del interruptor.
Apaga la corriente. Desconecte la rejilla durante 5
segundos, luego vuelva a conectar la rejilla y pruebe.
Repita según sea necesario.
Mantenga pulsado el botón ( ) durante 8 segundos
para habilitar el emparejamiento del interruptor.
El altavoz y el dispositivo inteligente no están conectados
a la misma red Wi-Fi.
Asegúrese de que su dispositivo inteligente esté
conectado a la misma red Wi-Fi para la que se conguró
el altavoz.
La conexión del cable neutro desde el interruptor al
ventilador no se activa.
Tienda un cable neutral dedicado desde el interruptor al
ventilador. Consulte a un electricista si es necesario.
El interruptor de pared no
funciona con el ventilador.
El interruptor de pared no está emparejado con el ventila-
dor. Pulse el botón ( ) en el interruptor de pared durante 5
segundos para iniciar el emparejamiento del interruptor.
La aplicación Homewerks
Connect no puede descubrir
el ventilador Homewerks.
El ventilador no está en modo de conguración.
Mantenga pulsado el botón ( ) en el interruptor de
pared LED durante 5 segundos para ingresar al modo de
conguración. El altavoz del ventilador dirá "Now in
set-up mode” (Ahora en modo de conguración). Siga los
pasos en la sección “Emparejamiento de su ventilador
Alexa con la aplicación Homewerks Connect” en la
página 24.
El ventilador y el dispositivo inteligente no están
conectados a la misma red Wi-Fi.
Asegúrese de que su dispositivo inteligente esté
conectado a la misma red Wi-Fi para la que se conguró
el ventilador.

29
Homewerks.com
SOLUCIÓN DE PROBLEMAS (Continuación)
PROBLEMA CAUSA POSIBLE SOLUCIÓN
Alexa no responde a tus
comandos.
El micrófono del ventilador está silenciado.
Si el indicador LED rojo se ilumina en el ventilador, el
micrófono está silenciado. Pulse el botón ( ) en el
interruptor de pared para activar el micrófono. El
indicador LED rojo en el ventilador se apagará.
Es posible que el ventilador de la bañera haya perdido la
señal de Wi-Fi o que el ventilador de la bañera no esté
emparejado con su cuenta de Amazon o con la apli-
cación Homewerks Connect.
Siga todos los pasos en la sección “Emparejamiento de
su ventilador Alexa con la aplicación Homewerks
Connect” en la página 24.
Las aplicaciones Amazon Alexa y Homewerks Connect
se registran en diferentes cuentas.
Cierre sesión en las aplicaciones Amazon Alexa y
Homewerks Connect. Inicie sesión en cada uno
nuevamente con la misma cuenta.
Está instalando dos o más ventiladores de bañera
SmartVent al mismo tiempo.
Apague completamente ambos ventiladores presionando
prolongadamente el botón de encendido en el interruptor
de pared. Una vez que ambas unidades estén apagadas,
cierre la aplicación Homewerks Connect y siga los
siguientes pasos:
• Mantenga presionado el botón ( ) en el primer
ventilador de bañera hasta que escuche un clic.
• Mantenga presionado el botón ( ) durante 8 segundos
para iniciar el proceso de emparejamiento del interruptor al
ventilador.
• Mantenga presionado el botón ( ) durante 8
segundos para activar el restablecimiento de fábrica
hasta que escuche "Factory Reset Successful”
(Restablecimiento de fábrica exitoso).
• Si no escucha el comando "Now in Set Up Mode”
(Ahora en modo de conguración), mantenga presio-
nado el botón ( ) durante 5 segundos hasta que
escuche "Now In Set Up Mode (Ahora en modo de
conguración).”
• Abra la aplicación Homewerks Connect y realice el
proceso de emparejamiento.
• Una vez que se haya congurado el primer ventilador y
todos los comandos estén funcionando correctamente,
mantenga presionado el botón ( ) en el interruptor de
pared para apagar este ventilador.
• Complete los pasos 1 - 5 anteriores para congurar el
segundo ventilador, pero durante el proceso de
emparejamiento, cambie el nombre del ventilador de
BAÑERA a otro nombre. sugerimos cambiar el nombre
a BAÑO.
• Una vez que ambos ventiladores se hayan congurado
de esta manera, puede volver a encender.
No hay sonido proveniente
del altavoz.
Ha ocurrido un problema de software.
Pulse el botón ( ) en el interruptor de pared durante 3
segundos para apagarlo. Luego presione el botón ( ) en
el interruptor de pared nuevamente durante 3 segundos
para volver a encenderlo
Realice un restablecimiento de fábrica pulsando el botón
( ) durante 8 segundos. NOTA: Esto eliminará todas
las parámetros del usuario. Después del restablecimien-
to de fábrica, deberá congurar el altavoz nuevamente.
Siga las instrucciones en la página 20.
El volumen está bajo o apagado. Suba o enciende el volumen.
El ventilador tiene problemas
de conectividad Wi-Fi.
Hay una conexión de red inestable. Asegúrese de que su ventilador esté dentro del alcance
de su enrutador Wi-Fi y tenga una conexión fuerte y
estable.
Otros dispositivos están causando interferencia. Compruebe que el ventilador esté alejado de otros
dispositivos que causen interferencia, como microondas,
monitores para bebés u otros dispositivos electrónicos.
Wi-Fi no está conectado porque la contraseña se ingresó
incorrectamente.
Verica que tienes la contraseña Wi-Fi correcta. Si cambió
su contraseña de Wi-Fi recientemente, actualice la
conguración de Wi-Fi de su dispositivo.
La congestión de la red está causando una baja potencia
de la señal. Si tiene varios dispositivos conectados a su red Wi-Fi,
intente eliminar algunos de ellos para reducir la congestión.
No se recibe señal Wi-Fi. El ventilador es compatible con Wi-Fi de 2.4GHz.
Asegúrese de que su dispositivo inteligente y el
ventilador estén conectados a 2,4 GHz.

30 Homewerks.com
VENTILADOR – GARANTÍA LIMITADA DE 3 AÑOS
Si el ventilador falla debido a un defecto en el material o la mano de obra en cualquier momento durante los primeros TRES años de
poseerlo, elfabricante lo reemplazará sin cargos y con el franqueo pagado a su discreción. Esta garantía no cubre productos que hayan
sido objeto de abuso, alteración, daño, mal uso, corte o desgaste. Esta garantía no cubre el uso en aplicaciones comerciales. Utilice
únicamente piezas de repuesto de reparación originales provistas por el fabricante para reparar este ventilador. El uso de piezas de
repuesto que no sean originales anulará su garantía. El fabricante RECHAZA todas las demás garantías implícitas o expresas, incluidas
todas las garantías de comercialización y / o idoneidad para un propósito particular. Como algunos estados no permiten exclusiones o
limitaciones en una garantía implícita, las exclusiones y limitaciones anteriores pueden no aplicarse. Esta garantía le otorga derechos
legales especícos y es posible que tenga otros derechos que varían de un estado a otro.
Esta garantía se limita únicamente al reemplazo de piezas defectuosas. Se excluyen los cargos de mano de obra y / o daños incurridos
durante la instalación, reparación, reemplazo, así como daños incidentales y consecuentes relacionados con lo anterior. Cualquier
daño a este producto como resultado de negligencia, mal uso, accidente, instalación o uso incorrecto que no sea el propósito
DEBERÍA ANULAR ESTA GARANTÍA.
Los costos de envío para el producto devuelto como parte de una reclamación de la garantía deben ser pagados por el cliente.
Las consultas sobre reclamaciones de garantía pueden dirigirse al 1-877-319-3757, de 7:30 a.m. a 4:30 p.m., CST, de lunes a viernes.
ALTAVOZ BLUETOOTH® - GARANTÍA LIMITADA DE 1 AÑO
Si el altavoz BLUETOOTH® falla debido a un defecto en el material o la mano de obra en cualquier momento durante los primeros un
año de poseerlo, elfabricante lo reemplazará sin cargos y con el franqueo pagado a su discreción. Esta garantía no cubre productos
que hayan sido objeto de abuso, alteración, daño, mal uso, corte o desgaste. Esta garantía no cubre el uso en aplicaciones comercia-
les. Utilice únicamente piezas de repuesto de reparación genuinas provistas por el fabricante para reparar este ventilador. El uso de
piezas de repuesto no originales anulará la garantía. El fabricante RECHAZA todas las demás garantías implícitas o expresas, inclu-
idas todas las garantías de comercialización y / o idoneidad para un propósito particular. Como algunos estados no permiten exclusio-
nes o limitaciones en una garantía implícita, las exclusiones y limitaciones anteriores pueden no aplicarse. Esta garantía le otorga
derechos legales especícos y es posible que tenga otros derechos que varían de un estado a otro.
Esta garantía se limita únicamente al reemplazo de piezas defectuosas. Se excluyen los cargos de mano de obra y / o daños incurridos
durante la instalación, reparación, reemplazo, así como daños incidentales y consecuentes relacionados con lo anterior. Cualquier
daño
a este producto como resultado de negligencia, mal uso, accidente, instalación o uso incorrecto que no sea el propósito DEBERÍA
ANULAR ESTA GARANTÍA.
Los costos de envío para el producto devuelto como parte de una reclamación de la garantía deben ser pagados por el cliente.
Las consultas sobre reclamaciones de garantía pueden dirigirse al 1-877-319-3757, de 7:30 a.m. a 4:30 p.m., CST, de lunes a viernes.
AMAZON ALEXA - GARANTÍA LIMITADA DE 1 AÑO
Los productos cubiertos por esta garantía se identican en https://www.amazon.com/devicewarranty
Si compró su Dispositivo o Accesorio Amazon (el "Dispositivo") en Amazon.com o en revendedores autorizados ubicados en los Estados
Unidos, la Garantía del Dispositivo es proporcionada porAmazon.com Services LLC, 410 Terry Ave. North, Seattle, WA 98109-5210, Estados
Unidos. Si compró su Dispositivo en cualquier otro sitio web de Amazon o en revendedores autorizados ubicados en otros países, la garantía
para el Dispositivo es proporcionada por la entidad identicada en https://www.amazon.com/devicewarrantyprovider. El proveedor de esta
garantía a veces se denomina en el presente documento "nosotros".
Cuando compra un Dispositivo reacondicionado nuevo o certicado, garantizamos el Dispositivo contra defectos en materiales y mano
de obra bajo el uso ordinario del consumidor durante un año a partir de la fecha de compra minorista original. Durante este período de
garantía, si surge un defecto en el Dispositivo y usted sigue las instrucciones para devolver el Dispositivo, a nuestra discreción, en la
medida permitida por la ley, (i) repararemos el Dispositivo utilizando piezas nuevas o restauradas, (ii) reemplace el Dispositivo con un
Dispositivo nuevo o restaurado que sea equivalente al Dispositivo a ser reemplazado, o (iii) le reembolse todo o parte del precio de
compra del Dispositivo. Esta garantía limitada se aplica, en la medida permitida por la ley, a cualquier reparación, pieza de reemplazo o
dispositivo de reemplazo por el resto del período de garantía original o por noventa días, cualquiera que sea el período más largo. Todas
las piezas y dispositivos reemplazados por los cuales se otorga un reembolso pasarán a ser de nuestra propiedad. Esta garantía limitada
se aplica solo a los componentes de hardware del Dispositivo que no están sujetos a accidentes, mal uso, negligencia, incendio o daños
por otras causas externas, alteración, reparación o uso comercial.

31
Homewerks.com
AMAZON ALEXA - GARANTÍA LIMITADA DE 1 AÑO (Continuación)
INSTRUCCIONES: Para obtener instrucciones especícas sobre cómo obtener el servicio de garantía para su Dispositivo, comuníquese
con el Servicio al Cliente utilizando la información de contacto en el lado izquierdo de esta página. En general, deberá entregar su Dispositivo
en su embalaje original o en un embalaje igualmente protector a la dirección especicada por el Servicio al Cliente. Antes de entregar su
Dispositivo para el servicio de garantía, es su responsabilidad eliminar cualquier medio de almacenamiento extraíble y hacer una copia
de seguridad de los datos, el software u otros materiales que haya almacenado o conservado en su Dispositivo. Es posible que dichos
medios de almacenamiento, datos, software u otros materiales se destruyan, pierdan o se vuelvan a formatear durante el servicio, y no
seremos responsables de dichos daños o pérdidas.
LIMITACIONES: EN LA MEDIDA PERMITIDA POR LA LEY, LA GARANTÍA Y LOS RECURSOS ESTABLECIDOS ANTERIORMENTE
SON EXCLUSIVOS Y EN LUGAR DE TODAS LAS OTRAS GARANTÍAS Y RECURSOS, Y NOSOTROS NEGAMOS ESPECÍFICA-
MENTE TODAS LAS GARANTÍAS ESTATUTARIAS O IMPLÍCITAS, INCLUYENDO, PERO SIN LIMITARSE A, LAS GARANTÍAS DE
COMERCIABILIDAD, PROPÓSITO PARTICULAR Y CONTRA DEFECTOS OCULTOS O LATENTES. SI NO PODEMOS RECHAZAR
LEGALMENTE LAS GARANTÍAS ESTATUTARIAS O IMPLÍCITAS, ENTONCES EN LA MEDIDA PERMITIDA POR LA LEY, TODAS
LAS GARANTÍAS SERÁN LIMITADAS EN DURACIÓN A LA DURACIÓN DE ESTA GARANTÍA LIMITADA EXPRESA Y AL SERVICIO
DE REPARACIÓN O REEMPLAZO.
ALGUNAS JURISDICCIONES NO PERMITEN LIMITACIONES DE LA DURACIÓN DE UNA GARANTÍA ESTATUTARIA O IMPLÍCITA,
POR LO QUE LA LIMITACIÓN ANTERIOR PUEDE NO APLICARSE EN SU CASO. NO SOMOS RESPONSABLES POR DAÑOS
DIRECTOS, ESPECIALES, INCIDENTALES O CONSECUENTES RESULTANTES DE CUALQUIER INCUMPLIMIENTO DE GARANTÍA
O BAJO CUALQUIER OTRA TEORÍA LEGAL. EN ALGUNAS JURISDICCIONES, LA LIMITACIÓN ANTERIOR NO SE APLICA A LA
MUERTE O LAS RECLAMACIONES POR LESIONES PERSONALES, NI NINGUNA RESPONSABILIDAD ESTATUTARIA POR ACTOS
Y / O OMISIONES NEGLIGENTES INTENCIONALES Y BRUTOS, POR LO QUE LA EXCLUSIÓN O LIMITACIÓN ANTERIOR PUEDE
NO APLICARSE EN SU CASO. ALGUNAS JURISDICCIONES NO PERMITEN LA EXCLUSIÓN O LIMITACIÓN DE DAÑOS DIRECTOS,
INCIDENTALES O CONSECUENTES, POR LO QUE LA EXCLUSIÓN O LIMITACIÓN ANTERIOR PUEDE NO APLICARSE EN SU
CASO. ESTA SECCIÓN DE "LIMITACIONES" NO SE APLICA A LOS CLIENTES DE LA UNIÓN EUROPEA.
Esta garantía limitada le otorga derechos especícos. Es posible que tenga derechos adicionales según la ley aplicable, y esta garantía
limitada no afecta dichos derechos.
Puede encontrar la información de contacto del Servicio al Cliente y otros términos aplicables e información del Dispositivo (incluso en otros
idiomas) en https://www.amazon.com/devicesupport.
-
 1
1
-
 2
2
-
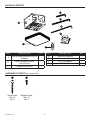 3
3
-
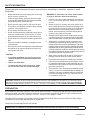 4
4
-
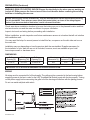 5
5
-
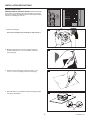 6
6
-
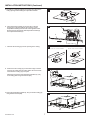 7
7
-
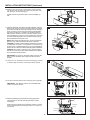 8
8
-
 9
9
-
 10
10
-
 11
11
-
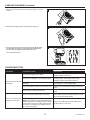 12
12
-
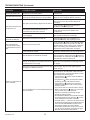 13
13
-
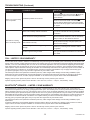 14
14
-
 15
15
-
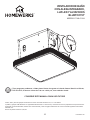 16
16
-
 17
17
-
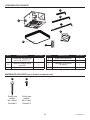 18
18
-
 19
19
-
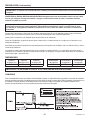 20
20
-
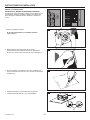 21
21
-
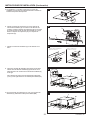 22
22
-
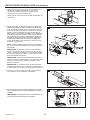 23
23
-
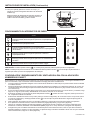 24
24
-
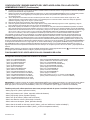 25
25
-
 26
26
-
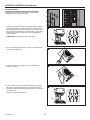 27
27
-
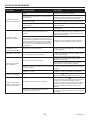 28
28
-
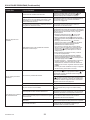 29
29
-
 30
30
-
 31
31


en otros idiomas
- English: HOMEWERKS 7148-01-AX User guide
Artículos relacionados
Otros documentos
-
Hampton Bay LDS-BF3003 Guía de instalación
-
Naxa NAS-5000 El manual del propietario
-
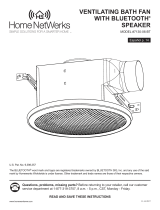 Home Netwerks 7130-06-BT Guía de instalación
-
Naxa NAS-5003 El manual del propietario
-
Naxa NAS-5001 El manual del propietario
-
Naxa NHS-5002 El manual del propietario
-
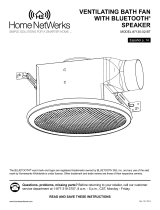 Home Netwerks 7130-02-BT Guía de instalación
-
 Home Netwerks 7130-08-BT Manual de usuario
-
Jensen JSB-550 Manual de usuario


