
37” TV Sound Bar System with Bluetooth
®
NHS-2011
Instruction Manual
Please read carefully before use and keep for future reference.

Page 2 Naxa Electronics
Table of Contents
Thank You ..................................................................... 3
In the Box ...................................................................... 3
Installing Your Sound Bar ............................................ 4
On a Table Top .................................................................................4
How to Mount the Sound Bar to a Wall ......................................4
At a Glance .................................................................... 6
Front View ....................................................................................... 6
Top View 7
Remote Control ..............................................................................8
Using the Remote Control ....................................................8
Replacing the Battery ...........................................................9
Connecting Power ........................................................ 10
Getting Started ............................................................ 10
Turning the Unit On and Off ...................................................... 10
Setting the Source Mode ............................................................ 10
Adjusting the Volume ................................................................... 11
Using Bluetooth
®
Mode ............................................... 11
Pairing a Bluetooth
®
Device ........................................................11
NFC One-Touch Setup .................................................................. 12
During Playback ............................................................................12
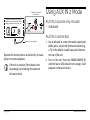
Using AUX IN 1 Mode ....................................................13
AUX IN 1 sources may include: ....................................................13
AUX IN 1 connection ......................................................................13
Using AUX IN 2 Mode 14
AUX IN 2 sources may include: ....................................................14
AUX IN 2 connection ......................................................................14
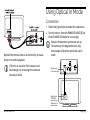
Using Optical IN Mode .................................................15
Connection .....................................................................................15
Warnings and Precautions .......................................... 17
Troubleshooting Guide ............................................... 20
Specications ..............................................................21
Support ........................................................................21
...........................................................................................
....................................................

www.naxa.com Page 3
Thank You
We know you have many choices when it comes to
technology; thank you for choosing us here at Naxa
Electronics. Established in 2001 in Los Angeles, Califor-
nia, we are dedicated to delivering products that en-
tertain and delight.
We trust that you will be happy with your purchase.
Please read this manual carefully and save it for refer-
ence. You may also nd the latest FAQ, documentation,
and other product material at our website. Come visit
us on the web at www.naxa.com and see all that we
have to offer!
In the Box
Please take a moment to make sure that you have ev-
erything in the list below. Although we make every ef-
fort to ensure that each Naxa device is securely packed
and sealed, we know a lot can happen in between us
and you. If anything is missing, check back with your
local retailer to get immediate assistance. If they can-
not help you, please contact our Naxa Support team at
www.naxa.com/supportcenter.
• NHS-2011
• AC/DC power adapter
• Remote Control with CR 2025 button cell
• 3.5mm stereo patch cable
• RCA stereo patch cable
• Instruction Manual

Page 4 Naxa Electronics
Installing Your Sound Bar
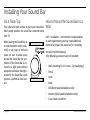
On a Table Top
Find a at and level surface to place your sound bar.
Most people position the sound bar centered below
their TV.
When placing the Sound Bar on
an entertainment center, book-
shelf, or any type of enclosed
space, be sure to allow space
around the Sound Bar for ven-
tilation. If the Sound Bar is en-
closed in a tight space without
adequate ventilation, heat gen-
erated by the Sound Bar could
produce a potential heat haz-
ard.
How to Mount the Sound Bar to a
Wall
Each installation environ
mounting.
You will need the following:
• Wall mounting kit (2 screws, 2 drywall
plugs)
• Pencil
• Level
• Ruler
• Drill (for drywall installations only)
• Hammer (for drywall installations only)
• Cross-head screwdriver
(the following accessories are not included)
ment is unique and has
its own requirements; you may
need additional
material to prepare the sound bar for

www.naxa.com Page 5
Naxa Electronics recommends that wall mounting be
performed by a qualied professional installer. Naxa
is not liable for any accidents or damage to property
or the sound bar due to incorrect installation.
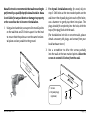
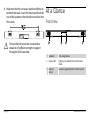
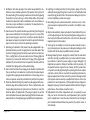
1. Using a level and ruler, use a pencil to mark 2 points
on the wall that are 25.9 inches apart. Use the level
to ensure that the points are on the same horizon-
tal plane and are parallel to the ground.
25.9 inches
(65.8 cm)
2. For drywall installations only; for wood, skip to
step 3: Drill holes at the two marked points on the
wall. Insert the drywall plugs into each of the holes;
use a hammer to gently tap them into place. The
plugs should t completely into the hole, with the
tops of the plug ush with the wall.
(For installations in brick or concrete walls, please
obtain a masonry bit, plugs, and screws from your
local hardware store.)
3. Use a screwdriver to drive the screws partially
into the wall at the two marked points. Allow the
screws to extend 0.3 inches from the wall.
1. Screws
2. Drywall plugs
(optional)

Page 6 Naxa Electronics
4. Make sure that the screws are stable and rmly at-
tached to the wall. Locate the mount points on the
rear of the sound bar, then hook the sound bar onto
the screws.
⚠⚠
The wall that the sound bar is mounted on
should be of sufcient strength to support
the weight of the sound bar.
At a Glance
Front View
1 Speakers Full-range drivers
2 Source LED Lights up to indicate the current source
mode.
3 Remote
Sensor
Receives signals from the remote control.

www.naxa.com Page 7
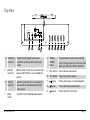
Top View
POWER/
SOURCE
VOL-
VOL+
AUX IN 1
AUX IN 2
L
R
OPTICAL IN
DC IN
DC 9V, 1.5A
POWER/
SOURCE
VOL- VOL+
AUX IN 1
AUX IN 2
L
R
OPTICAL IN
DC IN
DC 9V, 1.5A
4 OPTICAL IN
connector
Optical In mode. Digital optical audio
connection for devices with optical audio
output.
5 AUX IN 1
connector
AUX IN 1 mode. 3.5mm stereo connection for
devices with 3.5mm line-out or headphone
output.
6 AUX IN 2
connector
AUX IN 2 mode. RCA stereo connection for
devices with red and white RCA left/right
audio output.
7 Power
socket
Connector for the included power adapter.
8 POWER/
SOURCE
button
Press and hold to turn the unit on and off.
Press to change the active connection mode
(Bluetooth, Optical In, AUX IN 1, AUX IN 2).
9 VOL– button Press to decrease the volume.
10 VOL+ button Press to increase the volume.
11
button Press to start, pause, or resume playback.
12 button Press to skip to the previous track.
13
button Press to skip to the next track.

Page 8 Naxa Electronics
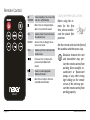
Remote Control
/
STANDBY
Power/standby. Press to turn the
unit on or off (standby).
Mute. Press to temporarily dis-
able or to restore the sound.
VOL– Volume down. Press to decrease
the volume level.
SOURCE Source. Press to change the ac-
tive source mode.
VOL+ Volume up. Press to increase the
volume level.
Previous. Press to skip to the
previous track (Bluetooth
mode).
Pause or resume playback
(Bluetooth mode).
Next. Press to skip to the next
track (Bluetooth mode).
Using the Remote Control
Before using the re-
mote for the rst
time, remove and dis-
card the plastic lm
protector.
Aim the remote control at the front of
the sound bar and then press a key.
⚠L
Obstacles between the unit
and transmitter may pre-
vent the remote control from
working. Direct sunlight, in-
candescent or uorescent
lamps, or any other strong
light shining on the remote
sensor of the unit may pre-
vent the remote control from
working properly.
NHS-2011

www.naxa.com Page 9
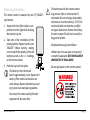
Replacing the Battery
The remote control is powered by one (1) “CR2025”-
type battery.
1. Squeeze the tab of the battery com-
partment to the right while drawing
the battery tray out.
2. Take note of the orientation of the
existing battery. Replace it with a new
“CR2025” lithium battery, making
sure to match the polarity of the old
battery (as well as the +/- markings
on the remote control.
3. Push the tray back into place.
⚠L
The battery in the remote will
last for approximately 1 year. Replace the
battery if the remote control does not
work. Always dispose of batteries accord-
ing to your local municipal regulations.
Do not use the remote control for other
equipment at the same time.
⚠⚠
The battery used in the remote control
may present a re or chemical burn if
mistreated. Do not recharge, disassemble,
incinerate, or heat the battery (~212°F). Do
not mix old with new batteries, or differ-
ent types of batteries. Remove the battery
from the remote if it will not be used for a
long period of time.
Keep batteries away from children.
Lithium coin cells can cause serious injury
or death if swallowed. SEEK MEDICAL HELP
IMMEDIATELY IF SWALLOWED.
Do not spill water on the remote control.
CR2025

Page 10 Naxa Electronics
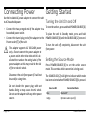
Connecting Power
Use the included AC power adapter to connect the unit
to AC household power.
• Connect the two-pronged end of the adapter to a
household power outlet.
• Connect the barrel plug end of the adapter to the
Power socket [7] of the unit.
⚠⚠
The adapter supports AC 100-240V power
only. Do not connect the power adapter to
a power outlet other than that which is in-
dicated here and on the rating label of the
power adapter as this may result in the risk
of re or electric shock.
Disconnect the unit from power if it will not
be used for a long time.
Do not handle the power plug with wet
hands. Doing so may cause electric shock.
Do not use the adapter with any other power
source.
Getting Started
Turning the Unit On and O
To turn the unit on, press and hold POWER/SOURCE [8].
To place the unit in Standby mode, press and hold
POWER/SOURCE [8] until the SOURCE LED [2] turns red.
To turn the unit off completely, disconnect the unit
from power.
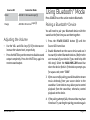
Setting the Source Mode
Press POWER/SOURCE [8] to set the active source
mode. This controls which connection is being used.
The SOURCE LED [2] will light to indicate which mode
has been selected when POWER/SOURCE [8] is pressed.
Source LED Connection Mode
Blue Bluetooth
®
Indigo Optical In audio input [4]

www.naxa.com Page 11
Source LED Connection Mode
Violet AUX IN 1: 3.5mm audio
input [5]
Orange AUX IN 2: RCA stereo
input [6]
Adjusting the Volume
• Use the VOL– and VOL+ keys [9, 10] to decrease or
increase the volume level, respectively.
• Press the MUTE key on the remote to disable sound
output completely. Press the MUTE key again to
restore sound output.
Using Bluetooth
®
Mode
Press SOURCE to set the active mode to Bluetooth.
Pairing a Bluetooth
®
Device
You will need to pair your Bluetooth device with the
sound bar the rst time you use them together.
1. Press the POWER/SOURCE button [8] until the
Source LED turns blue.
2. Enable Bluetooth on the source device and use it
to search for other Bluetooth devices. (Refer to the
user manual of your device if you need help with
this step.) Select the NAXA NHS-2011 sound bar
when the device nds it. If the device prompts you
for a pass code, enter “0000”.
3. After a successful pairing, you will be able to stream
music wirelessly from your source device to the
sound bar. Some devices may allow you to control
playback from the sound bar; otherwise, control
playback on the device.
4. If the pairing attempt fails, the sound bar may have
timed out. Try starting the pairing procedure again

Page 12 Naxa Electronics
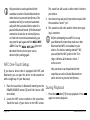
⚠L
Only one device can be paired with the
sound bar at a time. Disable Bluetooth on
other devices to prevent interference. The
sound bar will try to reconnect automati-
cally with the last paired device when it is
placed in Bluetooth mode. If the Bluetooth
connection is lost due to external factors,
or it will not reconnect automatically, you
may need to pair again with the
. Clear the from the
Bluetooth Devices list on your source
device before pairing again.
NFC One-Touch Setup
If you have a device that is equipped with NFC and
Bluetooth, you can pair the device to the sound bar
with a single tap. It’s just that easy!
1. Place the sound bar in Bluetooth mode (press the
POWER/SOURCE button [8] until the Source LED
turns blue).
2. Locate the NFC sensor marked on the sound bar.
Touch the back of your device to the NFC sensor.
The sound bar will sound a chime when it detects
your device.
3. Your device may ask you for permission to pair with
the sound bar. Select “yes”.
4. The sound bar will emit another chime when pair-
ing is complete.
⚠L
Before attempting to use NFC to set up
your Bluetooth connection, make sure that
Bluetooth and NFC are enabled on your
device. For devices running Android™ OS,
you can nd the NFC option in the “Set-
tings > Wireless & Networks > More...”
menu screen.
Only one device can be paired with the
sound bar at a time. Disable Bluetooth on
other devices to prevent interference.
During Playback
• Press the button [11] to stop playback. Press
again to resume playback.
NAXA NHS
-2011
NAXA NHS-2011

www.naxa.com Page 13
• Press the button [13] to skip to the next track;
press [12] to skip to the previous track
• Press the
key on the remote control to turn off
the sound. Press it again to resume the sound.
• Press the VOL–/VOL+ buttons [9/10] to adjust the
volume level.
Using AUX IN 1 Mode
AUX IN 1 sources may include:
• Personal audio players
• Personal computers or laptops
AUX IN 1 connection
1. Use a stereo 3.5mm jack cable (supplied) to con-
nect the headphone (or LINE/Audio) output of the
source device (e.g., an iPod) to the AUX IN 1 audio
input jack found on the side of the unit.
2. Turn on the unit. Press the POWER/SOURCE [8] un-
til the Source LED indicator turns violet. Start play-
back on the source device.

Page 14 Naxa Electronics
Connect to the 3.5mm Audio Out jack
of external audio devices including Tablets,
Laptops, Smartphones, MP3 Players, etc.
1 XUA mm5.3 oT jack on
the Sound Bar
3.5mm Aux In Cable (Included)
Operate the external device as directed by its manu-
facturer to control playback.
⚠L
If there is no sound or if the volume is not
loud enough, try increasing the volume on
the source device
Using AUX IN 2 Mode
AUX IN 2 sources may include:
• TV/DVD/VCR
AUX IN 2 connection
1. Use an AV cable to connect the audio output jacks
(white jack=L, red jack=R) of the source device (e.g.,
a TV) to the AUX IN 2 audio input jacks found on
the rear of the unit.
2. Turn on the unit. Press the POWER/SOURCE [8]
until the Source LED indicator turns orange. Start
playback on the source device.
IN

www.naxa.com Page 15
Operate the external device as directed by its manu-
facturer to control playback.
⚠L
If there is no sound or if the volume is not
loud enough, try increasing the volume on
the source device
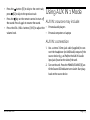
Using Optical In Mode
Connection
1. Follow the gure below to make the connections.
2. Turn the unit on. Press the POWER/SOURCE [8] un-
til the SOURCE LED indicator turns indigo.
⚠L
Not all entertainment systems are set up
the same way; the diagram below is only
one example of how the connection can be
made.
Optical Cable (not included)
OPTICAL OUT
Optical Out of
TV/DVD/Etc.
(referred to as
“Digital Out” on
some devices)
Optical in jack
of the Sound Bar
IN

Page 16 Naxa Electronics
Operate the external device as directed by its manu-
facturer to control playback.
⚠L
This optical connection only supports the
uncompressed PCM signal format. You may
need to adjust the digital output format
of your source device; contact the device
manufacturer to learn more.

www.naxa.com Page 17
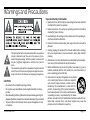
Warnings and Precautions
The lightning ash with arrowhead symbol within an equilateral
triangle is intended to alert the user to the presence of unin-
sulated “dangerous voltage” within the product’s enclosure that
may be of signicant magnitude to constitute risk of electric
shock
The exclamation point within an equilateral triangle is intended
to alert the user to the presence of important operation and ser-
vicing instructions in the literature accompanying the appliance.
CAUTION
• Do not block the ventilation openings or holes.
• Do not place any naked ames (such as lighted candles) on the ap-
paratus.
• When discarding batteries, follow all local rules and laws governing the
disposal of batteries. Consider the environmental impact of your actions!
• To prevent re or shock hazard, do not expose this appliance to rain
or moisture.
Important Safety Information
1. Read Instructions: All the safety and operating instructions should be
read before the product is operated.
2. Retain Instructions: The safety and operating instruction should be
retained for future reference.
3. Heed Warnings: All warnings on the product and in the operating in-
structions should be adhered to.
4. Follow Instructions: All operating and usage instructions should be
followed.
5. Cleaning: Unplug this product from the wall outlet before cleaning.
Do not use liquid cleaners or aerosol cleaners. Use a damp cloth for
cleaning.
6. Attachments: Use only attachments recommended by the manufac-
turer. Use of other attachments may be hazardous.
7. Water and Moisture: Do not use this product near water (e.g., near a
bathtub, washbowl, kitchen sink, laundry tub, in wet basements, or
near a swimming pool and the like).
8. Accessories: Do not place this product on an unstable
cart, stand, tripod, bracket, or table. Use only with
carts, stands, tripods, brackets, or tables recom-
mended by the manufacturer or sold with the
product. Any mounting of the product should fol-
low the manufacturer’s instructions and should use
a mounting accessory recommended by the manu-
facturer. A product and cart combination should be moved with care.
Quick stops, excessive force, and uneven surfaces may cause the
product and cart combination to overturn.

Page 18 Naxa Electronics
9. Ventilation: Slots and openings in the cabinet are provided for ven-
tilation to ensure reliable operation of the product and to protect it
from overheating. These openings should never be blocked by placing
the product on a bed, sofa, rug, or other similar surface. This product
should not be placed in a built-in installation such as a bookcase or
rack unless proper ventilation is provided or the manufacturer in-
structions have been adhered to.
10. Power Sources: This product should be operated only from the type of
power source indicated on the rating label. If you are not sure of the
type of power supply to your home, consult your product dealer or
local power company. For products intended to operate from battery
power or other sources, refer to the operating instructions.
11. Grounding or Polarization: This product may be equipped with a po-
larized alternating-current line plug that has one blade wider than
the other. This plug will only t into the power outlet in one direction.
This is a safety feature. If you are unable to insert the plug fully into
the outlet, try reversing the direction of the plug. If the plug should
still fail to t, contact an electrician to replace the obsolete outlet. Do
not defeat the safety purpose of the polarized plug.
12. Power-Cord Protection: Power supply cords should be routed so that
they are not likely to be walked on or pinched by items placed upon
or against them, paying particular attention to cords at plugs, conve-
nience receptacles, and at the point which they exit from the product.
13. Protective Attachment Plug: The product may be equipped with an at-
tachment plug with overload protection. This is a safety feature. See
the operating instructions for replacement or directions to reset the
protective device. If replacement of the plug is required, be sure the
service technician has used a replacement plug that has the same over-
load protection as the original plug as specied by the manufacturer.
14. Lightning: For added protection for this product, unplug it from the
wall outlet during a lightning storm or when it is left unattended and
unused for long periods of time. This will prevent damage to the prod-
uct due to lightning or power-line surges.
15. Overloading: Do not overload wall outlets, extension cords, or inte-
gral convenience receptacles as this can result in a risk of re or elec-
tric shock.
16. Object and Liquid Entry: Never push objects of any kind into this prod-
uct through openings as they may touch dangerous voltage points or
short-out parts that could result in a re or electric shock. Never spill
liquid of any kind on the product.
17. Servicing: Do not attempt to service this product yourself as open-
ing or removing covers may expose you to dangerous voltage or other
hazards. Refer all servicing to qualied service personnel.
18. Damage Requiring Service: Unplug this product from the wall outlet
and refer servicing to qualied service personnel under the follow-
ing conditions: a) when the power-supply or plug is damaged; b) if
liquid has been spilled or if objects have fallen into the product; c) if
the product has been exposed to rain or water; d) if the product does
not operate normally by following the operating instructions. Adjust
only those controls that are covered by the operating instructions as
improper adjustment of other controls may result in damage and will
often require extensive work by a qualied technician to restore the
product to its normal operation; e) if the product has been dropped or
damaged in any way; f) when the product exhibits a distinct change in
performance—this indicates a need for service.
19. Replacement Parts: When replacement parts are required, be sure
that your service technician has used replacement parts specied
by the manufacturer or have the same characteristics as the original
part. Unauthorized substitutions may result in re, electric shock, or
other hazards.

www.naxa.com Page 19
20. Safety Check: Upon completion of any service or repairs to this
product,ask the service technician to perform safety checks to ensure
that the product is in proper operating condition.
21. Wall or Ceiling Mounting: The product should be mounted to a wall or
ceiling only as recommended by the manufacturer.
22. Heat: The product should be situated away from heat sources such as
radiators,heat registers, stoves, or other products (including ampli-
ers) that produce heat.
WARNING:
This product contains lead, a chemical known to the State of California to
cause cancer and birth defects or other reproductive harm. Wash hands
after handling.
FCC NOTICE
This device complies with Part 15 of the FCC Rules. Operation is subject
to the following two conditions: (1) this device may not cause harmful
interference, and (2) this device must accept any interference received,
including interference that may cause undesired operation.
Note: This equipment has been tested and found to comply with the lim-
its for a Class B digital device, pursuant to Part 15 of the FCC Rules. These
limits are designed to provide reasonable protection against harmful in-
terference in a residential installation. This equipment generates, uses
and can radiate radio frequency energy and, if not installed and used in
accordance with the instructions, may cause harmful interference to ra-
dio communications. However, there is no guarantee that interference
will not occur in a particular installation. If this equipment does cause
harmful interference to radio or television reception, which can be de-
termined by turning the equipment off and on, the user is encouraged to
try to correct the interference by one or more of the following measures:
• Reorient or relocate the receiving antenna.
• Increase the separation between the equipment and receiver.
• Connect the equipment into an outlet on a circuit different from that
to which the receiver is connected.
• Consult the dealer or an experienced radio/TV technician for help.
CAUTION ON MODIFICATIONS
Any changes or modications not expressly approved by the grantee of
this device may void the authority granted by the FCC to operate the
equipment.

Page 20 Naxa Electronics
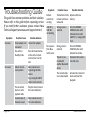
Troubleshooting Guide
This guide lists common problems and their solutions.
Please refer to this guide before requesting service.
If you need further assistance, please contact Naxa
Technical Support (www.naxa.com/supportcenter/).
Symptom Possible Cause Possible Solution
No power. Power adapter not
connected
Connect the adapter
The unit is in
Standby mode
Press the Power button
on the unit or remote
control to turn on the
unit.
No sound. Volume in mini-
mum position
Raise volume level
by pressing the VOL +
button.
Try pressing the MUTE
button on the remote.
The connected
device is not in
payback mode
Play the music/movie in
the connected device
Sound output of
the device weak
Raise volume level of
the connected device
Symptom Possible Cause Possible Solution
Remote
control not
working
The batteries in the
remote control are
exhausted
Replace with new
battery
not working
Wrong source is
selected
Press the POWER/
SOURCE button until
indicator turns violet
(AUX IN 1 ) / orange (AUX
IN 2 )
No response
from Blue-
tooth source
Wrong source is
selected
Press the POWER/
SOURCE button until
indicator turns Blue
The unit is con-
nected with
another Bluetooth
device
Disconnect the connec-
tion and retry.
The connected de-
vice is Deactivated
Activate the connected
device and start the
playback
AUX IN 1 /
AUX IN 2

www.naxa.com Page 21
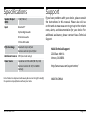
Specications
Speaker Output
(RMS)
10 W (5 W x 2)
Input Bluetooth
®
Optical digital audio
RCA stereo audio
3.5mm AUX audio
Effective Range Bluetooth: Up to 32 feet
Remote control: Up to 16 feet
Additional Features NFC (one touch setup)
Power Source Sound Bar: AC 100-240V (DC 9V, 1.5A)
Remote Control: DC 3V (1 x CR2025
battery)
Note: Product are improved continuously. We reserve the right to modify
the product and specications without prior notice.
Support
If you have problems with your device, please consult
the instructions in this manual. Please also visit us
on the web at www.naxa.com to get up to the minute
news, alerts, and documentation for your device. For
additional assistance, please contact Naxa Technical
Support.
NAXA Technical Support
2320 East 49th St.
Vernon, CA 90058
http://www.naxa.com/suportcenter/
MADE IN CHINA


Sistema de Sonido para TV tipo Barra de 37”
con Bluetooth
®
NHS-2011
Manual de Operación
Favor de leer este manual completamente antes de operar este producto.
Conservar el manual para futuras referencias.

Pagina 2 Naxa Electronics
Índice
Agradecimiento ............................................................ 3
Contenido en el Empaque ............................................ 3
Instalación de la Barra de Sonido ...............................4
Sobre una tabla .............................................................................. 4
Sobre la pared ................................................................................4
Descripción de Partes ................................................... 6
Parte Frontal .................................................................................. 6
Vista Superior ..................................................................................7
Control Remoto ..............................................................................8
Usando el Control Remoto ...................................................8
Reemplazando las baterias ..................................................9
Fuente de Alimentación .............................................10
Iniciando .......................................................................10
Encender / Apagar ....................................................................... 10
Ajuste del modo de Fuente ........................................................ 10
Ajuste de volumen ........................................................................ 11
Operación del Modo Bluetooth
®
............................... 11
Sincronizando el dispositivo Bluetooth® ................................. 11
Ajuste Un-Toque NFC ...................................................................12
Durante la reproducción .............................................................. 13
Operación de Modo AUX In 1 ........................................13
La fuente de entrada Auxiliar 1 puede ser ................................13
Conexión de la fuente de entrada Auxiliar 1 ............................13
Operación del Modo AUX In 2 ......................................14
La fuente de entrada Auxiliar 2 puede ser .............................. 14
Conexión de la fuente de entrada Auxiliar 2 ........................... 14
Operación del Modo Optical In ...................................15
Conexión .........................................................................................15
Advertencias y Precauciones ......................................
Guía rápida para la solución de problemas ............. 20
Especicaciones ......................................................... 21
Soporte ........................................................................ 21
17

www.naxa.com Pagina 3
Agradecimiento
Sabemos que usted tiene muchas opciones cuando se
trata de tecnología; gracias por elegir los productos
de Naxa Electronics. Fundada en 2001 en Los Ángeles,
California, estamos dedicados a ofrecer productos que
entretienen y satisfacen sus necesidades.
Conamos en que usted será feliz con su compra. Fa-
vor, de leer atentamente este manual y guárdelo para
futura referencia. Usted también puede encontrar las
preguntas más frecuentes, documentación y otro ma-
terial del producto en nuestro sitio web. Venga a visi-
tarnos en www.naxa.com y ver todo lo que tenemos
para ofrecer
Contenido en el Empaque
Favor de tomar unos momentos para asegurarse de que
se tiene todo lo que se enlista abajo. Aunque hacemos
todo lo posible para asegurarnos de que cada disposi-
tivo Naxa esté bien empacado y sellado, sabemos que
pueden pasar muchas cosas durante el empacado y
transporte. Si falta algún componente, acudir inmedi-
atamente con el proveedor para obtener asistencia in-
mediata. Favor de contactar al equipo de soporte naxa
en www.naxa.com/supportcenter.
• NHS-2011
• Adaptador ca/cc
• Control remoto con batería de 3 Vcc “CR2025”
• Cable de audio estereofónico de 3.5 mm
• Cable de línea RCA
• Manual de operación

Pagina 4 Naxa Electronics
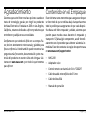
Instalación de la Barra de Sonido
Sobre una tabla
Encontrar una supercie plana y nivelada para instalar
la barra de sonido. La mayoría de las personas instala
la barra de sonido centrada de bajo de la TV.
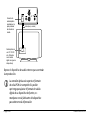
Al colocar la barra de sonido
en un centro de entreten-
imiento, una estantería, o
cualquier tipo de espacio
cerrado, asegurarse de de-
jar espacio libre alrededor de
la barra de sonido para una
adecuada ventilación. Si la
barra de sonido está encer-
rada en un espacio reducido
sin ventilación adecuada, el
calor generado por la barra
de sonido puede producir un
riesgo potencial de calor.
Sobre la pared
de instalación es único y tiene sus propios requerimien-
tos; es posible que tenga la necesidad de material adi-
cional para preparar la barra de sonido para el montaje.
Se requerira lo siguiente:
•
2 taquetes
• Lápiz
• Nivel
• Regla
• Taladro con una broca de 7/32 pulgadas (para in-
stalación sobre paredes secas solamente)
• Martillo (para instalación sobre paredes secas sol-
amente)
• Desarmador cruz
Sin embargo, cada entorno
2 tornillos,
Los siguientes accesorios no están incluidos.

www.naxa.com Pagina 5
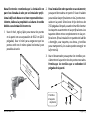
Naxa Electronics recomienda que la instalación en
pared sea llevada al cabo por un instalador profe-
sional calicado. Naxa no se hace responsable de ac-
cidentes, daños a la propiedad o a la barra de sonido
debido a una instalación incorrecta.
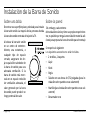
1. Usar el nivel, regla y lápiz para marcar los puntos
en la pared con una separación de 56.21 cm (22.13
pulgadas). Usar el nivel para asegurarse que los
puntos estén en el mismo plano horizontal y son
paralelas al suelo.
25.9 inches
(65.8 cm)
2. Para instalación sobre paredes secas solamente;
para pared de madera ver punto 3: Usar el taladro
para realizar las perforaciones en los 2 puntos mar-
cados en la pared. Seleccionar el tipo de broca de
7/32 pulgadas. Después, usando el martillo insertar
los taquetes suavemente en las perforaciones. Los
taquetes deben entrar completamente en las per-
foraciones. (Para instalación en paredes de ladrillo
u hormigón, usar taquetes, una broca, y tornillos
para mampostería, los cuales puede conseguir en
la ferretería).
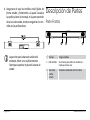
3. Usar el desarmador para apretar los tornillos par-
cialmente en la pared en los dos puntos marcados.
Permita que los tornillos que se extienden 0.3
pulgadas de la pared.
1. Tornillos
2. Taquetes
de plástico

Pagina 6 Naxa Electronics
4. Asegurarse de que los tornillos están jados de
forma estable y rmemente a la pared. Localizar
las perforaciones de montaje en la parte posterior
de la barra de sonido, entonces enganchar los tor-
nillos en las perforaciones.
La pared en que la barra de sonido está
montado deben ser lo sucientemente
fuerte para soportar el peso de la barra de
sonido.
Descripción de Partes
Parte Frontal
1 Bocinas Rango completo.
2 LED de Modo Se enciende para indicar el modo de en-
trada que está en uso.
3 Sensor del
control
remoto
Recibe las señales del control remoto.

www.naxa.com Pagina 7
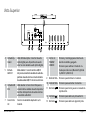
Vista Superior
POWER/
SOURCE
VOL-
VOL+
AUX IN 1
AUX IN 2
L
R
OPTICAL IN
DC IN
DC 9V, 1.5A
POWER/
SOURCE
VOL- VOL+
AUX IN 1
AUX IN 2
L
R
OPTICAL IN
DC IN
DC 9V, 1.5A
4 Entrada Óp-
tical In
Modo Entrada óptica. Conector de audio
óptico digital para dispositivos de audio
externos con salida de audio óptico digital.
5 Entrada
AUX IN 1
Modo Auxiliar 1. Conector estéreo de Ø 3.5
mm para la conexión de la salida de audio dis-
positivos de audio externos a través del cable
de audio auxiliar de Ø 3.5 mm en los extremos.
6 Entrada AUX
IN 2
Modo Auxiliar 2. Conectores RCA para la
conexión de las salidas de audio izquierdo/
derecho de dispositivos de audio externos
a través del cable RCA.
7 Conector de
Vcc
Conectar la salida del adaptador ca/cc
incluido.
8 Botón de
POWER/
SOURCE
Presione y mantenga para activar la uni-
dad de encendido y apagado.
Presionar para cambiar el modo de en-
trada que está en uso (Bluetooth, Optical
In, AUX IN 1, AUX IN 2).
9 Botón de VOL– Presionar para disminuir el volumen.
10 Botón de VOL+ Presionar para aumentar el volumen.
11 Botón de
Presionar para iniciar, pausar o reanudar la
reproducción.
12 Botón de
Presionar para saltar a la pista anterior.
13 Botón de
Presionar para saltar a la siguiente pista.

Pagina 8 Naxa Electronics
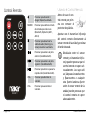
Control Remoto
Presionar para Esconder /
Apagar (Espera) la unidada.
SOURCE Presionar para cambiar el modo
de entrada que está en uso
(Bluetooth, Optical In, AUX 1,
AUX 2).
Presionar para desactivar la
salida de audio (silencio), pre-
sionar para volver a activarla.
Presionar para saltar a la pista
anterior (modo Bluetooth).
Presionar para saltar a la pista
siguiente (modo Bluetooth).
Presionar para iniciar o pausar la
reproducción (modo Bluetooth).
VOL– Presionar para disminuir el
volumen.
VOL+ Presionar para aumentar el
volumen.
Usando el Control Remoto
Antes de usar el con-
trol remoto por prim-
era vez remover el
protector de plástico.
Apuntar con el transmisor infrarrojo
del control remoto directamente al
sensor remoto de la unidad y presionar
el botón deseado.
Obstáculos entre el sensor
remoto y el transmisor infra-
rrojo pueden provocar que el
control remoto no opere ad-
ecuadamente. Los rayos del
sol, lámparas incandescentes
y uorescentes o cualquier
otra fuente luminosa fuerte
sobre el sensor remoto de la
unidad pueden provocar que
el control remoto no opere
adecuadamente.
NHS-2011

www.naxa.com Pagina 9
Reemplazando las baterias
El control remoto opera con una batería de 3 Vcc tipo
botón “CR2025”.
1. Presionar hacia la derecha sobre el
seguro de la bandeja de la batería y
jalar la bandeja hacia fuera.
2. Remover la batería gastada e in-
stalar una batería nueva de litio
(CR2025) en la bandeja, vericando
que el lado positivo de la batería
quede hacia arriba.
3. Introducir la bandeja en el compar-
timiento hasta escuchar un clic.
El periodo de vida de la batería
en el control remoto es de aproximada-
mente 1 año. Reemplazar la batería si el
control remoto no opera. Desechar las bat-
erías de forma adecuada de acuerdo con
las leyes de desechos sólidos de su locali-
dad para evitar daños al medio ambiente.
⚠
Las batería usadas en el control remoto
pueden generar riesgo de fuego o que-
maduras químicas si estás son usadas de
forma incorrecta. No recargar, desarmar,
incinerar, golpear o calentar las baterías.
No mezclar baterías nuevas con usadas o
de diferente tipo. Remover las baterías del
control remoto si este no va ser usado por
un periodo largo de tiempo.
Mantener las baterías lejos de los niños.
Pilas de botón de litio pueden causar
lesiones graves o la muerte si se ingiere.
BUSQUE AYUDA MÉDICA DE INMEDIATO SI
TRAGA.
No derramar agua sobre el control remoto.
CR2025
Pilas de botón de litio
pueden causar lesiones
graves o la muerte si se
ingiere. Retirarla de forma.
Mantener las baterías
lejos de los niños.

Pagina 10 Naxa Electronics
Fuente de Alimentación
Usar el adaptador ca/cc para operar la barra de sonido.
• Conectar el adaptador ca/cc al tomacorriente.
• Conectar la salida del adaptador al conector de Vcc
(7) de la barra de sonido.
⚠
El adaptador ca/cc opera en un rango de
voltaje de entrada de 100-240 V~ solamente.
No conectar el adaptador ca/cc a un tomacor-
riente con un voltaje diferente al especicado
en el manual y etiquetado, esto puede generar
riesgo de fuego o choque eléctrico.
Desconectar el adaptador ca/cc del tomacor-
riente y de la barra de sonido sin no va ser op-
erado por un periodo largo de tiempo.
No conectar o desconectar el adaptador ca/
cc del tomacorriente o de la barra de sonido
con las manos mojadas o húmedas, esto puede
generar riesgo de choque eléctrico.
No usar el adaptador ca/cc con otro dispositivo.
Iniciando
Encender / Apagar
Para encender la unidad, presione y mantenga POWER/
SOURCE [8].
Para colocar la unidad en modo de espera (apagada),
mantenga presionado POWER/SOURCE hasta que el
LED de Modo [2] se convierte en rojo.
Ajuste del modo de Fuente
Presionar POWER/SOURCE [8] para seleccionar el
modo de entrada deseado. Esto controla que conexión
es usada.
El LED de Modo [2] se iluminará para indicar que el
modo se ha seleccionado.

www.naxa.com Pagina 11
LED de Modo Modo de Conexión
Azul Bluetooth
®
Índigo Entrada de audio óptica
Violeta Entrada de audio de Ø 3.5 mm (AUX IN 1)
Naranja Entrada estéreo RCA (AUX IN 2)
Ajuste de volumen
• Presionar “VOL-“ o “VOL+” [9 o 10] para disminuir o
aumentar el volumen al nivel deseado.
• Presionar en el control remoto para desactivar
la salida de audio (silencio), presionar nuevamente
para volver a activar la salida de audio.
Operación del Modo
Bluetooth
®
Presionar “MODE” para seleccionar el modo de
Bluetooth.
Sincronizando el dispositivo Blue-
tooth®
Es necesario primero sincronizar el dispositivo Blue-
tooth con la barra de sonido para usarlos al mismo
tiempo.
1. Presionar POWER/SOURCE [8] en la barra de sonido
hasta que el indicador cambia a color azul.
2. Habilitar la función Bluetooth de la fuente de audio
externa.
3. Ajustar la fuente de audio externa para buscar
otros dispositivos Bluetooth (referirse al manual
de operación del dispositivo de audio externo si
necesita ayuda con estos pasos). En la lista de dis-
positivos Bluetooth encontrados, seleccionar la

Pagina 12 Naxa Electronics
barra de sonido NAXA NHS-2011. Si el dispositivo
requiere una contraseña, ingresar “0000”.
4. Después de que la sincronización es satisfacto-
ria, el dispositivo de audio externo está habilitado
para transmitir audio de forma inalámbrica hacia
la barra de sonido. Algunos dispositivos permiten
controlar la reproducción desde la barra de sonido,
de otra forma, controlar la reproducción desde el
dispositivo de audio externo.
5. Si el intento de sincronización falla, la barra de
sonido puede estar fuera de tiempo. Intentar sin-
cronizar los dispositivos nuevamente.
Sólo un dispositivo se puede sincronizar
con la barra de sonido a la vez. Desactivar
la función Bluetooth en otros dispositi-
vos para evitar interferencias. La barra
de sonido intentará volver a conectarse
automáticamente con el último disposi-
tivo sincronizado cuando se coloca en el
modo Bluetooth. Si se pierde la conexión
Bluetooth debido a factores externos, o no
se reconecta automáticamente, se debe
volver a sincronizar los dispositivos nueva-
dispositivos Bluetooth en su dispositivo de
audio externo antes de sincronizar nueva-
mente.
Ajuste Un-Toque NFC
Si tiene un dispositivo con las funciones de Bluetooth
y NFC, puede sincronizar el dispositivo a la barra de
sonido con un simple toque. ¡Es demasiado fácil!
1. Colocar la barra de sonido en el modo de
“Bluetooth” (presionar POWER/SOURCE [8] hasta
que el LED de Modo se ilumina en azul.
2. Localizar el sensor NFC sobre la etiqueta NFC de
la barra de sonido. Tocar con la parte posterior del
dispositivo Bluetooth el sensor NFC de la barra de
sonido. La barra de sonido detectara el dispositivo.
3. El dispositivo, solicitara la conrmación para sin-
cronizar la barra de sonido. Seleccionar “Yes” y la
sincronización es completada.
Antes de intentar usar la función NFC para
realizar la conexión Bluetooth, asegurarse
NAXA NHS-2011
mente. Desactivar de la lista de

www.naxa.com Pagina 13
que las funciones de Bluetooth y NFC del
dispositivo están habilitadas. Para dis-
positivos con sistema operativo Android™,
puede localizar la opción de la función NFC
en la pantalla de menú de “Ajustes > Redes
y redes inalámbricas > Mas….”
Durante la reproducción
• Presionar [11] para pausar la reproducción, pre-
sionar nuevamente para volver a la reproduc-
ción desde el punto donde se pauso.
• Presionar o [12 o 13] para saltar a la pista an-
terior o siguiente respectivamente.
• Presionar en el control remoto para desactivar la
salida de audio (silencio), presionar nuevamente
para volver a activar la salida de audio.
• Presionar VOL– o VOL+ [9 o 10] para ajustar el volu-
men al nivel deseado.
Operación de Modo
AUX IN 1
La fuente de entrada Auxiliar 1 pu-
ede ser
• Reproductor de audio personal.
• Computadora de escritorio o portátil.
Conexión de la fuente de entrada
Auxiliar 1
1. Usando un cable de línea de 3.5 mm (incluido) co-
nectar la salida de audio para los audífonos de la
fuente de audio externa (por ejemplo, un iPod) al
conector de entrada Auxiliar 1 localizado en la par-
te posterior de la barra de sonido.
2. Encender la barra de sonido. Presionar POWER/
SOURCE [8] en la barra de sonido hasta que el in-
dicador cambia a color violeta. Encender la fuente
de audio externa e iniciar la reproducción (por
ejemplo un iPod).

Pagina 14 Naxa Electronics
Al conector salida de audio de 3.5 mm
de la fuente de audio externa (Tableta,
Computadora, Teléfono celular, MP3, etc.)
Al conector de entrada Auxiliar 1
de la barra de sonido
Cable de línea de 3.5 mm para entrada
auxiliar 1 (incluido)
Operar el dispositivo de audio externo para controlar
la reproducción.
Si no hay salida de audio en la barra de
sonido o si el sonido es demasiado bajo,
intentar aumentar el volumen de la fuente
de audio externa.
Operación del Modo
AUX IN 2
La fuente de entrada Auxiliar 2 pu-
ede ser
• TV/DVD/VCR
Conexión de la fuente de entrada
Auxiliar 2
1. Usando un cable de Audio/Video conectar las sali-
das de audio (Conector blanco: Canal izquierdo, Co-
nector rojo: Canal derecho) de la fuente de audio
externa (por ejemplo, una TV) a los conectores de
entrada Auxiliar 2 localizados en la parte posterior
de la barra de sonido.
2. Encender la barra de sonido. Presionar POWER/
SOURCE [8] en la barra de sonido hasta que el in-
dicador cambia a color naranja. Encender la fuente
de audio externa e iniciar la reproducción (por
ejemplo, una TV).

www.naxa.com Pagina 15
Conectores de
salidade audio
TV / DVD / DVR / VCR
A los conectores de
entrada Auxiliar 2
de la barra de sonido
Operar el dispositivo de audio externo para controlar
la reproducción.
Si no hay salida de audio en la barra de
sonido o si el sonido es demasiado bajo,
intentar aumentar el volumen de la fuente
de audio.
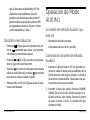
Operación del Modo
Optical In
Conexión
1. Hacer las conexiones conforme a la gura de abajo.
2. Encender la barra de sonido. Presionar POWER/
SOURCE [8] en la barra de sonido hasta que el in-
dicador cambia a color índigo.
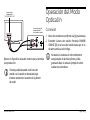
No todos los sistemas de entretenimiento
son ajustados de la misma forma, el dia-
grama de abajo es solo un ejemplo de cómo
realizar las conexiones.

Pagina 16 Naxa Electronics
Optical Cable (not included)
OPTICAL OUT
Conector de
entrada óptica
localizado en la
parte posterior
de la barra de
sonido
Salida óptica de
una TV / DVD /
etc. (Referida
como salida
digital en algunos
dispositivos)
Cable óptico (no incluido)
Operar el dispositivo de audio externo para controlar
la reproducción.
La conexión óptica solo soporta el formato
de señal PCM sin comprimir. Es posible
que tenga que ajustar el formato de salida
digital de su dispositivo de fuente; co-
muníquese con la fabricante del dispositivo
para obtener más información.

www.naxa.com Pagina 17
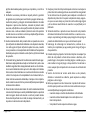
Advertencias y Precauciones
El símbolo del relámpago con punta de echa dentro de un
triángulo, es diseñado para advertir al usuario de voltajes pelig-
rosos no aislados dentro del producto que pueden ser de magni-
tud suciente para constituir riesgo de fuego o choque eléctrico
para las persona.
El símbolo de exclamación dentro de un triángulo, es para aler-
tar al usuario de la presencia de instrucciones importantes de
operación, mantenimiento y servicio que se encuentran dentro
de este instructivo
Precaución
• No bloquear las ranuras de ventilación.
• No colocar fuentes generadoras de ama (como velas, veladoras,
etc.) sobre la unidad.
• Al desechar las baterías seguir la reglas de desechos sólidos de su
localidad para evitar daños al medio ambiente.
• Para prevenir riesgo de fuego o choque eléctrico no exponer esta
unidad al goteo o salpicadura de agua, a la lluvia o humedad.
Importante Información de Seguridad
1. Leer las instrucciones. Deben leerse todas las instrucciones de oper-
ación y de seguridad antes de operar este producto.
2. Conservar las instrucciones. Deben conservarse las instrucciones de
operación y seguridad para futuras referencias.
3. Poner atención a las advertencias. Todas las advertencias en el pro-
ducto y las instrucciones de operación y seguridad deben de respet-
arse.
4. Seguir las instrucciones. Deben seguirse todas las instrucciones de
uso y operación.
5. Limpieza. Desconectar el cordón de alimentación del tomacorriente
antes de darle mantenimiento o limpieza al reproductor. Limpiar con
una tela, suave, limpia y seca, No usar limpiadores líquidos o en aero-
sol.
6. Accesorios. Usar solo accesorios/refacciones recomendados por el
fabricante.
7. Agua y humedad. No usar este producto cerca del agua, por ejemplo
cerca de una bañera, lavabo, fregadero de cocina o de lavar, sótanos
húmedos o cerca de una piscina.
8. Manejo y desplazamiento. No colocar este producto en
un carrito, plataforma, repisa o mesa inestables, el
producto puede caerse generando serias lesiones y
daños a las personas y/o al producto. Usar este pro-
ducto solo con el carrito, plataforma, repisa o mesa
recomendado por el fabricante o vendido con el pro-
ducto. La combinación del producto y de un carrito debe
moverse con cuidado. Las paradas repentinas, fuerza excesiva y las su-

Pagina 18 Naxa Electronics
percies desniveladas pueden generar que el producto y el carrito se
vuelquen.
9. Ventilación. Las ranuras y aberturas en la parte posterior y posterior
del gabinete son provistas para la ventilación y asegurar la buena op-
eración del producto y protegerlo del sobrecalentamiento. No deben
bloquearse o taparse estas aberturas, colocando el producto sobre
una cama, sofá alfombra u otra supercie similar. El producto no debe
colocarse cerca o sobre un radiador o fuentes de calor. Este producto
no debe colocarse en un librero o estante que impida el ujo del aire a
través de las ranuras de ventilación.
10. Fuentes de alimentación. Este producto debe ser operado solo con los
tipos de fuentes de alimentación indicados en la etiqueta de marcado,
si no está seguro del tipo de la fuente de poder de su casa, consultar
con su proveedor o con la compañía de electricidad local. Para producto
diseñados para operar con baterías u otras fuentes, referirse al manual
de operación.
11. Terminal de tierra y polarización. No eliminar la característica de segur-
idad de una clavija polarizada o clavija con terminal a tierra, esta es una
medida de seguridad. Una clavija polarizada cuanta con dos termina-
les con una terminal más ancha que la otra. Una clavija con terminal a
tierra cuenta con dos terminales con una tercera terminal con conexión
a tierra. Si la clavija no entra completamente en el tomacorriente, in-
tentar meterla nuevamente volteándola; si tampoco entra completa-
mente consultar a un electricista o personal calicado para reemplazar
el tomacorriente obsoleto.
12. Protección del cordón de alimentación. El cordón de alimentación debe
colocarse de forma tal que no exista probabilidad de pisarlo o apretarlo
sobre los lugares donde será colocado o contra el producto mismo.
Poner atención particular en el cordón, la clavija, el tomacorriente y en
los puntos en donde estos salen del producto.
13. Clavija con protección. Este producto puede contar con una clavija con
protección contra sobrecarga. Esta es una característica de seguridad.
Ver las instrucciones de operación para reemplazar o restablecer el
dispositivo de protección. Si requiere reemplazar la clavija, asegura-
rse que se use una clavija con protección contra sobrecarga original
y de las mismas características de acuerdo a lo especicado por el
fabricante.
14. Tormentas eléctricas o periodos sin uso. Desconectar este producto
del tomacorriente durante tormentas eléctricas o cuando va ser us-
ado por un periodo largo de tiempo para protegerlo. Esto protege al
producto de daños debido a los rayos o sobre líneas de poder.
15. Sobrecarga. No sobrecargar los tomacorrientes, cordones de ex-
tensión y los receptáculos ya que pueden generar riesgo de fuego o
choque eléctrico.
16. Entrada de objetos y líquidos. No introducir objetos de cualquier tipo
dentro de este producto a través de las ranuras o aberturas, estos
pueden llegar a tocar puntos de voltaje peligroso o salidas que pu-
eden resultar en riesgo de fuego o choque eléctrico. No derramar o
rociar cualquier tipo de líquido sobre las ranuras de ventilación del
producto.
17. Servicio. No intentar dar servicio usted mismo a este producto,
abriendo o removiendo las cubiertas, puede exponerse a voltajes
peligrosos u otros riesgos.
18. Daños que requieren servicio. Desconectar el producto del tomacor-
riente de pared y acudir a un centro de servicio autorizado o con per-
sonal calicado bajo las siguientes condiciones
• Cuando la clavija o el cordón de alimentación estén dañados.
• Cuando ha sido derramado liquido o han caído objetos en el
interior del producto.
• Si el producto ha sido expuesto a la lluvia o agua.

www.naxa.com Pagina 19
• Si el producto no opera adecuadamente siguiendo las instruc-
ciones de operación. Ajustar solo los controles que son indicados
en este manual de operación. El ajuste de otros controles puede
ocasionar daños y a menudo se requiere de trabajo excesivo
del servicio técnico para restablecer la operación normal del
producto.
• Si el producto se ha caído o golpeado o si la cubierta está dañada.
• Si el producto exhibe cambios en su funcionamiento normal.
Todo lo anterior indica la necesidad de darle servicio al producto.
19. Reemplazo de partes. Cuando es necesario el reemplazo de partes,
asegurarse que el servicio técnico use partes especicadas por el fab-
ricante o que tengan las mismas características que las partes origi-
nales. El reemplazo de partes no autorizadas puede resultar en fuego,
choque eléctrico u otros riesgos.
20. Vericar las medidas de seguridad. Una vez que se ha completado cu-
alquier tipo de servicio o reparación a este producto, solicitar al técni-
co de servicio que realice las pruebas de seguridad para poder deter-
minar que el producto está en condiciones apropiadas de operación.
21. Colocación en la pared o techo. El producto debe de colocarse en la
pared o techo de acuerdo a como lo especica el fabricante.
22. Calor. El producto debe colocarse lejos de fuentes de calor como ra-
diadores, registros de calor, estufas u otros productos que producen
calor (incluso amplicadores)
ADVERTENCIA
Este producto contiene plomo, una sustancia química que en algunos
países se conoce como causante de cáncer, defectos de nacimiento u
otros daños reproductivos. Lavarse las manos después de operarlo.
NOTICIA FCC
Este dispositivo cumple con la parte 15 de las reglas FCC. La operación
del aparato está sujeta a las dos siguientes condiciones: (1) Este aparato
no puede causar interferencia perjudicial y (2) este aparato debe aceptar
cualquier interferencia recibida, incluyendo interferencias que puedan
causar un funcionamiento no deseado.
Nota: Este dispositivo ha sido probado y cumple con las limitaciones de
un equipo digital Clase B, de acuerdo con la Parte 15 de las Normas FCC.
Estos límites están diseñados para permitir una protección razonable
contra interferencia dañina en una instalación residencial. Este equipo
genera, usa y puede emitir energía de frecuencia radial y, de no ser in-
stalado y utilizado de acuerdo con las instrucciones, puede causar in-
terferencia dañina a las comunicaciones radiales. Sin embargo, no existe
garantía de que la interferencia no pueda ocurrir en una instalación par-
ticular. Si este equipo causa una interferencia dañina a la recepción de la
radio o la televisión, lo cual se puede determinar encendiendo y apagando
el equipo, se recomienda al usuario tratar de corregir la interferencia me-
diante una o más de las siguientes medidas:
• Orientar nuevamente o reubicar la antena receptora.
• Aumentar la separación entre el equipo y el receptor.
• Conectar el equipo a una salida de un circuito diferente al receptor.
• Consultar a su proveedor o a un técnico de Radio y televisión.
PRECAUCION SOBRE MODIFICACIONES
Cualquier cambio o modicación no expresamente aprobada por la parte
responsable del cumplimiento puede anular la autoridad del usuario para
operar este reproductor.

Pagina 20 Naxa Electronics
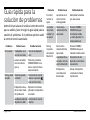
Guía rápida para la
solución de problemas
Antes de llevar la barra de sonido al centro de servicio
para su análisis, favor de seguir la guía rápida para la
solución de problemas. Si el problema persiste acudir
al centro de servicio autorizado.
Problema Posible Causa Posible Solucion
No enciende El adaptador ca/cc
no está conectado
Conectar el adaptador
ca/cc
La barra de sonido
esta en modo de
espera
Presionar y mantener
POWER/SOURCE en la
barra o control remoto
para encenderla
No hay salida
de audio
Volumen ajustado
al mínimo
Incrementar el nivel de
volumen o presionar
en el control remoto.
El dispositivo de au-
dio no está en modo
de reproducción
Reproducir la música o
película en el dispositivo
conectado
La salida de audio del
dispositivo es débil
Incrementar el nivel de
volumen
Problema Posible Causa Posible Solucion
El control
remoto no
opera
Las baterías en el
control remoto
están agotadas
Reemplazar la baterías
por unas nuevas
Los modos
de entrada
Auxiliar 1 y 2
no operan
Fuente selec-
cionada de forma
equivocada
Presionar POWER/
SOURCE hasta que
el indicador cambia
a violeta (Auxiliar 1) o
naranja (Auxilia 2)
No hay
respuesta
de la fuente
Bluetooth
Fuente selec-
cionada de forma
equivocada
Presionar POWER/
SOURCE hasta que el
indicador cambia a Azul
La unidad está co-
nectada a otro dis-
positivo Bluetooth
Desconectar el otro
dispositivo e intentarlo
nuevamente
El dispositivo
conectado está
desactivado
Activar el dispositivo
conectado e iniciar la
reproducción

www.naxa.com Pagina 21
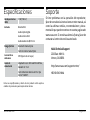
Especicaciones
Salida para bocinas
(RMS)
10 W (5 W x 2)
Entradas
Bluetooth®
Audio óptico digital
Audio estéreo RCA
Audio Auxiliar de Ø 3.5 mm
Rango efectivo Bluetooth: Hasta 32 pies
Control remoto: hasta 16 pies
Características
adicionales
NFC (Ajuste de un toque)
Fuente de
alimentación
Adaptador ca/cc: Entrada 100-240 Vca,
Salida 9 Vcc 1.5 A
Control Remoto: Batería de 3 Vcc tipo
botón “CR2025”.
Nota: Las especicaciones y diseño de este producto están sujetos a
cambios sin previo aviso para mejoras de los mismos.
Soporte
Si tiene problemas con la operación del reproductor,
favor de consultar las instrucciones en este manual, asi
como las ultimas noticias, recomendaciones y docu-
mentación que puede encontrar en nuestra pagina web
www.naxa.com. Si necesita asistencia futura, favor de
contactar al centro de servicio autorizado.
NAXA Technical Support
2320 East 49th St.
Vernon, CA 90058
http://www.naxa.com/supportcenter/
HECHO EN CHINA

-
 1
1
-
 2
2
-
 3
3
-
 4
4
-
 5
5
-
 6
6
-
 7
7
-
 8
8
-
 9
9
-
 10
10
-
 11
11
-
 12
12
-
 13
13
-
 14
14
-
 15
15
-
 16
16
-
 17
17
-
 18
18
-
 19
19
-
 20
20
-
 21
21
-
 22
22
-
 23
23
-
 24
24
-
 25
25
-
 26
26
-
 27
27
-
 28
28
-
 29
29
-
 30
30
-
 31
31
-
 32
32
-
 33
33
-
 34
34
-
 35
35
-
 36
36
-
 37
37
-
 38
38
-
 39
39
-
 40
40
-
 41
41
-
 42
42
-
 43
43
-
 44
44


en otros idiomas
- English: Naxa NHS-2011 Owner's manual
Artículos relacionados
-
Naxa NHS-2012 El manual del propietario
-
Naxa NHS-2007 El manual del propietario
-
Naxa NHS-2012A El manual del propietario
-
-
Naxa NDL-256 El manual del propietario
-
Naxa NPB-262 El manual del propietario
-
Naxa NPB-273 El manual del propietario
-
-
Naxa NAS-5003 El manual del propietario
-