Naxa NPB-273 El manual del propietario
- Categoría
- Reproductores de CD
- Tipo
- El manual del propietario
Este manual también es adecuado para

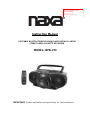
PORTABLE BLUETOOTH/MP3/CD/USB PLAYER WITH PLL AM/FM
STEREO RADIO CASSETTE RECORDER
THENEWGENERATION
IN
TECHNOLOGY
Instruction Manual
MODEL: NPB-273
IMPORTANT: Please read before using and keep for future reference.
17240-CD009BT
P/N.:227-009BTBN17-012L9
SIZE:120X175MM
70G
40 20 ,

2
Thank You
We know you have many choices when it comes to technology; thank
you for choosing us here at Naxa Electronics, Inc. Established in 2001 in
Los Angeles, California, we are dedicated to delivering products that en-
tertain and delight.
We trust that you will be happy with your purchase. Please read this
manual carefully and save it for reference. You may also find the latest
FAQ, documentation, and other product material at our website. Come
visit us on the web at www.naxa.com and see all that we have to offer!
In the Box
Please take a moment to make sure that you have everything in the list
below. Although we make every effort to ensure that each Naxa device is
securely packed and sealed, we know a lot can happen in between us
and you. If anything is missing, check back with your local retailer to get
immediate assistance. If they cannot help you, please contact our Naxa
Support team atwww.naxa.com/naxa_support.
• NPB-273 Portable CD/MP3/Radio/Cassette/Bluetooth Player
• AC power cord
• Remote Control
• User’s Manual
Support
If you have problems with your device, please consult the instructions in
this manual. Please also visit us on the web at www.naxa.com to get up
to the minute news, alerts, and documentation for your device. For
additional assistance, please contact Naxa Technical Support.
NAXA Technical Support
2320 East 49
th
St.
Vernon, CA 90058
Toll Free: (866) 411-6292
http://www.naxa.com/supportcenter/

3
Table of Contents
Thank You
........................................................................................................................... 2
In the Box .......................................................................................................2
Warnings and Precautions .............................................................................4
Important Safety Information ..........................................................................5
LOCATION AND CONTROLS .......................................................................9
FEATURES AND CONTROLS .....................................................................10
LOADING THE BATTERIES INTO THE REMOTE HANDSET .....................10
REMOTE CONTROL OPERATION .............................................................11
POWER SOURCE .......................................................................................11
AC/DC OPERATION ...............................................................................11
BASIC FUNCTIONS ....................................................................................11
Turning on the unit ..................................................................................11
Volume adjusting.....................................................................................11
Bass Boost System .................................................................................12
AUX in Operation ....................................................................................12
USING THE RADIO .....................................................................................12
Tuning Radio Stations .............................................................................12
Radio Station Memory Operation ............................................................12
USING THE CASSETTE ..............................................................................13
Playing the Cassette ...............................................................................13
CD/MP3/USB Recording ..............................................................................15
USING THE CD/MP3 ...................................................................................15
Discs for Playback ...................................................................................15
Loading a Disc ........................................................................................15
Playing a Disc .........................................................................................15
Selecting a Desired Track/Passage .............................................................16
Program Tracks.......................................................................................16
To Erase the Memory (Program) .............................................................17
Repeat ....................................................................................................17
Random Play ...............................................................................................17
LISTENING TO USB PLAYBACK ................................................................17
BLUETOOTH OPERATION .........................................................................18
SPECIFICATIONS .......................................................................................18

4
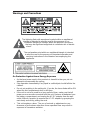
Warnings and Precautions
The lightning flash with arrowhead symbol within an equilateral
triangle is intended to alert the user to the presence of un
insulated “dangerous voltage” within the product’s enclosure
that may be significant magnitude to constitute risk of electric
shock.
The exclamation point within an equilateral triangle is intended
to alert the user to the presence of important operation and
servicing instructions in the literature accompanying the
appliance.
On Protection Against Laser Energy Exposure
• As the laser beam used in this products is harmful to the eyes, do not
attempt to disassemble the casing.
• Stop operation immediately if any liquid or solid object should fall into the
cabinet.
• Do not put anything in the safety slot. If you do, the laser diode will be ON
when the disc compartment door is still open.
• If the unit is not to be used for a long period of time, make sure that all
power sources are disconnected from the unit. Remove all batteries from
the battery compartment, and unplug the AC-DC adapter from the wall
outlet. Make it a practice to remove the AC-DC adapter by grasping the
main body and not by pulling the cord.
• This unit employs a laser. The use of controls or adjustment or per-
formance of procedures other than those specified here may result in
exposure to hazardous radiation.

5
Caution
• Do not block the ventilation openings or holes.
• Do not place any naked flames (such as lighted candles) on the apparatus.
• When discarding batteries, follow all local rules and laws governing the
disposal of batteries. Consider the environmental impact of your actions!
• Invisible laser radiation when open and interlock has failed or been
defeated. Avoid direct exposure to beam.
• To prevent fire or shock hazard, do not expose this appliance to rain or
moisture.
Important Safety Information
1. Read Instructions: All the safety and operating instructions should be read
before the product is operated.
2. Retain Instructions: The safety and operating instruction should be
retained for future reference.
3. Heed Warnings: All warnings on the product and in the operating in-
structions should be adhered to.
4. Follow Instructions: All operating and usage instructions should be
followed.
5. Cleaning: Unplug this product from the wall outlet before cleaning. Do not
use liquid cleaners or aerosol cleaners. Use a damp cloth for cleaning.
6. Attachments: Use only attachments recommended by the manufacturer.
Use of other attachments may be hazardous.
7. Water and Moisture: Do not use this product near water (e.g., near a
bathtub, washbowl, kitchen sink, laundry tub, in wet basements, or near a
swimming pool and the like).
8. Accessories: Do not place this product on an unstable cart, stand, tripod,
bracket, or table. Use only with carts, stands, tripods, brackets, or tables
recommended by the
manufacturer or sold with the product. Any mounting of the
product should
follow the manufacturer’s instructions and should use a
mounting accessory
recommended by the manufacturer. A product and cart combination should
be moved with care. Quick stops, excessive force, and uneven surfaces
may
cause the product and cart combination to overturn.
9. Ventilation: Slots and openings in the cabinet are provided for ventilation to
ensure reliable operation of the product and to protect it from overheating.
These openings should never be blocked by placing the product on a bed,
sofa, rug, or other similar surface. This product should not be placed in a
built-in installation such as a bookcase or rack unless proper ventilation is
provided or the manufacturer instructions have been adhered to.

6
10. Power Sources: This product should be operated only from the type of
power source indicated on the rating label. If you are not sure of the type of
power supply to your home, consult your product dealer or local power
company. For products intended to operate from battery power or other
sources, refer to the operating instructions.
11. Grounding or Polarization: This product may be equipped with a polarized
alternating-current line plug that has one blade wider than the other. This
plug will only fit into the power outlet in one direction. This is a safety
feature. If you are unable to insert the plug fully into the outlet, try reversing
the direction of the plug. If the plug should still fail to fit, contact an
electrician to replace the obsolete outlet. Do not defeat the safety purpose
of the polarized plug.
12. Power-Cord Protection: Power supply cords should be routed so that they
are not likely to be walked on or pinched by items placed upon or against
them, paying particular attention to cords at plugs, convenience
receptacles, and at the point which they exit from the product.
13. Protective Attachment Plug: The product may be equipped with an at-
tachment plug with overload protection. This is a safety feature. See the
operating instructions for replacement or directions to reset the protective
device. If replacement of the plug is required, be sure the service
technician has used a replacement plug that has the same overload
protection as the original plug as specified by the manufacturer.
14. Outdoor Antenna Grounding: If an outside antenna is connected to the
product, be sure the antenna system is grounded so as to provide some
protection against voltage surges and built-up static charges. Article 810 of
the National Electrical Code, ANS/NFPA70 provides information with
regard to proper grounding of the mast and supporting structure, grounding
of the lead-in wire to an antenna-discharge unit, size of grounding
conductors, location of antenna-discharge unit, connection to grounding
electrodes, and requirements for the grounding electrode (see figure).
15. Lightning: For added protection for this product, unplug it from the wall
outlet and disconnect the antenna or cable system during a lightning storm
or when it is left unattended and unused for long periods of time. This will
prevent damage to the product due to lightning or power-line surges.
16. Power Lines: An outside antenna system should not be located in the
vicinity of overhead power lines or other electric light or power circuits, or
where it can fall into such power lines or circuits. When installing an

7
outside antenna system, extreme care should be taken to keep from
touching such power lines or circuits, as contact with them might be fatal.
17. Overloading: Do not overload wall outlets, extension cords, or integral
convenience receptacles as this can result in a risk of fire or electric shock.
18. Object and Liquid Entry: Never push objects of any kind into this product
through openings as they may touch dangerous voltage points or shout-
out parts that could result in a fire or electric shock. Never spill liquid of any
kind on the product.
19. Servicing: Do not attempt to service this product yourself as opening or
removing covers may expose you to dangerous voltage or other hazards.
Refer all servicing to qualified service personnel.
20. Damage Requiring Service: Unplug this product from the wall outlet and
refer servicing to qualified service personnel under the following conditions:
a) when the power-supply or plug is damaged; b) if liquid has been spilled
or if objects have fallen into the product; c) if the product has been
exposed to rain or water; d) if the product does not operate normally by
following the operating instructions. Adjust only those controls that are
covered by the operating instructions as improper adjustment of other
controls may result in damage and will often require extensive work by a
qualified technician to restore the product to its normal operation; e) if the
product has been dropped or damaged in any way; f) when the product
exhibits a distinct change in performance—this indicates a need for service.
21. Replacement Parts: When replacement parts are required, be sure that
your service technician has used replacement parts specified by the
manufacturer or have the same characteristics as the original part.
Unauthorized substitutions may result in fire, electric shock, or other
hazards.
22. Safety Check: Upon completion of any service or repairs to this product,
ask the service technician to perform safety checks to ensure that the
product is in proper operating condition.
23. Wall or Ceiling Mounting: The product should be mounted to a wall or
ceiling only as recommended by the manufacturer.
24. Heat: The product should be situated away from heat sources such as
radiators, heat registers, stoves, or other products (including amplifiers)
that produce heat.
FCC NOTICE
This device complies with Part 15 of the FCC Rules. Operation is subject to the
following two conditions: (1) this device may not cause harmful interference,
and (2) this device must accept any interference received, including interference
that may cause undesired operation.
Note: This equipment has been tested and found to comply with the limits for a
Class B digital device, pursuant to Part 15 of the FCC Rules. These limits are
designed to provide reasonable protection against harmful interference in a
residential installation. This equipment generates uses and can radiate radio
frequency energy and, if not installed and used in accordance with the

8
instructions, may cause harmful interference to radio communications. However,
there is no guarantee that interference will not occur in a particular installation. If
this equipment does cause harmful interference to radio or television reception,
which can be determined by turning the equipment off and on, the user is
encouraged to try to correct the interference by one or more of the following
measures:
• Reorient or relocate the receiving antenna.
• Increase the separation between the equipment and receiver.
• Connect the equipment into an outlet on a circuit different from that to
which the receiver is connected.
• Consult the dealer or an experienced radio/TV technician for help.
CAUTION ON MODIFICATIONS
Any changes or modifications not expressly approved by the grantee of this
device may void the authority granted by the FCC to operate the equipment.
WARNING
This product contains lead, a chemical known to the State of California to cause
cancer and birth defects or other reproductive harm. Wash hands after
handling.

9
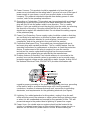
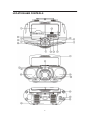
LOCATION AND CONTROLS

10
FEATURES AND CONTROLS
1. FOLDING HANDLE 15. SPEAKERS(L&R)
2. CD COMPARTMENT 16. CASSETTE FUNCTION KEYS
3. STANDBY/FUNCTION BUTTON
(RECORD
-PLAY-REWIND -FAST
4. BACK/TUN.- BUTTON FORWARD -STOP/EJECT -
PAUSE)
5. CD STOP BUTTON 17. CASSETTE COMPARTMENT
6. LCD DISPLAY 18. FM TELESCOPIC ANTENNA
7. CD PLAY/PAUSE/PAIR BUTTON 19. AC VOLTAGE SELECTOR
8.
EXT/TUN.+ BUTTON
(optional for dual voltage)
9. VOL.- BUTTON 20. BATTERY DOOR
10. BASS BUTTON 21. AC SOCKET
11. CD DOOR PUSH OPEN/CLOSE 22. POWER DRIVE WOOFER
12. VOL.+ BUTTON 23. AUX IN JACK
13. STANDBY INDICATOR 24. USB PORT
14. REMOTE SENSOR
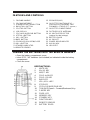
LOADING THE BATTERIES INTO THE REMOTE HANDSET
• Open the battery compartment cover.
• Insert 2PCS “AA” batteries (not included) as indicated inside the battery
compartment.
• Close the cover.
KEYFUNCTIONS:
1. MUTE KEY
2. M+ / M- KEY
3. MO/ST. KEY
4. FOLD.+/+10 KEY
5. FOLD.-/-10 KEY
6. BASS KEY
7. VOL.-/VOL.+ KEY
8. STOP KEY
9. CD PLAY/PAUSE/PAIR KEY
10. TUN./SKIP(Search - Forward/Backward) Key
11. P-MODE KEY
12. PROG. KEY
13. MEMORY KEY
14. STANDBY KEY
15. FUNCTION KEY
16. REMOTE SENSOR
17. BATTERY DOOR

11
REMOTE CONTROL OPERATION
To operate the unit with the remote control, point
the remote handset at the remote sensor on the
front panel and press the appropriate button on the
remote handset.
The remote works best within a range of 6 ~ 7
meters from the front panel and on an angle of 30
degrees. Bright sunlight or room light conditions can
interfere with the remote control. If the remote
operation is unsatisfactory or stops working entirely,
first try replacing the remote batteries, then try
reducing the room lighting conditions.
POWER SOURCE
This unit is designed to be operated on AC/DC.
AC
Operation
Plug the smaller end of AC power cord into AC jack on unit and the other
bigger end into household AC wall outlet. The batteries will be automatically
disconnected. For dual voltage version, make sure that the AC VOLTAGES
ELECTOR is switched to your local voltage.
DC Operation
Open the BATTERY COMPARTMENT DOOR. Install 8 pcs UM-1/D size
batteries (not included) into compartment. Please follow correct polarities as
indicated.
CAUTION
Remove batteries if they are exhausted or not being used for a long time.
Batteries contain chemical substances, so they should be disposed of properly.
BASIC FUNCTION
Turning on the unit
Press the STANDBY/FUNCTION button on unit or press the STANDBY key on
remote control, then press the STANDBY/FUNCTION button on unit or
FUNCTION key on remote control to choose FM or AM or BT or TAP or CD or
USB mode.
Volume adjusting
Press the electronic VOLUME UP/DOWN button on unit or on remote control
to increase or decrease volume.
Press MUTE button on remote control to turn off the sound. Press again to turn
on.

12
Bass Boost System
The BASS button controls the bass of the unit. Bass sound is the lower
frequency ranges of sound. The button can be pushed to OFF or ON mode,
When the BASS is on, the unit boosts (increases) the sound output of the bass
frequencies.
AUX IN Operation
This unit has provided an AUX-IN jack, through this jack other audio sources
can be connected.
1. Press the STANDBY/FUNCTION button on unit or FUNCTION key on
remote control to BT.
2. Connect the audio cable into the AUX-IN jack and the other end connect to
the AUDIO OUT jack of the external audio source. The unit will change to
AUX mode automatically.
3. Adjust the volume of the main unit. Press PLAY of the external audio
source (eg. MP3 player) to start playback.
USING THE RADIO
Tuning Radio Stations
1. Press the STANDBY/FUNCTION button on unit or FUNCTION key on
remote control to select FM or AM mode.
2. Tune to desired station by pressing the “NEXT/TUN.+“ or “BACK/TUN.-
“ button on unit or pressing the TUN./SKIP SEARCH
FORWARD/BACKWARD key on remote control, “STEREO” will show on
the display if receive stereo stations.
3. Press the VOLUME UP/DOWN button on unit or remote control to desired
volume level.
4. Extend FM TELESCOPIC ANTENNA to its full length if you are listening to
FM broadcasting. Gently move the unit back and forth to get the best
reception when you are listening to AM program, or place the unit in an
open location.
Note: The radio function is initially set at ST mode, if the broadcasting program
is too noisy when you are listening to FM stereo station, press MO/ST. button on
remote to switch to MONO FM. When you are receiving FM stereo program,
the display will show “STEREO”
5. To turn off the radio, press the STANDBY/FUNCTION button on unit or
FUNTION key on remote control to choose the other functions or press
STANDBY button to turn off the unit.
Radio Station Memory Operation
You may pre-store 30 (AM and FM) radio stations in memory for your preference,
so as you can listen to your desired station directly and quickly, no need to tune
and search every time.
1. Press the STANDBY/FUNCTION button on unit or the FUNCTION key on
remote control to select band (AM or FM), Tune into a station.

13
2. Press MEMORY button on remote, “P01” will flash on the display. Then
press the “NEXT/TUN.+“ or “BACK/TUN.-“ button on unit or press the
TUN./SKIP SEARCH FORWARD/BACKWARD key on remote control to
select the first desired station.
3. Press the M+ or M- key on remote to choose the desired sequence you
want to store, and then press MEMORY key on remote control again to
enter.
4. Search another station, repeat steps (2) & (3) until all desired stations
stored. Up to 30 stations can be programmed (10 for AM and 20 for FM).
5. Press the M+ or M- key on remote to listen to the stored station directly.
USING THE CASSETTE
Understanding the Buttons
RECORD
- Press to record from the radio or CD/MP3/USB/AUX/BT player.
PLAY
- Press to play cassettes.
REWIND - From stop mode, press to rewind the tape toward the beginning.
F.FWD
- From stop mode, press to advance the tape toward the end.
STOP/EJ
. - Press to stop current tape activity or to open the cassette
compartment door when no buttons are active.
PAUSE
- Press to interrupt tape play or record mode. Press the second time to
resume tape play or tape record mode.
Playing a Cassette Tape
1. Press the STANDBY/FUNCTION button on unit or the FUNCTION key on
remote to TAP.
2. Press STOP/EJ. button to open the cassette compartment door.
3. Insert cassette tape into the player with the open edge facing up and the
full reel on the right.
4. Close the door securely.
5. Press REWIND or F.FWD to move tape to the desired starting point.
6. Press PLAY button to begin playing the tape.
7. Adjust the volume to your desired listening level.
Automatic Stop Feature
When the cassette deck is operating in play or record mode and the end of the
tape is reached, the unit automatically shuts itself off and returns all buttons to
the off position.
Types of Cassettes
Use only good quality cassettes (IEC TYPE 1) for making recordings. May be
used to replay other types of cassette but is unable to make proper recording
on these more specialized tapes.
The use of C120 cassettes is NOT recommended in this machine.

14
Protecting Recording
Normally, anything recorded on the tape is automatically erased when new
recording is made. It is possible to protect your recording from accidental
erasure by removing the tabs found on the rear of the cassette.
When the cassette is held with the recorded side upper-most and exposed
tape facing the front, the protective tab will be found on the left rear of the
cassette.
All pre-recorded cassette are protected in this way to prevent accidental
erasure of the commercial recording. “Protected” cassette will prevent the
record button from being operated. If at any time you attempt to record and
find that this button will not depress, never force the mechanism or it may be
damaged. Check that a cassette has been loaded and that tab has not been
removed. Recording on a cassette from which the tabs have been removed
can be done by covering the tab openings with a piece of adhesive tape.
Care of a Cassette Mechanism
Gently clean the tape head and pinch wheel/capstan assemblies after every
10 hours of using the unit. A range of cassette care products are available.
The erase head and record/play head and the surface of the pinch roller are
delicate and must not be touched with metal objects such as screwdrivers.
You may find it easier to clean the assembly by pressing the PLAY button to
bright head and pinch roller into view. Be sure to press the STOP button after
cleaning the mechanism.
Damage to the pinch wheel can occur if the unit is left in PLAY mode with the
power switch off. Under no circum stances should you attempt to lubricate any
part of the machine.
Recording from the Radio
1. Load a blank tape into the tape compartment and close the door.
2. Press the STANDBY/FUNCTION button on unit or the FUNCTION key
on remote to AM or FM mode. Tune to required station by rotating the
TUNING KNOB.
3. Press RECORD key to begin recording. The RECORD key and PLAY
key go down simultaneously.
4. Press STOP/EJ. key to end recording.
5. To hear what you recorded, follow instructions in PLAYING A CASSETTE
TAPE.

15
NOTE: PAUSE FOR A MOMENT - Using the PAUSE key on the cassette deck
instead of the
STOP/EJ.keytomomentarilyinterruptrecordinggivesyouamuchclearrecording.
Radio Recording Tips
To temporarily pause the recording, press PAUSE key on the cassette deck.
Press PAUSE key again to resume recording.
CD/MP3/USB Recording
A. Install a blank tape into cassette compartment.
B. Press the STANDBY/FUNCTION button on unit or the FUNCTION key on
remote to CD or USB mode. Load a disc into the disc compartment or
insert a USB bar into the USB slot, start playback by pressing the CD
PLAY/PAUSE/PAIR button.
C. Press the RECORD BUTTON and PLAY BUTTON simultaneously to start
recording. Press the STOP/EJ BUTTON lightly to end recording, or the
unit will stop recording automatically while the tape reaches its end.
D. To listen to the recording, press FUNCTION button to select “TAP” playing
mode, then start tape playback.
USING THE CD/MP3
Discs for Playback
This system can playback all digital audio CD, MP3 finalized digital audio CD-
Recordable (CD-R) discs, finalized digital audio CD-Rewritable (CD-RW) discs
and CD-DA format digital audio CD/CD-R/CD-RW discs.
Loading a Disc
1. Press the STANDBY/FUNCTION button on unit or the FUNCTION key
on remote to CD mode.
2. Open the CD door. “OP” will be shown on the display.
3. Place an audio CD/MP3 into the tray with the label side facing up.
4. Close the CD door. The total number of tracks and the disc type will
appear on the display after several seconds.
5. To remove the CD, press CD door PUSH OPEN/CLOSE to open CD
compartment lid, grasp the CD by its edges, and carefully take it out.
Note:
To ensure good system performance, wait until the disc tray completely reads
the disc before proceeding.
If no disc loaded into the compartment or the disc is place upside down or
unreadable, the display will show “NO”.
Playing a Disc
1. The playback starts from track 1 automatically when reading the disc.
2. To pause playback, press PLAY/PAUSE/PAIR button on unit or on
remote. The current playing track no. will flash on the display.

16
3. To resume playback, press PLAY/PAUSE/PAIR button on unit or on
remote again.
4. To stop playback, press STOP button on unit or on remote, the total
number of tracks.
Selecting a Desired Track/Passage
To select a desired track
Press the NEXT/TUN.+ or BACK/TUN.- button on unit or the TUN./SKIP
SEARCH FORWARD/BACWARD on remote respectively in stop mode or
during playing until the desired track appears on the display. Press the
PLAY/PAUSE/PAIR button on unit or on remote to start play.
To search for a particular passage during playback (track scanning at
high speed)
Press and hold the NEXT/TUN.+ or BACK/TUN.- button on unit or the
TUN./SKIP SEARCH FORWARD/BACWARD on remote to scan the current
playing track at high speed until desired point (passage) appears, then
release the button for normal playback mode. Playback will start again from
this point.
To select a song which track number exceeds 10
(for MP3 disc only)
To select a song/track which number exceeds 10, press the FOLD.+/+10 or
FOLD.-/-10 key on the remote control each time to skip forward or backward
10 tracks, then press the NEXT/TUN.+ or BACK/TUN.- button on unit or the
TUN./SKIP SEARCH FORWARD/BACWARD on remote to select desired track.
For example: to select the 17
th
track from the 1
st
track, press FOLD.+/+10 key
on remote, and then press the NEXT/TUN.+ button on unit or the TUN./SKIP
SEARCH FORWARD key on remote six times immediately.
To select a desired folder (for an MP3 disc that contains more than one
folder)
To select a desired folder during playback, press and hold the FOLD.+/+10 or
FOLD.-/-10 key on remote control to next/previous folder.
Program Tracks
Programming tracks of disc are possible when playback is stopped. Up to CD
20 tracks /MP3 99 tracks can be stored in the memory in any order.
1. In stop mode, press the PROG. Key on remote, the “P” will flash and the
P01 indicator will be on.
2. Press the NEXT/TUN.+ button on unit or the TUN./SKIP SEARCH
FORWARD on remote to select the first desired track to be programmed.
3. Press the PROG. Key on remote to enter. The display
changes to show P02.
4. Repeat steps 2 & 3 to store other desired tracks until all
tracks are programmed.
5. Press the PLAY/PAUSE/PAIR button to start playback from the
first programmed track.
6. Press the STOP button to stop program playback.

17
To Erase the Memory (Program)
To clear the program, you have two options:
1. Press the STOP button twice to erase the memory, or
2. Open the CD compartment lid, program will be erased.
Repeat
You can play one track or all tracks on the disc repeatedly.
To Repeat a Single Track
1. Press the P-MODE key on remote control once in play “
“ shows
steadily on the display. The current track will be played over and over
again till you press the STOP button.
2. To cancel repeat play, press P-MODE key on remote till the "
"
disappears from display.
To repeat all the Tracks
1. Press P-MODE key on remote control till the " " shows steadily on the
display, all tracks on the disc will be played over and over again till you
press the STOP button.
2. To cancel repeat play, press the P-MODE key on remote till the“
“ disappears from the display.
To repeat current Directory (for MP3 only)
1. Press P-MODE key on remote control till “ FOLDER” shows steadily on
the display, the current directory will be played repeatedly until the STOP
button is pressed.
2. To cancel repeat play, press the P-MODE key on the remote till the “
FOLDER” disappears from the display.
Random Play
Press the P-MODE key on remote in play mode till the “RAND” shows steadily
on the display, the random play will start from next track automatically or press
CD skip forward button, until all tracks are played over and then stop. Press
the P-MODE key on remote once to cancel.
LISTENING TO USB PLAYBACK
1. Press the STANDBY/FUNCTION button on unit or the FUNCTION key on
remote to USB mode.
2. Connect the USB to the USB INPUT. The LCD will show the total number
of tracks stored in the USB. The playback stars from track 1 automatically
after reading the USB.
3. Press the STOP button on unit or on remote to stop playing. The display
will show total number of USB and STOP.
4. Proceed repeat play (repeat 1- repeat folder - repeat all)/program play/skip

18
up and back operation as the same described in above
“CD/MP3OPERATION”.
CAUTION:
• Do not use any USB extension cable for connecting the USB bar which
may cause harmful interference
BLUETOOTH OPERATION
1. Press the STANDBY/FUNCTION button to select the BLUETOOTH
function, the LCD will flash “bt”, after connecting, “bt” will display on the
LCD steadily.
2. Turn on the Bluetooth function on the device, scan the unit “NAXA
NPB-273” and connect, input the pass
word 0000 if required, then press
Play to start playback.
3. Press the NEXT/TUN.+ or BACK/TUN.- button to choose the desired
tracks.
4. Press the VOL.+/- button to adjust the volume to your desired level.
5. Press and hold the PLAY/PAUSE/PAIR button to disconnect Bluetooth.
SPECIFICATIONS
GENERAL
Power Requirement AC 110/220V ~60/50Hz
DC 12V UM-1 x 8 PCS
Remote Handset DC 3V 2 x UM-3 size batteries
Power consumption 35Watts
Dimensions 460mm (L) x 200mm (H) x342mm(W)
Operation temperature +5° C - + 35°C
RECEIVER SECTION
Receiving Bands AM /FM ST.
Tuning Range AM 520 - 1710KHz
FM 87.5 -108 MHz
COMPACT DISC SECTION
Optical Pickup 3-Beam Laser Frequency
Response 100Hz –16KHz
CASSETTESECTION
Recording System 2 Tracks 2channel (Stereo)
Biasing System DC bias
Frequency Response 125 –6.3 KHz
Wow and Flutter 0.35 %WRMS (JIS)

19
AUDIOSECTION
Power output Max. 5 Wattsx2
Woofer Power output Max. 10Watts
ACCESSORIES
Instruction Booklet 1
Remote Sensor 1
AC Cord 1
Note: Product is improved continuously. We reserve the right to modify
the product and specifications without prior notice.


THE NEW GENERATION IN TECHNOLOGY
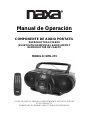
Manual de Operación
COMPONENTE DE AUDIO PORTATIL
REPRODUCTOR ESTEREO
(BLUETOOTH/CD/MP3/USB), RADIO AM/FM Y
REPRODUCTOR DE CASETE
MODELO: NPB-273
FAVOR DE LEER EL MANUAL COMPLETAMENTE ANTES DE OPERAR
ESTE PRODUCTO.
CONSERVAR EL MANUAL PARA FUTURAS REFERENCIAS.

2
Agradecimiento
Sabemos que usted tiene muchas opciones cuando se trata de tecnología;
gracias por elegir los productos de Naxa Electronics, Inc. Fundada en 2001 en
Los Ángeles, California, estamos dedicados a ofrecer productos que
entretienen y satisfacen sus necesidades.
Confiamos en que usted será feliz con su compra. Favor, de leer atentamente
este manual y guárdelo para futura referencia. Usted también puede encontrar
las preguntas más frecuentes, documentación y otro material del producto en
nuestro sitio web. Venga a visitarnos en www.naxa.com y ver todo lo que
tenemos para ofrecer
Contenido en el empaque
Favor de tomar unos momentos para asegurarse de que se tiene todo lo que
se enlista abajo. Aunque hacemos todo lo posible para asegurarnos de que
cada dispositivo Naxa esté bien empacado y sellado, sabemos que pueden
pasar muchas cosas durante el empacado y transporte. Si falta algún
componente, acudir inmediatamente con el proveedor para obtener asistencia
inmediata. Favor de contactar al equipo de soporte naxa en
www.naxa.com/naxa_support
• Componente de Audio Portátil NPB-273
• Cordón de Alimentación
• Control Remoto
• Manual de Operación

3
Índice
Agradecimiento 2
Contenido en el empaque 2
Advertencias y Precauciones 4
Importante Información de Seguridad 5
Descripción de Partes 8
Control Remoto 9
Instalación de las baterías 9
Descripción de partes 9
Operación del Control Remoto 10
Fuente de alimentación 10
Operación con Vca 10
Operación con Vcc 10
Funciones Básicas 10
Encender el Sistema 10
Control de Volumen 10
Sistema de Sonidos Bajos 10
Operación de la Entrada Auxiliar 10
Operación del Radio 11
Sintonizando una Estaciones de Radio 11
Almacenamiento Manual de las Estaciones en Memoria 11
Operación del Casete 11
Función de los Botones del Casete 11
Reproducción del Casete 11
Grabación de un casete 13
Operación del CD/MP3 13
Discos Reproducibles 13
Cargando un Disco 13
Reproducción de un Disco 13
Seleccionando una Pista / Punto Especifico 13
Programar Reproducción 14
Borrar Programa de Memoria 14
Repetir Reproducción 14
Reproducción Aleatoria 15
Reproducción de una Memoria USB 15
Operación Bluetooth 15
Especificaciones 16

4
Advertencias y Precauciones
PRECAUCION: PARA REDUCIR EL RIESGO DE
CHOQUE ELÉCTRICO NO REMOVER LA CUBIERTA
(O TAPA), DENTRO DE ESTE PRODUCTO NO HAY
PARTES QUE EL USUARIO PUEDA DARLE
SERVICIO, ACUDIR A UN CENTRO DE SERVICIO
AUTORIZADO O CON PERSONAL CALIFICADO.
El símbolo del relámpago con punta de flecha dentro de un
triángulo, es diseñado para advertir al usuario de “voltajes
peligrosos” no aislados dentro del Producto que pueden ser de
magnitud suficiente para constituir riesgo de fuego o choque
eléctrico para las persona.
El símbolo de exclamación dentro de un triángulo, es para alertar
al usuario de la presencia de instrucciones importantes de
operación, mantenimiento y servicio que se encuentran dentro de
este instructivo
Protección Contra la Exposición al Rayo Láser
• El rayo láser usado en estos productos es dañino a los ojos, no desensamblar el
producto.
• Detener la operación inmediatamente si cae en el interior del producto cualquier
líquido u objeto sólido.
• No presionar cualquier objeto en la ranura de seguridad del láser. Si hace esto, el
diodo láser se ACTIVA aun cuando la tapa del compartimiento del disco permanece
abierta.
• Si el producto no va ser usado por un periodo largo de tiempo, desconectar la fuente
de alimentación del producto. Remover las baterías del compartimiento y
desconectar el cordón de alimentación del tomacorriente. Remover el cordón de
alimentación, sujetándolo de la clavija, nunca removerlo jalando del cordón mismo.
• Este producto utiliza un lente láser. El uso de controles, ajustes o procedimientos
diferentes a los especificados en el manual, pueden resultar en exposición a
radiación laser peligrosa.

5
Precaución
• No bloquear las ranuras o aberturas de ventilación.
• No colocar ningún objeto generador de flama (como velas, veladoras, etc.) encima
del producto.
• Cuando las baterías se agoten, favor de seguir las leyes de su localidad para la
disposición de los desechos sólidos para evitar daños al medio ambiente.
¡Considerar el impacto en el medio ambiente de sus acciones!
• Radiación láser invisible al abrir el compartimiento del disco compacto y los seguros
fallen o son eliminados. Evitar la exposición directa al lente láser.
• Para prevenir riesgo de fuego o choque eléctrico, no exponer este producto a la
lluvia, goteo, salpicadura de agua o humedad
Importante Información de Seguridad
1. Leer las instrucciones – Deben leerse todas las instrucciones de operación y de
seguridad antes de operar este producto.
2. Conservar las instrucciones – Deben conservarse las instrucciones de operación y
seguridad para futuras referencias.
3. Poner atención a las advertencias – Todas las advertencias en el producto y las
instrucciones de operación y seguridad deben de respetarse.
4. Seguir las instrucciones – Deben seguirse todas las instrucciones de uso y
operación.
5. Limpieza – Desconectar el producto del tomacorriente antes de darle
mantenimiento o limpieza. No usar limpiadores líquidos o en aerosol. Para limpiar
el producto usar una tela suave, limpia y seca. Para manchas fuertes humedecer la
tela con una solución de agua y jabón neutro.
6. Accesorios – Usar solo accesorios o refacciones recomendados por el fabricante.
El uso de otros accesorios puede resultar peligroso.
7. Agua y humedad – No usar este Producto cerca del agua, por ejemplo cerca de
una bañera, lavabo, fregadero de cocina o de lavar, sótanos húmedos o cerca de
una piscina.
8. Manejo y desplazamiento – No colocar este Producto en un carrito, plataforma,
repisa o mesa inestables, el Producto puede caerse generando
serias lesiones y daños a las personas y/o al Producto.
Usar este Producto solo con el carrito, plataforma, repisa o mesa
recomendado por el fabricante o vendido con el Producto. La
combinación del Producto y de un carrito debe moverse con
cuidado. Las paradas repentinas, fuerza excesiva y las superficies desniveladas
pueden generar que el Producto y el carrito se vuelquen.
9. Ventilación – Las ranuras y aberturas en la parte posterior y posterior del gabinete
son provistas para la ventilación y asegurar la buena operación del reproductor y
protegerlo del sobrecalentamiento. No deben bloquearse o taparse estas aberturas,
colocando el Producto sobre una cama, sofá alfombra u otra superficie similar. El
reproductor no debe colocarse cerca o sobre un radiador o fuentes de calor. El
reproductor no debe colocarse en un librero o estante que impida el flujo del aire a
través de las ranuras de ventilación.
10. Fuentes de alimentación – Este producto debe ser operado solo con los tipos de
fuentes de alimentación indicados en la etiqueta de marcado, si no está seguro del
tipo de la fuente de alimentación de su casa, consultar con su proveedor o con la
compañía de electricidad local. Para productos diseñados para operar con baterías
u otras fuentes, referirse al manual de operación.
11. Terminal de tierra y polarización – No eliminar la característica de seguridad de una
clavija polarizada o clavija con terminal a tierra, esta es una medida de seguridad.
Una clavija polarizada cuanta con dos terminales, con una terminal más ancha que
la otra. Una clavija con terminal a tierra cuenta con dos terminales con una tercera
terminal con conexión a tierra. Si la clavija no entra completamente en el
tomacorriente, intentar meterla de nuevo volteándola: si tampoco entra

6
completamente consultar a un electricista o personal calificado para reemplazar el
tomacorriente obsoleto.
12. Protección del cordón de alimentación – El cordón de alimentación debe colocarse
de forma tal que no exista probabilidad de pisarlo o apretarlo sobre los lugares
donde será colocado o contra el Producto mismo. Poner atención particular en el
cordón, la clavija, el tomacorriente y en los puntos en donde estos salen del
Producto.
13. Clavija con protección de sobrecarga – Este producto puede estar equipado con
una clavija con protección de sobrecarga, esta es una característica de seguridad.
Consultar el manual para la sustitución o indicaciones para reiniciar el dispositivo
de protección. Si es necesario el reemplazo de la clavija, asegurarse que haya sido
reemplazada por una clavija que tenga la misma protección de sobrecarga de
acuerdo a lo especificado por el fabricante.
14. Antena exterior – Si una antena exterior es conectada en el producto, asegurar de
que el sistema de antena es puesto a tierra para proveer protección contra sobre
voltaje y cargas de corriente estática acumulada. La sección 810 del NEC (National
Electrical Code), ANSI/NFPA 70, Provee información respecto a la apropiada
puesta a tierra del poste y la estructura de soporte, cables principales, productos de
descarga de la antena, tipos de conductores a tierra, localización de los puntos de
descarga de la tierra, conexión a tierra de los electrodos y los requisitos de los
electrodos de conexión a tierra (ver figura)
15. Tormentas eléctricas o periodos sin uso – Para agregar protección a este producto,
desconectar el producto del tomacorriente durante tormentas eléctricas o cuando
no va ser usado por un periodo largo de tiempo para protegerlo. También
desconectar la antena exterior o el sistema de cable. Esto protege al reproductor
de daños debido a los rayos o sobre líneas de poder.
16. Líneas de poder – No debe de colocarse un sistema de antena exterior cerca de
las líneas eléctricas aéreas, luces o circuitos eléctricos, o en donde pueda caer
sobre dichas líneas eléctricas o circuitos. Al instalar un sistema de antena exterior,
tener cuidado extremo de no tocar las líneas o circuitos eléctricos, el contacto con
ellos puede resultar fatal.
17. Sobrecarga – No sobrecargar los tomacorrientes, cordones de extensión y los
receptáculos ya que pueden generar riesgo de fuego o choque eléctrico.
18. Entrada de objetos y líquidos – No introducir objetos de cualquier tipo dentro de
este producto a través de las ranuras o aberturas, estos pueden llegar a tocar
puntos de voltaje peligroso o salidas que pueden resultar en riesgo de fuego o
choque eléctrico. No derramar o rociar cualquier tipo de líquido sobre las ranuras
de ventilación del producto.
19. Servicio – No intentar dar servicio usted mismo a este producto, abriendo o
removiendo las cubiertas, puede exponerse a voltajes peligrosos u otros riesgos

7
20. Daños que requieren servicio – Desconectar el producto del tomacorriente de
pared y acudir a un centro de servicio autorizado o con personal calificado bajo las
siguientes condiciones a) Cuando la clavija o el cordón de alimentación estén
dañados. b) Cuando ha sido derramado liquido o han caído objetos en el interior
del producto, c) Si el producto ha sido expuesto a la lluvia o agua, d) Si el producto
no opera adecuadamente siguiendo las instrucciones de operación. Ajustar solo los
controles que son indicados en este manual de operación. El ajuste de otros
controles puede ocasionar daños y a menudo se requiere de trabajo excesivo del
servicio técnico para restablecer la operación normal del producto, e) Si el producto
se ha caído o golpeado o si la cubierta está dañada, f) Si el producto exhibe
cambios en su funcionamiento normal. Todo lo anterior indica la necesidad de darle
servicio al producto.
21. Reemplazo de partes – Cuando es necesario el reemplazo de partes, asegurarse
que el servicio técnico use partes especificadas por el fabricante o que tengan las
mismas características que las partes originales. El reemplazo de partes no
autorizadas puede resultar en fuego, choque eléctrico u otros riesgos.
22. Verificar las medidas de seguridad – Una vez que se ha completado cualquier tipo
de servicio o reparación a este producto, solicitar al técnico de servicio que realice
las pruebas de seguridad para poder determinar que el producto está en
condiciones apropiadas de operación.
23. Colocación en la pared o techo – El producto debe de colocarse en la pared o
techo de acuerdo a como lo especifica el fabricante.
24. Calor – El reproductor debe colocarse lejos de fuentes de calor como radiadores,
registros de calor, estufas u otros productos que producen calor (incluso
amplificadores).
NOTICIA FCC
Este producto cumple con la parte 15 de las reglas de la FCC. La operación de este
producto está sujeta a las dos siguientes condiciones: (1) es posible que este producto
no cause interferencia perjudicial, y (2) este producto debe aceptar cualquier interferencia,
incluyendo la que pueda causar la operación no deseada.
NOTA: Este producto ha sido probado y cumple con las limitaciones de un equipo digital
Clase B, de acuerdo con la Parte 15 de las Normas FCC. Estos límites están diseñados
para permitir una protección razonable contra interferencia dañina en una instalación
residencial. Este producto genera, usa y puede emitir energía de frecuencia radial y, de
no ser instalado y utilizado de acuerdo con las instrucciones, puede causar interferencia
dañina a las comunicaciones radiales. Sin embargo, no existe garantía de que la
interferencia no pueda ocurrir en una instalación particular. Si este producto causa una
interferencia dañina a la recepción de la radio o la televisión, lo cual se puede determinar
encendiendo y apagando el equipo, se recomienda al usuario tratar de corregir la
interferencia mediante una o más de las siguientes medidas:
• Orientar nuevamente o reubicar la antena receptora.
• Aumentar la separación entre el producto y el receptor.
• Conectar el equipo a una salida de un circuito diferente al receptor.
• Consultar a su proveedor o a un técnico de Radio y televisión.
PRECAUCION SOBRE MODIFICACIONES
Cualquier cambio o modificación no aprobada expresamente por el fabricante de este
producto puede anular la propiedad para operar el producto.
ADVERTENCIA
Este producto contiene acido, un químico conocido por el estado de California que puede
causar cáncer o defectos de nacimiento u otros daños reproductivos. Lavarse las manos
después de usar el producto.

8
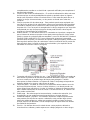
Descripción de Partes

9
Descripción de Partes
1. ASA / AGARRADERA
2. COMPARTIMIENTO DEL DISCO
COMPACTO
3. BOTÓN DE FUNCION / ESPERA
4. BOTON DE ANTERIOR / SINTONIA –
5. BOTÓN DE DETENER DISCO
COMPACTO “”
6. PANTALLA DE CRISTAL LIQUIDO
7. BOTON DE SINCRONIA /
REPRODUCIR/PAUSAR DISCO
COMPACTO “”
8. BOTON DE SIGUIENTE / SINTONIA +
9. BOTON DE VOLUMEN –
10. BOTON DE SONIDOS BAJOS
11. ABRIR/CERRAR PUERTA DEL
DISCO COMPACTO
12. BOTON DE VOLUMEN +
13. INDICADOR DE ESPERA
14. SENSOR INFRARROJO
15. BOCINAS
16. BOTONES DEL CASETE (GRABAR
“”, REPRODUCIR “”, REGRESO
RAPIDO “”, AVANCE RAPIDO “”,
DETENER/EXPULSAR “”,
PAUSAR “”)
17. COMPARTIMIENTO DEL CASETE
18. ANTENA TELECOPICA DE FM
19. SELECTOR DE VOLTAJE (PARA
VERSION DE VOLTAJE DUAL)
20. COMPARTIMIENTO DE LAS
BATERIAS
21. CONECTOR DE ENTRADA DE Vca
22. WOOFER
23. CONECTOR DE ENTRADA AUXILIAR
24. PUERTO USB
Control Remoto
Instalación de las baterías
• Remover la tapa del compartimiento de las baterías.
• Insertar 2 baterías de 1,5 Vcc tamaño “AA” o equivalentes (no incluidas), verificando la
correcta polaridad cómo se observa en el interior del compartimiento. Recomendamos el
uso de baterías alcalinas.
• Colocar la tapa del compartimiento de las baterías nuevamente.
Descripción de partes
1. BOTON DE SILENCIO “MUTE”
2. BOTON DE MEMORIA “M+ / M-“
3. BOTON DE MONOAURAL / ESTEREO “MO/ST”
4. BOTON DE CARPETA+ / +10
5. BOTON DE CARPETA- / -10
6. BOTON DE SONIDOS BAJOS “BASS”
7. BOTONES DE VOLUMEN “VOL+/VOL-“
8. BOTON DE DETENER DISCO COMPACTO “”
9. BOTON DE SINCRONIA / REPRODUCIR/PAUSAR
DISCO COMPACTO “”
10. BOTONES DE SINTONIA / SALTAR
11. BOTON DE PROGRAMA / MODO “P-MODE”
12. BOTON DE PROGRAMA “PROG”
13. BOTON DE MEMORIA
14. BOTON DE ESPERA
15. BOTON DE FUNCION
16. TRANSMISOR INFRARROJO
17. COMPARTIMIENTO DE LAS BATERIAS

10
Operación del Control Remoto
Para operar la unidad con el control remoto, apuntar directamente el
control remoto al sensor infrarrojo localizado en la parte frontal de la
unidad y presionar el botón apropiado en el control remoto.
El control remoto opera adecuadamente dentro de una distancia máxima
de 6 a 7 metros y con un ángulo de 30° a la izquierda y derecha con
respecto al sensor infrarrojo.
Los rayos del sol y los cuartos con mucha luminosidad pueden interferir
con la operación del control remoto. Si la operación del control remoto es
insatisfactoria o si deja de operar completamente, reemplazar las baterías
primero, entonces intentar reducir la intensidad luminosa del cuarto.
Fuentes de Alimentación
1. Operación con Vca
• Verificar que el voltaje de su localidad corresponde con el voltaje marcado en el producto.
• Sacar el cordón de alimentación localizado en el interior del compartimiento de las baterías.
Conectar el extremo del cordón de alimentación en el conector de entrada de Vca del
producto, entonces conectar el otro extremo del cordón de alimentación (clavija) en un
tomacorriente.
NOTA: Asegurarse de ajustar el selector de voltaje, al voltaje de su localidad (opcional, solo para
versión con voltaje dual).
2. Operación con Baterías (Vcc)
• Remover la tapa del compartimiento de las baterías. Insertar 8 baterías de 1,5 Vcc tamaño
“D”, “UM-1” o equivalentes (no incluidas), verificando la correcta polaridad cómo se observa
en el interior del compartimiento. Recomendamos el uso de baterías alcalinas. Colocar la tapa
del compartimiento de las baterías nuevamente.
Precaución:
Remover las baterías si están agotadas o no va ser usado el producto por un periodo largo de
tiempo.
Las baterías contienen sustancias química esta deben ser desechadas de forma adecuada para
evitar daños al medio ambiente.
Funciones Básicas
Encender el Sistema
Presionar y sostener “FUNCIÓN/ESPERA” en la unidad o presionar “ESPERA” en el control
remoto para encender la unidad, entonces presionar “FUNCIÓN/ESPERA” en la unidad o
“FUNCION” en el control remoto para seleccionar el modo de operación de Radio AM/FM,
Bluetooth, Casete, CD o USB.
Control de Volumen
Presionar “VOL-“ o ”VOL+” en la unidad o control remoto para ajustar el volumen al nivel deseado.
Presionar “SILENCIO” en el control remoto para desactivar la salida de audio (silencio), presionar
nuevamente para volver a activar la salida de audio.
Sistema de Bajos “Sonidos Graves”
El botón “BASS” controla los sonidos graves de la unidad. Los sonidos graves son los sonidos con
rangos de frecuencia bajos. El botón puede presionarse para Activar o Desactivar la función.
Cuando la función de sonidos graves esta activada, la unidad incrementa la salida de los sonidos
de frecuencias bajas.
Operación de la Entrada Auxiliar
Este producto cuenta con un conector de entrada auxiliar estéreo de Ø 3.5 mm, a través de este
conector otros dispositivos de audio externos pueden conectarse y la salida será amplificada.
1. Presionar “FUNCIÓN/ESPERA” en la unidad o “FUNCION” en el control remoto para
seleccionar el modo de operación Bluetooth “BT”.
2. Conectar un extremo del cable de audio al conector de entrada auxiliar del producto y
conectar el otro extremo del cable de audio al conector de salida de audio del dispositivo
externo. El producto cambia al modo auxiliar automáticamente.

11
3. Presionar “VOL-“ o ”VOL+” en la unidad o control remoto para ajustar el volumen al nivel
deseado. Presionar “REPRODUCIR” en el dispositivo de audio externo (por ejemplo
reproductor MP3, MP4, etc.) para iniciar la reproducción.
Operación del Radio
Sintonizando una Estación de Radio
1. Presionar “FUNCIÓN/ESPERA” en la unidad o “FUNCION” en el control remoto para
seleccionar el modo de operación de “Radio”.
2. Presionar “SINTONIA-” O “SINTONIA+” en la unidad o control remoto para sintonizar la
estación deseada, al sintonizar una estación de FM estéreo la pantalla despliega “STEREO”.
3. Presionar “VOL-“ O ”VOL+” en la unidad O control remoto para ajustar el volumen al nivel
deseado.
4. Cuando sintoniza una estación de FM, extender la antena telescópica completamente y
girarla para una mejor recepción. Si la estación es FM estéreo, el indicador de FM estéreo se
enciende.
Cuando sintoniza una estación de AM, girar el producto hasta obtener una mejor recepción o
colocarlo en un área abierta, debido a que el producto cuenta con una antena interna de barra
de ferrita.
Nota: La función de radio está ajustada inicialmente al modo de FM estéreo, si la estación
sintonizada tiene mucho ruido, presionar “MONOAURAL/ESTEREO” para cambiar al modo
de FM monoaural para eliminar el ruido.
5. Para desactivar la función de radio, presionar el botón de “ESPERA/FUNCIÓN” en la unidad o
“FUNCIÓN” en el control remoto para seleccionar otra función o apagar el producto
presionando el botón de “ESPERA”
Almacenamiento Manual de las Estaciones en Memoria
Puede almacenar hasta 30 estaciones de radio en memoria (AM y FM), con esto puede escuchar
las estaciones deseadas de forma directa y rápida, sin necesidad de sintonizar ni buscar las
estaciones nuevamente.
1. Presionar “FUNCIÓN/ESPERA” en la unidad o “FUNCION” en el control remoto para
seleccionar la banda de radio deseada de AM o FM.
2. Presionar “MEMORIA” en el control remoto y empieza a destellar en la pantalla “P01”,
entonces presionar “SINTONIA-” O “SINTONIA+” en el producto o control remoto para
sintonizar la primera estación deseada a almacenar.
3. Presionar “M-“ o “M+” en el control remoto para seleccionar el número de memoria de
almacenamiento, entonces presionar “MEMORIA” nuevamente para almacenar la estación en
el número de memoria seleccionado.
4. Sintonizar la siguiente estación que desea almacenar en memoria, repetir los pasos 2 y 3
para almacenarla en memoria. Hasta 30 estaciones pueden almacenarse en memoria (10
para AM y 20 para FM”)
5. Una vez que las estaciones están almacenadas en memoria, presionar “M-“ o “M+” en el
control remoto para sintonizar las estaciones directamente.
Operación del Casete
Función de los Botones del Casete
GRABAR “”: Presionar para iniciar la grabación del Radio, CD/MP3, Entrada Auxiliar, USB
REPRODUCIR “”: Presionar para iniciar la reproducción del casete.
REGRESO RAPIDO “”: En el modo detenido, presionar para regresar la cinta rápidamente.
AVANCE RAPIDO “”: En el modo detenido, presionar para avanzar la cinta rápidamente.
DETENER/EXPULSAR “”: Presionar para detener la actividad actual del casete o para abrir
el compartimiento del casete cuando no hay ningún botón activado.
PAUSA “”: Presionar para pausar la reproducción o grabación, presionar nuevamente para
continuar con la reproducción o grabación.
Reproducción del Casete
1. Presionar “FUNCIÓN/ESPERA” en la unidad o “FUNCION” en el control remoto para
seleccionar el modo de operación de Casete “TAPE”.

12
2. Presionar “/” para abrir el compartimiento del casete.
3. Insertar un casete en el compartimiento con el lado abierto hacia arriba y con el carrete con la
cinta del lado izquierdo. Asegurase de no tocar con los dedos la cinta del casete.
4. Cerrar el compartimiento del casete suavemente.
5. Presionar “” o “” para avanzar o regresar la cinta rápidamente hasta un punto deseado.
6. Presionar “” para iniciar la reproducción de la cinta.
7. Presionar “VOL-“ o ”VOL+” en la unidad o control remoto para ajustar el volumen al nivel
deseado.
8. Presionar “” para pausar la reproducción momentáneamente, presionar “” nuevamente
para continuar la reproducción.
9. Presionar “/” para detener la reproducción, presionar “/” nuevamente para expulsar el
casete.
Característica de Detener Automáticamente
Cuando el casete esta en modo de reproducción ó grabación y la cinta llega al final, el mecanismo
se detiene y apaga automáticamente, regresando todos los botones a la posición de desactivados.
Tipos de Casete
Usar solo casetes de alta calidad (IEC TYPE 1) para realizar grabaciones. Para reproducir pueden
usarse otros tipos de casetes pero esto no habilita la posibilidad para realizar grabaciones
apropiadas en estas cintas más especializadas. El uso de casetes de 120 minutos “C120” no es
recomendable.
Protección contra Borrado
Normalmente cualquier cinta de un
casete se borra automáticamente al
realizar una nueva grabación. Para
proteger una grabación de cualquier
borrado accidental, remover las
lengüetas localizadas en la parte de
abajo del casete.
Cuando el casete es sostenido con el lado superior hacia arriba y la cinta hacia el frente, la
lengüeta de protección de ese lado se localiza en el lado izquierdo de la parte de abajo del casete.
Todos los casetes pregrabados son protegidos de esa manera para evitar el borrado accidental de
la grabación comercial. Un casete protegido contra borrado no permite que el botón de grabación
“” pueda operar. Si en algún momento desea grabar y no puede operar el botón de grabación,
no forzar el mecanismo ya que puede dañarse. Verificar que un casete ha sido colocado y que las
lengüetas de grabación no han sido removidas. Para grabar en un casete donde las lengüetas se
han removido, puede realizarse cubriendo las aberturas donde estaban las lengüetas con un
pedazo de cinta adhesiva.
Cuidado del Mecanismo del Casete
Limpiar suavemente las cabezas de
reproducción/grabación, de borrado, el rodillo de
presión y la espiga después de cada 10 horas de
uso de la unidad de casete. Una gran variedad de
productos para el cuidado del casete hay
disponibles.
Las cabezas de borrado y de reproducción/grabación y la superficie del rodillo de presión son
delicadas y estos no deben de tocarse con objetos de metal como desarmadores. Para limpiar más
fácilmente estos elementos, presionar “” para tener más fácil acceso a las cabezas y al rodillo.
Asegurase de presionar “/” después de limpiar el mecanismo.
El mecanismo puede sufrir daños si la unidad es dejada en el modo de reproducción, cuando el
aparato se encuentra apagado. Bajo ninguna otra circunstancia intentar lubricar cualquier otra
parte del mecanismo

13
Grabación de un Casete
Grabación desde el Radio
1. Cargar un casete con la cinta en blanco en el compartimiento del casete.
2. Presionar “FUNCIÓN/ESPERA” en la unidad o “FUNCION” en el control remoto para
seleccionar el modo de Radio AM o FM. Sintonizar la estación deseada presionando
“SINTONIA-“ o “SINTONIA+”
3. Presionar “” y “” simultáneamente para iniciar la grabación en el casete.
4. Presionar “” para detener la grabación. o esperar a que la grabación se detenga
automáticamente cuando la cinta llega al final
5. Para escuchar la grabación, ver REPRODUCCION DEL CASETE.
Nota: Presionar “” para pausar la grabación momentáneamente, presionar “” nuevamente
para continuar la grabación.
Grabación desde un CD/MP3, USB
1. Cargar un casete con la cinta en blanco en el compartimiento del casete.
2. Presionar “FUNCIÓN/ESPERA” en la unidad o “FUNCION” en el control remoto para
seleccionar el modo de CD o USB. Cargar un disco en el compartimiento para disco o insertar
una memoria USB en el puerto USB, iniciar la reproducción presionando “SINCRONIA /
REPRODUCIR/PAUSAR”
3. Presionar “” y “” simultáneamente para iniciar la grabación en el casete. Presionar “”
para detener la grabación o esperar a que la grabación se detenga automáticamente cuando
la cinta llega al final.
4. Para escuchar la grabación, presionar “FUNCIÓN/ESPERA” en la unidad o “FUNCION” en el
control remoto para seleccionar el modo de operación de Casete “TAPE”, entonces iniciar la
reproducción del casete.
Operación del CD/MP3
Discos Reproducibles
Este producto puede reproducir discos de audio digital CD, MP3, discos grabables (CD-R), discos
regrabables de audio digital (CD-RW) y discos CD-DA de audio digital CD/CD-R/CD-RW.
Cargando un Disco
1. Presionar “FUNCIÓN/ESPERA” en la unidad o “FUNCION” en el control remoto para
seleccionar el modo de CD. Abrir el compartimiento del disco y la pantalla despliega “OP”
2. Colocar un disco de audio CD/MP3 en la bandeja con el lado con la etiqueta hacia arriba.
3. Cerrar el compartimiento del disco. Después de unos segundos la pantalla despliega el
número total de pistas del disco.
4. Para remover el disco, detener la reproducción del disco y esperar que deje de girar,
entonces abrir el compartimiento, sujetar el disco por el borde y removerlo cuidadosamente.
Notas:
• Para asegurar una buena operación del sistema, esperar a que el reproductor lea
completamente el disco antes de iniciar la reproducción del mismo.
• Si no hay ningún disco colocado en el compartimiento o el disco está colocado mal, la
pantalla despliega “NO”.
Reproducción del Disco
1. La reproducción del disco inicia automáticamente después de terminar de leer el disco.
2. Durante la reproducción, presionar “SINCRONIA / REPRODUCIR/PAUSAR” para pausarla y
el número de la pista destella en la pantalla.
3. Presionar “SINCRONIA / REPRODUCIR/PAUSAR” nuevamente para volver a la reproducción
desde el punto donde se pauso.

14
4. Durante la reproducción, presionar “” para detener la reproducción y la pantalla despliega el
número total de pistas del disco.
Selección de una Pista / Punto Especifico
Selección de una pista deseada
Presionar “ANTERIOR” o “SIGUIENTE” continuamente en el modo detenido o de reproducción
hasta que el número de la pista deseada se despliega en la pantalla. Presionar “SINCRONIA /
REPRODUCIR/PAUSAR” para iniciar la reproducción de la pista seleccionada.
Selección de un punto específico en una pista
Presionar y sostener “ANTERIOR” o “SIGUIENTE” durante la reproducción de una pista para
buscar un punto especifico dentro de la pista hacia atrás o hacia delante a alta velocidad hasta
encontrar el punto deseado, entonces liberar el botón para continuar la reproducción desde el
punto encontrado.
Selección de una pista mayor a 10 (Para discos MP3 solamente)
Para seleccionar un numero de pista mayor a 10, presionar “CARPETA+/+10” o “CARPETA-/-10”
en el control remoto cada vez que desea saltar 10 pistas hacia delante o hacia atrás , entonces
presionar “SINTONIA-” o “SINTONIA+” para seleccionar la pista deseada. Por ejemplo, para
seleccionar la pista 17, presionar “CARPETA+/+10” y entonces presionar “SINTONIA+” siete veces.
Selección de una carpeta (para discos MP3 que contienen más de una carpeta)
Para saltar a la carpeta deseada durante la reproducción, presionar y sostener “CARPETA+/+10” o
“CARPETA-/-10” para saltar a la carpeta siguiente o anterior.
Programar Reproducción
Es posible programar en orden deseado la reproducción de las pistas en el modo detenido.
Pueden almacenarse en memoria hasta 20 pistas para un disco normal y 99 pistas para un disco
MP3.
1. En el modo detenido, presionar “PROGRAMA”, el indicador de programa “P” empieza a
destellar y se despliega en la pantalla “P01”.
2. Presionar “SINTONIA-” o “SINTONIA+” para seleccionar el número de la pista deseada a
programar.
3. Presionar “PROGRAMA” nuevamente para almacenar en memoria la pista seleccionada y el
indicador en la pantalla cambia a “P02”.
4. Repetir los pasos 2 y 3 para almacenar las demás pistas.
5. Presionar “SINCRONIA / REPRODUCIR/PAUSAR”” para iniciar la reproducción de la primera
pista del programa.
6. Presionar “” para detener la reproducción del programa.
Borrar el programa de memoria
Para borrar el programa de reproducción de memoria hay dos formas:
1. Presionar “” dos veces cuando el disco está en reproducción o presionar “” una vez
cuando el disco está detenido, para borrar el programa.
2. Abrir la tapa del compartimiento del disco y el programa se borra de memoria.
Repetir Reproducción
Puede repetir la reproducción de una o todas las pistas del disco continuamente.
Repetir una pista
1. Estando en el modo de reproducción; presionar “PROGRAMA / P-MODE” una vez, el
indicador “
” se despliega en la pantalla, la pista actual en reproducción se repite
continuamente hasta presionar “”

15
2. Presionar “PROGRAMA / P-MODE” hasta que el indicador “ ” desaparece de la pantalla
para cancelar la función de repetir una pista.
Repetir todas las pistas del disco
1. Estando en el modo de reproducción; presionar “PROGRAMA / P-MODE” hasta que el
indicador “
” se despliega en la pantalla, todas las pistas del disco se reproducen
repetidamente hasta presionar “”.
2. Presionar “PROGRAMA / P-MODE” hasta que el indicador “
” desaparece de la pantalla
para cancelar la función de repetir todas las pistas.
Repetir la carpeta actual (para discos con formato MP3)
1. Estando en el modo de reproducción; presionar “PROGRAMA / P-MODE” hasta que el
indicador “
FOLDER” se despliega en la pantalla, la carpeta actual se reproduce
repetidamente hasta presionar “”.
2. Presionar “PROGRAMA / P-MODE” hasta que el indicador “
FOLDER” desaparece de la
pantalla para cancelar la función de repetir carpeta.
Reproducción al azar
1. Estando en el modo de reproducción; presionar “PROGRAMA / P-MODE” hasta que el
indicador “RAND” se despliega en la pantalla, entonces inicia automáticamente la
reproducción al azar de todas las pistas del disco en el orden determinado por el reproductor.
La reproducción se detiene hasta que todas las pistas son reproducidas.
2. Presionar “PROGRAMA / P-MODE” hasta que el indicador “RAND” desaparece de la pantalla
para cancelar la función de reproducción al azar.
Reproducción de una Memoria USB
1. Presionar “FUNCIÓN/ESPERA” en la unidad o “FUNCION” en el control remoto para
seleccionar el modo de USB.
2. Conectar la memoria o dispositivo USB al puerto USB, después de unos segundos la pantalla
despliega el número total de pistas en el dispositivo USB e inicia automáticamente la
reproducción desde la pista 1.
5. Durante la reproducción, presionar “SINCRONIA / REPRODUCIR/PAUSAR” para pausarla,
presionar nuevamente para volver a la reproducción en el punto donde se pauso.
6. Durante la reproducción, presionar “” para detener la reproducción y la pantalla despliega el
número total de pistas del disco.
7. Los procedimientos de repetir (repetir una, repetir carpeta, repetir todo), programación de la
reproducción, reproducción aleatoria, saltar y buscar son similares a los explicados en
OPERACIÓN DEL CD/MP3.
Precaución:
• No usar un cable de extensión USB para conectar el dispositivo USB, esto puede causar
interferencia.
Operación Bluetooth
1. Presionar “FUNCIÓN/ESPERA” en la unidad o “FUNCION” en el control remoto para
seleccionar el modo de Bluetooth. La pantalla mostrará un flash "bt" y después de conectar,
el "bt" se mostrará en la pantalla
2. Activar la función Bluetooth del dispositivo externo y activar la búsqueda de dispositivo
Bluetooth. En la lista de dispositivos encontrados, seleccionar “NAXA NPB-273” para
conectarlos. Ingresar la contraseña “0000” en caso de ser requerida. Entonces iniciar la
reproducción desde el dispositivo Bluetooth conectado.

16
3. Presionar “ANTERIOR” o “SIGUIENTE” para seleccionar una pista deseada.
4. Presionar “VOL-“ o “VOL+” para ajustar el volumen al nivel deseado.
5. Presionar y sostener “SINCRONIA / REPRODUCIR/PAUSAR” para desconectar el dispositivo
Bluetooth.
Nota:Solo un dispositivo Bluetooth puede conectarse a la vez.
Especificaciones
General
Fuentes de alimentación: Vca: 110/220 Vca 60/50 Hz
Vcc: 12 Vcc (8 x 1.5 Vcc Baterías “D” o “UM-1”)
Control Remoto: 3 Vcc (2 x 1.5 Vcc Baterías “AA” o “UM-3”)
Potencia de entrada Vca: 35 W
Dimensiones: 460 mm x 200 mm x 342 mm aproximadamente
Temperatura de operación: 5 ºC a 35 ºC
Sección de Radio
Bandas de recepción: AM / FM ST
Rango de frecuencias: AM: 520 kHz – 1710 kHz
FM: 87.5 MHz – 108 MHz
Sección de Disco Compacto
Captador óptico: 3 – rayos láser
Respuesta de frecuencia: 100 Hz – 16 kHz
Sección del Casete
Sistema de grabación: 2 pistas 2 canales (estéreo)
Sistema de borrado: Borrado magnético
Respuesta de frecuencia: 125 kHz – 6.3 kHz
Fluctuación: 0.35% Wrms (JIS)
Sección de Audio
Potencia de salida: 2 x 5 W máximo
Potencia de salida Woofer: 10 W máximo

17
Accesorios
Manual de operación
Control Remoto
Cordón de alimentación de Vca
Las especificaciones y el diseño de este producto están sujetos a cambios sin previo aviso para
mejoras de los mismos
-
 1
1
-
 2
2
-
 3
3
-
 4
4
-
 5
5
-
 6
6
-
 7
7
-
 8
8
-
 9
9
-
 10
10
-
 11
11
-
 12
12
-
 13
13
-
 14
14
-
 15
15
-
 16
16
-
 17
17
-
 18
18
-
 19
19
-
 20
20
-
 21
21
-
 22
22
-
 23
23
-
 24
24
-
 25
25
-
 26
26
-
 27
27
-
 28
28
-
 29
29
-
 30
30
-
 31
31
-
 32
32
-
 33
33
-
 34
34
-
 35
35
-
 36
36
-
 37
37
-
 38
38


Naxa NPB-273 El manual del propietario
- Categoría
- Reproductores de CD
- Tipo
- El manual del propietario
- Este manual también es adecuado para
en otros idiomas
- English: Naxa NPB-273 Owner's manual
Artículos relacionados
-
Naxa NPB-276 El manual del propietario
-
Naxa NPB-246 El manual del propietario
-
Naxa NPB-245 El manual del propietario
-
Naxa NPB-267 El manual del propietario
-
-
-
-
-
-
Otros documentos
-
Sytech SY2023BRONCE El manual del propietario
-
Premier SX-2124C Manual de usuario
-
-
Audiovox CE520 Operating Instructions Manual
-
Yamaha RX-930 El manual del propietario
-
-
Emerson EMMC35881 Manual de usuario
-
-
-