Kenmore 40753571310 El manual del propietario
- Categoría
- Deshumidificadores
- Tipo
- El manual del propietario
Este manual también es adecuado para

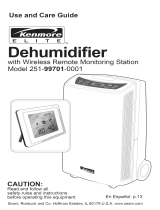
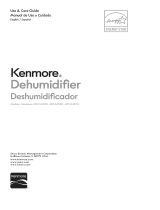
Use & Care Guide
Manual de Uso y Cuidado
English / Espafiol
Models, Modelos: 407.53571
I enmore
Dehum°di er
with externa_ pump
Deshumiditlcador
con bomba ÷xterna
Sears Brands Management Corporation
Hoffman Estates, IL 60179 U.S.A.
www.sears.com
www.kmart.com
www.kenmore.com

Package Contents.............................................2
Warranty ...........................................................2
Safety instructions............................................3
Electrical Requirements ..................................4
Installation ........................................................4,5
Key Features ....................................................5
Control Panel ...................................................6
Water Disposing Options ........................... 7
Installing the Gravity Drain Hose..................8,9
Installingthe External Pump................. 10,11
Using the Pump............................. •......12
Care and Maintenance ....................... 13
Troubleshooting,..... .....................................1,4,15
Error Codes........................................ 16
Product Specifications .............. .......... 16,17
Master Protection Agreements ............... 18
Spanish Section.................................... 19
Sears Service ................................Back Cover
...._: Kenmore Dehumidifier • 3 ft. Dehumidifier Drain Hose ......
• 16 ft. Pump Drain Hose * Drain Joint,2 Hose Clamps, 2 Screws * Use& Care Guide
* External Vertical Pump
Kenmore Urn|ted Warranty
When installed, operated and maintained according to all supplied instructions, if this appliance fails due
to a defect in material and workmanship within one year from the date of purchase, call 1-800-4-MY-
HOME® to arrange for free repair.
If this appliance isever usedfor other than private family purposes, this warranty applies for onty 90 days
from the date of purchase.
This warranty covers only defects in material and workmanship. Warranty coverage does NOT include:
1. Expendable items that can wear out from normal use, including but not limited to filters, belts,
light bulbs, and bags.
2. A service technician to instruct the user in correct product Tnstallation, operation or maintenance.
3. A service technician to clean or maintain this product.
4. Damage to or failure of this product if it is not installed, operated or maintained according to the
all instructions supplied with the product.
5. Damage to or failure of this product resulting from accident, abuse, misuse or use for other than
its intended purpose.
6. Damage to or failure ofthis product caused by the use of detergents, cleaners, chemicals or
utensils other than those recommended in all instructions supplied with the product.
7. : Damage to or failure of parts or systems resulting from unauthorized modifications made to this
product.
Disclaimer of implied warranties; limitation of remedies
Customer's sole and exclusive remedy under this limited warranty shall be product repair as provided
herein. Implied warranties, including warranties of merchantability or fitness for a particular purpose, are
limited to one year or the shortest period allowed by law. Sears shall not be liable for incidental or conse-
quential damages, Some states and provinces do not allow the exclusion or limitation of incidental or
consequential damages, or limitation on the duration of implied warranties of merchantability or fitness,
so these exclusions or limitations may not apply to you.
This warranty applies onJy while this appliance is used in the United States°
Thiswarranty gives you specific legal rights, and you may also have other rights which vary fromstate to
state.
Sears BrandsManagement Corporation, HafTman Estates,IL 60179
2

IMPORTANT CAUTIONSFOR USING YOUR DEHUMIDIFIER.
To reducethe riskof fire, elect_cal shock_injury_or damage to the
dehumidifiers,thesesafety precautionsmustbe followed:
Safety
• Do not place the power cord near a heater.
• Do not use an electrical outlet near flam-
mable or combustible materials such as
gasoline, propane, paint thinners, etc.
• Do not disassemble or modify dehumidifier
parts or components. It may cause electric
shock and failure.
Plug in the power cord properly.
• Do not turn the unit on and off by inserting
or pulling out the power plug.
• Do not damage the power cord or use an
unspecified power cord.
• Do not modify power cord length.
• Do not share the outlet with another appli-
a nce.
• Always plug into a grounded outlet. Not
grounding unit may cause electrical shock.
• Unplug the unit if it emits strange sounds,
odors, or smoke.
• Do not use an electrical outlet if it is loose
or damaged.
• Do not operate or plug in unit with wet
hands or in a wet environment.
' Ventilate area before operating dehumidi-
fier. Check for the presence of natural gas
or the buildup of other combustible vapors:
• Do not clean the dehumidifier with water.
Water may enter the unit and degrade the
insulation resulting in an electrical shock.
• If water enters the product, turn off the
dehumidifier's power switch, then unplug
the unit. Do not plug in unit until it has been
inspected by an authorized repair service.
• Because the fan rotates at high speed dur-
ing operation, always unplug dehumidifier
before attempting any recommended
maintenance or cleaning.
• Do not block the inlet or outlet. It may
cause unit to fall or to operate inefficiently.
• Do not remove plug from outlet by pull-
ing on the cord.
• When not in use, turning the unit off wilt
save energy. Unplug the dehumidifier
when not using for long periods of time.
• 'When removing the filter, be aware that
some metal parts may have sharp edges
and may cause injury.
• Do not use the water collected in the
bucket for drinking purposes. It is not
sanitary and could cause illness.
• Do not allow children to play with this
product.
Tips
• Make sure the dehumidifier is the correct
size for the area you want to dehumidify.
it is not designed to dehumidify the entire
house.
• For proper operation, the dehumidifier
should only be placed on a level floor.
• Close all doors, windows and other open-
ings to the room. The dehumidifier must
operate in an enclosed area to be effec-
tive.
° To clean, use a soft cloth; do not use
wax, thinners, or strong detergents as
they may change the color of the unit or
cause surface damage.
• Be sure to replace the bucket properly
after emptying to prevent water from
collecting on the floor causing damage to
some types of flooring.
• Do not put a pet or house plant where it
will be exposed to direct air flow. This
could injure the pet or plant.
• Operation without filter will cause unit
failure. Insert the filter securely. Clean it
every two weeks. (See Care and Mainte-
nance section in this manual.)

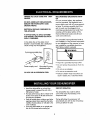
OBSERVEALLLOCALCODESAND ORDI-
NANCES.
DONOT,UNDERANYCIRCUMSTANCES,
REMOVE THE POWER SUPPLYCORD
GROUND PRONG,
ELECTRICALGROUND IS REQUIREDON
THIS APPLIANCE
A 11S-VOLT60Hz, AC ONLY, 15A FUSED
AND PROPERLYGROUNDED ELECTRICAL
SUPLLYISREQUIRED.
A time delay fuse or time delay circuit
breaker is recommended. Use a dedicated
circuit serving only this appliance.
3-prong grounded plug
Power supply cord
Grounded 3-prong
electrical outlet
DO NOT USEAN EXTENSION CORD.
RECOMMENDED GROUNDING METH-
OD
For your personal safety, this appliance
must be grounded. Thisappliance has a
power supply cord with a 3-prong ground-
ed plug. To minimize possible shock haz-
ard the cord mustbe plugged into a
matching grounded electrical outlet that
complies with the latest edition of the
National Electrical Codes and all local
codes and ordinances.
If a grounded 3-prong electrical outlet is
not available, it isthe personal responsibil-
ity and obligation of the customer to have
one installed by a qualified electrician.
ELECTRICALSHOCK HAZARD
....................• wAR.I.G
i/ii
• Plug into a grounded 3-prong outlet.
• Do not remove the ground pin from the
plug.
• Do not use an adapter.
• Do not use an extension cord.
• Failure to follow these instructions can
result in death, fire or electrical shock.
• Install the dehumidifier on a level floor
strong enoughto supportthe unitwith a
full bucket of water.
• For best performance, allow at least12-18
inches of air space on all sidesof the unit
for good air circulation.
• Keep all outside doors,windows and other
openingsclosed when operating the dehu-
midifier. Humid outdoor air will add to the
unit'sworkload.
• Leave the dehumidifier in an upright posi-
tion for 30 minutesbefore turning on.
DEFROSTOPERATION
The dehumidifier has a built-in defrost
controlthat sensesfrost buildup on the
evaporator coils.
During defrosting, the compressor will
automatically turn off; the fan will continue
running to defrost the coils.
4

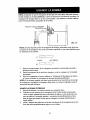
CHOOSING THE PROPERLOCATION
Use the dehumidifier:
• in the basement to help prevent moisture
damage.
• tn the kitchen,laundry room, bathroom,
and spa/exercise areas that have exces-
sivemoisture.
• to prevent moisture damage anywhere
books or valuables are stored.
during constructionor remodeling to
reduce drying time for drywall and paint.
However, checkand clean filter often.
AUTOMATIC SHUT OFF
• When the bucket is full, or when the
bucket has been removed, the compres-
sor will automatically stop. The fan will
continue to run to dehumidify for 3
minutes. Then the Bucket Full indicator
will flash and you wil! hear a ten second
audible alarm.
• The bucket must be placed in the proper
position for the dehumidifier to work.
The Bucket Full light will flash and the
dehumidifier will not run if the bucket is
not in the proper position. Dehumidifier
settings can not be changed when the
bucket is not in its proper position.
• The dehumidifier fan will shut off in 3
minutes, once the desired Relative Hu-
midity (RH) setting is reached, plus or
minus 5% RH.
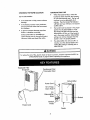
- ii I "1 IIIIIIIIIIIIIIIIIIIIII1_ g II I I IIIIIIIIIIIIIIIIIII I ' _1- [ I 111111111111 I II I I IIIIIIIIII1[ i i iuiiiiiiiiiiiiiiiiii J
J , - , ,, ......_ W ARNING ,..............
To reduce the risk of fire, electric shock or injury to persons, read the important SAFETY IN-
STRUCTIONS found on page 3 before operating this appliance.
I I I IIIIIIIII II/I * i i i i iiii iiiiiiii I II I I _ II
Washable Filter
Enclosure
Continuous Drain
Connector Door
\
Power Cord
Power Cord
16 ft. Pump
Drain Hose
3ft.
Dehumidifier
Hose
Vertical
Pump
Dehumidifier
Caster
Bucket

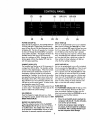
(8) (g) (lp) (12)(13)
(s) (2)
POWERON/OFF(1)
Once the unit is plugged in, the POWER INDICA-
TOR (10) will light. Pressing the POWER button
once will turn the unit ON and illuminate the digi-
tal display (9). The fan will operate for 3 minutes
to draw air through the dehumidifier to properly
sense relative humidity. The display will show the
humidity level of the room in 5% increments,
down to a minimum of 25%. Pressing the Power
button again will turn the display OFF and the
unit will cease operating.
HUMIDITY LEVEL(2/3)
The humiditylevel can be set in 5% incrementsin
a range from 35% to 80%. The humiditysetting
isshownin the digital display. When the humidi-
ty level of the room reaches the set level, the
compressor will stop,but the fan will continue
operating for 3 minutes.To set the unitto continu-
ousoperation, pressthe clownarrow button until
the display shows35%. Pressagain and thedis-
play will showCO. The Continuousindicator (13)
will light up on the control panel. To leave contin-
uousoperation, pressthe UParrow.
To checkthe current humiditysetting, pressthe up
or down arrow. The display will showand set 5%
above or below the currentsettings.
FAN SPEED(5)
PressFan Speed to toggle between Low,Med,
and Highfan speeds.Speed will be shownin FAN
SPEEDINDICATOR (8)
BUCKETFULLINDICATOR (11)
When the collection bucket isfull, the BUCKET
FULLIndicator (11)will light up and you will hear
an audible alarm. The audible alarm will lastup
to ten secondsThe dehumidifier will not rununtil
the bucket is removed, emptied and replaced.
(3) (1) (6)
DELAY START (4)
Unit can be programmed to turn on at a desired
delay time by pressing the Timer (4) key. When
the unit is powered OFF, press the timer key once
for 2-hour delay start. The 2 Hrs (7) timer indica-
tor will light up when the timer key is pressed.
Pressthe timer key once more for a 4-hour delay
start. The 4 Hrs (7) timer indicator will now light
up. Pressthe timer key a third time to clear the
timer setting. No timer indicators will light up
when the timer setting is cleared.
AUTO SHUT-OFF (4)
Unit can be programmed to turn off at a desired
time by pressing the Timer (4) key. When the unit
is powered ON, press the timer key once for 2-
hour automatic shut-off. The 2 Hrs (7) timer indi-
cator will light up when the timer key is pressed.
Pressthe timer key once more for a 4-hour auto-
matic shut-o_. The 4 Hrs (7) timer indicator will
now light up. Press the timer key a third time to
clear the timer setting. No timer indicators Will
light up when the timer setting is cleared.
FILTERRESET(12)
The FILTERRESETindicator (12) will light up when
the filter needscleaning. Removethe filter and
clean accordingly. Replace the filter when fin-
ishedand pressand hold the FILTER(6) key upto
5 secondsto resetthe filter indicator.
IMPORTANT.
Once the set humidity level isreached, the
compressorwill shutoff. The fan will contin-
ueto runfor up to 3 minutes.
• Anytime the compressorstopsrunning for
any reason, it will not restart for a minimum
of 3 minutes.Thisisa design feature to pro-
tect the compressorfrom damage.

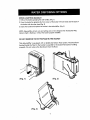
OPTION 1"EMPTYING MANUALLY
1. Pull out the bucket, grasping the side handles. (Fig. 1)
2. Carry the bucket by grasping the front corner of the bucket with one hand and the back of
the bucket with the other hand( Fig. 2)
3. Empty the bucket and replace the bucket in the dehumidifier. (Fig. 3)
NOTE: Dehumidifier will not work and settingscan not be changed when the BUCKETFULL
indicator light is flashing or without the bucket properly installed.
DO NOT REMOVE THE STYROFOAM IN THE BUCKET
This dehumidifier is equipped with a reliable Styrofoam float system. The Styrofoam
located inside the float in the bucket is essential to the bucket full system working
properly. Do not remove the Styrofoam from the float.
(Fig. 1)
L
(Fig. 2)
(Fig. 3)

Step 2=Open the drain connector door. (Figl 6)
I
I
]
1
l
(FIG. 6)
Step 3= Install and secure the drainage joint onto the drain connector. (Fig. 7)
(FIG. 7)
Step 4= Place large hose clamp on the fiat end of the dehumidifier drain hose. (Fig.
s)
/
(FIG. 8)

Step 5- Insert the drain hose onto the drainage joint so that it is fully seated. (Fig. 9)
(FIG. 9)
Step 5; Secure hose by pushing large hose clamp towards the drainage joint. (Fig.
lo) !
r
_'__ (FIG. 101
Step 6. Place bucket in the dehumidifier for operation. (Fig. 11)
(FIG. 11)
9

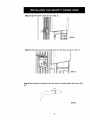
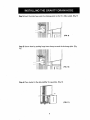
OPTION 3: EXTERNALVERTICALPUMP
INSTALLING THE _RNAL PUMP
Step 1: To install Dehumidifier Drain Hose, refer to Gravity
Drain Using Dehumidifier Hose instructions starting on page 9.
Step 2= For optimal operation, it is recommended that the
pump is placed on a fiat and level location. Attach the water
pump to a wall or other perpendicular fiat surface with the
included screws for security. (Fig. 12)
Step :3. Remove red cap from drain hose connector on pump.
Attach the small drain hose clamp onto the pump drain hose.
(Fig. 13)
(FIG. 13)
]0

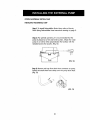
Step 4= Insert pump drain hose onto pump connector until it is
fully seated. Secure hose by pushing small clamp forward
towards the pump. (Fig. 14)
\
\ ! /t
(FIG. 14)
Step 5. Secure hose by pushing small clamp forward towards
the pump. (Fig. 15}
fi
tt
(FIG. 15)
Step 6. Insert the angled end of the dehumidifier drain hose
into the water pump tank. (Fig. 16).
___ •
(FIG, 16)
])

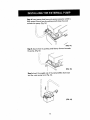
NOTE- Make sure the drain hose is lower than the horizontal plane of the drain on
the dehumidifier as seen in the illustration below. Drain hose should be as short as
possible and all kinks in the drain hose should be eliminated for proper pump opera-
tion.
3ft. Dehumidifier Drain Hose
i
i
i
!
|
(FIG, t7)
NOTE- If you need to cut the dehumidifier drain hose, only cut on the fiat end of the
hose. Do not cut the angled end as it isdesigned for insertion into the pump.
4
X
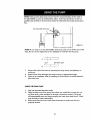
CUT DO NOT CUT
J
1. Remove flat end of the hose by squeezing the large clamp and pulling it to-
ward you.
2. Remove hose from drainage joint and cut hose to appropriate length.
3. Once cut is completed, refer to installing the Drain Hose to re-install dehumid-
ifier drain hose.
USING THE DRAIN PUMP
1. Plug into grounded electrical outlet.
2. Place the other end of the pump hose where you would like to empty the wa-
ter (floor drain, water container or through a basement window). The pump
will automatically start and begin pumping the water that drains into it. Check
hose for kinks or other obstructions.
3. Before and after each use, check hose connections to make sure they are
properly secured.
12

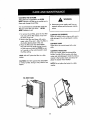
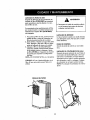
CLEANING THE AIR FILTER
After 250 hoursof operation the FILTER
RESETindicator will light up to remind you to
clean and change the air filter.
it isrecommended to periodically checkthe
filter for excessdirt evenif the FILTER
RESETindicator isoff.
1. To remove the air filter, press the two filter
tabs and pull the filter holder away from
the back of the unit.
....2. Remove the filter and clean with warm,
soapy water. Rinse and allow the filter to
dry before placing back in the unit.
3. Place the filter back into dehumidifier.
Plug unit back into outlet_ power the unit
on and press and hold the FILTER key up
to 5 seconds on the control panel to reset
the filter setting.
NOTE: DO NOT place the filter in a dish-
washer
CAUTION: DO NOT operate the dehumidifi-
er without a filter, Doing so may cause a unit
failure.
WARNING
• Disconnect power supply cord from re-
ceptacle before performing any mainte-
nance.
CLEANING THE EXTERIOR
Clean the cabinet using a damp cloth and a
mild detergent. Do not use bleach or abra,
sires.
CONTROL PANEL
Wipe down the control panel with a dry
cloth.
CLEANING THE BUCKET
Every few weeks, clean the dehumidifier
bucket. Partially fill the bucket with clean
water and mild detergent. Swish the mixture
around in the bucket, empty and rinse. Re-
place the bucket when finished
NOTE: Do not place the bucket in a dish-
washer.
FILTER TABS
\
]3

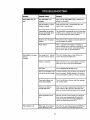
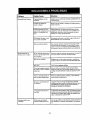
Problem
Dehumidifier does not
start.
PossibleCauses Solutions
Dehumidifier is not oper-
ating as
Intended.
The dehumidifier is un-
plugged.
Filter indicator is lit.
The fuseis blown / circuit
breaker is tripped.
Dehumidifier has reached
the userset humiditylevel
or the bucket isfull.
Make sure the dehumidifier's p[ug is pushed com-
pletely into the outlet.
Check the house fuse / circuit breaker box and
replace fuse or reset breaker.
i ,,,,,,IIHIH,,,
The dehumidifier automatically turns off when either
condition occurs. Change to a lower setting or emp-
ty the water bucket and replace properly.
Bucketis not in the proper Thebucket must bein place and securelyseatedfor
position, the dehumidifier to operate.
Power Failure.
Not enough time allowed
for unit to remove moisture.
There isa protective time delay of 3 minutesto
prevent tripping of the compressor overload. Forthis
reason, the unit will not start normal dehumidifica-
tion for 3 rain. after it is powered back on.
When first installed, allow at least 24 hours to
achieve the desired humidity level.
Airflow is restricted. Make sure there are no curtains, blinds, or furniture
blocking the side or back of the dehumidifier.
See the Cleaning The Air Filter sectionDirty filter.
The user set Humidity Level
may not be set low enough.
Doors and windows may
not be closed tightly.
Water is not draining
ithrough drain hose
Room temperature is too
low.
Filter needs to be cleaned
every 250 hours of use.
To reduce moisture, press the down arrow button to
lower the percent humidity desired in the room, or
set the dehumidifier to CO for continuous operation.
Checkthat all doors,windows, and otheropenings
are securely closed.
i , i ii lll,l,lrllll i r ii i
Make sure the drain is placed below the drain con-
nector nozzle to a!low gravity to drain the water
i (Refer to Gravity Draln Hose section in this manual).
i, ,! ,, r lrl iHi r i r
Moisture removal _sbest at higher roam tempera-
tures, Lower room temperatures will reduce the
moisture removal rate. This model is designed to
operate at temperatures above 41°F.
Once filter has been cleaned, pressthe FILTERbut-
' ton for 3 seconds to turn the filter indicator off.
14

i.I....... ,,,...,r.............
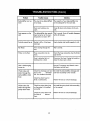
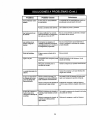
Problem
Dehumidifier runstoo
much
Frostappears on the
coils
Controls cannot be set
PosdbleCauses
The area to be dehumidified
istoo large.
Doors and windows are
open.
The dehumidifier has recently
been turned on or the room
temperature is below 41°F.
Bucketisfull or it has been
removed.
Fan Noise
Water on the floor
Unit is discharging
warm air
i,,,,,,,,
Water does not
drain through the
dehumidifier drain
hose
Water does not
drain through the
pump drain hose
Air is moving through the
unit.
i ,,i,,
Hose connection may be
loose.
Hose isattached but not
draining into a drain
,,,,i , , ,,,,
Check the drainage joint and
hose on the dehumidi-
fier. Is it installed correctly?
Check the drain hosefor
kinks or obstructions.
Check the pump drain hose
on the pump. Is it installed
correctly?
Check the pump drain hose
for kinks or obstruc-
tions.
Solutions
The capacity of your dehumidifier may
not be adequate for the room size.
Closeall doorsand windows to the out-
side.
Thisis normal. Frostwill usuallydisappear
within 60 minutes.
Empty bucket and instaltproperly in unit.
This is normal.
Check the hose connection.See the Drain-
age Section
, ,,,,,,,,,u........... ,,,,,,
Disconnect the hose if usingthe bucket or
place the hose near a drain.
Normal: Compressor and electric motor
discharge nominal heat.
................. , ,,,,,, ,,,,,,
Re-install the dehumidifier drainage joint
and hose according to the manual.
Flatten the hose or remove blockage.
Re-install the pumpdrain hose according
to the manual.
Flatten the hose or remove blockage.
]5

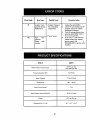
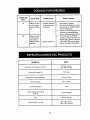
Error Code
F1
Error Type
H
Ambient Tem-
perature Sensor
Malfunction
Possible Cause
1. Sudden Change in
the surrounding
temperature.
2. Faulty Sensor
Corrective Action
,,ll , iiml ,, ,,,,
1. Unplug the dehumidifier.
2. Check the surroundingarea for
possible reasons for sudden
temperature changes.
3. Wait 30 minutes before plug-
ging the dehumidifier back in
for normal operation. .-
F2
Pipe Tem-
perature
Sensor Mal-
function
4_
If the "Error" is stillindicated,
please contact your nearest
servicecenter. Call 1-
800-488-1222 for servicecenter
locations.
ITEM #
Moisture Removal per 24 hours
PowerConsumption(W)
BucketCapacity
PowerSource
RatedCurrent(Amps)
SoundPressureLeveldB(L/M/H)
Weight
Dimensions(W x Dx H)
rm ml ml
53571
70 Pints per day
(32.9Litersperday)
745 Watts
17Pints(8 Liters)
115V / 60 HZ
7,3A
45/47/49 dB(A)
47.7 Ibs(21.6kg)
15,1" x 11.7"x 24.1"
16

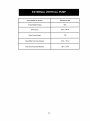
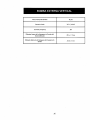
Pump capacity per 24 hours
Vertical Height Pumping
Power Source
Rated Current (Amps)
Dehumidifier Drain Hose Diameter
Pump Drain Hose Inside Diameter
,,,,,u,,,,,,
304 pintsper day
16 ft.
i,l,,,,, L
115v / 60 HZ
,12A
.50 in./ 13mm
,20 in / 5 mm
17

Master Protection Agreements
Congratulations on making a smart purchase. Your new Kenmore® product is de-
signed and manufactured for yearsof dependable operation. But like all products, it
may require preventive maintenance or repair from time to time. That's when hav-
ing a Master Protection Agreement can save you money and aggravation. The
Master Protection Agreement also helps extend the life of your new product. Here's
what the Agreement* includes:
[]
[]
[]
[] Parts and labor not just for repairing defects, but to help keep products oper-
ating properly under normal use, Our coverage goes well beyond the prod-
uct warranty, No deductibles, no functional failure excluded from coverage--
real protection.
[] Expert service by a force of more than 10,000 authorized Sears service
technicians, which means someone you can trust will be working on your
product.
Unlimited service calls and nationwide service, as often as you want us,
whenever you want us.
"No-lemon" guarantee - replacement of your covered product if four or more
product failures occur within twelve months.
Product replacement if your covered product can't be fixed.
Annual Preventive Maintenance Check at your request - no extra charge.
Fast help by phone - we call it Rapid Resolution - phone support from a
Sears representative on all products. Think of us as a "talking owner's manu-
al."
[] Power surge protection against electrical damage due to power fluctuations.
[] $250 Food Loss Protection annually for any food spoilage that is the result of
mechanical failure of any covered refrigerator or freezer.
[] Rental reimbursement if repair of your covered product takes longer than
• promised.
[] 10% discount off the regular price of any non-covered repair service and re-
lated installed parts.
Once you purchase the Agreement, a simple phone call is all that it takes for you to
schedule service. You can call anytime day or night, or schedule a service appoint-
ment online.
The Master Protection Agreement is a risk free purchase. If you cancel for any rea-
son during the product warranty pedod, we will provide a full refund. Or, a prorated
refund anytime after the product warranty period expires. Purchase your Master
Protection Agreement today!
Some limitations and exclusions apply. For prices and additional information
in the U.S.A. call 1-800-827-6655.
Sears Installation Service
For Sears professional installation of home appliances, garage door openers, water
heaters, and other major home items, in the U.S.A. or Canada call 1-800-4-MY-
HOME®,
]8

Contenidosde la Caja .............................................19
Garanffa ...................................................................20
Instrucclones de Seguridad.....................................20
RequisitesEl_ctficos...............................................21
Sacando la Bomba del Contenedor. .....................22
Instalaci6n ................................................................23
Caracter/sficas Importantes ..................................24
Panel de Control.......................... _........................25
Opciones para El|minor e! Agua.........................26
InstalandoMangueraDrenajeparGravedad........... 27,28
Instalando la Bomba Externa .................... .29,30
Usando la Boml0a......................................... 31
Culdado y Mantenimiento ........................ 32
Solucionesa Problemas............................... 33,34
C6digospar Errores............................... 35
Especificaciones del Producto.................... 35,36
Acuerdo de Protecci6nM6ster.................. 37
Serviclo Sears..................................Contraportada
• DeshumidiflcadorKenmore * BombaVertical Externa
.....• Manguera de 3 piespora Drenar Deshumidificador * Manguera de 10 pies para Bomba Drenaje
• Un_,6nde Drena,_e,2 Abrazaderas para Manguera, 2 Torn|lies. * Guia de Usay Culdados.
Garanffa Llmltada Kenmore
Cuando la instalacibn, uso_y mantenimiento esde acuerdo a todas los instrucciones suministradas y este electro-
dom_stico falla debido a mater|ales defectuosos y/o manufactura dentro de un aria de la fecha de €ompra, par
favor Ilamar 1-800-4-MY-HOME_ (1-800-469- 4663) para coordinar la reparaci6n gratis. SIeste electrodom_s-
rico no es usado para prop6sitos privados familiares, esta garantla aplica solamente par 90 dlos desde la _echa
de compra.
Estagarant[a cubre 0ntcamente defectos en los material yio manufactura. La cobertura de garantfa NO Incluye
Io stgulente
1. Los arffculos y partes que pueden toner descjaste par el usa normal° inctuyendo y sin limitar los filtrosa
coffees0 bombillas, y balsas.
2. Un t_cnico de servlcio para instruir al usuario en to instalaci6n correcta det producto, su user o manteni-
miento.
3. Un t_cnico de servlclo para limpiar odar mantenirniento a este producto.
4. Los dories o folios de este producto sila instalaci6n, usa o mantenim|ento no est_n de acuerdo o todas
I_s instrucciones surnlnlstradas con eI producto.
5. Los dares o fallas a este producto coma resultado de un accidentet abuso_ usa indebido o los uses que
no sean los indicodos.
6. Dafios o folios de este producto causados par el usa de detercjentes_ iimpiadores, utensilTos, o quimlcos
que no sean |as recomendados en todas Jas instruct|ones sumlnistradas con este preducto.
7. Dories e fa!las de partes o sistemas coma resultado de modificaciones no outorlzadas a este producto.
Descargo de garant|as impllcitas; Ilmitadones de recursoslegates
Etrecurso legal y exclusive del ciie_te bajo esta garanffa |imitada ser6 la reparoci6n del producto coma se
estipula en este manual del propietario. Los Garantlas irnplicitas, incluyendo garantias de comerclabilidad o
adaptabiIidad para un prop6sito particular, est_n limitadas a un a_o o al per|ode mos carte permit|do par la
ley. S_ars no set6 responsable par dafios incldentales o consecuentes. AtcJunosestados y provincias no permiten
la exclusi6n o limTtaci6n de dates incidentales o consecuentes, o los limltaciones en la duraci6n de ¢jaranffas
irnpiicitos de cornerciobilidad o adaptabiIidad, par Io tanto estos exclusiones o limltaciones podr{an no aplicar
para usted.
_sta garanfia aptica solamente cuando este electrodom6stico es usado en los EEUU.
Pstogaranffa le da austed derechos lecjaLes especificos, y usted podria tenor aires derechos que var{an de
estado a estado.
Sears BrandsManagement Corporation_Hoffman Estates,IL60179
19

PRECAUCIONES IMPORTANTESCUANDO USESU DESHUMIDIFICADOR.
Para reclucir el riesgo de incendior descarga el_=trlca, lesiones o dafio a los deshum[dificadores,
estas precaucJones de seguridad se deben seguir:
Seguridad
• No coioque el cable el_ctrico cerca de un ca-
lentador.
° No use un tomacorriente cerca de materiales
combustibleso inflamables como gasotina, gas
propano, disolvente de pinturas,etc.
• No desarmar o modificar partes o componentes
det deshumidificador. Esto podria causar una
descarcja el_ctrica y la falla de la unidad.
• Enchufe el cable el@ctricoapropiadamente.
• No encienda o apague la unidad desconectan-
do o conectando el enchufea untomacorriente.
• No dafie et cable el_ctrico o use un cable el_c-
trico no especificado.
• No modifique la Iongitud del cable el_ctrico.
• No comparta el uso del toma corriente con
otros electrodom_sticos.
• Siempre enchufe el cable a un tomacorriente
con contacto tierra. Si no hay contacto tierra
podrfa provocar una descarga el_ctrica.
• Desconecte ta unidad si emite sonidos extra_os,
ol0res,o humo.
•• No utitice un toma corriente que este flojo o
da_ado.
• No opere o conecte la unidad con las manos
mojadas o en un medio ambiente mojado.
• Ventile el 6rea antes de usar el deshumidifica-
dor. Revise sihay presencia de gas natural o la
acumulaci6n de otros vapores combustibles.
• No limpie el deshumidiflcadorcon agua. El
agua podria entrar on el interior de la unldad y
degradar el material aislante resultando en
descarga el_ctrica.
oSi el agua seintroduce dentro de la unidad,
apague el bot6n de encendido del deshumidifi-
cador y desconecte la unidad. No conecte la
unidad hasta que sea inspeccionada por un
agente de servicioautorizado.
• Debldo a que el ventilador gira a altas veloci-
dades durante suoperaci6n, siempredesconecte
el deshumidificador antesde intentar cualquier
mantenimiento recomendado o llmpieza del
unidad.
• No bloquear las entradas o salidasde la uni-
dad. Podria causar la falla o el funcionamiento
2O
• No desconecteet enchufedel toma corriente
tirando del cable.
• Apague la unidad cuando no este en uso, esto
le ahorrara energia. Desconecte el deshumidi-
ficador cuando no este en uso por largos
periodos de tiempo.
• Cuando quite el filtro, tenga en cuenta que
algunas partes met61icas podrian tener bordes
afilados que le podr_an causar lesiones.
• No useel agua colectada on el contenedor
de agua para beber. No essaludabte y puede
causar enfermedades.
• No permita que los ni_osjueguen con este
producto.
Consejos0tiles
• Aseg6rese de que el tama_o del deshumidffl-
cador es el correcto para el 6rea que usted
quiere deshumedecer.No esta dise_ado para
deshumedecertoda la casa.
° Para el funcionamiento apropiado, el deshu-
midificador debe sercolocado en un piso
nivelado.
• Cierre todas las puertas,ventanas,y otras
aberturas de la habitaci6n. El deshumidifica-
dor debe operar en un _rea cerrada para que
sea efectivo.
• Para limpiar la unidad useuna toalla suave;
no usecera, disolventes,o detergentes fuertes
ya que podrian cambiar el color o dafiar el
superficiede la unidad.
• Aseg0rese de colocar el contenedor de agua
apropiadamente despu_s de vaciarlo para
prevenir el derrame de agua enel piso ya que
podria causar da5os a ciertas clases de pisos.
• No ponga una mascota o planta donde esta-
rian expuestos directamente al flujo de aire.
Esto podria lesionar o da_ar la mascota o
planta.
• Laoperaci6n de la unidad sin el filtro causara
fallas a la unidad. Inserte el flltro de farina
segura. Limpie el filtro cada 2 semanas. (Ver
la secci6n de Cuidados y Mantenimiento en
este manual.)

OBSERVETODAS LAS ORDENANZAS Y
CODIGOS LOCALES.
BAJO NINGUNA ClRCUNSTANCIA, REMUE-
VA O QUITE LAPATILLADE CONTACTO
TIERRJ_DELCABLEDESUMtNISTRO ELEC-
TRICO.
ELCONTACTO ELECTRICOTIERRASE RE-
QUIERE EN ESTEELECTRODOMESTICO.
TAMBIEN ESREQUERIDO LO SIGUIENTE:
SUMINISTRO ELECTRICODE115-VATIOS
60Hz, SOLO AC, FUSIBLEDE 1SAY EL
CONTACTO TIERP,A APROPIADO.
Se recomienda un fusible cortacircuJtos con
demora de tiempo oun interruptor cortacir-
cuitos con demora de tiempo. Use un circuito
dedicado solamente para esta unidad
Enchufe de 3 Clavijas
(Sablede Sum_nistro
NO USEEXTENSIO.
NES.
tl
Tomacorrlente Con Con-
tacto Tierra paro 3 Cla-
vijas
METODO DECONTACTO TIERRA
RECOMENDADO
Para su secjuridad personal, este electro
domestico debe tener contacto tierra. Este
electrodom_st|co tiene un cable de suminis-
tro eI6ctrico con 3-clavijas con contacto
tierra. Para minimizar pos|ble pelicjro de
descarga ei6ctrica, eJcable el6ctrico debe
estar conectado a un torna corriente el6ctri-
co correspondiente que cumpJa con la ultima
edici6n de National Electrical Codes
(C6digos EI6ctricos Nacionales) y con los
c6dicjos y ordenanzas locales.
Si un tomacorriente de 3 entradas con con-
tacto tierra no esta disponible, es responsa-
bilidad y oblicjaci6n personal del cJiente
|nstalar uno par un etectricJsta calJficado
PELIGRO DE DESCARGA ELECTRICA
ADVERTENCIA
IIIII I1| III
i ii
• Conectar a un toma corriente de 3 entra-
das con contacto tierra.
• No cjuite ia clavija de contacto tierra del
enchufe.
• No use un adaptador.
• No use una extensi6n para suministro__I
el_ctrico.
• El no seguir estas instrucciones puede
resultar en muerte, |ncendio, o descarcja
el6ctrica.
2!

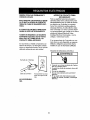
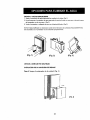
Paso 1=Saque el contenedor del deshumidificador (Fig. 1)
Paso 2: Localice la manija. Saque la manija del contenedor tirando tigeramente
de un lado del soporte de-la manija y ievante la manija. (Fig. 2)
Paso 3: Quite la cinta adhesiva protectora. Empuje las cejillas traseras del contene-
dor hacia adentro y levante el cobertor del contenedor. Saque la bomba, mangue-
ras, y la bolsa que contiene las abrazaderas de manguera, los tornillos de ta born-
ba, y el conector de drenaje. (F
FRENTE
PARTE DE ATRAS
CUIDADO
Pot favor sea cuidadoso cuando saque losmateriales y
partes. No dafie el flotador en el contenedor.
(FIG. 3)
Paso xl=Inserteel frente del cobertor del contenedor,y despu_s la parte de atr6s. Elcober-
tor estar6 segurocuando las cejillasdeatr6s secierren a presi6nen sulugar. Para re-
instalar la maniia, inserteun lado en el soporte de la manija y despu_sligeramentetire el
otro soporte para insertar el otro lado de ia manija. Inserteel contenedor dentro det deshu-
midificador. (Fig. 4)
(FIG. 4)
22

Antes de la instalaci6n, saque la bombay
los accesorios Iocalizados dentro del con-
tenedor del cleshumidificador (ver pagina
5).
O
lnstale el deshumidificador sobre un piso
nivelado y Io suficientementefuerte para
soportar la unidad con el contenedorde
acjua Ileno.
Para obtener un me]or rendimientot permi-
ta por io menos de 12 a18 pulgadas de
espacio alrededor de la unidad para una
buena circulaci6n del aire.
Mantenga todas las puertas exteriores,
ventanas, y otras aberturas cerradas
cuando el deshumidificador esta en uso. El
aire hOmedo del exterior aumentara la
carcja de traba]o para la unidad.
• Mantenga la unidad en posici6nvertical
por 30 minutos antes de encenderla.
OPERACION DE
DI:SCONGELAMIENTO
E1deshumidificador tiene un control de des-
concjelado incorporado que detecta la acu-
mulaci6n de hieloiescarcha en las bobinas
del evaporador
Durante el desconcjelamientot el compresor
se apagara autom6ticamente y el ventilador
continuara funcionado para descongelar las
bobinas.
ELIGIENDO LA UBICACION
ADECUADA
Use el deshumidiftcador:
• en el s6tano para ayudar a prevenir
dafios por la humedad.
• en la cocina, cuarto de lavander_a, cuar-
to de bafio, yen las a_reas de e]ercicio/
spa que tienen humedad excesiva.
• para prevenir dafios pot humedad en
cualquier lugar donde libros y ob]etos de
valor son almacenados.
• durante la construcci6n o remodeJaci6n s
para reducir el tiempo de secado de
paredes pintadas o tratadas con recul0ri-
mientos, sin embargo, aseg_rese de revi-
sar y limpiar el filtro frecuentemente.
APAGADO AUTOMATICO
• Cuando el contenedor de agua esta iieno,
o cuando el contenedor de agua no esta
en Ja posici6n correcta la luz indicadora
de BUCKET FULL (contenedor lleno de
acjua) se encender6 y usted escuchara la
alarma audible por 10 secjundos. La uni,
dad se apacjara autom_tJcamente.
• El contenedor debe ser colocado en la
posici6n apropiada para que el deshumi-
dificador funcione. La luz de BUCKET
FULL (contenedor de agua lleno) perma-
necer6 encendida y el deshumidificador
no funcionara si el contenedor de agua no
esta en la posici6n apropiada.
• El deshumidiflcador se apagara cuancio
alcance la configuraci6n de humedad
deseada, hasta mas Q menos el 5% de ia
humedad relativa (RH).
' ' _ iiii
ii i fl ii i i f f • ilia ii n
ADVERTENCIA
Jl rZILI I III ] I Jill I
Para reducir el riescjo de incendio, descarga el_ctrica, o lesiones a personas, es importante
que usted lea toda la informaci6n referente a INSTRUCCIONES DE SEGURIDAD en la pagi-
na 3 antes de usar este electrodom_stico.
i i iiii ii iiiiii i i iiii rlllrlllll
23

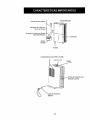
Cable de Suministro El_ctrico
Deshumidificador
Manguera de 16 pisepara
Bomba de Drenaje
Manguera de 3 pies para Drenaje
del Deshumidiflcador
Contenedor
Bornba
Vertical
1
Ruedas
Compartimlento para Filtro Lavable
Panel de Control
Cable de Suministro
El_ctrico
Manija
I
Puerta de Conector para
Drenaje Continua
24

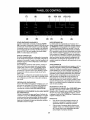
(1.0) (11) (12) (13)
(4) (5) (2)
POWER (ENCENDIDO/APAGADO) (I)
Cuando la unidad esta conectada, el indicador POWER
(10) se encender6. Presionando el bot6n de POWER una vez
eneender_=la unidad (ON) iluminado la pantalla digital(g).
La pantalla mostrara el ntvel de humedad en la habitaci6n
en incrementos del 5% hasta ltegar a120%. Presionado el
bof6n de POWER de nuevo apagara la pantalla digital
(OFF) y {a unidad dejara de funcionar.
NIVEL DE HUMEDAD (2/3)
El nivel de humedad puede ser canfigurado on incrementos
de 5% desde 35% basra 80%. La humedad conflgurada so
mostrara en la pantaila. Cuando el nivel de humedad en la
habitac{6n alcanza el nivel conflgurado, la unldad dejara
do deshumidificar.
Para eonfigurar la unidad en modo continua, presione el
bot6n con la tlecha hacia abajo hasta que la pantalla
muestre 35%. Presionede nuevo y la pantalla mostrara
"CO", El indicador de continua (CONTINUOUS) (13) se
encender6 en el panel de control. Para flnaiizar la opci6n
de operaci6n continua, presione el bot6n con la flecha
hacia arriba.
Para revisar la configuraci6n de humedad actual_ presione
los botones hacia arriba o hacia abajo, Lo pantalla mostra-
ray configurara con el 5% mas o menos de la conflgura-
ci6n actual.
VELOC1DAD DELVENTILADOR (5)
Pres[one FAN ,SPEED(Velocidad del Ventilador) para cam-
biar entre las velocidades LOW (Baja), MED (Mediano)t y
HI (Alto). La velocldad se rnostrara on el indicador de
veloctdad del ventitador (FAN ,SPEED INDICATOR) (8)
INDICADOR DE CONTENEDOR DE AGUA LLENO (BUCKET
FULL INDICATOR) (11)
Cuando el contenedor de agua esta lleno_el indlcador de
conteneder de agua lleno (BUCKET FULL)(1t) seencenderg
y usted escuchara una alarma audible. La alarrna audible
durara diez segundos. El deshumidificador no funcionara
hasta que ei contenedor do agua sea removido, vaciado, y
colocado de nuevo en su tugar.
(3) (1) (6)
INICIO RETRASADO(4)
La unidad puede set programada para funcionar en el
tiempa retrasado deseado. Presionando el bot6n temporlza-
dor (TIMER) (4), Cuando ]a un[dad este apagada pres[one
el bot6n temporizador (TIMER) una vez para 2 horas de
inicio retrasado. El indicador de temporizador de2 horas
(7) se encender_ cuando el bot6n temporizador esta presio-
nado, Preslone e| bot6n temporizador una vez mas para el
inicio retrasado de 4 horas (7), EI indicador de temporiza*
dor de 4 horas (7) se encender6. Presione el bot6n tempori-
zador par tercera vez para cancelar la conflcjuraci6n de
temporizador. Los indicadores de temporizador no se en-
cender6n cuando la configuraci6n de temporizador ha sido
cancelada,
AUTO APAGADO (4)
1.a un_dad puede ser programada para apagarse a la hora
deseada presionado el bot6n temporlzador (TIMER)(4).
Cuando ia unidad esta encendida_ presione el bot6n tempo-
r|zador (TIMER) una vez para el apagado autom_t_co en 2
horas. La luz indicadora de temporizador de :2 horas (7} se
encender_l cuando el bot6n ternpor_zador esta pres_onado.
Presione el bat6n temporizador una vez mas para el apa-
cjado autom6t|co en 4 hams (7}. La |uz ind[cadora de
tempodzador de 4 horas (7) so encender_. Presiane el
bot6n temporizador per tercera vez para cancelar ta confl-
guraci6n dei temporizador. Los iuz indicadora de tempori-
zador no se encender_ cuando ia conflgurac[6n de tempori-
zador ha sido cancelada,
REAJUSTANDO ELFILTP_O(12)
La luz indicadora de reajuste de filtro (FILTER RESETlnd|ca-
dot) (12) seencender_ cuando el fl|tro requlera limpieza.
Remueva el filtro y ffmplelo come seindlca. Coloque el fiffro
de nuevo en su iucJar cuando finallce la limpieza, pres[ane
y detenga el bot6n de filtro FILTER(6) par 5 segundos para
reajustar el indlcador de fiffro.
IMPORTANTE:
• Una vez que el nivel de humedad se alcanza, el
cornpresor seapagar_=. Elventtlador continuarg
funcionando durante un m6ximo de 3 m_nutos.
= Cada vez que el eompresor deja de funcionar per
cualquier raz6n, no se reinlclar_ durante un minima
de 3 minutos. Esta es una caracteristica de disefio
para proteger ei compresor de dafios.
25

OPCION b VACLARMANUALMENTE
1. Saque el contenedor de aguat acjarrando las manijas de los tados. (Fig. 1)
2. Lleve/transporte el contenedor de agua acjarrando la esquina frontal con una mano y ta parte trasera
del contenedor con la otra mano. ( Ficj, 2)
3. Vacfe el contenedor y col6quelo de nuevo en el deshumidificador. (Fig. 3)
NOTA_ El deshumidificador nofunclonara cuando la luz indicadora de contenedor Ileno(BUCKETFULL)
esta encendtda o siel contenedor noesta colocado apropladamente.
(Fig. 1) (Fig. 2)
(Fig. 3)
OPCION 2; DRENAJE POR GRAVEDAD
INSTALACION DE LA MANGUERA DE DRENAJE
Paso 1; Saque el contenedor de la unidad. (Fig. 5)
(FIG. 5)
26

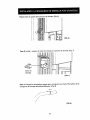
Paso 2=Abra la
auerta det conector de drenaje. (Fig. 6)
i
1 I
!
i
:=
=
i
(FIG. 6)
Paso 3: Instale y asegure la uni6n de drenaje al conector de drenaje. (Fig. 7)
l
i •
Uni6n de
Drenaje
(FIG, 7)
Paso 4: Coloque la abrazadera grande para manguera al extremo final piano de la
manguera de drenaje del deshumidificador. (Fig. 8)
9 ...... _ _
j"
S
I
2
(FIG. 8)
27

Paso 5: lnserte ia manguera de drenaje a to uni6n de drenaje para que este comple-
tamente asentado. (Fig. 9)
II !I
ii !!ili ili!_:,_,-41i
(FIG. 9)
Paso 6=Asegure la manguera empujando la abrazadera grande para manguera
hacia la uni6n de drenaje. (Fig. 10)
(FIG. 10)
Paso 7-- Coloque el contenedor en el deshumidificador para su funcionamiento.
(Fig. 11)
(FIG. 11)
28

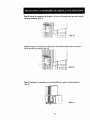
OPCION 3: INSTALANDO LA BOMBA EXTERNA
Paso 1: Para instatar ia Manguera de Drenaje del Deshumidifi-
cador, refi_rase alas instrucciones de Drenaje por Gravedad
Usando la Manguera del Deshumidificador en ia pagina 9.
Paso 2: Para el optimo funcionamiento, se recomienda que la
bomba sea colocada sobre una superficie plana y nivelada.
Atornille la bomba de agua a una pared o alguna otra super-
.....Écie plana perpendicular usando lostornillos para mayor
seguridad. (Fig. 12)
ii Tomillos ' ii (FIG. t2)
Paso 3: Quite el tap6n rojo del conector de manguera de
drenaje de la bomba. Coloque la abrazadera pequefia de la
manguera de drenaje a ia manguera de ta bomba de drena-
je. (Fig. 13)
\\
(FIG. 13)
29

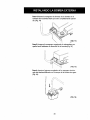
Paso _- Inserte la manguera de drenaje de ta bomba en el
conector de la bomba hasta que este completamente asenta-
da. (Fig. 14)
Paso 5: Asegure la manguera empujando la abrazadera pe-
quefia hacia adelante en direcci6n de la bomba.(Fig. 15)
J
...... I!FI
Jr
(FIG. 15)
Paso 6.. Inserte el extremo angulado de la manguera de dre-
naje dei deshumidiflcador en el tanque de la bomba de agua.
(Fig. 16).
(FIG. 16)
3O

NOTA= Aseg0rese de que la manguem de drenaje esta mas aba]o del piano horizon-
tal del drenaje en el deshumidificador como se muestra en la ilustraci6n de abajo. La
manguera de drenaje debe ser Io mas corta posible y los dobleces se deben eliminar
para el funcionamiento apropiado de la bomba.
Manguera de 3 piespara Drenaje del
Deshumidiftcador
(FIG. 17)
NOTA= Si usted necesita cortar la manguera de drenaje, solamente corte del extre-
mo piano de ta manguera.No corte el extremo angulado ya que esta disefiado para
ser insertado en la bomba.
.I I j :IL 9
CORTAR NO CORTAR
t. Quite el extremo piano de la manguera apretando la abrazadera grande y
tir6ndola hacia usted.
2. Quite la manguera de la uni6n de drenaje y corte la manguera a ia Iongitud
apropiada.
3. Una vez completado el corte, refi_rase a "Instalando la Manguera de Drena-
je" para re-instalar la manguera de drenaje del deshumidificador.
NOTA_ Si el extremo angular que tiene como prop6sito ser insertado en la bomba
es cortado por accidente, la manguera debe tenet un extremo angulado para ei_
apropiado drenaje del agua.
USANDO LA BOMBA DE DRENAJE
1. Enchufe la bomba a un toma corriente con contacto tierra.
2. Coloque el otro extremo de la manguera de la bomba donde usted quiere
vaciar el agua (drenaje de piso, contenedor de agua, o a tray,s de una ven-
tana de s6tano). La bomba iniciara y comenzara autom6ticamente a born-
bear el agua que drene. Revise que I0 manguera no tenga obstrucciones o
algOn doblez.
3. Antes y despu_s de cada uso, revise las conexiones de la manguera para veri-
ficar que esta apropiadamente segura y en su lugar.
31

LIMPIANDO ELFILTRO DE AIRE
Despu6s de 250 horas de usael indicador de
reajustar el filtro (FILTERRESET)se encender6
para recordarle a usted de limpiar y/o cam-
biar el filtro de aire.
Se recomienda revisar peri6dicamente el fittro
par exceso de polvo y suciedad aunque la luz
indicadora de reajustar filtro (FILTERRESET)
este apagada.
1. Para quitar el filtro de aire_ presione las dos
.... cejillas del f11troy saque el contenedor del
filtro de ia parte de atr6s de la unidad.
2. Quite el fittro y limpielo con agua tibia jabo-
nasa,. Enjuague y deje que el filtro se seque
antes de colocarlo de nuevo en la unidad.
3. Coloque et fJttroen el deshumidificador.
Conecte la unidad al tomacorriente. Encien-
da ia uniclad, presione y detenga el bot6n
de filtra (FILTER) par 5 segundos en el panel
de control para reajustar la configuraci6n
del flitro.
NOTA_ NO COLOQUE el tiltro en el lavaplatoS
CUIDADO: NO use el deshumidificador sinet
filtro. Si hace esto podrfa causar fallas a la
unidad.
ADVERTENCIA
• Desconecte el cable de suministroei6ctri-
co del tomacorriente antesde efectuar
cualquier mantenimiento.
LIMPIANDO ELEXTERIOR
Limpieel exterior usandouna toalla h0meda
con detergente suave. NO usectoro o mate-
riales abrasivos.
PANELDECONTROL
Sacude el panel de control con una toaila
seca.
LIMPIANDO EL CONTENEDOR DE AGUA
Despu_s de pocas semanas de usa, limpie el
contenedor del deshumidiflcador. Llene par-
cialmente el contenedor con acjua limpia y
detercjente suave. Agite la mezcla alrededor
del contenedor, vaci6 y enjuague. Coloque
el contenedor en su lugar cuando termine.
NOTA_ No coloque el contenedor en el lava-
platos
CFJILLASDELFILTRO
\
32

El deshumidificador no
funciona coma se espera
tndicador del flltro esta
encendido
,,,,,
PoslblesCausas
El deshumidiflcador no esta
enchufado
l ll.i
El fusible esta fundido/et
circuito se disparo
.i • IH
El deshurnidiflcador ha otCan-
zado el nivel configurado par el
usuarlo o el contenedor esta
lieno.
, ,, ,,,
El contenedor de agua no esla
en la posici6n apropiada
Fallo de suministrO e_ctrico
u,,L , ,i
No hay suftciente tiempo permi-
tido para que la unidod remue-
va la humedad
l l.i
Flujo de aire restringido
i. IlL
Filtro suclo
i H
El nivel de humedad programa-
do podria no estor Io suficlente-
mente bajo
ii11111
Puertas y ventonas podr[on no
estar cerradas ajustodamente
Et oguo no esta drenando par
la manguera
i ii ill,.
La temperotura del cuarto es
muy baja.
i i1,...
El flltro debe set limpiado
despu_s de 250 hams de usa
Soludones
i i ..... 1,, i H.. .m
Aseg(irese qua el enchufe esta insertodo comp|etamente en
el tomacorr[ente.
i i .i,.,, H.
Revise la caja de fusibles y remplace los fuslbles da_ados o
reinicie el circuito.
.. i.. i i,ii
El deshumidificador se apaga autom6ficamente cuando
cualquiera de estas dos situaciones ocurre. Camble a una
configuraci6n mas baja o vaci_ el contenedor de agua y
col6quelo en su lugar apropiadamente.
iJ ,.i. i 1,,,
El contenedor debe estar en su lugar y seguro para qua el
deshumidiflcador opera correctamente.
i.illl
Hay un retraso de t[empo protector (3 rain) para prevenir
una sobrecarga del compresor. Per esta raz6n, la unidad
podrla no comenzar normatmente Io deshumidiflcor par 3
rain despu_s de qua el sumlnlstro et_ctrico sea restabtecido.
i.i i ii .ll
Cuando se instale par primera vez, permita par io menos 24
horas para obtener el nivel de humedad deseado.
ill ii i,,ll_,,,i
AsegOrese qua no hay cortinas, perslanas, o muebles blo-
queando el frente o la parte de atr6s del deshumid]ficad0r.
ill i,. .i.,
Ver la secci6n Umplando el Rltro.
i - .i Hi i i H...
Pora alre mas seco, presione el botbn de fiecha hacia
abajo para bajar el % de humedad deseado en el cuarto, o
configure el deshum|cl|flcador a CO pora operaci6n cant|-
Rug.
Revise que todas las puertas, ventanas, y arras aberturas
estdn cerradas completamente.
ill ii. IH.
AsegOrese de que el clrenaje esta abojo de la boquilla
cOnectora para que permito el drena]e del agua par grave-
dad (Refi_rase a la secci6n en este manual referente a
Drena|e par Groveclud con Manguem)
iii ill, .i.i
La eliminaci6n de humedad es major en temperaturas altas.
Cuartos con temperaturas bajas reducirdn la capacidad de
elimtnaci6n de humedad. Este modelo esta disefiado para
operar a temperaturas arriba de 41°F.
i, .11ii.i
Una vez qua el flltro ha sido limplado, presione el bot6n de
filtro [FILTER) par 3 segundos para apagar la luz indicado-
ro.
..... nrl .i
33

Problema
i_lmt
Deshumidificador sobre-
cargado
Hay hielo/escarchaen
las bobinas
i=Illl =
Los controlesno se
pueden co_igurar o
cambiar
,/, ,,./,,u,,,.,,
Posibles Causas
i..i i/i ..i.tl J
El&rea para ser deshumidificada
es muy grande,
i ,i ,i, i i i
Ruidodel ventilador
Agua en el piso
1.111_
La unidaddescarga aim
caliente
Elagua no esta drenan-
do a trav6sde la man-
guera de drenaje del
deshumiditicador
.ll iiin.i
El agua de labomba no
fluye a trav6sde la
manguera de drenaje de
la bomba
ii ii.
Puertas y ventanas est=_nabiertas.
Eldeshumidificadorfue reciente-
nente encendido ola temperatura
delcuartoes menos de 41°F.
i i.i..
El compresorse apagara y el
ventilador continuarafuncionando
autombticamentepor3 minutosen
la configuracibnprogramada.
,, i i illlll
El aim se mueve a trav6s de la
unidad.
'll'=l I.I I I
La conexibnde la manguera puede
estarfloja.
Manguera conectadapero no
drenandoal drenaje.
i i i lit
Revise la unibnde drenajey la
manguera en el deshumidificador.
Estdn insta|adoscorrectamente?
Revise la manguera de drenaje por
obstruccionesoa!g_n doblez,
ill,
Revise la manguera de drenaje en
la bomba, Esta instaladacorrecta-
mente?
Revise ta manguera de drenaje de
la bomba porobstruccioneso
alg[_ndoblez.
Soluciones
,i.H. H.
La capacidad de su deshumidificador podria no
ser adecuadopara el tamaSo delcuarto,
Cierre todas las puertasy ventanas.
Esto es normal,El hielousualmentese desapa-
rece dentro de 60 minutos,
i,,i i i , H,
Esto es normal. Espere aproximadamente3
minutos y configure la velocidad del ventilador
al nivel deseado.
i, i,
Esto es normal.
, ,i,l=_,l i,,
Revise la conexi6n de la manguera, Veala
seccibn de Drenaje.
LL I,,JL,
Revise la manguera por posibles obstrucciones.
, iiilllll
Normal: El compmsor y el motor el_ctrico des-
cargan ca|or nominal,
ill
Re-instale la uni6n de drenaje del deshumidifi-
cadory la manguera de acuerdo al manual.
Enderece la manguera o quite losbloqueos.
Confirme que el extremo angulado esta presen-
te,
iir,,ll,i
Re-instale [a manguera de drenaje de la bomba
de acuerdo al manual.
Enderece la manguera o quite los bloqueos.
34

C6cligo por
Error
F1
F2
,,, , ,,,,,,,,
Tipo de Error
Falla en el Sen-
sor de Tempe-
ratura Ambien-
tal
Poslbles ¢ousas
i iill
1. Cambio repentino
en la temperatura
ambientaL
ii1,1,1i
Falla en el Sen-
sor de Tempe-
ratura de la
Bobina de Eva-
poraci6n
2. Sensor Defectuoso
• H, i.
1.
2.
3.
4.
Acd6n Correctlva
iiiiiiii ii
Desconecte la unidad.
Reviselos alrededores pot posi-
bles razones a cambios repenti-
nos de temperatura.
Esperepor 30 minutos antes de
conectar el deshumidificaclor
para su funcionamiento normal.
Si la indicaci6n de "ERROR"
continua, contacte el centro de
servicio mas cercano. Llame at
1-800-488-1222 para la ubica-
ci6n de loscentros de servicio.
, ,ll,
MODELO #
i .111..
Eliminaci6n de Humedad en 24 horas
Consumode Energfa(W)
i ill.
Capacldad de ContendordeAgua
r
Fuentede Energ{a
Corriente (Amperios)
Nivetde Presi6nde SonidodB
(B/M/A)
70 Pintas pot d_a
(32.9Litrospot d[a)
llll
745 Vatios
17 P[ntas(8 Litros)
115V / 60 HZ
7.3A
i,llliH, ll.i
45/47/49 dBCA)
Peso 47.7 Ibs (21.6 kg)
15.1"x 11.7" x 24.1"
Dimensiones (An x P x AI) (384 x 282 x 613 ram)
35

Altura Vertical de Bombeo
LI
Fuentede Poder
Corriente (Amperios)
Di6metro Interno de la Manguera de Drenaje del
Deshumidificador
Di6metro Internode la Manguera de Drenaje de ta
Bomba
16 pies
115V / 60 HZ
.12A
.50 in./ 13 mm
.20 in / 5 mm
36

Acuerdo de Proteccibn M&ster
Felicitaciones por hacer una compra inte/igente. Su nuevo producto Kenmore® esta
diseSado y fabricado para darle aSos de uso confiable. Pero como todos los pro-
ductos, podria requedr mantenimiento preventivo o reparaciones de vez en cuan-
do. Es ahi cuando el poseer el de Acuerdo de Proteccibn M_ster le puede ahorrar
dinem y evitar molestias. El Acuerdo de Protecci6n M_ster tambi6n le ayuda a
extender la vida _til de su nuevo producto. A continuaci6n !o que esta incluido en
el Acuerdo* :
[] Partes y mano de obra no solamente para reparar defectos, si no tambi6n
para ayudarle a mantener los productos funcionado apropiadarnente con el
uso normal. Nuestra cobertura va mas all& de la garantia del producto. Sin
deducibles que pagar, cobertura sin exclusibn por no funcionamiento por fa-
tlas-- protecci6n real.
[] Servicio experto compuesto por una fuerza de mas de 10,000 t_cnicos au-
torizados por Sears, Io que significa es que un t6cnico confiable estar_ traba-
jando en su producto.
[] Sin limite de ilamadas para servicio y cobertura de servicio en todo el
pais, tan a menudo como usted quiera y cuando usted quiera.
[] No garantia "lim6n" - reemplazo del producto cubierto si mas de cuatro fa-
llas ocurren dentro de doce meses.
[] Reemplazo de producto si su producto cubierto no puede ser reparado.
[] Inspeccibn de Mantenimiento Preventivo Anual cuando usted Io solicitem
sin cargo extra.
[] Ayuda r_pida por tel_fono- nosotros llamamos a este servicio Resolucibn
R&pida- apoyo por tel6fono de un representante de Sears en todos los pro-
ductos. Piense que somos un "manual de propietario que habla."
[] Protecci6n por sobrecargas el_ctricas contra daSos causados por fluctua-
clones o cambios el6ctricos.
[] Beneficio anual de $250 de Proteccibn Contra Perdidas de Alimentos debi-
do a una falta mec_nica de cualquier refrigerador o congelador cubierto.
[] Rembois6 por Alquiler si la reparacibn de su producto cubierto tarda mas del
tiempo prometido.
[] 10% de descuento del precio regular para cualquier servicio de reparaci6n de
productos no-cubiertos y partes relacionadas e instaladas.
Una vez que usted compre el Acuerdo, solo tiene que Ilamar para solicitar un servi-
cio. Usted puede llamar en cualquier momento, de dia o de noche, o solicitar una
cita para servicio en la internet.
El Acuerdo de Protecci6n M&ster es una compra sin riesgo alguno. Si usted cance-
la por cualquier motivo durante el pedodo de garantia de producto, le devolvere-
mos la cantidad total que usted pago. O, la devoluci6n prorrateada en cualquier
momento despu_s de que el periodo de garantia expire. !Compre su Acuerdo de
Proteccibn M_ster hoy mismo!
Algunas limitaciones y exclusiones aplican. Para precios e informaci6n adi-
cional en los Estados Unldos Ilame a 1-800-827-6655.
Servicio de Instalacibn Sears
Para/a insta/aci6nprofesionat Sears de electmdom_sticos para el hogar, contr01es
para puertasde garaje, calentadores de agua, y otros electrodomSsticos,llamar en
E.E.U.U. o Canad_ 1-800-4.MY-HOME®.
3?

38

39

You:r Home
managemylife
www_managemytife.c om
For repalr-:in.yoorhome-of all major brand:_l_ces,
lawn and:garden-equipment, or heating _nd?_oling __
no matter who made it, no matter who Sold :it]
For:the.replacement p_, acce_ories and
owne#s: manuals-that you need to:do-ib¥outself.
For Sears professional i.s_allation ofliome._pl!ances
and: _ms l_e g_ge door openers and watei'-h_ers,
I:,800_MY-HOM_
Carl anytime_dayor night
www._;e_rs.¢om
Our Home
For rep_r of carry-in items like vacuums, lawn equipment,
and ele_ranics, _ail an_me forthe location of your nearest
Sears Parts & Repair :Service: ¢emer
1-800_88-12:22 _u,s,A,)
WWW.$ q_11_l_.conl
To purchase _ protection agreement:on a product serviced by Sears::
i-800_:27-6655 (u.sA:I
Para pe@rserviCiode _eparaci6n
a domiciiio, y para order_arpiezas:
t.888._U.HOGAR e
_--888-784-642,.")
W'_-_ALSe31_S ._0 m
-
 1
1
-
 2
2
-
 3
3
-
 4
4
-
 5
5
-
 6
6
-
 7
7
-
 8
8
-
 9
9
-
 10
10
-
 11
11
-
 12
12
-
 13
13
-
 14
14
-
 15
15
-
 16
16
-
 17
17
-
 18
18
-
 19
19
-
 20
20
-
 21
21
-
 22
22
-
 23
23
-
 24
24
-
 25
25
-
 26
26
-
 27
27
-
 28
28
-
 29
29
-
 30
30
-
 31
31
-
 32
32
-
 33
33
-
 34
34
-
 35
35
-
 36
36
-
 37
37
-
 38
38
-
 39
39
-
 40
40


Kenmore 40753571310 El manual del propietario
- Categoría
- Deshumidificadores
- Tipo
- El manual del propietario
- Este manual también es adecuado para
en otros idiomas
- English: Kenmore 40753571310 Owner's manual
Artículos relacionados
-
Kenmore 40753550310 Manual de usuario
-
-
-
-
 Kenmore Elite 251.90701 Manual de usuario
-
 Kenmore Elite 99701 El manual del propietario
-
 Kenmore Elite 40554570411 El manual del propietario
-
-
-


Otros documentos
-
Keystone KSTAD707A El manual del propietario
-
-
 Kenmore Elite MDK-70AEN1-BA9B El manual del propietario
-
BLACK+DECKER BDT30WTB Manual de usuario
-
Whirlpool AD50GUSB Manual de usuario
-
-
LG UD501KOJ5 Manual de usuario
-
-
-
commercial cool CCD25JW Manual de usuario
