Utilitech 148008 Instrucciones de operación
- Tipo
- Instrucciones de operación

1
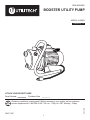
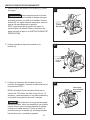
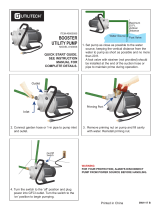
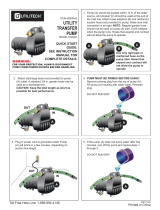
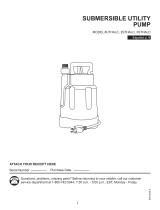
BOOSTER UTILITY PUMP
ITEM #0955585
MODEL #148008
Español p. 12
Serial Number
Purchase Date
Questions, problems, missing parts? Before returning to your retailer, call our customer
service department at 1-866-994-4148, 7:30 a.m. - 5:00 p.m., EST, Monday - Friday.
ATTACH YOUR RECEIPT HERE
AB171106
SW1116 B
Validation #LBWU-002234874.

2
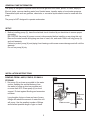
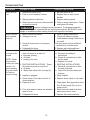
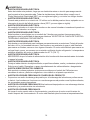
PACKAGE CONTENTS
SAFETY INFORMATION
PART DESCRIPTION QUANTITY
A Pump 1
B Garden Hose Adapters 2
Please read and understand this entire manual before attempting to assemble, operate, or install the
product.
NOTE: Pumps with the “UL” Mark and pumps with the “US” mark are tested to UL Standard UL778.
CSA certied pumps are certied to CSA Standard C22.2 No. 108. (CUS.)
A
B
DANGER
• ELECTRICAL SHOCK HAZARD.
This pump is non-submersible. Keep the motor dry at all times. Do not wash the motor. Do not
submerse the pump in water. Protect the motor from wet weather. Do not allow any part of cord or
receptacle ends to sit in water or in damp locations. Failure to follow these warnings will result in
death or serious injury, and/or property damage.
• FIRE/EXPLOSION HAZARD.
Pump only clear water. Do not pump flammable or explosive fluids such as gasoline, fuel oil,
kerosene, etc. Do not use in a flammable and/or explosive atmosphere. Failure to follow these
warnings could result in death or serious injury and/or property damage.
• RISK OF ELECTRIC SHOCK.
These pumps have not been investigated for use in swimming pool areas.
• RISK OF ELECTRIC SHOCK.
Always disconnect power source before attempting to install, service, or maintain the pump.
Never handle a pump with wet hands or when standing on wet or damp surface or in water. Fatal
electrical shock could occur.

3
WARNING
• ELECTRICAL SHOCK ALERT.
Before installing this product, have the electrical circuit checked by an electrician to ensure proper
grounding. All electrical installations must conform to the National Electric Code and all local
codes.
• ELECTRICAL SHOCK ALERT.
Connect this product to a properly-grounded 115 volt circuit equipped with a Ground Fault Circuit
Interrupter (GFCI) device.
• ELECTRICAL SHOCK ALERT.
Do not handle pump or pump motor with wet hands or when standing on a wet or damp surface or
in water.
• ELECTRICAL SHOCK ALERT.
These pumps are supplied with a 3-prong grounded plug to help protect you against the possibility
of electrical shock. DO NOT UNDER ANY CIRCUMSTANCES REMOVE THE GROUND PIN.
• ELECTRICAL SHOCK ALERT.
This pump is not intended to be permanently installed outdoors. Protect pump from extreme
heat, cold, and humidity. This pump is not waterproof and is not intended to be used in showers,
saunas, or other potentially wet locations. The motor is designed to be used in a clean, dry
location with access to an adequate supply of cooling air. Ambient temperature around the motor
should not exceed 104°F (40°C).
• ELECTRICAL SHOCK ALERT.
BE CERTAIN the pump power source is disconnected before installing or servicing pump.
• ELECTRICAL SHOCK ALERT.
Protect electrical cord from sharp objects, hot surfaces, oil, and chemicals. Avoid kinking the cord.
• CHEMICAL ALERT.
This product contains chemicals known to the state of California to cause cancer and birth defects
or other reproductive harm.
• PERSONAL INJURY/PRODUCT DAMAGE ALERT.
Provide a means of pressure relief if the pump discharge can be shut off or obstructed. Pumps
operating with a closed discharge can create hot liquid, which can cause burns.
• PERSONAL INJURY ALERT.
This pump is equipped with an automatic thermal overload and can restart without warning.
• PERSONAL INJURY ALERT.
Do not touch the motor when operating and allow the motor to cool before touching it after
operation. Motor is designed to operate at high temperatures.

4
PREPARATION
CAUTION
Before beginning installation of product, make sure all parts are present. Compare parts with
package contents list. If any part is missing or damaged, do not attempt to assemble the product.
Estimated Installation Time: 10 minutes
Tools may be required for assembly: Crescent wrench, PVC-safe pipe sealant or thread sealant tape.
• PERSONAL INJURY OR PRODUCT DAMAGE MAY RESULT.
This pump operates on 115 volts. Make certain that the power source conforms to the
requirements of your equipment.
• PRODUCT DAMAGE MAY RESULT.
The maximum temperature of the pumped liquid must not exceed 120°F (40°C). The minimum
allowable temperature is 40°F (4°C).
• PRODUCT DAMAGE MAY RESULT.
Be sure the water source and piping are clear of sand, dirt, and scale. Debris will clog the pump
and void the warranty. Use a screen or strainer on the inlet to prevent debris from entering the
pump.
• PRODUCT DAMAGE MAY RESULT.
Failure to protect the pump and piping from freezing will cause damage and void the warranty.
• PRODUCT DAMAGE MAY RESULT.
Do not run pump dry. Impeller and seal damage will result.
• PROPERTY DAMAGE MAY RESULT.
Drain all liquids from the system before servicing or storing.
• PERSONAL INJURY AND/OR PROPERTY DAMAGE MAY RESULT.
Make sure the discharge hose is secure before starting the pump. A loose discharge hose can
whip around and cause personal injury or property damage.
• PROPERTY DAMAGE MAY RESULT.
Do not operate this product while unattended.
• PROPERTY DAMAGE MAY RESULT.
Check hoses for worn areas before use and make certain that all connections are tight.
• PRODUCT DAMAGE MAY RESULT.
This pump is designed to pump water only. It has not been evaluated for pumping chemicals.
Check hoses for worn areas before use and make certain that all connections are tight.
• PRODUCT DAMAGE MAY RESULT.
Inspect the pump regularly for damage and perform routine maintenance as needed.

5
GENERAL PUMP INFORMATION
This pump is designed to sprinkle lawns and small gardens from lakes, ponds, or rivers, empty or
ll stock tanks, remove standing water from ooded areas, transfer water or boost water pressure.
Flammable liquids such as gasoline, chemicals, or corrosive liquids should never be used with this
pump.
The pump is NOT designed to operate underwater.
SETUP
1. Before installing pump (A), have the electrical circuit checked by an electrician to ensure proper
grounding.
BE CERTAIN the pump (A) power source is disconnected before installing or servicing this unit.
Be sure the water source and piping are clear of sand, dirt, and scale. Debris will clog pump (A)
and void warranty.
Failure to protect pump (A) and piping from freezing could cause severe damage and will void the
warranty.
Do not run pump (A) dry.
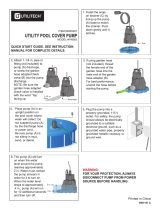
INSTALLATION INSTRUCTIONS
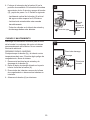
PUMPING FROM LAKES, PONDS, OR SMALL
STREAMS
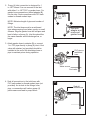
1. Set pump (A) as close as possible to the water
source, keeping the vertical distance from
the water to pump as short as possible and
no more than 20 ft. Place pump (A) on level
support. Protect against ooding and excessive
moisture.
Long lengths of pipe or hose and use of many
ttings will reduce the amount of water this unit
will pump. Use the smallest number of ttings
and shortest possible length of pipe or hose.
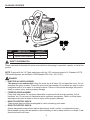
A
Water source
Outlet
Inlet
Maximum
20 ft.
vertical
distance
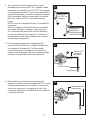
1

6
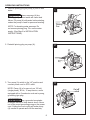
2. Pump (A) inlet connection is designed for 1
in. NPT thread. You can connect to the inlet
with either 1 in. NPT PVC or garden hose. For
garden hose connections, thread adapter (B)
into the inlet. Seal connections with PVC-safe
sealant or thread sealant tape.
NOTE: Minimize length of pipe and number of
ttings.
NOTE: The inlet hose must be a reinforced
type when pumping from lakes, ponds, or small
streams. Regular garden hose will collapse and
lead to failure of pump (A). Inlet line should be
the same diameter as the discharge line, or
larger.
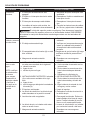
B
3. Attach garden hose to adapter (B) or connect
1 in. PVC pipe directly to pump (A) inlet. A foot
valve with strainer (not provided) should be
installed at the end of the discharge hose or
pipe to maintain prime during operation.
4. Seal all connections in the inlet hose with
PVC-safe sealant or thread sealant tape (not
provided). An air leak in the fittings, hose,
pipe, or connections will reduce pump (A)
performance and lead to pump failure.
A
A
A
Inlet
Seal all
connections
4
Water source
Inlet
Foot valve
PVC pipe or
reinforced
hose
3
Inlet with
1-in. NPT
PVC
Inlet with
adapter and
reinforced
garden hose
2
A

7
5. Connect 1 in. NPT pipe or garden hose to pump
(A) discharge. For garden hose connections,
thread adapter (B) into the discharge before
connecting the hose.
B
BOOSTING WATER PRESSURE
6. Connect 1 in. NPT pipe or garden hose to pump
(A) as in step 2. Connect the other end of the
inlet line to water supply such as a spigot.
Connect outlet pipe or hose to pump (A).
Do not run pump (A) with outlet
pipe or nozzle closed. The hose may burst
from excessive pressure. Use only reinforced
high-pressure hose or pipe for outlet pipe when
boosting water pressure.
A
A
A
Outlet
Inlet
6
Outlet with
1 in. NPT
PVC
Outlet with
adapter and
garden hose
5
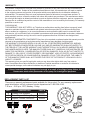
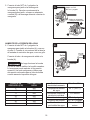
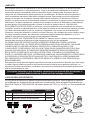
DISCHARGE
PRESSURE (PSI)
GALLONS PER
HOUR
5 800
10 700
17 600
25 500
30 400
40 200
50 100
Power supply required 115 Volts, 60 Hz
Maximum water
temperature
104°F (40°C)
Individual branch circuit
required
15 AMP minimum
Discharge connection 1 in. NPT
Inlet connection 1 in. NPT
Water depth rating Maximum of 25 ft.

8
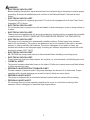
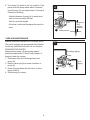
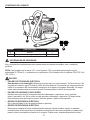
2. Reinstall priming plug on pump (A).
3. Turn pump (A) switch to the “off” position and
connect power cord to GFCI outlet.
NOTE: Pump (A) is for use only on 120 volt
(single phase), 60 Hz, 15 amp service, and is
equipped with a 3-conductor cord and e-prong,
grounding type plug.
Use a grounded receptacle
to reduce the risk of fatal electric shock. Never
cut off the round grounding prong on the power
cord. Cutting the cord or plug will make pump
(A) unsafe to operate and void the warranty.
A
A
On/o
switch
3
Priming
Plug
2
1. Remove priming plug on pump (A) and ll with
water.
Never run pump (A) dry.
Running pump without water will cause seal
failure. Fill pump (A) with water before starting,
unless the pump is used for pressure boosting.
NOTE: For boosting water pressure: Do
not remove priming plug. Turn on the water
supply. (See Step 6 in INSTALLATION
INSTRUCTIONS).
A
IL1858
s
Priming
Port
1
OPERATING INSTRUCTIONS

9
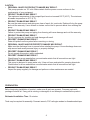
CARE AND MAINTENANCE
4. Turn pump (A) switch to the “on” position. If the
pump does not pump water within 5 minutes,
turn off pump (A) and repeat steps 1 through 4.
Check the following:
- Vertical distance of pump (A) to water level
must not be more than 20 feet.
- Inlet line must be airtight.
- All valves in inlet and discharge line must be
open.
Maintain adequate ventilation for the pump motor.
The motor bearings are permanently lubricated at
the factory. Additional lubrication is not required.
DRAINING FOR WINTER
Always protect pump (A) and piping against
freezing temperatures. If there is any danger of
freezing, drain the system.
1. Disconnect inlet and discharge lines from
pump (A).
2. Remove drain plug from lower front face of
pump (A).
3. Drain all piping below the frost line, or store
piping indoors.
4. Store pump (A) indoors.
Discharge piping
Inlet
piping
Outlet
Inlet
Drain
plug
1
A
A
Water source
Outlet
Inlet
Maximum
20 ft.
vertical
distance
4

10
TROUBLESHOOTING
PROBLEM POSSIBLE CAUSE CORRECTIVE ACTION
Motor will not
run.
1. Disconnect switch is off. 1. Be sure switch is on.
2. Fuse or circuit breaker is blown. 2. Replace fuse or reset circuit
breaker.
3. Starting switch is defective. 3. Replace starting switch.
4. Wires at motor are loose, disconnected
or wired incorrectly.
4. Refer to wiring instructions. Check
and tighten all wiring.
Capacitor voltage may be hazardous. To discharge capacitor,
touch short capacitor terminals with an insulated screwdriver. BE SURE to hold
handle of screwdriver while making contact with capacitor terminals.
Motor runs hot
and overload
kicks off.
1. Motor is wired incorrectly. 1. Refer to wiring instructions.
2. Voltage is too low. 2. Check with power company.
Install heavier wiring if wire size is
too small.
3. Pump (A) enclosure is not properly
vented.
3. Be sure pump (A) has sufficient
ventilation to cool the motor.
4. Collapsed inlet hose. 4. Replace with reinforced hose.
Motor runs but
no water is de-
livered.
NOTE: Check
prime before
looking for other
causes. Un-
screw priming
plug and check
for water in
pump housing.
1. NEW INSTALLATIONS - Pump (A)
does not prime as a result of:
a. Improper priming
b. Air leaks
c. Leaking foot valve
1. NEW INSTALLATIONS:
a. Re-prime according to
instructions.
b. Check all connections on inlet
line for leaks.
c. Replace foot valve.
2. EXISTING INSTALLATIONS - Pump
(A) does not prime as a result of:
a. Air leaks
b. Water level below inlet of pump (A)
2. EXISTING INSTALLATIONS:
a. Check all connections on inlet
line and shaft seal.
b. Lower inlet line into water and
re-prime.
3. Impeller is plugged. 3. Clean impeller.
4. Check valve or foot valve is stuck in
closed position.
4. Replace check valve or foot valve.
5. Pipes are frozen. 5. Thaw pipes. Bury pipe below frost
line. Protect pump (A) in a pit or
pump house.
6. Foot valve and/or strainer are buried in
sand or mud.
6. Raise foot valve and/or strainer
above any sand or mud.
7. Collapsed inlet hose. 7. Replace with reinforced hose.

11
Printed in China
WARRANTY
This product is warranted for one year from the date of purchase or two years from the date of manufacture,
whichever occurs rst. Subject to the conditions hereinafter set forth, the manufacturer will repair or replace
to the original consumer, any portion of the product which proves defective due to defective materials or
workmanship. This warranty does not cover replacement parts for failure due to normal wear and tear. To
obtain warranty service, contact the retailer from whom the product was purchased. The manufacturer retains
the sole right and option to determine whether to repair or replace defective equipment, parts or components.
Damage due to conditions beyond the control of the manufacturer is not covered by this warranty. For warranty
questions or service, call
1-866-994-4148.
THIS WARRANTY WILL NOT APPLY: (a) To defects or malfunctions resulting from failure to properly install,
operate or maintain the unit in accordance with printed instructions provided; (b) to failures resulting from
abuse, accident or negligence; (c) to normal maintenance services and the parts used in connection with
such service; (d) to units which are not installed in accordance with normal applicable local codes, ordinances
and good trade practices; and (e) the unit is used for purposes other than for what it was designed and
manufactured.
RETURN OF WARRANTED COMPONENTS: Any item to be repaired or replaced under this warranty must be
returned to the manufacturer at such place as the manufacturer may designate, freight prepaid.
THE WARRANTY PROVIDED HEREIN IS IN LIEU OF ALL OTHER EXPRESS WARRANTIES, AND MAY
NOT BE EXTENDED OR MODIFIED BY ANYONE. ANY IMPLIED WARRANTIES SHALL BE LIMITED TO
THE PERIOD OF THE LIMITED WARRANTY AND THEREAFTER ALL SUCH IMPLIED WARRANTIES ARE
DISCLAIMED AND EXCLUDED. THE MANUFACTURER SHALL NOT, UNDER ANY CIRCUMSTANCES, BE
LIABLE FOR INCIDENTAL, CONSEQUENTIAL OR SPECIAL DAMAGES, SUCH AS, BUT NOT LIMITED TO
DAMAGE TO, OR LOSS OF, OTHER PROPERTY OR EQUIPMENT, LOSS OF PROFITS, INCONVENIENCE,
OR OTHER INCIDENTAL OR CONSEQUENTIAL DAMAGES OF ANY TYPE OR NATURE. THE LIABILITY
OF THE MANUFACTURER SHALL NOT EXCEED THE PRICE OF THE PRODUCT UPON WHICH SUCH
LIABILITY IS BASED.
This warranty gives you specic legal rights, and you may have other rights which vary from state to
state. Some states do not allow limitations on duration of implied warranties or exclusion of incidental or
consequential damages, so the above limitations may not apply to you.
PART DESCRIPTION PART #
B Garden Hose Adapters 025061
C Drain Plug and Priming Plug 025062
D Impeller, Diffuser, Nozzle Kit 024609
There are no warranty replacement parts available for this product. For non-warranty replacement
parts listed below, call our customer service department at 1-866-994-4148,
7:30 a.m. - 5:00 p.m., EST, Monday - Friday.
D
B C
REPLACEMENT PARTS LIST
In those instances where damages are incurred as a result of an alleged pump failure, the
Homeowner must retain possession of the pump for investigation purposes.

12
BOMBA REFORZADORA
PARA USO GENERAL
ARTÍCULO #0955585
MODELO #148008
Número de serie
Fecha de compra
¿Preguntas, problemas, piezas faltantes? Antes de volver a la tienda, llame a nuestro
Departamento de Servicio al Cliente al 1- 866-994-4148, de lunes a viernes de 7:30 a.m.
a 5:00 p.m., hora estándar del Este.
ADJUNTE SU RECIBO AQUÍ
SW1116S B

13
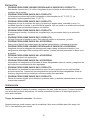
CONTENIDO DEL PAQUETE
INFORMACIÓN DE SEGURIDAD
PIEZA DESCRIPCIÓN CANTIDAD
A Bomba 1
B Adaptadores de manguera para jardín 2
Lea y comprenda completamente este manual antes de intentar ensamblar, usar o instalar el
producto.
NOTA: Las bombas con la marca “UL” y con la marca “US” se prueban para cumplir con los
estándares UL778 de UL. Las bombas con certicación CSA cumplen con el estándar CSA C22.2 No.
108. (CUS.)
A
B
PELIGRO
• PELIGRO DE DESCARGA ELÉCTRICA.
Esta bomba no es sumergible. Mantenga el motor seco en todo momento. No lave el motor. No
sumerja la bomba en agua. Proteja al motor del clima húmedo. No permita que ninguna parte del
cable ni los extremos del tomacorriente se apoyen en el agua ni en lugares húmedos. No seguir
estas instrucciones puede provocar la muerte, lesiones graves o daños a la propiedad.
• PELIGRO DE INCENDIO O EXPLOSIÓN.
Bombee solo agua limpia. No bombee líquidos inflamables o explosivos, como gasolina,
gasoil, queroseno, etc. No la utilice en una atmósfera inflamable o explosiva. No seguir estas
instrucciones puede provocar la muerte, lesiones graves o daños a la propiedad.
• RIESGO DE DESCARGA ELÉCTRICA.
No se ha verificado el uso de estas bombas en piscinas.
• RIESGO DE DESCARGA ELÉCTRICA.
Desconecte siempre la fuente de alimentación antes de intentar instalar, reparar o realizarle
mantenimiento a la bomba. Nunca manipule una bomba con las manos mojadas ni cuando esté
parado sobre una superficie húmeda o en el agua. Podría ocurrir una descarga eléctrica fatal.

14
ADVERTENCIA
• ALERTA DE DESCARGA ELÉCTRICA.
Antes de instalar este producto, haga que un electricista revise su circuito para asegurarse de
que la puesta a tierra sea adecuada. Todas las instalaciones eléctricas deben cumplir con el
Código Nacional de Electricidad (NEC, por sus siglas en inglés) y con todos los códigos locales.
• ALERTA DE DESCARGA ELÉCTRICA.
Conecte este producto a un circuito de 115 voltios con la debida puesta a tierra, equipado con un
interruptor de circuito de falla de puesta a tierra (GFCI, por sus siglas en inglés).
• ALERTA DE DESCARGA ELÉCTRICA.
No manipule la bomba o el motor de la bomba con las manos húmedas ni cuando esté parado en
una superficie húmeda o en el agua.
• ALERTA DE DESCARGA ELÉCTRICA.
Estas bombas se suministran con un enchufe de 3 clavijas con puesta a tierra para ayudar a
protegerlo contra la posibilidad de descargas eléctricas. NO RETIRE LA CLAVIJA DE PUESTA A
TIERRA BAJO NINGUNA CIRCUNSTANCIA.
• ALERTA DE DESCARGA ELÉCTRICA.
Esta bomba no está diseñada para instalarse permanentemente en exteriores. Proteja la bomba
del calor, el frío y la humedad extremos. Esta bomba no es resistente al agua ni está diseñada
para usarse en duchas, saunas u otros lugares húmedos. El motor está diseñado para usarse en
un lugar limpio y seco, con acceso a un suministro suficiente de aire refrigerante. La temperatura
ambiente alrededor del motor no debe exceder los 40 °C (104 °F).
• ALERTA DE DESCARGA ELÉCTRICA.
ASEGÚRESE de que la fuente de alimentación de la bomba esté desconectada antes de instalar
o reparar la bomba.
• ALERTA DE DESCARGA ELÉCTRICA.
Proteja el cable eléctrico de objetos afilados, superficies calientes, aceite y sustancias químicas.
Evite torcer el cable. Reemplace o repare inmediatamente los cables dañados o desgastados.
• ALERTA SOBRE PRODUCTOS QUÍMICOS.
Este producto contiene productos químicos reconocidos por el estado de California como
causantes de cáncer y defectos congénitos u otros daños en el aparato reproductivo.
• ALERTA DE LESIONES PERSONALES O DAÑOS EN EL PRODUCTO.
• Proporcione un medio de descarga de presión por si la descarga de la bomba se pudiera cerrar
u obstruir. Las bombas que funcionan con una descarga cerrada pueden crear líquidos calientes,
los que pueden causar quemaduras.
• ALERTA DE LESIONES PERSONALES.Esta bomba está equipada con una sobrecarga térmica
automática y se puede reiniciar sin advertencia.
• ALERTA DE LESIONES PERSONALES.
No toque el motor cuando esté en funcionamiento y permita que el motor se enfríe antes de
tocarlo después del funcionamiento. El motor está diseñado para funcionar a temperaturas altas.

15
PREPARACIÓN
PRECAUCIÓN
Antes de comenzar a instalar el producto, asegúrese de tener todas las piezas. Compare las piezas
con la lista del contenido del paquete. No intente ensamblar el producto si falta alguna pieza o si
estas están dañadas.
Tiempo de instalación estimado: 10 minutos.
Herramientas que puede requerir para el ensamblaje: llave sueca, sellador para tubo seguro de
PVC o cinta selladora para roscas.
• PODRÍAN PRODUCIRSE LESIONES PERSONALES O DAÑOS EN EL PRODUCTO.
Esta bomba funciona con 115 voltios. Asegúrese de que la fuente de alimentación cumpla con los
requisitos de su equipo.
• PODRÍAN PRODUCIRSE DAÑOS EN EL PRODUCTO.
La temperatura máxima del líquido bombeado no debe exceder los 40 °C (120 °F). La
temperatura mínima permitida es 4 °C (40 °F).
• PODRÍAN PRODUCIRSE DAÑOS EN EL PRODUCTO.
Asegúrese de que el suministro de agua y la tubería no tengan arena, suciedad ni sarro. La
suciedad obstruirá la bomba, lo que anulará la garantía. Use una malla o un colador en la entrada
para impedir que los desechos ingresen a la bomba.
• PODRÍAN PRODUCIRSE DAÑOS EN EL PRODUCTO.
Si no protege la bomba y la tubería del congelamiento, se provocarán daños y se anulará la
garantía.
• PODRÍAN PRODUCIRSE DAÑOS EN EL PRODUCTO.
No haga funcionar la bomba en seco. Se producirán daños en el impulsor y el sello.
• PODRÍAN PRODUCIRSE DAÑOS EN LA PROPIEDAD.
Drene todo el líquido del sistema antes de realizar mantenimiento o almacenar la bomba.
• PODRÍAN PRODUCIRSE LESIONES PERSONALES O DAÑOS EN LA PROPIEDAD.
Asegúrese de que la manguera de descarga esté segura antes de arrancar la bomba. Una
manguera de descarga suelta puede producir azotes y causar lesiones personales o daños en la
propiedad.
• PODRÍAN PRODUCIRSE DAÑOS EN LA PROPIEDAD.
No use este producto sin supervisión.
• PODRÍAN PRODUCIRSE DAÑOS EN LA PROPIEDAD.
Inspeccione las mangueras en búsqueda de áreas desgastadas antes de usarlas y asegúrese de
que todas las conexiones estén bien apretadas.
• PODRÍAN PRODUCIRSE DAÑOS EN EL PRODUCTO.
Esta bomba fue diseñada solo para bombear agua. No se ha probado su uso para bombear
productos químicos. Inspeccione las mangueras en búsqueda de áreas desgastadas antes de
usarlas y asegúrese de que todas las conexiones estén bien apretadas.
• PODRÍAN PRODUCIRSE DAÑOS EN EL PRODUCTO.
Revise de manera regular que la bomba no presente daños y realícele mantenimiento de rutina
cuando sea necesario.

16
INFORMACIÓN GENERAL DE LA BOMBA
Esta bomba está diseñada para rociar céspedes y jardines pequeños desde lagos, estanques o ríos,
vaciar o llenar tanques de acopio, retirar el agua estancada de áreas inundadas, transferir agua o
aumentar la presión del agua. Nunca se deben usar líquidos inamables como gasolina, químicos o
líquidos corrosivos con esta bomba.
La bomba NO fue diseñada para usarse bajo el agua.
INSTALACIÓN
1. Antes de instalar la bomba (A), haga que un electricista revise su circuito eléctrico para
asegurarse de que la puesta a tierra sea adecuada.
ASEGÚRESE de que la fuente de alimentación de la bomba (A) esté desconectada antes de
instalar o reparar la unidad.
Asegúrese de que el suministro de agua y la tubería no tengan arena, suciedad ni sarro. La
suciedad obstruirá la bomba (A) y anulará la garantía.
Si no protege la bomba (A) y la tubería del congelamiento, se podrían producir daños graves y se
anulará la garantía.
No haga funcionar la bomba (A) en seco.
INSTRUCCIONES DE INSTALACIÓN
BOMBEO DE LAGOS, ESTANQUES O
ARROYOS PEQUEÑOS
1. Coloque la bomba (A) lo más cerca posible
de la fuente de agua, manteniendo la menor
distancia vertical posible desde el agua hacia
la bomba, a no más de 6,09 metros. Coloque la
bomba (A) en un soporte nivelado. Protéjala de
las inundaciones y la humedad excesiva.
Las longitudes largas del tubo o de la manguera
y el uso de muchos conectores reducirán la
cantidad de agua que bombeará la unidad.
Use la menor cantidad de conectores y las
longitudes más cortas posibles del tubo o de la
manguera.
A
Fuente de agua
Salida
Entrada
Distancia
vertical
máxima de
6,09 metros
1

17
2. La conexión de entrada de la bomba (A) está
diseñada para una rosca NPT de 1 pulgada. Puede
conectarla a la entrada con el PVC NPT de 1 pulgada
o la manguera para jardín. Para las conexiones de la
manguera para jardín, coloque un adaptador roscado
(B) en la entrada. Selle las conexiones con sellador
para tubo seguro de PVC o cinta selladora para
roscas.
NOTA: minimice la longitud del tubo y la cantidad de
conexiones.
NOTA: la manguera de entrada debe ser reforzada
al bombear de lagos, estanques o arroyos peque-
ños. Una manguera para jardín común colapsará y
provocará una falla en la bomba (A). La tubería de
entrada debe ser del mismo diámetro que la tubería
de descarga o más grande.
B
3. Fije la manguera para jardín al adaptador (B) o
conecte el tubo de PVC de 1 pulgada directamente
a la entrada de la bomba (A). Se debe instalar
una válvula de pie con colador (no incluida) en el
extremo de la manguera o del tubo de descarga para
mantener el cebado durante el funcionamiento.
4. Selle todas las conexiones en la manguera de
entrada con sellador para tubo seguro de PVC o cinta
selladora para roscas (no se incluyen). Una fuga de
aire en los conectores, la manguera, el tubo o las
conexiones disminuirá el rendimiento de la bomba (A)
y hará que esta falle.
A
A
A
Entrada
Sellar todas las
conexiones
4
Fuente de agua
Entrada
Válvula de pie
Tubo de PVC
o manguera
reforzada
3
Entrada con
PVC NPT de
1 pulgada
Entrada con
adaptador y
manguera para
jardín reforzada
2
A

18
5. Conecte el tubo NPT de 1 pulgada o la
manguera para jardín a la descarga de
la bomba (A). Para las conexiones de la
manguera para jardín, coloque un adaptador
roscado (B) a la descarga antes de conectar la
manguera.
B
AUMENTO DE LA PRESIÓN DEL AGUA
6. Conecte el tubo NPT de 1 pulgada o la
manguera para jardín a la bomba (A), como en
el paso 2. Conecte el otro extremo de la tubería
de entrada al suministro de agua, como un grifo.
Conecte el tubo o la manguera de salida a la
bomba (A).
No haga funcionar la bomba
(A) con el tubo de salida o la boquilla cerrados.
La manguera puede explotar si hay presión
excesiva. Use solo mangueras o tubos para
alta presión reforzados para el tubo de salida
cuando aumente la presión del agua.
A
A
A
Salida
Entrada
6
Salida con PVC
NPT de 1 pulgada
Salida con adaptador
y manguera para jardín
5
PRESIÓN DE
DESCARGA (PSI)
GALONES POR
HORA
5 800
10 700
17 600
25 500
30 400
40 200
50 100
Suministro de
electricidad necesario
115 voltios, 60 Hz
Temperatura máxima
del agua
40 °C (104 °F)
Se requiere circuito de
derivación individual
15 A mínimo
Conexión de descarga NPT de 1 pulgada
Conexión de entrada NPT de 1 pulgada
Clasificación de
profundidad de agua
Máximo de 7,62
metros

19
2. Vuelva a instalar el tapón de cebado en la
bomba (A).
3. Coloque el interruptor de la bomba (A) en la
posición de apagado y conecte el cable eléctrico al
tomacorriente GFCI.
NOTA: la bomba (A) es solo para usarse en un
servicio de 120 voltios (de fase única), 60 Hz, 15
amperes, y está equipada con un cable conductor y
un enchufe con puesta a tierra de 3 clavijas.
!
Para disminuir el riesgo de descargas
eléctricas fatales, utilice un receptáculo con puesta
a tierra. Nunca corte la clavija redonda de puesta
a tierra en el cable eléctrico. Cortar el cable o el
enchufe hará que la bomba (A) sea insegura para
hacerla funcionar y anulará la garantía.
A
A
Interruptor
de encendido
y apagado
3
Tapón de
cebado
2
1. Retire el tapón de cebado de la bomba (A) y llene
con agua.
Nunca haga funcionar la bomba
(A) en seco. Si hace funcionar la bomba sin agua,
se puede producir una falla en el sellado. Llene la
bomba (A) con agua antes de arrancarla, a menos
que se use para aumentar la presión.
NOTA: para aumentar la presión del agua: no
retire el tapón de cebado. Abra el suministro de
agua (consulte el paso 6 en INSTRUCCIONES DE
INSTALACIÓN).
A
IL1858
s
Puerto
de cebado
1
INSTRUCCIONES DE FUNCIONAMIENTO

20
CUIDADO Y MANTENIMIENTO
4. Coloque el interruptor de la bomba (A) en la
posición de encendido. Si la bomba no bombea
agua dentro de los 5 minutos, apague la bomba
(A) y repita los pasos 1 a 4. Revise lo siguiente:
- La distancia vertical de la bomba (A) al nivel
del agua no debe superar los 6,09 metros.
- La tubería de entrada debe estar cerrada
herméticamente.
- Todas las válvulas en la tubería de entrada y
de descarga deben estar abiertas.
Mantenga una ventilación suficiente para el motor
de la bomba. Los cojinetes del motor se lubrican
permanentemente en la fábrica. No se necesita
lubricación adicional.
DRENADO PARA EL INVIERNO
Proteja siempre la bomba (A) y la tubería contra
temperaturas bajo cero. Si existe algún peligro de
congelamiento, drene el sistema.
1. Desconecte las tuberías de entrada y de
descarga de la bomba (A).
2. Retire el tapón de drenaje ubicado en la parte
inferior frontal de la bomba (A).
3. Drene todas las tuberías a menos de la línea
de congelamiento o almacene las tuberías en
interiores.
4. Almacene la bomba (A) en interiores.
Tubería de descarga
Tubería de
entrada
Descarga
Entrada
Tapón de
drenaje
1
A
A
Fuente de agua
Salida
Entrada
Distancia
vertical
máxima de
6,09 metros
4

21
SOLUCIÓN DE PROBLEMAS
PROBLEMA CAUSA POSIBLE ACCIÓN CORRECTIVA
El motor no
funciona.
1. El interruptor de desconexión está
apagado.
1. Asegúrese de que el interruptor esté
encendido.
2. El fusible o el interruptor de circuito están
fundidos.
2. Reemplace el fusible o restablezca el
interruptor circuito.
3. El interruptor de arranque está dañado. 3. Reemplace el interruptor de arran-
que.
4. Los cables del motor están sueltos, de-
sconectados o cableados incorrectamente.
4. Consulte las instrucciones de cablea-
do. Revise y ajuste todo el cableado.
!
El voltaje del capacitor puede ser peligroso. Para descargar el capacitor,
toque los terminales del capacitor cortos con un destornillador aislante. ASEGÚRESE
de sostener la manija del destornillador cuando haga contacto con los terminales del
capacitor.
El motor se
calienta y arranca
muchas veces.
1. El motor está incorrectamente cableado. 1. Consulte las instrucciones de
cableado.
2. El voltaje es demasiado bajo. 2. Verifique con la empresa de energía.
Instale un cableado más pesado si
el tamaño del cable es demasiado
pequeño.
3. El compartimiento de la bomba (A) no está
bien ventilado.
3. Asegúrese de que la bomba (A) tenga
suficiente ventilación para enfriar el
motor.
4. Manguera de entrada contraída. 4. Reemplace con una manguera
reforzada.
El motor funciona
pero no sale
agua.
NOTA: verifique
el cebado antes
de buscar
otras causas.
Desatornille el
tapón de cebado
y verifique si
hay agua en la
carcasa de la
bomba.
1. INSTALACIONES NUEVAS: la bomba (A)
no ceba como resultado de lo siguiente:
a. cebado incorrecto
b. fugas de aire
c. válvula de pie con fugas
1. INSTALACIONES NUEVAS
a. Vuelva a cebar de acuerdo con las
instrucciones.
b. Revise todas las conexiones de la
tubería de entrada para detectar
fugas.
c. Reemplace la válvula de pie.
2. INSTALACIONES EXISTENTES: la bomba
(A) no ceba como resultado de lo sigui-
ente:
a. fugas de aire
b. nivel de agua por debajo de la entrada de
la bomba (A)
2. INSTALACIONES EXISTENTES:
a. Revise todas las conexiones de la
tubería de entrada y del sello del
eje.
b. Baje la tubería de entrada al nivel
del agua y vuelva a cebar.
3. El impulsor está tapado. 3. Limpie el impulsor.
4. La válvula de retención o la válvula de pie
están atascadas en la posición cerrada.
4. Reemplace la válvula de retención o
la válvula de pie.
5. Las tuberías están congeladas. 5. Descongele las tuberías. Entierre la
tubería debajo de la línea de conge-
lación. Proteja la bomba (A) en una
fosa o en una caseta para bomba.
6. La válvula de pie o el colador están enter-
rados en arena o barro.
6. Levante la válvula de pie o el colador
por encima de la arena o del barro.
7. Manguera de entrada contraída. 7. Reemplace con una manguera
reforzada.

22
Impreso en China
GARANTÍA
Este producto cuenta con una garantía de un año a contar de la fecha de compra, o de dos años a contar
de la fecha de fabricación, lo que ocurra primero. Sujeto a las condiciones establecidas en el presente,
el fabricante reparará o reemplazará, para el consumidor original, cualquier parte del producto que se
compruebe que está defectuosa debido a defectos en los materiales o la mano de obra. Esta garantía no
cubre las piezas de repuesto por falla debido a desgaste normal. Para obtener los servicios de garantía,
póngase en contacto con el vendedor minorista donde adquirió el producto. El fabricante se reserva el
derecho y la opción exclusivos de determinar la reparación o el reemplazo de equipos, piezas o componentes
defectuosos. Los daños causados por condiciones que escapen del control del fabricante no están cubiertos
por esta garantía. Para realizar preguntas u obtener el servicio de garantía, llame al 1-866-994-4148.
ESTA GARANTÍA NO SE APLICARÁ: (a) a defectos o mal funcionamiento como resultado de una falla en la
instalación, operación o mantenimiento de la unidad según lo indicado en las instrucciones impresas provistas;
(b) a fallas resultantes debido al mal uso, accidente o negligencia; (c) a los servicios de mantenimiento
normativos y las piezas utilizadas en conexión con dichos servicios; (d) a unidades que no se instalaron según
los códigos normativos locales, las ordenanzas o las buenas prácticas comerciales aplicables; y (e) si la
unidad se utiliza para nes para los cuales no está destinada ni fabricada.
DEVOLUCIÓN DE LOS COMPONENTES EN GARANTÍA: cualquier artículo a reparar o reemplazar bajo esta
garantía debe devolverse al fabricante al lugar designado por este, con ete prepagado.
LA GARANTÍA QUE SE PROPORCIONA EN EL PRESENTE REEMPLAZA A TODAS LAS DEMÁS
GARANTÍAS EXPLÍCITAS Y NO PUEDE SER EXTENDIDA NI MODIFICADA POR NADIE. CUALQUIER
GARANTÍA IMPLÍCITA ESTARÁ LIMITADA AL PERÍODO DE LA GARANTÍA LIMITADA Y, POR
CONSIGUIENTE, SE RECHAZAN Y SE EXCLUYEN TODAS DICHAS GARANTÍAS IMPLÍCITAS. BAJO
NINGUNA CIRCUNSTANCIA, EL FABRICANTE SERÁ RESPONSABLE DE DAÑOS ACCIDENTALES,
RESULTANTES O ESPECIALES, INCLUIDOS, ENTRE OTROS, LOS DAÑOS A LA PROPIEDAD O AL
EQUIPO, O LA PÉRDIDA DE ESTOS, LA PÉRDIDA DE GANANCIAS, INCONVENIENTES U OTROS DAÑOS
ACCIDENTALES O RESULTANTES DE CUALQUIER TIPO O NATURALEZA. LA RESPONSABILIDAD
DEL FABRICANTE NO SUPERARÁ EL PRECIO DEL PRODUCTO SOBRE EL CUAL SE BASA DICHA
RESPONSABILIDAD.
Esta garantía le otorga derechos legales especícos, pero usted podría tener otros derechos que varían según
el estado. Algunos estados no permiten las limitaciones sobre la duración de las garantías implícitas, o la
exclusión de los daños accidentales o resultantes, de modo que las limitaciones mencionadas anteriormente
podrían no aplicarse en su caso.
PIEZA DESCRIPCIÓN PIEZA #
B Adaptadores de manguera para jardín 025061
C Tapón de drenaje y tapón de cebado 025062
D Impulsor, difusor, kit de boquillas 024609
No hay piezas de repuesto en garantía disponibles para este producto. Para las piezas de repuesto
no amparadas por la garantía que se mencionan a continuación, llame a nuestro Departamento de
Servicio al Cliente al 1-866-994-4148, de lunes a viernes de 7:30 a. m. a 5:00 p. m., hora estándar del
Este.
D
B C
LISTA DE PIEZAS DE REPUESTO
En aquellas instancias en que haya daños causados por una presunta falla de la bomba, el
propietario deberá conservar la bomba a fin de investigar dicha falla.
-
 1
1
-
 2
2
-
 3
3
-
 4
4
-
 5
5
-
 6
6
-
 7
7
-
 8
8
-
 9
9
-
 10
10
-
 11
11
-
 12
12
-
 13
13
-
 14
14
-
 15
15
-
 16
16
-
 17
17
-
 18
18
-
 19
19
-
 20
20
-
 21
21
-
 22
22


Utilitech 148008 Instrucciones de operación
- Tipo
- Instrucciones de operación
En otros idiomas
Documentos relacionados
-
 Utilitech 148008 Manual de usuario
-
 Utilitech 148007 Instrucciones de operación
-
 Utilitech 148001 Instrucciones de operación
-
 Utilitech 50AC-110N Instrucciones de operación
-
 Utilitech 148012 Instrucciones de operación
-
 Utilitech 148137 Instrucciones de operación
-
 Utilitech 148003 Guía del usuario
-
 Utilitech PPSP33 Guía de instalación
-
 Utilitech PPSU33 Manual de usuario
-
 Utilitech 148007 Manual de usuario


Otros documentos
-
Zoeller SPCP02 Manual de usuario
-
Wayne PLS Series Instrucciones de operación
-
-
AquaPRO 61041 Manual de usuario
-
Franklin Electric Inline400 El manual del propietario
-
Everbilt ZE00804 Guía del usuario
-
Flotec FP5112 Serie El manual del propietario
-
-
-
 Star Water Systems UTHALC Instrucciones de operación
