HoMedics PS-251 Instruction book
- Categoría
- Limpiadores a vapor de ropa
- Tipo
- Instruction book

Instruction Manual and
Warranty Information
PS-251
El manual en español
empieza a la página 13
P
l
e
a
s
e
T
a
k
e
A
M
o
m
e
n
t
N
o
w
Register
Your Product At:
www.homedics.com/register
Your valuable input regarding this
product will help us create
the products you will
want in the future.
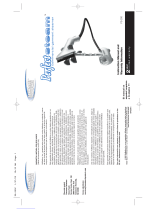
PERFECT STEAM DELUXE
commercial garment steamer
HoMedics®, Home Touch® y PerfectSteam® son marcas registradas de HoMedics, LLC.
© 2009 – 2015 HoMedics, LLC. Todos los derechos reservados.
IB-PS251
Garantía limitada por dos años
HoMedics vende sus productos con la intención de que no tengan defectos de fabricación ni de
mano de obra por un plazo de dos años a partir de la fecha de compra original, con las siguientes
excepciones. HoMedics garantiza que sus productos no tendrán defectos de material ni de mano de obra
en condiciones de uso y servicio normales. Esta garantía se extiende únicamente a consumidores y no
a minoristas.
Para obtener servicio del producto HoMedics en garantía, comuníquese con un representante de
relaciones con el consumidor para obtener ayuda. Asegúrese de tener a mano el número de modelo del
producto.
HoMedics no autoriza a ninguna persona, incluidos, entre otros, minoristas, posteriores consumidores
que compran el producto a un minorista o compradores remotos, a obligar a HoMedics de ninguna
otra forma más allá de las condiciones aquí establecidas. La garantía de este producto no cubre daños
causados por uso inadecuado o abuso; accidente; conexión de accesorios no autorizados; alteración
del producto; instalación inadecuada; reparaciones o modificaciones no autorizadas; uso inadecuado
de la fuente de energía/electricidad; cortes de energía; caída del producto; funcionamiento incorrecto o
daño de una pieza de funcionamiento debido al no cumplimiento del mantenimiento recomendado por
el fabricante; daños durante el transporte; robo; descuido; vandalismo; condiciones climáticas; pérdida
de uso en el período durante el cual el producto está en una instalación de reparación o a la espera de
piezas o reparación; o cualquier otra condición, sin importar cuál sea, que se encuentre fuera del control
de HoMedics.
Esta garantía es válida solamente si el producto se compra y se utiliza en el país en que se compra. Un
producto que requiera modificaciones o adaptación para habilitar su funcionamiento en cualquier otro
país que no sea aquel para el que fue diseñado, fabricado, aprobado y/o autorizado; o la reparación de
productos dañados por estas modificaciones no están cubiertos en esta garantía.
LA GARANTÍA QUE SE PROPORCIONA EN EL PRESENTE DOCUMENTO SERÁ LA GARANTÍA ÚNICA Y
EXCLUSIVA. NO EXISTIRÁN OTRAS GARANTÍAS EXPRESAS NI IMPLÍCITAS, QUE INCLUYEN CUALQUIER
GARANTÍA IMPLÍCITA DE COMERCIALIZACIÓN O APTITUD, NI NINGUNA OTRA OBLIGACIÓN POR
PARTE DE LA COMPAÑÍA CON RESPECTO A LOS PRODUCTOS CUBIERTOS POR ESTA GARANTÍA.
HOMEDICS NO TENDRÁ RESPONSABILIDAD ALGUNA POR NINGÚN DAÑO INCIDENTAL, CONSECUENTE
NI ESPECIAL. EN NINGÚN CASO ESTA GARANTÍA REQUERIRÁ MÁS QUE LA REPARACIÓN O EL
REEMPLAZO DE CUALQUIER PIEZA O PIEZAS QUE SE DETERMINE QUE TIENEN DEFECTOS DENTRO
DEL PERÍODO DE VIGENCIA DE LA GARANTÍA. NO SE ENTREGARÁN REEMBOLSOS. SI NO HAY PIEZAS
DE REPUESTO DISPONIBLES PARA LOS MATERIALES DEFECTUOSOS, HOMEDICS SE RESERVA EL
DERECHO DE REALIZAR SUSTITUCIONES DEL PRODUCTO EN LUGAR DE REPARAR O CAMBIAR PIEZAS.
Esta garantía no se extiende a la compra de productos abiertos, usados, reparados, vueltos a empacar
y/o vueltos a sellar, que incluye, entre otras cosas, la venta de dichos productos en sitios de remate
por Internet y/o la venta de dichos productos por revendedores o mayoristas. Todas y cada una de las
garantías cesarán y terminarán inmediatamente con respecto a cualquier producto o pieza del mismo que
se haya reparado, cambiado, alterado o modificado sin el consentimiento previo explícito y por escrito
de HoMedics.
Esta garantía le proporciona derechos legales específicos. Es posible que usted tenga derechos
adicionales que pueden variar de un país a otro. Debido a las regulaciones de ciertos países, es posible
que algunas de las limitaciones y exclusiones mencionadas arriba no se apliquen en su caso.
Para obtener más información con respecto a nuestra línea de productos en los Estados Unidos,
visítenos en: www.homedics.com. Para Canadá, visítenos en: www.homedics.ca.
Para obtener servicio en
EE. UU.
Correo electrónico:
De lunes a viernes,
de 8:30 a. m. a 7:00 p. m.
(hora del Este)
1.800.466.3342
Para obtener servicio
en Canadá
Correo electrónico:
De lunes a viernes,
de 8:30 a. m. a 5:00 p. m.
(hora del Este)
1.888.225.7378
IB-PS-251.indd 1-2 4/29/15 3:07 PM

2 3
IMPORTANT SAFETY INSTRUCTIONS:
WHEN USING ELECTRICAL PRODUCTS, BASIC SAFETY
PRECAUTIONS SHOULD ALWAYS BE FOLLOWED, INCLUDING
THE FOLLOWING:
READ ALL INSTRUCTIONS BEFORE USING.
WARNING -
To reduce the risk of burns, fire, electric shock,
or injury to persons:
•Burnscouldoccurfromtouchinghotmetalparts,hotwater,orsteam.Usecare
whenyouturnasteamapplianceupsidedown–theremaybehotwaterinthe
reservoir.
•Toreducetheriskofcontactwithhotwateremittingfromsteamvents,check
appliancebeforeeachusebyholdingitawayfrombodyandoperatingsteam
button.
•Useapplianceonlyforitsintendeduse.
•Toreducetheriskofelectricshock,donotimmersetheapplianceinwaterorother
liquids.
•Neveryankcordtodisconnectfromoutlet;instead,graspplugandpullto
disconnect.
•Donotallowcordtotouchhotsurfaces.Letappliancecoolcompletelybefore
puttingaway.Loopcordlooselyaroundappliancewhenstoring.
•Alwaysdisconnectappliancefromelectricaloutletwhenfillingwithwateror
emptying,andwhennotinuse.
•Donotoperateappliancewithadamagedcord,oriftheappliancehasbeen
droppedordamaged.Toreducetheriskofelectricshock,donot
disassembleorattempttorepairtheappliance,takeittoaqualifiedserviceperson
forexaminationandrepair.Incorrectreassemblyorrepaircouldcauseariskoffire,
electric shock, or injury to persons when the appliance is used.
•Closesupervisionisnecessaryforanyappliancebeingusedbyornearchildren.Do
not leave appliance unattended while connected.
•Toreducethelikelihoodofcircuitoverload,donotoperateanotherhighwattage
applianceonthesamecircuit.
•Ifanextensioncordisabsolutelynecessary,a15ampereratedcordshouldbe
used.Cordsratedforlessamperagemayoverheat.Careshouldbetakento
arrange the cord so that the cord cannot be pulled or tripped over.
•Attention California Residents:
WARNING: This product contains chemicals known to the State of California
to cause cancer, birth defects and other reproductive harm.
SAVE THESE INSTRUCTIONS
IB-PS-251.indd 2-3 4/29/15 3:07 PM

4 5
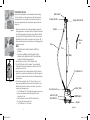
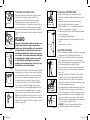
Grounding Instructions
Thisproductmustbegrounded.Ifitshouldmalfunctionor
breakdown, grounding provides a path of least resistance for the
electric current to reduce the risk of electric shock. This product is
equippedwithacordhavinganequipmentgroundingconductorand
agroundingplug.Theplugmustbepluggedintoanappropriate
outlet that is properly installed and grounded in accordance with all
local codes and ordinances.
DANGER
Improper connection of the equipment-grounding conductor
can result in a risk of electric shock. Check with a qualified
electrician or serviceman if you are in doubt as to whether
the product is properly grounded. Do not modify the plug
provided with the product - if it will not fit the outlet, you may
temporarily use an adapter (such as the one shown in Figure
B) until you have a proper outlet (such as the one shown in
Figure C) installed by a qualified electrician.
Thisproductisforuseonanominal120-voltcircuit,andhasa
groundingplugthatlooksliketheplugillustratedinFigureA.
AtemporaryadapterthatlooksliketheadapterillustratedinFigureB
maybeusedtoconnectthisplugtoa2-polereceptacleasshownin
FigureDifaproperlygroundedoutletisnotavailable.Thetemporary
adapter should be used only until a properly grounded outlet Figure
Ccanbeinstalledbyaqualifiedelectrician.Thetabforgrounding
screwFigureBextendingfromtheadaptermustbeconnectedtoa
permanentgroundsuchasaproperlygroundedoutletboxcover.
Whenevertheadapterisused,itmustbeheldinplacebyametal
screw.SeeFiguresDandE.
Perfect Steam Features
• Safeforuseonalltypesoffabrics
• Quickheat-upfeatureemitssteamin45seconds
• Convenientintegratedgarmenthanger
• Telescopingdesignforcompactstorage
• 5footflexiblehosewithSafeTouch
®
hose cover for safe and
comfortablehandling
• Easy-fillwatertankprovides45minutesofcontinuoussteam
• Rollingcastersforexcellentmobility
• Lowwaterautoshut-offforsafeuse
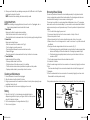
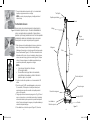
Assembly Instructions
1. Carefullyremoveallcontentsfrompackagingandinspectthe
producttomakesureallcomponentshavebeenreceived
(Fig.10).
2. Insertpoleintotopofunit.Matchthegroovesonthepolewiththe
notches in the pole connector and push down. Securely tighten
the nut on the pole over the connector by turning it clockwise
(Fig1).
3. Toattachthehangerattachment,aligntabsinhangerattachment
withgroovesonpoleandpushdown(Fig.2).
4. Fully extend the telescopic pole. To do so, open the 3 clips on the
poleandpullthepoleupwards(Fig.2).Whenfullyextendedclose
theclips.Makesurethatthepoleissecurelylockedintoplace
and cannot be pushed downward.
5. Attachthefabricbrushtothenozzlebysettingintoplace(Fig.3).
6. Attachhandle&hoseassemblytounit.Lineupthenutonthe
hose with the screw on the hose connector. Turn nut clockwise
untilitissecurelytightenedonthehoseconnector,(Fig4).It
should be tightly screwedintoplace.Thenyoumayhangthe
steamerhandleontothehangerattachment(Fig.3).
NOTE:Donothangthehoseonthehangerattachmentuntilafter
ithasbeenconnectedtothebasetopreventthehosefromfalling
on you.
7. Attachthecreasetool(Fig.5)ontothenozzletabandgentlypush
into place.
NOTE:Donotusethecreaseclampandthefabricbrushatthe
sametime
Pole
Turn
Turn
Nozzle
Tab
Crease
Clamp
Clips
Hanger
Attachment
Grounding Pin
Adapter
Tab for
Grounding
Screw
Figure A
Figure B
Figure D
Figure C
Figure E
Grounded
Outlet
Metal Screw
Fabric
Brush
Figure 1
Figure 2
Figure 3
Figure 4
Figure 5
IB-PS-251.indd 4-5 4/29/15 3:07 PM

6 7
Instructions for Use
Alwayscheckfabriclabelsforrecommendationsbeforesteaming.
Testcolorfastnessinaninconspicuousspot.Somefabricscanbe
steamedbetterfromtheundersideofthematerial.Heavyfabrics
mayrequirerepeatedsteaming.Neversteamagarmentwhileitis
being worn.
1. Removethewatertankfromtheunitbygraspingthehandleand
turningupsidedown.Unscrewthecapfromthebottomofthewater
tank.Holdthetankundercoldrunningwaterandfilltothedesired
level(Fig.6).DONOTfillpastthe45min.fillline.Whenyouhave
finishedfillingthetankscrewthecapbackonandturnover(Fig.7).
Placewatertankbackintounitandmakesureitissittingproperly&
securely in the cavity.
NOTE:
• Onlyfillthewatertankwithcoldwater.DoNOTuse
hot water.
• Donotuseanyadditivesinthewatersuchasfabric
softeners,scents,bleach,andstarch.Theywilldamage
thegarmentsteamerandyourgarment.
2. Plugthesteamercordintoa120VACelectricaloutlet.
3. TurntheOn/OffswitchtotheOnposition.Theswitchwilllight
toindicatethatthegarmentsteamerison.Steamwillemitin45
secondsfromthenozzle.
4. Hangthegarmentontothehangerattachment(Fig8).Steamthe
garmentinanup/downmotionstartingfromthetopofthegarment
tothebottom.Alwayskeepthehoseandnozzleelevatedabovethe
water container.
5. Thisunithasaresetbutton(Fig.10).Whentheunitrunsoutof
wateritwillautomaticallyshut-offtoensuresafeuseandthered
indicatorlightwillcomeonabovetheresetbutton.Ifyouwishto
continueyoursteamingsession:
• TurnOn/Offswitchto“Off”positionandunplugthepowercord
• RemoveandrefillwatertankbyfollowingStep1under
InstructionsforUse
• Plugthesteamercordintoa120VACelectricaloutlet.
• Pushtheresetbuttononsideofunit
• TurnOn/Offswitchto“On”position
Figure 6
Figure 7
Figure 8
Handle
Hose
Hose Connector
Steamer Nozzle
Fabric Brush
Hanger Attachment
Crease
Tool
Pole
Clips
Pole Connector
Water Tank
On/Off Switch
Casters
Indicator Light
Reset Button
Figure 10
IB-PS-251.indd 6-7 4/29/15 3:07 PM

8 9
6. WhenyouarefinishedwithyoursteamingsessionplacetheOn/OffswitchintheOffposition
andremovetheplugfromtheoutlet.
NOTE:Becautiouswhenhandlinguntilsteamerhasfullycooled.
Using Attachments
NOTE:Wheninstallingorchangingattachments,besuretheunitisoff,unplugged,andno
steamisbeingreleasedtoavoidcontactwithhotwater.
1. Fabric Brush
Helpsopenthefabricforgreatersteampenetration.
-Attachthefabricbrushontothesteamnozzle(Fig.3).
-Movethefabricbrushinadownwardmotionfromtoptobottomgentlybrushingthefabric.
2. Crease Tool
Helpscreateastraightcrease
-Attachthecreasetooltothesteamnozzle(Fig.5).
- Push the trigger to open the crease tool.
-Placethegarmentbetweenthecreasetoolandsteamnozzle.
-Releasethetrigger.
-Movethecreasetoolinadownwardmotionfromtoptobottomtosetacrease.
3. Travel Lint Roller
Helpsremovelightlintfromclothing
-Removeprotectivesheetfromlintroller.
-Rollstickysurfaceoflintrolleroverareaoflintonclothing.
- Pull off used outer sheet and tear at perforation to expose new sticky surface.
-Replaceprotectivesheettopreservestickysurfacefornextuse.
Cleaning and Maintenance
1. Besurethesteameristurnedoffandunplugged.
2. Allowthesteamertocoolforatleast30minutes.
3. Emptyanyexcesswaterfromthewatertankandallowittoairdrybeforereplacingthecap
and setting it back in the unit.
4. Emptyexcesswaterfromthereservoirbytippingunitoverasink.
Storing
1. Openthe3clips(Fig.2)onthetelescopicpoleandglideitslowlyto
collapse being careful not to pinch your fingers. When it is all the way down
close the 3 clips back into place.
2. Coilthehoseandplaceonthehangerattachment(Fig.9)
3. Store in a cool, dry place.
Removing Mineral Buildup
Onecommonproblemwithsteamersismineralbuildupcausedbythehighmineralcontent
inmanymunicipalwatersupplies.Mineralresidueinsideoftheinternalpipesandheatercan
causeintermittentsteamingorinseverecasesnosteamingatall.
Thebestwaytoavoidthisistousede-mineralizedordistilledwaterintheunit.Theprocedure
belowcanbeusedtoclearmineralbuildup.Ifyouareunabletousede-mineralizedordistilled
waterwerecommendyouusethisprocedureevery30hoursofoperationtohelpavoidmineral
buildup.
1. Turn the unit off and unplug the power cord.
2. Unscrewandremovethehosefromthehoseconnectoronthetopoftheunit.
3. Removethepolefromtheunit.
4. Removethewatertankfromthemainunitanddrainanywaterintheunitoverasink.
5. Makeamixtureof4oz.whitevinegarand4oz.water.Inmostcases1cupofthismixturewill
be sufficient.
6. Slowlypourthewater-vinegarmixtureintothehoseconnector(Fig.11).
a. Iftheinternalpipingisonlypartiallyblockedbymineralbuildup,thewater-vinegarmixture
willsoonstartflowingoutofthewaterintakehole.Ifthishappensproceedtostep8.
b. Iftheinternalpipingiscompletelyblocked,continuetopourthemixtureintothehose
connector until full.
7. Pourthewater-vinegarmixtureintothewaterintakeholeuntilfull.
8. Letstandfor40minutes.
9. Drainthewater-vinegarmixturefromhoseconnectororthereservoirbytippingtheunitovera
sink.
Pourcleanwaterthroughthehoseconnectorandwaterintakeholeuntilthevinegarsmell
dissipates.
Draintheresidualwaterfromhoseconnectororthereservoirbytippingtheunitoverasink.
Reassembletheunitandoperatenormally.
Iftheprocedureabovedoesnotreturntheunittonormaloperation,theunitmayneedservicing.
10.
11.
12.
Hose
Connector
Water Intake
Hole
Figure 11
Figure 9
IB-PS-251.indd 8-9 4/29/15 3:07 PM

10 11
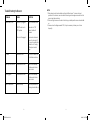
Trouble Shooting the Steamer
NOTE:
1.Watermineralcontentandconditionswillvaryindifferentareas.Toinsurecontinued
operationofthesteamer,neverstorewithoutcleaningandremovingexcesswaterfromthe
reservoir and water container.
2.Iftheresetlightcomesonwithwaterinthetankyouprobablyneedtoremovemineralbuild-
up.
3.Inareaswherethevoltageexceeds120V,itmaybenecessarytocleanyourunitmore
frequently.
PROBLEM CAUSE SOLUTION
Steamerfailstoheat Steamernotpluggedin
ON/OFFswitchnotin
“ON”position
Autoshutoffengaged
Plug in to electrical outlet
Pushswitchto“ON”
position. Switch will
illuminate.
Checkwatercontainerto
ensureitisnotempty.If
full, press the reset button
onsideofunit.Ifempty,
refill and push reset to
begin.
Nosteam Water level is low TurnON/OFFswitchOFF
and refill water container
Waterdripsfromnozzle Condensationinhose Holdthehosevertically
and allow water to drain
back into tank
Nozzlegurgles Condensationinhose Holdthehosevertically
and allow water to drain
back into tank
Steamisintermittent Mineralbuild-up Follow the procedure for
removingmineralbuild-up
IB-PS-251.indd 10-11 4/29/15 3:07 PM

12 13
Manual de instrucciones e
Información de garantía
PS-250
T
ó
m
e
s
e
u
n
m
o
m
e
n
t
o
a
h
o
r
a
Registre
su producto en:
www.homedics.com/register
Su valioso aporte sobre este
producto nos ayudará a
crear los productos que
desee en el futuro.
HoMedics
®
, Home Touch
®
, and PerfectSteam
®
are registered trademarks of HoMedics, LLC.
© 2009 – 2015 HoMedics, LLC. All rights reserved.
IB-PS251
PERFECT STEAM DELUXE
plancha a vapor comercial para ropa
Limited Two Year Warranty
HoMedics sells its products with the intent that they are free of defects in manufacture and workmanship
for a period of two years from the date of original purchase, except as noted below. HoMedics warrants
that its products will be free of defects in material and workmanship under normal use and service. This
warranty extends only to consumers and does not extend to Retailers.
To obtain warranty service on your HoMedics product, contact a consumer relations representative for
assistance. Please make sure to have the model number of the product available.
HoMedics does not authorize anyone, including, but not limited to, Retailers, the subsequent consumer
purchaser of the product from a Retailer or remote purchasers, to obligate HoMedics in any way
beyond the terms set forth herein. This warranty does not cover damage caused by misuse or abuse;
accident; the attachment of any unauthorized accessory; alteration to the product; improper installation;
unauthorized repairs or modifications; improper use of electrical/power supply; loss of power; dropped
product; malfunction or damage of an operating part from failure to provide manufacturer’s recommended
maintenance; transportation damage; theft; neglect; vandalism; or environmental conditions; loss of use
during the period the product is at a repair facility or otherwise awaiting parts or repair; or any other
conditions whatsoever that are beyond the control of HoMedics.
This warranty is effective only if the product is purchased and operated in the country in which the
product is purchased. A product that requires modifications or adoption to enable it to operate in any
other country than the country for which it was designed, manufactured, approved and/or authorized, or
repair of products damaged by these modifications is not covered under this warranty.
THE WARRANTY PROVIDED HEREIN SHALL BE THE SOLE AND EXCLUSIVE WARRANTY. THERE
SHALL BE NO OTHER WARRANTIES EXPRESS OR IMPLIED INCLUDING ANY IMPLIED WARRANTY OF
MERCHANTABILITY OR FITNESS OR ANY OTHER OBLIGATION ON THE PART OF THE COMPANY WITH
RESPECT TO PRODUCTS COVERED BY THIS WARRANTY. HOMEDICS SHALL HAVE NO LIABILITY FOR
ANY INCIDENTAL, CONSEQUENTIAL OR SPECIAL DAMAGES. IN NO EVENT SHALL THIS WARRANTY
REQUIRE MORE THAN THE REPAIR OR REPLACEMENT OF ANY PART OR PARTS WHICH ARE FOUND
TO BE DEFECTIVE WITHIN THE EFFECTIVE PERIOD OF THE WARRANTY. NO REFUNDS WILL BE GIVEN.
IF REPLACEMENT PARTS FOR DEFECTIVE MATERIALS ARE NOT AVAILABLE, HOMEDICS RESERVES
THE RIGHT TO MAKE PRODUCT SUBSTITUTIONS IN LIEU OF REPAIR OR REPLACEMENT.
This warranty does not extend to the purchase of opened, used, repaired, repackaged and/or resealed
products, including but not limited to sale of such products on Internet auction sites and/or sales of such
products by surplus or bulk resellers. Any and all warranties or guarantees shall immediately cease and
terminate as to any products or parts thereof which are repaired, replaced, altered, or modified, without
the prior express and written consent of HoMedics.
This warranty provides you with specific legal rights. You may have additional rights which may vary
from country to country. Because of individual country regulations, some of the above limitations and
exclusions may not apply to you.
For more information regarding our product line in the USA, please visit: www.homedics.com.
For Canada, please visit: www.homedics.ca.
For service in the USA
Email: [email protected]
Monday-Friday
8:30am-7:00pm EST
1.800.466.3342
For service in Canada
Email: [email protected]
Monday-Friday
8:30am-5:00pm EST
1.888.225.7378
IB-PS-251.indd 12-13 4/29/15 3:07 PM

14 15
IMPORTANTES INSTRUCCIONES
DE SEGURIDAD:
CUANDO UTILIZA PRODUCTOS ELÉCTRICOS,
SIEMPRE SE DEBEN SEGUIR CIERTAS PRECAUCIONES
BÁSICAS DE SEGURIDAD, COMO LAS SIGUIENTES:
LEA TODAS LAS INSTRUCCIONES ANTES DE USAR.
ADVERTENCIA - Parareducirelriesgodequemaduras,
incendio, choque eléctrico o lesiones a las personas
:
•Esposiblequesequemesitocalaspartesmetálicascalientes,elaguacalienteoel
vapor. Tenga cuidado cuando coloca un artefacto a vapor con la parte superior hacia
abajo;puedehaberaguacalienteeneldepósitodeagua.
•Parareducirelriesgodecontactoconelaguacalientequesaledelasaberturaspara
el vapor, verifique el artefacto antes de cada uso sosteniéndolo alejado de su cuerpo
ypresionandoelbotóndevapor.
•Useelartefactosolamenteparaelusoparaelcualfuediseñado.
•Parareducirelriesgodechoqueeléctrico,nosumerjaelartefactoenaguanien
otros líquidos.
•Nuncatiredelcableparadesconectardeltomacorriente;enlugardeeso,tomeel
enchufe y tire para desconectar.
•Nodejequeelcabletoquesuperficiescalientes.Dejequeelartefactoseenfríepor
completoantesdeguardarlo.Enrolleelcablealrededordeldispositivo,sinajustarlo,
cuando lo guarde.
•Siempredesconecteelartefactodeltomacorrientecuandolollenedeaguaocuandolo
vacíe, y cuando no se encuentre en uso.
•Nohagafuncionarelartefactoconuncabledañado,osielartefactosecayóosedañó.
Parareducirelriesgodechoqueeléctrico,nodesarmeniintenterepararelartefacto;
lléveloconunprofesionaldeserviciocalificadoparaqueloexamineylorepare.
Elrearmadoolareparaciónincorrectospodríancausarunriesgodeincendio,
choqueeléctricoolesiónalaspersonascuandousenelartefacto.
•Esnecesariaunaatentasupervisiónsobrecualquierartefactousadoporocerca
deunniño.Nodejeelartefactosinsupervisiónmientrasseencuentraconectado.
•Parareducirlaprobabilidaddesobrecargadelcircuito,nohagafuncionarningún
otroartefactodealtovatajeenelmismocircuito.
•Sirealmenteresultanecesariouncabledeextensión,sedebeusaruncable
declasificacióndeamperajede15.Esposiblequeloscablesconmenorclasificación
deamperajesesobrecalienten.Sedebetenercuidadoalacomodarelcablepara
que nadie tire de él o se tropiece con éste.
•Atención a los residentes de California:
ADVERTENCIA: Este producto contiene sustancias químicas que el estado
de California considera que causan cáncer, defectos congénitos y otros
daños reproductivos.
GUARDE ESTAS INSTRUCCIONES
IB-PS-251.indd 14-15 4/29/15 3:07 PM

16 17
Instrucciones de conexión a tierra
Esteproductodebeserconectadoatierra.Sillegaraafuncionar
incorrectamenteoadescomponerse,laconexiónatierra
proporcionaunarutademínimaresistenciaparalacorriente
eléctricareduciendoasíelriesgodechoqueeléctrico.Este
productoestáequipadoconunconductordeconexiónatierrayun
enchufedeconexiónatierra.Elenchufedebeestarenchufadoen
untomacorrienteapropiadoqueestéadecuadamenteinstaladoy
conectadoatierradeacuerdocontodosloscódigosyordenanzas
locales.
PELIGRO
Una conexión inadecuada del conductor de conexión a tierra
puede dar como resultado un riesgo de choque eléctrico.
Verifique con un electricista calificado o un técnico de servicio
si está en duda sobre si el producto está conectado a tierra
adecuadamente. No modifique el enchufe que se proporciona
con el producto – si no entra en el tomacorriente, usted puede
usar temporalmente un adaptador (como el que se muestra
en la Figura B) hasta que disponga de un tomacorriente
apropiado (como el que se muestra en la Figura C) que haya
sido instalado por un electricista calificado.
Esteproductodebeusarseenuncircuitode120voltiosnominales,y
estáequipadoconunenchufeconconexiónatierra,queseparece
alqueestáilustradoenlaFiguraA.Encasoquenosedisponga
deunenchufeconlaconexiónatierraapropiada,puedeusarse
unadaptadortemporal,similaralqueseilustraenlaFiguraB,
paraconectaresteenchufeauntomacorrientede2polaridades,
comoseindicaenlaFiguraD.Eladaptadortemporaldebería
usarsesólohastaqueunelectricistacalificadopuedainstalaruna
tomaconlaconexiónatierraapropiada(FiguraC).Lalengüeta
paraeltornillodeconexiónatierra(FiguraB)quesobresaledel
adaptadordebeconectarseaunatierrapermanentecomounacaja
eléctricapropiamenteconectadaatierra.Cadavezqueseutiliceel
adaptador,elmismodebesermantenidoensulugarconuntornillo
metálico.VerFigurasDyE.
Características del Perfect Steam
• Puedeusarseconseguridadconcualquiertipodetejido
• Lafuncióndecalentamientorápidopermiteproducirvaporen45
segundos.
• Ganchoparacolgarropaconvenientementeincorporado
• Diseñotelescópicoparaalmacenamientocompacto
• Mangueraflexiblede5’(1,5m)concubiertademangueraSafe
Touch
®
paraunmanejocómodoysinpeligro
• Eltanquedeagua,fácildellenar,permitelaproduccióndevapor
por40minutosseguidos
• Lasruedaspermitenmovilidadexcelente
• Elapagadoautomáticoporbajoniveldeaguahaceelusomás
seguro
• Drenajeconvenienteenlabase
Instrucciones de montaje
1. Retireconcuidadotodoelcontenidodelembalajeyreviseelproducto
paraasegurarsedequeharecibidotodaslaspiezas(Fig.10).
2. Inserteelposteeneltopedelaunidad.Hagacorresponderlas
ranuras en el poste con los relieves en el conector del poste, y
presionehaciaabajo.Ajustedeformaseguralatuercaenelposte
sobreelconectorgirándolahacialaderecha(Figura1).
3. Paracolocarelaccesorioparagancho,alineelaslengüetasdel
accesorioparaganchoconlasranurasdelposteyempujehacia
abajo(Fig.2).
4. Extiendaporcompletoelpostetelescópico.Paraeso,abralos
3sujetadoresenelposteyjaleelpostehaciaarriba(Figura2).
Despuésdeextenderelposte,vuelvaacerrarlossujetadores.
Asegúresedequeelposteestéfirmementecolocadoensulugary
quenoselepuedaempujarhaciaabajo.
5. Unaelcepilloparatelaenlaboquillacolocándoloensulugar(Figura3).
6. Unaelmontajedemangoylamangueraalaunidad.Alineela
tuercadelamangueraconeltornillodelconectordelamanguera.
Girelatuercahacialaderechahastaqueestéajustadadeforma
seguraenelconectordelamanguera(Fig.4).Debeestarbien
atornilladaenellugar.Luegopuedecolgarelmangodelaplancha
avaporenelaccesorioparaganchos(Fig.3).
ATENCIÓN:Nocuelguelamangueradelganchoantesde
conectarlaalabaseparaevitarqueselecaigaencima.
Poste
Turn
Girar
Sujetadores
Accesorios para
gancho
Espigo de conexión
a tierra
Adaptador
Lengüeta
para el
tornillo de
tierra
Figura A
Figura B
Figura D
Figura C
Figura E
Toma con
conexión a
tierra
Tornillo metálico
Tela
Cepillo
Figura 1
Figura 2
Figura 3
Figura 4
Figura 5
Lengüeta
de la
boquilla
Pinza para
pliegues
IB-PS-251.indd 16-17 4/29/15 3:07 PM

18 19
7. Conectelaherramientadeaumento(fig.5)enlasalientedela
boquillayempujesuavementeensulugar.
NOTA:nouselapinzaparaplieguesyelcepilloparatelaal
mismotiempo.
Instrucciones de uso
Revisesiemprelasrecomendacionesdelasetiquetasdela
tela antes de planchar al vapor. Pruebe la inalterabilidad del
colorenunlugardondepaseinadvertido.Algunastelasse
planchanmejoralvaporponiéndolasalrevés.Lastelaspesadas
probablementedebanserplanchadasalvaporvariasveces.
Nuncaplancheconvaporunaprendaquetengapuesta.
1. Retireeltanquedelaunidadsujetandoelmangoygíreloboca
abajo.Desenrosquelatapadelfondodeltanquedeagua.
Mantengaeltanquebajounchorrodeaguafríahastaquequede
llenoalniveldeseado(Figura5).NOlollenemásarribadelnivel
dellenadode40minutos.Unavezterminadodellenareltanque,
vuelvaaenroscarlatapaygírelobocaarriba(Figura6).Coloque
otravezeltanquedeaguaenlaunidadasegurándosedeque
quede bien posicionado y asegurado en su lugar.
NOTA:
• Usesoloaguafríaparallenareltanque.
NOuseaguacaliente.
• Nouseaditivosenelaguatalescomosuavizantes,
aromatizantes,blanqueadoresyalmidón.Dañaránla
plancha a vapor y a su prenda.
2. Enchufeelcordóndelvaporizadorenuntomacorrientede120
voltios.
3. GireelinterruptorOn/Off(encendido/apagado)enlaposición
On(encendido).Elinterruptorseiluminaparaindicarqueel
vaporizadorpararopaestáencendido.Laboquillaproducirá
vapor en 45 segundos.
4. Cuelguelaprendaenelaccesorioparaganchos(Fig.8).Paseel
vaporenlaprendaconunmovimientohaciaarribayhaciaabajo
comenzandodesdelapartesuperiordelaprendahastalaparte
inferior.Siempremantengalamangueraylaboquillaelevadaspor
encimadelrecipientedeagua.
5. Esteunidadtieneunbotóndereajuste(Figura10).Cuandose
Figura 6
Figura 7
Figura 8
Figure 10
Mango
Gancho
Poste
Conectordelposte
Tanque de agua
InterruptorOn/Off
Conectordemanguera
Luzindicadora
Botóndereajuste
Manguera
Boquillavaporizadora
TelaCepillo
Pliegue
Herramienta
Pinzas
Ruedas
IB-PS-251.indd 18-19 4/29/15 3:07 PM

20 21
Para guardar
1. Abralos3sujetadores(Fig.2)delpostetelescópicoydeslícelosuavementeparacolapsarlo,
conelcuidadodenopellizcarsusdedos.Despuésdecolapsarlassecciones,vuelvaa
cerrar los sujetadores.
2. Envuelvalamangueraycolóquelaenelgancho(Figura8).
3. Guardelaunidadenunlugarfrescoyseco.
Remoción de los depósitos minerales
Laacumulacióndedepósitosmineralesesunproblemafrecuentedelosvaporizadores;estees
causadoporelaltocontenidodemineralesenmuchasredesmunicipalesdeagua.Eldepósito
mineralalinteriordetubosycalentadorespuedecausarunflujoirregulardevaporo,enlos
casosmásserios,impedirporcompletolaemisióndevapor.
Lamejormaneradeevitaresteproblemaesladeusaraguadesmineralizadaodestilada.
Puedeusarseelsiguienteprocedimientoparalimpiarlaacumulacióndeminerales.Siusted
nopuedeusaraguadesmineralizadaodestilada,lerecomendamosllevaracaboelsiguiente
procedimientocada30horasdeoperaciónparaayudaraimpedirlaacumulacióndeminerales.
1. Apaguelaunidadydesenchufeelcableeléctrico.
2. Desenrosqueyretirelamangueradelconectorenlapartesuperiordelaunidad.
3. Retireelpostedelaunidad.
4. Retireeltanquedeaguadelaunidadprincipalydreneelaguadelaunidadsobreunapileta.
5. Prepareunamezclade4oz.devinagreblancoy4oz.deagua.Enmuchoscasosunataza
deestamezclaserásuficiente.
6. Lentamenteviertalamezcladeaguayvinagreenelconectordelamanguera(Fig.11).
a.Silatuberíainternaestásóloparcialmentebloqueadaporlosdepósitosminerales,la
mezcladeaguayvinagreempezaráasalirprontodelorificiodeentradadeagua.Sieso
ocurre,pasealpaso8.
b.Silatuberíainternaestácompletamentebloqueada,sigavertiendolamezclaenel
conectordelamanguerahastaquequedelleno.
7. Viertalamezcladeaguayvinagreenelorificiodeentradadeaguahastaquequedelleno.
8. Dejereposarpor40minutos.
9. Drenelamezcladeaguay
vinagre del conector de la
mangueraoelrecipientede
agua inclinando la unidad sobre
la pileta.
10.Viertaagualimpiaenlabase
delamanguerayenelorificio
de entrada de agua hasta
eliminareloloravinagre.Vuelva
amontarlaunidadyúsela
normalmente.
agotaelaguaenlaunidad,esteseapagaautomáticamenteporseguridadyseenciende
unaluzindicadoraroja(arribadelbotóndereajuste).Sideseacontinuarconsussesiónde
vaporización:
• Coloqueelinterruptor“On/Off”enlaposición“Off”ydesenchufeelcabledecorriente.
• Retireyvuelvaallenareltanquedeaguasiguiendoelpaso1acontinuación
Instruccionesdeuso
• Oprimaelbotóndereajusteenelladodelaunidad
• Enchufeelcabledelaplanchaavaporenuntomacorrientede120voltiosdeCA.
• GireelinterruptorOn/Offenlaposición“On”(encendido).
6. Cuandohaterminadosusesióndevaporización,gireelinterruptorOn/Offenlaposición
Off(apagado)ydesconecteelenchufedeltomacorriente.
ATENCIÓN:Manejeelvaporizadorconcautelahastaquesehayaenfriadoporcompleto.
Uso de los accesorios
NOTA:cuandoinstaleocambielosaccesorios,asegúresedequelaunidadestéapagada,
desenchufada y que no esté largando vapor para evitar el contacto con el agua caliente.
1. Cepillo para tela
Ayudaaabrirlatelaparaunamayorpenetracióndelvapor.
-Coloqueelcepilloparatelaenlaboquilladelaplanchaavapor(Fig.3).
-Desliceelcepilloparatelaconunmovimientodearribahaciaabajocepillandosuavementelatela.
2. Pliegue Herramienta
Ayudaacrearunplieguerecto
-Coloquelaherramientaparaplieguesenlaboquilladelaplanchaavapor(Fig.5).
-Presioneelgatilloparaabrirlaherramientaparapliegues.
-Coloquelaprendaentrelaherramientaparaplieguesylaboquilladelaplanchaavapor.
- Suelte el gatillo.
-Deslicelaherramientaparaplieguesconunmovimientodearribahaciaabajoparacrearunpliegue.
3. Rodillo para pelusa para viajes
Ayudaaquitarlaspelusasligerasdelaropa
-Quitelapelículaprotectoradelrodilloparapelusa.
- Pase la superficie adhesiva del rodillo para pelusa sobre el área de la ropa con pelusa.
- Quitelapelículausadaycorteenlaperforaciónparaexponerlanuevasuperficieadhesiva.
-Vuelvaacolocarlapelículaprotectoraparaconservarlasuperficieadhesivaparael
siguiente uso.
Limpieza y mantenimiento
1. Asegúresedequelaplanchaavaporestéapagadaydesenchufada.
2. Dejequeelvaporizadorseenfríepornomenosde30minutos.
3. Desocupetodoelexcesodeaguadeltanqueydéjelosecarantesdevolver
a colocar la tapa y posicionarlo en la unidad.
4. Desocupeelexcesodeaguadelrecipienteretirandoeltapóndedrenaje
(Figura9)einclinandolaunidad.
Conector de
manguera
Orificio de
entrada de
agua
Figure 11
Figura 9
IB-PS-251.indd 20-21 4/29/15 3:07 PM

22 23
11.Dreneelaguaresidualdelconectordelamangueraoeldepósitoinclinandolaunidadsobre
la pileta.
12.Sielprocedimientodearribanolograquelaunidadvuelvaafuncionarnormalmente,es
posiblequenecesitemantenimiento.
Solución de problemas del vaporizador
ATENCIÓN:
1. Elcontenidodemineralesylascondicionesdelaguavaríanenladiferentesáreas.Para
asegurarelfuncionamientocontinuodelvaporizador,nologuardenuncasinlimpiarloysin
drenar el exceso de agua del tanque y del recipiente.
2. Siseenciendelaluzdereinicioconaguaeneltanqueprobablementedebaretirarla
acumulacióndeminerales.
3. Enlasáreasdondeelvoltajeexcedelos120voltios,puedesernecesariolimpiarlaunidad
conmásfrecuencia.
PROBLEMA CAUSA SOLUCIÓN
Elvaporizadornocalienta Elvaporizadornoestá
Elinterruptor“ON/OFF”
noestáenlaposiciónde
encendido(ON)
Elapagadoautomático
está activado
Enchúfeloeneltomacorriente
conectado
Presione el interruptor para colocarlo
enlaposicióndeencendido(ON)
Elinterruptorseiluminará.
Reviseeltanquedeaguay
asegúresedequenoestévacío.
Si está vacío, vuelva a llenar y
presionereinicioparacomenzar.
Si está vacío, vuelva a llenarlo
yareinicializarparaempezarel
funcionamiento.
Noseproducevapor Elniveldeaguaestábajo GireelinterruptorenOFF
(apagado)yvuelvaallenarel
tanque de agua
Laboquillagoteaagua Condensacióndentrodel
tubo
Mantengaeltuboverticalydeje
que el agua se devuelva en el
tanque
Laboquillaborbotea Condensacióndentrodel
tubo
Mantengaeltuboverticalydeje
que el agua se devuelva en el
tanque
Elvaporesintermitente Haydepósitosminerales Sigaelprocedimientopararetirar
losdepósitosminerales
IB-PS-251.indd 22-23 4/29/15 3:07 PM
-
 1
1
-
 2
2
-
 3
3
-
 4
4
-
 5
5
-
 6
6
-
 7
7
-
 8
8
-
 9
9
-
 10
10
-
 11
11
-
 12
12


HoMedics PS-251 Instruction book
- Categoría
- Limpiadores a vapor de ropa
- Tipo
- Instruction book
en otros idiomas
- English: HoMedics PS-251
Artículos relacionados
-
 Home Touch PerfectSteam PS-250 Manual de usuario
-
HoMedics PS-300 Instruction book
-
-
-
 Home Touch PS-200 Manual de usuario
-
-
-
-


Otros documentos
-
 Top Innovations MC1407 Manual de usuario
-
Shark GS300 Series Manual de usuario
-
SINGER Garment Steamer El manual del propietario
-
Steamfast SF-540WH Guía del usuario
-
-
Electrolux GST10 Manual de usuario
-
-
Conair GS88 Manual de usuario
-
Rowenta Compact Valet El manual del propietario
-
Premier ED-3256 Manual de usuario
