
INSTRUCTION AND RECIPE BOOKLET
For your safety and continued enjoyment of this product, always read the instruction book carefully before using.
Stack5
®
Multifunctional Grill
GR-M3 Series

2
IMPORTANT
SAFEGUARDS
When using an electrical appliance, basic
safety precautions should always be followed:
1. READ ALL INSTRUCTIONS.
2. Unplug from outlet when not in use and
before cleaning. Allow to cool before
putting on or taking off parts and
before cleaning the appliance.
3. Do not touch hot surfaces; use handles
or knob. Always use oven mitts when
handling hot material.
4. To protect against risk of electrical shock,
do not immerse the cord, plugs, or grill
housing in water or any other liquid. If
housing falls into liquid, unplug the cord
from outlet immediately. DO NOT reach
into the liquid.
5. To avoid possible accidental injury,
close supervision is necessary when any
appliance is used by or near children.
6. Do not operate any appliance with a
damaged cord or plug or after the
appliance has malfunctioned or has been
dropped or damaged in any way or is not
operating properly. Return the appliance
to the Customer Service Center (see
Warranty for details) for examination,
repair or mechanical or electrical
adjustment.
7. The use of attachments not recommended
by Cuisinart may cause fire, electric
shock, or risk of injury.
8. Do not use outdoors or anywhere the cord
or unit housing might come into contact
with water while in use.
9. Do not use the grill for anything other than
its intended use.
10. This appliance is not intended for deep
frying foods.
11. To avoid the possibility of the grill being
accidentally pulled off work area, which
could result in damage to the cooker or
personal injury, do not let cord hang over
edge of table or counter.
12. To avoid damage to cord and possible fire
or electrocution hazard, do not let cord
contact hot surfaces, including a stove.
13. Extreme caution must be used when
moving the grill containing hot oil
or other hot liquids.
14. Do not place on or near a hot gas or
electric burner, or in a heated oven.
15. Do not operate grill in water or under
running water.
16. Avoid sudden temperature changes,
such as adding refrigerated foods to
a heated pot.
17. CAUTION: TO REDUCE THE RISK
OF ELECTRIC SHOCK, COOK ONLY
IN THE POT PROVIDED OR IN
CONTAINERS PLACED ON THE
COOKING RACK IN THE
PROVIDED POT.
18. CAUTION: A heated pan or grill plate may
damage countertops or tables. When
removing the baking pan or grill plate from
the heater plate, DO NOT place it directly
on any unprotected surface. Always set
the hot baking pan or grill plate on a trivet
or a rack.
19. Always attach plug to appliance first, then
plug cord in the wall outlet. To disconnect,
turn dial control to OFF, then remove plug
from wall outlet.
20.
Do not operate your appliance in an
appliance garage or under a wall cabinet.
When storing in an appliance garage,
always unplug the unit from the
electrical outlet. Not doing so could
create a risk of fire, especially if the
appliance touches the walls of the garage
or the door touches the unit as it closes.
SAVE THESE
INSTRUCTIONS
FOR HOUSEHOLD
USE ONLY
SPECIAL CORD SET
INSTRUCTIONS
A short detachable power supply cord is
provided to reduce the risks of becoming
entangled in or tripping over a longer cord.
Longer detachable power-supply cords or
extension cords are available and may be
used if care is exercised in their use.
If a long detachable power-supply cord or
extension cord is used, the marked electrical
rating of the extension cord should be at
least as great as the electrical rating of the
appliance. The extension cord should be a
grounding 3-wire cord. The longer cord
should be arranged so that it will not drape
over the countertop or tabletop where it can
be pulled on by children or tripped over
unintentionally.

3
CONTENTS
Important Safeguards................ 2
Features and Benefits ............... 3
The Stack5
®
Does it All............... 4
Assembly Instructions ............... 4
Operating Instructions ................ 4
Cleaning & Care ..................... 5
Tips & Hints ........................ 5
Brown, Sauté ................... 5
Slow Cook ...................... 5
Steam.......................... 6
Cooking Function Guidelines........... 7
Steaming Chart ..................... 8
Troubleshooting ..................... 9
Warranty Information ................ 10
Recipes........................... 11
FEATURES AND BENEFITS
1. Removable lid with silicone-wrapped
handle
2. Removable stainless steel steam rack
elevates ingredients to steam
3. Removable non-stick grill plate
for grilling
4. Removable, 5 qt. non-stick baking pan
for slow cooking, baking, browning/
sautéing, steaming, and griddling
5. Heater plate
6. Grill Housing
7. Dial control with settings from
WARM to 400˚F
a. Indicator lights signal “power on”
and heating/ready to cook
8. Silicone-wrapped handles
9. Removable cord (not shown)
for convenient, easy storage
10. BPA free (not shown)
All parts that are meant to come
into contact with food are BPA free
7
88
6
4
1
2
3
5
7a

4
THE STACK5
®
DOES IT ALL
The Stack5
®
is the ultimate kitchen
appliance, offering you six separate
cooking options.
GRILL
Use the Stack5
®
as a grill to cook burgers,
steak, poultry, fish and vegetables. When
the Stack5
®
is being used as a grill, use
the removable, non-stick grill plate.
GRIDDLE
Use the Stack5
®
as a griddle to cook
pancakes, eggs, French toast, hash
browns and breakfast meats. When the
Stack5
®
is being used as a griddle,
use the removable, non-stick baking pan.
BROWN/SAUTÉ
The Stack5
®
can function as an electric
skillet. Use the non-stick baking pan
to brown or sauté ingredients as an
independent skillet dish or as the
foundation to a slow-cooked dish.
SLOW COOK
The 5-quart, non-stick baking pan for the
Stack5
®
is the perfect-sized vessel to
create a variety of slow-cooked meals.
BAKE
Use the Stack5
®
to create baked cakes
and casseroles using the non-stick
baking pan.
STEAM
Steam anything from artichokes to broccoli
to chicken breasts in the Stack5
®
. Use the
stainless steel steam rack inside the
baking pan with a minimum of 3 cups of
water to steam.
ASSEMBLY
INSTRUCTIONS
Place your Stack5
®
on a clean, flat surface
where you intend to cook. The Stack5
®
can be positioned in three ways:
Grill Plate Position: Place the grill plate
on top of the heater plate.
Baking Pan Position: Place the baking
pan on top of the heater plate.
Steam Position: Place the baking pan on
top of the heater plate, add the steam rack
to the baking pan.
NOTE: Make sure steam rack is resting
on the pan support shelf, not the handle
rivets.
OPERATING
INSTRUCTIONS
Once the
Stack5
®
is assembled properly
and you are ready to begin cooking, turn
the dial clockwise to select desired cooking
temperature.
Temperatures range from WARM to 400˚F.
When the unit is plugged in, the upper white
indicator and blue ready light will illuminate
to indicate that the power is on. Once a
temperature is selected, the ready light
will go out.
It may take up to 10 minutes to reach the
selected temperature, depending on the
temperature level that was set. When the
thermostat has reached operating
temperature, the lower blue ready light
will indicate that the
Stack5
®
is ready for
cooking. During operation, the light will
continue to turn on and off as the
thermostat regulates the temperature.
This is normal.
The temperature controls are used to set
and maintain the temperature of the
cooking surface. You may vary the setting
of the control knob at any time during
cooking, and may wish to do so depending

5
on the types of foods you are cooking.
Refer to the Cooking Function Guidelines
chart and Steaming chart on pages
7 and 8 for recommendations.
CLEANING & CARE
All removable parts are dishwasher safe.
1. Unplug unit and allow it to cool
completely before cleaning.
2. Never immerse grill housing in water or
other liquids.
3. To clean the housing and control panel,
simply wipe with a clean, damp cloth.
4. Wash grill plate, baking pan, lid and
steam rack with warm, soapy water
and rinse thoroughly. Or, clean in the
dishwasher.
5. Dry all parts after every use.
6. Maintenance: Any other servicing
should be performed by an authorized
service representative.
NOTE: If food residue sticks to the baking
pan surface, fill pot with warm, soapy
water and allow it to soak before cleaning.
If scouring is necessary, use a nonabrasive
cleanser or liquid detergent with a nylon
pad or brush.
TIPS & HINTS
• Heat-up times may vary, based on a
number of factors. The selected
temperature, the current temperature of
the grill plate or baking pan, the contents
of the pan, and other factors can all
affect heat-up time.
• Always use nonstick utensils.
Metal utensils may damage the
nonstick coating.
BROWN/SAUTÉ TIPS
• Use the baking pan to brown and sauté.
Brown/Sauté as you would in a skillet or
sauté pan on the stove – from quickly
sautéed skillet dishes to the first step in
many braised or slow-cooked dishes.
• For even browning, it is important not to
crowd the pan. Foods should be cooked
in an even layer on the bottom of the
pan, so it is good to cook foods in
batches when necessary.
• Many recipes call for browning and
sautéing foods before slow cooking.
Some items produce more grease and
fat than is desirable in the finished dish.
To remove the excess grease, using pot
holders, very carefully remove the baking
pan from the base and pour out the
grease from the corner of the baking
pan. Return the baking pan to the base
and finish cooking the dish as desired.
• When browning meats, any brown bits
that are left in the bottom of the pan can
be used to flavor the dish. Simply add a
small amount of liquid (like wine or broth)
to the pan and scrape up the browned
bits with a wooden spoon – leave them
in pan. Incorporate into the dish or
sauce.
SLOW-COOKING TIPS
• Slow cook as you would in the oven.
Cook tougher cuts of meat until tender,
usually about 3 to 4 hours.
• Slow cooking is perfect for foods that
require long, slow simmering, such as
stews, and dried beans.
• Slow cooking is ideal for tougher and
less expensive cuts of meat like shoulder
and pot roast.
• We encourage browning foods before
slow cooking, as it adds much depth
and flavor to the finished dish. However,
if time is short, this step can be skipped
and all ingredients can be added to your
baking pan to slow cook.
• Ground meats should always be
browned before slow cooking.
• For best cooking results, fill baking pan
at least one-quarter full, but not more
than three-quarters full.
• “Crisp-tender” vegetables should be
added during the last 30 minutes of
cooking time to prevent overcooking.
Fresh herbs should be stirred into dishes
immediately before serving.
• We do not recommend removing the
lid when slow cooking, as heat will

6
escape, requiring extra cooking time.
•
Many slow-cooked foods, such as stews,
benefit from cooling and refrigerating,
then reheating – as the saying goes, stew
or chili is always better the second day.
• A great way to reheat slow-cooked foods
is to bring them to a simmer. Stir to
ensure all ingredients are warmed
through and then switch to 300˚ on the
Slow Cook function for serving.
• If using frozen foods, thaw completely
before slow cooking.
• Recipes can be assembled the night
before cooking. Brown ingredients if
necessary, and then combine with
remaining ingredients in baking pan.
Cover and refrigerate. When ready to
cook, place the baking pan on the base
heater plate and add 30 minutes to your
projected cooking time.
• To decrease the amount of fat in recipes,
remove as much of the visible fat as
possible from meats and poultry.
Remove skin from poultry and drain any
fat from browned meats.
STEAMING TIPS:
• Steaming is one of the healthiest
methods of cooking, as the smallest
amount of nutrients are lost in the
cooking process.
• To steam, fill the baking pan with
water to max/steam indicator, about 3 to
4 cups. Add ingredients to the steam
rack. Cover and select 400˚ F.
Steam times reflect the time when
temperature is selected.
• When adding heavier foods, like corn
on the cob, to the steaming rack, place
them on the middle of the rack and work
your way to the edges.
• Use the smaller amount of water, 3 cups
when steaming fish or seafood.
• Always use caution when removing lid.
It is best to remove the lid away from
you.

7
COOKING FUNCTION GUIDELINES
FUNCTION RECOMMENDED TEMPERATURE
Grill
Steak, Burgers, Chops, Chicken 400˚F
Bacon 375˚F
Vegetables 375˚F
Griddle
Eggs 250˚F
Pancakes, French Toast, Grilled
Cheese, Quesadillas
350˚F
Bacon 375˚F
Steaks, Sausage, Chicken 400˚F
Steam
Vegetables, Chicken 400˚F
Fish, Shellfish 350˚F
Bake
Cakes, Casseroles 275˚F to 350˚F
Brown/Sauté
Meats, Chicken 400˚F
Vegetables 350˚F to 375˚F
Slow Cook
Tougher cuts of meat, stews, chili 200˚F to 250˚F

8
Steaming Chart
FOOD AMOUNT PREPARATION COOKING TIME
Artichokes
2 individual
trimmed – see recipe
page 26
40–45 minutes
Asparagus
1 pound medium trimmed 10-12 minutes
Broccoli
1 bunch (about
16 to 20 oz.)
2-inch florets 10-12 minutes
Carrots, baby 1 pound
whole 18-20 minutes
Cauliflower
1 medium head
(about 20 oz.)
2-inch florets 15 minutes
Corn 4 ears
husked 15-18 minutes
Green beans 1 pound
trimmed 15-17 minutes
Peas, snow 1 pound
trimmed 10-11 minutes
Potatoes, new 2 pounds
whole 25-30 minutes
Potatoes, yellow/gold 16–20 ounces
slices or ¾-inch pieces 20 minutes
Potatoes, sweet 16–20 ounces
slices or ¾-inch pieces 14-15 minutes
Butternut Squash
1 pound cubed 20 minutes
Squash, summer/zucchini 1 pound
½-inch slices 12-14 minutes
Chicken
1 pound (about 2
large boneless
breasts)
whole 20-25 minutes
Shrimp* 1 pound (large)
peeled & deveined 8-10 minutes
Fish*
(salmon, swordfish, etc.)
1 pound
cut into portion sizes
thin fillet 8–10
minutes
thick fillet 15-20
minutes
Hard Boiled Eggs
12
20-25 minutes
*3 cups of water should be used here

9
Subject Question Answer/Solution
Power
Why won’t my unit turn on?
Check to make sure your unit is properly connected and
plugged into a functional outlet.
Contact Customer Service at 1-800-726-0190.
Cooking
When should I brown my meat
before slow cooking?
Browning meat before slow cooking is an optional step. It is
beneficial, as it adds flavor and color, but the step can be
omitted if time is short. Exception: ground meats which must
be browned.
Can I use the baking pan on
the stove/in the oven?
The baking pan was designed specifically for use in this grill.
We do not suggest using it on the stove or in the oven.
Cleaning
Can I put my unit in the
dishwasher?
All removable parts are top-rack dishwasher safe.
Do not immerse in water, or put the grill housing in the dishwasher.
Clean the grill housing and control panel with a clean, damp cloth.
The baking pan and grill plate
are nonstick – why is food
sticking?
While the baking pan and grill plate do have a nonstick
coating, it is possible for food residue to burn onto the baking
pan and grill plate, making it difficult to remove.
Food residue is sticking to the
baking pan and grill plate
surface. How do I clean it
without damaging it?
If food has burned on, fill baking pan or grill plate with warm,
soapy water and allow to soak before cleaning. If scouring is
necessary, use a nonabrasive cleanser or liquid detergent with
a nylon pad or brush.
Troubleshooting Chart

10
WARRANTY
Limited Three-Year Warranty
This warranty is available to U.S. consumers
only. You are a consumer if you own a
Cuisinart
®
Stack5
®
Multifunctional Grill that
was purchased at retail for personal, family or
household use. Except as otherwise required
under applicable law, this warranty is not
available to retailers or other commercial
purchasers or owners. We warrant that your
Cuisinart
®
Stack5
®
Multifunctional Grill will be
free of defects in materials and workmanship
under normal home use for 3 years from the
date of original purchase.
We recommend that you visit our website,
https://cuisinart.registria.com for a fast,
efficient way to complete your product
registration. However, product registration
does not eliminate the need for the consumer
to maintain the original proof of purchase in
order to obtain the warranty benefits. In the
event that you do not have proof of purchase
date, the purchase date for purposes of this
warranty will be the date of manufacture.
CALIFORNIA RESIDENTS ONLY
California law provides that for In-Warranty
Service, California residents have the option of
returning a nonconforming product (A) to the
store where it was purchased or (B) to another
retail store that sells Cuisinart products of the
same type. The retail store shall then,
according to its preference, either repair the
product, refer the consumer to an independent
repair facility, replace the product, or refund
the purchase price less the amount directly
attributable to the consumer’s prior usage of
the product. If neither of the above two options
results in the appropriate relief to the
consumer, the consumer may then take the
product to an independent repair facility, if
service or repair can be economically
accomplished. Cuisinart and not the consumer
will be responsible for the reasonable cost of
such service, repair, replacement, or refund for
nonconforming products under warranty.
California residents may also, according to
their preference, return nonconforming
products directly to Cuisinart for repair or, if
necessary, replacement by calling our
Consumer Service Center toll-free at
800-726-0190. Cuisinart will be responsible
for the cost of the repair, replacement, and
shipping and handling for such nonconforming
products under warranty.
HASSLE-FREE REPLACEMENT WARRANTY
Your ultimate satisfaction in Cuisinart products
is our goal, so if your Cuisinart
®
Stack5
®
Multifunctional Grill should fail within the
generous warranty period, we will repair it or,
if necessary, replace it at no cost to you.
To obtain a return shipping label, email us
at https://www.cuisinart.com/customer-
care/product-assistance/product-inquiry.
Or call our toll-free customer service
department at 1-800-726-0190 to speak with
a representative.
Your Cuisinart
®
Stack5
®
Multifunctional Grill
has been manufactured to the strictest
specifications and has been designed for use
only in 120-volt outlets and only with
authorized accessories and replacement parts.
This warranty expressly excludes any defects
or damages caused by attempted use of this
unit with a converter, as well as use with
accessories, replacement parts or repair
service other than those authorized by
Cuisinart. This warranty does not cover any
damage caused by accident, misuse, shipment
or other than ordinary household use. This
warranty excludes all incidental or
consequential damages. Some states do not
allow the exclusion or limitation of these
damages, so these exclusions may not apply
to you. You may also have other rights, which
vary from state to state.
Important: If the nonconforming product is to
be serviced by someone other than Cuisinart’s
Authorized Service Center, please remind the
servicer to call our Consumer Service Center
at 1-800-726-0190 to ensure that the problem
is properly diagnosed, the product is serviced
with the correct parts, and to ensure that the
product is still under warranty.

11
RECIPES
French Toast Strata ..............................11
Breakfast Sausage, Pepper
and Cheddar Frittata............................12
Banana Pancakes ................................12
Brunch Chilaquiles .............................. 13
Summer Vegetable Pasta Bake ........... 13
Eggplant Parmesan .............................14
Arroz con Pollo ....................................14
Chicken Cacciatore .............................15
Latin Shredded Chicken ......................15
Chicken Enchilada Casserole .............. 16
Grilled Chicken with
Spring Vegetables ................................16
Barbecued Brisket ...............................17
Skirt Steak Fajitas ................................18
Grilled Steak and Green Onions with
Salsa Verde ..........................................18
Chili con Carne ....................................19
Guinness Braised Beef Shanks ........... 19
Grilled Sausage and Peppers ..............20
Hawaiian Skewers ...............................21
Shrimp Scampi ....................................21
Stuffed Filet of Sole .............................21
Red Beans and Rice ............................ 22
Cauliflower Fried Rice .......................... 23
Butternut Squash and Farro Gratin ..... 23
Skillet Brussels Sprouts
with Red Onion ....................................24
Old-Fashioned
Macaroni and Cheese ..........................24
Polenta .................................................25
Bananas Foster .................................... 25
Raspberry Fig Upside-Down Cake .....25
Carrot Cake .......................................... 26
French Toast Strata
Prepare this dish the night before, so it is
ready to go first thing in the morning.
A perfect brunch dish!
Makes 8 servings
Nonstick cooking spray
4 large eggs
2 cups whole milk
1 cup heavy cream
1 tablespoon pure vanilla extract
¹/
³
cup pure maple syrup
2 teaspoons ground cinnamon
1 teaspoon ground nutmeg
¼ teaspoon salt
1 pound challah bread, cut into
9 x ½-inch strips
2 tablespoons packed light brown
sugar, divided
2 tablespoons unsalted butter,
cut into ½-inch cubes
1. Lightly coat the baking pan with
nonstick cooking spray.
2. Stir together the eggs, milk, heavy
cream, vanilla extract, maple syrup,
cinnamon, nutmeg and salt in a medium
mixing bowl. Whisk until foamy.
3. Tightly fit half of the challah strips into
the bottom of the baking pan. Pour half
of the egg mixture on top and evenly
dot with half of the brown sugar. Repeat
with the remaining bread, layering in the
opposite direction of the first layer of
bread. Pour the remaining egg mixture
on top, dot with the remaining brown
sugar.
4. Cover and chill in the refrigerator for
at least 2 hours, or overnight.
5. Remove the baking pan from the
refrigerator and bring to room
temperature. Place on the Cuisinart
®
Stack5
®
base and dot the top of the
strata with the butter; cover.
6. Set the temperature to 200°F. Bake for
about 2 hours. The strata is finished
when the internal temperature reaches
160°F.
7. Remove and serve immediately.
Nutritional information per serving: Calories 420
(47% from fat) • carb. 44g • pro. 11g • fat 11g
sat. fat 12g • chol. 190mg • sod. 430mg
calc. 177mg • fiber 2g

12
Breakfast Sausage,
Pepper and Cheddar
Frittata
A great brunch dish for a crowd –
or serve leftovers the next day as a
light lunch.
Makes 8 servings
2 teaspoons olive oil, divided
8 ounces cooked breakfast
sausage, cut into slices
1 medium red bell pepper
(about 5 to 6 ounces), cut into
½-inch dice
12 large eggs
½ cup milk
¾ teaspoon kosher salt
½ teaspoon freshly ground black
pepper
2 green onions, trimmed and
sliced
4 ounces Cheddar, shredded
1. Assemble the Cuisinart
®
Stack5
®
with
the baking pan and select 400°F.
Add one teaspoon of the olive oil to
the pan.
2. Once the oil is hot, add the sausage
slices. Lightly brown on both sides,
about 3 to 5 minutes per side. Remove
and reserve.
3. Add the remaining olive oil and the
diced red pepper; cook until lightly
browned and softened, about 5
minutes.
4. While the peppers are cooking, whisk
together the eggs with the milk and
salt and pepper.
5. Once peppers have softened, stir in
the green onions and let cook for an
additional minute or two.
6. Add the sausage back to the pan,
then lower the temperature to 300°F.
7. Add the egg mixture to the pan and
top with the shredded Cheddar.
Cover and let cook for about 35 to 40
minutes, until the eggs are set.
8. Serve immediately.
Nutritional information per serving
(based on 8 servings): Calories 271
(65% from fat) carb. 4g • pro. 19g • fat 19g
sat. fat 7g • chol. 309mg • sod. 771mg
calc. 175mg fiber 0g
Banana Pancakes
These pancakes lean on the sweet side –
perfect for that special Sunday brunch,
plus the kids will love them.
Makes about 14 pancakes
1¾ cups unbleached, all-purpose
flour
¼ cup granulated sugar
¼ cup light brown sugar, packed
1 teaspoon baking soda
½ teaspoon baking powder
¼ teaspoon table salt
¼ teaspoon ground cinnamon
1½ cups buttermilk
2 large eggs
¾ teaspoon pure vanilla extract
2 ripe bananas (½ mashed, 1½
cut into thin slices) divided
¼ cup unsalted butter, melted
Unsalted butter to coat pan
1. Stir the flour, granulated and light
brown sugars, baking soda, baking
powder, salt and cinnamon together in
a small mixing bowl. Reserve.
2. Put the buttermilk, eggs, vanilla
extract and mashed, ripe banana into
a separate large mixing bowl. Whisk
together until well blended.
3. Stir in the melted butter. And then
gently stir in the reserved dry
ingredients until just incorporated.
4. Assemble the Cuisinart
®
Stack5
®
to
350°F.
5. Once preheated, melt a small amount
of butter to just coat the baking pan.
6. Drop batter evenly into the baking pan
using a ¼-cup measure. Place 2 to 3
banana slices on each pancake. Cook
pancakes until bubbles form, about
2 minutes; flip and cook until done,
about 1 to 2 minutes longer. Repeat
with remaining batter.
7. Transfer to warm plates for serving.
As you finish each round of pancakes,

13
you can keep them warm on a wire rack
placed on a baking sheet inside a low
oven (200°F).
Nutritional Information per serving (2 pancakes):
Calories 199 (34% from fat) • carb. 27g • pro. 6g
fat 8g • sat. fat 4g • chol. 71mg • sod. 306mg
calc. 81mg • fiber 1g
Brunch Chilaquiles
A fun and flavorful egg dish – a great way
to spice up your next brunch.
Makes 15 servings
1 teaspoon olive oil
1 small onion, chopped
2 garlic cloves, finely chopped
1 jalapeño, seeded and chopped
1 pound tomatillos, cut into small
dice
½ teaspoon kosher salt
1 can (4 ounces) green chiles
1½ cups chicken broth, low sodium
8 cups tortilla chips, divided
6 large eggs
1 cup crumbled Cotija cheese
1 cup shredded Monterey Jack
cheese
Chopped cilantro
1. Assemble the Cuisinart
®
Stack5
®
with
the baking pan and select 400°F. Add
the oil to the pan. Once the oil is hot,
add the chopped onion, garlic, jalapeño,
tomatillos and salt. Stir occasionally and
cook for about 6 to 8 minutes, so that
vegetables are both soft and fragrant.
2. Add the green chiles and the chicken
broth and cook until mixture comes to
a simmer. Reduce the heat slightly to
maintain a steady, yet slow simmer.
3. Add half of the tortilla chips and toss in
liquid to coat. Create 6 pockets within
the chips and chile mixture to add the
eggs. Reduce the temperature to 175°F.
4. For ease, crack each egg and reserve
individually in small cups or ramekins.
When ready, add each egg into
individual, created pockets. Sprinkle with
half of the cheese.
5. Cover and cook for about 25 minutes,
until just cooked through, checking the
eggs on occasion to make sure they do
not cook too quickly.
6. When almost set, add the remaining
chips and then cheese. Cover once more
and cook until cheese is melted, about 8
to 10 minutes.
7. Sprinkle with chopped cilantro and serve
immediately.
Nutritional information per serving (based on 15
servings): Calories 565 (52% from fat) • carb. 47g
pro. 21g • fat 32g • sat. fat 9g • chol. 226mg
sod. 839mg • calc. 395mg • fiber 6g
Summer Vegetable
Pasta Bake
Why turn on the oven? The Cuisinart
®
Stack5 has got you covered!
Makes 8 to 10 servings
1 pound rigatoni
2 teaspoons olive oil
1 small eggplant, about 10 ounces,
cut into ½-inch cubes
1 small zucchini, about 5 to 6
ounces, cut into ½-inch cubes
1 small red bell pepper, about 8
ounces
1 teaspoon kosher salt, divided
1 large egg
1 container (15 ounces) ricotta
8 ounces mozzarella, shredded
2 ounces Parmesan, grated
2 cups grape tomatoes, halved
¼ cup fresh basil leaves
Nonstick cooking spray
1. Prepare rigatoni according to
manufacturer’s instructions, reserving
½ cup of pasta water.
2. Assemble the Cuisinart
®
Stack5
®
with
the baking pan and select 400°F. Add
the olive oil to the pan. Once the oil is
hot, add the cubed vegetables with ½
teaspoon of salt. Stir over the heat until
lightly browned and softened, about 10
to 12 minutes.
3. While vegetables are cooking, whisk
together the egg with the ricotta in a
large mixing bowl with ¼ teaspoon salt.
4. Assemble pasta by tossing it together
with the pasta water and the ricotta
mixture. Fold in the sautéed veggies,
mozzarella, Parmesan, grape tomatoes,

14
remaining ¼ teaspoon salt and fresh
basil leaves.
5. Carefully wipe the baking pan with a
paper towel and coat lightly with the
cooking spray.
6. Add the pasta to the baking pan and
select 325°F. Cover and bake for 45
minutes.
7. Serve immediately.
Nutritional information per serving (based on 10
servings): Calories 363 (33% from fat) • carb. 43g
pro. 19g • fat 13g • sat. fat 7g • chol. 51mg
sod. 524mg • calc. 304mg • fiber 3g
Eggplant Parmesan
Sauté and bake all in one pan!
Makes 16 servings
2 cups unbleached, all-purpose
flour
½ teaspoon salt
6 large eggs, lightly beaten
3 cups breadcrumbs
12 ounces eggplant, cut into ¼-inch
lengthwise slices
½ cup olive oil, divided
4 cups marinara sauce
8 ounces mozzarella, shredded,
divided
1 ounce Parmesan, grated, divided
1. Mix the flour together with the salt and
put into a shallow dish or container.
Similarly, put the beaten eggs and
breadcrumbs each in separate, shallow
containers, also for dipping.
2. Dredge each slice of eggplant, first in
the flour, then the eggs and finally the
breadcrumbs. After dredging in each,
pat the eggplant to remove any excess
ingredients before adding to the next.
3. When all of the eggplant is breaded,
assemble the Cuisinart
®
Stack5
®
with
the baking pan and select 400°F. Add
2 tablespoons of the oil. Once the oil is
hot, add slices of eggplant so that they
lay in the pan in a single layer. Brown
each side well and repeat with remaining
eggplant. Add new oil between additions
when necessary.
4. Once all of the eggplant is browned, turn
the heat off and allow the unit to cool
slightly before discarding oil and wiping
the pan completely clean.
5. Add 1 cup of the sauce to the clean
baking pan. Add an even layer of
the eggplant. Top with an additional
cup of sauce and then half of the
mozzarella and Parmesan. Continue
with an additional layer, ending with the
remaining cheese.
6. Cover and select 300°F. Bake for
about 30 to 40 minutes, until cheese is
completely melted.
7. Serve immediately.
Nutritional information per serving (based on 16
servings): Calories 332 (48% from fat) • carb. 31g
pro. 13g • fat 18g • sat. fat 5g • chol. 105mg
sod. 959mg • calc. 165mg • fiber 2g
Arroz con Pollo
This one-pan meal is always a crowd
favorite.
Makes about 6 servings
3 pounds bone-in, skin-on
chicken thighs
1 teaspoon kosher salt, divided
½ teaspoon freshly ground black
pepper
½ teaspoon extra virgin olive oil
1 small onion, chopped
1 small red pepper, chopped
4 garlic cloves, chopped
1 plum tomato, cut into ½-inch dice
¼ teaspoon smoked paprika
2 cups long grain white rice
3 cups chicken broth, low sodium
¹/
8
teaspoon saffron threads
1 bay leaf
½ cup frozen green peas
¹/
³
cup fresh parsley leaves, chopped
Lemon wedges for serving
1. Season the chicken on both sides with ½
teaspoon of the salt and the pepper.
2. Assemble the Cuisinart
®
Stack5
®
with the
baking pan and select 400°F. Add the oil
to the pan.

15
3. Once the oil is hot, add the chicken, skin
side down. Leave undisturbed until well
browned, about 15 to 20 minutes. Flip,
and continue cooking for an additional
10 to 15 minutes. Remove and reserve.
4. Add the onion, pepper and garlic and
cook for an additional 10 minutes.
5. Stir in the tomato with the remaining
salt and smoked paprika and cook for a
couple of minutes before adding the rice,
chicken broth, saffron and bay leaf. Allow
to come to a boil.
6. Once boiling, cover and cook for 10
minutes. Add the chicken back to the
pan and turn the heat to 300°F. Cover
and cook for an additional 25 to 30
minutes.
7. Stir in the frozen peas.
8. Taste and adjust seasoning according
to preference. Sprinkle with chopped
parsley and serve immediately with
lemon wedges.
Nutritional information per serving (based on 6
servings): Calories 523 (34% from fat) • carb. 41g
pro. 45g • fat 19g • sat. fat 5g • chol. 221mg
sod. 879mg • calc. 56mg • fiber 2g
Chicken Cacciatore
A warming dish for the cooler weather.
Makes 4 to 8 servings
8 boneless, skinless chicken thighs
1¼ teaspoons kosher salt, divided
¼ teaspoon freshly ground black
pepper
2 teaspoons olive oil
1 medium onion, halved and sliced
3 large garlic cloves, sliced
1 bell pepper, cut into ¼-inch strips
and then the strips cut in ½,
yielding ¼ x 2-inch strips
8 ounces baby bella mushrooms,
sliced
6 3-inch sprigs oregano
6 3-inch sprigs thyme
1 teaspoon sherry vinegar
1 can (15.5 ounces) diced tomatoes
1. Season the chicken on both sides with 1
teaspoon of salt and the pepper.
2. Assemble the Cuisinart
®
Stack5
®
with the
baking pan and select 400°F. Add the oil
to the pan.
3. Once the oil is hot, add the chicken to
the pan. Brown well, about 15 minutes
per side. Remove and reserve.
4. Add the sliced onion, garlic, pepper and
mushrooms with the remaining
¼ teaspoon of salt and sprigs of herbs.
Cook until slightly browned and softened,
about 15 minutes.
5. Add the vinegar and can of diced
tomatoes. Once the liquid comes to a
simmer, add the chicken back to the
pan, cover and turn to 250°F for about
1 hour. Chicken will be fork tender when
finished.
6. Taste and adjust seasoning according to
preference. Serve immediately.
Nutritional information per serving (based on 8
servings): Calories 266 (47% from fat) • carb. 7g
pro. 29g • fat 14g • sat. fat 3g • chol. 147mg
sod. 865mg • calc. 33mg • fiber 2g
Latin Shredded Chicken
This multipurpose chicken makes the
perfect filling for tacos or enchiladas and is
also delicious as a salad or grain bowl
topper.
Makes 10 servings
2 pounds boneless, skinless
chicken thighs
1 teaspoon ancho chili powder
1 teaspoon ground cumin
1 teaspoon kosher salt
1 medium onion
2 crushed garlic cloves
1 jalapeño pepper, halved and
seeded
2 sprigs cilantro
1 cup water
½ lime
1. Assemble the Cuisinart
®
Stack5
®
with the
baking pan.
2. Prepare the chicken by seasoning with
the chili powder, cumin and salt. Put
into the baking pan with one onion, cut
into quarters, 2 crushed garlic cloves, a
halved and seeded jalapeño, the cilantro

16
sprigs and cup of water. Cover and
select 400°F.
3. When the liquid comes to a boil, about 7
to 8 minutes, reduce the heat to 200°F.
Continue to cook until chicken is tender,
about 50 minutes.
4. Remove chicken and shred with fork or
fingers, once cool enough to handle.
Squeeze with lime. Taste and adjust
seasoning according to preference.
Nutritional information per serving (based on 10
servings): Calories 145 (29% from fat) • carb. 2g
pro. 23g • fat 5g • sat. fat 1g • chol. 94mg
sod. 372mg •calc. • 22mg • fiber 1g
Chicken Enchilada
Casserole
Cheesy and Latin-inspired comfort food
at its finest.
Makes about 15 servings
1 teaspoon vegetable oil
½ onion, finely chopped
1 jalapeño, seeded and finely
chopped
1 garlic clove, finely chopped
1 can (4 ounces) diced green chiles
1 can (15.5 ounces) black beans,
drained
½ teaspoon kosher salt
1 jar enchilada sauce
1 package corn tortillas
1 recipe Latin Shredded Chicken or
3-pound roasted chicken, meat
removed and shredded
2 cups shredded Monterey Jack
cheese
1. Assemble the Cuisinart
®
Stack5
®
with the
baking pan and select 350°F. Add the oil
to the pan.
2. Once the oil is hot, add the onion,
jalapeño and garlic. Stir over the heat
until the vegetables are soft and fragrant,
about 7 to 8 minutes. Add the green
chiles, drained black beans and salt into
the baking pan and stir over heat until
mixture comes to a simmer. Continue to
simmer for about 10 minutes to develop
flavor. Remove and reserve. Clean the
baking pan.
3. Assemble the casserole. Add ½ cup of
the enchilada sauce to the pan. Layer
with corn tortillas. Add ½ of the shredded
chicken, then ½ of the beans and then
¹/
³
of the cheese. Repeat. Finish with
a layer of tortillas and then finally the
cheese. Cover and select 300°F. Bake for
30 minutes until hot and the cheese is
completely melted.
Nutritional information per serving (based on 15
servings): Calories 307 (30% from fat) • carb. 29g
pro. 23g • fat 10g • sat. fat 4g • chol. 79mg
sod. 937mg • calc. 161mg • fiber 4g
Grilled Chicken with
Spring Vegetables
Light and zesty – ideal for lunch or dinner!
Makes 2 to 4 servings
2 boneless, skinless chicken
breasts (about 1½ pounds total)
½ cup plus 1 tablespoon extra virgin
olive oil, divided
¼ cup fresh lemon juice
1 tablespoon kosher salt, plus
additional for light seasoning
½ teaspoon paprika
3 sprigs fresh thyme
2 medium leeks, trimmed and
washed well, dark green parts
discarded, cut the root end close
so that it is still attached and then
cut into thin wedges
1 pound asparagus, hard ends
trimmed
1. Put the chicken in a non-reactive mixing
bowl or container. Stir together ½ cup
of olive oil, the lemon juice, salt, paprika
and thyme. Pour over the chicken and let
rest in the refrigerator for 1 hour.
2. When ready to cook, assemble the
Cuisinart
®
Stack5
®
with the grill plate and
select 400°F.
3. Once hot, add the chicken to the grill.
Allow to cook on the first side for
about 8 to 10 minutes before turning.
The chicken is done when the internal
temperature reaches 165°F in the
thickest part; it should take about 18
to 20 minutes total (depending on the

17
thickness of the breasts). Remove and
reserve when finished.
4. While the chicken is cooking, toss the
leeks and asparagus with the remaining
tablespoon of olive oil and a pinch of
salt.
5. Once the chicken is removed, add the
vegetables to the grill and cook until
lightly browned and cooked through,
about 10 minutes.
6. When vegetables are finished, slice
chicken and serve all together.
Nutritional information per serving (based on 4
servings): Calories 363 (46% from fat) • carb. 11g
pro. 39g • fat 19g • sat. fat 3g • chol. 109mg
sod. 873mg • calc. 61mg • fiber 3g
Barbecued Brisket
Plan ahead to marinate the brisket
overnight. The results are well worth it!
Makes about 8 to 10 servings
2 tablespoons packed light brown
sugar
1½ tablespoons chili powder
1 teaspoon Cajun seasoning
½ teaspoon smoked paprika
½ teaspoon kosher salt
½ teaspoon freshly ground black
pepper
2 to 3 pounds beef brisket
1 teaspoon vegetable oil
2 small onions, sliced
6 garlic cloves, finely chopped
2 tablespoons cider vinegar
½ tablespoon Worcestershire sauce
2 cups chicken broth, low sodium
¼ cup ketchup
3 tablespoons tomato paste
1 tablespoon brown sugar
1. In a small bowl, stir together the brown
sugar, chili powder, Cajun seasoning,
smoked paprika, salt and pepper. Rub
the blended spices all over the brisket.
Place in a non-reactive container or
resealable plastic bag and place in the
refrigerator overnight.
2. After brisket has marinated for the
appropriate amount of time, assemble
the Cuisinart
®
Stack5
®
with the baking
pan and set to 400°F. Add the oil to the
pan.
3. Once the oil is hot, add the brisket.
Brown each side, about 5 minutes per
side. Remove and reserve.
4. Add the onions and garlic and sauté
until soft and fragrant, about 3 to 5
minutes, then add the cider vinegar,
Worcestershire sauce and chicken broth,
stirring up any brown bits at the bottom
of the pan with a wooden spoon. Stir in
the ketchup, tomato paste and brown
sugar and bring to a simmer. Return
brisket to the pan, cover and turn the
temperature to 200°F.
5. Slow cook the brisket for about 3½ to
4 hours, until completely fork tender.
Check occasionally during the cooking
time, as the temperature may need to be
adjusted to maintain a slight simmer.
6. Allow brisket to cool completely in its
own cooking liquid, in the baking pan. If
time allows, refrigerate overnight before
serving.
7. To serve: Remove brisket from the liquid
when cool and cut across the grain of
the meat into thin slices. Place back into
liquid and set the Stack5
®
to 325°F to
reheat completely.
Nutritional information per serving (based on 10
servings): Calories 426 (53% from fat) • carb. 9g
pro. 40g • fat 24g • sat. fat 19g • chol. 146mg
sod. 509mg • calc. 42mg • fiber 1g

18
Skirt Steak Fajitas
A fun and tasty dish to make a fiesta any
night of the week!
Makes 4 servings
¾ pound skirt steak
1 teaspoon kosher salt, divided
¾ teaspoon ancho chili powder,
divided
4 teaspoons olive oil, divided
1 medium red onion, sliced
1 bell pepper, seeded and cut into
¼-inch slices
8 fajita-style flour tortillas
Guacamole, pico de gallo and
sour cream for serving
1. Assemble the Cuisinart
®
Stack5
®
with
the grill plate and select 400°F. While the
grill is preheating, season the steak on
both sides with ¾ teaspoon salt and ½
teaspoon chili powder.
2. Once it’s hot, put 2 teaspoons olive oil
on the grill. Cook the steak, about 4 to
5 minutes per side, for medium rare.
While the steak is cooking, season the
onion and pepper with remaining salt and
chili powder, and toss together with the
remaining oil.
3. When steak is finished, remove from grill
and let rest before slicing. Carefully wipe
grill plate with a paper towel and then
add the vegetables. Toss the vegetables,
occasionally, while cooking. Veggies
are done when softened and slightly
browned, about 7 minutes. Once ready,
push the vegetables to one side of the
grill and carefully wipe the free side. Turn
the temperature to 200°F.
4. To serve: Heat a tortilla or two on the
free side. Thinly slice the steak. When
the tortillas are warm, add some grilled
veggies and steak. Add desired toppings
like guacamole, pico de gallo and sour
cream.
Nutritional information per serving (based on 4
servings): Calories 358 (42% from fat) • carb. 30g
pro. 21g • fat 16g • sat. fat 4g • chol. 55mg
sod. 607mg • calc. 96mg • fiber 1g
Grilled Steak with Green
Onions and Salsa Verde
This recipe will easily become a regular in
your rotation – so easy and so flavorful!
Makes 2 to 4 servings
1 small garlic clove
1 small jalapeño, stem and seeds
discarded
1 cup fresh parsley leaves
¼ teaspoon kosher salt, plus more
for seasoning, divided
¼ teaspoon fresh lemon juice
¼ cup plus ½ teaspoon olive oil,
divided
2 strip steaks, about 1 to 1½ inches
thick
1 bunch green onions, root ends
trimmed
1. Make the salsa verde. Finely chop both
the garlic and jalapeño together in a
food processor using the large chopping
blade. Add the parsley, ¼ teaspoon salt
and lemon juice to the work bowl. Pulse
to roughly chop. With the motor running,
slowly add ¼ cup of olive oil through the
small feed tube until all ingredients are
incorporated. Taste and adjust seasoning
according to preference.
2. Assemble the Cuisinart
®
Stack5
®
with the
grill plate and select 400°F.
3. While the grill is preheating, season the
2 steaks liberally with salt on both sides.
Once the grill is hot, add the steaks.
Cook for about 5 to 7 minutes on each
side for medium rare (135°F internal
temperature).
4. While steaks are cooking, toss green
onions with ½ teaspoon olive oil and a
pinch of salt.
5. Remove and reserve steaks once cooked
to desired doneness. Rest before slicing.
6. Carefully wipe grill with paper towel and
add the green onions to the grill. Cook
until soft and lightly browned, about 7
minutes.
7. Slice steak and serve with the grilled
green onions and salsa verde.
Nutritional information per serving (based on 4
servings):Calories 359 (59% from fat) • carb. 3g

19
pro. 34g • fat 23g • sat. fat 5g • chol. 92mg
sod. 212mg calc. 62mg • fiber 1g
Chili con Carne
A take on true Texan beef chili with serious
depth of flavor.
Makes 6 to 8 servings
3 pounds beef chuck roast, cut
into 1½- to 2-inch pieces
2 teaspoons kosher salt, divided
½ teaspoon freshly ground black
pepper
2 tablespoons olive oil
1 onion, chopped
2 jalapeños, stemmed, seeded, and
chopped
1 poblano chile, stemmed and
chopped
4 garlic cloves, finely chopped
2 tablespoons ancho chili powder
1 teaspoon ground cumin
1 teaspoon Mexican oregano,
crumbled (oregano may be
substituted)
1 teaspoon dried marjoram
1 tablespoon masa harina
1 can (14.5 ounces) fire-roasted
crushed tomatoes
2 bay leaves
8 ounces dark lager-style beer
2 ounces (¼ cup) brewed espresso,
or strong coffee
Lime wedges and warm flour
tortillas, for serving
1. Season the meat on both sides with 1
teaspoon of salt and the freshly ground
black pepper. (TIP: For optimal browning,
pat meat dry with paper towels before
seasoning.)
2. Assemble the Cuisinart
®
Stack5
®
with the
baking pan and set to 400°F. Add the oil
to the pan.
3. Once the oil gets hot, begin browning the
meat, 3 to 4 minutes per side, working in
two batches. Remove and reserve.
4. Add the chopped onion, jalapeños,
poblano, and garlic, and cook until
softened and fragrant, about 5 to 8
minutes. Add the reserved meat, along
with drippings, back to pan.
5. Add the chili powder, cumin, oregano,
marjoram, and masa harina, and mix
to coat the meat and vegetables. Add
the remaining ingredients, including the
remaining teaspoon of salt, and allow the
mixture to come to a simmer.
6. When the mixture comes to a simmer,
lower the temperature to 200°F to
maintain a slight simmer. Cook until
tender, about 2 to 3 hours. Check
occasionally to make sure mixture is just
simmering; temperature may need to be
lowered to 175°F if boiling.
7. Once meat is tender, remove and discard
the bay leaves and stir to fully mix. Taste
and adjust the seasoning as desired.
Serve with lime wedges and warm
tortillas for sopping up the sauce!
Nutritional information per serving (based on 8
servings): Calories 390 (55% from fat) • carb. 8g
pro. 35g • fat 24g • sat. fat 10g • chol. 119mg
sod. 891mg • calc. 49mg • fiber 2g
Guinness Braised Beef
Shanks
A perfect, comforting dish for a cold
winter evening.
Makes 4 to 6 servings
4 beef shanks (about 3 to 3½
pounds total), about 1¼ inches
thick, 3 to 3½ inches in diameter,
tied
1 teaspoon kosher salt, divided
¼ teaspoon freshly ground black
pepper
1 teaspoon extra virgin olive oil
1 tablespoon unsalted butter
1 medium onion, chopped
1 leek, white and light green parts
only, halved and thinly sliced
2 medium carrots, peeled,
quartered and cut into ½-inch
slices
1 celery stalk, peeled and cut into
½-inch slices
4 garlic cloves, chopped
1 teaspoon dried thyme
12 ounces Guinness beer
2 tablespoons tomato paste
4 sprigs parsley, chopped

20
1. Season beef with ½ teaspoon salt and
the pepper. Reserve.
2. Assemble the Cuisinart
®
Stack5
®
with the
baking pan and select 400°F. Add the oil
to the pan.
3. Once the oil is hot, add the beef shanks
and cook for 5 to 6 minutes on each
side, until nicely browned. Remove and
reserve.
4. Add the butter to the pan and stir in the
chopped onions, leeks, carrots, celery,
garlic, thyme, and ½ teaspoon salt.
Cook until onions are translucent and
vegetables are slightly softened, about
5 minutes. Stir in the Guinness and
simmer for about 5 minutes. Stir in the
tomato paste. Nestle the shanks and any
accumulated liquid into the vegetables.
5. Cover and turn the temperature to 200°F.
Slow cook until completely tender, about
3 to 4 hours. Check occasionally during
the cooking time, as the temperature
may need to be adjusted to maintain a
slight simmer.
6. Blot the surface with a paper towel to
soak up any excess fat.
Stir in chopped parsley. Taste and adjust
seasoning according to preference.
Nutritional information per serving (based on 6
servings): Calories 373 (29% from fat) • carb. 9g
pro. 51g • fat 12g • sat. fat 4g • chol. 94mg
sod. 528mg • calc. 76mg • fiber 2g
Grilled Sausage and
Peppers
An easy, any-night meal.
Makes about 4 servings
1½ teaspoons olive oil, divided
1 pound fresh Italian chicken
sausages
1 red onion, cut into thin wedges
with the root intact
1 large red pepper, halved and
seeded, sliced lengthwise
¼ teaspoon kosher salt
Pinch smoked paprika
Pinch freshly ground black
pepper
1. Assemble the Cuisinart
®
Stack5
®
with
the grill pan and select 400°F. Add ½
teaspoon of the olive oil to the pan.
2. Once the oil is hot, add the sausages.
Cook for about 10 minutes, turning
once. Cover to continue cooking for an
additional 10 minutes, until sausages
are completely cooked through and
browned.
3. While the sausages are cooking, toss
the onion and red pepper with remaining
teaspoon of olive oil, salt, smoked
paprika and pepper.
4. Once sausages are completely cooked
through, remove and reserve. Add the
onions and peppers to the grill. Cook
until soft and lightly browned, about 7 to
10 minutes. Toss occasionally to evenly
cook.
5. Add the sausages back to the grill with
the peppers and onions to warm through.
Serve immediately.
Nutritional information per serving: Calories 214 (47%
from fat) • carb. 6g • pro. 22g • fat 11g • sat. fat 2g
chol. 85mg • sod. 808mg • calc. 31mg • fiber 1g

21
Hawaiian Skewers
Bold flavors of sweet and spicy come
together with these fun skewers!
Makes 8 skewers
12 large shrimp, shelled and
deveined
½ teaspoon honey
1 teaspoon plus 1 tablespoon
vegetable oil, divided
2 garlic cloves, crushed
6 sprigs fresh cilantro
¼ teaspoon fresh lime zest
¼ teaspoon kosher salt
6 ounces cooked chicken andouille
sausage
1 tablespoon sriracha
½ cup pineapple cubes
2 jalapeños, seeded and cut into
1-inch pieces
½ cup pineapple cubes
Stainless or wooden skewers
1. Put the shrimp in a small stainless bowl
and toss together with the honey, 1
teaspoon of oil, garlic, cilantro, lime and
salt. Cover and let rest in the refrigerator
for 1 hour.
2. While shrimp is marinating, cut the
andouille sausage into ½-inch slices.
Stir together the remaining oil with the
sriracha.
3. Assemble the skewers by threading the
pineapple and then jalapeño, followed
by the shrimp, and finally the andouille.
Repeat.
4. Repeat with remaining skewers. Brush
the skewers with the sriracha/oil mixture.
5. Assemble the Cuisinart
®
Stack5
®
with
the grill plate and set to 400°F. Once the
grill is hot, add the skewers, about 3 at a
time. Cover the grill and cook, about 4 to
5 minutes per side.
Nutritional information per skewer: Calories 87 (41%
from fat) • carb. 3g • pro. 10g • fat 4g • sat. fat 1g
chol. 70mg • sod. 434mg • calc. 30mg • fiber 0g
Shrimp Scampi
Serve this with plenty of crusty bread to
sop up the sauce!
Makes 2 to 4 servings
1 pound large shrimp,
approximately 16, peeled,
deveined and rinsed
½ teaspoon kosher salt, divided
¼ teaspoon freshly ground black
pepper, divided
1 teaspoon olive oil
3 tablespoons unsalted butter,
divided
4 garlic cloves, finely chopped
½ cup grape tomatoes, halved
¹/
8
teaspoon crushed red pepper
2 tablespoons fresh parsley,
chopped, divided
6 large basil leaves, torn into
pieces, divided
2 tablespoons fresh lemon juice
2 tablespoons dry white wine
1. Dry shrimp well and season both sides
with ¼ teaspoon salt and ¹/
8
teaspoon
pepper.
2. Assemble the Cuisinart
®
Stack5
®
with the
baking pan and select 400°F. Add the oil
to the pan.
3. Once the oil is hot, add the shrimp to
sear, about 1 to 2 minutes per side.
4. Remove and reserve shrimp once seared.
Add 1 tablespoon butter and the garlic to
the pan. Once the garlic is fragrant, add
the grape tomatoes, crushed red pepper,
remaining salt and pepper, and half of
the herbs.
5. Add the lemon juice and white wine and
bring the liquid to a simmer. When the
liquid has reduced slightly, whisk in the
remaining butter using a nonstick whisk.
6. When the butter is incorporated, stir in
reserved shrimp with remaining herbs.
7. Serve immediately in shallow bowls.
Nutritional information per serving (based on 4
servings): Calories 223 (47% from fat) • carb. 4g
pro. 24g • fat 12g • sat. fat 5g • chol. 193mg
sod. 440mg calc. 73mg • fiber 0g

22
Stuffed Fillet of Sole
Easy, yet elegant, this fish can be topped
with any light sauce. We love it plain with
lots of extra lemon!
Makes 6 stuffed fillets
8 ounces lump crabmeat
1 celery stalk, diced
2 scallions, thinly sliced
1 teaspoon fresh thyme leaves
1 tablespoon dry white wine
¼ cup lightly salted breadcrumbs
1 large egg, beaten
1 teaspoon kosher salt, divided
6 thin sole fillets, about 8 inches
long (any flat white fish fillets may
be substituted)
Freshly ground black pepper
Lemon wedges, for serving
Paprika, for garnish
1. Put crabmeat into a medium bowl. Pick
through and discard any shells. Add
diced celery, scallions, thyme, white
wine, breadcrumbs, egg and ½ teaspoon
of salt to the bowl. Gently combine and
reserve.
2. Add 3 cups of water to the baking
pan and then assemble the Cuisinart
®
Stack5
®
with the steaming rack.
3. Place the sole fillets on a flat surface in
front of you. Sprinkle both sides of the
fish with remaining salt and a pinch of
pepper.
4. Place a heaping ¼ cup of the crabmeat
filling in the center of each fillet. Fold the
tail end of the fillet over the crab mixture
and continue rolling to tightly secure.
Place each fillet, seam side down, onto
the steam rack and cover. Select 400°F
and cook for about 8 minutes for the
water to come to a boil, and then lower
the temperature to 350°F.
5. Cook for a total 20 to of 25 minutes,
until fish flakes easily. (NOTE: The water
may boil over at around 18 minutes;
reduce the temperature to 200°F for the
remainder of cooking time.)
6. Serve immediately with plenty of lemon
wedges and a sprinkle of paprika.
Nutritional information per fillet: Calories 129 (23%
from fat) • carb. 5g • pro. 19g • fat 3g • sat. fat 1g
chol. 107mg • sod. 1042mg • calc. 68mg • fiber 0g
Red Beans and Rice
A blend of Latin and Caribbean flavors
makes a delicious version of rice
and beans.
Makes about 10 cups
1 tablespoon extra virgin olive oil
2 garlic cloves, finely chopped
1 jalapeño, seeded and finely
chopped
4 stems fresh thyme
1 bay leaf
¾ teaspoon kosher salt, divided
1 ½-inch piece fresh ginger
½ teaspoon ground cinnamon
2¼ cups white rice
2 cans coconut milk
2½ cups chicken broth, low sodium
1 can (15 ounces) kidney beans,
drained
4 green onions, sliced into batons
for garnish
1. Assemble the Cuisinart
®
Stack5
®
with
the baking pan and select 350°F. Add the
olive oil to the pan.
2. Once the oil is hot, add the chopped
garlic and jalapeño. Sauté 2 to 3 minutes,
or until fragrant. Add the thyme, bay leaf,
½ teaspoon salt, ginger and cinnamon.
Stir to mix all ingredients well.
3. Stir in the rice to coat. Add the liquids,
turn the temperature up to 400°F
and cover. Once boiling, reduce heat
to 200°F, so the mixture is barely
simmering, and top with the lid. Continue
cooking the rice according to the
manufacturer’s suggested time, about 20
to 25 minutes.
4. Stir in kidney beans and cover. Allow to
rest, about 10 minutes, before fluffing
and serving.
5. Taste and adjust seasoning according to
preference. Serve immediately, garnished
with green onions.
Nutritional information per serving (based on 1
cup):Calories 470 (21% from fat) • carb. 77g
pro. 18g • fat 11g • sat. fat 9g • chol. 0mg
sod. 420mg • calc. 141mg • fiber 13g

23
Cauliflower Fried Rice
Fun and tasty side dish that is also
low in carbs!
Makes about 6 cups
2 tablespoons vegetable oil, divided
1 onion, finely chopped
1 small red pepper, cut into small
dice
1 small jalapeño, seeded and finely
chopped
1 1-inch piece fresh ginger, finely
chopped
3 garlic cloves, finely chopped
½ teaspoon salt
¼ teaspoon turmeric
1 medium cauliflower head, about 1
pound, or 6 cups of florets, finely
chopped or riced
Cilantro leaves and roasted
peanuts for garnish
1. Assemble the Cuisinart
®
Stack5
®
with
the baking pan and select 400°F.
Add 1 tablespoon of oil to the pan.
2. Once the oil is hot, add the onion, red
pepper, jalapeño, ginger and garlic.
Stir frequently and cook until soft and
fragrant, about 7 minutes. When it’s
fragrant, add the salt and the turmeric.
Stir together over the heat to incorporate.
3. Add the remaining oil and then the
cauliflower. Stir together well to coat
the cauliflower. Cover for about 5 to 10
minutes, so that the cauliflower becomes
tender.
4. Remove the cover and continue cooking.
Occasionally stir to scrape up any brown
bits on the bottom of the pan; this adds
to the crunch of the dish.
5. Taste and adjust seasoning according to
preference. Serve immediately, garnished
with cilantro leaves and roasted peanuts.
Nutritional information per ½-cup serving: Calories 68
(60% from fat) • carb. 6g • pro. 2g • fat 5g
sat. fat 1g • chol. 0mg • sod. 221mg
calc. 22mg fiber 2g
Butternut Squash and
Farro Gratin
The creaminess of butternut squash and
the delicate chew of farro play on texture,
while a few extra standout ingredients make
this a rich and deeply satisfying, all-in-one
dish. Can be served as a side or main dish.
Serves 6 to 8
1 large butternut squash, peeled
and cut into 1-inch cubes (about
1½ pounds)
¾ cup farro
1 teaspoon olive oil
8 ounces fresh, sweet Italian
sausage, chicken or pork, casings
removed
1 large leek, thinly sliced, white and
light green parts only
2 teaspoons fresh thyme leaves,
roughly chopped
¾ teaspoon kosher salt
1 cup grated fontina cheese,
divided
¾ cup heavy cream
¾ cup chicken broth, low sodium
Nonstick cooking spray
1. Add 4 cups of water to the baking pan
and assemble the Cuisinart
®
Stack5
®
with the steam rack in place. Add the
butternut squash, cover and select
400°F. Cook until the squash is tender,
about 20 minutes.
2. When it’s tender, remove the squash and
reserve. Add an additional cup of water
to the baking pan and select 400°F. Once
the water comes to a boil, add the farro
and cook until tender, about 20 minutes.
Strain the farro and reserve with the
squash.
3. Discard water, and wash and dry the
baking pan well. Add the oil to the pan
and set to 400°F. Once the oil is hot,
add the sausage. Break up the sausage
well with a wooden spoon and cook
until evenly browned. Add the leek and
reduce heat to 350°F; continue to cook
until soft and lightly browned.
4. Add the sausage and leek to the squash
and farro with the thyme, salt, half of
the fontina cheese, heavy cream, and
chicken stock. Stir to combine.

24
5. Clean and dry the baking pan and then
spray well with nonstick cooking spray.
Add the squash mixture to the baking
pan and select 325°F. Cover and cook for
about 25 minutes.
6. Remove the cover and top the casserole
with the remaining fontina cheese. Cover
and cook an additional 5 minutes to melt
the cheese.
7. Enjoy immediately.
Nutritional information (based on 8 servings): Calories
307 (46% from fat) • carb. 34g • pro. 11g
fat 17g • sat. fat 9g • chol. 58mg
sod. 420mg • calc. 150mg • fiber 4g
Skillet Brussels Sprouts
with Red Onion
This recipe will make you a Brussels
sprouts convert!
Makes about 3 cups
1 tablespoon olive oil, divided
1 pound Brussels sprouts, halved
lengthwise
1 medium red onion, halved
lengthwise with each half sliced
½ teaspoon kosher salt
¼ teaspoon freshly ground black
pepper
1 tablespoon pure maple syrup
1. Assemble the Cuisinart
®
Stack5
®
with
the baking pan and select 400°F.
Add 2 teaspoons of the olive oil to the
pan.
2. Once the oil is hot, add the Brussels
sprouts, cut side down. Cook, tossing
occasionally after about 5 minutes.
3. Lower the temperature to 350°F and
add the sliced onions with the salt
and pepper and remaining oil. Cook
for an additional 5 minutes, tossing
occasionally and then cover.
4. Cook for about 10 minutes and
occasionally stir until the sprouts are
tender.
5. Once tender, finish with the maple syrup.
Taste and adjust seasoning according to
preference. Serve immediately.
Nutritional information per serving (based on ½-cup
serving) Calories 69 (30% from fat) • carb. 11g
pro. 3g • fat 3g • sat. fat 0g • chol. 0mg
sod. 198mg • calc. 40mg • fiber 3g
Old-Fashioned
Macaroni and Cheese
Need we say more??!!
Makes about 15 servings
Cooking spray
1 pound elbow macaroni
½ cup unsalted butter
6 tablespoons unbleached,
all-purpose flour
6 cups whole milk
4 ounces Cheddar cheese,
shredded
4 ounces mozzarella cheese,
shredded
4 ounces Monterey Jack cheese,
shredded
¾ teaspoon kosher salt
Dash hot sauce
1 to 2 cups toasted breadcrumbs
1. Cook macaroni according to
manufacturer’s instructions. Drain pasta
and rinse under cold water. Toss with
some oil to prevent sticking.
2. Assemble the Cuisinart
®
Stack5
®
with
the baking pan and select 350°F. Add the
butter to the pan.
3. Once the butter is melted, stir in the
flour with a nonstick whisk until smooth.
Continue to cook while occasionally
stirring, for about 2 minutes.
4. Continue whisking and slowly pour
the milk into the butter/flour mixture.
Turn heat up slightly and stir mixture
occasionally, to evenly heat. Once
mixture comes to a boil, reduce the
heat to maintain a simmer for about 2
minutes.
5. Keep stirring until the mixture becomes
very thick. When thick, stir in the
shredded cheeses to the mixture. Once
all the cheese has been added, stir
sauce well until homogenous. Stir in salt,
hot sauce, and then the macaroni.
6. Turn the temperature to 300°F and cover.
Cook for about 35 minutes.

25
7. Sprinkle the toasted breadcrumbs over
the top before serving.
Nutritional information per serving (based on 15
servings): Calories 204 (54% from fat) • carb. 15g
pro. 8g • fat 12g • sat. fat 7g • chol. 38mg
sod. 159mg • calc. 204mg • fiber 1g
Polenta
This comforting, slow-cooked polenta can
be served in so many ways. Use it as a
creamy foundation for the Guinness Braised
Beef Shanks or Chicken Cacciatore. Or,
allow to cool until set and cut into squares
for grilling. It is also delicious on its own,
topped with plenty of your favorite
shredded cheese.
Makes about 10 servings
4 cups water or low-sodium broth
1 cup polenta
1 teaspoon kosher salt
2 tablespoons unsalted butter
1. Assemble the Cuisinart
®
Stack5
®
with the
baking pan and add the water or broth,
polenta and salt. Select 400°F. Once the
liquid comes to a boil, cover and set to
200°F.
2. The polenta will take about 3 hours to
completely cook. Stir occasionally while
cooking. The polenta should be thick yet
soft in texture. Once the polenta is ready
and soft, stir in butter.
3. Taste and adjust seasoning according to
preference.
Nutritional information per serving (based on 10
servings): Calories 60 (37% from fat) • carb. 9g
pro. 1g • fat 3g • sat. fat 1g • chol. 6mg
sod. 216mg • calc. 3mg • fiber 1g
Bananas Foster
Delicious topping for vanilla ice cream!
Makes 4 servings
6 tablespoons unsalted butter
2 ounces bourbon
4 bananas, halved lengthwise
¼ cup brown sugar
½ teaspoon ground cinnamon
Pinch kosher salt
Vanilla ice cream for serving
1. Assemble the Cuisinart
®
Stack5
®
with
the baking pan and select 350°F. Add the
butter to the pan.
2. Once the butter is melted, stir in the
bourbon. Add the bananas to the pan,
cut side down.
3. When bananas are slightly browned, add
the brown sugar, cinnamon and salt.
Continue to cook until bubbling.
4. Serve immediately with vanilla ice cream!
Nutritional information per serving (based on 4
servings): Calories 266 (37% from fat) • carb. 39g
pro. 1g • fat 11g • sat. fat 8g • chol. 30mg
sod. 1mg • calc. 6mg • fiber 3g
Raspberry Fig
Upside-Down Cake
Fun dessert using up some late
summer fruit.
Makes 12 servings
4 tablespoons plus ½ cup unsalted
butter, room temperature, divided
1 cup light brown sugar, divided
1 pound fresh figs, halved
lengthwise
½ pint raspberries
1½ cups unbleached, all-purpose
flour
1 teaspoon baking powder
¼ teaspoon baking soda
½ teaspoon salt
½ teaspoon ground cinnamon
¾ cup whole milk
2 large eggs

26
1 teaspoon pure vanilla extract
½ cup granulated sugar
1. Assemble the Cuisinart
®
Stack5
®
with the
baking pan and select 325°F. Let preheat
for about 5 minutes.
2. Once preheated, add 4 tablespoons of
butter to the pan. When melted, stir and
swirl the butter around the sides of the
pan. Add ¾ cup light brown sugar. Stir
together and cook until sugar melts and
the mixture begins to bubble.
3. Add the fruit to the pan. Make sure that
the figs are placed cut side down. Turn
temperature down slightly, to 250°F, and
prepare the cake batter.
4. In a small bowl, stir together the flour,
baking powder, baking soda, salt and
cinnamon. Put the milk in a 2-cup
measuring cup and add the eggs and
vanilla extract.
5. In a separate, larger bowl, add the
remaining ½ cup of room temperature
butter and mix with a hand mixer on low
speed. Add the granulated sugar and
remaining ¼ cup of light brown sugar
and cream together with the mixer until
light and fluffy.
6. Alternately add the dry and then wet
ingredients in several additions, starting
and ending with the dry ingredients.
7. Pour batter into the baking pan. Cover
and set back up to 325°F. Bake for about
25 minutes, until a toothpick comes out
clean. Invert the baking pan onto a large
cutting board to cut and serve.
Nutritional information per serving (based on 12
servings): Calories 298 (37% from fat) • carb. 45g
pro. 3g • fat 12g • sat. fat 8g • chol. 63mg
sod. 174mg • calc. 44mg • fiber 2g
Carrot Cake
Delicious and moist, this cake is always a
crowd pleaser!
Makes about 20 servings
Nonstick cooking spray
Cake:
1
2
/
3
cups unbleached, all-purpose
flour
1 tablespoon unsweetened cocoa
2 teaspoons baking powder
2 teaspoons cinnamon
1 teaspoon ginger
1 teaspoon baking soda
1 teaspoon salt
1¼ cups vegetable oil
1 cup granulated sugar
1 cup dark brown sugar
4 large eggs
1 teaspoon pure vanilla extract
1½ cups walnut pieces (6 ounces),
chopped
1 pound carrots, shredded
1 cup plump golden raisins
(6 ounces)
Frosting:
1 pound cream cheese, room
temperature, cut into 16 pieces
¼ pound unsalted butter, room
temperature, cut into 8 pieces
2 cups confectioners’ sugar
1 teaspoon pure vanilla extract
1. Assemble the Cuisinart
®
Stack5
®
with the
baking pan.
2. In a small bowl, stir together the flour,
cocoa, baking powder, cinnamon, ginger,
baking soda and salt.
3. In a large bowl, whisk together the oil
and sugars. Whisk in the eggs, one at a
time, and then the vanilla extract.
4. Add the dry ingredients to the wet
in 3 additions, incorporating the first
before adding the next. Finally fold in
the walnuts, shredded carrots and the
raisins.
5. Preheat the Stack5
®
by selecting 275°F.
When ready light illuminates, spray the
baking pan with cooking spray, pour in
the batter and cover.

27
6. Bake until a cake tester comes out clean,
about 1 hour 30 minutes to 1 hour 40
minutes. Remove baking pan from base
and allow to cool completely.
7. While cake is baking, prepare the
frosting. Beat the cream cheese and
butter together until smooth. Add the
confectioners’ sugar in several additions,
beating each addition until smooth.
Finally add the vanilla extract.
8. Once cake is completely cool, remove
from pan and frost.
Nutritional information per serving: Calories 581 (57%
from fat) • carb. 58g • pro. 6g • fat 38g
sat. fat 14g • chol. 89mg • sod. 396mg
calc. 59mg • fiber 2g

28
IB-16631-ESP-B
©2021 Cuisinart
East Windsor, NJ 08520
Printed in China
21CE078188

Parrilla multifunción
Stack5
®
MANUAL DE INSTRUCCIONES
Y LIBRO DE RECETAS
Para su seguridad y para disfrutar plenamente de este producto,
siempre lea cuidadosamente las instrucciones antes del uso.
Serie GR- M3

2
MEDIDAS DE
SEGURIDAD
IMPORTANTES
Al usar aparatos eléctricos, siempre debe
tomar
precauciones básicas de seguridad,
entre ellas las siguientes:
1. LEA TODAS LAS INSTRUCCIONES.
2. Desenchufe el aparato cuando no esté
en uso y antes de limpiarlo. Permita
que se enfríe antes de instalar/sacar
piezas y antes de limpiarlo.
3. No toque las superficies calientes;
use los mangos/asas y los botones o
perillas. Siempre tenga puestos guantes
para el horno/manoplas al manipular
materiales calientes.
4. Para reducir el riesgo de descarga
eléctrica, no sumerja el cable, los
enchufes ni la carcasa del aparato en
agua ni en ningún otro líquido. Si la
carcasa se cae al agua, desconecte
el cable de la toma de corriente
inmediatamente; NO toque el agua.
5. Supervise el uso de este aparato
cuidadosamente cuando sea usado por
o cerca de niños.
6. No use este aparato si el cable o el
enchufe están dañados, después de un
mal funcionamiento, después de que se
haya caído, o si está dañado; devuélvalo
a un centro de servicio autorizado (véase
la sección “Garantía”) para su revisión,
reparación o ajuste.
7. El uso de accesorios no recomendados
o provistos por Cuisinart presenta un
riesgo de incendio, descarga eléctrica o
heridas.
8. No lo use en exteriores ni en lugares
donde el aparato o el cable podrían
mojarse.
9. Úselo solamente para el uso previsto.
10. Este aparato no ha sido diseñado para
freír alimentos.
11. Para evitar la posibilidad de que el
aparato sea jalado accidentalmente del
área de trabajo, lo que podría resultar en
daños al aparato o lesiones personales,
no permita que el cable cuelgue en el
borde de la mesa o de la encimera.
12. Para evitar el riesgo de daño al cable,
incendio o electrocución, no permita que
el cable tenga contacto con superficies
calientes, incluso hornillas.
13. Tenga sumo cuidado al mover un
aparato que ontenga aceite u otro líquido
caliente.
14. No coloque el aparato sobre o cerca de
un quemador a gas o de un hornillo
eléctrico caliente, ni en un horno caliente.
15. No haga funcionar el aparato en agua o
bajo agua corriente.
16. Evite los cambios súbitos de
temperatura, como el que se produce al
introducir alimentos refrigerados en la
bandeja caliente.
17. PRECAUCIÓN: PARA REDUCIR EL
RIESGO DE DESCARGA ELÉCTRICA,
COCINE SOLAMENTE EN LA BANDEJA
PROVISTA, O EN RECIPIENTES
COLOCADOS SOBRE LA REJILLA DE
COCCIÓN AL VAPOR.
18. PRECAUCIÓN: La bandeja puede
quemar la superficie de las mesas y
encimeras. NO coloque la bandeja o la
rejilla calientes directamente sobre la
mesa u otra superficie; siempre use
un salvamantel o una rejilla resistentes
al calor.
19. Siempre conecte el cable al aparato
antes de enchufarlo en la toma de
corriente. Para desconectar ponga la
perilla de control en “OFF”, y luego
desenchufe el cable de la toma de
corriente.
20.
No haga funcionar el aparato debajo o
dentro de un armario/gabinete. Siempre
desenchufe el aparato antes de
guardarlo en un armario/gabinete.
Dejar el aparato enchufado representa
un riesgo de incendio, especialmente si
este toca las paredes o la puerta del
armario/gabinete cuando cierra.
GUARDE ESTAS
INSTRUCCIONES
PARA USO
DOMÉSTICO
SOLAMENTE
USO DE ALARGADORES
El cable removible provisto con este aparato
es corto, para reducir el riesgo de que
alguien se enganche o tropiece con un cable
más largo. Se podrá usar un cable alargador/
de extensión, siempre que respete las
precauciones siguientes.

3
La clasificación nominal del cable alargador/
de extensión removible más largo debe ser
por lo menos igual a la del aparato.
Asegúrese de que la extensión tiene puesta
a tierra. El cable más largo debe ser
acomodado de tal manera que no cuelgue
de la encimera/mesa, donde puede ser
jalado por niños o causar tropiezos.
ÍNDICE
Medidas de seguridad importantes ...... 2
Piezas y características ............... 3
La parrilla multifunción Stack5
®
lo hace todo ........................ 4
Instrucciones de ensamblaje ........... 4
Instrucciones de operación ............ 4
Limpieza y mantenimiento ............. 5
Consejos .......................... 5
Para dorar/saltear ................ 5
Para la cocción lenta .............. 5
Para cocinar al vapor.............. 6
Pautas de uso de las funciones
de cocción ......................... 7
Guía de cocción al vapor.............. 8
Resolución de problemas ............. 9
Garantía .......................... 10
Recetas .......................... 11
PIEZAS Y
CARACTERÍSTICAS
1. Tapa removible con asas envueltas en
silicona
2. Rejilla de cocción al vapor de acero
inoxidable
eleva los alimentos para cocinarlos al
vapor
3. Parrilla antiadherente removible
para asar
4. Bandeja antiadherente removible de
5 cuartos de galón (4.75 L)
para cocinar a fuego lento, hornear,
dorar/saltear, cocinar al vapor y asar a
la plancha
5. Placa calentadora
6. Carcasa
7. Control de temperatura desde
“WARM” (mantener caliente)
hasta 400 °F (205 °C)
a. Indicadores luminosos de encendido
(“POWER”) y listo (“READY”)
8. Agarraderas envueltas en silicona
9. Cable removible (no ilustrado)
para un almacenaje fácil y práctico
10. Sin BPA (no ilustrado)
Ninguna de las piezas en contacto con
los alimentos contiene bisfenol A (BPA)
7
88
6
4
1
2
3
5
7a

4
LA PARRILLA
MULTIFUNCIÓN STACK5
®
LO HACE TODO
La parrilla multifunción Stack5
®
es un
aparato de cocina perfeccionado que
reúne seis aparatos en uno.
PARRILLA
Use la Stack5
®
para asar hamburguesas,
bistec, pollo, pescado o vegetales. Nota:
Cuando use la unidad para asar, use la
parrilla antiadherente removible.
PLANCHA
Use la Stack5
®
como plancha para
preparar panqueques, huevos, tostadas
(“French toasts”), papas ralladas (“hash
browns”) y carne de desayuno. Nota:
Cuando use la unidad para cocinar a la
plancha, use bandeja antiadherente
removible.
DORAR/SALTEAR
La Stack5
®
puede usarse como una sartén
eléctrica. Use la bandeja antiadherente
para dorar o saltear los ingredientes. Los
ingredientes dorados/salteados también
pueden usarse como base en platos de
cocción lenta.
COCCIÓN LENTA
La bandeja antiadherente de 5 cuartos de
galón (4.75 L) de la Stack5
®
es perfecta
para crear una variedad de platos de
cocción lenta.
HORNEAR
Use la bandeja antiadherente para hornear
pasteles y cazuelas/guisos.
COCCIÓN AL VAPOR
Cocine al vapor cualquier cosa, desde
alcachofas hasta brócoli y pechugas de
pollo en la Stack5
®
. Coloque la rejilla de
cocción al vapor de acero inoxidable en la
bandeja y agregue un mínimo de 3 tazas
(710 ml) de agua.
INSTRUCCIONES DE
ENSAMBLAJE
Coloque la unidad sobre una superficie
limpia, plana y segura. La Stack5
®
puede
configurase de tres maneras, dependiendo
del accesorio usado:
Para usar la parrilla: Coloque la parrilla
directamente en la placa calentadora.
Para usar la bandeja: Coloque la bandeja
directamente en la placa calentadora.
Para usar la rejilla de cocción al vapor:
Coloque la bandeja en la placa
calentadora, y luego coloque la rejilla de
cocción al vapor en la bandeja.
NOTA: Cerciórese de que la rejilla de
cocción al vapor se apoya en la línea de
soporte de la bandeja, no en los
remaches de las agarraderas.
INSTRUCCIONES
DE OPERACIÓN
Una vez ensamblada la parrilla multifunción
Stack5
®
, simplemente gire la perilla de
control de temperatura al nivel deseado,
desde “WARM” (mantener caliente) hasta
400 °F (205 °C). Una vez enchufada la
unidad, la luz encendido (“READY”) blanca
y la luz de listo (“READY”) azul se
encenderán para indicar que la unidad está
encendida. Después de elegir la
temperatura, la luz
de listo se apagará.
Dependiendo de la temperatura elegida,
el calentamiento puede tomar hasta 10
minutos. Cuando el termostato alcance el
nivel temperatura adecuado, la luz de listo

5
azul se encenderá para indicar que la
unidad está lista para cocinar. Nota: La luz
se apagará y se volverá a encender durante
el uso, a medida que el termostato regula la
temperatura; esto es normal.
Use el control de temperatura para fijar y
mantener la temperatura de la superficie de
cocción, ajustando la temperatura durante
la cocción si es necesario.
Consulte las pautas de uso de las funciones
y la guía de cocción al vapor en las páginas
7 y 8 para recomendaciones.
LIMPIEZA Y
MANTENIMIENTO
Todas las piezas removibles son aptas
para lavavajillas.
1. Desenchufe la unidad y permita que se
enfríe completamente antes de
limpiarla.
2. Nunca sumerja la base/carcasa en agua
ni en ningún otro líquido.
3. Limpie la base/carcasa y el panel de
control con un paño ligeramente
humedecido.
4. Lave la parrilla, la bandeja, la tapa y la
rejilla de cocción al vapor en agua
jabonosa tibia y enjuáguelas bien.
También las puede lavar en el
lavavajillas.
5. Seque todas las piezas después de
lavarlas.
6. Mantenimiento: Cualquier otro servicio
debe ser realizado por un técnico
autorizado.
NOTA: Si es necesario, remoje la bandeja
en agua jabonosa tibia para despegar los
residuos antes de limpiarla. Si es necesario
restregarla, use un cepillo o un estropajo
de nylon y detergente líquido, o un
limpiador no abrasivo.
CONSEJOS Y
SUGERENCIAS
• El tiempo de precalentamiento puede
variar dependiendo de varios factores,
incluyendo la temperatura elegida, la
temperatura actual de la parrilla o de la
bandeja, y el contenido de la bandeja.
• Siempre use utensilios de madera,
plástico o silicona.
No use utensilios de metal, los cuales
pueden dañar el revestimiento
antiadherente.
CONSEJOS PARA DORAR/
SALTEAR
• Use la bandeja para dorar y saltear. Use
la bandeja como usaría un sartén en la
estufa para saltear ingredientes o
dorarlos antes de usarlos en muchos
platos de cocción lenta.
• Para conseguir resultados uniformes, no
sobrellene la vasija. Disponga los
alimentos en una capa uniforme en el
fondo de la bandeja, cocinando por
tandas si es necesario.
• Muchas recetas de cocción lenta
requieren dorar/saltear los ingredientes
antes de cocinarlos. Algunos alimentos
producen más grasa de lo que requiere
el plato final. Para quitar el exceso de
grasa, retire cuidadosamente la bandeja
de la base, usando agarraderas,
manoplas o guantes para el horno, y
vacíe la grasa por la esquina de la
bandeja. Vuelva a colocar la bandeja en
la base y termine de cocinar el plato.
• Cuando dore carne, puede usar los
residuos de carne pegados al fondo de
la bandeja para darle sabor al plato que
está preparando. Simplemente añada
una pequeña cantidad de líquido (tal
como vino o caldo) y raspe el fondo de
la bandeja con un cucharón de madera;
deje el jugo en la bandeja. Incorpore el
jugo en la receta o úselo para preparar
una salsa.
CONSEJOS PARA LA COCCIÓN
LENTA
• Cocine lentamente como lo haría en el
horno. Cocine los cortes de carne más
duros hasta que estén tiernos, por lo
general de 3 a 4 horas.
• La cocción lenta es ideal para cocinar
alimentos que requieren cocinarse por

6
mucho tiempo, tal como los guisos/
estofados y los frijoles.
• La cocción lenta es perfecta para
cocinar los cortes de carne menos
tiernos, tal como la paleta.
• Recomendamos dorar los alimentos
antes de cocinarlos a fuego lento para
dar más sabor y color al plato final. Sin
embargo, si el tiempo no lo permite, este
paso puede omitirse y todos los
ingredientes pueden ser añadidos a la
bandeja para cocinar a fuego lento.
• La carne molida siempre debe dorarse
antes de cocinarse a fuego lento.
• Para obtener resultados óptimos, llene la
bandeja hasta por lo menos un cuarto
de su capacidad, pero sin pasar tres
cuartos de su capacidad.
• Si desea que los vegetales estén
crujientes, agréguelos 30 minutos antes
del final de la cocción. Las hierbas
frescas deben agregarse
inmediatamente antes de servir.
• Procure no abrir la tapa durante la
cocción, ya que esto deja escapar el
vapor, alargando la cocción.
•
Muchas comidas cocinadas a fuego lento,
tales como los guisos/estofados, son
mejores al día siguiente, tras refrigerarse y
recalentarse.
• Una excelente manera de recalentar los
alimentos cocinados lentamente es
hervirlos a fuego lento. Revuelva para
asegurarse de que todos los
ingredientes se calienten, y luego ajuste
la temperatura a 300°F.
• Descongele los alimentos congelados
completamente antes de cocinarlos a
fuego lento.
• Si desea, puede preparar los
ingredientes la noche anterior y
refrigerarlos hasta el momento de
cocinar. Dore algunos ingredientes si es
necesario, y luego coloque todos los
ingredientes en la bandeja. Cubra y
refrigere. Cuando esté listo/a para
cocinar, coloque la bandeja en la base y
programe el tiempo de cocción,
agregándole 30 minutos.
• Para cocinar con menos grasa, quite la
grasa visible de la carne y del pollo.
Quite la piel del pollo y elimine la grasa
residual después de dorar la carne.
CONSEJOS PARA COCINAR AL
VAPOR:
• La cocción al vapor es uno de los
métodos de cocción más saludables,
puesto que conserva un máximo de
nutrientes.
• Para cocinar al vapor, llene la bandeja
con aprox. 3 a 4 tazas (710 a 945 ml) de
agua, hasta la línea “MAX/STEAM”.
Coloque los ingredientes sobre la rejilla
de cocción al vapor. Tapar y fijar la
temperatura en 400°F.
El tiempo empezará después de elegir la
temperatura.
• Cuando cocine alimentos pesados, tales
como mazorcas de maíz, coloque los
primeros alimentos en el centro de la
rejilla.
• Cuando cocine al vapor pescado o
mariscos, solo use 3 tazas (710 ml) de
agua.
• Tenga mucho cuidado al retirar la tapa.
Manténgala alejada de su cuerpo al
retirarla.

7
PAUTAS DE USO DE LAS FUNCIONES DE COCCIÓN
MODO TEMPERATURA ACONSEJADA
Parrilla
Bistec, hamburguesas, costillas, pollo 400˚F
Tocino 375˚F
Vegetales 375˚F
Plancha
Huevos 250˚F
Panqueques, tostadas francesas,
sándwiches de queso, quesadillas
350˚F
Tocino 375˚F
Bistec, salchichas, pollo 400˚F
Cocción al vapor
Vegetales, pollo 400˚F
Pescado, mariscos 350˚F
Hornear
Pastel, cazuelas/guisos/estofados 275˚F a 350˚F
Dorar/Saltear
Carnes, pollo 400˚F
Vegetales 350˚F a 375˚F
Cocción lenta
Cortes de carne más duros, guisos/
estofados, chiles
200˚F a 250˚F

8
Tabla de cocción al vapor
ALIMENTO CANTIDAD PREPARACIÓN
TIEMPO DE
COCCIÓN
Alcachofas
2
limpias 40 a 45 minutos
Brócoli/Brécol
1 racimo, aprox.
16 a 20 onzas
(455 a 600 g)
cogollos de 2 in. (5 cm) 10 a 12 minutos
Calabacines/Calabacitas 1 libra (455 g)
rodajas de ½ in.
(1.5 cm)
12 a 14 minutos
Calabaza moscada
1 libra (455 g) en cubos 20 minutos
Camarones*
1 libra (455 g);
grandes
pelados y limpios 8 a 10 minutos
Camote/batata
16 a 20 onzas
(455 a 600 g)
rebanar o cortar en
pedazos de ¾ in.
(2 cm)
14 a 15 minutos
Coliflor
1 mediana, aprox.
20 onzas (600 g)
cogollos de 2 in. (5 cm) 15 minutos
Espárragos
1 libra (455 g) limpios 10 a 12 minutos
Habichuelas 1 libra (455 g)
limpias 15 a 17 minutos
Huevos duros
12
20 a 25 minutos
Maíz 4 mazorcas
descascarillado 15 a 18 minutos
Papas amarillas
16 a 20 onzas
(455 a 600 g)
rebanar o cortar en
pedazos de ¾ in.
(2 cm)
20 minutos
Papas nuevas 2 libras (910 g)
enteras 25 a 30 minutos
Pescado*
(salmón, pez espada, etc.)
1 libra (455 g)
porciones pequeñas
filetes delgados:
8 a 10 minutos
filetes gruesos:
15 a 20 minutos
Pollo
1 libra (455 g);
aprox. 2
pechugas
deshuesadas
enteras 20 a 25 minutos
Tirabeques 1 libra (455 g)
limpios 10 a 11 minutos
Zanahorias “baby” 1 libra (455 g)
enteras 18 a 20 minutos
*Usar solamente 3 tazas (710 ml) de agua

9
Tema Pregunta/Problema Solución
Energía
La unidad no se enciende.
Compruebe que la unidad está enchufada y que la toma de
corriente a la cual está conectada está funcionando.
Comuníquese con nuestro servicio de atención al cliente al
1-800-726-0190.
Operación
¿Es necesario dorar la carne
antes de la cocción lenta?
Dorar la carne antes de la cocción lenta es opcional. Es
beneficioso, ya que da más sabor y color al plato final, pero
se puede omitir si el tiempo es corto. Excepción: La carne
molida siempre debe ser dorada antes de la cocción.
¿Se puede meter la bandeja al
horno o sobre la hornilla de la
estufa?
La bandeja ha sido diseñada especialmente para esta parrilla.
No aconsejamos que la use para cocinar alimentos en la
hornilla o al horno.
Limpieza
¿Se puede meter la unidad en
el lavavajillas?
Todas las piezas removibles son aptas para lavavajillas
(bandeja superior solamente).
No sumerja la base/carcasa en agua, ni la meta al lavavajillas.
Limpie la base/carcasa y el panel de control con un paño
ligeramente humedecido.
La bandeja y la parrilla son
antiadherentes. ¿Por qué los
alimentos se pegan?
Aunque la bandeja y la parrilla tienen un revestimiento
antiadherente, es posible que residuos de comida se quemen
en ellas, dificultando su remoción.
Hay residuos de alimentos en
la bandeja/parrilla. ¿Cómo
limpiarla sin dañar el
revestimiento antiadherente?
De ser necesario, remoje la bandeja/parrilla en agua jabonosa
tibia antes de lavarla. Si es necesario restregarla, use un
cepillo o un estropajo de nylon y detergente líquido o un
limpiador no abrasivo.
RESOLUCIÓN DE PROBLEMAS

10
GARANTÍA
Garantía limitada de tres años
Esta garantía es para los consumidores que
residen en los EE.UU. solamente. Usted es un
consumidor si posee una parrilla multifunción
Stack5
®
Cuisinart
®
que fue comprada en una
tienda para uso personal, familiar o casero. A
menos que la ley aplicable exija lo contrario,
esta garantía no es para los minoristas u otros
consumidores/compradores comerciales.
Cuisinart garantiza este producto contra todo
defecto de materiales o fabricación durante 3
años después de la fecha de compra original,
siempre que el aparato haya sido usado para
uso doméstico y según las instrucciones.
Le aconsejamos que llene el formulario de
registro disponible en https://cuisinart.registria.
com a fin de facilitar la verificación de la fecha
de compra original de este producto. Sin
embargo, no es necesario registrar el producto
para recibir servicio bajo esta garantía. En
ausencia de prueba de la fecha de compra, el
período de garantía será calculado a partir de la
fecha de fabricación del producto.
RESIDENTES DE CALIFORNIA
La ley del estado de California ofrece dos
opciones bajo el período de garantía. Los
residentes del estado de California pueden
regresar el producto defectuoso (A) a la tienda
donde lo compraron o (B) a otra tienda que
venda productos Cuisinart
®
de este tipo. La
tienda podrá, a su elección, reparar el producto,
referir el consumidor a un centro de servicio
independiente, sustituir el producto, o
reembolsar al consumidor el precio de compra
menos la cantidad directamente atribuible al
uso anterior del producto por el consumidor. Si
estas dos opciones no satisfacen al
consumidor, podrá llevar el aparato a un centro
de servicio independiente, siempre que se
pueda arreglar o reparar el aparato de manera
económica. Cuisinart (no el consumidor) será
responsable por los gastos de servicio,
reparación, sustitución o reembolso de los
productos defectuosos bajo garantía. Los
residentes de California también pueden, si lo
desean, mandar el producto defectuoso
directamente a Cuisinart para que lo reparen o
lo cambien. Para esto, se debe llamar a nuestro
servicio posventa al 1-800-726-0190. Cuisinart
será responsable por los gastos de reparación,
reemplazo, manejo y envío de los productos
defectuosos durante el período de garantía.
GARANTÍA DE REEMPLAZO SIN
DIFICULTADES
Su máxima satisfacción es nuestra prioridad,
así que si este producto Cuisinart
®
falla dentro
del generoso período de garantía, lo
repararemos o, de ser necesario, lo
reemplazaremos, sin costo alguno para usted.
Para obtener una etiqueta
de envío de devolución, contáctenos visitando
www.cuisinart.com/customer-care/product-
assistance/product-inquiry. O llame sin cargo
a nuestro servicio de atención al cliente, al
1-800-726-0190, para hablar con un
representante.
Este producto satisface las más altas
exigencias de fabricación y ha sido diseñado
para funcionar con 120 V, usando accesorios y
repuestos autorizados solamente. Esta garantía
excluye expresamente los defectos o daños
causados por accesorios, piezas o reparaciones
no autorizados por Cuisinart, así como los
defectos o daños causados por el uso de un
convertidor de voltaje. Esta garantía no cubre el
uso comercial o industrial del producto, y no es
válida en caso de daños causados por mal uso,
negligencia o accidente. Esta garantía excluye
todos los daños incidentales o consecuentes.
Algunos Estados no permiten la exclusión o
limitación de daños incidentales o
consecuentes, de modo que las limitaciones
mencionadas pueden no regir para usted.
Usted puede tener otros derechos que varían
de un Estado a otro.
Importante: Si debe llevar el producto
defectuoso a un centro de servicio no
autorizado, por favor informe al personal
del centro de servicio que deben llamar al
Centro de Servicio al Cliente de Cuisinart,
al 1-800-726-0190, a fin de diagnosticar el
problema correctamente, usar las piezas
correctas para repararlo y comprobar que
el producto aún está bajo garantía.

11
RECETAS
Budín de pan Jalá ............................. 11
Frittata de desayuno con salchicha,
pimiento y queso Cheddar ................ 12
Panqueques de banana .................... 12
Chilaquiles para el
desayuno-almuerzo ........................... 13
Pasta “al horno” con vegetales
de verano .......................................... 13
Gratén de berenjena ......................... 14
Arroz con pollo .................................. 15
“Cacciatore” de pollo ........................ 15
Pollo desmenuzado al estilo latino ... 16
Cazuela de enchilada de pollo .......... 16
Pollo asado con
vegetales de primavera ..................... 17
Falda a la barbacoa .......................... 17
Fajitas de bistec de falda .................. 18
Bistec con cebolletas y
salsa verde ........................................ 18
Chili con carne .................................. 19
Estofado de res en
cerveza Guinness .............................. 20
Salchichas asadas con pimientos..... 20
Pinchos hawaianos ........................... 21
Camarones Scampi ........................... 21
Filetes de lenguado rellenos
de cangrejo ........................................ 22
Frijoles rojos con arroz ...................... 22
Arroz de coliflor frito .......................... 23
Gratén de calabaza moscada
y farro ................................................ 23
Coles de Bruselas
con cebolla roja ................................. 24
Macarrones con queso
tradicionales ...................................... 25
Polenta .............................................. 25
“Foster” de banana ........................... 26
Torta invertida de frambuesa e higo . 26
Pastel de zanahoria ........................... 27
Budín de pan Jalá
Prepare este plato la noche anterior, para
que esté listo a primera hora.
¡Es el perfecto plato para el desayuno-
almuerzo!
Rinde 8 porciones
Spray vegetal
4 huevos grandes
2 tazas (475 ml) de leche entera
1 taza (235 ml) de crema líquida
para batir (“heavy cream”)
1 cucharada de extracto natural de
vainilla
¹/
³
taza (80 ml) de jarabe de arce/
maple
2 cucharaditas de canela en polvo
1 cucharadita de nuez moscada
rallada
¼ cucharadita de cucharadita
de sal
1 libra (455 g) de pan Jalá, en tiras
de 9 x ½ in. (1.5 x 23 cm)
2 cucharadas llenas de azúcar
rubia (azúcar de caña integral)
2 cucharadas (45 g) de mantequilla
sin sal, en pedacitos
1. Engrasar ligeramente la bandeja con
spray vegetal.
2. Colocar los huevos, la leche, la crema,
la vainilla, el jarabe, la canela, la nuez
moscada y la sal en un tazón mediano;
batir hasta conseguir una mezcla
espumosa.
3. Disponer la mitad de las tiras de pan
Jalá en el fondo de la bandeja. Verter
la mitad de la mezcla por encima, y
luego rociar uniformemente con la mitad
del azúcar rubio. Disponer el resto de
las tiras de pan, en dirección opuesta
a la primera capa. Verter el resto de
la mezcla por encima, y luego rociar
uniformemente con el azúcar rubio
restante.
4. Cubrir y refrigerar por 2 a 12 horas.
5. Sacar del refrigerador y llevar a
temperatura ambiente. Colocar la
bandeja en la base de la Stack5
®
y
cubrir con pedacitos de mantequilla;
tapar.

12
6. Fijar la temperatura en 200°F. Hornear
por aprox. 2 horas, hasta que la
temperatura interna alcance 160°F
(71°C).
7. Servir inmediatamente.
Información nutricional por porción: Calorías 420
(47% de grasa) • Carbohidratos 44g • Proteínas
11g • Grasa 11g • Grasa saturada 12g
Colesterol 190mg • Sodio 430mg
Calcio 177mg • Fibra 2g
Frittata de desayuno
con salchicha,
pimiento y queso
Cheddar
Un gran desayuno-almuerzo para una
multitud. ¡Y las sobras son perfectas para
un almuerzo ligero al día siguiente!
Rinde 8 porciones
2 cucharaditas de aceite de oliva
8 onzas (225 g) de salchicha de
desayuno precocinadas,
en rodajas
1 pimiento dulce rojo mediano,
en cubitos de ½ in. (1.5 cm)
12 huevos grandes
½ taza (120 ml) de leche
¾ cucharadita de sal kosher
½ cucharadita de pimienta negra
recién molida
2 cebolletas (“green onions”),
en rodajas
4 onzas (115 g) de queso Cheddar,
rallado
1. Ensamblar la Stack5
®
con la bandeja y
fijar la temperatura en 400 °F.
Colocar una cucharadita de aceite de
oliva en la bandeja.
2. Cuando el aceite esté caliente, agregar
las rodajas de salchicha. Dorar
ligeramente por aprox. 3 a 5 minutos
por lado. Retirar y reservar.
3. Colocar el aceite restante en la
bandeja y agregar los cubos de
pimiento; saltear por aprox. 5 minutos,
hasta que estén ligeramente dorados y
suaves.
4. Mientras el pimiento se está
cocinando, batir los huevos con la
leche, la sal y la pimienta.
5. Cuando el pimiento esté suave,
agregar la cebolleta y cocinar por 1 a 2
minutos adicionales.
6. Devolver la salchicha a la bandeja y
ajustar la temperatura a 300 °F.
7. Agregar la mezcla de leche y cubrir
con queso Cheddar. Tapar y dejar que
se cocine por 35 a 40 minutos, hasta
que los huevos estén cuajados.
8. Servir inmediatamente.
Información nutricional por porción
(basada en 8 porciones): Calorías 271 (65%
de grasa) • Carbohidratos 4g • Proteínas 19g
Grasa 19g • Grasa saturada 7g
Colesterol 309mg • Sodio 771mg
Calcio 175mg • Fibra 0g
Panqueques
de banana
Estos panqueques dulces son perfectos
para el desayuno-almuerzo. ¡Les
encantarán a los niños!
Rinde aprox. 14 panqueques
1¾ tazas (220 g) de harina común
¼ taza (50 g) de azúcar granulada
¼ taza (50 g) de azúcar rubia
(azúcar de caña integral)
1 cucharadita de bicarbonato
de sodio
½ cucharadita de polvo de hornear
¼ cucharadita de sal
¼ cucharadita de canela en polvo
1½ tazas (365 g) de suero de leche
(“buttermilk”)
2 huevos grandes
¾ cucharadita de extracto natural
de vainilla
2 bananas maduras (½ aplastada,
1½ en rodajas delgadas)
¼ taza (115 g) de mantequilla sin
sal, derretida
Mantequilla sin sal para engrasar
la bandeja
1. Colocar la harina, los azucares, el
bicarbonato, el polvo de hornear, la
sal y la canela en un tazón pequeño;
revolver. Reservar.
2. Colocar el suero de mantequilla, los
huevos, la vainilla y la banana en otro

13
tazón. Batir hasta conseguir una mezcla
homogénea.
3. Agregar la mantequilla derretida. Agregar
la mantequilla derretida.
4. Ensamblar la Stack5
®
con la bandeja y
fijar la temperatura en 350 °F.
5. Cuando esté caliente, agregar una
pequeña cantidad de mantequilla y
engrasar el fondo de la bandeja.
6. Formar panqueques de ¼ de taza (60 ml)
de la mezcla. Disponer 2 a 3 rodajas de
banana en cada panqueque. Cocinar por
aprox. 2 minutos, hasta que aparezcan
burbujas, y luego voltear y cocinar por
aprox. 1 a 2 minutos adicionales. Repetir
con el resto de la mezcla.
7. Servir en platos tibios. Para mantener
los panqueques calientes, ponerlos en
una placa para horno y meterlos al horno
(200 °F/100°C).
Información nutricional por porción (2 panqueques):
Calorías 199 (34% de grasa) • Carbohidratos 27g
Proteínas 6g • Grasa 8g • Grasa saturada 4g
Colesterol 71mg • Sodio 306mg • Calcio 81mg
Fibra 1g
Chilaquiles para el
desayuno-almuerzo
Un divertido y sabroso plato de huevos, ¡y
una gran manera de alegrar su próximo
desayuno-almuerzo!
Rinde 15 porciones
1 cucharadita de aceite de oliva
1 cebolla pequeña, picada
2 dientes de ajo, finamente picados
1 jalapeño, sin semillas, picado
1 libra de tomatillos, en cubitos
½ cucharadita de sal kosher
1 lata de 4 onzas (130 g) de chiles
verdes
1½ tazas (355 ml) de caldo de pollo
bajo en sodio
8 tazas (400 g) de chips/totopos
de maíz
6 huevos grandes
1 taza (140 g) de queso Cotija
desmenuzado
1 taza (115 g) de queso Monterey
Jack rallado
Cilantro fresco picado
1. Ensamblar la Stack5
®
con la bandeja y
fijar la temperatura en 400 °F.
Colocar el aceite en la bandeja. Cuando
el aceite esté caliente, agregar la cebolla,
el ajo, el jalapeño, los tomatillos y la sal.
Cocinar por 6 a 8 minutos., revolviendo
ocasionalmente, hasta que los vegetales
estén tiernos y fragrantes.
2. Agregar los chiles verdes y el caldo
de pollo; cocinar hasta que la mezcla
empiece a hervir. Reducir la temperatura
ligeramente para mantener un fuego
lento pero constante.
3. Agregar la mitad de las tortillas y revolver
para cubrir con el líquido. Hacer 6
abolladuras en la mezcla de chips/chile
para los huevos. Ajustar la temperatura a
175°F.
4. Romper cada huevo en una taza
pequeña o un ramequín. Cuando
esté listo/a, agregar los huevos en las
abolladuras. Rociar con la mitad del
queso.
5. Tapar y cocinar por aprox. 25 minutos,
chequeando los huevos de vez en
cuando para comprobar que no se
cocinan demasiado rápido.
6. Cuando estén casi listos, agregar
los chips restantes, y luego el queso
restante. Tapar otra vez y cocinar por
aprox. 8 a 10 minutos, hasta que el
queso esté derretido.
7. Rociar con cilantro picado y servir
inmediatamente.
Información nutricional por porción (basada en
15 porciones): Calorías 565 (52% de grasa)
Carbohidratos 47g • Proteínas 21g • Grasa 32g
Grasa saturada 9g • Colesterol 226mg • Sodio
839mg • Calcio 395mg • Fibra 6g
Pasta “al horno” con
vegetales de verano
¿Por qué encender el horno? ¡La Stack5
®
de
Cuisinart
®
lo hace todo!
Rinde 8 a 10 porciones
1 libra (455 g) de rigatoni
2 cucharaditas de aceite de oliva
1 berenjena pequeña, en cubos de
½ in. (1.5 cm)
1 calabacín/calabacita (“zucchini”)
pequeño, en cubos de ½ in. (1.5 cm)
1 pimiento dulce rojo de aprox.
8 onzas (225 g)
1 cucharadita de sal kosher
1 huevo grande

14
15 onzas (425 g) de queso ricota/
requesón
8 onzas (225 g) de queso Mozzarella,
rallado
2 onzas (55 g) de queso Parmesano,
rallado
2 tazas (300 g) de tomates de pera
½ taza (30 g) de hojas de albahaca
fresca
Spray vegetal
1. Preparar la pasta según las instrucciones
del fabricante, reservando ½ taza (120
ml) del líquido de cocción.
2. Ensamblar la Stack5
®
con la bandeja y
fijar la temperatura en 400 °F.
Colocar el aceite de oliva de en la
bandeja. Cuando el aceite esté caliente,
agregar los cubos de vegetales y
½ cucharadita de la sal. Cocinar,
revolviendo, por aprox. 10 a 12 minutos,
hasta que estén tiernos y dorados.
3. Mientras los vegetales se están
cocinando, colocar el queso ricota, el
huevo y ¼ de cucharadita de sal en un
tazón grande; batir.
4. Agregar la pasta cocinada y el líquido de
cocción reservado a la mezcla de queso.
Incorporar delicadamente los vegetales
salteados, la Mozzarella, el Parmesano,
los tomates de pera, ¼ de cucharadita
de sal y las hojas de albahaca fresca a la
mezcla.
5. Limpiar la bandeja con papel absorbente
y engrasar ligeramente con spray
vegetal.
6. Agregar la pasta y fijar la temperatura en
325 °F. Tapar y cocinar por 45 minutos.
7. Servir inmediatamente.
Información nutricional por porción (basada en
10 porciones): Calorías 363 (33% de grasa)
Carbohidratos 43g • Proteínas 19g • Grasa 13g
Grasa saturada 7g • Colesterol 51mg • Sodio
524mg • Calcio 304mg • Fibra 3g
Gratén de berenjena
¡Saltee y hornee en la misma bandeja!
Rinde 16 porciones
2 tazas (250 g) de harina común
½ cucharadita de sal
6 huevos grandes, ligeramente
batidos
3 tazas (120 g) de pan rallado
12 onzas (340 g) de berenjena, en
rodajas de ¼ in. (0.5 cm)
½ taza (120 ml) de aceite de oliva
4 tazas (945 ml) de salsa Marinara
8 onzas (225 g) de queso Mozzarella,
rallado
1 onza (30 g) de queso Parmesano,
rallado
1. Colocar la harina y la sal en un
recipiente/plato poco hondo; revolver.
Colocar los huevos batidos y el pan
rallado en otros dos recipientes poco
hondos.
2. Rebozar cada rodaja de berenjena,
primero en la harina, luego en los
huevos, y finalmente en el pan rallado.
Sacudir la berenjena para eliminar el
exceso después de cubrirla con cada
ingrediente.
3. Ensamblar la Stack5
®
con la bandeja y
fijar la temperatura en 400 °F. Agregar 2
cucharadas del aceite. Cuando el aceite
esté caliente, disponer las rodajas de
berenjena en la bandeja, en una sola
capa. Dorar cada lado y repetir con el
resto de las rodajas, agregando más
aceite si es necesario.
4. Cuando todas las rodajas estén doradas,
apagar la unidad y permitir que se enfríe
ligeramente antes de tirar el aceite y
limpiar la bandeja.
5. Colocar 1 taza (235 ml) de salsa
Marinara en la bandeja. Agregar una
capa uniforme de berenjena. Cubrir
con 1 taza (235 ml) adicional de salsa,
y luego con la mitad de la Mozzarella y
del Parmesano. Colocar otra capa de
berenjena, y luego otra capa de salsa,
terminando con el queso.
6. Tapar y fijar la temperatura en 300°F.
Hornear por 30 a 40 minutos, hasta que
el queso esté completamente derretido.
7. Servir inmediatamente.
Información nutricional por porción (basada en
16 porciones): Calorías 332 (48% de grasa)
Carbohidratos 31g • Proteínas 13g • Grasa 18g
Grasa saturada 5g • Colesterol 105mg • Sodio
959mg • Calcio 165mg • Fibra 2g

15
Arroz con pollo
Esta comida de un solo plato siempre les
encanta a todos.
Rinde aprox. 6 porciones
3 libras (1.35 kg) de muslo de pollo,
con hueso y piel
1 cucharadita de sal kosher
½ cucharadita de pimienta negra
recién molida
½ cucharadita de aceite de oliva
virgen extra
1 cebolla pequeña, picada
1 pimiento rojo pequeño, picado
4 dientes de ajo, picados
1 tomate italiano, en cubitos
¼ cucharadita de páprika ahumada
2 tazas (370 g) de arroz blanco de
grano largo
3 tazas (710 ml) de caldo de pollo
bajo en sodio
¹/
8
cucharadita de hebras de azafrán
1 hoja de laurel
½ taza (75 g) de arvejas congeladas
¹/
³
taza (30 g) de hojas de perejil
fresco, picadas
Pedazos de limón, para servir
1. Sazonar ambos lados del pollo con ½
cucharadita de la sal y de la pimienta.
2. Ensamblar la Stack5
®
con la bandeja y
fijar la temperatura en 400°F.
Colocar aceite en la bandeja.
3. Cuando el aceite esté caliente, agregar
el pollo, la piel apuntando hacia abajo.
Cocinar sin mover por aprox. 15 a 20
minutos, hasta que esté bien dorado.
Voltear y cocinar por 10 a 15 minutos
adicionales. Retirar y reservar.
4. Colocar la cebolla, el pimiento y el ajo en
la bandeja; cocinar por 10 minutos.
5. Agregar el tomate, la sal restante y la
páprika; cocinar por un par de minutos, y
luego agregar el arroz, el caldo de pollo,
el azafrán y la hoja de laurel. Cocinar
hasta que el líquido empiece a hervir.
6. Cuando el líquido empiece a hervir, tapar
y cocinar por 10 minutos. Después de
este tiempo, devolver el pollo a la olla y
ajustar la temperatura a 300 °F. Tapar y
cocinar por 25 a 30 minutos adicionales.
7. Agregar las arvejas congeladas.
8. Probar y ajustar la sazón al gusto.
Rociar con perejil picado y servir
inmediatamente, con pedazos de limón.
Información nutricional por porción (basada
en 6 porciones): Calorías 523 (34% de grasa)
Carbohidratos 41g • Proteínas 45g • Grasa 19g
Grasa saturada 5g • Colesterol 221mg • Sodio
879mg • Calcio 56mg • Fibra 2g
“Cacciatore” de pollo
El plato perfecto para calentarse cuando el
tiempo está fresco.
Rinde 4 a 8 porciones
8 muslos de pollo, deshuesados y
sin piel
1¼ cucharaditas de sal kosher
¼ cucharadita de pimienta negra
recién molida
2 cucharaditas de aceite de oliva
1 cebolla mediana, cortada a la
mitad y luego en rodajas
3 dientes de ajo grandes
1 pimiento dulce, en tiras de ¼ x 2
in. (0.5 x 5 cm)
8 onzas (255 g) de champiñones
comunes (también conocidos
como champiñones cremini o
champiñones de Paris), en rodajas
6 ramitas de 3 in. (7.5 cm) de romero
6 ramitas de 3 in. (7.5 cm) de tomillo
1 cucharadita de vinagre de jerez
1 lata de 15.5 onzas (410 g) de
tomates picados
1. Sazonar ambos lados del pollo con 1
cucharadita de sal y de pimienta.
2. Ensamblar la Stack5
®
con la bandeja y
fijar la temperatura en 400°F.
Colocar el aceite en la bandeja.
3. Cuando el aceite esté caliente, agregar
el pollo. Dorar por aprox. 15 minutos por
lado, hasta que esté bien dorado. Retirar
y reservar.
4. Agregar la cebolla, el ajo, el pimiento
y los champiñones, junto con la sal
restante y las hierbas. Cocinar por aprox.
15 minutos, hasta que estén suaves y
ligeramente dorados.
5. Agregar el vinagre y los tomates picados.
Cuando el líquido empiece a hervir,
devolver el pollo a la bandeja, tapar y
ajustar la temperatura a 250 °F; cocinar

16
por aprox. 1 hora. El pollo debería estar
tan tierno que se puede desmenuzar con
un tenedor.
6. Probar y ajustar la sazón al gusto. Servir
inmediatamente.
Información nutricional por porción (basada
en 8 porciones): Calorías 266 (47% de grasa)
Carbohidratos 7g • Proteínas 29g • Grasa 14g
Grasa saturada 3g • Colesterol 147mg
Sodio 865mg • Calcio 33mg • Fibra 2g
Pollo desmenuzado al
estilo latino
Este pollo versátil es el relleno perfecto
para tacos o enchiladas. También es
perfecto para añadir a ensaladas y tazones
de
rroz/cereales.
Rinde 10 porciones
2 libras (910 g) de muslos de pollo,
deshuesado y sin piel
1 cucharaditas de chile ancho en
polvo
1 cucharadita de comino en polvo
1 cucharadita de sal kosher
1 cebolla mediana
2 dientes de ajo machacados
1 jalapeño, sin semillas y cortado a
la mitad
2 ramitas de cilantro
1 taza (235 ml) de agua
½ lima/limón verde
1. Ensamblar la Stack5
®
con la bandeja.
2. Sazonar el pollo con el chile en polvo,
el comino y la sal. Colocarlo en la
bandeja, junto con la cebolla en cuartos,
2 dientes de ajo machacados, la mitad
del jalapeño, las ramitas de cilantro y
1 taza (235 ml) de agua. Tapar y fijar la
temperatura en 400 °F.
3. Cuando el líquido empiece a hervir
(después de aprox. 7 a 8 minutos),
ajustar la temperatura a 200 °F. Seguir
cocinando por aprox. 50 minutos, hasta
que el pollo esté tierno.
4. Retirar el pollo, dejar que se enfríe
ligeramente, y desmenuzarlo con un
tenedor o los dedos Rociar con jugo de
lima. Probar y ajustar la sazón al gusto.
Información nutricional por porción (basada en
10 porciones): Calorías 145 (29% de grasa)
Carbohidratos 2g • Proteínas 23g • Grasa 5g
Grasa saturada 1g • Colesterol 94mg
Sodio 372mg • Calcio 22mg • Fibra 1g
Cazuela de enchilada
de pollo
La máxima comida reconfortante de
inspiración latina.
Rinde aprox. 15 porciones
1 cucharadita de aceite vegetal
½ cebolla roja, finamente picada
1 jalapeño, sin semillas, finamente
picado
1 diente de ajo, finamente picado
1 latas de 4 onzas (115 g) de chiles
verdes picados
1 lata de 15.5 onzas (425 g) de
frijoles negros, escurridos
½ cucharadita de sal kosher
1 jarra de salsa para enchilada
1 paquete de tortillas de maíz
1 receta de pollo desmenuzado al
estilo latino o 3 libras (1.35 kg) de
pollo asado triturado
2 tazas (225 g) de queso Monterey
Jack rallado
1. Ensamblar la Stack5
®
con la bandeja y
fijar la temperatura en 350°F.
Colocar el aceite en la bandeja.
2. Cuando el aceite esté caliente, agregar
la cebolla, el jalapeño y el ajo. Cocinar
por aprox. 7 a 8 minutos, revolviendo,
hasta que los vegetales estén tiernos y
fragrantes. Agregar los chiles verdes,
los frijoles escurridos y la sal; tapar y
cocinar hasta que la mezcla empiece a
hervir. A continuación, seguir cocinando
por aprox. 10 minutos para desarrollar
los sabores. Retirar y reservar. Limpiar la
bandeja.
3. Armar la cazuela. Esparcir ½ taza (120
ml) de la salsa para enchilada en el
fondo de la bandeja. Cubrir con una
capa de tortillas de maíz. Cubrir con la
mitad del pollo desmenuzado, la mitad
de los frijoles, y ¹/
³
del queso. Repetir.
Terminar con una capa de tortilla, y
luego una capa de queso. Tapar y fijar
la temperatura en 300 °F. Hornear por
aprox. 30 minutos, hasta que el queso
esté caliente y completamente derretido.

17
Información nutricional por porción (basada en
15 porciones): Calorías 307 (30% de grasa)
Carbohidratos 29g • Proteínas 23g • Grasa 10g
Grasa saturada 4g • Colesterol 79mg • Sodio
937mg • Calcio 161mg • Fibra 4g
Pollo asado con
vegetales de primavera
Este plato ligero y fresco es ideal para el
almuerzo o la cena.
Rinde 2 a 4 porciones
2 pechugas de pollo deshuesada y
sin piel (aprox. 1½ libras/680 g)
½ taza (120 ml) + 1 cucharada de
aceite de oliva virgen extra
¼ taza (60 ml) de jugo de limón
fresco
1 cucharadita de sal kosher + un
poco más para sazonar
½ cucharadita de páprika
3 ramitas de tomillo fresco
2 puerros medianos, bien lavados,
parte blanca solamente (cortar
cerca de las raíces de manera que
quede unido, y luego cortar en
rodajas)
1 libra (455 g) de espárragos, sin las
extremidades duras
1. Colocar el pollo en un tazón no metálico.
En otro tazón, colocar ½ taza (120 ml) de
aceite de oliva, el jugo de limón, la sal,
la páprika y el tomillo; revolver. Verter la
mezcla por encima del pollo y refrigerar
por 1 hora.
2. Cuando esté listo/a para cocinar,
ensamblar la Stack5
®
con la parrilla y fijar
la temperatura en 400 °F.
3. Cuando la placa esté caliente, disponer
el pollo en ella. Cocinar por aprox. 8
a 10 minutos, y luego voltear. El pollo
está listo cuando la temperatura interna
en la parte más gruesa alcance 165
°F (74 °C). Esto debería tomar aprox.
18 a 20 minutos en total, dependiendo
del grosos de las pechugas. Retirar y
reservar.
4. Mientras el pollo se está cocinando,
combinar el puerro, el aceite de oliva
restante y una pizca de sal.
5. Después de retirar el pollo, colocar los
vegetales en la placa y cocinarlos por
aprox. 10 minutos, hasta que estén
dorados y bien cocinados.
6. Cuando los vegetales estén listos,
trinchar el pollo y servirlo junto con los
vegetales.
Información nutricional por porción (basada
en 4 porciones): Calorías 363 (46% de grasa)
Carbohidratos 11g • Proteínas 39g • Grasa 19g
Grasa saturada 3g • Colesterol 109mg
Sodio 873mg • Calcio 61mg • Fibra 3g
Falda a la barbacoa
Planee con antelación para tener tiempo
de dejar marinar la falda durante la noche.
¡El resultado vale la pena!
Rinde aprox. 8 a 10 porciones
2 cucharadas llenas de azúcar rubia
(azúcar de caña integral)
1½ cucharadas de chile en polvo
1 cucharadita de especias cajún
½ cucharadita de páprika ahumada
½ cucharadita de sal kosher
½ cucharadita de pimienta negra
recién molida
2 a 3 libras (910 g a 1.35 kg) de falda
de res
1 cucharadita de aceite vegetal
2 cebollas pequeñas, en rodajas
6 dientes de ajo, finamente picados
2 cucharadas de vinagre de sidra de
manzana
½ cucharada de salsa Worcestershire
2 tazas (475 ml) de caldo de pollo
bajo en sodio
¼ taza (60 ml) de salsa de tomate
(kétchup)
3 cucharadas de concentrado
de tomate
1 cucharada de azúcar moreno
1. Colocar el azúcar, el chile en polvo, las
especias cajún, la páprika ahumada, la
sal y la pimienta en un tazón; revolver.
Sazonar la carne con la mezcla. Colocar
en un recipiente no metálico (o en una
bolsa hermética) y refrigerar por una
noche.
2. Cuando esté listo/a para cocinar,
ensamblar la Stack5
®
con la bandeja y
fijar la temperatura en 400 °F. Colocar el
aceite en la bandeja.

18
3. Cuando el aceite esté caliente, agregar
la falda. Dorar cada lado por aprox. 5
minutos. Retirar y reservar.
4. Agregar la cebolla y el ajo y saltear por
aprox. 3 a 5 minutos, hasta que estén
suaves y fragrantes. Luego, agregar el
vinagre de sidra, la salsa Worcestershire
y el caldo de pollo; raspar el fondo de
la bandeja con un cucharón de madera
para despegar los residuos. Agregar el
kétchup, el concentrado de tomate y
el azúcar; cocinar hasta que empiece
a hervir. Cuando empiece a hervir,
devolver la falta a la bandeja, tapar y
ajustar la temperatura a 200 °F.
5. Cocinar a fuego lento por 3½ a 4 horas,
hasta que la carne esté tan tierna que
se puede desmenuzar con un tenedor
Revisar de vez en cuando durante la
cocción, ya que puede ser necesario
ajustar la temperatura para mantener el
líquido hirviendo a fuego lento.
6. Dejar que la falda se enfríe completamente
en el líquido de cocción, en la bandeja.
Si el tiempo lo permite, refrigerarla por
una noche antes de servir.
7. Para servir: Retirar la falda del líquido
y cortar en tajadas finas, en contra del
grano de la carne. Volver a colocar la
carne en el líquido de cocción y fijar la
temperatura en 325 °F para recalentar.
Información nutricional por porción (basada en
10 porciones): Calorías 426 (53% de grasa)
Carbohidratos 9g • Proteínas 40g • Grasa 24g Grasa
saturada 19g • Colesterol 146mg • Sodio 509mg
Calcio 42mg • Fibra 1g
Fajitas de bistec
de falda
¡Un plato divertido y sabroso para convertir
cualquier noche de la semana en fiesta!
Rinde 4 porciones
¾ libra (340 g) de bistec de falda
1 cucharadita de sal kosher
¾ cucharaditas de chile ancho en
polvo
4 cucharaditas de aceite de oliva
1 cebolla roja mediana, en rodajas
1 pimiento dulce, sin semillas, en
rodajas de ¼ in. (0.5 cm)
8 tortillas de trigo para fajitas
Guacamole, pico de gallo y crema
agria para servir
1. Ensamblar la Stack5
®
con la parrilla
y fijar la temperatura en 400 °F.
Mientras la parrilla se está calentando,
sazonar ambos lados del bistec con ¾
cucharaditas de sal y ½ cucharadita de
chile en polvo.
2. Cuando la parrilla esté caliente, colocar
2 cucharaditas de aceite de oliva en ella.
Cocinar el bistec por 4 a 5 minutos por
lado para carne poco hecha. Mientras
el bistec se está cocinando, sazonar la
cebolla y el pimiento con la sal y el chile
restantes, y revolver con el aceite de
oliva restante.
3. Cuando el bistec esté cocinado, retirarlo
de la parrilla y dejarlo reposar antes
de trincharlo. Limpiar cuidadosamente
las placas con papel absorbente, y
luego agregar los vegetales. Cocinar,
revolviendo ocasionalmente, por aprox.
7 minutos, hasta que los vegetales
estén suaves y ligeramente dorados.
Cuando estén listos, empujar los
vegetales a un lado de la parrilla y limpiar
cuidadosamente el lado libre. Ajustar la
temperatura a 200°F.
4. Para servir: Calentar 1 o 2 tortillas en el
lado libre de la parrilla. Cortar el bistec
en tajadas delgadas. Cuando las tortillas
estén tibias, colocar los vegetales
asados y bistec en ellas. Agregar la
guarnición deseada, p. ej., guacamole,
pico de gallo y crema agria.
Información nutricional por porción (basada
en 4 porciones): Calorías 358 (42% de grasa)
Carbohidratos 30g • Proteínas 21g • Grasa 16g
Grasa saturada 4g • Colesterol 55mg
Sodio 607mg • Calcio 96mg • Fibra 1g
Bistec con cebolletas
y salsa verde
¡Esta receta tan fácil y sabrosa se convertirá
en una de sus favoritas!
Rinde 2 a 4 porciones
1 diente de ajo pequeño
1 jalapeño, sin semillas/tallo
1 taza llena (120 g) de hojas de
perejil
½ cucharadita de sal kosher + un
poco más para sazonar
¼ cucharadita de jugo de limón
fresco
¼ taza (60 ml) + ½ cucharadita de
aceite de oliva

19
2 solomillos de aprox. 1 a 1½ in.
(2.5 a 4 cm) de grueso
1 manojo de cebolletas
(“green onions”)
1. Preparar la salsa verde. Picar finamente
el ajo y el jalapeño en una procesadora
de alimentos, usando la cuchilla
picadora grande. Agregar el perejil,
¼ de cucharadita de sal y el jugo de
limón. Pulsar para picar grueso. Sin
apagar la máquina, agregar ¼ de taza
(60 ml) de aceite de oliva por la boca de
alimentación y procesar para incorporar.
Probar y ajustar la sazón al gusto.
2. Ensamblar la Stack5
®
con la parrilla y
fijar la temperatura en 400 °F.
3. Mientras la parrilla se está calentando,
sazonar ambos lados de los bistecs
con sal. Cuando la parrilla esté caliente,
colocar los bistecs en ella. Cocinar por
aprox. 6 a 7 minutos por lado para carne
poco hecha (la temperatura interna
debería alcanzar 135 °F/57 °C).
4. Mientras los bistecs se están cocinando,
revolver las cebolletas con aceite de
oliva y una pizca de sal.
5. Cuando los bistecs estén cocinados al
gusto, retirar y reservar. Dejar reposar
antes de cortar.
6. Limpiar cuidadosamente la parrilla
con papel absorbente y colocar las
cebolletas en ella. Cocinar por aprox.
7 minutos, hasta que estén suaves y
ligeramente doradas.
7. Rebanar el bistec y servir con las
cebolletas y la salsa verde.
Información nutricional por porción
(basada en 4 porciones):
Calorías 359 (59% de grasa) • Carbohidratos 3g
Proteínas 34g • Grasa 23g • Grasa saturada 5g
Colesterol 92mg • Sodio 212mg • Calcio 62mg
Fibra 1g
Chili con carne
Un verdadero chile tejano con un sabor
intenso.
Rinde 6 a 8 porciones
3 libras (1.35 kg) de aguja/paleta de
res, en pedazos de 1½ a 2 in.
(3 a 5 cm)
2 cucharaditas de sal kosher
½ cucharadita de pimienta negra
recién molida
2 cucharadas de aceite de oliva
1 cebolla, picada
2 jalapeños, sin semillas, picados
1 chile poblano, sin semillas y picado
4 dientes de ajo, finamente picados
2 cucharada de chile ancho en polvo
1 cucharadita de comino en polvo
1 cucharadita de orégano mexicano
triturado (también puede usar
orégano regular)
1 cucharadita de mejorana seca
1 cucharada de masa harina
1 lata de 14.5 onzas (840 g) de
tomates asados al fuego
machacados
2 hojas de laurel
8 onzas (235 ml) de cerveza rubia o
clara
2 onzas (60 ml) de café expreso o de
café fuerte
Pedazos de lima/limón verde y
tortillas de harina tibias, para servir
1. Sazonar ambos lados de la carne con
1 cucharadita de la sal y pimienta
recién molida. (CONSEJO: Para que la
carne se dore mejor, secarla con papel
absorbente antes de sazonarla).
2. Ensamblar la Stack5
®
con la bandeja y
fijar la temperatura en 400 °F.
Colocar el aceite en la bandeja.
3. Cuando el aceite esté caliente, dorar la
carne por 3 a 4 minutos por lado (deberá
hacer esto en dos veces). Retirar y
reservar.
4. Agregar la cebolla picada, los jalapeños,
el chile poblano y el ajo; cocinar por
aprox. 5 a 8 minutos, hasta que estén
suaves y fragrantes. Agregar la carne
reservada, junto con su jugo.
5. Agregar el chile en polvo, el comino,
el orégano, la mejorana y la masa
harina; revolver para cubrir la carne y
los vegetales. Agregar el resto de los
ingredientes, incluyendo la cucharadita
de sal restante, y cocinar hasta que la
mezcla empiece a hervir.
6. Cuando la mezcla empiece a hervir,
ajustar la temperatura a 200 °F para
hervir a fuego lento. Cocinar por aprox. 2
a 3 horas, hasta que esté tierna. Revisar
de vez en cuando para comprobar
que la mezcla está hirviendo a fuego
lento (puede ser necesario bajar la
temperatura a 175 °F si está hirviendo).

20
7. Cuando la carne esté tierna, quitar y tirar
la hoja de laurel, y revolver bien. Probar
y ajustar la sazón al gusto. Servir con
pedazos de lima/limón verde y tortillas
de harina tibias para mojar en la salsa.
Información nutricional por porción (basada
en 8 porciones): Calorías 390 (55% de grasa)
Carbohidratos 8g • Proteínas 35g • Grasa 24g
Grasa saturada 10g • Colesterol 119mg
Sodio 891mg • Calcio 49mg • Fibra 2g
Estofado de res en
cerveza Guinness
Sustancioso plato,
perfecto para una noche fría.
Rinde 4 a 6 porciones
4 brazuelos de ternera, de aprox.
3 a 3½ in. (7.5 a 9 cm) de diámetro,
atados con hilo de cocina
1 cucharadita de sal kosher
¼ cucharadita de pimienta negra
recién molida
1 cucharadita de aceite de oliva
virgen extra
1 cucharada (15 g) de mantequilla
sin sal
1 puerro mediano (parte blanca y
verde claro solamente), finamente
rebanado
2 zanahorias medianas, peladas,
cuarteadas y cortadas en rodajas
de ½ in. (1.5 cm)
1 rama de apio, en rodajas de ½ in.
(1.5 cm)
4 dientes de ajo
1 cucharadita de tomillo seco
12 onzas (340 g) de cerveza Guinness
2 cucharadas de concentrado de
tomate
4 ramitas de perejil, picadas
1. Sazonar la res con ½ cucharadita de la
sal y toda la pimienta. Reservar.
2. Ensamblar la Stack5
®
con la bandeja y
fijar la temperatura en 400 °F.
Colocar aceite en la bandeja.
3. Cuando el aceite esté caliente, dorar los
brazuelos por 5 a 6 minutos por lado,
hasta que estén bien dorados. Retirar y
reservar.
4. Colocar la mantequilla en la bandeja,
y luego agregar las cebollas picadas,
el puerro, las zanahorias, el apio, el
ajo, el tomillo y ½ cucharadita de sal.
Cocinar por aprox. 5 minutos, hasta
que la cebolla esté translúcida y que
los vegetales estén ligeramente suaves.
Agregar la cerveza y hervir a fuego
lento por aprox. 5 minutos. Agregar el
concentrado de tomate. Volver a colocar
la carne en la olla.
5. Tapar y ajustar la temperatura a 200°F.
Cocinar por 3 a 4 horas, hasta que
la carne esté muy tierna. Revisar de
vez en cuando durante la cocción,
ya que puede ser necesario ajustar la
temperatura para mantener el líquido
hirviendo a fuego lento.
6. Quitar el exceso de grasa de la superficie
con papel absorbente.
Agregar el perejil picado. Probar y ajustar
la sazón al gusto.
Información nutricional por porción (basada
en 6 porciones): Calorías 373 (29% de grasa)
Carbohidratos 9g • Proteínas 51g • Grasa 12g
Grasa saturada 4g • Colesterol 94mg
Sodio 528mg • Calcio 76mg • Fibra 2g
Salchicha asada con
pimientos
Una comida fácil en cualquier noche.
Rinde aprox. 4 porciones
1½ cucharaditas de aceite de oliva
1 libra (455 g) de salchichas italianas
frescas
1 cebolla roja, en segmentos
delgados (dejar la raíz intacta)
1 pimiento dulce rojo grande, partido
a la mitad y cortado a lo largo en
rodajas delgadas
¼ cucharadita de sal kosher
1 pizca de páprika ahumada
1 pizca de pimienta negra recién
molida
1. Ensamblar la Stack5
®
con la bandeja y
fijar la temperatura en 400 °F.
Colocar ½ cucharadita del aceite de oliva
en la bandeja.
2. Cuando el aceite esté caliente, agregar
las salchichas. Cocinar por aprox. 10
minutos, volteando una vez. Tapar y
seguir cocinando por 10 minutos, hasta
que las salchichas estén doradas y
completamente cocinadas.

21
3. Mientras las salchichas se están
cocinando, revolver el pimiento rojo
con el aceite de oliva restante, la sal, la
páprika ahumada y la pimienta.
4. Cuando las salchichas estén cocinadas,
retirar y reservar. Colocar la cebolla y
el pimiento en la parrilla. Cocinar por
aprox. 7 a 10 minutos, hasta que estén
suaves y ligeramente dorados. Revolver
ocasionalmente para que se cocinen
uniformemente.
5. Volver a colocar las salchichas en
la parrilla para calentarlas. Servir
inmediatamente.
Información nutricional por porción: Calorías 214
(47% de grasa) • Carbohidratos 6g • Proteínas 22g
Grasa 11g • Grasa saturada 2g • Colesterol 85mg
Sodio 808mg • Calcio 31mg • Fibra 1g
Pinchos hawaianos
Audaces sabores dulces y picantes se unen
en estos divertidos pinchos.
Rinde 8 pinchos
12 camarones grandes, pelados y
desvenados
½ cucharadita de miel
1 cucharadita + 1 cucharada de
aceite vegetal
2 dientes de ajo, machacados
6 ramitas de cilantro fresco
¼ cucharadita de ralladura de
lima/limón verde fresco
¼ cucharadita de sal kosher
6 onzas (170 g) de “andouille” de
pollo cocinada
1 cucharada (15 ml) de salsa sriracha
½ taza (100 g) de cubos de piña
2 jalapeños, sin semillas, en pedazos
de 1 in. (2.5 cm)
Pinchos de acero inoxidable o de
madera
1. Colocar los camarones en un tazón
de acero inoxidable. Agregar la miel, 1
cucharadita de aceite, el ajo, el cilantro,
la ralladura y la sal. Cubrir y refrigerar por
1 hora.
2. Mientras los camarones se están
marinando, cortar la salchicha en rodajas
de ½ in. (1.5 cm). Revolver con el aceite
restante y la salsa sriracha.
3. Armar los pinchos insertando en orden:
un cubo de piña, un pedazo de jalapeño,
un camarón y una rodaja de salchicha.
Repetir.
4. Repetir con el resto de los pinchos.
Cepillar los pinchos con la mezcla de
aceite/salsa sriracha.
5. Ensamblar la Stack5
®
con la parrilla y
fijar la temperatura en 400 °F. Cuando la
parrilla esté caliente, colocar los pinchos
en ella, 3 a la vez. Tapar y asar por
aprox. 4 a 5 minutos por lado.
Información nutricional por pincho: Calorías 87
(41% de grasa) • Carbohidratos 3g • Proteínas 10g
Grasa 4 g • Grasa saturada 1 g • Colesterol 70mg
Sodio 434mg • Calcio 30mg • Fibra 0g
Camarones Scampi
¡Servir este plato con mucho pan crujiente
para mojar en la salsa!
Rinde 2 a 4 porciones
1 libra (455 g) de camarones grandes
(aprox. 16), pelados, desvenados y
enjuagados
½ cucharadita de sal kosher
¼ cucharadita de pimienta negra
recién molida
1 cucharadita de aceite de oliva
3 cucharadas (45 g) de mantequilla
sin sal
4 dientes de ajo, finamente picados
½ taza (75 g) de tomates de pera,
partidas a la mitad
¹/
8
cucharadita de hojuelas de
pimiento rojo
2 cucharadas de perejil fresco,
picado
6 hojas grandes de albahaca,
desgarradas
2 cucharadas de jugo de limón
fresco
2 cucharadas de vino blanco seco
1. Secar bien los camarones y sazonar
cada lado con ¼ de cucharadita de sal y
¹⁄
8
de cucharadita de pimienta.
2. Ensamblar la Stack5
®
con la bandeja y
fijar la temperatura en 400 °F.
Colocar el aceite en la bandeja.
3. Cuando el aceite esté caliente, agregar
los camarones y asarlos por aprox. 1 a 2
minutos por lado.

22
4. Retirar y reservar. Agregar 1 cucharada
(15 g) de mantequilla y el ajo. Cuando el
ajo esté fragrante, agregar los tomates
de pera, las hojuelas de pimienta roja,
la sal/pimienta restante y la mitad de las
hierbas.
5. Agregar el jugo de limón y el vino
blanco, y cocinar hasta que la mezcla
empiece a hervir. Cuando el líquido
se haya reducido ligeramente, agregar
la mantequilla restante y batir con un
batidor antiadherente.
6. Después de incorporar la mantequilla,
agregar los camarones reservados y las
hierbas restantes.
7. Servir inmediatamente, en cuencos poco
profundos.
Información nutricional por porción (basada
en 4 porciones): Calorías 223 (47% de grasa)
Carbohidratos 4g • Proteínas 24g • Grasa 12g
Grasa saturada 5g • Colesterol 193mg • Sodio
440mg • Calcio 73mg • Fibra 0g
Filetes de lenguado
rellenos de cangrejo
Fácil, pero elegante, estos filetes pueden ser
cubiertos con cualquier salsa ligera. ¡Nos
encantan simples, con mucho limón!
Rinde 6 filetes rellenos
8 onzas (225 g) de cangrejo
1 rama de apio, picada
2 cebolletas (“scallions”), finamente
picadas
1 cucharadita de tomillo fresco
1 cucharada (15 ml) de vino blanco
seco
½ taza (60 g) de pan rallado
ligeramente salado
1 huevo grande, batido
1 cucharadita de sal kosher
6 filetes de lenguado (o cualquier
otro pescado blanco plano)
delgados de aprox. 8 in. (20 cm)
de largo
Pimienta negra recién molida
Pedazos de limón para servir
Páprika, para decorar
1. Colocar el cangrejo en un tazón
mediano. Quitar los posibles cartílagos.
Agregar el apio, las cebolletas, el tomillo,
el vino blanco, el pan rallado, el huevo
y ½ cucharadita de la sal. Revolver
suavemente para combinar; reservar.
2. Agregar 3 tazas (710 ml) de agua a la
bandeja y colocar la rejilla de cocción al
vapor en ella.
3. Colocar los filetes de pescado sobre
una superficie plana. Sazonar ambos
lados con la sal restante y una pizca de
pimienta.
4. Colocar ¼ de taza (50 g) del relleno de
cangrejo en el centro de cada filete.
Doblar la cola del filete por encima de
la mezcla de cangrejo y enrollar el filete
de manera segura. Colocar cada filete
relleno en la rejilla de cocción al vapor,
con la junta hacia abajo, y tapar. Fijar
la temperatura en 400 °F y cocinar por
aprox. 8 minutos, hasta que el agua
empiece a hervir. Luego, ajustar la
temperatura a 350 °F.
5. Cocinar por un total de 20 a 25 minutos,
hasta que el pescado se desmenuce
fácilmente. (NOTA: Después de 18
minutos de cocción, puede ser que
el agua hierva demasiado. De ser así,
ajustar la temperatura a 200°F).
6. Rociar con páprika y servir
inmediatamente, con pedazos de limón.
Información nutricional por filete: Calorías 129
(23% de grasa) • Carbohidratos 5g • Proteínas 19g
Grasa 3g • Grasa saturada 1 g • Colesterol 107mg
Sodio 1042mg • Calcio 68mg • Fibra 0g
Frijoles rojos con arroz
Una mezcla de sabores latinos y caribeños,
este plato es una deliciosa versión del arroz
con frijoles tradicional.
Rinde aprox. 10 tazas
1 cucharada de aceite de oliva
virgen extra
2 dientes de ajo, finamente picados
1 jalapeño, sin semillas, finamente
picado
4 tallos de tomillo fresco
1 hoja de laurel
¾ cucharadita de sal kosher
1 trozo de ½ in. (1.5 cm) de jengibre
fresco
½ cucharadita de canela en polvo
2¼ tazas (415 g) de arroz blanco
2 latas de leche de coco
2½ tazas (590 ml) de caldo de pollo
bajo en sodio

23
1 lata de 15 onzas (465 g) de frijoles
rojos, escurridos
4 cebolletas (“green onion”),
cortadas en bastones, para
decorar
1. Ensamblar la Stack5
®
con la bandeja y
fijar la temperatura en 350°F.
Colocar el aceite en la bandeja.
2. Cuando el aceite esté caliente, agregar
el ajo picado y el jalapeño. Saltear por 2
a 3 minutos, hasta que estén fragrantes.
Agregar el tomillo, la hoja de laurel,
½ cucharadita de sal, el jengibre y la
canela. Revolver bien para mezclar.
3. Agregar el arroz; revolver para cubrir.
Agregar los ingredientes líquidos, ajustar
la temperatura a 400 °F y tapar. Cuando
empiece a hervir, ajustar la temperatura
a 200°F, de manera que hierva muy
ligeramente. Seguir cocinando, tapado,
por aprox. 20 a 25 minutos, según las
instrucciones del fabricante.
4. Agregar los frijoles y tapar. Dejar reposar
por aprox. 10 minutos antes de revolver
y servir.
5. Probar y ajustar la sazón al gusto.
Decorar con cebolletas y servir
inmediatamente.
Información nutricional por porción (1 taza):
Calorías 470 (21% de grasa) • Carbohidratos 77g
Proteínas 18g • Grasa 11g • Grasa saturada 9g
Colesterol 0mg • Sodio 420mg • Calcio 141mg
Fibra 13g
Arroz de coliflor frito
¡Un acompañamiento divertido, sabroso y
bajo en carbohidratos!
Rinde aprox. 6 tazas
2 cucharadas de aceite vegetal
1 cebolla, finamente picada
1 pimiento rojo pequeño, en cubitos
1 jalapeño, sin semillas, finamente
picado
1 trozo de 1 in. (2.5 cm) de jengibre
fresco, finamente picado
3 dientes de ajo, finamente picados
½ cucharadita de sal
¼ cucharadita de cúrcuma en polvo
1 coliflor mediana de aprox. 1 libra
(455 g), finamente picada
Hojas de cilantro y maní tostado
picado para decorar
1. Ensamblar la Stack5
®
con la bandeja y
fijar la temperatura en 400°F.
Colocar 1 cucharada del aceite en la
bandeja.
2. Cuando el aceite esté caliente, agregar
la cebolla, el pimiento dulce rojo, el
jalapeño, el jengibre y el ajo. Cocinar
por aprox. 7 minutos, revolviendo
frecuentemente, hasta que los vegetales
estén tiernos y fragantes. Cuando estén
fragrantes, agregar la sal y la cúrcuma.
Revolver para incorporar.
3. Agregar el aceite restante y el “arroz”
de coliflor. Revolver para cubrir. Cocinar
por aprox. 5 a 10 minutos, hasta que la
coliflor esté tierna.
4. Quitar la tapa y seguir cocinando,
revolviendo de vez en cuando para
despegar los residuos tostados en el
fondo de la bandeja (esto da más crujido
al plato final).
5. Probar y ajustar la sazón al gusto. Servir
inmediatamente, decorado con hojas de
cilantro y maní tostado picado.
Información nutricional por porción (½ taza):
Calorías 68 (60% de grasa) 6g • Proteínas 2g
Grasa 5g • Grasa saturada 1 g • Colesterol 0mg
Sodio 221mg • Calcio 22mg • Fibra 2g
Gratén de calabaza
moscada y farro
La cremosidad de la calabaza moscada y la
masticabilidad del farro dan a este plato una
textura interesante mientras los ingredientes
extra hacen que sea un plato “todo en uno”
rico y sustancioso. Sírvalo como
acompañamiento o plato principal.
Rinde 6 a 8 porciones
1 calabaza moscada (“butternut
squash”) de aprox. 1½ libras
(680 g) pelada y cortada en cubos
de 1 in. (2.5 cm)
¾ taza (130 g) de farro
1 cucharadita de aceite de oliva
8 onzas (225 g) de salchicha italiana
dulce de pollo o de cerdo fresca,
sin tripa
1 puerro grande (parte blanca y
verde claro solamente), finamente
rebanado
2 cucharadas llenas de hojas de
tomillo fresco, picado grueso
¾ cucharadita de sal kosher

24
1 taza (120 g) de queso Fontina
rallado
¾ taza (175 ml) de crema líquida para
batir (“heavy cream”)
¾ taza (175ml) de caldo de pollo bajo
en sodio
Spray vegetal
1. Ensamblar la Stack5
®
con la bandeja.
Colocar 4 tazas (945 ml) de agua en la
bandeja y colocar la rejilla de cocción
al vapor en ella. Agregar la calabaza
moscada, tapar y fijar la temperatura en
400 °F. Cocinar por aprox. 20 minutos,
hasta que la calabaza esté tierna.
2. Cuando la calabaza esté tierna, retirar y
reservar. Agregar 1 taza (235 ml) de agua
a la bandeja y fijar la temperatura en 400
°F. Cuando el agua empiece a hervir,
agregar el farro y cocinar por aprox. 20
minutos, hasta que esté tierno. Colar el
farro y reservar, junto con la calabaza.
3. Tirar el agua, y lavar y secar la bandeja.
Agregar el aceite y fijar la temperatura a
400 °F. Cuando el aceite esté caliente,
agregar la salchicha. Romper la
salchicha con un cucharón de madera y
cocinar hasta que esté uniformemente
dorada. Agregar el puerro y ajustar la
temperatura a 350°F; seguir cocinando
hasta que esté suave y ligeramente
dorado.
4. Agregar la salchicha y el puerro a la
mezcla de calabaza/farro, y luego añadir
el tomillo, la sal, la mitad del queso
Fontina, la crema y el caldo de pollo.
Revolver para mezclar.
5. Limpiar y secar la bandeja, y luego
engrasarla con spray vegetal. Agregar la
mezcla de calabaza y fijar la temperatura
en 325 °F. Tapar y cocinar por aprox. 25
minutos.
6. Quitar la tapa y cubrir con el queso
Fontina restante. Tapar y cocinar por
5 minutos adicionales para derretir el
queso.
7. Servir y disfrutar inmediatamente.
Información nutricional por porción (basada en
8 porciones): Calorías 307 (46% de grasa)
Carbohidratos 34g • Proteínas 11g • Grasa 17g
Grasa saturada 9g • Colesterol 58mg
Sodio 420mg • Calcio 150mg • Fibra 4g
Coles de Bruselas con
cebolla roja
¡Esta receta le hará querer las coles de
Bruselas!
Rinde aprox. 3 tazas
1 cucharada de aceite de oliva
1 libras (455 g) de coles de Bruselas,
partidas a la mitad
1 cebolla roja mediana, partida
longitudinalmente a la mitad
½ cucharadita de sal kosher
¼ cucharadita de pimienta negra
recién molida
1 cucharada de jarabe de arce/
maple puro
1. Ensamblar la Stack5
®
con la bandeja y
fijar la temperatura en 400 °F.
Colocar 2 cucharaditas del aceite de
oliva en la bandeja.
2. Cuando el aceite esté caliente, agregar
las coles de Bruselas, la parte cortada
apuntando hacia abajo. Cocinar por
aprox. 5 minutos, revolviendo de vez en
cuando.
3. Ajustar la temperatura a 350 °F y agregar
la cebolla, la sal, la pimienta y el aceite
restante. Cocinar por 5 segundos
adicionales, revolviendo de vez en
cuando, y luego tapar.
4. Cocinar por aprox. 10 minutos
adicionales, revolviendo de vez en
cuando, hasta que las coles de Bruselas
estén tiernas.
5. Cuando estén tiernas, agregar el jarabe
de arce. Probar y ajustar la sazón al
gusto. Servir inmediatamente.
Información nutricional por porción (½ taza):
Calorías 69 (30 % de grasa) 11g • Proteínas 3 g
Grasa 3g • Grasa saturada 0 g • Colesterol 0mg
Sodio 198mg • Calcio 40mg • Fibra 3g

25
Macarrones con queso
tradicionales
¿Hace falta decir más?
Rinde aprox. 15 porciones
Spray vegetal
1 libra (445 g) de macarrones
½ taza (115 g) de mantequilla sin sal
6 cucharadas (40 g) de harina común
6 tazas (1.4 L) de leche entera
4 onzas (115 g) de queso Cheddar,
rallado
4 onzas (115 g) de queso Mozzarella,
rallado
4 onzas (115 g) de queso Monterrey
Jack, rallado
¾ cucharadita de sal kosher
1 pizca de salsa picante
1 a 2 tazas (80 a 160 g) de pan
rallado tostado
1. Cocinar la pasta según las instrucciones
del fabricante. Escurrir y pasar por agua
fría. Revolver con el aceite de oliva para
evitar que se pegue; reservar.
2. Ensamblar la Stack5® con la bandeja y
fijar la temperatura en 350°F.
Colocar la mantequilla en la bandeja.
3. Cuando la mantequilla esté derretida,
agregar la harina y revolver con un
batidor antiadherente hasta conseguir
una mezcla suave. Seguir cocinando
por aprox. 2 minutos, revolviendo
ocasionalmente.
4. Sin dejar de revolver con el batidor,
agregar lentamente la leche a la mezcla
de mantequilla/harina. Subir ligeramente
la temperatura y seguir cocinando,
revolviendo ocasionalmente, para
calentar la mezcla uniformemente.
Cuando la mezcla empiece a hervir,
reducir el fuego y seguir cocinando a
fuego bajo por aprox. 2 minutos.
5. Segur revolviendo hasta que la mezcla
se ponga muy espesa. Cuando la mezcla
esté espesa, agregar el queso rallado.
Después de haber agregado todo el
queso, revolver hasta que esté derretido
y que la salsa esté homogénea. Agregar
la sal, la salsa picante, y luego los
macarrones; revolver.
6. Ajustar la temperatura a 300°F y tapar.
Cocinar por aprox. 35 minutos.
7. Rociar con pan rallado tostado antes de
servir.
Información nutricional por porción (basada en
15 porciones): Calorías 204 (54% de grasa)
Carbohidratos 15g • Proteínas 8g • Grasa 12g
• Grasa saturada 7g • Colesterol 38mg
Sodio 159mg • Calcio 204mg • Fibra 1g
Polenta
Este reconfortante plato de cocción lenta
puede ser servido de muchas maneras. Sirva
la polenta con nuestro estofado de res en
cerveza Guinness o nuestra “Cacciatore” de
pollo. O bien, permita que se enfríe hasta
que esté firme, córtela en cuadros y ásela.
También es deliciosa por sí sola, cubierta
con una generosa cantidad de su queso
rallado favorito.
Rinde aprox. 10 porciones
4 tazas (945 ml) de agua o de caldo
bajo en sodio
1 taza (165 g) de polenta
1 cucharadita de sal kosher
2 cucharadas (45 g) de mantequilla
sin sal
1. Ensamblar la Stack5
®
con la bandeja y
colocar el agua (o el caldo), la polenta y
la sal en la bandeja. Fijar la temperatura
en 400 °F. Cuando el líquido empiece a
hervir, tapar y ajustar la temperatura a
200 °F.
2. Cocinar por aprox. 3 horas, revolviendo
ocasionalmente durante la cocción.
La polenta debería estar espesa, pero
suave. Cuando la polenta esté cocinada
y suave, agregar la mantequilla; revolver.
3. Probar y ajustar la sazón al gusto.
Información nutricional por porción (basada en
10 porciones): Calorías 60 (37% de grasa)
Carbohidratos 9g • Proteínas 1g • Grasa 3g
Grasa saturada 1g • Colesterol 6mg
Sodio 216mg • Calcio 3mg • Fibra 1g

26
“Foster” de banana
¡Deliciosa cobertura para helado de vainilla!
Rinde 4 porciones
6 cucharadas (45 g) de mantequilla
sin sal
2 onzas (60 ml) de Bourbon
(güisqui americano)
4 bananas, cortadas por la mitad
a lo largo
¼ taza (50 g) de azúcar moreno
½ cucharadita de canela en polvo
1 pizca de sal kosher
Helado de vainilla para servir
1. Ensamblar la Stack5
®
con la bandeja y
fijar la temperatura en 350°F.
Colocar la mantequilla en la bandeja.
2. Cuando la mantequilla esté derretida,
agregar el güisqui. Colocar las bananas
en la bandeja, el lado cortado apuntando
hacia abajo.
3. Cuando las bananas estén ligeramente
doradas, agregar el azúcar, la canela
y la sal. Seguir cocinando hasta que
burbujee.
4. ¡Servir inmediatamente con helado de
vainilla!
Información nutricional por porción (basada en
4 porciones): Calorías 266 (37% de grasa)
Carbohidratos 39g • Proteínas 1g • Grasa 11g
Grasa saturada 8g • Colesterol 30mg • Sodio
1mg • Calcio 6mg • Fibra 3g
Torta invertida de
frambuesa e higo
Este postre divertido es una excelente
manera de usar las frutas de finales de
verano.
Rinde 12 porciones
4 cucharadas (55 g) + ½ taza (115 g)
de mantequilla sin sal,
a temperatura ambiente
1 taza (200 g) de azúcar rubia
(azúcar de caña integral)
1 libra (455 g) de higos frescos,
cortados por la mitad a lo largo
½ pinta (235 g) de frambuesas
1½ tazas (185 g) de harina común
1 cucharadita de polvo de hornear
¼ cucharadita de bicarbonato
de sodio
½ cucharadita de sal
½ cucharadita de canela en polvo
¾ taza (175 ml) de leche entera
2 huevos grandes
1 cucharadita de extracto natural de
vainilla
½ taza (100 g) de azúcar granulada
1. Ensamblar la Stack5
®
con la bandeja,
fijar la temperatura en 325°F y dejar que
se caliente por aprox. 5 minutos.
2. Cuando esté caliente, colocar 4
cucharadas (55 g) de mantequilla en la
bandeja. Cuando la mantequilla esté
derrita, cubrir el fondo y los lados de
la bandeja con ella. Agregar ¾ taza
(150 g) de azúcar rubia (azúcar de caña
integral). Cocinar, revolviendo, hasta que
el azúcar esté derretido y que empiece a
burbujear.
3. Agregar las frutas, colocando los higos
con el lado cortado hacia abajo. Ajustar
la temperatura a 250 °F y preparar la
mezcla de pastel.
4. Colocar la harina, el polvo de hornear,
el bicarbonato, la sal y la canela, en un
tazón pequeño; revolver. Colocar la leche
en una taza medidora de 2 tazas (475
ml), y agregar los huevos y la vainilla;
revolver.
5. En otro tazón grande, colocar la ½ taza
(115 g) de mantequilla restante y batir
a velocidad baja con una batidora de
mano. Agregar el azúcar granulado y ¼
de taza (50 g) de azúcar rubia; acremar
(con la batidora) hasta obtener una
mezcla ligera y esponjosa.
6. Agregar un tercio de la mezcla de
ingredientes secos, y luego un tercio
de la mezcla de ingredientes líquidos.
Repetir, un tercio a la vez, terminando
con los ingredientes secos.
7. Verter la mezcla en la bandeja. Tapar y
fijar la temperatura en 325 °F. Hornear
por aprox. 25 minutos, hasta que un
probador introducido en el centro
salga limpio Invertir la bandeja de
hornear sobre una tabla de cortar para
desmoldar. Cortar y servir.
Información nutricional por porción (basada en
12 porciones): Calorías 298 (37% de grasa)
Carbohidratos 45g • Proteínas 3 g • Grasa 12g
Grasa saturada 8g • Colesterol 63mg
Sodio 174mg • Calcio 44mg • Fibra 2g

27
Pastel de zanahoria
¡Delicioso y jugoso, este pastel
les encanta a todos!
Rinde aprox. 20 porciones
Spray vegetal
Pastel:
1
2
/
3
tazas (210 g) de harina común
1 cucharada de cacao amargo en
polvo
2 cucharaditas de polvo de hornear
2 cucharaditas de canela en polvo
1 cucharadita de jengibre en polvo
1 cucharadita de bicarbonato
de sodio
1 cucharadita de sal
1¼ tazas (295 ml) de aceite vegetal
1 taza (200 g) de azúcar granulada
1 taza (200 g) de azúcar morena
4 huevos grandes
1 cucharadita de extracto natural de
vainilla”
1½ tazas (170 g) de nueces, picadas
1 libra (455 g) de zanahorias, ralladas
1 taza (170 g) de pasas doradas
Cobertura:
1 libra (455 g) de queso crema, a
temperatura ambiente, en 16
pedazos
½ libra (225 g) de mantequilla sin sal
temperatura ambiente, en 8
pedazos
2 tazas (240 g) de azúcar glasé
1 cucharadita de extracto natural de
vainilla
1. Ensamblar la Stack5
®
con la bandeja.
2. Colocar la harina, el cacao, el polvo de
hornear, la canela, el bicarbonato y la sal
en un tazón pequeño; revolver.
3. Colocar el aceite y los azúcares en un
tazón grande; batir. Agregar los huevos,
uno a la vez, y luego la vainilla, batiendo
para incorporar después de cada
adición.
4. Agregar la mezcla de ingredientes secos
a los ingredientes líquidos en 3 veces,
revolviendo para incorporar después de
cada adición. Finalmente, incorporar las
nueces, la zanahoria rallada y las pasas.
5. Precalentar la Stack5
®
a 275 °F. Cuando
la luz de listo se encienda, engrasar
la bandeja con spray vegetal, verter la
mezcla en la bandeja y tapar.
6. Hornear por 1h30 a 1h40, hasta que un
probador introducido en el centro salga
limpio. Retirar la bandeja de la base y
dejar que se enfríe completamente.
7. Mientras el pastel se está horneando,
preparar la cobertura: Colocar el queso
crema y la mantequilla en un tazón
grande y batir hasta conseguir una
mezcla suave. Agregar el azúcar glasé en
varias veces, batiendo después de cada
adición. Seguir batiendo hasta conseguir
une mezcla suave. Finalmente, agregar la
vainilla.
8. Cuando el pastel esté frío, desmoldarlo y
cubrirlo con el baño de queso crema.
Información nutricional por porción: Calorías 581
(57% de grasa) • Carbohidratos 58g
Proteínas 6 g • Grasa 38g • Grasa saturada 14g
Colesterol 89mg • Sodio 396mg
Calcio 59mg • Fibra 2g

28
IB-16631-ESP-B
©2021 Cuisinart
East Windsor, NJ 08520
Printed in China
21CE078188
-
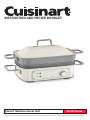 1
1
-
 2
2
-
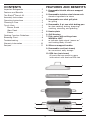 3
3
-
 4
4
-
 5
5
-
 6
6
-
 7
7
-
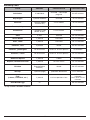 8
8
-
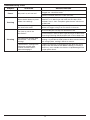 9
9
-
 10
10
-
 11
11
-
 12
12
-
 13
13
-
 14
14
-
 15
15
-
 16
16
-
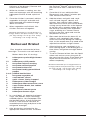 17
17
-
 18
18
-
 19
19
-
 20
20
-
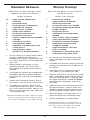 21
21
-
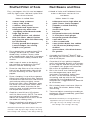 22
22
-
 23
23
-
 24
24
-
 25
25
-
 26
26
-
 27
27
-
 28
28
-
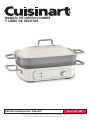 29
29
-
 30
30
-
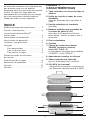 31
31
-
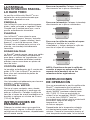 32
32
-
 33
33
-
 34
34
-
 35
35
-
 36
36
-
 37
37
-
 38
38
-
 39
39
-
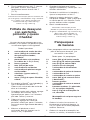 40
40
-
 41
41
-
 42
42
-
 43
43
-
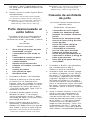 44
44
-
 45
45
-
 46
46
-
 47
47
-
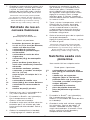 48
48
-
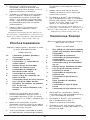 49
49
-
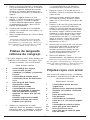 50
50
-
 51
51
-
 52
52
-
 53
53
-
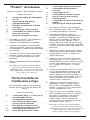 54
54
-
 55
55
-
 56
56


Cuisinart GR-M3 El manual del propietario
- Tipo
- El manual del propietario
- Este manual también es adecuado para
en otros idiomas
- English: Cuisinart GR-M3 Owner's manual
Artículos relacionados
-
Cuisinart PSC-350 Guía del usuario
-
Cuisinart MG-50 El manual del propietario
-
Cuisinart FP-14DCN Manual de usuario
-
-
Cuisinart FP-12 El manual del propietario
-
-
Cuisinart GHI0316IB-1-1 Manual de usuario
-
-
Otros documentos
-
Black & Decker IG100 Manual de usuario
-
GE 106811 El manual del propietario
-
Farberware 104554 Guía del usuario
-
Brentwood TS-257R Manual de usuario
-
Windmere GG400 Manual de usuario
-
-
Sanyo HPS-SG4 Manual de usuario
-
Hamilton Beach 25325 Manual de usuario
-
Premier ED-5253 Operating Instructions Manual
-
KALORIK Triple Burner Buffet Set Manual de usuario