Parkside 304988 Translation Of The Original Instructions
- Categoría
- Herramientas eléctricas
- Tipo
- Translation Of The Original Instructions
Este manual también es adecuado para

IAN 304988
NASS-/TROCKENSCHLEIFER
Originalbetriebsanleitung
MOLATRICE DA BANCO
Traduzione delle istruzioni d’uso originali
LIJADORA EN HÚMEDO Y SECO
Traducción del manual de instrucciones original
WET & DRY BENCH GRINDER
Translation of the original instructions
LIJADORA EN HÚMEDO Y SECO /
MOLATRICE DA BANCO PNTS 250 B1

Antes de empezar a leer abra la página que contiene las imágenes y, en seguida, familiarícese
con todas las funciones del dispositivo.
Prima di leggere aprire la pagina con le immagini e prendere confidenza con le diverse funzioni
dell’apparecchio.
Before reading, unfold the page containing the illustrations and familiarise yourself with all functions
of the device.
Klappen Sie vor dem Lesen die Seite mit den Abbildungen aus und machen Sie sich anschließend mit
allen Funktionen des Gerätes vertraut.
ES Traducción del manual de instrucciones original Página 5
IT / MT Traduzione delle istruzioni d’uso originali Pagina 22
GB/ MT Translation of the original instructions Page 38
DE/AT/CH Originalbetriebsanleitung Seite 54

max. 2 mm
1
4
5
4
78911 1012 6
32
13
7 6
6
5
14 15
16
17 212018 19

22
5
23 24
24
4
23
22
5
25
11
13
9
10
13

ES
5
Introducción
¡Felicitaciones por la compra de su nueva
aspiradora! Con ello se ha decidido por
un producto de suprema calidad.
Este aparato fue examinado durante la
producción con respecto a su calidad y so-
metido a un control nal. Con ello queda
garantizada la capacidad de funciona-
miento de su aparato.
Las instrucciones de servicio for-
man parte de este producto. Éstas
contienen importantes indicaciones
para la seguridad, el uso y la
eliminación del aparato. Familia-
rícese con todas las indicaciones
de manejo y seguridad antes de
usar el producto. Utilice el producto
sólo como se describe y para los
campos de aplicación indicados.
Guarde bien estas instrucciones y
entrégueselas al dar este producto
a terceros.
Aplicaciones
La ljadora en húmedo y seco está indicada
para alar herramientas (p.ej. cuchillos,
tijeras, cuchillas de torno), para desbar-
bar y alar pequeñas piezas de labor de
metal.
Este aparato no está previsto para otro
tipo de uso como puede ser, por ejemplo,
el lijado con herramientas de lijado no
apropiadas, lijado mediante líquido refri-
gerante, lijado con materiales peligrosos
para la salud como el amianto.
El aparato está destinado a ser usado en
el sector del bricolaje, y no ha sido conce-
bido para uso continuo profesional.
Este aparato sólo lo deben utilizar adultos.
Los jóvenes mayores de 16 años sólo de-
ben utilizar el aparato si están vigilados.
Contenido
Introducción ................................. 5
Aplicaciones .................................5
Descripción general ......................6
Volumen de suministro ......................6
Descripción funcional .......................6
Sinopsis ..........................................6
Características técnicas .................7
Instrucciones de seguridad ...........7
Símbolos y pictogramas ....................8
Instrucciones generales de seguridad .8
Instrucciones de seguridad
adicionales ...................................11
Riesgos residuales ..........................12
Montaje .....................................12
Montar ajustar los soportes de
las piezas de labor ........................12
Montar/ajustar protección
contra chispas ...............................13
Atornillar el aparato a la mesa de
trabajo .........................................13
Llenar el depósito de agua ..............13
Manejo ........................................13
Conectar y desconectar ..................14
Lijar con el disco abrasivo en seco ...14
Lijar con el disco abrasivo en
húmedo ........................................14
Cambiar disco abrasivo ..................15
Limpieza y mantenimiento ......... 16
Limpieza .......................................17
Trabajos generales de
mantenimiento ...............................17
Almacenaje ................................17
Eliminación y protección
del medio ambiente ...................17
Piezas de repuesto/Accesorios ... 18
Búsqueda de fallos .................... 19
Garantía .................................... 20
Servicio de reparación ...............21
Service-Center ............................21
Importador ................................ 21
Traducción de la Declaración de
conformidad CE original .............71

ES
6
El fabricante no se responsabiliza de los
daños ocasionados por un uso contrario a
las normas o por un manejo inadecuado.
Descripción general
Hallará las imágenes en las
solapas delantera y trasera.
Volumen de suministro
Desembale el aparato y compruebe que
esté completo. Evacue el material de em-
balaje de una forma conveniente.
• Aparato con discos abrasivos
premontados
• Protección contra chispas
• Material de montaje para jar al
aparato la protección contra chispas
- Tornillo de ajuste incl. arandelas y
anillos elásticos, tuerca
• Soporte para pieza de labor
• Material de montaje para jar los
soportes de las piezas de labor al
aparato
- Tuerca de estrella, arandela, disco
dentado y tornillo
• Cierre de goma
• Instrucciones de uso
Descripción funcional
La ljadora en húmedo y seco es un dispo-
sitivo combinado que dispone de un disco
abrasivo en seco y otro disco abrasivo
en húmedo con grosor de grano diferente
para el desbaste y el recticado no.
Para proteger al usuario, el aparato está
provisto con una protección contra chispas
y cubiertas del discos abrasivos.
El funcionamiento de las piezas de mando
puede consultarse en las descripciones
siguientes.
Sinopsis
1 Disco abrasivo en húmedo
2 Protección contra chispas
3 Tuerca de ajuste para protección
contra chispas
4 Cubierta del disco abrasivo
5 Disco abrasivo en seco
6 Soporte para pieza de labor
7 Tuerca de estrella para
montaje/ajuste del soporte de la
pieza de labor
8 Interruptor de encendido/apagado
9 Agujeros para montar en la mesa
10 Pie de goma (depósito de agua)
11 Cierre de goma para depósito de
agua
12 Cable de red
13 Depósito de agua
14 Disco dentado
15 Arandela
16 Tornillo de jación para soporte
para pieza de labor
17 Tuerca
18 Soporte para la protección contra
chispas
19 Arandela
20 Anillo elástico
21 Tornillo de ajuste para la jación
de la protección contra chispas
22 Tuerca de disco abrasivo
23 Brida de jación
24 Capas intermedias de cartón
25 Cubierta de protección para disco
abrasivo en seco
26 Brida de jación de material sintético
27 Brida de jación de material
sintético
28 Caja de engranaje
29 Arandela

ES
7
Características técnicas
Lijadora en húmedo y seco ... PNTS 250 B1
Tensión entrante nominal U ..230 V~, 50 Hz
Consumo de potencia P ............... 250 W
(S2 30 min)*
Clase de protección ..............................I
Tipo de protección ...........................IPX0
Revoluciones en vacíon
0
Disco abrasivo
en húmedo .................aprox. 128 min
-1
Disco abrasivo
en seco ....................aprox. 2950 min
-1
Peso (incl. accesorios) ......... aprox. 8,6 kg
Nivel presión acústica
(L
pA
) ....................... 80 dB(A); K
pA
=3 dB
Nivel potencia acústica
(L
WA
) ..................... 93 dB(A); K
WA
=3 dB
Valor total de oscilación (a
h
) ... 2,5 m/s
2
Disco abrasivo en húmedo
Diámetro exterior ................Ø 200 mm
Agujero ...............................Ø 20 mm
Espesor ....................................40 mm
Grano ...........................................80
Revoluciones n
max
................ 3820 min
-1
Velocidad de trabajo v
s
.... máx. 40 m/s
Disco abrasivo en seco
Diámetro exterior ................Ø 150 mm
Agujero ............................Ø 12,7 mm
Espesor ....................................20 mm
Grano ...........................................36
Revoluciones n
max
................ 4500 min
-1
Velocidad de trabajo v
s
.... máx. 35 m/s
* A los 30 min. de funcionamiento continuo
deberá hacerse una pausa hasta que la tem-
peratura del aparato sea inferior a 2 K (2°C)
de la temperatura ambiente.
Los valores de ruido y vibración se detec-
taron bajo cumplimiento de las normas y
prescripciones indicadas en la Declaración
de Conformidad.
El índice de emisión de vibraciones indi-
cado ha sido medido según un procedi-
miento de ensayo normalizado, y puede
ser usado para comparar herramientas
eléctricas entre sí.
El índice de emisión de vibraciones indica-
do también puede ser usado para estimar
por anticipado la exposición.
Aviso:
El índice de emisión de vibraciones
indicado puede diferir del valor
reseñado cuando se usa efectiva-
mente esa herramienta eléctrica y
según cómo se utilice.
Intente mantener la tensión, pro-
vocada por las vibraciones, tan
reducida como sea posible. Las
medidas para reducir la tensión por
las vibraciones son, por ejemplo,
llevar guantes al usar la herramien-
ta y limitar el tiempo de trabajo.
Para ello hay que tener en cuenta
todas las partes del ciclo de funcio-
namiento (por ejemplo, los tiempos
en los que la herramienta eléctrica
está desconectada y aquellos en
los que está encendida, pero fun-
ciona sin carga).
Instrucciones de
seguridad
¡ATENCIÓN!
Al hacer uso de herramientas elec-
trónicas deberán tenerse en cuenta
las siguientes medidas de seguri-
dad fundamentales para protegerse
contra descargas eléctricas, peligro
de lesiones o de incendio.
Antes de utilizar esta herramienta
electrónica lea todas las indicaciones
y consérvelas en un lugar seguro.

ES
8
Símbolos y pictogramas
Símbolos en las instrucciones de
uso:
Señales indicadoras de
peligro con información para
la prevención de daños a las
personas y a las cosas.
Señales de obligación con
información para la prevención de
daños.
Conecte el aparato a la red
eléctrica.
Retirar la clavija de alimentación.
Señales de indicación con
informaciones para un mejor
manejo del aparato.
Símbolos en el aparato:
¡Cuidado!
Peligro de accidentarse debido a
herramienta giratoria. Mantener las
manos alejadas.
Existe peligro de descarga
eléctrica. Desconecte el enchufe de
corriente antes de realizar trabajos
de mantenimiento o reparaciones.
Leer y tener en cuenta las
instrucciones de servicio del
aparato.
Póngase gafas de protección.
Póngase protección en los oídos.
Lleve una mascarilla protectora.
Peligro de cortaduras! Llevar
guantes que no puedan cortarse.
Utilizar disco abrasivo solo en
seco.
Utilizar disco abrasivo solo con
agua.
Máquinas no deben ir a la basu-
ra doméstica. Entregue su apara-
to a un centro de reciclaje.
Pictogramas en los discos
abrasivos:
No insertar disco de lijado defec-
tuoso.
Grácosenelembalaje:
Cartón ondulado
Instrucciones generales de
seguridad
El concepto de “herramienta eléctrica”
empleado en las indicaciones de seguri-
dad, se re ere a herramientas eléctricas
alimentadas por corriente (con cable de
red) y a herramientas eléctricas alimen-
tadas por batería (sin cable de red).
Trabajar de forma segura:
• Mantenga su lugar de trabajo
en orden. El desorden en la zona
de trabajo puede causar accidentes.
• Tengaencuentalasinuencias
del medio ambiente.
- No exponer las herramientas
eléctricas a la lluvia. No utilice
herramientas eléctricas en un

ES
9
ambiente húmedo o mojado.
Si penetra agua en el aparato
eléctrico, aumenta el riesgo de
descarga eléctrica.
- Procure iluminar bien el lugar de tra-
bajo.
- No use las herramientas eléctricas
donde exista peligro de incendio o
de explosión.
Los aparatos eléctricos generan chis-
pas que podrían encender el polvo
o los vapores.
• Protéjase de las descargas eléc-
tricas. Evite tocar físicamente las piezas
puestas a tierra, como tuberías, radiado-
res, hornos eléctricos o refrigeradores.
• Mantenga alejadas a las demás
personas. No permita que otras perso-
nas toquen la herramienta eléctrica o el
cable, especialmente los niños, y mantén-
galos alejados de su lugar de trabajo.
• Guarde las herramientas eléc-
tricas no usadas en un lugar
seguro. Las herramientas eléctricas no
usadas deberían guardarse en un lugar
seco, elevado o cerrado con llave, y
fuera del alcance de los niños.
• No sobrecargue la herramienta
eléctrica. Usted trabajará mejor y de
forma más segura dentro de la gama
de potencias indicada.
• Utilice la herramienta eléctrica
correcta.
- No utilice máquinas débiles para
realizar trabajos pesados.
- No utilice la herramienta eléctrica
para nalidades, para las que no
está prevista. Por ejemplo, no utilice
ninguna sierra circular manual para
cortar ramas de árboles ni tacos de
madera.
El uso de la herramienta eléctrica
para otros nes que los previstos pue-
de producir situaciones peligrosas.
• Lleve ropa adecuada.
- No lleve ropa suelta o joyas que
puedan ser atrapadas por las piezas
móviles del aparato.
- Al trabajar al aire libre, se recomien-
da llevar calzado antideslizante.
- Si tiene el cabello largo, llévelo cu-
bierto por una red.
• Utilice un equipo protector.
- Lleve gafas protectoras. Si no lo
hace, existe el riesgo de sufrir daños
oculares debido a chispas o partícu-
las desprendidas.
- Utilice una mascarilla en los trabajos
que produzcan polvo.
• Conecte el sistema extractor de
polvo. Si existiesen conexiones para
aspirar y recoger el polvo, convénzase
de que estén conectadas y se usen co-
rrectamente.
• Noutiliceelcableparanalida-
des ajenas a lo previsto. No utilice
el cable para sacar el enchufe de la
caja de empalme, y protéjalo del calor,
el aceite y los bordes alados.
• Asegure la pieza. Utilice los disposi-
tivos de sujeción o un tornillo de banco
para jar la pieza. Así se sujetará de
una forma más segura que con la mano.
• Evite adoptar una posición corpo-
ral anómala.
Procure estar rmemente erguido y man-
tenga en todo momento el equilibrio.
De esta forma podrá controlar mejor
la herramienta eléctrica en situaciones
inesperadas.
• Cuide sus herramientas con es-
mero. De esta forma se asegura el
mantenimiento de la seguridad de la
herramienta eléctrica.
- Mantenga limpias y aladas las
herramientas cortantes para poder
trabajar de una forma más segura y
mejor.

ES
1 0
- Siga las instrucciones de lubricación
y de cómo cambiar la herramienta.
- Compruebe periódicamente el cable
conector de la herramienta eléctrica
y, si estuviese deteriorado, haga que
un técnico lo reemplace.
- Compruebe periódicamente las lí-
neas de alargo y sustitúyalas cuando
estén deterioradas.
- Mantenga las asas secas, limpias y
libres de aceite y de grasas.
• Saque el enchufe de la caja de
empalme. Cuando no utilice la herra-
mienta eléctrica, antes de mantenerla y
al cambiar piezas.
Esta medida de precaución evitará que
la herramienta eléctrica se ponga en
marcha de forma inadvertida.
• No deje colocada ninguna llave
en la herramienta. Antes de conec-
tar el aparato, compruebe que no haya
quedado ninguna llave ni pieza de
ajuste dentro.
Las herramientas y llaves que se en-
cuentran en piezas giratorias del apa-
rato, pueden producir accidentes.
• Evite la puesta en marcha inad-
vertida. Asegúrese de que, al introdu-
cir el enchufe en la toma de corriente,
el interruptor esté desconectado.
• Utilice cables de alargo para el
exterior. Utilice al aire libre sólo ca-
bles de alargo autorizados para ello y
marcados correspondientemente.
• Esté atento, observe lo que hace y
utilice la herramienta eléctrica con
esmero. No utilice la herramienta eléc-
trica cuando esté cansado o se encuentra
bajo los efectos de drogas, alcohol o me-
dicamentos. Un momento de distracción
al utilizar la herramienta eléctrica puede
producir graves accidentes.
• Compruebe si su herramienta
eléctrica presenta algún desper-
fecto. De esta forma se asegura el
mantenimiento de la seguridad de la
herramienta eléctrica.
- Antes de utilizar la herramienta eléc-
trica, compruebe cuidadosamente
los dispositivos protectores y las pie-
zas ligeramente dañadas, para ase-
gurar que funcionen perfectamente y
según lo previsto.
- Compruebe que las piezas móviles
funcionan perfectamente, no estén
atascadas y no haya ninguna pieza
dañada. Las piezas deben estar
correctamente montadas y cumplir
todas las condiciones para asegurar
un perfecto funcionamiento.
- Las piezas y los sistemas protectores
deteriorados deben ser reparados
o cambiados adecuadamente por
un taller especializado reconocido,
mientras no se especique lo contra-
rio en las instrucciones de servicio.
- Los interruptores deteriorados deben
ser reemplazados por un taller de
servicio técnico.
- No utilice ninguna herramienta eléc-
trica, en la cual, el interruptor no se
deje conectar o desconectar.
Existe peligro de lesionarse.
• Atención: Si utiliza otras herramientas
u accesorios que los indicados, existe
cierto riesgo de sufrir lesiones.
• Haga que un técnico electricista
repare su herramienta eléctrica.
Esta herramienta eléctrica cumple las
disposiciones de seguridad pertinentes.
Las reparaciones sólo las debe realizar
un taller especializado, usando para
ello piezas de recambio originales. De
no ser así, existe riesgo de accidente
para el usuario.

ES
1 1
Para compensar el desgaste del disco
abrasivo, reajuste periódicamente la
protección contra chispas (distancia
máx. 2 mm)
• Cambie el disco abrasivo como muy
tarde cuando la protección contra chis-
pas y el soporte de la pieza de labor
ya no se puedan reajustar a una distan-
cia máxima de 2 mm.
• Procure que las chispas que se produ-
cen al lijar no provoquen peligro algu-
no, p.ej. que puedan alcanzar a perso-
nas o incendiar sustancias inamables.
• Cuando vaya a lijar, cepillar y cortar
póngase gafas protectoras, guantes
de seguridad, mascarilla y protección
para los oídos.
• No ponga nunca los dedos entre el
disco abrasivo y la protección contra
chispas o cerca de la cubierta de pro-
tección. Existe peligro de aplastamien-
to.
• Por razones de funcionalidad, las par-
tes del aparato que están en rotación
no pueden ser cubiertas. Por tanto,
actúe con prudencia y sujete bien la
pieza de labor para evitar que se des-
lice y que las manos puedan entrar en
contacto con el disco abrasivo.
• Al lijar, la pieza de labor se calienta.
No la toque del lado que se ha trabaja-
do, deje que se enfríe. Existe peligro de
quemadura. No utilice ningún medio
refrigerante o similar.
• No trabaje con el aparato si está can-
sado o ha ingerido alcohol o pastillas.
Haga las pausas necesarias a tiempo.
• Apague el aparato y desenchúfelo de
la corriente eléctrica
- para soltar una herramienta inter-
cambiable bloqueada,
- cuando el cable de conexión esté
dañado o se haya enrollado,
- si hace ruidos raros.
Instrucciones de seguridad
adicionales
• Conecte el aparato sólo a cajas de em-
palme que tengan un sistema protector
contra corrientes de falla (conmutador
FI), con una intensidad de corriente de
falla evaluable no mayor de 30 mA.
• Mantenga el cable de corriente y el de
alargo alejados de la muela. En caso
de dañarse o de seccionarse el cable
de corriente, saque inmediatamente el
enchufe de la caja de empalme.
No toque el cable antes de desenchu-
farlo de la corriente eléctrica. Existe
peligro debido a descarga eléctrica.
• Para evitar riesgos, el cambio del en-
chufe o del cable de alimentación siem-
pre ha de realizarlo el fabricante de la
herramienta electrónica o su servicio
técnico.
• Antes de encender el aparato, asegú-
rese de que esté bien jado sobre la
supercie de trabajo.
• Para su propia seguridad únicamente
utilice los accesorios y aparatos comple-
mentarios indicados en las instrucciones
de uso o aquellos recomendados por el
fabricante de la herramienta.
• Utilice solo las herramientas de lijado
recomendadas por el fabricante. No
utilice hojas de sierra Cerciórese de que
las dimensiones se adaptan al aparato.
• Solo utilice discos abrasivos, cuyas re-
voluciones (impresas) sean al menos tan
altas como las indicadas en la placa don-
de se especican los datos del aparato.
• Antes de utilizar el disco abrasivo rea-
lice un examen visual. No utilice discos
abrasivos dañados o deformados.
Cambie los discos abrasivos gastados.
• No use nunca el aparato sin la protec-
ción contra chispas ni sin la cubierta de
protección.

ES
1 2
• Utilice el aparato solo en posición
vertical y de pie y procure tener una
posición segura.
Riesgos residuales
Aunque usted maneje esta herramienta
eléctrica de acuerdo a las normas, siempre
permanecen riesgos residuales. En rela-
ción con la forma constructiva y el acaba-
do de esta herramienta eléctrica, pueden
presentarse los siguientes riesgos:
a) Daños en los pulmones, si no se utiliza
mascarilla.
b) Daños auditivos, si no se lleva una pro-
tección adecuada para los oídos.
c) Perjuicios para la salud provocados
por:
- entrar en contacto con la herramien-
ta de lijado en la zona no cubierta;
- expulsión de partes de las piezas de
labor o del disco abrasivo dañado.
d) Daños para la salud, derivados de las
vibraciones transmitidas al sistema ma-
no-brazo, en caso de que el aparato se
utilice durante un tiempo prolongado,
no se lleve de forma correcta o no esté
en las condiciones de mantenimiento
debidas.
Aviso: Esta herramienta eléctrica
genera durante su uso un campo
electromagnético. En determinadas
circunstancias, este campo puede
dañar implantes médicos activos
o pasivos. Para reducir el riesgo
de lesiones serias o mortales, re-
comendamos a las personas con
implantes médicos que consulten a
su médico o a su fabricante antes
de utilizar la máquina.
Montaje
¡Atención!
¡Riesgo de lesiones!
- Asegúrese de disponer de su-
ciente espacio para trabajar y de
no poner en peligro a ninguna
otra persona.
- Fije el aparato a la supercie
de trabajo siempre con tornillos
sucientemente largos y resisten-
tes para no perder el control del
aparato.
- Antes de ponerlo en funciona-
miento han de montarse correc-
tamente todas las cubiertas y los
dispositivos de protección.
- Antes de realizar cualquier ajuste
en el aparato, desenchúfelo.
Montar ajustar los soportes
de las piezas de labor
1. Atornille los soportes de las pie-
zas de labor (6) al aparato.
Para ello, utilice el tornillo (16),
la arandela (15), el disco denta-
do (14) y la tuerca de estrella (7)
que se adjuntan.
2. Ajuste el soporte para la pieza
de labor (6) del disco abrasivo
en seco con la tuerca de estrella
(7). La distancia entre el disco
abrasivo en seco (5) y el sopor-
te para pieza de labor (6) sea
como máximo de 2 mm.
Ajuste periódicamente el soporte
de la pieza de labor para compen-
sar el desgaste del disco abrasivo
(distancia máxima 2 mm).

ES
1 3
Montar/ajustar protección
contra chispas
1. Atornille la protección contra
chispas (18) a la cubierta pro-
tectora (
25). Para ello, utilice
el tornillo de ajuste (21) incl.
el anillo elástico y la arandela
(20/19), así como la tuerca (17).
2. Ajuste la protección contra
chispas (18) con el tornillo de
ajuste (21): la distancia entre el
disco abrasivo en seco (
5) y
el soporte para pieza de labor
(18) ha de ser como máximo de
2mm.
Ajuste periódicamente la protección
contra chispas para compensar el
desgaste del disco abrasivo (distan-
cia máxima 2 mm).
Aunque tenga la protección contra
chispas, cuando vaya a trabajar,
póngase también gafas de pro-
tección para evitar lesiones en los
ojos.
Atornillar el aparato a la
mesa de trabajo
1. Retire el pie de goma (10) del
depósito de agua.
2. Atornille el aparato con los 4
tornillos y tuercas a la mesa de
trabajo plana.
Para ello, introduzca los tornillos
por los 4 agujeros (9) en la base
del aparato.
Los tornillos y tuercas para el mon-
taje no están incluidos en el sumi-
nistro.
Llenar el depósito de agua
1. Inserte el cierre de goma (11) en
la apertura de vaciado del depó-
sito de agua (13).
2. Llene agua hasta la marca de nivel
del depósito de agua (13).
Manejo
¡Atención!
¡Riesgo de lesiones!
- Antes de realizar trabajos en el
aparato, desconecte siempre el
enchufe de corriente.
- Utilice sólo las muelas recticadoras
y los accesorios recomendados por el
fabricante. Si utiliza otras herramien-
tas u accesorios que los indicados,
existe cierto riesgo de sufrir lesiones.
- Solo utilice herramientas de lijado
que lleven los datos del fabricante,
tipo de ligadura, dimensiones y nú-
mero de revoluciones permitidas.
- Solo utilice discos abrasivos que
tengan las revoluciones (impresas)
y que al menos sean tan altas
como las indicadas en la placa
identicadora del tipo.
- No utilice muelas recticadoras
que presenten roturas, hendiduras
ni demás desperfectos.
- No haga funcionar el aparato nun-
ca sin pantalla visera protectora, y
no utilice hojas de sierra.
- Controle el disco abrasivo antes de
su utilización:
Revise el soporte para la protec-
ción contra chispas y el disco
abrasivo, así como el soporte de la
pieza de labor y el disco abrasivo
(distancia máxima 2 mm).
- En el momento en el que el soporte
para la protección contra chispas

ES
1 4
y el soporte de la pieza de labor
ya no se puedan colocar a máx.
2mm del disco abrasivo deberá
de cambiarse el disco abrasivo.
- Conecte el aparato sólo cuando
esté montado seguro sobre la su-
percie de trabajo.
Cuando el aparato esté fun-
cionando no acerque las ma-
nos al disco abrasivo.
¡Peligro de lesiones!
Aunque tenga la protección contra
chispas, cuando vaya a trabajar,
póngase también gafas de pro-
tección para evitar lesiones en los
ojos.
Conectar y desconectar
Procurar que la tensión de la cone-
xión de corriente coincida con la
indicada en la placa de caracterís-
ticas del aparato.
Conecte el aparato a una toma de
corriente.
1. Para ponerlo en marcha, pulse el
encendedor “I” (
8) y el aparato
arrancará.
2. Para detenerlo, pulse el desconectador
“0” (
8) y el aparato se apagará.
Cuando encienda el aparato espere hasta
que haya alcanzado el número máximo de
revoluciones. Entonces es cuando puede
empezar a lijar.
La muela es arrastrada aún
después de haber desconec-
tado el aparato. Existe peli-
gro de accidentarse.
Marcha de ensayo: Antes de trabajar
por primera vez y cada vez después de
cambiar la muela una marcha de ensayo
de cómo mínimo 60segundos sin carga.
Desconecte inmediatamente el aparato si
la muela oscilase, apareciesen vibraciones
considerables o se oigan ruidos anormales.
Lijar con el disco abrasivo
en seco
• Coloque la pieza de labor en su sopor-
te (
6) y colóquela, lentamente, en el
ángulo que desea en el disco abrasivo
en seco (
5).
• Mueva la pieza de labor ligeramente
de un lado a otro para obtener el mejor
lijado. Así el desgaste del disco abra-
sivo es uniforme. Deje que la pieza de
labor se enfríe.
• Abata la protección contra las chispas
(
2) mientras está recticando para
evitar lesionarse con las chispas.
Lijar con el disco abrasivo
en húmedo
• Compruebe el nivel de agua del depó-
sito: El disco abrasivo en húmedo (
1) deberá estar dentro del agua hasta
la marca de nivel
del depósito de
agua (
13).
• Colóquese delante del disco abrasivo
en húmedo (
1).
• Sujete la pieza de labor con las dos
manos y vaya bajándola lentamente
sobre el disco abrasivo en húmedo.
• La pieza de labor también puede apo-
yarse en los dientes del depósito de
agua (
13).

ES
1 5
Cambiar disco abrasivo
Indicaciones sobre el cam-
bio de discos abrasivos:
• No use nunca el aparato sin el
dispositivo de protección.
• Asegúrese de que la velocidad es-
pecicada para el disco abrasivo
sea igual o mayor que la veloci-
dad de medición de marcha en
vacío.
• Cerciórese de que el tamaño del
disco abrasivo sea adecuado
para el aparato.
• Solo utilice discos abrasivos que
están en perfectas condiciones
(prueba de sonido: los discos abra-
sivos que no están dañados, al
colgarlos de una cuerda, despren-
den un sonido claro cuando se gol-
pean con un martillo de plástico).
• Si el oricio de alojamiento es
demasiado pequeño, no trate de
aumentarlo.
• No utilice ningún casquillo reduc-
tor ni adaptador adicional para
ajustar el tamaño de los discos
con oricios demasiado grandes.
• No utilice hojas de sierra.
• Para montar las herramientas de
lijado solo se puede utilizar las
bridas de jación que se sumi-
nistran. Las capas intermedias
entre la brida de jación y las
herramientas de lijado han de ser
de material elástico p.ej. goma,
cartón blando, etc.
• Vuelva a montar completamente
el aparato tras cambiar el disco
abrasivo.
Apague el aparato y desenchúfelo
de la corriente eléctrica.
Deje que el aparato se enfríe.
Cuando cambie los discos abrasivos
póngase guantes de protección
para evitar posibles cortes.
Cambiar disco abrasivo en seco:
1. Retire la protección contra chispas
(
2) (ver “Montar/ajustar pro-
tección contra chispas”).
2. Suelte los tornillos de jación y re-
tire la cubierta del disco abrasivo
(
4) de la cubierta de protec-
ción (25).
3. Desatornille la tuerca del disco
abrasivo (22) con una llave (en-
trecaras19), mientras tanto ha de
sujetar el disco abrasivo en seco
(5) llevando guantes con la mano.
Desatornillar la tuerca (rosca a la
derecha): Girar en sentido contra-
rio a las agujas del reloj.
4. Retire la brida de jación (23) y
el disco abrasivo en seco (5).
5. Coloque el disco abrasivo en seco
(5) nuevo con las capas interme-
dias de cartón (4) y la brida de
jación (23). Destornille la tuerca
del disco abrasivo (22) a mano.
Desatornille la tuerca (rosca a la
derecha): En sentido de las agujas
del reloj.
6. Apriete la tuerca del disco abrasi-
vo con una llave (entrecaras19) a
mano ejerciendo presión media.
7. Atornille la cubierta de los discos
abrasivos (4).
8. Coloque la protección contra
chispas (
18) y el soporte de
la pieza de labor (
6), la dis-
tancia hacia el disco abrasivo en
seco (5) ha de ser de máximo de
2 mm (ver “Montaje”).

ES
1 6
La tuerca del disco abrasivo no
puede estar demasiado apretada
para evitar que la tuerca y el disco
abrasivo se rompan.
9. Marcha de ensayo: Antes de tra-
bajar por primera vez y cada vez des-
pués de cambiar la muela una marcha
de ensayo de cómo mínimo 60segun-
dos sin carga. Desconecte inmediata-
mente el aparato si la muela oscilase,
apareciesen vibraciones considerables
o se oigan ruidos anormales.
Cambiar disco abrasivo en
húmedo:
1. Suelte los 4 tornillos de jación
(13a/13b/13c/13d) de la caja
de engranaje (28) y retire el de-
pósito de agua (13).
2. Desatornille la tuerca del disco
abrasivo (22) con una llave (en-
trecaras19), mientras tanto ha
de sujetar el disco abrasivo en
húmedo (1) llevando guantes con
la mano.
Desatornillar la tuerca (rosca a la
derecha): Girar en sentido contra-
rio a las agujas del reloj.
3. Retire la brida de jación de
material sintético (26) y el disco
abrasivo en húmedo(1).
4. Coloque el nuevo disco abrasivo
en húmedo (1) y la brida de -
jación de material sintético (26).
Destornille la tuerca del disco
abrasivo (22) a mano.
Atornillar la tuerca derecha (ros-
ca a la derecha): En sentido de
las agujas del reloj.
Las dos bridas de jación de material
sintético (26/27) no son idénticas.
5. Apriete la tuerca del disco
abrasivo (22) con una llave (en-
trecaras19) a mano ejerciendo
presión media.
6. Vuelva a pasar el depósito de agua
(13) por encima del disco abra-
sivo en húmedo (1) apretándolo
contra la caja de engranajes (28).
7. Fije el depósito de agua (13) con
los cuatro tornillos de jación y las
arandelas a la caja de engranaje
(28).
La tuerca del disco abrasivo no
puede estar demasiado apretada
para evitar que la tuerca y el disco
abrasivo se rompan.
Entre la brida de jación (27) y la
caja de engranaje (28) hay una
arandela (29).
8. Marcha de ensayo: Antes de traba-
jar por primera vez y cada vez después
de cambiar la muela una marcha de
ensayo de cómo mínimo 60segundos
sin carga. Desconecte inmediatamente
el aparato si la muela oscilase, apare-
ciesen vibraciones considerables o se
oigan ruidos anormales.
Limpieza y
mantenimiento
Desconecte el enchufe de la co-
rriente antes de realizar cualquier
ajuste, reparación o mantenimiento.
Haga realizar en un taller es-
pecializado los trabajos que
no estén descritos en estas
instrucciones de servicio. Uti-
lice solamente piezas origina-
les. Deje enfriarse el aparato

ES
1 7
antes de realizar cualquier
trabajo de mantenimiento o
limpieza. Existe peligro de
quemaduras.
Limpieza
No utilizar detergentes ni disol-
ventes intensos. Las substancias
químicas pueden atacar las piezas
de plástico del aparato. No limpie
el aparato nunca bajo un chorro de
agua.
• Limpie a fondo el aparato cada vez
después de usarlo.
• Limpie la super cie del aparato con un
cepillo blando, un pincel o un paño.
Trabajos generales de
mantenimiento
Compruebe el aparato cada vez antes de
usarlo por si existe algún defecto obvio,
piezas desgastadas o dañadas, y si los
tornillos y demás piezas están correcta-
mente asentadas. Compruebe especial-
mente la muela recti cadora. Cambiar las
piezas defectuosas.
Almacenaje
• Antes de guardarla, vacíe el depósito
de agua (
13): retire el cierre de
material sintético (
11) de la apertu-
ra de vaciado del depósito de agua y
deje que vaya saliendo el agua.
• Cuando no use el equipo, debe guar-
darse éste en un lugar seco y protegido
de polvo, asegurando que está fuera
del alcance de niños.
• Las muelas deben guardarse el lugar
seco, apoyadas sobre su borde y no
deben apilarse.
Eliminación y protección
del medio ambiente
El equipo, sus accesorios y el material de
embalaje deben reciclarse en forma com-
patible con el medio ambiente.
Máquinas no deben ir a la basura
doméstica. Entregue su aparato a
un centro de reciclaje.
Lleve el embalaje de cartón
ondulado a un lugar para que
procedan a reciclarlo respetando el
medio ambiente.
Las partes plásticas y metálicas empleadas
pueden ser separadas por tipo y llevadas
al reciclaje. Consulte nuestro Centro de
Servicio para mayor información.
Los aparatos defectuosos que nos envíe, se
los evacuaremos de forma gratuita.

ES
1 8
Piezas de repuesto/Accesorios
Encontrará las piezas de repuesto y accesorios en
www.grizzly-service.eu
Si no tuviese acceso a Internet, póngase en contacto telefónico con el Service-Center (ver
“Service-Center“ página 21). Tenga a mano los números de pedido.
Part. Denominación Números
Instrucciones de pedido
de uso
5 Disco abrasivo en seco 91103553
1 Disco abrasivo en húmedo 30211041
11,13 Set Depósito de agua 30211042
22,26,27 Set Bridas de jación, húmedo 30211049
22,23 Set Bridas de jación, seco 30211044
2,3,17-21 Set Protección contra chispas 30211045
6,7,14-16 Set Soporte para pieza de labor 30211046
4 Set Cubierta del disco abrasivo 30211047
25 Set Cubierta de protección para disco abrasivo en seco 30211048

ES
1 9
Búsqueda de fallos
Apague el aparato y desenchúfelo de la corriente eléctrica.
Deje que el aparato se enfríe.
Problema Origen posible Subsanación del error
El aparato no
arranca
Falta tensión de alimentación
Salta el fusible de la casa
Enchufe, cable de la red, cable,
revisar enchufe de corriente o
reparar por electricista, revisar
fusible de la casa.
Interruptor de encendido/apa-
gado (
8) defectuoso
A reparar por el servicio al
cliente
Motor defectuoso
Las herramientas
de lijado no se
mueven aunque el
motor funciona
Tuerca del disco abrasivo (
22) está suelta
Apretar tuerca del disco abrasivo
(ver „Cambiar disco abrasivo“)
Pieza de labor, restos de la
pieza de labor o restos de
la herramienta de lijado blo-
quean el accionamiento
Retirar elementos que bloquean
El motor se ralenti-
za y se para
La pieza de labor sobrecarga
el aparato
Reducir presión sobre herramien-
ta de lijado
La pieza de labor no es apro-
piada
Disco abrasivo no
gira en redondo,
se escuchan ruidos
extraños
Tuerca del disco abrasivo (
22) está suelta
Apretar tuerca del disco abrasivo
(ver „Cambiar disco abrasivo“)
Disco abrasivo (
1/5) de-
fectuoso
Cambiar disco abrasivo
Protección contra chispas
(
2) o soporte de pieza de
labor (
6) están mal ajus-
tadas
Ajustar protección contra chis-
pas o soporte de pieza de labor
(ver „Montaje“)

ES
2 0
Garantía
Estimada clienta, estimado cliente:
Por este aparato se le concede una ga-
rantía de 3 años a partir de la fecha de
compra.
En caso de defectos de este producto, le
corresponden derechos legales contra el
vendedor del producto. Estos derechos no
serán limitados por la garantía expuesta a
continuación.
Condiciones de garantía
El plazo de garantía empieza con la fecha
de compra. Por favor, conserve bien el res-
guardo de caja original. Este documento
se necesitará como prueba de la compra.
Si dentro del plazo de tres años después
de la fecha de compra del aparato se de-
tecta un defecto de material o fabricación,
según nuestra elección, el producto será
reparado o sustituido gratuitamente. Esta
prestación de garantía presupone entregar
el aparato defectuoso y el comprobante
de compra (resguardo de caja) dentro
del plazo de los tres años, describiendo
brevemente por escrito en qué consiste el
defecto y cuándo se detectó.
Si el defecto está cubierto por nuestra
garantía, le devolveremos el aparato re-
parado o uno nuevo. Con la reparación o
la sustitución del producto no se inicia un
nuevo período de garantía.
Período de garantía y exigencias
legales en caso de defectos
El período de garantía no será prolonga-
do por la prestación de garantía. Esto se
aplica igualmente a las partes sustituidas
y reparadas. Daños y defectos ya existen-
tes eventualmente al comprar el aparato,
tienen que ser noticados inmediatamente
después de haberlo desempacado. Las re-
paraciones a efectuar al cabo del período
de garantía están sujetas a pago.
Volumen de la garantía
El aparato fue producido cuidadosamente
según las directivas estrictas de la calidad
y examinado concienzudamente antes de
la entrega.
La prestación de garantía tiene validez
para defectos de material o fabricación.
Esta garantía no se extiende a partes del
producto que están sometidas a un des-
gaste natural y, por lo tanto, pueden ser
consideradas como piezas de desgaste
(p. ej. disco abrasivo, brida de jación,
escobillas de carbón), o a daños en partes
frágiles (p. ej. interruptores).
Esta garantía caduca si el producto fue
dañado, utilizado impropiamente o no
sometido a mantenimiento. Para un uso
apropiado del producto, se han de cum-
plir exactamente todas las indicaciones
contenidas en las instrucciones de manejo.
Se tienen que evitar absolutamente nes
de aplicación y manejos, de los cuales
desaconsejan o advierten las instrucciones
de servicio.
El producto está previsto solamente para
el uso privado y no comercial. La garantía
caducará en el caso de un tratamiento
abusivo e impropio, uso de la fuerza o ma-
nipulaciones que no fueron efectuadas por
una lial de servicio autorizada.
Gestión en caso de garantía
Para garantizar una gestión rápida de su
reclamación, le rogamos seguir las siguien-
tes indicaciones:
• Para todas las consultas, tenga pre-
parado por favor el resguardo de
caja y el número de identicación
(IAN304988) como prueba de la com-
pra.

ES
2 1
• Por favor, saque el número de artículo
de la placa de características.
• Si surgen fallas en el funcionamiento
o cualquier defecto, contacte primera-
mente a la sección de servicio indicada
a continuación por teléfono o vía E-
Mail. Se le darán otras informaciones
acerca de la gestión de su reclama-
ción.
• Tras consultar con nuestro servicio de
postventa, un aparato identicado
como defectuoso puede ser enviado li-
bre de franqueo a la dirección de servi-
cio ya conocida por usted, adjuntando
el comprobante de compra (resguardo
de caja) e indicando en qué consiste
el defecto y cuándo surgió. Para evitar
problemas de recepción y costes adi-
cionales, utilice de todas maneras sólo
la dirección que se le comunicará. Ase-
gúrese de que el envío no se efectúe sin
franqueo, como mercancía voluminosa,
expréss u otro tipo de transporte espe-
cial. Envíe por favor el aparato inclu-
yendo todos los accesorios entregados
con la compra y garantice un embalaje
de transporte lo sucientemente seguro.
Servicio de reparación
Reparaciones que no están cubiertas por
la garantía, las puede dejar efectuar por
nuestra lial de servicio por cuenta suya.
Ésta le elaborará gustosamente un presu-
puesto.
Sólo atenderemos aparatos que hayan
sido enviados en un embalaje suciente y
franqueados.
Atención: Por favor, envíe el aparato lim-
pio, señalando el defecto a nuestra lial
de servicio.
No aceptaremos aparatos que hayan sido
enviados sin franqueo, como mercancía
voluminosa, expréss o cualquier tipo de
transporte especial.
Nos encargamos gratuitamente de la
eliminación de sus aparatos defectuosos
enviados.
Service-Center
ES
Servicio España
Tel.: 902 59 99 22
(0,08 EUR/Min. + 0,11 EUR/lla-
mada (tarifa normal))
(0,05 EUR/Min. + 0,11 EUR/lla-
mada (tarifa reducida))
E-Mail: [email protected]
IAN 304988
Importador
Por favor, observe que la siguiente direc-
ción no es una dirección de servicio. Con-
tacte primeramente al centro de servicio
mencionado arriba.
Grizzly Tools GmbH & Co. KG
Stockstädter Straße 20
D-63762 Großostheim
Alemania
www.grizzly-service.eu

2 2
I T M T
Introduzione
Congratulazioni per l’acquisto del Suo
nuovo apparecchio. Ha scelto un prodotto
altamente pregiato. Questo apparecchio
è stato sottoposto a un controllo di qualità
durante la produzione e quindi sottoposto
a un controllo nale. Quindi è garantito il
funzionamento del vostro apparecchio.
Le istruzioni per l’uso costituiscono
parte integrante di questo prodotto.
Contengono indicazioni importanti
per la sicurezza, l’uso e lo smalti-
mento. Prima dell’uso del prodotto,
si raccomanda di familiarizzare
con tutte le indicazioni di comando
e di sicurezza. Usare il prodotto
solo come descritto e per i campi
d’impiego specicati. Conservare le
istruzioni in un luogo sicuro e conse-
gnare la documentazione in caso di
cessione del prodotto a terzi.
Destinazione d‘uso
La molatrice da banco è idonea per aflare
utensili (ad es. coltelli, forbici, scalpelli) e
per sbavare e molare piccoli pezzi in me-
tallo.
L’apparecchio non è concepito per qualsiasi
altro tipo di utilizzo (ad esempio la leviga-
tura con utensili non adeguati, la levigatura
con liquidi refrigeranti, la levigatura di ma-
teriali nocivi come l’amianto).
L‘apparecchio è destinato all‘impiego dome-
stico. Non è stato concepito per l‘impiego
industriale permanente.
L‘apparecchio è destinato al‘uso da parte
di adulti. Giovani sopra i 16 anni possono
usare l‘apparecchio solo se sorvegliati da
un adulto. Il produttore declina ogni respon-
sabilità per danni causati da un uso impro-
prio o un comando errato.
Indice
Introduzione ............................ 22
Destinazione d‘uso .................... 22
Descrizione generale ................. 23
Volume di fornitura .........................23
Descrizione del funzionamento ........23
Panoramica ................................... 23
Dati tecnici ................................ 24
Indicazioni di sicurezza ............. 24
Simboli e pittogrammi ....................25
Indicazioni di sicurezza generali .....25
Ulteriori indicazioni di sicurezza ......27
Rischi residui .................................28
Montaggio ................................ 29
Montaggio/regolazione dei
poggiapezzi .................................29
Montaggio/regolazione il
parascintille ...................................29
Fissaggio dell’apparecchio al
banco di lavoro .............................29
Riempimento dell’acqua nel
contenitore d’acqua ........................30
Comando .................................. 30
Accensione e spegnimento ..............30
Molatura con la mola a secco .........31
Molatura con la mola a umido .........31
Sostituzione della mola ...................31
Pulizia e manutenzione ............. 33
Pulizia ..........................................33
Lavori di manutenzione generici .....33
Conservacione .......................... 33
Smaltimento/Tutela
dell’ambiente ............................ 33
Pezzi di ricambio/Accessori ....... 34
Ricerca di guasti ........................ 35
Garanzia .................................. 36
Servizio di riparazione .............. 37
Service-Center ........................... 37
Importatore .............................. 37
Traduzione della dichiarazione
di conformità CE originale ......... 70

2 3
I T M T
Descrizione generale
Le gure si trovano sulle pagine
pieghevoli anteriori e posterio-
ri.
Volume di fornitura
Rimuovere l‘apparecchio dall‘imballaggio
e controllare se è completo. Smaltire il
materiale di imballaggio secondo le dispo-
sizioni.
• Apparecchio con mole premontate
• Parascintille
• Materiale di montaggio per il ssaggio
del parascintille sull’apparecchio
- Vite di regolazione incl. rondella e
anello a molla, dado
• Portapezzo
• Materiale di montaggio per ssaggio
del portapezzo sull’apparecchio
- Dado a stella, rondella, disco dentato
e vite
• Chiusura in gomma
• Istruzioni per l’uso
Descrizione del funziona-
mento
La molatrice da banco è un apparecchio
combinato, dotato di una mola a secco e
una mola a umido con diversa grana per
la molatura grossolana e ne.
Per proteggere l’utilizzatore, l’apparecchio
è provvisto di parascintille e di calotta
protettiva.
La seguente descrizione illustra il funziona-
mento dei componenti.
Il funzionamento dei componenti è riporta-
to nelle seguenti descrizioni.
Panoramica
1 Mola a umido
2 Parascintille
3 Dado di regolazione per para-
scintille
4 Coprimola
5 Mola a secco
6 Poggiapezzo
7 Dado a stella per montaggio/
regolazione del portapezzo
8 Interruttore ON/OFF
9 Fori per montaggio al banco
10 Piedino di gomma (contenitore
per acqua)
11 Chiusura in gomma per contenito-
re d’acqua
12 Cavo di rete
13 Contenitore per acqua
14 Rondella di sicurezza
15 Rondella
16 Viti di ssaggio per
portapezzo
17 Dado
18 Supporto per parascintille
19 Rondella
20 Disco dentato
21 Vite di regolazione per supporto
per parascitnille
22 Dado per mola
23 Flangia di ssaggio
24 Strati intermedi in cartone
25 Calotta protettiva per mola a
secco
26 Flangia di serraggio in plastica
27 Flangia di serraggio in plastica
28 Scatola ingranaggio
29 Rondella

2 4
I T M T
Dati tecnici
Molatrice da banco .............. PNTS 250 B1
Tensione di entrata
nominale U .....................230 V~, 50 Hz
Potenza assorbita P ..250 W (S2 30 min)*
Classe di protezione ..............................I
Tipo di protezione ............................IPX0
Regime minimo n
0
Mola a umido ..................ca. 128 min
-1
Mola a secco ................ca. 2950 min
-1
Peso (incl. accessori) ................ca. 8,6 kg
Livello di pressione acustica
(L
pA
) ..................... 80 dB (A); K
pA
= 3 dB
Livello di potenza sonora
(L
WA
) .................... 93 dB(A); K
WA
= 3 dB
Valore totale di vibrazioni (a
h
) . 2,5 m/s
2
Mola a umido
Diametro esterno .................Ø 200 mm
Foro ....................................Ø 20 mm
Spessore ..................................40 mm
Grana ...........................................80
Numero di giri n
max
..... max. 3820 min
-1
Velocità operativa v
s
......... max. 40 m/s
Mola a secco
Diametro esterno .................Ø 150 mm
Foro .................................Ø 12,7 mm
Spessore ..................................20 mm
Grana ...........................................36
Numero di giri n
0
....... max. 4500 min
-1
Velocità operativa ............ max. 35 m/s
* Dopo un servizio continuo di 30 minuti è
prevista una pausa da protrarsi nché l’ap-
parecchio raggiunge una temperatura che si
discosta di meno di 2 K (2°C) dalla tempera-
tura ambiente.
I valori di rumorosità e vibrazione sono
stati determinati conformemente alle pre-
scrizioni e norme citate nella dichiarazione
di conformità.
Il valore di emissione di vibrazioni indicato
è stato misurato attraverso un procedimen-
to di controllo standardizzato e può essere
utilizzato per il confronto di un apparec-
chio elettrico con un altro.
Il valore di emissione di vibrazioni indicato
può essere anche utilizzato per una prima
valutazione dell’esposizione alla quale si
è soggetti.
Avvertenza:
Durante l’uso effettivo dell’apparec-
chio elettrico, il livello di emissione
di vibrazioni può differire da quello
indicato a seconda della tipologia
e della modalità d’uso.
Cercare di limitare il più possibile
l’esposizione alle vibrazioni. Per at-
tenuare l’esposizione alle vibrazioni
si possono ad esempio indossare
guanti durante l’utilizzo dell’utensile
e limitare l’orario di lavoro. In tal
senso occorre tenere conto di tutte
le componenti del ciclo operativo
(ad esempio i momenti in cui l’ap-
parecchio elettrico è spento e quelli
in cui è accesso, ma opera senza
carico).
Indicazioni di sicurezza
ATTENZIONE!
Durante l‘uso di utensili elettrici
devono essere osservate le seguenti
misure di sicurezza di base al ne
di evitare scosse elettriche e perico-
li di lesioni e incendi.
Prima di utilizzare il presente utensi-
le elettrico leggere tutte le istruzioni,
conservare in buono stato le avver-
tenze di sicurezza.

2 5
I T M T
Simboli e pittogrammi
Simboli riportati nelle istruzioni:
Simboli di pericolo con indi-
cazioni relative alla preven-
zione di danni a cose e per-
sone.
Simboli di divieto con indicazioni
relative alla prevenzione di danni.
Collegare l‘apparecchio
all‘alimentazione.
Staccare la spina.
Simboli di avvertenza con infor-
mazioni relative ad un uso corretto
dell’apparecchio.
Simboli sull‘apparecchio:
Attenzione!
Pericolo di lesioni a causa di utensi-
li rotanti! Tenere lontane le mani.
Pericolo a causa di scosse elettri-
che! Prima di effettuare lavori di
manutenzione e riparazione, stac-
care la presa dalla spina.
Leggere le istruzioni d‘uso.
Indossare le protezioni acustiche.
Indossare la protezione oculare.
Indossare una protezione per le vie
respiratorie.
Pericolo di ferite da taglio!
Indossare guanti a prova di taglio.
Utilizzare la mola solo a secco.
Utilizzare la mola solo
con acqua.
Le apparecchiature non si devono
smaltire insieme ai ri uti domestici.
Altri simboli sulle mole da levigatura:
Non utilizzare mole difettose.
Simbolo sull‘imballaggio:
Cartone ondulato
Indicazioni di sicurezza
generali
Con il termine “elettroutensile” adoperato
nelle istruzioni di sicurezza si intendono
gli elettroutensili collegati alla rete elettrica
(con cavo di rete) e gli elettroutensili a bat-
teria (senza cavo di rete).
Lavorare in modo sicuro:
• Tenere in ordine la zona di lavo-
ro. Disordine nella zona di lavoro può
causare incidenti.
• Tenerecontodegliinussiam-
bientali.
- Non esporre gli elettroutensili alla
pioggia. Non usare elettroutensili in
ambienti umidi o bagnati.
L’in ltrazione d’acqua in un utensile
elettrico aumenta il rischio di scosse
elettriche.
- Garantire una buona illuminazione
dell’area di lavoro.
- Non usare elettroutensili in zone a
rischio di incendi o esplosioni.
Utensili elettrici generano scintille che
potrebbero in ammare la polvere o i
vapori.

2 6
I T M T
• Proteggersi da scosse elettriche.
Evitare il contatto del corpo con le parti
collegate a terra (p. es. tubi, radiatori,
fornelli elettrici, frigoriferi).
• Tenere lontane altre persone.
Impedire che altre persone, in partico-
lare bambini, tocchino l’elettroutensile.
Tenerle lontane dalla zona di lavoro.
• Conservare elettroutensili inutiliz-
zati in un luogo sicuro. Elettrouten-
sili inutilizzati devono essere depositati
in un luogo asciutto, sospeso o chiuso,
fuori dalla portata di bambini.
• Non sovraccaricare l’elettrouten-
sile. Si lavora meglio e in modo più
sicuro nel campo di potenza specicato.
• Usare l’elettroutensile giusto.
- Non usare macchine a bassa potenza
per lavori pesanti.
- Non usare l’elettroutensile per scopi
diversi da quelli per i quali è previsto.
Per esempio, non usare una sega cir-
colare per tagliare tralicci o ceppi di
legno.
L’uso dell’utensile elettrico per scopi
diversi da quelli previsti può genera-
re situazioni pericolose.
• Indossare un abbigliamento
adatto.
- Non indossare capi d’abbigliamento
larghi o gioielli, potrebbero essere
catturati dalle parti in movimento.
- In caso di lavori all’aperto si racco-
manda di indossare scarpe antiscivolo.
- Usare una rete per raccogliere capelli
lunghi.
• Usare un’attrezzatura di prote-
zione.
- Indossare occhiali di sicurezza. La
mancata osservanza di questa dispo-
sizione può provocare lesioni agli
occhi a causa di scintille o particelle.
- Per lavori che generano polveri indos-
sare una maschera respiratoria.
• Collegare il dispositivo di aspira-
zione polveri. In presenza di attacchi
per l’aspirazione di polveri e dispositivi
di raccolta, assicurarsi che questi siano
collegati e usati correttamente.
• Non usare cavi per scopi diversi
da quelli previsti. Non usare il cavo
per staccare la spina dalla presa. Pro-
teggere il cavo da fonti di calore, olio e
spigoli vivi.
• Bloccare il pezzo. Usare dispositivi di
serraggio o una morsa a vite per blocca-
re il pezzo. In questo modo si garantisce
una presa più sicura che con le mani.
• Evitare posture anormali. Garan-
tire una posizione stabile e mantenere
l’equilibrio in ogni momento. In questo
modo è possibile controllare meglio la
sega elettrica nelle situazioni impreviste.
• Manutenere gli utensili con cura.
Molti infortuni sono causati da una
manutenzione non corretta degli utensili
elettrici.
- Tenere gli utensili di taglio sempre af-
lati e puliti per poter lavorare meglio
e in modo più sicuro.
- Controllare a intervalli regolari la con-
duttura di allacciamento dell’elettrouten-
sile e, in caso di danneggiamento, farla
sostituire da un esperto autorizzato.
- Controllare a intervalli regolari le
prolunghe e sostituirle quando sono
danneggiate.
- Tenere le impugnature asciutte, pulite
e prive di olio e grasso.
• Staccare la spina dalla presa. In
caso di inutilizzo dell’elettroutensile, pri-
ma di un intervento di manutenzione e
durante una sostituzione degli utensili.
Queste misure sono atte a impedire
l’avviamento involontario della sega
elettrica.
• Non lasciare inserite eventuali
chiavi per la sostituzione di uten-

2 7
I T M T
sili. Vericare prima dell’accensione se
le chiavi e gli utensili di regolazione
sono stati rimossi.
Un utensile o una chiave che si trova
all’interno di una parte rotante dell’ap-
parecchio, può causare lesioni.
• Evitare un avviamento involon-
tario. Assicurarsi che l’interruttore sia
spento quando si inserisce la spina nella
presa.
• Usare la prolunga per ambienti
esterni.
All’aperto usare solo prolunghe apposi-
tamente autorizzate e contrassegnate.
• Prestare attenzione ai propri mo-
vimenti e lavorare con l’utensile
elettrico usando raziocinio. Non
usare un utensile elettrico, quando si è
stanchi o si è sotto effetto di droghe, al-
col o farmaci. Un attimo di disattenzione
durante l’uso dell’utensile elettrico può
causare lesioni gravi.
• Controllare l’elettroutensile per
vericarelapresenzadieventua-
li danneggiamenti. In questo modo
si garantisce il mantenimento della sicu-
rezza dell’utensile elettrico.
- Prima di usare l’elettroutensile è neces-
sario controllare con cura i dispositivi
di sicurezza o le parti leggermente
danneggiate per vericare il loro fun-
zionamento perfetto e a regola d’arte.
- Controllare se le parti in movimento
sono perfettamente funzionanti e non
si inceppano oppure se sono dan-
neggiate. Tutte le parti devono essere
montate correttamente e soddisfare
tutti i requisiti, per garantire un funzio-
namento.
- Salvo diversamente specicato nelle
istruzioni per l’uso, i dispositivi di pro-
tezione e parti danneggiate devono
essere riparati o sostituiti da un’ofci-
na specializzata riconosciuta.
- Interruttori danneggiati devono essere
sostituiti presso un’ofcina per il servi-
zio di assistenza clienti.
- Non usare elettroutensili, nei quali
non è possibile accendere o spegne-
re l’interruttore. Pericolo di lesioni.
• Attenzione! L’uso di altri utensili e ac-
cessori può generare pericoli di lesioni.
• Fare riparare l’elettroutensile da
parte di un elettricista esperto.
Questo elettroutensile corrisponde alle
disposizioni di sicurezza in materia. Ri-
parazioni possono essere eseguite solo
da un’ofcina specializzata, nella quale
vengono usati ricambi originali; in caso
contrario possono vericarsi incidenti
per l’utilizzatore.
Ulteriori indicazioni di sicu-
rezza
• Collegare l’apparecchio solo a una
presa dotata di circuito di sicurezza
per correnti di guasto (interruttore FI)
con una corrente di guasto nominale di
massimo 30 mA.
• Tenere il cavo di rete e la prolunga
lontani dalla mola abrasiva. In caso di
danneggiamento o tranciatura staccare
immediatamente la spina dalla presa.
Non toccare la conduttura, prima che
sia stata staccata dalla rete.
Pericolo di schock elettrico
• La sostituzione della spina o del cavo
di alimentazione deve essere eseguita
esclusivamente dal costruttore dell’u-
tensile elettrico o dal rispettivo centro
assistenza, al ne di evitare l’insorgere
di pericoli.
• Accendere l’apparecchio solamente
dopo averlo ssato saldamente al pia-
no di lavoro.
• Per la propria sicurezza si raccomanda
di utilizzare solamente gli accessori

2 8
I T M T
saldo, in modo da evitare che scivoli e
che le mani entrino conseguentemente
in contatto con la mola.
• Durante la levigatura il pezzo si surri-
scalda. Non afferrarlo dal lato di lavo-
razione, lasciarlo raffreddare. Pericolo
di ustione! Non usare refrigeranti o
sostanze simili.
• Non usare l’apparecchio in caso di
stanchezza o dopo l’assunzione di alcol
o di medicinali. Interrompere sempre il
lavoro a tempo debito.
• Spegnere l’apparecchio ed estrarre la
spina
- per sbloccare un accessorio bloccato,
- se il cavo di alimentazione è danneg-
giato o si è ingarbugliato,
- in presenza di rumori inconsueti.
• Utilizzare l‘apparecchio solo in posizi-
one verticale e stabile e vericarne il
posizionamento sicuro.
Rischi residui
Anche se questo utensile elettrico viene
usato conformemente alle disposizioni,
rimangono sempre rischi residui. I seguenti
pericoli possono vericarsi in relazione
alla tipologia costruttiva e al tipo di esecu-
zione di questo elettrodomestico:
a) Danni ai polmoni, in caso di mancato
utilizzo di un apposito dispositivo di
protezione delle vie respiratorie.
b) Danni all’udito, in caso di mancato
utilizzo di un’apposita protezione acu-
stica.
c) Danni alla salute dovuti a
- il contatto con gli utensili di levigatura
in un’area non coperta;
- la proiezione di parti del pezzo in
lavorazione o di una mola danneg-
giata.
d) Danni alla salute risultanti dalle oscilla-
zioni mano-braccio, quando l’apparec-
e i dispositivi ausiliari indicati nelle
istruzioni d’uso o raccomandati, ovvero
indicati, dal costruttore dell’utensile.
• Utilizzare solamente gli utensili di le-
vigatura raccomandati dal costruttore.
Non utilizzare lame da sega Assicurarsi
che le dimensioni siano adatte all’appa-
recchio.
• Utilizzare solo mole il cui numero di giri
indicato corrisponde almeno a quello ri-
portato sulla targa identicativa dell’ap-
parecchio.
• Sottoporre la mola a un’ispezione visi-
va prima dell’utilizzo. Non usare mole
danneggiate o deformate. Sostituire la
mola quando usurata.
• Non usare mai l’apparecchio senza pa-
rascintille o calotta protettiva.
Regolare il parascintille periodicamen-
te, in modo da compensare l’usura del-
la mola (distanza max. 2 mm).
• Sostituire la mola non appena risulta
impossibile regolare il parascintille e il
poggiapezzo a una distanza massima
di 2 mm.
• Assicurarsi che le scintille provocate
dalla levigatura non costituiscano un
pericolo, ad esempio che non colpi-
scano persone o incendino sostanze
inammabili.
• Durante la levigatura, la spazzolatura e
la troncatura usare sempre gli occhiali
protettivi, i guanti di sicurezza, un di-
spositivo di protezione delle vie respira-
torie e le protezioni acustiche.
• Non tenere mai le dita fra la mola e il
parascintille, ovvero in prossimità della
calotta protettiva. Pericolo di schiaccia-
mento!
• Le parti rotanti dell’apparecchio non
possono essere coperte per non com-
promettere il funzionamento. Pertanto, si
raccomanda di procedere con attenzio-
ne e di tenere il pezzo da lavorare ben

2 9
I T M T
chio viene usato per un periodo prolun-
gato o non viene condotto o manutenuto
conformemente alle disposizioni.
Avvertenza! Questo utensile elettri-
co genera un campo magnetico du-
rante il funzionamento. In determi-
nate condizioni questo campo può
compromettere gli impianti medici
attivi o passivi. Per ridurre il perico-
lo di lesioni gravi o letali, consiglia-
mo alle persone con impianti medici
di consultare il medico e il produt-
tore dell’impianto medico prima di
azionare la macchina.
Montaggio
Attenzione! Pericolo di feri-
mento!
- Assicurarsi di disporre di uno spa-
zio sufciente allo svolgimento del
lavoro e di non compromettere la
sicurezza di altre persone.
- Fissare sempre l’apparecchio al
piano di lavoro con viti di lun-
ghezza e spessore sufcienti, in
modo da non perdere il controllo
dello stesso.
- Prima della messa in funzione mon-
tare correttamente tutte le coperture
e i dispositivi di protezione.
- Estrarre la spina prima di regola-
re l’apparecchio.
Montaggio/regolazione dei
poggiapezzi
1. Fissare i poggiapezzi (6) all’ap-
parecchio.
Per questa operazione utilizzare
la vite (16), la rondella (15), la
puleggia dentata (14) e il dado a
stella (7) in dotazione.
2. Regolare il poggiapezzo (6) del-
la mola a secco con la manopola
a stella (7). La distanza fra la
mola a secco (5) e il poggiapez-
zo (6) non deve superare i 2 mm.
Regolare il poggiapezzo periodica-
mente, in modo da compensare l’usu-
ra della mola (distanza max. 2mm).
Montaggio/regolazione il
parascintille
1. Avvitare il supporto del parascin-
tille (18) sulla calotta di protezio-
ne
(
25). Utilizzare a tal ne la
vite di regolazione (21) inclusi
l’anello a molla e la rondelle
(20/19) e il dado (17).
2. Regolare il parascintille (18) con
le viti di regolazione (21): La dis-
tanza fra la mola a secco (
5)
e il supporto del parascintille (18)
non deve superare i 2 mm.
In seguito regolare il parascintille pe-
riodicamente, per compensare l’usu-
ra delle mole (distanza max. 2mm).
Durante il lavoro, anche con i para-
scintille, indossare sempre occhiali
di protezione per evitare lesioni
agli occhi.
Fissaggio dell’apparecchio al
banco di lavoro
1. Rimuovere il piedino di gomma
(10) del contenitore di acqua.
2. Fissare l’apparecchio al piano di
lavoro con 4 viti e dadi.
A tal ne introdurre le viti nei 4 fori
(9) alla base dell’apparecchio.

3 0
I T M T
Le viti e i dadi di montaggio non
sono forniti con l’apparecchio.
Riempimento dell’acqua nel
contenitore d’acqua
1. Applicare la chiusura in gomma
(11) nell‘apertura di deusso del
contenitore di acqua (13).
2. Riempire no alla tacca dell’ac-
qua
acqua nel contenitore
acqua (13).
Comando
Attenzione! Pericolo di lesioni!
- Staccare la spina elettrica prima
di eseguire qualsiasi lavoro all‘ap-
parecchio.
- Usare solo mole e accessori consi-
gliati dal produttore. L’uso di altri
utensili e altri accessori può gene-
rare pericoli di lesioni.
- Usare solo utensili di levigatura
che riportano informazioni sul co-
struttore, il tipo di collegamento, le
dimensioni e il numero di giri per
cui è omologato.
- Utilizzare solo mole il cui numero
di giri indicato corrisponde alme-
no a quello riportato sulla targa
identicativa dell’apparecchio.
- Non usare mole spezzate, incrina-
te o danneggiate in altro modo.
- Non azionare mai l’apparecchio
senza visiera
- Ispezionare la mola prima dell’u-
so.
Vericare la distanza fra il para-
scintille e la mola nonché fra il
poggiapezzo e la mola (distanza
massima 2 mm).
- Sostituire la mola non appena
risulta impossibile posizionare il
parascintille e il poggiapezzo a
una distanza massima di 2 mm
dalla stessa.
- Accendere l‘apparecchio solo
dopo che è stato montato in modo
sicuro sulla supercie di lavoro.
Tenere le mani a distanza
dalla mola durante il funzio-
namento dell’apparecchio.
Pericolo di ferimento!
Durante il lavoro, anche con i para-
scintille, indossare sempre occhiali
di protezione per evitare lesioni agli
occhi.
Accensione e spegnimento
Prestare attenzione che la tensione
dell‘allacciamento alla rete corri-
sponda alla targhetta del tipo posta
sull‘apparecchio.
Collegare l‘apparecchio alla tensio-
ne di rete.
1. Per accendere l’apparecchio premere
l’interruttore di accensione “I“ (
8),
l’apparecchio viene avviato.
2. Per spegnere l’apparecchio premere
l’interruttore di spegnimento “0“ (
8),
l’apparecchio si spegne.
Dopo l’accensione attendere nché l’appa-
recchio ha raggiunto la velocità massima.
Solo allora procedere con la levigatura.
La mola abrasiva continua a
ruotare, dopo che l‘apparec-
chio è stato spento. Pericolo di
lesioni.

3 1
I T M T
Ciclo di prova:
Prima di eseguire il primo lavoro e dopo
ogni sostituzione della mola abrasiva,
effettuare un ciclo di prova di minimo
60secondi senza carico. Spegnere subito
l‘apparecchio se la mola abrasiva non gira
in modo uniforme, si veri cano notevoli
oscillazioni oppure si sentono rumori anor-
mali.
Molatura con la mola a secco
• Posizionare il pezzo da lavorare sul
poggiapezzo (
6) e guidarlo len-
tamente verso la mola a secco (
5)
all’inclinazione desiderata.
• Muovere il pezzo leggermente avanti e
indietro in modo da ottenere un risultato
di levigatura ottimale. In questo modo
si garantisce un’usura uniforme della
mola a secco. Di tanto in tanto lasciare
raffreddare il pezzo.
• Piegare il parascintille (
2) durante
la molatura verso il basso per evitare le-
sioni dovute alla formazione di scintille.
Molatura con la mola a umido
• Veri care il livello dell’acqua nel conte-
nitore d’acqua: La mola a umido (
1) deve trovarsi in acqua no alla tacca
dell’acqua
sul contenitore d’acqua
(
13).
• Posizionarsi davanti alla mola a umido
(
1).
• Tenere il pezzo con le due mani e ab-
bassarlo lentamente sulla mola a umi-
do.
•
Il pezzo può essere supportato anche sui
denti del contenitore di acqua (
13).
Sostituzione della mola
Indicazioni per la sostituzione:
• Non usare mai l’apparecchio sen-
za i dispositivi di protezione.
• Assicurarsi che il numero di giri
indicato sulla mola sia uguale o
maggiore al numero di giri nomi-
nale a vuoto dell’apparecchio.
• Assicurarsi che le dimensioni
della mola siano adatte all’appa-
recchio.
• Utilizzare solamente mole in
perfetto stato (Prova del suono: le
mole integre sospese a una corda
producono un suono nitido se col-
pite con un martello di plastica).
• Non ingrandire il foro della mola
se troppo piccolo.
• Non usare una bussola di ridu-
zione separata o un adattatore
per adattare le mole dotate di un
foro troppo grande.
• Non utilizzare lame da sega.
• Per il serraggio degli utensili di
levigatura usare solamente le
ange di ssaggio in dotazione.
Gli spessori fra la angia e l’u-
tensile devono essere in materiale
elastico, come gomma, cartone
morbido ecc.
• Dopo avere sostituito la mola,
rimontare completamente l’appa-
recchio.
Spegnere l’apparecchio ed estrarre
la spina. Lasciarlo raffreddare.
Durante la sostituzione della mola
indossare i guanti protettivi, in
modo da evitare di ferirsi taglian-
dosi.

3 2
I T M T
Sostituzione della mola a secco:
1. Rimuovere il parascintille ( 2)
(si veda „Montaggio/regolazio-
ne del parascintille“).
2. Allentare le viti di ssaggio ed
estrarre il coprimola (
4) dalla
calotta protettiva (
25).
3. Svitare il dado per mola (22) con
una chiave (chiave da 19) tenendo
la mola con una mano inguantata.
Svitare il dado (lettatura destror-
sa): ruotare in senso antiorario.
4. Estrarre la angia di ssaggio
(23) e la mola a secco (5).
5. Collocare la nuova mola a secco
(5) con gli strati intermedi in car-
tone (24) e la angia di ssaggio
(23) e avvitare manualmente il
dado per mola (22) sul dado (-
lettatura destrorsa):
ruotare in senso orario.
6. Stringere il dado per mola con una
chiave (chiave da 19) applicando
una forza manuale moderata.
7. Avvitare il coprimola (4)
8. Regolare il parascintille (
18)
e il portapezzo (
6): La distan-
za rispetto alla mola a secco (5)
non deve superare i 2 mm (vede-
re “Montaggio”).
Il dado della mola non deve essere
stretto eccessivamente per evitare
che la mola e il dado si rompano.
8. Ciclo di prova: Prima di eseguire il
primo lavoro e dopo ogni sostituzione
della mola abrasiva, effettuare un ciclo
di prova di minimo 60 secondi senza
carico. Spegnere subito l‘apparecchio se
la mola abrasiva non gira in modo uni-
forme, si vericano notevoli oscillazioni
oppure si sentono rumori anormali.
Sostituzione della mola a umido:
1. Allentare le 4 viti di ssaggio
(13a/13b/13c/13d) sulla scatola
ingranaggio (28) ed estrarre il
contenitore d’acqua (13).
2. Svitare il dado per mola (22) con
una chiave (chiave da 19) te-
nendo la mola a umido con una
mano inguantata.
Svitare il dado (lettatura destror-
sa): ruotare in senso antiorario.
3. Rimuovere la angia di ssaggio
in plastica (26) e la mola a umi-
do (1).
4. Collocare la nuova mola a umido
(1) e la angia di ssaggio in
plastica (26) con la rondella e
avvitare manualmente il dado per
mola (22) sul
dado destro (lettatura destror-
sa): ruotare in senso orario.
Le due ange di ssaggio in plasti-
ca (26/27) non sono identiche.
5. Stringere il dado per mola (22)
con una chiave (chiave da 19)
applicando una forza manuale
moderata.
6. Far scorrere di nuovo il conteni-
tore di acqua (13) sulla mola a
umido (1) e sull’alloggiamento
del meccanismo (28).
7. Fissare il contenitore di acqua
(13) con le quattro viti di ssag-
gio e le rondelle sulla scatola
ingranaggio (28).
Il dado della mola non deve essere
stretto eccessivamente per evitare
che la mola e il dado si rompano.

3 3
I T M T
Fra la angia di ssaggio (27) e la
scatola ingranaggio (28) si trova
una rondella (29).
8. Ciclo di prova:
Prima di eseguire il primo lavoro e
dopo ogni sostituzione della mola
abrasiva, effettuare un ciclo di prova di
minimo 60 secondi senza carico. Spe-
gnere subito l‘apparecchio se la mola
abrasiva non gira in modo uniforme, si
veri cano notevoli oscillazioni oppure
si sentono rumori anormali.
Pulizia e manutenzione
Staccare la spina elettrica prima
di eseguire qualsiasi intervento di
regolazione, manutenzione o ripa-
razione.
Fare eseguire il lavoro non
descritti nelle presenti istru-
zionidaun‘ofcinaspecia-
lizzata. Usare solo ricambi
originali. Lasciare raffred-
dare l‘apparecchio prima di
eseguire qualsiasi lavoro di
manutenzione e riparazione.
Pericolo di ustioni!
Pulizia
Non usare detergenti o solventi ag-
gressivi. Le sostanze chimiche pos-
sono aggredire le parti di plastica
dell‘apparecchio. Non pulire mai
l‘apparecchio sotto acqua corrente.
• Pulire a fondo l‘apparecchio dopo ogni
uso.
• Pulire la super cie dell‘apparecchio con
una spazzola morbida, un pennello o
un panno.
Lavori di manutenzione
generici
Controllare l‘apparecchio prima di ogni
uso per veri care la presenza di eventuali
difetti come parti allentate, consumate o
danneggiate, il corretto ssaggio delle viti
o la corretta sede delle altri parti. Control-
lare in particolare la mola abrasiva. Sosti-
tuire le parti danneggiate.
Conservacione
• Prima dello stoccaggio svuotare il con-
tenitore d’acqua (
13): rimuovere la
chiusura in gomma (
11) dall’apertu-
ra di scarico del contenitore d’acqua e
lasciare de uire l’acqua.
• Conservare l’apparecchio in un luogo
asciutto e privo di polvere, lontano dal-
la portata dei bambini.
• Le mole devono essere conservate in
posizione verticale in un luogo asciutto
e non devono essere accatastate.
Smaltimento/Tutela
dell’ambiente
Effettuare lo smaltimento dell’apparecchio,
degli accessori e della confezione nel
rispetto dell’ambiente presso un punto di
raccolta per riciclaggio.
Le apparecchiature non si devono
smaltire insieme ai ri uti domestici.
Smaltire l’imballaggio esterno
in cartone ondulato in modo da
garantirne il corretto riciclaggio nel
rispetto dell’ambiente.
• Consegnare l’apparecchio presso un
centro di raccolte e ricupero. Le parti
plastiche e di metallo usate potranno

3 4
I T M T
essere selezionate e avviate al ricupero.
Chiedere informazioni a riguardo al
nostro centro assistenza clienti.
• Lo smaltimento degli apparecchio difet-
tosi consegnati viene effettuato gratuita-
mente.
Pezzi di ricambio/Accessori
È possibile ordinare pezzi di ricambio e accessori all’indirizzo
www.grizzly-service.eu
Se non si dispone di una connessione Internet, contattare telefonicamente il centro di as-
sistenza (vedere “Service-Center” a pag. 37). Tenere a portata di mano i numeri d’ordine
riportati in basso.
Pos. Denominazione Numeri
Istruzioni d’ordine
per l’uso
5 Mola a secco 91103553
1 Mola a umido 30211041
11,13 Set contenitore per acqua 30211042
22,26,27 Set angia di ssaggio, umido 30211043
22,23 Set angia di ssaggio, secco 30211044
2,3,17-21 Set parascintille 30211045
6,7,14-16 Set poggiapezzo 30211046
4 Set coprimola 30211047
25 Set calotta protettiva per mola a secco 30211048

3 5
I T M T
Ricerca di guasti
Spegnere l’apparecchio ed estrarre la spina. Lasciarlo raffreddare.
Pericolo di scossa elettrica!
Problema Possibile causa Soluzione
L’apparecchio non
si accende
Manca la tensione di rete
Il salvavita si attiva
Ispezionare la presa, il cavo di
rete, la linea, la spina, eventuali
riparazioni dell’elettricista, il
salvavita.
Interruttore di accensione /
spegnimento (
8) difettoso
Riparazione al centro assistenza
Motore difettoso
Gli utensili di
levigatura non si
muovono anche se
il motore gira
Dado della mola (
22)
allentato
Stringere il dado della mola (si
veda “Sostituzione della mola”)
Il pezzo da lavorare, residui
dello stesso o degli utensili di
levigatura bloccano l’aziona-
mento
Rimuovere le cause di blocco
Il motore rallenta e
si ferma
Il pezzo sovraccarica l’appa-
recchio
Ridurre la pressione sull’utensile
di levigatura
Il pezzo da lavorare non è
adatto
La mola ruota in
modo irregolare,
si odono rumori
inconsueti
Dado della mola (
22)
allentato
Stringere il dado della mola (si
veda “Sostituzione della mola”)
Mola (
1/5) difettosa
Sostituire la mola
Parascintille (
2) o poggia-
pezzo (
6) non regolato
correttamente
Regolare il parascintille o il pog-
giapezzo (si veda “Montaggio”)

3 6
I T M T
Garanzia
Gentile cliente,
Su questo apparecchio Le viene concessa
una garanzia di 3 anni a partire dalla
data di acquisto.
In caso di difetti di questo prodotto può
avanzare diritti legali nei confronti del
venditore del prodotto. Tali diritti legali non
vengono limitati dalla nostra garanzia qui
di seguito rappresentata.
Condizioni di garanzia
Il termine di garanzia inizia con la data di
acquisto. La preghiamo di conservare in
un luogo sicuro lo scontrino scale origina-
le. Questo documento viene richiesto come
prova d’acquisto.
Qualora subentrasse un difetto di materiale
o di fabbricazione entro tre anni a partire
dalla data di acquisto di questo prodotto,
il prodotto verrà riparato o sostituito – a
nostra discrezione - gratuitamente da noi.
Questa prestazione di garanzia presuppo-
ne che venga presentato entro il termine di
tre anni l’apparecchio difettoso e la prova
d’acquisto (scontrino scale) e descritto
brevemente per iscritto in che cosa consiste
il difetto e quando si è vericato.
Se il difetto è coperto dalla nostra garan-
zia, riceverà il prodotto riparato oppure
un prodotto nuovo. Con la riparazione o
la sostituzione del prodotto non inizia un
nuovo periodo di garanzia.
Tempo di garanzia e diritti legali
per vizi della cosa
Il periodo di garanzia non viene prolunga-
to. Questo vale anche per parti sostituite
e riparate. Difetti e vizi presenti già al
momento dell’acquisto devono essere se-
gnalati immediatamente dopo la rimozione
dall’imballaggio. Riparazioni che accor-
rono dopo il periodo di garanzia sono a
pagamento.
Volume di garanzia
L’apparecchio è stato prodotto accurata-
mente secondo severe direttive di qualità
e controllato con coscienza prima della
consegna.
La prestazione di garanzia vale per difetti
di materiale o di fabbricazione. Questa
garanzia non si estende ai componenti
del prodotto che sono soggetti a normale
usura e che quindi possono essere visti
come parti di usura (p.es. mole, spazzole
di carbone, battuta, schermo protettivo) op-
pure per danneggiamenti delle parti fragili
(p.es. interruttori).
Questa garanzia decade se il prodotto è
stato danneggiato, non usato correttamen-
te o non manutenuto. Per un uso corretto
del prodotto devono essere osservate tutte
le indicazioni riportate nelle istruzioni per
l’uso. Destinazioni d’uso e azioni sconsi-
gliate nelle istruzioni d’uso o dalle quali
si viene avvertiti, sono tassativamente da
evitare.
Il prodotto è destinato solo per i privati e
non per uso commerciale. In caso di uso
improprio, esercizio della forza e inter-
venti non effettuati dalla nostra liale di
assistenza tecnica autorizzata, decade la
garanzia.
Svolgimento in caso di garanzia
Per garantire una rapida elaborazione del-
la Sua pratica, La preghiamo di seguire le
seguenti indicazioni:
• Per tutte le richieste tenere a portata di
mano lo scontrino scale e il codice di
identicazione (IAN 304988) come pro-
va d’acquisto.
• I codici articolo sono riportati sulla tar-
ghetta del tipo.

3 7
I T M T
• Nel caso in cui si dovessero vericare
difetti funzionali o altri vizi, La preghia-
mo di contattare telefonicamente o per
e-mail. Riceverà ulteriori informazioni
sullo svolgimento del Suo reclamo.
• Un prodotto rilevato come difettoso può
essere inviato con porto franco all’indi-
rizzo di assistenza comunicato, previa
consultazione del nostro servizio di
assistenza tecnica, allegando la prova
d‘acquisto (scontrini scali) e l’indica-
zione, in che cosa consiste il difetto e
quando si è vericato. Per evitare pro-
blemi di accettazione e costi aggiuntivi,
usare tassativamente solo l’indirizzo
che Le è stato comunicato. Assicurarsi
che la spedizione non avvenga in porto
assegnato, con merce ingombrante,
corriere espresso o altro carico specia-
le. Spedire l’apparecchio inclusi tutti gli
accessori forniti insieme al momento
dell’acquisto e garantire un imballaggio
di trasporto sufcientemente sicuro.
Servizio di riparazione
Riparazioni non soggette alla garanzia
possono essere effettuate dietro fattura dal-
la nostra liale di assistenza tecnica previo
preventivo gratuito da parte della stessa.
Possiamo lavorare solo apparecchi che
vengono spediti sufcientemente imballati
e affrancati.
Attenzione: Spedire l’apparecchio alla
nostra liale in condizioni pulite e con l’in-
dicazione del difetto. Apparecchi spediti in
porto assegnato - con merce ingombrante,
corriere espresso o altro carico speciale -
non vengono accettati.
Lo smaltimento degli apparecchi difettosi
spediti viene effettuato da noi gratuitamen-
te.
Service-Center
I T
Assistenza Italia
Tel.: 02 36003201
E-Mail: [email protected]
IAN 304988
M T
Assistenza Malta
Tel.: 80062230
E-Mail: [email protected]
IAN 304988
Importatore
Non dimenticare che il seguente indirizzo
non è un indirizzo di assistenza tecnica.
Contattare prima di tutto il centro di assi-
stenza tecnica sopra nominato.
Grizzly Tools GmbH & Co. KG
Stockstädter Straße 20
63762 Großostheim
Germania
www.grizzly-service.eu

G B M T
3 8
Introduction
Congratulations on the purchase of your
new device. With it, you have chosen a
high quality product.
During production, this equipment has
been checked for quality and subjected to
a nal inspection. The functionality of your
equipment is therefore guaranteed.
The operating instructions constitute
part of this product. They contain
important information on safety, use
and disposal. Before using the prod-
uct, familiarise yourself with all of
the operating and safety instructions.
Use the product only as described
and for the applications specied.
Keep this manual safely and in the
event that the product is passed on,
hand over all documents to the third
party.
Intended use
The wet/dry grinder is suitable for sharp-
ening tools (e.g. knives, scissors, chisels),
and deburring and grinding smaller metal
workpieces.
The device is not intended for all other
types of applications (e.g. grinding with
unsuitable grinding tools, grinding with a
coolant solution, grinding hazardous mate-
rials such as asbestos).
The equipment is intended for use in the
eld of DIY. It is not designed for commer-
cial use.
The equipment is designed for use by
adults. Young people under the age of 16
are permitted to use the equipment only
under supervision. The manufacturer shall
not be liable for damages caused by use
other than for the intended purpose or by
incorrect operation.
Content
Introduction ...............................38
Intended use .............................. 38
General description ....................39
Scope of delivery ........................... 39
Function description........................ 39
Summary ...................................... 39
Technicalspecications ...............40
Safety Instructions......................41
Symbols and icons ......................... 41
General safety instructions .............. 42
Further Safety Instructions ................ 43
Residual risks ................................. 44
Assembly ...................................45
Assemble/set workpiece supports .... 45
Assemble/adjust spark protection .... 45
Screw device on to workbench ........ 45
Fill water into the water tank ............ 46
Operation ..................................46
Switching on and off ...................... 46
Grinding with the dry grinding disc .. 47
Grinding with the wet grinding disc . 47
Change grinding disc ..................... 47
Cleaning and maintenance .........49
Cleaning ....................................... 49
General maintenance ..................... 49
Storage ......................................49
Waste disposal and
environmental protection ...........49
Replacement par ts/accessories ...50
Trouble Shooting ........................51
Guarantee .................................52
Repair Service ............................ 53
Service-Center ............................53
Importer .................................... 53
Translation of the original
EC declaration of conformity ......72

G B M T
3 9
General description
The illustrations can be found
on the front and rear fold-out
pages.
Scope of delivery
Unpack the equipment and check that it is
complete. Dispose of the packaging mate-
rial correctly.
• Device with pre-assembled grinding
discs
• Spark protection
• Assembly material for mounting the
spark protection on the machine
- adjusting screw incl. washer and
snap ring, nut
• Workpiece support
• Assembly material for mounting the
workpiece support on the machine
- star grip nut, washer, lock washer
and screw
• Rubber cap for water tank
• Instruction Manual
Function description
The wet/dry grinder is a combined device
that is equipped with a dry grinding disc
and a wet grinding disc with different
grain sizes for coarse and ne grinding.
The device is provided with a spark protec-
tion and protective hoods for the protection
of the user.
For the function of the operating parts,
please refer to the descriptions below.
Summary
1 Wet grinding disc
2 Spark protection
3 Adjusting screw nut for spark pro-
tection
4 Dry grinding disc cover
5 Dry grinding disc
6 Workpiece support
7 Star grip nut to mount/adjust the
workpiece support
8 On/off switch
9 Drillholes for table mounting
10 Rubber foot (water tank)
11 Rubber cap for water tank
12 Power cable
13 Water tank
14 Lock washer
15 Washer
16 Mounting screw for workpiece
support
17 Nut
18 Spark protection holder
19 Washer
20 Spring ring
21 Adjusting screw for spark protec-
tion fastener
22 Grinding disc nut
23 Clamping ange
24 Intermediate layers made of card-
board
25 Protective hood for dry grinding
disc
26 Clamping ange made of plastic
27 Clamping ange made of plastic
28 Gear unit housing
29 Washer

G B M T
4 0
Technical specications
Wet/Dry Grinder ................. PNTS 250 B1
Nominal input voltage U ...230 V~, 50 Hz
Power consumption P ................... 250 W
(S2 30 min)*
Safety class ..........................................I
Mechanical rating ............................IPX0
Idling speed n
0
wet grinding disc ...... approx. 128 min
-1
dry grinding disc .... approx. 2950 min
-1
Weight (incl. accessories) .. approx. 8.6 kg
Sound pressure level
(L
pA
) ..................... 80 dB (A); K
pA
= 3 dB
Sound power level
(L
WA
) .................... 93 dB(A); K
WA
= 3 dB
Vibration total value (a
h
) .......... 2.5 m/s
2
Wet grinding disc
Outer diameter ...................Ø 200 mm
Bore hole .............................Ø 20 mm
Thickness .................................40 mm
Grain size ...................................... 80
Speed n
max
......................... 3820 min
-1
Working speed v
s
............. max. 40 m/s
Dry grinding disc
Outer diameter ...................Ø 150 mm
Bore hole ..........................Ø 12.7 mm
Thickness .................................20 mm
Grain size ...................................... 36
Speed n
max
......................... 4500 min
-1
Working speed v
s
............. max. 35 m/s
* A break is introduced after 30 minutes of
uninterrupted operating duration until the de-
vice temperature differs 2 K (2°C) less than
room temperature.
Noise and vibration values have been
determined according to the standards and
regulations mentioned in the declaration of
conformity.
The stated vibration emission value was
measured in accordance with a standard
testing procedure and may be used to com-
pare one power tool to another.
The stated vibration emission value may
also be used for a preliminary exposure
assessment.
Warning!
The vibration emission value may
differ during actual use of the
power tool from the stated value
depending on the manner in which
the power tool is used.
Try to keep the exposure to vibra-
tions as low as possible. Examples
of measures to reduce vibration
exposure are the wearing of gloves
when using the tool and limiting the
working hours. For this purpose all
parts of the operating cycle have to
be considered (for example, times
when the electric tool is switched
off and times when it is switched on
but running without any load).

G B M T
4 1
Safety Instructions
WARNING!
When using power tools, observe
the following basic safety measures
for the prevention of electric shocks
and the risk of injury and re.
Please read all these instructions
before using the electric tools and
please keep the safety instructions.
Symbols and icons
Symbols in the manual:
Warning symbols with in-
formation on damage and
injury prevention.
Instruction symbols with information
on preventing damage.
Connect the machine to the power
supply..
Pull out the mains plug.
Help symbols with information on
improving tool handling.
Symbols on the device:
Warning!
Risk of injury from the rotating tool!
Keep hands away.
Risk of electric shock! Disconnect
from the mains before carrying out
maintenance and repair work.
Read the instruction manual.
Wear ear protection.
Wear eye protection.
Wear breathing protection.
Wear cut-resistant gloves.
Use grinding disc only for dry
grinding.
Use grinding disc only for grinding
with water.
Do not dispose of electrical equip-
ment in household waste.
Other symbols on the discs:
Never use faulty grinding discs.
Graphical symbol on the pa-
ckaging:
Corrugated cardboard

G B M T
4 2
General safety instructions
The term “power tool” used in the safety
instructions refers to mains-operated electric
tools (with a mains cable) and to battery-op-
erated electric tools (without a mains cable).
Safe operation:
• Keep work area clear. Cluttered
areas and benches invite injuries.
• Consider work area environment.
- Do not expose tools to rain. Do not
use tools in damp or wet locations.
Water entering a power tool will in-
crease the risk of electric shock.
- Keep work area well lit.
- Do not use tools in the presence of
ammable liquids or gases.
Power tools create sparks which may
ignite the dust or fumes.
• Guard against electric shock.
Avoid body contact with earthed or
grounded surfaces (e.g. pipes, radia-
tors, ranges, refrigerators).
• Keep other persons away.
Do not let persons, especially children,
not involved in the work touch the tool
or the extension cord and keep them
away from the work area.
• Store idle tools. When not in use,
tools should be stored in a dry locked-
up place, out of reach of children.
• Do not force the tool. It will do
the job better and safer at the rate for
which it was intended.
• Use the right tool.
- Do not force small tools to do the job
of a heavy duty tool.
- Do not use tools for purposes not
intended; for example do not use cir-
cular saws to cut tree limbs or logs.
Use of the power tool for operations dif-
ferent from those intended could result
in a hazardous situation.
• Dress properly.
- Do not wear loose clothing or jewel-
lery, they can be caught in moving
parts.
- Anti-slip footwear is recommended
when working outdoors.
- Wear protective hair covering to con-
tain long hair.
• Use protective equipment.
- Use safety glasses.
- Use face or dust mask if working op-
erations create dust.
• Connect dust extraction equip-
ment. If the tool is provided for the
connection of dust extraction and col-
lecting equipment, ensure these are con-
nected and properly used.
• Do not abuse the cord. Never
yank the cord do disconnect it from the
socket. Keep the cord away from heat,
oil and sham edges.
• Secure work. Where possible use
clamps or a vice to hold the work. It is
safer than using your hand.
• Do not overreach. Keep proper foot-
ing and balance at all times.
This enables better control of the power
tool in unexpected situations.
• Maintain tools with care.
Many accidents are caused by poorly
maintained power tools.
- Keep cutting tools sharp and clean for
better and safer performance.
- Follow instruction for lubricating and
changing accessories.
- Inspect tool cords periodically and if
damaged have them repaired by an
authorized service facility.
- Inspect extension cords periodically
and replace if damaged.
- Keep handles dry, clean and free
from oil and grease.
• Disconnect tools. When not in use,
before servicing and when changing

G B M T
4 3
accessories disconnect tools from the
power supply.
Such preventive safety measures reduce
the risk of starting the power tool acci-
dentaIly.
• Remove adjusting keys and
wrenches. Form the habit of checking
to see that keys and adjusting wrenches
are removed from the tool before turn-
ing it on. A wrench or a key left at-
tached to a rotating part of the power
tool may result in personal injury.
• Avoid unintentional starting.
Ensure switch is in “off” position when
plugging in.
• Use outdoor extension leads.
When the tool is used outdoors, use
only extension cords intended for out-
door use and so marked.
• Stay alert, watch what you are
doing and use common sense
when operating a power tool.
Do not use a power tool while you are
tired or under the inuence of drugs,
alcohol or medication. A moment of
inattention white operating power tools
may result in serious personal injury.
• Check damaged parts.
This will ensure that the safety of the
power tool is maintained.
- Before further use of tool, it should be
carefully checked to determine that it
will operate properly and perform its
intended function.
- Check for alignment of moving parts,
binding of moving parts, breakage of
parts, mounting and any other condi-
tions that may affect its operation.
- A guard or other part that is dam-
aged should be properly repaired or
replaced by an authorized service
centre unless otherwise indicated in
this instruction manual.
- Have defective switches replaced by
an authorized service centre.
- Do not use the tool if the switch does
not turn it on and off.
There is a risk of injury.
• Warning.
The use of any accessory or attachment
other than one recommended in this
instruction manual may present a risk of
personal injury.
• Have your tool repaired by a
qualiedperson.This electric tool
complies with the relevant safety rules.
Repairs should only be carried out by
qualied persons using original spare
parts, otherwise this may result in consid-
erable danger to the user.
Further Safety Instructions
• Connect the device only to a power
point with a residual current protective
device (RCD) with a measured residual
current of not more than 30 mA.
• Keep the mains cable and extension
cable away from the grinding disc. In
the event that it is damaged or severed,
immediately disconnect the plug from the
socket.
Do not touch the cable before it has
been disconnected from the mains.
Risk of electric shock.
• The replacement of the plug or the con-
nection line must always be executed
by the manufacturer of the electric tool
or his/her customer service in order to
avoid any hazards.
• Only switch the device on once it is
safely xed to the worktop.
• For your own safety only use accessories
and attachments which were stated in
the operating instructions or recommend-
ed or specied by the tool manufacturer.

G B M T
4 4
• If you are tired or have consumed al-
cohol or tablets, do not work with the
device. Always have a break on time.
• Switch the device off and remove the
mains plug
- to loosen a blocked insertion tool,
- if the connection line is damaged or
entangled,
- in case of unusual sounds.
• Only operate the equipment in an up-
right, standing position and ensure you
have secure footing.
Residual risks
Even if properly operating and handling this
electric tool, some residual risks will remain.
Due to its construction and build, this elec-
tric tool may present the following hazards:
a) Lung damage, if suitable respiratory
protection is not worn.
b) Hearing damage, if suitable ear protec-
tion is not worn.
c) Damages to health due to
- touching the area of the grinding tool
which was not covered;
- the ejection of pieces from workpiece
or damaged grinding discs.
d) Damage to your health caused by
swinging your hands and arms when
operating the appliance for longer pe-
riods of time or if the unit is not held or
maintained properly.
Warning! During operation, this
electric tool generates an electro-
magnetic eld which, under certain
circumstances, may impair the func-
tionality of active or passive medical
implants. To reduce the risk of seri-
ous or lethal injuries, we recommend
that persons with medical implants
consult their doctor and the manu-
• Only use grinding tools recommended
by the manufacturer. Do not use any
saw blades. Ensure that the dimensions
match those of the device.
• Only use grinding discs where the
printed rotational speed is at least as
high as what has been specied on the
name plate of the device.
• Carry out a visual inspection of the
grinding disc before use. Do not use
any damaged or deformed grinding
discs. Replace any damaged or worn
grinding discs.
• Never operate the device without spark
protection or protective hoods.
Periodically readjust the spark protection
in order to offset the wear and tear of
the grinding disc (distance max. 2 mm).
• Replace the grinding disc if the spark
protection and the workpiece support
can no longer be readjusted to a dis-
tance of max. 2 mm at the latest.
• Make sure that the sparks produced by
grinding do not present a danger, e.g.
reach people or ignite ammable sub-
stances.
• Always wear safety glasses, safety
gloves, respiratory protection and ear
protection when grinding, brushing and
separating.
• Never keep the ngers between the
grinding disc and spark protection or in
close proximity to the protective hoods.
There is a risk of crushing.
• The rotating parts of the device cannot
be covered due to functional reasons.
Therefore, proceed cautiously and hold
the workpiece rmly in order to avoid
slipping which could cause your hands to
come into contact with the grinding disc.
• The workpiece gets hot during grinding.
Do not touch the machined area, allow
it to cool down. There is a risk of burn-
ing. Do not use coolants or the like.

G B M T
4 5
facturer of their medical implant
before operating the machine.
Assembly
Caution! Risk of injury!
- Ensure that you have sufcient
space in which to work, and that
you do not endanger other peo-
ple.
- Always fasten the device on to
the work surface with screws
featuring the sufcient length and
thickness in order to maintain
control of the device.
- All covers and protective devices
must be assembled properly be-
fore commissioning.
- Disconnect the mains plug before
changing the setting on the de-
vice.
Assemble/set workpiece
supports
1. Screw the workpiece supports
(6) on to the device.
To do this, use the screw (16),
washer (15), toothed washer (14)
and star nut (7) supplied.
2. Set the workpiece support (6) of
the dry grinding disc with the star
grip nut (7) so that the distance
between the dry grinding wheel
(5) and the workpiece support (6)
must not exceed 2 mm.
Periodically readjust the workpiece
support in order to offset the wear
and tear of the grinding disc (dis-
tance max. 2 mm).
Assemble/adjust spark
protection
1. Screw the spark protection holder
(18) onto the protective hood
(
25). For this, use the adjus-
ting screw (21) including the snap
ring and washer (20/19) and the
nut (17).
2. Adjust the spark protection holder
(18) with the aid of the adjusting
screw (21) - The distance between
the dry grinding wheel (
5)
and the spark arrester holder (18)
must not exceed 2 mm. (see small
image).
Periodically readjust the spark pro-
tection in order to offset the wear
and tear of the grinding disc (dis-
tance max. 2mm).
Despite the spark protection, you
should always wear protective glass-
es when working in order to avoid
eye injuries.
Screw device on to workbench
1. Remove the rubber foot (10) of the
water container.
2. Screw the device onto the at
workbench with 4 screws and
nuts. Insert the screws through the
4bore holes (9) on the base of
the device.
The screws and nuts required for as-
sembly are not part of the scope of
delivery.

G B M T
4 6
Fill water into the water tank
1. Insert the rubber closure (11) into
the drain opening of the water
tank (13).
2. Fill water into the water tank (13)
up to the water level mark
.
Operation
Caution! Risk of injury!
- Always disconnect the plug from
the mains socket before working.
- Use only grinding discs and acces-
sories recommended by the manu-
facturer. The use of other insertion
tools and other accessories may
cause risk of injury.
- Only use grinding tools which
bear information about the manu-
facturer, type of binding, dimen-
sion and permitted number of
revolutions.
- Only use grinding discs where
the printed rotational speed is at
least as high as what has been
specied on the name plate of
the device.
- Do not use broken, cracked or oth-
erwise damaged grinding discs.
- Never operate the device without
the visual protection disc.
- Always inspect the grinding disc
before starting the device:
Check the distance between
the spark protection holder and
grinding disc as well as work-
piece support and grinding disc
(distance maximum 2 mm).
- The grinding disc must be re-
placed once the spark protection
holder and workpiece support
on the grinding disc do not have
distance of max. 2 mm.
- Switch on the equipment only
when it is safely installed on the
work surface.
Keep your hands away from
the grinding disc when the
device is in operation. Injury
hazard!
Despite the spark protection, you
should always wear protective
glasses when working in order to
avoid eye injuries.
Switching on and off
Ensure that the mains voltage
matches the specications on the
rating plate.
Connect the equipment to the mains.
1. To switch on, press the “I” On switch
(
8) and the device starts up.
2. To switch off, press the “0” off switch
(
8) and the device switches off.
After switching on the device, wait until the
device has reached its max. speed. Only
then must you start with the grinding.
The disc will continue to
run after the equipment is
switched off. There is a risk
of injury.
Test run:
Before starting work and after each
change of grinding disc, carry out a test
run of at least 60 seconds with no load.
Switch off the equipment immediately if the
disc runs lumpy, substantial vibrations oc-
cur, or abnormal noises are generated.

G B M T
4 7
Grinding with the dry
grinding disc
• Place the workpiece on the workpiece
support (
6) and slowly bring it to its
desired angle on the dry grinding disc
(
5).
• Move the workpiece slightly from side
to side in order to achieve an optimal
grinding result. This way, the dry grind-
ing disc is worn uniformly. Occasion-
ally, allow the workpiece to cool down.
• Fold the spark protection device (
2)
downwards while grinding in order to
avoid injury from sparks.
Grinding with the wet
grinding disc
• Check the water level in the water tank:
The wet grinding disc (
1) is to be
submerged in water up to the water level
mark
on the water tank ( 13).
• Stand in front of the wet grinding disc
(
1).
• Hold the workpiece with both hands
and lower it slowly onto the wet grind-
ing disc.
• The workpiece can also be supported
on the teeth of the water tank (
13).
Change grinding disc
Information on replacement:
• Never operate the device without
protective equipment.
• Ensure that the rotation speed
stated on the grinding disc is the
same or higher than the nominal
rotation speed of the device.
• Ensure that the grinding disc
dimensions match those of the
device.
• Only use awless grinding discs
(sound test: an undamaged grind-
ing disc hanging freely on a string
will result in a clear sound if it is
tapped with a plastic hammer).
• Never re-drill a locating hole which
is too small to make it larger.
• Never use separate bushings or
adapters in order to make grind-
ing discs whose hole is too large
t the device.
• Do not use any saw blades.
• To clamp the grinding tools only
use the clamping ange provid-
ed. The pads between the clamp-
ing ange and the grinding tools
must be made of elastic materials
e.g., rubber, soft cardboard etc.
• Always reassemble the device
completely after replacing the
grinding disc.
Switch the device off and remove
the mains plug.
Allow the device to cool down.
Wear protective gloves when
changing the grinding discs in or-
der to avoid cutting damages.
Change dry grinding disc:
1. Remove the spark protection (
2) (see „Assemble/adjust spark
protection”).
2. Loosen the xing screws and re-
move the dry grinding disc cover
(
4) from the protective hood
(25).
3. Unscrew the grinding disc
nut (22) with a screw wrench
(AF19mm) and hold against
the grinding disc with one hand
wearing a glove.

G B M T
4 8
Unscrew the nut (right-hand
thread): turn counter-clockwise.
4. Remove the clamping ange (23)
and the dry grinding disc (5).
5. Fit on the new dry grinding disc
(5) with the intermediate card-
board layers (24) and the clamp-
ing ange (23), and screw the
grinding disc nut (22) manually
onto the nut (right-hand thread):
turn clockwise.
6. Tighten the grinding disc nut with
a screw wrench (AF19mm) ap-
plying modest manual force.
7. Screw the dry grinding disc cover
(4).
8. Adjust the spark protection holder
(
18) and the workpiece sup-
port (
6) - The distance from the
dry grinding wheel (5) must not
exceed 2 mm (see „Assembly“).
The grinding disc nut must not be
screwed too tightly in order to
avoid a breaking of the grinding
disc and nut.
9. Test run: Before starting work and af-
ter each change of grinding disc, carry
out a test run of at least 60 seconds
with no load. Switch off the equipment
immediately if the disc runs lumpy, sub-
stantial vibrations occur, or abnormal
noises are generated.
Change wet grinding disc:
1. Release the 4 attachment screws
(13a/13b/13c/13d) on the gear-
box housing (28) and take off the
water tank (13).
2. Unscrew the grinding disc nut (22)
with a screw wrench (AF19mm)
and hold against the wet grinding
disc (1) with one hand wearing a
glove.
Unscrew the nut (right-hand th-
read): turn counter-clockwise.
3. Remove the plastic clamping an-
ge (26) and the wet grinding disc
(1).
4. Fit on the new wet grinding disc
(1) and the plastic clamping an-
ge (26) and screw the grinding
disc nut (22) manually onto the
right-side nut (right-hand thread):
turn clockwise.
The two plastic clamping anges
(26/27) are not identical.
5. Tighten the grinding disc nut with
a screw wrench (AF19mm) ap-
plying modest manual force.
6. Push the water tank (13) back
over the wet grinding disc (1) and
onto the gear unit housing (28).
7. .Attach the water tank (13)
with the attachment screws and
washers to the gearbox housing
(28).
The grinding disc nut must not be
screwed too tightly in order to
avoid a breaking of the grinding
disc and nut.
Between the clamping ange (27)
and the gearbox housing (28) there
is a washer (29).
8. Test run: Before starting work and af-
ter each change of grinding disc, carry
out a test run of at least 60 seconds
with no load. Switch off the equipment
immediately if the disc runs lumpy, sub-
stantial vibrations occur, or abnormal
noises are generated.

G B M T
4 9
Cleaning and
maintenance
Disconnect the plug before adjust-
ment, maintenance or repair.
Have any work not described
in these instructions carried
out by a specialist workshop.
Use only original components.
Allow the equipment to cool
before carrying out any main-
tenance and cleaning work.
There is a risk of burns.
Cleaning
Do not use cleaning agents or sol-
vents. Chemical substances may at-
tack plastic parts of the equipment.
Never clean the equipment under
running water.
• Clean the equipment thoroughly after
each use.
• Clean the surface of the equipment
with a brush or cloth.
General maintenance
Before each use, check the equipment
for obvious defects such as loose, worn
or damaged components and check that
screws or other parts are sitting correctly.
In particular, check the grinding disc. Re-
place damaged parts.
Storage
• Empty the water tank ( 13) before
storage: Pull the rubber closure (
11) from the drain opening of the wa-
ter tank and allow the water to drain
off
• Store the appliance in a dry place well
out of reach of children.
• Grinding discs must be stored dry and
upright and are not to be stacked.
Waste disposal and
environmental protection
Be environmentally friendly. Return the
tool, accessories and packaging to a recy-
cling centre when you have nished with
them.
Machines are not to be place with
domestic waste.
Recycle the corrugated
cardboard outer packaging in an
environmentally friendly manner.
• Hand over the device at an utilization
location. The plastic and metal parts
employed can be separated out into
pure materials and recycling can be
implemented. Ask your Service Center
about this.
• Defective units returned to us will be
disposed of for free.

G B M T
5 0
Replacement parts/accessories
Spare parts and accessories can be obtained at
www.grizzly-service.eu
If you do not have internet access, please contact the Service Centre via telephone
(see “Service-Center” page 53). Please have the order number mentioned below ready.
Position Description Order
Instruction number
manual
5 Dry grinding disc 91103553
1 Wet grinding disc 30211041
11,13 Set water tank 30211042
22,26,27 Set clamping ange, wet 30211049
22,23 Set clamping ange, dry 30211044
2,3,17-21 Set spark protection 30211045
6,7,14-16 Set workpiece support 30211046
4 Set dry grinding disc cover 30211047
25 Set protective hood for dry grinding disc 30211048

G B M T
5 1
Trouble Shooting
Always disconnect the plug from the mains socket before working.
Danger of electric shock.
Problem Possible Cause Error correction
Device doesn‘t start
Mains voltage missing
Main circuit breaker is tripped
Check the socket, mains cable,
line, mains plug, repairs to be
carried out by qualied electri-
cian if necessary, check main
circuit breaker.
On/off switch (
8) may be
defective
Repair by Customer Care
Engine faulty
Grinding tools do
not move although
the engine is run-
ning
Grinding disc nut (
22)
loose
Tighten grinding disc nut (see
“Changing the grinding disc“)
Workpiece, remaining work-
pieces or remaining grinding
tools block drive
Remove blockages
Engine is slower
and stops
Device is overloaded through
workpiece
Reduce pressure on grinding tool
Workpiece unsuitable
Grinding disc does
not rotate smoothly,
abnormal noises
can be heard
Grinding disc nut (
22)
loose
Tighten grinding disc nut (see
“Changing the grinding disc“)
Grinding disc (
1/5) faulty
Change grinding disc
Spark protection (
2) or
workpiece support (
6) set
incorrectly
Set spark protection or work-
piece support (see “Assembly“)

G B M T
5 2
Guarantee
Dear Customer, this equipment is provided
with a 3-year guarantee from the date of
purchase. In case of defects, you have stat-
utory rights against the seller of the prod-
uct. These statutory rights are not restricted
by our guarantee presented below.
Terms of Guarantee
The term of the guarantee begins on the
date of purchase. Please retain the original
receipt. This document is required as proof
of purchase.
If a material or manufacturing defect occurs
within three years of the date of purchase
of this product, we will repair or replace –
at our choice – the product for you free of
charge. This guarantee requires the defec-
tive equipment and proof of purchase to be
presented within the three-year period with
a brief written description of what consti-
tutes the defect and when it occurred.
If the defect is covered by our guarantee, you
will receive either the repaired product or a
new product. No new guarantee period be-
gins on repair or replacement of the product.
Guarantee Period and Statutory
Claims for Defects
The guarantee period is not extended by
the guarantee service. This also applies for
replaced or repaired parts. Any damages
and defects already present at the time of
purchase must be reported immediately af-
ter unpacking. Repairs arising after expiry
of the guarantee period are chargeable.
Guarantee Cover
The equipment has been carefully produced
in accordance with strict quality guidelines
and conscientiously checked prior to delivery.
The guarantee applies for all material and
manufacturing defects. This guarantee
does not extend to cover product parts
that are subject to normal wear and may
therefore be considered as wearing parts
(e.g.grinding discs, carbon brushes, stop-
per, protective screen) or to cover damage
to breakable parts (e.g. switches).
This guarantee shall be invalid if the prod-
uct has been damaged, used incorrectly or
not maintained. Precise adherence to all of
the instructions specied in the operating
manual is required for proper use of the
product. Intended uses and actions against
which the operating manual advises or
warns must be categorically avoided.
The product is designed only for private and
not commercial use. The guarantee will be
invalidated in case of misuse or improper han-
dling, use of force, or interventions not under-
taken by our authorised service branch.
Processing in Case of Guarantee
To ensure quick handling of you issue,
please follow the following directions:
• Please have the receipt and identica-
tion number (IAN 304988) ready as
proof of purchase for all enquiries.
• Please nd the item number on the rat-
ing plate.
• Should functional errors or other de-
fects occur, please initially contact the
service department specied below by
telephone or by e-mail. You will then
receive further information on the pro-
cessing of your complaint.
• After consultation with our customer
service, a product recorded as defective
can be sent postage paid to the service

G B M T
5 3
address communicated to you, with the
proof of purchase (receipt) and speci-
cation of what constitutes the defect
and when it occurred. In order to avoid
acceptance problems and additional
costs, please be sure to use only the ad-
dress communicated to you. Ensure that
the consignment is not sent carriage
forward or by bulky goods, express or
other special freight. Please send the
equipment inc. all accessories supplied
at the time of purchase and ensure ad-
equate, safe transport packaging.
Repair Service
For a charge, repairs not covered by the
guarantee can be carried out by our ser-
vice branch, which will be happy to issue
a cost estimate for you. We can handle
only equipment that has been sent with ad-
equate packaging and postage.
Attention: Please send your equipment to
our service branch in clean condition and
with an indication of the defect.
Equipment sent carriage forward or by
bulky goods, express or other special
freight will not be accepted.
We will dispose of your defective devices
free of charge when you send them to us.
Service-Center
G B
Service Great Britain
Tel.: 0871 5000 720
(£ 0.10/Min.)
E-Mail: [email protected]
IAN 304988
M T
Service Malta
Tel.: 80062230
E-Mail: [email protected]
IAN 304988
Importer
Please note that the following address is
not a service address. Please initially con-
tact the service centre specied above.
Grizzly Tools GmbH & Co. KG
Stockstädter Straße 20
DE-63762 Großostheim
GERMANY
www.grizzly-service.eu

DE AT CH
5 4
Einleitung
Herzlichen Glückwunsch zum Kauf Ihres
neuen Gerätes. Sie haben sich damit für ein
hochwertiges Gerät entschieden.
Dieses Gerät wurde während der Produkti-
on auf Qualität geprüft und einer Endkon-
trolle unterzogen. Die Funktionsfähigkeit
Ihres Gerätes ist somit sichergestellt.
Die Betriebsanleitung ist Bestandteil
dieses Gerätes. Sie enthält wichtige
Hinweise für Sicherheit, Gebrauch
und Entsorgung. Machen Sie sich vor
der Benutzung des Gerätes mit allen
Bedien- und Sicherheitshinweisen ver-
traut. Benutzen Sie das Gerät nur wie
beschrieben und für die angegebenen
Einsatzbereiche. Bewahren Sie die Be-
triebsanleitung gut auf und händigen
Sie alle Unterlagen bei Weitergabe
des Gerätes an Dritte mit aus.
Bestimmungsgemäße
Verwendung
Der Nass-/Trockenschleifer ist zum Schär-
fen von Werkzeugen (z.B. Messern,
Scheren, Meißeln) und zum Entgraten und
Schleifen von kleineren Werkstücken aus
Metall geeignet. Für alle anderen Anwen-
dungsarten (z.B. Schleifen mit nicht geeig-
neten Schleifwerkzeugen, Schleifen gesund-
heitsgefährdender Materialien wie Asbest)
ist das Gerät nicht vorgesehen.
Das Gerät ist für den Einsatz im Heimwer-
kerbereich bestimmt. Es wurde nicht für den
gewerblichen Dauereinsatz konzipiert. Das
Gerät ist zum Gebrauch durch Erwachsene
bestimmt. Jugendliche über 16Jahre dürfen
das Gerät nur unter Aufsicht benutzen.
Der Hersteller haftet nicht für Schäden, die
durch bestimmungswidrigen Gebrauch oder
falsche Bedienung verursacht wurden.
Original EG-Konformitäts-
erklärung ..................................73
Inhalt
Einleitung ...................................54
Bestimmungsgemäße
Verwendung .............................. 54
Allgemeine Beschreibung ...........55
Lieferumfang..................................55
Funktionsbeschreibung ....................55
Übersicht ......................................55
Technische Daten ........................56
Sicherheitshinweise ....................56
Symbole und Bildzeichen ................57
Allgemeine Sicherheitshinweise für
Elektrowerkzeuge ........................... 57
Weiterführende Sicherheitshinweise .59
Restrisiken .....................................60
Montage .................................... 61
Werkstückauagen montieren/
einstellen .......................................61
Funkenschutz montieren/einstellen ....61
Gerät auf Arbeitstisch verschrauben .62
Wasser in den Wassertank einfüllen .62
Bedienung .................................62
Ein- und Ausschalten .......................62
Schleifen mit der
Trockenschleifscheibe ......................63
Schleifen mit der Nassschleifscheibe 63
Schleifscheiben wechseln ................63
Reinigung und Wartung ............. 65
Reinigung .....................................65
Allgemeine Wartungsarbeiten .........65
Lagerung ...................................66
Entsorgung/Umweltschutz ..........66
Ersatzteile/Zubehör ...................66
Fehlersuche ................................67
Garantie ....................................68
Reparatur-Service ......................69
Service-Center ............................69
Importeur .................................. 69

DE AT CH
5 5
Allgemeine
Beschreibung
Die Abbildung der wichtigsten
Funktionsteile nden Sie auf
der vorderen und hinteren Aus-
klappseite.
Lieferumfang
Packen Sie das Gerät aus und kontrollieren
Sie, ob es vollständig ist. Entsorgen Sie
das Verpackungsmaterial ordnungsgemäß.
• Gerät mit vormontierten Schleifscheiben
• Funkenschutz
• Montagematerial zur Befestigung des
Funkenschutzes am Gerät
- Justierschraube inkl. Unterlegscheibe
und Federrring, Mutter
• Werkstückauage
• Montagematerial zur Befestigung der
Werkstückauage am Gerät
- Sternmutter, Unterlegscheibe, Zahn-
scheibe und Schraube
• Gummiverschluss für Wasserbehälter
• Betriebsanleitung
Funktionsbeschreibung
Der Nass-/Trockenschleifer ist ein Kombi-
gerät, ausgestattet mit einer Trockenschleif-
scheibe und einer Nassschleifscheibe mit
unterschiedlicher Körnung für den Grob-
und Feinschliff. Zum Schutz des Anwen-
ders ist das Gerät mit Funkenschutz und
Schutzhauben versehen.
Die Funktion der Bedienteile entnehmen Sie
bitte den nachfolgenden Beschreibungen.
Übersicht
1 Nassschleifscheibe
2 Funkenschutz
3 Justiermutter für Funkenschutz
4 Schleifscheiben-Abdeckung
5 Trockenschleifscheibe
6 Werkstückauage
7 Sternmutter zur Montage/
Justierung der Werkstückauage
8 Ein-/Ausschalter
9 Bohrungen für Tischmontage
10 Gummifuß (Wasserbehälter)
11 Gummiverschluss
für Wasserbehälter
12 Netzkabel
13 Wasserbehälter
14 Zahnscheibe
15 Unterlegscheibe
16 Befestigungsschraube
für Werkstückauage
17 Mutter
18 Funkenschutzhalter
19 Unterlegscheibe
20 Federring
21 Justierschraube
für Funkenschutzhalterung
22 Schleifscheiben-Mutter
23 Spannansch
24 Zwischenlagen aus Pappe
25 Schutzhaube für
Trockenschleifscheibe
26 Spannansch aus Kunststoff
27 Spannansch aus Kunststoff
28 Getriebegehäuse
29 Unterlegscheibe

DE AT CH
5 6
Technische Daten
Nass-/Trockenschleifer .......... PNTS 250 B1
Nenneingangsspannung U 230 V~, 50 Hz
Leistungsaufnahme P ................... 250 W
(S2 30 min)*
Schutzklasse ......................................... I
Schutzart ........................................IPX0
Leerlaufdrehzahl n
0
Nassschleifscheibe ........... ca. 128 min
-1
Trockenschleifscheibe ..... ca. 2950 min
-1
Gewicht (incl. Zubehör) ........... ca. 8,6 kg
Schalldruckpegel
(L
pA
) ..................... 80 dB (A); K
pA
= 3 dB
Schallleistungspegel
(L
WA
) ....................93 dB(A); K
WA
= 3 dB
Schwingungsgesamtwert (a
h
) .. 2,5 m/s
2
Nassschleifscheibe
Außendurchmesser ..............Ø 200 mm
Bohrung ............................... Ø 20 mm
Dicke .......................................40 mm
Körnung .........................................80
Drehzahl n
max
..................... 3820 min
-1
Arbeitsgeschwindigkeit v
s
...max. 40 m/s
Trockenschleifscheibe
Außendurchmesser .............. Ø 150 mm
Bohrung .............................Ø 12,7 mm
Dicke .......................................20 mm
Körnung .........................................36
Drehzahl n
max
..................... 4500 min
-1
Arbeitsgeschwindigkeit v
s
...max. 35 m/s
* Auf die untunterbrochene Betriebsdauer von
30 Minuten erfolgt eine Ruhepause, bis die
Gerätetemperatur weniger als 2 K (2°C) von
der Raumtemperatur abweicht.
Lärm- und Vibrationswerte wurden entspre-
chend den in der Konformitätserklärung
genannten Normen und Bestimmungen
ermittelt.
Der angegebene Schwingungsemissions-
wert ist nach einem genormten Prüfverfah-
ren gemessen worden und kann zum Ver-
gleich eines Elektrowerkzeugs mit einem
anderen verwendet werden.
Der angegebene Schwingungsemissionswert
kann auch zu einer einleitenden Einschät-
zung der Aussetzung verwendet werden.
Warnung:
Der Schwingungsemissionswert
kann sich während der tatsäch-
lichen Benutzung des Elektro-
werkzeugs von dem Angabewert
unterscheiden, abhängig von der
Art und Weise, in der das Elektro-
werkzeug verwendet wird.
Versuchen Sie, die Belastung durch
Vibrationen so gering wie möglich
zu halten. Beispielhafte Maßnah-
men zur Verringerung der Vibrati-
onsbelastung sind das Tragen von
Handschuhen beim Gebrauch des
Werkzeugs und die Begrenzung
der Arbeitszeit. Dabei sind alle An-
teile des Betriebszyklus zu berück-
sichtigen (beispielsweise Zeiten, in
denen das Elektrowerkzeug abge-
schaltet ist, und solche, in denen es
zwar eingeschaltet ist, aber ohne
Belastung läuft).
Sicherheitshinweise
ACHTUNG!
Beim Gebrauch von Elektrowerk-
zeugen sind zum Schutz gegen
elektrischen Schlag, Verletzungs- und
Brandgefahr folgende grundsätzliche
Sicherheitsmaßnahmen zu beachten.
Lesen Sie alle diese Hinweise,
bevor Sie dieses Elektrowerkzeug
benutzen, und bewahren Sie die
Sicherheitshinweise gut auf.

DE AT CH
5 7
Schleifscheibe nur mit Wasser
verwenden.
Elektrogeräte gehören nicht in den
Hausmüll.
Weitere Bildzeichen auf den
Schleifscheiben:
Keine defekte Schleifscheibe
einsetzen.
Bildzeichen auf der Verpackung:
Wellpappe
Allgemeine
Sicherheitshinweise für
Elektrowerkzeuge
Der in den Sicherheitshinweisen verwende-
te Begriff „Elektrowerkzeug“ bezieht sich
auf netzbetriebene Elektrowerkzeuge (mit
Netzkabel) und auf akkubetriebene Elekt-
rowerkzeuge (ohne Netzkabel).
Sicheres Arbeiten:
• Halten Sie Ihren Arbeitsbereich
in Ordnung. Unordnung im Arbeits-
bereich kann Unfälle zur Folge haben.
• Berücksichtigen Sie Umgebungs-
einüsse.
- Setzen Sie Elektrowerkzeuge nicht
dem Regen aus.
- Benutzen Sie Elektrowerkzeuge nicht
in feuchter oder nasser Umgebung.
Das Eindringen von Wasser in ein
Elektrowerkzeug erhöht das Risiko
eines elektrischen Schlages.
- Sorgen Sie für gute Beleuchtung des
Arbeitsplatzes.
- Benutzen Sie Elektrowerkzeuge nicht,
wo Brand- oder Explosionsgefahr
besteht. Elektrowerkzeuge erzeugen
Symbole und Bildzeichen
Symbole in der Betriebsanleitung:
Gefahrenzeichen mit Anga-
ben zur Verhütung von Per-
sonen- oder Sachschäden.
Gebotszeichen mit Angaben zur
Verhütung von Schäden.
Netzstecker einstecken.
Netzstecker. ziehen
Hinweiszeichen mit Informationen zum
besseren Umgang mit dem Gerät.
Bildzeichen auf dem Gerät:
Achtung!
Verletzungsgefahr durch sich dre-
hendes Werkzeug! Halten Sie Ihre
Hände fern.
Gefahr durch elektrischen Schlag!
Ziehen Sie vor Wartungs- und Re-
paraturarbeiten den Netzstecker
aus der Steckdose.
Betriebsanleitung lesen.
Tragen Sie Gehörschutz.
Tragen Sie Augenschutz.
Tragen Sie einen Atemschutz.
Gefahr durch Schnittverletzungen!
Tragen Sie schnittsichere Handschuhe.
Schleifscheibe nur trocken
verwenden.

DE AT CH
5 8
Funken, die den Staub oder die
Dämpfe entzünden können.
• Schützen Sie sich vor elekt-
rischem Schlag. Vermeiden Sie
Körperberührung mit geerdeten Teilen
(z.B. Rohren, Radiatoren, Elektroher-
den, Kühlgeräten).
• Halten Sie andere Personen fern.
Lassen Sie andere Personen, insbeson-
dere Kinder, nicht das Elektrowerkzeug
oder das Kabel berühren. Halten Sie sie
von Ihrem Arbeitsbereich fern.
• Bewahren Sie unbenutzte
Elektrowerkzeuge sicher auf.
Unbenutzte Elektrowerkzeuge sind an
einem trockenen, hochgelegenen oder
abgeschlossenen Ort, außerhalb der
Reichweite von Kindern, abzulegen. Es
besteht Verletzungsgefahr.
• Überlasten Sie Ihr Elektrowerk-
zeug nicht. Sie arbeiten besser und si-
cherer im angegebenen Leistungsbereich.
• Benutzen Sie das richtige
Elektrowerkzeug.
- Verwenden Sie keine leistungsschwa-
chen Maschinen für schwere Arbeiten.
- Benutzen Sie das Elektrowerkzeug nicht
für solche Zwecke, für die es nicht vor-
gesehen ist. Benutzen Sie zum Beispiel
keine Handkreissäge zum Schneiden
von Baumästen oder Holzscheiten.
Der Gebrauch von Elektrowerkzeugen
für andere als die vorgesehenen An-
wendungen kann zu gefährlichen Situa-
tionen führen.
• Tragen Sie geeignete Arbeits-
kleidung.
- Tragen Sie keine weite Kleidung oder
Schmuck, sie können von bewegli-
chen Teilen erfasst werden.
- Bei Arbeiten im Freien ist rutschfestes
Schuhwerk empfehlenswert.
- Tragen Sie bei langen Haaren ein
Haarnetz.
• Benutzen Sie Schutzausrüstung.
- Tragen Sie eine Schutzbrille. Bei
Nichtbeachtung können Augenver-
letzungen durch Funken oder Schleif-
partikel entstehen.
- Verwenden Sie bei stauberzeugen-
den Arbeiten eine Atemmaske.
• Schließen Sie die Staubabsaug-
Einrichtung an. Falls Anschlüsse zur
Staubabsaugung und Auffangeinrich-
tung vorhanden sind, überzeugen Sie
sich, dass diese angeschlossen und rich-
tig benutzt werden.
• Verwenden Sie das Kabel nicht für
Zwecke, für die es nicht bestimmt
ist. Benutzen Sie das Kabel nicht, um den
Netzstecker aus der Steckdose zu ziehen.
Schützen Sie das Kabel vor Hitze, Öl und
scharfen Kanten. Beschädigte oder ver-
wickelte Kabel erhöhen das Risiko eines
elektrischen Schlages.
• Sichern Sie das Werkstück. Benut-
zen Sie Spannvorrichtungen oder einen
Schraubstock, um das Werkstück fest-
zuhalten. Es ist damit sicherer gehalten
als mit Ihrer Hand.
• Vermeiden Sie abnormale Kör-
perhaltung. Sorgen Sie für sicheren
Stand und halten Sie jederzeit das
Gleichgewicht.
Dadurch können Sie das Elektrowerk-
zeug in unerwarteten Situationen bes-
ser kontrollieren.
• PegenSieIhreWerkzeugemit
Sorgfalt. Viele Unfälle haben ihre
Ursache in schlecht gewarteten Elektro-
werkzeugen.
- Halten Sie die Schneidwerkzeuge
scharf und sauber, um besser und
sicherer arbeiten zu können.
- Befolgen Sie die Hinweise zur Schmie-
rung und zum Werkzeugwechsel.
- Kontrollieren Sie regelmäßig das Netz-
kabel des Elektrowerkzeugs und lassen

DE AT CH
5 9
Sie dieses bei Beschädigung von ei-
nem anerkannten Fachmann erneuern.
- Kontrollieren Sie Verlängerungslei-
tungen regelmäßig und ersetzen Sie
diese, wenn sie beschädigt sind.
- Halten Sie die Handgriffe trocken,
sauber und frei von Öl und Fett.
• Ziehen Sie den Netzstecker aus
der Steckdose bei Nichtgebrauch
des Elektrowerkzeugs, vor der Wartung
und beim Wechsel von Werkzeugen.
Diese Vorsichtsmaßnahme verhindert
den unbeabsichtigten Start des Elektro-
werkzeuges.
• Lassen Sie keine Werkzeug-
schlüssel stecken. Überprüfen Sie
vor dem Einschalten, dass Schlüssel
und Einstellwerkzeuge entfernt sind.
Ein Werkzeug oder Schlüssel, der sich
in einem drehenden Geräteteil ben-
det, kann zu Verletzungen führen.
• Vermeiden Sie unbeabsichtigten
Anlauf. Vergewissern Sie sich, dass
der Schalter beim Einstecken des Ste-
ckers in die Steckdose ausgeschaltet ist.
• Benutzen Sie Verlängerungs-
kabel für den Außenbereich.
Verwenden Sie im Freien nur dafür
zugelassene und entsprechend gekenn-
zeichnete Verlängerungskabel.
• Seien Sie aufmerksam. Achten
Sie darauf, was Sie tun, und gehen Sie
mit Vernunft an die Arbeit. Benutzen
Sie das Elektrowerkzeug nicht, wenn
Sie unkonzentriert sind. Ein Moment
der Unachtsamkeit beim Gebrauch des
Elektrowerkzeuges kann zu ernsthaften
Verletzungen führen.
• Überprüfen Sie das Elektro-
werkzeug auf eventuelle Be-
schädigungen.
Damit wird sichergestellt, dass die
Sicherheit des Elektrowerkzeuges erhal-
ten bleibt.
- Vor weiterem Gebrauch des Elektro-
werkzeugs müssen Schutzvorrichtungen
oder leicht beschädigte Teile sorgfältig
auf ihre einwandfreie und bestimmungs-
gemäße Funktion untersucht werden.
- Überprüfen Sie, ob die beweglichen
Teile einwandfrei funktionieren und nicht
klemmen oder ob Teile beschädigt sind.
Sämtliche Teile müssen richtig montiert
sein und alle Bedingungen erfüllen,
um den einwandfreien Betrieb des
Elektrowerkzeugs zu gewährleisten.
- Beschädigte Schutzvorrichtungen
und Teile müssen bestimmungsgemäß
durch eine anerkannte Fachwerkstatt
repariert oder ausgewechselt werden,
soweit nichts anderes in der Betriebs-
anleitung angegeben ist.
- Benutzen Sie keine Elektrowerkzeuge,
bei denen sich der Schalter nicht ein-
und ausschalten lässt. Beschädigte
Schalter müssen bei einer Kunden-
dienstwerkstatt ersetzt werden.
• Achtung!
Der Gebrauch anderer Einsatzwerkzeu-
ge und anderen Zubehörs kann eine
Verletzungsgefahr für Sie bedeuten.
• Lassen Sie Ihr Elektrowerkzeug
durch eine Elektrofachkraft re-
parieren. Dieses Elektrowerkzeug
entspricht den einschlägigen Sicher-
heitsbestimmungen. Reparaturen dürfen
nur von einer Fachwerkstatt ausgeführt
werden, indem Originalersatzteile
verwendet werden; andernfalls können
Unfälle für den Benutzer entstehen.
Weiterführende
Sicherheitshinweise
• Schließen Sie das Gerät nur an eine
Steckdose mit Fehlerstrom-Schutzeinrich-
tung (FI-Schalter) mit einem Bemessungs-
fehlerstrom von nicht mehr als 30mA an.

DE AT CH
6 0
• Halten Sie Netzkabel und Verlänge-
rungskabel von der Schleifscheibe fern.
Ziehen Sie bei Beschädigung oder Durch-
schneiden sofort den Netzstecker aus
der Steckdose. Berühren Sie die Leitung
nicht, bevor sie vom Netz getrennt ist. Es
besteht Gefahr durch elektrischen Schlag.
• Der Austausch des Steckers oder der
Anschlussleitung ist immer vom Herstel-
ler des Elektrowerkzeugs oder seinem
Kundendienst auszuführen, um Gefähr-
dungen zu vermeiden.
• Schalten Sie das Gerät erst ein, wenn es
sicher auf der Arbeitsäche montiert ist.
• Zu Ihrer eigenen Sicherheit, benutzen
Sie nur Zubehör und Zusatzgeräte, die
in der Betriebsanleitung angegeben
oder vom Werkzeug-Hersteller empfoh-
len oder angegeben werden.
• Verwenden Sie nur vom Hersteller emp-
fohlene Schleifwerkzeuge. Verwenden
Sie keine Sägeblätter. Vergewissern Sie
sich, dass die Maße zum Gerät passen.
• Verwenden Sie nur Schleifscheiben, de-
ren aufgedruckte Drehzahl mindestens
so hoch ist wie die auf dem Typenschild
des Gerätes angegebene Drehzahl.
• Unterziehen Sie die Schleifscheibe vor
dem Gebrauch einer Sichtprüfung. Ver-
wenden Sie keine beschädigten oder
verformten Schleifscheiben. Wechseln
Sie eine abgenutzte Schleifscheibe aus.
• Betreiben Sie das Gerät niemals ohne
Funkenschutz oder Schutzhauben.
Stellen Sie den Funkenschutz periodisch
nach, um den Verschleiß der Schleifschei-
be auszugleichen (Abstand max. 2mm).
• Wechseln Sie die Schleifscheibe spä-
testens aus, wenn der Funkenschutz und
die Werkstückauage nicht mehr auf
einen Abstand von max. 2mm nachge-
stellt werden kann.
• Achten Sie darauf, dass beim Schlei-
fen entstehende Funken keine Gefahr
hervorrufen, z. B. Personen treffen oder
entammbare Substanzen entzünden.
• Tragen Sie beim Schleifen, Bürsten und
Trennen stets eine Schutzbrille, Sicher-
heitshandschuhe, einen Atemschutz und
einen Gehörschutz.
• Halten Sie nie die Finger zwischen
Schleifscheibe und Funkenschutz oder in
die Nähe der Schutzhauben. Es besteht
Gefahr durch Quetschen.
• Die rotierenden Teile des Gerätes können
aus funktionellen Gründen nicht abge-
deckt werden. Gehen Sie daher mit Be-
dacht vor und halten Sie das Werkstück
gut fest, um ein Verrutschen zu vermei-
den, wodurch Ihre Hände mit der Schleif-
scheibe in Berührung kommen könnten.
• Das Werkstück wird beim Schleifen heiß.
Nicht an der bearbeiteten Stelle anfas-
sen, lassen Sie es abkühlen. Es besteht
Verbrennungsgefahr. Verwenden Sie
kein Kühlmittel oder ähnliches.
• Arbeiten Sie mit dem Gerät nicht, wenn
Sie müde sind oder nach der Einnahme
von Alkohol oder Tabletten. Legen Sie
immer rechtzeitig eine Arbeitspause ein.
• Schalten Sie das Gerät aus und ziehen
Sie den Netzstecker
- zum Lösen eines blockierten Einsatz-
werkzeuges,
- wenn die Anschlussleitung beschädigt
oder verheddert ist,
- bei ungewöhnlichen Geräuschen.
• Bedienen Sie das Gerät nur in aufrech-
ter, stehender Position und achten Sie auf
einen sicheren Stand.
Restrisiken
Auch wenn Sie dieses Elektrowerkzeug
vorschriftsmäßig bedienen, bleiben immer
Restrisiken bestehen. Folgende Gefahren kön-
nen im Zusammenhang mit der Bauweise und
Ausführung dieses Elektrowerkzeugs auftreten:

DE AT CH
6 1
a) Lungenschäden, falls kein geeigneter
Atemschutz getragen wird.
b) Gehörschäden, falls kein geeigneter
Gehörschutz getragen wird.
c) Gesundheitsschäden durch
- Berührung der Schleifwerkzeuge im
nicht abgedeckten Bereich;
- Herausschleudern von Teilen aus
Werkstücken oder beschädigten
Schleifscheiben.
d) Gesundheitsschäden, die aus Hand-
Arm-Schwingungen resultieren, falls das
Gerät über einen längeren Zeitraum ver-
wendet wird oder nicht ordnungsgemäß
geführt und gewartet wird.
Warnung! Dieses Elektrowerkzeug
erzeugt während des Betriebs ein
elektromagnetisches Feld. Dieses
Feld kann unter bestimmten Umstän-
den aktive oder passive medizini-
sche Implantate beeinträchtigen.
Um die Gefahr von ernsthaften
oder tödlichen Verletzungen zu
verringern, empfehlen wir Personen
mit medizinischen Implantaten ihren
Arzt und den Hersteller des medizi-
nischen Implantats zu konsultieren,
bevor die Maschine bedient wird.
Montage
Achtung! Verletzungsgefahr!
- Achten Sie darauf, zum Arbeiten
genügend Platz zu haben und an-
dere Personen nicht zu gefährden.
- Befestigen Sie das Gerät immer
mittels Schrauben ausreichender
Länge und Stärke auf der Arbeits-
äche, um nicht die Kontrolle über
das Gerät zu verlieren.
- Vor Inbetriebnahme müssen alle
Abdeckungen und Schutzvorrichtun-
gen ordnungsgemäß montiert sein.
-
Ziehen Sie den Netzstecker, bevor Sie
Einstellungen am Gerät vornehmen.
Werkstückauagen
montieren/einstellen
1. Schrauben Sie die Werkstückauf-
lage (6) an dem Gerät fest.
Verwenden Sie hierzu die beilie-
gende Befestigungsschraube (16),
Unterlegscheibe (15), Zahnschei-
be (14)und Sternmutter (7).
2. Stellen Sie die Werkstückauage
(6) der Trockenschleifscheibe
mit der Sternmutter (7) ein. Der
Abstand zwischen Trockenschleif-
scheibe (5) und Werkstückauage
(6) darf maximal 2mm betragen.
Stellen Sie die Werkstückauage
periodisch nach, um den Verschleiß
der Schleifscheibe auszugleichen
(Abstand maximal 2mm).
Funkenschutz montieren/
einstellen
1. Schrauben Sie den Funkenschutz-
halter (18) an der Schutzhaube
(
25) fest. Verwenden Sie hier-
zu die Justierschraube (21) inkl.
Federring und Unterlegscheibe
(20/19) sowie die Mutter (17).
2. Stellen Sie den Funkenschutzhal-
ter (18) mit der Justierschraube
(21) ein: Der Abstand zwischen
Trockenschleifscheibe (
5)
und Funkenschutzhalter (18) darf
maxi mal 2mm betragen.
Stellen Sie den Funkenschutz perio-
disch nach, um den Verschleiß der
Schleifscheibe auszugleichen (Ab-
stand maximal 2mm).

DE AT CH
6 2
Tragen Sie beim Arbeiten trotz Fun-
kenschutz immer eine Schutzbrille, um
Augenverletzungen zu vermeiden.
Gerät auf Arbeitstisch
verschrauben
1. Nehmen Sie den Gummifuß (10)
des Wasserbehälters ab.
2. Schrauben Sie das Gerät mit
4Schrauben und Muttern auf
der planen Arbeitsäche fest.
Führen Sie dazu die Schrauben
durch die 4Bohrungen (9) am
Gerätesockel.
Die Schrauben und Muttern zur
Montage sind nicht im Lieferumfang
enthalten.
Wasser in den Wassertank
einfüllen
1. Stecken Sie den Gummiver-
schluss (11) in die Ablauföffnung
des Wasserbehälters (13).
2. Füllen Sie Wasser bis zur Was-
serstandsmarkierung
in den
Wasserbehälter (13) ein.
Bedienung
Achtung! Verletzungsgefahr!
- Ziehen Sie vor allen Arbeiten an
dem Gerät den Netzstecker.
- Verwenden Sie nur vom Herstel-
ler empfohlene Schleifscheiben
und Zubehörteile. Der Gebrauch
anderer Einsatzwerkzeuge und
anderen Zubehörs kann eine Ver-
letzungsgefahr für Sie bedeuten.
- Verwenden Sie nur Schleifwerk-
zeuge, die Angaben tragen
über Hersteller, Art der Bindung,
Abmessung und zulässige Umdre-
hungszahl.
- Verwenden Sie nur Schleifschei-
ben, deren aufgedruckte Drehzahl
mindestens so hoch ist wie die auf
dem Typenschild des Gerätes an-
gegebene Drehzahl.
- Verwenden Sie keine abgebroche-
nen, gesprungenen oder anderwei-
tig beschädigten Schleifscheiben.
- Betreiben Sie das Gerät niemals
ohne Schutzeinrichtungen.
- Kontrollieren Sie die Schleifschei-
be vor ihrer Verwendung:
Prüfen Sie den Abstand zwischen
Funkenschutzhalter und Schleif-
scheibe sowie Werkstückauage
und Schleifscheibe (Abstand maxi-
mal 2mm).
- Sobald Funkenschutzhalter und
Werkstückauage nicht mehr auf
max. 2 mm an die Schleifscheibe
herangestellt werden können,
muss die Schleifscheibe ausge-
tauscht werden.
- Schalten Sie das Gerät erst ein,
wenn es sicher auf der Arbeitsä-
che montiert ist.
Halten Sie Ihre Hände von
der Schleifscheibe fern, wenn
das Gerät in Betrieb ist. Es
besteht Verletzungsgefahr.
Tragen Sie beim Arbeiten trotz Fun-
kenschutz immer eine Schutzbrille, um
Augenverletzungen zu vermeiden.
Ein- und Ausschalten
Achten Sie darauf, dass die Span-
nung des Netzanschlusses mit
dem Typenschild am Gerät über-
einstimmt.

DE AT CH
6 3
Schließen Sie das Gerät an die
Netzspannung an.
1. Zum Einschalten drücken Sie den Ein-
schalter „I“ (
8), das Gerät läuft an.
2. Zum Ausschalten drücken Sie den Aus-
schalter „0“ (
8), das Gerät schaltet
ab.
Warten Sie nach dem Einschalten ab, bis
das Gerät seine max. Drehzahl erreicht hat.
Beginnen Sie erst dann mit dem Schleifen.
Die Schleifscheibe läuft nach,
nachdem das Gerät abge-
schaltet wurde. Es besteht
Verletzungsgefahr.
Probelauf:
Führen Sie vor dem ersten Arbeiten und
nach jedem Schleifscheibenwechsel einen
Probelauf von mindestens 1 Minute ohne
Belastung durch. Schalten Sie das Gerät
sofort aus, wenn die Schleifscheibe unrund
läuft, beträchtliche Schwingungen auftreten
oder abnorme Geräusche zu hören sind.
Schleifen mit der
Trockenschleifscheibe
• Legen Sie das Werkstück auf die Werk-
stückauage (
6) und führen Sie es
langsam im gewünschten Winkel an die
Trockenschleifscheibe (
5) heran.
• Bewegen Sie das Werkstück leicht hin
und her, um ein optimales Schleifergeb-
nis zu erhalten. Die Trockenschleifschei-
be wird so gleichmäßig abgenutzt.
Lassen Sie das Werkstück zwischen-
durch abkühlen.
• Klappen Sie den Funkenschutz (
2)
beim Schleifen nach unten, um Verlet-
zungen durch Funkenbildung zu vermei-
den.
Schleifen mit der
Nassschleifscheibe
• Prüfen Sie den Wasserstand im Was-
serbehälter: Die Nassschleifscheibe
(
1) soll sich bis zur Wasserstands-
markierung
am Wasserbehälter
(
13) im Wasser benden.
• Stellen Sie sich vor die Nassschleif-
scheibe (
1).
• Halten Sie das Werkstück mit beiden
Händen und senken es langsam auf die
Nassschleifscheibe ab.
• Das Werkstück kann auch an den
Zähnen des Wasserbehälters (
13)
abgestützt werden.
Schleifscheiben wechseln
Hinweise
zum Wechseln:
- Betreiben Sie das Gerät niemals ohne
Schutzeinrichtungen.
- Vergewissern Sie sich, dass die auf der
Schleifscheibe angegebene Drehzahl
gleich oder größer als die Bemessungs-
leerlaufdrehzahl des Gerätes ist.
- Vergewissern Sie sich, dass die Maße
der Schleifscheibe zum Gerät passen.
- Benutzen Sie nur einwandfreie Schleif-
scheiben (Klangprobe: Frei an einer
Schnur hängende unbeschädigte Schleif-
scheiben haben beim Anschlagen mit
Plastikhammer einen klaren Klang).
- Bohren Sie eine zu kleine Aufnahmeboh-
rung der Schleifscheibe nicht nachträg-
lich auf.
- Verwenden Sie keine getrennten Redu-
zierbuchsen oder Adapter, um Schleif-
scheiben mit großem Loch passend zu
machen.
- Verwenden Sie keine Sägeblätter.
- Zum Aufspannen der Schleifwerk-
zeuge dürfen nur die mitgelieferten

DE AT CH
6 4
Spannansche verwendet werden. Die
Zwischenlagen zwischen Spannansch
und Schleifwerkzeuge müssen aus elas-
tischen Stoffen z.B. Gummi, weicher
Pappe usw., bestehen.
- Montieren Sie das Gerät nach dem Schleif-
scheibenwechsel wieder vollständig.
Schalten Sie das Gerät aus und
ziehen Sie den Netzstecker.
Lassen Sie das Gerät abkühlen.
Tragen Sie beim Schleifscheiben-
wechsel Schutzhandschuhe, um
Schnittverletzungen zu vermeiden.
Trockenschleifscheibe wechseln:
1. Nehmen Sie den Funkenschutz
(
2) ab (siehe“Funkenschutz
montieren/einstellen“).
2. Lösen Sie die
Befestigungsschrauben und
nehmen Sie die Schleifscheiben-
Abdeckung (
4) von der
Schutzhaube (
25) ab.
3. Schrauben Sie die Schleif-
scheiben-Mutter (22) mit einem
Schraubenschlüssel (SW19) ab,
indem Sie die Trockenschleif-
scheibe (5) mit einer behand-
schuhten Hand gegenhalten.
Mutter (Rechtsgewinde)
abschrauben: Gegen den
Uhrzeigersinn drehen.
4. Nehmen Sie den Spann ansch
(23) und die Trockenschleifschei-
be (5) ab.
5. Setzen Sie die neue Trocken-
schleifscheibe (5) mit den
Zwischenlagen aus Pappe (24)
und den Spann ansch (23) auf.
Schrauben Sie die Schleifschei-
ben-Mutter (22) von Hand auf.
Mutter (Rechtsgewinde) aufschrau-
ben: Im Uhrzeigersinn drehen.
6. Ziehen Sie die Schleifscheiben-
Mutter mit einem Schrauben-
schlüssel (SW19) mit mäßiger
Handkraft an.
7. Schrauben Sie die Schleifschei-
ben-Abdeckung (4) an.
8. Stellen Sie den Funkenschutzhal-
ter (
18) und die Werkstück-
au age (
6) ein: Der Abstand
zur Trockenschleifscheibe (5)
darf maximal 2mm betragen
(siehe „Montage“).
Die Schleifscheiben-Mutter darf
nicht zu fest angezogen werden,
um ein Brechen von Schleifscheibe
und Mutter zu vermeiden.
9. Probelauf: Führen Sie vor dem ersten
Arbeiten und nach jedem Schleifschei-
benwechsel einen Probelauf von min-
destens 1Minute ohne Belastung durch.
Schalten Sie das Gerät sofort aus, wenn
die Schleifscheibe unrund läuft, beträcht-
liche Schwingungen auftreten oder
abnorme Geräusche zu hören sind.
Nassschleifscheibe wechseln:
1. Lösen Sie die 4 Befestigungsschrau-
ben (13a/13b/13c/13d) am Ge-
triebegehäuse (28) und nehmen
Sie den Wasserbehälter (13) ab.
2. Schrauben Sie die Schleif-
scheiben-Mutter (22) mit einem
Schraubenschlüssel (SW19) ab,
indem Sie die Nassschleifschei-
be (1) mit einer behandschuhten
Hand gegenhalten.
Mutter (Rechtsgewinde) ab-
schrauben: Gegen den Uhrzei-
gersinn drehen.

DE AT CH
6 5
3. Nehmen Sie den Spannansch
aus Kunststoff (26) und die Nass-
schleifscheibe (1) ab.
4. Setzen Sie die neue Nassschleif-
scheibe (1) und den Spannansch
aus Kunststoff (26) auf. Schrauben
Sie die Schleifscheiben-Mutter
(22) von Hand auf. Rechte Mut-
ter (Rechtsgewinde) aufschrau-
ben: Im Uhrzeigersinn drehen.
Die beiden Spannansche aus Kunst-
stoff (26/27) sind nicht identisch.
5. Ziehen Sie die Schleifscheiben-
Mutter (22) mit einem Schrau-
benschlüssel (SW19) mit mäßi-
ger Handkraft an.
6. Schieben Sie den Wasserbehäl-
ter (13) wieder über die Nass-
schleifscheibe (1) auf und an das
Getriebegehäuse (28) an.
7. Befestigen Sie den Wasserbehäl-
ter (13) mit den vier Befestigungs-
schrauben und Unterlegscheiben
am Getriebegehäuse (28).
Die Schleifscheiben-Mutter darf
nicht zu fest angezogen werden,
um ein Brechen von Schleifscheibe
und Mutter zu vermeiden.
Zwischen dem Spannansch (27)
und dem Getriebegehäuse (28) be-
ndet sich eine Unterlegscheibe (29).
8. Probelauf: Führen Sie vor dem ersten
Arbeiten und nach jedem Schleif-
scheibenwechsel einen Probelauf von
mindestens 1Minute ohne Belastung
durch. Schalten Sie das Gerät sofort aus,
wenn die Schleifscheibe unrund läuft, be-
trächtliche Schwingungen auftreten oder
abnorme Geräusche zu hören sind.
Reinigung und Wartung
Ziehen Sie vor jeglicher Einstellung,
Instandhaltung oder Instandsetzung
den Netzstecker.
Lassen Sie Arbeiten, die nicht
in dieser Betriebsanleitung
beschrieben sind, von einer
Fachwerkstatt durchführen.
Verwenden Sie nur Original-
teile. Lassen Sie das Gerät
vor allen Wartungs- und Rei-
nigungsarbeiten abkühlen. Es
besteht Verbrennungsgefahr!
Reinigung
Verwenden Sie keine Reinigungs-
bzw. Lösungsmittel. Chemische Sub-
stanzen können die Kunststoffteile
des Gerätes angreifen. Reinigen
Sie das Gerät niemals unter ießen-
dem Wasser.
• Reinigen Sie das Gerät nach jedem
Gebrauch gründlich.
• Reinigen Sie die Oberäche des Ge-
rätes mit einer weichen Bürste, einem
Pinsel oder einem Tuch.
Allgemeine
Wartungsarbeiten
Kontrollieren Sie das Gerät vor jedem
Gebrauch auf offensichtliche Mängel
wie lose, abgenutzte oder beschädigte
Teile, korrekten Sitz von Schrauben oder
anderer Teile. Prüfen Sie insbesondere die
Schleifscheiben. Tauschen Sie beschädigte
Teile aus.

DE AT CH
6 6
Lagerung
• Leeren Sie vor der Lagerung den Was-
serbehälter (
13): Ziehen Sie den
Gummiverschluss (
11) aus der Ab-
lauföffnung des Wasserbehälters und
lassen Sie das Wasser ablaufen.
• Bewahren Sie das Gerät an einem tro-
ckenen und staubgeschützten Ort auf,
außerhalb der Reichweite von Kindern.
• Schleifscheiben müssen trocken und
hochkant aufbewahrt werden und dür-
fen nicht gestapelt werden.
Entsorgung/Umweltschutz
Führen Sie Gerät, Zubehör und Verpa-
ckung einer umweltgerechten Wiederver-
wertung zu.
Elektrogeräte gehören nicht in den
Hausmüll.
Führen Sie die Umverpackung aus
Wellpappe einer umweltgerechten
Wiederverwertung zu.
• Geben Sie das Gerät an einer Verwer-
tungsstelle ab. Die verwendeten Kunst-
stoff- und Metallteile können sortenrein
getrennt werden und so einer Wieder-
verwertung zugeführt werden. Fragen
Sie hierzu unser Service-Center.
• Die Entsorgung Ihrer defekten eingesen-
deten Geräte führen wir kostenlos durch.
Ersatzteile/Zubehör
Ersatzteile und Zubehör erhalten Sie unter
www.grizzly-service.eu
Sollten Sie kein Internet haben, so wenden Sie sich bitte telefonisch an das Service-Center
(siehe „Service-Center“ Seite 69). Halten Sie die unten genannten Bestellnummern bereit.
Position Betriebsanleitung Bezeichnung Bestell-Nr.
5 Trockenschleifscheibe 91103553
1 Nassschleifscheibe 30211041
11,13 Set Wasserbehälter 30211042
22,26,27 Set Spann ansche, nass 30211049
22,23 Set Spann ansche, trocken 30211044
2,3,17-21 Set Funkenschutz 30211045
6 , 7,14 - 16 Set Werkstückau age 30211046
4 Set Schleifscheiben-Abdeckung 30211047
25 Set Schutzhaube (Trockenschleifscheibe) 30211048

DE AT CH
6 7
Fehlersuche
Ziehen Sie vor allen Arbeiten an dem Gerät den Netzstecker.
Gefahr durch elektrischen Schlag!
Problem Mögliche Ursache Fehlerbehebung
Gerät startet nicht
Netzspannung fehlt
Haussicherung spricht an
Steckdose, Netzkabel, Leitung,
Netzstecker prüfen, ggf. Repara-
tur durch Elektrofachmann,
Haussicherung prüfen.
Ein-/Ausschalter (
8) defekt
Reparatur durch Kundendienst
Motor defekt
Schleifwerkzeuge
bewegen sich
nicht, obwohl Mo-
tor läuft
Schleifscheiben-Mutter (
22)
locker
Schleifscheiben-Mutter anziehen
(siehe „Schleifscheiben wech-
seln“)
Werkstück, Werkstückreste
oder Reste der Schleifwerkzeu-
ge blockieren Antrieb
Blockaden entfernen
Motor wird lang-
samer und bleibt
stehen
Gerät wird durch Werkstück
überlastet
Druck auf Schleifwerkzeug ver-
ringern
Werkstück ungeeignet
Schleifscheibe läuft
unrund,
abnorme Geräu-
sche sind zu hören
Schleifscheiben-Mutter (
22)
locker
Schleifscheiben-Mutter anziehen
(siehe „Schleifscheiben wech-
seln“)
Schleifscheibe (
1/5) defekt
Schleifscheibe wechseln
Funkenschutz (
2) oder
Werkstückauage (
6)
falsch eingestellt
Funkenschutz oder Werkstückauf-
lage einstellen (siehe „Montage“)

DE AT CH
6 8
Garantie
Sehr geehrte Kundin, sehr geehrter Kunde,
Sie erhalten auf dieses Gerät 3 Jahre Ga-
rantie ab Kaufdatum.
Im Falle von Mängeln dieses Gerätes
stehen Ihnen gegen den Verkäufer des
Gerätes gesetzliche Rechte zu. Diese
gesetzlichen Rechte werden durch unsere
im Folgenden dargestellte Garantie nicht
eingeschränkt.
Garantiebedingungen
Die Garantiefrist beginnt mit dem Kauf-
datum. Bitte bewahren Sie den Original-
Kassenbon gut auf. Diese Unterlage wird
als Nachweis für den Kauf benötigt.
Tritt innerhalb von drei Jahren ab dem
Kaufdatum dieses Gerätes ein Material-
oder Fabrikationsfehler auf, wird das Ge-
rät von uns – nach unserer Wahl – für Sie
kostenlos repariert oder ersetzt. Diese Ga-
rantieleistung setzt voraus, dass innerhalb
der Drei-Jahres-Frist das defekte Gerät und
der Kaufbeleg (Kassenbon) vorgelegt und
schriftlich kurz beschrieben wird, worin der
Mangel besteht und wann er aufgetreten
ist.
Wenn der Defekt von unserer Garantie ge-
deckt ist, erhalten Sie das reparierte oder
ein neues Gerät zurück. Mit Reparatur
oder Austausch des Gerätes beginnt kein
neuer Garantiezeitraum.
Garantiezeit und gesetzliche
Mängelansprüche
Die Garantiezeit wird durch die Gewähr-
leistung nicht verlängert. Dies gilt auch
für ersetzte und reparierte Teile. Eventuell
schon beim Kauf vorhandene Schäden und
Mängel müssen sofort nach dem Auspa-
cken gemeldet werden. Nach Ablauf der
Garantiezeit anfallende Reparaturen sind
kostenpichtig.
Garantieumfang
Das Gerät wurde nach strengen Qualitäts-
richtlinien sorgfältig produziert und vor
Anlieferung gewissenhaft geprüft.
Die Garantieleistung gilt für Material- oder
Fabrikationsfehler. Diese Garantie erstreckt
sich nicht auf Geräteteile, die normaler
Abnutzung ausgesetzt sind und daher als
Verschleißteile angesehen werden können
(z.B. Schleifscheiben, Spannansche) oder
für Beschädigungen an zerbrechlichen Tei-
len (z.B. Schalter).
Diese Garantie verfällt, wenn das Gerät
beschädigt, nicht sachgemäß benutzt oder
nicht gewartet wurde. Für eine sachge-
mäße Benutzung des Gerätes sind alle in
der Betriebsanleitung aufgeführten Anwei-
sungen genau einzuhalten. Verwendungs-
zwecke und Handlungen, von denen in
der Betriebsanleitung abgeraten oder vor
denen gewarnt wird, sind unbedingt zu
vermeiden.
Das Gerät ist lediglich für den privaten
und nicht für den gewerblichen Gebrauch
bestimmt. Bei missbräuchlicher und unsach-
gemäßer Behandlung, Gewaltanwendung
und bei Eingriffen, die nicht von unserer
autorisierten Service-Niederlassung vorge-
nommen wurden, erlischt die Garantie.
Abwicklung im Garantiefall
Um eine schnelle Bearbeitung Ihres Anlie-
gens zu gewährleisten, folgen Sie bitte den
folgenden Hinweisen:
• Bitte halten Sie für alle Anfragen den
Kassenbon und die Identikationsnum-
mer (IAN304988) als Nachweis für
den Kauf bereit.
• Die Artikelnummer entnehmen Sie bitte
dem Typenschild.
• Sollten Funktionsfehler oder sonstige
Mängel auftreten kontaktieren Sie

DE AT CH
6 9
zunächst die nachfolgend benannte
Serviceabteilung telefonisch oder per
E-Mail. Sie erhalten dann weitere In-
formationen über die Abwicklung Ihrer
Reklamation.
• Ein als defekt erfasstes Gerät können
Sie, nach Rücksprache mit unserem
Kundenservice, unter Beifügung des
Kaufbelegs (Kassenbons) und der
Angabe, worin der Mangel besteht
und wann er aufgetreten ist, für Sie
portofrei an die Ihnen mitgeteilte
Service-Anschrift übersenden. Um An-
nahmeprobleme und Zusatzkosten zu
vermeiden, benutzen Sie unbedingt nur
die Adresse, die Ihnen mitgeteilt wird.
Stellen Sie sicher, dass der Versand
nicht unfrei, per Sperrgut, Express oder
sonstiger Sonderfracht erfolgt. Senden
Sie das Gerät bitte inkl. aller beim Kauf
mitgelieferten Zubehörteile ein und
sorgen Sie für eine ausreichend sichere
Transportverpackung.
Reparatur-Service
Sie können Reparaturen, die nicht der Ga-
rantie unterliegen, gegen Berechnung von
unserer Service-Niederlassung durchführen
lassen. Sie erstellt Ihnen gerne einen Kos-
tenvoranschlag.
Wir können nur Geräte bearbeiten, die
ausreichend verpackt und frankiert einge-
sandt wurden.
Achtung: Bitte senden Sie Ihr Gerät gerei-
nigt und mit Hinweis auf den Defekt an
unsere Service-Niederlassung.
Nicht angenommen werden unfrei - per
Sperrgut, Express oder mit sonstiger Son-
derfracht – eingeschickte Geräte.
Die Entsorgung Ihrer defekten eingesende-
ten Geräte führen wir kostenlos durch.
Service-Center
DE
Service Deutschland
Tel.: 0800 54 35 111
E-Mail: [email protected]
IAN 304988
AT
Service Österreich
Tel.: 0820 201 222
(0,15 EUR/Min.)
E-Mail: [email protected]
IAN 304988
CH
Service Schweiz
Tel.: 0842 665566
(0,08 CHF/Min.,
Mobilfunk max. 0,40 CHF/Min.)
E-Mail: [email protected]
IAN 304988
Importeur
Bitte beachten Sie, dass die folgende
Anschrift keine Serviceanschrift ist. Kon-
taktieren Sie zunächst das oben genannte
Service-Center.
Grizzly Tools GmbH & Co. KG
Stockstädter Straße 20
DE-63762 Großostheim
DEUTSCHLAND
www.grizzly-service.eu

7 0
M T
I T
Traduzione della dichiarazione
di conformità CE originale
Con la presente dichiariamo che la
molatrice da banco
serie di costruzione PNTS 250 B1
Numero di serie 201806000001 - 201806098700
corresponde a las siguientes Directivas de la UE corrientes en su respectiva versión
vigente:
2006/42/EC • 2014/30/EU • 2011/65/EU*
Per garantire la conformità sono state applicate le seguenti norme armonizzate e an-
che le norme e disposizioni nazionali che seguono:
EN 61029-1:2009/A11:2010 • EN 61029-2-4:2011 • EN 12413:2007+A1:2011
EN 55014-1:2017 • EN 55014-2:2015
EN 61000-3-2:2014 • EN 61000-3-3:2013
Il produttore è il solo responsabile della stesura della presente dichiarazione di conformità:
Christian Frank
(Apoderado de documentación)
Grizzly Tools GmbH & Co. KG
Stockstädter Straße 20
63762 Großostheim
GERMANY
30.06.2018
* L’oggetto descritto sopra è conforme alle prescrizioni della Direttiva 2011/65/EU del Parla-
mento Europeo e del Consiglio dell’8 giugno 2011 sulla restrizione dell’uso di determinate
sostanze pericolose nelle apparecchiature elettriche ed elettroniche.

7 1
ES
Traducción de la Declaración de
conformidad CE original
Mediante la presente declaramos que el
Lijadora en húmedo y seco
la serie PNTS 250 B1
Número de serie 201806000001 - 201806098700
corresponde a las siguientes Directivas de la UE corrientes en su respectiva versión
vigente:
2006/42/EC • 2014/30/EU • 2011/65/EU*
Para garantizar la conformidad, se aplicaron las siguientes normas armonizadas, así
como las normas y regulaciones nacionales:
EN 61029-1:2009/A11:2010 • EN 61029-2-4:2011 • EN 12413:2007+A1:2011
EN 55014-1:2017 • EN 55014-2:2015
EN 61000-3-2:2014 • EN 61000-3-3:2013
El fabricante es el único responsable de expedir esta Declaración de Conformidad:
Christian Frank
(Apoderado de documentación)
Grizzly Tools GmbH & Co. KG
Stockstädter Straße 20
63762 Großostheim
GERMANY
30.06.2018
* El objeto de la declaración arriba descrito cumple con las directrices de la Directiva
2011/65/UE del Parlamento Europeo y del Consejo de 8 de junio de 2011 sobre restriccio-
nes a la utilización de determinadas sustancias peligrosas en aparatos eléctricos y electróni-
cos.

7 2
G B
Translation of the original EC
declaration of conformity
We hereby conrm that the
PNTS 250 B1 series
wet/dry grinder
serial number 201806000001 - 201806098700
conforms with the following applicable relevant version of the EU guidelines:
2006/42/EC • 2014/30/EU • 2011/65/EU*
In order to guarantee consistency, the following harmonised standards as well as natio-
nal standards and stipulations have been applied:
EN 61029-1:2009/A11:2010 • EN 61029-2-4:2011 • EN 12413:2007+A1:2011
EN 55014-1:2017 • EN 55014-2:2015
EN 61000-3-2:2014 • EN 61000-3-3:2013
This declaration of conformity is issued under the sole responsibility of the
manufacturer:
Christian Frank
(Documentation Representative)
Grizzly Tools GmbH & Co. KG
Stockstädter Straße 20
63762 Großostheim
GERMANY
30.06.2018
* The object of the declaration described above satises the provisions of Directive 2011/65/EU of the
European Parliament and the Council of 8 June 2011 on limiting the use of certain harmful substances
in electrical and electronic appliances.
M T

7 3
DE
AT
Original
EG-Konformitätserklärung
Hiermit bestätigen wir, dass der
Nass-/Trockenschleifer
Modell PNTS 250 B1
Seriennummer 201806000001 - 201806098700
folgenden einschlägigen EU-Richtlinien in ihrer jeweils gültigen Fassung entspricht:
2006/42/EG • 2014/30/EU • 2011/65/EU*
Um die Übereinstimmung zu gewährleisten, wurden folgende harmonisierte Normen
sowie nationale Normen und Bestimmungen angewendet:
EN 61029-1:2009/A11:2010 • EN 61029-2-4:2011 • EN 12413:2007+A1:2011
EN 55014-1:2017 • EN 55014-2:2015
EN 61000-3-2:2014 • EN 61000-3-3:2013
Die alleinige Verantwortung für die Ausstellung dieser Konformitätserklärung trägt der
Hersteller:
Christian Frank
(Dokumentationsbevollmächtigter)
Grizzly Tools GmbH & Co. KG
Stockstädter Straße 20
63762 Großostheim
GERMANY
30.06.2018
* Der oben beschriebene Gegenstand der Erklärung erfüllt die Vorschriften der Richtlinie
2011/65/EU des Europäischen Parlaments und des Rates vom 8. Juni 2011 zur Beschränkung
der Verwendung bestimmter gefährlicher Stoffe in Elektro- und Elektronikgeräten.
2018-06-27_rev02_sh
CH

13
13a
13a
13c
13d
13b
22
1
26
28 29 27
28
22
1


GRIZZLY TOOLS GMBH & CO. KG
Stockstädter Straße 20
DE-63762 Großostheim
GERMANY
Estado de las informaciones · Versione delle
informazioni · Last Information Update
Stand der Informationen: 06 / 2018
Ident.-No.: 72036875062018-ES/IT
IAN 304988
Transcripción de documentos
LIJADORA EN HÚMEDO Y SECO / MOLATRICE DA BANCO PNTS 250 B1 LIJADORA EN HÚMEDO Y SECO MOLATRICE DA BANCO WET & DRY BENCH GRINDER NASS-/TROCKENSCHLEIFER Traducción del manual de instrucciones original Translation of the original instructions IAN 304988 Traduzione delle istruzioni d’uso originali Originalbetriebsanleitung Antes de empezar a leer abra la página que contiene las imágenes y, en seguida, familiarícese con todas las funciones del dispositivo. Prima di leggere aprire la pagina con le immagini e prendere confidenza con le diverse funzioni dell’apparecchio. Before reading, unfold the page containing the illustrations and familiarise yourself with all functions of the device. Klappen Sie vor dem Lesen die Seite mit den Abbildungen aus und machen Sie sich anschließend mit allen Funktionen des Gerätes vertraut. ES IT / MT GB/ MT DE /AT /CH Traducción del manual de instrucciones original Traduzione delle istruzioni d’uso originali Translation of the original instructions Originalbetriebsanleitung Página 5 Pagina 22 Page 38 Seite 54 1 2 3 13 4 5 4 12 7 11 10 14 15 9 8 7 6 19 20 6 16 5 max. 2 mm 6 17 18 21 10 13 22 11 9 5 13 25 23 24 5 24 23 22 4 ES Contenido Introducción Introducción ................................. 5 Aplicaciones ................................. 5 Descripción general ...................... 6 Volumen de suministro ......................6 Descripción funcional .......................6 Sinopsis ..........................................6 Características técnicas ................. 7 Instrucciones de seguridad ........... 7 Símbolos y pictogramas ....................8 Instrucciones generales de seguridad .8 Instrucciones de seguridad adicionales ...................................11 Riesgos residuales ..........................12 Montaje ..................................... 12 Montar ajustar los soportes de las piezas de labor ........................12 Montar/ajustar protección contra chispas ...............................13 Atornillar el aparato a la mesa de trabajo .........................................13 Llenar el depósito de agua ..............13 Manejo ........................................13 Conectar y desconectar ..................14 Lijar con el disco abrasivo en seco ...14 Lijar con el disco abrasivo en húmedo ........................................14 Cambiar disco abrasivo..................15 Limpieza y mantenimiento ......... 16 Limpieza .......................................17 Trabajos generales de mantenimiento ...............................17 Almacenaje ................................ 17 Eliminación y protección del medio ambiente ................... 17 Piezas de repuesto/Accesorios ... 18 Búsqueda de fallos .................... 19 Garantía .................................... 20 Servicio de reparación ............... 21 Service-Center ............................ 21 Importador ................................ 21 Traducción de la Declaración de conformidad CE original ............. 71 ¡Felicitaciones por la compra de su nueva aspiradora! Con ello se ha decidido por un producto de suprema calidad. Este aparato fue examinado durante la producción con respecto a su calidad y sometido a un control final. Con ello queda garantizada la capacidad de funcionamiento de su aparato. Las instrucciones de servicio forman parte de este producto. Éstas contienen importantes indicaciones para la seguridad, el uso y la eliminación del aparato. Familiarícese con todas las indicaciones de manejo y seguridad antes de usar el producto. Utilice el producto sólo como se describe y para los campos de aplicación indicados. Guarde bien estas instrucciones y entrégueselas al dar este producto a terceros. Aplicaciones La ljadora en húmedo y seco está indicada para afilar herramientas (p.ej. cuchillos, tijeras, cuchillas de torno), para desbarbar y afilar pequeñas piezas de labor de metal. Este aparato no está previsto para otro tipo de uso como puede ser, por ejemplo, el lijado con herramientas de lijado no apropiadas, lijado mediante líquido refrigerante, lijado con materiales peligrosos para la salud como el amianto. El aparato está destinado a ser usado en el sector del bricolaje, y no ha sido concebido para uso continuo profesional. Este aparato sólo lo deben utilizar adultos. Los jóvenes mayores de 16 años sólo deben utilizar el aparato si están vigilados. 5 ES El fabricante no se responsabiliza de los daños ocasionados por un uso contrario a las normas o por un manejo inadecuado. Descripción general Hallará las imágenes en las solapas delantera y trasera. Volumen de suministro Desembale el aparato y compruebe que esté completo. Evacue el material de embalaje de una forma conveniente. • Aparato con discos abrasivos premontados • Protección contra chispas • Material de montaje para fijar al aparato la protección contra chispas - Tornillo de ajuste incl. arandelas y anillos elásticos, tuerca • Soporte para pieza de labor • Material de montaje para fijar los soportes de las piezas de labor al aparato - Tuerca de estrella, arandela, disco dentado y tornillo • Cierre de goma • Instrucciones de uso Descripción funcional 6 La ljadora en húmedo y seco es un dispositivo combinado que dispone de un disco abrasivo en seco y otro disco abrasivo en húmedo con grosor de grano diferente para el desbaste y el rectificado fino. Para proteger al usuario, el aparato está provisto con una protección contra chispas y cubiertas del discos abrasivos. El funcionamiento de las piezas de mando puede consultarse en las descripciones siguientes. Sinopsis 1 Disco abrasivo en húmedo 2 Protección contra chispas 3 Tuerca de ajuste para protección contra chispas 4 Cubierta del disco abrasivo 5 Disco abrasivo en seco 6 Soporte para pieza de labor 7 Tuerca de estrella para montaje/ajuste del soporte de la pieza de labor 8 Interruptor de encendido/apagado 9 Agujeros para montar en la mesa 10 Pie de goma (depósito de agua) 11 Cierre de goma para depósito de agua 12 Cable de red 13 Depósito de agua 14 Disco dentado 15 Arandela 16 Tornillo de fijación para soporte para pieza de labor 17 Tuerca 18 Soporte para la protección contra chispas 19 Arandela 20 Anillo elástico 21 Tornillo de ajuste para la fijación de la protección contra chispas 22 23 24 25 Tuerca de disco abrasivo Brida de fijación Capas intermedias de cartón Cubierta de protección para disco abrasivo en seco 26 Brida de fijación de material sintético 27 Brida de fijación de material sintético 28 Caja de engranaje 29 Arandela ES Características técnicas Lijadora en húmedo y seco ... PNTS 250 B1 Tensión entrante nominal U .. 230 V~, 50 Hz Consumo de potencia P ............... 250 W (S2 30 min)* Clase de protección .............................. I Tipo de protección ...........................IPX0 Revoluciones en vacíon0 Disco abrasivo en húmedo ................. aprox. 128 min-1 Disco abrasivo en seco .................... aprox. 2950 min-1 Peso (incl. accesorios) ......... aprox. 8,6 kg Nivel presión acústica (LpA) ....................... 80 dB(A); KpA=3 dB Nivel potencia acústica (LWA) ..................... 93 dB(A); KWA=3 dB Valor total de oscilación (ah) ... 2,5 m/s2 Disco abrasivo en húmedo Diámetro exterior ................ Ø 200 mm Agujero ............................... Ø 20 mm Espesor ....................................40 mm Grano ...........................................80 Revoluciones nmax ................ 3820 min-1 Velocidad de trabajo vs .... máx. 40 m/s Disco abrasivo en seco Diámetro exterior ................ Ø 150 mm Agujero ............................ Ø 12,7 mm Espesor ....................................20 mm Grano ...........................................36 Revoluciones nmax ................ 4500 min-1 Velocidad de trabajo vs .... máx. 35 m/s * A los 30 min. de funcionamiento continuo deberá hacerse una pausa hasta que la temperatura del aparato sea inferior a 2 K (2°C) de la temperatura ambiente. Los valores de ruido y vibración se detectaron bajo cumplimiento de las normas y prescripciones indicadas en la Declaración de Conformidad. El índice de emisión de vibraciones indicado ha sido medido según un procedimiento de ensayo normalizado, y puede ser usado para comparar herramientas eléctricas entre sí. El índice de emisión de vibraciones indicado también puede ser usado para estimar por anticipado la exposición. Aviso: El índice de emisión de vibraciones indicado puede diferir del valor reseñado cuando se usa efectivamente esa herramienta eléctrica y según cómo se utilice. Intente mantener la tensión, provocada por las vibraciones, tan reducida como sea posible. Las medidas para reducir la tensión por las vibraciones son, por ejemplo, llevar guantes al usar la herramienta y limitar el tiempo de trabajo. Para ello hay que tener en cuenta todas las partes del ciclo de funcionamiento (por ejemplo, los tiempos en los que la herramienta eléctrica está desconectada y aquellos en los que está encendida, pero funciona sin carga). Instrucciones de seguridad ¡ATENCIÓN! Al hacer uso de herramientas electrónicas deberán tenerse en cuenta las siguientes medidas de seguridad fundamentales para protegerse contra descargas eléctricas, peligro de lesiones o de incendio. Antes de utilizar esta herramienta electrónica lea todas las indicaciones y consérvelas en un lugar seguro. 7 ES Símbolos y pictogramas Lleve una mascarilla protectora. Símbolos en las instrucciones de uso: Peligro de cortaduras! Llevar guantes que no puedan cortarse. Señales indicadoras de peligro con información para la prevención de daños a las personas y a las cosas. Señales de obligación con información para la prevención de daños. Conecte el aparato a la red eléctrica. Retirar la clavija de alimentación. Señales de indicación con informaciones para un mejor manejo del aparato. Símbolos en el aparato: ¡Cuidado! Peligro de accidentarse debido a herramienta giratoria. Mantener las manos alejadas. Existe peligro de descarga eléctrica. Desconecte el enchufe de corriente antes de realizar trabajos de mantenimiento o reparaciones. Leer y tener en cuenta las instrucciones de servicio del aparato. Póngase gafas de protección. 8 Póngase protección en los oídos. Utilizar disco abrasivo solo en seco. Utilizar disco abrasivo solo con agua. Máquinas no deben ir a la basura doméstica. Entregue su aparato a un centro de reciclaje. Pictogramas en los discos abrasivos: No insertar disco de lijado defectuoso. Gráficos en el embalaje: Cartón ondulado Instrucciones generales de seguridad El concepto de “herramienta eléctrica” empleado en las indicaciones de seguridad, se refiere a herramientas eléctricas alimentadas por corriente (con cable de red) y a herramientas eléctricas alimentadas por batería (sin cable de red). Trabajar de forma segura: • Mantenga su lugar de trabajo en orden. El desorden en la zona de trabajo puede causar accidentes. • Tenga en cuenta las influencias del medio ambiente. - No exponer las herramientas eléctricas a la lluvia. No utilice herramientas eléctricas en un ES • • • • • ambiente húmedo o mojado. Si penetra agua en el aparato eléctrico, aumenta el riesgo de descarga eléctrica. - Procure iluminar bien el lugar de trabajo. - No use las herramientas eléctricas donde exista peligro de incendio o de explosión. Los aparatos eléctricos generan chispas que podrían encender el polvo o los vapores. Protéjase de las descargas eléctricas. Evite tocar físicamente las piezas puestas a tierra, como tuberías, radiadores, hornos eléctricos o refrigeradores. Mantenga alejadas a las demás personas. No permita que otras personas toquen la herramienta eléctrica o el cable, especialmente los niños, y manténgalos alejados de su lugar de trabajo. Guarde las herramientas eléctricas no usadas en un lugar seguro. Las herramientas eléctricas no usadas deberían guardarse en un lugar seco, elevado o cerrado con llave, y fuera del alcance de los niños. No sobrecargue la herramienta eléctrica. Usted trabajará mejor y de forma más segura dentro de la gama de potencias indicada. Utilice la herramienta eléctrica correcta. - No utilice máquinas débiles para realizar trabajos pesados. - No utilice la herramienta eléctrica para finalidades, para las que no está prevista. Por ejemplo, no utilice ninguna sierra circular manual para cortar ramas de árboles ni tacos de madera. El uso de la herramienta eléctrica para otros fines que los previstos puede producir situaciones peligrosas. • Lleve ropa adecuada. - No lleve ropa suelta o joyas que puedan ser atrapadas por las piezas móviles del aparato. - Al trabajar al aire libre, se recomienda llevar calzado antideslizante. - Si tiene el cabello largo, llévelo cubierto por una red. • Utilice un equipo protector. - Lleve gafas protectoras. Si no lo hace, existe el riesgo de sufrir daños oculares debido a chispas o partículas desprendidas. - Utilice una mascarilla en los trabajos que produzcan polvo. • Conecte el sistema extractor de polvo. Si existiesen conexiones para aspirar y recoger el polvo, convénzase de que estén conectadas y se usen correctamente. • No utilice el cable para finalidades ajenas a lo previsto. No utilice el cable para sacar el enchufe de la caja de empalme, y protéjalo del calor, el aceite y los bordes afilados. • Asegure la pieza. Utilice los dispositivos de sujeción o un tornillo de banco para fijar la pieza. Así se sujetará de una forma más segura que con la mano. • Evite adoptar una posición corporal anómala. Procure estar firmemente erguido y mantenga en todo momento el equilibrio. De esta forma podrá controlar mejor la herramienta eléctrica en situaciones inesperadas. • Cuide sus herramientas con esmero. De esta forma se asegura el mantenimiento de la seguridad de la herramienta eléctrica. - Mantenga limpias y afiladas las herramientas cortantes para poder trabajar de una forma más segura y mejor. 9 ES - • • • • • 1 0 Siga las instrucciones de lubricación y de cómo cambiar la herramienta. - Compruebe periódicamente el cable conector de la herramienta eléctrica y, si estuviese deteriorado, haga que un técnico lo reemplace. - Compruebe periódicamente las líneas de alargo y sustitúyalas cuando estén deterioradas. - Mantenga las asas secas, limpias y libres de aceite y de grasas. Saque el enchufe de la caja de empalme. Cuando no utilice la herramienta eléctrica, antes de mantenerla y al cambiar piezas. Esta medida de precaución evitará que la herramienta eléctrica se ponga en marcha de forma inadvertida. No deje colocada ninguna llave en la herramienta. Antes de conectar el aparato, compruebe que no haya quedado ninguna llave ni pieza de ajuste dentro. Las herramientas y llaves que se encuentran en piezas giratorias del aparato, pueden producir accidentes. Evite la puesta en marcha inadvertida. Asegúrese de que, al introducir el enchufe en la toma de corriente, el interruptor esté desconectado. Utilice cables de alargo para el exterior. Utilice al aire libre sólo cables de alargo autorizados para ello y marcados correspondientemente. Esté atento, observe lo que hace y utilice la herramienta eléctrica con esmero. No utilice la herramienta eléctrica cuando esté cansado o se encuentra bajo los efectos de drogas, alcohol o medicamentos. Un momento de distracción al utilizar la herramienta eléctrica puede producir graves accidentes. • Compruebe si su herramienta eléctrica presenta algún desperfecto. De esta forma se asegura el mantenimiento de la seguridad de la herramienta eléctrica. - Antes de utilizar la herramienta eléctrica, compruebe cuidadosamente los dispositivos protectores y las piezas ligeramente dañadas, para asegurar que funcionen perfectamente y según lo previsto. - Compruebe que las piezas móviles funcionan perfectamente, no estén atascadas y no haya ninguna pieza dañada. Las piezas deben estar correctamente montadas y cumplir todas las condiciones para asegurar un perfecto funcionamiento. - Las piezas y los sistemas protectores deteriorados deben ser reparados o cambiados adecuadamente por un taller especializado reconocido, mientras no se especifique lo contrario en las instrucciones de servicio. - Los interruptores deteriorados deben ser reemplazados por un taller de servicio técnico. - No utilice ninguna herramienta eléctrica, en la cual, el interruptor no se deje conectar o desconectar. Existe peligro de lesionarse. • Atención: Si utiliza otras herramientas u accesorios que los indicados, existe cierto riesgo de sufrir lesiones. • Haga que un técnico electricista repare su herramienta eléctrica. Esta herramienta eléctrica cumple las disposiciones de seguridad pertinentes. Las reparaciones sólo las debe realizar un taller especializado, usando para ello piezas de recambio originales. De no ser así, existe riesgo de accidente para el usuario. ES Instrucciones de seguridad adicionales • Conecte el aparato sólo a cajas de empalme que tengan un sistema protector contra corrientes de falla (conmutador FI), con una intensidad de corriente de falla evaluable no mayor de 30 mA. • Mantenga el cable de corriente y el de alargo alejados de la muela. En caso de dañarse o de seccionarse el cable de corriente, saque inmediatamente el enchufe de la caja de empalme. No toque el cable antes de desenchufarlo de la corriente eléctrica. Existe peligro debido a descarga eléctrica. • Para evitar riesgos, el cambio del enchufe o del cable de alimentación siempre ha de realizarlo el fabricante de la herramienta electrónica o su servicio técnico. • Antes de encender el aparato, asegúrese de que esté bien fijado sobre la superficie de trabajo. • Para su propia seguridad únicamente utilice los accesorios y aparatos complementarios indicados en las instrucciones de uso o aquellos recomendados por el fabricante de la herramienta. • Utilice solo las herramientas de lijado recomendadas por el fabricante. No utilice hojas de sierra Cerciórese de que las dimensiones se adaptan al aparato. • Solo utilice discos abrasivos, cuyas revoluciones (impresas) sean al menos tan altas como las indicadas en la placa donde se especifican los datos del aparato. • Antes de utilizar el disco abrasivo realice un examen visual. No utilice discos abrasivos dañados o deformados. Cambie los discos abrasivos gastados. • No use nunca el aparato sin la protección contra chispas ni sin la cubierta de protección. • • • • • • • • Para compensar el desgaste del disco abrasivo, reajuste periódicamente la protección contra chispas (distancia máx. 2 mm) Cambie el disco abrasivo como muy tarde cuando la protección contra chispas y el soporte de la pieza de labor ya no se puedan reajustar a una distancia máxima de 2 mm. Procure que las chispas que se producen al lijar no provoquen peligro alguno, p.ej. que puedan alcanzar a personas o incendiar sustancias inflamables. Cuando vaya a lijar, cepillar y cortar póngase gafas protectoras, guantes de seguridad, mascarilla y protección para los oídos. No ponga nunca los dedos entre el disco abrasivo y la protección contra chispas o cerca de la cubierta de protección. Existe peligro de aplastamiento. Por razones de funcionalidad, las partes del aparato que están en rotación no pueden ser cubiertas. Por tanto, actúe con prudencia y sujete bien la pieza de labor para evitar que se deslice y que las manos puedan entrar en contacto con el disco abrasivo. Al lijar, la pieza de labor se calienta. No la toque del lado que se ha trabajado, deje que se enfríe. Existe peligro de quemadura. No utilice ningún medio refrigerante o similar. No trabaje con el aparato si está cansado o ha ingerido alcohol o pastillas. Haga las pausas necesarias a tiempo. Apague el aparato y desenchúfelo de la corriente eléctrica - para soltar una herramienta intercambiable bloqueada, - cuando el cable de conexión esté dañado o se haya enrollado, - si hace ruidos raros. 1 1 ES • Utilice el aparato solo en posición vertical y de pie y procure tener una posición segura. Riesgos residuales Aunque usted maneje esta herramienta eléctrica de acuerdo a las normas, siempre permanecen riesgos residuales. En relación con la forma constructiva y el acabado de esta herramienta eléctrica, pueden presentarse los siguientes riesgos: a) Daños en los pulmones, si no se utiliza mascarilla. b) Daños auditivos, si no se lleva una protección adecuada para los oídos. c) Perjuicios para la salud provocados por: - entrar en contacto con la herramienta de lijado en la zona no cubierta; - expulsión de partes de las piezas de labor o del disco abrasivo dañado. d) Daños para la salud, derivados de las vibraciones transmitidas al sistema mano-brazo, en caso de que el aparato se utilice durante un tiempo prolongado, no se lleve de forma correcta o no esté en las condiciones de mantenimiento debidas. Aviso: Esta herramienta eléctrica genera durante su uso un campo electromagnético. En determinadas circunstancias, este campo puede dañar implantes médicos activos o pasivos. Para reducir el riesgo de lesiones serias o mortales, recomendamos a las personas con implantes médicos que consulten a su médico o a su fabricante antes de utilizar la máquina. 1 2 Montaje - - - - ¡Atención! ¡Riesgo de lesiones! Asegúrese de disponer de suficiente espacio para trabajar y de no poner en peligro a ninguna otra persona. Fije el aparato a la superficie de trabajo siempre con tornillos suficientemente largos y resistentes para no perder el control del aparato. Antes de ponerlo en funcionamiento han de montarse correctamente todas las cubiertas y los dispositivos de protección. Antes de realizar cualquier ajuste en el aparato, desenchúfelo. Montar ajustar los soportes de las piezas de labor 1. Atornille los soportes de las piezas de labor (6) al aparato. Para ello, utilice el tornillo (16), la arandela (15), el disco dentado (14) y la tuerca de estrella (7) que se adjuntan. 2. Ajuste el soporte para la pieza de labor (6) del disco abrasivo en seco con la tuerca de estrella (7). La distancia entre el disco abrasivo en seco (5) y el soporte para pieza de labor (6) sea como máximo de 2 mm. Ajuste periódicamente el soporte de la pieza de labor para compensar el desgaste del disco abrasivo (distancia máxima 2 mm). ES Montar/ajustar protección contra chispas 1. Atornille la protección contra chispas (18) a la cubierta protectora ( 25). Para ello, utilice el tornillo de ajuste (21) incl. el anillo elástico y la arandela (20/19), así como la tuerca (17). 2. Ajuste la protección contra chispas (18) con el tornillo de ajuste (21): la distancia entre el disco abrasivo en seco ( 5) y el soporte para pieza de labor (18) ha de ser como máximo de 2 mm. Ajuste periódicamente la protección contra chispas para compensar el desgaste del disco abrasivo (distancia máxima 2 mm). Aunque tenga la protección contra chispas, cuando vaya a trabajar, póngase también gafas de protección para evitar lesiones en los ojos. Atornillar el aparato a la mesa de trabajo 1. Retire el pie de goma (10) del depósito de agua. 2. Atornille el aparato con los 4 tornillos y tuercas a la mesa de trabajo plana. Para ello, introduzca los tornillos por los 4 agujeros (9) en la base del aparato. Los tornillos y tuercas para el montaje no están incluidos en el suministro. Llenar el depósito de agua 1. Inserte el cierre de goma (11) en la apertura de vaciado del depósito de agua (13). 2. Llene agua hasta la marca de nivel del depósito de agua (13). Manejo - - - - - ¡Atención! ¡Riesgo de lesiones! Antes de realizar trabajos en el aparato, desconecte siempre el enchufe de corriente. Utilice sólo las muelas rectificadoras y los accesorios recomendados por el fabricante. Si utiliza otras herramientas u accesorios que los indicados, existe cierto riesgo de sufrir lesiones. Solo utilice herramientas de lijado que lleven los datos del fabricante, tipo de ligadura, dimensiones y número de revoluciones permitidas. Solo utilice discos abrasivos que tengan las revoluciones (impresas) y que al menos sean tan altas como las indicadas en la placa identificadora del tipo. No utilice muelas rectificadoras que presenten roturas, hendiduras ni demás desperfectos. No haga funcionar el aparato nunca sin pantalla visera protectora, y no utilice hojas de sierra. Controle el disco abrasivo antes de su utilización: Revise el soporte para la protección contra chispas y el disco abrasivo, así como el soporte de la pieza de labor y el disco abrasivo (distancia máxima 2 mm). En el momento en el que el soporte para la protección contra chispas 1 3 ES y el soporte de la pieza de labor ya no se puedan colocar a máx. 2 mm del disco abrasivo deberá de cambiarse el disco abrasivo. - Conecte el aparato sólo cuando esté montado seguro sobre la superficie de trabajo. Cuando el aparato esté funcionando no acerque las manos al disco abrasivo. ¡Peligro de lesiones! Aunque tenga la protección contra chispas, cuando vaya a trabajar, póngase también gafas de protección para evitar lesiones en los ojos. Conectar y desconectar Procurar que la tensión de la conexión de corriente coincida con la indicada en la placa de características del aparato. Conecte el aparato a una toma de corriente. 1. Para ponerlo en marcha, pulse el encendedor “I” ( 8) y el aparato arrancará. 2. Para detenerlo, pulse el desconectador “0” ( 8) y el aparato se apagará. Cuando encienda el aparato espere hasta que haya alcanzado el número máximo de revoluciones. Entonces es cuando puede empezar a lijar. La muela es arrastrada aún después de haber desconectado el aparato. Existe peligro de accidentarse. 1 4 Marcha de ensayo: Antes de trabajar por primera vez y cada vez después de cambiar la muela una marcha de ensayo de cómo mínimo 60 segundos sin carga. Desconecte inmediatamente el aparato si la muela oscilase, apareciesen vibraciones considerables o se oigan ruidos anormales. Lijar con el disco abrasivo en seco • Coloque la pieza de labor en su soporte ( 6) y colóquela, lentamente, en el ángulo que desea en el disco abrasivo en seco ( 5). • Mueva la pieza de labor ligeramente de un lado a otro para obtener el mejor lijado. Así el desgaste del disco abrasivo es uniforme. Deje que la pieza de labor se enfríe. • Abata la protección contra las chispas ( 2) mientras está rectificando para evitar lesionarse con las chispas. Lijar con el disco abrasivo en húmedo • Compruebe el nivel de agua del depósito: El disco abrasivo en húmedo ( 1) deberá estar dentro del agua hasta la marca de nivel del depósito de agua ( 13). • Colóquese delante del disco abrasivo en húmedo ( 1). • Sujete la pieza de labor con las dos manos y vaya bajándola lentamente sobre el disco abrasivo en húmedo. • La pieza de labor también puede apoyarse en los dientes del depósito de agua ( 13). ES Cambiar disco abrasivo • • • • • • • • • Indicaciones sobre el cambio de discos abrasivos: No use nunca el aparato sin el dispositivo de protección. Asegúrese de que la velocidad especificada para el disco abrasivo sea igual o mayor que la velocidad de medición de marcha en vacío. Cerciórese de que el tamaño del disco abrasivo sea adecuado para el aparato. Solo utilice discos abrasivos que están en perfectas condiciones (prueba de sonido: los discos abrasivos que no están dañados, al colgarlos de una cuerda, desprenden un sonido claro cuando se golpean con un martillo de plástico). Si el orificio de alojamiento es demasiado pequeño, no trate de aumentarlo. No utilice ningún casquillo reductor ni adaptador adicional para ajustar el tamaño de los discos con orificios demasiado grandes. No utilice hojas de sierra. Para montar las herramientas de lijado solo se puede utilizar las bridas de fijación que se suministran. Las capas intermedias entre la brida de fijación y las herramientas de lijado han de ser de material elástico p.ej. goma, cartón blando, etc. Vuelva a montar completamente el aparato tras cambiar el disco abrasivo. Apague el aparato y desenchúfelo de la corriente eléctrica. Deje que el aparato se enfríe. Cuando cambie los discos abrasivos póngase guantes de protección para evitar posibles cortes. Cambiar disco abrasivo en seco: 1. Retire la protección contra chispas ( 2) (ver “Montar/ajustar protección contra chispas”). 2. Suelte los tornillos de fijación y retire la cubierta del disco abrasivo ( 4) de la cubierta de protección (25). 3. Desatornille la tuerca del disco abrasivo (22) con una llave (entrecaras 19), mientras tanto ha de sujetar el disco abrasivo en seco (5) llevando guantes con la mano. Desatornillar la tuerca (rosca a la derecha): Girar en sentido contrario a las agujas del reloj. 4. Retire la brida de fijación (23) y el disco abrasivo en seco (5). 5. Coloque el disco abrasivo en seco (5) nuevo con las capas intermedias de cartón (4) y la brida de fijación (23). Destornille la tuerca del disco abrasivo (22) a mano. Desatornille la tuerca (rosca a la derecha): En sentido de las agujas del reloj. 6. Apriete la tuerca del disco abrasivo con una llave (entrecaras 19) a mano ejerciendo presión media. 7. Atornille la cubierta de los discos abrasivos (4). 8. Coloque la protección contra chispas ( 18) y el soporte de la pieza de labor ( 6), la distancia hacia el disco abrasivo en seco (5) ha de ser de máximo de 2 mm (ver “Montaje”). 1 5 ES La tuerca del disco abrasivo no puede estar demasiado apretada para evitar que la tuerca y el disco abrasivo se rompan. 9. Marcha de ensayo: Antes de trabajar por primera vez y cada vez después de cambiar la muela una marcha de ensayo de cómo mínimo 60 segundos sin carga. Desconecte inmediatamente el aparato si la muela oscilase, apareciesen vibraciones considerables o se oigan ruidos anormales. Cambiar disco abrasivo en húmedo: 1. Suelte los 4 tornillos de fijación (13a/13b/13c/13d) de la caja de engranaje (28) y retire el depósito de agua (13). 2. Desatornille la tuerca del disco abrasivo (22) con una llave (entrecaras 19), mientras tanto ha de sujetar el disco abrasivo en húmedo (1) llevando guantes con la mano. Desatornillar la tuerca (rosca a la derecha): Girar en sentido contrario a las agujas del reloj. 3. Retire la brida de fijación de material sintético (26) y el disco abrasivo en húmedo(1). 4. Coloque el nuevo disco abrasivo en húmedo (1) y la brida de fijación de material sintético (26). Destornille la tuerca del disco abrasivo (22) a mano. Atornillar la tuerca derecha (rosca a la derecha): En sentido de las agujas del reloj. Las dos bridas de fijación de material sintético (26/27) no son idénticas. 1 6 5. Apriete la tuerca del disco abrasivo (22) con una llave (entrecaras 19) a mano ejerciendo presión media. 6. Vuelva a pasar el depósito de agua (13) por encima del disco abrasivo en húmedo (1) apretándolo contra la caja de engranajes (28). 7. Fije el depósito de agua (13) con los cuatro tornillos de fijación y las arandelas a la caja de engranaje (28). La tuerca del disco abrasivo no puede estar demasiado apretada para evitar que la tuerca y el disco abrasivo se rompan. Entre la brida de fijación (27) y la caja de engranaje (28) hay una arandela (29). 8. Marcha de ensayo: Antes de trabajar por primera vez y cada vez después de cambiar la muela una marcha de ensayo de cómo mínimo 60 segundos sin carga. Desconecte inmediatamente el aparato si la muela oscilase, apareciesen vibraciones considerables o se oigan ruidos anormales. Limpieza y mantenimiento Desconecte el enchufe de la corriente antes de realizar cualquier ajuste, reparación o mantenimiento. Haga realizar en un taller especializado los trabajos que no estén descritos en estas instrucciones de servicio. Utilice solamente piezas originales. Deje enfriarse el aparato ES antes de realizar cualquier trabajo de mantenimiento o limpieza. Existe peligro de quemaduras. Limpieza No utilizar detergentes ni disolventes intensos. Las substancias químicas pueden atacar las piezas de plástico del aparato. No limpie el aparato nunca bajo un chorro de agua. • Limpie a fondo el aparato cada vez después de usarlo. • Limpie la superficie del aparato con un cepillo blando, un pincel o un paño. Trabajos generales de mantenimiento Compruebe el aparato cada vez antes de usarlo por si existe algún defecto obvio, piezas desgastadas o dañadas, y si los tornillos y demás piezas están correctamente asentadas. Compruebe especialmente la muela rectificadora. Cambiar las piezas defectuosas. Eliminación y protección del medio ambiente El equipo, sus accesorios y el material de embalaje deben reciclarse en forma compatible con el medio ambiente. Máquinas no deben ir a la basura doméstica. Entregue su aparato a un centro de reciclaje. Lleve el embalaje de cartón ondulado a un lugar para que procedan a reciclarlo respetando el medio ambiente. Las partes plásticas y metálicas empleadas pueden ser separadas por tipo y llevadas al reciclaje. Consulte nuestro Centro de Servicio para mayor información. Los aparatos defectuosos que nos envíe, se los evacuaremos de forma gratuita. Almacenaje • Antes de guardarla, vacíe el depósito de agua ( 13): retire el cierre de material sintético ( 11) de la apertura de vaciado del depósito de agua y deje que vaya saliendo el agua. • Cuando no use el equipo, debe guardarse éste en un lugar seco y protegido de polvo, asegurando que está fuera del alcance de niños. • Las muelas deben guardarse el lugar seco, apoyadas sobre su borde y no deben apilarse. 1 7 ES Piezas de repuesto/Accesorios Encontrará las piezas de repuesto y accesorios en www.grizzly-service.eu Si no tuviese acceso a Internet, póngase en contacto telefónico con el Service-Center (ver “Service-Center“ página 21). Tenga a mano los números de pedido. Part. Instrucciones de uso Denominación 5 Disco abrasivo en seco 91103553 1 Disco abrasivo en húmedo 30211041 11,13 Set Depósito de agua 30211042 22,26,27 Set Bridas de fijación, húmedo 30211049 22,23 Set Bridas de fijación, seco 30211044 2,3,17-21 Set Protección contra chispas 30211045 6,7,14-16 Set Soporte para pieza de labor 30211046 4 Set Cubierta del disco abrasivo 30211047 25 Set Cubierta de protección para disco abrasivo en seco 30211048 1 8 Números de pedido ES Búsqueda de fallos Apague el aparato y desenchúfelo de la corriente eléctrica. Deje que el aparato se enfríe. Problema El aparato no arranca Origen posible Subsanación del error Falta tensión de alimentación Salta el fusible de la casa Enchufe, cable de la red, cable, revisar enchufe de corriente o reparar por electricista, revisar fusible de la casa. Interruptor de encendido/apa8) defectuoso gado ( Motor defectuoso Las herramientas de lijado no se mueven aunque el motor funciona El motor se ralentiza y se para Tuerca del disco abrasivo ( 22) está suelta Apretar tuerca del disco abrasivo (ver „Cambiar disco abrasivo“) Pieza de labor, restos de la pieza de labor o restos de la herramienta de lijado bloquean el accionamiento Retirar elementos que bloquean La pieza de labor sobrecarga el aparato Tuerca del disco abrasivo ( 22) está suelta Disco abrasivo no gira en redondo, se escuchan ruidos extraños A reparar por el servicio al cliente Disco abrasivo ( fectuoso 1/5) de- Protección contra chispas ( 2) o soporte de pieza de 6) están mal ajuslabor ( tadas Reducir presión sobre herramienta de lijado La pieza de labor no es apropiada Apretar tuerca del disco abrasivo (ver „Cambiar disco abrasivo“) Cambiar disco abrasivo Ajustar protección contra chispas o soporte de pieza de labor (ver „Montaje“) 1 9 ES Garantía Estimada clienta, estimado cliente: Por este aparato se le concede una garantía de 3 años a partir de la fecha de compra. En caso de defectos de este producto, le corresponden derechos legales contra el vendedor del producto. Estos derechos no serán limitados por la garantía expuesta a continuación. paraciones a efectuar al cabo del período de garantía están sujetas a pago. Condiciones de garantía El plazo de garantía empieza con la fecha de compra. Por favor, conserve bien el resguardo de caja original. Este documento se necesitará como prueba de la compra. Si dentro del plazo de tres años después de la fecha de compra del aparato se detecta un defecto de material o fabricación, según nuestra elección, el producto será reparado o sustituido gratuitamente. Esta prestación de garantía presupone entregar el aparato defectuoso y el comprobante de compra (resguardo de caja) dentro del plazo de los tres años, describiendo brevemente por escrito en qué consiste el defecto y cuándo se detectó. Si el defecto está cubierto por nuestra garantía, le devolveremos el aparato reparado o uno nuevo. Con la reparación o la sustitución del producto no se inicia un nuevo período de garantía. Volumen de la garantía El aparato fue producido cuidadosamente según las directivas estrictas de la calidad y examinado concienzudamente antes de la entrega. La prestación de garantía tiene validez para defectos de material o fabricación. Esta garantía no se extiende a partes del producto que están sometidas a un desgaste natural y, por lo tanto, pueden ser consideradas como piezas de desgaste (p. ej. disco abrasivo, brida de fijación, escobillas de carbón), o a daños en partes frágiles (p. ej. interruptores). Esta garantía caduca si el producto fue dañado, utilizado impropiamente o no sometido a mantenimiento. Para un uso apropiado del producto, se han de cumplir exactamente todas las indicaciones contenidas en las instrucciones de manejo. Se tienen que evitar absolutamente fines de aplicación y manejos, de los cuales desaconsejan o advierten las instrucciones de servicio. El producto está previsto solamente para el uso privado y no comercial. La garantía caducará en el caso de un tratamiento abusivo e impropio, uso de la fuerza o manipulaciones que no fueron efectuadas por una filial de servicio autorizada. Período de garantía y exigencias legales en caso de defectos El período de garantía no será prolongado por la prestación de garantía. Esto se aplica igualmente a las partes sustituidas y reparadas. Daños y defectos ya existentes eventualmente al comprar el aparato, tienen que ser notificados inmediatamente después de haberlo desempacado. Las re- Gestión en caso de garantía Para garantizar una gestión rápida de su reclamación, le rogamos seguir las siguientes indicaciones: • Para todas las consultas, tenga preparado por favor el resguardo de caja y el número de identificación (IAN 304988) como prueba de la compra. 2 0 ES • Por favor, saque el número de artículo de la placa de características. • Si surgen fallas en el funcionamiento o cualquier defecto, contacte primeramente a la sección de servicio indicada a continuación por teléfono o vía EMail. Se le darán otras informaciones acerca de la gestión de su reclamación. • Tras consultar con nuestro servicio de postventa, un aparato identificado como defectuoso puede ser enviado libre de franqueo a la dirección de servicio ya conocida por usted, adjuntando el comprobante de compra (resguardo de caja) e indicando en qué consiste el defecto y cuándo surgió. Para evitar problemas de recepción y costes adicionales, utilice de todas maneras sólo la dirección que se le comunicará. Asegúrese de que el envío no se efectúe sin franqueo, como mercancía voluminosa, expréss u otro tipo de transporte especial. Envíe por favor el aparato incluyendo todos los accesorios entregados con la compra y garantice un embalaje de transporte lo suficientemente seguro. Servicio de reparación Reparaciones que no están cubiertas por la garantía, las puede dejar efectuar por nuestra filial de servicio por cuenta suya. Ésta le elaborará gustosamente un presupuesto. Sólo atenderemos aparatos que hayan sido enviados en un embalaje suficiente y franqueados. Atención: Por favor, envíe el aparato limpio, señalando el defecto a nuestra filial de servicio. No aceptaremos aparatos que hayan sido enviados sin franqueo, como mercancía voluminosa, expréss o cualquier tipo de transporte especial. Nos encargamos gratuitamente de la eliminación de sus aparatos defectuosos enviados. Service-Center ES Servicio España Tel.: 902 59 99 22 (0,08 EUR/Min. + 0,11 EUR/llamada (tarifa normal)) (0,05 EUR/Min. + 0,11 EUR/llamada (tarifa reducida)) E-Mail: [email protected] IAN 304988 Importador Por favor, observe que la siguiente dirección no es una dirección de servicio. Contacte primeramente al centro de servicio mencionado arriba. Grizzly Tools GmbH & Co. KG Stockstädter Straße 20 D-63762 Großostheim Alemania www.grizzly-service.eu 2 1 IT M T Indice Introduzione Introduzione ............................ 22 Destinazione d‘uso .................... 22 Descrizione generale ................. 23 Volume di fornitura .........................23 Descrizione del funzionamento ........23 Panoramica ...................................23 Dati tecnici ................................ 24 Indicazioni di sicurezza ............. 24 Simboli e pittogrammi ....................25 Indicazioni di sicurezza generali .....25 Ulteriori indicazioni di sicurezza ......27 Rischi residui .................................28 Montaggio ................................ 29 Montaggio/regolazione dei poggiapezzi .................................29 Montaggio/regolazione il parascintille...................................29 Fissaggio dell’apparecchio al banco di lavoro .............................29 Riempimento dell’acqua nel contenitore d’acqua ........................30 Comando .................................. 30 Accensione e spegnimento ..............30 Molatura con la mola a secco .........31 Molatura con la mola a umido.........31 Sostituzione della mola ...................31 Pulizia e manutenzione ............. 33 Pulizia ..........................................33 Lavori di manutenzione generici .....33 Conservacione .......................... 33 Smaltimento/Tutela dell’ambiente ............................ 33 Pezzi di ricambio/Accessori ....... 34 Ricerca di guasti ........................ 35 Garanzia .................................. 36 Servizio di riparazione .............. 37 Service-Center ........................... 37 Importatore .............................. 37 Traduzione della dichiarazione di conformità CE originale ......... 70 Congratulazioni per l’acquisto del Suo nuovo apparecchio. Ha scelto un prodotto altamente pregiato. Questo apparecchio è stato sottoposto a un controllo di qualità durante la produzione e quindi sottoposto a un controllo finale. Quindi è garantito il funzionamento del vostro apparecchio. 2 2 Le istruzioni per l’uso costituiscono parte integrante di questo prodotto. Contengono indicazioni importanti per la sicurezza, l’uso e lo smaltimento. Prima dell’uso del prodotto, si raccomanda di familiarizzare con tutte le indicazioni di comando e di sicurezza. Usare il prodotto solo come descritto e per i campi d’impiego specificati. Conservare le istruzioni in un luogo sicuro e consegnare la documentazione in caso di cessione del prodotto a terzi. Destinazione d‘uso La molatrice da banco è idonea per affilare utensili (ad es. coltelli, forbici, scalpelli) e per sbavare e molare piccoli pezzi in metallo. L’apparecchio non è concepito per qualsiasi altro tipo di utilizzo (ad esempio la levigatura con utensili non adeguati, la levigatura con liquidi refrigeranti, la levigatura di materiali nocivi come l’amianto). L‘apparecchio è destinato all‘impiego domestico. Non è stato concepito per l‘impiego industriale permanente. L‘apparecchio è destinato al‘uso da parte di adulti. Giovani sopra i 16 anni possono usare l‘apparecchio solo se sorvegliati da un adulto. Il produttore declina ogni responsabilità per danni causati da un uso improprio o un comando errato. IT Descrizione generale Le figure si trovano sulle pagine pieghevoli anteriori e posteriori. Volume di fornitura Rimuovere l‘apparecchio dall‘imballaggio e controllare se è completo. Smaltire il materiale di imballaggio secondo le disposizioni. • Apparecchio con mole premontate • Parascintille • Materiale di montaggio per il fissaggio del parascintille sull’apparecchio - Vite di regolazione incl. rondella e anello a molla, dado • Portapezzo • Materiale di montaggio per fissaggio del portapezzo sull’apparecchio - Dado a stella, rondella, disco dentato e vite • Chiusura in gomma • Istruzioni per l’uso Descrizione del funzionamento La molatrice da banco è un apparecchio combinato, dotato di una mola a secco e una mola a umido con diversa grana per la molatura grossolana e fine. Per proteggere l’utilizzatore, l’apparecchio è provvisto di parascintille e di calotta protettiva. La seguente descrizione illustra il funzionamento dei componenti. Il funzionamento dei componenti è riportato nelle seguenti descrizioni. M T Panoramica 1 Mola a umido 2 Parascintille 3 Dado di regolazione per parascintille 4 Coprimola 5 Mola a secco 6 Poggiapezzo 7 Dado a stella per montaggio/ regolazione del portapezzo 8 Interruttore ON/OFF 9 Fori per montaggio al banco 10 Piedino di gomma (contenitore per acqua) 11 Chiusura in gomma per contenitore d’acqua 12 Cavo di rete 13 Contenitore per acqua 14 Rondella di sicurezza 15 Rondella 16 Viti di fissaggio per portapezzo 17 18 19 20 21 Dado Supporto per parascintille Rondella Disco dentato Vite di regolazione per supporto per parascitnille 22 23 24 25 Dado per mola Flangia di fissaggio Strati intermedi in cartone Calotta protettiva per mola a secco 26 27 28 29 Flangia di serraggio in plastica Flangia di serraggio in plastica Scatola ingranaggio Rondella 2 3 IT M T Dati tecnici Molatrice da banco .............. PNTS 250 B1 Tensione di entrata nominale U .....................230 V~, 50 Hz Potenza assorbita P ..250 W (S2 30 min)* Classe di protezione .............................. I Tipo di protezione ............................IPX0 Regime minimo n0 Mola a umido..................ca. 128 min-1 Mola a secco ................ca. 2950 min-1 Peso (incl. accessori)................ ca. 8,6 kg Livello di pressione acustica (LpA) ..................... 80 dB (A); KpA= 3 dB Livello di potenza sonora (LWA) .................... 93 dB(A); KWA= 3 dB Valore totale di vibrazioni (ah) . 2,5 m/s2 Mola a umido Diametro esterno ................. Ø 200 mm Foro .................................... Ø 20 mm Spessore ..................................40 mm Grana ...........................................80 Numero di giri nmax ..... max. 3820 min-1 Velocità operativa vs ......... max. 40 m/s Mola a secco Diametro esterno ................. Ø 150 mm Foro ................................. Ø 12,7 mm Spessore ..................................20 mm Grana ...........................................36 Numero di giri n0 ....... max. 4500 min-1 Velocità operativa ............ max. 35 m/s * Dopo un servizio continuo di 30 minuti è prevista una pausa da protrarsi finché l’apparecchio raggiunge una temperatura che si discosta di meno di 2 K (2°C) dalla temperatura ambiente. I valori di rumorosità e vibrazione sono stati determinati conformemente alle prescrizioni e norme citate nella dichiarazione di conformità. 2 4 Il valore di emissione di vibrazioni indicato è stato misurato attraverso un procedimento di controllo standardizzato e può essere utilizzato per il confronto di un apparecchio elettrico con un altro. Il valore di emissione di vibrazioni indicato può essere anche utilizzato per una prima valutazione dell’esposizione alla quale si è soggetti. Avvertenza: Durante l’uso effettivo dell’apparecchio elettrico, il livello di emissione di vibrazioni può differire da quello indicato a seconda della tipologia e della modalità d’uso. Cercare di limitare il più possibile l’esposizione alle vibrazioni. Per attenuare l’esposizione alle vibrazioni si possono ad esempio indossare guanti durante l’utilizzo dell’utensile e limitare l’orario di lavoro. In tal senso occorre tenere conto di tutte le componenti del ciclo operativo (ad esempio i momenti in cui l’apparecchio elettrico è spento e quelli in cui è accesso, ma opera senza carico). Indicazioni di sicurezza ATTENZIONE! Durante l‘uso di utensili elettrici devono essere osservate le seguenti misure di sicurezza di base al fine di evitare scosse elettriche e pericoli di lesioni e incendi. Prima di utilizzare il presente utensile elettrico leggere tutte le istruzioni, conservare in buono stato le avvertenze di sicurezza. IT M T Simboli e pittogrammi Utilizzare la mola solo a secco. Simboli riportati nelle istruzioni: Utilizzare la mola solo con acqua. Simboli di pericolo con indicazioni relative alla prevenzione di danni a cose e persone. Simboli di divieto con indicazioni relative alla prevenzione di danni. Collegare l‘apparecchio all‘alimentazione. Staccare la spina. Simboli di avvertenza con informazioni relative ad un uso corretto dell’apparecchio. Simboli sull‘apparecchio: Attenzione! Pericolo di lesioni a causa di utensili rotanti! Tenere lontane le mani. Pericolo a causa di scosse elettriche! Prima di effettuare lavori di manutenzione e riparazione, staccare la presa dalla spina. Leggere le istruzioni d‘uso. Indossare le protezioni acustiche. Indossare la protezione oculare. Indossare una protezione per le vie respiratorie. Pericolo di ferite da taglio! Indossare guanti a prova di taglio. Le apparecchiature non si devono smaltire insieme ai rifiuti domestici. Altri simboli sulle mole da levigatura: Non utilizzare mole difettose. Simbolo sull‘imballaggio: Cartone ondulato Indicazioni di sicurezza generali Con il termine “elettroutensile” adoperato nelle istruzioni di sicurezza si intendono gli elettroutensili collegati alla rete elettrica (con cavo di rete) e gli elettroutensili a batteria (senza cavo di rete). Lavorare in modo sicuro: • Tenere in ordine la zona di lavoro. Disordine nella zona di lavoro può causare incidenti. • Tenere conto degli influssi ambientali. - Non esporre gli elettroutensili alla pioggia. Non usare elettroutensili in ambienti umidi o bagnati. L’infiltrazione d’acqua in un utensile elettrico aumenta il rischio di scosse elettriche. - Garantire una buona illuminazione dell’area di lavoro. - Non usare elettroutensili in zone a rischio di incendi o esplosioni. Utensili elettrici generano scintille che potrebbero infiammare la polvere o i vapori. 2 5 IT M T • Proteggersi da scosse elettriche. Evitare il contatto del corpo con le parti collegate a terra (p. es. tubi, radiatori, fornelli elettrici, frigoriferi). • Tenere lontane altre persone. Impedire che altre persone, in particolare bambini, tocchino l’elettroutensile. Tenerle lontane dalla zona di lavoro. • Conservare elettroutensili inutilizzati in un luogo sicuro. Elettroutensili inutilizzati devono essere depositati in un luogo asciutto, sospeso o chiuso, fuori dalla portata di bambini. • Non sovraccaricare l’elettroutensile. Si lavora meglio e in modo più sicuro nel campo di potenza specificato. • Usare l’elettroutensile giusto. - Non usare macchine a bassa potenza per lavori pesanti. - Non usare l’elettroutensile per scopi diversi da quelli per i quali è previsto. Per esempio, non usare una sega circolare per tagliare tralicci o ceppi di legno. L’uso dell’utensile elettrico per scopi diversi da quelli previsti può generare situazioni pericolose. • Indossare un abbigliamento adatto. - Non indossare capi d’abbigliamento larghi o gioielli, potrebbero essere catturati dalle parti in movimento. - In caso di lavori all’aperto si raccomanda di indossare scarpe antiscivolo. - Usare una rete per raccogliere capelli lunghi. • Usare un’attrezzatura di protezione. - Indossare occhiali di sicurezza. La mancata osservanza di questa disposizione può provocare lesioni agli occhi a causa di scintille o particelle. - Per lavori che generano polveri indossare una maschera respiratoria. 2 6 • Collegare il dispositivo di aspirazione polveri. In presenza di attacchi per l’aspirazione di polveri e dispositivi di raccolta, assicurarsi che questi siano collegati e usati correttamente. • Non usare cavi per scopi diversi da quelli previsti. Non usare il cavo per staccare la spina dalla presa. Proteggere il cavo da fonti di calore, olio e spigoli vivi. • Bloccare il pezzo. Usare dispositivi di serraggio o una morsa a vite per bloccare il pezzo. In questo modo si garantisce una presa più sicura che con le mani. • Evitare posture anormali. Garantire una posizione stabile e mantenere l’equilibrio in ogni momento. In questo modo è possibile controllare meglio la sega elettrica nelle situazioni impreviste. • Manutenere gli utensili con cura. Molti infortuni sono causati da una manutenzione non corretta degli utensili elettrici. - Tenere gli utensili di taglio sempre affilati e puliti per poter lavorare meglio e in modo più sicuro. - Controllare a intervalli regolari la conduttura di allacciamento dell’elettroutensile e, in caso di danneggiamento, farla sostituire da un esperto autorizzato. - Controllare a intervalli regolari le prolunghe e sostituirle quando sono danneggiate. - Tenere le impugnature asciutte, pulite e prive di olio e grasso. • Staccare la spina dalla presa. In caso di inutilizzo dell’elettroutensile, prima di un intervento di manutenzione e durante una sostituzione degli utensili. Queste misure sono atte a impedire l’avviamento involontario della sega elettrica. • Non lasciare inserite eventuali chiavi per la sostituzione di uten- IT • • • • sili. Verificare prima dell’accensione se le chiavi e gli utensili di regolazione sono stati rimossi. Un utensile o una chiave che si trova all’interno di una parte rotante dell’apparecchio, può causare lesioni. Evitare un avviamento involontario. Assicurarsi che l’interruttore sia spento quando si inserisce la spina nella presa. Usare la prolunga per ambienti esterni. All’aperto usare solo prolunghe appositamente autorizzate e contrassegnate. Prestare attenzione ai propri movimenti e lavorare con l’utensile elettrico usando raziocinio. Non usare un utensile elettrico, quando si è stanchi o si è sotto effetto di droghe, alcol o farmaci. Un attimo di disattenzione durante l’uso dell’utensile elettrico può causare lesioni gravi. Controllare l’elettroutensile per verificare la presenza di eventuali danneggiamenti. In questo modo si garantisce il mantenimento della sicurezza dell’utensile elettrico. - Prima di usare l’elettroutensile è necessario controllare con cura i dispositivi di sicurezza o le parti leggermente danneggiate per verificare il loro funzionamento perfetto e a regola d’arte. - Controllare se le parti in movimento sono perfettamente funzionanti e non si inceppano oppure se sono danneggiate. Tutte le parti devono essere montate correttamente e soddisfare tutti i requisiti, per garantire un funzionamento. - Salvo diversamente specificato nelle istruzioni per l’uso, i dispositivi di protezione e parti danneggiate devono essere riparati o sostituiti da un’officina specializzata riconosciuta. M T - Interruttori danneggiati devono essere sostituiti presso un’officina per il servizio di assistenza clienti. - Non usare elettroutensili, nei quali non è possibile accendere o spegnere l’interruttore. Pericolo di lesioni. • Attenzione! L’uso di altri utensili e accessori può generare pericoli di lesioni. • Fare riparare l’elettroutensile da parte di un elettricista esperto. Questo elettroutensile corrisponde alle disposizioni di sicurezza in materia. Riparazioni possono essere eseguite solo da un’officina specializzata, nella quale vengono usati ricambi originali; in caso contrario possono verificarsi incidenti per l’utilizzatore. Ulteriori indicazioni di sicurezza • Collegare l’apparecchio solo a una presa dotata di circuito di sicurezza per correnti di guasto (interruttore FI) con una corrente di guasto nominale di massimo 30 mA. • Tenere il cavo di rete e la prolunga lontani dalla mola abrasiva. In caso di danneggiamento o tranciatura staccare immediatamente la spina dalla presa. Non toccare la conduttura, prima che sia stata staccata dalla rete. Pericolo di schock elettrico • La sostituzione della spina o del cavo di alimentazione deve essere eseguita esclusivamente dal costruttore dell’utensile elettrico o dal rispettivo centro assistenza, al fine di evitare l’insorgere di pericoli. • Accendere l’apparecchio solamente dopo averlo fissato saldamente al piano di lavoro. • Per la propria sicurezza si raccomanda di utilizzare solamente gli accessori 2 7 IT • • • • • • • • • 2 8 M T e i dispositivi ausiliari indicati nelle istruzioni d’uso o raccomandati, ovvero indicati, dal costruttore dell’utensile. Utilizzare solamente gli utensili di levigatura raccomandati dal costruttore. Non utilizzare lame da sega Assicurarsi che le dimensioni siano adatte all’apparecchio. Utilizzare solo mole il cui numero di giri indicato corrisponde almeno a quello riportato sulla targa identificativa dell’apparecchio. Sottoporre la mola a un’ispezione visiva prima dell’utilizzo. Non usare mole danneggiate o deformate. Sostituire la mola quando usurata. Non usare mai l’apparecchio senza parascintille o calotta protettiva. Regolare il parascintille periodicamente, in modo da compensare l’usura della mola (distanza max. 2 mm). Sostituire la mola non appena risulta impossibile regolare il parascintille e il poggiapezzo a una distanza massima di 2 mm. Assicurarsi che le scintille provocate dalla levigatura non costituiscano un pericolo, ad esempio che non colpiscano persone o incendino sostanze infiammabili. Durante la levigatura, la spazzolatura e la troncatura usare sempre gli occhiali protettivi, i guanti di sicurezza, un dispositivo di protezione delle vie respiratorie e le protezioni acustiche. Non tenere mai le dita fra la mola e il parascintille, ovvero in prossimità della calotta protettiva. Pericolo di schiacciamento! Le parti rotanti dell’apparecchio non possono essere coperte per non compromettere il funzionamento. Pertanto, si raccomanda di procedere con attenzione e di tenere il pezzo da lavorare ben • • • • saldo, in modo da evitare che scivoli e che le mani entrino conseguentemente in contatto con la mola. Durante la levigatura il pezzo si surriscalda. Non afferrarlo dal lato di lavorazione, lasciarlo raffreddare. Pericolo di ustione! Non usare refrigeranti o sostanze simili. Non usare l’apparecchio in caso di stanchezza o dopo l’assunzione di alcol o di medicinali. Interrompere sempre il lavoro a tempo debito. Spegnere l’apparecchio ed estrarre la spina - per sbloccare un accessorio bloccato, - se il cavo di alimentazione è danneggiato o si è ingarbugliato, - in presenza di rumori inconsueti. Utilizzare l‘apparecchio solo in posizione verticale e stabile e verificarne il posizionamento sicuro. Rischi residui Anche se questo utensile elettrico viene usato conformemente alle disposizioni, rimangono sempre rischi residui. I seguenti pericoli possono verificarsi in relazione alla tipologia costruttiva e al tipo di esecuzione di questo elettrodomestico: a) Danni ai polmoni, in caso di mancato utilizzo di un apposito dispositivo di protezione delle vie respiratorie. b) Danni all’udito, in caso di mancato utilizzo di un’apposita protezione acustica. c) Danni alla salute dovuti a - il contatto con gli utensili di levigatura in un’area non coperta; - la proiezione di parti del pezzo in lavorazione o di una mola danneggiata. d) Danni alla salute risultanti dalle oscillazioni mano-braccio, quando l’apparec- IT chio viene usato per un periodo prolungato o non viene condotto o manutenuto conformemente alle disposizioni. Avvertenza! Questo utensile elettrico genera un campo magnetico durante il funzionamento. In determinate condizioni questo campo può compromettere gli impianti medici attivi o passivi. Per ridurre il pericolo di lesioni gravi o letali, consigliamo alle persone con impianti medici di consultare il medico e il produttore dell’impianto medico prima di azionare la macchina. Montaggio - - - Attenzione! Pericolo di ferimento! Assicurarsi di disporre di uno spazio sufficiente allo svolgimento del lavoro e di non compromettere la sicurezza di altre persone. Fissare sempre l’apparecchio al piano di lavoro con viti di lunghezza e spessore sufficienti, in modo da non perdere il controllo dello stesso. Prima della messa in funzione montare correttamente tutte le coperture e i dispositivi di protezione. Estrarre la spina prima di regolare l’apparecchio. Montaggio/regolazione dei poggiapezzi 1. Fissare i poggiapezzi (6) all’apparecchio. Per questa operazione utilizzare la vite (16), la rondella (15), la puleggia dentata (14) e il dado a stella (7) in dotazione. M T 2. Regolare il poggiapezzo (6) della mola a secco con la manopola a stella (7). La distanza fra la mola a secco (5) e il poggiapezzo (6) non deve superare i 2 mm. Regolare il poggiapezzo periodicamente, in modo da compensare l’usura della mola (distanza max. 2 mm). Montaggio/regolazione il parascintille 1. Avvitare il supporto del parascintille (18) sulla calotta di protezione ( 25). Utilizzare a tal fine la vite di regolazione (21) inclusi l’anello a molla e la rondelle (20/19) e il dado (17). 2. Regolare il parascintille (18) con le viti di regolazione (21): La distanza fra la mola a secco ( 5) e il supporto del parascintille (18) non deve superare i 2 mm. In seguito regolare il parascintille periodicamente, per compensare l’usura delle mole (distanza max. 2 mm). Durante il lavoro, anche con i parascintille, indossare sempre occhiali di protezione per evitare lesioni agli occhi. Fissaggio dell’apparecchio al banco di lavoro 1. Rimuovere il piedino di gomma (10) del contenitore di acqua. 2. Fissare l’apparecchio al piano di lavoro con 4 viti e dadi. A tal fine introdurre le viti nei 4 fori (9) alla base dell’apparecchio. 2 9 IT M T Le viti e i dadi di montaggio non sono forniti con l’apparecchio. Riempimento dell’acqua nel contenitore d’acqua 1. Applicare la chiusura in gomma (11) nell‘apertura di deflusso del contenitore di acqua (13). 2. Riempire fino alla tacca dell’acqua acqua nel contenitore acqua (13). Comando Attenzione! Pericolo di lesioni! - Staccare la spina elettrica prima di eseguire qualsiasi lavoro all‘apparecchio. - Usare solo mole e accessori consigliati dal produttore. L’uso di altri utensili e altri accessori può generare pericoli di lesioni. - Usare solo utensili di levigatura che riportano informazioni sul costruttore, il tipo di collegamento, le dimensioni e il numero di giri per cui è omologato. - Utilizzare solo mole il cui numero di giri indicato corrisponde almeno a quello riportato sulla targa identificativa dell’apparecchio. - Non usare mole spezzate, incrinate o danneggiate in altro modo. - Non azionare mai l’apparecchio senza visiera - Ispezionare la mola prima dell’uso. Verificare la distanza fra il parascintille e la mola nonché fra il poggiapezzo e la mola (distanza massima 2 mm). 3 0 - Sostituire la mola non appena risulta impossibile posizionare il parascintille e il poggiapezzo a una distanza massima di 2 mm dalla stessa. - Accendere l‘apparecchio solo dopo che è stato montato in modo sicuro sulla superficie di lavoro. Tenere le mani a distanza dalla mola durante il funzionamento dell’apparecchio. Pericolo di ferimento! Durante il lavoro, anche con i parascintille, indossare sempre occhiali di protezione per evitare lesioni agli occhi. Accensione e spegnimento Prestare attenzione che la tensione dell‘allacciamento alla rete corrisponda alla targhetta del tipo posta sull‘apparecchio. Collegare l‘apparecchio alla tensione di rete. 1. Per accendere l’apparecchio premere l’interruttore di accensione “I“ ( 8), l’apparecchio viene avviato. 2. Per spegnere l’apparecchio premere l’interruttore di spegnimento “0“ ( 8), l’apparecchio si spegne. Dopo l’accensione attendere finché l’apparecchio ha raggiunto la velocità massima. Solo allora procedere con la levigatura. La mola abrasiva continua a ruotare, dopo che l‘apparecchio è stato spento. Pericolo di lesioni. IT Ciclo di prova: Prima di eseguire il primo lavoro e dopo ogni sostituzione della mola abrasiva, effettuare un ciclo di prova di minimo 60 secondi senza carico. Spegnere subito l‘apparecchio se la mola abrasiva non gira in modo uniforme, si verificano notevoli oscillazioni oppure si sentono rumori anormali. Molatura con la mola a secco • Posizionare il pezzo da lavorare sul poggiapezzo ( 6) e guidarlo lentamente verso la mola a secco ( 5) all’inclinazione desiderata. • Muovere il pezzo leggermente avanti e indietro in modo da ottenere un risultato di levigatura ottimale. In questo modo si garantisce un’usura uniforme della mola a secco. Di tanto in tanto lasciare raffreddare il pezzo. • Piegare il parascintille ( 2) durante la molatura verso il basso per evitare lesioni dovute alla formazione di scintille. Molatura con la mola a umido • Verificare il livello dell’acqua nel contenitore d’acqua: La mola a umido ( 1) deve trovarsi in acqua fino alla tacca dell’acqua sul contenitore d’acqua ( 13). • Posizionarsi davanti alla mola a umido ( 1). • Tenere il pezzo con le due mani e abbassarlo lentamente sulla mola a umido. • Il pezzo può essere supportato anche sui denti del contenitore di acqua ( 13). M T Sostituzione della mola Indicazioni per la sostituzione: • Non usare mai l’apparecchio senza i dispositivi di protezione. • Assicurarsi che il numero di giri indicato sulla mola sia uguale o maggiore al numero di giri nominale a vuoto dell’apparecchio. • Assicurarsi che le dimensioni della mola siano adatte all’apparecchio. • Utilizzare solamente mole in perfetto stato (Prova del suono: le mole integre sospese a una corda producono un suono nitido se colpite con un martello di plastica). • Non ingrandire il foro della mola se troppo piccolo. • Non usare una bussola di riduzione separata o un adattatore per adattare le mole dotate di un foro troppo grande. • Non utilizzare lame da sega. • Per il serraggio degli utensili di levigatura usare solamente le flange di fissaggio in dotazione. Gli spessori fra la flangia e l’utensile devono essere in materiale elastico, come gomma, cartone morbido ecc. • Dopo avere sostituito la mola, rimontare completamente l’apparecchio. Spegnere l’apparecchio ed estrarre la spina. Lasciarlo raffreddare. Durante la sostituzione della mola indossare i guanti protettivi, in modo da evitare di ferirsi tagliandosi. 3 1 IT M T Sostituzione della mola a secco: Sostituzione della mola a umido: 1. Rimuovere il parascintille ( 2) (si veda „Montaggio/regolazione del parascintille“). 2. Allentare le viti di fissaggio ed estrarre il coprimola ( 4) dalla calotta protettiva ( 25). 3. Svitare il dado per mola (22) con una chiave (chiave da 19) tenendo la mola con una mano inguantata. Svitare il dado (filettatura destrorsa): ruotare in senso antiorario. 4. Estrarre la flangia di fissaggio (23) e la mola a secco (5). 5. Collocare la nuova mola a secco (5) con gli strati intermedi in cartone (24) e la flangia di fissaggio (23) e avvitare manualmente il dado per mola (22) sul dado (filettatura destrorsa): ruotare in senso orario. 6. Stringere il dado per mola con una chiave (chiave da 19) applicando una forza manuale moderata. 7. Avvitare il coprimola (4) 8. Regolare il parascintille ( 18) e il portapezzo ( 6): La distanza rispetto alla mola a secco (5) non deve superare i 2 mm (vedere “Montaggio”). 1. Allentare le 4 viti di fissaggio (13a/13b/13c/13d) sulla scatola ingranaggio (28) ed estrarre il contenitore d’acqua (13). 2. Svitare il dado per mola (22) con una chiave (chiave da 19) tenendo la mola a umido con una mano inguantata. Svitare il dado (filettatura destrorsa): ruotare in senso antiorario. 3. Rimuovere la flangia di fissaggio in plastica (26) e la mola a umido (1). 4. Collocare la nuova mola a umido (1) e la flangia di fissaggio in plastica (26) con la rondella e avvitare manualmente il dado per mola (22) sul dado destro (filettatura destrorsa): ruotare in senso orario. Il dado della mola non deve essere stretto eccessivamente per evitare che la mola e il dado si rompano. 8. Ciclo di prova: Prima di eseguire il primo lavoro e dopo ogni sostituzione della mola abrasiva, effettuare un ciclo di prova di minimo 60 secondi senza carico. Spegnere subito l‘apparecchio se la mola abrasiva non gira in modo uniforme, si verificano notevoli oscillazioni oppure si sentono rumori anormali. 3 2 Le due flange di fissaggio in plastica (26/27) non sono identiche. 5. Stringere il dado per mola (22) con una chiave (chiave da 19) applicando una forza manuale moderata. 6. Far scorrere di nuovo il contenitore di acqua (13) sulla mola a umido (1) e sull’alloggiamento del meccanismo (28). 7. Fissare il contenitore di acqua (13) con le quattro viti di fissaggio e le rondelle sulla scatola ingranaggio (28). Il dado della mola non deve essere stretto eccessivamente per evitare che la mola e il dado si rompano. IT Fra la flangia di fissaggio (27) e la scatola ingranaggio (28) si trova una rondella (29). 8. Ciclo di prova: Prima di eseguire il primo lavoro e dopo ogni sostituzione della mola abrasiva, effettuare un ciclo di prova di minimo 60 secondi senza carico. Spegnere subito l‘apparecchio se la mola abrasiva non gira in modo uniforme, si verificano notevoli oscillazioni oppure si sentono rumori anormali. Pulizia e manutenzione Staccare la spina elettrica prima di eseguire qualsiasi intervento di regolazione, manutenzione o riparazione. Fare eseguire il lavoro non descritti nelle presenti istruzioni da un‘officina specializzata. Usare solo ricambi originali. Lasciare raffreddare l‘apparecchio prima di eseguire qualsiasi lavoro di manutenzione e riparazione. Pericolo di ustioni! Pulizia Non usare detergenti o solventi aggressivi. Le sostanze chimiche possono aggredire le parti di plastica dell‘apparecchio. Non pulire mai l‘apparecchio sotto acqua corrente. • Pulire a fondo l‘apparecchio dopo ogni uso. • Pulire la superficie dell‘apparecchio con una spazzola morbida, un pennello o un panno. M T Lavori di manutenzione generici Controllare l‘apparecchio prima di ogni uso per verificare la presenza di eventuali difetti come parti allentate, consumate o danneggiate, il corretto fissaggio delle viti o la corretta sede delle altri parti. Controllare in particolare la mola abrasiva. Sostituire le parti danneggiate. Conservacione • Prima dello stoccaggio svuotare il contenitore d’acqua ( 13): rimuovere la chiusura in gomma ( 11) dall’apertura di scarico del contenitore d’acqua e lasciare defluire l’acqua. • Conservare l’apparecchio in un luogo asciutto e privo di polvere, lontano dalla portata dei bambini. • Le mole devono essere conservate in posizione verticale in un luogo asciutto e non devono essere accatastate. Smaltimento/Tutela dell’ambiente Effettuare lo smaltimento dell’apparecchio, degli accessori e della confezione nel rispetto dell’ambiente presso un punto di raccolta per riciclaggio. Le apparecchiature non si devono smaltire insieme ai rifiuti domestici. Smaltire l’imballaggio esterno in cartone ondulato in modo da garantirne il corretto riciclaggio nel rispetto dell’ambiente. • Consegnare l’apparecchio presso un centro di raccolte e ricupero. Le parti plastiche e di metallo usate potranno 3 3 IT M T essere selezionate e avviate al ricupero. Chiedere informazioni a riguardo al nostro centro assistenza clienti. • Lo smaltimento degli apparecchio difettosi consegnati viene effettuato gratuitamente. Pezzi di ricambio/Accessori È possibile ordinare pezzi di ricambio e accessori all’indirizzo www.grizzly-service.eu Se non si dispone di una connessione Internet, contattare telefonicamente il centro di assistenza (vedere “Service-Center” a pag. 37). Tenere a portata di mano i numeri d’ordine riportati in basso. Pos. Istruzioni per l’uso Denominazione 5 Mola a secco 91103553 1 Mola a umido 30211041 11,13 Set contenitore per acqua 30211042 22,26,27 Set flangia di fissaggio, umido 30211043 22,23 Set flangia di fissaggio, secco 30211044 2,3,17-21 Set parascintille 30211045 6,7,14-16 Set poggiapezzo 30211046 4 Set coprimola 30211047 25 Set calotta protettiva per mola a secco 30211048 3 4 Numeri d’ordine IT M T Ricerca di guasti Spegnere l’apparecchio ed estrarre la spina. Lasciarlo raffreddare. Pericolo di scossa elettrica! Problema L’apparecchio non si accende Possibile causa Soluzione Manca la tensione di rete Il salvavita si attiva Ispezionare la presa, il cavo di rete, la linea, la spina, eventuali riparazioni dell’elettricista, il salvavita. Interruttore di accensione / spegnimento ( 8) difettoso Riparazione al centro assistenza Motore difettoso Gli utensili di levigatura non si muovono anche se il motore gira Il motore rallenta e si ferma La mola ruota in modo irregolare, si odono rumori inconsueti Dado della mola ( allentato 22) Il pezzo da lavorare, residui dello stesso o degli utensili di levigatura bloccano l’azionamento Il pezzo sovraccarica l’apparecchio Dado della mola ( allentato Mola ( 22) 1/5) difettosa 2) o poggiaParascintille ( pezzo ( 6) non regolato correttamente Stringere il dado della mola (si veda “Sostituzione della mola”) Rimuovere le cause di blocco Ridurre la pressione sull’utensile di levigatura Il pezzo da lavorare non è adatto Stringere il dado della mola (si veda “Sostituzione della mola”) Sostituire la mola Regolare il parascintille o il poggiapezzo (si veda “Montaggio”) 3 5 IT M T Garanzia Gentile cliente, Su questo apparecchio Le viene concessa una garanzia di 3 anni a partire dalla data di acquisto. In caso di difetti di questo prodotto può avanzare diritti legali nei confronti del venditore del prodotto. Tali diritti legali non vengono limitati dalla nostra garanzia qui di seguito rappresentata. Condizioni di garanzia Il termine di garanzia inizia con la data di acquisto. La preghiamo di conservare in un luogo sicuro lo scontrino fiscale originale. Questo documento viene richiesto come prova d’acquisto. Qualora subentrasse un difetto di materiale o di fabbricazione entro tre anni a partire dalla data di acquisto di questo prodotto, il prodotto verrà riparato o sostituito – a nostra discrezione - gratuitamente da noi. Questa prestazione di garanzia presuppone che venga presentato entro il termine di tre anni l’apparecchio difettoso e la prova d’acquisto (scontrino fiscale) e descritto brevemente per iscritto in che cosa consiste il difetto e quando si è verificato. Se il difetto è coperto dalla nostra garanzia, riceverà il prodotto riparato oppure un prodotto nuovo. Con la riparazione o la sostituzione del prodotto non inizia un nuovo periodo di garanzia. Tempo di garanzia e diritti legali per vizi della cosa Il periodo di garanzia non viene prolungato. Questo vale anche per parti sostituite e riparate. Difetti e vizi presenti già al momento dell’acquisto devono essere segnalati immediatamente dopo la rimozione dall’imballaggio. Riparazioni che accor- 3 6 rono dopo il periodo di garanzia sono a pagamento. Volume di garanzia L’apparecchio è stato prodotto accuratamente secondo severe direttive di qualità e controllato con coscienza prima della consegna. La prestazione di garanzia vale per difetti di materiale o di fabbricazione. Questa garanzia non si estende ai componenti del prodotto che sono soggetti a normale usura e che quindi possono essere visti come parti di usura (p. es. mole, spazzole di carbone, battuta, schermo protettivo) oppure per danneggiamenti delle parti fragili (p. es. interruttori). Questa garanzia decade se il prodotto è stato danneggiato, non usato correttamente o non manutenuto. Per un uso corretto del prodotto devono essere osservate tutte le indicazioni riportate nelle istruzioni per l’uso. Destinazioni d’uso e azioni sconsigliate nelle istruzioni d’uso o dalle quali si viene avvertiti, sono tassativamente da evitare. Il prodotto è destinato solo per i privati e non per uso commerciale. In caso di uso improprio, esercizio della forza e interventi non effettuati dalla nostra filiale di assistenza tecnica autorizzata, decade la garanzia. Svolgimento in caso di garanzia Per garantire una rapida elaborazione della Sua pratica, La preghiamo di seguire le seguenti indicazioni: • Per tutte le richieste tenere a portata di mano lo scontrino fiscale e il codice di identificazione (IAN 304988) come prova d’acquisto. • I codici articolo sono riportati sulla targhetta del tipo. IT • Nel caso in cui si dovessero verificare difetti funzionali o altri vizi, La preghiamo di contattare telefonicamente o per e-mail. Riceverà ulteriori informazioni sullo svolgimento del Suo reclamo. • Un prodotto rilevato come difettoso può essere inviato con porto franco all’indirizzo di assistenza comunicato, previa consultazione del nostro servizio di assistenza tecnica, allegando la prova d‘acquisto (scontrini fiscali) e l’indicazione, in che cosa consiste il difetto e quando si è verificato. Per evitare problemi di accettazione e costi aggiuntivi, usare tassativamente solo l’indirizzo che Le è stato comunicato. Assicurarsi che la spedizione non avvenga in porto assegnato, con merce ingombrante, corriere espresso o altro carico speciale. Spedire l’apparecchio inclusi tutti gli accessori forniti insieme al momento dell’acquisto e garantire un imballaggio di trasporto sufficientemente sicuro. Servizio di riparazione M T Service-Center IT Assistenza Italia Tel.: 02 36003201 E-Mail: [email protected] IAN 304988 Assistenza Malta M T Tel.: 80062230 E-Mail: [email protected] IAN 304988 Importatore Non dimenticare che il seguente indirizzo non è un indirizzo di assistenza tecnica. Contattare prima di tutto il centro di assistenza tecnica sopra nominato. Grizzly Tools GmbH & Co. KG Stockstädter Straße 20 63762 Großostheim Germania www.grizzly-service.eu Riparazioni non soggette alla garanzia possono essere effettuate dietro fattura dalla nostra filiale di assistenza tecnica previo preventivo gratuito da parte della stessa. Possiamo lavorare solo apparecchi che vengono spediti sufficientemente imballati e affrancati. Attenzione: Spedire l’apparecchio alla nostra filiale in condizioni pulite e con l’indicazione del difetto. Apparecchi spediti in porto assegnato - con merce ingombrante, corriere espresso o altro carico speciale non vengono accettati. Lo smaltimento degli apparecchi difettosi spediti viene effettuato da noi gratuitamente. 3 7 G B M T Content Introduction Introduction ............................... 38 Intended use .............................. 38 General description .................... 39 Scope of delivery ........................... 39 Function description........................ 39 Summary ...................................... 39 Technical specifications ............... 40 Safety Instructions...................... 41 Symbols and icons ......................... 41 General safety instructions .............. 42 Further Safety Instructions ................ 43 Residual risks ................................. 44 Assembly ................................... 45 Assemble/set workpiece supports .... 45 Assemble/adjust spark protection .... 45 Screw device on to workbench ........ 45 Fill water into the water tank............ 46 Operation .................................. 46 Switching on and off ...................... 46 Grinding with the dry grinding disc .. 47 Grinding with the wet grinding disc . 47 Change grinding disc ..................... 47 Cleaning and maintenance ......... 49 Cleaning ....................................... 49 General maintenance ..................... 49 Storage ...................................... 49 Waste disposal and environmental protection ........... 49 Replacement parts/accessories ... 50 Trouble Shooting ........................ 51 Guarantee ................................. 52 Repair Service ............................ 53 Service-Center ............................ 53 Importer .................................... 53 Translation of the original EC declaration of conformity ...... 72 Congratulations on the purchase of your new device. With it, you have chosen a high quality product. During production, this equipment has been checked for quality and subjected to a final inspection. The functionality of your equipment is therefore guaranteed. 3 8 The operating instructions constitute part of this product. They contain important information on safety, use and disposal. Before using the product, familiarise yourself with all of the operating and safety instructions. Use the product only as described and for the applications specified. Keep this manual safely and in the event that the product is passed on, hand over all documents to the third party. Intended use The wet/dry grinder is suitable for sharpening tools (e.g. knives, scissors, chisels), and deburring and grinding smaller metal workpieces. The device is not intended for all other types of applications (e.g. grinding with unsuitable grinding tools, grinding with a coolant solution, grinding hazardous materials such as asbestos). The equipment is intended for use in the field of DIY. It is not designed for commercial use. The equipment is designed for use by adults. Young people under the age of 16 are permitted to use the equipment only under supervision. The manufacturer shall not be liable for damages caused by use other than for the intended purpose or by incorrect operation. G B General description The illustrations can be found on the front and rear fold-out pages. Scope of delivery Unpack the equipment and check that it is complete. Dispose of the packaging material correctly. • • • • • • • Device with pre-assembled grinding discs Spark protection Assembly material for mounting the spark protection on the machine - adjusting screw incl. washer and snap ring, nut Workpiece support Assembly material for mounting the workpiece support on the machine - star grip nut, washer, lock washer and screw Rubber cap for water tank Instruction Manual Function description The wet/dry grinder is a combined device that is equipped with a dry grinding disc and a wet grinding disc with different grain sizes for coarse and fine grinding. The device is provided with a spark protection and protective hoods for the protection of the user. For the function of the operating parts, please refer to the descriptions below. M T Summary 1 Wet grinding disc 2 Spark protection 3 Adjusting screw nut for spark protection 4 Dry grinding disc cover 5 Dry grinding disc 6 Workpiece support 7 Star grip nut to mount/adjust the workpiece support 8 On/off switch 9 Drillholes for table mounting 10 Rubber foot (water tank) 11 Rubber cap for water tank 12 Power cable 13 Water tank 14 Lock washer 15 Washer 16 Mounting screw for workpiece support 17 18 19 20 21 Nut Spark protection holder Washer Spring ring Adjusting screw for spark protection fastener 22 Grinding disc nut 23 Clamping flange 24 Intermediate layers made of cardboard 25 Protective hood for dry grinding disc 26 27 28 29 Clamping flange made of plastic Clamping flange made of plastic Gear unit housing Washer 3 9 G B M T Technical specifications Wet/Dry Grinder ................. PNTS 250 B1 Nominal input voltage U ...230 V~, 50 Hz Power consumption P ................... 250 W (S2 30 min)* Safety class .......................................... I Mechanical rating ............................IPX0 Idling speed n0 wet grinding disc ...... approx. 128 min-1 dry grinding disc .... approx. 2950 min-1 Weight (incl. accessories) .. approx. 8.6 kg Sound pressure level (LpA) ..................... 80 dB (A); KpA= 3 dB Sound power level (LWA) .................... 93 dB(A); KWA= 3 dB Vibration total value (ah).......... 2.5 m/s2 Wet grinding disc Outer diameter ................... Ø 200 mm Bore hole ............................. Ø 20 mm Thickness .................................40 mm Grain size ......................................80 Speed nmax ......................... 3820 min-1 Working speed vs............. max. 40 m/s Dry grinding disc Outer diameter ................... Ø 150 mm Bore hole .......................... Ø 12.7 mm Thickness .................................20 mm Grain size ......................................36 Speed nmax ......................... 4500 min-1 Working speed vs............. max. 35 m/s * 4 0 A break is introduced after 30 minutes of uninterrupted operating duration until the device temperature differs 2 K (2°C) less than room temperature. Noise and vibration values have been determined according to the standards and regulations mentioned in the declaration of conformity. The stated vibration emission value was measured in accordance with a standard testing procedure and may be used to compare one power tool to another. The stated vibration emission value may also be used for a preliminary exposure assessment. Warning! The vibration emission value may differ during actual use of the power tool from the stated value depending on the manner in which the power tool is used. Try to keep the exposure to vibrations as low as possible. Examples of measures to reduce vibration exposure are the wearing of gloves when using the tool and limiting the working hours. For this purpose all parts of the operating cycle have to be considered (for example, times when the electric tool is switched off and times when it is switched on but running without any load). G B Safety Instructions WARNING! When using power tools, observe the following basic safety measures for the prevention of electric shocks and the risk of injury and fire. Please read all these instructions before using the electric tools and please keep the safety instructions. Symbols and icons Symbols in the manual: Warning symbols with information on damage and injury prevention. Instruction symbols with information on preventing damage. Connect the machine to the power supply.. Pull out the mains plug. Help symbols with information on improving tool handling. M T Symbols on the device: Warning! Risk of injury from the rotating tool! Keep hands away. Risk of electric shock! Disconnect from the mains before carrying out maintenance and repair work. Read the instruction manual. Wear ear protection. Wear eye protection. Wear breathing protection. Wear cut-resistant gloves. Use grinding disc only for dry grinding. Use grinding disc only for grinding with water. Do not dispose of electrical equipment in household waste. Other symbols on the discs: Never use faulty grinding discs. Graphical symbol on the packaging: Corrugated cardboard 4 1 G B M T General safety instructions • The term “power tool” used in the safety instructions refers to mains-operated electric tools (with a mains cable) and to battery-operated electric tools (without a mains cable). Safe operation: • • • • • • • 4 2 Keep work area clear. Cluttered areas and benches invite injuries. Consider work area environment. - Do not expose tools to rain. Do not use tools in damp or wet locations. Water entering a power tool will increase the risk of electric shock. - Keep work area well lit. - Do not use tools in the presence of flammable liquids or gases. Power tools create sparks which may ignite the dust or fumes. Guard against electric shock. Avoid body contact with earthed or grounded surfaces (e.g. pipes, radiators, ranges, refrigerators). Keep other persons away. Do not let persons, especially children, not involved in the work touch the tool or the extension cord and keep them away from the work area. Store idle tools. When not in use, tools should be stored in a dry lockedup place, out of reach of children. Do not force the tool. It will do the job better and safer at the rate for which it was intended. Use the right tool. - Do not force small tools to do the job of a heavy duty tool. - Do not use tools for purposes not intended; for example do not use circular saws to cut tree limbs or logs. Use of the power tool for operations different from those intended could result in a hazardous situation. • • • • • • • Dress properly. - Do not wear loose clothing or jewellery, they can be caught in moving parts. - Anti-slip footwear is recommended when working outdoors. - Wear protective hair covering to contain long hair. Use protective equipment. - Use safety glasses. - Use face or dust mask if working operations create dust. Connect dust extraction equipment. If the tool is provided for the connection of dust extraction and collecting equipment, ensure these are connected and properly used. Do not abuse the cord. Never yank the cord do disconnect it from the socket. Keep the cord away from heat, oil and sham edges. Secure work. Where possible use clamps or a vice to hold the work. It is safer than using your hand. Do not overreach. Keep proper footing and balance at all times. This enables better control of the power tool in unexpected situations. Maintain tools with care. Many accidents are caused by poorly maintained power tools. - Keep cutting tools sharp and clean for better and safer performance. - Follow instruction for lubricating and changing accessories. - Inspect tool cords periodically and if damaged have them repaired by an authorized service facility. - Inspect extension cords periodically and replace if damaged. - Keep handles dry, clean and free from oil and grease. Disconnect tools. When not in use, before servicing and when changing G B • • • • • accessories disconnect tools from the power supply. Such preventive safety measures reduce the risk of starting the power tool accidentaIly. Remove adjusting keys and wrenches. Form the habit of checking to see that keys and adjusting wrenches are removed from the tool before turning it on. A wrench or a key left attached to a rotating part of the power tool may result in personal injury. Avoid unintentional starting. Ensure switch is in “off” position when plugging in. Use outdoor extension leads. When the tool is used outdoors, use only extension cords intended for outdoor use and so marked. Stay alert, watch what you are doing and use common sense when operating a power tool. Do not use a power tool while you are tired or under the influence of drugs, alcohol or medication. A moment of inattention white operating power tools may result in serious personal injury. Check damaged parts. This will ensure that the safety of the power tool is maintained. - Before further use of tool, it should be carefully checked to determine that it will operate properly and perform its intended function. - Check for alignment of moving parts, binding of moving parts, breakage of parts, mounting and any other conditions that may affect its operation. - A guard or other part that is damaged should be properly repaired or replaced by an authorized service centre unless otherwise indicated in this instruction manual. • • M T - Have defective switches replaced by an authorized service centre. - Do not use the tool if the switch does not turn it on and off. There is a risk of injury. Warning. The use of any accessory or attachment other than one recommended in this instruction manual may present a risk of personal injury. Have your tool repaired by a qualified person. This electric tool complies with the relevant safety rules. Repairs should only be carried out by qualified persons using original spare parts, otherwise this may result in considerable danger to the user. Further Safety Instructions • • • • • Connect the device only to a power point with a residual current protective device (RCD) with a measured residual current of not more than 30 mA. Keep the mains cable and extension cable away from the grinding disc. In the event that it is damaged or severed, immediately disconnect the plug from the socket. Do not touch the cable before it has been disconnected from the mains. Risk of electric shock. The replacement of the plug or the connection line must always be executed by the manufacturer of the electric tool or his/her customer service in order to avoid any hazards. Only switch the device on once it is safely fixed to the worktop. For your own safety only use accessories and attachments which were stated in the operating instructions or recommended or specified by the tool manufacturer. 4 3 G B • • • • • • • • • • 4 4 M T Only use grinding tools recommended by the manufacturer. Do not use any saw blades. Ensure that the dimensions match those of the device. Only use grinding discs where the printed rotational speed is at least as high as what has been specified on the name plate of the device. Carry out a visual inspection of the grinding disc before use. Do not use any damaged or deformed grinding discs. Replace any damaged or worn grinding discs. Never operate the device without spark protection or protective hoods. Periodically readjust the spark protection in order to offset the wear and tear of the grinding disc (distance max. 2 mm). Replace the grinding disc if the spark protection and the workpiece support can no longer be readjusted to a distance of max. 2 mm at the latest. Make sure that the sparks produced by grinding do not present a danger, e.g. reach people or ignite flammable substances. Always wear safety glasses, safety gloves, respiratory protection and ear protection when grinding, brushing and separating. Never keep the fingers between the grinding disc and spark protection or in close proximity to the protective hoods. There is a risk of crushing. The rotating parts of the device cannot be covered due to functional reasons. Therefore, proceed cautiously and hold the workpiece firmly in order to avoid slipping which could cause your hands to come into contact with the grinding disc. The workpiece gets hot during grinding. Do not touch the machined area, allow it to cool down. There is a risk of burning. Do not use coolants or the like. • • • If you are tired or have consumed alcohol or tablets, do not work with the device. Always have a break on time. Switch the device off and remove the mains plug - to loosen a blocked insertion tool, - if the connection line is damaged or entangled, - in case of unusual sounds. Only operate the equipment in an upright, standing position and ensure you have secure footing. Residual risks Even if properly operating and handling this electric tool, some residual risks will remain. Due to its construction and build, this electric tool may present the following hazards: a) Lung damage, if suitable respiratory protection is not worn. b) Hearing damage, if suitable ear protection is not worn. c) Damages to health due to - touching the area of the grinding tool which was not covered; - the ejection of pieces from workpiece or damaged grinding discs. d) Damage to your health caused by swinging your hands and arms when operating the appliance for longer periods of time or if the unit is not held or maintained properly. Warning! During operation, this electric tool generates an electromagnetic field which, under certain circumstances, may impair the functionality of active or passive medical implants. To reduce the risk of serious or lethal injuries, we recommend that persons with medical implants consult their doctor and the manu- G B facturer of their medical implant before operating the machine. Assembly Caution! Risk of injury! - Ensure that you have sufficient space in which to work, and that you do not endanger other people. - Always fasten the device on to the work surface with screws featuring the sufficient length and thickness in order to maintain control of the device. - All covers and protective devices must be assembled properly before commissioning. - Disconnect the mains plug before changing the setting on the device. Assemble/set workpiece supports 1. Screw the workpiece supports (6) on to the device. To do this, use the screw (16), washer (15), toothed washer (14) and star nut (7) supplied. 2. Set the workpiece support (6) of the dry grinding disc with the star grip nut (7) so that the distance between the dry grinding wheel (5) and the workpiece support (6) must not exceed 2 mm. Periodically readjust the workpiece support in order to offset the wear and tear of the grinding disc (distance max. 2 mm). M T Assemble/adjust spark protection 1. Screw the spark protection holder (18) onto the protective hood ( 25). For this, use the adjusting screw (21) including the snap ring and washer (20/19) and the nut (17). 2. Adjust the spark protection holder (18) with the aid of the adjusting screw (21) - The distance between the dry grinding wheel ( 5) and the spark arrester holder (18) must not exceed 2 mm. (see small image). Periodically readjust the spark protection in order to offset the wear and tear of the grinding disc (distance max. 2 mm). Despite the spark protection, you should always wear protective glasses when working in order to avoid eye injuries. Screw device on to workbench 1. Remove the rubber foot (10) of the water container. 2. Screw the device onto the flat workbench with 4 screws and nuts. Insert the screws through the 4 bore holes (9) on the base of the device. The screws and nuts required for assembly are not part of the scope of delivery. 4 5 G B M T Fill water into the water tank - Switch on the equipment only when it is safely installed on the work surface. 1. Insert the rubber closure (11) into the drain opening of the water tank (13). 2. Fill water into the water tank (13) up to the water level mark . Keep your hands away from the grinding disc when the device is in operation. Injury hazard! Operation Caution! Risk of injury! - Always disconnect the plug from the mains socket before working. - Use only grinding discs and accessories recommended by the manufacturer. The use of other insertion tools and other accessories may cause risk of injury. - Only use grinding tools which bear information about the manufacturer, type of binding, dimension and permitted number of revolutions. - Only use grinding discs where the printed rotational speed is at least as high as what has been specified on the name plate of the device. - Do not use broken, cracked or otherwise damaged grinding discs. - Never operate the device without the visual protection disc. - Always inspect the grinding disc before starting the device: Check the distance between the spark protection holder and grinding disc as well as workpiece support and grinding disc (distance maximum 2 mm). - The grinding disc must be replaced once the spark protection holder and workpiece support on the grinding disc do not have distance of max. 2 mm. 4 6 Despite the spark protection, you should always wear protective glasses when working in order to avoid eye injuries. Switching on and off Ensure that the mains voltage matches the specifications on the rating plate. Connect the equipment to the mains. 1. To ( 2. To ( switch on, press the “I” On switch 8) and the device starts up. switch off, press the “0” off switch 8) and the device switches off. After switching on the device, wait until the device has reached its max. speed. Only then must you start with the grinding. The disc will continue to run after the equipment is switched off. There is a risk of injury. Test run: Before starting work and after each change of grinding disc, carry out a test run of at least 60 seconds with no load. Switch off the equipment immediately if the disc runs lumpy, substantial vibrations occur, or abnormal noises are generated. G B Grinding with the dry grinding disc • • • Place the workpiece on the workpiece support ( 6) and slowly bring it to its desired angle on the dry grinding disc ( 5). Move the workpiece slightly from side to side in order to achieve an optimal grinding result. This way, the dry grinding disc is worn uniformly. Occasionally, allow the workpiece to cool down. Fold the spark protection device ( 2) downwards while grinding in order to avoid injury from sparks. Grinding with the wet grinding disc • • • • Check the water level in the water tank: The wet grinding disc ( 1) is to be submerged in water up to the water level mark on the water tank ( 13). Stand in front of the wet grinding disc ( 1). Hold the workpiece with both hands and lower it slowly onto the wet grinding disc. The workpiece can also be supported on the teeth of the water tank ( 13). Change grinding disc Information on replacement: • Never operate the device without protective equipment. • Ensure that the rotation speed stated on the grinding disc is the same or higher than the nominal rotation speed of the device. • Ensure that the grinding disc dimensions match those of the device. M T • Only use flawless grinding discs (sound test: an undamaged grinding disc hanging freely on a string will result in a clear sound if it is tapped with a plastic hammer). • Never re-drill a locating hole which is too small to make it larger. • Never use separate bushings or adapters in order to make grinding discs whose hole is too large fit the device. • Do not use any saw blades. • To clamp the grinding tools only use the clamping flange provided. The pads between the clamping flange and the grinding tools must be made of elastic materials e.g., rubber, soft cardboard etc. • Always reassemble the device completely after replacing the grinding disc. Switch the device off and remove the mains plug. Allow the device to cool down. Wear protective gloves when changing the grinding discs in order to avoid cutting damages. Change dry grinding disc: 1. Remove the spark protection ( 2) (see „Assemble/adjust spark protection”). 2. Loosen the fixing screws and remove the dry grinding disc cover ( 4) from the protective hood (25). 3. Unscrew the grinding disc nut (22) with a screw wrench (AF 19 mm) and hold against the grinding disc with one hand wearing a glove. 4 7 G B M T 4. 5. 6. 7. 8. Unscrew the nut (right-hand thread): turn counter-clockwise. Remove the clamping flange (23) and the dry grinding disc (5). Fit on the new dry grinding disc (5) with the intermediate cardboard layers (24) and the clamping flange (23), and screw the grinding disc nut (22) manually onto the nut (right-hand thread): turn clockwise. Tighten the grinding disc nut with a screw wrench (AF 19 mm) applying modest manual force. Screw the dry grinding disc cover (4). Adjust the spark protection holder ( 18) and the workpiece support ( 6) - The distance from the dry grinding wheel (5) must not exceed 2 mm (see „Assembly“). The grinding disc nut must not be screwed too tightly in order to avoid a breaking of the grinding disc and nut. 9. Test run: Before starting work and after each change of grinding disc, carry out a test run of at least 60 seconds with no load. Switch off the equipment immediately if the disc runs lumpy, substantial vibrations occur, or abnormal noises are generated. Change wet grinding disc: 1. Release the 4 attachment screws (13a/13b/13c/13d) on the gearbox housing (28) and take off the water tank (13). 2. Unscrew the grinding disc nut (22) with a screw wrench (AF 19 mm) and hold against the wet grinding 4 8 disc (1) with one hand wearing a glove. Unscrew the nut (right-hand thread): turn counter-clockwise. 3. Remove the plastic clamping flange (26) and the wet grinding disc (1). 4. Fit on the new wet grinding disc (1) and the plastic clamping flange (26) and screw the grinding disc nut (22) manually onto the right-side nut (right-hand thread): turn clockwise. The two plastic clamping flanges (26/27) are not identical. 5. Tighten the grinding disc nut with a screw wrench (AF 19 mm) applying modest manual force. 6. Push the water tank (13) back over the wet grinding disc (1) and onto the gear unit housing (28). 7. .Attach the water tank (13) with the attachment screws and washers to the gearbox housing (28). The grinding disc nut must not be screwed too tightly in order to avoid a breaking of the grinding disc and nut. Between the clamping flange (27) and the gearbox housing (28) there is a washer (29). 8. Test run: Before starting work and after each change of grinding disc, carry out a test run of at least 60 seconds with no load. Switch off the equipment immediately if the disc runs lumpy, substantial vibrations occur, or abnormal noises are generated. G B Cleaning and maintenance Disconnect the plug before adjustment, maintenance or repair. Have any work not described in these instructions carried out by a specialist workshop. Use only original components. Allow the equipment to cool before carrying out any maintenance and cleaning work. There is a risk of burns. Cleaning Do not use cleaning agents or solvents. Chemical substances may attack plastic parts of the equipment. Never clean the equipment under running water. • • Clean the equipment thoroughly after each use. Clean the surface of the equipment with a brush or cloth. General maintenance Before each use, check the equipment for obvious defects such as loose, worn or damaged components and check that screws or other parts are sitting correctly. In particular, check the grinding disc. Replace damaged parts. M T Storage • • • Empty the water tank ( 13) before storage: Pull the rubber closure ( 11) from the drain opening of the water tank and allow the water to drain off Store the appliance in a dry place well out of reach of children. Grinding discs must be stored dry and upright and are not to be stacked. Waste disposal and environmental protection Be environmentally friendly. Return the tool, accessories and packaging to a recycling centre when you have finished with them. Machines are not to be place with domestic waste. Recycle the corrugated cardboard outer packaging in an environmentally friendly manner. • • Hand over the device at an utilization location. The plastic and metal parts employed can be separated out into pure materials and recycling can be implemented. Ask your Service Center about this. Defective units returned to us will be disposed of for free. 4 9 G B M T Replacement parts/accessories Spare parts and accessories can be obtained at www.grizzly-service.eu If you do not have internet access, please contact the Service Centre via telephone (see “Service-Center” page 53). Please have the order number mentioned below ready. Position Instruction manual Description 5 Dry grinding disc 91103553 1 Wet grinding disc 30211041 11,13 Set water tank 30211042 22,26,27 Set clamping flange, wet 30211049 22,23 Set clamping flange, dry 30211044 2,3,17-21 Set spark protection 30211045 6,7,14-16 Set workpiece support 30211046 4 Set dry grinding disc cover 30211047 25 Set protective hood for dry grinding disc 30211048 5 0 Order number G B M T Trouble Shooting Always disconnect the plug from the mains socket before working. Danger of electric shock. Problem Possible Cause Error correction Mains voltage missing Main circuit breaker is tripped Check the socket, mains cable, line, mains plug, repairs to be carried out by qualified electrician if necessary, check main circuit breaker. Device doesn‘t start On/off switch ( defective 8) may be Repair by Customer Care Engine faulty Grinding tools do not move although the engine is running Engine is slower and stops Grinding disc nut ( loose 22) Workpiece, remaining workpieces or remaining grinding tools block drive Tighten grinding disc nut (see “Changing the grinding disc“) Remove blockages Device is overloaded through workpiece Reduce pressure on grinding tool Grinding disc nut ( loose Tighten grinding disc nut (see “Changing the grinding disc“) 22) Grinding disc does not rotate smoothly, Grinding disc ( 1/5) faulty abnormal noises Spark protection ( 2) or can be heard workpiece support ( 6) set incorrectly Workpiece unsuitable Change grinding disc Set spark protection or workpiece support (see “Assembly“) 5 1 G B M T Guarantee Dear Customer, this equipment is provided with a 3-year guarantee from the date of purchase. In case of defects, you have statutory rights against the seller of the product. These statutory rights are not restricted by our guarantee presented below. Terms of Guarantee The term of the guarantee begins on the date of purchase. Please retain the original receipt. This document is required as proof of purchase. If a material or manufacturing defect occurs within three years of the date of purchase of this product, we will repair or replace – at our choice – the product for you free of charge. This guarantee requires the defective equipment and proof of purchase to be presented within the three-year period with a brief written description of what constitutes the defect and when it occurred. If the defect is covered by our guarantee, you will receive either the repaired product or a new product. No new guarantee period begins on repair or replacement of the product. Guarantee Period and Statutory Claims for Defects The guarantee period is not extended by the guarantee service. This also applies for replaced or repaired parts. Any damages and defects already present at the time of purchase must be reported immediately after unpacking. Repairs arising after expiry of the guarantee period are chargeable. 5 2 Guarantee Cover The equipment has been carefully produced in accordance with strict quality guidelines and conscientiously checked prior to delivery. The guarantee applies for all material and manufacturing defects. This guarantee does not extend to cover product parts that are subject to normal wear and may therefore be considered as wearing parts (e.g. grinding discs, carbon brushes, stopper, protective screen) or to cover damage to breakable parts (e.g. switches). This guarantee shall be invalid if the product has been damaged, used incorrectly or not maintained. Precise adherence to all of the instructions specified in the operating manual is required for proper use of the product. Intended uses and actions against which the operating manual advises or warns must be categorically avoided. The product is designed only for private and not commercial use. The guarantee will be invalidated in case of misuse or improper handling, use of force, or interventions not undertaken by our authorised service branch. Processing in Case of Guarantee To ensure quick handling of you issue, please follow the following directions: • Please have the receipt and identification number (IAN 304988) ready as proof of purchase for all enquiries. • Please find the item number on the rating plate. • Should functional errors or other defects occur, please initially contact the service department specified below by telephone or by e-mail. You will then receive further information on the processing of your complaint. • After consultation with our customer service, a product recorded as defective can be sent postage paid to the service G B address communicated to you, with the proof of purchase (receipt) and specification of what constitutes the defect and when it occurred. In order to avoid acceptance problems and additional costs, please be sure to use only the address communicated to you. Ensure that the consignment is not sent carriage forward or by bulky goods, express or other special freight. Please send the equipment inc. all accessories supplied at the time of purchase and ensure adequate, safe transport packaging. Repair Service For a charge, repairs not covered by the guarantee can be carried out by our service branch, which will be happy to issue a cost estimate for you. We can handle only equipment that has been sent with adequate packaging and postage. Attention: Please send your equipment to our service branch in clean condition and with an indication of the defect. Equipment sent carriage forward or by bulky goods, express or other special freight will not be accepted. We will dispose of your defective devices free of charge when you send them to us. M T Service-Center G B Service Great Britain Tel.: 0871 5000 720 (£ 0.10/Min.) E-Mail: [email protected] IAN 304988 M T Service Malta Tel.: 80062230 E-Mail: [email protected] IAN 304988 Importer Please note that the following address is not a service address. Please initially contact the service centre specified above. Grizzly Tools GmbH & Co. KG Stockstädter Straße 20 DE-63762 Großostheim GERMANY www.grizzly-service.eu 5 3 DE AT CH Inhalt Einleitung Einleitung ................................... 54 Bestimmungsgemäße Verwendung .............................. 54 Allgemeine Beschreibung ........... 55 Lieferumfang..................................55 Funktionsbeschreibung ....................55 Übersicht ......................................55 Technische Daten ........................ 56 Sicherheitshinweise .................... 56 Symbole und Bildzeichen ................57 Allgemeine Sicherheitshinweise für Elektrowerkzeuge ...........................57 Weiterführende Sicherheitshinweise .59 Restrisiken .....................................60 Montage .................................... 61 Werkstückauflagen montieren/ einstellen.......................................61 Funkenschutz montieren/einstellen....61 Gerät auf Arbeitstisch verschrauben .62 Wasser in den Wassertank einfüllen .62 Bedienung ................................. 62 Ein- und Ausschalten .......................62 Schleifen mit der Trockenschleifscheibe......................63 Schleifen mit der Nassschleifscheibe 63 Schleifscheiben wechseln ................63 Reinigung und Wartung ............. 65 Reinigung .....................................65 Allgemeine Wartungsarbeiten .........65 Lagerung ................................... 66 Entsorgung/Umweltschutz.......... 66 Ersatzteile/Zubehör ................... 66 Fehlersuche ................................ 67 Garantie .................................... 68 Reparatur-Service ...................... 69 Service-Center ............................ 69 Importeur .................................. 69 Original EG-Konformitätserklärung .................................. 73 Herzlichen Glückwunsch zum Kauf Ihres neuen Gerätes. Sie haben sich damit für ein hochwertiges Gerät entschieden. Dieses Gerät wurde während der Produktion auf Qualität geprüft und einer Endkontrolle unterzogen. Die Funktionsfähigkeit Ihres Gerätes ist somit sichergestellt. 5 4 Die Betriebsanleitung ist Bestandteil dieses Gerätes. Sie enthält wichtige Hinweise für Sicherheit, Gebrauch und Entsorgung. Machen Sie sich vor der Benutzung des Gerätes mit allen Bedien- und Sicherheitshinweisen vertraut. Benutzen Sie das Gerät nur wie beschrieben und für die angegebenen Einsatzbereiche. Bewahren Sie die Betriebsanleitung gut auf und händigen Sie alle Unterlagen bei Weitergabe des Gerätes an Dritte mit aus. Bestimmungsgemäße Verwendung Der Nass-/Trockenschleifer ist zum Schärfen von Werkzeugen (z. B. Messern, Scheren, Meißeln) und zum Entgraten und Schleifen von kleineren Werkstücken aus Metall geeignet. Für alle anderen Anwendungsarten (z. B. Schleifen mit nicht geeigneten Schleifwerkzeugen, Schleifen gesundheitsgefährdender Materialien wie Asbest) ist das Gerät nicht vorgesehen. Das Gerät ist für den Einsatz im Heimwerkerbereich bestimmt. Es wurde nicht für den gewerblichen Dauereinsatz konzipiert. Das Gerät ist zum Gebrauch durch Erwachsene bestimmt. Jugendliche über 16 Jahre dürfen das Gerät nur unter Aufsicht benutzen. Der Hersteller haftet nicht für Schäden, die durch bestimmungswidrigen Gebrauch oder falsche Bedienung verursacht wurden. DE Allgemeine Beschreibung Die Abbildung der wichtigsten Funktionsteile finden Sie auf der vorderen und hinteren Ausklappseite. Lieferumfang Packen Sie das Gerät aus und kontrollieren Sie, ob es vollständig ist. Entsorgen Sie das Verpackungsmaterial ordnungsgemäß. • Gerät mit vormontierten Schleifscheiben • Funkenschutz • Montagematerial zur Befestigung des Funkenschutzes am Gerät - Justierschraube inkl. Unterlegscheibe und Federrring, Mutter • Werkstückauflage • Montagematerial zur Befestigung der Werkstückauflage am Gerät - Sternmutter, Unterlegscheibe, Zahnscheibe und Schraube • Gummiverschluss für Wasserbehälter • Betriebsanleitung Funktionsbeschreibung Der Nass-/Trockenschleifer ist ein Kombigerät, ausgestattet mit einer Trockenschleifscheibe und einer Nassschleifscheibe mit unterschiedlicher Körnung für den Grobund Feinschliff. Zum Schutz des Anwenders ist das Gerät mit Funkenschutz und Schutzhauben versehen. Die Funktion der Bedienteile entnehmen Sie bitte den nachfolgenden Beschreibungen. AT CH Übersicht 1 2 3 4 5 6 7 8 9 10 11 12 13 Nassschleifscheibe Funkenschutz Justiermutter für Funkenschutz Schleifscheiben-Abdeckung Trockenschleifscheibe Werkstückauflage Sternmutter zur Montage/ Justierung der Werkstückauflage Ein-/Ausschalter Bohrungen für Tischmontage Gummifuß (Wasserbehälter) Gummiverschluss für Wasserbehälter Netzkabel Wasserbehälter 14 Zahnscheibe 15 Unterlegscheibe 16 Befestigungsschraube für Werkstückauflage 17 18 19 20 21 Mutter Funkenschutzhalter Unterlegscheibe Federring Justierschraube für Funkenschutzhalterung 22 23 24 25 Schleifscheiben-Mutter Spannflansch Zwischenlagen aus Pappe Schutzhaube für Trockenschleifscheibe 26 27 28 29 Spannflansch aus Kunststoff Spannflansch aus Kunststoff Getriebegehäuse Unterlegscheibe 5 5 DE AT CH Technische Daten Nass-/Trockenschleifer.......... PNTS 250 B1 Nenneingangsspannung U 230 V~, 50 Hz Leistungsaufnahme P ................... 250 W (S2 30 min)* Schutzklasse ......................................... I Schutzart ........................................IPX0 Leerlaufdrehzahl n0 Nassschleifscheibe ........... ca. 128 min -1 Trockenschleifscheibe ..... ca. 2950 min -1 Gewicht (incl. Zubehör) ........... ca. 8,6 kg Schalldruckpegel (LpA) ..................... 80 dB (A); KpA= 3 dB Schallleistungspegel (LWA) .................... 93 dB(A); KWA= 3 dB Schwingungsgesamtwert (ah) .. 2,5 m/s2 Nassschleifscheibe Außendurchmesser.............. Ø 200 mm Bohrung ............................... Ø 20 mm Dicke ....................................... 40 mm Körnung......................................... 80 Drehzahl nmax ..................... 3820 min -1 Arbeitsgeschwindigkeit vs ...max. 40 m/s Trockenschleifscheibe Außendurchmesser.............. Ø 150 mm Bohrung .............................Ø 12,7 mm Dicke ....................................... 20 mm Körnung......................................... 36 Drehzahl nmax ..................... 4500 min -1 Arbeitsgeschwindigkeit vs ...max. 35 m/s * Auf die untunterbrochene Betriebsdauer von 30 Minuten erfolgt eine Ruhepause, bis die Gerätetemperatur weniger als 2 K (2°C) von der Raumtemperatur abweicht. Lärm- und Vibrationswerte wurden entsprechend den in der Konformitätserklärung genannten Normen und Bestimmungen ermittelt. 5 6 Der angegebene Schwingungsemissionswert ist nach einem genormten Prüfverfahren gemessen worden und kann zum Vergleich eines Elektrowerkzeugs mit einem anderen verwendet werden. Der angegebene Schwingungsemissionswert kann auch zu einer einleitenden Einschätzung der Aussetzung verwendet werden. Warnung: Der Schwingungsemissionswert kann sich während der tatsächlichen Benutzung des Elektrowerkzeugs von dem Angabewert unterscheiden, abhängig von der Art und Weise, in der das Elektrowerkzeug verwendet wird. Versuchen Sie, die Belastung durch Vibrationen so gering wie möglich zu halten. Beispielhafte Maßnahmen zur Verringerung der Vibrationsbelastung sind das Tragen von Handschuhen beim Gebrauch des Werkzeugs und die Begrenzung der Arbeitszeit. Dabei sind alle Anteile des Betriebszyklus zu berücksichtigen (beispielsweise Zeiten, in denen das Elektrowerkzeug abgeschaltet ist, und solche, in denen es zwar eingeschaltet ist, aber ohne Belastung läuft). Sicherheitshinweise ACHTUNG! Beim Gebrauch von Elektrowerkzeugen sind zum Schutz gegen elektrischen Schlag, Verletzungs- und Brandgefahr folgende grundsätzliche Sicherheitsmaßnahmen zu beachten. Lesen Sie alle diese Hinweise, bevor Sie dieses Elektrowerkzeug benutzen, und bewahren Sie die Sicherheitshinweise gut auf. DE Symbole und Bildzeichen Symbole in der Betriebsanleitung: Gefahrenzeichen mit Angaben zur Verhütung von Personen- oder Sachschäden. Gebotszeichen mit Angaben zur Verhütung von Schäden. Netzstecker einstecken. Netzstecker. ziehen Hinweiszeichen mit Informationen zum besseren Umgang mit dem Gerät. Bildzeichen auf dem Gerät: Achtung! Verletzungsgefahr durch sich drehendes Werkzeug! Halten Sie Ihre Hände fern. Gefahr durch elektrischen Schlag! Ziehen Sie vor Wartungs- und Reparaturarbeiten den Netzstecker aus der Steckdose. Betriebsanleitung lesen. Tragen Sie Gehörschutz. Tragen Sie Augenschutz. Tragen Sie einen Atemschutz. Gefahr durch Schnittverletzungen! Tragen Sie schnittsichere Handschuhe. Schleifscheibe nur trocken verwenden. AT CH Schleifscheibe nur mit Wasser verwenden. Elektrogeräte gehören nicht in den Hausmüll. Weitere Bildzeichen auf den Schleifscheiben: Keine defekte Schleifscheibe einsetzen. Bildzeichen auf der Verpackung: Wellpappe Allgemeine Sicherheitshinweise für Elektrowerkzeuge Der in den Sicherheitshinweisen verwendete Begriff „Elektrowerkzeug“ bezieht sich auf netzbetriebene Elektrowerkzeuge (mit Netzkabel) und auf akkubetriebene Elektrowerkzeuge (ohne Netzkabel). Sicheres Arbeiten: • Halten Sie Ihren Arbeitsbereich in Ordnung. Unordnung im Arbeitsbereich kann Unfälle zur Folge haben. • Berücksichtigen Sie Umgebungseinflüsse. - Setzen Sie Elektrowerkzeuge nicht dem Regen aus. - Benutzen Sie Elektrowerkzeuge nicht in feuchter oder nasser Umgebung. Das Eindringen von Wasser in ein Elektrowerkzeug erhöht das Risiko eines elektrischen Schlages. - Sorgen Sie für gute Beleuchtung des Arbeitsplatzes. - Benutzen Sie Elektrowerkzeuge nicht, wo Brand- oder Explosionsgefahr besteht. Elektrowerkzeuge erzeugen 5 7 DE • • • • • • 5 8 AT CH Funken, die den Staub oder die Dämpfe entzünden können. Schützen Sie sich vor elektrischem Schlag. Vermeiden Sie Körperberührung mit geerdeten Teilen (z. B. Rohren, Radiatoren, Elektroherden, Kühlgeräten). Halten Sie andere Personen fern. Lassen Sie andere Personen, insbesondere Kinder, nicht das Elektrowerkzeug oder das Kabel berühren. Halten Sie sie von Ihrem Arbeitsbereich fern. Bewahren Sie unbenutzte Elektrowerkzeuge sicher auf. Unbenutzte Elektrowerkzeuge sind an einem trockenen, hochgelegenen oder abgeschlossenen Ort, außerhalb der Reichweite von Kindern, abzulegen. Es besteht Verletzungsgefahr. Überlasten Sie Ihr Elektrowerkzeug nicht. Sie arbeiten besser und sicherer im angegebenen Leistungsbereich. Benutzen Sie das richtige Elektrowerkzeug. - Verwenden Sie keine leistungsschwachen Maschinen für schwere Arbeiten. - Benutzen Sie das Elektrowerkzeug nicht für solche Zwecke, für die es nicht vorgesehen ist. Benutzen Sie zum Beispiel keine Handkreissäge zum Schneiden von Baumästen oder Holzscheiten. Der Gebrauch von Elektrowerkzeugen für andere als die vorgesehenen Anwendungen kann zu gefährlichen Situationen führen. Tragen Sie geeignete Arbeitskleidung. - Tragen Sie keine weite Kleidung oder Schmuck, sie können von beweglichen Teilen erfasst werden. - Bei Arbeiten im Freien ist rutschfestes Schuhwerk empfehlenswert. - Tragen Sie bei langen Haaren ein Haarnetz. • Benutzen Sie Schutzausrüstung. - Tragen Sie eine Schutzbrille. Bei Nichtbeachtung können Augenverletzungen durch Funken oder Schleifpartikel entstehen. - Verwenden Sie bei stauberzeugenden Arbeiten eine Atemmaske. • Schließen Sie die StaubabsaugEinrichtung an. Falls Anschlüsse zur Staubabsaugung und Auffangeinrichtung vorhanden sind, überzeugen Sie sich, dass diese angeschlossen und richtig benutzt werden. • Verwenden Sie das Kabel nicht für Zwecke, für die es nicht bestimmt ist. Benutzen Sie das Kabel nicht, um den Netzstecker aus der Steckdose zu ziehen. Schützen Sie das Kabel vor Hitze, Öl und scharfen Kanten. Beschädigte oder verwickelte Kabel erhöhen das Risiko eines elektrischen Schlages. • Sichern Sie das Werkstück. Benutzen Sie Spannvorrichtungen oder einen Schraubstock, um das Werkstück festzuhalten. Es ist damit sicherer gehalten als mit Ihrer Hand. • Vermeiden Sie abnormale Körperhaltung. Sorgen Sie für sicheren Stand und halten Sie jederzeit das Gleichgewicht. Dadurch können Sie das Elektrowerkzeug in unerwarteten Situationen besser kontrollieren. • Pflegen Sie Ihre Werkzeuge mit Sorgfalt. Viele Unfälle haben ihre Ursache in schlecht gewarteten Elektrowerkzeugen. - Halten Sie die Schneidwerkzeuge scharf und sauber, um besser und sicherer arbeiten zu können. - Befolgen Sie die Hinweise zur Schmierung und zum Werkzeugwechsel. - Kontrollieren Sie regelmäßig das Netzkabel des Elektrowerkzeugs und lassen DE • • • • • • Sie dieses bei Beschädigung von einem anerkannten Fachmann erneuern. - Kontrollieren Sie Verlängerungsleitungen regelmäßig und ersetzen Sie diese, wenn sie beschädigt sind. - Halten Sie die Handgriffe trocken, sauber und frei von Öl und Fett. Ziehen Sie den Netzstecker aus der Steckdose bei Nichtgebrauch des Elektrowerkzeugs, vor der Wartung und beim Wechsel von Werkzeugen. Diese Vorsichtsmaßnahme verhindert den unbeabsichtigten Start des Elektrowerkzeuges. Lassen Sie keine Werkzeugschlüssel stecken. Überprüfen Sie vor dem Einschalten, dass Schlüssel und Einstellwerkzeuge entfernt sind. Ein Werkzeug oder Schlüssel, der sich in einem drehenden Geräteteil befindet, kann zu Verletzungen führen. Vermeiden Sie unbeabsichtigten Anlauf. Vergewissern Sie sich, dass der Schalter beim Einstecken des Steckers in die Steckdose ausgeschaltet ist. Benutzen Sie Verlängerungskabel für den Außenbereich. Verwenden Sie im Freien nur dafür zugelassene und entsprechend gekennzeichnete Verlängerungskabel. Seien Sie aufmerksam. Achten Sie darauf, was Sie tun, und gehen Sie mit Vernunft an die Arbeit. Benutzen Sie das Elektrowerkzeug nicht, wenn Sie unkonzentriert sind. Ein Moment der Unachtsamkeit beim Gebrauch des Elektrowerkzeuges kann zu ernsthaften Verletzungen führen. Überprüfen Sie das Elektrowerkzeug auf eventuelle Beschädigungen. Damit wird sichergestellt, dass die Sicherheit des Elektrowerkzeuges erhalten bleibt. AT CH - Vor weiterem Gebrauch des Elektrowerkzeugs müssen Schutzvorrichtungen oder leicht beschädigte Teile sorgfältig auf ihre einwandfreie und bestimmungsgemäße Funktion untersucht werden. - Überprüfen Sie, ob die beweglichen Teile einwandfrei funktionieren und nicht klemmen oder ob Teile beschädigt sind. Sämtliche Teile müssen richtig montiert sein und alle Bedingungen erfüllen, um den einwandfreien Betrieb des Elektrowerkzeugs zu gewährleisten. - Beschädigte Schutzvorrichtungen und Teile müssen bestimmungsgemäß durch eine anerkannte Fachwerkstatt repariert oder ausgewechselt werden, soweit nichts anderes in der Betriebsanleitung angegeben ist. - Benutzen Sie keine Elektrowerkzeuge, bei denen sich der Schalter nicht einund ausschalten lässt. Beschädigte Schalter müssen bei einer Kundendienstwerkstatt ersetzt werden. • Achtung! Der Gebrauch anderer Einsatzwerkzeuge und anderen Zubehörs kann eine Verletzungsgefahr für Sie bedeuten. • Lassen Sie Ihr Elektrowerkzeug durch eine Elektrofachkraft reparieren. Dieses Elektrowerkzeug entspricht den einschlägigen Sicherheitsbestimmungen. Reparaturen dürfen nur von einer Fachwerkstatt ausgeführt werden, indem Originalersatzteile verwendet werden; andernfalls können Unfälle für den Benutzer entstehen. Weiterführende Sicherheitshinweise • Schließen Sie das Gerät nur an eine Steckdose mit Fehlerstrom-Schutzeinrichtung (FI-Schalter) mit einem Bemessungsfehlerstrom von nicht mehr als 30 mA an. 5 9 DE AT CH • Halten Sie Netzkabel und Verlängerungskabel von der Schleifscheibe fern. Ziehen Sie bei Beschädigung oder Durchschneiden sofort den Netzstecker aus der Steckdose. Berühren Sie die Leitung nicht, bevor sie vom Netz getrennt ist. Es besteht Gefahr durch elektrischen Schlag. • Der Austausch des Steckers oder der Anschlussleitung ist immer vom Hersteller des Elektrowerkzeugs oder seinem Kundendienst auszuführen, um Gefährdungen zu vermeiden. • Schalten Sie das Gerät erst ein, wenn es sicher auf der Arbeitsfläche montiert ist. • Zu Ihrer eigenen Sicherheit, benutzen Sie nur Zubehör und Zusatzgeräte, die in der Betriebsanleitung angegeben oder vom Werkzeug-Hersteller empfohlen oder angegeben werden. • Verwenden Sie nur vom Hersteller empfohlene Schleifwerkzeuge. Verwenden Sie keine Sägeblätter. Vergewissern Sie sich, dass die Maße zum Gerät passen. • Verwenden Sie nur Schleifscheiben, deren aufgedruckte Drehzahl mindestens so hoch ist wie die auf dem Typenschild des Gerätes angegebene Drehzahl. • Unterziehen Sie die Schleifscheibe vor dem Gebrauch einer Sichtprüfung. Verwenden Sie keine beschädigten oder verformten Schleifscheiben. Wechseln Sie eine abgenutzte Schleifscheibe aus. • Betreiben Sie das Gerät niemals ohne Funkenschutz oder Schutzhauben. Stellen Sie den Funkenschutz periodisch nach, um den Verschleiß der Schleifscheibe auszugleichen (Abstand max. 2 mm). • Wechseln Sie die Schleifscheibe spätestens aus, wenn der Funkenschutz und die Werkstückauflage nicht mehr auf einen Abstand von max. 2 mm nachgestellt werden kann. • Achten Sie darauf, dass beim Schleifen entstehende Funken keine Gefahr 6 0 • • • • • • • hervorrufen, z. B. Personen treffen oder entflammbare Substanzen entzünden. Tragen Sie beim Schleifen, Bürsten und Trennen stets eine Schutzbrille, Sicherheitshandschuhe, einen Atemschutz und einen Gehörschutz. Halten Sie nie die Finger zwischen Schleifscheibe und Funkenschutz oder in die Nähe der Schutzhauben. Es besteht Gefahr durch Quetschen. Die rotierenden Teile des Gerätes können aus funktionellen Gründen nicht abgedeckt werden. Gehen Sie daher mit Bedacht vor und halten Sie das Werkstück gut fest, um ein Verrutschen zu vermeiden, wodurch Ihre Hände mit der Schleifscheibe in Berührung kommen könnten. Das Werkstück wird beim Schleifen heiß. Nicht an der bearbeiteten Stelle anfassen, lassen Sie es abkühlen. Es besteht Verbrennungsgefahr. Verwenden Sie kein Kühlmittel oder ähnliches. Arbeiten Sie mit dem Gerät nicht, wenn Sie müde sind oder nach der Einnahme von Alkohol oder Tabletten. Legen Sie immer rechtzeitig eine Arbeitspause ein. Schalten Sie das Gerät aus und ziehen Sie den Netzstecker - zum Lösen eines blockierten Einsatzwerkzeuges, - wenn die Anschlussleitung beschädigt oder verheddert ist, - bei ungewöhnlichen Geräuschen. Bedienen Sie das Gerät nur in aufrechter, stehender Position und achten Sie auf einen sicheren Stand. Restrisiken Auch wenn Sie dieses Elektrowerkzeug vorschriftsmäßig bedienen, bleiben immer Restrisiken bestehen. Folgende Gefahren können im Zusammenhang mit der Bauweise und Ausführung dieses Elektrowerkzeugs auftreten: DE a) Lungenschäden, falls kein geeigneter Atemschutz getragen wird. b) Gehörschäden, falls kein geeigneter Gehörschutz getragen wird. c) Gesundheitsschäden durch - Berührung der Schleifwerkzeuge im nicht abgedeckten Bereich; - Herausschleudern von Teilen aus Werkstücken oder beschädigten Schleifscheiben. d) Gesundheitsschäden, die aus HandArm-Schwingungen resultieren, falls das Gerät über einen längeren Zeitraum verwendet wird oder nicht ordnungsgemäß geführt und gewartet wird. Warnung! Dieses Elektrowerkzeug erzeugt während des Betriebs ein elektromagnetisches Feld. Dieses Feld kann unter bestimmten Umständen aktive oder passive medizinische Implantate beeinträchtigen. Um die Gefahr von ernsthaften oder tödlichen Verletzungen zu verringern, empfehlen wir Personen mit medizinischen Implantaten ihren Arzt und den Hersteller des medizinischen Implantats zu konsultieren, bevor die Maschine bedient wird. Montage Achtung! Verletzungsgefahr! - Achten Sie darauf, zum Arbeiten genügend Platz zu haben und andere Personen nicht zu gefährden. - Befestigen Sie das Gerät immer mittels Schrauben ausreichender Länge und Stärke auf der Arbeitsfläche, um nicht die Kontrolle über das Gerät zu verlieren. - Vor Inbetriebnahme müssen alle Abdeckungen und Schutzvorrichtungen ordnungsgemäß montiert sein. AT CH - Ziehen Sie den Netzstecker, bevor Sie Einstellungen am Gerät vornehmen. Werkstückauflagen montieren/einstellen 1. Schrauben Sie die Werkstückauflage (6) an dem Gerät fest. Verwenden Sie hierzu die beiliegende Befestigungsschraube (16), Unterlegscheibe (15), Zahnscheibe (14)und Sternmutter (7). 2. Stellen Sie die Werkstückauflage (6) der Trockenschleifscheibe mit der Sternmutter (7) ein. Der Abstand zwischen Trockenschleifscheibe (5) und Werkstückauflage (6) darf maximal 2 mm betragen. Stellen Sie die Werkstückauflage periodisch nach, um den Verschleiß der Schleifscheibe auszugleichen (Abstand maximal 2 mm). Funkenschutz montieren/ einstellen 1. Schrauben Sie den Funkenschutzhalter (18) an der Schutzhaube ( 25) fest. Verwenden Sie hierzu die Justierschraube (21) inkl. Federring und Unterlegscheibe (20/19) sowie die Mutter (17). 2. Stellen Sie den Funkenschutzhalter (18) mit der Justierschraube (21) ein: Der Abstand zwischen Trockenschleifscheibe ( 5) und Funkenschutzhalter (18) darf maximal 2 mm betragen. Stellen Sie den Funkenschutz periodisch nach, um den Verschleiß der Schleifscheibe auszugleichen (Abstand maximal 2 mm). 6 1 DE AT CH Tragen Sie beim Arbeiten trotz Funkenschutz immer eine Schutzbrille, um Augenverletzungen zu vermeiden. - Gerät auf Arbeitstisch verschrauben 1. Nehmen Sie den Gummifuß (10) des Wasserbehälters ab. 2. Schrauben Sie das Gerät mit 4 Schrauben und Muttern auf der planen Arbeitsfläche fest. Führen Sie dazu die Schrauben durch die 4 Bohrungen (9) am Gerätesockel. Die Schrauben und Muttern zur Montage sind nicht im Lieferumfang enthalten. Wasser in den Wassertank einfüllen 1. Stecken Sie den Gummiverschluss (11) in die Ablauföffnung des Wasserbehälters (13). 2. Füllen Sie Wasser bis zur Wasserstandsmarkierung in den Wasserbehälter (13) ein. Bedienung Achtung! Verletzungsgefahr! - Ziehen Sie vor allen Arbeiten an dem Gerät den Netzstecker. - Verwenden Sie nur vom Hersteller empfohlene Schleifscheiben und Zubehörteile. Der Gebrauch anderer Einsatzwerkzeuge und anderen Zubehörs kann eine Verletzungsgefahr für Sie bedeuten. - Verwenden Sie nur Schleifwerkzeuge, die Angaben tragen über Hersteller, Art der Bindung, 6 2 - - - Abmessung und zulässige Umdrehungszahl. Verwenden Sie nur Schleifscheiben, deren aufgedruckte Drehzahl mindestens so hoch ist wie die auf dem Typenschild des Gerätes angegebene Drehzahl. Verwenden Sie keine abgebrochenen, gesprungenen oder anderweitig beschädigten Schleifscheiben. Betreiben Sie das Gerät niemals ohne Schutzeinrichtungen. Kontrollieren Sie die Schleifscheibe vor ihrer Verwendung: Prüfen Sie den Abstand zwischen Funkenschutzhalter und Schleifscheibe sowie Werkstückauflage und Schleifscheibe (Abstand maximal 2 mm). Sobald Funkenschutzhalter und Werkstückauflage nicht mehr auf max. 2 mm an die Schleifscheibe herangestellt werden können, muss die Schleifscheibe ausgetauscht werden. Schalten Sie das Gerät erst ein, wenn es sicher auf der Arbeitsfläche montiert ist. Halten Sie Ihre Hände von der Schleifscheibe fern, wenn das Gerät in Betrieb ist. Es besteht Verletzungsgefahr. Tragen Sie beim Arbeiten trotz Funkenschutz immer eine Schutzbrille, um Augenverletzungen zu vermeiden. Ein- und Ausschalten Achten Sie darauf, dass die Spannung des Netzanschlusses mit dem Typenschild am Gerät übereinstimmt. DE Schließen Sie das Gerät an die Netzspannung an. 1. AT CH Schleifen mit der Nassschleifscheibe Zum Einschalten drücken Sie den Einschalter „I“ ( 8), das Gerät läuft an. Zum Ausschalten drücken Sie den Ausschalter „0“ ( 8), das Gerät schaltet ab. • Prüfen Sie den Wasserstand im Wasserbehälter: Die Nassschleifscheibe ( 2. 1) soll sich bis zur Wasserstandsmarkierung am Wasserbehälter ( 13) im Wasser befinden. • Stellen Sie sich vor die NassschleifWarten Sie nach dem Einschalten ab, bis scheibe ( 1). das Gerät seine max. Drehzahl erreicht hat. • Halten Sie das Werkstück mit beiden Beginnen Sie erst dann mit dem Schleifen. Händen und senken es langsam auf die Nassschleifscheibe ab. • Das Werkstück kann auch an den Die Schleifscheibe läuft nach, Zähnen des Wasserbehälters ( nachdem das Gerät abge13) schaltet wurde. Es besteht abgestützt werden. Verletzungsgefahr. Probelauf: Führen Sie vor dem ersten Arbeiten und nach jedem Schleifscheibenwechsel einen Probelauf von mindestens 1 Minute ohne Belastung durch. Schalten Sie das Gerät sofort aus, wenn die Schleifscheibe unrund läuft, beträchtliche Schwingungen auftreten oder abnorme Geräusche zu hören sind. Schleifen mit der Trockenschleifscheibe • Legen Sie das Werkstück auf die Werkstückauflage ( 6) und führen Sie es langsam im gewünschten Winkel an die Trockenschleifscheibe ( 5) heran. • Bewegen Sie das Werkstück leicht hin und her, um ein optimales Schleifergebnis zu erhalten. Die Trockenschleifscheibe wird so gleichmäßig abgenutzt. Lassen Sie das Werkstück zwischendurch abkühlen. • Klappen Sie den Funkenschutz ( 2) beim Schleifen nach unten, um Verletzungen durch Funkenbildung zu vermeiden. Schleifscheiben wechseln Hinweise zum Wechseln: - Betreiben Sie das Gerät niemals ohne Schutzeinrichtungen. - Vergewissern Sie sich, dass die auf der Schleifscheibe angegebene Drehzahl gleich oder größer als die Bemessungsleerlaufdrehzahl des Gerätes ist. - Vergewissern Sie sich, dass die Maße der Schleifscheibe zum Gerät passen. - Benutzen Sie nur einwandfreie Schleifscheiben (Klangprobe: Frei an einer Schnur hängende unbeschädigte Schleifscheiben haben beim Anschlagen mit Plastikhammer einen klaren Klang). - Bohren Sie eine zu kleine Aufnahmebohrung der Schleifscheibe nicht nachträglich auf. - Verwenden Sie keine getrennten Reduzierbuchsen oder Adapter, um Schleifscheiben mit großem Loch passend zu machen. - Verwenden Sie keine Sägeblätter. - Zum Aufspannen der Schleifwerkzeuge dürfen nur die mitgelieferten 6 3 DE AT CH Mutter (Rechtsgewinde) aufschrauben: Im Uhrzeigersinn drehen. 6. Ziehen Sie die SchleifscheibenMutter mit einem Schraubenschlüssel (SW19) mit mäßiger Handkraft an. 7. Schrauben Sie die Schleifscheiben-Abdeckung (4) an. 8. Stellen Sie den Funkenschutzhalter ( 18) und die Werkstückauflage ( 6) ein: Der Abstand zur Trockenschleifscheibe (5) darf maximal 2 mm betragen (siehe „Montage“). Spannflansche verwendet werden. Die Zwischenlagen zwischen Spannflansch und Schleifwerkzeuge müssen aus elastischen Stoffen z. B. Gummi, weicher Pappe usw., bestehen. - Montieren Sie das Gerät nach dem Schleifscheibenwechsel wieder vollständig. Schalten Sie das Gerät aus und ziehen Sie den Netzstecker. Lassen Sie das Gerät abkühlen. Tragen Sie beim Schleifscheibenwechsel Schutzhandschuhe, um Schnittverletzungen zu vermeiden. Die Schleifscheiben-Mutter darf nicht zu fest angezogen werden, um ein Brechen von Schleifscheibe und Mutter zu vermeiden. Trockenschleifscheibe wechseln: 1. Nehmen Sie den Funkenschutz ( 2) ab (siehe“Funkenschutz montieren/einstellen“). 2. Lösen Sie die Befestigungsschrauben und nehmen Sie die SchleifscheibenAbdeckung ( 4) von der Schutzhaube ( 25) ab. 3. Schrauben Sie die Schleifscheiben-Mutter (22) mit einem Schraubenschlüssel (SW19) ab, indem Sie die Trockenschleifscheibe (5) mit einer behandschuhten Hand gegenhalten. Mutter (Rechtsgewinde) abschrauben: Gegen den Uhrzeigersinn drehen. 4. Nehmen Sie den Spannflansch (23) und die Trockenschleifscheibe (5) ab. 5. Setzen Sie die neue Trockenschleifscheibe (5) mit den Zwischenlagen aus Pappe (24) und den Spannflansch (23) auf. Schrauben Sie die Schleifscheiben-Mutter (22) von Hand auf. 6 4 9. Probelauf: Führen Sie vor dem ersten Arbeiten und nach jedem Schleifscheibenwechsel einen Probelauf von mindestens 1 Minute ohne Belastung durch. Schalten Sie das Gerät sofort aus, wenn die Schleifscheibe unrund läuft, beträchtliche Schwingungen auftreten oder abnorme Geräusche zu hören sind. Nassschleifscheibe wechseln: 1. Lösen Sie die 4 Befestigungsschrauben (13a/13b/13c/13d) am Getriebegehäuse (28) und nehmen Sie den Wasserbehälter (13) ab. 2. Schrauben Sie die Schleifscheiben-Mutter (22) mit einem Schraubenschlüssel (SW19) ab, indem Sie die Nassschleifscheibe (1) mit einer behandschuhten Hand gegenhalten. Mutter (Rechtsgewinde) abschrauben: Gegen den Uhrzeigersinn drehen. DE 3. Nehmen Sie den Spannflansch aus Kunststoff (26) und die Nassschleifscheibe (1) ab. 4. Setzen Sie die neue Nassschleifscheibe (1) und den Spannflansch aus Kunststoff (26) auf. Schrauben Sie die Schleifscheiben-Mutter (22) von Hand auf. Rechte Mutter (Rechtsgewinde) aufschrauben: Im Uhrzeigersinn drehen. Die beiden Spannflansche aus Kunststoff (26/27) sind nicht identisch. 5. Ziehen Sie die SchleifscheibenMutter (22) mit einem Schraubenschlüssel (SW19) mit mäßiger Handkraft an. 6. Schieben Sie den Wasserbehälter (13) wieder über die Nassschleifscheibe (1) auf und an das Getriebegehäuse (28) an. 7. Befestigen Sie den Wasserbehälter (13) mit den vier Befestigungsschrauben und Unterlegscheiben am Getriebegehäuse (28). Die Schleifscheiben-Mutter darf nicht zu fest angezogen werden, um ein Brechen von Schleifscheibe und Mutter zu vermeiden. Zwischen dem Spannflansch (27) und dem Getriebegehäuse (28) befindet sich eine Unterlegscheibe (29). 8. Probelauf: Führen Sie vor dem ersten Arbeiten und nach jedem Schleifscheibenwechsel einen Probelauf von mindestens 1 Minute ohne Belastung durch. Schalten Sie das Gerät sofort aus, wenn die Schleifscheibe unrund läuft, beträchtliche Schwingungen auftreten oder abnorme Geräusche zu hören sind. AT CH Reinigung und Wartung Ziehen Sie vor jeglicher Einstellung, Instandhaltung oder Instandsetzung den Netzstecker. Lassen Sie Arbeiten, die nicht in dieser Betriebsanleitung beschrieben sind, von einer Fachwerkstatt durchführen. Verwenden Sie nur Originalteile. Lassen Sie das Gerät vor allen Wartungs- und Reinigungsarbeiten abkühlen. Es besteht Verbrennungsgefahr! Reinigung Verwenden Sie keine Reinigungsbzw. Lösungsmittel. Chemische Substanzen können die Kunststoffteile des Gerätes angreifen. Reinigen Sie das Gerät niemals unter fließendem Wasser. • Reinigen Sie das Gerät nach jedem Gebrauch gründlich. • Reinigen Sie die Oberfläche des Gerätes mit einer weichen Bürste, einem Pinsel oder einem Tuch. Allgemeine Wartungsarbeiten Kontrollieren Sie das Gerät vor jedem Gebrauch auf offensichtliche Mängel wie lose, abgenutzte oder beschädigte Teile, korrekten Sitz von Schrauben oder anderer Teile. Prüfen Sie insbesondere die Schleifscheiben. Tauschen Sie beschädigte Teile aus. 6 5 DE AT CH Lagerung Entsorgung/Umweltschutz • Leeren Sie vor der Lagerung den Wasserbehälter ( 13): Ziehen Sie den Gummiverschluss ( 11) aus der Ablauföffnung des Wasserbehälters und lassen Sie das Wasser ablaufen. • Bewahren Sie das Gerät an einem trockenen und staubgeschützten Ort auf, außerhalb der Reichweite von Kindern. • Schleifscheiben müssen trocken und hochkant aufbewahrt werden und dürfen nicht gestapelt werden. Führen Sie Gerät, Zubehör und Verpackung einer umweltgerechten Wiederverwertung zu. Elektrogeräte gehören nicht in den Hausmüll. Führen Sie die Umverpackung aus Wellpappe einer umweltgerechten Wiederverwertung zu. • Geben Sie das Gerät an einer Verwertungsstelle ab. Die verwendeten Kunststoff- und Metallteile können sortenrein getrennt werden und so einer Wiederverwertung zugeführt werden. Fragen Sie hierzu unser Service-Center. • Die Entsorgung Ihrer defekten eingesendeten Geräte führen wir kostenlos durch. Ersatzteile/Zubehör Ersatzteile und Zubehör erhalten Sie unter www.grizzly-service.eu Sollten Sie kein Internet haben, so wenden Sie sich bitte telefonisch an das Service-Center (siehe „Service-Center“ Seite 69). Halten Sie die unten genannten Bestellnummern bereit. Position Betriebsanleitung 5 Bezeichnung Trockenschleifscheibe Bestell-Nr. 91103553 1 Nassschleifscheibe 30211041 11,13 Set Wasserbehälter 30211042 22,26,27 Set Spannflansche, nass 30211049 22,23 Set Spannflansche, trocken 30211044 2,3,17-21 Set Funkenschutz 30211045 6,7,14-16 Set Werkstückauflage 30211046 4 Set Schleifscheiben-Abdeckung 30211047 25 Set Schutzhaube (Trockenschleifscheibe) 30211048 6 6 DE AT CH Fehlersuche Ziehen Sie vor allen Arbeiten an dem Gerät den Netzstecker. Gefahr durch elektrischen Schlag! Problem Gerät startet nicht Mögliche Ursache Fehlerbehebung Netzspannung fehlt Haussicherung spricht an Steckdose, Netzkabel, Leitung, Netzstecker prüfen, ggf. Reparatur durch Elektrofachmann, Haussicherung prüfen. Ein-/Ausschalter ( 8) defekt Motor defekt Schleifwerkzeuge bewegen sich nicht, obwohl Motor läuft Motor wird langsamer und bleibt stehen Schleifscheibe läuft unrund, abnorme Geräusche sind zu hören Schleifscheiben-Mutter ( locker 22) Werkstück, Werkstückreste oder Reste der Schleifwerkzeuge blockieren Antrieb Gerät wird durch Werkstück überlastet Schleifscheiben-Mutter ( locker Schleifscheibe ( 22) Reparatur durch Kundendienst Schleifscheiben-Mutter anziehen (siehe „Schleifscheiben wechseln“) Blockaden entfernen Druck auf Schleifwerkzeug verringern Werkstück ungeeignet Schleifscheiben-Mutter anziehen (siehe „Schleifscheiben wechseln“) 1/5) defekt Schleifscheibe wechseln 2) oder Funkenschutz ( Werkstückauflage ( 6) falsch eingestellt Funkenschutz oder Werkstückauflage einstellen (siehe „Montage“) 6 7 DE AT CH Garantie Sehr geehrte Kundin, sehr geehrter Kunde, Sie erhalten auf dieses Gerät 3 Jahre Garantie ab Kaufdatum. Im Falle von Mängeln dieses Gerätes stehen Ihnen gegen den Verkäufer des Gerätes gesetzliche Rechte zu. Diese gesetzlichen Rechte werden durch unsere im Folgenden dargestellte Garantie nicht eingeschränkt. Garantiebedingungen Die Garantiefrist beginnt mit dem Kaufdatum. Bitte bewahren Sie den OriginalKassenbon gut auf. Diese Unterlage wird als Nachweis für den Kauf benötigt. Tritt innerhalb von drei Jahren ab dem Kaufdatum dieses Gerätes ein Materialoder Fabrikationsfehler auf, wird das Gerät von uns – nach unserer Wahl – für Sie kostenlos repariert oder ersetzt. Diese Garantieleistung setzt voraus, dass innerhalb der Drei-Jahres-Frist das defekte Gerät und der Kaufbeleg (Kassenbon) vorgelegt und schriftlich kurz beschrieben wird, worin der Mangel besteht und wann er aufgetreten ist. Wenn der Defekt von unserer Garantie gedeckt ist, erhalten Sie das reparierte oder ein neues Gerät zurück. Mit Reparatur oder Austausch des Gerätes beginnt kein neuer Garantiezeitraum. Garantiezeit und gesetzliche Mängelansprüche Die Garantiezeit wird durch die Gewährleistung nicht verlängert. Dies gilt auch für ersetzte und reparierte Teile. Eventuell schon beim Kauf vorhandene Schäden und Mängel müssen sofort nach dem Auspacken gemeldet werden. Nach Ablauf der Garantiezeit anfallende Reparaturen sind kostenpflichtig. 6 8 Garantieumfang Das Gerät wurde nach strengen Qualitätsrichtlinien sorgfältig produziert und vor Anlieferung gewissenhaft geprüft. Die Garantieleistung gilt für Material- oder Fabrikationsfehler. Diese Garantie erstreckt sich nicht auf Geräteteile, die normaler Abnutzung ausgesetzt sind und daher als Verschleißteile angesehen werden können (z. B. Schleifscheiben, Spannflansche) oder für Beschädigungen an zerbrechlichen Teilen (z. B. Schalter). Diese Garantie verfällt, wenn das Gerät beschädigt, nicht sachgemäß benutzt oder nicht gewartet wurde. Für eine sachgemäße Benutzung des Gerätes sind alle in der Betriebsanleitung aufgeführten Anweisungen genau einzuhalten. Verwendungszwecke und Handlungen, von denen in der Betriebsanleitung abgeraten oder vor denen gewarnt wird, sind unbedingt zu vermeiden. Das Gerät ist lediglich für den privaten und nicht für den gewerblichen Gebrauch bestimmt. Bei missbräuchlicher und unsachgemäßer Behandlung, Gewaltanwendung und bei Eingriffen, die nicht von unserer autorisierten Service-Niederlassung vorgenommen wurden, erlischt die Garantie. Abwicklung im Garantiefall Um eine schnelle Bearbeitung Ihres Anliegens zu gewährleisten, folgen Sie bitte den folgenden Hinweisen: • Bitte halten Sie für alle Anfragen den Kassenbon und die Identifikationsnummer (IAN 304988) als Nachweis für den Kauf bereit. • Die Artikelnummer entnehmen Sie bitte dem Typenschild. • Sollten Funktionsfehler oder sonstige Mängel auftreten kontaktieren Sie DE zunächst die nachfolgend benannte Serviceabteilung telefonisch oder per E-Mail. Sie erhalten dann weitere Informationen über die Abwicklung Ihrer Reklamation. • Ein als defekt erfasstes Gerät können Sie, nach Rücksprache mit unserem Kundenservice, unter Beifügung des Kaufbelegs (Kassenbons) und der Angabe, worin der Mangel besteht und wann er aufgetreten ist, für Sie portofrei an die Ihnen mitgeteilte Service-Anschrift übersenden. Um Annahmeprobleme und Zusatzkosten zu vermeiden, benutzen Sie unbedingt nur die Adresse, die Ihnen mitgeteilt wird. Stellen Sie sicher, dass der Versand nicht unfrei, per Sperrgut, Express oder sonstiger Sonderfracht erfolgt. Senden Sie das Gerät bitte inkl. aller beim Kauf mitgelieferten Zubehörteile ein und sorgen Sie für eine ausreichend sichere Transportverpackung. Reparatur-Service Sie können Reparaturen, die nicht der Garantie unterliegen, gegen Berechnung von unserer Service-Niederlassung durchführen lassen. Sie erstellt Ihnen gerne einen Kostenvoranschlag. Wir können nur Geräte bearbeiten, die ausreichend verpackt und frankiert eingesandt wurden. Achtung: Bitte senden Sie Ihr Gerät gereinigt und mit Hinweis auf den Defekt an unsere Service-Niederlassung. Nicht angenommen werden unfrei - per Sperrgut, Express oder mit sonstiger Sonderfracht – eingeschickte Geräte. Die Entsorgung Ihrer defekten eingesendeten Geräte führen wir kostenlos durch. AT CH Service-Center DE AT CH Service Deutschland Tel.: 0800 54 35 111 E-Mail: [email protected] IAN 304988 Service Österreich Tel.: 0820 201 222 (0,15 EUR/Min.) E-Mail: [email protected] IAN 304988 Service Schweiz Tel.: 0842 665566 (0,08 CHF/Min., Mobilfunk max. 0,40 CHF/Min.) E-Mail: [email protected] IAN 304988 Importeur Bitte beachten Sie, dass die folgende Anschrift keine Serviceanschrift ist. Kontaktieren Sie zunächst das oben genannte Service-Center. Grizzly Tools GmbH & Co. KG Stockstädter Straße 20 DE-63762 Großostheim DEUTSCHLAND www.grizzly-service.eu 6 9 IT M T Traduzione della dichiarazione di conformità CE originale Con la presente dichiariamo che la molatrice da banco serie di costruzione PNTS 250 B1 Numero di serie 201806000001 - 201806098700 corresponde a las siguientes Directivas de la UE corrientes en su respectiva versión vigente: 2006/42/EC • 2014/30/EU • 2011/65/EU* Per garantire la conformità sono state applicate le seguenti norme armonizzate e anche le norme e disposizioni nazionali che seguono: EN 61029-1:2009/A11:2010 • EN 61029-2-4:2011 • EN 12413:2007+A1:2011 EN 55014-1:2017 • EN 55014-2:2015 EN 61000-3-2:2014 • EN 61000-3-3:2013 Il produttore è il solo responsabile della stesura della presente dichiarazione di conformità: Grizzly Tools GmbH & Co. KG Stockstädter Straße 20 63762 Großostheim GERMANY 30.06.2018 Christian Frank (Apoderado de documentación) * L’oggetto descritto sopra è conforme alle prescrizioni della Direttiva 2011/65/EU del Parlamento Europeo e del Consiglio dell’8 giugno 2011 sulla restrizione dell’uso di determinate sostanze pericolose nelle apparecchiature elettriche ed elettroniche. 7 0 ES Traducción de la Declaración de conformidad CE original Mediante la presente declaramos que el Lijadora en húmedo y seco la serie PNTS 250 B1 Número de serie 201806000001 - 201806098700 corresponde a las siguientes Directivas de la UE corrientes en su respectiva versión vigente: 2006/42/EC • 2014/30/EU • 2011/65/EU* Para garantizar la conformidad, se aplicaron las siguientes normas armonizadas, así como las normas y regulaciones nacionales: EN 61029-1:2009/A11:2010 • EN 61029-2-4:2011 • EN 12413:2007+A1:2011 EN 55014-1:2017 • EN 55014-2:2015 EN 61000-3-2:2014 • EN 61000-3-3:2013 El fabricante es el único responsable de expedir esta Declaración de Conformidad: Grizzly Tools GmbH & Co. KG Stockstädter Straße 20 63762 Großostheim GERMANY 30.06.2018 Christian Frank (Apoderado de documentación) * El objeto de la declaración arriba descrito cumple con las directrices de la Directiva 2011/65/UE del Parlamento Europeo y del Consejo de 8 de junio de 2011 sobre restricciones a la utilización de determinadas sustancias peligrosas en aparatos eléctricos y electrónicos. 7 1 Translation of the original EC declaration of conformity G B M T We hereby confirm that the PNTS 250 B1 series wet/dry grinder serial number 201806000001 - 201806098700 conforms with the following applicable relevant version of the EU guidelines: 2006/42/EC • 2014/30/EU • 2011/65/EU* In order to guarantee consistency, the following harmonised standards as well as national standards and stipulations have been applied: EN 61029-1:2009/A11:2010 • EN 61029-2-4:2011 • EN 12413:2007+A1:2011 EN 55014-1:2017 • EN 55014-2:2015 EN 61000-3-2:2014 • EN 61000-3-3:2013 This declaration of conformity is issued under the sole responsibility of the manufacturer: Grizzly Tools GmbH & Co. KG Stockstädter Straße 20 63762 Großostheim GERMANY 30.06.2018 Christian Frank (Documentation Representative) * The object of the declaration described above satisfies the provisions of Directive 2011/65/EU of the European Parliament and the Council of 8 June 2011 on limiting the use of certain harmful substances in electrical and electronic appliances. 7 2 Original EG-Konformitätserklärung DE AT CH Hiermit bestätigen wir, dass der Nass-/Trockenschleifer Modell PNTS 250 B1 Seriennummer 201806000001 - 201806098700 folgenden einschlägigen EU-Richtlinien in ihrer jeweils gültigen Fassung entspricht: 2006/42/EG • 2014/30/EU • 2011/65/EU* Um die Übereinstimmung zu gewährleisten, wurden folgende harmonisierte Normen sowie nationale Normen und Bestimmungen angewendet: EN 61029-1:2009/A11:2010 • EN 61029-2-4:2011 • EN 12413:2007+A1:2011 EN 55014-1:2017 • EN 55014-2:2015 EN 61000-3-2:2014 • EN 61000-3-3:2013 Die alleinige Verantwortung für die Ausstellung dieser Konformitätserklärung trägt der Hersteller: Grizzly Tools GmbH & Co. KG Stockstädter Straße 20 63762 Großostheim GERMANY 30.06.2018 Christian Frank (Dokumentationsbevollmächtigter) * Der oben beschriebene Gegenstand der Erklärung erfüllt die Vorschriften der Richtlinie 2011/65/EU des Europäischen Parlaments und des Rates vom 8. Juni 2011 zur Beschränkung der Verwendung bestimmter gefährlicher Stoffe in Elektro- und Elektronikgeräten. 2018-06-27_rev02_sh 7 3 13b 13a 13 22 28 1 13a 13c 13d 1 28 29 27 26 22 GRIZZLY TOOLS GMBH & CO. KG Stockstädter Straße 20 DE-63762 Großostheim GERMANY Estado de las informaciones · Versione delle informazioni · Last Information Update Stand der Informationen: 06 / 2018 Ident.-No.: 72036875062018-ES/IT IAN 304988-
 1
1
-
 2
2
-
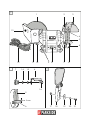 3
3
-
 4
4
-
 5
5
-
 6
6
-
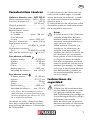 7
7
-
 8
8
-
 9
9
-
 10
10
-
 11
11
-
 12
12
-
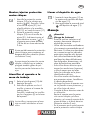 13
13
-
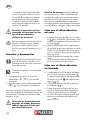 14
14
-
 15
15
-
 16
16
-
 17
17
-
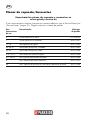 18
18
-
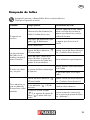 19
19
-
 20
20
-
 21
21
-
 22
22
-
 23
23
-
 24
24
-
 25
25
-
 26
26
-
 27
27
-
 28
28
-
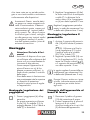 29
29
-
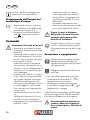 30
30
-
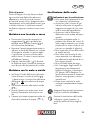 31
31
-
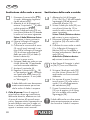 32
32
-
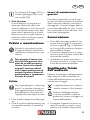 33
33
-
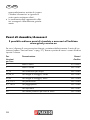 34
34
-
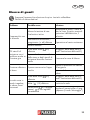 35
35
-
 36
36
-
 37
37
-
 38
38
-
 39
39
-
 40
40
-
 41
41
-
 42
42
-
 43
43
-
 44
44
-
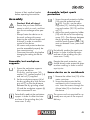 45
45
-
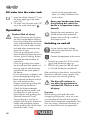 46
46
-
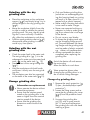 47
47
-
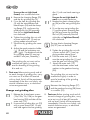 48
48
-
 49
49
-
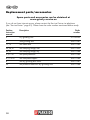 50
50
-
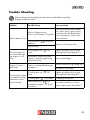 51
51
-
 52
52
-
 53
53
-
 54
54
-
 55
55
-
 56
56
-
 57
57
-
 58
58
-
 59
59
-
 60
60
-
 61
61
-
 62
62
-
 63
63
-
 64
64
-
 65
65
-
 66
66
-
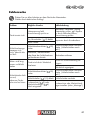 67
67
-
 68
68
-
 69
69
-
 70
70
-
 71
71
-
 72
72
-
 73
73
-
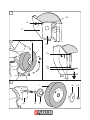 74
74
-
 75
75
-
 76
76


Parkside 304988 Translation Of The Original Instructions
- Categoría
- Herramientas eléctricas
- Tipo
- Translation Of The Original Instructions
- Este manual también es adecuado para
en otros idiomas
- italiano: Parkside 304988
- English: Parkside 304988
- Deutsch: Parkside 304988
Artículos relacionados
-
Parkside PDOS 200 B2 Translation Of The Original Instructions
-
Parkside PWSA 12 B1 Translation Of The Original Instructions
-
Parkside PSDS 240 A1 Instrucciones de operación
-
Parkside PMGS 12 B2 Operation and Safety Notes
-
Parkside PWS 125 A1 ANGLE GRINDER Operation and Safety Notes
-
-
Parkside PFBS 9.6 A1 Operation and Safety Notes
-
-
-
Otros documentos
-
Scheppach 4903106901 Manual de usuario
-
Pattfield Doppelschleifer 150 W El manual del propietario
-
ULTIMATE SPEED UPM 120 B3 Instrucciones de operación
-
DeWalt DWE496-AR Manual de usuario
-
EINHELL TE-AG 18/115 Li Kit Instrucciones de operación
-
Hilti DAG 450-S Instrucciones de operación
-
Metabo DSD 250 Instrucciones de operación
-
-
Scheppach PL45 bgs 700 Manual de usuario
-
Einhell Classic TC-BG 200 Manual de usuario