
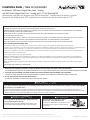
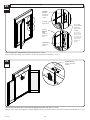
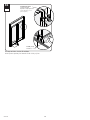
Accessories such as grilles, art glass, and insect screens may dislodge and become airborne if window/door is impacted by wind borne debris from
severe storms or hurricane strength winds. In the event of a storm, remove all accessories from windows/doors and move to a safe location. DO NOT
stand infront of or near windows/doors.
Los accesorio como las rejillas, los vidrios decorativos y los mosquiteros pueden caer y ser llevados por el aire si la ventana o puerta sufre el
impactode algún fragmento transportado por el viento fuerte de tormentas ohuracanes. En caso de tormenta, retire todos los accesorios de puertas
yventanas y guárdelos en un lugar seguro. NO se pare delante o cerca de puertas y ventanas.
for Andersen
®
200 Series Hinged Patio Doors - Inswing
and 200 Series Hinged Patio Doors - Inswing with 1/2" Low Threshold Sill
para puertas para patio con bisagras serie 200 de Andersen® - batiente hacia el interior y puertas
para patio con bisagras serie 200 - batiente hacia el interior con riel de umbral bajo de 1/2"
0005430 BE-00 Revised 07/10/17
Installation Guide / Guía de instalación
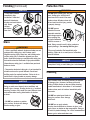
Do not carry or lift unit by extension jambs. Doing so may result
in injury, product or property damage.
No levante ó cargue la unidad cogiéndola de las jambas, esto
puede ocasionar daño al producto y dañar su área de trabajo.
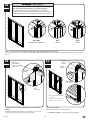
Unsecured door may swing open or closed
causing injury. Secure door when open.
Una puerta sin protección se puede abrir o cerrar
y provocar lesiones. Asegure la puerta cuando
está abierta.
“Andersen” and all other marks where denoted are trademarks of Andersen Corporation. ©2011-2017 Andersen Corporation. All rights reserved.
“Andersen” y las demás marcas que aparezcan son marcas registradas de Andersen Corporation. ©2011-2017 Andersen Corporation. Todos los derechos reservados.
▶ Do not remove packing clips from door until instructed.
No retire los sujetadores de embalaje de la puerta hasta que se le indique.
Thank you for choosing Andersen. / Gracias por elegir Andersen.
▶ Read guide from beginning to end before starting installation. Read all warnings and cautions during unit installation.
Lea completamente la guía antes de comenzar la instalación. Lea y respete todas las advertencias y precauciones durante la instalación de la unidad.
▶ Check with your local building code ofcial to identify and conrm compliance with local building code requirements.
Consulte los códigos locales de construcción para identicar y conrmar que se cumplan los requisitos del código de construcción.
Instructions are for typical, new wood-framed wall construction with weather protection in place.
Instructions may not be right for all installations due to building design, construction materials or methods used and/or building or site conditions.
Consult a contractor or architect for recommendations.
Installation Flanges on the unit alone will not properly ash and seal the window/door. Follow these instructions carefully.
For questions call 1-888-888-7020.
Due to ongoing product changes, updated test results and/or industry best practices, this installation procedure may change over time. For updated
installation guides, removal instructions and/or additional installation information, visit andersenwindows.com/installation.
Contact local authorities or waste management companies for proper recycling and/or disposal of removed window or patio door.
Please leave this guide with building owner.
Las instrucciones son para construcción nueva en paredes con marco de madera que cuentan con protección contra la intemperie.
Es posible que las instrucciones no sean las adecuadas para todas las instalaciones debido al diseño del edicio, los materiales de construcción o los
métodos utilizados, y/o las condiciones de la obra o el edicio. Consulte a un constructor o arquitecto para obtener recomendaciones.
Las bridas de instalación en la unidad no proporcionarán por sí mismas un ashing ni sellarán la ventana o la puerta de manera adecuada. Siga las
siguientes instrucciones cuidadosamente.
Si tiene alguna pregunta llame al 1-888-888-7020.
Debido a los cambios continuos de los productos, los resultados de los exámenes actualizados y las mejores prácticas de la industria, este procedimiento de
instalación se puede cambiar con el tiempo. Para actualizar las guías de instalación, instrucciones de eliminación e información de instalación adicional, visite
andersenwindows.com/installation.
Póngase en contacto con las autoridades locales o con empresas de gestión de residuos para reciclaje y desecho adecuados de la ventana o puerta del patio
eliminadas.
Deje esta guía con el dueño de la construcción.

▶ Para la versión en español de la Información Importante de Seguridad y del Producto, vaya a: andersenwindows.com
Procedure and
Product Information
IMPORTANT
Important Safety and
Product Information
for Andersen® Windows and Doors
“Andersen” and all other marks where denoted are trademarks of Andersen Corporation. ©2016 Andersen Corporation. All rights reserved. SAFETY/PRODUCT INFORMATION 9144348 BB Revised 11/30/2016
Thank you for choosing Andersen.
Please leave this document with building owner.
This is the Safety Alert Symbol used to alert you to
potential injury hazards. Obey all safety messages that
follow this symbol to avoid possible injury or death.
Signal Word and Consequence
Major Injury/Death
WARNING
COULD
Result in:
Minor Injury
CAUTION
COULD
Result in:
Product or Property
Damage
NOTICE
COULD
Result in:
Read installation instructions from beginning to end before starting window or door installation.
To congure installation instructions go to: andersenwindows.com/installation
·
Handling Installation
WARNING
· Use caution when working at elevated heights and
around window and door openings. Follow the
manufacturers’ instructions for ladders and scaffolding.
Failure to do so could result in injury or death.
· Support window or door in opening at all times until
fastened. Failure to do so could result in window or door
falling out causing injury, property or product damage.
· Windows and doors have small parts (e.g. hole plugs,
operator spline caps, fasteners, etc.). Small parts if
swallowed could pose a choking hazard to young
children. Dispose of unused, loose, or easily removed
small parts. Failure to do so could result in injury.
WARNING
· Windows and doors can be heavy. Use safe lifting
techniques and a reasonable number of people with
enough strength to lift, carry, and install window and
door products. Heavier windows and doors will require
mechanical assistance. Failure to do so could result in
injury, product or property damage.
· DO NOT lift or carry window or door by the exterior
trim or extension jambs. Doing so could result in injury,
product or property damage.
· Windows, doors, and installation components can
have sharp edges. Wear protective equipment when
handling. Failure to do so could result in injury.
Tools
· Follow manufacturers’ instructions for hand and power tools. Always wear safety glasses. Failure to do so could result in
injury, product or property damage.
WARNING
❚ Tools .................1
❚ Handling ...........1
❚ Installation ....1-2
❚ Sealing .............2
❚ Fastening ..........2
❚ Finishing .......2-3
Safety and Product Information Index
❚ Glass .......................3
❚ Protective Film .........3
❚ Cleaning ..................3
❚ Use ..........................4
❚ Product Information ..4
Read this Important Safety and Product
Information completely before starting.

NOTICE
· Andersen head ashing and installation anges
DO NOT take the place of window and door ashing
tape or liquid ashing. Window or door must be properly
ashed and sealed with a material compatible sealant
for protection against water and air inltration.
Failure to
do so could result in product or property damage.
· DO NOT set window or door directly on installation
ange. Doing so could affect product performance, and
could result in product or property damage.
· DO NOT set window directly on sill plate. Elevate
window with shims under the side jambs. Failure to do
so could affect operation and product performance, and
could result in product damage.
· Window or door must be properly shimmed. Failure to
do so could affect operation and product performance,
and could result in product damage.
· Joined windows or doors must be individually
supported in the opening. Failure to do so could affect
operation and product performance, and could result in
product or property damage.
· A continuous full perimeter interior seal between
window or door frame and opening is required. Failure to
do so will affect product performance, and could result
in product or property damage.
Installation (Continued)
NOTICE
· Use masonry screws when fastening directly into
masonry or through a buck into masonry. Failure to do
so could affect product performance, and could result in
product or property damage.
· DO NOT over drive screws or nails. Doing so could
result in product damage.
· Fasteners must be attached to a structural framing
member. Failure to do so will reduce the structural
performance to less than published values and could
affect product performance, and could result in product
or property damage.
Fastening
WARNING
· Metal fasteners and components could corrode when
exposed to preservative-treated or fire-retardant treated
lumber. Use approved fasteners and components to
fasten window or door. Failure to do so could cause a
failure resulting in injury, product or property damage.
· Fastener must attach to a structural framing member
with a 1-1/2" minimum fastener embedment. Failure to
do so could result in injury, product or property damage.
· DO NOT remove screws that attach installation clips or
gusset plates to window or door frames. Doing so could
result in injury, product or property damage.
Sealing
NOTICE
· Clean and prepare surfaces receiving sealant following
sealant manufacturer's instructions. Failure to do so
could result in water inltration causing product or
property damage.
CAUTION
· Follow instructions of foam, sealant, and flashing
manufacturer regarding safety, material application,
compatibility, and periodic maintenance for continued
weather resistance of their product. Failure to do so
could result in injury, product or property damage.
Finishing
NOTICE
· DO NOT stain or paint weatherstrip, vinyl, glass, or
hardware. Doing so could result in product damage.
· Read and follow nish manufacturer's instructions and
safety information. Failure to do so could result in
product damage.
· DO NOT over load brush with stain or paint when
nishing. Doing so could allow nish to wick between
glass stop or grille, and glass.

Glass
· Unless specifically ordered, Andersen windows are not
equipped with safety glass, and if broken, could
fragment causing injury. Many laws and building codes
require safety glass in locations adjacent to or near
doors. Andersen windows are available with safety glass
that could reduce the likelihood of injury when broken.
Information on safety glass is available from your local
Andersen dealer.
· Tempered or laminated safety glass is not standard for
windows and must be special ordered. Check local
building codes for required locations. Failure to do so
could result in injury, product or property damage.
WARNING
· DO NOT apply any type of film to insulating glass.
Doing so could cause thermal stress conditions and
result in glass damage. Shading devices (e.g. insulated
coverings, shutters, etc.) could also cause thermal stress
and condensation causing deterioration of windows
or doors.
· DO NOT use sealants on exterior
glass surface. Sealants will damage
exterior coating on glass.
NOTICE
· DO NOT place suction grips over lm
seam. Suction grips will not hold if
placed over lm seam to lift or move
window or door. Window or door will
fall and could result in injury, product
or property damage.
· DO NOT remove
protective film near
flammable materials.
Static charge created
when removing film
can ignite flammable
materials or cause a
shock. Doing so could result in injury, product or
property damage. See warning label on glass.
· Dispose of protective film immediately after
removing. Failure to do so could pose a suffocation
hazard to children.
NOTICE
· DO NOT remove protective lm until after construction
is completed. Doing so could allow glass to be damaged.
NOTICE
· Acid solutions used for cleaning masonry or concrete
will damage glass, fasteners, hardware, and metal
ashing. Protect window or door and follow cleaning
product manufacturer's instructions. If acid contacts
window or door, wash all surfaces immediately with
clean water.
· DO NOT use metal razor blades to
clean glass surface. Glass damage
could result.
· DO NOT use or apply solvents,
abrasives, harsh chemicals or cleaners to glass, sash,
panels, frame, or window or door components. Doing so
will result in product damage. For a list of recommended
cleaners go to: andersenwindows.com
Cleaning
Protective Film
WARNING
Finishing (Continued)
· Finish wood surfaces
immediately after
installation. Unnished
wood will deteriorate,
discolor, and could bow or
split. Some
surfaces
are hidden
from view.
NOTICE

IMPORTANT
Product and General Information
· Buildings constructed prior to 1978 could contain
lead paint which could be disturbed during window or
door replacement. For more information on proper
management of lead paint, go to: www.epa.gov/lead
· Instructions may not be right for all installations due
to building design, construction materials, or methods
used and/or building or site conditions. Consult a
contractor or architect for recommendations.
· Installation flanges may need to be removed for some
installations. (e.g. masonry, replacement), or where
exterior finish is already applied (e.g. siding, brick
veneer, stucco).
· Installation ange on the window or door alone will not
properly ash and seal the window or door.
· DO NOT remove band, plastic ties, or packing clips
from window or door until instructed.
IMPORTANT
· DO NOT remove performance (NFRC) label until after
nal inspection. Doing so could delay nal inspection
and sign-off by the code ofcial.
· Check with your local building code ofcial to identify
and conrm compliance with local building code
requirements.
· Contact local authorities or waste management
company for proper recycling and disposal instructions
for removed window or door.
· Clean glass using liquid glass cleaner.
· Clean exterior frame, sash, panels, and insect screens
using mild detergent and water with a soft cloth
or brush.
· For hard to clean areas, use a nonabrasive cleaner.
· Extension jambs can be factory applied on some
windows or eld applied prior to installation. DO NOT
apply extension jambs prior to window or door
installation that will be fastened with installation clips.
Doing so could prevent access to installation clips for
fastening.
· For extension jamb application refer to instructions
included with part(s) or go to: andersenwindows.com
· Protective lm and exterior coating are not present
on all windows or doors.
· Remove protective lm by peeling from seam or
corner. Use a plastic scraper to start if needed.
· Remove protective lm within six (6) months of
installation and when temperature is above 32° F.
· Protective Film is not a
substitute for masking.
Product Information (Continued)
Use
WARNING
· DO NOT stand in front of or near windows or doors
during a storm. Doing so could result in injury.
Accessories such as grilles, art glass, and insect screens
could dislodge and become airborne if window or door is
impacted by wind borne debris from severe storms or
hurricane strength winds. In the event of a storm, remove
all accessories from windows or doors and move to a
safe location.
· DO NOT install air conditioner in
window. Doing so could result in
injury, product or property damage.
CAUTION
· DO NOT attach objects or accessories to window or
door except Andersen® products specifically designed
for the window or door. Doing so could result in injury,
product or property damage.

6
0005430
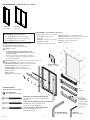
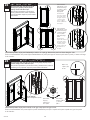
Single-Panel
Panel simple
• House Wrap Tape / Cinta para sellar las uniones del house wrap exterior
• Drip Cap (full width) / Tapa de goteo (ancho competo)
• Extension Jambs (optional) / Jambas de extensión (opcional)
• Low Expanding Foam / Espuma de baja expansión
• Shims (waterproof) / Cuñas (impermeables)
• Foam Backer Rod / Varilla de respaldo de espuma
• Sealant / Sellador
• Staples / Grapas
• Roong Nails / Clavos para techo
Formable Self-Adhering Sill Flashing*
Flashing para riel auto-adherente moldeable*
Flashing* / Flashing*
Unit Identication / Identicación De La Unidad
Screw Pack Contents:
Contenido del paquete de tornillos:
(8-10) #10 x 3" Yellow Zinc Chromate Screws
(8 ó 10) Tornillos No. 10 x 3" de cinc amarillos
cromados
Parts Included / Partes incluidas
(1) Instruction Guide /
Guía de instrucciones
(1) Patio Door Unit /
Unidad de puerta de patio
(1) Screw Pack /
Paquete de tornillos
Tools Needed / Herramientas necesarias
• Safety glasses / Gafas de seguridad
• Tape measure / Cinta métrica
• Level / Nivel
• Utility knife / Cuchilla de uso general
• Putty Knife / Espátula
• Staple Gun / Pistola engrapadora
• Phillips Screwdriver / Destornillador Phillips
• Flat Blade Screwdriver / Destornillador de punta plana
• Drill/Driver / Taladro para instalar tornillos
• Caulk Gun / Pistola para calafatear
• J-Roller / Rodillo tipo J
D
C
A
B
* Or other ashing method/material recommended by
a contractor or architect. Installation anges do not take
the place of ashing.
* O bien otro método/material de ashing recomendado
por el contratista o arquitecto. Las bridas de instalación
no reemplazan el ashing.
(1) Temporary Handle
(1) Temporales manejar
(1) Hex Key
(1) Llave hexagonal
C
B
A
B
B
D
or*
o bien*
Liquid Flashing
Recommended
on concrete slab.
Flashing líquido
Se recomienda su
uso en losa de
concreto.
(2) Corner Gasket
(2) Junta de esquina
(2) #10 x 3" Clear Chromate Screws (active door only)
(2)Tornillos No. 10 x 3" cromados claros
(puertas de apertura únicamente)
(2, 10 or 16) #10 x 3" Screws (hinge nish)
(2, 10 ó 16) Tornillos No. 10 x 3"
(acabado de bisagra)
(9-11) Hole Plugs
(9-11) Tapones para oricios
Supplies Needed / Suministrose necesarios
Two-Panel
Panel doble

0005430
7
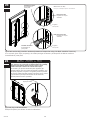
• To lock, turn lock turn-piece to
horizontal position.
• To unlock, turn lock turn-piece to
vertical position. Open door by
bringing handle downward.
• Para cerrar, gire la pieza de bloqueo
a la posición horizontal.
• Para desbloquear, gire la pieza de
bloqueo a la posición vertical. Abra la
puerta llevando la manija hacia abajo.
Single Point Active Lock Operation
Funcionamiento del cerrojo de apertura
de punto simple
Multi-Point Active Lock Operation
Funcionamiento del cerrojo de apertura
de varios puntos
• To lock, lift and hold handle to engage
upper and lower hook bolts. Turn lock
turn-piece to horizontal position.
• To unlock, turn lock turn-piece to
vertical position. Open door by
bringing handle downward.
• Para bloquear, levante y sostenga la
manija para enganchar los pasadores de
gancho superiores e inferiores. Gire la
pieza de bloqueo a la posición horizontal.
• Para desbloquear, gire la pieza de
bloqueo a la posición vertical. Abra la
puerta llevando la manija hacia abajo.
Passive Lock Operation
Funcionamiento del cerrojo fijo
• To lock, lift handle to engage upper and lower
flush bolts. Then, lock active lock.
• To unlock, unlock active lock then, open passive
panel by bringing handle down.
• Para bloquear, levante la manija para enganchar
los pasadores embutidos superiores e inferiores.
Luego, bloquee el cerrojo de apertura.
• Para desbloquear, desbloquee el cerrojo de
apertura y, luego, abra el panel fijo bajando la
manija.
• For installations where interior finishing material is
higher than 1-1/4" above the subfloor, raise door by
placing a wooden spacer under sill to gain
sufficient clearance for door to open. Allowances
must be made in height of rough opening.
• En el caso de instalaciones donde el material del
acabado interior está a más de 1-1/4" por encima
del contrapiso, eleve la puerta colocando un
espaciador de madera debajo del riel para obtener
el espacio libre suficiente para abrir la puerta.
Se debe tener en cuenta la altura de la abertura
no acabada.
Subfloor
Contrapiso
3/4" max.
3/4" máx.
• For installations where full panel (180°) operation
is desired, install unit flush to interior surface and
apply interior casing no thicker than 3/4". If
thicker Interior Casing is used, chamfer edge to
prevent interference with panel, as shown.
• En instalaciones donde se requiere un
funcionamiento completo del panel (180º), instale
la unidad al ras en la superficie interior y aplique
una moldura interior de no más de 3/4" de
espesor. Si usa una moldura interior de mayor
espesor, bisele el borde para evitar que interfiera
con el panel, tal como se muestra.
Interior Casing
(chamfered)
Moldura interior
(biselada)
1-1/4"
• If passive lock is activated in the open position,
the flush bolt could interfere with flooring if raised
more than 1/2"
• Si el cerrojo fijo se activa cuando la puerta está
abierta, el pasador embutido podría chocar con el
piso si se levanta a más de 1/2".

Exterior
21
Interior
3
Exterior Exterior
5
Exterior
Exterior
4
6
0005430
8
Cut opening in house wrap.
Corte una abertura en el house wrap.
Fold in and staple.
Doble y engrape.
Level
Nivel
n
1
n
2
n
Tape
Cinta
Width of flashing
Ancho del flashing.
45°
Fold ap up and tape.
Doble la pestaña hacia arriba y coloque cinta.
Check opening size. Allow for ashing thickness.
Verique el tamaño de la abertura. Tenga en cuenta el espesor
del ashing.
Check plumb, level, square. Diagonals must be within 1/8".
Verique la plomada, el nivel y la cuadratura. Las diagonales
deben estar entre 1/8".
Tape Measure
Cinta métrica
Tape Measure
Cinta métrica
3
Utility Knife
Cuchilla de
uso general
Cut and create top ap from house wrap.
Corte y cree una pestaña superior con el house wrap.

7
Exterior
9
0005430
Apply ashing at sill (liquid ashing recommended on concrete slab).
Aplique el ashing en el riel inferior (se recomienda el uso de ashing
líquido en losa de concreto).
Liquid Flashing
Recommended on
concrete slab.
Flashing líquido
Se recomienda su uso
en losa de concreto.
2-3"
6"
Formable Self-Adhearing
Sill Flashing
Flashing para riel
autoadherente moldeable
J-roller
Rodillo tipo J
Apply using rm pressure.
Aplique presionando rmemente.
Apply formable self-adhering sill ashing. Make
sure there are no wrinkles or voids. Failure to do
so may result in product /property damage.
Aplique ashing para riel autoadherente
moldeable. Asegúrese de que no haya arrugas ni
vacíos. De no hacerlo así, podrían producirse
daños al producto/propiedad.

9
Exterior
8
Exterior
Sill
Riel
Sill
Riel
Sill
Riel
Sill
Riel
3-7/8"
2-3/4"
4-1/4"
4-3/4"
2-1/4"
1-3/8"
2-1/4"
2-1/8"
1/2"
1/4"
1/2"
3/4"
4-9/16" Wall Construction
Construcción de la pared de 4-9/16"
4-9/16" Wall Construction
Construcción de la pared de 4-9/16"
6-9/16" Wall Construction
Construcción de la pared de 6-9/16"
6-9/16" Wall Construction
Construcción de la pared de 6-9/16"
1/2" Low Threshold Sill Sealant Placement
Colocación del sellador para riel de umbral bajo de 1/2"
Standard Sill Placement
Colocación del riel inferior estándar
0005430
10
Top/Sides
Laterales/parte
superior
Apply sealant at top and sides. Apply three beads sealant at sill and liberally in bottom
corners.
Aplique el sellador en la parte superior y en los laterales. Aplique tres listones de
sellador en el riel y libremente en la esquina inferior.
Tape the ashing corners as shown.
Pegue con cinta las esquinas con ashing,
como se muestra.
Tape
Cinta
3/8" Bead Sealant
Sellador para lis-
tones de 3/8"
Caulk Gun
Pistola para
calafatear
1/2"

12
Exterior
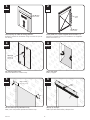
Apply installation ange corner gasket.
Aplique la junta de esquina de la brida de instalación.
Some doors may require installation anges to
be snapped into position as shown.
Es posible que algunas puertas necesiten bridas
de instalación para colocarlas en la posición
adecuada, como se muestra.
11
Exterior
10
Interior
Lock door.
Asegure la puerta.
Remove packaging handles and discard.
Retire las manijas de embalaje y deséchelas.
11
Install position
Posición para
instalar
Shipping position
Posición para el
envío
Installation Flange
Brida de
instalación
0005430
Windows and doors can be heavy. Use safe lifting techniques and
a reasonable number of people with enough strength to lift, carry,
and install window and door products. Heavier windows and
doors will require mechanical assistance. Failure to do so could
result in injury, product or property damage.
Las puertas y las ventanas pueden ser pesadas. Utilice técnicas
seguras de levantamiento de peso y un número razonable de
personas con suciente fuerza para levantar, cargar e instalar los
productos de puertas y ventanas. Las puertas y ventanas más
pesadas requerirán asistencia mecánica. De no hacerlo así,
podrían producirse lesiones personales, daños al producto y/o a
la propiedad.
Flat Blade Screwdriver
Destornillador de punta plana
Temporary Lock Handle
Manija temporal
Packing Handle
Manija de embalaje
Drill / Driver
Taladro Destornillador
Installation Flange Corner Gasket
Junta de esquina de la brida de
instalación

15
16
Exterior
13
Interior
Interior
Center door in opening at sill and tip door into opening.
Centre la puerta en la abertura del riel e incline la puerta dentro
de la abertura.
Support door in rough opening at all times until
secured. Failure to do so may result in door falling out
causing injury, property, and/or product damage.
Sostenga la puerta en una apertura no acabada
siempre hasta que esté segura. Si no lo hace, la
puerta se puede caer y provocar lesiones, daños al
producto y/o a la propiedad.
12
0005430
Level
Nivel
Tape Measure
Cinta métrica
Shim
Cuña
Fasten door through installation holes. Spacing of fasteners shall
not exceed 38".
Ajuste la puerta a través de los oricios de instalación.
La distancia entre sujetadores no debe superar las 38".
Check plumb, level and square. Adjust shims as needed until
diagonal measurements are within 1/8".
Verique la plomada, el nivel y la cuadratura. Ajuste las cuñas según
sea necesario hasta que las medidas diagonales estén entre las 1/8".
Drill/Driver
Taladro/Destornillador
14
Interior
Shim behind each hinge and fastener hole at sides. Shims must be
tight to installation ange and recessed 3/8".
Coloque cuñas detrás de cada bisagra y oricio del sujetador en los
costados. Las cuñas deben ajustarse a la brida de instalación y
empotrarse unos 3/8 pulgadas.
Shim tight to
installation
flange.
Ajuste la cuña
a la brida de
instalación.
Installation
Flange
Brida de
instalación
Recessed 3/8"
3/8 pulgadas
empotrados
Shim
Cuña
3" Screw
Tornillo de 3"

17
19
Interior
18
Interior
13
Insert screwdriver in upper lock hole and turn to unlock door.
Insert temporary handle in lower hole and turn to open door.
Inserte el destornillador en el oricio superior del cerrojo y gire
para desbloquear la puerta. Inserte la manija temporal en el
oricio inferior y gire para abrir la puerta.
0005430
Fasten side jambs through top and bottom holes of hinges. Replace
factory applied screws if present.
Ajuste las jambas laterales a través de los oricios superior e inferior de
las bisagras. Reemplace los tornillos colocados en fábrica, si los hubiera.
Remove and properly dispose of tape over latch and packaging
spacer.
Retire y deseche adecuadamente la cinta que se encuentra
sobre el receptor y el espaciador de embalaje.
Interior
Tape
Cinta
Packaging Spacer
Espaciador de
embalaje
Temporary
Handle
Manija
temporal
Flat Blade Screwdriver
Destornillador de punta
plana
#10 x 3" Color-Matched Screws
Tornillos de igual color nº 10 de 3"
Replace factory
applied screws if
present.
Reemplace los
tornillos colocados
en fábrica, si los
hubiere.

20
Exterior
21
Interior
Shim behind ush bolt receiver. Fasten receiver through center holes with #10 x 3" screws.
Coloque cuñas detrás del receptor de pasador embutido. Ajuste el receptor a través de los oricios centrales con tornillos No. 10 x 3".
0005430
14
Fasten through latch and hook bolt receivers using #10 x 3" screws.
Ajuste a través del pasador y los receptores de pasador de gancho con tornillos nº 10 de 3".
Single-Panel (AL, AR) or Astragal-Hinged (SAL, SAR) Only / Únicamente para panel simple (AL, AR) o con bisagras y astrágalo (SAL, SAR)
3" Screw
Tornillo de 3"
3" Color
Matched
Screw
Tornillo de
igual color
de 3"
Hook Bolt
Receiver
Receptor de
pasador de
gancho
Latch Receiver
Receptor de
aldaba
Do not shim
directly behind
hook bolt or
latch receiver
opening
No coloque
cuñas directa-
mente detrás
de la abertura
del receptor de
aldaba ni del
pasador de
gancho
Flush Bolt Receiver
Receptor de pasador
embutido

22
Interior
15
0005430
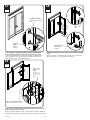
Check door operation. Adjust panel horizontally to achieve an equal gap between the panel and frame along the sides.
Revise el funcionamiento de la puerta. Ajuste horizontalmente el panel para lograr el mismo espacio entre el panel y el marco a lo largo
de los laterales.
Check door operation. Adjust panel vertically so the gap at top equals the gap at sides.
Revise el funcionamiento de la puerta. Ajuste el panel verticalmente para que el espacio en la parte superior sea igual al espacio
en los laterales.
Unsecured door may swing open or closed causing injury, property, and/or
product damage. Secure door when open.
Una puerta sin protección se puede abrir o cerrar y provocar lesiones, daños al
producto y/o a la propiedad. Asegure la puerta cuando está abierta.
Unsecured door may swing open or closed
causing injury, property, and/or product
damage. Secure door when open.
Una puerta sin protección se puede abrir o
cerrar y provocar lesiones, daños al producto
y/o a la propiedad. Asegure la puerta cuando
está abierta.
23
Interior
Gap at top
equal to gap
at side
5/32" Hex Key
Llave hexagonal de 5/32"
Turn middle
hinge(s)
toward (+) to
raise panel
Turn middle
hinge(s) toward
(-) to lower
panel
Turn horizontal
adjustment on top
and bottom hinge
clockwise to move
panel toward
hinge jamb.
Gire hacia la
derecha el ajuste
horizontal en las
bisagras superior
e inferior, para
mover el panel
hacia la jamba de
la bisagra.
Turn horizontal
adjustment on top
and bottom hinge
counterclockwise
to move panel
away from hinge
jamb.
Gire hacia la
izquierda el ajuste
horizontal en las
bisagras superior
e inferior, para
alejar el panel de
la jamba de la
bisagra.

24
25
Exterior
Exterior
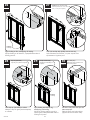
Apply hole plugs at all hole locations.
Coloque los tapones para oricios en todas las ubicaciones.
Hole Plug
Tapón para oricio
Latch Receiver Tab
Lengüeta del receptor
de aldaba
Latch Receiver Tab
Lengüeta del receptor
de aldaba
Multi-Point Locks Only
Cerrojos de multiples puntos únicamente
To tighten
Para ajustar
To tighten
Para ajustar
Flat Blade Screwdriver
Destornillador de
punta plana
Flat Blade Screwdriver
Destornillador de
punta plana
16
0005430
Adjust latch receiver tab(s) to achieve weatherstrip contact and compression using a at blade screwdriver if necessary.
Si es necesario, ajuste el(los) receptor(es) de aldaba para lograr el contacto y la compresión del burlete usando un
destornillador de punta plana.
Windows and doors have small parts (e.g. hole plugs, operator spline
caps, fasteners, etc.). Small parts if swallowed could pose a choking
hazard to young children. Dispose of unused, loose, or easily
removed small parts. Failure to do so could result in injury.
Las ventanas y las puertas cuentan con piezas pequeñas (por
ejemplo: tapones, tapas de la ranura del operador, sujetadores, etc.).
Las piezas pequeñas, si llegaran a ser ingeridas, pueden representar
un riesgo de asxia para niños pequeños. Deseche las piezas sueltas
y que no utilice o que hayan sido retiradas. De no hacerlo así,
podrían producirse lesiones personales.

2726
Exterior Exterior
28
Exterior
29
Exterior
30
Exterior
17
0005430
Apply ashing at sides, overlapping sill ashing.
Aplique ashing en los laterales, superponiéndolo sobre el
ashing para riel.
Flashing
Flashing
Seal sides and top only. Quickly move to next step.
Selle únicamente los laterales y la parte superior. Pase
rápidamente al siguiente paso.
Fold house wrap down and tape with
house wrap tape.
Doble el house wrap hacia abajo y
péguelo con cinta de house wrap.
Flashing
Flashing
Apply ashing over drip cap leg,
overlapping side ashing.
Aplique el ashing sobre la pata de la
tapa de goteo, sobreponiéndolo sobre el
ashing de la peana.
Place drip cap (full width) in sealant.
Coloque la tapa de goteo (ancho completo)
en sellador.
2"
Sealant (at top and sides only)
Sellador (únicamente en los late-
rales y en la parte superior)
Overlap Side Flashing
Superponga el ashing de
la peana
Drip Cap (full width)
Tapa de goteo (ancho completo)
House Wrap Tape
Cinta para sellar las uniones del
house wrap exterior

31
Interior
18
0005430
Seal top and sides. Seal at sill and oor.
Selle la parte superior y los laterales. Selle el riel y el piso.
Low Expanding Foam
(at sides and top)
Espuma de baja expansión
(en los laterales y en la
parte superior)
Sealant (at sill)
Sellador (en el riel)

32
Exterior
33
Exterior
34
Exterior
19
0005430
Leave 1/4" gap at head and sides between exterior trim/siding/stucco/brick and door for sealing.
Deje un espacio de 1/4" en la cabecera y en los laterales entre el contramarco/el revestimiento/el estuco/el ladrillo exterior y la puerta para el
sellado.
For installations using Andersen® Exterior Trim, go to the installation
guide included with trim to complete door and trim installation.
Para obtener información sobre la instalación con el contramarco
exterior Andersen®, consulte la guía de instalación que se incluye con el
contramarco para completar la instalación del contramarco y de la puerta.
Insert backer rod at sides and top between frame and nish
material.
Introduzca la varilla de respaldo en los laterales y en la parte
superior entre el marco y el material de acabado.
Seal on sides and top.
Selle en los laterales y la parte superior.
▶ Installation is complete. / La instalación está completa.
1/4"
1/4"
1/4"
Trim/Siding
Contramarco/revestimiento
Stucco
Estuco
Brick
Ladrillo
Backer Rod
(1/4" minimum)
Varilla de respaldo
(mínimo de 1/4")
Trim
Contramarco
Putty Knife
Espátula
Backer Rod
Varilla de
respaldo
Sealant
Sellador
Trim
Contramarco
Do not seal along sill or seal/block
weep holes.
No selle a lo largo del riel ni selle/
bloquee los oricios de goteo.
-
 1
1
-
 2
2
-
 3
3
-
 4
4
-
 5
5
-
 6
6
-
 7
7
-
 8
8
-
 9
9
-
 10
10
-
 11
11
-
 12
12
-
 13
13
-
 14
14
-
 15
15
-
 16
16
-
 17
17
-
 18
18
-
 19
19


en otros idiomas
- English: Andersen 9180302 Installation guide
Artículos relacionados
-
Andersen PSBBGRORB Guía de instalación
-
-
-
-
Andersen 9142353 Instrucciones de operación
-
-
-
-
-
Otros documentos
-
MP Doors N3068R4HWW224 Guía de instalación
-
 Therma-Tru Pre-hung Door Systems Manual de usuario
-
Andersen Windows & Doors Andersen 200 Series Replacement Manual
-
 Feather River Doors A42105-3A4 Guía de instalación
-
Legrand Shim-lock Guía de instalación
-
Feather River Doors FF3780 Guía de instalación
-
Feather River Doors 722490-400 Guía de instalación
-
Clearly Secure WN6X8 Manual de usuario
-
MP Doors HT6068R002W3 Instrucciones de operación
-
Pella 80AT0102 Manual de usuario

