
www.lgappliances.com
Window-TypeAir
'S
MODELS, MODEL OS : LWHD2500ER
_s valuable
may
proper air
_pmper use.
order to p_vent
isuse or improper
for any damages
tioner.

FOR YOUR RECORDS
Write the model and serial numbers here:
Mode| #
_rial #
You can fir_ them _ a label on the side of each ua_.
Dea_eCs Name
Date Purchas_
II 8[ap[e you_ re_ip[ to [his page #_[t'_,ee_ant yc_ ne_ it
to prove date of purchase or for warranty issue.
READ THIS MANUAL
Inside _,u will find many h_p|ul hints o,n hc_v to use and
maintain _ur air cor_ditio,n_ pro_dy. Just a [i_le preventive
care on _3ur _[t _n _v_ y_ a great: deal ol time and
money over 'the life of your ai_ conditioner,
YouH find many an_w_s toi c,ommoa problems in the c_rt
of t_¢_b_ho_ing tips. if _u revi_ our ch_t d
Troubleshooting Tips first you may no_ _ to cal_ fo,r
serv_e at a&
• Contact: the, author{_d service t_hnician for repai_
or maintenance of this unit,
• Contact the install_ for installation ,of this unit.
• The air conditioner is not intendied for use by young
children o,r invalids without s,upervision.
• Yo_n_ chi|dten shoei_ be _rvis_ to e_s,ure that
they _o not play with the air conditioner:
• Whe_ tlhe power cord is to be repla_d, repla_ment
work shah be _rformed by aethorizedi personnel only'
_si#g o_ly g_uine r_lacement parts.
• |nstall_lon work musl be performed in _cor_a#ce
with the National Electric Code [by quailfi_ and
authorized personnel on|y,
2 Room Air Conditioner

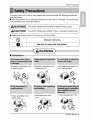
To prevent injjury i tOthe user or other people and property damage, the b_liowing instructions
_"°'"°'°'_"'°.:c_'_o;f_a,,ondoo_o,o ,os,,oc,,oo_,,,_ose.armo_dama_oXhosor,oosoeso
is classifi_ by the foJ]owJng indications,
I.......oz..s..oo,.od.c-e,t..0oss.0..,.o.deo.":rso.'ou.'o.o 1
[. CAUTION This symbo_ indicates the possibility of injury or d_a_ to properties only J
IB Meanings of symbols us,_ in this manual are as shown below,
Be sure, not to ,do,
Be sure to follow the instruction,
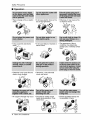
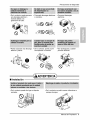
[] Installation
, _herwise, it may _use a fire
or electrica_ sh_k,
• It may _use failure and
ellectnc shako
• Otherwi_, it may cause a fire
or eEectrica[Ishock,
° Sharp, _ges may cause
injury.
• Itwill _u_ electric _k or fire
due _ heat genera_on,
• It may cau_ exp!osbn or fire,
Owner_ Manual 3

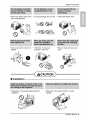
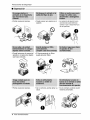
!I Operation
•There isdanger of fire or electric
shocL
• it may cau_ fire and electric
shocL
• _erM_ it may cauce fire and
electric shock acc_ent.
• An oxygen shortage may occur.
• Itwill cause electric shock or fire
due to heat gienerat:ion.
* Itwillcause _ai[ureof ma_ine or
e]e#Eic shocL
• _henNi_, it may e_ectr[cal
sho_ and failure.
• _herwise_ it may _use a fire
or eledrica_ sh_k,
• The ap_arance of the air
cond_ioner may deteriorate,
change caior, or devebp suda_
f_aws,_
° Since the _anrotates at high
_,_d during operation, it may
cause injury.
4 Room Air Conditioner
° Prevent accidental startup and
the,po_b[lity of iniury.

Safety Precautions
• Hwill cause e_tric shock or fire • litwill cau_ ellectric shock or fire.. .°litwill _ui_ eliectric shock.
due to heat generation_
• ff may cause etedric sh_ and
_mage
• Othe_ise, it:m_/cau_
explosion, and a fire,
I In allation
• O_erwi_, it may cause dispute w_h the
neigh_rs.
',_ey are sharp and may cause
injury,
• O,the_ise, it may cause vibration or water
[leakage.
Owner_ Manual 5

SafetyPrecautions
[] Operation
• it my cause injury.
• It may _use an iniury through
dropping of the unit or fa!lling
dOWn.,
°'_tmay cause injury.
6 Room Air Conditioner
•, it m_ cause produ_ failure.
* Operation with0ut fillers will
_use 'failure
° _hep_ise, it may do harm to
your heakh.
°The appearance o1Me air
conditioner m_ dietefiorate,
change co.].or,.ordevelop _rface
fl._s
° it conlains con_inmer4s and will
make you sick.
* OthepMse, it may cau_
pe_ona[ injury.

Before Operation
1. Contact an installation specialist for installation.
2. Plug in the power plug properly.
3. Use a dedicat_ circuit.
4. Do not use an extension cord.
5. Do not start/stop operation by pluggin#/unplugging the _wer cord.
6. if the _rd!plug is damaged, replace it with only an authorized replacement
part.
1i_ Being expos_ to direct airflow for an extend_ period of time could be
hazardous to your health, Do, not expose _cupants, pe_, or plants to direct
airflow for extended periods of time.
2. Due to the _ssibilibj d oxygen deficiency, ventilate the r_m when used
together with stoves or other heating device&
3 Do not use this air conditioner for nonospecified special purples (e.g,
preserving precision devices, fo_, pets, plants, and art objects). Such u_ge
could damage the items,
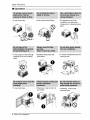
1 Do not touch the metal _rts of the unit when removing the filter, Injuries can
occur when handling sharp metal edges.
2. Do not use water to clean inside the air conditioner. Exposure to water can
destroy the insulation, leading to possible electric shock.
3. When ,cleaning the unit, first make sure that the _wer and breaker are turn,_
off. The fan rotates at a very high speed during operation. There is a
_ssiibili#y of injury if the unit's power is a_identally trigger_ on while
cleaning inner parts of the unit,
For repair and maintenance, contact your authorized service dealer.
i!_ ii _i_
Owner_ Manual 7

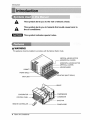
Introduction
This symbol alerts you to the, risk of electric shock,.
This symbol alerts you to hazards that could cause harm to,
the air cond_ione, r.
This symbol indicates, sp_ial notes.
This, appliance _ouJd _ installed in accordance with the National Electric Cod&
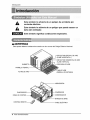
VERTICAL AiR DEFLECTOR
(HORIZONTAL LOUVER)
HIOR]ZO_AL A]RDEFLECTOR
(VERTICAL LOUVER)
AiR DISCHARGE
FRONT GRILLE
AIR F_LTER
-AIR INTAKE(INLET GRILLE)
8RACE
EVAPORATOR
CONTROL PANEL
REMOTE CO,NTRO,LLER_
COMPRESSOR
CONDENSER
BASE PAN
POWER _RD
8 Room Air Conditioner

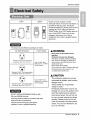
El_trical Safety
! !5V~ 230V-
w
Power cord may include a current
interrupter device. A test and reset button is
provided on the plug case. The device
should _ tested on a periodic basis by first
pressing the TEST button and then the
RESET b_ton, if the TEST button does not
trip or if the RESET bu'_on will not stay
engaged, di_.ntinue u_ of the air
co.nditiioner and contact a qualifi_ _rvice
technician.
The sha_ may be different a_ordingi to its mo_L
Use Wall Re_ptac[e Power Supply
Slandard i25V 3owire grounding
receplac_e raled 15A 125V AC
Standard 25OV,, 3w[_e groundfn_g
receptacle rated 15,A, 25OV AC
Standard 25OV, 3-w_te grounding
receptacle rated 2OA,, 250,V AC
Use i5 AMP, time
del!ay f_e or 15 AMP,,
c_rcuit breaker°
Use _-_ AMP, time
dellay f_e or :20 AMP,
circuit brewer,
DO NOT USE AN EXTENSION CORD on 230,,
208, and 230/2_ Volt uni_.
Nil wiring should be made in accordance w_ Io._1
elect_i_li co_s and regula_on&
Aluminum hou_ wiring may p_e special
problem& Con_ a qualified e_ectrician.
A WARNING
N_et push the test button duffng
_herwise this pilugi_n damaged,
This devi_ conllains ch_i_3,L including
lead, kn_n to,the S_te of California to
cause cancer; and birth def_:;ts or other
reproducth_e harm,
Wash han_Jsa_er hatching,
Do no_ remove, m_i_y or immerse this, p_ug,
ff this d_ice tri_0 the _use it:to, &_
corrected _[ore further u_,
CAUTIIION
The _nductors inside this co_d are
surrounded Ibyshields, whiclh monitor
leakage current.
These shields are not grounded,.
<Made in Tower>
Peri_ica_ly examine the cord for any
damage, Do not use this pr_u_ in the
event the shields, become expose.
Avoid sh_k hazard, this unit: can not
u_r servicedi o_ning the tamer
resistant. Sea[_ potion d the unit
voids al! warranties and performance
claim& This unit not intended for u_
as an on-off switch.
Owner_ Manual 9

(PLEASE READ CAREFULLY)
FOR THE USER'S PERSONAL SAFET_ HIS
APPLIANCE MUST BE PROPERLY GROUNOED
Thei _#er cord _ _is appliance is equip_d with a
threo-pror_ (grounding) _ug, U_ this with a standard
thr_os|ot (gr¢_nding) wail _er out_et to minimize the
h_a[d of el[_tdc sh_;ko The c_tomer sho,ul!d have the
wall receptac# and circuit checked by a quaiif[_J
electrician to make sure the r_eptade is pro_dy
DO NOT CUT OR REMOVE THE THIRD (GROUND)
PRONG FROM THE P_ER PLUG,
A. SI_ATIONS WHEN'_E APPLIANCE WILL BE
DISCONNECTED OCCASIONALLY:
Because, _ I_tentia_ safety hazards, we stronglly
discourage the use of an adia_ _ug_ H_ever, if you
wish to u_ an adapter, a TEMPORARY CONNECTION
may _ made. Use UL-iisted ada_er, availab_ from
most ]_al h_dvva_e stores,
....[he _arges]oi in the adapter must #_ a]k3ne{l w_h the
large slot in the te_ptade to assure a _oper _larity
conni_ti®_
: Attachi_ _e adapter g_o,undterminallto _e wa_|
receptac{e_v_ isc_ do_ not ground the applian_
unless _e covetscrewis _1, and not Insu|a_ed,and
_e wa|| t_p_cle isgroundedthroughthe house
wiring,The custom_ she,e_ h_e the cir¢aitchoked
bya qua|ifi_ ele_ician to make sum_e receptacle
is proper_groun_e_,
Di_o=nn_t '|he _er _rd from the a_3,pter, using ,one
hand _ each. Otl°_M_, the a_pter grou_ t_mir_]
m_ht break. DO NOT USE the ap#i_ce with a broken
adapter p_ugi.
8, SiI"rLIIATI[ONSWHEN'THE APPLIANCE WILL BE
DISCONNECTED, OFTEN,i
C_ not _se an ad@ter pi_ in thee, situation&
Unplugging the power oord frequently can lead to an
ev_tua_ breakage of the ground terminal The waB
power outlet should _ replaced by a thr_-sIot
(g_ounding) o_iet instead,
USE OF EXTENSION CORDS
Because _ _t_tia_ _|ety hazards, we strongly
discoarrage the use of an ext_sion cord. H_#_._er, if
you wish to use an extension cord, _e, a CSA
certified_JL4isted 3-v_re (grou_ing) extensbn cord,
rated at i 5,A, 125V,
10 Ro,_m, Air Conditioner

Ins_llation
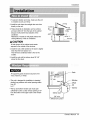
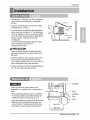
1,To prevent vibration and noise, _ke sure the unit
is installed securely and firmly,
2. install the unit where the sunlight _,es not shine
directly on the unit,
3..There should _ no obstacles, such as a fen_
and wall, within 20' from the back ,ofthe cabinet
be_u_ it will prevent Iheat radiation of the
condense£
Restd_ion of outside air will gre.at_yreduce the
oeoHngefficien_ of the air conditioner,
All side louvers d the cabinet must remain
exposed 1othe outside of the _ructure_
4. Install the unit a little slant_ _ the ba_ is slightly
lower than the front (abo_ 1/2").
_nis will force _n_n_d water to flow to the
outside.
5..Install the unit with the _ttom about 30' _60"
abe_ the floor level,
AHsupporting parts,should _ _cur_ to firm
wood, ma_n_, or metal.
"i This unff _ d_igned [oirinstaliatiion in standard
double Ihungwindows with a_ual opening widths
from _"
to 41°',
* _e top and bottom windc_w_sh mu_ open
su_ciently to a_bw a clear verflca_ opening of 19'°
from the bottom of the up_r sash to,the window
stool
_-- 29" to 41
lg"" rain
Inner s,iilll
' SHI
Ext:eHor
Owner_ Manual 11

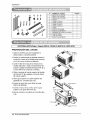
Installation
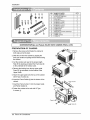
NO., NAME OF PARTS;
1 FRAME CURTAIN 2
2 SU PiP_RT BRACKET 2
3 SILL BRACK_ 2
4 LOCKNUT 4
6 '7
7 SCREW (T'YPE C) 5
8 SCREW_TYPED} 2
9 CARRIAGE BOLT 2
lO FOAMSTRIP 1
l I FOAM SEAL 1
12 WINDOWLOCKINGBRACKET 1
i3 DRAIN P_PE i
14 FRAMEGUIDE 2
15 FOAM-PE 1
SCREWDRIVER(Phi!ips and F!atead), RULER, KNIFE, HAMMER, PENCIL, LEVEL ]
PREPARATION OF CHASSIS
1, Remove the screws which fasten the cabinet at
both sides and at tlheback, screws
2. S_idethe unit from the cabinet by gripping! the "_
base pan handle,and pulling fo,_ard while bracing
the cabinet,
3, Cut _e window _sh _a_ to the proper I!eng_
Peel off the ba_ing and a_ach the Foam-S,eaJ,@
to,the undersi_ of _e window sash.
4, Remove the backing from the top upper guide
Foam-PE @ and at_ch it to the bosom o__e
Upper Guide,
5 Attach _e upper guide onto the top of the cabinet
with 3 Type A screws ®.
6.,insed the Frame Guides @ into,the i_ttom ollthe
cabinet,
7, _n_d the Frame Curtain _ intothe Upper Guide
and Frame Guides @.,
8. Fasten the cudains to,the unit with 10 _¢p,e
A screws®,
Uppe_ Guide
(Type
12 Ro,om, Air Co,nditioner

Ins_llation
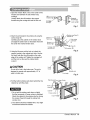
1,Open the wind_, Mark a line on the ce_er o_the
window stool between the _de window stop
moldings,
Loo_y attach the sill bm_cketto the _pport
bracket using the _rriage boll:and the lock nut,
-41111.Bracket,
Fig. 1
2i,A_ch the si_lbracket to.the wind_ sill using the
CarefuHiyplace the cabinet on the window st_l
and align the center mark on _e bottom front wffh
the _nter line marked window st_L
3, Using the M-scr_ and the !ock n_, attach the
support bracket '_othe _binet #ack hole, U_ the
first track helle after the sill bracket on the outer
ed_ of the window _IL Tighten the carria_ bolt
and the lock nut..Be sure the cabinet s_nts
ou_ard,
Cabinet
Tra,ok he_e
ofwin,dew
sii[I
boit @ (Type8}
nut bracket
Fig. 2
Do not drill a h,o_ein _e biot_oimipan..The unit is
design_ to operate wi_ app,roximate_y1/2" of
water in bo_om pan
Guide
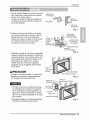
4. Pull the bottom window _sh down behind the Top
retainer bar unti! they meet,,
Window sash
k
1, Do not p,u_l_e window _sh down soitightly
that the movement of name curtain is restrictS,
Attach the _binet to the window stool by driving
the screws _ype B),_rough the cabinet into
window stool.
2,The cabinet should be inslall_ with a very slight
tiff downward toward the ,ou_ide.
cabinet
FramecuRain
Fig, 4
Owner_ Manual 13

Installation
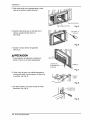
5. Pull each Rame curtain fully to,each window _sh
track, and pull the bo_:omwindow sash down
behind the Top re_iner bar until it meets,
6. Attach each Frame curtain the window sash by
using scr_s (Type C,) (See Fig, 6)
Front Ang_
G Screw(Ty_9 B) Fig. 5
@ _ype C)
Fig. 6
7. Slide the unit into the cabinet:.(S_ Fig. 7)
& CAUTION
For secur_y purpose, rein_.aH _rews(Type A)
at cabinet's sides..
_:_W
8. Cut the Foam-_ip to the proper bngth and insert
betw_n the upper win_w sas_hand the lower
window sash,(See Fig, 8)
Fig. 7
9, A_ch the Window locking bracket w_h a screw
(Ty_ C.),(See Fig..9,)
j
Fig, 8
1I- Win_w _king
b_acket
Fig, 9
14 Ro,om, Air Co,nditioner

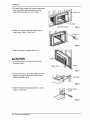
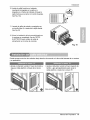
10, At'_ch the front ,grille'tothe cabinet by inse_ing
the tabs on the grille into the ta_ on the front of
the cabinet, Push the, grillle in until _ snail, into
pJace_(S_ Fig,!0)
Installation
11. Lift the inlet grilile and secure it with a screw
(Ty_ A) through the front grille,(See Fig, !0,)
12.Window installation of room air conditioner is now
comp_t,ed. See ELECTRICAL DATAfor attaching
power cord to eU_dcal outlet.
Fig, lO
i ii _i_ii_
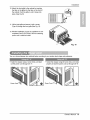
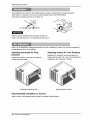
You can choo_ between _o meth_s below according to your window st_l shape and preference.
• Fasten the stopper u_ng 2 screw holies, and tead
out the power cord through sift "A°',
IPower
•Fasten the stop_r using lett _rew hole_and rotate
properly to i_d the p,_er cord out through sliit'°B".
Pow,e r
,i
Y
Owner_ Manual 15

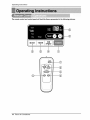
Operating Instructions
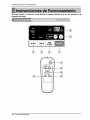
'Theremote co,ntmil=and control pane/' will I_k like those represent_ in the _l_wing' pictures,
®
®
16 Ro,om, Air Co,nditioner

Operatinginstructions
1, P_,/E R
Operation starts when this button is p,r_s_ and stops when you pros the button again.
2, TEMPERATURE CONTROL
The thermostat monitors room temperature to maintain the desired temperature_
The thermostat can be set between 60'_F-8.6_:F(16 }C_-30_:C)..
The unit tak_ an average of 30 minute. 'to adjust the room temperature by 1_:E
3. OPERATION MODE SELECTOR
Select c_ling m_e to coo_the room.
Sele_ energy saver mode for energy saving o_ra_on.
Select 'fanmode for _c ven_lating fan o_rat:ion_
SeJe_ dry mode for dry ,operation.
4. FAN SPEED SELECTOR
For increas_ _wer while coo,ling, sel!ect a higher fan speed,
3.steps: High _ Low _ Med
5. ON/OFFTIMER
The timer can be set to s_rt and s_opthe unit in hourly increments(up to 12 hours).
6, REM_E CONTROL SENSOR
1. Push o,_ the cc,Jer on the back _ the remote control with your thumb
2, P_ attention to p,o,larityand insert two new AAA 15V batteries,
3. Reattach the oover.
Do not u_ rechar_aNe batteries. Make sure thai both batteries are new.
Do not mix alkaline, stan_rd(Carbon-zJnc) or rechargeab_e(NickeFcadmium)
batteries.
• h order to preJen4di_harge, remove the batteries from the remote co,ntro_ff the
air condff:ioner is not going to be used for an extend_ period _ time
Keep,the remote con_ro_away from extremely hot or humid places..
To main_in op_mal operation of the remote control, the remote sensor should
not be exposed to dire_ sunlight.
° The remote co,n_roEcan be mounted on a wall using the moun_ble ho_er..
Owr_er_ Manual 17

OperatingInstructions
De veneration _evermust be in the CLOSE posPuonin order to.maintain Me b_.t cooling conditions,
When fresh air is n_essary in the r_m, set the ventilation iever f,oMe OPEN _sition.
The damper is opened and room air is drawn oiut_
Before using the ventilation feature, position the le_,er,as
shown, First, p,ul[ down part @ to horizontal line with part _i:.
Aifftow can be adjusted by changing the diredion of the air cond_ioner's _ouvers.This can al_ increa_ the
cooling effidenc_/of Me air conditioner.
Adjusting Horizontal Air Flow
Adiusting the vertica_ louvers,left and right will
change hoirizonta[ airflow,
Adjui_ing Vertical Air IFIow Direction
Adiu!_ing the hori_ntal vane up and _wn will
chan_ ver_cal airflow_The vane _n be adjusted by
nudging the vane backward or forward,.
Adiusting horizontalair flow Adiu_ing ver_Jcalair flow
Re_mmend_ orien_tion of louvers
Adiust buyers to face Ul_ards when _o_ing to.maximize cooling eflicien_
18 Ro,om, Air Co,nditioner

Operatinginstructions
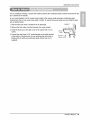
_e air conditioner employs a proper drain method whereby the condensed water (moisture re_ved from the
air) is,drained to the ou_ide,
In very humid weather, (and for reverse cycle models in the re,_ersemo_) excessive,condensate water
removed from the air may cause _me water to collar, To remove this excess water you can install the,drain
pan as de_ai_d _low_
1,Take Me drain pan which is _ated in the air di_harge
2. Remove the hole rubber from the base-pan (for some m_els),.
CABINET
3, Insta!l the drain pan to the right corner of the cabinet with 4 (or 2)
_rews.
4. Connect the drain ho,_ of 315' insi_ diameter to the ou_et boated
at the bottom of the drain panNou can purcha_ the drain hose or
tubing locally to satiny your par_,cular needs. (Drain hose is n,ot
supplied),.
DRAIN
PAN
DRAIN HOSE
Owner_ Manual 19

MaintenanceandService
Turn Me power off and unplug the power plug before clieaning the air conditioner.
....
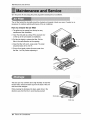
The air filter behind the inlet griUeshould be checked and c_aned at least once e_ry 2 weeks ,(oras
ne_ary) to maintain oip,tima!pefforman_ o,fthe air conditioner,
How to remove the air filter
1.The grille may be o_n_ from Me top for easy
main_n,an_ after ins_llation.
2 Open the inlet grill!e by p,uHingoff the exp_d door
en the top of the unit (ba_d en installation),.
3. Pull Me tab s_ighflyto release the filter. Pull the
filter in the _me dire_ion as the opening,
4. Clean the filter w_h warm, sea_ water. The water
should _ _ow 40_:C:(I 04,_:F),,
5, Rin_ off and gently shake off excess water #om
the filter:, Let it dry before rep,la_ing it,,
iiii
_e _se pan may overflow due to high humidify, To drain the
exce_ water, remove the drain _p kern the back of the unit
and s_ure the drainpipe.
When pressing the drainpipe into place, apply force in the
direction aw_ from the fins to avoid iniuringi youir_lf,,
20 Ro,om, Air Co,nditioner

MaintenanceandService
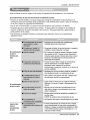
Before calling for se_ice, ple_3sereview the bHowing li_ of _mmo.n proNems and _.l_,_bns.
The air conditioner is o_rating normally when:
*You hear a pinging noise. This is caused by water being picked up by the con_nser ,onrainy days or in
highly humidconditions, This,feature is designed to help remove moisture in tlhe air and improve cooling
efficiency.
.,You hear 1hethermostat c_ick,This _ cau_d by the compressor cycle sta_ing and stopping,
.,You _e water dripping from the rear of the unit Water may be cohered in the ba_ pan in h_hly hum_
conditions, o,r,onrainy days This 'water overflc_wsand drips _romthe rear of the unit,
, You hear _e fan running whi_ethe compre_or is silent. This is a norma_operational feature.
T_ air co,nd#ioner may _ operating abnormally when:
• Make sure the plug is completelly plugg_ into _,e
o_et
_,e air conditioner
d_s not o_rate
Aiit conditioner
d_s not cool
Check t:hefuse"circuit breaker _x and replace the
fu_ or reset _e breaker
In the event of a power _ai_ure,_t the power control
to OFE When the power is restored, wait 3 minutes
to resta_ _e air conditioner to prevent the
oomp,r_sor from overloading
Press the RESET b,_on located on the power cord
p_ug _tthe RESET bu_on will not stay engaged,
di_,ontinue use of the air conditioner and contact a
qualified _ice technidan
Make sure there are,no curtains, blinds, furniture or
other obstacles in front of _e air conditioner
* Turn the knob to a higher setting, The highest _tting
provide, m_imum cooling
. Clean the filter at least every 2 weeks, Refer to the
"Maintenance and Service '_section o__e manual
• Niter the air conditioner is turned o,n,you ne_ to
give the air conditioner _me time to cool _e room.
Ice ap_ars o,nthe
airconditioner, i
0
o
returns.
CLOSE the air conditioner vent
S_ Ice ap_ars on the air conditioner _!ow
Ice may block the air flow and obstruct the air
condi*Jonerfrom pro_Hy cooling the room, _t the
fan at MED or HIGH while setting the thermostat at 1
or 2 until the i_ meR&
Owner_ Manual 21

Memo
22 Room Air Conditioner

Acondicionadordeairetipoventana
Tenga a bienleer cuidladosamenteeste manual. Contiene
info_acidn valio_ acerca del acondicionado, r de ai_
Este manual puede ayudarlo a ahorrar tiempo y dinem;
describe el manteNmiento adecuado del _ondicionador
y cdmo eviNr su u_ incorrecto.
Preste aten,ci6nalas precauciones a fin de p,Pevenir
riesgos potencialesy da_ cau_do _r real uso o
instalaci6n inad_uada. LG no _ responsabiliza _r
_n ,daho caus_o pot el real uso del acondicionador:

,o
PARA SUS ARCHIVOS
Escriba aqui ell mode_o y n_mero de serie:
Mod,e|o n°:
Serie n_:
Pu_ encon_r estos datos en _aetique_a sitaada en e_
Ateral de ca_ unidado
Niombre del dist_buidor:
Fecha _ compra:
[] Adjunte su r_ibo a es_ p&#ina con la g[apado_-a para
e_ momento q!ae Io n_ite _ra p,ro_r la fec_ de su
adquisici6n o para la validaci6n d,e A garantia,
LEA ESTE MANUAL
En sa #_ledor encont_a_& machos conseios _tJl_ sobre la
u_lizaciSn y mantenimiento de su a_ndicbnador de aire,.
U_3s F_cos cai,dados _r sa _de lie pu_en ahorra[
macho tiempo y dir_eto darante la, vida de sa
acondicioa,ador de aire,
En _a tab_a de consejos para Ila soliaci6n rapiida de
p[_m,a,s enco,nl[ra_A machas r_piu_las a _c_ p[o,bliemas
mAs habih_ales, Si revisa pHmero naestra Tabla de
Consejos _ra la solaci6n rApkJa de problemas, ta] vez no
necosite Hamar nunca al _rvicio t_ni_,
2 Aire Acondicionado,r

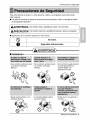
PrecaucionesdeSeguridad
Pare m,itar les.[ones al usuario o,a otas personas y dafios, a la p,_opi_ad, est_s instrucciolnes
esten _gukse
II Una o_raci6,n incorrecta _r ignora[ las in_rucciones pr_a_a i,esbnes o dash. La ser[_ad se c[asifica
_r Iiassi,gu[ent_ [ndiicacion_..
Este sim_o {ndi_ I!apos[biidad @ mue_e o,de _ria !_i61_ "}
, Pfa _d,oCs_deUlC,{O' iNbo[::t::'ila_'°s' n_EcEsi:'°mEE;_, b[lidad de ['jOnes 0 "I" a ,a prOp'ie'd j
i ® .............................................................,o ...................................................................I
g Siga es=s instrueeiones" J
iJJiiJJiiJJiiJJiiJJiiJJiiJJiiJJiiJJiiJJiiJJiiJJiiJJiiJJii{_Ji_:
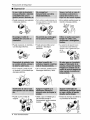
[] InstalaciOn
° De Io conlt_ario, podda provocar
un in_ndio o descarga
e[ectri_
• _ Io contrad,o, _,dria provocar
un incendio o descarga
• De Io _ntrar[o, puede provo_r
una des_rga el_ri_ o
in_ndio debido a {a
generaci6n de ca_oro
• Puede ocasionar _!los y una
de_arga electdca,
* Los b,ordes afi{ados pu,_en
provo_r lesiones,
• Podria ocurrir una explosion o
inc-endio,
Manual de! Propietario 3

Precauciones de, Seguridad
[] O,peracibn
* Pu_e ocasionar una ex£1osion
o descarga electric&
• Delo co_:rario,pu_e provocaruna
@sc_ eled_ca o in_ndio @bide
a/a generaci6nde cabr,
', Pue,de ocasion,ar un incendie y
una descia_a electrica.
• Puede provocar fallios e,nel
pr_ucto, o descargas
el_tricas,
• De iocontrarb,, podria provocar un
incendioo descarga ele_r_a.
• Laaparienciadel apa'ato_ are
acondicioaadopue_ deteriorar,
cambiarel _lor o _,_rrol_ar fluios
ea !as
• De Io contrado, puede _urdr
un incendio y un a_idente _r
* Pu_e ocurrir un falta de
oxigeno,
• De !o co_rario,_ pueden ocu_ir
descargas ,e!6_dcas y _ll!os0
• _ido a que el ven,tila_,r gira a
alta velocidad dum_e el
furncionamiento,_dria o,casionar
lesiones.
4 Aire Acondicionado,r
• Evitara el arranque accidental y
la p,osibilidad de lesiones,

Precauciones de Seguridad
• De 1ocontrado, puede provocar
una descarga e[ectrica o
incendio, debido a _a
generacion de calor,
• P_dffa ocasionar una ,descarga
electri_ y daffos,
• Provocara de_argas e]ectricas
o incendios..
[] Instalacibn
" _ _0 i comrario, _dria ocu_ir
una explosidn o incendio,
o De [o cont_ario pu_e dar lugar a disputas
vecinalies.
• Provocar& descargas
e[_dcas.,
• Son punti,agudas y pueden
provocar lesiones
° De Io contrano se _ria cau_r vibr.aciones o
escapes ,deagua.
Manual de! Propietario 5

PrecaucionesdeSeguridad
[] O,peracibn
=P_da ocasionar les:io,nes. • Puede _usar una averia en el
aparato.
• Laaparienciadel aparao _ aire
acondicionadopue_ deteriot_r,
cambiarel _lor o _rrol/ar fluios
en las supedicies,
i" Puede lesionarse al caerse del
aparalo o al ,caerse _os:obje_os
que haya col_do,
• Podda ocasionar lesienes.
• El _ncionamienl_o sin filtrois
puede provocar falto&
• _ Io contrado0 _dria dahar su
sa_ud.
6 Aire Acondicionador
• De _ocont_rio,, Ip_rian ocumr
lesiones p,ersonales,

Antes de poner el _uipo en funcionamiento
1. Pongase en contacto con un especialis_ para realizar la instalacion.
2. Enchufe correctamente la toma de alimentaci6n.
3. Utilice un ciirouito dedicado.
4. No utilice un _bie aiargador.
5. No inicie/cese el funcionamiento enchufandotdesenchufando el cable
el_trico.
6. Si el _bileienchufe esta dahado, sustiitt_yalo solo _r una pieza autorizada.
1. Estando expuesto a la circulaci6n dir_ta de aire dumnte un extenso peri_o
de tiempo _dria resuJtar peligroso pare su salud. No exponga alas personas,
animales domesticos, o alas plantas a la circulaci6n de aire dumnte largos
periodos de tiempo.
2. Debido a la probabiJidad de fain de oxigeno, ventile el cuarto cuando este
utilizado el aparato junto con estufas u otros apamt_ de calefa_i6n.
3. No utilice este aire acondicionado con prop6sitos esp_iales no especificados
(Ej.: conservacion de dispositivos de pr_isi6n, comida, animales domesticos,
p[antas y objetos de arte). Ta[ uso p,_ria daSar los articulos.
1. No toque las piezas metalicas de la unidadi al retimr el fiitro Manejar aristas
afiladas de metal puede causar lesiones.
2. No utilice el agua para limpiar el interior dell aire acondicionado. La exposici6n
al agua pu_e destruir el aislamiento, _nduciendo a _sibles descargas
el_tricas.
3. Ai limpiar la unidad, aseigurese antes de que la eil_tricidad y el interruptor
est,_n apagiados. Eliventilador rota a muy alta vellocidad diurante el
funcionamiento del equipo. Existe la posibilidad de lesiones si acciona
accidentalmente I!ael_tricidad de la unidad mientms limpia el interior de la
Para cuestiones de reparaci6n y mantenimiento, _ngase en contacto con su
distribuidor de servicio autorizado.
Manual del Propietario 7

lntroducciSn
Este slm_lo Io advie_e de un I_ligm, de accidente po,r
corriente el,_ctrica.
Este s{m_olo !o adive_e de un peligro que pu_a causar un
daho, del ventliador.
Es,te s{m_lo significa condi_iones es,p_iales.
E_e aparato i debefia in_ai,arse de acuerdo con _asnormas de] C_igo Ele_fico Naciona]
GASINETE
PARR]L_ FRONTAL
HLTRO DE A_RE
DEFLECTOR VERTICAL DE AIRE
(A_BE HORIZONTAL )
DEFLECT'ORHORIZONTAL DE A]RE
(A_BE VERTICAL)
DESCARGA DEA]RE
:TOMA DE iAtRE
(PARRILLA D'EiENTRADA)
AB_DERA
PANELDECONTROL_
CONTROL REMOTO
COMiPRE_R
CONDENSAD,OR
8AINDIEJADE BASE
CABLE ELECTRICA
8 Aire Acondicionado,r

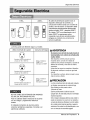
SeguraidaElectrica
115V- 230V_
, u
El cable de ali_ntaci6n pue_ induir un
disposHivo inte_uptor de cordente, La
carcasa ,delenchufe cuen_a con un _t6n
prueba y ,otto de reinicio.. El dis_ivo de_
comprobarse pen6di_ente presi_a_o
pnmero et _,sn TESZ y despues RESET.
Si el bot6n TEST no se desco_cta o si el
_t6n RESET no permanece a_ivo,
suspe_a el uso del aJreacondicionado y
_,gase en contacto con un tecnico de
_rvicio. cualificado.
La forma p,uede ser diferente seg_Onsu mode!o.
Utiilice el enchufe de la pared Co,n_mo _ Energi.a
Star_dard 125V, enchufe _ 3
L_neas de 15A, 125V AC
Standard 250V, ench_Jte _ 3
L_neas de 15A, 250V AC
Standard 250V_ enchufe _ 3
L_n_s de 20A, 250V AC
Utili® un fusible de
5AMP, o un
I#_÷rrupto_de 15AMP,
Utili_ _ fusible de
20AMP, o un
Merru ptot de _AMP,
NO USE CABLE DE EXTENSION EN UNIDADES
DE 208, 230, AND 20&I23.0VOLTIOS.
T_o. et _bl_d.o debera realiizarse de acuerdo
con los c6digos y reglament.os el6_ricos
locales.
El cableado do.mestico de alumJnio podria
o_sionar p,roblemas esp_i.ales, Consulte a un
electricista caliificado.
Nopre_ol_ nuln__ botbn_ pr_a dur_ el
iuncio_m_nto, _ Ioco_r_no _ _chufe podna
tesuitarda_ado,
Estedisp_ivo colq_er__odu_os quimic_,
inclu_ndo pbm0,,cor_ci_ ene!estado
Californiacomoptoductocan_rige_ yca_ante de
defectosdena.cimientoyotrc_daSosals_tema
_ve_ bienAsmanostras m_ipu!__el dispositivo
Nodesmonte,modifiqu,enisumerjaenaguaeste
enchde.
Si,eldispos_k®_ a_ivara debera_rregir la ,causa
_tes devolvera Ailizado.
Loshi!{_sco_du_oresdentrodelcab__a_ _odeados
£o_bli_daies,quesu_vi_n/a cotfie_tedefuga,
E_osbiindajes_oestg_pu_t_ a ti,erra,
<Fabri_doenTower>
E×ami_e_r_di_me_le ,elcab!een _,,a ,d,e
_alqu_r d,afi¢Noutili_ este_roductosii,_ b_indaj_
[esultaranexpuestos,
Eviteelrie_o dede_rgas e_ricas: e_a unidad_o
puedeset_ega_adap0reiusuario_r setre_ste_tey
apruebadealte_a_o_esMa_ipularlap0[ci_ _l!ada
delaunidada_ul,arat0dasAs_ra_t[_ y queias@
_e_dimien_oE_aunidad_oesladi_e_ad,a_a_a_ u_
®toouni#_erru_ord,een_ndid0-apagad0,
Manual del Propietario 9

Seguraida Efectrica
(FAVORLEA CON ATENCIdN)
PORLA D PERSONALDEL USUARIO,ESTE
APARATODEBE SERDEBfDAMENTENEUTRALIZADO,
El cord6n de energia _ este aparato, esta _uipado
con tres pan,cable a tierra) _ili_ este con un
enchufe de pared _ _es _li_s(a tie,a) para
minimi_r el peligro _ choque electrico. EJcliente
de_ revi_r e_receptor de pa_edy el circuito pot un
e_edricista cafificado,para a_gurarse que ia
rece_i6n esta _lb,idamen_ neutrali_.
NO CORTE0 REMUEVALA PATA(GROUND)
f;)SL
h. SITUACiONES EN LAS CUALES EL APARATO
ES DESCONECTADO OCASIONALMENTE:
Debi_ a_peligro _tencia_, nosotros no
recomendamos, e_u_, de adaptado,res, Sin embargo,
si usted desea utiHzarun adiaptador, una CONEXiON
TEMPORAL, puede _r
efectuada. Utilice adag_adores UL, disponib_es en la
mayoria _ los estab._ecimientos de
herramientas. _ pa_ mas grande del adaptador
_be ser a_ineada con la pata mas gran_ del
interrupto.r para as_urar_ una polari_d6n
adecuada.
Adaptar la terminal del ground del adaptador a
_acubie_ de la _red con un
tomilio no neutra_iza el a_rato a _nos que la
cubierta del tomillo sea de me_l, u no se_
in_lad_, y e_receptor de _r_ este
ne_li_do _ _av_s ,delalam[brado dell_acasa,
El cliente debe hater venficar el circui_ por un
e_ectricista calificado para a_gurarse que el
receptor es_ debidamente neutraliz_do.
{_esco,_de el cor_n de ermrgia _l adaptador,
utiiiza_ una rrano en c_da uno. De io contratb, la
terminal dela_dor pue_ rom_me, NO,UTILI!CEel
apamto con un er_hufe roto.
B, S_TUACIO,NESEN LAS CUALES EL APARATO
ES DESCONECTADO CON
FRECUiENC[IA.
No _[]i_ un adaptador en estas circunstanc[as.
De_onectar el cordon de energia con frecuencia Io
]levarAa__¢entua] _omp.imien_o.de la terminal
neut_a!_aci6n, La _uda de energia de la pared
_be set reempla_da pot una salida de tres
patas(neutra_izada).
USO DE EXTENSIONES
Deb,ir_ al _ligro r,,ote_ciaLno.reco.mendamos Iia
utiHzaci6n dle extensiones.. Sin embark, si usted
_sea utili_ una extensi6n, utili_ una
_ifica_ pot CSNUL de tres.alambres,
_ta_gada 15A, 125V..
10 Aire Acondicionador

Ins_la,cion
i, Para prevenJr la vibracidn y ell _ido_ as,_rese
que la unidad est6 in_alada con seguridad y
firmez&
2.. Irnstale I.aunidad donde I.aluz del soi_n,ocaiga
directamenl,e en la misma.
3. La parte exterior del gabin,ete d,ebieextenderse
hacia duera _r Io menos a 12" sin o.bstaculos,
como pot ejemplo un _rcoi o una pared, dentro
de los 20" desde la _rte p,o_e,rior de1gabinete
porque evitara la radiaci6n de ca_or de!
conden_dor.
La restricd6n de_ aire exterior #_uce en gran
parte _aeficiencia de enfdar de_
acondicionad.o.r de ai#e.
Ai[e l:_e_
b
Rad_c_n
de_ior
S_[e 20"
C¢[co
Todos los alabes laterales del gab,inete dean
perman_er expuesto,s a la parte e_erior de _a
estrudura,
4. Ilnstallela unidad un _o Jndinada para que la
parte posterior quede ligeramente m_s baja
que el frente (airededor de !/2"). Eslo fo.rzara al
agua condensada a ffuir hacia e_exterior.
5. instale la unidad con el rondo aproximadamente
30°'~60'' _r encima del nivel de_ p,iso..
Todas las piezas de soporte dean e_a.r
as_uradas con madera fuerte, mamposteria, o
me'taL
. Esla unidad esta diseSada para _r instalada
en _ntanas doNes ba_ulalntes estandar con
amplitud de apertura real de_e 29" a 41"
• _s hojas irfferiores y su_rior,es de la venlana
deben abrirse _o,suficiente para permffir ulna
luz 'vertica_ de 19,'°desde la parte inferior de la
hoja superior basra el asiento de Ilaventana,
'19"rain
asier_to
Manual del Prop,ietario 11

Instalacion
NOMBR£ DELAIPARTE ¢a_id_
1 MARCODELACORTINA
2 MENSULADESO_RTE
:3 MENSU_ DEI,,,ALFE!?AR
4 TUERCA
5 TORNILLO(TIPOA)
6 TORNILLO(T_POB}
2
2
2
,4
14
7
7 TORNl_ioO i"[_£,,,C: L ............................................................................................
8 TORNILLO(T!POD)
9 PZRNO
10 BURLETEDEES_JMA
11 BURLETEdeESPUMA-PE
12 ABRA_'_/P_DERJAC_ONA_ VENT,_A
13 TUBODEPURGA
#4 GUiA DELMARCO
15 8URLE"[_ de ESPUMA-PE
2
2
!
1
1
1
2
1
I DES_RNIL_R (Philip.s y Flatead), REGLA, CUCHtLL_ MARTILL_ LAP, Z,, MiVEL.
PREPARACION DEL CHASlS
1, Quite bs tornil!os qu,e unen el gabinete a
ambos Iladlosy a la parle posterior.
2. Desiice la unidad desde el gabiinele asJendo la
maniia de la base de _abandeja base mie,ntras
con la otra mano soistiene eI gabinete.
3. Corte el sello de la hoja de la ventana en la
medida adecuada. Quite el recubrimiento del
so_Me y pegue eliburtete de Espuma-PE @ a
la cara inferior de, la hoja de la ventana,,
,4.Quite e_soporle ,de la guia sulperio,r del buHete
de Espuma PE @y p_ue, la a la parle inferior
de la guia su_rior.
5. Fije la guia superior a la parle supedor del
gabinete con 3 tomillos tipo A @.
,6,Iinserle las guias del marco @ en Iiaparte
inferior del gabinete.
7, Inserle e_marco de [a cortina _)en la 9uia
su_rior y las guias del marco, @.
8, F!je fas _rlin,a,s a Ilauni,dad con 4 tomillos tipo
A@
(T_PO
(TIPO A}
12 Aire Acondicionador

1.,Abra la ven'_ana,,Marque una linea en el centro
de la repisa de la ventana entre 1asmolduras
de to_ de la ventana _ateraL
Co_oque sin apretar la mensula de1alf6Jzar en
la mensu_a de soporte utilizando el _mo y la
tuerca de segutidad.
MENSULADEL
ALFE_ZAR,I
BUiLON@
lnstalacion
TUERCADE
2 CoUoque la mensula de! aff6izar en el alf6izar
de la ventana utilizando los _ornilllos (Tim B),.
Apriete e! pemo y la tuer_ de s_uridad,
Repi_ de la ventana y aBnee I,amarca _ntral
en el frente del fondo con la linea central
m,arcada en Ja repisa de,Javentan,a,
Fig, 1
TOBNiLLOPARA
TUE%ADESEGURI_
DEEANTE%CHO
#EILAVENTANA
3_ Utilizando e! tomiHo M y _atuer_ de seguridad,
coloque la mensul!a de soporte en el orificio de
la guia del gabinete,, Use e! primer orfficio de Ila
guia despu6s de la m6nsula del alf6zar en eli
borde exterior del alfe,izar de Eavet_tana.
Apriete el perno y la tuerca de s_uridad.
Aseg_Srese de que el gabinete est6 indinado
hacia afuer&
No perfore la charola det fondo, _ unidad esta
diseSada para operar con aproximadamente
1_ '' de agua en la charola dei fondio.
MARCO DE_
VENTANA
Fig, 2
REP_SADEVEIkrANA
PARTEFRONTALINTERIOR
Fig, 3
BARRADE
RETENCIONSUPERIOR
1i.No hale el marco de la ventana hacia ,abajo
tan apJretado que se restrinja el movimiento
de _osdesBzadores, Sujete e! gabinete a la
rep,isa de la ventana insstalando los to,rnillos
(tim A o B)Ja trav6s del gabinete en la repisa
de Ja_ntana,
2_El gabinete debera set instalado ligeramente
inclinado haci,a abajo hacia ef exterior
GAB_NETE
PANEL GUIA
CI_A DE ESPUMA@
Fig, 4
Manual del Prop,Jetario 13

Instalacion
5,,Hale cada panel guia completamente a cada
lado de la ventana y repita del paso 2,.
Pa_e Fron'AIImerior
QTORNI½0(TIPO B/ Fig. 5
6,.Adjunte cada panel guia a cada lado de la
ventana usando tomillos (Tipo, C),.
O.JerFig.6)
7. Desfice el chasis dentro del gabiinete.
(Ver Fig,7)
(TIPO C}
Fig, 6
Para p,m.pssitos de seguddad, reinstale los
tornillos _ipo A) a [los lados deUgabinete.
8i0Corte la tira de goma a la medida .apmp,iada e
introd_zcala entre la parte superior e inferior de
Laven_na, (Vet Fig, 8)
TORNILLO
Fig, 7
9. Se debe instalar el asa antes de fijar el frente
deco_ti'vo, (Ver Fig, 9)
Fig. 8
SOPORTE DE
URA
Fig, 9
14 Aim Acondicionador

10_Insta[e la re_illlafrontal en e[ cabinete
insertando la ilengQeta en la reiil[a a la
lengQeta ,enel frente del cabinete, Empuje la
rejiHa ha,_a que se cierre con sonido de go[pc
(vet Fig_ 10))
lnstalacion
i 1, Levante la reiill,a de entrada y asegSrela con
un torniHo (tipo A),a t_ves de la reiJHafrontal,
(Vet Fig, 10)
12. Ahora la instalaci6n del aire acondicionado en
la ventana es completada. Vea _osDATOS
ELECTRI,COS p,ara instalar el cable de
,alimen_aci6n en _atoima de corriente_
Fig. 10
i i _i i_i _
P'uede escoger entre los dos metodos abajo descritois de acuerdo a I,aforma del taburete de su ventana
y su preferenci&
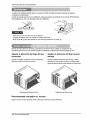
• Aprete el obturador usando 2 hoyos de tomi_o, y
saque e_cane elledrico ,atraves de la ranura
,_A,0'
° Apre_e e_obturador usando el hoyo izquierdo ,de
to,rnillo,, y gire aprop,iadamente pare sacar el
ca_e eledrico, a traves de la ranura "8'_'_
Cable
sJ
Manual del Prop,ietario 15

Instruccionnes ,de Funcionamiento
£1 control mmoto y el _ir_el _ con_/ tendran un as_o, _recido, a! de los que apamcen en /a,
fotograf(-a m_s abaio.
®
®
16 Aim Acondicionador

tnstrucdonnesdeFuncionamient,o
1, POWER (ENCENDIDO)
E_funcionamiento se inicia cuando se pulsa esta tecla y se detiene cuando se la presiona
nuevamente,
2, CONTROL DE _MPERATURA
E_term,ostato mon_oreia _atemperatura de la habitacion para mantener la tempera_ura deseada..
E_termos_to puedle set colocado entre 60°F~86_F (16'_C-_,_C),
unidad toma un promedio de 30 minutos p,araajustar _atemperatura de la habitaci,onen l_'R
3, FU_IONAMIENTO, DEL MODO SELECTOR
Se_cione el modo fresco, (cool), para enfnar la habitacion,
Se_eccione el mode de aho._o de energi.a para el funcionamiento del ahorro de energia,
Sel_done ell modo venliladlor (fan) para el funcionamiento del venti_ador,
Se_cione el!modlo seco (dry) para e_ fuincionamiento seco,
4, SELECTOR DE VELOGIDAD DEL VENTILADOR (FAN SPEED)
Para aumentar la capacidad mientras se refresca, se_eccione una mayor ve_ocida,ddel ventilado_.
3 P.asos: High (alta) ..........Low (baja) ...........Med (m_ia)
5, CRONOMETRO ON/OFF (ENCENiDIDO/_AGADO)
El cronometro puede ser co[ocado para iniciar y detener _aunidad en incrementos por hora
(hasta 12 horas)..
6, SENSOR IDEL CONTROL REMOTO
i, IFmpuie ha,cia afuera con su pulgar la cubierta en la parte _._edor del ,control
remoto.
2., iPreste atenci6n a Iiapo_aridad e iinse_e dos nuevas baterias AAA 1.5V.
3. Vuelva a colocar la cubierta
No u_ balerias recargables. AsegL_rese que ambas baterias _an nuevas.
No mezcle las pBas alcalinas, es_ndares(Carbonozinic) o recargab_es(Niquel-
cadmium),
• Para evffar que se desearguen, quite las baterias del con4rol remoto si e_
acondicionado,r de aiire no va a ser usado p,or un periodo largo de tiempo..
Mantenga el ,contro_remoto lej,os,de los lugares h_medos o extremadamente
ca_ientes. Para mantener el funcio,namiento 6primo del control remoto, el sensor
remoto, no de_ exponerse a _aIluz so_ar directa.
• El soporte m,ontable de_control remote, puede ser m,ontado sobre una pared.
Manual del Prop,ietario 17

Instrucdonnes ,de Funcionamiento,
palanca de vent[_acbn_bera estar en _aIposbi6n CLUE (Cer_do) para peder mantener 1asmeiores
c_ndic[on_ de enfri_nto.
,Cuan_,_ n_es_e airefr_co,en ]ah_i_ci6n,co]oqu_A palancadeventi_ac_,nen _ap_ic[6nOPEN (_.ierto).
E]_ortJg_dorse abrey sed_car_ e_aiirede lah_d6n..
CER_R VENTIMOIONABR_R
Antes de,usar _a_racteristica de ventilaci6n,
co],oque ]a pa]anca coma se, muestra, iPrimero ja]e hacia
abajo I!aparte _ para que quede en run.affnea horizon_l _n ].apa_e @,
,_j, ,,y .s_ ¸
El flujo de aire Ipuede set a}ustado _mb,iando ]a direccbn ,detas reji[las de,venti]a,cbn de]
acond[cionador de aire. E_o i puede tambi6n, incrementar la eficacia dell ac,o,ndic[onador de,aire.
Ajustar la direccibn del flujo, de aim Ajustar la dir_ci6n de,I flujo de aire
Ajustar las: reiillas verti_les hacia la izquie_a y
derecha cambiara el fluio horizontal,
Ajustar el alabe horizontal hacia arriba y a_io,
_mb[ara e_flujo ide aire vertical, La aleta puede
,aiustarse presionando hacia de,ante o hacia arras
Adju_[n,,g horizontal air f_ow Adjusting ve_[,_l air flow
Re_mmend_ orientation of louvers
iAdiu,s_ louvers:to,face upwards when coo_i% to maximize coolin,g efficiency,,
18 Aire Acondicionador

tnstrucdonnesdeFuncionamient,o
E[ aire acendidonado utiHza url m6todo de purga adecuado en donde
el agua condensada. (humedad retirada del aJre)se purga al exterior,
En climas demasiado, h_m_os (y para m_e_,os de cido invertido, en la
m_alidad de inversi6n) e[ agua conden_da excesiva que _ retira dell
aire pu_e ocasionar que _ recollecte a[go de agua. Para e[iminar este
exeeso de agua, puedie in_alar una charo,_ade purga come se detaHa
a continuaci6n,
1,Tome la charola de purga que se !ocaliza en la de_arga de aire o
en Iiabarrera.
DE PURGA
[
DEPUBGA
2. Retire el orificio de hu[e de la charola de la ba_. (_ra algunos m_e[os).
3, instale Ja,charola de, purga ,en eJextermo izquierdo del gabJnet,econ 4 (o 2) tornillos,
4. Connie [a manguera de purga en la descarga Iocalizada en el fondo de [a charo[a ,de Ipurga. Puede
ad,quirir [a manguera o tuberia de purgga Iocallmente para satisfacer sus n_sidades particulates
(No,se induiye Ilamanguera de purga).,
Manual del Prop,ietario 19

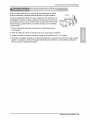
Cuidado y Mantenimiento
Oesconecte !a energia y desenchufe la unidad antes _ limpiar e! acondicionador _ aim.
El fi[tro de aire detras de _ap,ardlla de entrada debe _r _ntrolado y iimpiado _r ilo menos una vez
_da dos semanas (o cuando sea necesario) para mantener el rendimiento opflmo del acondicionador
de aire,
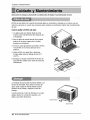
Como quitar ,elfiltro de aire
1, _ rejiBa ipuede set abie_a desde _aparle
su_dor para m,antenimiento facif despues de
la instalaci6n_
2, Abra, la rejiBa de entrad,a tirando de la puerta
externa en la parte su_rior de [launidad
(basadia en in_alaci6n).
31,Tire de la cuba _i,geramente iPara liberar e_fi_tro,
Tire del filtro en la misma direcd6n de, ta
abertu_,
4, Limp,ie el fi[tro con agua tibia y jabonosa
El agua de_ estar mr debaio de los 40'_C
5i@Eniuague y sacuda suavemente e[ ex_so de
a,gu,adel flirt,o, Deje_o secar ,antes de colocado
nuevamente
bandeia de base pueJe inundarse debido a un
e,x_so de hum_ad0 Pa_ drenar el ex_so de
agua, quite Iiatapa de drenaje desde la pad,e
_,_erior de la unidad y asegure el _5o de
Cuando presione e_caffo de drenaje en su lugar,
aplique fuerza en [a dir_ci6n opuesta alas
aletas, para evffar lesionarse,
20 Aim Acondicionador

Cuidadoy Mantenimient.o
Anles de Iiamar al servicio, tenga a bien revisar la siguiente lista de probliemas y sus so,luciones,,
E/acondi¢ionador de aire est_ funcionando normalmente cuando:
• IEscucha un sonido met&lice, Lo causa e_agua qiue recoge e! condensador en dias Iluviosos o en
co,ndiciones de mucha humeda& Esta caracteristica est& diseffada, para ayudar a quitar la humedad
en el aire y mejorar [a capacidad de enfriamiento,
° eye un ,clic en eUtermostato_ Lo causa el cic_odell compresor que comienza y se defiene,
° Ve ,gotear agu,a de I,aparte posterior de la unida& El agua pu_e set rec_ida e# I,ab,andeia d!e
base en co,NdicioiResdie mucha hurn_ad o dias de Iluvia. Esta agua desborda y gotea desde la
parte _sterior de I,aunidad.
° eye funcionar el ventilador mientras e[ compresor est,_ s#encioso. Esto,es una _radedstica
operativa normal.,
E__ondidon_or
de _ire n,o
func_na para
rlada
• A_gQre_ que e e_hufe e_ co_,le_rr_nte
ench_,a_ ,_ntro ,_l tomacorriente
• Co_ebe el fusible !la caja del d_yur_tory reern_place
e! fu_bi[e o vue_va e! disyuntor a su lugar,
• En el case dieun corte de _mente, col_ue el co,ntro_
de ence_ido en OFF. Cuando _ haya restaura_ la
corfie_e, espere durante 3 minrutospara velvet a hacer
funcbnar el acondicioradot de aire _ra p_venir la
sobrecarga de! compr_or,
• Presione el botbn RESET sJtuadoen el e,r#h_ del
c_le de _imentaci6n. Si e_boton RES_ no
..........................................................................pe_maneceactive, s_pen_ e_u_ _l aire
aco_idonado y pongase en cont_cto con un tecn_o
ser_,icbcualifi_.
• A_gore_ que _ haya co_nas,, persianas, m_iles u
otros ebs_,culos frente ,a[ acoindiciona_r de aire
• Gire la pedlla a ura _sici6n m_ _. Mientr_ m,_s
alltoeste mayo_rselra,.elfrio pr_,ordonado,
El_ondic{on_or
de _ire n,oenfff_
• Limpb el filtro a[ menos una vez cadla_s semiar_as,
Refierase a [asecci6n '_uida_ y Mantenimiento*'i_.l
maJ_uaL
• B_que a]gunaho,mall[a,deresistenc_ e_end_a y el
aire frio vuelve..
• C_ERRE Iiaven_Aci6n de[ acond_ionador ._ aire
• VeaAparece hielo sobre el acondicionador _ aire ab,ajo
so_e
a,_,ndic_naeot
de air_
• El h_o [puedebloq[LeaJ"la oorriente de _re e impair
que el acondidonador de aire enffie co#ectamente la
habi_cio_, Col,_iue la velocidad del ventiAdor en MED
o ALTA(HIGH) mient_rascollocael termostato en 1 o 2
basra que e_hJe[ose funda,
Manual del Prop,ietario 21

Nota
22 Aire Acondicionador

Nota
ManualdelProp,ietario23

Nota
24 AireAcondicionador

LG Electronics Inc, reparar6 o sustituird, gratuitamente, su producto si resulta defectuoso en materiales o mano de
obra bajo condiciones normales de uso durante el periodo de garantTa mencionado m6s abajo, efectivo a parfir de
la fecha de compra del producto original por parte del consumidor. Esta garantia limitada s61o es v61ida para el
comprador original del producfo, y efectiva s61o cuando este se ufilice dentro de los Estados Unidos, incluyendo
Alaska, Hawai, y los territorios estadounidenses.
PER[ODO DEGARANTiA:
Mano de obra: 5 argos desde la fecha
de compra.
Piezas: 5 a6os desde la fecha de compra.
Compresor: 5 a6os desde la fecha de
compra.
PROCESO DE SERVICIO:
Llame al tel6fono 1-800-243-0000 y seleccione la opci6n
adecuada. Por favor, tenga disponible el fipo de producto (Aire
acondicionado), nOmero de modelo, nOmero de serie, y c6digo
postal.
La mano de obra bajo garantia cubre el coste de la Asistencia
en domicilio de todas las piezas, incluyendo el compresor.
ESTA GARANT[A $E OTORGA EN SUSTITUClON O EXCLUSION DE TODA OTRA GARANTiA, EXPRESA O IMPL[ClTA,
INCLUYENDO SIN LIMITAR CUALQUIER GARANT[A DE CALIDAD O IDONEIDAD CON UN PROPOSITO CONCRETO. EN LA
MEDIDA EN QUE CUALQUIER GARANTiA IMPLiCITA ES OBLIGADA POR LA LEY, EST/_ LIMITADA EN DURACION AL
PERiODO DE GARANTiA YA MENCIONADO. LG NO SERA.RESPONSABLEDE NINGUN DANO RESULTANTE,INDIRECTO, O
ACCIDENTAL DE NINGUN TIPO, INCLUYENDO INGRESOSO GANANCIA$ PERDIDAS,EN CONEXION CON ELPRODUCTO.
CIERTOS ESTADOSNO ACEPTAN LA LIMITACION DE DURACION DE UNA GARANTiA IMPLiCITA O LA EXCLUSI6N DE
DANO$ RESULTANTESO ACCIDENTALES, POR LO QUE LAS LIMITACIONE$ O EXCLLISIONE$ MENCIONADAS PUEDEN NO
SERAPLICABLESEN SU CASO.
ESTAGARANT|A LIMITADA NO SEAPLICA A:
I.
2.
3.
Las visitas de Asistencia a domicilio para enfregar, recoger y/o instalar el producfo, instruir o sustituir
fusibles en su casa o corregir el cableado, o la correcci6n de reparaciones no autorizadas; y
Da_os o problemas de funcionamiento provocados por un uso inadecuado, abuso, funcionamiento
fuera de especificaciones ambientales o contrario a requisitos o precauciones en la Guia de
funcionamiento, accidente,fuego,inundaciones, insfalaci6n inadecuada,fuerza mayor,
modificaciones o alteraciones no autorizadas, corriente el_ctrica o tensi6n incorrecta, o uso comercial,
o usos distintos a aquellos para los que fue dise6ado.
Por Io tanto, loscostes de reparaci6n o sustituci6n de un producto defectuoso deber6 correr por cuenta
del consumidor.
NUMEROS DELCENTROINTERACTIVOS PARACLIENTES:
Probar su cobertura por garantia
Obtener asistencia del centro de asistencia
autorizado m6s cercano, obtener asistencia de
producto, cliente, o servicio
Conserve su ticket y recibo de compra para probar la
fecha de adquisici6n del producto.
Deber6 enfregar una copia de su recibo de compra
en el momento en que reciba servicio bajo garanf_a,
Llame an 1-800-243-0000, 24 horas al dia, 7 dias a la
semana.
Seleccione la opci6n adecuada del menU, y tenga
disponible su tipo de producto (aire acondicionado),
n0mero de modelo, n0mero de serie, y c6digo postal; o
visite nuestro sitio Web en http://www.lgappliances.com

LGElectronicsInc,willrepairoratitsoptionreplace,withoutcharge,yourproductifitprovestobedefectivein
materialorworkmanshipundernormaluseduringthewarrantyperiodsetforthbelow,effectivefromthedateof
originalconsumerpurchaseoftheproduct,Thislimitedwarrantyisgoodonlytotheoriginalpurchaseroftheproduct
andeffectiveonlywhenusedintheUnitedStatesincludingAlaska,Hawaii,andU,S,Territories,
WARRANTY PERIOD:
Labor: 5 Year from the Date of Purchase.
Parts: 5 Year from the Date of Purchase,
Compressor: 5 Years from the Date of
Purchase.
HOW SERVICE ISHANDLED:
Call 1-800-243-0000 and choose the appropriate prompt, Please
have product type (Room Air Conditioner), model number, serial
number, and ZIP code ready,
The warranted labor covers the cost of In-Home Service on all
parts including the compressor,
THIS WARRANTY IS IN LIEUOF ANY OTHERWARRANTIES, EXPRESSOR IMPLIED, INCLUDING WITHOUT LIMITATION, ANY
WARRANTY OF MERCHANTABILITYOR FITNESSFOR A PARTICULARPURPOSE.TO THE EXTENTANY IMPLIEDWARRANTY IS
REQUIREDBY LAW, IT IS LIMITEDIN DURATION TO THE EXPRESSWARRANTY PERIODABOVE. LG WILLNOT BE LIABLEFOR
ANY CONSEQUENTIAL, INDIRECT, OR INCIDENTAL DAMAGES OF ANY KIND, INCLUDING LOST REVENUESOR PROFITS,IN
CONNECTION WITH THE PRODUCT. SOME STATESDO NOT ALLOW LIMITATION ON HOW LONG AN IMPLIED WARRANTY
LASTSOR THEEXCLUSION OF INCIDENTAL OR CONSEQUENTIAL DAMAGES, SO THE ABOVE LIMITATIONSOR EXCLUSIONS
MAY NOT APPLYTO YOU.
THISLIMITEDWARRANTYDOES NOT APPLYTO:
2,
Service trips to your home to deliver, pick up, and/or install the product, instruct, or replace house fuses or
correct wiring, or correction of unauthorized repairs; and
Damages or operating problems that result from misuse, abuse, operation outside environmental
specifications or contrary to the requirements or precautions in the Operating Guide, accident, vermin,
fire, flood, improper installation, acts of God, unauthorized modification or alteration, incorrect electrical
current or voltage, or commercial use, or use for other than intended purpose,
3. Therefore, the cost of repair or replacement of such a defective product shall be borne by the consumer.
CUSTOMERINTER-ACTIVECENTERNUMBERS:
To Prove Warranty Coverage
ToObtain Nearest Authorized Service Center or Sales
Dealer, or to Obtain Product, Customer, or Service
Assistance
Retain your Sales Receipt to prove date of purchase.
A copy of your Sales Receipt must be submitted at
the time warranty service is provided,
Call 1-800-243-0000, 24 hrs a day, 7 days per week.
Choose the appropriate prompt from the menu, and
have your product type (Room Air Conditioner), model
number, serial number, and ZIP Code; or visit our
website at http://www.lgappliances.corn.
Patent No. "Us 6, 412, 298
P!No.: 3828A21004K Printed in China
-
 1
1
-
 2
2
-
 3
3
-
 4
4
-
 5
5
-
 6
6
-
 7
7
-
 8
8
-
 9
9
-
 10
10
-
 11
11
-
 12
12
-
 13
13
-
 14
14
-
 15
15
-
 16
16
-
 17
17
-
 18
18
-
 19
19
-
 20
20
-
 21
21
-
 22
22
-
 23
23
-
 24
24
-
 25
25
-
 26
26
-
 27
27
-
 28
28
-
 29
29
-
 30
30
-
 31
31
-
 32
32
-
 33
33
-
 34
34
-
 35
35
-
 36
36
-
 37
37
-
 38
38
-
 39
39
-
 40
40
-
 41
41
-
 42
42
-
 43
43
-
 44
44
-
 45
45
-
 46
46
-
 47
47
-
 48
48


LG LWHD2500ER El manual del propietario
- Tipo
- El manual del propietario
- Este manual también es adecuado para
en otros idiomas
- English: LG LWHD2500ER Owner's manual
Artículos relacionados
-
LG CL8000ER El manual del propietario
-
-
LG Electronics LWHD1200FR Manual de usuario
-
-
LG HBLG6000R El manual del propietario
-
LG BG8000ER El manual del propietario
-
-
-
-
Otros documentos
-
Goldstar WG1805R El manual del propietario
-
COMFORT-AIRE RAD-183A El manual del propietario
-
Goldstar M8004R El manual del propietario
-
-
-
Goldstar WG5004R El manual del propietario
-
-