COMFORT-AIRE RAD-101B El manual del propietario
- Tipo
- El manual del propietario

MODEL: RAD-10,1 B
9

_uUo_ ...........................3
_ore Operat_n .............................. 7
Int_uction ..................................... 8
Sym_ Used in this Manual ........8
Features ........................................ 8
El_l Safety................................9
Adapter.........................................11
Exte_n Cod ............................ 11
Wi_ Requir_e_ .................12
Size ...............................................12
Of ................................. 13
P_lon of C_sis ............... 14
Unit !n_!a_ ............................ 15
ope_ I_m_ons ...................17
_rr_te C_ol _erations ........ 17
Air Di_on ............................... t9
V_ Co_trol ............................. 19
_in Pipe .................................. 20
Rem_l _m Widow ............... 20
Ab Fiffer ..................................... 21
Cl_ing] the _r _d_oner .....21
How to _ove
FrontGdtle ................................. 22
Com_ Prol:_s and
Sol_s ....................................... 23
TroutY_ti_ ............................ 24
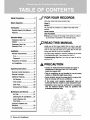
FOR YOUR RECORDS
Write _e modeland ser_ r_s here:
_el #
Ser_ #
_ can findthe num_ on a I_el on the sid_ o| the
pmd_.
D_ PumPed
• Stap_ _r r_ipt _ this pa_ in _ ,Erver.__ need it
to prove_ of purch_e o,rfor wa_ iss_so
READ THIS MANUAL
!_e _ wifl!find many _!_ul! hin_ _ h_ to _e and
_ntaJn yourair co_i_!" pro_dy, Ju= a _i_ pr_tive
cam on _ur pa_ _n sa_ _u a g_t dee! of ti_ and
_J over_ life of yourair _io_er.
Y_'I_ flr_ _'_y an_ _ c_n pt'o_JemJs in the _att
oftrou_h_g _ps. ff you re_,d_ our_
_u_es_ng _1_ fl_ _ may _ ne_ to c_ll _
_ at all
• _nta_ an _ho_ Service Ce_ for mp_r
mai_.ce of:this un_. Ca!! 1_77-755_7932 m
• This air cond_er _ n_ i_ for use _ _ung
_i_ren ot _ _ _ _peF¢l_n.
•Young i_i_ren _uld _ su_rvi_ to en_m _
,.If t_ p_ _ mq_res _cement, have
A,Jt_ _i_er irmtalil_n exact imp__ part.
• Installetl. P_ _ be _orm_ In _rdsnce
w_ the N_ionel El_c C_ by quailed a_
aut_ _nne! only,
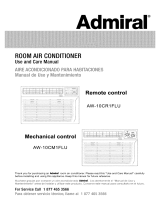
Room Air Con

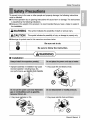
To prevent inju_ to the u_r or ot_r people and proper damage, the fo{/owing instructions
must be followed,
m incorrect operat_n due to ignoAng in_ruct_ons w_H_use harm or damage, The seriousness
is cJ_sified _ the fol_wing indications.
m Because of the weight of _e product, it _srecommended that you have a helper to assist in
the installatieao
iiiiiiiiiiiiiiiiiiiiiiiiiiiiiiiiiiiiiiiiiiiiiiiiiiiiiiiiiiiiiiiiiiiiiiiiii.......
[] Meanings of symbols used in this manua_ are as shown be/_.
@,
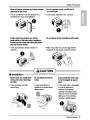
m |nstal ion
,, Improper a_emb_y or insta}_tion may ca_e
in_rre_ o_ratbn includinginjury,fire,
p,oorperformance and
* It may cause fire and ele_nc shock.
• _tm_ cause ele_dc sh_ a_ failure.

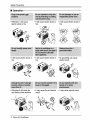
Safety Precautions
m Operation
=Otherwise, _t_! cause
e_ric shock or fire,
,,it will _use electricsh_ or
fire,
, it:wil_ _use el_t_ shock o[
, O_e_ise it wilicause fire
and el_r_ sh_k a_ent,
4 Room Air Co r
"_t will cause etectrie shock or
fire.
,,Jtmaycausefire and e_ectric
sh_ko
,,it wil_cause ele_#c shock or
fin.
,,No grounding may _use
,,_tm_j _u_ ele_ric shock.

SafebyPreca_s
Do.ot,o e air .d[ Jo.,er
* The air condi_oner must be _erate.d in a * Hmay _ exp!_, fire, and burn.
enc_ area to _ most e_,,e.
• k wil!cause electric _k or failure of
• Water may enter _e unit and degrade
ir_ul=iono litm_ _use an ,el_ric sh_.
[] Ins_!lation
theun_w_n _ang
the fi!'mr,
• _y _'e sh_p and may
cau_ inju_.
Oon_ b_k the |n_ or Ensure _at _e o__
_1_' dam_ _ age
_r,
• It may_use, _iJureof
applianceor'_,r_q,_
• ff tf-_ outer _ is,damaged,
it musl _ _red or
replaced imm_tely.
Leaving it _ma_d _uld
resuff in the air ¢ondi_oner
_l_ng out of the w_ndow,
creating a safety hazard.

5a_ P_u_oFm
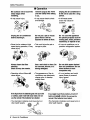
[] Operation
,Wuch
sharp edg_ _en (n_ _ _le)_ _king it _11 n_ _ u_d _ra _ng
insUliing' it_ _ri_,
• it m_ cause injury. • it:may _u_ ele_ric sh_
_d da_,.
., It v,_l waste power
and _ may _use an
a_dent.
b_m _aning it.
• _ the fan rofatesat high
_d during _emtion, it may
._ injury.
pl_t where k _|lbe s_ci= _t_ su_
ex_d to ei_ait_ flow' C_l_ Pro, _s, pr_ion
m_h!r_, or _je_ ofa_,
• Dis could injurethe _t or • It _ _ air _ioner, not a
pr_ision refrigeration system.
• O_on wi_o_ fikem will
,_use failure
• T_ app_n_, of the air
_ndiUoner _y detedo_te,
charge co_or,or develop,
suite flaws.
•.It _ notsanii_ an_ _uld
c_u_ iiln_s orperso_]i
injury h_.
* The chemi_is in ba_es _Id _se b_ms or
o_er heai_ haza_s.
• The ch,_i_ls in batteries _ld _use bums o_"
o_er hea]_ h_a_s.
6 Room Air er

_fore Operation
1. Plug in the power _rd properly:
2. Use a dedicated circuit. Overloading the line could create a fire hazard..
3, Do not use an extension cord. S_ page i 1 for more details.
4. Do not start/stop operation by plugging/unplugging the power cord.
5. if the power cord is damag_ and requires replacement, have an Authorized
Servi_r install an replacement paM.
1. Being exposed to direct airflow for an emended period of time could be
hazardous to your health. Do not expose occupants, pets, or plants to .direct
airflow for nded periods of time.
2. Due to the possibii_y of oxygen deficiency, ventiiate the room when used
t_ether w_h stoves or other heating devices.
3. Do not use this air conditioner for non-sp_ifi_ specia_ purposes (e.g.
preserving precision devices, food, pets, piants, and art objeds). Such usage
_uid damage the items.
4. The air conditioner is a consumer comfo_ appliance, not a precision climate
control system.
i. Do not touch the metai parts of the unit when removing the filter. Injuries can
occur when handling sharp metal edges.
2. Do not use water to clean inside the air conditioner. Ex_sure to water can
destroy the insulation, Ieading to possible electric shock.
3, When cleaning the un_, first make sure that the power and breaker are turned
off. The fan rotates at a ve_ high speed during operation. There is a
poseibili_ of injuPj ff the unit's _wer is accidentally triggered on while
ciean{ng inner parts of the unit.
For repair' and maintenance, contact an Authorized Servia Center, See the
warran_ page for details or call 1-8_-755-79_. Have your model number
and serial number avaiiab_e. _ey should be written on page. 2 of this manual.
Manual Y

Introduction
This symbol alerts you to the risk _ electric shock.
This symbol alerts you to haza_s _ could cause harm to the
air conditioner,
This sym_l indicates s_cia| notes.
WARNING: _is appliance should be installed in accordan_ with the
National Ele_tic C_e°
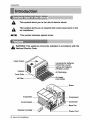
Up_r Guide
Front G_lle
Air Filter
Honzon_l Air Defl_o,r
(Horizontal Louver)
Verti_i Air D_e_or
(Ve_ca! Lo,_er)
-- Air Dis_arge
Air Intake
(Inlet Grille)
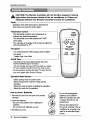
Control Boa_
Re,_te Co_roller__
Base Pan
Power Cord
8 Room Air Co r

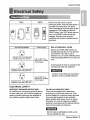
i15V~ 230V~
Power _ may include a ,cu_nt
interrupter ,device, A test and r_t b_ Is
provided on _e p!_l case, me devica
should be,tested _ a pa_odio basis by _t,
pr_sing _e TEST bu_ and _en _me
_SET Ibu_on° if the TEST bu_ does not
t_p or ff the RESET blain "_1_not s_y
eaga_d, d_,nanue use _ the air
_dltJo_r and _tact a qaal_ed s_lca
techniciani,
Sta_ t25% 3-wire g_lndi_
re_,lP_C_e _t_ 1_, 125V AC U_ 15_P. N_
de_ay f_e _ 15 AMP..
8_dard 2_V, 3-wi_ @_u_di_
_tac_e _ed _, 2_V AC
Use 20 AMP. _
_e _J_d _A, 2_V AC
Use of extension co_s
B_u_ of _tentlal safe|y I_a_& we
str_gly d_umge the u_ o#an _tension
_rd_ Ho,_er, if _u wish _ _e an
extension ,_rd,. use a CSA c__L4is_ed
3-wl_ (girmJnding)e×tensl_i _,_, _ 15A,
125M
Nil _i_ s_uld _ _,dle i_ a_dan_ _th
_] electrical _des and _ul_s.
Numinulm house wiring m_ _e _.al
p_lems. C_suit a qual_i_ ele_ian.
ELECTRICAL 8AF ET_
IMPO_ANT GROUNDING INSTRUC_O_
_r _nd_o_ has,a th_rong grounding p|ug
i_er sup_ _, _Ich must _ _ugg_ In_
_y g_nd_ thm_pr_gi wall _p_e _r
_ur prot_oa against pos_Ne sho_ hazard,
230, 208, a_ 2301208 _LT UN_S
_,,esa u_ are equi_ed _ a _e_
g_undJng plug o_ _e _er _ap_ _, _ch
m,_t _ p_ged i_ a matchi_ ip_ grounded
thr_pmngl wall _clie for _ur protec_J_
agains_ p_.sib_e sho_ ha_rd, Ifsu_ a_ _t is
not p_ent, one m_t _ ins_l_d by a qual_
e_c_icia_ in a_dan_ with _e Natbnal E.II_d_l
_e a_ I_l _ and o_ina_,
DO NOTUSE._ EX_NSlION CORDon 230,
208,and 2_,1208_ un_.
9

Ele Safety
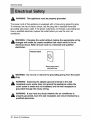
WARNING: This app|lance must _ p_pody g_unded,
The power cord of _is appliance is equip_d with a three-prong grounding plug.
To minimize the dsk of electric shock, use the plug with a standard three-slot
grounding wall power outlet, if the power outlet does not include a grounding slot,
have a quaLifi_ eiectrician repiace the outlet _fore you use the room air
conditioner.
WARNING: Changing the outl_ without making the appropriate wiring
changes wiii create an unsafe condition that couid result in fire or
eiectrical shock. Refer all such work to a ilcens_ and qua|ifi_
el_iclan,
P_ meth_
Ensurep_r grou_
exi_ _f_e use
WARNING: Do n_ cut or remove the grounding prong from the power
plugo
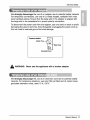
WARNING: Attaching the adapter g_und retinal to the wall
_ceptacle cover _rew does not ground the appliance unless _e
cover screw is metal and not insulted, and the wall receptacle is
grounded though the house widngo
WARNING: if you have any doubt whether the air conditioner is
proporly grounded, have the wall rece_cle and ci_uit choked _ a
qualified electrician,
10 Room Air Con r

We strong_ discourage the use of an adapter due to potent_a_ s h_ards.
For temporary connections, u_ on_y a ULolisted adapte5 avaiiable from most
local hard#are Mores. Ensure that the large slot in the adapter is.aligned with
the _arge slot in the r_eptac_e for a pro_r pofari_ connection.
To disconne_ the power cord from the adapter, use one hand on each to avoid
damaging the ground terminal Avoid frequentJy unplugging the power cord as
this can lead to eventua_ ground termina! damage.
_Me_J _rew
WARNING: Never u_ the appliance with a broken adapter.
We strongly ,discourage the use of an extension cord due to potential
hazards. For tem_rary situations, use oniy CSA certified and UL iisted 3-wire
grounded extension cords, rated 15 A, i25 V.
0 Manual 11

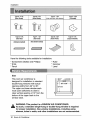
T_ k: t 1 EA Type B,:5 _ Ty_ C: 1 _ Ty_ D:3
TNe E: 1 _ Type F: 1 _ TypeG: 2 _ Type H: _
(Seal_p) (Sash S_I) (_e IP_e_)
(AdP__e _ed) (N_ adh_e backed)
...............................................................................................
Have the following tools avail_le for installation:
* Screwdriver (Slotted and Philtips) * Ruler
* Knife * Hammer
* Pencil * Level
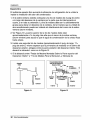
Size
This room air conditioner is
designed for ins_llation in standard
double-hung windows with actual
opening widths from _" to 36°.
The upper and lower window sash
must o_n sufficiently to aJlow a
clear vertical _ening of 13" from the
bottom of the upper sash to the
window stool,
.,,,,,,,,,o,i__. to _"
/
13" min
I I
WARNING:_is p_duct is a WINDOW AiR CONDi_ONERo
As such, a stsn_ single=hung or doublmhung window is _quited
for proof insf_llationo Non-w|ndow installations, including using
s| , holes in wails, and other insta|iations are not re_mmen_o
12 Room Air Conditioner

tion
Cieatance
Proper clearance enhances the cooling efficien_ of the unit and prevents heat
radiation of the condenser.
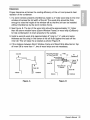
1+if a storm window presents interference, n a 2" wide wood strip to the inner
window sHi across the fu+l width of the sllL The wood strip should _ th+ck
enough to raise the height of the window sill so _at the unit _ be installed
without interference by _e storm window frame.
2+See Figure. B+The top of the wood strip shou+d be _proximatety 3/4" higher
than the storm window frame (Storm Window Frame) or wood stdp (Outdoors)
to help condensation to drain properly to the outside.
3+ install a second wood strip (approximate+y 6+ _ong by 11/2" wide and same
thinness as first strip) in the center of the sill flush ag_nst the back off the
inner sill+This will rai_ the L bracket as shown Figure. B.
4+ If the distance between Storm Window Frame and Wood Strip Mounted on Top
o# _nner Sill is more _an i ", two of wood strips are not n_essary+
Inner_ll
l_om 7 _ out_m
Figure, A Figure, B
Owner's Manual i3

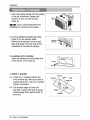
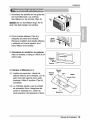
Instaflation
i. In_ the guide panels into the guides
of the air conditioner. Fasten the
curtains to the unit with screws
(Type A).
: Use a _ong _rewdriver and
tnstaillng the screws will be easier.
2,,Cut the adhesive-ba _a_ strip
E) to the window w_h.
Remove the backing from the seal
strip and attach _e seal strip to _e
underside of the bottom window.
T_ A
3. Loca_ng unit in windew
Open the window and mark center line
on the center of the inner siiL
4. A_ch L bra_et
4-1. install the L brackets behind the
inner window sill, with short side of
b t as shown. Use the 2 screws
(Type A) provided.
4-2. The bracket helps to hold unff
_curely in place. Be sure to p_ace
b t edge flush against back of
inner sill
14 Room Air Conditioner

Ins_llation
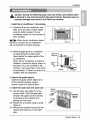
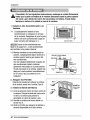
Caution: During the following step, ho|d unit: firmly unti| window sash
is lowered to top channel behind si_ panel frames. Pe_onal Injury or
pmper_ damage may _sult if unit faUs from window:
i _Install the air conditioner in the window
1ol. Carefully lift the air _nditioner and
slide it into the open window. Make
sure the bottom guide of the air
conditioner drops into the notches of
the L bracket.
_: When _e air conditioner drops
into the L bracket, the air _nditioner
w[tl be centered in window opening.
,CenterLine
While steadying the air _nditioner,
carefully bring the window sash
down behind the upper guide of the
air condffioner.
When the air conditioner is properly
installed, it should titt slightly down at
the back. if it is set correctly in the
window, it wil_ hang lower in the back
automatically. If it d_s not, there is a
problem with the installation.
2. Secure the guide panels
E_end the guide panels (Type G) to
fill the window opening using 4
_rews B) to secure them.
3. Install t_ sash seal and sash I_k
3_1
Cut the sash _ai F) to the
window width. Stuff the sash _ai
between the giass _d the window
to prevent air and insects from
geeing into the room.
n the L bracket using a screw
(Type A).
3-3, Remove the screws that secure the
cabinet and base pan in the right
side,
L Brac_
Owner's Ma#uat f5

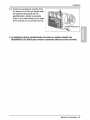
3-4. Fasten the suppo_ bracket (Type H)
using a screw removed from the air
conditioner cabinet. Attach the
suppo_ bracket (Type H) to _e inner
window sift with a screw (Type B).
4. Window installation of room air condiUoner is now completed°
See ELECTRICAL DATA for a_ching power cod to eie_ticai outieto
R_m, Air CondiUoner

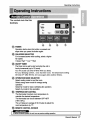
Operating lnstm_ons
The _ntrols _ook like this:
O_ra_on starts men _is button isp_ed and
stops vv_en_you pm_ the _JttO,nagain.
FANSPEED SELECTOR
Forincreased_r while_oiing, sele_ a higher
fan s_ed,.
3steps:High --Low,-- M_
ONIOFFTIMER
me timer can be set to sta_ and stop the unit In
hourlyincremen_ (up to !2 hours).
You will usually use shut-off Ume _ile _ou sleep.
For your Seeping _mfo, rt, on_ thetimer is set, the tem_rature set_i_
will rai_ 2°F _er 3Omins and _ again a_er another 30minso
OPERATIONMODESELECTOR
_,le_ _o_ing m_e to_,1 _e room.
Sele_ enemysavermode _r energysa,_r_
Sele_ fan mode for ba_c ventil_ng fan o_ration.
_le_ dry mode.f_- d_ o_ration.
TEMPERATU_ CONTROL
The thermostat mon_ors room _mperature
maintain the desired tem_rature°
The thermostat can be set _tw_n 6_F~8_F
The unit_s; an av_ge of_ minut_ _ adjust_e
room t,em_mtum _ !°E
_MOTE CONTROL SEN_R
i iI
ow,_.r's Mahdi

O_mting
CAUTION: The Remote Controller wig not fun_ion properly ff strong
light strikes the sensor window of the air conditioner or if there am
obstacles between the Remote Controller and 'the air conditioner°
Operation sta_ wh_ _k buttonisprosed and
sto_ whenyoupressMe button again,
Tmperatum Control
me th mon_.o_ mornt_pemture to
main_in the desiredtemperetumo
De the_ _n ibesetbe_veen 60°F~86°F
The unit _kes an .averse of 30 minut_ _ adjust the
room temi_reture by 1"IF.
Fan S_
For incased _v_r whiie_ling, _lect a higher
fan :spe_.
3 steps: High-L_-M_
Onl_ Timer
The _mer _n _ set to startand stopthe un_ in
hou_yincren'en_ (upto 12 hours).
You _ll usually use shutoff time,while you s_p,°
For'your sleeping _lmfo_,on_ the Umeris set,
• e tem_ratu_ se_ng will raise 2_ after 30rains
and on_ again a_er another 30mi_.
O_raUon Mode Selector
Sel_ _ling m_e to coolthe _m.
_!_ energysaverm_e _,r energysaving
_1_ fan m_e for ba_c venUlaUngfan o_retion.
_le,_ d_ m_e for d_ opere_on.
How to Insert
i. Rem_ the _r from the _ of Me,remote
_n_ler
2. Insert two batt_.
su_ of_ polari_ when instaUing the
sure that bo_ b_e_es are r_v.
3. Re-_ch _e cover..
Temp
Timer M_ie
Do not u_ recha_able
batteries. Such ba_ries
d_r fr_ standardd_ _ls,
in sha_, dimensions,and
Re_,'e the b_er_ _m
the remote _tmller if_e air
condi_oner is _t: _ng _
u_d _r an _-tend_ i_g_
of t_me.
Room Air Cond_oner

Ope_ting Instructs
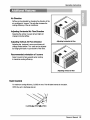
Air Di_tlon
AJr_ _n _ adjus_d by _anging the dijon of the
air condi_onefs ilouve_,_s _n aim in=ctea_the
_ling _ency of the air _n_d_ner.
Adjus_ng Hori_n_l ,Nr Flow Oire_on
Adjus_ng _e 've_cal /_uve_ i_ and _ght _ll
c_nge _ri_zonta_ ai_.
AdjusUng Verti_l Air Flow Dir_tion
AdjustJ_ the ho_! vane up and down will
c_nge ve_ aii_, The va_ _n be adjusted
nudging the _ or up and do'_ of the vane.
Recommended orientation of louvers
Adjust 10_ to fa,_ u_ards _en _oli_
m_imize _Ung emdien_,
Adjusting ho_! air_,w
AdJu_ng ve_ air fl_
VentControl
For m_mum _ting emciencf, CLOSE the ve_, This willla_l_ intema! air d_l_°
OPEN _ _nt to dilate sta_e,a_r,
CLOS E,,I,,VENT--t OPEN
_er_ Manual

Operating Instructions
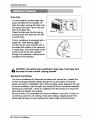
Drain Pipe
in Ihumid weather, excess water may
_use the Base Pan to ove_ow. To
drain the water, remove the Drain Cap
and _cure the Drain Pi_ to me rear
hole of the Base Pan.
Press the d_in pipe into me ho!e by
pushing down and avcay from the fins
to avoid injury.
This air _nditioner is equipped with a
slinger fan. (See drawing, _ght. )
The fan has an o_er nng that _ns in
me water mat _llects in me base pan
if it gets deep. That conden_te is men
picked up by the fan and expelled
mrough the condenser, making the air
conditioner more efficient.
_refu! when in_ing the drain pi_. Push away _m
the sha_ fin area to avoid injudng yourselfi
Removal From Window
Turn the air condiUoner off, disconnect me power _rd, remove the L bracket, me
s_ews and Su=ppo_ Bm_et installed through the top and I_om of me guide
panels, and save for reinstalla_ion later. Close the guide panels. Keeping a firm grip
on the air _ndition,er, r_ise the sash, and _reful_ ti_ me air cond_ioner bayard,
dimining any ccondensate. Lift the air _ndi_oner from the window and remove me
sash seal from _f_ween the windows.
Be sum to drain ALL _ndensate from the,air conditioner, if _u don't, it could run
OL_while you carry the unit, making a m_ and creating a slipping hazard. This
simpJe step wil! save you mu_ cleaning and make a safer _rk environment.
Room Air

Maintenanceand Sei_qce
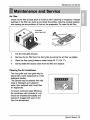
Air Filter
Check the air filter at least twice a month to see if cleaning is n_essary, Trapped
particles in the filter can buiJdup and blo_ the allow, reaucing _oiing capacity
and _using an a_umula_on of frost on the eva_mtor. To clean _e air filter:
1.
3_
4.
Pull the inlet,grille forward.
Remove the air fi_er from the front ,grille by puiiing the air filter up slightly,
Wash _e filter using lukewarm water bel_ 40 °C (i04 °F).
Gently shake _e excess water from the filter and replace.
Cleaning The Air Conditioner
The front grille and inlet gdHe may
wiped _ a cloth dampen_ in a mild
detergent _luUon.
The _binet may be wash_ w_h mi!d
_ap or detergent ,and lukewarm
w_ter, then polished with Liquid Wax
for Appllancesi,
To ensure _ntinu.ed _ak emciency,
• e condenser _i!s (ou_iide of unit)
should be checked periodi_lly and
cleaned if cl_ged with _ot or di_
from _,e atmosphere,
Owner _ Manua/

MaintenanceandService
H_ to Remove the Front Grille
1i' P'ull the inlet grillieforward
2. Remove the screw secudng the
Front Gril!le.
3. Push the grille up from the _om and
the top of the grille away from me
case as the top _bs [lifto,_ o,ftheir
22 Room Air er

B_o_ Calling for' Servico
Maintenance _ _e
If you have proteins with your air _nditioner, read the foll_ing information and
tR/to solve the problem. If you _nnot find a _lutiion, turn off the air coind_ioner
and _ntact your dealer.
Air conditioner does not o_m_
1. Ensure that the air conditioneris plug.g_ into a proper outlet.
2. Check _e fuse or ciroJ_ breaker.
3. Ch_ whether the voltage is unusually high or low.
Air d_s not feel cold _ough on the cooling _ng
1. Ensure that the temperature,settingsare co_e_.
2. Check to see if the air filter is clogged with dust. if _, clean the filter.
3. Ensure that the air flow frmm the o_side is not _structed and that there is a
clearance of _r i20" between the back of the air cond_Jonerand _e wall ori
fence behind it.
4. Close all doors and windows and check for any source of heat in the room.
Before _lling for _rvice, ple_e review the following list of common
problems and _luUons.
The air conditioner is ope_ting normally when:
• You hear a pinging noise. This is caused _ water being picked up by the _n on
rainy days or in highly humid cond_ions. _is feature is designed to help remove
moisture in the air and improve c_ling efficiency.
See the section on Slinger Fan, page 20.
• You hear the thermostat click.This is cau_d by the compres_r cycle sta_ing
and stopping.
• You see water dripping from the rear of the unit. Water may be collected in _e
base pan in high_ humid cond_ions or on rainy days. This water overflows and
dri_ from the rear of the unit.
• You hear the fan running while the _mpressor is silent. _is is a normal
o_rational feature.
Ow_r's Mahdi

Maintena_ andService
i ii i i _
iii_i_iiiii iiiiii iiii ii iiii iiiiii iiii ii ii
The air _nditioner may _ ope_n,g abno_al!y when:
Air
does not
m The air conditioner is
[] The fu_ is blowrJci_it
Make sure the .aircondi_oner plug is
pushod compJetely into the outlet.
Check the house fuse/circuit
breaker box and replace the _se
or reset the breaker.
........................................................................
If power failure occurs, Urn the
[] Power _ilureo mode con_-ol to Off ( Mechanical
Type).
does not
cool as it
to prevent tripping of the compressor
ove_oad.
[] The current inte_pter Press the RESET bu_on located
device is tripod, on the power cord
plug. If the RESET button will not
discontinue use _ the air
conditioner and contact a quailed
service t_nician.
[] Ai_ is restricted. Make sure there are no cumins,
_inds, or furniture b!_ing the
_nt of the air conditioner.
[] The thermo_at may not Turn the knob to a higher number.
be set hig h enough. The highest se_ing provides.
maximum cooling.
...................................................
[] The air filter is dido Clean the 51ter at least every 2
See the Care and Main_nance
[] The room may have been When the air conditioner is first
hot. turned on, you need to allow time
for the room to cool d_n.
-_/d-airisescaping. Check for o_n furnace floor
isters and co_d air returns.
S_ Air CondiUoner Freezing Up
freezing up
[] Ice bloc_ the air fl_ and
sto_ the air conditioner
from cooling the morn.
Set the m_e control at High Fan
or High Cool with thermos_t at i
or 2.
* You _n rear to the Energy S_r program in detail at www.ene_tar:,gov:
Room Air _di'doner

_ner's Man_! 25

Memo
26 Room Air Conditioner

P_ucio_s de _ut_ad ..........28
A_ de p_er en m_a ............
|nt_6n ................................... 33
SImbol_ Utilizadose_
E_(e M_ual ....................................33
Cara_er(sticas ............................. 33
Segur_ El_rica .......................
U_ Transito,rio_ un
__r ...................................... 36
U_ Tempora)de un
_e A_0t .............................36
In_lac|_ ...................................... 37
R_uerim_s _ Ven_'la .......... 37
Tama_ .................................... 37
EsPa_o lib_ .............................. 38
P_a_6n _ _ C_ ........ 39
In_6n _ _ Unidad .............. 40
|n_io_ de
Funcionam_nto .............................. 42
I_ns de ContmE
F{e_o ...........................................42
Control F_e_o ........................... 43
Adi_al_ e Ca_erf_ ........44
Di_ de_Aim ................ 44
C_I _ venti]_iin ............... 44
Tubo de Desag0e ..................... 45
Re--do de la Ve_a .........45
M_nim|_o y Se_©_ ............. 46
FHttode Airs ...............................46
Aco_ado ............................46
Co_ Remo'_r ta Panl_
Ftont_ ........................................ 47
Pm_a_ y So)uciones
__ ...................................... 48
R_uc_ de pro_s ............. 49
PARA SUS ARCHIVOS
Escr(_ aqu! e) _e!o y n_rn_ de set,e:
Mo_o n°:
_r_ n°;
Puedeen_ntmt I_ n_ros en _ e_u_ de la _
later_ d_ pt_.
_a _ c_:
I! _unte su reci_ _ _ _g(_ con (a g_pa_ra p_
el _mento que Io _ite Wa probar la(_a de su
adquisi_n o papa_ _[dacl_n ,_ _ _r_ia_
LEA ESTE MANUAL
En su tnt_or __ m_ _s 0_l'es_re
utl(_i6n y _n_n_[ento _ su _i_ de _m.
LIr_ ip_os _dos p_ su parle _ p_en a_ar
m_ho t)_ y _inem _urante _ vi_ de s_
_ndi_n_dor de aim.
En _ labia de co_sejos para la sol_ci_n r_i_ de
plrobl_s enco_mr_ m_ _puestas a I_ p_)emas
m_s h_itual_. Si revlsa primeto, nuest_ TabIa de
_sejos pare _ _l_n r_ida de pmb)emas,_ vez no
ne_ite I_rr_r n_ allseato _n_.
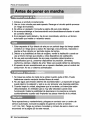
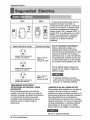
PRECAUClON
ub_ _ _ m_ _r_.
_ odi__ _n _ __ _
.o i_n _ elaim_nd_d_
• Sl_ _ el_ dealiSOn, _ a_
• El_ _ I_i_ d_ _r _ _ _ al
_igo E_ _donal, _¢a_ _ _ _1 _o y
Manual _! Propietan'o 27

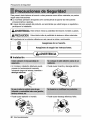
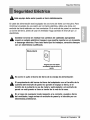
Precauciones de Seguridad
Para prevenir tanto _esiones a_usuario u o_as pe_onas come daSos mateti_es, es precise
s_u_t _nstru_iones,
m La in_tre_a operaci6n de! aparato come consecuencia de ignorar I_ instrucciones
p r_ da_os o le_ones,
m A cau_ de_ peso p del producto, se rec_m_enda que usted tenga a un ayudante a
pa_icipa en la instalac_n,
m El Wgnificado de t_ s{mbolos utiIWa_ en este manual se _ndica a cont_nuaciSn,
A_g_rese de no hacedo. 1
Aseg_tese de seguit |
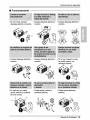
m |nstalaci6n
,,Un montaie o ins_laci6n defectuoso puede
p run funcionamiento ir_orr_o,
induyendo nests _ _esiones, ince_ios o
_s¢_ el_ricas,
• Pue_ cau,,s_e_|_i6n e incendio.
28 Aim A_ a_r
,, Pue_ causar incendie y descarga el6_d_
, Pue_ causar descarga e_tri_ y WH_,

Preca de
m Funcionamiento
• De otto mo_, ca
d a el_f_ o incendio.
,,Cau_ d a el o
incendio.
,, En caso que no, puede
, Causar_ descarga e_ctdca o
incendio.
, Causar_ descargael_n_ o
in_ndio.
, Causar_ de_arga e_@tdca o
in_ndio.
,, Si _ hay conex_n a masa,
se puede producit una
de_a_ el6_rica.
causar +ncendio y acci_nte
de _rto drcuito.
, Puede causar ir_endio y
accide_e e_6ctrico.
,,Puedecausar _arga
e_6ctdca.
®
Manual del rio 29

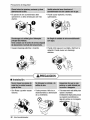
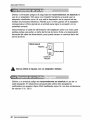
Prec_gu#on_ de Seguridad
, El a_rato de aire acondic_onado debe
o_rse en un Area ce#ada papaser m_
, r,_descatga el_tt_._ o in_io.
• Pu_e _u_r _p!osiSn, incendio,
quemadara&
• Puede entrat 8gua en la unidad y disminuir la
ais}aci_. Pue_ cau_r una descarga
el6_r}ca.
[] |ns |aci6n
PRECAUCiON
, Son fitosas y pueden _asar
_esiones.
,, Pu_e p r e!AI}o de un
el_trodom6st_o odeterioradSn
su rendimiento°
30 Aim A dot

[] Funcionamlento
_que _ _ _n I_
• Hay nesgo _ le_on_
8harp
cue_ (.o_ _1_
Cuan® I0 _ue,
* Pu_e _r descar_
e_rica y daSo=
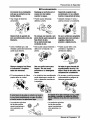
Precauctones _ Seguridad
_dic_n® si_ a _l_
• Gastar_ ene_graen w_ y
_drfa pr_ocar un a_ide_.
• _mo _ _la_r 9i_ a al_ • E_e puede CaL=_ lesi_s o • P_@ CaL_Z @J_Oa los
_ocidad cu=a_oest__n_, _os en la mas_ o la _irr:_es o vege_es y
_u_r le_ p_rdida _ o_etos
Slempm _um los fi_ g_ una _o sua_ _m
al in_r_dos: _mpiel_ |imp_ro NOu_
_da d_ _'n=n_, _1_ o _ d_en_
• EI f_onam_nto sin fi_ros
puede _r la unidad0
•_ uni@d del _re _icionado
pue_ _tefiom_, _m_r de
color,odesa_ll_ manc,_s en
superf_ie.
No _ el _ dren_a d_
a_dic|o_d!Or _ _im'l No
didja _ flu_o de _m S610a !_
_p_ de I_ h_clen;
• No _ _ y _r_'a provocar
erffermedad_ o _li_s
lesio_es _onales
• Los p_ctos q_iml_
de _ pilas podrian
_sar quem_uras u
_ros perjuiciosa _a
_lud
*L_ pr_u_ quimi_s
]as pilas _ri_
Manual _1 P_ietar_ 31

,P_io _ Funcion_iento
1. Coloque el .ench_e correctamente.
2. Use un _nico circuito pare este aparato. Re_rgar e_circuito podrfa provo_r
un riesgo de incendlos.
3. No _ilice un alargador. Consulte la p_gina 36 para m_s detal[es.
4. No arraniqiue/detenga ,el funcionamiento enchufando/deser'_hufando e[ cable
de _mente elderly.
5. Si el alargador est_ daffado y ha de ser re_mb, iado, _licite a un t_ni_
autorizado que instale un re_bio exacto.
1. E_ar expuesto al fliujo dimcto, de aire _r un _r[odo largo de tiempo pu_e
_nst_uir unJriesgo para su saiud. No exponga a I_ _rsonas, mascotas o
plantas al flu,jo directo por peffodos largos de, tiempo.
2. Debido a la _sib, ilidad de faff_ade oxrgeno,, ventile la h_itaci6n cuando se
u_ al mismo tiempo que e_ufas u otros dispositivos de calefacci6no
3. No u_ este aco.ndicionador de aire para piro_s_.os determinados no
esp_fi_dos (por ej.: preservar dispositLvos de precisi6n, alim.entos,
cachorros, plantas y objetos de arte). Tales usos iPuede daffar los e!.ementos,
4. E! aparato de aire acondicionado es un aparato diseffado pare e! _nfo_ del
consumidor. No es un sistema aclimatiza_r.
1. No toque las partes de metal de la unidad cuando quite e_filtm. Puede
las_marse cuando manipule bordes filosos de metal.
2. No u_ agua Ipara limpiar adentro de! acondicionador. La exposici6n a! agua
puede destruir la ais!aci6n y esto a su vez provocar una des_rga el_rica.
3. Cuando [imp,ie la unida,d, a.s_r.e_ que la _rriente y e! inte_uptor est_n
desconectados. E[ ventilador gim a muy alta vel_idad cuando est&.
funcionando. Existe la _sibilidad de lesio.narse si la energfa _ conecLa
acciden_lmente cuando est6 limpiando las piezas intemas de la unidad.
"n
Pare reparaciones y mantenimiento, po gase en _nta,_o con un ce_ro de
sewicio autorizado. Consulte la p&gina de garantfa o Ilame al nemero
1-8_-.75_7932. Tenga su n_m_r ,dem_elo y n_mero de. serie a mano. Los
en_ntmr& en la p_gina 25 de este manual.
_re A_diciona_¥

Este sfmbolo Io advie_e de un peligro de acciden_ pot corriente
ei6_rica°
E_e sfmbo|o Io adtve_e de un _|tg_ que pu_a causar un da_o
de| vent|iador.
Este sfmbo|o sign_ica _nd_cciones es_ciai_s_
ADVE_ENCIA : Este aparato deberfa instalarse de acue_o con |as
normas de| C6digo E|_rico National
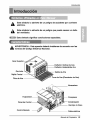
Gula Su
Deflector Venial de Aim
Deflector H_l de Ai_
Rejilla Fron_l
IFiffrode Aire
Salida deem
Toma de Aim (Re_,lector de Aire)
Panel! de Con_o!
ContromRemoto
B_nd,eja de Base
Cable el,_ctHca
Manual del rio

Segu'm_
1i5,V,~
[El_bile _ alimen_ci6n _Je_ _duir un
dis_.it_vo inte_p1[or _ _rd_nte La
_r_ del enchufe cuenta con un bo_bn de
p_a y o_ de retn_lo. El di_os_vo d_e
_p_ ped_i_men|e ptes_nando
_m_ el bot6a TEST y desp_s RESET. S_
e_bo_n _ST _ se d_e_ o si el _t_
_SET no p,_n_ a_ivo,, su_n_ el
uso de_ aire acondidon_o y p6nga_ an
_a_ _n un t_ ,de_rvi_
USi_ el e_hufe de la pa_
l_V, e_ufe de 3
Une_ _ 15A, 1:25VAC
Sta_ 250V, e_ufe de 3
LJne_ _ 15A, 2_ AC
S_ 250V, e_e de 3
_sumo de _ergla
U_!ll_ unfu_b_ de
15AMP.o _n
U_llii_e_nfggbWde
2OAMIP.o un
SEGURIDAD, ELE_ICA
N__F_ DE __ A TI_PA
IM_RTA_S
E__re acondi_nado t_ne aria ciavija de
con_i6n a tier_ de tr_ pa_s en s_ cable _e
suminst_o de eaerg_a, qa,e _r& ench_se en
un toma_ente die _ed de tres paras
conec_do a _ier_ ade_adamente _m s_
p_n _ntra un _i_e rie_o ee
USO _ C_N_$ BE _NSION
D_ido a,I_tencia! de pel_;;roa s_
_urid_ ba_ _ circularizes
rect-_dam_ enca_i_ame_te _ utiliar
_o,n_ die extens_n. Sin emba_& s.l
us_ _e_e _sar un _rd_n de extensiSn,
es 8bsol!u_men_e _ce_ q!ae este
un _#n listado bajo UL ,de_es _pigas
_n, _e_6_ a tierra _l_do 15A, t25V,
T@ e! caeca,do de_ reaiizar_
acuer_ _n _s c_i_ y r_men_
El _b_eado _m,,6stl_, ,de 8_m_n_
_dtla _onsr p_Jema.s es_iaWs.
Estas _n_@._. es_ _lpad_ con _ ciav_ja de
_n,e_6n a tte_ de tres paras en e! cable de
_mini_ro _ en,ergia q_e de_ e_h_ _ un
t_o_n_e ,de_ _m _,es pa_s _nect_, a
tlerra a_e ('_r I_s llus_raciones a
_ntinu_ciSn) _ su pto|_n _t_ un _ilbie
de_o _ ele_r_Jcion. Si _o tiene un tom_ni_e
_n estas _r_a'sticas, _n elect_isl_ _do
de_r& instalar uno de 8caerdo _n el C_l_
EIct_ National y los _s y no,rmas _les.
34 Aim Acondiciona_r
NO UISe _ ca_e de eAension,

d
Este equi_ de_ estar puesto a tierra deb_dame_.
E_cable de a_imentaciSn est,. equipado de una toma de tierra con tres pins. Para
minimizar et peligro de una _esiSn pot corriente ei_ctdca, utiiice una toma c.on
enchufe de tierra est_ndar con tres contactos. Si el enchufe de pared no contiene
un _rne de tierm, antes de usar el ventilador haga cambiar el enchufe pot un
electricista.
Cambiar la toma sin realizar |os cambios _ cab|carlo apropiados
crear_ un es_do e|_ctrico inseguro que p_rfa resu_tar en un In_ndto
o descarga e|_ctrica. Para todo este tlpo de trabajos, consulte stempre ....
con un eIectricista cuaifficado.
_i_n _es _ _Jlzar e[
No co_e nt quite e| _rne de tlerra de |a clavija _ allmen_ct6n
El acop|amlento de| borne de _erra de| adaptadot con ei _mi||o de |a
cubierta de| ench_e de pared no pondr_ ei equipo a ||erra, s| el
tornillo de la cubierta no es de metal y ais|ado y e| enchufe de
pa_d no est& puesto a tierra a trav6s de |a _d de |a casa.
En el caso de cua_quier duda respecto a la correcta puesta a tierra
de| venUlador, haga revlsat e| enchufe de pared y el circu_o pot un
e|ectricista p |onai,
Manual del Propietan'o

Debido a eventuates pe_igros de s_uridad no r_omendamos en abso|L_o e_
use de un adaptader. SSIo para una conexiSn transitofia se puede user el
adaptader clasificedo come UL que est_ a disposiciSn en [a mayor{a de las
tiendas de productos el6ctricos. A_enda que e orificio g_de en el edaptader
corresponda al erificie grande en el enchufe pare legrar la cone×iSn con la
polaridad correcta°
Desconectando el cabie de alimentac[Sn del adaptador utHice una mane pare
sendas partes pare _itar un daSo del _rne de tierra° Evite una desconexi6n
frecuente de_ cable de alimentJaci6n, pues puede causer un eventual daSe de_
borne de _erra,
Tomlllo_ MetaJ
Nunca urn|icee| _uipo con un adaptador da_adoo
Debido a un eventual pei[gro no r_omendamos _ a_ol_o el use de un
cable alargader. En situaciones exce_ienales utiiice s61o alargadores
ce_fficados con puesta a tierra CSA dasificados _mo UL _n tres _nducteres
de valores 15 A, i 25 V.
36 Aire

InstalaciSn
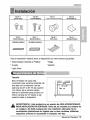
_, A: 1t _p0,8:5 Tipo C:1 T_ _ 3
(Toml)_ _) _omtl_ M_o) (Tebede Dtenai_+Atandela) (8 Parents L),
TipoE: l
(_h_ivo p_r)
'r_ F: 1
(_ del _)
_h_o p_tedor)
T_ G:2
(PanelGuia)
'T_ H: i
(_r_a P_s)
Para la instalaci6n de_da tenet a disposici6n los instrumentos siguientes:
* DestornilEador (EstreUa y PhiUips) * Reg(a
* CucjiUo * MartHIo
* LApiz Nivel
Tama_o
Este ventHador de casa est&
construido para ventanas estAndar de
dos alas con (a extensi6n rea_ de
a_ura de 22" a 36°° El aIa supedor
y el inferior de ia ventana deben
abdrse io suficiente para producir un
orfficio vertical de 13" desde el a(a
superior hasta e( ante_cho.
--_ 22" a 36" ---,
Mln. 13"
l
ADVERTENCIA : Este ptoducto es un aparato de A|RE ACONDICIONADO
PARA |NSTALAC|_N EN VENTANAS. Como ta|, se ne_ita una ven_na de
un cue|gue o de dob|e cue|gue para una in_laci6n adecuada. No se
recomlendan )nsta(aciones en |_gares q_ no _n ventanas, _liizando
¢asqu(|(_, odfXciosen )as parers n! oualq_ier otro tipo°
Manual del Propietario 37

Instalac/6n
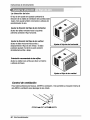
Espa¢lo iibre
El suficiente espacio tibre aumenta Laeflciencia de refdgemci6n de la unidad e
impide ra irradiacJ6n deJ calor de_ condensador.
1. Si Lasobre-ventana esto_a co_6quese una tira de madera de 2 pulg de ancho
a ro la_o dei descan_ de la _n_na por la parte que de Intemamente aJ
cuarto, yen toda su extensi6n° La tira de madera debe _r Io suficientemente
grue_ para elevar el descanso de Ja ventana, de ta_ m_era que _aunidad de
aire acondicionado pueda set intalada sin interferencia del marco de Ja _bre°
ventana (storm window).
2. Ver Figura, B. La parte su_rior de _atira de madera debe estar
apro×imadamente a 3/4de pulg m_s a{_ que el marco de _asobre ven_na,
(storm window) para ayudar a que el agua de _nden_ci6n de la unidad fluya
hacia afuera.
3. instate una segunda ti_ de madera (aproximadamente 6 puIg. de targo, I_/2
puFg de ancho y mismo e_e_r que _aprimeratira de madera) en e_centro del
descanso exterior, pSngala contra la parte posterior de1 descanso interior. Esto
elevarA _a m6nsula L _mo en la Figurao B.
4. Si _adis_ncia entre "Franja de Madera Montada Sobre _aParte superior de_
Descanso intedor ° y "TLra de Madera Para _aMensula L y Mensu_a de
Interior
F_gura, A Figura. B
38 Aim A dot

1. Introduzca los paneles en _osgules de{
aire acondidonado° Las cosines
atorn{Hel_ con los tornillos (T_po A),
Use un atornirlador largo. As_ le
set& m&s f&cil instalar los tomiUos,
2. Corte la banda adhesive (,_ipo E) y
col6quela de{ ancho de {aven_a.
Remueve el p_st{co de ta banda adhesive
y col6quela en la pa_e superior de el
marco inferior de _ ventana.
3. Co|o_ndo |a unidad en la ventana
Abra _aventana y marque UNEA en el
centre esta.
4. Co|oque e! M6nsu|a en L
4-1, lnstale los so_rtes L detr_s de
aif6izar interne de _ave_ana, con el
lado corto de{ soporte _mo
ilustmdo, Utilice 2 torniHos (Tipo A)
proveidos,
4o2. La m6nsula ayuda a que la unidad
se encuentre firmeo AsegQre_ de
poner la m6nsula en L centre la
parle riot de{ descanso interior,
Manual del Propietario 39

tnsta
Precau_6n: En las siguient_ instruct|ones, _en_ ia unidad flrmemente
haste que ia parte _edi_ de laventana descansesobre la parle subtler
de! canal y _r detr_s del ma_ _ los pa_ies co_izos_ Puedehair
_siones o da_os si |a unidad _ cae de |a ven_na.
1. Ingle el Aire Acondicionado a |a
Venf_na
1-i_ Cuidado_mente le'_nte el aire
a_ndicionado y coldquelo en el hoyo
de la ventana,.Aseg_rese de que la guia
inferiorder aim acondicionado caiga en
lugar_rre_o del m6n_la en L.
Cuandoel aire ac_dicionado _a
_jadoon e{_p_rt en L,el aireacond/cionade
ser_ ce_de _mo _ed_ eb_rvar.
1-2.Mientras_ntiene el aireacond_na_ en
_s_n, cuida_samente bajee__ordede {a
ve _perior haste_agulasuperiordel
aire acondicionado.
Una_z insta]adod_idamente e{aparatode
airea_ndi_nado, d_ria inelinar_
_ige_mentehaciaabajeensu d_.
SI _t& malpuestoen laventana,_l_r& m&s
pot _ parte_efiot a_om_ti_mente.
S}no iohace,hayunaprob_m__n la
l
2, Asegure los _neIes
E_nda los_ne_s parere_ienarlosor_
do laven_an_usandolos4 terni_l_ (Ti_ _).
3. |nstaie |a Banda de| Marco
3-i.CoMe labandadeIm_co delmismoa_ho de
_a ,_l_ue la_nda del _tre
eI vidr_y la _ntana parepr_eni_la
_netraci6n a!euertode in ey aire.
3-2.Atomitlelacerradura_l marcousandou_
tomiiieTipoA.
3-3.Quite toetomiHosquea_gura_ el gabinetey
cacero_ deep e en el _ad__rrec_o.
( T'_ IF )
40 Aire A ador

34, Amarre la escuadra de so_rte (Tipo
H) usando un brnillo que puede sacar
del cabinete det aparato de aire
acond_lonado, Acople _aescuadra
(Ti_ H) a _aparte interior de la repisa
de _aventana con un tomiilo (Tipo B).
8_ Pa_ (T_ H),
4, La |nsta_ci6n _l aire acondtcionado _ ve_ana no completa. Vea
SEGURiDAD ELECTRICA _ta conec_r |a e_enslbn e|_ctrica al to_ co_iente,
Manual det 41

!_racciones _ ft._ncionamien_
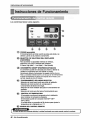
Los contro es tiienen este as cto,
POWER (en,_nd_)
El fun_namlen_o se ini_a cua,ndo_ pu_a esta t_la y_
detien=ecuando se _ presiona n_vamente.
SELECTOR [DEVELOClilDAD DEL VEN_OR
(FA SPEED)
Para ,aumentar _acapacidad mi_tr_ se _esca,
s_o_ una mayor _!_d_ de; veSiCant,
3 Pasos: H_h (alta} - Low (baja) - M_ (m_ia)
CRONOMIETRO ON/OFF (E_EN_IAPAGA_)
E_cmnbmetro pL_ set _1_ para in_iar y _tener la
unid_ en i_remen_s por hora (Ihasta 12 _ras).
!Nor_lmente L,_t_ ,e_t__or dea_!o mlen,_s duerme.
_ _ _n"_di_ad miens du_e,, u_ vez que se 5_ae! __or,
@Jste_ _mtu_ _ _r_ ZF despJ6s_ _ min_os y una
_ d_ de otros 30 _u!_s,
_N_ONAMiE_O DEL MO'_ SELE_R
_l_ci_e el m_o fre_ (_ pa_ e_a_ _ci6n,
_l_i_e el m_o _ aho_ de energla pare el
f_ncionamien_o _1 aho_ _ ene_ia,
_lecci_e el mo_ v_=r (fan)para el fu__o d_
_l_i_e el _o s_, (dry) _ra el_inci_iento
CONTROL DE TEMPERATUFi_
El _t_s_to _nitorea ia tem_ra_ra de _ h_n
_ man,erie€ la tempe_at_ra _ada.
E_te_t_to _ede ser _locado entre _F~_F
La uni_d t_a un prom_io _ 30 minut_ _,a _ustar la
te_m_ra de la h_aci6_ en !'_F,
SENSOR DEL CO_O,Li R_MO_
Aire Acondicio_r

PRECAU_6N: Ei mando a dis_ncia no funcionard co_ctamente si
una luz fuette h_e contacto con eli sensor dei aim acondicIonado ,os!
hay ,obs_culos ent_ el mando a dis_ncia y e! sin a_ndicionsd!o°
POWER (en_ndido)
Elfuncionamiento se iniciacua,n_ se puisa,es_ t_la y _ detiene
cuar_o se ilapmsiona nuevamente,
CONTROL, DE TEMPERATURA
El termostato monitorea la tem_ratura de la
habitad6n pa_ mantener la temperature desea@.
El _rmostato pu_e set col_.,ado entre _F-86°F
(i6°C-30°C). La uni_ad toms un promedio de
minutes para _ustar latempera_ra de la habitaci_
en l°F.
DE VELOClDAD DEL
VENTI_DOR (FAN SPEED)
Pasos:High (a_)-Low (baja)-M_ (media)
CRON_MET_ OWOFF
el_incion_iento _,
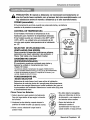
C6mo Porter |as _ater{as
Papaella hag,a_;l_ar _ _a seg_n la di_i6n
della fle_a.
2. In_uz_ las dos.baterlas, _s_e siemp_ I_
po_r_ad a.Ii_.aJar I._ piias.U_ b._er{_ nu_.
3.Velar a _r/_, resbat_do la t_ _s_ Ii_
Temp
Timer _de
- No _i_i_ _ter{s r,ec_gab{es,
_:_s _n difer_ntes de _a,
dirne_si6n y _so res_o a
_asbaterfas s_as usu_es,
, _que I_ hater(as del[
t_emando cuando .e!
a_ndic{onador no _ta a set
u_,de d_rante un _ar_ per_e°
Manual de/Propie_rio

triP--Jones _ _nd_am_nto
di_ci6=n _l air,e
EJflujo de aire pu_e set ajustado _m_a_o la
dir_ de las rejiflas ,devenUla_, de_a_ndicionador
de, re..Esto pu_e tambi6n incmm,e_r la efi_ia de_
a_,d_Jona_r de _re.
Aju_t la di_ci6n= di_flujo deaimho_n_l.
_ustar I_ reji!_ ve_les hada{a_quie_a
_er_ha _bia_ elflu_ horizont_.
Ajustat |a direcci6n _ flu|o de aim vertical
Ajus_ el _labe ho_zontalha_a arri_ y
ab_oc_'-nbiar_el flu_ de aim ve_, Eli_labe
pue_r ajusta_ moviendola_-te posledor
_1 &l,abehacia_ o_jo,
_ci6n _omendada de I_ mj|ll_
_u_e las rejifl_ haciaamba para il_ar ia]i_imo
a e_a de_fm_o.
Aju_' ei flujo _ aim h__l
_u_r e! flujo de aim _!
Control de ventilac n
P_ m_ima eficienciade frescura, CIERRE laventilaci,6n.Esto _itird _acir_la_6n inte_ de
_re°ABRA _ ven_ilac_n _a ,des__,argarel aim viciado.i
CER_A_VE_I_C|_,_IER]'A
Aire a,dor

Operating In
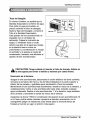
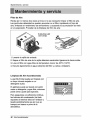
_bo de Desag0e
En c[imas h_medos, es posib_e que la
Bandeja _dora se []enne de agua.
Para qui_r et agua acumu_ado, es
p_clso _nectar el tube de desagQe.
Quite la Tapa de_ Desag0e y conecte e_
Tube a ta Bandeja Evaporadora.
Este aparato de aire acond[c[onado va
equipado _n an venti_ador de
extra_i6no (V6ase la [Iust:raci6n de
abajo). E_ventHador tiene un anil_o
extemo que gira en el agua que recoge
en la plancha base al entrar en
profundidad. _ _ndensaci6n [a recoge
e] ventHador y ta expulsa a trav6s dei
condensado5 haciendo mAs eficiente af
aparato de aire acondicionado.
PRECAUTi6N: Tenga culdado a| In t e| tube _ drenaje. A|_jaio de
|a area aguda para evttat e| des|ice y |esiones _t usted mismo,
Remevedo de |a Ven_na
Apague el a[re acondicionado, des_necte e_cord6n ei6ctr[co del toma corflente,
remueva la cerradura de[ marco y _ostornH_os [nstalados en la parte superior e
inferior de los panefes, y gu_rdelos para reinstalaci6n. Cierre los pane_es.
Manteniendo el aire acondicionado fuertemente, levante ei marco de la ventana, y
cu[dadosamente, incline el aire acond[c[onado hac[a atr,_s, botando cuaiqu[er
agua condensada. DesHce el aire acondicionado 1" a la derecha, luego [ev_nte_o
de la ventana y remu_vale la banda de_ marco de la ventana.
_egOrese de drenar TODO el condensado del aparato de aire acondic[onado. Si
no Io hace, podr{a salirse mientras transporta el aparato, ensuciando, con el
consiguiente peHgro de resbaiones. Este stmpie paso te ahorrarA t[em_ de
{impieza y harA de su lugar un entomo mAs seguro.
Manual del Propietario 45

Man toy _rvicJo
Fi|t_ de Aire
Revi_ pot {o menos dos veces al rues si no es necesar[o limpiar el fi_ro de a[re.
Las partfcu_as detenidad se pueden acumuLar en e{ fHtro impidiendo e[ fluio de1
aire, IJmi_ndo er rendimiento de enfriamiento y causando [a acumu]ac[6n de h[e_o
en el evaporadoro P der de _a][mpieza der fi_tro de aire:
i. Levante la rejiHa de entrada
2. Saque er filtro de aire de [a rejiHa delantera sac&ndolo tigeramente hac[a arriba.
3. _ve e_fUtro con agua _bia de temperatura menot de 40°C (104°F)o
4. E_urra ligeramente el agua sobrante de_ f[Itro y vuelva a [nsta_ar{o.
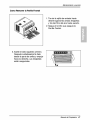
Llmpt_ de| Aire Acondtc[onado
La papilla frontal puede set limpiada con
un trapo hQmedo moja_ en un
detergente suave,
El _binete puede ser Javado con jab6n
suave o detergente y agua tibia, entonces
pu][doCera Liqu[da para aparatos.
Para asegurarse una eficiencia continua,
las bobinas de[ condensador (del [ado
_puesto a[ exterior) debe set revisado y
lavado ped_icamente sea por que se
tranque con basura o _lvo de la
atmosf_fico.
46 Aire

Man y
Como Remover la Parilla Frontal
1. Tire de la rejilla de entrada hacia
de,ante agarrando ambas lengOetas
y tire del filtro del aire hasta sacadoo
2. Saque el tomil_o que asegura _a
ParrHEaFrontal.
3. Suelte el _ado izquierdo primero.
Despu6s cuidadosamente ha_e
desde _a parte de arriba y empuje
hacia _aderech& Ms lengOetas
estAn aseguradas°
Manual del 47

Man toy
Antes de Liamar el _r¢ic|o de Asistencla T_cnica
Si tiene problemas con su ventilador, _ea _asinformaciones siguientes y trate de
resolver el pro_ema. Si no puede encontrar la so_uci6n, desconecte el ventilador
y dirrjase a su suministrador°
E| ventHadot no funciona
1. Compruebe que el ventilador est_ conectado en un enchufe corre_o°
2. Revise el fusible.
3. Comprue_ que la tenslSn no sea demastado alta o b_a.
A| ajus_rse e! en_amiento, el airs no psrece fr{o io suflclente
i, Revise si los ajustes de la temperatura son co|rectos
2. Rev-ise si el _tro de airs no estA atascado de _lvoo En el _so de que sf,
_mbie ei fHtro.
3. Compruebe que sfuem no haya un obst_,culo del f_ujo de sire y si entre ia
parte trasem del ventitador y Ia pared o _abar|era haya espacio libre de per !o
menos 1 mmro (20°).
4, Cierre todas las puer_s y ventanas y compruebe que no haya una fuente de
_lor en la habitaci6n.
Antes de ilamar al sewicio, tenga a bien revisar _asiguiente iista de
probiemas y sus solucioneso
El acondicionador de airs est_ funcionando normalmente cuando:
= Escucha un son|do met_lico. Lo cau_ el agua que e el condensador en
dfas Iluviosos o en condiciones de mucha hum_ad. Esta caracterfstica es_
diseSada para ayudar a quitar la humedad en el airs y mejorar la capacidad de
Consuite la sscci6n dei Ventilador de e×t_cci6n en Is p_gina 45.
- Oye un clic en el termostato. Lo csusa el title del compre_r que comienza y se
de,erie.
,,Ve gotear agua de _aparts posterior de la unidad. Et agua puede set rec_ida
en _abandeja de base en condiciones de mucha humedad o d{as de Huvia. Esta
agua desborda y desde ta parts posterior de la unidad.
• Oye funcionar eLvenUtador mientrss e_compresor est,. siiencioso. Esto es uns
caracterfstics operativa normaL
48 Airs

Mantenirnfentoy,sie_ClO
El acondicionador de a,ire p,u_e estar _ncionando ano_almente cua,ndo=
El aire
A_g_re_ que ei aire a_ndicionado
est_ _ne_do _mpietamente a la
_ente de energia.
Cheque los fusibles/inte#uptor de _a
_sa y r_mplace I_ fusibles o
r_st_blez_ e! inter_ptor de energlao
do no
Cuando _aenerg a se Uezca,
espere 3 minutes para en_nder de
nuewoel alre a_ndiclonado (_po
Me_ni_ )._,n esto _i_r& que so
pr_ca unasobro_rga ,enel _mpresor.
El aire
a_,ndiiciona
do no enfrla
_rno
El aire
do enfria
demasiado
iii!i_i_!i___i__i!i!!!i!i_ii_ii!!!!i_!_!__!__!!!i!i!i!iiiiiiiiiiiiiii!!!i!i!!!!!i!iii!i!iiiii!_i___!_!_!_!_!_i_!_!_i_i_i!_ii_ii_!i_!i_!i_!i_!i_i!i!ii!i!!i!!!!!!!!!!_!!!!!!!_!_!!!_!_!!!_!!!!!!!i!ii_i!_ii_i!_ii_ii_iiii!_!__!!!!!_!!_!!_!!_!__!!_!_!!!_!!_!!_i_!i!!!_!i!!!!!i!i!iiiiiiiiiiiiii_i!_!_!_!_!_!_!_!!i!i!iiiiiiiiiii!iiiiiiiiiiiiiiiiii!ii!i_!!____!!_!!!i!____!!__!__!____!___i!__i_ii__!!_!!i!_i!_!!_i!__!_i!__!_i!__i_!i_!i_!i__i!!!!!_!_!!!!!i!!_!i!i!ii_ii_ii_iiiiii_i!!ii_ii_ii_ii_ii_ii_iiiiiiiii!ii_i__!__i__!_!!!_!_!!_!__!__!_!_!_!_!__!__!_!!!_!__!!_!___!_!_____!_!_!_!__!!_!__!i_i__!!_!__!!_!__!!__!_!!!!!!_!_!i_i_i_i_i_i!i____!_!i___i!_!i_i_i!i_i!_!i_i!_!i_ii!_!ii_i!!!i!iii!i!iiiiiiiiiii!ii!i!i_i_i!_!_
presion el _t6n situade en el
enchufe del cable de aiiimen_i61n
Si e_ _t6n The i_anece a_ivo,
sus_nda el u_ del aire acondidonado y
Ip6ngase en _n_cto _n un t_nico de
serviciio cuali_,
• _gQro_ q!ue no haya _nas,
persianas o muebles Noqueando e!
_ente dei aire a_ndidonado_
• _ustar ei _ntroI de tem_ratura a an
namero maisbajo.
• Limpie eJBitroper 1om,en_ cada dos
semanasoVeala se_i6n de
instruccionesde operad6no
Cuando usted enciende el ai_
a_n, didonadlo debe _pe_r un
memento _=m qua I!ahabi_ci6n sie
enfde.
regrese°
, Estai_ez_ una tem_r-atu_ m_s alta.
• IE_ijae_mode a_, de_ventHador High
Fan o en_iado alto High Cool con el
term,estate en e_n_me_ i o 2.
Usted Ipu_e _ri_e al Enemy Star pro,grarna con _do d/etaHe en wv_en,_ys_r, gov,
Manual det Pr_ietario 4:9

Nota
50 Aire Acondicionador

Specifications and performance data subject to change without notice.
HEAT CONTROLLER, INC.
1900 WELLWORTH AVENUE • JACKSON, MICHIGAN 49203
THE QUALITY LEADER IN CONDITIONING AIR
P/No.: MFL61984501 Printed in China
-
 1
1
-
 2
2
-
 3
3
-
 4
4
-
 5
5
-
 6
6
-
 7
7
-
 8
8
-
 9
9
-
 10
10
-
 11
11
-
 12
12
-
 13
13
-
 14
14
-
 15
15
-
 16
16
-
 17
17
-
 18
18
-
 19
19
-
 20
20
-
 21
21
-
 22
22
-
 23
23
-
 24
24
-
 25
25
-
 26
26
-
 27
27
-
 28
28
-
 29
29
-
 30
30
-
 31
31
-
 32
32
-
 33
33
-
 34
34
-
 35
35
-
 36
36
-
 37
37
-
 38
38
-
 39
39
-
 40
40
-
 41
41
-
 42
42
-
 43
43
-
 44
44
-
 45
45
-
 46
46
-
 47
47
-
 48
48
-
 49
49
-
 50
50
-
 51
51


COMFORT-AIRE RAD-101B El manual del propietario
- Tipo
- El manual del propietario
en otros idiomas
- English: COMFORT-AIRE RAD-101B Owner's manual
Artículos relacionados
Otros documentos
-
Goldstar GWHD5000 El manual del propietario
-
LG LWHD1500ER El manual del propietario
-
-
-
-
-
Goldstar WG5004R El manual del propietario
-
-
 Admiral (Kelon) AW-10CM1FLU El manual del propietario
-
