
OWNER'S MANUAL
MANUAL DEL PROPIETARIO
Models/Modelo
I
R5004,
TI
L5004R,WG5004
WG5004R, GL5004

S_ty Precautions .............................3
Before O_ration ...........................f
l_rodu_on .................................. 8
Symbots Used in this Manual ........8
Features ........................................ 8
Ele_icall Safety ...................................9
Temporary U_ of an
Adapter ........................................ 10
ns_llation ......................................11
Window RequimmenLs ..................11
Size ........................................... 11
Localion .................................... 12
Clearance .................................12
Preparation of Chassis ............... 13
Unii_Installation ............................ 14
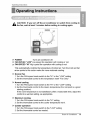
O_r_ng Ins_ctions ................ 15
|c_l:ion and Function
of Controls ..................................... 15
Remote Control Operations ........16
Remote Controiller ....................... 17
Additional Featur_ ........................t8
Air Diredion ............................. 18
Drain Pipe ................................... t8
Removal from Window ................18
Maintenan_ and Service ............ 19
Air Fi_er ..................................... 19
C_eaningthe Air Cor_ditioner ..... 19
How to Remove _e
Fronl Gri]Je ................................. 19
Common Problems and
Solutions........................................
T_ubieshootin_.............................21
,,o
®
FOR YOUR RECORDS
Write the model andl serial numbers here:
Mode! #
_dal #
BYou can find the numt_s on a laL_ on the side of the,
p,rodu_
Dealer's Name.
O_e Purchased
II1Sta,p_e yr_ur receipt to this page i=nthe event yo_ _edl it
to p_ove date ,d purchase or for waKanty [ss,u_,
READ THIS MANUAL
Ins||de _u will find many he4pful hints oin h_to _e and
mainLain your ,air condi_io,n_ prosody. Just a little preventJ_
care on y©ur _t _n _,¢e y_ a gloat deal d time and
money over [he life of your air condiaoner
You111find many answers to,_mmon problems in the c#_rt
of troubEesho_ing tips, lit you revi_v our chart of
Troubleshooting Tips first, you may no{ _ to _l] for
serv_e at aft,
• Con_et an Authorized _r¢ice Center for repair or
maintenance of this un_, Cal| 1-80,0-243-0,00_ to
locate the nearest ASC
• This air conditioner is not intended for ese by young
children or i_valids without supervisiom
• Young children sho_|d be s_rvised to ens.u_ th_
they do not play w_h the air ,conditioner,
,. |f the power co_ requires repla_ment, have an
Authorized Servicer in_al| an e_ct rep|acem_t paA.
• |nstallation work must be performed i_ _cord_nce
with the National E|ectric Code. by qua|ifi_ and
authorized pe_onne| on|y;
2 Rc_m Air Conditioner

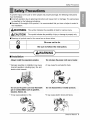
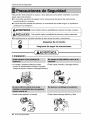
Safety Precautions
To prevent injury b the user or other p_p,le and property damage, the following instructions
must be foil,owed.
[] [Incorrect operation due to ignoring instructions wilil cause harm or damage. The seriousness
is c]as.sifi_ by the following indications.
[] Because of the weight of the product, it is re_mmended that you have a heiper to assist in
the installation.
[] Meanings of s,ymbo_s us_ in this manual are as, shov_ _low.
B,e sure not to do. _]
q
Be sure to _llow th
m Installation
Always ins_U the expansion pane_(s). Do not place _e _wer co_ near a heater.
• Improper assem_y or installation may cause
in_rr,ect o_ration, including injury, fire, and
el_tdc sho_ hazards,
° It may _use fire and electdc sh_.
. it may cau_ explosion or fire. * it may cause electdc s,h_k ,and failure.
Owner's Manual 3

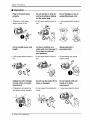
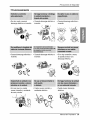
i Operation
,, Otherwise, it will _use
electric shock or fire.
, _twilli cause el_tric shock or * litwill cause eliectric shock or
fire. fiire.
°' It will _use ei_tric shock or
fire.
other appliances,
° It will cause e_tric shod,: or • No grounding may _use
fire. ei_tric sho_.
"i Otherwise it will _use fi_
and eJec_ic shock a_ident.
° _tmay cause fire and electric • It may cause e_tric shock,.
shock.
4 Rc_m Air Conditioner

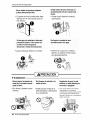
Salty Precautions
' The air conditioner must be operated iin
a enc!o_d area to _ most effective.
, It may cause explosio,n., fire, and bum.
• It will cause electric shock or failure of
machine.
* Water may enter the unit and d_rage Me
in,sulat:io,n,.litmay cause an ,electric s.h_k..
[] Installation
......... ....
"They are sharp and may
cause injury:
,4t may cau_ failure of appliance • ff the outer _ is damaged,
or performance deteriorate.
it must be repair_ or
rep._a_d imm_iately.
Leaving it damag_ could
result in the air conditioner
_ll[ng out ,ofthe window,
creating a _3fety hazatd_
Own,er_ Manual 5

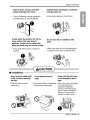
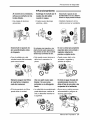
[] Operation
Be cautious n=to Hold _e piug by the head Unplug _eair condffioner
_e sharp edges when when taking it if it wiB not _ u_d for a
long ped_'
• it may cau_ iniury.
" it may cau_ electric shock
and damage,
. it will waste power consumption
in vain and [t may cause accident.
e_es
machinery, or obje_s of a_,
" Since the fan rotates at high • This could injury the pet or
spe_ during ,o_rafion, it may p_ant,
cause injury.
• It is an air conditioner, not a
precision refrigeration system,,
Always inse, _e filter Usea S_ do_ to clean: D0 Do not drink water drained
s_urely, not use wax, thinner, or a from air condi_oner: Don=
Clean _ every _o weeks; s_ong d_ergent direct ai_ at room
occupantson y,
Operation without filters will
cause failure.
,' The ap_arance of the aiir
conditioner may deteriorate,
change color, or ,develop
surface flaws.
I!tis not sanitary and co,uld
cause illness or _r_nal
injury hazard.
6 Room Air Conditioner

Before Operation
i i Plug in the power cord properly.
2. Use, a dedicated circuit. Overloading the line could create a fire hazard.
3. Do, not use an extension cord. See page 10 for more details.
4. Do not start/stop operation by plugging/unplugging the _wer cord.
5. IIIfthe power cord is damaged and r_uires replacement, have an Authorized
Sewicer install an exact replacement part.
1i_ Being expos_ to direct aidlow for an extend_ period of time oould be
hazardous to your health. Do not expose occupants, pets, or plants to direct
airflow for extended periods of time.
2. Due to the _ssibility d oxygen deficiency, ventilate the r_m when used
together with stoves or other heating device&
3 Do, not use this air conditioner for non-specified sp_ial purposes (e.g.
preserving pr_ision devices, fo_, pets,, plants, and art objects). Such usage
could damage the items.
4. The air conditioner is a _nsurner comfort appliance, not a precision climate
control system.
i. Do not touch the metal parts of the unit when removing the filter. I_uries can
occur when handling sharp metal edges.
2. Do not use water to clean inside the air conditioner. Exposure to water can
destroy the insulation, leading to possible electric shock.
3. When cleaning the unit, first make sure that the _er and breaker are turned
off. The fan rotates at a very high speed during operation. There is a
_ssibili_ of injury if the unit's p_er is accidentally trigg,eredl on while
cleaning inner parts d the unit.
For repair and maintenance,, contact an Authoriz_ Service Center. See the
warranty page for details or call (800) 243-0000 Have yo,ur model number and
serial number available. They should be written on page 2 of this manual.
Own'er_ Manual 7

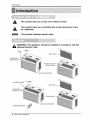
Intrcduc,tion
This symbol aleds you to the risk of electric shock.
This symbol aleds you to haza_s that could cause harm to the
air conditioner.
This symbol indicates s_cial notes.
WARNING: This appliance should be installed in acco_ance with the
National Electric Code.
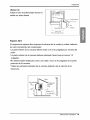
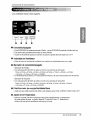
KNOB
NORIIZONTAL
NR DEFLECTOR
CAB#4ET
AIR F_rI,,,,,,TER
R_S KER S,W]TCHIS
FRONT GRILLE
COOL A_RD_SCHARGE
CABINET
CONTROL BOARD
AIRRLTER
HORIZONiTAL
AiR DEFLECTOR
FRONT GRILLE
Remote oa ntro,IIlet ,,,,,,,,,,,,,,,,,,,,_'
8 Rc_m Air Conditioner

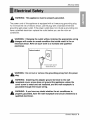
ElectricalSafety
WARNING: This appliance must be pro_rly grounded.
The power cord of this appliance is.equipped with a three-prong grounding plug.
To minimize the rusk of electric shock, use the plug with a standard three-slot
grounding wall power outlet.. IIfthe power outlet does not include a grounding slot,
have a qualified electrician replace the outlet before you use the room air
conditioner,.
Changing the outlet without making the appropriate wiring
changes will create an uncle condition that could result in fire or
electrical shock. Refer all such work to a licens_ and qualified
Pt_err_ method_
E_ _rsu_eFope_ground
II
exists before us4
WARNING: DO not cut or remove the grounding prong from tlhe _wer
WARNING: Attaching the adapter ground terminal to the wall
receptacle cover screw does not ground the appliance gnlesis the
cover screw is metal and not insulated, and the wall r_eptacle is
grounded through the house wiring.
W'ARNING: If you have any doubt whether the air conditioner is
properly ground_, have the wal! receptacle and cimuit ch_k_ by a
qualified electrician.
Owner_ Manual 9

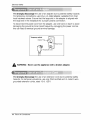
We strongly discourage the use of an adapter due to potentia! safety h_ards.
For temporary connections, use only a UL-lis.ted adapter, available from most
local hardware stores. Ensure that the large slot in the adapter is aligned with
the large slot in the receptacle for a proper polarity connection.
To,disconnect the power cord from the adapter, use one hand on each to avoid
damaging the ground terminal. Avoiid frequently unplugging the power cord as
this can lead to eventual ground terminal damage,
"_Met_ Screw
WARNING: Never u_ the appliance with a broken adapter,
We strongly discourage the use of an extension ,cord due to potential safety
hazards.. For temporary situations, use only CSA certified and UL listed 3-wire
grounded extension cords, rated 15 A, 125 \,L
10 Room Air Conditionier

h_,sta#afio,n
TypeA: i4, EA Ty_ B:2 EA TypeC: 2 EA Type D: 3 EA
(Wood S_ew) (Wood Screw)
!_ '
E E
o _ _
...._ype E: 1 EA [ype F: 1 EA Type G: 2 EA lype H: i EA
(Seal Stdp) (Sash Se,al} (Guide Panel} (Upper Guide}
(Mkes_e backed) (Notadhesiveb_ked)
Have the following tools available for installation:
* Screwdriver (,Slotted and Phillips) * Ruler
* Knife * Hammer
* Pencil * Level
This room air _nditioner is
designed for installation in standard
double-hung wind.s with actual
opening widths from 2!"to 35'%
The upper and lower win,d_ sash
must open sufficiently to allen a
clear vertical opening of 12" from the
bottom of the upper sash to the
window sitoo,I.
- 21" to 3,5'"-----_
12" min
WARNING: This product is a WINDOW AIR CONDITIO, NER.
As such, a standard single-hung or double-hung window is required
for proper ins_llation. Non-window ins_llations, including using
sleeves, holes in walls, and other installations are not recommended,
O'wner_s Manual 11

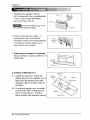
Installation
Install tlhe air _nditioner where the
sunlight does not shine directly on the
unit,
17,'_/16"rain
(Without Frame Curtain}
Proper clearance enhances the _oling efficiency of the unit and prevents heat
radiation of the condenser.
* The bottom of the cabinet should be 30" to 60" a_ve the ground.
* The outside of the _binet must extend outward for at least 1/2".
* There should be, no obstacles such as a fence or wall within 20" from the back
of the cabinet.
* All side louvers of the cabinet must remain exposed to, the outside of the
structure.
Fenoe
m
12 Room Air ,Cond#ioner

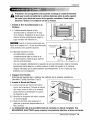
instafiatio,n
1, insert the guide panels(Type G)
into the guides of the air conditioner
(Type H),Fasten the curtains to the
unit with screws (Type A).
: Use a long screwdriver and
installling the screv,_swill be easier.
i:i
TypeA
2o Cut the adhesive-back_ seal s_ip
(Type E) to the window width.
Remove the backing from the seal
s_ip and attach the seal strip to the
underside of the _ttom window.
3. Locating unit in window
Open the window and mark center line
on the center of the inner sill,
4 Attach L bracket
4-1. Ins.tall the L brackets behind the
inner window sill, with short side of
bracket as sh_n. Use the 2 sicrews
(Type A) provided.
4-2. The bracket helps to hold unit
securely in place. Be sure to place
bracket edge flush against back of
inner sill
_nr_,rSill
Outer Si_i
A Inside
Cer_{erLine
O_side
ILBracket
O'wner's Manual 13

Installation
i
i
Caution: During the following step, hold unit firmly until window sash
is lowered to top channel behind side panel frames. Pemonal injury or
prope_ damage may result if unit falls from window.
1_Install the air conditioner in the window
1-1. Carefully li_ the air _nditioner and
slide it into the open window. Make
sure the _ttom guide of the air
conditioner drops into the notches of
the L bracket.
: When the air conditioner drops
into the L bracket, the air _nditioner
will be center_ in window opening.
t
CENTER UNE
1=2_
While steadying the air conditioner,
car,efu!ly bring the wind_ sash
down behind the upper guide of the
air conditioner.
When the air _nditioner is properiy
installed, it should tilt slightly down at
the back° if it is set correctly in the
window, it will hang lower in the back
automatically. If it does not, there is a
problem with the installation.
BOTTOM
GUWOE
_L
L BR_KET
2, Secure the guide panels
Extend the guide panels (Type G) to
fill the window opening using 2 screws (Type B),
2 screws (Type C) to secure them
3. Install the sash seal and sash lock
3_1.
3_2.
Cut the sash seal (Type F) to the
wind_ width. Stuff the sash seal
be_een the glass and the wind_
to prevent air and insets from
getting into the room.
Fasten the L bracket using a screw
(Type A)
3-3. Remove the screws that s_ure the
cabinet and base pan in the right
TYPE C
SASH
(TYPEF}
4. Window installation of room air conditioner is now completed.
See ELECTRICAL DATE for a_ching power cord to electrical outlet.
14 Room Air ,Cond#ioner

Operating Instructions
If you turn off the air conditioner or switch from cooling to
the fan, wait at least 3.minutes before setting to cooling again..
POWER -Turns air _nditioner off_
i> FAN SPEED "LOW"Low speed fan operation with c_ling or not.
i> FAN SPEED "HI" High speed fan operation with c_ling or not.
This automatically condo, is the temperature of ind_r air: Turn the knob _ that
arrow _ints to the _oler marks for more moderate c_ling.
Nodal Fan
i_ Turn the FAN speed mode switch to the "Hi" or the "LOW" setting
2. Set the thermostat control to the temperature mark "Fan Only"
Nodal cooling
1. Turn the FAN speed m_e switch to the "HI" or tlhe "LOW" setting
2. Set the thermostat control to the desire temperature (the mid-_int is a go_
starting position).
If the room temperature is not satisfactory after a reasonable time, adjust the
control to a warmer setting, as appropriate.
Maximum cooling
1, Turn the FAN speed m_e switch to the "HI" setting
2. Set the thermostat control to the cooler temperature mark.
Quieter operation
1. Turn the FAN speed mode switch to the "LOW" setting
2 Set the thermostat control as needed,
Room A# Con,difioner 15

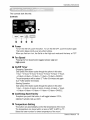
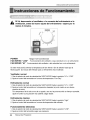
O,_ratJng instructions
The controls look like this
O
O
O
O
Power
To turn the Set O,N,push the button. To turn the Set OFF, push the bu_on again.
This button takes priority over any other bu_ons,
When you first turn it on, the Set is on the High cool mode and the temp. at 72°F
Fan Speed
Pressingthe Fan Speed button toggles betweenLow and
High speeds.
On/OffTimer
- Stopping Operation
Ea_ press of the buttoncycles throughthe options in this order:
1Hour--_,2Hours-,3 Hours--_4Hlours_.,5IHours_,6Hours-,7 Hours
---,8Hours_9 Hours_!0, Hours_,11Hours_12 Hours_CANCLE
The set temperaturewill be raised 2°Fafter 30 minutes and again
by 2°F a_er another 30 minutes
- Starting Operation
Ea_ press of the buttoncycles throughthe options in this order:
I Hour-' 2 Hours-'3 Hours-'4 H!ours-,5 Hou_--_,6Hours-'7 Ho,urs
--_8 Hours-9 Hours-_'10Hours-'11 Ho,urs_12 Hours-_,CANCLE,
C,_l/Energy Sav,erlFantDry
Everytime you push this button, it will toggle between COOL,
ENERGY SAVER,FAN and DRY..
O
Temperature Setting
This button ,canautomatically ,controlthe temperature of the room.
The temperature, can be set within a rance of 60°F to 86°F by I"F.
S.electthe lower number for lower temperature of the moon
Owner's Manual 16

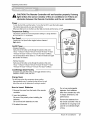
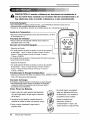
OperatingInstructions
CAUTION: The Remote ConitroiHer will not function properly if strong
light strikes the sensor window of the air conditioner or _ there are
obstacles between the Remote Controller and the air conditioner.
To turn the Set ON, push the button Toiturn the Set OFF, push the button again.
]_h_ button takes priodty over any other buttons.
When you first turn it on, the Set [son the High c_l mode and the temp. at 72°F
Temperature SiettiNg
This button controls the ro,ern tempe{ature _tting in a rang÷ between
_T and 86T' in ! increments.
Fan Speed
Pl_essingthe Fan Sp_d but[® t_gles be_,_n Low and
On!Off Timer l
- Stopping Opera,on
Each pre_ o,fthe bL_on cycles through t_ options in this o_er:
1 Hour --,2 HoL_s-*3 Hours-*4 Hours-,5 Hours-,6 Hoursi_tt Hou_
_8 HoL_rs_9Hours_10 Ho,u_'-',I 1Hou_12 Hours-,CANCLE.
The _t tem_rature wil!lbe raised by 2°F after 30 minut_ and again
afl.erano_er % min_es.
oSta#ing O_ration
Each press d _e button ,cyc_sthrough t:L_options in this order:
1 Hour_2 Hou_3 Hours-,4 Hours--.5 Hours--*6Hours-.7 Hou_
-,8 Hours-,9 Hours--d0 Hours.-,11 Hours_12 Hours-,CANOLE.
Cool/Energy Saver/Fan/D_
Evep/t[me you push this bu_o,n,it w[B to_]e between ,COOL,
ENERGY SAVER, FAN, and DRY.
Energy Saver
The fan stops when the compressor stops _o,ling.
Appm,ximately every 3 minutes the fan wiUturn o,nand
check the _an'i air to determine if c_Bng is n_,d_.
How to Inseff
1i.Remove the cover from the _ d the remote
controller
2. inert two batteries.
Be sure d the polarity when instaHling_e
ba_eri_
B.e sure that _th batteries are new,
3. Re-a_ch the _ver,
Do not use rechargeable
batteries. Such batteries
differ _rom standard dhry_]]s
in shape, dimensions, and
performance..
Remove the _eries from
• e remote oontroller if _e air
conditioner is not going to be
used for an extended length
d time.
Room Air Oondt_io,ner 17

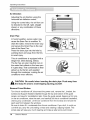
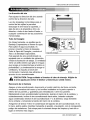
Opefa_fnig Instructions
Air Direction
Adjusting the air direction using the
horizontal air deflector _n_:ro!.
Using the _n#ol tabs, the air flow can
be directed to the, left, right, straight
ahead, or any combination of these
directions.
Drain Pipe
in humid weather, ex_ss water may
cause the Base Pan to overflow. To
drain the water, remove the Drain Cap
and secure the Drain Pipe to the rear
hole of the Base Pan.
Press the drain pipe into the hole by
pushing down and away from the fins
to avoid injury.
This air _nditioner is equipped with a
slinger fan. (See drawing, bel_.)
The fan has an outer ring that runs in
the ,water that collects in the base pan
ff it gets deep. That condensate is then
picked up by the fan and expelled
through the _ndenser, making the air
_nditioner more efficient.
Ring
Be careful when in.fling the drain pi_. Push away from
the sharp fin area to avoid slipping injuring yourself.
Removal From Window
Turn the air conditioner off, disconnect the power cord, remove the L bracket the
screws and Support Bracket installed through the top and bosom of the guide
panels, and save for reinstaliation later..Close the guide panels. Keeping a firm grip,
on the air conditioner; raise the sash, and carefully tilt the air conditioner backward,
draining any condensate Lift the air conditioner from the window and remove the
sash s.eal from between the windows.
Be sure to drain ALL condensate from the air conditioner. IIfyou don't, it oouldl run
out while you carry the unit,making a mess and creating a slipping hazard This
simple step will save you much cl!eaning and make a safer work environment.
18 Owners Manual

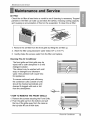
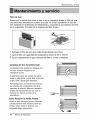
Maintenanceand Service
Air Filter
Ch_k the air filter at least twice a month to se,e if cleaning is n_,essary. Trapped
particles in the filter can build up, and block the ai_ow, reducing _o, ling capacity
and causing an a_umulation of frost on the _a_rator. To clean the air filter:
1...Remove the air filter from the front grille by lifting the air filter up.
2 Wash the fitter using lukewarm water b,e[ow 40 ° C (i04 ° F).
3. Gently shake the excess water from the filter and replace.
Cleaning The Air Conditioner
The front grille and inlet grille may be
wip_ with a cloth dampened in a mild
detergent solution.
The cabinet may be washed with mild
soap, or detergent and lukewarm
water, then polish_ with I........iiquidWax
for Appliances.
To ensure continued peak efficiency,
the condenser _ils (outside of unit)
should be check_ periodically and
cleaned if clogg_ with soot or dirt
from the atmosphere.
• H,OW TO REMOVE THE FRONT GRILLE
i. Remove the screws s,_uring the Front Grille.
2. Push the grille up from the bottom and pull
the top of the grille away from the case as
the top, tabs lift out of their slots,.
Room Air Conditioner 19

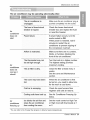
Maintenance aind Service
Before Calling for Service
iii_i_!!i_!!i_!!i_!!i_!!i_!!i_!!i_!!i_!!i_!!i_!!i_i_ii _ _iii_
If you have problems with your air _nditioner, read the following information and
try to solve the problem If you cannot find a solution, turn off the air conditioner
and contact your dealer,
Air conditioner does not o_rate
1. Ensure that the air _nditioner isi plugg_ into a proper outlet.
2, Check the fuse or circuit breaker,
3. Ch_k whether the _ltage is unusually high or low.
Air does not _el cold ,enough on the cooling setting
1. Ensure that the temperature settings are correct.
2. Ch_k to see if the air filter is clogged with dust. If so, clean the fil_er.
3. Ensure that the air flow from the outside is not obstructed and that there is a
clearance of over 20" be_een the back of the air conditioner and the wall or
fen_ behind it.
4. Close all doors and windows andi check for any source of heat in the room.
Before calling for service, please review the following list of common
problems and solutions
The air conditioner is operating normally when:
• You hear a pinging noise This is _used by water being picked up by the fan on
raii_ days or in highly humid conditions. This feature is designed to help remove
moisture in the air and improve c_ling efficiency.
See the section on Slinger Fan, page i8,
• You hear the thermostat click. This is caused Ibythe compressor cycle starting
and sitopping.
• You see water dripping from the rear of the unit. Water may be coll_ed in the
base pan in highly humid conditions or on rainy day& This water overflows andl
drips from the rear of the unit.
,, You hear the fan running while the compressor is silent. This is a normal
operational feature.
20 Room Air ,C'onditi_er

Maintenance and Service
The air conditioner may be operating abnormally when:
The air conditioner _s
Air
conditioner
does not
start
Make sure the air conditioner plug is
pushed completely into the outlet.
The fuse is blown/circuit Ch_k the house fuse/circuit
breaker box and replace the fuse
or reset the breaker.
_er failure. If power failure occurs, turn the
mode control to Off.
When _wer is restored, wait 3
minutes to restart the air
conditioner to prevent tripping of
the compressor overload.
Airflow is restricted. Make sure there are no ,curtains,
blinds, or furniture blocking the
front of the air conditioner.
The thermostat may not Turn the knob to a higher number.
be set high enough. The highest setting provides
Air maximum c_ling.
conditioner ---The-ai_;f_lier-is-d-ir_y.- .......... Cieanthe-filter-ai-[east every 2
does not
cool as it weeks.
should See the care and Maintenance
Air
conditioner
freezing up
The r_m may have been
hot.
When the air conditioner is first
turned on, you need to allow time
for the room to cool down.
Cold air is es_ping Ch_k for open furnace floor
registers and cold air returns°
See Air Conditioner Freezing Up
below.
ice bilks the air f!ow and
stops the air conditioner
from cooling the room,
Set the mode control at High Fan
or High Cool with thermostat at i
,or2_
* You _n refer lo the Energy Star pr_ram in deta_ilat w_,energyslargov,
Owner's Ma_a! 21

22 Room Air Conditioner

PARA SUS ARCHIVOS
I_scri_ aqu_ e] modelio, y r_mero de sede:
Mode|o n'::
I Pu_e e,_ontt-ar bs nQmeros en ]a etiqueta de ]a parte
lateral d@ p,rod_to.
Nombre del disl_buidor:
Fecha de compra:
[] Adjulnt_ _u recibo a e.eltap_gin_ con la grap_d_a p_ra
e_momento que, io n_,ite _ra proL_r ia fecha de su
adquisici6n o para A va][dacibn de I!agarantia,
LEA ESTE MANUAL
En su intedor enco,nt[arA muchos _s;nsejce Qfliies sobre ]a
u_lizaci6r_ y mantenimienlo de su a_andici_ado_ de aire
Unos, _s cuida_s _r su parte ]e pueden ahorrar
mucho tiempo y dine[o durante ]a vida de su!
acondici_ador de aJre.
En [la tabla de consejos para la soluc[6n rApida de
problemas encorCdar_t muchas respuestas a I_ ip_oblemas
mas habitua]es. Si revisa primero nuestfra Tabla de
Con_jes, para la so_uc[6n r_,pMa ,_ #ob_emas, tal vez no
nec_ite I[amar nunca a__er_iciio tecnico_
F
PRECAUCIION
• Confute a unC_tro deSen_icioAutori_o par_rep_raro
re_li_t _ m_ntenimiento de_ _ni_. Ll_me_1_0-2_,-0_
_ra _b_a_ e CSAm_s cerc_no,
• Elaite _ndtcio,n_o _,o_ _o, pataset usado_t ni_os
_e6_ o discap_a_os sin ]as_is_o_ ad_ada,
• Los altos _ee6_ dean _r survives p_r'aasegera/rque
noj_eg_en conel airea,condicionado,
• Sl h_y q_ cambiate__ble de al_ment_n,sol_i_te _ant_cnico _e
se_tcio q_e_nstale_n r_mb[o ex_cto,
• Elttab_jode ]_ inst_l_c[_ _be set tea]iz_o de _rd,o al
C_d[goE_tfico, _¢ion_]_ _ni_mente potel pe_o,r_al_]if[_o y
Manual det Prop,ietario 23

Precaudones de. Segufi_d
Para prevenir tanto lesiones al usuario u otras personas como daSos matedales, es preciso
seguir estas [n,struociones..
m La in_rrecta operaci6n d,el aparato como consecuencia de ignorar las instrucciones
iprovocara ,daSos o lesion, es.
• A cause de! peso pe_do de! producto, se r_mienda que ustedl tenga a un ayudiante a
participa en lia instalaci6n,
ADVERTENCIA
, PRECAUC:ION
Es.te simbolo indica [laposibilidad de lesi,ones mortales, o graves..
Este simbolio indica ia posibiiidad de iesiones o daSos materioales.
• E[ signifi_do de los s[mbo!os uti[izadois en este manual se indi_ a conflnuaci6,n,
i A_g_re_ de no hacer!o,
Aseg_rese de seguir las instrucciones.
• Instalacion
• Un morntajeo tns,taladsn ,def_t_o ipue_
provost un fundonamiento incoirrecto, [r_cluyen_
• piu,ede caus.ar incend[o y descarga ,el,6ctri_.
d_gos de _iones, in_ndic, s o descargas el_ctricas,
• Puede cau!_r explosi6n o in_ndio.
24 Aim Acondicio_,a_r
"i P'uede causar descalrga ,el_trica y fallios.

Precaudones de Seguridad
=Funcionamiento
• De otto, m_o_ causara
descarga e]ectrica o incendio.,
, Cau_ra deis_rga e._ectlri_ o
in_ndio.
• En_que no, puede
• Gausara descarga el_tfica o
[ncend[o.
° Causarade_a_a e]_tfiica o
incend[oi..
!
• Causara des_rga el_tfica o
incendio.
, Si no,hay conexi6,na masa,
puede pr,oducir una
de_arga e_tric&
causar incendio y accidente
de _rto circuito,
• Puede _usar incendio y
a_idente el_tfico.
• Pu_e ,causar descarga
electric.
Manual det Propietario 25'

Precaudones de Seguddad
y _s a_uras _e _l&
• E] aparato de air,e acondicionado debe
operar_ en un area cerradla pa[a set
m,_s efectivo,
Venffie antes de h_cer funcionar el
acondicionador de iairecuando _le
elgas:
• Pu_e. causar exp]o,si6n,,in_ndio,
que.maduras.
Si ent_ agua a la enidad,gireel inter_pto,
principal del arte_o... Tomecont_o con
e__ntrode_rviciodespu_s
desconectarele_hufe dei tom_riente,
• Causara descarga el_tHca o [ncend[o.
NO limpie la unided de aire
acondicionado _n agua'
• Puede entr ar agua e,nla unidad y
dismin,uir la ais]aci,6n.Puede _usar
una de,scargaellectrica.
PRECAUCION
[] Instalacibn
• Son fi]osas y pueideln causar
I,es[,ones.
* Pu_e provocar e] fa]lo de un
electro_mest[co o detefiorac[6n
de su rendimiento.
! Si Is carcasa exterior _& daSada,
debe repararse o recam_arse
iam_iatmente. _iarla _dda provo_
q_' el aparato de a_ad_ioriado se
caiga de laventana con el eonsiguiente
26 Aim Acondicio_,a_r

PrecaucionesdeSeguridad
AImomento _ in_laci6n, _s_nga e]en_L_e p_el O_en_e elapamtodeaire
', Hay r[esgo de ]esiones
personales.
. Puede causar des_rga
electdca y daSo.
. Gas'_ra energ[a en vano y
_dlrfa provocar un acc[,dente.
Desenchufe e] apar_o de No col_ue una mas_ 0 una No usela unidadi _ra pm_sitos
aire acondicionado a_es planta donde qu_e expu_to al especial_, _i_ como animals o
de limpiarlo: flujo di_cto deaire_No se siente veg_al_, m_uinas de
• Comoel venit[lla_r gira a a_ta
ve_od_d _ando esta func[onando,
puede ,_usar I_[ones.
* Es_ei p,u_e causar lesiones o
daffos en la ma_o_ o [a
pianta.
• Pu_e causaJ" da_o, a los
animales o vegetales y
perdlida de objetos.
• Ellfuncionamiento sin filtros,
puede da_ar la unidad.
• _ unidadd_la[reacondidonado
puede,deledor_e, ,ca-nbiarde
co]o_,o desarroillarm_chas en
la sup,ed[cie,
• No es sanoiy podria provost
enferrn_ad,es, o peligros ,de
]esiones
Manual det Propietario 27

PredoatFuncionamiento
1. Coloque el enchufe corr_tamente.
2. Use un unico circuito p,am este aparato.Recargar el circuito _dria iProvocar
un riesgo de incendios.
3 No utilice un alargador Consuite la pagina 3t para mas detalles,,
4. No arranqueidetenga el funcionaiento enchufandoidesenchufando el cable
de, corHente el_tn_,
5. Si el alargador esta daSado, y ha de ser recambiado,solicite a un tecnieo
autorizado que installe un recambio exacto.
1. Estar expuesto al flujo directo de aire _r un periodo Ilargo de tiempo pu_e
constituir un riesgo para su salud. No ex_nga alas personas, masootas o
plantas al flujo, dir_to pot periodos Iiargos d,e tiempo,
2. Debido a la posibilidad de falta de oxigeno, ventile la hab,itacion cuando se
use al mismo tiempo que, es.tufas u otros dispositi_s de _lefaccion.
3. No use este acondicionador de aire para pro_sitos determinados no
esp_ificados (por ej..: preservar dispositivos de precision, alimentos,
cachorros, plantas y objetos de arte),. Tales usos puede da_ar los elementos.
4. El aparato d,e aire acondicionado ,es un aparato dis eSado para el _nfo_ de
consumidor.No es un sistema aclimatizador.
i i i
i.. No toque las pa_es de metal de la unidad cuando quite el filtro. Puede
lastimarse cuando manipule bordes filo,sos de metal,
2. No use agua pare iimp,iar adentro de i acondicionador. La ex_sicion al agua
pu_e destruir la aislacion y esto a su vez prov_ar una descarga electrica.
3. Cuando limp,ie la unidad, asegurese que la corriiiente y el interruptor esten
desconectados. El ventilador gira a muy alta vel_idad cuando est_
funcionando. Existe la _sibilidad dei lesionarse si la energia se conecta
accidenta_mente cuando este limpiando las piezas internas de ia unidad.
P'ara reparaciones y mantenimiento,_ngase en contacto oon un centro de serJicio
autorizado.Consulite la pagiina de garantia o Illame al numero(800)243-OOOO.Tenga
su numeor d emodello y numero de serie a mano.Los enc4)ntrara en la pagina 23
de este manual.
28 Aire Acondicio_,a_r

introducci6n
Es,te sim_lo Io advie_e de un _ligro de accidente p,or corriente
Esite sim_lo Io ,adive_e de an peligro qu,e pueda cau_r un da_o
del vent|iador,
Este simbolo significa condicciones esp_iales,
ADVERTENCIA : Este aparato deberia instalarse de acuerdo con las,
normas del Cbdigo El_trico Nacior_al.
IPane_ de Control Gavirr_ete
Fi_ro de Aire
Tableau de con#o_e ,Gavinete
R'eji
Cont:ro_R_oto
Manual det Prop,ietario

Este equi_ .debe .es_r puesto a tierra debidamente.
El cable de aHmentacion esta equipado de una toma de tierra con tres pins. Para
minimizar el peligro de una lesi6n _r corriente eJ_trica, utHice una toma con
enchufe de tierm estandar con tres contactos_ Si el enchufe de _r_ no contiene
un borne de tierra, antes de usar el ventilador haga cambiar ,elenchufe por un
electricista.
Cambiar la toma sin realizar los camibios de cableado apropiados
crear_ un estado eldctrico inseguro que podria resultar en un
incendio o descarga el_trica.Para todo este tipo de trabaijos ,
consulte siempre con run electricista cualificado.
"J' A_g_rese q_ existe debida_utralizaciSn ar_tesde uti/izarel
apa_a_o,
No. corte ni quite el borne de tierra de la clavija de alimentacibn
El acop|amiento del borne de tierra del adaptador con el tornillo de la
cubierta del enchufe de par_ no pondr_ el equipo a tierra, si e!
tornillo de la cub.i.erta no es de metal y es_ aislado y el enchufe de
pared no est_ puesto a tierra a travds de |a r_ die |a cam.
En el caso de cualquier duda res.pecto a la correcta puesta a tierra
de| ventilador, haga revisar e| enchufe de par_ y el circuito pot un
e|ectricista profesional,
30 Aire Acondicio_,a_r

SegufidadElectfica
Debido a eventuales peligros de seguridad no recomendamos en ab_luto el
uso de un adaptador° S61o,para una conexi6n tmnsitoria se puede usar el
adiaptador clasificado _mo UL qiue esta a disposici6n en la mayoria de las
tiendas dei productos el6ctri_s. Atienda que e orificio grande en e/adaptador
_rres.F_nda al ,orificio gmnde en el en,chufe para Ii,ograrIiaconexion con la
polaridad _rr_ta.
Des_nectando, el _ble de a!imen_ci6n de! adaptador utilice una mano pare
sendas partes para evitar un d.aho del borne di,etierra. Evite una descon,,exi6n
fr_uente de!i cable de alimen_ci6n, pues pu_e causar un eventual da5o de!
borne de tierra.
Cubierta _1
}ornillo de Metai
Nunca ,_ilice el equi_ con un adaptador daSado,
Debido a un eventual peligro, no recomend,am,os en absoluto el uso de un
cable alargador. En situaciones excepcionaJes utilice s61o alargadores
certifi_dosi con puesta a tierra CSA ctasificados como UL con tres conductores
de valores i5 A, 125 \Z
Manual del Prop,ietario 31

instalacion
Ti_ A: i4 Tipo B: 2 Tip,o C: 2 Tipo D: 3
(Tomillo co_o} (Tomillo Mediano} (Tomillo Mediano) (E_Par&ql,esis L)
Tipo E: I
E
lr
Tipo F: 1
(Bar_@de_Marco)

tns_taci6n
Ubicaci 6n
instale el air,e aco,ndicionado donde no
reciba !uz solar dir_ta
Exterior
Espaeio, iibre
Si pm_miona espacio libre mejorara la eficacia d,e la unidad y evi_r,_ radia,cidn
de calor p,roc_ente del condiensador,
*La pa_e inferior de la caroasia debera estar a 30 o 60 pulgadas por encima del
suelo,
*La parte exterior de la ,carcasa debera sobresallir hacia fuera al menos i/2
pulgadas...
*No debera haber obst,_culos como una valia o muro a 20 pulgadas de la part,e
posterior de la car_sa,
*T_as las persianas laterales de la carcasa deberan dar ali exterior de la
estructura.
Aire enfdado
Manual det Prop,ietario 33

Instalacidn
1,,!11troduzca los paneles (Tipo G),
en los gu ias, de_45 ,aire acondicionad,o
,(Tipo H),oLascortinas atornilelas
con los tornillos (Tipo A),.
Use un atornillador largo, Asl lie
set& mAsfAcif instala ]ostomiHos
_ A
2, Co_,e la banda adhesiva (Tip,oE), y
co]6que]a del ancho de la ventana.
Remueva e] plast[co de Ilabanda adhesiva
y ,co]6quelaen la parte superior d,ee]
marco inferior de la ventan&
Banda
3. C:olocando Ila unidad en la ven_na
Abra la ve,ntana y marque UNEA en ,el
centro esta
4. Coloque el M_nsula en L
4-1. ]lnstale Ilos so_rtes L detr,as de
alfeizar interno de la velltana, 0OI1el
lado corto de! soporte como esta
ilustrado. Utilice 2 tornillos (Tipo A)
proveidos.
4o2. La mensula ayuda a que la unidad
se encuentre firme. _egurese de
_ner ]!amellsula en L contra la
pa_e posterior del descanso interior,
Tipo A
Exterior
I_nsuia en L
34 Aim Acondicio_,a_r

_nsi_a!c_6n
Precauti6n,.'_ ' • IEnlas siguientes instrucciones, sosten_ LaunJdadfirmemeate
hasta que la pa_e corredi_ de la vea_aa descanse sobm la pa_e superior
del canal y por detrbs del marco de los paneles co,rr_izos, Puede ihaber
lesiones o d,a_,ossi la unidad se cae de la ventana,i
1_Instale el Aire Aco,ndicionado a la
1-1. Cuidadosamente levante ei aire
acondicionado,y col6qiuelo en el hoyo
de Uaventana_Aseg@ese de que la guia
inferior del aire acondicionado caiga en
lugar correcto del mensula en L,
Lineadel!Centro
i
Cuando el aire acondicionado sea
fijado en et support en L, el aire acondicionado
sera centrado como pueden obse_ar.
1-2. Mientras mantiene e! aire
acondicionado, en posici6n,
cuidadosamente baje el borde de la
ventana superior hasta Ila guia superior
del aire acondicionado.
Una vez instalado diebidamente el aparato de aim acondicionado,, deberia inclinarrs,e
ligeramente haoia abaio, en su parte po,sterior.Si esta real puesto en la ventana,
colgara mas abajo por la pa_e posterior automaticamente. Si no io hace,hay una
problema con la instalaci6n.
2:. Asegure los Paneles,
Extienda los paneles, par a re!l,enar los orificios de la ventana usando los
2tornillos (Tip,oB),2tornillios (TipoC).
3, Insal,e la Banda del Marco
3-1. Corte Ilabanda del marco del mismo
ancho de la ventana, Co!oque la banda
del marco entre el vidriio y la ventana
para prevenir la penetracion al cuarto
de insect,osy aire.
3-2, Ato,rnille la cermdura del marco usando,
unto, rnillo(TipoA),
3-3. Quite los tornilliosque aseguran el
gabinete y ,cace#oladespreciable en el
lado correcto_
4_
SuppoA en L
TipoA
TipoB
T_poC
Tip_ F
instala,cibn del aire ,acondicionado de vent,ana no estard compleX, Vea
SEGURIDAD ELECTRICA para co,nectar la e_ensibn el_ctrica a! toma corriente.
Manual del Prop,ietario 35

in,struccJones de funcionamiento
Si Vd. de_onectia el ventilador o Io conmuta del enfriamiento a la
ventilacibn, antes del nuevo ajuste del enfriamiento esipere pot !o.
men.os 3 minutos.
-Apa,ga e] aire acondicionado
FiAN SPEED "LOW" -Funcionamiento de] ventilador a baja ve]_idad con o siin enfr[am[ento
FAN SPEED "141" -Funcio,namiento delve, ntiiado, r a aita ve_idad con o sin enfdamiento
De este m_o p_ra contro]ar Iatemperatura del a#e [nter[or_G#e el selector hasta que ]a
fliecha apunte las ma[_s de_enfriad,or para un enfdamiento mas mo,derado.
Ventilador normal
1. Gire el sefector de m_o de vel_idad dell VENT[ILADOR basra fa posici6n '_HI_'o "LOW"
2_ Ajuste el control del termostato en la marca de tem_ratura '°Fan Only '_
Enfriamiento normal
1. Gire el seiector ,de m_o de vel_idad del VENTILADOR hasta la _sici6n "HI_',o "LOW'
2_ Ajuste el control del termostato en la tem_ratura deseada (el p,unto medio, es una buena
_sici6n de inici,o)
Si la temperatura de la salla no es de su agrado, una vez haya transcurfido un tiempo razonable,
ajuste el co,ntro] a una posici6,n mas caliente_ _gun de.e,
Enfriamiento mdximo
I_ Gire, el sefecto[ ,de m_o de vel_idad del 'VENTILADOR hasta la pos[ciSn ,y_,
2_ Ajuste ell control! del te,rmostato en la mar_ de tem_ratura del enfr[ador,
Funcionamiento silencios-o
1, G[rei e_selector ,de m_o de vel_idad del VENTILADOR hasta la _sici6,n "LOW"_
2, Ajuste e! control _e! teirmostato s_un sea necesafio,
36 Manual det Prop,ietatio

Instrucciones de fundonamie,nto
Los contro_es tien,en este aspecto.
O
O
Enecndido/Apagado
' Para EN,CENDER.e!sistema presione e!bot6n_ y para APAGARLO presione eJbot6n o,travez.
• Este botSntiene priod_d sobre todos los otros _,tones.
t Cuan_ _ enciende el aparato per pdmera vez,usara los aju_es _1 mode High ,C_ a 72'F
0 Vel_idad del Ventilador
• PulGarel boron d_ v.elocidad deJven_lador ham .cambiar1asvelocide.ade_ en#e Low y High,
0
Marcador de encendido/Apagado
oOperac@l de Parada:
• Con ca_ pu!l_ci6n, de! boron _ realiza an cicl!oi_r las opciones,en este erda:
1 hera--,2 horas--_3 horas_ horas--,5 ho.ras_6 horas-_7 horas--,8 horas --,9 heras
410 betas --_11 hera--12 horas-_ CANCEL
, _ temperatura fija _ ,e_evara2 "F tTan_u#idos _ minutes y de nuevo tran_urri_s otros 30 minutes,
- Operaci6n@ Inidaci6n::
, Con_da p,ulsaci6n@1t'_tan sereaH_ unciclo perlas o_iones en,e_e orden:
1 hora--_2 horas_3 horas_ horas_5, ho,ras_6 horas_ horas _ horas_ horas
--,i0 horas--,11 horas_ 2 horas--_CANCEL
0 Frio/Ahorrador de energia/VentiladodSeco
° Cada vez que usted presione este bot6n, este seBalara entre COOL., ENERGY SAVER, FAN y DRY.
0 Ajustede laTemper_ura
, Este bet 6n pue_ contro._ar_ temperatura _ cua_lo automaticamente, La temp,eratura
pu_e ajustar de grade en grade, de_e 60 °F basra 86°F cada 1°F. SeJe_ione el
nL_lmeromas bajo para la temperatura m&s b.ajaen el cuarto..
Ai.re Acondicionador 32'

In,strucciones _ funcio,namiento
PRECAUTION: El mando, a distancia no fuincionarb correctament:e si
una luz fue_e hace con_cto con el sen_r del aire acondicionado o si
hay ob_cu!os entre el mando a dist_ncia y e! aire acondicionado.
• Para ENCENDER el sistema presione e! bot6n, y para APAGARLO presioneer bot6n otra vez:,
° Este boron tiieneprioddad _bre todos los otros betones.
° Cuando Ud iloencien_ por primera vez ei sisterna est& en el y la tem_ratura es _ 72°F
Ajuste de la Temperatura
° E_e _t6n controla la temperatura de _ _a entre lio_60F y los86°F
en increme_os de 1F
Velocidad del Ventilador
° Pu_ar el bot6n de veloci_d _1 ventilado.r hace cambim las
veloci_des entre Low y High
Marca,dorde Encendido/Apagado
.....O_raci6n _ Parada: [
L
• Con cade pul_d6n dell bot6.nse realiza un ciclo pot las opcio.nes
en este orden: 1 hera-,2 horas-,3 horas_4 horas_5 h.oras-,
6 horas--,7 horas_ horas-_ horas-,10 horas-,11 horas
12 horas _CANCEL
•_ temperatura fija se e[evara 2°F transcarddos_ minutos y de naevo
_anscur_idos o_os 30 minutos
O_raci6n _ iniciaci6n:
° Con cade pullsacion _[ boron _ real!iza un ciclo pot las op¢iones
en es_e.orden: 1 hera-,2 horas-,3 horas-,4 horas-,5 horas-_
6 horas-,7 horas-,8 horas-,9 horas-,10 betas-,11 horas-,
12 hor_ =,CANC:EL
Frio/Ahorrador de EnergiaHentilado, r/S_o
° Carla vez que presione este bo16n,las pallabrasCOOL, ENERGY SAVER,
FAN y DRY apare_ran alternadamente.
Power
Ahorrador de Energ{a
El venti_ador _ detiene cuando e[compressor no sigue enfriando
• Aproxima_mente _da 3 minutos el ven@a_r _ enoen_r&
y ne,cesitara vedficar la temperatura _! cuado para _ber si
es necesario mas enfriamiiento,
Cbmo Porter ias Baterias
1 Quite _ata_ de la pa_e _sterior del telemando
Para etlo haga deslizar [a tapa segSn la direcci6n
dell _af[echa.
2 [ntroduzcaliasdos baterias, respete siempre lia
pollandadal instalar las pilas Use baterias nu¢vas
3 Velvet a cermr, resbaiando [atapa hasta ia
posici_ iniciall
• No u_lice bateris r_argab[es
estas son diferentes de birma
de diimensii6n y uso res_cto a
Ilas baterias _cas usuales
• Seque [as bateffas dei
telemando cuando el
acoindicionador no vaya a set
usado durante un lalrgo peff_o
38 Manual del Propietario

Instrucciones,de funcionamiento
La direccion de! aire
Para ajustar la direccion de! aire usando
control de la direccion del aire.
Las dos lengQetas horizontales para el
control de las rejillas le permiten
descargar el aire hacia la izquierda, o
algo de aire a la izquierda y otro a la
derecha, o todo el aire hacia el frente, o
cualquier combinacidn de las _siciones
mencionadas.
Tu_ de DesagLie
En climas humedos, es posible que la
Bandeja Evaporadora se Ilenne de agua.
Pan quitar el agua acumulado, es
preci_ con_tar el tubo de desagOe,
Quite la Tapa del DesagOe y conecte el
Tubo a la Bandeja Evaporadora.
Este aparato de aire acondicionado va
equipado con un ventilador de extraccion.
(Vease la ilustmcidn de abajo). El ventilador
tiene un anil!o externo que gim en el agua
que recoge en la plancha base al entmr en
profundidad. La condensacion la r_oge el
ventilador y Ilaexpulsa a traves del
condensador, haciendo mas eficiente al
aparato de aiire aoondicionado.
]-ubo i
Tapa del DesagOe
PRECAUTION: Tenga cuidado al in_rtar el tubo de drenaje. A|_jalo de
la area aguda para evi_r el des|ice y |esiones _r ust_ mismo.
Removerlo de la Ventana
Apague el aire .acondicionado, desconecte el cord6n electrico del torna corriente,
remueva la c,ermdura del marco y los tornillos instalados en ia _rte superior e
inferior de los _neles, y guardelos para reins_ia,ci6n. Cierre los paneles.
Manteniendo, el aire acondicionado fuerternente, ilevante el marco de iliaventana, y
cuidadosarnente, incline el aire acondicionado, hacia atr_,s, _tando cualquier
agua condensada. Desli_ ell aire acondicionado I '" a la derecha, luego levantelo
de lia ventana y remuevale lia banda del marco de lia ventana.
Asegurese de drenar TODO el condensado del aparato de aire acondicionado, Si no
Io hace, _dria salirse mientras transporta el .aparato, ensuciando:, con ei_consiguiente
p,eligro die resbalones. Este sirnpe paso, le ahorrara tiernpo de limpieza y hara de su
lugar un erntorno rnas seguro.
Aire Acondicionador i39

Mantenimiento y servicio
Filtro ,de Aire
Revise por io menos dos v_es al mes si no, es necesario limpiar el filtro, de aire,
Las particulas detenidad se pueden acumular en el filtro impi.diendo el flujo del
aire, limitando el rendimiento de enfriamiento y causando la acumulaci6n de ihielo
en ,el evaporad,or. Proceder d,e la limpi,eza del filtro de aire:
i. Extra.iga el filitro d,el aire de la rejilla frontal tirando del mism,o
2 Lave el filtro con agua tibia de temperatura menor de 40°C (i04°F),
3. Escurra ligeramente el agua sob,rante del filtro y vuelva a instalarlo.
Limpieiza del Aire Acondicionado
La parrilla frontal puede set limpiada con
un trapo hQmedo mojado en un
detergente suave.
El gabinete p,uede set lavadlo con jiabon
suave o detergente y agua tibia, entonces
pulido Cera Liquida para aparato&
Para asegurarse una eficiencia oontiinu&
las bobinas del condensador (del ladio
expuesto al exterioO debe ser revisado y
la'¢ado,peri6dicamente sea por que se
tranqlue _n basura o polvo de I,a
Como Remover la Parilla Frontal
Suelte el Ilado i.zquierdo primero IDespues
cuidadosamente hale desde la parte de
,arriba y empo ha,cia la derech,a,.Las
I!enguetas estan aseguradas.
Manual del Propiietario

Mantenimientoy ,servicio
Antes de Llamar el Servicio de Asistencia T6cnica
Si tiene probiemas con su ventilador, lea las informaciones siguientes y trate de
resollver el problem& Si no puede encontrar la soluci6n, descon_te el ventilador
y dirijase a su suministrador.
El ventilador no funciona
1. _mpruebe que el ventilador este con_tado en un enchufe _rrecto.
2. Revise el fusible.
3. Compruebe que la tensioin no sea demasiado alta o Ibaja.
AI ajustarse el enfriamiento, el aire no par_e frio Io suficiente
i. Revise si los aiustes de la temperatura son correctos
2. Revise isi el filtro de aire no est,_ atascadlo de polvo. En el caso de que si,
cambie el filtro.
3. Compruebe que afuera no haya un obstaculo del flujo de aire y si entre la
parte trasera del ventiliador y la paired o la barrera haya espacio libre de por Iio
menos 1 metro (20").
4. Cieirre todas las puertas y ventanas y _mpruelbe que no haya una fuente de
calor en la habitacion.
Antes de Ilamar al servicio, tenga a bien revisar la siguiente lista de
problemas y sus solucioneis.
El acondicionador de aire est_ fun,cionando norma/mente cuando:
• Escucha un sonido metalico, Lo causa el agua que recoge el condensador en
dias !luviosos o en condiciones de mucha humedad, Esta _mcteristica est,_
diseSada pare ayudar a quitar la ihumedad en el aire y mejomr la ca_cidad de
enfriamiento.
° Consulte la sec4_i6n del Veintilador de extraccion en la I_gina 39.
• Oye un clic en el termostato. Lo _u, sa el ciclo del _mpresor que comienza y se
• Ve gotear agua de la parte posterior de la unidad, iEIagua puede set recogida
en la bandeja de base en condiciones de mucha hum_ad o alias de Iluvia. Esta
agua desborda y gotea desde i la parte posterior de Ila unidad.
• Oye funcionar el ventilador mientras el compresor esta silencioso. Esto es una
caracteristica operativa normal.
Manual det Propietario 41

Mantenimientoy servicio
E,!acondicionador de aire puede estar funcionando anormalmente cuando:
El aire
a_ndiciona
do no
El aire
acondiciona
do, no enfria
corno
Aseg_rese que ei aire acondicionado
esta conectado completamente a la
fuente de energia.
Cheque los fusiibles/interruptor de Ila
casa y reemp,liace Ilosfusib,les o
r,eestablez,ca,elinterruptor de ,energia,
• Cuando la energia se reestablezca,
espere 3 minutos para encender de
nuevo eJ aire acondicionado, Con esto
evitara que se produzca una
sob,recarga en e[ compresor.
,,AsegQrese que no haya cortin_,
persianas o muebles bloqueando el
frente del aire acondicionado.
Ajustar ellcontro[ de temperatura a un
nQ!meromas bajo,
,,Limpie e[ filtro por Iiomenos cada dos
semana& Vea la se,cci6n de
instrucciones de operaci6n_
, Cuando usted eneiende el aire
acondicionado debe esperar un
memento para que la habitaci6n se
enfde.
,,Asegt_rese que todas Iiassalidas de
aire esten cerradas para que el aire
regrese.
• Establezca una temperatura mds alta.
El aire
do, enfriia
• Elija el mo,do alito del! ventilador High
Fan o enfriado alito High Oool con ,el
termostato en el nt_mer,o 1 o 2,
Usted puede referirse a! Energy Star programa coi_ todo detaHe en www:energystar_gov,
42 Aim Acondicion, a_r

Goldstar will repair or repiace your product, at Go_dstaCs option, if it ip_oves to be defective in material or
workmanship under normal use, during the warranty pedod set forth below, effective from 'the date ,of orig_n,al
consJmer pu_ch_e of the prod_t Th_slimited warranty B good only 1o'the original purchaser of the p_oduc_ and
effective only when u_d In t_ United State, including Al_ka, Hawa_Land U,S Terrltorle¢.
WAR_NTY _RIOD:
La_: 1 Y_trom the D_e of F_Jrchase.
P_s: 1 Y_ fl'om the Date ,o_Purch,_
C_esso_: 5 Years from ib_ ©ale of
Purch_,
HOWSERVICEISHANDLED:
Call 1-_-243@_ and ch_ the ,appropr_e p_ompt,
Plea_ have p_oduct type (Ai_ Cor_it_r_r)_ model number,
serial numbeL and ZIP/postal code ready.
"_t_ terms of th_s warranty cover In-home service on the Indicated
m_ls,
mlS WAR'RAI'_I{IS IN BEU OF ANY OTHERWARRANT|E&EXPRE_ OR |MPLIED_INCLLIDINGWITHOUTLIMITATIONI_ANY
WARRANTYOF ME_HANTASIL|_ OR FITNESSFORA PARTICULAR_R_S& TO THEE_ENT ANY IMPtIED WARRA_ IS
REQUIREDIBYLAW |I' 8; HMITEIDIN DURATIONTOTHIE_£SS WARIBANTt{_RI_,D ABOVE° LG W|L[NOT _ LIABLE_R
ANY C'ONSEQUENIIAL,|NDI_CT, OR INCIDENIAL DAMAGES OF ANY _|ND, INCWDiNG LOST_VENUES Ol_ _OFff& |N
CONNECTION WITHTHEIPRODUCT=SOM_ _A_S DO NOTALLOW L|MlffATIONON HOW LONG AN |MPIJ_IDWARRA_
LASTSOR TH__XCLUSION OF INCIDENTALOR CONS_ENTIAL DAMAGE& SOTHEABOV_ LIMITATIONSOR:EXCLUSIONS
MAY NOTAPPLYI"OYOU
_15 LIM_ED WARRANW DOES _0_ AP_Y _O':
1 _Pdce t_ip,sto your home to del!ve_, pick up, and/or Instail t_ p_oduct, instruct, or _ep_e ho_e f[£_s or
correct wrl_ or correction of una_or_ed repairs; and
2,
Damages or operating problems that result from m/suse,abuse,,ope_atiion outside envlronmenta_
S_iCJtticat_ons O[ contra[y to the _eiqu_remients or precautions inthe Operating Gusde,_cidient verm!n,
fl_e.flood, _mprope_instail_ion. _ts of God, unau_orized msS#_ion or alter_on, Incorrect eiectrlcai
current or volt.e, or commercial u_ o__ fo_other than _ntendedpurple
3. _he_efo_e,_ c_ of _epair _ r_acement _ _h a d_fec_e product sh_l _ _ by _e consu_r.
CUSTOMER INTERoA_IV_ C£NT_R NUM_E_
To_ove WarrantyCayenne
_o Obtain Nearest A_ze_ $_ce Cer#e_ or S_Jes
Deal_ or _ Ob|_n Pr_c_, Cus_ _ _rvtce
Assis_e
IRetat_ your Sal_ _ecei_ to prove da_e i _ _Jrc_e.
A copy ,of your S,o!,es Receipt must be subm!tted at
th_ time war,crib/serdce is p_ovl_d,
Calll 800_'9_7_9_ 24 hrs.a day, 7'days p_ 'w_k_
P_ess the appro_te opt'lon, and please have you_
p_uct ft'Pe (AIR CON©I_C_4ER},a_>dZIP/postal code
_eadv,
P/No.: _28A901_A Printed in China
-
 1
1
-
 2
2
-
 3
3
-
 4
4
-
 5
5
-
 6
6
-
 7
7
-
 8
8
-
 9
9
-
 10
10
-
 11
11
-
 12
12
-
 13
13
-
 14
14
-
 15
15
-
 16
16
-
 17
17
-
 18
18
-
 19
19
-
 20
20
-
 21
21
-
 22
22
-
 23
23
-
 24
24
-
 25
25
-
 26
26
-
 27
27
-
 28
28
-
 29
29
-
 30
30
-
 31
31
-
 32
32
-
 33
33
-
 34
34
-
 35
35
-
 36
36
-
 37
37
-
 38
38
-
 39
39
-
 40
40
-
 41
41
-
 42
42
-
 43
43


Goldstar WG5004R El manual del propietario
- Tipo
- El manual del propietario
en otros idiomas
- English: Goldstar WG5004R Owner's manual
Artículos relacionados
Otros documentos
-
LG HBLG5004 El manual del propietario
-
-
COMFORT-AIRE RAD-101A El manual del propietario
-
-
-
-
LG HBLG6000R El manual del propietario
-
-
-