
MODELS: RAD-IOIA
9

Safety Precautions .......................... 3
Before Operation ............................ 7
Introduction .................................... 8
Symbols U_d in this Manua,I ........8
Features ........................................ 8
Electrical Safety ............................ 9
EJectrical Data ............................... 9
Temporary Use of an
Adapter .................................... 1t
Temporary Use of an
Extension Cord ............................ 1t
Installation .................................... 12
Window Requirements ............ 13
Size ......................................... 13
Select the best location .......... 13
Preparation of Chassis ............... 14
Unit Installation ............................ 15
Operating Instructions ................ 17
Location and Function
of Controls .................................... 17
Remote Centre! Operations ........18
Remote Controller ....................... 19
Additional Features .................... 20
Air Direction ............................ 20
Drain Pipe ............................... 20
Maintenance and Service ............2t
Air F_lter ................................... 21
Cleaning the Air Conditioner .....2I
How to Remove the
FrontGnl_ ................................. 22
Common Problems and
Solutions .........................................23
Troubleshooting .......................... 24
# FOR YOUR RECORDS
Wrde the model a,nd serlat nu,mbers here'
Model #
Serial #
You carl tindlthem on a label on 1he si,de el _he p,_(x_u(l_
De#!ler's IName
Date Purchased
III Sta_p,le your receipt to this page in the event you need i,t
to prove date r_fparPha.ee or fcJrwarranty isquns.
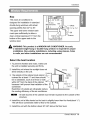
READ THIS MANUAL
Inside you will find many helpful h_nts on how to use and
maintain your air conditioner propedy Just a httle p_event,we
,(:are on your ;)art caf_ save you a _j[eal deal o_ hme a,r_d
money o,,,'ci [hc ]lie of you_ all corldittoncr_
Yeulll find many answe[s to common problems in the chart
of troubleshooting tips. if you review ou[ ch_t_tof
Troubleshooting, Tips first, you :may not need to call for
servif:e at a_l
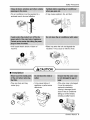
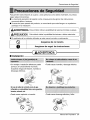
PRECAUTION
• Con,tact an Authorized Service Center for repair o;r
maintenan, ce of thins ,unit. Carl 1-800-243-0000 to
locate the nearest ASC.
•This air conditioner is not mr ended for use by young
children or inv,!lids without supervision.
o¥o,u,ng children, should be supervised to ensure that
they do not play with the air conditioner.
- If the power cord requires replacement, Ihave an
Authorizedl Servicer install an exact replacement part.
• Inslallation work must be performed in accordance
with the Nation, all Electric Code Iby q,ual_fied and
authori_zed personn,el only.
2 Room Air ,Conditioner

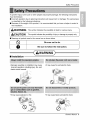
To prevent iniury to the user or other peop.le and property damage, the following instructions
must be foil,owed,
[] incorrect operation due to ignoring instructions wilil _us.e harm or damage.. The seriousness
is clas.sifi_ by the bllowing indications.
[] Because ot the weight of the product, it is r_omm.ended that you have a hetper to. assist in
the installation.
[] Meanings of symbols us._ in this manua_ are as. shown below.
Biesure not to do 'i, _]
q
B,esure to follow
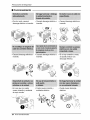
[] Installation
• improper assembly or _instatlation may cause
incorrect o_ration, inclluding injury, fire, and
ele_ric shock ha_rds.
• it may cau_ expliosiionor fire.
%,
• It may cause fire and electric sh_k.
.. it may cause failure and el.e_ric sh_k.
Owner_ Manual 3

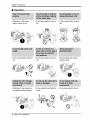
[] Operation
• Otherwise, it will cause
electric sh_k or fire
° ]t w[H _use electric: shock o,r
fire.
° _he_[se it may ,cause fire
and electric sh_k acciident.
• _twill cause el_tric shock or
fire_
°'_twill cause e_ric shock or
fire.
° _tmay cause fire and eiectr[,c
sh_;k,.
° it will cause electric sh_k or
fire
• INogrounding may cause
el_"tric sh_k.
° It w[[I cause electric sh_k.
4 Room Air Conditioner

, The air conditioner must be operated in a
enclosed area to be most effective
• Utmay cause explosion, fire, and burn.
. Ut:wi!l cau_ electric shock or fai!lure of
machine.
, Water may enter _e unit: and degrade the
insulation. It may cause an electric shock.
[] Installation
. They are sharp and may
cause injury,
C ,CAUT'O'"I
• _ may _use failure of
appliance or performan_
deteriorate.
• Ifthe outer case is damaged,
it must _ repair_ or
repi_aced immediately.
Leaving it damaged _uld
result in the air _nditioiner
hlling out of the window,
creating a _fety hazard.
Ownerb Manual 5

• It may _use injury: * It may cau_ e_ectric shock
and damage_
,, it will waste power'
consumption in vain and it
may cause accident_
j'
° Since the fan routes at high
speed during o_ration, it may
cause injury.
• Operation without filters will
cause failure.
,,This couUdiniure the pet or
plant,
!il_ ii_¸ _:_,0
_ii;iii!!_"_:i_:_
° it is an air conditioner, not:a
precision refrigera_on system,,
,'The ap_arance of the air
conditbner may deteriorate,
change color_ or devebp
suda_ flaws.
,,It is not sanitary and could
cause illness ,or_rs,ona_
injury hazard.
6 Rc_m Air Conditioner

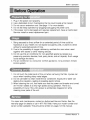
BeforeOperation
1i' Plug in the power cord properly.
2:. Use a dedicated circuit. Overloading the line could create a fire hazard.
3. Iao not use an extension cord. See page, 11 for more details.
4. Do not staWstop operation by plugging/unplugging the power cord.
5. IIfthe power cord is.damaged and requires, replacement, have an Authorized
Servicer install an exact replacement part.
1i_ Being exposed to direct airflow for .an extended period o,ftime could b,e
hazardous to your health, Do, not expose occupants, pets, or plants to direct
airflow for extended periods of time.
2. Due to the possibility of oxygen deficiency, ventilate the room when used
together with stoves ,orother heating devices.
3. Do not use this. air conditioner for non-specified special purposes (e.g.
preserving precision devices, food, peR, p,lan_, and art objects). Such usage
could damage the items.
43The air conditioner is a consumer comfort appliance, not a precision climate
control system.
21.
3_
Do not touch the metai parts o,fthe unit when removing the filter. Iqunes ,can
occur when handling sharp metal edges.
Do not use water to clean inside the air conditioner. Exposure to water can
destroy the insulation, leading to possible electric shock.
When cleaning the unit, first make sure that the power and breaker are turned
off. The fan rotates at a very high speed during operation. There isia
possibility of injury if the unit's power is.accidentally triggered o,nwhile
cleaning inner parts of the unit.
For repair and maintenance, contact an Authorized Service Center. See the,
warranty page for details or calt 1i-8.77-755-7932 Have your model number and
serial number .available. They should be written on page 2 of this manual.
Owner_ Manual 7

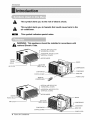
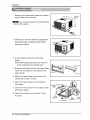
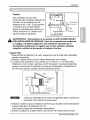
In,troduc,don
_i _LI_IIIIIIIIIIIIIIIIIIIIIIIIIIIIIIIIIIIIIIIIIIIIIIIIIIIIIIIIIIIIIIIIIIIIIIIII I :i
This symbol aleds you to the risk of electric shock.
This symbol aleds you to haza_s that could cause harm to the
air conditioner.
This symbol indicates s_cial notes.
WARNING: This appliance should be ins_lled in accordance with
national Electric Code.
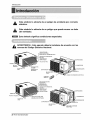
CABINET
FRONT
GRILLE
A!RFILTER
VERTICAL A_RDEFLECTOR
(HORIZONTN_LOUVER)
HOR_'ONTALAIR DEFLECTOR
(VERTICAL LOUVER)
D_SCHARGE
AIR _NTAKE
(INLETGRILLE)
BRACE
E_<&POR_rOR_
CONTROLBOARD
REMOTE
CONTROLLER
CONDENSER
_BASEPAN
POWER CORD
VER"[_CALAIR DEFLECTOR
4ORIZONT_ AIR DEFLECTOR
FRONT
AIR F_LTER
DISCHARGE
AiR iNTAKE:
(INLET GiRiLLEi
CONTROLBOARD
_BASEPAN
POWER CORD
8 Rc_m Air Conditioner

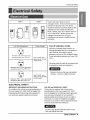
Elect.dealSafety
115V~ 230V ~
Power _rd may include a current
inte_upter device. A test and reset butto,n i,s
provided on Me, plug case. The devil,
shouM _ tested on a periodic basis by first
pressing the TES]" button and then the
RESET button, if the TES] button does not
#'ip ,o,rif the RESET button wil! not s,_y
engaged, di.s_ntinu,e use d the air
_ndifloner and contact a qualified seHice
te_nic:ian_
Use Wall Receptacle Power Supply
Sl_andardI25V, 3-wire gmun,ding
receplac_e rated 15A_125V AC
Standard 250V'_ 3-wire grounding
_eceptacle rated 15A, 250V AC
@.-
Standard250V, 3°wh*e groundk_g
receptacle rated _A, 2_V AC
Use 15 AMP, tJer_
de_ay fL_e or 15 AMP
drcuit breaker°
Use 20 AMP_ t_
de_ay f_e or :20 AMP_
drcuit breaker.
Use of extension cords
Be_u_ d _ential sa_ hazards, we
strongly dis_urage the use d an extension
®rd. However, if you wish to u_ an
extension _rd, use a CSA certifiiedlUL-listed
3-wire (grounding) extension oord rated 15A,
125V.
N_wiring should _ made in .accordance with
Io_ eledrical codes and r_ulations.
Aluminum house wiring may pose special
problems. Consult a qualified electrician.
ELECTRICAL SAFE_
IMPORTANT GROUNDING INSTRUCTIONS
Air conditioner has a three-pronggrounding plug on
its power supply cord, which triust _ pNgged into
properly grounded threeoprong wal_receptacle for
your pm_ection against p,ossib# shock hazard.
230, 208, and 2301208 VOLT UNITS
'These units am equipped with a throe-prong
grounding pJugon the peter supply ,cord,which
must/L_ iplu_ed into a matching properly grounded
thr_prong wad r,eceptacJefor your prot,e,ction
against possib_ shock hazard. If ,suchan outlet is
not:pr_ent, one must i_ installed by a qualified
e_ectrician iil accordance with the National Electrical
Code and i_al c_es and o,rdinan_s.
DO NOT USE AN EX"[ENSION CORD on 2_,
_8, and 23012_8Volt units.
Owner's Mar, ual 9

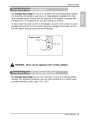
WARNING: This appliance must be properly grounded..
The power cord of this appliance is equipped with a three-prong grounding plug.
To miinimize the risk of electric shock, use the plug with a standard three-slot
grounding wall power outlet. If the power outlet does not include a grounding slot,
have a qualified eiectrician replace the outlet before you use the room air
conditioner.
Changing the outlet without making the appropriate wiring
changes will create an unsafe condition that could result in fire o.r
el_trical shock, Refer all such work to a li.cens_ and qualified
exists _t:ore u_
Do not cut or remove the grounding prong from the _wer
WARNING: Attaching the adapter ground terminal to the wall
receptacle cover _rew does not ground tlhe appliance unless the
cover screw is metal and not insulate, and the wall receptacle is
grounded through the house wiring.
WARNING: If you have any doubt whether the air conditioner is
properly ground_, have the wall r_eptacle and circuit checked by a
qualified el_trician,
10 Room Air Coeditioner

ElectricalSafety
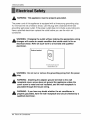
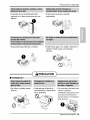
We strongly di_ourage the use of an adapter due to potential sdety hazards.
For temporary connections, use only a UL-][sted adapter, avaiiaibie from most
local hardware stores. Ensure that the large slot in the adapter is aligned with
the large slot in the receptacle for a proper polarity connection.
To disconnect the power cord from the adapter, use one hand on each to avoid
damaging the ground terminal. Avoid frequently unplugging the power cord as
this can lead to eventual ground terminal damage.
Adapter Plug_._ i
Receptacle Cover
"Metal _rew
Never u_ the appliance with a broken adapter,
We strongly di_ourage the use of an extension cord due to potential safety
h_ards. For temporary situations, use only CSA certified and UL listed 3-wire
grounded extension cords, rated 15 A, ! 25 V.
Owners Manual 11

Instaifl,ation
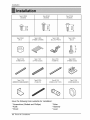
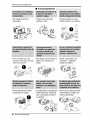
Type&SEA "[y_ C:5EA
E
Ty_ D:2EA TypeE:2EA TypeF:2EA
(FR_E CURTAIN) (SILLSUPPORT)
TypeG:2EA
10
_ j,
TypeH:I_ TypeI:1EA TypeJ:t EA %v_ K:2EA
(UPPERGUIDE)
_ L:IEA TypeO:1EA
(W1ND_LQ_SB_£"_ ,(D_N JOINT PIPE) (DRAINWASHER}
Have the following tools available for installation:
* _r_dlriver (Slotted and Philllips) * Ruller
* Knife * Hammer
* Pencil * Level
12 Room Air ,Conditioner

installation
This room air conditioner is
designed for installation in standa#d
double-hung windows with actual
opening widths from 22" to 36".
The upper and lower window sash
must open s,ufficiently to a!!ow a
clear ve_ical opening of i5" f_m the
bottom of the upper _sh to the
window sty!,
to 1t/4"
WARNING:This product is a WINDOW AIR CONDITIONER. As such,
a standard single-hung or doiuble-hung wind_ is required for proper
insta!lation_ Non-window installations, including using sleeves, holes
in walls, and other installations are not recommended..
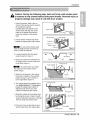
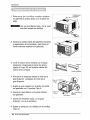
Select the best location
1. To prevent vibration and noise, make sure
the unit is.install_ securely and firmly
2. Ins,tall the unit where the sunlight does not / ,ing
shine, directly on the unit. /
C_led air _ _ Heat
3, The outside d t!he cabinet must extend R'_._ _ radiation
outward for at least iii and there should II
be no obs_cles., s.uch as a fence o,rwalll, " II ,=,= i
within 20" from the back of the cabinet _ _ _t-!__i_ ...............
because it will prevent heat radiation of the _/ [1 -"_'] AboutI/Z' ,
condenser.. _ /_ over 2o'
Restriction of outside air wili greatly r_uce
the c_ling efficiency d the air conditioner.
Fence
i
All side louvers of the cabinet must remain expos_ to the outside of the
4. Install the unit a li_le slanted so the back is slightly lower than the front(about V2").
This will force _ndensed water to flow to,the outside.
5. install the unit with the _ttom a_ut 30"-"60" a_ve the fl_r level.
Owner_Manuaf 13

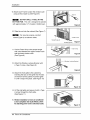
Installation
1, Remove the screws which fasten the cabinet
at both sides and at the ba,ck,
Use a long screwdriver and installing the
screws will b,e easier.
2. S_ide the unit from the cabinet by gripping the
base pan handlUe and pulling forward whi_e
bracing the cabinet,
3. Cut the window sash sea_ to the proper
length,
Peel off the backing and attach the Foam-Pe
to the underside of the window sash.
.
5_
Remove the backing from the top, Upper Guide
Fo,am-PE and attach it to the bottom of the
Upper Guide
Attach the Upper Guide onto the top of the
cabinet with 3 Type A screws.
6. Inse_ the Frame Guides into the bottom of
the cabinet,
,
Inse_ the Frame Cu_ain into the Upper Guide
and Frame Guides,
8. Fasten the curtains to the unk with 4 Type
FOamope
(Type A) upperGuide
_rcw
Screw
,(Ty_ A)
Frame ,Gui_s, (Type A),
Foam-Pe
14 Room, Air Co,nditioner

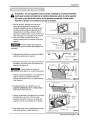
Installation
Caution: During the following step, ihold unit firmly until window sash
is lowered to top channel _hind side panel frames. Personal injury or'
property damage, may result if un_ falls from window.
,
2_
Open the window. Mia_ a line on
center of Me window stoo,[(or desired
air conditioner _ocatJon)_
Carefully p_acethe cabine! on the
window stool and align the center
mark on '[he boltom front with the
center line markd in the window
stool.
Pull the _3ttom window sash down
behind the up_r guide unti_it meets.
_i :Do not pull #_ewindow sash
down _ tightJy that the movement of
Frame Cu_ain is,restricted,
& Lo_lly as_mble the silli support
using the parts in Figure 3,,
4. S,elect the _ition thai:wiHIp_ac_the
sil_support near the outer most _int
on sill (See Figure 4),
_i " B,e_reful when you install
#}e cabinet ,(Frame Guides will be
broken easily}.
5_
Attach the sill support to,the cabinet
track ho,llein relation to Me sel_ted
position using 2 Ty_ A screws in,
each sup_r[(See Figure 4).
6_ The _binet shoulid be instalil_ with a
ve_ s|igh't ti!t(about Vz") downward
toward the, outside (See Figure 5),,,
Adjust the _lt ,and the nut of sil!
sup_rt for balandngi the cabinet.
7. Attach the @binet to the window stool
by driving the screws (Type B:Length
sixteen millimeters and below.) through
the front angle into window stool
8. P'uHeach Frame cut.in fullly to,each
window sash track, and repeat step 2
Upper Guk_e
_Wi_ow S_ool
Fro_ Angle Figure 1
Up_,r Guide
Figure 2
INDOOR
Bo_t
Fimame Guide
Nut Figure 3
S_'ew(Type A)
iNDOOR
9UTDOOR Figure 4
Sc_,ew(Type B)
Sil! Supper
Si_iSupport
le
Figure 5
Owner_Manual 15

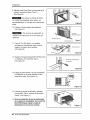
Installation
9., Attach each Frame Curtain the window sash
using screws (Type C),.(S_ Figure 6)
: DO NOT DRILL A HOLE IN THE
8oTroM PAN. me unit is ,designed to operate
with approximately 1/2" of water in bottom pan.
c
Figure 6
10. Slide the. unit into the cabinet.(See Figure 7)
: For security purpose, reinst_l
screws(Ty_ A),at cabinet's sides.
[
Screw(TypeA}
Power Cord
11, Cut the Foam-Stdp to the p,#o_r length
and inse_ _tw_n the up_r window _h
and the I!,owerwindow _sh_
(See Figure 8)
Foam Stdp
Figu_ 8
12, Attach the Window Locking Bracket with
a Type C screw,., (See Figure 9,)
13. Attach the front gdlle toi the cabinet by
inseAing the tabs o,nthe grille into,the tabs
on the front of the cabinet. Push the gri_ie
in until it snaps into place. (See Figure 10)
14. Lift the inlet gdHe _d s_ure it with a Type
A screw through the front grille.
(See Figure 11 )
15. Window installation of room air _nditloner
is now completed° See ELECTRICAL DATA
for a#aching _w_" cord to .electrica/ outleL
Figure 9
Figure I0
Figure 11
16 Ro,_m, Air Co#ditioner

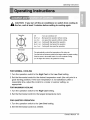
OperatingInstructions
CAUTION: if you turn off the air conditioner or switch from _o.iing to
the fan, wait at:least 3 minutes. _fore se_ing to cooling again.
,O_rafJon
_,_
T_rm_
5
Off - Turns air conditioner oft
Med Fan - Med sp_d fan operation withoull coo,ling.
Low Fan oLow s,pe_ f_n operation without c_][ng,,
Higih € oo] - C_ling with h_h s_i fan operation,
Med Cool - C_ling with fred speed fan operation
Low Co,o_ oC_Jlin,gwith low spe_ 'tanoperation_
This automatically m,ntrds lhe temperature of'the ind(_r air.
Turn the kn_ so that arrow points to the later marks,for greater coding,
Point the a_ow to,the smaller marks, for m_e m_era_ coo,ling_
(i.e. the hight the numb_;_,t_ grater the coding)
FOR NORMAL COOLING
1 Turn the operation switch to the High Cool or the Low Cool se_ing,
2. Set the thermostat _ntrol to the ,desired temperature mark (the mid-_int is a
good starting positio.n). If the room temperature is not satisfactory after a
reasonable time, adjust the control to a _o, ler or warmer s,e_ing, as.
FOR MAXIMUM COOLING
i, Turn the operation switch to the High Cool setting,
2o Set the thermostat _ntrol to the largest temperature mark.
FOR QUIETER OPERATION
1. Turn the operation switch to the Low Cool setting.
2, ,Set the thermostat _ntrol as needed.
Owner_ Manual 17

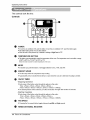
Operatinginstructions
The controls _k like this:
® •
_ 10jturnthe aircond_#ner ON, _sh the buBon_[o turnthe air condLtionerOFF,pushthe buttonagain.
• Thisbu_ontakespriority o,_r anyotherbuffo,ns_
• When theuni_isfi_s_poweredup,it defaultsto settings ofHigh Cee| at72_
TEMPERATURE SETTING
• Thils_on canaul_aticaUy _'_nt[olthe tem_ature ofthe room.Thetem_rature can be_t within a range
of@°F '1[o,86°F _ 1°£(16°C to 30°Cby 1°C)
Sel_t the_wer numbe_fo_I_er tem_ture ofther_m.
E_ry_ime _u push this I_Jt[,on,it wfflt_,gle be_,_n COOL, FAN, and DRY
ENERGY SAVER
• _e fan stops,when _e compress_ stops c_lJng,
• Approximatellye_ry 3 minutesthe'_n will1turn on andch_ the roomai_todetermine i'l_c_ling is needed,
- Stopping Operation
• Each press,of the button cycl_ through t:_ opU.onsin this o_der:
IHour _,2140u_-*3Hours--4Hou_ -_5Hours_6Hours
7!_ou_s.,8Hou_s_ 9Houi's., lOHou_s.._11Hours_ 12Houis_ CANCLE
• The settemperature wiil!be rai_d by 2_ after 30 minutes and again after anoth_ 30 minut_
- Starting Operation
• Each press of i_hebutton cycles through tt_ options in _is order:
1Hour--_4ours _,3Hours _4Hou_ --5Hours -_6.Hours-_
7Hour- 8H®rs-,. 9Hours-- 10N_irs _ 11Hours-_12H_s --CANCEL
FAN SPEED
Pressing the Fans_d button t_g_s _e_ Low,Mid and Nigh s_s.
REMOCON SIGNAL RECEIVER
18 Ro,_m, Air Co#ditioner

OperadngInstructions
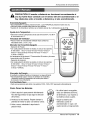
CAUTI,ON: The Remote Controller will not function properly ff strong
light strikes the sensor window of the air _nditioner or ff there are
obstacles beH_een the Remote Controller and the air conditioner.
• _o turn he Set O,N,push the button. To turn the Set OFF, push the button again.
• This b_on takes priority over any other buttons.
• When you first turn iton, the se_is on the High cool mode and 'the,'temp. at 72'_F
Temperature Se_ing
• This button contro_the room temperature setting in a range
_een 60_F to 86_Fin 1_Fincrements.
Fan S_
• Pressing the F_q Spe_ bu_0n t0ggU_ bei_een Low,Mid and Hi
speeds,
On/_ Timer
- Stopping O_ration
• Each press of the button cycles through the options in his
o_der:
IHour_ 2Hours_ 3Hours-,,4Hours-_5Hours-_6Hours._
7Hours_ 8Hours-,.9Hours_10Hours--11Hours--12Hour_ CANCLE,
° The set temperature will be _ai_d by 2'_Fa_er _ minu_es_d
agan after another _ minute.
- Starling Operation
• Each pros of the button cyc_ through the options in this
order:
1Hour-_2Hours-_3Hours_*4Hours- 5Hours- 6Hours.._
7Hours_SHours _9Hours_ 10Hours_11Hours-_12Hours_ CANCLE,
Energy Saver ...........................................................................................................................................................................................................................................................................................................
The fan stops when the compre_or stops cooling_
* Approximately eve_ 3 minutes the fan wil! tuimon and
check thieroom air to dete_iine if coo_ingis needed.
• Ev,e_time you push this bL_on_ it will t_gie between COOL FAN, and DRY,
How to Inert
1..Remove the cover from the.ba_ of the.remote
_ntroHer
2. I!nsert_o batterie&
• Be sure of the polarity when installing the
batteri,es.
oBe sure that both batteries are new.
3 Re-attach the cover.
• Do notuse rechargeable
batteries. Such bakeries
differ from standiarddry ceils
in sha_, dimensions, and
performance.
° Remove the batteries from
the remote controller if the air
conditioner is not going to,be
used for an extend_ length
of time,,
Owners Manual 19

Operating Instruc#ons
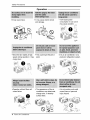
Air Direction
The direction of air can be controlled wher_er you
want to _o! by adjusting the horizontal louver and
the vertica! Ilouver
• HORIZONTAL AIR-DIRECTION CONTROL
The horizontal air direction is adjusted by
rotating the vertical louver right or left
• _,_RTICAL AIR-DIRECTION CONTROL
The vertical air direction is adjusted by
rotating the horizontal louver forward or
Drain Pi_
In humid weather, excess water may
cause the Base Pan to overfly. To
drain the water, remove the Drain Cap
and secure the Drain Pipe to the rear
hole of the Base Pan.
Press the drain pipe into the hole by
pushing down and away from the fins
to avoid injury.
This air conditioner is _uipped with a
slinger fan. (See drawing, Ibelow.)
The fan has an outer ring that runs in
the water that collects in the base pan
if it gets deep. That condensate is then
picked up by the fan and expelled
through the condenser, making the air
conditioner more efficient.
Ring
CAUTION: 8e careful when inserting itlhe drain pipe. Push may _om
the sharp fin area to avoid slipping injuring you_lf.
20 Ro_m Air Conditioner

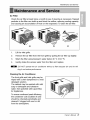
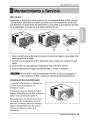
MaintenanceandService
Air Filter
Check the air filter at leiast twice a month to see if cleianing is necessary. Trapped
_rticlies in the filter can build up and block the airflow, reducing cooling capacity
and causing an accumulation of frost on the evaporator, To clean the air filter:
2.
4.
Lift. the inlet grille
Remove the air filter from the front grillle by pulliing the air filter up slightly,
Wash the filter using lukewarm water below _ °C (1_ °F).
Gently shake the excess water from the filter and replace.
I_ :DO NOT operate the, air conditioner without a filter because dirt and lint will
clog # and reduce performance.
Cleaning the Air Conditioner
The front grille and Inlet grille may be
wiped with a cloth dampen_ in a mild
detergent solution,
The cabinet may b,e wash_ with miJd
soap or detergent and lukewarm
water, then polished with Liquid Wax
for Appliances.
To ensure _ntinued peak efficiency,
the _ndenser coils: (outside of unit)
should be, choked periodi_lly and
cleaned if clogged with soot or dirt
from the atmosphere.
Owners Manual 21

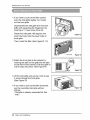
Maintenance and Service
i, If you want to pull out the filter upward,
open the inlet grille slightly,. Turn inside
out the front grille.
Disassemble the inlet grille from the front
grille with separating the hing_ part by
inserting a "_' type screw-driver tip,
Rotate the inlet grille i80 d,_rees and
insert the h_ks into the lower holes of
front grille.
Then, insert the filter. (See Figure12, i3)
Figure 12
Inlet Gr#/e Figure 13
2.Attach the front grille to the cabinet by
inserting the tabs on the grille into the tabs
on the front of the cabinet Push the grille in
until it snaps into place. (See Figure1.4)
Figure 14
3, L_ the inlet grille and s_ure it with a type
A screw though the front grille.
(See Figure 15)
4. If you want to pull out the filter dewnwardi,
use the reversible inlet grille without
change.
(Tlhe grille is.already assembll_ for that
way.)
Figure 15
22 Room Air Conditioner

Maintenanceand Service
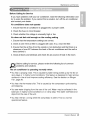
Before Calling for Service
If you have problems: with your .air conditioner, read the following
information and
try to solve the prob_em_ If you cannot find a solution, turn off the air conditioner
and _ntact your dea_er,
Air conditioner does not operate
1. Ensure that the air _nditioner is plugged into a proper outlleL
2_Check the fuse or circuit breaker.
3. Check whether the voltage is unusually high or low.
Air does not fee! ,cold enough on the cooling setting
1. Ensure that the temperature se_iings are correct.
2. Ch_k to see if the air filter is clogged with dust. If so, clean the filter.
3. Ensure that the air flow from the outside is not obstructed and that there is a
clearance of over 20" between the back of the air conditioner and the wall or
fen_ behind it.
4. Close all doors and windows and check for any source of heat in the r_m_
Before calling for semice, please review the folllowing list of common
problems and _lution&
The air conditioner is operating normally when:
• You hear a pinging noise. This is caused by water being picked up by the fan on
rainy days or in highly humid conditions. This feature is designed tO help remove
moisture in the air and improve cooling efficiency. See the section on Slinger
Fan, page 2,0.
• You hear the thermostat click. This iis caused by the compressor cycle starting
and stopping.
• You see water dripping from the rear of the unit. Water may" be collected in the
base pan in highly humid conditions or on rainy days. This water overflows and
drips from the rear of the unit.
° You hear the fan running while the compressor is silent. This is a normal
operational feature
Owners Manual 23

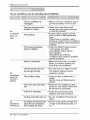
MaintenanceandService
The air conditioner may be operating abnormiallywhen:
Air
conditioner
does not
start
The air conditioner is
unplugged.
..................................
The fuse is I:_own/ci_uit
o
The current inter_pter
• Make sure the air conditioner plug is
pushed completely into the outlet.
Check the house fuse/circuit
breaker box and replace the fuse
or reset the breaker.
If power failure occurs, turn the
mode control to Off. Mechanical
is restored, wait 3
minutes to restart the air conditioner
to prevent tripping of the compressor
overload.
Press the RESET button located
on the power cord plug.
if the RESET button will not
stay engaged,
discontinue use of the air
conditioner and contact a qualified
set€ice technician.
Airflow is restricted, o Make sure there are no ,curtains.,
blinds, or furniture blocking the
front of the air conditioner.
---The-i her:mos_t ma_; n-o; ..... ; _Tu;n -t_he-knob-to a ih ighe_,_-nu-m-ber ....
be set high enough. The highest se_ing provides.
Air maximum c_ling.
conditioner ...............................................................................
does not • Clean the filter at least every 2
cool as it weeks..
should See the care and Maintenance
Air
conditioner
freezing up
hot. turned on, you need to allow time
for the _oom to cool down.
Cold air is escaping. • Check for open furnace fl_r
registers and cold air returns.
C_ling coils have iced up. ° See Air Conditioner Freezing Up
below.
ice bilks the ,air flow and
stops the air conditioner
from cooling the room.
• Set the mode control at High Fan
or High Cool with thermostat at 1
or 2.
24 Room Air Cond#ioner

ManualdelProp,ietario25

PARA SUS ARCHIVOS
Escriba ,aqu_e_mode_o y n_mero de s_ie:
Modelo n:
_tie n_:
Pu_e en_ntrar bs n_me_os en _aetJqueta de ]a paste,
aatera_d_ producto
Nombre del distri_idlor:
Fecha _ compra:
[]_d!jante su recib_ a esta p&gina con _agr_pador_ F_ra
e_ momento, que Io necesite para probar i,af_ha dle su
_dquisici6n o papa _avalidaci6n de A g_ranHao
LEA ESTE MANUAL
En sa interior ,e_con{i_af_ mach_ consei,os _tJ_s; sobte la
_i_izaci6n y mantenimiento de sa acondk,_nador de aire,.
Unos _s caidados _r su parte lie puden ahorrar
macho tiempo y dinetoi durar_te la vida de su
,acondick)n,ador _ aire.
En la tab,la de consejos para ia soliacbn rAp,ida de
problemas encontrarA machas rospuestas a los probliemas
mAs habituales. Si revisa primero naestra Tabla de
Consejos pa[a la s_uci6in rApida de p)oblemas, _1 vez no
_cosite llamar nan_ al _rvicio t_nico,
• Cont_te a un_CentrodeSewicie Autor_do pare rep_raro
tealii_r _ m_enimi_t_ de est_ un=idl_&Ll_mea 1_0-2_0
para _¢at e CSA m_s ¢ema_o,
• El a_te_cone_clo_o no _ a_o, _m setusado_t _i_
_q_; Odisc_p_dos st_ lasuipervts_a_dec_da,
) Los n_ _e_os debea _r s_pe_i_dos p_masegurat q_le
nO j_ COIn _ a#eaco_l¢toaado,
• SI hay_ge ¢am_ar elcable de _l!tme_t_¢t6_,_ltcite _ _a t_lco,
de se_¢lcfoq_ inSta_gr_r_c-ambioe_cto
, _11tmb_jo_ lainstalaci6ndebeset _lli=do de_c_erdoal
C6d_o E!_rico Naciort_!,_i=aicameatepote! pe_oaa! ¢_(ifica_ y
_uto_do,
26 Aire Acondicionador

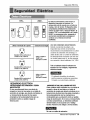
P'recaucio,nes de Segufidad
Para prevenir tanto lesiones ai usuar[o u otras personas como daSos mater[ales, es prec[so
seguir estas, instruccione&
[] La iincorrecta operaci6n dell ap,arato oomo cons,ecuencia de ign,orar ]as instruccion,es
provocar& dlaSos o lesiones..
[] A cause de] peso pesado de] producto_ se recomienda que ust_ tenga a un ayudante a
participa en _ains_laci6n,
I, AD, VERTEr,iCIA Este simbo]o indlica ]a pos.ibilidad de ]e.siones mortales o graves,
PRECAUCION Este s.irnbolo indlica [laposibiiiidlad de lesiones o daSos materioales.
[] El significado de _oss{mbolos, utiIizados en este manual se indica .acontinuacion
Asegure_ de no, hacerlo.
A_gdrese de seguir las instru_iones.
I instalacion
• Un montaje o instalaciSn defectuo_ puede
pr_o_r un funci,onamiento incorrecto,
inc_uyendo rie_os de I!esione& incendios o
des.cargas, electri_s..
• Puede ,causrar incendiio y de_arga el_rica.
ben_na,s0_vente,
• Puede cau_r explosi6n o incendiio. • Puede cau!_r descarga electrica y falios.
Manual del Prop,ietario 27

Precaud,ones die Seguridad i
[] Funcionamiento
• De otto modo, cau_ra
descarga electrica o incendio.
• Causara de_arga electldca o
incendio.
• Cau_ra descarga electrica o
in_ndio
. Cau_ra diescarga electrica o,
inoendio.
• En ,caso que no, pu_e
. Causara de_arga el_trica o
incendio.
• Si no hay _nexi6n a masa,
pu_e pr_ucir una
descarga electrica,,
_+,,_v_ _ _%_
_:$; t iiiiifiilfil{!{l]liifT,7]}lif i
causar iincen,dio y accldente
de _o circuito,
• Pu_e causar incen,di,o y
accidente el_trico,.
• Puede cau_r descar,gia
ellectricao
<-f'"]]7" +%.....
28 Aim Acondicionador

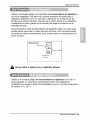
Precauciones de Seguridad
• El aparat,o de aire a_naicionado debe
operar_ en un _rea cerradia para set m_s
efectivo.
,.Puede cau_r explosi6,n,incendio,
quemaduras
• Cau_ra descarga electrica o incenaio,. ', Puede en#ar agua en la unidad y dis.minuir la
.ais[aci6n...[Pu_e causar una des_rga
,el_trba.
Ill Instailacion
• Son filosas y pueden cau_r
lesio,nes,.
• Pue_ provocare[falb _ un
e[_trodomestico o _terioraci6n
de su rendimiento.
• Si_a_rca_ exteriore_Ad&_ad&_be
F_arars,eo rec_biar_
inm_iat_menteDejarla_rb provocar
queel ap_atodeacondicbnadose
_iga @lavent&_&cone_®ns_u@nte
pelig_ode lesion_
Z
Manual del Prop,ietario 29

Precauciones de Seguddad
m Funcionamiento,
• Hay riesgo de lesiones
personale&
• Puede causar de_arga
el_trica y daSo.
° Gastara energfa en vano y
_dria provocar un accideme.
• Comoelventiladorg_raa alta
velocidadcuando esta funcionando,
pu_e _u_r lesiones,
• El funcionamiento sin filtros
puede da_ar la unidiad.
• Este puede cau_r lesiones o
daSos en la mascota o la
planta.
• Puede cau_r daSo a los
animales o v egetales y
_rdida de objetos,
° La uni_d _ aJreacondicionado
piuede deteriorarse,cambiarde
collor,o desarroH_manchasen
I,asupe#icie.
• No es sano y podria provocar
enfermedades o [peligros de
lesiones personal!es.
30 Aire Acondicionador

Previoal Funcionamiento
1. Coiloque el enchufe correctamente.
2. Use un Onico circuito para este aparato. Recargar el circuito podria provocar
un riesgo de incendio&
3._No utilice un alargador. Consulte lap,agina 35 p,ara mas detalles.
4. No, arranque!detenga el funcionamiento enchufando/desenchufando el cable
de corriente el6ctric&
5..S.iel alargador esta da_ado y ha de set recambiado,,, s.olicite a un tecnico
autorizado que instale un recambiio exacto..
1. Esitar expuesto allflujo directo de aire pot un iPedodo largo de tiempo puede
constituir un desgo para su salud. No exponga a las. personas, mascotas o
plantas al flujo directo pot periodos largos de tiemp,o.
2. Debido a la posibilidad de falta de oxfgeno, ventile la habitaci6n cuando se
use a! mismo tiemp,o que estufas u otros, dispositivos de callefacciOn.
3. No use este acondicionador de aire para propositos, determinados no
es.pecificados (por ej: preservar dispositivos de precision, alimentos,
cacho, rros, plantas y objetos de arte). Tales usos puede da_ar los elementos.
41.El aparato de aire acondicionado es un aparato dis.e_ado para el confort del
consumidon No es un sistem.a aclimatizador
i ii i_ ii
1. No toque las partes de metal de I,auniidad cuando quite el filtro. Puede
lastimarse cuando manipule bordes filosos, de metal.
2. No use agua !para limpiar adentro del acondicionador. La expo,siciOn al agua
puede destruir la aislaci6n y esto a su vez provocar una descarga el6ctrica.
3. Cuando limpie la unidad, asegOrese que i.acorriente y el interruptor esten
desconectado& El ventilador gira a muy alta velocidad cuando esta
funcio, nando. Existe la posibilidad d,e lesionarse si la energia se conecta
accidentalmente cuando este limpiando las piezas internas de la unidad,
Para reparaciones y mantenimiento, p6ngase en contacto con un centro de
servicio autorizado. Consulte la p_gina de garantfa o flame al nOmero i-877-755-
7932. Tenga su nOmeor d emodelo y nOmero de sede a man& Los enoontrarA
en la pagina 25 de este manual
Manual del Prop,ietario 3i

lntroducd6n
Este simbolo Io adviert,e de un peligro de accidente por corriente
Este s,imbo!o Io adiverte de un peligro que pu_a causar un da6o
del ventliador,
Este simbo!o signffica condicciones esp,_iales,
ADVERTENCIA : Este, aparato, deberia instalarse de acuerdo ,con las
normas dei C6digo E|dctrico Nacional.
DEFLECq_ORDE
HORIZO##AL
(VENTANI_S HOR_ZONTALES)
DIEF_CT,ORHORIZONTAL
GABINE_E
REJILLA
FRON°[AL
Fi_'I'RO DE,
AIRE
DE C_{TR_
PANEi,
CONTROL
REMOTO
-CONDENSA_
DEFLECTORHORIZON"rAL
G_INETE
RE,JILD_FRONTAL"
F&TRODE
AIRE
SAL!DA DE AiRE
EVAPORADOR
DECOntROL
PANEL
=CONDENSADOR
32 Aire Acondicionador

Segura_daEt#ctrica
l
El able de a_i_n_i6r_ pu_e incluir un
di_osiflvo inte_ptor de _iente.
_ _1 _ufe oJenta _ un bot6n de
p_e_ y o_ro_ reiinido, E! dis_tivo _
_mpro_ pe¢_,,amen_ pmsienando
pdrneroel botbn TEST y ,_6s RESET. Si
el botSnTEST no se des_ o _ et bot6n
RESET no perman_ _. _s_nda
use _1 aiirea_ndi_nado y I;_gase en
_nta_ _ un _ni_ de _cio
_li_.,ado.
UtilLce_ en_t,_e _ la _ed Consu_o, _ Ene_ia
Standa_ 1125V,._u_ _ 3
Ur_ _ i_, !25V AC Util_ ur__e
I_MP. o
Standa_250V, _chufe _ 3
Ll_s _ i5A, 250V AC
(_ _1_ _ _e die
_MP... o_
_da_ 250V, _ufe _ 3
Li_ _ 20A. 250V AC
USO DE CORDONES DE EXTENSION
_bido, al potencial de, peligro a su
seguddad baio cie_s ci_cunstancias
r_mendamos e_redidamente no u_iiar
cordones ,deex_nsi6n_ Sin embargo, si
usted decide usar un cord6n die extensi6n,
es ab_lutamen'[e necesario que este sea
un co,rddn listado bajo UL de tres espi,gas
con _nexi6n a tierra _lifi_do 15A, 125V.
Todo el _eado _ber& m_se de
ac_erdo _n !_ oh,digs, y regl_entos
e_d_, I_les.
El cableado dom_slJco de aluminio
podda oc_sionar pro,biemas es_ciaies,_
Consulte a un electricista calificado,.
SEGURiDAD E_CTRICA
'_, A_
El aim a_ici_a_ tiene _r_a_avija de
_nexi6n a flerra _ tres pat_ en su _e de
_mirtstro de er_r_a, que de,_e_ ench_rse
_n tomacorriente de _red de t_es paras
_ado a tterm a_ad_ente pare s_
prote,_i6n _ntm un _sible riesgo de
,L,,_tl_ DE _ _ y _ _ _
IEstas unidades es'_n _ui_..s _ una _¢i_
_e_J_n a t_r_ _ ires _ en el _
sumini_ de _e_la que _be_ en_ufa_ en _n
tomaco_iente de par_ _ra try. paras _,_do a
flerra ad_u_amente (ver las i_tra_es a
con_n_a_) _ra su prot_n _n_ _n p_
_, de elecirocuct_.. Si no _e_ gn,t_rflente
_ _ _-acteds_cas, un _ri_ta _l!iflcado
_f_ in_r u_, de acuerde _ el!_igo
IEI_i_ NacionaJy _ _ig_ y no_m_ Ior_es,
No u_ un cable _ exte_on.
Manual del Propietario 33

Este equi_ .debe .es_r puesto a tierra debidamente.
El cable de aHmentacion esta equipado de una toma de tierra con tres pins. Para
minimizar el peligro de una lesi6n _r corriente eJ_trica, utiHce una toma con
enchde de tierm estandar con tres _ntactos, Si el enchde de _r_ no contiene
un borne de tierra, antes d,e usar el ventilador haga cambiar el enchufe por un
electricis_.
Cambiar la toma sin reali_r !os cambios de cableado apmpiados
crear_ un es_do eldctrico inseguro que podria resul_r en un incendio
o descarga eldctrica. Para todo este tipo de trabajos, consume siempre
con un electricista cualificado.
A_gSrese q_} existe debida
neutra_izaciSnantes de u_izar el
aparato,
No, corte ni quite el _rne de tierra de la clavija de alimenlacibn
El acoplamiento de! borne de tierra de! adaptador con e! torrfll!o de !a
cubierta del enchufe de pared no po.ndrd el equipo a tierra, si el
torniilo de la cubierta no. es de metal y esta aislado y e! enchufe de
pared no es_ puesto a tierra a travds de la r_ de la ca_.
En el caso de cualquier duda res.p_to a la corr_ta pues_ a tierra
del ventilador, haga revisar el enchufe de. par_ y el circuffo pot un
electricista profesional.
34 Aire Acondicionador

Debiido a _entuales peligros de seguridad no recomendamos en ab_luto el
uso de un adaptador° Solo. para una conexion tmnsitoria se pu_e usar el
adiaptador clasificado oomo UL que esta a dis_sici6n en la mayoria de las
tiendas dei productos electricos. Atienda que e orificio grande en el adap_dor
_rres_nda al ,orificio gmnde en el en,chufe para Iiograr Iiaconexion con la
polaridad _rr_ta
Desconectando e.! _b.le de al!imen_cidn de! adaptado.r utilice una mano pare
sendas partes para evitar un d.aho _,el borne de tierra. Evite una desco, nexion
frecuente del cable de alimentacion, pues pu_e causar un eventual da5o del
borne de t_erra.
A°°°t°°°r-X
Cubierta ®1
}ornillo de Metai
iiti
!i,_,iiiii_,,iiiiiii,,_!i
;i_iiiiiiiiiiiiiiiv::
Nunca _ilice el equi_ con un adiaptador daSado.
Debido a un eventual peligro, no recomendamos en absoluto el uso de un
cable alargador. En situaciones excepcionaJes utilice s61o alargadores
certificados con puesta a tierra CSA cfa.sificados como UL con t:res conductores
de valores i5 A, 125 _,,L
Manual de/Prop,ietario 35

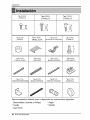
Instatacidn
Tipo A:16 EA Tipo,B:3 EA Tip,o C:5 EA
(TORNILLO) (TORN]LLO) (TORN[LLO)
I E
E
Tipo D:2 EA
Ti_ E:2 EA
(PANEL GUiA)
Tipo F:2 EA
SOPORTE DE AILFEIZAR)
Tipo G:2 EA
.J [-
Tipo H!:t EA Tipo !:i EA Ti_ d:! EA T_, K:2 EA
(TIRA DEGOMA) (B,_DA ADHESIVA) (GU[A MARCO)
Tipo L:i EA Tipo,M:I EA TilFX)N:t EA Tipo O:'1EA
(_[_:_I_T_) (BANDA ADHESIVA) (TAPADEL DESAGOE) (ARANDE[_)
Pan la instalaci6n debeiria tener a dis_3sici6n los instrumentos siguientes:
* Destomillador (Estrella y Phillips), * Regla
* Cucjillo * MartiHo
* Lapiz Nivel
36 Aire Acondicionador

lnstalacion
Este ventilador de casa est,_
_nstruido para ventanas est,_ndar de
dos alas _n la ext:ension rea! de
apertura de 22" a 3". El ala superior
y e! inferior de la ventana deben
abrirse Io suficiente para producir un
orificio ve_ical de 15" desde el ala
superior hasta el ant,ep_ho.
! !
I .........................1
15° rain Banql
|
to 11/4.....
ADVERTENCIA : Este producto es.un aparato de AIRE ACOND,ICIONAD, O
PARA INSTALACION EN VENTANAS. Como tal, _ n_sita una ventana de
un cuielgu.e,o .dedob!e cuelgue _ra una insta|.a.cion adecuada. No se
recomiendan instalaciones en lugares que no sean ventanas, uti|izando
casquillos, orificios en las paredes, ni cualquier otto tipo..
IEspacio libre
1.Para prevenir la vibraci6n y el ruidlo, asegure de que la unidd este insa al.ada
segura y fimemente..
2.1nstale la unidad donde el sol n,o reflej,e directmente en la unidad,
3.La _lida debe extendeirse hacia afuera _r 111omenos 11" y no debe haber
obst,aculos, _mo cercas o, paredes, en 20" de la pa_e de atra.s del gabinete
porque va ha prevenir la rediaci6n de calor de! condensador. Restriciones dl
aire de fuera reducira grande mente lia diciencia del aire
Toldo,
Air,€
Radiacion
de caloilr
L
T_as las ventanilllas de IIIoslad,os de! g.abinete deben mantenerse
expuestas hacia afuera de la estructura,
4.1nstaile la unidad un poco inciinada de tal forma que la pa_e trasera este ligemm
ent,emas baja que fl frente(ce_a d,e 1/2").
Esto forzar,¢ el agua dell condensador hacia afuera...
5.1nsta!e la unidad con la _rt,e inferior cerca de 30"-_" arriba nive! de suelo.
Manual del Propietado 3Z

Instafaci6n
i. Remueva los tomill!os cuales sujjetan
el gabinete a ambos lados y en la parte de
arras,
Use un atornil_ad,or larg,o_Asi le sera
mas fa,ci{ instala los to,milos.
2. De,slice la unidad fuera del gabinete tomando
e_agarradero de Ja bandeia y hale hacJa el
frente mientras mantiene el gabinete.
3. Co Ae e_marco de Ilaventana con el largo
apropiado. De_renda la pa_e de arras y
sujete el Foam-PE en Iia parte inferior de_
marco de ilaventana,
4. Remueva ,el,em_que desde ,e_sello de la
guia Supenor y p6guello al rondo dle Ilia
guia Superior.
5. Sujete la guiia superio, r en la pa_e de arriba
del gabinete _n 3 tomillos Tipo A.
6. Ilnserta la Guia Marco en ta pa_e inferior
del gabinet,e,
7. _nseAe los Paneles Gu{as en _agu{a
Superior yen _aGuia Marco.
(Ti$_ A) Su_rior
Screw
(Tipo A) ,Guia Marco
_rew
Guia Marco (Tipo A)
8. Siuiete el armazon a la unidad ,con 4 torniHios°
(Tipo A)
38 Aire Acondicionador

tnstalacidn
Pr_auti6n: IEnlas siguientes instrucciones, sosten_ Launidad firmemente
hasta que la parte c.orr.edi_ de la ven_na descan_ sobm la pa_e superior
del canal y por detrds del marco de los paneles co.rr_izos. Puede haber
I_iones o d.a6.ossi la unidad se cae de la ventana.i
1, Abra la 'renan.a, Marque un.a _inea en e_
centro de_ banqueta de _aventana(o U.a
ubicaci6n deseada del sire acondicionado)
Cuidado_mente ubique el g_inete en _a
b,anque_ de la ventana y a_inee la marca
central en el fren_ inferior con el centro de la
_/r_eamarcada en la banquets de la ventana.
2. Hale hacia abajo la parte inferior de la
ventana Ihasta que se una detras _ la guia
No hale la ventana hacia a_jo 'tan
apr_adamente que e,_movimiento _l panelguia _a
res_ing_o,
Gala Sa
Panel
3. Ligeramente en_mb_e el soporte del affeizar
usando las partes de la Figura 3,
4, Sele_ione la posici6n que ubicar& el sopo_te
del alf_i_r cerca del punto m_s exterior _
alfei_r,(Ver Figu!ra 4)
Tengia cuida_ ial instaliar e_
gabinete(las Guias Marco _ romlpen fAcilmente),
5, Pegue el _porte antepecho ales rteles ,de la
csja en relacion .ala _sicion _sead.a
u_ndo dos tornil!os. Tipo A en cs_ so_rte,
(Vet Rgura 4),
6_E_gabinete deb,e _r ins_l]a_, con una
p_ueSa cai_(c_ca de %") ha_a abajo
hacia afuera (Vet FigL_ra5).
7. Adiunte eli gabinete al banquete de Ilaventana
atorniHsndo los toirnillos (Tipo B: Lsrgo
dliec:i_is milimetros y menos.} a traves dell
,_ngulo,front_li en la banqueta _ la ventana.
8, Hale ca_ panel gula completamente a cads
lado de la ventana y repita del paso 2.
_nt:edor Exterior
Sopo_e de_AIf_izar
Guia Marco
T_'niHo(Tipo AI,
#
Gabinet,e
Ext,enor
<
Fig_ra 4
Tomillo(_'i_ B}
_rte del A_f#izar
£
<
de
Mar_
Angulo de Delante
T,orniilo(Ti_ Bi
So_Ae de_ Al'rei_r Fig_ra 5
Manual del Prop,ietario 39

instalaci6n
9. Adjunte cada P_el GuJfaa cada lado de la
ventana usando tomillos (Tipo C),
(Ver Figura 6)
No pefore la charola de! fondo,,
La unJdad est& diseffada para operar ,_n
aproximadamente 1/2" _ agua en la charola del
rondo.
10_ Desiice e_chas_s dentro del gabinete
(Ver Figura 7)
" Por razo,nes de seguddad, re
iinstale los to,rnillos(Ti_ A) en los lados ,del
gabinete,
11. Corte [a Tira De Goma a la m,_ida
apmpiada e intmd6zcal!a entre I.apa_e
superior e inferior de la ventana,
(Ver Figura 8.)
12, Sujete la Chapade So_e En E_Marco De
La Ventana con untomi_l,o T[po C,
(Ver Figura 9)
t & Pegue ell p.anel frontal a la caia insertando i
los fiiadores en el p_el adentro _osdel
pane_ de fa c_a. (Ver Figu_ 10)
14. iLevante la parri[la de entrada y ajOste[a
con fomi[ios Tipo A, atraves de la p,arrilla
fron_L (Ver Figura 11)
!5, Ahora /a instalaci6n de/aire acondicionado
en la ventana es comp_da. Vea los DA TOS
ELECTR/COS para, lnsta/ar el cab_ de
a#ment_i6n _ /a toma de,,¢orrien,te,
40 Aire Acondicionador
Conrdon
de Aiimentacio!r_
/
Tomillo{TipoA) Figura7'
Gom_
Figura 8
Chapa de so_tle pa_a
la ve_tana
Figura9
Figara i0
Figara 11

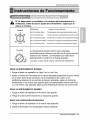
Inst;ucciones de funcionamiento
Si Vd. de_o.necta ,el ventiliador o Io conmuta del enfriamiento a |a
ventUaci6n, antes del nuevo ajuste del enfriamiento esiper.e por !o
menos 3 minutos.
O_[ation
T_rmos_
:Apagael aire acor_icionado,
:£ermit,eIs0perad®_ lav_0_d media_ ,_enfllad0_sin_riar,
:PertainI_@emci6ndelavelcci_d baja@1v,enti_adorsinenfdar,
MedFan(VentiladorMedio}
_w _ n(VentiladorB_o}
HighCool(Enfriam_ntoA_o! :Pe[mitee_riar_n la_eraci6n,delavel0¢Nada_ delvenli_[:
MedCooi{EnffiamiemtoMedio):Permite_riar e_ is0pe_ac_delav_0cidadmedia_ v_flador,
_w C,ool(E#f¢amiento%jo} :Rotate®fria_®nla_l_ea @lavdcadad_ja dd',@a_a®_
La temperatura dei_aire interno sera controlada
autom&ticamente. Mientras mas alta sea la marca m&s fr/o
,estarA ,el aire internio,. La t,emp,eratura se se!ecciona
posicionando el control en la marca de_ada.
(es deck, a mayor _a el n_mero, mayo_sera el enfr[amiento)
PARA UN ENFRIAMIENTO NORMAL
1. _nga el _t6.n de o.pe_tion en High Cool o Low Cool.
2. Ajuste el control del Termostat en la mama deseada(usualmente e.I punto m_io
es an buen punto para comenzar).. Si la temperatura del cuarto no es
satifactoria des:pues dle un periodo de tiempo, razo,nable, ajuste el controll de
tempemtura a una marca mas grand,e (para una temperatu_ interna mas fria)
o a una rnarca rnas p_ueSa (para que la temperatura interna sea menos fria)...
PARA UN ENFRIAMIENTO MAXIMO
i. Ponga el boton de operation en la marca mas grande.
2. Ponga el control del Termostat en la marcamas grande i.
PARA UNA OPERACION SILENCIOSA
1, Ponga el _t6n de o,p,emt:ion en la marca mas pequeSa,
2. _nga el termostat en la temperatura interi,or deseada.
Manual del Prop,ietario 41

Instruccionesdefuncionamiente
Los controles tienen este asp ecto:
@
@ Enecndido/A_gado
' Para ENCENDER e] sistema presione el bot6n, y para APAGARLO presione e] _t6n o_ra vez.
• Este bot6n tiene prioddad sobre todos ]os otros botone&
• Cuando _ enc[ende e[ aparalo pox pdmera vez,usara ].osajusies _11mode High C_ll a 72"F
@Ajustede la Temperatura
•Este _t6n puede ,_ntrolar _atemperatura del cuarto automaticamente. La temperatu ra
se puede aiustar _ grado e,ngrado,, de_ 60 "F hasta 86°F cada 1°F. Seteccione e]
numero m&s b@o,pare latem_atura m&s baja en el cua_,.
@ FrioNentilador/Seco
,Cada vez que usted presione este boton, este seSalara entre COOL, F_i y DRY.
@ Ahorrador de energia
El ventJlador se detiienecuando el compres_r no sigue enffiando.
•Aproximadamente _da 3 minutes e]ventiiador se en_nder& y nec_ii_ara verif_ar la temperature
del cuarto para saber si es necesar[o mas enfriamiento.
0 Marcador deencendido/Apagado
° Operaci6n de Parada:
° Con cada pulsaci6ndel biotoR _ realiza un cido per las opciones en este orden:
1 ho.ra--_2 horas-_3, horas-_.4 horas-_.5 horas-_,6 horas-_7 heras -_.8 betas --,9 betas
--_10 horas _11 betas---* 12 betas--* CANCEL
• Latemperatura fija se elevara 2 "F transcurridos 30 minutes y de nuevo tran_urridos otros 30 min_os.
- Op,er,acionde Iniciaci6n:
° Con .cadapulsaci6n del bot6n _ realiza LmdClO._r las opci.onesen este o.rden:
1 hera--,2 horas-_3 horas--,4 betas--,5 betas--,6 horas--*7 betas--,8 horas--,9 horas
_10 horas_ 1 horas--4 2 ho.ras_CANCEL
0' Vel,_idad del Ventilador
° Pullsare_boron de v.ellocidadldlelventilad_r hace c,-3mbiarlas ve]ocideades entre Low,Midy High
0 RECEPTOR DE ,SENAL
42 Aire A_ndicionador

lnstruccionesdefuncionarniento
PRECAUTI6N: El mando, a distancia no fuincionarb _rrectament:e si
una luz fue_e hace ,con_cto con el sen_r del aire acondicionado o si
hay ob_cu!os entre el mando a dist3ncia y el aire acondicionado.
• Para ENCENDER el sistema presione ,e_bot6n, y para APAGARLO pres.bnee[ bot6n otra vez,
• Este boron tiene prioddad_bre lodos los ,otrosb,_ones.
• Cuando,Ud..iloencien_ por primera vez, e]sisterna est#.en el y la tem_ratura _ _ 72°F.
Aju=stede la Temperatura
° E_e _t6n controla ]a temperatura de _ _la entre Iios60'_'Fy los86°F
en increme_os de 1"F,
Velocidad del Ventilador
° Pu_.ar eUboron de vel_i_d _1 ventilador hace cambiarrIns
veloci_d_ e_re Low:Mid y High
Marcador de Encendido/Apagado
oO_raci6n _ Parada: -1
° Con cade pullsad6n dell boto.nse rea]iza un cid.o pot _asopciiones|
en _te orden: 1 hora-*2 horas_3 borax4 horns-*5 horas-_
6 horas-,7 horas_8 horas_9 horas._lO horas_l i horas _ L
12 horas--*CANCEL
%
*La temperatura ilia se elevara 2_F#anscurddos _ minutos y de nuevo
#an_umdos otros 30 minute.
- O_raci6n _ ]niciacion:
, Con _de pulsaci6n _1! boron _ realiza un cido pot ]as.op¢iones
en este orden: 1 horn--,2 horas_3 horns-*4 horas_5 h.oras-*
6 horas-*7 horas-*8 horns--,9 hoiras._lO horns-*11 horns -*
12 horns.--,CANCEL
Power
Ahorrador de Energia
El ventilador se detiene cuando e!compressor no sigue enfriando,
° Aproxima_mente _da 3 minuto_ el venti]a_r _ en_n_r&
y necesffar,_venficar ]a temperatura _] cuarto para saber si
es inecesado mas.enffiamiento
F#oHent:ilador/Seco
° Cada vez ,quepresione este bot()in, InSpalabras COOL FAN y DRY apareceran a_temadamen_
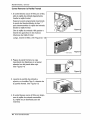
COmo Porter las Baterias
1. Quite la ta_ de la parte posterior de] telemando,
Para ell!ohaga deslizar la ta_. s_n la direcciSn
de] la flecha.
2, introduz_ las dos baterias Respetesiempre la
po]ari,dadal insta]ar las pilas. Use ba_eriasn_evas.
3.Volve_a cermr, resba]andola ta_ hasta la
posicioninicia],
• No ufllice bater[s recargables,
estas son diferentes de forma,
de dimensi6n y uso resp_to a
]as _terias _cas usua]es.
° S_ue las baterias del
telemando cuando el
acondicionador no vaya a ser
usado durante un largo period&
Manual del Propietario 43

instruccionesdefuncionamiento
clir_cibn de| aire
La ,direcci6n del aire pu_e. ser _ntrolad.a cuando
usteddesee enfriar, ajustando la palanca vertical
y la palianca horiziontall.
" CONTROL DE LA DIRECCI6N HORIZONTAL DEL AIRE
La direcci6n horizontal del aire es ajus_da
rotando lapalanca vertical hacia la derecha o,
hacia ia izquierda.
" CONTROL DE LA DIRECC/ON VERTICAL DEL AIRE
La direcci6n vertical del aire es ajustada rotando
la palanca horizontal hacia adelanto o hacia
Tubo, de _sagiJe
En climas hum,_os, ,es_sible que. la
_ndeja Evaporadom se llenne d,e agua.
Para quitar el agua acumulado, es
[preciso conectar el tu_ de desagQe
,Quite la Tapa del DesagOe y con_te el
Tubo a la Bandeja Eva_radora.
Este aparato de aire acondicionado va
_uipado con un ventilador de
extraccion. (Vease ia iiustracion de
abajo). El ventilador tiene un anillo
externo que gira en el agua que recoge
en la piancha base all entrar en
Iprofundidad. La condensacion la re_ge
el ventilador y la expul_ a traves del
condensador, haciendo mas eficiente al
aparato de aire acondicionado,
PRECAUTION: Tenga cuidado al insertar el tubo de dren,aje. Al_jalo de
la area aguda para ev_ar el des,lice y !esiones por usted mismo,
Aim Acondicionador

Mantenimiento y servicio,
Filtro ,de Aire
Revise por io menos dos v_es al mes si noi es necesario limpiar el filtro de aire,
Las particulas detenidad se pueden acumular en el filtro impi,diendo el flujo dei
aire, limitando el rendimiento de enfriamiento y causando la acumulaci6n de ihielo
en ,el evaporad,or. Proceder de la limpi,eza del fiitro de aire:
(a) (b)
1. Abra la rejilla hacia arriba tirando la _rte inferior d,e la rejilla o hacia abajo tiran
parte superior de la reji!la,
2. Usando una lengUeta,tire el filtro iieramente hacia arriba para sacario _r aba
arriba.
3, Lave el fiiiltrocon agua tibia de temperatura menor de _°C (i04°F).
4, Escurra ligeramente e! agua sobrante del filtro y vuelva a ins_larlo,
i NO OP'ERE el aire aco,ndicionado sin filtro ya que la suciedad y el
tamo obstruira el filtro y reducira la efiiiciencia del funcio,namiento...
Limpie,za de! Aire Acondiciona,do
La parrilla frontal puede set Limp,iada con
un trapo hQmedo mojado en un
detergente suave.
El gabinete puede ser lavadio con jab6n
suave o detergente y agua tibia, entonces
pullido Cera Liquida para aparatos..
Para asegurarse una eficiencia continua,
las bobinas del condensador (del lado
expuesto al extedo 0 debe ser revisado y
lava,do peri6dicamente sea por ,que se
tranq,ue _n basura o polvo de la
atmosferico.
Manual de/Propietario 45

Mantenirnientoyservicio
Como Remover la Parilla Frontal
1. Si ust_ desea sacar el filtro por arriba,
abra la rejiHa de entrada ligeramente.
Vuelte la rejilla frontal.
Separe la parte engoznadia insertando
la punta del destornillador de tipo "-"
para desensamblar la rejHla de entrada
desde la rejil!a frontal.
Gire iliarejil_a de entrada 180 grados e
inserte los ganchos en los hu_os
inferiores del rijiHa frontal.
Luego, inserte e! fi_tro (Ver Figura12, !3
Figara 12
2. Pegue el pane_ frontal a la caja
insertando los fijadores en el panel
adentro _os del panel dela caja.
(Ver Figura !4)
Rgara 14
3. Levante la parrilla de entrada y
ajQstela con tornillos Tipo A, atraves de
la parrilla frontal. (Ver iFigura 15)
4, Si ust_ desea sacar el filtro por abajo,
usar la rejilla de entrada reversible.
(_ reiilla es ya dise5ada para tal
manera)
F_gura 15
46 Aire Acondicionador

Mantenimiento y servicio
Antes de Lilamar el Servicio de Asistencia T6cnica
Si tiene probJernas con su ventitador, lea las informaciones siguientes y trate de
reso,llver el probliema. Si no puede encontrar la soluci6n, descon_te el ventilado,r
y dirijase a su suministrador.
E! ventilador no funciona
1. _mpruebe que el ventilador este con_tado en un enchufe _rrecto.
2. Revise el fusible.
3. Compruebe que Illiatensioin no sea demasiado alta o Ibaja.
AI ajustarse el enfriamiento, el aire no par_e fr'{o Io suficiente
i. Revise isi los ajustes de la temperatura son correctos
2. Revise si el filtro de aire no est,_ atascadlo de polvo. En este caso, limpiie el
filtro.
3. Compruebe que afuem no haya un obstaculo del flujo de aire y si entre la
parte trasera del ventiliador y la paired o la barrera haya espacio Ilibre de por 11o
menos 1 metro (20").
4. Cierre todas ins puertas y ventanas y _mpruelbe que no haya una fuente de
callor en _ahabitaci6n.
Antes de Ilamar al servicio, tenga a bien revisar la siguiente lista de
problemas y sus solucioneis.
El acondicionador de aire est_ funcionan, do norma/mente cuanido;
• Escucha un sonido metalico, Lo causa el agua que recoge el condensador en
dins !!uviosos o en condiciones de mucha humedad. Esta _mcter_stica esta
diseSada pare ayudar a quitar la humedad en ei aire y m_omr la ca_cidad de
enfriamiento. Consulte la se_i6n del Ventilador de w_tracci6r en Ilapagina 44.
° Oye an clic en el termostato. Lo causa el ciclo del compresor que comienza y se
° Ve gotear agua de la parte iposterior de _a unidad. El agua puede ser recogida
en la bandeja de base en _ndiciones de mucha hum_ad o dias de Iluvia. Esta
agua desbo, rda y gotea desde la parte posterior de _a unidad.
° Oye fun cionar el ventilador mientras el compresor esta silencioso. Esto es una
caracteristica opemtiva normal
Manual del Propietario 47

Mantet-fimientoy servicio
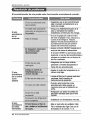
El aicondicionador de aire puede estar funcionando ano_almente cuando:
El aim
do no
El aire
do no enffia
_ri3o
El aim
do en_a
/_egO_se que ei aire acondicionado
_tb con_do comple_mente a la
fuente de energiao
Chloe los fusi_es/interruptor de [a
_sa y reemplaco los fiJsi_es o
reesta_ezca el inte_uptorde energia.
• Si _ _ apa_n,d6 vud_ a_con_
del m_o ia 8i_gado (Tipo Mecani_ ),i
C_o _ la energ_ se mstaum,
e_ 3 minutos pare __ar
acondi_or de aim pare pm_nir
di_a_r _1 ove_o_ _1 compress.
• presion el botbn RESETsituade en el
en_ufe del _ble de alimentcibn
Si el bot6n Tno permanec_ a_ivo,
sus_nda e_u_ del aire acondicionado y
_nga_ en contacto con un t6_ico de
ser,,'i_o _alifi_ioi,
As_erese que no h_a cortinas,
_rsian_ o mueb_esbloqueando el
frente de! aim acondicionado.
•Ajustar el contmJde tempera_m a un
n_mero_s bajo.
, Limpieel fil_o _r Iiomenos _da dos
_manas. Vea la _i6n de
instruccionesde o_mci6n.
Cua_o ust_ enciiende el aite
acondicionadode_ es_rar un
_mento para que la habitacibnse
•As_mse quetodas las _lidas de
aire_t_n _rradas pareq_e elaim
• E_.abiezca una temperature m_isalta.
• El_a el m_o alto del ven_lador High
Fan o enfriado alto High C_{ con el
t_rmostato en el n_mero 1 o 2:.
48 Aim Acondicionador

ManualdelPropietario49

Specifications and performance data subject to change without notice.
HEAT CONTROLLER, INC.
1900 WELLWORTH AVENUE • JACKSON, MICHIGAN 49203
THE QUALITY LEADER IN CONDITIONING AIR
P/No: 3828A20800K Printed in China
-
 1
1
-
 2
2
-
 3
3
-
 4
4
-
 5
5
-
 6
6
-
 7
7
-
 8
8
-
 9
9
-
 10
10
-
 11
11
-
 12
12
-
 13
13
-
 14
14
-
 15
15
-
 16
16
-
 17
17
-
 18
18
-
 19
19
-
 20
20
-
 21
21
-
 22
22
-
 23
23
-
 24
24
-
 25
25
-
 26
26
-
 27
27
-
 28
28
-
 29
29
-
 30
30
-
 31
31
-
 32
32
-
 33
33
-
 34
34
-
 35
35
-
 36
36
-
 37
37
-
 38
38
-
 39
39
-
 40
40
-
 41
41
-
 42
42
-
 43
43
-
 44
44
-
 45
45
-
 46
46
-
 47
47
-
 48
48
-
 49
49
-
 50
50


COMFORT-AIRE RAD-101A El manual del propietario
- Tipo
- El manual del propietario
- Este manual también es adecuado para
en otros idiomas
- English: COMFORT-AIRE RAD-101A Owner's manual
Artículos relacionados
Otros documentos
-
Goldstar WG8005R El manual del propietario
-
LG BG8000ER El manual del propietario
-
-
LG CL8000ER El manual del propietario
-
Goldstar WG5004R El manual del propietario
-
-
-
-
-