
w_¢,lgapplia nc_,com
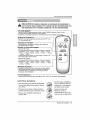
OWNER'S MANUAL
MANUAL DEL PROPIETARIO
ROOM AIR CONDITIONER
AIRE ACONDICIONADOR
ModelslModelo GWHD6500R
!iiiiIiiIiiIiiIiiIiiIiiIiiIiiIiiIiiIiiIiiIiiIiiIiiIiiIiiIiiIiiiiiiiiiiiiiiiiiiiiiiiiiiiiiiiiiiiiii_ii_
Jventil_or
esta
_ra el futuro

SafetyPrecautions..........................3
BeforeOperation.................... 7
Inlroductlon .................................... 8
Sym_ls Used in this Manual ........8
Features ...................................... 8
Electrical Safety ........................... 9
TemporaryUse ofan
Adapter ........................................ 10
TemporaryUse of an
Extension Cord ...........................10
Installation...................................11
Window Requirements ................ 11
Size .........................................11
Clearance .............................. 12
Preparation of Chassis ...........13
Unit InstaJlaflen .................... 14
O_rating Instructions ................. 16
Location and Function
ofControls ...................................16
Remote Confzol Operations .....17
Remote Controller ............ 18
Additional Features ..................... 19
Air Direction .......................... 19
Dram Pipe............................... 19
Removal from Window ........ 19
Maintenance and Service ............20
Air Filter .................................... 20
Cleaning the Air Conditioner ....,20
How to Remove the
F_ontGrille..........................21
Com_n Problemsand
Solutions.......................................22
Troubleshooting ...........................23
FOR YOUR RECORDS
Write the model and sedal numbers here:
Model #
Serial #
You can find the numbars on a I_el on the side of the
product.
Dealer's Na_
Date Purchased
[] Sta#e your receipt to this pa_ in tf"e event you need
to prove date of purchase or for wa_ra_y issues.
READ THIS MANUAL
Ins_e you will find many helpfuU hints al how to use and
maintain your air conditioner properly. Just a IAle preventive
care on your _rt can sa_ you a great dea_ of time and
money cycerthe life of your air conditioner.
You'll find many answers to common problems in the chart
of troubleshooting tips. If you rov_w our chart of
Troubleshooting Tips first, you may not need to call for
service at all.
PRECAUTION
• Contact an Authoriz_ Service Center for repair or
maintenance of this unit. Call 1-800-243-0000 to
locate the nearest ASC.
• This air conditioner is not intended for use by young
children or invalids without supervision,
• Young children should be su_rvis_ to ensu_ that
they do not play w_h the air conditioner.
• H the power cord requi_s replacement, have an
Authorized Servicer install an exact replacement part,
• Installation work must be pe_-formed in accordance
with the National Electric Code by qualified and
authorized per,_onne| only.
2 Room Air Conditioner

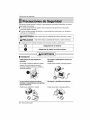
SafetyPrecautions
To prevent injury to the user or other people and property damage, the following instructions
must be followed.
m Incorrect operatbn due to ignoring instructions wi[[ cause harm or damage. The seriousness
is classified by the following indications.
m Because of the weight of the product, it is r_mmended that you have a helper to assist in
the insta[[atbn,,
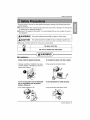
WARNING This symbol indicates the possibility of death or _rious injury: |
!
ACAUTIONu__--- This symbol hdicates the possibilityof injury or d_age to property only. J
II Meanings of symbols u_d in this manual are as shown below.
Be sure not to do.
Be sure to follow the instruction,
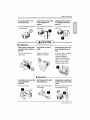
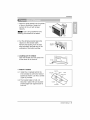
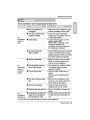
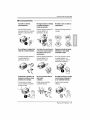
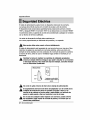
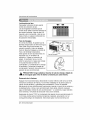
[] Installation
AIw_s installt_ ex_asion _nei(s), Do r_ placethe Her cordn_ra heater,
. [mpro_r assembly or installationmay cause
incorrect o_ration, including injury, fire, and
electric shock hazards.
. Itmay cau_ fire and electric shock.
Do n_ ,usethepowercordnear flammable Do _t disas_mble or modify produ_s,
. _tmay cau_ explosion or fire, . _tmay cau_ failure and electric shock
Owner's Manual 3

_fety Precautions
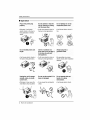
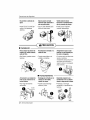
[] Operation
Plug in the p_et plug Do not o_rate or stop the Do n_ dama,geor we an
• Otherwise, itwill cause
electric shock or fire due to
heat generation or electric
shock.
. Itwill cause electric shock or
fire due to heat generation.
Do not m_ify _er cO_ Usetheairconditionero"
. _twill cause eiectric shock or
fire.
A ayS .toa
: otherappliances.
• it will cause electric sho_ or . Itwill cause electric shock or . Nogrounding may cause
fire due to heat generation, fire due to heat generation, electric shock (_e Installation
Manual).
Unplug theunit if strange Donot u_ the _ck_ if it is Do n_ operatewffhwet
sour,Js__o_i or smoke I_se or damage,
comefromit. er,vironme_.
* Otherwise Rmay cause fire
and el_tric shock accident,
• it may cause fire and electric • Rwill_use electric shock.
shock,
4 Room Air Conditioner

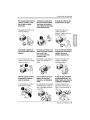
SafetyPrecaudons
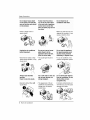
Do n_ allowwaterto run Leave|he,d_r do_d while Ve_ii_e More O_t_ing
into el_ric parts, the airconditioner is air conditi_er whengas
running: g_s outi
, _twill cause failure of machine • It is not designed to cool the
or electdc shock, entire house.
, It may cause expiosion, fire,
and burn.
!!Ii:I !!ii
[] Installation
....Never touch the metal _S Do not _k the inlet,or Ensure that the o_er case ....
•Theyaresharpandmay
causeinjury.
•It may _use failure of
appliance or accident.
• If the outer _se is damaged,
it must be re_ired or
replaced immediately.
Leaving it damaged could
result in the air conditioner
falling out of the window,
creating a safety hazard.
[] O_ration
Be cautious not to touch the Hole the p!_ by the head Unplug the air conditioner if
sharp _ges _en _en taking it o_, it will not _usa fora long
installing, pedocL
• _tmay cause injury.
Sharp
es
• Itmay_use electricshock
and damage
• Prevent accidental startup and
the _ssibility of injury
Owner's Manual 5

SafetyPrecautions
Do not placeheaw obje_ _fWaterente_thePmdec_ Do notdean the air
on the powercordand take turn offthe_e p_r uwitch cond_ionerwithw_er.
caresothatthecordshould ofthemainbodyofapplian_.
_king the powsroplugo_ from
the s_ket,
•There isdanger of fire or
electric shock.
• Water may enter the unit and
degrade the insulation. Jtmay
cause an electric shock,
• Since the fan rotates at high
s_ed dudng o_rat[on, itmay
ca,u_ injury,
(Don1 sk in the drY,)machinery, or o_e,_s of a_,
• This could injurethe pet or • It isan air conditioner, not a
plant, precision refrigeration system.
AlWaysin_ thefi,er U_a _ clothto c!_a; Do DOnetdrinkwaterdrain_
securely, not usewax_thinner,era _om air,condkiener, Donot
strongd_ergent, direct airflow _ _m
.................... occupa_sonly'
• Operation without filters will
cause failure.
• The ap_arance of the air
conditioner may deteriorate,
change color, or develop
surface flaws,,
®
• It contains containments and
will make you sick. This could
damage your heaJth
6 Room Air Conditioner

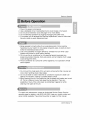
BeforetoOperation
i. Plug in the power cord properly.
2. Use a dedicated circuit. Overloading the line could create a fire hazard.
3, Do not use an extension cord. See page 10 for more details.
4, Do not start/stop operation by plugging/unplugging the power cord.
5, If the power cord is damaged and requires replacement, have an Authorized
Servicer install an exact replacement part.
1. Being exposed to direct airflow for an extended period of time could be
hazardous to your health. Do not expose occupants, pets, or plants to direct
airflow for extended periods of time.
2. Due to the possibility of oxygen deficiency, ventilate the room when used
together with stoves or other heating devices
3, Do not use this air conditioner for non-specified special purposes (e.g.
preserving precision devices, food, pets, plants, and art objects). Such usage
could damage the items.
4. The air conditioner is a consumer comfort appliance, not a precision climate
control system.
1. Do not touch the metal parts of the unit when removing the filter. Injuries can
occur when handling sharp metal edges.
2. Do not use water to clean inside the air conditioner. Exposure to water can
destroy the insulation, leading to possible electric shock.
3, When cleaning the unit, first make sure that the power and breaker are turned
off. The fan rotates at a very high speed during operation, There is a
possibility of injury if the unit's power is accidentally triggered on while
cleaning inner parts of the unit
For repair and maintenance, contact an Authorized Service Center. See the
warranty page for details or call (800) 243-0000. Have your model number and
serial number available. They should be written on page 2 of this manual.
Owner's Manual 7

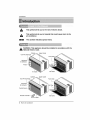
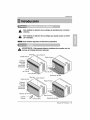
Introduction
This symbol alerts you to the risk of electric shock.
This symbol alerts you to hazards that could cause harm to the
air conditioner,
This symbol indicates special notes.
_ ARNING: This appliance should be install_ in accordance with the
National El_tric Code.
Cabinet
C_] Air
FrontGrille
Air Deflector
Air Intake
Cabinet
Cool Air Discharge
Guide
Front Grille
Horizontal
Air _flector Air
Control
Remote controller_
Air Intake
8 Room Air Conditioner

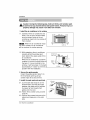
Power cord may include a currant inter_pter devico. A test and reset button is
provided on the plug case. _e device should be tested on a periodic basis by
first pressing the TEST button and then the RESET button. If the TEST button
does not trip or if the RESET button will not stay engaged, discontinue use
of the air cond_ioner and contact a qualified service technician.
Damaged power supply cord must be replaced with a new power supply cord
obtained from the product manufacture and not repaired.
WARNING: This appliance must be prow_ grounded,
The power cord of this applian_ is equipped w_h a three-prong grounding plug.
To minimize the dsk of electric shock, use _e plug with a standard _ree-slot
grounding wall _wer ouUet. If the _wer ouUet d_s not include a grounding slot,
have a qualified electrician repJace the ouUet before you use the room air
condi_oner.
WARNING: Chmlging the outlet w_out n-rakingtim appropriate wiring
changes will create an unsafe condkion that could result In fire or
electricol shoc_ Refer all such work to a licensed and qualified
ele_rician.
P_ m_hod
______ F_'lsu_pro_ grou_
existsbofo_
_J ....
WARNING: Do not CL<or remove the grounding prong from the power
WARNING: Attaching the adapter ground terminal to the wall
receptacle cover screw d_s not ground the appliance unless the
cover _ is meta! and not insulated, and the wal! receptacle is
grounded through tim house wiring,
WARNING: If you have any doubt whether t_ air conditioner is
properly grounded, have the wall t_eptac4e and circuit choked by a
qualmed electrician,
Owner_ Manual 9

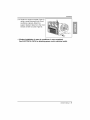
We strongly discourage the use of an adapter due to potential safety hazards.
For temporary connections, use only a UL-listed adapter, available from most
Io_1 hardware stores. Ensure that the large slot in the adapter is aligned with
the large slot in the receptacle for a proper polar_ connection.
To disconnect the power cord from the adapter, use one hand on each to avoid
damaging the ground terminal. Avoid f_uently unplugging the power cord as
this can lead to eventual ground terminal damage.
Ternary A_hpt_ Plug
WARNING: Never use Me appliance with a broken adapter,
We strongly discou_e the use of an extension cord due to potenBal safety'
h_rds. For temporary situaUons, use only CSA cortffied and UL listed 3-wire
grounded _ension cords, rated 15 A, 125 V.
10 R_ Air Co_',ditioner

Installation
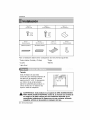
Ty_ A: 11 EA TypeB: 5 EA Ty_ C:3 EA
(Short Screw) (Wood Screw) (L Bracket)
....... E' /[
Ty_ D:i EA TypeE: i EA Ty_ F: 2 EA Ty_ G:1 EA
(Sea/Strip} (Sash Sea!) (Guide Pane} (Support Bracket}
(Adhes ve backed)
(Notad_sive _cked)
Have the following tools available for insta]Bat[on:
* Screwdriver (Slotted and Phillips) * Ruler
* Knife * Hammer
* Pencil * Level
Size
This room air conditioner is
designed for installation in standard
double-hung windows with actual
opening widths from 22" to 36".
The upper and lower window sash
must open sufficiently to allow a
clear vertical opening of 13" from the
bottom of the upper sash to the
window stool
WARNING: This product is a WINDOW AiR CONDITIONER.
As such, a standard single-hung or double-hung window is required
for pro_r installation. Non-window installations, including using
sleeves, holes in walls, and other installations are not recommended.
Owner's Manual 11

Installation
Clearance
Proper clearance enhances the cooling efficiency of the unit and prevents heat
radiation of the condenser.
1. if a storm window presents interference, fasten a 2" wide wood strip to the inner
window sill across the full width of the sill. The wood strip should be thick
enough to raise the height of the window sill so that the unit can be installed
without interference by the storm window frame.
2. See Figure. B. The top of the wood strip should be approximately 3/#, higher
than the storm window frame (Storm Window Frame) or wood strip (Outdoors)
to help condensation to drain properly to the outside.
3. install a second wood strip (approximately 6" long by 1V2"wide and same
thickness as first strip) in the center of the sill flush against the back off the
inner sill. This will raise the L bracket as shown Figure. B.
4. If the distance between Storm Window Frame and Wood Strip Mounted on Top
of inner Sill is more than 1", two of wood strips are not necessary.
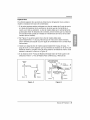
Inner S_
In II_ Ou'td_rs
Wood S1rp Mounted 1° Max
Figure, A Figure, B
i2 Room Air Conditioner

lnstalla#on
1, insert the guide panels into the guides
of the air conditioner, Fasten the
curtains to the unit with screws
(Type A).
: Use a long screwdriver and
installing the screws wifl be easier.
T_e,A
2. Cut the adhesive-backed seal strip
(Type D) to the window width.
Remove the backing from the seal
strip and attach the seal strip to the
underside of the bottom window.
Sea_Stri
(Type
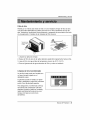
3, Locating unit in window
Open the window and mark center line
on the center of the inner sill.
4. Attach L bracket
4-1, install the L brackets behind the
inner window sill, with short side of
bracket as shown, Use the 2 screws
(Type A) provided,
4-2. The bracket helps to hold unit
securely in place. Be sure to place
bracket edge flush against back of
inner sill,
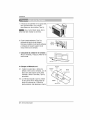
Outer Sll
_nr_ Sill
Outs de
L B_acket
Inside
Center Lir#
Owner's Manual i3

Ins_Ha#on
_ aution: During the following step, hold unit firmly until window sash
is Iower_ to top channel behind side panel frames. Personal injury or
property damage may result if unit falls from wind_,
i. Install the air conditioner in the win_w
1-1. Carefully li_ the air conditioner and
slide it into the open window,. Make
sure the bottom guide of the air
conditioner drops into the notches of
the L bracket.
: When the air conditioner drops
into the L bracket, the air conditioner
will be centered in window opening.
1-2. While steadying the air conditioner,
carefully bring the window sash
down behind the upper guide of the
air conditioner.
When the air conditioner is properly
installed, it should tilt slightly down at
the back. If it is set correctly in the
window, itwill hang lower in the back
automatically.. If it does not, there is a
problem with the installation,.
2. S_ure the guide panels
Extend the guide panels (Type F) to
fill the window opening using 4
screws (Type B) to secure them.
3. Install the sash seal and _sh lock
3-1. Cut the sash seal (Type E) to the
window width. Stuff the sash seal
between the glass and the window
to prevent air and insects from
getting into the room.
3-2. Fasten the L bracket using a screw
(Type A).
3-3. Remove the screws that secure the
cabinet and base pan in the right
side.
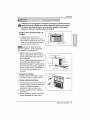
L Bracket
Ty_
S_h Seal
(Ty_ E}
i4 Room Air Conditioner

Installation
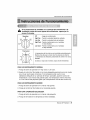
3-4. Fasten the support bracket (Type G)
using a screw removed from the air
conditioner cabinet. Attach the
support bracket (Type G) to the inner
window sill with a screw (Type B).
S_rt Bracket(Ty_ G}
4. Window installation of room air conditioner is now complete.
S_ ELECTRICAL DATA for attaching power cord to electrical outlet.
Owner's Manual i5

Operatingtnstrucbons
CAUTION: If you turn off the air conditioner or switch from c_ling to
the fan, wait at least 3 minutes before _tting to c_ling wain.
H_h I
F_;/_ - HNh
Thermostat
5
i 6
\ ,
2"' _8
9
Off - Turns air conditioner off,
High Fan oHighs_ed fan operation without cooling.
L_ Fan oLows_ed fan operation without cooling.
High C_I oCooling with high speed fan operation.
L_ C_I oCooling with low sp_d fan operation,
This automatically controls the temperature of the indoorak.
Turnthe knob so that arrow points to the larger marks for greater
cooling,,Point the arrow to the sma,ller marks for more moderate
cooling.
(i.e.the higher the num_r, the greater the cooiing)
FOR NORMAL COOLING
1. Turn the operation switch to the High C_l or the Low _ol setting.
2. Set the thermostat control to the desired temperature mark (the mid-point is a
good starting position). If the room temperature is not satisfactory after a
reasonable time, adjust the control to a cooler or warmer setting, as
appropriate.
FOR MAXIMUM COOLING
i. Turn the operation switch to the High C_l setting.
2. Set the thermostat control to the largest temperature mark.
FOR QUIETER OPERATION
i. Turn the operation switch to the Low C_l setting.
2. Set the thermostat control as needed.
i6 Room Air Conditioner

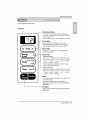
The controls look like this:
Controls
v Temp
ner
aver
ode cooio)"--
Operatlng Instructions
perjure Setting
* This bu_on can automatically control the tem_rature
ofthe room. The temperature can _ set within a r_qge of
60_Fto 86'_Fby I'_F.
Select the lower number for lower temperature of the room,
Energy Saver
The fan stopswhen the compressor stops cooiing.
* Approx mately every 3 minutes the ff_ will turn on and
check the r_m air to determine if cooling isn_ded,
• EverytJmeyou push this button, itwiii toggle between
COOL, FAN, &qd DRY
On/OffTimer
oStopping Operation
Each pressof the button cycles through the options in this
order:l Hour 2 Hours 3 Hours 4 Hours 5 Hours
6Hours *7Hours 8Hours 9Hours 10Hours
11 Hours 12 Hours CANCLE.
The settemperaure wll be raised_F after 30 minutes
and again afteranother 30 minutes
oStopping Operation
Each pressof the button cycles through the options in this
order: 1Hour 2 Hours 3 Hours 4 Hours 5 Hours
6Hours .7Hours _8Hours gHours t0Hours
11 Hours 12Hours_CANCLE
-- Power
*To turn the un_ ON, push the button Toturn the un_OFF,
push the button again.
- Ths b_on takes priorty over anyother buttons.
*When the unit a first powered up, it defaults to settings of
High Cool at72°R
FanSp_
• Pressing the Fss Speed button toggles _tween Low and
High apeeds_
Owner's Manual i2'

OperatingInstructions
_ AUTION: The Remote Controller will not function properly if strong
light strikes the _n_r window of the air conditioner or if there are
obstacles _tw_n the Remote Controller and the air conditioner,
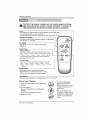
Power
• To turn the Set ON, push the button. To turn the Set OFF, push the button again.
• This bL_on takes priority over any other buttons.
• When you first turn it on the Set is on the High c_] m_e and the temp at 72°F
Temperature Setting
• This button controls the r_m temperature setting ina range between
60°F and 86°F in 1_increments,
Power
Fan Speed
• Press ngthe Fan Speed buttont_ges be_een Low and
High speeds.
On/Off Timer
- Sto_ing _eration
Each pressof the button cycles through the optons n ths order:
1Hour 2Hours 3Hours 4Hours 5Hours *6Hours 7Hours
8Hours 9 Hours 10Hours 11 Hours 12Hours CANCLE,
The set tem_rature wll ber_sed by 2°F after 30 m nutes and
again after another30 mnutes.
- Sta_ing _efaflon
Each presscf the bu_en cycles through the opt ons n ths order:
1 Hour 2Hours 3Hours 4 Hours 5 Hours, 6 Hours
7 Hours 8 Hours 9 Hours 10Hours 11 Hours 12 Hours
CANCLE,
The fan sto_ when the compressor st_s cooling,
• Approximately every 3 minutes the fan will turn on and
check the r®m ,_r to determine if c_]ing isn_ded.
Fan Speed
"rimer Mode
• Everytime you push this button, itwill toggle _tw_n C_L, FAN and DRY.
How to Insert Batteries
1. Remove the cover from the back of the remote
controller
2. Insert two batteries.
• Be sure of the _]ar[ty when installingthe
batteries.
, Be sure that both batteries are new.
3_Re-attach the cover.
• Do not u_ rechargeable
batteries. Such batteries
differ from standard dry ceils
in shape, dimensions, and
performance.
• Remove the batteries from
the remote controi]er if the air
conditioner is not going to be
u_d for an extended length
of time.
i8 Room Air Conditioner

O_ratingInstructions
Air Direction
Adjusting the air direction using the
horizontal air deflector control
Using the control tabs, the air flow can
be directed to the ]eft, right, straight
ahead, or any combination of these
directions.
Drain Pipe
In humid weather, excess water may'
cause the Base Pan to overflow. To
drain the ,water, remove the Drain Cap
and secure the Drain Pipe to the rear
hole of the Base Pan.
Press the drain pipe into the hole by
pushing down and away from the fins
to avoid injury.
This air conditioner is equipped with a
slinger fan. (See drawing, below.)
The fan has an outer ring that runs in
the ,water that collects in the base pan
if it gets deep, That condensate is then
picked up by the fan and expelled
through the condenser, making the air
conditioner more efficient.
\Ring
CAUTION: Be careful when in_rting the drain pipe, Push away from
the sharp fin area to avoid slipping injuring yourself,
Removal From Window
Turn the air conditioner off, disconnect the power cord remove the L bracket, the
screws and Support Bracket installed through the top and bottom of the guide
panels, and save for reinstallation laten Close the guide panels. Keeping a firm grip
on the air conditioner, raise the sash, and carefully tilt the air conditioner backward,
draining any condensate. Lift the air conditioner from the window and remove the
sash seal from between the windows.
Be sure to drain ALL condensate from the air conditioner. If you don't, it could run
out while you carry the unit, making a mess and creating a slipping h_ard. This
simple step will save you much cleaning and make a safer work environment.
Owner's Manual i9

Maintenanceand Service
Air Filter
Check the air filter at least _ice a month to see if cleaning is necessary. Trapped
particles in the filter can build up and block the airflow, reducing cooling capacity
and causing an accumulation of frost on the evaporator. To clean the air filter:
1. Li_ the inlet grille.
2. Remove the air filter from the front grille by pulling the air filter up slightly.
3. Wash the filter using lukewarm water below 40 _ (104 _).
4. Gently shake the excess ,water from the filter and replace.
Cleaning The Air Conditioner
The front grille and Inlet grille may be
wiped with a cloth dampened in a mild
detergent solution.
The cabinet may be ,washed with mild
soap or detergent and lukewarm
water, then polished with Liquid Wax
for Appliances.
To ensure continued peak efficiency,
the condenser coils (outside of uni9
should be checked periodically and
cleaned if clogged with soot or dirt
from the atmosphere.
Room Air Conditioner

MaintenanceandService
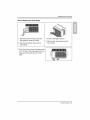
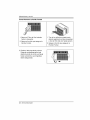
How to Remove the Front Grille
1. Remove the thermostat knob and
the operation knob by pulling.
2. Remove the screw securing the
Front Grille.
1. Pull the inBetgrille forward
2,,Remove the screw securing the
Front Gri]Be,
3. Push the grille up from the bottom and
pull the top of the grille away from the
case as the top tabs lift out of their
s_ots.
Owner's Manual 21

Maintenanceand Service
Before Calling for Se_ice
If you have problems with your air conditioner, read the foflowing information and
try to solve the problem, if you cannot find a solution, turn off the air conditioner
and contact your dealer.
Air conditioner does not operate
1. Ensure that the air conditioner is plugged intoa proper outlet.
2. Check the fuse or circuit breaker.
3, Check whether the voltage is unusually high or low,
Air d_s not feel cold enough on the cooling setting
1. Ensure that the temperature settings are correct.
2, Check to see if the air filter is clogged with dust. if so, clean the filter.
3, Ensure that the air flow from the outside is not obstructed and that there is a
clearance of over 20" be_een the back of the air conditioner and the wail or
fence behind it.
4. Close all doors and windows and check for any source of heat in the room.
Before calling for service, please review the following list of common
problems and solutions,
The air conditioner is operating normally when:
• "Youhear a pinging noise. This is caused by water being picked up by"the fan on
rainy days or in highly humid conditions. This feature is designed to help remove
moisture in the air and improve cooling efficiency.
See the section on Slinger Fan, page 19,
• You hear the thermostat click, This is caused by the compressor cycle starting
and stopping.
• You see water dripping from the rear of the unit. Water may be collected in the
base pan in highly humid conditions or on rainy days. This water overflows and
drips from the rear of the unit.
• You hear the fan running while the compressor is silent. This is a normal
operational feature.
22 Room Air Conditioner

Maintenanceand Service
n The air conditioner is • Make sure the air conditioner plug is
unplugged, pushed completely into the outlet.
breaker box and replace the fuse
Air or reset the breaker.
conditioner -i_;_er°fai_ure_ ....... o If power failure occurs, turn the
does not mode control to Off.
start When power is restored, wait 3
minutes to restart the air
conditioner to prevent tripping of
the compressor ovedoad.
II The currentinte_pter • PresstheRESETbutton_ed onthepower
Air
conditioner
d_s not
cool _ it
should
II Airflow is restricted.
I The thermostat may not
cordplug.IftheRESETbL,_tonwillnotstay
enga_, d_ntinue u_ oftheair_dit_one_
•_dcontactaqualifiedser¢i_techni_n.
• Make sure there are no cumins,
blinds, or furniture blowing the
front of the air conditioner.
• Turn the knob to a higher number.
_e highest setting provides
maximum cooling.
II The room may have been
hot,
II Cold air is escaping.
weeks.
See the care and Maintenance
section.
When the air conditioner is first
turned on, you need to allow time
for the room to _1 down.
Ch_k for open furnace floor
registers and cold air returns.
below.
Air !! Ice iblocks the air flow and ,, Set the mode control at High Fan
conditioner stops the air conditioner or High Cool with thermostat at 1
freezing up from cooling the _m. or 2.
* You can refer to the Energy Star p_m in detail at www.energystat.gov.
Owner'sManual 23

24 Room Air Conditioner

Precaucionesde Segundad.........26
Antes da porter en matcha ...........30
lntroduccibn ...................... 31
SimbomesUtilizes en
Este Manual.............................. 31
C_actefi_cas ...................... 31
Seguridad El_ctdca .................. 32
Usa Transitotia de un
Ada1_tador................................. 33
Usa TemporaMde un
Cable Nargader ....................... 33
_nstalaci0n .............................. 34
Requetimientos de Ventana ........34
Tarnaffo ..................................... 34
E_acio Libra ............................ 35
Preparad6n de la Carcasa ..........36
[nstalac_0nde la Unidad ..............37
Ins_rucciones de
Funeionamiento ....................................39
_ocalizac_6ny Funci6n _ los
Contmles ................................... 39
_struccions de Control
Remoto ..................................... 40
Control Remora .......................... 41
Adicionales e Ca;actedsticas .... 42
La Ditecci6n del AJre ................42
Tuba de Desag_e ..................... 42
Rernovefla de a Ventana ..... 42
Mantenlmiento y Se_icio .............43
Fifo de AJre ........................... 43
Urnpieza del AJre
Acondicionade .......................... 43
Coma Remover uaParBla
Frontal .................................. 44
Problemas y Soluciones
Habituales ..................................... 45
_esoluci6n de pr_lemas .............46
PARA SUS ARCHIVOS
Escriba aqui e] mode[o y n_mero de serie:
Setie n°:
P_de enconha_ I_ nl3meros en [a etiqueta de [a parle
_teral del pique:to.
Nombre del distrt_idor:
Fecha de compta:
III A_iunte su re¢:i_ a esta p_gina con la g_a_dora _ra
el momenta que 1o r_cesite _[a pr_ar la fecha de su
adquisici6n o papa ]a vai[daci6n de la garantia.
LEA ESTE MANUAL
En su interior encom_a_& rout:has conse_s _ti_s sabre la
utilizaci_ y mantenimiento de su acondic_nador de aire.
Unos _cos cuidados _r su parte le pueden ahorrar
mucho tiempo y dinero durante la vida de su
acond_nador de aire,
En [a labia de conseios papa la soiuci6n rapida de
proMemas enc:_t_a_ muchas _espuestas a _s pr_._lemas
m_s habitua[es, Si revisa ptimero nuestra Tabia de
Consejos para ]a soluci6n r,_pida de p_ob[emas, ta] vez no
=_c_site ]lamar nunca a] _rvic[o tecnico,
PRECAUCION
• Contacte a u_ Centto de _rvlclo Autod_do p_ra n_pamto
realizer e_mant_nlm]_to deesta unidad L_me a 1_80_.243.6_0
_t_ _blc_t e__A _ canna,
• El :_[te_ond[c[or_do no e_ aptop_ta _r _o _r niSo_
peque_= odi=cap_itado= =in [_ supervision_ecu_=.
• Los niSo__eque_'_osdebsn _er s_perv_ados pare a_urar qua
noj_ue_ con e__its acondicion_o.
• St h_ q_e ¢_mbi_t e( cable_e a_m_taci6n_ soii¢_te_ un t_n[co
deser_[c[oq_ Ins_ un recamb[oex_cto,
• E] ttaba_ de [_ [nst_[_n d_ _r _ai_do deacuerdo al
Cbdl_o _]_t[co Nacfon_[__n_amente p_ e[ _rsonal c_Bf_adoy
a_tofizado.
Manual del Propietario 25

PrecaucionesdeSegundad
Para prevenir tanto lesiones al usuario u otras personas como daSos materiales, es preciso
seguir estas instrucciones.
m La in_rrecta operaci6n de] aparato como _nsecuencia de ignorar las instrucciones
provocar& daSos o ]esiones.
m A cause de] peso pesado de] producto, se r_m[enda que usted tenga a un ayudante a
participa en la instalaci6n,.
m El significado de lossl'mbolos ufl]izados en este manual se indi_ a continuaci6n,
f A_gure_ de no hacerlo.
As_urese de s_uir las instrucciones,
[] Instalacion
Instale siempreel(los) pane!(es)de No_!_ue e!cable electd_ _rca de un
expansion, calefactor,
• Un montaje o instalaci6n defectuoso puede
provocar un funcionamiento incorrecto,
incluyendo fiesgos de ]esiones,in_ndios o
• Puede _usar [n_ndio y des_rga el6ctfi_.
benzina,_lvente, etc. :
' Puede causar exp]osi6n o in_ndio.. , Puede causar fal]os y descarga eiectfica.
Aire Acondicionador

[] Funcionamiento
Precauciones de Seguridad
. De otto modo, cau_ra,
des_rga el6ctfi_ o incendio
debido a la generaci6n de
calor,
ad_damente, .... la unidad inse_ando 0 esp_ifica_,
tirando del ench_,
• Causara de_arga el_trica o . Cau_r&, descarga electrica o
hcendio debido a la incendio.
generaci6n de calor.
• Cau_rA des_rga el6ctri_ o
in_ndio debido a la
generaci6n de calor,
*CausarA de_arga electdca o
incendiodebido a la
generaci6n de talon
• Si no hay conexi6n a masa,
se puede producir una
descarga electrica (Vea el
Manual de instaiaci6n.)
extraSos en la unidad,
• En caso que no, puede
cau_r incendioy accidente
de circuito.
o daSado, enun ambientehumedo,
• Puede _usar incendio y
accidente el_trico.
• Puede causar descarga
electrica,
Manual del Propietario 2Z

PrecaucionesdeSegundad
, Puede causar una falla del
motor o una descarga
el6ctrica.
• _sta no esta diseffado _ra
enfriar la casa enter&
, Puede causar explosi6n,
incendio, quemaduras.
[] Instalacibn
Nuncatoquelas piezasde No_uee la e_rada ola A_g_re_ deque lacaja
metalde la unidadcuando _]ida .deaim. extemanoest_da_ada_r
quitee]fi]tro, los anGso_sgaste,
• Son filo_s y pueden _usar
lesiones.
•Puede causar fallos en [a
unJdado accJdentes.
•Si_ca,'casaextedo_esla_Sad&
repa,mrseomcambiarse
inmediat_mente,Dei_*lap_riaprowa_'
queeiap_o @aco_diciona_se
caigadeiaveman__r_eico_siguiente
_iigro@I_io_esi
AImoaleatodesuinstalsci6n;:
ev_e.que_ .con_c_conlos
bordesafilados,
• Hay riesgo de lesiones
personales.
Bordes
[] Funcionamiento '"
_dici0rado si_ova__,@izar_
cua_o Io saque, _a_e unI_goperi,_o_ ti_apo,
•Puede causar des_rga
ei@ctri_ y daSo.
•Prevenga un arranque
accidental y la posibilidad de
lesiones.
28 Aire Acondicionador

PrecaucionesdeSeguridad
Noco ueObjeto, e,
cable de co_iente y cuide
que el cable r_ quede
presionado_
• Hay pel[gro de [ncendioo de
des_rga el6ctd_.
Sie_ra aguaa laun_, gireel No limpie ia unidad deaire
[_rruptorprinci_l _ a_efacto, acondicionado con agua.
Tometornadocone__atm de
_tcio despuesdedescon_.arel
ench_ _1 toma_rriente:
• Puede entrar agua en ]a
unidad y d[sm[nuir la
aislaciSn_Puede causar una
descarga e]ectr[ca
Desench_ et a_rato de NO€oloqueunamascota o una Nou_ _aunidad_m piop6s_os
aire acondic[onado antes de p_antadondequede expuestoal ,_cia_es ta!escomoanimalso
limpiarlo, flujo.dir_o deaire. vegetates,m_quinasde
No_ sientedondeh_y_ pmcisionuobj_s dea.e_
corrie_esde aire'
• Comoelve_tI_dorgr_ a_lta
velocidadcua_doestAfu_cion_do,
• Este puede cau_r ]esioneso
daSos en ]a mascota o la
planta
• Puede causar dat_oa los
animales o vegeta]es y
perdida de objetos,
al intrados, Lirnpielos
ca_ dos_rnanas,
limpiar. Nou_ ceras, a._ndiciona_r _aire.!No
_]ventes o ,und_erge_e d[dja elflujo de airs sbloa I_
fuerte _upantes de la hab_ci.bn,
• E] func[onamiento sin fi]tros
puede daSar la unidad.
• La un[dad_] aim a_nd[cionado
puededetefiom_se_mb[ar de
color,o desarrol]armanchasen
]asupeff[c[e
• Contiene elementos que
puedert set nocivos pa_asu
salud, / Esto puede daSa_su
salu&
®
Manual del Propietario

PrevioalFundonamiento
'! !!i!il!lli i!!! I!ii:iii !!iI ; ii¸¸ ;:
1. Coloque el enchufe correctamente.
2. Use un Onico circuito para este aparato. Recargar el circuito podria provocar
un desgo de incendios.
3. No utilice un alargador. Consulte la pagina 10 para m,_s detalles.
4. No arranque/detenga el funcionamiento enchufandoidesenchufando el cable
de corriente electric&
5. Si el alargador estA daCiado y ha de ser recambiado, solicite a un tecnico
autodzado que instale un recambio exacto.
i iiiii
1. Estar expuesto al flujo directo de aire por un periodo largo de tiempo puede
constituir un riesgo para su salud. No exponga alas personas, mascotas o
plantas al flujo directo per perfodes largos de tiempo.
2. Debido a la posibilidad de falta de oxigeno, ventile la habitaciOn cuando se
use al mismo tiempo que estufas u otros dispositivos de calefacciOn.
3. No use este acondicionador de aire para propOsitos determinados no
especificados (pot ej.: preservar dispositivos de precision, alimentos,
cachorros, plantas y objetos de arte). Tales usos puede daOar los elementos.
4. El aparato de aire acondicionado es un aparato disei_ado para el confort del
consumidor. No es un sistema aclimatizador
1. No toque las partes de metal de la unidad cuando quite el filtro. Puede
lastimarse cuando manipule bordes filosos de metal.
2. No use agua para limpiar adentro del acondicionador. La exposiciOn al agua
puede destruir la aislaci6n y esto a su vez provocar una descarga elOctrica.
3. Cuando limpie la unidad, aseg0rese que la cordente y el interruptor esten
desconectados. El ventilador gira a muy alta velocidad cuando esta.
funcionando. Existe la posibilidad de lesionarse si la energfa se conecta
accidentalmente cuando este limpiando las piezas internas de la unidad
Para reparaciones y mantenimiento, p6ngase en contacto con un centro de
servicio autodzado. Consulte la pAgina de garantfa o Ilame al n0mero (800) 243-
0000. Tenga su n0meor d emodelo y n0mero de serie a mano. Los encontrara
en la pagina 2 de este manual.
30 Aire Acondicionador

IntroducciSn
Este simbolo Io adviede de un peligro de accidente pot corriente
el_tric&
Este simbolo Io adiverte de un peligro que pu_a causar un daho
del ventliador.
Este simbolo significa condicciones esp_iales.
ADVERTENCIA : Este aparato deberia instalarse de acuerdo con las
normas de! C_igo El_trico Nacional.
iiiiiiiiiiiiiiiiiiiiiiiiiiiiiiiiii....
SaWa de Aire
Deflector
de Aire
(Ventani]las
Verticakies)
Panel
de Control
Toma de
Gavi nete
Sa]ida de Aire
Deflector
Horizontal
de
(Ventanillas
Verticakles)
Guia Superior
Rejilla Frontal
=iltro de Aire
Recolector de Aire
Jia Superior
Rejilla Frontal
Tableau de control
Control
Remoto L_ Tomade Aire
Filtro de Aire
R_ol_tor de Aire
Manual del Propietarie 31

_u_d Elec_ca
El cable de alimentaci6n pu_e induir un dis_sitivo interruptor de cordente.
La _rca_ dei enchufe cuenta con un bot6n de prueba y otto de reinicio.
El dis_sPLivo debe comprobarse _ri6dic_mente presionando primero el bot6n
TEST y despu6s RESET. Si el bot(_nTEST no se desconecta o si el boton RESET
no _rman_e activo, suspenda el uso del aire acondicionado y _ng_ en contacto
con un t_cnico de servicio cualfficado.
Un cable de alimentaci6n da_ado debe sustituirse por
uno nuevo pro_rcionado pot fabd_nte del pr_u_o y no reparado
Este _ui_ debe estar puesto a t_rra debi_n'mnte.
El cable de alimentaci6n est& _uipado de una toma de tierra con ires pins. Para
minimi_r el peligro de una lesi6n _r corriente el6ctrica, utilice una toma con
enchufe de tierra estdndar con tres contactos. Si el enchufe de pared no contiene
un borne de tierra, antes de u_r el ventflador haga cambiar el enchL_ r_r un
electricista,
Cambiar la torr_asin realizar los cambios de ca_eado apropiados
crear_ un estado el_rieo insegum q_ _dr'a resultar en un incendio
o de_arga ele_ri_, Para todo este ti_ de _bajos, _nsulte siempre
_n un el_icista cualifieado.
_rese q_ _ d_i_
_d_ _ deutilizar
No corte ni qu_ el _rne de tierra de la clavija de alimentaci6n
El acoplamiento del borne _ tie_ del adaptador con el tomillo de la
cubie_ del en_ufe de pa_ no pondt_ el equi_ a tierm, si el
tornillo de la cublerta no _ _ m_l y est_ aislado y el enchufe de
_ no esti puesto a tlerra a trav_s de la _ de la casa.
En el _so de cualquler duda res_o a la correc_.a pues_ a tierra
del ventilador, haga _isar el enchufe _ pa_ y el circuito _r un
el_icista pmfesional.
32 A/re Ac_'_icioP.ador

Debido a eventuales peligros de seguridad no recomendamos en absoluto el
uso de un adaptador. $51o para una conexi6n transitoria se pu_e usar el
adaptador clasificado como UL que est& a dis_sici6n en {a mayoria de las
tiendas de productos el_ctricos. Atienda que e odficJo grande en el adaptador
corresponda al odfido gmnde en el enchufe para Iograr la conexiSn con la
_laridad correcta.
Descone_ndo el _le de alimentaci6n del adaptador LCdliceuna mano para
sendas partes para evitar un daSo del borne de tierra. Evite una de_onexi6n
fr_uente del cane de alimentaci6n, pues puede causar un eventual daSo del
borne de tierra.
M_todotem_l _'_
Ad_d_/__ _ II
]1
M_
Nunca utili_ el equi_ con un ada_dor da_ado,
Debido a un _ntual peligro no m_mendamos en a_oluto emu_ de un
_le alargador, En situaciones exce_onal_ utilices61oalargadores
certificados con pue_a a tierra CSA clasificados como UL con tres conductores
de _lores 15 A, 125 V.
Manual det Propie_rio 33

Ins_laci6n
Ti_ A: 11 Tipo B: 5 Tipo C: 3
(Tomillocorto} (Torrillo Mediano) (E_Pa_nlesis L}
J
E
E
,t==
Tipo D:I Ti_ E: i Ti_ F:2 "ripoG: 1
(BandaAdhesiva} (Bandade[ Marco) (Panel Gala) (Soste,ngaPar_,ntesis}
(Adhesvo poster or) (Noad_vo _sterior}
Para la insta]aci6n debeda tener a disposmci6n Bosinstrumentos siguientes:
* Destornillador (Estre]la y Phillips) * Reg]a
* Cucj[]lo * Mart[]Bo
* Lapiz Nive]
Tamale
Este ventilador de casa esta
construido para ventanas estandar de
dos alas con ]a extension real de
apertura de 22" a 36". El a]a superior
y el inferior de la ventana deben
abr[rse Io sufic[ente para producir un
ofif[c[o vertical de 13" desde el a]a
superior hasta el antepecho.
_ DVERTENCIA : Este pr_ucto es un aparato de AIRE ACONDICIONADO
PARA INSTALACION ENVENTANAS, Como tal, se necesita una ventana de
un cuelgue o de doble cuelgue para una instalacibn adecuada, No
recomiendan instalaciones en lugares que no sean ventana& utilizando
casquillos, orificios en las paredes ni cualquier otto tipo.
34 Aire Acondicionador

Instatacion
Espacio libre
E] sufic[ente espacio [ibre aumenta ]a eficiencia de refrigerac[6n de ]a unidad e
imp[de [a irradiac[6n de[ ca[or de] condensador.
1. Si ]a sobreoventana estorba co[oquese una tira de madera de 2 pulg de ancho
a ]o largo de] descanso de [a ventana por ]a parte que de internamente a]
cuarto, yen toda su extensi6n. La tira de madera debe ser ]o suficientemente
gruesa para e[evar e] descanso de [a ventana, de ta] manera que la unidad de
a[re acond[cionado pueda ser [nta]ada sin interferencia de] marco de [a sobre-
ventana (storm window).
2. Ver Figura. B. La parte superior de [a tira de madera debe estar
aproximadamente a 3/4de pu]g mas a[ta que e] marco de la sobre ventana,
(storm window) para ayudar a que e] agua de condensacion de la unidad fluya
hacia afuera.
3. ]nsta]e una segunda tira de madera (aproximadamente 6 puig. de largo, 11/2
pu[g de ancho y mismo espesor que ]a primeratira de madera) en el centro del
descanso exterior, p6nga]a contra ]a parte posterior de[ descanso interior. Esto
e[evarA [a m6nsu]a L como en ]a Figura. B.
4. Si ]a distancia entre "Franja de Madera Montada Sobre la Parte superior del
Descanso Interior"y "Tira de Madera Para [a Mensu]a L y Mensula de
Antep_cffo
!_ior
!
F_an_de Ma@_aMonta@
S(_e la?a_lesu_t del
De_aaso interior 1" Max.
Figura, A Figura, B
Manual del Propietario 35

Ins_laci6n
i. Introduzca los paneles en los guias de]
aire acondidonado. Las cortinas
atornillelas con los tornillos (Tipo A).
Use un atomi]lador ]argo.Asi le
ser_ m_s f_cil insta]ar los tornil]os.
Tipo A
2. Corte la banda adhesiva (Tipo D) y
coloque]a del ancho de la ventana.
Remueva el p]astico de ]abanda adhesiva
y co]oque]a en la parte superior de e]
marco inferiorde ]aventan&
B._r_da
Adhesiva
(Tipo D)
3. Col_ando la unidad en la ventana
Abra ]a ventana y marque L]NEA en e]
centro esta.
4. Coloque el Mensula en L
4-1. ]nsta]e los soportes L detrAs de
alf6izar interno de ]a ventana, con eB
]ado corto de] soporte como estA
i]ustrado. Uti]ice 2 torni]los (Tipo A)
proveidos.
4-2. La mensu]a ayuda a que la unidad
se encuentre firme. Aseg0rese de
poner la mensula en L contra ]a
parte posterior de] descanso interior.
Exl_or
M_nsula en L
Interior
Linea del Cent_o
36 Aire Acondicionador

lnsta/acidn
Precautibn: En las siguientes instrucciones, sostenga la unidad firmemente
ha_a que la parte cor_iza de laventana descanse sobre la pa_e superior
del canal y por detr_s del marco de los panelescorredizos. Puede haber
lesiones o da_os si la unidad se cae de la ventana.
1. Instale el Aire Acondicionado a la
Ventana
1-1. Cuidadosamente levante elaire
a_ndicionado y col6quelo en el hoyo
de la ventana. Aseg_rese de que la guia
inferior dei aire acondicionado caiga en
lugar correcto dei mensula en L.
Cuandoel aireacondicionado_a
fiiadoenel suppbrtenL,elaireacondidonado
_r_i centrado_mo pu_en obsewar.
1-2.MientrasmantieneelaJreacondidonad_en
posicJ6n,cuidad_samentebajeelbordedela
ventanasu_rior hastala guiasuperiordel
aireacondicionad_.
Unavezinstaladodebidamenteetaparatode
aireacondidona_, de_ria inclinarse
ligeramentehaciaabajoensuparleposterior
Si esta_malpuestoen laventana,colgara_ma.s
abajoporla partepbsteriorautom_iti_mente.
Si no Iohace,hayunaproblemaconla
instaJaciOn.
2. A_gure los Paneles
Extiendalospanelesparareilenarlosonfidos
de laventanausandolos4 tornillos(TigbB).
3. Instale la Banda del Marco
3-1.Cortela bandadd marcodelmismoanchode
la ventana.Col_ue la bandadelmarcoentre
el viddoyla ventanaparapr_venirla
penetracional cuartodeinsectosyaire,
3-2,Atornillelacerradura@1marcousandoun
tornilloTi_ A.
3-3.QuiteJostorniJlosqueaseguranelgabinetey
cacerdadespreciableen el ladocorrecto.
\
Linea _1 Centare
Borde_ laVe_ana Saperio_
_ii_¸_ii_i_i
iili ....
Manual del Propietario 37

Instalacidn
3-4. Amarre ]a escuadra de soporte (Tipo
G) usando un torni]lo que puede sacar
del cabinete del aparato de aire
acondicionado. Acop]e la escuadra
(Tipo G) a la parte interior de ]a repisa
de la ventana con un torni]lo (Tipo B).
4. La instalacibn del aire acondicionado de ventana no estarb completa. Vea
SEGURIDAD ELECTRICA para conectar la extensibn el_ctrica al toma corriente.
38 Aire Acondicionador

tnstruccionesdefuncionamiento
Si Vd. de_onecta el ventilador o Io conmuta del enfriamiento a ia
ventilacibn, antes del nuevo ajuste del enfriamiento espere pot Io
menos 3 minutos,
i
H_h _- H_h
- A_ga e[ acondicionador,
High Fan o Permite [a ve[ocidad rapida del venti[ador.
L_ Fan o Permite [a ve[ocidad lenta de[ venfllador.
High C_I - Permitee[ enfriamiento con el ventilador
en alta velocidad,
Low C_I - Permitee[ enfriamiento con el ventilador
en ba_avelocidad.
Thermostat
5
La temperatura del aire interno sera controlada automD,ti_mente.
Mientras mas alta sea la marca mas frio estara el aire intemio.
La tempera,tara _ selecciona posicionando el control en ta marca
deseada.
(es d_ir, a mayor sea el nQmero,mayor sera,el enfriamiento)
PARA UN ENFRIAMIENTO NORMAL
1. Ponga el bot6n de operation en High Cool o Low Cool,
2. Ajuste el control del Termostat en la marca deseada(usualmente el punto medic
es un buen punto para comenzar). Si la temperatura del cuarto no es
satifactoria despu6s de un periodo de tiempo razonable, ajuste el control de
temperatura a una marca m_s grande (para una temperatura interna m_s frfa)
o a una marca mas pequeffa (para que la temperatura interna sea menos fria).
PARA UN ENFRIAMIENTO MAXIMO
i. Ponga el bot6n de operation en la marca mAs grande.
2, Ponga el control del Termostat en la marcamas grande.
PARA UNA OPERACION SILENCIOSA
1. Ponga el bot6n de operation en la marca mas pequefia.
2. Ponga e[ termostat en la temperatura interior deseada.
Manual del Propietario 39

tnstruccionesdefuncionamiento
Los controles tienen este aspecto:
Controles
v Temp
nergy
aver
Ajustedela Tem_ratura
• Estebet6n pu_e co_lrolar ia lemperalur_ del cuade
autemAti_me_te, Latem_ratura se puede _ustar de grade
engrade, desde 60F hasta 86F cada 1'F, Seleccione el
n_merom_.sbajegara la temperatura m_s ba_aen el cuado.
Ahorradordeenergia
El verstlador sedet ene cua_qdeel compressorno sigue enfriando_
• Aprox madamenlecarla 3minulos ei ventiiador seencender_,
y necesitarAverificar latem_ratura del euado g&,a sabersi
es necesaro ragsenfriam er_to,
FrioNentUador/S_o
Cadavezque usted presieneeste _t6n, este ser_al_,Aentre
COOL, FANy DRY.
Matador deencendido/Apagado
oOperaci6n de Parada:
Concada puls,_c6ndelboronse re_iza unciclo_r laso_iones
enes'teorden:1 hera 2betas * 3horas* 4 horas 5 betas
6heras 7heras 8betas 9betas lOheras 11horas
12hot_ CANCEL
temperaturafija _ elevate.2°Ftranscurrides30minutesy de
nuevotranscurdde¢etres30minetos,
oOperaciSnde Incaci6n:
Cencada pulsac6ndelbotSnse rea/izaunciclo_r lasepciones
enes'teorden:1 hera 2betas, 3horas, 4 horas 5 her'as4
6heras *7heras *8heras 9betas lOheras 11heras
12heras CANCEL,
* ParaENCENDER elsistema presione el bet6n,
y para APAGARLO presone el bet6netra vez.
, Estebot6n tiene pdoridadsobre lodes iosolros botenes.
*Cuando se enciende e!a_rato _r primeravez, usarA los
a_ustesdel mode Hgh Cooi a 72_F
Vel_idacl delVentilador
, Pulsarel boronde vel_idad dei ventiiador hace c._mbiarlas
ve_idades entre Low y Hgh.
40 Aire Acondicionador

Instruccionesdefuncionamiento
PRECAUTION: El mando a distancia no funcionar_ corr_tamente si
una luz fuerte hace contacto con el _nsor del aire acondicionado o si
hay ob_culos entre el mando a distancia y el aire acondicionado.
• P_a ENCENDER el sistema pr_ione el bot6n, y para APAGARLO presione el bot6n otra vez,
• Este bot6n t_ene prioddad sobre tod_s los otros botones.
• Cuando Ud. Ioenciende por primera vez, el sistema esta en el y _ temperatura es de 72°F.
Ajustede la Temperatura
• Este boron cont_ola latem_r_ura de [asa[a entre los 60_F y [es
86°F en incrementos_ 1°,
Vel_idad del Ventilador
• PuJs_ el bot6n de veloddad _1 ventiJador hace c=_mbiar[as
vei_ida_s entre Low y High
Marcadorde En_ndido/Apagado
- O_racidn de Parada:
Con cada pulsaci6n del _t6n se reaIiza un cic[o _r las _cion_
enesteor_n: 1 hora ,2 horas 3horas 4 horas 5horas
......._6horas 7horas 8horas 9horas 10horas 11horas
........12 ho_as CANCEL,
La temperatura ilia se elevar& 2°F tr_scurri_s 30 minut_ y de
nuevo transcurridos otros 30 minutos.
-O_acidn _ lniciaci6n:
Con cada pulsaci6n det _t6n se rea[iza un cic[o _r las _ciones
enesteorden:lhora ,2herao 3hor_ 4horas ,5hor_
........6horas 7 ho_as 8horas 9ho_as 10horas 11 horas
........12 ho_as CANCEL,
Fan S_ed
Timer Mode
Ahorrador de Ene_ia
E[venti_dor se _tiene cuan_ e[ compressor no sigue enfriando
Aprox:ima_mente ca_ 3 minutos el ve_ila_r se encen_r&
y ne_sit_& verificar la temperatura del cuarto para saber si
es nec_ado m&senfd_iento
FrioNentilador/Seco
• Ca_ vez que presione este bot6n [as _bras COOL FAN y DRY _arecer&n _ternadamente,
iiiiiiiiiiii_iiiiiiiiiiiiiiiiiiiiiiiiiiiiiiiiiiiiiii....
Como Porter las Baterias
1.Quite la tapa de la parte posteriordel telemando.
Paraello haga deslizarla tapa_un la direcci6n
del la flecha
2.Introduzca las dos bategas, Respetesiempre la
_laridad al instaJarlas pilas,Use batedas m_e,,ras
3.Volvera cerrar,resbalandola tapa hastala
_ici6n inicia],
• No u_lice bateris recargables,
estas son diferentes de forma,
de dimensi6n y uso respecto a
las baterias secas usuale&
. Seque las baterias dei
telemando cuando el
acondicionador no vaya a _r
u_do durante un largo _riodo.
Manual del Propietario 41

/nstrucciones de funcionamiento
La direccibn del aire
Paraajustar ]adir_cion de] aire usando
_ntro] de ]a direction del aire.
Las dos leng0etas horizonta]espara e]
_ntro] de ]as rejillas ]epermiten descargar eB
aire hacia ]a izquierda, o algo de aire a la
izquierda y otto a la derecha, o todo el aire
hacia el frente, o cua]quier combination de
]asposiciones mencionadas.
Tu_ de Desag_e
En c]imas hOmedos, es posible que la
Bandeja Evaporadora se ]lenne de agua.
Para quitar e] agua acumulado, es
preciso conectar el tubo de desagOe.
Quite ]a Tapa del DesagOe y conecte e]
Tubo a ]a Bandeja Evaporadora.
Este aparato de ahe acondicionado va
equipado con un venti]ador de
extracciOn. (VOase la ilustraciOn de
abajo). E] ventilador tiene un anil]o
externo que gira en e] agua que recoge
en la plancha base al entrar en
profundidad. La condensaciOn ]a recoge
el ventilador y ]a expulsa a traves del
condensador, haciendo mas eficiente a]
aparato de aire acondicionado.
rapa de] De_gL_e
PRECAUTION: Tenga cuidado al in_rtar el tubo de drenaje, Aiejalo de
la area aguda para evitar el deslice y lesiones por usted mismo,
Removerlo de la Ventana
Apague e] aire acondicionado, desconecte e] cordon el0ctrico del toma cordente,
remueva la cerradura de] marco y los torni]]os instalados en la parte superior e
inferior de los paneles, y guArdelos para reinsta]aciOn. Cierre los paneles.
Manteniendo el aire acondicionado fuertemente, ]evante el marco de la ventana, y
cuidadosamente, incline el aire acondicionado hacia arras, botando cuaiquier
agua condensada. Des]ice e] aire acondicionado 1" a ]a derecha, luego levAntelo
de la ventana y remu0va]e la banda de] marco de la ventana.
Aseg0rese de drenar TODO e] condensado del aparato de aire acondicionado. Si
no Io hace, podr[a salirse mientras transporta el aparato, ensuciando, con el
consiguiente peligro de resbalones. Este simple paso ]e ahorrara tiempo de
42 Aire Acondicionador

Mantenimiento y servicio
Filtm de Aire
Revise per Io menos dos veces al rues si no es necesado limpiar el filtro de aire.
Las partfculas detenidad se pueden acumular en el filtro impidiendo el flujo del
aire, limitando el rendimiento de enfdamiento y causando la acumulaci6n de hielo
en el evaporador. Proceder de la Iimpieza del filtro de aire:
Node_ forzar
a abrir oabrira
Ioleios,
1. Levante la rejilla de entrada
2. Saque el filtro de aire de la rejilla delantera sacandolo Iigeramente hacia arriba.
3. Lave el filtro con agua tibia de temperatura menor de 40_ (104_).
4. Escurra Iigeramente el agua sobrante del filtro y vuelva a instalado.
Limpie_ clel Aire Aconclicionado
La parrilla frontal puede ser limpiada con
un trapo hOmedo mojado en un
detergente suave.
El gabinete puede set lavado con jab6n
suave o detergente y agua tibia entonces
pulido Cera Liquida para aparatos.
Para asegurarse una eficiencia continua,
las bobinas del condensador (del lade
expuesto al exterior) debe ser revisado y
lavado peri_icamente sea pot que se
tranque con basura o polvo de la
atmosfedco.
Manual del Propietario 4-3

Mantenimientoyservicio
Como Remover la Parilla Frontal
1. Saque el Filtro de Aire halando
hacia la Jzquierda.
2. Saque el tornillo que asegura la
Parrilla Frontal.
1.Tire de BarejiHa de entrada hacia
delante agarrando ambas lengOetas
y tire de1fiBtrodeBaire hasta sacarlo.
2. Saque el torniHo que asegura la
ParriHa Frontal
3. Suelte el lado izquierdo primero.
Despu6s cuidadosamente hale
desde la parte de arriba y empuje
hacia la derecha. Las lengLietas
estAn aseguradas.
44 Aire Acondicionador

Mantenimiento y servicio
Antes de Llamar el Servicio de Asistencia T_cnica
S[ tiene prob]ernas con su vent[]ador, lea ]as informac[ones siguientes y trate de
reso]ver e] prob]ema. Si no puede encontrar Baso]uci6n, desconecte el ventilador
y dirijase a su sumJnistrador.
El ventilador no funciona
1. Compruebe que el ventilador est6 coneotado en un enchufe correcto.
2. Revise el fusible.
3. Compruebe que ]a tension no sea demasiado a]ta o baja.
AI ajustar_ el enfriamiento, el aire no parece frio Io suficiente
1. Revise s[ los ajustes de ]a temperatura son correctos
2. Revise si e] fi]tro de aire no esta atascado de poBvo.En el caso de que si,
cambie el fi]tro.
3. Compruebe que afuera no haya un obstAcu]o deBflujo de aire y si entre ]a
parte trasera de] vent[]ador y la pared o ]a barrera haya espacio libre de por ]o
menos 1 metro (20").
4. Cierre todas ]as puertas y ventanas y compruebe que no haya una fuente de
ca]or en la habitacion,
iiiiiiiiiiiiiii_iiiiiiiiiiiiiiiiiiiiiiiiiiiiiiiiiiii....
Antes de ]lamar a] servicio, tenga a bien revisar ia siguiente I[sta de
prob]emas y sus so]uciones.
El acondicionador de a/Yeestd funcionando normaimente cuando:
• Escucha un sonido meta]ico. Lo causa el agua que recoge el condensador en
dias Iiuviosos o en cond[c[ones de mucha humedad. Esta caracteristica est,_
diseiiada para ayudar a quitar la humedad en el aire y mejorar la capacidad de
enfdamiento.
Consu]te ]a secc[6n del Vent[]ador de extracci6n en la p_gina 19.
• Oye un cl[c en el termostato. Lo causa e] cic]o del compresor que comienza y se
detiene.
• Ve gotear agua de ]a parte posterior de la unidad. E] agua puede ser recogida
en la bandeja de base en condiciones de mucha humedad o dias de I]uvia Esta
agua desborda y gotea desde ]a parte posterior de ]a unidad.
• Oye funcionar e] ventilador mientras el compresor est_ si]encioso. Esto es una
caracterist[ca operativa normal.
Manual del Propietario 45

Mantenimiento y so_cio
El acondlcionador de aire pu_ es_r funcionando ano_almente cuan_:
i !!ii !!i!!ii!!!!liiliiiiiiil;i ! ii i!ii! ii llllllll ! i lllllllllllllll i!i
El aire
acondidona
do no
endende
[] El aire acondicionado est_
d_necta_.
[] LEIfusi_e esta quemado/el
interruptor de energia se ha
bioqueado.
[] El disp_s_vointermptor de
contrite esta
desconectado,
[] El flujode aire esta
t_tringide.
• _gdre_ que eiaire acondicionad_
est_ _nectado c_pletamente a la
fiJente_ energia.
• Cheque {osfusibles/intemJptorde {a
casa y _mplace los fusibles o
reestablezca elintemJptorde energia,
• Cuan_ Jaenergfase reestablezca,
e_ere 3 minutos para encen_r de
nue_ el aireacondicionado.Conesto
ev;_m que se produzcauna
s_r_..ar_ en eJcompresor.
Presioneelbot6nRESETsitu_ _ ele_ufe
de__le dealimer_.a_n
el_n RES_noperrr_necea_vo,_da
usodelaire_cbna® yp6_ en_.o _ un
t6_ de serv'icio_ali_do,
° Asegl]reseque nohayacor'_nas,
persianaso muebles _ueando el
frente delaire acondiciona_.
El aire
acondiciona
do no enfr'a
_rrto
debiera
TEMPERATUP,A en un nSmerom_sbajo.
nSmemm_sa_to.
[] IEIfiltro de aire esta sucio. • Umpie el filtro por Io menos cada dos
semanas.Vea la secc_6nde
instruccionesde operaci6n,
[] El cuarto a_n esta caJiente. ° Cuan_ ustedencien@ el aire
acondic_onadodebe esperar un
momentopara que la habitaei6n se
enfrie.
-aJ irJos-e- ............. ; quet-odas s iu-as....
aire est_ncerradas para que el aire
regrese.
[] Elserpent{n de refdgerac_6n . Est_ezca una temperatura _ alta.
se ha congelado.
El aire [] El hie_e_oquea el flujo de ° EHjae_mode alto de_ventilador High
acondiciona aire y detiene el enfriamiento Fano enfriado alto High Cool conel
do enfria del cuarto, termostato en ei nl_mero1 o 2.
dernasiado
Usted puede referirse a_ EneKjy Star pr_rama con todo deta_{e en www.energystar._.
46 AJre

LG Electronics Inc. will repair or at its option replace, without charge, your product if it proves to be defective in
material or workmanship under normal use during the warranty period set forth below, effective from the date of
original consumer purchase of the product. This limited warranty is good only to the original purchaser of the product
and effective only when used in the United States including Alaska, Hawaii, and U.S. Territories.
WARRANTY PERIOD:
Labor: 1 Yeer from the Date of Purchase.
Paris: 1 Year from the Date of Purchase.
Compressor: 5 Years from the Date of
Purchase.
HOW SERVICE 15 HANDLED:
Call 1-800-243-0000 and choose the appropriate prompt. Please
have product type (Room Air Conditioner), model number, serial
number, and ZIP code ready.
The warranted labor covers the cost of In-Home Service on all
pads including the compressor.
THIS WARRANTY IS IN LIEU OF ANY OTHER WARRANTIES, EXPRESS OR IMPLIED, INCLUDING WITHOUT LIMITATION, ANY
WARRANTY OF MERCHANTABILITY OR FITNESSFOR A PARTICULAR PURPOSE. TO THE EXTENT ANY IMPLIED WARRANTY IS
REQUIRED BY LAW, IT IS LIMITED IN DURATION TO THE EXPRESSWARRANTY PERIOD ABOVE. LG WILL NOT BE LIABLE FOR
ANY CONSEQUENTIAL, INDIRECT, OR INCIDENTAL DAMAGES OF ANY KIND, INCLUDING LOSTREVENUESOR PROFITS, IN
CONNECTION WITH THE PRODUCT. SOME STATESDO NOT ALLOW LIMITATION ON HOW LONG AN IMPLIED WARRANTY
LASTSOR THE EXCLUSION OF INCIDENTAL OR CONSEQUENTIAL DAMAGES, SO THE ABOVE LIMITATIONS OR EXCLUSIONS
MAY NOT APPLY TO YOU.
THIS LIMI11_DWARRANTY DOES NOT APPLY TO:
1.
2.
Service trips to your home to deliver, pick up, and/or Install the product, Instruct, or replace house fuses or
correct wiring, or correction of unauthorized repairs; and
Damages or operating problems that result from misuse, abuse, operation outside environmental
specifications or contrary to the requirements or precautions in the Operating Guide, accident, vermin,
fire, flood, Improper Installation, acts of God, unauthorized modification or alteration, Incorrect electrical
current or voltage, or commercial use, or use for other than intended purpose.
3. lhemfom, the cost of midair or replacement of such e defective product shell be borne by the consumer.
CUSTOMER INTER-ACTIVE CENTER NUMBERS:
ToProveWarrantyCoverage
To Obtain Nearest Authorized Service Center or Sales
Dealer, or to Obtain Product, Customer, or Service
Assistance
Retain your Sales Receipt to prove date of purchase.
A copy of your Sales Receipt must be submitted at
the time warranty service is provided.
Call 1-800-243-0000, 24 hrs a day, 7 days per week.
Choose the appropriate prompt from the menu, and
have your product type (Room Air Conditioner), model
number, serial number, and ZIP Code; or visit our
website at http'J/www.lgappllances.com
Patent No. : Us 6, 412, 298
P/No.: 3828A20528C Printed inThailand
-
 1
1
-
 2
2
-
 3
3
-
 4
4
-
 5
5
-
 6
6
-
 7
7
-
 8
8
-
 9
9
-
 10
10
-
 11
11
-
 12
12
-
 13
13
-
 14
14
-
 15
15
-
 16
16
-
 17
17
-
 18
18
-
 19
19
-
 20
20
-
 21
21
-
 22
22
-
 23
23
-
 24
24
-
 25
25
-
 26
26
-
 27
27
-
 28
28
-
 29
29
-
 30
30
-
 31
31
-
 32
32
-
 33
33
-
 34
34
-
 35
35
-
 36
36
-
 37
37
-
 38
38
-
 39
39
-
 40
40
-
 41
41
-
 42
42
-
 43
43
-
 44
44
-
 45
45
-
 46
46
-
 47
47


Goldstar GWHD6005R El manual del propietario
- Tipo
- El manual del propietario
- Este manual también es adecuado para
En otros idiomas
- English: Goldstar GWHD6005R Owner's manual
Documentos relacionados
-
Goldstar WG5005 Manual de usuario
-
LG WG5005 Manual de usuario
-
Zenith Goldstar GWHD6507R El manual del propietario
-
-
-
-
-
-
Goldstar WG5004R El manual del propietario
-
Otros documentos
-
COMFORT-AIRE COMFORT AIRE RADS-51C El manual del propietario
-
-
-
LG LW8011ER El manual del propietario
-
COMFORT-AIRE RAD-101B El manual del propietario
-
-
-
LG HBLG6000R El manual del propietario
-
MD Building Products 03772 Guía de instalación
-