
OWNER'S MANUAL
MANUAL DEL PROPIETARIO
Models/Modelo R1003
B
BG8000ER,

,o
FOR YOUR RECORDS
Write the model andl serial numbers here:
Mode| #
_rial #
You can find them on a ia_l on the side of t_ pr_Juct,
D_ler's Nlame
Date Pu=mhas_
lib Staple you_-receipt to thiis page in the e_nt y_ nec_i it
to prove @'_ted purchase or for warran#/iSSLJ_.
READ THIS MANUAL
Inside you will find many _lpfu[ hind on how to use and
maintain your air condit[o_r pro_r]y. Just: a little pr@_entive
care on your _rt can _ve y_J a g_eat deal d time and
money over '[he life of your air cond_ioner,
You111find many answers to, common problems in the chart
of tr_bl_hoo_ing tips. ff you r_iew our chart of
Treubleshootingi Tips first, you may not _ to call for
serv'_e at all,
i' _,nta_ an Authorlz_ Service Center for repair or
maintenance of this unit. Call 1_00-2_-0000 to
locate the nearest ASC,
•This air conditioner is not internd_ for use by youn9
chil,dt_ ot invalids without supervision.
•Young _ildren shou|d be supervisedi tlo ensure that
th_ do not play with the air conditioner.
• If the power cord recluires replacement, have an
Authorized _rvicer install ;an exact rep|acement pa_.
• |ns_l|atton work mu_ he _rform_ in a_o_ance
with the National _lecttlc C_e iby qualified and
a_thorlzed per_,onnel onlyo
2 Room Air Conditioner

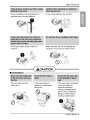
Sa_ Precautions
To prevent iniury to the user or other peop, le and property damage, the following instructions
must be foil,owed.
[] incorrect operation due to ignoring instructions wilil _us.e harm or diamage. The seriousness
is classified by the folio,wing indications.
[] Because of the weight of the product, it is r_ommended that you have a heiper to assist in
the installation.
[] Meanings of symbols us_ in this manua_ are as, shown below.
Biesure not to do 'i, _
q
B,esure to folio
[] Installation
• improper assembly or instaflation may cause
incorrect o_ratJon, including injury, fire, and
electric shock ha_rds,
_'_ ',4
• it may cau_ explosion or fire.
iH
• It may cause fire and electric sh_k.
° it may cause failure and e]_ric sho_.
Own,er_ Manual 3

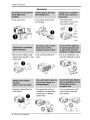
[] Operation
• _hetwise, it will cause
electric sh_k or fire
• i'twill _use electdc shock or
fire.
• _twilli cause et_tric shock or
fire_
• _herwise it may ,cau_ fire
and electdc shock a_iident.
• it will cause e_tdc sho_ or
fire.
, ,AYe'''¸ ........
• _tmay cause fire and ,ei_tri,c
shock,.
• litwill cause eliectric sh_k or
fire
o,No grounding may cause
el_"tric sh_k.
• It will cau_ electric sh_k.
4 Room Air Conditioner

. The air conditioner must be operated in a
enclosed area to,be most effective_
• Utmay cause .exp,losion, fire, and burn.
, Ut:wi!l cause electric shock or fai!lure of
machine.
, Water may enter me unit and degrade the
insulation. It may cause an elec#ic shock.
[] Installation
.They are sharp and may
cause injury,
• _ may _use failure o,f
appliance or performance
• If the o_er case is damaged,
it must be repair_ or
repi_aced immediately.
Leaving it damaged could
result in the air _nditioner
falling out o,fthe window,
creating a _fety hazard.
Owner_ Manual 5

° it may _use injury: • It may cau_ electric shock
and damage.
,. it will waste power
consumption in vain and it
may cause accident,
• Since the fan rotates at high
spe_ during o_ration, it may
cause injury.
• Operation without filters will
cause failure.
,,This oouUdiniure the pet or
plant,
• it is an air conditioner, not:a
precision refrigera_on system.,
•'Theap_arance of the air
conditioner may deteriorate,
change color_or develop
suffa_ flaws.
.,It is not sanitary and coulld
cause illness .o.r_r_nal
injury hazard,
....
6 Rc_m Air Conditioner

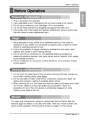
Befot'e Operation
1i' Plug in the, power cord properly.
2. Use a dedicated circuit. Overloading the line could create a fire hazard.
3. Iao not use an extension cord. See page 10 for more detaii]s.
4. Do not staWstop operation by plugging/unplugging the power cord.
5. IIfthe power cord is damaged and requires, replacement, have an Authorized
Servicer install an exact replacement part.
1i_ Being exposed to direct airflow for .an extended period o,ftime could b,e
hazardous to your health, Do, not expose occupants, pets, or plants to direct
airflow for extended periods of time.
2i_Due to the possibility of oxygen deficiency, ventilate the room when used
together with stoves or other heating devices,
3 Do not use this air conditioner for non-specified special purposes (e.g.
preserving precision devices, food, peR, p,lan_, and art objects). Such usage
could damage the, items.
43The air conditioner is a consumer comfort appliance, not a precision climate
control system.
1. Do not touch the metal parts of the unit when removing the filter. Injuries ,can
occur when handling sharp metal edges.
2. Do not use water to clean inside the air conditioner. Exposure t,owater can
destroy the insulation, leading to possible electric shock.
3. When cleaning the unit, first make sure that the power and breaker are turned
off. The, fan rotates at a very high speed during operation. There is a
possibility of injury if the unit's power is accidentally triggered on while
cleaning inner parts of the unit.
For repair and maintenance, contact an Authorized Service Center. See the,
warranty page for details or call ,(800),243-000& Have your model number and
serial number available. They should be written on page, 2 of this manual.
Owner_ Manual 7

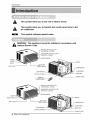
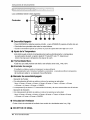
Int_uction
This symbol aleds you to the risk of electric shock.
This symbol aleds you to haza_s that could cause harm to the
air conditioner.
CABINET
FRONT
GRILLE
A!R FILTER
This symbol indicates s_cial notes.
WARNING: This appliance should be ins_lled in accordance with
national Electric Code.
\LERTICALAIR DEFLECTOR
(HORIZONT_ LOUVER)
HOR_'ONTALAIR DEFLECTOR
NERTWCALLOUVER)
D_SCHARGE
AIR _NTAKE
(INLETGRILLE)
BRACE
EVAPOrCATOR_
CONTROL BOARD
REMOTE
CONTROLLER
CONDENSER
_BASEPAN
POWER CORD
VERTICAL AIR DEFLECTOR
4ORIZONT_ AIR DEFLECTOR
FRONT
AIR F_LTER
DISCHARGE
AiR iNTAKE
(INLET GiRiLLEi
C,ONTROLBOARD
B_E PAN
POWER CORD
8 Rc_m Air Conditioner

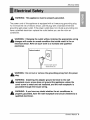
ElectricalSafety
WARNING: This appliance must be pro_rly grounded.
The power cord of this appliance is.equipped with a three-prong grounding plug.
To minimize the rusk of electric shock, use the plug with a standard three-slot
grounding wall power outlet.. IIfthe power outlet does not include a grounding slot,
have a qualified electrician replace the outlet before you use the room air
conditioner,.
Changing the outlet without making the appropriate wiring
changes will create an uncle condition that could result in fire or
electrical shock. Refer all such work to a licens_ and qualified
Pt_err_ method_
E_ _rsu_eFope_ground
II
exists before us4
WARNING: DO not cut or remove the grounding prong from tlhe _wer
WARNING: Attaching the adapter ground terminal to the wall
receptacle cover screw does not ground the appliance gnlesis the
cover screw is metal and not insulated, and the wall r_eptacle is
grounded through the house wiring.
W'ARNING: If you have any doubt whether the air conditioner is
properly ground_, have the wal! receptacle and cimuit ch_k_ by a
qualified electrician.
Owner_ Manual 9

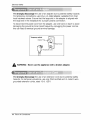
We strongly discourage the use of an adapter due to potentia! safety h_ards.
For temporary connections, use only a UL-lis.ted adapter, available from most
local hardware stores. Ensure that the large slot in the adapter is aligned with
the large slot in the receptacle for a proper polarity connection.
To,disconnect the power cord from the adapter, use one hand on each to avoid
damaging the ground terminal. Avoiid frequently unplugging the power cord as
this can lead to eventual ground terminal damage,
"_Met_ Screw
WARNING: Never u_ the appliance with a broken adapter,
We strongly discourage the use of an extension ,cord due to potential safety
hazards.. For temporary situations, use only CSA certified and UL listed 3-wire
grounded extension cords, rated 15 A, 125 \,L
10 Room Air Conditionier

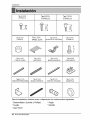
in,staflation
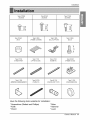
T/pe A:i6EA TypeB:3EA
E
E
tf
_=::==:==::,,:2,,::_ . _
TypeD:2EA TypeE:2EA TypeF:2EA TypeG:2EA
(FRAMECURTAIN},
,j [-
1I'
Ty_ i,,,i:1_ TypeI:1EA TypeJ:t EA TypeK:2EA
(UPPERGUIDE}
TypeL:I EA Type M:!EA Type N:IEA Type O:1EA
(DRAINJOINT PIPE)
Have the, following tools available, for installation:
* Screwdriver (Slotted and Phillips) * Ruler
* Knife * Hammer
* Pencil * Level
Owners Manual 11

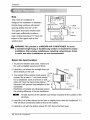
Installation
This room air conditioner is
designed for installation in standard
doubiehung windows with actual
opening widths from 22" to 36".
The upper andi lower window sash
must open sufficiently to al!ow a
clear ve_ical opening of i5" from the
bottom of the. upper sash to the
window stool.
WARNING:This product is a WINDOW AIR C,ONDITIONER. As such,
a standard single-hung ,or double-hung window is required for proper
installation. Non-window insta!lations, including using s!eeves, holes
in walls, and other installations are not recommended.
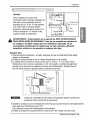
Select the best location
1. To prevent vibration and noise, make sure
the, unit: is !!installed securely and fiirmly
2. Install the unit where the sunlight does not
shine directly on the unit•
C_led air
3. The outside of the cabinet must extend _-.__.
outward for at least i i' and there should
be no obstacles, such as a fence or wall,./
within 20" from the back of the cabinet
because it will prevent Iheat radiation of the
Restriction d outside air will greatly r_uce
the c@!ing efficiency d the air conditioner.
Awning
Heat
radiation
1/2"
Over 20"
Fen_
•All side louver! o,fthe cabinet must remain expos_ to the outside of the
structure.
4. install the unit a little slanted so the back is slightly lower than the front(about V2")..
This will force condensed water to flow to the outside.
5. Install the unit with the bottom about 30"~60" above the fl_r level.
12 Room Air ,Cond#i_er

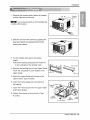
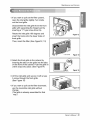
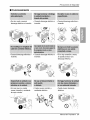
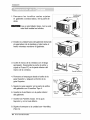
Ins_llation
1, Remove, the _rews which fasten the cabinet
a,tboth sides and at the back:,
Use a long screwdriver and installing the
screws will be easier.
2. Slide the unit from the cabinet: by gdpping the
base pan handle and pulling forward while
bracing the cabineL
3:. Cut the window sash sea[ to the proper
length
Peel off the backing and attach the Foam-Pe
to, the underside of the window sash.
.
5_
Remove the backing from the top, Upper Guide
Fo,am-PE and attach it to the bottom of the
Upper Guioe
Attach the Upper Guide onto the top of the
cabinet with 3 Type A screws.
6. insert the Frame Guides into the bottom of
the cabinet,
.
,
Inse_ the Frame Cu_ain into the Upper Guide
and Frame Guides.
Fasten the cu_ains to the unit with 4 Type
A screws.
Foam Pe
(Type A) up#er G_ide
Screw
_ew
(Type A)
Frame Guides
(Type A)
Foarr_Pe
Frame
Owtt,e,¢_Manual 13

Installation
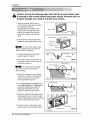
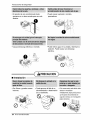
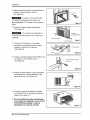
i
Caution: During the following step, hold unit firmly until window sash
is lowered to top channel behind side _nel frames. Per_nal injury or
property damage may result if unff falls from window.
2_
Open the window, MaA a line on
_nter of'the window stool(or desired
air conditioner location),
Carefuffy place the cabinet on the
window stool and align the _nter
mark on the bottom fro,nt wi#_ the
center line marked in the window
stool,
Pull the bottom window sash down
behind the upper guide until it meets.
:Do not pul] the window _sh
down so tightly that the movement of
Frame Curtain is restricted
3. Loose,ly assemble Me sill support
using the parts in Figure 3.
4. Se]_;t the, _s,iti,on that wil!l place the
sift support near the outer most po,int
on sill (_e Figure 4)
° Be careful when you [nstaff
the _binet (:Frame Guid_ willl
broken easily),.
5_
Attach the sift support to the cabinet
track holle in relatiion to the sel_ted
position using 2 Ty_ A screws in
each support(See Figure 4),
6 The cabinet should be [ns_lli_ wi#'l,a
ve_ slight tiff(about _!_"),downward
toward _e outside (S_ Figui_e,5)_
Adjust the _lt and the nut of sil!
support fo,r balancing t_hecabinet,,
7, Attach the cabinetto the window stool
by driving the screws ,(Type B:[,o,ength
sixteen millimeters and below.) through
the front angle into window stool
8, Puff ea_ Frame curtain fully to each
window sash track, and repeat step, 2.
Upper Guide
Window
Frame CuRa!n
Foam-Pc
Figure i
Figure 2
OUTDOOR
i
SillSuppom
Screw(Type A)
INDOOR
Screw(Type B}
#
Cabinet:
OUTDOOR Figure 4
Si_ Support
Scr_(Type IB)
S!HSuppeR:
Track
Figure 5
14 Room Air Conditioner

installation
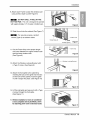
9. A_ach each Frame Curtain the window sash
using screws, (Type C).(See Figure 6)
: DO NOT DRILL A HOLE IN THE
BO_'OM PAN, The unit is designed t,o operate
with approximately 1/2" of water in bottom pan,
Ty_ C
10. Sllide the unit into the cabinet.(See Figure 7)
•For security purpose, reinstall
_rews(Type A) at cabinet's sides,
Screw(Type A)
. Power Cord
1i1,0Cut the Foam-Strip to the proper length
and inse_ betw_n the upper window sash
and the Ilower window sash.
(See Figure 8}
Foam Strp
12. Attach the Window Locking Bracket with
a Ty_ C screw. (S_ Figure 9)
Window Locki_ng Bracket
13,.,Attach the front grille to the cabinet by
inserting the tabs on the ,grille into the tabs
on the front of the cabinet. Push the grille
in until it snaps into place. (See Figure 10)
14,.,Lift the inliet griiie and s_ure, it with a Type,
A screw through the front grille,
(See Figure 11)
15,. Wirtdow lrts'_llaitloty of room air conditto_r
is _w completed. _ ELECTRICAL DATA
for attaching _wer cord to e_trical outlet.
Figure il
Own'e,y_ Manual 15

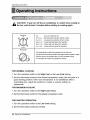
Operating instructions
If you turn off the air cond_ioner or switch from cooling to
the fan, wait at least 3 minutes I_fore _tting to c_ling again..
Operation,
Off °Turns air _nditioner off.
Med Fan ° M_ speed fan o_ration without ®oling.
Low Fan - Low speed [an o[_rat_n without _oling,
High Cool - Cooling with high sp_d fan operation.
Med Cool - Cooling with mad sp_d tan o_ratJon,
Low Cooi - Co0,iingwith 10wspeed tan 0,peralion.
The_ostat
" This a_utomaticaBycontrols the tem_rat_._red the ind_[ air.
Turn t_ knob,soithat arrow points to _e Iiargermarks,for greater cooling,
Point the ,arrow[ot_ s,mal_r marks fa more rr_dera_e_aing.
(i.e. the higher [he humor, t_e greater the _oling}
FOR NORMAL. COOLING
1, Turn the operation switch to the High Cool or the Low Cool setting
2. Set the thermostat control to the desired temperature mark (the mid-_int is a
g_d starting _sition). If the room temperature is not satisfactory after a
reasonable time, adjust the con_"oi to a _oler or warmer setting, as
FOR MAXIMUM COOLING
i, Turn the operation switch to the High Cool setting.
2. Set the thermostat control to the Ilargiest temperature mark.
• = [ '
FOR QUIETER OPERATION
1, Turn the operation switch to the Low Cool se_ing.
2, Set the thermostat _ntrol as ne_.
16 Room Air Conditioner

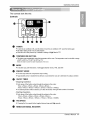
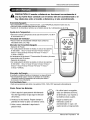
Operatinginstructions
The centre,is ]!ooklike this"
O
O
e.]Oturn the air co_itio_r O,N,pushthe butt®. [o turn the,air conditionerOFF,pushthe huron again.
oThis _Jttontake. pdo,dtyovera_ other bu_ons.
eWhen the unitisfirst poweredup,itdefaultstosdtings of High _oli at7_
TEMPERATURE SETTING
• This b_on canautomatically/controlthe tem_rature ofthe r_. Thetem_ture can be set within a range
oif60°F to 86°F_ t°E(16°C to 30°Cby 1°C)
SelecttheI_er numberforI_er tem_r_u_e of Lher_m,
,mEv_rytime you #Jsh [his _[to,n, itwil t_31e _[we_i ,COOL,FAN, ar_ DRY.
ENERGY SAVER
• The fan stops when the _mpressor stops c_ing.
• Approximatelyev_y 3.minutest_ fain_will'_urn® and che_kthe_®rn airto _t,ermine i_c®ling _ ne_ed.
ON/OFF TIMER
- Stopping Operation
o E_h pros of the button cycl_ through the opt:ionsin this.o_der:
1Hour_2Hou_ --3Hours _4Hours _,5Hours-,-6Hours-,,
7Houis-,.8Hours._9Hours-,.lOHou_s.. 11H(_s ._12'Hours.,,CANCLE
e.'Theset t_r.ature will _ raised by 2_ after 30,minut_ and again after another 30 minutes.
- Starting Operation
• E_h press of the button cycl_ through the opt:bns in _is order:
1Hour-_2Hou_ -_3Hours-,.4Hours_5Hours -*6Hours
7Hourso 8Hours.*9Hours_ l_ou_ _ 11Hours_-12_{ours-- CANCEL
FAN SPEED
o, Pr_sing _e Fans_d buttontoggl_ _tween Low and High s_
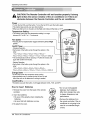
REMOCON SIGNAL RECEIVER
Own,e,r_ Manual 17

OperatL_g tnstructions
_ AUTIO, N: The Remote Controller will not function properly if strong
light strikes the sen_r window of the air cond_ioner or' if there are,
obstacles between the Remote Controller and the air conditioner.
• To turn the Set ON, push the button. To,turn the,Set OFF, push the button again.
• Th_ bu_on takes p,riodtyover any other b_tons.
• When you first turn it on,,'the,set is on the High cool mo_ and the temp., at 72°F
T,emp,eratu_ S,e_ing
• Th_ Ibuttoncontrol the room temperature setting in a range
be_een 60°F to 86"_Fin I:'F increment,
Power
Fan Spe_
• Pressing the Fan Speed button togglesbetween Lowand High
spe_s..
OrdOff Timer
oStopping Operation
• Each press of the button cycl_ through the options in this
or_r:
IHour_ 2Hours_ 3Hours=_4Heurs-*5Hours_ 6Hours
7Hours-_SHours--PHours-*10Hours--11Hours-,.12Hour.s-_CANCLE,
• The set temperature will be rai,_dl by 2°F .after30 minutes and
again after ano_er 30 minutes.
- Starting O_ration
• Each press of the button oycl!esthrough the options in this
or_r:
1Hour-,.2Hours--3Hours_*4Hours--5Hours- 6Hours-*
7Hours_ 8Hours-*PHours-* 10Hours_ 11Hours_ 12Hours_ CANCLE.
Energy Saver
The fan stops when the compressor StOi_ COO_i_
• Approximately every 3 minutes the fan wil! turn on and
check the room air to determine if c_ling is n_d_.
• Ever#me you p,u_ this button, Hwil! t_g_e between COOL, FAN_and DRY,
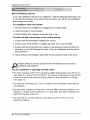
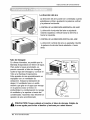
How to Inert
1. Remove the _ver from the ba_ o_the remote
co,ntroHer
2. Inert two batteries,
, Be sure of tlhe _lar_y when installing the
batteries.
o Be sure that both batteries are new.
& Re-attach the cover.
• Do not u_ rechargeable
batteries. Suc:h batteries
differ from s_ndard dry _]]s
in shape, dimensions, and
performance..
• Remove the batteries, from
the remote oontroHer if the air
conditioner is.not going to be
used for an extended length
of time.
18 Room Air Co_,ditioner

Operating Instructions
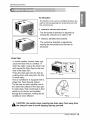
Air Direction
The direction of air can be _ntrotlied wherever you
,want to,c_,U by adjusting the horizontal louver and
the vertical louver.
• HOiR/ZONTALAIR-DIR'ECTI_# C01'4TROL
The horizontal air direction is adjust_ by
rotating the verticall louver right or [eft.
• _RTICAL AIR_D'IRECTION CONTROL
The vertical! air direction is adjusted by
rotating the horizontal louver forward or
Drain Pi_
In humid weather, excess water may
,cause the Base Pan to overflow, To
drain the water, remove the Drain Cap
and s_ure the Drain Pipe to the rear
hole of the Base Pan
Press the drain pipe into, the hole by
pushing d_n and away from the fins
to avoid injury:
This air _nditio, ner is equipped with a
slinger fan. (.See drawing, below.)
The fan has an outer ring that runs in
tihewater that coJ!_ts in the base pan
if it gets deep. That _ndensate is then
pick_ up by the fan and expe[l_
through the condenser, making the air
_nditioner more efficient.
Ring
Be careful when inserting the drain pipe. IPush away from
the sharp fin area to avoid slipping injuring yourseff.
Owner's Manual 19

Maintenance and Service
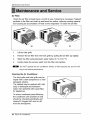
Air Filter
Check the air filter at least twice a month to see if cleaning is neces_ry. Trapped
particles in the filter can build up and blink the airflow, r_ucing _oling capacity
and causing an accumulation of frost on the evaporaton To clean the air filter:
(a) (b) (c)
.
2.
3.
4,
Lift the inlet grille,
Remove the air filter from the front grille by pulling the air filter up slightly:
Wash the fiJter using Iiukewarm water below 40 °C (104 °F),
Gently shake the excess water from the filter and replace.
:DO NOT operate the air conditioner without a hTter because dirt and lint will
clog # and reduce performance.
Cleaning the Air Conditioner
The front grille and Inlet grille may be
wip_ with a cloth dampened in a mild
detergent solution,
The cabinet may' be washed with mild
soap or detergent and lukewarm
water, then _lished with Liquid Wax
for Appliances.
To ensure continued peak efficiency,
the condenser coils (o.utside of unit).
should be checked periodically and
cleaned if clogg_ with s_t or dirt
from the atmosphere.
20 Room Air Co_,ditioner

Mamte,na,nce and Servic_
i, If you want to pull out the filter upward,
open the inlet grille slightly. Turn inside
out the front grille,.
Disassemble the in_et grille from the, front
grille with separating the hing_ part by
inserting a '_' type screw-driver tip_
Rotate the inlet grille i80 degrees and
insert the h_ks into the lower holes of
front grille.
Then, insert the filter. (See Figure12, t3)
Figure 12
2.Attach the front grille to the cabinet by
inserting the tabs on the grille into tlhe tabs
on the front of the cabinet. Push the grille in
until it snaps into p_a_. (See Fi,gurei4)
Figu_ 14
3i, Lift the inlet grille and s_ure it:with a type
A s_ew through the front grille.
(See Figure 15)
4...If you want to pull out the fiilter downward,
use the reversible inlet grille without
(The grille is already assembled for that
way,.)
Figure i5
Owners Manual 21

Maintenance and Service
i
i
Before Calling for Service
If you have problems with your air conditioner, read] the following
information and
try to, solve the problem If you cannot find a solution, turn ,off the air ,_nditioner
and contact your dealer,
Air conditioner does not operate
i ..Ensure that the air _nditiioneir isi plugg_ into a proper outlet.
2, Check the fuse or circuit breaker°
3..Check whetheir the voltage is unusually high or low.
Air does not feel cold ,enough on the cooling setting
i. Ensure that the tempe_ture settings are oorrect.
2. Ch_k to see iifthe air filter iisclogged with dust.. If so, clean the filter.
3.. Ensure that the air flow from the outside is not obstruct_ and that there is a
clearance of over 20" between the back ,ofthe air conditioner and the wall or
fence behind it.
4. Close, all doors and windows and check for any _urce of heat in the r_m
Before calling for service, please review the following list of common
problems and solutions
The air conditioner is operating normally when:
• You hear a pinging noise This is caused by water being picked up by the fan on
rainy days or in highly humid conditions. This feature is designed to help remove
moisture iinthe air and improve cooling efficiency. See the section on Slinger
Fan, page 19.
° You hear the thermostat click. This is caused by the compressor cycle starting
and stopping.
° You see water dripping from the rear of the unit. Water may be collected in the
base pan in highly humid conditions or on rainy days. This water overflows and
drips from the rear of the unit,
° You hear the fan running while the compressor is sillent. This isi a normal
operational feature.
22 Room Air Co_,ditioner

MaintenanceandService
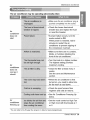
The air condi#,oner may be ,opera,ting abnormally when;
Air
conditioner
does not
start
Air
conditioner
does not
cool as it
should
Air
conditioner
freezing up
Make sure the air conditioner plug is
pushed completely into the outlet..
Ch_k the house fuse/circuit
breaker _x and replace the fuse
or reset the, breaker.
If power failure _curs, turn the
m_e _ntrol to _.
When _wer is restore, wait 3.
minutes to restart the air
,conditioner to prevent tripping of
the compressor overl_d.
Make sure there are no ,curtains,
bliinds, or furniture blocking the
front of the air conditioner.
Turn the knob to a higher number.
The highest setting provides
maximum c_ling.
Clean the filter at Ile,astevery 2
weeks.
See the care and Maintenance
When the air conditioner is first
turn_ on, you ne,_ to a[!low time
for the room to cool down.
Ch_k for open furnace f!_r
registe_ and co,ld air returns.
See Air Conditioner Freez:ing Up
below,
iiiiiiiiiiiiiiiiiiii
Set the mode control at High Fan
or High Cool with thermostat at 1
,or2,
You can refer to the Energy Star pr_ram in detail at www, energystar gov
Owt],e,r_ Manual 23

24 RoomAir Conditioner

PARA SUS ARCHIVOS
I_scri_ aqu_ e] model[o,y n_mero de serie.:
Modeio r[":
_He n;
Puede encontrar los nrum_ _ i.ae_iqueta de _ parte
lateral del pr_ucto
Nornbre del dis_buidor:
Fecha de compra:
[] Adjulnt_ _J recibo a e_lta p_gin_ con la grap_d_a p_ra
e_momento que io n_,_.ite _ra proL_r ia fecha de su
adquisici6n o para A va]idaci6n de I!agarantia,
LEA ESTE MANUAL
En su intedor enco,r_t[ar_ muchos _s)nsejce QtJiiessobre ]a
u_[izaci6r_ y mantenim[ento de su a_and[c[_ado_ de aide
Unos, _s cuida_s _r su parte ]e pueden ahorrar
mucho tiempo, y dine[o durante la vid_ de su!
acondici_ado_ de aire_
En [la tabl_ de consejos para la soluc[6n r_pid_ de
problemas encor¢#a_t muchas respuestBs _ I_ Ip_oblemas
mAs habituaies. Si revisa primero nuest_r_ Tabla de
Con_jes. para la so[ucid_n r_.pMa ,_ #ob_emas, tal vez no
nec_ite ll_mar nunca al _rviciio tecnico.
PRECAUCION
• Co.nt_te _unC_tro de Se_icio Autot[_io _t_ rep_lrato
re_iizatetm_ntenim_n_e de_ en_. LI_me_ 1-8_-2_40_
p_mu[b.[_t elCSA m_s cetc_no,
• _] attea_adicto_do, no_ aptopatasetusadop_ ntSos
p_ue_es o disc_psc:_t_oss_a]asepe_'v_s[_ad_ru_da,
,.[Losa[5_ _ee6_ deb_ sets:epefv_sad_p_ra_egurat _e
no_eg_n .cone! a#e acondic_nado,
..$1hayque_mblar e[cabliede_ftmeatac[Sn,sol,ire a eat_cn_co
de _vic[o que[n_le _ tecamblo,e_o_
• Eltr_bajo _e Iiainflation de_ set re_B_do _e acuer_ _11
Codigo E_tico _acionaL 5_[camenteper elpe_ona[ ¢a_!_ic_do.y
_utofizadlo,,
Manual det Prop,ietario 25

Precauciones de Seguridad
Para prevenir tanto les[ones a] usuario u otras personas como daSos matedales, es preciso
seguir estas instruociones..
III La in,_rrecta o_ci6n die] apara_o como consecuencia de ignorar las [nstrucciones.
provocarA da6os o lesiones..
I A cause de_ peso pe_do de! producto, se r_mienda que usted tenga a un ayudiante a
pa_icipa en Iiainsta]aci6n,
,ADVERTENCIA
PRECAUC:ION
Este simbolo indica [lapos[bi]i,dad de _esi,ones morta]es o graves.
Este simbolio indica ]a posibilidad de ]esiones o daSos mater[oales.
l El signifi_do de los simbo!os ut:[[izados en este manual se indi_ a conflnuac[6n,
I A_g_ir'e_ de no hacer!o,
Aseg_rese de seguir las instrucciones.
[] Instalacion
• Un mo,ntaje o in,s_laci6n ,defectuo_ pu_e
provocar un funcio,namiento [ncorr_o,
[ncluyendo riesgos de ]esiones incendios o
descargas el_tricas.
° Piu,ede causar in_ndio y descarga ,ei,6ctr[_.
• Puede cau!_r expiosi6n o in_ndio. • iP'uede causar de_arga e]ectrica y faHos.
26 Aire Acondicio_,a_r

Precauciones de Seguridad
ImFuncionamiento
• De,otto,m_o, causara
descarga e]ectrica o incendio.
• Cau_ra deiscatga electri_ o
in_ndlio.
• _usarh des_rga elec_ica o
incend[o.
• Causara des_rga el_tfica o,
incendio.
° Causara de,alga e]_trica o
incendio,,
. Si no,hay conexi6n a masa,
puede pr,oducir una
de_arga e_triic&
° En _ que no, puede
+_<i,)I+ i if'i7_7'ii 7;;filiiiiiiiii_:m;,'
7 ++_ 177f}iiii{ i{t_iTiT¢J$_
causar incendio y accidente
de _rto i circuito,
7
ii
i
• Puede _usar incendio y
,a_idente ell_rico.,
• Puede ,causar descarga
Manual det ,Prop,ietario 27

Precaudones de Segufldad
• El aparato de air.e acondicionado de_
,o_rarse en un &re.a cerrada para ser m_s
.efecflvo.
• Causara descarga e[ectdca o,incendio.
• Pu.ede caus.ar exp_osi6n, inc.endio.,
quemadurias°
° Pu.ed.e entr.ar agua en [a urfidad y disminuir la
ais[aci6n. Puede _usar una des_rga
e_rica.
[] Instaiacion
° Son fil,os.as,y pueden causar
[esi,ones.
• Pu_e I_OVO_r el fa[[o de urn • Silacarca_ extedor_ta _ada,
electrodorn@stico o deterioraci_
de su rendimiento..
f
>-,
J
28 Aim Acondicio_,a_r

Precauciones de Seguridad
iI Funcionamiento
• Hay inesgode lesiones
_rsonales.
• Puede causar descarga
el_trica y daSo.
° Gastara energia en vano y
podda provocar un accidente.
• Oomoel ventilador gira a a_a
vei!o_d.ad_:ando esta funcionando,
puede _usar lesiones
il
• El funcionamiento sin filtro,s.
puede daSar Iiaunidad.
• Este p,u_e causar [lesiones oi
daSos en la ma_ota o la
p!.anta.
° Pu_ie cau_r da_o, a los
anima_es o v _e_les y
p,erdida de obietos
• La unidaddelaire acondicionado
puededeteriorarse,cambiarde
color,o desarro,_larm_,chas en
la supe#icie.
• No es sano y podria pro,vo,car
enfermedadies o peliigros de
I.esi,ones _rsonales..
Manual det Prop,ietario

Previoat Fundonamiento
1..Coloque ell enchufe correctamente.
2. Use un Onico circuito para este aparato. R.ecargar ,e!circuito p,odria provocar
un riesgo de incendios.
3. No utii[ce un alargador. Consulte Iiapagina 33 para mas detalles.
4. No arranque/detenga el funcionamiento enchufandoidesench_ufando el cable
de corriente electric&
5. Si eli alargador esta da_ado y iha de, ser recambiado, solicite a un tecn4co
auto,rizado que instale un recambio exact&
1..Estar expuesto al flujo directo de aire por un periodoi largo de tiempo puede
constituir un riesgo para su sislud. No exponga a las personas, mascotas ,o
pUantas a] flujo directo, pot periodos largos de tiempo.
2. D,ebid,o a la posibilidad de falta de oxigeno, ventile la habitaci6n cuando se
use al mismo tiempo qlue es.tufas u otros dispositivos die calefacciOn.
3. No use este acondicionador de aire para propositos determinados no
especificados (pot ej.: preservar dispositivos de precision, alimentos,
cachorros, plantas y objetos de arte). Tales usios puede da_ar los elementos.
4. El aparato de .aire acondicionado es un apa_at:o dise_.ado para el confort del
consumidor. No es un sistema acliimatizador.
1. No toque las partes de metal de la unidad cuando quite el filtro. Puede
lastimarse cuando manipule bordes filosos de metal.
2. No use agua para limpiar adentro del a,co,n,dicioniador. La exposici6n allagua
puede destruir la aislaci6n y esto, a su vez provocar una descarga el6ctrica.
3. Cuando limpie la unidad, asegOrese que la corriente y el interruptor esten
desconectados. El ventillador gira a muy alta velocidad cuando es.ta
funcionando Existe la po,sibilidad de lesionars.e si la energ[a se conecta
accidentalmente cuando este Ilimpiando las piezas internas de la unidad
Para reparaciones y mantenimiento,, pongase en contacto con un centro de
servicio autorizado. Consulte la p_gina de garantia o, Ilame al nOmero (800) 243-
0000. Tenga su nOmeor d emodelo, y nOmero de s.erie a mano. Los encontrar_
en la pagin.a 25. de este manual.
30 Aire Acondicio_,a_r

introduccion
Es,te sim_lo Io a_Jie_e de ,un _ligro de accidente p,or corriente
Esite sim_lo Io adive_e de an peligro qu,e pueda cau_r un da6o
, del vent|iador,
Este simbo!o significa condicciones esp_iales_
ADVERTENCIA : Este aparato deberia ins,_lar_ de a,cu,erdo con las
normas de! C_igo E!_ctrico NacionaL
_ FLECTOR DE
(VENTANIIU_S HOR_ONTALES)
_FLECTOR HORIZONT_
A!RE
DECONTROL
PANEL
-CONDENSA_R
GABINETE
REJILLA FR_{TAL"
F&TRODiE
AIRE
EVAPORAE_R
DECONTROL
PANEL
SUSPENSORES
Manual det Prop,ietario 31

Este equi_ .debe .es_r puesto a tierra debidamente.
El cable de aHmentacion esta equipado de una toma de tierra con tres pins. Para
minimizar el peligro de una lesi6n _r corriente eJ_trica, utHice una toma con
enchufe de tierm estandar con tres contactos_ Si el enchufe de _r_ no contiene
un borne de tierra, antes de usar el ventilador haga cambiar ,el enchufe por un
electricista.
Cambiar la toma sin realist los cambios de cab,leado apmpiados
crearb un es_do elJ_ctrico inseguro que podria resul_r en un incendio
o descarga el_ctrica. Para todo este tipo de trabajos, consume siempre
con un el.ectricista cualificado.
_ A_g_rese q_ existe debidaneutra_izaciSnantes de uti_izarel
aparato,
No, corte ni quite el _rne de tierra de la clavija de alimenlacibn
El acoplamiento de! borne de tierra de! adaptador con e! torni!!o de !a
cubierta del enchufe de pared no po.ndrd el equipo a tierra, si el
torniilo de la cubierta no. es de metal y es'_ aislado y el enchufe de
pared no es_ puesto a tierra a trav_s de |a r_ de la cam.
En el caso de cualquier duda res.p_to a la co.rr_ta pues_ a tierra
del ventilador, haga revisar el enchufe de. par_ y el circuffo pot un
electricista profesional.
32 Aire Acondicio_,a_r

SeguridadElectri,ca
Debiido a eventuales peligros de seguridad no recomendamos en absoluto el
uso de un adaptador° Solo, pare una conexion tmnsitoria se puede usar el
adiaptador clasificado oomo UL que esta a disposici6n en la mayoria de las
tiendas de productos el6ctri_s. Atienda que e orificio grande en el adaptador
_rres.F_nda al ,orificio gmnde en el en,chufe para Iiograr Iiaconexion con la
polaridad _rr_ta
Desconectando, el _ble de alimen_cidn de! adaptador utilice una mano pare
sendas partes para evitar un d.aho del borne di,etierra. Evite una desconexi6n
fr_uente del cable de alimentacion, pues pu_e causar un eventual da5o de!
borne de tierra.
Ad°ot°d°r-X'
Cubierta _1
}ornillo de Metai
@
Nunca _ilice el equi_ coin un adaptador daSado,
Debido a un eventual peligro no recomendamos en absoluto el uso de un
cable alargador. En situaciones excepcionales utilice solo alargadores
certificados con puesta a tierra CSA clasificados como UL con tres conductores
de valores i5 A, 125 \Z
Manual det ,Prop,ietario 33

tnstalacidn
Tipo A:16 EA Tipo,B:3 EA Tip,o C:5 EA
(TO,RNILLO) (TORNILLO) (TORNILLO)
Tipo D:2 EA
Ti_ E:2 EA
(PANEL GUiA)
Tipo F:2 EA
SOPORTE DE AILFEi_,R)
Tipo G:2 EA
,j [-
_,_ 10
Tipo H!:t EA Tipo !:i EA Ti_ d:! EA T_, K:2 EA
(TIRA DEGOMA) (BANDAADHESIVA)
Tipipo L:'I EA Tipo,M:1 EA Ti_ i N:t EA Tipo,'O:'1EA
(_[_ _,W_ (BANDA ADHESIVA) (TARAO,ELDESAGOE) (ARANDE[_,)
Pa_ la instalaci6n deberia tener a dis_sici6n los instrumentos siguientes:
* Destomillador (Estrella y Phillips), * Regla
* Cucjillo * Martillo
* Lapiz Nivel
34 Aire Acondicio_,a_r

Instalacion
i_ _i_ii i_iI
Este ventilado, r de casa esta
construido para ventanas estandar de
dos alas _n la extension rea! de
apertura de 22" a 36'". E! ala superior
y el inferior de la ven_na deben
abrirse io suficiente para Iproducir un
orificio ve_ical de 15" desde e_ala
superior hasta el antepecho_
I
15=rain IBanc
ADVERTENCIA : Este producto es un aparato de AIRE ACOND|CIONADO
PARA INSTALACION EN VENTANAS. Como tal, _ n_esita una ventana de
un cue!.gu.eo .dedoble cuei.gu.e _ra una instal.acion adecuada, No se
recomiendan instalaciones en lugaresi que no sean ventana& utilizando
casqui!l!os, orificios en las paredes ni cualquier otro tipo,
Es_cio libre
i, Para prevenir la vibraci6n y el ruido, asegure de que la unidd este insta alada
segura y fimemente.
2.1nstale la unidad d,ond,e el sol n,o refleje directmente en la unidad.
3.La _lida debe extendlerse hacia afuera por io menos 11" y no debe haber
obstacuios, como cercas o paredes, en 20" de la _rte de atr&s del gabinet,e
po,rque va ha prevenir la rediacion de calor del co,ndensador. Restriciones dl
aire de fue ra reducira gr.ande mente la eficiencia del aire
Toldo
Air,e
Radiacio,n
de calor
T_as las ventanillas de IIIoslados del gabinete deben mantenerse
expues_s hacia afue_ de. la estructura,
4.1nstale la unidad un _co inclinada de tal forma que la _e trasera este ligerament,e
imas baja quefl frente(cerca de 1/2").
Esto _oEar,_ el agua del condensador hacia afuera..
5.1nstale la unidad con la pa_e inferior cerca de _"_60" arriba nivel de suelo.
Manual det Prop,ietario 35

in,stalacidn
1i,R,emueva los tornillos cuale, s sujetan
el gabinete a ambos lados yen la parte de
Use un atornillador largo. Asi le sera
mas facil instala los tornilos.
TorniBos para
tr;an_e
2. Desiiice la unidad fue ra del gabinete tomando
el agarradero de la bandeja y hale hacia el
frente imientras mantiene el gabinete.
3. Corte ellmarco de la ventana con el largo
apropiado. Desprenda la paAe de atras y
sujete el FoamoPE en la pa_e inferior del
marco de la ven_nai,
4_Remueva ei em_que de_e el sell,o de la
guia Superior y p,eguelo al rondo de la
guia Superior
5, Sujete la guia superior en la parte de arriba
del gabinete con 3 to,rnillos Tipo A.
6. Inserta la Guia Marco en la _rte inferior
del gabinete.
7_Inse_e !os Paneles Gutas en la guia
Superior yen la Guia Marco.
(Tipo A) Superior
S,cr_
8. Sujete el armazon a la unidad con 4 tornillos.
(Tipo A)
36 Aire Acondicio_,a_r

Pr_auti6n: IEnlas siguientes instrucciones, sosten_ la unidad fkmemente
hasta que la pa_e corr.edii_ de la ven_na descanse sobm la pa_e superior
del canal y por detr_s del marco de los paneles co.rr_izos. Puede haber
lesiones o d.aS.ossi la unidad se cae de la ventana.i
1. Ab,ra la ven_na, Marque una Iinea en el
centro de_ banqueta de la ventana(o U.a
ubicaci6n deseada del aire acondicionado)
Cuidadlosamente ubique el gabinete en la
b,_que_ de la ventana y alinee la marca
central en el fren_ inferior con el centre de la
_/nea marcada en la banquets de la ventana.
2. Hale hacia abajo la parte inferior de la
ventana Ihasta que _ una detras de la guia
No hale la ventana hacia a_jo 'tan
apr_adamente que e,_movimiento _l panelguia _a
resting,o,
Gu_aSu
_aVenbana
Angu!o de ©e!ante Figura 1
Marco Gu[a Superi_
Panel
3. Ligeramente ensamble el soporte del affeizar
usando las partes de la Figura 3,
4, Seleccione la posici6n que ubiic,ar8 el soporte
del alf6i_r cerca del punto m_s exterior _l
alfei_r.(Ver Figlura 4)
Tengia cuida_ ial ins'taliar el
gabinete(las Guias Marco _ romlpe,n fAcllmente).
5, Pegue el _,porte antepecho a los rteles ,de la
caja en relacion a fa _sicion _,sead,a
u_ndo dos to,rnil!os, Tipo A en ca_ so_rte,
(V,er Figura 4),
6, E_gabinete deb,e _t insular, con una
pequeSa cai_(c_ca de %") ha_a abajo
hacia afuera (Vet Figura 5),
7. Ad_unte eli gabinete ial banquete de Ilaventana
atorniHando los tornillos (Tipo B: Largo
diieci_is milimetros y menos.} a traves dell
,_ngulo.front_li en la banqueta de _aventana.
8, Hale cada panel gula completamente a cada
lade de la ventana y repita del paso 2.
_ntedor Exterior
Sopo_e de_ AIf_izar
Guia Marco
Gabinete
Exte_or
Tomillo(l"i_ B}
_rte del At_#izar
de
Mar_
Angul,o de Delante
T',omiiio(Ti_ B}
So_Ae de_ Al'r_i_r Figura 5
Manual dot Prop,ietario 3Z

tnstalacidn
9, Adjunte cada P'aneUGuia a ,cada lado de la
ventana usando tornilios (Tipo C).
(Ver iFigura 6)
N0i perbre la charola ,de_fondo
La unidad es,t_ dliseffada para oipelrar con
aproximadamente 1/2" de agua en la c_rola det
fond0,
10, Deslice el chas[s dentro del gabinete,
(Vet Figura 7)
" Por razones de s_uridad, re
ins;tale los tomilllos(Tipo A) en Fos [lados de4
11. Co_e la Tira De ,Goma a la m_iida
ap,mpiada e intr_Qz_[a entre I!apa_e
superior e inferior de ia ventana,
(Ver Figura 8)
Conrdon
de A_imer_acion
Terniilo(Tipo A)
12, Sujete la Chapade Sopo_e En El Marco De
L Ventana con un4:orniffo Tipo C.
(Vet Figu_ 9)
13, Pegue el pane_ fronta_ a la caja insertando
Iios fijadores en el panel adentro Io,sdel
panel de la _ia. (Vet IFigura 1O)
Chapa die so_rte pa_a
la ven_na
Figura 9
Figura i0
14. Levante la pardHa de entrada y aiQstela
con tomiff,os: Tipo i A, atrav6s de la parrilla
fron_J, (Ver Figura i i)
15. Ahora _ instalacion del aire acondicionade
en _aiven_na es comple_da, Vea _s DATOS
ELECTS/COS para i_lar el cable de
aflmentacl6n en la toma de corriente.
Figura il
38 Aim Acondicio_,a_r

instruccienes de funcionamiente
Si Vd. de_o.nectia ,el ventiliador o Io conmuta del enfriamiento a |a
ventilacibn, antes del nuevo ajuste del enfriamiento esipere per !o
menos 3 minutes.
O_[ation
T_rmostat
0 _iAp,aga_}
M_ IFan(Ventiad0rMedi0}
HighC_l(E_friam_ntoA_o}
MedCoo_EnffiamienfoMedio}:?ermite_riar _ iaope_c_delav_0_dadmedia_ _fla,_r
&_'C,_iE_f_mient0 %j0} :Petite ®fiia_o0nla_r_4_ @lav_c_i_ad_ja de_v®_a®_,
:Apagaelaireaco_icionado,
:Petite_aepemci__ _av_o_admedia_ ;_neado__n_r_ar,
:Perm_ela _emci6n delavelcci_d baja@_v,enti_adorsinenfdsr,
:Pe[mi_enfriare0ala_eraci6n,dela_le_ad a_ delrennin®I:
La temperatura de,I aire interno sera _ntrolada
automaticamente. Mientras mas alta sea la marca mas frio
,estar& ,el aire internio,, La temperatura se se!ecciona
posicionando el control en la marca deseada,
(es deck, a mayor _a el nQmero, mayor sera el enfriamiento)
PARA UN ENFRIAMIENTO NORMAL
1. _nga el _t6.n de operation en High Cool o Low Cool.
2. Ajuste el control dei Termostat en la marca deseada(usualmente el punto m_io
es un buen punto para comenza0. Si la temperatura del cuarto no es
satifactoria despues die un peri_o de tiempo razo,nable, ajuste el control de
tempemtura a una marca mas grandie (para una temperature interna mas fria)
o a una rnarca rnas p_ueSa (para que la temperatura interna sea menos fria).
PARA UN ENFRIAMIENTO MAXIMO
i. Ponga el bot6n de operation en la marca mas grande.
2. _nga el control del Termostat en la marcamas grande.
PARA UNA OPERACION SILENCIOSA
1. Ponga el _t6,n de op,emtion en la marca mas pequeSa.
2. _nga el termostat en la temperatura interi,or deseada.
Manual del Prop,ietario 39

tnstrucciones de fun,cion,amien,to,
Los contro_es tien,en este aspecto:
Q @
@ Enecndido/Apagado
° Para ENCENDER el sistema presion,e,el b,ot6n, y para APAGARLO presi,oneel _t6n ,otravez.
• Estebot6n tiene prioddad sobre todos los otros botones.
• Caando _ enciende e[ i_alT'_,O pO[ pdmera vez,usara I,osajustes _11mo_ High C_I a 72"F
@ Ajuste de la Temperatura
•Este botSn puede _ntro[ar [a temperatura de[ cuarto automaticamente. La temperatu ra
se puede ajustar _ gra_ en grado, de_ 60 "F basra 86°F cada I°F. Seleccione el
numero mas bajo pare la tem_ratura mas baja en el cua_,.
O FrioNentilador/Seco
•Cada vez que usted presione este botSn, este seffalara entre COOL, F_i y DRY.
O Ahorrador de energia
El ventilador se detiienecuando e[ ®mpres_r no sigue enfriando
•Aproximadamente _da 3 minutos el ventiiador se en_nder.& y nec_i[ar.a verif_ar la tem_ratura
del cuarto para sa_r si es necesario mas enfriamiento.
O Marcador de en_ndidolApagado
° Operaci6n de Parada:
° Con cada pulsaci6n del bo_6n_ realiza un cido por las opciones en este orden:
1 ho.ra-_2 horas-_.3, horas_ horas-_.5 horas---,6 horas-_,7 h.oras--,8 horas -_9 horas
--,10 horas ---,11 horas--, 12 horas--* CANCEL
• La temperatura fija se elevar& 2 "F transcurrid_. 30 minutos y de nuevo tran_urridos .otroG30 min_os.
- Op.er.aci6n de [nJciaci6n:
° Con .ca&_lpulsation del boron _ realiza un dclo. _r _asopciones en este o.rden:
1 hora-_2 horas-_3 horas-_4 horas--*5 horas--,6 horas-_7 horas-_8 horas-_9 horas
_10, horas_ 1 horas--.12 ho.ras_CANCEL
O' Ve,l_idad del Ventilador
• Pul_r e__t6n de vel_idad del ventil.ador h.ace_mbiar las velocideades entre Low y High.
O RECEPTOR DE ,SENAL
40 Aire Acondicio_,a_r

In,strucciones _ funcionamiento
PRECAUTION: El mando, a distancia no fuincionarb correctament:e si
una luz fue_e hace con_cto con el sen_r del aire acondicionado o si
hay ob_cu!os entre el mando a dist_ncia y e! aire acondicionado,
• Para ENCENDER el sistema presione e_bot6n, y para APAGARLO presioneer botsn otra vez:
° Este bot.Sntiene prioddad _bre todos los..otrosb.o_.ones.
° Cuando Ud..iloencien_ por pdmera vez, e]sistema est& en el y la tem_ratura es _ 72°F.
Ajuste de la Temperatura
° E_e _t6n controla ]a temperatura de _ _a entre lio_60"F y los86°F
en increme_os de 1"F_
Velocidad del Ventilador
° Pu_.ar el boron de veloci_d _l ventilador hace cambiar las
veloci_d_ entre Low y High,
Marcador de EncendidolApagado
oO_raci6n de Parada: |
° Con cade pullsad6ndell bot6n se rea]iza un cicto pot _asopciio.nes|
en es.teorden: 1 hora_2 horas_3 hora_4 horas-,5 horas_
6 horas-,7 horas-_8 horas_9 horas,_10 horas_l i horas _ !
12 horas-,CANCEL
%
•La temperatura ilia se elevara 2"F #anscu_ridos _ minutos y de naevo
_an_umdlos otros 30 minutos.
- O_mci6n _ ]niciacion:
° Con _de puls.aci6n_1 boron _ realiza un c[clo por ]as op¢iones
en este orden: 1 hora-,2 horas-,3 horas_,4 horas-,5 h.oras-,
6 horns-,7 horns--,8 horas-,9 horas._10 horas-,11 horas -*
12 horas--_CANCEL
piowx e r
Fan _eed!
Ahorrador de Energ{a
El ventilador se detiene cuando e_compressor no sigue enfriando_
° Aproxima_mente _da 3 minutos el venti]a_r _ en_n_r&
y neces_ar,_vedficar la temperatura _] cuarto para saber si
es necesario mas enfdamiento
FriofVent:ilador/Seco
° Carla vez ,quepresione este boron, laSpalabras COOL FAN y DRY apareceran a_ternadamen'_
COmo Porter las Biaterias
1. Quite la t_ de Ilaparte _steriior del telemando,.
Para e]]o haga deslizar la tapa segun la direcci6n
de] la flecha
2, introduz_ las dos balerias Respetesiempre la
po]ari,dada_insta]arlas picas.Usebaterias n_evas.
3.Volvera cer'r_r,resbalar_o Iata_ hasta ]a
posici6n iniciaL
• No u_ice biateris recalrgables,
estas son diferent:es de form&
de dimensi6n y uso respecto a
]as _terias secas usu,a]es.
° Seque i.asbatedas de]
telemando cuando el
acondicionado,r no vaya a ser
usado durante un largo periodo,
Manual det Prop,ietario 41

/nstru_iones de funcionamiento
dir_cibn del aire
La ,direcci6n de_ aire pu_e ser _ntrolada cuando,
usteddesee enfriar, ajustando la palanca veAical
y la palianca horiziontall.
• CONTROL DE LA DIRECCI6N HORIZONTAL DEL AIRE
La direcci6n horizontal del aire es, ajus_da
rotando lap,alan,ca vertical hacia la derecha o
haci,a ia i,zquierda.
• CONTROL DE LA DIRECC/ON VERTICAL DEL AIRE
La direcci6n vertica! del aire es ajustada rotando
la palanca horizo, ntal hacia adelanto o hacia
Tubo, de _sagiJe
En climas hum,_os, ,es _sible que la
_ndeja Evaporadom se l[lenne de agu&
Para quitar el agua acumulado, es
p,reciso conectar et tu_ de desag6_e_
,Quite la Tapa del DesagQe y con_te el
Tubo a la Bandeja Eva_radora.
Este ap,arato de aire acondicionado va
_uipado con un ventilador de
extraccion. (Vease ia iiustracion de
abajo). El ventilador tiene un anillo
externo que gira en el agua qlue recoge
en la piancha base all entrar en
profundidad. La co,ndensacidn la recoge
el ventilador y la expu{_ a traves del
condensador, h.aciendo mas eficiente al
apamto de aire acondicio, nado,
PRECAUTI6N: Tenga cuidado al in_rtar el tubo de drenaje. Al_jalo de
la area aguda para evitar el des,lice y !esiones por usted mismo.
42 Aim Acondicio_,a_r

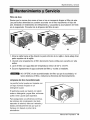
Mantenimientoy servicio
Filtro ,de Aire
Revise por io menos dos v_es al mes si no, es. necesario limpiar el filtro de aire.
Las particulas detenidad se pueden acumular en el filtro impidiendo el flujo del
aire, limitando el rendimiento de enfriamiento y causando la acumulaci6n de ihielo
en e/evapomd,or. Pro,ceder de la limpi,eza del filtro de aire:
(a) (b) (c)
1_Abra la rejilla hacia arriba tirando la _rte inferior de la rejilla o hacia abajo tiran
parte superior de la reji!la,
2. Usando, una lengUeta,tire el filtro lieramente hacia arriba para sacarlo _r aba
arriba.
3. Lave el fiiiltrocon agua tibia de temperatura menor de _°C (104°F).
4, Escurm ligemmente el agua sobmnte del filtro y vuelva a instalarlo,
i NO OP'ERE el aire acondicionado sin filtro ya que la suciedad y el
tamo obstruira el filtro y reducira la efiiiciencia del funcio,namiento...
Limpie,za de! Aire Acondiciona,do
La parrilla frontal puede ser limpiada con
un trapo hQmedo mojado en un
detergiente suave.
El gabinete puede ser lavado con jab6n
suave o detergente y agua tibia, entonces
pullido Cera Liquida para aparatos..
Para asegurarse una eficiencia continua,
las bobinas del condensador (del lado
expuesto al exterio 0 debe ser revisado y
lava,do p,eri6dicamente sea por que se
tranque _n basura o polvo de la
atmosfedco.
Manual del ,Propietario

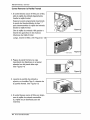
Mantenimiento y servicio
Como Remover la Parilla Fron_l
1. Si ust_ desea sacar el filtro por arriba,
abra la rejilla de entrada ligeramente.
Vuelte la rejilla frontal.
Separe la parte engoznada insertando
la punta del destornillador de tipo "-"
para desensamblar la rejilla de entrada
desde la rejil!a frontal.
Gire ila rejilla de entrada 180 grados e
inserte los ganchos en los huecos
inferiores del rijilla frontal.
Luego, inserte e! filtro (Vet Figura12, !3
Figara 12
Iin1¢t Gri_e Figuria !3
2. Pegue el panel frontal a la caja
insertando los fijadores en el panel
adentro _os del panel dela caja.
(Vet Figura ! 4)
Rgara 14
3. Levante la parrilla de entrada y
ajQstela con tornillos Tipo A, atraves de
la parrilla frontal. (Vet iFigura 15)
4, Si ust_ desea sacar e! filtro por abajo,
usar la rejilla de entrada reversible.
(_ reiilla es ya dise5ada para tal
manera)
Figura 15
Aire Acondicio_,a_r

Mantenimientoy servicio
Antes de Lilamar el Servicio de Asistencia T_cnica
Si tiene probiemas con su ventitador, lea las informaciones siguientes y trate de
resollverel probllema. Si no puede encontrar la soluci6n, descon_te el ventilador
y dirijase a su suministrador.
El ventilador no funciona
1. _mpruebe que eJventilador este con_tado en un enchufe _rrecto.
2_ Revise el fusible.
3.,Compruebe que liatensi6in no sea demasiado alta o Ibaja.
AI ajustarse el enfriamiento, el aire no par_e frio Io suficiente
1. Revise isi los ajustes de la ternperatura so,n correctos
2. Revise isi el filtro de aire no est,_ atascadlo de polvo. En este caso, limpiie el
filtro...
3. Compruebe que afuera no haya un obstaculo del flujo de aire y si entre la
parte trasera del ventiliador y la paired o la barrera haya espacio Ilibre de pot IIo
menos 1 metro (20").
4. Cieirre todas las puertas y ventanas y _mpruelbe que no haya una fuente de
callor en _ahabitacion.
Antes de Ilamar al servici,o, tenga a bien revisar la siguiente lista de
problemas y sus solHcioneis.
El acondicionador de aire est# fun cionando norma/mente cuando:
• Escucha un sonido me_lico,,, Lo cauisa el agua que recoge el condensador en
dins !!uviosos o ,en condicio, nes d,e mucha humedad, Esta _ra,cteristica ,esta
diseSada para ayudar a quitar la humedad en el aire y mejomr la ca_cidad de
enfriamiento. Consulte la se_i6n del Ventilador de iwxtraccior en lla pagina 42.
° Oye un clic en el termostato. Lo _u=sa el ciclo del compresor que comienza y se
° Ve gotear agua de la parte posterior de la unidad. El agua puede ser recogida
en la bandeja de base en condiciones de much,a hum_ad o dias de Iluvia. Esta
agua desborda y g,otea desde la parte posterior de la unidad.
° Oye funcionar el ventilador mientras el compresor esta silencioso,.. Esto es una
caracteristica opemti_ normal
Manual det ,Prop,ietario

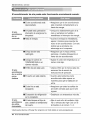
Man,teinimientoy sepvicio
ii ii i i i
E! acondicionador de aire puede estar funcionando anormalmente cuando:
El aire
a_ndiciona
do no
• El aim acondicionado esta • AsegQrese que ei aire acondicionado
desconectado esta conectado completarnente a la
fuente de energia.
• El fusible esta quemado/el , Cheque los fusibles/interruptor de la
interruptor de energia se ha casa y reemplace los fusibles o
reestablezca el interruptor de energ[a,
• Falta de energia. • Cuando la energia se reestablezca,
espere 3 minutos para encender de
nuevo el aire acondicionado, Con esto
evitar_t que se produzca una
sobrecarga en el compresor.
• El fJujo de aire esta ° AsegL]rese que no haya cortinas,
restringido, persianas o muebtes b,loqueando el
frente del aire acondicionado.
, Ajustar el control de temperatura a un
TEMPERATURA en un numero m&s bajo,
, Limpie el filtro por Io menos cada dos
El aire semanas. Vea la secci6n de
acondiciona instrucciones de operaci6n,
do no enfria ............................................................................
corno • El cuarto aun esta caliente_ , Cuando usted enciende el aire
acondicionado debe esperar un
momento para que la habitaci6n se
enfde.
• El aire frio se esta • Asegt]rese que todas las salidas de
escapando, aire esten cerradas para que el aire
regrese.
• El serpentin de refrigeracion • Establezca una temperatura ma.s alta.
El aire
acondiciona
do, enfriia
• El hielo b_oquea el flujo de
aire y detiene el enfriamiento
del cuarto_
° Elija el mo,do alto del! ventilador High
Fan o enfriado alto High Cool con ,el
termostato en el nt]mer,o 1 o 2,
Usted p,uede refetirse a_ Energy Star programa coin todo detaHe en www, energystar_gov',
46 Aire Acondicio_,a_r

ManualdelPropietario 47

Goldstar will repair or replace your product, at Goldstar's option, if it proves to be defective in material or
workmanship under normal use, during the warranty period set forth below, effective from the date of original
consumer purchase of the product. This limited warranty is good only to the original purchaser of the product and
effective only when used in the United States, including Alaska, Hawaii, and U.S.Territories.
WARRANTY PERIOD:
Labor: 1Year from the Date of Purchase.
Parts: 1 Year from the Date of Purchase.
Compressor: 5 Years from the Date of
Purchase.
HOW SERVICEISHANDLED:
Call 1-800-243-0000 and choose the appropriate prompt.
Please have product type (Air Conditioner), model number,
serial number, and ZiP/postal code ready.
The terms of this warranty cover in-home service on the indicated
models.
THISWARRANTYIS IN LIEUOF ANY OTHERWARRANTIES,EXPRESSOR IMPLIED,INCLUDING WITHOUTLIMITATION,ANY
WARRANTYOF MERCHANTABILITYOR FITNESSFORA PARTICULARPURPOSE.TO THEEXTENTANY IMPLIEDWARRANTYIS
REQUIREDBY LAW, ITIS LIMITEDIN DURATIONTO THEEXPRESSWARRANTYPERIODABOVE. LG WILLNOT BELIABLEFOR
ANY CONSEQUENTIAL,INDIRECT,OR INCIDENTALDAMAGES OF ANY KIND, INCLUDING LOSTREVENUESOR PROFITS,IN
CONNECTION WITH THEPRODUCT. SOME STATESDO NOT ALLOWLIMITATIONON HOW LONG AN IMPLIEDWARRANTY
LASTSOR THEEXCLUSIONOF INCIDENTALOR CONSEQUENTIALDAMAGES,SO THEABOVE LIMITATIONSOR EXCLUSIONS
MAY NOTAPPLYTO YOU.
THISLIMITEDWARRANTYDOESNOTAPPLYTO:
1. Service trips to your home to deliver, pick up, and/or install the product, instruct, or replace house fuses or
correct wiring, or correction of unauthorized repairs; and
2.
Damages or operating problems that result from misuse, abuse, operation outside environmental
specifications or contrary to the requirements or precautions in the Operating Guide, accident, vermin,
fire, flood, improper installation, acts of God, unauthorized modification or alteration, incorrect electrical
current or voltage, or commercial use, or use for other than intended purpose.
3. Therefore, the cost of repair or replacement of such a defective product shall be borne by the consumer.
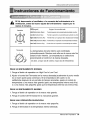
CUSTOMERINTER-ACTIVECENTERNUMBERS:
To Prove Warranty Coverage
To Obtain Nearest Authorized Service Center or Sales
Dealer, or to Obtain Product, Customer, or Service
Assistance
Retain your Sales Receipt to prove date of purchase.
A copy of your Sales Receipt must be submitted at
the time warranty service is provided.
Call 800-984-7469, 24 hrs a day, 7 days per week.
Press the appropriate option, and please have your
product type (AIR CONDITIONER), and ZIP/postal code
ready.
Patent No.: US 6, 412, 298
P!No,: 3828A20290Z Printed in China
-
 1
1
-
 2
2
-
 3
3
-
 4
4
-
 5
5
-
 6
6
-
 7
7
-
 8
8
-
 9
9
-
 10
10
-
 11
11
-
 12
12
-
 13
13
-
 14
14
-
 15
15
-
 16
16
-
 17
17
-
 18
18
-
 19
19
-
 20
20
-
 21
21
-
 22
22
-
 23
23
-
 24
24
-
 25
25
-
 26
26
-
 27
27
-
 28
28
-
 29
29
-
 30
30
-
 31
31
-
 32
32
-
 33
33
-
 34
34
-
 35
35
-
 36
36
-
 37
37
-
 38
38
-
 39
39
-
 40
40
-
 41
41
-
 42
42
-
 43
43
-
 44
44
-
 45
45
-
 46
46
-
 47
47
-
 48
48


LG BG8000ER El manual del propietario
- Tipo
- El manual del propietario
- Este manual también es adecuado para
en otros idiomas
- English: LG BG8000ER Owner's manual
Artículos relacionados
-
LG CL8000ER El manual del propietario
-
-
LG HBLG6000R El manual del propietario
-
-
-
-
LG KG1200R El manual del propietario
-
Otros documentos
-
Goldstar WG8005R El manual del propietario
-
-
-
COMFORT-AIRE RAD-101A El manual del propietario
-
-
-
-
-
-