
OWNER'S MANUAL
MANUAL DEL PROPIETARIO
@_
@
I I
I
Models/Modelo WG5005, WG5005R
@
after
para eifuturo

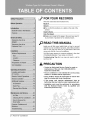
FOR YOUR RECORDS
Write the rnc_e_ and _r_l num_ here:
IMPel #
Seria_ #
IYou _n f_nd the numbers on a label on the side d the
pr_uct.
IDeale:s Name
Date Purcha_d
I Staple your r_eipt to this _ge in the event you n_d it
to prove d,a_eof purchase c_ for warranty issues.
READ THIS MANUAL
Ihnside you willlfind many Ihe_pful hin[s on h_ to ,u_ and
mainl_ain your air condi_oner _operlly. Just ia li_e prevenl_ive
_re on your part can save you a grit deal of time and
money over the life of 'your air c®di[io_r.
"_'o,L_l[find many answers to c_mon problems in t_ chart
of troub4es,hootir_ tips. _fyou review our chart of
Troubleshooting Tips first, you may not n_d to ca[i for
service a| all,
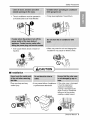
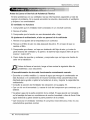
PRECAUTION
Conta_ an Auth,orized Service Center for re_ir or
maintenance of this unit. Ca_l !_06-243-0000 to
locate the nearest AS.C.
* The air conditioner is not intend_ for use by young
chil.dren or invalids w_tho.ut supe_is_on_
, Young childre_ should _ supewi_d to ensure that
they do not play with the. air cond_io.ner.
, If the power cord requires r,ep|_cement, have _n
A_thonzed Servicer install an exact replacement pa_.
Ins_||_ion work m_st be _rformed in accordance
with the. Nationa| Electric Code. by qualified and
a_tho_zed personnel only.
....
2 Room A_F Conditioner

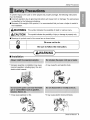
Safety Precautions
To prevent injury to the user or other people and propeAy damage, the fo,liowing ins_uctions
must b,e followed.
[] incorrect operation due to ignoring hstructions will cause harm or damage. The seriousness.
iis cla_ifi_ by the following indications.
[] Because d the weight d the pr_uct, it is re_immended that you have a helper to assist in
the installation.
[] Meanings of syrnbo,Js used iin this n_nual are as s.ho_ _1o,¢¢.
Be sure not to d
.... --"
Be sure to, follow i
[] Installation
"Improper assemb4y or installation may _use
incorrect o_ration, including injury, fire, and
el_tric sho_ ha_rds.
• it may cause exp,iosio,n or fire.
* It may cau_ fire and electric sh_k
* lit may cau_ electdc sh_k and failure.
Owner's Manua/ 3

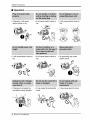
Safety Precautions
[] Operation
Otherwise, it wil[I _use
electriic shock or fire.
_twill cause el_txic shock or
fire.
* Othe_¢is, e it:will cause fire
and e_ectdc shock accident.
• litwill cause el_tric sho_ or * it will cau_ electdc shock or
fire. fire.
, It wili cause ,el_tric sho_ or
fire.
• No, grounding may cause
electric sho_.
It may cause fire and electric • It may _use electric shock.
shock.,
4 R_m Air Conditioner

Safety Precautio#,s
• The air _ndifloner must be operated in
a enclosed area to be most effective.
• it wilt cause el_tric sh_k or failure of
machine.
m In aiiation
*They are sharp and may
cause injury,
,. lit may cau_ explosion, fire,and burn.
Water may enter the unit .and d_rage Me
insulation.it may cau_ an el_ric sh_k.
CAUTION
'mlitmay cause failure of appliance • IIfthe. outer use is damag_i,
,
or peffo_,ance detenorate.
r
/
I
/
it must _ repair_ or
repUa_d imm_iatelly.
Leaving it damag_ _uld
res.u_tin the ai r _n,ditioner
fallling out of the window,
creating a _fety hazard,
Owner's Manual ,5

Safety Precautions
, it may cause iniury.
[] Operation
it may cause electric shock
and damage.
• It will waste power consumptiion
in vain and it may cause accident.
ewes
o Since the fan ro._tes .at high o Thiis _,uld injury the pet or
s_ during o_r.ation, it may pi.anL
cause injury.
" It is an .air conditioner, not .a
pr_ision refrigeration system.
* O_r,ati,on without filters will
cau_ failure.
The ap_ara.nce of the air
conditioner may deteriorate_
change coior, or d_eiop
• It is not sanitary .and could
cause ii_lnessor _rsonal
injury hazard,,
.6 Room Air Conditioner

Before Operadon
i Plug in the power cord properly.
2. Use a dedicat_ circuit. Overloading the line could create a fire hazard.
3. Do not use an extension cord. See page 10 for more detaills.
4. Do not start/stop operation by plugging/unp!ugging the _wer cord.
5. If the power cord is damaged and r_uires replacement, have an Authorized
Servicer install an exact replacement part.
t. Being exposed to, direct airflow for an extend_ period of time could be
hazardous to your health, Do not expose occupants, pets, o,r plants to direct
aidow for extended periodlsi of time.
2. Due to the _ssibility d oxygen ddiciency, ventilate the room when used
together with stoves or other heating devices.
3, Do not use this air conditioner for non-specified sp_ia! purposes (e,g,
preserving pr_ision devices, food, pets, plants, and art objects). Such usage
could damage the items.
4. The air _nditioner is a consumer ,comfort appliance, not a precision climate
control system.
i. Do not touch the metal parts of the unit when removing the filter. Injuries can
occur when handling sharp metal edges.
2. Do not use water to clean inside the air conditioner. Exposure to water can
destroy the insulation, leading to possible elec_-ic shock,
3. When cleaning the unit, first make sure that the power and breaker are turned
off. The fan rotates at a very high speed during operation. There is a
possibility of injury if the unit's _wer is a_i,dentally triggered on while
cleaning inner parts d the unit,
For repair and maintenance, _ntact an A uthoriz_ Service Center. See the
warranty page for details or call (8,00) 243-0000. Have your model number and
serial number available. They should be wri_en on page 2 of this manual.
Owner's Manual 7

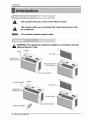
introduction
This symbol ale,s you to the risk of electric shock.
This symbol aleds you to hazards that could cau_ harm to the
air conditioner.
This symbol indicates s_cial notes.
:: iiiiiiiiiiiiiiiiiiiiiiiiiiiiiiiiiiiiiiiiiiiiiiiiiiiiiiiiiiiiiii:
WARNING: This appliance should be installed in accordance with the
National Electric Code.
CABINET
KNOB
HORIZONTAL
,AiR DEFLECTOR
i: FRON_",GRILLE
COOL AIR DISCHARGE
CABINET
CONiT_L BOARD
AIR FILTER
HORIZONTAL
A_R DEFLECTOR
FRONT 'GRILLE
Remote oontrolfe, r_
COOL AIR D]_HARGE
8 R_m Air Co,nditioner

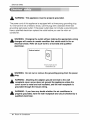
Ete,ctr_cel Safety
115V~
J
I
Power cord may include a current
interrupter device A test and reset button is
pro,vided on the plug case. The device,
should be tested on a periodic basis by 'firs1
pressing the TEST button and then the
RESET button. If the TEST butten does not
trip or # the RESET button wi_linot s_y
engage& discontinue use d the air
conditioner and @ntact a qualified sewi_,
technician.
Use Wail Receptacle Power Supply
Siandard 125V 3.owiregrounding
_eceptacle rated 15A, 125V AC U_ 15 AMP_ t_me
delay fu_ or 15 AMP,
_ c_r'eu_t breaker,
S_andard 2£_)V, 3,,,,,w_ grounding
re_p_clle, rated 15A, 2:50V AC
Use 20 AMP, t_lime
,delay fu_ or _, AMP,
,circuit b,rea_r,
S_andard 250V, 3,o,W_rOgrounding
re_ptacle rat:ed 2CA, 250V AC
ELECTRICAL SAFETY
IMPORTANT G'_'UNDING INSTRUCTIONS
Air conditioner has a three-prong grounding plug on
its _wer supply cord, which must be plug_d into
propedy grounded threeoprong wall receptacle for
'your pro,tection against p_siNe shock hazard.
Use, of extensioin cords,
B_ause d po,tentia_safety hazards,iwe
strongly discourage tihe use of an extension
cord Ho_ever, if you wish _ouse an
extension co,rd, use a CSA cert_ed/UL-listed
3-wire (grounding) exlension cold0 rated t5A,
125V.
All wiring should _ made iinaccordance with
I_,al electrical codes and r_ulations.
Numinum house wMng may i_se special
proNems. Consult a qu.a_ifiedel_[dcian.
23& 208, and 2301208_LT UNITS
These units are equipp_ with a th_-prorig
grounding plug on the power suipp_,co,rd, w!hich
must _ p_ugged into a matching propedy grounded
threeoprong wal_re_ptade for your proted:Jon
against pessiNe shock hazard If such an outlet is
not p,resenL one must &9 installed by a qualified
ellectrician in ac£ordance wilh the National IE[edrical
Code .and_oca!d._d_ and erdinances.
DO NOT USE AN EXTENSION CORD o,n230,
208, and 230/208 Voit units,
Owner's _eual 9

Electrical Safety
WARNING: This appliance must be properly grounded.
The power cord of this appliance is equipped with a threeoprong grounding plug.
To minimize the risk of electric shock, use the plug with a standard three-slot
grounding wall power outlet. If the power outlet does not include a grounding slot,
have a qualified electrician replace the outlet before you use the room air
conditioner,
WARNING: Changing the outlet without making the appropriate wiring
changes will create an unsafe condition that could result in fire or
el_trica! shock, Refer all such work to a !icens_ and qualifi_
Preferred method
Ensure proper ground
exists _fote u_
Do not cut or remove the grounding prong from the _wer
Attaching the adapter ground terminal to the wall
receptacle cover screw does not ground the appliance unless the
cover scr_ is metal and not insulated, and the wall receptacle is
grounded through the Ihouse wiring.
If you Ihave any doubt whether the air conditioner isi
properly ground_, have the wall r_eptacle and circuit ch_k_ by a
qualified electrician.
10 Room Air Co,ndifioner

Electd,_lSafety
We strongly discourage the use of an adapter due to potential safety hazards.
For temporary connections, use only a UIL°]isted adapter, available from most:
local hardware stores. Ensure that the large sliot in the adapter is aligned with
the large slot in the receptacle for a proper polarity connection.
To disconnect the power cord from the adapter, use one hand on each to avoid
damaging the ground terminal. Avoid frequently unplugging the power cord as
this can lead to eventual ground terminal damage.
Tem_taty method
Adapter Plug.._
Receplacl_
Metal Screw
Never use the appliance with a broken adapter,
We strongly discourage the use of an extension cord due, to potential safety
hazards. For temporary situations, use only CSA certified and UL listed 3-wire
grounded extension cords, rated 15 A, 125 V.
Owner's Manual 11

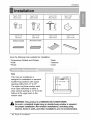
Instafla#on
TypeA: 14 EA Type B:2 lEA Type C: 2 EA TyL_ D: 3 EA
(ShortScrew} (WoadScrew) (L Bracket')
E
E
....lype E: 1 EA Type F: 1 EA Type G: 2 EA Fype H: 1 EA
(Seal Strip} (Guide Panel}
(M_sive _cked) (Netad_sive backed)
Have the fo,llc_wingtools available for installation:
* Screwdriver (Slotted and Phillips) * Ruler
* Knife * Hammer
* Pencil * Level
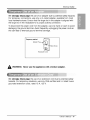
This r_m air _,nditioner is
designed for installation in standard
double-hung windows with actual
opening widths from 21" to 35",
The upper and lower wind_ sash
must open sufficiently to allow a
clear vertical opening of 12" from the
bottom d the upper sash to the
windc_J stool.
-21" to 35" ----
12" rain
WARNING: This product is a WINDOW AIR CONDITIONER.
As such, a standard single-hung or double-hung window is required
for proof ins_llation. Non-window installations, including using
sleeves, holes in walls, and other installations are not recommended_
12 Room Air Conditioner

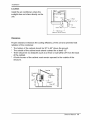
Instattation
Install the air _n,ditio, ner where the
sunlight does not shine directly on the
unit.
later or Wall
17',:_/16'' rnin
(Without: Frame Culiain}
Offset
1/2° to 1I/4_'_
E×t:edor
Proper clearance enhances the cooling efficiency of the, unit and prevents heat
radiation of the condenser.
* The bottom of the cabinet should be 30" to 60" above the ground.
* The outside of the cabinet must extend outward for at least 1/2".
* There should be no obstacles such as a fence o,r wall within 20" from the back
d the cabinet.
* All side louvers of the cabinet must remain exposed to the outside of the
structure.
Cooled Air
Aw n ing
Fence
_n'er's Manual 13

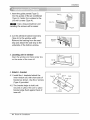
lnsta,/lation
1. insert the guide panels(Type G)
into the guides, of the air conditioner
(Type H),Fasten the curtains to the
unit with screws (Type A).
: Use a long screwdriver and
installing the screws will be easier.
2,,Cut the adhesive-backed seal s_ip,
(Type E) to the window width.
Remove the b,acking from the seal
strip and attach the seal striip to the
underside of the _ttom window.
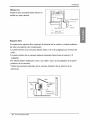
3. Locating unit in window
Open the w[n,dow and mark center line
on the _nter of the inner sill,
iS
4_Attach L bracket
.4-1, install the L brackets behind the
inner window sill with short side of
bracket as shown, Use the 2 screws
(Type A) provided.
4-2. The bracket helps to hold unit
securely in place. Be sure to place
bracket edge flush against back of
inner sili.
I;aside
Center Line
14 Room Air Conditioner

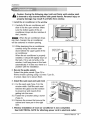
installation
Caution: During the _llowing step, hold unit firmly until window sash
is lowered to top channel behind side panel frames.. IPe_onal injury or
property damage may result if unit falls from wind_.
!_ install the air conditioner in the window
1-1. Carefully Illiftthe air conditioner and
slide it into the open window. Make
sure the _ttom guide of the air
_nditioner drops into, the notches of
the L bracket.
: When the air conditioner drops
into the L bracket, the air _nditioner
will be centered in window opening.
T
CENTERLINE
i=2_
While steadying the air _nditioner,
carefully bring the window sash
down behind the upper guide of the
air conditioner_
When the air _nditioner is. properly
installS, it should tilt slightly d_n at
the back. If it is set correctly in the
window, it will hang I_er in the back
automatically.. If it does not, there is a
problem with the installation.
W_ND_-A__FRAME_-_,
UPPERG_JID_---_._
h
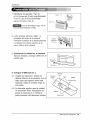
2, Secure the guide panels
Extend the guide panels (Type G) to,
fill the window opening ,using 2 screws ,(Type B),
2 screws (Type C) to secure them_
3. Install the sash seal and sash lock
3-1.
3,_2
3i_3,
Cut the sash seal (Type F) to the
wind_ width. Stuff the sash seal
between the glass and the window
to prevent air and insets from
getting into tlhe room...
Fasten the L bracket using a screw
(Type A)
Remove the s,cr,_s that s_ure the
cabinet and base pan in the right
L B_CKET
TYPE C
4. Window installation of room air conditioner is now completed.
S_ ELECTRICAL DATE for a_aching power cord to electrical outlet.
Owner's Manual 1:5

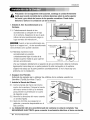
Operating instructions
CAUTION: ff you turn off the air conditioner or switch from cooling to
tlhe fan, wait at least 3 minutes _re _ffing to cooling again,,
POWER -Turns air conditio, ner off.
FAN SPEED "LOW"Low speed fan operation with c_ling or not.
FAN SPEED "HI" High speed fan operation with _oling or not.
This automatically controls the temperature of ind_r air. Turn the knob, so that
arrow _ints to the cooler marks for more moderate cooling.
I> Nodal Fan
1.Turn the FAN speed m_e switch to the "Hi" or the "LOW" setting
2. Set the thermostat control to the temperature mark "Fan Only"
Nodal cooling
1.Turn the FAN speed m_e switch to the "HI" or the "LOW" setting
2. Set the thermostat controi to the desire temperature (the mid-_int is a good
starting position).
If the room temperature is not satisfactory after a reasonable time, adjust the
control to a warmer setting, as appropriate.
Maximum cooling
1.Turn the FAN speed m_e switch to the "HI" setting
2. Set the thermostat control to the c_ler temperature mark.
I> Quieter operation
1.Turn the FAN speed m_e switch to the "LOW"' setting
2. Set the thermostat control as needed.
16 Room Air Conditioner

O_ra_ng ]ns;:ructions
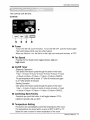
The controls look like this:
_ii i iii___%_ii _ _ _
O
O
Power
To turn the Set ON, push the,button. To turn the Set OFF, push the buEon again.
This button takes priori_ over any other buttons,
When you first turn it on, the Set is on the High cool mode and the temp, at 72"F
Fan Speed
Pressingthe Fan Speedbutton toggles between Low and
Highspeeds.
0 On/Off Timer
- Stopping Operation
Each pre_ of the,buttoncycles through the options in this order:
1Hour -_2 Hours_3 Hours-.4 Hours-,5 Hours-.6 Hours-.7 Hours
_8 Hours_,9 Hours_t0 Hiours--,11Hours._12 Hours_CANCLE,
The settemperaturewill be raised 2°F after 30 minutes and again
by 2°F after anot!her30 minutes,
° Starting Operation
Ea_ pressof the button cycles through the options in this order:
1Hour-, 2 Hours-,3 Hours-,4 Hours-'5 Hours--6 Hours-'7 Hours
_ 8 Hours-'9 Hours_10 Hours-.11 Hours-.!2 Hours_CANCLE
0 C_l/Ene_y SavertFan/Dry
Evewtime you push this button, litwill togglle between COOL,
ENERGY SAVER,FAN and DRY.
O
TemperatureSe_ing
This button can automatically control the temperature d the room.
The temperature can be set within a rance of 60_Fto 86°F by I°F,
Select the lower number for lower temperature d the moore
Owner s Manual 17

Operating Instructions
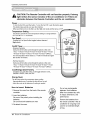
_ AUTION: The Remote Controller will not function properly if strong
light strikes the sensor window of the air conditioner or _ there are
obstacles be_een the Remote Controller and tlhe air conditioner.
To Lurnthe Set ON, push [he button, To turn the Set OFF, push the button again
This biuttoRtakes pr[odty over any other buttons,
When you tint turn it on, the Set [so,nlhe High coo] m_e and [Ihetemp at 72"F
Temperature Setting
This buiton controls the r_m temperaiure _tting in a ran_ between
60T and 86T in ! increments.
Fan Speed
Pres_ the Fan Spc_d Ibutto_[_gles b,e_een Low and!
High :speeds
On!_ Timer
-S_opp,[ngOpera__ion
Each press,d file button cyc_s through the optJo_ in this order:
1 Hour -,2 Ho,u_-*3 Hour-*4 Heu_s--_5Hours-*6 ].4ours_7Hours
._8 Hours=.,9Hours-d0 Hours-,11 Ho,urs._12Hours_CANCLE.
The_t tem_rature will be _a_edby 2°F after30 minutes and again
after .another30 minuCes.
Sta#ing Ol_ration
Ea_ p,_s d the button cyc_s through the e,p_o,r6in this o,rder:
1 Hour_2 H,ours_3 Hours--,4H,o,urs--*5Hours_6 Hours---*7Hours
-,8 Hours--*9Hours-,10 Hours-,11 Hours-,12 Hours-,CN4CLE.
Fan Sp_
Eve@'timeyou push this button, itwill revile between COOL,
ENERGY SAVER, FAN, and DRY.
Energy Saver
The fan stops when the comiPressor sk)ps cooling.
App,roximately eve_ 3 minutes the fan will t:umon and
check the r_m air to delermine, if co,ol[ngiis need_.
How to Inseff Batteries
1..Remo_ the cover from the ba_ d the remote
cont#oil,er
2. inert _o _tteri_.
Be sure of the po,l!arity when installing the
battefi_.
Be sure that both bakeries are new.
3. Re-attach the cover.
Do, not use rechargeable
batteries. Such batteries
di_r from standard dry cells
in shape, dimensions, and
performance.
Remove the batteries from
the remote _ntro, ll!er [f _e air
_ndifloner [s not going to be
u_d for an extended length
d time.
18 Room Air Conditioner

Operating #_structio#s
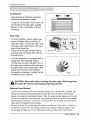
Air Direction
Adjusting the air direction using the
ho,rizontal air deflector conLroL
Using the con_o_ tabs, the air flaw can
be dir_ted to the Ileff, right, straight
ahead, or any ,combination ,of these
directions..
Drain Pipe
In humid weather, excess water may
cause the Base Pan to overflow. To
drain the water, remove the Drain Cap
and secure the Drain Pipe to the rear
hole of the Base Pan.
Press the drain pipe into the ho_e by
pushing down and away from the fins
to avoid injury.
This air ,_nditioner is equipped with a
slinger fan.. (See drawing, bel_:),
The fan has an outer ring that runs in
the water that colliects in the base pan
if it gets deep. That condensate is then
picked up by the fan and expelled
through the _ndenser, making the air
_nditioner more efficient..
DRAIN
Ring
Be careful when in.fling the drain pipe. Push away from
the sharp fin area to avoid slipping injuring yourself.
Removal From Window
Turn the air _nditioner off, disconnect the power cord, remove the L bracket, the
screws and Support Bracket installed through the top, and bosom d the guide
panels, and save for reinstalliation later. Close the guide panels. Keeping a firm grip
on the air conditioner, raise the sash, and carefully tilt the air conditioner back.ward,
draining any condensate. Lift the air conditioner from the window and remove the
sash seal from between the windows.
Be sure to drain ALL condensate from the air conditioner. If you don't, it could run
out while you carry the unit,making a mess and creating a slipping hazard. This
s[mp,ie step wiii] save you much ,cleaning and make a safer work environment.
Owner's Mar_uat 19

MaintenanceandService
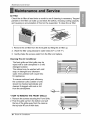
Air Filter
Ch_k the air filter at least _ice a month to see if cleaning is necessary: Trapp_
particles in the filter can build up and block the airflow, reducing _oling capacity
and causing an a_umulation of frost on the eva_rator. To clean the air filter:
1. Remove the air filter from the front grille by lifting the air fitter up.
2, Wash the fitter using lukewarm water betow 40" C (1i04 ° F),
3, Gently shake the ex_ss water from the filter and replace.
Cleaning The Air Conditioner
The front grille and inlet grille may be
wip_ with a cloth dampened in a mild
detergent solution.
The cabinet may be wasihed with mild
soap or detergent andi lukewarm
water, then _lish_ with Liquid Wax
for Appliances.
To ensure continued peak efficiency,
the condenser coils (outside of uni0
should be checked periodically and
cleaned if clogg_ with s_t or dirt
from the atm,osphere_
• HOW TO REMOVE THE FRONT GRILLE
i. Remove the screws s_uring the Front Grille
2. Push the grille up from the bottom and pull
the top of the grille away from the case as
the top tabs lift out of their slots.
Room Air Conditioner

Maintenance and Service
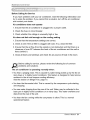
Before Calling for Service
if you have problems with your air conditioner, read the following ir/formation and
try to solve the problem° If you cannot find a solution, turn off the air conditioner
and _ntact your dealer.
Air conditioner does not operate
1. Ensure that the air conditioner is plugg_ into a proper outlet.
2 Ch_k the fuse or circuit breaker
3. Chalk whether the voltage is unusually high or love.
Air does not _e! cold enough on the cooling setting
1. Ensure that the temperature settings are correct.
2. Ch_k to see if the air filter is cl_ged with dust. if so, dean the fillter.
3. Ensure that the air fl_ from the outside is not obstruct_ and that there is a
clearance of over 20" be_een the back of the air conditioner and the ,wall or
fence behind it.
4. Close all doors and windows and check for any source of heat in the r_m.
Before calling for service, please review the foll_ing list of common
problems and solutions
The air conditioner is operating normally when:
• You hear a pinging noise. This is caused by water being picked up by the fan on
rainy days or in highly humid conditions. This feature is designed to help remove
moisture in the air and improve c_ling efficienc3_.
See the section on Slinger Fan, page i8.
• "You hear the thermostat click. This is caused by the compressor cyclle starting
and stopping.
• You see water dripping from the rear of the unit. Vv'atermay be collected in the
base pan in highly humid conditions or on rainy' days. This water overflows and
drips from the rear of the unit.
• You hear the fan running while the compressor is silent. This is a normal
operational feature.
Owner's Mar_uat 21

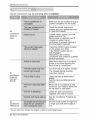
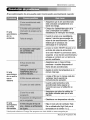
Maintenance and Service
The air conditio, ner may be operating abno, rmallywhen:
Make sure the air conditioner plug is
pushed comp!etely into the outlet.
Air
conditioner
does not
start
Air
conditioner
does not
cool as it
should
Air
conditioner
freezing up
Check the house fuse/circuit
breaker box and replace the fuse
or reset the breaker.
!f power failure occurs, turn the
mode control to Off.
When power is restored, wait 3
minutes to restart the air
conditioner to prevent tripping of
the compressor overload,
Press the RESET b,u_Ho,n_located
on the power cord plug.
if the RESET bu_on will not
stay engaged,
discontinue use of the air
conditioner and contact a qua!ified
service technician.
Make sure there are no,curtains,
blinds, or furniture blocking the
front of the air conditioner.
Turn the knob to a higher number
The higlhest setting provides
maximum cooling.
Clean the filter at !east every 2
weeks
See the care and Maintenance
section.
When the air conditioner is first
turned on, you need to allow time
for the room to coo! down.
Check for open furnace floor
registers and cold air returns.
See Air Conditioner Freezing Up
beiow,
Set the mode control at High Fan
or High Coo] with thermostat at 1
or 2.
" You _n refer to the Energy Star pr_ram in ,detail at _w, energystar,giov,
22 Roo,mi Air Conditioner

PARA SUS ARCHIVOS
Escdba aqu_ _ modelo y nom_o de serie:
S@t_e n_:
m Pu_e encontrar mosnOmeros en _iaetJqueta de la pa_e
la_al de_ produc_o.
Nombr'e _| dis_ribuidor:
F_ha de compta:
II Adjun[e su _-e,cl_ a es,[a _9ina ¢x)nla gFapado_a #_a
el m,omento que k3n_esi[e pa[a pr,ob,ar _afecha de su
adquisici6n o _ra la va_idac#n de la garantia
LEA ESTE MANUAL
En su in[erk_r encontrara muchos conse}os _ti_es _blre I_
u_llizaci6n y mantenimiento de su a_ndicio[_sdor de aire.
Unos poco® cu_ados por su parle lie pueden ahorrar
mucho _iempo y dinero durante la vida de su
acondicionador de aire,
En _a tabla de _nsejos para Ila solluci6n rapida de
prob_emas encoJnt_ara muchas respu_tas a los IProb]emas
m_s habil_uaJes, Si r¢-_isa prime_o nuest_ Tabl_ _e
Co_sejo_ _a la soluci6n rapida die proMemas, _ vez no
necesito Hamar nunca al servicio tecnico,
PRECAUCION
Manual det Propietafio 23

Pr_aucione,s de Seguri_d
Para prevenir tanto lesiones a] usuario, u otras per_nas come daSos matedales, es precise
seguir estas instru_iones.
m La incorrecta operaci6n del aparato @me consecuencia de ignorar [las.instruociones
provocara da_os o lesiones.
[] A cause de_ peso pe_do, del producto_ se r_mienda que usted tenga a un ayudante a
participa en _a instalacJ6n_
| El siignifi_do ,de los simbollos uti]izados en este manual se indica ,aco,n,flnuaci6n
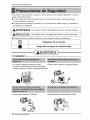
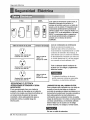
[] Ins laci6n
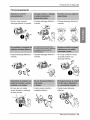
Un monroe o instalaci6Jndeterge pue_ • P'uede cau_r incendio y descarga eliectdca.
pro.vocar un fundonamlento tnco_edo, _luyendo
desgos de lesiones, in_ndio¢ o,desc'_rgasi el@tricas
Puede causar exp_os.i6n o in_ndio.
24 Aim Acendicion,ador
Puede cau_r de_arga e_@trica y fat_os.

Precauciones de Seguridad
mFuncionamiento
• De,otto modo,, cau_ra
descarga electrica o incendio.
•Cau_ra des_rga e_6ctd_ o
• £n _so que no, puede
•,Causara descarga e_6ctrica o
incendio.
. Causalra de_arga el4ctrica o
ince,ndio,
• Causara desi_rgja e_trica o
incendi,o.
• Si no hay conexi6n a masa,
puede produciir una
de_arga ell4ctdc&
causar iln,cen,dio y accidente
de corto c[rcuito.
• Puede causar [n_n,dio y
acddente electncoo
. Pu_e causar d,escarga
Manual de__P_p,ietario 25

Pr_audonesdeSeguri_d
yotrasa_uras de_a;
El aparato de aire acondiciona,do del_
o_rar_ en un area cerrada para _r
mas @ifecflvo,
.....ve.ti_eant_eehaterluncio.are_
aco,d_c_onado_dea_recuando
gas_
"Pu_e causar explosi6n,in_ndio_
No JimpieJaunidad de aire
acondicionade con agua.
• Puede entr ar agua en ila unidad y
disminuir la a[slaci6n.Pu,ede causar
una ,descarga e.lectdcao
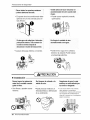
[] I_stalaci6_
Son fibsas y pu_en causar
"Puede provocar e! fa_!ode un
e_ectr_omesflco o delerioracion
de su r,endimiento.
Si la,carcasa exterior _stA @5ada
debe re_'a_e o r_amR4arse
ir_m_.;_riatmer_te,_atla _da p_'ovocar
q_e el aparato de ,a_ndicionado se
caiga de la ventana,con e_cgnsiguiente
_ligro de lesiones
26 Aim Acondicion,ador

PrecaudonesdeSegundad
_rdes m_=d=s:
* Hay rie_o de lesiones
[] Funcionamiento
cue_ (.ode_cable)==.di=_=._= =i.=vaamil==b
q .....
"Pueide causar ,des_rga ,Gastara enei[gia eR va[no y
e.16c:tricay daSo, #3drfa p,rovocar un accidente.
_ireacondicion_do ames plama 6o_e _e _xp_ al esp_ciai__al_ como _nimalso
de [[mpiarIo,, flujo dinette de a_re_No se siemte
dotagehaya ¢or_en_es de alre, pre_isi0_ u obje_ _e a_e_
• Comoe{ ve_tih_,r gira a a_a • Este pu_e causar lesioReis O • Pu_e causer daSo a los
ve!ocidad_a£do esta _uncio_do, daSos en Is mascota o la animales o vegetales y
puede ¢ausarI_b,£es. p_anta..... _rdlida de obietos.
• El funcionamiento sin filtros
puede ,daSar la unidad.
•.La unid_d _1 aire acondidonado
puede deterior_se, camb,iar ,d,e
_lo, r, o _sarro,H,ar manchas en
h supedicie.,
- No es sano y p_ria provo_r
e,nfermedades ,opeligros de,
Man,ua_ de__P_p,ietado 27

PrevJoat Fundenamiento
!_ Coloque el enchufe corr_tament:e.
2_ Use un unico circuito para este aparato.Recargar el circuito _dria provocar
un riesgo de in,cendios,
3._No utilice un alargador,Consulte la pagina 3t para mas detalles
4. No arranque/detenga el funcionaiento enchufandddesenchufando el cable
de corriente e.l_tri_.
5, Si el alargador esta daSado y ha de set reeambiado,solioite a un tecnico
autorizado que instale un recambio exacto.
i. Estar expueisto al flujo directo de aire _r un periodo largo de tiempo pude
constituir un riesgo para su saiud.. No exponga alas personas, mascotas o
plantas al flujo dir_to pot p,eri,odos largos de tiem_,
2, Debido a la [_sibiiidad de falta de oxigeno, ventile la hab,itaci6n cuando se
use al mismo tiempo que estufas u otros dispositivos de _le_ccion.
3 No use este acondicionador de aire para pro_sitos determinados no
esp_ificados (pot ej.: preservar dispositi_s de precisi6n, alimentos,
cachorros, plantas y objetos de arte). Tales usos pu_Je dafiar los elementos.
4. Et aparato de aire acondicionado es un a_rato disefado _ra et confort de
consumidor.No es un sistema aclimatizador.
i. No toque las partes de metal de la unidad cuando quite el filtro.. Pu_e
lastimarse cuando manipule bordes filosos de metal,
2. No use agua para limpiar adentro del acondicionador.. La exposici6n al ag,uia
puede i de,s:truir la aislaci6n y esto a su vez prov_ar una desearga electric.a.
3. Cuando limp,ie la unidad, aseg_urese que la corriente y el interruptor esten
desconec:_do& El ventilador gira a muy alta vel_idad cuando, estA
funcionando.. Existe la _sibilidad de, lesionarse si la energia se _neicta
accidentalmente cuando este limpiando las p.iezas internas de la unidad.
!
i
Para reparaciones y mantenimiento,_ngase en contacto con un centro de. servicio
autorizado..Consulte la pagina de garantia o Ilame al numero(8_)243-0€_0.Tenga
su nurneor d emodelo y numero de seriie a mano.lLo,s encontrara en la pagin.a 23
de este manuaL.
28 Aire Acondicion,ador

lntroducci,dn
..... H_ H Hi
Este s.im_lo Io advierte de un _ligro de accidente por corriente
el_trica,
_te sim_lo I,oadiverte de un peligro que pu_a causar un da_o
del ventliador,
_te s.imbolo significa c=ondicciones eisp_iales,
ADVERTENCIA : Este aparato deberia instalar_ ,de acuerdo con las
normas de| C6digo El_trico Nacional..
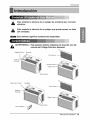
Panel de Co_'_tro_ Gavi_ete
Defl_:tor .......... ::_#-_
Horzonta_
Filtro de Aire
Panel de Control
Reiilla Fro_ta
Sa li,de ,deAire
Tableau de _ntrole Gavinete
_fleelor
Horzontal
Filtro de Aire
Reii_laFronlal
©onto_ Remote
Manuai del Propieta,#o

SeguraidaEl_tfica
i i5V- 230V_
2) El able de a.li_n_¢i6n p_e. incluirun
d_s_,,e, i_er_ptor de _flen_. La
_sa del en,_de cuba _n un _t6n
p_eba y ot_ de _n[_. El disposittvo debe
_mprobarse pe_i_men_ Ipres_aa_
pnmere e_b_ TEST y desp,u_s RESET. Si
el _t6m TEST no _ d,e_:;on_ o si@ bot6n
RESET no pe_e_ a_'vo,, suspe_a el
use del aire a_di¢ilonade y _ngase en
_n_o _ un tecnt_ de s_victo.
Util[_ el ,e_de _ la _r_ _mo _, E_gia USO BE CORO,ONES BE EXTENSION
........... Debido al potencial de peligro a su
S_ndatd I_V, _de _ 3
Une_ de 15A, !25V AC
Standa_ 2_50V,_de _ 3
L[n_ de 15A.,_V AC
Standa_ 250V,,_chufe _ 3
Lirn_ de 20A,,_V AC
15N4_P.o u_
Inte_u_r _ 15AMP,
_AMP. o u_
s_uridad baio ciertas circ_ns_ncias
recomendamos encar_Jidamente no utiliar
c,ordonos de extensi6n. Sin emba#g,o0si
us_edld_;ide usar un c_rdSn de extensi6n,
es a_.olutamente n_esario que este soa
un _rdSn listado baio UL de ires ÷spigas
con conexi6n a tierra calificado i5A_
Todo el _blea_ deber& teal_z_se de
acuerdo _n I_ ,c_ig_ y r_l_en_s
El _N,eado dom&'sflc_ de, alluminio
#_r[a ocasionar problemas esipeciales.
Consulte a un electricis_ @_i'Iic.ado.
SEGURIDAD ELECTRICA
__ONES DE __4 A _ER_
E[ _ire ace_icionado tiene _na c_av!ja.
_xi_ a flerra de tres __ en _ able de
_min_ _ .ene_la, que d_& en_ufa_ en
un to_co_iente de I_red _ ires pa_
_r_do _ tie_ a_adam_te _ra su
p, n c,_tta un posible tiesgo
_as unida_s _n equi_das. _ una _vija de
_n_ a _erra _ tr_ _s e_ _ _e
sumi'nis_o _ energia q_ d_er& en_e e_ un
_ma_iente de pared _ra t_es ipatas c_,nectado a
'_e_ a_cua_e_ (_r' las il_st_es a
_ntin, uaci6n) _m su pro_ _ u_ _si_e
t_o de ,e_roc_n. 81_ _e un tom_rr_te
_n es_s _erlstP.,as, un e[_r_sta _l_i_
_,_e_ l_t_r u_ de _ue_ con el C_.
El_ricoI,_al y _os_ig_ y _s. locales.
30 Aim Acondidonador
No _ un cable _ e_xt_,sion.

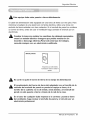
Este equipo debe estar puesto a tierra debidamenteo
El ,cable de alimentacion esta _uipado de una toma de tierra con tres pins. Para
minimizar e_peligro de una lesion per corriente el6ctrica, utilice una toma con
enchufe de tierra estandar _n tres _ntactos. Si el enchufe de pared no contiene
un borne de tierra, antes de usar el ventHador haga cambiar el enchufe per un
Cambiar la toma sin realizar los camibies, de cableado apropiados
crear_ un estado el_ctrico in_guro que podr{a resuitar en un
incendio o descarga e!_ctricaoPara rode este tipo de trabajes,
consu|te siempre con un electricista cuali_cado.
M6todo prefer|do
Aseg_r_se que exist_ debida
neutraliza¢i_ an_es,_ utilizar e_
ap,a_to
No come ni quite el borne de tierra de la clavija de alimen_ci6n
El a,ceplamiente del berne de tierra del adaptader con el tern|lie de la
cubier_ de| enchufe de pared no pendr_ el equipe a tierra, si el
torn|lie de la cubierta no es d,e meal y est_ ais,lado y el ench_e de
pared no est_ pueste a tierra a trav_s de la red de la casa.
En el case de cualquier duda rest,ere a la corre,cta puesta a tierra
de! ventilader, haga revisar e! ench_e de pared y el circuite per un
electricist:a pro_sionaL
Manual de/Propietario 3'!

Segu,ri_dEI_tric_
Debido a eventuales peligros de seguridad no recomendamos en ab_luto el
uso de un adaptador. $6[o para una conexi6n transitoria se puede usar e[
adaptador ctasificado como UL que esta a di,s_sici6n en la mayoria de las
tiendas dei productos electricos. Atie,nda que e orificio grande en eliada_ador
_rresponda al ,orificio grande en e[ enchufe para [ogmr [a conexi6n con [a
po_aridad corr_ta.
Desconectando el _ble de alimentaci6n del adaptador utilice una mano pare
sendas partes para evitar un daho del borne de tierra. Evite una descon,exi6n
fr_uente det cable de alimentaci6n, pues pu_e causar un eventual daSo dei
borne de tiers.
M_o tempora_l
Cubietla del
_orni!lo de Meta!
Nunca _ilice el _ui_ con un ,adaptador daSado°
Debido a un eventual peiigro no recomendamosi en absoluto el u_ de un
_ble alargador. En situaciones excepcionales utilice s61o alargadores
certificado,s con puesta a t:ier_ CSA clasifi_dos como UL con tres oonductores
de valores i5 A, 125 V.
32 Aire Acondicionador

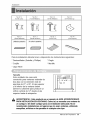
Tipo A: 14 Tipo B: 2 Ti_ C: 2 Tipo D: 3
(Tomillo oorta} (Tomillo Mediano) (Tomillo M_iano) (El Par_ntesis L)
_ C
E '
E
I
Tipo E: 1 Tipo F::1 Tipo G: 2 Tipo H: 1
(B_eda Adhesiva) (Bar_@dei Marco) (P_e_ Gij_a) (Gu[a superior}
(Adh_ivo posterior) (No,adhesivoposterior}
IPara la instalacion debeiria tener a dis_sici6n Ilos instrumentos siguientes:
* Destornillador (Estrella y Phillips)
* Cuqillo
* Lapiz Nivel
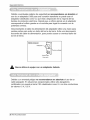
Tama#o
Este ventilador de casa esta
construido para ventanas estandar de
dos alas con ia extension real de
apertura de 21" a 35", El ala superior
y el inferior de la ventana deben
abrirse 1osufi,ciente para producir un
orificio vertical de 12" desde el ala
q .........21. a 35o ___.
Min 12"
1
superior ha,sta el a,ntep_ho,,
ADVERTENCIA : Este pmdiucto es un aparato de AIRE ACONDIC|ONADO
PARA INSTALACION EN VENTANAS, Como tal, _ n_esita una ven_na ,de
un cuelgrue o de doble cuelgue para una instalacio, n ad_uad& No
recomiendan instalaciones en lugares que no _,an ventanas, uti!izando
casquillos, orificios en las paredes ni cualquier otto ti_,
Man,ua/ de__P_p,ietafio 33

Instalacidn
Ubicaci 6n
Inst,aie el aire acondicionado donde n,o
r,_iba luz solar dir_ta
Espacio !ibre
Si pro_rciona espacio libre mejorara la di,ca,cia de la unidad y evitara radiaci6n
de calor proc_ente del condensador.
*La parte inferior de la carcasa debera eistar a 30 o 60 pulgadas po,r encima del
suelo
*La pa_e exterior de la carca_ debera sobresalir hacia fuera al menos 1/2
*No debera haber ,obstacu!os como una va!la o mur,o a 20 pulgadas d,e ila parte
po,steri,or de la carcasa.
*T_as las p,ersianas lateiraleis de la car_sa deberan dar al exterior de la
estructura.
Aire en|liadoi
34 Aire Acondicion,ador

!, Introduzca tos paneles (Tipo G),
en los guias del .45aire acondi,cionado
(Tipo H),.Las cortinas atorniilelas
_n los tornillo,s (Tipo A),.
Use un atornillador ]argo, Asi le,
set8 mAs fAcil insta]a ]os torniHos,,
Ti_ A
2. Cio_e la banda adhesiva (TipoE } y
co]6quela del ancho de la ventan&
Remulevael plastico de Ilabanda adhesiva
y c,ot6quela en la parte superior de el
marco inferior de ]a ventan&
Banda
Adhesiva
("_i DO E )
3. Co]o,cando |a unidad en la ventana
Abra la v,entana y marque LINEA en el
centro esta.
4, Co]oque e] M_nsula en L
4-1. _nstale los so_rtes L detras de
alfeizar interno de la ventana, con el
lado corto de! so,porte _mo, esta:
Hustrado. Utilice 2 torniilos (Tipo A)
4-2 La mensula ayuda a que la unidad
se encuentre firme. As:egurese de
_ner la mensula en L contra la
parte posterior del! descanso interior.
iDesca_so
interio_
Ti_ A
]re,crier
Linea del Cent[o
Man,ual de__P_p,ietaflo 35

IPr_auti6n: En _assiguientes instrucciones, so_enga la unid,ad firmemente
has_ que la parte cor'r_i_ de la ventana descanse sobre la pa_e superior
del canal y pot detr_s del marco de los;paneles corr_izos_ Pu_e haber
lesiones o da_os si la unidad _ cae ,deJaventana,
1,,Instale el Aire Acondicionado a la
Ventana
1-1, Cuidadosamente le_n_e ,elai#e
acondicionado y cot6quelo en el hoyo
de la ventan& Aseg_Oresede que la guia
inferior del aire acondieionado caiga en
lugar correcto del m6nsula en L_
Lineadel Centro
Cuando el aire acondicionado sea
fiiado en el support en L, e! aire acondicionado
sera centrado ,como pueden observar
1-2. Mientras mantiene et aire
acondicionado en posici6n,
cuidadosamente baje el borde de la
ventana superior hasta la guia superior
del aire acondi.cionado.
Guia I_te_or
i
Suppo_lenL
Una vez instaladod,ebidamente el aparato de aire acondi,cionado_deberia inclinarse
hgeramente"haeia aba:joen su parte posterior_Si esta real puesto en la ventana,
colgara mas abajo por la parte posterior automaticamente_ Si no Io hace,hay una
problema con la instalaci6n,,
2. A_gul'e los Paneles
Extienda los p,aneles par a rellenar los orificios de la ventana usando, los
2torniHos (TipoB),2torniHos (TipoC)_
3, Instale la Banda del Marco suppo_enL
3_ Corte la Ibanda del marco del mismo
ancho, de la ventana Coloque lab, anda
del marco entre el vidrio y la ventana
para prevenir la penetraci6n al cuarto
de insectos y aire.
Ato,rnilile la cerradura del marco usando,
un tornillo(TipoA)_
Quite los torni!los que aseguran el
gabinete y cacerola despreciab, le en el
lado correcto.
4, _ instalaci6n d,el aire acondi,ci,onado ,de ve,n_na n,o estara completa, Vea
SEGURIDAD ELECTRICA para conec_r la extensi6n el_ctrica al tom,a corriente,
36 Aim Acondicion,ador

ln,,st_ucdones de funcibnamiento
Si Vdode_onecta el venti|ador o 1o conmu_ del enfriamiento a |a
ventilaci6n, antes del nuevo ajuste del enfriamiento espere per Io
menos 3 minutes,
POWER -Apaga el aire acondicionado
FAN SPEED "LOW" -Funcionamiento del ventiilador a baia vell_idad con o sin enfriamiento
FAN SPEED "H|" -Fun,cionami,ento d,el ve,ntila,do,r a aJt,avel_lidad ,con o sin enfriamiento
De est,emode p_ra controlar la temperatura del aire interior. Gire el sei[ector h,as_ que [a
flecha apunte las marcas d,elenfriador para un ,enfriami,entomas m_erado,.
Vent|lad,or normal
1,.Gire el selector de m_o de ve_idad del VENTILADOR hasta la posici6n "HI' o "LOW ''
2. Aiuste el co,n'tr,oldel term,estate ,en la mar,ca d,e temperatura "Fan Only"
Enfriamiento norma|
1. Gire,el selector de m_o de ve_idad de/VENTILADOR hasta la posi,ci6n "HII'' o _'LOW"
2 Aiuste el controi delltermostato en i,atemperatura deseada (el punto m_io es una buena
posici6n de inicio)
Si _atemperatura de la sala no es de su agrado_una vez haya transcurrido un tiempo razonable,
aiuste ,elco,ntrol a una posi,ci6nmas caliente, _gun de.e,
Enfriamiento m_ximo
1 Gire el selector de m_o de ve_idad del VENTILADOR hasta la p,osici6n, "Hi-_-''y,,
2 Aiuste el control del termostato en I,amarc,a de tem_ratura del enfdador_
Funcionamiento silencio_
1, Gire el selector de m_o de ve_ocidad del VENTILADOR hasta lia pOSi'Ci6n '°LOWL
2, Aiuste el control del te_*mostato s_Qn sea necesario.
Man,ual de__P_p,ietafio 37

/nstruccionesde funcionamiento
Los contmles ti,enen este aspecto.
@
@ IEnecndido/Apagado
• Para ENCENDER e! si_ema presione e! _t6n, y para AiPAGA.RLOpresione el _t6iR otra vez,
• Este bot6n,tiene prioridad sob,re todos los otros _tones,
, Cuan_ se enciende el ap,arato por pdmera vez,u_ra los ajust:es del m_a High C_l a 72°F
@ Vel_idad del Ventilador
° Pulsar el barn _ ve!,ocidad del v,entiladar ha,cecambiar Ilasvelacidea_s, en_e Law y High
O Marcado,r deencendido/Apagado
°Op,eraci6nde Parada:
• Con,cadia pulsacion del baton _ realiza un ciclo _r las opciones en este oirder_:
1 hara--.2 horas--.3 horas_ haras45 horas--.6 horas--.7 horas 48 horas 49 horas
-_10 horas --.11 horas---. 12 horas,-_ CANCEL
• _ temperatura fija _ elevara :2"F transcurddos 30 minutos y de nuevo, _-an_urrMos o,tros_ minutos,,
-Operaci6n @ hidaci6n:
, Can cada pulsaci6n _l b,ot6nse realiza un ciclo pot las o_ion_, en este or_n:
1 hora_2 horas_3 ho,ras_ horas45 horas_6 horas-W hatas _ ho,ras_, haras
--..! 0 horas--.11 horas_42 horas--..CANIOEIL
@ Frio/Ahorrad,orde energia/Ventilador/Seco
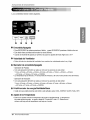
• Cada vez ,que usted presione este bot6n este se_allara entre COOL, ENERGY SAVER, FAN y DRY.
@ Ajustede la Tempera_ura
• Este bo.ton puede cantralar la temperatura _1 cuada au'tamaticamen_e. La temperatura
pu_e aiustar _ grada en grada, de_e 60,"F hasta 86"F cada 1"F. Selecciane el
numero, mas baja para _at,emperatura m&s ibaia en el cuada.
38 Aim Acondicion,ador

Instrucciones _ fun,cionamien,to
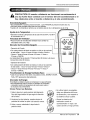
PRECAUTION: E| mando a distancia no funcionar_ correc_mente si
una lu,z fuerte hate contacto con el sensor del aire acondicionado o si
hay ob_cu!os entre el mando a dis_ncia y el aire acondicionadoo
• Para ENCENDER ell_sltema presiene eJ_t6n. y papaAPAGARLO pre_one el bot6n otra vez
• Este bot6n t@ne prioridad _bre to_s los otros botones
• Cuando Ud io enciende per prirnera vez. e_s_tema es_ on el y la temperatura _ de 72F
Ajuste de la Temperatura
• Este _t6n controla latempera_ura de la sala entre _ 60_F y !os86F
en incrementos de 1"F,
Vellocidaddel Ventilador
° Pulsar e__t6n de ve!_,ad _1 ventil,a_r hace cambiar Ins
vel_i_des entre Low y High,
Marcador de Encendido,/Apagado
oOperaci6n _ Parada: |
L
• Con cade p,u!_d,6n del boron _ rea_izaun ciclo po,r las opciones
en este orden: 1 hora_ 2 horas-,3 hoira_4 horas-_5 horas-,
6 horas-,7 ho,ras,_ ho,ras_ horas--,10 her,as-,11 ho,ras
12 horas-,CANCEL
•La tempera_ura ilia _ elevara 2"F tran_rridos 3,0minutes y de nuevo
l_ranscu_os o_os _ minutes
Power
- Operacion _ iniciaci6n:
° Con cade pul_cidn _J _t6n _ realiza un cido per las o_iones
en este orden: 1 hera-2 horas--.3 hera.4 horas--.5 horas_
6 horas-.7 horas-.8 horas-.9 horas-.10 Ihoras-.11 hoiras-.
12 horas=.CANCEL
Frio/Ahorrador de Energia/Ventiladorl$_o
° Cad_ vez que presione esle boron. Ilaspalabras CC_L. ENERGY SAVER.
FAN y DRY _areceran alternadamente
Ahorrador de Energia
El ventilador _ dletiene cuando el compressor no sigue enfriando
° Apre×imadamente _da 3 minut_ e_ventilador _ en_nd_ra.
y n_esitara verificar la temperatura de! cua_o para saber si
es nec_ado mas enffiamien_e
C6mo Porter las Baterias
1. Quile la lap,a de la pad,e posterior del telemando.
Pa_ elio, haga deslizar la tapa segSn IiadirecciSn
della 11echa.
2. Introduzca las dos bateri_, respete siempre la
£olaridad al instalar Ilaspilas. Use baterias nuevas_
3. Velvet a cerrar, resba_a_o la tapa hasta la
No, ufliice bateris r_ar,gables,
estas son diferentes de brma,
de dimensidn y use r,esp_to a
las. baterias _cas usua]es.
•.Seque las baterias, del
telemando cuando e!
acondiicionador no vaya a _r
usado dutante un Ilargo peric_o.
Manual de__P_p,ietado 39

lnstrucciones de funcionamiento
La dir,ecci6n del aire
Para ajustar la direccion de! aire usando
_ntrol de la dir_cion del aire,
Las dos lengQetas horizontales para el
control de las rejillas le iPermiten
descargar el aire hacia la izquierda, o
aigo de aire a la izquierda y otro a la
derecha, o todo el aire hacia el frente, o
,cuaiqui,er combinaci6n de las _sicion,es
mencionadas.
Tu_ ,de Desag_e
En climas humedos, es posible que la
Bandeja Eva_radora se Ilenne de agua.
Para quitar el agua acumulado, es
preciso con,_tar el tu_ de desagOe.
Quite la Tapa del DesagQe y conecte ,el
_J_ a la Bandqa Evaporador&
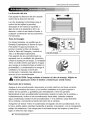
Este aparato de aire .acondici,onado va
equipado con un ventitad,or d,e extracci6n,
(Vease la ilustraci6n de abajo), Et ventilador
tiene un aniilo externo que gira en el agua
,que recoge en ia piancha base al entrar en
profundidad. La _nden_ci6n la r_oge el
ventilado, r y la expulsa a traves del
condensador, haciendo mas eficiente al
apar.at0 de aire acondicionado.
Fubo
Tapa del Desag{Je
IPRECAUT|6N: Tenga cuidado, a| in_rtar el tubo de drenaje. Ai_jalo de
la area aguda para evitar el desiiee y |esiones _r ust_ mismo.
Removeri_o de la Ventana
A@ague el aire acondicionado, desconecte el co_d6n electrico del tom a corriente,
remueva la cerradura del marco y los torniHos instalados en la parte superior e
inferior de los paneles, y guarde.los para reinstalaci6n. Cierre los pan,eles.
Manteniendo el aire acondicionado fuertemente, bvante el marco de la ventana, y
cuidadosamente, incline el aire iacondicio,nado, hacia atras, _tando cuallquier
agua condensada. IDesllice el aire acondicionado i" a la der_ha, Iluego Ilevantelo
de ta ventana y remu6va_e la banda del marco de la ventana.
Asegurese de drenar TODO el _ndensado .del aparato de aire a_ndicionado. Si no
Io hace, _dria saline mient_s tmnspo_a el aparato, ensuciando, con el consiguiente
peligro de resbalones. Este simpe paso i,e ahorrara tiempo de limp.ieza y hara .de su
lugar un erntorno mas seguro.
40 Aim Acondicion,ador

Mantenimien, toy servicio
Fiitro de Aire
Revise p,or 1omenos dos veces al rues si no es necesario limpiar ,el filtro de aire,
Las particuias detenidad se pueden acurnular en et filtro impidiendo ei flujo del
aire, limitando el rendimiento de enfriamiento y causando la acumulacion de hiel,o
en el evalc_rador. Proceder de la limpieza del filtro de air,e:
i ,.Extraiga el fiitro del aire de I,arejilla frontal titan,do del mismo
2. Lave el filtro con agua tibia de temperatura menor de 40°C ,(I_°F).
3. Escurra ligeramente el agua sobmnte del fi[tro y vueiva a instaiarlo.
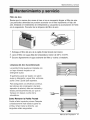
Limpieza del Aire Acondicionado
La parrilla frontal puede set limpiada con
un trapo hOmedo mojado en un
detergente suave,,
El gabinete puede ser Ilavado oon jab6n
suave o detergente y agua tibia, entonces
pulido Cera Liquida para aparatos
Para asegurarse una eficiencia continua,
las bobinas ,delcondensador (de1lado
expuesto al exterior) debe ser revisado y
I,avado peri6dieamente sea por que se
tranque con basura o polvo de la
Como Remover la Parilla Frontal
Suelte el lado izquierdo primero Despues
cuidadosamente hale desde la parte de
ardba y empo hacia la de_echa, Las
lenguetas estan aseguradas.
Manual de__P_p,ietario 4!

Mantenimie#to y servicio
Antes de Liamar el Servicio de Asis,tencia T6cnica
Si tiene problemas con su ventHador, lea las informaciones siguientes y trat,e de
resolver el problema. Si no puede encontrar la soluci6n, desconecte el ventilador
y dir{jase a su suministrador.
E! venti!adot i no funciona
1. Compruebe que el ventillador este con_tado en un enchufe _rrecto..
2 Revise el fusible,
3. Compruebe que la tensi6n no sea demasiado alta o baja.
A! ajustarse el enfriamien_o, e| aire no parece fr'fo |o suficiente
1. Revise si los ajustes de la temperatura son correctos
2. Revise si el filtro de aire no es-ta atascado de p,olvo. En el caso dei que sf,
cambie el filtro.
3. Compruebe que afuera no haya an obstaculo del flujo de airey si entre la
parte trasera del ventilador y la pared o la barrera haya espacio Iibre de pot Io
me.nos i metro ,(20").
4. Cierre t_Jas las puertas y ventanas y compruebe que no haya una flJente de
calor en la habitaci6n.
Antes de Hamar al sep¢icio, tenga a bien revisar Ilasiguiente lista de
problemas y sus soluciones.
El a.condicionador ,de aire est# funcionando normalmente ,cuando:
,, Escucha an sonido metali,co, Lo causa el agua que recoge el condensador en
dias Iluviosos o en _ndicion,es de mucha humedad, Esta caracteristica esta
,diseSada para ayudar a quitar la hum_ad en el aire y mej,o_r la capacidad de
enfriamiento.
• Consullte la seccion del Veintilador de extraccion en la pagina 39.
- Oye an clic en el termostato. Lo causa el ciclo del _mpresor que comienza y se
Ve gotear agua de, la parte posterior de la unidad, El agua puede ser recogida
en la bandeja de base en _ndiciones de mucha Ihumedad o dfas de Huvia. Esta
agua desborda y gotea desde la parte posterior de la unidlad.
Oye funcionar el ventilador mientras el compresor esta silencioso. Esto es una
caracterfsti_ ope.rativa normal
42 Aim Acondicion,ador

MantenimienZoy servi'cio
El acondicionador de aire puede es_r funcionando anormalmen_ cuando:
E_aire
a_ndiciona
do no
enciende
El aire
a_ndiciona
do no, enfria
_rRo
debiera
E_aire
do enfria
dernasiado
A_gLlre$ie que ei aite a_n, dicionado
es_ ,conectado completa_nte a la
_ente de energia,
Cheque _s fusi_es/inte_p_r de la
_ y reempla_ los fusiMes o
rees_btez_ el interruptor de ene_ia.
Cuando la energ a se rees_ez_,
espere 3 minu_s _ on.rider de
nu_.o el aire acondicionado. Con _to
ev_ra que se produ_ una
soh,_rga en el _mpresor.
_rese que no haya coronas,
persianaso muebles I_ueande el
_n_ del aire a_ndi_onado.
• _us_mr el _ntrol de temperature a un
nSmem m_s bajo.
• Limpie el flltro por Io menos cada dos
semanas. Yea la s_6n de
inst_cciones de o_raci6n.
• Cuando _sted en_ende el aire
a_ndi_o_ado debe esperar un
moment, para que la habi_ci6n se
_eres,e que todas las _lidas de
aire e_n ce_das para que el aire
regrese,,
Es_ez_ una tem_tum m_s,alta.
Elija el m_o al_, del _ntilador High
Fan o en_ia,,doalto High C_l _ el
termosta_ en e_n_mero 1 o 2.
Usted pu_e re,ferir_ al Energy Star programa con t_o detalle en www,.energystar, gov
Manual dot ,Propieta,rio, 43

Goidstar wiil repair or replace your product, at Goiidsfa_'s option, _fit proves to be defective In materia_ or
workmanship unde__normal use, during the warranty period set forth below, effective from the date of original
corsumer purchase o't the product, ThS limited wanan_ isgood on_yto 'the orlglrsal purchaser of 'the p_od_t ar'_
effective only when _ In 'tb@United St@es including Alaska, Hawa_Land U,S Terrlto4es
WAR_NT_ PERIO,D:
[_or: I Ye_ from the _e of Pu_rchase
_: 1Y_ from the _e of Pu_cha_
C_es_u_r: 5 Years from I_ DuI¢_ ot
Pu_ct_,
HOWSERVICEISHANDLED:
Call 1-8_-243-_ and ch_ the approprt,_e prompt,
Plea_ have p_oduct type (A_ Cor'dit©_r) mode_ number,
_ria_ numbeL and ZIP/postal code ready.
'Theto[ms of _is wa_ranl_/cover in-home serv_e on _e I_toated
mo_ls.
THIS WARRAt_ IS IN UIIEUtOF ANY OTI-IER WARRANT|ES, IEXPRE_ OR IM_IED iNCLUDiNG WITHOUT UIMITATION, ANY
WA_N_ OF MERCHANTABIHT¥ OR F_ESS _R A PARI"|CUL,AR_SE TO THE _ENT ANY |MPtlED WArRAnTY IS
REQIJiRED BY LAW, IT IS &iMIT_D IN _JRAT_N ITO IH_ EX_S.$ WARRANTY _IO,D A_VE LG WEL NOT _ LIABLE _R
ANY CONSEQU_NI|AL0 |NDI_CT, ,OR |NC|D_NIA& DAMAGES O_ ANY _|ND, INCI,UDiNG ILOS| _VENUE$ O_ _R_$:, iN
CONNECTION W#H THE PRODUCT. SOIM_ $TA_S DO NOT ALLOW L|M|TAI'ION ON HOW LONG AN |M_|ED WA_RAIN_¥
LA$_ OIRTHE _XC[USION OF INC|DENTAL OR CONS_QUENIIIAL DAMAGE& _ THE ABOV_ IL|MI_ATIONS OR EXCLIJS|O_
MAY NOT AP_LY TO YOU
THIS LIMIF[IED'WA_iRAN_ _ES N01_ A_¥ TO':
1 _n,4ce trips to 'Four home to dei_ver, pick up, and/or instail t_ p[oduct, I_trucf, or rep_,e ho_e f_s o_
correct wiring_ or correction of unau_o_ed repairs; and
2,
Damages or operathg problems that result from m_suse,abuse, operation outside environmental
s_c_Ica_ons o_ contrary to tb_ requirements or precau_ons inthe Operating ,Guide..c_c!dient, vermin,
fire, flood, Improper Ip_tallat©n,actsof God, unau_o_zed modlficatbn oralter_ion, Inco_'ectelectrical
current or voltoge, or commercial _e, or _ for other than intended purpo_
3+ _refo_e, _ oost of+_ir _ r_ace_ni of such a eefecfive p+oduof shall be b_ by +hee_e_o
CU81"OM_ INffER_ACTIVE CENT_ NUMB,ER_:
To_ove Warran_ C_v°e_:le
'To Ob_n Newest Au|h_z_ Semite Cenle_ _ S_ies
_al_, _ to Obt_n Pro_, Custo_ _ _rvice
As_st_e
II_tain you_8_ Recei_ |o _ove date of #_c_e.
A copy of you_ Sa!,es Receipt must be subm!tted at
tr-e t_me wa_anl_/service is provi_d
C_ll 8,0,0,_984W469, 24 hrs a _y, 7 d_ys _tr week,
Press 'the appropr_te opt'ion, a_ please have your
product type (AIR CONDIT/_4ER), and ZIPi[_#al code
_dy,
PINe.: _28Ag01_,D Pnnted in China
-
 1
1
-
 2
2
-
 3
3
-
 4
4
-
 5
5
-
 6
6
-
 7
7
-
 8
8
-
 9
9
-
 10
10
-
 11
11
-
 12
12
-
 13
13
-
 14
14
-
 15
15
-
 16
16
-
 17
17
-
 18
18
-
 19
19
-
 20
20
-
 21
21
-
 22
22
-
 23
23
-
 24
24
-
 25
25
-
 26
26
-
 27
27
-
 28
28
-
 29
29
-
 30
30
-
 31
31
-
 32
32
-
 33
33
-
 34
34
-
 35
35
-
 36
36
-
 37
37
-
 38
38
-
 39
39
-
 40
40
-
 41
41
-
 42
42
-
 43
43
-
 44
44


Goldstar WG5005 El manual del propietario
- Tipo
- El manual del propietario
- Este manual también es adecuado para
en otros idiomas
- English: Goldstar WG5005 Owner's manual