
OWNER'S MANUAL
MANUAL DEL PROPIETARIO
Models/Modelo Mi O04R
i
M8004R,
para el futuro,

FOR YOUR RECORDS
Write the model and seria_ numbers here:
Mode! #
Serial #
"Youcan fi_'ld the numbers on a labe_ on the side of the
pr_uct,
Dealer's Name
Dale P'urchas_
IIi Staple your receipt to this Ipaglein the ewat yo_=need i_
to p_ove _te ,ofpurchase or for warranty issues,
READ THiS MANUAL
Inside you will {ind many _lp{u{ hints oin how to use and
maintain your .air conditio,r_r pro_dy. Just a little pr_entive
care on your _rt can save, y_ a great deal of' time and
money over the iife of your air cond_ioner.
htbulll find mar_/answers to, common problems in the chart
of troub[esho@ing t#s Ill you review ,our chart of
Troubleshooting Tips first, you may rlo¢ r_ed to, ca[I for
serv_e at a&
• Contact an Authorized _r_ Center for repair or
maintenance of this un_ Call i-_,-243_00 to
locate the nearest ASC
.,This air cond_toner is no_ int_ded for u_ by 'young
children or invalids without supervision.
•Young children shou|d be su_rvis_ to ensure that
they do not p|ay wRh the ai_,_nditioner,
• if the power cord r_uires rep,la_ment, have an
Author_z_ Servicer instal| _n exa_ rep|ace_nt pa_.
.,installation wo_ must be performed in ac_rdl_nce
with the National E|ectri,c Code by q_a||Ii_ and
authorlzed personnel on|y;
2 Room Air Conditioner

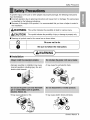
To prevent iniury to the user or other _op_e and property damage, the following instructions
must be folllowed.
[] incorrect operation due to ignoring instructions willl cause harm or damage. The seriiousness
is classified by the following indications.
[] Because of the weight of the product, it is re_mmended that you have a helper to assist in
the installation.
[] Meanings of symbols us_ in this manual are as shown below.
Be sure not to do. "/
q
Be sure to follow t
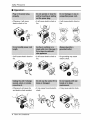
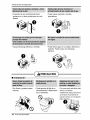
[] Installation
. improper assemNy or installation may cause
incorrect o_ration, inclluding injury,fire, and
electric shock hazards.
. It may cause explosion or fire.
. It may cause fire and electric shock.
• It may cause ,el,ectric shock and failure.
Owner_ Manual 3

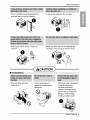
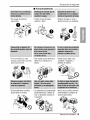
[] Operation
. ._he_ise, it will cause
electric shock or fire
, _will _use electric shock or
fire.
, _herwise it will cause fire
and electric shock accident.
• It willlcause e_ectricshock or
fire.
• It will cause ele_ric sho_ or
fire.
• It may cause fire and electri.c
shock...
• litwiillcause ellectric shock or
fire.
• No grounding may _use
ele_ric sho_.
4 Room Air Conditioner
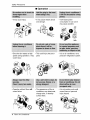
• It may cause electric shock.

, The air conditioner must be operated in a
enclosed area to be most effective
, Ut:wi!l cause electric shock or failure of
machine.
• It may cause explosion, fire, and burn.
[] Installation
. They are sharp and may
cause injury.
. Water may enter the unit: and degrade the
insulation. It may cause an elec#ic shock.
CAUTiO'N
• _ may _use failure of
appliance or performance
J
• If the o_er case is damaged,
it must be repair_ or
repi_aced immediately.
Leaving it damaged could
result in the air _nditioner
hlling out of the window,
creating a _fety hazard.
Owner_ Manual 5

m Operation
, It may cause injury. • It may cause electric shock
and damage.
., it will waste power
consumption in vain and it
may cause accident
, Since the fan rotates at high
sp.e_ during operation, it:may
cause injury.
. Operation without riflers will
cause failure..
• This _,uld iniury the _t or
plant,
• ff is an air _nditioner, not a
precision refrigeration system
• Tlhe ap_arance of the air
condffi,oner may deteriorate,
change color, or develop
s.ufface flaws.
.,It is not sanitary and coulld
cause illness or _r_nal
injury hazard.
6 Room Air Conditioner

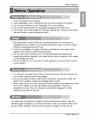
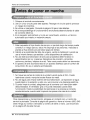
Be_re Opera#on
1i' Plug in the, power cord properly.
2. Use a dedicated circuit. Overloading the line could create a fire hazard.
3. Iao not use an extension cord. See page 10 for more detaii]s.
4. Do not staWstop operation by plugging/unplugging the power cord.
5. IIfthe power cord is damaged and requires, replacement, have an Authorized
Servicer install an exact replacement part.
1i_ Being exposed to direct airflow for .an extended period o,ftime could b,e
hazardous to your health, Do, not expose occupants, pets, or plants to direct
airflow for extended periods of time.
2i_Due to the possibility of oxygen deficiency, ventilate the room when used
together with stoves or other heating devices,
3 Do not use this air conditioner for non-specified special purposes (e.g.
preserving precision devices, food, peR, p,lan_, and art objects). Such usage
could damage the, items.
43The air conditioner is a consumer comfort appliance, not a precision climate
control system.
1. Do not touch the metal parts of the unit when removing the filter. Injuries ,can
occur when handling sharp metal edges.
2. Do not use water to clean inside the air conditioner. Exposure t,owater can
destroy the insulation, leading to possible electric shock.
3. When cleaning the unit, first make sure that the power and breaker are turned
off. The, fan rotates at a very high speed during operation. There is a
possibility of injury if the unit's power is accidentally triggered on while
cleaning inner parts of the unit.
For repair and maintenance, contact an Authorized Service Center. See the,
warranty page for details or call ,(800),243-000& Have your model number and
serial number available. They should be written on page, 2 of this manual.
Owner_ Manual 7

/ntrodu'c#on
This symbol alerts you to the risk of electric shock.
This symbol alerts you to hazards that could cause harm to the
air conditioner.
This symbol indicates s_cial notes.
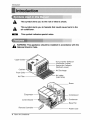
WARNING: This appliance should be install_ in accordance with the
National El_tric C_e.
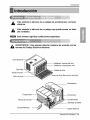
Upper Guide
Cabinet
Front Grille
Air Filter
Horizontal Air Deflector
(Horizontal Louver)
Ve_ica! Air Deflecto, r
(Ve,rt[cal Louver),
Air Diischarge
Brace
Evaporator
Control Board
Remote Controi]ler ...............................................
Compressor
Condenser
Base Pan
Power Cord
8 Room Air Con,d_tioner

ElectricalSafety
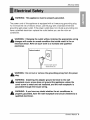
WARNING: This appliance must be pro_rly grounded.
The power cord of this appliance is.equipped with a three-prong grounding plug.
To minimize the rusk of electric shock, use the plug with a standard three-slot
grounding wall power outlet.. IIfthe power outlet does not include a grounding slot,
have a qualified electrician replace the outlet before you use the room air
conditioner,.
Changing the outlet without making the appropriate wiring
changes will create an uncle condition that could result in fire or
electrical shock. Refer all such work to a licens_ and qualified
Pt_err_ method_
E_ _rsu_eFope_ground
II
exists before us4
WARNING: DO not cut or remove the grounding prong from tlhe _wer
WARNING: Attaching the adapter ground terminal to the wall
receptacle cover screw does not ground the appliance gnlesis the
cover screw is metal and not insulated, and the wall r_eptacle is
grounded through the house wiring.
W'ARNING: If you have any doubt whether the air conditioner is
properly ground_, have the wal! receptacle and cimuit ch_k_ by a
qualified electrician.
Owner_ Manual 9

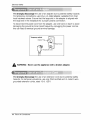
We strongly discourage the use of an adapter due to potentia! safety h_ards.
For temporary connections, use only a UL-lis.ted adapter, available from most
local hardware stores. Ensure that the large slot in the adapter is aligned with
the large slot in the receptacle for a proper polarity connection.
To,disconnect the power cord from the adapter, use one hand on each to avoid
damaging the ground terminal. Avoiid frequently unplugging the power cord as
this can lead to eventual ground terminal damage,
"_Met_ Screw
WARNING: Never u_ the appliance with a broken adapter,
We strongly discourage the use of an extension ,cord due to potential safety
hazards.. For temporary situations, use only CSA certified and UL listed 3-wire
grounded extension cords, rated 15 A, 125 \,L
10 Room Air Conditionier

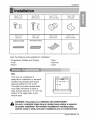
tns,_ltafion
TypeA: 11 EA Type C::1 EA Ty_ D: 3 EA
(ShortScrew) ,(DrainJoint Pi_}
TypeB: 5 EA
(Wood Screw}
_ E
...._ype E: 1 EA [ype F: 1 EA Type G:2 EA lype H: i EA
(Seal Strip} (Sash Se,al} (Guide Panel}
(MhesNe backed) (Notadhesiveb_ked)
Have the fallowing tools available for installation:
* Screwdriver (,Slotted and Phillips) * Ruler
* Knife * Hammer
* Pencil * Level
This room air conditioner is
designed for installation in standard
double-hung windows with actual
opening widths from 22" to 36"_
The upper ,and lower window sash
must open sufficiently to allow a
clear verticall opening of 13" from the
bottom of the upper sash to the
wi ndow s,tooli.
,,_,_,_,,_" to 36" ---,,
13" re,in
WARNING: This product is a WINDOW AIR CONDITIONER.
As such, a standard single-hung or double-hung window is required
for proper insitallatiorl. Non-wind_ installations, including using
sleeves, holes in walls, and other installations are not recommended,
Owne, s Manud 11

Installation
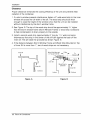
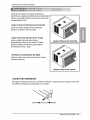
Proper clearance enhances the cooling! efficiency of the unit and prevents heat
radiation of the condenser.
1. If a storm window presents interference, fasten a 2" wide wood strip to the inner
window sill across the full width of the sill. The wood strip should be thick
enough to raise the height ,of the window sill so that the unit can b,e installed
without interference by the storm window frame.
2..See Figure. B. The top of the wood strip should be, approximately 3/4" higher
than the storm window frame (Storm Window Rame) or wood strip (Outdoors)
to help ,condensation to drain properly t,o the outside.
3. Install a second wood strip (approximately 6" long by 11/2"wide and same
thickness as first strip) in the center of the sill flush against the back off the
inner sill. This will raise the L bracket as shown Figure. B.
4. If the distance between Storm Window Frame and Wood Strip Mounted on Top
of Inner Sill is more than 1", two of wood strips are not necessary.
Inner Si_l
indoors
Figure, A Figure, B
12 Room Air Conditioner

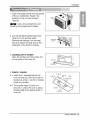
Installation
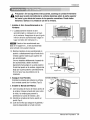
ii
1. insert the guide panels into the guides
of the air conditioner. Fasten the
curtains to the unit with screws
(Type A).
_: Use a long screwdriver and
installing the screws will be easier,
Ty_ A
2. Cut the adhesive-backed seal strip
(Type E) to the window width,
Remove the backing from the seai
strip and attach the seal strip to the
underside of the bottom window.
3. Locating unit in window
Open the window and mark center line
on the center of the inner sill.
4 Attach L bracket
4-!. Ins.tatlithe L brackets behind the
inner window sill, with short side of
bracket as shown, Use the 2 screws
(Type A) provided.
4-2. The bracket helps to hold unit
securely in pliace. Be sure to place
bracket edge flush against back of
inner sill,.
A Inside
,Cen{erLime
O_id,e
ILBracket
Owne, s Manual 13

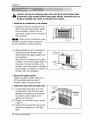
in,stallation
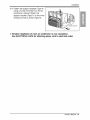
Caution: During the following step, hold unit firmly until window sash
is lowered to top channel behind side panel frames, Personal injury or
property damage may result if unit falls from window.
1. Install the air conditioner in the window
1-1. Carefully ][ftthe, air ,conditioner and
slide it into the open window. Make
sure the bottom guide of the air
conditioner drops into the notches of
the L bracket.
: When the air conditioner drops
into the L bracket, the air conditioner
will be centered in window opening.
-2
While steadying the air conditioner,
carefully bring the window sash
down behind the upper guide of the
air conditioner.
When the air conditioner [sproperly
installed, it should t:ilt sligihtly down at
the back. If it is set correctly in the
window, [twill hang lower in the back
automatically. If it does not, there is a
problem with the installation.
2_S_ure the guide _neis
Extend the guide panels (Type G) to
filli the window opening using 4
screws (5ype B) to, secure them.
3 install tlhe _sh seal and sash lock
3-1,
3-2,
Cut the sash seal (Type F) to the
window width Stuff the sash seal
be_een the glass and the window
to prevent air and iinsiects from
geeing into the room,
Fasten the L bracket using a screw
(Type A),.
3,_3.Remove the screws that secure the
cabinet and base pan in the right
side.
L IB_'acket
Type
Ty_ B
14 Room Air CoinditJoRec

Installation
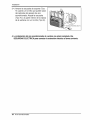
3-4. Fasten the support bracket (Type H)
using a screw removed from the air
conditioner cabinet. Attach the
support bracket (Type H) to the inner
window sili with a screw (Type B)_
4 Window installation of room air conditioner is now completed,,
S_ ELEiCTRICAL DATA for attaching power cord to electrical outlet.
Owner_ Manual 15

OpeFaitjn,g instructions
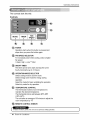
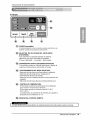
The controls ]looklike this
FAN
Operation starts when this button is pressed and
stops when you press the button again.
FAN SPEED SELECTOR
For increased power while coo,ling, select a higher
fan speed,
3,steps: High --Low i Med
Re timer can be set to,start and stop, the unit in
hourly increments (up to,12 hour).
OPERATION MODE SELECTOR
Select _oling m_e to cool the room.
Select energy saver m_e for energy saving
operation.
Select fan mode for basic ventilating _n operation.
Select dry mode for dry operation.
TEMPERATURE CONTROL
The thermostat monitors room temperature to,
main_in the desired temperature,
The thermostat can be set between 60_F~8,_F
(16"C~30°C).
The unit takes an average d 30 minutes to adjust Me
room temperature by I°R
REMOTE CONTROL SENSOR
the unit _Jnsas ptevious _tting operation.
16 Room Air Conditioner

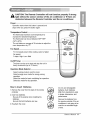
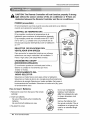
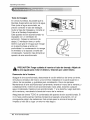
CAU'TION: Tlhe Remote Controller will not funcition pro_rly if strong
light strikes the sensor wind_ of the air conditioner or if there are
obs_cles Ibe_een the Remote Controller and the air conditioner.
Operation starts when this button is pressed and
stops when you press the button again,
Temperature Control
The thermostat monitors room temperature to
maintain the desired temperature,
The thermostat can be set between 60°F~86°F
(16"C~30"C).
The unit takes an average of 30 minutes to adjust the
room temperature by 1 F.
FaR ,Speed
For increased power while c_lling, select a higher
fan speed.
3 steps: High-Low-M_
Fan S_ed
Power
The timer can be set to sta_ and stop the unit in
houdy incremen%(up to t2 hours:),
O,pe_tion Mode Selectom
Select cc.oling mode to cool the room,
Select energy saver mode for energy saving
Select fan mode for basic ventilating fan oiperation,
Select dry mode for dry operation.,
H_ to In_
1i.,Remove the cover from the _ck d the remote
controller
2_ Inert two ba_eri_.
Be sure o# _e polarity when installing the
batteries.
Be sure that both batteries are new.
3. Re-attach _e cover.
Do not use rechargeable
batteries,,,Such batteries
differ from standard dry _lls
in sha_, dimensions, and
performance.
Remove the batteri_ _rom
the remote controller ifthe air
conditioner is not going to be
used for an extend_ length
of time,
Owner's Manual 17

Operating instructions
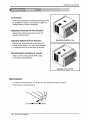
Air Dire_ion
Airflow can be adjusted by changing the direction of the
air _,nditJoner's louvers, This can a_so increase the
cooling efficiency of me air conditioner
Adjusting Horizontal Air Flow Direction
Adius_ng the ve_i_U louvers Ueftand right will
change horizontal ai_ow.
Adjusting Ve_ical Air Flow Direction
Adiusflng the horizon_l vane up and down will
change vertica!l .airflow, The vane can be .adjusted
by nudging 'the back or up and down of the vane.
Recommended orientation _ louvers
Adiust louvers to face upwards when cooling
'to maximize cooling efficiency.
Adjusting hodzon_! air 'flow
Adjusting vertical air flow
Vent Control
For maximum _oling efficient, CLOSE the venL [his will allow in[ernal air circulation°
OPEN the ven[ to discharge stale air.
CLOSE,_VENT_OP'EN
18 R_)m Air Ce_idoner

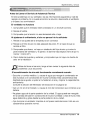
Operating Instructions
Drain Pipe
In humid weather, excess water may
cause the Base Pan to overflow. To
drain the water, remove the Drain Cap
and secure the Drain Pipe to the rear
hole of the Base Pan.
Press the drain pipe into the hole by
pushing d_n and away from the fins
to avoid injury.
This air _nditioner is equipped with a
slinger fan. (See drawing, below:)
The fan has an outer ring that runs in
the water that collects in the base pan
if it gets deep. That condensate is then
picked up by the fan and expelled
through the _ndenser, making the air
_nditioner more efficient.
Be careful when inseffing the drain pi_. Push away from
the sharp fin area to avoid slipping injuring you_elf.
Removal From Window
Turn the air conditioner off, disconnect the power cord, remove the L bracket, the
screws and Support Bracket installed through the top and bottom d the guide
panels, and save for reinstallation later: Close the guide panels. Keeping a firm grip,
on the air condiitioner; raise the sash, andi cardullly tilt the air conditioner Ibackward,
d_ining any condensate, Lift the air conditioner from the window and remove the
sash seal from between the windows.
Be sure to drain ALL condensate from the air conditioner. IIfyou don't, it _ulld! ruin
out while you carry the unit, making a mess and creating a slipping hazard, This
simple step wil! save you much cleaning and make a safer work environment
O'wner,s Manual 19

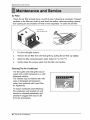
Maintenance ,aitld Service
Air Filter
Check the air filter at least: twice a month to see if cleaning is necessary.. Trapped
particles in the filter can build up and Ibl_k the airflow, r_ucing _oling capacity
and causing an accumulation of frost on the evaporato,r, To clean the air filter:
Donot'ror_
openoro_n tofar.
1.
2.
3.
4.
Pull the inlet grille forward.
Remove the air filter from the front grille Iby pulling the air filter up slightly:
Wash the filter using lukewarm water below 40 °C (1i04 °F).
Gently shake the excess water _om the filter and replace.
Cleaning The Air Conditioner
The front grille and Inlet grille may be
wip_ with a cloth dampened in a mild
detergent solution,
The cabinet may be washed with mild
soap or detergent and lukewarm
water, then _iished with Liquid Wax
for Appliances
To ensure continued peak efficiency,
the condenser _ils ,(outside of unit),
should be check_ periodically and
cleanedl if clogged with soot or dirt
from the atmosphere.
20 Room Air ,C'onditi_er

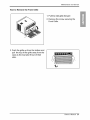
Maintenance and Service
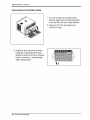
How to Remove the Front Grille
i ,.,Pull the inlet grille forward
2, Remove the s_,ew s,_uring the
Front Grille,
3, Push the grille up from the bosom and
pu!l the top of the grille away from, the
case as,the top tabs lift out of their
O,wner,s Manual 21

Maintenance ,and Service
Before Calling for Service
If you have problems with your air conditioner, read the following information and
try to solve the problem If you cannot find a solution, turn off the air conditioner
and contact your dealer.
Air conditioner does not operate
1. Ensure that the air conditioner isi plugged into a proper outlet.
2_Check the fuse or circuit breake_n
3. Check whether the voltage is unusually high or low.
Air does not feel cold enough on the cooling _tting
1. Ensure that the temperature settings are correct.
2. Check to see iifthe air fillter iisclogged with dust. Iifso, clean the filter.
3. Ensure that the air flow from the outside is not obstructed and that there is a
clearance of over 20" be_een the back of the .air conditioner and the wall or
fence behind it.
4_Close all doors and windows and check for any source of heat in the room
Before calling for service, please review the followingl Iiist of common
problems and solutio, ns
The air conditioner is operating normally when:
• You hear a pinging noise This is caused by water being picked up by the fan on
rainy days or in highly humid conditions. This feature is designed to help remove
moisture in the air and improve cooling efficiency.
See the section on Slinger Fan, page 19.
• You hear the thermostat click. Thisi is caused b,y the compressor cycle starting
and stopping.
• Yo,u see water dripping from the rear of the unit. Water may be collected in the
base pan in highly humid conditio, ns or on rainy days. This water overflows and
drips fro,m the rear of the unit.
• You hear the fan running while the compressor is silent. This is a normal
operational feature.
22 Room Air Conditioner

Maintenance and Service
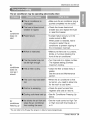
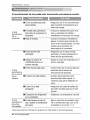
The air conditioner may be o_rating abnormally when':
Air
conditioner
does not
start
Air
conditioner
does not
cool as it
should
Air
i_ _
cond_boner
freezing up,
• Make sure the air conditioner plug is
pushed completely into the outlet.
Check the, house fuse/circuit
breaker box and replace the fuse
or resiet the breaker.
If power failure occurs, turn the
mode control 4o Off.
When power is restored, wait 3
minutes to restart the air
conditioner to prevent tripping of
the compressor overload.
Make sure there are no curtains,
blinds, or furniture blocking the
front of the air conditioner.
Turn the knob to a higher number.
The highest setting provides
maximum cooling.
Clean the filter at least every 2
weeks.
See the care and Maintenance
section.
When the air conditioner is first
turned on, you need to allow time
for the room to cool down.
Check for open furnace floor
registers and cold air returns.
See Air Conditioner Freezing Up
below.
Set the mode control at High Fan
or High Cool with thermostat at !
or 2
"You _n refer to tlhe Energy Star pr_ram in detail at www, energystar.gov.
¢'Owne, s Manual 23

24 RoomAirConditioner

Precauciones de Seguridad .........26
A_s de _ner en _rcha ............30
In_ucci on .................................. 31
Simbolos Ultilizados en
Este Martual................................. 31
_racted_icas ............................ 3l
Seguddad Elec_ca ......................32
Use Transitotio de un
A
daptador ..................................... 33
Cable A[ar_dor ...........................33
Instalacibn ....................................34
Requerimien_o_ de Vent_na ........34
TamaSo ..................................... 34
Espacio Libre ..............................35
Preparaci6n _ la Carcasa ...........36
Instaiaci6nde la Uni_d ..............37
Instrucciones de
Funcion_miento ..............................39
Instruccions de _ t_ol
Remolo ....................................... 39
Con_ol Remob ........................... 40
Adicionales e Caractedsticas .......41
La Direccion del Aire ..................41
C:o_rol de ventilacitn .............. 4!
Tubo _ Dengue .........................42
Removerlo de la Ven_na .........42
Mantenimiento y Servicio ................43
Fiitro _ Aire ............................. 43
Ump_za del Aire
Acondicionado ......................... 43
Come Remover la PariHa
Fron_l......................................44
Problemas y Soluciones
Habituales ......................................45
Re_luci6n _ problemas.............46
PARA SUS ARCHIVES
Escnba aqu[ el modelio, y nBmem de serie:
Mode|o n ° :
Pue_ enco,nt{ar [1_ nOime_os en [a etiq_a _ _a_rte
laterat d,e] _oducto,
Nembre eel disl_Hbuider:
Fee:ha de compra:
il Adjulnt_ _J recibo a esta p_gi_ con la glr_padlor_ p_ra
el memento que io neces,ite [_ra proof la fec_ de su
adquisici6n o para _ validaci6n de I!agarantia,
LEA ESTE MANUAL
En S_ intedor enco,m{ar_ touches consejc6 _tiles s_{re
u_lizaei6rl 7 mante_imiento de su acondiei_ador de air,e,
Unos _cos cuidad_ _r su parte le pueden ahorrar
mucho tiempo, y dine[o durante la vida de su
acondick_lador de a#e.
E_ [la tabla de consejos para la so,luci6n rapida de
pmbbmas encont{ara muchas respuestas a _ pmb_emas
mas habituales_ Si revisa primero nuestra Tabla de
Consejos papa la so_uci6n r_p_a c_ _lemas, tal vez no
necesite I_amar nunca al _r'¢icio tecnico,
PRECAUCION
• Centare a unCentre deServicio Autoriz_o £ar_rep_raro
m_liz_r_ m_ntenirni_te de _t_ _rfid_d. Ll_me_1-_0-243_0
_m _b_at ,_ CSA m_iscerc_o
, _1_[re _¢ondicion_o no _ afro pataset u;_o F_t n[=_o_
_q_e6o_ o dlisc_lPa_it_e$_in I__pelrvisio_ _d_:u_d_.
•L_ niiios_Uie_ _e_n _r SUI_ViSa_S p_raasegurat qus
no jeegue# cone aireaco_lctoa_do.
. Sihayquec_mbiarelc_blede ali_nt_i6n, _l_e _ _ntecnico
de suvicio q_e ins_e _n rec_mbioexacto.
, I=lttab_jo de I_ insta_ciSn debe_er _ealiz_o de _rdo al
_d[go, iE_tico _ctonal, _nfcamentepot el personalcalif[_e y
Manual del P,rop,ietario

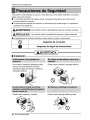
Pre_uciones de, Seguridad
Para prevenir tanto lesiones al usuar[o u otras personas como daSos matefiales, es preciso
seguir estas instru_iones...
lib La in,_rrecta o_ci6n die] apara_o como co,nsecuencia de ignorar las [nstrucciones.
provocarA daS_os o lesiones..
m A cause del peso _sado del producto, se recomienda que usted tenga a run ayudante a
pa_icipa en la instalaci6n,
I ADVERTENC:IA
&PRECAUCION
Este simbolo indica _aposib,ilidad de lesiones mortales o graves..
Este simbollo indica la posibilidad dleI.esioneso daSos matedoales.
| El signifi_do de los s_mbo!os ut:ilizados .en este manual se indi_ a conflnuaci6Jn,
I A_gurese de no hacer!o,
As_urese de s_uir las instrucciones.
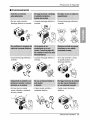
[] Instalaci6n
. Un montaie o insta]ac[6n ,defe,ctuoso puede
provocar un funcionamiento, [ncorrecto,
incliuyendo desgos de lesiones, incendiios o
descargas, el6ctricas.
• Puede caus.ar incendio y descarga e]6ctri_.
, Puede cau!_r exp]osi6,no inc.endio.
26 Aim Acond_cionador
• IP'ued.ecausar descarga e]ectr[ca y faHos,

PrecaudonesdeSeguridad
III Funcionamiento
, De otto modo, causara
descarga electrica o incendio.
. Causar_ descarga electrica o
incendio.
, En caso que no,,puede
• _usalra descarga eliectdca o
incendio.
.Causar#.descarga eliectica o
incendio.
• Causara de_arga e[ectrica o
incendio,
• Si no hay conexi6n, a masa,
se puede p,roducir una
descarga ele_rica
causar incendio, y accidente
de _rto circuito,,
• Puede _usar incendlio y
accidente elle_rico.
• Puede ,causar descarga
electric.
Manual del Propietario 27

Pr_auciones de, Seguridad
, E] aparato de air.e acondicionado de_
o_rarse en un _reia ce_.ada para set m_s
.efecflvo.
, Causara descarga e[ectdca o incend[o.
• Puede caus.ar explosi6n, [nc.endio.,
quemaduras.
• Pu.ed.e entr.ar agua en [.aunidad y disminu[r la
ais[aci6n. Puede _usar una des_rga
e_e_ricao
[] Instaiacibn
, Son fi]os.as y pueden causar
[es[,ones.
• Pu_e IFOVOCarel fa[[ode urn
e]ectrodomest[coo deter[oraci6n
de su rendim[ento.
/
I
/
Silacsrca_exterior_:a ,_ffada,
reparar_0[_biarse
inm_diat_e_te,Deiafla_ria provoc&_
queelaparatodeacondicbnado
_igadeIsre,tara,coselconsiguiente
pel_rodeie_ones
28 Aire Acondlcioinadof

Precauciones de Seguridad
ii Funcionamiento
,,Hay fiesgo de [esiones
_rsona]es.
• Puede causar descarga
e]@tdca y daho.
• Gastara enelrgia en vano y
podfia provocarun accidente,
. Oomoel ventilador gira a a_a
vei!o_d,ad_ando esta funcionando,
puede _usar lesiones
, El funcionamiento sin f[Itro,s,
puede daSar Iiaunidad,
. Este p,u_e causar [lesiones oi
daSos en la ma_ota o Iia
p]anta.
• Pu_e causar da_o a los
animales o vegetales y
perdida de obietos.
• La unidaddela[reacondicionado
[puededeteriorarse,cambiarde
color,o desarro_arm_,chas en
la supe#icie.
• No es sano y podria pro,vo,car
I
enfermedades o pel!igros de
],esi,ones_rsonales,.
Manual del P,rop,ietario 29

Previoat Funcionamiento
1..Coloque ell enchufe correctamente.
2_ Use un Onico circuito para este aparato. R.ecargar ,e!c[rcuito p,odria provocar
un r[esgo de incendios.
3. No ut[iice un alargador. Consulte Iiapag[na 33. para mas detalles,
4. No arranque/detenga el func[onamiento enchufandoidesench_ufando el cable
de corriente electric&
5. Si eli alargador esta da_ado y iha de, ser recambiado, solicite a un tecn4co
auto,rizado que instale un recambio exact&
1..Estar expuesto al flujo directo de aire por un periodoi largo de tiempo puede
constituir un riesgo para su sislud. No exponga a las personas, mascotas ,o
pUantas a] flujo directo, pot periodos largos de tiempo.
2. D,ebid,o a la posibilidad de falta de oxigeno, ventile la habitaci6n cuando se
use al mismo tiempo qlue es.tufas u otros dispositivos die calefacciOn.
3. No use este acondicionador de aire para propositos determinados no
especificados (pot ej.: preservar dispositivos de precision, alimentos,
cachorros, plantas y objetos de arte). Tales usios puede da_ar los elementos.
4. El aparato de .aire acondicionado es un apa_ato dise_.ado para el confort del
consumidor, No es un sistema aclimatizador.
1. No toque las partes de metal de la unidad cuando quiite el filtro. Puede
lastimarse cuando manipule bordes fiiosos de metal.
2. No use agua para I[mpiar adentro del a,condicioniador. La expos[c[6n allagua
puede destruir la aislaci6n y esto, a su vez provocar una descarga el6ctrica.
3. Cuando limpie la unidad, asegOrese que la cordente y el interruptor esten
desconectados. El ventillador gira a muy alta velocidad cuando es.ta
func[onando Existe la po,sibilidad de lesionars.e si la energ[a se conecta
acc[dentaimente cuando este Ilimpiando las piezas internas de la unidad
Para reparaciones y mantenim[ento,, pongase en contacto con un centro de
serv[c[o autor[zado. Consulte la p_g[na de garantia o, Ilame al nOmero (800) 243-
0000. Tenga su nOmeor d emodelo, y nOmero de s.erie a mano. Los encontrar_
en la pagin,a 25, de este manual.
30 Aire Acond_cioinador

introduccion
Este sim_lo Io advie, rte de un _ligro de accidente por co,rriente
Es,te sim_lo Io ,adiverte de un peligro qu,e pu_a cau_r un daSo
del ventliador.
Este simbolo significa condicciones esp_iales.
ADVERTENCIA : Este aparato deberia instalar_ de a,cu,erdo con i,as
normas de! C_igo Electrico Nacional.
Guia iSlu
Gavinete
Rejillla Frontal
Filtro de Aire
Deflector Vertical de Aire
Deflector Horizontal de Aire
Sal[da de Aire
Toma de Aire (Recolector die Aire)
Eva
Panel de Control
Control Remoto
Abrazadera
Compresor
Bandeja de Base
Cable el6ctrica
Manual del P,rop,ietario 31

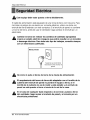
Este equipo ,debeestar puesto a tierm debidamente.
El cable de alimentaciOn esta equipado de una toma de tierra con tres pins. Para
minimizar ell peligro de una lesi6n por corriente electriica, utilliice una toma con
enchufe de tierra estandar con tres contactos.. S.i el enchufe de pared no contiene
un borne de tierra, antes de usar el ventilador haga cambiar el enchufe por un
electricista.
Cambiar la toma sin realizar los cambios de cableado apmpiados
crearb un estado el_trico ins_giuro que podria resu|tar en un incendio
o descarga el_ctrica, Para todo este tipo de trabajois, consiulte siempre
con un electricista cualificado,
_ A_gOrese que existe debidaneutra_izaci6nantes de ufliizar el
No corte ni quite el _rne de tierra de la clavija de alimentacibn
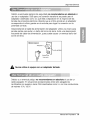
El acoplamiento de! borne de tierra de! adaptador con e! torni!lo de !a
cubierta del enchufe de pared no pondra el equipo a tierra, si el
tor'ni!lo de la cubierta no. es de metal y esta aislado y el enchufe de
pared no .esta puesto a ti.erra a traves de |a r_ d.e la cam.
En el caso de cualquier duda res.p_to a la co.rr_ta p.uest.a a tierra
dei ventilador, haga revisar el enchufe de park y el ci_uito _r un
electricista pm.fesional.
32 Aim Acond_cionador

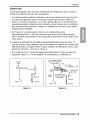
Debido a eventualies peligros de seguriidadi no recomendamos en ab,_luto er
uso, de un adaptador. SOlo para una conexiOn transitona se puede usar el
adaptador clasiificado como UL que est_ a disposiciOn en la mayoria de Iias
tiendas de productos electricos. Atienda que e orificio grande en el adaptador
corresponda al orificio grande en e! enchufe para Iograr la conexiOn con la
poiaridad correcta
Desconectando el cable de alimentaciOn dell adaptador utilice una mano p,ara
sendas partes, para evitar un daOo del borne, de ti,err& Evite una desconexion
frecuente det cable de alimentaciOn, pues puede causar un eventual daOo del
borne de tierra.
Cubierta_1
}emilio de Me'ta!
Nunca utilice el _ui_ con un adaptador daOado,
Debido a un eventual p,etigro no recomendamos en ab_luto el uso de un
cable alargador. En situaciones excepcionales utilice s01o alargadores
certificados con puesta a tierra CSA clasificados como UL con tres conductores
de valores 15 A, 125 V.
Manual del P,rop,ietario

in,stataciSn
_ A: 11 Tipo B:5 Tipo D:3
(Tomille ®rte} (Temillo Mediiano) (Tube de Dre_qaje} (El Par_elesis L)
_V
i 'i
°'FipoE: 1 Tip,o F: 1 Tipo a, 2 °rir_ H: !
(Adhesivo postedo0
(i'4oadh_vo posterior}
Para la instalaciiOn deberia tener a disposiciOn los instrumentos siguientes:
* Destorni]Lador (Estrelila y Phillips) * Regla
* Cucjillo * Marti]lo
* LApiz Nive]
Este ventilador de casa es,ta
construido para ventanas estandar de
dos alas con la extension real de
apertura de 22" a 36". El ala superior
y el inferior de la ventana deben
abrirse liesuficiente para pro,ducir un
ofific[o vertical de 13'" desde el ala
superior hasta el antepecho.
.._Lo 22" a 36"
M[n, 13"
I I
_ ADVERTENCIA : Este producto es un a_rato de AIRE ACONDICIONADO
, PARA iNSTALAC!ONi EN VENTANAS, Como tal, se necesita una ventana de,
un cuelgue o de doble cuelgue para una ins_lacion a,d_ua,da,, N,ose
mcomiendan instalaciones en lugares que no _an ven_nas, utilizando
caNuillos, ,o,dficios en las paredes ni cuaiquier otto tipo,
34 Aire Acond_cioinador

Ins,tatacidn
Es_cio libre
E] suficiente espacio libre aumenta la eficiencia de refdgeraci,On de la un[dad e
impide la irradiaci6n de] calor del condensador.
1. Si ]a sobre-ventana estorba col6quese una tira de madera de 2 pulg de ancho
a I0 largo del descanso de la ventana por la parte que de internamente al
cuarto, yen toda su extensi6n ILatira de mad,era debe ser Io suficientemente
gruesa para elevar e] descanso de la ventana, de tal manera que la unidad de,
aire acondicionado pueda ser iintalada sin [nterferencia del marco de la sobre-
ventana (storm wiindow).
2. Vet Figura. B. La parte superior de ]a tira die madera deb,e estar
.aprox[madamente a 3/4de p,u]g mas alta que ,el marco de la sob,re ventana,
(storm window) para ayudar a que e! agua de condensacion de la unidad fluya
hacia duer.a.
3. Instale una segunda tira de madera (aproximadamente 6 pulg. de largo, 1_/2
pulg de ancho y mismo espesor que la primeratira de madera) en el centro de]
descanso exterior, p6nga]a contra la parte posterio, r del descanso interior. Esto
e]evarA la mensulia L como en la Figura. B.
4 S[ ]a distancia entre "Franja de Madera Montada Sobre la Parte superior del
Des,,cansointerior"y "Tira de Madera Para la Mensula L y Mensula de
Franjade/_a Monta_
S_e, la Par_esuperiordel
De_aa_ _nterier i° Max,
interior Exterior
Fi,gura. A Fi,gura. B
Manual del Propietario

in,statacidn
!. Introdiuzca los pan,eUesen los:guias del
aire acondicionado. Las cortinas
atorniHelas con !os torniiHos (Tipo A).
Use un atornillador largo. Asi le
ser& m&s f&cil iinstalar liestorniill,o,s.
2. Corte la banda adhesiva (Tipo E) y
col6quela del anch,ode la ventana.
Remueva e! pla.stico de la banda adhesiva
y col6quela en la parte superior de el
marco inferior de la ventana.
Banda
(Til_ E)
3. Colocandio la unidad en la ventana
Abra la ventana y marque LH'qEA en el
centre esta.
4. Coloque el iensula en L
4-1. instale los soportes L detras de
alfeizar iinterno de la ventana, con e,l
lado corto del soporte come est_
ilustrado. Utilice 2 tornil!os (Tipo A)
proveidos,
4-2. La mensulla ayuda a que la unidad
se encuentre firme. AsegOrese de
poner la m@nsula en L contra la
parte posterior del descanso interior.
De_anso
Exterior
_nsula en L
I_ior
Lin,ead,elCentre
36 Aire Acond_cioinador

tns,_taci6n
Pr'_autibn: En las siguientes inst:mcciones, sostenga la unidad firmemente
ha.staque la parte co_ediza de la ventana descan_ sobre la parte superior
del canal y por detrbs del marco de los paneles co._izos, Puede haber
lesiortes o dah,ossi la unidad se cae de la ventana,
1, Instale el Aire Acondicionado a la
1-1, Cuidadosamente le_ante el aire
acondicionado y ,cobqueb en el hoyo
de laventana. Aseg0rese de que la guia
inferior dellaire acondicionado caiga en
lugar _rrecto del mensula en L
Cuandoelaire acondicionadosea
fijadoenellsupporten IL,el aireacondicionado
ser_cen_radocomopuedenobse_ar,
1-2.Mientrasmantieneel aideacondidonadoen
_siciOn,cuidadosamentebajeel bordedela
,antanasuperiorbasrala guiasuperiordd
aireacondicionado,
Una_z instala_3debidamentee!_arato, de
aireacondicionado,debedaindinarse
ligeramentehaciaabaioen su _rte, posterior,
S.iesta realpuestoenla ventana,colg.a_amas
abajoporIlaparteposteriorautom&ticamente.
S,ino Iohace,hayunaproblemaconla
instalacbn.
2. Asegure los _neles
Extien_ lospanties _ra rdlenar losorifidos
dela ventanausaq_ los4 tornillos(TipoB).
3. Instale la Banda del Marco,
3-1.Cortela b_ dellmarcodel mismoanchode
laventana.Col_ue Ilabandadd marcoentre
el vidrioy la ventana_ra prevenirla
_net_aci0n_ cuartode insectosy aire.
3-2.Atomillela cen-adurade/marcousandoun
tomi!lo_p,oA.
3-3,_ite ilostornillo_queas_uran el gabinde y
_cerda despredableenel la_ correcto,
ii1' 11
Borde _ la Ve,nlar_a_Jpe_
f
marmot 1,'4"
Cerra_a del Marco
-ripe A
Tip® B
Manual del P,rop,ietario 37

Instalaci6n
3-4. Amarre la escuadra de soporte (Tipo
H) usando un tornillo que puede sacar
dellcabinete del aparato de aire
acondicionado. Acople la escuadra
(Tipo H) a Laparte interior de la repisa
de la ventana con un tornillo (Tipo B).
4. _ irtstalaci6n del aire acondicionado de v_tana no estarb completa. Vea
SEGURIDAD ELECTRICA para con_tar la ,extensibn el_trica alltoma corriente.
38 Aim Acond_cionador

instrucciones de fun,cion,amiento,
POWER (_cendido),
IEIfuncionamier_fo se irlicia cuando _ puisa esta tecla y _e
detiene cuando se la presiona nuevamente,
SE_CTOR DE VEL_IDAD iDEL VENT|LADOR
(FAN SPEED)
Para aur_,ntar ]a capacidad mientras _ reffesca,
seJ_cione una mayor vel_idad de,_ventilador,
3 Pasos: High (a[Ita) - Low (baia) -Med (media)
CRONOMETRO ON/OFF (ENCENDIDO/AP'AGADO)
IEIcron6metro pu_ie _r collocadlo para iniciar y detener la
unidad en incrementos pot hora (hasta 12 horas),.
FIJNCIONAMIENTO DEL MODO SELECTOR
S,e_cio_ ,elm_o fre_o, (c_l) para er#dar la habi'l_ci6,r_,
Se[_cio_ el mode de ahorro de energia para ei
funcio,namiento del ahorro de e,negia,
Se_;cio_ e_modo v_qtilador (fan) papae_fuacionamiento del
v_tilador.
Se_cio_ e! modo s_ (dry) para e!funcionamiento s_o,,
CONTROL DE TEMPERATURA
El termoslato, monitorea la l:empe_atura de la habitaci6n
para mante_e[ lla tem_ratu['a deseada.
El termostatoi [uede ser col_ado entre _':F_86°F
(16:C_30_0),
La unida,d t_a un prom,_io de _ minutos para ajus_[a,r la,
temperatura de [a ha_taciSn en I_F
SENSOR DEL CONTROL REMOTO
Manual del P,rop,ietario

InstruccJones de funcionamiento
CAU'TION: Tlhe Remote Controller will not function pro_rly if strong
light strikes the sensor wind_ of the air conditioner or if there are
obstacles Ibe_een the Remote Controller and the air conditioner°
POWER (encendido)
E] funcionamientoi se inicia cuando se pu]sa esta te,cla y se detiene
cuando se la pres[ona nuevamente_
CONTROL DE TEMPERATURA
El termostato monJtoirea la temperatura de la
habitac[6n para mantener _atemperatura desead&
El termostatoi [puede. set co]ocado entre 60°F~86°F
(16_C~30°C), La unidad toma un promedio de 30
m[nutos para ajustar latemperatura de ]a habitac[6n
en 1°R
DE VELOCIDAD DEL
VENTILADOR (FAN SPEED)
Para aumentar la capacidad m[entras se refresca_
seleccione una mayor ve]ocidad de] ventHador. 3
Pasos: High (allta)-Low (baja)-Med (media)
CRONOMETRO ON/OFF i
E! cron6metro puede ser co!ocado para iniciar y
detener Ilaun[dad en incrementos por hora
(basra 12 horas).
FUNCIONAMIENTO DEL
MODO SELECTOR
Seleccione el modo fresco, (C_J) para enfriar la habitaci6n,
Selecc[one e_modo de ahorro de energia _ra elfuncio,namiento
del ahorro de energia_Seteccione e] modo venti]ador (fan) para el
func[onamiento del venti_ador: Se_ecc[one e_modo, seco (dry) para
el func[onam[ento seco.
V ]'emp A
Timer Mode
How to In_ff
1, Remove the cover from the back of the remote
_ntroHer
2. Insert two ba_er[_.
sure of the poliaritywhen installing the
batteries,
sure that both bakeries are new,
3. Re-at_ch the cover.
Do not use rechargea_e
batteries, Su_ batteries
differ from standard dry cells,
in sha_, dimensJons, and
_rfo,rmance,
Remove the batt,eri_ from
the remote controller if the air
_ndition,er is not going to
usedi for an extended Iiength
d time.
40 Aim Acond_cionador

tnstrucciones de funcionamien, to
Eliflujo de aire pu_e _r aiuista_ cambiando ],a
d[recci6n de las rej[Hasde ventilaci6n de] acond[c[onadior
deaire. Esto puede tamb[6n [ncrernentarla eficacia del
acondidonador de,aire,
Ajus_ia[ ]a diir_cibn de flujo de ai_ hofi_n_l,
Aiustar las reji]las ve_es h,acia ]a [zquierda
yderecha cambiara el flujo hoifizontal,
Ajustar la direcci6n d_ flujo de aire recital
Ajustar e! _[abe horizon_l hacia arriba y
abaj_mbiar_ el flujo de a[re vertical, Ei &[abe
puede_r ajustado moviendo la parte _sterior
de] _abehacia arfiba o abajo,.
Ode_aci6n rec_Jendada de !as rejililas
Ajuste las rej[I]as hacia arfiba para Ilevar a] m_ximo
a eficacia del fre_,
Aju_ar el flujo de aire h_iz_tal
Ajustar _ flujo de aire vertical
Control de ventila, ciSn
Para m4x[ma ,e,ficiencia de ffescura C]ERRE ia ventilaci6n, Esto piermitir4 ]a circulaci@ intema de
aire.ABRA la vent[liaci6n para de_argar el aire viciado,.
CERRADA_VEi'_I_CION_I. ABERTA
Manual det ,Prop,ietario 41

OperatingIns s
i
i
Tube de De_e
En cliimas hOmedios, es posiiblle que la
Bandeja Evaporadora se Ilenne de agu.a.
Para quitar el agua acumulado,, es
preciso conectar el tubo ,de desag_e.
Quite ia Tapa del DesagOe y co,necte el
Tubo a la Bandeja Evaporadora
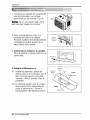
Este aparato de aire .acondicionado va
equip,ado con un ventilador de
extraccion (Vease la iliustracion de
ab_o,),. El ventilador tiene un anillo
externo que gira en el agua que recoge
en la plancha base al entrar en
profundidad. La condensaciOn la recoge
ell ventiiliador y Ilaexpullsa a traves diel
condensador, haciiendo mAs eficiente al
aparato de aire acondicionado.
Orai_C®
Ring
PRECAUTION: Tenga cuidado al in_rtar el tubo de dmnaje. AI6jalo de
la area aguda para evitar'el deslice y lesio,nes por usted mismo,.
IRemove,rlo de la Ventana
Apague eliaire acondicionado, desconecte el cordon elOctrico, del toma corriente,
remueva la cerradura del marco i y los tornilJos instalados en la parte superior e
inferior de los paneles, y guardelos para reinstalacion. Cierre los. paneles.
Manteniendo el aire acondicionado fuertemente, levante el marco de la ventana, y
cuidadosamente, incline eli .aire acondicionado hacia atras, botando cualquier
agua condensada. Deslice el aire acondicionado 1" a la derecha, luego levantelo
de la ventana y remuevale la banda del marco de la ventan&
Aseg0rese de drenar TODO el condensado de! aparato de aire acondicionado. Si
no Io hate, podria salirs.e mientras transporta el aparato, ensuciando, con e!
consiguiente peligro de resbalones. Este simple paso le .ahorr.ara tiempo de
limpieza y hara de su lugar un entomo mas s,eguro.
42 Aim Acond_cionador

Mantenimientoy servicJo
Filtm ,de iAire
Revise por io menos, dos veces ai rues si no es necesario limpiar el filtro de aire.
Las particulas detenidad se pueden acumular en elifiltro, impidiendo el fiujo dei
aire, iimit.ando el rendimiento de enfriamiento y causando la acumullaci6n de hieloi
en el e_apo,rador. Pro,ceder de la limpieza del filtro de aire:
1. Levante la rejilla de entrada
2. Saque el filltro de aire de la rejililla delantera sacAndolo Iligeramente hacia arriba.
3. Lave e! filtro con agua tibia de temperatura meno,r de 40_ (104°F),o
4. Escurra ligeramente el agua sobrante del filtro y vuelva a instalarlio.
Limpieza de! Aire Acondicionado
La parrilla frontal pue,dleset limpiada con
un trapo h_lmedo m_ado en un
detergente suave.
El gabinete puede set lavado con jab6n
suave o detergente y agua tibia, enton_s
pulido Cera Liquida para aparatos.
Para asegurarse una eficiencia continua,
las bobinas, del condensador (det lado
expuesto al exterior) debe ser revisado y
lavado ped6dicamente sea pot que se
tranque _n basura o polvo, de l.a
atmosf,edco.
Manual del Propietario

Mantenimientoy servicio
Como Remover la Parilla Frontal
1, Tire de ia rejilla de entrada hacia
delante agarrando ambas lengOetas
y tire del filtro de1 aire hasta sacado.
2, Saque el torniflo que asegura ila
Parrilla Frontal,
3, Suelte el lado izquierdo, pdmero,
Despues cuidadosamente hale
desde la parte de arriba y empuje
hacia la derecha. Las leng_Oetas
est_n aseguradas.
44 Aim Acond_cionador

Mantenimientoy servicJo
Antes de Lilamar el Servicio de Asistencia T_cnica
Si tiene probiemas ,con su venti]ador, lea las informaciones sigu[entes y trate de
resolver e] problema. Si no puede encontrar ]a soluciOn, desconecte eliventila,dor
y dirijase a su suministrador.
E! ventilador no funcio,na
1. Coimpruebe que ell '¢enti]ador est6 coneotado en un enohufe correoto.
2_Revise el fusible.
3. Compruebe que Ilatensi6n no sea demasiado allta o baja.
AI ajustarse el enfriamiento, el aire no pareee frio Io suficiente
1. Revise si Uosajustes dle la temperatura son correctos
2. Revise si el filltro de aire no estA atascado de po]vo. En e] caso de que si,
cambie el fi]tro.
3. Compruebe que afuera no haya un ob,st_tculo del fiujo de aire y si entre la
p,arte trasera de] ventillador y la pared o ]a barrera haya espacio Ilibre de pot Io
menos 1 metro (20").
4. Cierre todas las puertas y ventanas y compruebe que no haya una fuente de
calor en la habitad6n.
Antes de tlamar ai servicio, tenga a bien revisar ]a siguiente lista de
problemas y sus soluci,ones.
El acondicionador de aire esta: funcionando norma/mente cuando:
• Escucha un sonidio metalico. Lo causa ,elagua qu,e recoge el condensado, r en
dias Iluviosos o en condiciones de mucha humedad. Esta car acteristica est:a
dise_aaa para ayudar a quitar la Ihumedad en el aire y mejorar la capacidad de
enfriamiento.
Consu]te Ilasection dell Vent[iadlor de, extracciOn en Ilap,Ag[na 42.
• Oye un c]ic en el termostato. Lo causa ,el ciclo del co,mpresor que comienza y se
detiene.
• Ve gotear agua de ]a parte posterior de la un[dadi.i 811agua puedie ser recogida
en la bandeja de base en condiciones de mucha humedad o dias de Iluvia. Esta
agua desborda y gotea desde ]a parte posterior de, la unidad.
• Oye funcionar el ventiliador mientras el compresor estA silencioso. Esto es una
caractedstica operativa normal.
Manual de/P,rop,ietario 45

Mantenimiento y servicie
El acondicionador de aire puede estar funcionando anormalmen'te cuando:
EEaire
acondiiciona
do no
enciende
• El aire acondicionado esta • Aseg0rese que ei aire acondicionado
esta conectado completamente a la
fuente de energia.
• El fusible est,. quernado/el • Cheque los fusibles/interruptor de la
interruptor de energia se ha casa y reemplace los fusibles o
reestablezca el interruptor de energ[a.
• Falta de energ_a. • Cuando la energia se reestablezca,
espere 3 minutos para encender de
nuevo el aire acondicionado. Con esto
evitara que se produzca una
sobrecarga en ef compresor.
[] El flujo de aire esta • Aseg0rese que no haya cortinas,
persianas o muebles bloqueando el
frente del aire acondicionado.
• Ajustar el control de temperatura a un
TEMPERATURA en un n0mero mas bajo_
n0mero m_s alto.
[] El filtro de aire est_ sucio.
Er aire
acondiciona
do no enfria ..................
corno • E! cuarto a_n esta calienteo
debiera
EFaire
acondiciona
do enfria
demasiado
• Limpie el filtro pot Io menos cada dos
semanas. Vea la seccion de
instrucciones de operacion.
• Cuando usted enciende el aire
acondicionado debe esperar un
momento para que la habitacion se
enfrie.
• E! aire frio se esta
escapandc.
• El serpentin de refrigeraci6n
se ha congelado.
• Aseg0rese que todas las salidas de
aire es_n cerradas para que el aire
regrese
• Est_lezca una temperaura m_s alta.
• El hielo bloquea el flujo de
aire y detiene el enfriamiento
del cuart&
• Elija el modo alto del!ventilador High
Fan o enfriado alto High Cool _n et
termostato en el n0mero 1 o 2.
Usted p,uede referirse aUEnergy Star pr_/rama con todo detaHe en www.energystar.gov,
46 Aire Acond_cionador

ManualdelPropietario 47

Goldstar will repair or replace your product, at Goldstar's option, if it proves to be defective in material or
workmanship under normal use, during the warranty period set forth below, effective from the date of original
consumer purchase of the product. This limited warranty is good only to the original purchaser of the product and
effective only when used in the United States, including Alaska, Hawaii, and U.S.Territories.
WARRANTY PERIOD:
Labor: 1Year from the Date of Purchase.
Parts: 1 Year from the Date of Purchase.
Compressor: 5 Years from the Date of
Purchase.
HOW SERVICEISHANDLED:
Call 1-800-243-0000 and choose the appropriate prompt.
Please have product type (Air Conditioner), model number,
serial number, and ZiP/postal code ready.
The terms of this warranty cover in-home service on the indicated
models.
THISWARRANTYIS IN LIEUOF ANY OTHERWARRANTIES,EXPRESSOR IMPLIED,INCLUDING WITHOUTLIMITATION,ANY
WARRANTYOF MERCHANTABILITYOR FITNESSFORA PARTICULARPURPOSE.TO THEEXTENTANY IMPLIEDWARRANTYIS
REQUIREDBY LAW, ITIS LIMITEDIN DURATIONTO THEEXPRESSWARRANTYPERIODABOVE. LG WILLNOT BELIABLEFOR
ANY CONSEQUENTIAL,INDIRECT,OR INCIDENTALDAMAGES OF ANY KIND, INCLUDING LOSTREVENUESOR PROFITS,IN
CONNECTION WITH THEPRODUCT. SOME STATESDO NOT ALLOW LIMITATIONON HOW LONG AN IMPLIEDWARRANTY
LASTSOR THEEXCLUSIONOF INCIDENTALOR CONSEQUENTIALDAMAGES,SO THEABOVE LIMITATIONSOR EXCLUSIONS
MAY NOTAPPLYTO YOU.
THISLIMITEDWARRANTYDOESNOTAPPLYTO:
I,
2.
Service trips to your home to deliver, pick up, and/or install the product, instruct, or replace house fuses or
correct wiring, or correction of unauthorized repairs; and
Damages or operating problems that result from misuse, abuse, operation outside environmental
specifications or contrary to the requirements or precautions in the Operating Guide, accident, vermin,
fire, flood, improper installation, acts of God, unauthorized modification or alteration, incorrect electrical
current or voltage, or commercial use, or use for other than intended purpose.
3. Therefore, the cost of repair or replacement of such a defective product shall be borne by the consumer.
CUSTOMERINTER-ACTIVECENTERNUMBERS:
To Prove Warranty Coverage
To Obtain Nearest Authorized Service Center or Sales
Dealer, or to Obtain Product, Customer, or Service
Assistance
Retain your Sales Receipt to prove date of purchase.
A copy of your Sales Receipt must be submitted at
the time warranty service is provided.
Call 800-984-7469, 24 hrs a day, 7 days per week.
Press the appropriate option, and please have your
product type (AIR CONDITIONER), and ZIP/postal code
ready.
Patent No.: US 6, 412, 298
P!No.: 3828A20437D Printed in China
-
 1
1
-
 2
2
-
 3
3
-
 4
4
-
 5
5
-
 6
6
-
 7
7
-
 8
8
-
 9
9
-
 10
10
-
 11
11
-
 12
12
-
 13
13
-
 14
14
-
 15
15
-
 16
16
-
 17
17
-
 18
18
-
 19
19
-
 20
20
-
 21
21
-
 22
22
-
 23
23
-
 24
24
-
 25
25
-
 26
26
-
 27
27
-
 28
28
-
 29
29
-
 30
30
-
 31
31
-
 32
32
-
 33
33
-
 34
34
-
 35
35
-
 36
36
-
 37
37
-
 38
38
-
 39
39
-
 40
40
-
 41
41
-
 42
42
-
 43
43
-
 44
44
-
 45
45
-
 46
46
-
 47
47
-
 48
48


Goldstar M8004R El manual del propietario
- Tipo
- El manual del propietario
- Este manual también es adecuado para
en otros idiomas
- English: Goldstar M8004R Owner's manual
Artículos relacionados
Otros documentos
-
LG CL8000ER El manual del propietario
-
Zenith ZW5010 El manual del propietario
-
-
-
LG HBLG6000R El manual del propietario
-
COMFORT-AIRE COMFORT AIRE REG-123A El manual del propietario
-
-
-
Kodak BTSPK103 Manual de usuario
-
Kodak BTSPK113 Wireless Party Speaker Manual de usuario