Goldstar GWHD5000 El manual del propietario
- Tipo
- El manual del propietario

S
www.goI&_pliar_es+com
OWNER'S MANUAL
MANUAL DEL PROPiETARIO
Models/Modelo GWHD5000

S_ P_ons ...........................3
.........................
In_duction ..................................... 8
SyruPs Used in this Manual ............8
Featu_es .......................................... 8
Adap_ ........................................ tl
Tempom_ Use of an
E_r_n Cord ............................ 11
Inml_t_n ........................................._2
WindOw P,equ_ents .................t 2
Size ........................................... 12
Loca_ .......................................13
Oea_n_ ................................. 13
_rat[on of C_is ................14
UnitIn_|la_ ............................15
Ope_ I_tNctJons ..................16
_on a_ Fun_on
of Co_ ........................................16
_l_al Fea_ms ....................... 17
Air Di_n .............................. 17
D=mimPipe................................... "7
_n_va] _ Win_ ............... 17
Main_ance and Se_ ............18
Air Fl_r ....................................18
Cleaning_ _r Cor_ition_ .....t8
HOw_ Re_e
Fm_ Grille.................................18
Co.on Problemsand
,o
FOR YOUR RECORDS
Write _e model8nd s_ r_J_ h_:
Model #
Ser_i #
mYoUcan find_ num_m on a _1 _ _ s_e of the
p_uct.
O_le_s
Date Pu_haeed
m S_p_ your _ipt _ this pa_ in_ _t _ need it
p_ d_ of purch_e o__r warra_ is_s,
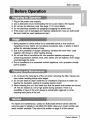
READ THIS MANUAL
!_e _ w[!]!fi_d _a_ _lpfu!! hi_ _ h_ t_ use _nd
_int_n _ur _lr co_l_r p_dy, Jus_ta flttliepreventive
_ _ _u_ part _n sa_ you a gm_t _l _ ti_ and
ov_ _ I_ _ _r' air _d_io,_er.
of trou_hoot_g tips._f_u review ou_'_ of
Trou_esh_ng _i_ first, i_ m_' _t n_ to _ll _
_evtce at _fl.
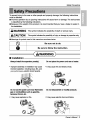
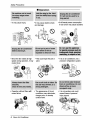
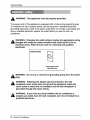
PRECAUTION
Room Air Cond#_,_er

To prevent inju_ _ _e u_r or o_er _ple and property damage, _e _Uowing
must _ _ll_d.
[] In_rrect open, on due to igno_ng ins_ions _U _use harm or damage. The seriousness
is class_ed by tl_ foUowi_
[] Becau_ of the weight _ _e p_du_, it is recommended _at _ have a hel_r _ assist in
the i_!_a_on.
[] Meanings _ sym_!!s us_ in _is ma,nus!!8re as shown be!_,
[] Ins liation
" Improper assem_y or ilnstalJa_onim_ cau_
In_ed _n, includinginjiu_, fire, and
poorpe_ormance,el_zic sho_ h_ards.
• it may _u_ fire and ele_ric sh_.
It may _use explosionor fire. " It may _u_ e_ric sh_k and failure.
_er's Manual 3

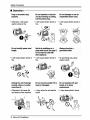
[] Operation
. Obhe_, it will _,use
elec'_c _,o_ or fin,
• Itwillcau_ e_ric sh_ or • Itwill_se elec'_csink or
fire. _re.
• It will _use ele_ic sho_ or ,, It will cau_ e_ric sh_ or ,, No groundi_ m_ cau_
fire. fire. electric sh_.
. Ot_se itwill_u_ _re
and el_ s_ a_ident.
• it _y _u_ _re and ele_c , It may _use e_ric sh_k.
4 Room Air Conditioner

_fe_ Precautions
" _e air _n, di_ner mus_ be _erated in
a enclosed area. to _ most effe_ve.
•. _t_ cau_ explosion,_re,and bum.
, It _1 cause electric sh_k or failure
machine.
• Water may enter the unit _ d_m_
insulation.It may cau_ an electricsh_..
[] Ins llation
•Th,_ aresharpandmay
causeinjury.
*It may cause failure of _pli_ • !f the o_er _e is _aged,
or peffo_an_ detenoratei. _tmu_ be repair_ or
replaced imm_iately..
Leaving k damag_ could
resuff _nthe air _nd_tioner
fallt_ out of the window,
creating a _fety _a_.
_,,ner_ Manual

_ P_ons
_,- ,,,, ::: jj_j_j :::::: : ::: :::: rrrrr rr ::: ,,, - ::
[] O_ratu,on
. It may _use Injiu_:
"It maycauseele_nc _k
and damage.
, It _l w_ power consumption
in vain and it may cau_ ac_idem.
* Since the _n re,ares m high
sp_d during operation, ff may
cause injury:
* This cou_ injure,the pet or
planL
'* it is an _r _nd_i,oner, not a
pr_:ision refngemibn s_t_f.
• Ol_r_ _out _ers will
cause failure.,
* _e appearan_ of _e air
change _ller, er d_l,op.
surface fla_.
* It is not sani_,ry a_ cou_
_use i!lness or pe_:on_
lnju_ hi_,a_,
6 R_m Air Cond#_ner

1. Plug in the _wer cord proper_.
2. Use a d_icated circuit. Overloading the line could create a fire h_ard.
3. Do not u_ an extension c,ord. See page 1i for more details.
4. Do not staWstop operation by pluggin_unplugging the power cod.
5. IIf_e power cord is damaged and requires repla_ment, have an Authorized
Se_icer instaB an exact replacement pa_.
i. Being ex_d to direct airflow for _ e_ended peri_ of time could be
hazardous to your health. Do not e_ose o_upants, pets, or plants to dir_
airflow _r extended periods of time.
2. Due to the possibility of oxygen deficiency, ventilate the room when us_
together with stoves or other heating d_i_s.
3. Do not u_ _is air _nditioner for non-specified special purposes (e.g.
preserving precision devices, P_, pets, plants, and art objects). Such u_ge
could damage the items.
4. _e air condiUoner is a consumer _m_ appliance, not a precision climate
control system.
i. Do not touch the metal pa_s of the unit when removing the filter. Injuries can
o_ur when handling sha_ metal _ges.
2:. IDo not use water to clean inside the air condffioner. Exposure to water can
destroy _e insulation, leading to _ssible et_ric sh_.
3. When cleaning the unit, first make sure _at _e power and br_ker are turned
off. The fan rotates at a very high speed during operation. _ere is a
possibil_ of injury if the unit's power is accidentally triggered on whBe
cleaning inner par_ of the unit°
For repair iand mai_enan_, _act an A_odzed Service Center. See the
warranty page for details or ca_l (8,00) 243_0. Have your m_el number and
_dal number avai{a_e.i They should be written on page 2 of this manual
OwneKs M_nua! 7

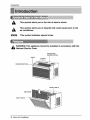
Introductio_
This symbol alerts you to the risk of el_Hc sh_P_
This sym_l alerts you to ha_rds th_ could _u_ harm to t_
air conditioner,
This symbol indicates special notes.
WARNING: This appliance should _ indued in acco_ance with the
N_ionai Ele_ric Cede.
KNOB
C_IINET
AIR DEFLEC'_R
R_KER
FRONT GRILLE
8 Room Air Condi

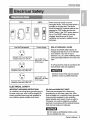
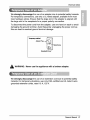
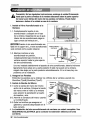
115,V~
Power cord may i_ude a current
inte_pter devi_ A test _d met _tton is
pr_i_ on 'the plug case. Re dev_e
sh@JId be tested ,ona i_rl_ic _Is by first
pressi_ me TEST button and men _e
RESF button, if B_eTEST b,_on d_es not
tdp er if t_ RESF bu_ wlfl, not s_y
engage, di_-ontinue u_ of _e air
cend_i_er a_ _nta,_ a qu_if_ _rv_ce
/iiiiiiii_iiiiiii_iiiiiiii[iiii
UI_ Wall R_eptac_ Power Supply
t_cle tared 1_,, 125V AC
_le rate_ i 5A, 2_V AC
S_ 2_,V, 3-_re groundling
_¢_e rate_ 2CA, 2_V AC
U_ 15 AMP', time
delay fu_ ,o_15 A_P,
drou_: breaker,
Use _0 _P. time
_lay fu_ o__ AMP.
cir_i_t b_a_r,.
Use of e nsion cords
Stro_'y discoum_, _e use of an _e_
cord. _e,_o i_you _sh to use
e_sion co_, use a CSA cer'dfied_L-I_ted
3-_re (glroundi_g) e_t_sion _rd, _ed 1_,
!25V.
AHwi_ng shouldibe m_e _ a_co_,_
I_t el_ri_ _es a_ _egu_tions.
Aluminum I_use winng _y p_ specia_
prowls. Co.It a qualified e_dcia_.,
ELECTRICAL SAF_
IMPORTA_ G_UN_NG INS_UC_S
Air _er_r has a three.prong g_unding pl,ug ee
_r supp_ _rd, which m_st be pluggi_ into
p_perly gr_ _mpr®g _ll re.prate _r
your protectio_ag_n_ possi_e sh_ hazard,
2_, _, and _ _LT U,N_
The_ _s are _ip_ with a three-prong
gmu_ng pl_ on the po'_ su_ly co_d, _h
m_t be _ug_d in¢oa mat_ing properly _o_nd_
th!remp_g wat! receptacle for your p!rot_ion
a_lns! [_ss_ble _: ha_d. If such,an o_et
_ot _e_nt, _e m_st be i_led _ a q_allfl_
ele_ian in a_nce _th the Na_! Ele_ica_
Co_ and Io_ c_s a_d o_dinanees,
N_ USE AN _ENSION CORD _ 2_,
208, a_ _3_2_ V_t units.
_ner'e Manual 9

El ! Sa_
WARNING: This appliance must _ properly grounded.
The power cord of this appi[ance Is equipped wr_ a three-prong grounding plug.
To minimize the risk of electric shock, use the plug with a standard three-siot
grounding wail power outtet, if the power outlet does not include a grounding siot,
have a quaiffied electrician replace the outlet before you use _e room air
conditioner.
WARNING: Changing the o_|et without ma_ng the appropriate wiring
chang_ will crea_ an unsafe _ndition that could result in fire or
ei_trtcai shock. Refer aii such wo_ to a licensed and quaiifled
el_riclan.
Ensureproperg_Jnd
e_ts _ use
WARNING: Do not cut or remove the g_unding prong from the power
plug.
WARNING: hing the adapter ground terminal to the wall
recep_cle cover scr_ does not ground me appllan_ unless the
covet screw is metal and not Insul , and the wall re le is
groun_ through the house wiring.
WARNING: if you h_e any doubt whe_er the air conditioner is
pro_rly grounded, have the wal! recep_cle and circuit checked by a
qualifi_ el_rician.
10 Room Air _n

t Safety
We strongly discourage the use of an adapter due to potential safety h_ards,
For temporary conn_tions, u_ only a UL-listed adapter, available from mo_
local hardware stores. Ensure that the large s_ot in the r is aligned with
the large slot in the receptacle for a proper polart_ connection.
To disconnect the power cord from the adapter, u_ one hand on each to avoid
damaging the ground terminal. Avoid frequently unplugging the power cord as
this can lead to eventual ground termina! damage.
Tem_ m_h_
_le _r
WARNING: Never use the appliance with a broken adapter.
We stmng!y discourage the u_ of an extension cord due to potenti_
hazards. _r temporary situations, use only CSA certified and UL li 3-wire
grounded extension cords, rated 15 A, 125 V.
Owner's Manual

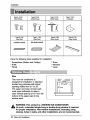
Ty_ 14_ Type B:2 _ T_ C:2 _ Type D:3
(_o_t S_) (W_ _) (W_ _r_) (L S_ket)
T_ E: 1
(SealS_p)
(_h_i_ bsck_)
Ty_ F: 1
(Guide Panel)
T_H: i
,(Upper_e)
Have the _llowing tools available for installation:
* Screwdriver (Slotted and Phillips) * Ruler
* Knife * Hammer
* Pencil * Level
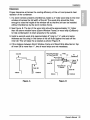
This mum air cond_oner is
design_ _r insbilation in s_ndard
doublmhung _ndows wi_ a_ua_
opening widhhs from 21" to 35".
The up_r and lower window sash
must open s_ciently to allow a
clear verU_l o_ning of 12" _om the
bottom of _e upper sash to the
window stool,
,,o,._ 2i" _ 35° ---,.
i_ rain
WARNING: This p.mduct is a WINDOW _R CONDmONER.
As such, a standard slngle-hung or double-hung window is _quired
_r proper in_!lation. Non_indow in_ilations, including using
sleeves, holes in _!is, and _.er install_ions am not re_mmend_.
Room iAir er

lns_latio_
Proper clearance enhances the _oling efficien_ of the unit and preven_ heat
radiation of _e condenser.
!, If a storm window presen_ interference, fasten a 2" wide wo_ stdp to the inner
window si=liacross the full width of the sill. The wood _rip should be thick
enough to raise the height of the window sill _ _at _e un_ can _ installed
without interference by, _e storm window frame.
2. S_ Figure. BoThe top of the wood _rip should be _proximately 3/4" higher
than the sto_ window frame (Storm Window Frame) or wood _rip (Outdoors)
to help condensa_on to drain pro_rly to _e outside,
3. Install a second wo_ _dp (approximately 6" long by 1V2" wide and same
thinness _ fimt stdp) in the center of the sill flush against the ba_ off the
inner sill. This will rai_ the L bracket as shown Figure. B.
4. If the distance between Storm Wind_ Frame and Wood Strip Mounted on Top,
of Inner Sil! is more _an ! ", two of wood _rips are not n_essary.
Fl,gum, A IFlgum, B
Owner's Manual

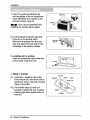
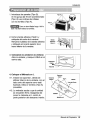
I. Insert the guide panels(Type G)
into _e guides of the air _nditioner
(Type H),Fa_en _e cumins _ the
unit with _rews (Ty_ A).i
: Use a !ong screwdriver and
installing _e s_ews, will _ easier,
Ty_ A
Type A
2. C_ the adhesiv_ba_ed sea! strip
(Type E) _ the window width,
Remove _e backing from the seal
strip and attach me sea{ stdp to me
underside of the bottom window..
3. Locating unit in window
Open _e windowand mark _nter line
on _e centerof the inner sill
//
4. A_ch L bracket
_1. Install _e L brackets behind the,
inner window sill, wi_ sho_ side
bracket as shown. Use the 2 screws
(Type A) provide.
42. The bra_et, helps to. hold un_
s_reiy in pla_,. _e sure to p,lace
bracket _ge flush against ba_ of
iinner sill
Room Air C

ln_llation
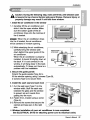
Caution: During the following step,, hold unit firmly until wind_ sash
isi lowered to top channel behind side panel _ames. Personal injury or
pm_f damage may result if unit falls _m _nd_.
1. Instil the air condiUoner in the window
1-1. Carefully !_ the air _ndiUoner and
slide it into he own window. Make
sure the bottom guide of he air
_nditioner drops into the notches of
the L bracket:,
: When the air conditioner drops
into the L bra_et, he air _nditioner
will be centered in wind_ o_ning.
!-2. While steadying the air _nditioner,
_refully bring he window saslh
d_n behind the upper guide of the
air _nditioner.
When he air _nditioner is pro_rly
ins_il_, it should Ult s_ighBy down at
the ba_. If it is set. _rr_[y in the
window, _ wi!! hang !ower in the bac_,
automatically. !f it does no_, there is a
problem wih the installation.
2. _cure the guide panels
Extend the guide panels (Type G) to
fill the window opening using2 _mws. (,Type B),
2 screws _ype C) _osecure them,
3, Instil 'the sash seal and sash lock
_2.
Cut the sash seal (Type F) to the
window _. Stuff he sash seal
between he gla_ and the window
ito prevent air and insects from
getting into he room.
Fasten the L bracket using a screw
(Type A).
3-3. Remove the. screws hat secure the
_binet and ba_ pan in the right
S/_H SEAL
(TY_F)
4, Window ins_llation of room air conditioner is now _mpleted.
S_ ELECTRICAL DATE for a_ching power cord to electrical outleL
_e'r's Manual

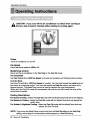
Ope_b'ng Instructions
CAUTION: If you turn off the air conditioner or _itch i_om cooling to
the fan, wait at I_st 3 min_es before setting to _oling again,,
• Jrns air ,_nditioner on and off.
Fan Sp_d
Use to set the,fan speed _ LOW _ IHl.
M,o_emp Control
Use to set the air _ndHJoner to the Fan On_ or the Cool On mode,
Fan Onty M_e
Use Fan Onlyat HI or LOW Fan S_ to provide air circulation and filtenng w_hout cr_ling.
Cool On M_
Use C_I On with HI or LOW Fan S_d for cooling. Turn the kn_ toward the c_ler area for
the indoor air to become c_ler. Turn _e kn_ toward the Cool On area for the ind_r air to
i_me warmer. The M_e/Temp _ntro_ is used to main_n the room temperature.
When set in the Cool On m_e, _ compres_r will cycle on _d off to ke_ the room at the
same level of _mfort.
Cooling _riptions
For Normal Cooling - Sel_ the _1 On mode with_e Mode_emp knob setat the midpoint,
For M_lmum Cooling - _lect the Cool On mode w_ the Mode/Temp knob set towa_ the
_oler ar_.
For Qu_r & Nig_ime _oling - Sele_ the Cool Ginmode withthe Mode/'remp knobset
toward the Cool ,Onarea,
NO_: If you move the Mode_emp control knob from the Cool On se_ng to the Fan Only
setting, wait at lea_ 3 minutes befo_ _it_ing ba_ to a _o! On setting.
Room Air Conditi_er

Operatingin,stru_ons
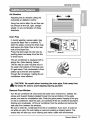
Air Dire_ion
Adjusting the air direcUon using the
horizontal air deflie_or cont_l.
Using Me control tabs, the air now _n
be dire_ to Me !eft, right, straight
ahead, or any _mbination of these
Drain Pipe,
in humid wea_er, excess water may
_use the Base Pan to ove_ow. To
drain Me water, remove the IDmin Cap
and secure the Drain Pipe to,the rear
hole of Me Base Pan.
Pre_ Me drain pi_ into,Me hole by
pushing down and _tay from the fins
toavoid injury.
This air _nditioner is _uipped with a
slinger _n. (See drawing, be!ow:)
The _n has an outer ring that runs in
the water that collects in the ba_ pan
if it gets deep. That _ndensate is then
pick_ up by the fan and expell_
through the _ndenser, making _e air
_nditioner moire emcient.
Be car,_l _,en inserUng the drain pipe, Push _ay _om
the sharp fin area to avoid slipping inju_ng youmelf.
Removal From Wind_
_Jrn Me air cond_ioner off, di_nnect Me p_er cord, _move the L bra_et, Me
screws and Support Bracket installed through Me top and _ttom of the guide
panels, and save _r reinstaHation later. CJose the guide panels. Keeping a fi_ grip
on the air _ndi_oner, raise the sash, and care_iliy Ult Me air _nditioner bac_rd,
draining any _ndensate. Lift Me air cond_ioner from, the window and remove Me
sash seal from betw_n Me windows.
Be sure _ drain ALL condensate from the air _ndiUoner. if you don_, it _uld run
out while you _ the unit,making a mess and creating a slipping h_ard. This
simple step will _ve you much cleaning and make a safer _ environment.
Owners Ma_al

MaintenanceaM Servi_
Air Filter
Che_ the air filter at least Mice a month to see ff cleaning is necessary. Trap_d
particl_ in the filter can build up and block the airflow, r_ucing cooling _paci_
and _using an a_umulation of _ost on the evaporator, To.clean the air filter:
i. Remove _e air filter from _e front g_lle by _Jng the air filter up.
2. Wash the filter using lukewarm _ter below 40 ° C (t04 °IF),.
3. Gently shake _e excess water from the filter and replace.
Cleaning The Air Conditioner
The front grille and Inlet grille m_ be
wiped with a cloth dampen_ in a re!lid
dete_ent solution.
The cabinet may be wash_J wi_ mi_d
soap or detergent and lukewarm
water, then polish_ with Liquid Wax
_r Appliances.
To ensure continu_ peak efficiency,
the condenser _ils (ou_ide of unit)
shou!d be checked periodi_lly and
dean_ ff clogged with soot or dirt
from the a_osphere.
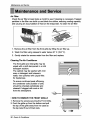
• HOW TO REMOVE THE FRONT GRILLE
1. Remove the screws se,curing the Front Gdlle.
2. Push the, gdlle up from the bottom and pull
• e top of the grille away from the _se as
• e top tabs !_ out of their slots.
Room Air Conditioner

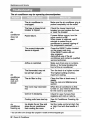
Maint_nce and Service
Before Calling for Service
if you have problems wi_ your air cond_ioner, read the following
information and
t_ to solve the problem. If you cannot find a solution, turn off the air _nditioner
and cont3ct your dealer.
Air _nditioner d_s not o_rate
1. Ensure _at _e air conditioner is plugged into a,proper o_let.
2. Check the fiJse or circuitbreaker.
3, Check whether the _ltage is unusually high or low.
Air d_s n_ _1 cold enough ,onthe c_llng setting
1. Ensure _at the temperature settings are ,corr..
2, Che_ to see if the air filter' is clogged with dust_ If so, ,cleanthe filter,
3. Ensure _at the air flow from the outside is not obstructedand that there is a
cleamn_ of over 20" between the back of the air _nditioner and the wall or
_nce behind it,.
4. Close all dc,om and windows and check for any"_ume of heat in _,e room.
Before callingfor ser¢i_, please review the following HStof _mmon
problemsand sol!utions.
The air c_d#ioner is operating when:
You hear a pinging noi_. This is _used by water being picked up by the fan on
rainy days or in highly humid _nditions. This feature is design_ to help remove
moisture in the air and improve cooling efficient.
See _e section on Slinger Fan, page li7.
• Youhear the thermostat click._is is _used _ the compressor cycle starting
and stopping.
You see water dripping from _e rear of _e un_. Water may be coH_ed in the
base pan in highly humid conditions or ion rainy days. This water overflows and
drips from the rear of the unit.
• You h_r _e fan running while the compressor issilent. This is a normal
operational feature.
_ner's Manual

Maintenanceand _r¢ice
The air conditioner may _ operating abnormallywhen:
does not
does not
cool as it
The air conditioner is
_r _ilu re.
Make sure the .aircondi_oner plug is
push_ completely into the o_let,
Che_ the house fuse/circuit
breaker box and replace the fuse
or reset the breaker.
If _er failure occurs, turn the
mode control to Off.
When power is restored, wait 3
minutes to resta_ the air
conditioner to prevent triADpingof
Press the RESET bu_on {ocated
devi_ is tripod, on the power cord plug.
If the RESET button _ll not
s_y engaged,
discontinue use of the air
conditioner and contact a quailed
service technician.
Air_ow is restri_ed.
be set high enough.
........................
Make sure there are no. curtains,
_inds, or _rni_re bl_ing the
front of the air conditioner.
Turn the, knob to a higher number
The highest se_ng provides,
maximum cooling.
Clean the fllter at least ever,./2
See the care and Maintenan_
hot_
_^_en the air conditioner is first
turned on, you need to allow time
_r the r_m to cool down.
Che_ for open furnace floor
isters and cold air returns.
Cooling coils have iced up. See _r CondiUoner Freezing Up
_r
_eezing up
!ce blo_s the air flow and
from cooling the morn.
Set the m_e control at High Fan
or High Cool with thermostat at 1
or 2.
*You _n refer to the Enemy Star program in detail at www.energystar.gov.
Room Air Conditioner

..............................................................................................................................................)))))))))))))))iii/iiiiiiiiiiiiHii)iiHli)i i i i i iiiii iiiiiiiiiii
))))))))))))))iii_i_i_i_i_i_ii_ii_i!!iiiiiiiiiiiiiii
ii i i il iiii illi ill i Nil i i Nil iilil ililll llili lllil lllii llli iili iill ilil ilil llii iilii iilii iilli i il _ll ii_ll ii_i iili iiii llli iili llii llii llll
iiii ii il iili ii ii lilii iilli lilil ililll llili lllli illil llll Jill llll illl ilii iilli iilll iilli iilil iil Ill iilll iilli ililil illi llll liil lili iiil Jill
Owner's Manual 21

Memo
22 Room Air Conditioner

PARA SUS ARCHiVOS
Escd_ _{ el _lo y n_m_em_ serie:
m Puede e_n_ar i_s N_ir_ en la eUque_ de ]a _e
[atera| de_producto°
INom_ de| d_s_ido_:
mAdjun_e su _eci_ 8 esta p_gina _n la _a_m _r,_
el momento que 1on_si_÷ _a proof |a f_ de su
adquisictSn o _ra _ _ad6n _ _ gamnt|a.
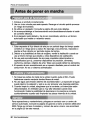
LEA ESTE MANUAL
En su fntedore_r_. mgch_ _se_ _l_les_re
u_|i_c_ y m_tenlml_to de sg _n_t_,_r de _r_
Ua_ p_s cuidados _ _ parte |e pu_e_ ahorrar
m_ho y dinero d_rante la vtda de s_
_ndic_,_dor _ aire..
En la tab_a de _nsejos _r_ la sol_i_ _pida
pro_ enc_tra_ m_as te_u_s a !_ p_o_l_as
m_s habituales. Si _isa prime_ nue_ra T_b|a de
_n_ _ la s_uci6n _a _ p_b_as, _ _/r_
i_slte flamar n_n_ aJse_tcio t_i_,
PRECAUCION
_ od__s dn la_perv_ a_u_,
Manual del Pmpietario _

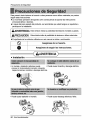
Pre_,uc_nes de Segundad
Para prevenir tanto _esiones a_usuario u otras _rson,as _,mo dafios maten_es, es pre_so
seguir estas instru_iones.
m_ Inertia _raci6n del aparato _ _ns_uencla de Ignorar las Instru_iones
provocar& daSos o _esi=ones,o
mA _use de_ peso p del producto, se r_mlenda que usted tenga a on a_.Jdante a
partici_ en _ain;s_c_no
[] El _gniflca_ de J_ s{mbolos utilities en este mahdi se _n,d_ a ,_ntinua,cl6n,
[] |ns laci6n
• Un mon_ o ir_la_n def_ pu_
pr_o_,r un fun_n_mie_ in_o, i_luyen_
• Pue_ causat inc_io y de_ar_, el6_r_,
rie_os _ _iones, in,_d_s; e de_ar_s __,
• Puede caul_t _c_li6n o indigo,
24 AireAc_dicio_r
,, Pue_ caesar descar_ e_Grl_ y fallos.

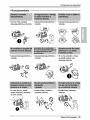
Pr_L_ione$ de
[]Funoionamiento
• _ otro modo, _usar&
desc_rga el_ o In_nd_o.
, Cau_r& de_ar_ e_ctrica o
Ince_o°
,,_u_ d a ei6ct_ o
i_endl.o.
• _usar_ _rga e_6_ o
incendio.
• En caso que no, pu_e
,,Causar_ de_arga e_rica o
in_io.
, Si no hay conexi6n a _a,
se _!e producir u_
descarga gloria.
caesar ince_io y a_nte
de codo cir_ito.
,,Pu_e cau_r incendio y
a_i_te e_6_rico.
,, Pue_ _ar de_a_
e_6_rica.
Manual det P_r_ 25

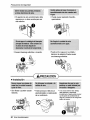
Preca_Jon_ _ Seguridad
- El ap,arato de ai_ acondidona_ debe
_era_e en an Area _rrada pa_ ser
m_s ,_ivoo
• Poe_ c_u_r e_losi6n,lncendio,
, Pu_e en_ i_rag_a en la unidad y
d_minuir A _slaci6noPu_e, ,_u_r
un.a_a e!_d_.
[] |ns |aci6n
=_n filo_s y pueden caasa.r
"Pu._ pr_o_r el f_lo de un
e_om6sUco o d!ete_ora_n
de su re_imie_o.
debe_ra_se o,recamb_
queel a_a_o dea_c_
_a _ lav_n_,con N_gut_
Aim A_n,d_ador

Preca_ionesdeS_ur_d
, Hay riesgo de _.esiones
persor_o
[] Funcionami,ento ....................................................................................................................................................................................................................................................................................................................................................................
• Pu_e _usar de_a
el_n_ y dafio.
•G_r_ ene_{a envanoy
_rfa prewar una_i_nte,
_mo _ _nUl_r giraaa_
v_idad c_n_o _ fun_n_,
_e ¢au_rle_or_.
• Elfu_onam_nto sin _ros
puede d_8.r _aunidad.
,, _e pue_ caus_ _es_es o
da.fios en la mas_ta o la
p,lanta.
, P_ cau_ _o a los
_ima._es o vegetales y
_rd_a _ obietos.
,,_ unidad_ii _re a_dicio_do
puededetedora_, cambiarde
_lor, o de_oll_ man@_asen
,, No,es _ y i_da prov_
enfe_ades o peH.grosde
lesiones _,rso_ales.
Manual _I' Propiet_do 27

P_io
1. Coloque e_ench_e correctamente.
2. Use un _ni_ circuito pare este aparato. Re_rgar el circuito podrfa provo_r
un riesgo de incendios.
3. No _ilice un alargador. Consulte la p_gina _ para m_s detal[es.
4. No arranque/detenga el funcionamiento enchufando/deser'_hufando el cable
de _mente elderly.
5. Si el alargador est_ daffado y ha de ser recambiado, _licite a un t_ni_
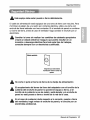
autorizado que instale un recambio exacto.
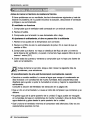
1. E_ar expuesto al fliujo dimcto de aire _r un _rfodo largo de tiempo pu_e
_nst_uir un riesgo para su saiud. No ex_nga a I_ _rsonas, mascotas o
plantas al flu,jo directo por perfodos largos de tiempo.
2. Debido a la _sibilidad de faff_ade ox[geno, ventile la h_itaci6n cuando se
u_ al mismo tiempo que e_ufas u otros dispositivos de calefacci6no
3. No u_ este acondicionador de aire para piro_s_os determinados no
esp_fi_dos (por ej.: preservar dispositLvos de precisi6n, alimentos,
cachorros, plantas y objetos de arte). Tales usos iPuede daffar los elementos,
4. E! aparato de aire acondicionado es un aparato diseffado para el _nfo_ del
consumidor. No es un sistema aclimatiza_r.
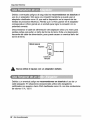
1. No toque las partes de metal de la unidad cuando quite el filtro. Puede
las_marse cuando manipule bordes fi!osos de metal.
2. No u_ agua Ipara limpiar adentro de! acondicionador. La exposici6n a! agua
puede destruir la ais!aci6n y esto a su vez provocar una des_rga el_rica.
3. Cuando [imp ie la unidad, as_re_ que la _rriente y e! inte_uptor est_n
desconectados. EI ventilador gim a muy alta vel_idad cuando est&
funcionando. Existe la _sibilidad de lesionarse si la energfa _ conecta
acciden_lmente cuando est6 limpiando las piezas intemas de la unidad.
"n
Para reparaciones y mantenimiento, po gase en _nta_o con un _ro de
sewicio autorizado. Consulte la p_gina de garantfa o Ilame al nemero (800) 2_-
0_0. Tenga su n_meor d emodelo y n_mero de serie a mano. Los encon_ar&
en [a p_.gina 25 de este manual.
_re A_diciona_¥

EsW sfmbo|o Io advie_e de un _lii_ro de a_idente pot corriente
el,_trica.
E_ sfmbo|o Io adive_e de un _|ig_ que pu_a causar un da_o
de| vent|tador:
Este sirnbo|o signifi_ condiccion_ es_iia|es.
ADVERTENC|A : Este ,apar_o de_ria instalar'_ de acuerdo con las
rto_as, del C6digo Ei_rico National
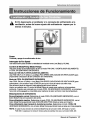
Fi)tro
T_a de Ai_
R_il_ Frunta
Manual del Pr_ietario

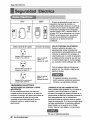
Seguridad Et_ctd_
ii5V~ 2 V~
~
EJcable _ 81imentad6# pue_ intuit un
dis_t_o interpret _ _en_.. La
ca_ dell enchufe cuen_ _n un bot6n de
pru_a y o_ de _in_cio.. El di_sffivo debe
_pi_ p_i6dli_mente _esbnando
pdmere el _6n TEST y d_p_ RESET. Si
e_bo_ TEST _ se de_ec_ o st e! _t_
P_SET no _n_ active,, suspenda el
use del alre a_ndlcion_o y ip6nga_
_ta,cte con un t,_i_ de _rvi_
UUIi_ el _chufe de la par_ _eumo de _ergla
SNr_ 125V, e_e de 3
Nr_ _ !_, 125V _ _lice an_Wb_ de
15AMP.o un
I_rrup_ _ 15AMP
S_ _V, e_e de 3
IUne_ _ 1_, 250V AC
(_ U_iil_ unf_bie de
_AMP, o un
2_, e_ufe de 3 Ii_rru_,_ 20_P.
8EGURIDAD _LEC_ICA
El a_re acend_nado t_ne una ciavI_,ade
cone_i6n a ti_ de tres paras an s_ c_e
sumine_o de energla, que _r& ench_ en
un toma_en_ de p_ de tree Ipar_
_nectado a tier_ adecuad_nte _ra sw
prote_6n _ntra _n _i_e rie_e de
U$O _ CORBONES DE _EN_ON
D_ldo 81_tencia| de pel_i_ a su
s_rid_ be_ c_e_ _ur_tan_as
rec_dam_ en_re_e_nte _ utiiiar
_rden_ de extens_m Sin embargo, si
usted _ user _n _ de exteasi6n,
es ebsol!u_mente _ce_ que este _a
un, cerd6n listado _jo UL de _s _pigas
_n _6_ a tie_ _lifi_do !5A, i25V.
T_ el _bI_do de_ realizari_
acuer_ _n _s c_t_ y regAment_
El _bleade _m,_ti_ 1_ alumiai_
_dtla o,_s_r p_.lemas especlales.
Cons_e a un e_ctd_eta califi_do,
_as _n_d_ _t_ ._ipad_ con _na cilia de
con,_n a tle_ de t_es pa_ en el cable de
_mini_ _ ene_ia q_e de_ e_h_rse _ un
tom_rr_n|e de _ed! _ _es _s _ne_, a
tierra e_ada_e (vet las ilu_r_ienes a
_nt_u_i6n) pa_ _ pro|_i6n _ta _ _ible
deege _ e_ectr_clono S__e tiene ua Iomace_e_e
_n estas _ra_e_icas, _n elect_i_ _o
deve_ instalar une de acuerdo _ el C_di_
EI_K_o Nac_on_ y lee y _rm_ i_ales.
Aim A_nd_na_r
No u_ _n cane, de eAension,

EiSte equipo de_ estat puesto ,atier_ debidamen_.
El _ble de alimentaci6n est,_ equipado de una toma de tier_ con tr,es pins. Para
minimizar el [_igro de una Iesi6n _r corriente el_rica, _ifice una toma con
enchufe de tierra est,_ndar con tres contacto& Si .el enchufe de pared no conaene
un borne de tierra, antes ,de u_r el ventilador haga cambiar el enchufe por un
Camblat la toma sin tealizar los camibi_ de _bl_do apto, pJadoa
c_ar_ un estade el_ctrico ins_uro que pe,drfa _sul_t en un
incendio o d_rga e|6_rlca°iPara rode este ripe de trabaj_,
consuite siemipre con un eiectri,cis_ cualfflcado,
_rese _e ex_e _b_
No co_e ni quite e! bor_ de tletra de |a davija de ali__aci6n
El acop,|amiento de| borne de tierra de| adaptador con el torni|lo de |a
cubi,e_ de| enchufe de pa_ n,e pondr_i e| _uipo a tierra, s,!e|
tomi|lo de |a cuble_ no es de metal y est_ aislado y e! enchu_ de
pa_d no es_ puesto a tierra a t=_v6s de,la _ de |a ca_°
En e| case _ cua|quier duda _sp_o a la cor_ pu_ a tierra
do| ventilador, haga revisar e| enchufe de pa_d y el ci_u_o per un
electricista profeslena|°
Manual det Pr_rto 31

Debido a _entuales pedigree de s_uridad no, recomendamos en absolute e_
use. de un adaptador, SSIo pare una cone×iSn tmnsit:,ofia se puede user e_
adaptader das_cado _me UL que est_ a dispesiciSn en la mayor{a de _,as
tiendas de productos el6_fi,coe. A_end,a que e orificio grande en .e_adap_dor
_rreeponda alo, fificie grande en el enchu_ pare legrar la _ne×i6n con la
polaridad _rre_.
Desconectando el _e de eJimentaci6n dlel adaptador uti_ice una mane pare
sondes partes pare evitar un dose de_ borne, de tier_o Evite una d,escone×i6n
frecuente de_ _ble de alimen_ciSn, pues puede cau_r un eventua_ daSo de{
borne de tierm,
Tom[lie_ Me_
Cubietta del
_nt_r
Nunca uti|ice el _uipo con un adap_dor da_,adoo
Debido a un eve_ua_ peligro no recomendam_ en a_ol_o el u_ de un
cable aJargadoro En situaciones ex_pci,onaJes utHice s6_o alargadores
_fficad/os _n puesta a tier_ CSA d_ificados come UL _n tres conductores
de vailores 15 A, 1i25 Me
Aire A dot

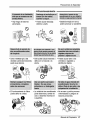
Tipo_ 14 T_ B:2 Ti_ D:3
_tl!o M_ia_) (ElP_tesis L)
i...m:..........................................................ii
E
,i¸
Tt_ _ 1 _, F: _ _po G: 2 W]_ HI:
(_da _ _rc_) (PanelGufa) (Guia _dor)
(_t_sivo p_ed_) (No_si_ _
','i'iiiiiiiiiiii_iiiiiiiiiii
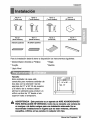
Para la insta_aci6n de_fia tenet a disposici6n los instrumentos siguientes:
* De_erniHador (EstreHa y Phillips) * Regta
* CucjiHo * Martillo
* L_piz Nivet
Tamale
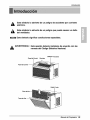
Este ven_lader de ca sa est_
construido para ven_nas est&ndar de
des alas con la e×tensi6n real de
_e_u_ de 21" a 35". El aia sunder
y el inferior de la ventana deben
_,rirse lo s_iciente para producir un
orfficio ver_cal de 12" desde el ala
superior hasta el antepecho.
21" a 35"
Mln. i2"
ADVE_ENCIA : Este p_ucto _ un aparato de AIRE ACONDIClONADO
PARA INSTA_ClON ENVENTANAS. Come tal, _ _c_s_ una ven_na de
un cuelgue o de doble cuelgue _ra una instalaci6n adecuada. No se
_mlen_n in_|acio_s en lugams q_ no _an ven_nas, t,_ili_ndo
casquUlos, odflc|os en las _mdes ni cualquler _m tipo.
Manual de/Propie_rio 33

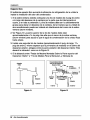
Espacio libre
El sLfficiente espacio libre aumen_ la eflciencia de refrigemci6n de la u,nidad e
impide la i_adiaci6n del _lor del conden_dor.
!. Si la sobm-ventana esto_a co I_uese una tim de madem de 2 pulg de an_o
a Io llano del descan_ de la ventana por la parte que de Jnternamente aJ
cuarto, yen t_a su extensibn. _ tira de madem debe mr io suficientemente
g_esa para elevar el descan_ de la ventana, de tal m_era que la unidad de
aire acondicionado pue_ ser intalada sin interferencia dell marco de la _bre-
ventana (sto_ window).
2, Ver Figura. B. _ parte superior de la tira de madem debe estar
aproxima_mente a 3/4de pulg mas alta que e! marco de la _bre ventana,
(storm window) ipara ayudar a que el agua de condlen_ci6n de la unidad flLrfa
hacia afuera.
3. In_ale una segunda tim de madera (_mximadamente 6 pulg. de largo, 11/2
pulg de ancho y mismo e_e_r que la primeratira de madem) en e! centro de!
descanso exterior, p6ngala contra la parte posterior del des_nso interior. Esto
elevard !a m_nsu!a L como en la Figura. B.
4. Si la dis_ncia entre "Fmnja de Madem Mo_3da Sobre la Parte su_rior de l
De_anso Intedo# y "Tira de Madera Pare la Mensula L y Mensula de
Figure. A Figura. B
Aim A¢_r_tctona_r

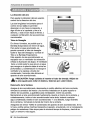
1. Introduzca los paneles _ipo, G).
en los ,gu{as del 45 aire acondicionado
(Ti_ H).Las co._inas atornMe_as
_n los ternWos (_po A).
Use un atorni_liador la_oo As_'le
_ m_s f&cil india I_ tomillos.
_poA,
_po A
2. Co_e _abanda adhesive _ipoE ) y
col6quela del encho de _even_na.
Remueva el p_s_co de _ab_de edhes_
y col._ue_a en _apa._e su_rior de el
marco inferior .de la ventana.
_hes_va
3. Co|ocando |a unidad en le veni_Na
Abra la ventana y marque LIiNiEAen el
centro esta°
/,/
4. Coioque el M6nsu|a en L
4-i. {nstal,e los _rtes L detr,_s de
alf_izar interno de _aventana., con .el
_ado corto de_ soporte come est,_
ilustmdo. Utilice 2 torniHos _ipo A)
proveidos.
4-2. La m6neula ayuda a que la unidad
se encuentre firme. AsegQre_ de
poner la m_nsuia en L contra la
parle posterior dei des_nso interioc
Manual det Pm_eta_ 35'

instataciSn
P_u_6n: En _as,sigu_nt_ ins,t_ion_, sostenga I,aunidad _tmemen_
hss_ q_ la _e _i_ _ la v_a d_n_ ,s_ JQ_ su_or
_l _nal y pot' _rds _ ma_o _ I_ pa_es cor__o Pu_ hair
lesiones o da_os s! la unidad _ ¢ae de la ven_ns,
1, Insta|e e| Aire Acondiclonado a Ja
Ventana
1ol, Cuidado_mente le_nte el airs
a_ndicion.ado y colSque_oen e_hoyo
de Javer_tana.AsegOrese de que la gu{a
inferior de_airs a_ndicio_d,o c_ en
lugar correcto demm6r_ula en L0
,Cuandoe__re a_ndicionado sea
fijado en e_.suppo_ en L, el airs aco._iidonado
ser_ ce_rado come pueden observar°
Mientms ma_iene ellairs
a_ndicionado en posic[6n,
culdado_ente baje el bo_e de la
ventana superior ha.s_ _agu[a su_rior
del _re acondicionado.
Una vez ins_la_ d_idamente e_aparato de airs a_n,.di_ona_,, de_r_a inc_ina_e
_i_r_ente hacia _ajo. en su parts pos_e_or.Si est_ _l puesto en _aven_a,,
_gar& m_.sabajo pot _apa_e p3ste_°or autom_camente. Si n,oIohace,hay una
prob_ema _n _ains_aci6n.
2. A_u_ |os Psneles
E×_enda !os pansies par a reHenar !os odficios do la ventana usande, !os
2_.omiHos(Tipo_),_om[Hos _ip, oC).
3. |n_ale la Bands de] Ma_o
3-1. Corte la banda del marco dei mismo
_cho de la ventana. Col_ue la banda
del marco entre el vidrio y _aventana
para pr_,,enir la penetraciSn al c_ai_o
de insectos y aide..
3_-2.Atornil_e _acerrad_ra de! marco usando
_n tornillo(Ti_,A)o
3-3. Qu_e los torniHos q_e as_uran e!
gabinete y _cerola desprec:iable en ,e_
lade. co_ecto,.
4_i_
Ti_ A
TipoF
[_ ins_|a,ci_ de| airs acondtclonado de ve_tana no estard _mp_ta° Ve,a
SEGUR_DAD EL_CTR_CA pata coheir |a e,xte_sibn el_tr_ca a| toms
cerrienteo
36 _re, dot

Inst_ciones _ func_,_miento
SiiVd, de_onec_ eJventiladot o |o oonmu_ del enf_damiento a la
ve_i!i,a,ci6n, antes del nuevo ajuste dei en_[amiento espere per Io
_nos 3 minutes°
_iende y a_ el _ndi_dor _ _re.
I__ _ Fan
U_ e=_ fusion _ _ar lave_idad del_i_ador ,_m Low(Bajo)y Hi(_o),
Con_| de M_emp (M_emp)
Use para aju_r el acondictona_r de aim al modo FAN ONLY e,/ENTI_DOR SOLAMENTE)
o COOL ON (ENFRIADO ENCENDI_)_
Modo _ FAN ONLY (VE_DOR _._MIE_)
Use FAN ONLY en Hi (hJto) o Low (Bajo) FAN SPEED (VEL_:IDAD DE VEt-_I_R) _ra
propo_mnar cimulacion de _re y 'fill_cion-'r_;_ sin e_amiento.
Modo _ C_L ON (ENFRL&_O ENCENDIDO)
Use COOL ON _n Hi (Nto) o Low (Bajo) FAN SPEED (VEL_IDAiD DE VENTILADOR) _ra
enfr_amien_o,Gim _ boton h_ia COOLER _ra que el _re de interior _ e_e mas.
GIre el boron hacia el area _ul mas p_uena pare que eJaire de
I_e_ot se ,_liente m_, El _n_ol _ M p es usado _ra mantener a temperature
_biente. Cuando este _ocado en el m_o COOL ON (ENFR_ADO ENCENDIDO), el _mpresor
hara ci_ entre _gado y encend_ para mantener el sawn al mismo nive_de temperature..
Descri_iones de en_i_iento
Pare en_iento _rmal. Selec_one ei modo COOL ON (ENFRI_O ENCENDIDO), con el
boton Mode/Temp en ia _,icion de_ _nt_.
_m enfdamiento _imo, ._|eccione el _ COOL ON (ENFRIADO ENCENDIDO), con el
boton Mode/Temp apuntan,_ hacia COOLER (MAS FRIO) (hacia e_a_ _ul mayor)..
Pare e_iamiento mass_nqui_ & duran_ !as noc_s. _!_ione e_modo COOL iON
(ENFRi_O ENCEND_DO), _n el botort M_e_emp _ntando hacia ,elar_ _l mas p_na_
NOTA: _ ust_ m_rve el _t.on dieconlr_ de t#_e,qemp _ la _io_ COOL _ h_ia la _n,ci_
FAN ONLY, espere _ Io mer_ 3 minutos antes de carnbiar o_a vez a la _io_ COOL ON.
M_ual del Propietafio 37

l ones _ funcionamis,nto
ditecci6n de| at_
Para ajus_r _ad[reccion del ai_ ueando
_,ntrol de Ja d[reccion de_aire°
Las dos EengSetas hor/zon_ies para e_
_ntrol de Jas rejiHas {,epermiten
descargar el aire hac:ia la izquierda, o
algo de aire a la izquierda y otto a la
der_ha, o rode e! aire hacia e_f_nte, o
cu,alquier combinaciSn de ias _siciones
menc[onadaso
Tu_ de D_,_i_e
Remove_o de ]a Ve_n_
Apague ei aire aco_dicionado, desconecte el co.tin el_tr[_ del toma col_iente,
rem_eva _acermdura del mar_ y los tomiHos instalados en ia pa_e superior e
inferior de los paneles, y g_&_elos pare reins_acidn,, Cie_e Ilos paneies.
M!anteni_endo el aire acondicion_ fuertemente, llevante el marco de, la ven_na, y
cuidiados_,ente, incline el aiCe acondicionado ihacia arras, botando coalquier
agua _n,den_,da. Des_ice el aire a_ndicio_ado 1" a ia derecha, lu_o lev&ntelo
de la ventana y remu_vale la banda del marco de la venta_a.
AsegQre_ de ,drenar TODO e[ condensado del apara,to de _re acondi_onado° Si no
Io hace, podr{a salirse mientras trar_po,_a el _rato, ens_ciando, con el consiguiente
p,eliigrode resbalones. Este simpe paso le ahorrar& tiem_ de limpieza y hat& de su
I_gar un emtomo m_s seg_ro.
_reA r

Mantenlmtentoy se_io
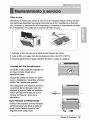
Filtro _ Ai_
Revise per Io menos dos. veces a! rues si no es necesario limpiar et filtro .de air&
L_ pa_fcul&s detenidad se pueden acumu!ar en .elfiltro impidiendo el flujo del
aire, limi_ndo el rendimiento de enfriamiento y _usan_. la acumulaci6n de hielo
en el evaporador. Pro_der de la limpieza del filtro de aire:
1. E_miga el _tro del! aire de la rejila fron_l tirando de! misme
2. Lave e_filtro _n agua tibia de tem_ratura mener de 40°C (i04°F).
3, _curra Jigeramente el agua sobrante del filtro y vuelva a instalarlo.
Limpieza del Aire ,Acondicionado
La pa_il!la fron_l p,uede ser limpiada _n
un trapo hemedo mojado en un
detergente suave°
El gabinete pu_e _r lavado con j_6n
suave o detergente y agua tibia, entonces
pulido Cera Liqluidapa_ aparatos.
Para asegurar_ una eficiencia _ntinua,
las _binas, del conden_dor (del lade
exp,uesto a! e_erior) debe set revisado y
lavado _ri_icamente _a _r que se
tranque con basura o po{vo de la
atmosf_ricoo
Come Remover la Padlla Frontal
Suelte el lade izquierdoprimeroDespu_s
cuidado_mente hallede_e la pa=_ede
arHbay em_ hacia la derech& _s
lenguet_ est_n aseguradas,
_u_
_
Manual del Prqpietar_ 39 i

Mantenimiento y se,,'vic_
Antes _ Llamar el SeP,_icio de Asistencla T6cnica
Si tiene pro_emas _n su ventilador, lea las informaciones siguientes y trate de
resolver e! pro_ema. Si no puede en_ntrar la soluci6n, des_necte e! _ntilador
y dirfjase a su suministrador.
El ventiladot no _nciona
1. Comp_e_ que el ventflador est_ _nectado en un enchufe corr_o.
2. Revi_ e! fusible,
3. CompnJebe que la tensi6n no sea demaslado a_a o baja.
AI ajustame e! enffiamiento, el aire no _rece fr{o Io s,_clen_
1, R_ise si los ajustes de la temperature son _rrectos
2. Revi_ si el fi_ro de aire no est_ a_s_do de polvo. En el _so de que sf,
_mbte el fi_roo
3. Compruebe que afuera no haya un obstdculo del fiujo de aire y si entre la.
pa_e trasera del ven_ilador y la _red o la ba_era haya es_cio fibre .de por Io
menos 1 mm:ro (20°).
14,Cierre todas las pue_as y ventanas y .compruebe que n.o haya una fue_e de
_lor en la habitaci6n.
Antes. de flamar al servicio, tenga a bien revi_r la siguiente iista .de
problemas y sus soluciones.
E1 acondicionado¥ _ aire _ta funcionando normalmente cuando:
• E_ucha un sonido met_lico. Lo causa el agua que recoge e_condensador en
dfas Iluviosos o en condidones de mucha hum_ad. Esta _racterfstic-a es_
diseSada pare ayudar a qui_r la humedad on el aire y mejorar la capacidad de
Consuke la _cci6n del Ventiiador de e_racci6n en ia _gina 38.
- Oye un clic en el termostato. Lo _usa el ciclo del compresor que comien_ y
• Ve gotear agua de la pa_e posterior de la unidad. El agua pu_e ser r_gida
,en ila bandeja de ba_ en co.ndiciones de mucha humedad o d{as de lluvia. Es_
agua de_orda y gotea desde la parte posterior de la unidad.
• Oye funcionar el ventilad,or mientras el compresor estd silencioso.Esto es una
caracterfsUca operativa normal.
_,re A dot

Mantenimlen_y se_icio
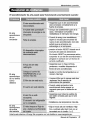
El acondicionador de aire p,u_e es_r func_nando ano,_a#nente cuando:
Ei aire
_g_ei_ que .eiaire a_ndicionado
est_ _nec_ado completamente ala
_ente de ene_ia.
Cheque I[_ _sible_inte_uptor de _a
_sa y reempiace _ _sibles. o
_stablezca ei interrup_r de energi.a,
do no
• Cuando la energ a _ _es_blez_,
espere 3 minutos pare.encender de
nuevo,el aite acondicion.ado. Con esto
evi_ que seproduz_ una
sobrecarga en el _mpresor.
• presi,on e_botdn situade en el
enchufe del cable de elimentcidn
Si eI bot6n RESETno pe_ane_ a_ivo,
suspenda el u_Dde,Iaire acondidonado y
i_ngase en con_cto _n un t_ni_ de
servicio cuali_do,
Ei aire
do no en_ia
_rno
debiera
El aire
do enfria
dernasiado
_gO_._ q!ueno h_a cortinas,
persianas o muebles bloqaeando el
#e_e del Bite a_ndidonado.
_us_r ei _n_oI de,tempe_tu_ a un
n_merom_sbaj,o.
, AsegOre_ que todas las salidas ,de
aire est6n _das pare que el aire
• Estaib,lez_ una tempera._m m_s al_.
• EItja el modo a_o dei ven_lador High
Fan o enfdado al_oHigh Cool _n el
termos_to en el nOme_ 1 o 2.
Used pu_e referirse al Enemy Star p_rama con todo de_aHe en _,,en,_gys_r._.
Menull del P_ie_rio 4f

42 Aire Acondicionador

Goldstar re,parar6 o _'#u_6, gratu#amente, sulpto,ducto _ re_Jffa def,ecfu_o en mat_es omano cle
abra boJo oondlic4_ no_d_ ,de u_ durante _ I_Odo de. goran41fa m_lo_do i_ _Jo. e_¢o a _#_ de
Ilafeoha de, compta d!e_p_od_to oMg_na!l par pade d_ con_midlot, E#a garantfa _lmffa_ s61!oe¢ v6Hda para e!
comprador odg_nal de_/ioroducto, y efecflva s6_o cuando _te se ut_lce dentro d!e _osEstad_ Un_os, Inciuyendo
A_Aa. Ha'_. y _ t_rfforios est_ouni_.
_ne _ _: | eP_ d_÷ _ fecha
_: ] e6_ de_._de]a fe_a _ compra.
C__ 5 _ desde Io f_ de
comp_a,
Llame ai tel¢fono 1.43_243_ y _c_e _aopd_
ad_. Par favor; te_a d_e_b_e e_tl_ _ producto _#e
acondid_do), n_eto de m#d_o., nQ_ro de _e. y ,c_go
pos_
La m®o de o_a _o garan#a cubre e!_te de _ _#enc_
en domlc_o de t_s I_ p_e_s, I_uy_do e_corr#[e_,
E$_A GA_AN_A $_ OTO_GA 8_ Sg_#Cl6N O _XCLgSi6N _i_ TOD'A OTRA GARAN_A, _XP_SA O I_PL|CITA,
_NC_!_ _N IU_TAR C_QU|_ GARAN_TA D_ CALiD_ O I_EiDAD _N _N I_651fO CO_O, _N
M_D|DA EN QUE C_ALQUI£R GA_IA |_PL_C_'A E$ O_UGADA IPO_ _ L,_, _$'f_ IL|M|'TADA EN DU_AC:i_N AL
01_O$ ESTA_$ _ AC:E_AN _ U_#ACION !D,E#_Ci6N D_ UINA GARAN_A |_P&_C[[A O [A _XC&#$16N D_
#A_O$ _ULTAH_ O AC_i_A_,& _ LO _J_ _ _iTACiONE$ O EXC&g_|ON_$ MENCEO_D_ _#EN NO
_A GAR._A _MlffADA I_ _ A_
2.
&
Las vis#as de A_iste,Rc_a a domicll_o para entregat, recoget y/o lnsta_ar el prod_cto, _f#_ir o susfltu#
fu_lbl_ _ su o_ o _ir et c_do, o _ oo_recci_ de rep_ac_ _, a'utor_: y
Da_os o p_obtem_ de funclonamlento provocados par u_ u_o _P_decuado,. abuso, func_am_ento
fueta de especiflcac_ones ambtentales o contr_Ho a requ_sffos o precouc_ones en _ Gu_a de
f_nclo_amlento, acclde_te, fuego, I_undoc_on,es, _Rst_Cl6i_ _nadiec_ada_ fuil_rza mayor,
m_lflcacbne_ o a#er_{o,_e_ _o a_i'zadas, co,ante el_c#_ca o te#_6n _n,correcta, o u_ cancel,
o _ _nt'os a aq_ _ra !c_ q_ De _a_,
_0MEROS OELCE_ INIE_VOS P_A C_EN_:
Prober _ co_a _ gamma
_ber6 entregar una copra de su rec_bo de c_pra
÷n e__to, e_ _e rec_ _rv_c_o ba_o _ra#_a.
_Jame a| !-800-2_-0000, _ horns al dla, 7 d_os a _!o
Seiec,clo_e la opcl6_ adieoua_a de_ menQ. y ten, ga
disponible su flpo de producfo (alte aco_d_io_ado).

LGE_ect[on_cs_nc,repair or at its opHe, n replloce. wHho_t charge, your produot _f_lr_OVe_ _Obe dlefee_'ive in
mater_ai o,[workmanship under normal use during the wasranty period set forth below, effective fromthe date of
o_l_ cop, s_ purch_e of _ product, Th_ _mfod warranty Jsgood o,#_yto Me o#g4nail putrc_ser of the prod_
and _tlve only _en _ in _e U_ed Star's. [ncludfng A_ka. Hcrwa_. and U.,S,T_fl_.
WA_ _OD:
Le_: 1Yeer #_ _ Date of P_rc_
Pe_ 1Y_ #am the _te of _rch_
_p_: 5 Y_ from the Date of
Purchase.
HOW SE_ !IS_NDLED:
Cait i-_243_ and choose _ app_op_aCe prompt Pl_
have prod_ t_e (R_ A_ Co_o_e0. m@l n_beh _a_
humor, and _P code ready°
T_ wairro{_ed _aborcovers the cost of h-Home _#_[_ _ _]
THIS WA_r_ iS iN U£U OF ANY O_R W__ _ O_ i_D,,, INCLUD_G W[TH_T _ITATIONo _Y
_I_D BY LAW, _ IS !L_MI_ |N DURATION TO'TH_ _P_-,S WAR_W PE_OD' _VE_ ILG_ NOT _ _JAB_ _R
_Y C-ON_JEN'_AL, IND_EClr, _ IN_DE_AL DAMA_S OF A_Y _IND, INC_ LO_' R_ _ _, I_
_NE_ W_ TH_ _DUC[ _ _A_S DO NOT ALLOW _AT_ _ HOW LONG _ [MP_ED W_
MAY NOT'A_Y TO'¥OUo
THIS_ WA_NTY _ _T _Y TO:
2_
_$c,e _l#S to yO_ ihome to de_lver, #ok up, and/or inst_ the _u_,ct, _n_t, or repi/ace h_ fl_
c_ect wi,r_g, or c_ect_on of una_ho_zed r_m; and
Damages or ,op,erat_n,g! problems that result from m_su$e, abuse, operation ,outside environmental
S_C_O_ Or O0_ toithe r_u[rements _ p{ecauf!ons _nthe Operating G_e, acciden_, vermin,
fire. fl_d. _mpto_r i_lati_, acts of God. u_u_odzed _dlflc_#n or a#erafion. _ncor_f _ec_ca!
cu_t _ voyage, or commercial u_. or _ _.lr ot_r th_ I_ter'_ed purp_.
C_MER: _TER*A_ CE_R NU_:
_ _w _ _ _ _ _ _ _rr_
A copy of your Sales Receipt m_t be submitted at
t_ time warr_y sot-,4ce _ prov_di
_1! 1-800-_-00_, _4 ha a de/, 7 _ _ _.
h_e your p_od_t ty_ (Roo_,_r'_nd_oneO, mode_
numl0,_, _i numbe_, and _P Code;
P/No,: 3828A21004F' Printed in China
-
 1
1
-
 2
2
-
 3
3
-
 4
4
-
 5
5
-
 6
6
-
 7
7
-
 8
8
-
 9
9
-
 10
10
-
 11
11
-
 12
12
-
 13
13
-
 14
14
-
 15
15
-
 16
16
-
 17
17
-
 18
18
-
 19
19
-
 20
20
-
 21
21
-
 22
22
-
 23
23
-
 24
24
-
 25
25
-
 26
26
-
 27
27
-
 28
28
-
 29
29
-
 30
30
-
 31
31
-
 32
32
-
 33
33
-
 34
34
-
 35
35
-
 36
36
-
 37
37
-
 38
38
-
 39
39
-
 40
40
-
 41
41
-
 42
42
-
 43
43
-
 44
44


Goldstar GWHD5000 El manual del propietario
- Tipo
- El manual del propietario
en otros idiomas
- italiano: Goldstar GWHD5000 Manuale del proprietario
- English: Goldstar GWHD5000 Owner's manual
Artículos relacionados
Otros documentos
-
LG LWHD1500ER El manual del propietario
-
COMFORT-AIRE RAD-101B El manual del propietario
-
-
-
-
-
-
-
-
Jenn-Air JGD8430ADS Guía de instalación