Garant heavy-duty rack roller shutters Instrucciones de operación
- Tipo
- Instrucciones de operación

DE
EN
FR
IT
ES
GARANT Schwerlastregal Rollladen
GARANT heavy-duty rack roller shutters / Volets roulants pour rayonnages lourds GARANT / Saracinesca
per scaffali per carichi pesanti GARANT / GARANT Estantería para cargas pesadas Persiana
Programmierung / Programming / Programmation /
Programmazione / Programación

2
DE
EN
FR
IT
ES

www.hoffmann-group.com
DE
EN
FR
IT
ES
Inhalt
1. Nachstellen der Endlagen ........................................................................................................ 5
1.1. Nachstellen der oberen fest programmierten Endlage .................................................... 5
1.2. Nachstellen der unteren fest programmierten Endlage ...................................................5
2. Rücksetzen auf Werkseinstellung (Reset) ...........................................................................6
3. Aktivieren des Antriebes (Lernbereitschaft) ....................................................................... 7
4. Prüfen und Ändern der Drehrichtung...................................................................................7
4.1. Drehrichtungsänderung bei Erstinbetriebnahme
oder nach Rücksetzen auf Werkseinstellung (Reset). .........................................................7
4.2. Nachträgliche Drehrichtungsänderung,
ohne Rücksetzung auf Werkseinstellung. ...............................................................................8
5. Beide Endlagen fest gespeichert ........................................................................................... 8
6. Einlernen einer „my“-Position ( Lieblingsposition) ..........................................................10
7. Löschen der „my“-Position (Lieblingsposition) ................................................................10
8. Nachträgliches Einlernen des ersten Funkhandsenders .............................................11
3

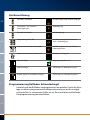
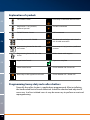
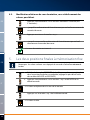
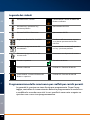
Zeichenerklärung
Taste AUF / Einfahren Antrieb stoppt in der unteren Endlage
Taste Stopp / „my“-Position,
Lieblingsposition
AB-Bewegung
Taste AB / Ausfahren AUF-Bewegung
Feinjustierung AUF / AB Antrieb bestätigt durch eine kurze
AUF- / AB-Bewegung
Programmiertaste des Funksenders Antrieb stoppt in der „my“-Position /
Lieblingsposition
Programmiertaste des Funksensors Rolladen mit Stoppern
Obere Endlage Vorgang abgeschlossen
Untere Endlage Sicherung Ein / Netzspannung Ein
Antrieb stoppt in der oberen Endlage Sicherung Aus / Netzspannung Aus
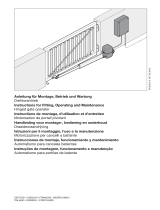
Programmierung Rollladen Schwerlastregal
Generell wird der Rollladen vorprogrammiert ausgeliefert. Nach der Mon-
tage ist die fest programmierte Endlagenerkennung zu prüfen und ggf.
nachzustellen. In vereinzelten Fällen ist ein Reset und die anschließende
Neuprogrammierung durchzuführen.
4
DE
EN
FR
IT
ES

www.hoffmann-group.com
DE
EN
FR
IT
ES
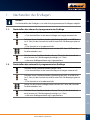
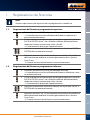
1. Nachstellen der Endlagen
Hinweis:
Das Nachstellen der Endlagen ist nur bei fest programmierten Endlagen möglich.
1.1. Nachstellen der oberen fest programmierten Endlage
▶ Drücken Sie am Funkhandsender die AUF-Taste.
→ Der Antrieb fährt in die obere Endlage und stoppt automatisch.
▶ Drücken Sie am Funkhandsender gleichzeitig die AUF- und AB-Taste
(ca. 5 Sek.), bis der Antrieb mit einer kurzen Auf-/Ab-Bewegung bestä-
tigt.
→ Der Antrieb ist in Lernbereitschaft.
▶ Stellen Sie die obere Endlage erneut mit der AUF- bzw. AB-Taste des
Funkhandsenders ein.
▶ Drücken Sie am Funkhandsender die „my“-Taste, bis der Antrieb mit
einer kurzen Auf-/Ab-Bewegung bestätigt (ca. 2 Sek.).
→ die neue Endlagenerkennung ist gespeichert.
1.2. Nachstellen der unteren fest programmierten Endlage
▶ Drücken Sie am Funkhandsender die AB-Taste.
→ Der Antrieb fährt in die untere Endlage und stoppt automatisch.
▶ Drücken Sie am Funkhandsender gleichzeitig die AUF- und AB-Taste
(ca. 5 Sek.), bis der Antrieb mit einer kurzen Auf-/Ab-Bewegung bestä-
tigt.
→ Der Antrieb ist in Lernbereitschaft.
▶ Stellen Sie die untere Endlage erneut mit der AUF- bzw. AB-Taste des
Funkhandsenders ein.
▶ Drücken Sie am Funkhandsender die „my“-Taste, bis der Antrieb mit
einer kurzen Auf-/Ab-Bewegung bestätigt (ca. 2 Sek.).
→ die neue Endlagenerkennung ist gespeichert.
5

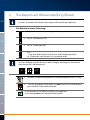
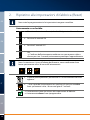
2. Rücksetzen auf Werkseinstellung (Reset)
Hinweis: Es werden alle Programmierungen und Einstellungen gelöscht.
Ein Antrieb an einer Sicherung:
▶ Schalten Sie die Netzspannung (z.B. Sicherung) für ca. 2 Sekunden AUS
▶ Für ca. 10 Sekunden EIN
▶ Für ca. 2 Sekunden AUS
▶ EIN
→ der Antrieb bestätigt mit einer Auf- oder Ab-Bewegung für
ca. 5 Sekunden, der Antrieb ist in Lernbereitschaft.
Hinweis: Befindet sich der Behang in den Endlagen, bestätigt der Antrieb mit
einer kurzen Auf-/Ab-Bewegung
▶ Drücken Sie jetzt am eingelernten Funkhandsender die PROG-Taste ...
▶ ... bis der Antrieb das Rücksetzen mit zwei kurzen Auf-/Ab-Bewegun-
gen innerhalb 7 Sekunden bestätigt.
→ Der Antrieb ist auf Werkseinstellung zurückgesetzt.
→ Der Antrieb muss neu programmiert werden.
6
DE
EN
FR
IT
ES

www.hoffmann-group.com
DE
EN
FR
IT
ES
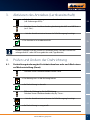
3. Aktivieren des Antriebes (Lernbereitschaft)
▶ Schalten Sie den zu programmierenden Antrieb ein
(z.B. Sicherung auf Ein)
▶ Drücken Sie am Funkhandsender gleichzeitig die AUF- und AB-Taste
(ca. 5 Sek.) ...
▶ ... bis der Antrieb mit einer kurzen Auf-/Ab-Bewegung bestätigt.
→ Der Antrieb ist in Lernbereitschaft
Hinweis: Befindet sich der Antrieb in Lernbereitschaft, fährt der Antrieb nur
solange die AUF- oder AB-Taste gedrückt wird (Tipp Betrieb).
4. Prüfen und Ändern der Drehrichtung
4.1. Drehrichtungsänderung bei Erstinbetriebnahme oder nach Rücksetzen
auf Werkseinstellung (Reset).
▶ Drücken Sie am Funkhandsender die AB-Taste.
→ Der Behang muss in Ab-Richtung fahren.
→ die Drehrichtung ist korrekt.
▶ Fährt der Behang in die Auf-Richtung:
Drücken Sie am Funkhandsender die „my“-Taste ...
▶ ... bis der Antrieb mit einer kurzen Auf-/Ab-Bewegung bestätigt
→ die Drehrichtung ist umgestellt.
7

4.2. Nachträgliche Drehrichtungsänderung, ohne Rücksetzung auf
Werkseinstellung.
▶ Drücken Sie hierzu gleichzeitig die Auf- und Ab-Taste (ca. 5 Sek.) ...
▶ bis der Antrieb mit einer kurzen Auf-/Ab-Bewegung bestätigt.
▶ Drücken Sie danach die „my“-Taste ...
▶ ... bis der Antrieb erneut mit einer kurzen Auf-/Ab-Bewegung
bestätigt.
→ die Drehrichtung ist umgestellt.
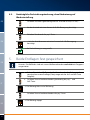
5. Beide Endlagen fest gespeichert
Hinweis: Die Rollläden sind mit starren Wellenverbindern und nicht mit Stoppern
ausgestattet
▶ Fahren Sie mit der AB-Taste des Funkhandsender den Behang in die
gewünschte untere Endlage (Feinjustage mit der Auf- und Ab-Taste
möglich)
▶ Drücken Sie am Funkhandsender gleichzeitig die „my“- und
AUF-Taste
→ Der Behang fährt in Auf-Richtung
▶ Drücken Sie am Funkhandsender die „my“-Taste
→ Der Behang stoppt.
8
DE
EN
FR
IT
ES

www.hoffmann-group.com
DE
EN
FR
IT
ES
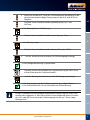
▶ Fahren Sie mit der AUF-Taste des Funkhandsender den Behang in die
gewünschte obere Endlage (Feinjustage mit der Auf- und Ab-Taste
möglich)
▶ Drücken Sie am Funkhandsender gleichzeitig die „my“- und
AB-Taste.
→ Der Behang fährt in Ab-Richtung
▶ Drücken Sie am Funkhandsender erneut die „my“-Taste.
→ Der Behang stoppt.
▶ Drücken Sie am Funkhandsender die „my“-Taste (ca. 2 Sek.) ...
▶ ... bis der Antrieb mit einer kurzen Auf-/Ab-Bewegung bestätigt
→ Die Endlagenerkennung ist gespeichert.
▶ Drücken Sie zum Abschließen der Programmierung die PROG-Taste
auf der Rückseite des Funkhandsenders ...
▶ ... bis der Behang mit einer kurzen Auf-/Ab-Bewegung bestätigt
→ Die Programmierung der Endlagenerkennung ist abgeschlossen.
→ Der Antrieb befindet sich im Normalbetrieb (Selbsthaltung).
Hinweis: Nachdem Sie die Endlagen programmiert haben und ein erster Funk-
handsender eingelernt ist, fährt der Antrieb im Normalbetrieb ( kurzes Drücken
der AUF- oder AB-Taste startet die Fahrbewegung, bis die „my“-Taste, stopp,
betätigt wird.)
9

6. Einlernen einer „my“-Position ( Lieblingsposition)
Hinweis: Ab Werk ist eine „my“-Position (Lieblingsposition) auf Lüftung (Rollladen
nicht komplett geschlossen) voreingestellt, die Sie individuell anpassen können.
Die „my“-Position kann manuell mit der „my“-Taste oder automatisch über eine
Sonnenautomatik angefahren werden.
▶ Fahren Sie den Behang mit der AUF- oder AB-Taste des
Funkhandsender in die von Ihnen bevorzugte „my“-Position
▶ Drücken Sie jetzt am Funkhandsender die „my“-Taste (ca. 5 Sek.) ...
▶ ... bis der Behang mit einer kurzen Auf-/Ab-Bewegung bestätigt
→ Die neue „my“-Position ist gespeichert.
7. Löschen der „my“-Position (Lieblingsposition)
Hinweis: Wird die „my“-Position (Lieblingsposition) gelöscht, bleibt der Rollladen
bei der Betätigung der „my“-Taste bzw. bei Sonnenautomatik in seiner aktuellen
Position.
▶ Drücken Sie am Funkhandsender die „my“-Taste
→ Der Behang fährt in die gespeicherte „my“-Position.
▶ Drücken Sie jetzt am Funkhandsender die „my“-Taste (ca. 5 Sek.) ...
▶ ... bis der Behang mit einer kurzen Auf-/Ab-Bewegung bestätigt.
→ Die gespeicherte „my“-Position ist gelöscht.
10
DE
EN
FR
IT
ES

www.hoffmann-group.com
DE
EN
FR
IT
ES
8. Nachträgliches Einlernen des ersten
Funkhandsenders
Hinweis: Nur notwendig, wenn die in Kapitel 3 – 5 beschriebene Programmierung
nicht mit dem Einlernen des ersten Funkhandsenders abgeschlossen wurde.
Soll das Einlernen des ersten Funkhandsenders nachträglich geschehen
(z.B. bei Programmierung der Endlagen in der Fertigung und Einlernen des
Funksenders bei der Installation) ist wie folgt zu verfahren:
▶ Schalten Sie den zu programmierenden Antrieb ein
(z.B. Sicherung auf Ein)
→ Der Antrieb bestätigt mit einer kurzen Auf-/Ab-Bewegung
▶ Drücken Sie am Funkhandsender gleichzeitig die AUF- und AB-Taste
(ca. 5 Sek.) ...
▶ ... bis der Antrieb mit einer kurzen Auf-/Ab-Bewegung bestätigt.
→ Der Antrieb ist in Lernbereitschaft
▶ Drücken Sie die PROG-Taste auf der Rückseite des Funkhandsenders ...
▶ ... bis der Behang mit einer kurzen Auf-/Ab-Bewegung bestätigt
→ Der Funkhandsender ist eingelernt.
→ Der Antrieb befindet sich im Normalbetrieb (Selbsthaltung).
Hinweis: Nachdem Sie die Endlagen programmiert haben und ein erster Funk-
handsender eingelernt ist, fährt der Antrieb im Normalbetrieb (kurzes Drücken
der AUF- oder AB-Taste startet die Fahrbewegung, bis die „my“-Taste, stopp,
betätigt wird.
11

12
DE
EN
FR
IT
ES

www.hoffmann-group.com
DE
EN
FR
IT
ES
1. Adjusting the limit of travel positions ................................................................................15
1.1. Adjusting the upper hard coded limit of travel position ..............................................15
1.2. Adjusting the lower hard coded limit of travel position ................................................ 15
2. Resetting to factory settings (Reset) ..................................................................................16
3. Activating the drive (now in learn readiness mode) ...................................................... 17
4. Checking and changing the direction of rotation ..........................................................17
4.1. Changing the direction of rotation at first commissioning
or after a reset to factory settings. ......................................................................................... 17
4.2. Retrospective change to the direction of rotation,
without a reset to factory settings. ........................................................................................ 18
5. Both limit of travel positions are saved as non-volatile values .................................18
6. Teaching "my" position (preferred position) ....................................................................20
7. Deleting "my" position (preferred position) .....................................................................20
8. Retrospective teaching of the first radio remote control ............................................21
13

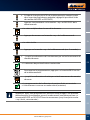
Explanation of symbols
"UP" button / Raise Drive stops at the lower limit of travel
Stop button / "my" position,
preferred position
"DOWN" movement
"DOWN" button / Lower "UP" movement
Fine adjustment UP / DOWN The drive acknowledges with a brief
UP / DOWN movement
Programming button for the radio
transmitter
Drive stops in "my" position / preferred
position
Programming button for the radio
sensor
Roller shutter with stoppers
Upper limit of travel Operation complete
Lower limit of travel Circuit-breaker ON / Power ON
Drive stops at the upper limit of travel Circuit-breaker OFF / Power OFF
Programming heavy-duty rack roller shutters
Normally the roller shutter is supplied pre-programmed. After installation,
the hard coded limit of travel detection should be checked and adjusted if
necessary. In a few isolated cases it may be necessary to perform a reset and
reprogramming.
14
DE
EN
FR
IT
ES

www.hoffmann-group.com
DE
EN
FR
IT
ES
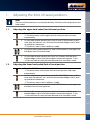
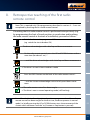
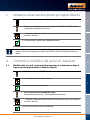
1. Adjusting the limit of travel positions
Note:
The limit of travel positions can be adjusted only if the limit of travel positions are
hard coded.
1.1. Adjusting the upper hard coded limit of travel position
▶ Press the UP button on the radio remote control.
→ The drive moves to the upper limit of travel position and stops
automatically.
▶ On the radio remote control, press the UP and DOWN buttons at the
same time (for about 5 sec.) until the drive acknowledges with a brief
up and down movement.
→ The drive is now in learn readiness mode.
▶ Using the radio remote control UP and DOWN buttons, once again set
the upper limit of travel position.
▶ On the radio remote control, press the "my" button until the drive
acknowledges with a brief up and down movement (approx. 2 sec.).
→ the new limit of travel position detection has now been saved.
1.2. Adjusting the lower hard coded limit of travel position
▶ Press the DOWN button on the radio remote control.
→ The drive moves to the lower limit of travel position and stops
automatically.
▶ On the radio remote control, press the UP and DOWN buttons at the
same time (for about 5 sec.) until the drive acknowledges with a brief
up and down movement.
→ The drive is now in learn readiness mode.
▶ Using the radio remote control UP and DOWN buttons, once again set
the lower limit of travel position.
▶ On the radio remote control, press the "my" button until the drive
acknowledges with a brief up and down movement (approx. 2 sec.).
→ the new limit of travel position detection has now been saved.
15

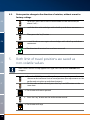
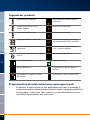
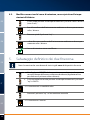
2. Resetting to factory settings (Reset)
Note: This will delete all settings and programming.
One drive per circuit breaker:
▶ Switch the power OFF for approx. 2 seconds (e.g. by means of the
circuit breaker).
▶ Switch it ON for approx. 10 seconds
▶ Switch it OFF for approx. 2 seconds
▶ ON
→ the drive acknowledges with an up and down movement for ap-
prox. 5 seconds; the drive is now in learn readiness mode.
Note: If the shutter is at one of the limits of travel positions, the drive acknowl-
edges with a brief up and down movement.
▶ Now press the PROG button on the radio remote control that has been
taught ...
▶ ... until the drive acknowledges the reset with two brief up and down
movements within 7 seconds.
→ The drive has now been reset to the factory settings.
→ The drive must now be reprogrammed.
16
DE
EN
FR
IT
ES

www.hoffmann-group.com
DE
EN
FR
IT
ES
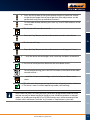
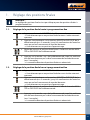
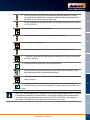
3. Activating the drive (now in learn readiness mode)
▶ Switch the drive to be programmed ON
(e.g. switch the circuit breaker ON)
▶ On the radio remote control, press the UP and DOWN buttons at the
same time (for about 5 sec.) ...
▶ ... until the drive acknowledges with a brief up and down movement.
→ The drive is in now in learn readiness mode
Note: When the drive is in learn readiness mode, the drive will move only whilst
the UP or DOWN button is kept depressed (jog mode).
4. Checking and changing the direction of rotation
4.1. Changing the direction of rotation at first commissioning or after a
reset to factory settings.
▶ Press the DOWN button on the radio remote control.
→ The shutter must move in the DOWN direction.
→ The direction of rotation is therefore correct.
▶ If the shutter moves in the UP direction:
Press the "my" button on the radio remote control ...
▶ ... until the drive acknowledges with a brief up and down movement.
→ The direction of rotation has now been reversed.
17

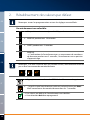
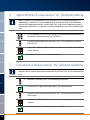
4.2. Retrospective change to the direction of rotation, without a reset to
factory settings.
▶ To do this, press the UP and DOWN buttons at the same time (for
about 5 sec.) ...
▶ until the drive acknowledges with a brief up and down movement.
▶ Then press the "my" button ...
▶ ... until the drive once again acknowledges with a brief up and down
movement.
→ The direction of rotation has now been reversed.
5. Both limit of travel positions are saved as
non-volatile values
Note: Roller shutters are equipped with rigid shaft connections and not with
stoppers
▶ Press the DOWN button of the radio remote control to move the
shutter to desired lower limit of travel position (fine adjustment can be
performed using the up and down buttons)
▶ On the radio remote control, press the "my" and UP buttons at the
same time
→ The shutter will move upwards
▶ Press the "my" button on the radio remote control
→ The shutter will stop.
18
DE
EN
FR
IT
ES

www.hoffmann-group.com
DE
EN
FR
IT
ES
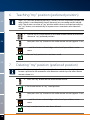
▶ Press the UP button of the radio remote control to move the shutter
to the desired upper limit of travel position (fine adjustment can be
performed using the up and down buttons)
▶ On the radio remote control, press the "my" and DOWN buttons at the
same time
→ The shutter will move downwards
▶ Press the "my" button on the radio remote control a second time
→ The shutter will stop.
▶ Press the "my" button on the radio remote control (approx. 2 sec.) ...
▶ ... until the drive acknowledges with a brief up and down movement.
→ The limit of travel position detection has now been saved.
▶ To exit programming, press the PROG button on the back of the radio
remote control ...
▶ ... until the shutter acknowledges with a brief up and down move-
ment.
→ This also exits the programming of the limit of travel position detection.
→ The drive is now in normal operating mode (self-latching).
Note: After the limits of travel positions have been programmed and the radio
remote control has been taught for the first time, the drive operates in normal
mode (i.e. briefly pressing the UP or DOWN button starts the movement of the
shutter which continues until the "my" button or Stop button is pressed).
19

6. Teaching "my" position (preferred position)
Note: "my" position (preferred position) is factory-set to a ventilation position (the
roller shutter is not completely closed); however you can configure this individ-
ually. The shutter can move to "my" position either when instructed manually by
the "my" button, or automatically in response to an automatic solar detection
switch.
▶ Use the UP or DOWN button on the radio remote control to move the
shutter to "my" preferred position
▶ Now press the "my" button on the radio remote control (approx. 5 sec.)
...
▶ ... until the shutter acknowledges with a brief up and down move-
ment.
→ the new "my" position has now been saved.
7. Deleting "my" position (preferred position)
Note: If "my" position (preferred position) has been deleted, when the "my"
button is pressed or the automatic solar detection switch trips the roller shutter
remains where it is.
▶ Press the "my" button on the radio remote control
→ The shutter moves to "my" saved position.
▶ Now press the "my" button on the radio remote control (approx. 5 sec.)
...
▶ ... until the shutter acknowledges with a brief up and down move-
ment.
→ "my" saved position has now been deleted.
20
DE
EN
FR
IT
ES

www.hoffmann-group.com
DE
EN
FR
IT
ES
8. Retrospective teaching of the first radio
remote control
Note: This is required only if the programming described in sections 3 – 5 was not
completed by teaching the first radio remote control.
If teaching the first radio remote control is performed retrospectively (e.g.
by programming the limit of travel positions in production and teaching
the radio remote control at the time of installation), proceed as follows:
▶ Switch the drive to be programmed ON
(e.g. switch the circuit breaker ON)
... The drive acknowledges with a brief up and down movement.
▶ On the radio remote control, press the UP and DOWN buttons at the
same time (for about 5 sec.) ...
▶ ... until the drive acknowledges with a brief up and down movement.
→ The drive is in now in learn readiness mode
▶ Press the PROG button on the back of the radio remote control ...
▶ ... until the shutter acknowledges with a brief up and down move-
ment.
→ The radio remote control has been taught.
→ The drive is now in normal operating mode (self-latching).
Note: After the limit of travel positions have been programmed and the radio
remote control has been taught for the first time, the drive operates in normal
mode (i.e. briefly pressing the UP or DOWN button starts the movement of the
shutter which continues until the "my" button or Stop button is pressed).
21

22
DE
EN
FR
IT
ES

www.hoffmann-group.com
DE
EN
FR
IT
ES
1. Réglage des positions finales ................................................................................................ 25
1.1. Réglage de la position finale haute à programmation fixe .......................................... 25
1.2. Réglage de la position finale basse à programmation fixe ........................................... 25
2. Rétablissement des valeurs par défaut .............................................................................26
3. Activation de l'entraînement (position d'apprentissage) ............................................27
4. Vérification et modification du sens de rotation .............................................................27
4.1. Modification du sens de rotation lors de la première mise
en service ou après rétablissements des valeurs par défaut (reset). .........................27
4.2. Modification ultérieure du sens de rotation,
sans rétablissement des valeurs par défaut. .......................................................................28
5. Les deux positions finales à mémorisation fixe ..............................................................28
6. Apprentissage d'une position « my » (position préférée) ............................................30
7. Effacement de la position « my » (position préférée) ....................................................30
8. Apprentissage ultérieur de la première télécommande .............................................31
23

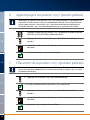
Légende des symboles
Touche MONTÉE / Rentrée L'entraînement s'arrête en position
finale basse
Touche Arrêt / Position « my »,
position préférée
Mouvement de descente
Touche DESCENTE / Sortie Mouvement de montée
Réglage fin MONTÉE / DESCENTE Entraînement confirmé par un bref
mouvement de MONTÉE / DESCENTE
Touche de programmation de la télé-
commande
L'entraînement s'arrête en position
« my » / position préférée
Touche de programmation du capteur
sans fil
Volet roulant avec butées
Position finale haute Processus terminé
Position finale basse Fusible Marche / Tension secteur
Marche
L'entraînement s'arrête en position
finale haute
Fusible Arrêt / Tension secteur Arrêt
Programmation du volet roulant pour rayonnages lourds
En général, le volet roulant est livré préprogrammé. Après le montage, il
convient de vérifier la détection des positions finales à programmation fixe
et de la régler si nécessaire. Dans certains cas, une réinitialisation et une
nouvelle programmation sont nécessaires.
24
DE
EN
FR
IT
ES

www.hoffmann-group.com
DE
EN
FR
IT
ES
1. Réglage des positions finales
Remarque :
Le réglage des positions finales n'est possible que pour des positions finales à
programmation fixe.
1.1. Réglage de la position finale haute à programmation fixe
▶ Appuyez sur la touche MONTÉE de la télécommande.
→ L'entraînement passe en position finale haute et s'arrête automati-
quement.
▶ Appuyez simultanément sur les touches MONTÉE et DESCENTE de la
télécommande (env. 5 secondes) jusqu'à la confirmation de l'entraîne-
ment par un bref mouvement de montée/descente.
→ L'entraînement est en position d'apprentissage.
▶ Réglez de nouveau la position finale haute à l'aide de la touche MON-
TÉE ou DESCENTE de la télécommande.
▶ Appuyez sur la touche « my » de la télécommande jusqu'à la confirma-
tion de l'entraînement par un bref mouvement de montée/descente
(env. 2 secondes).
→ La nouvelle détection de position finale est mémorisée.
1.2. Réglage de la position finale basse à programmation fixe
▶ Appuyez sur la touche DESCENTE de la télécommande.
→ L'entraînement passe en position finale basse et s'arrête automati-
quement.
▶ Appuyez simultanément sur les touches MONTÉE et DESCENTE de la
télécommande (env. 5 secondes) jusqu'à la confirmation de l'entraîne-
ment par un bref mouvement de montée/descente.
→ L'entraînement est en position d'apprentissage.
▶ Réglez de nouveau la position finale basse à l'aide de la touche MON-
TÉE ou DESCENTE de la télécommande.
▶ Appuyez sur la touche « my » de la télécommande jusqu'à la confirma-
tion de l'entraînement par un bref mouvement de montée/descente
(env. 2 secondes).
→ La nouvelle détection de position finale est mémorisée.
25

2. Rétablissement des valeurs par défaut
Remarque : toutes les programmations et tous les réglages seront effacés.
Un entraînement sur un fusible :
▶ Coupez la tension secteur (p. ex. fusible) pendant environ 2 secondes
▶ MARCHE pendant env. 10 secondes
▶ ARRÊT pendant env. 2 secondes
▶ MARCHE
→ Confirmation de l'entraînement par un mouvement de montée ou
de descente pendant env. 5 secondes ; l'entraînement est en position
d'apprentissage.
Remarque : si le volet se trouve dans les positions finales, l'entraînement confirme
par un bref mouvement de montée/descente
▶ Appuyez ensuite sur la touche PROG de la télécommande apprise...
▶ ...jusqu'à ce que l'entraînement confirme la réinitialisation par deux
brefs mouvements de montée/descente dans les 7 secondes.
→ Les valeurs par défaut de l'entraînement sont rétablies.
→ L'entraînement doit être reprogrammé.
26
DE
EN
FR
IT
ES

www.hoffmann-group.com
DE
EN
FR
IT
ES
3. Activation de l'entraînement (position d'apprentissage)
▶ Enclenchez l'entraînement à programmer (p. ex. fusible sur Marche)
▶ Appuyez simultanément sur les touches MONTÉE et DESCENTE de la
télécommande (env. 5 secondes)...
▶ ...jusqu'à la confirmation de l'entraînement par un bref mouvement de
montée/descente.
→ L'entraînement est en position d'apprentissage
Remarque : si l'entraînement est en position d'apprentissage, il se déplace
uniquement tant que la touche MONTÉE ou DESCENTE est actionnée (mode
impulsion).
4. Vérification et modification du sens de rotation
4.1. Modification du sens de rotation lors de la première mise en service ou
après rétablissements des valeurs par défaut (reset).
▶ Appuyez sur la touche DESCENTE de la télécommande.
→ Le volet doit se déplacer dans le sens de la descente.
→ Le sens de rotation est correct.
▶ Si le volet se déplace dans le sens de la montée :
Appuyez sur la touche « my » de la télécommande...
▶ ...jusqu'à la confirmation de l'entraînement par un bref mouvement de
montée/descente
→ Le sens de rotation est inversé.
27

4.2. Modification ultérieure du sens de rotation, sans rétablissement des
valeurs par défaut.
▶ Appuyez simultanément sur les touches Montée et Descente (env.
5 secondes)...
▶ ...jusqu'à la confirmation de l'entraînement par un bref mouvement de
montée/descente.
▶ Appuyez ensuite sur la touche « my »...
▶ ...jusqu'à une nouvelle confirmation de l'entraînement par un bref
mouvement de montée/descente.
→ Le sens de rotation est inversé.
5. Les deux positions finales à mémorisation fixe
Remarque : les volets roulants sont équipés de raccords d'arbre fixes et non de
butées
▶ À l'aide de la touche DESCENTE de la télécommande, amenez le volet
dans la position finale basse souhaitée (réglage fin possible à l'aide
des touches MONTÉE et DESCENTE)
▶ Appuyez simultanément sur les touches « my » et MONTÉE de la
télécommande
→ Le volet se déplace dans le sens de la montée
▶ Appuyez sur la touche « my » de la télécommande
→ Le volet s'arrête.
28
DE
EN
FR
IT
ES

www.hoffmann-group.com
DE
EN
FR
IT
ES
▶ À l'aide de la touche MONTÉE de la télécommande, amenez le volet
dans la position finale haute souhaitée (réglage fin possible à l'aide
des touches MONTÉE et DESCENTE)
▶ Appuyez simultanément sur les touches « my » et DESCENTE de la
télécommande.
→ Le volet se déplace dans le sens de la descente
▶ Appuyez de nouveau sur la touche « my » de la télécommande.
→ Le volet s'arrête.
▶ Appuyez sur la touche « my » de la télécommande (env. 2 secondes)...
▶ ...jusqu'à la confirmation de l'entraînement par un bref mouvement de
montée/descente
→ La détection de position finale est mémorisée.
▶ Pour terminer la programmation, appuyez sur la touche PROG au dos
de la télécommande...
▶ ...jusqu'à la confirmation du volet par un bref mouvement de montée/
descente
→ La programmation de la détection de position finale est terminée.
→ L'entraînement se trouve en mode normal (maintien).
Remarque : après avoir programmé les positions finales et appris une première
télécommande, l'entraînement passe en mode normal (une brève pression sur
la touche MONTÉE ou DESCENTE lance le mouvement jusqu'à ce que la touche
« my »/Arrêt, soit actionnée.)
29

6. Apprentissage d'une position « my » (position préférée)
Remarque : par défaut, une position « my » (position préférée) est préréglée sur
l'aération (le volet roulant n'est pas complètement fermé). Vous pouvez person-
naliser cette position. La position « my » peut être démarrée manuellement à
l'aide de la touche « my » ou automatiquement par un automatisme solaire.
▶ Amenez le volet dans la position « my » préférée à l'aide de la touche
MONTÉE ou DESCENTE de la télécommande.
▶ Appuyez ensuite sur la touche « my » de la télécommande (env. 5 se-
condes)...
▶ ...jusqu'à la confirmation du volet par un bref mouvement de montée/
descente
→ La nouvelle position « my » est mémorisée.
7. Effacement de la position « my » (position préférée)
Remarque : si la position « my » (position préférée) est effacée, le volet roulant
conserve la position adoptée lors de l'actionnement de la touche « my » ou avec
l'automatisme solaire.
▶ Appuyez sur la touche « my » de la télécommande
→ Le volet se déplace dans la position « my » mémorisée.
▶ Appuyez ensuite sur la touche « my » de la télécommande (env. 5 se-
condes)...
▶ ...jusqu'à la confirmation du volet par un bref mouvement de montée/
descente.
→ La position « my » mémorisée est effacée.
30
DE
EN
FR
IT
ES

www.hoffmann-group.com
DE
EN
FR
IT
ES
8. Apprentissage ultérieur de la première
télécommande
Remarque : cette opération est uniquement nécessaire si la programmation
décrite aux points 3 – 5 ne s'est pas achevée par l'apprentissage de la première
télécommande.
Si l'apprentissage de la première télécommande doit s'effectuer a poste-
riori (p. ex. lors de la programmation des positions finales au cours de la
fabrication et de l'apprentissage de la télécommande lors de l'installation),
procédez comme suit :
▶ Enclenchez l'entraînement à programmer (p. ex. fusible sur Marche)
→ Confirmation de l'entraînement par un bref mouvement de montée/
descente
▶ Appuyez simultanément sur les touches MONTÉE et DESCENTE de la
télécommande (env. 5 secondes)...
▶ ...jusqu'à la confirmation de l'entraînement par un bref mouvement de
montée/descente.
→ L'entraînement est en position d'apprentissage
▶ Appuyez sur la touche PROG au dos de la télécommande...
▶ ...jusqu'à la confirmation du volet par un bref mouvement de montée/
descente
→ La télécommande est apprise.
→ L'entraînement se trouve en mode normal (maintien).
Remarque : après avoir programmé les positions finales et appris une première
télécommande, l'entraînement passe en mode normal (une brève pression sur
la touche MONTÉE ou DESCENTE lance le mouvement jusqu'à ce que la touche
« my »/Arrêt, soit actionnée).
31

32
DE
EN
FR
IT
ES

www.hoffmann-group.com
DE
EN
FR
IT
ES
1. Registrazione dei finecorsa ....................................................................................................35
1.1. Registrazione del finecorsa programmato superiore .....................................................35
1.2. Registrazione del finecorsa programmato inferiore ........................................................35
2. Ripristino alle impostazioni di fabbrica (Reset) ..............................................................36
3. Attivazione dell'azionamento (pronto per l'apprendimento) ....................................37
4. Controllo e modifica del senso di rotazione .....................................................................37
4.1. Modifica del senso di rotazione alla prima messa in funzione
o dopo il ripristino alle impostazioni di fabbrica (Reset)................................................ 37
4.2. Modifica successiva del senso di rotazione,
senza ripristino alle impostazioni di fabbrica. .................................................................... 38
5. Salvataggio definitivo dei due finecorsa ........................................................................... 38
6. Apprendimento di una posizione "my" (posizione preferita) .....................................40
7. Cancellazione della posizione "my" (posizione preferita) ............................................40
8. Apprendimento successivo del primo trasmettitore manuale .................................41
33

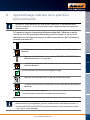
Legenda dei simboli
Pulsante SALITA / rientro L'azionamento si ferma all'altezza del
finecorsa inferiore
Pulsante Stop / posizione "my",
posizione preferita
Spostamento DISCESA
Pulsante DISCESA / fuoriuscita Spostamento SALITA
Regolazione fine SALITA / DISCESA Conferma dell'azionamento attraver-
so un breve spostamento SALITA /
DISCESA
Pulsante di programmazione del
trasmettitore
L'azionamento si arresta nella posizio-
ne "my” / posizione preferita
Pulsante di programmazione del
sensore radio
Saracinesca con dispositivi di arresto
Finecorsa superiore Procedura terminata
Finecorsa inferiore Fusibile On / Tensione di rete On
L'azionamento si arresta all'altezza del
finecorsa superiore
Fusibile Off / Tensione di rete Off
Programmazione della saracinesca per scaffali per carichi pesanti
In generale la saracinesca viene fornita pre-programmata. Dopo il mon-
taggio, controllare il riconoscimento finecorsa programmato in modo fisso
e modificarlo secondo necessità. In casi specifici è necessario eseguire un
ripristino con successiva riprogrammazione.
34
DE
EN
FR
IT
ES

www.hoffmann-group.com
DE
EN
FR
IT
ES
1. Registrazione dei finecorsa
Nota:
i finecorsa possono essere registrati solo se programmati in modo fisso.
1.1. Registrazione del finecorsa programmato superiore
▶ Premere il pulsante SALITA sul trasmettitore manuale.
→ L'azionamento arriva fino all'altezza del finecorsa superiore e si
arresta automaticamente.
▶ Sul trasmettitore manuale premere contemporaneamente il pulsante
SALITA e DISCESA (circa 5 sec.) fino alla conferma dell'azionamento
mediante un breve spostamento salita / discesa.
→ L'azionamento è pronto per l'apprendimento.
▶ Impostare nuovamente il finecorsa superiore con il pulsante SALITA o
DISCESA del trasmettitore manuale.
▶ Premere il pulsante "my" sul trasmettitore manuale fino alla conferma
dell'azionamento mediante un breve spostamento salita / discesa
(circa 2 sec.).
→ Il nuovo riconoscimento finecorsa viene memorizzato.
1.2. Registrazione del finecorsa programmato inferiore
▶ Premere il pulsante DISCESA sul trasmettitore manuale.
→ L'azionamento arriva fino all'altezza del finecorsa inferiore e si arre-
sta automaticamente.
▶ Sul trasmettitore manuale premere contemporaneamente il pulsante
SALITA e DISCESA (circa 5 sec.) fino alla conferma dell'azionamento
mediante un breve spostamento salita / discesa.
→ L'azionamento è pronto per l'apprendimento.
▶ Impostare nuovamente il finecorsa inferiore con il pulsante SALITA o
DISCESA del trasmettitore manuale.
▶ Premere il pulsante "my" sul trasmettitore manuale fino alla conferma
dell'azionamento mediante un breve spostamento salita / discesa
(circa 2 sec.).
→ Il nuovo riconoscimento finecorsa viene memorizzato.
35

2. Ripristino alle impostazioni di fabbrica (Reset)
Nota: tutte le programmazioni e le impostazioni vengono cancellate.
Azionamento su un fusibile:
▶ Disattivare la tensione di rete (ad es. fusibile) per circa 2 secondi
▶ Per circa 10 secondi ON
▶ Per circa 2 secondi OFF
▶ ON
→ Conferma dell'azionamento mediante uno spostamento salita o
discesa per circa 5 secondi; azionamento pronto per l'apprendimento.
Nota: la saracinesca si trova all'altezza dei finecorsa, come confermato da un
breve spostamento salita / discesa dell'azionamento
▶ A questo punto premere il pulsante PROG sul trasmettitore manuale
appreso...
▶ ... fino a quando l'azionamento non conferma il ripristino con due
brevi spostamenti salita / discesa nel giro di 7 secondi.
→ L'azionamento viene ripristinato alle impostazioni di fabbrica.
→ L'azionamento deve essere riprogrammato.
36
DE
EN
FR
IT
ES

www.hoffmann-group.com
DE
EN
FR
IT
ES
3. Attivazione dell'azionamento (pronto per l'apprendimento)
▶ Accendere l'azionamento da programmare (ad es. fusibile su ON)
▶ Premere contemporaneamente il pulsante SALITA e DISCESA sul tra-
smettitore manuale (circa 5 sec.) ...
▶ ... fino alla conferma dell'azionamento mediante un breve spostamen-
to salita / discesa.
→ L'azionamento è pronto per l'apprendimento
Nota: se l'azionamento si trova nella fase di apprendimento, l'azionamento si
muove solo se viene premuto il pulsante SALITA o DISCESA (modalità intermit-
tente).
4. Controllo e modifica del senso di rotazione
4.1. Modifica del senso di rotazione alla prima messa in funzione o dopo il
ripristino alle impostazioni di fabbrica (Reset).
▶ Premere il pulsante DISCESA sul trasmettitore manuale.
→ La saracinesca è in modalità discesa
→ Il senso di rotazione è corretto.
▶ Se la saracinesca è in modalità salita:
Premere il pulsante "my" sul trasmettitore manuale ...
▶ ... fino alla conferma dell'azionamento mediante un breve spostamen-
to salita / discesa
→ Il senso di rotazione viene modificato.
37

4.2. Modifica successiva del senso di rotazione, senza ripristino alle impo-
stazioni di fabbrica.
▶ A tale scopo premere contemporaneamente il pulsante salita e discesa
(circa 5 sec.) ...
▶ fino alla conferma dell'azionamento mediante un breve spostamento
salita / discesa.
▶ Premere quindi il pulsante "my" ...
▶ ... fino alla nuova conferma dell'azionamento mediante un breve spo-
stamento salita / discesa
→ Il senso di rotazione viene modificato.
5. Salvataggio definitivo dei due finecorsa
Nota: le saracinesche sono dotate di cintini rigidi e non di dispositivi di arresto
▶ Con il pulsante DISCESA del trasmettitore manuale portare la saraci-
nesca all'altezza del finecorsa inferiore desiderato (regolazione fine
possibile con il pulsante salita e discesa)
▶ Sul trasmettitore manuale premere contemporaneamente il pulsante
"my" e SALITA
→ La saracinesca è in modalità salita
▶ Premere il pulsante "my" sul trasmettitore manuale
→ La saracinesca si arresta.
38
DE
EN
FR
IT
ES

www.hoffmann-group.com
DE
EN
FR
IT
ES
▶ Con il pulsante SALITA del trasmettitore manuale portare la saraci-
nesca all'altezza del finecorsa superiore desiderato (regolazione fine
possibile con il pulsante salita e discesa)
▶ Sul trasmettitore manuale premere contemporaneamente il pulsante
"my" e DISCESA.
→ La saracinesca è in modalità discesa
▶ Premere il pulsante "my" sul trasmettitore manuale.
→ La saracinesca si arresta.
▶ Premere il pulsante "my" sul trasmettitore manuale (circa 2 sec.) ...
▶ ... fino alla conferma dell'azionamento mediante un breve spostamen-
to salita / discesa
→ Il riconoscimento finecorsa viene memorizzato.
▶ Per concludere la programmazione, premere il pulsante PROG sulla
parte posteriore del trasmettitore manuale ...
▶ ... fino alla conferma della saracinesca mediante un breve spostamento
salita / discesa
→ La programmazione del riconoscimento finecorsa è così terminata.
→ L'azionamento si trova nella modalità di funzionamento normale (rite-
nuta).
Nota: una volta programmati i finecorsa ed eseguito l'apprendimento di un primo
trasmettitore manuale, l'azionamento si trova nella modalità di funzionamento
normale (premendo brevemente il pulsante SALITA o DISCESA il movimento si
avvia fino a quando non viene premuto il pulsante "my", Stop).
39

6. Apprendimento di una posizione "my" (posizione preferita)
Nota: in fabbrica viene predefinita una posizione "my" (posizione preferita) su
ventilazione (saracinesca non completamente chiusa) che può essere adattata
in base alle esigenze personali. La posizione "my" può essere raggiunta manual-
mente con il pulsante "my" oppure in modo automatico tramite un automatismo
sole.
▶ Con il pulsante SALITA o DISCESA del trasmettitore manuale portare la
saracinesca nella posizione "my" preferita.
▶ A questo punto premere il pulsante "my" sul trasmettitore manuale
(circa 5 sec.) ...
▶ ... fino alla conferma della saracinesca mediante un breve spostamento
salita / discesa
→ La nuova posizione "my" viene memorizzata.
7. Cancellazione della posizione "my" (posizione preferita)
Nota: se la posizione "my" (posizione preferita) viene cancellata, la saracinesca
rimane nella sua attuale posizione azionando il pulsante "my" o con automatismo
sole.
▶ Premere il pulsante "my" sul trasmettitore manuale
→ La saracinesca si porta nella posizione "my" memorizzata.
▶ A questo punto premere il pulsante "my" sul trasmettitore manuale
(circa 5 sec.) ...
▶ ... fino alla conferma della saracinesca con un breve spostamento salita
/ discesa.
→ La posizione "my" memorizzata viene cancellata.
40
DE
EN
FR
IT
ES

www.hoffmann-group.com
DE
EN
FR
IT
ES
8. Apprendimento successivo del primo trasmet-
titore manuale
Nota: necessaria solo se la programmazione descritta nei capitoli 3 - 5 non si è
conclusa con l'apprendimento del primo trasmettitore manuale.
Per un apprendimento successivo del primo trasmettitore manuale (ad es.
in caso di programmazione dei finecorsa e di apprendimento del trasmetti-
tore durante l'installazione), procedere come descritto di seguito:
▶ Accendere l'azionamento da programmare (ad es. fusibile su On)
→ L'azionamento conferma con un breve spostamento salita / discesa
▶ Premere contemporaneamente il pulsante SALITA e DISCESA sul tra-
smettitore manuale (circa 5 sec.) ...
▶ ... fino alla conferma dell'azionamento mediante un breve spostamen-
to salita / discesa.
→ L'azionamento è pronto per l'apprendimento
▶ Premere il pulsante PROG sulla parte posteriore del trasmettitore
manuale ...
▶ ... fino alla conferma della saracinesca mediante un breve spostamento
salita / discesa
→ L'apprendimento del trasmettitore manuale è stato completato.
→ L'azionamento si trova nella modalità di funzionamento normale (rite-
nuta).
Nota: una volta programmati i finecorsa ed eseguito l'apprendimento di un primo
trasmettitore manuale, l'azionamento si trova nella modalità di funzionamento
normale (premendo brevemente il pulsante SALITA o DISCESA il movimento si
avvia fino a quando non viene premuto il pulsante "my", Stop).
41

42
DE
EN
FR
IT
ES

www.hoffmann-group.com
DE
EN
FR
IT
ES
1. Reajuste de las posiciones finales ........................................................................................45
1.1. Reajuste de la posición final superior programada fija .................................................45
1.2. Reajuste de la posición final inferior programada fija ..................................................... 45
2. Reposición al ajuste de fábrica (reset) ...............................................................................46
3. Activación del accionamiento (modo de programación) ............................................47
4. Comprobar y modificar el sentido de giro ........................................................................47
4.1. Modificación del sentido de giro al realizar la primera puesta
en servicio o tras la reposición al ajuste de fábrica (reset). ........................................... 47
4.2. Modificación posterior del sentido de giro
sin reposición al ajuste de fábrica. .........................................................................................48
5. Ambas posiciones finales guardadas fijas ........................................................................48
6. Programación de una posición "my" (posición favorita) ..............................................50
7. Borrar la posición "my" (posición favorita) ........................................................................50
8. Programación posterior del primer radiotransmisor manual ...................................51
43

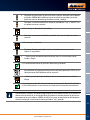
Explicación de los signos
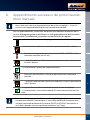
Botón pulsador ARRIBA / Entrada El accionamiento se detiene en la
posición final inferior
Botón pulsador Parada / posición "my",.
Posición favorita
Movimiento ABAJO
Botón pulsador ABAJO / Retirada Movimiento hacia ARRIBA
Ajuste de precisión ARRIBA / ABAJO Accionamiento confirmado mediante
un movimiento corto ARRIBA / ABAJO
Botón pulsador de programación del
radiotransmisor
El accionamiento se detiene en la
posición "my" / posición favorita
Botón pulsador de programación del
sensor inalámbrico
Persiana con topes
Posición final superior Proceso concluido
Posición final inferior Fusible Con / Tensión de red Con
El accionamiento se detiene en la
posición final superior
Fusible Des / Tensión de red Des
Programación Persiana Estantería para cargas pesadas
Generalmente se entrega la persiana previamente programada. Después
del montaje se debe comprobar y reajustar si fuera preciso el reconoci-
miento de la posición final programado fijo. En determinados casos se debe
realizar un reset y la nueva programación subsiguiente.
44
DE
EN
FR
IT
ES

www.hoffmann-group.com
DE
EN
FR
IT
ES
1. Reajuste de las posiciones finales
Observación:
El reajuste de las posiciones finales solo es posible con posiciones finales progra-
madas fijas.
1.1. Reajuste de la posición final superior programada fija
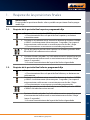
▶ Presione el botón pulsador ARRIBA en el radiotransmisor manual.
→ El accionamiento lleva a la posición final superior y se detiene
automáticamente.
▶ Presione en el radiotransmisor manual los botones pulsadores ARRIBA
y ABAJO simultáneamente (durante aprox. 5 segundos), hasta que el
accionamiento confirma con un movimiento corto Arriba / Abajo.
→ El accionamiento se encuentra en modo de programación.
▶ Ajuste de nuevo la posición final superior con el botón pulsador ARRI-
BA o ABAJO del radiotransmisor manual.
▶ Presione el botón pulsador "my" del radiotransmisor manual hasta que
el accionamiento confirme con un movimiento corto Arriba / Abajo
(aprox. 2 segundos).
→ el nuevo reconocimiento de la posición final está guardado.
1.2. Reajuste de la posición final inferior programada fija
▶ Presione el botón pulsador ABAJO en el radiotransmisor manual.
→ El accionamiento lleva a la posición final inferior y se detiene auto-
máticamente.
▶ Presione en el radiotransmisor manual los botones pulsadores ARRIBA
y ABAJO simultáneamente (durante aprox. 5 segundos), hasta que el
accionamiento confirme con un movimiento corto Arriba / Abajo.
→ El accionamiento se encuentra en modo de programación.
▶ Ajuste de nuevo la posición final inferior con el botón pulsador ARRIBA
o ABAJO del radiotransmisor manual.
▶ Presione el botón pulsador "my" del radiotransmisor manual hasta que
el accionamiento confirme con un movimiento corto Arriba / Abajo
(aprox. 2 segundos).
→ el nuevo reconocimiento de la posición final está guardado.
45

2. Reposición al ajuste de fábrica (reset)
Observación: Se borran todas las programaciones y todos los ajustes.
Un accionamiento en un fusible:
▶ Desconecte la tensión de red (p.ej., fusible) durante aprox. 2 segundos
▶ Durante aprox. 10 segundos Con
▶ Durante aprox. 2 segundos Des
▶ Con
→ el accionamiento confirma con un movimiento Arriba o Abajo
durante
aprox. 5 segundos, el accionamiento está en modo de programación.
Observación: Si el cortinaje se encuentra en las posiciones finales, el acciona-
miento lo confirma con un movimiento corto Arriba / Abajo
▶ Presione ahora en el radiotransmisor manual programado el botón
pulsador PROG ...
▶ ... hasta que el accionamiento confirme la reposición con dos movi-
mientos cortos Arriba / Abajo durante aprox. 7 segundos.
→ El accionamiento está repuesto al ajuste de fábrica.
→ El accionamiento se debe volver a programar.
46
DE
EN
FR
IT
ES

www.hoffmann-group.com
DE
EN
FR
IT
ES
3. Activación del accionamiento (modo de programación)
▶ Encienda el accionamiento que se ha de programar
(p. ej., fusible en Con)
▶ Presione simultáneamente en el radiotransmisor manual los botones
pulsadores ARRIBA y ABAJO (aprox. 5 segundos) ...
▶ ... hasta que el accionamiento confirme con un movimiento corto
Arriba / Abajo.
→ El accionamiento está en modo de programación
Observación: Si el accionamiento se encuentra en modo de programación, fun-
ciona solamente mientras se mantiene presionado el botón pulsador ARRIBA o
ABAJO (funcionamiento por impulsos).
4. Comprobar y modificar el sentido de giro
4.1. Modificación del sentido de giro al realizar la primera puesta en servi-
cio o tras la reposición al ajuste de fábrica (reset).
▶ Presione el botón pulsador ABAJO en el radiotransmisor manual.
→ El cortinaje debe desplazarse hacia abajo.
→ el sentido de giro es correcto.
▶ Si el cortinaje se desplaza hacia arriba:
Presione el botón pulsador "my" en el radiotransmisor manual...
▶ ... hasta que el accionamiento confirme con un movimiento corto
Arriba / Abajo
→ el sentido de giro se ha invertido.
47

4.2. Modificación posterior del sentido de giro sin reposición al ajuste de
fábrica.
▶ Para ello, presione simultáneamente los botones pulsadores Arriba y
Abajo (aprox. 5 segundos) ...
▶ ... hasta que el accionamiento confirme con un movimiento corto
Arriba / Abajo.
▶ Presione a continuación el botón pulsador "my" ...
▶ ... hasta que el accionamiento confirme nuevamente con un movi-
miento corto Arriba / Abajo.
→ el sentido de giro se ha invertido.
5. Ambas posiciones finales guardadas fijas
Observación: Las persianas están dotadas de elementos de unión de eje rígidos y
no de topes
▶ Desplace el cortinaje a la posición final inferior deseada con el botón
pulsador ABAJO del radiotransmisor manual (es posible ajuste de
precisión con los botones pulsadores Arriba y Abajo)
▶ Presione simultáneamente los botones pulsadores "my" y "ARRIBA" en
el radiotransmisor manual
→ El cortinaje se desplaza hacia arriba
▶ Presione el botón pulsador "my" en el radiotransmisor manual
→ El cortinaje se detiene.
48
DE
EN
FR
IT
ES

www.hoffmann-group.com
DE
EN
FR
IT
ES
▶ Desplace el cortinaje a la posición final superior deseada con el botón
pulsador ARRIBA del radiotransmisor manual (es posible ajuste de
precisión con los botones pulsadores Arriba y Abajo)
▶ Presione simultáneamente los botones pulsadores "my" y "ABAJO" en
el radiotransmisor manual.
→ El cortinaje se desplaza hacia abajo
▶ Presione nuevamente el botón pulsador "my" en el radiotransmisor
manual.
→ El cortinaje se detiene.
▶ Presione el botón pulsador "my" en el radiotransmisor manual
(aprox. 2 segundos) ...
▶ ... hasta que el accionamiento confirme con un movimiento corto
Arriba / Abajo
→ El reconocimiento de la posición final está guardado.
▶ Para finalizar la programación presione el botón pulsador PROG en el
lado posterior del radiotransmisor manual ...
▶ ... hasta que el cortinaje confirme con un movimiento corto Arriba /
Abajo
→ La programación del reconocimiento de la posición final ha finalizado.
→ El accionamiento se encuentra en modo normal (parada automática).
Observación: Después de haber programado las posiciones finales y un primer ra-
diotransmisor manual, el accionamiento funciona en modo normal (al presionar
brevemente los pulsadores ARRIBA o ABAJO arranca el movimiento de desplaza-
miento hasta que se acciona el botón pulsador "my", parada)
49

6. Programación de una posición "my" (posición favorita)
Observación: De fábrica sale preajustada una posición "my" (posición favorita) en
ventilación (persiana no completamente cerrada), que puede adaptar individual-
mente. Se puede alcanzar la posición "my" manualmente con el botón pulsador
"my" o automáticamente por medio de un control automático de luz solar.
▶ Desplace el cortinaje a su posición "my" preferida con el botón pulsa-
dor ARRIBA o ABAJO del radiotransmisor manual
▶ Presione ahora el botón pulsador "my" en el radiotransmisor manual
(aprox. 5 segundos) ...
▶ ... hasta que el cortinaje confirme con un movimiento corto Arriba /
Abajo
→ La nueva posición "my" está guardada.
7. Borrar la posición "my" (posición favorita)
Observación: Si se borra la posición "my" (posición favorita), la persiana se man-
tiene en su posición actual al accionar el botón pulsador "my" o con el control
automático de luz solar.
▶ Presione el botón pulsador "my" en el radiotransmisor manual
→ El cortinaje se desplaza a la posición "my" guardada.
▶ Presione ahora el botón pulsador "my" en el radiotransmisor manual
(aprox. 5 segundos) ...
▶ ... hasta que el cortinaje confirme con un movimiento corto Arriba /
Abajo.
→ La posición "my" está borrada.
50
DE
EN
FR
IT
ES

www.hoffmann-group.com
DE
EN
FR
IT
ES
8. Programación posterior del primer
radiotransmisor manual
Observación: Solo en caso necesario, si la programación descrita en los capítulos
3 – 5 no ha finalizado con la programación del primer radiotransmisor manual.
Si se ha de realizar posteriormente la programación del primer radiotrans-
misor manual (p. ej., en caso de programación de las posiciones finales en
la producción y programación del radiotransmisor durante la instalación)
debe procederse como sigue:
▶ Encienda el accionamiento que se ha de programar
(p. ej., fusible en Con)
→ El accionamiento confirma con un movimiento breve Arriba / Abajo
▶ Presione simultáneamente en el radiotransmisor manual los botones
pulsadores ARRIBA y ABAJO (aprox. 5 segundos) ...
▶ ... hasta que el accionamiento confirme con un movimiento corto
Arriba / Abajo.
→ El accionamiento está en modo de programación
▶ Presione el botón pulsador PROG en el lado posterior del radiotrans-
misor manual ...
▶ ... hasta que el cortinaje confirme con un movimiento corto Arriba /
Abajo
→ El radiotransmisor manual está programado.
→ El accionamiento se encuentra en modo normal (parada automática).
Observación: Después de haber programado las posiciones finales y un primer ra-
diotransmisor manual, el accionamiento funciona en modo normal (al presionar
brevemente los pulsadores ARRIBA o ABAJO arranca el movimiento de desplaza-
miento hasta que se acciona el botón pulsador "my", parada).
51

www.hoffmann-group.com
04698-in Copyright © Hoffmann Group
-
 1
1
-
 2
2
-
 3
3
-
 4
4
-
 5
5
-
 6
6
-
 7
7
-
 8
8
-
 9
9
-
 10
10
-
 11
11
-
 12
12
-
 13
13
-
 14
14
-
 15
15
-
 16
16
-
 17
17
-
 18
18
-
 19
19
-
 20
20
-
 21
21
-
 22
22
-
 23
23
-
 24
24
-
 25
25
-
 26
26
-
 27
27
-
 28
28
-
 29
29
-
 30
30
-
 31
31
-
 32
32
-
 33
33
-
 34
34
-
 35
35
-
 36
36
-
 37
37
-
 38
38
-
 39
39
-
 40
40
-
 41
41
-
 42
42
-
 43
43
-
 44
44
-
 45
45
-
 46
46
-
 47
47
-
 48
48
-
 49
49
-
 50
50
-
 51
51
-
 52
52


Garant heavy-duty rack roller shutters Instrucciones de operación
- Tipo
- Instrucciones de operación
en otros idiomas
Artículos relacionados
-
Garant 23 7510 Instrucciones de operación
-
-
-
-
-
-
Otros documentos
-
Somfy Sonesse 30 RS485 Manual de usuario
-
 Holex safety cabinet Instrucciones de operación
-
Somfy FREEROLL RTS El manual del propietario
-
Chamberlain BAS300K El manual del propietario
-
-
Novoferm Novomatic 423 Accu El manual del propietario
-
-
 Hörmann Ecostar PORTRONIC D5000 El manual del propietario
-
-

