Bella 0.9 L Deep Fryer, Stainless Steel El manual del propietario
- Categoría
- Freidoras
- Tipo
- El manual del propietario
Este manual también es adecuado para

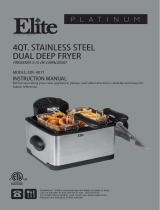
0.9L DEEP FRYER
0.9L FREIDORA
Instruction Manual (Recipe Guide)
Manual de instrucciones (Guía de recetas)
Register your product and get support at:
Para registrar y obtener asistencia de su producto ir:
www.bellahousewares.com
SO-309514_13769_BELLA_0.9L Deep Fryer_145x210_IM_R9.indd 1 2018-01-03 11:49 AM

THANK YOU
For Your Purchase
BellaLifestyle
BellaLife
@
bellahousewares.com
#get inspired
Register
& sign up for special
announcements and trendy
recipes!
Tell us what you think!
Rate, review or ask us a question.
SO-309514_13769_BELLA_0.9L Deep Fryer_145x210_IM_R9.indd 2 2018-01-03 11:49 AM

TABLE OF CONTENTS
Important Safeguards ........................................................................................................................................ 2
Additional Important Safeguards ..................................................................................................................... 3
Notes on the Plug (Detachable Cord Instructions) ........................................................................................4
Notes on the Cord...............................................................................................................................................4
Plasticizer Warning ............................................................................................................................................. 4
Electric Power...................................................................................................................................................... 4
Getting to Know Your Deep Fryer ................................................................................................................... 5
Before Using for the First Time ........................................................................................................................ 6
Operating Instructions ...................................................................................................................................6-7
Deep Fryer Helpful Hints ...................................................................................................................................8
Draining & Recycling Oil ....................................................................................................................................9
Cooking Chart .................................................................................................................................................... 9
User Maintenance Instructions ....................................................................................................................... 10
Care & Cleaning Instructions .......................................................................................................................... 10
Storing Instructions .......................................................................................................................................... 10
Trouble Shooting .............................................................................................................................................. 11
Recipes .......................................................................................................................................................... 12-13
Warranty ............................................................................................................................................................14
ÍNDICE
Medidas de seguridad importantes ............................................................................................................... 16
Otras medidas de seguridad importantes .................................................................................................... 17
Notas sobre el enchufe .................................................................................................................................... 18
Notas sobre el cable (Instrucciones sobre el cable separable) .................................................................. 18
Advertencia sobre plasticantes ....................................................................................................................18
Corriente eléctrica ............................................................................................................................................ 18
Descripción de la freidora .............................................................................................................................. 19
Antes de utilizar el producto por primera vez ..............................................................................................20
Instrucciones de funcionamiento .............................................................................................................20-21
Consejos útiles sobre la freidora ....................................................................................................................22
Escurrimiento y reciclaje del aceite ...............................................................................................................23
Tabla de cocción .............................................................................................................................................. 23
Instrucciones de mantenimiento para el usuario ........................................................................................24
Instrucciones de cuidado y limpieza .............................................................................................................. 24
Instrucciones de almacenamiento .................................................................................................................24
Solución de problemas .................................................................................................................................... 25
Recetas ......................................................................................................................................................... 26-27
Garantía..............................................................................................................................................................28
SO-309514_13769_BELLA_0.9L Deep Fryer_145x210_IM_R9.indd 1 2018-01-03 11:49 AM

2
IMPORTANT SAFEGUARDS
WARNING: When using electrical appliances, basic safety precautions should
always be followed, including the following:
1. READ ALL INSTRUCTIONS.
2. Do not touch hot surfaces. Use handles or knobs. Use oven mitts or potholders.
3. To protect against electric shock do not immerse cord, plugs, or appliance in
water or other liquid.
4. This appliance is not intended for use by persons (including children) with
reduced physical, sensory or mental capabilities, or lack of experience and
knowledge, unless they have been given supervision or instruction concerning
use of the appliance by a person responsible for their safety.
5. Close supervision is necessary when any appliance is used by or near children
6. Unplug from outlet when not in use and before cleaning. Allow to cool before
putting on or taking off parts, and before cleaning the appliance.
7. Do not operate any appliance with a damaged cord or plug or after the
appliance malfunctions, or has been damaged in any manner. Return appliance
to the nearest authorized service facility for examination, repair or adjustment.
8. The use of accessory attachments not recommended by the appliance
manufacturer may cause injuries.
9. Indoor, countertop use only. Do not use the appliance outdoors.
10. Do not let the cord hang over edge of the table or counter, or touch hot surfaces.
11. Do not place on or near a hot gas or electric burner, or in a heated oven.
12. Extreme caution must be used when moving the deep fryer containing hot oil
13. Always attach plug to appliance rst, then plug cord in the wall outlet.
Todisconnect, slide the temperature control to OFF or lower temperature
setting. Then remove plug from wall outlet.
14. Do not leave this appliance unattended during use
15. Do not use appliance for other than intended use
16. Be sure handle is properly assembled to fry basket and locked in place. See
detail assembly instructions.
17. Follow all instructions for removal of moisture/ice and thawing before cookin.g
18. Always cook with lid in closed position, except when frying French fries and
high moisture foods. Ensure both lid and vessel are completely dry after
washing and before use.
FOR HOUSEHOLD USE ONLY
SAVE THESE INSTRUCTIONS
SO-309514_13769_BELLA_0.9L Deep Fryer_145x210_IM_R9.indd 2 2018-01-03 11:49 AM

3
ADDITIONAL
IMPORTANT SAFEGUARDS
CAUTION HOT SURFACES: This appliance generates heat and escaping steam
duringuse. Proper precautions must be taken to prevent the risk of burns, res,
orother injury to persons or damage to property.
CAUTION: This appliance is hot during operation and retains heat for some
time afterturning OFF. Always use oven mitts when handling hot materials and
allow metal parts to cool before cleaning. Do not place anything on top of the
appliance while it is operating or while it is hot.
1. All users of this appliance must read and understand this owner’s manual
before operating or cleaning the appliance.
2. The cord to this appliance should be plugged into a 120V AC electrical outlet only.
3. If this appliance begins to malfunction during use, immediately unplug the cord.
Do not use or attempt to repair the malfunctioning appliance.
4. Do not immerse detachable power cord in any liquid. If the cord falls in water
or other liquid, DISCARD IMMEDIATELY and replace it with a new cord.
If the supply cord to this appliance is damaged, it must be replaced by
contactingConsumer Service.
5. Keep the cord out of reach from children and infants to avoid the risk of
electric shock and choking.
6. Use fry basket handle to raise and lower fry basket. Always raise fry basket
out of hot oil and allow cooked food to rest for 5 to 10 seconds before
removing food from basket.
7. Dry damp foods before placing into oil. When deep frying frozen foods,
removeany excessive ice as it can cause hot oil to spatter.
8. Always keep lid closed while Deep Fryer is frying foods.
9. Do not obstruct the ltered air outlet vent on top of lid with any objects.
Avoid contact with escaping steam from the ltered air outlet during operation.
10. Keep appliance at least 4 inches away from walls or other objects during
operation. Do not place any objects on top of appliance while it is operating.
Place the appliance on a at surface that is resistant to heat.
11. Be sure oil tank is lled with oil to a level above MIN as marked.
Do not operate appliance without oil or with an insufcient amount of oil.
Do not over-ll the tank with oil past the MAX mark.
WARNING: Under- or over-lling the oil tank may damage the Deep Fryer
andcould result in serious personal injury.
12. Always pour unheated oil into tank before plugging in and heating.
Never pour oil into heated tank.
13. Ensure that there are no ammable objects on or near the appliance.
If the oil catches re, unplug the appliance and replace the lid.
Never use water to extinguish the re.
14. Do not operate this appliance if the lid and the tank are not completely dry.
15. It is not recommended to move the Deep Fryer containing hot oil.
Allow to cool before moving.
16. Do not use this Deep Fryer to boil water.
SO-309514_13769_BELLA_0.9L Deep Fryer_145x210_IM_R9.indd 3 2018-01-03 11:49 AM

4
Notes on the Plug
This appliance has a polarized plug (one blade is wider than the other).
To reduce the risk of electric shock, this plug will t in a polarized outlet only
oneway. If the plug does not t fully into the outlet, reverse the plug. If it still
does not t, contact aqualied electrician. Do not modify the plug in any way.
Notes on the Cord (Detachable Cord Instructions)
CAUTION: A short detachable power-supply cord is provided to reduce the risk of
personal injury resulting from becoming entangled in or tripping over a longer cord.
The cord is designed to break away from the Deep Fryer quickly and smoothly to
prevent the unit from tipping over when someone unintentionally pulls on the cord.
This detachable cord is designed for use with this Deep Fryer only.
Do not try using it on any other appliance.
WARNING: Serious hot-oil burns may result from a deep fat fryer being pulled
off acountertop. Do not allow the cord to hang over the edge of the counter
whereitmay be grabbed by children or become entangled with the user. Do not
use with anextensioncord.
Plasticizer Warning
CAUTION: To prevent Plasticizers from migrating to the nish of the counter top
ortable top or other furniture, place NON-PLASTIC coasters or place mats between
theappliance and the nish of the counter top or table top. Failure to do so may
cause the nish to darken; permanent blemishes may occur or stains can appear.
Electric Power
If the electrical circuit is overloaded with other appliances, your appliance may
notoperate properly. Itshould be operated on a separate electrical circuit from
otherappliances.
SO-309514_13769_BELLA_0.9L Deep Fryer_145x210_IM_R9.indd 4 2018-01-03 11:49 AM

5
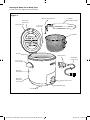
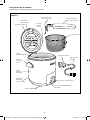
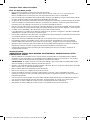
Getting to Know Your Deep Fryer
Product may vary slightly from illustrations.
Figure 1
Removable Lid
Filtered Air
Outlet Vent
Cool Touch
Lid Handle
Fry Basket
Red HEATING Light
Temperature Control
Detachable
Power Cord
Polarized Plug
Stainless
Steel Body
Appliance
Receptacle
(not shown)
Non-Slip Feet
Cool Touch
BodyHandles
Oil Tank
Fry Basket
Detachable Handle
Basket Handle Release
SO-309514_13769_BELLA_0.9L Deep Fryer_145x210_IM_R9.indd 5 2018-01-03 11:49 AM

6
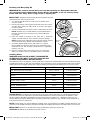
Before Using for the First Time
1. Remove all packing material and labels from the fry basket, fry basket handle and the inside and
outside of the Deep Fryer.
2. During rst use of the Deep Fryer, the oil tank and fryer basket may emit a slight odor.
This is normal. Toavoid this odor, please follow the instructions outlinedbelow.
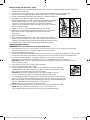
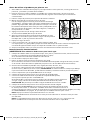
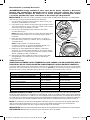
3 Pull the plastic basket handle to separate from metallic handle bar
4. Assemble the fry basket handle onto the basket.
With the black handle in hand, squeeze both handle bars together.
Pullthe black handle out to extend it to its longest position.
Continuetosqueeze, tting the bars in through the basket
support wiresand lock into the 2 wire tabs. (See Figure 2 and 3.)
Set the fry basketaside.
5. Add 3.75 cups/.9 L water to the MAX level on theoiltank.
6. Following the Operating Instructions outlined in this Instruction
Manual, heat water at the lowest temperature (225ºF) for
10minutes.
7. Allow water to cool.
8. Wash fry basket and handle in hot, soapy water. Use a slightly
soapy sponge and wipe the inside of the oil tank. Wipe clean with
a damp paper towel. Wipe the Deep Fryer body with a damp cloth.
9. Dry the oil tank and fry basket thoroughly before deep frying.
Operating Instructions
WARNING! This unit should not be used to boil water.
1. Place the Deep Fryer on a clean, dry, at, heat-resistant surface such as a table or counter top,
approximately 2 feet from a standard 120V AC electrical outlet.
2. Use the lid handle to open the lid.
3. Set the assembled fry basket with handle aside. (If necessary, see detailed fry basket handle assembly
instructions described in the Before Using for the First Time section of this Instruction Manual.)
4. Pour liquid cooking oil (corn, vegetable, rapeseed, peanut, etc.) into the tank.
Fill with oil to a level between the MIN (2 cups /.5 L) and MAX (3.75 cups/.9 L) marks.
WARNING:Under-orover - lling the oil tank may damage the Deep Fryer and could result in
seriouspersonal injury.
5. Close the lid until it snaps securely onto the body.
6. Turn the temperature control to OFF.
7. Connect the detachable power cord into the appliance receptacle, with the
“THIS SIDE UP” topside. (See Figure 3.) Make sure the cord is rmly inplace.
Thenconnect the polarized plug to the wall outlet.
CAUTION: Do not let the cord hang over the edge of table orcounter.
8. Turn the temperature control to the desired cooking temperature.
9. The red HEATING light will illuminate as the Deep Fryer heats the oil. Oil may
makea “popping” sound inside the Deep Fryer as the oil heats. This is normal.
When theoil reaches the selected cooking temperature, the red HEATING light
will turn OFF indicating the Deep Fryer is ready for use.
NOTE: Allow 5 to 7 minutes for the oil to preheat.
10. Carefully place food into the fry basket. Do not overll fry basket with food.
NOTE: Maximum food frying capacity is 1 to 1.5 cups at one time.
The fry basket should never be more than 2/3 full of food to be fried.
Figure 2
Figure 3
SO-309514_13769_BELLA_0.9L Deep Fryer_145x210_IM_R9.indd 6 2018-01-03 11:49 AM

7
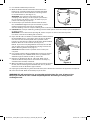
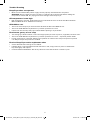
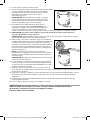
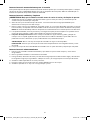
11. Use the lid handle to open the lid.
12. With the basket handle centered at the front of the
Deep Fryer, carefully lower the fry basket with food
into the hot oil. Fitthe handle bars into the grooves
inthe lid and close. (SeeFigure 4.)
WARNING: This appliance generates heat and
escaping steam during use. Use proper precautions
to prevent the risk of burns, res, or other injury to
persons or damage to property.
13. As the Deep Fryer cooks the food and the oil cools,
the red HEATING light will cycle on and off as proper
cooking temperature of the oil is maintained.
See the Cooking Chart for sample cooking times and temperatures.
14. CAUTION: Do not open lid during cooking! Hot oil could spatter out of the Deep Fryer causing burns
orother injuries.
WARNING: Use caution when opening lid; steam escapes as soon as the lid is opened.
Use oven mitts when handling hot materials.
15. Open the lid and turn food as needed. When food is cooked
to desired doneness, using oven mitts, liftthe fry basket
out of the oil and carefully hook the fry basket’s wire
hangers up and over the front of the oil tank. Allow cooked
foods to drain for 5-10 seconds. (See Figure 5.)
NOTE: To prevent early degradation of the oil, do not add
salt or other spices to the food during frying or when the
food isdraining above the frying oil.
CAUTION: DO NOT touch fry basket wires as they are
veryhot!
16. Use a heat-resistant long-handled fork or tongs to remove
cooked food or pour cooked foods from fry basket onto
absorbent paper towels to soak up excess oil.
17. Replace fry basket into the oil. Close lid, allow unit to
reheat todesired temperature and continue to deep fry
another batch offood, if desired.
18. When all cooking is complete, turn the temperature control
to OFF; nish removing all fried food from the fry basket
ontowire racks or absorbent paper towels.
19. Unplug the polarized plug from the wall outlet, then detachthe cord from the appliance receptacle.
20. Close the lid and allow oil and Deep Fryer to cool.
WARNING! Oil will remain hot for an extended period of time. Be sure all parts of the
DeepFryer and the oil have cooled completely beforediscardingorstoringoil and
cleaningtheunit.
Figure 4
Figure 5
SO-309514_13769_BELLA_0.9L Deep Fryer_145x210_IM_R9.indd 7 2018-01-03 11:49 AM

8
Deep Fryer Helpful Hints
Deep Frying
• Never over-ll the fry basket with food. NOTE: Maximum food frying capacity is 1 to 1.5 cups at one
time. The fry basket should never be more than 2/3 full of food to be fried.
• Fry more batches of smaller amounts of food. Best results are obtained when the hot oil can freely
circulate all around the food.
• In general, pre-cooked foods require higher temperatures and less cooking time.
• Cut or sort food into uniform sizes. Cook same-size pieces together so they will be cooked in the
same amount of time.
• Be sure foods are free from ice crystals and excess moisture before frying.
Water on the surface of the food can cause the oil to spatter and foam.
• When using a breading, evenly coat the food to be fried. Fine, uniform crumbs stick better than
coarse, uneven ones. Shake off all extra breading to help keep oil clean.
• To prevent contamination of the oil, do not add salt or other spices to the food during frying or
when the food is draining above the oil.
• Space coated foods so they do not touch while cooking.
• For best results when frying doughs or foods dipped in a liquid batter, place the foods into the
basket rst and then lower the fry basket into the hot oil.
• Always use the fry basket to lift food out of the oil; hook the basket to the rim and allow oil to drain.
Then remove fried food from the fry basket.
• Place fried foods on brown grocery bags to drain oil and keep fried foods crispy.
Frying Oil
WARNING! Never, under any circumstances, add water or any other liquid to the oil.
• Never over-ll or under-ll the fryer with oil. The MAX oil capacity is (3.75 cups/.9 L). The MIN oil
capacity is (2 cups/450ml). Both the MIN and MAX oil levels are marked on the inside of the tank.
WARNING: Under or over-lling the oil tank may damage the Deep Fryer and could result in serious
personal injury.
• Always use sunower oil, rapeseed oil, vegetable oil or corn oil. Never use hard fats, olive oil or oil
with ahigh water content.
• Never mix different oils together to fry foods.
• Never use butter or margarine to fry foods.
• When frying sh or seafood, the oil may absorb a “shy” taste or odor. To eliminate transferring
this “shy” taste or odor to other foods, we suggest changing the oil before frying other foods.
• Cooled, used oil should be removed from the tank and ltered after every frying session.
Cleaned oil can be used several times.
• Replace used oil with fresh if the oil smokes when heated.
• Replace used oil with fresh if the oil foams or bubbles when heated.
SO-309514_13769_BELLA_0.9L Deep Fryer_145x210_IM_R9.indd 8 2018-01-03 11:49 AM

9
Draining and Recycling Oil
WARNING! Be careful around hot parts and hot spitting oil. Remember that the
oil is actually hotter than boiling water! Never put hands in the oil. Always keep
hands and face away from rising steam or spitting oil.
IMPORTANT:
Cooled, used oil should be removed from the tank
and ltered after every frying session.
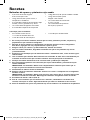
1. Use the handle lid to open; remove the fry basket from
unit. Setaside.
2. Remove the lid by releasing the black tabs from the central
spindle. Grasp lid rmly and pull lid up and off. (See Figure
6.) Setlid aside.
3. Use the special oil drain spout to pour used oil from the tank.
NOTE: DO NOT pour used oil down any household drain.
Discardused oil into a container with a lid and dispose
ingarbage.
4. Filter the cooled oil through a ne sieve into a wide-neck,
airtight,covered container. Use a funnel to avoid oil spillage.
NOTE: A paper towel, coffee lter or piece of clean cotton material
can be placed in the fry basket and used to lter used oil.
5. As oil will absorb food avors and odors, it’s a good
idea tolabel the container with the type of food that was
cooked in the oil. Forexample: sweet desserts, vegetables,
chicken, sh, etc.
6. Replace used oil with fresh if the oil has an unpleasant
odor, ifitsmokes, foams, or bubbles when it is heated.
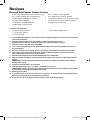
Cooking Chart
WARNING! ALWAYS USE A MEAT THERMOMETER
TOENSURE THAT MEAT, POULTRY AND FISH ARE
COOKED THOROUGHLY BEFORE EATING.
The following chart is intended as a basic guide only. The quantity of food fried at one time and the type/size
of food being fried may alter the total cooking time. Remember, frying smaller batches will result in better
cooking times and a higher food quality. Adjust cooking temperature and cooking time to suit your taste.
FOOD
TEMP COOKING TIME
Fish, battered, fresh or thawed 325° F - 350° F 5 to 10 minutes
Vegetables, breaded, thawed 350°F 4 to 6 minutes
Donuts 350°F 3 to 5 minutes
Chicken pieces, bone-in, fresh or thawed 350°F 10 to 15 minutes
Chicken strips, frozen 375° F 5 to 10 minutes
Shrimp, breaded, thawed 350°F 2 to 3 minutes
Shrimp, breaded, frozen 375° F 4 to 5 minutes
Fritters 375° F 2 to 4 minutes
French fries/onion rings, frozen 375° F 3 to 5 minutes
PLEASE NOTE: The USDA recommends that meats such as beef and lamb, etc. should be cooked to an
internal temperature of 145ºF/63ºC. Pork should be cooked to an internal temperature of 160ºF/71ºC and
poultry products should be cooked to an internal temperature of 170ºF/77ºC - 180ºF/82ºC to be sure any
harmful bacteria has been killed. When reheating meat/poultry products, they should also be cooked to an
internal temperature of 165ºF/74ºC.
NOTE: Frozen foods may require different cooking times and temperatures; follow package directions. Use
374ºF/191ºC for all foods that have package instructions for a higher temperature and adjust times as necessary.
IMPORTANT: Remove ice crystals from frozen foods before placing in the hot oil.
CAUTION: NEVER ll the fry basket more than 2/3 full.
Figure 6
Oil Drain
Spout
2 Black Tabs
Central Spindle
SO-309514_13769_BELLA_0.9L Deep Fryer_145x210_IM_R9.indd 9 2018-01-03 11:49 AM

10
User Maintenance Instructions
This appliance requires little maintenance. It contains no user-serviceable parts. Any servicing
requiringdisassembly other than cleaning must be performed by a qualied appliance repair technician.
Care & Cleaning Instructions
WARNING! Allow the fryer to cool fully before emptying the oil and cleaning the appliance.
1. Make sure your Deep Fryer is unplugged and the fry basket and oil/oil tank have cooled completely.
2. Remove the fry basket from the oil tank. Squeeze both handle bars together to disassemble fry
basket from handle.
3. Remove the Lid. Carefully strain the oil from the tank into a suitable container.
(See section Draining and Recycling Oil in this Instruction Manual for complete details.)
NOTE: It is best to work over a sink or garbage can in case of any spillage.
4. The removable lid, fry basket and handle are dishwasher-safe, or may be washed by hand in hot,
soapywater. Dry all parts thoroughly.
5. Oil Tank Cleaning: Fill emptied tank with hot, soapy water and allow to soak.
Use a stiff nylon brush to remove stubborn or burned-on residue. Do not use
harsh or abrasive cleaning products as they may damage the surface of the tank.
WARNING: Never immerse the Deep Fryer body in water or other liquids.
CAUTION: Make sure the oil tank is completely dry after washing and before use.
6. Wipe the Deep Fryer Stainless Steel body with a damp cloth and dry completely.
Storing Instructions
1. Make sure your Deep Fryer is unplugged and all parts are clean and dry before storing.
2. Never store Deep Fryer while it is hot or wet.
3. To store, disassemble fry basket from handle. Squeeze handlebars and collapse black handle for
storage. Place the clean basket and handle into the oil tank.
4. Store detachable cord in the fry basket.
5. Push the lid closed until it snaps securely onto the body.
6. Store appliance in its box or in a clean, dry place.
SO-309514_13769_BELLA_0.9L Deep Fryer_145x210_IM_R9.indd 10 2018-01-03 11:49 AM

11
Trouble Shooting
Deep Fryer does not operate
• Make sure the detachable power supply cord is properly attached to the receptacle.
WARNING: Always check to make sure there is sufcient oil in the oil tank before sliding the
temperature control ON. Dry frying will cause damage to the Deep Fryer
Oil temperature is too high
• Not enough oil in oil tank. Unplug Deep Fryer and check oil level. Oil level should be between
MINandMAX ll lines. Add oil as necessary.
Oil bubbles over
• Too much oil in Deep Fryer oil tank. Never ll with oil above the MAX ll line.
• Too much food added to fry basket. Fry smaller quantities at a time.
• Food is too wet. Pat dry with paper towels before placing in fryer basket.
Food tastes greasy or not crisp
• The wrong type of oil has been used. Use a high-quality oil such as peanut, vegetable, canola or corn.
• Too much food added to fry basket. Fry smaller quantities at a time. – especially frozen foods.
• Frying temperature is too low. Allow unit to preheat or reheat to the recipe temperature prior to
use. Adjust recipe temperature if needed.
Food or Deep Fryer emits unpleasant odors
• Oil has deteriorated. Change oil as needed.
• Lid odor lter is saturated. Remove lid and clean in hot, soapy water or place in dishwasher.
Drythoroughly and replace.
• Used oil absorbs food odors. Do not fry desserts in oil that has been used to fry sh.
SO-309514_13769_BELLA_0.9L Deep Fryer_145x210_IM_R9.indd 11 2018-01-03 11:49 AM

Recipes
12
Roasted Red Pepper Cheese Fritters
• 3-3/4 cups vegetable or canola oil for frying
• 4 oz. cream cheese, room temperature
• 2 tablespoons roasted red peppers,
drained, nely chopped
• 1/2 teaspoon smoked paprika
• 2 tablespoons mayonnaise
• 6 oz. cheddar cheese, grated
• 4 oz. pepper-jack cheese, grated
• 1/2 teaspoon Kosher salt, or more to taste
• 1/8 teaspoon cayenne pepper, optional
• pepper jelly, for serving
3 Stations for Breading:
• 2/3 cup all-purpose our
+ 1/3 cup corn starch
• 1 cup buttermilk
• 1 cup panko breadcrumbs
1. In a medium mixing bowl, mix cream cheese, chopped peppers, mayonnaise and paprika
untilwell combined.
2. Add the grated cheese and salt/pepper to the cream cheese mixture.
Combine well. Ifdesired,add more salt and/or cayenne pepper to taste.
3. Chill for 2 hours or preferably, overnight.
4. Use a measuring tablespoon to make uniform balls of roasted red pepper cheese and
rollintofritters.
5. Set up 3 stations for breading: our + cornstarch, buttermilk and panko breadcrumbs
6. Use a fork to mix our and cornstarch together. Roll each fritter in the our mixture
untilcompletely coated. Dust off the excess.
7. Add the oured fritter into the buttermilk and coat completely.
8. Roll wet buttermilk fritter in the panko breadcrumbs, pressing the panko rmly into the
fritters.
IMPORTANT: Fritters must be completely coated to prevent fried cheese from leaking
during deepfrying.
9. Continue until all fritters are breaded.
10. Chill breaded fritters for 1 to 2 hours or freeze for 1/2 hour.
IMPORTANT: Fritters must be very cold to prevent fried cheese from leaking during deep
frying. Keep fritters refrigerated before frying.
11. Preheat oil to 375ºF.
12. Fry 3 to 5 fritters at a time for about 2 to 4 minutes, turning halfway, until golden brown.
Continue frying until all of the fritters are cooked.
13. Serve the roasted red pepper cheese fritters warm with pepper jelly.
SO-309514_13769_BELLA_0.9L Deep Fryer_145x210_IM_R9.indd 12 2018-01-03 11:49 AM

Recipes
13
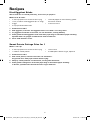
Fried Eggplant Sticks
These sticks are so crunchy and tasty, and so easy to prepare!
Makes 36 to 40 sticks
• 3-3/4 cups peanut or canola oil for frying
• 1 rm, medium sized eggplant (6-1/2” long)
• 2 eggs
• 2 cups panko breadcrumbs
• salt and pepper to taste freshly grated
Parmesan cheese
• marinara sauce
1. Preheat oil to 350ºF.
2. Peel eggplant, if desired. Cut eggplant into 1/2-in. thick x 3-in. long sticks.
3. Fry eggplant in batches of 10 sticks, for 4 to 5 minutes, turning halfway.
4. Drain golden brown eggplant sticks on brown paper bags or absorbent paper toweling.
Sprinklewith salt, pepper and Parmesan cheese while hot.
5. Serve with marinara sauce.
Sweet Potato Cottage Fries for 1
Makes 1-1/2 cups
• 3-3/4 cups peanut or canola oil for frying
• 1 medium sweet potato
• salt to taste
• 2 tablespoons brown sugar, optional
1. Preheat oil to 375ºF.
2. Peel sweet potato, if desired. Cut into 1/4” thick discs.
Dry potato discs with paper towels before frying.
3. Deep fry sweet potatoes 8 to 9 minutes, turning after 5 minutes.
4. Drain golden cottage fries on brown paper bags or absorbent paper toweling.
If desired, sprinkle with salt and/or brown sugar while hot.
SO-309514_13769_BELLA_0.9L Deep Fryer_145x210_IM_R9.indd 13 2018-01-03 11:49 AM

Limited TWO-YEAR Warranty
SENSIO Inc. hereby warrants that for a period of TWO YEARS from the date
of purchase, this product will be free from mechanical defects in material and
workmanship, and for 90 days in respect to non-mechanical parts. At its sole
discretion, SENSIO Inc. will either repair or replace the product found to be
defective, or issue a refund on the product during the warranty period.
The warranty is only valid for the original retail purchaser from the date of initial
retail purchase and is not transferable. Keep the original sales receipt, as proof of
purchase is required to obtain warranty validation. Retail stores selling this product
do not have the right to alter, modify, or in any way revise the terms and conditions
of the warranty.
EXCLUSIONS:
The warranty does not cover normal wear of parts or damage resulting from
any of the following: negligent use of the product, use of improper voltage or
current, improper routine maintenance, use contrary to the operating instructions,
disassembly, repair, or alteration by anyone other than qualied SENSIO Inc.
personnel. Also, the warranty does not cover Acts of God such as re, oods,
hurricanes, or tornadoes.
SENSIO Inc. shall not be liable for any incidental or consequential damages caused
by the breach of any express or implied warranty. Apart from the extent prohibited
by applicable law, any implied warranty of merchantability or tness for a particular
purpose is limited in time to the duration of the warranty. Some states, provinces or
jurisdictions do not allow the exclusion or limitation of incidental or consequential
damages, or limitations on how long an implied warranty lasts, and therefore, the
above exclusions or limitations may not apply to you. The warranty covers specic
legal rights which may vary by state, province and/or jurisdiction.
HOW TO OBTAIN WARRANTY SERVICE:
You must contact Customer Service at our toll-free number: 1-866-832-4843.
A Customer Service Representative will attempt to resolve warranty issues over the
phone. If the Customer Service Representative is unable to resolve the problem,
you will be provided with a case number and asked to return the product to
SENSIO Inc. Attach a tag to the product that includes: your name, address, daytime
contact telephone number, case number, and description of the problem. Also,
include a copy of the original sales receipt. Carefully package the tagged product
with the sales receipt, and send it (with shipping and insurance prepaid) to SENSIO
Inc.’s address. SENSIO Inc. shall bear no responsibility or liability for the returned
product while in transit to SENSIO Inc.’s Customer Service Center.
14
SO-309514_13769_BELLA_0.9L Deep Fryer_145x210_IM_R9.indd 14 2018-01-03 11:49 AM

15
SO-309514_13769_BELLA_0.9L Deep Fryer_145x210_IM_R9.indd 15 2018-01-03 11:49 AM

16
MEDIDAS DE SEGURIDAD
IMPORTANTES
ADVERTENCIA: Cuando se utilizan aparatos eléctricos, se deben seguir
precauciones de seguridad básicas, entre ellas:
1. LEA TODAS LAS INSTRUCCIONES.
2. No toque las supercies calientes. Utilice las asas o manijas. Use manoplas
para horno o agarraderas.
3. Para protegerse contra una descarga eléctrica, no sumerja el cable, los
enchufes niel aparato en agua u otros líquidos.
4. Este dispositivo no está diseñado para ser utilizado por personas (incluidos
niños) con capacidades físicas, sensoriales o mentales reducidas, o falta de
experiencia y conocimiento, a menos que una persona responsable de su
seguridad los supervise o los instruya en el uso del aparato.
5. Es necesario supervisar atentamente a los niños si usan aparatos o están cerca
deellos.
6. Desenchufe el aparato del tomacorriente cuando no lo utilice y antes de limpiarlo.
Deje enfriar el aparato antes de colocarle o retirarle piezas y antes de limpiarlo.
7. No utilice ningún aparato si el cable o el enchufe están dañados, o si el aparato
nofunciona bien o se ha dañado de alguna forma. Lleve el aparato al servicio
técnico autorizado más cercano para que lo examinen, reparen o ajusten.
8. El uso de accesorios que no estén recomendados por el fabricante del aparato
puede provocar lesiones.
9. No lo utilice en exteriores.
10. No permita que el cable cuelgue por el borde de la mesa o mesada, ni toque
supercies calientes.
11. No lo coloque encima ni cerca de un quemador eléctrico o de gas caliente,
nideunhorno caliente.
12. Se debe tener sumo cuidado cuando se traslada un aparato con aceite u otros
líquidos calientes.
13. Siempre conecte el extremo del enchufe magnético al aparato en primer
lugar; luego, enchufe el cable al tomacorriente de la pared. Para desconectar
el aparato, coloque el control de temperatura en la posición de apagado (OFF).
Luego desenchufe la unidad del tomacorriente de la pared.
14. No deje este aparato sin vigilancia durante el uso.
15. No le dé al aparato otro uso que no sea el indicado.
16. Asegúrese de que el mango de la cesta para freír esté correctamente montado
en la cesta y bloqueado en su lugar. Consulte las instrucciones de montaje
detalladas en el Manual de instrucciones.
17. Asegúrese de que el mango de la cesta para freír esté correctamente
enganchado al tanque de aceite, con ambas barras del mango instaladas en las
ranuras de latapa. Cierre y bloquee la tapa.
GUARDE ESTAS
INSTRUCCIONES
PARA USO DOMÉSTICO
ÚNICAMENTE
SO-309514_13769_BELLA_0.9L Deep Fryer_145x210_IM_R9.indd 16 2018-01-03 11:49 AM

17
OTRAS MEDIDAS DE
SEGURIDAD IMPORTANTES
PRECAUCIÓN CON LAS SUPERFICIES CALIENTES: Este aparato genera calor y vapor
de escape durante el uso. Se deben tomar las medidas necesarias para evitar riesgos
de quemaduras, incendios u otras lesiones a personas o daño a la propiedad.
PRECAUCIÓN: Este aparato se calienta durante el funcionamiento y retiene
el calor por un tiempo luego de apagarse. Siempre use manoplas para horno
cuando manipule materiales calientes y deje enfriar las piezas metálicas antes de
limpiarlas. No coloque nada encima del aparato mientras esté en funcionamiento
o mientras esté caliente.
1. Todos los usuarios de este aparato deben leer y comprender este manual
delpropietario antes de operar o limpiar la unidad.
2. El cable del aparato debe enchufarse únicamente a un tomacorriente
eléctrico de120 V de CA.
3. Si este aparato comienza a funcionar mal durante el uso, desenchufe el cable
inmediatamente. No utilice ni intente reparar el aparato si funciona mal.
4. No sumerja el cable eléctrico separable en ningún líquido. Si el cable se
cae al agua u otro líquido, DESÉCHELO INMEDIATAMENTE y reemplácelo
por uno nuevo. Si se daña el cable de alimentación que se conecta a este
aparato, debecomunicarse con el Servicio al cliente para que lo reemplacen.
5. Mantenga el cable alejado de los niños y bebés para evitar el riesgo de
descarga eléctrica y asxia.
6. Use el mango de la cesta para freír para levantar y bajar esta cesta. Siempre
levante la cesta para freír y aléjela del aceite caliente. Deje que el alimento
frito repose durante 5 a 10 segundos antes de quitarlo de la cesta.
7. Seque los alimentos húmedos antes de colocarlos en aceite. Cuando fría
alimentos congelados, quite el hielo en exceso ya que puede hacer que el
aceite caliente salpique.
8. Siempre mantenga la tapa cerrada mientras se estén friendo alimentos.
9. No obstruya con ningún objeto el respiradero de aire ltrado de la parte
superior de la tapa. Evite el contacto con el vapor que escapa del respiradero
de aire ltrado durante el funcionamiento.
10. Mantenga el aparato alejado al menos 10 cm (4”) de las paredes u otros
objetos durante su funcionamiento. No coloque ningún objeto en la parte
superior del aparato mientras esté en funcionamiento. Coloque el aparato en
una supercie plana resistente al calor.
11. Procure llenar el tanque con aceite hasta un nivel superior a la marca MIN
(Mínimo). No use el aparato sin aceite o sin la cantidad de aceite suciente.
Procure que el aceite no supere la marca MAX (Máximo) del tanque.
ADVERTENCIA: Si coloca aceite en el tanque por debajo o por encima del nivel
adecuado, puede dañar la freidora y ocasionar lesiones personales graves.
12. Siempre vierta aceite frío en el tanque antes de enchufar el aparato y que
comience a calentar. Nunca vierta aceite si el tanque está caliente.
13. Procure que no haya objetos inamables sobre el aparato o cerca de este.
Sielaceite se enciende, desenchufe el aparato y vuelva a colocar la tapa.
Nuncause agua para sofocar el fuego.
14. No use el aparato si la tapa y el tanque no están completamente secos.
15. No se recomienda trasladar la freidora si contiene aceite caliente.
Déjelaenfriarantes de trasladarla.
16. No use esta freidora para hervir agua.
SO-309514_13769_BELLA_0.9L Deep Fryer_145x210_IM_R9.indd 17 2018-01-03 11:49 AM

18
Notas sobre el enchufe
Este aparato tiene un enchufe polarizado (una clavija es más ancha que la
otra). Para reducir el riesgo de descarga eléctrica, este enchufe se debe colocar
en un tomacorriente polarizado en una sola dirección. Si el enchufe no entra
completamente en el tomacorriente, dé vuelta el enchufe. Si aun así no encaja,
llame a un electricista calicado. No modique el enchufe de ninguna manera.
Notas sobre el cable (Instrucciones sobre el cable separable)
PRECAUCIÓN: Se suministrará un cable de alimentación corto separable
para reducir elriesgo de lesiones personales a causa de un enredo o tropiezo
con un cable más largo. El cable se diseñó para desprenderse de la freidora
rápidamente y sin inconvenientes a n de evitar que la unidad se caiga cuando
alguien tire del cable accidentalmente.
Este cable separable se diseñó para usarse con la freidora únicamente.
Nointenteusarlo con ningún otro aparato.
ADVERTENCIA: Si alguien tira de una freidora en una mesada, puede ocasionar
quemaduras graves con aceite caliente. No permita que el cable cuelgue del
borde dela mesada, ya que los niños podrían agarrarlo o el usuario podría
enredarse con él. No use este aparato con un cable de extensión.
Advertencia sobre plasticantes
PRECAUCIÓN: A n de evitar que los plasticantes se adhieran al acabado
delamesada o mesa o de otro mueble, coloque un posafuentes o salvamanteles
que NOSEA DE PLÁSTICO entre el aparato y la supercie de la mesada o mesa.
Sinosehace esto, es posible que el acabado se oscurezca; se pueden formar
marcaspermanentes o aparecer manchas.
Corriente eléctrica
Si se recarga el circuito eléctrico con otros aparatos, es posible que este aparato
nofuncione correctamente. Se debe utilizar en un circuito eléctrico separado
delosotros aparatos.
SO-309514_13769_BELLA_0.9L Deep Fryer_145x210_IM_R9.indd 18 2018-01-03 11:49 AM

19
Descripción de la freidora
El producto puede diferir levemente de la ilustración
Figura 1
Tapa desmontable
Respiradero
deaire ltrado
Asa de la
tapa fría
al tacto
Cesta para freír
Luz roja de CALENTAMIENTO
(HEATING)
Control de temperatura
Cable eléctrico
separable
Enchufe polarizado
Cuerpo
de acero
inoxidable
Receptáculo
del aparato
(no se muestra)
Patas antideslizantes
Asas del
cuerpo frías
al tacto
Tanque
de aceite
Mango separable
de la cesta para freír
Desconexión del
mango de la cesta
SO-309514_13769_BELLA_0.9L Deep Fryer_145x210_IM_R9.indd 19 2018-01-03 11:49 AM

20
Antes de utilizar el producto por primera vez
1. Quite todos los materiales de empaque y las etiquetas de la cesta para freír, el mango de la cesta
para freír, y el interior y exterior de la freidora.
2. Durante el primer uso de la freidora, es posible que el tanque de aceite y la cesta para freír
emitan un leve olor. Es normal. Para evitar este olor, siga las instrucciones que se mencionan
acontinuación.
3. Halar la manija de pl’astico para separarla de la barra metálica
4. Monte el mango de la cesta para freír en la cesta.
Con el mango negro en la mano, junte las barras del mango
apretándolas. Jale del mango negro para extenderlo lo más lejos
posible. Siga apretando, hasta que las barras encajen a través de
los alambres de soporte de la cesta para freír y bloquéelos en las
dos (2) lengüetas de alambre. (Consulte la gura 2). Coloque la
cesta para freír a un lado.
5. Agregue 3,75 tazas o 0,9 L de agua hasta alcanzar
el nivel máximo (MAX) del tanque de aceite.
6. Siga las Instrucciones de funcionamiento detalladas en este
Manual de instrucciones para calentar el agua a la temperatura
más baja (107 °C [225 °F]) durante 10 minutos.
7. Deje que el agua se enfríe.
8. Lave la cesta para freír y el mango con agua caliente y jabón. Use
una esponja con muy poco jabón y limpie el interior del tanque de aceite. Continúe la limpieza con
una toalla de papel húmeda. Limpie el cuerpo de la freidora con un paño húmedo.
9. Seque el tanque de aceite y la cesta para freír minuciosamente antes de comenzar a freír.
Instrucciones de funcionamiento
¡ADVERTENCIA! Esta unidad no debe usarse para hervir agua.
1. Coloque la freidora sobre una supercie limpia, seca, plana y resistente al calor, como una mesa o
mesada, a una distancia de aproximadamente 60 cm (2 pies)
de un tomacorriente eléctrico estándar de 120 V de CA.
2. Use el asa de la tapa para abrir la tapa.
3. Deje a un lado la cesta para freír montada con el mango.
(Si es necesario, consulte las instrucciones detalladas de montaje del mango de la cesta para freír
en la sección “Antes de utilizar el producto por primer vez” de este Manual de instrucciones).
4. Vierta aceite comestible líquido (de maíz, vegetal, de colza, de maní, etc.)
en el tanque. Llene el tanque con aceite hasta un nivel entre las marcas MIN
(2 tazas o 0,5 L) y MAX (3,75 tazas o 0,9 L). ADVERTENCIA: Si coloca aceite en el tanque por debajo
o por encima del nivel adecuado, puede dañar la freidora y ocasionar lesiones personales graves.
5. Cierre la tapa hasta que encaje debidamente en el cuerpo.
6. Coloque el control de temperatura en la posición de apagado (OFF).
7. Conecte el cable de alimentación separable al receptáculo del aparato,
con la parte superior que dice “THIS SIDE UP”
(Este lado arriba). (Consulte la gura 3). Procure que el cable esté rmemente en
su lugar. Luego, conecte el enchufe polarizado al tomacorriente de pared.
PRECAUCIÓN: No permita que el cable cuelgue del borde de la mesa o mesada.
8. Coloque el control de temperatura en la temperatura de cocción elegida.
9. La luz roja de CALENTAMIENTO se iluminará mientras la freidora calienta el aceite.
Elaceite puede emitir un sonido de “estallido” dentro de la freidora mientras el
aceite secalienta. Es normal. Cuando el aceite alcance la temperatura de cocción elegida, la luz roja
de CALENTAMIENTO se apagará, lo que indica que la freidora está lista para usarse.
NOTA: Deje que el aceite se precaliente durante 5 a 7 minutos.
10. Coloque cuidadosamente el alimento en la cesta para freír. No llene en exceso la cesta para freír
conalimento.
NOTA: La capacidad máxima para freír alimentos es de 237 a 355 cm³ (1 a 1,5 tazas) por vez.
Nunca se debe llenar la cesta para freír con alimentos más de 2/3 de su capacidad.
Figura 2
Figura 3
SO-309514_13769_BELLA_0.9L Deep Fryer_145x210_IM_R9.indd 20 2018-01-03 11:49 AM

21
11. Use el asa de la tapa para abrir la tapa.
12. Con el mango de la cesta centrado en el frente de la freidora,
sumerja cuidadosamente la cesta para freír cargada
con alimentos en el aceite caliente. Encaje las barras
del mango en las ranuras de la tapa y cierre.
(Consultela gura 4).
ADVERTENCIA: Este aparato genera calor y vapor de
escape durante el uso. Tome las medidas necesarias
para evitar riesgos de quemaduras, incendios u otras
lesiones apersonas o daño a la propiedad.
13. A medida que la freidora cocina el alimento y el
aceite se enfría, la luz roja de CALENTAMIENTO se
encenderá y apagará intermitentemente mientras se
mantiene la temperatura adecuada de cocción del
aceite. Consulte los tiempos y las temperaturas de cocción de ejemplo en la Tabla de cocción.
14. PRECAUCIÓN: ¡No abra la tapa durante la cocción! El aceite de la freidora podría salpicar y
ocasionar quemaduras u otras lesiones.
ADVERTENCIA: Tenga cuidado al abrir la tapa; el vapor se escapa apenas se abre. Use manoplas
para horno cuando manipule materiales calientes.
15. Abra la tapa y dé vuelta el alimento, según sea necesario.
Cuando el alimento tenga el punto de cocción deseado, con
manoplas para horno, levante el mango de la cesta para
freír para sacarla del aceite y enganche cuidadosamente la
cesta encima de la parte delantera del tanque de aceite.
Deje escurrir los alimentos fritos durante 5 a 10 segundos.
(Consulte la gura 5).
NOTA: Para evitar que el aceite se eche a perder
precozmente, no agregue sal ni otras especias al alimento
mientras lo fríe o cuando el alimento se escurre sobre el
aceite para freír.
PRECAUCIÓN: NO toque los alambres de la cesta para freír
ya que están muy calientes.
16. Use un tenedor o una tenaza con mango largo resistentes
al calor para quitar el alimento cocido o trasladarlos de la
cesta para freíra las toallas de papel absorbente para que
absorban elexceso deaceite.
17. Vuelva a colocar la cesta para freír en el aceite. Cierre la
tapa, deje que la unidad vuelva a calentarse hasta la temperatura deseada y siga friendo otra tanda
de alimento si lo desea.
18. Al nalizar la cocción, coloque el control de temperatura en laposición de apagado (OFF); termine
de trasladar todo el alimento frito de la cesta para freír a rejillas de alambre o toallas de papel
absorbente.
19. Desconecte el enchufe polarizado del tomacorriente de pared; luego, desprenda el cable del
receptáculo del aparato.
20. Cierre la tapa y deje que el aceite y la freidora se enfríen.
¡ADVERTENCIA! El aceite permanecerá caliente durante un período prolongado. Procure que
todas las piezas de la freidora y el aceite se hayan enfriado completamente antes
de desechar o almacenar el aceite y de limpiar la unidad.
Consejos útiles sobre la freidora
Figura 4
Figura 5
SO-309514_13769_BELLA_0.9L Deep Fryer_145x210_IM_R9.indd 21 2018-01-03 11:49 AM

22
Consejos útiles sobre la freidora
Freír en abundante aceite
• Nunca llene en exceso la cesta para freír con alimentos.
NOTA: La capacidad máxima para freír alimentos es de 237 a 355 cm³ (1 a 1,5 tazas) por vez.
Nunca se debe llenar la cesta para freír con alimentos más de 2/3 de su capacidad.
• Fría más tandas de cantidades más pequeñas de alimento. Se obtienen mejores resultados cuando
elaceite caliente puede circular libremente alrededor del alimento.
• En general, los alimentos precocidos requieren temperaturas más altas y menos tiempo de cocción.
• Corte o clasique el alimento de modo que su tamaño sea uniforme. Cocine las piezas del mismo
tamaño juntas, de modo que se cocinen en la misma cantidad de tiempo.
• Procure que los alimentos no presenten cristales de hielo ni exceso de humedad antes de freírlos.
Elaguapresente en la supercie del alimento puede ocasionar que el aceite salpique y eche espuma.
• Cuando use un rebozado, cubra de forma pareja el alimento que freirá.
Las migajas nas y uniformes se adhieren mejor que las gruesas e irregulares. Sacuda el rebozado
adicional para ayudar a mantener el aceite limpio.
• Para evitar la contaminación del aceite, no agregue sal ni otras especias al alimento mientras lo fríe
ni cuando el alimento se escurre sobre el aceite.
• Separe los alimentos rebozados de modo que no se toquen entre sí mientras se cocinan.
• Para obtener mejores resultados al freír masas o alimentos ensopados en masa para rebozar
líquida, coloque los alimentos en la cesta en primer lugar y, luego, la cesta en el aceite caliente.
• Siempre use la cesta para freír para extraer el alimento del aceite; enganche la cesta en el borde y
deje que se escurra el aceite. Luego, quite el alimento frito de la cesta para freír.
• Coloque los alimentos fritos en bolsas de papel madera para escurrir el aceite y mantener el
alimento fritocrocante.
Aceite hirviendo
¡ADVERTENCIA! NUNCA, BAJO NINGUNA CIRCUNSTANCIA, AGREGUE AGUA U OTRO
LÍQUIDO EN EL ACEITE.
• Nunca coloque en la freidora más ni menos aceite del adecuado. La capacidad máxima (MAX)
de aceite es (3,75 tazas/0,9 L). La capacidad mínima (MIN) de aceite es (2 tazas/0,5 L). Los niveles
mínimo y máximo de aceite están marcados en el interior del tanque.
ADVERTENCIA: Si coloca aceite en el tanque por debajo o por encima del nivel adecuado, puede
dañar la freidora y ocasionar lesiones personales graves.
• Siempre use aceite de girasol, de colza, vegetal o de maíz. Nunca use grasas endurecidas, aceite de
oliva ni aceite con un alto contenido de agua.
• Nunca mezcle diferentes aceites para freír alimentos.
• Nunca use manteca ni margarina para freír alimentos.
• Al freír pescado o mariscos, el aceite puede asimilar un gusto u olor a pescado. Para evitar
transferir este gusto u olor a pescado a otros alimentos, le sugerimos cambiar el aceite antes de
freír otros alimentos.
• Una vez que se haya enfriado, el aceite usado se debe retirar del tanque y se debe ltrar cada vez
que sehayan terminado de freír los alimentos. El aceite limpio se puede usar varias veces.
• Reemplace el aceite usado por aceite nuevo si esta despide humo al calentarse.
• Reemplace el aceite usado por aceite nuevo si esta produce espuma al calentarse.
SO-309514_13769_BELLA_0.9L Deep Fryer_145x210_IM_R9.indd 22 2018-01-03 11:49 AM

23
Escurrimiento y reciclaje del aceite
¡ADVERTENCIA! Tenga cuidado al estar cerca de las piezas calientes y del aceite
caliente que chisporrotea. Recuerde que el aceite está más caliente que el agua
hirviendo. Nunca coloque las manos en el aceite. Siempre mantenga las manos
yelrostro alejados del vapor ascendente o del aceite que chisporrotea.
IMPORTANTE:
Una vez que se haya enfriado, el aceite usado se debe retirar del tanque y se debe ltrar
cada vez que se hayan terminado de freír los alimentos.
1. Use el asa de la tapa para abrir la tapa; retire la cesta para
freírdela unidad. Déjela a un lado.
2. Para retirar la tapa, libere las lengüetas negras del eje central.
Tome rmemente la tapa y jale hacia arriba hasta sacarla.
(Consulte la gura 6). Déjela a un lado.
3. Use el pico escurridor de aceite especial para volcar
elaceite deltanque.
NOTA: NO vierta aceite usado en ningún drenaje doméstico.
Deseche el aceite usado en un envase con tapa y tírelo a
labasura.
4. Filtre el aceite enfriado con una criba na a un envase
decuello ancho, estanco y cubierto. Useunembudo para
evitar derrames.
NOTA: Puede colocar una toalla de papel,
un ltro para café o un material de algodón limpio en la
cesta parafreír a n de ltrar el aceite usado.
5. Dado que el aceite absorberá los sabores y olores del
alimento, esuna buena idea etiquetar el envase con el tipo
de alimento quese cocinó en el aceite. Por ejemplo: postres
dulces, vegetales,pollo, pescado, etc.
6. Reemplace el aceite usado por aceite nuevo si tiene olor
desagradable o si produce humo, espuma o burbujas
alcalentarse.
Tabla de cocción
¡ADVERTENCIA! SIEMPRE USE UN TERMÓMETRO PARA CARNES A FIN DE GARANTIZAR QUE LA
CARNE ROJA, DE AVE Y PESCADO ESTÉN COMPLETAMENTE COCIDAS ANTES DE COMERLAS.
La siguiente tabla pretende servir de guía básica únicamente. La cantidad de alimento frito de una vez y el tipo/tamaño
de alimento que se fríe pueden alterar el tiempo de cocción total. Recuerde: si fríe tandas más pequeñas logrará mejores
tiempos de cocción y mayor calidad de alimentos. Ajuste la temperatura y el tiempo de cocción a su gusto.
ALIMENTO TEMPERATURA TIEMPO DE COCCIÓN
Pescado, rebozado, fresco o descongelado 165 a 175 °C (325 a 350 °F) 5 a 10 minutos
Vegetales, rebozados, descongelados 175 °C (350 °F) 4 a 6 minutos
Rosquillas 175 °C (350 °F) 3 a 5 minutos
Trozos de pollo, con hueso,
fresco o descongelado
175 °C (350 °F) 10 a 15 minutos
Tiras de pollo, congeladas 190 °C (375 °F) 5 a 10 minutos
Camarones, empanizados, descongelados 175 °C (350 °F) 2 a 3 minutos
Camarones, empanizados, congelados 190 °C (375 °F) 4 a 5 minutos
Buñuelos 190 °C (375 °F) 2 to 4 minutos
Papas fritas/aros de cebolla, congelados 190 °C (375 °F) 3 to 5 minutes
TENGA EN CUENTA: El USDA recomienda que las carnes tales como la carne de vaca, de cordero, etc.,
secocinen hasta alcanzar una temperatura interna de 63 °C/145 °F. El cerdo se debe cocinar hasta alcanzar
unatemperatura interna de 71 °C/160 °F y las aves se deben cocinar hasta alcanzar una temperatura interna de
77°C/170°F a 82 °C/180 °F para asegurarse de matar toda bacteria perjudicial. Cuando se recalientan productos
con carne de vaca o ave, también se deben cocinar hasta alcanzar una temperatura interna de 74 °C/165 °F.
NOTA: Es posible que los alimentos congelados requieran tiempos y temperaturas de cocción diferentes;
sigalas instrucciones del paquete. Use 191 °C (374 °F) para todos los alimentos cuyas instrucciones
requieran unatemperatura más alta y regule el tiempo según sea necesario.
I
MPORTANTE: Quite los cristales de hielo de los alimentos congelados antes de colocarlos en aceite caliente.
PRECAUCIÓN: NUNCA llene la cesta para freír más de 2/3 de su capacidad.
Figura 6
Pico
escurridor
de aceite
2 lengüetas
negras
Eje central
SO-309514_13769_BELLA_0.9L Deep Fryer_145x210_IM_R9.indd 23 2018-01-03 11:49 AM

24
Instrucciones de mantenimiento para el usuario
Este aparato requiere de poco mantenimiento. No contiene piezas que el usuario pueda reparar. Cualquier
servicio en el que la unidad deba desarmarse, con la excepción de la limpieza, debe ser realizado por un
técnico de reparación de aparatos eléctricos calicado.
Instrucciones de cuidado y limpieza
¡ADVERTENCIA! Deje que la freidora se enfríe antes de vaciar el aceite y de limpiar el aparato.
1. Asegúrese de que su freidora esté desenchufada y que la cesta para freír y el aceite/tanque de
aceite sehayan enfriado por completo.
2. Quite la cesta para freír del tanque de aceite. Junte las barras del mango apretándolas para
desmontar lacesta para freír del mango.
3. Retire la tapa. Escurra con cuidado el aceite del tanque en un envase adecuado. (Consulte la sección
Escurrimiento y reciclaje del aceite de este Manual de instrucciones para conocer los detalles completos).
NOTA: Se recomienda trabajar sobre un lavaplatos o un cubo de basura en caso de que ocurran derrames.
4. La tapa desmontable, la cesta para freír y el mango son aptos para lavavajillas o se pueden lavar a
mano con agua caliente y jabón. Seque todas las piezas minuciosamente.
5. Limpieza del tanque de aceite: Llene el tanque vaciado con agua caliente y jabón, y déjelo en
remojo. Useun cepillo rígido de nilón para eliminar los residuos rebeldes o quemados. No use
productos fuertes oabrasivos ya que pueden dañar la supercie del tanque.
ADVERTENCIA: Nunca sumerja el cuerpo de la freidora en agua ni otros líquidos.
PRECAUCIÓN: Procure que el tanque de aceite esté completamente seco luego de lavarlo y antes
deusarlo.
6. Limpie el cuerpo de acero inoxidable de la freidora con un paño húmedo y séquelo por completo.
Instrucciones de almacenamiento
1. Procure que la freidora esté desenchufada y que todas sus piezas estén limpias y secas antes
deguardarla.
2. Nunca guarde la freidora si está caliente o húmeda.
3. Para guardarla, desmonte la cesta para freír del mango. Apriete las barras del mango y desconecte
laslengüetas negras para guardarlas. Coloque la cesta y el mango limpios en el tanque de aceite.
4. Guarde el cable separable en la cesta para freír.
5. Empuje la tapa para cerrarla hasta que encaje debidamente en el cuerpo.
6. Guarde el aparato en su caja o en un lugar limpio y seco.
SO-309514_13769_BELLA_0.9L Deep Fryer_145x210_IM_R9.indd 24 2018-01-03 11:49 AM

25
Solución de problemas
La freidora no funciona.
• Procure que el cable de alimentación separable esté debidamente conectado al receptáculo.
ADVERTENCIA: Siempre asegúrese de que haya suciente aceite en el tanque antes de que el
control delatemperatura se coloque en ON. Freír en seco puede causar daños en la freidora.
La temperatura del aceite está demasiado alta.
• No hay aceite suciente en el tanque. Desenchufe la freidora y compruebe el nivel de aceite.
El nivel de aceite debe estar entre las líneas de llenado mínimo (MIN) y máximo (MAX).
Agregue aceite según sea necesario.
El aceite forma burbujas.
• Hay demasiado aceite en el tanque de la freidora.
Nunca coloque aceite por encima de la línea de llenado máximo (MAX).
• Agregó demasiado alimento a la cesta para freír. Fría cantidades más pequeñas por vez.
El alimento está demasiado húmedo. Séquelo suavemente con toallas de papel antes de colocarlo
en la cesta para freír.
El alimento sabe a grasa o no está crocante.
• Usó el tipo de aceite incorrecto. Use un aceite de alta calidad, como aceite de maní, vegetal,
decanolaode maíz.
• Agregó demasiado alimento a la cesta para freír. Fría cantidades más pequeñas por vez,
especialmentesise trata de alimentos congelados.
• La temperatura para freír está demasiado baja. Antes de usarla, deje que la unidad precaliente o
recaliente de acuerdo con la temperatura de la receta. Regule la temperatura de la receta si es necesario.
El alimento o la freidora emiten olores desagradables.
• El aceite se ha echado a perder. Cambie el aceite según sea necesario.
• El ltro de olor de la tapa está saturado. Retire la tapa y lávela con agua caliente y jabón,
oenellavavajillas. Séquela por completo y vuelva a colocarla.
• El aceite usado asimila los olores de los alimentos. No fría postres en aceite que se haya usado
parafreírpescado.
SO-309514_13769_BELLA_0.9L Deep Fryer_145x210_IM_R9.indd 25 2018-01-03 11:49 AM

Recetas
26
Buñuelos de queso y pimiento rojo asado
• 3,75 tazas de aceite vegetal
o de canola para freír
• 110 g (4 onzas) de queso crema, a
temperatura ambiente
• 2 cucharadas soperas de pimientos rojos
asados, secos y picados muy nos
• 1/2 cucharadita de paprika ahumado
• 2 cucharadas soperas de mayonesa
• 170 g (6 onzas) de queso Cheddar rallado
• 110 g (4 onzas) de queso
Pepper Jack rallado
• 1/2 cucharadita de sal kosher
o más, agusto
• 1/8 cucharadita de pimienta
de cayena, opcional
3 bandejas para el rebozado:
• 2/3 taza de harina común
+ 1/3 taza de almidón de maíz
• 1 taza de suero de mantequilla
• 1 taza de pan rallado Panko
1. En un bol para mezclar mediano, mezcle queso crema, pimientos picados, mayonesa y
paprika hasta que estén bien integrados.
2. Agregue el queso rallado y la sal/pimienta a la mezcla del queso crema. Integre bien.
Si lo desea, agregue más sal y/o pimienta de cayena a gusto.
3. Ponga a enfriar por 2 horas o, preferentemente, durante una noche.
4. Con una cuchara medidora, haga bolas uniformes de queso con pimiento rojo asado
yformebuñuelos.
5. Prepare las tres bandejas para el rebozado: harina + almidón de maíz, suero de leche y pan
ralladoPanko.
6. Use un tenedor para mezclar bien la harina con el almidón de maíz. Pase cada buñuelo por
lamezcla de harina hasta que esté bien cubierto. Sacuda para quitar el excedente.
7. Coloque el buñuelo enharinado en el suero de leche y cúbralo por completo.
8. Pase el buñuelo mojado en suero de leche por el pan rallado Panko, presionando el pan
contra elbuñuelo.
IMPORTANTE: Los buñuelos deben estar completamente cubiertos para evitar que se
escape elqueso frito durante la cocción en la freidora.
9. Continúe hasta rebozar todos los buñuelos.
10. Ponga a enfriar los buñuelos rebozados durante 1 a 2 horas o colóquelos en el congelador
durante 1/2 hora.
IMPORTANTE: Los buñuelos deben estar muy fríos para evitar que se escape el queso frito
durante la cocción en la freidora. Mantenga los buñuelos refrigerados antes de freírlos.
11. Precaliente el aceite a 190 °C (375 °F).
12. Fría de a 3 a 5 buñuelos por vez durante 2 a 4 minutos, volteándolos a la mitad de la
cocción, hasta que se doren. Siga friendo hasta que todos los buñuelos estén cocidos.
13. Sirva los buñuelos de queso con pimiento rojo asado calientes con mermelada de pimiento.
SO-309514_13769_BELLA_0.9L Deep Fryer_145x210_IM_R9.indd 26 2018-01-03 11:49 AM

Recetas
27
Bastones de berenjena fritos
Estos bastones son muy crujientes y sabrosos ¡y muy fáciles de preparar!
Para 36 a 40 bastones
• 3,75 tazas de aceite de maní o de canola
para freír
• 1 berenjena mediana rme
(16 cm [6-1/2”] de largo)
• 2 huevos
• 2 tazas de pan rallado Panko
• Sal y pimienta a gusto
• Queso parmesano recién rallado
• Salsa marinera
1. Precaliente el aceite a 175 °C (350 °F).
2. Pele la berenjena si lo desea.
Corte la berenjena en bastones de 1 cm (½”) de grosor x 7,5 cm (3”) de largo.
3. Fría la berenjena en tandas de 10 bastones, durante 4 a 5 minutos, volteándolos a la mitad
delacocción.
4. Escurra los bastones dorados en bolsas de papel madera o toallas de papel absorbente.
Espolvoree con sal, pimienta y queso parmesano mientras estáncalientes.
5. Sirva con salsa marinera.
Discos de batata fritos para 1
Para 1,5 tazas
• 3,75 tazas de aceite de maní
o de canola para freír
• 1 batata mediana
• Sal a gusto
• 2 cucharadas de azúcar morena, opcional
1. Precaliente el aceite a 175 °C (350 °F).
2. Pele la berenjena si lo desea. Corte la berenjena en bastones de
1 cm (½”) de grosor x 7,5cm(3”)de largo.
3. Fría la berenjena en tandas de 10 bastones, durante 4 a 5 minutos,
volteándolos a la mitad delacocción.
4. Escurra los bastones dorados en bolsas de papel madera o toallas de papel absorbente.
Espolvoree con sal, pimienta y queso parmesano mientras están calientes.
SO-309514_13769_BELLA_0.9L Deep Fryer_145x210_IM_R9.indd 27 2018-01-03 11:49 AM

Garantía limitada de DOS AÑOS
Mediante la presente, SENSIO Inc. garantiza que, durante el plazo de DOS AÑOS a
partir de la fecha de compra, este producto no presentará defectos mecánicos en el
material ni en la mano de obra, y durante 90 días, no los presentará en las piezas no
mecánicas. A su entera discreción, SENSIO Inc. reparará o reemplazará el producto
que resulte defectuoso, o emitirá un reembolso por el producto durante el plazo de
garantía.
Esta garantía es válida únicamente para el comprador minorista original a partir
de la fecha de compra minorista inicial y no es transferible. Conserve el recibo de
compra original, ya que se exige una prueba de compra para obtener la validación
de la garantía. Las tiendas minoristas no tienen derecho a alterar, modicar ni
corregir de ninguna manera los términos y condiciones de la garantía.
EXCLUSIONES:
La garantía no cubre el desgaste normal de las piezas ni el daño ocasionado por
cualquiera de las siguientes causas: uso negligente del producto, uso de un voltaje
o corriente incorrectos, mantenimiento de rutina inadecuado, uso contrario al de
las instrucciones de funcionamiento, desarmado, reparación o alteración a cargo de
personas que no sean miembros del personal calicado de SENSIO Inc. Asimismo,
la garantía no cubre actos de la naturaleza, como incendios, inundaciones,
huracanes o tornados.
SENSIO Inc. no asumirá responsabilidad por daños incidentales o resultantes
ocasionados por la violación de cualquier garantía expresa o implícita. Salvo en
la medida en que lo prohíban las leyes aplicables, cualquier garantía implícita de
comerciabilidad o aptitud para un propósito particular se limita temporalmente a la
duración de la garantía. Algunos estados, provincias o jurisdicciones no permiten la
exclusión ni la limitación de daños incidentales o resultantes, o limitaciones sobre
la duración de una garantía implícita y, por lo tanto, es posible que las exclusiones o
limitaciones mencionadas no le correspondan. La garantía cubre derechos legales
especícos que pueden variar de un estado, una provincia o una jurisdicción a
otros.
CÓMO OBTENER EL SERVICIO DE GARANTÍA:
Debe comunicarse con el Servicio de atención al cliente a nuestro número
telefónico gratuito: 1-866-832-4843. Un representante del Servicio de atención
al cliente intentará resolver los problemas referidos a la garantía por teléfono.
Si este no puede resolver el problema, le proporcionarán un número de caso y
le solicitarán que devuelva el producto a SENSIO Inc. Adhiera una etiqueta al
producto que incluya: su nombre, dirección, número telefónico de contacto durante
el día, número de caso y descripción del problema. Además, incluya una copia del
recibo de compra original. Envuelva cuidadosamente el producto etiquetado con
el recibo de compra, y envíelo (con el envío y el seguro prepagados) a la dirección
de SENSIO Inc. SENSIO Inc. no asumirá obligación ni responsabilidad alguna por el
producto devuelto que esté en el trayecto hacia el Centro de servicio al cliente de
SENSIO Inc.
28
SO-309514_13769_BELLA_0.9L Deep Fryer_145x210_IM_R9.indd 28 2018-01-03 11:49 AM

GRACIAS
Para su compra
BellaLifestyle
BellaLife
@
bellahousewares.com
inspírate
Registrarse
y rmar para arriba para
anuncios especiales y los ingresos
de la moda!
Cuéntanos lo que piensas!
Evaluar, revisar o hacernos una
pregunta.
!
29
SO-309514_13769_BELLA_0.9L Deep Fryer_145x210_IM_R9.indd 29 2018-01-03 11:49 AM

SO-309514 Rev. 9
For customer service questions or comments
Dudas o comentarios contactar el departamento de servicio al cliente
1-866-832-4843 / [email protected]
BELLA is a registered trademark of Sensio Inc., Montréal, Canada H3B 3X9.
All rights reserved.
BELLA es una marca registrada de Sensio Inc., Montréal, Canada H3B 3X9.
Todos los derechos reservados.
SO-309514_13769_BELLA_0.9L Deep Fryer_145x210_IM_R9.indd 30 2018-01-03 11:49 AM
-
 1
1
-
 2
2
-
 3
3
-
 4
4
-
 5
5
-
 6
6
-
 7
7
-
 8
8
-
 9
9
-
 10
10
-
 11
11
-
 12
12
-
 13
13
-
 14
14
-
 15
15
-
 16
16
-
 17
17
-
 18
18
-
 19
19
-
 20
20
-
 21
21
-
 22
22
-
 23
23
-
 24
24
-
 25
25
-
 26
26
-
 27
27
-
 28
28
-
 29
29
-
 30
30
-
 31
31
-
 32
32


Bella 0.9 L Deep Fryer, Stainless Steel El manual del propietario
- Categoría
- Freidoras
- Tipo
- El manual del propietario
- Este manual también es adecuado para
en otros idiomas
Artículos relacionados
-
Bella 2L Deep Fryer El manual del propietario
-
-
-
-
-
Bella 3.5L Deep Fryer El manual del propietario
Otros documentos
-
Elite EDF-401T Manual de usuario
-
 Maxi-matic EDF-401T Manual de usuario
-
Oster 3.7L Immersion Deep Fryer Manual de usuario
-
Oster CKSTDF102-SS Manual de usuario
-
Black & Decker DF100S Guía del usuario
-
Hamilton Beach 35042 Guía del usuario
-
-
Bravetti F1063B El manual del propietario
-
Farberware 103736 Guía del usuario
-
Hamilton Beach 35034 Manual de usuario
