Panasonic PVDF203 Instrucciones de operación
- Categoría
- Reproductores de DVD
- Tipo
- Instrucciones de operación
Este manual también es adecuado para

TV
/
DVD
/
VCR Combination
Operating Instructions
Model No.
PV-DF203/PV-DF273
Basic Operation
Initial Setup
TV Operation
Timer Operation
Advanced Operation
For Your Information
LSQT0694A
• Initial Setup and Connection Procedures are on pages 14 to 15.
As an ENERGY STAR
®
Partner, Matsushita Electric Corporation
of America has determined that this product or product model
meets the ENERGY STAR
®
guidelines for energy effi ciency.
Please read these instructions carefully before attempting to connect,
operate or adjust this product. Please save this manual.
Spanish Quick Use Guide is included.
(Guía para rápida consulta en español está incluida.)
This operating instruction book is designed for use with models PV-DF203 and PV-DF273. Illustrations
in this manual show the PV-DF273. Fea tures may vary, so please read care ful ly.
For assistance, please call : 1-800-211-PANA(7262) or send e-mail to : [email protected]
MULTI FORMAT PLAYBACK
*Ability to play back may depend on recording conditions.

2
Important Safeguards and Pre cau tions
OUTDOOR ANTENNA INSTALLATION
USING THE UNIT
INSTALLATION
1 POWER SOURCE CAUTION
Operate only from power source indicated on unit
or in this manual. If uncertain, have your Electric
Utility Service Company or Video Products Dealer
verify your home power source.
2 POWER CORD PLUG
For safety, this unit has a polarized type plug (one
wide blade), or a three-wire grounding type plug.
Always hold the plug fi rmly and make sure your
hands are dry when plugging in or unplugging the AC
power cord.
Regularly remove dust, dirt, etc. from the plug.
POLARIZED PLUG CAUTION:
The plug fi ts into outlet only one way. If it cannot be
fully inserted, try reversing it. If it still will not fi t, have an
electrician install the proper wall outlet. Do not tamper
with the plug.
GROUNDING PLUG CAUTION:
The plug requires a three-hole grounding outlet.
If necessary, have an electrician install the proper
outlet. Do not tamper with the plug.
3 POWER CORD
To avoid unit malfunction, and to protect against
electrical shock, fi re or personal injury:
- Keep power cord away from heating appliances and
walking traffi c. Do not rest heavy objects on, or roll
such objects over the power cord.
- Do not tamper with the cord in any way.
- An extension cord should have the same type plug
(polarized or grounding) and must be securely
connected.
- Overloaded wall outlets or extension cords are fi re
hazards.
- Frayed cords, damaged plugs, and damaged or
cracked wire insulation are hazardous and should
be replaced by a qualifi ed electrician.
4 DO NOT BLOCK VENTILATION HOLES
Ventilation openings in the cabinet release heat
generated during operation. If blocked, heat
build-up may result in a fi re hazard or heat
damage to cassettes or discs.
For your protection:
a.Never cover ventilation slots while unit is ON,
or operate unit while placed on a bed, sofa, rug,
or other soft surface.
b.Avoid built-in installation, such as a book case
or rack, unless properly ventilated.
5 AVOID EXTREMELY HOT LOCATIONS OR
SUDDEN TEMPERATURE CHANGES
Do not place unit over or near a heater or radiator,
in direct sunlight, inside closed ve hi cles, in high
temperature [over 95 °F (35 °C)], or in over 75%
humidity. If unit is suddenly moved from a cold place
to a warm one, moisture may con dense in unit and
on the tape causing dam age. Never sub ject unit to
vibration, im pact, or place it so that the sur face is tilted
as in ter nal parts may be se ri ous ly dam aged.
6 TO AVOID PERSONAL INJURY
• Never place unit on support or
stand that is not fi rm, level, and
adequately strong. The unit could
fall causing serious injury to a
child or adult and damage to the
unit.
• Move any appliance and
cart combination with care.
Quick stops, excessive force, and uneven surfaces
may cause objects to overturn.
• Carefully follow all operating instructions.
Before unit is brought out of storage or moved to a new location,
refer again to the INSTALLATION section of these safe guards.
1 KEEP UNIT WELL AWAY FROM WATER OR MOISTURE,
such as vases, sinks, tubs, etc.
2 IF EXPOSED TO RAIN, MOISTURE, OR STRONG IMPACT,
unplug unit and have it inspected by a qualifi ed service
technician before use.
3 ELECTRICAL STORMS
During a lightning storm, or before leaving unit unused for
extended periods of time, disconnect all equipment from the
power source as well as the antenna and cable system.
4 WHEN UNIT IS PLUGGED IN
• DO NOT OPERATE IF:
- liquid has spilled into unit.
- unit was dropped or otherwise damaged.
- unit emits smoke, odours, or noises.
Immediately unplug unit, and have it inspected by a service
technician to avoid potential fi re and shock hazards.
• Never drop or push any object through openings in unit.
Touching internal parts may cause electric shock or fi re
hazard. Do not put any foreign object on the tray.
• Keep magnetic objects, such as speakers, away from unit to
avoid electrical interference.
5 USING ACCESSORIES
Use only accessories recommended by the manufacturer to
avoid risk of fi re, shock, or other hazards.
6 CLEANING UNIT
Unplug unit. Use a clean, dry, chemically untreated cloth to
gently remove dust or debris. DO NOT USE cleaning fl uids,
aerosols, or forced air that could over-spray, or seep into unit
and cause electrical shock. Any substance, such as wax,
adhesive tape, etc. may mar the cabinet surface. Exposure to
greasy, humid, or dusty areas may adversely affect internal
parts.
READ AND RETAIN ALL SAFETY AND
OPERATING INSTRUCTIONS. HEED ALL
WARNINGS IN THE MANUAL AND ON UNIT
SERVICE
1 DO NOT SERVICE PRODUCT YOURSELF
If, after carefully following detailed operating in struc tions, the
unit does not operate properly, do not attempt to open or remove
covers, or make any adjustments not described in the manual.
Unplug unit and contact a qualifi ed service tech ni cian.
2 REPLACEMENT OF PARTS
Make sure the service technician uses only parts specifi ed by
the manufacturer, or have equal safety char ac ter is tics as original
parts. The use of unauthorized substitutes may result in fi re,
electric shock, or other hazards.
3 SAFETY CHECK AFTER SERVICING
After unit is serviced or repaired, request that a thorough safety
check be done as described in the manufacturer’s service
literature to ensure video unit is in safe operating condition.
1 SAFE ANTENNA AND CABLE CONNECTION
An outside antenna or cable system must be properly grounded
to provide some protection against built up static charges
and voltage. Section 810 of the National Electrical Code,
ANSI/NFPA 70 (in Canada, part 1 of the Canadian Electrical
Code) provides information regarding
proper grounding of the mast and
supporting structure, grounding of the
lead-in wire to an antenna discharge
unit, size of grounding conductors,
location of antenna discharge unit,
con nec tion to grounding electrodes,
and requirements for the grounding
electrode.
2 KEEP ANTENNA CLEAR OF HIGH
VOLTAGE POWER LINES OR CIRCUITS
Locate an outside antenna system well away from power lines
and electric light or power circuits so it will never touch these
power sources should it ever fall. When installing antenna,
absolutely never touch power lines, circuits or other power
sources as this could be fatal.
GROUND
CLAMP
ELECTRIC
SERVICE
EQUIPMENT
ANTENNA
LEAD IN
WIRE
ANTENNA
DISCHARGE UNIT
(NEC SECTION 810-20)
GROUNDING CONDUCTORS
(NEC SECTION 810-21)
GROUND CLAMPS
POWER SERVICE GROUNDING
ELECTRODE SYSTEM
(NEC ART 250, PART H)
NEC
- NATIONAL ELECTRICAL CODE

3
CAUTION:
LASER RADIATION
WHEN OPEN. DO NOT
STARE INTO BEAM.
This product utilizes both a Cathode Ray Tube (CRT) and other components that contain lead. Disposal
of these materials may be regulated in your community due to environmental considerations. For
disposal or recycling information please contact your local authorities, or the Electronics Industries
Alliance: <http://www.eiae.org.>
CAUTION:
UNIT IS A CLASS I LASER PRODUCT.
HOWEVER THIS UNIT USES A VISIBLE LASER BEAM WHICH COULD
CAUSE HAZARDOUS RADIATION EXPOSURE IF DIRECTED. BE
SURE TO OPERATE THE UNIT CORRECTLY AS INSTRUCTED.
WHEN THIS UNIT IS PLUGGED TO THE WALL OUTLET, DO NOT
PLACE YOUR EYES CLOSE TO THE OPENING OF THE DISC TRAY
AND OTHER OPENINGS TO LOOK INTO THE INSIDE OF THIS UNIT.
USE OF CONTROLS OR ADJUSTMENTS OR PERFORMANCE OF
PROCEDURES OTHER THAN THOSE SPECIFIED HEREIN MAY
RESULT IN HAZARDOUS RADIATION EXPOSURE.
DO NOT OPEN COVERS AND DO NOT ATTEMPT TO REPAIR THE
UNIT YOURSELF. REFER SERVICING TO QUALIFIED PERSONNEL.
Safety Precautions/Mesures de sécurité
This symbol warns the user that uninsulated voltage within the
unit may have suffi cient magnitude to cause electric shock.
Therefore, it is dangerous to make any kind of contact with any
inside part of this unit.
This symbol alerts the user that important literature concerning
the operation and main te nance of this unit has been included.
Therefore, it should be read carefully in order to avoid any
problems.
CAUTION: TO REDUCE THE RISK
OF ELECTRIC SHOCK, DO NOT
REMOVE COVER (OR BACK)
NO USER-SERVICEABLE PARTS
INSIDE REFER SERVICING TO
QUALIFIED SERVICE PERSONNEL
RISK OF ELECTRIC SHOCK
DO NOT OPEN
CAUTION
ATTENTION:
RAYONNEMENT LASER
EN CAS D’OUVERTURE.
NE PAS REGARDER
DANS LE FAISCEAU.
(Inside of product)
FCC NOTICE:
This equipment has been tested and found to comply with part 15 of the FCC Rules. These limits are
designed to provide reasonable protection against harmful interference when operated in a residential
environment. If this equipment does cause interference to radio or television reception, which can be
determined by turning the equipment off and on, use the equipment in another location and/or utilize an
electrical outlet different from that used by the receiver. If necessary, consult the dealer or an experienced
radio/TV technician for help. You may fi nd the booklet, “Something About Interference” available from
FCC local regional offi ces helpful.
This video recorder, equipped with the HQ (High Quality) System, is compatible with existing VHS
equipment. Only use those tapes with the
mark. It is recommended that only cassette tapes that
have been tested and inspected for use in 2, 4, 6, and 8 hour VCR machines be used. This television
receiver provides display of television closed captioning in accordance with §15.119 of the FCC rules.
Warning : To prevent fi re or shock hazard, do not expose this equipment to rain or
mois ture.
Caution : To prevent electric shock, match wide blade of plug to wide slot, fully insert.
Avertissement : Afi n de prévenir tout risque d’incendie ou de chocs électriques, ne pas exposer
cet appareil à la pluie ou à une humidité excessive.
Attention : Pour éviter les chocs électriques, introduire la lame la plus large de la fi che dans
la borne correspondante de la prise et pousser jusqu’au fond.
FCC WARNING : Any unauthorized changes or modifi cations to this equipment would void the
user’s authority to operate.
Region Management Information
This unit is designed and man u fac tured to respond to the
Region Management Information that is recorded on a DVD
disc. If the Region number described on the DVD disc does
not cor re spond to the Region number of this unit, this unit
cannot play this disc.
• The region number of this player is “1.”
• The player will play DVD-Video marked with labels containing “1”
or “ALL.”
1
Example:

4
For assistance, please call : 1-800-211-PANA(7262) or send e-mail to : [email protected]
4
Before Using
Record/Playback Time
Only use tapes with the mark in this unit.
Tape Speed
Setting
Type of Video Cassette
T60 T120 T160
SP
(Standard
Play)
1 Hour 2 Hours
2 Hours
40 Minutes
LP
(Long Play)
2 Hours 4 Hours
5 Hours
20 Minutes
SLP
(Super Long
Play)
3 Hours 6 Hours 8 Hours
Congratulations
On your purchase of one of the most
sophisticated and reliable products on the market
today. Used properly, it will bring you and your
family years of enjoyment. Please fi ll in the
information below. The serial number is on the
tag located on the back of your unit.
Remote Control
LSSQ0391
Date of Purchase
Dealer Purchased From
Dealer Address
Dealer Phone No.
Model No.
Serial No.
Accessories
Battery replacement caution
• Do not mix old and new batteries.
• Do not mix alkaline with manganese batteries.
1) Open the cover.
3) Close the cover.
2) Insert batteries as
marked.
Loading the Batteries
Break off the tab to
protect.
Record Tab
Screw driver
Cover the hole
with cellophane tape.
To record again.
Prevent Accidental Tape Erasure
Batteries 2 “AA”
To order accessories,
call toll free
1-800-332-5368.

55
Initial Setup
Table of Contents
Basic Operation
TV Operation
Advanced Operation
For Your Information
Initial Setup
Timer Operation
Important Safeguards and Precautions ...........................................................2
Safety Precautions/Mesures de sécurité..........................................................3
Before Using .......................................................................................................4
Information (Unit, Cassette, Disc).....................................................................6
Location of Controls ..........................................................................................8
Connections......................................................................................................11
Initial Setup (Ready to Play) ............................................................................14
Reset Language, Channels, Clock, Time Zone Adjust..................................16
Playback a Tape................................................................................................18
Record On a Tape.............................................................................................18
Copy Your Tapes (Dubbing)............................................................................19
Basic DVD Operation .......................................................................................20
TV Operation.....................................................................................................22
MTS Broadcast/TV Stereo System..................................................................23
Closed Caption System ...................................................................................24
TV Timer Features ............................................................................................26
On-Screen Display (OSD) ................................................................................27
Timer Recording...............................................................................................28
Tape Operation .................................................................................................30
Special VCR Features ......................................................................................34
V-Chip Control Feature ...................................................................................36
Audio Features .................................................................................................40
Video/Audio Menu ............................................................................................42
Video/Audio Adjustment..................................................................................43
Disc Operation .................................................................................................44
DVD Operation using On-Screen Displays ....................................................49
MP3/WMA/JPEG Playback Operation.............................................................52
DVD Lock Feature.............................................................................................55
Settings for DVD Operation.............................................................................56
Language Code List .........................................................................................59
Before Requesting Service..............................................................................60
Warning and Instruction Displays ..................................................................62
Spanish Quick Use Guide/Guía para rápida consulta...................................63
Limited Warranty ..............................................................................................70
Customer Services Directory ..........................................................................71
Index ..................................................................................................................72
DVD
TV / VCR
TV / VCR
DVD
TV / VCR
TV / VCR
TV / VCR
DVD
TV / VCR

6
For assistance, please call : 1-800-211-PANA(7262) or send e-mail to : [email protected]
6
Information (Unit, Cassette, Disc)
V
I
DE
O
HEADS
M
AY
NEED C
LEA
N
I
N
G
P
L
EASE
I
NSERT
HEAD
C
LEA
N
I
N
G
CASSETTE
OR
REFER
T
O
M
A
NU
AL
END
:
P
L
AY
Playing older or damaged tapes may eventually
cause video heads to become clogged.
Head Cleaning
Unit auto adjusts clock for DST (Daylight Saving
Time.)
DST (Daylight Saving Time)
• If your area does not observe Daylight Saving Time,
select DST : OFF (see “Clock” on pages 16 and 17).
• Keep these time changes in mind when pro gram ming
the unit for timer recordings.
Features for a Quality Picture
Digital Auto Tracking
Continuously analyzes the signal and adjusts for
optimum picture quality.
Manual Tracking Control (to reduce picture noise)
Use during Playback and Slow Motion mode to
reduce picture noise. Press the 3 or 6 NUMBER
keys on the remote control or CH
on the
unit until the picture clears up. To return to Auto
Tracking, press POWER off, then on again a few
seconds later.
V-Lock Control
In Still mode, the 3 or 6 NUMBER keys on the
remote control or CH
on the unit operate as a
V-Lock control to reduce jitter.
• Use “dry” type head cleaning cassette only.
(Part No. NV-TCL30PT is recommended.)
• Follow cleaning tape directions carefully. Excessive
use of head cleaning tape can shorten the video head
life.
During playback this
screen appears if
clogging is detected.
To clear message from
screen, press PLAY on
the remote or unit.
Head Clog Sensor
Specifi cations
• Designs and spec i fi ca tions are sub ject to change
without no tice.
■ Spring (First Sunday in April)
DST: ON
➞
Sets clock ahead one hour.
■ Autumn (Last Sunday in October)
DST: ON
➞
Turns clock back one hour.
Note
Display
Picture Tube
20 inch measured
diagonal pure fl at
Picture Tube (PV-DF203)
27 inch measured
diagonal pure fl at
Picture Tube (PV-DF273)
VCR
Video Recording
System
4 rotary heads helical scanning
system
Audio Track
1 track (Normal)
2 channel (Hi-Fi Audio Sound)
Tuner
Broad cast Channels VHF 2 ~ 13, UHF 14 ~ 69
CA BLE Channels
Midband A through I (14 ~ 22)
Superband J through W (23 ~ 36)
Hyperband AA ~ EEE (37 ~ 64)
Lowband A-5 ~ A-1 (95 ~ 99)
Special CABLE channel 5A (01)
Ultraband 65 ~ 94, 100 ~ 125
General
Power Source 120 V AC, 60 Hz
Power
Consumption
Power
On
Approx. 134 W (PV-DF203)
Approx. 161 W (PV-DF273)
Power
Off
Approx. 3.5 W
Television System EIA Standard NTSC color
Speak er 2 pieces 5 W
Op er at ing
Temperature
5 °C ~ 35 °C (41 °F ~ 95 °F)
Op er at ing Humidity 10 % ~ 75 %
Weight
30 k
g
(66.1 lbs.) (PV-DF203)
52 k
g
(114.4 lbs.) (PV-DF273)
Di men sions
(W x H x D)
604 mm (23-3/4
″
) x 523 mm (20-5/8
″
) x
503 mm (19-3/4
″
) (PV-DF203)
760 mm (29-7/8
″
) x 651 mm (25-5/8
″
) x
503 mm (19-3/4
″
) (PV-DF273)
Discs played
DVD disc
(DVD-Video, DVD-R)
12 cm (5
″
) single-sided, single-layer
12 cm (5
″
) single-sided, double-layer
12 cm (5
″
) double-sided, double-layer
(one layer per side)
8 cm (3
″
) single-sided, single-layer
8 cm (3
″
) single-sided, double-layer
8 cm (3
″
) double-sided, double-layer
(one layer per side)
Compact disc
(CD-DA, VIDEO CD,
CD-R, CD-RW)
5
″
(12 cm) disc
3
″
(8 cm) disc
MP3, WMA, JPEG
Digital audio output
Optical digital output Optical connector
Pickup
Wavelength
655 nm (DVD)
790 nm (Video CD/CD)
Laser power: CLASS II
Apparatus Claims of U.S. Patent Nos. 4,631,603,
4,577,216, 4,819,098, and 4,907,093, licensed
for limited viewing uses only.
This product incorporates copyright protection
technology that is protected by method claims of
certain U.S. Patents and other intellectual
property rights owned by Macrovision Corporation
and other rights owners. Use of this copyright
protection technology must be authorized by
Macrovision Corporation, and is intended for
home and other limited viewing uses only unless
otherwise authorized by Macrovision Cor po ra tion.
Reverse engineering or dis as sem bly is
prohibited.

77
Initial Setup
Handling precautions
• Sticking a label on the disc may impair
DVD-R playback.
• Do not attach sticker to discs. (Do not use
discs with exposed adhesive from tape or
left over peeled-off stickers.)
• Only hold disc by
edges as shown.
Fingerprints, dirt, and
scratches can cause
skipping and
distortion.
• Do not write on
label side of disc.
• Never use record
cleaning sprays,
benzine, thinner,
static electricity
prevention
liquids, or
any other
solvent.
• Be careful
not to drop
or bend
disc.
• Do not place more than 1 disc on disc tray.
• Do not try to close disc tray when disc is not
properly placed.
• Always store discs in their proper cases
when
not in use.
Angle
Some DVD discs feature scenes si mul ta ne ous ly shot from different
angles. The ANGLE button can be used to view the scene from different
angles. (ANGLE Indicator lights up on the unit when a scene recorded at
different angles is detected.)
Chapter Number
Titles are subdivided into numbered sections. You can quickly search for
a favorite scene using these numbers.
DVD
A high-density optical disc on which high-quality pictures and sound have
been digitally recorded. DVD incorporates new video compression
technology (MPEG II) and high-density recording technology which allow
entire movies to be recorded with incredible playback quality.
Playback Control
With Video CD (version 2.0), scenes or in for ma tion may be selected for
viewing or listening from an interactive menu that appears on the TV
screen.
Subtitles
Written dialogue which appears at the bottom of the screen.
Time Number
The elapsed play time from the start of a disc or title. Use to quickly fi nd
scenes. (May not work with some discs.)
Title Number
For DVD discs with two or more titles, the title is numbered as title 1, title 2,
etc.
Track Number
Numbers assigned to tracks on Video CDs and CDs to allow specifi c
tracks to be quickly located.
Video CD
CD containing picture and sound with same quality level as video tape.
This unit also supports Video CDs with playback control (version 2.0).
If disc is brought from a cold to a
warm
environment, moisture may form on
the disc
Wipe away moisture with a soft, dry,
lint-free cloth before using disc. (See
above.)
Improper disc storage
Discs could be damaged if stored or left
in areas:
• exposed to direct sunlight.
• that are humid or dusty.
• near heat (i.e. heater, radiator, etc.).
Disc Handling
Disc tray
Disc
To clean disc surface
With a soft, damp (water only) cloth,
gently wipe from the center hole to the
outer edge as shown below. (Wiping in a
circular pattern will scratch the surface.)
Defi nition of Terms
Discs that can be played
Disc type
Disc
Logo
Disc formats supported by this
unit
DVD-Video
• DVD-Video format
DVD-R
• DVD-Video formatted discs
(fi nalized*)
It may not be possible to play these
discs in all cases due to the type of
disc or condition of the recording.
Video CD
• Video-CD format
CD-DA
• CD-DA format
CD-R
• CD-DA format
• Video-CD format
• MP3/WMA/JPEG fi le and fi nalized*.
CD-RW
Discs which cannot be played with this unit
• CD-ROM
• CDV
• CVD
• CD-G
• CD-TEXT
• SACD
• Photo-CD
• Discs played 8 cm (3
″
) or 12 cm (5
″
)
• * A process that allows play on compatible equipment.
• DVD with Region No. other
than “1” or “ALL”
• DVD of PAL system
• DVD-ROM
• DVD-AUDIO
• DVD-RW
• DVD+RW

8
For assistance, please call : 1-800-211-PANA(7262) or send e-mail to : [email protected]
8
Location of Controls
Remote Control Buttons
INPUT
Select a input source.
EJECT/OPEN/CLOSE
See next page.
POWER
Turns the unit on or off.
DISPLAY
Displays the TV status and
clock. In DVD mode, displays
disc and unit information.
RAPID TUNE
Displays the last channel
you were watching.
MUTE
Mutes the sound instantly.
ACTION
Displays Main Menu.
CHANNEL UP/DOWN
Selects a channel.
REW/SLOW-
Rewinds tape and searches reverse
scene. Decreases slow motion speed
in Still mode.
STOP
Stops recording or playback.
STILL/PAUSE
Pauses picture in Playback mode and
frame advance picture in Still mode.
SKIP-
|
/SEARCH
Skips back one chapter or track.
Goes to previous menu screen. Goes
directly to the desired recording.
AUDIO
Selects the desired audio
mode.
PROGRAM
Displays SET PROGRAM
screen. You can set Timer
Program and On-Timer.
REC
Records a program.
ANGLE
Selects the desired angle in
DVD mode.
TV/VCR
Sets to TV/VCR mode.
DVD
Sets to DVD mode.
NUMBER Keys
Selects a channel directly.
ADD/DELETE/CLEAR
Adds or deletes a channel.
Cancels an item on the screen.
MENU
Displays DVD menu.
SELECT
Controls navigation around
on-screen menu.
SET
Sets a selected menu.
VOLUME UP/DOWN
Adjusts volume.
PLAY
Begins playback.
FF/SLOW+
Fast forwards tape and forward
visual search. Increases slow
motion speed in Still mode.
TITLE
Selects the desired title by
number on some DVDs.
SKIP+
|
/CM SKIP/ZERO
SEARCH
Skips one chapter or track. Goes
to next screen. In Stop mode,
goes to the counter “0:00:00.” In
Playback mode, skips over 1 to
3 minutes of tape.
SURROUND/V.S.S.
Creates a deeper, 3-D sound
effect.
SUB TITLE
Selects a different subtitle
language.
ZOOM/COUNTER RESET
Enlarges specifi c portions of
DVD picture. Resets to “0:00:00”
at desired portion of tape.
RETURN/SPEED
Returns to DVD menu screen.
Selects recording speed of tape.
TRACKING UP/DOWN
Reduces picture noise during
Playback and Slow Motion.

99
Initial Setup
EJECT/OPEN/CLOSE button:
When this button is pressed in TV-VCR mode, the tape is ejected.
This button is inoperative if pressed during recording.
If pressed in DVD mode, the disc tray opens or closes.
Indicators on the Front Panel
<Model PV-DF273 unit shown>
Remote Sensor
ANGLE Indicator (RED)
Lights when a scene
recorded at a different angles
is detected. (DVD only).
Pg 45.
ON TIMER Indicator (ORANGE)
Lights when the On Timer is set.
Pg 26.
PROG TIMER Indicator
(GREEN)
Lights when the unit is set for
Timer Recording. It fl ashes
when a Timer Recording
has been set with no tape
inserted, the clock is not set,
or the tape is in motion.
Pg 28.
REC Indicator (RED)
Lights during recording.
In Rec Pause or OTR
Pause mode, the indicator
fl ashes.
Pg 18.

10
For assistance, please call : 1-800-211-PANA(7262) or send e-mail to : [email protected]
10
Front View of the unit
<Model PV-DF273 unit shown>
Location of Controls (continued)
Phones Jack
Connect an earphone
or headphones.
Built In Speaker
Disc Tray Cassette Compartment
Audio/Video Input
Connector 2 (LINE 2)
Connect from other
component.
S-Video Input Connector 2
(LINE 2)
Connect from other component
with S-Video.
If the disc cannot be removed,
First unplug unit.
Then, prepare a rigid wire (e.g.
an extended paper clip, etc.) and,
applying moderate force, insert it
straight into the hole at the base of
the tray. The tray will eject a little.
Now, pull the tray all the way out and
remove the disc.
POWER
Turns the unit on or off.
STOP
Stops playback.
PAUSE
Pauses picture in Playback mode
and frame advance picture in Still
mode.
PLAY
Begins playback.
OPEN/CLOSE
Opens or closes the disc tray.
SKIP
Skips one chapter or track.
Goes to next screen.
SKIP
Skips back one chapter or track.
Goes to previous menu screen.
REC
Records a program.
FAST FORWARD/SEARCH
Fast forwards tape and
forward visual search.
Increases slow motion
speed in Still mode.
PLAY
Begins playback.
REPEAT
Set to see a recording over
and over.
REWIND/SEARCH
Rewinds tape and searches
reverse scene. Decreases
slow motion speed in Still
mode.
STOP
Stops playback.
EJECT
Eject the tape.
INPUT
Select a input source.
CHANNEL UP/DOWN
Selects a channel.
TRACKING UP/DOWN
Reduces picture noise during Playback
and Slow Motion.
VOLUME UP/DOWN
Adjusts volume.
Disc Operation
Tape Operation

1111
Initial Setup
Rear View of the unit
Connections
<Model PV-DF273 unit shown>
For ANT./Cable
Connect the cable from
Antenna/Cable to the VHF/UHF
terminal on the unit.
For DSS/Cable Box
Connect the OUT jack on your
cable box to the VHF/UHF
terminal on the unit with a RF
cable.
Overtightening “Nut type” RF coaxial cables
may damage jacks. Finger tighten only.
WARNING
AC Power Plug
When plugged into an AC
outlet, this unit consumes
3.5 W of electric power in
OFF condition.
VHF/UHF Antenna
Input Terminal
See below.
Audio/Video Input
Connector 1 (LINE 1)
Connect from other
component.
Optical digital audio
output connector
Pg. 12
S-Video Input
Connector 1 (LINE 1)
Connect from other
component with S-Video.
Audio Output
Connector (L/R)
Pg. 12
IN from
ANT./CABLE
VHF/UHF
VHF/UHF
VHF/UHF
VHF/UHF
Cable TV
Converter Box
IN from
ANT./CABLE

12
For assistance, please call : 1-800-211-PANA(7262) or send e-mail to : [email protected]
12
Audio connections
Enjoy the powerful movie theater and hall-like sound available with multiple channel audio found on
DVDs by connecting an amplifi er and speakers. There are two types of connection, digital and analog.
Connections (continued)
Connect an amplifi er to enjoy high-quality stereo
sound with sampling frequencies of 96 kHz.
■ Analog connection
Connect an amplifi er with Dolby Digital and
DTS decoders to enjoy surround sound.
You can also enjoy stereo sound with
sampling frequencies of 48 kHz if the material
is not copy-protected and the equipment you
connect is compatible with these signals.
■ Digital connection
OPTICAL
Firmly
connect the
cable to the
connector.
Speakers (example)Speakers (example)
Please see
amplifi er manual
for speaker
requirements.
Amplifi er with built
in Dolby Digital and
DTS decoders.

1313
Initial Setup
Manufactured under license from Dolby
Laboratories. “Dolby” and the double-D
symbol are trade marks of Dolby
Laboratories.
Manufactured under license from
Digital Theater Systems, Inc. US Pat.
No. 5,451,942, 5,956,674, 5,974,380,
5,978,762 and other world-wide patents
issued and pending. “DTS” is a registered
trademark of Digital Theater Systems,
Inc. Copyright 1996, 2000 Digital Theater
Systems, Inc. All rights reserved.
IMPORTANT NOTE:
Caution for optical digital audio
output connector:
• When connecting an amplifi er (with an Optical
digital input connector) which does not contain
the Dolby Digital or dts decoder, be sure to
select “PCM” at “Dolby Digital” and “PCM” at
“dts” of the Settings for DVD Operation “AUDIO
OUTPUT” (see page 57). Otherwise, any
attempt to play DVDs may cause such a high
level of noise that it may be harmful to your
ears and damage your speakers.
• When a dts decoder is connected, please
select “Bitstream” at “dts” of the Settings for
DVD Operation “AUDIO OUTPUT.” If “PCM”
is selected, there will be stereo sound. (See
page 57).
• Video CDs and CDs can be played as usual.
• Some dts decoders which do not support
DVD-dts Interface may not work properly with
the unit.
Notes on audio output from the optical
digital audio output con nec tor
Enjoying digital audio output from the
digital audio output con nec tor
*
1
The type of audio output from the connector can be
selected by the Settings for DVD Operation. (See
page 57.)
*
2
Sound having 96 kHz sampling is converted into 48
kHz sampling when it is output from the unit’s optical
digital audio output connector.
For your reference:
• Dolby Digital is a digital sound compression technique
developed by the Dolby Laboratories Licensing Corporation.
Supporting 5.1-channel surround sound, as well as stereo
(2-channel) sound, this technique enables a large quantity of
sound data to be effi ciently recorded on a disc.
• Linear PCM is a signal recording format used in CDs. While
CDs are recorded in 44.1 kHz/16 bit, DVDs are recorded in
48 kHz/16 bit up to 96 kHz/24 bit.
• If you have a Dolby Pro Logic Surround decoder, you
will obtain the full benefi t of Pro Logic from the same
DVD movies that provide full 5.1 channel Dolby Digital
soundtracks, as well as from titles with the Dolby Surround
mark. For information on Panasonic or Technics Dolby Pro
Logic Surround Sound Decoders please contact your local
dealer.
Disc
Sound
recording
format
Optical digital audio output
from connector
DVD
Dolby Digital
Dolby Digital bitstream
(1-5.1 ch) or PCM (48 kHz
sampling/16 bit only)*
1
Linear PCM
(48/96 kHz
16/20/24 bit)
Linear PCM (2ch)
(48 kHz sampling/16 bit
only)*
2
dts
Bitstream or PCM (48 kHz
sampling/16 bit only)*
1
Video CD MPEG 1
PCM
(44.1 kHz sampling)
CD Linear PCM
Linear PCM
(44.1 kHz sampling)
MP3 MP3
Linear PCM
(It depends on the MP3 fi le)
WMA WMA
Linear PCM
(It depends on the WMA fi le)
Note
Turn down the volume, then turn this unit, as well
as other equipment to be connected, off before
pro ceed ing with connection.
Do not block ventilation holes of any equipment
and arrange them so that air can circulate freely.
Read through the instructions before connecting
other equipment.
Ensure that you observe the colour coding when
connecting audio and video cables.
Check List

14
For assistance, please call : 1-800-211-PANA(7262) or send e-mail to : [email protected]
14
Initial Setup (Ready to Play)
PROCEEDING
AUTO CLOCK SET
CANCEL : PRESS STOP KEY
2
/
6
/
2003
THU
12
:
00
P
M
DST
:
O
N
A
UTO
C
L
OCK SET
CO
M
P
L
ETED
SETT
I
N
G
:
CH
1
0
PLEASE
SET
CLOCK BY
P
R
ESS
I
NG
ACT
I
ON
KEY
A
UTO
C
L
OCK SET
I S I NCO
M
P
L
ETE
Plug the unit power cord into an AC wall outlet.
1
3
2
• If you use a cable box, turn it on and set it to the Public
Broadcasting Service (PBS) channel in your time zone. If you
use a DSS receiver, it must be turned off.
ACTION
TV/VCR
SELECT
SET
POWER
Initial Setup (Ready to Play)
Please make all cable or antenna connections before powering on.
Press POWER* on the remote or unit. The unit
comes on and auto channel and clock set
starts.
Settings are made automatically. When setup
is done, this screen appears.
If AUTO CLOCK SET IS INCOMPLETE screen appears,
set the clock using MANUAL CLOCK SET procedure on
next page.
CH AUTO SET PROCEEDING
Press TV/VCR on the remote for TV-VCR mode.
• Function buttons are inoperative during
Initial Setup.
• To remove a cassette during Auto Set,
press EJECT twice on the remote or
STOP twice on the unit. In this case,
settings must be made manually. (See
pages 16-17.)
• Depending on conditions, Auto Clock
Set may take longer than 30 minutes.
In this case, press STOP to stop setup
and perform settings manually. (See
pages 16-17.)
EJECT
Notes
STOP

1515
Initial Setup
Note to CABLE system installer:
This re mind er is pro vid ed to call the CABLE (Cable TV) System Installers at ten tion to Article 820-40
of the NEC that pro vides guide lines for proper grounding and, in par tic u lar, specifi es that the cable
ground shall be con nect ed to the ground ing system of the build ing, as close to the point of cable entry
as practical.
THU
SET
:
SET
SE
L
E
C
T
:
END
:
ACT
I
O
N
SET
C
L
OC
K
DST
:
O
N
SE
L
E
C
T
M
O
N
TH
*
Important:
If a remote control button does not work when pressed, press the TV/VCR button on
the remote and try the button again.
Manual Clock Set
If AUTO CLOCK SET was incomplete, manually
set the clock as follows.
Press ACTION on the remote to display
SET CLOCK Menu screen.
1
Press to select the month and press
SET to set. In the same manner, select
and set the date, year, time, and DST
(Daylight Saving Time).
2
Press ACTION twice to start CLOCK and
exit.
3
Reset all unit Memory Functions
When moving unit to a new location, or if a mistake
was made in the Initial Setup section.
• Make sure a tape is not inserted in the unit.
Turn the unit Power
on.
1
Press and hold both PLAY and FF on the unit
for more than 5 seconds.
• The power will shut off.
• Please ignore “NO CASSETTE” warning.
2
Perform “Initial Setup” on page 14.
3

16
For assistance, please call : 1-800-211-PANA(7262) or send e-mail to : [email protected]
16
Reset Language, Channels, Clock,
3)Press to select
“MANUAL,” then
press SET.
(For Auto Clock Set,
select “AUTO CLOCK
SET,” and press SET.)
3) Press to select
“ANTENNA,” then
press SET to set
your antenna system
(“TV” or “CABLE”).
4) Press to select
“AUTO SET,” then
press SET.
• After Channel Auto Set
is fi nished, Clock Auto
Set will be performed.
(If clock is set manually, Clock
Auto Set will not be performed.)
(“TIME ZONE ADJUST”
appears only when
auto clock is set.)
1) Press to
select language
icon.
2) Press SET
repeatedly.
■ Language ■ Channels ■ Clock
Press ACTION*
to display MAIN MENU.
3) Press ACTION
to exit.
1) Press to
select “CH.”
2) Press SET.
1) Press to
select “CLOCK.”
2) Press SET.
1
2
For English
For Spanish
For French
<Example MANUAL
CLOCK SET screen>
Continued on
the next page.
SET
:
SET
BACK
:
START
:
ACT
I
O
N
SET
C
L
OC
K
DST
:
O
N
2 / 6/
:
2003
THU
12
00
PM
SE
L
E
C
T
HOUR
SE
L
E
C
T
:
M
A
I
N
M
EN
U
DVD
LOCK
CH
C
L
OC
K
TV
LANGUAGE
END :
ACT
I
O
N
SE
L
E
C
T
:
SET
:
SET
5
3
1
M
A
I
N
M
EN
U
DVD
LOCK
CH
C
L
OC
K
TV
LANGUAGE
END :
ACT
I
O
N
SE
L
E
C
T
:
SET
:
SET
5
3
1
MENU PR
I
NCIPAL
DVD
BLOQUEO
CANAL
RELOJTV
ID
I
OMA
TERM
I
NAR :
ACT
I
O
N
ELEG
I
R
:
F
I
JAR
:
SET
5
3
1
HOLA
MENU
DVD
BLOCAGE
CANAL
HORLOGETELE
LANGUE
FIN :
ACT
I
O
N
SEL.
:
REGLER
:
SET
5
3
1
BONJOUR
M
A
I
N
M
EN
U
DVD
LOCK
CH
C
L
OC
K
TV
LANGUAGE
END :
ACT
I
O
N
SE
L
E
C
T
:
SET
:
SET
5
3
1
HELLO
M
A
I
N
M
EN
U
DVD
LOCK
CH
C
L
OC
K
TV
LANGUAGE
END
:
ACT
I
O
N
SE
L
E
C
T
:
SET
:
SET
5
3
1
ANT
ENN
A
:
C
ABLE
A
U
T
O
S
E
T
W
EAK
S
I
GNAL
D
I
SPLAY
:
OFF
SELE
C
T
:
SET
:
SET
END
:
ACT
I
O
N
SET UP
CH
A
NNE
L
AUT
O
C
L
OC
K SET
M
A
NU
AL
T
I
M
E
ZO
N
E
A
D
JUS
T
:
0
SELE
C
T
:
SET
:
SET
END
:
ACT
I
O
N
SET
C
L
OC
K
M
A
I
N
M
EN
U
DVD
LOCK
CH
C
L
OC
K
TV
LANGUAGE
END
:
ACT
I
O
N
SE
L
E
C
T
:
SET
:
SET
5
3
1

1717
Initial Setup
Time Zone Adjust
AUT
O
C
L
OC
K SET
M
A
NU
AL
T
I
M
E
ZO
N
E
A
D
JUS
T
:
0
SELE
C
T
:
SET
:
END
:
ACT
I
O
N
SET
C
L
OC
K
AUT
O
C
L
OC
K SET
M
A
NU
AL
T
I
M
E
ZO
N
E
A
D
JUS
T
:
+1
SELE
C
T
:
SET
:
END
:
ACT
I
O
N
SET
C
L
OC
K
M
A
I
N
M
EN
U
DVD
LOCK
CH
C
L
OC
K
TV
LANGUAGE
END
:
ACT
I
O
N
SE
L
E
C
T
:
SET
:
SET
5
3
1
4)Press and
press SET to
select and set the
month, date, year,
time, and DST
(Daylight Saving
Time)
.
To Make
Corrections,
repeatedly press
to move to
error, then correct.
5)Press ACTION
twice to start the
clock and exit this
mode.
3)Press to select
“TIME ZONE
ADJUST” and
press or
to subtract or
add hour(s) as
necessary.
4)Press ACTION
twice to exit.
• “TIME ZONE
ADJUST” returns
to “0” if clock is set
manually.
(Only when Auto Clock is set.)
Add or Delete a Channel
■ Time Zone Adjust
1) Press to
select “CLOCK.”
2) Press SET.
To add channel:
Select channel with NUMBER
keys and press ADD/DLT.
To delete channel:
Select channel with CH
or NUMBER keys and press
ADD/DLT.
C
HANNEL
08
ADDED
C
HANNEL
08
DE
L
E
T
ED
*
Important:
If a remote control button does not work when pressed,
press the TV/VCR button on the remote and try the button
again.
ADD/DLT
SELECT
SET
ACTION
NUMBER
keys
CH

18
For assistance, please call : 1-800-211-PANA(7262) or send e-mail to : [email protected]
18
Record On a Tape
Playback a Tape
1
Insert a cassette.
• The unit power comes
on automatically.
To prevent tape jam,
Record tab
remove loose or peeling
labels from tapes.
Press PLAY* to play a tape.
2
■
Forward/ Reverse scene search
➞
Press FF/SLOW+ or REW/SLOW-.
➞
Press again or PLAY to release.
■
Still (Freeze) picture
➞
Press STILL/PAUSE.
➞
Press PLAY to release.
■
Slow Motion picture
➞
Press FF/SLOW+ (increases speed) or
REW/SLOW- (decreases speed) in Still
mode.
➞
Press PLAY to release.
■
Frame by Frame picture
➞
Press STILL/PAUSE in Still mode.
➞
Press PLAY to release.
■
Stop
➞
Press STOP
■
Rewind tape
➞
Press REW/SLOW- in
Stop mode
■
Fast forward tape
➞
Press FF/SLOW+
in Stop mode
■
Eject tape
➞
Press EJECT on the
remote or STOP/EJECT on the unit
• These features work best in SP or SLP mode.
• After the unit is in Still or Slow mode for 3 minutes, it will
switch to Stop mode automatically to protect the tape
and the video head.
Press CH or NUMBER keys to
select a channel.
• For “LINE” input, see bottom of next page.
2
3
4
Press SPEED to select recording speed
(see page 4).
Press REC to start recording.
• To edit out unwanted portions, press
STILL/PAUSE to pause and resume recording.
• You cannot view another channel during
recording.
• After the unit has been in Rec Pause mode for 5
minutes, it will stop automatically to protect the tape
and the video head.
• The remaining recording time of an OTR can be
displayed by pressing DISPLAY.
■
Stop
➞
Press STOP
■
One Touch Recording (OTR)
[recording in progress]
Press REC
repeatedly to set
the recording
length (30 min - 4 hours.)
• The unit stops recording at a preset time.
• PROG TIMER Indicator lights on the unit.
1
Insert a tape with record tab.
• The unit power comes on automatically.
EJECT
SELECT
SET
DISPLAY
FF/SLOW+
REW/SLOW-
STOP
REC
STILL/
PAUSE
ACTION
SPEED
CH
• It is not possible to record from DVD/Video CD/CD
to VHS tape using this unit.
PLAY
• If tape has no record tab (see page 4), auto play
begins.
Normal Rec
0:30 1:00
1:302:003:004:00
NUMBER
keys
SP = Standard Play
LP = Long Play
SLP = Super Long Play
• Selected speed is displayed.
Notes
Notes
Operation using unit buttons
REC Indicator
Insert a tape.
CH REC
Press to stop
and/or eject tape.
PLAY/REPEAT
INPUT
Cable or antenna is connected.
Power cord is plugged in.
Check List

1919
Basic Operation
e
Copy Your Tapes (Dubbing)
*
Important: If a remote control button does not work when pressed, press the
TV/VCR
button on the remote
and try the button again.
R-AUDIO OUT-L
VIDEO OUT S-VIDEO OUT
L-AUDIO IN2-R
VIDEO IN2
S-VIDEO IN2
R-AUDIO IN1-L
VIDEO IN1
S-VIDEO IN1
Connections you’ll
need to make
Playing (Source) VCR
If cables are connected to both connectors (S-VIDEO IN or VIDEO IN), the S-VIDEO
signal will be selected automatically. (The S-VIDEO signal has priority.) If you would
like to display the VIDEO signals being input to the VIDEO IN connector, do not
connect any cables to the S-VIDEO IN connector.
Playback (Source)
1
Recording (Editing) unit
Insert pre-recorded
tape.
Insert blank tape with
record tab.
• Dubbing tapes protected with
Copy Guard will have poor
quality results.
2
3
4
5
Press PLAY then press PAUSE at starting
point to put in Standby mode.
Press PLAY to start dubbing.
Press STOP to stop dubbing.
Select “LINE” mode.
See “Selecting Input Mode” below.
Selecting Input Mode
Caution
(Perform operation of steps 4 and 5 on both units at same time.)
• Unauthorized exchanging and/or copying of copyrighted recordings may be copyright infringement.
• Please note that some tapes cannot be dubbed on this unit. Also, it is not possible to dub DVD/Video CD/CD to
VHS tape using this unit.
Press REC, then press STILL/PAUSE
immediately to put in Standby mode.
Press STILL/PAUSE to start dubbing.
Press STOP to stop dubbing.
1
2
3
125LINE1
(CABLE)
69
(TV)
or
LINE2
Method 1:
Press INPUT repeatedly.
Channel Number LINE1 LINE2
Method 3:
a Press ACTION for MAIN MENU.
b Press
to select “TV,” then press
ACTION for SET UP TV screen.
c Press to select “INPUT SELECT,” and
then press to select “TUNER” or “LINE.”
d Press ACTION twice to exit this mode.
Method 2:
Press CH
. The display will change as follows.
Recording (Editing) unit
BackFront

20
For assistance, please call : 1-800-211-PANA(7262) or send e-mail to : [email protected]
20
Press or
NUMBER key(s)
(see below) to
select title, and
press SET or PLAY
to start playing.
• “Pressing SET or
PLAY” is not
necessary when using
NUMBER keys.
4
1
Insert a disc.
• If a disc is already inserted, go to step 3.
(Depending on the disc, playback may start
automatically.)
1) Press OPEN/CLOSE.
2) Place disc into disc tray.
2
Press PLAY to start play. Disc tray
closes automatically.
3
CLOSE
If an interactive DVD*
1
or a Video CD with
playback control*
2
is
used and a TITLE MENU
appears, go to step 4.
• You may also close
the tray by pressing
OPEN/CLOSE.
• Data reading time differs
with each disc.
• Hold disc by its edges only (page
7) with printed side up and use
guides to place into tray. Use
1
3″(8 cm) or
2
5″ (12 cm) disc.
*
1
Interactive DVD...
May include multiple camera angles, stories, etc.
*
2
Video CD with playback control...
Particular scenes or information can be
interactively selected from a menu that appears
on the screen.
T
I
TLE MENU
Cas
t
l
es
Love
r
s
B
i
r
ds
Dogs
T
I
TLE MENU
Cas
t
l
es
Love
r
s
B
i
r
ds
Dogs
<Example 1>
<Example 2>
To return to MENU (play stops)
Press TITLE, MENU, or RETURN. (DVD)
Press RETURN. (Video CD)
Press STOP to stop play.
5
6
Press OPEN/CLOSE to eject the disc.
Dogs
of the world
1
2
Press POWER* on the remote or unit.
<Input Example>
1 digit number 1 ••• 1
2 digit number 12 ••• 10
➞
1
➞
2
3 digit number 123 •••100
➞
1
➞
2
➞
3
Press SKIP+
|
or SKIP-
|
to go to next or
previous menu screen.
• SKIP function not available with all discs.
Please refer to disc jacket for operation information.
Using NUMBER key(s) starts play automatically.
The number of available titles varies with each disc.
READING
SELECT
SET
NUMBER
keys
POWER
OPEN/
CLOSE
DVD
10
TITLE
MENU
PLAY
FF/SLOW+
RETURN
SKIP+
|
REW/
SLOW-
STOP
STILL/
PAUSE
SKIP-
|
Basic DVD Operation
Operation using unit buttons
Press PLAY.
Insert disc.
Press
OPEN/CLOSE.
2
•
6
3
2
Press STOP.
5
Press POWER.
1
Cable or antenna is connected.
Power cord is plugged in.
If unit is connected to an audio amplifi er, turn
the stereo system’s power on.
Check List

2121
Basic Operation
• Please read the disc jacket for operation information.
• If a single sided disc is placed in upside down, “THIS
TYPE OF DISC CANNOT BE PLAYED. PLEASE
INSERT A DIFFERENT DISC” is displayed.
• Remove disc and press unit POWER off when not in
use.
• Disc continues to rotate with menu displayed even
after play is done. Press STOP to clear menu display
when fi nished with menu.
■ Forward/ Reverse rapid scene search
➞
Press FF/SLOW+ or REW/SLOW-
during play.
➞
Press PLAY to release.
• Starting forward/reverse search during play started from
menu on Video CDs may recall menu.
• Search speed, slow at fi rst, increases with each
additional press of the button up to 5 levels.
• When appears on the screen while a
button is being pressed, it means that the
corresponding operation is prohibited by the
unit or the disc.
The unit memorizes the point where STOP is
pressed (STOP
display on the screen).
Press PLAY to resume play from this point.
Pressing STOP again or opening the tray cancels
RESUME, however, RESUME is not canceled
when power is turned off and on.
• RESUME works only with discs for which elapsed
play time is displayed during play.
RESUME function
Power turns off after unit has been in Stop mode
(DVD) for about 5 minutes.
Auto-Power Off function
1. Do steps 1-3 (previous page).
When menu appears, press STOP.
2. Press NUMBER key(s) to select desired
track (play begins).
• Check disc for track numbers.
• Press “1” to start at beginning of disc.
To Resume Menu use,
Press STOP, and press PLAY, then the menu
appears. Now, go to step 4 (previous page).
Enjoy Video CDs featuring
playback control without using
menus (Video CDs only)
*Important: I
f a remote control button does not work when pressed, press the DVD button on
the remote and try the button again.
Chapter/Track Chapter/Track Chapter/
T
rackChapter/
T
rack
Current playback position
Reverse Skip Forward Skip
■ Still (Pause) Picture
➞
Press STILL/PAUSE during play.
➞
Press PLAY to release
.
• DVD/Video CD : The unit will enter Still picture mode.
• CD : The unit will enter Pause mode.
■ Forward/ Reverse Chapter/Track Skip
➞
Press SKIP+
|
or SKIP-
|
during
play.
Each press skips a chapter (DVD) or track
(Video CD/CD).
Pressing SKIP-
|
once midway through a
chapter/track returns to start of that chapter/track.
Each additional press skips back one chapter/track.
• Pressing SKIP+
|
or SKIP-
|
during play
started from menu on Video CDs may recall menu.
■ Frame by Frame picture (DVD/Video
CD)
➞
Press STILL/PAUSE in Still mode.
➞
Press PLAY to release.
• Each press advances picture one frame.
• Hold down for consecutive frame advance.
• Whether pictures are advanced by “FRAME” or
“FIELD” is selected automatically (see page 58).
■ Slow Motion picture (DVD/Video CD)
➞
Press FF/SLOW+ or REW/SLOW- (DVD
only) in Still mode.
➞
Press PLAY to release.
• Slow motion speed, slow at fi rst, is increased with
each additional press of the button up to 5 levels.
• Reverse slow motion is not available for video CDs.
Notes

22
For assistance, please call : 1-800-211-PANA(7262) or send e-mail to : [email protected]
22
For assistance, please call : 1-800-211-PANA(7262) or send e-mail to : [email protected]
TV Operation
1
Press POWER* on the remote or unit.
■ Using the 100 key
When selecting CABLE channels 100 to 125 with
the NUMBER keys, fi rst press the 100 key, and
then enter the remaining two digits.
■ Rapid Tune
Press R-TUNE to display the last channel you
were watching.
■ Audio Mute
Press MUTE to instantly mute the sound. Press
again to restore the previous sound level.
■ Phones
Connect an earphone (not supplied) or headphones
(not supplied) to the Phones Jack.
*
Important:
If a remote control button does not work
when pressed, press the TV/VCR button on
the remote and try the button again.
Use CH or
NUMBER keys to
select a channel.
2
CH08
3
Press VOL + or
VOL - to adjust
volume.
24
VOL+/-
NUMBER
keys
POWER
RAPID
TUNE
100 Key
CH
MUTE
PHONES
Jack
POWER
VOL+/VOL-
CH
Cable or antenna is connected.
Power cord is plugged in.
Check List

2323
TV Operation
DISPLAY
AUDIO
MTS Broadcast/TV Stereo System
Receivable Broadcast Types
The following are possible audio broadcast types and
on-screen displays. The signal being received is indicated with
an “
” mark while the selected audio mode is indicated with
an arrow. To change the audio mode for these broadcasts, see
the “Audio Mode for TV Viewing” section below.
Press DISPLAY to display the broadcast signal being
received.
MTS Stereo and SAP broadcast
Multi-channel Television Sound Stereo
(main language) and Secondary Audio
Program (sub language) broadcasts are
being received simultaneously. Select
the STEREO or SAP audio mode.
MTS Stereo broadcast
Multi-channel Television Sound Stereo
broadcast. Select STEREO audio
mode.
• If stereo broadcast is weak and the
display fl ickers, select MONO audio mode
for possible improvement.
SAP broadcast
Secondary Audio Program (sub
language). Select SAP audio mode for
the sub language.
Audio Mode for TV Viewing
Press AUDIO to select the desired audio mode as described above.
(Arrow shows selection.)
• Each press of AUDIO will change the audio mode as shown below.
• “SAP” is selected with fi rst press of AUDIO.
MONO broadcast
Normal monaural sound broadcast.
1
2
:
0
0
A
M
CH08
STER
EO
SAP
M
ONO
SP
1
2
:
0
0
A
M
CH08
STER
EO
SAP
M
ONO
SP
STER
EO
SAP
M
ONO
1
2
:
0
0
A
M
CH08
SP
STER
EO
SAP
M
ONO
1
2
:
0
0
A
M
CH08
SP
< Example >
STER
EO
SAP
M
ONO
Press AUDIO
Press AUDIO
Press AUDIO
Equipped with -TV
Noise Reduction for true MTS
reproduction.
-TV Noise
Reduction is required for good
stereo separation and audio fi delity.
is a registered trademark,
and is licensed by
Technology
Licensing.
STER
EO
SAP
M
ONO
STER
EO
SAP
M
ONO

24
For assistance, please call : 1-800-211-PANA(7262) or send e-mail to : [email protected]
24
For assistance, please call : 1-800-211-PANA(7262) or send e-mail to : [email protected]
Closed Caption Mode Feature
1
This multi-use system not only allows the hearing impaired to enjoy selected programs, but also makes
useful information from TV stations available to everyone.
Press ACTION* to display MAIN MENU.
Closed Caption Mode Selections
Caption Mode: CAP C1 or C2
A narration of selected TV
programs is displayed.
Check TV program listings for CC
(Closed Caption) broadcasts.
Caption Mode: TEXT C1 or C2
Most of the screen will be
blocked out. When the TV station
broadcasts information, such as
program listings, it will appear in
this space.
Caption Mode: OFF
Closed Caption/Text narration will
not be displayed.
5
Press ACTION three times to return to
the normal screen.
2
1) Press
to select “TV.”
2) Press SET to
display SET
UP TV screen.
3
1) Press to
select
“CAPTION.”
2) Press SET to
display
CAPTION
screen.
OFF
CAP C1
TEXT C1
CAP C2
TEXT C2
4
1) Press to
select
CAPTION
MODE.
2) Press SET
repeatedly to
select mode.
(See left.)
CAPT
I
ON
CA
PT
I
O
N
MODE
:
CAP C1
CC ON MUTE
:
CAP C1
SET
:
SET
SE
L
E
C
T
:
END
:
ACT
I
O
N
M
A
I
N
M
EN
U
DVD
LOCK
CH
C
L
OC
K
TV
LANGUAGE
END :
ACT
I
O
N
SE
L
E
C
T
:
SET
:
SET
5
3
1
SELE
C
T
:
END
:
ACT
I
O
N
SET
UP TV
SET
:
SET
CA
PT
I
O
N
I
NP
UT
SELE
C
T
:
T
UNER
SET
UP
V
I
DEO
/
A
UD
I
O
DVD
VOL
AD
JU
ST
:
+
2
Closed Caption System
Recording and Playing Back a Closed Caption/Text Program
Record : Record normally. Closed Caption/Text signal, if present, is recorded
automatically.
Playback : Start playback. Perform above steps to select desired caption mode.
• The closed caption or text signal may
be broadcast over C1, C2, or both.
Also, text contents can vary so you
may wish to try different settings.
• While recording one station and
watching another, Captioning will
not be displayed.
Notes

2525
TV Operation
1
Caption On Mute Feature
Closed Caption narration, if available, is displayed when
MUTE button is pressed for silence.
Press ACTION to display MAIN MENU.
• When a disc supporting closed caption is
used, the subtitle and the closed caption
may overlap. In this case, turn the subtitle or
caption on mute mode off. (See page 44.)
2
1) Press to select
“TV.”
2) Press SET to display
SET UP TV screen.
6
Press ACTION three times to return to the normal
screen.
7
Press MUTE to mute the sound and display
closed captioning.
• To cancel, press MUTE again.
3
1) Press to select
“CAPTION.”
2) Press SET to display
CAPTION screen.
M
A
I
N
M
EN
U
DVD
LOCK
CH
C
L
OC
K
TV
LANGUAGE
END :
ACT
I
O
N
SE
L
E
C
T
:
SET
:
SET
5
3
1
SELE
C
T
:
END
:
ACT
I
O
N
SET
UP TV
SET
:
SET
CA
PT
I
O
N
I
NP
UT
SELE
C
T
:
T
UNER
SET
UP
V
I
DEO
/
A
UD
I
O
DVD
VOL
AD
JU
ST
:
+
2
4
1) Press to select
CAPTION MODE.
2) Press SET repeatedly
to select “OFF.”
NO
CAP C1
CAP C2
5
1) Press to select
CC ON MUTE.
2) Press SET repeatedly
to select desired mode.
• Each press of SET will
change the display as shown
left.
• The caption may be broadcast
over CAP C1 or C2.
CAPT
I
ON
CA
PT
I
O
N
MODE
:
OFF
CC ON MUTE
:
CAP C1
SET
:
SET
SE
L
E
C
T
:
END
:
ACT
I
O
N
*Important: I
f a remote control button does not work when pressed, press the TV/VCR button
on the remote and try the button again.
SELECT
SET
MUTE
ACTION
Note

26
For assistance, please call : 1-800-211-PANA(7262) or send e-mail to : [email protected]
26
For assistance, please call : 1-800-211-PANA(7262) or send e-mail to : [email protected]
TV Timer Features
1
ON-TIMER with Alarm
This unit can be set to automatically power on in one of
3 modes (TV, VCR Playback, or DVD/Video CD/CD.)
You can also combine the On-Timer with a one minute
alarm that gradually increases in volume.
• If no button on the remote or unit (including a
button used to turn off the alarm) is pressed
within 60 minutes after unit turns itself on, it will
turn itself back off.
Press PROG* to display SET PROGRAM
screen.
To Cancel ON-TIMER,
Repeat steps 1 and 2. Then, press ADD/DLT to clear
the time in step 3. Now, press PROG to end.
“ON TIMER END” briefl y appears on-screen.
2
1) Press to select
“ON TIMER.”
2) Press SET to
display ON TIMER
screen.
SET
:
SET
SE
L
E
C
T
:
END
:
PROG
SET PROGRAM
T I MER PR
OGRAMM
I
NG
ON T
I
MER
S
LEEP
T
I
MER : 00
3
• ON-TIMER mode
selection order
1) Press to select
desired settings.
2) Press SET to set
the ON-TIMER
time or ON-TIMER
mode.
• Make sure a tape is
inserted if Playback
mode is selected.
• Make sure a disc
is inserted if DVD
(DVD/Video CD/CD)
mode is selected.
4
Press to select
ALARM “ON” or
“OFF.”
When “ON” is selected,
an alarm will gradually increase in volume for one
minute or until canceled by pressing any button
(including VOL + -).
To Make Corrections,
use
and to move back and correct.
5
Press PROG to set ON TIMER.
• “ON TIMER SET” is displayed.
• ON-TIMER Indicator lights up on the unit.
Sleep Timer
This unit can be set for auto power off.
Press PROG to display SET
PROGRAM screen.
1
To cancel,
press SET repeatedly until 00 appears.
2
1) Press to
select SLEEP
TIMER.
2) Press SET
repeatedly to
select the
desired time.
3
Press PROG to return to the normal
screen.
• Pressing DISPLAY with sleep timer set
displays remaining time.
O
N T
I
M
E
R
SE
L
E
C
T
H
OU
R
SET
:
SET
SE
L
E
C
T
:
END
:
PROG
ALAR
M
:
O
N
O
N T
I
M
E
R
SE
L
E
C
T
ALARM
SET
:
SET BACK
:
SE
L
E
C
T
:
END
:
PROG
ALAR
M
:
O
N
C
ANCEL
:
ADD / DLT
SET
:
SET
SE
L
E
C
T
:
END
:
PROG
SET PROGRAM
T I MER PR
OGRAMM
I
NG
ON T
I
MER
S
LEEP
T
I
MER : 00
SLEEP TIMER 30 60 90 00
VCR
C
H
01
C
H
125
C
H
02
C
H
03
DVD
Note
ON-TIMER Indicator
The clock is set to the correct time.
Check List

2727
TV Operation
TV/VCR Status & Clock Display
Press DISPLAY to display or remove the overlay.
Blue Screen Display
When a function button is pressed (PLAY, FF, etc.) or you change
channels, the unit mode or channel number will be displayed.
CH08
Channel & Function Display
PLAY
Whenever a blank section of a tape comes up in Playback
mode, or when the selected channel has no broadcast signal
with the Weak Signal Display Feature set to “OFF” (see page
34), the screen will turn solid blue.
REC
1
2
:
0
0
P
M
0
:
25
CH08
-
0
:
1
2
:
3
4
SP
STER
EO
SAP
M
ONO
Function Status
Current Time
Rec Time
Remaining
(OTR mode
only, see page
18.)
Counter
Tape
Speed
(See
page 4.)
Receivable
Broadcast
Types (See
page 23.)
Channel
DISPLAY
ADD/DLT
PROG
*
Important: If a remote control button does not work when pressed, press the
TV/VCR
button on the remote
and try the button again.
SELECT
SET
On-Screen Display (OSD)

28
For assistance, please call : 1-800-211-PANA(7262) or send e-mail to : [email protected]
28
For assistance, please call : 1-800-211-PANA(7262) or send e-mail to : [email protected]
Timer Recording
Press PROG to end
the program.
To Enter More
Programs,
press
to select
and SET to set a
blank program
number, and then
repeat step 3.
Press PROG twice to exit this mode.
• If you’re using a cable box, make sure that it is tuned
to the desired channel and the power is left on for
timer recording.
• PROG TIMER Indicator lights up on the unit.
You can set up to 8 programs to be recorded while you
are away.
1
2
3
Press PROG* to display SET PROGRAM
screen.
1) Press to select
TIMER
PROGRAMMING.
2) Press SET to
display screen.
• If a program is already in memory, press , and
SET to select an unused program number.
Press to select
and SET or
to set
the recording DATE.
• 1~31 = One time
• DAILY = MON~FRI
• WEEKLY SUN~SAT
= Same time once a week
Repeat step 3 to set:
• Start time, Stop time
• Channel (or LINE for outside source)
• Speed (SP, LP, SLP)
Today’s
Date
Example
4
5
DAILY
7
2
1
31
68 9
SELECT / Selection Order
WEEKLY
(SAT)
WEEKLY
(MON)
WEEKLY
(SUN)
C
AN
C
EL
:
A
DD
/
DLT
SELECT
1
-
8
:
E
NTER
:
SET
END
:
P
R
O
G
P DT
STA
R
T
ST
O
P
CH
SPD
1
day
9
:
00
p
12
:
00
a
08
SP
2
-- --
:
--
--
:
--
--
--
3
-- --
:
--
--
:
--
--
--
4
-- --
:
--
--
:
--
--
--
SET
:
SET
SE
L
E
C
T
:
END
:
PROG
SET PROGRAM
T I MER PR
OGRAMM
I
NG
ON T
I
MER
S
LEEP
T
I
MER : 00
SE
L
E
C
T
START
D
AT
E
7
F
R
I
--:--
--:--
--
T
OD
A
Y
DATE START ST
O
P
C
H
SP
SELE
C
T
:
SET
:
SET
END
:
P
R
O
G
-
-
-
-
-
-
-
-
--
-
-
-
-
-
-
--
-
-
-
-
-
-
PROG TIMER Indicator
Cable or antenna is connected.
Power cord is plugged in.
The clock is set to correct time.
The tape is long enough.
The record tab is in place.
Check List

2929
Timer Operation
Repeat steps 1 and 2 on page 28.
1
Press PROG twice to exit this mode.
2
3
To Clear program...
4
Press to select
the desired program.
1) Press SET to
display.
2) Press
to select
and press SET
or
to set new
program contents.
3) Press PROG.
Cancel a Timer Recording:
(Recording is in progress)
Hold down STOP for a few
seconds to cancel the Timer
Recording.
• Any future daily or weekly recordings will
be performed as programmed.
Press ADD/DLT.
Review, Replace or Clear
Program Contents :
(
Recording is not in progress
)
• 2 minutes before Timer recording is performed, “PLEASE
PREPARE FOR TIMER REC” appears and/or the PROG
TIMER Indicator fl ashes. Be sure a cassette with record
tab is loaded and the unit is in Stop mode.
• If the start times of two programs overlap, the lower
numbered program will have priority.
• If the start time for a Timer Recording comes up during a
normal recording or One Touch Recording (page 18), the
Timer Recording will not be performed.
• If there is a power interruption of more than one minute,
the recording may not be performed or continued.
• If “INCOMPLETE” appears after all items have been set,
check all entries and make necessary corrections.
*
Important:
I
f a remote control button does not work when pressed, press the TV/VCR button on
the remote and try the button again.
C
AN
C
EL
:
A
DD
/
DLT
SELECT
1
-
8
:
E
NTER
:
SET
END
:
P
R
O
G
8
SAT
9
:
00
P
12
:
00
A
08
DATE
S
TART
S
TOP
CH
SELE
C
T
:
SET
:
SET
END
:
P
R
O
G
BACK
:
SE
L
E
C
T
START
D
AT
E
T
OD
A
Y
SLP
-
-
-
-
-
-
-
-
--
-
-
-
-
-
-
--
-
-
-
-
-
-
P DT
STA
R
T
ST
O
P
CH
S
PD
1
-- --
:
--
--
:
--
--
--
2
8
10
:
00
p
12
:
00
a
125
SP
3
10
8
:
00
p
9
:
00
p
10
SP
4
S
U
9
:
00
p
10
:
00
p
L
LP
SELECT
1
-
8
:
E
NTER
:
SET
END
:
P
R
O
G
SELECT
SET
ADD/DLT
PROG
STOP
To Replace program...
Notes

30
For assistance, please call : 1-800-211-PANA(7262) or send e-mail to : [email protected]
30
For assistance, please call : 1-800-211-PANA(7262) or send e-mail to : [email protected]
Search System is ...
Each time a recording is made, an invisible index mark is placed on the tape. When timer recordings are
made, program index and information are also included. These index marks can be used to access or
scan recordings.
1
Press SEARCH*
in Playback or
Stop mode to
display INDEX
SEARCH screen,
and then press
NUMBER keys
to select the
recording number.
• To calculate
number, see below.
Index Search
Go directly to the desired recording.
• If Index Search is started very close to an index
mark, that index mark may not be counted in
the search.
2
Playback begins
at search end. To
search forward
or back 1 index,
press FF or REW
while screen left
is displayed (10
seconds).
NOTE: indicates start points of each recording.
61572 34
■ To calculate the Index Number
17534 62
Example 2:
To go to rec. 6 from rec. 2, enter 4 and press FF.
ENTER
I
NDEX
NUMBER
:
1
US
I
NG 1
-
9
KEYS
FOR
W
ARD
SEARCH
:
FF
REVERSE SEARCH
:
REW
EX
I
T
:
SEARCH
I
NDEX SEARCH
FOR
W
ARD
SEARCH
:
FF
REVERSE SEARCH
:
REW
I
NDEX SEARCH
To cancel, press PLAY.
NUMBER
keys
SELECT
SET
REW
FF
SEARCH
Tape Operation
Press FF or REW to start search.
Example 1:
To go to rec. 2 from rec. 4, enter 3 and press REW.
Note
FF
REW

3131
Advanced Operation
*
Important:
If a remote control button does not work when pressed, press the TV/VCR button on the
remote and try the button again.
Repeat Play
Set to see a recording over and over.
PLAY
REPEAT ON
To turn “ON,”
press PLAY/REPEAT on the unit repeatedly in
Playback mode to select “REPEAT ON.”
To turn “OFF,”
repeat above to select “REPEAT OFF.”
• Playback repeats when tape end is reached or
an unrecorded portion longer than 30 seconds is
detected.
• For repeat play in DVD mode, see page 51.
Note
PLAY/REPEAT

32
For assistance, please call : 1-800-211-PANA(7262) or send e-mail to : [email protected]
32
For assistance, please call : 1-800-211-PANA(7262) or send e-mail to : [email protected]
Tape Operation (continued)
Zero Search
To quickly return to a specifi c tape counter
location.
1
2
Press STOP.
4
5
3
Continue playback, rewind, or fast
forward.
Press COUNTER
RESET at the
desired position to
reset to “0:00:00.”
Press DISPLAY* during playback to
display the Counter.
Press CM/ZERO in stop mode to start
ZERO SEARCH.
0
:
00
:
00
SLP
PLAY 12
:
00
PM
• Unit goes into FF or REW mode and stops at the
last point the Counter was set to 0:00:00.
DISPLAY
STOP
CM/ZERO
COUNTER
RESET

3333
Advanced Operation
Press CM/ZERO repeatedly to select skip time in
Playback mode.
Commercial Skip
By pressing the CM/ZERO button in Playback mode you
can skip over 1 to 3 minutes of recorded tape in just a few
seconds.
• No indication appears.
■ Auto Shut Off
No broadcast signal in TV mode (Only when Weak Signal
Display is set to OFF.), DVD stops, or blank tape is played
for 5 minutes.
➞
Power turns off
• This feature is canceled if any button is pressed during above
conditions.
■ Auto Playback
Insert a tape in Power off mode
➞ Power turns on
• Playback begins if tape has no record tab.
■ Auto Rewind (except for Recording)
Tape reaches its end
➞ Rewind, ➞ Stop
■ Playback Auto Eject (Repeat Play is “OFF”)
Tape with no record tab reaches its end
➞ Rewind, ➞ Stop, ➞ Eject
Auto Operation Functions
*
Important:
If a remote control button does not work when pressed, press the TV/VCR button on the
remote and try the button again.
OFF
1st Press 1 min skip
2nd Press 2 min skip
3rd Press 3 min skip

34
For assistance, please call : 1-800-211-PANA(7262) or send e-mail to : [email protected]
34
For assistance, please call : 1-800-211-PANA(7262) or send e-mail to : [email protected]
When “ON” is selected, the picture is displayed
even when a broadcast signal is weak or
non-existent.
Weak Signal Display Feature
1
2
3
• “ON” = Picture is displayed regardless of signal
condition, and may not always be clearly
visible.
“OFF” = Screen turns solid blue when signal is absent
or weak.
• If unit is connected to equipment which has blue back
feature, selecting “ON” will have no effect on the other
equipment.
4
Press ACTION* to display MAIN MENU.
1) Press
to select “CH.”
2) Press SET to
display SET
UP CHANNEL
screen.
Press ACTION twice to return to the
normal screen.
1) Press to
select WEAK
SIGNAL
DISPLAY.
2) Press SET
to set “ON” or
“OFF.”
M
A
I
N
M
EN
U
DVD
LOCK
CH
C
L
OC
K
TV
LANGUAGE
END
:
ACT
I
O
N
SE
L
E
C
T
:
SET
:
SET
5
3
1
ANT
ENN
A
:
C
ABLE
A
U
T
O
S
E
T
W
EAK S
I
GNAL
D
I
SPLAY
:
OFF
SELE
C
T
:
SET
:
SET
END
:
ACT
I
O
N
SET UP
CH
A
NNE
L
ADD/DLT
ACTION
SELECT
SET
Special VCR Features
Notes
It is necessary to enter TV
mode by pressing TV/VCR
before selecting “CH” on the
MAIN MENU.
Check List

3535
Advanced Operation
VCR Lock
All operations are prohibited except Timer
recording and tape eject. Useful for families with
small children.
In Stop mode, hold
down REC on
the unit without a
cassette inserted for 7
seconds to turn “ON.”
(Please ignore “NO
CASSETTE” warning.)
Repeat above with or
without cassette to turn
“OFF.”
• VCR Lock is canceled automatically after about 24
hours if clock is set.
*
Important:
If a remote control button does not work when pressed, press the TV/VCR button on
the remote and try the button again.
V
C
R L
OCK
A
C
T
I
VAT
E
D
V
C
R L
OCK
O
FF
REC

36
For assistance, please call : 1-800-211-PANA(7262) or send e-mail to : [email protected]
36
For assistance, please call : 1-800-211-PANA(7262) or send e-mail to : [email protected]
Press ACTION* to display MAIN MENU.
Enter Secret Code
A 4-digit code must be entered to view a blocked
program or change rating settings.
1
• Some rental movies do not include V-Chip
data.
• DO NOT forget your secret code.
• Once ratings are set, restricted tapes or
programs cannot be accessed unless the
secret code is entered.
Changing your secret code
• You will need your current code.
Do steps 1 ~ 3. In step 4, press CLEAR to clear
current code.
Repeat steps 3 and 4 to enter new code.
Process of V-Chip Control Feature
Setup BlockingEnter Code
Press SET to display
US Ratings menu
(see pages 37-38).
Or
Press ACTION twice
to exit.
4
1) Press NUMBER
keys to enter your
secret code.
2) Enter same
code again for
confi rmation.
3
• Step 2) not necessary when changing rating or
secret code.
• Take care that you are not observed entering the
secret code.
To Make Corrections
Press
repeatedly to move the cursor.
Press NUMBER keys to make the correction.
1) Press to
select “LOCK.”
2) Press SET to
display LOCK
screen.
2
V-Chip Control Feature is...
This unit has a built-in V-Chip Control which allows you
to block unwanted TV usage based on US MOVIES and
US TV PROGRAMS Ratings.
LOCK
RECOGN
I
ZED
CHANGE
CODE
:
ADD
/
DLT
CONT
I
NUE
:
SET
END
:
ACT
I
O
N
CONF
I
RM 4
-
D
I
G
I
T CODE
****
****
BACK SPACE
:
ENTER
:
0
-
9
END
:
ACT
I
O
N
LOCK
ENTER 4
-
D
I
G
I
T
CODE
-
-
M
A
I
N
M
EN
U
DVD
LOCK
CH
C
L
OC
K
TV
LANGUAGE
END :
ACT
I
O
N
SE
L
E
C
T
:
SET
:
SET
5
3
1
NUMBER
key
CLEAR
SELECT
SET
ACTION
V-Chip Control Feature
Notes

3737
Advanced Operation
1
1) Press to select
US MOVIES.
2) Press SET to set
“ON” or “OFF.”
If LOCK menu is not displayed, perform “Enter
Secret Code” steps on page 36.
■ “ON”
➞
V-Chip Control is activated.
■ “OFF”
➞
V-Chip Control is deactivated.
US MOVIES Ratings US MOVIES RATINGS
*
Important:
If a remote control button does not work when pressed, press the TV/VCR button on the
remote and try the button again.
2
1) Press to
select CHANGE
SETTINGS.
2) Press SET to
display screen.
3
1) Press to
select VIEW NR
PROGRAMS?.
2) Press SET to set
“YES” or “NO.”
NR (Not Rated) PROGRAMS
Some movies, such as old movies or foreign
movies usually have no ratings.
4
Press to select
and SET to set
ratings to be blocked.
(See ratings chart on
this page.)
5
Press ACTION to redisplay LOCK
menu and continue with US TV
PROGRAMS Ratings Setup (page 38).
Or,
press ACTION three times to exit.
• “NEXT PAGE” displays CANADIAN V-Chip
setting menu. Not necessary except when viewing
Canadian tapes or broadcasts.
US MOV
I
ES
:
O
FF
CHANGE
SET
T
I
NGS
US
TV
PROGRAMS
:
O
FF
CHANGE
SET
T
I
NGS
DVD
LOCK
:
O
FF
CHANGE
SET
T
I
NGS
SELE
C
T
:
SET
:
SET
END
:
ACT
I
O
N
LOCK
NEXT
PAGE
SELE
C
T
:
SET
:
SET
END
:
ACT
I
O
N
LOCK
NEXT
PAGE
US MOV
I
ES
:
O
FF
CHANGE
SET
T
I
NGS
US
TV
PROGRAMS
:
O
FF
CHANGE
SET
T
I
NGS
DVD
LOCK
:
O
FF
CHANGE
SET
T
I
NGS
Process of V-Chip Control Feature
Setup
BlockingEnter Code
G
GENERAL AUDIENCE:
All ages admitted.
PG
PARENTAL GUIDANCE:
Some material may not be suitable
for children.
PG-13
PARENTS CAUTIONED:
Some material may be inappropriate
for children under 13.
R
RESTRICTED:
Children under 17 must be
accompanied by a parent or adult.
NC-17
OVER AGE 17 ONLY:
No one 17 and under admitted.
X ADULTS ONLY:
Note

38
For assistance, please call : 1-800-211-PANA(7262) or send e-mail to : [email protected]
38
For assistance, please call : 1-800-211-PANA(7262) or send e-mail to : [email protected]
US TV PROGRAMS RATINGS: Chart 1
US TV PROGRAMS RATINGS: Chart 2
1
1) Press * to
select US TV
PROGRAMS.
2) Press SET to set
“ON” or “OFF.”
US TV PROGRAMS Ratings
If LOCK menu is not displayed, do “Enter
Secret Code” steps on page 36.
US MOV
I
ES
:
O
FF
CHANGE
SET
T
I
NGS
US
TV
PROGRAMS
:
O
FF
CHANGE
SET
T
I
NGS
DVD
LOCK
:
O
FF
CHANGE
SET
T
I
NGS
SELE
C
T
:
SET
:
SET
END
:
ACT
I
O
N
LOCK
NEXT
PAGE
2
1) Press to
select CHANGE
SETTINGS.
2) Press SET to
display screen.
SELE
C
T
:
SET
:
SET
END
:
ACT
I
O
N
LOCK
NEXT
PAGE
US MOV
I
ES
:
O
FF
CHANGE
SET
T
I
NGS
US
TV
PROGRAMS
:
O
FF
CHANGE
SET
T
I
NGS
DVD
LOCK
:
O
FF
CHANGE
SET
T
I
NGS
NR (Not Rated) PROGRAMS
Some TV shows, such as news, sports, weather,
bulletins, emergency information usually have no
ratings.
3
1) Press to
select VIEW NR
PROGRAMS?.
2) Press SET to set
“YES” or “NO.”
TV
-
Y
TV
-
Y7
TV
-
G
TV
-
PG
TV
-
1
4
TV
-
MA
FV
V
S L D
V
S L D
V
S L
UNLOCKED
V
I
E
W
NR
PROGRAMS
?
:
YES
CONTA
I
NS NO RAT
I
NG
SELE
C
T
:
SET
:
SET
END
:
ACT
I
O
N
• You may select from standard TV ratings (chart 1), or
customize to a specifi c content rating (chart 2).
4
Press to select
and SET to set
ratings to be blocked.
(See ratings charts on
this page.)
• Ratings highlighted in
green will be blocked.
Ratings in white letters
will not be blocked.
V
I
E
W
NR
PROGRAMS
?
:
YES
FOR
ALL
CH
I
LDREN
SELE
C
T
:
SET
:
SET
END
:
ACT
I
O
N
TV
-
Y
TV
-
Y7
TV
-
G
TV
-
PG
TV
-
1
4
TV
-
MA
FV
V
S L D
V
S L D
V
S L
UNLOCKED
5
Press ACTION three times to exit this mode.
• “NEXT PAGE” displays CANADIAN V-Chip setting
menu. Not necessary except when viewing Canadian
tapes or broadcasts.
V-Chip Control Feature (continued)
FV Fantasy Violence
V Violence
S Sexual Situations
L Adult Language
D Sexually Suggestive Dialogue
TV-Y FOR ALL CHILDREN:
Content specifi cally geared to young
viewers ages 2-6.
TV-Y7 FOR AGE 7 AND OLDER:
May contain mild physical or comedic
violence which may frighten children
under 7.
TV-G GENERAL AUDIENCE:
Contains little or no violence, strong
language, or sexual dialogue or
situations.
TV-PG PARENTAL GUIDANCE:
May contain infrequent coarse
language, limited violence, some
suggestive sexual dialogue and
situations.
TV-14 PARENTS CAUTIONED:
May contain sophisticated themes,
sexual situations, strong language,
and more intense violence.
TV-MA MATURE AUDIENCE:
May contain mature themes, profane
language, graphic violence, and
sexual situations.
■ “ON”
➞
V-Chip Control is activated.
■ “OFF”
➞
V-Chip Control is deactivated.
Process of V-Chip Control Feature
Setup
BlockingEnter Code
Note
Note

3939
Advanced Operation
*
Important:
If a remote control button does not work when pressed, press the TV/VCR button on the
remote and try the button again.
Blocking Message
• If a program or movie
exceeds the ratings you
have set, a message
will appear on a black
background and sound is
muted.
<When V-Chip Control is activated>
To View a Blocked Program/Movie
[Temporarily Deactivate V-Chip Control]
Enter your secret code (ACCESS CODE) in the
Blocking Message screen.
• V-Chip Control is reactivated when power is turned off
or power failure occurs.
[Deactivate V-Chip Control]
Enter your secret code (steps 1-3 page 36). Then,
set US MOVIES and/or US TV PROGRAMS to
“OFF” using
and SET. (Ratings set on pages
37 and 38 is retained and will be in effect when
V-Chip Control is activated again.)
CH08
RAT
I
NG
:
PG
-
1
3
ACCESS
CODE
----
PROGRAM
RAT
I
NG
EXCEEDED
ENTER :
0
-
9
SELECT
SET
ACTION
DISPLAY
Process of V-Chip Control Feature
Setup
Blocking
Enter Code

40
For assistance, please call : 1-800-211-PANA(7262) or send e-mail to : [email protected]
40
For assistance, please call : 1-800-211-PANA(7262) or send e-mail to : [email protected]
With the proper audio mode
setting, your unit can:
• Record and playback MTS stereo broadcast
(main language) in stereo Hi-Fi. Stereo sound is
recorded on the left and right audio tracks and
on the video portion of a tape.
• Record and playback a monaural broadcast
(main language) or SAP (Secondary Audio
Program, usually in a second language) on the
Hi-Fi tracks for better quality monaural sound.
• Playback non-Hi-Fi tapes in monaural.
Audio Mode for Playback
Choose the type of sound track for playback.
Choose audio mode to match recording type.
1
See the “Playback a Tape” section on page
18 to playback the tape.
• Only tapes recorded in Hi-Fi stereo will playback with true
stereo sound. Standard stereo tapes will playback with
monaural sound.
• To listen to Hi-Fi stereo playback, the unit AUDIO (L/R)
jacks must be connected to a stereo amp and speakers.
• There may be a difference in audio level between Hi-Fi
and normal audio playback.
2
• This screen appears when you press AUDIO during
playback.
Press AUDIO*
repeatedly
(each press
within 5 seconds) to
select desired mode.
H
I
F
I
(
L
/
R
)
H
I
F
I
(
L
)
H
I
F
I
(
R
)
N
ORM
AL
1
Press AUDIO repeatedly to select the audio
mode according to the type of broadcast to be
recorded.
• The Audio mode selected stays in effect until it is
changed.
See the “Record On a Tape” section on page
18 to do a recording.
2
Audio Mode for Recording
SELECT
SET
VOL+/-
MUTE
SURROUND/
VSS
ACTION
AUDIO
Audio Features
Notes
• Select “HIFI (L/R),” to listen to a regular Hi Fi Stereo
recording.
Select “HIFI (L)” or “HIFI (R)” to listen only to the left or right
channel of a stereo recording. This is commonly used for
Karaoke, music on one channel and vocal on the other.
Select “NORMAL” for linear stereo playback from a
recorded tape with Hi Fi disabled.

4141
Advanced Operation
DVD Volume Adjust
1
Some DVDs are recorded in lower average volume
levels. For these DVDs, this unit can be set so that
the average volume is increased automatically.
Press ACTION* to display MAIN MENU.
*
Important:
If a remote control button does not work when pressed, press the TV/VCR button on the
remote and try the button again.
2
1) Press
to select “TV.”
2) Press SET to
display SET UP
TV screen.
M
A
I
N
M
EN
U
DVD
LOCK
CH
C
L
OC
K
TV
LANGUAGE
END :
ACT
I
O
N
SE
L
E
C
T
:
SET
:
SET
5
3
1
3
1) Press to
select DVD
VOL ADJUST.
2) Press SET to
set the level (0,
+1, or +2).
SELE
C
T
:
END
:
ACT
I
O
N
SET
UP TV
SET
:
SET
CA
PT
I
O
N
I
NP
UT
SELE
C
T
:
T
UNER
SET
UP
V
I
DEO
/
A
UD
I
O
DVD
VOL
AD
JU
ST
:
+
2
4
Press ACTION twice to return to the
normal screen.
Enjoy a surround-like effect if you are using two
front speakers only. The effect is broadened
and sound seems to come from virtual speakers
on either side if the disc has surround signals
recorded on it.
Press VSS in DVD mode.
• The Surround sound effects can be changed by
pressing VSS repeatedly as shown by the fi gure
below.
• V.S.S. effects is available in DVD mode only.
• Turn off the surround effects on the other equipment.
• V.S.S. will not work, or will have less effect, with some
discs.
• Turn V.S.S. off if it causes distortion.
V.S.S. (Virtual Surround Sound)
[DVD only]
VSS OFF
VSS1
VSS2
VSS3
Default
You can hear a deeper, 3-D sound effect using
just the unit’s two front speakers.
Press SURROUND.
• “SURROUND ON” is
displayed.
SURROUND ON
To Cancel,
press SURROUND.
• Surround sound effect is not available for normal
(mono) broadcasts.
• The surround effect (TV, VCR mode only) is not
output to Audio Output L/R Connector.
Surround Sound System
SURROUND OFF
Notes
Notes

42
For assistance, please call : 1-800-211-PANA(7262) or send e-mail to : [email protected]
42
For assistance, please call : 1-800-211-PANA(7262) or send e-mail to : [email protected]
1
Press ACTION* to display MAIN MENU.
Audio Menu
Video Menu
a
Do steps 1-3 left.
This feature allows easy setting of picture and sound suitable for each program source.
1) Press to
select “AUDIO
MENU.”
2) Press SET to
select desired
mode. (See
below.)
SELE
C
T
:
SET
:
SET
END
:
ACT
I
O
N
SET
UP
V
I
DEO
/
A
UD
I
O
V
I
D
E
O
MENU
:
NO
RM
A
L
V
I
D
E
O
AD
J
UST
A
UD
I
O
MENU
:
MU
S
I
C
A
UD
I
O
AD
J
UST
b
c
Press ACTION three times to end setup.
• The effects of this feature on the signal is not output
to the Audio/Video Output Connector.
• When AUDIO MENU mode is “AUTO,” the AUDIO
ADJUST setting will be “STANDARD.”
• AUDIO MENU settings remain in memory.
• VIDEO MENU settings do not remain in memory.
1) Press to
select “VIDEO
MENU.”
2) Press SET
repeatedly to
select desired
mode. (See
below.)
4
SELE
C
T
:
SET
:
SET
END
:
ACT
I
O
N
SET
UP
V
I
DEO
/
A
UD
I
O
V
I
D
E
O
MENU
:
NO
RM
A
L
V
I
D
E
O
AD
J
UST
A
UD
I
O
MENU
:
MU
S
I
C
A
UD
I
O
AD
J
UST
5
Press ACTION three times to end setup.
1) Press
to select “TV.”
2) Press SET to
display SET
UP TV screen.
2
M
A
I
N
M
EN
U
DVD
LOCK
CH
C
L
OC
K
TV
LANGUAGE
END :
ACT
I
O
N
SE
L
E
C
T
:
SET
:
SET
5
3
1
1) Press to
select
“SET UP
VIDEO/AUDIO.”
2) Press SET to
display.
SELE
C
T
:
END
:
ACT
I
O
N
SET
UP TV
SET
:
SET
CA
PT
I
O
N
I
NP
UT
SELE
C
T
:
T
UNER
SET
UP
V
I
DEO
/
A
UD
I
O
DVD
VOL
AD
JU
ST
:
+
2
3
[Audio Menu]
■ NORMAL
■ AUTO
[Audio AGC (Auto Gain Control)]
The sound level is automatically adjusted to suit
the program source (see below left).
■ MOVIE
Sound suited to movies.
■ MUSIC
Sound suited to music. (Factory setting)
■ SPEECH
Sound suited to dialogue.
[Video Menu]
■ NORMAL
Factory setting.
■ MOVIE
Picture is adjusted for a movie-like feel.
■ NIGHT
Color and picture intensity are adjusted to be
easier on the eyes for night viewing.
Low
Standard
High
Volume level
TV TV
CD
AUDIO MENU : NORMAL
Volume level
Low
Standard
High
TV TV
CD
AUDIO MENU : AUTO
<Audio AGC Example>
SELECT
SET
ACTION
Video/Audio Menu
Notes

4343
Advanced Operation
*
Important:
If a remote control button does not work when pressed, press the TV/VCR button on the
remote and try the button again.
1
Press ACTION to display MAIN MENU.
Audio Adjustment
Video Adjustment
6
Press ACTION four times to end setup.
1) Press
to select “TV.”
2) Press SET to
display SET
UP TV screen.
2
M
A
I
N
M
EN
U
DVD
LOCK
CH
C
L
OC
K
TV
LANGUAGE
END :
ACT
I
O
N
SE
L
E
C
T
:
SET
:
SET
5
3
1
1) Press to
select
“SET UP
VIDEO/AUDIO.”
2) Press SET to
display.
SELE
C
T
:
END
:
ACT
I
O
N
SET
UP TV
SET
:
SET
CA
PT
I
O
N
I
NP
UT
SELE
C
T
:
T
UNER
SET
UP
V
I
DEO
/
A
UD
I
O
DVD
VOL
AD
JU
ST
:
+
2
3
1) Press to
select “VIDEO
ADJUST.”
2) Press SET to
display.
4
SELE
C
T
:
SET
:
SET
END
:
ACT
I
O
N
SET
UP
V
I
DEO
/
A
UD
I
O
V
I
D
E
O
MENU
:
NO
RM
A
L
V
I
D
E
O
AD
J
UST
A
UD
I
O
MENU
:
MU
S
I
C
A
UD
I
O
AD
J
UST
To Reset VIDEO Controls,
press
and SET to select and set
“STANDARD.” All controls return to their factory
settings.
5
CO
L
OR
T
I
NT
B
R
I
GH
T
N
E
SS
P
I
C
T
UR
E
SH
A
R
P
N
E
SS
ST
A
N
D
ARD
ADJUST
:
SE
L
E
C
T
:
END
:
ACT
I
O
N
V
I
DEO ADJUST
1) Press to
select an item.
(See below.)
2) Press
to
adjust.
f
Press ACTION four times to end setup.
d
e
BASS
TREBLE
BALANCE
ST
A
N
D
ARD
ADJUST
:
SE
L
E
C
T
:
END
:
ACT
I
O
N
AUDIO ADJUST
SELE
C
T
:
SET
:
SET
END
:
ACT
I
O
N
SET
UP
V
I
DEO
/
A
UD
I
O
V
I
D
E
O
MENU
:
NO
RM
A
L
V
I
D
E
O
AD
J
UST
A
UD
I
O
MENU
:
MU
S
I
C
A
UD
I
O
AD
J
UST
a
Press ACTION to display MAIN MENU.
1) Press
to select “TV.”
2) Press SET to
display SET UP
TV screen.
b
1) Press to
select
“SET UP
VIDEO/AUDIO.”
2) Press SET to
display.
c
M
A
I
N
M
EN
U
DVD
LOCK
CH
C
L
OC
K
TV
LANGUAGE
END :
ACT
I
O
N
SE
L
E
C
T
:
SET
:
SET
5
3
1
SELE
C
T
:
END
:
ACT
I
O
N
SET
UP TV
SET
:
SET
CA
PT
I
O
N
I
NP
UT
SELE
C
T
:
T
UNER
SET
UP
V
I
DEO
/
A
UD
I
O
DVD
VOL
AD
JU
ST
:
+
2
1) Press to
select “AUDIO
ADJUST.”
2) Press SET to
display.
1) Press to
select an item.
(See below.)
2) Press
to
adjust.
To Reset AUDIO Controls,
press
and SET to select and set
“STANDARD.” All controls return to their factory
settings.
Video/Audio Adjustment
[VIDEO Adjustment]
■ COLOR Control
Adjust colour intensity.
■ TINT Control
Adjust for natural fl esh tones.
■ BRIGHTNESS Control
Adjust picture brightness.
■ PICTURE Control
Adjust picture intensity by adjusting both
contrast and colour level in the proper balance.
■ SHARPNESS Control
Increases or decreases the level of detail in the
image.
[AUDIO Adjustment]
■ BASS Control
To adjust the intensity of low frequency sound.
■ TREBLE Control
To adjust the intensity of high frequency sound.
■ BALANCE Control
Controls the difference in audio level between
the left or right speaker.
• The levels set here do not affect other audio
equipment when connected to the Audio Output
L/R Connector.

44
For assistance, please call : 1-800-211-PANA(7262) or send e-mail to : [email protected]
44
For assistance, please call : 1-800-211-PANA(7262) or send e-mail to : [email protected]
Press SUB TITLE* in
Play mode to display
the subtitle selection
on-screen.
• Display disappears
after 5 seconds.
• When no subtitles
are offered, “-” will be
displayed instead of
the language number.
AUDIO:3 ESP
Dolby Digital 3/2.1ch
Hola
SELECT :
END : AUDIO
AUDIO:1 ENG
Dolby Digital 3/2.1ch
Hello
SELECT :
END : AUDIO
Te amo
• When closed captioning is used along with subtitles, they may
overlap. If so, turn one function off. (See pages 24 and 25.)
• If after several presses of the button the language does not
change, language selection is not offered on the disc.
• Subtitles may not change to the selected language
immediately.
• When disc is removed, subtitles revert to initial setting
language. If the initial language is not recorded on the disc,
the disc’s priority language will appear.
You can select a different subtitle language (if offered)
than the one set at the Settings for DVD Operation. (See
page 56.)
1) Press to select
desired language.
2) Press
(or )
to select “ON” or
“OFF.”
Subtitle Language (DVD only)
[
Subtitle language]
[Audio soundtrack language]
• Change the No. by pressing , and press
SET.
You can change the audio soundtrack language,
selected at the Settings for DVD Operation, to a
different language if available. (See page 56.)
(This operation works only with discs on which multiple
audio soundtrack languages are recorded.)
Press AUDIO in
Play mode to display
the audio selection
on-screen.
Audio Soundtrack Language (DVD only)
Audio attribute 1 type,
sampling frequency, bit
No. of the disc.
[Audio attribute 1 type, sampling
frequency, bit No. of the disc (see
page 57)
]
1
2
a
b
Number of subtitle language being played back.
Press to select
desired language.
Audio soundtrack
language being played
back.
• If, after several presses of the AUDIO button the
language does not change, language selection is
not offered on the disc.
• When disc is removed, language reverts to initial
setting. If this language is not recorded on the disc,
the language recorded will be heard.
• Display disappears after
5 seconds.
Disc Operation
ENG English
FRA French
DEU German
ITA Italian
ESP Spanish
NLD Dutch
SVE Swedish
NOR Norwegian
DAN Danish
POR Portuguese
RUS Russian
JPN Japanese
CHI Chinese
KOR Korean
MAL Malay
VIE Vietnamese
THA Thai
Other
LPCM
96 kHz
or
48 kHz
16 bit
Linear PCM disc20 bit
24 bit
Dolby
Digital
1 ch - 5.1 ch Dolby Digital disc
dts 1 ch - 5.1 ch dts disc
Notes
Notes
Please read “Basic DVD Operation” on
page 20.
Check List

4545
Advanced Operation
SELECT :
END : AUDIO
When
appears on the screen while a
button is being pressed, it means that the
corresponding operation is prohibited by
the unit or the disc.
• ANGLE Indicator lights up on the unit when
a scene recorded at different angles is
detected.
• The angle number can be set beforehand
so that the angle is switched whenever
ANGLE Indicator lights up.
• DVD Karaoke (1 vocal) VOCAL ON VOCAL OFF
• DVD Karaoke (2 vocals) VOCAL V1 VOCAL V2 VOCAL V1
+
V2 VOCAL OFF
• Video CD LR L R
a
Press AUDIO in Play mode to display the audio
screen.
Vocal selection for Karaoke discs (DVD/Video CD)
DVDs may contain scenes shot from multiple camera
angles allowing the same scene to be viewed at different
angles. You can view these angles, if available, using the
ANGLE button.
1
Press ANGLE in Play
mode to display the angle
selection on-screen.
• Display disappears after 5
seconds.
Multiple Angle Viewing (DVD only)
2
Press to select the
desired angle.
b
1) Press (or ) to
select as shown below.
2) Press
(or ) to set.
(DVD only)
Number of angle being played back.
You can enlarge specifi c portions of a picture and select the
zoom ratio using the ZOOM button on the remote during
DVD playback.
Set Zoom size.
Press ZOOM repeatedly to change display as follows.
Picture Zoom (DVD only)
• You can enlarge the center portion of the image to one of 2
magnifi cations.
• Closed captioning will not be displayed
while Picture Zoom is used. To see
subtitles, set the subtitle feature to ON (see
page 44).
• The subtitle cannot be enlarged nor can it’s
position be changed.
• The picture zoom feature does not work
with a Video CD.
• During picture zoom, “ZOOM1” or “ZOOM2”
appears on-screen for 5 second.
• Zooming, on some discs, may result in poor
picture quality, or may not operate at all.
X 1.0 (ORIGINAL)
1st press
2nd press
3rd press
X 1.5 (ZOOM 1) X 2.0 (ZOOM 2)
ZOOM 1
ZOOM 2
ZOOM 2
■ Use the , , and buttons to move the
position up, down, left and right.
SELECT
SET
ANGLE
SUB TITLE
AUDIO
ZOOM
*
Important:
If a remote control button does not work when pressed, press the DVD button on the
remote and try the button again.
Notes
Notes
ANGLE Indicator

46
For assistance, please call : 1-800-211-PANA(7262) or send e-mail to : [email protected]
46
For assistance, please call : 1-800-211-PANA(7262) or send e-mail to : [email protected]
Some DVDs have more than one title, e.g. movies. If
the disc offers a title menu, you can select the desired
title number. (Operation may vary according to the
disc.)
1
Press TITLE* in Play
mode to display title
screen.
Title menu (DVD only)
DVDs may offer a special menu. This menu may
include guides to unique contents, audio/subtitle
languages, etc. Although contents and operation may
vary, the following steps show basic steps for using the
menu.
a
b
Press MENU in Play
mode to display DVD
menu.
1) Press or
NUMBER key(s) to
select an item.
2) Press SET or
PLAY to access.
DVD menu (DVD only)
2
1) Press or
NUMBER key(s) to
select a title.
2) Press SET or
PLAY to start play.
• Step 2) not necessary
when using NUMBER
key(s).
<Example>
<Example>
<Example>
<Example>
• Step 2) not necessary
when using NUMBER
key(s).
Repeat step “b” if there is more than one menu.
T I TLE MENU
Cas
t
l
es
Love
r
s
B
i
r
ds
Dogs
T
I
TLE MENU
Cas
t
l
es
Love
r
s
Dogs
B
i
r
ds
DVD MENU
3 . ANGLE
1 . SUBT
I
TLE
2 . AUD
I
O
DVD MENU
3 . ANGLE
1 . SUBT
I
TLE
2 . AUD
I
O
B
i
rds
of the world
NUMBER
key
CLEAR
TITLE
MENU
ACTION
PLAY
STOP
Disc Operation (continued)
SELECT
SET
DISPLAY

4747
Advanced Operation
• Up to 15 tracks can be programmed.
• “
” or “ ” (depending on disc) indicates additional
PROGRAM PLAY screen. Press
for next or
previous screen.
• To clear the last program one by one,
Press
to move to “CLEAR LAST” and press
SET. (Pressing CLEAR also clears last program.)
• To clear all programs,
Press
to move to “CLEAR ALL” and press SET.
(Programs are also cleared when the power is turned off or the
disc is removed.)
You can program specifi c tracks and order of
play.
Program Play (Video CD/CD)
1
Press ACTION in Stop mode to display MAIN
MENU.
6
1) Press to
select “START.”
2) Press SET to start
play of programs
in the sequence
selected.
•To cancel, press STOP during play, then press CLEAR.
*
Important:
If a remote control button does not work when pressed, press the TV/VCR, DVD button on the
remote and try the button again.
2
1) Press to
select “DVD.”
2) Press SET to
display screen.
3
1) Press to select
“PLAY MODE.”
2) Press SET to
display screen.
4
1) Press to
select “PROGRAM
PLAY.”
2) Press SET to
display screen.
5
1) Press
to select a track
number. (Track
numbers on disc
are displayed.)
2) Press SET to set.
•Repeat step 5 to select another track.
•The selected track is added on the right side.
M
A
I
N
M
EN
U
DVD
LOCK
CH
C
L
OC
K
TV
LANGUAGE
END :
ACT
I
O
N
SE
L
E
C
T
:
SET
:
SET
5
3
1
DVD MAIN MENU
SELECT :
SET : SET
END : ACTION
4:3 Pan & Scan
PLAY MODE
SELECT :
SET : SET
END : ACTION
PROGRAM PLAY
SELECT :
SET : SET
END : ACTION
DI SC PROGRAM
1 61116 5 8
2 7 12 17 15 6
3 8 13 18 1 13
4 9 14 19 3 2
5101520 2
CLEAR LAST
CLEAR ALL START
PROGRAM PLAY
SELECT :
SET : SET
END : ACTION
DI SC PROGRAM
1 61116 5 8
2 7 12 17 15 6
3 8 13 18 1 13
4 91419 3 2
5101520 2
CLEAR LAST
CLEAR ALL START
Program Repeat Play
(Video CD/CD)
d
Press SET to enter Select mode.
Cursor move to “OFF.”
e
Press to select “DISC.”
(Unit Information Screen)
(Unit Information Screen)
a
Do steps 1 through 6 on this page.
b
Press DISPLAY to display Disc
Information screen.
(Disc Information Screen)
c
Press DISPLAY again to display Unit
Information screen.
f
Press SET to set mode. Cursor
move to “REPEAT.” To cancel, select
“REPEAT: OFF” in step e, then press
SET.
SELECT :
SET : SET END : DI SPLAY
PLAY
REPEAT: DISC
PROGRAM PLAY
SET : SET END : D ISPLAY
SET : SET NEXT : DISPLAY
TRACK : 1 VIDEO CD
PBC : OFF 1 : 35 : 12
Notes
Unit is in TV-VCR mode, press TV/VCR.
Video CD or CD is inserted.
Check List

48
For assistance, please call : 1-800-211-PANA(7262) or send e-mail to : [email protected]
48
For assistance, please call : 1-800-211-PANA(7262) or send e-mail to : [email protected]
Tracks are played in a random order.
Random Play (Video CD/CD)
Press ACTION* in Stop mode to display
MAIN MENU.
1
1) Press
to select “DVD.”
2) Press SET to
display screen.
2
M
A
I
N
M
EN
U
DVD
LOCK
CH
C
L
OC
K
TV
LANGUAGE
END :
ACT
I
O
N
SE
L
E
C
T
:
SET
:
SET
5
3
1
1) Press to select
“PLAY MODE.”
2) Press SET to
display screen.
3
DVD MAIN MENU
SELECT :
SET : SET
END : ACTION
4:3 Pan & Scan
1) Press to select
“RANDOM PLAY.”
2) Press SET to begin
random play.
• To cancel, press STOP during play, then press CLEAR.
4
PLAY MODE
SELECT :
SET : SET
END : ACTION
CLEAR
ACTION
STOP
*
Important: If a remote control button does
not work when pressed, press
the TV/VCR, DVD button on
the remote and try the button
again.
Disc Operation (continued)
SELECT
SET

4949
Advanced Operation
1
Press DISPLAY in Play or Stop mode to display
“On-Screen Display.”
When DISPLAY is pressed, On-Screen Displays show disc
information (title/chapter/track number, elapsed playing
time) and unit information (Repeat Play, Play mode).
• Each press of DISPLAY changes the on-screen display
as follows. (Please refer to page 50 or 51.)
3
1) Press to select the setting.
2) Press SET to set.
• When numbers are
displayed (e.g. title
number), the NUMBER
keys are also available.
• If the number entered
is not on the disc, the
entry will have no effect.
Re-enter the correct
number.
• For more details, refer
to the disc operation
information.
To return to the
normal screen,
press CLEAR or
DISPLAY repeatedly.
<Example of DVD>
SELECT :
SET : SET NEXT : DISPLAY
T I TLE : 12 DVD
CHAPTER : 11 0:12:34
SELECT :
SET : SET NEXT : DISPLAY
T I TLE : 12 DVD
CHAPTER : 24 0:12:34
2
1) Press (or ) to select an item.
2) Press SET to set.
<Example of Video CD>
SET : SET NEXT : DISPLAY
TRACK : 12 VIDEO CD
PBC : OFF 0 : 12 : 34
SET : SET NEXT : DISPLAY
TRACK : 17 VIDEO CD
PBC : OFF 0 : 12 : 34
• When DISPLAY is pressed during
play of a Video CD with play control,
the NUMBER keys are not available
on the displayed screen. In this case,
press DISPLAY again to remove the
displayed screen.
• When
appears on the screen while
a button is being pressed, it means
that the corresponding operation is
prohibited by the unit or the disc.
• DISPLAY button does not function while DVD TITLE MENU
is displayed.
NUMBER
keys
SELECT
SET
CLEAR
DISPLAY
DVD Operation using On-Screen Displays
Selected disc information
Normal Screen
Selected unit information
Note
Notes
Unit is in DVD mode, press DVD.
Check List

50
For assistance, please call : 1-800-211-PANA(7262) or send e-mail to : [email protected]
50
For assistance, please call : 1-800-211-PANA(7262) or send e-mail to : [email protected]
Detailed Descriptions of Each On-Screen Display
• Track No. and elapsed playing time are not displayed during
play started from menu of Video CDs with playback control.
• When
appears on the screen while a button is being pressed,
it means that the corresponding operation is prohibited by the
unit or the disc.
SELECT :
SET : SET NEXT : DISPLAY
T I TLE : 1 DVD
CHAPTER : 12 1 : 12 : 55
2
3
4
SET : SET NEXT : DISPLAY
TRACK : 1 VIDEO CD
PBC : OFF 1 : 35 : 12
A
B
C
D
NUMBER
keys
DVD Operation using On-Screen Displays (continued)
SELECT :
SET : SET NEXT : DISPLAY
T I TLE : 1 DVD
CHAPTER : 12 1 :
--
:
--
If SET is pressed while
making entries, unit returns
to the condition before
entries were made.
1
SELECT
SET
Notes
Disc information screen (for DVD)
Disc information screen (for Video CD/ CD)
A. Track No.
• Select “TRACK,” and press SET.
• Change the No. by pressing or NUMBER keys, and
press SET.
B. Playback control ON/OFF
[Video CD with playback control only]
ON Video CD menu play is displayed.
OFF Video CD menu play is not displayed.
C. Disc currently being played
Video CD CD
D. Elapsed playing time
1. TITLE No.
• Select “TITLE,” and press SET*.
• Change the No. by pressing or NUMBER keys, and
press SET.
2. Chapter No.
• Select “CHAPTER,” and press SET.
• Change the No. by pressing or NUMBER keys, and
press SET.
3. Disc currently being played
4. Elapsed playing time
The screen may be changed by selecting the elapsed time.
• Select the elapsed playing time (“xx:xx:xx”), and press SET.
• Change the elapsed time by pressing NUMBER keys.
Hours
➞
Minutes
➞
Seconds are entered in order.
If the time entered is not on the disc, the entry will have
no effect.
Re-enter the correct time.
e.g., press 0 - 1 - 2 - 3 - 4 - 5 for 01 : 23 : 45.
Hour Minutes Seconds
• This function does not work with some discs.

5151
Advanced Operation
SET : SET END : DISPLAY
PLAY
REPEAT : CHAPTER
SET : SET END : DISPLAY
PLAY
REPEAT : DISC
RANDOM PLAY
TITLE
chapter
chapter
chapter
CHAPTER REPEAT
TITLE REPEAT
NORMAL PLAY
CURRENT PLAYBACK POSITION
•
CHAPTER/TITLE REPEAT PLAY (DVD)
•
TRACK/DISC REPEAT PLAY (Video CD/CD)
For your reference
a. Repeat Play
Unit information screen
• Select “REPEAT”, and press SET.
• Change the desired mode during play by pressing , and press SET.
*
Important:
I
f a remote control button does not work when pressed, press the DVD button on the
remote and try the button again.
• For repeat play in VCR mode, see page 31.
b. Play mode [Video CD/ CD only] (See page 47 or 48.)
a
b
track
track
track
TRACK REPEAT
DISC REPEAT
NORMAL PLAY
CURRENT PLAYBACK POSITION
DVD CHAPTER REPEAT TITLE REPEAT REPEAT OFF
Video CD/CD TRACK REPEAT DISC REPEAT REPEAT OFF
PROGRAM PLAY program play
RANDOM PLAY random play
---- normal play

52
For assistance, please call : 1-800-211-PANA(7262) or send e-mail to : [email protected]
52
For assistance, please call : 1-800-211-PANA(7262) or send e-mail to : [email protected]
MP3/WMA/JPEG Playback Operation
PLAY
PLAY MODE : NORMAL
00
:
00
:
00
ROOT
. .
My favorite
CAR1
TECHNO
CAR2
POPS
END
_
W
ALTZ
J
AZZ
PICTURES
1
Press POWER* on the
remote or unit.
Press OPEN/CLOSE,
and then place an
MP3/WMA/JPEG disc
into the disc tray. Press
OPEN/CLOSE to close.
2
This unit can play MP3/WMA/JPEG
format CD-R or CD-RW recorded for
personal use on a PC, etc.
Some discs may not play due to
recording condition.
3
• MP3/WMA/JPEG menu
is displayed.
• Playback starts
automatically (except
JPEG fi les).
• CD directory is displayed.
ROOT
My favorite
TECHNO
POPS
J
AZZ.wma
CAR1.jpg
CAR2.jpg
END
_
W
ALTZ.mp3
PICTURES
picture1.jpg
picture2.jpg
picture3.jpg
picture4.jpg
Function
Status
Counter
PLAY MODE
Folder area
(Current folder
appears green.)
File area
(Selected
fi le/folder is
highlighted.
Titles are
displayed up to
11 characters.)
:MP3 fi le :WMA fi le :JPEG fi le
:Folder :Parent folder
Press to select the desired
PLAY MODE.
Press to move cursor to
File area or PLAY MODE.
(In STOP mode)
4
Select an MP3/WMA fi le ( / ).
MP3/WMA Playback (See next page)
Select a Parent folder ( ).
Make changes to the previous
directory display.
Select a folder ( ).
Display fi les/folders contained in the
folder.
Select an JPEG fi le ( ).
JPEG Playback (See next page)
5
Press ACTION to
return to the DVD MAIN
MENU. (Press ACTION
again to return to the
MP3/WMA/JPEG MENU.)
PLAY
MODE:
MP3/WMA Playback
JPEG Playback
- Slide-show -
NORMAL
All MP3/WMA fi les are
selected and played back
one time only.
All JPEG fi les are selected
and played back one time
only.
SINGLE
REPEAT
The selected MP3/WMA fi le
is played back repeatedly.
The selected JPEG fi le is
played back repeatedly.
FOLDER
REPEAT
The MP3/WMA fi les
contained in the selected
folder are played back
repeatedly. However, folders
below the selected folder are
not played back.
The JPEG fi les contained in
the selected folder are played
back repeatedly.
However, folders below the
selected folder are not played
back.
DISC
REPEAT
All MP3/WMA fi les are played
back repeatedly.
All JPEG fi les are played
back repeatedly.
PLAY MODE selection
Press to select items and SET
or PLAY to start.
MP3/WMA/JPEG MENU SCREEN
Windows Media, and the Windows logo are trademarks,
or registered trademarks of Microsoft Corporation in
the United States and/or other countries. WMA is a
compression format developed by Microsoft Corporation.
It achieves the same sound quality as MP3 with a fi le size
that is smaller than that of MP3.
Example: If the CD-R/CD-RW
fi le hierarchy is displayed on the
PC as shown in diagram at left,
MP3/WMA/JPEG Menu Screen,
like the one below is displayed.
• File names are displayed in
ascending order (1, 2, 3...9, A, B,
C...Y, Z) in the MP3/WMA/JPEG
MENU Screen ROOT.
■
File area Operation
(In STOP mode)
■
Play mode Operation
(In STOP mode)
Explanation of Icons
MPEG Layer-3 audio decoding technology licensed from
Fraunhofer IIS and Thomson multimedia.
Press SKIP+
|
(next) or SKIP-
|
(previous) to skip a fi le/folder
page (7fi les) in the File area.
Note

5353
Advanced Operation
SELECT
SET
POWER
OPEN/
CLOSE
ANGLE
PLAY
FF/SLOW+
ZOOM
SKIP+
|
REW/
SLOW-
STOP
STILL/
PAUSE
SKIP-
|
ACTION
MP3/WMA Playback
JPEG Playback
Press to select an JPEG fi le (
)
.
Press SET or PLAY. Selected fi le is
displayed.
1
2
■
Next/Previous Search
Press SKIP+
|
or SKIP-
|
.
JPEG Playback Screen
<Example: CAR1>
Do steps 1~3 on page 52.
Press ACTION to return to the DVD MAIN
MENU.
3
■
Start Slide-show
Press FF/SLOW+ or REW/SLOW-.
(see next page)
■
Enlarging an image
Press ZOOM. (see next page)
■
Rotating an image
Press ANGLE. (see next page)
■
Returned on the MP3/WMA/JPEG MENU
Press STOP. (see previous page)
PLAY
PLAY MODE : NORMAL
00
:
00
:
00
ROOT
. .
My favorite
CAR1
TECHNO
CAR2
POPS
END
_
W
ALTZ
J
AZZ
PICTURES
ROOT
My favorite
CAR1.jpg
CAR2.jpg
END
_
W
ALTZ.mp3
PICTURES
picture1.jpg
SKIP+
|
SKIP-
|
<Example: CAR1> <Example: CAR2>
<Example>
Only the JPEG
fi les in a folder that
were saved while
being displayed
are displayed.
You can play JPEG images.
Displayable Image Size: 32x32~7680x7680 pixels
• Some JPEG format may not be played back.
■
Forward/ Reverse Search
Press FF/SLOW+ or REW/SLOW- during play.
Press PLAY to release.
• Search speed, slow at fi rst, increases with
each additional press of the button up to 5
levels.
■
Forward/ Reverse Track Skip
Press SKIP+
|
or SKIP-
|
during play.
Each press skips a track.
• If pressed within fi rst 3 seconds of playback,
skips to the previous track. If over 3 seconds,
returns to top of track. (SKIP-
|
only.)
• Put unit in Stop mode before performing
folder/fi le selection (see step 4 on previous
page.)
■
Pause
Press PAUSE during play.
Press PLAY to release.
Press SET or PLAY to start playback.
2
3
4
Press OPEN/CLOSE to eject the disc.
The MP3 MENU is closed automatically.
Press STOP to stop play.
• Copyright protected fi les and fi les containing errors
cannot be played back. The unit skips to the next fi le.
Press to select an MP3/WMA fi le
(
/ ) in STOP mode.
1
Do steps 1~3 on page 52.
Note
Note

54
For assistance, please call : 1-800-211-PANA(7262) or send e-mail to : [email protected]
54
For assistance, please call : 1-800-211-PANA(7262) or send e-mail to : [email protected]
MP3/WMA/JPEG Playback Operation (continued)
■
Still picture
Press PAUSE (only SLIDE)
■
Forward/Reverse Track Skip
Press SKIP+
|
or SKIP-
|
. Each press
skips a fi le.
■
Cancel slide show
Press STOP to return to the MP3/WMA/JPEG
MENU.
(During JPEG Playback.)
JPEG fi les are displayed automatically (about
every 3 seconds) as a slide-show.
Image changes every 3 seconds.
JPEG Playback - Slide-show -
Press FF/SLOW+ or REW/SLOW-.
1
<Example>
<Example>
FF/SLOW+
REW/SLOW-
Press ACTION to return to the DVD MAIN
MENU.
2
(During JPEG Playback.)
You can enlarge specifi c portions of a JPEG
picture and select the zoom ratio using the ZOOM
button on the remote.
Set Zoom size.
Press ZOOM repeatedly to change display as
follows.
Press STOP to return to the MP3/WMA/JPEG
MENU.
• You can enlarge the center portion of the image to
one of 2 magnifi cations.
• Operation can be done during Rotation (below).
■
Use the , , and buttons to move the
position up, down, left and right.
JPEG Playback - Zoom -
JPEG Playback - Rotation -
(During JPEG Playback.)
You can rotate a JPEG picture using the ANGLE
button on the remote during JPEG Playback. (The
JPEG picture will be rotated 90 ° clockwise.)
Set rotation.
Press ANGLE repeatedly to change display
as below. (During JPEG Playback screen)
Press STOP to return to the MP3/WMA/JPEG
MENU.
1st
Press
2nd
Press
3rd
Press
ROOT
My favorite
TECHNO
CAR1.jpg
CAR2.jpg
END
_
W
ALTZ.mp3
PICTURES
picture1.jpg
picture2.jpg
picture3.jpg
picture4.jpg
X 1.0 (ORIGINAL)
3rd press
X 1.5 (ZOOM 1) X 2.0 (ZOOM 2)
1st press
2nd press
Image changes every 3 seconds.
picture 1 picture 2 picture 3 picture 4
picture 3 picture 2 picture 1
• Operation can be done during ZOOM (above).
• The vertical/horizontal ratio of rotated JPEG
images may vary when they are displayed.
• Position cannot be changed on X1.0 ORIGINAL
images.
If FF/SLOW is pressed while picture 1 is displayed.
If REW/SLOW- is pressed while picture 3 is
displayed.
Only the JPEG fi les in a folder that were saved
while being displayed are displayed.
4th
Press
Note
Notes

5555
Advanced Operation
To change DVD LOCK settings
After entering your secret code in
step 3 on page 36, select “OFF” to
deactivate DVD Lock or change the
rating level.
1
1) Press * to select
“DVD LOCK.”
2) Press SET to set “ON”
or “OFF.”
DVD Lock Ratings (DVD only)
■ “ON”
➞
DVD Lock is activated.
■ “OFF”
➞
DVD Lock is deactivated.
LEVEL 1: LOCK ALL:
Playback of all DVDs, CDs and Video
CDs is prohibited. (Use to prohibit play of
mature theme DVDs not encoded with a
rating level.)
LEVEL 2: DVDs expressly for children can be played
back.
LEVEL 3 to 7: DVDs for general audiences/children
can be played back. (DVDs with mature
content are prohibited.)
LEVEL 8: NO LIMIT: (Factory preset)
All DVDs can be played back.
You can prevent playback of DVDs with a specifi c rating level which may be unsuitable for children.
• Some DVDs are encoded with a rating level. If the disc rating is higher (stricter) than the one you preset, playback
will be prohibited.
<When DVD Lock is activated>
After DVD Lock is set and a blocked DVD
is played, this message will appear. The
message may differ depending on the
disc.
To continue viewing a blocked
program for now,
Press
to select “YES” and SET.
Then, enter your 4-digit secret code.
When “NO” is selected, blocked programs
cannot be viewed.
• Ratings which are highlighted in Green will be blocked; those
not highlighted (white letters) will not be blocked.
Perform DVD Lock setting in TV mode.
Enter your secret code to display LOCK menu.
(Perform “Enter Secret Code” steps on page 36.)
US MOV
I
ES
:
O
FF
CHANGE
SET
T
I
NGS
US
TV
PROGRAMS
:
O
FF
CHANGE
SET
T
I
NGS
DVD
LOCK
:
O
FF
CHANGE
SET
T
I
NGS
SELE
C
T
:
SET
:
SET
END
:
ACT
I
O
N
LOCK
NEXT
PAGE
SELECT :
SET : SET END : DISPLAY
,
YOUR SELECTION EXCEEDS THE
PLAYER S RATING LIMIT.
DO YOU WANT TO CHANGE THE
LIMIT?
YES
NO
Discs not encoded with a rating level will play even if the jacket states it is for mature audiences.
For these discs, the DVD Lock Ratings will not work.
Caution
2
1) Press to select
“CHANGE SETTINGS.”
2) Press SET to display
screen.
US MOV
I
ES
:
O
FF
CHANGE
SET
T
I
NGS
US
TV
PROGRAMS
:
O
FF
CHANGE
SET
T
I
NGS
DVD
LOCK
:
O
FF
CHANGE
SET
T
I
NGS
SELE
C
T
:
SET
:
SET
END
:
ACT
I
O
N
LOCK
NEXT
PAGE
3
1) Press to select
rating level.
2) Press SET to
select “LOCKED” or
“UNLOCKED.”
LOCK ALL
SELE
C
T
:
SET
:
SET
END
:
ACT
I
O
N
1
2
3
4
5
6
7
8
UNLOCKED
4
Press ACTION three times to exit.
*
Important:
If a remote control button does not work when
pressed, press the TV/VCR
, DVD button on the
remote and try the button again.
SELECT
SET
ACTION
DVD Lock Feature
<When blocked programs>
PROGRAM RATING EXCEEDED

56
For assistance, please call : 1-800-211-PANA(7262) or send e-mail to : [email protected]
56
For assistance, please call : 1-800-211-PANA(7262) or send e-mail to : [email protected]
DISC LANGUAGES (DVD only)
To select and set the language of the audio soundtrack,
subtitles, or title/DVD menus for all discs to be played.
“AUDIO” selections
To select the audio soundtrack language.
(Factory preset: English)
English/Spanish/French/Japanese
Original: Original disc language
OTHER
✱✱✱✱
: Other language selection*
1
“SUBTITLE” selections
To select the subtitle language.
(Factory preset: AUTO)
AUTO: Same language selected for “AUDIO”
• If language set for “AUDIO” is
used in playback, subtitles will not
appear.
• If another language is used during
playback, the subtitles will appear
in the language selected at “AUDIO”
setup.
English/Spanish/French/Japanese
OTHER
✱✱✱✱
: Other language selection*
1
“MENUS” selections
(Factory preset: English)
To select the language used in title menus or
DVD menus.
English/Spanish/French/Japanese
OTHER
✱✱✱✱
: Other language selection*
1
To enter OTHER ✱✱✱✱ code number,
Press NUMBER keys (Please refer to
language codes on page 59).
To make corrections, press
repeatedly to
delete language code number, and correct.
1
3
Once initial settings are done, they remain
in memory (even after the power is off) until
changed. This means the unit will always
operate under the same conditions (especially
DVDs) each time.
DISC LANGUAGES (See below.)
Any languages offered on the disc can be set. If a
language not offered is set, the original disc language
will be selected.
AUDIO OUTPUT (See page 57.)
You can set the audio output that comes from the
digital audio output terminal.
STILL MODE (See page 58.)
To select “FIELD” or “FRAME” to prevent jitter or to
make small text or fi ne patterns clearly visible in a still
picture. When “AUTO” is set, “FIELD” or “FRAME” is
selected automatically.
TV MODE (See page 58.)
To select whether the video material for a wide-screen
will be played back in Pan & Scan style or in Letterbox
style.
4
1) Press to
select “DISC
LANGUAGES.”
2) Press SET to
display screen.
Press ACTION* in Stop mode to display
MAIN MENU.
1) Press to
select an item.
2) Press SET to set.
2
1) Press to
select “DVD.”
2) Press SET to
display screen.
1) Press to
select an item.
2) Press SET
repeatedly for
desired language.
(Please refer right.)
5
6
Press ACTION to redisplay DVD MAIN
MENU and go to step 3 to setup another item.
Or, press ACTION three times to exit.
*
1
If the selected language is not offered, the
original disc language is selected.
DVD MAIN MENU
SELECT :
SET : SET
END : ACTION
DISC LANGUAGES
AUDIO OUTPUT
ST I LL MODE : AUTO
TV MODE : 4 : 3 Pan & Scan
DVD MAIN MENU
SELECT :
SET : SET
END : ACTION
DISC LANGUAGES
AUDIO OUTPUT
ST I LL MODE : AUTO
TV MODE : 4 : 3 Pan & Scan
M
A
I
N
M
EN
U
DVD
LOCK
CH
C
L
OC
K
TV
LANGUAGE
END :
ACT
I
O
N
SE
L
E
C
T
:
SET
:
SET
5
3
1
Settings for DVD Operation
DISC LANGUAGES
SELECT :
SET : SET
END : ACTION
AUDIO : English
SUBT I TLE : AUTO
MENUS : English
Unit is in TV-VCR mode, press TV/VCR.
Check List

5757
Advanced Operation
*
Important:
If a remote control button does not work when pressed, press the TV/VCR
, DVD
button on the remote and try the button again.
• Make settings according to amplifi er
connected to optical audio output as shown
in above table.
*1 When connecting an amplifi er (with an
optical digital input connector) which
does not contain the Dolby Digital or
dts decoder, be sure to select “PCM.”
If “Bitstream” is selected, starting DVD
play may cause such a high level of noise
as to be harmful to your ears and damage
the speakers.
*2 When a dts decoder is connected, please
select “Bitstream” in “dts.” If “PCM” is
selected, there will be stereo sound.
AUDIO OUTPUT
Select the digital output to be output from the optical
digital audio output connector of the unit.
Do steps 1 and 2 on page 56.
■ “LPCM (DVD)” selections
OFF: Linear PCM of less than 48 kHz/16 bit
is output. When playing DVDs recorded
in linear PCM of over 48 kHz/20 bit, no
digital audio is output. (Factory preset)
PCM: When playing DVDs recorded in
linear PCM of 48 kHz/20 bit/24 bit or
more, digital audio converted to 44.1
kHz/16 bit or 48 kHz/16 bit is output.
(Digital output of PCM audio is restricted
to48 kHz/16 bit or below for copyright
protection.)
■ “Dolby Digital” selections
Bitstream: Dolby Digital bitstream (1ch-5.1ch) is
output. (Factory preset)
PCM: When you have connected a amplifi er
that doesn’t have a built-in Dolby Digital
decoder.
■ “dts” selections
Bitstream: dts bitstream is output. (Factory preset)
PCM: When you have connected a amplifi er
that doesn’t have a built-in dts decoder.
■ “DRC (Dynamic Range Compression)”
selections
OFF: Normal audio range is selected. (Factory
preset)
ON: For dynamic sound even at low volume,
this is useful for late-night listening.
[Dolby Digital DVDs only].
1) Press to
select an item.
2) Press SET
repeatedly for
output. (See
below.)
1) Press to
select “AUDIO
OUTPUT.”
2) Press SET to
display screen.
1
3
2
4
Press ACTION to redisplay DVD MAIN MENU
and go to step 2 to setup another item. Or,
press ACTION three times to exit.
AUDIO OUTPUT
SELECT :
SET : SET
END : ACTION
LPCM(DVD) : OFF
Dolby Digital : Bitstream
dts : Bitstream
DRC : OFF
DVD MAIN MENU
SELECT :
SET : SET
END : ACTION
DISC LANGUAGES
AUDIO OUTPUT
ST I LL MODE : AUTO
TV MODE :
4:3 Pan & Scan
Type of
amplifi er
to be
connected
Recommended setting
LPCM
(DVD)
Dolby
Digital
dts
No amplifi er
is connected
AV amplifi er
without Dolby
Digital/dts
decoder
PCM PCM*
1
PCM*
1
AV amplifi er
including
Dolby Digital
decoder
PCM Bitstream PCM
AV amplifi er
including
Dolby
Digital/dts
decoder
PCM Bitstream Bitstream*
2
SELECT
SET
ACTION

58
For assistance, please call : 1-800-211-PANA(7262) or send e-mail to : [email protected]
58
For assistance, please call : 1-800-211-PANA(7262) or send e-mail to : [email protected]
STILL MODE
1
1) Press * to select
“STILL MODE.”
2) Press SET repeatedly
for mode. (See below)
2
Do steps 1 and 2 on page 56.
AUTO: “FIELD” (Field still) or “FRAME” (Frame still)
is automatically selected during the still mode.
(Factory preset)
FIELD: “FIELD” (Field still) is always selected.
This setting will reduce jitter when compared
with “AUTO” on some discs.
FRAME: “FRAME” (Frame still) is always selected.
Some texts and fi ne patterns will be seen clearly
when compared with “AUTO” on some discs.
Selecting TV MODE
a
1) Press to select “TV
MODE.”
2) Press SET repeatedly
for mode. (See below.)
b
Do steps 1 and 2 on page 56.
4:3 Pan & Scan : Widescreen video data is played in Pan
& Scan style (left and right of screen is
trimmed.)
• Video data not formatted in Pan &
Scan will play in letterbox style.
4:3 Letterbox : Widescreen video data is played in
Letterbox style (top and bottom of
screen has black margin).
Set the screen display style for widescreen video material
playback.
4:3 Pan & Scan (Factory preset)
4:3 Letterbox
Set to reduce jitter in a displayed still picture or a motion
picture.
3
Press ACTION twice to exit this mode.
Press ACTION twice to exit this mode.
c
Example
(Factory preset)
*
Important:
If a remote control button does not
work when pressed, press the DVD
button on the remote and try the
button again.
DVD MAIN MENU
SELECT :
SET : SET
END : ACTION
DISC LANGUAGES
AUDIO OUTPUT
ST I LL MODE : AUTO
TV MODE : 4 : 3 Pan & Scan
DVD MAIN MENU
SELECT :
SET : SET
END : ACTION
DISC LANGUAGES
AUDIO OUTPUT
ST I LL MODE : AUTO
TV MODE : 4 : 3 Pan & Scan
SELECT
SET
ACTION
Settings for DVD Operation (continued)

5959
For Your Information
Code Language
6565
Afar
6566
Abkhazian
6570
Afrikaans
6577
Ameharic
6582
Arabic
6583
Assamese
6588
Aymara
6590
Azerbaijani
6665
Bashkir
6669
Byelorussian
6671
Bulgarian
6672
Bihari
6678
Bengali;Bangla
6679
Tibetan
6682
Breton
6765
Catalan
6779
Corsican
6783
Czech
6789
Welsh
6865
Danish
6869
German
6890
Bhutani
6976
Greek
6978
English
6979
Esperanto
6983
Spanish
6984
Estonian
6985
Basque
7065
Persian
7073
Finnish
7074
Fiji
Code Language
7678
Lingala
7679
Laothian
7684
Lithuanian
7686
Latvian, Lettish
7771
Malagasy
7773
Maori
7775
Macedonian
7776
Malayalam
7778
Mongolian
7779
Moldavian
7782
Marathi
7783
Malay
7784
Maltese
7789
Burmese
7865
Nauru
7869
Nepali
7876
Dutch
7879
Norwegian
7982
Oriya
8065
Panjabi
8076
Polish
8083
Pashto, Pushto
8084
Portuguese
8185
Quechua
8277
Rhaeto-Romance
8279
Romanian
8285
Russian
8365
Sanskrit
8368
Sindhi
8372
Serbo-Croatian
8373
Singhalese
Code Language
7079
Faroese
7082
French
7089
Frisian
7165
Irish
7168
Scots Gaelic
7176
Galician
7178
Guarani
7185
Gujarati
7265
Hausa
7273
Hindi
7282
Croatian
7285
Hungarian
7289
Armenian
7365
Interlingua
7378
Indonesian
7383
Icelandic
7384
Italian
7387
Hebrew
7465
Japanese
7473
Yiddish
7487
Javanese
7565
Georgian
7575
Kazakh
7576
Greenlandic
7577
Cambodian
7578
Kannada
7579
Korean
7583
Kashmiri
7585
Kurdish
7589
Kirghiz
7665
Latin
Code Language
8375
Slovak
8376
Slovenian
8377
Samoan
8378
Shona
8379
Somali
8381
Albanian
8382
Serbian
8385
Sundanese
8386
Swedish
8387
Swahili
8465
Tamil
8469
Telugu
8471
Tajik
8472
Thai
8473
Tigrinya
8475
Turkmen
8476
Tagalog
8479
Tonga
8482
Turkish
8484
Tatar
8487
Twi
8575
Ukrainian
8582
Urdu
8590
Uzbek
8673
Vietnamese
8679
Volapük
8779
Wolof
8872
Xhosa
8979
Yoruba
9072
Chinese
9085
Zulu
Enter the appropriate code number for the initial settings “AUDIO,” “SUBTITLE” and/or “MENUS” (see
page 56).
Language Code List

60
For assistance, please call : 1-800-211-PANA(7262) or send e-mail to : [email protected]
60
For assistance, please call : 1-800-211-PANA(7262) or send e-mail to : [email protected]
Check the following points once again if you are having trouble with your unit.
Before Requesting Service
Power Correction
No power…
• Completely insert Power Plug into an AC outlet.
• Set POWER button to ON.
Power turns itself off...
• Auto power-off (shut off) occurs after about 5 min. in DVD mode with no
operation, or if there is no broadcast signal in TV or Playback mode. Turn the
power back on.(P
. 21, 33)
Monitor Correction
No picture or sound...
• Make sure your antenna system (TV or CABLE), is correctly set. (P. 11)
• Completely insert Power Plug into an AC outlet.
•
Set POWER button to ON.
Poor picture with normal
sound...
• Adjust BRIGHTNESS, SHARPNESS, and PICTURE controls in the SET UP
Vide
o Adjustment. (P. 43)
Poor sound with normal
picture...
• Adjust VOLUME control. (P. 22)
Poor TV reception...
• Adjust SHARPNESS and PICTURE controls in the SET UP Video
Adjustmen
t. (P. 43)
No color or poor color... • Adjust TINT and COLOR controls in the SET UP Video Adjustment. (P. 43)
Ghost (multiple)
images...
• Install a directional antenna.
TV programs cannot be
watched...
• Make sure the selected channel is in unit’s memory. (P. 16)
Channel cannot be
selected...
• Only the channel being recorded can be viewed on this unit.
VCR Correction
TV program cannot be
recorded...
• Make sure your antenna system (TV or CABLE), is correctly set. (P. 11)
• Mak
e sure cassette record tab is intact. (P. 4)
Timer recording cannot
be performed…
• Check that clock is set to current time and date.
• Make sure DSS/CABLE box (if used) is left on and tuned to channel to be
recorded.
• Set recording Start/Stop times correctly. (P. 28-29)
• Timer recording may not be performed or continued if a power interruption of
more than 1 minute occurs before or during a Timer Recording, even after
power is r
estored.
No playback picture, or
the playback picture is
noisy or contains
streaks...
• Adjust TRACKING control in either direction. (P. 6)
• Try Head Cleaning. (P. 6)
VCR cannot be
controlled...
• Make sure VCR LOCK is set to off. (P. 35)
Remote Control Correction
Unit cannot be
controlled...
• Aim Remote directly at the remote sensor on the unit. (P. 9)
• Avoid any object blocking signal path.
• Inspect the remote batteries. (P. 4)
• Make sure VCR LOCK is set to off. (P. 35)
• Exposing unit remote sensor to direct fl uorescent or outdoor lig
ht may cause
signal interference.
ACTION, PLAY,
SELECT, SET POWER,
etc. buttons cannot be
selected...
• Press TV/VCR for TV-VCR mode. (P. 18)
• Press DVD for DVD mode. (P. 20)
• Che
ck remote batteries.

6161
For Your Information
If you cannot resolve the problem, please call the Customer Satisfaction Center for product
assistance at 1-800-211-PANA(7262).
To locate an authorized servicenter call toll free 1-800-211-PANA(7262)
or send e-mail to : [email protected].
DVD/Video CD/CD
Correction
Play fails to start even
when PLAY is pressed...
• This unit cannot play discs other than DVDs, Video CDs and CDs.
• The disc may be dirty and require cleaning.
Play starts but then
stops
immediately...
• Be sure disc is installed with label side up.
Picture is distorted
during rapid advance or
rapid reverse...
• The picture will be somewhat distorted at times: this is normal.
No Forward/Reverse
search play...
• Some discs may have sections which prohibit Forward/Reverse search. (P. 21)
Play does not start even
when title is selected...
• Confi rm the “DVD LOCK” setting. (P. 55)
Audio soundtrack and/or
subtitle language is not
the one selected at the
initial settings...
• If the audio soundtrack and/or subtitle language selected at DVD initial settings
does not exist on the disc, it will not be accessible.
No subtitles...
• Subtitles appear only when available on disc.
• Select “ON” at the “Subtitle language” section (P. 44) to display subtitles.
Alternative audio
soundtrack
(or subtitle) language
cannot be selected...
• Alternative language cannot be selected with discs which do not contain more than
one language.
• For some discs, alternative language cannot be selected with the AUDIO or SUB
TITLE button. Try selecting it from the DVD MAIN MENU if available.
Angle cannot be
changed...
• This function is dependent on software availability. Even if disc has multiple angles,
they may be recorded for specifi c scenes only (ANGLE Indicator on unit lights up). (P.
45)
Miscellaneous Correction
Video cassette cannot
be inserted...
• Insert the cassette window side up; record tab facing you.
Video cassette cannot
be removed...
• Completely insert Power Plug into an AC outlet.
Eject does not function
or insertion cannot be
done...
• Turn the POWER off and then on, and try ejecting or inserting the tape again.
Video cassette ejects
when a recording is
started, or the power is
turned off for timer
recording...
• Make sure cassette record tab is intact. (P. 4)
The disc cannot be
removed...
• First, unplug unit. Then, prepare a rigid wire (e.g. an extended paper clip, etc.) and,
applying moderate force, insert it straight into the hole at the base of the tray. The
tray will eject a little. Now, pull the tray all the way out and remove the disc. (P. 10)
In Stop mode, the VCR
motor (CYLINDER)
continues to rotate..
• To enable Quick Play mechanism, the VCR cylinder will rotate for about 3 minutes.
This reduces response time from Stop to Play mode and from Play to Rewind Search
mode.

62
For assistance, please call : 1-800-211-PANA(7262) or send e-mail to : [email protected]
62
For assistance, please call : 1-800-211-PANA(7262) or send e-mail to : [email protected]
These displays will alert you of a missed operation or provide further instructions.
Warning and Instruction Displays
OSD Caution
PLEASE SET
CLOCK BEFORE
PROGRAMMING
If you attempt to set or review a Timer Recording or set the On-Timer and the Clock
is not set... (P.16-17)
CHECK CASSETTE
RECORD TAB
If you press REC, and a cassette is inserted with no record tab... (P.4, 18)
TO CANCEL TIMER
REC HOLD DOWN
STOP KEY FOR
APPROX 3 SEC
If you press STOP during a Timer Recording... (P.29)
NO CASSETTE
PLEASE INSERT A
CASSETTE
If you press PLAY, FF, REW, or REC without a cassette inserted... (P.18)
PLEASE PREPARE
FOR TIMER REC
If the unit is not in Stop mode or a cassette with record tab is not inserted two
minutes before a Timer Recording is about to begin... (P.28-29)
VIDEO HEADS MAY
NEED CLEANING
PLEASE INSERT
HEAD CLEANING
CASSETTE OR
REFER TO MANUAL
END: PLAY
If head cleaning becomes necessary while playing back a tape... (P.6)
VCR LOCK
ACTIVATED
If you press a function button other than STOP/EJECT or POWER while the unit is
in VCR Lock mode... (P.35)
PLEASE CHECK
THE DISC, AND
FOR STAINS OR
SCRATCHES ON
DISC
If you press PLAY, or the unit reads data from a stained or scratched disc in DVD
mode. Also, if the type of disc is other than DVD, Video CD or CD... (P.7)
THIS DISC MAY NOT
BE PLAYED IN YOUR
REGION
Playback of a disc with different region number was attempted. Only discs marked
region “1,” “ALL,” or those that include “1” are playable on this unit. (P.3)
THIS TYPE OF DISC
CANNOT BE PLAYED.
PLEASE INSERT A
DIFFERENT DISC
An unusable disc is inserted in the unit. (P.7)
CANNOT PLAY THIS
FILE
This fi le format cannot be played.
(Appears during MP3/WMA/JPEG fi le playback)(P.52)
THIS FILE IS
PROTECTED
This fi le is copyright protected and cannot be played back.
(Playback is prohibited.)(P.52)
IT IS PROHIBITED
TO COPY DVD/
VIDEO CD/CD TO
VHS
If you press REC in DVD mode... (P.18-19)

6363
For Your Information
■ Conexión para Ant./Cable
Conecte Ant./Cable a la entrada de antena de la TV
(VHF/UHF).
Conecte por favor todas las conexiones del cable o
de la antena antes de energizar los aparatos.
1
Conecte el cable electrico de la unidad
en el enchufe de pared de la CA.
Realizando Confi guración Inicial
2
Encienda la TV
mediante el control
o directamente en
la unidad. La unidad
inicia la busqueda
de canales y
ajusta el tiempo
automaticamente.
■ Conexión para Sistema Digital de
Satelite (DSS)/Convertidor de cable
Conecte la salida del convertidor de cable la entrada
“VFH/UHF” con el RF cable.
Presione TV/VCR para la modalidad TV-VCR.
3
Selecciones
se realizaran
automaticamente,
cuando la
confi guracion
termine la pantalla
siguiente aparecera.
Ajustar de nuevo el reloj
1
Presione ACTION para visualizar el
menú.
2
Presione
para
seleccionar
“RELOJ,” y
luego Presione
SET.
3
Presione
para
seleccionar
“MANUAL” y
luego presione
SET.
4
Presione y
SET para
seleccionar y
ajustar la hora y
la fecha.
5
Presione ACTION dos veces para
que el reloj comience a funcionar
y
salir de este modo.
Ajuste Manual del Reloj
1
Presione dos veces la tecla
ACTION para poner el RELOJ en
marcha y salir.
Si el ajuste automático del reloj no se ha
completado, ajuste el reloj manualmente de la
siguiente manera.
2
3
2
/
6
/
2003
THU
12
:
00
P
M
DST
:
O
N
A
UTO
C
L
OCK SET
CO
M
P
L
ETED
SETT
I
N
G
:
CH
1
0
PLEASE
SET
CLOCK BY
P
R
ESS
I
NG
ACT
I
ON
KEY
A
UTO
C
L
OCK SET
I S I NCO
M
P
L
ETE
CH AUTO SET PROCEEDING
PROCEEDING
AUTO CLOCK SET
CANCEL : PRESS STOP KEY
Spanish Quick Use Guide/Guía para rápida consulta
• Si usa convertidor de cable, enciendala y seleccione el
Servicio Publico de Canales de Television (PBS) en su
horario de uso o tiempo de su zona. Si utiliza receptor
DSS este debe de estar apagado.
• Si “AUTO CLOCK SET IS
INCOMPLETE” aparece
en pantalla, coloque
el tiempo usando el
procedimiento manual
(MANUAL CLOCK SET),
vealo enseguida.
Presione ACTION en el control
remoto para visualizar la pantalla
del menú RELOJ.
Presione para seleccionar el
mes y SET para colocarlo. De la
misma forma, seleccione y ajuste
la fecha, año, hora y DST (Hora de
Verano).
• Los botones de funciones son inoperantes
durante la Confi guración inicial.
• Para retirar un cassette durante el Ajuste
automático, pulse EJECT dos veces en el control
remoto o STOP dos veces en el VCR. En este
caso, los ajustes se deben realizar manualmente.
(Vea la p.16-17 de Libro de operaciones
avanzadas).
• Dependiendo de las condiciones, puede
que el Ajuste automático del reloj tarde
más de 30 minutos. En ese caso, pulse STOP
para detener la confi guración y realice los ajustes
manualmente. (Vea la p.16-17 de Libro de
operaciones avanzadas).
Nota
Continúa...
VHF/UHF
Ant./Cable
VHF/UHF
Ant./Cable
Convertidor de cable
VHF/UHF
VHF/UHF
5
3
1
MENU PR
I
NCIPAL
DVD
BLOQUEO
CANAL
RELOJTV
ID
I
OMA
TERM
I
NAR :
ACT
I
O
N
ELEG
I
R
:
F
I
JAR
:
SET
FIJACION AUTOMATICA
M
A
NU
AL
AJUSTE ZONA HORA
:
0
ELEGIR :
FIJAR : SET
TERMINAR : ACTI ON
FIJAR RELOJ
FIJAR RELOJ
VERANO
:
ACT
2 / 6/
:
2003
JUE
12
00
PM
ELEGIR HORA
ELEGIR:
FIJAR : SET
I NIC IAR : ACTION
RETROCEDER:

64
For assistance, please call : 1-800-211-PANA(7262) or send e-mail to : [email protected]
64
For assistance, please call : 1-800-211-PANA(7262) or send e-mail to : [email protected]
Operaciones básicas para la
reproducción (VCR)
1
2
■
Para encontrar una escena en particular
Búsqueda hacia adelante
➞
Presione FF/SLOW+
Búsqueda hacia atrás
➞
Presione REW/SLOW-
■
Para ver una imagen fi ja (congelada)
➞
Presione STILL/PAUSE
■
Para ver en cámara lenta
➞
Presione FF/SLOW+ o REW/SLOW- en el
modo de imagen fi ja
■
Para ver imágenes cuadro a cuadro
➞
Presione STILL/PAUSE en el modo de
imagen fi ja
■
Para parar
➞
Presione STOP
■
Para rebobinar la cinta
➞
Presione REW/SLOW-
■
Para hacer avanzar la cinta rápidamente
➞
Presione FF/SLOW+
■
Para expulsar el cassette
➞
Presione EJECT en el con trol remoto o
STOP/EJECT en el videograbador combinado
Operaciones básicas para la grabación
1
2
3
4
Grabación con temporizador
1
Presione PROG para visualizar “FIJAR
PROGRAMACION.”
1) Presione
para seleccionar
“TEMPORIZADOR.”
2) Presione SET
para visualizar.
2
Repita el paso 3 para ajustar:
hora de comienzo, hora de parada, canal (o LINEA
para una fuente exterior), velocidad (SP, LP, SLP)
Presione para
seleccionar y
presione SET o
para colocar.
• 1-31 = Grabación única
• DIARIO = a la misma
hora de lunes a viernes
• SEMANAL = a la misma
hora una vez a la
semana
3
5
Presione PROG dos veces para salir de
este modo.
• Si está usando un decodifi cador de TV ca ble,
asegúrese que se encuentra en el canal
deseado y que la alimentación queda conectada
para grabar con temporizador.
• El indicador PROG TIMER se enciende en el
videograbador combinado.
Presione REC para comenzar la
grabación.
• Para no editar ó grabar partes de una grabación,
presione STILL/PAUSE para hacer una pausa
durante la grabación.
• No podrá ver otro canal durante la grabación.
■
Para parar
➞
Presione STOP.
■
Si se desea que el videograbador
deje de grabar a una hora
prefi jada. (Grabación de un toque)
Presione REC repetidamente para ajustar la
hora de grabación (30 min - 4 horas.)
4
Presione PROG para
terminar el programa.
Para introducir
más programas,
presione
y SET
para seleccionar el
número de programa
en blanco, y luego
repita los pasos 3.
Presione PLAY.
• La reproducción comienza automáticamente si
el cassette no tiene la lengüeta para prevención
de grabación.
Inserte un cassette.
• El videograbador combinado se enciende
automáticamente.
Inserte un cassette con la lengüeta
para prevención de grabado.
• El videograbador combinado se enciende
automáticamente.
Presione CH o las teclas numéricas
para seleccionar el canal.
Presione SPEED para seleccionar
la velocidad de grabación.
SP = reproducción normal
LP = reproducción larga
SLP = reproducción super larga
• La velocidad seleccionada debe aparecer en la
pantalla.
• Si ya existe un programa en la memoria,
presione ▲▼ y SET para seleccionar un
número de programa sin usar.
Fecha
de hoy
1
P FE I
N
I
C
PARADA
CA VEL
2
-- --
:
--
--
:
--
--
--
3
-- --
:
--
--
:
--
--
--
4
-- --
:
--
--
:
--
--
--
ELE
G
I
R
1
-
8 :
C
AN
C
ELAR
:
ADD/DLT
ENTRAR
:
SET
TER
M I
NAR
:
PROG
D
I 9
:
00
p 12
:
00
a
08 SP
F
I
J
AR
:
SET
ELE
G
l
R
:
F
I
J
AR
PROGRA
M
AC
I
ON
TE
MP
O
R
l
ZADOR
ENCENDIDO AUTOMATICO
TE
MP
O
R
l
ZADOR
-
D
O
RMIR
:
00
TER
M
l
NAR
:
P
R
O
G
ELEGIR FECHA DE INICIO
7
VIE
--:-- --:--
--
H
O
Y
FECHA INICIO PARADA
C
A
SLP
-
-
-
-
-
-
-
-
--
-
-
-
-
-
-
--
-
-
-
-
-
-
F
I
J
AR
:
SET
ELE
G
l
R
:
TER
M
l
NAR
:
P
R
O
G
Spanish Quick Use Guide/Guía para rápida consulta

6565
For Your Information
■
Para buscar una escena en particular
Búsqueda hacia adelante
Presione FF/SLOW+ en el modo de
reproducción.
Búsqueda hacia atrás
➞
Presione FF/SLOW- en el modo de reproducción.
(Para liberar, presione PLAY)
■
Para saltar un capítulo o una pista Salto
hacia adelante
Presione SKIP+
l en el modo de reproducción.
Un capítulo (DVD) o una pista (Vídeo CD/CD)
se salta cada ves que se oprime la tecla.
Salto hacia atrás
➞
Presione SKIP- l
en el modo de reproducción.
■
Para ver una imagen fi ja
Presione PAUSE durante la reproducción. (Para
liberar, presione PLAY)
■
Para ver imágenes cuadro a cuadro
(DVD/Vídeo CD)
Presione STILL/PAUSE en el modo de imagen
fi ja. La imagen avanza un cuadro cada vez que
presiona la tecla. (Para volver a la reproducción
normal, presione PLAY.)
■
Para ver en cámara lenta
(DVD/Vídeo CD)
Presione FF/SLOW+ o FF/SLOW- en el modo
de imagen fi ja. (Para liberar, presione PLAY)
1
2
3
4
5
6
Presione POWER en el control remoto o
el aparato y luego el boton DVD.
Introducir un disco.
1) Presione OPEN/CLOSE.
2) Ponga un disco en la bandeja de disco.
• Sujete el disco sin tocar ninguna de sus
superfi cies, póngalo con el lado donde esté
impreso el título hacia arriba, alinéelo con las
guías y póngalo en su posición apropiada.
Disco de 3”(8 cm) Disco de 5” (12 cm)
Presione PLAY para Iniciar la
reproducción. La bandeja del disco se
cierra automáticamente.
• Si está usando un DVD interactivo (Interactive
DVD) o un Vídeo CD con contol de reproducción
(playback control) y aparece un menú de títulos
(TITLE MENU) en la pantalla, siga al paso 4.
Presione OPEN/CLOSE para expulsar el
disco.
1) Presione o las teclas
numéricas para seleccionar el
artículo deseado.
2) Presione SET para la reproducción.
Si usa las teclas
numéricas, la reproducción comienza
automáticamente.
Presione STOP para parar la
reproducción.
Operaciones básicas del DVD
1
Cambio del idioma de subtítulos
[DVD solamente]
EI idioma de los subtítulos seleccionado al hacer
las fi jaciones iniciales se puede cambiar por otro
idioma diferente, si éste se encuentra disponible.
Presione SUB TI TLE
durante la
reproducción.
• Cuando no haya
subtítulos grabados, “-”
se visualizará en lugar
del número de idioma.
2
1) Presione para
seleccionar el
idioma deseado.
2) Presione
(o
) para seleccionar
“ACTIVO” o
“INACTIVO.”
1
Presione AUDIO
durante la
reproducción para
visualizar la pantalla
AUDIO.
EI idioma de la pista de sonido seleccionado al
hacer las fi jaciones iniciales se puede cambiar
por otro idioma diferente, si éste se encuentra
disponible.
2
Presione para
seleccion el idioma
deseado.
Cambio del idioma de la pista de sonido
[DVD solamente]
SUBTITULO : 1 ENG ACTIVO
I love you
ELEGIR :
ACTIVO/INACTIVO :
TERMINAR : SUB TITLE
SUBTITULO : 3 ESP ACTIVO
Te amo
ELEGIR :
ACTIVO/INACTIVO :
TERMINAR : SUB TITLE
SONIDO: 1 ENG
Dolby Digital 3/2.1ch
Hello
ELEGIR :
TERMINAR : AUDIO
SONIDO: 3 ESP
Dolby Digital 3/2.1ch
Hola
ELEGIR :
TERMINAR : AUDIO

66
For assistance, please call : 1-800-211-PANA(7262) or send e-mail to : [email protected]
66
For assistance, please call : 1-800-211-PANA(7262) or send e-mail to : [email protected]
1
2
Presione AUDIO durante la reproducción
para visualizar la pantalla AUDIO.
1) Presione (o )
para seleccionar el
ajuste deseado.
2) Presione
(o ) para
ajustar. (DVD
solamente)
• DVD Karaoke (1 vocal)
VOCAL ON➞VOCAL OFF
• DVD Karaoke (2 vocales)
VOCAL V1➞VOCAL V2➞VOCAL V1+V2➞VOCAL OFF
• Video CD
LR➞L➞R
Selección de vocal para los discos de Karaoke
[DVD/Video CD]
Durante la reproducción de un DVD, puede ampliar a
imagen seleccionando la relación de zoom usando el
botón ZOOM mediante control remoto.
Seleccione el tamaño de la imagen.
Presione ZOOM repetidamente para cambiar el
tamaño de la imagen como se indica a continuación:
■
Use los botones , , y para desplazar
la posición hacia arriba, hacia abajo, hacia la
izquierda o hacia la derecha.
1
Presione ANGLE
durante la
reproducción para
visualizar la pantalla
de ángulo.
Algunos discos DVD tienen escenas que han sido filmadas
simultáneamente desde un número de ángulos diferentes.
Con estos discos, la misma escena podrá verse desde
cada uno de estos ángulos diferentes utilizando el botón
ANGLE.
2
Presione para
seleccionar el ángulo
deseado.
Visión desde otro ángulo [DVD solamente]
Ampliación de la imagen [DVD solamente]
Algunos discos con películas, por ejemplo,
vienen con dos o más títulos. Si el disco tiene
un menú de títulos grabados, el botón TITLE
podrá utilizarse para seleccionar el título de la
película.
1
2
Presione TITLE durante la
reproducción. Ahora se visualiza una
lista de los títulos del disco.
1) Presione
o las
teclas
numéricas para
seleccionar el
título deseado.
2) Presione SET o
PLAY.
Utilización de un menú de títulos
[DVD solamente]
1
Algunos discos DVD tienen estructuras únicas
de menús llamadas menús DVD.
Por ejemplo, los DVDs programados con un
contenido complejo proporcionan menús guía, y
los grabados con varios idiomas proporcionan
menús para audio e idiomas de subtítulos.
Aunque los contenidos de los menús DVD y la
operación cambian de disco a disco, a
continuación se explica la operación básica
cuando se utiliza esta característica.
Presione MENU durante la
reproducción. El menú de DVD
introducido en el disco se visualiza
ahora.
2
1) Presione
o las teclas
numéricas para
seleccionar el
articulo
deseado.
2) Presione SET o
PLAY.
Utilización de un menu de DVD
[DVD solamente]
ANGULO
: 1
ELEGIR :
ELEGIR :
ANGULO
: 2
SONIDO: 2 ENG VOZ ACTIVO
ELEGIR
:
TERMINAR : AUDIO
T
I
TLE MENU
Cas
t
l
es
Love
r
s
B
i
r
ds
Dogs
Dogs
of the world
DVD MENU
3 . ANGLE
1 . SUBT
I
TLE
2 . AUD
I
O
Spanish Quick Use Guide/Guía para rápida consulta

6767
For Your Information
Puede usted programar pistas específi cas y el orden de
reproducción.
Presione ACTION en el modo paro (STOP)
para visualizar MAIN MENU.
1) Presione para
seleccionar
“MODO
DE REPRODUCCION.”
2) Presione SET para
visualizar.
1) Presione para
seleccionar
“REPRODUCCION
DE PROGRAMAS.”
2) Presione SET para
visualizar.
1) Presione
para seleccionar
“DVD.”
2) Presione SET para
visualizar.
1) Presione
para seleccionar el
número de la pista
deseada. (Se
visualizan los
números de la pista
del disco).
2) Presione SET para
seleccionar.
• Repita el paso 5 para
seleccionar otra pista.
• La pista seleccionada se
añade a la parte derecha.
1) Presione
para seleccionar
“INICIAR.”
2) Presione SET.
• La reproducción
comienza en la
secuencia programada.
• Para cancelar, presione
STOP durante la
reproducción y luego
presione CLEAR.
1
3
4
2
5
6
Las pistas se reproducen de forma arbitraria.
Repita los pasos 1-3 de la
“Reproduccion programa”.
1) Presione para
seleccionar
“REPRODUCCION
ALEATORIA.”
2) Presione SET.
• Comienza la reproducción
arbitraria.
• Para cancelar, presione
STOP durante la
reproducción y luego
presione CLEAR.
1
2
Reproducción programada
[Vídeo CD/CD]
Reproducción arbitraria
[Vídeo CD/CD]
MENU PR
I
NCIPAL
DVD
BLOQUEO
CANAL
RELOJTV
ID
I
OMA
TERM
I
NAR :
ACT
I
O
N
ELEG
I
R
:
F
I
JAR
:
SET
5
3
1
DVD MENU PRINCIPAL
ELEGIR :
FIJAR : SET
TERMINAR : ACTION
IDIOMAS DEL DI SCO
SALIDA DE AUDIO
DETENER RASTREO : CAMPO
4:3 PREFERENCIA : Letterbox
MODO DE REPRODUCCION
MODO DE REPRODUCCION
ELEGIR :
FIJAR : SET
TERMINAR : ACTION
REPRODUCCION DE PROGRAMAS
REPRODUCCION ALEATORIA
REPRODUCCION DE PROGRAMAS
ELEGIR :
FIJAR : SET
TERMINAR : ACTION
DISCO
PROGRAMA
1 61116 5 8
2 7 12 17 15 6
3 8 13 18 1 13
4 91419 3 2
5101520 2
BORRAR EL ULTIMO
BORRAR TODO INICIAR
REPRODUCCION DE PROGRAMAS
ELEGIR :
FIJAR : SET
TERMINAR : ACTION
DISCO
PROGRAMA
1 61116 5 8
2 7 12 17 15 6
3 8 13 18 1 13
4 91419 3 2
5101520 2
BORRAR EL ULTIMO
BORRAR TODO INICIAR
MODO DE REPRODUCCION
ELEGIR :
FIJAR : SET
TERMINAR : ACTION
REPRODUCCION DE PROGRAMAS
REPRODUCCION ALEATORIA

68
For assistance, please call : 1-800-211-PANA(7262) or send e-mail to : [email protected]
68
For assistance, please call : 1-800-211-PANA(7262) or send e-mail to : [email protected]
1) Presione st para seleccionar el artículo
deseado.
2) Presione SET.
4
1
2
3
5
Volver a visualizar el
menú de DVD para continuar el ajuste.
Presione ACTION y pase al paso 3 para ajustar
otro
articulo o, para salir, presione ACTION
tres veces.
Presione ACTION en el modo de paro
(STOP) para visualizar MAIN MENU.
1) Presione para seleccionar “DVD.”
2) Presione SET para visualizar.
1) Presione st para seleccionar el artículo
deseado.
2) Presione SET.
IDIOMAS DEL DISCO
Todos los idiomas ofrecidos en el disco pueden ser
ajustados, Si el idioma ajustado no es ofrecido en el
disco, se seleccionará el idioma original del disco.
SALIDA DE AUDIO
Puede usted ajustar la salida audio procedente de la
terminal de salida audio digital.
DETENER RASTREO
Para seleccionar “CAMPO” o “CUADRO” para
prevenir inestabilidad o para permitir ver textos
pequeños o patrones fi nos claramente en el modo de
imagen fi ja.
4 : 3 PREFERENCIA
Para seleccionar si el material del vídeo para pantalla
ancha será vuelto a reproducir en el estilo Pan&Scan
o en el estilo Letterbox en la pantalla.
Seleccione “AUDIO”
Inglés/Español/Francés/Japones:
(Fijación de fábrica : inglés)
Original : Se seleccionará el idioma original de cada
disco.
OTRO **** : Se puede seleccionar el otro idioma.
Seleccione “SUBTITULO”
AUTO : Se seleccionará el mismo que fue seleccionado en
la preparación de “AUDIO”. (Fijación de fábrica)
• Si el idioma seleccionado en la preparación de
“AUDIO” se utiliza durante la reproducción, los
subtítulos no aparecerán.
• Si se utiliza otro idioma durante la
reproducción, los subtítulos aparecerán en
el idioma seleccionado en la preparación de
“AUDIO”
Inglés/Español/Francés/Japones
OTRO **** : Se puede seleccionar el otro idioma.
Seleccione “MENU”
Inglés/Español/Francés/Japones :
(Fijación de fábrica : inglés)
OTRO **** : Se puede seleccionar el otro idioma.
Selección de IDIOMAS DEL DISCO
[DVD solamente]
<Ejemplo de DVD>
<Ejemplo de Vídeo CD>
2
3
1) Presione (o ) para
seleccionar el articulo deseado.
2) Presione SET para colocar.
1
Cuando se presiona DISPLAY, la visualización
en pantalla muestra la información del disco
(título / capítulo / número de lista, tiempo
transcurrido de reproducción, audio / idioma
del subtítulo, y ángulo) e información (repetir
la reproducción, modo reproducción, Karaoke
vocal encendido / apagado, etc.).
Presione DISPLAY en el modo
reproducción o parada para visualizar
en pantalla.
• Cada vez que se presione DISPLAY, la
visualización en pantalla cambia como se
muestra a continuación.
Para volver
a la pantalla
normal,
presione
repetidamente
CLEAR o
DISPLAY.
Funcionamiento del DVD utilizando
visualizaciones en pantalla
1)Presione
para
seleccionar
el ajuste
deseado.
2)Presione
SET para
colocar.
Fijaciones iniciales
ELEGIR :
FIJAR : SET SIGU I ENTE: DI SPLAY
T I TULO : 12 DVD
CAPITULO
: 11 0:12:34
PISTA : 12 VI DEO CD
PBC : INACTI VO 0 : 12 : 34
FIJAR : SET SIGU I ENTE: DI SPLAY
PISTA : 17 VIDEO CD
PBC : INACTI VO 0 : 12 : 34
FIJAR : SET SIGU I ENTE: DI SPLAY
ELEGIR :
FIJAR : SET SIGU I ENTE: DI SPLAY
T I TULO : 12 DVD
CAPITULO:
24 0:12:34
Spanish Quick Use Guide/Guía para rápida consulta
Información seleccionada del disco
Información seleccionada de la unidad
Pantalla normal

6969
For Your Information
Selección de DETENER RASTREO
AUTO : Durante el modo de imagen fi ja se
seleccionarán automáticamente
“Campo fi jo” o “Cuadro fi jo” (Fijacion
de fabrica)
CAMPO : Seleccione este ajuste cuando ocurra
“distorsión” en las imagenes, incluso
cuando se haya seleccionado “AUTO”.
CUADRO : “Cuadro fi jo” esta siempre
seleccionado. Se utiliza cuando no
se puedan ver claramente textos
pequeño o patrones fi nos incluso
cuando esté seleccionado “AUTO”.
Selección de 4 : 3 PREFERENCIA
4:3 Pan&Scan : Datos de la pantalla ancha
de vídeo son reproducidos
en el estilo Pan & Scan (la
parte derecha e izquierda de
la pantalla son recortadas).
(Fijación de fábrica)
• Datos de vídeo no
formateados en Pan & Scan
serán reproducidos en el estilo
letterbox.
4:3 Letterbox : Datos de la pantalla ancha de
vídeo son reproducidos en el
estilo Letterbox (la parte de
arriba y abajo de la pantalla
tienen un margen negro).
Funcionamiento de la ejecución de MP3/WMA/JPEG
Puede utilizar esta unidad para reproducir audio
de formato MP3/WMA/JPEG, grabado para uso
personal con una computadora, etc., en un
CD-ROM o CD-RW.
La ejecución puede no tener lugar en algunos
casos, debido a las condiciones de la grabación.
Presione POWER en el control remoto o
unidad.
Presione OPEN/CLOSE y a continuacion
coloque un disco MP3/WMA/JPEG en la
bandeja de discos.
Presione OPEN/CLOSE para cerrarla.
Se visualizará el MENU MP3/WMA/JPEG
y la ejecución se iniciará
automáticamente.
(Se visualizará el directorio del CD.)
Estado de
la función
Área de las
carpetas
(La carpeta
visualizada
actualmente
se volverá
verde)
Contador
Carpeta
principal
Área de
archivos
(El
archivo/ la
carpeta se
visualiza
con un
cursor.)
MODO DE REPRODUCCIÓN
1
2
3
REPROD
MODE DE REPRODUCCION:
NORMAL
00
:
00
:
00
ROOT
. .
My favorite
CAR1
TECHNO
CAR2
POPS
END
_
W
ALTZ
J
AZZ
PICTURES
:
Archivo MP3
:
Archivo WMA
:
Archivo JPEG
:
Carpeta
:
Carpeta principal
■
Ejecución MP3/WMA/JPEG (Durante el modo STOP)
Presione para seleccionar un archivo
MP3/WMA
( / ) o un archivo JPEG
(
)
, y
presione SET o PLAY.
• MP3/WMA
Búsqueda hacia adelante/hacia atrás
➞Presione FF/SLOW+ o REW/SLOW- durante la
ejecución.
Salto de Pista hacia adelante/hacia atrás
➞Presione SKIP+
|
o SKIP-
|
durante la
ejecución.
• JPEG
Búsqueda siguiente/anterior
➞Presione SKIP+
|
o SKIP-
|
.
Inicie la muestra-diapositiva
➞Presione FF/SLOW+ o REW/SLOW-.
Ampliando una imagen
➞Presione ZOOM.
Rotando una imagen
➞Presione ANGLE.
Presione STOP para detener la operacion descrita
arriba.
■Seleccione MODO DE REPRODUCCION
(Durante el modo STOP)
Presione
para mover el cursor a MODO DE
REPRODUCCION, y Presione
para
seleccionar el
MODO DE REPRODUCCIÓN deseado.
[MODO DE REPRODUCCIÓN]
NORMAL: Todos los archivos se reproducen sólo
una vez
REPETICION DE UNA MUSIC:
El archivo seleccionado se reproduce
repetidamente.
REPETICION DE UN ARCHIVO:
Los archivos que se encuentran en la carpeta
seleccionada se reproducen repetidamente.
REPETICION DEL DISCO:
Todos los archivos se reproducen repetidamente.
Presione ACTION para regresar al DVD
MAIN PRINCIPAL.
4

70
For assistance, please call : 1-800-211-PANA(7262) or send e-mail to : [email protected]
70
For assistance, please call : 1-800-211-PANA(7262) or send e-mail to : [email protected]
PANASONIC CONSUMER ELECTRONICS
COMPANY, DIVISION OF MATSUSHITA ELECTRIC
CORPORATION OF AMERICA
One Panasonic Way Secaucus, New Jersey 07094
PANASONIC SALES COMPANY, DIVISION OF
MATSUSHITA ELECTRIC OF PUERTO RICO, INC.,
AVE. 65 de Infantería, Km. 9.5 San Gabriel Industrial
Park, Carolina, Puerto Rico 00985
Panasonic/Quasar Video Products
Limited Warranty
Limited Warranty Coverage
If your product does not work properly because of a defect in materials or workmanship, Panasonic
Consumer Electronics Company or Panasonic Sales Company (collectively referred to as “the warrantor”)
will, for the length of the period indicated on the chart below, which starts with the date of original
purchase (“warranty period”), at its option either (a) repair your product with new or refurbished parts, or
(b) replace it with a new or a refurbished product. The decision to repair or replace will be made by the
warrantor.
During the “Labor” warranty period there will be no charge for labor. During the “Parts” warranty period,
there will be no charge for parts. You must carry-in or mail-in your product or arrange for in-home
service, as applicable, during the warranty period.
If non-rechargeable batteries are included, they are not warranted. This warranty only ap plies to
products purchased and serviced in the United States or Puer to Rico. This warranty is extended only to
the original purchaser of a new product which was not sold “as is”. A purchase receipt or other proof of
the original purchase date is required for warranty service.
Carry-In, Mail-in or In-Home Service
For Carry-In, Mail-In or In-Home Service (as applicable) in the United States call toll free contact
number listed above or visit Panasonic Web Site: http://www.panasonic.com
For assistance in Puerto Rico call Panasonic Sales Company (787)-750-4300 or fax (787)-768-2910.
In-Home service, if applicable, requires clear, complete and easy access to the product by the
authorized servicer and does not include removal or re-installation of an installed product. It is possible
that certain in-home repairs will not be completed in-home, but will require that the product, or parts of
the product, be removed for shop diagnosis and/or repair and then re turned.
Limited Warranty
Product
Parts Labor Service Contact Number
Camcorder
One (1) Year (except CCD
Image Sensor)
CCD Image Sensor - 6 (Six)
Months
Ninety (90) Days
Ninety (90) Days
Carry-In or Mail-In 1-800-211-PANA(7262)
DVD/VCR Deck,
A/V Mixer
One (1) Year Ninety (90) Days Carry-In or Mail-In 1-800-211-PANA(7262)
TV/VCR, TV/DVD,
TV/DVD/VCR
Combination
One (1) Year (except CRT)
CRT - Two (2) Years
Ninety (90) Days
Ninety (90) Days
Carry-In: 21″ CRT and Smaller
In-Home or Carry-In: 22″ CRT and
Larger
1-800-211-PANA(7262)
TV/HDR
Combination
One (1) Year (except CRT)
CRT - Two (2) Years
Ninety (90) Days
Ninety (90) Days
In-Home or Carry-In 1-888-843-9788
Rechargeable
Batteries
(in exchange for
defective item)
Ten (10) Days Not Applicable Carry-In or Mail-In 1-800-211-PANA(7262)
Tape
(in exchange for
defective item)
Five (5) Days Not Applicable Carry-In or Mail-In 1-800-211-PANA(7262)
Memory Cards
(in exchange for
defective item)
Ninety (90) Days Not Applicable Carry-In or Mail-In 1-800-211-PANA(7262)

7171
For Your Information
Customer Services Directory
Web Site: http://www.panasonic.com
You can purchase parts, accessories or locate your
nearest servicenter by vis it ing our Web Site.
For Product Information, Operating Assistance, Literature Request, Dealer
Lo ca tions, and all Customer Service inquiries please contact:
1-800-211-PANA (7262), Monday-Friday 9 am-9 pm; Saturday-Sunday 10 am-7 pm,
EST. or send e-mail : [email protected]
For hearing or speech impaired TTY users, TTY : 1-877-833-8855
Service in Puerto Rico
Matsushita Electric of Puerto Rico, Inc. Panasonic Sales Company/
Factory Servicenter:
Ave. 65 de Infantería, Km. 9.5, San Gabriel Industrial Park,
Carolina, Puerto Rico 00985
Phone (787)750-4300 Fax (787)768-2910
1-800-332-5368 (Customer Orders Only)
For hearing or speech impaired TTY users, TTY : 1-866-605-1277
Panasonic Services Company 20421 84th Avenue South, Kent, WA 98032
(Monday-Friday 6 am-5 pm; Saturday 6 am-10:30 am, PST)
(Visa, MasterCard, Discover Card, American Express, Check)
Accessory Purchases:
Limited Warranty Limits And Exclusions
This warranty ONLY COVERS failures due to defects in materials or workmanship, and DOES NOT
COVER normal wear and tear or cosmetic damage, nor does it cover markings or retained images on
the picture tube resulting from viewing fi xed images (including, among other things, letterbox pictures
on standard 4:3 screen TV’s, or non-expanded standard 4:3 pic tures on wide screen TV’s, or onscreen
data in a stationary and fi xed location). The warranty ALSO DOES NOT COVER damages which
occurred in shipment, or failures which are caused by products not supplied by the warrantor, or failures
which result from accidents, misuse, abuse, neglect, mishandling, misapplication, alteration, faulty
installation, set-up ad just ments, misadjustment of consumer controls, improper maintenance, power
line surge, lightning damage, modifi cation, or commercial use (such as in a hotel, offi ce, restaurant, or
other business), rental use of the product, service by anyone other than a Factory Servicenter or other
Authorized Servicer, or damage that is attributable to acts of God.
THERE ARE NO EXPRESS WARRANTIES EXCEPT AS LISTED UNDER “LIMITED WARRANTY
COVERAGE”. THE WARRANTOR IS NOT LIABLE FOR INCIDENTAL OR CONSEQUENTIAL
DAMAGES RESULTING FROM THE USE OF THIS PRODUCT, OR ARISING OUT OF ANY BREACH
OF THIS WARRANTY. (As examples, this excludes damages for lost time, cost of having someone
remove or re-install an installed unit if applicable, or travel to and from the servicer, loss of media or
images, data or other memory or recorded content. The items listed are not exclusive, but are for
illustration only.)
ALL EXPRESS AND IMPLIED WARRANTIES, INCLUDING THE WARRANTY OF
MERCHANTABILITY, ARE LIMITED TO THE PERIOD OF THE LIMITED WARRANTY.
Some states do not allow the exclusion or limitation of incidental or consequential damages, or
limitations on how long an implied warranty lasts, so the exclusions may not apply to you.
This warranty gives you specifi c legal rights and you may also have other rights which vary from state
to state. If a problem with this product develops during or after the warranty period, you may contact
your dealer or Servicenter. If the problem is not handled to your satisfaction, then write to the warrantor’
s Consumer Affairs Department at the addresses listed for the warrantor.
PARTS AND SERVICE (INCLUDING COST OF AN IN-HOME SERVICE CALL, WHERE
APPLICABLE) WHICH ARE NOT COVERED BY THIS LIMITED WARRANTY ARE YOUR
RESPONSIBILITY.
As of August 2002

72
For assistance, please call : 1-800-211-PANA(7262) or send e-mail to : [email protected]
72
For assistance, please call : 1-800-211-PANA(7262) or send e-mail to : [email protected]
A
Accessories ................................................. 4
AC Power Plug...........................................11
ACTION button ......................................8, 16
ADD/DLT/CLEAR button........................ 8, 17
Audio Adjustment ......................................43
Audio Auto Gain Control (AGC)................. 42
AUDIO button ..................................8, 23, 40
Audio Connections ....................................12
Audio Features .....................................40-41
Audio Menu ...............................................42
Audio Mode for Playback........................... 40
Audio Mode for Recording......................... 40
Audio Mode for TV Viewing........................ 23
Audio Mute ................................................22
Audio/Video Input
connector (LINE) .................................10, 19
Audio Output Connector (L/R) ..............11-12
Auto Operation Functions.......................... 33
B
Batteries ......................................................4
Before Requesting Service...................60-61
Before Using................................................ 4
Blocking Message .....................................39
Blue Screen Display .................................. 27
Broadcast Types ........................................ 23
C
Cassette Compartment .............................10
Caption On Mute ......................................25
Channel ..........................................16-17, 27
CHANNEL UP / DOWN button .............. 8, 22
Clock.....................................................16-17
Closed Caption.....................................24-25
CM SKIP/ZERO SEARCH button.....8, 32-33
Commercial Skip .......................................33
Connections...............................................11
Connections, Audio.................................... 12
Connections, DSS / Cable Box..................11
Connections, Antenna / Cable................... 11
Copy Your Tapes (Dubbing) .......................19
COUNTER RESET button..................... 8, 32
Customer Services Directory ................... 71
D
DISPLAY button..................................... 8, 27
DST (Daylight Saving Time) ........................6
E
EJECT button ...........................................8-9
Eject tape...................................................18
F
Fast Forward..............................................18
FF/SLOW+ button.................................. 8, 18
Forward Search .........................................18
Frame by Frame Advance .........................18
Front Panel Indicators..................................9
Function Display ........................................27
H
Head Cleaning.............................................6
I
Important Safeguards and Precautions.......2
Information (Unit, Cassette, Disc).............6-7
Initial Setup................................................ 14
Index Search .............................................30
Indicators on the Front Panel.......................9
Input Mode.................................................19
L
Language...................................................16
Limited Warranty...................................70-71
Location of Controls................................8-11
M
MTS Broadcast / TV Stereo System.......... 23
MUTE button .........................................8, 22
N
NUMBER keys.......................................8, 22
O
100 Key......................................................22
One Touch Recording (OTR) ..................... 18
On-Screen Display (OSD) ......................... 27
ON-TIMER Indicator..............................9, 26
ON-TIMER with Alarm...............................26
P
Phones ......................................................22
Playback ....................................................18
PLAY button........................................... 8, 18
POWER button ......................................8, 14
PROG button ...................................8, 26, 28
PROG TIMER Indicator ......................... 9, 28
Q
Quality Picture ............................................. 6
R
Rapid Tune.................................................22
R-TUNE button...................................... 8, 22
REC button............................................ 8, 18
REC Indicator ........................................ 9, 18
Rec(ord).....................................................18
Record / Playback Speed Settings ..............4
Remote Control Buttons .............................. 8
Remote Sensor............................................9
Repeat Play ...............................................31
Reset Language, Channels, Clock .......16-17
Reset unit ..................................................15
Reverse Search......................................... 18
REW/SLOW- button...............................8, 18
Rewind.......................................................18
S
Safety Precautions ...................................... 3
SEARCH button................................8, 30-31
Secret Code...............................................36
Selecting Input Mode................................. 19
SELECT / SET button............................8, 16
Sleep Timer ...............................................26
Slow Motion............................................... 18
Spanish Quick Use Guide .................. 63-69
Special VCR Features ..........................34-35
Specifi cations ..............................................6
SPEED button .......................................8, 18
Still Picture.................................................18
STILL/PAUSE button .............................8, 18
STOP button.......................................... 8, 18
SURROUND button............................... 8, 41
Surround Sound ........................................41
T
Table of Contents......................................... 5
Tape Erasure Prevention .............................4
Tape Operation .....................................30-33
Timer Program Review, Replace, Clear .....29
Timer Recording ........................................28
Timer Recording Cancellation ................... 29
Time Zone Adjust.......................................17
TRACKING / V-LOCK buttons..................6, 8
TV Operation ............................................. 22
TV Timer Features..................................... 26
TV/VCR button.............................................8
TV/VCR Status & Clock Display ................ 27
Index
TV / VCR

7373
For Your Information
A
ANGLE button .................................8, 45, 54
ANGLE Indicator....................................9, 45
Auto-Power Off function.............................21
AUDIO button ..................................8, 44, 45
AUDIO OUTPUT........................................57
Audio soundtrack language (DVD) ............44
B
Basic DVD Operation.................................20
C
CLEAR button...................................8, 47-49
D
Defi nition of terms .......................................7
Disc Audio attribute 1 type, sampling
frequency, bit No........................................44
Disc format ..................................................7
Disc handling............................................... 7
Disc information screen ............................. 50
DISC LANGUAGES (DVD) ........................ 56
Disc Operation......................................44-48
Disc Tray ..........................................7, 10, 20
DISPLAY button..................................... 8, 49
DVD button ............................................8, 20
DVD Lock Feature (DVD)........................... 55
DVD Lock Ratings (DVD)........................... 55
DVD menu (DVD) ......................................46
DVD Operation using On-Screen Displays .....49
DVD Volume Adjust ...................................41
F
Forward / Reverse Chapter / Track skip ......21
Forward / Reverse rapid scene search ...... 21
Frame by Frame picture
(DVD/Video CD) ........................................21
J
JPEG Playback.....................................53-54
K
Karaoke (DVD/Video CD) ..........................45
L
Language Code List ..................................59
M
MENU button......................................... 8, 46
MP3 Playback............................................53
Multiple angle viewing (DVD).....................45
O
OPEN / CLOSE button.......................... 8, 20
Optical digital audio output connector.....11-13
P
Picture Zoom (DVD) .................................. 45
Play............................................................20
Playback control (Video CDs)....................21
PLAY button........................................... 8, 20
Program Play (Video CD/CD).................... 47
Program Repeat Play (Video CD/CD) ....... 47
R
Random Play (Video CD/CD)....................48
Region number............................................ 3
Repeat Play............................................... 51
RESUME function .....................................21
RETURN button ....................................8, 20
REW/FF/SLOW +/- button.....8, 20-21, 53-54
S
Settings for DVD Operation ..................56-58
SKIP+
|
/SKIP-
|
..........8, 20-21, 52-54
Slow Motion (DVD/Video CD)....................21
STILL MODE ............................................. 58
Still (Pause) Picture...................................21
STILL / PAUSE button ...........................8, 21
Subtitle language (DVD)............................ 44
SURROUND/VSS button.......................8, 41
T
TV MODE .................................................. 58
Title menu (DVD) .......................................46
U
Unit information screen (Unit).................... 51
V
V.S.S. (Virtual Surround Sound) ................41
W
WMA Playback .......................................... 53
Z
ZOOM button......................................... 8, 45
U
Unit, Front/Rear View............................10-11
US MOVIES Ratings..................................37
US TV PROGRAMS Ratings ..................... 38
V
VCR Lock .................................................. 35
Video Adjustment.......................................43
Video Menu................................................42
V-Chip Control Feature .........................36-39
VHF / UHF Antenna Input Terminal ........... 11
VOLUME UP / DOWN button ................8, 22
W
Warning and Instruction Displays.............. 62
Weak Signal Display Feature..................... 34
Z
Zero Search...............................................32
DVD
TV / VCR


75
NOTES

LSQT0694A
Panasonic Consumer Electronics Company,
Division of Matsushita Electric Corporation of America
One Panasonic Way Secaucus, New Jersey 07094
Panasonic Sales Company (“PSC”),
Division of Matsushita Electric of Puerto Rico, Inc.
Ave. 65 de Infantería, Km. 9.5
San Gabriel Industrial Park, Carolina, Puerto Rico 00985
Printed in Indonesia
LSQT0694A
S0203-0
P
-
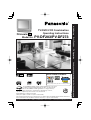 1
1
-
 2
2
-
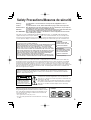 3
3
-
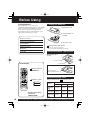 4
4
-
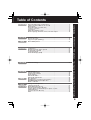 5
5
-
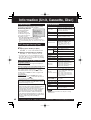 6
6
-
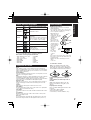 7
7
-
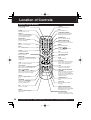 8
8
-
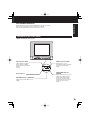 9
9
-
 10
10
-
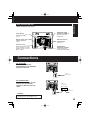 11
11
-
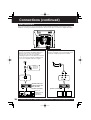 12
12
-
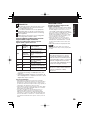 13
13
-
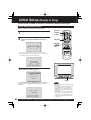 14
14
-
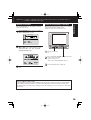 15
15
-
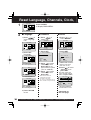 16
16
-
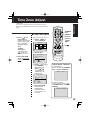 17
17
-
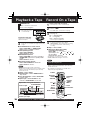 18
18
-
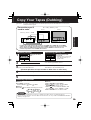 19
19
-
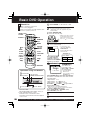 20
20
-
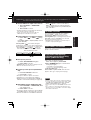 21
21
-
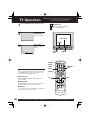 22
22
-
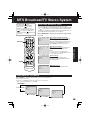 23
23
-
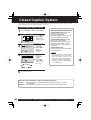 24
24
-
 25
25
-
 26
26
-
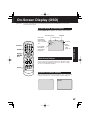 27
27
-
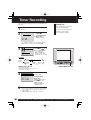 28
28
-
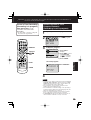 29
29
-
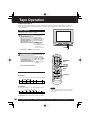 30
30
-
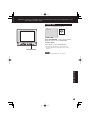 31
31
-
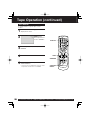 32
32
-
 33
33
-
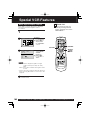 34
34
-
 35
35
-
 36
36
-
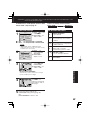 37
37
-
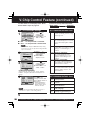 38
38
-
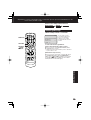 39
39
-
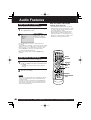 40
40
-
 41
41
-
 42
42
-
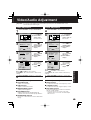 43
43
-
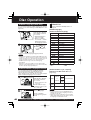 44
44
-
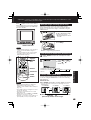 45
45
-
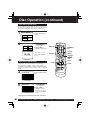 46
46
-
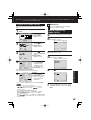 47
47
-
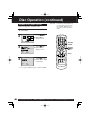 48
48
-
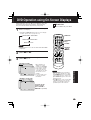 49
49
-
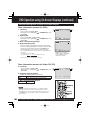 50
50
-
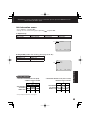 51
51
-
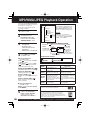 52
52
-
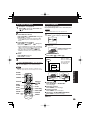 53
53
-
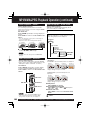 54
54
-
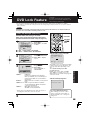 55
55
-
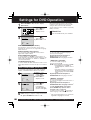 56
56
-
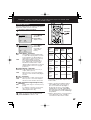 57
57
-
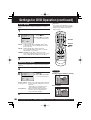 58
58
-
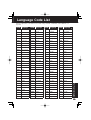 59
59
-
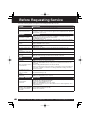 60
60
-
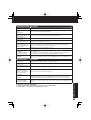 61
61
-
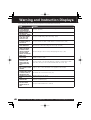 62
62
-
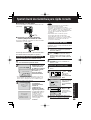 63
63
-
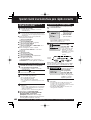 64
64
-
 65
65
-
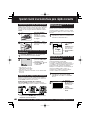 66
66
-
 67
67
-
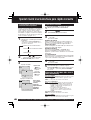 68
68
-
 69
69
-
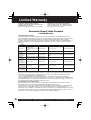 70
70
-
 71
71
-
 72
72
-
 73
73
-
 74
74
-
 75
75
-
 76
76


Panasonic PVDF203 Instrucciones de operación
- Categoría
- Reproductores de DVD
- Tipo
- Instrucciones de operación
- Este manual también es adecuado para
En otros idiomas
Documentos relacionados
-
Panasonic PVD4763S Instrucciones de operación
-
-
-
-
-
-
-
-
-
Otros documentos
-
Memorex MP4047 Manual de usuario
-
Sony KV 20VS42 Manual de usuario
-
Disney Cars C1320PTVD Manual de usuario
-
Toshiba SD-V392SU Manual de usuario
-
TEAC AD-800 Manual de usuario
-
-
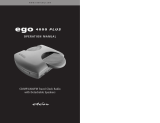 Ego Technology 4000 Plus Manual de usuario
-
-
Haier HLH32BBTV-01 Manual de usuario
-
Pioneer AVD-W6210 Manual de usuario
