Hobart CENTERLINE HMM20 Manual de usuario
- Categoría
- Mezcladores
- Tipo
- Manual de usuario

701 S. RIDGE AVENUE
TROY, OHIO 45374-0001
937-332-3000
www.hobartcorp.com
INSTRUCTION
MANUAL
MODEL
HMM20
FORM 45268 Rev. A (October 2018)

– 2 –
© HOBART, 2018
TABLE OF CONTENTS
GENERAL ............................................................................................................................................. 3
INSTALLATION .................................................................................................................................... 3
Unpacking ........................................................................................................................................ 3
Location ........................................................................................................................................... 3
Electrical Connections (Cord Connected Mixers) ............................................................................ 4
Check Initial Operation .............................................................................................................. 4
OPERATION ........................................................................................................................................ 5
STANDARD CONTROLS .................................................................................................................... 6
Model HMM20 (With Three Mix Speeds)......................................................................................... 6
Mixer Speeds ................................................................................................................................... 6
Button Function Description ............................................................................................................ 6
BOWL PLACEMENT ........................................................................................................................... 7
Agitator ............................................................................................................................................ 7
To Install ..................................................................................................................................... 7
To Remove ................................................................................................................................. 7
Prepare For Mixing .......................................................................................................................... 8
Mixing Modes .................................................................................................................................. 8
Timed Mixing Mode ......................................................................................................................... 9
Operating Notes .............................................................................................................................. 9
Unloading ...................................................................................................................................... 10
Wire Cage Assembly ..................................................................................................................... 10
Remove and Clean Bowl Guard Wire Cage .............................................................................11
Reinstall Bowl Guard Wire Cage ..............................................................................................11
Agitators and Attachments ............................................................................................................. 12
CLEANING ......................................................................................................................................... 13
MAINTENANCE ................................................................................................................................. 14
Lubrication ..................................................................................................................................... 14
Slideways ................................................................................................................................. 14
Planetary Seal ......................................................................................................................... 14
Adjustments ................................................................................................................................... 15
Agitator Clearance ................................................................................................................... 15
Measure Clearance ................................................................................................................. 15
Adjust the Bowl/Agitator Clearance ......................................................................................... 15
TROUBLESHOOTING ...................................................................................................................... 16
Service ........................................................................................................................................... 16

– 3 –
Installation, Operation and Care of
Centerline by Hobart 20-Quart Mixer
SAVE THESE INSTRUCTIONS
GENERAL
The Centerline by Hobart 20-quart mixer is a bench-type mixer which features three-speeds, a digital
timer, a manual bowl lift, and a #12 attachment hub as standard equipment.
A variety of attachments, agitators, and accessories are available. These are described in the Agitators
and Attachments section of this manual.
INSTALLATION
UNPACKING
The mixer was inspected before leaving the factory. The carrier assumes full responsibility for safe delivery
upon acceptance of the shipment. Check for possible shipping damage immediately after receipt.
If the mixer is found to be damaged, complete the following steps:
1. Carrier must be notifi ed within fi ve business days of receipt.
2. Carrier’s local terminal must be notifi ed immediately upon discovery (note the time, date, and who
was spoken to), and follow up and confi rm with written or electronic communication.
3. All original packing materials must be kept for inspection purposes.
4. The mixer cannot have been moved, installed, or modifi ed.
5. Notify Hobart customer care at (800) 333-7447.
LOCATION
Prior to installation, test the electrical service to ensure it agrees with the specifi cations on the machine
data plate.
Place the mixer on a suitable sturdy level surface. There should be adequate space around the mixer
for the user to operate the controls and to install and remove bowls. Holes are located in the base to
permanently secure the mixer, although this is not necessary in normal installations.

– 4 –
ELECTRICAL CONNECTIONS (Cord Connected Mixers)
The electrical cord on this machine is equipped with a three-pronged grounding
plug which must be connected to a properly grounded receptacle. If the receptacle is not the
proper grounding type, contact an electrician. DO NOT remove the grounding prong from the plug.
Electrical and grounding connections must comply with the applicable portion of
the National Electrical Code and/or other local electrical codes.
Check Initial Operation
1. Apply power to the mixer by inserting the cord plug into a properly grounded outlet.
2. Machine will beep three times indicating machine is ready.
3. Install the bowl on the bowl support and raise into the mix position, with the bowl support up and
bowl guard wire cage closed.
4. Turn the speed gear shift lever to 1.
5. Run the machine by pushing the ON/OFF button.

– 5 –
OPERATION
Moving agitator in bowl. Keep hands, clothing and utensils out of bowl while in
operation. Do not use without interlocked guard.
The Centerline by Hobart 20-quart mixer is equipped with a timer and controls. Refer to Fig. 1 for operating
parts and OPERATION section for their functions.
The bowl guard wire cage must be in closed position or the mixer will not operate.
The bowl must remain in mix position on bowl support, and the bowl support must be raised (mix position)
or the mixer will not operate.
Fig. 1
CONTROLS
ATTACHMENT
HUB
DRIP CUP
BOWL GUARD
WIRE CAGE
AGITATOR
SPLASH
GUARD
BOWL
SUPPORT
APRON

– 6 –
STANDARD CONTROLS
MODEL HMM20 (With Three Mix Speeds)
MIXER SPEEDS
SPEED 1 (Low) This speed is for heavy mixtures such as heavy batters, potatoes, pizza
dough, and bread dough.
SPEED 2 (Medium) This speed is for mixing cake batters and mashing potatoes.
SPEED 3 (High) This speed is for incorporating air into light batches, as well as fi nishing
whipped items.
BUTTON FUNCTION DESCRIPTION
NOTE: The machine will beep once when any button is pressed.
ON/OFF
Press the ON/OFF button to start the mixer. If the mixer is running,
press the ON/OFF button to stop the mixer.
SEC UP
ARROW
Press once to increase the time in 1 second increments. Press and
hold to quickly increase time until released. Range is 0-59.
SEC DOWN
ARROW
Press once to decrease the time in 1 second increments. Press and
hold to quickly decrease time until released. Range is 0-59.
MIN UP
ARROW
Press once to increase the time in 1 minute increments. Press and
hold to quickly increase time until released. Range is 0-59.
MIN DOWN
ARROW
Press once to decrease the time in 1 minute increments. Press and
hold to quickly decrease time until released. Range is 0-59.
NOTE: The seconds and minutes are set independently.
NOTE: The ON/OFF button is used to clear overload error.
Fig. 2
TIMER
DISPLAY
SECOND
UP
MINUTE
UP
SECOND
DOWN
MINUTE
DOWN
ON/OFF
SPEED GEAR
SHIFT LEVER

– 7 –
BOWL PLACEMENT
The bowl must be installed on the bowl support before the agitator is installed.
To install the bowl, lower the bowl support and move bowl clamps to the open position (Fig. 3). Position
the bowl so the alignment bracket on the back of the bowl is in the bowl retainer and the alignment pins
on the front of the bowl support fi t in the holes on the sides of the bowl. Lock the bowl in place by rotating
the bowl clamps (Fig. 4).
AGITATOR
To install an agitator, the bowl must be on the bowl support.
To Install
1. Lower the bowl.
2. Open the bowl guard wire cage.
3. Place the agitator inside the bowl and align the horizontal slot on the agitator with the agitator shaft
pin.
4. Slide the agitator up the agitator shaft and turn it clockwise to seat the shaft pin in the slot of the
agitator shank.
To Remove
1. Open the bowl guard wire cage.
2. Lower the bowl.
3. Lift the agitator and turn it counterclockwise. Slide agitator down and off the agitator shaft.
Fig. 3 Fig. 4

– 8 –
PREPARE FOR MIXING
1. Place the mixing bowl on the bowl support.
2. Pour ingredients into the bowl.
3. Place the agitator inside the bowl, and then
attach it to the agitator shaft (Fig. 5).
4. Lift bowl support.
5. Correctly close the bowl guard wire cage.
6. The mixer is now ready for mixing.
MIXING MODES
1. Turn the speed gear shift lever (Fig. 6) to select a mix speed. The timer display reads OFF (Fig. 6).
NOTE: GearSafe™ protects gears if speeds are changed during mixing operation without stopping machine.
2. Press the ON/OFF button (Fig. 7) to begin mixing. The timer display reads ON (Fig. 7).
NOTE: If the wire cage is opened or the bowl is lowered at any time, the mixing operation will stop. To
resume the mixing operation, close the wire cage or raise the bowl and press the ON/OFF button.
3. Press the ON/OFF button to stop the mixer. The timer display reads OFF.
4. Press the ON/OFF button to resume mixing if needed.
Fig. 5
Fig. 6 Fig. 7
SPEED GEAR
SHIFT LEVER
ON/OFF
BUTTON

– 9 –
TIMED MIXING MODE
1. Turn the speed gear shift lever (Fig. 6) to select a mix speed. The timer display reads OFF (Fig. 6).
2. Press the MIN UP/DOWN and SEC UP/DOWN arrows until the timer display reads the desired
mixing time (Fig. 8). This is the set time.
3. Press the ON/OFF button to begin mixing; the timer starts counting down from the set time.
4. To stop the mixer at any time, press the ON/OFF button. To resume mixing, press the ON/OFF
button. For example: The mixer is started at speed 1 for 30 seconds and is stopped after 10 seconds.
Pressing the ON/OFF button will resume the mixing operation and the remaining 20 seconds will
count down.
NOTE: If the wire cage is opened or the bowl is lowered at any time, the mixing operation will stop. To
resume the mixing operation, close the wire cage or raise the bowl and press the ON/OFF button.
5. When the timer reaches 00:00, the mixer stops and beeps three times. The count-down timer then
displays the last set time.
OPERATING NOTES
• If the mixer is stopped during a mixing operation, the timer also stops. The timer starts again (with
the time remaining) when the ON/OFF button is pressed (Fig. 8).
Fig. 8
ON/OFF
BUTTON

– 10 –
UNLOADING
1. Open the bowl guard wire cage assembly.
2. Lower bowl support.
3. Remove the agitator from the agitator shaft.
4. Open the bowl clamps.
5. Lift the bowl off the pins and remove from the bowl support.
WIRE CAGE ASSEMBLY
The bowl guard wire cage assembly can be rotated out-of-the-way to the left to add ingredients or to
access the bowl and agitator.
Note how the plastic carriers allow the wire cage to ride around the circumference of the planetary drip cup.
• Open the bowl guard wire cage; rotate it to your left (Fig. 9).
• Close the bowl guard wire cage; rotate it to your right until it stops in the closed position (Fig. 10).
NOTE: The bowl guard wire cage must be returned to the closed position for the mixer to operate.
Fig. 9
Fig. 10

– 11 –
Remove and Clean Bowl Guard Wire Cage
Lower the bowl. Rotate the wire cage assembly to the left until it is positioned underneath the splash guard.
Remove the agitator and bowl.
While holding the wire cage assembly with both hands, rotate it completely to the left. When the front-center
retainer (Fig. 11) reaches the end of its travel, it can be lowered through the fl at (Fig. 11) on the ridge of
the drip cup (Fig. 11). After lowering the front-center retainer, move the wire cage assembly slightly to the
rear so the rear retainers clear the ridge on the drip cup. The wire cage assembly can now be lowered
and removed.
Wash the bowl guard wire cage assembly in a sink, rinse with clear water, and dry with a clean cloth.
The splash guard can be wiped off and/or washed with a cloth or sponge using warm, soapy water. Rinse
with clear water and dry with a clean cloth.
Reinstall Bowl Guard Wire Cage
Hold the wire cage assembly so its top ring is positioned around the planetary drip cup with the grooves
in both nylon rear retainers straddling the ridge on the drip cup at the rear. Lift the wire cage assembly so
the front-center retainer passes up through the fl at on the ridge of the drip cup and rotate the wire cage
assembly to the right. The wire cage assembly is properly assembled when all three retainers straddle
the ridge on the drip cup in three opposed locations. Rotate the wire cage assembly to the right until it
stops at the front-center position.
Rotate the wire cage out-of-the-way to the left to install or remove the agitator and bowl or to add ingredients.
Return the wire cage to its front-center position to operate the mixer.
Fig. 11
FRONT-CENTER
RETAINER
RIDGE
DRIP CUP
FLAT

– 12 –
AGITATORS AND ATTACHMENTS
20-Qt. Flat Beater 20-Qt. Wire Whip 20-Qt. Dough Hook
20-Qt. J Dough Hook 20-Qt. Bowl (SST)
20-Qt. Ingredient Chute 20-Qt. Table

– 13 –
CLEANING
Unplug machine power cord before beginning any cleaning procedure.
The mixer should be thoroughly cleaned daily. DO NOT use a hose to clean the mixer; it should be washed
with a clean, damp cloth. The base allows ample room for cleaning under the mixer. The apron (Fig. 1)
may be removed for cleaning by loosening the screws. The drip cup (Fig. 1) should be wiped clean. For
cleaning the bowl guard wire cage assembly, refer to page 11.

– 14 –
MAINTENANCE
Unplug machine power cord before beginning any maintenance procedure.
LUBRICATION
Slideways
The slideways (Fig. 12) should be lubricated approximately twice a year. To reach these areas, fully lower
the bowl support and remove the apron (Fig. 12), which is secured by screws. Wipe a thin coat of Lubriplate
630AA on each slideway. Install the apron.
Planetary Seal
Occasionally, the planetary seal (Fig. 13) may become dry and begin to squeak. To correct this, work a
little lubrication (mineral oil) under the lip of the seal.
Fig. 12 Fig. 13
PLANETARY
SEAL
SLIDEWAYS
(Behind Cover)
APRON

– 15 –
ADJUSTMENTS
Agitator Clearance
The agitator clearance should be checked periodically. The agitator must not touch the bowl.
The maximum clearance between the bottom of the bowl and the B fl at beater is 1/8" (3mm).
Install a bowl and agitator (e.g., beater). If the bowl and beater come into contact before the bowl support
reaches its stop, adjust the stop screw. Refer to Adjust the Bowl/Agitator Clearance.
Measure Clearance
Pour enough fl our in the bowl to cover the bottom of the bowl where the beater travels. With the bowl fully
raised (beater should not touch the bottom of the bowl), briefl y run the mixer at the lowest speed.
Turn off the mixer, disconnect the electrical power supply, and measure the depth of fl our where the beater
has traced a path. This measurement should be taken at several points around the bowl to assure accuracy.
Adjust the Bowl/Agitator Clearance
• Remove the apron (Fig. 14), which is secured by screws.
• Adjust the clearance by loosening the stop nut and moving the screw (Fig. 15) clockwise to increase
the clearance or counterclockwise to decrease the clearance.
• After the adjustments are made, tighten the stop nut and replace the apron, and secure it with the
screws.
• Carefully operate the bowl lift several times to check the adjustment.
Fig. 14 Fig. 15
APRON
STOP
NUT
SCREW

– 16 –
TROUBLESHOOTING
Symptoms Possible Causes
Mixer will not start Flashing time display – see below.
Branch circuit protector is in open position - check
fuse or disconnect switch.
Mixer is overloaded.
Wire cage is not in the closed position.
Bowl is not in closed (mix) position or bowl is not
in up position.
Agitator touches bowl Bowl is not in closed (mix) position.
Improper agitator clearance - see Maintenance
for adjustment procedure.
Agitator is not installed properly.
Planetary seal squeaks Seal requires occasional lubrication - see
Maintenance.
Timer display fl ashing time and machine is
beeping
If the timer display is fl ashing and machine
is beeping, press ON/OFF button to reset. If
symptom still exists, contact your local Hobart
Service offi ce.
Timer display reads OP (Fig. 16) Speed gear shift lever is not properly seated.
SERVICE
If service is needed on this equipment, contact your local Hobart Service offi ce at (888) 4HOBART.
Fig. 16
SPEED GEAR
SHIFT LEVER
FORM 45268 Rev. A (October 2018) PRINTED IN U.S.A.

701 S. RIDGE AVENUE
TROY, OHIO 45374-0001
937-332-3000
www.hobartcorp.com
MANUEL
D’INSTRUCTION
MODÈLE
HMM20
FORMULAIRE 45268 Rév. A (octobre 2018)

– 2 –
© HOBART, 2018
TABLE DES MATIÈRES
RENSEIGNEMENTS GÉNÉRAUX ..................................................................................................... 3
INSTALLATION .................................................................................................................................... 3
Déballage ........................................................................................................................................ 3
Emplacement ................................................................................................................................... 3
Raccordements électriques (batteur-mélangeur à fi l) ...................................................................... 4
Contrôler la première utilisation ................................................................................................. 4
FONCTIONNEMENT ........................................................................................................................... 5
COMMANDES STANDARD ................................................................................................................ 6
Modèle HMM20 (avec trois vitesses de mélange) ........................................................................... 6
Vitesses du batteur-mélangeur ........................................................................................................ 6
Description des fonctions des boutons ............................................................................................ 6
MISE EN PLACE DU BOL ................................................................................................................... 7
Agitateur .......................................................................................................................................... 7
Assemblage ............................................................................................................................... 7
Retrait ........................................................................................................................................ 7
Préparation pour le mélange ........................................................................................................... 8
Modes de mélange .......................................................................................................................... 8
Mode de mélange minuté ................................................................................................................ 9
Notes sur l’opération ........................................................................................................................ 9
Déchargement ............................................................................................................................... 10
Grille de protection ........................................................................................................................ 10
Retrait et nettoyage de la grille de protection du bol ................................................................11
Mise en place de la grille de protection ....................................................................................11
Agitateurs et accessoires .............................................................................................................. 12
NETTOYAGE...................................................................................................................................... 13
ENTRETIEN ....................................................................................................................................... 14
Lubrifi cation ................................................................................................................................... 14
Glissières ................................................................................................................................. 14
Joint planétaire ........................................................................................................................ 14
Réglages ....................................................................................................................................... 15
Distance de dégagement de l’agitateur ................................................................................... 15
Mesurer la distance de dégagement ....................................................................................... 15
Réglage de la distance de dégagement du bol/agitateur ........................................................ 15
DÉPANNAGE ..............................................................................................................................
....... 16
Service ........................................................................................................................................... 16

– 3 –
Installation, utilisation et entretien du
batteur-mélangeur de 20 pte Centerline par Hobart
CONSERVEZ CES INSTRUCTIONS
RENSEIGNEMENTS GÉNÉRAUX
Le batteur-mélangeur de 20 pte Centerline par Hobart est un batteur-mélangeur sur socle qui comporte
trois vitesses, une minuterie numérique, un bol à levage manuel et un moyeu de fi xation nº 12 en tant
que matériel normalisé.
Une variété d'agitateurs et d'accessoires sont disponibles. Ceux-ci sont décrits dans la section Agitateurs
et accessoires de ce manuel.
INSTALLATION
DÉBALLAGE
Ce batteur-mélangeur a été inspecté avant de quitter l'usine. La société de transport assume l'entière
responsabilité de la livraison en bon état du fait de l'acceptation de l'expédition. Inspectez le batteur-
mélangeur dès sa réception pour des bris dus au transport.
Si vous constatez que le batteur-mélangeur est endommagé, procédez comme suit :
1. La société de transport doit être notifi ée dans les cinq jours ouvrables suivant la réception du robot
culinaire.
2. La société de transport doit être notifi ée immédiatement une fois le dommage constaté (notez l'heure,
la date et la personne de contact), et faites un suivi de la notifi cation et confi rmez-la au moyen de
communication écrite ou électronique.
3. Tous les matériaux d'emballage originaux doivent être conservés aux fi ns d'inspection.
4. Le batteur-mélangeur ne peut pas avoir été déplacé, installé ou modifi é.
5. Communiquez avec le service à la clientèle de Hobart au 1 800 333-7447.
EMPLACEMENT
Avant d’installer le batteur-mélangeur, vérifi ez que le service électrique est conforme aux spécifi cations
sur la plaque signalétique de l’appareil.
Placez le batteur-mélangeur sur une surface de niveau solide et appropriée. Il devrait y avoir suffi samment
d'espace autour du batteur-mélangeur pour que l'utilisateur puisse actionner les commandes et installer et
retirer les bols. Des trous sont situés dans la base pour fi xer de manière permanente le batteur-mélangeur,
bien que cela ne soit pas nécessaire dans les installations normales.

– 4 –
RACCORDEMENTS ÉLECTRIQUES (batteur-mélangeur à fi l)
AVERTISSEMENT
Le cordon d'alimentation sur cette machine est doté d'une fi che de terre à trois
broches qui doit être branchée à une prise correctement mise à la terre. Si la prise n’est pas de type
de mise à la terre, contactez un électricien. N'enlevez PAS la broche de mise à la terre de la fi che.
AVERTISSEMENT
Les raccordements électriques et de mise à la terre doivent être conformes aux
parties applicables du National Electrical Code et/ou d'autres codes électriques locaux.
Contrôler la première utilisation
1. Mettez le batteur-mélangeur sous tension en insérant la fi che du cordon dans une prise correctement
mise à la terre.
2. Le batteur-mélangeur émet trois bips indiquant que l’appareil est prêt.
3. Installez le bol sur le support à bol et relevez-le dans la position pour mélanger, avec le support à
bol vers le haut et la grille de protection du bol en position fermée.
4. Tournez le levier de changement de vitesse vers 1.
5. Faites fonctionner l’appareil en appuyant sur le bouton ON/OFF (marche/arrêt).

– 5 –
FONCTIONNEMENT
AVERTISSEMENT
Agitateur en mouvement dans le bol. Gardez les mains, les vêtements et les ustensiles
hors du bol pendant le fonctionnement. N’utilisez pas le batteur-mélangeur sans de protection
interverrouillée.
Le batteur-mélangeur de 20 pte Centerline par Hobart est équipé d'une minuterie et de commandes.
Reportez-vous à la fi gure 1 pour les pièces de fonctionnement et la section FONCTIONNEMENT pour
connaître leurs fonctions.
La grille de protection du bol doit être fermée; sinon le batteur-mélangeur ne peut pas fonctionner.
Le bol doit rester en position de mélange sur le support à bol, et le support à bol doit être levé (position
de mélange) sinon le batteur-mélangeur ne fonctionnera pas.
Fig. 1
COMMANDES
ADAPTATEUR À
ACCESSOIRES
COUPELLE
ANTIGOUTTE
GRILLE DE
PROTECTION
DU BOL
AGITATEUR
PARE-
ÉCLABOUSSURES
SUPPORT
À BOL
TABLIER

– 6 –
COMMANDES STANDARD
MODÈLE HMM20 (avec trois vitesses de mélange)
VITESSES DU BATTEUR-MÉLANGEUR
VITESSE 1 (basse)
Cette vitesse est utile pour les mélanges lourds tels que les pâtes lourdes, les pommes de
terre, la pâte à pizza et la pâte à pain.
VITESSE 2 (moyenne)
Cette vitesse permet de mélanger les pâtes à gâteaux et mettre en purée les pommes de terre.
VITESSE 3 (haute)
Cette vitesse permet d'incorporer de l’air dans des lots légers et de terminer les aliments fouettés.
DESCRIPTION DES FONCTIONS DES BOUTONS
REMARQUE : L'appareil émet un bip une fois que vous appuyez sur un bouton.
ON/OFF
(MARCHE/
ARRÊT)
Appuyez sur le bouton ON/OFF (marche/arrêt) pour démarrer le batteur-mélangeur. Si le batteur-mélangeur
fonctionne, appuyez sur le bouton ON/OFF pour arrêter le batteur-mélangeur.
FLÈCHE VERS
LE BAS DE SEC
Appuyez une fois sur ce bouton pour augmenter le temps par incréments de 1 seconde. Maintenez le bouton
enfoncé pour augmenter rapidement le temps jusqu'au moment où vous le relâchez. La plage est de 0-59.
FLÈCHE VERS
LE HAUT DE
SEC
Appuyez une fois sur ce bouton pour diminuer le temps par incréments de 1 seconde. Maintenez le bouton
enfoncé pour diminuer rapidement le temps jusqu'au moment où vous le relâchez. La plage est de 0-59.
FLÈCHE VERS
LE HAUT DE MIN
Appuyez une fois sur ce bouton pour augmenter le temps par incréments de 1 minute. Maintenez le bouton
enfoncé pour augmenter rapidement le temps jusqu'au moment où vous le relâchez. La plage est de 0-59.
FLÈCHE VERS
LE BAS DE MIN
Appuyez une fois sur ce bouton pour diminuer le temps par incréments de 1 minute. Maintenez le bouton
enfoncé pour diminuer rapidement le temps jusqu'au moment où vous le relâchez. La plage est de 0-59.
REMARQUE : Les secondes et les minutes sont défi nies indépendamment.
REMARQUE : Le bouton ON/OFF (marche/arrêt) peut être utilisé pour eff acer l'erreur de surcharge.
Fig. 2
AFFICHEUR
DE LA
MINUTERIE
SECONDE
(AUGMENTER)
MINUTE
(AUGMENTER)
SECONDE
(DIMINUER)
MINUTE
(DIMINUER)
MARCHE/ARRÊT
LEVIER DE CHANGEMENT
DE VITESSE

– 7 –
MISE EN PLACE DU BOL
Le bol doit être installé sur le support à bol avant d’installer l'agitateur.
Pour installer le bol, abaissez le support à bol et déplacez les pinces du bol en position ouverte (fi g. 3).
Placez le bol de façon à ce que le support d'alignement à l'arrière du bol se trouve dans le dispositif de
retenue du bol et que les goupilles d'alignement sur le devant du support à bol s'insèrent dans les orifi ces
situés sur les côtés du bol. Verrouillez le bol en faisant tourner les pinces du bol (fi g. 4).
AGITATEUR
Pour installer un agitateur, le bol doit se trouver sur le support à bol.
Assemblage
1. Abaissez le bol.
2. Ouvrez la grille de protection du bol.
3. Placez l'agitateur à l'intérieur du bol et alignez la fente horizontale de l'agitateur avec la goupille de
la tige pour agitateur.
4. Faites glisser l'agitateur le long de la tige pour agitateur et tournez-le dans le sens horaire pour
placer la goupille de la tige dans la fente de l’arbre de l'agitateur.
Retrait
1. Ouvrez la grille de protection du bol.
2. Abaissez le bol.
3. Levez l'agitateur et tournez-le dans le sens antihoraire. Faites glisser l'agitateur vers le bas et
enlevez-le de la tige pour agitateur.
Fig. 3 Fig. 4

– 8 –
PRÉPARATION POUR LE MÉLANGE
1. Placez le bol de mélange sur le support à bol.
2. Versez les ingrédients dans le bol.
3. Placez l’agitateur à l’intérieur du bol, puis fi xez-le
à la tige pour agitateur (fi g. 5).
4. Levez le support à bol.
5. Fermez correctement la grille de protection du
bol.
6. Le batteur-mélangeur est maintenant prêt à
l’emploi.
MODES DE MÉLANGE
1. Tournez le levier de changement de vitesse (fi g. 6) pour sélectionner une vitesse de mélange.
L'affi cheur de la minuterie indique OFF (arrêt) (fi g. 6).
REMARQUE : GearSafe™ protège les engrenages si les vitesses sont modifi ées pendant le mélange
sans arrêter la machine.
2. Appuyez sur le bouton ON/OFF (marche/arrêt) (fi g. 7) pour démarrer le mélange. L'affi cheur de la
minuterie indique ON (marche) (fi g. 7).
REMARQUE : Si la grille est ouverte ou si le bol est abaissé à tout moment, l'opération de mélange s'arrête.
Pour reprendre l'opération de mélange, fermez la grille ou levez le bol et appuyez sur le bouton ON/OFF
(marche/arrêt).
3. Appuyez sur le bouton ON/OFF (marche/arrêt) pour arrêter le batteur-mélangeur. L'affi cheur de la
minuterie indique OFF (arrêt).
4. Appuyez sur le bouton ON/OFF (marche/arrêt) pour reprendre l’opération de mélange, selon les
besoins.
Fig. 5
Fig. 6 Fig. 7
LEVIER DE
CHANGEMENT DE
VITESSE
MARCHE/ARRÊT
BOUTON

– 9 –
MODE DE MÉLANGE MINUTÉ
1. Tournez le levier de changement de vitesse (fi g. 6) pour sélectionner une vitesse de mélange.
L'affi cheur de la minuterie indique OFF (arrêt) (fi g. 6).
2. Appuyez sur les fl èches MIN (haut/bas) et SEC (haut/bas) jusqu'à ce que l’affi cheur de la minuterie
indique la durée de mélange désirée (fi g. 8). Ce temps est la durée défi nie.
3. Appuyez sur le bouton ON/OFF (marche/arrêt) pour commencer à mélanger; la minuterie commence
à compter à partir de la durée défi nie.
4. Pour arrêter le batteur-mélangeur à tout moment, appuyez sur le bouton ON/OFF. Pour reprendre
l’opération de mélange, appuyez sur le bouton ON/OFF. Par exemple : le batteur-mélangeur démarre
à la vitesse 1 pendant 30 secondes et s'arrête après 10 secondes. Appuyez sur le bouton ON/OFF
(marche/arrêt) pour reprendre l'opération de mélange et les 20 secondes restantes seront décomptées.
REMARQUE : Si la grille est ouverte ou si le bol est abaissé à tout moment, l'opération de mélange s'arrête.
Pour reprendre l'opération de mélange, fermez la grille ou levez le bol et appuyez sur le bouton ON/OFF
(marche/arrêt).
5. Lorsque la minuterie atteint 00:00, le batteur-mélangeur s'arrête et émet trois bips. Le compte à
rebours affi che ensuite la durée défi nie restante.
NOTES SUR L’OPÉRATION
• Si le batteur-mélangeur est arrêté pendant une opération de mélange, la minuterie s'arrête également.
La minuterie redémarre (avec la durée restante) lorsque le bouton ON/OFF est appuyé (fi g. 8).
Fig. 8
BOUTON
MARCHE/ARRÊT

– 10 –
DÉCHARGEMENT
1. Ouvrez la grille de protection du bol.
2. Abaissez le support à bol.
3. Retirez l'agitateur de la tige pour agitateur.
4. Ouvrez les pinces du bol.
5. Soulevez le bol des goupilles et retirez-le du support à bol.
GRILLE DE PROTECTION
La grille de protection du bol peut être tournée vers la gauche pour ajouter des ingrédients ou pour accéder
au bol et à l'agitateur.
Notez comment les supports en plastique permettent à la grille de protection de circuler autour de la
circonférence de la coupelle antigoutte planétaire.
• Ouvrez grille de protection du bol; faites-la pivoter vers la gauche (fi g. 9).
• Fermez la grille de protection du bol; faites-la pivoter vers la droite jusqu'à ce qu'elle s'arrête en
position fermée (fi g. 10).
REMARQUE : La grille de protection du bol doit être retournée en position fermée afi n que le batteur-
mélangeur puisse fonctionner.
Fig. 9
Fig. 10

– 11 –
Retrait et nettoyage de la grille de protection du bol
Abaissez le bol. Faites pivoter l'assemblage la grille de protection vers la gauche jusqu'à ce qu'elle soit
positionnée sous le pare-éclaboussures. Retirez l'agitateur et le bol.
En tenant la grille avec vos deux mains, tournez-la complètement vers la gauche. Lorsque le dispositif de
retenue du centre avant (fi g. 11) atteint la fi n de sa course, il peut être abaissé à travers la partie plate (fi g.
11) sectionnée de la saillie de la coupelle antigoutte (fi g. 11). Après avoir abaissé le dispositif de retenue
du centre avant, déplacez légèrement la grille vers l'arrière de manière à ce que les dispositifs de retenue
arrière se dégagent de la saillie sur la coupelle antigoutte. La grille de protection peut maintenant être
abaissée et retirée.
Lavez la grille de protection du bol dans un évier, rincez à l'eau claire et séchez avec un chiff on propre.
Le pare-éclaboussure peut être essuyé et/ou lavé à l’aide d’un chiff on ou une éponge avec de l'eau chaude
savonneuse. Rincez à l'eau claire et séchez avec un chiff on propre.
Mise en place de la grille de protection
Tenez la grille de protection de sorte que son anneau supérieur soit positionné autour de la coupelle
antigoutte planétaire avec les rainures dans les deux dispositifs de retenue arrière en nylon chevauchant
le saillie sur la coupelle antigoutte à l'arrière. Levez la grille de protection de manière à ce que le dispositif
de retenue du centre avant passe la partie plate sectionnée de la saillie de la coupelle antigoutte et
faites pivoter la grille vers la droite. La grille de protection est correctement assemblée lorsque les trois
dispositifs de retenue chevauchent le saillie de la coupelle antigoutte dans trois emplacements opposés.
Faites pivoter la grille de protection vers la droite jusqu'à ce qu'elle s'arrête en position centrale avant.
Faites pivoter la grille vers la gauche pour installer ou retirer l'agitateur et le bol ou pour ajouter des
ingrédients.
Retournez la grille de protection dans sa position centrale avant pour faire fonctionner le batteur-mélangeur.
Fig. 11
DISPOSITIF DE
RETENUE DU
CENTRE AVANT
SAILLIE DE
LA COUPELLE
ANTIGOUTTE
PARTIE PLATE

– 12 –
AGITATEURS ET ACCESSOIRES
Batteur plat 20 pte Fouet 20 pte Crochet à pâte 20 pte
Crochet à pâte J 20 pte Bol (SST) 20 pte
Chute d’ingrédients 20 pte Table 20 pte

– 13 –
NETTOYAGE
AVERTISSEMENT
Débranchez le cordon d'alimentation de l’appareil avant d’entamer toute procédure
de nettoyage.
Le batteur-mélangeur doit être nettoyé à fond tous les jours. N'utilisez PAS de tuyau pour nettoyer le batteur-
mélangeur; il doit être lavé avec un chiff on propre et humide. La base permet amplement d'espace pour
le nettoyage sous le batteur-mélangeur. Le tablier (fi g. 1) peut être retiré pour le nettoyage en desserrant
les vis. La coupelle antigoutte (fi g. 1) doit être nettoyé. Pour nettoyer la grille de protection, reportez-vous
à la page 11.

– 14 –
ENTRETIEN
AVERTISSEMENT
Débranchez le cordon d'alimentation de l’appareil avant d’entamer toute procédure
d’entretien.
LUBRIFICATION
Glissières
Les glissières (fi g. 12) doivent être lubrifi ées environ deux fois par an. Pour atteindre ces zones, abaissez
complètement le support à bol et retirez le tablier (fi g. 12), qui est fi xé par des vis. Appliquez une fi ne
couche de « Lubriplate 630AA » sur chaque glissière. Installez le tablier.
Joint planétaire
Le joint planétaire (fi g. 13) peut devenir sec et commencer à grincer. Pour corriger cela, appliquez un peu
de lubrifi cation (huile minérale) sous la lèvre du joint.
Fig. 12 Fig. 13
JOINT
PLANÉTAIRE
GLISSIÈRES
(derrière le cache)
TABLIER

– 15 –
RÉGLAGES
Distance de dégagement de l’agitateur
Vérifi ez régulièrement la distance de dégagement de l'agitateur. L'agitateur ne doit pas toucher le bol. La
distance de dégagement maximale entre le fond du bol et le batteur plat B est de 1/8 po (3 mm).
Installez le bol et un agitateur (par ex., batteur). Si le bol et le batteur entrent en contact avant que le
support à bol n'atteigne son arrêt, réglez la vis d'arrêt. Reportez-vous à la section Réglage de la distance
de dégagement du bol/agitateur.
Mesurer la distance de dégagement
Versez suffi samment de farine dans le bol pour couvrir le fond du bol où le batteur se déplace. Avec le bol
complètement relevé (le batteur ne doit pas toucher le fond du bol); faites tourner brièvement le batteur
à la vitesse la plus basse.
Éteignez le batteur-mélangeur, débranchez le cordon d’alimentation et mesurez la profondeur de la farine
où le batteur a tracé un chemin. Cette mesure devrait être prise à plusieurs points autour du bol pour
assurer la précision.
Réglage de la distance de dégagement du bol/agitateur
• Enlevez le tablier (fi g. 14) fi xé par des vis.
• Réglez la distance de dégagement en desserrant l’écrou d’arrêt et en déplaçant la vis (fi g. 15)
dans le sens horaire pour augmenter la distance de dégagement ou dans le sens antihoraire pour
diminuer la distance de dégagement.
• Une fois les réglages eff ectués, serrez l'écrou d'arrêt et replacez le tablier, puis fi xez-le avec les vis.
• Faites lever le bol plusieurs fois afi n de vérifi er le réglage.
Fig. 14 Fig. 15
TABLIER
ÉCROU
D’ARRÊT
VIS

– 16 –
DÉPANNAGE
Symptômes Causes possibles
Le batteur-mélangeur ne démarre pas. L’affi cheur de la minuterie clignote – reportez-vous ci-
dessous.
Le protecteur de circuit de dérivation est en position
ouverte – vérifi ez le fusible ou le sectionneur.
Le batteur-mélangeur est surchargé.
La grille de protection n’est pas en position fermée.
Le bol n'est pas en position fermée (mélange) ou le bol
n'est pas en position haute.
L’agitateur touche le bol. Le bol n'est pas en position fermée (mélange).
Distance de dégagement incorrect de l'agitateur –
consultez la section Entretien pour connaître la procédure
de réglage.
L'agitateur n'est pas installé correctement.
Le joint planétaire grince. Le joint nécessite de lubrifi cation occasionnelle – consultez
la section Entretien.
L’affi cheur de la minuterie clignote et
l’appareil émet des bips.
Si l'affi chage de la minuterie clignote et que l’appareil émet
des bips, appuyez sur le bouton ON/OFF (marche/arrêt)
pour réinitialiser. Si le symptôme persiste, contactez le
bureau de service Hobart local.
L'affi cheur de la minuterie indique OP
(fi g. 16).
Le levier de changement de vitesse n'est pas correctement
installé.
SERVICE
Si une réparation est nécessaire sur cet équipement, contactez votre bureau de service Hobart local au
1 888 4HOBART.
Fig. 16
LEVIER DE
CHANGEMENT DE
VITESSE
FORMULAIRE 45268 Rév. A (octobre 2018) IMPRIMÉ AUX É.-U.

701 S. RIDGE AVENUE
TROY, OHIO 45374-0001
937-332-3000
www.hobartcorp.com
MANUAL DE
INSTRUCCIONES
MODELO
HMM20
FORMULARIO 45268 Rev. A (Octubre de 2018)

– 2 –
© HOBART, 2018
TABLA DE CONTENIDO
GENERAL ............................................................................................................................................. 3
INSTALACIÓN ..................................................................................................................................... 3
Desembalaje .................................................................................................................................... 3
Ubicación ......................................................................................................................................... 3
Conexiones eléctricas (Batidoras conectadas con cable) ............................................................... 4
Revisión inicial de operación ..................................................................................................... 4
OPERACIÓN ........................................................................................................................................ 5
CONTROLES ESTÁNDAR ................................................................................................................. 6
Modelo HMM20 (con tres velocidades de batido) ........................................................................... 6
Velocidades de la batidora .............................................................................................................. 6
Descripción de la función de los botones ........................................................................................ 6
COLOCACIÓN DEL TAZÓN ............................................................................................................... 7
Batidor ............................................................................................................................................. 7
Para instalarlo ............................................................................................................................ 7
Para quitarlo .............................................................................................................................. 7
Preparación para mezclar ............................................................................................................... 8
Modos de mezclado ........................................................................................................................ 8
Modo de mezclado programado ...................................................................................................... 9
Notas de funcionamiento ................................................................................................................. 9
Descarga ....................................................................................................................................... 10
Montaje de la rejilla del tazón ........................................................................................................ 10
Cómo retirar y limpiar la rejilla de la guarda del tazón..............................................................11
Cómo volver a colocar la rejilla del tazón .................................................................................11
Batidores y aditamentos ................................................................................................................ 12
LIMPIEZA ........................................................................................................................................... 13
MANTENIMIENTO ............................................................................................................................. 14
Lubricación .................................................................................................................................... 14
Guías ....................................................................................................................................... 14
Sello planetario ........................................................................................................................ 14
Ajustes ........................................................................................................................................... 15
Espacio libre del batidor .......................................................................................................... 15
Medida del espacio libre .......................................................................................................... 15
Ajuste del espacio libre del tazón y del batidor........................................................................ 15
RESOLUCIÓN DE PROBLEMAS ...............................................................
...................................... 16
Servicio .......................................................................................................................................... 16

– 3 –
Instalación, operación y cuidado de
la batidora Centerline de 20 cuartos de galón por
Hobart
CONSERVE ESTAS INSTRUCCIONES
GENERAL
La batidora Centerline de 20 cuartos de galón por Hobart es una batidora de tipo banco que tiene tres
velocidades, un temporizador digital, una palanca de levantamiento manual del tazón y una entrada de
aditamentos n.° 12 como equipamiento estándar.
Están disponibles una variedad de aditamentos, batidores y accesorios. Estos elementos se describen
en la sección Batidores y aditamentos de este manual.
INSTALACIÓN
DESEMBALAJE
La batidora fue inspeccionada antes de salir de fábrica. El transportista asume total responsabilidad
por la entrega segura una vez aceptado el cargamento. Compruebe que no haya daños al cargamento
inmediatamente después de recibirlo.
Si la batidora está dañada, siga estos pasos:
1. Notifi car al transportista dentro de los cinco días hábiles siguientes a la fecha de recepción.
2. Notifi car de inmediato a la terminal local del transportista tras el descubrimiento (anotar la hora, la
fecha y la persona con quien se habló) y hacer un seguimiento y enviar la confi rmación mediante
comunicaciones escritas o electrónicas.
3. Conservar todos los materiales originales del embalaje por motivos de inspección.
4. La batidora no debe moverse, instalarse ni modifi carse.
5. Notifi car al Servicio de Atención al Cliente de Hobart al (800) 333-7447.
UBICACIÓN
Antes de la instalación, pruebe el servicio eléctrico para asegurarse de que concuerda con las especifi caciones
de la placa de datos del equipo.
Coloque la batidora sobre una superfi cie nivelada y resistente. Debe haber espacio adecuado alrededor de
la batidora para que el usuario opere los controles e instale y retire los tazones. La batidora tiene orifi cios en
la base para asegurarla en forma permanente, si bien esto no es necesario en las instalaciones normales.

– 4 –
CONEXIONES ELÉCTRICAS (Batidoras conectadas con cable)
ADVERTENCIA
El cable eléctrico de esta máquina está equipado con un enchufe de conexión a
tierra con tres terminales que se deben conectar correctamente a una toma con conexión a tierra.
Si la toma corriente no es la correcta, comuníquese con un electricista. NO quite el terminal de
conexión a tierra del enchufe.
ADVERTENCIA
Las conexiones eléctricas y a tierra deben cumplir con la parte aplicable del Código
Eléctrico Nacional o de otros códigos eléctricos locales.
Revisión inicial de operación
1. Conecte la alimentación a la batidora insertando el enchufe del cable en una toma con conexión a
tierra apropiada.
2. La batidora emitirá tres pitidos para indicar que está lista.
3. Instale el tazón en el soporte del tazón y levántelo a la posición de mezclado con el soporte del
tazón y cierre la rejilla del tazón.
4. Lleve la palanca de cambio de velocidades a la posición 1.
5. Ponga en funcionamiento la batidora al presionar el botón ON/OFF.

– 5 –
OPERACIÓN
ADVERTENCIA
El batidor gira en el tazón, por lo que deberá mantener fuera las manos, la ropa y
los utensilios mientras está en funcionamiento. No use la batidora con la rejilla abierta.
La batidora Centerline de 20 cuartos de galón por Hobart está equipada con un temporizador y controles.
Consulte la Fig. 1 para conocer las partes y la sección OPERACIÓN para conocer sus funciones.
La rejilla del tazón debe estar cerrada para que la batidora funcione.
El tazón debe quedar en la posición de mezclado en el soporte del tazón y este soporte debe levantarse
(posición de mezclado) para que la batidora funcione.
Fig. 1
CONTROLES
ENTRADA DE
ADITAMENTOS
COLECTOR
DE GOTEO
REJILLA DE LA
GUARDA DEL
TAZÓN
BATIDOR
GUARDA CONTRA
SALPICADURAS
SOPORTE
DEL TAZÓN
CUBIERTA

– 6 –
CONTROLES ESTÁNDAR
MODELO HMM20 (con tres velocidades de batido)
VELOCIDADES DE LA BATIDORA
VELOCIDAD 1 (baja) Esta velocidad es para mezclas espesas, como masas espesas, papas,
mezcla para pizza y mezcla para pan.
VELOCIDAD 2 (intermedia) Esta velocidad es para mezclar mezclas de tortas y puré de papas.
VELOCIDAD 3 (alta) Esta velocidad es para incorporar aire en los lotes ligeros y también
para terminar productos batidos.
DESCRIPCIÓN DE LA FUNCIÓN DE LOS BOTONES
NOTA: La batidora emitirá un pitido una vez cuando se presione cualquier botón.
ON/OFF (ENCENDIDO/
APAGADO)
Presione el botón ON/OFF para iniciar la batidora. Si la batidora está funcionando, presione el
botón ON/OFF para detenerla.
FLECHA SEC UP
(AUMENTAR SEGUNDOS)
Presione una vez para aumentar el tiempo en incrementos de 1 segundo. Mantenga presionado
para aumentar el tiempo rápidamente hasta soltarlo. El rango comprende de 0 a 59.
FLECHA SEC DOWN
(DISMINUIR SEGUNDOS)
Presione una vez para disminuir el tiempo en incrementos de 1 segundo. Mantenga presionado
para disminuir el tiempo rápidamente hasta soltarlo. El rango comprende de 0 a 59.
FLECHA MIN UP
(AUMENTAR MINUTOS)
Presione una vez para aumentar el tiempo en incrementos de 1 minuto. Mantenga presionado
para aumentar el tiempo rápidamente hasta soltarlo. El rango comprende de 0 a 59.
FLECHA MIN DOWN
(DISMINUIR MINUTOS)
Presione una vez para disminuir el tiempo en incrementos de 1 minuto. Mantenga presionado
para disminuir el tiempo rápidamente hasta soltarlo. El rango comprende de 0 a 59.
NOTA: Los segundos y minutos se confi guran de forma independiente.
NOTA: El botón ON/OFF se utiliza para borrar el error de sobrecarga.
Fig. 2
PANTALLA DEL
TEMPORIZADOR
AUMENTAR
SEGUNDOS
AUMENTAR
MINUTOS
DISMINUIR
SEGUNDOS
DISMINUIR
MINUTOS
ON/OFF
PALANCA DE CAMBIO
DE VELOCIDADES

– 7 –
COLOCACIÓN DEL TAZÓN
El tazón debe colocarse en el soporte del tazón antes de colocar el batidor.
Para instalar el tazón, baje el soporte del tazón y mueva las abrazaderas del tazón a la posición de
apertura (Fig. 3). Coloque el tazón de forma tal que el soporte de alineación en la parte posterior del tazón
esté en el dispositivo de retención del tazón y los pernos de alineación en la parte frontal del soporte del
tazón encajen en los orifi cios de los laterales del tazón. Asegure el tazón en su lugar al girar las abrazaderas
(Fig. 4).
BATIDOR
Para colocar el batidor, el tazón deben estar en el soporte del tazón.
Para instalarlo
1. Baje el tazón.
2. Abra la rejilla del tazón.
3. Coloque el batidor dentro del tazón y alinee la ranura horizontal en el batidor con el perno del eje
del batidor.
4. Deslice el batidor hacia arriba del eje y gírelo hacia la derecha para asentar el perno del eje en la
ranura del mango del batidor.
Para quitarlo
1. Abra la rejilla del tazón.
2. Baje el tazón.
3. Levante el batidor y gírelo hacia la izquierda. Deslice el batidor hacia abajo del eje.
Fig. 3 Fig. 4

– 8 –
PREPARACIÓN PARA MEZCLAR
1. Coloque el tazón para mezclar en el soporte
del tazón.
2. Vierta los ingredientes en el tazón.
3. Coloque el batidor dentro del tazón y
asegúrelo
al eje (Fig. 5).
4. Levante el soporte del tazón.
5. Cierre bien la rejilla del tazón.
6. El batidor ahora está listo para mezclar.
MODOS DE MEZCLADO
1. Coloque la palanca de cambio de velocidades (Fig. 6) para seleccionar una velocidad de mezclado.
En la pantalla del temporizador, se lee OFF (APAGADO) (Fig. 6).
NOTA: GearSafe™ protege los engranajes si se cambian las velocidades durante la operación de
mezclado sin detener la máquina.
2. Presione el botón ON/OFF (Fig. 7) para comenzar a mezclar. En la pantalla del temporizador, se
lee ON (ENCENDIDO) (Fig. 7).
NOTA: Si la rejilla se abre o el tazón se baja en cualquier momento, la operación de mezclado se detendrá.
Para reiniciar la operación de mezclado, cierre la rejilla o levante el tazón y presione el botón ON/OFF.
3. Presione el botón ON/OFF para detener la batidora. En la pantalla del temporizador, se lee OFF
(APAGADO).
4. Presione el botón ON/OFF para reanudar el mezclado, si es necesario.
Fig. 5
Fig. 6 Fig. 7
PALANCA DE CAMBIO
DE VELOCIDADES
BOTÓN
ON/OFF

– 9 –
MODO DE MEZCLADO PROGRAMADO
1. Coloque la palanca de cambio de velocidades (Fig. 6) para seleccionar una velocidad de mezclado.
En la pantalla del temporizador, se lee OFF (APAGADO) (Fig. 6).
2. Presione las fl echas MIN UP/DOWN y SEC UP/DOWN hasta que en la pantalla del temporizador
se lea el tiempo de mezclado deseado (Fig. 8). Este es el tiempo programado.
3. Presione el botón ON/OFF para comenzar el mezclado; el temporizador inicia la cuenta regresiva
del tiempo programado.
4. Para detener la batidora en cualquier momento, presione el botón ON/OFF. Para reanudar el
mezclado, presione el botón ON/OFF. Por ejemplo, la batidora se inicia en la velocidad 1 durante
30 segundos y se detiene después de 10 segundos. Presione el botón ON/OFF para reanudar la
operación de mezclado y reiniciar la cuenta regresiva de los 20 segundos restantes.
NOTA: Si la rejilla se abre o el tazón se baja en cualquier momento, la operación de mezclado se detendrá.
Para reiniciar la operación de mezclado, cierre la rejilla o levante el tazón y presione el botón ON/OFF.
5. Cuando el temporizador llega a 00:00, la batidora se detiene y suena una alarma tres veces. El
temporizador en cuenta regresiva mostrará el último tiempo que se ingresó.
NOTAS DE FUNCIONAMIENTO
• Si la batidora se detiene durante una operación de mezclado, el temporizador también se detiene.
El temporizador comienza nuevamente (con el tiempo restante) cuando se presiona el botón ON/
OFF (Fig. 8).
Fig. 8
BOTÓN
ON/OFF

– 10 –
DESCARGA
1. Abra la rejilla del tazón.
2. Baje el soporte del tazón.
3. Retire el batidor del eje.
4. Abra las abrazaderas del tazón.
5. Levante el tazón de los pernos y quítelo del soporte del tazón.
MONTAJE DE LA REJILLA DEL TAZÓN
El montaje de la rejilla del tazón puede girarse de forma que no estorbe hacia la izquierda para agregar
los ingredientes o llegar al tazón y al batidor.
Observe cómo las guías de plástico permiten que la rejilla vaya alrededor del colector de goteo del planetario.
• Abra la rejilla del tazón: gírela hacia la izquierda (Fig. 9).
• Cierre la rejilla del tazón: gírela hacia la derecha hasta que tope en la posición de cierre (Fig. 10).
NOTA: La rejilla del tazón debe regresarse a la posición de cierre para que la batidora funcione.
Fig. 9
Fig. 10

– 11 –
Cómo retirar y limpiar la rejilla de la guarda del tazón
Baje el tazón. Gire el montaje de la rejilla de la guarda hacia la izquierda hasta que esté colocado por
debajo de la guarda contra salpicaduras. Quite el batidor y el tazón.
Mientras sostiene el montaje de la rejilla de la guarda con ambas manos, gírelo por completo hacia la izquierda.
Cuando el dispositivo de retención frontal central (Fig. 11) llegue al fi nal de su recorrido, puede bajarse hasta que
quede plano (Fig. 11) en el borde del colector de goteo (Fig. 11). Después de bajar el dispositivo de retención frontal
central, mueva el montaje de la rejilla de la guarda levemente hacia atrás para que los dispositivos de retención
traseros despejen el borde en el colector de goteo. El montaje de la rejilla de la guarda ahora puede bajarse y quitarse.
Lave el montaje de la rejilla de la guarda del tazón en el fregadero, enjuáguela con agua limpia y séquela
con un trapo limpio.
La guarda contra salpicaduras puede lavarse con un trapo o esponja, agua tibia y jabón. Enjuáguela con
agua limpia y séquela con un trapo limpio.
Cómo volver a colocar la rejilla del tazón
Sostenga el montaje de la rejilla de la guarda de forma tal que su anillo superior esté colocado alrededor del
colector de goteo del planetario con las ranuras en los dispositivos de retención traseros de nailon extendidas
por sobre el borde del colector de goteo en la parte trasera. Levante el montaje de la rejilla de la guarda de forma
tal que el dispositivo de retención frontal central pase por arriba del parte plana en el borde del colector de goteo
y gire el montaje de la rejilla hacia la derecha. El montaje de la rejilla está correctamente ensamblado cuando
los tres dispositivos de retención se extienden por encima del borde del colector de goteo en tres ubicaciones
opuestas. Gire el montaje de la rejilla hacia la derecha hasta que se detenga en la posición frontal central.
Gire la rejilla de forma que no estorbe hacia la izquierda para instalar o quitar el batidor y el tazón o para
agregar los ingredientes.
Regrese la rejilla a su posición frontal central para poner en funcionamiento la batidora.
Fig. 11
DISPOSITIVO
DE RETENCIÓN
FRONTAL
CENTRAL
BORDE DEL
COLECTOR DE
GOTEO
PARTE PLANA

– 12 –
BATIDORES Y ADITAMENTOS
Batidor plano 20 qt Batidor de alambre 20 qt Gancho para masa 20 qt
Gancho para masa tipo J de 20 qt
Tazón de 20 qt (SST)
Embudo para los ingredientes de 20 qt
Mesa de 20 qt

– 13 –
LIMPIEZA
ADVERTENCIA
Desenchufe el cable de alimentación de la máquina antes de comenzar cualquier
procedimiento de limpieza.
La batidora debe limpiarse cuidadosamente a diario. NO utilice una manguera para limpiarla; hágalo con
un trapo limpio y húmedo. La base tiene un espacio amplio para la limpieza debajo de la batidora. La
cubierta (Fig. 1) puede retirarse para la limpieza afl ojando los tornillos. El colector de goteo (Fig. 1) debe
limpiarse. Para la limpieza del montaje de la rejilla de la guarda del tazón, vaya a la página 11.

– 14 –
MANTENIMIENTO
ADVERTENCIA
Desenchufe el cable de alimentación de la máquina antes de comenzar cualquier
procedimiento de mantenimiento.
LUBRICACIÓN
Guías
Las guías (Fig. 12) deben lubricarse aproximadamente dos veces al año. Para llegar a estas zonas, baje
completamente el soporte del tazón y retire la cubierta (Fig. 12), que está asegurada con tornillos. Limpie
con una capa delgada de Lubriplate 630AA en cada guía. Coloque la cubierta.
Sello planetario
En ocasiones, el sello planetario (Fig. 13) puede secarse y comenzar a rechinar. Para corregir esto,
aplique un poco de lubricante (aceite mineral) debajo del labio del sello.
Fig. 12 Fig. 13
SELLO
PLANETARIO
GUÍAS
(detrás de la cubierta)
CUBIERTA

– 15 –
AJUSTES
Espacio libre del batidor
El espacio libre del batidor debe revisarse en forma periódica. El batidor no debe tocar el tazón. El espacio
libre máximo entre la parte inferior del tazón y el batidor plano tipo B es de 1/8” (3 mm).
Coloque un tazón y un batidor (p. ej., el batidor plano tipo B). Si el tazón y el batidor entran en contacto
antes de que el soporte del tazón llegue a su tope, ajuste el tornillo de tope. Consulte la sección Ajuste
del espacio libre del tazón y del batidor.
Medida del espacio libre
Vierta una cantidad sufi ciente de harina en el tazón para cubrir el fondo del tazón donde gira el batidor.
Con el tazón totalmente levantado (el batidor no debe tocar el fondo del tazón), haga funcionar brevemente
la batidora a la velocidad más baja.
Apague la batidora, desconéctela y mida la profundidad de la harina donde el batidor haya dejado un
camino. Esta medida debe tomarse en varios puntos alrededor del tazón para asegurar la precisión.
Ajuste del espacio libre del tazón y del batidor
• Quite la cubierta (Fig. 14), que está asegurada con tornillos.
• Ajuste el espacio libre al afl ojar la tuerca de tope y mover el tornillo (Fig. 15) hacia la derecha para
aumentar el espacio libre o hacia la izquierda para disminuir el espacio libre.
• Después de realizar los ajustes, ajuste la tuerca de tope, reemplace la cubierta y sujétela con los
tornillos.
• Levante con cuidado el tazón varias veces para revisar el ajuste.
Fig. 14 Fig. 15
CUBIERTA
TUERCA
DE TOPE
TORNILLO

– 16 –
RESOLUCIÓN DE PROBLEMAS
Problemas Causas posibles
La batidora no arranca. La pantalla parpadea; consulte lo siguiente.
El protector de circuito derivado está abierto.
Revise el fusible o el interruptor de desconexión.
La batidora está sobrecargada.
La rejilla no está cerrada.
El tazón no está cerrado (posición de mezclado)
o no está subido.
El batidor toca el tazón. El tazón no está cerrado (posición de mezclado).
El espacio del batidor no es el adecuado. Vaya
a la sección Mantenimiento para conocer el
procedimiento de ajuste.
El batidor no está colocado correctamente.
El sello planetario rechina. El sello debe lubricarse de vez en cuando.
Consulte la sección Mantenimiento.
La pantalla del temporizador parpadea mostrando
el tiempo y la máquina emite una alarma
Si la pantalla del temporizador parpadea y la
máquina emite una alarma, presione el botón ON/
OFF para restablecer. Si el síntoma continúa,
comuníquese con su ofi cina de servicio local de
Hobart.
En la pantalla del temporizador se lee OP
(Fig. 16).
La palanca de cambio de velocidades no está
correctamente asentada.
SERVICIO
Si este equipo necesita servicio, llame a su ofi cina de servicio local de Hobart al (888) 4HOBART.
Fig. 16
PALANCA DE
CAMBIO DE
VELOCIDADES
FORMULARIO 45268 Rev. A (Octubre de 2018) IMPRESO EN EE. UU.
Transcripción de documentos
INSTRUCTION MANUAL MODEL HMM20 701 S. RIDGE AVENUE TROY, OHIO 45374 - 0001 937-332-3000 www.hobar tcorp.com FORM 45268 Rev. A (October 2018) TABLE OF CONTENTS GENERAL............................................................................................................................................. 3 INSTALLATION .................................................................................................................................... 3 Unpacking........................................................................................................................................ 3 Location ........................................................................................................................................... 3 Electrical Connections (Cord Connected Mixers) ............................................................................ 4 Check Initial Operation .............................................................................................................. 4 OPERATION ........................................................................................................................................ 5 STANDARD CONTROLS .................................................................................................................... 6 Model HMM20 (With Three Mix Speeds)......................................................................................... 6 Mixer Speeds................................................................................................................................... 6 Button Function Description ............................................................................................................ 6 BOWL PLACEMENT ........................................................................................................................... 7 Agitator ............................................................................................................................................ 7 To Install..................................................................................................................................... 7 To Remove................................................................................................................................. 7 Prepare For Mixing .......................................................................................................................... 8 Mixing Modes .................................................................................................................................. 8 Timed Mixing Mode ......................................................................................................................... 9 Operating Notes .............................................................................................................................. 9 Unloading ...................................................................................................................................... 10 Wire Cage Assembly ..................................................................................................................... 10 Remove and Clean Bowl Guard Wire Cage .............................................................................11 Reinstall Bowl Guard Wire Cage ..............................................................................................11 Agitators and Attachments............................................................................................................. 12 CLEANING ......................................................................................................................................... 13 MAINTENANCE ................................................................................................................................. 14 Lubrication ..................................................................................................................................... 14 Slideways................................................................................................................................. 14 Planetary Seal ......................................................................................................................... 14 Adjustments ................................................................................................................................... 15 Agitator Clearance ................................................................................................................... 15 Measure Clearance ................................................................................................................. 15 Adjust the Bowl/Agitator Clearance ......................................................................................... 15 TROUBLESHOOTING ...................................................................................................................... 16 Service ........................................................................................................................................... 16 © HOBART, 2018 –2– Installation, Operation and Care of Centerline by Hobart 20-Quart Mixer SAVE THESE INSTRUCTIONS GENERAL The Centerline by Hobart 20-quart mixer is a bench-type mixer which features three-speeds, a digital timer, a manual bowl lift, and a #12 attachment hub as standard equipment. A variety of attachments, agitators, and accessories are available. These are described in the Agitators and Attachments section of this manual. INSTALLATION UNPACKING The mixer was inspected before leaving the factory. The carrier assumes full responsibility for safe delivery upon acceptance of the shipment. Check for possible shipping damage immediately after receipt. If the mixer is found to be damaged, complete the following steps: 1. Carrier must be notified within five business days of receipt. 2. Carrier’s local terminal must be notified immediately upon discovery (note the time, date, and who was spoken to), and follow up and confirm with written or electronic communication. 3. All original packing materials must be kept for inspection purposes. 4. The mixer cannot have been moved, installed, or modified. 5. Notify Hobart customer care at (800) 333-7447. LOCATION Prior to installation, test the electrical service to ensure it agrees with the specifications on the machine data plate. Place the mixer on a suitable sturdy level surface. There should be adequate space around the mixer for the user to operate the controls and to install and remove bowls. Holes are located in the base to permanently secure the mixer, although this is not necessary in normal installations. –3– ELECTRICAL CONNECTIONS (Cord Connected Mixers) The electrical cord on this machine is equipped with a three-pronged grounding plug which must be connected to a properly grounded receptacle. If the receptacle is not the proper grounding type, contact an electrician. DO NOT remove the grounding prong from the plug. Electrical and grounding connections must comply with the applicable portion of the National Electrical Code and/or other local electrical codes. Check Initial Operation 1. Apply power to the mixer by inserting the cord plug into a properly grounded outlet. 2. Machine will beep three times indicating machine is ready. 3. Install the bowl on the bowl support and raise into the mix position, with the bowl support up and bowl guard wire cage closed. 4. Turn the speed gear shift lever to 1. 5. Run the machine by pushing the ON/OFF button. –4– OPERATION Moving agitator in bowl. Keep hands, clothing and utensils out of bowl while in operation. Do not use without interlocked guard. The Centerline by Hobart 20-quart mixer is equipped with a timer and controls. Refer to Fig. 1 for operating parts and OPERATION section for their functions. The bowl guard wire cage must be in closed position or the mixer will not operate. The bowl must remain in mix position on bowl support, and the bowl support must be raised (mix position) or the mixer will not operate. ATTACHMENT HUB CONTROLS DRIP CUP SPLASH GUARD BOWL GUARD WIRE CAGE APRON AGITATOR BOWL SUPPORT Fig. 1 –5– STANDARD CONTROLS MODEL HMM20 (With Three Mix Speeds) TIMER DISPLAY SECOND UP MINUTE UP SPEED GEAR SHIFT LEVER ON/OFF MINUTE DOWN SECOND DOWN Fig. 2 MIXER SPEEDS SPEED 1 (Low) SPEED 2 (Medium) SPEED 3 (High) This speed is for heavy mixtures such as heavy batters, potatoes, pizza dough, and bread dough. This speed is for mixing cake batters and mashing potatoes. This speed is for incorporating air into light batches, as well as finishing whipped items. BUTTON FUNCTION DESCRIPTION NOTE: The machine will beep once when any button is pressed. ON/OFF Press the ON/OFF button to start the mixer. If the mixer is running, press the ON/OFF button to stop the mixer. SEC UP ARROW Press once to increase the time in 1 second increments. Press and hold to quickly increase time until released. Range is 0-59. SEC DOWN ARROW Press once to decrease the time in 1 second increments. Press and hold to quickly decrease time until released. Range is 0-59. MIN UP ARROW Press once to increase the time in 1 minute increments. Press and hold to quickly increase time until released. Range is 0-59. MIN DOWN ARROW Press once to decrease the time in 1 minute increments. Press and hold to quickly decrease time until released. Range is 0-59. NOTE: The seconds and minutes are set independently. NOTE: The ON/OFF button is used to clear overload error. –6– BOWL PLACEMENT The bowl must be installed on the bowl support before the agitator is installed. To install the bowl, lower the bowl support and move bowl clamps to the open position (Fig. 3). Position the bowl so the alignment bracket on the back of the bowl is in the bowl retainer and the alignment pins on the front of the bowl support fit in the holes on the sides of the bowl. Lock the bowl in place by rotating the bowl clamps (Fig. 4). Fig. 3 Fig. 4 AGITATOR To install an agitator, the bowl must be on the bowl support. To Install 1. Lower the bowl. 2. Open the bowl guard wire cage. 3. Place the agitator inside the bowl and align the horizontal slot on the agitator with the agitator shaft pin. 4. Slide the agitator up the agitator shaft and turn it clockwise to seat the shaft pin in the slot of the agitator shank. To Remove 1. Open the bowl guard wire cage. 2. Lower the bowl. 3. Lift the agitator and turn it counterclockwise. Slide agitator down and off the agitator shaft. –7– PREPARE FOR MIXING 1. Place the mixing bowl on the bowl support. 2. Pour ingredients into the bowl. 3. Place the agitator inside the bowl, and then attach it to the agitator shaft (Fig. 5). 4. Lift bowl support. 5. Correctly close the bowl guard wire cage. 6. The mixer is now ready for mixing. Fig. 5 MIXING MODES 1. Turn the speed gear shift lever (Fig. 6) to select a mix speed. The timer display reads OFF (Fig. 6). NOTE: GearSafe™ protects gears if speeds are changed during mixing operation without stopping machine. 2. Press the ON/OFF button (Fig. 7) to begin mixing. The timer display reads ON (Fig. 7). NOTE: If the wire cage is opened or the bowl is lowered at any time, the mixing operation will stop. To resume the mixing operation, close the wire cage or raise the bowl and press the ON/OFF button. 3. Press the ON/OFF button to stop the mixer. The timer display reads OFF. 4. Press the ON/OFF button to resume mixing if needed. SPEED GEAR SHIFT LEVER ON/OFF BUTTON Fig. 6 Fig. 7 –8– TIMED MIXING MODE 1. Turn the speed gear shift lever (Fig. 6) to select a mix speed. The timer display reads OFF (Fig. 6). 2. Press the MIN UP/DOWN and SEC UP/DOWN arrows until the timer display reads the desired mixing time (Fig. 8). This is the set time. 3. Press the ON/OFF button to begin mixing; the timer starts counting down from the set time. 4. To stop the mixer at any time, press the ON/OFF button. To resume mixing, press the ON/OFF button. For example: The mixer is started at speed 1 for 30 seconds and is stopped after 10 seconds. Pressing the ON/OFF button will resume the mixing operation and the remaining 20 seconds will count down. NOTE: If the wire cage is opened or the bowl is lowered at any time, the mixing operation will stop. To resume the mixing operation, close the wire cage or raise the bowl and press the ON/OFF button. 5. When the timer reaches 00:00, the mixer stops and beeps three times. The count-down timer then displays the last set time. ON/OFF BUTTON Fig. 8 OPERATING NOTES • If the mixer is stopped during a mixing operation, the timer also stops. The timer starts again (with the time remaining) when the ON/OFF button is pressed (Fig. 8). –9– UNLOADING 1. Open the bowl guard wire cage assembly. 2. Lower bowl support. 3. Remove the agitator from the agitator shaft. 4. Open the bowl clamps. 5. Lift the bowl off the pins and remove from the bowl support. WIRE CAGE ASSEMBLY The bowl guard wire cage assembly can be rotated out-of-the-way to the left to add ingredients or to access the bowl and agitator. Note how the plastic carriers allow the wire cage to ride around the circumference of the planetary drip cup. • Open the bowl guard wire cage; rotate it to your left (Fig. 9). • Close the bowl guard wire cage; rotate it to your right until it stops in the closed position (Fig. 10). NOTE: The bowl guard wire cage must be returned to the closed position for the mixer to operate. Fig. 9 Fig. 10 – 10 – Remove and Clean Bowl Guard Wire Cage Lower the bowl. Rotate the wire cage assembly to the left until it is positioned underneath the splash guard. Remove the agitator and bowl. While holding the wire cage assembly with both hands, rotate it completely to the left. When the front-center retainer (Fig. 11) reaches the end of its travel, it can be lowered through the flat (Fig. 11) on the ridge of the drip cup (Fig. 11). After lowering the front-center retainer, move the wire cage assembly slightly to the rear so the rear retainers clear the ridge on the drip cup. The wire cage assembly can now be lowered and removed. Wash the bowl guard wire cage assembly in a sink, rinse with clear water, and dry with a clean cloth. The splash guard can be wiped off and/or washed with a cloth or sponge using warm, soapy water. Rinse with clear water and dry with a clean cloth. FLAT FRONT-CENTER RETAINER RIDGE DRIP CUP Fig. 11 Reinstall Bowl Guard Wire Cage Hold the wire cage assembly so its top ring is positioned around the planetary drip cup with the grooves in both nylon rear retainers straddling the ridge on the drip cup at the rear. Lift the wire cage assembly so the front-center retainer passes up through the flat on the ridge of the drip cup and rotate the wire cage assembly to the right. The wire cage assembly is properly assembled when all three retainers straddle the ridge on the drip cup in three opposed locations. Rotate the wire cage assembly to the right until it stops at the front-center position. Rotate the wire cage out-of-the-way to the left to install or remove the agitator and bowl or to add ingredients. Return the wire cage to its front-center position to operate the mixer. – 11 – AGITATORS AND ATTACHMENTS 20-Qt. Flat Beater 20-Qt. Wire Whip 20-Qt. Dough Hook 20-Qt. J Dough Hook 20-Qt. Bowl (SST) 20-Qt. Ingredient Chute 20-Qt. Table – 12 – CLEANING Unplug machine power cord before beginning any cleaning procedure. The mixer should be thoroughly cleaned daily. DO NOT use a hose to clean the mixer; it should be washed with a clean, damp cloth. The base allows ample room for cleaning under the mixer. The apron (Fig. 1) may be removed for cleaning by loosening the screws. The drip cup (Fig. 1) should be wiped clean. For cleaning the bowl guard wire cage assembly, refer to page 11. – 13 – MAINTENANCE Unplug machine power cord before beginning any maintenance procedure. LUBRICATION APRON SLIDEWAYS (Behind Cover) PLANETARY SEAL Fig. 12 Fig. 13 Slideways The slideways (Fig. 12) should be lubricated approximately twice a year. To reach these areas, fully lower the bowl support and remove the apron (Fig. 12), which is secured by screws. Wipe a thin coat of Lubriplate 630AA on each slideway. Install the apron. Planetary Seal Occasionally, the planetary seal (Fig. 13) may become dry and begin to squeak. To correct this, work a little lubrication (mineral oil) under the lip of the seal. – 14 – ADJUSTMENTS Agitator Clearance The agitator clearance should be checked periodically. The agitator must not touch the bowl. The maximum clearance between the bottom of the bowl and the B flat beater is 1/8" (3mm). Install a bowl and agitator (e.g., beater). If the bowl and beater come into contact before the bowl support reaches its stop, adjust the stop screw. Refer to Adjust the Bowl/Agitator Clearance. Measure Clearance Pour enough flour in the bowl to cover the bottom of the bowl where the beater travels. With the bowl fully raised (beater should not touch the bottom of the bowl), briefly run the mixer at the lowest speed. Turn off the mixer, disconnect the electrical power supply, and measure the depth of flour where the beater has traced a path. This measurement should be taken at several points around the bowl to assure accuracy. Adjust the Bowl/Agitator Clearance SCREW APRON STOP NUT Fig. 14 Fig. 15 • Remove the apron (Fig. 14), which is secured by screws. • Adjust the clearance by loosening the stop nut and moving the screw (Fig. 15) clockwise to increase the clearance or counterclockwise to decrease the clearance. • After the adjustments are made, tighten the stop nut and replace the apron, and secure it with the screws. • Carefully operate the bowl lift several times to check the adjustment. – 15 – TROUBLESHOOTING Symptoms Mixer will not start Agitator touches bowl Planetary seal squeaks Timer display flashing time and machine is beeping Timer display reads OP (Fig. 16) Possible Causes Flashing time display – see below. Branch circuit protector is in open position - check fuse or disconnect switch. Mixer is overloaded. Wire cage is not in the closed position. Bowl is not in closed (mix) position or bowl is not in up position. Bowl is not in closed (mix) position. Improper agitator clearance - see Maintenance for adjustment procedure. Agitator is not installed properly. Seal requires occasional lubrication - see Maintenance. If the timer display is flashing and machine is beeping, press ON/OFF button to reset. If symptom still exists, contact your local Hobart Service office. Speed gear shift lever is not properly seated. SPEED GEAR SHIFT LEVER Fig. 16 SERVICE If service is needed on this equipment, contact your local Hobart Service office at (888) 4HOBART. FORM 45268 Rev. A (October 2018) – 16 – PRINTED IN U.S.A. MANUEL D’INSTRUCTION MODÈLE HMM20 701 S. RIDGE AVENUE TROY, OHIO 45374-0001 937-332-3000 www.hobartcorp.com FORMULAIRE 45268 Rév. A (octobre 2018) TABLE DES MATIÈRES RENSEIGNEMENTS GÉNÉRAUX ..................................................................................................... 3 INSTALLATION .................................................................................................................................... 3 Déballage ........................................................................................................................................ 3 Emplacement................................................................................................................................... 3 Raccordements électriques (batteur-mélangeur à fil)...................................................................... 4 Contrôler la première utilisation ................................................................................................. 4 FONCTIONNEMENT ........................................................................................................................... 5 COMMANDES STANDARD ................................................................................................................ 6 Modèle HMM20 (avec trois vitesses de mélange)........................................................................... 6 Vitesses du batteur-mélangeur ........................................................................................................ 6 Description des fonctions des boutons ............................................................................................ 6 MISE EN PLACE DU BOL................................................................................................................... 7 Agitateur .......................................................................................................................................... 7 Assemblage ............................................................................................................................... 7 Retrait ........................................................................................................................................ 7 Préparation pour le mélange ........................................................................................................... 8 Modes de mélange .......................................................................................................................... 8 Mode de mélange minuté ................................................................................................................ 9 Notes sur l’opération........................................................................................................................ 9 Déchargement ............................................................................................................................... 10 Grille de protection ........................................................................................................................ 10 Retrait et nettoyage de la grille de protection du bol ................................................................11 Mise en place de la grille de protection ....................................................................................11 Agitateurs et accessoires .............................................................................................................. 12 NETTOYAGE...................................................................................................................................... 13 ENTRETIEN ....................................................................................................................................... 14 Lubrification ................................................................................................................................... 14 Glissières ................................................................................................................................. 14 Joint planétaire ........................................................................................................................ 14 Réglages ....................................................................................................................................... 15 Distance de dégagement de l’agitateur ................................................................................... 15 Mesurer la distance de dégagement ....................................................................................... 15 Réglage de la distance de dégagement du bol/agitateur ........................................................ 15 DÉPANNAGE ..................................................................................................................................... 16 Service ........................................................................................................................................... 16 © HOBART, 2018 –2– Installation, utilisation et entretien du batteur-mélangeur de 20 pte Centerline par Hobart CONSERVEZ CES INSTRUCTIONS RENSEIGNEMENTS GÉNÉRAUX Le batteur-mélangeur de 20 pte Centerline par Hobart est un batteur-mélangeur sur socle qui comporte trois vitesses, une minuterie numérique, un bol à levage manuel et un moyeu de fixation nº 12 en tant que matériel normalisé. Une variété d'agitateurs et d'accessoires sont disponibles. Ceux-ci sont décrits dans la section Agitateurs et accessoires de ce manuel. INSTALLATION DÉBALLAGE Ce batteur-mélangeur a été inspecté avant de quitter l'usine. La société de transport assume l'entière responsabilité de la livraison en bon état du fait de l'acceptation de l'expédition. Inspectez le batteurmélangeur dès sa réception pour des bris dus au transport. Si vous constatez que le batteur-mélangeur est endommagé, procédez comme suit : 1. La société de transport doit être notifiée dans les cinq jours ouvrables suivant la réception du robot culinaire. 2. La société de transport doit être notifiée immédiatement une fois le dommage constaté (notez l'heure, la date et la personne de contact), et faites un suivi de la notification et confirmez-la au moyen de communication écrite ou électronique. 3. Tous les matériaux d'emballage originaux doivent être conservés aux fins d'inspection. 4. Le batteur-mélangeur ne peut pas avoir été déplacé, installé ou modifié. 5. Communiquez avec le service à la clientèle de Hobart au 1 800 333-7447. EMPLACEMENT Avant d’installer le batteur-mélangeur, vérifiez que le service électrique est conforme aux spécifications sur la plaque signalétique de l’appareil. Placez le batteur-mélangeur sur une surface de niveau solide et appropriée. Il devrait y avoir suffisamment d'espace autour du batteur-mélangeur pour que l'utilisateur puisse actionner les commandes et installer et retirer les bols. Des trous sont situés dans la base pour fixer de manière permanente le batteur-mélangeur, bien que cela ne soit pas nécessaire dans les installations normales. –3– RACCORDEMENTS ÉLECTRIQUES (batteur-mélangeur à fil) AVERTISSEMENT Le cordon d'alimentation sur cette machine est doté d'une fiche de terre à trois broches qui doit être branchée à une prise correctement mise à la terre. Si la prise n’est pas de type de mise à la terre, contactez un électricien. N'enlevez PAS la broche de mise à la terre de la fiche. AVERTISSEMENT Les raccordements électriques et de mise à la terre doivent être conformes aux parties applicables du National Electrical Code et/ou d'autres codes électriques locaux. Contrôler la première utilisation 1. Mettez le batteur-mélangeur sous tension en insérant la fiche du cordon dans une prise correctement mise à la terre. 2. Le batteur-mélangeur émet trois bips indiquant que l’appareil est prêt. 3. Installez le bol sur le support à bol et relevez-le dans la position pour mélanger, avec le support à bol vers le haut et la grille de protection du bol en position fermée. 4. Tournez le levier de changement de vitesse vers 1. 5. Faites fonctionner l’appareil en appuyant sur le bouton ON/OFF (marche/arrêt). –4– FONCTIONNEMENT AVERTISSEMENT Agitateur en mouvement dans le bol. Gardez les mains, les vêtements et les ustensiles hors du bol pendant le fonctionnement. N’utilisez pas le batteur-mélangeur sans de protection interverrouillée. Le batteur-mélangeur de 20 pte Centerline par Hobart est équipé d'une minuterie et de commandes. Reportez-vous à la figure 1 pour les pièces de fonctionnement et la section FONCTIONNEMENT pour connaître leurs fonctions. La grille de protection du bol doit être fermée; sinon le batteur-mélangeur ne peut pas fonctionner. Le bol doit rester en position de mélange sur le support à bol, et le support à bol doit être levé (position de mélange) sinon le batteur-mélangeur ne fonctionnera pas. ADAPTATEUR À ACCESSOIRES COMMANDES COUPELLE ANTIGOUTTE PAREÉCLABOUSSURES GRILLE DE PROTECTION DU BOL TABLIER AGITATEUR SUPPORT À BOL Fig. 1 –5– COMMANDES STANDARD MODÈLE HMM20 (avec trois vitesses de mélange) AFFICHEUR DE LA MINUTERIE SECONDE (AUGMENTER) MINUTE (AUGMENTER) LEVIER DE CHANGEMENT DE VITESSE MARCHE/ARRÊT MINUTE (DIMINUER) SECONDE (DIMINUER) Fig. 2 VITESSES DU BATTEUR-MÉLANGEUR VITESSE 1 (basse) Cette vitesse est utile pour les mélanges lourds tels que les pâtes lourdes, les pommes de terre, la pâte à pizza et la pâte à pain. VITESSE 2 (moyenne) Cette vitesse permet de mélanger les pâtes à gâteaux et mettre en purée les pommes de terre. VITESSE 3 (haute) Cette vitesse permet d'incorporer de l’air dans des lots légers et de terminer les aliments fouettés. DESCRIPTION DES FONCTIONS DES BOUTONS REMARQUE : L'appareil émet un bip une fois que vous appuyez sur un bouton. ON/OFF (MARCHE/ ARRÊT) FLÈCHE VERS LE BAS DE SEC FLÈCHE VERS LE HAUT DE SEC FLÈCHE VERS LE HAUT DE MIN FLÈCHE VERS LE BAS DE MIN Appuyez sur le bouton ON/OFF (marche/arrêt) pour démarrer le batteur-mélangeur. Si le batteur-mélangeur fonctionne, appuyez sur le bouton ON/OFF pour arrêter le batteur-mélangeur. Appuyez une fois sur ce bouton pour augmenter le temps par incréments de 1 seconde. Maintenez le bouton enfoncé pour augmenter rapidement le temps jusqu'au moment où vous le relâchez. La plage est de 0-59. Appuyez une fois sur ce bouton pour diminuer le temps par incréments de 1 seconde. Maintenez le bouton enfoncé pour diminuer rapidement le temps jusqu'au moment où vous le relâchez. La plage est de 0-59. Appuyez une fois sur ce bouton pour augmenter le temps par incréments de 1 minute. Maintenez le bouton enfoncé pour augmenter rapidement le temps jusqu'au moment où vous le relâchez. La plage est de 0-59. Appuyez une fois sur ce bouton pour diminuer le temps par incréments de 1 minute. Maintenez le bouton enfoncé pour diminuer rapidement le temps jusqu'au moment où vous le relâchez. La plage est de 0-59. REMARQUE : Les secondes et les minutes sont définies indépendamment. REMARQUE : Le bouton ON/OFF (marche/arrêt) peut être utilisé pour effacer l'erreur de surcharge. –6– MISE EN PLACE DU BOL Le bol doit être installé sur le support à bol avant d’installer l'agitateur. Pour installer le bol, abaissez le support à bol et déplacez les pinces du bol en position ouverte (fig. 3). Placez le bol de façon à ce que le support d'alignement à l'arrière du bol se trouve dans le dispositif de retenue du bol et que les goupilles d'alignement sur le devant du support à bol s'insèrent dans les orifices situés sur les côtés du bol. Verrouillez le bol en faisant tourner les pinces du bol (fig. 4). Fig. 3 Fig. 4 AGITATEUR Pour installer un agitateur, le bol doit se trouver sur le support à bol. Assemblage 1. Abaissez le bol. 2. Ouvrez la grille de protection du bol. 3. Placez l'agitateur à l'intérieur du bol et alignez la fente horizontale de l'agitateur avec la goupille de la tige pour agitateur. 4. Faites glisser l'agitateur le long de la tige pour agitateur et tournez-le dans le sens horaire pour placer la goupille de la tige dans la fente de l’arbre de l'agitateur. Retrait 1. Ouvrez la grille de protection du bol. 2. Abaissez le bol. 3. Levez l'agitateur et tournez-le dans le sens antihoraire. Faites glisser l'agitateur vers le bas et enlevez-le de la tige pour agitateur. –7– PRÉPARATION POUR LE MÉLANGE 1. Placez le bol de mélange sur le support à bol. 2. Versez les ingrédients dans le bol. 3. Placez l’agitateur à l’intérieur du bol, puis fixez-le à la tige pour agitateur (fig. 5). 4. Levez le support à bol. 5. Fermez correctement la grille de protection du bol. 6. Le batteur-mélangeur est maintenant prêt à l’emploi. Fig. 5 MODES DE MÉLANGE 1. Tournez le levier de changement de vitesse (fig. 6) pour sélectionner une vitesse de mélange. L'afficheur de la minuterie indique OFF (arrêt) (fig. 6). REMARQUE : GearSafe™ protège les engrenages si les vitesses sont modifiées pendant le mélange sans arrêter la machine. 2. Appuyez sur le bouton ON/OFF (marche/arrêt) (fig. 7) pour démarrer le mélange. L'afficheur de la minuterie indique ON (marche) (fig. 7). REMARQUE : Si la grille est ouverte ou si le bol est abaissé à tout moment, l'opération de mélange s'arrête. Pour reprendre l'opération de mélange, fermez la grille ou levez le bol et appuyez sur le bouton ON/OFF (marche/arrêt). 3. Appuyez sur le bouton ON/OFF (marche/arrêt) pour arrêter le batteur-mélangeur. L'afficheur de la minuterie indique OFF (arrêt). 4. Appuyez sur le bouton ON/OFF (marche/arrêt) pour reprendre l’opération de mélange, selon les besoins. MARCHE/ARRÊT BOUTON LEVIER DE CHANGEMENT DE VITESSE Fig. 6 Fig. 7 –8– MODE DE MÉLANGE MINUTÉ 1. Tournez le levier de changement de vitesse (fig. 6) pour sélectionner une vitesse de mélange. L'afficheur de la minuterie indique OFF (arrêt) (fig. 6). 2. Appuyez sur les flèches MIN (haut/bas) et SEC (haut/bas) jusqu'à ce que l’afficheur de la minuterie indique la durée de mélange désirée (fig. 8). Ce temps est la durée définie. 3. Appuyez sur le bouton ON/OFF (marche/arrêt) pour commencer à mélanger; la minuterie commence à compter à partir de la durée définie. 4. Pour arrêter le batteur-mélangeur à tout moment, appuyez sur le bouton ON/OFF. Pour reprendre l’opération de mélange, appuyez sur le bouton ON/OFF. Par exemple : le batteur-mélangeur démarre à la vitesse 1 pendant 30 secondes et s'arrête après 10 secondes. Appuyez sur le bouton ON/OFF (marche/arrêt) pour reprendre l'opération de mélange et les 20 secondes restantes seront décomptées. REMARQUE : Si la grille est ouverte ou si le bol est abaissé à tout moment, l'opération de mélange s'arrête. Pour reprendre l'opération de mélange, fermez la grille ou levez le bol et appuyez sur le bouton ON/OFF (marche/arrêt). 5. Lorsque la minuterie atteint 00:00, le batteur-mélangeur s'arrête et émet trois bips. Le compte à rebours affiche ensuite la durée définie restante. BOUTON MARCHE/ARRÊT Fig. 8 NOTES SUR L’OPÉRATION • Si le batteur-mélangeur est arrêté pendant une opération de mélange, la minuterie s'arrête également. La minuterie redémarre (avec la durée restante) lorsque le bouton ON/OFF est appuyé (fig. 8). –9– DÉCHARGEMENT 1. Ouvrez la grille de protection du bol. 2. Abaissez le support à bol. 3. Retirez l'agitateur de la tige pour agitateur. 4. Ouvrez les pinces du bol. 5. Soulevez le bol des goupilles et retirez-le du support à bol. GRILLE DE PROTECTION La grille de protection du bol peut être tournée vers la gauche pour ajouter des ingrédients ou pour accéder au bol et à l'agitateur. Notez comment les supports en plastique permettent à la grille de protection de circuler autour de la circonférence de la coupelle antigoutte planétaire. • Ouvrez grille de protection du bol; faites-la pivoter vers la gauche (fig. 9). • Fermez la grille de protection du bol; faites-la pivoter vers la droite jusqu'à ce qu'elle s'arrête en position fermée (fig. 10). REMARQUE : La grille de protection du bol doit être retournée en position fermée afin que le batteurmélangeur puisse fonctionner. Fig. 9 Fig. 10 – 10 – Retrait et nettoyage de la grille de protection du bol Abaissez le bol. Faites pivoter l'assemblage la grille de protection vers la gauche jusqu'à ce qu'elle soit positionnée sous le pare-éclaboussures. Retirez l'agitateur et le bol. En tenant la grille avec vos deux mains, tournez-la complètement vers la gauche. Lorsque le dispositif de retenue du centre avant (fig. 11) atteint la fin de sa course, il peut être abaissé à travers la partie plate (fig. 11) sectionnée de la saillie de la coupelle antigoutte (fig. 11). Après avoir abaissé le dispositif de retenue du centre avant, déplacez légèrement la grille vers l'arrière de manière à ce que les dispositifs de retenue arrière se dégagent de la saillie sur la coupelle antigoutte. La grille de protection peut maintenant être abaissée et retirée. Lavez la grille de protection du bol dans un évier, rincez à l'eau claire et séchez avec un chiffon propre. Le pare-éclaboussure peut être essuyé et/ou lavé à l’aide d’un chiffon ou une éponge avec de l'eau chaude savonneuse. Rincez à l'eau claire et séchez avec un chiffon propre. PARTIE PLATE DISPOSITIF DE RETENUE DU CENTRE AVANT SAILLIE DE LA COUPELLE ANTIGOUTTE Fig. 11 Mise en place de la grille de protection Tenez la grille de protection de sorte que son anneau supérieur soit positionné autour de la coupelle antigoutte planétaire avec les rainures dans les deux dispositifs de retenue arrière en nylon chevauchant le saillie sur la coupelle antigoutte à l'arrière. Levez la grille de protection de manière à ce que le dispositif de retenue du centre avant passe la partie plate sectionnée de la saillie de la coupelle antigoutte et faites pivoter la grille vers la droite. La grille de protection est correctement assemblée lorsque les trois dispositifs de retenue chevauchent le saillie de la coupelle antigoutte dans trois emplacements opposés. Faites pivoter la grille de protection vers la droite jusqu'à ce qu'elle s'arrête en position centrale avant. Faites pivoter la grille vers la gauche pour installer ou retirer l'agitateur et le bol ou pour ajouter des ingrédients. Retournez la grille de protection dans sa position centrale avant pour faire fonctionner le batteur-mélangeur. – 11 – AGITATEURS ET ACCESSOIRES Batteur plat 20 pte Fouet 20 pte Crochet à pâte 20 pte Crochet à pâte J 20 pte Bol (SST) 20 pte Chute d’ingrédients 20 pte Table 20 pte – 12 – NETTOYAGE AVERTISSEMENT Débranchez le cordon d'alimentation de l’appareil avant d’entamer toute procédure de nettoyage. Le batteur-mélangeur doit être nettoyé à fond tous les jours. N'utilisez PAS de tuyau pour nettoyer le batteurmélangeur; il doit être lavé avec un chiffon propre et humide. La base permet amplement d'espace pour le nettoyage sous le batteur-mélangeur. Le tablier (fig. 1) peut être retiré pour le nettoyage en desserrant les vis. La coupelle antigoutte (fig. 1) doit être nettoyé. Pour nettoyer la grille de protection, reportez-vous à la page 11. – 13 – ENTRETIEN AVERTISSEMENT Débranchez le cordon d'alimentation de l’appareil avant d’entamer toute procédure d’entretien. LUBRIFICATION TABLIER GLISSIÈRES (derrière le cache) JOINT PLANÉTAIRE Fig. 12 Fig. 13 Glissières Les glissières (fig. 12) doivent être lubrifiées environ deux fois par an. Pour atteindre ces zones, abaissez complètement le support à bol et retirez le tablier (fig. 12), qui est fixé par des vis. Appliquez une fine couche de « Lubriplate 630AA » sur chaque glissière. Installez le tablier. Joint planétaire Le joint planétaire (fig. 13) peut devenir sec et commencer à grincer. Pour corriger cela, appliquez un peu de lubrification (huile minérale) sous la lèvre du joint. – 14 – RÉGLAGES Distance de dégagement de l’agitateur Vérifiez régulièrement la distance de dégagement de l'agitateur. L'agitateur ne doit pas toucher le bol. La distance de dégagement maximale entre le fond du bol et le batteur plat B est de 1/8 po (3 mm). Installez le bol et un agitateur (par ex., batteur). Si le bol et le batteur entrent en contact avant que le support à bol n'atteigne son arrêt, réglez la vis d'arrêt. Reportez-vous à la section Réglage de la distance de dégagement du bol/agitateur. Mesurer la distance de dégagement Versez suffisamment de farine dans le bol pour couvrir le fond du bol où le batteur se déplace. Avec le bol complètement relevé (le batteur ne doit pas toucher le fond du bol); faites tourner brièvement le batteur à la vitesse la plus basse. Éteignez le batteur-mélangeur, débranchez le cordon d’alimentation et mesurez la profondeur de la farine où le batteur a tracé un chemin. Cette mesure devrait être prise à plusieurs points autour du bol pour assurer la précision. Réglage de la distance de dégagement du bol/agitateur TABLIER VIS ÉCROU D’ARRÊT Fig. 14 Fig. 15 • Enlevez le tablier (fig. 14) fixé par des vis. • Réglez la distance de dégagement en desserrant l’écrou d’arrêt et en déplaçant la vis (fig. 15) dans le sens horaire pour augmenter la distance de dégagement ou dans le sens antihoraire pour diminuer la distance de dégagement. • Une fois les réglages effectués, serrez l'écrou d'arrêt et replacez le tablier, puis fixez-le avec les vis. • Faites lever le bol plusieurs fois afin de vérifier le réglage. – 15 – DÉPANNAGE Symptômes Le batteur-mélangeur ne démarre pas. L’agitateur touche le bol. Le joint planétaire grince. L’afficheur de la minuterie clignote et l’appareil émet des bips. L'afficheur de la minuterie indique OP (fig. 16). Causes possibles L’afficheur de la minuterie clignote – reportez-vous cidessous. Le protecteur de circuit de dérivation est en position ouverte – vérifiez le fusible ou le sectionneur. Le batteur-mélangeur est surchargé. La grille de protection n’est pas en position fermée. Le bol n'est pas en position fermée (mélange) ou le bol n'est pas en position haute. Le bol n'est pas en position fermée (mélange). Distance de dégagement incorrect de l'agitateur – consultez la section Entretien pour connaître la procédure de réglage. L'agitateur n'est pas installé correctement. Le joint nécessite de lubrification occasionnelle – consultez la section Entretien. Si l'affichage de la minuterie clignote et que l’appareil émet des bips, appuyez sur le bouton ON/OFF (marche/arrêt) pour réinitialiser. Si le symptôme persiste, contactez le bureau de service Hobart local. Le levier de changement de vitesse n'est pas correctement installé. LEVIER DE CHANGEMENT DE VITESSE Fig. 16 SERVICE Si une réparation est nécessaire sur cet équipement, contactez votre bureau de service Hobart local au 1 888 4HOBART. FORMULAIRE 45268 Rév. A (octobre 2018) – 16 – IMPRIMÉ AUX É.-U. MANUAL DE INSTRUCCIONES MODELO HMM20 701 S. RIDGE AVENUE TROY, OHIO 45374-0001 937-332-3000 www.hobartcorp.com FORMULARIO 45268 Rev. A (Octubre de 2018) TABLA DE CONTENIDO GENERAL............................................................................................................................................. 3 INSTALACIÓN ..................................................................................................................................... 3 Desembalaje.................................................................................................................................... 3 Ubicación ......................................................................................................................................... 3 Conexiones eléctricas (Batidoras conectadas con cable) ............................................................... 4 Revisión inicial de operación ..................................................................................................... 4 OPERACIÓN ........................................................................................................................................ 5 CONTROLES ESTÁNDAR ................................................................................................................. 6 Modelo HMM20 (con tres velocidades de batido) ........................................................................... 6 Velocidades de la batidora .............................................................................................................. 6 Descripción de la función de los botones ........................................................................................ 6 COLOCACIÓN DEL TAZÓN ............................................................................................................... 7 Batidor ............................................................................................................................................. 7 Para instalarlo ............................................................................................................................ 7 Para quitarlo .............................................................................................................................. 7 Preparación para mezclar ............................................................................................................... 8 Modos de mezclado ........................................................................................................................ 8 Modo de mezclado programado ...................................................................................................... 9 Notas de funcionamiento ................................................................................................................. 9 Descarga ....................................................................................................................................... 10 Montaje de la rejilla del tazón ........................................................................................................ 10 Cómo retirar y limpiar la rejilla de la guarda del tazón..............................................................11 Cómo volver a colocar la rejilla del tazón .................................................................................11 Batidores y aditamentos ................................................................................................................ 12 LIMPIEZA ........................................................................................................................................... 13 MANTENIMIENTO ............................................................................................................................. 14 Lubricación .................................................................................................................................... 14 Guías ....................................................................................................................................... 14 Sello planetario ........................................................................................................................ 14 Ajustes ........................................................................................................................................... 15 Espacio libre del batidor .......................................................................................................... 15 Medida del espacio libre .......................................................................................................... 15 Ajuste del espacio libre del tazón y del batidor........................................................................ 15 RESOLUCIÓN DE PROBLEMAS ..................................................................................................... 16 Servicio .......................................................................................................................................... 16 © HOBART, 2018 –2– Instalación, operación y cuidado de la batidora Centerline de 20 cuartos de galón por Hobart CONSERVE ESTAS INSTRUCCIONES GENERAL La batidora Centerline de 20 cuartos de galón por Hobart es una batidora de tipo banco que tiene tres velocidades, un temporizador digital, una palanca de levantamiento manual del tazón y una entrada de aditamentos n.° 12 como equipamiento estándar. Están disponibles una variedad de aditamentos, batidores y accesorios. Estos elementos se describen en la sección Batidores y aditamentos de este manual. INSTALACIÓN DESEMBALAJE La batidora fue inspeccionada antes de salir de fábrica. El transportista asume total responsabilidad por la entrega segura una vez aceptado el cargamento. Compruebe que no haya daños al cargamento inmediatamente después de recibirlo. Si la batidora está dañada, siga estos pasos: 1. Notificar al transportista dentro de los cinco días hábiles siguientes a la fecha de recepción. 2. Notificar de inmediato a la terminal local del transportista tras el descubrimiento (anotar la hora, la fecha y la persona con quien se habló) y hacer un seguimiento y enviar la confirmación mediante comunicaciones escritas o electrónicas. 3. Conservar todos los materiales originales del embalaje por motivos de inspección. 4. La batidora no debe moverse, instalarse ni modificarse. 5. Notificar al Servicio de Atención al Cliente de Hobart al (800) 333-7447. UBICACIÓN Antes de la instalación, pruebe el servicio eléctrico para asegurarse de que concuerda con las especificaciones de la placa de datos del equipo. Coloque la batidora sobre una superficie nivelada y resistente. Debe haber espacio adecuado alrededor de la batidora para que el usuario opere los controles e instale y retire los tazones. La batidora tiene orificios en la base para asegurarla en forma permanente, si bien esto no es necesario en las instalaciones normales. –3– CONEXIONES ELÉCTRICAS (Batidoras conectadas con cable) ADVERTENCIA El cable eléctrico de esta máquina está equipado con un enchufe de conexión a tierra con tres terminales que se deben conectar correctamente a una toma con conexión a tierra. Si la toma corriente no es la correcta, comuníquese con un electricista. NO quite el terminal de conexión a tierra del enchufe. ADVERTENCIA Las conexiones eléctricas y a tierra deben cumplir con la parte aplicable del Código Eléctrico Nacional o de otros códigos eléctricos locales. Revisión inicial de operación 1. Conecte la alimentación a la batidora insertando el enchufe del cable en una toma con conexión a tierra apropiada. 2. La batidora emitirá tres pitidos para indicar que está lista. 3. Instale el tazón en el soporte del tazón y levántelo a la posición de mezclado con el soporte del tazón y cierre la rejilla del tazón. 4. Lleve la palanca de cambio de velocidades a la posición 1. 5. Ponga en funcionamiento la batidora al presionar el botón ON/OFF. –4– OPERACIÓN ADVERTENCIA El batidor gira en el tazón, por lo que deberá mantener fuera las manos, la ropa y los utensilios mientras está en funcionamiento. No use la batidora con la rejilla abierta. La batidora Centerline de 20 cuartos de galón por Hobart está equipada con un temporizador y controles. Consulte la Fig. 1 para conocer las partes y la sección OPERACIÓN para conocer sus funciones. La rejilla del tazón debe estar cerrada para que la batidora funcione. El tazón debe quedar en la posición de mezclado en el soporte del tazón y este soporte debe levantarse (posición de mezclado) para que la batidora funcione. ENTRADA DE ADITAMENTOS CONTROLES COLECTOR DE GOTEO GUARDA CONTRA SALPICADURAS REJILLA DE LA GUARDA DEL TAZÓN CUBIERTA BATIDOR SOPORTE DEL TAZÓN Fig. 1 –5– CONTROLES ESTÁNDAR MODELO HMM20 (con tres velocidades de batido) PANTALLA DEL TEMPORIZADOR AUMENTAR SEGUNDOS AUMENTAR MINUTOS PALANCA DE CAMBIO DE VELOCIDADES ON/OFF DISMINUIR MINUTOS DISMINUIR SEGUNDOS Fig. 2 VELOCIDADES DE LA BATIDORA VELOCIDAD 1 (baja) Esta velocidad es para mezclas espesas, como masas espesas, papas, mezcla para pizza y mezcla para pan. VELOCIDAD 2 (intermedia) Esta velocidad es para mezclar mezclas de tortas y puré de papas. VELOCIDAD 3 (alta) Esta velocidad es para incorporar aire en los lotes ligeros y también para terminar productos batidos. DESCRIPCIÓN DE LA FUNCIÓN DE LOS BOTONES NOTA: La batidora emitirá un pitido una vez cuando se presione cualquier botón. ON/OFF (ENCENDIDO/ APAGADO) Presione el botón ON/OFF para iniciar la batidora. Si la batidora está funcionando, presione el botón ON/OFF para detenerla. FLECHA SEC UP Presione una vez para aumentar el tiempo en incrementos de 1 segundo. Mantenga presionado (AUMENTAR SEGUNDOS) para aumentar el tiempo rápidamente hasta soltarlo. El rango comprende de 0 a 59. FLECHA SEC DOWN Presione una vez para disminuir el tiempo en incrementos de 1 segundo. Mantenga presionado (DISMINUIR SEGUNDOS) para disminuir el tiempo rápidamente hasta soltarlo. El rango comprende de 0 a 59. FLECHA MIN UP (AUMENTAR MINUTOS) Presione una vez para aumentar el tiempo en incrementos de 1 minuto. Mantenga presionado para aumentar el tiempo rápidamente hasta soltarlo. El rango comprende de 0 a 59. FLECHA MIN DOWN (DISMINUIR MINUTOS) Presione una vez para disminuir el tiempo en incrementos de 1 minuto. Mantenga presionado para disminuir el tiempo rápidamente hasta soltarlo. El rango comprende de 0 a 59. NOTA: Los segundos y minutos se configuran de forma independiente. NOTA: El botón ON/OFF se utiliza para borrar el error de sobrecarga. –6– COLOCACIÓN DEL TAZÓN El tazón debe colocarse en el soporte del tazón antes de colocar el batidor. Para instalar el tazón, baje el soporte del tazón y mueva las abrazaderas del tazón a la posición de apertura (Fig. 3). Coloque el tazón de forma tal que el soporte de alineación en la parte posterior del tazón esté en el dispositivo de retención del tazón y los pernos de alineación en la parte frontal del soporte del tazón encajen en los orificios de los laterales del tazón. Asegure el tazón en su lugar al girar las abrazaderas (Fig. 4). Fig. 3 Fig. 4 BATIDOR Para colocar el batidor, el tazón deben estar en el soporte del tazón. Para instalarlo 1. Baje el tazón. 2. Abra la rejilla del tazón. 3. Coloque el batidor dentro del tazón y alinee la ranura horizontal en el batidor con el perno del eje del batidor. 4. Deslice el batidor hacia arriba del eje y gírelo hacia la derecha para asentar el perno del eje en la ranura del mango del batidor. Para quitarlo 1. Abra la rejilla del tazón. 2. Baje el tazón. 3. Levante el batidor y gírelo hacia la izquierda. Deslice el batidor hacia abajo del eje. –7– PREPARACIÓN PARA MEZCLAR 1. Coloque el tazón para mezclar en el soporte del tazón. 2. Vierta los ingredientes en el tazón. 3. Coloque el batidor dentro del tazón y asegúrelo al eje (Fig. 5). 4. Levante el soporte del tazón. 5. Cierre bien la rejilla del tazón. 6. El batidor ahora está listo para mezclar. Fig. 5 MODOS DE MEZCLADO 1. Coloque la palanca de cambio de velocidades (Fig. 6) para seleccionar una velocidad de mezclado. En la pantalla del temporizador, se lee OFF (APAGADO) (Fig. 6). NOTA: GearSafe™ protege los engranajes si se cambian las velocidades durante la operación de mezclado sin detener la máquina. 2. Presione el botón ON/OFF (Fig. 7) para comenzar a mezclar. En la pantalla del temporizador, se lee ON (ENCENDIDO) (Fig. 7). NOTA: Si la rejilla se abre o el tazón se baja en cualquier momento, la operación de mezclado se detendrá. Para reiniciar la operación de mezclado, cierre la rejilla o levante el tazón y presione el botón ON/OFF. 3. Presione el botón ON/OFF para detener la batidora. En la pantalla del temporizador, se lee OFF (APAGADO). 4. Presione el botón ON/OFF para reanudar el mezclado, si es necesario. PALANCA DE CAMBIO DE VELOCIDADES BOTÓN ON/OFF Fig. 6 Fig. 7 –8– MODO DE MEZCLADO PROGRAMADO 1. Coloque la palanca de cambio de velocidades (Fig. 6) para seleccionar una velocidad de mezclado. En la pantalla del temporizador, se lee OFF (APAGADO) (Fig. 6). 2. Presione las flechas MIN UP/DOWN y SEC UP/DOWN hasta que en la pantalla del temporizador se lea el tiempo de mezclado deseado (Fig. 8). Este es el tiempo programado. 3. Presione el botón ON/OFF para comenzar el mezclado; el temporizador inicia la cuenta regresiva del tiempo programado. 4. Para detener la batidora en cualquier momento, presione el botón ON/OFF. Para reanudar el mezclado, presione el botón ON/OFF. Por ejemplo, la batidora se inicia en la velocidad 1 durante 30 segundos y se detiene después de 10 segundos. Presione el botón ON/OFF para reanudar la operación de mezclado y reiniciar la cuenta regresiva de los 20 segundos restantes. NOTA: Si la rejilla se abre o el tazón se baja en cualquier momento, la operación de mezclado se detendrá. Para reiniciar la operación de mezclado, cierre la rejilla o levante el tazón y presione el botón ON/OFF. 5. Cuando el temporizador llega a 00:00, la batidora se detiene y suena una alarma tres veces. El temporizador en cuenta regresiva mostrará el último tiempo que se ingresó. BOTÓN ON/OFF Fig. 8 NOTAS DE FUNCIONAMIENTO • Si la batidora se detiene durante una operación de mezclado, el temporizador también se detiene. El temporizador comienza nuevamente (con el tiempo restante) cuando se presiona el botón ON/ OFF (Fig. 8). –9– DESCARGA 1. Abra la rejilla del tazón. 2. Baje el soporte del tazón. 3. Retire el batidor del eje. 4. Abra las abrazaderas del tazón. 5. Levante el tazón de los pernos y quítelo del soporte del tazón. MONTAJE DE LA REJILLA DEL TAZÓN El montaje de la rejilla del tazón puede girarse de forma que no estorbe hacia la izquierda para agregar los ingredientes o llegar al tazón y al batidor. Observe cómo las guías de plástico permiten que la rejilla vaya alrededor del colector de goteo del planetario. • Abra la rejilla del tazón: gírela hacia la izquierda (Fig. 9). • Cierre la rejilla del tazón: gírela hacia la derecha hasta que tope en la posición de cierre (Fig. 10). NOTA: La rejilla del tazón debe regresarse a la posición de cierre para que la batidora funcione. Fig. 9 Fig. 10 – 10 – Cómo retirar y limpiar la rejilla de la guarda del tazón Baje el tazón. Gire el montaje de la rejilla de la guarda hacia la izquierda hasta que esté colocado por debajo de la guarda contra salpicaduras. Quite el batidor y el tazón. Mientras sostiene el montaje de la rejilla de la guarda con ambas manos, gírelo por completo hacia la izquierda. Cuando el dispositivo de retención frontal central (Fig. 11) llegue al final de su recorrido, puede bajarse hasta que quede plano (Fig. 11) en el borde del colector de goteo (Fig. 11). Después de bajar el dispositivo de retención frontal central, mueva el montaje de la rejilla de la guarda levemente hacia atrás para que los dispositivos de retención traseros despejen el borde en el colector de goteo. El montaje de la rejilla de la guarda ahora puede bajarse y quitarse. Lave el montaje de la rejilla de la guarda del tazón en el fregadero, enjuáguela con agua limpia y séquela con un trapo limpio. La guarda contra salpicaduras puede lavarse con un trapo o esponja, agua tibia y jabón. Enjuáguela con agua limpia y séquela con un trapo limpio. PARTE PLANA DISPOSITIVO DE RETENCIÓN FRONTAL CENTRAL BORDE DEL COLECTOR DE GOTEO Fig. 11 Cómo volver a colocar la rejilla del tazón Sostenga el montaje de la rejilla de la guarda de forma tal que su anillo superior esté colocado alrededor del colector de goteo del planetario con las ranuras en los dispositivos de retención traseros de nailon extendidas por sobre el borde del colector de goteo en la parte trasera. Levante el montaje de la rejilla de la guarda de forma tal que el dispositivo de retención frontal central pase por arriba del parte plana en el borde del colector de goteo y gire el montaje de la rejilla hacia la derecha. El montaje de la rejilla está correctamente ensamblado cuando los tres dispositivos de retención se extienden por encima del borde del colector de goteo en tres ubicaciones opuestas. Gire el montaje de la rejilla hacia la derecha hasta que se detenga en la posición frontal central. Gire la rejilla de forma que no estorbe hacia la izquierda para instalar o quitar el batidor y el tazón o para agregar los ingredientes. Regrese la rejilla a su posición frontal central para poner en funcionamiento la batidora. – 11 – BATIDORES Y ADITAMENTOS Batidor plano 20 qt Batidor de alambre 20 qt Gancho para masa 20 qt Gancho para masa tipo J de 20 qt Tazón de 20 qt (SST) Embudo para los ingredientes de 20 qt Mesa de 20 qt – 12 – LIMPIEZA ADVERTENCIA Desenchufe el cable de alimentación de la máquina antes de comenzar cualquier procedimiento de limpieza. La batidora debe limpiarse cuidadosamente a diario. NO utilice una manguera para limpiarla; hágalo con un trapo limpio y húmedo. La base tiene un espacio amplio para la limpieza debajo de la batidora. La cubierta (Fig. 1) puede retirarse para la limpieza aflojando los tornillos. El colector de goteo (Fig. 1) debe limpiarse. Para la limpieza del montaje de la rejilla de la guarda del tazón, vaya a la página 11. – 13 – MANTENIMIENTO ADVERTENCIA Desenchufe el cable de alimentación de la máquina antes de comenzar cualquier procedimiento de mantenimiento. LUBRICACIÓN CUBIERTA GUÍAS (detrás de la cubierta) SELLO PLANETARIO Fig. 12 Fig. 13 Guías Las guías (Fig. 12) deben lubricarse aproximadamente dos veces al año. Para llegar a estas zonas, baje completamente el soporte del tazón y retire la cubierta (Fig. 12), que está asegurada con tornillos. Limpie con una capa delgada de Lubriplate 630AA en cada guía. Coloque la cubierta. Sello planetario En ocasiones, el sello planetario (Fig. 13) puede secarse y comenzar a rechinar. Para corregir esto, aplique un poco de lubricante (aceite mineral) debajo del labio del sello. – 14 – AJUSTES Espacio libre del batidor El espacio libre del batidor debe revisarse en forma periódica. El batidor no debe tocar el tazón. El espacio libre máximo entre la parte inferior del tazón y el batidor plano tipo B es de 1/8” (3 mm). Coloque un tazón y un batidor (p. ej., el batidor plano tipo B). Si el tazón y el batidor entran en contacto antes de que el soporte del tazón llegue a su tope, ajuste el tornillo de tope. Consulte la sección Ajuste del espacio libre del tazón y del batidor. Medida del espacio libre Vierta una cantidad suficiente de harina en el tazón para cubrir el fondo del tazón donde gira el batidor. Con el tazón totalmente levantado (el batidor no debe tocar el fondo del tazón), haga funcionar brevemente la batidora a la velocidad más baja. Apague la batidora, desconéctela y mida la profundidad de la harina donde el batidor haya dejado un camino. Esta medida debe tomarse en varios puntos alrededor del tazón para asegurar la precisión. Ajuste del espacio libre del tazón y del batidor CUBIERTA TORNILLO TUERCA DE TOPE Fig. 14 Fig. 15 • Quite la cubierta (Fig. 14), que está asegurada con tornillos. • Ajuste el espacio libre al aflojar la tuerca de tope y mover el tornillo (Fig. 15) hacia la derecha para aumentar el espacio libre o hacia la izquierda para disminuir el espacio libre. • Después de realizar los ajustes, ajuste la tuerca de tope, reemplace la cubierta y sujétela con los tornillos. • Levante con cuidado el tazón varias veces para revisar el ajuste. – 15 – RESOLUCIÓN DE PROBLEMAS Problemas La batidora no arranca. Causas posibles La pantalla parpadea; consulte lo siguiente. El protector de circuito derivado está abierto. Revise el fusible o el interruptor de desconexión. La batidora está sobrecargada. La rejilla no está cerrada. El tazón no está cerrado (posición de mezclado) o no está subido. El batidor toca el tazón. El tazón no está cerrado (posición de mezclado). El espacio del batidor no es el adecuado. Vaya a la sección Mantenimiento para conocer el procedimiento de ajuste. El batidor no está colocado correctamente. El sello planetario rechina. El sello debe lubricarse de vez en cuando. Consulte la sección Mantenimiento. La pantalla del temporizador parpadea mostrando Si la pantalla del temporizador parpadea y la el tiempo y la máquina emite una alarma máquina emite una alarma, presione el botón ON/ OFF para restablecer. Si el síntoma continúa, comuníquese con su oficina de servicio local de Hobart. En la pantalla del temporizador se lee OP La palanca de cambio de velocidades no está (Fig. 16). correctamente asentada. PALANCA DE CAMBIO DE VELOCIDADES Fig. 16 SERVICIO Si este equipo necesita servicio, llame a su oficina de servicio local de Hobart al (888) 4HOBART. FORMULARIO 45268 Rev. A (Octubre de 2018) – 16 – IMPRESO EN EE. UU.-
 1
1
-
 2
2
-
 3
3
-
 4
4
-
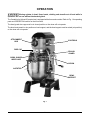 5
5
-
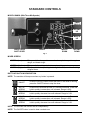 6
6
-
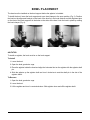 7
7
-
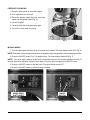 8
8
-
 9
9
-
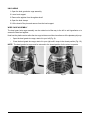 10
10
-
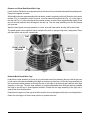 11
11
-
 12
12
-
 13
13
-
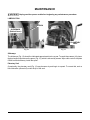 14
14
-
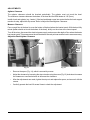 15
15
-
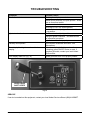 16
16
-
 17
17
-
 18
18
-
 19
19
-
 20
20
-
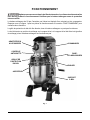 21
21
-
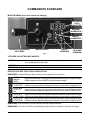 22
22
-
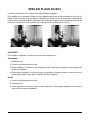 23
23
-
 24
24
-
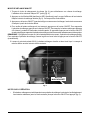 25
25
-
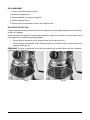 26
26
-
 27
27
-
 28
28
-
 29
29
-
 30
30
-
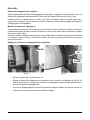 31
31
-
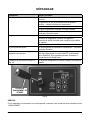 32
32
-
 33
33
-
 34
34
-
 35
35
-
 36
36
-
 37
37
-
 38
38
-
 39
39
-
 40
40
-
 41
41
-
 42
42
-
 43
43
-
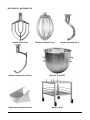 44
44
-
 45
45
-
 46
46
-
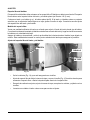 47
47
-
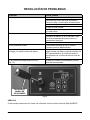 48
48


Hobart CENTERLINE HMM20 Manual de usuario
- Categoría
- Mezcladores
- Tipo
- Manual de usuario
en otros idiomas
- français: Hobart CENTERLINE HMM20 Manuel utilisateur
- English: Hobart CENTERLINE HMM20 User manual
Artículos relacionados
Otros documentos
-
 Centerline HMM10 Mixer Manual de usuario
-
Waring WSM10L Manual de usuario
-
Vollrath Mixer Manual de usuario
-
Hamilton Beach HMD300-UK El manual del propietario
-
Buffalo GJ461 El manual del propietario
-
Globe SP62P-4 El manual del propietario
-
KitchenAid kv25g0xsl Manual de usuario
-
KitchenAid KV25G0XSL5 El manual del propietario
-
KitchenAid KSM7586 Manual de usuario
-
KitchenAid KP26M9PC Guía del usuario
