
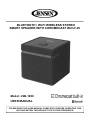
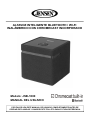
BLUETOOTH / WI-FI WIRELESS STEREO
SMART SPEAKER WITH CHROMECAST BUILT-IN
Model: JSB-1000
USER MANUAL
PLEASE READ THIS USER MANUAL COMPLETELY BEFORE OPERATING THIS
UNIT AND RETAIN THIS BOOKLET FOR FUTURE REFERENCE.


E
1
IMPORTANT SAFETY INSTRUCTIONS
When used in the directed manner, this unit has been designed and manufactured to ensure your personal safety.
However, improper use can result in potential electrical shock or fire hazards. Please read all safety and operating
instructions carefully before installation and use, and keep these instructions handy for future reference. Take special
note of all warnings listed in these instructions and on the unit.
1. Read these instructions – All the safety and operating instructions should be read before the appliance is
operated.
2. Keep these instructions – The safety and operating instructions should be kept for future reference.
3. Heed all warnings – All warnings on the appliance and in the operating instructions should be adhered to.
4. Follow all instructions – All operation and use instructions should be followed.
5. Do not use this apparatus near water – The appliance should not be used near water; for example, near a bath
tub, washbowl, kitchen sink, laundry tub, in a wet basement, or near a swimming pool.
6. Clean only with dry cloth – The appliance should be cleaned only as recommended by the manufacturer.
7. Do not block any ventilation openings. Install in accordance with the manufacturer’s instructions. The
appliance should be situated so that its location or position does not interfere with its proper ventilation. For
example, the appliance should not be situated on a bed, sofa, rug, or similar surface that may block the
ventilation openings; or placed in a built-in installation, such as a bookcase or cabinet that may impede the
flow of air through the ventilation openings.
8. Do not install near any heat sources such as radiators, heat registers, stoves, or other apparatus (including
amplifiers) that produce heat.
9. AC adaptor is used as disconnect device and it should remain readily operable during intended use. In order
to disconnect the apparatus from the mains completely, the AC adaptor should be disconnected form the
mains socket outlet completely.
10. Only use attachments / accessories specified by the manufacturer.
11. Use only with a cart, stand, tripod, bracket, or table specified by the manufacturer,
or sold with the apparatus. When a cart is used, use caution when moving the
cart/apparatus combination to avoid injury from tip-over.
12. Unplug this apparatus during lightning storms or when unused for long periods of time.
13. Refer all servicing to qualified service personnel. Servicing is required when the apparatus has been damaged
in any way, such as power-supply cord or plug is damaged, liquid has been spilled or objects have fallen into
the apparatus, the apparatus has been exposed to rain or moisture, does not operate normally, or has been
dropped.
14. This appliance shall not be exposed to dripping or splashing water and that no object filled with liquids such as
vases shall be placed on the apparatus.
15. Power Sources – The appliance should be connected to a power supply only of the type described in the
operating instructions or as marked on the appliance. Do not overload wall outlet.
16. Battery shall not be exposed to excessive heat such as sunshine, fire or the like
17. Danger of explosion if battery is incorrectly replaced. Replace only with the same or equivalent type.
18. Do not attempt to dismantle, open or repair this product yourself. If a fault occurs, seek advice from your local
qualified service technician or contact the distributor via the telephone number at the back of this instruction
manual.
19. Caution marking and nameplate are located on the bottom of product.

E
2
IMPORTANT NOTE
Avoid installing the unit in locations described below:
• Places exposed to direct sunlight or close to heat radiating appliances such as electric heaters.
• Places subject to constant vibration.
• Dusty, humid or moist places.
• Sources of electrical noise such as fluorescent lamps or motors.
• In case of malfunction due to electrostatic discharge, the apparatus has to be reset by disconnecting it from mains
supply, wait at least for 60 seconds before reconnect the AC power cord.
COMPLIANCE WITH FCC REGULATIONS
This device complies with Part 15 of the FCC Rules. Operation is subject to the following two conditions:
1) this device may not cause harmful interference, and
2) this device must accept any interference received, including interference that may cause undesired operation.
NOTE: This equipment has been tested and found to comply with the limits for a Class B digital device, pursuant to
Part 15 of the FCC Rules. These limits are designed to provide reasonable protection against harmful interference in a
residential installation. This equipment generates, uses and can radiate radio frequency energy and, if not installed
and used in accordance with the instructions, may cause harmful interference to radio communications. However,
there is no guarantee that interference will not occur in a particular installation. If this equipment does cause harmful
interference to radio or television reception, which can be determined by turning the equipment off and on, the user is
encouraged to try to correct the interference by one or more of the following measures:
- Reorient or relocate the receiving antenna.
- Increase the separation between the equipment and receiver.
- Connect the equipment into an outlet on a circuit different from that to which the receiver is connected.
- Consult the dealer or an experienced radio/TV technician for help.
CAUTION: Changes or modifications not expressly approved by the party responsible for
compliance could void the user’s authority to operate the equipment.
Protect Your Furniture
This product is equipped with non-skid rubber 'feet' to prevent the product from moving when you operate the controls.
These 'feet' are made from non-migrating rubber material specially formulated to avoid leaving any marks or stains on
your furniture. However certain types of oil based furniture polishes, wood preservatives, or cleaning sprays may
cause the rubber 'feet' to soften, and leave marks or a rubber residue on the furniture. To prevent any damage to your
furniture we strongly recommend that you purchase small self-adhesive felt pads, available at hardware stores and
home improvement centers everywhere, and apply these pads to the bottom of the rubber 'feet' before you place the
product on fine wooden furniture.

E
3
DEAR JENSEN® CUSTOMER
Selecting fine audio equipment such as the unit you've just purchased is only the start of your musical enjoyment.
Now it's time to consider how you can maximize the fun and excitement your equipment offers. This manufacturer
and the Electronic Industries Association's Consumer Electronics Group want you to get the most out of your
equipment by playing it at a safe level. One that lets the sound come through loud and clear without annoying
blaring or distortion and, most importantly, without affecting your sensitive hearing.
Sound can be deceiving. Over time your hearing "comfort level" adapts to higher volumes of sound. So what
sounds "normal" can actually be loud and harmful to your hearing. Guard against this by setting your equipment at
a safe level BEFORE your hearing adapts.
To establish a safe level:
Start your volume control at a low setting.
Slowly increase the sound until you can hear it comfortably and clearly, and without distortion.
Once you have established a comfortable sound level:
Set the dial and leave it there.
Taking a minute to do this now will help to prevent hearing damage or loss in the future. After all, we want you
listening for a lifetime.
We Want You Listening For a Lifetime
Used wisely, your new sound equipment will provide a lifetime of fun and enjoyment. Since hearing damage from
loud noise is often undetectable until it is too late, this manufacturer and the Electronic Industries Association's
Consumer Electronics Group recommend you avoid prolonged exposure to excessive noise.
Customer's Record:
The serial number of this product is found on its back cover. You should note the serial number of this unit in the
space provided as a permanent record of your purchase to aid in identification in the event of theft of loss.
Model Number: JSB-1000 Serial Number: ____________________

E
4
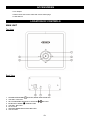
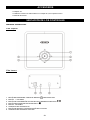
ACCESSORIES
1 x AC Adaptor
1 x Stereo Audio Connection Cable with 3.5mm stereo plugs
1 x User Manual
LOCATION OF CONTROLS
MAIN UNIT
Top View
Back View
1. POWER ON/STANDBY BUTTON, MODE INDICATOR LED
2. VOLUME + BUTTON
3. Wi-Fi STREAM/BLUETOOTH PLAY/PAUSE BUTTON
4. BLUETOOTH MODE /PAIR BUTTON
5. VOLUME - BUTTON
6.
DC IN JACK
7. SPEAKER RESET/RECOVERY BUTTON
8.
AUX IN JACK

E
5
GETTING STARTED
DOWNLOADING THE GOOGLE HOME APP
Go to the iTunes App Store (for iOS devices) or to Google Play (for Android devices) to download the Google Home
app to the device you want to connect (smartphone, tablet, etc.).
CONNECTING THE AC POWER
This unit operates using the included AC adaptor with 18V 1.5A (center-positive ) output, and is
compatible with standard 120V~ 60Hz AC household power
1. Insert the the DC Plug of the AC Adaptor into the DC IN jack on the back of the unit. Plug the AC Adaptor into a
standard 120V~ 60Hz AC wall outlet.
2. The unit will initialize when first plugged in. The initialization process could take up to 60 seconds to complete,
so please wait for this process to finish before proceeding. The LED will light solid red for several seconds then
changes to flashing white for several seconds while the unit is initializing. The LED may turn on and off during
the initialization process, this is normal. The LED will be flashing White when the initialization is completed. The
unit is now in setup Mode.
NOTE: 1.) The initialization process may take up to 60 seconds or longer when first connected. This process is
normal and only occurs when first plugged in.
2.) If the unit has been setup to connect your Wi-Fi network successfully, the LED will be solid Red after booting
in about 60 seconds. The unit is now in Standby mode.

E
6
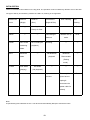
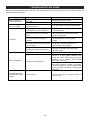
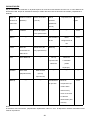
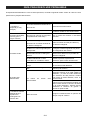
INITIALIZATION
There is a multicolor LED indicator on the top panel. The operation mode is indicated by different color of the LED.
The type of activity is indicated by whether the LED is on, flashing or its brightness:
Note:
A rapid flashing LED indicates an error. The device will automatically attempt to resolve the issue.
Mode LED
color
Solid on
(Bright)
Solid on
(Dim)
Pulse Effect
(Bright & Dim)
Slow Flashing
Fast
Flashing
Red
booting
Standby Mode/
Ready for Cast
---
---
Error
White
---
---
Connecting to
Network
Network set up
mode
Error
Green
Wi-Fi audio
streaming
Mode
Wi-Fi mode (No
playback)
Buffering
---
---
Blue
Bluetooth
Mode
---
No Bluetooth
playback
Bluetooth
Discoverable
( Pairing
mode)
---
Yellow
AUX Mode
(playing)
Aux Mode
(No playback)
---
---
---
Orange
----
---
Update in
process
Recovery Mode
(User have to
unplug &
reconnect the
power cable for
reboot)
Error

E
7
SETTING UP THE JSB-1000 ON A NETWORK
1. Make sure the device you want to connect (smartphone, tablet, etc.) is connected to a Wi-Fi network. The same
Wi-Fi network will also be used for pairing the JSB-1000 with the Google Home app.
2. Make sure that Bluetooth is also enabled on your device (smartphone, tablet, etc.). During the set-up process
the Google Home app will access your device (smartphone, tablet, etc.) using Bluetooth.
3. With the JSB-1000 in Standby Mode, open the Google Home app and select the Devices icon . A
new screen will open showing available devices and the JSB-1000 will show as “Needs Setup.”
IMPORTANT: It may take up to a minute for the JSB-1000 to appear as an available device in the Google Home
window, so do not select “Add New Device” in the app.
4. Follow the instructions in the Google Home app to complete the setup. The setup process may take several
minutes. It’s normal for the LED indicator on the JSB-1000 to change colors or turn off for several seconds
during the set-up process.
5. After the setup is complete, the LED Indicator will be solid Red (Standby mode), indicating the speaker is ready
to stream. Refer to the “Using Chromecast built-in” section below for instructions on how to use Chromecast
built-in.
Note: If you are setting up multiple speakers in the Google Home app, make sure the other speakers are turned off
when setting up a new speaker.
USING CHROMECAST BUILT-IN
The JSB-1000 comes with Chromecast built-in. It lets you stream your favorite music from your phone, tablet or laptop
right to your speakers. Easily control the JSB-1000 with apps you already know and love from your iPhone, iPad,
Android phone or tablet, Mac or Windows laptop, or Chromebook.
1. Once you’ve completed setting up the JSB-1000 in the Google Home app, tap the
Cast button in any Chromecast-enabled app and select the JSB-1000 from the device menu.
NOTE: Consult the Google Home app for a list of apps that are Chromecast-enabled.
2. Audio will stream from the Chromecast-enabled app to JSB-1000 over your home Wi-Fi network. The LED
Indicator is lit solid Green to indicate the unit is in Wi-Fi mode. When audio is streaming, the WI-FI STATUS LED
INDICATOR will be solid green.
3. Use the VOLUME + BUTTON to increase the volume.
4. Use the VOLUME – BUTTON to decrease the volume.

E
8
STREAMING TO MULTIPLE SPEAKERS WITH CHROMECAST BUILT-IN
If you have multiple speakers set-up in the Google Home app, they can be grouped together so they all stream the
same audio content.
1. Select the JSB-1000 from the Google Home app Devices List by clicking on the Devices icon .
2. Tap in the upper right corner of the JSB-1000 device window in the Google Home app and select “Create
Group.”
3. Select at least two speakers (box will be checked once selected) from the list for the group and enter a name for
the group.
4. The group will appear as an available connection when the Cast button is tapped in Chromecast-enabled apps.
5. Access the speaker group in the Google Home app to control play/pause or control the volume (if available in
supported apps) of each speaker.
SPOTIFY CONNECT
How to use Connect
You’ll need Spotify Premium to use Connect, see details on the included insert.
1. Add your new device to the same Wi-Fi network as your phone, tablet or PC (see product user instructions for
details).
2. Open the Spotify app on your phone, tablet or PC, and play any song.
3. If you’re using the app on a phone - tap the song image in the bottom left of the screen. For tablet and PC move to
step 4.
4. Tap the Connect icon
5. Pick your device from the list. If you can’t see it, just check it’s connected to the same Wi-Fi network as your phone,
tablet or PC. All done! Happy listening.
Licenses
The Spotify Software is subject to third party licenses found here: www.spotify.com/connect/third-party-licenses.
BLUETOOTH OPERATION
PAIRING (LINKING) A BLUETOOTH ENABLED CELL PHONE OR OTHER BLUETOOTH ENABLED
DEVICE to the JSB-1000
1. With the JSB-1000 in Stand-by Mode, tap the center Bluetooth button to select Bluetooth mode. The
Mode Indicator LED turns blue and will be flashing. The JSB-1000 is now ready to pair (link) with your
Bluetooth device.

E
9
2. Turn on the Bluetooth feature of your cell phone and turn down the volume to avoid sudden loud sound bursts
from the speaker. Enable the search or scan feature to find the JSB-1000 [xx.xx].
Note: [xx.xx] is the last 4 digits of speaker Mac address. If you have more than 1 JSB-1000 within range,
make sure you are connecting to the appropriate speaker.
3. Select "JSBW-1000" from the device list when it appears on your device screen. If required, enter the pass
code “0000” to pair (link) the JSB-1000 with your cell phone.
4. After successfully pairing (linking) your cell phone with the JSB-1000, the Mode Indicator LED stops flashing
and remains lit blue. You can now play music from your cell phone or Bluetooth device wirelessly to the
JSB-1000.
Note: If you want to connect the JSB-1000 to another cell phone after pairing successfully, then you need to
turn off the Bluetooth on the paired cell phone first if it is in range before going through the above steps.
Otherwise, the JSB-1000 will automatically reconnect to the previously linked cell phone or device. Then
press and hold the Bluetooth button to put the JSB-1000 into Bluetooth pairing mode, the LED
Indicator will be flashing Blue.
5. Press the VOLUME +/- button to adjust the volume level.
6. Press the PLAY/PAUSE button to pause or resume playback.
7. To turn off the JSB-1000 Bluetooth, press and hold the /STANDBY button on main unit for 2 seconds to
turn the unit to standby mode. Mode Indicator LED turns red. Don’t forget to also turn off the Bluetooth feature
on your cell phone or Bluetooth device.
Notes:
1.) Refer to manual of your cell phone or other Bluetooth enabled device for Bluetooth operation, since it may
vary from model to model.
2.) If your Bluetooth enabled device does not support A2DP, it will not play the music through the speaker,
even after it's paired (linked).
3.) If you are pairing (linking) your computer to the JSB-1000 using Bluetooth, you may need to set the
JSB-1000 as your computer’s default sound device.
Note: In power on mode, If no sound playback or paused by user for 15 minutes, unit will turn into standby mode
automatically for power saving.
Re-linking to a cell phone or Bluetooth device
If your cell phone or Bluetooth device is already paired with the JSB-1000, but became unlinked at some point, even
with both Bluetooth devices turned on. You can re-link them by:
1. Tap the /PAIR button to re-link your cell phone. The Mode Indicator LED will turn blue and flash while linking.
2. Select the JSB-1000 from the devices list on your cell phone for linking. The Mode Indicator LED stops flashing
and remains lit blue if the JSB-1000 and your cell phone have been re-linked successfully.
3. You can also re-link the JSB-1000 by using Bluetooth operation of your cell phone. Please refer to operation
manual of your cell phone for more information.

E
10
AUXILIARY INPUT
This unit provides an auxiliary audio signal input jack for connecting external audio devices like MP3 players, CD
players and listen to them through the speakers of this unit.
1. Use an audio cable (included) with one 3.5 mm stereo plug on each end of the cable.
2. To select auxiliary audio input, plug one end into the Aux IN jack on the back of main unit, unit will turn into
AUX mode automatically, Mode Indicator LED turns Yellow.
3. Plug the other end of the cable into the Line-out Jack or Headphone Jack of your external audio device.
4. Turn on the external audio device and the main unit.
5. The volume level can now be controlled through the main unit. Operate all other functions on the auxiliary
device as usual.
NOTE:
If you connect this unit to the Line-Out Jack of your external device then you only need to adjust the volume
control of this unit. If you connected the Headphone Jack of your external device then you may need to adjust
both the volume control of your external device and the volume control of this unit to find the most desirable
volume setting.
In power on mode, If no sound playback or paused by user for 15 minutes, unit will turn into standby mode
automatically for power saving.
Press and hold the POWER button for 2 seconds to turning off the unit when you finish listening. Don't
forget to switch off the power of your external device as well.
RESETING THE JSB-1000
Power Cycle Reset
In case of malfunction due to electrostatic discharge, the apparatus has to be reset by disconnecting it from mains
supply, wait at least for 60 seconds before reconnect the AC power cord.
If above steps cannot reset the unit, you may need to go through below process for factory reset.
Factory Reset
1. In Power ON mode, press and hold the RESET button for 5 seconds until MODE indicator LED change to Red
2. Release the RESET button, unit will go into set up mode.
3. Waiting for about 2 minutes, MODE indicator stop changing color and flashing white.
4. Clear catches of apps in your samrtphone. Go through SETTING UP THE JSB-1000 ON A NETWORK section
in the manual.

E
11
Note:
In Power ON mode, press and hold the RESET button longer than 5 seconds until MODE indicator LED change to
Red then Orange may drive speaker into Recovery mode, Orange LED flashing. If this happen, go through power
cycle reset procedures mentioned above and then factory reset procedures. Do not keep holding the RESET button if
the LED turns Red from other color.
SOFTWARE UPDATES
The JSB-1000 internal software will automatically be updated when updates become available, and when the
JSB-1000 is ON and connected to a Wi-Fi network. The LED Indicator will be flashing Orange during an update, and
the JSB-1000 will auto-reboot automatically after the update is finished.
NOTE: Software updates can occur at any time, but they will normally be scheduled to occur in the middle of the night
to avoid interfering with your listening.
CARE AND MAINTENANCE
1. Do not subject the unit to excessive force, shock, dust or extreme temperature.
2. Do not tamper the internal components of the unit.
3. Clean your unit with a dry cloth. Solvent or detergent should never be used.
4. Avoid leaving your unit in direct sunlight or in hot, humid or dusty places.
5. Keep your unit away from heating appliances and sources of electrical noise such as fluorescent lamps or motors.
CLEANING THE UNIT
To prevent fire or shock hazard, disconnect your unit from the AC power source when cleaning.
The finish on the unit may be cleaned with a dust cloth and cared for as other furniture, Use caution when
cleaning and wiping the plastic parts.
If the cabinet becomes dusty wipe it with a soft dry dust cloth. Do not use any wax or polish sprays on the
cabinet.
If the front panel becomes dirty or smudged with fingerprints it may be cleaned with a soft cloth slightly
dampened with a mild soap and water solution. Never use abrasive cloths or polishes, as these will damage the
finish of your unit.
CAUTION: Never allow any water or other liquids to get inside the unit while cleaning.
Note: This unit is not magnetically shielded and may cause color distortion on the screen of some TVs or video
monitors. To avoid this, you may need to move the unit further away from the TV or monitor if unnatural color shifts or
image distortion occurs.

E
12
TROUBLESHOOTING GUIDE
Should you experience difficulties in the use of this player please refer to the following chart or call 1-800-777-5331 for
Product Service and Support.
Symptom
Possible Problem
Solution
The unit does not
respond (no power)
The unit is disconnected from the
AC outlet.
Reconnect to the AC outlet.
The AC outlet has not power.
Try the unit on another outlet.
Unit is ON but there is
low or no volume
The volume control has been turned
all the way down.
Turn the Volume control to a higher output.
No Sound
Google Cast speaker is not in same
WiFi network of your smartphone.
Use the same WiFi network for speaker &
your smartphone.
Speaker is not set up for Google
Cast.
Set up speaker by following the set up
steps in the manual.
You have not select casting to
speaker.
Select speaker in your samrtphone
screen.
Bluetooth speaker is not linked with
the cell phone.
Go through “Bluetooth Operations”
process to link the speakers.
Speaker placement out of range.
Relocate the speaker within Bluetooth
operating range
Sound is distorted
Volume level is set too high.
Decrease the volume.
Sound source is distorted.
If the external device original sound
source is of poor quality, distortion and
noise are easily noticed with high-power
speakers. Try a different audio source
such as a music CD .
If you are using an external sound source
like older generation of iPod, try reducing
the output volume on the device itself. Also
try turning bass boost OFF or change the
EQ setting.
Unit gets warm after
extended play at high
volume
This is normal.
Turn the unit off for a period of time or
lower volume.

E
13
SPECIFICATION
Power requirement:
Main Unit AC-DC Adaptor DC 18V, 1.5 A
At Spectra, environmental and social responsibility is a core value of
our business. We are dedicated to continuous implementation of
responsible initiatives with an aim to conserve and maintain the
environment through responsible recycling.
Please visit us at http://www.spectraintl.com/green.htm for more information on Spectra’s green initiatives or to find a
recycler in your area.
The Bluetooth® word mark and logos are registered trademarks owned by Bluetooth SIG, Inc. and any use of such
marks by Spectra Merchandising Intl, Inc. is under license. Other trademarks and trade names are those of their
respective owners.
Chromecast is a trademark of Google Inc.
The Spotify software is subject to third party licenses found here:
https://developer.spotify.com/esdk-third-party-licenses/

E
14
90 DAY LIMITED WARRANTY AND SERVICE
VALID IN THE U.S.A. ONLY
SPECTRA MERCHANDISING INTERNATIONAL, INC. warrants this unit to be free from defective materials or factory
workmanship for a period of 90 days from the date of original customer purchase and provided the product is utilized
within the U.S.A. This warranty is not assignable or transferable. Our obligation under this warranty is the repair or
replacement of the defective unit or any part thereof, except batteries, when it is returned to the SPECTRA Service
Department, accompanied by proof of the date of original consumer purchase, such as a duplicate copy of a sales
receipt.
You must pay all shipping charges required to ship the product to SPECTRA for warranty service. If the product is
repaired or replaced under warranty, the return charges will be at SPECTRA’s expense. There are no other express
warranties other than those stated herein.
This warranty is valid only in accordance with the conditions set forth below:
1. The warranty applies to the SPECTRA product only while:
a. It remains in the possession of the original purchaser and proof of purchase is demonstrated.
b. It has not been subjected to accident, misuse, abuse, improper service, usage outside the descriptions and
warnings covered within the user manual or non-SPECTRA approved modifications.
c. Claims are made within the warranty period.
2. This warranty does not cover damage or equipment failure caused by electrical wiring not in compliance with
electrical codes or SPECTRA user manual specifications, or failure to provide reasonable care and necessary
maintenance as outlined in the user manual.
3. Warranty of all SPECTRA products applies to residential use only and is void when products are used in a
nonresidential environment or installed outside the United States.
This warranty gives you specific legal rights, and you may also have other rights which vary from state to state. TO
OBTAIN SERVICE please remove all batteries (if any) and pack the unit carefully and send it freight prepaid to
SPECTRA at the address shown below. IF THE UNIT IS RETURNED WITHIN THE WARRANTY PERIOD shown
above, please include a proof of purchase (dated cash register receipt) so that we may establish your eligibility for
warranty service and repair of the unit without cost. Also include a note with a description explaining how the unit is
defective. A customer service representative may need to contact you regarding the status of your repair, so please
include your name, address, phone number and email address to expedite the process.
IF THE UNIT IS OUTSIDE THE WARRANTY PERIOD, please include a check for $40.00 to cover the cost of repair,
handling and return postage. All out of warranty returns must be sent prepaid.
It is recommended that you contact SPECTRA first at 1-800-777-5331 or by email at custserv@spectraintl.com for
updated information on the unit requiring service. In some cases the model you have may be discontinued, and
SPECTRA reserves the right to offer alternative options for repair or replacement.
SPECTRA MERCHANDISING INTERNATIONAL, INC.
4230 North Normandy Avenue,
Chicago, IL 60634, USA.
1-800-777-5331
To register your product, visit the link on the website below to enter your information.
http://www.spectraintl.com/wform.htm
1116 Printed in China

ALTAVOZ INTELIGENTE BLUETOOTH / WI-FI
INALÁMBRICO CON CHROMECAST INCORPORADO
Modelo: JSB-1000
MANUAL DEL USUARIO
POR FAVOR LEA ESTE MANUAL DE USUARIO COMPLETAMENTE ANTES DE
OPERAR ESTA UNIDAD Y GUARDE ESTE FOLLETO PARA FUTURA REFERENCIA.


S
1
INSTRUCCIONES DE SEGURIDAD IMPORTANTES
Cuando se utiliza de forma dirigida, esta unidad ha sido diseñada y fabricada para garantizar su seguridad personal.
Sin embargo, el uso incorrecto puede resultar en choque eléctrico potencial o riesgos de incendio. Lea
detenidamente todas las instrucciones de seguridad y funcionamiento antes de instalar y utilizar y guarde estas
instrucciones para futuras referencias. Tome en cuenta todas las advertencias enumeradas en estas instrucciones y
en la unidad.
1. Lea estas instrucciones - Todas las instrucciones de seguridad y funcionamiento del aparato deben ser leídas
antes de su uso.
2. Guarde estas instrucciones - Las instrucciones de seguridad y funcionamiento deben guardarse para futura
referencia.
3. Preste atención todas las advertencias - Todas las advertencias en el aparato y en las instrucciones de
funcionamiento deben ser cumplidas.
4. Siga todas las instrucciones - Todas las instrucciones de operación y uso deben ser seguidas.
5. No utilice este aparato cerca del agua - El aparato no debe utilizarse cerca del agua; por ejemplo, cerca de
una tina de baño, lavado, fregadero de la cocina, tina de lavado, en un sótano húmedo ni cerca de una
piscina.
6. Limpie sólo con un paño seco - El aparato debe limpiarse sólo como lo recomienda el fabricante.
7. No bloquee las aberturas de ventilación. Instale de acuerdo con las instrucciones del fabricante. El aparato
debe estar situado de manera que su ubicación o posición no interfiera con la ventilación adecuada del mismo.
Por ejemplo, el aparato no debe estar situado en una cama, sofá, alfombra o superficie similar que pueda
bloquear las aberturas de ventilación; ni debe ser colocado en una instalación incorporada, tal como una
estantería o un armario que pueda impedir el flujo de aire a través de las aberturas de ventilación.
8. No instale cerca de fuentes de calor tales como radiadores, registros de calor, estufas u otros aparatos
(incluyendo amplificadores) que produzcan calor.
9. El adaptador de AC se utiliza como dispositivo de desconexión y debe permanecer fácilmente operable
durante el uso previsto. Para desconectar completamente el aparato de la red, el adaptador de AC debe
desconectarse completamente del tomacorriente.
10. Utilice únicamente accesorios especificados por el fabricante.
11. Úselo sólo con un cargador, soporte, trípode, mesa especificado por el fabricante
o que este sea vendido con el aparato. Cuando se utilice un cargador, tenga
precaución al mover la combinación de cargador/aparato para evitar lesiones ya
que este puede volcarse.
12. Desconecte este aparato durante tormentas eléctricas o cuando no se utilice durante largos períodos de
tiempo.
13. Remita todos los servicios a personal de servicio calificado. Se requiere mantenimiento cuando el aparato ha
sido dañado de alguna manera, si el cable o cordón de corriente está dañado, si se ha derramado líquido o
han caído objetos en el aparato, si el dispositivo ha estado expuesto a la lluvia o la humedad, no funciona
normalmente o se ha caído.
14. Este artefacto no debe ser expuesto a goteos o salpicaduras de agua. Así también ningún objeto que
contenga de líquidos, como jarrones debe ser colocado en el aparato.
15. Fuentes de alimentación de energía - El aparato sólo debe conectarse a una fuente de alimentación del tipo
descrito en el manual de instrucciones o marcado en el aparato. No sobrecargue el tomacorriente de pared.
16. La batería no debe ser expuesta a calor excesivo como sol, fuego o similar
17. Existe peligro de explosión si la batería se sustituye incorrectamente. Reemplace sólo con el mismo tipo o
equivalente.
18. No intente desmontar, abrir o reparar este producto usted mismo. Si se produce un fallo, consulte a su técnico
de servicio calificado local o póngase en contacto con el distribuidor a través del número de teléfono que se
encuentra al final de este manual de instrucciones.
19. La marca de precaución y placa de identificación se encuentran en la parte inferior del producto.

S
2
NOTA IMPORTANTE
Evite instalar la unidad en las ubicaciones descritas a continuación:
Lugares expuestos a la luz directa del sol o cerca de calentadores eléctricos.
Lugares sujetos a vibraciones constantes.
Lugares con polvo o húmedos.
Fuentes de ruido eléctrico tales como lámparas fluorescentes o motores.
Al desconectarlo de la corriente eléctrica, espere al menos 60 segundos antes de volver a conectar el cable de
alimentación de AC en caso de un fallo debido a una descarga electrostática, el aparato debe reiniciarse.
CUMPLIMIENTO DE LAS NORMAS DE LA FCC (Comisión Federal de
Comunicaciones)
Este dispositivo cumple con las Reglas de la FCC, parte 15. El funcionamiento está sujeto a las dos condiciones
siguientes:
(1) este dispositivo no puede causar interferencia dañina, y
(2) este dispositivo debe aceptar cualquier interferencia recibida, incluyendo interferencias que puedan
causar un funcionamiento no deseado.
NOTA: Este equipo ha sido probado y cumple con los requisitos para un dispositivo digital de Clase B, de acuerdo
con las Reglas de la FCC, Parte 15. Estos límites están diseñados para proporcionar una protección razonable
contra interferencias dañinas en una instalación residencial. Este equipo genera, utiliza y puede irradiar energía
de radiofrecuencia y, si no se instala y utiliza de acuerdo con las instrucciones, puede causar interferencia
perjudicial a las comunicaciones de radio. Sin embargo, no hay garantía que no se produzcan interferencias en
una instalación en particular. Si este equipo causa interferencias perjudiciales a la recepción de radio o televisión,
lo cual puede determinarse apagando y encendiendo el equipo, se recomienda al usuario que intente corregir la
interferencia mediante una o más de las siguientes medidas:
- Reorientar o reubicar la antena receptora.
- Incremente la separación entre el equipo y el receptor.
- Conecte el equipo a una toma de corriente en un circuito distinto al que está conectado el receptor.
- Consulte con el distribuidor o un técnico de radio/TV con experiencia para obtener ayuda.
PRECAUCIÓN: Los cambios o modificaciones no aprobados expresamente por la parte responsable del
cumplimiento podrían anular la autoridad del usuario para operar el equipo.
Proteja sus muebles
Este producto está equipado con “pies” de goma antideslizantes para evitar que el producto se mueva cuando
maneje los controles. Estos "pies" están hechos de material de goma no desplazable especialmente formulado para
evitar dejar marcas o manchas en sus muebles. Sin embargo, ciertos tipos de abrillantadores de muebles a base de
aceite, conservantes de madera o aerosoles de limpieza pueden hacer que los "pies" de caucho se suavicen y dejen
marcas o algún residuo de goma en los muebles. Para evitar cualquier daño a sus muebles, recomendamos que
compre pequeñas almohadillas de fieltro autoadhesivas, disponibles en ferreterías y centros de mejoras para el hogar
ubicadas en varios lugares y coloque estas almohadillas en la parte inferior de los "pies" de goma antes de colocar el
producto en sus muebles finos de madera.

S
3
ESTIMADO CLIENTE DE JENSEN®
La selección de equipos de audio refinados, tal como la unidad que acaba de comprar es sólo el comienzo de su
deleite musical. Ahora es el momento de considerar cómo puede maximizar la diversión y la emoción que ofrece
su equipo. El fabricante y El Grupo de Consumo Electrónico de la Asociación de Industrias Electrónicas quieren
sacar el máximo provecho de su equipo utilizándolo a un nivel seguro. Una que permita que el sonido llegue de
manera alta y clara sin estruendo ni distorsión y, lo más importantemente, sin afectar su sensible sentido auditivo.
El sonido puede ser engañoso. Con el tiempo, su "nivel de comodidad" de audición se adapta a mayor volumen
de sonido. Así que lo que suena "normal" puede ser fuerte y perjudicial para su audición. Para evitar esto, ajuste
su equipo a un nivel seguro ANTES de que su audición se adapte.
Para establecer un nivel seguro:
Inicie con el control de volumen a un nivel bajo.
Aumente lentamente el sonido hasta que pueda oírlo de manera cómoda, clara, y sin distorsión.
Una vez haya establecido un nivel cómodo de sonido:
Coloque el marcador y déjelo allí.
Tomarse un minuto para realizar este procedimiento le ayudará a prevenir daño auditivo o pérdida de audición en
el futuro. Después de todo, queremos preservar su audición para toda la vida.
Deseamos que escuches por toda la vida
Utilizado sabiamente, su nuevo equipo de sonido proporcionará una vida de diversión y deleite. Dado que los
daños auditivos causados por el ruido son a menudo indetectables hasta que es demasiado tarde, el fabricante y
El Grupo de Consumo Electrónico de la Asociación de Industrias Electrónicas recomiendan evitar la exposición
prolongada a ruidos excesivos.
Registro del cliente:
El número de serie de este producto se encuentra en la contraportada. Debe anotar el número de serie de esta
unidad en el espacio provisto como un registro permanente de su compra para ayudar en la identificación en caso
de pérdida o robo.
Número de Modelo: JSB-1000 Número de Serie: ________________

S
4
ACCESORIOS
1 x Adaptor AC
1 x Cable de conexión de audio estéreo con clavijas de 3,5 mm para el mismo.
1 x Manual del usuario
UBICACIÓN DE LOS CONTROLES
UNIDAD PRINCIPAL
Vista Superior
Vista trasera
1. BOTÓN DE ENCENDIDO / MODO DE ESPERA , INDICADOR LED
2. BOTÓN + VOLUMEN
3. BOTÓN DE TRANSMISIÓN Wi-Fi/BLUETOOTH REPRODUCIR/PAUSA
4. BOTÓN MODO EMPAREJAR/ BLUETOOTH
5. BOTÓN - VOLUMEN
6.
CONEXIÓN DE ENTRADA DC
7. BOTÓN DE REINICIO / RECUPERACIÓN DEL ALTAVOZ
8.
CONEXIÓN DE ENTRADA AUXILIAR

S
5
INICIO
DESCARGUE LA APLICACIÓN GOOGLE HOME
Ingrese a la tienda de aplicaciones iTunes (para dispositivos iOS) o a Google Play (para dispositivos Android) para
descargar la aplicación Google Home al dispositivo que desea conectar (teléfono inteligente, tableta, etc.).
CONEXIÓN DE LA ENERGÍA DE AC
Esta unidad funciona utilizando el adaptador de AC incluido con 18V 1.5A (centro-positivo ) salida, y
es compatible con 120V~ 60Hz AC de energía eléctrica en el hogar.
1. Inserte el conector DC del adaptador de AC en la toma de entrada DC de la parte posterior de la unidad.
Conecte el adaptador de CA a un 120V~ 60Hz AC al tomacorrientes.
2. La unidad se iniciará cuando se conecte por primera vez. El proceso de inicialización podría tardar hasta 60
segundos en completarse, así que espere a que termine este proceso antes de continuar. El indicador LED se
encenderá de color rojo sólido durante varios segundos y cambiará a parpadear en blanco durante varios
segundos mientras la unidad se está inicializando. El indicador LED puede encenderse y apagarse durante el
proceso de inicialización, esto es normal. El indicador LED parpadeará en color blanco cuando se complete la
inicialización. La unidad está ahora en el modo de configuración.
NOTA: 1.) El proceso de inicialización puede tardar hasta 60 segundos o más cuando se conecte por primera
vez el aparato. Este proceso es normal y sólo ocurre cuando se conecta por primera vez.
2.) Si la unidad ha sido configurada para conectar su red Wi-Fi con éxito, el indicador LED estará color rojo de
manera fija después unos 60 segundos de haber inicializado. La unidad se encuentra en modo de espera.

S
6
INICIALIZACIÓN
Hay un indicador LED multicolor en el panel superior. El modo de funcionamiento se indica con un color diferente de
El indicador LED. El tipo de actividad se indica por medio del LED si este se encuentra encendido, parpadeando o
brillando:
Nota:
El indicador LED intermitente, parpadeando rápidamente indica un error. El dispositivo intentará automáticamente
resolver el problema.
Modo de
acuerdo al
color LED
Sólido encendido
(Brillante)
Sólido encendido
(Tenue)
Efecto
pulsante
(Brillante &
Tenue)
Parpadeo lento
Parpadeo
rápido
Rojo
inicializar
Modo de espera/
Listo para emisión
---
---
Error
Blanco
---
---
Conectando a
la red
Modo
configuración de
red
Error
Verde
Modo de
transmisión de
audio Wi-Fi
Modo Wi-Fi (No
hay reproducción)
Buffering
---
---
Azul
Modo Bluetooth
---
No hay
reproducción
Bluetooth
Bluetooth
Localizable
( Modo
emparejar)
---
Amarillo
Modo AUX
(Reproduciendo)
Modo Auxiliar
(No hay
reproducción)
---
---
---
Naranja
----
---
Actualización
en proceso
Modo de
recuperación (el
usuario debe
desconectar y
volver a conectar
el cable de
alimentación para
reiniciar)
Error

S
7
CONFIGURANDO EL JSB-1000 EN UNA RED
1. Asegúrese que el dispositivo que desea conectar (teléfono inteligente, tableta, etc.) esté conectado a una red
Wi-Fi. La misma red Wi-Fi también se utilizará para emparejar el JSB-1000 con la aplicación Google Home.
2. Asegúrese que el Bluetooth también esté habilitado en su dispositivo (teléfono inteligente, tableta, etc.).
Durante el proceso de configuración, la aplicación Google Home accederá a su dispositivo (teléfono inteligente,
tablet, etc.) mediante Bluetooth.
3. Con el JSB-1000 en modo de espera, abra la aplicación Google en la ventana de inicio y seleccione el
icono de dispositivos . Se desplegará una nueva pantalla que mostrará los dispositivos disponibles y el
JSB-1000 aparecerá como "Configuración de necesidades".
IMPORTANT E: Puede demorar hasta un minuto para que el JSB-1000 aparezca como un dispositivo disponible en
la ventana de inicio de Google, por lo que no debe seleccionar "Agregar nuevo dispositivo" en la aplicación.
4. Siga las instrucciones de la aplicación de Google en la ventana de Inicio para completar la configuración. El
proceso de configuración puede tardar varios minutos. Es normal que el indicador LED del JSB-1000 cambie de
color o se apague durante varios segundos durante el proceso de configuración.
5. Una vez finalizada la configuración, el indicador LED se mantendrá rojo fijo (modo de espera), indicando que el
altavoz está listo para transmitir. Consulte la sección "Uso de Chromecast incorporado" a continuación para
obtener instrucciones sobre cómo usar Chromecast incorporado.
Nota: si está configurando varios altavoces en la aplicación Google en la ventana de inicio, asegúrese de que los
otros altavoces estén apagados al configurar un altavoz nuevo.
USO DE CHROMECAST INCORPORADO
El JSB-1000 viene con Chromecast incorporado. Este le permite transmitir su música favorita desde su teléfono,
tableta o computadora portátil directamente a su altavoz. Controle fácilmente el JSB-1000 con aplicaciones que ya
conoce y ama su iPhone, iPad, teléfono o tableta Android, computadora portátil Mac o Windows o Chromebook.
1. Una vez que haya completado la configuración de JSB-1000 en la aplicación Inicio de Google, toque botón Cast
(transmitir) En cualquier aplicación habilitada para Chromecast, seleccione JSB-1000 en el menú del
dispositivo.
NOTA: Consulte la aplicación Google en la ventana de inicio para obtener una lista de las aplicaciones
compatibles con Chromecast.
2. El audio se transmitirá desde la aplicación habilitada para Chromecast a JSB-1000 a través de la red Wi-Fi
doméstica. El indicador LED estará encendido en verde fijo para indicar que la unidad está en modo Wi-Fi.

S
8
3. Cuando el audio se está transmitiendo, el INDICADOR LED DE ESTADO WI-FI estará verde. Use el BOTÓN +
VOLUMEN para aumentar el volumen,
4. Use el BOTÓN - VOLUMEN para disminuir el volumen.
TRANSMISIÓN A MULTIPLES ALTAVOCES CON CHROMECAST INCORPORADO
Si tiene varios altavoces configurados en la aplicación de Google en la ventana de Inicio, éstos pueden agruparse
para que todos transmitan el mismo contenido de audio
1. Seleccione el JSB-1000 en la lista de dispositivos de la aplicación Desde la Lista de dispositivos de la aplicación
de Google en la ventana de inicio haciendo clic en el icono Dispositivos .
2. Toque en la esquina superior derecha de la ventana del dispositivo JSB-1000 en la aplicación de Google
ventana de inicio y seleccione "Crear grupo".
3. Seleccione al menos dos altavoces (el recuadro se verificará una vez seleccionado) en la lista del grupo e
introduzca un nombre para el grupo.
4. El grupo aparecerá como una conexión disponible cuando se ejecuta el botón Cast (transmitir) en
aplicaciones habilitadas para Chromecast.
5. Acceda al grupo de altavoces en la aplicación de Google ventana de inicio para controlar reproducir/pausar o
controlar el volumen (si está disponible en las aplicaciones compatibles) de cada altavoz.
CONECCIÓN A SPOTIFY
Cómo utilizar la conexión
Necesitará Spotify Premium para usar la conexión, consulte los detalles en el inserto incluido.
1. Agregue su nuevo dispositivo a la misma red Wifi que su teléfono, tableta o PC (consulte las instrucciones de uso
del producto para más detalles).
2. Abra la aplicación Spotify en su teléfono, tableta o PC y reproduzca cualquier canción.
3. Si estás usando la aplicación en un teléfono, toca la imagen de la canción en la parte inferior izquierda de la
pantalla. Para tableta y PC, vaya al paso 4.
4. Toque el icono Conectar
5. Elija el dispositivo de la lista. Si no puede verlo, solo compruebe que está conectado a la misma red Wi-Fi que su
teléfono, tableta o PC.
¡Todo listo! Disfrute de escuchar su música.
Licencias
El software Spotify está sujeto a las licencias de terceros que se encuentran aquí:
www.spotify.com/connect/third-party-licenses.

S
9
OPERACIÓN DEL BLUETOOTH
EMPAREJANDO (CONECTANDO) UN TELÉFONO CELULAR CON BLUETOOTH ENCENDIDO U
OTRO DISPOSITIVO CON BLUETOOTH ACTIVADO AL JSB-1000
1. Con el JSB-1000 en modo de espera, toque el centro del Bluetooth para seleccionar el modo Bluetooth.
El indicador LED se iluminará en azul de manera intermitente. El JSB-1000 estará preparado para emparejar
(enlazarse) con su dispositivo Bluetooth.
2. Encienda la función Bluetooth de su teléfono celular y baje el volumen para evitar sonidos repentinos y
fuertes del altavoz. Habilite la función de búsqueda o exploración para encontrar el JSB-1000 [xx.xx].
Nota: [xx.xx] son los últimos 4 dígitos de la dirección Mac del altavoz. Si tiene más de 1 JSB-1000 a su
alcance, asegúrese que se está conectando al altavoz apropiado.
3. Seleccione "JSBW-1000" en la lista de dispositivos cuando aparezca en la pantalla del dispositivo. Si fuera
necesario, ingrese el código de acceso "0000" para emparejar (conectar) el JSB-1000 con su teléfono
celular.
4. Después de conectar correctamente su teléfono celular con el JSB-1000, el indicador LED dejará de estar
intermitente y permanecerá encendido en azul. Ahora puede reproducir música desde su teléfono celular o
dispositivo Bluetooth de forma inalámbrica al JSB-1000.
Nota: Si desea conectar el JSB-1000 a otro teléfono celular después de emparejarlo con éxito, deberá
desactivar primero el Bluetooth del teléfono celular emparejado si está en el rango antes de realizar los
pasos anteriores. De lo contrario, el JSB-1000 se volverá a conectar automáticamente al teléfono celular
o al dispositivo previamente conectado. A continuación, mantenga presionado el botón Bluetooth
para colocar el JSB-1000 en el modo de sincronización de Bluetooth, el indicador LED estará con una
luz azul intermitente.
5. Presione el botón VOLUMEN +/- para ajustar el nivel de volumen.
6. Presione el botón REPRODUCIR/PAUSA para pausar o resumir la reproducción.
7. Para apagar el JSB-1000 Bluetooth, mantenga pulsado el botón / MODO DE ESPERA en la unidad
principal durante 2 segundos para ponerla en modo de espera. El indicador LED se encenderá color rojo.
No olvide también desactivar la función Bluetooth en su teléfono celular o dispositivo Bluetooth.
Notas:
1.) Consulte el manual de su teléfono celular u otro dispositivo habilitado para Bluetooth para el
funcionamiento del mismo, ya que puede variar de modelo a modelo.
2.) Si su dispositivo habilitado para Bluetooth no es compatible con A2DP, no reproducirá la música a través
del altavoz, incluso después de haberlo emparejado (enlazado).
3.) Si está emparejando su computadora con el JSB-1000 usando Bluetooth, puede que necesite configurar
el JSB-1000 como el dispositivo de sonido predeterminado de su computador.

S
10
Nota: En el modo de encendido, si no hay reproducción de sonido o la reproducción es pausada por el usuario
durante 15 minutos, la unidad se cambiará a modo de espera automáticamente para ahorro de energía.
Re-enlazando un teléfono celular o dispositivo Bluetooth
Si su teléfono celular o dispositivo Bluetooth ya está emparejado con el JSB-1000, pero se ha desvinculado en algún
momento, incluso con ambos dispositivos Bluetooth activados. Puede re-vincularlos por medio de:
1. Toque el botón /EMPAREJAR para volver a vincular su teléfono celular. El indicador LED se iluminará en
azul de manera intermitente.
2. Seleccione el JSB-1000 en la lista de dispositivos de su teléfono celular para realizar la vinculación. El indicador
LED dejará de estar intermitente y permanecerá encendido en color azul, solamente si el JSB-1000 y su
teléfono celular han sido re-enlazados correctamente.
3. También puede volver a emparejar el JSB-1000 mediante el uso de Bluetooth de su teléfono celular. Consulte el
manual de operación de su teléfono celular para obtener más información.
ENTRADA AUXILIAR
Esta unidad proporciona una entrada de señal de audio auxiliar para conectar dispositivos de audio externos como
reproductores de MP3, reproductores de CD y así escucharlos a través de los altavoces de esta unidad.
1. Utilice un cable de audio (incluido) con una salida del estéreo de 3,5 mm en cada extremo del cable.
2. Para seleccionar la entrada auxiliar de audio, conecte un extremo en la entrada Aux IN en la parte trasera de
la unidad principal, la unidad se cambiará a modo AUX automáticamente, el indicador LED se volverá
amarillo.
3. Conecte el otro extremo del cable a la línea de salida o a los auriculares de su dispositivo de audio externo.
4. Encienda el dispositivo de audio externo y la unidad principal.
5. El nivel de volumen ahora se puede controlarse a través de la unidad principal. Todas las demás funciones
pueden operarse desde el dispositivo auxiliar como de costumbre.
NOTA:
Si conecta esta unidad a la línea de salida de su dispositivo externo, entonces sólo tendrá que ajustar el control
de volumen de esta unidad. Si ha conectado los auriculares de su dispositivo externo, es posible que deba
ajustar el control de volumen de su dispositivo externo y el control de volumen de esta unidad para encontrar el
ajuste de volumen deseable.
En el modo de encendido, si no hay reproducción de sonido o la reproducción es pausada por el usuario
durante 15 minutos, la unidad cambiará automáticamente al modo de espera para ahorrar energía.
Presione y mantenga presionado el botón POWER durante 2 segundos para apagar la unidad cuando
termine de escuchar su reproducción. De igual manera no olvide apagar su dispositivo externo.
RESTABLECER EL JSB-1000
Reinicio del ciclo de encendido
En caso de fallo debido a una descarga electrostática, el aparato debe reiniciarse desconectándolo de la red, espere
al menos 60 segundos antes de volver a conectar el cable de alimentación de AC.
Si los pasos anteriores no le ayudan a restablecer la unidad, es posible que requiera llevar a cabo el proceso a
continuación para el restablecimiento de configuración de fábrica.

S
11
Restablecimiento de configuración de fábrica
1. En el modo de encendido, mantenga presionado el botón RESTABLECER durante 5 segundos hasta que el
indicador LED cambie a color rojo.
2. Suelte el botón RESTABLECER, la unidad entrará en el modo de configuración.
3. Espere unos 2 minutos, el indicador dejará de cambiar de color y se pondrá intermitente en blanco.
4. Limpie el canché de aplicaciones en su teléfono inteligente. Diríjase a la sección CONFIGURACIÓN del JSB-1000
en la sección EN RED en el manual.
Nota:
En el modo de Encendido, presione y mantenga presionado el botón RESTABLECER más de 5 segundos hasta que
el indicador LED cambie a color rojo y luego a naranja puede configurar el altavoz al modo Recuperación, cuando el
indicador LED se encuentre intermitente en color naranja. Si esto sucede, realice los procedimientos de reinicio del
ciclo mencionados anteriormente y luego los procedimientos de restablecimiento de configuración de fábrica. No
mantenga presionado el botón RESTABLECER si el indicador LED cambia a rojo de otro color.
ACTUALIZACIONES DE SOFTWARE
El software interno del JSB-1000 se actualizará automáticamente cuando las actualizaciones estén disponibles y
cuando el JSB-1000 esté ENCENDIDO y conectado a una red Wi-Fi. El indicador LED estará intermitente de color
naranja durante la actualización y el JSB-1000 se reiniciará automáticamente una vez finalizada la actualización.
NOTA: Las actualizaciones de software pueden ocurrir en cualquier momento, pero normalmente se programarán
para que ocurran en medio de la noche para evitar interferir con su reproducción de música.
CUIDADO Y MANTENIMIENTO
1. No someta la unidad a fuerza excesiva, golpes, polvo o temperaturas extremas.
2. No manipule los componentes internos de la unidad.
3. Limpie la unidad con un paño seco. Nunca use disolvente o detergente.
4. Evite dejar la unidad bajo la luz solar directa o en lugares calurosos, húmedos o con polvo.
5. Mantenga su unidad alejada de aparatos de calefacción y fuentes de ruido eléctrico, tales como lámparas
fluorescentes o motores.
LIMPIEZA DE LA UNIDAD
Para evitar incendios o descargas eléctricas, desconecte la unidad de la fuente de alimentación de AC al
limpiarla.
El acabado de la unidad puede limpiarse con un paño de polvo y debe ser cuidada como otros muebles. Tenga
cuidado al limpiar y sacudir las piezas plásticas.
Si el gabinete se llenara de polvo, límpielo con un paño suave y seco. No utilice ningún tipo de cera o pasta de
pulir en el gabinete.
Si el panel frontal se ensucia o se mancha con huellas dactilares, se puede limpiar con un paño suave
ligeramente humedecido con una solución suave de jabón y agua. No utilice nunca paños abrasivos ni
abrillantadores, ya que pueden dañar el acabado de la unidad.
PRECAUCIÓN: Nunca permita que el agua u otros líquidos entren dentro de la unidad mientras la limpia.
Nota: Esta unidad no está protegida magnéticamente y puede causar distorsión de color en la pantalla de algunos
televisores o monitores de vídeo. Para evitar esto, es posible que si se produce un cambio de color o distorsión de la
imagen necesite mover la unidad lejos del televisor o monitor.

S
12
GUÍA PARA RESOLVER PROBLEMAS
Si experimenta dificultades en el uso de este reproductor, consulte el siguiente cuadro o llame al 1-800-777-5331
para Servicio y Soporte del Producto.
Dificultad
Posible problema
Solución
La unidad no
responde (no hay
energía)
La unidad está desconectada de la
toma de AC.
Reconecte al tomacorriente.
La toma de AC no tiene corriente.
Prueba la unidad en otro tomacorriente.
La unidad se
encuentra encendida,
pero hay poco o
ningún volumen
El control de volumen se ha girado
completamente hacia abajo.
Gire el control de volumen a una salida
más alta.
No existe sonido
El altavoz de Google Cast no se
encuentra en la misma red WiFi de
su teléfono inteligente.
Utilice la misma red WiFi para altavoz y
su teléfono inteligente.
El altavoz no está configurado para
Google Cast.
Configure el altavoz siguiendo los pasos
de configuración del manual.
No ha seleccionado el casting del
altavoz.
Seleccione el altavoz en la pantalla del
teléfono inteligente.
El altavoz Bluetooth no está
conectado con el teléfono celular.
Revise el proceso "Operaciones
Bluetooth" para vincular los altavoces.
El altavoz se encuentra fuera de
rango.
Reubique el altavoz dentro del rango de
funcionamiento del Bluetooth
El sonido está
distorsionado
El volumen está configurado muy
alto.
Disminuya el volumen.
La fuente de sonido está
distorsionada.
Si la fuente de sonido original del
dispositivo externo es de mala calidad, la
distorsión y el ruido se notan fácilmente
con altavoces de alta potencia. Pruebe
una fuente de audio diferente, como un
CD de música.
Si está utilizando una fuente de sonido
externa como una generación anterior de
iPod, intente reducir el volumen de salida
en el propio dispositivo. También intente
desactivar el aumento de graves o
cambie el ajuste de EQ.
La unidad se calienta
después de una
reproducción
prolongada a un
volumen alto
Esto es normal.
Apague la unidad durante un período de
tiempo o baje el volumen.

S
13
ESPECIFICACIONES
Requerimiento de energía:
Unidad principal: Adaptador AC-DC, DC 18V, 1.5 A
En Spectra, la responsabilidad ambiental y social es un valor
fundamental de nuestro negocio. Estamos dedicados a la
implementación continua de iniciativas responsables con el
objetivo de conservar y mantener el medio ambiente a través del
reciclaje responsable.
Visítenos en: http://www.spectraintl.com/green.htm para obtener más información sobre las iniciativas ecológicas de
Spectra o para encontrar un reciclador en su área.
La marca Bluetooth® del texto y logotipos son marcas registradas propiedad de Bluetooth SIG, Inc. y cualquier uso
de dichas marcas por parte de Spectra Merchandising Intl, Inc. está bajo licencia. Otras marcas y nombres
comerciales son de sus respectivos propietarios.
Chromecast es una marca comercial de Google Inc.
El software Spotify está sujeto a licencias de terceros que se encuentran aquí:
https://developer.spotify.com/esdk-third-party-licenses/

S
14
90 DÍAS DE GARANTÍA Y SERVICIOS LIMITADOS
VÁLIDO SOLAMENTE EN LOS ESTADOS UNIDOS
SPECTRA MERCHANDISING INTERNATIONAL, INC. Garantiza que esta unidad está libre de materiales
defectuosos o error de manufactura de fábrica por un período de 90 días a partir de la fecha de la compra original del
cliente y siempre y cuando el producto se utilice dentro de los Estados Unidos. Nuestra obligación bajo esta garantía
es la reparación o reemplazo de la unidad defectuosa o cualquier parte de la misma, exceptuando las baterías,
cuando se devuelve al Departamento de Servicio de SPECTRA, acompañada de una prueba de la fecha de compra
original por parte del consumidor, así como una copia del recibo de compra.
Usted debe pagar todos los gastos de envío requeridos para enviar el producto a SPECTRA para el servicio de
garantía. Si el producto es reparado o reemplazado bajo garantía, los gastos de devolución correrán por cuenta de
SPECTRA. No hay otras garantías expresas que no sean las establecidas aquí.
Esta garantía es válida únicamente de acuerdo con las condiciones establecidas a continuación:
1. La garantía se aplica al producto SPECTRA solamente mientras:
a. Queda en posesión del comprador original y se demuestra la prueba de compra.
b. No ha sufrido accidentes, mal uso, abuso, servicio inapropiado, uso fuera de las descripciones y advertencias
cubiertas en el manual del usuario o modificaciones no aprobadas por SPECTRA.
c. Los reclamos se realizan dentro del período de garantía.
2. Esta garantía no cubre los daños o fallos del equipo causados por el cableado eléctrico que no cumpla con los
códigos eléctricos o especificaciones del manual del usuario de SPECTRA, o por no proporcionar el cuidado
adecuado y el mantenimiento necesario como se describe en el manual del usuario.
3. La garantía de todos los productos SPECTRA se aplica únicamente a uso residencial y es nula cuando los
productos se utilizan en un entorno no residencial o son instalados fuera de los Estados Unidos.
Esta garantía le otorga derechos legales específicos y también puede tener otros derechos que varían
de un Estado a otro. PARA OBTENER SERVICIO, retire todas las pilas (si hubiere) y empaque la unidad con cuidado
y envíe el paquete pagado por adelantado a SPECTRA a la dirección que se muestra a continuación. SI LA UNIDAD
SE VUELVE DENTRO DEL PERIODO DE GARANTÍA que se muestra arriba, incluya una prueba de compra (factura
o de recibo con fecha) para que podamos establecer su elegibilidad para el servicio de garantía y reparación de la
unidad sin costo alguno. También incluya una nota con una descripción que explique cómo la unidad está fallando o
se encuentra defectuosa. Es posible que un representante de servicio al cliente tenga que ponerse en contacto con
usted para verificar el estado de su reparación. Por favor, incluya su nombre, dirección, número de teléfono y
dirección de correo electrónico para agilizar el proceso.
SI LA UNIDAD ESTÁ FUERA DEL PERÍODO DE GARANTÍA, por favor incluya un cheque por un monto de $40.00
para cubrir el costo de la reparación, manejo y devolución del paquete. Todas las devoluciones de la garantía deben
enviarse por adelantado.
Se recomienda que se comunique con SPECTRA primero al 1-800-777-5331 o por correo electrónico a
custserv@spectraintl.com para obtener información actualizada sobre la unidad que requiere servicio. En algunos
casos el modelo que tiene puede ser descontinuado, y SPECTRA se reserva el derecho de ofrecer alternativas para
la reparación o reemplazo del mismo.
SPECTRA MERCHANDISING INTERNATIONAL, INC.
4230 North Normandy Avenue,
Chicago, IL 60634, USA.
1-800-777-5331
Para registrar su producto, visite el enlace en el sitio web a continuación para ingresar su información
http://www.spectraintl.com/wform.htm
1116 Impreso en China
-
 1
1
-
 2
2
-
 3
3
-
 4
4
-
 5
5
-
 6
6
-
 7
7
-
 8
8
-
 9
9
-
 10
10
-
 11
11
-
 12
12
-
 13
13
-
 14
14
-
 15
15
-
 16
16
-
 17
17
-
 18
18
-
 19
19
-
 20
20
-
 21
21
-
 22
22
-
 23
23
-
 24
24
-
 25
25
-
 26
26
-
 27
27
-
 28
28
-
 29
29
-
 30
30
-
 31
31
-
 32
32


en otros idiomas
- English: Jensen JSB-1000 User manual
Artículos relacionados
Otros documentos
-
LG GM84SDSB Manual de usuario
-
Quick SBC 1450 ADV PLUS Manual de usuario
-
 Kinyo BT132 Manual de usuario
-
Flex JS 18.0-EC Manual de usuario
-
Terraillon HOMNI El manual del propietario
-
 Boss Audio Systems 614UA El manual del propietario
-
Sony HT-Z9F Manual de usuario
-
Sony HTZ9F Manual de usuario
-
Sony HT-MT500 Instrucciones de operación
-
Sony HT-CT800 Instrucciones de operación

