Cameo OPUS® SP5+ Manual de usuario
- Categoría
- Focos
- Tipo
- Manual de usuario

USER´S MANUAL
BEDIENUNGSANLEITUNG
MANUEL D`UTILISATION
MANUAL DE USUARIO
INSTRUKCJA OBSŁUGI
MANUALE D‘ USO
OPUS SP5 PLUS
PROFILE MOVING HEAD
CLOSP5PLUS

CONTENTS / INHALTSVERZEICHNIS / CONTENU /
CONTENIDO / TREŚĆ / CONTENUTO
ENGLISH
INFORMATION ON THIS USER MANUAL 4
INTENDED USE 4
DEFINITIONS AND SYMBOL EXPLANATIONS 4
SAFETY INSTRUCTIONS 5
NOTES FOR MOBILE INDOOR DEVICES 8
INCLUDED 9
INTRODUCTION 9
CONNECTIONS, OPERATING AND DISPLAY ELEMENTS 10
OPERATION 13
SETUP AND INSTALLATION 20
CARE, MAINTENANCE AND REPAIR 21
TECHNICAL DATA 22
MINIMUM DISTANCE TO ILLUMINATED SURFACE 23
MINIMUM DISTANCE TO NORMALLY FLAMMABLE MATERIALS 23
DISPOSAL 24
MANUFACTURER’S DECLARATIONS 24
DEUTSCH
INFORMATIONEN ZU DIESER BEDIENUNGSANLEITUNG 25
BESTIMMUNGSGEMÄSSER GEBRAUCH 25
BEGRIFFS- UND SYMBOLERKLÄRUNGEN 25
SICHERHEITSHINWEISE 26
HINWEISE FÜR ORTSVERÄNDERLICHE INDOOR-GERÄTE 30
LIEFERUMFANG 30
EINFÜHRUNG 30
ANSCHLÜSSE, BEDIEN- UND ANZEIGEELEMENTE 31
BEDIENUNG 34
AUFSTELLUNG UND MONTAGE 42
PFLEGE, WARTUNG UND REPARATUR 43
TECHNISCHE DATEN 44
MINDESTABSTAND ZUR BELEUCHTETEN FLÄCHE 46
MINDESTABSTAND ZU NORMAL ENTFLAMMBAREN MATERIALIEN 46
ENTSORGUNG 46
HERSTELLERERKLÄRUNGEN 46

FRANÇAIS
INFORMATIONS SUR CE MANUEL D'UTILISATION 48
UTILISATION PRÉVUE 48
DÉFINITIONS ET EXPLICATION DES PICTOGRAMMES 48
CONSIGNES DE SÉCURITÉ 49
NOTES POUR LES APPAREILS MOBILES D'INTÉRIEUR 53
LIVRAISON INCLUSE 53
INTRODUCTION 54
CONNECTEURS, UTILISATION ET INDICATEURS 55
FONCTIONNEMENT 58
MONTAGE ET INSTALLATION 66
ENTRETIEN, MAINTENANCE ET RÉPARATIONS 67
CARACTÉRISTIQUES TECHNIQUES 68
DISTANCE MINIMALE PAR RAPPORT À LA SURFACE ÉCLAIRÉE 70
DISTANCE MINIMALE PAR RAPPORT AUX MATÉRIAUX NORMALEMENT INFLAMMABLES 70
MISE AU REBUT 70
DÉCLARATIONS DU FABRICANT 71
ESPAÑOL
INFORMACIÓN SOBRE ESTE MANUAL DEL USUARIO 72
USO PREVISTO 72
DEFINICIONES Y EXPLICACIONES DE LOS SÍMBOLOS 72
INSTRUCCIONES DE SEGURIDAD 73
NOTAS PARA LOS EQUIPOS PORTÁTILES QUE SE INSTALAN EN INTERIORES 77
ENTREGA INCLUIDA 77
INTRODUCCIÓN 77
CONEXIONES, MANDOS E INDICADORES 78
FUNCIONAMIENTO 81
INSTALACIÓN Y MONTAJE 89
CUIDADO, MANTENIMIENTO Y REPARACIÓN 90
DATOS TÉCNICOS 91
DISTANCIA MÍNIMA A LA SUPERFICIE ILUMINADA 93
DISTANCIA MÍNIMA A MATERIALES NORMALMENTE INFLAMABLES 93
RECICLAJE 93
DECLARACIÓN DEL FABRICANTE 94

POLSKI
INFORMACJE NA TEMAT NINIEJSZEJ INSTRUKCJI OBSŁUGI 95
ZAMIERZONE ZASTOSOWANIE 95
DEFINICJE I OBJAŚNIENIA SYMBOLI 95
INSTRUKCJE BEZPIECZEŃSTWA 96
UWAGI DOTYCZĄCE MOBILNYCH URZĄDZEŃ WEWNĘTRZNYCH 100
DOSTAWA WLICZONA W CENĘ 100
WPROWADZENIE 101
PRZYŁĄCZA, ELEMENTY OBSŁUGI I WSKAŹNIKI 102
OBSŁUGA 105
KONFIGURACJA I INSTALACJA 113
PIELĘGNACJA, KONSERWACJA I NAPRAWA 113
DANE TECHNICZNE 114
MINIMALNA ODLEGŁOŚĆ OD OŚWIETLANEJ POWIERZCHNI 116
MINIMALNA ODLEGŁOŚĆ OD NORMALNIE ŁATWOPALNYCH MATERIAŁÓW 116
UTYLIZACJA 116
DEKLARACJE PRODUCENTA 117
ITALIANO
INFORMAZIONI SU QUESTO MANUALE DI ISTRUZIONI 118
USO PREVISTO 118
DEFINIZIONI E SPIEGAZIONI DEI SIMBOLI 118
ISTRUZIONI DI SICUREZZA 119
NOTE PER I DISPOSITIVI MOBILI PER INTERNI 123
CONSEGNA INCLUSA 123
INTRODUZIONE 123
CONNESSIONI, ELEMENTI DI COMANDO E DI VISUALIZZAZIONE 124
FUNZIONAMENTO 127
INSTALLAZIONE E MONTAGGIO 135
CURA, MANUTENZIONE E RIPARAZIONE 136
DATI TECNICI 137
DISTANZA MINIMA DALLA SUPERFICIE ILLUMINATA 138
DISTANZA MINIMA DA MATERIALI NORMALMENTE INFLAMMABILI 138
SMALTIMENTO 139
DICHIARAZIONI DEL PRODUTTORE 139


6
DMX
ITALIANO
POLSKI
ESPAÑOL
FRANCAIS
DEUTSCHENGLISH
ENGLISH
You have made the right choice!
This device has been developed and manufactured to the highest quality standards to ensure
many years of problem-free operation. Please read this user manual carefully to be able to use
your new Cameo product quickly and optimally. Further information about Cameo Light is availab-
le on our website CAMEOLIGHT.COM.
INFORMATION ON THIS USER MANUAL
• Carefully read the safety instructions and the entire manual before operating the device.
• Observe the warnings on the device and in the user manual.
• Always keep the user manual within reach.
• If you sell or pass on the device, it is important that you also include this user manual, as it is
an integral part of the product.
INTENDED USE
The product is a device for event technology!
This product has been developed for professional use in the field of event technology and is not
suitable for use as domestic lighting!
Furthermore, this product is only intended for qualified users with specialist knowledge of event
technology!
Use of the product outside the specified technical data and operating conditions is considered
inappropriate!
Liability for damage and third-party damage to persons and property due to inappropriate use is
excluded!
The product is not suitable for:
• Use by persons (including children) with limited physical, sensory or mental abilities or lack of
experience and knowledge.
• Children (children must be instructed not to play with the device).
DEFINITIONS AND SYMBOL EXPLANATIONS
1. DANGER: The word DANGER, possibly in combination with a symbol, indicates immediately
dangerous situations or conditions for life and limb.
2. WARNING: The word WARNING, possibly in combination with a symbol, indicates potentially
dangerous situations or conditions for life and limb.
3. CAUTION: The word CAUTION, possibly in combination with a symbol, is used to indicate situa-
tions or conditions that may lead to injury.
4. ATTENTION: The word ATTENTION, possibly in combination with a symbol, refers to situations
or states that can lead to damage to property and/or the environment.

7
DMX DEUTSCHFRANCAIS
ESPAÑOL ENGLISH
ITALIANO POLSKI
This symbol identifies hazards that can cause electric shock.
This symbol identifies hazardous areas or hazardous situations.
This symbol indicates hazards caused by hot surfaces.
This symbol indicates hazards caused by intense light sources.
This symbol indicates a device in which there are no user-replaceable parts.
This symbol indicates additional information on the operation of the product.
SAFETY INSTRUCTIONS
HAZARD:
1. Do not open or modify the unit.
2. If your device no longer functions properly, if liquids or objects get inside it or if it
has been damaged in any other way, switch it off immediately and disconnect it
from the mains. The device may be repaired only by authorised repair technicians.
3. For devices of protection class 1, the protective conductor must be connected
correctly. Never disconnect the protective conductor. Devices of protection class 2
do not have a protective conductor.
4. Ensure that live cables are not kinked or otherwise mechanically damaged.
5. Never bypass the unit fuse.
WARNING:
1. The device may not be operated if it shows obvious signs of damage.
2. The device may only be installed in a voltage-free state.
3. If the mains cable of the device is damaged, do not operate the device.
4. Permanently connected power cables may only be replaced by a qualified person.
ATTENTION:
1. Do not operate the unit if it has been exposed to large temperature fluctuations
(for example, after transport). Moisture and condensation can damage the device.
Switch on the device only when it has reached room temperature.
2. Make sure that the voltage and frequency of the mains supply correspond to the
values indicated on the unit. If the device has a voltage selector switch, do not
connect the device until it has been set correctly. Use only suitable power cables.

8
DMX
ITALIANO
POLSKI
ESPAÑOL
FRANCAIS
DEUTSCHENGLISH
3. To disconnect the unit from the mains at all poles, it is not sufficient to press the
on/off switch on the unit.
4. Make sure that the fuse used corresponds to the type printed on the unit.
5. Make sure that appropriate measures have been taken against overvoltage (e.g.
lightning strike).
6. Observe the specified maximum output current on units with Power Out connec-
tion. Ensure that the total current consumption of all connected devices does not
exceed the specified value.
7. Replace pluggable mains cables only with original cables.
HAZARD:
1. Danger of suffocation! Plastic bags and small parts must be kept out of reach of
persons (including children) with reduced physical, sensory or mental capabilities.
2. Danger from falling down! Make sure that the device is securely installed and will
not fall down. Only use suitable stands or mounts (particularly for fixed installa-
tions). Ensure that accessories are properly installed and secured. Ensure that
applicable safety regulations are observed.
WARNING:
1. Use the device only in the manner intended.
2. Operate the device only with the accessories recommended and intended by the
manufacturer.
3. During installation, observe the safety regulations applicable in your country.
4. After connecting the unit, check all cable routes to avoid damage or accidents, e.g.
due to tripping hazards.
5. Always observe the specified minimum distance to normally flammable materials!
Unless explicitly stated, the minimum distance is 0.3 m.
6. Always observe the minimum distance to the illuminated surface that can be read
on the device!
CAUTION:
1. In the case of moving components such as mounting brackets or other moving
components, there is a possibility of jamming.
2. In the case of units with motor-driven components, there is a risk of injury from the
movement of the unit. Sudden movement of the device can cause shock reactions.
3. The housing surface of the device can become very hot during regular operation.
Ensure that accidental touching of the housing is not possible. Always allow the
lamp to cool sufficiently before removal, maintenance work and charging etc.

9
DMX DEUTSCHFRANCAIS
ESPAÑOL ENGLISH
ITALIANO POLSKI
ATTENTION:
1. Do not install or use the device in the vicinity of radiators, accumulators, stoves, or
other heat sources. Ensure that the device is always installed in such a way that it is
sufficiently cooled and cannot overheat.
2. Do not place any ignition sources, such as burning candles, near the device.
3. Ventilation openings must not be covered and fans must not be blocked.
4. Use the original packaging or packaging provided by the manufacturer for trans-
port.
5. Avoid shock or impact to the unit.
6. Observe the IP protection class as well as the ambient conditions such as tempera-
ture and humidity according to the specification.
7 Devices can be continuously further developed. In the event of deviating information on
operating conditions, performance or other device properties between the user manual
and the device labelling, the information on the device always takes priority.
8. The unit is not suitable for tropical climates and for operation above 2000 m above
sea level.
9. Unless explicitly stated, the unit is not suitable for operation in marine conditions .
CAUTION! IMPORTANT INFORMATION REGARDING LIGHTING PRODUCTS!
1. Never look directly into the beam of light, not even for a short period of time.
2. Never look into the beam of light using optical devices such as a magnifying glass.
3. Stroboscopic effects may cause epileptic seizures in susceptible individuals!
SIGNAL TRANSMISSION BY RADIO (E.G. W-DMX OR AUDIO RADIO SYSTEMS):
The quality and performance of wireless signal transmissions generally depends on
the ambient conditions.
The following factors can impact range and signal stability, for example:
Shielding (e.g. masonry, metal structures, water)
High volume of radio traffic (e.g. powerful wireless LAN networks)
Interference
Electromagnetic radiation (e.g. LED video screens, dimmers)
All range specifications refer to free-field application with visual contact and without
interference!
The operation of transmission systems is subject to official regulations. These may
vary from region to region and must be checked by the operator before use (e.g. radio
frequency and transmission power).

10
DMX
ITALIANO
POLSKI
ESPAÑOL
FRANCAIS
DEUTSCHENGLISH
WARNING: Devices with wireless signal transmission are not suitable for use in sen-
sitive areas in which radio operation can lead to potential detrimental effects. These
include:
• Hospitals, health centres or other healthcare facilities that provide patient treatment
with skilled personnel and equipment.
• Hazardous areas Class I, II and III
• Restricted areas
• Military facilities
• Aircraft or vehicles
• Areas where the use of mobile phones is prohibited
TRANSMISSION VIA W-DMX
WARNING: Ingeneral, wireless DMX transmission must not be used for applications
with safety-related factors that could result in personal injury or property damage in
the event of failure.
This applies in particular to moving scene or traverse structures, DMX-controlled mo-
tors/lifts or lifting devices for operating DMX-operated platform lifts, hydraulic systems
or comparable moving components.
Furthermore, wireless DMX transmission must not be used to trigger flame or py-
rotechnic devices, explosion-driven effects, or to control gas or liquid effects. These
include CO2 cannons, confetti shooters, water effects or similar.
CAUTION! POTENTIAL DAMAGE FROM EXTERNAL LIGHT SOURCES!
Solar radiation, laser radiation and bundled light beams from other spotlights can da-
mage the housing and internal components such as filters, gobo and colour wheels,
motors, cables, belts, etc., as well as light sources!
Do not expose the unit and especially the lens opening to direct sunlight, laser radi-
ation and bundled light beams from other spotlights during unpacking, installation,
prolonged non-use and operation! Always point the lens opening towards the floor
when the unit is not in use! For this purpose, also use the Sun Protection function,
which can be activated via DMX command (see Device Settings channel in the DMX
table). An integrated gyroscope sensor detects the position of use. Damage caused by
external light sources is excluded from the manufacturer's warranty!

11
DMX DEUTSCHFRANCAIS
ESPAÑOL ENGLISH
ITALIANO POLSKI
NOTES FOR MOBILE INDOOR DEVICES
1. Temporary operation! Event equipment is generally only designed for temporary
operation.
2. Continuous operation or permanent installation can impair the functioning of the
device and cause premature ageing.
INCLUDED
Remove the product from the packaging and remove all packaging material.
Please check the completeness and integrity of the delivery and notify
Please contact your sales partner immediately after the purchase if the delivery is not complete or
is damaged. The packaging includes:
X1 x OPUS SP5 PLUS LED Moving Head
X2 x Omega mounting bracket
X1x Power cord
XUser manual
INTRODUCTION
MOVING HEAD OPUS SERIES
CLOSP5PLUS
CONTROL FUNCTIONS:
34-channel and 50-channel DMX control (CLOSP5PLUS)
27-channel and 33-channel DMX control (CLOSP5PLUS with optional CLOSP5AM animation
wheel module)
Art-Net
sACN
W-DMX™
RDM-enabled
Master/slave operation
Standalone functions
FEATURES:
500 W High Efficiency LED. Framing Shutter Module. CMY + CTO colour blending Colour wheel
with 7 brilliant colours + open and split colours. Gobo wheel 1 with 8 fixed gobos + open. Gobo
wheel 2 with 7 rotating gobos + open (gobos interchangeable). 2 rotating prisms. Focusing and
zoom function via DMX. Frosted filter and iris Strobe. Pan and tilt motors with 16-bit resolution.
Battery-powered. Display for mains-independent setting. Automatic position correction. Tempera-
ture-controlled fans. 3- and 5-pole DMX connections. RJ45 network connections. Wireless DMX™
Neutrik powerCON TRUE1 mains connections IN and OUT. 2 Omega mounting brackets included.
Operating voltage 100-240 V AC. Power consumption 800W. The spotlight features the RDM
standard (Remote Device Management). Remote device management allows the user to view the
status and configuration of RDM terminals via an RDM-capable controller.

12
DMX
ITALIANO
POLSKI
ESPAÑOL
FRANCAIS
DEUTSCHENGLISH
ADDITIONAL PROPERTIES
The CLOSP5P moving head comes equipped with a 4-way framing shutter module. The 4-way
framing shutter module can be interchanged with the CLOSP5AM animation wheel module. The
software and corresponding DMX modes are upgraded automatically.
CONNECTIONS, OPERATING AND DISPLAY ELEMENTS
1 23
4 5
6
7
8
1 POWER IN
Neutrik powerCON TRUE1 mains input socket. Operating voltage 100–240 V AC/50–60 Hz. A
suitable mains cable with powerCON TRUE1 plug is included.
2 POWER OUT
Neutrik powerCON TRUE1 mains output socket. Facilitates power supply to other CAMEO spot-
lights. Ensure that the total power consumption of all devices connected to the device does not
exceed the given ampere (A) value.
3 FUSE
Fuse holder for 5 x 20 mm micro fuses. IMPORTANT NOTE: Replace the fuse only with one of the
same type and rating. In the event of repeated fuse failure, please contact an authorised service
centre.
4 DMX IN
Male 3-pin and 5-pin XLR sockets for connection of a DMX control device (e.g. DMX console).
5 DMX OUT
Female 3-pin or 5-pin XLR sockets for sending the DMX control signal.

13
DMX DEUTSCHFRANCAIS
ESPAÑOL ENGLISH
ITALIANO POLSKI
6 NET IN
RJ45 network connector for connecting to an Art-Net or sACN network. Use CAT 5e or better
cables to set up the network.
7 NET OUT
RJ45 network connector for connecting additional Art-Net or sACN-capable devices to the net-
work. Use CAT 5e or better cables to set up the network.
8 ANTENNA FOR W-DMX™
The antenna for control via W-DMX™ remains in the holder (= operating position) during operation.
9 PRESSURE SENSITIVE LC DISPLAY WITH ILLUMINATION
Thanks to the pressure-sensitive LC display, the device can be operated directly from the display
(glove-compatible). The LCD display shows the currently activated mode (main display), the menu
items in the selection menu and the numerical value or operating status in certain menu items. If
there is no control signal to the device, the display starts flashing; the flashing stops as soon as a
control signal is present (DMX and slave operation, ArtNet and sACN).
10 TOUCH-SENSITIVE CONTROLS
MODE - Pressing MODE (repeatedly) takes you one level up in the menu structure, to the main
display.
UP and DOWN - Select the individual menu items in the main menu (DMX address, opera-
ting mode, etc.) and in the submenus.
ENTER – Starting from the main display, press ENTER to enter the main menu. In the main menu,
press ENTER to access the menu level in which values can be changed. Confirm value changes by
pressing ENTER.
LEFT and RIGHT X - Use the control panels to change the value of a menu item, such as the
DMX address, as desired.
9
10
11

14
DMX
ITALIANO
POLSKI
ESPAÑOL
FRANCAIS
DEUTSCHENGLISH
11 USB INTERFACE
USB interface for updating the device firmware. In the Service menu, set the status for USB
update to ON. When available, download the latest firmware from the product page at www.
cameolight.com, unzip it and copy the files to a folder without special characters on a USB stick.
Disconnect the Moving Head from the mains and all input connections (DMX / Ethernet), connect
the USB stick to the USB interface and reconnect the Moving Head to the mains. The USB stick is
automatically recognised and shown in the display. Now navigate to the corresponding folder on
the USB stick and confirm with ON. The update procedure begins. Do not remove the USB stick or
disconnect the Moving Head from the mains during the update procedure.
The battery-powered display can be activated, even if the device is not connected to the mains. To
do this, press and hold MODE for approximately 3 seconds. You can now access device informati-
on to change and save system settings without mains connection. External control of the spotlight
is not activated in this case. For this reason, the display shows that there is no DMX signal even if
a DMX signal is available at the device.
12 PAN LOCK
Mechanical locking device used to prevent the rotation of
the head in the horizontal direction during transport. Dis-
connect the unit from the mains, move the head parallel
to the base (4 possible positions) and push the locking
lever in the direction of the pan rotation axis to lock it in
position. Unlock the device before startup.
13 TILT LOCK
Mechanical locking device used to prevent the rotation
of the head in the vertical direction during transport (7
positions). Disconnect the unit from the mains and slide
the locking lever in the direction of the tilt rotation axis,
moving the head of the unit vertically until one of the 7
locking positions is found and the locking lever engages.
Unlock the device before startup.
13
12

15
DMX DEUTSCHFRANCAIS
ESPAÑOL ENGLISH
ITALIANO POLSKI
OPERATION
NOTES
As soon as the fixture is correctly connected to the mains, "Software
Update Please Wait..." and the Cameo logo with information on the
fixture model are shown in the display one after the other during the
start-up process and the motor reset. After this process, the spotlight is
ready for operation and the previously selected mode will be activa-
ted. On the one hand, the headlamp is operated with the help of the
touch-sensitive control panels next to the display; on the other hand,
the pressure-sensitive display (glove-compatible) itself can be used to
reach all menu items and make settings intuitively as desired. Informa-
tion on which control element in the display and which control panel
next to the display have the same function can be found in the adjacent
table. The following describes the operation using the control panels
next to the display.
MAIN DISPLAY
The top line of the display shows whether and which control signal is present at the unit, the line
below shows the currently activated operating mode (DMX Standard / Extended, Static, Auto,
Slave) and the DMX start address or the corresponding operating mode (in the example DMX
start address 001) is clearly visible in the middle. As soon as the control signal is interrupted, the
characters in the display start flashing and "None" (no signal) is displayed behind "Signal" in the
upper line. The display can be rotated 180° by tapping the touch-sensitive control panel DOWN; if
the display is already rotated 180°, tap the control panel UP to return the display to the standard
image. The display can also be rotated 180° by pressing the "roof symbol" in the pressure-sensi-
tive display.
Display of the input signal
DMX mode or operating mode
DMX start address or operating mode
Information on the device
model Back to main display =
any position in the display or
Press ENTER
Display battery status
Rotate display by 180
Main menu

16
DMX
ITALIANO
POLSKI
ESPAÑOL
FRANCAIS
DEUTSCHENGLISH
CONTROL MENU (Control)
SETTING DMX START ADDRESS (DMX Address)
Starting from the main display, press ENTER to enter the main menu. Use the and controls to
select the control menu Control and press ENTER. Use UP and DOWN to select the menu item
"DMX Address" and confirm by pressing ENTER. Now set the desired DMX start address using the
LEFT and RIGHT control panels and confirm with ENTER (highest value depends on the activated
DMX mode). Press MODE twice to return to the main display, the selected DMX start address is
now shown in large letters on the display when DMX mode is activated.
SET DMX MODE (DMX Mode)
Starting from the main display, press ENTER to enter the main menu. Use the and controls to
select the control menu Control and press ENTER. Use UP and DOWN to select the menu item
"DMX Mode" and confirm by pressing ENTER. Select the desired DMX mode again with UP and
DOWN and confirm the selection with ENTER. Press MODE 2x to return to the main display, the
selected DMX mode is now activated. Tables with the channel assignment of the different DMX
modes can be found in these instructions under DMX CONTROL.
NETWORK SETTINGS (Network)
Starting from the main display, press ENTER to enter the main menu. Use the and controls to
select the control menu Control and press ENTER. Use UP and DOWN to select the menu item
"Network" and confirm by pressing ENTER. For information on the network settings, please refer
to the table below. Confirm all network setting changes with ENTER.

17
DMX DEUTSCHFRANCAIS
ESPAÑOL ENGLISH
ITALIANO POLSKI
Network
Network
Input
Activate / deactivate
network input
OFF Network input deactivated
ON Network input activated
Protocol Network protocol ArtNET ArtNet Protocol
sACN sACN protocol
Address Universe 1 - 256,
Set IP address and subnet mask
Universe
000 - 255
000 to 255. Change value with
LEFT and RIGHT, confirm with
ENTER.
IP Address
Select block with LEFT and RIGHT,
change value with UP and DOWN,
confirm with ENTER.
IP Subnet
Mask
Select block with LEFT and RIGHT,
change value with UP and DOWN,
confirm with ENTER.
DMX OUT Output network signal
via DMX OUT
OFF Do not output signal
ON Output signal
W-DMX SETTINGS (Wireless)
Starting from the main display, press ENTER to enter the main menu. Use the and controls to
select the control menu Control and press ENTER. Use UP and DOWN to select the menu item
"Wireless" and confirm by pressing ENTER. For information on the W-DMX settings, please refer
to the table below. Confirm all changes to the settings with ENTER.
Wireless
W-DMX OFF Deactivate W-DMX
ON Activate W-DMX
Operating
(currently in beta status)
Receiver W-DMX module configured as receiver
Transmitter W-DMX module configured as transmitter
Transmitting
(currently in beta status)
G3 G3 transmission standard
G4s G4S transmission standard
Link Link
Pair with W-DMX devices. W-DMX must be enabled
on all devices, and the pairing with a transmitter
must be reset (Receive Reset)
Unlink Unpair all devices
Receive Reset NO Do not reset transmitter pairing
YES Reset transmitter pairing

18
DMX
ITALIANO
POLSKI
ESPAÑOL
FRANCAIS
DEUTSCHENGLISH
STAND ALONE MODES (Stand Alone)
Starting from the main display, press ENTER to enter the main menu. Use the and controls to
select the control menu Control and press ENTER. Using and , now select the menu item “Stand
Alone” and confirm by pressing ENTER. Now select one of the three stand-alone modes using the
and controls and confirm with ENTER.
STANDALONE STATIC MODE (Static)
The Static mode allows PAN, Tilt, Dimmer, Strobe, Colour Wheel and Gobo Wheel etc. to be
adjusted directly on the device with values between 000 to 255, similar to a DMX control unit. In
this way, an individual scene can be created without an additional DMX controller. After you have
selected the "Static" operating mode, as previously described under "STAND ALONE OPERATING
MODES", the settings can be made as desired. The submenu items correspond to channels 1 to
50 in 50-channel extended DMX mode (see DMX CONTROL, select submenu item with UP and
DOWN, change value with LEFT and RIGHT, confirm with ENTER). Press MODE repeatedly to return
to the main display.
STAND ALONE OPERATION MODE AUTO PROGRAMS (Auto Prog)
The 4 different auto programmes (Program 1 - 4) each consist of fixed programmed head mo-
vements, gobo and colour changes etc., the running speed can be set separately. As previously
described under "STAND ALONE OPERATING MODES", select the Auto operating mode, confirm
with ENTER, select the desired Auto programme using UP and DOWN, confirm with ENTER and
now change the value for the running speed from 000 to 100 as desired using LEFT and RIGHT.
Confirm with ENTER. Press MODE repeatedly to return to the main display.

19
DMX DEUTSCHFRANCAIS
ESPAÑOL ENGLISH
ITALIANO POLSKI
SLAVE MODE (Slave)
The slave operating mode is selected as previously described under item "STAND ALONE OPERA-
TING MODES". Connect the slave unit and the master unit (same model, same software version)
using a DMX cable (master DMX OUT - slave DMX IN) and activate one of the standalone modes
Auto or Static in the master unit. The slave unit will now follow the master unit. Press MODE
repeatedly to return to the main display.
SYSTEM SETTINGS (Settings)
Starting from the main display, press ENTER to enter the main menu. Select the Settings menu for
the system settings using the UP and DOWN control panels and press ENTER.
This will take you to the submenu for setting the submenu items (see table, select with UP and
DOWN, confirm with ENTER, change value or status with UP and DOWN, confirm with ENTER).
Settings (bold = factory setting)
Display Display
Settings
Reverse
OFF No display rotation
ON Display is rotated through 180°
(e.g. for overhead installation)
Backlight OFF
Deactivation of the display
lighting after approx. 30 seconds
of inactivity
ON Display lighting permanently on
DMX fail
Operating status
when DMX signal is
interrupted
Black Activates blackout
Hold Last command is retained
Car activates Auto mode
Dimmer
curve
Selecting the
Dimmer curve Linear Light intensity increases linearly with
DMX value

20
DMX
ITALIANO
POLSKI
ESPAÑOL
FRANCAIS
DEUTSCHENGLISH
Dimmer
Curve
Selecting the
Dimmer curve
Exponential
Light intensity can be finely adjusted
at lower DMX values and broadly
adjusted at higher DMX values
Logarithmic
Light intensity can be broadly adjusted
at lower DMX values and finely adjus-
ted at higher DMX values
Dimmer curve
Light intensity can be finely adjusted at
lower and higher DMX values and bro-
adly adjusted at medium DMX values
LED
Frequency
Configuration of LED
PWM frequency
650Hz, 1530Hz,
3600Hz, 12KHz,
25KHz
Pan / Tilt Device head settings
Pan reverse OFF Does not reverse pan direction
ON Reverses pan direction
Tilt Reverse OFF Does not reverse tilt direction
ON Reverses tilt direction
Pan Angle 630 Pan angle 630°
540 Pan angle 540°
Feedback
OFF Automatic position correction is
disabled
ON Automatic position correction is
enabled
B.O. Moving Automatic blackout
for head movement
OFF No blackout during head movement
ON Blackout during head movement
Fixture Type Device type: Profile modules
Spot Module
Fan Fan control
Car Automatic fan control
Fan Off Deactivated fan with greatly
reduced brightness
Constant Low Constantly low fan speed with
reduced brightness, if necessary
Constant Mid Constant average fan speed with
reduced brightness, if necessary
Constant High Constant high fan speed
DIMMER CURVES
linear
DMX value
Light intensity
exponential
DMX value
Light intensity
logarithmic
DMX value
Light intensity
S-curve
DMX value
Light intensity

21
DMX DEUTSCHFRANCAIS
ESPAÑOL ENGLISH
ITALIANO POLSKI
SERVICEMENU
Starting from the main display, press ENTER to enter the main menu. Use the UP and DOWN
control fields to select the Service menu and press ENTER.
This takes you to the submenu for editing the submenu items (select with UP and DOWN, confirm
with ENTER, change value with LEFT and RIGHT, confirm with ENTER).
Calibrate - Calibrate the components with values from 000 to 255 (password 050).
Test Manual - Manual testing of the components with values from 000 to 255.
Reset Motor - Reset the motors. All = All motors, Pan&Tilt = Pan and Tilt motors,
Head Only = Motors in the unit head.
USB Update - Firmware update via USB interface. OFF = Block firmware update via USB
interface. ON = Allow firmware update via USB interface.
Factory Reset - Reset to factory settings.
DEVICE INFORMATION (Info)
Starting from the main display, press ENTER to enter the main menu. Use the and controls to
select the information menu Info and press ENTER.
This will take you to the submenu for reading the device information (select with and , confirm
with ENTER).
System Info
Error info
Function error display
If a fault is not corrected by a reset or restart, the defective unit must be repaired by
an authorised service centre.
Tempera-
ture Temperature display
Head xx°C/F°
Base xx°C/F°
Unit Temperature display in degrees
Celsius or Fahrenheit

22
DMX
ITALIANO
POLSKI
ESPAÑOL
FRANCAIS
DEUTSCHENGLISH
Runtime Displays
operating time
Total Time Displays total operating time in hours
Current Time Displays the current operating time
Time PW Enter the password for resetting the current
operating time (Time PW = 050)
Clean Current Resets the current operating time
Firmware
Display of the firm-
ware of the compo-
nents 1U to 8U
Vx.xx
Model
Info
Information about the
unit version
Profiles
Modules Module with framing shutter
Spot Module Module with animation wheel
SETUP AND INSTALLATION
Thanks to its integrated rubber feet, the spotlight can be positioned in a suitable location on a
firm and level surface. Traverse installation can be achieved with the help of two Omega brackets,
which are attached to the base of the device (A). 2 x Omega brackets are included. Suitable beam
clamps are available as an option. Ensure firm connections and secure the spotlight to the secu-
ring lug (B) with a suitable safety cable.
IMPORTANT NOTE: Overhead installation requires extensive experience, including
calculation of working load limits, installation materials used and regular safety
checks of all installation materials and fixtures. If you do not have these qualifica-
tions, do not attempt to perform an installation yourself. Refer instead to a qualified
professional.
B
BA
A

23
DMX DEUTSCHFRANCAIS
ESPAÑOL ENGLISH
ITALIANO POLSKI
CARE, MAINTENANCE AND REPAIR
In order to ensure the long-term, proper functioning of the device, it must be regularly cleaned
and, if necessary, maintained. The maintenance requirement depends on the intensity of use and
the environment in which it is used. We generally recommend a visual inspection before each
operation. Furthermore, we recommend carrying out all the applicable maintenance measures
specified below once every 500 operating hours or, in the case of a lower intensity of use, at the
latest after one year. Warranty claims may be limited in the event of defects resulting from inade-
quate maintenance.
CARE (carried out by user)
WARNING! Before carrying out any care or maintenance, the power supply – and, if
possible, all device connections – must be disconnected.
PLEASE NOTE! Improper care can lead to impairment of the device or even its
destruction.
1. Housing surfaces must be cleaned with a clean, damp cloth. Make sure that no moisture can
penetrate the device.
2. Air inlets and outlets must be regularly cleaned of dust and dirt. If compressed air is used,
make sure that damage to the device is prevented (e.g. fans must be blocked in this case).
3. Lines and plug contacts must be cleaned regularly and dust and dirt must be removed.
4. In general, no cleaning agents or abrasive agents may be used, otherwise the surface finish
may be damaged.
5. Devices must generally be stored dry and protected from dust and dirt.
MAINTENANCE AND REPAIR (by qualified personnel only)
HAZARD! There are live components in the device. Even after disconnecting the
mains connection, there may still be residual voltage in the device, for example, due
to charged capacitors.
PLEASE NOTE! There are no user-serviceable assemblies in the device.
PLEASE NOTE! Maintenance and repair work may only be carried out by qualified
specialist personnel authorised by the manufacturer. If in doubt, consult the manufac-
turer.
PLEASE NOTE! Improperly performed maintenance work may affect warranty claims.

24
DMX
ITALIANO
POLSKI
ESPAÑOL
FRANCAIS
DEUTSCHENGLISH
TECHNICAL DATA
Product number: CLOSP5PLUS
Product type: LED moving light
Type: Moving Head
Number of lamps: 1
Type of lamp: 500W High Efficiency LED
Colour
temperature lamp: Cold white 6600K
CRI: >70
LED PWM frequency: 650Hz, 1530Hz, 3600Hz, 12kHz, 25kHz (adjustable)
Colour blend function: CMY + CTO
Number of colours:
Colour wheel: 7 + open and split colours
Number of gobos: 15 + open (8 fixed + 7 rotating)
Gobo size: Ø outside 22.9mm (-0.2 / +0.1mm), Ø motif 19mm,
material thickness 1.1mm (glass)
Beam angle: 6° - 42°
DMX input: 3-pin XLR male
5-pin XLR male
DMX output: 3-pin XLR female
5-pin XLR female
Network connections. RJ45 IN and OUT (lockable)
DMX mode: 34-channel, 50-channel
DMX functions:
Pan/Tilt, Pan/Tilt fine, Dimmer, Dimmer fine, Multifunctional strobe,
Cyan, Cyan fine, Magenta, Magenta fine, Yellow, Yellow fine, CTO,
CTO fine, Colour wheel, Colour wheel rotation, Gobo wheel 1, Gobo 1
rotation, Gobo 1 rotation fine, Gobo wheel 1 rotation, Gobo 1 shake,
Gobo wheel 2, Gobo wheel 2 rotation, Gobo 2 shake, Zoom, Zoom
fine, Focus, Focus fine, Iris, Prism, Prism Rotation, Frost, Blade 1 - 4,
Blade 1 - 4 fine, Shape Rotation, Shape Rotation fine, Pan/Tilt Macros,
Pan/Tilt Speed, Dimmer Curve, System Settings
Standalone functions: Automatic programmes 1–4, static mode, master/slave operation
System settings:
Wireless Setting, Display Reverse, Display Lighting On/Off, DMX
Fail, Dimmer Curve, Pan Reverse, Tilt Reverse, Pan Angle, Feedback,
Fan Setting, Movement Blackout, Test, Motor Reset, Factory Reset,
Network Settings
Control: DMX512, RDM enabled, W-DMX™ (Receiver), Art-Net, sACN
PAN angle: 540°/630°
TILT angle: 270°
Operating controls: Touch-sensitive controls BACK, ENTER, UP, DOWN, LEFT, RIGHT, pres-
sure-sensitive graphic colour LCD display (glove-compatible)
Display elements: Illuminated graphic colour LC display, battery-powered for mains-in-
dependent system settings

25
DMX DEUTSCHFRANCAIS
ESPAÑOL ENGLISH
ITALIANO POLSKI
Operating voltage: 100–240 V AC / 50–60 Hz
Power consumption: 800 W
Luminous flux: 22000 lm
Power supply
connection: Neutrik TRUE1 input and output (output max. 4A)
Fuse: T8AL / 250V (5 x 20mm)
Ambient operating tem-
perature: -15°C to 40°C
Relative air humidity: < 85%, non-condensing
Minimum distance to
illuminated surface: 3 m
Minimum distance to
normally flammable
materials:
0.5 m
Housing material: Metal, ABS
Housing colour: Black
Housing cooling: Heatpipe cooling system plus temperature controlled fans
Dimensions (W x H x D,
without bracket): 397 x 741.5 x 285mm
Weight: 27.8kg
Additional features: 1m mains cable with TRUE1 plug and
2 Omega mounting brackets included
MINIMUM DISTANCE TO ILLUMINATED SURFACE
0.5 m
This symbol with distance information in metres (m) indicates the minimum dis-
tance of the luminaire to the illuminated surface. In this example, the distance is
0.5m. Please refer to the technical data in this manual and the imprint on the unit
casing for the value valid for this unit!
MINIMUM DISTANCE TO NORMALLY FLAMMABLE MATERIALS
0.5 m
This symbol with distance indication in metres (m) indicates the minimum
distance of the appliance to normally flammable materials. In this example, the
distance is 0.5m. Please refer to the technical data in this manual for the value
valid for this unit!

26
DMX
ITALIANO
POLSKI
ESPAÑOL
FRANCAIS
DEUTSCHENGLISH
DISPOSAL
PACKAGING:
1. Packaging can be fed into the reusable material cycle using the usual disposal
methods.
2. Please separate the packaging in accordance with the disposal laws and recycling
regulations in your country.
DEVICE:
1. This appliance is subject to the European Directive on Waste Electrical and
Electronic Equipment as amended. WEEE Directive Waste Electrical and Electronic
Equipment. Old appliances do not belong in household waste. The old device must
be disposed of via an approved disposal company or a municipal disposal facility.
Please observe the applicable regulations in your country!
2. Observe all disposal laws applicable in your country.
3. As a private customer, you can obtain information on environmentally-friendly dis-
posal options from the seller of the product or the appropriate regional authorities.
MANUFACTURER’S DECLARATIONS
Manufacturer's warranty & limitation of liability
Adam Hall GmbH, Adam-Hall-Str. 1, D-61267 Neu Anspach /
E-mail: [email protected] / +49 (0)6081 / 9419-0
Our current warranty conditions and limitation of liability can be found at:
https://cdn-shop.adamhall.com/media/pdf/Manufacturers-Declarations-CAMEO_DE_EN_ES_FR.pdf
In case of service, please contact your sales partner.
CE conformity
Adam Hall GmbH hereby confirm that this product meets the following guidelines (where applicable):
Low-Voltage Directive (2014/35/EU)
EMC Directive (2014/30/EU)
RoHS (2011/65/EU)
RED (2014/53/EU)
EC Declaration of Conformity
Declarations of conformity for products subject to the LVD, EMC, RoHS Directive can be requested
from [email protected]
Declarations of conformity for products subject to RED can be downloaded from www.adamhall.
com/compliance/.
Subject to misprints and errors, as well as technical or other modifications!

27
DMX DEUTSCHFRANCAIS
ESPAÑOL ENGLISH
ITALIANO POLSKI
DEUTSCH
Sie haben die richtige Wahl getroffen!
Dieses Gerät wurde unter hohen Qualitätsanforderungen entwickelt und gefertigt, um viele Jahre
einen reibungslosen Betrieb zu gewährleisten. Bitte lesen Sie diese Bedienungsanleitung sorgfäl-
tig, damit Sie Ihr neues Produkt von Cameo Light schnell und optimal einsetzen können. Weitere
Informationen über Cameo Light erhalten Sie auf unserer Website CAMEOLIGHT.COM.
INFORMATIONEN ZU DIESER BEDIENUNGSANLEITUNG
• Lesen Sie vor Inbetriebnahme die Sicherheitshinweise und die gesamte Anleitung aufmerksam durch.
• Beachten Sie die Warnungen auf dem Gerät und in der Bedienungsanleitung.
• Bewahren Sie die Bedienungsanleitung immer in Reichweite auf.
• Wenn Sie das Gerät verkaufen oder weitergeben, händigen Sie unbedingt auch diese Bedie-
nungsanleitung aus, da sie ein wesentlicher Bestandteil des Produkts ist.
BESTIMMUNGSGEMÄSSER GEBRAUCH
Bei dem Produkt handelt es sich um ein Gerät für die Veranstaltungstechnik!
Das Produkt ist für den professionellen Einsatz im Bereich der Veranstaltungstechnik entwickelt
worden und ist nicht für die Verwendung in Haushalten geeignet!
Weiterhin ist dieses Produkt nur für qualifizierte Benutzer mit Fachkenntnissen im Umgang mit
Veranstaltungstechnik vorgesehen!
Die Benutzung des Produkts außerhalb der spezifizierten technischen Daten und Betriebsbedin-
gungen gilt als nicht bestimmungsgemäß!
Haftung für Schäden und Drittschäden an Personen und Sachen durch nicht bestimmungsgemä-
ßen Gebrauch ist ausgeschlossen!
Das Produkt ist nicht geeignet für:
• Personen (einschließlich Kinder) mit eingeschränkten körperlichen, sensorischen oder geistigen
Fähigkeiten oder mangelnder Erfahrung und Kenntnis.
• Kinder (Kinder müssen angewiesen werden, nicht mit dem Gerät zu spielen).
BEGRIFFS- UND SYMBOLERKLÄRUNGEN
1. GEFAHR: Mit dem Wort GEFAHR, evtl. in Kombination mit einem Symbol, wird auf unmittelbar
gefährliche Situationen oder Zustände für Leib und Leben hingewiesen.
2. WARNUNG: Mit dem Wort WARNUNG, evtl. in Kombination mit einem Symbol, wird auf
potentiell gefährliche Situationen oder Zustände für Leib und Leben hingewiesen.
3. VORSICHT: Mit dem Wort VORSICHT, evtl. in Kombination mit einem Symbol, wird auf Situatio-
nen oder Zustände hingewiesen, die zu Verletzungen führen können.
4. ACHTUNG: Mit dem Wort ACHTUNG, evtl. in Kombination mit einem Symbol, wird auf Situatio-
nen oder Zustände hingewiesen, die zu Sach- und/oder Umweltschäden führen können.

28
DMX
ITALIANO
POLSKI
ESPAÑOL
FRANCAIS
DEUTSCHENGLISH
Dieses Symbol kennzeichnet Gefahren, die einen elektrischen Schlag verursachen
können.
Dieses Symbol kennzeichnet Gefahrenstellen oder gefährliche Situationen.
Dieses Symbol kennzeichnet Gefahren durch heiße Oberflächen.
Dieses Symbol kennzeichnet Gefahren durch intensive Lichtquellen.
Dieses Symbol kennzeichnet ein Gerät, in dem sich keine vom Benutzer austauschba-
ren Teile befinden.
Dieses Symbol kennzeichnet ergänzende Informationen zur Bedienung des Produkts.
SICHERHEITSHINWEISE
GEFAHR:
1. Öffnen Sie das Gerät nicht und verändern Sie es nicht.
2. Wenn Ihr Gerät nicht mehr ordnungsgemäß funktioniert, Flüssigkeiten oder Gegen-
stände in das Geräteinnere gelangt sind, oder das Gerät anderweitig beschädigt
wurde, schalten Sie es sofort aus und trennen es von der Spannungsversorgung.
Dieses Gerät darf nur von autorisiertem Fachpersonal repariert werden.
3. Bei Geräten der Schutzklasse 1 muss der Schutzleiter korrekt angeschlossen wer-
den. Unterbrechen Sie niemals den Schutzleiter. Geräte der Schutzklasse 2 haben
keinen Schutzleiter.
4. Sorgen Sie dafür, dass spannungsführende Kabel nicht geknickt oder anderweitig
mechanisch beschädigt werden.
5. Überbrücken Sie niemals die Gerätesicherung.
WARNUNG:
1. Das Gerät darf nicht in Betrieb genommen werden, wenn es offensichtliche Be-
schädigungen aufweist.
2. Das Gerät darf nur im spannungsfreien Zustand installiert werden.
3. Wenn das Netzkabel des Geräts beschädigt ist, darf das Gerät nicht in Betrieb
genommen werden.
4. Fest angeschlossene Netzleitungen dürfen nur von einer qualifizierten Person
ersetzt werden.

29
DMX DEUTSCHFRANCAIS
ESPAÑOL ENGLISH
ITALIANO POLSKI
ACHTUNG:
1. Nehmen Sie das Gerät nicht in Betrieb, wenn es starken Temperaturschwankungen
ausgesetzt war (beispielsweise nach dem Transport). Feuchtigkeit und Kondensat
könnten das Gerät beschädigen. Schalten Sie das Gerät erst ein, wenn es Umge-
bungstemperatur erreicht hat.
2. Stellen Sie sicher, dass die Spannung und die Frequenz des Stromnetzes mit den
auf dem Gerät angegebenen Werten übereinstimmen. Verfügt das Gerät über einen
Spannungswahlschalter, schließen Sie das Gerät erst an, wenn dieser korrekt
eingestellt ist. Nutzen sie nur geeignete Netzkabel.
3. Um das Gerät allpolig vom Netz zu trennen genügt es nicht, den Ein-/Aus-Schalter
am Gerät zu betätigen.
4. Stellen Sie sicher, dass die eingesetzte Sicherung dem auf dem Gerät abgedruck-
ten Typ entspricht.
5. Stellen Sie sicher, dass geeignete Maßnahmen gegen Überspannung (z.B. Blitz-
schlag) ergriffen wurden.
6. Beachten Sie den angegebenen maximalen Ausgangsstrom an Geräten mit Power
Out Anschluss. Beachten Sie, dass die gesamte Stromaufnahme aller angeschlos-
senen Geräte den vorgegebenen Wert nicht überschreitet.
7. Ersetzen Sie steckbare Netzleitungen nur durch Originalleitungen.
GEFAHR:
1. Erstickungsgefahr! Kunststoffbeutel und Kleinteile müssen außer Reichweite von
Personen (einschließlich Kindern) mit eingeschränkten körperlichen, sensorischen
oder geistigen Fähigkeiten aufbewahrt werden.
2. Gefahr durch Herabfallen! Stellen Sie sicher, dass das Gerät sicher installiert ist
und nicht herunterfallen kann. Verwenden Sie ausschließlich geeignete Stative
bzw. Befestigungen (im Besonderen bei Festinstallationen). Stellen Sie sicher, dass
Zubehör ordnungsgemäß installiert und gesichert ist. Achten sie dabei darauf, dass
geltende Sicherheitsbestimmungen eingehalten werden.
WARNUNG:
1. Verwenden Sie das Gerät nur in der vorgesehenen Art und Weise.
2. Betreiben Sie das Gerät nur mit dem vom Hersteller empfohlenen und vorgesehe-
nen Zubehör.
3. Beachten Sie bei der Installation die für Ihr Land geltenden Sicherheitsvorschriften.
4. Überprüfen Sie nach dem Anschluss des Geräts alle Kabelwege, um Schäden oder
Unfälle, z. B. durch Stolperfallen zu vermeiden.
5. Beachten Sie unbedingt den angegebenen Mindestabstand zu normal entflammba-
ren Materialien! Sofern dieser nicht explizit ausgewiesen ist, beträgt der Mindest-
abstand 0,3m.
6. Beachten Sie unbedingt den auf dem Gerät abzulesenden Mindestabstand zur
beleuchteten Fläche!

30
DMX
ITALIANO
POLSKI
ESPAÑOL
FRANCAIS
DEUTSCHENGLISH
VORSICHT:
1. Bei beweglichen Bauteilen wie Montagebügeln, oder sonstigen beweglichen Bau-
teilen besteht die Möglichkeit sich zu klemmen.
2. Bei Geräten mit motorisch angetriebenen Bauteilen besteht Verletzungsgefahr
durch die Bewegung des Gerätes. Plötzliche Gerätebewegungen können zu
Schreckreaktionen führen.
3. Die Gehäuseoberfläche des Geräts kann sich im regulären Betrieb stark erwärmen.
Stellen Sie sicher, dass ein versehentliches Berühren des Gehäuses ausgeschlos-
sen ist. Lassen Sie das Gerät vor dem Abbau, vor Wartungsarbeiten und vor dem
Aufladen etc. immer ausreichend abkühlen.
ACHTUNG:
1. Installieren und betreiben Sie das Gerät nicht in der Nähe von Heizkörpern, Wärme-
speichern, Öfen oder sonstigen Wärmequellen. Sorgen Sie dafür, dass das Gerät
immer so installiert ist, dass es ausreichend gekühlt wird und nicht überhitzen kann.
2. Platzieren Sie keine Zündquellen wie z.B. brennende Kerzen in der Nähe des Geräts.
3. Lüftungsöffnungen dürfen nicht abgedeckt und Lüfter nicht blockiert werden.
4. Nutzen Sie zum Transport die Originalverpackung oder vom Hersteller dafür vorge-
sehene Verpackungen.
5. Vermeiden Sie, dass Erschütterung oder Schläge auf das Gerät einwirken.
6. Beachten sie die IP-Schutzart, sowie die Umgebungsbedingungen wie Temperatur
und Luftfeuchtigkeit entsprechend der Spezifizierung.
7. Geräte können stetig weiterentwickelt werden. Bei abweichenden Angaben zu Be-
triebsbedingungen, Leistung oder sonstigen Geräteeigenschaften zwischen Bedie-
nungsanleitung und Gerätebeschriftung, hat immer die Angabe auf dem Gerät Priorität.
8. Das Gerät ist nicht für tropische Klimazonen und für den Betrieb oberhalb 2000m
über NN geeignet.
9. Sofern nicht explizit ausgewiesen, ist das Gerät nicht für den Betrieb unter Marine-
bedingungen geeignet.
VORSICHT! WICHTIGE HINWEISE IN BEZUG AUF LICHT-PRODUKTE!
1. Blicken Sie niemals, auch nicht kurzzeitig, direkt in die Lichtquelle.
2. Blicken Sie niemals mit optischen Geräten wie Vergrößerungsgläsern in die Lichtquelle.
3. Stroboskopeffekte können bei empfindlichen Menschen epileptische Anfälle auslösen!
SIGNALÜBERTRAGUNG PER FUNK (Z.B. W-DMX ODER AUDIO-FUNKSYSTEME):
Die Qualität und Leistungsfähigkeit kabelloser Signalübertragungen ist generell
abhängig von den Umgebungsbedingungen.
Einfluss auf die Reichweite und Signalstabilität haben z.B.:
Abschirmung (z.B. Mauerwerk, Metallbauten, Wasser)
Hohes Funkaufkommen (z.B. starke W-LAN Netze)
Interferenzen
Elektromagnetische Strahlung (z.B. LED-Videowände, Dimmer)

31
DMX DEUTSCHFRANCAIS
ESPAÑOL ENGLISH
ITALIANO POLSKI
Alle Reichweitenangaben beziehen sich auf Freifeldanwendung mit Sichtkontakt ohne
Störeinflüsse!
Der Betrieb von Sendeanlagen unterliegt behördlichen Bestimmungen. Diese können
regional unterschiedlich ausfallen und müssen vor Inbetriebnahme vom Betreiber
überprüft werden (z.B. Funkfrequenz und Sendeleistung).
WARNUNG: Geräte mit kabelloser Signalübertragung sind nicht für den Betrieb in
sensiblen Bereichen, in denen Funkbetrieb zu möglichen Wechselwirkungen führen
kann, geeignet. Dazu zählen z.B.:
• Krankenhäuser, Gesundheitszentren oder andere Einrichtungen des Gesundheitswe-
sens, die Patientenbehandlungen mit Fachpersonal und -ausrüstung durchführen.
• Ex-Bereiche der Klassen I, II und III
• Sperrbereiche
• Militärische Einrichtungen
• Flugzeuge oder Fahrzeuge
• Bereiche, in denen die Nutzung von Mobiltelefonen untersagt ist
SIGNALÜBERTRAGUNG PER W-DMX
WARNUNG: Generell darf kabellose DMX-Übertragung nicht für Anwendungen mit
sicherheitsrelevanten Faktoren genutzt werden, die im Falle eines Versagens Personen-
oder Sachschäden zur Folge haben können.
Dies gilt im Speziellen für bewegte Szenen- oder Traversenstrukturen, für DMX-gesteu-
erte Motoren/Hebezeuge oder Hebevorrichtungen zum Betreiben von DMX-betriebenen
Bühnenliften, Hydrauliksystemen oder vergleichbaren beweglichen Komponenten.
Weiterhin darf kabellose DMX-Übertragung nicht zum Auslösen von Flammen- oder
pyrotechnischen Geräten, explosionsgetriebenen Effekten, sowie zur Steuerung von
Gas oder Flüssigkeitseffekten benutzt werden. Dazu zählen z.B. Co2-Kanonen, Konfet-
ti-Shooter, Wasser-Effekte oder Ähnliches.
ACHTUNG! POTENTIELLE BESCHÄDIGUNG DURCH EXTERNE LICHTQUELLEN!
Sonneneinstrahlung, Laserstrahlung und gebündelte Lichtstrahlen anderer Schein-
werfer können das Gehäuse und interne Komponenten, wie Filter, Gobo- und Farbrä-
der, Motoren, Kabel, Riemen etc., sowie Leuchtmittel beschädigen!
Setzen Sie das Gerät und vor allem die Linsenöffnung während des Auspackens, der
Installation, längerem Nichtgebrauch und im Betrieb nicht direkter Sonneneinstrah-
lung, Laserstrahlung und gebündelten Lichtstrahlen anderer Scheinwerfer aus! Rich-
ten Sie die Linsenöffnung stets Richtung Boden, wenn das Gerät nicht in Gebrauch
ist! Nutzen Sie dafür auch die Sun Protection-Funktion, die über DMX-Befehl aktiviert
werden kann (siehe Device Settings-Kanal in der DMX-Tabelle). Ein integrierter Gyro-
skop-Sensor erkennt dabei die Gebrauchslage. Schäden, die durch externe Lichtquel-
len entstehen, sind von der Herstellergarantie ausgeschlossen!

32
DMX
ITALIANO
POLSKI
ESPAÑOL
FRANCAIS
DEUTSCHENGLISH
HINWEISE FÜR ORTSVERÄNDERLICHE INDOOR-GERÄTE
1. Temporärer Betrieb! Veranstaltungsequipment ist grundsätzlich nur für den
vorübergehenden Betrieb konzipiert.
2. Dauerbetrieb oder dauerhafte Installation kann zur Beeinträchtigung der Funktion
und vorzeitiger Alterung der Geräte führen.
LIEFERUMFANG
Entnehmen Sie das Produkt aus der Verpackung und entfernen Sie sämtliches Verpackungsmaterial.
Bitte überprüfen Sie die Vollständigkeit und Unversehrtheit der Lieferung und benachrichtigen Sie
Ihren Vertriebspartner bitte unverzüglich nach dem Kauf, falls die Lieferung nicht komplett oder
beschädigt ist. Im Lieferumfang des Produkts sind enthalten:
X1 x OPUS SP5 PLUS LED Moving Head
X2 x Omega-Montagebügel
X1 x Netzkabel
XBedienungsanleitung
EINFÜHRUNG
MOVING HEAD OPUS SERIE
CLOSP5PLUS
STEUERUNGSFUNKTIONEN:
34-Kanal und 50-Kanal DMX-Steuerung (CLOSP5PLUS)
27-Kanal und 33-Kanal DMX-Steuerung (CLOSP5PLUS mit optionalem Animation Wheel
Modul CLOSP5AM)
Art-Net
sACN
W-DMX™
RDM enabled
Master / Slave Betrieb
Standalone Funktionen

33
DMX DEUTSCHFRANCAIS
ESPAÑOL ENGLISH
ITALIANO POLSKI
EIGENSCHAFTEN:
500 W High Efficiency LED. Framing Shutter Modul. CMY + CTO Farbmischung. Farbrad mit 7
brillanten Farben + offen und Split-Farben. Goborad 1 mit 8 fixen Gobos + offen. Goborad 2 mit
7 rotierenden Gobos + offen (Gobos austauschbar). 2 rotierende Prismen. Fokussierung und
Zoom-Funktion über DMX. Frostfilter und Iris. Stroboskop. Pan und Tilt Motoren mit 16-Bit Auflö-
sung. Batteriegespeistes. Display für netzunabhängige Einstellung. Automatische Positionskorrek-
tur. Temperaturgesteuerte Lüfter. 3- und 5-polige DMX-Anschlüsse. RJ45 Netzwerkanschlüsse.
Wireless DMX™. Neutrik powerCON TRUE1 Netzanschlüsse IN und OUT. 2 Omega-Montagebügel
inklusive. Betriebsspannung 100-240V AC. Leistungsaufnahme 800W. Der Scheinwerfer verfügt
über den RDM-Standard (Remote Device Management). Diese Gerätefernverwaltung ermöglicht
die Statusabfrage und Konfiguration von RDM-Endgeräten über einen RDM-fähigen Controller.
ZUSÄTZLICHE EIGENSCHAFTEN
Der Moving Head CLOSP5PLUS wird mit einem 4-fach Framing Shutter Modul ausgestattet aus-
geliefert. Das 4-fach Framing Shutter Modul kann gegen das optional erhältliche Animation Wheel
Modul CLOSP5AM ausgetauscht werden. Die Umstellung der Gerätesoftware und der entspre-
chenden DMX-Modi geschieht dabei automatisch.
ANSCHLÜSSE, BEDIEN- UND ANZEIGEELEMENTE
1 23
4 5
6
7
8
1 POWER IN
Neutrik powerCON TRUE1 Netzeingangsbuchse. Betriebsspannung 100 - 240V AC / 50 - 60Hz. Ein
geeignetes Netzkabel mit powerCON TRUE1 Gerätestecker befindet sich im Lieferumfang.
2 POWER OUT
Neutrik powerCON TRUE1 Netzausgangsbuchse. Dient der Netzversorgung weiterer CAMEO
Scheinwerfer. Achten Sie darauf, dass die gesamte Stromaufnahme aller angeschlossenen Geräte
den auf dem Gerät in Ampere (A) angegebenen Wert nicht überschreitet.

34
DMX
ITALIANO
POLSKI
ESPAÑOL
FRANCAIS
DEUTSCHENGLISH
3 FUSE
Sicherungshalter für 5 x 20mm Feinsicherungen. WICHTIGER HINWEIS: Ersetzen Sie die Sicherung
ausschließlich durch eine Sicherung des gleichen Typs und mit gleichen Werten. Sollte die Siche-
rung wiederholt auslösen, wenden Sie sich bitte an ein autorisiertes Servicezentrum.
4 DMX IN
Männliche 3- und 5-Pol XLR-Buchsen zum Anschließen eines DMX-Kontrollgeräts (z.B. DMX-Pult).
5 DMX OUT
Weibliche 3- und 5-Pol XLR-Buchsen zum Weiterleiten des DMX-Steuersignals.
6 NET IN
RJ45 Netzwerk-Anschluss zum Verbinden mit einem Art-Net bzw. sACN Netzwerk. Verwenden Sie
für die Einrichtung des Netzwerks Kabel der Kategorie CAT-5e oder besser.
7 NET OUT
RJ45 Netzwerk-Anschluss zum Verbinden weiterer Art-Net bzw. sACN-fähige Geräte mit dem
Netzwerk. Verwenden Sie für die Einrichtung des Netzwerks Kabel der Kategorie CAT-5e oder
besser.
8 ANTENNE FÜR W-DMX™
Die Antenne für die Steuerung per W-DMX™ verbleibt während des Betriebs in der Halterung (=
Betriebsposition).
9 DRUCKEMPFINDLICHES LC-DISPLAY MIT BELEUCHTUNG
Dank des druckempfindlichen LC-Displays kann die Bedienung des Geräts direkt am Display
erfolgen (handschuhtauglich). Das Display zeigt die aktuell aktivierte Betriebsart an (Hauptanzei-
ge), die Menüpunkte im Auswahl-Menü und den Zahlenwert bzw. Betriebszustand in bestimmten
Menüpunkten. Liegt kein Steuersignal am Gerät an, fängt das Display an zu blinken, das Blinken
stoppt, sobald ein Steuersignal anliegt (DMX- und Slave-Betrieb, ArtNet und sACN).
9
10
11

35
DMX DEUTSCHFRANCAIS
ESPAÑOL ENGLISH
ITALIANO POLSKI
10 BERÜHRUNGSEMPFINDLICHE BEDIENFELDER
MODE - Durch (wiederholtes) Drücken auf MODE gelangen Sie in der Menüstruktur eine Ebene
höher, bis zur Hauptanzeige.
UP und DOWN - Auswählen der einzelnen Menüpunkte im Hauptmenü (DMX-Adresse,
Betriebsart usw.) und in den Untermenüs.
ENTER - Ausgehend von der Hauptanzeige gelangen Sie durch Drücken auf ENTER in das Haupt-
menü. Im Hauptmenü gelangen Sie durch Drücken auf ENTER auf die Menüebene, auf der Sie
Wertänderungen vornehmen können. Wertänderungen bestätigen Sie ebenfalls durch Drücken auf
ENTER.
LEFT und RIGHT X - Verwenden Sie die Bedienfelder, um den Wert eines Menüpunkts, wie z.B.
die DMX-Adresse, wunschgemäß zu verändern.
11 USB-SCHNITTSTELLE
USB-Schnittstelle zum Updaten der Geräte-Firmware. Stellen Sie im Service-Menü den Status
bei USB Update auf ON. Laden Sie, sobald verfügbar, die aktuelle Firmware von der Produktseite
auf cameolight.com, entpacken sie und kopieren die Dateien in einen Ordner ohne Sonderzeichen
auf einen USB-Stick. Trennen Sie den Moving Head vom Stromnetz und allen Input-Anschlüs-
sen (DMX / Ethernet), schließen den USB-Stick an der USB-Schnittstelle an und verbinden den
Moving Head wieder mit dem Stromnetz. Der USB-Stick wird automatisch erkannt und im Display
angezeigt. Navigieren Sie nun zum entsprechenden Ordner auf dem USB-Stick und bestätigen Sie
diesen mit „ON“. Die Update-Prozedur beginnt. Entfernen Sie während der Update-Prozedur den
USB-Stick nicht und trennen den Moving Head nicht vom Stromnetz.
Das batteriegespeiste Display lässt sich aktivieren, selbst wenn das Gerät nicht am Stromnetz
angeschlossen ist. Drücken und halten Sie hierfür MODE für die Dauer von circa 12 Sekunden.
Sie können nun netzunabhängig Geräteinformationen auslesen und Systemeinstellungen ändern
und abspeichern. Die externe Steuerung des Scheinwerfers wird in diesem Fall nicht aktiviert. Aus
diesem Grund wird, auch wenn ein Steuer-Signal am Gerät anliegt, im Display angezeigt, dass
kein Steuer-Signal anliegt.

36
DMX
ITALIANO
POLSKI
ESPAÑOL
FRANCAIS
DEUTSCHENGLISH
12 PAN LOCK
Mechanische Verriegelungsvorrichtung um beim Trans-
port das Verdrehen des Kopfes in horizontaler Richtung
zu verhindern. Trennen Sie das Gerät vom Netz, bringen
den Kopf parallel zur Basis (4 Positionen) und drücken
den Arretierhebel zum Verriegeln in Richtung Pan-Dre-
hachse. Entriegeln Sie die Vorrichtung vor Inbetriebnah-
me des Geräts.
13 TILT LOCK
Mechanische Verriegelungsvorrichtung um beim Trans-
port das Verdrehen des Kopfes in vertikaler Richtung zu
verhindern (7 Positionen). Trennen Sie das Gerät vom
Netz und schieben den Arretierhebel zum Verriegeln in
Richtung Tilt-Drehachse, bewegen Sie dabei den Kopf
des Geräts auf vertikaler Ebene, bis eine der 7 Rastpo-
sitionen gefunden ist und der Arretierhebel einrastet.
Entriegeln Sie die Vorrichtung vor Inbetriebnahme des
Geräts.
BEDIENUNG
HINWEISE
Sobald der Scheinwerfer korrekt am Stromnetz angeschlossen ist, wer-
den während des Startvorgangs und des Motoren-Resets nacheinander
„Software Update Please Wait...“ und das Cameo Logo mit Informatio-
nen zum Gerätemodell im Display angezeigt. Nach diesem Vorgang ist
der Scheinwerfer betriebsbereit und die Betriebsart, die zuvor ange-
wählt war, wird aktiviert. Die Bedienung des Scheinwerfers erfolgt zum
einen mit Hilfe der berührungsempfindlichen Bedienfelder neben dem
Display, zum anderen kann das druckempfindliche Display (hand-
schuhtauglich) selbst genutzt werden, um alle Menüpunkte zu erreichen
und Einstellungen intuitiv nach Wunsch vorzunehmen. Informationen
dazu, welches Bedienelement im Display und welches Bedienfeld neben
dem Display die gleiche Funktion haben, finden Sie in der nebenstehen-
den Tabelle. Nachfolgend wird die Bedienung mit Hilfe der Bedienfelder
neben dem Display beschrieben.
HAUPTANZEIGE
In der oberen Zeile des Displays wird angezeigt, ob und welches Steuersignal am Gerät anliegt, in
der Zeile darunter die aktuell aktivierte Betriebsart (DMX Standard / Extended, Static, Auto, Slave)
und gut sichtbar in der Mitte die DMX-Startadresse oder die entsprechende Betriebsart (im Bei-
spiel DMX-Startadresse 001). Sobald das Steuer-Signal unterbrochen wird, beginnen die Zeichen
13
12

37
DMX DEUTSCHFRANCAIS
ESPAÑOL ENGLISH
ITALIANO POLSKI
im Display zu blinken und hinter „Signal“ in der oberen Zeile wird „None“ angezeigt (kein Signal),
liegt das Steuer-Signal wieder an, wechselt das Display wieder zur Hauptanzeige. Die Display-An-
zeige kann um 180° gedreht werden, indem Sie auf das berührungsempfindliche Bedienfeld
DOWN tippen, ist die Display-Anzeige bereits um 180° gedreht, tippen Sie auf das Bedienfeld UP,
um die Display-Anzeige wieder zur Standard-Abbildung zu bringen. Die Display-Anzeige kann
ebenfalls um 180° gedreht werden, indem Sie auf das „Dach-Symbol“ im druckempfindlichen
Display drücken.
Anzeige des Eingangs-Signals
DMX-Modus bzw. Betriebsart
DMX-Startadresse bzw. Betriebsart
Informationen zum Geräte-
modell Zurück zur Hauptanzeige =
beliebige Stelle im Display oder
ENTER drücken
Displaybatterie-Status
Display-Anzeige um 180° drehen
Hauptmenü
KONTROLLMENÜ (Control)
DMX-STARTADRESSE EINSTELLEN (DMX Address)
Ausgehend von der Hauptanzeige gelangen Sie durch Drücken auf ENTER in das Hauptmenü.
Wählen Sie mit Hilfe der Bedienfelder UP und DOWN das Kontrollmenü Control aus und drücken
auf ENTER. Mit Hilfe von UP und DOWN wählen Sie nun den Menüpunkt „DMX Address“ aus und
bestätigen durch Drücken auf ENTER. Die gewünschte DMX-Startadresse stellen Sie nun mit Hilfe
der Bedienfelder LEFT und RIGHT ein und bestätigen mit ENTER (höchster Wert abhängig vom
aktivierten DMX-Modus). Drücken Sie 2x auf MODE, um zurück zur Hauptanzeige zu gelangen,
die ausgewählte DMX-Startadresse wird nun groß dargestellt im Display angezeigt, wenn die
DMX-Betriebsart aktiviert ist.
DMX-MODUS EINSTELLEN (DMX Mode)
Ausgehend von der Hauptanzeige gelangen Sie durch Drücken auf ENTER in das Hauptmenü.
Wählen Sie mit Hilfe der Bedienfelder UP und DOWN das Kontrollmenü Control aus und drücken
auf ENTER. Mit Hilfe von UP und DOWN wählen Sie nun den Menüpunkt „DMX Mode“aus und

38
DMX
ITALIANO
POLSKI
ESPAÑOL
FRANCAIS
DEUTSCHENGLISH
bestätigen durch Drücken auf ENTER. Den gewünschten DMX-Modus wählen Sie wiederum mit
UP und DOWN und bestätigen die Auswahl mit ENTER. Drücken Sie 2x auf MODE, um zurück zur
Hauptanzeige zu gelangen, der ausgewählte DMX-Modus ist nun aktiviert. Tabellen mit der Kanal-
belegung der verschiedenen DMX-Modi finden Sie in dieser Anleitung unter DMX STEUERUNG.
NETZWERKEINSTELLUNGEN (Network)
Ausgehend von der Hauptanzeige gelangen Sie durch Drücken auf ENTER in das Hauptmenü.
Wählen Sie mit Hilfe der Bedienfelder UP und DOWN das Kontrollmenü Control aus und drücken
auf ENTER. Mit Hilfe von UP und DOWN wählen Sie nun den Menüpunkt „Network“ aus und bestä-
tigen durch Drücken auf ENTER. Informationen zu den Netzwerkeinstellungen entnehmen Sie bitte
der nachstehenden Tabelle. Bestätigen Sie alle Netzwerkeinstellungsänderungen mit ENTER.
Network
Network
Input
Netzwerkeingang aktivieren /
deaktivieren
OFF Netzwerkeingang deaktiviert
ON Netzwerkeingang aktiviert
Protocol Netzwerkprotokoll ArtNET ArtNet Protokoll
sACN sACN Protokoll
Address
Universum 1 - 256,
IP-Adresse und Subnetzmaske
einstellen
Universe
000 - 255
000 bis 255. Wert ändern mit LEFT
und RIGHT, bestätigen mit ENTER.
IP Address
Block auswählen mit LEFT und
RIGHT, Wert ändern mit UP und
DOWN, bestätigen mit ENTER.
IP Subnet
Mask
Block auswählen mit LEFT und
RIGHT, Wert ändern mit UP und
DOWN, bestätigen mit ENTER.
DMX Out Netzwerksignal über DMX OUT
ausgeben
OFF Signal nicht ausgeben
ON Signal ausgeben

39
DMX DEUTSCHFRANCAIS
ESPAÑOL ENGLISH
ITALIANO POLSKI
W-DMX EINSTELLUNGEN (Wireless)
Ausgehend von der Hauptanzeige gelangen Sie durch Drücken auf ENTER in das Hauptmenü.
Wählen Sie mit Hilfe der Bedienfelder UP und DOWN das Kontrollmenü Control aus und drücken
auf ENTER. Mit Hilfe von UP und DOWN wählen Sie nun den Menüpunkt „Wireless“ aus und
bestätigen durch Drücken auf ENTER. Informationen zu den W-DMX Einstellungen entnehmen Sie
bitte der nachstehenden Tabelle. Bestätigen Sie alle Änderungen der Einstellungen mit ENTER.
Wireless
W-DMX OFF W-DMX deaktivieren
ON W-DMX aktivieren
Operating
(zurzeit im Beta-Status)
Receiver W-DMX-Modul als Empfänger konfiguriert
Transmitter W-DMX-Modul als Sender konfiguriert
Transmitting
(zurzeit im Beta-Status)
G3 G3 Übertragungsstandard
G4S G4S Übertragungsstandard
Link Link
Mit W-DMX-Geräten koppeln. W-DMX muss bei allen
Geräten aktiviert und die Kopplung mit einem Trans-
mitter aufgehoben sein (Receive Reset)
UnLink Entkoppeln aller Geräte
Receive Reset NO Kopplung mit einem Transmitter nicht aufheben
YES Kopplung mit einem Transmitter aufheben
STAND-ALONE-BETRIEBSARTEN (Stand Alone)
Ausgehend von der Hauptanzeige gelangen Sie durch Drücken auf ENTER in das Hauptmenü.
Wählen Sie mit Hilfe der Bedienfelder UP und DOWN das Kontrollmenü Control aus und drücken
auf ENTER. Mit Hilfe von UP und DOWN wählen Sie nun den Menüpunkt „Stand Alone“ aus und
bestätigen durch Drücken auf ENTER. Wählen Sie jetzt eine der drei Stand-Alone-Betriebsarten
mit Hilfe der Bedienfelder UP und DOWN aus und bestätigen mit ENTER.

40
DMX
ITALIANO
POLSKI
ESPAÑOL
FRANCAIS
DEUTSCHENGLISH
STAND-ALONE-BETRIEBSART STATISCHER MODUS (Static)
Der Statische Modus ermöglicht es, ähnlich wie mit einem DMX-Steuergerät, PAN, TILT, Dimmer,
Stroboskop, Farbrad und Goborad usw. direkt am Gerät mit Werten von 000 bis 255 einzustellen.
Somit kann eine individuelle Szene erstellt werden, ohne einen zusätzlichen DMX-Controller zu
benötigen. Nachdem Sie, wie zuvor unter „STAND-ALONE-BETRIEBSARTEN“ beschrieben, die
Betriebsart „Static“ ausgewählt haben, können die Einstellungen wie gewünscht vorgenommen
werden. Die Untermenüpunkte entsprechen hierbei den Kanälen 1 bis 50 im 50-Kanal Extended
DMX-Modus (siehe DMX STEUERUNG, Untermenüpunkt auswählen mit UP und DOWN, Wert
ändern mit LEFT und RIGHT, bestätigen mit ENTER). Drücken Sie wiederholt auf MODE, um zur
Hauptanzeige zurückzugelangen.
STAND-ALONE-BETRIEBSART AUTO PROGRAMME (Auto Prog)
Die 4 verschiedenen Auto-Programme (Program 1 - 4) bestehen jeweils aus fest programmierten
Kopfbewegungen, Gobo- und Farbwechseln usw., die Laufgeschwindigkeit ist separat einstellbar.
Wählen Sie, wie zuvor unter Punkt „STAND-ALONE-BETRIEBSARTEN“ beschrieben, die Auto-Be-
triebsart aus, bestätigen mit ENTER, wählen das gewünschte Auto-Programm mit Hilfe von UP
und DOWN aus, bestätigen mit ENTER und ändern nun den Wert für die Laufgeschwindigkeit mit
Hilfe von LEFT und RIGHT nach Wunsch von 000 bis 100. Bestätigen Sie mit ENTER. Drücken Sie
wiederholt auf MODE, um zur Hauptanzeige zurückzugelangen.
SLAVE-BETRIEB (Slave)
Die Auswahl der Slave-Betriebsart erfolgt wie zuvor unter Punkt „STAND-ALONE-BETRIEBSAR-
TEN“ beschrieben. Verbinden Sie die Slave- und die Master-Einheit (gleiches Modell, gleicher
Softwarestand) mit Hilfe eines DMX-Kabels (Master DMX OUT - Slave DMX IN) und aktivieren in
der Master-Einheit eine der Standalone Betriebsarten Auto oder Static. Nun folgt die Slave-Einheit
der Master-Einheit. Drücken Sie wiederholt auf MODE, um zur Hauptanzeige zurückzugelangen.

41
DMX DEUTSCHFRANCAIS
ESPAÑOL ENGLISH
ITALIANO POLSKI
SYSTEMEINSTELLUNGEN (Settings)
Ausgehend von der Hauptanzeige gelangen Sie durch Drücken auf ENTER in das Hauptmenü.
Wählen Sie mit Hilfe der Bedienfelder UP und DOWN das Menü für die Systemeinstellungen Set-
tings aus und drücken auf ENTER.
Daraufhin gelangen Sie in das Untermenü zum Einstellen der Untermenüpunkte, siehe Tabelle
(Auswahl mit UP und DOWN, bestätigen mit ENTER, Status ändern mit UP und DOWN, bestätigen
mit ENTER):
Settings (Fettdruck = Werkseinstellung)
Display Display-
Einstellungen
Reverse
OFF Keine Drehung der Display-An-
zeige
ON Drehung der Display-Anzeige um
180° (bei Kopfübermontage)
Backlight
OFF
Deaktivierung der Display-Be-
leuchtung nach ca. 30 Sekunden
Inaktivität
ON Display-Beleuchtung permanent
an
DMX Fail
Betriebszustand bei
DMX-Signal-
Unterbrechung
Black Aktiviert Blackout
Hold Letzter Befehl wird gehalten
Auto Aktiviert die Auto-Betriebsart
Dimmer
Curve
Auswählen der
Dimmerkurve
Linear Die Lichtintensität steigt linear mit
dem DMX-Wert an
Exponential
Die Lichtintensität lässt sich im unte-
ren DMX-Wertbereich fein und im obe-
ren DMX-Wertbereich grob einstellen
Logarithmic
Die Lichtintensität lässt sich im
unteren DMX-Wertbereich grob und
im oberen DMX-Wertbereich fein
einstellen
Dimmerkurve
Die Lichtintensität lässt sich im unte-
ren und oberen DMX-Wertbereich fein
und im mittleren DMX-Wertbereich
grob einstellen

42
DMX
ITALIANO
POLSKI
ESPAÑOL
FRANCAIS
DEUTSCHENGLISH
LED
Frequency
Einstellen der LED
PWM Frequenz
650Hz, 1530Hz,
3600Hz, 12KHz,
25KHz
Pan / Tilt Einstellungen des
Gerätekopfs
Pan Reverse
OFF Keine Umkehrung der Pan Bewe-
gungsrichtung
ON Umkehrung der Pan Bewe-
gungsrichtung
Tilt Reverse
OFF Keine Umkehrung der Tilt Bewe-
gungsrichtung
ON Umkehrung der Tilt Bewegungs-
richtung
Pan Angle 630 Pan Winkel 630°
540 Pan Winkel 540°
Feedback
OFF Automatische Positionskorrektur
deaktiviert
ON Automatische Positionskorrektur
aktiviert
B.O. Moving
Automatischer
Blackout bei
Kopfbewegung
OFF Kein Blackout bei Kopfbewegung
ON Blackout bei Kopfbewegung
Fixture Type Gerätetyp Profile Module
Spot Module
Fan Lüftersteuerung
Auto Automatische Lüfterseuerung
Fan Off Deaktivierte Lüfter bei stark
reduzierter Helligkeit
Constant Low
Konstant niedrige Lüfterge-
schwindigkeit bei reduzierter
Helligkeit, falls notwendig
Constant Mid
Konstant mittlere Lüfterge-
schwindigkeit bei reduzierter
Helligkeit, falls notwendig
Constant High Konstant hohe Lüftergeschwin-
digkeit
DIMMERKURVEN
linear
DMX-Wert
Lichtintensität
exponentiell
DMX-Wert
Lichtintensität
logarithmisch
DMX-Wert
Lichtintensität
S-Kurve
DMX-Wert
Lichtintensität

43
DMX DEUTSCHFRANCAIS
ESPAÑOL ENGLISH
ITALIANO POLSKI
SERVICEMENÜ
Ausgehend von der Hauptanzeige gelangen Sie durch Drücken auf ENTER in das Hauptmenü.
Wählen Sie mit Hilfe der Bedienfelder UP und DOWN das Service-Menü Service aus und drücken
auf ENTER.
Daraufhin gelangen Sie in das Untermenü zum Bearbeiten der Untermenüpunkte (Auswahl mit UP
und DOWN, bestätigen mit ENTER, Wert ändern mit LEFT und RIGHT, bestätigen mit ENTER).
Calibrate - Kalibrieren der Komponenten mit Werten von 000 bis 255 (Passwort 050).
Test Manual - Manuelles Testen der Komponenten mit Werten von 000 bis 255.
Reset Motor - Zurücksetzen der Motoren. All = Alle Motoren, Pan&Tilt = Pan und Tilt Motoren,
Head Only = Motoren im Gerätekopf.
USB Update - Firmware-Update via USB-Schnittstelle. OFF = Firmware-Update per USB-Schnitt-
stelle blocken. ON = Firmware-Update per USB-Schnittstelle erlauben.
Factory Reset - Zurücksetzen auf Werkseinstellungen.
GERÄTEINFORMATIONEN (Info)
Ausgehend von der Hauptanzeige gelangen Sie durch Drücken auf ENTER in das Hauptmenü.
Wählen Sie mit Hilfe der Bedienfelder UP und DOWN das Informations-Menü Info aus und drücken
auf ENTER.
Daraufhin gelangen Sie in das Untermenü zum Ablesen der Geräteinformationen (Auswahl mit UP
und DOWN, bestätigen mit ENTER).

44
DMX
ITALIANO
POLSKI
ESPAÑOL
FRANCAIS
DEUTSCHENGLISH
System Info
Error Info
Funktionsfehleranzeige
Falls sich ein Funktionsfehler durch einen Reset oder Neustart nicht beheben lässt,
muss die defekte Einheit von einem autorisierten Servicezentrum repariert werden.
Tempera-
ture Temperaturanzeige
Head xx°C/F°
Base xx°C/F°
Unit Anzeige der Temperatur in Celsius oder
Fahrenheit
Runtime Betriebszeitanzeige
Total Time Anzeige der Gesamtbetriebszeit in Stunden
Current Time Anzeige der momentanen Betriebszeit
Time PW
Eingabe des Passworts zum Zurücksetzen der
momentanen Betriebszeit
(Time PW = 050)
Clean Current Zurücksetzen der momentanen Betriebszeit
Firmware
Anzeige der Firmwa-
re der Komponenten
1U bis 8U
Vx.x.x
Model
Info
Information zur
Geräteversion
Profile
Module Modul mit Framing Shutter
Spot Module Modul mit Animationsrad
AUFSTELLUNG UND MONTAGE
Dank der integrierten Gummifüße kann der Scheinwerfer an einer geeigneten Stelle auf eine feste
und ebene Fläche gestellt werden. Die Montage an einer Traverse erfolgt mit Hilfe zweier Ome-
ga-Bügel, die an der Gerätebasis befestigt werden (A). Zwei Omega-Bügel sind im Lieferumfang
enthalten, geeignete Traversenklemmen sind optional erhältlich. Sorgen Sie für feste Verbindun-
gen und sichern Sie den Scheinwerfer mit einem geeigneten Sicherungsseil an einer der dafür
vorgesehenen Stellen (B).
WICHTIGER HINWEIS: Überkopfmontage erfordert umfassende Erfahrung, ein-
schließlich der Berechnung der Grenzwerte für die Arbeitslast, des verwendeten
Installationsmaterials und der regelmäßigen Sicherheitsüberprüfung aller Instal-
lationsmaterialien und Scheinwerfer. Wenn Sie diese Qualifikationen nicht haben,
versuchen Sie nicht, eine Installation selbst durchzuführen, sondern nutzen Sie die
Hilfe von professionellen Unternehmen.

45
DMX DEUTSCHFRANCAIS
ESPAÑOL ENGLISH
ITALIANO POLSKI
B
BA
A
PFLEGE, WARTUNG UND REPARATUR
Um die einwandfreie Funktion des Geräts auf Dauer zu gewährleisten, muss es regelmäßig ge-
pflegt und bei Bedarf gewartet werden. Der Pflege- bzw. Wartungsbedarf steht in Abhängigkeit der
Nutzungsintensität und -umgebung. Wir empfehlen generell eine Sichtprüfung vor jeder Inbetrieb-
nahme. Weiterhin empfehlen wir alle 500 Betriebsstunden, oder bei geringerer Nutzungsintensität
spätestens nach Ablauf eines Jahres alle unten genannten und zutreffenden Pflegemaßnahmen
durchzuführen. Bei Mängeln, die auf eine unzureichende Pflege zurückzuführen sind, kann es zu
Einschränkungen der Garantieansprüche kommen.
PFLEGE (vom Anwender durchführbar)
WARNUNG! Vor jeglichen Pflegemaßnahmen müssen die Spannungsversorgung und
sofern möglich sämtliche Geräteverbindungen getrennt werden.
HINWEIS! Unsachgemäße Pflege kann zu Beeinträchtigung des Gerätes führen bis
hin zur Zerstörung.
1. Gehäuseoberflächen müssen mit einem sauberen, feuchten Tuch gereinigt werden. Dabei ist
darauf zu achten, dass keine Feuchtigkeit in das Gerät eindringen kann.
2. Luft Ein- und Austrittsöffnungen müssen regelmäßig von Staub und Schmutz befreit werden.
Im Fall des Einsatzes von Druckluft ist darauf zu achten, dass Beschädigungen am Gerät
verhindert werden (z.B. müssen Lüfter für diesen Fall blockiert werden).
3. Leitungen und Steckkontakte sind regelmäßig zu reinigen und von Staub und Schmutz zu
befreien.
4. Es dürfen generell keine Reinigungsmittel oder Mittel mit schleifender Wirkung zur Pflege
verwendet werden, andernfalls ist mit Beeinträchtigung der Oberflächenbeschaffenheit zu
rechnen.
5. Geräte sind generell trocken zu lagern und vor Staub und Verschmutzung zu schützen.

46
DMX
ITALIANO
POLSKI
ESPAÑOL
FRANCAIS
DEUTSCHENGLISH
WARTUNG UND REPARATUR (nur durch Fachpersonal)
GEFAHR! Im Gerät befinden sich Spannungsführende Bauteile. Auch nach Trennung
der Netzverbindung kann noch Restspannung im Gerät vorhanden sein, z.B. durch
geladene Kondensatoren.
HINWEIS! Im Gerät befinden sich keine für den Anwender zu wartenden Baugruppen.
HINWEIS! Wartungs- und Reparaturmaßnahmen dürfen nur vom Hersteller autori-
siertem Fachpersonal durchgeführt werden. Im Zweifel wenden Sie sich an den
Hersteller.
HINWEIS! Unsachgemäß ausgeführte Wartungsarbeiten können den
Gewährleistungs anspruch beeinträchtigen.
TECHNISCHE DATEN
Artikelnummer: CLOSP5PLUS
Produktart: LED Moving Light
Typ: Moving Head
Anzahl Leuchtmittel: 1
Typ Leuchtmittel: 500W High Efficiency LED
Farbtemperatur
Leuchtmittel: Kaltweiß 6600K
CRI: 70
LED PWM Frequenz: 650Hz, 1530Hz, 3600Hz, 12kHz, 25kHz (einstellbar)
Farbmischfunktion: CMY + CTO
Farbrad Anzahl Farben: 7 + offen und Split-Farben
Anzahl Gobos: 15 + offen (8 fix + 7 rotierend)
Gobogröße: Ø außen 22,9mm (-0,2 / +0,1mm), Ø Motiv 19mm, Materialstärke
1,1mm (Glas)
Abstrahlwinkel: 6° - 42°
DMX-Eingang: 3-Pol XLR männlich
5-Pol XLR männlich
DMX-Ausgang: 3-Pol XLR weiblich
5-Pol XLR weiblich
Netzwerkanschlüsse: RJ45 IN und OUT (verriegelbar)
DMX-Modus: 34-Kanal, 50-Kanal
DMX Funktionen:
Pan/Tilt, Pan/Tilt fein, Dimmer, Dimmer fein, multifunktionales Stro-
boskop, Cyan, Cyan fein, Magenta, Magenta fein, Yellow, Yellow fein,
CTO, CTO fein, Farbrad, Farbrad Rotation, Goborad 1, Gobo 1 Rotation,
Gobo 1 Rotation fein, Goborad 1 Rotation, Gobo 1 Shake, Goborad 2,
Goborad 2 Rotation, Gobo 2 Shake, Zoom, Zoom fein, Fokus,

47
DMX DEUTSCHFRANCAIS
ESPAÑOL ENGLISH
ITALIANO POLSKI
DMX Funktionen:
Fokus fein, Iris, Prisma, Prisma Rotation, Frost, Blade 1 - 4, Blade 1 -
4 fein, Shape Rotation, Shape Rotation fein, Pan/Tilt Makros, Pan/Tilt
Speed, Dimmerkurve, Systemeinstellungen
Standalone Funktionen: Auto Programm 1 - 4, Statischer Modus, Master/Slave-Betrieb
Systemeinstellungen:
Wireless Setting, Display Reverse, Display Beleuchtung On/Off, DMX
Fail, Dimmer Curve, Pan Reverse, Tilt Reverse, Pan Winkel, Feedback,
Fan Setting, Movement Blackout, Test, Motor Reset, Factory Reset,
Netzwerkeinstellungen
Steuerung: DMX512, RDM enabled, W-DMX™ (Receiver), Art-Net, sACN
PAN Winkel: 540°/630°
TILT Winkel: 270°
Bedienelemente:
Berührungsempfindliche Bedienfelder MODE, ENTER, UP, DOWN,
LEFT, RIGHT, druckempfindliches Grafik-Farb-LC-Display (hand-
schuhtauglich)
Anzeigeelemente: Beleuchtetes Grafik-Farb-LC-Display, Batteriespeisung für netzunab-
hängige Systemeinstellungen
Betriebsspannung: 100 - 240V AC / 50 - 60Hz
Leistungsaufnahme: 800W
Lichtstrom: 22000 lm
Stromversorgungs-
anschluss: Neutrik TRUE1 Ein- und Ausgang (Ausgang max. 4A)
Sicherung: T8AL / 250V (5 x 20mm)
Umgebungstemperatur
in Betrieb: -15°C - 40°C
Relative Luftfeuchtigkeit: < 85%, nicht kondensierend
Mindestabstand zur
beleuchteten Fläche: 3m
Mindestabstand zu
normal entflammbaren
Materialien:
0,5m
Gehäusematerial: Metall, ABS
Gehäusefarbe: Schwarz
Gehäusekühlung: Heatpipe Kühlsystem plus temperaturgesteuerte Lüfter
Abmessungen (B x H x T,
ohne Montagebügel): 397 x 741,5 x 285mm
Gewicht: 27,8kg
Weitere Eigenschaften: 1m Netzkabel mit TRUE1 Stecker und
2 Omega-Montagebügel im Lieferumfang

48
DMX
ITALIANO
POLSKI
ESPAÑOL
FRANCAIS
DEUTSCHENGLISH
MINDESTABSTAND ZUR BELEUCHTETEN FLÄCHE
0.5 m
Dieses Symbol mit Entfernungsangabe in Metern (m) gibt den Mindestabstand des
Leuchtkörpers zur beleuchteten Fläche an. In diesem Beispiel beträgt der Abstand
0,5m. Den für dieses Gerät gültigen Wert entnehmen Sie bitte den technischen
Daten in dieser Anleitung und dem Aufdruck auf dem Gerätegehäuse!
MINDESTABSTAND ZU NORMAL ENTFLAMMBAREN MATERIALIEN
0.5 m
Dieses Symbol mit Entfernungsangabe in Metern (m) gibt den Mindestabstand
des Geräts zu normal entflammbaren Materialien an. In diesem Beispiel beträgt
der Abstand 0,5m. Den für dieses Gerät gültigen Wert entnehmen Sie bitte den
technischen Daten in dieser Anleitung!
ENTSORGUNG
VERPACKUNG:
1. Verpackungen können über die üblichen Entsorgungswege dem Wertstoffkreislauf
zugeführt werden.
2. Bitte trennen Sie die Verpackung entsprechend der Entsorgungsgesetze und Wert-
stoffverordnungen in Ihrem Land.
GERÄT:
1. Dieses Gerät unterliegt der europäischen Richtlinie für Elektro- und Elektronik-Alt-
geräte in der jeweils geltenden aktuellen Fassung. WEEE-Richtlinie Waste Elec-
trical and Electronical Equipment. Altgeräte gehören nicht in den Hausmüll. Das
Altgerät muss über einen zugelassenen Entsorgungsbetrieb oder eine kommunale
Entsorgungseinrichtung entsorgt werden. Bitte beachten Sie geltende Vorschriften
in Ihrem Land!
2. Beachten Sie alle in Ihrem Land geltenden Entsorgungsgesetze.
3. Als Privatkunde erhalten Sie Informationen zu umweltfreundlichen Entsorgung-
smöglichkeiten über den Händler, bei dem das Produkt erworben wurde, oder über
die entsprechenden regionalen Behörden.

49
DMX DEUTSCHFRANCAIS
ESPAÑOL ENGLISH
ITALIANO POLSKI
HERSTELLERERKLÄRUNGEN
Herstellergarantie & Haftungsbeschränkung
Adam Hall GmbH, Adam-Hall-Str. 1, D-61267 Neu Anspach /
E-Mail [email protected] / +49 (0)6081 / 9419-0
Unsere aktuellen Garantiebedingungen und Haftungsbeschränkung finden Sie unter:
https://cdn-shop.adamhall.com/media/pdf/Manufacturers-Declarations-CAMEO_DE_EN_ES_FR.pdf
Im Servicefall wenden Sie sich an Ihren Vertriebspartner.
CE-Konformität
Hiermit erklärt die Adam Hall GmbH, dass dieses Produkt folgender Richtlinie entspricht (soweit
zutreffend):
Niederspannungsrichtlinie (2014/35/EU)
EMV-Richtlinie (2014/30/EU)
RoHS (2011/65/EU)
RED (2014/53/EU)
CE-Konformitätserklärung
Konformitätserklärungen für Produkte, die der LVD, EMC, RoHS-Richtlinie unterliegen, können
unter [email protected] angefragt werden.
Konformitätserklärungen für Produkte, die der RED-Richtlinie unterliegen, können unter www.
adamhall.com/compliance/ heruntergeladen werden.
Druckfehler und Irrtümer, sowie technische oder sonstige Änderungen sind vorbehalten!

50
DMX
ITALIANO
POLSKI
ESPAÑOL
FRANCAIS
DEUTSCHENGLISH
FRANCAIS
Vous avez fait le bon choix!
Cet appareil a été développé et fabriqué selon les normes de qualité les plus élevées afin de garantir de
nombreuses années de fonctionnement sans problème. Veuillez lire attentivement ce manuel d'utilisa-
tion afin de pouvoir utiliser votre nouveau produit Cameo rapidement et de manière et optimale. De plus
amples informations sur Cameo Light sont disponibles sur notre site web CAMEOLIGHT.COM.
INFORMATIONS SUR CE MANUEL D'UTILISATION
• Lisez attentivement les consignes de sécurité et l'ensemble du manuel avant d'utiliser l'appareil.
• Respectez les avertissements figurant sur l'appareil et dans le manuel d'utilisation.
• Gardez toujours le manuel d'utilisation à portée de main.
• Si vous vendez ou transmettez l'appareil, il est important d'inclure également ce manuel d'utili-
sation, car il fait partie intégrante du produit.
UTILISATION PRÉVUE
Ce produit est un appareil pour technologie événementielle.
Ce produit a été développé pour un usage professionnel dans le domaine de la technologie événe-
mentielle et ne convient pas à un usage domestique.
En outre, ce produit est exclusivement destiné à des utilisateurs qualifiés possédant des connais-
sances spécialisées en matière de technologie événementielle.
L'utilisation du produit en dehors du contexte technique et des conditions de fonctionnement
spécifiées est considérée comme inappropriée.
Toute responsabilité relative aux dommages et aux dégâts causés par des tiers aux personnes et
aux biens suite à une utilisation inappropriée est exclue.
Le produit ne convient pas:
• À une utilisation par des personnes (y compris les enfants) ayant des capacités physiques,
sensorielles ou mentales limitées ou un manque d'expérience et de connaissances.
• Aux enfants (les enfants doivent être informés qu'ils ne doivent pas jouer avec l'appareil).
DÉFINITIONS ET EXPLICATION DES PICTOGRAMMES
1. DANGER : Le mot DANGER, éventuellement associé à un pictogramme, indique des situations
ou des conditions directement dangereuses pour la vie et l'intégrité physique.
2. AVERTISSEMENT : Le mot AVERTISSEMENT, éventuellement associé à un pictogramme,
indique des situations ou des conditions potentiellement dangereuses pour la vie et l'intégrité
physique.
3. ATTENTION : Le mot ATTENTION, éventuellement associé à un pictogramme, est utilisé pour
indiquer des situations ou des conditions pouvant entraîner des blessures.
4. ATTENTION : Le mot ATTENTION, éventuellement associé à un pictogramme, fait référence à
situations ou états qui peuvent entraîner des dommages matériels et/ou environnementaux.

51
DMX DEUTSCHFRANCAIS
ESPAÑOL ENGLISH
ITALIANO POLSKI
Ce pictogramme identifie les dangers qui peuvent causer un choc électrique.
Ce pictogramme identifie les zones ou les situations dangereuses.
Ce pictogramme indique les dangers causés par les surfaces portées à haute tempé-
rature.
Ce symbole indique les dangers causés par des sources lumineuses intenses.
Ce symbole indique que l'appareil ne contient aucune pièce remplaçable par l'utilisateur.
Ce pictogramme indique des informations supplémentaires concernant le fonctionne-
ment du produit.
CONSIGNES DE SÉCURITÉ
DANGER:
1. N'ouvrez pas l'appareil et ne lui apportez aucune modification.
2. Si votre appareil ne fonctionne plus correctement, si des liquides ou des objets ont
pénétré à l'intérieur ou s'il a été endommagé de toute autre manière, éteignez-le
immédiatement et débranchez-le du secteur. L'appareil ne peut être réparé que
par des techniciens de service après-vente agréés.
3. Pour les appareils de la classe de protection 1, le conducteur de protection (mise
à la terre) doit être connecté correctement. Ne débranchez jamais le conducteur
de protection. Les appareils de la classe de protection 2 ne disposent pas d'un
conducteur de protection.
4. Assurez-vous que les câbles sous tension ne sont pas tordus, pincés ou endomma-
gés mécaniquement.
5. Ne contournez jamais le fusible de l'appareil.
AVERTISSEMENT:
1. L'appareil ne doit pas être utilisé s'il présente des signes évidents de dommages.
2. L’appareil doit être installé uniquement alors qu'il se trouve hors tension.
3. Si le câble d'alimentation de l'appareil est endommagé, n'utilisez pas l'appareil.
4. Les câbles d'alimentation fixes ne peuvent être remplacés que par une personne
qualifiée.

52
DMX
ITALIANO
POLSKI
ESPAÑOL
FRANCAIS
DEUTSCHENGLISH
AVIS:
1. Ne faites pas fonctionner l'appareil s'il a été exposé à de fortes variations de tem-
pérature (par exemple, après le transport). L'humidité et la condensation internes
peuvent endommager l'appareil. N'allumez l'appareil qu'une fois qu'il a atteint la
température ambiante.
2. Assurez-vous que la tension et la fréquence du réseau électrique correspondent
aux valeurs indiquées sur l'appareil. Si l'appareil dispose d'un sélecteur de tension,
ne connectez pas l'appareil avant de l'avoir réglé correctement. N'utilisez que des
câbles secteur adaptés.
3. Pour déconnecter l'appareil du secteur sur tous les contacts, il ne suffit pas d'ap-
puyer sur l'interrupteur marche/arrêt de l'appareil .
4. Assurez-vous que le fusible utilisé correspond au type imprimé sur l'appareil.
5. Assurez-vous que des mesures appropriées ont été prises contre les surtensions
(par exemple, la foudre).
6. Respectez l'intensité maximale de sortie spécifiée sur les appareils possédant un
renvoi secteur (Power Out). Vérifiez que la consommation totale de courant de tous
les appareils connectés ne dépasse pas la valeur indiquée.
7. Remplacez les câbles secteur enfichables uniquement par des câbles d'origine.
DANGER:
1. Danger d'asphyxie ! Les sacs en plastique et les petites pièces doivent être tenus
hors de portée des personnes (y compris les enfants) aux capacités physiques,
sensorielles ou mentales réduites.
2. Risque de chute ! Assurez-vous que l'appareil est bien installé et qu'il ne risque
pas de tomber. N'utilisez que des supports ou fixations adaptés (notamment en
installation fixe). Assurez-vous que les accessoires sont correctement installés et
fixés. Veillez à ce que les règles de sécurité applicables soient respectées.
AVERTISSEMENT:
1. N'utilisez l'appareil que de la manière prévue.
2. N'utilisez avec l'appareil que des accessoires recommandés et prévus par le
fabricant.
3. Pendant l'installation, respectez les règles de sécurité en vigueur dans votre pays.
4. Après avoir branché l'appareil, vérifiez le cheminement de tous les câbles pour évi-
ter tout dommage ou accident, par exemple en raison de risques de trébuchement.
5. Respectez toujours la distance minimale spécifiée par rapport aux matériaux
normalement inflammables ! Sauf mention explicite, la distance minimale est de
0,3 m.
6. Respectez toujours la distance minimale de la surface éclairée lisible sur l'appareil.

53
DMX DEUTSCHFRANCAIS
ESPAÑOL ENGLISH
ITALIANO POLSKI
ATTENTION:
1. Dans le cas de composants mobiles tels que des supports de montage ou d'autres
pièces similaires, il existe un risque de blocage.
2. Dans le cas des appareils dotés de composants motorisés, il existe un risque de
blessure dû au mouvement de l'appareil. Un mouvement brusque de l'appareil
peut provoquer des réactions de choc.
3. La surface du boîtier de l'appareil peut devenir très chaude en cours de fonctionne-
ment normal. Veillez à ce qu'il ne soit pas possible de toucher accidentellement le
boîtier. Laissez toujours la lampe refroidir suffisamment avant toute manipulation
(dépose, entretien, recharge, etc.).
AVIS:
1. N'installez pas et n'utilisez pas l'appareil à proximité de radiateurs, d'accumulateurs,
de poêles ou d'autres sources de chaleur. Veillez toujours à ce que l'appareil soit
installé de manière à ce qu'il soit suffisamment refroidi et ne puisse pas surchauffer.
2. Ne placez aucune source d'inflammation, telle qu'une bougie allumée, à proximité
de l'appareil.
3. Les ouvertures de ventilation ne doivent pas être couvertes et les ventilateurs ne
doivent pas être bloqués.
4. Pour le transport, utilisez l’emballage d’origine ou l’emballage fourni par le fabri-
cant.
5. Évitez tout choc ou impact sur l'appareil.
6. Respectez la classe de protection IP ainsi que les conditions ambiantes telles que
la température et l'humidité spécifiées dans les caractéristiques.
7 Les dispositifs peuvent être perfectionnés en permanence. En cas d'informations diver-
gentes sur les conditions de fonctionnement, les performances ou d'autres propriétés
de l'appareil entre le manuel d'utilisation et l'étiquetage de l'appareil, les informations
figurant sur l'appareil sont toujours prioritaires.
8. L'appareil n'est pas adapté aux climats tropicaux ni à un fonctionnement à plus de
2000 m au-dessus du niveau de la mer.
9. Sauf indication expresse, l'appareil ne convient pas à un fonctionnement en milieu
marin.
ATTENTION! INFORMATIONS IMPORTANTES AU SUJET DES PRODUITS D'ÉCLAI-
RAGE!
1. Ne regardez jamais directement le faisceau lumineux, même pendant un court
instant.
2. 2. Ne regardez jamais le faisceau lumineux à l'aide de dispositifs optiques tels qu'une
loupe.
3. Les effets stroboscopiques peuvent provoquer des crises d'épilepsie chez les
personnes sensibles.

54
DMX
ITALIANO
POLSKI
ESPAÑOL
FRANCAIS
DEUTSCHENGLISH
TRANSMISSION DE SIGNAUX PAR RADIO (PAR EXEMPLE, W-DMX OU SYSTÈMES
DE RADIO AUDIO) :
La qualité et les performances des transmissions de signaux sans fil dépendent
généralement des conditions environnantes.
Les facteurs suivants peuvent avoir un impact sur la portée et la stabilité du signal :
Absoprtion (par exemple, maçonnerie, structures métalliques, eau)
Utilisation intensive du spectre HF (par exemple, réseaux locaux sans fil de grande
puissance)
Interférences
Rayonnement électromagnétique (par exemple, écrans vidéo LED, gradateurs)
Toutes les valeurs de portée se réfèrent à une application en champ libre avec un
contact visuel et sans interférences.
L’exploitation des systèmes émetteurs HF est soumise à des réglementations offi-
cielles. Ces réglementations peuvent varier d’une région/d’un pays à l’autre et doivent
être vérifiées par l’opérateur avant la mise en service (par exemple, fréquence radio
et puissance de l’émetteur).
DANGER: Devices with wireless signal transmission are not suitable for use in sen-
sitive areas in which radio operation can lead to potential detrimental effects. Citons
notamment :
• Hospitals, health centres or other healthcare facilities that provide patient treatment
with skilled personnel and equipment.
• Zones dangereuses Classe I, II et III
• Zones d'accès restreint
• Installations militaires
• Avions ou véhicules
• Zones où l'utilisation des téléphones portables est interdite
TRANSMISSION VIA W-DMX
AVERTISSEMENT : Latransmission DMX sans fil ne doit pas être utilisée pour des
applications présentant des facteurs de sécurité susceptibles d'entraîner des blessures
ou des dommages matériels en cas de défaillance.
Cela s'applique en particulier aux scènes et structures mobiles, aux moteurs/ascen-
seurs ou dispositifs de levage commandés par DMX pour contrôle de plates-formes
élévatrices, de systèmes hydrauliques ou de dispositifs mobiles similaires.
En outre, la transmission DMX sans fil ne doit pas être utilisée pour déclencher des
dispositifs générateurs de flammes ou pyrotechniques, des effets à explosion ou pour
contrôler des effets de gaz ou de liquides. Ces dispositifs peuvent être des canons à
CO2, des canons à confettis, des machines à effets d'eau ou autres.

55
DMX DEUTSCHFRANCAIS
ESPAÑOL ENGLISH
ITALIANO POLSKI
ATTENTION! DOMMAGES POTENTIELS CAUSÉS PAR DES SOURCES LUMI-
NEUSES EXTERNES !
Le rayonnement solaire, les rayons laser et les faisceaux lumineux d'autres projec-
teurs peuvent endommager le boîtier et les composants internes tels que les filtres,
les roues de gobos et de couleurs, les moteurs, les câbles, les courroies, etc. ainsi
que les sources lumineuses.Ne pas exposer l'appareil et en particulier l'ouverture de
la lentille à la lumière directe du soleil, aux rayons laser et aux faisceaux lumineux
d'autres projecteurs lors du déballage, de l'installation, de l'inutilisation prolongée et
de l'utilisation. Lorsque l'appareil n'est pas utilisé, orientez toujours l'ouverture de la
lentille vers le sol. Pour ce faire, vous pouvez utiliser la fonction de protection solaire,
activable via une commande DMX (voir le canal Device Settings (Paramètres de
l'appareil) dans le tableau DMX). Un capteur gyroscopique intégré détecte la position
d'utilisation. Les dommages causés par des sources lumineuses externes sont exclus
de la garantie du fabricant.
NOTES POUR LES APPAREILS MOBILES D'INTÉRIEUR
1. Utilisation temporaire ! Les équipements événementiels ne sont généralement
conçus que pour un fonctionnement temporaire.
2. Une utilisation continue ou une installation permanente peut nuire au fonctionne-
ment de l'appareil et provoquer un vieillissement prématuré.
LIVRAISON INCLUSE
Sortez le produit du carton et retirez tous les matériaux d'emballage.
Veuillez vérifier l'intégralité et l'intégrité de la livraison et la notifier
Veuillez contacter votre partenaire commercial immédiatement après l'achat si la livraison n'est
pas complète ou si elle n'a pas été effectuée dans les délais impartis
est endommagé. Le carton contient :
X1 x lyre asservie à LED à couteaux OPUS SP5 PLUS
X2 x supports de montage Omega
X1 x cordon secteur
XManuel de l'utilisateur

56
DMX
ITALIANO
POLSKI
ESPAÑOL
FRANCAIS
DEUTSCHENGLISH
INTRODUCTION
LYRE ASSERVIE SÉRIE OPUS
CLOSP5PLUS
FONCTIONS DE CONTRÔLE DISPONIBLES
Contrôle DMX 34 canaux et 50 canaux (CLOSP5PLUS)
Contrôle DMX 27 canaux et 33 canaux (CLOSP5PLUS avec module de roue d'animation CLOS-
P5AM en option)
Art-Net
sACN
PARAMÈTRES
Activé par RDM
Fonctionnement maître/esclave
Modes autonomes
POINTS FORTS :
lED 500 W à haute efficacité. Module d'encadrement des volets. - Mélange de couleurs CMJ
+ CTO Roue des couleurs avec 7 couleurs brillantes + couleurs ouvertes et divisées. Roue de
gobos 1 avec 8 gobos fixes + ouverts. Roue de gobos 2 avec 7 gobos rotatifs + ouverts (gobos
interchangeables). 2 prismes rotatifs. Fonction de mise au point et de zoom via DMX. Filtre et
iris dépolis Fonctions Moteurs de panoramique et d'inclinaison avec une résolution de 16 bits.
Alimentation par piles. Affichage pour le réglage indépendant du réseau. Correction automatique
de la position. Ventilateurs à température contrôlée. connexions DMX à 3 et 5 pôles. Connexions
réseau RJ45. DMX™ sans fil Connexions secteur Neutrik powerCON TRUE1 IN et OUT. 2 supports
de montage Omega inclus. Tension secteur: 100-240V. Consommation électrique 800W. Le
projecteur est compatible avec le protocole RDM (Remote Device Management). La gestion à
distance des appareils permet à l'utilisateur de visualiser l'état et la configuration des terminaux
RDM via un contrôleur compatible RDM.
PROPRIÉTÉS SUPPLÉMENTAIRES
La tête mobile CLOSP5P est équipée d'un module d'obturation à 4 voies. Le module d'obturation
à 4 voies est interchangeable avec le module de roue d'animation CLOSP5AM. Le logiciel et les
modes DMX correspondants sont mis à jour automatiquement.

57
DMX DEUTSCHFRANCAIS
ESPAÑOL ENGLISH
ITALIANO POLSKI
CONNECTEURS, UTILISATION ET INDICATEURS
1 23
4 5
6
7
8
1 POWER IN
Embase d'entrée secteur Neutrik powerCON TRUE1. Tension secteur: 100-240 V, 50-60 Hz. Un
câble d'alimentation approprié, doté d'une fiche powerCON TRUE1, est livré.
2 POWER OUT
Embase de renvoi secteur Neutrik powerCON TRUE1. Facilite l'alimentation d'autres projecteurs
CAMEO. Assurez-vous que la consommation totale de tous les projecteurs connectés ne dépasse
pas la valeur indiquée, en ampères (A).
3 FUSIBLE
Porte-fusible pour micro-fusibles de 5 x 20 mm. REMARQUE IMPORTANTE : Remplacez le fusible
uniquement par un fusible de même type et de même valeur. En cas de défaillance persistante
des fusibles, veuillez prendre contact avec un centre de service autorisé.
4 DMX IN
Embases XLR mâles à 3 et 5 broches pour branchement d'un contrôleur DMX (par exemple, une
console lumières DMX)
5 DMX OUT
Embases femelles XLR à 3 ou 5 broches pour l'envoi du signal de contrôle DMX.
6 NET IN
Port réseau RJ45 pour la connexion à un réseau Art-Net ou sACN. Utilisez des câbles CAT 5e ou
supérieur pour configurer le réseau.

58
DMX
ITALIANO
POLSKI
ESPAÑOL
FRANCAIS
DEUTSCHENGLISH
7 NET OUT
Connecteur réseau RJ45 pour connecter au réseau d'autres appareils Art-Net ou sACN. Utilisez
des câbles CAT 5e ou supérieur pour configurer le réseau.
8 ANTENNE W-DMX™
L'antenne pour pilotage par W-DMX™ est placée dans le support (= position d'utilisation).
9 AFFICHEUR LC TACTILE RÉTRO-ÉCLAIRÉ
Grâce à l'écran à cristaux liquides tactile, le projecteur peut être contrôlé directement à partir de
l'écran (compatible avec les gants). L'écran LCD affiche le mode en cours (affichage principal),
les éléments disponibles en sélection dans le menu et la valeur numérique ou l'état de fonction-
nement de certains éléments du menu. Si aucun signal de commande n'est envoyé à l'appareil,
l'écran commence à clignoter ; le clignotement s'arrête dès qu'un signal de commande est
présent (DMX et mode esclave, ArtNet et sACN).
10 COMMANDES TACTILES
MODE - En appuyant sur MODE (plusieurs fois), vous montez d'un niveau dans la structure du
menu, jusqu'à l'affichage principal.
UP et DOWN - Sélectionnez les différents éléments du menu principal (adresse DMX, mode
de fonctionnement, etc.) et des sous-menus.
ENTER - A partir de l'écran principal, appuyez sur ENTER pour accéder au menu principal. Dans
le menu principal, appuyez sur ENTER pour accéder au niveau de menu dans lequel les valeurs
peuvent être modifiées. Confirmez les changements de valeur en appuyant sur la touche ENTER.
LEFT et RIGHT X - Utilisez les panneaux de contrôle pour modifier la valeur d'un élément de
menu, tel que l'adresse DMX, comme vous le souhaitez.
11 INTERFACE USB
Interface USB pour la mise à jour du micrologiciel de l'appareil. Dans le menu Service, réglez
l'état de la mise à jour USB sur ON. Lorsqu'il est disponible, téléchargez le dernier micrologiciel
à partir de la page du produit à l'adresse www.cameolight.com, décompressez-le et copiez les
fichiers dans un dossier sans caractères spéciaux sur une clé USB. Débranchez la tête mobile du
secteur et de toutes les connexions d'entrée (DMX / Ethernet), connectez la clé USB à l'interface
9
10
11

59
DMX DEUTSCHFRANCAIS
ESPAÑOL ENGLISH
ITALIANO POLSKI
USB et reconnectez la tête mobile au secteur. La clé USB est automatiquement reconnue et affi-
chée à l'écran. Naviguez maintenant vers le dossier correspondant sur la clé USB et confirmez en
cliquant sur ON. La procédure de mise à jour commence. Ne retirez pas la clé USB et ne débran-
chez pas la tête mobile du secteur pendant la procédure de mise à jour.
Alimenté par batterie, l'écran peut être activé même si l'appareil n'est pas branché sur le secteur.
Pour ce faire, appuyez sur la touche MODE et maintenez-la enfoncée pendant environ 3 secondes.
Vous pouvez désormais accéder aux informations de l'appareil pour modifier et enregistrer les
paramètres du système sans connexion au secteur. Le contrôle externe du projecteur n'est pas
disponible dans ce cas. Pour cette raison, l'écran indique qu'il n'y a pas de signal DMX, même si
un signal DMX est disponible sur l'appareil.
12 VERROUILLAGE DU PANNEAU
Dispositif de verrouillage mécanique empêchant la
rotation de la tête dans le sens horizontal pendant le
transport. Débranchez l'appareil, déplacez la tête paral-
lèlement à la base (4 positions possibles) et poussez le
levier de verrouillage dans le sens de l'axe de rotation
du plateau pour le bloquer en position. Déverrouillez
l'appareil avant le démarrage.
13 VERROUILLAGE DE L'INCLINAISON
Dispositif de verrouillage mécanique empêchant la
rotation de la tête dans le sens vertical pendant le
transport (7 positions). Débranchez l'appareil et faites
glisser le levier de verrouillage dans le sens de l'axe de
rotation de l'inclinaison, en déplaçant la tête de l'appareil
verticalement jusqu'à ce que vous trouviez l'une des 7
positions de verrouillage et que le levier de verrouillage
s'enclenche. Déverrouillez l'appareil avant le démarrage.
13
12

60
DMX
ITALIANO
POLSKI
ESPAÑOL
FRANCAIS
DEUTSCHENGLISH
FONCTIONNEMENT
REMARQUES:
Dès que le projecteur est correctement connecté au réseau, le mes-
sage "Software Update Please Wait..." et le logo Cameo avec des
informations sur le modèle du projecteur s'affichent successivement
sur l'écran pendant le processus de démarrage et la réinitialisation du
moteur. Après cette opération, le projecteur est prêt à fonctionner et le
mode précédemment sélectionné est activé. D'une part, le projecteur se
contrôle à l'aide des panneaux de commande tactiles situés à côté de
l'écran ; d'autre part, l'écran sensible à la pression (compatible avec les
gants) permet d'accéder à tous les éléments de menu et d'effectuer les
réglages de manière intuitive, comme vous le souhaitez. Vous trouverez
dans le tableau ci-contre l'équivalence entre éléments de contrôle à
l'écran et panneau de commande situé à côté de l'écran. Les para-
graphes suivants décrivent le fonctionnement des panneaux de contrôle
situés à côté de l'écran.
ÉCRAN PRINCIPAL
La ligne supérieure de l'écran indique si et quel signal de commande est présent sur l'appa-
reil, la ligne inférieure indique le mode de fonctionnement actuellement activé (DMX Standard /
Extended, Static, Auto, Slave) et l'adresse de départ DMX ou le mode de fonctionnement corres-
pondant (dans l'exemple l'adresse de départ DMX 001) est clairement visible au milieu. Dès que
le signal de contrôle est interrompu, les caractères de l'écran commencent à clignoter et "None"
(pas de signal) s'affiche derrière "Signal" sur la ligne supérieure. L'écran peut être tourné de 180°
en touchant le panneau de commande tactile vers le BAS ; si l'écran est déjà tourné de 180°,
touchez le panneau de commande vers le HAUT pour revenir à l'image standard. Vous pouvez
également faire pivoter l'écran de 180° en appuyant sur le "symbole du toit" dans l'écran tactile.
Affichage du signal d'entrée
Mode DMX ou mode de fonctionnement
Adresse de départ DMX ou mode de
fonctionnement
Informations sur l'appareil
modèle Retour à l'affichage principal =
n'importe quelle position dans l'affichage ou
Appuyez sur ENTER
Affichage de l'état de la batterie
Rotation de l'affichage de 180°
Main menu (Menu principal)

61
DMX DEUTSCHFRANCAIS
ESPAÑOL ENGLISH
ITALIANO POLSKI
MENU CONTROL (Control)
RÉGLAGE DE L'ADRESSE DE DÉPART DMX (DMX Address)
À partir de l'écran principal, appuyez sur ENTER pour accéder au menu principal. Utilisez les
commandes et pour sélectionner le menu Control, puis appuyez sur ENTER. Utilisez les touches
HAUT et BAS pour sélectionner l'élément de menu "DMX Address", puis confirmez en appuyant
sur la touche ENTER. Réglez ensuite l'adresse de départ DMX souhaitée à l'aide des panneaux de
contrôle GAUCHE et DROIT et confirmez en appuyant sur ENTER (la valeur la plus élevée dépend
du mode DMX activé). Appuyez deux fois sur MODE pour revenir à l'affichage principal, l'adresse
de départ DMX sélectionnée est maintenant affichée en grandes lettres sur l'écran lorsque le
mode DMX est activé.
SET DMX MODE (DMX Mode)
À partir de l'écran principal, appuyez sur ENTER pour accéder au menu principal. Utilisez les
commandes et pour sélectionner le menu Contrôle et appuyez sur ENTER. Utilisez les touches
HAUT et BAS pour sélectionner l'élément de menu "Mode DMX" et confirmez en appuyant sur
la touche ENTRÉE. Sélectionnez à nouveau le mode DMX souhaité à l'aide des touches UP et
DOWN et confirmez la sélection à l'aide de la touche ENTER. Appuyez 2x sur MODE pour revenir à
l'affichage principal, le mode DMX sélectionné est maintenant activé. Vous trouverez les tableaux
d'affectation des canaux pour les différents modes DMX dans ce mode d'emploi, à la rubrique
CONTRÔLE DMX.
PARAMÈTRES RÉSEAU (Network)
À partir de l'écran principal, appuyez sur ENTER pour accéder au menu principal. Utilisez les com-
mandes et pour sélectionner le menu Control et appuyez sur ENTER. Utilisez les touches HAUT
et BAS pour sélectionner l'élément de menu "Network" et confirmez en appuyant sur la touche
ENTRÉE. Pour plus d'informations sur les paramètres du réseau, veuillez vous référer au tableau
ci-dessous. Confirmez toutes les modifications des paramètres du réseau en appuyant sur la
touche ENTER.

62
DMX
ITALIANO
POLSKI
ESPAÑOL
FRANCAIS
DEUTSCHENGLISH
Network
Network
Input
Activer / désactiver l'entrée
réseau
OFF Entrée réseau désactivée
ON Entrée réseau activée
Protocol Network protocol ArtNET Protocole ArtNet
sACN protocole sACN
Adress
Univers 1 - 256,
Définir l'adresse IP et le masque
de sous-réseau
Univers
000 - 255
000 à 255. Modifiez la valeur avec
GAUCHE et DROITE, confirmez
avec ENTER.
IP Address
(Adresse IP)
Sélectionnez le bloc avec GAUCHE
et DROITE, modifiez la valeur avec
HAUT et BAS, confirmez avec
ENTRÉE.
Masque de
sous-réseau
IP
Sélectionnez le bloc avec GAUCHE
et DROITE, modifiez la valeur avec
HAUT et BAS, confirmez avec
ENTRÉE.
DMX OUT Sortie du signal réseau via DMX
OUT
OFF Ne pas émettre de signal
ON Signal de sortie
PARAMÈTRES W-DMX (Wireless)
À partir de l'écran principal, appuyez sur ENTER pour accéder au menu principal. Utilisez les
commandes et pour sélectionner le menu Contrôle et appuyez sur ENTER. Utilisez les touches
HAUT et BAS pour sélectionner l'élément de menu "Sans fil" et confirmez en appuyant sur la
touche ENTRÉE. Pour plus d'informations sur les réglages W-DMX, veuillez vous référer au tableau
ci-dessous. Confirmez toutes les modifications apportées aux paramètres en appuyant sur la
touche ENTER.

63
DMX DEUTSCHFRANCAIS
ESPAÑOL ENGLISH
ITALIANO POLSKI
Wireless
W-DMX OFF Désactiver W-DMX
ON W-DMX activé
Operating
(actuellement en version
bêta)
Receiver Module W-DMX configuré comme récepteur
Transmitter Module W-DMX configuré comme émetteur
Transmitting Receiver
(actuellement en version
bêta)
G3 Norme d'émission G3
G4s Norme d'émission G4s
Link Link
Appairer des appareils W-DMX. W-DMX doit être
activé sur tous les appareils et le couplage avec un
émetteur doit être réinitialisé (réinitialisation de la
réception)
Unlink Désappairer tous les appareils
Receive Reset NO Ne réinitialisez pas l'appairage de l'émetteur
YES Réinitialisation de l'appairage de l'émetteur
MODES AUTONOMES (Stand Alone)
À partir de l'écran principal, appuyez sur ENTER pour accéder au menu principal. Utilisez les
commandes et pour sélectionner le menu Contrôle et appuyez sur ENTER. A l'aide des touches
et , sélectionnez le point de menu "Stand Alone" et confirmez en appuyant sur la touche ENTER.
Sélectionnez ensuite l'un des trois modes autonomes à l'aide des commandes et et confirmez
avec ENTER.
MODE STATIQUE STANDALONE (Statc)
Le mode statique permet de régler les paramètres PAN, Tilt, Dimmer, Strobe, Colour Wheel et
Gobo Wheel, etc. directement sur l'appareil avec des valeurs comprises entre 000 et 255, comme
avec une unité de contrôle DMX. Il est ainsi possible de créer une scène spécifique sans utili-
ser de contrôleur DMX. Après avoir sélectionné le mode de fonctionnement "statique", comme
décrit précédemment dans la section "MODES DE FONCTIONNEMENT AUTONOME", vous pouvez
procéder aux réglages souhaités. Les éléments du sous-menu correspondent aux canaux 1 à 50
en mode DMX étendu à 50 canaux (voir CONTRÔLE DMX, sélectionnez l'élément du sous-menu
avec HAUT et BAS, changez la valeur avec GAUCHE et DROITE, confirmez avec ENTRÉE). Appuyez
plusieurs fois sur MODE pour revenir à l'affichage principal.

64
DMX
ITALIANO
POLSKI
ESPAÑOL
FRANCAIS
DEUTSCHENGLISH
MODE DE FONCTIONNEMENT AUTONOME PROGRAMMES AUTO (Auto Prog)
Les 4 programmes automatiques différents (Programme 1 - 4) consistent chacun en des mou-
vements de tête, des changements de gobos et de couleurs, etc. programmés et fixes, la vitesse
de défilement pouvant être réglée séparément. Comme décrit précédemment sous "MODES DE
FONCTIONNEMENT AUTOMATIQUES", sélectionnez le mode de fonctionnement Auto, confirmez
avec ENTER, sélectionnez le programme Auto désiré en utilisant UP et DOWN, confirmez avec
ENTER et changez maintenant la valeur de la vitesse de marche de 000 à 100 comme vous le
souhaitez en utilisant LEFT et RIGHT. Confirmez avec ENTER. Appuyez plusieurs fois sur MODE
pour revenir à l'affichage principal.
MODE ESCLAVE (Slave)
Le mode de fonctionnement esclave est sélectionné comme décrit précédemment au point
"MODES DE FONCTIONNEMENT AUTONOME". Connectez l'unité esclave et l'unité maître (même
modèle, même version du logiciel) à l'aide d'un câble DMX (sortie DMX maître - entrée DMX
esclave) et activez l'un des modes autonomes Auto ou Static dans l'unité maître. Le projecteur
esclave répond alors au projecteur maître. Appuyez plusieurs fois sur MODE pour revenir à l'affi-
chage principal.
SYSTEM SETTINGS (Settings)
À partir de l'écran principal, appuyez sur ENTER pour accéder au menu principal. Sélectionnez
le menu Paramètres pour les paramètres du système à l'aide des panneaux de contrôle HAUT et
BAS et appuyez sur ENTRÉE.

65
DMX DEUTSCHFRANCAIS
ESPAÑOL ENGLISH
ITALIANO POLSKI
Vous accédez ainsi au sous-menu permettant de régler les éléments du sous-menu (voir tableau,
sélectionnez avec HAUT et BAS, confirmez avec ENTRÉE, modifiez la valeur ou l'état avec HAUT et
BAS, confirmez avec ENTRÉE).
Settings (en gras = réglage d'usine)
Display Display
l'appareil
Reverse
OFF Pas de rotation de l'affichage
ON
L'écran peut être tourné de 180°
(par exemple pour une installa-
tion en hauteur)
Backlight
(Rétroéclairage)
OFF
Désactivation de l'éclairage
de l'écran après environ 30
secondes d'inactivité
ON Le rétro-éclairage de l'écran est
activé en permanence
DMX fail
État de fonction-
nement lorsque le
signal DMX est
interrompu
Black Active l’occultation (blackout)
Hold Maintien de la dernière commande
reçue
Auto active le mode Auto
Dimmer
Curve
Sélection de la
Dimmer curve
Linear L’intensité lumineuse augmente linéai-
rement avec la valeur DMX
Exponential
L’intensité lumineuse varie finement
pour les valeurs DMX basses, et plus
grossièrement pour les valeurs DMX
élevées
Logarithmic
L’intensité lumineuse varie grossière-
ment pour les valeurs DMX basses et
avec précision pour les valeurs DMX
élevées
Dimmer Curve
L’intensité lumineuse varie finement
pour les valeurs DMX basses et
élevées, et plus grossièrement pour les
valeurs DMX intermédiaires

66
DMX
ITALIANO
POLSKI
ESPAÑOL
FRANCAIS
DEUTSCHENGLISH
LED
Frequency
Configuration de la
fréquence PWM de
la LED
650Hz, 1530Hz,
3600Hz, 12KHz,
25KHz
Pan / Tilt Paramètres de la tête
de l'appareil
Pan reverse
OFF N'inverse pas le sens du pano-
ramique
ON Inverse la direction du panora-
mique
Tilt Reverse OFF N'inverse pas le sens de l'incli-
naison
ON Inverse le sens de l'inclinaison
Pan Angle 630 Angle panoramique 630
540 Angle panoramique 540
Feedback
OFF La correction automatique de la
position est désactivée
ON La correction automatique de la
position est activée
B.O. Moving
Coupure d'électricité
automatique pour
mouvement de la
tête
OFF Pas de noir lorsque la tête bouge
ON Noir lorsque la tête bouge
Fixture Type Type d'appareil : Profile Module
Spot Module
Fan Contrôle du
ventilateur
Auto Contrôle automatique du venti-
lateur
Fan Off Ventilateur désactivé et lumino-
sité fortement réduite
Constant Low
Vitesse du ventilateur constante
et faible, luminosité réduite si
nécessaire
Constant Mid
Vitesse constante et moyenne
du ventilateur, luminosité réduite
si nécessaire
Constant High Vitesse constante et élevée du
ventilateur
COURBES DE GRADATEUR
Linear
Valeur DMX
Intensité
lumineuse
Exponential
Valeur DMX
Intensité
lumineuse
Logarithmic
Valeur DMX
Intensité
lumineuse
S-curve
Valeur DMX
Intensité
lumineuse

67
DMX DEUTSCHFRANCAIS
ESPAÑOL ENGLISH
ITALIANO POLSKI
SERVICEMENU
À partir de l'écran principal, appuyez sur ENTER pour accéder au menu principal. Utilisez les
champs de contrôle UP et DOWN pour sélectionner le menu Service et appuyez sur ENTER.
Vous accédez ainsi au sous-menu permettant de modifier les éléments du sous-menu (sélec-
tionner avec HAUT et BAS, confirmer avec ENTRÉE, modifier la valeur avec GAUCHE et DROITE,
confirmer avec ENTRÉE).
Calibrate - Calibrer les composants avec des valeurs de 000 à 255 (mot de passe 050).
Test Manual - Test manuel des composants avec des valeurs de 000 à 255.
Test Motor - Réinitialise les moteurs. All = Tous les moteurs, Pan&Tilt = Moteurs Pan et Tilt,
Head Onlly = Moteurs dans la tête de l'unité.
USB Update - Mise à jour du micrologiciel via l'interface USB. OFF = Bloquer la mise à jour du
micrologiciel via l'interface USB. ON = Autorise la mise à jour du micrologiciel via l'interface USB.
Factory Reset - Réinitialise les paramètres d'usine.
INFORMATIONS SUR LE DISPOSITIF (Info)
À partir de l'écran principal, appuyez sur ENTER pour accéder au menu principal. Utilisez les
commandes et pour sélectionner le menu d'information Info et appuyez sur ENTER.
Vous accédez ainsi au sous-menu de lecture des informations sur l'appareil (sélectionner avec et,
valider avec ENTER).
System Info
Error Info
Affichage d'une erreur de fonctionnement
Si une erreur n'est pas corrigée par une réinitialisation ou un redémarrage, l'appareil
défectueux doit être réparé par un centre de service agréé.
Tempera-
ture
Affichage de la
température
Head xx°C/F°
Base xx°C/F°

68
DMX
ITALIANO
POLSKI
ESPAÑOL
FRANCAIS
DEUTSCHENGLISH
Tempera-
ture
Affichage de la
température Unute Affichage de la température en degrés Celsius
ou Fahrenheit
Runtime Affiche la durée de
fonctionnement
Total Time Affiche la durée totale de fonctionnement en
heures
Current Time Affiche le temps de fonctionnement actuel
Temps PW
Saisissez le mot de passe pour réinitialiser le
temps de fonctionnement actuel
(Time PW = 050)
Clean Current Réinitialise le temps de fonctionnement actuel
Firmware
Affichage du fir-
mware des compo-
sants 1U à 8U
Vx.xx
Model
Info
Informations sur la
version de l'appareil
Profile
Module Module avec volet d'encadrement
Spot Module Module avec roue d'animation
MONTAGE ET INSTALLATION
Grâce à ses pieds en caoutchouc intégrés, le projecteur peut être positionné à un endroit ap-
proprié sur une surface ferme et plane. L'installation sur structure est possible, en utilisant deux
supports en oméga, qui viennent se fixer à la base de l'appareil (A). 2 supports en oméga sont li-
vrés. Des pinces pour poutre adaptées sont disponibles en option. Veillez à ce que les connexions
soient solides et fixez le projecteur à la languette de fixation (B) à l'aide d'un câble de sécurité
approprié.
REMARQUE IMPORTANTE : l'installation en hauteur nécessite une grande expéri-
ence, notamment en ce qui concerne le calcul des limites de charge de travail, les
matériaux d'installation utilisés et les contrôles de sécurité réguliers de tous les
matériaux et accessoires d'installation. Si vous ne possédez pas ces qualifications,
n'essayez pas d'effectuer l'installation vous-même. Adressez-vous plutôt à un
professionnel qualifié.

69
DMX DEUTSCHFRANCAIS
ESPAÑOL ENGLISH
ITALIANO POLSKI
B
BA
A
ENTRETIEN, MAINTENANCE ET RÉPARATIONS
Afin de garantir le bon fonctionnement à long terme de l'appareil, celui-ci doit être régulièrement
nettoyé et, si nécessaire, passer en maintenance. Le besoin de maintenance dépend de l'intensité
de l'utilisation et de l'environnement dans lequel il est utilisé. Nous recommandons généralement
une inspection visuelle avant chaque utilisation. En outre, nous recommandons d'effectuer toutes
les opérations de maintenance applicables spécifiées ci-dessous une fois toutes les 500 heures
de fonctionnement ou, en cas d'intensité d'utilisation moindre, au plus tard au bout d'un an.
Les demandes de garantie peuvent être limitées en cas de défauts résultant d'une maintenance
inadéquate.
ENTRETIEN (effectué par l'utilisateur)
AVERTISSEMENT! Avant d'effectuer toute opération de maintenance, il faut débran-
cher l'alimentation électrique et, si possible, toutes les connexions de l'appareil.
À NOTER: Un entretien inadéquat peut entraîner une dégradation de l'appareil pou-
vant aller jusqu'à sa destruction.
1. Les surfaces du boîtier doivent être nettoyées avec un chiffon propre et humide. Veillez à éviter
toute infiltration d’humidité dans l’appareil.
2. Les entrées et sorties d’air doivent être régulièrement débarrassées de la poussière et des
saletés. Si vous utilisez de l’air comprimé, veillez à ne pas endommager l’appareil (dans ce
cas, il faut bloquer les ventilateurs avant d’envoyer l’air comprimé).
3. Les câbles et les contacts des connecteurs doivent être nettoyés régulièrement et la poussière
et la saleté doivent être éliminées.
4. De façon générale, n’utilisez aucun produit de nettoyage agressif ou substance abrasive, sous
peine d’endommager la finition de surface de l’appareil.

70
DMX
ITALIANO
POLSKI
ESPAÑOL
FRANCAIS
DEUTSCHENGLISH
5. Les appareils doivent généralement être stockés au sec et protégés de la poussière et de la
saleté.
MAINTENANCE ET RÉPARATION (uniquement par du personnel qualifié)
DANGER! L'appareil contient des composants sous tension. Même après avoir
débranché la fiche de la prise secteur, il peut subsister une tension résiduelle dans
l'appareil, par exemple en raison de condensateurs chargés.
À NOTER: L'appareil ne contient pas de sous-ensembles pouvant être réparés par
l'utilisateur.
À NOTER: Les travaux d'entretien/maintenance et de réparation ne doivent être
effectués que par du personnel qualifié et agréé par le fabricant. En cas de doute,
consultez le fabricant.
À NOTER: Les travaux d'entretien mal effectués peuvent affecter les demandes de
garantie.
CARACTÉRISTIQUES TECHNIQUES
Référence produit CLOSP5PLUS
Type de produit: Tête mobile LED
Type: Projecteur asservi
Nombre de lampes : 1
Type de lampe : 500W LED haute efficacité
Température de
couleur lampe : Blanc froid 6600K
IRC: >70
Fréquence MLI LED: 650Hz, 1530Hz, 3600Hz, 12kHz, 25kHz (réglable)
Fonction de mélange
des couleurs : CMJ + CTO
Nombre de couleurs :
Roue des couleurs : 7 + couleurs ouvertes et fractionnées
Nombre de gobos : 15 + ouvert (8 fixes + 7 tournants)
Taille des gobos : Ø extérieur 22,9mm (-0,2 / +0,1mm), Ø motif 19mm, épaisseur du
matériau 1,1mm (verre)
Angle du faisceau: 6° - 42°
Entrée DMX: XLR mâle à 3 broches
XLR mâle à 5 broches
Sortie DMX: XLR femelle à 3 broches
XLR femelle à 5 broches
Connexions réseau : RJ45 IN et OUT (verrouillable)
Mode DMX: 34 canaux, 50 canaux

71
DMX DEUTSCHFRANCAIS
ESPAÑOL ENGLISH
ITALIANO POLSKI
Fonctions DMX:
Pan/Tilt, Pan/Tilt fin, Dimmer, Dimmer fin, Stroboscope multifonction-
nel, Cyan, Cyan fin, Magenta, Magenta fin, Jaune, Jaune fin, CTO,
CTO fin, Roue des couleurs, Rotation de la roue des couleurs, Roue
des gobos 1, Rotation des gobos 1, Rotation des gobos 1 fin, Rotation
de la roue des gobos 1, Secousses des gobos 1, Roue des gobos
2, Rotation de la roue des gobos 2, Secousses des gobos 2, Zoom,
Zoom fin, Mise au point, Mise au point fine, Iris, Prisme, Prisme Ro-
tation, Frost, Lame 1 - 4, Lame 1 - 4 fine, Rotation de forme, Rotation
de forme fine, Macros Pan/Tilt, Vitesse Pan/Tilt, Courbe de gradation,
Réglages du système
Fonctions autonomes: Programmes automatiques 1-4, mode statique, fonctionnement
maître/esclave
Paramètres système:
Réglage sans fil, inversion de l'affichage, activation/désactivation de
l'éclairage de l'affichage, échec DMX, courbe de gradation, inver-
sion panoramique, inversion de l'inclinaison, angle panoramique,
rétroaction, réglage du ventilateur, occultation des mouvements, test,
réinitialisation du moteur, réinitialisation d'usine, réglages du réseau
Control : DMX512, RDM, W-DMX™ (récepteur), Art-Net, sACN
Angle PAN : 540°/630°
Angle de basculement : 270°
Éléments de contrôle:
Commandes tactiles BACK, ENTER, UP, DOWN, LEFT, RIGHT, écran
graphique couleur LCD sensible à la pression (compatible avec les
gants)
Éléments d’affichage: Écran graphique éclairé à cristaux liquides, alimenté par batterie pour
les réglages du système indépendants du secteur
Tension secteur: 100–240 VCA/50–60Hz
Consommation
électrique: 800 W
Flux lumineux 22000 lm
Alimentation
Connecteur : Entrée et sortie Neutrik TRUE1 (sortie max. 4A)
Fusible: T8AL / 250V (5 x 20mm)
Température ambiante
de fonctionnement : -15°C à 40°C
Humidité relative de l'air < 85% , sans condensation
Distance minimale par
rapport à la surface
éclairée :
3 m
Distance minimale par
rapport aux matériaux
normalement inflam-
mables :
0,5m
Matériau du boîtier: Métal, ABS

72
DMX
ITALIANO
POLSKI
ESPAÑOL
FRANCAIS
DEUTSCHENGLISH
Couleur du boîtier : Noir
Refroidissement
du boîtier:
Système de refroidissement par caloducs et ventilateurs à
température contrôlée
Dimensions (L x H x P,
sans support) : 397 x 741,5 x 285mm
Poids: 27,8kg
Caractéristiques
supplémentaires:
Câble d'alimentation de 1m avec fiche TRUE1 et
2 supports de montage Omega inclus
DISTANCE MINIMALE PAR RAPPORT À LA SURFACE ÉCLAIRÉE
0,5m
Ce symbole avec des informations sur la distance en mètres (m) indique la
distance minimale entre le luminaire et la surface éclairée. Dans cet exemple, la
distance est de 0,5 m. Veuillez vous référer aux données techniques de ce manuel
et à l'impression sur le boîtier de l'appareil pour connaître la valeur applicable
pour cet appareil.
DISTANCE MINIMALE PAR RAPPORT AUX MATÉRIAUX NORMALEMENT IN-
FLAMMABLES
0,5m
Ce symbole avec indication de la distance en mètres (m) indique la distance
minimale de l'appareil par rapport aux matériaux normalement inflammables.
Dans cet exemple, la distance est de 0,5 m. Veuillez vous référer aux données
techniques de ce manuel pour connaître la valeur applicable pour cet appareil.
MISE AU REBUT
EMBALLAGE :
1. Les emballages peuvent être introduits dans le cycle des matériaux réutilisables
en utilisant les méthodes d'élimination habituelles.
2. Veillez à trier les emballages conformément aux lois sur la mise au rebut et aux
réglementations sur le recyclage en vigueur dans votre pays.
APPAREIL:
1. Cet appareil est soumis à la directive européenne sur les déchets d'équipements
électriques et électroniques telle qu'amendée. Directive DEEE relative aux déchets
d’équipements électriques et électroniques. Les appareils usagés ne doivent pas
être jetés dans les ordures ménagères. L'appareil usagé doit être éliminé par une
entreprise de recyclage agréée ou une déchetterie municipale. Veillez à respecter
les réglementations en vigueur dans votre pays.
2. Respectez toutes les lois sur l'élimination des déchets applicables dans votre
pays.
3. En tant que particulier, vous pouvez obtenir des informations sur les possibilités
d'élimination respectueuse de l'environnement auprès du vendeur du produit ou
des autorités régionales compétentes.

73
DMX DEUTSCHFRANCAIS
ESPAÑOL ENGLISH
ITALIANO POLSKI
DÉCLARATIONS DU FABRICANT
GARANTIE DU FABRICANT ET LIMITATION DE RESPONSABILITÉ
Adam Hall GmbH, Adam-Hall-Str. 1, D-61267 Neu Anspach /
Courriel : [email protected] / +49 (0)6081 9419-0
Nos conditions de garantie et notre limitation de responsabilité actuelles peuvent être consultées
en ligne à l'adresse suivante :
https://cdn-shop.adamhall.com/media/pdf/Manufacturers-Declarations-CAMEO_DE_EN_ES_FR.pdf
En cas de recours au service après-vente, veuillez contacter votre interlocuteur commercial.
Conformité CE
Adam Hall GmbH confirme par la présente que ce produit est conforme aux directives suivantes
(le cas échéant) :
Directive basse tension (2014/35/UE)
Directive CEM (2014/30/UE)
RoHS (2011/65/EU)
RED (2014/53/EU)
Déclaration de conformité CE
Les déclarations de conformité pour les produits soumis aux directives LVD, EMC, RoHS peuvent
être demandées à [email protected]
Les déclarations de conformité des produits soumis à la directive RED peuvent être téléchargées
sur www.adamhall.com/compliance/.
SOUS RÉSERVE DE FAUTES D'IMPRESSION ET D'ERREURS, AINSI QUE DE MODIFICATIONS
TECHNIQUES OU AUTRES !

74
DMX
ITALIANO
POLSKI
ESPAÑOL
FRANCAIS
DEUTSCHENGLISH
ESPAÑOL
Ha tomado la decisión correcta.
Este aparato ha sido desarrollado y fabricado siguiendo las normas de calidad más exigentes para
garantizarle muchos años de funcionamiento sin problemas. Lea atentamente este manual de
usuario para poder utilizar su nuevo producto Cameo de forma rápida y óptima. Encontrará más
información sobre CameoLight en nuestra página web CAMEOLIGHT.COM.
INFORMACIÓN SOBRE ESTE MANUAL DEL USUARIO
• Lea atentamente las instrucciones de seguridad y todo el manual antes de utilizar el equipo.
• Respete los indicadores de advertencia que aparecen en el equipo y en las instrucciones de uso.
• Tenga siempre a mano el manual de usuario.
• Si vende o cede el aparato, es importante que incluya también este manual del usuario, ya que
forma parte integrante del producto.
USO PREVISTO
¡El producto es un equipo para eventos!
Este producto ha sido desarrollado para uso profesional en eventos y no es adecuado para su uso
en los hogares.
Además, este producto está destinado únicamente a usuarios cualificados con conocimientos
especializados en eventos.
Cualquier uso de este producto que no tenga en cuenta los datos técnicos y las condiciones de
funcionamiento especificados se considera un uso inadecuado.
El uso inadecuado de este producto exime de toda responsabilidad por daños personales y mate-
riales, incluso de terceros.
El producto no es adecuado para:
• Personas (incluidos niños) con capacidades físicas, sensoriales o mentales reducidas o con
falta de experiencia y conocimientos.
• Niños (los niños deben recibir instrucciones de no jugar con este dispositivo).
DEFINICIONES Y EXPLICACIONES DE LOS SÍMBOLOS
1. PELIGRO: La palabra PELIGRO, posiblemente en combinación con un símbolo, indica una situ-
ación o condición inminentemente peligrosa para la vida y la integridad física.
2. ADVERTENCIA: La palabra ADVERTENCIA, posiblemente en combinación con un símbolo, indi-
ca situaciones o condiciones potencialmente peligrosas para la vida y la integridad física.
3. PRECAUCIÓN: La palabra PRECAUCIÓN, posiblemente en combinación con un símbolo, se
utiliza para indicar situaciones o condiciones que pueden provocar lesiones.
4. ATENCIÓN: La palabra ATENCIÓN, posiblemente en combinación con un símbolo, indica situa-
ciones o condiciones que pueden provocar daños a la propiedad y/o al medioambiente.

75
DMX DEUTSCHFRANCAIS
ESPAÑOL ENGLISH
ITALIANO POLSKI
Este símbolo indica peligro de descarga eléctrica.
Este símbolo identifica las zonas o situaciones peligrosas.
Este símbolo indica peligro por superficie a alta temperatura.
Este símbolo indica peligro causado por fuentes de luz intensas.
Este símbolo indica que el equipo no contiene piezas que el usuario pueda sustituir.
Este símbolo indica información adicional sobre el funcionamiento del equipo.
INSTRUCCIONES DE SEGURIDAD
PELIGRO:
1. No abra ni modifique el equipo.
2. Si el equipo deja de funcionar correctamente, si han entrado líquidos u objetos en
el interior del equipo o si este ha sufrido algún otro desperfecto, apáguelo inme-
diatamente y desconéctelo de la corriente eléctrica. Este equipo solo puede ser
reparado por un técnico autorizado.
3. Para los equipos de la clase de protección1, el conductor de protección debe estar
conectado correctamente. No desconecte nunca el conductor de protección. Los
equipos de la clase de protección2 no tienen conductor de protección a tierra.
4. Asegúrese de que los cables con tensión no estén doblados ni dañados mecánica-
mente de alguna forma.
5. Nunca puentee el fusible del equipo.
ADVERTENCIA:
1. El equipo no debe ponerse en funcionamiento si presenta daños evidentes.
2. El equipo solo debe instalarse cuando esté desenchufado de la corriente eléctrica.
3. Si el cable eléctrico está dañado, no ponga en funcionamiento el equipo.
4. Los cables eléctricos fijos solo deben ser sustituidos por una persona cualificada.
ATENCIÓN:
1. Si el equipo ha estado expuesto a un cambio brusco de temperatura (por ejemplo,
después del transporte), no lo encienda inmediatamente. La condensación o la
humedad podrían dañar el equipo. No encienda el equipo hasta que haya alcanza-
do la temperatura ambiente.

76
DMX
ITALIANO
POLSKI
ESPAÑOL
FRANCAIS
DEUTSCHENGLISH
2. Asegúrese de que la tensión y la frecuencia de la red eléctrica coinciden con los
valores indicados en el equipo. Si el equipo dispone de un selector de tensión,
antes de enchufarlo a la red eléctrica, asegúrese de que el valor seleccionado es
correcto. Utilice solo cables eléctricos adecuados.
3. Para desconectar completamente el equipo de la red eléctrica, no es suficiente con
pulsar el interruptor de encendido/apagado del equipo.
4. Asegúrese de que el fusible utilizado corresponde al tipo impreso en el equipo.
5. Asegúrese de que se han tomado las medidas necesarias contra las sobreten-
siones (por ejemplo, si cae un rayo).
6. Respete la corriente de salida máxima especificada en los equipos con salida
eléctrica en paralelo. Asegúrese de que el consumo total de corriente de todos los
equipos conectados no supera el valor especificado.
7. Sustituya los cables eléctricos solo por otros cables originales.
PELIGRO:
1. ¡Peligro de asfixia! Las bolsas de plástico y las piezas pequeñas deben mantenerse
fuera del alcance de las personas (incluidos los niños) con capacidades físicas,
sensoriales o mentales reducidas.
2. ¡Peligro de caída! Asegúrese de que el equipo está bien instalado y no se puede
caer. Utilice únicamente soportes y anclajes adecuados (especialmente en insta-
laciones fijas). Asegúrese de que los accesorios están correctamente instalados y
bien fijados. Asegúrese de que se cumplen las normas de seguridad pertinentes.
ADVERTENCIA:
1. Utilice el equipo solo de la manera prevista.
2. Utilice solo los accesorios recomendados por el fabricante para el equipo.
3. Durante la instalación, respete las normas de seguridad de su país.
4. Después de conectar el equipo, compruebe todas las tiradas de cable para evitar
daños o accidentes, por ejemplo, por riesgo de tropiezo.
5. ¡Es esencial respetar la distancia mínima especificada a los materiales normal-
mente inflamables! Si no se indica explícitamente, la distancia mínima es de
0,3m.
6. Respete siempre la distancia mínima a la superficie iluminada que está indicada en
el aparato.
PRECAUCIÓN:
1. En el caso de los componentes móviles, como los soportes de montaje u otros
elementos móviles, existe la posibilidad de que se atasquen.
2. En el caso de los equipos con componentes accionados por motor, existe riesgo de
lesiones por el movimiento del equipo. Un movimiento brusco del aparato puede
provocar lesiones por impacto.

77
DMX DEUTSCHFRANCAIS
ESPAÑOL ENGLISH
ITALIANO POLSKI
3. La superficie de la carcasa del equipo puede calentarse mucho durante el fun-
cionamiento regular. Asegúrese de que no sea posible tocar accidentalmente la
carcasa. Deje siempre que la lámpara se enfríe lo suficiente antes de desmontarla,
realizar trabajos de mantenimiento, recarga, etc.
ATENCIÓN:
1. No instale ni opere el equipo cerca de radiadores, salidas de calefacción, estufas u
otras fuentes de calor. Asegúrese siempre de que el equipo está instalado de forma
que esté suficientemente refrigerado y no pueda sobrecalentarse.
2. No coloque ninguna fuente de ignición, como velas encendidas, cerca del aparato.
3. Las rejillas de ventilación no deben estar cubiertas; los ventiladores no deben estar
bloqueados.
4. Utilice el embalaje original u otro embalaje suministrado por el fabricante para el
transporte.
5. Evite los golpes o impactos en el equipo.
6. Respete la clase de protección IP, así como las condiciones ambientales, como la
temperatura y la humedad, de acuerdo con las especificaciones.
7 Los dispositivos pueden seguir desarrollándose continuamente. En caso de que la
información sobre las condiciones de funcionamiento, el rendimiento u otras propie-
dades del aparato especificada en el manual del usuario difiera de la información del
etiquetado del aparato, siempre tendrá prioridad la información del aparato.
8. El equipo no es adecuado para climas tropicales ni para funcionar a más de
2.000m sobre el nivel del mar.
9. A menos que se indique explícitamente, el equipo no es adecuado para su uso en
entornos marinos.
¡PRECAUCIÓN! INFORMACIÓN IMPORTANTE SOBRE LOS PRODUCTOS DE ILUMI-
NACIÓN
1. No mire nunca directamente al haz de luz, ni siquiera durante un breve periodo de
tiempo.
2. No mire nunca al haz de luz utilizando dispositivos ópticos como una lupa.
3. ¡Los efectos estroboscópicos pueden provocar ataques epilépticos en individuos
susceptibles!
TRANSMISIÓN DE SEÑALES POR RADIO (COMO W-DMX O SISTEMAS DE AUDIO
POR RADIO):
La calidad y las prestaciones de las transmisiones de señales inalámbricas suelen
depender de las condiciones ambientales.
Por ejemplo, los siguientes factores pueden influir en el alcance y la estabilidad de la
señal:
Apantallamiento (como muros, estructuras metálicas, agua).
Saturación del espectro de radio (redes inalámbricas potentes).
Interferencias
Radiación electromagnética (videowalls LED, reguladores de intensidad de luces).

78
DMX
ITALIANO
POLSKI
ESPAÑOL
FRANCAIS
DEUTSCHENGLISH
Todas las especificaciones sobre el alcance se refieren a la operación en campo libre
con línea directa visual y sin interferencias.
El funcionamiento de los transmisores está sujeto a la normativa oficial. Esta puede
variar de una región a otra y el operador debe verificarla antes del uso (como la
frecuencia de radio y la potencia de transmisión).
ADVERTENCIA: Devices with wireless signal transmission are not suitable for use
in sensitive areas in which radio operation can lead to potential detrimental effects.
Entre las zonas sensibles están:
• Hospitales, centros de salud u otros centros de atención sanitaria que prestan
atención al paciente con personal y equipos especializados.
• Zonas peligrosas de claseI, II y III.
• Zonas restringidas.
• Instalaciones militares.
• Aviones y vehículos.
• Zonas en las que está prohibido el uso de teléfonos móviles.
TRANSMISIÓN POR W-DMX
ADVERTENCIA: En general, la transmisión DMX inalámbrica no debe utilizarse para
aplicaciones con factores relacionados con la seguridad que puedan provocar lesiones
personales o daños materiales en caso de fallo .
Esto se aplica en particular a las estructuras móviles de escena o trusses, motores/el-
evadores controlados por DMX o equipos de elevación que accionan por DMX platafor-
mas elevadoras controladas, sistemas hidráulicos o componentes móviles similares.
Además, la transmisión DMX inalámbrica no debe utilizarse para activar dispositivos
de llama o pirotécnicos, efectos con explosiones o para controlar efectos de gas o
líquidos. Estos incluyen cañones de CO2, disparadores de confeti, efectos de agua o
similares.
¡PRECAUCIÓN! POSIBLES DAÑOS POR FUENTES DE LUZ EXTERNAS
La radiación solar, la radiación láser y los haces de luz agrupados de otros focos
pueden dañar la carcasa y los componentes internos, como los filtros, las ruedas de
gobos y colores, los motores, los cables, las correas, etc., ¡así como las fuentes de
luz!
No exponga el aparato, y especialmente la abertura de la lente, a la luz solar directa,
a la radiación láser ni a los haces de luz de otros focos durante el desembalaje, la
instalación, la inactividad prolongada y el funcionamiento Cuando no utilice el equipo,
dirija siempre la abertura del objetivo hacia el suelo. Para ello, también puede utilizar
la función «Sun Protection», que puede activarse mediante un comando DMX (véase
el canal «Device Settings» en la tabla DMX). Un sensor giroscópico integrado detecta
la posición de uso. Los daños causados por fuentes de luz externas quedan excluidos
de la garantía del fabricante

79
DMX DEUTSCHFRANCAIS
ESPAÑOL ENGLISH
ITALIANO POLSKI
NOTAS PARA LOS EQUIPOS PORTÁTILES QUE SE INSTALAN EN
INTERIORES
1. ¡Funcionamiento temporal! Los equipos para eventos suelen estar diseñados solo
para un uso temporal.
2. El uso continuado o la instalación fija pueden deteriorar el funcionamiento y provo-
car el envejecimiento prematuro de los equipos.
ENTREGA INCLUIDA
Saque el producto del envase y retire todo el material de embalaje.
Por favor, compruebe la completitud e integridad de la entrega y notifíquelo
Póngase en contacto con su socio de ventas inmediatamente después de la compra si la entrega
no está completa o está dañado. En el embalaje se incluyen los siguientes componentes:
X1 x Cabeza móvil OPUS SP5 PLUS LED
X2 x Soporte de montaje Omega
X1cable eléctrico
XManual de usuario
INTRODUCCIÓN
CABEZA MÓVIL SERIE OPUS
CLOSP5PLUS
FUNCIONES DE CONTROL:
Control DMX de 34 y 50 canales (CLOSP5PLUS)
Control DMX de 27 y 33 canales (CLOSP5PLUS con el módulo opcional de rueda de animación
CLOSP5AM)
Art-Net
sACN
W-DMX™
RDM habilitado
Funcionamiento Maestro/Esclavo
Funciones en modo Autónomo

80
DMX
ITALIANO
POLSKI
ESPAÑOL
FRANCAIS
DEUTSCHENGLISH
CARACTERÍSTICAS:
lED de alta eficiencia de 500 W. Módulo de persiana enmarcable. - Mezcla de colores CMY + CTO
Rueda de colores con 7 colores brillantes + colores abiertos y divididos. Rueda de gobos 1 con
8 gobos fijos + abierta. Rueda de gobos 2 con 7 gobos giratorios + abiertos (gobos intercam-
biables). 2 prismas giratorios. Función de enfoque y zoom a través de DMX. Filtro esmerilado e iris
Strobe Motores de giro e inclinación con resolución de 16 bits. Funciona con pilas. Pantalla para
ajuste independiente de la red. Corrección automática de la posición. Ventiladores con control de
temperatura. conexiones DMX de 3 y 5 polos. Conexiones de red RJ45. DMX™ inalámbrico Conex-
iones de red Neutrik powerCON TRUE1 IN y OUT. 2 soportes de montaje Omega incluidos. Tensión
operativa: 100-240VCA. Consumo de energía 800W. El foco es compatible con el estándar RDM
(Remote Device Management). La gestión remota de dispositivos permite al usuario ver el estado
y la configuración de los terminales RDM a través de un controlador compatible con RDM.
PROPIEDADES ADICIONALES
La cabeza móvil CLOSP5P viene equipada con un módulo de obturación de encuadre de 4 vías.
El módulo de persiana de encuadre de 4 vías puede intercambiarse con el módulo de rueda de
animación CLOSP5AM. El software y los modos DMX correspondientes se actualizan automática-
mente.
CONEXIONES, MANDOS E INDICADORES
1 23
4 5
6
7
8
1 POWER IN
Toma de entrada de red Neutrik powerCON TRUE1. Tensión operativa: 100-240VCA, 50/60Hz. Se
incluye un cable de red adecuado con enchufe powerCON TRUE1.
2 POWER OUT
Toma de salida de red Neutrik powerCON TRUE1. Permite la alimentación de otros focos CAM-
EO. Asegúrese de que el consumo total de todos los equipos enchufados al equipo no supere el
amperaje (A) indicado.

81
DMX DEUTSCHFRANCAIS
ESPAÑOL ENGLISH
ITALIANO POLSKI
3 FUSIBLE
Portafusibles para microfusibles de 5 x 20 mm. NOTA IMPORTANTE: Sustituya el fusible solo por
uno del mismo tipo y características. Si el fusible se fundiera varias veces, póngase en contacto
con un servicio técnico autorizado.
4 DMX IN
Tomas XLR macho de 3 y 5 patillas para la conexión de un dispositivo de control DMX (por ejemp-
lo, una consola DMX).
5 DMX OUT
Tomas XLR hembra de 3 ó 5 patillas para enviar la señal de control DMX.
6 NET IN
Conector de red RJ45 para conectarse a una red Art-Net o sACN. Utilice cables cat5e o superior
para la conexión a la red.
7 NET OUT
Conector de red RJ45 para conectar a la red dispositivos adicionales compatibles con Art-Net o
sACN. Utilice cables cat5e o superior para la conexión a la red.
8 ANTENA PARA W-DMX™
Die Antenne für die Steuerung per W-DMX™ verbleibt während des Betriebs in der Halterung (=
Betriebsposition).
9 PANTALLA LC SENSIBLE A LA PRESIÓN CON ILUMINACIÓN
Gracias a la pantalla LC sensible a la presión, el aparato puede manejarse directamente desde la
pantalla (compatible con guantes). La pantalla LCD muestra el modo activado en ese momento
(pantalla principal), las opciones del menú de selección y el valor numérico o el estado de funcio-
namiento en determinadas opciones del menú. Si no hay ninguna señal de control en el aparato,
la pantalla empieza a parpadear; el parpadeo se detiene en cuanto hay una señal de control
(funcionamiento DMX y esclavo, ArtNet y sACN).
9
10
11

82
DMX
ITALIANO
POLSKI
ESPAÑOL
FRANCAIS
DEUTSCHENGLISH
10 CONTROLES
MODO - Pulsando MODE (repetidamente) se sube un nivel en la estructura de menús, hasta la
pantalla principal.
ARRIBA y ABAJO - Seleccionan los distintos elementos del menú principal (dirección DMX,
modo de funcionamiento, etc.) y de los submenús.
ENTER - Partiendo de la pantalla principal, pulse ENTER para entrar en el menú principal. En el
menú principal, pulse ENTER para acceder al nivel de menú en el que se pueden modificar los
valores. Confirme los cambios de valor pulsando ENTER.
IZQUIERDA y DERECHA X - Utilice los paneles de control para cambiar el valor de un elemento
del menú, como la dirección DMX, según desee.
11 INTERFAZ USB
Interfaz USB para actualizar el firmware del dispositivo. En el menú Servicio, ajuste el estado de
la actualización USB a ON. Cuando esté disponible, descargue el firmware más reciente de la
página del producto en www.cameolight.com, descomprímalo y copie los archivos en una carpeta
sin caracteres especiales de una memoria USB. Desconecte el cabezal móvil de la red eléctrica y
de todas las conexiones de entrada (DMX / Ethernet), conecte la memoria USB a la interfaz USB
y vuelva a conectar el cabezal móvil a la red eléctrica. La memoria USB se reconoce automática-
mente y se muestra en la pantalla. Ahora navegue hasta la carpeta correspondiente de la memo-
ria USB y confirme con ON. Comienza el procedimiento de actualización. No extraiga la memoria
USB ni desconecte el cabezal móvil de la red eléctrica durante el procedimiento de actualización.
La pantalla alimentada a batería puede funcionar aunque el equipo no esté conectado al sumin-
istro eléctrico. Para ello, mantenga pulsado MODE durante aproximadamente 3 segundos. Ahora
podrá acceder a la información del equipo para cambiar y guardar los ajustes del sistema sin
estar enchufado a la red eléctrica. En este caso, no es posible el control externo del foco. Por
esta razón, la pantalla indica que no hay señal DMX aunque en realidad sí haya una señal DMX
conectada al equipo.

83
DMX DEUTSCHFRANCAIS
ESPAÑOL ENGLISH
ITALIANO POLSKI
12 BLOQUEO DEL GIRO HORIZONTAL
Dispositivo de bloqueo mecánico utilizado para evitar
la rotación del cabezal en sentido horizontal durante el
transporte. Desconecte el aparato de la red eléctrica,
mueva el cabezal en paralelo a la base (4 posiciones
posibles) y empuje la palanca de bloqueo en el senti-
do del eje de rotación del plato para bloquearlo en su
posición. Desbloquee el dispositivo antes de ponerlo en
marcha.
13 BLOQUEO DEL GIRO VERTICAL
Dispositivo de bloqueo mecánico utilizado para impedir
la rotación del cabezal en sentido vertical durante el
transporte (7 posiciones). Desenchufe el equipo de la red
eléctrica y deslice la palanca de bloqueo en la dirección
del eje de giro vertical, mueva la cabeza del equipo
en vertical hasta encontrar una de las 7posiciones de
bloqueo y que la palanca de bloqueo encaje (LOCK). Des-
bloquee el dispositivo antes de ponerlo en marcha.
FUNCIONAMIENTO
NOTAS
En cuanto la luminaria esté correctamente conectada a la red eléctrica,
aparecerán en la pantalla, uno tras otro, el mensaje "Software Update
Please Wait..." y el logotipo de Cameo con información sobre el modelo
de la luminaria durante el proceso de puesta en marcha y el reinicio
del motor. Tras este proceso, el foco estará listo para funcionar y se
activará el modo seleccionado previamente. Por un lado, el faro se
maneja con la ayuda de los paneles de control táctiles situados junto a
la pantalla; por otro, la propia pantalla sensible a la presión (compatible
con guantes) puede utilizarse para acceder a todos los elementos del
menú y realizar los ajustes de forma intuitiva según se desee. En la
tabla adyacente encontrará información sobre qué elemento de control
de la pantalla y qué panel de control junto a la pantalla tienen la misma
función. A continuación se describe el funcionamiento mediante los
paneles de control situados junto a la pantalla.
PANTALLA PRINCIPAL
La línea superior de la pantalla muestra si hay señal de control presente en la unidad y cuál es, la
línea inferior muestra el modo de funcionamiento activado actualmente (DMX Estándar / Exten-
dido, Estático, Automático, Esclavo) y la dirección de inicio DMX o el modo de funcionamiento
correspondiente (en el ejemplo la dirección de inicio DMX 001) es claramente visible en el centro.
13
12

84
DMX
ITALIANO
POLSKI
ESPAÑOL
FRANCAIS
DEUTSCHENGLISH
En cuanto se interrumpe la señal de control, los caracteres de la pantalla empiezan a parpadear
y aparece "Ninguno" (sin señal) detrás de "Señal" en la línea superior. La pantalla puede girarse
180° tocando el panel de control táctil hacia ABAJO; si la pantalla ya está girada 180°, toque el
panel de control hacia ARRIBA para volver a la imagen estándar. La pantalla también se puede
girar 180° pulsando el "símbolo del techo" en la pantalla sensible a la presión.
Visualización de la señal de entrada
Modo DMX o modo de funcionamiento
Dirección de inicio DMX o modo
de funcionamient
Información sobre el dispositivo
modelo Volver a la pantalla principal =
cualquier posición de la pantalla o
Pulse ENTER
Mostrar el estado de la batería
Girar la pantalla 180°
Menú principal.
MENÚ DE CONTROL (Control)
AJUSTE DE LA DIRECCIÓN DMX DE INICIO (DMX Address)
Partiendo de la pantalla principal, pulse ENTER para acceder al menú principal. Utilice los mandos
y para seleccionar el menú Control y pulse ENTER. Utilice ARRIBA y ABAJO para seleccionar la
opción de menú "Dirección DMX" y confirme pulsando ENTER. Ahora ajuste la dirección de inicio
DMX deseada utilizando los paneles de control IZQUIERDO y DERECHO y confirme con ENTER (el
valor más alto depende del modo DMX activado). Pulse MODE dos veces para volver a la pan-
talla principal, la dirección de inicio DMX seleccionada se muestra ahora en letras grandes en la
pantalla cuando se activa el modo DMX.
SET DMX MODE (DMX Mode)
Partiendo de la pantalla principal, pulse ENTER para acceder al menú principal. Utilice los mandos
y para seleccionar el menú Control y pulse ENTER. Utilice ARRIBA y ABAJO para seleccionar la
opción de menú "Modo DMX" y confirme pulsando ENTER. Seleccione de nuevo el modo DMX
deseado con ARRIBA y ABAJO y confirme la selección con ENTER. Pulse MODE 2x para volver a la
pantalla principal, el modo DMX seleccionado está ahora activado. Encontrará tablas con la asig-
nación de canales de los distintos modos DMX en estas instrucciones, en el apartado CONTROL
DMX.

85
DMX DEUTSCHFRANCAIS
ESPAÑOL ENGLISH
ITALIANO POLSKI
CONFIGURACIÓN DE LA RED (Network)
Partiendo de la pantalla principal, pulse ENTER para acceder al menú principal. Utilice los mandos
y para seleccionar el menú Control y pulse ENTER. Utilice ARRIBA y ABAJO para seleccionar la
opción de menú "Red" y confirme pulsando ENTER. Para obtener información sobre la configura-
ción de la red, consulte la tabla siguiente. Confirme todos los cambios de configuración de la red
con ENTER.
Network
Network
Input
Activar / desactivar
la entrada de red
OFF Entrada de red desactivada
ON Entrada de red activada
Protocol Protocolo de red Art-Net Protocolo ArtNet
sACN protocolo sACN
Address
Universo 1 - 256,
Establezca la dirección IP y la
máscara de subred
Universe
000 - 255
000 a 255. Cambie el valor con
IZQUIERDA y DERECHA, confirme
con ENTER.
IP Address
Seleccione el bloque con IZQUI-
ERDA y DERECHA, cambie el valor
con ARRIBA y ABAJO, confirme con
ENTER.
IP Subnet
Mask
Seleccione el bloque con IZQUI-
ERDA y DERECHA, cambie el valor
con ARRIBA y ABAJO, confirme con
ENTER.
DMX OUT Salida de la señal de red a
través de DMX OUT
OFF No emitir señal
ON Señal de salida

86
DMX
ITALIANO
POLSKI
ESPAÑOL
FRANCAIS
DEUTSCHENGLISH
CONFIGURACIÓN W-DMX (Wireless)
Partiendo de la pantalla principal, pulse ENTER para acceder al menú principal. Utilice los mandos
y para seleccionar el menú Control y pulse ENTER. Utilice ARRIBA y ABAJO para seleccionar la
opción de menú "Inalámbrico" y confirme pulsando ENTER. Para obtener información sobre los
ajustes de la W-DMX, consulte la tabla siguiente. Confirme todos los cambios en los ajustes con
ENTER.
Wireless
W-DMX OFF Desactivar W-DMX
ON Activar W-DMX
Operating
(actualmente en estado
beta)
Receiver Módulo W-DMX configurado como receptor
Transmisor Módulo W-DMX configurado como transmisor
Transmitting
(actualmente en estado
beta)
G3 Norma de transmisión G3
G4s Norma de transmisión G4S
Link Link
Emparejar con dispositivos W-DMX. La función
W-DMX debe estar activada en todos los dispositivos
y el emparejamiento con un transmisor debe resta-
blecerse (Restablecer recepción)
Unlink Desemparejar todos los dispositivos
Receive Reset NO No restablezca el emparejamiento del transmisor
YES Restablecer el emparejamiento del transmisor
MODOS AUTÓNOMOS (Stand Alone)
Partiendo de la pantalla principal, pulse ENTER para acceder al menú principal. Utilice los mandos
y para seleccionar el menú Control y pulse ENTER. Seleccione ahora con y la opción de menú
"Stand Alone" y confirme con ENTER. Seleccione ahora uno de los tres modos autónomos medi-
ante los mandos y y confirme con ENTER.

87
DMX DEUTSCHFRANCAIS
ESPAÑOL ENGLISH
ITALIANO POLSKI
MODO ESTÁTICO STANDALONE (Static)
El modo estático permite ajustar PAN, Inclinación, Atenuador, Estroboscopio, Rueda de color y
Rueda de gobos, etc. directamente en el aparato con valores entre 000 y 255, de forma similar a
una unidad de control DMX. De este modo, se puede crear una escena individual sin necesidad de
un controlador DMX adicional. Una vez seleccionado el modo de funcionamiento "Estático", como
se ha descrito anteriormente en "MODOS DE FUNCIONAMIENTO AUTÓNOMO", puede realizar los
ajustes que desee. Los elementos del submenú corresponden a los canales 1 a 50 en el modo
DMX ampliado de 50 canales (consulte CONTROL DMX, seleccione el elemento del submenú con
ARRIBA y ABAJO, cambie el valor con IZQUIERDA y DERECHA, confirme con ENTER). Pulse MODE
repetidamente para volver a la pantalla principal.
MODO DE FUNCIONAMIENTO AUTÓNOMO PROGRAMAS AUTOMÁTICOS (Auto Prog)
Los 4 programas automáticos diferentes (Programa 1 - 4) constan cada uno de movimientos fijos
programados del cabezal, cambios de gobo y de color, etc., la velocidad de funcionamiento puede
ajustarse por separado. Como se ha descrito anteriormente en "MODOS DE FUNCIONAMIENTO
AUTÓNOMO", seleccione el modo de funcionamiento Auto, confirme con ENTER, seleccione el
programa Auto deseado utilizando ARRIBA y ABAJO, confirme con ENTER y cambie ahora el valor
de la velocidad de marcha de 000 a 100 según desee utilizando IZQUIERDA y DERECHA. Confirme
con ENTER. Pulse MODE repetidamente para volver a la pantalla principal.
MODO ESCLAVO (Slave)
El modo de funcionamiento esclavo se selecciona como se ha descrito anteriormente en el punto
"MODOS DE FUNCIONAMIENTO SOLO". Conecte la unidad esclava y la unidad maestra (mis-
mo modelo, misma versión de software) mediante un cable DMX (DMX OUT maestro - DMX IN
esclavo) y active uno de los modos autónomos Auto o Estático en la unidad maestra. Ahora, la
unidad esclava seguirá a la unidad maestra. Pulse MODE repetidamente para volver a la pantalla
principal.

88
DMX
ITALIANO
POLSKI
ESPAÑOL
FRANCAIS
DEUTSCHENGLISH
SYSTEM SETTINGS (Settings)
Partiendo de la pantalla principal, pulse ENTER para acceder al menú principal. Seleccione el
menú Configuración para los ajustes del sistema utilizando los paneles de control ARRIBA y
ABAJO y pulse ENTER.
Se abrirá el submenú para ajustar los elementos del submenú (véase la tabla, seleccione con UP y
DOWN, confirme con ENTER, cambie el valor o el estado con UP y DOWN, y confirme con ENTER).
Settings (negrita = ajuste de fábrica)
Display Display
Settings
Reverse
OFF No girar la pantalla
ON
La pantalla se gira 180° (por
ejemplo, para una instalación
aérea)
Backlight OFF
Desactivación de la iluminación
de la pantalla tras unos 30
segundos de inactividad
ON Pantalla siempre encendida
DMX Fail
Estado de funcio-
namiento cuando la
señal DMX es
interrumpido
Black Activa el oscurecimiento
Hold Se conserva el último comando
Auto activa el modo automático
Dimmer
Curve
Selección del
Curva de atenuación
Linear La intensidad de la luz aumenta de
forma lineal con el valor DMX
Exponential
Ajustar la intensidad luminosa con
precisión en los valores DMX bajos y
de forma más brusca en los valores
DMX altos

89
DMX DEUTSCHFRANCAIS
ESPAÑOL ENGLISH
ITALIANO POLSKI
Dimmer
Curve
Selección del
Curva de atenuación
Logarithmic
Ajustar la intensidad luminosa de
forma más brusca en los valores DMX
bajos y con precisión en los valores
DMX altos
Dimmerkurve
Ajustar la intensidad luminosa con
precisión en los valores DMX altos y
bajos, y de forma más amplia en los
valores DMX intermedios
LED
Frequency
Configuración de la
frecuencia PWM del
LED
650Hz, 1530Hz,
3600Hz, 12KHz,
25KHz
Pan / Tilt Ajustes del cabezal
del dispositivo
Pan Reverse
OFF No invertir la dirección de giro
horizontal
ON Invertir la dirección de giro
horizontal
Tilt Reverse
OFF No invertir la dirección de giro
vertical
ON Invertir la dirección de giro
vertical
Pan Angle 630 Ángulo panorámico 630
540 Ángulo panorámico 540
Feedback
OFF Desactivada la corrección au-
tomática de la posición
ON Activada la corrección automáti-
ca de la posición
B.O. Moving
Apagado automático
para movimiento de
la cabeza
OFF Sin oscurecimiento durante el movi-
miento de la cabeza
ON Oscurecimiento durante el movimiento
de la cabeza
Fixture Type Tipo de dispositivo: Profile Module
Spot Module
Fan Control del ventilador
Auto Control automático del ventilador
Fan Off Ventilador desactivado con brillo
muy reducido
Constant Low
Velocidad del ventilador
constantemente baja con brillo
reducido, si es necesario
Constant Mid
Velocidad media constante del
ventilador con brillo reducido, si
es necesario
Constant High Velocidad alta y constante del
ventilador

90
DMX
ITALIANO
POLSKI
ESPAÑOL
FRANCAIS
DEUTSCHENGLISH
CURVAS DE ATENUACIÓN:
Linear
Valor DMX
Intensidad de
la luz
Exponential
Valor DMX
Intensidad de
la luz
Logarithmic
Valor DMX
Intensidad de
la luz
S-curve
Valor DMX
Intensidad de
la luz
SERVICEMENU
Partiendo de la pantalla principal, pulse ENTER para acceder al menú principal. Utilice los campos
de control ARRIBA y ABAJO para seleccionar el menú Servicio y pulse ENTER.
Esto le lleva al submenú para editar los elementos del submenú (seleccione con ARRIBA y ABAJO,
confirme con ENTER, cambie el valor con IZQUIERDA y DERECHA, confirme con ENTER).
Calibrate - Calibre los componentes con valores de 000 a 255 (contraseña 050).
Test Manual - Prueba manual de los componentes con valores de 000 a 255.
Test Motor - Reinicia los motores. All = Todos los motores, Pan&Tilt = Motores Pan y Tilt,
Head Only Cabezal = Motores en el cabezal de la unidad.
USB Update - Actualización del firmware a través de la interfaz USB. OFF = Bloquea la actual-
ización del firmware a través de la interfaz USB. ON = Permite la actualización del firmware a
través de la interfaz USB.
Factory Reset de fábrica - Restablecer los valores de fábrica.
INFORMACIÓN DEL DISPOSITIVO (Info)
Partiendo de la pantalla principal, pulse ENTER para acceder al menú principal. Utilice los mandos
y para seleccionar el menú de información Info y pulse ENTER.
Accederá al submenú de lectura de la información del aparato (seleccione con y , confirme con
ENTER).

91
DMX DEUTSCHFRANCAIS
ESPAÑOL ENGLISH
ITALIANO POLSKI
System Info
Error Info
Indicación de error de funcionamiento
Si una avería no se corrige con un reinicio o reinicio, la unidad defectuosa debe ser
reparada por un centro de servicio autorizado.
Tempera-
ture
Indicación de la
temperatura
Head xx°C/F°
Base xx°C/F°
Unit Indicación de la temperatura en grados Cel-
sius o Fahrenheit
Runtime Muestra el tiempo
de funcionamiento
Total Time Muestra el tiempo total de funcionamiento en
horas
Current Time Muestra el tiempo de funcionamiento actual
Time PW
Introduzca la contraseña para restablecer la
hora de funcionamiento actual
(Hora PW = 050)
Clean Current Restablece el tiempo de funcionamiento actual
Firmware
Visualización del
firmware de los com-
ponentes 1U a 8U
Vx.x.x
Model
Info
Información sobre la
versión de la unidad
Perfile
Module Módulo con persiana de encuadre
Spot Module Módulo con rueda de animación
INSTALACIÓN Y MONTAJE
Gracias a sus pies de goma integrados, el foco puede colocarse en un lugar adecuado sobre una
superficie firme y nivelada. La instalación en truss puede realizarse con la ayuda de dos soportes
en omega, que se fijan a la base del equipo (A). Se suministran 2soportes en omega. Hay dis-
ponibles abrazaderas como accesorio opcional. Asegúrese de que las conexiones sean firmes y
fije el foco a la argolla (B) con un cable de seguridad adecuado.
NOTA IMPORTANTE: La instalación aérea requiere una amplia experiencia, incluido
el cálculo de los límites de carga de trabajo, los materiales de instalación utilizados y
las comprobaciones periódicas de seguridad de todos los materiales y accesorios de
instalación. Si no tiene estos conocimientos, no intente realizar la instalación usted
mismo y, en cambio, diríjase a un profesional cualificado.

92
DMX
ITALIANO
POLSKI
ESPAÑOL
FRANCAIS
DEUTSCHENGLISH
B
BA
A
CUIDADO, MANTENIMIENTO Y REPARACIÓN
Para garantizar el buen funcionamiento del equipo a largo plazo, hay que limpiarlo con regu-
laridad y, si es necesario, hacerle las revisiones necesarias. Los requisitos de mantenimiento
dependen de la intensidad de uso y del entorno en el que se utilice. Por lo general, recomenda-
mos una inspección visual antes de cada puesta en marcha. Además, recomendamos llevar a
cabo todas las medidas de mantenimiento aplicables que se especifican a continuación una vez
cada 500horas de funcionamiento o, en caso de uso menos intensivo, al cabo de un año como
máximo. Las reclamaciones de garantía pueden estar limitadas en caso de defectos debidos a un
mantenimiento inadecuado.
LIMPIEZA (llevada a cabo por el usuario)
¡ADVERTENCIA! Antes de realizar cualquier trabajo de limpieza y mantenimiento,
debe desenchufarse del suministro eléctrico y, si es posible, quitar todas las conex-
iones del equipo.
NOTA: Un cuidado inadecuado puede deteriorar el equipo o incluso destruirlo.
1. Las superficies de la carcasa deben limpiarse con un paño limpio y húmedo. Asegúrese de que
la humedad no pueda penetrar en el dispositivo.
2. Las entradas y salidas de aire deben limpiarse regularmente para eliminar el polvo y la suc-
iedad. Si se utiliza aire comprimido, hay que tener cuidado para evitar que se dañe el equipo
(por ejemplo, los ventiladores deben estar tapados).
3. Los cables y los contactos de los enchufes deben limpiarse regularmente para eliminar el
polvo y la suciedad.
4. En general, no deben utilizarse productos de limpieza ni agentes abrasivos, ya que de lo con-
trario podría dañarse el acabado de la superficie.

93
DMX DEUTSCHFRANCAIS
ESPAÑOL ENGLISH
ITALIANO POLSKI
5. Por lo general, los equipos deben guardarse en un lugar seco y protegido del polvo y la
suciedad.
MANTENIMIENTO Y REPARACIÓN (solo por personal cualificado)
¡PELIGRO! Dentro del equipo hay componentes con tensión. Incluso después de des-
enchufar el equipo del suministro eléctrico, puede haber tensiones residuales dentro
del equipo, por ejemplo, en los condensadores.
NOTA: No hay componentes en el equipo que puedan ser reparadas por parte del
usuario.
NOTA: Los trabajos de mantenimiento y reparación sólo pueden ser realizados por
personal especializado cualificado y autorizado por el fabricante. En caso de duda,
consulte al fabricante.
NOTA: Los trabajos de mantenimiento realizados de forma incorrecta pueden com-
prometer el derecho a la garantía.
DATOS TÉCNICOS
Referencia: CLOSP5PLUS
Tipo de producto: Cabeza móvil LED
Tipo: Cabeza móvil
Número de lámparas: 1
Tipo de lámpara: lED de alta eficiencia de 500 W
Temperatura de
color lamp: Blanco frío 6600K
CRI: >70
Frecuencia de modu-
lación de pulso de LED: 650Hz, 1530Hz, 3600Hz, 12kHz, 25kHz (ajustable)
Mezcla de colores: CMY + CTO
Número de colores en la
rueda de colores: 7 + colores abiertos y divididos
Número de gobos: 15 + abiertos (8 fijos + 7 rotativos)
Tamaño del gobo: Ø exterior 22,9 mm (-0,2 / +0,1 mm), Ø motivo 19 mm,
grosor del material 1,1 mm (vidrio)
Ángulo de haz: 6° - 42°
Entrada DMX: XLR macho de 3 patillas
XLR macho de 5 patillas
Salida DMX: XLR hembra de 3 pines
XLR hembra de 5 pines
Conexiones de red: ENTRADA y SALIDA RJ45 (bloqueables)
Modo DMX: 34 canales, 50 canales

94
DMX
ITALIANO
POLSKI
ESPAÑOL
FRANCAIS
DEUTSCHENGLISH
Funciones DMX:
Pan/Tilt, Pan/Tilt fino, Atenuador, Atenuador fino, Estroboscopio mul-
tifunción, Cian, Cian fino, Magenta, Magenta fino, Amarillo, Amarillo
fino, CTO, CTO fino, Rueda de color, Rotación de la rueda de color,
Rueda de gobo 1, Rotación del gobo 1, Rotación del gobo 1 fino,
Rotación de la rueda de gobo 1, Agitación del gobo 1, Rueda de gobo
2, Rotación de la rueda de gobo 2, Agitación del gobo 2, Zoom, Zoom
fino, Enfoque, Enfoque fino, Iris, Prisma, Prisma Rotación, Escarcha,
Cuchilla 1 - 4, Cuchilla 1 - 4 fina, Rotación de la forma, Rotación
de la forma fina, Macros de panorámica/inclinación, Velocidad de
panorámica/inclinación, Curva de atenuación, Ajustes del sistema
Funciones en
modo Autónomo:
Programas automáticos 1-4, modo estático, funcionamiento maestro/
esclavo
Ajustes del sistema:
Ajuste inalámbrico, inversión de la pantalla, encendido/apagado de la
iluminación de la pantalla, fallo DMX, curva de atenuación, inversión
de la panorámica, inversión de la inclinación, ángulo de la panorámi-
ca, retroalimentación, ajuste del ventilador, apagado del movimiento,
prueba, reinicio del motor, reinicio de fábrica, ajustes de red
Control: DMX512, RDM habilitado, W-DMX™ (receptor), Art-Net, sACN
Ángulo PAN: 540°/630°
Ángulo de inclinación: 270°
Controles de
funcionamiento:
Controles táctiles ATRÁS, INTRO, ARRIBA, ABAJO, IZQUIERDA, DERE-
CHA, pantalla gráfica LCD en color sensible a la presión (compatible
con guantes)
Elementos de
visualización:
Pantalla gráfica LC en color iluminada, alimentada por pilas para
ajustes del sistema independientes de la red eléctrica
Tensión eléctrica: 100-240 V CA / 50-60 Hz
Consumo: 800 W
Flujo luminoso: 22000 lm
Alimentación
eléctrica Conexión: Entrada y salida Neutrik TRUE1 (salida máx. 4A)
Fusible: T8AL / 250V (5 x 20mm)
Temperatura ambiente
operativa: −15 a 40°C
Humedad relativa: <85%, sin condensación
Distancia mínima a la
superficie iluminada: 3 m
Distancia mínima a
materiales normalmente
inflamables:
0,5m
Material de la carcasa: Metal, ABS
Color de la carcasa: Negro
Refrigeración de la
carcasa:
Sistema de refrigeración Heatpipe más ventiladores de temperatura
controlada

95
DMX DEUTSCHFRANCAIS
ESPAÑOL ENGLISH
ITALIANO POLSKI
Dimensiones (An. × Al. ×
F., sin soporte): 397 x 741,5 x 285 mm
Peso: 27,8kg
Otras características: Cable de red de 1 m con enchufe TRUE1 y
2 soportes de montaje Omega incluidos
DISTANCIA MÍNIMA A LA SUPERFICIE ILUMINADA
0,5m
Este símbolo con información de distancia en metros (m) indica la distancia
mínima de la luminaria a la superficie iluminada. En este ejemplo, la distancia es
de 0,5 m. Consulte las característica técnicas en este manual y la serigrafía de la
carcasa del equipo para conocer el valor válido de este equipo.
DISTANCIA MÍNIMA A MATERIALES NORMALMENTE INFLAMABLES
0,5m
Este símbolo con indicación de distancia en metros (m) indica la distancia
mínima del aparato a materiales normalmente inflamables. En este ejemplo, la
distancia es de 0,5 m. Consulte las característica técnicas en este manual para
conocer el valor válido de este equipo.
RECICLAJE
EMBALAJE:
1. El embalaje puede reciclarse a través de los métodos habituales de eliminación de
residuos.
2. Por favor, separe el embalaje de acuerdo con las normas de eliminación de residu-
os y las normas de reciclaje de su país.
APARATO:
1. Este aparato está sujeto a la Directiva Europea aplicable a los residuos de
aparatos eléctricos y electrónicos, en su versión modificada. (Directiva RAEE sobre
residuos de aparatos eléctricos y electrónicos). Los aparatos viejos no deben
depositarse en la basura doméstica. El aparato viejo debe desecharse a través de
una empresa de eliminación de residuos autorizada o de una instalación municipal
de eliminación de residuos. Respete la normativa vigente en su país.
2. Respete todas las leyes de eliminación aplicables en su país.
3. Como cliente particular, puede obtener información sobre las opciones de elimi-
nación respetuosas con el medioambiente en el establecimiento donde adquirió el
producto o de las autoridades regionales competentes.

96
DMX
ITALIANO
POLSKI
ESPAÑOL
FRANCAIS
DEUTSCHENGLISH
DECLARACIÓN DEL FABRICANTE
Garantía del fabricante y limitación de responsabilidad
Adam Hall GmbH, Adam-Hall-Str. 1, D-61267 Neu Anspach /
Correo electrónico: [email protected] / +49 (0)6081 9419 0
Puede consultar nuestras condiciones de garantía y la limitación de responsabilidad vigentes en:
https://cdn-shop.adamhall.com/media/pdf/Manufacturers-Declarations-CAMEO_DE_EN_ES_FR.pdf
Para cualquier tarea de mantenimiento o reparación, póngase en contacto con su distribuidor.
Conformidad CE
Por la presente, Adam Hall Ltd. declara que este producto cumple las siguientes directrices (si
procede):
Directiva de baja tensión (2014/35/UE)
Directiva EMC (2014/30/UE)
RoHS (2011/65/UE)
RED (2014/53/UE)
Declaración de conformidad CE
Las declaraciones de conformidad de los productos sujetos a las directivas LVD, EMC y RoHS
pueden solicitarse a [email protected]
Las declaraciones de conformidad de los productos sujetos a la RED pueden descargarse de
www.adamhall.com/compliance/.
Sujeto a erratas y errores, así como a modificaciones técnicas o de otro tipo.

97
DMX DEUTSCHFRANCAIS
ESPAÑOL ENGLISH
ITALIANO POLSKI
POLSKI
Dokonali Państwo dobrego wyboru!
Urządzenie to zostało opracowane i wyprodukowane zgodnie z najwyższymi standardami jakości,
aby zapewnić wiele lat bezproblemowej pracy. Proszę uważnie przeczytać niniejszą instrukcję
obsługi, aby móc szybko i optymalnie korzystać z nowego produktu Cameo. Więcej informacji na
temat Cameo Light znajdą Państwo na naszej stronie internetowej CAMEOLIGHT.COM.
INFORMACJE NA TEMAT NINIEJSZEJ INSTRUKCJI OBSŁUGI
• Przed rozpoczęciem korzystania z urządzenia należy uważnie przeczytać instrukcje dotyczące bezpie-
czeństwa oraz całą instrukcję obsługi.
• Należy przestrzegać ostrzeżeń umieszczonych na urządzeniu i w instrukcji obsługi.
• Instrukcję obsługi należy zawsze przechowywać w zasięgu ręki.
• Jeżeli sprzedają Państwo lub przekazują urządzenie, ważne jest, aby dołączyli Państwo również
niniejszą instrukcję obsługi, ponieważ stanowi ona integralną część produktu.
ZAMIERZONE ZASTOSOWANIE
Produkt jest urządzeniem do technologii eventowej!
Ten produkt został opracowany do użytku profesjonalnego w dziedzinie techniki eventowej i nie
nadaje się do użytku jako oświetlenie domowe!
Ponadto produkt ten przeznaczony jest wyłącznie dla wykwalifikowanych użytkowników posiada-
jących specjalistyczną wiedzę z zakresu techniki eventowej,
Użytkowanie produktu poza podanymi danymi technicznymi i warunkami eksploatacji uważa się
za niewłaściwe!
Wyklucza się odpowiedzialność za szkody osobowe i rzeczowe osób trzecich spowodowane
niewłaściwym użytkowaniem!
Produkt nie jest odpowiedni dla:
• Stosowania przez osoby (w tym dzieci) o ograniczonych możliwościach fizycznych, sensorycz-
nych lub umysłowych lub z brakiem doświadczenia i wiedzy.
• Dzieci (dzieci należy pouczyć, aby nie bawiły się urządzeniem).
DEFINICJE I OBJAŚNIENIA SYMBOLI
1. NIEBEZPIECZEŃSTWO: Słowo NIEBEZPIECZEŃSTWO, ewentualnie w połączeniu z symbolem,
wskazuje na sytuacje lub warunki bezpośrednio zagrażające życiu i zdrowiu.
2. OSTRZEŻENIE: Słowo OSTRZEŻENIE, ewentualnie w połączeniu z symbolem, wskazuje na
potencjalnie niebezpieczne sytuacje lub warunki dla życia i zdrowia.
3. PRZESTROGA: Słowo PRZESTROGA, ewentualnie w połączeniu z symbolem, jest używane do
wskazania sytuacji lub warunków, które mogą prowadzić do obrażeń.
4. UWAGA: Słowo UWAGA, ewentualnie w połączeniu z symbolem, odnosi się do sytuacji lub
stanów, które mogą prowadzić do szkód materialnych i/lub środowiskowych.

98
DMX
ITALIANO
POLSKI
ESPAÑOL
FRANCAIS
DEUTSCHENGLISH
Ten symbol wskazuje na zagrożenia, które mogą spowodować porażenie prądem.
Ten symbol oznacza niebezpieczne obszary lub niebezpieczne sytuacje.
Ten symbol oznacza zagrożenia spowodowane gorącymi powierzchniami.
Ten symbol oznacza zagrożenia powodowane przez intensywne źródła światła.
Ten symbol oznacza urządzenie, w którym nie ma części wymienianych przez użyt-
kownika.
Ten symbol oznacza dodatkowe informacje na temat działania produktu.
INSTRUKCJE BEZPIECZEŃSTWA
ZAGROŻENIE:
1. Nie otwierać ani nie modyfikować urządzenia.
2. Jeśli urządzenie przestanie działać prawidłowo, jeśli do jego wnętrza dostaną się
płyny lub przedmioty lub jeśli zostanie ono uszkodzone w jakikolwiek inny sposób,
należy je natychmiast wyłączyć i odłączyć od zasilania. Urządzenie może być
naprawiane wyłącznie przez autoryzowanych serwisantów.
3. W przypadku urządzeń klasy ochrony 1 przewód ochronny musi być prawidłowo
podłączony. Nigdy nie odłączać przewodu ochronnego. Urządzenia klasy ochrony 2
nie posiadają przewodu ochronnego.
4. Upewnić się, że przewody pod napięciem nie są zagięte lub w inny sposób uszko-
dzone mechanicznie.
5. Nigdy nie należy omijać bezpiecznika urządzenia.
OSTRZEŻENIE!
1. Urządzenie nie może być używane, jeśli wykazuje wyraźne oznaki uszkodzenia.
2. Urządzenie może być instalowane wyłącznie w stanie beznapięciowym.
3. Jeśli kabel zasilający urządzenia jest uszkodzony, nie należy używać urządzenia.
4. Kable zasilające podłączone na stałe mogą być wymieniane tylko przez wykwalifi-
kowany personel.

99
DMX DEUTSCHFRANCAIS
ESPAÑOL ENGLISH
ITALIANO POLSKI
UWAGA:
1. Nie używać urządzenia, jeżeli było narażone na duże wahania temperatury (np. po
transporcie). Wilgoć i kondensacja mogą uszkodzić urządzenie. Urządzenie należy
włączać dopiero wtedy, gdy osiągnie temperaturę pokojową.
2. Upewnić się, że napięcie i częstotliwość sieci zasilającej odpowiadają wartościom
podanym na urządzeniu. Jeżeli urządzenie posiada przełącznik wyboru napięcia,
nie należy podłączać urządzenia, dopóki nie zostanie on prawidłowo ustawiony.
Stosować tylko odpowiednie kable zasilające.
3. Aby odłączyć urządzenie od sieci na wszystkich biegunach, nie wystarczy nacisnąć
włącznik/wyłącznik na urządzeniu.
4. Upewnić się, że zastosowany bezpiecznik odpowiada typowi podanemu na urzą-
dzeniu.
5. . Upewnić się, że podjęto odpowiednie środki przeciwko przepięciu (np. uderzeniu
pioruna).
6. W urządzeniach z przyłączem Power Out należy przestrzegać wartości podanego
maksymalnego prądu wyjściowego. Należy upewnić się, że całkowity pobór prądu
wszystkich podłączonych urządzeń nie przekracza podanej wartości.
7. Podłączane kable sieciowe należy wymieniać tylko na oryginalne.
ZAGROŻENIE:
1. Niebezpieczeństwo uduszenia! Plastikowe torby i małe części muszą być prze-
chowywane poza zasięgiem osób (w tym dzieci) o ograniczonych zdolnościach
fizycznych, sensorycznych lub umysłowych.
2. Niebezpieczeństwo upadku! Proszę upewnić się, że urządzenie jest bezpiecznie
zamontowane i nie spadnie. Należy używać wyłącznie odpowiednich stojaków lub
uchwytów (szczególnie w przypadku instalacji stałych). Upewnić się, że akcesoria
są prawidłowo zamontowane i zabezpieczone. Zapewnić przestrzegania obowiązu-
jących przepisów bezpieczeństwa.
OSTRZEŻENIE!
1. Urządzenie należy używać tylko zgodnie z przeznaczeniem.
2. Urządzenie należy użytkować wyłącznie z akcesoriami zalecanymi i przeznaczony-
mi przez producenta.
3. Podczas instalacji należy przestrzegać przepisów bezpieczeństwa obowiązujących
w Państwa kraju.
4. Po podłączeniu urządzenia należy sprawdzić wszystkie trasy kabli, aby uniknąć
uszkodzeń lub wypadków, np. z powodu ryzyka potknięcia się.
5. Proszę zawsze przestrzegać podanej minimalnej odległości od normalnie łatwopal-
nych materiałów! Jeśli nie jest to wyraźnie określone, minimalna odległość wynosi
0,3 m.
6. Należy zawsze przestrzegać minimalnej odległości od oświetlanej powierzchni, któ-
rą można odczytać na urządzeniu!

100
DMX
ITALIANO
POLSKI
ESPAÑOL
FRANCAIS
DEUTSCHENGLISH
PRZESTROGA!
1. W przypadku ruchomych elementów, takich jak wsporniki montażowe lub inne
ruchome elementy, istnieje możliwość zakleszczenia.
2. W przypadku urządzeń z elementami napędzanymi silnikiem istnieje ryzyko obra-
żeń spowodowanych ruchem urządzenia. Nagły ruch urządzenia może wywołać
reakcje szokowe.
3. Powierzchnia obudowy urządzenia może się bardzo nagrzewać podczas regularnej
pracy. Upewnić się, że przypadkowe dotknięcie obudowy nie jest możliwe. Przed
demontażem, pracami konserwacyjnymi, ładowaniem itp. należy zawsze odczekać,
aż lampa wystarczająco ostygnie.
UWAGA:
1. Nie należy instalować ani używać urządzenia w pobliżu grzejników, akumulatorów,
pieców lub innych źródeł ciepła. Należy zadbać o to, aby urządzenie było zawsze
zainstalowane w taki sposób, aby było wystarczająco chłodzone i nie mogło się
przegrzać.
2. W pobliżu urządzenia nie należy umieszczać żadnych źródeł zapłonu, takich jak
palące się świece.
3. Nie wolno zakrywać otworów wentylacyjnych i blokować wentylatorów.
4. Do transportu należy używać oryginalnego opakowania lub opakowania dostarczo-
nego przez producenta.
5. Unikać wstrząsów i uderzeń w urządzenie.
6. Należy przestrzegać stopnia ochrony IP oraz warunków otoczenia, takich jak tem-
peratura i wilgotność, zgodnie ze specyfikacją.
7 Urządzenia mogą być stale rozwijane. W przypadku rozbieżnych informacji dotyczących
warunków pracy, wydajności lub innych właściwości urządzenia pomiędzy instrukcją
obsługi a etykietą urządzenia, pierwszeństwo mają zawsze informacje na urządzeniu.
8. Urządzenie nie nadaje się do pracy w klimacie tropikalnym oraz do pracy na wyso-
kości powyżej 2000 m n.p.m.
9. O ile nie jest to wyraźnie określone, urządzenie nie nadaje się do pracy w warun-
kach morskich.
PRZESTROGA! WAŻNE INFORMACJE DOTYCZĄCE PRODUKTÓW OŚWIETLENIO-
WYCH!
1. Nigdy nie należy patrzeć bezpośrednio w wiązkę światła, nawet przez krótki czas.
2. Nigdy nie należy patrzeć w wiązkę światła za pomocą urządzeń optycznych, takich jak
szkło powiększające.
3. Efekty stroboskopowe mogą powodować napady padaczkowe u podatnych osób!

101
DMX DEUTSCHFRANCAIS
ESPAÑOL ENGLISH
ITALIANO POLSKI
TRANSMISJA SYGNAŁU DROGĄ RADIOWĄ (NP. W-DMX LUB SYSTEMY RADIOWE
AUDIO):
Jakość i wydajność transmisji sygnału bezprzewodowego zasadniczo zależy od
warunków otoczenia.
Następujące czynniki mogą wpływać na zasięg i stabilność sygnału:
Ekranowanie (np. mur, konstrukcje metalowe, woda)
Duże natężenie ruchu radiowego (np. silne bezprzewodowe sieci LAN)
Zakłócenia
Promieniowanie elektromagnetyczne (np. ekrany wideo LED, ściemniacze)
Wszystkie specyfikacje zasięgu odnoszą się do zastosowania w polu swobodnym z
kontaktem wzrokowym i bez zakłóceń!
Działanie systemów przesyłowych podlega oficjalnym regulacjom. Mogą się one
różnić w zależności od regionu i muszą zostać sprawdzone przez operatora przed
użyciem (np. częstotliwość radiowa i moc transmisji).
OSTRZEŻENIE: Urządzenia z bezprzewodową transmisją sygnału nie nadają się do
użytku w obszarach wrażliwych, w których działanie fal radiowych może prowadzić
do potencjalnych szkodliwych skutków. Obejmują one:
• Szpitale, ośrodki zdrowia lub inne placówki opieki zdrowotnej, które zapewniają
leczenie pacjentów przez wykwalifikowany personel i sprzęt.
• Obszary niebezpieczne klasy I, II i III
• Obszary zastrzeżone
• Obiekty wojskowe
• Samoloty lub pojazdy
• Obszary, w których zabronione jest używanie telefonów komórkowych
TRANSMISJA PRZEZ W-DMX
OSTRZEŻENIE: Ogólnie rzecz biorąc, bezprzewodowa transmisja DMX nie może
być używana do zastosowań związanych z czynnikami bezpieczeństwa, które mogą
spowodować obrażenia ciała lub uszkodzenie mienia w przypadku awarii.
Dotyczy to w szczególności ruchomych konstrukcji scen lub trawersów, silników/pod-
nośników sterowanych przez DMX lub urządzeń podnoszących do obsługi podnośni-
ków platformowych sterowanych przez DMX, systemów hydraulicznych lub porówny-
walnych ruchomych elementów.
Ponadto, bezprzewodowa transmisja DMX nie może być używana do wyzwalania
płomieni lub urządzeń pirotechnicznych, efektów wybuchowych lub do sterowania
efektami gazowymi lub płynnymi. Należą do nich armatki CO2, miotacze konfetti,
efekty wodne itp.

102
DMX
ITALIANO
POLSKI
ESPAÑOL
FRANCAIS
DEUTSCHENGLISH
PRZESTROGA! POTENCJALNE USZKODZENIE PRZEZ ZEWNĘTRZNE ŹRÓDŁA
ŚWIATŁA!
Promieniowanie słoneczne, promieniowanie laserowe i wiązki światła z innych reflek-
torów mogą uszkodzić obudowę i elementy wewnętrzne, takie jak filtry, gobo i koła
kolorów, silniki, kable, paski itp. oraz źródła światła!
Proszę nie wystawiać urządzenia, a zwłaszcza otworu obiektywu, na bezpośrednie
działanie promieni słonecznych, promieniowania laserowego i wiązek światła z
innych reflektorów podczas rozpakowywania, instalacji, długotrwałego nieużywa-
nia i eksploatacji! Otwór obiektywu należy zawsze kierować w stronę podłogi, gdy
urządzenie nie jest używane! W tym celu należy również użyć funkcji Sun Protection,
którą można aktywować za pomocą komendy DMX (patrz kanał Device Settings
w tabeli DMX). Zintegrowany czujnik żyroskopowy wykrywa pozycję użytkowania.
Uszkodzenia spowodowane przez zewnętrzne źródła światła nie są objęte gwarancją
producenta!
UWAGI DOTYCZĄCE MOBILNYCH URZĄDZEŃ WEWNĘTRZNYCH
1. Działanie tymczasowe! Sprzęt eventowy jest zazwyczaj przeznaczony wyłącznie do
pracy tymczasowej.
2. Ciągła eksploatacja lub stała instalacja może pogorszyć funkcjonowanie urządzenia
i spowodować jego przedwczesne starzenie się.
DOSTAWA WLICZONA W CENĘ
Wyjąć produkt z opakowania i usunąć wszystkie materiały opakowaniowe.
Proszę sprawdzić kompletność i integralność dostawy i powiadomić
Proszę skontaktować się z partnerem handlowym natychmiast po zakupie, jeśli dostawa nie jest
kompletna lub
jest uszkodzony. Opakowanie zawiera:
X1 x ruchoma głowica LED OPUS SP5 PLUS
X2 x wspornik montażowy Omega
X1x Przewód zasilający
XInstrukcja Uzytkowania

103
DMX DEUTSCHFRANCAIS
ESPAÑOL ENGLISH
ITALIANO POLSKI
WPROWADZENIE
SERIA OPUS Z RUCHOMĄ GŁOWICĄ
CLOSP5PLUS
FUNKCJE KONTROLNE:
34-kanałowe i 50-kanałowe sterowanie DMX (CLOSP5PLUS)
27-kanałowe i 33-kanałowe sterowanie DMX (CLOSP5PLUS z opcjonalnym modułem koła anima-
cji CLOSP5AM)
Art-Net
sACN
W-DMX™
Obsługa RDM
Praca w trybie Master/Slave
Funkcje w trybie Standalone
CECHY:
Wysokowydajna dioda LED o mocy 500 W. Moduł migawki ramowej. - Mieszanie kolorów CMY +
CTO Koło kolorów z 7 wspaniałymi kolorami + kolory otwarte i podzielone. Koło gobo 1 z 8 stałymi
gobosami + otwarte. Koło gobo 2 z 7 obrotowymi gobosami + otwarte (gobosy wymienne). 2
obrotowe pryzmaty. Funkcja ustawiania ostrości i zoomu za pośrednictwem DMX. Matowy filtr
i przysłona Strobe Silniki obrotu i pochylenia z 16-bitową rozdzielczością. Zasilanie bateryjne.
Wyświetlacz dla ustawień niezależnych od sieci. Automatyczna korekta położenia. Wentylatory
z regulacją temperatury. 3- i 5-pinowe złącza DMX. Połączenia sieciowe RJ45. Bezprzewodowy
DMX Złącza sieciowe IN i OUT Neutrik powerCON TRUE1. w zestawie 2 uchwyty montażowe Ome-
ga. Napięcie robocze 100-240 V AC. Pobór mocy 800 W. Reflektor posiada standard RDM (Remote
Device Management). Zdalne zarządzanie urządzeniami umożliwia użytkownikowi przeglądanie
stanu i konfiguracji terminali RDM za pośrednictwem kontrolera obsługującego RDM.
DODATKOWE WŁAŚCIWOŚCI
Ruchoma głowica CLOSP5P jest wyposażona w 4-kierunkowy moduł migawki kadrującej. Moduł
4-kierunkowej migawki ramkowej można zamienić z modułem koła animacji CLOSP5AM. Opro-
gramowanie i odpowiednie tryby DMX są aktualizowane automatycznie.

104
DMX
ITALIANO
POLSKI
ESPAÑOL
FRANCAIS
DEUTSCHENGLISH
PRZYŁĄCZA, ELEMENTY OBSŁUGI I WSKAŹNIKI
1 23
4 5
6
7
8
1 POWER IN
Gniazdo zasilania sieciowego Neutrik powerCON TRUE1. Napięcie robocze 100-240 V AC/50-60
Hz. W zestawie znajduje się odpowiedni kabel sieciowy z wtyczką powerCON TRUE1.
2 WYJŚCIE ZASILANIA
Gniazdo wyjścia sieciowego Neutrik powerCON TRUE1. Umożliwia zasilanie innych reflektorów
CAMEO. Należy upewnić się, że całkowity pobór mocy wszystkich urządzeń podłączonych do
urządzenia nie przekracza podanej wartości w amperach (A).
3 BEZPIECZNIK
Uchwyt bezpiecznika dla mikro bezpieczników 5 x 20 mm. WAŻNA UWAGA: Bezpiecznik należy
wymieniać wyłącznie na bezpiecznik tego samego typu i o takich samych parametrach. W przy-
padku ponownego zadziałania bezpiecznika należy skontaktować się z autoryzowanym centrum
serwisowym.
4 DMX IN
Męskie 3-pinowe i 5-pinowe gniazda XLR do podłączenia urządzenia sterującego DMX (np. kon-
soli DMX).
5 DMX OUT
Żeńskie 3-pinowe lub 5-pinowe gniazda XLR do wysyłania sygnału sterującego DMX.
6 NET IN
Złącze sieciowe RJ45 do podłączenia do sieci Art-Net lub sACN. Do konfiguracji sieci proszę
używać kabli CAT 5e lub lepszych.

105
DMX DEUTSCHFRANCAIS
ESPAÑOL ENGLISH
ITALIANO POLSKI
7 NET OUT
Złącze sieciowe RJ45 do podłączania dodatkowych urządzeń Art-Net lub sACN do sieci. Do konfi-
guracji sieci proszę używać kabli CAT 5e lub lepszych.
8 ANTENA DLA W-DMX
Antena do sterowania na W-DMX™ jest mocowana w czasie zakładania w położeniu środkowym
(= Betriebsposition).
9 CZUŁY NA NACISK WYŚWIETLACZ LCD Z PODŚWIETLENIEM
Dzięki wrażliwemu na nacisk wyświetlaczowi LC, urządzenie może być obsługiwane bezpośrednio
z wyświetlacza (kompatybilne z rękawicami). Wyświetlacz LCD pokazuje aktualnie aktywowany
tryb (wyświetlacz główny), pozycje menu w menu wyboru oraz wartość liczbową lub stan pracy w
niektórych pozycjach menu. Jeśli nie ma sygnału sterującego do urządzenia, wyświetlacz zaczyna
migać; miganie ustaje, gdy tylko pojawi się sygnał sterujący (DMX i praca slave, ArtNet i sACN).
10 DOTYKOWE ELEMENTY STERUJĄCE
MODE - Wielokrotne naciśnięcie przycisku MODE powoduje przejście o jeden poziom wyżej w
strukturze menu, do ekranu głównego.
UP i DOWN - Wybór poszczególnych pozycji menu w menu głównym (adres DMX, tryb
pracy itp.) oraz w podmenu.
ENTER - Zaczynając od ekranu głównego, proszę nacisnąć ENTER, aby wejść do menu główne-
go. W menu głównym proszę nacisnąć ENTER, aby przejść do poziomu menu, w którym można
zmieniać wartości. Proszę potwierdzić zmiany wartości naciskając ENTER.
LEWY i PRAWY X - Proszę użyć paneli sterowania, aby zmienić wartość elementu menu,
takiego jak adres DMX, zgodnie z życzeniem.
11 INTERFEJS USB
Interfejs USB do aktualizacji oprogramowania sprzętowego urządzenia. W menu serwisowym
proszę ustawić status aktualizacji USB na ON. Jeśli jest dostępne, proszę pobrać najnowsze
oprogramowanie sprzętowe ze strony produktu pod adresem www.cameolight.com, rozpakować
je i skopiować pliki do folderu bez znaków specjalnych w pamięci USB. Proszę odłączyć Moving
Head od zasilania i wszystkich połączeń wejściowych (DMX / Ethernet), podłączyć pamięć USB
9
10
11

106
DMX
ITALIANO
POLSKI
ESPAÑOL
FRANCAIS
DEUTSCHENGLISH
do interfejsu USB i ponownie podłączyć Moving Head do zasilania. Pamięć USB zostanie automa-
tycznie rozpoznana i pokazana na wyświetlaczu. Teraz proszę przejść do odpowiedniego folderu w
pamięci USB i potwierdzić przyciskiem ON. Rozpoczyna się procedura aktualizacji. Proszę nie wyj-
mować pamięci USB ani nie odłączać Moving Head od zasilania podczas procedury aktualizacji.
Wyświetlacz zasilany bateryjnie można aktywować, nawet jeśli urządzenie nie jest podłączone
do sieci elektrycznej. Aby to zrobić, proszę nacisnąć i przytrzymać MODE przez około 3 sekundy.
Można teraz uzyskać dostęp do informacji o urządzeniu, aby zmienić i zapisać ustawienia sys-
temowe bez podłączenia do sieci. W tym przypadku zewnętrzne sterowanie reflektorem nie jest
aktywowane. Z tego powodu wyświetlacz pokazuje, że nie ma sygnału DMX, nawet jeśli sygnał
DMX jest dostępny w urządzeniu.
12 PAN LOCK
Mechaniczne urządzenie blokujące używane do zapobie-
gania obracaniu się głowicy w kierunku poziomym pod-
czas transportu. Proszę odłączyć urządzenie od zasilania,
przesunąć głowicę równolegle do podstawy (4 możliwe
pozycje) i popchnąć dźwignię blokującą w kierunku osi
obrotu panewki, aby zablokować ją w pozycji. Proszę
odblokować urządzenie przed uruchomieniem.
13 TILT LOCK
Mechaniczne urządzenie blokujące używane do zapobie-
gania obracaniu się głowicy w kierunku pionowym pod-
czas transportu (7 pozycji). Odłączyć urządzenie od sieci
i przesunąć dźwignię blokującą w kierunku pionowej osi
obrotu, przesuwając głowicę urządzenia w pionie, aż do
znalezienia jednej z 7 pozycji blokujących i zatrzaśnięcia
dźwigni blokującej (LOCK). Proszę odblokować urządze-
nie przed uruchomieniem.
13
12

107
DMX DEUTSCHFRANCAIS
ESPAÑOL ENGLISH
ITALIANO POLSKI
OBSŁUGA
UWAGI
Gdy tylko urządzenie zostanie prawidłowo podłączone do sieci, podczas
procesu uruchamiania i resetowania silnika na wyświetlaczu pojawi się
komunikat "Software Update Please Wait..." oraz logo Cameo z infor-
macją o modelu urządzenia. Po zakończeniu tego procesu reflektor jest
gotowy do pracy, a wybrany wcześniej tryb zostanie aktywowany. Z jed-
nej strony, reflektor jest obsługiwany za pomocą dotykowych paneli ste-
rowania obok wyświetlacza; z drugiej strony, sam wyświetlacz wrażliwy
na nacisk (kompatybilny z rękawicami) może być używany do dotarcia
do wszystkich pozycji menu i intuicyjnego wprowadzania ustawień
zgodnie z potrzebami. Informacje o tym, który element sterujący na
wyświetlaczu i który panel sterujący obok wyświetlacza mają tę samą
funkcję, można znaleźć w sąsiedniej tabeli. Poniżej opisano obsługę za
pomocą paneli sterowania obok wyświetlacza.
WYŚWIETLACZ GŁÓWNY
Górna linia wyświetlacza pokazuje, czy i jaki sygnał sterujący jest obecny w urządzeniu, linia
poniżej pokazuje aktualnie aktywowany tryb pracy (DMX Standard / Extended, Static, Auto, Slave),
a adres startowy DMX lub odpowiedni tryb pracy (w przykładzie adres startowy DMX 001) jest wy-
raźnie widoczny pośrodku. Gdy tylko sygnał sterujący zostanie przerwany, znaki na wyświetlaczu
zaczną migać, a za napisem "Signal" w górnym wierszu pojawi się napis "None" (brak sygna-
łu). Wyświetlacz można obrócić o 180°, dotykając dotykowego panelu sterowania W DÓŁ; jeśli
wyświetlacz jest już obrócony o 180°, proszę dotknąć panelu sterowania W GÓRĘ, aby przywrócić
standardowy obraz. Wyświetlacz można również obrócić o 180°, naciskając "symbol dachu" na
wyświetlaczu czułym na nacisk.
Wyświetlanie sygnału wejściowego
Tryb DMX lub tryb pracy
Adres startowy DMX lub tryb pracy
Informacje o urządzeniu
model Powrót do ekranu głównego =
w dowolnej pozycji na wyświetlaczu lub
Proszę nacisnąć ENTER
Wyświetlanie stanu baterii
Obrót wyświetlacza o 180°
Menu główne

108
DMX
ITALIANO
POLSKI
ESPAÑOL
FRANCAIS
DEUTSCHENGLISH
CONTROL MENU (Control)
USTAWIANIE ADRESU STARTOWEGO DMX (DMX Address)
Zaczynając od ekranu głównego, proszę nacisnąć ENTER, aby wejść do menu głównego. Za
pomocą przycisków i proszę wybrać menu Sterowanie i nacisnąć ENTER. Proszę zastosować UP
i DOWN, aby wybrać pozycję menu "DMX Address" i potwierdzić wciskając ENTER. Teraz proszę
ustawić żądany adres startowy DMX za pomocą paneli sterowania LEFT i RIGHT i potwierdzić
przyciskiem ENTER (najwyższa wartość zależy od aktywowanego trybu DMX). Proszę nacisnąć
MODE dwa razy, aby powrócić do głównego wyświetlacza, wybrany adres startowy DMX jest teraz
wyświetlany dużymi literami na wyświetlaczu, gdy tryb DMX jest aktywny.
SET DMX MODE (DMX Mode)
Zaczynając od ekranu głównego, proszę nacisnąć ENTER, aby wejść do menu głównego. Za
pomocą przycisków i proszę wybrać menu Sterowanie i nacisnąć ENTER. Proszę zastosować UP i
DOWN, aby wybrać pozycję menu "DMX Mode" i potwierdzić wciskając ENTER. Proszę ponownie
wybrać żądany tryb DMX za pomocą przycisków UP i DOWN i potwierdzić wybór przyciskiem
ENTER. Proszę wcisnąć MODE 2x, aby powrócić do głównego wyświetlacza, wybrany tryb DMX
jest teraz aktywny. Tabele z przypisaniem kanałów dla różnych trybów DMX można znaleźć w
niniejszej instrukcji w sekcji DMX CONTROL.
USTAWIENIA SIECI (Network)
Zaczynając od ekranu głównego, proszę nacisnąć ENTER, aby wejść do menu głównego. Za
pomocą przycisków i proszę wybrać menu Sterowanie i nacisnąć ENTER. Proszę zastosować UP i
DOWN, aby wybrać pozycję menu "Network" i potwierdzić naciskając ENTER. Aby uzyskać infor-
macje na temat ustawień sieciowych, proszę zapoznać się z poniższą tabelą. Proszę potwierdzić
wszystkie zmiany ustawień sieciowych przyciskiem ENTER.

109
DMX DEUTSCHFRANCAIS
ESPAÑOL ENGLISH
ITALIANO POLSKI
Network
Network
Input
Aktywacja/dezaktywacja
wejścia sieciowego
OFF Wejście sieciowe wyłączone
ON Aktywowane wejście sieciowe
Protocol Protokół sieciowy ArtNET Protokół ArtNet
sACN protokół sACN
Address
Universe 1 - 256,
Ustawianie adresu IP i
maski podsieci
Universe
000 - 255
000 do 255. Zmienić wartość za
pomocą przycisków W LEWO i W
PRAWO, potwierdzić przyciskiem
ENTER.
IP Address
Wybrać blok za pomocą LEWO
i PRAWO, zmienić wartość za
pomocą GÓRA i DÓŁ, potwierdzić
za pomocą ENTER.
IP Subnet
Mask
Wybrać blok za pomocą LEWO
i PRAWO, zmienić wartość za
pomocą GÓRA i DÓŁ, potwierdzić
za pomocą ENTER.
DMX Out Wyjście sygnału sieciowego
przez DMX OUT
OFF Proszę nie wysyłać sygnału
ON Sygnał wyjściowy
USTAWIENIA W-DMX (Wireless)
Zaczynając od ekranu głównego, proszę nacisnąć ENTER, aby wejść do menu głównego. Za
pomocą przycisków i proszę wybrać menu Sterowanie i nacisnąć ENTER. Proszę zastosować
UP i DOWN, aby wybrać pozycję menu "Wireless" i potwierdzić naciskając ENTER. Aby uzyskać
informacje na temat ustawień W-DMX, proszę zapoznać się z poniższą tabelą. Proszę potwierdzić
wszystkie zmiany ustawień przyciskiem ENTER.

110
DMX
ITALIANO
POLSKI
ESPAÑOL
FRANCAIS
DEUTSCHENGLISH
Wireless
W-DMX Off Dezaktywacja W-DMX
ON Aktywować W-DMX
Operating
(obecnie w wersji beta)
Receiver Moduł W-DMX skonfigurowany jako odbiornik
Transmitter Moduł W-DMX skonfigurowany jako nadajnik
Transmitting
(obecnie w wersji beta)
G3 Standard przekładni G3
G4s Standard transmisji G4S
Link Link
Parowanie z urządzeniami W-DMX. W-DMX musi być
włączony na wszystkich urządzeniach, a parowanie
z nadajnikiem musi być zresetowane (Receive Reset)
Unlink Rozparować wszystkie urządzenia
Receive Reset NO Nie resetować parowania nadajnika
YES Resetowanie parowania nadajnika
TRYBY SAMODZIELNE (Stand Alone)
Zaczynając od ekranu głównego, proszę nacisnąć ENTER, aby wejść do menu głównego. Za
pomocą przycisków i proszę wybrać menu Sterowanie i nacisnąć ENTER. Za pomocą przycisków
i , proszę wybrać pozycję menu "Stand Alone" i potwierdzić, naciskając przycisk ENTER. Teraz
proszę wybrać jeden z trzech trybów autonomicznych za pomocą przycisków i i potwierdzić
przyciskiem ENTER.
STANDALONE STATIC MODE (Static)
Tryb statyczny umożliwia regulację PAN, Tilt, Dimmer, Strobe, Colour Wheel i Gobo Wheel itp. bez-
pośrednio na urządzeniu z wartościami od 000 do 255, podobnie jak w przypadku jednostki steru-
jącej DMX. W ten sposób można stworzyć indywidualną scenę bez dodatkowego sterownika DMX.
Po wybraniu trybu pracy "Statyczny", zgodnie z wcześniejszym opisem w części "TRYBY PRACY
SAMODZIELNEJ", można dokonać ustawień zgodnie z potrzebami. Pozycje podmenu odpowiadają
kanałom od 1 do 50 w 50-kanałowym rozszerzonym trybie DMX (patrz KONTROLA DMX, wybierz
pozycję podmenu za pomocą GÓRA i DÓŁ, zmień wartość za pomocą LEWO i PRAWO, potwierdź
za pomocą ENTER). Proszę nacisnąć MODE, aby powrócić do ekranu głównego.

111
DMX DEUTSCHFRANCAIS
ESPAÑOL ENGLISH
ITALIANO POLSKI
TRYB PRACY SAMODZIELNEJ PROGRAMY AUTO (Auto Prog)
Każdy z 4 różnych programów automatycznych (Program 1 - 4) składa się ze stałych zaprogra-
mowanych ruchów głowicy, zmian gobo i kolorów itp. prędkość pracy można ustawić osobno.
Jak opisano wcześniej w sekcji "TRYBY PRACY SAMODZIELNEJ", proszę wybrać tryb pracy Auto,
potwierdzić przyciskiem ENTER, wybrać żądany program Auto za pomocą przycisków UP i DOWN,
potwierdzić przyciskiem ENTER, a następnie zmienić wartość prędkości od 000 do 100 zgodnie
z życzeniem za pomocą przycisków LEFT i RIGHT. Proszę potwierdzić przyciskiem ENTER. Proszę
nacisnąć MODE, aby powrócić do ekranu głównego.
TRYB SLAVE (Slave)
Tryb pracy slave wybiera się w sposób opisany wcześniej w punkcie "TRYBY PRACY SAMODZIEL-
NEJ". Połączyć urządzenie podrzędne i urządzenie nadrzędne (ten sam model, ta sama wersja
oprogramowania) za pomocą kabla DMX (master DMX OUT - slave DMX IN) i aktywować jeden z
trybów autonomicznych Auto lub Static w urządzeniu nadrzędnym. Jednostka podrzędna będzie
teraz podążać za jednostką nadrzędną. Proszę nacisnąć MODE, aby powrócić do ekranu główne-
go.
SYSTEM SETTINGS (Settings)
Zaczynając od ekranu głównego, proszę nacisnąć ENTER, aby wejść do menu głównego. Za po-
mocą przycisków GÓRA i DÓŁ proszę wybrać menu ustawień systemu i nacisnąć przycisk ENTER.
Spowoduje to przejście do podmenu w celu ustawienia pozycji podmenu (patrz tabela, wybierz
za pomocą UP i DOWN, potwierdź za pomocą ENTER, zmień wartość lub status za pomocą UP i
DOWN, potwierdź za pomocą ENTER).

112
DMX
ITALIANO
POLSKI
ESPAÑOL
FRANCAIS
DEUTSCHENGLISH
Settings (pogrubione = ustawienie fabryczne)
Display Display
Settings
Reverse
OFF Brak rotacji wyświetlacza
ON
Wyświetlacz jest obracany o
180° (np. w przypadku montażu
nad głową)
Backlight
OFF
Dezaktywacja podświetlenia wy-
świetlacza po ok. 30 sekundach
bezczynności
ON Stale włączone podświetlenie
wyświetlacza
DMX Fail
Stan pracy, gdy
sygnał DMX jest
przerwany
Black Aktywuje zaciemnienie
Hold Zachowywane jest ostatnie polecenie
Auto aktywuje tryb automatyczny
Dimmer
Curve
Wybór
Dimmer curve
Linear Intensywność światła wzrasta liniowo
wraz z wartością DMX
Exponential
Intensywność światła może być
precyzyjnie regulowana przy niższych
wartościach DMX i szeroko regulowa-
na przy wyższych wartościach DMX
Logarithmic
Intensywność światła można regulo-
wać w szerokim zakresie przy niższych
wartościach DMX i precyzyjnie przy
wyższych wartościach DMX
Dimmer Curve
Intensywność światła może być
precyzyjnie regulowana przy niższych
i wyższych wartościach DMX i szeroko
regulowana przy średnich wartościach
DMX
LED
Frequency
Konfiguracja często-
tliwości PWM diod
LED
650Hz, 1530Hz,
3600Hz, 12KHz,
25KHz
Pan / Tilt Ustawienia głowicy
urządzenia
Pan Reverse OFF Nie odwraca kierunku obrotu
ON Odwraca kierunek panewki
Tilt Reverse OFF Nie odwraca kierunku nachy-
lenia
ON Odwraca kierunek pochylenia
Pan Angle 630 Kąt obrotu 630°
540 Kąt obrotu 540°
Feedback
OFF Automatyczna korekta położenia
jest wyłączona
ON Automatyczna korekta położenia
jest włączona

113
DMX DEUTSCHFRANCAIS
ESPAÑOL ENGLISH
ITALIANO POLSKI
B.O. Moving
Automatyczne
zaciemnienie dla
ruch głowy
OFF Brak zaciemnienia podczas ruchu
głowy
ON Utrata przytomności podczas ruchu
głowy
Fixture Type Typ urządzenia: Profile Module
Spot Module
Fan Sterowanie
wentylatorem
Auto Automatyczne sterowanie wen-
tylatorem
Fan Off Dezaktywowany wentylator o
znacznie zmniejszonej jasności
Constant Low
Stała niska prędkość wentyla-
tora ze zmniejszoną jasnością,
jeśli to konieczne
Constant Mid
Stała średnia prędkość wenty-
latora ze zmniejszoną jasnością,
jeśli to konieczne
Constant High Stała wysoka prędkość wenty-
latora
KRZYWE ŚCIEMNIANIA
liniowy
Wartość DMX
Natężenie
światła
Exponential
Wartość DMX
Natężenie
światła
Logarithmic
Wartość DMX
Natężenie
światła
S-curve
Wartość DMX
Natężenie
światła
SERWIS
Zaczynając od ekranu głównego, proszę nacisnąć ENTER, aby wejść do menu głównego. Za
pomocą przycisków GÓRA i DÓŁ proszę wybrać menu Serwis i nacisnąć przycisk ENTER.
Spowoduje to przejście do podmenu umożliwiającego edycję pozycji podmenu (wybór za pomocą
przycisków UP i DOWN, potwierdzenie przyciskiem ENTER, zmiana wartości za pomocą przyci-
sków LEFT i RIGHT, potwierdzenie przyciskiem ENTER).
Calibrate - kalibracja komponentów przy użyciu wartości od 000 do 255 (hasło 050).
Test Manual - ręczne testowanie komponentów z wartościami od 000 do 255.

114
DMX
ITALIANO
POLSKI
ESPAÑOL
FRANCAIS
DEUTSCHENGLISH
Reset Moror - resetowanie silników. All = Wszystkie silniki, Pan&Tilt = Silniki Pan i Tilt,
Head Only = Silniki w głowicy urządzenia.
USB Update - aktualizacja oprogramowania sprzętowego przez interfejs USB. OFF = zablokowa-
nie aktualizacji oprogramowania sprzętowego przez interfejs USB. ON = Zezwól na aktualizację
oprogramowania sprzętowego przez interfejs USB.
Factory Reset - Przywracanie ustawień fabrycznych.
INFORMACJE O URZĄDZENIU (Info)
Zaczynając od ekranu głównego, proszę nacisnąć ENTER, aby wejść do menu głównego. Za
pomocą przycisków i proszę wybrać menu informacyjne Info i nacisnąć ENTER.
Spowoduje to przejście do podmenu odczytu informacji o urządzeniu (proszę wybrać za pomocą i,
potwierdzić za pomocą ENTER).
System Info
Error Info
Wyświetlacz błędu funkcji Jeśli usterka nie zostanie usunięta przez zresetowanie
lub ponowne uruchomienie, uszkodzone urządzenie musi zostać naprawione przez
autoryzowane centrum serwisowe.
Tempera-
ture
Wyświetlacz tempe-
ratury
Head xx°C/F°
Base xx°C/F°
Unit Wyświetlanie temperatury w stopniach Celsju-
sza lub Fahrenheita
Runtime Wyświetla czas pracy
Total Time Wyświetla całkowity czas pracy w godzinach
Current Time Wyświetla bieżący czas pracy
Time PW
Proszę wprowadzić hasło do resetowania
bieżącego czasu pracy
(Time PW = 050)
Clean Current Resetuje bieżący czas pracy
Firmware
Wyświetlanie opro-
gramowania sprzęto-
wego komponentów
od 1U do 8U
Vx.xx
Model
Info
Informacje o wersji
urządzenia
Profile
Module Moduł z roletą kadrującą
Spot Module Moduł z kołem animacji

115
DMX DEUTSCHFRANCAIS
ESPAÑOL ENGLISH
ITALIANO POLSKI
KONFIGURACJA I INSTALACJA
Dzięki zintegrowanym gumowym nóżkom reflektor można umieścić w odpowiednim miejscu na
twardej i równej powierzchni. Montaż na kratownicy można wykonać za pomocą dwóch wspor-
ników Omega, które są przymocowane do podstawy urządzenia (A). w zestawie znajdują się 2 x
wsporniki Omega. Odpowiednie klamry do kratownic są dostępne jako opcja. Proszę upewnić się,
że połączenia są trwałe i przymocować reflektor do uchwytu zabezpieczającego (B) za pomocą
odpowiedniej linki zabezpieczającej.
WAŻNA UWAGA: Montaż napowietrzny wymaga dużego doświadczenia, w tym
obliczania limitów obciążenia roboczego, stosowanych materiałów instalacyjnych
i regularnych kontroli bezpieczeństwa wszystkich materiałów instalacyjnych i os-
przętu. Jeśli nie posiadają Państwo takich kwalifikacji, nie należy podejmować prób
samodzielnej instalacji. Proszę zwrócić się do wykwalifikowanego specjalisty.
B
BA
A
PIELĘGNACJA, KONSERWACJA I NAPRAWA
Aby zapewnić długotrwałe i prawidłowe funkcjonowanie urządzenia, należy je regularnie czyścić
i w razie potrzeby konserwować. Wymóg konserwacji zależy od intensywności użytkowania i
środowiska, w którym jest używany. Generalnie zalecamy kontrolę wzrokową przed każdym
uruchomieniem. Ponadto zalecamy przeprowadzanie wszystkich wymienionych poniżej czynności
konserwacyjnych raz na 500 godzin pracy lub, w przypadku mniejszej intensywności użytkowania,
najpóźniej po roku. Roszczenia gwarancyjne mogą być ograniczone w przypadku wad wynikają-
cych z nieodpowiedniej konserwacji.
PIELĘGNACJA (przeprowadzana przez użytkownika)
OSTRZEŻENIE! Przed przystąpieniem do jakichkolwiek czynności konserwacyjnych
należy odłączyć zasilanie i, jeśli to możliwe, wszystkie połączenia urządzenia.

116
DMX
ITALIANO
POLSKI
ESPAÑOL
FRANCAIS
DEUTSCHENGLISH
UWAGA: Niewłaściwe obchodzenie się z urządzeniem może doprowadzić do jego
uszkodzenia, a nawet zniszczenia.
1. Powierzchnie obudowy należy czyścić czystą, wilgotną szmatką. Proszę upewnić się, że do
urządzenia nie przedostanie się wilgoć.
2. Wloty i wyloty powietrza muszą być regularnie czyszczone z kurzu i brudu. Jeśli używane jest
sprężone powietrze, należy upewnić się, że urządzenie nie zostanie uszkodzone (np. w takim
przypadku należy zablokować wentylatory).
3. Należy regularnie czyścić przewody i styki wtyczek oraz usuwać kurz i brud.
4. Zasadniczo nie wolno stosować żadnych środków czyszczących ani ściernych, w przeciwnym
razie wykończenie powierzchni może zostać uszkodzone.
5. Urządzenia muszą być przechowywane w suchym miejscu i chronione przed kurzem i brudem.
KONSERWACJA I NAPRAWA (tylko przez wykwalifikowany personel)
NIEBEZPIECZEŃSTWO! W urządzeniu znajdują się elementy pod napięciem. Nawet
po odłączeniu zasilania sieciowego w urządzeniu może nadal występować napięcie
szczątkowe, na przykład z powodu naładowanych kondensatorów.
UWAGA: W urządzeniu nie ma podzespołów, które mogą być serwisowane przez
użytkownika.
UWAGA: Prace konserwacyjne i naprawcze mogą być wykonywane wyłącznie przez
wykwalifikowany personel specjalistyczny autoryzowany przez producenta. W razie
wątpliwości należy skonsultować się z producentem.
UWAGA: Nieprawidłowo wykonane prace konserwacyjne mogą mieć wpływ na rosz-
czenia gwarancyjne.
DANE TECHNICZNE
Numer produktu: CLOSP5PLUS
Typ produktu: Ruchome światło LED
Typ: Ruchoma głowa
Liczba lamp: 1
Typ lampy: Wysokowydajna dioda LED o mocy 500 W
Temperatura barwowa
lamp: Zimna biel 6600K
CRI: >70
Częstotliwość PWM LED: 650Hz, 1530Hz, 3600Hz, 12kHz, 25kHz (regulowane)
Funkcja mieszania
kolorów: CMY + CTO

117
DMX DEUTSCHFRANCAIS
ESPAÑOL ENGLISH
ITALIANO POLSKI
Liczba kolorów:
Koło kolorów: 7 + kolory otwarte i dzielone
Liczba gobosów: 15 + otwarte (8 stałych + 7 obrotowych)
Rozmiar gobo: Ø zewnętrzna 22,9 mm (-0,2 / +0,1 mm), Ø motywu 19 mm, grubość
materiału 1,1 mm (szkło)
Kąt wiązki 6° - 42°
Wejście DMX: 3-pin XLR męski
5-pin XLR męski
Wyjście DMX: 3-stykowe XLR żeńskie
5-stykowe XLR żeńskie
Połączenia sieciowe: Wejście i wyjście RJ45 (z możliwością blokady)
DMX mode: 34-kanałowy, 50-kanałowy
Funkcje DMX
Pan/Tilt, Pan/Tilt fine, Dimmer, Dimmer fine, Multifunctional strobe,
Cyan, Cyan fine, Magenta, Magenta fine, Yellow, Yellow fine, CTO,
CTO fine, Colour wheel, Colour wheel rotation, Gobo wheel 1, Gobo 1
rotation, Gobo 1 rotation fine, Gobo wheel 1 rotation, Gobo 1 shake,
Gobo wheel 2, Gobo wheel 2 rotation, Gobo 2 shake, Zoom, Zoom
fine, Focus, Focus fine, Iris, Prism, Prism Rotation, Frost, Blade 1 - 4,
Blade 1 - 4 fine, Shape Rotation, Shape Rotation fine, Pan/Tilt Macros,
Pan/Tilt Speed, Dimmer Curve, System Settings
Funkcje w trybie
Standalone: Programy automatyczne 1-4, tryb statyczny, praca master/slave
Ustawienia systemu:
Ustawienia bezprzewodowe, odwrócenie wyświetlacza, włączenie/
wyłączenie oświetlenia wyświetlacza, awaria DMX, krzywa ściemnia-
nia, odwrócenie obrotu, odwrócenie pochylenia, kąt obrotu, sprzęże-
nie zwrotne, ustawienie wentylatora, zaciemnienie ruchu, test, reset
silnika, reset fabryczny, ustawienia sieciowe
Kontrola: DMX512, z obsługą RDM, W-DMX™ (odbiornik), Art-Net, sACN
PAN kąt: 540°/630°
Kąt pochylenia: 270°
Elementy sterowania:
Przyciski dotykowe BACK, ENTER, UP, DOWN, LEFT, RIGHT, koloro-
wy graficzny wyświetlacz LCD wrażliwy na nacisk (kompatybilny z
rękawicami)
Elementy wyświetlacza: Podświetlany kolorowy wyświetlacz graficzny LC, zasilany bateryjnie
dla niezależnych od sieci ustawień systemu
Napięcie robocze: 100-240 V AC / 50-60 Hz
Pobór mocy: 800 W
Strumień świetlny: 22000 lm
Zasilanie Złącze: Wejście i wyjście Neutrik TRUE1 (wyjście maks. 4 A)
Bezpiecznik: T8AL / 250V (5 x 20 mm)
Temperatura robocza
otoczenia: -15°C do 40°C

118
DMX
ITALIANO
POLSKI
ESPAÑOL
FRANCAIS
DEUTSCHENGLISH
Względna wilgotność
powietrza: < 85%, bez kondensacji
Minimalna odległość od
oświetlanej powierzchni: 3 m
Minimalna odległość od
normalnie łatwopalnych
materiałów:
0,5 m
Materiał obudowy: Metal, ABS
Kolor obudowy: Czarny
Chłodzenie obudowy: System chłodzenia Heatpipe oraz wentylatory z regulacją temperatury
Wymiary (szer. x wys. x
gł., bez wspornika): 397 x 741,5 x 285 mm
Masa: 27,8kg
Dodatkowe funkcje: Kabel sieciowy o długości 1 m z wtyczką TRUE1 i
w zestawie 2 wsporniki montażowe Omega
MINIMALNA ODLEGŁOŚĆ OD OŚWIETLANEJ POWIERZCHNI
0,5 m
Ten symbol z informacją o odległości w metrach (m) wskazuje minimalną
odległość oprawy od oświetlanej powierzchni. W tym przykładzie odległość ta
wynosi 0,5 m. Proszę zapoznać się z danymi technicznymi zawartymi w niniejszej
instrukcji i nadrukiem na obudowie urządzenia, aby uzyskać informacje o wartości
obowiązującej dla tego urządzenia!
MINIMALNA ODLEGŁOŚĆ OD NORMALNIE ŁATWOPALNYCH MATERIAŁÓW
0,5 m
Ten symbol z oznaczeniem odległości w metrach (m) wskazuje minimalną
odległość urządzenia od normalnie łatwopalnych materiałów. W tym przykładzie
odległość ta wynosi 0,5 m. Proszę zapoznać się z danymi technicznymi
zawartymi w niniejszej instrukcji, aby uzyskać wartość obowiązującą dla tego
urządzenia!
UTYLIZACJA
OPAKOWANIE:
1. Opakowania można wprowadzić do cyklu recyklingu materiałów do ponownego
wykorzystania przy użyciu standardowych metod utylizacji.
2. Prosimy o oddzielenie opakowania zgodnie z przepisami dotyczącymi utylizacji i
recyklingu obowiązującymi w danym kraju.

119
DMX DEUTSCHFRANCAIS
ESPAÑOL ENGLISH
ITALIANO POLSKI
URZĄDZENIE:
1. Niniejsze urządzenie podlega Dyrektywie Europejskiej w sprawie zużytego sprzętu
elektrycznego i elektronicznego z późniejszymi zmianami. Dyrektywa WEEE
Zużyty sprzęt elektryczny i elektroniczny. Stare urządzenia nie należą do odpadów
domowych. Stare urządzenie należy zutylizować za pośrednictwem zatwierd-
zonej firmy utylizacyjnej lub komunalnego zakładu utylizacji. Należy przestrzegać
odpowiednich przepisów obowiązujących w danym kraju!
2. Należy przestrzegać wszystkich przepisów dotyczących utylizacji obowiązujących
w Państwa kraju.
3. Jako klient prywatny mogą Państwo uzyskać informacje na temat przyjaznych
dla środowiska opcji utylizacji od sprzedawcy produktu lub odpowiednich władz
regionalnych.
DEKLARACJE PRODUCENTA
Gwarancja producenta i ograniczenie odpowiedzialności
Adam Hall GmbH, Adam-Hall-Str. 1, D-61267 Neu Anspach /
E-mail: [email protected] / +49 (0)6081 / 9419-0
Nasze aktualne warunki gwarancji i ograniczenia odpowiedzialności można znaleźć na stronie:
https://cdn-shop.adamhall.com/media/pdf/Manufacturers-Declarations-CAMEO_DE_EN_ES_FR.pdf
W przypadku konieczności skorzystania z usług serwisowych należy skontaktować się ze swoim
sprzedawcą.
Zgodność z CE
Adam Hall GmbH niniejszym potwierdza, że niniejszy produkt spełnia następujące wytyczne (w
stosownych przypadkach):
Dyrektywa niskonapięciowa (2014/35/EU)
Dyrektywa EMC (2014/30/EU)
RoHS (2011/65/EU)
RED (2014/53/EU)
Deklaracja zgodności EC
Deklaracje zgodności dla produktów podlegających dyrektywie LVD, EMC, RoHS można zamówić
na stronie [email protected]
Deklaracje zgodności dla produktów podlegających RED można pobrać ze strony www.adamhall.
com/compliance/.
Zastrzega się możliwość wystąpienia błędów w druku i pomyłek, a także zmian tech-
nicznych i innych!

120
DMX
ITALIANO
POLSKI
ESPAÑOL
FRANCAIS
DEUTSCHENGLISH
ITALIANO
Ottima scelta!
Questo dispositivo è stato sviluppato e prodotto secondo i più alti standard di qualità, per garantire
molti anni di funzionamento senza problemi. Leggere attentamente questo Manuale di istruzioni
per iniziare rapidamente a utilizzare al meglio il prodotto Cameo. Ulteriori informazioni su Ca-
meoLight sono disponibili sul nostro sito web CAMEOLIGHT.COM.
INFORMAZIONI SU QUESTO MANUALE DI ISTRUZIONI
• Prima di utilizzare il dispositivo, leggere attentamente le istruzioni di sicurezza e l’intero manuale.
• Rispettare le avvertenze riportate sul dispositivo e nel manuale d’istruzioni.
• Tenere sempre a portata di mano il manuale d’istruzioni.
• Se si vende o si cede il dispositivo, è importante accludere anche questo manuale d’istruzioni
perché è parte integrante del prodotto.
USO PREVISTO
Il prodotto è un dispositivo per eventi!
Questo prodotto è stato sviluppato per l’uso professionale nel campo della tecnologia degli eventi
e non è adatto per l’illuminazione domestica.
Questo prodotto, inoltre, è destinato esclusivamente a utenti qualificati e con conoscenze speciali-
stiche in materia di tecnologia degli eventi,
Utilizzare il prodotto senza attenersi ai dati tecnici e alle condizioni di esercizio specificate è
considerato uso improprio.
È esclusa la responsabilità per danni a persone e cose causati da uso improprio.
Il prodotto non è adatto a:
• Utilizzo da parte di persone (compresi i bambini) con capacità fisiche, sensoriali o mentali
limitate o mancanza di esperienza e conoscenza.
• Bambini (ai bambini deve essere insegnato a non giocare con il dispositivo).
DEFINIZIONI E SPIEGAZIONI DEI SIMBOLI
1. PERICOLO: la parola PERICOLO, eventualmente abbinata a un simbolo, indica situazioni o
condizioni di pericolo imminente per la vita e l’incolumità delle persone.
2. AVVERTENZA: la parola AVVERTENZA, eventualmente abbinata a un simbolo, indica situazioni o
condizioni potenzialmente pericolose per la vita e l’incolumità delle persone.
3. CAUTELA: la parola CAUTELA, eventualmente abbinata a un simbolo, viene utilizzata per indi-
care situazioni o condizioni che possono provocare lesioni.
4. ATTENZIONE: la parola ATTENZIONE, eventualmente abbinata a un simbolo, indica situazioni o
condizioni che possono provocare danni alle cose e/o all’ambiente.

121
DMX DEUTSCHFRANCAIS
ESPAÑOL ENGLISH
ITALIANO POLSKI
Questo simbolo identifica pericoli che possono causare scosse elettriche.
Questo simbolo identifica aree o situazioni pericolose.
Questo simbolo indica i pericoli causati da superfici calde.
Questo simbolo indica i pericoli causati da fonti luminose intense.
Questo simbolo indica un dispositivo che non contieneparti sostituibili dall’utente.
Questo simbolo indica informazioni aggiuntive sul funzionamento del prodotto.
ISTRUZIONI DI SICUREZZA
PERICOLO
1. Non aprire o modificare l’unità.
2. Se il dispositivo non funziona più correttamente, se liquidi o oggetti sono pene-
trati al suo interno o se il dispositivo è stato danneggiato in qualsiasi altro modo,
spegnerlo immediatamente e staccarlo dall’alimentazione di rete. Il dispositivo può
essere riparato unicamente da tecnici autorizzati alla riparazione.
3. Per i dispositivi di classe di protezione1, il conduttore di protezione deve essere
collegato correttamente. Non scollegare mai il conduttore di protezione. I dispositivi
della classe di protezione2 non hanno il conduttore di protezione.
4. Verificare che i cavi sotto tensione non siano piegati o riportino altri danni meccanici.
5. Non bypassare mai il fusibile del dispositivo.
AVVERTENZA
1. Il dispositivo non deve essere utilizzato se presenta evidenti segni di danneggia-
mento.
2. Il dispositivo può essere installato solo se a tensione zero.
3. Non mettere in funzione il dispositivo se il cavo di rete dello stesso è danneggiato.
4. I cavi di alimentazione fissi possono essere sostituiti solo da una persona qualificata.
ATTENZIONE
1. Non utilizzare il dispositivo se è stato esposto a forti oscillazioni di temperatura (ad
esempio, dopo il trasporto). L’umidità e la condensa possono danneggiare il dispo-
sitivo. Accendere il dispositivo solo quando ha raggiunto la temperatura ambiente.

122
DMX
ITALIANO
POLSKI
ESPAÑOL
FRANCAIS
DEUTSCHENGLISH
2. Verificare che la tensione e la frequenza dell’alimentazione di rete corrispondano ai
valori indicati sul dispositivo. Se il dispositivo è dotato di un selettore di tensione,
non collegare il dispositivo finché non è impostato correttamente. Usare solo cavi
di alimentazione adatti.
3. Per scollegare il dispositivo dalla rete elettrica su tutti i poli, non basta premere
l’interruttore di accensione/spegnimento del dispositivo.
4. Verificare che il fusibile utilizzato corrisponda al tipo stampato sull’unità.
5. Accertarsi che siano state adottate misure appropriate contro la sovratensione (ad
es. fulmini).
6. Attenersi alla corrente di uscita massima specificata sui dispositivi con connessio-
ne Power Out (potenza in uscita). Assicurarsi che il consumo totale di corrente di
tutti i dispositivi collegati non superi il valore specificato.
7. Sostituire unicamente con cavi originali i cavi di rete collegabili.
PERICOLO
1. Pericolo di soffocamento! I sacchetti di plastica e le piccole parti devono essere te-
nuti fuori dalla portata di persone (compresi i bambini) con ridotte capacità fisiche,
sensoriali o mentali.
2. Pericolo di caduta! Assicurarsi che il dispositivo sia installato in modo sicuro e non
possa cadere. Utilizzi solo stativi o supporti adatti (in particolare per le installazioni
fisse). Assicurarsi che gli accessori siano installati e fissati correttamente. Aver
cura di rispettare le norme di sicurezza applicabili.
AVVERTENZA
1. Utilizzare il dispositivo solo secondo il modo previsto.
2. Utilizzare il dispositivo solo con gli accessori raccomandati e previsti dal produttore.
3. Durante l’installazione, osservare le norme di sicurezza vigenti nel proprio Paese.
4. Dopo aver collegato l’unità, controllare tutti i percorsi dei cavi per evitare danni o
incidenti, ad esempio per il rischio di inciampare.
5. Rispettare sempre la distanza minima specificata dai materiali normalmente
infiammabili! Se non esplicitamente indicato, la distanza minima è di 0,3metri.
6. Rispettare sempre la distanza minima dalla superficie illuminata indicata sul
dispositivo!
CAUTELA
1. Per i componenti mobili, come le staffe di montaggio o altri componenti amovibili,
esiste la possibilità che si inceppino.
2. Nel caso di unità con componenti azionati a motore, sussiste il rischio di lesioni
provocate dal movimento dell’unità. Il movimento improvviso del dispositivo può
provocare shock.
3. La superficie dell’alloggiamento del dispositivo può diventare molto calda durante
il normale funzionamento. Accertarsi che non sia possibile toccare l’alloggiamento
accidentalmente. Attendere sempre che la lampada si sia raffreddata a sufficienza
prima di rimuoverla, sottoporla a manutenzione, ricaricarla ecc.

123
DMX DEUTSCHFRANCAIS
ESPAÑOL ENGLISH
ITALIANO POLSKI
ATTENZIONE
1. Non installare o utilizzare l’apparecchio vicino a radiatori, accumulatori, stufe o altre
fonti di calore. Assicurarsi sempre che il dispositivo sia installato in modo che possa
raffreddarsi a sufficienza e non si surriscaldi.
2. Non metta fonti di accensione, come candele accese, vicino al dispositivo.
3. Le aperture di ventilazione non devono essere coperte e le ventole non devono
essere bloccate.
4. Utilizzare l’imballaggio originale o l’imballaggio fornito dal produttore per il trasporto.
5. Evitare urti o colpi al dispositivo.
6. Rispettare la classe di protezione IP e le condizioni ambientali, come temperatura e
umidità, indicate nelle specifiche.
7 I dispositivi possono essere continuamente sviluppati. In caso di discrepanza delle
informazioni inerenti alle condizioni di esercizio, alle prestazioni o ad altre caratteristi-
che del dispositivo, tra il manuale d’istruzioni e l’etichettatura sul dispositivo, hanno
sempre la priorità le informazioni sul dispositivo.
8. L’unità non è adatta ai climi tropicali e al funzionamento sopra i 2000metri sul
livello del mare.
9. Se non esplicitamente indicato, l’unità non è adatta a operare in ambiente marino.
CAUTELA! INFORMAZIONI IMPORTANTI SUI PRODOTTI DI ILLUMINAZIONE
1. Non guardare mai direttamente nel fascio di luce, nemmeno per pochi istanti.
2. Non guardare mai nel fascio di luce utilizzando dispositivi ottici come lenti d’ingrandi-
mento.
3. Gli effetti stroboscopici possono provocare crisi epilettiche in soggetti sensibili!
TRASMISSIONE DEL SEGNALE VIA RADIO (AD ESEMPIO W-DMX O SISTEMI
RADIO AUDIO)
La qualità e la performance delle trasmissioni di segnali wireless generalmente dipen-
dono dalle condizioni ambientali.
I seguenti fattori possono influire sulla portata e sulla stabilità del segnale, ad esempio:
Schermatura (come muratura, strutture metalliche, acqua)
Volume di traffico radio elevato (come reti LAN wireless potenti)
Interferenza
Radiazioni elettromagnetiche (come schermi video a LED, dimmer)
Tutte le specifiche della portata si riferiscono ad applicazioni in campo libero con
contatto visivo e senza interferenze.
Il funzionamento dei sistemi di trasmissione è soggetto a regolamenti ufficiali. Questi
regolamenti possono variare da una regione all’altra e devono essere verificati
dall’operatore prima della messa in funzione (quali la radiofrequenza e la potenza di
trasmissione).

124
DMX
ITALIANO
POLSKI
ESPAÑOL
FRANCAIS
DEUTSCHENGLISH
AVVERTENZA: Devices with wireless signal transmission are not suitable for use
in sensitive areas in which radio operation can lead to potential detrimental effects.
Queste zone includono:
• Ospedali, centri sanitari o altre strutture sanitarie che forniscono trattamenti ai
pazienti con personale e attrezzature qualificate.
• Zone pericolose di classe I, II e III
• Zone ad accesso ristretto
• Strutture militari
• Aerei o veicoli
• Aree in cui è vietato l’uso di telefoni cellulari
TRASMISSIONE VIA W-DMX
AVVERTENZA: in generale, la trasmissione DMX wireless non deve essere utilizzata
per applicazioni con fattori di sicurezza che potrebbero causare lesioni personali o
danni alle cose in caso di guasto.
Questo vale in particolare per le scenografie mobili o le strutture a traliccio, per motori
o elevatori controllati via DMX, per i dispositivi di sollevamento di ascensori da palco-
scenico azionati via DMX, per sistemi idraulici o analoghi componenti mobili.
La trasmissione DMX wireless non deve essere utilizzata per attivare dispositivi a
fiamma, dispositivi pirotecnici o effetti a rischio di esplosione, né per controllare effetti
a gas o liquidi quali cannoni a CO2, spara-coriandoli, giochi d’acqua o simili.
CAUTELA! POTENZIALI DANNI DA FONTI DI LUCE ESTERNE!
Le radiazioni solari, le radiazioni laser e i fasci di luce di altri faretti possono danneg-
giare l’alloggiamento e i componenti interni, come filtri, gobo e ruote di colori, motori,
cavi, cinghie ecc., ma anche le sorgenti luminose.
Non esporre il dispositivo, e in particolare l’apertura delle lenti, alla luce solare diretta,
alle radiazioni laser e ai fasci di luce di altri faretti sia quando viene disimballato, in-
stallato e utilizzato, sia in caso di non utilizzo prolungato. Rivolgere sempre l’apertura
della lente verso il pavimento quando l’unità non è in uso! A questo scopo, utilizzare
anche la funzione Sun Protection, che può essere attivata tramite comando DMX
(vedi il canale Device Settings nella tabella DMX). Un sensore giroscopico integrato
rileva la posizione di utilizzo. I danni causati da fonti di luce esterne sono esclusi dalla
garanzia del produttore!

125
DMX DEUTSCHFRANCAIS
ESPAÑOL ENGLISH
ITALIANO POLSKI
NOTE PER I DISPOSITIVI MOBILI PER INTERNI
1. Funzionamento temporaneo! Le attrezzature per eventi sono generalmente proget-
tate solo per il funzionamento temporaneo.
2. L’uso continuo o l’installazione fissa possono compromettere il funzionamento del
dispositivo e causare invecchiamento precoce.
CONSEGNA INCLUSA
Estrarre il prodotto dalla confezione ed eliminare tutto il materiale di imballaggio.
La preghiamo di verificare la completezza e l'integrità della consegna e di comunicarlo a
La preghiamo di contattare il suo partner commerciale subito dopo l'acquisto, se la consegna non
è completa o se non è stata effettuata
è danneggiato. La confezione comprende:
X1 x Testa mobile OPUS SP5 PLUS LED
X2 x staffa di montaggio Omega
X1cavo di alimentazione
XManuale di istruzioni
INTRODUZIONE
TESTA MOBILE SERIE OPUS
CLOSP5PLUS
FUNZIONI DI CONTROLLO
Controllo DMX a 34 e 50 canali (CLOSP5PLUS)
Controllo DMX a 27 e 33 canali (CLOSP5PLUS con modulo ruota di animazione CLOSP5AM opzionale)
Art-Net
sACN
W-DMX™
Abilitato a RDM
Funzionamento master/slave
Funzioni indipendenti

126
DMX
ITALIANO
POLSKI
ESPAÑOL
FRANCAIS
DEUTSCHENGLISH
CARATTERISTICHE
500 W LED ad alta efficienza. Modulo persiana con cornice. - Miscelazione di colori CMY + CTO
Ruota dei colori con 7 colori brillanti + colori aperti e divisi. Ruota gobo 1 con 8 gobo fissi + aper-
to. Ruota gobo 2 con 7 gobo rotanti + aperti (gobo intercambiabili). 2 prismi rotanti. Funzione di
messa a fuoco e zoom tramite DMX. Filtro smerigliato e iride Strobe Motori di panoramica e incli-
nazione con risoluzione a 16 bit. Alimentazione a batteria. Display per l'impostazione indipendente
dalla rete. Correzione automatica della posizione. Ventole a temperatura controllata. connessioni
DMX a 3 e 5 poli. Connessioni di rete RJ45. DMX™ senza fili Connessioni di rete Neutrik powerCON
TRUE1 IN e OUT. 2 staffe di montaggio Omega incluse. Tensione di esercizio: 100-240VCA. Con-
sumo di energia 800W. Il faretto ottempera lo standard RDM (Remote Device Management). La
gestione remota dei dispositivi consente all'utente di visualizzare lo stato e la configurazione dei
terminali RDM tramite un controller compatibile con RDM.
PROPRIETÀ AGGIUNTIVE
La testa mobile CLOSP5P è dotata di un modulo otturatore a 4 vie. Il modulo otturatore a 4 vie può
essere scambiato con il modulo ruota di animazione CLOSP5AM. Il software e le modalità DMX
corrispondenti vengono aggiornate automaticamente.
CONNESSIONI, ELEMENTI DI COMANDO E DI VISUALIZZAZIONE
1 23
4 5
6
7
8
1 POWER IN
Presa di ingresso di rete Neutrik powerCON TRUE1. Tensione di esercizio 100-240V CA/50-60Hz.
È incluso un cavo di rete adatto con spina powerCON TRUE1.
2 POWER OUT
Presa di uscita di rete Neutrik powerCON TRUE1. Facilita l’alimentazione di altri faretti CAMEO. As-
sicurarsi che il consumo totale di energia di tutti i dispositivi collegati all’apparecchio non superi il
valore in ampere (A) indicato.

127
DMX DEUTSCHFRANCAIS
ESPAÑOL ENGLISH
ITALIANO POLSKI
3 FUSIBILE
Portafusibili per microfusibili da 5 x 20 mm. NOTA IMPORTANTE: sostituire il fusibile solo con un
fusibile dello stesso tipo e caratteristiche. In caso di guasti ripetuti ai fusibili, rivolgersi a un centro
di assistenza autorizzato.
4 DMX IN
Prese XLR maschio a 3 e 5 pin per il collegamento di un dispositivo di controllo DMX (ad esempio,
console DMX).
5 DMX OUT
Prese XLR femmina a 3 o 5 pin per l'invio del segnale di controllo DMX.
6 NETTO IN
Connettore di rete RJ45 per il collegamento a una rete Art-Net o sACN. Usare cavi CAT 5e o
migliori per configurare la rete.
7 USCITA NETTA
Connettore di rete RJ45 per collegare alla rete altri dispositivi Art-Net o compatibili con sACN.
Usare cavi CAT 5e o migliori per configurare la rete.
8 ANTENNA PER W-DMX™
L'antenna per la guida per W-DMX™ è visibile durante il viaggio nella posizione di partenza (=
posizione di partenza).
9 DISPLAY LC SENSIBILE ALLA PRESSIONE CON ILLUMINAZIONE
Grazie al display LC sensibile alla pressione, il dispositivo può essere azionato direttamente dal
display (compatibile con i guanti). Il display LCD mostra la modalità attualmente attivata (display
principale), le voci del menu di selezione e il valore numerico o lo stato operativo di alcune voci
del menu. Se non c'è alcun segnale di controllo al dispositivo, il display inizia a lampeggiare; il
lampeggiamento si interrompe non appena è presente un segnale di controllo (DMX e funziona-
mento slave, ArtNet e sACN).
9
10
11

128
DMX
ITALIANO
POLSKI
ESPAÑOL
FRANCAIS
DEUTSCHENGLISH
10 COMANDI A SFIORAMENTO
MODE - Premendo MODE (ripetutamente) sale di un livello nella struttura dei menu, fino alla
visualizzazione principale.
SU e GIÙ - Seleziona le singole voci del menu principale (indirizzo DMX, modalità operativa,
ecc.) e dei sottomenu.
ENTER - Partendo dalla visualizzazione principale, prema ENTER per accedere al menu principale.
Nel menu principale, prema INVIO per accedere al livello di menu in cui è possibile modificare i
valori. Confermi le modifiche del valore premendo INVIO.
SINISTRA e DESTRA X - Utilizzi i pannelli di controllo per modificare il valore di una voce di
menu, come l'indirizzo DMX, come desiderato.
11 INTERFACCIA USB
Interfaccia USB per l'aggiornamento del firmware del dispositivo. Nel menu Assistenza, imposti
lo stato dell'aggiornamento USB su ON. Quando disponibile, scarichi il firmware più recente
dalla pagina del prodotto su www.cameolight.com, lo decomprima e copi i file in una cartella sen-
za caratteri speciali su una chiavetta USB. Scolleghi Moving Head dalla rete elettrica e da tutte le
connessioni di ingresso (DMX / Ethernet), colleghi la chiavetta USB all'interfaccia USB e ricolleghi
Moving Head alla rete elettrica. La chiavetta USB viene riconosciuta automaticamente e visua-
lizzata sul display. Ora navighi nella cartella corrispondente sulla chiavetta USB e confermi con
ON. Inizia la procedura di aggiornamento. Non rimuova la chiavetta USB e non scolleghi il Moving
Head dalla rete elettrica durante la procedura di aggiornamento.
Il display a batteria può essere attivato anche se il dispositivo non è collegato alla rete elettrica.
Per farlo, tenga premuto MODE per circa 3 secondi. Ora è possibile accedere alle informazioni del
dispositivo per modificare e salvare le impostazioni del sistema senza collegamento alla rete elet-
trica. Il controllo esterno del faretto in questo caso non si attiva, il display, perciò, indica assenza
di segnale DMX anche se sul dispositivo è effettivamente disponibile un segnale DMX.

129
DMX DEUTSCHFRANCAIS
ESPAÑOL ENGLISH
ITALIANO POLSKI
12 BLOCCO PAN
Dispositivo di blocco meccanico utilizzato per impedire
la rotazione della testa in direzione orizzontale durante
il trasporto. Scolleghi l'unità dalla rete elettrica, sposti
la testa parallelamente alla base (4 posizioni possibili)
e spinga la leva di bloccaggio in direzione dell'asse di
rotazione della pentola per bloccarla in posizione. Sbloc-
care il dispositivo prima dell'avvio.
13 BLOCCO TILT
Dispositivo di bloccaggio meccanico utilizzato per
impedire la rotazione della testa in direzione verticale
durante il trasporto (7 posizioni). Staccare l’unità dalla
rete elettrica e scorrere la leva di bloccaggio in direzione
dell’asse di rotazione TILT muovendo la testa del disposi-
tivo in verticale fino a quando trova una delle 7posizioni
di bloccaggio e la leva di bloccaggio si innesta (LOCK).
Sbloccare il dispositivo prima dell'avvio.
FUNZIONAMENTO
NOTE
Non appena l'apparecchio è collegato correttamente alla rete elettri-
ca, sul display vengono visualizzati uno dopo l'altro "Aggiornamento
software attendere..." e il logo Cameo con le informazioni sul modello
dell'apparecchio, durante il processo di avvio e il reset del motore. Dopo
questo processo, il faretto è pronto per il funzionamento e la modalità
precedentemente selezionata sarà attivata. Da un lato, il faro viene
azionato con l'aiuto dei pannelli di controllo sensibili al tatto accanto al
display; dall'altro, lo stesso display sensibile alla pressione (compati-
bile con i guanti) può essere utilizzato per raggiungere tutte le voci del
menu ed effettuare le impostazioni in modo intuitivo, come desiderato.
Le informazioni su quale elemento di controllo nel display e quale
pannello di controllo accanto al display hanno la stessa funzione sono
riportate nella tabella adiacente. Di seguito viene descritto il funziona-
mento dei pannelli di controllo accanto al display.
DISPLAY PRINCIPALE
La riga superiore del display indica se e quale segnale di controllo è presente sull'unità, la riga
sottostante mostra la modalità operativa attualmente attivata (DMX Standard / Esteso, Statico,
Automatico, Slave) e l'indirizzo iniziale DMX o la modalità operativa corrispondente (nell'esempio
l'indirizzo iniziale DMX 001) è chiaramente visibile al centro. Non appena il segnale di controllo
13
12

130
DMX
ITALIANO
POLSKI
ESPAÑOL
FRANCAIS
DEUTSCHENGLISH
viene interrotto, i caratteri sul display iniziano a lampeggiare e viene visualizzato "Nessuno"
(nessun segnale) dietro a "Segnale" nella riga superiore. Il display può essere ruotato di 180°
toccando il pannello di controllo sensibile al tatto GIÙ; se il display è già ruotato di 180°, tocchi il
pannello di controllo SU per riportare il display all'immagine standard. Il display può anche essere
ruotato di 180° premendo il "simbolo del tetto" sul display sensibile alla pressione.
Visualizzazione del segnale di ingresso
Modalità DMX o modalità operativa
Indirizzo di avvio DMX o
modalità operativa
Informazioni sul dispositivo
modello Torna alla visualizzazione principale =
qualsiasi posizione nel display o
Premere INVIO
Visualizza lo stato della batteria
Rotazione del display di 180°
Menu principale
CONTROL MENU (Control)
IMPOSTAZIONE DELL'INDIRIZZO DI AVVIO DMX (DMX Address)
Partendo dal display principale, prema ENTER per accedere al menu principale. Utilizzi i controlli e
per selezionare il menu Controllo e prema INVIO. Utilizzi i tasti SU e GIÙ per selezionare la voce di
menu "Indirizzo DMX" e confermi premendo ENTER. Ora imposti l'indirizzo iniziale DMX deside-
rato utilizzando i pannelli di controllo SINISTRA e DESTRA e confermi con ENTER (il valore più alto
dipende dalla modalità DMX attivata). Prema due volte MODE per tornare al display principale;
l'indirizzo di partenza DMX selezionato è ora visualizzato a grandi lettere sul display quando la
modalità DMX è attivata.
SET DMX MODE (DMX Mode)
Partendo dal display principale, prema ENTER per accedere al menu principale. Utilizzi i controlli e
per selezionare il menu Controllo e prema INVIO. Utilizzi i tasti SU e GIÙ per selezionare la voce di
menu "Modalità DMX" e confermi premendo ENTER. Selezioni nuovamente la modalità DMX de-
siderata con SU e GIÙ e confermi la selezione con ENTER. Prema MODE 2x per tornare al display
principale; la modalità DMX selezionata è ora attivata. Le tabelle con l'assegnazione dei canali
delle diverse modalità DMX si trovano in queste istruzioni alla voce CONTROLLO DMX.

131
DMX DEUTSCHFRANCAIS
ESPAÑOL ENGLISH
ITALIANO POLSKI
IMPOSTAZIONI DI RETE (Network)
Partendo dal display principale, prema ENTER per accedere al menu principale. Utilizzi i controlli
e per selezionare il menu Controllo e prema INVIO. Utilizzi i tasti SU e GIÙ per selezionare la voce
di menu "Rete" e confermi premendo INVIO. Per informazioni sulle impostazioni di rete, faccia
riferimento alla tabella seguente. Confermi tutte le modifiche alle impostazioni di rete con ENTER.
Network
Network
Input Attiva/disattiva l'ingresso di rete OFF Ingresso di rete disattivato
ON Ingresso di rete attivato
Protocol Protocollo di rete Art-Net Protocollo ArtNet
sACN protocollo sACN
Address
Universo 1 - 256,
Impostare l'indirizzo IP e la
maschera di sottorete
Universe
000 - 255
da 000 a 255. Modifichi il valore
con SINISTRA e DESTRA, e confer-
mi con INVIO.
IP Address
Selezioni il blocco con SINISTRA e
DESTRA, modifichi il valore con SU
e GIÙ, confermi con INVIO.
IP Subnet
Mask
Selezioni il blocco con SINISTRA e
DESTRA, modifichi il valore con SU
e GIÙ, confermi con INVIO.
DMX Out Uscita del segnale di rete
tramite DMX OUT
OFF Non emettere il segnale
ON Segnale di uscita
IMPOSTAZIONI W-DMX (Wireless)
Partendo dal display principale, prema ENTER per accedere al menu principale. Utilizzi i controlli
e per selezionare il menu Controllo e prema INVIO. Utilizzi i tasti SU e GIÙ per selezionare la voce
di menu "Wireless" e confermi premendo INVIO. Per informazioni sulle impostazioni di W-DMX,
faccia riferimento alla tabella seguente. Confermi tutte le modifiche alle impostazioni con ENTER.

132
DMX
ITALIANO
POLSKI
ESPAÑOL
FRANCAIS
DEUTSCHENGLISH
Wireless
W-DMX OFF Disattivare W-DMX
ON Attivare il W-DMX
Operating
(attualmente in stato di
beta)
Receiver Modulo W-DMX configurato come ricevitore
Transmitter Modulo W-DMX configurato come trasmettitore
Transmitting
(attualmente in stato beta)
G3 Trasmissione G3 standard
G4s Standard di trasmissione G4S
Link Link
Si accoppi con i dispositivi W-DMX. W-DMX deve
essere abilitato su tutti i dispositivi e l'accoppiamen-
to con un trasmettitore deve essere resettato (Reset
ricezione)
Unlink Disaccoppia tutti i dispositivi
Ricezione Reset NO Non resettare l'accoppiamento del trasmettitore
YES Azzeramento dell'accoppiamento del trasmettitore
MODALITÀ STAND ALONE (STAND ALONE)
Partendo dal display principale, prema ENTER per accedere al menu principale. Utilizzi i controlli
e per selezionare il menu Controllo e prema INVIO. Utilizzando e , selezioni ora la voce di menu
"Stand Alone" e confermi premendo ENTER. Ora selezioni una delle tre modalità stand-alone
utilizzando i comandi e e confermi con ENTER.
MODALITÀ STANDALONE STATICA (Static)
La modalità Statica consente di regolare PAN, Tilt, Dimmer, Strobo, Ruota Colore e Ruota Gobo
ecc. direttamente sul dispositivo con valori compresi tra 000 e 255, in modo simile a un'unità di
controllo DMX. In questo modo, è possibile creare una scena individuale senza un controller DMX
aggiuntivo. Dopo aver selezionato la modalità operativa "Statica", come descritto in precedenza in
"MODALITÀ DI FUNZIONAMENTO STAND ALONE", le impostazioni possono essere effettuate come

133
DMX DEUTSCHFRANCAIS
ESPAÑOL ENGLISH
ITALIANO POLSKI
desiderato. Le voci del sottomenu corrispondono ai canali da 1 a 50 nella modalità DMX estesa a
50 canali (vedere CONTROLLO DMX, selezionare la voce del sottomenu con SU e GIÙ, modificare il
valore con SINISTRA e DESTRA, confermare con ENTER). Prema ripetutamente MODE per tornare
al display principale.
MODALITÀ DI FUNZIONAMENTO STAND ALONE PROGRAMMI AUTO (Auto Prog)
I 4 diversi programmi automatici (Programma 1 - 4) consistono ciascuno in movimenti program-
mati fissi della testa, cambi di gobo e di colore, eccetera; la velocità di esecuzione può essere
impostata separatamente. Come descritto in precedenza nella sezione "MODALITÀ DI FUNZIO-
NAMENTO STAND ALONE", selezioni la modalità di funzionamento Auto, confermi con ENTER,
selezioni il programma Auto desiderato usando UP e DOWN, confermi con ENTER e ora modifichi il
valore della velocità di marcia da 000 a 100 come desiderato usando LEFT e RIGHT. Confermi con
INVIO. Prema ripetutamente MODE per tornare al display principale.
MODALITÀ SLAVE (Slave)
La modalità di funzionamento slave viene selezionata come descritto in precedenza al punto
"MODALITÀ DI FUNZIONAMENTO STAND ALONE". Colleghi l'unità slave e l'unità master (stesso
modello, stessa versione software) utilizzando un cavo DMX (master DMX OUT - slave DMX IN) e
attivi una delle modalità standalone Auto o Static nell'unità master. L’unità slave ora seguirà l’unità
master. Prema ripetutamente MODE per tornare al display principale.
SYSTEM SETTINGS (Settings)
Partendo dal display principale, prema ENTER per accedere al menu principale. Selezioni il menu
Impostazioni per le impostazioni del sistema utilizzando i pulsanti SU e GIÙ e prema INVIO.

134
DMX
ITALIANO
POLSKI
ESPAÑOL
FRANCAIS
DEUTSCHENGLISH
La scena viene attivata quando si conferma e si possono effettuare le impostazioni desiderate
(vedere tabella, selezionare con UP e DOWN, confermare con ENTER, modificare il valore o lo stato
con UP e DOWN, confermare con ENTER).
Settings (grassetto = impostazione di fabbrica)
Display Display
Settings
Reverse
OFF Nessuna rotazione del display
ON
Il display viene ruotato di 180°
(ad esempio, per l'installazione
sopraelevata)
Backlight
OFF
Disattivazione dell'illuminazione
del display dopo circa 30 secon-
di di inattività
ON L’illuminazione del display è
sempre accesa
DMX Fail
Stato di funziona-
mento quando il
segnale DMX è
interrotto
Black Attiva il blackout
Hold L'ultimo comando viene conservato
Auto attiva la modalità Auto
Dimmer
Curve
Selezionando il
Curva dimmer
Linear L’intensità della luce aumenta in modo
lineare con il valore DMX
Exponential
L’intensità della luce può essere rego-
lata con precisione a valori DMX più
bassi e ampiamente regolata a valori
DMX più elevati
Logarithmic
L’intensità della luce può essere
ampiamente regolata a valori DMX più
bassi e regolata con precisione a valori
DMX più elevati
Curva dimmer
L’intensità della luce può essere rego-
lata con precisione a valori DMX più
bassi e più alti e ampiamente regolata
a valori DMX medi

135
DMX DEUTSCHFRANCAIS
ESPAÑOL ENGLISH
ITALIANO POLSKI
LED
Frequency
Configurazione della
frequenza PWM del
LED
650Hz, 1530Hz,
3600Hz, 12KHz,
25KHz
Pan/Tilt Impostazioni della
testa del dispositivo
Pan Reverse OFF Non inverte la direzione pan
ON Inverte la direzione pan
Tilt Reverse OFF Non inverte la direzione tilt
ON Inverte la direzione tilt
Pan Angle 630 Angolo di panoramica 630°
540 Angolo di panoramica 540°
Feedback
OFF La correzione automatica della
posizione è disattivata
ON La correzione automatica della
posizione è attivata
B.O. Moving
Blackout automatico
per movimento della
testa
OFF Nessun blackout durante il movimento
della testa
ON Blackout durante il movimento della
testa
Fixture Type Tipo di dispositivo: Profile Module
Spot Module
Fan Controllo del
ventilatore
Auto Controllo automatico del venti-
latore
Fan Off Ventola disattivata con luminosi-
tà notevolmente ridotta
Constant Low
Velocità della ventola costan-
temente bassa con luminosità
ridotta, se necessario
Constant Mid
Velocità media costante della
ventola con luminosità ridotta, se
necessario
Constant High Alta velocità costante del ven-
tilatore
CURVE DIMMER:
Linear
Valore DMX
Intensità
luminosa
Exponential
Valore DMX
Intensità
luminosa
Logarithmic
Valore DMX
Intensità
luminosa
S-curve
Valore DMX
Intensità
luminosa

136
DMX
ITALIANO
POLSKI
ESPAÑOL
FRANCAIS
DEUTSCHENGLISH
SERVICEMENU
Partendo dal display principale, prema ENTER per accedere al menu principale. Utilizzi i campi di
controllo SU e GIÙ per selezionare il menu Assistenza e prema INVIO.
Questo la porta al sottomenu per modificare le voci del sottomenu (selezionare con SU e GIÙ,
confermare con INVIO, modificare il valore con SINISTRA e DESTRA, confermare con INVIO).
Calibrate - Calibra i componenti con valori da 000 a 255 (password 050).
Test Manual - Test manuale dei componenti con valori compresi tra 000 e 255.
Reset Motor - Azzeramento dei motori. All = Tutti i motori, Pan&Tilt = Motori Pan e Tilt,
Head Only = Motori nella testa dell'unità.
USB Update - Aggiornamento del firmware tramite interfaccia USB. OFF = Blocca l'aggiorna-
mento del firmware tramite interfaccia USB. ON = Consente l'aggiornamento del firmware tramite
l'interfaccia USB.
Factory Reset - Ripristina le impostazioni di fabbrica.
INFORMAZIONI SUL DISPOSITIVO (Info)
Partendo dal display principale, prema ENTER per accedere al menu principale. Utilizzi i controlli e
per selezionare il menu Informazioni Info e prema INVIO.
Questo la condurrà al sottomenu per la lettura delle informazioni sull'apparecchio (selezionare con
e, confermare con ENTER).
System Info
Error Info
Visualizzazione dell'errore di funzione
Se un guasto non viene corretto da un reset o da un riavvio, l'unità difettosa deve
essere riparata da un centro di assistenza autorizzato.
Tempera-
ture
Display della
temperatura
Head xx°C/F°
Base xx°C/F°
Unit Visualizzazione della temperatura in gradi
Celsius o Fahrenheit

137
DMX DEUTSCHFRANCAIS
ESPAÑOL ENGLISH
ITALIANO POLSKI
Runtime Visualizza il tempo
di funzionamento
Total Time Visualizza il tempo di funzionamento totale in ore
Current Time Visualizza il tempo di funzionamento attuale
Time PW Inserisca la password per reimpostare l'ora di
funzionamento attuale (Time PW = 050)
Clean Current Azzera il tempo di funzionamento attuale
Firmware
Visualizzazione del
firmware dei compo-
nenti da 1U a 8U
Vx.xx
Model
Info
Informazioni sulla
versione dell'unità
Profile
Module Modulo con otturatore a cornice
Spot Module Modulo con ruota di animazione
INSTALLAZIONE E MONTAGGIO
Grazie ai piedini in gomma integrati, il faretto può essere posizionato in un luogo adatto su una
superficie solida e piana. Il montaggio su traversa può essere effettuato utilizzando due staffe
Omega che vengono fissate alla base del dispositivo (A). Le due staffe Omega sono fornite in
dotazione, mentre morsetti adatti per le traverse sono disponibili come opzione. Verificare che i
collegamenti siano ben saldi e fissare il faretto al punto previsto (B) con una corda di sicurezza
adeguata.
NOTA IMPORTANTE: l'installazione sopraelevata richiede un'ampia esperienza,
compreso il calcolo dei limiti di carico di lavoro, i materiali di installazione utilizzati e
i controlli di sicurezza regolari di tutti i materiali di installazione e dei dispositivi. Non
cercare di eseguire l’installazione per conto proprio se non si hanno queste compe-
tenze, ma affidarsi a imprese professioniste.
B
BA
A

138
DMX
ITALIANO
POLSKI
ESPAÑOL
FRANCAIS
DEUTSCHENGLISH
CURA, MANUTENZIONE E RIPARAZIONE
Per garantire il funzionamento corretto nel lungo termine del dispositivo, è necessario effettuarne
la pulizia e, se necessario, la manutenzione regolarmente. I requisiti di manutenzione dipendono
dall’intensità e dall’ambiente di utilizzo. In generale, raccomandiamo un’ispezione visiva prima di
ogni utilizzo. Consigliamo inoltre di eseguire tutti i pertinenti interventi di manutenzione indicati
di seguito ogni 500ore di esercizio o, in caso di uso meno intensivo, al massimo dopo un anno. I
diritti di garanzia possono essere limitati in caso di difetti derivanti da manutenzione inadeguata.
CURA (effettuata dall’utente)
AVVERTENZA! Prima di effettuare qualsiasi intervento di cura o manutenzione, è
necessario scollegare l’alimentatore e, se possibile, staccare tutti i collegamenti del
dispositivo.
NOTA! Una cura inadeguata può comportare il danneggiamento e addirittura la distru-
zione del dispositivo.
1. Le superfici dell'alloggiamento devono essere pulite con un panno pulito e umido. Assicurarsi
che l’umidità non possa penetrare nel dispositivo.
2. Gli ingressi e le uscite dell’aria devono essere puliti regolarmente da polvere e sporcizia. Se si
utilizza l’aria compressa, aver cura che il dispositivo non venga danneggiato (in questo caso,
ad es., le ventole devono essere bloccate).
3. I cavi e i contatti a spina devono essere puliti regolarmente, e polvere e sporcizia devono
essere rimossi.
4. In generale non devono essere utilizzati detergenti o agenti abrasivi, altrimenti la finitura della
superficie potrebbe esserne danneggiata.
5. In generale, i dispositivi devono essere conservati in un luogo asciutto e protetto da polvere e
sporcizia.
MANUTENZIONE E RIPARAZIONE (solo da parte di personale qualificato)
PERICOLO! Nel dispositivo sono presenti componenti sotto tensione. Anche dopo la
disconnessione dalla rete elettrica, nel dispositivo potrebbe permanere della tensione
residua, ad esempio a causa di condensatori carichi.
NOTA! Il dispositivo non contiene gruppi che richiedono manutenzione da parte
dell’utente.
NOTA! Gli interventi di manutenzione e riparazione devono essere eseguiti solo da
personale specializzato qualificato e autorizzato dal produttore. In caso di dubbio,
consultare il produttore.
NOTA! Gli interventi di manutenzione eseguiti in modo improprio possono inficiare il
diritto di garanzia.

139
DMX DEUTSCHFRANCAIS
ESPAÑOL ENGLISH
ITALIANO POLSKI
DATI TECNICI
Codice prodotto: CLOSP5PLUS
Tipo di prodotto: Luce mobile a LED
Tipo: Testa mobile
Numero di lampade: 1
Tipo di lampada: 500W LED ad alta efficienza
Temperatura del
colore lamp: Bianco freddo 6600K
CRI: >70
Frequenza PWM LED: 650Hz, 1530Hz, 3600Hz, 12kHz, 25kHz (regolabile)
Funzione
miscelazione colori: CMY + CTO
Numero di colori:
Ruota dei colori: 7 + colori aperti e divisi
Numero di gobo: 15 + aperti (8 fissi + 7 rotanti)
Dimensioni del gobo: Ø esterno 22,9 mm (-0,2 / +0,1 mm), Ø motivo 19 mm, spessore
materiale 1,1 mm (vetro)
Angolo del fascio: 6° - 42°
Ingresso DMX: XLR maschio a 3 pin
XLR maschio a 5 pin
Uscita DMX: XLR femmina a 3 pin
XLR femmina a 5 pin
Connessioni di rete: RJ45 IN e OUT (bloccabile)
Modalità DMX: 34 canali, 50 canali
Funzioni DMX:
Pan/Tilt, Pan/Tilt fine, Dimmer, Dimmer fine, Strobo multifunzione,
Ciano, Ciano fine, Magenta, Magenta fine, Giallo, Giallo fine, CTO, CTO
fine, Ruota colori, Rotazione ruota colori, Ruota Gobo 1, Rotazione
Gobo 1, Rotazione Gobo 1 fine, Rotazione Gobo 1, Agitazione Gobo
1, Ruota Gobo 2, Rotazione Gobo 2, Agitazione Gobo 2, Zoom, Zoom
fine, Focus, Messa a fuoco fine, Iride, Prisma, Prisma Rotazione,
Gelo, Lama 1 - 4, Lama 1 - 4 fine, Rotazione forma, Rotazione forma
fine, Macro Pan/Tilt, Velocità Pan/Tilt, Curva Dimmer, Impostazioni di
sistema
Funzioni indipendenti: Programmi automatici 1-4, modalità statica, funzionamento master/
slave
Impostazioni di sistema:
Impostazione wireless, inversione del display, accensione/spegni-
mento del display, guasto DMX, curva dimmer, inversione panora-
mica, inversione dell'inclinazione, angolo di panoramica, feedback,
impostazione della ventola, oscuramento del movimento, test, reset
del motore, reset di fabbrica, impostazioni di rete
Controllo: DMX512, RDM abilitato, W-DMX™ (ricevitore), Art-Net, sACN
Angolo PAN: 540°/630°
Angolo di inclinazione: 270°

140
DMX
ITALIANO
POLSKI
ESPAÑOL
FRANCAIS
DEUTSCHENGLISH
Controlli operativi:
Comandi sensibili al tatto BACK, ENTER, UP, DOWN, LEFT, RIGHT,
display LCD grafico a colori sensibile alla pressione (compatibile con
i guanti)
Indicatori: Display LCD grafico a colori illuminato, alimentato a batteria per le
impostazioni del sistema indipendenti dalla rete
Tensione operativa: 100–240 V CA / 50–60 Hz
Consumo: 800 W
Flusso luminoso: 22000 lm
Alimentatore
Collegamento Ingresso e uscita Neutrik TRUE1 (uscita max. 4A)
Fusibile: T8AL / 250V (5 x 20 mm)
Temperatura ambiente
di funzionamento: Da −15°C a 40°C
Umidità relativa dell’aria < 85%, senza formazione di condensa
Distanza minima dalla
superficie illuminata: 3 m
Distanza minima da
materiali normalamente
inflammabili:
0,5m
Materiale cassa: Metallo, ABS
Colore cassa: Nero
Raffreddamento cassa: Sistema di raffreddamento Heatpipe e ventole a
temperatura controllata
Dimensioni
(L × H × P, senza staffa): 397 x 741,5 x 285 mm
Peso: 27,8kg
Caratteristiche
aggiuntive:
Cavo di rete da 1 m con spina TRUE1 e
2 staffe di montaggio Omega incluse
DISTANZA MINIMA DALLA SUPERFICIE ILLUMINATA
0,5m
Questo simbolo con informazioni sulla distanza in metri (m) indica la distanza
minima dell'apparecchio di illuminazione dalla superficie illuminata. In questo
esempio, la distanza è di 0,5 metri. Per il valore valido per questa unità, prendere
come riferimento i dati tecnici nel presente manuale e quanto stampato sull’invo-
lucro dell’unità!
DISTANZA MINIMA DA MATERIALI NORMALMENTE INFLAMMABILI
0,5m
Questo simbolo con indicazione della distanza in metri (m) indica la distanza
minima dell'apparecchio dai materiali normalmente infiammabili. In questo es-
empio, la distanza è di 0,5 metri. Per il valore valido per questa unità, prendere
come riferimento i dati tecnici nel presente manuale!

141
DMX DEUTSCHFRANCAIS
ESPAÑOL ENGLISH
ITALIANO POLSKI
SMALTIMENTO
IMBALLAGGIO
1. Gli imballaggi possono essere immessi nel ciclo dei materiali riutilizzabili attra-
verso i consueti metodi di smaltimento.
2. Separare l’imballaggio in conformità alle norme sullo smaltimento e alle dispo-
sizioni sul riciclaggio vigenti nel proprio Paese.
DISPOSITIVO
1. Questo dispositivo è soggetto alla Direttiva europea sui rifiuti di apparecchiature
elettriche ed elettroniche nella versione in vigore. (Direttiva RAEE: Rifiuti di appar-
ecchiature elettriche ed elettroniche). I dispositivi e le batterie vecchi non devono
essere gettati nei rifiuti domestici. Il dispositivo vecchio deve essere smaltito
tramite un’azienda di smaltimento approvata o un impianto di smaltimento urbano.
Rispettare le normative in vigore nel proprio Paese!
2. Rispettare tutte le leggi sullo smaltimento vigenti nel proprio Paese.
3. Come cliente privato, è possibile ottenere informazioni sulle opzioni di smaltimento
ecologico dal venditore del prodotto o dalle autorità regionali competenti.
DICHIARAZIONI DEL PRODUTTORE
Garanzia del produttore e limitazione di responsabilità
AdamHall GmbH, Adam-Hall-Str. 1, D-61267 Neu Anspach
E-mail: [email protected] / +49 (0)6081 / 9419-0
Le nostre attuali condizioni di garanzia e la limitazione di responsabilità sono reperibili all’indirizzo:
https://cdn-shop.adamhall.com/media/pdf/Manufacturers-Declarations-CAMEO_DE_EN_ES_FR.pdf
Per interventi di manutenzione o riparazione, contattare il proprio partner commerciale.
Conformità CE
Adam Hall GmbH conferma che questo prodotto soddisfa le seguenti linee guida (ove applicabili):
Direttiva LVD (bassa tensione, 2014/35/UE)
Direttiva EMC (2014/30/UE)
RoHS (2011/65/UE)
RED (2014/53/UE)
Dichiarazione di conformità CE
Le dichiarazioni di conformità per i prodotti soggetti alle direttive LVD, CEE, RoHS possono essere
richieste a [email protected]
Le dichiarazioni di conformità per i prodotti soggetti alla direttiva RED possono essere scaricate
dalla pagina www.adamhall.com/compliance/.
Soggetto a refusi ed errori, nonché a modifiche tecniche o di altro tipo.

142
DMX
ITALIANO
POLSKI
ESPAÑOL
FRANCAIS
DEUTSCHENGLISH
DMX CONTROL / DMX STEUERUNG / PILOTAGE DMX /
CONTROL DMX / STEROWANIE DMX / CONTROLLO DMX
50CH Mode Extended
Ch. Function Values Sub-Group
1Pan 000 - 255 0% to 100% Pan
2 Pan fine 000 - 255 0% to 100%
3 Tilt 000 - 255 0% to 100% Tilt
4 Tilt fine 000 - 255 0% to 100%
5 Dimmer 000 - 255 0% to 100% Dimmer
6 Dimmer fine 000 - 255 0% to 100%
7 Strobe Functions
000 - 005 Strobe open
Multifunc-
tional
Strobe
006 - 010 Strobe closed
011 - 033 Pulse Random, slow -> fast
034 - 056 Ramp up Random, slow -> fast
057 - 079 Ramp down Random, slow -> fast
080 - 102 Random Strobe Effect, slow -> fast
103 - 127 Strobe Break Effect, 5s…..1s (Short
burst with break)
128 - 250 Strobe slow -> fast <1Hz - 20Hz
251 - 255 Strobe open
8 Cyan 000 - 255 0% to 100% Cyan
9 Cyan Fine 000 - 255 0% to 100%
10 Magenta 000 - 255 0% to 100% Magenta
11 Magenta Fine 000 - 255 0% to 100%
12 Yellow 000 - 255 0% to 100% Yellow
13 Yellow Fine 000 - 255 0% to 100%
14 CTO 000 - 255 0% to 100% CTO
15 CTO Fine 000 - 255 0% to 100%
16 Colour Wheel
000 - 005 Colour off (open)
Colour Wheel
006 - 017 Open/Deep Red
018 - 029 Deep Red
030 - 041 Deep Red / Medium Blue
042 - 053 Medium Blue
054 - 065 Medium Blue / Deep Green
066 - 077 Deep Green
078 - 089 Deep Green / Lavender
090 - 101 Lavender
102 - 113 Lavender / Amber
114 - 125 Amber
126 - 137 Amber / CTO
138 - 149 CTO

143
DMX DEUTSCHFRANCAIS
ESPAÑOL ENGLISH
ITALIANO POLSKI
16 Colour Wheel
150 - 161 CTO / Congo Blue
Colour Wheel
162 - 173 Congo Blue
174 - 185 Congo Blue / Open
186 - 192 Colour off (open)
193 - 223 Colour Wheel rot. Slow -> Fast, CW
224 - 224 Colour Wheel rot. Stop
225 - 255 Colour Wheel rot. Fast -> Slow, CCW
17 Gobo Wheel 1
000 - 005 Open
Gobo
006 - 018 Gobo 1
019 - 031 Gobo 2
032 - 044 Gobo 3
045 - 057 Gobo 4
058 - 070 Gobo 5
071 - 083 Gobo 6
084 - 096 Gobo 7
097 - 109 Gobo 1 shake (slow-fast)
110 - 122 Gobo 2 shake (slow-fast)
123 - 135 Gobo 3 shake (slow-fast)
136 - 148 Gobo 4 shake (slow-fast)
149 - 161 Gobo 5 shake (slow-fast)
162 - 187 Gobo 6 shake (slow-fast)
175 - 190 Gobo 7 shake (slow-fast)
191 - 192 Open
193 - 223 Gobo Wheel rot. Slow -> Fast, CW
224 - 224 Gobo Wheel rot. Stop
225 - 255 Gobo Wheel rot. Fast -> Slow, CCW
18 Gobo 1 Rotation
000 - 005 Gobo1 Rot. Off
006 - 128 Gobo Position 0° ... 540°
129 - 191 Gobo Rotation, Slow -> Fast, CW
192 - 192 Gobo Rotation Stop
193 - 255 Gobo Rotation, Fast -> , CCW
19 Gobo 1 Rotation
fine 000 - 255 Gobo indexing fine
20 Gobo Wheel 2
000 - 005 Open
006 - 017 Gobo 1
018 - 029 Gobo 2
030 - 041 Gobo 3
042 - 053 Gobo 4
054 - 065 Gobo 5
066 - 077 Gobo 6
078 - 089 Gobo 7
090 - 101 Gobo 8

144
DMX
ITALIANO
POLSKI
ESPAÑOL
FRANCAIS
DEUTSCHENGLISH
20 Gobo Wheel 2
102 - 113 Gobo 1 shake (slow-fast)
Gobo
114 - 125 Gobo 2 shake (slow-fast)
126 - 137 Gobo 3 shake (slow-fast)
138 - 149 Gobo 4 shake (slow-fast)
150 - 161 Gobo 5 shake (slow-fast)
162 - 173 Gobo 6 shake (slow-fast)
174 - 185 Gobo 7 shake (slow-fast)
186 - 191 Gobo 8 shake (slow-fast)
191 - 192 Open
193 - 223 Gobo Wheel rot. Slow -> Fast, CW
224 - 224 Gobo Wheel rot. Stop
225 - 255 Gobo Wheel rot. Fast -> Slow, CCW
21 Zoom 000 - 255 Narrow to wide Zoom
22 Zoom fine 000 - 255 Narrow to wide
23 Focus 000 - 255 0% to 100% Focus
24 Focus fine 000 - 255 0% to 100%
25 Iris
000 - 192 Open - Close
Iris
193 - 201 Pulse, slow -> fast (with Dim)
202 - 210 Pulse, slow -> fast (without Dim)
211 - 219 Pulse Random, slow -> fast (without
Dim)
220 - 228 Ramp up, slow -> fast (with Dim)
229 - 237 Ramp up, slow -> fast (without Dim)
238 - 246 Ramp down, slow -> fast (with Dim)
247 - 255 Ramp down, slow -> fast (without
Dim)
26 Prism Wheel
000 - 005 No Prism
Prism006 - 130 Prism 1 (3 Facet)
131 - 255 Prism 2 (6 Facet)
27 Prism Rotation
000 - 005 Prism Rot. Off
Prism Rota-
tion
006 - 128 Prism Position 0 ... 540°
129 - 191 Prism Rotation, Slow -> Fast, CW
192 - 192 Prism Rotation Stop
193 - 255 Prism Rotation, Fast -> Slow, CCW
28 Frost 000 - 255 0% to 100% Frost
29 Blade 1A 000 - 255 0% - 100%
Framing
Blades
30 Blade 1A fine 000 - 255 0% - 100%
31 Blade 1B 000 - 255 0% - 100%
32 Blade 1B fine 000 - 255 0% - 100%
33 Blade 2A 000 - 255 0% - 100%
34 Blade 2A fine 000 - 255 0% - 100%
35 Blade 2B 000 - 255 0% - 100%

145
DMX DEUTSCHFRANCAIS
ESPAÑOL ENGLISH
ITALIANO POLSKI
36 Blade 2B fine 000 - 255 0% - 100%
Framing
Blades
37 Blade 3A 000 - 255 0% - 100%
38 Blade 3A fine 000 - 255 0% - 100%
39 Blade 3B 000 - 255 0% - 100%
40 Blade 3B fine 000 - 255 0% - 100%
41 Blade 4A 000 - 255 0% - 100%
42 Blade 4A fine 000 - 255 0% - 100%
43 Blade 4B 000 - 255 0% - 100%
44 Blade 4B fine 000 - 255 0% - 100%
45 Shape Rotation 000 - 255 0% - 100%
46 Shape Rotation
Fine 000 - 255 0% - 100%
47 Pan/Tilt Macro
000 - 005 Off
Auto
Movement
006 - 040 PAN „small > big“
041 - 075 TILT „small > big“
076 - 110 PAN / TILT „small > big“
111 - 145 PAN / TILT (invers) „small > big“
146 - 180 Circle „small > big“
181 - 215 Circle (invers) „small > big“
216 - 255 Random „small > big“
48 Pan/Tilt Speed 000 - 255 Pan/Tilt Fast -> Slow Pan/Tilt
speed
49 Set Dimmer
Curve
000 - 005 No function
Set Dimmer
Curve
006 - 063 Linear Dimmer Curve
064 - 127 Exponential Dimmer Curve
128 - 191 Logarithmic Dimmer Curve
192 - 255 S-Curve Dimmer Curve
50
Device Settings
(please read
remark 1*)
000 - 005 No function
Device
Settings
006 - 020 Blackout while Moving on (Hold 3s)
021 - 035 Blackout while Moving off (Hold 5s)
036 - 050 Invert Pan on (Hold 3s)
051 - 065 Invert Pan off (Hold 5s)
066 - 080 Invert Tilt on (Hold 3s)
081 - 095 Invert Tilt off (Hold 5s)
096 - 097 No Function
098 - 099 Fan Auto
100 - 101 Fan Off
102 - 103 Fan Constant Low
104 - 105 Fan Constant Medium
106 - 107 Fan Constant High
108 - 125 No Function
126 - 140 LED PWM Freq. 650 Hz (hold 3s)

146
DMX
ITALIANO
POLSKI
ESPAÑOL
FRANCAIS
DEUTSCHENGLISH
50
Device Settings
(please read
remark 1*)
141 - 155 LED PWM Freq. 1530 Hz (hold 3s)
Device
Settings
156 - 170 LED PWM Freq. 3.600 Hz (hold 3s)
171 - 185 LED PWM Freq. 12.000 Hz (hold 3s)
186 - 200 LED PWM Freq. 25.000 Hz (hold 3s)
201 - 215 Reset Pan/Tilt (Hold 3s)
216 - 230 Reset only Head (Hold 3s)
231 - 255 Reset All Functions (Hold 3s)
34CH Mode Standard
Ch. Function Values Sub-Group
1Pan 000 - 255 0% to 100% Pan
2 Pan fine 000 - 255 0% to 100%
3 Tilt 000 - 255 0% to 100% Tilt
4 Tilt fine 000 - 255 0% to 100%
5 Dimmer 000 - 255 0% to 100% Dimmer
6 Dimmer fine 000 - 255 0% to 100%
7 Strobe Functions
000 - 005 Strobe open
Multi
functional
Strobe
006 - 010 Strobe closed
011 - 033 Pulse Random, slow -> fast
034 - 056 Ramp up Random, slow -> fast
057 - 079 Ramp down Random, slow -> fast
080 - 102 Random Strobe Effect, slow -> fast
103 - 127 Strobe Break Effect, 5s…..1s (Short
burst with break)
128 - 250 Strobe slow -> fast <1Hz - 20Hz
251 - 255 Strobe open
8 Cyan 000 - 255 0% to 100% Cyan
9 Magenta 000 - 255 0% to 100% Magenta
10 Yellow 000 - 255 0% to 100% Yellow
11 CTO 000 - 255 0% to 100% CTO
12 Colour Wheel
000 - 005 Colour off (open)
Colour Wheel
006 - 017 Open/Deep Red
018 - 029 Deep Red
030 - 041 Deep Red / Medium Blue
042 - 053 Medium Blue
054 - 065 Medium Blue / Deep Green
066 - 077 Deep Green
078 - 089 Deep Green / Lavender
090 - 101 Lavender
102 - 113 Lavender / Amber
114 - 125 Amber
126 - 137 Amber / CTO

147
DMX DEUTSCHFRANCAIS
ESPAÑOL ENGLISH
ITALIANO POLSKI
12 Colour Wheel
138 - 149 CTO
Colour Wheel
150 - 161 CTO / Congo Blue
162 - 173 Congo Blue
174 - 185 Congo Blue / Open
186 - 192 Colour off (open)
193 - 223 Colour Wheel rot. Slow -> Fast, CW
224 - 224 Colour Wheel rot. Stop
225 - 255 Colour Wheel rot. Fast -> Slow, CCW
13 Gobo Wheel 1
000 - 005 Open
Gobo
006 - 018 Gobo 1
019 - 031 Gobo 2
032 - 044 Gobo 3
045 - 057 Gobo 4
058 - 070 Gobo 5
071 - 083 Gobo 6
084 - 096 Gobo 7
097 - 109 Gobo 1 shake (slow-fast)
110 - 122 Gobo 2 shake (slow-fast)
123 - 135 Gobo 3 shake (slow-fast)
136 - 148 Gobo 4 shake (slow-fast)
149 - 161 Gobo 5 shake (slow-fast)
162 - 187 Gobo 6 shake (slow-fast)
175 - 190 Gobo 7 shake (slow-fast)
191 - 192 Open
193 - 223 Gobo Wheel rot. Slow -> Fast, CW
224 - 224 Gobo Wheel rot. Stop
225 - 255 Gobo Wheel rot. Fast -> Slow, CCW
14 Gobo 1 Rotation
000 - 005 Gobo1 Rot. Off
006 - 128 Gobo Position 0° ... 540°
129 - 191 Gobo Rotation, Slow -> Fast, CW
192 - 192 Gobo Rotation Stop
193 - 255 Gobo Rotation, Fast -> , CCW
15 Gobo 1 Rotation
Fine 000 - 255 Gobo indexing fine
16 Gobo Wheel 2
000 - 005 Open
006 - 017 Gobo 1
018 - 029 Gobo 2
030 - 041 Gobo 3
042 - 053 Gobo 4
054 - 065 Gobo 5
066 - 077 Gobo 6
078 - 089 Gobo 7

148
DMX
ITALIANO
POLSKI
ESPAÑOL
FRANCAIS
DEUTSCHENGLISH
16 Gobo Wheel 2
090 - 101 Gobo 8
Gobo
102 - 113 Gobo 1 shake (slow-fast)
114 - 125 Gobo 2 shake (slow-fast)
126 - 137 Gobo 3 shake (slow-fast)
138 - 149 Gobo 4 shake (slow-fast)
150 - 161 Gobo 5 shake (slow-fast)
162 - 173 Gobo 6 shake (slow-fast)
174 - 185 Gobo 7 shake (slow-fast)
186 - 191 Gobo 8 shake (slow-fast)
191 - 192 Open
193 - 223 Gobo Wheel rot. Slow -> Fast, CW
224 - 224 Gobo Wheel rot. Stop
225 - 255 Gobo Wheel rot. Fast -> Slow, CCW
17 Zoom 000 - 255 Narrow to wide Zoom
18 Focus 000 - 255 0% to 100% Focus
19 Iris
000 - 192 Open - Close
Iris
193 - 201 Pulse, slow -> fast (with Dim)
202 - 210 Pulse , slow -> fast (without Dim)
211 - 219 Pulse Random, slow -> fast (without
Dim)
220 - 228 Ramp up, slow -> fast (with Dim)
229 - 237 Ramp up, slow -> fast (without Dim)
238 - 246 Ramp down, slow -> fast (with Dim)
247 - 255 Ramp down, slow -> fast (without
Dim)
20 Prism Wheel
000 - 005 No Prism
Prism006 - 130 Prism 1 (3 Facet)
131 - 255 Prism 2 (6 Facet)
21 Prism Rotation
000 - 005 Prism Rot. Off
Prism
Rotation
006 - 128 Prism Position 0 ... 540°
129 - 191 Prism Rotation, Slow -> Fast, CW
192 - 192 Prism Rotation Stop
193 - 255 Prism Rotation, Fast -> Slow, CCW
22 Frost 000 - 255 0% to 100% Frost
23 Blade 1A 000 - 255 0% - 100%
Framing
Blades
24 Blade 1B 000 - 255 0% - 100%
25 Blade 2A 000 - 255 0% - 100%
26 Blade 2B 000 - 255 0% - 100%
27 Blade 3A 000 - 255 0% - 100%
28 Blade 3B 000 - 255 0% - 100%
29 Blade 4A 000 - 255 0% - 100%
30 Blade 4B 000 - 255 0% - 100%

149
DMX DEUTSCHFRANCAIS
ESPAÑOL ENGLISH
ITALIANO POLSKI
31 Shape Rotation 000 - 255 0% - 100% Framing
Blades
32 Pan/Tilt Speed 000 - 255 Pan/Tilt Fast -> Slow Pan/Tilt
speed
33 Set Dimmer
Curve
000 005 No function
Set Dimmer
Curve
006 - 063 Linear Dimmer Curve
064 - 127 Exponential Dimmer Curve
128 - 191 Logarithmic Dimmer Curve
192 - 255 S-Curve Dimmer Curve
34
Device Settings
(please read
remark 1*)
000 - 005 No function
Device
Settings
006 - 020 Blackout while Moving on (Hold 3s)
021 - 035 Blackout while Moving off (Hold 5s)
036 - 050 Invert Pan on (Hold 3s)
051 - 065 Invert Pan off (Hold 5s)
066 - 080 Invert Tilt on (Hold 3s)
081 - 095 Invert Tilt off (Hold 5s)
096 - 097 No Function
098 - 099 Fan Auto
100 - 101 Fan Off
102 - 103 Fan Constant Low
104 - 105 Fan Constant Medium
106 - 107 Fan Constant High
108 - 125 No Function
126 - 140 LED PWM Freq. 650 Hz (hold 3s)
141 - 155 LED PWM Freq. 1530 Hz (hold 3s)
156 - 170 LED PWM Freq. 3.600 Hz (hold 3s)
171 - 185 LED PWM Freq. 12.000 Hz (hold 3s)
186 - 200 LED PWM Freq. 25.000 Hz (hold 3s)
201 - 215 Reset Pan/Tilt (Hold 3s)
216 - 230 Reset only Head (Hold 3s)
231 - 255 Reset All Functions (Hold 3s)

150
DMX
ITALIANO
POLSKI
ESPAÑOL
FRANCAIS
DEUTSCHENGLISH
EN: (1*) After the adjustments have been made, set the value to 000 to avoid disturbance by
endless function call.
DE: (1*) Nachdem die Einstellungen vorgenommen wurden, stellen Sie den Wert auf 000 ein, um
Störungen durch endlosen Funktionsaufruf zu vermeiden.
FR: (1*) Une fois les ajustements effectués, réglez la valeur sur 000 pour éviter les perturbations
par appel de fonction sans fin.
ES: (1*) Después de realizar los ajustes, establezca el valor en 000 para evitar perturbaciones
mediante una llamada de función sin fin.
PL: (1*) Po dokonaniu ustawień ustaw wartość na 000, aby uniknąć zakłóceń przez niekończące
się wywołanie funkcji.
IT: (1*) Dopo aver effettuato le regolazioni, impostare il valore su 000 per evitare disturbi causati
da una chiamata a funzione infinita.

151
DMX DEUTSCHFRANCAIS
ESPAÑOL ENGLISH
ITALIANO POLSKI

152
DMX
ITALIANO
POLSKI
ESPAÑOL
FRANCAIS
DEUTSCHENGLISH

153
DMX DEUTSCHFRANCAIS
ESPAÑOL ENGLISH
ITALIANO POLSKI

CAMEOLIGHT.COM
REV: 01
Adam Hall GmbH
Adam-Hall-Str. 1 | 61267 Neu-Anspach | Germany
Phone: +49 6081 9419-0 | adamhall.com
Adam Hall Ltd. | The Seedbed Business Centre | SS3 9QY Essex | United Kingdom
-
 1
1
-
 2
2
-
 3
3
-
 4
4
-
 5
5
-
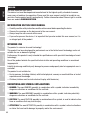 6
6
-
 7
7
-
 8
8
-
 9
9
-
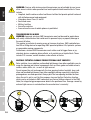 10
10
-
 11
11
-
 12
12
-
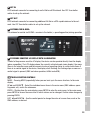 13
13
-
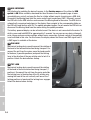 14
14
-
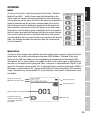 15
15
-
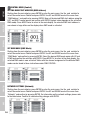 16
16
-
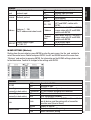 17
17
-
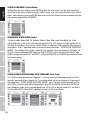 18
18
-
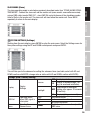 19
19
-
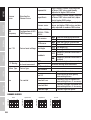 20
20
-
 21
21
-
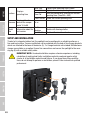 22
22
-
 23
23
-
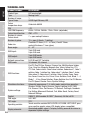 24
24
-
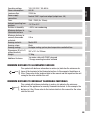 25
25
-
 26
26
-
 27
27
-
 28
28
-
 29
29
-
 30
30
-
 31
31
-
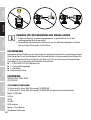 32
32
-
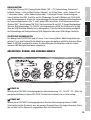 33
33
-
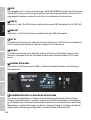 34
34
-
 35
35
-
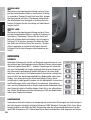 36
36
-
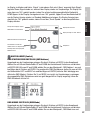 37
37
-
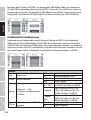 38
38
-
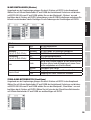 39
39
-
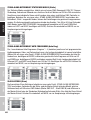 40
40
-
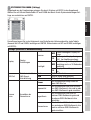 41
41
-
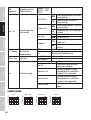 42
42
-
 43
43
-
 44
44
-
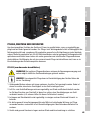 45
45
-
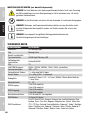 46
46
-
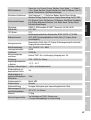 47
47
-
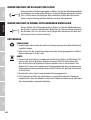 48
48
-
 49
49
-
 50
50
-
 51
51
-
 52
52
-
 53
53
-
 54
54
-
 55
55
-
 56
56
-
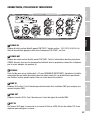 57
57
-
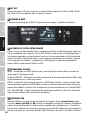 58
58
-
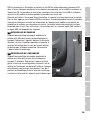 59
59
-
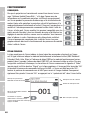 60
60
-
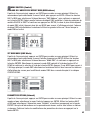 61
61
-
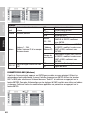 62
62
-
 63
63
-
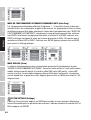 64
64
-
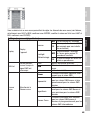 65
65
-
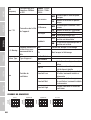 66
66
-
 67
67
-
 68
68
-
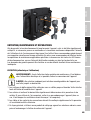 69
69
-
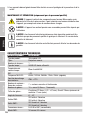 70
70
-
 71
71
-
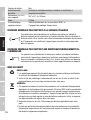 72
72
-
 73
73
-
 74
74
-
 75
75
-
 76
76
-
 77
77
-
 78
78
-
 79
79
-
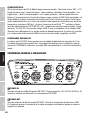 80
80
-
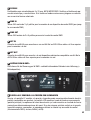 81
81
-
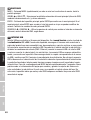 82
82
-
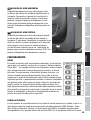 83
83
-
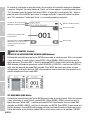 84
84
-
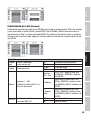 85
85
-
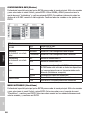 86
86
-
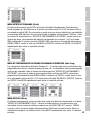 87
87
-
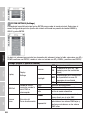 88
88
-
 89
89
-
 90
90
-
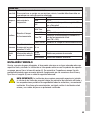 91
91
-
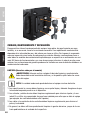 92
92
-
 93
93
-
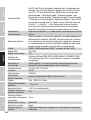 94
94
-
 95
95
-
 96
96
-
 97
97
-
 98
98
-
 99
99
-
 100
100
-
 101
101
-
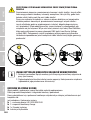 102
102
-
 103
103
-
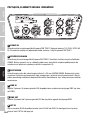 104
104
-
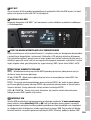 105
105
-
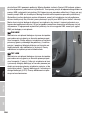 106
106
-
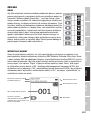 107
107
-
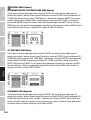 108
108
-
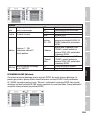 109
109
-
 110
110
-
 111
111
-
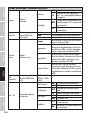 112
112
-
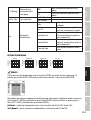 113
113
-
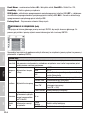 114
114
-
 115
115
-
 116
116
-
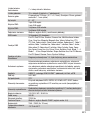 117
117
-
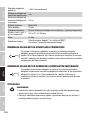 118
118
-
 119
119
-
 120
120
-
 121
121
-
 122
122
-
 123
123
-
 124
124
-
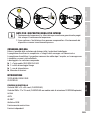 125
125
-
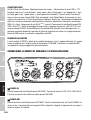 126
126
-
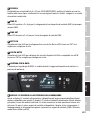 127
127
-
 128
128
-
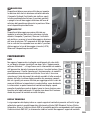 129
129
-
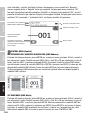 130
130
-
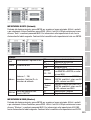 131
131
-
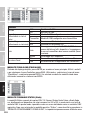 132
132
-
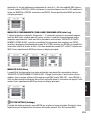 133
133
-
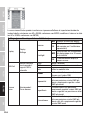 134
134
-
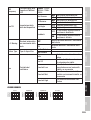 135
135
-
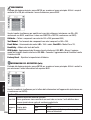 136
136
-
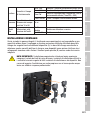 137
137
-
 138
138
-
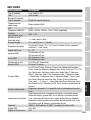 139
139
-
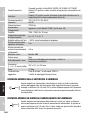 140
140
-
 141
141
-
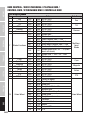 142
142
-
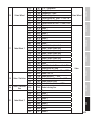 143
143
-
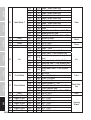 144
144
-
 145
145
-
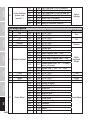 146
146
-
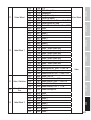 147
147
-
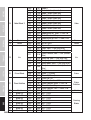 148
148
-
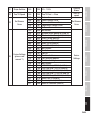 149
149
-
 150
150
-
 151
151
-
 152
152
-
 153
153
-
 154
154


Cameo OPUS® SP5+ Manual de usuario
- Categoría
- Focos
- Tipo
- Manual de usuario
En otros idiomas
- français: Cameo OPUS® SP5+ Manuel utilisateur
- italiano: Cameo OPUS® SP5+ Manuale utente
- English: Cameo OPUS® SP5+ User manual
- Deutsch: Cameo OPUS® SP5+ Benutzerhandbuch
- polski: Cameo OPUS® SP5+ Instrukcja obsługi
Documentos relacionados
-
Cameo OTOS® H5 Manual de usuario
-
-
-
-
-
-
-
Cameo F2 FC IP Manual de usuario
-
Cameo Movo Beam Z 100 Manual de usuario
-
