Clatronic hms 2772 El manual del propietario
- Tipo
- El manual del propietario

R
HMS 2772
Bedienungsanleitung/Garantie
Gebruiksaanwijzing/Garantie • Mode d’emploi/Garantie
Instrucciones de servicio/Garantía • Manual de instruções/Garantia
Istruzioni per l’uso/Garanzia • Instruction Manual/Guarantee
Instrukcja obsługi/Gwarancja • Návod k použití/Záruka
A használati utasítás/garancia • Mod de întrebuinflare/Garanflie
Руководство по эксплуатации/Гарантия
Handmixer-Set
Handmixer-Set • Set Mixeur
Equipo batidora • Batdeira de mão
Set frullatore a mano • Hand mixer set
Mikser ręczny - komplet • Ruční mixér
Kézi mixerkészlet • Mixer de mânæ-set
Ручной миксер с принадлеж-ностями
5....-05-HMS 2772 06.05.2003 9:25 Uhr Seite 1

Inhalt
Inhoud • Sommaire • Indice • Índice • Indice
Contents • Spis treści • Obsah • Tartalom • Conflinut • Содержание
D
Übersicht Bedienelemente . . . . . . . . . . . . . . . . . . . . . . . . . .Seite 3
Bedienungsanleitung . . . . . . . . . . . . . . . . . . . . . . . . . . . . . . .Seite 4
Garantie . . . . . . . . . . . . . . . . . . . . . . . . . . . . . . . . . . . . . . . .Seite 6
NL
Overzicht bedieningselementen . . . . . . . . . . . . . . . . . . . . . .Pagina 3
Gebruiksaanwijzing . . . . . . . . . . . . . . . . . . . . . . . . . . . . . . . .Pagina 8
Garantie . . . . . . . . . . . . . . . . . . . . . . . . . . . . . . . . . . . . . . . .Pagina 10
F
Aperçu des éléments de commande . . . . . . . . . . . . . . . . . . .Page 3
Mode d’emploi . . . . . . . . . . . . . . . . . . . . . . . . . . . . . . . . . . .Page 12
Garantie . . . . . . . . . . . . . . . . . . . . . . . . . . . . . . . . . . . . . . . .Page 14
E
Vista de conjunto Elementos de mando . . . . . . . . . . . . . . . .Página 3
Instrucciones de servicio . . . . . . . . . . . . . . . . . . . . . . . . . . . .Página 16
Garantia . . . . . . . . . . . . . . . . . . . . . . . . . . . . . . . . . . . . . . . .Página 18
P
Vista geral dos elemntos de comando . . . . . . . . . . . . . . . . .Página 3
Manual de instruções . . . . . . . . . . . . . . . . . . . . . . . . . . . . . .Página 20
Garantía . . . . . . . . . . . . . . . . . . . . . . . . . . . . . . . . . . . . . . . .Página 22
I Descrizione dei singoli pezzi . . . . . . . . . . . . . . . . . . . . . . . .Pagina 3
Istruzioni per l’uso . . . . . . . . . . . . . . . . . . . . . . . . . . . . . . . . .Pagina 24
Garanzia . . . . . . . . . . . . . . . . . . . . . . . . . . . . . . . . . . . .Pagina 27
GB
Control element overview . . . . . . . . . . . . . . . . . . . . . . . . . . .Page 3
Instruction Manual . . . . . . . . . . . . . . . . . . . . . . . . . . . . . . . . .Page 28
Guarantee . . . . . . . . . . . . . . . . . . . . . . . . . . . . . . . . . . . . . .Page 30
PL
Przegląd elemetów obsługi . . . . . . . . . . . . . . . . . . . . . . . . .Strona 3
Instrukcja obsługi . . . . . . . . . . . . . . . . . . . . . . . . . . . . . . . .Strona 32
Gwarancja . . . . . . . . . . . . . . . . . . . . . . . . . . . . . . . . . . .Strona 35
CZ
Přehled obsluhovací prvky . . . . . . . . . . . . . . . . . . . . . . . . . .Strana 3
Návod k použití . . . . . . . . . . . . . . . . . . . . . . . . . . . . . . . . . .Strana 36
Záruka . . . . . . . . . . . . . . . . . . . . . . . . . . . . . . . . . . . . .Strana 38
H
A hasznalt elemek megtekintése . . . . . . . . . . . . . . . . . . . . .Oldal 3
A hasznalati utasítás . . . . . . . . . . . . . . . . . . . . . . . . . . . . . .Oldal 40
Garancia . . . . . . . . . . . . . . . . . . . . . . . . . . . . . . . . . . . . . . . .Oldal 42
RO
Privire de ansamblu al modului de întrebuinflare . . . . . . . .Paginæ 3
Mod de întrebuinflare . . . . . . . . . . . . . . . . . . . . . . . . . . . . . .Paginæ 44
Garanflie
. . . . . . . . . . . . . . . . . . . . . . . . . . . . . . . . . . . . . .
Paginæ 46
RUS
Обзор управляющих элементов . . . . . . . . . . . . . . . . . . . .стр. 3
Руководство по эксплуатации . . . . . . . . . . . . . . . . . . . . . .стр. 48
Гарантия . . . . . . . . . . . . . . . . . . . . . . . . . . . . . . . . . . . . . . . . .стр. 51
5....-05-HMS 2772 06.05.2003 9:25 Uhr Seite 2

3
Übersicht über die Bedienelemente
1 Handmixer 6 Taste zur Entriegelung des Oberteils
2 Knopf zum Lösen der Knethaken 7 Rührschüssel
3 Stufenwahlschalter (6 Stufen) 8 Mixständer
4 TURBO-Taste 9 Knethaken
5 Bewegliches Oberteil
5....-05-HMS 2772 06.05.2003 9:25 Uhr Seite 3

Allgemeine Sicherheitshinweise
• Lesen Sie vor Inbetriebnahme dieses Gerätes die Bedienungsanleitung sehr
sorgfältig durch und bewahren Sie diese inkl. Garantieschein, Kassenbon und
nach Möglichkeit den Karton mit Innenverpackung gut auf.
• Benutzen Sie das Gerät ausschließlich für den privaten und den dafür
vorgesehenen Zweck. Dieses Gerät ist nicht für den gewerblichen Gebrauch
bestimmt. Benutzen Sie es nicht im Freien (außer es ist für den bedingten
Einsatz im Freien vorgesehen). Halten Sie es vor Hitze, direkter
Sonneneinstrahlung, Feuchtigkeit (auf keinen Fall in Flüssigkeiten tauchen) und
scharfen Kanten fern. Benutzen Sie das Gerät nicht mit feuchten Händen. Bei
feucht oder nass gewordenem Gerät sofort den Netzstecker ziehen. Nicht ins
Wasser greifen.
• Schalten Sie das Gerät aus und ziehen Sie immer den Stecker aus der
Steckdose (ziehen Sie am Stecker, nicht am Kabel) wenn Sie das Gerät nicht
benutzen, Zubehörteile anbringen, zur Reinigung oder bei Störung.
• Betreiben Sie das Gerät nicht unbeaufsichtigt. Sollten Sie den Arbeitsplatz ver-
lassen, schalten Sie das Gerät bitte immer aus, bzw. ziehen Sie den Stecker
aus der Steckdose (ziehen Sie am Stecker, nicht am Kabel).
• Um Kinder vor Gefahren elektrischer Geräte zu schützen, sorgen Sie bitte
dafür, dass das Kabel nicht herunter hängt und Kinder keinen Zugriff auf das
Gerät haben.
• Prüfen Sie Gerät und Kabel regelmäßig auf Schäden. Ein beschädigtes Gerät
bitte nicht in Betrieb nehmen.
• Reparieren Sie das Gerät nicht selbst, sondern suchen Sie bitte einen autori-
sierten Fachmann auf. Um Gefährdungen zu vermeiden, ein defektes Netzkabel
bitte nur vom Hersteller, unserem Kundendienst oder einer ähnlich qualifizierten
Person durch ein gleichwertiges Kabel ersetzen lassen.
• Verwenden Sie nur Original-Zubehör.
• Beachten Sie bitte die nachfolgenden ”Speziellen Sicherheitshinweise...”.
Spezielle Sicherheitshinweise
• Vor dem Auswechseln der Zubehörteile muss das Gerät ausgeschaltet und vom
Netz getrennt werden!
• Greifen Sie nicht in den Mixbehälter.
• Tragen oder heben Sie das Gerät nicht während des Betriebs, sondern schal-
ten Sie es zuerst aus und ziehen Sie danach den Netzstecker. Tragen Sie das
Gerät immer mit beiden Händen!
• Reinigen Sie das Gerät nur, wie unter „Reinigung“ beschrieben.
Turbo Betrieb
Zum kurzzeitigen Schalten auf Höchstdrehzahl. Beim Drücken in kurzen Abständen
erreichen Sie einen Pulsbetrieb.
Achtung: Benutzen Sie diese Funktion maximal 1 Minute.
4
D
5....-05-HMS 2772 06.05.2003 9:25 Uhr Seite 4

Benutzung der Knethaken/Rührbesen
1. Stellen Sie den Stufenwahlschalter (3) auf „0/AUS“ und stellen Sie sicher, dass
der Mixer (1) vom Netz getrennt ist.
2. Pressen Sie das Ende der Knethaken bzw. der Rührbesen in die dafür vorgese-
henen Öffnungen des Mixers, bis diese einrasten. Durch leichtes Drehen beim
Pressen wird das Einsetzen erleichtert. Bitte beachten Sie: Der Knethaken mit
der Tellerscheibe am Schaft lässt sich nur auf der von unten gesehen, linken
Seite, des Mixers einstecken.
3. Stecken Sie den Netzstecker in eine vorschriftsmäßig installierte Schutzkontakt-
steckdose 230 V / 50 Hz.
4. Sie können nun am Handmixer (1) mit dem Stufenwahlschalter (3) verschiede-
ne Geschwindigkeiten einstellen.
5. Zum Lösen der Knethaken/Rührbesen stellen Sie den Stufenwahlschalter auf
„0/AUS“ und vergewissern sich , dass der Mixer vom Netz getrennt ist.
6. Drücken Sie den Knopf (2) zum Lösen der Knethaken/Rührbesen. Durch leich-
tes Ziehen können diese nun entnommen werden.
Benutzung des Mixerständers
Wählen Sie bitte eine ebene, rutschfeste Fläche als Standort für den Mixständer aus.
1. Setzen Sie den Handmixer (1) auf das Oberteil (5) des Mixerständers (8) auf.
Bitte kontrollieren Sie den festen Sitz.
2. Montieren Sie, wie schon unter Benutzung der Knethaken/Rührbesen beschrie-
ben, die Haken.
3. Um die Rührschüssel (7) unterzustellen, drücken Sie die Taste (6) zur
Entriegelung des Mixerständeroberteils (5) und klappen den Mixer nach oben.
4. Stellen Sie die mit Ihren gewünschten Zutaten gefüllte Rührschüssel auf den
dafür vorgesehenen Drehteller. Klappen Sie den Mixer wieder nach unten.
5. Stecken Sie den Netzstecker in eine vorschriftsmäßig installierte Schutzkontakt-
steckdose 230 V / 50 Hz.
6. Sie können nun am Handmixer (1) mit dem Stufenwahlschalter (3) verschiede-
ne Geschwindigkeiten einstellen.
7. Angetrieben wird die Rührschüssel durch die Bewegung der Rührwerkzeuge in
den Zutaten.
8. Möchten Sie den Mixvorgang beenden schalten Sie den Stufenwahlschalter auf
„0“ und trennen Sie das Gerät vom Netz.
9. Nach der Beendigung drücken Sie erneut die Taste (6) zur Entriegelung des
Mixerständeroberteils (5) und klappen den Mixer nach oben.
10. Die Rührschüssel kann nun entnommen werden. Die Haken entnehmen Sie
bitte wie bereits unter Benutzung der Knethaken/Rührbesen beschrieben.
11. Um den Mixer vom Oberteil (5) des Mixerständers zu trennen, heben Sie ihn
zuerst am hinteren Teil (Kabel) an und nehmen ihn dann nach oben ab.
5
D
5....-05-HMS 2772 06.05.2003 9:25 Uhr Seite 5

Wählen Sie für die Anwendung ein Werkzeug und eine Geschwindigkeit gemäß fol-
gender Tabelle:
Produkt / Zubereitungsart max. Menge Werkzeug Stufe Max. Betriebszeit
Schwerer Teig (z. B. Hefeteig) 500 g Knethaken 1 -4 3 min
Rührteig 750 g Schneebesen 2 -5 5 min
Biskuitteig, Waffelteig, Sahne 750 g Schneebesen 2 -5 oder Turbo 5 min
Reinigung
1. Ziehen Sie vor jeder Reinigung den Netzstecker aus der Steckdose.
2. Zur äußeren Reinigung des Gerätes benutzen Sie nur ein feuchtes Spültuch.
3. Benutzen Sie keine scharfen oder scheuernden Reinigungsmittel.
4. Abnehmbare Teile die mit Teig in Berührung gekommen sind (Knetwerkzeug und
Rührschüssel), können Sie in einem Spülbad reinigen.
Garantie
Wir übernehmen für das von uns vertriebene Gerät eine Garantie von 24 Monaten
ab Kaufdatum (Kassenbon).
Innerhalb der Garantiezeit beseitigen wir unentgeltlich die Mängel des Gerätes oder
des Zubehörs*), die auf Material- oder Herstellungsfehler beruhen, durch Reparatur
oder, nach unserem Ermessen, durch Umtausch. Garantieleistungen bewirken
weder eine Verlängerung der Garantiefrist, noch beginnt dadurch ein Anspruch auf
eine neue Garantie!
Als Garantienachweis gilt der Kaufbeleg. Ohne diesen Nachweis kann ein kosten-
loser Austausch oder eine kostenlose Reparatur nicht erfolgen.
Im Garantiefall geben Sie bitte komplette Gerät in der Originalverpackung zusam-
men mit dem Kassenbon an Ihren Händler.
*) Schäden an Zubehörteilen führen nicht automatisch zum kostenlosen Umtausch
des kompletten Gerätes. Wenden Sie sich in desem Fall bitte an unsere Hotline!
Glasbruchschäden bzw. Brüche von Kunststoffteilen sind grundsätzlich kosten-
pflichtig!
Sowohl Defekte an Verbrauchszubehör bzw. Verschleißteilen (z.B. Motorkohlen,
Knethaken, Antriebsriemen, Ersatzfernbedienung, Ersatzzahnbürsten, Sägeblättern
usw.), als auch Reinigung, Wartung oder der Austausch von Verschleißteilen, fallen
nicht unter die Garantie und sind deshalb kostenpflichtig!
Die Garantie erlischt bei Fremdeingriff.
Nach der Garantie
Nach Ablauf der Garantiezeit können Reparaturen kostenpflichtig vom entsprechen-
den Fachhandel oder Reparaturservice ausgeführt werden.
6
D
5....-05-HMS 2772 06.05.2003 9:25 Uhr Seite 6

7
D
Service für unsere
Haushaltsartikel
Verschleißteile für Haushaltsartikel
(soweit diese nicht vom Fachmann
ausgewechselt werden müssen),
Ersatzkannen, Staubsaugerfilterbeutel
usw. können Sie mit Angabe des
Gerätetyps unter folgender Telefon-
Hotline bestellen:
0 21 52 / 20 06 – 888
Service für unsere
Unterhaltungselektronik
Verschleißteile und Ersatzteile für
unsere Unterhaltungselektronik (soweit
diese nicht vom Fachmann ausge-
wechselt werden müssen) wie z. B.
Fernbedienungen, Bedienteilklappen,
Lautsprecherblenden usw. können Sie
mit Angabe des Gerätetyps unter fol-
gender Telefon-Hotline bestellen:
0 2152 / 20 06 – 666
Für technische Fragen haben wir für Sie folgende e-mail-Adresse eingerichtet:
Interessieren Sie sich für weitere Clatronic-Produkte?
Besuchen Sie doch einmal unsere Homepage unter
www.clatronic.de oder www.clatronic.com
5....-05-HMS 2772 06.05.2003 9:25 Uhr Seite 7

Algemene veiligheidsinstructies
• Lees vóór de ingebruikname van dit apparaat de handleiding uiterst zorgvuldig
door en bewaar deze goed, samen met het garantiebewijs, de kassabon en zo
mogelijk de doos met de binnenverpakking.
• Gebruik het apparaat uitsluitend privé en uitsluitend voor de voorgeschreven
toepassing. Dit apparaat is niet geschikt voor commercieel gebruik (tenzij het
bedoeld is voor beperkt gebruik in de buitenlucht). Bescherm het tegen hitte,
directe zonnestralen, vocht (i geen geval in vloeistoffen dompelen) en scherpe
kanten. Gebruik het apparaat niet met vochtige handen. Bij vochtig of nat gewor-
den apparaat onmiddellijk de stroomtoevoer onderbreken. Niet in het water grij-
pen.
• Schakel het apparaat uit en onderbreek altijd de stroomtoevoer (trek aan de
steker, nooit aan de kabel) wanneer u het apparaat niet gebruikt, hulpstukken
aanbrengt, reinigt of wanneer storingen optreden.
• Laat het ingeschakelde apparaat niet zonder toezicht werken. Schakel het
apparaat altijd uit of trek de steker uit de contactdoos (trek aan de steker, niet
aan de kabel) voordat u de werkplek verlaat.
• Bescherm kinderen tegen gevaren en zorg ervoor dat kabels nooit los omlaag
hangen en dat het apparaat buiten het bereik van kinderen blijft.
• Controleer regelmatig of het apparaat beschadigingen vertoont. Een bescha-
digd apparaat mag niet in gebruik worden genomen.
• Repareer het apparaat nooit zelf, maar breng het naar een geautoriseerde vak-
man. Voorkom gevaren en laat een defecte kabel altijd alleen door de fabrikant,
onze technische dienst of een eender gekwalificeerde persoon vervangen door
een soortgelijke kabel.
• Gebruik alleen originele reserveonderdelen.
• Neem de onderstaande “Speciale veiligheidsinstructies“ in acht.
Speciale veiligheidsinstructies
• Voor de vervanging van hulpstukken moet het apparaat uitgeschakeld en de
stroomtoevoer onderbroken zijn!
• Grijp nooit in de mengkom.
• Draag of verplaats het apparaat nooit zolang het is ingeschakeld. Schakel het
altijd eerst uit en onderbreek dan de stroomtoevoer!
Draag het apparaat steeds met beide handen!
• Reinig het apparaat uitsluitend zoals onder "Reiniging" beschreven staat.
Overzicht van de bedieningselementen
1 Handmixer 6 Toets voor de ontgrendeling
2 Knop om de deeghaken te lossen van het bovengedeelte
3 Standenschakelaar (6 standen) 7 Mengkom
4 TURBO-toets 8 Mixerstandaard
5 Beweeglijk bovenstuk 9 Deeghaken
8
NL
5....-05-HMS 2772 06.05.2003 9:25 Uhr Seite 8

Turbobedrijf
Hiermee kunt u kortstondig naar een hoog toerental schakelen. Als u de knop
steeds indrukt en loslaat, kunt u pulserend werken.
OPGELET: gebruik deze functie maximaal 1 minuut!
Gebruik van de deeghaken/kloppers
1. Zet de standenschakelaar (3) op “0/UIT” en waarborg dat de stroomtoevoer
naar de mixer (1) onderbroken is.
2. Druk het uiteinde van de deeghaken of kloppers in de daarvoor aangebrachte
openingen aan de mixer totdat deze inklinken. Door enigszins te draaien bij het
indrukken, kunt u deze gemakkelijker aanbrengen. Let op: de deeghaak met de
schotelschijf aan de schacht kan alléén op de vanaf beneden gezien linkerzijde
van de mixer worden aangebracht.
3. Sluit de apparaatsteker aan op een correct geïnstalleerde en geaarde contact-
doos 230 V / 50 Hz.
4. Aan de handmixer (1) kunt u nu verschillende standen instellen met de stan-
denschakelaar (3).
5. Om de deeghaak/roerklopper te verwijderen zet u de standenschakelaar op
“0/UIT” en waarborgt u dat de stroomtoevoer naar de mixer onderbroken is.
6. Druk op de knop (2) om de deeghaak/roerklopper te verwijderen Door even te
trekken, kunt u deze nu verwijderen.
Gebruik van de mixerstandaard
Kies een vlak en stroef oppervlak als standplaats voor de mixstandaard.
1. Plaats de handmixer (1) op het bovengedeelte (5) van de mixstandaard (8).
Controleer de correcte montage.
2. Plaats de deeghaken/kloppers zoals beschreven staat onder "Gebruik van de
deeghaken / kloppers".
3. Druk op de toets (6) om het bovengedeelte van de mixstandaard (5) te ontgren-
delen en klap de mixer naar boven om de mengkom (7) te kunnen plaatsen.
4. Zet de mengkom met de te mengen ingrediënten op het draaiplateau. Klap
daarna de mixer weer naar beneden.
5. Sluit de apparaatsteker aan op een correct geïnstalleerde en geaarde contact-
doos 230 V / 50 Hz.
6. Nu kunt u aan de handmixer (1) verschillende snelheden instellen met de stan-
denschakelaar (3).
7. De mengkom wordt aangedreven door middel van de bewegingen van de roer-
gereedschappen in de ingrediënten.
8. Wanneer u het mixen wilt beëindigen, zet u de standenschakelaar op “0” en
onderbreekt u de stroomtoevoer naar het apparaat.
9. Druk na afloop opnieuw op de toets (6) om het bovengedeelte van de mixstan-
daard (5) te ontgrendelen en klap de mixer naar boven.
9
NL
5....-05-HMS 2772 06.05.2003 9:25 Uhr Seite 9

10. De mengkom kan nu worden weggenomen. U verwijdert de haken zoals
beschreven staat onder "Gebruik van de deeghaken/kloppers".
11. Til de mixer aan de achterzijde (kabel) op en neem hem naar boven weg om de
mixer van het bovengedeelte (5) van de mixstandaard te scheiden.
Kies voor het gebruik een hulpstuk en een snelheid volgens onderstaande tabel:
Product/bereidingswijze max. Hoeveelheid Hulpstuk Stand Max. arbeidsdur
Zwaar deeg (bijv. gistdeeg) 500 g deeghaken 1 -4 3 min
Roerdeeg 750 g kloppers 2 -5 5 min
Biscuitdeeg, wafelbeslag, Slagroom 750 g kloppers 2 -5 of Turbo 5 min
Reiniging
1. Trek vóór iedere reiniging de apparaatsteker uit de contactdoos.
2. Gebruik een vochtige doek om de buitenkant van het apparaat te reinigen.
3. Gebruik geen scherpe of schurende reinigingsmiddelen.
4. Afneembare delen die met deeg in contact zijn gekomen (kneedwerktuigen en
mengkom) kunt u gewoon afwassen.
Dit apparaat is gekeurd conform de op dit moment van toepassing zijnde CE-
richtlijnen zoals bijvoorbeeld elektromagnetische compatibiliteit en laagspannings-
voorschriften en is geconstrueerd volgens de nieuwste veiligheidstechnische voor-
schriften.
Technische wijzigingen voorbehouden!
Garantie
Voor het door ons geleverde apparaat verlenen wij een garantie van 24 maanden
vanaf koopdatum (kassabon).
Eventuele gebreken aan het apparaat of aan het toebehoren*) die zijn ontstaan
door productie- of materiaalfouten verhelpen wij binnen deze periode kosteloos
door middel van reparatie of, naar ons oordeel, door vervanging. Eventuele garan-
tiegevallen verlengen noch de geldigheidsduur van de garantie, noch begint daar-
door een nieuwe garantieperiode!
Het koopbewijs geldt als garantiebewijs. Zonder dit bewijs kan geen kosteloze
reparatie of vervanging plaatsvinden.
Geef in garantiegevallen het complete apparaat in de originele verpakking samen
met de kassabon af bij uw handelaar.
*) Schade aan onderdelen leidt niet automatisch tot kosteloze vervanging van het
complete apparaat. Neem in dit geval contact op met onze hotline! De reparatie van
glasbreuk of breuk van kunststofonderdelen wordt altijd berekend!
10
NL
5....-05-HMS 2772 06.05.2003 9:25 Uhr Seite 10

Niet defecten aan de hulpstukken of aan de slijtende onderdelen (bijv. koolborstels,
deeghaken, drijfriemen, reserveafstandsbediening, reservetandenborstels, zaag-
bladen enz.), maar ook reiniging, onderhoud of de vervanging van slijtende delen
vallen niet onder de garantie en geschieden altijd tegen berekening!
Bij ingrepen door derden komt de garantieverlening te vervallen.
Na de garantieperiode
Na afloop van de garantieperiode kunnen reparaties tegen berekening worden uit-
gevoerd door de betreffende vakhandelaar of de technische dienst.
11
NL
5....-05-HMS 2772 06.05.2003 9:25 Uhr Seite 11

Conseils généraux de sécurité
•
Lisez attentivement ce mode d’emploi avant de mettre l’appareil en marche pour
la première fois. Conservez le mode d’emploi ainsi que le bon de garantie, votre
ticket de caisse et si possible, le carton avec l’emballage se trouvant à l’intérieur.
• N’utilisez cet appareil que pour un usage privé et pour les taches auxquelles il
est destiné. Cet appareil n’est pas prévu pour une utilisation professionnelle. Ne
l’utilisez pas en plein air (sauf s’il est indiqué que vous pouvez le faire).
Protégez-le de la chaleur, des rayons directs du soleil, de l’humidité (ne le plon-
gez en aucun cas dans l’eau) et des objets tranchants. N’utilisez pas cet
appareil avec des mains humides. S’il arrive que de l’humidité ou de l’eau att-
eignent l’appareil, débranchez aussitôt le câble d’alimentation. Ne touchez pas
les parties mouillées.
• Arrêtez l’appareil et débranchez toujours le câble d’alimentation de la prise de
courant (tirez sur la fiche, pas sur le câble) si vous n’utilisez pas l’appareil, si
vous installez les accessoires, pour le nettoyage ou en cas de panne.
• Ne laissez jamais fonctionner l’appareil sans surveillance. Arrêtez toujours l’ap-
pareil ou débranchez le câble d’alimentation (en tirant sur la fiche et non pas
sur le câble) si vous devez vous absenter.
• Pour protéger les enfants des risques engendrés par les appareils électriques ,
veillez à ce que le câble ne pende pas de l’appareil et que l’appareil ne soit pas
à portée des enfants.
• Contrôlez régulièrement l’appareil et le câble. Ne mettez pas l’appareil en mar-
che s’il est endommagé.
• Ne réparez pas l’appareil vous-même. Contactez plutôt un technicien qualifié.
Pour éviter toute mise en danger, ne faites remplacer le câble défectueux que
par un câble équivalent et que par le fabricant, notre service après-vente ou
toute personne de qualification similaire.
• N’utilisez que les accessoires d’origine.
• Respectez les „conseils de sécurité spécifiques à cet appareil“ ci-dessous ...
Conseils de sécurité spécifiques à cet appareil
• Arrêtez et débranchez toujours l’appareil avant de changer d’accessoire !
• N’introduisez jamais vos doigts dans le mixer
• Ne portez ni ne soulevez jamais l’appareil pendant le fonctionnement. Arrêtez-le
et débranchez-le d’abord. Portez toujours l’appareil à deux mains !
• Ne nettoyez l’appareil que selon les indications données dans « Nettoyage ».
Description des différents éléments
1 Mixeur 6 Touche de déverrouillage
2 Bouton de détachement du pétrin de la partie supérieure
3 Variateur de vitesses (6 vitesses) 7 Bol mixeur
4 Touche TURBO 8 Support à mixeur
5 Partie supérieure amovible 9 Pétrin
12
F
5....-05-HMS 2772 06.05.2003 9:25 Uhr Seite 12

Fonctionnement turbo
Pour une courte utilisation à très grande vitesse. En appuyant par à-coup, vous
obtenez un fonctionnement Pulse.
ATTENTION: N’utilisez jamais cette fonction plus d’une minute!
Utilisation du pétrin / fouet mélangeur
1. Positionnez le sélecteur de fonctions (3) sur “0/AUS” et vérifiez que le robot (1)
n’est pas branché.
2. Introduisez l’extrémité du pétrin ou du fouet mélangeur dans l’orifice du mixeur
prévue à cet effet, en poussant jusqu’à ce qu’il s’enclenche. Le montage est
d’autant plus facile si vous tournez légèrement tout en poussant l’accessoire
dans l’orifice. Attention: Le pétrin équipé du disque ne peut être fixé que sur le
côté gauche du robot, vu du dessous.
3. Branchez le câble d’alimentation dans une prise de courant de 230 V / 50 Hz
en bon état de fonctionnement.
4. Vous pouvez alors régler différentes vitesses grâce au variateur de vitesses (3)
situé sur le mixeur (1).
5. Pour libérer le pétrin/fouet, vérifiez que le sélecteur de fonctions est sur “0/AUS”
et que le robot est débranché.
6. Enfoncez le bouton (2) pour libérer le pétrin/fouet. Vous pouvez alors légère-
ment tirer dessus pour les sortir de l’orifice.
Utilisation du support à mixeur
Choisissez une surface plane et non glissante pour utiliser le robot
1. Placez le robot (1) sur la partie supérieure (5) du pied de l’appareil (8). Veillez à
ce que l’appareil soit stable.
2. Installez les accessoires suivant les indications précédemment données dans
Utilisation du pétrin /fouet mélangeur.
3. Pour placer le bol mixer (7) sous l’appareil, enfoncez la touche (6) pour déver-
rouiller la partie supérieure du mixer (5) puis orientez l’appareil vers le haut.
4. Placez le bol mixeur préalablement rempli des ingrédients de votre choix sur le
plateau tournant prévu à cet effet. Orientez le robot à nouveau vers le bas.
5. Branchez le câble d’alimentation dans une prise de courant de 230 V / 50 Hz
en bon état de fonctionnement.
6. Vous pouvez alors régler différentes vitesses grâce au variateur de vitesses (3)
situé sur le mixeur (1).
7. Le bol mixer est mis en mouvement par l’action des pétrins dans les aliments.
8. Si vous souhaitez arrêter l’appareil, positionnez le sélecteur de fonctions sur “0”
et débranchez l’appareil.
9. Lorsque vous avez fini, enfoncez à nouveau la touche (6) pour déverrouiller la
partie supérieure du mixer (5) puis orientez l’appareil vers le haut.
13
F
5....-05-HMS 2772 06.05.2003 9:25 Uhr Seite 13

10. Vous pouvez alors enlever le bol mixeur. Détachez les accessoires suivant les
indications données dans Utilisation du pétrin ou fouet mélangeur.
11. Pour séparer le mixer de la partie supérieure de l’appareil (5), soulevez le mixer
d’abord par l’arrière (câble) avant de le retirer de l’appareil.
Choisissez, selon l’utilisation, l’accessoire et la vitesse adaptés d’après le tableau
suivant:
Produit/mode de préparation quantité max. accessoires position durée max. de
fonctionnement
Pâte épaisse (par ex. pâte à levain) 500 g pétrin 1 -4 3 min
Pâte à gâteau 750 g fouet mélangeur 2 -5 5 min
Pâte à biscuit , à gaufre, Crème fraîche
750 g fouet mélangeur 2 -5 ou Turbo 5 min
Entretien
1. Débranchez le câble d’alimentation de la prise de courant avant chaque
nettoyage.
2. Utilisez un torchon humide pour nettoyer l’extérieur de l’appareil.
3. N’utilisez en aucun cas de détergent corrosif ou abrasif.
4. Vous pouvez laver les pièces salies par la pâte (accessoire à pétrir et bol
mélangeur) normalement à l’eau savonneuse.
Cet appareil a été contrôlé d’après toutes les directives européennes actuelles
applicables, comme par exemple concernant la compatibilité électromagnétique et
la basse tension. Cet appareil a été fabriqué en respect des réglementations tech-
niques de sécurité les plus récentes.
Sous réserve de modifications techniques.
Garantie
Nous accordons une garantie de 24 mois à dater de la date d’achat (ticket de
caisse) pour l’appareil que nous vendons.
Pendant la durée de la garantie, nous éliminons gratuitement les défauts de l’appa-
reil ou des accessoires *) découlant d’un vice de matériau ou de fabrication au
moyen d’une réparation ou, selon notre estimation, au moyen d’un remplacement.
Les prestations dans le cadre de la garantie n’entraînent aucune prorogation de la
durée de garantie et ne donnent pas droit à une nouvelle garantie !
Le justificatif de garantie est le reçu. Sans ce justificatif, aucun remplacement
gratuit ni aucune réparation gratuite ne peuvent être effectués.
En cas de recours à la garantie, ramenez votre appareil complet, dans son
emballage d'origine, accompagné de votre preuve d'achat, à votre revendeur.
14
F
5....-05-HMS 2772 06.05.2003 9:25 Uhr Seite 14

*) Les endommagements de pièces d’accessoires ne justifient pas automatique-
ment l’échange gratuit de l’appareil complet. Contactez alors notre centrale télépho-
nique! La casse de pièces en verre ou en plastique est dans tous les cas à votre
charge!
Les défauts sur les accessoires ou les pièces d’usure (p.ex. les charbons de
moteurs, crochets, courroies d’entraînement, télécommande de rechange, brosses
à dents de rechange, lames de scies etc.) ainsi que le nettoyage, l’entretien ou le
remplacement de pièces d’usure ne sont pas garantis et sont donc payants !
En cas d’intervention étrangère, la garantie devient caduque.
Après la garantie
Après écoulement de la durée de garantie, les réparations peuvent être effectuées,
contre paiement, par le commerce spécialisé ou le service de réparation.
15
F
5....-05-HMS 2772 06.05.2003 9:25 Uhr Seite 15

Indicaciones generales de seguridad
• Antes de la puesta en servicio de este aparato lea detenidamente el manual de
instrucciones y guarde este bien incluido la garantía, el recibo de pago y si es
posible también el cartón de embalaje con el embalaje interior.
• Solamente utilice el aparato para el uso privado y para el fin previsto. Este
aparato no está destinado para el uso profesional. No lo utilice al aire libre
(en excepto que esté destinado para el uso limitado al aire libre). No lo expon-
ga al calor, a la entrada directa de rayos de sol, a la humedad ( en ningún caso
sumerja el aparato en agua) y a los cantos agudos. No utilice el aparato con las
manos húmedas. En caso de que el aparato esté húmedo o mojado retire de
momento la clavija de la caja de enchufe. No tocar el agua.
• Desconecte el aparato y siempre retire la clavija de la caja de enchufe (tire de
la clavija no del cable), cuando no quiera utilizar el aparato, montar piezas o en
caso de limpieza o defectos.
• No utilice el aparato sin vigilancia. En caso de que tenga que dejar su lugar de
trabajo, desconecte siempre el aparato o retire la clavija de la caja de enchufe
(por favor tire de la clavija y no del cable).
•
Para evitar que los niños se hagan daños eléctricos, siempre tenga atención, que
el cable no cuelgue hacia abajo y que los niños no tengan acceso al aparato.
• Controle regularmente si el aparato o el cable tiene defectos. No ponga en ser-
vicio un aparato defecto.
• No repare el aparato por su cuenta, sino vaya a un establecimiento autorizado.
Para evitar peligros, deje sustituir un cable defecto por uno de la misma calidad
solamente por el fabricante, nuestro servicio al cliente o una similar persona
cualificada.
• Solamente utilice accesorios originales.
• Por favor tenga atención a las “Indicaciones especiales de seguridad…“
indicadas a continuación.
Observaciones especiales de seguridad
• ¡Antes de cambiar los accesorios debe estar el aparato apagado y desconecta-
do de la red!
• No entre en contacto con el recipiente de batir.
• Durante el funcionamiento no cargue o eleve el aparato, sino apaguélo primero
y desconéctelo de la red. ¡Siempre lleve el aparato con las dos manos!
• Solamente debe limpiar el aparato como indicado bajo el apartado ”Limpieza”.
Resumen de los elementos de manejo
1 Batidora de mano 6 Tecla para el desbloqueo
2
Botón para liberar los ganchos amasadores
de la parte superior
3 Selector de velocidades (6
velocidades
) 7 Recipiente
4 Tecla TURBO 8 Varilla
5 Parte superior movible 9
Ganchos amasadores
16
E
5....-05-HMS 2772 06.05.2003 9:25 Uhr Seite 16

Funcionamiento turbo
Para una utilización corta a alta velocidad. Apriete la tecla por intermitencias para
obtener un funcionamiento Pulso.
Atención: ¡Por favor utilice esta función solamente hasta 1 minuto!
Manejo de los ganchos amasadores /
ganchos batidores
1. Coloque el interruptor de contactos escalonados (3) a la posición "0/AUS" y
asegúrese que la batidora (1) no esté conectada a la red
2. Apriete el final de los ganchos amasodores o ganchos batidores en la abertura
de la batidora hasta que enrosquen. La colocación de estos ganchos es más
fácil si al apretar se giran levemente. Por favor tenga atención que: El gancho
amasador con la arandela de platillo en el astil, solamente se deja meter en la
parte izquierda, mirando desde abajo, de la batidora.
3. Introduzca la clavija de red en una caja de enchufe con tomatierra 230 V /
50 Hz e instalada según reglamento.
4. Ahora puede eligir en la batidora de mano (1) con el selector de velocidades (3)
varias velocidades.
5. Para soltar el gancho amasador/varilla batidora, coloque el interruptor de
contactos escalonados (3) a la posición "0/AUS" y asegúrese que la batidora
(1) no esté conectada a la red.
6. Presione el botón (2) para soltar el gancho amasador/varilla batidora. Los
ganchos se pueden desencajar tirando levemente de ellos.
Manejo de la varilla
Se ruega elegir una superficie plana y antideslizante para colocar la base-batidora.
1. Coloque la batidora de mano (1) sobre la parte superior (5) de la base-batidora
(8). Se ruega controlar el ajuste seguro.
2. Coloque , como ya descrito en el manejo de los ganchos amasadores/ganchos
batiodres, los ganchos.
3. Para colocar el recipiente de batir (7) por abajo, presione la tecla (6) que des-
bloquea la parte superior de la batidora (5) y pliegue la batidora hacia arriba.
4. Coloque ahora el recipiente con los ingredientes encima del plato giratorio. Baje
la batidora de nuevo.
5. Introduzca la clavija de red en una caja de enchufe con tomatierra 230 V / 50
Hz e instalada según reglamento.
6. Ahora puede con la batidora de mano (1) y el selector de velocidades (3) elegir
entre varias velocidades.
7. El recipiente de batir es impulsado por el movimiento de las herramientas de
batir en los ingredientes.
8. Si desea finalizar el procedimiento de batir, ponga el interruptor de contactos
escalonados a la posición “0” y retire el aparato de la red.
17
E
5....-05-HMS 2772 06.05.2003 9:25 Uhr Seite 17

9. Después de la finalización presione de nuevo la tecla (6) para el desbloqueo de
la parte superior de la batidora (5) y pliegue la batidora hacia arriba.
10. El recipiente se puede coger ahora. Los ganchos desencájelos como descrito
en el manejo de los ganchos amasadores / ganchos batidores.
11. Para separar la batidora de la parte superior (5), debe alzarla por la parte tra-
sera (cable) y después quitarla desde arriba.
Para la utilización elija una herramienta y una velocidad según la tabla a continua-
ción:
Producto / Cantidad máxima Herramienta Escalón Tiempo de
Método de preparación uso máximo
Masa pesada
(p.ej. masa de levadura) 500 g ganchos amasadores 1 -4 3 min
Pastaflora 750 g ganchos batidores 2 -5 5 min
Masa de bizcocho, gofres, Nata 750 g ganchos batidores 2 -5 o Turbo 5 min
Limpieza
1. Antes de cada limpieza, retire la clavija de la caja de enchufe.
2. Para la limpieza exterior del aparato solamente utilice un paño humedecido.
3. No utilice detergentes agresivos o abrasivos.
4. Las piezas desmontables que hayan entrado en contacto con la masa (herra-
mienta de amasar o bol para mezclar), las puede lavar en un baño jabonoso.
Este aparato se ha examinado según las normativas actuales y vigentes de la
Comunidad Europea, como p.ej. compatibilidad electromagnética y directiva de
baja tensión y se ha construido según las más nuevas especificaciones en razón
de la seguridad.
No reservamos el derecho de efectuar modificaciones técnicas.
Garantía
Para el aparato comercializado por nosotros nos responsabilizamos con una
garantía de 24 meses a partir de la fecha de compra (factura de compra).
Durante el período de garantía nos encargamos gratuítamente de los defectos del
aparato y de los accesorios*), que se hayan originado por defectos del material o
de la fabricación. Dependiendo de nuestra estimación se realizará una reparación
o un cambio. ¡Los servicios de garantía no prolangan la garantía, ni se incia por
ello un período nuevo de garantía!
Como comprobante para la garantía es válido la factura de compra. Sin este com-
probante no se podrá realizar un cambio o una reparación gratuíta.
En caso de garantía entregue el aparato completo en su embalaje original
junto con la factura a su agente comerciante.
18
E
5....-05-HMS 2772 06.05.2003 9:25 Uhr Seite 18

*) Defectos en las piezas de accesorio, no significan automáticamente el recambio
gratuito del aparato completo. ¡En este caso dirijase por favor a nuestra linea de
atención al cliente! ¡Rotos de vidrio o roturas en las piezas de plástico deben
pagarse siempre por el cliente !
Defectos en los accesorios de uso o en las piezas de desgaste (p.ej. escobillas de
carbón del motor, varillas amasadoras, correas de transmisión, mando a distancia
de repuesto, cepillos de dientes de repuesto, hojas de sierra etc.), como también la
limpieza, mantenimiento o el recambio de piezas de desgaste no recaen en la
garantía e irán al cargo del cliente!
En caso de intervención ajena se expira la garantía.
Después de la garantía
Después de haber expirado la garantía se pueden realizar las reparaciones por el
concesionario o por el servicio de reparaciones. Los gastos irán al cargo del cliente.
19
E
5....-05-HMS 2772 06.05.2003 9:25 Uhr Seite 19

Instruções gerais de segurança
• Antes de pôr este aparelho a funcionar, leia muito atentamente as instruções
de emprego e guarde-as muito bem, juntamente com o talão de garantia, o
talão de compra e, tanto quanto possível, a embalagem com os elementos inte-
riores.
• Utilize o aparelho exclusivamente para fins privados e para a finalidade para a
qual o mesmo foi concebido. Este aparelho não se destina a fins comerciais.
Não o utilize ao ar livre (a não ser que o mesmo possa ser usado ao ar livre
sob determinadas condições). Mantenha-o protegido do calor, de irradiação
solar directa, da humidade (não o imergir de forma alguma em quaisquer líqui-
dos) e de arestas aguçadas. Não utilize o aparelho com as mãos molhadas. No
caso de o aparelho ficar húmido ou molhado, retire imediatamente a ficha da
tomada. Não tocar na água.
• Sempre que não utilizar o aparelho, ou desejar montar acessórios, ou queira
limpá-lo, ou ainda em caso de avarias, deverá desligá-lo e retirar a ficha da
tomada (puxe pela ficha e não pelo fio).
• O aparelho não deverá funcionar sem vigilância. No caso de ter de se ausentar
do local onde o aparelho estiver a funcionar, desligue-o sempre ou retire a ficha
da tomada (puxe pela ficha e não pelo fio).
• Para proteger as crianças dos perigos relacionados com aparelhos eléctricos,
nunca deixe os fios pendurados e atente em que as crianças não possam che-
gar a tais aparelhos.
• Verifique regularmente se o aparelho ou o fio têm alguns danos. Nunca ponha
a funcionar um aparelho com quaisquer danos.
• Não tente reparar o aparelho, dirija-se a um técnico da especialidade, devida-
mente autorizado. Para evitar quaisquer perigos, é favor substituir um fio danifi-
cado por um fio da mesma qualidade. Tal deverá ser efectuado pelo fabricante,
pelos nossos serviços de assistência ou por outra pessoa com as mesmas
qualificações.
• Utilize apenas acessórios de origem.
• É favor observar as seguintes „Instruções especiais de segurança...“.
Instruções especiais de segurança
• Antes de se substituírem os acessórios, deverá desligar-se o aparelho e retirar-
se a ficha da tomada!
• Não introduza a mão no recipiente da batedeira.
• Não movimente nem levante o aparelho durante o funcionamento. Desligue-o
em primeiro lugar e retire seguidamente a ficha da tomada. Pegue sempre no
aparelho com ambas as mãos!
• Proceda à limpeza do aparelho apenas da forma indicada na rubrica
“Limpeza”.
20
P
5....-05-HMS 2772 06.05.2003 9:25 Uhr Seite 20

Descrição dos elementos
1 Batedeira 6 Tecla para desbloquear
2 Botão para soltar as varinhas de amassar a parte superior
3 Selector de velocidades (6 velocidades) 7 Recipiente de misturas
4 Tecla TURBO 8 Suporte para a batedeira
5 Parte superior móvel 9 Varinhas para amassar
Funcionamento turbo
Para obter momentaneamente o número máximo de rotações. Carregando a tecla
em intervalos curtos, consegue-se uma operação intermitente.
ATENÇÃO: Não utilizar esta função mais de 1 minuto!
Utilização das varinhas para amassar/bater
1. Coloque o selector (3) na posição “0/AUS” e certifique-se de que a batedeira
(1) está desligada da corrente.
2. Introduzir as extremidades das varinhas nos orifícios próprios da batedeira, até
as mesmas ficarem engatadas. A montagem será facilitada, girando-se ligeira-
mente as extremidades durante a introdução. Atenção: a varinha de amassar
com o disco em forma de prato no cabo só pode ser introduzida na parte
esquerda da batedeira (vista de baixo).
3. Introduza a ficha numa tomada de 230 voltes / 50 Hz, com protecção de
contactos, convenientemente instalada.
4. Poderão agora seleccionar-se várias velocidades na batedeira (1), utilizando-se
o selector de velocidades (3).
5. Para soltar a varinha de amassar, coloque o selector na posição “0/AUS” e cer-
tifique-se de que a batedeira não está ligada à corrente.
6. Pressione o botão (2) para soltar a varinha de amassar. Puxando-as ligeira-
mente, as mesmas sairão com facilidade.
Utilização do suporte da batedeira
Coloque o suporte da batedeira sobre uma superfície plana e não escorregadia
1. Coloque a batedeira (1) na parte superior (5) do suporte (8). Certifique-se de
que está bem fixa.
2. Montar as varinhas da forma descrita em Utilização das varinhas para amas-
sar/bater.
3. Para colocar o recipiente (7) por baixo da batedeira, pressione a tecla (6) para
desbloquear a parte superior do suporte (5) e levante a batedeira.
4. Colocar sobre o prato giratório o recipiente com os ingredientes desejados.
Torne a baixar a batedeira.
5. Introduza a ficha numa tomada de 230 voltes / 50 Hz, com protecção de
contactos, convenientemente instalada.
21
P
5....-05-HMS 2772 06.05.2003 9:25 Uhr Seite 21

6. Poderão agora seleccionar-se várias velocidades na batedeira (1) utilizando-se
o selector de velocidades (3).
7. O recipiente será accionado pelo movimento das varinhas dentro dos ingre-
dientes.
8. Quando acabar, desloque o selector para a posição “0” e retire a ficha da toma-
da.
9. Depois de terminar, pressione novamente a tecla (6) para desbloquear a parte
superior do suporte (5) e levante a batedeira.
10. Pode retirar-se agora o recipiente. Desmontar as varinhas da forma descrita em
Utilização das varinhas para amassar/bater.
11. Para separar a batedeira da parte superior (5) do suporte, levante-a em pri-
meiro lugar pela parte traseira (fio) e retire-a então, puxando-a para cima.
Utilize uma varinha e uma velocidade segundo a tabela seguinte:
Produto / Forma de preparação Quantidade máx. Varinha Velocidade Funcionamento máx.
Massa pesada (p. ex. massa para pão 500 g Varinha de amassar 1-4 3 min
Massa normal para bolos 750 g Varinha de bater claras 2-5 5 min
Massa para tartes, wafles, natas 750 g Varinha de bater claras 2-5 ou turbo 5 min
Limpeza
1. Antes de cada limpeza, retire a ficha da tomada.
2. Para limpar o exterior da máquina, utilize apenas um pano húmido.
3. Não use detergentes cáusticos nem corrosivos.
4. As peças móveis que se sujaram com a massa (varinhas e recipiente) poderão
ser lavadas normalmente em água com detergente.
Este aparelho foi controlado nos termos das actuais directivas da CEE
aplicáveis, tais como inocuidade electromagnética e directiva sobre baixa
tensão, e fabricado de acordo com as mais novas prescrições da segurança
técnica.
Reserva-se o direito de alterações!
Garantia
O aparelho vendido pela nossa empresa tem uma garantia de 24 meses a partir
da data da compra (talão).
Durante o período de garantia, procederemos à remoção grátis - por reparação,
ou, segundo a nossa decisão, por substituição - das deficiências do aparelho ou
dos acessórios*) que provenham de erros de material ou de fabricação. A pre-
stação de serviços relacionados com a garantia não prolongarão a mesma, nem
iniciarão um novo prazo de garantia!
O talão de compra consistirá prova desta garantia. Sem o mesmo, não será pos-
sível proceder-se a qualquer troca ou reparação grátis.
22
P
5....-05-HMS 2772 06.05.2003 9:25 Uhr Seite 22

Em caso de garantia, entregue o aparelho completo, juntamente com o talão de
compra, na loja onde o mesmo foi comprado.
*) No caso de danos em quaisquer acessórios, não será efectuada automática-
mente uma substituição completa do aparelho. Contacte neste caso a nossa hotli-
ne! Danos causados por quebras de peças de vidro ou de plástico terão de ser
pagos pelo cliente!
Não estão incluídos na garantia quaisquer defeitos de acessórios ou de peças que
se desgastem (como, por exemplo, carvões do motor, varinhas, correias do motor,
telecomandos, escovas de dentes, folhas de serra, etc.), nem a limpeza, a manu-
tenção ou a substituição de peças que se desgastem, devendo tais despesas ser
reembolsadas!
A garantia terminará sempre que tenha havido intervenção alheia nos aparelhos.
Após a garantia
Após a expiração do prazo de garantia, poderão ser efectuados arranjos por pes-
soal especializado, ou pelos nossos serviços de reparações, contra reembolso.
23
P
5....-05-HMS 2772 06.05.2003 9:25 Uhr Seite 23

Norme di sicurezza generali
• Prima di mettere in funzione questo apparecchio, leggere molto attentamente le
istruzioni per l’uso e conservarle con cura unitamente al certificato di garanzia,
allo scontrino e, se possibile, alla scatola di cartone con la confezione interna.
• Utilizzare l’apparecchio esclusivamente per scopi privati e conformemente al
tipo di applicazione previsto. Questo prodotto non è stato concepito ai fini di un
impiego in ambito industriale. Non utilizzarlo all’aperto (a meno che non sia
contemplato un particolare tipo di uso all’aperto nel rispetto di specifiche
condizioni). Proteggerlo dal calore, nonché dall’esposizione diretta ai raggi sola-
ri e dall’umidità (non immergerlo mai in sostanze liquide) e tenerlo a distanza
da oggetti con spigoli affilati. Non utilizzare l’apparecchio con le mani umide.
Nel caso in cui si bagni o si inumidisca l’apparecchio, staccare immediatamente
la spina. Evitare il contatto con l’acqua.
• Disattivare l’apparecchio e staccare sempre la spina dalla relativa presa
(si raccomanda di afferrare il connettore e non il cavo quando si effettua questa
operazione) allorché non si utilizza l’apparecchio, quando si applicano degli
accessori oppure nel caso in cui lo si debba pulire o si siano manifestate
anomalie.
• Non mettere in funzione l’ apparecchio senza sorveglianza. Se si dovesse
assentarsi dal posto di lavoro, spegnere e disconnettere sempre l’ apparecchio,
(prendendo in mano la spina, non tirando il cavo).
• Allo scopo di proteggere i bambini contro i pericoli che possono derivare dagli
apparecchi elettrici, accertarsi che non vi siano cavi pendenti e che i bambini
non possano accedere in alcun modo all’apparecchio stesso.
• Controllare periodicamente l’apparecchio per verificare che non vi siano danni.
Non mettere in funzione l’apparecchio nel caso in cui sia guasto.
• Non tentare di riparare l’apparecchio, bensì rivolgersi a un tecnico autorizzato.
Al fine di evitare l’insorgere di situazioni di pericolo, si raccomanda di contattare
il costruttore, il nostro servizio di assistenza tecnica o un tecnico ugualmente
qualificato per la sostituzione del cavo di alimentazione difettoso con un cavo
equivalente.
• Utilizzare esclusivamente accessori originali.
• Rispettare le seguenti “Speciali norme di sicurezza...“.
Avvertenze speciali di sicurezza
• Prima di sostituire gli accessori spegnere l’apparecchio e staccare la spina!
• Non infilare mai le mani nel recipiente di miscelazione!
• Non portare né sollevare l’apparecchio mentre è in funzione. Prima spegnerlo e
poi staccare la spina. Portare sempre l’apparecchio con entrambe le mani!
• Pulire l’apparecchio solo come descritto in “Pulizia”.
24
I
5....-05-HMS 2772 06.05.2003 9:25 Uhr Seite 24

Elementi di comando
1 Frullatore
2 Tasto per lo sblocco dei ganci impastatori
3 Interruttore di selezione degli stadi di commutazione (6 stadi)
4 Tasto TURBO
5 Sovrastruttura orientabile
6 Tasto per sbloccare la parte superiore
7 Scodella di miscelazione
8 Supporto di miscelazione
9 Ganci impastatori
Funzionamento rapido (turbo)
Per passare in breve tempo al numero massimo di giri. Premendo a brevi intervalli
potete lavorare con il funzionamento ad impulsi.
ATTENZIONE: non utilizzate questa funzione per più di 1 minuto.
Uso dei ganci impastatori/bracci agitatori
1. Mettere il selettore di velocità (3) su “0/OFF” e accertarsi che il frullatore (1) sia
staccato dalla rete elettrica.
2. Inserite con una leggera pressione l’estremità dei ganci impastatori ovvero dei
bracci agitatori nelle apposite aperture del frullatore, fino all’incastro meccanico.
Girando leggermente mentre si preme, si facilita l’inserimento. Attenzione: è
possibile inserire la frusta a spirale con il dischetto sulla barretta solo sull’appo-
sito lato a sinistra dello sbattitore.
3. Inserire la spina in una presa con contatto di terra regolarmente installata da
230 V / 50 Hz.
4. Ora potete regolare sul frullatore (1) diverse velocità avvalendovi dell’interruttore
di selezione degli stadi di commutazione (3).
5. Per staccare le fruste a spirale/a filo mettere il selettore di funzioni su “0/OFF” e
accertarsi che non ci sia corrente.
6. Premere il tasto (2) per staccare le fruste a spirale/a filo. Tirandoli un po’ si pos-
sono sfilare.
Uso del supporto di miscelazione
Per la base scegliere una superficie piana e non scivolosa.
1. Mettere lo sbattitore (1) sulla parte superiore (5) della base (8). Controllare il fis-
saggio stabile.
2. Montate i ganci come già descritto in precedenza in Uso dei ganci
impastatori/bracci agitatori.
3. Per sottoporre il recipiente per gli alimenti (7), premere il tasto (6) per sbloccare
la parte superiore della base e rivoltare lo sbattitore verso l’ alto.
25
I
5....-05-HMS 2772 06.05.2003 9:25 Uhr Seite 25

4. Mettete la scodella di miscelazione con gli ingredienti che desiderate sull’appo-
sito piatto girevole (7). Rimettere a posto lo sbattitore.
5. Inserire la spina in una presa con contatto di terra regolarmente installata da
230 V / 50 Hz.
6. Con l’interruttore di selezione (3) potete ora regolare sul frullatore (1) diverse
velocità.
7. Il recipiente degli alimenti si mette in moto grazie al movimento degli accessori
negli ingredienti.
8. Se si desidera terminare il lavoro, mettere il selettore di velocità su “0” e stacca-
re la corrente.
9. Terminato il lavoro premere nuovamente il tasto (6) per sbloccare la parte
superiore della base (5) e rivoltare lo sbattitore verso l’alto.
10. Ora potete togliere la scodella di miscelazione. Per cortesia togliete i ganci pro-
cedendo come già descritto in Uso dei ganci impastatori/bracci agitatori.
11. Per staccare lo sbattitore dalla parte superiore della base (5), tirarlo prima verso
l’ alto tenendolo dalla parte posteriore (cavo) e poi afferrarlo all’ insù.
Per l’uso scegliere un utensile e una velocità conformemente alla seguente tabella:
prodotto / tipo di preparazione quantità massima utensile velocità durata massima
pasta pesante (per esempio
pasta per il pane o la pizza) 500 g fruste a spirale 1 -4 3 min
pasta per dolci 750 g fruste a filo 2 -5 5 min
pasta per biscotto o cialde, panna 750 g fruste a filo 2 -5 o turbo 5 min
Pulizia
1. Prima di ogni operazione di pulizia staccare la spina.
2. Per la pulizia esterna dell’apparecchio utilizzare solo un panno umido.
3. Non usare detergenti abrasivi o corrosivi.
4. I pezzi sfilabili che sono entrati in contatto con la pasta (ganci e scodella di
mescola) si possono lavare in acqua e detergente per stoviglie.
Questo apparecchio è stato controllato sulla base di tutte le direttive CE attuali in
vigore in questo settore, quali per esempio la normativa in materia di compatibilità
elettromagnetica e la direttiva in materia di bassa tensione, ed è stato costruito
conformemente alle norme di sicurezza più moderne.
Con riserva di apportare modifiche tecniche.
26
I
5....-05-HMS 2772 06.05.2003 9:25 Uhr Seite 26

Garanzia
Per l’apparecchio da noi messo in commercio ci assumiamo una garanzia di
24 mesi dalla data di acquisto (scontrino).
Durante la garanzia noi ci impegniamo ad eliminare gratuitamente i guasti dell’ap-
parecchio o degli accessori*), dovuti a difetti di materiale o di fabbricazione, riparan-
doli o, a nostra discrezione, sostituendoli. Le prestazioni in garanzia danno luogo a
una proroga della garanzia né danno diritto ad una nuova garanzia!
Per la garanzia è sufficiente lo scontrino di acquisto. Senza questo scontrino non
sussiste il diritto né ad una sostituzione né ad una riparazione gratuita.
Nel caso si ricorra alla garanzia, restituire al rivenditore l’apparecchio completo in
ogni sua parte, nell’imballaggio originale unitamente allo scontrino.
*) Danni agli accessori non giustificano automaticamente lo scambio gratuito dell’-
apparecchio completo. Si prega di mettersi in contatto con la nostra centrale telefo-
nica. Danni alle parti di vetro oppure fratture ai pezzi di materia plastica sono obbli-
gatoriamente a spese del cliente.
La riparazione di pezzi d’uso ovvero soggetti a logoramento (cursori, ganci impa-
statori, cinghie di trasmissione, telecomandi di ricambio, spazzolini di ricambio,
lame di seghe ecc.) come anche operazioni di pulizia e manutenzione o la sostitu-
zione di pezzi soggetti a logoramento non rientrano nella garanzia e quindi sono a
pagamento!
La garanzia si annulla nel caso di intervento da parte di terzi.
Dopo la garanzia
Al termine della garanzia le riparazioni possono essere eseguite dietro pagamento
dal corrispettivo negozio specializzato o servizio riparazioni.
27
I
5....-05-HMS 2772 06.05.2003 9:25 Uhr Seite 27

General Safety Instructions
• Read the operating instructions carefully before putting the appliance into ope-
ration and keep the instructions including the warranty, the receipt and, if possi-
ble, the box with the internal packing.
• The appliance is designed exclusively for private use and for the envisaged pur-
pose. This appliance is not fit for commercial use. Do not use it outdoors (except
if it is designed to be used outdoors). Keep it away from sources of heat, direct
sunlight, humidity (never dip it into any liquid) and sharp edges. Do not use the
appliance with wet hands. If the appliance is humid or wet, unplug it immediate-
ly. Do not put it in water.
• When cleaning or putting it away, switch off the appliance and always pull out
the plug from the socket (pull on the plug, not the cable) if the appliance is not
being used and remove the attached accessories.
• Do not operate the machine without supervision. If you should leave the work-
place, always switch the machine off or remove the plug from the socket (pull
the plug itself, not the lead).
• To protect children from the dangers posed by electrical appliances, make sure
that the cable is hanging low and that children do not have access to the appli-
ance.
• Check the appliance and the cable for damage on a regular basis. Do not use
the appliance if it is damaged.
• Do not try to repair the appliance on your own. Always contact an authorized
technician. To avoid the exposure to danger, always have a faulty cable be
replaced only by the manufacturer, by our customer service or by a qualified
person and with a cable of the same type.
• Use only original spare parts.
• Pay careful attention to the following “Special Safety Instructions“.
Special safety instructions
• Before changing the attachments, the appliance must be disconnected from the
mains!
• Do not insert your fingers into the mixing vessel.
• Do not carry or lift the appliance during use. Always switch it off first and pull out
the plug. Carry the appliance always with both hands!
• Clean the appliance only as described in „Cleaning“.
Overview of Components
1 Handmixer 6 Button for unlocking
2
Button for the releasing of the kneader hooks
the upper section
3 Speed regulator (6 speeds) 7 Mixer bowl
4 TURBO button 8 Mixer stand
5 Mobile upper part 9 Kneader hooks
28
GB
5....-05-HMS 2772 06.05.2003 9:25 Uhr Seite 28

Turbo operation
This is for switching to maximum speed for a short time. Press at short intervals for
pulsed mode operation.
WARNING! Do not use this function for more than one minute!
How to use the Kneader hooks/beater
1. Turn the power level selector switch (3) to "0/OFF" and ensure that the mixer (1)
has been disconnected from the mains.
2. Press the end of the kneader hooks/beater into the corresponding mixer ope-
nings until the hooks click into place. While pressing, turn slightly in order to
facilitate the whole operation. Please note that the kneading hook with the cur-
ved washer on the shaft can only be inserted on the left-hand side of the mixer
when viewed from the bottom.
3. Insert the mains plug into a properly installed 230V/50 Hz safety power socket.
4. The handmixer (1) can be used at various speeds set with the speed regulator
(3).
5. In order to release the kneading hook/whisk turn the power level selector switch
to "0/OFF" and ensure that the mixer has been disconnected from the mains.
6. Press the button (2) to release the kneading hook/whisk. Remove the device by
turning it slightly.
How to use the Mixer stand
Please select a flat non-slip surface for the mixer stand.
1. Place the hand mixer (1) on the upper section (5) of the mixer stand (8). Please
check whether this is fixed firmly in place.
2. Mount the hooks as described above in the section “How to use the Kneader
hooks/beater”.
3. In order to place the mixing bowl (7) underneath, press the button (6) to unlock
the upper section of the mixer stand (5) and fold the mixer upwards.
4. Place the mixer bowl filled with the desired ingredients onto the revolving plate.
Now fold the mixer down again.
5. Insert the mains plug into a properly installed 230V/50 Hz safety power socket.
6. The handmixer (1) can be used at various speeds set with the speed regulator
(3).
7. The mixing bowl is driven by the movement of the mixing tools through the
ingredients.
8. When you would like to stop mixing, turn the power level selector switch to "0"
and unplug the device from the mains.
9. When you have finished press the button (6) again to unlock the upper section
of the mixer stand (5) and fold the mixer upwards.
10. Now the mixer bowl can be removed. Remove the hooks as described above in
the section “How to use the Kneader hooks/beater”.
29
GB
5....-05-HMS 2772 06.05.2003 9:25 Uhr Seite 29

11. In order to separate the mixer from the upper section (5) of the mixer stand, first
lift it by the rear section (cables) and then remove it by pulling upwards.
Always choose a utensil and a speed according to the following table:
Product/ Max. Quantity Utensil Level Max.
Type of Preparation Operating Time
Heavy dough (e.g. yeast dough) 500 g kneader hook 1 -4 3 min
Cake mixture 750 g beater 2 -5 5 min
Sponge mixture, wafer mixture, Cream 750 g beater 2 -5 or Turbo 5 min
Cleaning
1. Before cleaning the equipment, always remove the mains plug from the socket.
2. Only a damp cloth should be used for cleaning the outside of the machine.
3. Do not use any caustic or abrasive detergents.
4. Removable parts which have come into contact with the mixture (kneading
utensils and mixing bowl) can be cleaned in soapy water.
This device has been tested according to all relevant current CE guidelines,
such as electromagnetic compatibility and low voltage directives, and has been
constructed in accordance with the latest safety regulations.
Subject to technical changes without prior notice!
Guarantee
The device supplied by our Company is covered by a 24 month guarantee starting
on the date of purchase (receipt).
During the life of the guarantee any fault of the device or its accessories *) ascriba-
ble to material or manufacturing defects will be eliminated free of charge by repai-
ring or, at our discretion, by replacing it. The guarantee services do not entail an
extension of the life of the guarantee nor do they give rise to any right to a new
guarantee!
Proof of the guarantee is provided by the proof of purchase. Without proof of
purchase no free replacement or repair will be carried out.
If you wish to make a claim under the guarantee please return the entire machine
in the original packaging to your dealer together with the receipt.
*) Damage to accessories does not mean automatic free replacement of the whole
machine. In such cases please contact our hotline. Broken glass or breakage of
plastic parts are always subject to a charge.
Defects to consumables or parts subject to wearing (e.g. motor pistons, kneading
blades, drive shafts, spare remote control, spare toothbrushes, saw blades, etc.)
30
GB
5....-05-HMS 2772 06.05.2003 9:25 Uhr Seite 30

as well as cleaning, maintenance or the replacement of said parts are not covered
by the guarantee and hence are to be paid!
The guarantee lapses in case of unauthorized tampering.
After the expiry of the guarantee
After the expiry of the guarantee repairs can be carried by the competent dealer or
repair service against the payment of the ensuing costs.
31
GB
5....-05-HMS 2772 06.05.2003 9:25 Uhr Seite 31

Ogólne wskazówki bezpieczeństwa
• Przed uruchomieniem urządzenia proszę bardzo dokładnie przeczytać
instrukcję obsługi.Proszę zachować ją wraz z kartą gwarancyjną, parago-
nem i w miarę możliwości również kartonem z opakowaniem wewnętrznym.
• Proszę wykorzystywać urządzenie jedynie dla prywatnego celu,jaki został
przewidziany dla urządzenia.Urządzenie to nie zostało przewidziane do
użytku w ramach działalności gospodarczej.Proszę nie korzystać z urządze-
nia na zewnątrz (chyba że w określonych warunkach).Proszę trzymać urząd-
zenie z daleka od ciepła,bezpośredniego promieniowania słonecznego,wil-
goci (w żadnym wypadku nie zanurzać w substancjach płynnych)oraz
ostrych krawędzi.Proszę nie obsługiwać urządzenia wilgotnymi
dłońmi.Jeżeli urządzenie jest wilgotne lub mokre,proszę natychmiast
wyciągnąć wtyczkę.
• Jeżeli nie korzystacie Państwo z urządzenia,jeżeli chcecie Państwo zamonto-
wać jakieś akcesoria,w celu wyczyszczenia lub w przypadku jakichkolwiek
zakłóceń,proszę zawsze wyłączyć urządzenie i wyjąć wtyczkę z gniazdka
(proszę pociągnąć za wtyczkę,nie za przewód zasilający).
• Pracującego urządzenia nie należy pozostawiać bez nadzoru. Jeżeli opusz-
czają Państwo miejsce pracy, należy zawsze pamiętać o wyłączeniu urząd-
zenia, wzgl. wyjęciu wtyczki z gniazda (należy ciągnąć za wtyczkę, nie za
kabel).
• Aby uchronić dzieci przed niebezpieczeństwem związanym z elektrycznymi
urządzeniami,proszę zadbać o to,aby przewód zasilający nigdy nie wisiał
luźno,oraz aby dzieci nie miały dostępu do urządzenia.
• Proszę regularnie kontrolować urządzenie pod kątem uszkodzeń.Proszę nie
uruchamiać uszkodzonego urządzenia.
• W razie awarii proszę nie naprawiać urządzenia samemu lecz skorzystać z
pomocy autoryzowanego specjalisty. Jeżeli przewód zasilający nieodłącz-
alny ulegnie uszkodzeniu, to powinien on być wymieniony u producenta lub
w specjalnym zakładzie naprawczym albo przez wykwalifikowaną osobę w
celu uniknięcia zagrożenia.
• Proszę stosować tylko oryginalne akcesoria.
• Prosimy pamiętać o podanych dalej „Specjalnych wskazówkach doty-
czących bezpieczecznego użytkowania“
Szczególne zalecenia z zakresu bezpieczeństwa
• Przed wymianą elementów wyposażenia należy wyłączyć urządzenie i
odłączyć je od sieci!
• Proszę nie wkładać rąk do pojemnika miksera
• W trakcie pracy urządzenia nie wolno go przenosić lub podnosić. W pierws-
zej kolejności należy zawsze wyłączyć malakser i wyjąć wtyczkę z gniazda
elektrycznego. Urządzenie należy zawsze nosić oburącz!
• Urządzenie wolno czyścić jedynie w sposób podany w punkcie
„Czyszczenie”.
32
PL
5....-05-HMS 2772 06.05.2003 9:25 Uhr Seite 32

Zestawienie elementów obsługi
1 Mikser ręczny 6 Przycisk odblokowujący
2 Przycisk do zwalniania mieszadeł część górną
do ugniatania 7 Pojemnik do mieszania
3 Przełącznik trzystopniowy (6 stopnie) 8 Stojak mieszaka
4 Przycisk TURBO 9 Mieszadła do ugniatania
5 Ruchoma część górna
Napęd turbo
Przeznaczony do krótkotrwałego przełączania na najwyższą liczbę obrotów.
Jeżeli będziecie Państwo przyciskać go w krótkich odstępach, urządzenie
będzie pracowało pulsacyjnie.
UWAGA: proszę nie korzystać z tej funkcji dłużej niż przez jedną minutę!
Używanie mieszadeł do ugniatania/
mieszadeł do ubijania
1. Proszę ustawić przełącznik wyboru stopni pracy (3) na pozycji „0/AUS” i
upewnić się, że mikser (1) jest odłączony od sieci.
2. Końcówki mieszadeł do ugniatania wzgl. mieszadeł do ubijania wcisnąć w
przewidziane do tego otwory w mikserze, do momentu wzębienia się zapad-
ki. Lekkie obracanie przy wciskaniu ułatwia osadzenie. Proszę pamiętać:
sztabkę ugniatającą z tarczą talerzową na trzonku można zamocować
wyłącznie patrząc na mikser od dołu, po jego lewej stronie.
3. Proszę podłączyć wtyczkę do prawidłowo zainstalowanego gniazda z zesty-
kiem ochronnym 230V/ 50 Hz.
4. Teraz za pomocą przełącznika stopniowego (3) można ustawiać na mikser-
ze (1) różne prędkości.
5. Aby zwolnić sztabkę ugniatającą/ trzepaczkę proszę ustawić przełącznik
wyboru stopni pracy na pozycji „0/AUS” i upewnić się, że mikser jest
odłączony od sieci.
6. Aby zwolnić sztabkę ugniatającą/ trzepaczkę proszę nacisnąć przycisk (2).
Po lekkim pociągnięciu można wyjąc mieszadła.
Używanie stojaka miksera (blendera)
Dla ustawienia podstawy mieszadła proszę wybrać płaską, bezpoślizgową
powierzchnię.
1. Proszę założyć mikser ręczny (1) na górną część (5) podstawy miksera (8).
Prosimy skontrolować prawidłowość osadzenia.
2. Zamontować mieszadła w sposób opisany w punkcie „Używanie mieszadeł
do ugniatania / mieszadeł do ubijania”.
33
PL
5....-05-HMS 2772 06.05.2003 9:25 Uhr Seite 33

3.
W celu podstawienia miski do mieszania (7), należy nacisnąć przycisk (6) w
celu odblokowania górnej części stelaża miksera (5) i odchylić mikser do góry.
4. Pojemnik do mieszania napełniony przygotowanymi przez Państwa składni-
kami należy ustawić na przewidzianym do tego talerzu obrotowym. Proszę
ponownie pochylić mikser w dół.
5. Proszę podłączyć wtyczkę do prawidłowo zainstalowanego gniazda z zesty-
kiem ochronnym 230V/ 50 Hz.
6. Teraz za pomocą przełącznika stopniowego (3) można ustawiać na mikser-
ze (1) różne prędkości.
7. Miska do mieszania napędzana jest poprzez ruch narzędzi mieszających w
składnikach.
8. Gdy chcą Państwo zakończyć proces miksowania proszę przełączyć
przełącznik wyboru stopni pracy na pozycję „0” i odłączyć urządzenie od
sieci.
9. Po zakończeniu należy, poprzez naciśnięcie przycisku (6), ponownie odblo-
kować górną część stelaża miksera i odchylić mikser do góry.
10. Można teraz zdjąć pojemnik do mieszania. Mieszadła należy wyjąć w
sposób opisany w punkcie „Używanie mieszadeł do ugniatania / mieszadeł
do ubijania”.
11. W celu odłączenia miksera od części górnej (5) stelaża, należy najpierw
unieść tylną część miksera (kabel) a następnie zdjąć ku górze.
Narzędzia i prędkości należy dobierać zgodnie z poniższą tabelą:
Produkt/ maks. ilość narzędzie stopień maks.
sposób przyrządzenia czas pracy
Ciasta ciężkie (np. drożdżowe) 500 g
ugniatania
1 -4 3 min
Ciasta ubijane 750 g
ubijania
2 -5 5 min
Ciasto biszkoptowe, waflowe, Śmietana
750 g
ubijania
2 -5 lub Turbo 5 min
Czyszczenie
1. Przed czyszczeniem proszę wyciągnąć wtyczkę z kontaktu.
2. Z zewnątrz proszę oczyścić urządzenie wilgotną myjką.
3. Proszę nie stosować żadnych ostrych ani szorujących środków czysz-
czących.
4. Części zdejmowane, które miały kontakt z ciastem (akcesoria do ugniatania,
mieszania ciasta oraz misa), mogą Państwo w zwykły sposób umyć pod
bieżącą wodą.
Niniejsze urządzenie odpowiada wymaganiom normy bezpieczeństwa użytkowa-
nia oraz spełnia wymagania dyrektywy niskonapięciowej i kompatybilności elek-
tromagnetycznej.
Zastrzega się prawo do zmian technicznych!
34
PL
5....-05-HMS 2772 06.05.2003 9:25 Uhr Seite 34

WARUNKI GWARANCJI
Przyznajemy 24 miesięcy gwarancji na produkt licząc od daty zakupu.
W tym okresie będziemy bezpłatnie usuwać w terminie 14 dni od daty dostarcze-
nia wadliwego sprzętu z kartą gwarancyjną do miejsca zakupu wszystkie uszko-
dzenia powstałe w tym urządzeniu na skutek wady materiałów lub wadliwego
wykonania, naprawiając oraz wymieniając wadliwe części lub (jeśli uznamy za sto-
sowne) wymieniając całe urządzenie na nowe.
Sprzęt do naprawy powinien być dostarczony w komplecie wraz z dowodem
zakupu oraz z ważną kartą gwarancyjną do sprzedawcy w miarę możliwości w
oryginalnym opakowaniu lub innym odpowiednim dla zabezpieczenia przed uszko-
dzeniem. W razie braku kompletnego opakowania fabrycznego, ryzyko uszkodze-
nia sprzętu podczas transportu do i z miejsca zakupu ponosi reklamujący.
Naprawa gwarancyjna nie dotyczy czynności przewidzianych w instrukcji obsługi,
do wykonania których zobowiązany jest użytkownik we własnym zakresie i na
własny koszt.
Gwarancja nie obejmuje:
• mechanicznych, termicznych, chemicznych uszkodzeń sprzętu i wywołanych
nimi wad,
• uszkodzeń powstałych w wyniku działania sił zewnętrznych takich jak wyłado-
wania atmosferyczne, zmiana napięcia zasilania i innych zdarzeń losowych,
• nieprawidłowego ustawienia wartości napięcia elektrycznego, zasilanie z nie-
odpowiedniego gniazda zasilania,
• sznurów połączeniowych, sieciowych, żarówek, baterii, akumulatorów,
• uszkodzeń wyrobu powstałych w wyniku niewłaściwego lub niezgodnego z
instrukcją jego użytkowania, przechowywania, konserwacji, samowolnego
zrywania plomb oraz wszelkich przeróbek i zmian konstrukcyjnych dokonanych
przez użytkownika lub osoby niepowołane,
• roszczeń z tytułu parametrów technicznych wyrobu, o ile są one zgodne z
podanymi przez producenta,
• prawidłowego zużycia i uszkodzeń, które mają nieistotny wpływ na wartość
lub działanie tego urządzenia.
Karta gwarancyjna bez pieczątki sklepu, daty sprzedaży, nie wypełniona, źle
wypełniona, ze śladami poprawek, nieczytelna wskutek zniszczenia, bez
możliwości ustalenia miejsca sprzedaży oraz dołączonego dowodu zakupu jest
nieważna.
Korzystanie z usług gwarancyjnych nie jest możliwe po upływie daty ważności
gwarancji. Gwarancja na części lub całe urządzenie, które są wymieniane kończy
się, wraz z końcem gwarancji na to urządzenie.
Wszystkie inne roszczenia, wliczając w to odszkodowania są wykluczone chyba, że
prawo przewiduje inaczej. Roszczenia wykraczające poza tą umowę nie są
uwzględniane przez tą gwarancję.
Gwarancja oraz zawarte w niej warunki obowiązują na terenie Rzeczpospolitej
Polskiej.
35
PL
5....-05-HMS 2772 06.05.2003 9:25 Uhr Seite 35

Všeobecné bezpečnostní pokyny
• Před uvedením tohoto přístroje do provozu si velmi pozorně přečtěte návod
k obsluze a tento návod spolu se záručním listem, pokladním blokem a
podle možností i s obalem a vnitřním vybavením obalu dobře uschovejte.
• Používejte tento přístroj výlučně pro soukromou potřebu a pro stanovené
účely. Tento přístroj není určen pro komerční použití. Nepoužívejte jej v
otevřeném prostoru (s výjimkou přístrojů, které jsou podmíněné používání
venku určeny). Chraňte jej před horkem, přímým slunečním zářením, vlhko-
stí (v žádném případě jej neponořujte do kapalin) a stykem s ostrými hrana-
mi. Nepoužívejte přístroj v případě, že máte vlhké ruce. Jestliže dojde k navl-
hčení nebo namočení přístroje, okamžitě vytáhněte zástrčku ze zásuvky.
Vyvarujte se styku s vodou.
• Přístroj vypněte a vždy vytáhněte zástrčku ze zásuvky (tahejte jen za zástrč-
ku, nikdy ne za kabel), jestliže nebudete přístroj používat, chcete-li
namontovat příslušenství, přístroj vyčistit nebo v případě poruchy.
• Přístroj nesmí zůstat v provozu bez dozoru. Jestliže musíte pracoviště opu-
stit, vždy přístroj vypněte, resp. vytáhněte zástrčku ze zásuvky (vždy tahejte
za zástrčku, nikdy ne za kabel).
• Abyste ochránili děti před riziky spojenými s elektrickými přístroji, postarejte
se o to, aby kabel nevisel dolů a děti na přístroj nedosáhly.
• Pravidelně kontrolujte přístroj a přívodní kabel z hlediska poškození. Jestliže
přístroj vykazuje nějakou závadu, neuvádějte jej do provozu.
• Neopravujte přístroj vlastními silami, nýbrž vyhledejte autorizovaného
opraváře. Abyste eliminovali rizika, nechejte poškozený přívodní kabel
nahradit kabelem se stejnými hodnotami a to jen výrobcem, naším servisem
pro zákazníky nebo jinou kvalifikovanou osobou.
• Používejte jen originální příslušenství.
• Respektujte, prosím, následující „Speciální bezpečnostní pokyny ...“.
Speciální bezpečnostní pokyny
• Před výměnou jednotlivých dílů příslušenství musí být přístroj vypnut a odpo-
jen od el. sítě !
• Nesahejte do mixovací nádoby.
• Nepřenášejte nebo nenadzdvihávejte přístroj během provozu, nýbrž je nejpr-
ve vypněte a poté vytáhněte zástrčku ze zásuvky. Při přenášení držte přístroj
vždy oběma rukama!
• Čištění přístroje provádějte jen způsobem popsaným v kapitole „Čištění“.
Přehled ovládacích prvků
1 Ruční mixér 6 Tlačítko pro odjištění horního dílu
2 Knoflík k uvolnění hnětacích háků 7 Míchací mísa
3 Volič výkonových stupňů (6 stupně) 8 Stojan pro ruční mixér
4 Tlačítko TURBO 9 Hnětací háky
5 Pohyblivá horní část
36
CZ
5....-05-HMS 2772 06.05.2003 9:25 Uhr Seite 36

Turbo-provoz
Je určeno ke krátkodobému přepnutí na maximální otáčky. Stiskáváním v
krátkých intervalech dosáhnete tzv. pulzního provozu.
POZOR! Používejte tuto funkci po dobu maximálně 1 minuty!
Používání hnětacích háků / šlehacích metel
1. Nastavte přepínač výkonových stupňů (3) do polohy “0/AUS” a zajistěte
odpojení mixéru (1) od elektrické sítě.
2. Zatlačte konce hnětacích háků resp. šlehacích metel do pro ně určených
otvorů až zaklapnou. Nasazování si můžete usnadnit lehkým pootáčením při
zatlačování. Mějte, prosím, na paměti následující: Hnětací hák s talířovým
kotoučem na dříku lze nasadit na levou stranu mixéru (při pohledu zespo-
du).
3. Zastrčte zástrčku do zásuvky s ochranným kolíkem 230 V / 50 Hz, instalo-
vané v souladu s příslušnými předpisy.
4. Nyní můžete na ručním mixéru (1) nastavit pomocí voliče výkonových stupňů
(3) různé rychlosti.
5. Před uvolněním hnětacího háku/šlehacích metel nastavte přepínač
výkonových stupňů do polohy “0/AUS” a ujistěte se, že že mixér je odpojen
od elektrické sítě.
6. K uvolnění hnětacího háku/šlehacích metel stlačte tlačítko (2). Lehkým
vytažením je nyní můžete vyjmout.
Používání stojanu pro ruční mixér
Pro umístění stojanu mixéru zvolte rovnou, neklouzavou plochu.
1. Nasaďte ruční mixér (1) na horní díl (5) stojanu mixéru (8). Zkontrolujte
pevné usazení.
2. Namontujte háky způsobem stejným, jaký je popsán výše v oddíle „Používání
hnětacích háků / šlehacích metel“.
3. Aby bylo možno vložit míchací mísu (7) pod mixér, stiskněte tlačítko (6) pro
odjištění horního dílu stojanu mixéru (5) a vyklopte mixér nahoru.
4. Míchací mísu naplněnou požadovanými surovinami postavte na pro ni
určený otočný talíř. Sklopte mixér opět dolů.
5. Zastrčte zástrčku do zásuvky s ochranným kolíkem 230 V / 50 Hz, instalo-
vané v souladu s příslušnými předpisy.
6. Nyní můžete na ručním mixéru (1) nastavit pomocí voliče výkonových stupňů
(3) různé rychlosti.
7. Míchací mísa je poháněna pohybem mísících nástrojů ve zpracovávané
surovině.
8. Chcete-li mixování ukončit, přepněte přepínač výkonových stupňů do polohy
“0” a odpojte přístroj od elektrické sítě.
9. Po skončení práce stiskněte znovu tlačítko (6) pro odjištění horního dílu sto-
janu mixéru (5) a vyklopte mixér nahoru.
37
CZ
5....-05-HMS 2772 06.05.2003 9:25 Uhr Seite 37

38
CZ
10. Nyní lze šlehací metly vyjmout. Háky vyjměte stejným způsobem, jaký je
popsán výše v oddíle „Používání hnětacích háků / šlehacích metel“.
11. Pro odpojení horního dílu (5) stojanu mixéru jej nejprve nadzdvihněte za
zadní část (kabel) a poté jej odejměte směrem nahoru.
Pro požadovaný účel si zvolte nástavec a rychlost podle následující tabulky:
Produkt/způsob přípravy max. množství nástavec stupeň max.
doba provozu
Těžké těsto (např. kynuté těsto) 500 g hnětacích háků 1 -4 3 min
Třené těsto 750 g šlehacích metel 2 -5 5 min
Piškotové, vaflové těsto , ·Slehaãka 750 g šlehacích metel 2 -5 nebo Turbo 5 min
Čištění
1. Před každým čištěním vytáhněte zástrčku ze zásuvky.
2. K čištění vnějšího povrchu přístroje používejte jen vlhký hadřík.
3. Nepoužívejte žádné drsné nebo agresivní čistící prostředky.
4. Odnímatelné díly, které přišly do styku s těstem (hnětací mechanismus a
mísu pro hnětení) můžete umýt v běžné mycí lázni.
Tento přístroj byl testován podle všech příslušných, v současné době platných
směrnic CE, jako je např. elektromagnetická kompatibilita a direktiva o nízko-
napěťové bezpečnosti, a byl zkonstruován podle nejnovějších bezpečnostně-
technických předpisů.
Vyhrazujeme si technické změny!
Záruka
Na námi prodaný přístroj poskytujeme záruku v trvání 24 měsíců od data prode-
je (pokladní doklad).
Během záruční lhůty odstraníme bezplatně všechny vady přístroje nebo
příslušenství*), které vzniknou v důsledku vad materiálu nebo výrobních vad, a to
opravou nebo, podle našeho uvážení, formou výměny. Záruční plnění nemají za
následek ani prodloužení záruční doby ani tím nevzniká nárok na novou záruku!
Jako záruční doklad slouží doklad o koupi. Bez tohoto dokladu nelze uskutečnit
bezplatnou výměnu nebo bezplatnou opravu.
V případě uplatnění záruky předejte, prosím, kompletní přístroj v originálním
obalu spolu s pokladním dokladem Vašemu obchodníkovi.
*) Poškození příslušenství není automaticky důvodem pro bezplatnou výměnu
kompletního přístroje. V takovém případě se obraťte na naši Hotline! Prasklé
skleněné resp. plastové díly zásadně podléhají povinnosti úhrady!
Jak na vady na spotřebním příslušenství, resp. dílech podléhajících rychlému
opotřebení (např. uhlíky motoru, hnětací háky, hnací řemeny, náhradní dálkové
5....-05-HMS 2772 06.05.2003 9:25 Uhr Seite 38

ovládání, náhradní zubní kartáčky, pilové listy atd.), tak i na čištění, údržbu nebo
výměnu dílů podléhajících rychlému opotřebení se záruka nevztahuje a je proto
nutno je uhradit!
Záruka zaniká v případě, že dojde k zásahu neautorizovanou osobou.
Po uplynutí záruky
Po uplynutí záruční doby je možno za úplatu provést opravy v příslušném
odborném obchodě nebo opravně.
39
CZ
5....-05-HMS 2772 06.05.2003 9:25 Uhr Seite 39

Általános biztonsági rendszabályok
• A készülék használatba vétele előtt gondosan olvassa végig a használati
utasítást, és őrizze meg a garancialevéllel, a pénztári nyugtával és lehetőleg
a csomagolókartonnal, ill. az abban lévő bélésanyaggal együtt!
• Kizárólag személyi célra használja a készüléket, és csupán arra, amire való!
A készülék nem ipari jellegű használatra készült. Ne használja a szabadban
(hacsak nem a szabadban való, meghatározott korlátok közötti használatra
van szánva)! Ne tegye ki erős hőhatásnak, közvetlen napsugárzásnak és
nedvességnek (semmi esetre se mártsa folyadékba), és óvja az éles
szélektől! Ne használja a készüléket vizes kézzel! Ha a készülék vizes vagy
nedves lett, azonnal húzza ki a konnektorból! Ne nyúljon bele a vízbe!
• Kapcsolja ki a készüléket, és amikor nem használja, tartozékokat helyez rá,
tisztítja, vagy ha zavart észlel, mindig húzza ki a csatlakozó dugaszt a
konnektorból!
• Ne működtesse a készüléket felügyelet nélkül! Ha elhagyja a munkahelyet,
mindig kapcsolja ki a készüléket, ill. húzza ki a dugaszt a konnektorból (a
dugasznál, és nem a kábelnél fogva)!
• Annak érdekében, hogy a gyermekeket megvédje az elektromos készülékek
okozta veszélyektől, soha ne hagyja a kábeleket szabadon lógva, és olyan
helyre tegye a készüléket, ahol gyermekek nem férhetnek hozzá!
• Rendszeresen ellenőrizze, hogy nincs-e a készüléken vagy a kábelen
sérülés! Sérült készüléket soha ne helyezzen üzembe!
• A kockázatok elkerülése végett ne maga javítsa a készüléket, hanem
keressen fel egy erre kiképzett szakembert! Ha hibás a csatlakozó kábel,
csak a gyártótól, a vevőszolgálatunktól vagy hasonló képzettségű személytől
kérjen helyette azonos értékű másik kábelt!
• Csak eredeti tartozékokat használjon!
• Tartsa be az itt következő "Speciális biztonsági rendszabályokat" ...
A készülékre vonatkozó speciális biztonsági
rendszabályok
• A tartozékok kicserélésekor a készüléket ki kell kapcsolni, és áramtalanítani
kell.
• Ne nyúljon bele a keverőedénybe!
• Működés közben ne vigye a készüléket arrébb, és ne emelje meg! Először
mindig kapcsolja ki, utána pedig húzza ki a hálózati csatlakozó dugót a kon-
nektorból. Ha máshová viszi a készüléket, mindig két kézzel fogja meg!
• Mindig úgy tisztítsa a készüléket, ahogy a "Tisztítás" címszó alatt olvasható!.
40
H
5....-05-HMS 2772 06.05.2003 9:25 Uhr Seite 40

A kezelõelemek áttekintése
1 Kézimixer 6 A felső rész reteszelését
2 Dagasztóhorog-kioldó gomb kioldó gomb
3 Fokozatkapcsoló (6 fokozat) 7 Keverõedény
4 TURBO-gomb 8 Mixerállvány
5 Mozgatható felsõ rész 9 Dagasztóhorog
Turbó-üzemmód
Rövid ideig a legnagyobb fordulatszámra kapcsolhatjuk a készüléket. Ha rövid
idõközönként megnyomjuk, a készülék lüktetve üzemel.
FIGYELEM! Ezt a funkciót legfeljebb 1 percig szabad használni.
A dagasztóhorog/habverõ használata
1. Állítsa a fokozatkapcsolót (3) „0/AUS“-ra, és győződjék meg róla, hogy a
mixer (1) le van-e választva a hálózatról!
2. A dagasztóhorog ill. a habverõ végét nyomja a mixer erre való nyílásába,
míg be nem kattan. Ha közben enyhén fordítja az eszközt, könnyebben tudja
beilleszteni. Ügyeljen rá: A szárán tányérkoronggal szerelt dagasztókorong
csak a mixer alulról nézve bal oldalán dugható be!
3. Dugaszoljuk be a készülék hálózati csatlakozóját egy elõírásszerěen felsze-
relt 230 V / 50 Hz-es védõérintkezõs konnektorba.
4. Most már a fokozatkapcsolóval (3) különbözõ sebességeket állíthat be a
kézimixeren (1).
5. A dagasztóhorog/habverő kioldásához állítsa a fokozatkapcsolót „0/AUS“-ra,
és győződjék meg róla, hogy a készülék le van-e választva a hálózatról!
6. Nyomja meg a dagasztóhorog/habverő kioldására szolgáló gombot (2)!
Ezután enyhén meghúzva, ki tudja õket venni.
A mixerállvány használata
A mixelőállvány elhelyezésére válasszon sima, csúszásmentes felületet!
1. Helyezze rá a kézi mixer (1) a mixelőállvány (5) felső részére (8)! Ellenőrizze,
hogy stabilan rögzült-e!
2. Szerelje fel a horgokat, ahogy a "dagasztóhorog/habverõ használatánál" le
van írva.
3. Ahhoz, hogy a mixer alá lehessen állítani a keverőedényt (7), nyomja meg a
mixelőállvány felső részének (5) reteszelését kioldó gombot (6), és billentse
fel a mixert!
4. Helyezze a kívánt hozzávalókkal megtöltött keverõedényt az erre szánt for-
gótányérra. Billentse újra le a mixert!
5. Dugaszoljuk be a készülék hálózati csatlakozóját egy elõírásszerěen felsze-
relt 230 V / 50 Hz-es védõérintkezõs konnektorba.
41
H
5....-05-HMS 2772 06.05.2003 9:25 Uhr Seite 41

6. Most már a fokozatkapcsolóval (3) különbözõ sebességeket állíthat be a
kézimixeren (1).
7. A keverőedényt a hozzávalókba merülő keverőszerszámok mozgása hajtja
meg.
8. Ha be kívánja fejezni a mixelést, állítsa a fokozatkapcsolót „0“-ra, és húzza ki
a készüléket a konnektorból!
9. A munka befejezése után nyomja meg ismét a mixelőállvány felső részének
(5) reteszelését kioldó gombot (6), és billentse fel a mixert!
10. Kiveheti a keverõedényt. Távolítsa el a horgokat, ahogy a
"dagasztóhorog/habverõ használata" alatt le van írva.
11. Ha a mixert le akarja választani a mixelőállvány felső részéről (5), emelje
meg először a hátsó részénél (kábel), majd felfelé húzva vegye le!
Kies voor het gebruik een hulpstuk en een snelheid volgens onderstaande tabel:
Termék/Elkészítési mód Max. tömeg Szerszám Fokozat Max. üzemidő
Sűrű tészta (pl. kelt tészta) 500 g dagasztóhorog 1 -4 3 min
Kevert tészta 750 g habverõ 2 -5 5 min
Piskótatészta, ostyatészta, Tejszín 750 g habverõ 2 -5 vagy Turbo 5 min
Tisztítás
1. Minden tisztítás elõtt húzzuk ki a csatlakozót a konnektorból.
2. A készülék külsõ tisztításához csak nedves mosogatóruhát használjunk.
3. Ne használjunk erõs vagy koptató hatású tisztítószereket.
4. A tésztával érintkezésbe kerülõ levehetõ egységeket (keverõszerzámok és
keverõtál), mosogatóban tisztíthatjuk.
Ezt a készüléket az Európa Tanács minden vonatkozó aktuális irányelve szerint
(pl. elektromágnesesség-elviselő képesség vagy kisfeszültség-elviselő képes-
ség) ellenőriztük, és a legújabb biztonságtechnikai előírások szerint készült.
Megjegyezzük az esetleges müszaki változásokat!
Garancia
Az általunk forgalmazott készülékre a vétel időpontjától (pénztári nyugta)
számított 24 havi garanciát vállalunk.
A garanciális időn belül saját mérlegelésünk szerint javítással vagy cserével
díjtalanul megszüntetjük a készülék vagy a tartozék *) olyan hiányosságait, ame-
lyek anyaghibára vagy gyártási hibára vezethetők vissza. A garanciális szolgál-
tatások sem a garanciális idő meghosszabbítását nem eredményezik, sem nem
alapoznak meg újabb garanciára való igényt!
42
H
5....-05-HMS 2772 06.05.2003 9:25 Uhr Seite 42

A garancia igazolására a pénztári nyugta szolgál. E nélkül az igazolás nélkül sem
díjmentes csere, sem díjtalan javítás nem végezhető.
Garanciális esetben szíveskedjék az alapkészüléket eredeti csomagolásában a
pénztári nyugtával együtt átadni a kereskedőjének!
*) A tartozékok a jogszabályban előírt szavatossági kötelezettség (6 hónap)
hatálya alá tartoznak, és nem vezetnek az egész készülék díjtalan cseréjére.
Ilyen esetben ne a készüléket küldje be, ill. rendelje meg, hanem
vevőszolgálatunkkal egyeztetve csak a hibás tartozékot! Az üvegtörés okozta
hibák mindig térítéskötelesek!
Sem az elhasználódó tartozékokban, ill. kopó alkatrészekben (pl. szénkefe,
dagasztóhorog, hajtószíj, póttávvezérlő, pótfogkefe, fűrészlap stb.) bekövetkező
hibák, sem a tisztítás, karbantartás vagy a kopó alkatrészek cseréje nem esik a
garancia hatálya alá, következésképp térítésköteles.
Illetéktelen beavatkozás a garancia megszűnését eredményezi.
A garanciális idő után
A garanciális idő eltelte után a megfelelő szakkereskedésben vagy javítószol-
gálatnál végeztethet térítésköteles javításokat.
43
H
5....-05-HMS 2772 06.05.2003 9:25 Uhr Seite 43

Indicaflii generale de siguranflæ
• Înainte de punerea în funcfliune a acestui aparat citifli cu atenflie instrucfliunile de
utilizare øi pæstrafli inclusiv certificatul de garanflie, bonul de casæ øi dupæ posibi-
litæfli ambalajul.
• Folosifli acest aparat exclusiv în scop privat øi în cel pentru care a fost conce-
put. Acest aparat nu este conceput pentru utilizarea industrialæ. Nu-l folosifli în
exterior (doar dacæ este conceput pentru a fi folosit în exterior). Evitafli
expunerea aparatului la cælduræ, la influenfla directæ a razelor solare, umezealæ
(este interzisæ scufundarea acestuia în lichide) øi nu folosifli obiecte ascuflite în
timpul utilizærii. Evitafli folosirea aparatului cu mâinile ude. În cazul în care apa-
ratul este umed sau ud, deconectafli imediat de la reflea. Nu bægafli mâna în
apæ.
• Oprifli aparatul øi deconectafli întotdeuna de la reflea (tragefli de øtecher øi nu de
cablu) atunci când nu folosifli aparatul, când montafli accesorii, în timpul curæflærii
sau în cazul unor defecfliuni de funcflionare.
• Nu læsafli aparatul nesupravegheat în timpul utilizærii. În cazul în care suntefli
nevoifli sæ pæræsifli locul de muncæ, oprifli întotdeauna aparatul, resp. deconectafli
de la reflea (tragefli de øtecher, nu de cablu).
• Pentru a proteja copiii faflæ de pericolele aparatelor electrice, asigurafli-væ cæ
aceøtia nu au acces la ele øi nu læsafli cablurile sæ atârne.
• Verificafli regulat aparatul øi cablurile în vederea detectærii defecfliunilor. Nu
folosifli aparate defecte.
• Pentru repararea aparatului contactafli un specialist autorizat. Pentru înlocuirea
unuiui cablu defect de reflea contactafli, în vederea evitærii riscurilor, pro-
ducætorul, serviciul nostru de clienfli sau o persoanæ calificatæ.
• Folosifli doar accesorii originale.
• Væ rugæm sæ citifli cu atenflie øi urmætoarele „Indicaflii speciale de siguranflæ…“
Indicaflii speciale de siguranflæ
• Înaintea de a schimba accesoriile, oprifli aparatul øi deconectafli de la reflea!
• Nu introducefli mâna în recipientul pentru mixare.
• Nu ridicafli øi nu flinefli aparatul în mânæ în timp ce funcflioneazæ. Acesta trebuie
întâi oprit øi apoi deconectat de la reflea.
fiinefli aparatul întotdeauna cu ambele mâini!
• Curæflafli aparatul dupæ cum este descris în capitolul “Curæflare”
44
RO
5....-05-HMS 2772 06.05.2003 9:25 Uhr Seite 44

Privire de ansamblu asupra elementelor de deservire
1 Mixer portabil
2 Buton pentru desprinderea cârligului de fræmântat
3 Întrerupætor pentru treapta de funcflionare (6 trepte)
4 Tasta TURBO
5 Componentæ superioaræ mobilæ
6 Buton pentru deblocarea pærflii superioare
7 Castron
8 Suport pentru mixer
9 Cârlig de fræmântat
Mod de funcflionare TURBO
Pentru trecerea de scurtæ duratæ la turaflia maximæ. Dacæ apæsafli în intervale scurte
obflinefli modul de funcflionare pulsatoriu.
Atenflie: Folosifli aceastæ funcflie pentru maxim 1 minut.
Utilizarea cârligului de fræmântat/paletei de amestecare
1. Poziflionafli întrerupætorul (3) la “0/OPRIT” øi verificafli dacæ mixerul (1) este
deconectat de la reflea.
2. Apæsafli capætul cârligului de fræmântat respectiv al paletei pentru amestecare în
gaura prevæzutæ pentru acest lucru a mixerului pânæ la blocarea
mecanicæ.Atenflie: cârligul de fræmântat împreunæ cu farfuria de la trunchi poate
fi introdusæ, privind mixerul de jos, doar în partea stângæ a acestuia.
3. Conectafli la o prizæ cu protecflie instalatæ regulamentar de 230 V/50Hz.
4. Acum putefli regla cu ajutorul întrerupætorului (3) la mixerul portabil (1) diferite
viteze.
5. Pentru desprinderea cârligului de fræmântat/a paletei pentru amestecare
poziflionafli întrerupætorul la “0/OPRIT” øi asigurafli-væ cæ mixerul este deconectat
de la reflea.
6. Apæsafli butonul (2) pentru a desprinde cârligul de fræmântat/paleta pentru ame-
stecare. Acum le putefli desprinde trægând uøor de ele.
Utilizarea suportului pentru mixer
Alegefli o suprafaflæ dreaptæ, antiderapantæ pentru suport.
1. Montafli mixerul portabil (1) pe componenta superioaræ (5) a suportului (8). Væ
rugæm sæ controlafli dacæ este bine fixat.
2. Montafli cârligele dupæ cum este descris la utilizarea cârliguluide fræmântat /a
paletei pentru amestecare.
3. Pentru a aøeza jos vasul pentru amestecare (7), apæsafli butonul (6) pentru
deblocarea pærflii superioare (5) a suportului de mixer øi rabatafli în sus mixerul.
4. Punefli castronul umplut cu ingrediente pe farfuria rotativæ prevæzutæ pentru
acest lucru. Læsafli mixerul în jos.
45
RO
5....-05-HMS 2772 06.05.2003 9:25 Uhr Seite 45

5. Conectafli la o prizæ cu protecflie instalatæ regulamentar de 230V/50 Hz.
6. Acum putefli regla cu ajutorul întrerupætorului (3) la mixerul portabil (1) diferite
viteze.
7. Vasul pentru amestecare este acflionat prin miøcærile instrumentelor de ameste-
care în ingrediente.
8. Dacæ dorifli sæ oprifli procesul de mixare poziflionafli întrerupætorul la “0” øi deco
nectafli de la reflea.
9. Dupæ încheierea operafliei de amestecare apæsafli din nou butonul (6) pentru
deblocarea pærflii superioare (5) a suportului de mixer øi rabatafli în sus mixerul.
10. Putefli îndepærta acum castronul. Cârligele pot fi demontate dupæ cum este
descris la utilizarea cârligului de fræmântat/a paletei pentru amestecare.
11. Pentru a separa mixerul de partea superioaræ (5) a suportului de mixer, ridicafli-l
la început de partea din spate (cablu) øi îndepærtafli-l apoi prin tragere în sus.
Alegefli pentru utilizare o paletæ øi o vitezæ în funcflie de urmætorul tabel:
Produs/mod de preparare Cantitate max. paletæ treaptæ timp max. de funcflionare
aluat greu (de ex. aluat de drojdie) 500 g cârlig de fræmântat 1 -4 3 min
aluat spumos 750 g paletæ pentru bætut spumæ 2 -5 5 min
aluat de biscuifli, aluat de napolitane,
friøcæ 750 g paletæ pentru bætut spumæ 2 -5 sau Turbo 5 min
Curæflare
1. Înaintea fiecærui proces de curæflare deconectafli de la reflea.
2. Pentru curæflarea exterioaræ a aparatului, folosifli doar o cârpæ umedæ.
3. Nu folosifli substanfle puternice de curæflare sau praf de frecare.
4. Componentele demontabile care au intrat în contact cu aluatul (palete pentru
fræmântat øi castron) pot fi curæflate în chiuvetæ.
Acest aparat a fost verificat în conformitate cu toate directivele actuale ale CE,
cum ar fi de ex. compatibilitatea magneticæ øi directiva de tensiune joasæ, øi a fost
construit în conformitate cu cele mai noi prevederi de siguranflæ tehnicæ.
Schimbæri technice sînt rezervate!
Garanflie
Acordæm pentru aparatul nostru o garanflie de 24 de luni începând cu data
achiziflionærii (bon de casæ).
Pe durata perioadei de garanflie remediem gratuit defecfliunile aparatului sau ale
accesoriilor*) rezultate ca urmare a unor defecfliuni din fabricaflie, reparând sau, în
funcflie de aprecierea noastræ, înlocuind aparatul. Reparafliile în garanflie nu duc la
prelungirea teremenului de garanflie øi nici la obflinerea unei noi garanflii!
Pentru a beneficia de garanflie, cumpærætorul este obligat sæ prezinte chitanfla/factu-
ra originalæ de cumpærare a aparatului. Færæ aceastæ dovadæ nu se poate efectua
înlocuirea sau reparaflia gratuitæ a aparatului.
46
RO
5....-05-HMS 2772 06.05.2003 9:25 Uhr Seite 46

În cazul remedierilor în garanflie predafli aparatul integral în ambalajul original
împreunæ cu bonul de casæ la service-ul autorizat.
*) Defecfliunile accesoriilor nu includ în mod automat schimbarea întregului aparat.
În acest caz væ rugæm sæ sunafli la unul din numerele noastre de telefon!
Deteriorærile componentelor din sticlæ respectiv ale celor din material plastic trebuie
plætite!
Atât defectele de la accesoriile funcflionale resp. componetele care se uzeazæ (de
ex. paleta de fræmântat, curea de distribuflie, telecomandæ de rezervæ, periufle de
dinfli de rezervæ, pânza de fieræstræu) cât øi curæflarea, întreflinerea sau înlocuirea
componentelor care se uzeazæ, nu untræ sub incidenfla garanfliei øi de aceea trebuie
plætite!
Garanflia dispare în cazul intervenfliei stræine.
Post-garanflie
Dupæ scurgerea teremenului de garanflie reparafliile pot fi efectuate gratuit de cætre
service-ul autorizat.
47
RO
5....-05-HMS 2772 06.05.2003 9:25 Uhr Seite 47

Общие указания по технике безопасности
• Перед началом эксплуатации прибора внимательно прочитайте
прилагаемую инструкцию по эксплуатации и сохраните ее в надежном
месте, вместе с гарантийным талоном, кассовым чеком и, по
возможности, картонной коробкой с упаковочным материалом.
• Пользуйтесь прибором только частным образом и по назначению.
Прибор не предназначен для коммерческого использования. Не
пользуйтесь прибором под открытым небом (исключая приборы,
эксплуатация которых под открытым небом допустима). Предохраняйте
прибор от жары, прямых солнечных лучей, влажности (ни в коем случае
не погружайте его в воду) и ударов об острые углы. Не прикасайтесь к
прибору влажными руками. Если прибор увлажнился или намок, тут же
выньте вилку из розетки. Не прикасайтесь к мокрым местам.
• После эксплуатации, монтаже принадлежностей, чистке или поломке
прибора всегда вынимайте вилку из розетки (тяните за вилку, а не за
кабель).
• Не оставляйте включенные электроприборы без присмотра. Если
возникнет необходимость отлучиться, то выключите электроприбор или
выньте вилку из розетки (тяните за вилку, а не за кабель).
• Для защиты детей от поражений электротоком, следите за тем, чтобы
кабель не висел где попало и дети не имели доступа к прибору.
• Регулярно осматривайте прибор и кабель на предмет возможных
повреждений. Ни в коем случае не включайте прибор, имеющий
повреждения.
• Ни в коем случае не ремонтируйте прибор самостоятельно, а
обращайтесь в таком случае за помощью к специалисту, имеющему
соответствующий допуск. Из соображений безопасности, замена
сетевого шнура на равнозначный допускается только через завод-
изготовитель, нашу сервисную мастерскую или соответствующего
квалифицированного специалиста.
• Используйте только оригинальные запчасти.
• Пожалуйста, соблюдайте нижеследующие "Специальные указания по
технике безопасности ...".
Специальные указания по технике безопасности
• Перед сменой принадлежностей обязательно выключите прибор и
отключите его от сети.
• Не суйте руки в миксерный бокал.
• Запрещается подымать или переносить прибор во время его работы,
сначала выключите его и выньте сетевую вилку. Переносите прибор
только двумя руками!
• Чистите прибор как это описано в главе "Чистка".
48
RUS
5....-05-HMS 2772 06.05.2003 9:25 Uhr Seite 48

Обзор элементов управления
1 Ручной миксер
2 Кнопка расфиксации смесительных крюков
3 Ступенчатый переключатель режима работы (6 позиции )
4 Кнопка "TURBO"
5 Верхняя подвижная часть подставки
6 Кнопка для разблокировки верхней части
7 Смесительная чаша
8 Подставка для миксера
9 Смесительный крюк
Tурбо-режим
Для кратковременного переключения на максимальную скорость вращения.
Нажатиями с коротким интервалом достигается импульсный режим работы
миксера.
ВНИМАНИЕ: В этом режиме разрешается работать максимум 1 минуту!
Порядок пользования смесительным
крюком/венчиком
1. Установите переключатель (3) в положение "0/AUS" ("0/ВЫКЛ") и
убедитесь в том, что миксер (1) отключен от сети.
2. Вставьте конец смесительного крюка или венчика в предусмотренные
для них отверстия на миксере, до фиксации. Легкое проворачивание при
этом облегчит монтаж. Примечание: смесительный крюк с диском на оси
вставляется только с левой стороны миксера, если смотреть снизу.
3. Вставьте вилку в заземленную розетку с напряжением сети 230 V, 50 Hz,
установленную в соответствии с предписаниями.
4. При помощи переключателя режима работы (3) на ручном миксере (1)
вы можете установить различные скорости вращения.
5. Для снятия смесительного крюка/венчика установите переключатель в
положение "0/AUS" ("0/ВЫКЛ") и убедитесь в том, что миксер отключен
от сети.
6. Для снятия смесительного крюка/венчика нажмите кнопку (2). Легким
потягиванием вытащите смесительный крюк/венчик.
Порядок пользования подставкой для миксера
Для установки миксера выберите ровное, нескользкое место.
1. Вставьте ручной миксер (1) в верхнюю часть (5) подставки (8).
Проконтролируйте правильную посадку.
2. Вставьте смесительный крюк, как это уже было описано в главе
"Порядок пользования смесительным крюком/венчиком".
49
RUS
5....-05-HMS 2772 06.05.2003 9:25 Uhr Seite 49

3. Для того, чтобы подставить смесительную чашу (7), нажмите кнопку (6),
чтобы разблокировать верхнюю часть (5) и откиньте миксер вверх.
4. Наполните смесительную чашу необходимыми ингредиентами и
установите чашу на предусмотренную для нее вращающуюся подставку.
Опустите миксер обратно.
5. Вставьте вилку в заземленную розетку с напряжением сети 230 V, 50 Hz,
установленную в соответствии с предписаниями.
6. При помощи переключателя режима работы (3) на ручном миксере (1)
вы можете установить различные скорости вращения.
7. Смесительная чаша приводится в движение благодаря перемещению
смесителей в чаше с ингредиентами.
8. Для прекращения процедуры установите переключатель в положение "0"
и отключите миксер от сети.
9. В заключении нажмите опять на кнопку (6), чтобы разблокировать
верхнюю часть (5) и откиньте миксер вверх.
10. Снимите смесительную чашу с подставки. Снимите смесительные
крюки, как это уже было описано в главе "Порядок пользования
смесительным крюком/венчиком".
11. Чтобы отделить миксер от верхней части (5) подставки, приподымите
его сначала за заднюю часть (кабель), а затем выньте вверх.
В зависимости от потребности выберите подходящую насадку и скорость ее
вращения из нижеследующей таблицы:
Продукт/ Макс. количество Насадка Положение Макс. время
Метод приготовления переключателя работы
Густое тесто (к примеру: хлебное) 500 g cмесительный крюк 1 -4 3 мин.
Tесто (не густое) 750 g венчик 2 -5 5 мин.
Бисквитное, вафельное тесто, Сливки
750 g венчик 2 -5 или Tурбо 5 мин.
Чистка
1. Перед каждой чисткой вынимайте вилку из розетки.
2. Для наружной очистки тестомесительной машины пользуйтесь влажной
тряпкой.
3. Не пользуйтесь сильными или абразивными моющими средствами.
4. Съемные детали, которые имели контакт с тестом, можно промыть в
моющем растворе.
Это изделение прошло все необходимые и актуальные проверки,
предписанные директивой СЕ, к прим. на электромагнитную
совместимость и соответствие требованиям к низковольтной технике, оно
было также сконструировано и построено с учетом последних требований
по технике безопасности.
Мы оставляем за собой право на технические изменения!
50
RUS
5....-05-HMS 2772 06.05.2003 9:25 Uhr Seite 50

Гарантийное обязательство
Гарантийный срок на территории Российской Федерации устанавливается
полномочными представителями.
Кассовый чек является гарантийным талоном. Без него невозможен
бесплатный ремонт или замена изделия.
В случае возникновжния притензий по гарантии, предъявите изделие в
полнойкомплектации, с оригинальной упаковкой и кассовым чеком
торговой точке, продавшей это изделие.
*) Дефекты принадлежностей не служат причиной для автоматической
замены всего изделия. В этом случае позвоните нам, пожалуйста, по
горячей линии! Разбитые стеклянные и поломаные пластмассовые детали
возмещаются только за дополнительную оплату!
Дефекты изнашиваемых принадлежностей или трущихся деталей (например
контактные щетки моторов, смесительные крюки, приводные ремни,
запасные пульты управления, запасные зубные щетки, пильные полотна и
т.д.), а также чистка, техобслуживание или замена трущихся деталей не
попадают под гарантию, и поэтому проводятся за отдельную оплату!
Гарантия теряется при вскрытии изделия посторонними лицами.
После гарантии
После окончания срока гарантии, ремонт изделий производится за оплату,
соответствующими мастерскими или пунктами сервисного обслуживания.
51
RUS
5....-05-HMS 2772 06.05.2003 9:25 Uhr Seite 51

D-47906 Kempen/Germany · Industriering Ost 40
Internet: http://www.clatronic.de · email: [email protected]
Technische Daten
Modell: HMS 2772
Bemessungsspannung/-frequenz: 230 V, 50 Hz
Bemessungsaufnahme: 220 Watt
Schutzklasse: ΙΙ
Dieses Gerät wurde nach allen zutreffenden,
aktuellen CE-Richtlinien geprüft, wie z.B.
elektromagnetische Verträglichkeit und
Niederspannungsdirektive und wurde nach den
neuesten sicherheitstechnischen Vorschriften
gebaut.
Technische Änderungen vorbehalten!
Bitte führen Sie das ausgediente Gerät
einer umweltgerechten Entsorgung zu.
Stünings, Krefeld • 04/03
5....-05-HMS 2772 06.05.2003 9:25 Uhr Seite 52
Transcripción de documentos
5....-05-HMS 2772 06.05.2003 9:25 Uhr Seite 1 R Bedienungsanleitung/Garantie Gebruiksaanwijzing/Garantie • Mode d’emploi/Garantie Instrucciones de servicio/Garantía • Manual de instruções/Garantia Istruzioni per l’uso/Garanzia • Instruction Manual/Guarantee Instrukcja obsługi/Gwarancja • Návod k použití/Záruka A használati utasítás/garancia • Mod de întrebuinflare/Garanflie Руководство по эксплуатации/Гарантия Handmixer-Set Handmixer-Set • Set Mixeur Equipo batidora • Batdeira de mão Set frullatore a mano • Hand mixer set Mikser ręczny - komplet • Ruční mixér Kézi mixerkészlet • Mixer de mânæ-set Ручной миксер с принадлеж-ностями HMS 2772 5....-05-HMS 2772 06.05.2003 9:25 Uhr Seite 2 Inhalt D NL F E P I GB PL CZ H RO RUS Inhoud • Sommaire • Indice • Índice • Indice Contents • Spis treści • Obsah • Tartalom • Conflinut • Содержание Übersicht Bedienelemente . . . . . . . . . . . . . . . . . . . . . . . . . .Seite Bedienungsanleitung . . . . . . . . . . . . . . . . . . . . . . . . . . . . . . .Seite Garantie . . . . . . . . . . . . . . . . . . . . . . . . . . . . . . . . . . . . . . . .Seite Overzicht bedieningselementen . . . . . . . . . . . . . . . . . . . . . .Pagina Gebruiksaanwijzing . . . . . . . . . . . . . . . . . . . . . . . . . . . . . . . .Pagina Garantie . . . . . . . . . . . . . . . . . . . . . . . . . . . . . . . . . . . . . . . .Pagina Aperçu des éléments de commande . . . . . . . . . . . . . . . . . . .Page Mode d’emploi . . . . . . . . . . . . . . . . . . . . . . . . . . . . . . . . . . .Page Garantie . . . . . . . . . . . . . . . . . . . . . . . . . . . . . . . . . . . . . . . .Page Vista de conjunto Elementos de mando . . . . . . . . . . . . . . . .Página Instrucciones de servicio . . . . . . . . . . . . . . . . . . . . . . . . . . . .Página Garantia . . . . . . . . . . . . . . . . . . . . . . . . . . . . . . . . . . . . . . . .Página Vista geral dos elemntos de comando . . . . . . . . . . . . . . . . .Página Manual de instruções . . . . . . . . . . . . . . . . . . . . . . . . . . . . . .Página Garantía . . . . . . . . . . . . . . . . . . . . . . . . . . . . . . . . . . . . . . . .Página Descrizione dei singoli pezzi . . . . . . . . . . . . . . . . . . . . . . . .Pagina Istruzioni per l’uso . . . . . . . . . . . . . . . . . . . . . . . . . . . . . . . . .Pagina Garanzia . . . . . . . . . . . . . . . . . . . . . . . . . . . . . . . . . . . .Pagina Control element overview . . . . . . . . . . . . . . . . . . . . . . . . . . .Page Instruction Manual . . . . . . . . . . . . . . . . . . . . . . . . . . . . . . . . .Page Guarantee . . . . . . . . . . . . . . . . . . . . . . . . . . . . . . . . . . . . . .Page Przegląd elemetów obsługi . . . . . . . . . . . . . . . . . . . . . . . . .Strona Instrukcja obsługi . . . . . . . . . . . . . . . . . . . . . . . . . . . . . . . .Strona Gwarancja . . . . . . . . . . . . . . . . . . . . . . . . . . . . . . . . . . .Strona Přehled obsluhovací prvky . . . . . . . . . . . . . . . . . . . . . . . . . .Strana Návod k použití . . . . . . . . . . . . . . . . . . . . . . . . . . . . . . . . . .Strana Záruka . . . . . . . . . . . . . . . . . . . . . . . . . . . . . . . . . . . . .Strana A hasznalt elemek megtekintése . . . . . . . . . . . . . . . . . . . . .Oldal A hasznalati utasítás . . . . . . . . . . . . . . . . . . . . . . . . . . . . . .Oldal Garancia . . . . . . . . . . . . . . . . . . . . . . . . . . . . . . . . . . . . . . . .Oldal Privire de ansamblu al modului de întrebuinflare . . . . . . . .Paginæ Mod de întrebuinflare . . . . . . . . . . . . . . . . . . . . . . . . . . . . . .Paginæ Garanflie . . . . . . . . . . . . . . . . . . . . . . . . . . . . . . . . . . . . . .Paginæ Обзор управляющих элементов . . . . . . . . . . . . . . . . . . . .стр. Руководство по эксплуатации . . . . . . . . . . . . . . . . . . . . . .стр. Гарантия . . . . . . . . . . . . . . . . . . . . . . . . . . . . . . . . . . . . . . . . .стр. 3 4 6 3 8 10 3 12 14 3 16 18 3 20 22 3 24 27 3 28 30 3 32 35 3 36 38 3 40 42 3 44 46 3 48 51 5....-05-HMS 2772 06.05.2003 9:25 Uhr Seite 3 Übersicht über die Bedienelemente 1 2 3 4 5 Handmixer Knopf zum Lösen der Knethaken Stufenwahlschalter (6 Stufen) TURBO-Taste Bewegliches Oberteil 6 7 8 9 Taste zur Entriegelung des Oberteils Rührschüssel Mixständer Knethaken 3 5....-05-HMS 2772 06.05.2003 9:25 Uhr Seite 4 Allgemeine Sicherheitshinweise D • • • • • • • • • Lesen Sie vor Inbetriebnahme dieses Gerätes die Bedienungsanleitung sehr sorgfältig durch und bewahren Sie diese inkl. Garantieschein, Kassenbon und nach Möglichkeit den Karton mit Innenverpackung gut auf. Benutzen Sie das Gerät ausschließlich für den privaten und den dafür vorgesehenen Zweck. Dieses Gerät ist nicht für den gewerblichen Gebrauch bestimmt. Benutzen Sie es nicht im Freien (außer es ist für den bedingten Einsatz im Freien vorgesehen). Halten Sie es vor Hitze, direkter Sonneneinstrahlung, Feuchtigkeit (auf keinen Fall in Flüssigkeiten tauchen) und scharfen Kanten fern. Benutzen Sie das Gerät nicht mit feuchten Händen. Bei feucht oder nass gewordenem Gerät sofort den Netzstecker ziehen. Nicht ins Wasser greifen. Schalten Sie das Gerät aus und ziehen Sie immer den Stecker aus der Steckdose (ziehen Sie am Stecker, nicht am Kabel) wenn Sie das Gerät nicht benutzen, Zubehörteile anbringen, zur Reinigung oder bei Störung. Betreiben Sie das Gerät nicht unbeaufsichtigt. Sollten Sie den Arbeitsplatz verlassen, schalten Sie das Gerät bitte immer aus, bzw. ziehen Sie den Stecker aus der Steckdose (ziehen Sie am Stecker, nicht am Kabel). Um Kinder vor Gefahren elektrischer Geräte zu schützen, sorgen Sie bitte dafür, dass das Kabel nicht herunter hängt und Kinder keinen Zugriff auf das Gerät haben. Prüfen Sie Gerät und Kabel regelmäßig auf Schäden. Ein beschädigtes Gerät bitte nicht in Betrieb nehmen. Reparieren Sie das Gerät nicht selbst, sondern suchen Sie bitte einen autorisierten Fachmann auf. Um Gefährdungen zu vermeiden, ein defektes Netzkabel bitte nur vom Hersteller, unserem Kundendienst oder einer ähnlich qualifizierten Person durch ein gleichwertiges Kabel ersetzen lassen. Verwenden Sie nur Original-Zubehör. Beachten Sie bitte die nachfolgenden ”Speziellen Sicherheitshinweise...”. Spezielle Sicherheitshinweise • • • • Vor dem Auswechseln der Zubehörteile muss das Gerät ausgeschaltet und vom Netz getrennt werden! Greifen Sie nicht in den Mixbehälter. Tragen oder heben Sie das Gerät nicht während des Betriebs, sondern schalten Sie es zuerst aus und ziehen Sie danach den Netzstecker. Tragen Sie das Gerät immer mit beiden Händen! Reinigen Sie das Gerät nur, wie unter „Reinigung“ beschrieben. Turbo Betrieb Zum kurzzeitigen Schalten auf Höchstdrehzahl. Beim Drücken in kurzen Abständen erreichen Sie einen Pulsbetrieb. Achtung: Benutzen Sie diese Funktion maximal 1 Minute. 4 5....-05-HMS 2772 06.05.2003 9:25 Uhr Seite 5 Benutzung der Knethaken/Rührbesen D 1. Stellen Sie den Stufenwahlschalter (3) auf „0/AUS“ und stellen Sie sicher, dass der Mixer (1) vom Netz getrennt ist. 2. Pressen Sie das Ende der Knethaken bzw. der Rührbesen in die dafür vorgesehenen Öffnungen des Mixers, bis diese einrasten. Durch leichtes Drehen beim Pressen wird das Einsetzen erleichtert. Bitte beachten Sie: Der Knethaken mit der Tellerscheibe am Schaft lässt sich nur auf der von unten gesehen, linken Seite, des Mixers einstecken. 3. Stecken Sie den Netzstecker in eine vorschriftsmäßig installierte Schutzkontaktsteckdose 230 V / 50 Hz. 4. Sie können nun am Handmixer (1) mit dem Stufenwahlschalter (3) verschiedene Geschwindigkeiten einstellen. 5. Zum Lösen der Knethaken/Rührbesen stellen Sie den Stufenwahlschalter auf „0/AUS“ und vergewissern sich , dass der Mixer vom Netz getrennt ist. 6. Drücken Sie den Knopf (2) zum Lösen der Knethaken/Rührbesen. Durch leichtes Ziehen können diese nun entnommen werden. Benutzung des Mixerständers Wählen Sie bitte eine ebene, rutschfeste Fläche als Standort für den Mixständer aus. 1. Setzen Sie den Handmixer (1) auf das Oberteil (5) des Mixerständers (8) auf. Bitte kontrollieren Sie den festen Sitz. 2. Montieren Sie, wie schon unter Benutzung der Knethaken/Rührbesen beschrieben, die Haken. 3. Um die Rührschüssel (7) unterzustellen, drücken Sie die Taste (6) zur Entriegelung des Mixerständeroberteils (5) und klappen den Mixer nach oben. 4. Stellen Sie die mit Ihren gewünschten Zutaten gefüllte Rührschüssel auf den dafür vorgesehenen Drehteller. Klappen Sie den Mixer wieder nach unten. 5. Stecken Sie den Netzstecker in eine vorschriftsmäßig installierte Schutzkontaktsteckdose 230 V / 50 Hz. 6. Sie können nun am Handmixer (1) mit dem Stufenwahlschalter (3) verschiedene Geschwindigkeiten einstellen. 7. Angetrieben wird die Rührschüssel durch die Bewegung der Rührwerkzeuge in den Zutaten. 8. Möchten Sie den Mixvorgang beenden schalten Sie den Stufenwahlschalter auf „0“ und trennen Sie das Gerät vom Netz. 9. Nach der Beendigung drücken Sie erneut die Taste (6) zur Entriegelung des Mixerständeroberteils (5) und klappen den Mixer nach oben. 10. Die Rührschüssel kann nun entnommen werden. Die Haken entnehmen Sie bitte wie bereits unter Benutzung der Knethaken/Rührbesen beschrieben. 11. Um den Mixer vom Oberteil (5) des Mixerständers zu trennen, heben Sie ihn zuerst am hinteren Teil (Kabel) an und nehmen ihn dann nach oben ab. 5 5....-05-HMS 2772 D 06.05.2003 9:25 Uhr Seite 6 Wählen Sie für die Anwendung ein Werkzeug und eine Geschwindigkeit gemäß folgender Tabelle: Produkt / Zubereitungsart Schwerer Teig (z. B. Hefeteig) Rührteig Biskuitteig, Waffelteig, Sahne max. Menge 500 g 750 g 750 g Werkzeug Knethaken Schneebesen Schneebesen Stufe Max. Betriebszeit 1 -4 3 min 2 -5 5 min 2 -5 oder Turbo 5 min Reinigung 1. 2. 3. 4. Ziehen Sie vor jeder Reinigung den Netzstecker aus der Steckdose. Zur äußeren Reinigung des Gerätes benutzen Sie nur ein feuchtes Spültuch. Benutzen Sie keine scharfen oder scheuernden Reinigungsmittel. Abnehmbare Teile die mit Teig in Berührung gekommen sind (Knetwerkzeug und Rührschüssel), können Sie in einem Spülbad reinigen. Garantie Wir übernehmen für das von uns vertriebene Gerät eine Garantie von 24 Monaten ab Kaufdatum (Kassenbon). Innerhalb der Garantiezeit beseitigen wir unentgeltlich die Mängel des Gerätes oder des Zubehörs*), die auf Material- oder Herstellungsfehler beruhen, durch Reparatur oder, nach unserem Ermessen, durch Umtausch. Garantieleistungen bewirken weder eine Verlängerung der Garantiefrist, noch beginnt dadurch ein Anspruch auf eine neue Garantie! Als Garantienachweis gilt der Kaufbeleg. Ohne diesen Nachweis kann ein kostenloser Austausch oder eine kostenlose Reparatur nicht erfolgen. Im Garantiefall geben Sie bitte komplette Gerät in der Originalverpackung zusammen mit dem Kassenbon an Ihren Händler. *) Schäden an Zubehörteilen führen nicht automatisch zum kostenlosen Umtausch des kompletten Gerätes. Wenden Sie sich in desem Fall bitte an unsere Hotline! Glasbruchschäden bzw. Brüche von Kunststoffteilen sind grundsätzlich kostenpflichtig! Sowohl Defekte an Verbrauchszubehör bzw. Verschleißteilen (z.B. Motorkohlen, Knethaken, Antriebsriemen, Ersatzfernbedienung, Ersatzzahnbürsten, Sägeblättern usw.), als auch Reinigung, Wartung oder der Austausch von Verschleißteilen, fallen nicht unter die Garantie und sind deshalb kostenpflichtig! Die Garantie erlischt bei Fremdeingriff. Nach der Garantie Nach Ablauf der Garantiezeit können Reparaturen kostenpflichtig vom entsprechenden Fachhandel oder Reparaturservice ausgeführt werden. 6 5....-05-HMS 2772 06.05.2003 9:25 Uhr Service für unsere Haushaltsartikel Verschleißteile für Haushaltsartikel (soweit diese nicht vom Fachmann ausgewechselt werden müssen), Ersatzkannen, Staubsaugerfilterbeutel usw. können Sie mit Angabe des Gerätetyps unter folgender TelefonHotline bestellen: Seite 7 Service für unsere D Unterhaltungselektronik Verschleißteile und Ersatzteile für unsere Unterhaltungselektronik (soweit diese nicht vom Fachmann ausgewechselt werden müssen) wie z. B. Fernbedienungen, Bedienteilklappen, Lautsprecherblenden usw. können Sie mit Angabe des Gerätetyps unter folgender Telefon-Hotline bestellen: 0 21 52 / 20 06 – 888 0 21 52 / 20 06 – 666 Für technische Fragen haben wir für Sie folgende e-mail-Adresse eingerichtet: [email protected] Interessieren Sie sich für weitere Clatronic-Produkte? Besuchen Sie doch einmal unsere Homepage unter www.clatronic.de oder www.clatronic.com 7 5....-05-HMS 2772 06.05.2003 9:25 Uhr Seite 8 Algemene veiligheidsinstructies NL • • • • • • • • • Lees vóór de ingebruikname van dit apparaat de handleiding uiterst zorgvuldig door en bewaar deze goed, samen met het garantiebewijs, de kassabon en zo mogelijk de doos met de binnenverpakking. Gebruik het apparaat uitsluitend privé en uitsluitend voor de voorgeschreven toepassing. Dit apparaat is niet geschikt voor commercieel gebruik (tenzij het bedoeld is voor beperkt gebruik in de buitenlucht). Bescherm het tegen hitte, directe zonnestralen, vocht (i geen geval in vloeistoffen dompelen) en scherpe kanten. Gebruik het apparaat niet met vochtige handen. Bij vochtig of nat geworden apparaat onmiddellijk de stroomtoevoer onderbreken. Niet in het water grijpen. Schakel het apparaat uit en onderbreek altijd de stroomtoevoer (trek aan de steker, nooit aan de kabel) wanneer u het apparaat niet gebruikt, hulpstukken aanbrengt, reinigt of wanneer storingen optreden. Laat het ingeschakelde apparaat niet zonder toezicht werken. Schakel het apparaat altijd uit of trek de steker uit de contactdoos (trek aan de steker, niet aan de kabel) voordat u de werkplek verlaat. Bescherm kinderen tegen gevaren en zorg ervoor dat kabels nooit los omlaag hangen en dat het apparaat buiten het bereik van kinderen blijft. Controleer regelmatig of het apparaat beschadigingen vertoont. Een beschadigd apparaat mag niet in gebruik worden genomen. Repareer het apparaat nooit zelf, maar breng het naar een geautoriseerde vakman. Voorkom gevaren en laat een defecte kabel altijd alleen door de fabrikant, onze technische dienst of een eender gekwalificeerde persoon vervangen door een soortgelijke kabel. Gebruik alleen originele reserveonderdelen. Neem de onderstaande “Speciale veiligheidsinstructies“ in acht. Speciale veiligheidsinstructies • • Voor de vervanging van hulpstukken moet het apparaat uitgeschakeld en de stroomtoevoer onderbroken zijn! Grijp nooit in de mengkom. Draag of verplaats het apparaat nooit zolang het is ingeschakeld. Schakel het altijd eerst uit en onderbreek dan de stroomtoevoer! Draag het apparaat steeds met beide handen! Reinig het apparaat uitsluitend zoals onder "Reiniging" beschreven staat. 1 2 3 4 5 Handmixer Knop om de deeghaken te lossen Standenschakelaar (6 standen) TURBO-toets Beweeglijk bovenstuk • • Overzicht van de bedieningselementen 8 6 7 8 9 Toets voor de ontgrendeling van het bovengedeelte Mengkom Mixerstandaard Deeghaken 5....-05-HMS 2772 06.05.2003 9:25 Uhr Seite 9 Turbobedrijf NL Hiermee kunt u kortstondig naar een hoog toerental schakelen. Als u de knop steeds indrukt en loslaat, kunt u pulserend werken. OPGELET: gebruik deze functie maximaal 1 minuut! Gebruik van de deeghaken/kloppers 1. Zet de standenschakelaar (3) op “0/UIT” en waarborg dat de stroomtoevoer naar de mixer (1) onderbroken is. 2. Druk het uiteinde van de deeghaken of kloppers in de daarvoor aangebrachte openingen aan de mixer totdat deze inklinken. Door enigszins te draaien bij het indrukken, kunt u deze gemakkelijker aanbrengen. Let op: de deeghaak met de schotelschijf aan de schacht kan alléén op de vanaf beneden gezien linkerzijde van de mixer worden aangebracht. 3. Sluit de apparaatsteker aan op een correct geïnstalleerde en geaarde contactdoos 230 V / 50 Hz. 4. Aan de handmixer (1) kunt u nu verschillende standen instellen met de standenschakelaar (3). 5. Om de deeghaak/roerklopper te verwijderen zet u de standenschakelaar op “0/UIT” en waarborgt u dat de stroomtoevoer naar de mixer onderbroken is. 6. Druk op de knop (2) om de deeghaak/roerklopper te verwijderen Door even te trekken, kunt u deze nu verwijderen. Gebruik van de mixerstandaard Kies een vlak en stroef oppervlak als standplaats voor de mixstandaard. 1. Plaats de handmixer (1) op het bovengedeelte (5) van de mixstandaard (8). Controleer de correcte montage. 2. Plaats de deeghaken/kloppers zoals beschreven staat onder "Gebruik van de deeghaken / kloppers". 3. Druk op de toets (6) om het bovengedeelte van de mixstandaard (5) te ontgrendelen en klap de mixer naar boven om de mengkom (7) te kunnen plaatsen. 4. Zet de mengkom met de te mengen ingrediënten op het draaiplateau. Klap daarna de mixer weer naar beneden. 5. Sluit de apparaatsteker aan op een correct geïnstalleerde en geaarde contactdoos 230 V / 50 Hz. 6. Nu kunt u aan de handmixer (1) verschillende snelheden instellen met de standenschakelaar (3). 7. De mengkom wordt aangedreven door middel van de bewegingen van de roergereedschappen in de ingrediënten. 8. Wanneer u het mixen wilt beëindigen, zet u de standenschakelaar op “0” en onderbreekt u de stroomtoevoer naar het apparaat. 9. Druk na afloop opnieuw op de toets (6) om het bovengedeelte van de mixstandaard (5) te ontgrendelen en klap de mixer naar boven. 9 5....-05-HMS 2772 NL 06.05.2003 9:25 Uhr Seite 10 10. De mengkom kan nu worden weggenomen. U verwijdert de haken zoals beschreven staat onder "Gebruik van de deeghaken/kloppers". 11. Til de mixer aan de achterzijde (kabel) op en neem hem naar boven weg om de mixer van het bovengedeelte (5) van de mixstandaard te scheiden. Kies voor het gebruik een hulpstuk en een snelheid volgens onderstaande tabel: Product/bereidingswijze max. Hoeveelheid Zwaar deeg (bijv. gistdeeg) 500 g Roerdeeg 750 g Biscuitdeeg, wafelbeslag, Slagroom 750 g Hulpstuk deeghaken kloppers kloppers Stand 1 -4 2 -5 2 -5 of Turbo Max. arbeidsdur 3 min 5 min 5 min Reiniging 1. 2. 3. 4. Trek vóór iedere reiniging de apparaatsteker uit de contactdoos. Gebruik een vochtige doek om de buitenkant van het apparaat te reinigen. Gebruik geen scherpe of schurende reinigingsmiddelen. Afneembare delen die met deeg in contact zijn gekomen (kneedwerktuigen en mengkom) kunt u gewoon afwassen. Dit apparaat is gekeurd conform de op dit moment van toepassing zijnde CErichtlijnen zoals bijvoorbeeld elektromagnetische compatibiliteit en laagspanningsvoorschriften en is geconstrueerd volgens de nieuwste veiligheidstechnische voorschriften. Technische wijzigingen voorbehouden! Garantie Voor het door ons geleverde apparaat verlenen wij een garantie van 24 maanden vanaf koopdatum (kassabon). Eventuele gebreken aan het apparaat of aan het toebehoren*) die zijn ontstaan door productie- of materiaalfouten verhelpen wij binnen deze periode kosteloos door middel van reparatie of, naar ons oordeel, door vervanging. Eventuele garantiegevallen verlengen noch de geldigheidsduur van de garantie, noch begint daardoor een nieuwe garantieperiode! Het koopbewijs geldt als garantiebewijs. Zonder dit bewijs kan geen kosteloze reparatie of vervanging plaatsvinden. Geef in garantiegevallen het complete apparaat in de originele verpakking samen met de kassabon af bij uw handelaar. *) Schade aan onderdelen leidt niet automatisch tot kosteloze vervanging van het complete apparaat. Neem in dit geval contact op met onze hotline! De reparatie van glasbreuk of breuk van kunststofonderdelen wordt altijd berekend! 10 5....-05-HMS 2772 06.05.2003 9:25 Uhr Seite 11 Niet defecten aan de hulpstukken of aan de slijtende onderdelen (bijv. koolborstels, deeghaken, drijfriemen, reserveafstandsbediening, reservetandenborstels, zaagbladen enz.), maar ook reiniging, onderhoud of de vervanging van slijtende delen vallen niet onder de garantie en geschieden altijd tegen berekening! Bij ingrepen door derden komt de garantieverlening te vervallen. Na de garantieperiode Na afloop van de garantieperiode kunnen reparaties tegen berekening worden uitgevoerd door de betreffende vakhandelaar of de technische dienst. 11 NL 5....-05-HMS 2772 06.05.2003 9:25 Uhr Seite 12 Conseils généraux de sécurité F • • • • • • • • • Lisez attentivement ce mode d’emploi avant de mettre l’appareil en marche pour la première fois. Conservez le mode d’emploi ainsi que le bon de garantie, votre ticket de caisse et si possible, le carton avec l’emballage se trouvant à l’intérieur. N’utilisez cet appareil que pour un usage privé et pour les taches auxquelles il est destiné. Cet appareil n’est pas prévu pour une utilisation professionnelle. Ne l’utilisez pas en plein air (sauf s’il est indiqué que vous pouvez le faire). Protégez-le de la chaleur, des rayons directs du soleil, de l’humidité (ne le plongez en aucun cas dans l’eau) et des objets tranchants. N’utilisez pas cet appareil avec des mains humides. S’il arrive que de l’humidité ou de l’eau atteignent l’appareil, débranchez aussitôt le câble d’alimentation. Ne touchez pas les parties mouillées. Arrêtez l’appareil et débranchez toujours le câble d’alimentation de la prise de courant (tirez sur la fiche, pas sur le câble) si vous n’utilisez pas l’appareil, si vous installez les accessoires, pour le nettoyage ou en cas de panne. Ne laissez jamais fonctionner l’appareil sans surveillance. Arrêtez toujours l’appareil ou débranchez le câble d’alimentation (en tirant sur la fiche et non pas sur le câble) si vous devez vous absenter. Pour protéger les enfants des risques engendrés par les appareils électriques , veillez à ce que le câble ne pende pas de l’appareil et que l’appareil ne soit pas à portée des enfants. Contrôlez régulièrement l’appareil et le câble. Ne mettez pas l’appareil en marche s’il est endommagé. Ne réparez pas l’appareil vous-même. Contactez plutôt un technicien qualifié. Pour éviter toute mise en danger, ne faites remplacer le câble défectueux que par un câble équivalent et que par le fabricant, notre service après-vente ou toute personne de qualification similaire. N’utilisez que les accessoires d’origine. Respectez les „conseils de sécurité spécifiques à cet appareil“ ci-dessous ... Conseils de sécurité spécifiques à cet appareil • • • • Arrêtez et débranchez toujours l’appareil avant de changer d’accessoire ! N’introduisez jamais vos doigts dans le mixer Ne portez ni ne soulevez jamais l’appareil pendant le fonctionnement. Arrêtez-le et débranchez-le d’abord. Portez toujours l’appareil à deux mains ! Ne nettoyez l’appareil que selon les indications données dans « Nettoyage ». 1 2 3 4 5 Mixeur Bouton de détachement du pétrin Variateur de vitesses (6 vitesses) Touche TURBO Partie supérieure amovible Description des différents éléments 12 6 7 8 9 Touche de déverrouillage de la partie supérieure Bol mixeur Support à mixeur Pétrin 5....-05-HMS 2772 06.05.2003 9:25 Uhr Seite 13 Fonctionnement turbo F Pour une courte utilisation à très grande vitesse. En appuyant par à-coup, vous obtenez un fonctionnement Pulse. ATTENTION: N’utilisez jamais cette fonction plus d’une minute! Utilisation du pétrin / fouet mélangeur 1. Positionnez le sélecteur de fonctions (3) sur “0/AUS” et vérifiez que le robot (1) n’est pas branché. 2. Introduisez l’extrémité du pétrin ou du fouet mélangeur dans l’orifice du mixeur prévue à cet effet, en poussant jusqu’à ce qu’il s’enclenche. Le montage est d’autant plus facile si vous tournez légèrement tout en poussant l’accessoire dans l’orifice. Attention: Le pétrin équipé du disque ne peut être fixé que sur le côté gauche du robot, vu du dessous. 3. Branchez le câble d’alimentation dans une prise de courant de 230 V / 50 Hz en bon état de fonctionnement. 4. Vous pouvez alors régler différentes vitesses grâce au variateur de vitesses (3) situé sur le mixeur (1). 5. Pour libérer le pétrin/fouet, vérifiez que le sélecteur de fonctions est sur “0/AUS” et que le robot est débranché. 6. Enfoncez le bouton (2) pour libérer le pétrin/fouet. Vous pouvez alors légèrement tirer dessus pour les sortir de l’orifice. Utilisation du support à mixeur Choisissez une surface plane et non glissante pour utiliser le robot 1. Placez le robot (1) sur la partie supérieure (5) du pied de l’appareil (8). Veillez à ce que l’appareil soit stable. 2. Installez les accessoires suivant les indications précédemment données dans Utilisation du pétrin /fouet mélangeur. 3. Pour placer le bol mixer (7) sous l’appareil, enfoncez la touche (6) pour déverrouiller la partie supérieure du mixer (5) puis orientez l’appareil vers le haut. 4. Placez le bol mixeur préalablement rempli des ingrédients de votre choix sur le plateau tournant prévu à cet effet. Orientez le robot à nouveau vers le bas. 5. Branchez le câble d’alimentation dans une prise de courant de 230 V / 50 Hz en bon état de fonctionnement. 6. Vous pouvez alors régler différentes vitesses grâce au variateur de vitesses (3) situé sur le mixeur (1). 7. Le bol mixer est mis en mouvement par l’action des pétrins dans les aliments. 8. Si vous souhaitez arrêter l’appareil, positionnez le sélecteur de fonctions sur “0” et débranchez l’appareil. 9. Lorsque vous avez fini, enfoncez à nouveau la touche (6) pour déverrouiller la partie supérieure du mixer (5) puis orientez l’appareil vers le haut. 13 5....-05-HMS 2772 F 06.05.2003 9:25 Uhr Seite 14 10. Vous pouvez alors enlever le bol mixeur. Détachez les accessoires suivant les indications données dans Utilisation du pétrin ou fouet mélangeur. 11. Pour séparer le mixer de la partie supérieure de l’appareil (5), soulevez le mixer d’abord par l’arrière (câble) avant de le retirer de l’appareil. Choisissez, selon l’utilisation, l’accessoire et la vitesse adaptés d’après le tableau suivant: Produit/mode de préparation quantité max. Pâte épaisse (par ex. pâte à levain) Pâte à gâteau Pâte à biscuit , à gaufre, Crème fraîche 500 g 750 g 750 g accessoires position pétrin fouet mélangeur fouet mélangeur 1 -4 2 -5 2 -5 ou Turbo durée max. de fonctionnement 3 min 5 min 5 min Entretien 1. Débranchez le câble d’alimentation de la prise de courant avant chaque nettoyage. 2. Utilisez un torchon humide pour nettoyer l’extérieur de l’appareil. 3. N’utilisez en aucun cas de détergent corrosif ou abrasif. 4. Vous pouvez laver les pièces salies par la pâte (accessoire à pétrir et bol mélangeur) normalement à l’eau savonneuse. Cet appareil a été contrôlé d’après toutes les directives européennes actuelles applicables, comme par exemple concernant la compatibilité électromagnétique et la basse tension. Cet appareil a été fabriqué en respect des réglementations techniques de sécurité les plus récentes. Sous réserve de modifications techniques. Garantie Nous accordons une garantie de 24 mois à dater de la date d’achat (ticket de caisse) pour l’appareil que nous vendons. Pendant la durée de la garantie, nous éliminons gratuitement les défauts de l’appareil ou des accessoires *) découlant d’un vice de matériau ou de fabrication au moyen d’une réparation ou, selon notre estimation, au moyen d’un remplacement. Les prestations dans le cadre de la garantie n’entraînent aucune prorogation de la durée de garantie et ne donnent pas droit à une nouvelle garantie ! Le justificatif de garantie est le reçu. Sans ce justificatif, aucun remplacement gratuit ni aucune réparation gratuite ne peuvent être effectués. En cas de recours à la garantie, ramenez votre appareil complet, dans son emballage d'origine, accompagné de votre preuve d'achat, à votre revendeur. 14 5....-05-HMS 2772 06.05.2003 9:25 Uhr Seite 15 *) Les endommagements de pièces d’accessoires ne justifient pas automatiquement l’échange gratuit de l’appareil complet. Contactez alors notre centrale téléphonique! La casse de pièces en verre ou en plastique est dans tous les cas à votre charge! Les défauts sur les accessoires ou les pièces d’usure (p.ex. les charbons de moteurs, crochets, courroies d’entraînement, télécommande de rechange, brosses à dents de rechange, lames de scies etc.) ainsi que le nettoyage, l’entretien ou le remplacement de pièces d’usure ne sont pas garantis et sont donc payants ! En cas d’intervention étrangère, la garantie devient caduque. Après la garantie Après écoulement de la durée de garantie, les réparations peuvent être effectuées, contre paiement, par le commerce spécialisé ou le service de réparation. 15 F 5....-05-HMS 2772 06.05.2003 9:25 Uhr Seite 16 Indicaciones generales de seguridad E • • • • • • • • • Antes de la puesta en servicio de este aparato lea detenidamente el manual de instrucciones y guarde este bien incluido la garantía, el recibo de pago y si es posible también el cartón de embalaje con el embalaje interior. Solamente utilice el aparato para el uso privado y para el fin previsto. Este aparato no está destinado para el uso profesional. No lo utilice al aire libre (en excepto que esté destinado para el uso limitado al aire libre). No lo exponga al calor, a la entrada directa de rayos de sol, a la humedad ( en ningún caso sumerja el aparato en agua) y a los cantos agudos. No utilice el aparato con las manos húmedas. En caso de que el aparato esté húmedo o mojado retire de momento la clavija de la caja de enchufe. No tocar el agua. Desconecte el aparato y siempre retire la clavija de la caja de enchufe (tire de la clavija no del cable), cuando no quiera utilizar el aparato, montar piezas o en caso de limpieza o defectos. No utilice el aparato sin vigilancia. En caso de que tenga que dejar su lugar de trabajo, desconecte siempre el aparato o retire la clavija de la caja de enchufe (por favor tire de la clavija y no del cable). Para evitar que los niños se hagan daños eléctricos, siempre tenga atención, que el cable no cuelgue hacia abajo y que los niños no tengan acceso al aparato. Controle regularmente si el aparato o el cable tiene defectos. No ponga en servicio un aparato defecto. No repare el aparato por su cuenta, sino vaya a un establecimiento autorizado. Para evitar peligros, deje sustituir un cable defecto por uno de la misma calidad solamente por el fabricante, nuestro servicio al cliente o una similar persona cualificada. Solamente utilice accesorios originales. Por favor tenga atención a las “Indicaciones especiales de seguridad…“ indicadas a continuación. Observaciones especiales de seguridad • • ¡Antes de cambiar los accesorios debe estar el aparato apagado y desconectado de la red! No entre en contacto con el recipiente de batir. Durante el funcionamiento no cargue o eleve el aparato, sino apaguélo primero y desconéctelo de la red. ¡Siempre lleve el aparato con las dos manos! Solamente debe limpiar el aparato como indicado bajo el apartado ”Limpieza”. 1 2 3 4 5 Batidora de mano Botón para liberar los ganchos amasadores Selector de velocidades (6 velocidades) Tecla TURBO Parte superior movible • • Resumen de los elementos de manejo 16 6 7 8 9 Tecla para el desbloqueo de la parte superior Recipiente Varilla Ganchos amasadores 5....-05-HMS 2772 06.05.2003 9:25 Uhr Seite 17 Funcionamiento turbo E Para una utilización corta a alta velocidad. Apriete la tecla por intermitencias para obtener un funcionamiento Pulso. Atención: ¡Por favor utilice esta función solamente hasta 1 minuto! Manejo de los ganchos amasadores / ganchos batidores 1. Coloque el interruptor de contactos escalonados (3) a la posición "0/AUS" y asegúrese que la batidora (1) no esté conectada a la red 2. Apriete el final de los ganchos amasodores o ganchos batidores en la abertura de la batidora hasta que enrosquen. La colocación de estos ganchos es más fácil si al apretar se giran levemente. Por favor tenga atención que: El gancho amasador con la arandela de platillo en el astil, solamente se deja meter en la parte izquierda, mirando desde abajo, de la batidora. 3. Introduzca la clavija de red en una caja de enchufe con tomatierra 230 V / 50 Hz e instalada según reglamento. 4. Ahora puede eligir en la batidora de mano (1) con el selector de velocidades (3) varias velocidades. 5. Para soltar el gancho amasador/varilla batidora, coloque el interruptor de contactos escalonados (3) a la posición "0/AUS" y asegúrese que la batidora (1) no esté conectada a la red. 6. Presione el botón (2) para soltar el gancho amasador/varilla batidora. Los ganchos se pueden desencajar tirando levemente de ellos. Manejo de la varilla Se ruega elegir una superficie plana y antideslizante para colocar la base-batidora. 1. Coloque la batidora de mano (1) sobre la parte superior (5) de la base-batidora (8). Se ruega controlar el ajuste seguro. 2. Coloque , como ya descrito en el manejo de los ganchos amasadores/ganchos batiodres, los ganchos. 3. Para colocar el recipiente de batir (7) por abajo, presione la tecla (6) que desbloquea la parte superior de la batidora (5) y pliegue la batidora hacia arriba. 4. Coloque ahora el recipiente con los ingredientes encima del plato giratorio. Baje la batidora de nuevo. 5. Introduzca la clavija de red en una caja de enchufe con tomatierra 230 V / 50 Hz e instalada según reglamento. 6. Ahora puede con la batidora de mano (1) y el selector de velocidades (3) elegir entre varias velocidades. 7. El recipiente de batir es impulsado por el movimiento de las herramientas de batir en los ingredientes. 8. Si desea finalizar el procedimiento de batir, ponga el interruptor de contactos escalonados a la posición “0” y retire el aparato de la red. 17 5....-05-HMS 2772 E 06.05.2003 9:25 Uhr Seite 18 9. Después de la finalización presione de nuevo la tecla (6) para el desbloqueo de la parte superior de la batidora (5) y pliegue la batidora hacia arriba. 10. El recipiente se puede coger ahora. Los ganchos desencájelos como descrito en el manejo de los ganchos amasadores / ganchos batidores. 11. Para separar la batidora de la parte superior (5), debe alzarla por la parte trasera (cable) y después quitarla desde arriba. Para la utilización elija una herramienta y una velocidad según la tabla a continuación: Producto / Cantidad máxima Herramienta Escalón Método de preparación Masa pesada (p.ej. masa de levadura) 500 g ganchos amasadores 1 -4 Pastaflora 750 g ganchos batidores 2 -5 Masa de bizcocho, gofres, Nata 750 g ganchos batidores 2 -5 o Turbo Tiempo de uso máximo 3 min 5 min 5 min Limpieza 1. 2. 3. 4. Antes de cada limpieza, retire la clavija de la caja de enchufe. Para la limpieza exterior del aparato solamente utilice un paño humedecido. No utilice detergentes agresivos o abrasivos. Las piezas desmontables que hayan entrado en contacto con la masa (herramienta de amasar o bol para mezclar), las puede lavar en un baño jabonoso. Este aparato se ha examinado según las normativas actuales y vigentes de la Comunidad Europea, como p.ej. compatibilidad electromagnética y directiva de baja tensión y se ha construido según las más nuevas especificaciones en razón de la seguridad. No reservamos el derecho de efectuar modificaciones técnicas. Garantía Para el aparato comercializado por nosotros nos responsabilizamos con una garantía de 24 meses a partir de la fecha de compra (factura de compra). Durante el período de garantía nos encargamos gratuítamente de los defectos del aparato y de los accesorios*), que se hayan originado por defectos del material o de la fabricación. Dependiendo de nuestra estimación se realizará una reparación o un cambio. ¡Los servicios de garantía no prolangan la garantía, ni se incia por ello un período nuevo de garantía! Como comprobante para la garantía es válido la factura de compra. Sin este comprobante no se podrá realizar un cambio o una reparación gratuíta. En caso de garantía entregue el aparato completo en su embalaje original junto con la factura a su agente comerciante. 18 5....-05-HMS 2772 06.05.2003 9:25 Uhr Seite 19 *) Defectos en las piezas de accesorio, no significan automáticamente el recambio gratuito del aparato completo. ¡En este caso dirijase por favor a nuestra linea de atención al cliente! ¡Rotos de vidrio o roturas en las piezas de plástico deben pagarse siempre por el cliente ! Defectos en los accesorios de uso o en las piezas de desgaste (p.ej. escobillas de carbón del motor, varillas amasadoras, correas de transmisión, mando a distancia de repuesto, cepillos de dientes de repuesto, hojas de sierra etc.), como también la limpieza, mantenimiento o el recambio de piezas de desgaste no recaen en la garantía e irán al cargo del cliente! En caso de intervención ajena se expira la garantía. Después de la garantía Después de haber expirado la garantía se pueden realizar las reparaciones por el concesionario o por el servicio de reparaciones. Los gastos irán al cargo del cliente. 19 E 5....-05-HMS 2772 06.05.2003 9:25 Uhr Seite 20 Instruções gerais de segurança P • • • • • • • • • Antes de pôr este aparelho a funcionar, leia muito atentamente as instruções de emprego e guarde-as muito bem, juntamente com o talão de garantia, o talão de compra e, tanto quanto possível, a embalagem com os elementos interiores. Utilize o aparelho exclusivamente para fins privados e para a finalidade para a qual o mesmo foi concebido. Este aparelho não se destina a fins comerciais. Não o utilize ao ar livre (a não ser que o mesmo possa ser usado ao ar livre sob determinadas condições). Mantenha-o protegido do calor, de irradiação solar directa, da humidade (não o imergir de forma alguma em quaisquer líquidos) e de arestas aguçadas. Não utilize o aparelho com as mãos molhadas. No caso de o aparelho ficar húmido ou molhado, retire imediatamente a ficha da tomada. Não tocar na água. Sempre que não utilizar o aparelho, ou desejar montar acessórios, ou queira limpá-lo, ou ainda em caso de avarias, deverá desligá-lo e retirar a ficha da tomada (puxe pela ficha e não pelo fio). O aparelho não deverá funcionar sem vigilância. No caso de ter de se ausentar do local onde o aparelho estiver a funcionar, desligue-o sempre ou retire a ficha da tomada (puxe pela ficha e não pelo fio). Para proteger as crianças dos perigos relacionados com aparelhos eléctricos, nunca deixe os fios pendurados e atente em que as crianças não possam chegar a tais aparelhos. Verifique regularmente se o aparelho ou o fio têm alguns danos. Nunca ponha a funcionar um aparelho com quaisquer danos. Não tente reparar o aparelho, dirija-se a um técnico da especialidade, devidamente autorizado. Para evitar quaisquer perigos, é favor substituir um fio danificado por um fio da mesma qualidade. Tal deverá ser efectuado pelo fabricante, pelos nossos serviços de assistência ou por outra pessoa com as mesmas qualificações. Utilize apenas acessórios de origem. É favor observar as seguintes „Instruções especiais de segurança...“. Instruções especiais de segurança • • • • 20 Antes de se substituírem os acessórios, deverá desligar-se o aparelho e retirarse a ficha da tomada! Não introduza a mão no recipiente da batedeira. Não movimente nem levante o aparelho durante o funcionamento. Desligue-o em primeiro lugar e retire seguidamente a ficha da tomada. Pegue sempre no aparelho com ambas as mãos! Proceda à limpeza do aparelho apenas da forma indicada na rubrica “Limpeza”. 5....-05-HMS 2772 06.05.2003 9:25 Uhr Seite 21 Descrição dos elementos 1 2 3 4 5 Batedeira Botão para soltar as varinhas de amassar Selector de velocidades (6 velocidades) Tecla TURBO Parte superior móvel 6 7 8 9 P Tecla para desbloquear a parte superior Recipiente de misturas Suporte para a batedeira Varinhas para amassar Funcionamento turbo Para obter momentaneamente o número máximo de rotações. Carregando a tecla em intervalos curtos, consegue-se uma operação intermitente. ATENÇÃO: Não utilizar esta função mais de 1 minuto! Utilização das varinhas para amassar/bater 1. Coloque o selector (3) na posição “0/AUS” e certifique-se de que a batedeira (1) está desligada da corrente. 2. Introduzir as extremidades das varinhas nos orifícios próprios da batedeira, até as mesmas ficarem engatadas. A montagem será facilitada, girando-se ligeiramente as extremidades durante a introdução. Atenção: a varinha de amassar com o disco em forma de prato no cabo só pode ser introduzida na parte esquerda da batedeira (vista de baixo). 3. Introduza a ficha numa tomada de 230 voltes / 50 Hz, com protecção de contactos, convenientemente instalada. 4. Poderão agora seleccionar-se várias velocidades na batedeira (1), utilizando-se o selector de velocidades (3). 5. Para soltar a varinha de amassar, coloque o selector na posição “0/AUS” e certifique-se de que a batedeira não está ligada à corrente. 6. Pressione o botão (2) para soltar a varinha de amassar. Puxando-as ligeiramente, as mesmas sairão com facilidade. Utilização do suporte da batedeira Coloque o suporte da batedeira sobre uma superfície plana e não escorregadia 1. Coloque a batedeira (1) na parte superior (5) do suporte (8). Certifique-se de que está bem fixa. 2. Montar as varinhas da forma descrita em Utilização das varinhas para amassar/bater. 3. Para colocar o recipiente (7) por baixo da batedeira, pressione a tecla (6) para desbloquear a parte superior do suporte (5) e levante a batedeira. 4. Colocar sobre o prato giratório o recipiente com os ingredientes desejados. Torne a baixar a batedeira. 5. Introduza a ficha numa tomada de 230 voltes / 50 Hz, com protecção de contactos, convenientemente instalada. 21 5....-05-HMS 2772 P 06.05.2003 9:25 Uhr Seite 22 6. Poderão agora seleccionar-se várias velocidades na batedeira (1) utilizando-se o selector de velocidades (3). 7. O recipiente será accionado pelo movimento das varinhas dentro dos ingredientes. 8. Quando acabar, desloque o selector para a posição “0” e retire a ficha da tomada. 9. Depois de terminar, pressione novamente a tecla (6) para desbloquear a parte superior do suporte (5) e levante a batedeira. 10. Pode retirar-se agora o recipiente. Desmontar as varinhas da forma descrita em Utilização das varinhas para amassar/bater. 11. Para separar a batedeira da parte superior (5) do suporte, levante-a em primeiro lugar pela parte traseira (fio) e retire-a então, puxando-a para cima. Utilize uma varinha e uma velocidade segundo a tabela seguinte: Produto / Forma de preparação Quantidade máx. Varinha Velocidade Massa pesada (p. ex. massa para pão 500 g Varinha de amassar 1-4 Massa normal para bolos 750 g Varinha de bater claras 2-5 Massa para tartes, wafles, natas 750 g Varinha de bater claras 2-5 ou turbo Funcionamento máx. 3 min 5 min 5 min Limpeza 1. 2. 3. 4. Antes de cada limpeza, retire a ficha da tomada. Para limpar o exterior da máquina, utilize apenas um pano húmido. Não use detergentes cáusticos nem corrosivos. As peças móveis que se sujaram com a massa (varinhas e recipiente) poderão ser lavadas normalmente em água com detergente. Este aparelho foi controlado nos termos das actuais directivas da CEE aplicáveis, tais como inocuidade electromagnética e directiva sobre baixa tensão, e fabricado de acordo com as mais novas prescrições da segurança técnica. Reserva-se o direito de alterações! Garantia O aparelho vendido pela nossa empresa tem uma garantia de 24 meses a partir da data da compra (talão). Durante o período de garantia, procederemos à remoção grátis - por reparação, ou, segundo a nossa decisão, por substituição - das deficiências do aparelho ou dos acessórios*) que provenham de erros de material ou de fabricação. A prestação de serviços relacionados com a garantia não prolongarão a mesma, nem iniciarão um novo prazo de garantia! O talão de compra consistirá prova desta garantia. Sem o mesmo, não será possível proceder-se a qualquer troca ou reparação grátis. 22 5....-05-HMS 2772 06.05.2003 9:25 Uhr Seite 23 Em caso de garantia, entregue o aparelho completo, juntamente com o talão de compra, na loja onde o mesmo foi comprado. P *) No caso de danos em quaisquer acessórios, não será efectuada automáticamente uma substituição completa do aparelho. Contacte neste caso a nossa hotline! Danos causados por quebras de peças de vidro ou de plástico terão de ser pagos pelo cliente! Não estão incluídos na garantia quaisquer defeitos de acessórios ou de peças que se desgastem (como, por exemplo, carvões do motor, varinhas, correias do motor, telecomandos, escovas de dentes, folhas de serra, etc.), nem a limpeza, a manutenção ou a substituição de peças que se desgastem, devendo tais despesas ser reembolsadas! A garantia terminará sempre que tenha havido intervenção alheia nos aparelhos. Após a garantia Após a expiração do prazo de garantia, poderão ser efectuados arranjos por pessoal especializado, ou pelos nossos serviços de reparações, contra reembolso. 23 5....-05-HMS 2772 06.05.2003 9:25 Uhr Seite 24 Norme di sicurezza generali I • • • • • • • • • Prima di mettere in funzione questo apparecchio, leggere molto attentamente le istruzioni per l’uso e conservarle con cura unitamente al certificato di garanzia, allo scontrino e, se possibile, alla scatola di cartone con la confezione interna. Utilizzare l’apparecchio esclusivamente per scopi privati e conformemente al tipo di applicazione previsto. Questo prodotto non è stato concepito ai fini di un impiego in ambito industriale. Non utilizzarlo all’aperto (a meno che non sia contemplato un particolare tipo di uso all’aperto nel rispetto di specifiche condizioni). Proteggerlo dal calore, nonché dall’esposizione diretta ai raggi solari e dall’umidità (non immergerlo mai in sostanze liquide) e tenerlo a distanza da oggetti con spigoli affilati. Non utilizzare l’apparecchio con le mani umide. Nel caso in cui si bagni o si inumidisca l’apparecchio, staccare immediatamente la spina. Evitare il contatto con l’acqua. Disattivare l’apparecchio e staccare sempre la spina dalla relativa presa (si raccomanda di afferrare il connettore e non il cavo quando si effettua questa operazione) allorché non si utilizza l’apparecchio, quando si applicano degli accessori oppure nel caso in cui lo si debba pulire o si siano manifestate anomalie. Non mettere in funzione l’ apparecchio senza sorveglianza. Se si dovesse assentarsi dal posto di lavoro, spegnere e disconnettere sempre l’ apparecchio, (prendendo in mano la spina, non tirando il cavo). Allo scopo di proteggere i bambini contro i pericoli che possono derivare dagli apparecchi elettrici, accertarsi che non vi siano cavi pendenti e che i bambini non possano accedere in alcun modo all’apparecchio stesso. Controllare periodicamente l’apparecchio per verificare che non vi siano danni. Non mettere in funzione l’apparecchio nel caso in cui sia guasto. Non tentare di riparare l’apparecchio, bensì rivolgersi a un tecnico autorizzato. Al fine di evitare l’insorgere di situazioni di pericolo, si raccomanda di contattare il costruttore, il nostro servizio di assistenza tecnica o un tecnico ugualmente qualificato per la sostituzione del cavo di alimentazione difettoso con un cavo equivalente. Utilizzare esclusivamente accessori originali. Rispettare le seguenti “Speciali norme di sicurezza...“. Avvertenze speciali di sicurezza • • • • 24 Prima di sostituire gli accessori spegnere l’apparecchio e staccare la spina! Non infilare mai le mani nel recipiente di miscelazione! Non portare né sollevare l’apparecchio mentre è in funzione. Prima spegnerlo e poi staccare la spina. Portare sempre l’apparecchio con entrambe le mani! Pulire l’apparecchio solo come descritto in “Pulizia”. 5....-05-HMS 2772 06.05.2003 9:25 Uhr Seite 25 Elementi di comando 1 2 3 4 5 6 7 8 9 I Frullatore Tasto per lo sblocco dei ganci impastatori Interruttore di selezione degli stadi di commutazione (6 stadi) Tasto TURBO Sovrastruttura orientabile Tasto per sbloccare la parte superiore Scodella di miscelazione Supporto di miscelazione Ganci impastatori Funzionamento rapido (turbo) Per passare in breve tempo al numero massimo di giri. Premendo a brevi intervalli potete lavorare con il funzionamento ad impulsi. ATTENZIONE: non utilizzate questa funzione per più di 1 minuto. Uso dei ganci impastatori/bracci agitatori 1. Mettere il selettore di velocità (3) su “0/OFF” e accertarsi che il frullatore (1) sia staccato dalla rete elettrica. 2. Inserite con una leggera pressione l’estremità dei ganci impastatori ovvero dei bracci agitatori nelle apposite aperture del frullatore, fino all’incastro meccanico. Girando leggermente mentre si preme, si facilita l’inserimento. Attenzione: è possibile inserire la frusta a spirale con il dischetto sulla barretta solo sull’apposito lato a sinistra dello sbattitore. 3. Inserire la spina in una presa con contatto di terra regolarmente installata da 230 V / 50 Hz. 4. Ora potete regolare sul frullatore (1) diverse velocità avvalendovi dell’interruttore di selezione degli stadi di commutazione (3). 5. Per staccare le fruste a spirale/a filo mettere il selettore di funzioni su “0/OFF” e accertarsi che non ci sia corrente. 6. Premere il tasto (2) per staccare le fruste a spirale/a filo. Tirandoli un po’ si possono sfilare. Uso del supporto di miscelazione Per la base scegliere una superficie piana e non scivolosa. 1. Mettere lo sbattitore (1) sulla parte superiore (5) della base (8). Controllare il fissaggio stabile. 2. Montate i ganci come già descritto in precedenza in Uso dei ganci impastatori/bracci agitatori. 3. Per sottoporre il recipiente per gli alimenti (7), premere il tasto (6) per sbloccare la parte superiore della base e rivoltare lo sbattitore verso l’ alto. 25 5....-05-HMS 2772 I 06.05.2003 9:25 Uhr Seite 26 4. Mettete la scodella di miscelazione con gli ingredienti che desiderate sull’apposito piatto girevole (7). Rimettere a posto lo sbattitore. 5. Inserire la spina in una presa con contatto di terra regolarmente installata da 230 V / 50 Hz. 6. Con l’interruttore di selezione (3) potete ora regolare sul frullatore (1) diverse velocità. 7. Il recipiente degli alimenti si mette in moto grazie al movimento degli accessori negli ingredienti. 8. Se si desidera terminare il lavoro, mettere il selettore di velocità su “0” e staccare la corrente. 9. Terminato il lavoro premere nuovamente il tasto (6) per sbloccare la parte superiore della base (5) e rivoltare lo sbattitore verso l’alto. 10. Ora potete togliere la scodella di miscelazione. Per cortesia togliete i ganci procedendo come già descritto in Uso dei ganci impastatori/bracci agitatori. 11. Per staccare lo sbattitore dalla parte superiore della base (5), tirarlo prima verso l’ alto tenendolo dalla parte posteriore (cavo) e poi afferrarlo all’ insù. Per l’uso scegliere un utensile e una velocità conformemente alla seguente tabella: prodotto / tipo di preparazione quantità massima pasta pesante (per esempio pasta per il pane o la pizza) 500 g pasta per dolci 750 g pasta per biscotto o cialde, panna 750 g utensile velocità durata massima fruste a spirale fruste a filo fruste a filo 1 -4 2 -5 2 -5 o turbo 3 min 5 min 5 min Pulizia 1. 2. 3. 4. Prima di ogni operazione di pulizia staccare la spina. Per la pulizia esterna dell’apparecchio utilizzare solo un panno umido. Non usare detergenti abrasivi o corrosivi. I pezzi sfilabili che sono entrati in contatto con la pasta (ganci e scodella di mescola) si possono lavare in acqua e detergente per stoviglie. Questo apparecchio è stato controllato sulla base di tutte le direttive CE attuali in vigore in questo settore, quali per esempio la normativa in materia di compatibilità elettromagnetica e la direttiva in materia di bassa tensione, ed è stato costruito conformemente alle norme di sicurezza più moderne. Con riserva di apportare modifiche tecniche. 26 5....-05-HMS 2772 06.05.2003 9:25 Uhr Seite 27 Garanzia I Per l’apparecchio da noi messo in commercio ci assumiamo una garanzia di 24 mesi dalla data di acquisto (scontrino). Durante la garanzia noi ci impegniamo ad eliminare gratuitamente i guasti dell’apparecchio o degli accessori*), dovuti a difetti di materiale o di fabbricazione, riparandoli o, a nostra discrezione, sostituendoli. Le prestazioni in garanzia danno luogo a una proroga della garanzia né danno diritto ad una nuova garanzia! Per la garanzia è sufficiente lo scontrino di acquisto. Senza questo scontrino non sussiste il diritto né ad una sostituzione né ad una riparazione gratuita. Nel caso si ricorra alla garanzia, restituire al rivenditore l’apparecchio completo in ogni sua parte, nell’imballaggio originale unitamente allo scontrino. *) Danni agli accessori non giustificano automaticamente lo scambio gratuito dell’apparecchio completo. Si prega di mettersi in contatto con la nostra centrale telefonica. Danni alle parti di vetro oppure fratture ai pezzi di materia plastica sono obbligatoriamente a spese del cliente. La riparazione di pezzi d’uso ovvero soggetti a logoramento (cursori, ganci impastatori, cinghie di trasmissione, telecomandi di ricambio, spazzolini di ricambio, lame di seghe ecc.) come anche operazioni di pulizia e manutenzione o la sostituzione di pezzi soggetti a logoramento non rientrano nella garanzia e quindi sono a pagamento! La garanzia si annulla nel caso di intervento da parte di terzi. Dopo la garanzia Al termine della garanzia le riparazioni possono essere eseguite dietro pagamento dal corrispettivo negozio specializzato o servizio riparazioni. 27 5....-05-HMS 2772 06.05.2003 9:25 Uhr Seite 28 General Safety Instructions GB • • • • • • • • • Read the operating instructions carefully before putting the appliance into operation and keep the instructions including the warranty, the receipt and, if possible, the box with the internal packing. The appliance is designed exclusively for private use and for the envisaged purpose. This appliance is not fit for commercial use. Do not use it outdoors (except if it is designed to be used outdoors). Keep it away from sources of heat, direct sunlight, humidity (never dip it into any liquid) and sharp edges. Do not use the appliance with wet hands. If the appliance is humid or wet, unplug it immediately. Do not put it in water. When cleaning or putting it away, switch off the appliance and always pull out the plug from the socket (pull on the plug, not the cable) if the appliance is not being used and remove the attached accessories. Do not operate the machine without supervision. If you should leave the workplace, always switch the machine off or remove the plug from the socket (pull the plug itself, not the lead). To protect children from the dangers posed by electrical appliances, make sure that the cable is hanging low and that children do not have access to the appliance. Check the appliance and the cable for damage on a regular basis. Do not use the appliance if it is damaged. Do not try to repair the appliance on your own. Always contact an authorized technician. To avoid the exposure to danger, always have a faulty cable be replaced only by the manufacturer, by our customer service or by a qualified person and with a cable of the same type. Use only original spare parts. Pay careful attention to the following “Special Safety Instructions“. Special safety instructions • • Before changing the attachments, the appliance must be disconnected from the mains! Do not insert your fingers into the mixing vessel. Do not carry or lift the appliance during use. Always switch it off first and pull out the plug. Carry the appliance always with both hands! Clean the appliance only as described in „Cleaning“. 1 2 3 4 5 Handmixer Button for the releasing of the kneader hooks Speed regulator (6 speeds) TURBO button Mobile upper part • • Overview of Components 28 6 7 8 9 Button for unlocking the upper section Mixer bowl Mixer stand Kneader hooks 5....-05-HMS 2772 06.05.2003 9:25 Uhr Seite 29 Turbo operation GB This is for switching to maximum speed for a short time. Press at short intervals for pulsed mode operation. WARNING! Do not use this function for more than one minute! How to use the Kneader hooks/beater 1. Turn the power level selector switch (3) to "0/OFF" and ensure that the mixer (1) has been disconnected from the mains. 2. Press the end of the kneader hooks/beater into the corresponding mixer openings until the hooks click into place. While pressing, turn slightly in order to facilitate the whole operation. Please note that the kneading hook with the curved washer on the shaft can only be inserted on the left-hand side of the mixer when viewed from the bottom. 3. Insert the mains plug into a properly installed 230V/50 Hz safety power socket. 4. The handmixer (1) can be used at various speeds set with the speed regulator (3). 5. In order to release the kneading hook/whisk turn the power level selector switch to "0/OFF" and ensure that the mixer has been disconnected from the mains. 6. Press the button (2) to release the kneading hook/whisk. Remove the device by turning it slightly. How to use the Mixer stand Please select a flat non-slip surface for the mixer stand. 1. Place the hand mixer (1) on the upper section (5) of the mixer stand (8). Please check whether this is fixed firmly in place. 2. Mount the hooks as described above in the section “How to use the Kneader hooks/beater”. 3. In order to place the mixing bowl (7) underneath, press the button (6) to unlock the upper section of the mixer stand (5) and fold the mixer upwards. 4. Place the mixer bowl filled with the desired ingredients onto the revolving plate. Now fold the mixer down again. 5. Insert the mains plug into a properly installed 230V/50 Hz safety power socket. 6. The handmixer (1) can be used at various speeds set with the speed regulator (3). 7. The mixing bowl is driven by the movement of the mixing tools through the ingredients. 8. When you would like to stop mixing, turn the power level selector switch to "0" and unplug the device from the mains. 9. When you have finished press the button (6) again to unlock the upper section of the mixer stand (5) and fold the mixer upwards. 10. Now the mixer bowl can be removed. Remove the hooks as described above in the section “How to use the Kneader hooks/beater”. 29 5....-05-HMS 2772 GB 06.05.2003 9:25 Uhr Seite 30 11. In order to separate the mixer from the upper section (5) of the mixer stand, first lift it by the rear section (cables) and then remove it by pulling upwards. Always choose a utensil and a speed according to the following table: Product/ Max. Quantity Type of Preparation Heavy dough (e.g. yeast dough) 500 g Cake mixture 750 g Sponge mixture, wafer mixture, Cream 750 g Utensil Level kneader hook beater beater 1 -4 2 -5 2 -5 or Turbo Max. Operating Time 3 min 5 min 5 min Cleaning 1. 2. 3. 4. Before cleaning the equipment, always remove the mains plug from the socket. Only a damp cloth should be used for cleaning the outside of the machine. Do not use any caustic or abrasive detergents. Removable parts which have come into contact with the mixture (kneading utensils and mixing bowl) can be cleaned in soapy water. This device has been tested according to all relevant current CE guidelines, such as electromagnetic compatibility and low voltage directives, and has been constructed in accordance with the latest safety regulations. Subject to technical changes without prior notice! Guarantee The device supplied by our Company is covered by a 24 month guarantee starting on the date of purchase (receipt). During the life of the guarantee any fault of the device or its accessories *) ascribable to material or manufacturing defects will be eliminated free of charge by repairing or, at our discretion, by replacing it. The guarantee services do not entail an extension of the life of the guarantee nor do they give rise to any right to a new guarantee! Proof of the guarantee is provided by the proof of purchase. Without proof of purchase no free replacement or repair will be carried out. If you wish to make a claim under the guarantee please return the entire machine in the original packaging to your dealer together with the receipt. *) Damage to accessories does not mean automatic free replacement of the whole machine. In such cases please contact our hotline. Broken glass or breakage of plastic parts are always subject to a charge. Defects to consumables or parts subject to wearing (e.g. motor pistons, kneading blades, drive shafts, spare remote control, spare toothbrushes, saw blades, etc.) 30 5....-05-HMS 2772 06.05.2003 9:25 Uhr Seite 31 as well as cleaning, maintenance or the replacement of said parts are not covered by the guarantee and hence are to be paid! The guarantee lapses in case of unauthorized tampering. After the expiry of the guarantee After the expiry of the guarantee repairs can be carried by the competent dealer or repair service against the payment of the ensuing costs. 31 GB 5....-05-HMS 2772 06.05.2003 9:25 Uhr Seite 32 Ogólne wskazówki bezpieczeństwa PL • • • • • • • • • Przed uruchomieniem urządzenia proszę bardzo dokładnie przeczytać instrukcję obsługi.Proszę zachować ją wraz z kartą gwarancyjną, paragonem i w miarę możliwości również kartonem z opakowaniem wewnętrznym. Proszę wykorzystywać urządzenie jedynie dla prywatnego celu,jaki został przewidziany dla urządzenia.Urządzenie to nie zostało przewidziane do użytku w ramach działalności gospodarczej.Proszę nie korzystać z urządzenia na zewnątrz (chyba że w określonych warunkach).Proszę trzymać urządzenie z daleka od ciepła,bezpośredniego promieniowania słonecznego,wilgoci (w żadnym wypadku nie zanurzać w substancjach płynnych)oraz ostrych krawędzi.Proszę nie obsługiwać urządzenia wilgotnymi dłońmi.Jeżeli urządzenie jest wilgotne lub mokre,proszę natychmiast wyciągnąć wtyczkę. Jeżeli nie korzystacie Państwo z urządzenia,jeżeli chcecie Państwo zamontować jakieś akcesoria,w celu wyczyszczenia lub w przypadku jakichkolwiek zakłóceń,proszę zawsze wyłączyć urządzenie i wyjąć wtyczkę z gniazdka (proszę pociągnąć za wtyczkę,nie za przewód zasilający). Pracującego urządzenia nie należy pozostawiać bez nadzoru. Jeżeli opuszczają Państwo miejsce pracy, należy zawsze pamiętać o wyłączeniu urządzenia, wzgl. wyjęciu wtyczki z gniazda (należy ciągnąć za wtyczkę, nie za kabel). Aby uchronić dzieci przed niebezpieczeństwem związanym z elektrycznymi urządzeniami,proszę zadbać o to,aby przewód zasilający nigdy nie wisiał luźno,oraz aby dzieci nie miały dostępu do urządzenia. Proszę regularnie kontrolować urządzenie pod kątem uszkodzeń.Proszę nie uruchamiać uszkodzonego urządzenia. W razie awarii proszę nie naprawiać urządzenia samemu lecz skorzystać z pomocy autoryzowanego specjalisty. Jeżeli przewód zasilający nieodłączalny ulegnie uszkodzeniu, to powinien on być wymieniony u producenta lub w specjalnym zakładzie naprawczym albo przez wykwalifikowaną osobę w celu uniknięcia zagrożenia. Proszę stosować tylko oryginalne akcesoria. Prosimy pamiętać o podanych dalej „Specjalnych wskazówkach dotyczących bezpieczecznego użytkowania“ Szczególne zalecenia z zakresu bezpieczeństwa • • • • 32 Przed wymianą elementów wyposażenia należy wyłączyć urządzenie i odłączyć je od sieci! Proszę nie wkładać rąk do pojemnika miksera W trakcie pracy urządzenia nie wolno go przenosić lub podnosić. W pierwszej kolejności należy zawsze wyłączyć malakser i wyjąć wtyczkę z gniazda elektrycznego. Urządzenie należy zawsze nosić oburącz! Urządzenie wolno czyścić jedynie w sposób podany w punkcie „Czyszczenie”. 5....-05-HMS 2772 06.05.2003 9:25 Uhr Seite 33 Zestawienie elementów obsługi 1 2 3 4 5 Mikser ręczny Przycisk do zwalniania mieszadeł do ugniatania Przełącznik trzystopniowy (6 stopnie) Przycisk TURBO Ruchoma część górna 6 7 8 9 PL Przycisk odblokowujący część górną Pojemnik do mieszania Stojak mieszaka Mieszadła do ugniatania Napęd turbo Przeznaczony do krótkotrwałego przełączania na najwyższą liczbę obrotów. Jeżeli będziecie Państwo przyciskać go w krótkich odstępach, urządzenie będzie pracowało pulsacyjnie. UWAGA: proszę nie korzystać z tej funkcji dłużej niż przez jedną minutę! Używanie mieszadeł do ugniatania/ mieszadeł do ubijania 1. Proszę ustawić przełącznik wyboru stopni pracy (3) na pozycji „0/AUS” i upewnić się, że mikser (1) jest odłączony od sieci. 2. Końcówki mieszadeł do ugniatania wzgl. mieszadeł do ubijania wcisnąć w przewidziane do tego otwory w mikserze, do momentu wzębienia się zapadki. Lekkie obracanie przy wciskaniu ułatwia osadzenie. Proszę pamiętać: sztabkę ugniatającą z tarczą talerzową na trzonku można zamocować wyłącznie patrząc na mikser od dołu, po jego lewej stronie. 3. Proszę podłączyć wtyczkę do prawidłowo zainstalowanego gniazda z zestykiem ochronnym 230V/ 50 Hz. 4. Teraz za pomocą przełącznika stopniowego (3) można ustawiać na mikserze (1) różne prędkości. 5. Aby zwolnić sztabkę ugniatającą/ trzepaczkę proszę ustawić przełącznik wyboru stopni pracy na pozycji „0/AUS” i upewnić się, że mikser jest odłączony od sieci. 6. Aby zwolnić sztabkę ugniatającą/ trzepaczkę proszę nacisnąć przycisk (2). Po lekkim pociągnięciu można wyjąc mieszadła. Używanie stojaka miksera (blendera) Dla ustawienia podstawy mieszadła proszę wybrać płaską, bezpoślizgową powierzchnię. 1. Proszę założyć mikser ręczny (1) na górną część (5) podstawy miksera (8). Prosimy skontrolować prawidłowość osadzenia. 2. Zamontować mieszadła w sposób opisany w punkcie „Używanie mieszadeł do ugniatania / mieszadeł do ubijania”. 33 5....-05-HMS 2772 PL 06.05.2003 9:25 Uhr Seite 34 3. W celu podstawienia miski do mieszania (7), należy nacisnąć przycisk (6) w celu odblokowania górnej części stelaża miksera (5) i odchylić mikser do góry. 4. Pojemnik do mieszania napełniony przygotowanymi przez Państwa składnikami należy ustawić na przewidzianym do tego talerzu obrotowym. Proszę ponownie pochylić mikser w dół. 5. Proszę podłączyć wtyczkę do prawidłowo zainstalowanego gniazda z zestykiem ochronnym 230V/ 50 Hz. 6. Teraz za pomocą przełącznika stopniowego (3) można ustawiać na mikserze (1) różne prędkości. 7. Miska do mieszania napędzana jest poprzez ruch narzędzi mieszających w składnikach. 8. Gdy chcą Państwo zakończyć proces miksowania proszę przełączyć przełącznik wyboru stopni pracy na pozycję „0” i odłączyć urządzenie od sieci. 9. Po zakończeniu należy, poprzez naciśnięcie przycisku (6), ponownie odblokować górną część stelaża miksera i odchylić mikser do góry. 10. Można teraz zdjąć pojemnik do mieszania. Mieszadła należy wyjąć w sposób opisany w punkcie „Używanie mieszadeł do ugniatania / mieszadeł do ubijania”. 11. W celu odłączenia miksera od części górnej (5) stelaża, należy najpierw unieść tylną część miksera (kabel) a następnie zdjąć ku górze. Narzędzia i prędkości należy dobierać zgodnie z poniższą tabelą: Produkt/ maks. ilość sposób przyrządzenia Ciasta ciężkie (np. drożdżowe) 500 g Ciasta ubijane 750 g Ciasto biszkoptowe, waflowe, Śmietana 750 g narzędzie stopień ugniatania ubijania ubijania 1 -4 2 -5 2 -5 lub Turbo maks. czas pracy 3 min 5 min 5 min Czyszczenie 1. Przed czyszczeniem proszę wyciągnąć wtyczkę z kontaktu. 2. Z zewnątrz proszę oczyścić urządzenie wilgotną myjką. 3. Proszę nie stosować żadnych ostrych ani szorujących środków czyszczących. 4. Części zdejmowane, które miały kontakt z ciastem (akcesoria do ugniatania, mieszania ciasta oraz misa), mogą Państwo w zwykły sposób umyć pod bieżącą wodą. Niniejsze urządzenie odpowiada wymaganiom normy bezpieczeństwa użytkowania oraz spełnia wymagania dyrektywy niskonapięciowej i kompatybilności elektromagnetycznej. Zastrzega się prawo do zmian technicznych! 34 5....-05-HMS 2772 06.05.2003 9:25 Uhr Seite 35 WARUNKI GWARANCJI PL Przyznajemy 24 miesięcy gwarancji na produkt licząc od daty zakupu. W tym okresie będziemy bezpłatnie usuwać w terminie 14 dni od daty dostarczenia wadliwego sprzętu z kartą gwarancyjną do miejsca zakupu wszystkie uszkodzenia powstałe w tym urządzeniu na skutek wady materiałów lub wadliwego wykonania, naprawiając oraz wymieniając wadliwe części lub (jeśli uznamy za stosowne) wymieniając całe urządzenie na nowe. Sprzęt do naprawy powinien być dostarczony w komplecie wraz z dowodem zakupu oraz z ważną kartą gwarancyjną do sprzedawcy w miarę możliwości w oryginalnym opakowaniu lub innym odpowiednim dla zabezpieczenia przed uszkodzeniem. W razie braku kompletnego opakowania fabrycznego, ryzyko uszkodzenia sprzętu podczas transportu do i z miejsca zakupu ponosi reklamujący. Naprawa gwarancyjna nie dotyczy czynności przewidzianych w instrukcji obsługi, do wykonania których zobowiązany jest użytkownik we własnym zakresie i na własny koszt. Gwarancja nie obejmuje: • mechanicznych, termicznych, chemicznych uszkodzeń sprzętu i wywołanych nimi wad, • uszkodzeń powstałych w wyniku działania sił zewnętrznych takich jak wyładowania atmosferyczne, zmiana napięcia zasilania i innych zdarzeń losowych, • nieprawidłowego ustawienia wartości napięcia elektrycznego, zasilanie z nieodpowiedniego gniazda zasilania, • sznurów połączeniowych, sieciowych, żarówek, baterii, akumulatorów, • uszkodzeń wyrobu powstałych w wyniku niewłaściwego lub niezgodnego z instrukcją jego użytkowania, przechowywania, konserwacji, samowolnego zrywania plomb oraz wszelkich przeróbek i zmian konstrukcyjnych dokonanych przez użytkownika lub osoby niepowołane, • roszczeń z tytułu parametrów technicznych wyrobu, o ile są one zgodne z podanymi przez producenta, • prawidłowego zużycia i uszkodzeń, które mają nieistotny wpływ na wartość lub działanie tego urządzenia. Karta gwarancyjna bez pieczątki sklepu, daty sprzedaży, nie wypełniona, źle wypełniona, ze śladami poprawek, nieczytelna wskutek zniszczenia, bez możliwości ustalenia miejsca sprzedaży oraz dołączonego dowodu zakupu jest nieważna. Korzystanie z usług gwarancyjnych nie jest możliwe po upływie daty ważności gwarancji. Gwarancja na części lub całe urządzenie, które są wymieniane kończy się, wraz z końcem gwarancji na to urządzenie. Wszystkie inne roszczenia, wliczając w to odszkodowania są wykluczone chyba, że prawo przewiduje inaczej. Roszczenia wykraczające poza tą umowę nie są uwzględniane przez tą gwarancję. Gwarancja oraz zawarte w niej warunki obowiązują na terenie Rzeczpospolitej Polskiej. 35 5....-05-HMS 2772 06.05.2003 9:25 Uhr Seite 36 Všeobecné bezpečnostní pokyny CZ • • • • • • • • • Před uvedením tohoto přístroje do provozu si velmi pozorně přečtěte návod k obsluze a tento návod spolu se záručním listem, pokladním blokem a podle možností i s obalem a vnitřním vybavením obalu dobře uschovejte. Používejte tento přístroj výlučně pro soukromou potřebu a pro stanovené účely. Tento přístroj není určen pro komerční použití. Nepoužívejte jej v otevřeném prostoru (s výjimkou přístrojů, které jsou podmíněné používání venku určeny). Chraňte jej před horkem, přímým slunečním zářením, vlhkostí (v žádném případě jej neponořujte do kapalin) a stykem s ostrými hranami. Nepoužívejte přístroj v případě, že máte vlhké ruce. Jestliže dojde k navlhčení nebo namočení přístroje, okamžitě vytáhněte zástrčku ze zásuvky. Vyvarujte se styku s vodou. Přístroj vypněte a vždy vytáhněte zástrčku ze zásuvky (tahejte jen za zástrčku, nikdy ne za kabel), jestliže nebudete přístroj používat, chcete-li namontovat příslušenství, přístroj vyčistit nebo v případě poruchy. Přístroj nesmí zůstat v provozu bez dozoru. Jestliže musíte pracoviště opustit, vždy přístroj vypněte, resp. vytáhněte zástrčku ze zásuvky (vždy tahejte za zástrčku, nikdy ne za kabel). Abyste ochránili děti před riziky spojenými s elektrickými přístroji, postarejte se o to, aby kabel nevisel dolů a děti na přístroj nedosáhly. Pravidelně kontrolujte přístroj a přívodní kabel z hlediska poškození. Jestliže přístroj vykazuje nějakou závadu, neuvádějte jej do provozu. Neopravujte přístroj vlastními silami, nýbrž vyhledejte autorizovaného opraváře. Abyste eliminovali rizika, nechejte poškozený přívodní kabel nahradit kabelem se stejnými hodnotami a to jen výrobcem, naším servisem pro zákazníky nebo jinou kvalifikovanou osobou. Používejte jen originální příslušenství. Respektujte, prosím, následující „Speciální bezpečnostní pokyny ...“. Speciální bezpečnostní pokyny • • Před výměnou jednotlivých dílů příslušenství musí být přístroj vypnut a odpojen od el. sítě ! Nesahejte do mixovací nádoby. Nepřenášejte nebo nenadzdvihávejte přístroj během provozu, nýbrž je nejprve vypněte a poté vytáhněte zástrčku ze zásuvky. Při přenášení držte přístroj vždy oběma rukama! Čištění přístroje provádějte jen způsobem popsaným v kapitole „Čištění“. 1 2 3 4 5 Ruční mixér Knoflík k uvolnění hnětacích háků Volič výkonových stupňů (6 stupně) Tlačítko TURBO Pohyblivá horní část • • Přehled ovládacích prvků 36 6 7 8 9 Tlačítko pro odjištění horního dílu Míchací mísa Stojan pro ruční mixér Hnětací háky 5....-05-HMS 2772 06.05.2003 9:25 Uhr Seite 37 Turbo-provoz CZ Je určeno ke krátkodobému přepnutí na maximální otáčky. Stiskáváním v krátkých intervalech dosáhnete tzv. pulzního provozu. POZOR! Používejte tuto funkci po dobu maximálně 1 minuty! Používání hnětacích háků / šlehacích metel 1. Nastavte přepínač výkonových stupňů (3) do polohy “0/AUS” a zajistěte odpojení mixéru (1) od elektrické sítě. 2. Zatlačte konce hnětacích háků resp. šlehacích metel do pro ně určených otvorů až zaklapnou. Nasazování si můžete usnadnit lehkým pootáčením při zatlačování. Mějte, prosím, na paměti následující: Hnětací hák s talířovým kotoučem na dříku lze nasadit na levou stranu mixéru (při pohledu zespodu). 3. Zastrčte zástrčku do zásuvky s ochranným kolíkem 230 V / 50 Hz, instalované v souladu s příslušnými předpisy. 4. Nyní můžete na ručním mixéru (1) nastavit pomocí voliče výkonových stupňů (3) různé rychlosti. 5. Před uvolněním hnětacího háku/šlehacích metel nastavte přepínač výkonových stupňů do polohy “0/AUS” a ujistěte se, že že mixér je odpojen od elektrické sítě. 6. K uvolnění hnětacího háku/šlehacích metel stlačte tlačítko (2). Lehkým vytažením je nyní můžete vyjmout. Používání stojanu pro ruční mixér Pro umístění stojanu mixéru zvolte rovnou, neklouzavou plochu. 1. Nasaďte ruční mixér (1) na horní díl (5) stojanu mixéru (8). Zkontrolujte pevné usazení. 2. Namontujte háky způsobem stejným, jaký je popsán výše v oddíle „Používání hnětacích háků / šlehacích metel“. 3. Aby bylo možno vložit míchací mísu (7) pod mixér, stiskněte tlačítko (6) pro odjištění horního dílu stojanu mixéru (5) a vyklopte mixér nahoru. 4. Míchací mísu naplněnou požadovanými surovinami postavte na pro ni určený otočný talíř. Sklopte mixér opět dolů. 5. Zastrčte zástrčku do zásuvky s ochranným kolíkem 230 V / 50 Hz, instalované v souladu s příslušnými předpisy. 6. Nyní můžete na ručním mixéru (1) nastavit pomocí voliče výkonových stupňů (3) různé rychlosti. 7. Míchací mísa je poháněna pohybem mísících nástrojů ve zpracovávané surovině. 8. Chcete-li mixování ukončit, přepněte přepínač výkonových stupňů do polohy “0” a odpojte přístroj od elektrické sítě. 9. Po skončení práce stiskněte znovu tlačítko (6) pro odjištění horního dílu stojanu mixéru (5) a vyklopte mixér nahoru. 37 5....-05-HMS 2772 CZ 06.05.2003 9:25 Uhr Seite 38 10. Nyní lze šlehací metly vyjmout. Háky vyjměte stejným způsobem, jaký je popsán výše v oddíle „Používání hnětacích háků / šlehacích metel“. 11. Pro odpojení horního dílu (5) stojanu mixéru jej nejprve nadzdvihněte za zadní část (kabel) a poté jej odejměte směrem nahoru. Pro požadovaný účel si zvolte nástavec a rychlost podle následující tabulky: Produkt/způsob přípravy max. množství Těžké těsto (např. kynuté těsto) 500 g Třené těsto 750 g Piškotové, vaflové těsto , ·Slehaãka 750 g nástavec stupeň hnětacích háků šlehacích metel šlehacích metel 1 -4 2 -5 2 -5 nebo Turbo max. doba provozu 3 min 5 min 5 min Čištění 1. 2. 3. 4. Před každým čištěním vytáhněte zástrčku ze zásuvky. K čištění vnějšího povrchu přístroje používejte jen vlhký hadřík. Nepoužívejte žádné drsné nebo agresivní čistící prostředky. Odnímatelné díly, které přišly do styku s těstem (hnětací mechanismus a mísu pro hnětení) můžete umýt v běžné mycí lázni. Tento přístroj byl testován podle všech příslušných, v současné době platných směrnic CE, jako je např. elektromagnetická kompatibilita a direktiva o nízkonapěťové bezpečnosti, a byl zkonstruován podle nejnovějších bezpečnostnětechnických předpisů. Vyhrazujeme si technické změny! Záruka Na námi prodaný přístroj poskytujeme záruku v trvání 24 měsíců od data prodeje (pokladní doklad). Během záruční lhůty odstraníme bezplatně všechny vady přístroje nebo příslušenství*), které vzniknou v důsledku vad materiálu nebo výrobních vad, a to opravou nebo, podle našeho uvážení, formou výměny. Záruční plnění nemají za následek ani prodloužení záruční doby ani tím nevzniká nárok na novou záruku! Jako záruční doklad slouží doklad o koupi. Bez tohoto dokladu nelze uskutečnit bezplatnou výměnu nebo bezplatnou opravu. V případě uplatnění záruky předejte, prosím, kompletní přístroj v originálním obalu spolu s pokladním dokladem Vašemu obchodníkovi. *) Poškození příslušenství není automaticky důvodem pro bezplatnou výměnu kompletního přístroje. V takovém případě se obraťte na naši Hotline! Prasklé skleněné resp. plastové díly zásadně podléhají povinnosti úhrady! Jak na vady na spotřebním příslušenství, resp. dílech podléhajících rychlému opotřebení (např. uhlíky motoru, hnětací háky, hnací řemeny, náhradní dálkové 38 5....-05-HMS 2772 06.05.2003 9:25 Uhr Seite 39 ovládání, náhradní zubní kartáčky, pilové listy atd.), tak i na čištění, údržbu nebo výměnu dílů podléhajících rychlému opotřebení se záruka nevztahuje a je proto nutno je uhradit! Záruka zaniká v případě, že dojde k zásahu neautorizovanou osobou. Po uplynutí záruky Po uplynutí záruční doby je možno za úplatu provést opravy v příslušném odborném obchodě nebo opravně. 39 CZ 5....-05-HMS 2772 06.05.2003 9:25 Uhr Seite 40 Általános biztonsági rendszabályok H • • • • • • • • • A készülék használatba vétele előtt gondosan olvassa végig a használati utasítást, és őrizze meg a garancialevéllel, a pénztári nyugtával és lehetőleg a csomagolókartonnal, ill. az abban lévő bélésanyaggal együtt! Kizárólag személyi célra használja a készüléket, és csupán arra, amire való! A készülék nem ipari jellegű használatra készült. Ne használja a szabadban (hacsak nem a szabadban való, meghatározott korlátok közötti használatra van szánva)! Ne tegye ki erős hőhatásnak, közvetlen napsugárzásnak és nedvességnek (semmi esetre se mártsa folyadékba), és óvja az éles szélektől! Ne használja a készüléket vizes kézzel! Ha a készülék vizes vagy nedves lett, azonnal húzza ki a konnektorból! Ne nyúljon bele a vízbe! Kapcsolja ki a készüléket, és amikor nem használja, tartozékokat helyez rá, tisztítja, vagy ha zavart észlel, mindig húzza ki a csatlakozó dugaszt a konnektorból! Ne működtesse a készüléket felügyelet nélkül! Ha elhagyja a munkahelyet, mindig kapcsolja ki a készüléket, ill. húzza ki a dugaszt a konnektorból (a dugasznál, és nem a kábelnél fogva)! Annak érdekében, hogy a gyermekeket megvédje az elektromos készülékek okozta veszélyektől, soha ne hagyja a kábeleket szabadon lógva, és olyan helyre tegye a készüléket, ahol gyermekek nem férhetnek hozzá! Rendszeresen ellenőrizze, hogy nincs-e a készüléken vagy a kábelen sérülés! Sérült készüléket soha ne helyezzen üzembe! A kockázatok elkerülése végett ne maga javítsa a készüléket, hanem keressen fel egy erre kiképzett szakembert! Ha hibás a csatlakozó kábel, csak a gyártótól, a vevőszolgálatunktól vagy hasonló képzettségű személytől kérjen helyette azonos értékű másik kábelt! Csak eredeti tartozékokat használjon! Tartsa be az itt következő "Speciális biztonsági rendszabályokat" ... A készülékre vonatkozó speciális biztonsági rendszabályok • • • • 40 A tartozékok kicserélésekor a készüléket ki kell kapcsolni, és áramtalanítani kell. Ne nyúljon bele a keverőedénybe! Működés közben ne vigye a készüléket arrébb, és ne emelje meg! Először mindig kapcsolja ki, utána pedig húzza ki a hálózati csatlakozó dugót a konnektorból. Ha máshová viszi a készüléket, mindig két kézzel fogja meg! Mindig úgy tisztítsa a készüléket, ahogy a "Tisztítás" címszó alatt olvasható!. 5....-05-HMS 2772 06.05.2003 9:25 Uhr Seite 41 A kezelõelemek áttekintése 1 2 3 4 5 Kézimixer Dagasztóhorog-kioldó gomb Fokozatkapcsoló (6 fokozat) TURBO-gomb Mozgatható felsõ rész 6 7 8 9 H A felső rész reteszelését kioldó gomb Keverõedény Mixerállvány Dagasztóhorog Turbó-üzemmód Rövid ideig a legnagyobb fordulatszámra kapcsolhatjuk a készüléket. Ha rövid idõközönként megnyomjuk, a készülék lüktetve üzemel. FIGYELEM! Ezt a funkciót legfeljebb 1 percig szabad használni. A dagasztóhorog/habverõ használata 1. Állítsa a fokozatkapcsolót (3) „0/AUS“-ra, és győződjék meg róla, hogy a mixer (1) le van-e választva a hálózatról! 2. A dagasztóhorog ill. a habverõ végét nyomja a mixer erre való nyílásába, míg be nem kattan. Ha közben enyhén fordítja az eszközt, könnyebben tudja beilleszteni. Ügyeljen rá: A szárán tányérkoronggal szerelt dagasztókorong csak a mixer alulról nézve bal oldalán dugható be! 3. Dugaszoljuk be a készülék hálózati csatlakozóját egy elõírásszerěen felszerelt 230 V / 50 Hz-es védõérintkezõs konnektorba. 4. Most már a fokozatkapcsolóval (3) különbözõ sebességeket állíthat be a kézimixeren (1). 5. A dagasztóhorog/habverő kioldásához állítsa a fokozatkapcsolót „0/AUS“-ra, és győződjék meg róla, hogy a készülék le van-e választva a hálózatról! 6. Nyomja meg a dagasztóhorog/habverő kioldására szolgáló gombot (2)! Ezután enyhén meghúzva, ki tudja õket venni. A mixerállvány használata A mixelőállvány elhelyezésére válasszon sima, csúszásmentes felületet! 1. Helyezze rá a kézi mixer (1) a mixelőállvány (5) felső részére (8)! Ellenőrizze, hogy stabilan rögzült-e! 2. Szerelje fel a horgokat, ahogy a "dagasztóhorog/habverõ használatánál" le van írva. 3. Ahhoz, hogy a mixer alá lehessen állítani a keverőedényt (7), nyomja meg a mixelőállvány felső részének (5) reteszelését kioldó gombot (6), és billentse fel a mixert! 4. Helyezze a kívánt hozzávalókkal megtöltött keverõedényt az erre szánt forgótányérra. Billentse újra le a mixert! 5. Dugaszoljuk be a készülék hálózati csatlakozóját egy elõírásszerěen felszerelt 230 V / 50 Hz-es védõérintkezõs konnektorba. 41 5....-05-HMS 2772 H 06.05.2003 9:25 Uhr Seite 42 6. Most már a fokozatkapcsolóval (3) különbözõ sebességeket állíthat be a kézimixeren (1). 7. A keverőedényt a hozzávalókba merülő keverőszerszámok mozgása hajtja meg. 8. Ha be kívánja fejezni a mixelést, állítsa a fokozatkapcsolót „0“-ra, és húzza ki a készüléket a konnektorból! 9. A munka befejezése után nyomja meg ismét a mixelőállvány felső részének (5) reteszelését kioldó gombot (6), és billentse fel a mixert! 10. Kiveheti a keverõedényt. Távolítsa el a horgokat, ahogy a "dagasztóhorog/habverõ használata" alatt le van írva. 11. Ha a mixert le akarja választani a mixelőállvány felső részéről (5), emelje meg először a hátsó részénél (kábel), majd felfelé húzva vegye le! Kies voor het gebruik een hulpstuk en een snelheid volgens onderstaande tabel: Termék/Elkészítési mód Max. tömeg Sűrű tészta (pl. kelt tészta) 500 g Kevert tészta 750 g Piskótatészta, ostyatészta, Tejszín 750 g Szerszám dagasztóhorog habverõ habverõ Fokozat 1 -4 2 -5 2 -5 vagy Turbo Max. üzemidő 3 min 5 min 5 min Tisztítás 1. 2. 3. 4. Minden tisztítás elõtt húzzuk ki a csatlakozót a konnektorból. A készülék külsõ tisztításához csak nedves mosogatóruhát használjunk. Ne használjunk erõs vagy koptató hatású tisztítószereket. A tésztával érintkezésbe kerülõ levehetõ egységeket (keverõszerzámok és keverõtál), mosogatóban tisztíthatjuk. Ezt a készüléket az Európa Tanács minden vonatkozó aktuális irányelve szerint (pl. elektromágnesesség-elviselő képesség vagy kisfeszültség-elviselő képesség) ellenőriztük, és a legújabb biztonságtechnikai előírások szerint készült. Megjegyezzük az esetleges müszaki változásokat! Garancia Az általunk forgalmazott készülékre a vétel időpontjától (pénztári nyugta) számított 24 havi garanciát vállalunk. A garanciális időn belül saját mérlegelésünk szerint javítással vagy cserével díjtalanul megszüntetjük a készülék vagy a tartozék *) olyan hiányosságait, amelyek anyaghibára vagy gyártási hibára vezethetők vissza. A garanciális szolgáltatások sem a garanciális idő meghosszabbítását nem eredményezik, sem nem alapoznak meg újabb garanciára való igényt! 42 5....-05-HMS 2772 06.05.2003 9:25 Uhr Seite 43 A garancia igazolására a pénztári nyugta szolgál. E nélkül az igazolás nélkül sem díjmentes csere, sem díjtalan javítás nem végezhető. Garanciális esetben szíveskedjék az alapkészüléket eredeti csomagolásában a pénztári nyugtával együtt átadni a kereskedőjének! *) A tartozékok a jogszabályban előírt szavatossági kötelezettség (6 hónap) hatálya alá tartoznak, és nem vezetnek az egész készülék díjtalan cseréjére. Ilyen esetben ne a készüléket küldje be, ill. rendelje meg, hanem vevőszolgálatunkkal egyeztetve csak a hibás tartozékot! Az üvegtörés okozta hibák mindig térítéskötelesek! Sem az elhasználódó tartozékokban, ill. kopó alkatrészekben (pl. szénkefe, dagasztóhorog, hajtószíj, póttávvezérlő, pótfogkefe, fűrészlap stb.) bekövetkező hibák, sem a tisztítás, karbantartás vagy a kopó alkatrészek cseréje nem esik a garancia hatálya alá, következésképp térítésköteles. Illetéktelen beavatkozás a garancia megszűnését eredményezi. A garanciális idő után A garanciális idő eltelte után a megfelelő szakkereskedésben vagy javítószolgálatnál végeztethet térítésköteles javításokat. 43 H 5....-05-HMS 2772 06.05.2003 9:25 Uhr Seite 44 Indicaflii generale de siguranflæ RO • • • • • • • • • Înainte de punerea în funcfliune a acestui aparat citifli cu atenflie instrucfliunile de utilizare øi pæstrafli inclusiv certificatul de garanflie, bonul de casæ øi dupæ posibilitæfli ambalajul. Folosifli acest aparat exclusiv în scop privat øi în cel pentru care a fost conceput. Acest aparat nu este conceput pentru utilizarea industrialæ. Nu-l folosifli în exterior (doar dacæ este conceput pentru a fi folosit în exterior). Evitafli expunerea aparatului la cælduræ, la influenfla directæ a razelor solare, umezealæ (este interzisæ scufundarea acestuia în lichide) øi nu folosifli obiecte ascuflite în timpul utilizærii. Evitafli folosirea aparatului cu mâinile ude. În cazul în care aparatul este umed sau ud, deconectafli imediat de la reflea. Nu bægafli mâna în apæ. Oprifli aparatul øi deconectafli întotdeuna de la reflea (tragefli de øtecher øi nu de cablu) atunci când nu folosifli aparatul, când montafli accesorii, în timpul curæflærii sau în cazul unor defecfliuni de funcflionare. Nu læsafli aparatul nesupravegheat în timpul utilizærii. În cazul în care suntefli nevoifli sæ pæræsifli locul de muncæ, oprifli întotdeauna aparatul, resp. deconectafli de la reflea (tragefli de øtecher, nu de cablu). Pentru a proteja copiii faflæ de pericolele aparatelor electrice, asigurafli-væ cæ aceøtia nu au acces la ele øi nu læsafli cablurile sæ atârne. Verificafli regulat aparatul øi cablurile în vederea detectærii defecfliunilor. Nu folosifli aparate defecte. Pentru repararea aparatului contactafli un specialist autorizat. Pentru înlocuirea unuiui cablu defect de reflea contactafli, în vederea evitærii riscurilor, producætorul, serviciul nostru de clienfli sau o persoanæ calificatæ. Folosifli doar accesorii originale. Væ rugæm sæ citifli cu atenflie øi urmætoarele „Indicaflii speciale de siguranflæ…“ Indicaflii speciale de siguranflæ • • • • 44 Înaintea de a schimba accesoriile, oprifli aparatul øi deconectafli de la reflea! Nu introducefli mâna în recipientul pentru mixare. Nu ridicafli øi nu flinefli aparatul în mânæ în timp ce funcflioneazæ. Acesta trebuie întâi oprit øi apoi deconectat de la reflea. fiinefli aparatul întotdeauna cu ambele mâini! Curæflafli aparatul dupæ cum este descris în capitolul “Curæflare” 5....-05-HMS 2772 06.05.2003 9:25 Uhr Seite 45 Privire de ansamblu asupra elementelor de deservire 1 2 3 4 5 6 7 8 9 RO Mixer portabil Buton pentru desprinderea cârligului de fræmântat Întrerupætor pentru treapta de funcflionare (6 trepte) Tasta TURBO Componentæ superioaræ mobilæ Buton pentru deblocarea pærflii superioare Castron Suport pentru mixer Cârlig de fræmântat Mod de funcflionare TURBO Pentru trecerea de scurtæ duratæ la turaflia maximæ. Dacæ apæsafli în intervale scurte obflinefli modul de funcflionare pulsatoriu. Atenflie: Folosifli aceastæ funcflie pentru maxim 1 minut. Utilizarea cârligului de fræmântat/paletei de amestecare 1. Poziflionafli întrerupætorul (3) la “0/OPRIT” øi verificafli dacæ mixerul (1) este deconectat de la reflea. 2. Apæsafli capætul cârligului de fræmântat respectiv al paletei pentru amestecare în gaura prevæzutæ pentru acest lucru a mixerului pânæ la blocarea mecanicæ.Atenflie: cârligul de fræmântat împreunæ cu farfuria de la trunchi poate fi introdusæ, privind mixerul de jos, doar în partea stângæ a acestuia. 3. Conectafli la o prizæ cu protecflie instalatæ regulamentar de 230 V/50Hz. 4. Acum putefli regla cu ajutorul întrerupætorului (3) la mixerul portabil (1) diferite viteze. 5. Pentru desprinderea cârligului de fræmântat/a paletei pentru amestecare poziflionafli întrerupætorul la “0/OPRIT” øi asigurafli-væ cæ mixerul este deconectat de la reflea. 6. Apæsafli butonul (2) pentru a desprinde cârligul de fræmântat/paleta pentru amestecare. Acum le putefli desprinde trægând uøor de ele. Utilizarea suportului pentru mixer Alegefli o suprafaflæ dreaptæ, antiderapantæ pentru suport. 1. Montafli mixerul portabil (1) pe componenta superioaræ (5) a suportului (8). Væ rugæm sæ controlafli dacæ este bine fixat. 2. Montafli cârligele dupæ cum este descris la utilizarea cârliguluide fræmântat /a paletei pentru amestecare. 3. Pentru a aøeza jos vasul pentru amestecare (7), apæsafli butonul (6) pentru deblocarea pærflii superioare (5) a suportului de mixer øi rabatafli în sus mixerul. 4. Punefli castronul umplut cu ingrediente pe farfuria rotativæ prevæzutæ pentru acest lucru. Læsafli mixerul în jos. 45 5....-05-HMS 2772 RO 06.05.2003 9:25 Uhr Seite 46 5. Conectafli la o prizæ cu protecflie instalatæ regulamentar de 230V/50 Hz. 6. Acum putefli regla cu ajutorul întrerupætorului (3) la mixerul portabil (1) diferite viteze. 7. Vasul pentru amestecare este acflionat prin miøcærile instrumentelor de amestecare în ingrediente. 8. Dacæ dorifli sæ oprifli procesul de mixare poziflionafli întrerupætorul la “0” øi deco nectafli de la reflea. 9. Dupæ încheierea operafliei de amestecare apæsafli din nou butonul (6) pentru deblocarea pærflii superioare (5) a suportului de mixer øi rabatafli în sus mixerul. 10. Putefli îndepærta acum castronul. Cârligele pot fi demontate dupæ cum este descris la utilizarea cârligului de fræmântat/a paletei pentru amestecare. 11. Pentru a separa mixerul de partea superioaræ (5) a suportului de mixer, ridicafli-l la început de partea din spate (cablu) øi îndepærtafli-l apoi prin tragere în sus. Alegefli pentru utilizare o paletæ øi o vitezæ în funcflie de urmætorul tabel: Produs/mod de preparare aluat greu (de ex. aluat de drojdie) aluat spumos aluat de biscuifli, aluat de napolitane, friøcæ Cantitate max. paletæ 500 g cârlig de fræmântat 750 g paletæ pentru bætut spumæ 750 g treaptæ 1 -4 2 -5 paletæ pentru bætut spumæ 2 -5 sau Turbo timp max. de funcflionare 3 min 5 min 5 min Curæflare 1. Înaintea fiecærui proces de curæflare deconectafli de la reflea. 2. Pentru curæflarea exterioaræ a aparatului, folosifli doar o cârpæ umedæ. 3. Nu folosifli substanfle puternice de curæflare sau praf de frecare. 4. Componentele demontabile care au intrat în contact cu aluatul (palete pentru fræmântat øi castron) pot fi curæflate în chiuvetæ. Acest aparat a fost verificat în conformitate cu toate directivele actuale ale CE, cum ar fi de ex. compatibilitatea magneticæ øi directiva de tensiune joasæ, øi a fost construit în conformitate cu cele mai noi prevederi de siguranflæ tehnicæ. Schimbæri technice sînt rezervate! Garanflie Acordæm pentru aparatul nostru o garanflie de 24 de luni începând cu data achiziflionærii (bon de casæ). Pe durata perioadei de garanflie remediem gratuit defecfliunile aparatului sau ale accesoriilor*) rezultate ca urmare a unor defecfliuni din fabricaflie, reparând sau, în funcflie de aprecierea noastræ, înlocuind aparatul. Reparafliile în garanflie nu duc la prelungirea teremenului de garanflie øi nici la obflinerea unei noi garanflii! Pentru a beneficia de garanflie, cumpærætorul este obligat sæ prezinte chitanfla/factura originalæ de cumpærare a aparatului. Færæ aceastæ dovadæ nu se poate efectua înlocuirea sau reparaflia gratuitæ a aparatului. 46 5....-05-HMS 2772 06.05.2003 9:25 Uhr Seite 47 În cazul remedierilor în garanflie predafli aparatul integral în ambalajul original împreunæ cu bonul de casæ la service-ul autorizat. RO *) Defecfliunile accesoriilor nu includ în mod automat schimbarea întregului aparat. În acest caz væ rugæm sæ sunafli la unul din numerele noastre de telefon! Deteriorærile componentelor din sticlæ respectiv ale celor din material plastic trebuie plætite! Atât defectele de la accesoriile funcflionale resp. componetele care se uzeazæ (de ex. paleta de fræmântat, curea de distribuflie, telecomandæ de rezervæ, periufle de dinfli de rezervæ, pânza de fieræstræu) cât øi curæflarea, întreflinerea sau înlocuirea componentelor care se uzeazæ, nu untræ sub incidenfla garanfliei øi de aceea trebuie plætite! Garanflia dispare în cazul intervenfliei stræine. Post-garanflie Dupæ scurgerea teremenului de garanflie reparafliile pot fi efectuate gratuit de cætre service-ul autorizat. 47 5....-05-HMS 2772 06.05.2003 9:25 Uhr Seite 48 Общие указания по технике безопасности RUS • • • • • • • • • Перед началом эксплуатации прибора внимательно прочитайте прилагаемую инструкцию по эксплуатации и сохраните ее в надежном месте, вместе с гарантийным талоном, кассовым чеком и, по возможности, картонной коробкой с упаковочным материалом. Пользуйтесь прибором только частным образом и по назначению. Прибор не предназначен для коммерческого использования. Не пользуйтесь прибором под открытым небом (исключая приборы, эксплуатация которых под открытым небом допустима). Предохраняйте прибор от жары, прямых солнечных лучей, влажности (ни в коем случае не погружайте его в воду) и ударов об острые углы. Не прикасайтесь к прибору влажными руками. Если прибор увлажнился или намок, тут же выньте вилку из розетки. Не прикасайтесь к мокрым местам. После эксплуатации, монтаже принадлежностей, чистке или поломке прибора всегда вынимайте вилку из розетки (тяните за вилку, а не за кабель). Не оставляйте включенные электроприборы без присмотра. Если возникнет необходимость отлучиться, то выключите электроприбор или выньте вилку из розетки (тяните за вилку, а не за кабель). Для защиты детей от поражений электротоком, следите за тем, чтобы кабель не висел где попало и дети не имели доступа к прибору. Регулярно осматривайте прибор и кабель на предмет возможных повреждений. Ни в коем случае не включайте прибор, имеющий повреждения. Ни в коем случае не ремонтируйте прибор самостоятельно, а обращайтесь в таком случае за помощью к специалисту, имеющему соответствующий допуск. Из соображений безопасности, замена сетевого шнура на равнозначный допускается только через заводизготовитель, нашу сервисную мастерскую или соответствующего квалифицированного специалиста. Используйте только оригинальные запчасти. Пожалуйста, соблюдайте нижеследующие "Специальные указания по технике безопасности ...". Специальные указания по технике безопасности • • • • 48 Перед сменой принадлежностей обязательно выключите прибор и отключите его от сети. Не суйте руки в миксерный бокал. Запрещается подымать или переносить прибор во время его работы, сначала выключите его и выньте сетевую вилку. Переносите прибор только двумя руками! Чистите прибор как это описано в главе "Чистка". 5....-05-HMS 2772 06.05.2003 9:25 Uhr Seite 49 Обзор элементов управления 1 2 3 4 5 6 7 8 9 RUS Ручной миксер Кнопка расфиксации смесительных крюков Ступенчатый переключатель режима работы (6 позиции ) Кнопка "TURBO" Верхняя подвижная часть подставки Кнопка для разблокировки верхней части Смесительная чаша Подставка для миксера Смесительный крюк Tурбо-режим Для кратковременного переключения на максимальную скорость вращения. Нажатиями с коротким интервалом достигается импульсный режим работы миксера. ВНИМАНИЕ: В этом режиме разрешается работать максимум 1 минуту! Порядок пользования смесительным крюком/венчиком 1. Установите переключатель (3) в положение "0/AUS" ("0/ВЫКЛ") и убедитесь в том, что миксер (1) отключен от сети. 2. Вставьте конец смесительного крюка или венчика в предусмотренные для них отверстия на миксере, до фиксации. Легкое проворачивание при этом облегчит монтаж. Примечание: смесительный крюк с диском на оси вставляется только с левой стороны миксера, если смотреть снизу. 3. Вставьте вилку в заземленную розетку с напряжением сети 230 V, 50 Hz, установленную в соответствии с предписаниями. 4. При помощи переключателя режима работы (3) на ручном миксере (1) вы можете установить различные скорости вращения. 5. Для снятия смесительного крюка/венчика установите переключатель в положение "0/AUS" ("0/ВЫКЛ") и убедитесь в том, что миксер отключен от сети. 6. Для снятия смесительного крюка/венчика нажмите кнопку (2). Легким потягиванием вытащите смесительный крюк/венчик. Порядок пользования подставкой для миксера Для установки миксера выберите ровное, нескользкое место. 1. Вставьте ручной миксер (1) в верхнюю часть (5) подставки (8). Проконтролируйте правильную посадку. 2. Вставьте смесительный крюк, как это уже было описано в главе "Порядок пользования смесительным крюком/венчиком". 49 5....-05-HMS 2772 RUS 06.05.2003 9:25 Uhr Seite 50 3. Для того, чтобы подставить смесительную чашу (7), нажмите кнопку (6), чтобы разблокировать верхнюю часть (5) и откиньте миксер вверх. 4. Наполните смесительную чашу необходимыми ингредиентами и установите чашу на предусмотренную для нее вращающуюся подставку. Опустите миксер обратно. 5. Вставьте вилку в заземленную розетку с напряжением сети 230 V, 50 Hz, установленную в соответствии с предписаниями. 6. При помощи переключателя режима работы (3) на ручном миксере (1) вы можете установить различные скорости вращения. 7. Смесительная чаша приводится в движение благодаря перемещению смесителей в чаше с ингредиентами. 8. Для прекращения процедуры установите переключатель в положение "0" и отключите миксер от сети. 9. В заключении нажмите опять на кнопку (6), чтобы разблокировать верхнюю часть (5) и откиньте миксер вверх. 10. Снимите смесительную чашу с подставки. Снимите смесительные крюки, как это уже было описано в главе "Порядок пользования смесительным крюком/венчиком". 11. Чтобы отделить миксер от верхней части (5) подставки, приподымите его сначала за заднюю часть (кабель), а затем выньте вверх. В зависимости от потребности выберите подходящую насадку и скорость ее вращения из нижеследующей таблицы: Продукт/ Макс. количество Насадка Положение Метод приготовления переключателя Густое тесто (к примеру: хлебное) 500 g cмесительный крюк 1 -4 Tесто (не густое) 750 g венчик 2 -5 Бисквитное, вафельное тесто, Сливки 750 g венчик 2 -5 или Tурбо Макс. время работы 3 мин. 5 мин. 5 мин. Чистка 1. Перед каждой чисткой вынимайте вилку из розетки. 2. Для наружной очистки тестомесительной машины пользуйтесь влажной тряпкой. 3. Не пользуйтесь сильными или абразивными моющими средствами. 4. Съемные детали, которые имели контакт с тестом, можно промыть в моющем растворе. Это изделение прошло все необходимые и актуальные проверки, предписанные директивой СЕ, к прим. на электромагнитную совместимость и соответствие требованиям к низковольтной технике, оно было также сконструировано и построено с учетом последних требований по технике безопасности. Мы оставляем за собой право на технические изменения! 50 5....-05-HMS 2772 06.05.2003 9:25 Uhr Seite 51 Гарантийное обязательство RUS Гарантийный срок на территории Российской Федерации устанавливается полномочными представителями. Кассовый чек является гарантийным талоном. Без него невозможен бесплатный ремонт или замена изделия. В случае возникновжния притензий по гарантии, предъявите изделие в полнойкомплектации, с оригинальной упаковкой и кассовым чеком торговой точке, продавшей это изделие. *) Дефекты принадлежностей не служат причиной для автоматической замены всего изделия. В этом случае позвоните нам, пожалуйста, по горячей линии! Разбитые стеклянные и поломаные пластмассовые детали возмещаются только за дополнительную оплату! Дефекты изнашиваемых принадлежностей или трущихся деталей (например контактные щетки моторов, смесительные крюки, приводные ремни, запасные пульты управления, запасные зубные щетки, пильные полотна и т.д.), а также чистка, техобслуживание или замена трущихся деталей не попадают под гарантию, и поэтому проводятся за отдельную оплату! Гарантия теряется при вскрытии изделия посторонними лицами. После гарантии После окончания срока гарантии, ремонт изделий производится за оплату, соответствующими мастерскими или пунктами сервисного обслуживания. 51 5....-05-HMS 2772 06.05.2003 9:25 Uhr Seite 52 Technische Daten Modell: HMS 2772 Bemessungsspannung/-frequenz: 230 V, 50 Hz Bemessungsaufnahme: 220 Watt Schutzklasse: ΙΙ Dieses Gerät wurde nach allen zutreffenden, aktuellen CE-Richtlinien geprüft, wie z.B. elektromagnetische Verträglichkeit und Niederspannungsdirektive und wurde nach den neuesten sicherheitstechnischen Vorschriften gebaut. Technische Änderungen vorbehalten! D-47906 Kempen/Germany · Industriering Ost 40 Internet: http://www.clatronic.de · email: [email protected] Stünings, Krefeld • 04/03 Bitte führen Sie das ausgediente Gerät einer umweltgerechten Entsorgung zu.-
 1
1
-
 2
2
-
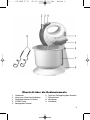 3
3
-
 4
4
-
 5
5
-
 6
6
-
 7
7
-
 8
8
-
 9
9
-
 10
10
-
 11
11
-
 12
12
-
 13
13
-
 14
14
-
 15
15
-
 16
16
-
 17
17
-
 18
18
-
 19
19
-
 20
20
-
 21
21
-
 22
22
-
 23
23
-
 24
24
-
 25
25
-
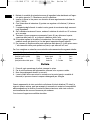 26
26
-
 27
27
-
 28
28
-
 29
29
-
 30
30
-
 31
31
-
 32
32
-
 33
33
-
 34
34
-
 35
35
-
 36
36
-
 37
37
-
 38
38
-
 39
39
-
 40
40
-
 41
41
-
 42
42
-
 43
43
-
 44
44
-
 45
45
-
 46
46
-
 47
47
-
 48
48
-
 49
49
-
 50
50
-
 51
51
-
 52
52


Clatronic hms 2772 El manual del propietario
- Tipo
- El manual del propietario
en otros idiomas
- français: Clatronic hms 2772 Le manuel du propriétaire
- italiano: Clatronic hms 2772 Manuale del proprietario
- English: Clatronic hms 2772 Owner's manual
- Deutsch: Clatronic hms 2772 Bedienungsanleitung
- русский: Clatronic hms 2772 Инструкция по применению
- Nederlands: Clatronic hms 2772 de handleiding
- português: Clatronic hms 2772 Manual do proprietário
- polski: Clatronic hms 2772 Instrukcja obsługi
- čeština: Clatronic hms 2772 Návod k obsluze
- română: Clatronic hms 2772 Manualul proprietarului
Artículos relacionados
-
Clatronic HMS 2739 El manual del propietario
-
-
Clatronic HMS 3320 El manual del propietario
-
-
-
-
-
Clatronic HM 3471 Manual de usuario
-
-
Otros documentos
-
Tristar MX-4152 Manual de usuario
-
Elta hm 120 set Manual de usuario
-
WMF KULT X Manual de usuario
-
SEVERIN HM 3823 Instrucciones de operación
-
Fakir MC El manual del propietario
-
Camry CR 4215 El manual del propietario
-
Silvercrest SHMS 300 A1 Operating Instructions Manual
-
Silvercrest 90843 Instrucciones de operación