TEAC PD-H500 El manual del propietario
- Categoría
- Reproductores de CD
- Tipo
- El manual del propietario

pd-h500
`
COMPACT DISC PLAYER
9A06054300
This appliance has a serial number located
on the rear panel. Please record the model
number and serial number and retain them
for your records.
Model number
Serial number
WARNING: TO PREVENT FIRE OR SHOCK
HAZARD, DO NOT EXPOSE THIS
APPLIANCE TO RAIN OR MOISTURE.
The exclamation point within an equilateral triangle is intended to alert the user to the
presence of important operating and maintenance (servicing) instructions in the literature
accompanying the appliance.
The lightning flash with arrowhead symbol, within equilateral triangle, is intended to alert
the user to the presence of uninsulated “dangerous voltage” within the product’s enclosure
that may be of sufficient magnitude to constitute a risk of electric shock to persons.
CAUTION: TO REDUCE THE RISK OF ELECTRIC SHOCK, DO NOT
REMOVE COVER (OR BACK). NO USER-SERVICEABLE PARTS INSIDE.
REFER SERVICING TO QUALIFIED SERVICE PERSONNEL.
Ü
ÿ
Ÿ
Thanks for buying a TEAC. Read this manual carefully to get the
best performance from this unit.
Nous vous remercions pour l’achat d’un appareil TEAC.
Lire ce manuel avec attention pour obtenir les meilleures
performances possibles de cet appareil.
Vielen Dank für den Kauf dieses TEAC-Geräts.
Bitte lesen Sie diese Anleitung sorgfältig durch, um die Leistungs-
fähigkeit dieses Geräts optimal nutzen zu können.
Grazie per aver acquistato un prodotto TEAC.
Leggere attentamente questo manuale per ottenere le migliori
prestazioni da questo apparecchio.
Enhorabuena por la adquisición de un TEAC.
Lea detenidamente este manual a fin de obtener el mejor
rendimiento de esta unidad.
OWNER’S MANUAL .................... 4
MANUEL DU PROPRIETAIRE ...... 12
BEDIENUNGSANLEITUNG........... 20
MANUALE DI ISTRUZIONI .......... 28
MANUAL DEL USUARIO ............. 36
ENGLISHFRANÇAISDEUTSCH
ITALIANO
ESPAÑOL
D

Important Safety Instructions
_
2
_
CAUTION:
••
Read all of these Instructions.
••
Save these Instructions for later use.
••
Follow all Warnings and Instructions marked on the audio
equipment.
1) Read Instructions
— All the safety and operating instructions
should be read before the product is operated.
2) Retain Instructions — The safety and operating instructions
should be retained for future reference.
3) Heed Warnings — All warnings on the product and in the
operating instructions should be adhered to.
4) Follow Instructions — All operating and use instructions should
be followed.
5) Cleaning — Unplug this product from the wall outlet before
cleaning. Do not use liquid cleaners or aerosol cleaners. Use a
damp cloth for cleaning.
6) Attachments — Do not use attachments not recommended by
the product manufacturer as they may cause hazards.
7) Water and Moisture — Do not use this product near water
_
for
example, near a bath tub, wash bowl, kitchen sink, or laundry tub; in
a wet basement; or near a swimming pool;and the like.
8) Accessories — Do not place this product on an unstable cart,
stand, tripod, bracket, or table.The product may fall, causing serious
injury to a child or adult, and serious damage to the product. Use
only with a cart, stand, tripod, bracket, or table recommended by the
manufacturer, or sold with the product. Any mounting of the product
should follow the manufacturer’s instructions, and should use a
mounting accessory recommended by the manufacturer.
9) A product and cart combination should be moved with care.
Quick stops, excessive force, and uneven surfaces may cause the
product and cart combination to overturn.
10) Ventilation — Slots and openings in the cabinet are provided
for ventilation and to ensure reliable operation of the product and to
protect it from overheating, and these openings must not be
blocked or covered. The openings should never be blocked by
placing the product on a bed, sofa, rug, or other similar surface.
This product should not be placed in a built-in installation such as a
bookcase or rack unless proper ventilation is provided or the
manufacturer’s instructions have been adhered to.
11) Power Sources — This product should be operated only from
the type of power source indicated on the marking label. If you are
not sure of the type of power supply to your home, consult your
product dealer or local power company. For products intended to
operate from battery power, or other sources, refer to the operating
instructions.
12) Grounding or Polarization — This product may be equipped
with a polarized alternating-current line plug (a plug having one
blade wider than the other). This plug will fit into the power outlet
only one way.This is a safety feature. If you are unable to insert the
plug fully into the outlet, try reversing the plug.If the plug should still
fail to fit, contact your electrician to replace your obsolete outlet. Do
not defeat the safety purpose of the polarized plug.
13) Power-Cord Protection — Power-supply cords should be
routed so that they are not likely to be walked on or pinched by
items placed upon or against them, paying particular attention to
cords at plugs, convenience receptacles, and the point where they
exit from the product.
14) Outdoor Antenna Grounding — If an outside antenna or
cable system is connected to the product, be sure the antenna or
cable system is grounded so as to provide some protection against
voltage surges and built-up static charges. Article 810 of the
National Electrical Code, ANSI/NFPA 70, provides information with
regard to proper grounding of the mast and supporting structure,
grounding of the lead-in wire to an antenna discharge unit, size of
grounding conductors, location of antenna-discharge unit,
connection to grounding electrodes, and requirements for the
grounding electrode.
"Note to CATV system installer:
This reminder is provided to call the CATV system installer’s
attention to Section 820-40 of the NEC which provides guidelines
for proper grounding and, in particular, specifies that the cable
ground shall be connected to the grounding system of the building,
as close to the point of cable entry as practical.
ANTENNA
LEAD IN
WIRE
ANTENNA
DISCHARGE UNIT
(NEC SECTION 810-20)
GROUNDING CONDUCTORS
(NEC SECTION 810-21)
GROUND CLAMPS
POWER SERVICE GROUNDING
ELECTRODE SYSTEM
(NEC ART 250. PART H)
NEC - NATIONAL ELECTRICAL CODE
ELECTRIC
SERVICE
EQUIPMENT
Example of Antenna Grounding as per
National Electrical Code, ANSI/NFPA 70
GROUND
CLAMP
15) Lightning — For added protection for this product during a
lightning storm, or when it is left unattended and unused for long
periods of time, unplug it from the wall outlet and disconnect the
antenna or cable system. This will prevent damage to the product
due to lightning and power-line surges.
16) Power Lines — An outside antenna system should not be
located in the vicinity of overhead power lines or other electric light
or power circuits, or where it can fall into such power lines or
circuits. When installing an outside antenna system, extreme care
should be taken to keep from touching such power lines or circuits
as contact with them might be fatal.
17) Overloading — Do not overload wall outlets, extension cords,
or integral convenience receptacles as this can result in risk of fire
or electric shock.
18) Object and Liquid Entry — Never push objects of any kind into
this product through openings as they may touch dangerous voltage
points or short-out parts that could result in a fire or electric shock.
Never spill liquid of any kind on the product.
19) Servicing — Do not attempt to service this product yourself as
opening or removing covers may expose you to dangerous voltage
or other hazards.Refer all servicing to qualified service personnel.
20) Damage Requiring Service — Unplug this product from the
wall outlet and refer servicing to qualified service personnel under
the following conditions:
a) when the power-supply cord or plug is damaged.
b) if liquid has been spilled, or objects have fallen into the product.
c) if the product has been exposed to rain or water.
d) if the product does not operate normally by following the
operating instructions. Adjust only those controls that are covered
by the operating instructions as an improper adjustment of other
controls may result in damage and will often require extensive work
by a qualified technician to restore the product to its normal
operation.
e) if the product has been dropped or damaged in any way.
f ) when the product exhibits a distinct change in performance
_
this indicates a need for service.
21) Replacement Parts — When replacement parts are required,
be sure the service technician has used replacement parts
specified by the manufacturer or have the same characteristics as
the original part. Unauthorized substitutions may result in fire,
electric shock, or other hazards.
22) Safety Check — Upon completion of any service or repairs to
this product, ask the service technician to perform safety checks to
determine that the product is in proper operating condition.
23) Wall or Ceiling Mounting — The product should be mounted
to a wall or ceiling only as recommended by the manufacturer.
24) Heat — The product should be situated away from heat sources
such as radiators, heat registers, stoves, or other products
(including amplifiers) that produce heat.

_
3
_
OCAUTION OACHTUNG OOBSERVERA OADVARSEL
1 THIS LABEL IS ATTACHED TO THE PLACE AS ILLUSTRATED TO
INFORM THAT THE APPARATUS CONTAINS A LASER COMPONENT.
1 DIESE AUFKLEBEMARKE IST AN DEM IN DER ABBILDUNG
GEZEIGTEN ORT ANGEBRACHT UM DARAUF HINZUWEISEN, DASS
IM INNERN DES GERÄTS EINE LASER-KOMPONENTE BEFINDET.
1 PÅSKRIFTEN SITTER PÅ APPARATEN SOM VISAS SOM
UPPMANING OM ATT APPARATEN OMFATTAR EN INBYGGD
LASERKOMPONENT.
1 DETTE MÆRKAT ER ANBRAGT SOM VIST I ILLUSTRATIONEN FOR
AT ADVARE BRUGEREN OM AT APPARATET INDEHOLDER EN
LASERKOMPONENT.
2 DETTE MÆRKAT ER SOM VIST PÅ ILLUSTRATIONEN ANBRAGT PÅ
INDERSIDEN AF TOPDÆKSLET FOR AT ADVARE BRUGEREN OM
AT YDERLIGERE FREMTRÆNGEN VIL VÆRE FORBUNDET MED
FARE FOR AT UDSÆTTE SIG FOR LASERSTRÅLING.
ADVARSEL — BETJENING AF ANDRE KONTROLLER OG
REGULATORER ELLER BENYTTELES AF ANDRE
FREMGANGSMÅDER END BESKREVET HERI ER FORBUNDET MED
FARE FOR UDSÆTTELSE FOR LASERSTRÅLING.
VARING: APPARATEN INNEHÅLLER LASER KOMPONENT MED
STRÅLNING ÖVERSTIGANDE KLASS 1.
"ADVARSEL: USYNLIG LASERSTRÅLING VED ÅBNING NAR
SIKKERHEDSAFBRYDERE ER UDE AF FUNKTION. UNDGÅ
UDSAETTELSE FOR STRÅLING"
"VAROITUS! SUOJAKOTELOA EI SAA AVATA. LAITE SISÄLTÄÄ
LASERDIODIN. JOKA LÄHETTÄ (NÄKYMÄTÖNTÄ) SILMILLE
VAARALLISTA LASERSÄTEILYÄ".
ADVARSEL: USYNLIG LASERBESTRÅLING NÅR DENNE
DELEN ER ÅPEN OG SIKKERHETSSPERREN ER UTKOBLET
UNNGÅ UTSETTELSE FOR STRÅLING.
CLASS 1 LASER PRODUCT
LUOKAN 1 LASERLAITE
KLASS 1 LASERAPPARAT
1
2
CAUTION - INVISIBLE LASER RADIATION WHEN OPEN AND
INTERLOCKS DEFEATED. AVOID EXPOSURE TO BEAM.
VORSICHT! UNSICHTBARE LASERSTRAHLUNG TRITT AUS.
WENN DECKEL GEÖFFNET UND WENN
SICHERHEITSVERRIEGELUNG ÜBERBRÜCKT IST.
NICHT DEM STRAHL AUSSETZEN !
VARNING - OSYNLIG LASERSTRÅLNING NÄR DENNA DEL
ÄR ÖPPNAD OCH SPÄRR ÄR URKOPPLAD.
STRÅLEN ÄR FARLIG.
ADVARSEL - USYNLIG LASERSTRÅLING VED ÅBNING, NÅR
SIKKERHEDSAFBRYDERE ER UDE AF FUNKTION.
UNDGÅ UDSÆTTELSE FOR STRÅLING.
VAROITUS! SUOJAKOTELOA EI SAA AVATA. LAITE SISÄLTÄÄ
LASERDIODIN, JOKA LÄHETTÄÄ (NÄKYMÄTÖNTÄ)
SILMILLE VAARALLISTA LASERSÄTEILYÄ.
ADVARSEL - USYNLIG LASERBESTRÅLING NÅR DENNE DELEN ER
ÅPEN OG SIKKERHETSSPERREN ER UTKOBLET.
UNNGÅ UTSETTELSE FOR STRÅLING.

This unit has been designed specifically for
reproduction of compact discs bearing the
D mark. No other discs can be
reproduced.
OAlways place the compact disc in the
disc tray with the label facing upward.
(Compact discs can be played only on
one side.)
OTo remove a disc from its storage case,
press down on the center of the case
and lift the disc out, holding it carefully
by the edges.
How to remove the disc
How to hold the disc
OFingermarks and dust should be
carefully wiped off the disc's recorded
surface with a soft cloth.
Wipe radially
ONever use such chemicals as record
sprays, antistatic sprays or fluid, benzine
or thinner to clean compact discs. Such
chemicals will do irreparable damage to
the disc's plastic surface.
ODiscs should be returned to their cases
after use to avoid serious scratches that
could cause the laser pickup to "skip."
ODo not expose discs to direct sunlight or
high humidity and temperature for
extended periods.
Long exposure to high temperatures can
warp the disc.
ODo not stick paper or write anything with
a ballpoint pen on the surface of the
label side.
OChoose the installation location of your
unit carefully. Avoid placing it in direct
sunlight or close to a source of heat.
Also avoid locations subject to
vibrations and excessive dust, heat, cold
or moisture. Keep away from such
sources of hum as transformers or
motors.
ODo not open the cabinet as this might
result in damage to the circuitry or
electrical shock. If a foreign object
should get into the unit, contact your
dealer.
OBe sure not to handle discs with dirty
fingers. Never insert a disc which has a
crack on the surface.
OWhen removing the power plug from the
wall outlet, always pull directly on the
plug, never yank the cord.
OTo keep the laser-pickup clean, do not
touch it, and do not forget to close the
disc tray.
ODo not attempt to clean the unit with
chemical solvents as this might damage
the finish. Use a clean, dry cloth.
OKeep this manual in a safe place for
future reference.
Table of Contents
Before Use..................................................... 4
Connections and Rear Panel Overview .... 5
Front Panel Controls and Their
Functions..................................................... 6
Display............................................................ 6
Remote Control.............................................. 7
Basic Operation ............................................ 8
Repeat Play.................................................... 8
Program Play................................................. 9
Shuffle Play.................................................. 10
Time Display................................................. 10
Specifications.............................................. 10
Troubleshooting .......................................... 11
Before Use
_
4
_
Read This Before Operating Handling the Discs
Beware of condensation
When the player (or a compact disc) is
moved from a cold to a warm place or
used after sudden temperature
change, there is the danger of
condensation. Water vapor in the air
could condense on the mechanism or
the laser pickup. If droplets of water
form on these parts, correct playback
will be impossible because the laser
will not read the information from the
disc correctly.
To prevent this, if you are going to use
the player in a condition where
condensation could occur, you should
leave the player for 1 or 2 hours after
plugging it into an AC outlet depending
on the amount of condensation. If this
is done, the player will stabilize at the
temperature of its surroundings.
IMPORTANT (for U.K. Customers)
DO NOT cut off the mains plug from this
equipment.
If the plug fitted is not
suitable for the power points in your
home or the cable is too short to reach
a power point, then obtain an
appropriate safety approved extension
lead or consult your dealer.
If nonetheless the mains plug is cut off,
remove the fuse and dispose of the plug
immediately, to avoid a possible shock
hazard by inadvertent connection to the
mains supply.
If this product is not provided with a
mains plug, or one has to be fitted,
then
follow the instructions given below:
IMPORTANT. DO NOT make any
connection to the larger terminal which
is marked with the letter E or by the
safety earth symbo
ç or coloured
GREEN or GREEN-and-YELLOW.
The wires in the mains lead on this
product are coloured in accordance
with the following code:
BLUE: NEUTRAL
BROWN: LIVE
As these colours may not correspond
with the coloured markings identifying
the terminals in your plug proceed as
follows:
The wire which is coloured BLUE must
be connected to the terminal which is
marked with the letter N or coloured
BLACK.
The wire which is coloured BROWN
must be connected to the terminal
which is marked with the letter L or
coloured RED.
When replacing the fuse only a
correctly rated approved type should
be used and be sure to re-fit the fuse
cover.
IF IN DOUBT — CONSULT A
COMPETENT ELECTRICIAN.

ENGLISH
Connections and Rear Panel Overview
_
5
_
1REMOTE CONTROL jacks
These jacks are used for the connection of
the TEAC Mini Component system (T-H500,
R-H500, A-H500) for the purpose of
operating it using the Remote Control unit
(RC-613 provided with the A-H500
amplifier) or system control signals.
Connect the jack A (or B) to the jack A (or
B) on other unit either on or beneath this
unit.
Note:
The remote control transmitter is not
provided with this unit.
Signal input/output cord
Remote control cord
2REMOTE CONTROL SELECTOR
switch
SYSTEM position:
Set the switch to this position when you
operate the system connected with remote
control jacks A and B on the TEAC A-H500
amplifier.
SINGLE position:
Set to this position when you operate this
unit alone with the optional remote control
unit (not provided).
Note:
If set to the SINGLE position, this unit
cannot be operated even if the amplifier is
operated manually or using the remote
control pointed toward it to operate this
unit.
3DIGITAL OUT(PUT) OPTICAL
terminals
These terminals are used for connecting to
the DIGITAL INPUT OPTICAL terminals on
the MD player and the D/A converter by
using the optical fiber cable (not provided).
When connecting the optical fiber cable,
remove the cap on the terminal. Leave the
cap in place when it is not in use.
4LINE OUT jacks
Connect these jacks to the CD input jacks
on the amplifier:
White pin-plug
T White jack (left)
Red pin-plug
T Red jack (right)
5AC power cord
Plug this AC power cord into an AC wall
socket or AC OUTLETS on the amplifier.
12 3 4 5
A-H500

Front Panel Controls and Their Functions
_
6
_
1power standby/on button
2power standby indicator
This indicator lights up in the power
standby mode; goes out when this unit is
turned on.
5 Time mode indicator
6 Time counter/Program number
indicator
This shows the time information
corresponding to the time mode indicator,
in minutes and seconds. During the
program mode, a program number is
indicated here.
3remote sensor
This sensor is used when this unit is
operated alone by the optional remote
control transmitter. The sensor operates
only when the REMOTE CONTROL
SELECTOR switch on the rear panel is set
to the SINGLE position.
7 REPEAT play indicator
ONE : This lights up when the repeat play
of a single track is engaged.
ö : This lights up when the repeat play
of an entire disc is engaged.
A-B : This lights up when the A-B section
repeat play is engaged.
8 Over mark
This indicator lights up when the total
number of tracks on the disc is 16 or more.
9 Track calendar display
0 Program indicator
q SHUFFLE play indicator
Display
12
3
45 6 7
4Disc tray
Load a disc on this tray with its label side
up while the tray is open.
When playing an 8 cm (3-inch) CD single
disc, make sure that the disc is set at the
center of the tray.
5open/close (∫) button
Press this button to open the disc tray.
Press it again to close the tray.
6Music skip buttons (Ú/Æ)
These buttons are used for selecting the
desired track on the disc.
Æ : Press to skip forward.
Ú : Press to skip backward.
You can skip to the beginning of the
track being played by pressing the
button once. If you hold the button
pressed, you can skip to the
previous tracks in sequence.
7Pause button (ƒ)
Press this button to pause playing. To
restart playing, press it again or the play
button (
∏).
8 Play button (∏)
Press this button to start play.
9stop button
Press this button to stop playing.
0Display
This display shows the current operating
states of this unit.
q0 9
8
34 5
21 0 9 8 7
6
1 Play indicator
2 Pause indicator
3 Track number indicator
4 Index number indicator

ENGLISH
Remote Control
_
7
_
1[power on] button
2power standby button
3Indicator
This indicator blinks in green in the CD
operating mode; blinks in red in other
mode.
4Cassette deck operation buttons
5Numeric buttons
These numeric buttons are used for
selecting track numbers on the CD, or for
preset channels on the tuner.
They can be used for the CD after the CD
button or the CD play (
∏) button is
pressed.
6Input selector buttons of the
amplifier
7Tuner operating buttons
8CD Player operation buttons
OSearch (/Ò) buttons
These buttons are used for searching for
the desired position quickly during play
or in the pause mode.
Ò: for forward search
: for backward search
Omusic skip (Ú/Æ) buttons
Oplay (∏) button
Opause (ƒ) button
Ostop (∑) button
Otime button (see page 10)
Orepeat (1/ALL, A-B) play buttons (see
page 8)
Oprogram button (see page 9)
Oclear button (see page 9)
Oshuffle button (see page 10)
Odisc skip button
This button is used for only the CD
changer player. So, this button does not
operate for the single CD player such as
the PD-H500.
9[volume up/down] button
O+: press to increase the volume.
O–: press to decrease the volume.
0[dimmer] button
Press this button when you want to darken
the displays on the system. Press it again
to resume the original brightness.
q[sleep] timer button
This button is used for engaging the sleep
timer in the tuner T-H500.
Note:
This remote control unit (RC-613) is
provided with the amplifier A-H500.
wRDS (Radio Data System) mode
button
2
1
q
0
w
3
4
5
6
7
8
9

(You can use this function only with the
remote control unit.)
∑ One-repeat play function
OPress the 1/ALL repeat button once.
- Only the current track is played
repeatedly.
* If you select other tracks during one-
repeat play, the track selected last
will be repeated.
∑ All-repeat play function
OPress the 1/ALL repeat button once
more.
- All the tracks on a disc is played
repeatedly.
*When the tracks are programmed,
only the programmed tracks will be
repeated.
* Press the button once more to cancel
the 1/ALL repeat play function.
∑ A-B repeat play function
(1)During play, press the A-B repeat
button at the desired start point (A).
- Then "A-" will be displayed and "B"
will blink on the display.
(2)Press the button again at the desired
end point (B).
- Then "A-B" will be displayed and only
A-B section will be played
repeatedly.
(3)Press the button once more to cancel
the A-B repeat play function.
Repeat Play
_
8
_
Basic Operation
1 Press the open/close (∫) button.
The disc tray will slide out.
2 Load a disc with its label side facing
up.
3 Press the open/close button again.
The disc tray will close. At this time, use
care not to let your hand get trapped.
The total number of tracks and total
play time on the disc will be displayed.
4 Select the track you want by pressing
the music skip button (
Ú/Æ).
5 Press the play button (∏), and the CD
will be played.
6 Press the pause button (ƒ) when you
want to pause playing.
7 Press the stop button when you want to
stop playing.
Note
This unit will automatically start playing in
the following cases:
OWhen you select CD on the amplifier (A-
H500).
OWhen you turn the system on with the
amplifier's input selector set to CD.
∑ Last position memory function
If the program button is pressed during
normal play, the player will revert to a
position at which the stop button was
previously pressed. Then, the playing will
restart from that particular position.
Total Play Time
Total Number
of Tracks
Last
Track
First
Track

With this program play function, you can
program up to 32 tracks in any desired
order.
Before beginning:
OProgramming can be done only with the
remote control unit.
OProgramming can be done only in the
stop mode.
∑ Programming with numeric buttons
1. Press the CD button.
Then, the numeric buttons will work as
selection buttons of track on the disc.
2. Press the program button in the stop
mode.
The display will show as follows:
3. Select the desired tracks by pressing
the numeric buttons.
Example: 2T6T12
The 2nd, 6th, and 12th tracks have been
programmed in sequence.
4. Press the play (∏) button.
The program play will start in the
programmed order.
Notes:
OIf you press the program button while
programming, programming will cease
and change into the program recall
mode.
OIf you stop playing, the programmed
contents will disappear from the display,
but they are not lost from the memory.
Press the program button when you
want to recall the programmed contents.
∑ Programming with music skip
button
1. Press the program button in the stop
mode.
2. Select the desired track by using the
music skip (
Ú/Æ) button.
Example:
Track No. 5
3. Press the program button again.
Then, the 5th track has been
programmed as program No. 1.
4. Repeat step 2 and step 3 to continue
programming other tracks.
5. Press the play (
∏) button.
The program play will start in the
programmed order.
Note:
If you press the program button twice
continuously while programming,
programming will cease and change into
the program recall mode.
For your reference:
O"FULL" appears on the display when the
33rd track has been programmed (no
further programming is possible).
OTrack numbers not actually on the disc
cannot be programmed.
OThe programmed contents are not lost
even if the unit is turned off, but they are
lost when the disc tray is opened.
OThe unit will stop automatically when all
the programmed tracks have finished
playing, and the programmed contents
disappear from the display, but they are
not lost.
OIt is possible to program with the disc
tray opened. Track numbers not actually
on the disc will be automatically skipped
when the disc starts playing.
∑ Recalling the program
As the programmed contents are not lost
even if you stop playing or turn off the unit,
you can recall them later.
1. Press the program button.
Then the first programmed track will
appear on the display.
2. Press the button repeatedly if you want
to check the programmed contents.
Each time the button is pressed, the next
programmed contents will appear on the
display in the programmed order.
3. Press the play (∏) button if you want to
play the disc in the programmed order.
∑ Erasing all the programmed
contents
1. Press the program button.
2. Press the clear button and hold it for
longer than 2 seconds.
Then, all the programmed contents will
be lost, and they are also lost when the
disc tray is opened.
Note:
The program button and the clear button
can work only in the stop mode.
* Changing the programmed contents
ODeleting:
Undesired tracks can be deleted from
the originally programmed contents.
1. Press the program button repeatedly
until the track number that you want to
delete appears on the display.
2. Press the clear button.
Then that track number will be deleted
from the programmed contents.
If you press the button repeatedly, the
next programmed tracks will be deleted
one by one each time the button is
pressed.
∑ Adding after the last track:
1. Press the program button repeatedly
until "END" appears on the display.
2. Enter new tracks in the same way as
normal programming after "END"
disappears from the display
∑ Adding to any position:
1. Select the program number which you
want to add a new track to by pressing
the program button.
2. Enter the new track in the same way as
normal programming.
Program Play
_
9
_
ENGLISH
Program No.
Track No.

_
10
_
Laser System : 3-beam laser
Digital Filter : 8-times oversampling
Frequency Response : 20-20,000 Hz (±2 dB)
Error Correction Method :
Cross Interleave Reed-Solomon
code
S/N Ratio :
More than 100 dB (IHF "A" filter
used)
THD : Less than 0.02% (1 kHz)
Output Voltage : 2 V rms
Power Source : 230 VAC, 50 Hz
Power Consumption : 9 W
Dimensions (WxHxD) : 285 x 132 x 292 mm
Weight: : 3.9 kg
Accessories:
Signal input/output cord
Remote control cord
OImprovements may result in specifi-
cation or feature changes without
notice.
OPhotos and illustrations may differ
slightly from production models.
Specifications
(You can use this function only with the
remote control unit.)
1. Press the shuffle button.
Tracks are played in random order.
2. Press the button again to cancel the
shuffle play function.
When this function is canceled, play will
continue from the subsequent track in
normal order.
Notes
1. This function operates even in the stop
mode or during play.
2. If you press the
Æ button during
shuffle play, you can select tracks at
random irrespective of the current track
number. And if you press the
Ú
button, play will start from the beginning
of the current track.
3. A once selected or played track will not
be played any more.
(You can use this function only with the the
remote control unit.)
States of the display
This unit can display four types of time
mode on the time counter in the display.
1. The elapsed time of the current track is
displayed when playback begins.
2. Press the time button once during play.
Then, the remaining time of the current
track will be displayed.
3. Press the time button again.
Then, the total elapsed time of the disc
will be displayed.
4. Press the time button once more.
Then, the total remaining time of the disc
will be displayed.
Notes
1. Time will not be displayed during the
programmed play if the programmed
contents exceed 100 minutes. At this
time, "--.--" will be shown instead.
2. If you press the time button in the stop
mode, the total track number and the
total playing time on a disc will be
displayed.
3. When track 33 or more is played, the
remaining time will not be displayed.
Shuffle Play
Time Display

ENGLISH
Troubleshooting
_
11
_
Problem Probable cause(s) Suggested remedy
No power when power button is pressed. Power plug not inserted securely. Plug in securely.
No playback when disc is loaded. Disc loaded with label side down. Load with label side up.
Disc dirty. Clean disc surface.
No audio output (or too low level output). Connection to stereo system is incorrect. Check connections.
Misoperation of amplifier. Check amplifier's control/switch setting.
A single track can only be played. 1/ALL button engaged. Press button to disengage it.
No program playback. program button not pressed. Press button to display "PROGRAM".
play button not pressed. Press button.
Mistracking (sound jumping). Player receiving vibration or shock. Change the installation position of player.
Disc dirty. Clean disc surface.
Hum. Pin-cord plug not connected securely. Re-connect plug securely.
Noise in tuner. Player too near tuner. Keep a reasonable distance between
them or switch off player's power.
Remote control unit operation is impossible. REMOTE CONTROL SELECTOR switch is Set switch to correct position.
not set correctly. Refer to page 5.
Batteries not inserted in remote control unit. Insert batteries.
No programming is possible. Numeric The remote control is set to a mode other Select CD on the remote control.
button entry is not accepted. than CD.
Before calling for service, check through the chart below for probable causes of the problems you experience while using this unit.

_
12
_
Cet appareil a été conçu spécialement
pour la reproduction des disques audio-
numériques portant la marque "
˛".
Les autres disques ne peuvent pas être
reproduits.
O Toujours placer le disque audio-
numérique dans le tiroir, l'étiquette
dirigée vers le haut. (Les disques
audionumériques ne peuvent être lus
que sur une face.)
O Pour retirer un disque de son boîtier,
presser le centre du boîtier et sortir le
disque en le tenant soigneusement par
les bords.
Comment retirer le disque
Comment tenir le disque
OLes empreintes digitales et la poussière
sur la surface du disque doivent être
essuyées avec soin avec un chiffon
doux.
Essuyer du centre vers l'extérieur
ONe jamais utiliser de produits chimiques
comme des aérosols pour disques,
aérosols ou liquide antistatiques, de la
benzine ni de diluants pour nettoyer les
disques audionumériques. De tels
produits chimiques endommageront de
façon définitive la surface de plastique
du disque.
OLes disques doivent toujours être remis
dans leurs boîtiers après l'usage pour
éviter des rayures sérieuses qui
pourraient provoquer des "sauts" du
capteur laser.
ONe pas exposer les disques directement
au soleil ni à l'humidité ou à des
températures élevées pendant
longtemps. Une longue exposition à de
hautes températures peut voiler le
disque.
ONe pas coller de papier ni écrire quoi
que ce soit avec un crayon-bille sur la
surface de la face comportant
l'étiquette.
OChoisir avec soin l'endroit où vous
placerez votre appareil. Eviter de le
placer directement au soleil ou près
d'une source de chaleur. Eviter aussi les
endroits sujets à des vibrations, à de la
poussière excessive, à la chaleur, au
froid ou à l'humidité. Toujours le garder
éloigné de sources de bourdonnements
telles que des transformateurs ou
moteurs.
ONe pas ouvrir le coffret car ceci
risquerait de provoquer des dommages
aux circuits ou des chocs électriques. Si
un objet rentre dans l'appareil, contacter
votre revendeur.
ONe pas manipuler les disques avec des
mains sales. Ne jamais insérer un disque
dont la surface est craquelée.
OLors du débranchement du cordon
d'alimentation de la prise murale,
toujours tirer sur la fiche et non sur le
cordon.
OPour garder le capteur laser propre, ne
pas y toucher et ne pas oublier de
fermer le tiroir du disque.
ONe pas essayer de nettoyer l'appareil
avec des solvants chimiques car ceci
pourrait endommager le fini de
l'appareil. Utiliser un chiffon propre et
sec.
OGarder soigneusement ce manuel
d'instructions pour une référence
ultérieure.
Table des matières
Raccordements et présentation
du panneau arrière.................................. 13
Commandes et fonctions du
panneau avant.......................................... 14
Afficheur....................................................... 14
Télécommande............................................ 15
Fonctionnement de base........................... 16
Lecture répétée........................................... 16
Lecture programmée.................................. 17
Lecture en ordre aléatoire (SHUFFLE)..... 18
Affichage des temps de lecture............... 18
Caractéristiques techniques..................... 18
Dépannage................................................... 19
Avant utilisation
Lire ceci avant de faire
fonctionner l'appareil
Manipulation des disques
Attention à la condensation
Quand le lecteur (ou un disque
audionumérique) est déplacé d'un
endroit froid à un endroit chaud ou
utilisé après un changement rapide de
la température, il y a danger de
condensation. La vapeur d'eau que
comporte l'air risque de se condenser
sur le mécanisme ou sur le capteur
laser. Si des gouttelettes d'eau se
forment sur ces pièces, une lecture
correcte sera impossible car le laser
ne pourra pas lire correctement les
informations du disque. Pour éviter
ceci, si vous devez utiliser le lecteur
sous des conditions qui peuvent
provoquer une condensation, vous
devez le laisser tel quel pendant 1 ou 2
heures, selon le degré de
condensation, après l'avoir branché
sur une prise CA. Le lecteur se
stabilisera alors à la température de
l'environnement.

_
13
_
FRANÇAIS
Raccordements et présentation du panneau arrière
1Prises REMOTE CONTROL
(Télécommande)
Ces prises permettent de brancher des
éléments de la mini- chaîne TEAC (T-H500,
R-H500, A-H500), de façon à pouvoir la
commander à l'aide de la télécommande
(RC-613 fournie avec l'amplificateur A-
H500) ou des signaux de commande de la
chaîne.
Connectez la fiche A (ou B) à la prise
correspondante, A (ou B), situé sur l'autre
élément placé au-dessus ou en dessous de
celui-ci.
Nota:
L'émetteur de télécommande n'est pas
fourni avec cet appareil.
2Interrupteur SELECTOR /
REMOTE CONTROL (Sélecteur
de télécommande)
position SYSTEM:
Mettre l'interrupteur sur SYSTEM lorsque
l'appareil est raccordé par l'intermédiaire
des prises A et B de la Télécommande à
l'amplificateur TEAC A-H500.
Cordon Signal Input/Output
(entrée/sortie de signal)
Cordon de la
télécommande
position SINGLE (SEUL):
Mettre l'interrupteur sur la position SINGLE
si vous utilisez cet appareil seul avec la
télécommande (non fournie avec le
lecteur).
Nota:
Quand l'interrupteur est sur la position
SINGLE l'appareil ne peut pas fonctionner
même si on actionne l'amplificateur
manuellement ou en utilisant la
télécommande.
3Prises DIGITAL OUTPUT
OPTICAL (sortie numérique
optique)
Ces prises permettent de raccorder
l'appareil aux prises DIGITAL INPUT
OPTICAL (entrée numérique optique) du
lecteur MD et du convertisseur N/A à
l'aide du câble à fibre optique (non fourni
avec le lecteur).
Nota:
Pour brancher le câble à fibre optique,
retirez le bouchon de protection placé sur
la prise. Laissez ce bouchon en place si
vous n'utilisez pas cette prise.
4Prises LINE OUT (sortie
analogique)
Connectez ces fiches aux prises d'entrée
du lecteur de disque compact situées sur
l'Amplificateur:
Fiche blanche
T prise femelle blanche (L)
Fiche rouge
T prise femelle rouge (R)
5Cordon d'alimentation (CA)
Branchez ce cordon d'alimentation CA sur
une prise de courant CA murale ou sur les
connecteurs de sortie CA « AC OUTLETS »
de l'Amplificateur.
12 3 4 5
A-H500

_
14
_
Commandes et fonctions du panneau avant
3Capteur de la télécommande
Ce capteur ne fonctionne que lorsque
l'appareil est employé seul avec sa
télécommande optionnelle.
Il n'est actif que lorsque l'interrupteur
REMOTE CONTROL -- SELECTOR (Sélection
Télécommande) situé sur le panneau
arrière est positionné sur SINGLE.
4Tiroir à disque
Pour charger un disque, faites sortir le
tiroir à disque puis chargez le disque sur le
plateau, étiquette vers le haut.
Pour lire un disque compact 80 mm (3
pouces), veiller à bien placer le disque au
centre du plateau du tiroir.
5 Indicateur de Mode Temps
6 Compteur de temps/Indicateur
de numéro de Programme
Ce voyant affiche les informations de
temps correspondant à l'indicateur de
Mode Temps, en minutes et en secondes.
En cas de lecture programmée, le numéro
des programmes est affiché ici.
7 Indicateur de Lecture Répétée
(REPEAT)
ONE (1) : Ce voyant s'allume en cas de
lecture répétée d'une seule
plage.
ö : Ce voyant s'allume en cas de lecture
répétée d'un disque entier.
A-B : Ce voyant s'allume en cas de lecture
répétée des plages situées entre les
repères A et B.
8 voyant Over (Dépassement)
Ce voyant s'allume quand le disque
comporte un total de 16 plages ou plus.
9 Affichage du Calendrier des
plages
0 Indicateur de Programme
q Voyant de lecture en SHUFFLE
(lecture en ordre aléatoire)
Afficheur
12
3
45 6 7
34 5
21 0 9 8 7
q0 9
8
5Touche « open/close » (∫)
(ouvert/fermé)
Appuyez sur cette touche pour ouvrir le
tiroir à disque.
Appuyez à nouveau sur cette touche pour
fermer le tiroir à disque.
6Touches de Saut rapide de
plages musicales (
Ú/Æ)
Ces touches permettent de sélectionner le
morceau désiré sur le disque.
Appuyez sur
Æ pour faire avancer le
disque vers l'avant.
Appuyez sur
Ú pour une recherche vers
l'arrière.
Pour revenir au début du morceau en
cours de lecture appuyer une fois sur la
touche. Maintenir cette touche enfoncée
pour revenir sur les morceaux précédents
(déplacement vers l'arrière.
7Touche Pause (ƒ)
Appuyez sur cette touche pour interrompre
provisoirement la lecture.
Pour reprendre la lecture, appuyez à
nouveau sur cette touche ou appuyez sur
la touche Lecture (
∏).
8Touche Lecture (∏)
Appuyez sur cette touche pour démarrer la
lecture.
9Touche « stop » (arrêt)
Appuyez sur cette touche pour arrêter la
lecture.
0Afficheur
Cet afficheur présente les différents états
de fonctionnement de l'appareil.
1touche « power standby/on »
(Marche/arrêt -veille / sous
tension)
2voyant veille
Ce voyant s'allume quand l'appareil est en
mode « veille »; il s'éteint quand l'appareil
est sous tension.
1 Voyant Lecture
2 Voyant Pause
3 Indicateur de numéro de Plage
4 Indicateur de numéro d'Indice
6

_
15
_
FRANÇAIS
Télécommande
1touche de mise sous tension
2touche « veille»
3Voyant
Ce voyant clignote en vert en mode de
fonctionnement disque compact, en rouge
pour les autres modes.
4Touches de commande du
magnétophone à cassette
5Touches numériques
Les touches numériques permettent de
sélectionner les numéros de plage sur un
disque compact ou les stations
présélectionnées sur le syntoniseur.
On peut les utiliser pour le disque compact
après avoir appuyé sur la touche CD ou sur
la touche de Lecture de CD (
∏).
6Touches de sélection d'entrée
de l'Amplificateur
7Touches de commande du
Syntoniseur
8Touches de commande du
Lecteur de disque compact:
Otouche Search (/Ò) (recherche)
Ces touches permettent de rechercher
rapidement un endroit précis, en cours
de lecture ou en mode Pause.
Ò: pour effectuer une recherche vers
l'avant
: pour effectuer une recherche vers
l'arrière
Otouches de saut de plages (Ú/Æ)
Otouche lecture (∏)
Otouche pause (ƒ)
Otouche stop (∑)
Otouche temps (voir page 18)
Otouches de lecture répétée (1/ ALL
(1/TOUT) ou A-B) (voir page 16)
Otouche programme (voir page 17)
Otouche de remise à zéro (voir page 17)
Otouche de lecture en ordre aléatoire
(SHUFFLE) (voir page 18)
Otouche de saut de disque
Cette touche n'est utilisée que par les
lecteurschangeurs de disque compact.
Elle n'est donc pas disponible sur les
lecteurs de disque unique tels que le
PD-H500.
9touche volume up/down
(réglage du volume)
Oappuyez sur + pour augmenter le volume
Oappuyez sur – pour diminuer le volume
0touche de contrôle d'intensité
lumineuse (dimmer)
Appuyez sur cette touche pour atténuer la
luminosité des affichages de l'appareil.
Appuyez de nouveau sur cette même
touche pour revenir à la luminosité
d'origine.
qtouche de minuterie de veille
(sleep timer)
Cette touche sert à enclencher la
minuterie de veille du Syntoniseur T-H500.
REMARQUE:
Cette Télécommande (RC-613) est livrée
avec l'Amplificateur (A-H500).
wTouche de mode RDS
2
1
q
0
w
3
4
5
6
7
8
9

(Cette fonction ne peut être utilisée
qu'avec la télécommande)
∑ Fonction Lecture Répétée
OAppuyez une fois sur la touche 1/ALL
(1/TOUT)
- Seule la plage en cours sera lue de
façon répétée.
*Si on sélectionne d'autres plages
pendant qu'on est en Lecture Répétée
Plage Unique, c'est la dernière plage
sélectionnée qui sera répétée.
∑ Fonction Lecture Répétée Toutes
Plages
OAppuyez une seconde fois sur la
touche 1/ALL (1/TOUTES)
- Toutes les plages du disque sont lues
de façon répétée.
* Si des plages ont été programmées,
seules ces plages seront répétées.
* Appuyez de nouveau sur cette touche
pour annuler la fonction Lecture
Répétée 1/ALL (1/TOUTES)
∑ Fonction Lecture Répétée de A à B
(1)En cours de lecture, appuyez sur la
touche de lecture répétée A-B pour
sélectionner le point à partir duquel
vous souhaitez commencer la lecture
(A).
- « A- » s'affiche, « B » clignote dans la
fenêtre d'affichage.
(2)Appuyez de nouveau sur la touche
pour définir le point de fin de lecture
souhaité (B).
- « A-B » s'affiche, seule la partie
comprise entre les points A et B sera
lue de façon répétée.
(3)Appuyez de nouveau sur cette touche
pour annuler la fonction Lecture
Répétée A-B.
_
16
_
Lecture répétée
Fonctionnement de base
1 Appuyez sur la touche « open/close »
(
∫) (ouvert/fermé);
Le tiroir à disque sort.
2 Chargez le disque, côté étiquette vers
le haut.
3 Appuyez à nouveau sur la touche
« open/close ».
Le tiroir à disque se referme. Faites
attention à ne pas vous coincer la main.
Le nombre total de plages et la durée
totale de lecture du disque s'affichent.
4 Sélectionnez la plage voulue en
appuyant sur la touche de Saut de
plages (
Ú/Æ).
5 Appuyez sur la touche Lecture (∏), la
lecture du disque compact démarre.
6 Appuyez sur la touche Pause (ƒ) pour
interrompre provisoirement la lecture.
7 Appuyez sur la touche stop pour arrêter
complètement la lecture.
ATTENTION
L'appareil commencera automatiquement
la lecture dans les cas suivants:
OSi vous sélectionnez CD sur
l'Amplificateur (A-H500).
OLorsque vous mettez l'appareil sous
tension, le sélecteur d'entrée de
l'Amplificateur étant réglé sur CD.
∑ Fonction mémoire de la dernière
position précédente
Si on actionne la touche « program »
(programme) pendant la lecture normale,
le lecteur se repositionne à l'endroit où il
se trouvait la dernière fois que vous avez
appuyé sur la touche « stop » (arrêt). La
lecture reprend alors au début de cette
plage comportant cette position définie.
Durée totale de
lecture
Nombre total
de plages
Dernier
plage
Premier
plage

_
17
_
FRANÇAIS
La fonction Lecture Programmée permet
de programmer jusqu'à 32 plages dans
n'importe quel ordre souhaité.
Avant de commencer:
OLa programmation n'est possible qu'à
l'aide de la Télécommande.
OLa programmation ne peut s'effectuer
que lorsque l'appareil est en mode stop
(arrêt).
∑ Programmation à l'aide des touches
numériques
1. Appuyez sur la touche CD.
Les touches numériques permettent
alors de sélectionner les plages du
disque.
2. Appuyez sur la touche Programme en
mode stop (arrêt).
On obtient l'affichage suivant:
3. Sélectionner les plages désirées en
appuyant sur les touches numériques
correspondantes.
Exemple: 2T6T12
Les plages 2, 6 et 12 ont été
programmées dans cet ordre.
4. Appuyez sur la touche Lecture (∏).
La lecture du programme sélectionné
commence dans l'ordre choisi.
REMARQUES:
OSi vous appuyez sur la touche
Programme en cours de programmation,
celle-ci est interrompue et l'appareil
passe en fonction Rappel de
Programme.
OSi vous arrêtez la lecture, le contenu du
programme disparaît de l'affichage mais
le programme n'est pas effacé. Appuyez
sur la touche Programme pour rappeler
la sélection programmée.
∑ Programmation à l'aide de la
touche de saut de plage musicale
1. Appuyez sur la touche Programme alors
que l'appareil est en mode stop (arrêt).
2. Sélectionnez la plage souhaitée à l'aide
de la touche de saut de plage
(
Ú/Æ)
Exemple: plage n° 5
3. Appuyez de nouveau sur la touche
Programme.
La plage n° 5 a été programmée comme
1er morceau du programme.
4. Répéter les étapes 2 et 3 pour
programmer d'autres morceaux.
5. Appuyez sur la touche Lecture (
∏).
La lecture du programme sélectionné
commence dans l'ordre défini.
REMARQUE:
Si vous appuyez deux fois de suite sur la
touche Programme pendant que vous êtes
en train de définir un programme, la
programmation est interrompue et
l'appareil passe en mode Rappel du
Programme.
Pour votre information:
OL'indication « FULL » (PLEIN) apparaît
sur l'afficheur, après la programmation
du trente-troisième morceau. (Il n'est
pas possible de programmer au-delà.)
OLes plages dont le numéro ne se trouve
pas sur le disque ne peuvent pas être
programmées.
OLe contenu du programme n'est pas
effacé même si on met l'appareil hors
tension, mais il est effacé si l'on ouvre le
tiroir à disque.
OL'appareil s'arrête automatiquement une
fois la lecture de toutes les plages
programmées terminée; le contenu du
programme disparaît de la Fenêtre
d'affichage, mais n'est pas effacé.
OIl est possible de sélectionner un
programme alors que le tiroir à disque
est ouvert.
Les numéros des plages qui ne sont pas
sur le disque seront automatiquement
effacés quand la lecture commencera.
∑ Rappel d'un Programme
Le contenu du programme n'étant pas
effacé même si l'on arrête la lecture ou si
l'on éteint l'appareil, il est possible de le
rappeler ultérieurement.
1. Pour cela, appuyez sur la touche
Programme.
La première plage programmée s'affiche
sur l'afficheur.
2. Appuyez plusieurs fois sur cette touche
pour vérifier le contenu du programme.
Chaque fois que l'on appuie sur cette
touche, la plage programmée suivante
s'affiche.
3. Appuyez sur la touche Lecture (∏) pour
lire le disque dans l'ordre programmé.
∑ Effacement complet du programme
1. Appuyez sur la touche Programme.
2. Appuyer sur la touche CLEAR (Remise à
zéro) et la maintenir enfoncée pendant
au moins deux secondes.
L'ensemble des programmes est effacé;
de même tous les programmes seront
effacés si l'on ouvre le tiroir à disque.
REMARQUE:
Les touches Programme et Remise à zéro
ne peuvent être activés qu'en mode stop
(arrêt).
* Modification du contenu d'un programme
OSuppression de plages:
Il est possible de supprimer certains
morceaux programmés préalablement.
1. Pour cela, appuyez plusieurs fois sur la
touche Programme jusqu'à ce que le
numéro de la plage que l'on veut
supprimer apparaisse sur l'afficheur.
2. Appuyez sur la touche CLEAR (remise à
zéro).
La plage portant le numéro affiché est
supprimée du programme.
Si vous appuyez sur cette touche de
façon répétée, les plages programmées
suivantes seront supprimées l'une après
l'autre.
∑ Ajout d'une plage à la suite de la
dernière plage programmée:
1. Appuyez plusieurs fois sur la touche
Programme jusqu'à ce que la mention
END (fin) apparaisse sur l'afficheur.
2. Entrez les nouvelles plages de la même
manière que pour une programmation
normale, dès que la mention END a
disparu de la fenêtre d'affichage.
∑ Ajout d'une plage en un point
quelconque du programme:
1. Sélectionnez le numéro du programme
désiré, puis appuyer sur la touche
Programme pour ajouter le morceau
désiré.
2. Entrez le morceau désiré de la même
façon que pour une programmation
normale.
Lecture programmée
Program No.
(n° de programme)
Track No.
(n° de plage)

_
18
_
Détecteur laser : laser triple faisceau
Filtre numérique :
suréchantillonnage octuple
Réponse en fréquence :
20 à 20 000 Hz (± 2 dB)
Système de correction d'erreur :
code CIRC
(Cross Interleave Reed-Solomon)
Rapport signal/bruit :
supérieur à 100 dB (pondéré « A »)
DHT : inférieure à 0,02% (1 kHz)
Tension de sortie : 2 V efficace
Alimentation : 230 V, 50 Hz
Consommation électrique : 9 W
Dimensions (L x H x P) : 285 x 132 x 292 mm
Poids : 3,9 kg
Accessoires
Cordon de signal audio : 1
Cordon de télécommande : 1
ODes améliorations peuvent apporter des
changements dans les caractéristiques
techniques et générales sans avis
préalable.
OLes photos et illustrations peuvent
légèrement différer du produit fini.
Caractéristiques
techniques
(Cette fonction ne peut être utilisée
qu'avec la télécommande.)
1. Appuyez sur la touche Shuffle.
Les plages sont lues dans un ordre
aléatoire.
2. Appuyez de nouveau sur cette touche
pour annuler la fonction Lecture
Aléatoire.
Après avoir annulé cette fonction, la
lecture du disque se poursuivra dans
l'ordre normal à partir de la plage
suivante.
REMARQUES:
1. Cette fonction est disponible même
lorsque l'appareil est à l'arrêt, ou
pendant la lecture.
2. Si vous appuyez sur la touche
Æ
pendant la Lecture Aléatoire, vous
pouvez sélectionner une plage au
hasard quelle que soit la plage en cours
de lecture. Si vous appuyez sur la
touche
Ú, la lecture commencera au
début de la plage en cours de lecture.
3. Une plage sélectionnée ou lue une fois
ne sera plus lue par la suite.
(Cette fonction ne peut être utilisée
qu'avec la télécommande.)
Etats de l'affichage
Cet appareil permet d'afficher quatre types
de mode temps sur le compteur de temps
de l'Afficheur.
1. Le temps écoulé depuis le début de la
plage en cours s'affiche dès le début de
la lecture.
2. Appuyez sur la touche Time une fois
pendant la lecture.
Le temps de lecture restant pour la plage
en cours s'affiche.
3. Appuyez de nouveau sur la touche
d'affichage du temps.
La durée totale écoulée depuis le début du
disque s'affiche.
4. Appuyez encore une fois sur cette
touche, le temps de lecture total restant
jusqu'à la fin du disque s'affiche.
AVERTISSEMENTS:
1. La durée de lecture ne sera pas affichée
en cas de lecture programmée si la
durée du programme est supérieure à
100 minutes. l'afficheur indiquera alors
« --.-- ».
2. Si on appuie sur la touche temps en
mode « stop », le nombre total de plages
et la durée totale de lecture du disque
apparaissent sur l'afficheur.
3. En cas de lecture de la plage 33 ou plus,
le temps restant jusqu'à la fin du disque
ne s'affiche pas.
Lecture en ordre aléatoire
(SHUFFLE)
Affichage des temps de
lecture

_
19
_
FRANÇAIS
Dépannage
Problème Cause(s) probable(s) Solution
L'appareil ne s'allume pas quand on appuie La prise est mal enfoncée dans la prise Bien enfoncer la prise dans la prise murale.
sur la touche Marche/arrêt. murale.
Pas de lecture après chargement du disque. Le disque est chargé étiquette vers le bas. Remettre le disque en place étiquette vers
le haut.
Disque sale. Nettoyer la surface du disque.
Pas de son ou (ou son très faible). Les branchements à la chaîne stéréo Vérifier les branchements.
sont mal faits.
Mauvais fonctionnement de l'amplificateur. Vérifier le réglage de la commande et de
l'interrupteur sur l'amplificateur.
L'appareil ne lit qu'un seul morceau. La touche 1/ALL (1/TOUT) est enfoncée. Appuyez sur la touche pour la débloquer.
Pas de lecture du programme. La touche PROGRAM n'est pas enfoncée. Appuyez sur cette touche pour que
l'indication PROGRAM s'affiche.
La touche PLAY (Lecture) n'est pas Appuyez sur cette touche.
enfoncée.
Mauvais positionnement sur la plage Le lecteur est soumis à des vibrations Changez le lecteur de place.
(le son saute). ou à des chocs.
Le disque est sale. Nettoyez la surface du disque.
Bourdonnement Le cordon de raccordement est mal Vérifier le contact au niveau de la prise.
enfoncé.
Bruit au syntoniseur. Le lecteur est placé trop près du Placez ces appareils à une certaine distance
syntoniseur. l'un de l'autre ou éteignez le lecteur.
La télécommande ne fonctionne pas. L'interrupteur SELECTOR / REMOTE Mettre l'interrupteur sur la bonne position.
CONTROL (télécommande) n'est pas Voir page 13.
sur la bonne position.
Il n'y a pas de piles dans la télécommande. Mettre des piles.
Impossible de programmer. Entrée par Télécommande réglée sur un mode Sélectionnez CD sur la télécommande.
la touche numérique non acceptée. autre que CD.
Avant de vous adresser à un technicien, vérifier à l'aide du tableau ci-dessous que le problème rencontré n'est pas dû à l'une des causes
suivantes.

_
20
_
Dieses Gerät ist ausschließlich zum
Abspielen von Compact Discs vorgesehen,
die mit dem "
˛" Symbol gekennzeichnet
sind.
O CDs stets mit nach oben weisendem
Etikett in den CD-Halter einlegen. (CDs
sind nur einseitig bespielt.)
O Zur Entnahme einer CD aus ihrer
Schutzhülle die Haltenabe in der Mitte
drücken. Die CD vorsichtig an ihrer
Kante halten und entnehmen.
Entnehmen der CD
Die CD am Rand halten
OFingerabdrücke und Staub auf der
bespielten Seite mit einem sauberen
trockenen Tuch entfernen.
Gerade nach außen wischen
OUnter keinen Umständen zur Reinigung
von CDs herkömmliche Plattenreini-
gungsmittel wie Plattenspray oder
-flüssigkeit, Benzin, Farbverdünner oder
ähnliche Chemikalien verwenden. Die
Kunststoffoberfläche der CD kann hier-
durch irreparablen Schaden nehmen!
OCDs nach Gebrauch stets wieder in ihre
Schutzhülle einlegen. Hierdurch sind
diese vor Staub, Kratzern etc. geschützt,
die zu Abtastaussetzern des Lasers
führen können.
OCDs niemals über einen längeren
Zeitraum direkter Sonneneinstrahlung,
hoher Feuchtigkeit und Temperatur
aussetzen.
Bei längerer Einwirkung von hohen
Temperaturen kann es zu Ver-werfungen
der CD kommen.
OKeine Aufkleber an der Etikettseite
anbringen, und niemals mit einem
Kugelschreiber die Etikettseite
beschriften.
OWählen Sie einen geeigneten Standort
für den Spieler. Nicht geeignet sind
Standorte, die direkter Sonnenein-
strahlung, Heizquellen, Vibrationen,
Staubeinwirkung, starken Temperatur-
schwankungen oder Feuchtigkeit
ausgesetzt sind. Von Brummstörungen
verursachenden Geräten wie Transfor-
matoren etc. fernhalten.
ONiemals das Gehäuse öffnen, da
hierdurch Schäden an der Elektronik
und/oder elektrische Schläge verursacht
werden können. Falls ein Fremdkörper in
das Geräteinnere gelangen sollte,
wenden Sie sich bitte an Ihren
Fachhändler.
OCDs niemals mit verschmutzten Fingern
handhaben. Niemals eine verkratzte CD
einlegen.
OBei Abziehen des Netzkabels darauf
achten, das Kabel am Stecker zu halten.
Niemals am Kabel ziehen.
OUm den Laser-Tonabnehmer sauber-
zuhalten, diesen nicht berühren und den
CD-Halter stets einfahren.
OZur Gehäusereinigung keine Lösungs-
mittel verwenden, da hierdurch die
Gehäuseoberfläche beschädigt werden
kann. Ein sauberes trockenes Tuch
verwenden.
OBewahren Sie diese Bedienungs-
anleitung auf, um bei eventuell später
auftauchenden Fragen darin nach-
schlagen zu können.
INHALTSVERZEICHNIS
Anschlüsse auf der Geräterückseite....... 21
Bedienungselemente und deren
Funktion..................................................... 22
Display.......................................................... 22
Fernbedienung ............................................ 23
Grundlegende Funktionen......................... 24
Wiederholungsfunktion ............................. 24
Titelprogrammierung.................................. 25
Zufallsfunktion............................................. 26
Zeitanzeige................................................... 26
Technische Daten....................................... 26
Hilfe bei der Fehlersuche .......................... 27
Vor Inbetriebnahme
Bitte vor Inbetriebnahme lesen Handhaben der CD's
Auf Kondensationsniederschlag
achten!
Wenn das Gerät oder CDs von kalter in
eine warme Umgebung gebracht
werden, bzw. einer starken Tempera-
turschwankung ausgesetzt sind,
besteht die Gefahr von Kondensa-
tionsniederschlag am Laser-
Tonabnehmer. Durch eine solche
Beeinträchtigung wird die Abtast-
funktion des Lasers schwerwiegend
gestört, so daß keine Toninformation
von der CD erhältlich ist. Sollte die
Möglichkeit von Kondensations-
niederschlag gegeben sein, emp-
fehlen wir, nach Netzanschluß ein bis
zwei Stunden bis zur Inbetriebnahme
zu warten. Nach Ablauf dieser
Zeitspanne sollte ein Temperatur-
ausgleich des Geräts gegeben sein.

_
21
_
DEUTSCH
Anschlüsse auf der Geräterückseite
1REMOTE CONTROL Buchsen
(Fernbedienung)
Diese Buchsen dienen zum Anschluß der
Fernbedienungsverbindungen des TEAC
Mini-Komponenten Systems (T-H500, R-
H500, A-H500), um dieses mit der
Fernbedienung (RC-613, im Lieferumfang
des Verstärkers A-H500) oder via System-
Steuersignalen zu steuern.
Verbinden Sie die Buchse „A“ (oder „B“)
mit der entsprechenden Buchse „A“ (oder
„B“) der darüber oder darunter befindli-
chen Systemkomponente.
Hinweis:
Die Fernbedienung gehört nicht zum
Lieferumfang des CD-Players.
Cinchkabel
Fernbedienungskabel
2Fernbedienungs-Wahlschalter
Position: SYSTEM
Stellen Sie den Schalter auf diese Position,
wenn Ihr System über die Fernbedienungs-
Anschlußbuchsen „A“ und „B“ des
Verstärkers TEAC A-H500 verbunden ist.
Position: SINGLE
Stellen Sie den Schalter auf diese Position,
falls Sie lediglich den CD-Player mittels
einer Fernbedienung (nicht im Lieferum-
fang) steuern wollen.
Hinweis:
Falls sich der CD-Player im Systemverbund
befindet, jedoch auf „SINGLE“-Betrieb
eingestellt ist, kann das Gerät nicht durch
manuelle Bedienung vom Verstärker oder
durch die, auf das Gerät gerichtete,
Fernbedienung gesteuert werden.
3Optischer Digitalausgang
Diese Anschlüsse dienen dazu, den CD-
Player mittels optischer Verbindungskabel
(nicht im Lieferumfang) mit den
Digitaleingängen eines MD-Recorders
oder eines externen D/A-Wandlers zu
verbinden.
Hinweis:
Entfernen Sie die Schutzkappe vom
optischen Digitalausgang, bevor Sie das
optische Verbindungskabel anschließen.
Wird dieser Ausgang nicht benutzt, lassen
Sie die Kappe, zum Schutz vor Staub, in
ihrer Halterung.
4LINE OUT Cinchbuchsen
Verbinden Sie diese Buchsen mit den CD
INPUT-Buchsen des Verstärkers:
Weißer Stecker
T Weiße Buchse (links)
Roter Stecker
T Rote Buchse (rechts)
5Netzkabel/Netzstecker
Stecken Sie den Netzstecker in eine
Netzsteckdose.
12 3 4 5
A-H500

_
22
_
Bedienungselemente und deren Funktion
4CD-Schublade
Legen Sie, während die Schublade
geöffnet ist, hier die Compact Disc, mit
ihrer Labelseite nach oben, ein.
Falls Sie eine CD-Single mit einem
Durchmesser von 8 cm (3 inches)
wiedergeben möchten, stellen Sie sicher,
daß sie zentriert in die Schublade
eingelegt wurde.
5Öffnen/Schließen Taste (∫)
Betätigen Sie diese Taste, um die CD-
Schublade zu öffnen.
Betätigen Sie diese Taste erneut, um die
CD-Schublade zu schließen.
6 Spielzeit-Anzeige
Hier wird die aktuelle Spielzeit, in
Abhängigkeit vom eingestellten Spielzeit-
Anzeigemodus, in Minuten und Sekunden
dargestellt. Bei programmierter
Wiedergabe wird hier die Programm-
Nummer angezeigt
7 Wiederholungs-Anzeige
ONE : erscheint, wenn ein Titel wiederholt
wiedergegeben wird.
ö : erscheint, wenn die gesamte CD
wiederholt wiedergegeben wird.
A-B : erscheint, wenn der zuvor markierte
Abschnitt zwischen Punkt „A“ und
Punkt „B“ wiedergegeben wird.
8 Over-Anzeige
Diese Anzeige signalisiert, daß sich auf der
derzeit im Laufwerk befindlichen CD mehr
als 15 Titel befinden.
9 Titelkalender-Anzeige
0 Programm-Anzeige
q Anzeige der Zufallsautomatik
Display
12
3
45 6 7
34 5
21 0 9 8 7
q0 9
8
6Titel-Sprungtasten (Ú/Æ)
Diese Tasten dienen zur direkten Anwahl
des gewünschten Titels einer CD.
Æ: Betätigen Sie diese Taste, um zum
Titelanfang des folgenden Stückes
zu gelangen.
Ú: Betätigen Sie diese Taste, um zum
Anfang des derzeitigen, bzw.
vorangegangenen Stückes zu
gelangen.
Sie „springen“ an den Titelanfang
des momentan aktiven Titels durch
einmaliges Betätigen dieser Taste.
Wenn Sie die Taste gedrückt halten,
können Sie an die Titelanfänge der
vorangegangenen Titel „springen“.
7Pause-Taste (ƒ)
Betätigen Sie diese Taste, um die
Wiedergabe kurzzeitig zu unterbrechen.
Zum Fortsetzen der Wiedergabe betätigen
Sie die Pause-Taste erneut oder die
Wiedergabe-Taste (
∏).
8Wiedergabe-Taste (∏)
Mit dieser Taste starten Sie die
Wiedergabe einer CD.
9Stop-Taste
Mit dieser Taste beenden Sie die
Wiedergabe einer CD.
0Display
In der Anzeige werden die jeweiligen
Betriebszustände des CD-Players
angezeigt.
1Netz Ein-/Ausschalter (Standby)
2Standby-Anzeige
Diese Anzeige leuchtet, wenn das Gerät
auf „Standby“ geschaltet ist. Sie erlischt
beim Einschalten.
3Fernbedienungs-Infrarotsensor
Dieser Sensor dient zum Empfang der
Fernsteuersignale, wenn der CD-Player mit
der optionalen Fernbedienung und nicht im
Systemverbund betrieben wird.
Der Sensor ist nur dann aktiv, wenn sich
der Fernbedienungs-Wahlschalter auf der
Geräterückseite in der „SINGLE“-Stellung
befindet.
1 Wiedergabe-Anzeige
2 Pause-Anzeige
3 Anzeige der Titelnummer
4 Anzeige der Indexnummer
5 Zeitanzeigemodus-Anzeige
6

_
23
_
DEUTSCH
Fernbedienung
1Netz-Einschalttaste
2Standby-Taste (Aus)
3Klangquellen-Anzeige
Diese Anzeige blinkt grün, wenn als
Wiedergabequelle der CD-Player gewählt
ist. Sie blinkt rot, wenn eine andere
Klangquelle gewählt wurde.
4Laufwerkstasten des Cassetten
Decks
5Numerische Tastatur
Die numerischen Tasten dienen sowohl der
direkten Titelanwahl einer CD als auch der
direkten Wahl von Sender-Speicherplätzen
im Tunerbetrieb.
Die Tasten können zur Titelanwahl einer CD
benutzt werden, nachdem Sie entweder
die CD-Taste oder die CD-Wiedergabetaste
(
∏) betätigt haben.
6Eingangswahlschalter-Tasten
des Verstärkers
7Bedienfeld des Tuners
8Funktionstasten des CD-Players
OSuchfunktionstasten (/Ò)
Mit diesen Tasten können Sie die
gewünschte Stelle eines Titels, während
der Wiedergabe oder im Pausemodus,
erreichen.
Ò: vorwärts Suchen
: rückwärts Suchen
OSprung-Tasten (Ú/Æ)
OWiedergabe-Taste (∏)
OPause-Taste (ƒ)
OStop-Taste (∑)
OSpielzeit-Taste (siehe Seite 26)
OWiederholungsfunktion (1/Gesamt/A->B)
(siehe Seite 24)
OProgrammierungs-Taste (siehe Seite 25)
OLösch-Taste (siehe Seite 25)
OZufallsfunktion (siehe Seite 26)
ODisc Skip Taste
Diese Taste steht lediglich bei der
Verwendung eines CD-Wechslers zur
Verfügung. Auf die Bedienung des PD-
H500 hat sie keinen Einfluß.
9Lautstärke-Tasten
O+: Betätigen Sie diese Taste, um die
Wiedergabelautstärke zu erhöhen.
O–: Betätigen Sie diese Taste, um die
Wiedergabelautstärke zu vermindern.
0Dimmer-Taste
Betätigen Sie diese Taste, wenn Sie die
Helligkeit der Systemdisplays abdunkeln
möchten.
Bei erneutem Betätigen wird die
Originalhelligkeit wieder eingestellt.
qTaste zur Einstellung der
Abschaltzeit (Sleep Timer)
Betätigen Sie diese Taste, um die Sleep
Timer Funktion des Tuners T-H500 zu
aktivieren und einzustellen.
Hinweis:
Die Fernbedienung (RC-613) gehört zum
Lieferumfang des Verstärkers (A-H500).
wRDS (Radio Data System) mode
button
2
1
q
0
w
3
4
5
6
7
8
9

(Diese Funktion steht lediglich bei der
Verwendung einer Fernbedienung zur
Verfügung.)
∑ Titelwiederholung (ONE)
OBetätigen Sie die Wiederholungstaste
(1/All) einmal.
- Lediglich der momentane Titel wird
nun wiederholt wiedergegeben.
*Wenn Sie bei aktivierter
Titelwiederholfunktion einen anderen
Titel anwählen, wird der jeweils
zuletzt angewählte Titel wiederholt.
∑ Gesamtwiederholung (ALL)
OBetätigen Sie die Widerholungstaste
(1/All) zweimal.
- Die gesamte CD wird nun wiederholt
wiedergegeben.
*Falls Sie zuvor eine Titelauswahl
programmiert haben, wird lediglich
diese Auswahl wiederholt.
*Ein erneutes Betätigen der
Wiederholungstaste beendet die
Funktion.
∑ Wiederholung eines markierten
Abschnittes A-B
(1)Betätigen Sie während der
Wiedergabe die A->B Taste, um den
gewünschten Wiederholungs-
Startpunkt (A) zu markieren.
- Im Display wird „A“ angezeigt und
„B“ beginnt zu blinken.
(2)Zum Markieren des gewünschten
Wiederholungs-Endpunktes (B)
betätigen Sie die Taste erneut.
- „A->B“ wird im Display angezeigt,
und der soeben ausgewählte
Abschnitt wird wiederholt
wiedergegeben.
(3)Ein erneutes Betätigen der Taste
beendet die Wiederholungsfunktion.
_
24
_
Wiederholungsfunktion
Grundlegende Funktionen
1 Betätigen Sie die Öffnen/Schließen-
Taste (
∫).
Die CD-Schublade öffnet sich.
2 Legen Sie die CD mit der Beschriftung
nach oben in die Schublade.
3 Betätigen Sie erneut die Öffnen/
Schließen-Taste.
Die CD-Schublade schließt sich. Achten
Sie dabei darauf, daß sich während
dieses Vorgangs Ihre Hand nicht mehr
in der Schublade befindet.
Die Anzahl der auf der CD befindlichen
Titel sowie deren Gesamtspielzeit
werden im Display angezeigt.
4 Wählen mit den Skip-Tasten
(
Ú/Æ) den gewünschten Titel aus.
5 Betätigen Sie die Wiedergabe-Taste
(
∏), und die Wiedergabe beginnt.
6 Betätigen Sie zum kurzzeitigen
Unterbrechen der Wiedergabe die
Pause-Taste (
ƒ).
7 Betätigen Sie die Stop-Taste, um die
Wiedergabe zu beenden.
Hinweis:
Der CD-Player beginnt unter den folgenden
Voraussetzung automatisch mit der
Wiedergabe:
OWenn Sie am Verstärker (A-H500) als
Tonquelle „CD“ auswählen.
OWenn beim Einschalten des Systems
sich der Eingangswahlschalter des
Verstärkers in der Position „CD“
befindet.
∑ Speicherfunktion
Falls Sie während der Wiedergabe die
Programm-Taste betätigen, kehrt der CD-
Player an die Stelle der CD zurück, an der
zuvor die Stop-Taste zuletzt betätigt wurde.
Die Wiedergabe beginnt nun ab Anfang
dieses Titels.
Gesamtspielzeit
Gesamt-Titelzahl
Letzter
Titel
Erster
Titel

_
25
_
DEUTSCH
Die Titelprogrammierfunktion ermöglicht
eine freie Programmierung von bis zu 32
Titeln in beliebiger Reihenfolge.
Bevor Sie beginnen:
ODie Programmierung einer Titelfolge ist
lediglich via Fernbedienung möglich.
ODie Programmierung einer Titelfolge ist
lediglich im Stopmodus möglich.
∑ Programmierung mittels der
numerischen Tastatur
1. Betätigen Sie die CD-Taste.
Die numerischen Tasten dienen nun zur
Eingabe der Titelnummern.
2. Betätigen Sie die Programm-Taste,
während sich der CD-Player im
Stopmodus befindet.
Im Display wird
folgendes angezeigt:
3. Wählen Sie den/die gewünschten Titel,
durch Eingabe der entsprechenden
Titelnummer, in der gewünschten
Reihenfolge, aus.
Beispiel: 2T6T12
Der 2., 6. und 12. Titel wurden in dieser
Reihenfolge programmiert.
4. Betätigen Sie die Wiedergabe-
Taste(
∏).
Die Wiedergabe Ihrer programmierten
Titelfolge beginnt.
Hinweis:
OFalls Sie während der Programmierung
die Programm-Taste betätigen, wird die
Eingabefunktion für die Titelprogram-
mierung abgebrochen.
OWenn Sie die Wiedergabe einer
programmierten Titelfolge beenden,
verschwindet die Anzeige im Display,
das Programm steht Ihnen jedoch
weiterhin zur Verfügung.
Betätigen Sie die Programm-Taste
erneut, um es wieder aufzurufen.
∑ Programmierung mittels der
Sprung-Tasten
1. Betätigen Sie die Programm-Taste,
während sich der CD-Player im
Stopmodus befindet.
2. Wählen Sie mittels der Sprung-Tasten
(
Ú/Æ) den/die gewünschten Titel
aus.
Beispiel: Titelnummer: 5
3. Betätigen Sie erneut die Programm-
Taste.
Der 5. Titel der CD wurde als 1.
Programmnummer gespeichert.
4. Wiederholen Sie die Schritte 2 und 3,
um die Titelprogrammierung fortzu-
setzen.
5. Betätigen Sie die Wiedergabe-Taste
(
∏).
Die Wiedergabe der programmierten
Titelfolge beginnt.
Hinweis:
Falls Sie während der Programmierung die
Programm-Taste wiederholt betätigen,
wird die Eingabefunktion für die
Titelprogrammierung abgebrochen.
Beachten Sie:
OBeim Versuch, einen 33. Titel in eine
Programmfolge aufzunehmen, erscheint
„FULL“ im Display (es können keine
weiteren Titel programmiert werden).
OTitelnummern, die auf einer CD nicht
vorhanden sind, können auch nicht
programmiert werden.
ODer Inhalt einer programmierten
Titelfolge wird nicht gelöscht, selbst
dann nicht, wenn das System
zwischenzeitlich abgeschaltet wird. Erst
das Öffnen der CD-Schublade löscht den
Programmspeicher.
ODie Wiedergabe wird automatisch
beendet, wenn alle programmierten Titel
wiedergegeben wurde, und die Anzeige
des Programms verschwindet vom
Display. Die programmierte Titelfolge
bleibt jedoch weiterhin erhalten.
OEs ist möglich, eine Titelfolge bei
geöffneter CD-Schublade zu program-
mieren.
Titelnummern, die sich nicht auf der CD
befinden, werden automatisch aus dem
Programm entfernt, sobald die
Wiedergabe gestartet wird.
∑ Erneutes Aufrufen einer program-
mierten Titelfolge
Da der Programmspeicher weder durch
das Betätigen der Stop-Taste, noch durch
Abschalten des Systems verlorengeht,
können Sie ihn jederzeit erneut aufrufen.
1. Betätigen Sie die Programm-Taste.
Die erste, programmierte Titelnummer
erscheint in der Anzeige.
2. Betätigen Sie wiederholt die
Programm-Taste, um die gesamte
programmierte Titelfolge zu überprüfen.
Bei jedem Betätigen wird die
nächstfolgende Titel- und Programm-
nummer im Display angezeigt.
3. Betätigen Sie die Wiedergabe-Taste
(
∏), um die Wiedergabe der
programmierten Titelfolge zu starten.
∑ Löschen der programmierten
Titelfolge
1. Betätigen Sie die Programm-Taste.
2. Betätigen Sie die Löschtaste (Clear)
länger als 2 Sekunden.
Das Programm wird hierdurch gelöscht.
Dieser Vorgang entspricht dem Öffnen
der CD-Schublade.
Hinweis:
Sowohl die Programm- als auch die
Löschtaste sind lediglich im Stopmodus
verfügbar.
* Ändern einer programmierten Titelfolge
OLöschen:
Titel, die Sie nicht mehr hören möchten,
können aus einem bestehenden
Programm gelöscht werden.
1. Betätigen Sie die Programm-Taste so
oft, bis die Titelnummer, die Sie aus dem
Programm entfernen möchten, im
Display angezeigt wird.
2. Betätigen Sie die Löschtaste (Clear).
Der Titel, dessen Titelnummer gerade im
Display angezeigt wird, wird aus der
programmierten Titelfolge gelöscht.
Wenn Sie die Taste wiederholt
betätigen, werden die nachfolgenden,
programmierten Titel ebenfalls gelöscht.
Jedes Betätigen der Taste löscht eine
Titelnummer.
∑ Neue Titel nach dem letzten
programmierten Titel anfügen
1. Betätigen Sie die Programm-Taste so oft,
bis „END“ im Display angezeigt wird.
2. Nachdem „END“ nicht mehr angezeigt
wird, geben Sie nun die gewünschte(n)
Titelnummer(n) in der gewohnten Art
und Weise ein.
∑ Hinzufügen weiterer Titel an einer
beliebigen Stelle des bestehenden
Programms
1. Wählen Sie die Stelle der program-
mierten Titelfolge, an der Sie einen
neuen Titel einfügen wollen, und
betätigen Sie die Programm-Taste.
2. Geben Sie nun die gewünschte(n)
Titelnummer(n) in der gewohnten Art
und Weise ein.
Titelprogrammierung
Programm-
Nummer
Titelnummer

_
26
_
Lasersystem : 3-Strahl-Laser
Digitalfilter : 8-fach Oversampling
Frequenzgang : 20 - 20.000 Hz (±2 dB)
Fehlerkorrektur :
Cross Interleave Reed-Solomon
Code
Fremdspannungsabstand :
besser als 100 dB (mit IHF „A“
Filter)
Verzerrung (THD) : weniger als 0,02 %
(1 kHz)
Ausgangsspannung : 2 Volt RMS
Netzspannung : 230 Volt, 50 Hz
Leistungsaufnahme : 9 Watt
Abmessungen (B x H x T) :
285 x 132 x 292 mm
Gewicht : 3,9 kg
Zubehör
1 x Cinchkabel
1 x Fernbedienungskabel
OTechnische Änderungen vorbehalten.
OFotografische und graphische Abbil-
dungen können leicht vom gekauften
Modell abweichen.
Technische Daten
(Diese Funktion steht lediglich bei der
Verwendung einer Fernbedienung zur
Verfügung.)
1. Betätigen Sie die Taste für die
Zufallsfunktion.
Die Titel einer CD werden nun in einer
zufälligen Reihenfolge wiedergegeben.
2. Ein erneutes Betätigen der Taste
beendet die Zufallsfunktion.
Nach dem Beenden der Zufallsfunktion
wird die Wiedergabe mit dem derzeit
aktiven Titel, in der auf der CD
vorliegenden Titelfolge, fortgesetzt.
Hinweis:
1. Diese Funktion steht sowohl während
der Wiedergabe als auch im Stopmodus
zur Verfügung.
2. Befindet sich der CD-Player im
Zufallsmodus, und Sie betätigen die
Æ-Taste, wird automatisch zum
Anfang eines anderen, zufällig
ermittelten Titels „gesprungen“.
Betätigen Sie die
Ú-Taste, beginnt die
Wiedergabe des momentanen Titels
erneut.
3. Trotz der zufälligen Auswahl der Titel
wird kein Titel wiederholt oder zweimal
wiedergegeben.
(Diese Funktion steht lediglich bei der
Verwendung einer Fernbedienung zur
Verfügung.)
Die verschiedenen Darstellungen
Vier verschiedene Zeit-Darstellungen
werden unterstützt:
1. Die seit Beginn der Wiedergabe
verstrichene Titelspielzeit wird
angezeigt.
2. Betätigen Sie einmal die Spielzeit-
Taste, damit die noch verbleibende
Titelspielzeit angezeigt wird.
3. Betätigen Sie nochmals die Spielzeit-
Taste, damit die bisher verstrichene
Gesamtspielzeit der CD angezeigt wird.
4. Betätigen Sie nochmals die Spielzeit-
Taste, damit die noch verbleibende
Gesamtspielzeit der CD angezeigt wird.
Hinweis:
1. Während der Wiedergabe einer
programmierten Titelfolge kann keine
Zeit-Darstellung angezeigt werden,
wenn das Programm eine
Gesamtspielzeit von 100 Minuten
überschreitet. Im Display erscheint
stattdessen die Meldung „--:--“.
2. Wenn Sie im Stopmodus die Spielzeit-
Taste betätigen, wird sowohl die Anzahl
der auf der CD befindlichen Titel als
auch die Gesamtspielzeit im Display
angezeigt.
3. Falls eine höhere Titelnummer als „32“
wiedergegeben wird, ist eine Zeitan-
zeige nicht möglich.
Zufallsfunktion
Zeitanzeige

_
27
_
DEUTSCH
Hilfe bei der Fehlersuche
Problem Mögliche Ursache Mögliche Abhilfe
Keine Funktion, obwohl der Netzschalter Der Netzstecker befindet sich nicht richtig Stecken Sie den Netzstecker richtig in die
betätigt wurde in der Steckdose Steckdose
Keine Wiedergabe, obwohl sich eine CD im Die CD wurde mit der Labelseite nach Legen Sie die CD mit deren Labelseite nach
Laufwerk befindet unten eingelegt oben in die CD-Schublade
Die CD ist verschmutzt Reinigen Sie die CD
Zu geringe oder keine Wiedergabelautstärke Die Anschlüsse der Systemkomponenten . Überprüfen Sie die Anschlüsse
wurden nicht korrekt vorgenommen
Fehlfunktion des Verstärkers Überprüfen Sie die Regler- und
Schaltereinstellungen des Verstärkers
Es kann lediglich ein Titel wiedergegeben 1/All-Wiederholfunktion ist aktiv Betätigen Sie die Wiederholungstaste
werden
Die Wiedergabe einer programmierten . Die Programm-Taste wurde nicht betätigt Betätigen Sie die Programm-Taste
Titelfolge ist nicht möglich
Die Wiedergabe-Taste wurde nicht betätigt Betätigen Sie die Wiedergabe-Taste
Mistracking (Wiedergabe „springt“) Externe Erschütterungen wirken auf Stellen Sie den CD-Player an einem
den CD-Player ein anderen Ort auf
Die CD ist verschmutzt Reinigen Sie die CD
Brummen Das Cinchkabel wurde nicht richtig Stecken Sie die Stecker der Cinchkabel
angeschlossen richtig in die dafür vorgesehenen Buchsen
Geräusche während des Tunerbetriebes Der CD-Player steht zu nahe am Tuner Versuchen Sie den CD-Player möglichst
weit vom Tuner entfernt aufzustellen, oder
schalten Sie den CD-Player auf „Standby“
Die Steuerung mittels der Fernbedienung Der Fernbedienungswahlschalter ist nicht Stellen Sie den Schalter auf die
ist nicht möglich auf die korrekte Position eingestellt entsprechende Position ein
(siehe auch Seite 21)
In der Fernbedienung befinden sich keine Setzen Sie Batterien ein
oder leere Batterien
Es kann keine Programmierung Die Fernbedienung befindet sich nicht in Wählen Sie „CD“ auf der Fernbedienung
vorgenommen werden der CD-Betriebsart
Die numerische Tastatur spricht nicht an
Bevor Sie sich an Ihren Händler oder das zuständige Service-Center wenden, überprüfen Sie bitte anhand der folgenden Tabelle, ob Sie das
Problem vielleicht auf einfache Weise beheben können.

_
28
_
Questo apparecchio è stato studiato parti-
colarmente per la riproduzione di CD con il
marchio
˛ . Nessun altro tipo di CD può
essere riprodotto.
O Porre il CD sul piatto sempre con
l'etichetta rivolta verso l'alto (i CD sono
registrati solamente su di un lato).
O Per togliere il CD dal suo contenitore,
premere sul centro della scatola e
sollevare il disco verso l'alto, tenendolo
con cura sui lati.
Modo corretto di togliere il CD
Modo corretto di tenere il CD
OImpronte digitali e polvere devono
essere accuratamente tolte dal lato
registrato del disco con un panno
morbido.
Pulire in senso radiale
ONon fare mai uso di prodotti chimici
quali spray per dischi, spruzzatori o fluidi
antistatici, benzina o altri solventi per
pulire i CD. Questi prodotti chimici
possono danneggiare in modo irrepa-
rabile la superficie di plastica del CD.
OI CD, dopo l'uso, devono essere riposti
nella propria scatola, allo scopo di
evitare possibili scalfitture che
potrebbero causare lo "scivolamento"
del raggio laser di lettura.
OEvitare di esporre i CD alla diretta luce
del sole, all'umidità o ad alte tempe-
rature per periodi prolungati. Una lunga
esposizione ad alte temperature può far
ondulare i CD.
ONon incollare carta e non scrivere con
penne a sfera o simili oggetti appuntiti
sulla superficie del CD dal lato
dell'etichetta.
OScegliere con cura il luogo in cui
installare l'apparecchio. Evitare di
esporlo alla diretta luce del sole o ad
una sorgente di calore. Evitare inoltre
luoghi soggetti a vibrazioni o ad
eccessive accumulazioni di polvere,
calore, freddo od umidità. Tenere inoltre
l'apparecchio lontano da sorgenti di
disturbi quali trasformatori o motori.
ONon aprire la cassa dell'apparecchio.
Ciò potrebbe danneggiarne la circuita-
zione o causare scariche elettriche. Se
un qualche oggetto estraneo dovesse
essere entrato nell'apparecchio ste-sso,
rivolgersi al rivenditore.
OAccertarsi di non maneggiare i CD con
le dita sporche. Non inserire mai un CD
con la superficie crepata.
OPer staccare la spina dalla presa di rete,
agire direttamente sulla spina stessa,
evitando di tirare il cavo.
OPer mantenere pulito il pickup laser
evitare di toccarlo, e non dimenticare di
chiudere sempre il piatto del CD.
OEvitare di pulire l'apparecchio con
solventi chimici poichè ciò potrebbe
danneggiare la rifinitura esterna. Fare
semplicemente uso di un panno pulito ed
asciuto.
OTenere questo manuale in un luogo di
facile accesso, per ogni eventuale futuro
riferimento.
Indice
Prima dell'uso.............................................. 28
Collegamenti e descrizione
pannello posteriore ................................. 29
Funzioni e relativi controlli sul
pannello frontale...................................... 30
Display.......................................................... 30
Telecomando RC-613.................................. 31
Operazioni fondamentali............................ 32
Ascolto ripetuto........................................... 32
Ascolto programmato ................................ 33
Ascolto dei brani non progressivo........... 34
Display del tempo ....................................... 34
Caratteristiche tecniche............................ 34
Ricerca guasti ............................................. 35
Prima dell'uso
Leggere questo manuale prima
di procedere all'uso
Come tenere i CD
Attenzione alla condensazione
Quando l'apparecchio (o i dischi
compatti) viene trasferito da un luogo
freddo in uno caldo, o viene usato
dopo una brusca varizione di
temperatura, c'è il pericolo di
condensazione. Il vapore acqueo in
sospensione nell'aria può condensarsi
sul meccanismo o sul pickup laser. Se
delle gocce d'acqua si formano su
queste parti un ascolto corretto
diventa impossibile perchè il pickup
laser non può leggere perfettamente
l'informazione dal disco. Per far fronte
a questo problema, se si usa
l'apparecchio in condizioni ove sia
possibile il verificarsi della conden-
sazione, sarà opportuno attendere,
prima di utilizzare l'apparecchio, per
una o due ore, dopo aver inserito nella
presa di corrente il cavo di alimen-
tazione, per permettergli di stabi-
lizzarsi alla temperatura dell'ambiente.

_
29
_
ITALIANO
Collegamenti e descrizione pannello posteriore
1Prese REMOTE CONTROL
Servono per collegare tra loro i
componenti del sistema in modo che possa
essere azionato dal telecomando (il
modello RC-613 è in dotazione
all'amplificatore integrato AH-500) oppure
da segnali di controllo.
Collegare, con l'apposito cavetto, la presa
A alla relativa presa A (oppure la presa B
alla relativa presa B) dell'apparecchio
collocato sopra o sotto questo
apparecchio.
NOTA:
questo apparecchio non e' fornito di
telecomando.
Cavo per segnali
ingresso/uscita
Cavo per telecomando
2Selettore REMOTE CONTROL
Posizione SYSTEM
Portare il selettore in questa posizione
quando il sistema funziona collegato alle
prese A e B relative al telecomando
sull'amplificatore TEAC A-H500.
Posizione SINGLE
Scegliere questa posizione quando si vuole
pilotare singolarmente questo lettore di CD
tramite il telecomando (non fornito in
dotazione).
Nota:
Quando il selettore è in posizione SINGLE,
il lettore non può essere azionato tramite
l'amplificatore, nemmeno se questo è
azionato manualmente o puntando il
telecomando nella sua direzione.
3Terminali DIGITAL OUTPUT
OPTICAL
Servono per il collegamento ai terminali
DIGITAL INPUT OPTICAL su un lettore di
MD o su un convertitore D/A, tramite un
cavo a fibra ottica (non in dotazione).
Quando si collega il cavo a fibra ottica,
togliere il cappellotto sul terminale;
lasciare invece il cappellotto al suo posto
quando non si usa il cavo.
4Prese LINE OUT
Vanno collegate alle prese ingresso CD
sull'Amplificatore:
Spinotto bianco
T presa bianca (a
sinistra)
Spinotto rosso
T presa rossa (a destra)
5Cavo di alimentazione
Inserire questo cavo in una presa di rete,
oppure nella presa AC OUTLETS sul
pannello posteriore dell'amplificatore.
12 3 4 5
A-H500

_
30
_
Funzioni e relativi controlli sul pannello frontale
3Sensore telecomando
Viene usato quando il lettore viene pilotato
singolarmente tramite un telecomando
(opzionale).
Questo sensore svolge il suo compito solo
quando il selettore REMOTE CONTROL, sul
pannello posteriore, si trova in posizione
SINGLE.
4Cassetto del disco.
Aprire il cassetto e inserirvi il disco con
l'etichetta rivolta verso l'alto.
Quando si riproduce un CD singolo da 8
cm, verificare che si trovi proprio al centro
del cassetto.
5 Indicatore modo Time (tempo)
6 Indicatore contanastro/numero
programma
Riporta normalmente l'indicatore del tempo
in minuti e secondi. Durante il modo di
programmazione mostra invece il numero
di programma.
7 Indicatore REPEAT (ascolto
ripetuto)
ONE : si accende quando è in corso
l'ascolto ripetuto di un singolo brano.
ö : si accende quando è in corso
l'ascolto ripetuto dell'intero disco.
A-B : si accende quando è in corso
l'ascolto ripetuto della sezione A-B.
8 Over mark
Questo indicatore si accende quando il
numero dei brani presenti sul disco è pari a
16, o più.
9 Display calendario dei brani.
0 Indicatore di programma.
q Indicatore di ascolto Shuffle
(non progressivo)
Display
12
3
45 6 7
34 5
21 0 9 8 7
q0 9
8
5Tasto Open/Close (∫)
Premere questo tasto per aprire il cassetto
del disco.
Premere il tasto ancora una volta per
richiudere il cassetto.
6Tasti Skip (Ú/Æ)
Servono per scegliere il brano desiderato
sul disco;
Æ: per effettuare il salto di un brano in
avanti.
Ú: per effettuare il salto di un brano
all'indietro.
Premendo il tasto una sola volta, si
salta all'inizio del brano in corso.
Mantenendo premuto il tasto, si
salta in sequenza ai brani
precedenti.
7Tasto Pause (ƒ) (pausa)
Premere questo tasto per imporre una
pausa alla riproduzione.
Per riprendere la riproduzione, premere il
tasto di nuovo, oppure premere Play (
∏).
8Tasto Play (∏) (ascolto)
Quando si prema questo tasto inizia
l'ascolto.
9Tasto Stop
Premendo questo tasto, l'ascolto si
interrompe.
0Display
Vengono qui visualizzati gli stati operativi in
atto.
1Tasto Power
(accensione/standby).
2Indicatore Power
(accensione/standby)
Si illumina quando l'apparecchio è
alimentato ma in condizione di attesa; si
spegne quando l'apparecchio viene
acceso.
1 Indicatore Play (ascolto)
2 Indicatore Pause (pausa)
3 Indicatore numero del brano
4 Indicatore numero Indice
6

_
31
_
ITALIANO
Telecomando RC-613
1Tasto Power (accensione)
2Tasto Power (standby).
3Indicatore
Lampeggia in verde nel modo operativo
CD; lampeggia in rosso negli altri modi
operativi.
4Tasti per comandare il
registratore a cassetta.
5Tasti numerici
Vengono usati per scegliere il numero dei
brani contenuti nel CD, oppure per pre-
selezionare le emittenti sul sintonizzatore.
Possono essere usati per il CD dopo aver
premuto il tasto CD o CD Play (
∏).
6Selettori d'ingresso
dell'amplificatore.
7Tasti per comandare il
sintonizzatore.
8Tasti per comandare il lettore di
CD:
OTasti Search (/Ò)
Servono per la ricerca rapida del brano
desiderato quando il lettore è in Play o
Pause.
Ò: per la ricerca in avanti
: per la ricerca all'indietro
OTasti Skip (Ú/Æ) (salto di uno o più
brani)
OTasto Play (∏) (ascolto)
OTasto Pause (ƒ) (pausa)
OTasto Stop (∑)
OTasto Time (vedi pagina 34)
OTasti per ascolto ripetuto
(1 brano/tutti i brani/sezione A-B) (vedi
pagina 32)
OTasto Program (ascolto programmato)
(vedi pagina 33)
OTasto Clear (cancellazione) (vedi pagina
33)
OTasto Shuffle (ascolto non progressivo)
(vedi pagina 34)
OTasto Skip Disc (salto di un disco)
Serve solo per i lettori di CD multipli.
Non è quindi disponibile per un lettore di
CD singolo, come il PD-H500
9Tasti Volume
O+: per aumentare il volume.
O–: per diminuire il volume.
0Tasto Dimmer (attenuatore di
luce)
Premere questo tasto quando si vuole
diminuire la luminosità dei display;
premerlo una seconda volta per
ripristinare la luminosità normale.
qTasto Sleep Timer
Serve ad attivare il temporizzatore per la
funzione Sleep nel sintonizzatore T-H500.
NOTA:
Questo telecomando (RC-613) fa parte
degli accessori in dotazione
all'amplificatore integrato A-H500.
wTasto di modo RDS
2
1
q
0
w
3
4
5
6
7
8
9

(Questo tipo di ascolto può essere attivato
soltanto tramite il telecomando.)
∑ Funzione One Repeat Play (ascolto
ripetuto di un brano)
OPremere una volta il tasto 1/ALL
Repeat.
- Verrà letto ripetutamente solo il brano
in corso.
*Selezionando altri brani mentre è
attiva la funzione One Repeat Play,
verrà ripetuto il brano selezionato per
ultimo.
∑ Funzione All Repeat Play (ascolto
ripetuto di tutti i brani)
OPremere ancora una volta il tasto
1/ALL Repeat.
- Verranno letti ripetutamente tutti i
brani contenuti nel disco.
*Se ci sono brani programmati,
verranno ripetuti solo quelli.
* Premere il tasto ancora una volta per
porre termine a questa funzione
∑ Funzione A-B Repeat Play (ascolto
ripetuto della porzione A-B)
(1)Nel corso della lettura, premere il
tasto A-B Repeat dove si vuole che
inizi la ripetizione: tale punto resta
designato come (A).
- Sul display si accenderà l'indicatore
"A", mentre "B" lampeggerà.
(2)Premere di nuovo il tasto dove si
vuole che la ripetizione abbia fine:
tale punto resta designato come (B).
- Sul display si accenderà allora
l'indicatore "A-B" e verrà letta
ripetutamente. solo la porzione A-B
del disco
(3)Premere il tasto ancora una volta per
porre fine a questa funzione.
_
32
_
Ascolto ripetuto
Operazioni fondamentali
1 Premere il tasto Open/Close (∫).
Il cassetto del disco uscirà verso
l'esterno.
2 Appoggiare sul cassetto il disco da
ascoltare, con l'etichetta rivolta verso
l'alto.
3 Premere ancora il tasto Open/Close.
Il cassetto del disco si richiude
(attenzione a non chiuderci dentro
anche qualche dito).
Vengono visualizzati il numero
complessivo dei brani ed il tempo totale
di ascolto.
4 Scegliere il brano desiderato
premendo il tasto Skip (
Ú/Æ).
5 Premere il tasto Play (∏): ha inizio
l'ascolto del CD.
6 Premere il tasto Pause (ƒ) per
interrompere l'ascolto.
7 Premere il tasto Stop quando si vuole
fermare l'ascolto, tornando alla
posizione iniziale
NOTA:
Questo apparecchio inizierà automatica-
mente a riprodurre nei seguenti casi:
Oquando si sceglie la posizione CD
sull'amplificatore (A-H500).
Oquando si accende l'impianto con il
selettore d'ingresso dell'amplificatore
predisposto su CD.
∑ Funzione di memoria.dell'ultima
posizione
Quando si preme il tasto Program durante
l'ascolto, il lettore ritorna nella posizione in
cui si trovava alla precedente pressione
del tasto Stop. L'ascolto riprendera' quindi
del brano che contiene quella posizione.
Il tempo totale
di ascolto
Numero
complessivo dei
brani
Ultimo
brano
Primo
brano

_
33
_
ITALIANO
Questa funzione permette di programmare
fino a 32 brani, nell'ordine desiderato.
Informazioni preliminari:
OLa programmazione si può effettuare
solo tramite il telecomando.
OLa programmazione può avvenire solo
quando il lettore si trova nel modo Stop.
∑ Programmazione mediante i tasti
numerici
1. Premere il tasto CD.
I tasti numerici funzionano ora come
selettori dei brani sul disco.
2. Premere il tasto Program, nel modo Stop
Sul display apparirà:
3. Scegliere i brani desiderati premendo i
tasti numerici.
Esempio: 2T6T12
Il secondo, il sesto e il dodicesimo brano
risultano così programmati in sequenza.
4. Premere il tasto Play (∏).
I brani cominceranno ad essere letti,
nell'ordine programmato.
NOTE:
OSe si preme il tasto Program nel corso
della programmazione, la stessa si
interromperà e subentrerà la funzione
Program Recall
OFermando la lettura, i brani programmati
scompariranno dal display ma non
verranno cancellati.
Quando si desidera richiamarli, basta
premere il tasto Program.
∑ Programmazione mediante i tasti
Music Skip
1. Premere il tasto Program, con
l'apparecchio nel modo Stop.
2. Scegliere il brano desiderato
utilizzando i tasti Music Skip
(
Ú/Æ)
Esempio: Brano No.5
3. Premere ancora il tasto Program.
Il brano No.5 risulta così inserito come
No.1 del programma.
4. Ripetere i passi 2. e 3. per procedere
alla programmazione di altri brani.
5. Premere il tasto Play (
∏).
La riproduzione a programma avrà inizio,
rispettando la sequenza scelta.
NOTA:
Premendo il tasto Program due volte
consecutive nel corso della
programmazione, la stessa si interromperà
e subentrerà la funzione Program Recall.
Informazioni supplementari:
OSul display appare la scritta "FULL" dopo
che è stato letto il 33esimo brano (non è
possibile inserirne altri).
ONon si possono programmare numeri di
brani che non risultano presenti nel
disco.
OI brani programmati non vengono
cancellati quando si spegne
l'apparecchio; vengono invece
cancellati quando si apre il cassetto del
disco.
OL'apparecchio si ferma
automaticamente quando tutti i brani
programmati sono stati letti; la relativa
scritta sul display scompare, ma i brani
non vengono cancellati.
OSi può programmare con il cassetto del
disco aperto.
I numeri dei brani che non risultano
presenti sul disco verranno
automaticamente cancellati quando il
disco comincia ad essere letto.
∑ Richiamo della Lettura program-
mata
Dato che il contenuto del programma non
si cancella nemmeno fermando la
riproduzione o spegnendo l'apparecchio,
potrà essere richiamato in un secondo
tempo.
1. Premere il tasto Program.
Apparirà sul display il numero del primo
brano programmato.
2. Per verificare il contenuto del
programma, premere ripetutamente il
tasto Program.
Ad ogni pressione apparirà sul display,
in sequenza, il numero del successivo
brano programmato.
3. Premere il tasto Play (∏), se si
desidera ascoltare il disco nell'ordine
programmato.
∑ Cancellazione di tutti i brani
programmati
1. Premere il tasto Program.
2. Premere il tasto Clear e lasciarlo
premuto per più di 2 secondi.
Tutti i brani programmati verranno allora
cancellati, anche se il cassetto del disco
è aperto.
NOTA:
I tasti Program e Clear funzionano solo nel
modo Stop.
* Modifica dei brani programmati
OCancellazione:
Si possono cancellare dal programma
originale brani indesiderati.
1. Premere ripetutamente il tasto Program,
fino a quando appare sul display il
numero del brano da cancellare.
2. Premere il tasto Clear.
Il numero del brano verrà allora
eliminato dal programma.
Ad ogni successiva pressione del tasto,
verrà eliminato uno degli altri brani del
programma.
∑ Aggiunta di un brano, dopo l'ultimo
programmato.
1. Continuare a premere il tasto Program
fino a quando appare sul display la
scritta "END".
2. Inserire i nuovi brani come già fatto per
la normale programmazione, quando
"END" non è più visualizzato.
∑ Aggiunta di brani, in qualsiasi altra
posizione
1. Scegliere il numero del programma al
quale si vuole aggiungere un brano
premendo il tasto Program.
2. Inserire il nuovo brano come già fatto
per la normale programmazione.
Ascolto programmato
No.
Programma
No. di brano

_
34
_
Sistema laser : a 3 fasci
Filtro digitale :
ad ottuplo sovracampionamento
Risposta in frequenza :
20 Hz - 20 kHz (±2 dB)
Sistema correzione errori :
Cross Interleave Reed-Solomon
Code
Rapporto segnale/rumore :
maggiore di 100 dB (con filtro "A"
IHF)
Distorsione armonica totale :
minore di 0,02% (1 kHz)
Tensione d'uscita : 2 V RMS
Alimentazione : 230 V, 50 Hz
Potenza assorbita : 9 W
Dimensioni (largh. x alt. x prof.) :
285 x 132 x 292 mm
Peso : 3,9 kg
Accessori in dotazione:
1 cavo per segnali ingresso/uscita
1 cavo per telecomando
OEventuali miglioramenti possono com-
portare cambiamenti di dati tecnici e di
caratteristiche senza preavviso.
OLe fotografie e le illustrazioni possono
differire leggermente dal modelli pro-
dotti.
Caratteristiche tecniche
(Questo tipo di ascolto può essere gestito
soltanto tramite il telecomando.)
1. Premere il tasto Shuffle.
I brani verranno letti in ordine non
progressivo.
2. Premere ancora il tasto per porre fine a
questa funzione:
la lettura proseguirà nel normale ordine
progressivo, a partire dal brano
successivo.
NOTE:
1. Questa funzione è disponibile anche
quando il lettore si trova nel modo Stop o
in lettura.
2. Quando si preme il tasto
Æ durante la
lettura Shuffle, il brano viene scelto
casualmente, senza tener conto del
numero del brano in corso.
Quando invece si preme il tasto
Ú, la
lettura partirà dall'inizio del brano in
corso.
3. Il brano selezionato verrà letto una volta
sola.
(Questa funzione può essere attivata solo
tramite il telecomando.)
Stati del display
Sul display del contatempo di questo
apparecchio possono apparire quattro
diverse letture relative al tempo.
1. Quando inizia la lettura, viene
visualizzato il tempo trascorso
dall'inizio del brano.
2. Premendo una volta il tasto Time
durante la lettura,
verrà visualizzato il
tempo restante del brano in corso.
3. Premendo una seconda volta il tasto
Time,
verrà visualizzato il tempo totale
trascorso del disco.
4. Premendo una terza volta il tasto Time
verrà infine visualizzato il tempo totale
restante del disco.
NOTE:
1. Durante l`ascolto programmato, il tempo
non verrà visualizzato se la durata dei
brani programmati supera i 100 minuti: in
questo caso apparirà invece questo
simbolo "----".
2. Premendo il tasto Time quando
l'apparecchio è nel modo Stop verranno
visualizzati il numero totale dei brani e il
tempo totale di lettura del disco.
3. Dopo che è stato letto il 33esimo brano,
non verrà più visualizzato il tempo
restante.
Ascolto dei brani non
progressivo
Display del tempo

_
35
_
ITALIANO
Ricerca guasti
Problema Causa probabile Rimedio
Quando si preme il tasto Power La spina di alimentazione non è ben Inserire correttamente la spina
l'apparecchio non si accende. inserita
Quando il disco è inserito l'apparecchio Il disco è stato caricato alla rovescia. Caricare il disco con l'etichetta verso
non lo legge. l'alto.
Il disco è sporco Pulire la superficie del disco.
Non si sente il suono (oppure ha un Il collegamento al sistema non è corretto. Verificare i collegamenti.
livello d'uscita troppo basso)
Cattivo funzionamento dell'amplificatore. Verificare la posizione dei commutatori
di controllo dell'amplificatore
Può essere letto soltanto un brano. E' attivo il tasto 1/ALL. Premere il tasto per disattivarlo.
Impossibile la lettura programmata. Non è premuto il tasto PROGRAM. Premere il tasto per far visualizzare
"PROGRAM".
Non è premuto il tasto PLAY. Premere il tasto PLAY.
Errata centratura sulla traccia L'apparecchio è soggetto a vibrazioni Cambiare la posizione di installazione.
(suono saltellante) od urti.
Il disco è sporco Pulire la superficie del disco.
Ronzio La spina del cavo di collegamento non è Inserire di nuovo la spina a fondo.
ben inserita.
Rumore proveniente dal sintonizzatore. Il lettore di CD è troppo vicino al Tenere i due apparecchi ad una ragionevole
sintonizzatore. distanza, oppure spegnere il lettore.
Impossibile l'azionamento mediante Il selettore REMOTE CONTROL non è Portare il selettore nella giusta posizione
telecomando. posizionato correttamente. (vedi pagina 29).
Nel telecomando non sono inserite le pile. Inserire le pile nel telecomando.
Impossibile la programmazione. (Non sono Sul telecomando è stata selezionata una Selezionare la funzione CD sul telecomando.
accettati i numeri selezionati con i tasti) funzione diversa da CD.
Prima di richiedere un intervento di assistenza, verificare se il problema riscontrato è riportato sulla tabella che segue ed applicare il rimedio
consigliato.

_
36
_
Este aparato ha sido específicamente
diseñado para la reproducción de compact
disc con la marca
˛. No pueden
reproducirse otros discos.
OColoque siempre el compact disc en la
bandeja con la etiqueta hacia arriba.
(Los compact disc pueden reproducirse
de un solo lado.)
OPara sacar el disco de su caja, presione
el centro de la caja y retire el disco
sujetándolo por los bordes con cuidado.
Modo correcto de sacar el disc
Modo correcto de sujetar el disc
ODebe limpiarse cuidadosamente la
superficie grabada con un paño suave
eliminando las huellas digitales y el
polvo.
Limpiar radialmente
ONo utilice productos químicos tales
como pulverizadores para limpiar
discos, pulverizadores o líquidos
antiestáticos, bencina o diluyente para
limpiar los compact disc. Tales
productos dañarán irreparablemente la
superficie plástica del disco.
OGuarde siempre los discos en sus cajas
luego de escucharlos para evitar rayas
de consideración que podrían hacer
"saltar" el fonocaptor laser.
ONo deje los discos expuestos a la luz
directa del sol o en lugares con alta
humedad y temperatura por mucho
tiempo.
Una prolongada exposición a altas
temperaturas puede alabear el disco.
ONo fije papeles ni escriba con un
bolígrafo sobre la superficie de la
etiqueta.
OElija con cuidado el lugar de instalación
para su aparato. No lo coloque a la luz
solar directa o cerca de fuentes que
generen calor. Evite también lugares
expuestos a vibraciones y muy
polvorientos, calurosos, fríos o
húmedos. Manténgalo alejado de
fuentes de zumbidos tales como
transformadores o motores.
ONo abra el gabinete ya que esto podría
producir daños en los circuitos o
electrochoques. Si entrara algún objeto
en el interior del aparato, póngase en
contacto con su concesionario.
ONo toque los discos con los dedos
sucios. Nunca coloque un disco que
tenga la superficie rayada.
OAl desenchufar el cordón del
tomacorriente, tire siempre de la clavija,
nunca del cordón.
OPara mantener limpio el fonocaptor
laser, no lo toque y no olvide cerrar la
bandeja portadisco.
ONo utilice solventes químicos para
limpiar el aparato ya que podría dañar el
acabado. Use un paño seco y limpio.
OGuarde este manual en un lugar seguro
para usarlo como referencia en el
futuro.
Índice
Conexiones del panel posterior................ 37
Los controles del panel frontal
y sus funciones ........................................ 38
Pantalla......................................................... 38
Mando a distancia...................................... 39
Funcionamiento básico.............................. 40
Repetición.................................................... 40
Reproducción programada....................... 41
Reproducción al azar................................. 42
Contador....................................................... 42
Especificaciones......................................... 42
Solución de problemas.............................. 43
Previo al empleo
Lea lo siguiente antes de poner
en funcionamiento el aparato
Manipulación de discos
Cuidado con la condensación
Cuando se cambia el reproductor (o un
compact disc) de un lugar frío a otro
cálido o cuando se utiliza luego de un
cambio brusco de temperatura, existe
el peligro de condensación. El vapor
de agua en el aire puede condensarse
en el mecanismo o en el fonocaptor
laser. Si se forman gotas de agua en
estas partes, será imposible lograr una
reproducción adecuada debido a que
el laser no leerá correctamente la
información del disco. Para prevenir
esto, si va a utilizar el reproductor en
un lugar donde pueda producirse
condensación, déjelo durante 1 ó 2
horas enchufado en un tomacorriente
de alterna según la cantidad de
condensación. De este modo, el
reproductor se estabilizará según la
temperatura de la zona circundante.

_
37
_
ESPAÑOL
Conexiones del panel posterior
1Terminales de control remoto
Estos terminales se utilizan para conectar
el sistema de Mini Componentes TEAC (T-
H500, R-H500, A-H500) a fin de controlarlo a
través del mando a distancia (RC-613,
incluido con el amplificador A-H500) o de
las señales de control del sistema.
Conecte el terminal A (o B) del reproductor
de CD al terminal A (o B) de la otra unidad,
situada encima o debajo de ella.
Nota:
No se incluye el mando a distancia con
este equipo.
Cable de entrada/salida de señal
Cable de control
remoto
2Selector de control remoto
Posición SYSTEM:
Seleccione esta posición cuando desee
controlar desde el mando a distancia todo
el sistema conectado a través de los
terminales de control remoto A y B del
amplificador A-H500.
Posición SINGLE:
Seleccione esta posición cuando desee
controlar únicamente este componente
desde el mando a distancia opcional (no
incluido).
Nota:
En la posición SINGLE, el reproductor no
podrá ser controlado manualmente desde
el amplificador ni desde el mando a
distancia del sistema.
3Terminales ópticos de salida
digital (DIGITAL OUTPUT
OPTICAL)
Estos terminales se utilizan para la
conexión a los terminales DIGITAL INPUT
OPTICAL de reproductor de MD y del
convertidor D/A por medio del cable de
fibra óptica (no incluido).
Cuando conecte el cable de fibra óptica,
retire el tapón del terminal. Deje el tapón
puesto cuando no utilice el terminal.
4Salidas LINE OUT
Conecte estas salidas a las entradas CD
del amplificador:
Clavija blanca
T terminal blanco (izquierda)
Clavija roja
T terminal rojo (derecha)
5Cable de alimentación
Conecte este cable a una toma mural o a la
toma de c.a. del amplificador.
12 3 4 5
A-H500

_
38
_
Los controles del panel frontal y sus funciones
1botón de encendido/apagado
2indicador de espera
Este indicador permanece iluminado en el
modo de espera, y apagado cuando la
unidad está encendida.
3sensor remoto
Este sensor se utiliza para el control
independiente del reproductor desde el
mando a distancia opcional.
Sólo está operativo cuando el selector de
control remoto del panel posterior se
encuentra en la posición SINGLE.
1 Indicador de reproducción
2 Indicador de pausa
3 Indicador de número de pista
4 Indicador de número de índice
4bandeja de disco
Cargue un disco en la bandeja con la
etiqueta hacia arriba.
En el caso de los CD sencillos de 8†cm (3"),
compruebe que el disco queda situado en
el centro de la bandeja.
5botón de apertura/cierre (∫)
Pulse este botón para abrir y cerrar la
bandeja de disco.
7 Indicador de repetición
ONE : Se ilumina cuando está activado el
modo de repetición de una sola pista.
ö : Se ilumina cuando está activado el
modo de repetición del disco
completo.
A-B : Se ilumina cuando está activado el
modo de repetición de la sección A-B.
8 Indicador de exceso de pistas
Este indicador se ilumina cuando el número
total de pistas del disco es 16 o más.
9 Calendario musical
0 Indicador de programa
q Indicador de reproducción al
azar
Pantalla
12
3
45 6 7
6botones de salto de pista
(
Ú/Æ)
Estos botones se emplean para
seleccionar la pista deseada del disco.
Æ : Salto hacia adelante.
Ú : Salto hacia atrás.
Puede saltar hasta el comienzo de la
pista en curso pulsando el botón una
vez. Si mantiene pulsado el botón,
puede saltar a las pistas anteriores
de forma secuencial.
7botón de pausa (ƒ)
Pulse este botón para detener
momentáneamente la reproducción.
Para reanudarla, pulse de nuevo este
botón o el de reproducción (
∏).
8botón de reproducción (∏)
Pulse este botón para dar comienzo a la
reproducción.
9botón de parada
Pulse este botón para detener la
reproducción.
0pantalla
Esta pantalla informa sobre la situación
operativa de la unidad en cada momento.
q0 9
8
34 5
21 0 9 8 7
6
5 Indicador de modo de contador
6 Contador de tiempo/indicador
de número de programa
Esto indica el tiempo correspondiente al
mode de indicación de tiempo, en minutos
y segundos. Durante la activación del
modo de programa, el número de
programa aparece indicado aquí.

_
39
_
ESPAÑOL
Mando a distancia
1botón de encendido
2botón de apagado (espera)
3indicador luminoso
Este indicador parpadea en verde en el
modo de CD, y en rojo en el resto de
modos.
4Botones operativos de la platina
5Botones numéricos
Estos botones numéricos se utilizan para
seleccionar números de pista del CD o
para presintonizar canales en el
sintonizador.
También pueden utilizarse para controlar el
CD después de pulsar el botón CD o el de
reproducción (
∏).
6Selectores de entrada del
amplificador
7Botones operativos del
sintonizador
8Botones operativos del
reproductor de CD:
Obotones de búsqueda (/Ò)
Estos botones se utilizan para buscar
rápidamente una posición deseada
durante la reproducción o en el modo de
pausa.
Ò: búsqueda hacia adelante
: búsqueda hacia atrás
Obotones de salto de pista (Ú/Æ)
Obotón de reproducción (∏)
Obotón de pausa (ƒ)
Obotón de parada (∑)
Obotón de contador (véase página 42)
Obotones de repetición (1/ALL, A-B)
(véase página 40)
Obotón de programa (véase página 41)
Obotón de borrado (véase página 41)
Obotón de reproducción al azar (véase
página 42)
Obotón de salto de disco
Este botón se emplea únicamente con el
cambiador de CD.
Por tanto, permanece inoperativo en
reproductores sencillos como el PD-
H500.
9botones de volumen +/-
O+: pulse este botón para elevar el
volumen
O–: pulse este botón para reducir el
volumen
0botón de brillo
Pulse este botón para oscurecer las
pantallas del equipo.
Pulse el botón de nuevo para restablecer
el brillo original.
qbotón de desconexión
automática
Este botón se utiliza para activar el modo
de desconexión automática del
sintonizador T-H500.
Nota:
Este mando a distancia (RC-613) va
incluido con el amplificador A-H500.
wbotón del modo RDS
2
1
q
0
w
3
4
5
6
7
8
9

_
40
_
(Esta función sólo se puede activar desde
el mando a distancia.)
∑ Repetición de una pista
OPulse una vez el botón de repetición
"1/ALL".
- Se repetirá la reproducción de la
pista en curso.
*Si cambia de pista durante la
repetición de una de ellas, se repetirá
la última pista seleccionada.
∑ Repetición de todas las pistas
OPulse de nuevo el botón de repetición
"1/ALL".
- Se repetirá la reproducción de todas
las pistas del disco.
* Cuando hay pistas programadas, sólo
se repetirá la reproducción de éstas.
*Pulse de nuevo el botón para
cancelar la función de repetición.
∑ Repetición A-B
(1)Durante la reproducción, pulse el
botón de repetición A-B en el punto
de inicio deseado (A).
- En la pantalla se visualiza "A-", y "B"
aparece intermitente.
(2)Pulse el botón de nuevo en el punto
final del fragmento (B).
- En la pantalla se visualiza "A-B", y se
repite el fragmento comprendido
entre los puntos A y B.
(3)Pulse de nuevo el botón para
cancelar la repetición A-B.
Repetición
Funcionamiento básico
1 Pulse el botón de apertura/cierre (∫)
La bandeja de disco se deslizará hacia
afuera.
2 Cargue un disco con la etiqueta hacia
arriba.
3 Pulse de nuevo el botón de
apertura/cierre.
La bandeja se cerrará. Tenga cuidado
de no obstaculizar el cierre con la
mano.
En la pantalla se visualizará el número
total de pistas y el tiempo total de
reproducción del disco.
4 Seleccione la pista deseada con el
botón de salto de pista (
Ú/Æ).
5 Pulse el botón de reproducción (∏), y
el disco se pondrá en funcionamiento.
6 Cuando desee suspender
momentáneamente la reproducción,
pulse el botón de pausa (
ƒ).
7 Para detener la reproducción, pulse el
botón de parada.
Nota
La unidad comenzará automáticamente la
reproducción en los siguientes casos:
OCuando seleccione "CD" en el
amplificador (A-H500).
OCuando encienda el equipo estando
seleccionada la posición "CD" del
selector de entrada del amplificador.
∑ Memoria de última posición
Si se pulsa el botón de programa durante
la reproducción normal, el reproductor
regresará a la posición en que se pulsó el
botón de parada. Seguidamente, la
reproducción se reanudará desde la pista
correspondiente (a dicha posición).
Tiempo total de
reproducción
Número total
de pistas
Ultima
pista
Primera
pista

_
41
_
ESPAÑOL
Con esta función puede programar hasta
32 pistas en el orden deseado.
Antes de comenzar:
OLa programación sólo se puede realizar
desde el mando a distancia.
OLa programación sólo se puede realizar
desde la posición de parada.
∑ Programación con los botones
numéricos
1. Pulse el botón CD.
Los botones numéricos actuarán como
selectores de las pistas del disco.
2. Pulse el botón de programa desde la
posición de parada.
En la pantalla se visualizará:
3. Seleccione las pistas deseadas
pulsando los botones numéricos.
Ejemplo: 2T6T12
Las pistas número 2, 6 y 12 quedan
programadas en ese orden.
4. Pulse el botón de reproducción (∏)
Se iniciará la reproducción del
programa en el orden especificado.
Notas:
OSi pulsa el botón de programa durante la
programación, quedará cancelada y se
activará la función de reproducción de
programa.
OSi detiene la reproducción, el contenido
del programa desaparecerá de la
pantalla, pero no se borrará.
Pulse el botón de programa cuando
desee seleccionar el contenido
programado.
∑ Programación con el botón de salto
de pista
1. Pulse el botón de programa desde la
posición de parada.
2. Seleccione la pista deseada con el
botón de salto (
Ú/Æ).
Ejemplo:
pista número 5.
3. Pulse de nuevo el botón de programa.
La pista número 5 queda programada
con el número 1.
4. Repita los pasos 2 y 3 para programar
otras pistas.
5. Pulse el botón de reproducción (
∏)
El programa comenzará a reproducirse
en el orden especificado.
Nota:
Si pulsa el botón de programa dos veces
seguidas durante la programación,
quedará cancelada y se activará la función
de reproducción de programa.
Observaciones:
O"FULL" aparece en la pantalla después
de programar la pista n° 33 (ya no es
posible incluir más pistas en el
programa).
ONo se pueden programar números de
pista que no existan en el disco.
OEl contenido del programa no se borra
aunque se apague el equipo, pero se
borrará cuando se abra la bandeja.
OLa unidad se detendrá automáticamente
cuando todas las pistas programadas
hayan sido reproducidas. El contenido
del programa desaparecerá de la
pantalla, pero no se borrará.
OEs posible programar con la bandeja
abierta.
Los números de pista que no existan en
el disco se borrarán automáticamente
en el momento de iniciarse la
reproducción.
∑ Reproducción del programa
Puesto que el contenido del programa no
se borra aunque se detenga la
reproducción o se apague el equipo, más
tarde podrá reproducirlo.
1. Pulse el botón de programa.
La primera pista programada se
visualizará en la pantalla.
2. Pulse repetidas veces el botón si desea
revisar el contenido del programa.
Cada vez que pulse el botón, en la
pantalla irán apareciendo por orden las
pistas programadas.
3. Pulse el botón de reproducción (∏) si
desea reproducir el disco en el orden
programado.
∑ Borrado del programa
1. Pulse el botón de programa.
2. Mantenga pulsado 2 segundos el botón
de borrado.
Todo el contenido del programa quedará
borrado del mismo, igual que si se abre
la bandeja de disco.
Nota:
El botón de programa y el botón de borrado
sólo están operativos desde la posición de
parada.
* Cambio del contenido del programa
OSupresión de pistas:
Las pistas no deseadas se pueden
suprimir del programa original.
1. Pulse repetidas veces el botón de
programa hasta que aparezca en la
pantalla el número de la pista que
desea suprimir del programa.
2. Pulse el botón de borrado.
El número de pista quedará suprimido
del programa.
Si pulsa varias veces el botón, se irán
borrando una a una las siguientes pistas
del programa, una cada vez que se pulse
el botón.
∑ Añadido de pistas al final del
programa:
1. Pulse repetidas veces el botón de
programa hasta que visualice "END" en
la pantalla.
2. Cuando desaparezca "END" de la
pantalla, introduzca las nuevas pistas
por el método normal de programación.
∑ Añadido de pistas en cualquier
posición:
1. Seleccione el número de programa en el
que desea añadir la nueva pista
pulsando el botón de programa.
2. Utilice el método de programación
normal para introducir la nueva pista.
Reproducción programada
Program NO.
(n° de programa)
Track NO.
(n° de pista)

_
42
_
Sistema láser : 3 haces
Filtro digital : Óctuple sobremuestreo
Respuesta en frecuencia :
20-20.000 Hz (±2dB)
Método corrección errores : CIRC
Relación señal/ruido :
Más de 100dB (con filtro IHF "A")
Distorsión armónica total :
Menor de 0,02% (1 kHz)
Tensión de salida : 2 V RMS
Alimentación : 230 V, 50 Hz
Consumo : 9 W
Dimensiones (anch. x alt. x prof.) :
285 x 132 x 292 mm
Peso : 3,9 kg
Accesorios
Cable entrada/salida señal : 1
Cable de control remoto : 1
OPosibles mejoras puede originar
cambios en las especificaciones o
características sin aviso.
OLas fotos e ilustraciones puede diferir
ligeramente de los modelos de
producción.
Especificaciones
(Esta función sólo se puede activar desde
el mando a distancia).
1. Pulse el botón de reproducción al azar.
Las pistas se reproducirán en un orden
aleatorio.
2. Pulse de nuevo el botón para cancelar
la reproducción al azar.
Cuando se cancela esta función, la
reproducción continuará normalmente a
partir de la siguiente pista.
Notas
1. Esta función se puede activar desde las
posiciones de parada y de reproducción.
2. Si pulsa el botón "
Æ" durante la
reproducción al azar, podrá seleccionar
las pistas al azar con independencia del
número de pista en curso. Y si pulsa el
botón "
Ú", la reproducción se iniciará
desde el principio de la pista en curso.
3. Una pista ya reproducida en una
ocasión no podrá hacerlo más veces.
(Esta función sólo se puede activar desde
el mando a distancia).
Estados de la pantalla
Esta unidad puede ofrecer cuatro tipos de
lectura de tiempo en el contador:
1. El tiempo transcurrido de la pista en
curso se visualiza cuando da comienzo
la reproducción.
2. Pulse una vez el botón de contador
durante la reproducción,
y se visualizará
el tiempo restante de la pista en curso.
3. Pulse de nuevo el botón de contador.
Aparecerá la lectura del tiempo total
transcurrido del disco.
4. Vuelva a pulsar el botón.
Se visualizará el tiempo total restante
del disco.
Notas
1. El tiempo no se visualizará durante la
reproducción de un programa si el
contenido del mismo excede de 100
minutos. En su lugar aparecerá la
indicación "--.--".
2. Si pulsa el botón de contador desde la
posición de parada, en la pantalla
aparecerán el número total de pistas y el
tiempo total de reproducción del disco.
3. Cuando se reproduzca la pista número
33 o superior, no se ofrecerá la lectura
de tiempo restante.
Reproducción al azar
Contador

_
43
_
ESPAÑOL
Solución de problemas
Problema Probable causa Solución recomendada
El equipo no se enciende cuando se pulsa El cable de alimentación no está bien Conéctelo debidamente.
el botón de encendido. conectado.
No se inicia la reproducción cuando se Disco insertado con la etiqueta hacia abajo. Déle la vuelta al disco.
carga el disco.
El disco está sucio. Limpie la superficie del disco.
No hay salida de sonido (o es muy débil). Conexión al sistema estéreo incorrecta. Revise las conexiones.
Anomalía en el amplificador. Revise los ajustes de control/interruptor
del amplificador.
Sólo se puede reproducir una pista. Está activado el botón "1/ALL". Púlselo de nuevo para desactivarlo.
No es posible la reproducción programada. No ha pulsado el botón de programa. Pulse el botón para que se visualice
"PROGRAM".
No ha pulsado el botón de reproducción. Pulse el botón.
Saltos de sonido. El reproductor está sometido a vibraciones Cambie la unidad de emplazamiento.
o impactos.
El disco está sucio. Limpie la superficie del disco.
Se percibe un zumbido Clavija mal conectada. Conéctela debidamente.
Ruido en el sintonizador. El reproductor está demasiado cerca del epárelos razonablemente o apague el
sintonizador. reproductor.
No es posible controlar el equipo con el El interruptor REMOTE CONTROL SELECTOR Seleccione la posición adecuada.
mando a distancia. no está en la posición adecuada. Consulte la página 37.
No ha insertado pilas en el mando. Inserte las pilas.
No es posible programar. Las entradas de El mando a distancia tiene seleccionado Seleccione CD en el mando a distancia.
los botones numéricos no son aceptadas. un modo distinto de CD.
Antes de solicitar asistencia técnica, compruebe los puntos de la siguiente tabla por si identifica la causa del problema.

TEAC CORPORATION
3-7-3, Nakacho, Musashino-shi, Tokyo 180, Japan Phone: (0422) 52-5081
TEAC AMERICA, INC. 7733 Telegraph Road, Montebello, California 90640 Phone: (213) 726-0303
TEAC CANADA LTD. 340 Brunel Road, Mississauga, Ontario L4Z 2C2, Canada Phone: 905-890-8008
TEAC UK LIMITED 5 Marlin House, Marlins Meadow, The Croxley Centre, Watford, Herts. WD1 8YA, U.K. Phone: 01923-819699
TEAC DEUTSCHLAND GmbH Bahnstrasse 12, 65205 Wiesbaden-Erbenheim, Germany Phone: 0611-71580
TEAC FRANCE S.A. 17, Rue Alexis-de-Tocqueville, CE 005 92182 Antony Cedex, France Phone: (1) 42.37.01.02
TEAC NEDERLAND BV Perkinsbaan 11, 3439 ND Nieuwegein, Nederland Phone: 03-402-30229
TEAC AUSTRALIA PTY., LTD.
106 Bay Street, Port Melbourne, Victoria 3207, Australia Phone: (03) 9644-2442
A.C.N. 005 408 462
TEAC ITALIANA S.p.A. Via C. Cantù 5, 20092 Cinisello Balsamo, Milano, Italy Phone: 02-66010500
TO THE USER
This equipment has been tested and found to comply with the limits for a Class B digital device, pursuant to Part 15
of the FCC Rules. These limits are designed to provide reasonable protection against interference in a residential
area. This device generates and uses radio frequency energy and if not installed and used in accordance with the
instructions, it may cause interference to radio or TV reception. If this unit does cause interference with TV or radio
reception you can try to correct the interference by one or more of the following measures:
a) Reorient or relocate the receiving antenna.
b) Increase the separation between the equipment and the receiver.
c) Plug the equipment into a different outlet so that it is not on the same circuit as the receiver.
If necessary, consult the dealer or an experienced radio/TV technician for additional suggestions.
CAUTION:
Changes or modifications to this equipment not expressly approved by TEAC CORPORATION for compliance could
void the user's authority to operate this equipment.
THIS DIGITAL APPARATUS DOES NOT EXCEED
THE CLASS B LIMITS FOR RADIO NOISE
EMISSIONS FROM DIGITAL APPARATUS AS SET
OUT IN THE RADIO INTERFERENCE REGULA-
TIONS OF THE CANADIAN DEPARTMENT OF
COMMUNICATIONS.
LE PRÉSENT APPAREIL NUMÉRIQUE N'ÉMET PAS
DE BRUITS RADIOÉLECTRIQUES DÉPASSANT LES
LIMITES APPLICABLES AUX APPAREILS NUMÉRI-
QUES DE CLASSE B PRÉSCRITES DANS LE
RÉGLEMENT SUR LE BROUILLAGE RADIO-
ÉLECTRIQUE ÉDICTÉ PAR LE MINISTÈRE DES
COMMUNICATIONS DU CANADA.
AC POWER CORD CONNECTION
CAUTION:
TO PREVENT ELECTRIC SHOCK, MATCH WIDE
BLADE OF PLUG TO WIDE SLOT, FULLY INSERT.
CORDE DE CONNEXION CA
ATTENTION:
POUR ÉVITER LES CHOCS ÉLECTRIQUES,
INTRODUIRE LA LAME LA PLUS LARGE DE LA
FICHE DANS LA BORNE CORRESPONDANTE DE
LA PRISE ET POUSSER JUSQU'AU FOND.
For U.S.A.
For CANADA
For CANADA
PRINTED IN KOREA
Transcripción de documentos
9A06054300 ` pd-h500 D COMPACT DISC PLAYER ENGLISH Thanks for buying a TEAC. Read this manual carefully to get the best performance from this unit. Nous vous remercions pour l’achat d’un appareil TEAC. Lire ce manuel avec attention pour obtenir les meilleures performances possibles de cet appareil. Ü ÿ Ÿ OWNER’S MANUAL .................... 4 MANUEL DU PROPRIETAIRE ...... 12 BEDIENUNGSANLEITUNG........... 20 MANUALE DI ISTRUZIONI .......... 28 MANUAL DEL USUARIO ............. 36 CAUTION: TO REDUCE THE RISK OF ELECTRIC SHOCK, DO NOT REMOVE COVER (OR BACK). NO USER-SERVICEABLE PARTS INSIDE. REFER SERVICING TO QUALIFIED SERVICE PERSONNEL. The lightning flash with arrowhead symbol, within equilateral triangle, is intended to alert the user to the presence of uninsulated “dangerous voltage” within the product’s enclosure that may be of sufficient magnitude to constitute a risk of electric shock to persons. The exclamation point within an equilateral triangle is intended to alert the user to the presence of important operating and maintenance (servicing) instructions in the literature accompanying the appliance. This appliance has a serial number located on the rear panel. Please record the model number and serial number and retain them for your records. Model number Serial number WARNING: TO PREVENT FIRE OR SHOCK HAZARD, DO NOT EXPOSE THIS APPLIANCE TO RAIN OR MOISTURE. ITALIANO Enhorabuena por la adquisición de un TEAC. Lea detenidamente este manual a fin de obtener el mejor rendimiento de esta unidad. ESPAÑOL Grazie per aver acquistato un prodotto TEAC. Leggere attentamente questo manuale per ottenere le migliori prestazioni da questo apparecchio. DEUTSCH FRANÇAIS Vielen Dank für den Kauf dieses TEAC-Geräts. Bitte lesen Sie diese Anleitung sorgfältig durch, um die Leistungsfähigkeit dieses Geräts optimal nutzen zu können. Important Safety Instructions CAUTION: • Read all of these Instructions. • Save these Instructions for later use. • Follow all Warnings and Instructions marked on the audio equipment. "Note to CATV system installer: This reminder is provided to call the CATV system installer’s attention to Section 820-40 of the NEC which provides guidelines for proper grounding and, in particular, specifies that the cable ground shall be connected to the grounding system of the building, as close to the point of cable entry as practical. 1) Read Instructions — All the safety and operating instructions should be read before the product is operated. 2) Retain Instructions — The safety and operating instructions should be retained for future reference. 3) Heed Warnings — All warnings on the product and in the operating instructions should be adhered to. 4) Follow Instructions — All operating and use instructions should be followed. 5) Cleaning — Unplug this product from the wall outlet before cleaning. Do not use liquid cleaners or aerosol cleaners. Use a damp cloth for cleaning. 6) Attachments — Do not use attachments not recommended by the product manufacturer as they may cause hazards. 7) Water and Moisture — Do not use this product near water _ for example, near a bath tub, wash bowl, kitchen sink, or laundry tub; in a wet basement; or near a swimming pool; and the like. 8) Accessories — Do not place this product on an unstable cart, stand, tripod, bracket, or table. The product may fall, causing serious injury to a child or adult, and serious damage to the product. Use only with a cart, stand, tripod, bracket, or table recommended by the manufacturer, or sold with the product. Any mounting of the product should follow the manufacturer’s instructions, and should use a mounting accessory recommended by the manufacturer. 9) A product and cart combination should be moved with care. Quick stops, excessive force, and uneven surfaces may cause the product and cart combination to overturn. Example of Antenna Grounding as per National Electrical Code, ANSI/NFPA 70 ANTENNA LEAD IN WIRE GROUND CLAMP ANTENNA DISCHARGE UNIT (NEC SECTION 810-20) ELECTRIC SERVICE EQUIPMENT GROUNDING CONDUCTORS (NEC SECTION 810-21) GROUND CLAMPS POWER SERVICE GROUNDING ELECTRODE SYSTEM (NEC ART 250. PART H) NEC - NATIONAL ELECTRICAL CODE 15) Lightning — For added protection for this product during a lightning storm, or when it is left unattended and unused for long periods of time, unplug it from the wall outlet and disconnect the antenna or cable system. This will prevent damage to the product due to lightning and power-line surges. 16) Power Lines — An outside antenna system should not be located in the vicinity of overhead power lines or other electric light or power circuits, or where it can fall into such power lines or circuits. When installing an outside antenna system, extreme care should be taken to keep from touching such power lines or circuits as contact with them might be fatal. 17) Overloading — Do not overload wall outlets, extension cords, or integral convenience receptacles as this can result in risk of fire or electric shock. 18) Object and Liquid Entry — Never push objects of any kind into this product through openings as they may touch dangerous voltage points or short-out parts that could result in a fire or electric shock. Never spill liquid of any kind on the product. 19) Servicing — Do not attempt to service this product yourself as opening or removing covers may expose you to dangerous voltage or other hazards. Refer all servicing to qualified service personnel. 20) Damage Requiring Service — Unplug this product from the wall outlet and refer servicing to qualified service personnel under the following conditions: a) when the power-supply cord or plug is damaged. b) if liquid has been spilled, or objects have fallen into the product. c) if the product has been exposed to rain or water. d) if the product does not operate normally by following the operating instructions. Adjust only those controls that are covered by the operating instructions as an improper adjustment of other controls may result in damage and will often require extensive work by a qualified technician to restore the product to its normal operation. e) if the product has been dropped or damaged in any way. f ) when the product exhibits a distinct change in performance _ this indicates a need for service. 21) Replacement Parts — When replacement parts are required, be sure the service technician has used replacement par ts specified by the manufacturer or have the same characteristics as the original part. Unauthorized substitutions may result in fire, electric shock, or other hazards. 22) Safety Check — Upon completion of any service or repairs to this product, ask the service technician to perform safety checks to determine that the product is in proper operating condition. 23) Wall or Ceiling Mounting — The product should be mounted to a wall or ceiling only as recommended by the manufacturer. 24) Heat — The product should be situated away from heat sources such as radiators, heat registers, stoves, or other products (including amplifiers) that produce heat. 10) Ventilation — Slots and openings in the cabinet are provided for ventilation and to ensure reliable operation of the product and to protect it from overheating, and these openings must not be blocked or covered. The openings should never be blocked by placing the product on a bed, sofa, rug, or other similar surface. This product should not be placed in a built-in installation such as a bookcase or rack unless proper ventilation is provided or the manufacturer’s instructions have been adhered to. 11) Power Sources — This product should be operated only from the type of power source indicated on the marking label. If you are not sure of the type of power supply to your home, consult your product dealer or local power company. For products intended to operate from battery power, or other sources, refer to the operating instructions. 12) Grounding or Polarization — This product may be equipped with a polarized alternating-current line plug (a plug having one blade wider than the other). This plug will fit into the power outlet only one way. This is a safety feature. If you are unable to insert the plug fully into the outlet, try reversing the plug. If the plug should still fail to fit, contact your electrician to replace your obsolete outlet. Do not defeat the safety purpose of the polarized plug. 13) Power-Cord Protection — Power-supply cords should be routed so that they are not likely to be walked on or pinched by items placed upon or against them, paying particular attention to cords at plugs, convenience receptacles, and the point where they exit from the product. 14) Outdoor Antenna Grounding — If an outside antenna or cable system is connected to the product, be sure the antenna or cable system is grounded so as to provide some protection against voltage surges and built-up static charges. Article 810 of the National Electrical Code, ANSI/NFPA 70, provides information with regard to proper grounding of the mast and supporting structure, grounding of the lead-in wire to an antenna discharge unit, size of grounding conductors, location of antenna-discharge unit, connection to grounding electrodes, and requirements for the grounding electrode. _2_ OCAUTION OACHTUNG OOBSERVERA OADVARSEL 1 THIS LABEL IS ATTACHED TO THE PLACE AS ILLUSTRATED TO INFORM THAT THE APPARATUS CONTAINS A LASER COMPONENT. CAUTION - INVISIBLE LASER RADIATION WHEN OPEN AND INTERLOCKS DEFEATED. AVOID EXPOSURE TO BEAM. VORSICHT! UNSICHTBARE LASERSTRAHLUNG TRITT AUS. WENN DECKEL GEÖFFNET UND WENN SICHERHEITSVERRIEGELUNG ÜBERBRÜCKT IST. NICHT DEM STRAHL AUSSETZEN ! VARNING - OSYNLIG LASERSTRÅLNING NÄR DENNA DEL ÄR ÖPPNAD OCH SPÄRR ÄR URKOPPLAD. STRÅLEN ÄR FARLIG. 1 DIESE AUFKLEBEMARKE IST AN DEM IN DER ABBILDUNG GEZEIGTEN ORT ANGEBRACHT UM DARAUF HINZUWEISEN, DASS IM INNERN DES GERÄTS EINE LASER-KOMPONENTE BEFINDET. 1 PÅSKRIFTEN SITTER PÅ APPARATEN SOM VISAS SOM UPPMANING OM ATT APPARATEN OMFATTAR EN INBYGGD LASERKOMPONENT. 2 1 DETTE MÆRKAT ER ANBRAGT SOM VIST I ILLUSTRATIONEN FOR ADVARSEL - USYNLIG LASERSTRÅLING VED ÅBNING, NÅR SIKKERHEDSAFBRYDERE ER UDE AF FUNKTION. UNDGÅ UDSÆTTELSE FOR STRÅLING. VAROITUS! AT ADVARE BRUGEREN OM AT APPARATET INDEHOLDER EN LASERKOMPONENT. SUOJAKOTELOA EI SAA AVATA. LAITE SISÄLTÄÄ LASERDIODIN, JOKA LÄHETTÄÄ (NÄKYMÄTÖNTÄ) SILMILLE VAARALLISTA LASERSÄTEILYÄ. 2 DETTE MÆRKAT ER SOM VIST PÅ ILLUSTRATIONEN ANBRAGT PÅ ADVARSEL - USYNLIG LASERBESTRÅLING NÅR DENNE DELEN ER ÅPEN OG SIKKERHETSSPERREN ER UTKOBLET. UNNGÅ UTSETTELSE FOR STRÅLING. INDERSIDEN AF TOPDÆKSLET FOR AT ADVARE BRUGEREN OM AT YDERLIGERE FREMTRÆNGEN VIL VÆRE FORBUNDET MED FARE FOR AT UDSÆTTE SIG FOR LASERSTRÅLING. ADVARSEL — BETJENING AF ANDRE KONTROLLER OG REGULATORER ELLER BENYTTELES AF ANDRE FREMGANGSMÅDER END BESKREVET HERI ER FORBUNDET MED FARE FOR UDSÆTTELSE FOR LASERSTRÅLING. VARING: APPARATEN INNEHÅLLER LASER KOMPONENT MED STRÅLNING ÖVERSTIGANDE KLASS 1. "ADVARSEL: USYNLIG LASERSTRÅLING VED ÅBNING NAR SIKKERHEDSAFBRYDERE ER UDE AF FUNKTION. UNDGÅ UDSAETTELSE FOR STRÅLING" "VAROITUS! SUOJAKOTELOA EI SAA AVATA. LAITE SISÄLTÄÄ LASERDIODIN. JOKA LÄHETTÄ (NÄKYMÄTÖNTÄ) SILMILLE VAARALLISTA LASERSÄTEILYÄ". ADVARSEL: USYNLIG LASERBESTRÅLING NÅR DENNE DELEN ER ÅPEN OG SIKKERHETSSPERREN ER UTKOBLET UNNGÅ UTSETTELSE FOR STRÅLING. 1 CLASS 1 LASER PRODUCT LUOKAN 1 LASERLAITE KLASS 1 LASERAPPARAT _3_ Before Use Read This Before Operating OChoose the installation location of your unit carefully. Avoid placing it in direct sunlight or close to a source of heat. Also avoid locations subject to vibrations and excessive dust, heat, cold or moisture. Keep away from such sources of hum as transformers or motors. ODo not open the cabinet as this might result in damage to the circuitry or electrical shock. If a foreign object should get into the unit, contact your dealer. OBe sure not to handle discs with dirty fingers. Never insert a disc which has a crack on the surface. OWhen removing the power plug from the wall outlet, always pull directly on the plug, never yank the cord. OTo keep the laser-pickup clean, do not touch it, and do not forget to close the disc tray. ODo not attempt to clean the unit with chemical solvents as this might damage the finish. Use a clean, dry cloth. OKeep this manual in a safe place for future reference. Beware of condensation When the player (or a compact disc) is moved from a cold to a warm place or used after sudden temperature change, there is the danger of condensation. Water vapor in the air could condense on the mechanism or the laser pickup. If droplets of water form on these parts, correct playback will be impossible because the laser will not read the information from the disc correctly. To prevent this, if you are going to use the player in a condition where condensation could occur, you should leave the player for 1 or 2 hours after plugging it into an AC outlet depending on the amount of condensation. If this is done, the player will stabilize at the temperature of its surroundings. Table of Contents Before Use ..................................................... 4 Connections and Rear Panel Overview .... 5 Front Panel Controls and Their Functions..................................................... 6 Display ............................................................ 6 Remote Control.............................................. 7 Basic Operation ............................................ 8 Repeat Play.................................................... 8 Program Play ................................................. 9 Shuffle Play.................................................. 10 Time Display................................................. 10 Specifications.............................................. 10 Troubleshooting .......................................... 11 Handling the Discs This unit has been designed specifically for reproduction of compact discs bearing the D mark. No other discs can be reproduced. OAlways place the compact disc in the disc tray with the label facing upward. (Compact discs can be played only on one side.) OTo remove a disc from its storage case, press down on the center of the case and lift the disc out, holding it carefully by the edges. IMPORTANT (for U.K. Customers) DO NOT cut off the mains plug from this equipment. If the plug fitted is not suitable for the power points in your home or the cable is too short to reach a power point, then obtain an appropriate safety approved extension lead or consult your dealer. If nonetheless the mains plug is cut off, remove the fuse and dispose of the plug immediately, to avoid a possible shock hazard by inadvertent connection to the mains supply. How to remove the disc If this product is not provided with a mains plug, or one has to be fitted, then follow the instructions given below: How to hold the disc IMPORTANT. DO NOT make any connection to the larger terminal which is marked with the letter E or by the safety earth symbo ç or coloured GREEN or GREEN-and-YELLOW. The wires in the mains lead on this product are coloured in accordance with the following code: OFingermarks and dust should be carefully wiped off the disc's recorded surface with a soft cloth. Wipe radially BLUE: BROWN: NEUTRAL LIVE As these colours may not correspond with the coloured markings identifying the terminals in your plug proceed as follows: The wire which is coloured BLUE must be connected to the terminal which is marked with the letter N or coloured BLACK. ONever use such chemicals as record sprays, antistatic sprays or fluid, benzine or thinner to clean compact discs. Such chemicals will do irreparable damage to the disc's plastic surface. ODiscs should be returned to their cases after use to avoid serious scratches that could cause the laser pickup to "skip." ODo not expose discs to direct sunlight or high humidity and temperature for extended periods. Long exposure to high temperatures can warp the disc. ODo not stick paper or write anything with a ballpoint pen on the surface of the label side. _4_ The wire which is coloured BROWN must be connected to the terminal which is marked with the letter L or coloured RED. When replacing the fuse only a correctly rated approved type should be used and be sure to re-fit the fuse cover. IF IN DOUBT — CONSULT COMPETENT ELECTRICIAN. A Connections and Rear Panel Overview 2 3 4 5 ENGLISH 1 Signal input/output cord Remote control cord A-H500 1REMOTE CONTROL jacks These jacks are used for the connection of the TEAC Mini Component system (T-H500, R-H500, A-H500) for the purpose of operating it using the Remote Control unit (RC-613 provided with the A-H500 amplifier) or system control signals. Connect the jack A (or B) to the jack A (or B) on other unit either on or beneath this unit. Note: The remote control transmitter is not provided with this unit. 2REMOTE CONTROL SELECTOR switch SYSTEM position: Set the switch to this position when you operate the system connected with remote control jacks A and B on the TEAC A-H500 amplifier. SINGLE position: Set to this position when you operate this unit alone with the optional remote control unit (not provided). Note: If set to the SINGLE position, this unit cannot be operated even if the amplifier is operated manually or using the remote control pointed toward it to operate this unit. _5_ 3DIGITAL OUT(PUT) OPTICAL terminals These terminals are used for connecting to the DIGITAL INPUT OPTICAL terminals on the MD player and the D/A converter by using the optical fiber cable (not provided). When connecting the optical fiber cable, remove the cap on the terminal. Leave the cap in place when it is not in use. 4LINE OUT jacks Connect these jacks to the CD input jacks on the amplifier: White pin-plug T White jack (left) Red pin-plug T Red jack (right) 5AC power cord Plug this AC power cord into an AC wall socket or AC OUTLETS on the amplifier. Front Panel Controls and Their Functions 4Disc tray 3 4 5 Load a disc on this tray with its label side up while the tray is open. When playing an 8 cm (3-inch) CD single disc, make sure that the disc is set at the center of the tray. 6 5open/close (∫) button Press this button to open the disc tray. Press it again to close the tray. 6Music skip buttons (Ú/Æ) These buttons are used for selecting the desired track on the disc. Æ : Press to skip forward. Ú : Press to skip backward. You can skip to the beginning of the track being played by pressing the button once. If you hold the button pressed, you can skip to the previous tracks in sequence. 2 1 0 9 8 7 7Pause button (ƒ) Press this button to pause playing. To restart playing, press it again or the play button (∏). 1power standby/on button 8 3remote sensor This sensor is used when this unit is operated alone by the optional remote control transmitter. The sensor operates only when the REMOTE CONTROL SELECTOR switch on the rear panel is set to the SINGLE position. 2power standby indicator This indicator lights up in the power standby mode; goes out when this unit is turned on. Play button (∏) Press this button to start play. 9stop button Press this button to stop playing. 0Display This display shows the current operating states of this unit. Display 1 3 2 4 5 6 7 7 REPEAT play indicator ONE : This lights up when the repeat play of a single track is engaged. ö : This lights up when the repeat play of an entire disc is engaged. A-B : This lights up when the A-B section repeat play is engaged. 8 Over mark q 0 9 8 This indicator lights up when the total number of tracks on the disc is 16 or more. 9 Track calendar display 1 Play indicator 5 Time mode indicator 2 Pause indicator 6 Time counter/Program number indicator 3 Track number indicator This shows the time information corresponding to the time mode indicator, in minutes and seconds. During the program mode, a program number is indicated here. 4 Index number indicator _6_ 0 Program indicator q SHUFFLE play indicator 2 1 q 1[power on] button 9[volume up/down] button 2power standby button O+: press to increase the volume. O–: press to decrease the volume. 3Indicator 0[dimmer] button 4 This indicator blinks in green in the CD operating mode; blinks in red in other mode. Press this button when you want to darken the displays on the system. Press it again to resume the original brightness. 5 4Cassette deck operation buttons q[sleep] timer button 5Numeric buttons This button is used for engaging the sleep timer in the tuner T-H500. 3 6 0 w 7 8 These numeric buttons are used for selecting track numbers on the CD, or for preset channels on the tuner. They can be used for the CD after the CD button or the CD play (∏) button is pressed. 6Input selector buttons of the amplifier 9 7Tuner operating buttons 8CD Player operation buttons OSearch (/Ò) buttons These buttons are used for searching for the desired position quickly during play or in the pause mode. Ò: for forward search : for backward search Omusic skip (Ú/Æ) buttons Oplay (∏) button Opause (ƒ) button Ostop (∑) button Otime button (see page 10) Orepeat (1/ALL, A-B) play buttons (see page 8) Oprogram button (see page 9) Oclear button (see page 9) Oshuffle button (see page 10) Odisc skip button This button is used for only the CD changer player. So, this button does not operate for the single CD player such as the PD-H500. _7_ Note: This remote control unit (RC-613) is provided with the amplifier A-H500. wRDS (Radio Data System) mode button ENGLISH Remote Control Repeat Play Basic Operation (You can use this function only with the remote control unit.) ∑ One-repeat play function OPress the 1/ALL repeat button once. - Only the current track is played repeatedly. * If you select other tracks during onerepeat play, the track selected last will be repeated. 1 Press the open/close (∫) button. The disc tray will slide out. 2 Load a disc with its label side facing up. 3 Press the open/close button again. The disc tray will close. At this time, use care not to let your hand get trapped. The total number of tracks and total play time on the disc will be displayed. Total Number of Tracks ∑ Last position memory function If the program button is pressed during normal play, the player will revert to a position at which the stop button was previously pressed. Then, the playing will restart from that particular position. ∑ All-repeat play function OPress the 1/ALL repeat button once more. - All the tracks on a disc is played repeatedly. * When the tracks are programmed, only the programmed tracks will be repeated. * Press the button once more to cancel the 1/ALL repeat play function. Total Play Time First Track 4 ∑ A-B repeat play function Select the track you want by pressing the music skip button (Ú/Æ). 5 Press the play button (∏), and the CD will be played. 6 Press the pause button (ƒ) when you want to pause playing. 7 Press the stop button when you want to stop playing. Last Track (1) During play, press the A-B repeat button at the desired start point (A). - Then "A-" will be displayed and "B" will blink on the display. (2) Press the button again at the desired end point (B). - Then "A-B" will be displayed and only A-B section will be played repeatedly. Note This unit will automatically start playing in the following cases: OWhen you select CD on the amplifier (AH500). OWhen you turn the system on with the amplifier's input selector set to CD. (3) Press the button once more to cancel the A-B repeat play function. _8_ Program Play ∑ Programming with music skip button 1. Press the program button in the stop mode. 2. Select the desired track by using the music skip (Ú/Æ) button. Example: Track No. 5 ∑ Programming with numeric buttons 1. Press the CD button. Then, the numeric buttons will work as selection buttons of track on the disc. 2. Press the program button in the stop mode. The display will show as follows: 3. Select the desired tracks by pressing the numeric buttons. Example: 2T6T12 The 2nd, 6th, and 12th tracks have been programmed in sequence. Track No. Notes: OIf you press the program button while programming, programming will cease and change into the program recall mode. OIf you stop playing, the programmed contents will disappear from the display, but they are not lost from the memory. Press the program button when you want to recall the programmed contents. As the programmed contents are not lost even if you stop playing or turn off the unit, you can recall them later. 1. Press the program button. Then the first programmed track will appear on the display. 2. Press the button repeatedly if you want to check the programmed contents. Each time the button is pressed, the next programmed contents will appear on the display in the programmed order. 3. Press the play (∏) button if you want to play the disc in the programmed order. 3. Press the program button again. Then, the 5th track has been programmed as program No. 1. 4. Repeat step 2 and step 3 to continue programming other tracks. 5. Press the play (∏) button. The program play will start in the programmed order. ∑ Erasing all the programmed contents Note: If you press the program button twice continuously while programming, programming will cease and change into the program recall mode. Note: The program button and the clear button can work only in the stop mode. Program No. 4. Press the play (∏) button. The program play will start in the programmed order. ∑ Recalling the program For your reference: O"FULL" appears on the display when the 33rd track has been programmed (no further programming is possible). OTrack numbers not actually on the disc cannot be programmed. OThe programmed contents are not lost even if the unit is turned off, but they are lost when the disc tray is opened. OThe unit will stop automatically when all the programmed tracks have finished playing, and the programmed contents disappear from the display, but they are not lost. OIt is possible to program with the disc tray opened. Track numbers not actually on the disc will be automatically skipped when the disc starts playing. 1. Press the program button. 2. Press the clear button and hold it for longer than 2 seconds. Then, all the programmed contents will be lost, and they are also lost when the disc tray is opened. * Changing the programmed contents ODeleting: Undesired tracks can be deleted from the originally programmed contents. 1. Press the program button repeatedly until the track number that you want to delete appears on the display. 2. Press the clear button. Then that track number will be deleted from the programmed contents. If you press the button repeatedly, the next programmed tracks will be deleted one by one each time the button is pressed. ∑ Adding after the last track: 1. Press the program button repeatedly until "END" appears on the display. 2. Enter new tracks in the same way as normal programming after "END" disappears from the display ∑ Adding to any position: 1. Select the program number which you want to add a new track to by pressing the program button. 2. Enter the new track in the same way as normal programming. _9_ ENGLISH With this program play function, you can program up to 32 tracks in any desired order. Before beginning: OProgramming can be done only with the remote control unit. OProgramming can be done only in the stop mode. Shuffle Play Time Display Specifications (You can use this function only with the remote control unit.) 1. Press the shuffle button. Tracks are played in random order. (You can use this function only with the the remote control unit.) States of the display This unit can display four types of time mode on the time counter in the display. 1. The elapsed time of the current track is displayed when playback begins. Laser System : 3-beam laser Digital Filter : 8-times oversampling Frequency Response : 20-20,000 Hz (±2 dB) Error Correction Method : Cross Interleave Reed-Solomon code S/N Ratio : More than 100 dB (IHF "A" filter used) THD : Less than 0.02% (1 kHz) Output Voltage : 2 V rms Power Source : 230 VAC, 50 Hz Power Consumption : 9 W Dimensions (WxHxD) : 285 x 132 x 292 mm Weight: : 3.9 kg Accessories: Signal input/output cord Remote control cord 2. Press the button again to cancel the shuffle play function. When this function is canceled, play will continue from the subsequent track in normal order. Notes 1. This function operates even in the stop mode or during play. 2. If you press the Æ button during shuffle play, you can select tracks at random irrespective of the current track number. And if you press the Ú button, play will start from the beginning of the current track. 3. A once selected or played track will not be played any more. 2. Press the time button once during play. Then, the remaining time of the current track will be displayed. 3. Press the time button again. Then, the total elapsed time of the disc will be displayed. 4. Press the time button once more. Then, the total remaining time of the disc will be displayed. Notes 1. Time will not be displayed during the programmed play if the programmed contents exceed 100 minutes. At this time, "--.--" will be shown instead. 2. If you press the time button in the stop mode, the total track number and the total playing time on a disc will be displayed. 3. When track 33 or more is played, the remaining time will not be displayed. _ 10 _ OImprovements may result in specification or feature changes without notice. OPhotos and illustrations may differ slightly from production models. Troubleshooting Before calling for service, check through the chart below for probable causes of the problems you experience while using this unit. Probable cause(s) Suggested remedy No power when power button is pressed. Power plug not inserted securely. Plug in securely. No playback when disc is loaded. Disc loaded with label side down. Load with label side up. Disc dirty. Clean disc surface. Connection to stereo system is incorrect. Check connections. Misoperation of amplifier. Check amplifier's control/switch setting. A single track can only be played. 1/ALL button engaged. Press button to disengage it. No program playback. program button not pressed. Press button to display "PROGRAM". play button not pressed. Press button. Player receiving vibration or shock. Change the installation position of player. Disc dirty. Clean disc surface. Hum. Pin-cord plug not connected securely. Re-connect plug securely. Noise in tuner. Player too near tuner. Keep a reasonable distance between them or switch off player's power. Remote control unit operation is impossible. REMOTE CONTROL SELECTOR switch is not set correctly. Set switch to correct position. Refer to page 5. Batteries not inserted in remote control unit. Insert batteries. The remote control is set to a mode other than CD. Select CD on the remote control. No audio output (or too low level output). Mistracking (sound jumping). No programming is possible. Numeric button entry is not accepted. _ 11 _ ENGLISH Problem Avant utilisation Table des matières Raccordements et présentation du panneau arrière.................................. 13 Commandes et fonctions du panneau avant.......................................... 14 Afficheur....................................................... 14 Télécommande............................................ 15 Fonctionnement de base ........................... 16 Lecture répétée........................................... 16 Lecture programmée.................................. 17 Lecture en ordre aléatoire (SHUFFLE)..... 18 Affichage des temps de lecture ............... 18 Caractéristiques techniques..................... 18 Dépannage................................................... 19 Lire ceci avant de faire fonctionner l'appareil OChoisir avec soin l'endroit où vous placerez votre appareil. Eviter de le placer directement au soleil ou près d'une source de chaleur. Eviter aussi les endroits sujets à des vibrations, à de la poussière excessive, à la chaleur, au froid ou à l'humidité. Toujours le garder éloigné de sources de bourdonnements telles que des transformateurs ou moteurs. ONe pas ouvrir le coffret car ceci risquerait de provoquer des dommages aux circuits ou des chocs électriques. Si un objet rentre dans l'appareil, contacter votre revendeur. ONe pas manipuler les disques avec des mains sales. Ne jamais insérer un disque dont la surface est craquelée. OLors du débranchement du cordon d'alimentation de la prise murale, toujours tirer sur la fiche et non sur le cordon. OPour garder le capteur laser propre, ne pas y toucher et ne pas oublier de fermer le tiroir du disque. ONe pas essayer de nettoyer l'appareil avec des solvants chimiques car ceci pourrait endommager le fini de l'appareil. Utiliser un chiffon propre et sec. OGarder soigneusement ce manuel d'instructions pour une référence ultérieure. Attention à la condensation Quand le lecteur (ou un disque audionumérique) est déplacé d'un endroit froid à un endroit chaud ou utilisé après un changement rapide de la température, il y a danger de condensation. La vapeur d'eau que comporte l'air risque de se condenser sur le mécanisme ou sur le capteur laser. Si des gouttelettes d'eau se forment sur ces pièces, une lecture correcte sera impossible car le laser ne pourra pas lire correctement les informations du disque. Pour éviter ceci, si vous devez utiliser le lecteur sous des conditions qui peuvent provoquer une condensation, vous devez le laisser tel quel pendant 1 ou 2 heures, selon le degré de condensation, après l'avoir branché sur une prise CA. Le lecteur se stabilisera alors à la température de l'environnement. _ 12 _ Manipulation des disques Cet appareil a été conçu spécialement pour la reproduction des disques audionumériques portant la marque "˛ ". Les autres disques ne peuvent pas être reproduits. O Toujours placer le disque audionumérique dans le tiroir, l'étiquette dirigée vers le haut. (Les disques audionumériques ne peuvent être lus que sur une face.) O Pour retirer un disque de son boîtier, presser le centre du boîtier et sortir le disque en le tenant soigneusement par les bords. Comment retirer le disque Comment tenir le disque OLes empreintes digitales et la poussière sur la surface du disque doivent être essuyées avec soin avec un chiffon doux. Essuyer du centre vers l'extérieur ONe jamais utiliser de produits chimiques comme des aérosols pour disques, aérosols ou liquide antistatiques, de la benzine ni de diluants pour nettoyer les disques audionumériques. De tels produits chimiques endommageront de façon définitive la surface de plastique du disque. OLes disques doivent toujours être remis dans leurs boîtiers après l'usage pour éviter des rayures sérieuses qui pourraient provoquer des "sauts" du capteur laser. ONe pas exposer les disques directement au soleil ni à l'humidité ou à des températures élevées pendant longtemps. Une longue exposition à de hautes températures peut voiler le disque. ONe pas coller de papier ni écrire quoi que ce soit avec un crayon-bille sur la surface de la face comportant l'étiquette. Raccordements et présentation du panneau arrière 1 3 4 5 Cordon Signal Input/Output (entrée/sortie de signal) FRANÇAIS Cordon de la télécommande 2 A-H500 1Prises REMOTE CONTROL (Télécommande) Ces prises permettent de brancher des éléments de la mini- chaîne TEAC (T-H500, R-H500, A-H500), de façon à pouvoir la commander à l'aide de la télécommande (RC-613 fournie avec l'amplificateur AH500) ou des signaux de commande de la chaîne. Connectez la fiche A (ou B) à la prise correspondante, A (ou B), situé sur l'autre élément placé au-dessus ou en dessous de celui-ci. Nota: L'émetteur de télécommande n'est pas fourni avec cet appareil. 2Interrupteur SELECTOR / REMOTE CONTROL (Sélecteur de télécommande) position SYSTEM: Mettre l'interrupteur sur SYSTEM lorsque l'appareil est raccordé par l'intermédiaire des prises A et B de la Télécommande à l'amplificateur TEAC A-H500. position SINGLE (SEUL): Mettre l'interrupteur sur la position SINGLE si vous utilisez cet appareil seul avec la télécommande (non fournie avec le lecteur). Nota: Pour brancher le câble à fibre optique, retirez le bouchon de protection placé sur la prise. Laissez ce bouchon en place si vous n'utilisez pas cette prise. Nota: Quand l'interrupteur est sur la position SINGLE l'appareil ne peut pas fonctionner même si on actionne l'amplificateur manuellement ou en utilisant la télécommande. 4Prises LINE OUT (sortie analogique) 3Prises DIGITAL OUTPUT OPTICAL (sortie numérique optique) Ces prises permettent de raccorder l'appareil aux prises DIGITAL INPUT OPTICAL (entrée numérique optique) du lecteur MD et du convertisseur N/A à l'aide du câble à fibre optique (non fourni avec le lecteur). _ 13 _ Connectez ces fiches aux prises d'entrée du lecteur de disque compact situées sur l'Amplificateur: Fiche blanche T prise femelle blanche (L) Fiche rouge T prise femelle rouge (R) 5Cordon d'alimentation (CA) Branchez ce cordon d'alimentation CA sur une prise de courant CA murale ou sur les connecteurs de sortie CA « AC OUTLETS » de l'Amplificateur. Commandes et fonctions du panneau avant 3 4 5 5Touche « open/close » (∫) (ouvert/fermé) 6 Appuyez sur cette touche pour ouvrir le tiroir à disque. Appuyez à nouveau sur cette touche pour fermer le tiroir à disque. 6Touches de Saut rapide de plages musicales (Ú/Æ) Ces touches permettent de sélectionner le morceau désiré sur le disque. Appuyez sur Æ pour faire avancer le disque vers l'avant. Appuyez sur Ú pour une recherche vers l'arrière. Pour revenir au début du morceau en cours de lecture appuyer une fois sur la touche. Maintenir cette touche enfoncée pour revenir sur les morceaux précédents (déplacement vers l'arrière. 2 1 0 1touche « power standby/on » (Marche/arrêt -veille / sous tension) 9 8 7 3Capteur de la télécommande Ce capteur ne fonctionne que lorsque l'appareil est employé seul avec sa télécommande optionnelle. Il n'est actif que lorsque l'interrupteur REMOTE CONTROL -- SELECTOR (Sélection Télécommande) situé sur le panneau arrière est positionné sur SINGLE. 2voyant veille Ce voyant s'allume quand l'appareil est en mode « veille »; il s'éteint quand l'appareil est sous tension. 7Touche Pause (ƒ) Appuyez sur cette touche pour interrompre provisoirement la lecture. Pour reprendre la lecture, appuyez à nouveau sur cette touche ou appuyez sur la touche Lecture (∏). 8Touche Lecture (∏) Appuyez sur cette touche pour démarrer la lecture. 9Touche « stop » (arrêt) 4Tiroir à disque Pour charger un disque, faites sortir le tiroir à disque puis chargez le disque sur le plateau, étiquette vers le haut. Pour lire un disque compact 80 mm (3 pouces), veiller à bien placer le disque au centre du plateau du tiroir. Appuyez sur cette touche pour arrêter la lecture. 0Afficheur Cet afficheur présente les différents états de fonctionnement de l'appareil. Afficheur 1 q 3 2 0 4 5 6 7 9 8 7 Indicateur de Lecture Répétée (REPEAT) ONE (1) : Ce voyant s'allume en cas de lecture répétée d'une seule plage. ö : Ce voyant s'allume en cas de lecture répétée d'un disque entier. A-B : Ce voyant s'allume en cas de lecture répétée des plages situées entre les repères A et B. 8 voyant Over (Dépassement) 1 Voyant Lecture 5 Indicateur de Mode Temps Ce voyant s'allume quand le disque comporte un total de 16 plages ou plus. 2 Voyant Pause 6 Compteur de temps/Indicateur de numéro de Programme 3 Indicateur de numéro de Plage Ce voyant affiche les informations de temps correspondant à l'indicateur de Mode Temps, en minutes et en secondes. En cas de lecture programmée, le numéro des programmes est affiché ici. 9 Affichage du Calendrier des plages 4 Indicateur de numéro d'Indice _ 14 _ 0 Indicateur de Programme q Voyant de lecture en SHUFFLE (lecture en ordre aléatoire) Télécommande 1touche de mise sous tension 2 3 2touche « veille» 9touche volume up/down (réglage du volume) Oappuyez sur + pour augmenter le volume Oappuyez sur – pour diminuer le volume 3Voyant q 4 5 4Touches de commande du magnétophone à cassette 6 5Touches numériques 0 w Ce voyant clignote en vert en mode de fonctionnement disque compact, en rouge pour les autres modes. 7 8 9 Les touches numériques permettent de sélectionner les numéros de plage sur un disque compact ou les stations présélectionnées sur le syntoniseur. On peut les utiliser pour le disque compact après avoir appuyé sur la touche CD ou sur la touche de Lecture de CD (∏). 6Touches de sélection d'entrée de l'Amplificateur 7Touches de commande du Syntoniseur 8Touches de commande du Lecteur de disque compact: Otouche Search (/Ò) (recherche) Ces touches permettent de rechercher rapidement un endroit précis, en cours de lecture ou en mode Pause. Ò: pour effectuer une recherche vers l'avant : pour effectuer une recherche vers l'arrière Otouches de saut de plages (Ú/Æ) Otouche lecture (∏) Otouche pause (ƒ) Otouche stop (∑) Otouche temps (voir page 18) Otouches de lecture répétée (1/ ALL (1/TOUT) ou A-B) (voir page 16) Otouche programme (voir page 17) Otouche de remise à zéro (voir page 17) Otouche de lecture en ordre aléatoire (SHUFFLE) (voir page 18) Otouche de saut de disque Cette touche n'est utilisée que par les lecteurschangeurs de disque compact. Elle n'est donc pas disponible sur les lecteurs de disque unique tels que le PD-H500. _ 15 _ 0touche de contrôle d'intensité lumineuse (dimmer) Appuyez sur cette touche pour atténuer la luminosité des affichages de l'appareil. Appuyez de nouveau sur cette même touche pour revenir à la luminosité d'origine. qtouche de minuterie de veille (sleep timer) Cette touche sert à enclencher la minuterie de veille du Syntoniseur T-H500. REMARQUE: Cette Télécommande (RC-613) est livrée avec l'Amplificateur (A-H500). wTouche de mode RDS FRANÇAIS 1 Lecture répétée Fonctionnement de base (Cette fonction ne peut être utilisée qu'avec la télécommande) ∑ Fonction Lecture Répétée OAppuyez une fois sur la touche 1/ALL (1/TOUT) - Seule la plage en cours sera lue de façon répétée. * Si on sélectionne d'autres plages pendant qu'on est en Lecture Répétée Plage Unique, c'est la dernière plage sélectionnée qui sera répétée. 1 Appuyez sur la touche « open/close » (∫) (ouvert/fermé); Le tiroir à disque sort. 2 Chargez le disque, côté étiquette vers le haut. 3 Appuyez à nouveau sur la touche « open/close ». Le tiroir à disque se referme. Faites attention à ne pas vous coincer la main. Le nombre total de plages et la durée totale de lecture du disque s'affichent. Nombre total de plages Durée totale de lecture ATTENTION L'appareil commencera automatiquement la lecture dans les cas suivants: OSi vous sélectionnez CD sur l'Amplificateur (A-H500). OLorsque vous mettez l'appareil sous tension, le sélecteur d'entrée de l'Amplificateur étant réglé sur CD. ∑Fonction mémoire de la dernière position précédente Si on actionne la touche « program » (programme) pendant la lecture normale, le lecteur se repositionne à l'endroit où il se trouvait la dernière fois que vous avez appuyé sur la touche « stop » (arrêt). La lecture reprend alors au début de cette plage comportant cette position définie. ∑ Fonction Lecture Répétée Toutes Plages OAppuyez une seconde fois sur la touche 1/ALL (1/TOUTES) - Toutes les plages du disque sont lues de façon répétée. * Si des plages ont été programmées, seules ces plages seront répétées. * Appuyez de nouveau sur cette touche pour annuler la fonction Lecture Répétée 1/ALL (1/TOUTES) Premier plage Dernier plage ∑ Fonction Lecture Répétée de A à B 4 Sélectionnez la plage voulue en appuyant sur la touche de Saut de plages (Ú/Æ). 5 Appuyez sur la touche Lecture (∏), la lecture du disque compact démarre. 6 Appuyez sur la touche Pause (ƒ) pour interrompre provisoirement la lecture. 7 (1) En cours de lecture, appuyez sur la touche de lecture répétée A-B pour sélectionner le point à partir duquel vous souhaitez commencer la lecture (A). - « A- » s'affiche, « B » clignote dans la fenêtre d'affichage. (2) Appuyez de nouveau sur la touche pour définir le point de fin de lecture souhaité (B). - « A-B » s'affiche, seule la partie comprise entre les points A et B sera lue de façon répétée. Appuyez sur la touche stop pour arrêter complètement la lecture. (3) Appuyez de nouveau sur cette touche pour annuler la fonction Lecture Répétée A-B. _ 16 _ Lecture programmée La fonction Lecture Programmée permet de programmer jusqu'à 32 plages dans n'importe quel ordre souhaité. Avant de commencer: OLa programmation n'est possible qu'à l'aide de la Télécommande. OLa programmation ne peut s'effectuer que lorsque l'appareil est en mode stop (arrêt). 3. Appuyez de nouveau sur la touche Programme. La plage n° 5 a été programmée comme 1er morceau du programme. 4. Répéter les étapes 2 et 3 pour programmer d'autres morceaux. 5. Appuyez sur la touche Lecture (∏). La lecture du programme sélectionné commence dans l'ordre défini. ∑ Programmation à l'aide des touches numériques REMARQUE: Si vous appuyez deux fois de suite sur la touche Programme pendant que vous êtes en train de définir un programme, la programmation est interrompue et l'appareil passe en mode Rappel du Programme. REMARQUE: Les touches Programme et Remise à zéro ne peuvent être activés qu'en mode stop (arrêt). Pour votre information: OL'indication « FULL » (PLEIN) apparaît sur l'afficheur, après la programmation du trente-troisième morceau. (Il n'est pas possible de programmer au-delà.) OLes plages dont le numéro ne se trouve pas sur le disque ne peuvent pas être programmées. OLe contenu du programme n'est pas effacé même si on met l'appareil hors tension, mais il est effacé si l'on ouvre le tiroir à disque. OL'appareil s'arrête automatiquement une fois la lecture de toutes les plages programmées terminée; le contenu du programme disparaît de la Fenêtre d'affichage, mais n'est pas effacé. OIl est possible de sélectionner un programme alors que le tiroir à disque est ouvert. Les numéros des plages qui ne sont pas sur le disque seront automatiquement effacés quand la lecture commencera. 2. Appuyez sur la touche CLEAR (remise à zéro). La plage portant le numéro affiché est supprimée du programme. Si vous appuyez sur cette touche de façon répétée, les plages programmées suivantes seront supprimées l'une après l'autre. 3. Sélectionner les plages désirées en appuyant sur les touches numériques correspondantes. Exemple: 2T6T12 Les plages 2, 6 et 12 ont été programmées dans cet ordre. Track No. (n° de plage) Program No. (n° de programme) 4. Appuyez sur la touche Lecture (∏). La lecture du programme sélectionné commence dans l'ordre choisi. REMARQUES: OSi vous appuyez sur la touche Programme en cours de programmation, celle-ci est interrompue et l'appareil passe en fonction Rappel de Programme. OSi vous arrêtez la lecture, le contenu du programme disparaît de l'affichage mais le programme n'est pas effacé. Appuyez sur la touche Programme pour rappeler la sélection programmée. ∑ Programmation à l'aide de la touche de saut de plage musicale 1. Appuyez sur la touche Programme alors que l'appareil est en mode stop (arrêt). 2. Sélectionnez la plage souhaitée à l'aide de la touche de saut de plage (Ú/Æ) Exemple: plage n° 5 ∑ Rappel d'un Programme Le contenu du programme n'étant pas effacé même si l'on arrête la lecture ou si l'on éteint l'appareil, il est possible de le rappeler ultérieurement. 1. Pour cela, appuyez sur la touche Programme. La première plage programmée s'affiche sur l'afficheur. 2. Appuyez plusieurs fois sur cette touche pour vérifier le contenu du programme. Chaque fois que l'on appuie sur cette touche, la plage programmée suivante s'affiche. 3. Appuyez sur la touche Lecture (∏) pour lire le disque dans l'ordre programmé. _ 17 _ 1. Appuyez sur la touche Programme. 2. Appuyer sur la touche CLEAR (Remise à zéro) et la maintenir enfoncée pendant au moins deux secondes. L'ensemble des programmes est effacé; de même tous les programmes seront effacés si l'on ouvre le tiroir à disque. * Modification du contenu d'un programme OSuppression de plages: Il est possible de supprimer certains morceaux programmés préalablement. 1. Pour cela, appuyez plusieurs fois sur la touche Programme jusqu'à ce que le numéro de la plage que l'on veut supprimer apparaisse sur l'afficheur. ∑ Ajout d'une plage à la suite de la dernière plage programmée: 1. Appuyez plusieurs fois sur la touche Programme jusqu'à ce que la mention END (fin) apparaisse sur l'afficheur. 2. Entrez les nouvelles plages de la même manière que pour une programmation normale, dès que la mention END a disparu de la fenêtre d'affichage. ∑ Ajout d'une plage en un point quelconque du programme: 1. Sélectionnez le numéro du programme désiré, puis appuyer sur la touche Programme pour ajouter le morceau désiré. 2. Entrez le morceau désiré de la même façon que pour une programmation normale. FRANÇAIS 1. Appuyez sur la touche CD. Les touches numériques permettent alors de sélectionner les plages du disque. 2. Appuyez sur la touche Programme en mode stop (arrêt). On obtient l'affichage suivant: ∑ Effacement complet du programme Lecture en ordre aléatoire (SHUFFLE) Affichage des temps de lecture Caractéristiques techniques (Cette fonction ne peut être utilisée qu'avec la télécommande.) 1. Appuyez sur la touche Shuffle. Les plages sont lues dans un ordre aléatoire. (Cette fonction ne peut être utilisée qu'avec la télécommande.) Etats de l'affichage Cet appareil permet d'afficher quatre types de mode temps sur le compteur de temps de l'Afficheur. 1. Le temps écoulé depuis le début de la plage en cours s'affiche dès le début de la lecture. 2. Appuyez sur la touche Time une fois pendant la lecture. Le temps de lecture restant pour la plage en cours s'affiche. Détecteur laser : laser triple faisceau Filtre numérique : suréchantillonnage octuple Réponse en fréquence : 20 à 20 000 Hz (± 2 dB) Système de correction d'erreur : code CIRC (Cross Interleave Reed-Solomon) Rapport signal/bruit : supérieur à 100 dB (pondéré « A ») DHT : inférieure à 0,02% (1 kHz) Tension de sortie : 2 V efficace Alimentation : 230 V, 50 Hz Consommation électrique : 9 W Dimensions (L x H x P) : 285 x 132 x 292 mm Poids : 3,9 kg Accessoires Cordon de signal audio : 1 Cordon de télécommande : 1 3. Appuyez de nouveau sur la touche d'affichage du temps. La durée totale écoulée depuis le début du disque s'affiche. ODes améliorations peuvent apporter des changements dans les caractéristiques techniques et générales sans avis préalable. OLes photos et illustrations peuvent légèrement différer du produit fini. 2. Appuyez de nouveau sur cette touche pour annuler la fonction Lecture Aléatoire. Après avoir annulé cette fonction, la lecture du disque se poursuivra dans l'ordre normal à partir de la plage suivante. REMARQUES: 1. Cette fonction est disponible même lorsque l'appareil est à l'arrêt, ou pendant la lecture. 2. Si vous appuyez sur la touche Æ pendant la Lecture Aléatoire, vous pouvez sélectionner une plage au hasard quelle que soit la plage en cours de lecture. Si vous appuyez sur la touche Ú, la lecture commencera au début de la plage en cours de lecture. 3. Une plage sélectionnée ou lue une fois ne sera plus lue par la suite. 4. Appuyez encore une fois sur cette touche, le temps de lecture total restant jusqu'à la fin du disque s'affiche. AVERTISSEMENTS: 1. La durée de lecture ne sera pas affichée en cas de lecture programmée si la durée du programme est supérieure à 100 minutes. l'afficheur indiquera alors « --.-- ». 2. Si on appuie sur la touche temps en mode « stop », le nombre total de plages et la durée totale de lecture du disque apparaissent sur l'afficheur. 3. En cas de lecture de la plage 33 ou plus, le temps restant jusqu'à la fin du disque ne s'affiche pas. _ 18 _ Dépannage Avant de vous adresser à un technicien, vérifier à l'aide du tableau ci-dessous que le problème rencontré n'est pas dû à l'une des causes suivantes. Cause(s) probable(s) Solution L'appareil ne s'allume pas quand on appuie sur la touche Marche/arrêt. La prise est mal enfoncée dans la prise murale. Bien enfoncer la prise dans la prise murale. Pas de lecture après chargement du disque. Le disque est chargé étiquette vers le bas. Remettre le disque en place étiquette vers le haut. Disque sale. Nettoyer la surface du disque. Les branchements à la chaîne stéréo sont mal faits. Vérifier les branchements. Mauvais fonctionnement de l'amplificateur. Vérifier le réglage de la commande et de l'interrupteur sur l'amplificateur. L'appareil ne lit qu'un seul morceau. La touche 1/ALL (1/TOUT) est enfoncée. Appuyez sur la touche pour la débloquer. Pas de lecture du programme. La touche PROGRAM n'est pas enfoncée. Appuyez sur cette touche pour que l'indication PROGRAM s'affiche. La touche PLAY (Lecture) n'est pas enfoncée. Appuyez sur cette touche. Le lecteur est soumis à des vibrations ou à des chocs. Changez le lecteur de place. Le disque est sale. Nettoyez la surface du disque. Bourdonnement Le cordon de raccordement est mal enfoncé. Vérifier le contact au niveau de la prise. Bruit au syntoniseur. Le lecteur est placé trop près du syntoniseur. Placez ces appareils à une certaine distance l'un de l'autre ou éteignez le lecteur. La télécommande ne fonctionne pas. L'interrupteur SELECTOR / REMOTE CONTROL (télécommande) n'est pas sur la bonne position. Mettre l'interrupteur sur la bonne position. Voir page 13. Il n'y a pas de piles dans la télécommande. Mettre des piles. Télécommande réglée sur un mode autre que CD. Sélectionnez CD sur la télécommande. Pas de son ou (ou son très faible). Mauvais positionnement sur la plage (le son saute). Impossible de programmer. Entrée par la touche numérique non acceptée. _ 19 _ FRANÇAIS Problème Vor Inbetriebnahme INHALTSVERZEICHNIS Anschlüsse auf der Geräterückseite....... 21 Bedienungselemente und deren Funktion ..................................................... 22 Display .......................................................... 22 Fernbedienung ............................................ 23 Grundlegende Funktionen ......................... 24 Wiederholungsfunktion ............................. 24 Titelprogrammierung.................................. 25 Zufallsfunktion............................................. 26 Zeitanzeige................................................... 26 Technische Daten....................................... 26 Hilfe bei der Fehlersuche .......................... 27 Bitte vor Inbetriebnahme lesen OWählen Sie einen geeigneten Standort für den Spieler. Nicht geeignet sind Standorte, die direkter Sonneneinstrahlung, Heizquellen, Vibrationen, Staubeinwirkung, starken Temperaturschwankungen oder Feuchtigkeit ausgesetzt sind. Von Brummstörungen verursachenden Geräten wie Transformatoren etc. fernhalten. ONiemals das Gehäuse öffnen, da hierdurch Schäden an der Elektronik und/oder elektrische Schläge verursacht werden können. Falls ein Fremdkörper in das Geräteinnere gelangen sollte, wenden Sie sich bitte an Ihren Fachhändler. OCDs niemals mit verschmutzten Fingern handhaben. Niemals eine verkratzte CD einlegen. OBei Abziehen des Netzkabels darauf achten, das Kabel am Stecker zu halten. Niemals am Kabel ziehen. OUm den Laser-Tonabnehmer sauberzuhalten, diesen nicht berühren und den CD-Halter stets einfahren. OZur Gehäusereinigung keine Lösungsmittel verwenden, da hierdurch die Gehäuseoberfläche beschädigt werden kann. Ein sauberes trockenes Tuch verwenden. OBewahren Sie diese Bedienungsanleitung auf, um bei eventuell später auftauchenden Fragen darin nachschlagen zu können. Auf Kondensationsniederschlag achten! Wenn das Gerät oder CDs von kalter in eine warme Umgebung gebracht werden, bzw. einer starken Temperaturschwankung ausgesetzt sind, besteht die Gefahr von Kondensationsniederschlag am LaserTonabnehmer. Durch eine solche Beeinträchtigung wird die Abtastfunktion des Lasers schwerwiegend gestört, so daß keine Toninformation von der CD erhältlich ist. Sollte die Möglichkeit von Kondensationsniederschlag gegeben sein, empfehlen wir, nach Netzanschluß ein bis zwei Stunden bis zur Inbetriebnahme zu warten. Nach Ablauf dieser Zeitspanne sollte ein Temperaturausgleich des Geräts gegeben sein. _ 20 _ Handhaben der CD's Dieses Gerät ist ausschließlich zum Abspielen von Compact Discs vorgesehen, die mit dem "˛" Symbol gekennzeichnet sind. O CDs stets mit nach oben weisendem Etikett in den CD-Halter einlegen. (CDs sind nur einseitig bespielt.) O Zur Entnahme einer CD aus ihrer Schutzhülle die Haltenabe in der Mitte drücken. Die CD vorsichtig an ihrer Kante halten und entnehmen. Entnehmen der CD Die CD am Rand halten OFingerabdrücke und Staub auf der bespielten Seite mit einem sauberen trockenen Tuch entfernen. Gerade nach außen wischen OUnter keinen Umständen zur Reinigung von CDs herkömmliche Plattenreinigungsmittel wie Plattenspray oder -flüssigkeit, Benzin, Farbverdünner oder ähnliche Chemikalien verwenden. Die Kunststoffoberfläche der CD kann hierdurch irreparablen Schaden nehmen! OCDs nach Gebrauch stets wieder in ihre Schutzhülle einlegen. Hierdurch sind diese vor Staub, Kratzern etc. geschützt, die zu Abtastaussetzern des Lasers führen können. OCDs niemals über einen längeren Zeitraum direkter Sonneneinstrahlung, hoher Feuchtigkeit und Temperatur aussetzen. Bei längerer Einwirkung von hohen Temperaturen kann es zu Ver-werfungen der CD kommen. OKeine Aufkleber an der Etikettseite anbringen, und niemals mit einem Kugelschreiber die Etikettseite beschriften. Anschlüsse auf der Geräterückseite 1 2 3 4 5 Cinchkabel Fernbedienungskabel DEUTSCH A-H500 1REMOTE CONTROL Buchsen (Fernbedienung) Diese Buchsen dienen zum Anschluß der Fernbedienungsverbindungen des TEAC Mini-Komponenten Systems (T-H500, RH500, A-H500), um dieses mit der Fernbedienung (RC-613, im Lieferumfang des Verstärkers A-H500) oder via SystemSteuersignalen zu steuern. Verbinden Sie die Buchse „A“ (oder „B“) mit der entsprechenden Buchse „A“ (oder „B“) der darüber oder darunter befindlichen Systemkomponente. Hinweis: Die Fernbedienung gehört nicht zum Lieferumfang des CD-Players. 2Fernbedienungs-Wahlschalter 3Optischer Digitalausgang Position: SYSTEM Stellen Sie den Schalter auf diese Position, wenn Ihr System über die FernbedienungsAnschlußbuchsen „A“ und „B“ des Verstärkers TEAC A-H500 verbunden ist. Diese Anschlüsse dienen dazu, den CDPlayer mittels optischer Verbindungskabel (nicht im Lieferumfang) mit den Digitaleingängen eines MD-Recorders oder eines externen D/A-Wandlers zu verbinden. Position: SINGLE Stellen Sie den Schalter auf diese Position, falls Sie lediglich den CD-Player mittels einer Fernbedienung (nicht im Lieferumfang) steuern wollen. Hinweis: Falls sich der CD-Player im Systemverbund befindet, jedoch auf „SINGLE“-Betrieb eingestellt ist, kann das Gerät nicht durch manuelle Bedienung vom Verstärker oder durch die, auf das Gerät gerichtete, Fernbedienung gesteuert werden. Hinweis: Entfernen Sie die Schutzkappe vom optischen Digitalausgang, bevor Sie das optische Verbindungskabel anschließen. Wird dieser Ausgang nicht benutzt, lassen Sie die Kappe, zum Schutz vor Staub, in ihrer Halterung. 4LINE OUT Cinchbuchsen Verbinden Sie diese Buchsen mit den CD INPUT-Buchsen des Verstärkers: Weißer Stecker T Weiße Buchse (links) Roter Stecker T Rote Buchse (rechts) 5Netzkabel/Netzstecker Stecken Sie den Netzstecker in eine Netzsteckdose. _ 21 _ Bedienungselemente und deren Funktion 3 4 5 6Titel-Sprungtasten (Ú/Æ) 6 Diese Tasten dienen zur direkten Anwahl des gewünschten Titels einer CD. Æ: Betätigen Sie diese Taste, um zum Titelanfang des folgenden Stückes zu gelangen. Ú: Betätigen Sie diese Taste, um zum Anfang des derzeitigen, bzw. vorangegangenen Stückes zu gelangen. Sie „springen“ an den Titelanfang des momentan aktiven Titels durch einmaliges Betätigen dieser Taste. Wenn Sie die Taste gedrückt halten, können Sie an die Titelanfänge der vorangegangenen Titel „springen“. 7Pause-Taste (ƒ) 2 1 0 1Netz Ein-/Ausschalter (Standby) 2Standby-Anzeige Diese Anzeige leuchtet, wenn das Gerät auf „Standby“ geschaltet ist. Sie erlischt beim Einschalten. 3Fernbedienungs-Infrarotsensor Dieser Sensor dient zum Empfang der Fernsteuersignale, wenn der CD-Player mit der optionalen Fernbedienung und nicht im Systemverbund betrieben wird. Der Sensor ist nur dann aktiv, wenn sich der Fernbedienungs-Wahlschalter auf der Geräterückseite in der „SINGLE“-Stellung befindet. 9 8 7 Betätigen Sie diese Taste, um die Wiedergabe kurzzeitig zu unterbrechen. Zum Fortsetzen der Wiedergabe betätigen Sie die Pause-Taste erneut oder die Wiedergabe-Taste (∏). 4CD-Schublade 8Wiedergabe-Taste (∏) Legen Sie, während die Schublade geöffnet ist, hier die Compact Disc, mit ihrer Labelseite nach oben, ein. Falls Sie eine CD-Single mit einem Durchmesser von 8 cm (3 inches) wiedergeben möchten, stellen Sie sicher, daß sie zentriert in die Schublade eingelegt wurde. Mit dieser Taste starten Sie die Wiedergabe einer CD. 5Öffnen/Schließen Taste (∫) Betätigen Sie diese Taste, um die CDSchublade zu öffnen. Betätigen Sie diese Taste erneut, um die CD-Schublade zu schließen. 9Stop-Taste Mit dieser Taste beenden Sie die Wiedergabe einer CD. 0Display In der Anzeige werden die jeweiligen Betriebszustände des CD-Players angezeigt. Display 1 3 2 4 5 6 7 7 Wiederholungs-Anzeige ONE : erscheint, wenn ein Titel wiederholt wiedergegeben wird. ö : erscheint, wenn die gesamte CD wiederholt wiedergegeben wird. A-B : erscheint, wenn der zuvor markierte Abschnitt zwischen Punkt „A“ und Punkt „B“ wiedergegeben wird. q 0 1 Wiedergabe-Anzeige 2 Pause-Anzeige 3 Anzeige der Titelnummer 4 Anzeige der Indexnummer 9 8 6 Spielzeit-Anzeige Hier wird die aktuelle Spielzeit, in Abhängigkeit vom eingestellten SpielzeitAnzeigemodus, in Minuten und Sekunden dargestellt. Bei programmierter Wiedergabe wird hier die ProgrammNummer angezeigt 5 Zeitanzeigemodus-Anzeige _ 22 _ 8 Over-Anzeige Diese Anzeige signalisiert, daß sich auf der derzeit im Laufwerk befindlichen CD mehr als 15 Titel befinden. 9 Titelkalender-Anzeige 0 Programm-Anzeige q Anzeige der Zufallsautomatik Fernbedienung 1Netz-Einschalttaste 3 3Klangquellen-Anzeige 1 4 5 q 6 0 w Diese Anzeige blinkt grün, wenn als Wiedergabequelle der CD-Player gewählt ist. Sie blinkt rot, wenn eine andere Klangquelle gewählt wurde. 4Laufwerkstasten des Cassetten Decks 5Numerische Tastatur 7 8 9 Die numerischen Tasten dienen sowohl der direkten Titelanwahl einer CD als auch der direkten Wahl von Sender-Speicherplätzen im Tunerbetrieb. Die Tasten können zur Titelanwahl einer CD benutzt werden, nachdem Sie entweder die CD-Taste oder die CD-Wiedergabetaste (∏) betätigt haben. 6Eingangswahlschalter-Tasten des Verstärkers O+: Betätigen Sie diese Taste, um die Wiedergabelautstärke zu erhöhen. O–: Betätigen Sie diese Taste, um die Wiedergabelautstärke zu vermindern. 0Dimmer-Taste Betätigen Sie diese Taste, wenn Sie die Helligkeit der Systemdisplays abdunkeln möchten. Bei erneutem Betätigen wird die Originalhelligkeit wieder eingestellt. qTaste zur Einstellung der Abschaltzeit (Sleep Timer) Betätigen Sie diese Taste, um die Sleep Timer Funktion des Tuners T-H500 zu aktivieren und einzustellen. Hinweis: Die Fernbedienung (RC-613) gehört zum Lieferumfang des Verstärkers (A-H500). wRDS (Radio Data System) mode button 7Bedienfeld des Tuners 8Funktionstasten des CD-Players OSuchfunktionstasten (/Ò) Mit diesen Tasten können Sie die gewünschte Stelle eines Titels, während der Wiedergabe oder im Pausemodus, erreichen. Ò: vorwärts Suchen : rückwärts Suchen OSprung-Tasten (Ú/Æ) OWiedergabe-Taste (∏) OPause-Taste (ƒ) OStop-Taste (∑) OSpielzeit-Taste (siehe Seite 26) OWiederholungsfunktion (1/Gesamt/A->B) (siehe Seite 24) OProgrammierungs-Taste (siehe Seite 25) OLösch-Taste (siehe Seite 25) OZufallsfunktion (siehe Seite 26) ODisc Skip Taste Diese Taste steht lediglich bei der Verwendung eines CD-Wechslers zur Verfügung. Auf die Bedienung des PDH500 hat sie keinen Einfluß. _ 23 _ DEUTSCH 2 2Standby-Taste (Aus) 9Lautstärke-Tasten Wiederholungsfunktion Grundlegende Funktionen (Diese Funktion steht lediglich bei der Verwendung einer Fernbedienung zur Verfügung.) ∑ Titelwiederholung (ONE) OBetätigen Sie die Wiederholungstaste (1/All) einmal. - Lediglich der momentane Titel wird nun wiederholt wiedergegeben. * Wenn Sie bei aktivierter Titelwiederholfunktion einen anderen Titel anwählen, wird der jeweils zuletzt angewählte Titel wiederholt. 1 Betätigen Sie die Öffnen/SchließenTaste (∫). Die CD-Schublade öffnet sich. 2 Legen Sie die CD mit der Beschriftung nach oben in die Schublade. 3 Betätigen Sie erneut die Öffnen/ Schließen-Taste. Die CD-Schublade schließt sich. Achten Sie dabei darauf, daß sich während dieses Vorgangs Ihre Hand nicht mehr in der Schublade befindet. Die Anzahl der auf der CD befindlichen Titel sowie deren Gesamtspielzeit werden im Display angezeigt. Gesamt-Titelzahl Gesamtspielzeit Hinweis: Der CD-Player beginnt unter den folgenden Voraussetzung automatisch mit der Wiedergabe: OWenn Sie am Verstärker (A-H500) als Tonquelle „CD“ auswählen. OWenn beim Einschalten des Systems sich der Eingangswahlschalter des Verstärkers in der Position „CD“ befindet. ∑ Gesamtwiederholung (ALL) OBetätigen Sie die Widerholungstaste (1/All) zweimal. - Die gesamte CD wird nun wiederholt wiedergegeben. * Falls Sie zuvor eine Titelauswahl programmiert haben, wird lediglich diese Auswahl wiederholt. * Ein erneutes Betätigen der Wiederholungstaste beendet die Funktion. ∑Speicherfunktion Falls Sie während der Wiedergabe die Programm-Taste betätigen, kehrt der CDPlayer an die Stelle der CD zurück, an der zuvor die Stop-Taste zuletzt betätigt wurde. Die Wiedergabe beginnt nun ab Anfang dieses Titels. Erster Titel Letzter Titel ∑ Wiederholung eines markierten Abschnittes A-B 4 Wählen mit den Skip-Tasten (Ú/Æ) den gewünschten Titel aus. 5 Betätigen Sie die Wiedergabe-Taste (∏), und die Wiedergabe beginnt. 6 Betätigen Sie zum kurzzeitigen Unterbrechen der Wiedergabe die Pause-Taste (ƒ). 7 Betätigen Sie die Stop-Taste, um die Wiedergabe zu beenden. (1) Betätigen Sie während der Wiedergabe die A->B Taste, um den gewünschten WiederholungsStartpunkt (A) zu markieren. - Im Display wird „A“ angezeigt und „B“ beginnt zu blinken. (2) Zum Markieren des gewünschten Wiederholungs-Endpunktes (B) betätigen Sie die Taste erneut. - „A->B“ wird im Display angezeigt, und der soeben ausgewählte Abschnitt wird wiederholt wiedergegeben. _ 24 _ (3) Ein erneutes Betätigen der Taste beendet die Wiederholungsfunktion. Titelprogrammierung ∑ Programmierung mittels der numerischen Tastatur 1. Betätigen Sie die CD-Taste. Die numerischen Tasten dienen nun zur Eingabe der Titelnummern. 2. Betätigen Sie die Programm-Taste, während sich der CD-Player im Stopmodus befindet. Im Display wird folgendes angezeigt: 3. Wählen Sie den/die gewünschten Titel, durch Eingabe der entsprechenden Titelnummer, in der gewünschten Reihenfolge, aus. Beispiel: 2T6T12 Der 2., 6. und 12. Titel wurden in dieser Reihenfolge programmiert. Titelnummer ProgrammNummer 4. Betätigen Sie die WiedergabeTaste(∏). Die Wiedergabe Ihrer programmierten Titelfolge beginnt. Hinweis: OFalls Sie während der Programmierung die Programm-Taste betätigen, wird die Eingabefunktion für die Titelprogrammierung abgebrochen. OWenn Sie die Wiedergabe einer programmierten Titelfolge beenden, verschwindet die Anzeige im Display, das Programm steht Ihnen jedoch weiterhin zur Verfügung. Betätigen Sie die Programm-Taste erneut, um es wieder aufzurufen. ∑ Programmierung Sprung-Tasten mittels der 1. Betätigen Sie die Programm-Taste, während sich der CD-Player im Stopmodus befindet. 2. Wählen Sie mittels der Sprung-Tasten (Ú/Æ) den/die gewünschten Titel aus. Beispiel: Titelnummer: 5 3. Betätigen Sie erneut die ProgrammTaste. Der 5. Titel der CD wurde als 1. Programmnummer gespeichert. 4. Wiederholen Sie die Schritte 2 und 3, um die Titelprogrammierung fortzusetzen. 5. Betätigen Sie die Wiedergabe-Taste (∏). Die Wiedergabe der programmierten Titelfolge beginnt. Hinweis: Falls Sie während der Programmierung die Programm-Taste wiederholt betätigen, wird die Eingabefunktion für die Titelprogrammierung abgebrochen. Beachten Sie: OBeim Versuch, einen 33. Titel in eine Programmfolge aufzunehmen, erscheint „FULL“ im Display (es können keine weiteren Titel programmiert werden). OTitelnummern, die auf einer CD nicht vorhanden sind, können auch nicht programmiert werden. ODer Inhalt einer programmierten Titelfolge wird nicht gelöscht, selbst dann nicht, wenn das System zwischenzeitlich abgeschaltet wird. Erst das Öffnen der CD-Schublade löscht den Programmspeicher. ODie Wiedergabe wird automatisch beendet, wenn alle programmierten Titel wiedergegeben wurde, und die Anzeige des Programms verschwindet vom Display. Die programmierte Titelfolge bleibt jedoch weiterhin erhalten. OEs ist möglich, eine Titelfolge bei geöffneter CD-Schublade zu programmieren. Titelnummern, die sich nicht auf der CD befinden, werden automatisch aus dem Programm entfernt, sobald die Wiedergabe gestartet wird. ∑ Erneutes Aufrufen einer programmierten Titelfolge Da der Programmspeicher weder durch das Betätigen der Stop-Taste, noch durch Abschalten des Systems verlorengeht, können Sie ihn jederzeit erneut aufrufen. 1. Betätigen Sie die Programm-Taste. Die erste, programmierte Titelnummer erscheint in der Anzeige. 2. Betätigen Sie wiederholt die Programm-Taste, um die gesamte programmierte Titelfolge zu überprüfen. Bei jedem Betätigen wird die nächstfolgende Titel- und Programmnummer im Display angezeigt. 3. Betätigen Sie die Wiedergabe-Taste (∏), um die Wiedergabe der programmierten Titelfolge zu starten. _ 25 _ ∑ Löschen der programmierten Titelfolge 1. Betätigen Sie die Programm-Taste. 2. Betätigen Sie die Löschtaste (Clear) länger als 2 Sekunden. Das Programm wird hierdurch gelöscht. Dieser Vorgang entspricht dem Öffnen der CD-Schublade. Hinweis: Sowohl die Programm- als auch die Löschtaste sind lediglich im Stopmodus verfügbar. * Ändern einer programmierten Titelfolge OLöschen: Titel, die Sie nicht mehr hören möchten, können aus einem bestehenden Programm gelöscht werden. 1. Betätigen Sie die Programm-Taste so oft, bis die Titelnummer, die Sie aus dem Programm entfernen möchten, im Display angezeigt wird. 2. Betätigen Sie die Löschtaste (Clear). Der Titel, dessen Titelnummer gerade im Display angezeigt wird, wird aus der programmierten Titelfolge gelöscht. Wenn Sie die Taste wiederholt betätigen, werden die nachfolgenden, programmierten Titel ebenfalls gelöscht. Jedes Betätigen der Taste löscht eine Titelnummer. ∑ Neue Titel nach dem letzten programmierten Titel anfügen 1. Betätigen Sie die Programm-Taste so oft, bis „END“ im Display angezeigt wird. 2. Nachdem „END“ nicht mehr angezeigt wird, geben Sie nun die gewünschte(n) Titelnummer(n) in der gewohnten Art und Weise ein. ∑ Hinzufügen weiterer Titel an einer beliebigen Stelle des bestehenden Programms 1. Wählen Sie die Stelle der programmierten Titelfolge, an der Sie einen neuen Titel einfügen wollen, und betätigen Sie die Programm-Taste. 2. Geben Sie nun die gewünschte(n) Titelnummer(n) in der gewohnten Art und Weise ein. DEUTSCH Die Titelprogrammierfunktion ermöglicht eine freie Programmierung von bis zu 32 Titeln in beliebiger Reihenfolge. Bevor Sie beginnen: ODie Programmierung einer Titelfolge ist lediglich via Fernbedienung möglich. ODie Programmierung einer Titelfolge ist lediglich im Stopmodus möglich. Zufallsfunktion Zeitanzeige Technische Daten (Diese Funktion steht lediglich bei der Verwendung einer Fernbedienung zur Verfügung.) 1. Betätigen Sie die Taste für die Zufallsfunktion. Die Titel einer CD werden nun in einer zufälligen Reihenfolge wiedergegeben. (Diese Funktion steht lediglich bei der Verwendung einer Fernbedienung zur Verfügung.) Die verschiedenen Darstellungen Vier verschiedene Zeit-Darstellungen werden unterstützt: 1. Die seit Beginn der Wiedergabe verstrichene Titelspielzeit wird angezeigt. 2. Ein erneutes Betätigen der Taste beendet die Zufallsfunktion. Nach dem Beenden der Zufallsfunktion wird die Wiedergabe mit dem derzeit aktiven Titel, in der auf der CD vorliegenden Titelfolge, fortgesetzt. 2. Betätigen Sie einmal die SpielzeitTaste, damit die noch verbleibende Titelspielzeit angezeigt wird. Lasersystem : 3-Strahl-Laser Digitalfilter : 8-fach Oversampling Frequenzgang : 20 - 20.000 Hz (±2 dB) Fehlerkorrektur : Cross Interleave Reed-Solomon Code Fremdspannungsabstand : besser als 100 dB (mit IHF „A“ Filter) Verzerrung (THD) : weniger als 0,02 % (1 kHz) Ausgangsspannung : 2 Volt RMS Netzspannung : 230 Volt, 50 Hz Leistungsaufnahme : 9 Watt Abmessungen (B x H x T) : 285 x 132 x 292 mm Gewicht : 3,9 kg Zubehör 1 x Cinchkabel 1 x Fernbedienungskabel Hinweis: 1. Diese Funktion steht sowohl während der Wiedergabe als auch im Stopmodus zur Verfügung. 2. Befindet sich der CD-Player im Zufallsmodus, und Sie betätigen die Æ-Taste, wird automatisch zum Anfang eines anderen, zufällig ermittelten Titels „gesprungen“. Betätigen Sie die Ú-Taste, beginnt die Wiedergabe des momentanen Titels erneut. 3. Trotz der zufälligen Auswahl der Titel wird kein Titel wiederholt oder zweimal wiedergegeben. 3. Betätigen Sie nochmals die SpielzeitTaste, damit die bisher verstrichene Gesamtspielzeit der CD angezeigt wird. 4. Betätigen Sie nochmals die SpielzeitTaste, damit die noch verbleibende Gesamtspielzeit der CD angezeigt wird. Hinweis: 1. Während der Wiedergabe einer programmierten Titelfolge kann keine Zeit-Darstellung angezeigt werden, wenn das Programm eine Gesamtspielzeit von 100 Minuten überschreitet. Im Display erscheint stattdessen die Meldung „--:--“. 2. Wenn Sie im Stopmodus die SpielzeitTaste betätigen, wird sowohl die Anzahl der auf der CD befindlichen Titel als auch die Gesamtspielzeit im Display angezeigt. 3. Falls eine höhere Titelnummer als „32“ wiedergegeben wird, ist eine Zeitanzeige nicht möglich. _ 26 _ OTechnische Änderungen vorbehalten. OFotografische und graphische Abbildungen können leicht vom gekauften Modell abweichen. Hilfe bei der Fehlersuche Problem Mögliche Ursache Mögliche Abhilfe Keine Funktion, obwohl der Netzschalter betätigt wurde Der Netzstecker befindet sich nicht richtig in der Steckdose Stecken Sie den Netzstecker richtig in die Steckdose Keine Wiedergabe, obwohl sich eine CD im Laufwerk befindet Die CD wurde mit der Labelseite nach unten eingelegt Legen Sie die CD mit deren Labelseite nach oben in die CD-Schublade Die CD ist verschmutzt Reinigen Sie die CD Die Anschlüsse der Systemkomponenten . wurden nicht korrekt vorgenommen Überprüfen Sie die Anschlüsse Fehlfunktion des Verstärkers Überprüfen Sie die Regler- und Schaltereinstellungen des Verstärkers Es kann lediglich ein Titel wiedergegeben werden 1/All-Wiederholfunktion ist aktiv Betätigen Sie die Wiederholungstaste Die Wiedergabe einer programmierten . Titelfolge ist nicht möglich Die Programm-Taste wurde nicht betätigt Betätigen Sie die Programm-Taste Die Wiedergabe-Taste wurde nicht betätigt Betätigen Sie die Wiedergabe-Taste Externe Erschütterungen wirken auf den CD-Player ein Stellen Sie den CD-Player an einem anderen Ort auf Die CD ist verschmutzt Reinigen Sie die CD Brummen Das Cinchkabel wurde nicht richtig angeschlossen Stecken Sie die Stecker der Cinchkabel richtig in die dafür vorgesehenen Buchsen Geräusche während des Tunerbetriebes Der CD-Player steht zu nahe am Tuner Versuchen Sie den CD-Player möglichst weit vom Tuner entfernt aufzustellen, oder schalten Sie den CD-Player auf „Standby“ Die Steuerung mittels der Fernbedienung ist nicht möglich Der Fernbedienungswahlschalter ist nicht auf die korrekte Position eingestellt Stellen Sie den Schalter auf die entsprechende Position ein (siehe auch Seite 21) In der Fernbedienung befinden sich keine oder leere Batterien Setzen Sie Batterien ein Die Fernbedienung befindet sich nicht in der CD-Betriebsart Wählen Sie „CD“ auf der Fernbedienung Zu geringe oder keine Wiedergabelautstärke Mistracking (Wiedergabe „springt“) Es kann keine Programmierung vorgenommen werden Die numerische Tastatur spricht nicht an _ 27 _ DEUTSCH Bevor Sie sich an Ihren Händler oder das zuständige Service-Center wenden, überprüfen Sie bitte anhand der folgenden Tabelle, ob Sie das Problem vielleicht auf einfache Weise beheben können. Prima dell'uso Indice Prima dell'uso.............................................. 28 Collegamenti e descrizione pannello posteriore ................................. 29 Funzioni e relativi controlli sul pannello frontale...................................... 30 Display .......................................................... 30 Telecomando RC-613.................................. 31 Operazioni fondamentali............................ 32 Ascolto ripetuto........................................... 32 Ascolto programmato ................................ 33 Ascolto dei brani non progressivo........... 34 Display del tempo ....................................... 34 Caratteristiche tecniche............................ 34 Ricerca guasti ............................................. 35 Leggere questo manuale prima di procedere all'uso OScegliere con cura il luogo in cui installare l'apparecchio. Evitare di esporlo alla diretta luce del sole o ad una sorgente di calore. Evitare inoltre luoghi soggetti a vibrazioni o ad eccessive accumulazioni di polvere, calore, freddo od umidità. Tenere inoltre l'apparecchio lontano da sorgenti di disturbi quali trasformatori o motori. ONon aprire la cassa dell'apparecchio. Ciò potrebbe danneggiarne la circuitazione o causare scariche elettriche. Se un qualche oggetto estraneo dovesse essere entrato nell'apparecchio ste-sso, rivolgersi al rivenditore. OAccertarsi di non maneggiare i CD con le dita sporche. Non inserire mai un CD con la superficie crepata. OPer staccare la spina dalla presa di rete, agire direttamente sulla spina stessa, evitando di tirare il cavo. OPer mantenere pulito il pickup laser evitare di toccarlo, e non dimenticare di chiudere sempre il piatto del CD. OEvitare di pulire l'apparecchio con solventi chimici poichè ciò potrebbe danneggiare la rifinitura esterna. Fare semplicemente uso di un panno pulito ed asciuto. OTenere questo manuale in un luogo di facile accesso, per ogni eventuale futuro riferimento. Attenzione alla condensazione Quando l'apparecchio (o i dischi compatti) viene trasferito da un luogo freddo in uno caldo, o viene usato dopo una brusca varizione di temperatura, c'è il pericolo di condensazione. Il vapore acqueo in sospensione nell'aria può condensarsi sul meccanismo o sul pickup laser. Se delle gocce d'acqua si formano su queste parti un ascolto corretto diventa impossibile perchè il pickup laser non può leggere perfettamente l'informazione dal disco. Per far fronte a questo problema, se si usa l'apparecchio in condizioni ove sia possibile il verificarsi della condensazione, sarà opportuno attendere, prima di utilizzare l'apparecchio, per una o due ore, dopo aver inserito nella presa di corrente il cavo di alimentazione, per permettergli di stabilizzarsi alla temperatura dell'ambiente. _ 28 _ Come tenere i CD Questo apparecchio è stato studiato particolarmente per la riproduzione di CD con il marchio ˛ . Nessun altro tipo di CD può essere riprodotto. O Porre il CD sul piatto sempre con l'etichetta rivolta verso l'alto (i CD sono registrati solamente su di un lato). O Per togliere il CD dal suo contenitore, premere sul centro della scatola e sollevare il disco verso l'alto, tenendolo con cura sui lati. Modo corretto di togliere il CD Modo corretto di tenere il CD OImpronte digitali e polvere devono essere accuratamente tolte dal lato registrato del disco con un panno morbido. Pulire in senso radiale ONon fare mai uso di prodotti chimici quali spray per dischi, spruzzatori o fluidi antistatici, benzina o altri solventi per pulire i CD. Questi prodotti chimici possono danneggiare in modo irreparabile la superficie di plastica del CD. OI CD, dopo l'uso, devono essere riposti nella propria scatola, allo scopo di evitare possibili scalfitture che potrebbero causare lo "scivolamento" del raggio laser di lettura. OEvitare di esporre i CD alla diretta luce del sole, all'umidità o ad alte temperature per periodi prolungati. Una lunga esposizione ad alte temperature può far ondulare i CD. ONon incollare carta e non scrivere con penne a sfera o simili oggetti appuntiti sulla superficie del CD dal lato dell'etichetta. Collegamenti e descrizione pannello posteriore 1 Cavo per telecomando 2 3 4 5 Cavo per segnali ingresso/uscita ITALIANO A-H500 1Prese REMOTE CONTROL Servono per collegare tra loro i componenti del sistema in modo che possa essere azionato dal telecomando (il modello RC-613 è in dotazione all'amplificatore integrato AH-500) oppure da segnali di controllo. Collegare, con l'apposito cavetto, la presa A alla relativa presa A (oppure la presa B alla relativa presa B) dell'apparecchio collocato sopra o sotto questo apparecchio. NOTA: questo apparecchio non e' fornito di telecomando. 2Selettore REMOTE CONTROL Posizione SYSTEM Portare il selettore in questa posizione quando il sistema funziona collegato alle prese A e B relative al telecomando sull'amplificatore TEAC A-H500. Posizione SINGLE Scegliere questa posizione quando si vuole pilotare singolarmente questo lettore di CD tramite il telecomando (non fornito in dotazione). Nota: Quando il selettore è in posizione SINGLE, il lettore non può essere azionato tramite l'amplificatore, nemmeno se questo è azionato manualmente o puntando il telecomando nella sua direzione. 3Terminali DIGITAL OUTPUT OPTICAL Servono per il collegamento ai terminali DIGITAL INPUT OPTICAL su un lettore di MD o su un convertitore D/A, tramite un cavo a fibra ottica (non in dotazione). Quando si collega il cavo a fibra ottica, togliere il cappellotto sul terminale; lasciare invece il cappellotto al suo posto quando non si usa il cavo. 4Prese LINE OUT Vanno collegate alle prese ingresso CD sull'Amplificatore: Spinotto bianco T presa bianca (a sinistra) Spinotto rosso T presa rossa (a destra) 5Cavo di alimentazione Inserire questo cavo in una presa di rete, oppure nella presa AC OUTLETS sul pannello posteriore dell'amplificatore. _ 29 _ Funzioni e relativi controlli sul pannello frontale 3 4 5 5Tasto Open/Close (∫) 6 Premere questo tasto per aprire il cassetto del disco. Premere il tasto ancora una volta per richiudere il cassetto. 6Tasti Skip (Ú/Æ) Servono per scegliere il brano desiderato sul disco; Æ: per effettuare il salto di un brano in avanti. Ú: per effettuare il salto di un brano all'indietro. Premendo il tasto una sola volta, si salta all'inizio del brano in corso. Mantenendo premuto il tasto, si salta in sequenza ai brani precedenti. 7Tasto Pause (ƒ) (pausa) 2 1 0 1Tasto Power (accensione/standby). 9 8 7 3Sensore telecomando 2Indicatore Power (accensione/standby) Si illumina quando l'apparecchio è alimentato ma in condizione di attesa; si spegne quando l'apparecchio viene acceso. Premere questo tasto per imporre una pausa alla riproduzione. Per riprendere la riproduzione, premere il tasto di nuovo, oppure premere Play (∏). Viene usato quando il lettore viene pilotato singolarmente tramite un telecomando (opzionale). Questo sensore svolge il suo compito solo quando il selettore REMOTE CONTROL, sul pannello posteriore, si trova in posizione SINGLE. 8Tasto Play (∏) (ascolto) 4Cassetto del disco. 0Display Aprire il cassetto e inserirvi il disco con l'etichetta rivolta verso l'alto. Quando si riproduce un CD singolo da 8 cm, verificare che si trovi proprio al centro del cassetto. Vengono qui visualizzati gli stati operativi in atto. Quando si prema questo tasto inizia l'ascolto. 9Tasto Stop Premendo questo tasto, l'ascolto si interrompe. Display 1 3 2 4 5 6 7 7 Indicatore REPEAT (ascolto ripetuto) ONE : si accende quando è in corso l'ascolto ripetuto di un singolo brano. ö : si accende quando è in corso l'ascolto ripetuto dell'intero disco. A-B : si accende quando è in corso l'ascolto ripetuto della sezione A-B. q 0 9 8 1 Indicatore Play (ascolto) 5 Indicatore modo Time (tempo) 2 Indicatore Pause (pausa) 6 Indicatore contanastro/numero programma 3 Indicatore numero del brano Riporta normalmente l'indicatore del tempo in minuti e secondi. Durante il modo di programmazione mostra invece il numero di programma. 4 Indicatore numero Indice _ 30 _ 8 Over mark Questo indicatore si accende quando il numero dei brani presenti sul disco è pari a 16, o più. 9 Display calendario dei brani. 0 Indicatore di programma. q Indicatore di ascolto Shuffle (non progressivo) Telecomando RC-613 3 9Tasti Volume 2Tasto Power (standby). O+: per aumentare il volume. O–: per diminuire il volume. 3Indicatore 1 q 4 Lampeggia in verde nel modo operativo CD; lampeggia in rosso negli altri modi operativi. 5 4Tasti per comandare il registratore a cassetta. 6 5Tasti numerici 0 w 7 8 Vengono usati per scegliere il numero dei brani contenuti nel CD, oppure per preselezionare le emittenti sul sintonizzatore. Possono essere usati per il CD dopo aver premuto il tasto CD o CD Play (∏). 6Selettori d'ingresso dell'amplificatore. 9 0Tasto Dimmer (attenuatore di luce) Premere questo tasto quando si vuole diminuire la luminosità dei display; premerlo una seconda volta per ripristinare la luminosità normale. qTasto Sleep Timer Serve ad attivare il temporizzatore per la funzione Sleep nel sintonizzatore T-H500. NOTA: Questo telecomando (RC-613) fa parte degli accessori in dotazione all'amplificatore integrato A-H500. wTasto di modo RDS 7Tasti per comandare il sintonizzatore. 8Tasti per comandare il lettore di CD: OTasti Search (/Ò) Servono per la ricerca rapida del brano desiderato quando il lettore è in Play o Pause. Ò: per la ricerca in avanti : per la ricerca all'indietro OTasti Skip (Ú/Æ) (salto di uno o più brani) OTasto Play (∏) (ascolto) OTasto Pause (ƒ) (pausa) OTasto Stop (∑) OTasto Time (vedi pagina 34) OTasti per ascolto ripetuto (1 brano/tutti i brani/sezione A-B) (vedi pagina 32) OTasto Program (ascolto programmato) (vedi pagina 33) OTasto Clear (cancellazione) (vedi pagina 33) OTasto Shuffle (ascolto non progressivo) (vedi pagina 34) OTasto Skip Disc (salto di un disco) Serve solo per i lettori di CD multipli. Non è quindi disponibile per un lettore di CD singolo, come il PD-H500 _ 31 _ ITALIANO 2 1Tasto Power (accensione) Ascolto ripetuto Operazioni fondamentali (Questo tipo di ascolto può essere attivato soltanto tramite il telecomando.) ∑ Funzione One Repeat Play (ascolto ripetuto di un brano) OPremere una volta il tasto 1/ALL Repeat. - Verrà letto ripetutamente solo il brano in corso. * Selezionando altri brani mentre è attiva la funzione One Repeat Play, verrà ripetuto il brano selezionato per ultimo. Premere il tasto Open/Close (∫). Il cassetto del disco uscirà verso l'esterno. NOTA: Questo apparecchio inizierà automaticamente a riprodurre nei seguenti casi: 2 Appoggiare sul cassetto il disco da ascoltare, con l'etichetta rivolta verso l'alto. 3 Premere ancora il tasto Open/Close. Il cassetto del disco si richiude (attenzione a non chiuderci dentro anche qualche dito). Vengono visualizzati il numero complessivo dei brani ed il tempo totale di ascolto. Oquando si sceglie la posizione CD sull'amplificatore (A-H500). Oquando si accende l'impianto con il selettore d'ingresso dell'amplificatore predisposto su CD. 1 Numero complessivo dei brani Il tempo totale di ascolto ∑Funzione di memoria.dell'ultima posizione Quando si preme il tasto Program durante l'ascolto, il lettore ritorna nella posizione in cui si trovava alla precedente pressione del tasto Stop. L'ascolto riprendera' quindi del brano che contiene quella posizione. ∑ Funzione All Repeat Play (ascolto ripetuto di tutti i brani) OPremere ancora una volta il tasto 1/ALL Repeat. - Verranno letti ripetutamente tutti i brani contenuti nel disco. * Se ci sono brani programmati, verranno ripetuti solo quelli. * Premere il tasto ancora una volta per porre termine a questa funzione Primo brano Ultimo brano ∑ Funzione A-B Repeat Play (ascolto ripetuto della porzione A-B) 4 Scegliere il brano desiderato premendo il tasto Skip (Ú/Æ). 5 Premere il tasto Play (∏): ha inizio l'ascolto del CD. 6 Premere il tasto Pause (ƒ) per interrompere l'ascolto. 7 Premere il tasto Stop quando si vuole fermare l'ascolto, tornando alla posizione iniziale (1) Nel corso della lettura, premere il tasto A-B Repeat dove si vuole che inizi la ripetizione: tale punto resta designato come (A). - Sul display si accenderà l'indicatore "A", mentre "B" lampeggerà. (2) Premere di nuovo il tasto dove si vuole che la ripetizione abbia fine: tale punto resta designato come (B). - Sul display si accenderà allora l'indicatore "A-B" e verrà letta ripetutamente. solo la porzione A-B del disco (3) Premere il tasto ancora una volta per porre fine a questa funzione. _ 32 _ Ascolto programmato ∑ Programmazione mediante i tasti numerici 1. Premere il tasto CD. I tasti numerici funzionano ora come selettori dei brani sul disco. 2. Premere il tasto Program, nel modo Stop Sul display apparirà: 3. Scegliere i brani desiderati premendo i tasti numerici. Esempio: 2T6T12 Il secondo, il sesto e il dodicesimo brano risultano così programmati in sequenza. No. di brano No. Programma 4. Premere il tasto Play (∏). I brani cominceranno ad essere letti, nell'ordine programmato. NOTE: OSe si preme il tasto Program nel corso della programmazione, la stessa si interromperà e subentrerà la funzione Program Recall OFermando la lettura, i brani programmati scompariranno dal display ma non verranno cancellati. Quando si desidera richiamarli, basta premere il tasto Program. ∑ Programmazione mediante i tasti Music Skip 1. Premere il tasto Program, con l'apparecchio nel modo Stop. 2. Scegliere il brano desiderato utilizzando i tasti Music Skip (Ú/Æ) Esempio: Brano No.5 3. Premere ancora il tasto Program. Il brano No.5 risulta così inserito come No.1 del programma. 4. Ripetere i passi 2. e 3. per procedere alla programmazione di altri brani. 5. Premere il tasto Play (∏). La riproduzione a programma avrà inizio, rispettando la sequenza scelta. NOTA: Premendo il tasto Program due volte consecutive nel corso della programmazione, la stessa si interromperà e subentrerà la funzione Program Recall. Informazioni supplementari: OSul display appare la scritta "FULL" dopo che è stato letto il 33esimo brano (non è possibile inserirne altri). ONon si possono programmare numeri di brani che non risultano presenti nel disco. OI brani programmati non vengono cancellati quando si spegne l'apparecchio; vengono invece cancellati quando si apre il cassetto del disco. OL'apparecchio si ferma automaticamente quando tutti i brani programmati sono stati letti; la relativa scritta sul display scompare, ma i brani non vengono cancellati. OSi può programmare con il cassetto del disco aperto. I numeri dei brani che non risultano presenti sul disco verranno automaticamente cancellati quando il disco comincia ad essere letto. ∑ Richiamo della Lettura programmata Dato che il contenuto del programma non si cancella nemmeno fermando la riproduzione o spegnendo l'apparecchio, potrà essere richiamato in un secondo tempo. 1. Premere il tasto Program. Apparirà sul display il numero del primo brano programmato. 2. Per verificare il contenuto del programma, premere ripetutamente il tasto Program. Ad ogni pressione apparirà sul display, in sequenza, il numero del successivo brano programmato. 3. Premere il tasto Play (∏), se si desidera ascoltare il disco nell'ordine programmato. _ 33 _ ∑ Cancellazione di tutti i brani programmati 1. Premere il tasto Program. 2. Premere il tasto Clear e lasciarlo premuto per più di 2 secondi. Tutti i brani programmati verranno allora cancellati, anche se il cassetto del disco è aperto. NOTA: I tasti Program e Clear funzionano solo nel modo Stop. * Modifica dei brani programmati OCancellazione: Si possono cancellare dal programma originale brani indesiderati. 1. Premere ripetutamente il tasto Program, fino a quando appare sul display il numero del brano da cancellare. 2. Premere il tasto Clear. Il numero del brano verrà allora eliminato dal programma. Ad ogni successiva pressione del tasto, verrà eliminato uno degli altri brani del programma. ∑ Aggiunta di un brano, dopo l'ultimo programmato. 1. Continuare a premere il tasto Program fino a quando appare sul display la scritta "END". 2. Inserire i nuovi brani come già fatto per la normale programmazione, quando "END" non è più visualizzato. ∑ Aggiunta di brani, in qualsiasi altra posizione 1. Scegliere il numero del programma al quale si vuole aggiungere un brano premendo il tasto Program. 2. Inserire il nuovo brano come già fatto per la normale programmazione. ITALIANO Questa funzione permette di programmare fino a 32 brani, nell'ordine desiderato. Informazioni preliminari: OLa programmazione si può effettuare solo tramite il telecomando. OLa programmazione può avvenire solo quando il lettore si trova nel modo Stop. Ascolto dei brani non progressivo (Questo tipo di ascolto può essere gestito soltanto tramite il telecomando.) 1. Premere il tasto Shuffle. I brani verranno letti in ordine non progressivo. 2. Premere ancora il tasto per porre fine a questa funzione: la lettura proseguirà nel normale ordine progressivo, a partire dal brano successivo. NOTE: 1. Questa funzione è disponibile anche quando il lettore si trova nel modo Stop o in lettura. 2. Quando si preme il tasto Æ durante la lettura Shuffle, il brano viene scelto casualmente, senza tener conto del numero del brano in corso. Quando invece si preme il tasto Ú, la lettura partirà dall'inizio del brano in corso. 3. Il brano selezionato verrà letto una volta sola. Display del tempo Caratteristiche tecniche (Questa funzione può essere attivata solo tramite il telecomando.) Stati del display Sul display del contatempo di questo apparecchio possono apparire quattro diverse letture relative al tempo. 1. Quando inizia la lettura, viene visualizzato il tempo trascorso dall'inizio del brano. Sistema laser : a 3 fasci Filtro digitale : ad ottuplo sovracampionamento Risposta in frequenza : 20 Hz - 20 kHz (±2 dB) Sistema correzione errori : Cross Interleave Reed-Solomon Code Rapporto segnale/rumore : maggiore di 100 dB (con filtro "A" IHF) Distorsione armonica totale : minore di 0,02% (1 kHz) Tensione d'uscita : 2 V RMS Alimentazione : 230 V, 50 Hz Potenza assorbita : 9 W Dimensioni (largh. x alt. x prof.) : 285 x 132 x 292 mm Peso : 3,9 kg Accessori in dotazione: 1 cavo per segnali ingresso/uscita 1 cavo per telecomando 2. Premendo una volta il tasto Time durante la lettura, verrà visualizzato il tempo restante del brano in corso. 3. Premendo una seconda volta il tasto Time, verrà visualizzato il tempo totale trascorso del disco. 4. Premendo una terza volta il tasto Time verrà infine visualizzato il tempo totale restante del disco. NOTE: 1. Durante l`ascolto programmato, il tempo non verrà visualizzato se la durata dei brani programmati supera i 100 minuti: in questo caso apparirà invece questo simbolo "----". 2. Premendo il tasto Time quando l'apparecchio è nel modo Stop verranno visualizzati il numero totale dei brani e il tempo totale di lettura del disco. 3. Dopo che è stato letto il 33esimo brano, non verrà più visualizzato il tempo restante. _ 34 _ OEventuali miglioramenti possono comportare cambiamenti di dati tecnici e di caratteristiche senza preavviso. OLe fotografie e le illustrazioni possono differire leggermente dal modelli prodotti. Ricerca guasti Prima di richiedere un intervento di assistenza, verificare se il problema riscontrato è riportato sulla tabella che segue ed applicare il rimedio consigliato. Causa probabile Rimedio Quando si preme il tasto Power l'apparecchio non si accende. La spina di alimentazione non è ben inserita Inserire correttamente la spina Quando il disco è inserito l'apparecchio non lo legge. Il disco è stato caricato alla rovescia. Caricare il disco con l'etichetta verso l'alto. Il disco è sporco Pulire la superficie del disco. Il collegamento al sistema non è corretto. Verificare i collegamenti. Cattivo funzionamento dell'amplificatore. Verificare la posizione dei commutatori di controllo dell'amplificatore Può essere letto soltanto un brano. E' attivo il tasto 1/ALL. Premere il tasto per disattivarlo. Impossibile la lettura programmata. Non è premuto il tasto PROGRAM. Premere il tasto per far visualizzare "PROGRAM". Non è premuto il tasto PLAY. Premere il tasto PLAY. L'apparecchio è soggetto a vibrazioni od urti. Cambiare la posizione di installazione. Il disco è sporco Pulire la superficie del disco. Ronzio La spina del cavo di collegamento non è ben inserita. Inserire di nuovo la spina a fondo. Rumore proveniente dal sintonizzatore. Il lettore di CD è troppo vicino al sintonizzatore. Tenere i due apparecchi ad una ragionevole distanza, oppure spegnere il lettore. Impossibile l'azionamento mediante telecomando. Il selettore REMOTE CONTROL non è posizionato correttamente. Portare il selettore nella giusta posizione (vedi pagina 29). Nel telecomando non sono inserite le pile. Inserire le pile nel telecomando. Sul telecomando è stata selezionata una funzione diversa da CD. Selezionare la funzione CD sul telecomando. Non si sente il suono (oppure ha un livello d'uscita troppo basso) Errata centratura sulla traccia (suono saltellante) Impossibile la programmazione. (Non sono accettati i numeri selezionati con i tasti) _ 35 _ ITALIANO Problema Previo al empleo Índice Conexiones del panel posterior................ 37 Los controles del panel frontal y sus funciones ........................................ 38 Pantalla......................................................... 38 Mando a distancia...................................... 39 Funcionamiento básico.............................. 40 Repetición .................................................... 40 Reproducción programada ....................... 41 Reproducción al azar ................................. 42 Contador....................................................... 42 Especificaciones......................................... 42 Solución de problemas .............................. 43 Lea lo siguiente antes de poner en funcionamiento el aparato OElija con cuidado el lugar de instalación para su aparato. No lo coloque a la luz solar directa o cerca de fuentes que generen calor. Evite también lugares expuestos a vibraciones y muy polvorientos, calurosos, fríos o húmedos. Manténgalo alejado de fuentes de zumbidos tales como transformadores o motores. ONo abra el gabinete ya que esto podría producir daños en los circuitos o electrochoques. Si entrara algún objeto en el interior del aparato, póngase en contacto con su concesionario. ONo toque los discos con los dedos sucios. Nunca coloque un disco que tenga la superficie rayada. OAl desenchufar el cordón del tomacorriente, tire siempre de la clavija, nunca del cordón. OPara mantener limpio el fonocaptor laser, no lo toque y no olvide cerrar la bandeja portadisco. ONo utilice solventes químicos para limpiar el aparato ya que podría dañar el acabado. Use un paño seco y limpio. OGuarde este manual en un lugar seguro para usarlo como referencia en el futuro. Manipulación de discos Este aparato ha sido específicamente diseñado para la reproducción de compact disc con la marca ˛ . No pueden reproducirse otros discos. OColoque siempre el compact disc en la bandeja con la etiqueta hacia arriba. (Los compact disc pueden reproducirse de un solo lado.) OPara sacar el disco de su caja, presione el centro de la caja y retire el disco sujetándolo por los bordes con cuidado. Modo correcto de sacar el disc Modo correcto de sujetar el disc ODebe limpiarse cuidadosamente la superficie grabada con un paño suave eliminando las huellas digitales y el polvo. Limpiar radialmente Cuidado con la condensación Cuando se cambia el reproductor (o un compact disc) de un lugar frío a otro cálido o cuando se utiliza luego de un cambio brusco de temperatura, existe el peligro de condensación. El vapor de agua en el aire puede condensarse en el mecanismo o en el fonocaptor laser. Si se forman gotas de agua en estas partes, será imposible lograr una reproducción adecuada debido a que el laser no leerá correctamente la información del disco. Para prevenir esto, si va a utilizar el reproductor en un lugar donde pueda producirse condensación, déjelo durante 1 ó 2 horas enchufado en un tomacorriente de alterna según la cantidad de condensación. De este modo, el reproductor se estabilizará según la temperatura de la zona circundante. _ 36 _ ONo utilice productos químicos tales como pulverizadores para limpiar discos, pulverizadores o líquidos antiestáticos, bencina o diluyente para limpiar los compact disc. Tales productos dañarán irreparablemente la superficie plástica del disco. OGuarde siempre los discos en sus cajas luego de escucharlos para evitar rayas de consideración que podrían hacer "saltar" el fonocaptor laser. ONo deje los discos expuestos a la luz directa del sol o en lugares con alta humedad y temperatura por mucho tiempo. Una prolongada exposición a altas temperaturas puede alabear el disco. ONo fije papeles ni escriba con un bolígrafo sobre la superficie de la etiqueta. Conexiones del panel posterior 1 Cable de control remoto 2 3 4 5 Cable de entrada/salida de señal 1Terminales de control remoto Estos terminales se utilizan para conectar el sistema de Mini Componentes TEAC (TH500, R-H500, A-H500) a fin de controlarlo a través del mando a distancia (RC-613, incluido con el amplificador A-H500) o de las señales de control del sistema. Conecte el terminal A (o B) del reproductor de CD al terminal A (o B) de la otra unidad, situada encima o debajo de ella. Nota: No se incluye el mando a distancia con este equipo. 2Selector de control remoto Posición SYSTEM: Seleccione esta posición cuando desee controlar desde el mando a distancia todo el sistema conectado a través de los terminales de control remoto A y B del amplificador A-H500. Posición SINGLE: Seleccione esta posición cuando desee controlar únicamente este componente desde el mando a distancia opcional (no incluido). Nota: En la posición SINGLE, el reproductor no podrá ser controlado manualmente desde el amplificador ni desde el mando a distancia del sistema. 3Terminales ópticos de salida digital (DIGITAL OUTPUT OPTICAL) Estos terminales se utilizan para la conexión a los terminales DIGITAL INPUT OPTICAL de reproductor de MD y del convertidor D/A por medio del cable de fibra óptica (no incluido). Cuando conecte el cable de fibra óptica, retire el tapón del terminal. Deje el tapón puesto cuando no utilice el terminal. 4Salidas LINE OUT Conecte estas salidas a las entradas CD del amplificador: Clavija blanca T terminal blanco (izquierda) Clavija roja T terminal rojo (derecha) 5Cable de alimentación Conecte este cable a una toma mural o a la toma de c.a. del amplificador. _ 37 _ ESPAÑOL A-H500 Los controles del panel frontal y sus funciones 3 4 5 6botones de salto de pista (Ú/Æ) 6 Estos botones se emplean para seleccionar la pista deseada del disco. Æ : Salto hacia adelante. Ú : Salto hacia atrás. Puede saltar hasta el comienzo de la pista en curso pulsando el botón una vez. Si mantiene pulsado el botón, puede saltar a las pistas anteriores de forma secuencial. 7botón de pausa (ƒ) Pulse este botón para detener momentáneamente la reproducción. Para reanudarla, pulse de nuevo este botón o el de reproducción (∏). 8botón de reproducción (∏) 2 1 0 9 8 7 Pulse este botón para dar comienzo a la reproducción. 9botón de parada 1botón de encendido/apagado Pulse este botón para detener la reproducción. 4bandeja de disco Este indicador permanece iluminado en el modo de espera, y apagado cuando la unidad está encendida. Cargue un disco en la bandeja con la etiqueta hacia arriba. En el caso de los CD sencillos de 8†cm (3"), compruebe que el disco queda situado en el centro de la bandeja. 3sensor remoto 5botón de apertura/cierre (∫) 2indicador de espera 0pantalla Esta pantalla informa sobre la situación operativa de la unidad en cada momento. Pulse este botón para abrir y cerrar la bandeja de disco. Este sensor se utiliza para el control independiente del reproductor desde el mando a distancia opcional. Sólo está operativo cuando el selector de control remoto del panel posterior se encuentra en la posición SINGLE. Pantalla 1 3 2 4 5 6 7 7 Indicador de repetición ONE : Se ilumina cuando está activado el modo de repetición de una sola pista. ö : Se ilumina cuando está activado el modo de repetición del disco completo. A-B : Se ilumina cuando está activado el modo de repetición de la sección A-B. q 0 9 8 8 Indicador de exceso de pistas Este indicador se ilumina cuando el número total de pistas del disco es 16 o más. 1 Indicador de reproducción 5 Indicador de modo de contador 9 Calendario musical 2 Indicador de pausa 6 Contador de tiempo/indicador de número de programa 0 Indicador de programa 3 Indicador de número de pista Esto indica el tiempo correspondiente al mode de indicación de tiempo, en minutos y segundos. Durante la activación del modo de programa, el número de programa aparece indicado aquí. _ 38 _ q Indicador de reproducción al azar 4 Indicador de número de índice Mando a distancia 1botón de encendido 3 3indicador luminoso 1 4 5 q 6 0 w 7 8 9 Este indicador parpadea en verde en el modo de CD, y en rojo en el resto de modos. 4Botones operativos de la platina 5Botones numéricos Estos botones numéricos se utilizan para seleccionar números de pista del CD o para presintonizar canales en el sintonizador. También pueden utilizarse para controlar el CD después de pulsar el botón CD o el de reproducción (∏). 6Selectores de entrada del amplificador 7Botones operativos del sintonizador O+: pulse este botón para elevar el volumen O–: pulse este botón para reducir el volumen 0botón de brillo Pulse este botón para oscurecer las pantallas del equipo. Pulse el botón de nuevo para restablecer el brillo original. qbotón de desconexión automática Este botón se utiliza para activar el modo de desconexión automática del sintonizador T-H500. Nota: Este mando a distancia (RC-613) va incluido con el amplificador A-H500. wbotón del modo RDS 8Botones operativos del reproductor de CD: Obotones de búsqueda (/Ò) Estos botones se utilizan para buscar rápidamente una posición deseada durante la reproducción o en el modo de pausa. Ò: búsqueda hacia adelante : búsqueda hacia atrás Obotones de salto de pista (Ú/Æ) Obotón de reproducción (∏) Obotón de pausa (ƒ) Obotón de parada (∑) Obotón de contador (véase página 42) Obotones de repetición (1/ALL, A-B) (véase página 40) Obotón de programa (véase página 41) Obotón de borrado (véase página 41) Obotón de reproducción al azar (véase página 42) Obotón de salto de disco Este botón se emplea únicamente con el cambiador de CD. Por tanto, permanece inoperativo en reproductores sencillos como el PDH500. _ 39 _ ESPAÑOL 2 2botón de apagado (espera) 9botones de volumen +/- Repetición Funcionamiento básico (Esta función sólo se puede activar desde el mando a distancia.) ∑ Repetición de una pista OPulse una vez el botón de repetición "1/ALL". - Se repetirá la reproducción de la pista en curso. * Si cambia de pista durante la repetición de una de ellas, se repetirá la última pista seleccionada. 1 Pulse el botón de apertura/cierre (∫) La bandeja de disco se deslizará hacia afuera. 2 Cargue un disco con la etiqueta hacia arriba. 3 Pulse de nuevo el botón de apertura/cierre. La bandeja se cerrará. Tenga cuidado de no obstaculizar el cierre con la mano. En la pantalla se visualizará el número total de pistas y el tiempo total de reproducción del disco. Número total de pistas Tiempo total de reproducción 4 Seleccione la pista deseada con el botón de salto de pista (Ú/Æ). 5 Pulse el botón de reproducción (∏), y el disco se pondrá en funcionamiento. 6 Cuando desee suspender momentáneamente la reproducción, pulse el botón de pausa (ƒ). 7 Para detener la reproducción, pulse el botón de parada. Nota La unidad comenzará automáticamente la reproducción en los siguientes casos: OCuando seleccione "CD" en el amplificador (A-H500). OCuando encienda el equipo estando seleccionada la posición "CD" del selector de entrada del amplificador. ∑Memoria de última posición Si se pulsa el botón de programa durante la reproducción normal, el reproductor regresará a la posición en que se pulsó el botón de parada. Seguidamente, la reproducción se reanudará desde la pista correspondiente (a dicha posición). ∑ Repetición de todas las pistas OPulse de nuevo el botón de repetición "1/ALL". - Se repetirá la reproducción de todas las pistas del disco. * Cuando hay pistas programadas, sólo se repetirá la reproducción de éstas. * Pulse de nuevo el botón para cancelar la función de repetición. Primera pista Ultima pista ∑ Repetición A-B (1) Durante la reproducción, pulse el botón de repetición A-B en el punto de inicio deseado (A). - En la pantalla se visualiza "A-", y "B" aparece intermitente. (2) Pulse el botón de nuevo en el punto final del fragmento (B). - En la pantalla se visualiza "A-B", y se repite el fragmento comprendido entre los puntos A y B. (3) Pulse de nuevo el botón para cancelar la repetición A-B. _ 40 _ Reproducción programada ∑ Programación con los botones numéricos 1. Pulse el botón CD. Los botones numéricos actuarán como selectores de las pistas del disco. 2. Pulse el botón de programa desde la posición de parada. En la pantalla se visualizará: 3. Seleccione las pistas deseadas pulsando los botones numéricos. Ejemplo: 2T6T12 Las pistas número 2, 6 y 12 quedan programadas en ese orden. Track NO. (n° de pista) Program NO. (n° de programa) 4. Pulse el botón de reproducción (∏) Se iniciará la reproducción del programa en el orden especificado. Notas: OSi pulsa el botón de programa durante la programación, quedará cancelada y se activará la función de reproducción de programa. OSi detiene la reproducción, el contenido del programa desaparecerá de la pantalla, pero no se borrará. Pulse el botón de programa cuando desee seleccionar el contenido programado. ∑ Programación con el botón de salto de pista 1. Pulse el botón de programa desde la posición de parada. 2. Seleccione la pista deseada con el botón de salto (Ú/Æ). Ejemplo: pista número 5. 3. Pulse de nuevo el botón de programa. La pista número 5 queda programada con el número 1. 4. Repita los pasos 2 y 3 para programar otras pistas. 5. Pulse el botón de reproducción (∏) El programa comenzará a reproducirse en el orden especificado. Nota: Si pulsa el botón de programa dos veces seguidas durante la programación, quedará cancelada y se activará la función de reproducción de programa. Observaciones: O"FULL" aparece en la pantalla después de programar la pista n° 33 (ya no es posible incluir más pistas en el programa). ONo se pueden programar números de pista que no existan en el disco. OEl contenido del programa no se borra aunque se apague el equipo, pero se borrará cuando se abra la bandeja. OLa unidad se detendrá automáticamente cuando todas las pistas programadas hayan sido reproducidas. El contenido del programa desaparecerá de la pantalla, pero no se borrará. OEs posible programar con la bandeja abierta. Los números de pista que no existan en el disco se borrarán automáticamente en el momento de iniciarse la reproducción. ∑ Reproducción del programa Puesto que el contenido del programa no se borra aunque se detenga la reproducción o se apague el equipo, más tarde podrá reproducirlo. 1. Pulse el botón de programa. La primera pista programada se visualizará en la pantalla. 2. Pulse repetidas veces el botón si desea revisar el contenido del programa. Cada vez que pulse el botón, en la pantalla irán apareciendo por orden las pistas programadas. 3. Pulse el botón de reproducción (∏) si desea reproducir el disco en el orden programado. ∑ Borrado del programa 1. Pulse el botón de programa. 2. Mantenga pulsado 2 segundos el botón de borrado. Todo el contenido del programa quedará borrado del mismo, igual que si se abre la bandeja de disco. Nota: El botón de programa y el botón de borrado sólo están operativos desde la posición de parada. * Cambio del contenido del programa OSupresión de pistas: Las pistas no deseadas se pueden suprimir del programa original. 1. Pulse repetidas veces el botón de programa hasta que aparezca en la pantalla el número de la pista que desea suprimir del programa. 2. Pulse el botón de borrado. El número de pista quedará suprimido del programa. Si pulsa varias veces el botón, se irán borrando una a una las siguientes pistas del programa, una cada vez que se pulse el botón. ∑ Añadido de pistas al final del programa: 1. Pulse repetidas veces el botón de programa hasta que visualice "END" en la pantalla. 2. Cuando desaparezca "END" de la pantalla, introduzca las nuevas pistas por el método normal de programación. ∑ Añadido de pistas en cualquier posición: 1. Seleccione el número de programa en el que desea añadir la nueva pista pulsando el botón de programa. 2. Utilice el método de programación normal para introducir la nueva pista. _ 41 _ ESPAÑOL Con esta función puede programar hasta 32 pistas en el orden deseado. Antes de comenzar: OLa programación sólo se puede realizar desde el mando a distancia. OLa programación sólo se puede realizar desde la posición de parada. Reproducción al azar Contador Especificaciones (Esta función sólo se puede activar desde el mando a distancia). 1. Pulse el botón de reproducción al azar. Las pistas se reproducirán en un orden aleatorio. (Esta función sólo se puede activar desde el mando a distancia). Estados de la pantalla Esta unidad puede ofrecer cuatro tipos de lectura de tiempo en el contador: 1. El tiempo transcurrido de la pista en curso se visualiza cuando da comienzo la reproducción. Sistema láser : 3 haces Filtro digital : Óctuple sobremuestreo Respuesta en frecuencia : 20-20.000 Hz (±2dB) Método corrección errores : CIRC Relación señal/ruido : Más de 100dB (con filtro IHF "A") Distorsión armónica total : Menor de 0,02% (1 kHz) Tensión de salida : 2 V RMS Alimentación : 230 V, 50 Hz Consumo : 9 W Dimensiones (anch. x alt. x prof.) : 285 x 132 x 292 mm Peso : 3,9 kg Accesorios Cable entrada/salida señal : 1 Cable de control remoto : 1 2. Pulse de nuevo el botón para cancelar la reproducción al azar. Cuando se cancela esta función, la reproducción continuará normalmente a partir de la siguiente pista. Notas 1. Esta función se puede activar desde las posiciones de parada y de reproducción. 2. Si pulsa el botón "Æ" durante la reproducción al azar, podrá seleccionar las pistas al azar con independencia del número de pista en curso. Y si pulsa el botón "Ú", la reproducción se iniciará desde el principio de la pista en curso. 3. Una pista ya reproducida en una ocasión no podrá hacerlo más veces. 2. Pulse una vez el botón de contador durante la reproducción, y se visualizará el tiempo restante de la pista en curso. 3. Pulse de nuevo el botón de contador. Aparecerá la lectura del tiempo total transcurrido del disco. 4. Vuelva a pulsar el botón. Se visualizará el tiempo total restante del disco. Notas 1. El tiempo no se visualizará durante la reproducción de un programa si el contenido del mismo excede de 100 minutos. En su lugar aparecerá la indicación "--.--". 2. Si pulsa el botón de contador desde la posición de parada, en la pantalla aparecerán el número total de pistas y el tiempo total de reproducción del disco. 3. Cuando se reproduzca la pista número 33 o superior, no se ofrecerá la lectura de tiempo restante. _ 42 _ OPosibles mejoras puede originar cambios en las especificaciones o características sin aviso. OLas fotos e ilustraciones puede diferir ligeramente de los modelos de producción. Solución de problemas Antes de solicitar asistencia técnica, compruebe los puntos de la siguiente tabla por si identifica la causa del problema. Probable causa El equipo no se enciende cuando se pulsa el botón de encendido. El cable de alimentación no está bien conectado. Conéctelo debidamente. No se inicia la reproducción cuando se carga el disco. Disco insertado con la etiqueta hacia abajo. Déle la vuelta al disco. El disco está sucio. Limpie la superficie del disco. Conexión al sistema estéreo incorrecta. Revise las conexiones. Anomalía en el amplificador. Revise los ajustes de control/interruptor del amplificador. Sólo se puede reproducir una pista. Está activado el botón "1/ALL". Púlselo de nuevo para desactivarlo. No es posible la reproducción programada. No ha pulsado el botón de programa. Pulse el botón para que se visualice "PROGRAM". No ha pulsado el botón de reproducción. Pulse el botón. El reproductor está sometido a vibraciones o impactos. Cambie la unidad de emplazamiento. El disco está sucio. Limpie la superficie del disco. Se percibe un zumbido Clavija mal conectada. Conéctela debidamente. Ruido en el sintonizador. El reproductor está demasiado cerca del sintonizador. epárelos razonablemente o apague el reproductor. No es posible controlar el equipo con el mando a distancia. El interruptor REMOTE CONTROL SELECTOR no está en la posición adecuada. Seleccione la posición adecuada. Consulte la página 37. No ha insertado pilas en el mando. Inserte las pilas. El mando a distancia tiene seleccionado un modo distinto de CD. Seleccione CD en el mando a distancia. No hay salida de sonido (o es muy débil). Saltos de sonido. No es posible programar. Las entradas de los botones numéricos no son aceptadas. Solución recomendada ESPAÑOL Problema _ 43 _ For U.S.A. TO THE USER This equipment has been tested and found to comply with the limits for a Class B digital device, pursuant to Part 15 of the FCC Rules. These limits are designed to provide reasonable protection against interference in a residential area. This device generates and uses radio frequency energy and if not installed and used in accordance with the instructions, it may cause interference to radio or TV reception. If this unit does cause interference with TV or radio reception you can try to correct the interference by one or more of the following measures: a) Reorient or relocate the receiving antenna. b) Increase the separation between the equipment and the receiver. c) Plug the equipment into a different outlet so that it is not on the same circuit as the receiver. If necessary, consult the dealer or an experienced radio/TV technician for additional suggestions. CAUTION: Changes or modifications to this equipment not expressly approved by TEAC CORPORATION for compliance could void the user's authority to operate this equipment. For CANADA THIS DIGITAL APPARATUS DOES NOT EXCEED THE CLASS B LIMITS FOR RADIO NOISE EMISSIONS FROM DIGITAL APPARATUS AS SET OUT IN THE RADIO INTERFERENCE REGULATIONS OF THE CANADIAN DEPARTMENT OF COMMUNICATIONS. LE PRÉSENT APPAREIL NUMÉRIQUE N'ÉMET PAS DE BRUITS RADIOÉLECTRIQUES DÉPASSANT LES LIMITES APPLICABLES AUX APPAREILS NUMÉRIQUES DE CLASSE B PRÉSCRITES DANS LE RÉGLEMENT SUR LE BROUILLAGE RADIOÉLECTRIQUE ÉDICTÉ PAR LE MINISTÈRE DES COMMUNICATIONS DU CANADA. For CANADA AC POWER CORD CONNECTION CORDE DE CONNEXION CA CAUTION: TO PREVENT ELECTRIC SHOCK, MATCH WIDE BLADE OF PLUG TO WIDE SLOT, FULLY INSERT. ATTENTION: POUR ÉVITER LES CHOCS ÉLECTRIQUES, INTRODUIRE LA LAME LA PLUS LARGE DE LA FICHE DANS LA BORNE CORRESPONDANTE DE LA PRISE ET POUSSER JUSQU'AU FOND. TEAC CORPORATION 3-7-3, Nakacho, Musashino-shi, Tokyo 180, Japan Phone: (0422) 52-5081 TEAC AMERICA, INC. 7733 Telegraph Road, Montebello, California 90640 Phone: (213) 726-0303 TEAC CANADA LTD. 340 Brunel Road, Mississauga, Ontario L4Z 2C2, Canada Phone: 905-890-8008 TEAC UK LIMITED 5 Marlin House, Marlins Meadow, The Croxley Centre, Watford, Herts. WD1 8YA, U.K. Phone: 01923-819699 TEAC DEUTSCHLAND GmbH Bahnstrasse 12, 65205 Wiesbaden-Erbenheim, Germany Phone: 0611-71580 TEAC FRANCE S.A. 17, Rue Alexis-de-Tocqueville, CE 005 92182 Antony Cedex, France Phone: (1) 42.37.01.02 TEAC NEDERLAND BV Perkinsbaan 11, 3439 ND Nieuwegein, Nederland Phone: 03-402-30229 TEAC AUSTRALIA PTY., LTD. A.C.N. 005 408 462 106 Bay Street, Port Melbourne, Victoria 3207, Australia Phone: (03) 9644-2442 TEAC ITALIANA S.p.A. Via C. Cantù 5, 20092 Cinisello Balsamo, Milano, Italy Phone: 02-66010500 PRINTED IN KOREA-
 1
1
-
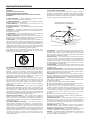 2
2
-
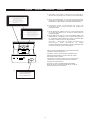 3
3
-
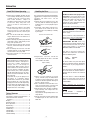 4
4
-
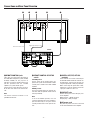 5
5
-
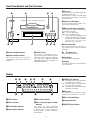 6
6
-
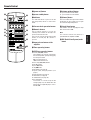 7
7
-
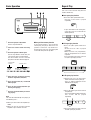 8
8
-
 9
9
-
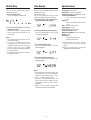 10
10
-
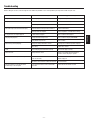 11
11
-
 12
12
-
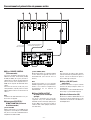 13
13
-
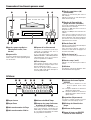 14
14
-
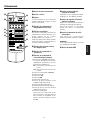 15
15
-
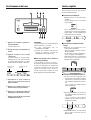 16
16
-
 17
17
-
 18
18
-
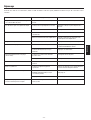 19
19
-
 20
20
-
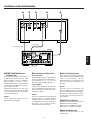 21
21
-
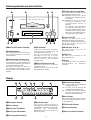 22
22
-
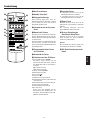 23
23
-
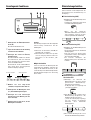 24
24
-
 25
25
-
 26
26
-
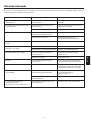 27
27
-
 28
28
-
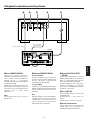 29
29
-
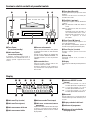 30
30
-
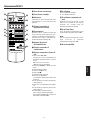 31
31
-
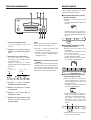 32
32
-
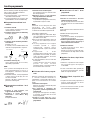 33
33
-
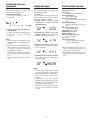 34
34
-
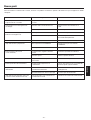 35
35
-
 36
36
-
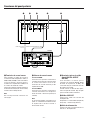 37
37
-
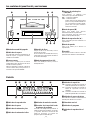 38
38
-
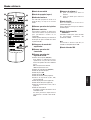 39
39
-
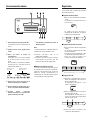 40
40
-
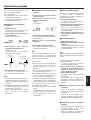 41
41
-
 42
42
-
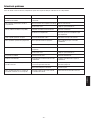 43
43
-
 44
44


TEAC PD-H500 El manual del propietario
- Categoría
- Reproductores de CD
- Tipo
- El manual del propietario
En otros idiomas
- français: TEAC PD-H500 Le manuel du propriétaire
- italiano: TEAC PD-H500 Manuale del proprietario
- English: TEAC PD-H500 Owner's manual
- Deutsch: TEAC PD-H500 Bedienungsanleitung
Documentos relacionados
-
TEAC PD-H570 El manual del propietario
-
-
-
-
-
-
-
-
-