Silvercrest 73271 Operation and Safety Notes
- Categoría
- Ollas arroceras
- Tipo
- Operation and Safety Notes
Este manual también es adecuado para

5
IAN 73271 IAN 73271
KOMPERNASS GMBH
Burgstraße 21
D-44867 Bochum
www.kompernass.com
Estado de las informaciones · Last Information Update
Stand der Informationen:
02/2012 · Ident.-No.: SRK700A1112011-2
COCEDOR DE ARROZ SRK 700 A1
COCEDOR DE ARROZ
Instrucciones de utilización y de seguridad
RICE COOKER
Operation and Safety Notes
ES Instrucciones de utilización y de seguridad Página 1
GB / MT Operation and Safety Notes Page 9
DE / AT / CH Bedienungs- und Sicherheitshinweise Seite 17
Antes de empezar a leer abra la página que contiene las imágenes y, en seguida, familiarícese con todas
las funciones del dispositivo.
Before reading, unfold the page containing the illustrations and familiarise yourself with all functions of
the device.
Klappen Sie vor dem Lesen die Seite mit den Abbildungen aus und machen Sie sich anschließend mit allen
Funktionen des Gerätes vertraut.
REISKOCHER
Bedienungs- und Sicherheitshinweise
CV_73271_SRK700A1_LB5.indd 1-3CV_73271_SRK700A1_LB5.indd 1-3 03.02.12 11:5503.02.12 11:55

1
2
4
5
6
7
8
3
CV_73271_SRK700A1_LB5.indd 4-6CV_73271_SRK700A1_LB5.indd 4-6 03.02.12 11:5603.02.12 11:56

- 1 -
ÍNDICE PÁGINA
Indicaciones de seguridad 2
Finalidad de uso 3
Datos técnicos 3
Volumen de suministro 3
Visión global del aparato 3
Antes del primer uso 3
Utilización del cocedor para arroz 3
Cocer arroz.......................................................................................................................................3
Cocer al vapor .................................................................................................................................5
Eliminación de fallos 6
Cuidado y limpieza 7
Evacuación 7
Garantía y asistencia técnica 7
Importador 8
Lea atentamente este manual de instrucciones antes del primer uso y consérvelo para posteriores
utilizaciones. Entréguelas en caso de traspasar el aparato a terceros.
IB_73271_SRK700A1_LB5 03.02.2012 10:52 Uhr Seite 1

- 2 -
Cocedor de arroz
Indicaciones de seguridad
¡Peligro! ¡Descarga eléctrica!
• Conecte el cocedor para arroz sólo a una base
de enchufe correctamente instalada y con toma
de tierra con la tensión de red indicada en la
placa de características del aparato.
• ¡Extraiga siempre la clavija de red de la base
de enchufe, al mover el aparato, al llenarlo, en
caso de avería, antes de limpiarlo o cuando no
lo esté utilizando!
• No tire nunca del cable de alimentación, para
extraer la clavija de red de la base de enchufe.
Tire de la clavija de red.
• No toque la clavija con las manos mojadas o
húmedas.
No sumerja bajo ningún concepto el aparato
en agua u otros líquidos.
• Si el aparto cae dentro de un líquido extraiga
inmediatamente la clavija de red de la base de
enchufe. Después no vuelva a ponerlo a funciona-
miento y hágalo revisar en un servicio técnico
autorizado.
• No exponga el aparato a humedad y no lo utilice
en el exterior.
• No utilice el cocedor para arroz, si usted se en-
cuentra sobre suelo húmedo o si sus manos o el
aparato están mojados.
• Coloque el cable de red de tal forma que no
entre en contacto con objetos calientes o afilados.
• No doble ni aprisione el cable de red, y no lo
enrolle en torno al aparato.
• En caso de una clavija de red dañada o cable
de red dañado, encomiende su sustitución a
personal técnico autorizado o al servicio de
posventa con el fin de evitar riesgos.
!Peligro de lesiones!
• No deje el aparato desatendido durante el
funcionamiento.
¡CUIDADO! ¡Por el orificio de salida de vapor
y al abrir la tapa se desprende vapor calien-
te! ¡Peligro de quemaduras!
Este símbolo sobre el aparato le advierte de
peligro de quemaduras debido a superficies
calientes.
• No permita utilizar el aparato a personas (incluidos
los niños) cuyas facultades físicas, sensoriales o
mentales, así como su falta de conocimientos o
de experiencia, les impida hacer un uso seguro
del mismo si no están bajo vigilancia o han sido
instruidos correctamente acerca del uso del apa-
rato.
• Vigile a los niños para asegurarse de que no
juegan con el aparato.
• Deje que el aparato y los accesorios se enfríen
completamente antes de limpiarlos y guardarlos.
• No utilice ningún tipo de temporizador externo
o un sistema de control remoto para accionar el
aparato.
¡
Atención! ¡Daños en el aparato!
• No cubra la tapa durante la cocción con toallas
o similares.
• Nunca coloque el aparato en la proximidad
alguna fuente de calor.
• Nunca abra la carcasa. En este caso no existe
seguridad y perderá el derecho a la garantía.
• Utilice siempre los accesorios contenidos en el
volumen de suministro y nunca utilice el aparato
sin colocar el recipiente.
IB_73271_SRK700A1_LB5 03.02.2012 10:52 Uhr Seite 2

- 3 -
Finalidad de uso
Utilice el cocedor para arroz exclusivamente para
cocinar arroz y para cocer al vapor alimentos
como p.ej. verduras o pescado.
¡Este cocedor para arroz no está destinada a uso
industrial, sino exclusivamente para uso privado en
el hogar!
Datos técnicos
Tensión nominal: 220 - 240 V
~
/ 50 Hz
Consumo de potencia: 700 W
Volumen de suministro
1 Cocedor para arroz, incl. recipiente de cocción y
accesorio para cocción al vapor
1 línea de alimentación con enchufe con puesta
a tierra
1 Vaso medidor
1 cuchara de plástico
1 Instrucciones de uso
La capacidad total del vaso medidor es de aprox.
180 ml. Para facilitar el llenado, el vaso medidor
posee 2 escalas diferentes:
1/4 = aprox. 45 ml
1/2 = aprox. 90 ml
3/4 = aprox. 135 ml
40 = aprox. 40 ml
80 = aprox. 80 ml
120 = aprox. 120 ml
160 = aprox. 160 ml
Visión global del aparato
1 Orificio de salida de vapor
2 Tapadera
3 Accesorio para cocción al vapor
4 Recipiente de cocción
5 Lámpara de control amarilla (mantener caliente)
6 lámpara de control roja (cocer)
7 Selector de función para „cocer“ y
„mantener caliente“
8 Hembrilla de conexión para cable de alimentación
Antes del primer uso
Extraiga el cocedor para arroz cuidadosamente
del embalaje. Retire las posibles láminas de protec-
ción y limpie los restos de polvo de embalaje de las
piezas que entren en contacto con los alimentos.
Limpie el aparato como se describe en el capítulo
„Cuidado y limpieza”.
Utilización del cocedor para
arroz
Con este aparato es posible tanto cocinar arroz como
cocer al vapor simultáneamente otros alimentos. Ex-
perimente un poco, para determinar la cantidad
adecuada de agua y el tiempo de cocción apro-
piado para las posibles combinaciones.
Cocer arroz
Advertencia:
Unte el interior del recipiente de cocción 4 de forma
homogénea con un poco de grasa o aceite vegetal
para conseguir un mejor resultado.
1. Retirela tapa 2.
2. Retire el recipiente de cocción 4.
IB_73271_SRK700A1_LB5 03.02.2012 10:52 Uhr Seite 3

- 4 -
Nota:
¡Si está dañado el recipiente de cocción 4, no conti-
núe utilizando! Por los daños puede suceder que la
desconexión de seguridad del aparato se dispara no
pudiendo volver a conectar el aparato.
3. Mida la cantidad de arroz deseada con la ayuda
del vaso medidor suministrado.
A modo orientativo sirve: un vaso medidor raso -
lleno de arroz - resulta en una porción para una
persona. Determine la cantidad de arroz / agua
adecuada para usted realizando varios intentos.
4. Lave bien el arroz suelto y escúrralo. En este
proceso se pierden nutrientes, pero si se omite el
lavado el resultado de la cocción podría no ser
igual de bueno y podría formarse mayor canti-
dad de espuma y vapor en el depósito de cocci-
ón 4. Respete siempre las indicaciones de pre-
paración del productor del arroz.
5. Después de lavar el arroz, introdúzcalo en el
recipiente de cocción 4 de manera que quede
plano.
Nota:
¡Introduzca al menos 2 vasos medidores de arroz
en el cocedor para arroz! ¡Si utiliza menos arroz
puede que el resultado no sea bueno!
6. Vierta agua a continuación hasta la marca
CUP correspondiente en el recipiente de cocci-
ón 4 :
• 2 vasos medidores de arroz =
agua hasta la marca CUP „2”
• 4 vasos medidores de arroz =
agua hasta la marca CUP „4”
• 6 vasos medidores de arroz =
agua hasta la marca CUP „6”
• 8 vasos medidores de arroz =
agua hasta la marca CUP „8”
• 10 vasos medidores de arroz =
agua hasta la marca CUP „10”
Según su gusto, puede añadir también sal al
arroz.
Nota:
Si utiliza agua caliente es posible reducir el tiempo
de cocción. Utilice en este caso un poco menos de
agua que la que se indica mediante la marca CUP
en el depósito de cocción 4.
Nota:
Según el tipo de arroz es posible que deba introdu-
cir más o menos agua para alcanzar un resultado
óptimo. Varíe la cantidad de agua según su expe-
riencia y gusto.
7. Una vez llenado el recipiente de cocción 4,
colóquelo en la carcasa del cocedor para
arroz.
Preste atención que...
- ... no haya humedad ni ningún grano de arroz en
el exterior del recipiente 4 para evitar que se en-
sucie la zona de cocción. En caso necesario lim-
pie el exterior con un trapo limpio seco.
- ... el recipiente de cocción 4 no se coloque incli-
nado o torcido en la carcasa del cocedor de ar-
roz. Coloque el recipiente de cocción 4 siempre
correctamente y recto en la carcasa del cocedor
de arroz. de lo contrario puede su
ceder que la desconexión de seguridad del apa-
rato se dispara no pudiendo volver a conectar el
aparato.
Nota:
Este aparato va equipado con un interruptor de se-
guridad: El proceso de cocción no se puede iniciar
sin recipiente de cocción 4 sin tapa 2. Con tapa
colocada 2 en cambio se puede iniciar el proceso
de cocción con recipiente de cocción vacío.
8. Cierre la tapa 2.
9. Introduzca la línea de conexión en la hembrilla
de conexión 8 en el lateral del aparato.
10. Introduzca la clavija de red en una base de
enchufe instalada según lo prescrito. La lámpara
de control amarilla 5 se ilumina.
IB_73271_SRK700A1_LB5 03.02.2012 10:52 Uhr Seite 4

- 5 -
Atención!
Durante el proceso de cocción sale vapor de la
apertura de salida de vapor 1. No coloque nunca
las manos u otras partes del cuerpo sobre la aper-
tura de salida de vapor 1 durante el proceso de
cocción. Existe peligro de sufrir quemaduras.
11. Pulse el selector de función 7 hacia abajo. La
lámpara de control amarilla 5 se apaga
y la lámpara de control roja 6 se ilumina.
El proceso de cocción comenzará.
Nota:
Si el recipiente de cocción 4 no está colocado y
relleno el selector de función 7 no se puede situar
en „cocer”.
Cuando el arroz esté cocido, el cocedor para arroz
conecta automáticamente la función de manteni-
miento de calor. La lámpara de control roja 6
se apaga, mientras que la lámpara de control ama-
rilla 5 se vuelve a iluminar.
12. Abra la tapa 2. El arroz está ahora listo para
su consumo.
Atención!
Utilice exclusivamente para la extracción del arroz
la cuchara de plástico adjunta. De lo contrario po-
dría dañar el revestimiento antiadherente.
Si no va a consumir el arroz de inmediato:
• No abra la tapa 2 durante el tiempo de mante-
nimiento de calor.
• No deje el arroz más de 2 horas en el manteni-
miento de calor.
Atención!
Extraiga la clavija de red de la base de enchufe
si no sigue utilizando el cocedor de arroz. ¡Existe
riesgo de descarga eléctrica!
Cocer al vapor
Atención!
Durante el proceso de cocción no levante el acce-
sorio para cocción al vapor 3, ya que existe peligro
de quemaduras debido al vapor generado. El acce-
sorio para cocción al vapor 3 se calienta durante
el proceso de cocción. Saque el accesorio para
cocción al vapor 3 del recipiente de cocción 4
con la ayuda de unos guantes de cocina o similares.
Nota:
Preste atención que se coloque correctamente el reci-
piente de cocción 4 también en la cocción a vapor.
El recipiente de cocción 4 no se debe dañar. de lo
contrario puede suceder que la desconexión de segu-
ridad del aparato se dispara no pudiendo volver a
conectar el aparato.
1. Vierta la cantidad de agua deseada en el re-
cipiente de cocción 4. El tiempo de cocción
depende de la cantidad de agua vertida.
Observe los ejemplos de la siguiente tabla.
• 1 vaso medidor lleno es suficiente para aprox.
15 minutos de cocción al vapor.
• 2 vasos medidores llenos son suficiente para
aprox. 30 minutos de cocción al vapor.
IB_73271_SRK700A1_LB5 03.02.2012 10:52 Uhr Seite 5

- 6 -
Verduras
Agua en
mililitros
Peso /
Cantidad
Setas (enteras) aprox. 120 ml aprox. 450 g
Guisantes
(con vaina)
aprox. 200 ml aprox. 350 g
Espárragos aprox. 200 ml. aprox. 450 g
Zanahorias
(peladas)
aprox. 240 ml aprox. 450 g
judías verdes
(cortadas)
aprox. 240 ml aprox. 450 g
judías verdes
(enteras)
aprox. 300 ml aprox. 450 g
Coles de
Bruselas
aprox. 300 ml aprox. 350 g
Mazorcas
de maíz
aprox. 360 ml 2 mazorcas
Pescado /
Mariscos
Agua en
mililitros
Peso /
Cantidad
Mariscos
( cocer hasta
que se abran)
aprox. 120 ml aprox. 450 g
Gambas
(cocer hasta
alcanzar un
color rosado)
aprox. 140 ml aprox. 350 g
Pescado (filete) aprox. 180 ml aprox. 350 g
Bistec aprox. 240 ml aprox. 450 g
Ostras
(en concha)
aprox. 300 ml aprox. 700 g
2. Introduzca los alimentos que desea cocer en el
accesorio para cocción al vapor 3.
3. Coloque el recipiente sobe el recipiente de
cocción 4.
4. Cierre la tapa 2.
5. Enchufe el aparato. La lámpara de control ama-
rilla 5 se ilumina.
6. Pulse el selector de función 7 hacia abajo. La
lámpara de control amarilla 5 se apa-
ga y la lámpara de control roja 6 se ilumi-
na. El proceso de cocción comenzará.
Tan pronto como toda el agua introducida en el re-
cipiente de cocción 4 se haya evaporado, el coce-
dor para arroz volverá automáticamente a la fun-
ción de mantenimiento de calor. La lámpara de
control roja 6 se apaga, mientras que la lám-
para de control amarilla 5 se vuelve a iluminar.
Los alimentos introducidos están ahora perfecta-
mente cocidos y listos para comer.
Eliminación de fallos
Error Motivo Reparación
El aparato no
muestra
ninguna
función.
El cocedor
para arroz no
está conectado
a la base de
enchufe.
Inserte la clavija
de red en una
base de
enchufe de red.
La base de
enchufe está
defectuosa.
Utilice una
base de enchu-
fe distinta.
La lámpara de
control amarilla
5 se ilumina,
sin embargo no
se puede iniciar
el proceso de
cocción.
El recipiente de
cocción 4 está
vacío y el inter-
ruptor de seguri-
dad no se pue-
de presionar
hacia abajo.
Introduzca los
alimentos que
desea cocer en
el recipiente de
cocción
4.
IB_73271_SRK700A1_LB5 03.02.2012 10:52 Uhr Seite 6

- 7 -
Cuidado y limpieza
¡Peligro! ¡Descarga eléctrica!
• ¡Antes de limpiar y guardar el aparato extraiga
siempre la clavija de red y deje que se enfríe
completamente!
• Tenga cuidado de que no caiga ningún líquido
sobre la placa calentadora y en el interior del
cocedor para arroz.
• Para la limpieza de la carcasa del cocedor incl.
la placa calentadora utilice un paño seco. No
utilice ningún detergente ni producto de limpieza
agresivos. Éstos podrían dañar la superficie.
• Limpie el accesorio para cocción al vapor 3, la
tapa 2, el recipiente de cocción 4, la cuchara
de plástico y el vaso medidor en agua jabonosa.
• Seque todas las piezas antes de volver a poner
el aparato de nuevo en funcionamiento.
Evacuación
En ningún caso deberá tirar el aparato
con la basura doméstica. Este producto
está sujeto a la directiva europea
2002/96/EC.
Evacue el aparato en un centro de evacuación auto-
rizado a través de las instalaciones de evacuación
comunitarias.
Preste atención a las normas en vigor.
En caso de duda póngase en contacto con las in-
stalaciones municipales de evacuación de residuos.
El material de embalaje debe desecharse
de forma respetuosa con el medio ambiente.
Garantía y asistencia técnica
Con este aparato recibe usted 3 años de garantía
desde la fecha de compra. El aparato ha sido fabri-
cado cuidadosamente y ha sido probado antes de
su entrega. Guarde el comprobante de caja como
justificante de compra. Si necesitara hacer uso de
la garantía, póngase en contacto por teléfono con
su centro de servicio habitual. Éste es el único
modo de garantizar un envío gratuito.
La garantía cubre sólo defectos de fabricación o
del material, pero no los daños de transporte, pie-
zas sujetas a desgaste y los daños sufridos por las
piezas frágiles p. ej. el interruptor o baterías. Este
producto ha sido diseñado exclusivamente para el
uso particular y no para el uso industrial.
En caso de manipulación indebida e incorrecta, uso
de la fuerza y en caso de abrir el aparato personas
extrañas a nuestros centros de asistencia técnica
autorizados, la garantía pierde su validez. Esta gar-
antía no reduce en forma alguna sus derechos le-
gales.
Por el mero hecho de hacer uso de la garantía no
implica la prolongación del período de válidez de
la garantía. Ello rige también para piezas sustitui-
das y reparadas. Los posibles daños y defectos de-
tectados al comprar el producto, se han de notificar
de inmediato o como muy tarde dos días desde la
fecha de compra. . Finalizado el periodo de garan-
tía, las reparaciones se han de abonar.
Servicio España
Tel.: 902 59 99 22
(0,08 EUR/Min. + 0,11 EUR/llamada
(tarifa normal))
(0,05 EUR/Min. + 0,11 EUR/llamada
(tarifa reducida))
E-Mail: [email protected]
IAN 73271
IB_73271_SRK700A1_LB5 03.02.2012 10:52 Uhr Seite 7

- 8 -
Importador
KOMPERNASS GMBH
BURGSTRASSE 21
44867 BOCHUM, (ALEMANIA)
www.kompernass.com
IB_73271_SRK700A1_LB5 03.02.2012 10:52 Uhr Seite 8

- 9 -
CONTENT PAGE
Safety information 10
Intended use 11
Technical Data 11
Items supplied 11
Appliance Overview 11
Before the First Use 11
Using the Rice Cooker 11
Cooking Rice..................................................................................................................................11
Steaming.........................................................................................................................................13
Troubleshooting 14
Cleaning and care 15
Disposal 15
Warranty and Service 15
Importer 16
Read the operating instructions carefully before using the device for the first time and preserve this booklet
for later reference. Pass this manual on to whoever might acquire the device at a future date.
IB_73271_SRK700A1_LB5 03.02.2012 10:52 Uhr Seite 9

- 10 -
Rice Cooker
Safety information
Danger! Electric shock!
• Connect the rice cooker only to correctly installed
and earthed mains sockets supplying a voltage
that tallies with the details given on the appliance
identification plate.
• Always remove the plug from the mains power sok-
ket when you move or fill the device, in the event
of problems, before cleaning the appliance and
when the cooker is not in use!
• Never disconnect the appliance by pulling on
the power cable. Always pull on the plug itself.
• Never touch the appliance plug with wet or moist
hands.
Never submerse the device in water or other
liquids.
• Should the appliance ever fall into a liquid,
IMMEDIATELY remove the plug from the mains
power socket. Then, do not operate the appliance
again until it has been inspected by an approved
service company.
• Never subject the appliance to moisture and do
not use it outdoors.
• Do not use the rice cooker while standing on a
wet floor or when your hands or the appliance
are wet.
• Position the power cable so that it does not come
into contact with hot or sharp-edged objects.
• Do not kink or crush the power cable and do not
wind it around the appliance.
• Arrange for defective power plugs and/or cables
to be replaced at once by qualified technicians
or our Customer Service Department.
Risk of personal injury!
• Never leave the appliance unattended during
operation.
WARNING! Hot steam escapes from the
steam hole and upon opening the cover! Risk
of scalding!
This symbol on the appliance warns you on
the risk of burns caused by hot surfaces.
• This appliance is not intended for use by individuals
(including children) with restricted physical, physio-
logical or intellectual abilities or deficiences in
experience and/or knowledge unless they are
supervised by a person responsible for their safety
or receive from this person instruction in how the
appliance is to be used.
• Children should be supervised to ensure that
they do not play with the appliance.
• Allow the appliance and accessories to cool
completely before cleaning and storing them.
• Do not use an external timing switch or a separate
remote control system to operate the appliance.
Important! Appliance damage!
• When cooking, never cover the appliance lid
with handtowels or anything similar.
• Never place the appliance adjacent to sources
of heat.
• Never open the housing. If you do, the safety
concept of the appliance can no longer be assured
and the warranty becomes void.
• Only use the accessory parts provided with the
appliance and never use the appliance without
first inserting the cooking bowl.
IB_73271_SRK700A1_LB5 03.02.2012 10:52 Uhr Seite 10

- 11 -
Intended use
Only use the rice cooker for cooking rice and
steaming foods, such as vegetables or fish.
This rice cooker is not intended for commercial use; it
is intended exclusively for use in private households!
Technical Data
Rated voltage: 220 - 240 V
~
/ 50 Hz
Power consumption: 700 W
Items supplied
1 Rice cooker,
incl. cooking bowl and steaming attachment
1 power cable fitted with a plug
1 measuring cup
1 plastic spoon
1 operating manual
The total capacity of the measuring cup is approxi-
mately 180 ml. The measuring cup has 2 different
sets of measurement markings to make filling easier:
1/4 = approx. 45 ml
1/2 = approx. 90 ml
3/4 = approx. 135 ml
40 = approx. 40 ml
80 = approx. 80 ml
120 = approx. 120 ml
160 = approx. 160 ml
Appliance Overview
1 Steam exit opening
2 Lid
3 Steamer attachment
4 Cooking bowl
5 Yellow control lamp (Keep-warm)
6 Red control lamp (Cooking)
7 Function selector switch for "Cooking" and
"Keep-warm"
8 Connection socket for the power cable
Before the First Use
Carefully remove the rice cooker from the packaging.
Remove all possibly remaining protective foils and
clean any packaging-dust remnants from all compo-
nents that will come into contact with foodstuffs.
Clean the appliance as described in the chapter
"Cleaning and Care".
Using the Rice Cooker
With this appliance, it is possible to cook rice as
well as to steam other foods at the same time. Ex-
periment with finding the right quantity of water and
the right cooking time for the various combinations.
Cooking Rice
Note:
Coat the inside of the cooking bowl 4 evenly with
a little grease or vegetable oil to achieve a better
cooking result.
1. Remove the lid 2.
2. Take the cooking bowl 4 out.
IB_73271_SRK700A1_LB5 03.02.2012 10:52 Uhr Seite 11

- 12 -
Note:
If the cooking bowl 4 is damaged, discontinue all
further use! Due to the damage it may be that the
safety shut-off of the appliance has triggered and
the appliance does not allow itself to be switched on.
3. Measure the desired quantity of rice using the
supplied measuring cup.
As a general rule: A level measuring cup - filled
with rice - yeilds a portion for one person. Deter-
mine the right quantity of rice and water for you
in a few cooking attempts.
4. Thoroughly wash and sieve the loose rice. Nu-
trients will be lost with this, however, if you do
not wash the rice this could lead to poor cooking
results and elevated foam and steam formation
in the cooking bowl 4. Also, always pay heed
to the preparation instructions of the rice produ-
cer.
5. After washing it, pour the rice into the cooking
bowl 4 and smooth it out.
Note:
Place at least 2 measuring beakers of rice into the
rice cooker! A lesser volume of rice could cause
inferior cooking results!
6. Then add water in the cooking bowl 4 as per
the following cup markings:
• 2 Measuring beakers of rice =
Water up to cup marking "2"
• 4 Measuring beakers of rice =
Water up to cup marking "4"
• 6 Measuring beakers of rice =
Water up to cup marking "6"
• 8 Measuring beakers of rice =
Water up to cup marking "8"
• 10 Measuring beakers of rice =
Water up to cup marking "10"
Subject to taste preferences, salt can also be
added to the rice.
Note:
If you use warm water the cooking time can be
shortened. In this case, use somewhat less water
than is given on the cup marking in the cooking
bowl 4.
Note:
Subject to the type/sort of rice being prepared, it
could be that you may have to insert a little more or
less water to achieve an optimal cooking result.
Vary the amount of water in accordance with your
individual experiences and personal preference.
7. When the cooking bowl 4 is full, place it back
in the rice cooker housing.
Ensure that...
- ... to avoid dirtying the cooking area, check to
make sure there is no moisture or rice located on
the outside of the cooking bowl 4. If necessary,
wipe the outside with a clean cloth.
- ... the cooking bowl 4 is not skewed or tilted
when being placed in the rice cooker housing. Al-
ways insert the cooking bowl 4 correctly and pre-
cisely into the rice cooker housing. If you do not, it
may be that the safety shut-off of the
appliance will trigger and the appliance does not
allow itself to be switched on.
Note:
This appliance is fitted with a safety switch:
the cooking process cannot be started with an empty
cooking vessel 4 without a lid 2. However, with the
lid 2 in place the cooking process can also be started
with an empty cooking vessel.
8. Close the appliance lid 2.
9. Insert the power cable into the socket 8 on
the side of the appliance.
10. Insert the power plug into a properly installed
power socket. The yellow control lamp 5
glows.
IB_73271_SRK700A1_LB5 03.02.2012 10:52 Uhr Seite 12

- 13 -
Important!
During the cooking process steam is emitted from
the steam exit opening 1. NEVER hold your hands
or other parts of the body over the steam exit ope-
ning 1 during the cooking process. There is a risk
of receiving severe scalds!
11. Press the function selector switch 7 down. The
yellow control lamp 5 extinguishes and
the red control lamp 6 starts to glow.
The cooking process begins.
Note:
If the cooking bowl 4 is not correctly positioned,
the function selector switch 7 cannot be moved to
the setting "Cooking".
As soon as the rice is cooked, the rice cooker switches
itself automatically back to the keep-warm setting.
The red control lamp 6 extinguishes and the
yellow control lamp 5 starts to glow.
12. Open the lid 2. The rice is now ready for
consumption.
Attention!
For removal of the rice use exclusively the supplied
plastic spoon. If you do not, the non-stick coating
could be damaged.
If you do not consume the rice immediately
• During the keep-warm period, do not open the
lid 2.
• Do not leave the rice for longer than 2 hours in
the keep.warm state.
Important!
Always remove the plug from the mains power sok-
ket when the rice cooker is not in use. Otherwise,
there is a permanent risk of receiving an electric
shock!
Steaming
Important!
Do not lift the steaming attachment 3 up during the
steaming process - the escaping steam brings with it
the real risk of scalding. The steaming attachment 3
becomes hot during the steaming process. When
taking hold of the steaming attachment 3, use oven
cloths or something similar to lift it from the cooking
bowl 4.
Note:
Ensure that the cooking bowl 4 is also inserted
correctly when it is used for steaming. The cooking
bowl 4 must not be damaged. If it is, it may be that
the safety shut-off of the appliance will trigger and
the appliance does not allow itself to be switched
on.
1. Pour the required amount of water into the cooking
bowl 4. The cooking time is dependant on the
inserted volume of water. Take note of the examples
given in the following table.
• 1 filled measuring cup is sufficient for about
15 minutes of steaming.
• 2 filled measuring cups are sufficient for about
30 minutes of steaming, etc.
IB_73271_SRK700A1_LB5 03.02.2012 10:52 Uhr Seite 13

- 14 -
Vegetables
Water in
milliliter
Weight /
quantity
Mushrooms
(whole)
approx.
120 ml
approx. 450 g
Peas
(with pods)
approx.
200 ml
approx. 350 g
Asparagus
approx.
200 ml.
approx. 450 g
Carrots
(peeled)
approx.
240 ml
approx. 450 g
Green beans
(cut)
approx.
240 ml
approx. 450 g
Green beans:
(whole)
approx.
300 ml
approx. 450 g
Brussels sprouts
approx.
300 ml
approx. 350 g
Corncobs
approx.
360 ml
2 cobs
Fish / seafood
Water in
milliliter
Weight /
quantity
Mussels
(cook until they
are opened)
approx.
120 ml
approx. 450 g
Prawns
(cook until a
pink colour)
approx.
140 ml
approx. 350 g
Fish (Fillet)
approx.
180 ml
approx. 350 g
Steak
approx.
240 ml
approx. 450 g
Oysters
(in the shell)
approx.
300 ml
approx. 700 g
2. Place the food to be steamed in the steaming
attachment 3.
3. Place the container on the cooking bowl 4.
4. Close the appliance lid 2.
5. Place the power plug in a wall socket. The
yellow control lamp 5 glows.
6. Press the function selector switch 7 down. The
yellow control lamp 5 extinguishes and
the red control lamp 6 starts to glow.
The steaming process begins.
As soon as the added water has left the cooking
bowl 4 by being completely turned to steam, the
rice cooker automatically switches back to the
"keeping warm" mode.
The red control lamp 6 extinguishes and the
yellow control lamp 5 starts to glow again.
The food is now completely steamed and is ready
to eat.
Troubleshooting
Defect Cause Solution
The device
does not func-
tion.
The rice cooker
is not plugged
in.
Push the power
plug into the
wall socket.
The power
socket is
defective.
Use a
different wall
power socket.
The yellow indi-
cator light 5
switches on, but
the cooking
process cannot
be started.
The cooking
bowl 4 is empty
and, as such,
the safety
switch cannot
be pressed
down.
Fill the cooking
bowl 4 with
the foodstuffs to
be cooked.
IB_73271_SRK700A1_LB5 03.02.2012 10:52 Uhr Seite 14

- 15 -
Cleaning and care
Danger! Electric shock!
• ALWAYS remove the plug from the wall socket
before cleaning, and allow the appliance to
cool completely before cleaning and storing it!
• Make certain that no liquid comes into contact
with the heating plate and the insides of the rice
cooker.
• Use a dry cloth to clean the rice cooker housing
incl. the heating plate. Do not use harsh cleaners
and abrasive materials. These could damage the
upper surfaces.
• Clean the steaming attachment 3, the lid 2,
the cooking bowl 4, the plastic spoon and the
measuring cup in water containing a mild deter-
gent.
• Dry all parts before using the appliance again.
Disposal
Do not dispose of the appliance in your
normal domestic waste. This product is
subject to the provisions of European
Directive 2002/96/EC.
Dispose of the appliance through an approved dis-
posal centre or at your community waste facility.
Observe the currently applicable regulations.
In case of doubt, please contact your waste dis-
posal centre.
Dispose of all packaging materials in an
environmentally friendly manner.
Warranty and Service
The warranty for this appliance is for 3 years from
the date of purchase. The appliance has been ma-
nufactured with care and meticulously examined be-
fore delivery. Please retain your receipt as proof of
purchase. In the event of a warranty claim, please
make contact by telephone with our Service Depart-
ment. Only in this way can a post-free despatch for
your goods be assured.
The warranty covers only claims for material and
manufacturing defects, but not for transport dama-
ge, for wearing parts or for damage to fragile com-
ponents, e.g. buttons or batteries. This product is for
private use only and is not intended for commercial
use. The warranty is void in the case of abusive and
improper handling, use of force and internal tampe-
ring not carried out by our authorized service
branch. Your statutory rights are not restricted in any
way by this warranty.
The warranty period will not be extended by repairs
made under warranty. This applies also to replaced
and repaired parts. Any damage and defects extant
on purchase must be reported immediately after un-
packing the appliance, at the latest, two days after
the purchase date. Repairs made after the expira-
tion of the warranty period are subject to payment.
Service Great Britain
Tel.: 0871 5000 720 (£ 0.10/Min.)
E-Mail: [email protected]
Service Malta
Tel.: 80062230
E-Mail: [email protected]
IAN 73271
IAN 73271
IB_73271_SRK700A1_LB5 03.02.2012 10:52 Uhr Seite 15

- 16 -
Importer
KOMPERNASS GMBH
BURGSTRASSE 21
44867 BOCHUM, GERMANY
www.kompernass.com
IB_73271_SRK700A1_LB5 03.02.2012 10:52 Uhr Seite 16

- 17 -
INHALTSVERZEICHNIS SEITE
Sicherheitshinweise 18
Verwendungszweck 19
Technische Daten 19
Lieferumfang 19
Geräteübersicht 19
Vor dem ersten Gebrauch 19
Benutzung des Reiskochers 19
Reis kochen.....................................................................................................................................19
Dampfgaren....................................................................................................................................21
Fehlerbehebung 22
Reinigen und Pflegen 23
Entsorgen 23
Garantie und Service 23
Importeur 24
Lesen Sie die Bedienungsanleitung vor der ersten Verwendung aufmerksam durch und heben Sie diese für
den späteren Gebrauch auf. Händigen Sie bei Weitergabe des Gerätes an Dritte auch die Anleitung aus.
IB_73271_SRK700A1_LB5 03.02.2012 10:52 Uhr Seite 17

- 18 -
Reiskocher
Sicherheitshinweise
Gefahr! Elektrischer Schlag!
• Schließen Sie den Reiskocher nur an eine vor-
schriftsmäßig installierte und geerdete Steckdose
mit der auf dem Typenschild des Gerätes ange-
gebenen Netzspannung an.
• Ziehen Sie, wenn Sie das Gerät bewegen, befül-
len, bei Störungen, bevor Sie das Gerät reinigen
oder wenn Sie es nicht gebrauchen, immer den
Netzstecker aus der Netzsteckdose!
• Ziehen Sie niemals am Netzkabel, um den Netz-
stecker aus der Netzsteckdose zu ziehen. Ziehen
Sie am Netzstecker selbst.
• Berühren Sie den Gerätestecker nicht mit nassen
oder feuchten Händen.
Sie dürfen das Gerät keinesfalls in Wasser
oder andere Flüssigkeiten tauchen.
• Sollte das Gerät doch einmal in Flüssigkeit gefal-
len sein, ziehen Sie sofort den Netzstecker aus
der Netzsteckdose. Danach das Gerät nicht
mehr in Betrieb nehmen, sondern erst von einer
zugelassenen Servicestelle überprüfen lassen.
• Setzen Sie das Gerät keiner Feuchtigkeit aus und
benutzen Sie es nicht im Freien.
• Benutzen Sie den Reiskocher nicht, wenn Sie sich
auf feuchtem Boden befinden oder wenn Ihre
Hände oder das Gerät nass sind.
• Verlegen Sie das Netzkabel so, dass es nicht mit
heißen oder scharfkantigen Gegenständen in
Berührung kommt.
• Knicken oder quetschen Sie das Netzkabel
nicht, und wickeln Sie es nicht um das Gerät.
• Lassen Sie beschädigte Netzstecker oder Netz-
kabel sofort von autorisiertem Fachpersonal
oder dem Kundenservice austauschen, um
Gefährdungen zu vermeiden.
Verletzungsgefahr!
• Lassen Sie das Gerät während des Betriebes
nicht ohne Aufsicht.
VORSICHT! Aus der Dampfaustrittsöffnung und
beim Öffnen des Deckels tritt heißer Dampf
aus! Verbrühungsgefahr!
Dieses Symbol auf dem Gerät warnt Sie vor
Verbrennungsgefahr durch heiße Oberflä-
chen.
• Dieses Gerät ist nicht dafür bestimmt, durch
Personen (einschließlich Kinder) mit einge-
schränkten physischen, sensorischen oder
geistigen Fähigkeiten oder mangels Erfahrung
und/oder mangels Wissen benutzt zu werden,
es sei denn, sie werden durch eine für ihre
Sicherheit zuständige Person beaufsichtigt oder
erhielten von ihr Anweisungen, wie das Gerät
zu benutzen ist.
• Kinder sollten beaufsichtigt werden, um sicherzu-
stellen, dass sie nicht mit dem Gerät spielen.
• Lassen Sie das Gerät und die Zubehörteile voll-
ständig abkühlen, bevor Sie sie reinigen und ver-
stauen.
• Benutzen Sie keine externe Zeitschaltuhr oder
ein separates Fernwirksystem um das Gerät zu
betreiben.
Achtung! Geräteschäden!
• Decken Sie während des Kochens niemals den
Deckel mit Handtüchern oder ähnlichem ab.
• Stellen Sie das Gerät niemals in der Nähe von
Wärmequellen auf.
• Öffnen Sie niemals das Gehäuse. In diesem Fall
ist die Sicherheit nicht gegeben und die Gewähr-
leistung erlischt.
• Verwenden Sie nur die im Lieferumfang enthalte-
nen Zubehörteile und benutzen Sie das Gerät
nie ohne den eingesetzten Kochbehälter.
IB_73271_SRK700A1_LB5 03.02.2012 10:52 Uhr Seite 18

- 19 -
Verwendungszweck
Benutzen Sie den Reiskocher ausschließlich zum
Kochen von Reis und zum Dampfgaren von Lebens-
mitteln, wie z. B. Gemüse oder Fisch.
Dieser Reiskocher ist nicht für den gewerblichen
Gebrauch bestimmt, sondern ausschließlich für die
Benutzung im privaten Haushalt!
Technische Daten
Nennspannung: 220 - 240 V
~
/ 50 Hz
Leistungsaufnahme: 700 W
Lieferumfang
1 Reiskocher,
inkl. Kochbehälter und Dampfgareinsatz
1 Anschlussleitung mit Schutzkontaktstecker
1 Messbecher
1 Kunststofflöffel
1 Bedienungsanleitung
Die Gesamtkapazität des Messbechers beträgt ca.
180 ml. Zur Erleichterung der Befüllung besitzt der
Messbecher 2 unterschiedliche Skalierungen:
1/4 = ca. 45 ml
1/2 = ca. 90 ml
3/4 = ca. 135 ml
40 = ca. 40 ml
80 = ca. 80 ml
120 = ca. 120 ml
160 = ca. 160 ml
Geräteübersicht
1 Dampfaustrittsöffnung
2 Deckel
3 Dampfgareinsatz
4 Kochbehälter
5 gelbe Kontrolllampe (Warmhalten)
6 rote Kontrolllampe (Kochen)
7 Funktionswahlschalter für „Kochen“ und
„Warmhalten“
8 Anschlussbuchse für Netzleitung
Vor dem ersten Gebrauch
Entnehmen Sie den Reiskocher vorsichtig aus der
Verpackung. Entfernen Sie eventuell vorhandene
Schutzfolien und reinigen Sie die mit Lebensmitteln
in Berührung kommenden Teile von Verpackungs-
staubresten. Reinigen Sie das Gerät wie im Kapitel
„Reinigen und Pflegen” beschrieben.
Benutzung des Reiskochers
Mit diesem Gerät ist es möglich, sowohl Reis zu ko-
chen als auch gleichzeitig andere Lebensmittel
dampfzugaren. Experimentieren Sie ein wenig, um
die hierfür richtige Menge Wasser und die richtige
Kochzeit für die verschiedenen Kombinationsmög-
lichkeiten herauszufinden.
Reis kochen
Hinweis:
Bestreichen Sie die Innenseite des Kochbehälters 4
gleichmäßig mit ein wenig Fett oder Pflanzenöl, um
ein besseres Kochergebnis zu erzielen.
1. Nehmen Sie den Deckel 2 ab.
2. Entnehmen Sie den Kochbehälter 4.
IB_73271_SRK700A1_LB5 03.02.2012 10:52 Uhr Seite 19

- 20 -
Hinweis:
Wenn der Kochbehälter 4 beschädigt ist, benutzen
Sie diesen nicht weiter! Durch die Beschädigungen
kann es sein, dass die Sicherheitsabschaltung des
Gerätes auslöst und das Gerät sich nicht mehr ein-
schalten lässt.
3. Messen Sie die gewünschte Menge Reis mit
Hilfe des mitgelieferten Messbechers ab.
Als Richtwert gilt: Ein gestrichener Messbecher
- gefüllt mit Reis - ergibt eine Portion für eine
Person. Ermitteln Sie, die für Sie richtige Men-
ge Reis / Wasser, durch einige Kochversuche.
4. Waschen Sie den losen Reis gründlich und sie-
ben Sie ihn ab. Dabei gehen zwar Nährstoffe
verloren, jedoch kann es ohne Waschen zu
schlechteren Kochergebnissen und zu erhöhter
Schaum- und Dampfbildung im Kochbehälter
4 kommen. Beachten Sie auch immer die Zu-
bereitungshinweise des Reisherstellers.
5. Geben Sie den Reis nach dem Waschen in
den Kochbehälter 4 und streichen Sie den
Reis glatt.
Hinweis:
Geben Sie mindestens 2 Messbecher Reis in den
Reiskocher! Bei weniger Reis kann es zu schlechten
Kochergebnissen kommen!
6. Anschließend gießen Sie bis zur entsprechen-
den CUP-Markierung im Kochbehälter 4 Was-
ser ein:
• 2 Messbecher Reis = Wasser bis zur CUP-
Markierung „2”
• 4 Messbecher Reis = Wasser bis zur CUP-
Markierung „4”
• 6 Messbecher Reis = Wasser bis zur CUP-
Markierung „6”
• 8 Messbecher Reis = Wasser bis zur CUP-
Markierung „8”
• 10 Messbecher Reis = Wasser bis zur CUP-
Markierung „10”
Je nach Geschmacksrichtung, kann dem Reis
auch Salz hinzugefügt werden.
Hinweis:
Wenn Sie warmes Wasser verwenden, kann die
Kochzeit verkürzt werden. Verwenden Sie dann
allerdings etwas weniger Wasser, als die CUP-Mar-
kierung im Kochbehälter 4 vorsieht.
Hinweis:
Je nach Reissorte kann es vorkommen, dass Sie et-
was mehr oder etwas weniger Wasser einfüllen
müssen, um ein optimales Kochergebnis zu erzielen.
Variieren Sie die Wassermenge nach Ihren eigenen
Erfahrungen und Geschmack.
7. Setzen Sie nach dem Befüllen des Kochbehäl-
ters 4, diesen in das Reiskochergehäuse ein.
Achten Sie dabei darauf, dass...
- ... sich keine Feuchtigkeit und kein Reis an der
Außenseite des Kochbehälters 4 befinden, um
eine Verschmutzung des Kochbereiches zu vermei-
den. Gegebenenfalls ist die Außenseite mit einem
sauberen Tuch trocken zu wischen.
- ... der Kochbehälter 4 nicht schief oder verkantet
in das Reiskochergehäuse eingesetzt wird. Setzen
Sie den Kochbehälter 4 immer korrekt und gera-
de in das Reiskochergehäuse ein. Ansonsten kann
es sein, dass die Sicherheitsabschaltung des Gerä-
tes auslöst und das Gerät sich nicht mehr einschal-
ten lässt.
Hinweis:
Dieses Gerät ist mit einem Sicherheitsschalter ausge-
stattet: der Kochvorgang lässt sich mit leerem Koch-
behälter 4 ohne Deckel 2 nicht starten. Mit aufge-
setztem Deckel 2 kann der Kochvorgang jedoch
auch mit leerem Kochbehälter gestartet werden.
8. Schließen Sie den Deckel 2.
9. Stecken Sie die Anschlussleitung in die An-
schlussbuchse 8 an der Geräteseite.
10. Stecken Sie den Netzstecker in eine vorschrifts-
mäßig installierte Netzsteckdose. Die gelbe
Kontrolllampe 5 leuchtet auf.
IB_73271_SRK700A1_LB5 03.02.2012 10:52 Uhr Seite 20

- 21 -
Achtung!
Während des Garvorgangs tritt Dampf aus der
Dampfaustrittsöffnung 1 aus. Halten Sie niemals
Hände oder andere Körperteile über die Dampfaus-
trittsöffnung 1 während des Garvorganges. Es be-
steht die Gefahr von Verbrühungen!
11. Drücken Sie den Funktionswahlschalter 7
nach unten. Die gelbe Kontrolllampe 5
erlischt und die rote Kontrolllampe 6
leuchtet auf. Der Kochvorgang beginnt.
Hinweis:
Ist der Kochbehälter 4 nicht eingesetzt und gefüllt,
lässt sich der Funktionswahlschalter 7 nicht auf
„Kochen” stellen.
Sobald der Reis gekocht ist, schaltet der Reiskocher
automatisch auf die Warmhaltefunktion zurück. Die
rote Kontrolllampe 6 erlischt, während die
gelbe Kontrolllampe 5 wieder aufleuchtet.
12. Öffnen Sie den Deckel 2. Der Reis ist nun fertig
zum Verzehr.
Achtung!
Verwenden Sie zur Entnahme des Reises ausschließ-
lich den mitgelieferten Kunststofflöffel. Ansonsten
kann die Antihaftbeschichtung beschädigt werden.
Wenn Sie den Reis nicht sofort verzehren:
• Öffnen Sie während der Warmhaltezeit nicht den
Deckel 2.
• Lassen Sie den Reis nicht länger als 2 Stunden in
der Warmhaltung.
Achtung!
Ziehen Sie stets den Netzstecker aus der Netz-
steckdose, wenn Sie den Reiskocher nicht mehr ver-
wenden. Es besteht die Gefahr eines elektrischen
Schlages!
Dampfgaren
Achtung!
Während des Garvorgangs den Dampfgareinsatz
3 nicht abheben, da durch den austretenden
Dampf Verbrühungsgefahr besteht. Der Dampfgar-
einsatz 3 erhitzt sich während des Garvorgangs.
Nehmen Sie den Dampfgareinsatz 3 mittels Topf-
lappen oder ähnlichem vom Kochbehälter 4 ab.
Hinweis:
Achten Sie darauf, dass der Kochbehälter 4 auch
beim Dampfgaren korrekt eingesetzt ist. Der Koch-
behälter 4 darf nicht beschädigt sein. Ansonsten
kann es sein, dass die Sicherheitsabschaltung des
Gerätes auslöst und das Gerät sich nicht mehr ein-
schalten lässt.
1. Gießen Sie die gewünschte Wassermenge in
den Kochbehälter 4. Die Garzeit ist abhängig
von der eingefüllten Wassermenge. Beachten
Sie die Beispiele in der nachfolgenden Tabelle.
• 1 gefüllter Messbecher ist ausreichend für ca.
15 Minuten Dampfgaren.
• 2 gefüllte Messbecher sind ausreichend für ca.
30 Minuten Dampfgaren usw.
Fisch / Mee-
resfrüchte
Wasser in
Milliliter
Gewicht /
Menge
Muscheln
(bis zum
Öffnen garen)
ca. 120 ml ca. 450 g
Garnelen
(bis rosa Fär-
bung garen)
ca. 140 ml ca. 350 g
Fisch (Filet) ca. 180 ml ca. 350 g
Steak ca. 240 ml ca. 450 g
Austern
(in der Schale)
ca. 300 ml ca. 700 g
IB_73271_SRK700A1_LB5 03.02.2012 10:52 Uhr Seite 21

- 22 -
2. Geben Sie die zu garenden Lebensmittel in
den Dampfgareinsatz 3.
3. Setzen Sie das Behältnis auf den Kochbehälter
4.
4. Schließen Sie den Deckel 2.
5. Stecken Sie den Netzstecker in eine Netz-
steckdose. Die gelbe Kontrolllampe 5
leuchtet auf.
6. Drücken Sie den Funktionswahlschalter 7
nach unten. Die gelbe Kontrolllampe 5
erlischt und die rote Kontrolllampe 6
leuchtet auf. Das Dampfgaren beginnt.
Gemüse
Wasser in
Milliliter
Gewicht /
Menge
Pilze (ganz) ca. 120 ml ca. 450 g
Erbsen
(mit Schale)
ca. 200 ml ca. 350 g
Spargel ca. 200 ml ca. 450 g
Karotten
(geschält)
ca. 240 ml ca. 450 g
grüne Bohnen
(geschnitten)
ca. 240 ml ca. 450 g
grüne Bohnen
(ganz)
ca. 300 ml ca. 450 g
Rosenkohl ca. 300 ml ca. 350 g
Maiskolben ca. 360 ml 2 Kolben
Sobald das eingefüllte Wasser vollständig aus dem
Kochbehälter 4 verdampft ist, schaltet der Reisko-
cher automatisch auf die Warmhaltefunktion zurück.
Die rote Kontrolllampe 6 erlischt, während
die gelbe Kontrolllampe 5 wiederum auf-
leuchtet.
Die eingefüllten Lebensmittel sind fertig gegart und
können verzehrt werden.
Fehlerbehebung
Fehler Ursache Behebung
Das Gerät zeigt
keine Funktion.
Der Reiskocher
ist nicht mit der
Steckdose ver-
bunden.
Stecken Sie den
Netzstecker in
eine Netz-
steckdose.
Die Netz-
steckdose ist
defekt.
Benutzen Sie
eine andere
Netzsteckdose.
Die gelbe Kon-
trolllampe 5
leuchtet, der
Kochvorgang
kann jedoch
nicht gestartet
werden.
Der Kochbehäl-
ter 4 ist leer
und der Sicher-
heitsschalter
wird so nicht
herunter-
gedrückt.
Füllen Sie die
zu garenden
Lebensmittel in
den Kochbehäl-
ter 4.
IB_73271_SRK700A1_LB5 03.02.2012 10:52 Uhr Seite 22

- 23 -
Reinigen und Pflegen
Gefahr! Elektrischer Schlag!
• Ziehen Sie vor dem Reinigen immer den Netz-
stecker und lassen Sie das Gerät vollständig ab-
kühlen, bevor Sie es reinigen und verstauen!
• Achten Sie darauf, dass keine Flüssigkeit auf die
Heizplatte und in das Innere des Reiskochers ge-
langt.
• Zur Reinigung des Reiskochergehäuses inkl. der
Heizplatte benutzen Sie ein trockenes Tuch. Ver-
wenden Sie keine scharfen Reinigungs- und
Scheuermittel. Diese können die Oberfläche an-
greifen.
• Reinigen Sie den Dampfgareinsatz 3, den
Deckel 2, den Kochbehälter 4, den Kunststoff-
löffel und den Messbecher in spülmittelhaltigem
Wasser.
• Trocknen Sie alle Teile, bevor Sie das Gerät wie-
der in Betrieb nehmen.
Entsorgen
Werfen Sie das Gerät keinesfalls in den
normalen Hausmüll. Dieses Produkt
unterliegt der europäischen Richtlinie
2002/96/EC.
Entsorgen Sie das Gerät über einen zugelassenen
Entsorgungsbetrieb oder über Ihre kommunale
Entsorgungseinrichtung.
Beachten Sie die aktuell geltenden Vorschriften.
Setzen Sie sich im Zweifelsfall mit Ihrer Entsorgungs-
einrichtung in Verbindung.
Führen Sie alle Verpackungsmaterialien
einer umweltgerechten Entsorgung zu.
Garantie und Service
Sie erhalten auf dieses Gerät 3 Jahre Garantie ab
Kaufdatum. Das Gerät wurde sorgfältig produziert
und vor Anlieferung gewissenhaft geprüft.
Bitte bewahren Sie den Kassenbon als Nachweis
für den Kauf auf. Bitte setzen Sie sich im Garantie-
fall mit Ihrer Servicestelle telefonisch in Verbindung.
Nur so kann eine kostenlose Einsendung Ihrer Ware
gewährleistet werden.
Die Garantieleistung gilt nur für Material- oder
Fabrikationsfehler, nicht aber für Transportschäden,
Verschleißteile oder für Beschädigungen an zer-
brechlichen Teilen, z. B. Schalter oder Akkus. Das
Produkt ist lediglich für den privaten und nicht für
den gewerblichen Gebrauch bestimmt.
Bei missbräuchlicher und unsachgemäßer Behand-
lung, Gewaltanwendung und bei Eingriffen, die
nicht von unserer autorisierten Service-Niederlas-
sung vorgenommen wurden, erlischt die Garantie.
Ihre gesetzlichen Rechte werden durch diese
Garantie nicht eingeschränkt.
Die Garantiezeit wird durch die Gewährleistung
nicht verlängert. Dies gilt auch für ersetzte und repa-
rierte Teile. Eventuell schon beim Kauf vorhandene
Schäden und Mängel müssen sofort nach dem
Auspacken gemeldet werden, spätestens aber zwei
Tage nach Kaufdatum. Nach Ablauf der Garantie-
zeit anfallende Reparaturen sind kostenpflichtig.
IB_73271_SRK700A1_LB5 03.02.2012 10:52 Uhr Seite 23

- 24 -
Service Deutschland
Tel.: 01805 772 033 (0,14 EUR/Min. aus dem dt.
Festnetz, Mobilfunk max. 0,42 EUR/Min.)
E-Mail: [email protected]
Service Österreich
Tel.: 0820 201 222 (0,15 EUR/Min.)
E-Mail: [email protected]
Service Schweiz
Tel.: 0842 665566 (0,08 CHF/Min.,
Mobilfunk max. 0,40 CHF/Min.)
E-Mail: [email protected]
Importeur
KOMPERNASS GMBH
BURGSTRASSE 21
44867 BOCHUM, GERMANY
www.kompernass.com
IAN 73271
IAN 73271
IAN 73271
IB_73271_SRK700A1_LB5 03.02.2012 10:52 Uhr Seite 24
Transcripción de documentos
Antes de empezar a leer abra la página que contiene las imágenes y, en seguida, familiarícese con todas las funciones del dispositivo. Before reading, unfold the page containing the illustrations and familiarise yourself with all functions of the device. Klappen Sie vor dem Lesen die Seite mit den Abbildungen aus und machen Sie sich anschließend mit allen Funktionen des Gerätes vertraut. COCEDOR DE ARROZ SRK 700 A1 KOMPERNASS GMBH Burgstraße 21 D-44867 Bochum www.kompernass.com COCEDOR DE ARROZ RICE COOKER Instrucciones de utilización y de seguridad Operation and Safety Notes ES GB / MT DE / AT / CH Instrucciones de utilización y de seguridad Operation and Safety Notes Bedienungs- und Sicherheitshinweise Página 1 Page 9 Seite 17 REISKOCHER Bedienungs- und Sicherheitshinweise Estado de las informaciones · Last Information Update Stand der Informationen: 02/2012 · Ident.-No.: SRK700A1112011-2 IAN 73271 CV_73271_SRK700A1_LB5.indd 1-3 5 IAN 73271 03.02.12 11:55 1 2 3 4 8 5 CV_73271_SRK700A1_LB5.indd 4-6 6 7 03.02.12 11:56 IB_73271_SRK700A1_LB5 03.02.2012 10:52 Uhr ÍNDICE Seite 1 PÁGINA Indicaciones de seguridad 2 Finalidad de uso 3 Datos técnicos 3 Volumen de suministro 3 Visión global del aparato 3 Antes del primer uso 3 Utilización del cocedor para arroz 3 Cocer arroz.......................................................................................................................................3 Cocer al vapor .................................................................................................................................5 Eliminación de fallos 6 Cuidado y limpieza 7 Evacuación 7 Garantía y asistencia técnica 7 Importador 8 Lea atentamente este manual de instrucciones antes del primer uso y consérvelo para posteriores utilizaciones. Entréguelas en caso de traspasar el aparato a terceros. -1- IB_73271_SRK700A1_LB5 03.02.2012 10:52 Uhr Cocedor de arroz Seite 2 !Peligro de lesiones! • No deje el aparato desatendido durante el funcionamiento. Indicaciones de seguridad ¡CUIDADO! ¡Por el orificio de salida de vapor y al abrir la tapa se desprende vapor caliente! ¡Peligro de quemaduras! ¡Peligro! ¡Descarga eléctrica! • Conecte el cocedor para arroz sólo a una base de enchufe correctamente instalada y con toma de tierra con la tensión de red indicada en la placa de características del aparato. • ¡Extraiga siempre la clavija de red de la base de enchufe, al mover el aparato, al llenarlo, en caso de avería, antes de limpiarlo o cuando no lo esté utilizando! • No tire nunca del cable de alimentación, para extraer la clavija de red de la base de enchufe. Tire de la clavija de red. • No toque la clavija con las manos mojadas o húmedas. Este símbolo sobre el aparato le advierte de peligro de quemaduras debido a superficies calientes. • No permita utilizar el aparato a personas (incluidos los niños) cuyas facultades físicas, sensoriales o mentales, así como su falta de conocimientos o de experiencia, les impida hacer un uso seguro del mismo si no están bajo vigilancia o han sido instruidos correctamente acerca del uso del aparato. • Vigile a los niños para asegurarse de que no juegan con el aparato. • Deje que el aparato y los accesorios se enfríen completamente antes de limpiarlos y guardarlos. • No utilice ningún tipo de temporizador externo o un sistema de control remoto para accionar el aparato. No sumerja bajo ningún concepto el aparato en agua u otros líquidos. • Si el aparto cae dentro de un líquido extraiga inmediatamente la clavija de red de la base de enchufe. Después no vuelva a ponerlo a funcionamiento y hágalo revisar en un servicio técnico autorizado. • No exponga el aparato a humedad y no lo utilice en el exterior. • No utilice el cocedor para arroz, si usted se encuentra sobre suelo húmedo o si sus manos o el aparato están mojados. • Coloque el cable de red de tal forma que no entre en contacto con objetos calientes o afilados. • No doble ni aprisione el cable de red, y no lo enrolle en torno al aparato. • En caso de una clavija de red dañada o cable de red dañado, encomiende su sustitución a personal técnico autorizado o al servicio de posventa con el fin de evitar riesgos. ¡Atención! ¡Daños en el aparato! • No cubra la tapa durante la cocción con toallas o similares. • Nunca coloque el aparato en la proximidad alguna fuente de calor. • Nunca abra la carcasa. En este caso no existe seguridad y perderá el derecho a la garantía. • Utilice siempre los accesorios contenidos en el volumen de suministro y nunca utilice el aparato sin colocar el recipiente. -2- IB_73271_SRK700A1_LB5 03.02.2012 10:52 Uhr Seite 3 Finalidad de uso Visión global del aparato Utilice el cocedor para arroz exclusivamente para cocinar arroz y para cocer al vapor alimentos como p.ej. verduras o pescado. ¡Este cocedor para arroz no está destinada a uso industrial, sino exclusivamente para uso privado en el hogar! 1 Orificio de salida de vapor 2 Tapadera 3 Accesorio para cocción al vapor 4 Recipiente de cocción 5 Lámpara de control amarilla (mantener caliente) 6 lámpara de control roja (cocer) 7 Selector de función para „cocer“ y „mantener caliente“ 8 Hembrilla de conexión para cable de alimentación Datos técnicos Tensión nominal: Consumo de potencia: 220 - 240 V ~ / 50 Hz 700 W Antes del primer uso Extraiga el cocedor para arroz cuidadosamente del embalaje. Retire las posibles láminas de protección y limpie los restos de polvo de embalaje de las piezas que entren en contacto con los alimentos. Limpie el aparato como se describe en el capítulo „Cuidado y limpieza”. Volumen de suministro 1 Cocedor para arroz, incl. recipiente de cocción y accesorio para cocción al vapor 1 línea de alimentación con enchufe con puesta a tierra 1 Vaso medidor 1 cuchara de plástico 1 Instrucciones de uso Utilización del cocedor para arroz La capacidad total del vaso medidor es de aprox. 180 ml. Para facilitar el llenado, el vaso medidor posee 2 escalas diferentes: 1/4 = aprox. 45 ml 1/2 = aprox. 90 ml 3/4 = aprox. 135 ml 40 = aprox. 40 ml 80 = aprox. 80 ml 120 = aprox. 120 ml 160 = aprox. 160 ml Con este aparato es posible tanto cocinar arroz como cocer al vapor simultáneamente otros alimentos. Experimente un poco, para determinar la cantidad adecuada de agua y el tiempo de cocción apropiado para las posibles combinaciones. Cocer arroz Advertencia: Unte el interior del recipiente de cocción 4 de forma homogénea con un poco de grasa o aceite vegetal para conseguir un mejor resultado. 1. Retirela tapa 2. 2. Retire el recipiente de cocción 4. -3- IB_73271_SRK700A1_LB5 03.02.2012 10:52 Uhr Seite 4 Nota: Nota: ¡Si está dañado el recipiente de cocción 4, no continúe utilizando! Por los daños puede suceder que la desconexión de seguridad del aparato se dispara no pudiendo volver a conectar el aparato. Si utiliza agua caliente es posible reducir el tiempo de cocción. Utilice en este caso un poco menos de agua que la que se indica mediante la marca CUP en el depósito de cocción 4. Nota: 3. Mida la cantidad de arroz deseada con la ayuda del vaso medidor suministrado. A modo orientativo sirve: un vaso medidor raso lleno de arroz - resulta en una porción para una persona. Determine la cantidad de arroz / agua adecuada para usted realizando varios intentos. 4. Lave bien el arroz suelto y escúrralo. En este proceso se pierden nutrientes, pero si se omite el lavado el resultado de la cocción podría no ser igual de bueno y podría formarse mayor cantidad de espuma y vapor en el depósito de cocción 4. Respete siempre las indicaciones de preparación del productor del arroz. 5. Después de lavar el arroz, introdúzcalo en el recipiente de cocción 4 de manera que quede plano. Según el tipo de arroz es posible que deba introducir más o menos agua para alcanzar un resultado óptimo. Varíe la cantidad de agua según su experiencia y gusto. 7. Preste atención que... - ... no haya humedad ni ningún grano de arroz en el exterior del recipiente 4 para evitar que se ensucie la zona de cocción. En caso necesario limpie el exterior con un trapo limpio seco. - ... el recipiente de cocción 4 no se coloque inclinado o torcido en la carcasa del cocedor de arroz. Coloque el recipiente de cocción 4 siempre correctamente y recto en la carcasa del cocedor de arroz. de lo contrario puede su ceder que la desconexión de seguridad del aparato se dispara no pudiendo volver a conectar el aparato. Nota: ¡Introduzca al menos 2 vasos medidores de arroz en el cocedor para arroz! ¡Si utiliza menos arroz puede que el resultado no sea bueno! 6. Una vez llenado el recipiente de cocción 4, colóquelo en la carcasa del cocedor para arroz. Vierta agua a continuación hasta la marca CUP correspondiente en el recipiente de cocción 4 : • 2 vasos medidores de arroz = agua hasta la marca CUP „2” • 4 vasos medidores de arroz = agua hasta la marca CUP „4” • 6 vasos medidores de arroz = agua hasta la marca CUP „6” • 8 vasos medidores de arroz = agua hasta la marca CUP „8” • 10 vasos medidores de arroz = agua hasta la marca CUP „10” Según su gusto, puede añadir también sal al arroz. Nota: Este aparato va equipado con un interruptor de seguridad: El proceso de cocción no se puede iniciar sin recipiente de cocción 4 sin tapa 2. Con tapa colocada 2 en cambio se puede iniciar el proceso de cocción con recipiente de cocción vacío. Cierre la tapa 2. Introduzca la línea de conexión en la hembrilla de conexión 8 en el lateral del aparato. 10. Introduzca la clavija de red en una base de enchufe instalada según lo prescrito. La lámpara de control amarilla 5 se ilumina. 8. 9. -4- IB_73271_SRK700A1_LB5 03.02.2012 10:52 Uhr Seite 5 Cocer al vapor Atención! Durante el proceso de cocción sale vapor de la apertura de salida de vapor 1. No coloque nunca las manos u otras partes del cuerpo sobre la apertura de salida de vapor 1 durante el proceso de cocción. Existe peligro de sufrir quemaduras. Atención! Durante el proceso de cocción no levante el accesorio para cocción al vapor 3, ya que existe peligro de quemaduras debido al vapor generado. El accesorio para cocción al vapor 3 se calienta durante el proceso de cocción. Saque el accesorio para cocción al vapor 3 del recipiente de cocción 4 con la ayuda de unos guantes de cocina o similares. 11. Pulse el selector de función 7 hacia abajo. La lámpara de control amarilla 5 se apaga y la lámpara de control roja 6 se ilumina. El proceso de cocción comenzará. Nota: Nota: Preste atención que se coloque correctamente el recipiente de cocción 4 también en la cocción a vapor. El recipiente de cocción 4 no se debe dañar. de lo contrario puede suceder que la desconexión de seguridad del aparato se dispara no pudiendo volver a conectar el aparato. Si el recipiente de cocción 4 no está colocado y relleno el selector de función 7 no se puede situar en „cocer”. Cuando el arroz esté cocido, el cocedor para arroz conecta automáticamente la función de mantenimiento de calor. La lámpara de control roja 6 se apaga, mientras que la lámpara de control amarilla 5 se vuelve a iluminar. 1. Vierta la cantidad de agua deseada en el recipiente de cocción 4. El tiempo de cocción depende de la cantidad de agua vertida. Observe los ejemplos de la siguiente tabla. 12. Abra la tapa 2. El arroz está ahora listo para su consumo. • 1 vaso medidor lleno es suficiente para aprox. 15 minutos de cocción al vapor. • 2 vasos medidores llenos son suficiente para aprox. 30 minutos de cocción al vapor. Atención! Utilice exclusivamente para la extracción del arroz la cuchara de plástico adjunta. De lo contrario podría dañar el revestimiento antiadherente. Si no va a consumir el arroz de inmediato: • No abra la tapa 2 durante el tiempo de mantenimiento de calor. • No deje el arroz más de 2 horas en el mantenimiento de calor. Atención! Extraiga la clavija de red de la base de enchufe si no sigue utilizando el cocedor de arroz. ¡Existe riesgo de descarga eléctrica! -5- IB_73271_SRK700A1_LB5 Pescado / Mariscos 03.02.2012 Agua en mililitros Mariscos ( cocer hasta aprox. 120 ml que se abran) Gambas (cocer hasta aprox. 140 ml alcanzar un color rosado) Pescado (filete) aprox. 180 ml Bistec aprox. 240 ml 10:52 Uhr Peso / Cantidad 2. Introduzca los alimentos que desea cocer en el accesorio para cocción al vapor 3. 3. Coloque el recipiente sobe el recipiente de cocción 4. 4. Cierre la tapa 2. 5. Enchufe el aparato. La lámpara de control amarilla 5 se ilumina. 6. Pulse el selector de función 7 hacia abajo. La lámpara de control amarilla 5 se apaga y la lámpara de control roja 6 se ilumina. El proceso de cocción comenzará. aprox. 450 g aprox. 350 g aprox. 350 g aprox. 450 g Ostras (en concha) aprox. 300 ml aprox. 700 g Verduras Agua en mililitros Peso / Cantidad Setas (enteras) aprox. 120 ml Seite 6 Tan pronto como toda el agua introducida en el recipiente de cocción 4 se haya evaporado, el cocedor para arroz volverá automáticamente a la función de mantenimiento de calor. La lámpara de control roja 6 se apaga, mientras que la lámpara de control amarilla 5 se vuelve a iluminar. Los alimentos introducidos están ahora perfectamente cocidos y listos para comer. aprox. 450 g Guisantes (con vaina) aprox. 200 ml Espárragos aprox. 200 ml. aprox. 450 g Eliminación de fallos aprox. 350 g Zanahorias (peladas) aprox. 240 ml aprox. 450 g judías verdes (cortadas) aprox. 240 ml aprox. 450 g judías verdes (enteras) aprox. 300 ml aprox. 450 g Coles de Bruselas aprox. 300 ml aprox. 350 g Mazorcas de maíz aprox. 360 ml 2 mazorcas Error Motivo Reparación El cocedor Inserte la clavija para arroz no de red en una está conectado El aparato no base de a la base de muestra enchufe de red. enchufe. ninguna La base de Utilice una función. enchufe está base de enchudefectuosa. fe distinta. La lámpara de control amarilla 5 se ilumina, sin embargo no se puede iniciar el proceso de cocción. -6- El recipiente de cocción 4 está vacío y el interruptor de seguridad no se puede presionar hacia abajo. Introduzca los alimentos que desea cocer en el recipiente de cocción 4. IB_73271_SRK700A1_LB5 03.02.2012 10:52 Uhr Cuidado y limpieza Seite 7 Garantía y asistencia técnica Con este aparato recibe usted 3 años de garantía desde la fecha de compra. El aparato ha sido fabricado cuidadosamente y ha sido probado antes de su entrega. Guarde el comprobante de caja como justificante de compra. Si necesitara hacer uso de la garantía, póngase en contacto por teléfono con su centro de servicio habitual. Éste es el único modo de garantizar un envío gratuito. La garantía cubre sólo defectos de fabricación o del material, pero no los daños de transporte, piezas sujetas a desgaste y los daños sufridos por las piezas frágiles p. ej. el interruptor o baterías. Este producto ha sido diseñado exclusivamente para el uso particular y no para el uso industrial. En caso de manipulación indebida e incorrecta, uso de la fuerza y en caso de abrir el aparato personas extrañas a nuestros centros de asistencia técnica autorizados, la garantía pierde su validez. Esta garantía no reduce en forma alguna sus derechos legales. Por el mero hecho de hacer uso de la garantía no implica la prolongación del período de válidez de la garantía. Ello rige también para piezas sustituidas y reparadas. Los posibles daños y defectos detectados al comprar el producto, se han de notificar de inmediato o como muy tarde dos días desde la fecha de compra. . Finalizado el periodo de garantía, las reparaciones se han de abonar. ¡Peligro! ¡Descarga eléctrica! • ¡Antes de limpiar y guardar el aparato extraiga siempre la clavija de red y deje que se enfríe completamente! • Tenga cuidado de que no caiga ningún líquido sobre la placa calentadora y en el interior del cocedor para arroz. • Para la limpieza de la carcasa del cocedor incl. la placa calentadora utilice un paño seco. No utilice ningún detergente ni producto de limpieza agresivos. Éstos podrían dañar la superficie. • Limpie el accesorio para cocción al vapor 3, la tapa 2, el recipiente de cocción 4, la cuchara de plástico y el vaso medidor en agua jabonosa. • Seque todas las piezas antes de volver a poner el aparato de nuevo en funcionamiento. Evacuación En ningún caso deberá tirar el aparato con la basura doméstica. Este producto está sujeto a la directiva europea 2002/96/EC. Evacue el aparato en un centro de evacuación autorizado a través de las instalaciones de evacuación comunitarias. Preste atención a las normas en vigor. En caso de duda póngase en contacto con las instalaciones municipales de evacuación de residuos. Servicio España Tel.: 902 59 99 22 (0,08 EUR/Min. + 0,11 EUR/llamada (tarifa normal)) (0,05 EUR/Min. + 0,11 EUR/llamada (tarifa reducida)) E-Mail: [email protected] El material de embalaje debe desecharse de forma respetuosa con el medio ambiente. IAN 73271 -7- IB_73271_SRK700A1_LB5 03.02.2012 10:52 Uhr Importador KOMPERNASS GMBH BURGSTRASSE 21 44867 BOCHUM, (ALEMANIA) www.kompernass.com -8- Seite 8 IB_73271_SRK700A1_LB5 03.02.2012 10:52 Uhr CONTENT Seite 9 PAGE Safety information 10 Intended use 11 Technical Data 11 Items supplied 11 Appliance Overview 11 Before the First Use 11 Using the Rice Cooker 11 Cooking Rice ..................................................................................................................................11 Steaming .........................................................................................................................................13 Troubleshooting 14 Cleaning and care 15 Disposal 15 Warranty and Service 15 Importer 16 Read the operating instructions carefully before using the device for the first time and preserve this booklet for later reference. Pass this manual on to whoever might acquire the device at a future date. -9- IB_73271_SRK700A1_LB5 03.02.2012 10:52 Uhr Seite 10 Rice Cooker Risk of personal injury! • Never leave the appliance unattended during operation. Safety information WARNING! Hot steam escapes from the steam hole and upon opening the cover! Risk of scalding! Danger! Electric shock! • Connect the rice cooker only to correctly installed and earthed mains sockets supplying a voltage that tallies with the details given on the appliance identification plate. • Always remove the plug from the mains power sokket when you move or fill the device, in the event of problems, before cleaning the appliance and when the cooker is not in use! • Never disconnect the appliance by pulling on the power cable. Always pull on the plug itself. • Never touch the appliance plug with wet or moist hands. This symbol on the appliance warns you on the risk of burns caused by hot surfaces. Never submerse the device in water or other liquids. • Should the appliance ever fall into a liquid, IMMEDIATELY remove the plug from the mains power socket. Then, do not operate the appliance again until it has been inspected by an approved service company. • Never subject the appliance to moisture and do not use it outdoors. • Do not use the rice cooker while standing on a wet floor or when your hands or the appliance are wet. • Position the power cable so that it does not come into contact with hot or sharp-edged objects. • Do not kink or crush the power cable and do not wind it around the appliance. • Arrange for defective power plugs and/or cables to be replaced at once by qualified technicians or our Customer Service Department. • This appliance is not intended for use by individuals (including children) with restricted physical, physiological or intellectual abilities or deficiences in experience and/or knowledge unless they are supervised by a person responsible for their safety or receive from this person instruction in how the appliance is to be used. • Children should be supervised to ensure that they do not play with the appliance. • Allow the appliance and accessories to cool completely before cleaning and storing them. • Do not use an external timing switch or a separate remote control system to operate the appliance. Important! Appliance damage! • When cooking, never cover the appliance lid with handtowels or anything similar. • Never place the appliance adjacent to sources of heat. • Never open the housing. If you do, the safety concept of the appliance can no longer be assured and the warranty becomes void. • Only use the accessory parts provided with the appliance and never use the appliance without first inserting the cooking bowl. - 10 - IB_73271_SRK700A1_LB5 03.02.2012 10:52 Uhr Seite 11 Intended use Appliance Overview Only use the rice cooker for cooking rice and steaming foods, such as vegetables or fish. This rice cooker is not intended for commercial use; it is intended exclusively for use in private households! 1 Steam exit opening 2 Lid 3 Steamer attachment 4 Cooking bowl 5 Yellow control lamp (Keep-warm) 6 Red control lamp (Cooking) 7 Function selector switch for "Cooking" and "Keep-warm" 8 Connection socket for the power cable Technical Data Rated voltage: Power consumption: 220 - 240 V ~ / 50 Hz 700 W Items supplied 1 Rice cooker, incl. cooking bowl and steaming attachment 1 power cable fitted with a plug 1 measuring cup 1 plastic spoon 1 operating manual The total capacity of the measuring cup is approximately 180 ml. The measuring cup has 2 different sets of measurement markings to make filling easier: 1/4 = approx. 45 ml 1/2 = approx. 90 ml 3/4 = approx. 135 ml 40 = approx. 40 ml 80 = approx. 80 ml 120 = approx. 120 ml 160 = approx. 160 ml Before the First Use Carefully remove the rice cooker from the packaging. Remove all possibly remaining protective foils and clean any packaging-dust remnants from all components that will come into contact with foodstuffs. Clean the appliance as described in the chapter "Cleaning and Care". Using the Rice Cooker With this appliance, it is possible to cook rice as well as to steam other foods at the same time. Experiment with finding the right quantity of water and the right cooking time for the various combinations. Cooking Rice Note: Coat the inside of the cooking bowl 4 evenly with a little grease or vegetable oil to achieve a better cooking result. 1. Remove the lid 2. 2. Take the cooking bowl 4 out. - 11 - IB_73271_SRK700A1_LB5 03.02.2012 10:52 Uhr Seite 12 Note: Note: If the cooking bowl 4 is damaged, discontinue all further use! Due to the damage it may be that the safety shut-off of the appliance has triggered and the appliance does not allow itself to be switched on. 3. Measure the desired quantity of rice using the supplied measuring cup. As a general rule: A level measuring cup - filled with rice - yeilds a portion for one person. Determine the right quantity of rice and water for you in a few cooking attempts. 4. Thoroughly wash and sieve the loose rice. Nutrients will be lost with this, however, if you do not wash the rice this could lead to poor cooking results and elevated foam and steam formation in the cooking bowl 4. Also, always pay heed to the preparation instructions of the rice producer. 5. After washing it, pour the rice into the cooking bowl 4 and smooth it out. Note: Place at least 2 measuring beakers of rice into the rice cooker! A lesser volume of rice could cause inferior cooking results! 6. Then add water in the cooking bowl 4 as per the following cup markings: • 2 Measuring beakers of rice = Water up to cup marking "2" • 4 Measuring beakers of rice = Water up to cup marking "4" • 6 Measuring beakers of rice = Water up to cup marking "6" • 8 Measuring beakers of rice = Water up to cup marking "8" • 10 Measuring beakers of rice = Water up to cup marking "10" Subject to taste preferences, salt can also be added to the rice. If you use warm water the cooking time can be shortened. In this case, use somewhat less water than is given on the cup marking in the cooking bowl 4. Note: Subject to the type/sort of rice being prepared, it could be that you may have to insert a little more or less water to achieve an optimal cooking result. Vary the amount of water in accordance with your individual experiences and personal preference. 7. When the cooking bowl 4 is full, place it back in the rice cooker housing. Ensure that... - ... to avoid dirtying the cooking area, check to make sure there is no moisture or rice located on the outside of the cooking bowl 4. If necessary, wipe the outside with a clean cloth. - ... the cooking bowl 4 is not skewed or tilted when being placed in the rice cooker housing. Always insert the cooking bowl 4 correctly and precisely into the rice cooker housing. If you do not, it may be that the safety shut-off of the appliance will trigger and the appliance does not allow itself to be switched on. Note: This appliance is fitted with a safety switch: the cooking process cannot be started with an empty cooking vessel 4 without a lid 2. However, with the lid 2 in place the cooking process can also be started with an empty cooking vessel. Close the appliance lid 2. Insert the power cable into the socket 8 on the side of the appliance. 10. Insert the power plug into a properly installed power socket. The yellow control lamp 5 glows. 8. 9. - 12 - IB_73271_SRK700A1_LB5 03.02.2012 10:52 Uhr Important! During the cooking process steam is emitted from the steam exit opening 1. NEVER hold your hands or other parts of the body over the steam exit opening 1 during the cooking process. There is a risk of receiving severe scalds! 11. Press the function selector switch 7 down. The yellow control lamp 5 extinguishes and the red control lamp 6 starts to glow. The cooking process begins. Seite 13 Steaming Important! Do not lift the steaming attachment 3 up during the steaming process - the escaping steam brings with it the real risk of scalding. The steaming attachment 3 becomes hot during the steaming process. When taking hold of the steaming attachment 3, use oven cloths or something similar to lift it from the cooking bowl 4. Note: Note: If the cooking bowl 4 is not correctly positioned, the function selector switch 7 cannot be moved to the setting "Cooking". As soon as the rice is cooked, the rice cooker switches itself automatically back to the keep-warm setting. The red control lamp 6 extinguishes and the yellow control lamp 5 starts to glow. 12. Open the lid 2. The rice is now ready for consumption. Attention! For removal of the rice use exclusively the supplied plastic spoon. If you do not, the non-stick coating could be damaged. Ensure that the cooking bowl 4 is also inserted correctly when it is used for steaming. The cooking bowl 4 must not be damaged. If it is, it may be that the safety shut-off of the appliance will trigger and the appliance does not allow itself to be switched on. 1. Pour the required amount of water into the cooking bowl 4. The cooking time is dependant on the inserted volume of water. Take note of the examples given in the following table. • 1 filled measuring cup is sufficient for about 15 minutes of steaming. • 2 filled measuring cups are sufficient for about 30 minutes of steaming, etc. If you do not consume the rice immediately • During the keep-warm period, do not open the lid 2. • Do not leave the rice for longer than 2 hours in the keep.warm state. Important! Always remove the plug from the mains power sokket when the rice cooker is not in use. Otherwise, there is a permanent risk of receiving an electric shock! - 13 - IB_73271_SRK700A1_LB5 03.02.2012 10:52 Uhr Fish / seafood Water in milliliter Weight / quantity Mussels (cook until they are opened) approx. 120 ml approx. 450 g Prawns (cook until a pink colour) approx. 140 ml approx. 350 g Fish (Fillet) approx. 180 ml approx. 350 g Steak approx. 240 ml approx. 450 g Oysters (in the shell) approx. 300 ml approx. 700 g Vegetables Water in milliliter Weight / quantity Mushrooms (whole) approx. 120 ml approx. 450 g Peas (with pods) approx. 200 ml approx. 350 g Seite 14 2. Place the food to be steamed in the steaming attachment 3. 3. Place the container on the cooking bowl 4. 4. Close the appliance lid 2. 5. Place the power plug in a wall socket. The yellow control lamp 5 glows. 6. Press the function selector switch 7 down. The yellow control lamp 5 extinguishes and the red control lamp 6 starts to glow. The steaming process begins. As soon as the added water has left the cooking bowl 4 by being completely turned to steam, the rice cooker automatically switches back to the "keeping warm" mode. The red control lamp 6 extinguishes and the yellow control lamp 5 starts to glow again. The food is now completely steamed and is ready to eat. Troubleshooting Defect Asparagus approx. 200 ml. Carrots (peeled) approx. 240 ml approx. 450 g Green beans (cut) approx. 240 ml approx. 450 g Green beans: (whole) approx. 300 ml approx. 450 g Brussels sprouts approx. 300 ml approx. 350 g Corncobs approx. 360 ml 2 cobs Cause Solution approx. 450 g The device does not function. The rice cooker Push the power is not plugged plug into the in. wall socket. The power socket is defective. Use a different wall power socket. The cooking The yellow indibowl 4 is empty cator light 5 Fill the cooking and, as such, switches on, but bowl 4 with the safety the cooking the foodstuffs to switch cannot process cannot be cooked. be pressed be started. down. - 14 - IB_73271_SRK700A1_LB5 03.02.2012 10:52 Uhr Cleaning and care Warranty and Service Danger! Electric shock! • ALWAYS remove the plug from the wall socket before cleaning, and allow the appliance to cool completely before cleaning and storing it! • Make certain that no liquid comes into contact with the heating plate and the insides of the rice cooker. • Use a dry cloth to clean the rice cooker housing incl. the heating plate. Do not use harsh cleaners and abrasive materials. These could damage the upper surfaces. • Clean the steaming attachment 3, the lid 2, the cooking bowl 4, the plastic spoon and the measuring cup in water containing a mild detergent. • Dry all parts before using the appliance again. Disposal Do not dispose of the appliance in your normal domestic waste. This product is subject to the provisions of European Directive 2002/96/EC. Dispose of the appliance through an approved disposal centre or at your community waste facility. Observe the currently applicable regulations. In case of doubt, please contact your waste disposal centre. Dispose of all packaging materials in an environmentally friendly manner. Seite 15 The warranty for this appliance is for 3 years from the date of purchase. The appliance has been manufactured with care and meticulously examined before delivery. Please retain your receipt as proof of purchase. In the event of a warranty claim, please make contact by telephone with our Service Department. Only in this way can a post-free despatch for your goods be assured. The warranty covers only claims for material and manufacturing defects, but not for transport damage, for wearing parts or for damage to fragile components, e.g. buttons or batteries. This product is for private use only and is not intended for commercial use. The warranty is void in the case of abusive and improper handling, use of force and internal tampering not carried out by our authorized service branch. Your statutory rights are not restricted in any way by this warranty. The warranty period will not be extended by repairs made under warranty. This applies also to replaced and repaired parts. Any damage and defects extant on purchase must be reported immediately after unpacking the appliance, at the latest, two days after the purchase date. Repairs made after the expiration of the warranty period are subject to payment. Service Great Britain Tel.: 0871 5000 720 (£ 0.10/Min.) E-Mail: [email protected] IAN 73271 Service Malta Tel.: 80062230 E-Mail: [email protected] IAN 73271 - 15 - IB_73271_SRK700A1_LB5 03.02.2012 10:52 Uhr Importer KOMPERNASS GMBH BURGSTRASSE 21 44867 BOCHUM, GERMANY www.kompernass.com - 16 - Seite 16 IB_73271_SRK700A1_LB5 03.02.2012 10:52 Uhr INHALTSVERZEICHNIS Seite 17 SEITE Sicherheitshinweise 18 Verwendungszweck 19 Technische Daten 19 Lieferumfang 19 Geräteübersicht 19 Vor dem ersten Gebrauch 19 Benutzung des Reiskochers 19 Reis kochen.....................................................................................................................................19 Dampfgaren....................................................................................................................................21 Fehlerbehebung 22 Reinigen und Pflegen 23 Entsorgen 23 Garantie und Service 23 Importeur 24 Lesen Sie die Bedienungsanleitung vor der ersten Verwendung aufmerksam durch und heben Sie diese für den späteren Gebrauch auf. Händigen Sie bei Weitergabe des Gerätes an Dritte auch die Anleitung aus. - 17 - IB_73271_SRK700A1_LB5 03.02.2012 10:52 Uhr Seite 18 Reiskocher Verletzungsgefahr! • Lassen Sie das Gerät während des Betriebes nicht ohne Aufsicht. Sicherheitshinweise VORSICHT! Aus der Dampfaustrittsöffnung und beim Öffnen des Deckels tritt heißer Dampf aus! Verbrühungsgefahr! Gefahr! Elektrischer Schlag! • Schließen Sie den Reiskocher nur an eine vorschriftsmäßig installierte und geerdete Steckdose mit der auf dem Typenschild des Gerätes angegebenen Netzspannung an. • Ziehen Sie, wenn Sie das Gerät bewegen, befüllen, bei Störungen, bevor Sie das Gerät reinigen oder wenn Sie es nicht gebrauchen, immer den Netzstecker aus der Netzsteckdose! • Ziehen Sie niemals am Netzkabel, um den Netzstecker aus der Netzsteckdose zu ziehen. Ziehen Sie am Netzstecker selbst. • Berühren Sie den Gerätestecker nicht mit nassen oder feuchten Händen. Sie dürfen das Gerät keinesfalls in Wasser oder andere Flüssigkeiten tauchen. • Sollte das Gerät doch einmal in Flüssigkeit gefallen sein, ziehen Sie sofort den Netzstecker aus der Netzsteckdose. Danach das Gerät nicht mehr in Betrieb nehmen, sondern erst von einer zugelassenen Servicestelle überprüfen lassen. • Setzen Sie das Gerät keiner Feuchtigkeit aus und benutzen Sie es nicht im Freien. • Benutzen Sie den Reiskocher nicht, wenn Sie sich auf feuchtem Boden befinden oder wenn Ihre Hände oder das Gerät nass sind. • Verlegen Sie das Netzkabel so, dass es nicht mit heißen oder scharfkantigen Gegenständen in Berührung kommt. • Knicken oder quetschen Sie das Netzkabel nicht, und wickeln Sie es nicht um das Gerät. • Lassen Sie beschädigte Netzstecker oder Netzkabel sofort von autorisiertem Fachpersonal oder dem Kundenservice austauschen, um Gefährdungen zu vermeiden. Dieses Symbol auf dem Gerät warnt Sie vor Verbrennungsgefahr durch heiße Oberflächen. • Dieses Gerät ist nicht dafür bestimmt, durch Personen (einschließlich Kinder) mit eingeschränkten physischen, sensorischen oder geistigen Fähigkeiten oder mangels Erfahrung und/oder mangels Wissen benutzt zu werden, es sei denn, sie werden durch eine für ihre Sicherheit zuständige Person beaufsichtigt oder erhielten von ihr Anweisungen, wie das Gerät zu benutzen ist. • Kinder sollten beaufsichtigt werden, um sicherzustellen, dass sie nicht mit dem Gerät spielen. • Lassen Sie das Gerät und die Zubehörteile vollständig abkühlen, bevor Sie sie reinigen und verstauen. • Benutzen Sie keine externe Zeitschaltuhr oder ein separates Fernwirksystem um das Gerät zu betreiben. Achtung! Geräteschäden! • Decken Sie während des Kochens niemals den Deckel mit Handtüchern oder ähnlichem ab. • Stellen Sie das Gerät niemals in der Nähe von Wärmequellen auf. • Öffnen Sie niemals das Gehäuse. In diesem Fall ist die Sicherheit nicht gegeben und die Gewährleistung erlischt. • Verwenden Sie nur die im Lieferumfang enthaltenen Zubehörteile und benutzen Sie das Gerät nie ohne den eingesetzten Kochbehälter. - 18 - IB_73271_SRK700A1_LB5 03.02.2012 10:52 Uhr Seite 19 Verwendungszweck Geräteübersicht Benutzen Sie den Reiskocher ausschließlich zum Kochen von Reis und zum Dampfgaren von Lebensmitteln, wie z. B. Gemüse oder Fisch. Dieser Reiskocher ist nicht für den gewerblichen Gebrauch bestimmt, sondern ausschließlich für die Benutzung im privaten Haushalt! Technische Daten 1 Dampfaustrittsöffnung 2 Deckel 3 Dampfgareinsatz 4 Kochbehälter 5 gelbe Kontrolllampe (Warmhalten) 6 rote Kontrolllampe (Kochen) 7 Funktionswahlschalter für „Kochen“ und „Warmhalten“ 8 Anschlussbuchse für Netzleitung Nennspannung: Leistungsaufnahme: Vor dem ersten Gebrauch 220 - 240 V ~ / 50 Hz 700 W Lieferumfang 1 Reiskocher, inkl. Kochbehälter und Dampfgareinsatz 1 Anschlussleitung mit Schutzkontaktstecker 1 Messbecher 1 Kunststofflöffel 1 Bedienungsanleitung Die Gesamtkapazität des Messbechers beträgt ca. 180 ml. Zur Erleichterung der Befüllung besitzt der Messbecher 2 unterschiedliche Skalierungen: 1/4 = ca. 45 ml 1/2 = ca. 90 ml 3/4 = ca. 135 ml 40 = ca. 40 ml 80 = ca. 80 ml 120 = ca. 120 ml 160 = ca. 160 ml Entnehmen Sie den Reiskocher vorsichtig aus der Verpackung. Entfernen Sie eventuell vorhandene Schutzfolien und reinigen Sie die mit Lebensmitteln in Berührung kommenden Teile von Verpackungsstaubresten. Reinigen Sie das Gerät wie im Kapitel „Reinigen und Pflegen” beschrieben. Benutzung des Reiskochers Mit diesem Gerät ist es möglich, sowohl Reis zu kochen als auch gleichzeitig andere Lebensmittel dampfzugaren. Experimentieren Sie ein wenig, um die hierfür richtige Menge Wasser und die richtige Kochzeit für die verschiedenen Kombinationsmöglichkeiten herauszufinden. Reis kochen Hinweis: Bestreichen Sie die Innenseite des Kochbehälters 4 gleichmäßig mit ein wenig Fett oder Pflanzenöl, um ein besseres Kochergebnis zu erzielen. 1. 2. - 19 - Nehmen Sie den Deckel 2 ab. Entnehmen Sie den Kochbehälter 4. IB_73271_SRK700A1_LB5 03.02.2012 10:52 Uhr Seite 20 Hinweis: Hinweis: Wenn der Kochbehälter 4 beschädigt ist, benutzen Sie diesen nicht weiter! Durch die Beschädigungen kann es sein, dass die Sicherheitsabschaltung des Gerätes auslöst und das Gerät sich nicht mehr einschalten lässt. Wenn Sie warmes Wasser verwenden, kann die Kochzeit verkürzt werden. Verwenden Sie dann allerdings etwas weniger Wasser, als die CUP-Markierung im Kochbehälter 4 vorsieht. 3. Je nach Reissorte kann es vorkommen, dass Sie etwas mehr oder etwas weniger Wasser einfüllen müssen, um ein optimales Kochergebnis zu erzielen. Variieren Sie die Wassermenge nach Ihren eigenen Erfahrungen und Geschmack. Hinweis: 4. 5. Messen Sie die gewünschte Menge Reis mit Hilfe des mitgelieferten Messbechers ab. Als Richtwert gilt: Ein gestrichener Messbecher - gefüllt mit Reis - ergibt eine Portion für eine Person. Ermitteln Sie, die für Sie richtige Menge Reis / Wasser, durch einige Kochversuche. Waschen Sie den losen Reis gründlich und sieben Sie ihn ab. Dabei gehen zwar Nährstoffe verloren, jedoch kann es ohne Waschen zu schlechteren Kochergebnissen und zu erhöhter Schaum- und Dampfbildung im Kochbehälter 4 kommen. Beachten Sie auch immer die Zubereitungshinweise des Reisherstellers. Geben Sie den Reis nach dem Waschen in den Kochbehälter 4 und streichen Sie den Reis glatt. 7. Achten Sie dabei darauf, dass... - ... sich keine Feuchtigkeit und kein Reis an der Außenseite des Kochbehälters 4 befinden, um eine Verschmutzung des Kochbereiches zu vermeiden. Gegebenenfalls ist die Außenseite mit einem sauberen Tuch trocken zu wischen. - ... der Kochbehälter 4 nicht schief oder verkantet in das Reiskochergehäuse eingesetzt wird. Setzen Sie den Kochbehälter 4 immer korrekt und gerade in das Reiskochergehäuse ein. Ansonsten kann es sein, dass die Sicherheitsabschaltung des Gerätes auslöst und das Gerät sich nicht mehr einschalten lässt. Hinweis: Geben Sie mindestens 2 Messbecher Reis in den Reiskocher! Bei weniger Reis kann es zu schlechten Kochergebnissen kommen! 6. Setzen Sie nach dem Befüllen des Kochbehälters 4, diesen in das Reiskochergehäuse ein. Anschließend gießen Sie bis zur entsprechenden CUP-Markierung im Kochbehälter 4 Wasser ein: • 2 Messbecher Reis = Wasser bis zur CUPMarkierung „2” • 4 Messbecher Reis = Wasser bis zur CUPMarkierung „4” • 6 Messbecher Reis = Wasser bis zur CUPMarkierung „6” • 8 Messbecher Reis = Wasser bis zur CUPMarkierung „8” • 10 Messbecher Reis = Wasser bis zur CUPMarkierung „10” Je nach Geschmacksrichtung, kann dem Reis auch Salz hinzugefügt werden. Hinweis: Dieses Gerät ist mit einem Sicherheitsschalter ausgestattet: der Kochvorgang lässt sich mit leerem Kochbehälter 4 ohne Deckel 2 nicht starten. Mit aufgesetztem Deckel 2 kann der Kochvorgang jedoch auch mit leerem Kochbehälter gestartet werden. Schließen Sie den Deckel 2. Stecken Sie die Anschlussleitung in die Anschlussbuchse 8 an der Geräteseite. 10. Stecken Sie den Netzstecker in eine vorschriftsmäßig installierte Netzsteckdose. Die gelbe Kontrolllampe 5 leuchtet auf. 8. 9. - 20 - IB_73271_SRK700A1_LB5 03.02.2012 10:52 Uhr Dampfgaren Achtung! Während des Garvorgangs tritt Dampf aus der Dampfaustrittsöffnung 1 aus. Halten Sie niemals Hände oder andere Körperteile über die Dampfaustrittsöffnung 1 während des Garvorganges. Es besteht die Gefahr von Verbrühungen! 11. Drücken Sie den Funktionswahlschalter 7 nach unten. Die gelbe Kontrolllampe 5 erlischt und die rote Kontrolllampe 6 leuchtet auf. Der Kochvorgang beginnt. Hinweis: Ist der Kochbehälter 4 nicht eingesetzt und gefüllt, lässt sich der Funktionswahlschalter 7 nicht auf „Kochen” stellen. Sobald der Reis gekocht ist, schaltet der Reiskocher automatisch auf die Warmhaltefunktion zurück. Die rote Kontrolllampe 6 erlischt, während die gelbe Kontrolllampe 5 wieder aufleuchtet. 12. Öffnen Sie den Deckel 2. Der Reis ist nun fertig zum Verzehr. Seite 21 Achtung! Während des Garvorgangs den Dampfgareinsatz 3 nicht abheben, da durch den austretenden Dampf Verbrühungsgefahr besteht. Der Dampfgareinsatz 3 erhitzt sich während des Garvorgangs. Nehmen Sie den Dampfgareinsatz 3 mittels Topflappen oder ähnlichem vom Kochbehälter 4 ab. Hinweis: Achten Sie darauf, dass der Kochbehälter 4 auch beim Dampfgaren korrekt eingesetzt ist. Der Kochbehälter 4 darf nicht beschädigt sein. Ansonsten kann es sein, dass die Sicherheitsabschaltung des Gerätes auslöst und das Gerät sich nicht mehr einschalten lässt. 1. • • Achtung! Verwenden Sie zur Entnahme des Reises ausschließlich den mitgelieferten Kunststofflöffel. Ansonsten kann die Antihaftbeschichtung beschädigt werden. Gießen Sie die gewünschte Wassermenge in den Kochbehälter 4. Die Garzeit ist abhängig von der eingefüllten Wassermenge. Beachten Sie die Beispiele in der nachfolgenden Tabelle. 1 gefüllter Messbecher ist ausreichend für ca. 15 Minuten Dampfgaren. 2 gefüllte Messbecher sind ausreichend für ca. 30 Minuten Dampfgaren usw. Fisch / Meeresfrüchte Wasser in Milliliter Gewicht / Menge ca. 120 ml ca. 450 g ca. 140 ml ca. 350 g Fisch (Filet) ca. 180 ml ca. 350 g Steak ca. 240 ml ca. 450 g Austern (in der Schale) ca. 300 ml ca. 700 g Muscheln (bis zum Öffnen garen) Garnelen (bis rosa Färbung garen) Wenn Sie den Reis nicht sofort verzehren: • Öffnen Sie während der Warmhaltezeit nicht den Deckel 2. • Lassen Sie den Reis nicht länger als 2 Stunden in der Warmhaltung. Achtung! Ziehen Sie stets den Netzstecker aus der Netzsteckdose, wenn Sie den Reiskocher nicht mehr verwenden. Es besteht die Gefahr eines elektrischen Schlages! - 21 - IB_73271_SRK700A1_LB5 03.02.2012 10:52 Uhr Gemüse Wasser in Milliliter Gewicht / Menge Pilze (ganz) ca. 120 ml ca. 450 g Erbsen (mit Schale) ca. 200 ml ca. 350 g Spargel ca. 200 ml ca. 450 g Seite 22 Sobald das eingefüllte Wasser vollständig aus dem Kochbehälter 4 verdampft ist, schaltet der Reiskocher automatisch auf die Warmhaltefunktion zurück. Die rote Kontrolllampe 6 erlischt, während die gelbe Kontrolllampe 5 wiederum aufleuchtet. Die eingefüllten Lebensmittel sind fertig gegart und können verzehrt werden. Fehlerbehebung 2. 3. 4. 5. 6. Karotten (geschält) ca. 240 ml grüne Bohnen (geschnitten) ca. 240 ml ca. 450 g grüne Bohnen (ganz) ca. 300 ml ca. 450 g Rosenkohl ca. 300 ml ca. 350 g Maiskolben ca. 360 ml 2 Kolben ca. 450 g Fehler Das Gerät zeigt keine Funktion. Ursache Behebung Der Reiskocher Stecken Sie den ist nicht mit der Netzstecker in Steckdose vereine Netzbunden. steckdose. Die Netzsteckdose ist defekt. Benutzen Sie eine andere Netzsteckdose. Die gelbe Kon- Der Kochbehältrolllampe 5 ter 4 ist leer Füllen Sie die leuchtet, der und der Sicher- zu garenden Kochvorgang heitsschalter Lebensmittel in kann jedoch wird so nicht den Kochbehälnicht gestartet herunterter 4. werden. gedrückt. Geben Sie die zu garenden Lebensmittel in den Dampfgareinsatz 3. Setzen Sie das Behältnis auf den Kochbehälter 4. Schließen Sie den Deckel 2. Stecken Sie den Netzstecker in eine Netzsteckdose. Die gelbe Kontrolllampe 5 leuchtet auf. Drücken Sie den Funktionswahlschalter 7 nach unten. Die gelbe Kontrolllampe 5 erlischt und die rote Kontrolllampe 6 leuchtet auf. Das Dampfgaren beginnt. - 22 - IB_73271_SRK700A1_LB5 03.02.2012 10:52 Uhr Reinigen und Pflegen Seite 23 Garantie und Service Gefahr! Elektrischer Schlag! • Ziehen Sie vor dem Reinigen immer den Netzstecker und lassen Sie das Gerät vollständig abkühlen, bevor Sie es reinigen und verstauen! • Achten Sie darauf, dass keine Flüssigkeit auf die Heizplatte und in das Innere des Reiskochers gelangt. • Zur Reinigung des Reiskochergehäuses inkl. der Heizplatte benutzen Sie ein trockenes Tuch. Verwenden Sie keine scharfen Reinigungs- und Scheuermittel. Diese können die Oberfläche angreifen. • Reinigen Sie den Dampfgareinsatz 3, den Deckel 2, den Kochbehälter 4, den Kunststofflöffel und den Messbecher in spülmittelhaltigem Wasser. • Trocknen Sie alle Teile, bevor Sie das Gerät wieder in Betrieb nehmen. Entsorgen Werfen Sie das Gerät keinesfalls in den normalen Hausmüll. Dieses Produkt unterliegt der europäischen Richtlinie 2002/96/EC. Sie erhalten auf dieses Gerät 3 Jahre Garantie ab Kaufdatum. Das Gerät wurde sorgfältig produziert und vor Anlieferung gewissenhaft geprüft. Bitte bewahren Sie den Kassenbon als Nachweis für den Kauf auf. Bitte setzen Sie sich im Garantiefall mit Ihrer Servicestelle telefonisch in Verbindung. Nur so kann eine kostenlose Einsendung Ihrer Ware gewährleistet werden. Die Garantieleistung gilt nur für Material- oder Fabrikationsfehler, nicht aber für Transportschäden, Verschleißteile oder für Beschädigungen an zerbrechlichen Teilen, z. B. Schalter oder Akkus. Das Produkt ist lediglich für den privaten und nicht für den gewerblichen Gebrauch bestimmt. Bei missbräuchlicher und unsachgemäßer Behandlung, Gewaltanwendung und bei Eingriffen, die nicht von unserer autorisierten Service-Niederlassung vorgenommen wurden, erlischt die Garantie. Ihre gesetzlichen Rechte werden durch diese Garantie nicht eingeschränkt. Die Garantiezeit wird durch die Gewährleistung nicht verlängert. Dies gilt auch für ersetzte und reparierte Teile. Eventuell schon beim Kauf vorhandene Schäden und Mängel müssen sofort nach dem Auspacken gemeldet werden, spätestens aber zwei Tage nach Kaufdatum. Nach Ablauf der Garantiezeit anfallende Reparaturen sind kostenpflichtig. Entsorgen Sie das Gerät über einen zugelassenen Entsorgungsbetrieb oder über Ihre kommunale Entsorgungseinrichtung. Beachten Sie die aktuell geltenden Vorschriften. Setzen Sie sich im Zweifelsfall mit Ihrer Entsorgungseinrichtung in Verbindung. Führen Sie alle Verpackungsmaterialien einer umweltgerechten Entsorgung zu. - 23 - IB_73271_SRK700A1_LB5 03.02.2012 10:52 Uhr Service Deutschland Tel.: 01805 772 033 (0,14 EUR/Min. aus dem dt. Festnetz, Mobilfunk max. 0,42 EUR/Min.) E-Mail: [email protected] IAN 73271 Service Österreich Tel.: 0820 201 222 (0,15 EUR/Min.) E-Mail: [email protected] IAN 73271 Service Schweiz Tel.: 0842 665566 (0,08 CHF/Min., Mobilfunk max. 0,40 CHF/Min.) E-Mail: [email protected] IAN 73271 Importeur KOMPERNASS GMBH BURGSTRASSE 21 44867 BOCHUM, GERMANY www.kompernass.com - 24 - Seite 24-
 1
1
-
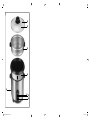 2
2
-
 3
3
-
 4
4
-
 5
5
-
 6
6
-
 7
7
-
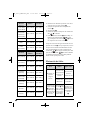 8
8
-
 9
9
-
 10
10
-
 11
11
-
 12
12
-
 13
13
-
 14
14
-
 15
15
-
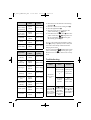 16
16
-
 17
17
-
 18
18
-
 19
19
-
 20
20
-
 21
21
-
 22
22
-
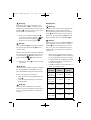 23
23
-
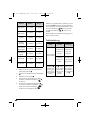 24
24
-
 25
25
-
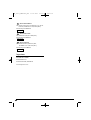 26
26


Silvercrest 73271 Operation and Safety Notes
- Categoría
- Ollas arroceras
- Tipo
- Operation and Safety Notes
- Este manual también es adecuado para
en otros idiomas
- English: Silvercrest 73271
- Deutsch: Silvercrest 73271
Artículos relacionados
Otros documentos
-
Unold 58315 El manual del propietario
-
 Caso Design SV 400 Instrucciones de operación
-
Aroma ARC-856 Manual de usuario
-
-
Caso Sous Vide combination set Instrucciones de operación
-
Groupe Brandt CV-900M El manual del propietario
-
-
-
-
SEVERIN RK 2425 Manual de usuario
