Silvercrest 293156 El manual del propietario
- Categoría
- Ollas arroceras
- Tipo
- El manual del propietario

IAN 293156
RICE COOKER AND FOOD STEAMER
OLLA ARROCERA Y VAPORERA SRK 400 A3
RICE COOKER AND FOOD STEAMER
Operating instructions
OLLA ARROCERA Y VAPORERA
Instrucciones de uso

US - EN Operating instructions Page 1
US - ES Instrucciones de uso Página 25
Before reading, unfold the page containing the illustrations and familiarize yourself with all functions of the
device.
Antes de empezar a leer abra la página que contiene las imágenes y, en seguida, familiarícese con todas
las funciones del dispositivo.

A
B

SRK 400 A3 US-EN │ 1 ■
Table of Contents
Introduction .......................................2
Warning types .....................................2
Safety instructions ..................................3
Important cord information .....................................7
Proper use ........................................7
Package contents ...................................8
Operating elements .................................9
Technical specifications ..............................9
Preparations before first use ........................10
Unpacking ................................................ 10
Disposal of the packaging ................................... 10
Using the rice cooker ...............................11
Preparing pretreated rice .................................... 11
Preparing rice that has not been pretreated ...................... 13
Steam cooking ............................................ 17
Troubleshooting ...................................19
Cleaning .........................................19
Storage ..........................................21
Disposal .........................................21
3 year limited warranty ............................22
Distributor ........................................23
IB_293156_SRK400A3_LB9.indb 1 15.01.18 12:43

SRK 400 A3
■ 2 │ US-EN
Introduction
Congratulations on the purchase of your new appliance!
You have chosen a modern, high-quality product. These operating
instructions are part of the product. They contain important informa-
tion about safety, usage, and disposal. Before using the product,
please familiarize yourself with all operating and safety instructions.
This appliance may only be used as described and for the purposes
indicated. Please also pass these operating instructions on to any
future owner.
Warning types
The following warning types are used in these operating instructions:
This is the safety alert symbol. It is used to alert you to poten-
tial injury hazards. Obey all safety messages that follow this
symbol to avoid possible injury and death.
DANGER indicates a hazardous situation that, if not avoided, will
result in death or serious injury.
WARNING indicates a hazardous situation that, if not avoided, could
result in death or serious injury.
CAUTION indicates a hazardous situation that, if not avoided, could
result in minor or moderate injury.
NOTICE indicates information that is considered important, but not
hazardous (e.g. messages related to property damage).
IB_293156_SRK400A3_LB9.indb 2 15.01.18 12:43

SRK 400 A3 US-EN │ 3 ■
Safety instructions
This section contains important safety instructions for using the appli-
ance. This appliance complies with statutory safety regulations.
Improper use may result in personal injury and property damage.
IMPORTANT SAFETY
INSTRUCTIONS
When using electrical appliances, basic safety precautions
should always be followed, including the following:
1) Read all instructions.
2) Do not touch hot surfaces. Use handles or knobs.
3) To protect against electric shock, do not immerse cord, plugs
or the appliance in water or other liquids.
4) Keep appliance and cord away from children. Cleaning and
user maintenance tasks must not be carried out by children.
The appliance and its connecting cord must be kept away
from children.
5) Children must not play with the appliance.
6) This appliance can be used by persons with reduced physical,
sensory or mental capabilities or lack of experience and
knowledge, provided that they are under supervision or have
been told how to use the appliance safely and are aware of
the potential risks.
7) Close supervision is necessary when any appliance is used
by or near children.
8) Always attach plug to appliance first, then plug cord into the
wall outlet. To disconnect the appliance, turn the control to
"OFF", then pull the plug from the wall outlet.
IB_293156_SRK400A3_LB9.indb 3 15.01.18 12:43

SRK 400 A3
■ 4 │ US-EN
9) Always remove the plug from the power socket when you
move or fill the appliance, in the event of problems, before
cleaning the appliance and when the cooker is not in use!
10) Unplug the appliance from the outlet when not in use and
before cleaning. Allow the appliance to cool before putting
on or taking off parts.
11) Check the appliance for visible external damage before use.
Do not operate any appliance with a damaged cord or plug
or after the appliance malfunctions or has been damaged in
any manner. Return the appliance to the nearest authorized
service provider for examination, repair or adjustment.
12) The use of accessory attachments not recommended by the
appliance manufacturer may result in fire, electric shock, or
injury to persons.
13) Do not use the appliance outdoors.
14) Do not let cord hang over the edge of table or counter, or
touch hot surfaces.
15) Do not kink or crush the power cord and do not wind it
around the appliance.
16) Ensure that the appliance, the power cord, and the plug do
not come into contact with heat sources such as hotplates or
naked flames.
17) Ensure that the power cord never gets wet or damp when
the appliance is in use. Route the cord so that it cannot be
trapped or damaged in any way.
18) Do not place on or near a gas or electric burner, or in a
heated oven or near other sources of heat.
IB_293156_SRK400A3_LB9.indb 4 15.01.18 12:43

SRK 400 A3 US-EN │ 5 ■
19) Extreme caution must be used when moving an appliance
containing hot oil or other hot liquids.
20) Do not use the appliance for anything other than its in-
tended use.
SAVE THESE INSTRUCTIONS
FOR HOUSEHOLD USE ONLY.
ADDITIONAL SAFETY INSTRUCTIONS
► Never immerse the appliance in water or other liquids!
Otherwise, there is risk of electric shock.
► Should the appliance fall into liquid, IMMEDIATELY remove
the power plug from the socket. Then, do not operate the
appliance again until it has been inspected by an approved
service company.
► Hot surface! This symbol warns of hot surfaces on the
appliance!
► Hot steam escapes from the steam outlet opening and
upon opening the cover! Risk of scalding!
► The escaping water vapor is extremely hot! Risk of Burns!
► Allow the appliance and accessories to cool completely before
cleaning and storing them.
► Do not leave the appliance unattended while in use.
► Connect the rice cooker only to correctly installed and
grounded power sockets supplying a voltage that corre-
sponds with the details provided on the appliance identifica-
tion plate.
IB_293156_SRK400A3_LB9.indb 5 15.01.18 12:43

SRK 400 A3
■ 6 │ US-EN
► The plug connection of the appliance must not come into con-
tact with any liquids. Never touch the appliance plug with wet
or moist hands.
► Do not use the rice cooker if you are standing on a wet floor
or if your hands and/or the appliance are wet.
► Cook only in removable container.
► Never disconnect the appliance by pulling the power cord
from the power socket. Always disconnect the plug itself.
► The appliance should be set up in such a way that you have
unrestricted access to the power socket at all times and can
disconnect the plug immediately in an emergency.
► All repairs must be carried out by authorized specialist compa-
nies or by the customer service department. Improper repairs
may put the user at risk. They will also invalidate any warranty
claims.
► Do not use an external timer switch or a separate remote control
system to operate the appliance.
► Never cover the lid with a cloth or the like during cooking.
► Never open the housing. If you do, the safety concept of
the appliance can no longer be assured and the warranty
becomes void.
► Only use the accessory parts provided with the appliance and
never use the appliance without first inserting the cooking bowl.
IB_293156_SRK400A3_LB9.indb 6 15.01.18 12:43

SRK 400 A3 US-EN │ 7 ■
Important cord information
This appliance has a polarized plug. To reduce the risk of electric shock,
there is only one way this plug is intended to fit into a polarized outlet. If the
plug does not completely fit into the outlet, reverse the plug. If it still does not
fit, contact a qualified electrician. Do not attempt to modify the plug in any
way.
► A short power supply cord (or detachable power supply cord) should be
used to reduce the risk resulting from becoming entangled in, or tripping
over a longer cord.
► Longer detachable power supply cords or extension cords may be used if
they are used carefully.
► If a longer detachable power supply cord or extension cord is used:
1) The marked electrical rating of the cord set or extension cord should
be at least as great as the electrical rating of the appliance;
2) The cord should be arranged so that it will not drape over the counter-
top or tabletop, where it can be pulled on by children, or tripped over
unintentionally; and
3) If the appliance has a grounded plug, the cord set or extension cord
should also be a grounded 3-wire cord.
Proper use
This appliance is used for cooking rice and steaming food such as
vegetables or fish.
This appliance is intended exclusively for use in domestic households.
Do not use it for commercial applications!
The appliance may be hazardous if used for any other purpose or for
use beyond the scope described in these operating instructions.
► Use the appliance only for its intended purpose.
► Observe the procedures described in these operating instructions.
Claims of any kind for damage resulting from improper use, incompe-
tent repairs, unauthorized modifications, or the use of non-approved
spare parts will not be accepted. The risk shall be borne solely by the
user.
IB_293156_SRK400A3_LB9.indb 7 15.01.18 12:43

SRK 400 A3
■ 8 │ US-EN
Package contents
The appliance comes standard with the following components:
▯ Rice cooker and food steamer incl. cooking bowl and steam
cooking insert
▯ Measuring cup
▯ Plastic spoon
▯ Power cord with safety plug
▯ Operating instructions
1) Remove all parts of the appliance and the operating instructions
from the box.
2) Remove all packaging materials as well as foils and stickers.
3) Clean all parts of the appliance as described in the section
"Cleaning".
►Check the package for completeness and signs of visible damage.
If the delivery is incomplete or damage has occurred as a result of
defective packaging or during transport, contact the customer
service hotline (see "3 year limited warranty" section).
IB_293156_SRK400A3_LB9.indb 8 15.01.18 12:43

SRK 400 A3 US-EN │ 9 ■
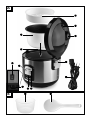
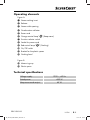
Operating elements
Figure A:
1 Steam cooking insert
2 Release
3 Steam outlet opening
4 Condensation collector
5 Power cord
6 Orange control lamp " " (Keep-warm)
7 Function selector switch
8 Socket for power cord
9 Red control lamp " " (Cooking)
0 On/Off switch
q Bracket for the plastic spoon
w Cooking bowl
Figure B:
e Measuring cup
r Plastic spoon
Technical specifications
Voltage supply 120V ~, 60Hz
Rated power 400 W
Keep-warm mode output 45 W
IB_293156_SRK400A3_LB9.indb 9 15.01.18 12:43

SRK 400 A3
■ 10 │ US-EN
Preparations before first use
Unpacking
RISK OF SUFFOCATION!
► Packaging materials are not children’s toys. Therefore, children
must not be allowed to play with them.
♦ Remove all parts of the appliance and the operating instructions
from the box.
♦ Remove all packaging material.
Disposal of the packaging
The packaging materials have been selected for their environmental
friendliness and ease of disposal, and are therefore recyclable.
Returning the packaging to the material cycle conserves raw materials
and reduces the amount of waste that is generated. Dispose of pack-
aging materials that are no longer needed in accordance with
applicable local regulations.
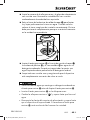
Note the marking on the different packaging materials and separate
them as necessary. The packaging materials are marked with abbrevi-
ations (b) and numbers (a) with the following meanings:
1–7: Plastics
20–22: Paper and cardboard
80–98: Composites
►If possible, keep the original packaging of the appliance through-
out the entire warranty period so you can repackage it properly if
you need to submit a warranty claim.
IB_293156_SRK400A3_LB9.indb 10 15.01.18 12:43

SRK 400 A3 US-EN │ 11 ■
Using the rice cooker
The appliance can be used to cook rice and steam other food at the
same time. Experiment with finding the right quantity of water and the
right cooking time for the various foods.
►Before using the appliance for the first time, fill the cooking bowl
w up to the CUP marking "4", and allow it to boil for around 30
min (see section entitled "Steam cooking" for operation). Now
throw this water away, allow the appliance to cool down and then
clean the cooking bowl w thoroughly.
Preparing pretreated rice
You will find pretreated rice in retail stores under the name "Quick
cook rice", "Easy cook rice" or similar.
►Coat the inside of the cooking bowl w evenly with a little fat or
vegetable oil to achieve a better cooking result.
►Never exceed the 5 CUP/1 liter scale in the cooking bowl w.
If you do, the water may overflow!
1) Open the lid by pressing the release 2 and lifting the lid
simultaneously.
2) Remove the cooking bowl w.
3) Pour the rice and the amount of water specified on the rice
packet into the cooking bowl w.
►Always prepare at least enough rice so that it reaches at least the
CUP marking "2" when the water is added. Failure to do so could
lead to poor cooking results!
IB_293156_SRK400A3_LB9.indb 11 15.01.18 12:43

SRK 400 A3
■ 12 │ US-EN
4) Place the cooking bowl w in the appliance:
Ensure that...
–... there is no moisture or rice on the outside of the cooking
bowl w – this will prevent messes in the cooking area.
If necessary, wipe the outside with a clean cloth.
–... the cooking bowl w is not skewed or tilted when being
placed in the rice cooker housing. Always insert the cooking
bowl w correctly and precisely into the rice cooker housing.
Otherwise, the safety shut-off of the appliance may be acti-
vated and the appliance will not allow itself to be turned on.
5) Now close the lid.
6) Connect the power cord 5 to the socket for power cord 8
and insert the power plug into the power socket.
7) Turn the appliance on using the On/Off switch 0. The orange
control lamp " " 6 lights up.
8) Press down the function selector switch 7 and cook the rice
for the amount of time specified on the rice packet.
9) When the rice is ready:
–If you want to eat the rice immediately, disconnect the plug
from the power socket.
–If you wish to keep the rice warm (max. 2 hours), press the
function selector switch 7 upwards.
10) When you have removed the rice, turn the appliance off at the
On/Off switch 0 and pull the power plug out of the power
socket.
►Some types of easy-cook rice still have to swell after cooking.
Always follow the preparation instructions on the packaging of the
rice.
IB_293156_SRK400A3_LB9.indb 12 15.01.18 12:43

SRK 400 A3 US-EN │ 13 ■
PROPERTY DAMAGE!
► Use only the supplied plastic spoon r to remove the rice. Other
spoons may damage the anti-stick coating of the cooking bowl w.
►You can insert the plastic spoon r into the bracket for the plastic
spoon q at the edge of the rice cooker. This way, it is always
ready at hand!
Preparing rice that has not been pretreated
►Coat the inside of the cooking bowl w evenly with a little fat or
vegetable oil to achieve a better cooking result.
1) Open the lid by pressing the release 2 and lifting the lid
simultaneously.
2) Remove the cooking bowl w.
►If the cooking bowl w is damaged, do not continue to use it! The
damage may have caused the safety shut-off of the appliance to
activate, and the appliance will not allow itself to be turned on.
3) Measure the desired quantity of rice with the help of the sup-
plied measuring cup e. As a general rule: A level measuring
cup e, filled with rice, is a portion for one person. Determine
the right quantity of rice/water for yourself by making a few
cooking attempts.
4) Thoroughly wash and drain the rice. This may remove some
of the nutrition, but not washing the rice could lead to poor
cooking results and increased foam and steam formation in the
cooking bowl w. Always pay attention to the rice manufacturer’s
preparation instructions.
IB_293156_SRK400A3_LB9.indb 13 15.01.18 12:43

SRK 400 A3
■ 14 │ US-EN
5) After washing the rice, pour it into the cooking bowl w and
smooth it out.
6) Then add water up to the relevant CUP markings in the cooking
bowl w.
–2 Measuring cups of rice = Water up to CUP marking "2"
–3 Measuring cups of rice = Water up to CUP marking "3"
–4 Measuring cups of rice = Water up to CUP marking "4"
–5 Measuring cups of rice = Water up to CUP marking "5"
Subject to your taste preferences, salt can also be added to the rice.
►Never exceed the 5 CUP/1 liter scale in the cooking bowl w.
If you do, the water may overflow!
►Always prepare at least 2 portions of rice. Failure to do so could
lead to poor cooking results!
►The cooking time can be shortened by using hot water. However,
if you do this, use a little less water than is indicated by the CUP
marking in the cooking bowl w.
►Subject to the type/sort of rice being prepared, it could be that
you may have to add a little more or less water to achieve an
optimal cooking result. Vary the amount of water in accordance
with your individual experiences and personal preference.
7) After filling the cooking bowl w, put it back into the rice
cooker housing.
Ensure that...
–... there is no moisture or rice on the outside of the cooking
bowl w – this will prevent messes in the cooking area.
If necessary, wipe the outside with a clean cloth.
–... the cooking bowl w is not skewed or tilted when being
placed in the rice cooker housing. Always insert the cooking
bowl w correctly and precisely into the rice cooker housing.
Otherwise, the safety shut-off of the appliance may be acti-
vated and the appliance will not allow itself to be turned on.
IB_293156_SRK400A3_LB9.indb 14 15.01.18 12:43

SRK 400 A3 US-EN │ 15 ■
8) Now close the lid.
9) Connect the power cord 5 to the socket for power
cord 8 and insert the power plug into the power socket.
10) Turn the appliance on using the On/Off switch 0.
The orange control lamp " " 6 lights up.
RISK OF INJURY!
► During the cooking process, steam is emitted from the steam outlet
opening 3. NEVER hold your hands or other parts of the body
over the steam outlet opening 3 during the cooking process.
Risk of scalding!
11) Press the function selector switch 7 downward. The orange
control lamp " " 6 turns off and the red control lamp " "
9 lights up. The cooking process starts.
►If the cooking bowl w is not correctly positioned, the function
selector switch 7 cannot be moved to the "Cook" setting.
As soon as the rice is cooked, the rice cooker turns itself automatically
back to the keep-warm setting. The red control lamp " " 9 turns
off and the orange control lamp " " 6 lights up again. Wait for
five minutes.
IB_293156_SRK400A3_LB9.indb 15 15.01.18 12:43

SRK 400 A3
■ 16 │ US-EN
►You can keep the rice warm for approx. 2 hours if you like.
However, the taste and the degree of cooking of the rice may
change the longer it is kept warm.
12) Open the lid. The rice is now ready to eat.
PROPERTY DAMAGE!
► Use only the supplied plastic spoon r to remove the rice.
Other spoons may cause damage to the anti-stick coating.
►You can insert the plastic spoon r into the bracket for the plastic
spoon q at the edge of the rice cooker. This way, it is always
ready at hand!
If you do not eat the rice immediately:
–Do not remove the lid whilst keeping the rice warm.
–Do not keep the rice warm for longer than 2 hours.
RISK OF ELECTRIC SHOCK!
► Always pull the power plug out of the power socket when no
longer using the rice cooker.
13) When you have removed the rice, turn the appliance off at the
On/Off switch 0 and pull the power plug out of the power
socket.
IB_293156_SRK400A3_LB9.indb 16 15.01.18 12:43

SRK 400 A3 US-EN │ 17 ■
Steam cooking
RISK OF INJURY!
► Do not lift up the steam cooking insert 1 during the steaming
process – risk of scalding from escaping steam. The steam
cooking insert 1 becomes hot during the steaming process.
To hold the steam cooking insert 1, use oven mitts or
something similar to lift it from the cooking bowl w.
►Ensure that the cooking bowl w is also inserted correctly when it
is used for steaming. The cooking bowl w must not be damaged.
Otherwise, the safety shut-off of the appliance may be activated
and the appliance will not allow itself to be turned on.
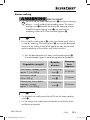
1) Pour the desired quantity of water into the cooking bowl w.
Use the examples given in the following tables as guidelines.
Vegetables (weight) Quantity
of water
Steaming
time
(approx.)
Green beans, cabbage, carrots
approx. 7.1 oz (200 g)
1–2 measuring
cups e25 minutes
Mushrooms, halved
8.8 oz (250 g)
1 measuring
cup e15 minutes
Kidney beans, brown beans,
asparagus, spinach
approx. 7.1 oz (200 g)
1–2 measuring
cups e20 minutes
►Cut the food into small pieces that will fit into the steam cooking
insert 1.
►Cut the carrots into small pieces and divide up the florets of the
cauliflower or broccoli.
IB_293156_SRK400A3_LB9.indb 17 15.01.18 12:43

SRK 400 A3
■ 18 │ US-EN
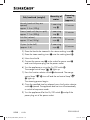
Fish/seafood (weight) Quantity of
water
Steaming
time
(approx.)
Mussels (cook until they are
opened)
approx. 3.5 oz (100 g)
1 measuring
cup e10 minutes
Prawns (cook until they turn pink)
approx. 7.1 oz (200 g)
1 measuring
cup e15 minutes
Fish fillet (salmon)
approx. 12 oz (350 g)
2 measuring
cups e20 minutes
Oysters (in the shell)
(approx. 3 - 4)
2 measuring
cups e30 minutes
2) Place the food to be steamed in the steam cooking insert 1.
3) Place the steam cooking insert 1 onto the cooking bowl w.
4) Now close the lid.
5) Connect the power cord 5 to the socket for power cord 8
and insert the power plug into the power socket.
6) Turn the appliance on using the On/Off switch 0.
The orange control lamp " " 6 lights up.
7) Press the function selector switch 7 downward. The orange
control lamp " " 6 turns off and the red control lamp " "
9 lights up.
The steaming process begins.
8) Once the specified time has elapsed, press the function selector
switch 7 upward. The appliance does not turn off automatically
or switch to keep-warm mode.
9) Turn the appliance off at the On/Off switch 0 and pull the
power plug out of the power socket.
IB_293156_SRK400A3_LB9.indb 18 15.01.18 12:43

SRK 400 A3 US-EN │ 19 ■
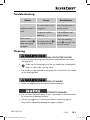
Troubleshooting
Defect Cause Rectification
Appliance doesn’t
work.
The rice cooker is not
plugged in.
Insert the plug into a
power socket.
The power socket is
defective.
Use a different wall
power socket.
The function
selector switch 7
keeps springing
up again.
The cooking bowl w is
not seated correctly.
Insert the cooking
bowl w correctly into
the rice cooker.
Cleaning
RISK OF ELECTRIC SHOCK!
► Always remove the plug from the power socket before you clean
the appliance.
► Under no circumstances must the rice cooker be submerged in
water or held under running water.
► No liquid must be allowed to penetrate the inside of the rice cooker
or the heating plate!
RISK OF INJURY!
► Allow the appliance to cool down before cleaning it.
PROPERTY DAMAGE!
► Do not clean the attachments of your rice cooker in the dishwasher,
as it may cause damage to them.
► Do not use aggressive, chemical or abrasive cleaning agents!
They could irreparably damage the upper surfaces!
IB_293156_SRK400A3_LB9.indb 19 15.01.18 12:43

SRK 400 A3
■ 20 │ US-EN
■ Always empty the condensation collector 4 after use.
■ Clean the rice cooker casing and the heating plate with a dry
cloth. Remove stubborn dirt with a moderately damp, well wrung-
out cloth.
■ Remove the closure of the steam outlet opening 3 for cleaning
and give the closure a thorough cleaning with water. When
replacing the closure, ensure that it is correctly inserted: The closure
must be pressed down completely so that it sits firmly in the intended
recess.
■ Clean the cooking bowl w, the steam cooking insert 1, the plastic
spoon r and the measuring cup e in water containing a mild
detergent. Then rinse all parts with plenty of clean water to remove
any residual detergent.
■ Dry everything with a dry cloth and ensure that the appliance is
completely dry before using it again.
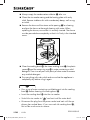
►Pour a cup of water containing a mild detergent into the cooking
bowl w before cleaning the cooking bowl w.
►Insert the cooking bowl w into the rice cooker.
►Switch the rice cooker to " " and wait until the water boils.
►Disconnect the plug from the power socket and wait until the ap-
pliance has cooled down. If you now wash the cooking bowl w,
dirt will be much easier to remove.
IB_293156_SRK400A3_LB9.indb 20 15.01.18 12:43

SRK 400 A3 US-EN │ 21 ■
Storage
■ Let the appliance cool down completely before putting it into
storage.
■ Store the appliance in a dry and dust-free location.
Disposal
Electrical appliances may not be thrown away as part of normal
household trash. If you can no longer use your electrical appliance,
dispose of it in accordance with the legal provisions applicable in
your state. This will ensure that old electrical appliances are recycled
and environmental pollution is kept to a minimum. Further information
about disposal is available on the Internet at www.epa.gov.
IB_293156_SRK400A3_LB9.indb 21 15.01.18 12:43

SRK 400 A3
■ 22 │ US-EN
3 year limited warranty
What does this warranty cover?
The warranty covers:
▯ Damage, breakage or inoperability due to defect.
▯ Damage not caused by normal wear and tear or failure to follow
the safety and maintenance instructions provided in the user
manual.
What is not covered by the warranty?
The warranty does not cover damage caused by:
▯ Normal wear and tear of the product, including fragile parts
(such as switches, glass, etc.);
▯ Improper use or transport;
▯ Disregarding safety and maintenance instructions;
▯ Accidents or acts of nature (e.g. lightning, fire, water, etc.);
▯ Tampering with the product (such as removing cover, unscrewing
screws etc.)
Consequential and incidental damages are also not covered under
this warranty. However, some states do not allow the exclusion or
limitation of incidental or consequential damages, so this limitation or
exclusion may not apply to you.
What is the period of coverage and warranty resolution?
The warranty is for 3 years from the date of purchase.
At our discretion, product will either be refunded or replaced.
What will we not do?
We will not:
▯ Start a new warranty period upon product exchange;
▯ Repair product.
IB_293156_SRK400A3_LB9.indb 22 15.01.18 12:43

SRK 400 A3 US-EN │ 23 ■
How to process the warranty?
To initiate, please:
▯ Call customer service at 1 (844) 543-5872
▯ Visit the Website Customer Service Platform at
www.lidl.com/contact-us
or
▯ Visit a LIDL store for further assistance
To ensure the quickest warranty return process, please have the
following available:
▯ The original sales receipt that includes the date purchased;
▯ The product and manual in the original package;
▯ A statement of the problem.
What must you do to keep the warranty in effect?
▯ Retain the original receipt;
▯ Follow all product instructions;
▯ Do not repair or modify the product.
How does state law relate to this warranty?
This warranty gives you specific legal rights, and you may also have
other rights which vary from state to state. All implied warranties are
limited by the duration and terms of this warranty. Some states do not
allow limitations on how long an implied warranty lasts, so the above
limitation may not apply to you.
Distributor
LIDL US LLC.
ARLINGTON
VA 22202
IB_293156_SRK400A3_LB9.indb 23 15.01.18 12:43

SRK 400 A3
■ 24 │ US-EN
IB_293156_SRK400A3_LB9.indb 24 15.01.18 12:43

SRK 400 A3 US-ES │ 25 ■
Contenido
Introducción ......................................26
Tipos de advertencias ..............................26
Instrucciones de seguridad ..........................27
Información importante sobre el cable .......................... 31
Uso adecuado .....................................32
Contenido del empaque ............................32
Elementos operativos ..............................33
Especificaciones técnicas ............................33
Preparativos antes del primer uso ....................34
Desempaque .............................................. 34
Eliminación del empaque .................................... 34
Uso de la olla para arroz ...........................35
Preparación de arroz pretratado .............................. 35
Preparación de arroz que no ha sido pretratado .................. 37
Cocción al vapor .......................................... 41
Solución de problemas .............................44
Limpieza .........................................44
Almacenamiento ..................................46
Eliminación .......................................46
Garantía limitada de 3 años .........................47
Importador .......................................48
IB_293156_SRK400A3_LB9.indb 25 15.01.18 12:43

SRK 400 A3
■ 26 │ US-ES
Introducción
¡Felicidades por la compra de su nuevo dispositivo!
Ha elegido un producto moderno y de alta calidad. Este instructivo
de operación es parte del producto. Contiene información importante
sobre seguridad, uso y eliminación. Antes de usar el producto, fami-
liarícese con todas las instrucciones de operación y seguridad.
Este dispositivo debe usarse exclusivamente como se describe y para
los fines indicados. También entregue este instructivo de operación a
cualquier propietario futuro.
Tipos de advertencias
Los siguientes tipos de advertencias se usan en este instructivo de
operación:
Este es el símbolo de alerta de seguridad. Se usa para
alertarle sobre peligros de lesiones potenciales. Obedezca
todos los mensajes de seguridad a continuación de este
símbolo para evitar posibles lesiones y la muerte.
PELIGRO indica una situación peligrosa que, si no se evita, provocará
la muerte o lesiones graves.
ADVERTENCIA indica una situación peligrosa que, si no se evita,
podría provocar la muerte o lesiones graves.
PRECAUCIÓN indica una situación peligrosa que, si no se evita,
podría provocar lesiones leves o moderadas.
AVISO indica información que se considera importante, pero no está
relacionada con peligro (por ejemplo, mensajes relacionados con
daños materiales).
IB_293156_SRK400A3_LB9.indb 26 15.01.18 12:43

SRK 400 A3 US-ES │ 27 ■
Instrucciones de seguridad
Esta sección contiene instrucciones de seguridad importantes para
el uso del dispositivo. Este dispositivo cumple con las normas de se-
guridad legales. El uso inadecuado puede provocar lesiones
personales y daños materiales.
INSTRUCCIONES IMPORTANTES
DE SEGURIDAD
Al usar dispositivos eléctricos, siempre deben observarse
precauciones básicas de seguridad, entre otras:
1) Lea todas las instrucciones.
2) No toque las superficies calientes. Use asas o perillas.
3) Para protegerse contra descargas eléctricas, no sumerja el
cable, enchufe o el dispositivo en agua u otros líquidos.
4) Mantenga el dispositivo y el cable alejados de los niños.
Los niños no deben llevar a cabo las tareas de limpieza y
mantenimiento. El dispositivo y su cable de conexión deben
mantenerse lejos de los niños.
5) Los niños no deben jugar con el dispositivo.
6) Este dispositivo puede ser usado por niños y por personas
con capacidades físicas, sensoriales o mentales reducidas
y falta de experiencia o conocimiento si son supervisadas o
han sido instruidas sobre cómo usar el dispositivo de forma
segura y están conscientes de los riesgos potenciales.
7) Se requiere supervisión cercana cuando cualquier dispositivo
sea usado por o cerca de niños.
8) Siempre conecte el enchufe al dispositivo primero, y luego
conecte el cable del enchufe en la toma de corriente en la
pared. Para desconectar el dispositivo, coloque el control en
la posición "OFF" (APAGADO) y desenchufe la clavija de la
toma de corriente.
IB_293156_SRK400A3_LB9.indb 27 15.01.18 12:43

SRK 400 A3
■ 28 │ US-ES
9) Desconecte siempre la clavija del conector cuando mueva o
llene el dispositivo, en caso de presentarse problemas, antes
de limpiar el dispositivo y cuando la olla no esté siendo
usada.
10) Desenchufe el dispositivo de la toma de corriente cuando
no lo use y antes de limpiarlo. Deje que el dispositivo se
enfríe antes de colocar o retirar partes.
11) Verifique si el dispositivo muestra algún daño externo visible
antes de usarlo. No opere ningún dispositivo con el cable o
clavija dañados o después de que el mismo haya fallado o
haya sido dañado de alguna manera. Devuelva el dispositivo
al proveedor de servicios autorizado más cercano para que
lo revise, repare o ajuste.
12) El uso de accesorios no recomendados por el fabricante del
dispositivo puede provocar un incendio, descargas eléctricas
o lesiones a las personas.
13) No use el dispositivo en exteriores.
14) No permita que el cable cuelgue sobre el borde de una
mesa o barra, o que toque superficies calientes.
15) No tuerza ni aplaste el cable de alimentación y no lo enrede
en el dispositivo.
16) Asegúrese de que el dispositivo, el cable de alimentación y
la clavija no entren en contacto con fuentes de calor tales
como planchas térmicas o flamas abiertas.
17) Asegúrese de que el cable de alimentación nunca se moje
o humedezca cuando el dispositivo esté en uso. Tienda
el cable de tal manera que no quede atrapado o resulte da-
ñado de alguna forma.
18) No lo coloque sobre o cerca de un quemador de gas o
eléctrico, o en un horno caliente o cerca de otras fuentes de
calor.
IB_293156_SRK400A3_LB9.indb 28 15.01.18 12:43

SRK 400 A3 US-ES │ 29 ■
19) Debe tenerse cuidado extremo cuando mueva un dispositi-
vo que contenga aceite caliente u otros líquidos calientes.
20) No use el dispositivo para ningún otro fin que no sea el
previsto.
CONSERVE ESTE INSTRUCTIVO
EXCLUSIVO PARA USO DOMÉSTICO.
INSTRUCCIONES DE SEGURIDAD ADICIONALES
► ¡Nunca sumerja el dispositivo en agua u otro líquido!
De lo contrario, existe el riesgo de descarga eléctrica.
► En caso de que el dispositivo caiga en un líquido, desconecte
INMEDIATAMETE la clavija de alimentación del conector.
Posteriormente, no use el dispositivo hasta que una compañía
de servicio autorizada lo haya revisado.
► ¡Superficie caliente! ¡Este símbolo advierte de superficies
calientes en el dispositivo!
► ¡El vapor caliente escapa de la abertura de salida de
vapor y al abrir la tapa! ¡Riesgo de quemaduras por
vapor!
► ¡El vapor de agua que escapa es extremadamente caliente!
¡Riesgo de quemaduras!
► Permita que el dispositivo y los accesorios se enfríen completa-
mente antes de lavarlos y guardarlos.
► No deje el dispositivo desatendido mientras esté funcio-
nando.
IB_293156_SRK400A3_LB9.indb 29 15.01.18 12:43

SRK 400 A3
■ 30 │ US-ES
► Conecte la olla para arroz solamente en conectores de
alimentación instalados correctamente y conectados a tie-
rra, que proporcionen un voltaje que corresponda al que se
indica en la placa de especificaciones del dispositivo.
► La conexión de la clavija del dispositivo no debe entrar en
contacto con ningún líquido. Nunca toque la clavija del
dispositivo con las manos mojadas o húmedas.
► No use la olla para arroz si está parado sobre un piso
mojado o si sus manos o el dispositivo están húmedos.
► Cocine solamente en un recipiente removible.
► Nunca desconecte el dispositivo del conector jalando el cable
de alimentación. Desconecte siempre jalando de la clavija.
► El dispositivo debe colocarse de tal forma que usted tenga
acceso sin restricciones al conector en todo momento y pueda
desconectar la clavija inmediatamente en caso de emergencia.
► Todas las reparaciones deben ser realizadas por compañías
especialistas autorizadas o por el departamento de servicio
al cliente. Las reparaciones inadecuadas pueden poner en
riesgo al usuario. También invalidarán cualquier derecho de
garantía.
► No use un temporizador externo o un sistema de control
remoto independiente para operar el dispositivo.
► Nunca cubra la tapa con una tela o un objeto similar al cocinar.
► Nunca abra la carcasa. En caso de hacerlo, no podrá garan-
tizarse la seguridad del dispositivo y la garantía quedará
anulada.
► Use solamente las piezas de accesorio que se proporcionan
con el dispositivo, y nunca use el dispositivo sin primero insertar
el tazón de cocción.
IB_293156_SRK400A3_LB9.indb 30 15.01.18 12:43

SRK 400 A3 US-ES │ 31 ■
Información importante sobre el cable
Este dispositivo tiene una clavija polarizada. Para reducir el riesgo de des-
cargas eléctricas, solo hay una manera en que esta clavija puede introducirse
en un contacto polarizado. Si la clavija no se introduce por completo en el
contacto, inviértala. Si aun así no se introduce, póngase en contacto con un
electricista calificado. No intente modificar la clavija de ningún modo.
► Deberá usarse un cable de alimentación corto (o un cable de alimen-
tación desprendible) para reducir el riesgo que resulta de enredarse o
tropezarse con un cable largo.
► Pueden usarse cables de alimentación largos desprendibles o extensiones
si se usan con cuidado.
► Si se usa un cable de alimentación más largo desprendible o una
extensión:
1) Las características eléctricas marcadas en el juego de cable o exten-
sión deberán ser por lo menos similares a las del dispositivo;
2) El cable deberá ser tendido de tal manera que no cuelgue sobre la
barra o mesa donde pueda ser jalado por niños o con el que pueda
tropezarse involuntariamente; y
3) Si el dispositivo tiene una clavija de tipo aterrizado, el juego de cable o
extensión también deberá ser un cable de tres hilos de tipo aterrizado.
IB_293156_SRK400A3_LB9.indb 31 15.01.18 12:43

SRK 400 A3
■ 32 │ US-ES
Uso adecuado
Este dispositivo se usa para cocer arroz y para cocer comida al
vapor como verduras o pescado.
Este dispositivo está diseñado exclusivamente para uso doméstico.
¡No lo use para aplicaciones comerciales!
El dispositivo puede ser peligroso si se usa para algún otro propósito
o si se usa fuera del ámbito descrito en este instructivo de operación.
► Use el dispositivo exclusivamente para el propósito previsto.
► Siga los procedimientos descritos en este instructivo de uso.
No se aceptará ningún tipo de reclamación por el uso inadecuado,
reparaciones incompetentes, modificaciones no autorizadas, o el uso
de refacciones no autorizadas. El usuario será la única persona que
asuma el riesgo.
Contenido del empaque
El dispositivo se entrega de manera estándar con los siguientes
componentes:
▯ Olla arrocera y vaporera, incluyendo tazón para cocinar e inser-
to de cocción al vapor
▯ Vaso medidor
▯ Cuchara de plástico
▯ Cable de alimentación con clavija de seguridad
▯ Instructivo de operación
1) Retire todas las partes del dispositivo y el instructivo de opera-
ción de la caja.
2) Retire todos los materiales de empaque y las envolturas y
calcomanías.
3) Limpie todas las partes del dispositivo como se describe en la
sección "Limpieza".
IB_293156_SRK400A3_LB9.indb 32 15.01.18 12:43

SRK 400 A3 US-ES │ 33 ■
►Verifique que el paquete esté completo y no muestre signos visi-
bles de daño. Si la entrega está incompleta o dañada debido al
empaque defectuoso o durante el transporte, póngase en contac-
to con la línea directa de Servicio al Cliente (consulte la sección
"Garantía limitada de 3 años").
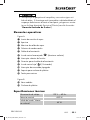
Elementos operativos
Figura A:
1 Inserto de cocción al vapor
2 Apertura
3 Abertura de salida de vapor
4 Colector de condensación
5 Cable de alimentación
6 Luz de control anaranjada " " (Mantener caliente)
7 Interruptor selector de función
8 Conector para el cable de alimentación
9 Luz de control roja " " (Cocinando)
0 Interruptor de encendido/apagado
q Soporte para cuchara de plástico
w Tazón para cocinar
Figura B:
e Vaso medidor
r Cuchara de plástico
Especificaciones técnicas
Alimentación de voltaje 120V ~, 60Hz
Potencia nominal 400W
Salida del modo "Mante-
ner caliente" 45W
IB_293156_SRK400A3_LB9.indb 33 15.01.18 12:43

SRK 400 A3
■ 34 │ US-ES
Preparativos antes del primer uso
Desempaque
¡RIESGO DE ASFIXIA!
► Los materiales de empaque no son juguetes para niños.
Por lo tanto, no debe permitirse a los niños jugar con estos.
♦ Retire todas las partes del dispositivo y el instructivo de opera-
ción de la caja.
♦ Retire todo el material de embalaje.
Eliminación del empaque
Los materiales de empaquetado han sido seleccionados por su com-
patibilidad ambiental y facilidad de eliminación, y por lo tanto, son
reciclables.
Devolver el empaque al ciclo de materiales conserva las materias
primas y reduce la cantidad de desechos que se generan. Elimine los
materiales de empaquetado que ya no se necesitan de conformidad
con las normas locales aplicables.
Observe las marcas en los diferentes materiales de empaquetado
y sepárelos según sea necesario. Los materiales de empaquetado
están marcados con abreviaturas (a) y números (b) con los siguientes
significados:
1–7: Plásticos
20–22: Papel y cartón
80–98: Materiales compuestos
►Si es posible, conserve el material de empaque original del dispo-
sitivo durante todo el periodo de garantía para que el dispositivo
pueda volver a empaquetarse adecuadamente en caso de presen-
tar una reclamación de garantía.
IB_293156_SRK400A3_LB9.indb 34 15.01.18 12:43

SRK 400 A3 US-ES │ 35 ■
Uso de la olla para arroz
El dispositivo puede usarse para cocer arroz y cocer a vapor otros
alimentos al mismo tiempo. Experimente para encontrar la cantidad
correcta de agua y el tiempo de cocción adecuado para los diversos
alimentos.
►Antes de usar el dispositivo por primera vez, llene el tazón para
cocinar w hasta la marca CUP (VASO) "4", y déjelo hervir durante
unos 30 min (vea la sección "Cocción al vapor" para el uso).
Ahora deseche esta agua, permita que el dispositivo se enfríe y
luego limpie el tazón para cocinar w exhaustivamente.
Preparación de arroz pretratado
Puede encontrar arroz pretratado en tiendas con el nombre "Arroz
rápido para cocer", "Arroz fácil de cocer" o frases similares.
►Cubra el interior del tazón para cocinar w de manera uniforme
con un poco de grasa o aceite vegetal para obtener un mejor
resultado de cocción.
►Nunca exceda la escala de 5 CUP/1 litro en el tazón para
cocinar w. ¡Si lo hace, el agua puede derramarse!
1) Presione la apertura 2 para abrir la tapa y levante la tapa
al mismo tiempo.
2) Retire el tazón para cocinar w.
3) Vierta el arroz y la cantidad de agua especificada en el
paquete de arroz en el tazón para cocinar w.
►Prepare siempre al menos suficiente arroz de manera que llegue
como mínimo a la marca CUP "2" cuando se agregue el agua.
¡No hacer esto podría causar malos resultados de cocción!
IB_293156_SRK400A3_LB9.indb 35 15.01.18 12:43

SRK 400 A3
■ 36 │ US-ES
4) Coloque el tazón para cocinar w en el dispositivo:
Asegúrese de que...
–... no haya humedad o arroz en la parte externa del tazón
para cocinar w; esto evitará desórdenes en el área de
cocinar. Si es necesario, limpie la parte externa con un
trapo limpio.
–... el tazón para cocinar w no esté mal colocado o incli-
nado cuando se coloque en el compartimiento de la olla
para arroz. Inserte siempre el tazón para cocinar w en
forma correcta y precisa en el compartimiento de la olla
para arroz. De lo contrario, se activará el apagado de
seguridad del dispositivo y este no permitirá encenderse.
5) Ahora cierre la tapa.
6) Conecte el cable de alimentación 5 en el conector para el
cable de alimentación 8 e inserte la clavija de alimentación
en la toma de corriente.
7) Encienda el dispositivo con el interruptor de encendido y apa-
gado 0. La luz de control anaranjada " " 6 se enciende.
8) Presione el interruptor selector de función 7 y cocine el arroz
durante el tiempo especificado en el paquete de arroz.
9) Cuando el arroz esté listo:
–Si desea comer el arroz inmediatamente, desconecte la
clavija del conector de alimentación.
–Si desea mantener el arroz caliente (máx. 2 horas), presione
el interruptor selector de función 7 hacia arriba.
10) Una vez que haya retirado el arroz, apague el dispositivo con
el interruptor de encendido/apagado 0 y retire la clavija del
conector de alimentación.
►Algunos tipos de arroz de fácil cocción aún tienen que inflarse
después de cocerse.
Siga siempre las instrucciones de preparación que están en el
paquete del arroz.
IB_293156_SRK400A3_LB9.indb 36 15.01.18 12:43

SRK 400 A3 US-ES │ 37 ■
¡DAÑOS MATERIALES!
► Use solamente la cuchara de plástico r que se proporciona para
sacar el arroz. Otras cucharas pueden dañar la capa antiadherente
del tazón para cocinar w.
►Puede colocar la cuchara de plástico r en el soporte para la
cuchara de plástico q en el borde de la olla para arroz. ¡En
esta forma, siempre está a la mano!
Preparación de arroz que no ha sido pretratado
►Cubra el interior del tazón para cocinar w de manera uniforme
con un poco de grasa o aceite vegetal para obtener un mejor
resultado de cocción.
1) Presione la apertura 2 para abrir la tapa y levante la tapa al
mismo tiempo.
2) Retire el tazón para cocinar w.
►Si el tazón para cocinar w se daña, ¡deje de usarlo! El daño
puede haber causado que se activara el apagado de seguridad
del dispositivo y este no permitirá encenderse.
3) Mida la cantidad deseada de arroz con la ayuda del vaso
medidor incluido e. Como regla general: Un vaso medidor e,
lleno con arroz, es una porción para una persona.
Determine la cantidad correcta de arroz y agua por sí mismo
haciendo varios intentos de cocción.
IB_293156_SRK400A3_LB9.indb 37 15.01.18 12:43

SRK 400 A3
■ 38 │ US-ES
4) Lave bien y drene el arroz. Esto podría eliminar algunos
nutrientes, pero si no lava el arroz, podría obtener malos
resultados de cocción y mayor cantidad de espuma y vapor
en el tazón para cocinar w. Ponga siempre atención a las
instrucciones de preparación del arroz del fabricante
5) Después de lavar el arroz, viértalo en el tazón para cocinar w
y deje que se ablande.
6) Después agregue agua hasta las marcas CUP correspondientes
en el tazón para cocinar w.
–2 vasos medidores de arroz = Agua hasta la marca
CUP "2"
–3 vasos medidores de arroz = Agua hasta la marca
CUP "3"
–4 vasos medidores de arroz = Agua hasta la marca
CUP "4"
–5 vasos medidores de arroz = Agua hasta la marca
CUP "5"
Según sus preferencias de sabor, también puede agregarse sal
al arroz.
►Nunca exceda la escala de 5 CUP/1 litro en el tazón para coci-
nar w. ¡Si lo hace, el agua puede derramarse!
►Prepare siempre por lo menos 2 porciones de arroz. ¡No hacer
esto podría causar malos resultados de cocción!
►El tiempo de cocción puede acortarse con el uso de agua caliente.
Sin embargo, si hace esto, use un poco menos de agua de la que
indica la marca CUP en el tazón para cocinar w.
►Dependiendo del tipo de arroz que esté preparando, podría ser
que tenga que agregar un poco más o un poco menos de agua
para obtener el mejor resultado de cocción. Varíe la cantidad de
agua de acuerdo con su experiencia y preferencia personal.
IB_293156_SRK400A3_LB9.indb 38 15.01.18 12:43

SRK 400 A3 US-ES │ 39 ■
7) Después de llenar el tazón para cocinar w, vuelva a colocarlo
en el compartimiento de la olla para arroz.
Asegúrese de que...
–... no haya humedad o arroz en la parte externa del tazón
para cocinar w; esto evitará desórdenes en el área de
cocinar. Si es necesario, limpie la parte externa con un
trapo limpio.
–... el tazón para cocinar w no esté mal colocado o incli-
nado cuando se coloque en el compartimiento de la olla
para arroz. Inserte siempre el tazón para cocinar w en
forma correcta y precisa en el compartimiento de la olla
para arroz. De lo contrario, se activará el apagado de
seguridad del dispositivo y este no permitirá encenderse.
8) Ahora cierre la tapa.
9) Conecte el cable de alimentación 5 en el conec-
tor para el cable de alimentación 8 e inserte la clavija de
alimentación en el conector de alimentación.
10) Encienda el dispositivo con el interruptor de encendido y apa-
gado 0. La luz de control anaranjada " " 6 se enciende.
¡RIESGO DE LESIONES!
► Durante el proceso de cocción, se emite vapor por la abertura de
salida de vapor 3. NUNCA mantenga las manos ni otras partes
del cuerpo sobre la abertura de salida de vapor 3 durante el
proceso de cocción. ¡Riesgo de quemaduras por vapor!
11) Presione el interruptor selector de función 7 hacia abajo. La
luz de control anaranjada " " 6 se apaga y la luz de con-
trol roja " " 9 se enciende. El proceso de cocción inicia.
IB_293156_SRK400A3_LB9.indb 39 15.01.18 12:43

SRK 400 A3
■ 40 │ US-ES
►Si el tazón para cocinar w no está colocado correctamente, el
interruptor selector de función 7 no puede moverse al ajuste
"Cook" (Cocer).
Una vez que el arroz está cocido, la olla para arroz regresa automá-
ticamente al ajuste Mantener caliente. La luz de control roja " " 9
se apaga y la luz de control anaranjada " " 6 se enciende nueva-
mente. Espere cinco minutos.
►Si desea, puede mantener el arroz caliente durante unas 2 horas.
Sin embargo, el sabor y el grado de cocción del arroz pueden
variar entre más tiempo se mantenga caliente.
12) Abra la tapa. El arroz está listo ahora para comer.
¡DAÑOS MATERIALES!
► Use solamente la cuchara de plástico r que se proporciona para
sacar el arroz. Otras cucharas pueden dañar el recubrimiento
antiadherente.
►Puede colocar la cuchara de plástico r en el soporte para la
cuchara de plástico q en el borde de la olla para arroz. ¡En
esta forma, siempre está a la mano!
Si no consume el arroz inmediatamente:
–No quite la tapa mientras mantiene el arroz caliente.
–No mantenga el arroz caliente durante más de 2 horas.
IB_293156_SRK400A3_LB9.indb 40 15.01.18 12:43

SRK 400 A3 US-ES │ 41 ■
¡RIESGO DE DESCARGA
ELÉCTRICA!
► Desconecte siempre la clavija del conector de alimentación cuan-
do ya no vaya a usar la olla para arroz.
13) Una vez que haya retirado el arroz, apague el dispositivo con
el interruptor de encendido/apagado 0 y retire la clavija del
conector de alimentación.
Cocción al vapor
¡RIESGO DE LESIONES!
► No levante el inserto de cocción con vapor 1 durante el pro-
ceso de cocción al vapor; existe riesgo de escaldaduras por
el vapor que sale. El inserto de cocción con vapor 1 se
calienta durante el proceso de cocción al vapor. Para sujetar
el inserto de cocción con vapor 1, use guantes para horno
o algo similar para levantarlo del tazón para cocinar w.
►Asegúrese de que el tazón para cocinar w también esté inserta-
do correctamente cuando se use para cocción al vapor. El tazón
para cocinar w no debe estar dañado. De lo contrario, se acti-
vará el apagado de seguridad del dispositivo y este no permitirá
encenderse.
1) Vierta la cantidad de agua deseada en el tazón para cocinar
w. Utilice los ejemplos de las siguientes tablas como guía.
IB_293156_SRK400A3_LB9.indb 41 15.01.18 12:43

SRK 400 A3
■ 42 │ US-ES
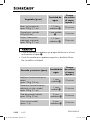
Vegetales (peso) Cantidad de
agua
Tiempo
de cocción
al vapor
(aprox.)
Ejotes, col, zanahorias
aprox. 200 g (7.1 oz)
1–2 vasos
medidores e25 minutos
Champiñones, partidos
250 g (8.8 oz)
1 vaso medidor
e15 minutos
Frijoles, frijoles pintos,
espárragos, espinacas
aprox. 200 g (7.1 oz)
1–2 vasos
medidores e20 minutos
►Corte los alimentos en pedazos que quepan fácilmente en el inser-
to de cocción al vapor 1.
►Corte las zanahorias en pedazos pequeños y divida las floreci-
llas, la coliflor o el brócoli.
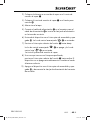
Pescado y mariscos (peso) Cantidad de
agua
Tiempo
de cocción
al vapor
(aprox.)
Mejillones (cocine hasta que se
abran)
aprox. 100 g (3.5 oz)
1 vaso
medidor e10 minutos
Camarones (cocine hasta que
adquieran un color rosado)
aprox. 200 g (7.1 oz)
1 vaso
medidor e15 minutos
Filete de pescado (salmón)
aprox. 350 g (12 oz)
2 vasos
medidores e20 minutos
Ostras (en la concha)
(aprox. 3 - 4)
2 vasos
medidores e30 minutos
IB_293156_SRK400A3_LB9.indb 42 15.01.18 12:43

SRK 400 A3 US-ES │ 43 ■
2) Coloque el alimento a ser cocido al vapor en el inserto de
cocción al vapor 1.
3) Coloque el inserto de cocción al vapor 1 en el tazón para
cocinar w.
4) Ahora cierre la tapa.
5) Conecte el cable de alimentación 5 en el conector para el
cable de alimentación 8 e inserte la clavija de alimentación
en la toma de corriente.
6) Encienda el dispositivo con el interruptor de encendido y apa-
gado 0. La luz de control anaranjada " " 6 se enciende.
7) Presione el interruptor selector de función 7 hacia abajo.
La luz de control anaranjada " " 6 se apaga y la luz de
control roja " " 9 se enciende.
Se inicia el proceso de cocción al vapor.
8) Una vez que transcurre el tiempo especificado,
presione el interruptor selector de función 7 hacia arriba. El
dispositivo no se apaga automáticamente ni cambia al modo
Mantener caliente.
9) Apague el dispositivo con el interruptor de encendido y apa-
gado 0 y desconecte la clavija de alimentación del conector
de corriente.
IB_293156_SRK400A3_LB9.indb 43 15.01.18 12:43

SRK 400 A3
■ 44 │ US-ES
Solución de problemas
Falla Causa Solución
El dispositivo no
funciona.
La olla para arroz no
está conectada.
Inserte la clavija
en un conector de
alimentación.
El conector de alimen-
tación está defectuoso.
Utilice un conector de
alimentación dife-
rente.
El interruptor
selector de fun-
ción 7 continúa
botándose.
El tazón para cocinar
w no está asentado
correctamente.
Inserte el tazón para
cocinar w correcta-
mente en la olla para
arroz.
Limpieza
¡RIESGO DE DESCARGA
ELÉCTRICA!
► Desconecte siempre la clavija del conector de alimentación antes
de limpiar el dispositivo.
► Bajo ninguna circunstancia puede sumergirse la olla para
arroz en agua o ponerse bajo el chorro de agua.
► ¡No debe permitirse que penetre líquido dentro de la olla para
arroz o a la placa de calentamiento!
¡RIESGO DE LESIONES!
► Permita que el dispositivo se enfríe antes de limpiarlo.
¡DAÑOS MATERIALES!
► No lave los accesorios de la olla para arroz en la máquina lava-
platos, ya que esta puede dañarlos.
► ¡No use productos de limpieza agresivos, químicos o abrasivos!
¡Estos pueden dañar irreparablemente las superficies superiores!
■ Vacíe siempre el colector de condensación 4 después del uso.
IB_293156_SRK400A3_LB9.indb 44 15.01.18 12:43

SRK 400 A3 US-ES │ 45 ■
■ Limpie la carcasa de la olla para arroz y la placa de calentamiento
con una tela seca. Remueva la suciedad difícil con una tela
moderadamente humedecida bien exprimida.
■ Retire el cierre de la abertura de salida de vapor 3 para limpiar-
la y limpie profusamente el cierre con agua. Cuando vuelva a
colocar el cierre, asegúrese de insertarlo correctamente: El cierre
debe presionarse completamente para que se asiente firmemente
en la cavidad correspondiente.
■ Limpie el tazón para cocinar w, el inserto de cocción al vapor 1,
la cuchara de plástico r y el vaso medidor e en agua con un
detergente moderado. Después enjuague todas las partes con
agua limpia abundante para eliminar el detergente residual.
■ Seque todo con una tela seca y asegúrese de que el dispositivo
esté completamente seco antes de volver a usarlo.
►Vierta una taza de agua que contenga un detergente moderado en
el tazón para cocinar w antes de limpiar el tazón para cocinar w.
►Inserte el tazón para cocinar w en la olla para arroz.
►Cambie la olla para cocinar a " " y espere hasta que hierva el
agua.
►Desconecte la clavija del conector de alimentación y espere hasta
que el dispositivo se haya enfriado. Si lava ahora el tazón para
cocinar w, será mucho más fácil remover la suciedad.
IB_293156_SRK400A3_LB9.indb 45 15.01.18 12:43

SRK 400 A3
■ 46 │ US-ES
Almacenamiento
■ Deje que el dispositivo se enfríe completamente antes de guardarlo.
■ Guarde el dispositivo en un lugar seco y libre de polvo.
Eliminación
Los dispositivos eléctricos no deben desecharse como parte de la
basura doméstica normal. Si ya no puede usar su dispositivo eléctrico,
elimínelo de conformidad con las disposiciones legales aplicables en
su estado. Esto asegura que los dispositivos eléctricos usados sean
reciclados y la contaminación ambiental se mantenga a un nivel
mínimo. Puede encontrar más información sobre la eliminación de
desechos en Internet en www.epa.gov.
IB_293156_SRK400A3_LB9.indb 46 15.01.18 12:43

SRK 400 A3 US-ES │ 47 ■
Garantía limitada de 3 años
Lo que cubre la presente garantía
La garantía incluye:
▯ Daños, quebraduras o incapacidad para funcionar debido a
defectos.
▯ Daños que no hayan sido causados por el desgaste propio del
uso o por no seguir las instrucciones de seguridad y mantención
incluidas en el manual para el usuario.
Lo que no cubre esta garantía
La garantía no cubre daños causados por:
▯ El desgaste propio del uso del producto, incluidas las partes
frágiles (como interruptores, piezas de vidrio, etc.).
▯ Uso o transporte no indicado del producto.
▯ Desatención a las instrucciones de seguridad y mantención.
▯ Accidentes o causas de fuerza mayor (e.g. relámpagos, incendio,
inundación, etc.).
▯ Manipulación mal intencionada del producto (retirar la cubierta,
tornillos, etc.).
La presente garantía tampoco cubre daños indirectos o emergentes.
Sin embargo algunos estados no permiten la exclusión o limitación de
daños indirectos o emergentes, por lo que dicha exclusión o limita-
ción pudiera no aplicarse en su caso.
Período de cobertura y resolución de la garantía
La garantía es válida por 3 años a partir de la fecha de compra. La
empresa, según lo estime conveniente, devolverá el dinero o repon-
drá el producto.
La empresa no:
▯ Dará inicio a un nuevo período de garantía al hacerse el cambio
del producto.
▯ Reparará el producto.
IB_293156_SRK400A3_LB9.indb 47 15.01.18 12:43

SRK 400 A3
■ 48 │ US-ES
¿Cómo se tramita la garantía?
Recomendamos que primero usted:
▯ Llame al Servicio de atención al cliente al 1 (844) 543-5872.
▯ Visite el Portal de atención al cliente en
www.lidl.com/contact-us
▯ Visite una de nuestras tiendas LIDL en caso de cualquier inquietud.
A fin de acelerar el trámite de la garantía, tenga a bien contar con lo
siguiente:
▯ Recibo de venta original que incluya la fecha de compra.
▯ Producto y manual en su empaque original.
▯ Descripción del problema.
¿Qué debe hacer usted para mantener la garantía vigente?
▯ Guardar el recibo original.
▯ Seguir todas las instrucciones para el uso del producto.
▯ No realizar ninguna reparación ni alteración al producto.
¿De qué manera influyen las leyes estatales con esta
garantía?
La presente garantía le otorga derechos legales específicos, y pudie-
ra usted contar con otros derechos los cuales varían de un estado a
otro. Todas las garantías implícitas se encuentran limitadas
a la duración y términos de la presente garantía. Algunos estados no
permiten limitaciones al período de tiempo y términos de la garantía
implícita, por lo que dichas limitaciones pudieran no aplicarse en su
caso.
Importador
LIDL US LLC.
ARLINGTON
VA 22202
IB_293156_SRK400A3_LB9.indb 48 15.01.18 12:43

IAN 293156
LIDL US LLC.
ARLINGTON
VA 22202
Made in /Hecho en: China
Last Information Update · Estado de las informaciones:
12 / 2017 · Ident.-No.: SRK400A3-112017-2
9
-
 1
1
-
 2
2
-
 3
3
-
 4
4
-
 5
5
-
 6
6
-
 7
7
-
 8
8
-
 9
9
-
 10
10
-
 11
11
-
 12
12
-
 13
13
-
 14
14
-
 15
15
-
 16
16
-
 17
17
-
 18
18
-
 19
19
-
 20
20
-
 21
21
-
 22
22
-
 23
23
-
 24
24
-
 25
25
-
 26
26
-
 27
27
-
 28
28
-
 29
29
-
 30
30
-
 31
31
-
 32
32
-
 33
33
-
 34
34
-
 35
35
-
 36
36
-
 37
37
-
 38
38
-
 39
39
-
 40
40
-
 41
41
-
 42
42
-
 43
43
-
 44
44
-
 45
45
-
 46
46
-
 47
47
-
 48
48
-
 49
49
-
 50
50
-
 51
51
-
 52
52


Silvercrest 293156 El manual del propietario
- Categoría
- Ollas arroceras
- Tipo
- El manual del propietario
en otros idiomas
- English: Silvercrest 293156 Owner's manual