MTD 11A-084E729 Manual de usuario
- Categoría
- Cortadoras de césped
- Tipo
- Manual de usuario

Safety • Assembly • Operation • Tips &Techniques • Maintenance • Troubleshooting • Parts Lists • Warranty
OF A O AL
22" Rotary Mower- Model Series 080
iMPORTANT
READ SAFETY RULES AND iNSTRUCTiONS CAREFULLY BEFORE OPERATION
Warning: Thisunitisequippedwithaninternalcombustionengineandshouldnotbeusedon or nearanyuniiprovedforest-covered,brush-
coveredor grass-coveredlandunlesstheengine'sexhaustsystemisequippedwitha sparkarrestermeetingapplicablelocalor statelaws(if any).
If a sparkarresterisused,it shouldbemaintainedineffectiveworkingorderbytheoperator.IntheStateofCaliforniatheaboveisrequiredbylaw
(Section4442oftheCaliforniaPublicResourcesCode).Otherstatesmayhavesimilarlaws.Federallawsapplyonfederallands.A sparkarrester
forthemufflerisavailablethroughyournearestengineauthorizedservicedealeror contacttheservicedepartment,RO.Box361131Cleveland,
Ohio44136-0019.
PRINTEDIN U.S.A
MTD LLC, P.O. BOX 361131 CLEVELAND, OHIO 44136-0019
FORMNO.769-01482
10/11/2004

This Operator's Manual is an important part of your new lawn mower, it will help you assemble,
prepare and maintain the unit for best performance. Please read and understand what it says.
Table of Contents
Slope Gauge ....................................................... 3
Safe Operation Practices ................................... 4
Setup and Adjustment ....................................... 6
Operating Your Lawn Mower ............................ 10
Maintaining Your Lawn Mower ......................... 12
Trouble Shooting .............................................. 14
Parts List ........................................................... 15
Warranty ............................................................ 16
Finding and Recording Model Number
BEFOREYOU STARTASSEMBLING
YOURNEW EQUIPMENT,
please locatethe modelplate onthe equipmentand copythe
informationtothe sample modelplate providedtothe right.
Youcan locatethe modelplate by standingat the operating
position andlookingdown atthe rear ofthe deck. This
informationwill be necessaryto usethe manufacturer'sweb
site and/or obtain assistancefrom the CustomerSupport
Departmentoran authorizedservice dealer.
Model Number
www.mtdproducts.com
Serial Number
MTD LLC
P.O= BOX 361131
CLEVELAND, OH 44136
330-220-4683
800-800-7310
Customer Support
Please do NOTreturn the unit to the retailer from which it was
purchased, without first contacting Customer Support.
Ifyou have difficultyassemblingthis productor have any
questions regardingthe controls,operationor maintenanceof
this unit,youcanseek help from the experts.Choosefrom the
options below:
1. Visit mtdproducts.com for manyusefulsuggestions.
Click on CustomerSupport buttonand you willget the four
options reproducedinthis sampleto the right.Click on the
appropriate buttonand helpis immediatelyavailable.
2. Phonea Customer Support Representative
at 1(800) 800-7310.
3. The engine manufacturer isresponsiblefor all engine-
relatedissueswith regardsto performance,power-rating,
specifications,warranty and service. Pleasereferto the
engine manufacturer'sOwner's/Operator's Manual,packed
separatelywith your unit,for moreinformation.
Click here to search our knowledge base.
Search by product, keyword, or phrase.
Login to check the status of your questions, modify
your inquiries, or update your personal profile.
Need local assistance? Click here to find authorized
service centers in your area.
Need a manual and/or parts list? Download
literature from recent model years.
2

O
o
1=
o
>:.
(13
O3
(13
(13
O-
O
O
(--
O5
E
O
(13
(13
o3
(13
O-
O
o3
(13
E
(]3
(13
o
(13
C5
('5
O3
O5
(13
t"b
(13
O9
o5
(13
O-
O
O3
-5
O3
O
O
E
Sightandholdthis levelwith a verticaltree...
also
I
15°

WARNING
Thissymbolpoints
out importantsafety
instructionswhich,if
notfollowed,could
endangerthe personal
i safetyand/or property
I ofyourselfand others.
Readandfollowall
instructionsinthis
manualbeforeat-
temptingto operate
i this machine.Failure
I to complywiththese
instructionsmay result
i inpersonalinjury.When
youseethis symbol.
i HEED ITS WARNING!
Your Responsibility
Restrictthe use
ofthis powermachine
to personswho read,
_understand
ano followthe warnings
and instructions
inthis manual
and on the machine.
WARNING: EngineExhaust,some of itsconstituents,andcertain vehiclecompo-
nentscontain or emit chemicals knownto Stateof Californiato cause cancer and
birth defectsor other reproductiveharm.
DANGER: Thismachinewas builtto beoperatedaccordingto the rulesfor safe operationin this
manual.As with anytype of powerequipment,carelessnessor erroronthe part ofthe operatorcan
result inseriousinjury.This machine iscapableof amputatinghands andfeet andthrowing objects.
Failureto observethe followingsafety instructionscould resultin serious injuryor death.
Children
Tragicaccidentscanoccurifoperatorisnotalertto presence
ofchildren.Childrenareoftenattractedtomowerand mowing
activity.Theydonot understandthe dangers.Neverassume
thatchildrenwill remainwhereyoulastsawthem.
1. Keepchildrenoutofthe mowingareaand underwatchful
careofa responsibleadultotherthanthe operator.
2. Bealertandturnmoweroffif achildentersthearea.
3. Beforeandwhilemovingbackwards,lookbehindanddown
forsmallchildren.
4. Useextremecarewhenapproachingblindcorners,
doorways,shrubs,trees,or otherobjectsthat mayobscure
yourvisionofa child whomayrunintothe mower.
5. Keepchildrenawayfromhotor runningengines.Theycan
sufferburnsfroma hotmuffler.
6. Neverallowchildrenunder14yearsoldto operateapower
mower.Children14yearsoldand overshouldreadand
understandoperationinstructionsandsafetyrulesinthis
manualandshouldbetrainedandsupervisedbyaparent.
General Operation
1. Readthisoperator'smanual carefullyinits entiretybefore
attemptingtoassemblethismachine.Read,understand,
andfollowall instructionsonthe machineandin the
manual(s) beforeoperation.Becompletelyfamiliarwith
thecontrolsandthe properuseofthis machinebefore
operatingit. Keepthis manualinasafeplaceforfuture
andregularreferenceandfor orderingreplacementparts.
2. Thismachineisaprecisionpieceof powerequipment,
nota plaything.Therefore,exerciseextremecautionat all
times.Yourunithas beendesignedto performonejob: to
mowgrass.Do notuseit foranyotherpurpose.
3. Neverallow childrenunder14yearsoldto operatethis
machine.Children14yearsoldand overshouldreadand
understandthe instructionsinthismanualandshould
betrainedand supervisedby a parent.Onlyresponsible
individualswhoarefamiliarwiththeserulesofsafe
operationshouldbeallowedto usethis machine.
4. Thoroughlyinspectthe areawherethe equipmentisto
beused.Removeall stones,sticks,wire,bones,toysand
otherforeignobjectswhichcouldbetripped overor picked
upandthrownbythe blade.Thrownobjectscancause
seriouspersonalinjury.Planyourmowingpatternto avoid
dischargeof materialtowardroads,sidewalks,bystanders
andthe like.Also,avoiddischargingmaterialagainsta
wallorobstructionwhichmaycausedischargedmaterial
toricochetbacktowardtheoperator.
5. Tohelpavoidbladecontactora thrownobjectinjury,
stayinoperatorzonebehindhandlesandkeepchildren,
bystanders,helpersandpetsatleast75feetfrom mower
whileit is inoperation.Stopmachineifanyoneenters
area.
6. Alwayswearsafetyglassesor safetygogglesduringopera-
tionandwhile performinganadjustmentor repairtoprotect
youreyes.Thrownobjectswhich ricochetcancauseserious
injurytothe eyes.
7. Wearsturdy,rough-soledworkshoesand close-fitting
slacksandshirts.Shirtsandpantsthatcoverthe armsand
legsandsteel-toedshoesarerecommended.Neveroperate
thismachineinbarefeet,sandals,slipperyor lightweight
(e.g.canvas)shoes.
8. Donotputhandsorfeetnearrotatingpartsor undercutting
deck.Contactwithbladecanamputatehandsandfeet.
9. Amissingor damageddischargecovercancause blade
contactor thrownobjectinjuries.
10.Manyinjuriesoccurasa resultofthe mowerbeingpulled
overthefoot duringafall causedbyslippingor tripping.
Do notholdontothe mowerifyouarefalling;releasethe
handleimmediately.
11.Neverpullthe mowerbacktowardyouwhileyouare
walking.Ifyoumustbackthe mowerawayfromawallor
obstructionfirstlookdownand behindtoavoidtrippingand
thenfollowthesesteps:
a. Stepbackfrommowertofully extendyourarms.
b. Besureyouarewellbalancedwithsurefooting.
c. Pullthe mowerbackslowly,no morethanhalfway
towardyou.
d. Repeatthesestepsas needed.
12.Do notoperatethe mowerwhileunderthe influenceof
alcoholordrugs.
13.Do notengage theself-propelledmechanismon unitsso
equippedwhilestartingengine.
14.Thebladecontrolhandleisasafetydevice.Neverattempt
tobypassitsoperation.Doingso makesthe safetydevice
inoperativeandmayresultin personalinjurythrough
contactwiththe rotatingblade.Thebladecontrolhandle
mustoperateeasilyin bothdirectionsandautomatically
returntothe disengagedpositionwhenreleased.
15.Neveroperatethe mowerinwet grass.Alwaysbesureof
yourfooting. Aslipand fall cancauseseriouspersonal
injury.If youfeelyouarelosingyourfooting,releasethe
bladecontrolhandleimmediatelyand the bladewillstop
rotatingwithinthreeseconds.
16.Mowonlyin daylightor goodartificiallight.Walk,neverrun.
17.Stopthe bladewhencrossinggraveldrives,walksor roads.
18.If theequipmentshouldstartto vibrateabnormally,stopthe
engineandcheckimmediatelyfor the cause.Vibrationis
generallya warningoftrouble.
4

19.Shuttheengineoff andwait untilthe bladecomesto a
completestopbeforeremovingthe grasscatcheror unclog-
ging thechute.
The cuttingbladecontinuesto rotatefor a fewsecondsafter
the engineisshutoff. Neverplaceany partofthe bodyin
the bladearea untilyouaresurethe bladehasstopped
rotating.
20. Neveroperatemowerwithoutpropertrail shield,discharge
cover,grasscatcher,bladecontrolhandleor othersafety
protectivedevicesin placeand working.Neveroperate
mowerwithdamagedsafetydevices.Failuretodo so,can
resultin personalinjury.
21. Mufflerandenginebecomehotandcan causeaburn.Do
nottouch.
22.Only usepartsandaccessoriesmadeforthismachineby
manufacturer.Failuretodo socanresultinpersonalinjury.
23. Ifsituationsoccurwhicharenotcoveredin thismanual,
usecareand goodjudgment.Contactyourdealerfor
assistance.Telephone1-800-800-7310forthe nameofyour
nearestdealer.
Slope Operation
Slopesareamajorfactorrelatedto slipandfallaccidentswhich
can resultinsevereinjury.Operationonslopesrequiresextra
caution.Ifyoufeeluneasyon aslope,do notmowit.Foryour
safety,usetheslopegaugeincludedaspartofthis manualto
measureslopesbeforeoperatingthisunitonaslopedor hilly
area.Iftheslopeisgreaterthan15degrees,donot mowit.
Do:
1. Mowacrossthefaceofslopes;neverupanddown.Exercise
extremecautionwhenchangingdirectiononslopes.
2. Watchfor holes,ruts,rocks, hiddenobjects,or bumpswhich
can causeyouto slipor trip. Tallgrasscan hideobstacles.
3. Alwaysbesureofyourfooting.A slip andfall cancause
seriouspersonalinjury.Ifyoufeelyouarelosingyour
balance,releasethe bladecontrolhandleimmediately,and
the bladewill stoprotatingwithin3seconds.
Do Not:
1. Donot mowneardrop-offs,ditchesorembankments,you
could loseyourfootingorbalance.
2. Donot mowslopesgreaterthan 15degreesasshownon
the slopegauge.
3. Donot mowon wetgrass.Unstablefootingcouldcause
slipping.
Service
Safe HandlingOf Gasoline:
1. To avoidpersonalinjury orpropertydamageuseextreme
care inhandlinggasoline.Gasolineisextremelyflammable
andthevaporsareexplosive.Seriouspersonalinjurycan
occurwhengasolineisspilledonyourselforyourclothes
whichcanignite.
2. Washyourskin andchangeclothesimmediately.
3. Useonlyanapprovedgasolinecontainer.
4. Neverfill containersinsidea vehicleoron atruckor trailer
bedwitha plasticliner.Alwaysplacecontainersonthe
groundawayfromyourvehiclebeforefilling.
5. Removegas-poweredequipmentfromthe truckortrailer
andrefuelit onthe ground.Ifthisis notpossible,thenrefuel
suchequipmentonatrailerwitha portablecontainer,rather
thanfroma gasolinedispensernozzle.
6. Keepthe nozzlein contactwiththe rimofthefueltank or
containeropeningat alltimesuntilfuelingis complete.Do
notuseanozzlelock-opendevice.
7. Extinguishallcigarettes,cigars,pipesandothersources
ofignition.
8. Neverfuel machineindoorsbecauseflammablevaporswill
accumulatein thearea.
9. Neverremovegascap oraddfuelwhileengineishot or
running. Allowengineto coolatleasttwominutesbefore
refueling.
10.Neveroverfillfueltank. Filltankto nomorethanY2inch
belowbottomoffiller neckto provideforfuelexpansion.
11.Replacegasolinecapandtightensecurely.
12.If gasolineis spilled,wipeitoff theengineand equipment.
Moveunittoanotherarea.Wait5minutesbeforestarting
engine.
13.Neverstorethe machineorfuel containernearanopen
flame,sparkor pilotlightasona waterheater,space
heater,furnace,clothesdryeror othergasappliances.
14.Toreducefire hazard,keepmowerfreeofgrass,leaves,
orother debrisbuild-up.Cleanupoil orfuelspillageand
removeanyfuel soakeddebris.
15.Allowamowertocoolat least5 minutesbeforestoring.
GeneralService:
1. Neverrunanengineindoorsorin apoorlyventilatedarea.
Engineexhaustcontainscarbonmonoxide,anodorlessand
deadlygas.
2. Beforecleaning,repairing,or inspecting,makecertainthe
bladeandall movingpartshavestopped.Disconnectthe
sparkplugwireandgroundagainstthe engineto prevent
unintendedstarting.
3. Checkthe bladeandenginemountingboltsatfrequent
intervalsfor propertightness.Also,visuallyinspectbladefor
damage(e.g.,bent,cracked,worn)Replacebladewiththe
originalequipmentmanufacture's(O.E.M.)bladeonly,listed
inthismanual."Useof partswhichdo notmeetthe original
equipmentspecificationsmayleadto improperperformance
andcompromisesafety!"
4. Mowerbladesaresharpandcancut.Wrapthebladeor wear
gloves,anduseextracautionwhenservicingthem.
5. Keepallnuts,bolts,andscrewstightto besurethe equip-
mentis insafeworkingcondition.
6. Nevertamperwithsafetydevices.Checktheirproperopera-
tionregularly.
7. Afterstrikingaforeignobject,stopthe engine,discon-
nectthesparkplugwireandgroundagainsttheengine.
Thoroughlyinspectthe mowerfor anydamage.Repairthe
damagebeforestartingandoperatingthemower.
8. Neverattemptto makea wheelor cuttingheightadjustment
whiletheengineis running.
9. Grasscatchercomponents,dischargecover,andtrail
shieldaresubjecttowear anddamagewhichcould expose
movingpartsor allowobjectsto bethrown.Forsafety
protection,frequentlycheckcomponentsandreplaceim-
mediatelywithoriginalequipmentmanufacturer's(O.E.M.)
partsonly,listedinthis manual."Useofpartswhich do
notmeetthe originalequipmentspecificationsmayleadto
improperperformanceandcompromisesafety!"
10.Do notchangetheenginegovernorsettingor overspeedthe
engine.Thegovernorcontrolsthe maximumsafeoperating
speedoftheengine.
11.Maintainor replacesafetylabels,asnecessary.
12.Observeproperdisposallawsandregulations.Improper
disposaloffluidsandmaterialscanharmtheenvironment.
5
WARNING
Thissymbol points
out importantsafety
instructionswhich, if
notfollowed,could
endangerthe personal
safety and/or property
of yourselfand others.
Readand followall
instructions inthis man-
ual beforeattemptingto
operatethis machine.
Failureto comply with
these instructionsmay
result inpersonalinjury.
Whenyou seethis
symbol.
HEED iTS WARNING!
YourResponsibility
Restrictthe use
of this powermachine
to personswho read.
understand
and followthe warnings
and instructions
in this manua
and onthe machine.

iii !iii ii ili I
Adjustment
Yourmower is shipped
with the handle inthe
higherheight position.
NOTE: Eachend of
the lower handlemust
beplaced inthe same
relativeposition.
iMPORTANT
This unit isshipped
without gasolineor
oil in the engine. Fill
upgasolineand oil
as instructedinthe
accompanyingengine
manual BEFORE
operating your mower.
Step 1
1. For shippingpurposes, thechute deflectoron
your mowerisheld in an uprightposition bya
retainer.Removethe retainer asfollows:
a. Push chute deflector uptowards engine.
Holdingdeflectorinthis position,remove
the retainerand discard.See Step 1
b. Lowerthe chute deflectorcarefullykeeping
yourfingers out of theway.
2. Performthe following sequencefor
handlesetup
a. Lift the upperhandle upfrom folded
positionA and pull it to extendedposition
B followingthe arrowin Step2. The handle
shouldclick intothis position.
b. Makesure thecarriage boltisseated
properlyin the handle.Tightenwing nuts
securing upper handleto the lower handle
3. If satisfiedwith heightof handle,tightenwing
nutsat theends of the lower handleshown in
Step 3. Forconvenienceof operating,you may
adjustthe handleheightas follows:
a. Removethe wing nuts shownin Step3 and
removethe lowerhandle.
b. Positioneach handlebracketstud intothe
tophole inthe lowerhandle.
c. Tightenthe wing nuts.
Step 2
j
Step 3
6

4.RopeguideSetupasfollowsinStep4:
a. Holdthebladecontrolhandleagainstthe
upperhandle.PositionA.
b. Slowlypullstarterropeoutoftheengine.
PositionB.
c. Slipstarterropeintotheropeguide.
PositionC.
d. Tightenropeguidewingnut.PositionD.
5.Eachwheelhasaheightadjustmentlever
tochangethecuttingheightofthemower.
Depressheightadjustmentlevertowardsthe
wheelandslidelevertodesiredpositionfora
changeincuttingheight.SeeStep5.
6.Ifyourmowerisequippedwithanoptional
mulchingbaffle,installitontheright
sideofthedeck.Followthesequence
indicatedhere.
a. Liftupandholdtheside-discharge
chutedeflectorandinsertbottomlipofthe
mulchingbaffleinsidethechuteopening
SeeStep6.
b. Snaphooksofthemulchingbaffleover
thehingepinofthechutedeflector.The
hooksmustsnapintoplaceonthehinge
pin,lockingthemulchingbafflefirmlyonto
themower.Releasethechutedeflector.
Step 4
Step 5
CUTTINGHEIGHT
Step 5
A whee smust be
placed in the same
relative pos tionl For
rough Orunevenlawns
movetheheight adjust-
ment leverto a higher
position.This will stop
scalping ofgrassl
!
MULCHINGBAFFLE
(i soeq.ippe )
Step6
Forproperassemblyl
installbottom lipinside
chute opening before
placing hooks overthe
hingepnl
IMPORTANT
Thisunit
without gasolineOr
theengine: Fill
up gasoline
as instruCtedinthe
accompanying engine
manualBEFORE
7

Know Your Lawn Mower
Mower
WARNING
This blade control
mechanism isa
safety device. Never
attemptto bypass its
operations.
Use extreme care
when handling
gasoline.Gasoline is
extremelyflammable
and the vapors are
explosive. Never fuel
the machine indoors
or while the engine
is hot or running.
Extinguishcigarettes,
cigars, pipes and
other sources of
ignition.
Blade ControlHandle
Upper Handle
Recoil
Starter Ro
Gas Ca
HeightAdjustment
Lever
HeightAdjustment
Lever
Primer
Figure 1
Now that you have set up your lawn mower for op-
eration, get aquainted with its controls and features.
These are described below and illustrated this
page. This knowledge will
allow you to use your new equipment to its fullest
potential.
Blade Control Handle
The blade control handle is attached to the upper
handle of the mower. Depress the blade control
handle to operate the unit. Release it to stop engine
and blade.
_ WARNING:This blade control
mechanism is a safety device.
Never attempt to bypass its
operations.
Cutting Height Adjustment Levers
One adjustment lever is located on each wheel and
is used to adjust the cutting height. All four levers
have to be at the same relative position to ensure
uniform cut.
Recoil Starter
The recoil starter is attached to the right upper
handle. Stand behind the unit and pull the recoil
starter rope to start the unit.
Mulching Baffle (if so equipped)
The mulching baffle is used to recirculate grass
clippings back to the lawn. Attach it as instructed on
page 7 of this manual.
Gas and Oil Fill-Up
1. Check oil level and add oil if necessary. Follow engine
manual for this. See Figure 1above for location of oil
fill.
2. Servicetheenginewithgasolineasinstructedinthe
enginemanual. See
Figure1aboveforlocationofgascap.
,_ WARNING: Use extreme care
when handling gasoline. Gasoline
is extremely flammable and the
vapors are explosive. Never fuel
the machine indoorsor whilethe
engine is hot or running. Extin-
guish cigarettes, cigars, pipes and
other sources of ignition.
8

i_ i i ii i I
WARNING: The operationof
any lawn mower can result in
foreign objects being thrown
intothe eyes, which can damage
your eyesseverely. Always wear
safety glasseswhile operating
the mower, or while performing
any adjustments or repairs on it.
Engine
WARNING: Be sure no one other
than the operator is standing
nearthe lawn mower while
starting engine or operating
mower. Never run engine indoors
or in enclosed,poorly ventilated
areas. Engine exhaust contains
carbon monoxide, an odorless
and deadly gas. Keep hands,
feet, hair and loose clothing away
from any moving parts on engine
and lawn mower.
1. Pushprimerthreetimes.Waitabouttwoseconds
betweeneachpush.See Figure2. Intemperature
around550For below,primefivetimes.Donotprime
to restarta warmengine.
2. Standingbehindthemower,squeezetheblade
controlhandleagainst upperhandle.SeeFigure2.
3. Holdingthesetwo handlestogetherfirmly,grasp
recoilstarterhandleand pullropeoutwitha rapid,
continuous,fullarmstroke.SeeFigure2.Keeping
a firmgripon thestarterhandle,lettheroperewind
slowly.Repeatuntilenginecranks.Lettherope
rewindeachtimeslowly.
Stopping Engine
1. Releasebladecontrolhandleto stoptheengineand
theblade.
2. Disconnectsparkplugwirefromsparkplugand
groundagainsttheengine.
Using Your Lawn Mower
Be sure the lawn is clear of stones, sticks, wire, or
other objects which could damage the lawn mower
or the engine. Such objects could be accidently
thrown by the mower in any direction and cause seri-
ous personal injury to the operator and others.
WARNING: if you strike a foreign
object, stop the engine. Remove
wire from the spark plug, thor-
oughly inspectthe mower for any
damage, and repair the damage
before restarting and operating
the mower. Extensive vibration
of the mower during operation is
an indicationof damage. The unit
should be promptly inspected
and repaired.
Operating Tips
1. Forbestresults,do notcutwetgrass.
2. Newgrass,thickgrass,orwet grassmayrequirea
narrowercut.
3. Fora healthierlawn,nevercutoff morethanone-third
ofthetotallengthofthegrass.
4. Yourlawnshouldbecut inthefallaslongasthere
isgrowth.
5. Foreffectivemulching,donotcutwetgrass.
6. Adjustgroundspeedaccordingto conditionof lawn.
7. Ifthegrasshasbeenallowedtogrowin excessof 4
inches,mulchingis notrecommended.Mowusing
thesidedischargetoreducethegrassheightto3-1/4
inchesor lessbeforemulching.
Figure 2
The operation of any
lawn mower can result
in foreign objects
being thrown into
the eyes,which can
damage your eyes
severely. Alwayswear
safety glasseswhile
operating the mower,
or while performing
any adjustments or
repairs on it.
Besure no one other
than the operator is
standing near the lawn
mower while starting
engine or operating
mower. Never run
engine indoorsor
in enclosed,poorly
ventilatedareas. En-
ineexhaust contains
:arbon monoxide, an
odorless and deadly
gas. Keep hands, feet,
hair and loose clothing
away from any moving
parts on engine and
lawn mower.
9

S?_:?_'_:!_ _ _!b_
Mainta=n
t
Your Lawn
ower
WAR. .G
i
A waysstopengine;
disconnect spark
plug, and ground
againstenginebefore
cleaning, lubricating
ordo nganyk ndof
maintenance onyour
We do ni
the use of pressure
washersor garden
hoseto clean your
unit.These may Cause
damage toeleCtric
Componentsispindles,
pulleys; bearingS,or
theengine;The use
of waterwil! resultin
shortened !ifeand
reduceserviceability;
_ ARNING: Always stop engine,
disconnect spark plug, and
groundagainst engine before
cleaning, lubricating or doing
any kind of maintenance on your
machine.
Figure 3
GasCap Air Filter
Spark Plug
Figure 4
General Recommendations
1. Alwaysobservesafetyruleswhenperforming
anymaintenance.
2. Thewarrantyon thislawnmowerdoesnotcover
itemsthathavebeensubjectedtooperatorabuse
or negligence.Toreceivefullvaluefromwarranty,
operatormustmaintainthelawnmoweras
instructedhere.
3. Changingof engine-governedspeedwillvoid
enginewarranty.
4. Alladjustmentsshouldbecheckedat leastonce
eachseason.
5. Periodicallycheckall fastenersand makesurethese
aretight.
Lubrication
1. Lubricatepivotpointson thebladecontrolhandleat
leastoncea seasonwithlightoil.Thebladecontrol
mustoperatefreelyinbothdirections.SeeFigure3.
2. Lubricatethewheelsatleastoncea seasonwith
lightoil (ormotoroil).If wheelsareremovedforany
reason,lubricatesurfaceoftheaxleboltandinner
surfaceof thewheelwithlightoil.SeeFigure3.
3. Lubricatethetorsionspringandpivotpointonthe
chutedeflectorperiodicallywith lightoilto prevent
rust.See Figure3.
4. Followtheaccompanyingenginemanualforlubrica-
tionscheduleandinstructionforenginelubrication.
Cleaning Mower
Clean underside ofthe mower deck after each
useto prevent build-up of grass clippings or other
debris. Follow steps belowfor this job.
1. Disconnectsparkplugwire.Draingasolinefromlawn
mower,or placea pieceof plasticunderthegascap
SeeFigure4.
2. Tipthemowersothat itrestsonthehousing.Keep
thesidewiththeaircleanerfacingup.Holdthe
mowerfirmly.
__1= ARNING: Never tip the mower
more than 90 degrees inany
directions and do not leave the
mower tipped for any length of
time. Oil can drain intothe upper
part ofthe engine causing a
starting problem.
3. Scrapeandcleanthe undersideofthedeckwitha
suitabletool.Donotspraywithwater.
4. Putthemowerbackonitswheelsontheground.If
youhadputplasticunderthegascapearlier,make
sureto removeitnow.
10

Blade Care
,__ WARNING: When removing the
cutting blade for sharpening or
replacement, protect your hands
with a pair of heavy gloves or use
a heavy rag to hold the blade.
Periodicallyinspectthebladeadapterforcracks,
especiallyifyoustrikeaforeignobject.Replacewhen
necessary.Followthestepsbelowforbladeservice.
1. Disconnectsparkplugwirefromsparkplug.Turn
moweronitssidemakingsurethattheair filterand
thecarburetorareup.
2. Removetheboltandthebladebellsupportwhich
holdthebladeandthebladeadaptertotheengine
crankshaft.SeeFigure5.
3. Removebladeandadapterfromthecrankshaft.
4. Thebladecanbesharpenedwithafileor ona
grindingwheel.Donotattemptto sharpentheblade
whileit isstillonthe mower.
5. Whensharpeningtheblade,followtheoriginalangle
ofgrind.Grindeachcuttingedgeequallytokeepthe
bladebalanced.
6. Removebladefromtheadapterfortestingbalance.
7. Balancethebladeon a roundshaftscrewdriverto
check.Removemetalfromtheheavysideuntilit
balancesevenly.
_ ARNING: An unbalancedblade
will cause excessive vibration
when rotating at high speeds.
itmay cause damage to mower,
and could break causing per-
sonal injury.
8. Lubricatetheenginecrankshaftandtheinnersurface
ofthebladeadapterwithlightoil.Slidetheblade
adapterontotheenginecrankshaft.
9. Placethebladeon theadaptersuchthattheside
oftheblademarked"Bottom"(orwithpartnumber)
facesgroundwhenthemowerisintheoperating
position.Makesurethatthebladeisalignedand
seatedon bladeadapterflanges.
10.Placebladebellsupportontheblade.Alignnotches
onthebladebellsupportwithsmallholesinblade.
11.Replacehexboltandtightenhexbolttotorque:450
in.Ibs.rain.,600in.Ibs.max.
Toensuresafeoperationofyourmower,periodically
checkthebladeboltforcorrecttorque.
Off-Season Storage
Thefollowingstepsshouldbetakentoprepareyourlawn
mowerforstorage.
1. Cleanandlubricatemowerthoroughlyasdescribedin
thelubricationinstructions.
2. Wedonotrecommendtheuseofa pressurewasher
or gardenhosetocleanyourunit.
3. Refertoenginemanualforcorrectengine
storageinstructions.
4. Coatmower'scuttingbladewithchassisgreaseto
preventrusting.
5. Storemowerin a dry,cleanarea.Donotstorenextto
corrosivematerials,suchasfertilizer.
Whenstoringanytypeofpowerequipmentina poorly
ventilatedor metalstorageshed,careshouldbe takento
rust-prooftheequipment.Usinga lightoilor silicone,coat
theequipment,especiallycablesand allmovingpartsof
yourlawnmowerbeforestorage.
Blade JBladeAdapter
Hex Bolt Blade Bell
Support
J
Figure 5
11
Maintaining
MoWer
WARNING
When removing
the cutting blade
for sharpening or
replacement, protect
your handswith a
pair of heavy gloves
or use a heavy rag to
hold the blade.
An unbalanced blade
will causeexcessive
vibration when rotat-
ing at high speeds, it
maycause damage
to mower, and could
break causing per-
sonal injury.

Forrepairs beyond
the minor adjustments
listed here, contact
an authorized service
dealer.
i
Problem Cause Remedy
En n f ils to start Bladecontrolhandledisengaged
I 1: Engagebladecontrolhandle.
g ea , ....
2. Sparkplugwiredisconnected. 21 connectwireto sparkplug,
&Fuel tankemptyorstalefuel. & Fill tankwith€ieanlfreshgasolinei
41 Enginenotprirned. & Primeengineasinstructedin
OPerating ouiLawnMowei
Fut sark u 5 Cean adjustgap or repace
a y p p!g,
6. Blockedfueliinel 6, Cleanfuelline;
7 Engine flooded 7. Waitafew minutestorestart,but
do notprime.
Engineruns erratic
1. Sparkplugwireloose.
2. Blockedfuellineor stalefuel.
3. Ventingascapplugged.
4. Waterordirt infuelsystem.
5. Dirtyaircleaner.
6. Carburetoroutofadjustment.
1. Connectandtightenspark
plugwire.
2. Cleanfuelline;filltankwithclean,
freshgasoline.
3. Clearvent.
4. Drainfueltank.Refillwith
freshfuel.
5. Refertoenginemanual.
6. Refertoenginemanual.
Engne overheats 1 Engneoil levellow. 1. FIIcrankcasewithproperoil.
2. Airflow restricted• I 2. Removeblowerhousing
! I, andclean•
I 3. Carburetornotadjustedproperly• 3. Referto enginemanual.
Occasionalskips 1. Sparkpluggaptooclose. 1. Adjustgap to.030".
(hesitates)at 2. Carburetoridlemixtureadjustment 2. Refertoenginemanual.
highspeed improperlyset.
Idlespoorly 1. Sparkplugfouled,faultyorgap 1. Resetgapto .030"orreplace
toowide. sparkplug
2 Carburetorimproperlyadjusted. 2. Referto enginemanual•
. 3 Dirtyaircleaner. . 3 Referto enginemanual.
Excessive 1. Cuttingbladelooseor unbalanced. 1. Tightenbladeandadapter.
Vibration Balanceblade.
2. Bentcuttingblade. 2. Seean authorizedservicedealer.
Mowerwill not 1. Wetgrass. 1. Donotmowwhengrassiswet
mulch grass wait untilatertocut.
2 Excessivel' highgrass I 2. Mowonceata highcuttingheight,
• Y " thenmowagainatdesiredheight
I I or makea narrowercuttingpath.
3 Dullblade
I " ' I 3. Sharpenorreplaceblade•
Unevencut 1. Wheelsnotpositionedcorrectly. 1. Placeall fourwheelsin same
heightposition.
2. Dullblade. 2. Sharpenor replaceblade.
12

13
ii i _iI_ii

@
\
\
\
14

17032A ChuteHinge
17098 HingeClip
682-3064 HandleBracketAssemblyRH
682-3065 HandleBracketAssemblyLH
687-02048 DeckAssembly22"(nologo)
687-02051 LeverAssembly(includesRef.#17)
687-02094 PivotArm
710-0216 HexCapScrew3/8-16x .75
710-0599 TT Screw1/4-20x 0.5"
710-0654A TT Screw3/8-16x 1.0
710-1044 HexCapScrew3/8-24x 1.5
710-1174 CarriageBolt 5/16-18x2.0
710-1205 EyeBolt
712-0431 LockNut3/8-16
720-0279 WingNut
720-0284 WingNut
720-0426 HeightAdjusterKnob
725-0157 CableTie
731-04019 TrailShield
731-04197 MulchingPlug(ifequipped)
731-1034B HingedChuteDeflectorAssembly
731-1035B ChuteDeflector
732-1014 TorsionSpring
734-1987 RearWheel8 x 1.8
734-1988 FrontWheel7x 1.8
736-0270 BellWasher.265IDx .75OD
736-0451 SaddleWasher.320IDx .93OD
736-0524B BladeBellSupport
736-0741 BellWasher.760IDx 1.25OD
738-1172 ShoulderScrew
738-1173 ShoulderScrew
741-0751 HeightAdjusterBearing
742-0642A StandardBlade22"
742-0742A MulchingBlade22"
746-0957 BladeControlCable- 37.25"
746-0946 BladeControlCable- 48.25"
746-1130 BladeControlCable- 40"
747-0710 HingePin
747-1161A BladeControlHandle
748-0376C BladeAdapter
749-04037 LowerHandle
749-1092A UpperHandle
Parts List
To order replacement
parts, contact 1-800-
800-7310 orvisit www.
mtdproducts.com.
15

MANUFACTURER'S LiMiTED WARRANTY FOR
ThelimitedwarrantysetforthbelowisgivenbyMTDLLCwithrespectto
newmerchandisepurchasedandusedin theUnitedStates,itsposses-
sionsandterritories.
"MTD"warrantsthisproductagainstdefectsin materialandworkmanship
fora periodoftwo(2) yearscommencingonthedateoforiginalpurchase
andwill,atits option,repairor replace,freeofcharge,anypartfoundto
bedefectiveinmaterialsor workmanship.Thislimitedwarrantyshallonly
applyifthis producthasbeenoperatedandmaintainedinaccordance
withtheOperator'sManualfurnishedwiththeproduct,andhasnotbeen
subjectto misuse,abuse,commercialuse,neglect,accident,improper
maintenance,alteration,vandalism,theft,fire,water,ordamagebecause
ofotherperilor naturaldisaster.Damageresultingfromtheinstallationor
useofanypart,accessoryorattachmentnotapprovedbyMTDforuse
withtheproduct(s)coveredbythis manualwillvoidyourwarrantyasto
anyresultingdamage.
Normalwearpartsarewarrantedto befreefromdefectsinmaterialand
workmanshipfora periodofthirty(30)daysfromthedateof purchase.
Normalwearpartsinclude,butare notlimitedto itemssuchas: batteries,
belts,blades,bladeadapters,grassbags,riderdeckwheels,seats,snow
throwerskidshoes,shaveplates,augerspiralrubberandtires.
HOW TO OBTAINSERVICE: Warrantyservice isavailable,WITH
PROOFOF PURCHASE,throughyour localauthorized service
dealer.Tolocate the dealer in yourarea, check yourYellowPages, or
contact MTD LLCat RO. Box361131,Cleveland,Ohio 44136-0019,or
call 1-800-800-7310or 1-330-220-4683or log on to our Web site at
www.mtdproducts.com.
Thislimitedwarrantydoesnot providecoverageinthefollowingcases:
a. Theengineor componentpartsthereof.Theseitemsmaycarrya
separatemanufacturer'swarranty.Refertoapplicablemanufacturer's
warrantyfortermsandconditions.
b. Logsplitterpumps,valves,andcylindershavea separateoneyear
warranty.
c. Routinemaintenanceitemssuchaslubricants,filters,blade
sharpening,tune-ups,brakeadjustments,clutchadjustments,deck
adjustments,andnormaldeteriorationoftheexteriorfinishduetouse
orexposure.
d. Servicecompletedbysomeoneotherthananauthorizedservice
dealer.
e. MTDdoesnotextendanywarrantyforproductssoldor exported
outsideofthe UnitedStates,itspossessionsandterritories,except
thosesoldthroughMTD'sauthorizedchannelsofexportdistribution.
f. ReplacementpartsthatarenotgenuineMTDparts.
g. Transportationchargesand servicecalls.
No impliedwarranty,includinganyimpliedwarranty of merchant-
ability of fitness for a particularpurpose,applies after the applicable
periodof expresswritten warranty aboveas to the partsas identi-
fied. Noother expresswarranty, whether written or oral, exceptas
mentionedabove,givenby anypersonor entity,includinga dealer
or retailer,with respect to anyproduct,shallbind MTD.Duringthe
periodof the warranty, the exclusive remedyisrepairor replacement
of the productas set forth above.
Theprovisionsas set forth inthis warranty providethe sole and
exclusive remedyarising from the sale. MTDshall not be liable
for incidentalor consequential loss or damageincluding,without
limitation, expensesincurredfor substitute or replacementlawncare
services or for rentalexpensesto temporarily replacea warranted
product.
Somestatesdo notallowtheexclusionor limitationofincidentalor
consequentialdamages,or limitationson howlonganimpliedwarranty
lasts,sotheaboveexclusionsor limitationsmaynotapplytoyou.
Innoeventshallrecoveryofanykindbegreaterthantheamountofthe
purchasepriceoftheproductsold.Alterationof safetyfeatures of the
productshallvoid this warranty. Youassumetheriskandliabilityfor
loss,damage,or injurytoyouandyourpropertyand/ortoothersandtheir
propertyarisingoutofthemisuseor inabilitytousetheproduct.
Thislimitedwarrantyshallnotextendto anyoneotherthantheoriginal
purchaseror tothepersonforwhomitwaspurchasedasa gift.
HOWSTATELAWRELATESTOTHISWARRANTY: Thislimitedwar-
rantygivesyouspecificlegalrights,andyoumayalsohaveotherrights
whichvaryfromstatetostate.
IMPORTANT:OwnermustpresentOriginalProofofPurchasetoobtain
warrantycoverage.
MTD LLC, P.O. BOX 361131 CLEVELAND, OHIO 44136-0019; Phone: 1-800-800-7310, 1-330-220-4683

Seguridad=Ensamblaje=Operaci6n=Consejos y T_cnicas.Mantenimiento-Soluci6n de problemas.Lista de Parte=Grantias
A AL P A O
Podadora giratoria 22".. IVlodelo Serie 080
IMPORTANTE
LEA CON ATENCION LAS REGLAS DE SEGURiDAD E INSTRUCCIONES ANTES
DE OPERAR LA PODADORA
ADVERTENCIA: Esta unidad est_ equipada con un motor de combusti6n interna y no debe set utilizada en o cerca de un
terreno agreste cubierto por bosque, malezas o hierba e×cepto clue el sistema de escape del motor est_ equipado con un
amortiguador de chispas que cumpla con las leyes locales o estatales correspondientes (en caso de existir). Si se utiliza
un amortiguador de chispas el operador Io debe mantener en condiciones de uso adecuadas. En el Estado de California
las medidas anteriormente mencionadas son e×igidas pot ley (Articulo 4442 del C6digo de Recursos P_blicos de Califor=
nia). Es posible que existan leyes similares en otros estados. Las leyes federales se aplican en territorios federales. Su
distribuidor m_s cercano autorizado para realizar el mantenimiento del motor puede conseguir el amortiguador de chispas
para el silenciador sino usted puede comunicarse con el departamento de servicios al apartado postal P.O. Box 361131
Cleveland, Ohio 44136=0019.
FORMNO.769-01482
10/11/2004
PRINTEDIN U.S.A MTD LLC, P.O. BOX 361131 CLEVELAND, OHIO 44136=0019

Este manual de operador es una parte importante de su nueva m_quina podadora. Le
ayudar_ a montar, preparar y mantener la unidad para obtener los mejores resultados.
Por favor lea y comprenda el contenido del manual.
r =
Ind=ce
Indicador de pendiente ................................... 19
Pr_cticas de seguridad en la operaci6n ......... 20
Configuraci6n y ajustes ................................... 22
Funcionamiento de la podadora ..................... 24
Mantenimiento de la podadora ........................ 26
Soluci6n de problemas .................................... 28
Etiquetas de seguridad .................................... 29
Lista de las piezas ............................................ 30
B squeda y registro del n mero de modelo
ANTESDE COMENZARA ENSAMBLARSU NUEVO
EQUIPO,
por favorIocalice la piacadel modeio enel equipoy copie la
informaci6nen la placamodelo a la derecha. Paraencontrar
la placa de modelocol6quese detr_.sde la unidadenla
posici6n del operadory mire haciaabajoen la parte posterior
de la cubierta. Lapresente informaci6nresultar_,necesaria
parael usodel sitio web delfabricante y/ o parasolicitar
ayudadel DepartamentodeAsistencia alClienteo de un
distribuidorautorizado.
Nt3merode modelo
D
www.mtdproducts.com
Nt3merode serie
MTD LLC
P.O= BOX 361131
CLEVELAND, OH 44136
330-220-4683
800-800-7310
Asistencia al Cliente
Por favor, NO devuelva la unidad al minorista a quien se la adquiri6 sin contactarse
primero con el Departamento de Asistencia al Cliente.
Encasodetenerproblemasparaensamblareste productoo de
tenerdudascon respectoa loscontroles,funcionamientoo man-
tenimientodel mismo, puedesolicitarla ayudadelos expertos.
Elijaentre lasopcionesquese presentanacontinuaci6n:
1. Visitemtdproducts.com sideseanurnerosassugerenciasQtiles.
Hagaclioenel bot6ndeAsistenciaal Clientey recibir_,lascuatro
opcionesquesereproducena la derecha.Hagaclic enel bot6n
apropiadoy podr_,disponerde ayudadeforrnainrnediata.
2. Si deseacontactarseconunRepresentante del Departa-
mento de Asistencia al Cliente, porfavorcornuniqueseal
1(800)800-7310.
3. Elfabricante del motor esel responsablede todaslas
cuestionesrelacionadasconel rendirniento,potenciade salida,
especificaoiones,garantiay rnantenirnientodel motor.Porfavor,para
mayorconfirrnaci6n,consulteel manualdelpropietario/operadordel
fabricantedelmotorqueesenviado,en unpaqueteporseparado,
juntoconsuunidad.
Hagaclicaqui parabuscaren nuestrabasedeconcirnie
tos.Busqueporproducto,palabraclaveo frase.
Entreal sisternapararevisarel estadode suscon-
sultas,rnodificarlaso actualizarsuperfilpersonal.
_Servicio
_,NecesitaayudaensuIocalidad?Hagaclicaqui para
encontrarcentrosde servicioautorizadosen su_.rea.
_,Necesitaunmanualy/o listade piezas?Descarguela
docurnentaci6nde rnodelosde a_osrecientes.
18

I!
o
(D
o3
(D
o3
(1) ---
cc_
c _
"-- 0
o -o
_g
E _
t-_
"5
o,_
o t-_
rj _
_-%
-i,-..-,
O9 0
_ r--
Alineey sostengaestenivelcon unArbolvertical...
o laesqu
15
ina de una construcci6n...
a_ r--_ o el postede
i unacerca.
I
I
I

operaclon
ADVERTENCIA
Este simbolo indica in-
strucciones de seguridad
importantes que de no
seguirse,se podria poner
en peligro la seguriclad
personalyio la propiedad
i suyay de terceros. Leay
I sigatodas las instruccio-
nesen este manualantes
de iniciar la operaci6n
de esta mfiquina. En
i caso de no seguir
estas instrucciones
podria provocar lesiones
I personales. Cuandovea
este simbolo
SIGA LA ADVERTENCIA
Su
responsabilidad:
S61opermitaque usen
estama.quinaelectrica
las personasque lean,
comprendany respeten
las advertenciasy las
instruccionesque apa-
i recenen este manualy
en la mfiquina.
ADVERTENCIA: El escape del motor de este producto, algunos de sus componentes y
algunos componentes del vehiculo contienen o emiten productos quimicos que el estado
de California considera que pueden producir cfincer, defectos de nacimiento u otros
problemas reproductivos.
PELIGRO: Esta mfiquina estfi dise_ada para ser utilizada respetando las reglas de seguridad contenidas en
este manual. AI igual que con cualquiertipo de equipo electrico, un descuido o error de parte del operador
puede producir lesiones graves. Esta mfiquina es capaz de amputar manos y piesy de arrojar objetos con
gran fuerza. De no respetar las instrucciones de seguridad siguientes se pueden producir lesiones graves o
la muerte.
N i _os 13. Nuncaalmacenela mfiquina oel recipientedecombustibleen un
espaciocerradodondehayafuego, chispaso aparatosconpiloto
Puedenocurriraccidentestrfigicossiel operadornoestfiatento ala
presenciadeni_os.PorIogenerala losni_oslesatraenlaspodado-
rasy laactividaddepodarel cesped.Noentiendenlos riesgosni los
peligros.Nuncade porsentadoquelosni_ospermaneceranenel
mismolugardondelosvio porQltimavez.
1. Mantengaalos ni_osfueradelAreadetrabajoy bajoestricta
vigilanciadeunadultoresponsableademasdel operador.
2. Est_alertay apaguela podadorasiunni_o ingresaal Area.
3. Antesymientasse estamoviendohaciaarras,mirehaciaarrasy
cuidequenohayani_os.
4. Tengaextremaprecauci6ncuandose aproximea esquinas
ciegas,entradasdepuertas,arbolesuotrosobjetos quepuedan
obstaculizarlela vistadeunni_o quepudiesecorrerhacia la
podadora.
5. Mantengaalejadosa losni_osdelos motoresenmarchao
calientes.Puedensufrir quemadurascon unsilenciadorcaliente.
6. Nuncapermitaqueni_osmenoresde 14afiosoperenesta
maquina.Losni_os mayoresde14afiosdebenleery entender
lasinstruccionesdeoperaci6ny reglasdeseguridadcontenidas
enestemanualy debenserentrenadosy supervisadosporsus
padres.
Funcionamiento
Manejo seguro de la gasolina:
1. Paraevitar lesionespersonaleso dafiosmaterialessea
sumamentecuidadosoal manipularla gasolina.Lagasolinaes
altamenteinflamabley losvaporessonexplosivos.Se puede
lesionargravementesi derramagasolinasobreustedo sobrela
ropaya quesepuede encender.
2. Lavesela piely cambiesede ropadeinmediato.
3. Utilices61orecipientesparagasolinaautorizados.
4. NuncaIleneloscontenedoresenel interiordeunvehiculo
ocami6n ocajade camionetacon recubrimientosplasticos.
Coloquesiemprelosrecipientesen el pisoy lejos delvehiculo
antesdeIlenarlos.
5. Retire el equipoagasolinadel cami6no remolquey Ilenelo
enel piso.Si estonoes posible,entoncesIlenedicho equipo
enunremolquecon unrecipienteportatil,envez dedesdeun
dispensadorde gasolina.
6. Mantengala boquilladeIlenadoen contactocon elbordedela
entradadeltanquede gasolinaocontenedorentodomomento
hastaque est_ Ileno.No utiliceundispositivoparaabrir/cerrarla
boquilla.
7. Apaguetodosloscigarrillos, cigarros,pipasy otrasfuentesde
combusti6n.
8. Nuncacarguecombustibleen lamaquinaen interioresporque
losvaporesinflamablespodrianacumularseenel Area.
9. Nuncasaquela tapadel gas niagregue combustiblemientrasel
motorestacalienteo enmarcha.Deje queel motorseenfrie por
Iomenosdos minutosantesdevolveracargarcombustible.
10. Nuncarecargueel tanquedecombustible.Lleneel tanque no
masde 1/2pulgadapordebajode la basedel cuellode Ilenado
paradejarespacioparala expansi6ndel combustible.
11. Vuelvaacolocarla tapadela gasolinay ajQstelabien.
12. Limpielagasolina derramadasobreel motory el equipo.
Trasladelamaquinaaotra zona.Espere5 minutosantesde
encenderel motor.
comoporejemplo, calentadoresdeagua, calentadores,hornos,
secadoresderopau otrosaparatosa gas.
14. Parareducirel riesgode incendiomantengalamaquinalimpia
depasto,hojasy deacumulaci6ndeotros escombros.Limpielos
derramesdeaceite ocombustibley saquetodoslosdesechos
embebidosconcombustible.
15. Dejequela maquinase enfrie5minutos porIomenosantesde
almacenarla.
Funcionamiento general:
1. Leay sigatodas lasinstruccionescontenidasenestemanual
antesdeintentarensamblarestamaquina.Lea,comprenday siga
todaslas instruccionesquefiguranen lamaquinayen el olos
manualesantesdeintentaroperarla. Familiaricesecompletamente
con loscontrolesy con el usoapropiadodeesta maquinaantesde
operarla.Guardeeste manualenunlugar seguropara referencias
futurasy regularesy parasolicitar repuestos.
2. Estamaquinaes una piezadeequipode precisi6n,nounjuguete.
Portanto,tenga la maxima precauci6nentodo momento.Su
unidadhasidodise_ada pararealizarunatarea: cortarel c@sped.
Nola utilicecon ningQnotro prop6sito.
3. Nopermita nuncaque losnii_osmenoresde 14a_osoperenesta
maquina.Los nii_osde14a_osy mas debenleery comprenderlas
instruccionescontenidasenestemanualy deben sercapacitados
y supervisadosporuno de lospadres.Unicamentelosindividuos
responsablesquesehayanfamiliarizadocon estasreglasde
seguridadpara laoperaci6ndeberan usaresta maquina.
4. Inspeccioneminuciosamenteel Areaendonde utilizarael equipo.
Saquetodaslas piedras,palos,cables, huesos,juguetesy otros
objetosextrafios con losquepodria tropezaro que podrianser
arrojadosporla cuchilla. Losobjetos arrojadosporla maquina
puedenproducir lesionesgraves.Planifiqueel patr6nenel que va
air descargandoel recorteparaevitarquela descargadematerial
se realicehacia loscaminos,lasveredas,losobservadores,etc.
Eviteademasdescargarmaterialcontralas paredesy obstruc-
cionesquepodrian provocarqueel materialdescargado rebote
contrael operador.
5. Paraayudar aevitar el contactocon la cuchillao unalesi6npor
unobjetoarrojado, mant@ngaseenla zona deloperadordetras de
lasmanijasy mantengaa losni_os,observadores,ayudantesy
mascotasapartadosal menos25 metrosdela podadoramientras
estaen operaci6n.Detengala maquinasialguien entraenla zona.
6. Paraprotegerselosojosutilicesiempreanteojoso antiparrasde
seguridadmientrasoperala maquinao mientrasla ajustao repara.
Losobjetosarrojadosquerebotanpueden lesionargravementela
vista.
7. Utilicezapatosde trabajoresistentes,de suelafuertey pantalones
y camisasajustados.Se recomiendautilizarcamisas y pantalones
quecubranlosbrazosy laspiernas,asi comocalzadocon puntas
reforzadasen acero.Nuncaopereesta maquinacon los pies
desnudos,sandalias,ocon zapatosligerosocon los quese pueda
resbalar(por ejemplo,calzadode Iona).
8. Noponga lasmanoso lospiescercade laspiezas rotatoriaso
enla tolvadela cortadora. Elcontacto con lascuchillaspuede
producirla amputaci6ndemanosy pies.
20

9. Unacubiertadedescargafaltanteo dafiadapuede provocarel
contacto con lacuchillao lesionespor objetosarrojados.
10. Muchaslesionesocurrencomo resultadodepasar la cortadora
sobre los piesdurante unaca[da provocadaporderrapeso
tropiezos. Nose sostengadela podadorasi seestacayendo,
suelte lamanijainmediatamente.
11. Nuncatirehaciaustedla podadora mientrascamina.Sidebe
retrocederla podadora paraevitaruna pareduobstaculo,mire
primeroabajoy atras paraevitar tropezarsey luegosigaestos
pasos:
a. Retrocedade la podadorahastaestirar completamente
susbrazos.
b. AsegQresequeesta bienequilibradoy bienparado.
c. Tiredela podadoralentamentehaciausted,nomasalia dela
mitaddela distancia entreustedy la podadora.
d. Repitaestos pasoscomo se requiera.
12. Noopereesta maquinaestandobajo losefectosdel alcoholo de
drogas.
13. Noembragueel mecanismode autopropulsi6nenunidadescon
este equipomientrasarrancaelmotor.
14. Elmecanismode controldela cuchilla esundispositivode
seguridad.Nuncaintentedesviarsedesu funcionamiento.De
hacerlonofuncionarianlosdispositivosdeseguridady podrian
producirselesionespersonalesporel contactocon lascuchillas
giratorias.Las manijasdecontrolde lacuchilla debenfuncionar
bienenambasdireccionesy regresarautomaticamenteala
posici6ndedesengranecuandose lassuelta.
15. Nuncaoperela podadoraenc_sped ht_medo.Siempreest_seguro
de su equilibrio.Sitropiezay cae puedelesionarsegravemente.Si
sientequepierde el equilibrio,suelteinmediatamentela manijade
control dela cuchillay la cuchilladejarade girarentressegundos.
16.Corte el c_spedsolamentecon luzdedia ocon unabuenaluz
artificial. Camine,nuncacorra.
17. Detengalacuchillacuandocruce caminosde gravilla,pasoso
andadores.
18. Si la maquinacomenzaraavibrar demaneraanormal,detenga
el motor,y busqueinmediatamentelacausa. Lavibraci6n porIo
general es unaadvertenciadealgt_nproblema.
19.Apagueel motory espere hastaque la cuchilla sedetenga
completamenteantesde retirarla guardaparael recortedec_sped
o desatorarla tolva.La cuchillacontinQagirando porunoscuantos
segundos despuesque el motorse haapagado.Nuncacoloque
ningunapartedelcuerpo enel Areade la cuchillahastaque est6
seguro quela cuchillahadetenidosumovimientorotatorio.
20. Nuncaoperela cortadorasin lasguardasapropiadas,cubierta
de descarga,guardapararecorte, manija decontrolde lacuchilla
y otrosdispositivosdeseguridady protecci6nensu lugary
funcionando.Nuncaopere lacortadora si losdispositivosde
seguridadestandafiados. Si noIohace,esto puedetenercomo
resultadolesiones.
21. Elsilenciadory elmotorse calientany puedenproducirquemadu-
ras.Nolostoque.
22. Utilicesolamentepartesy accesorios fabricadosespecialmente
paraestamaquina,originalesdel fabricante(OEM).Si noIohace,
esto puedetenercomoresultadolesionespersonales.
23. Sise presentansituacionesqueno estanprevistasenestemanual
sea cuidadosoy useel sentidocomtJn.Marqueal teldono 1-800-
800-7310paracontactarel departamentodeatenci6nal clientey
obtenerel nombredesu distribuidormascercano.
Funcionamiento en pendientes:
Laspendientessonunfactorimportantequese relacionacon losacci-
dentesproducidosporderrapesy caidasy quepuedenproducirlesiones
graves.Laoperaci6nen pendientesrequieremayorprecauci6n.Si no
se sienteseguroen unapendiente,nola pode.Paraseguridad,use el
medidordependientesquese incluyecomopartedeestemanualpara
medirla pendienteantesdeoperarla unidaden unazona inclinada.Si
la pendientesuperalos 15grados,nola pode.
Haga Iosiguiente:
1. Muevala podadoraatrav_sde lascarasde lapendiente,nunca
haciaarribay abajo.Tengacuidado cuandocambiededirecci6n
cuandooperela maquinaenpendientes.
2. Est_atentoa losagujeros,ra[ces,rocas,objetosocultos o
abultamientosquepuedanprovocarquesederrape ose tropiece.
Elc_sped alto puedeocultarobstaculos.
3. Siempreest_segurode suequilibrio. Sitropiezay caepuede
lesionarsegravemente.Sisientequepierdeel equilibrio,suelte
inmediatamentela manijadecontrolde lacuchillay lacuchilla
dejarade girarentres(3) segundos.
No haga Iosiguiente:
1. Nocorte el c_spedcercadepozos,hundimientos,bancos, podria
perderel equilibrio.
2. Nopode pendientesmayoresde 15gradoscomo Ioindicael
medidordependientes.
3. Nopode el c_spedht_medo.Sinoesta firmementeparado,puede
resbalarse.
Servicio
1. Nuncaenciendaunmotorenespacioscerradosoen unazona
conpocaventilaci6n.El escapedelmotorcontienemon6xidode
carbono,ungasinodoroy letal.
2. Beforecleaning,repairing,or inspecting,makecertaintheAntes
delimpiar,repararo inspeccionarlamaquina,compruebeque
la cuchillay todaslaspartesquesemuevense bandetenido.
Desconecteel cablede la bujiay p6ngalodemaneraquehaga
masacontrael motorparaevitarquese enciendademanera
accidental.
3. Reviselospernosdemontajedela cuchillay delmotora intervalos
frecuentesparaverificarqueest_nbien apretados.Inspeccione
ademasvisualmentelacuchillaen buscadedafios(abolladuras,
desgaste,roturas,etc.).Reemplacela cuchillacon equipooriginal
delfabricante(OEM)listadoenestemanual."Lautilizaci6nde
partesquenocumplanconlasespecificacionesdeequipos
originalespodriatenercomoresultadounrendimientoincorrectoy
ademasla seguridadpodriaestar comprometida"
4. Lascuchillasdelas podadorasson muyafiladasy podriancortarlo.
Envuelvalacuchillao utiliceguantesyextremeprecauciones
cuandole deservicio.
5. Mantengatodoslospernos,tuercasytornillosbienajustadospara
asegurarsequela maquinaseencuentraencondicionessegurasde
operaci6n.
6. Nuncamanipulelosdispositivosdeseguridaddemaneraimpru-
dente.Controleperi6dicamentequefuncionendeformaadecuada.
7. Afterstrikinga foreignobject,stop theengine,disconnectthespark
Despuesdegolpearcon algQnobjetoextrafio,detengael motor,
desconecteel cabledela bujiayconecteel motoramasa.Inspec-
cioneminuciosamentela maquinaparadeterminarsiesta dafiada.
Repareel dafioantesdeencenderlayoperarla.
8. Nuncatratede ajustaruna ruedaola altura decortemientrasel
motorestaenmarcha.
9. Loscomponentesde latolvapararecorte,cubiertadedescargay
escudode riel,estan sujetosadesgastey dafios quepodriadejar
expuestaspartes quese mueveno permitirquese arrojenobjetos.
Paraprotegersu seguridad,verifique frecuentementetodos los
componentesyreemplaceloss61ocon partesdelosfabricantesde
equiposoriginales(O.E.M) listadaseneste manual."La utilizaci6n
departes quenocumplancon lasespecificacionesdeequipos
originalespodria tenercomo resultadoun rendimientoincorrectoy
ademaslaseguridadpodria estarcomprometida"
10. Nocambiela configuraci6ndelreguladordelmotorni acelere
demasiadoelmismo.El reguladorcontrolalavelocidadmaxima
seguradeoperaci6ndel motor.
11. Mantengaoreemplacelasetiquetasdeseguridad,seg_nsea
necesario.
12. Observelasleyesy normasaplicablesparadisponeradecuada-
mentedelosdesechos.Ladescargainapropiadade liquidoso
materialespuededafiar elmedioambiente.
21
Pr cticas de
operation
ADVERTENCIA:
Estes[mbolo in-
dica instruccionesde
seguridadimportantes
que de noseguirse, se
podr[aponer en peligro
la seguridad personal
y/o la propiedadsuyay
deterceros. Lea y siga
todas lasinstrucciones
en este manualantes
de iniciarla operaci6n
de esta m_tquina.En
caso deno seguir
estas instrucc_onespo-
dr[aprovocarlesiones
3ersonales.Cuando
veaeste s[mbolo
SIGA LA ADVERTENCIA
Su
responsabilidad:
$61opermitaque usen
esta ma.quinaelectrica
las personasque lean,
comprendany respeten
las advertenciasy las
nstruccionesque apa-
recenen estemanualy
en la m_.quina.

f 1. Parael embarque,el deflectordel canal en
odadorase env[a
con la manijaen la
NOTA:Cada extremo
de la manijasuperior
debe sercolocado en
la misma posici6n
relativa.
k.
Paso 1
Paso 2
Paso 3
IMPORTMITE:
Estaunidadseenv[asin
gasolinaniaceiteenel
motor.Llenecongasolina
oseindicaen
lasinstruccionesquese
incluyenenel manualde
motoradjuntoANTESde
)nerenfuncionamiento
supodadora.
su podadorase mantieneen posici6nvertical
medianteuna retenci6n.Quite la retenci6n
como sigue:
a. Empujeel deflectorde canal haciaarriba
haciael motor.Mantengael deflectoren
estaposici6n mientrasquita la retenci6ny
la desecha. Vea el Paso 1
b. Bajecuidadosamenteel deflectordecanal
manteniendosus dedosfuera del alcance.
2. Realicela secuenciaa continuaci6npara
ajustarla manija
a. Levantela manijasuperior desdesu
posici6n plegadaA y tire de la misma hasta
la posici6n extendida Bsiguiendo la flecha
en el Paso2. La manijadebe hacerclic
cuando este ensu posici6n.
b.AsegOresede que elbul6n decarro este
apropiadamenteasentadoen la manija.
Apriete lastuercas de mariposapara
sujetarla manijasuperior a lamanija
inferior3. Siesta satisfechocon la altura
de la manija,apriete las tuercas de mari
posa en los extremosde la manija inferior
mostradosen el Paso3. Paracomodidad
de la operaci6n, puedeajustar la alturade
la manijacomo sigue:
3. La guia de lacuerda ya est,. unida alcostado
derecho de la manijasuperior.Afloje la tuerca
de mariposaque sujetala guiade cuerda.
a. Quitelas tuercas de mariposaque se
muestranen el Paso3 y quite la manija
inferior.
b. Coloqueel perno de la mensula de la
manijaen el orificiosuperiorde la manija
inferior.
c. Apriete lastuercas de mariposa.A
22

4. Colocaci6n de la guia de cuerdacomo sigue
en el Paso4:
a. Sostengala manija decontrol dela
cuchillacontra la manijasuperior.
Posici6nA.
b. Tirelentamentede la cuerda dearranque
parasacarladel motor. Posici6nB.
c. Deslicela cuerda de arranque enla guia.
Posici6nC.
d. Apriete latuerca de mariposade la guia
de la cuerda. Posici6nD.
5. Cadarueda tiene una palancade ajuste de
alturapara cambiar laalturade corte de la
podadora.Presionela palanca de ajuste de
alturahacia la rueday deslice la palanca
hasta laposici6n deseadapara cambiar la
alturade corte.Yea el Paso 5.
6. Sisu podadoraestdtequipadacon undeflec-
tor opcionalpara abono,instdtleloal lado
derechode la plataforma.Siga la secuencia
que se indica.
a. Levanteysostenga el deflectordel lado de
la descargae inserteel labio inferiorde la
tolvade abono dentrode la apertura del
canal. Veael Paso6.
b,
Una losganchosde latolva deabono so-
bre elpasadordel deflectorde canal. Los
ganchos deben ajustarseensu lugaren el
pasadorde bisagra,sujetando latolva de
abono firmementeen la podadora.Suelte
el deflector decanal.
Paso 4
Paso 5
ALTURADEL CORTE
Paso5
Todaslas ruedas
debenser colocadas
enla mismaposiciSn
relativa:Cuandoel
terrenoesagresteo
irregular cambiela
palancadeajuste dela
alturaa unaposici6n
masalta, Deesta
manerase cuidam_sel
I
TOLVADEABONO
(siesparte del equ
PaSo6
Parainstalarla cor-
rectamente;
I
introduzcael labio
inferior dentro dela
ape turadesCanal
antesdecolocar los
ganchos sobre el
pasador debisagra:
I
I
IMPORTANTE
Esta UnidadSeenvia
gasolinani aceiteenel
rnot0r!LleneCongasolina
yaceiteComoSeindica
enlasinstruccionesque
Se incluyenenel manual
de motoradjuntoANTES
de poneren
23

i i ii i i
Funciona.
m lento de
ADVERTENCIA:
Este mecaoismo de
control de ia cuchifla
es un dispositivo de
seguridad. Hunca
intente desviarse de
su funcienamiento.
Tonga extremo
cuidade cuando
manipule la gaso-
lina. La gasolina es
aitamente inflamable
y los vapores son
explosives. Hunca
le agregue combus-
tible a la m_quina en
interiores e mientras
eJmotor est_ caliente
o en funcionamiento.
Apague los cigarril-
los, cigarres, pipas
y otras fuentes de
cembusti6n.
Mantenga sus manos
y pies alejados deJ
_rea de torte y de la
tolva.
ConsuJte la etiqueta
de adverfencias
en ia unidad.
/_ Manijasuperior
Arrancadorde
retroceso
Cuerda del
arrancador
Tap6nde
Palancadeajuste de la
altura
Tolvadeabono (si es
parte del
Llenadode aceite
Palancade ajustede la
altura
Cebador
Figure 1
Ahora que ya ha ajustado su podadora para su
funcionamiento, familiaricese con sus controles y
caracteristicas. Estos se describen y se ilustran en
esta pagina. Este conocimiento le permitir_, utilizar
su nuevo equipo a su m_xima capacidad.
Control de la cuchilla
La manija de control de la cuchilla est& unida a la
manija superior. Presione la manija de control de
la cuchilla contra la manija superior para operar la
unidad. Libere la manija de control de la cuchilla
para detener el motor y la cuchilla.
__IL ADVERTENCIA:Estemecanis-
mo de controlde la cuchilla es
andisposiUvode seguridad.
Nuncaintente desviarsedesu
funcionamiento.
Tolva de abono
(si es parte del equipo)
La tolva de abono permite usar los recortes del
c_sped como abono, regresandolos a la podadora.
Conecte la tolva para recortes siguiendo las instruc-
clones de la pagina 7 de este manual.
Llenado de gasolina y aceite
1. Verifique el nivel del aceite y agregue mas
de ser necesario. Siga las instrucciones el
manual del motor. Vea la ubicaci6n del tap6n
de Ilenado de aceite en la Figura 1.
.
Realice el servicio del motor con gasolina
como se indica en el manual del motor. Vea
la ubicaci6n del tap6n de Ilenado de com-
bustible en la Figura 1.
Palancasdeajuste dela altura de corte
Estas palancas estan ubicadas una en cada
rueda y se usan para corregir la altura de corte.
Las cuatro palancas tienen que estar en la misma
posici6n relativa para asegurar un corte uniforme.
Arrancador de retroceso
El arrancador de retroceso esta unido a la manija
superior derecha. Para encender la unidad
col6quese detras de la misma y tire de la cuerda
del arrancador de retroceso.
ADVERTENCIA:Tongaextremo
cuidadocuandomanipule la
gasolina.La gasolinaesalta-
monte inflamabley los vapores
sonexplosivos.Nuncale agreg-
uecombustiblea la m_quina en
interioreso mientras el motor
est_ caliente o en funciona-
miento. Apaguelos ci_larrilios,
cigarros,pipasy otrasfuentes
decombusU6n.
24

i_ i i ii i I
ADVERTENCIA:AI operar una cor-
tadora trituradora puede ser que
objetos extrafios scan arrojados
a los ojos Io cual puede dafiarlos
gravemente. Utilice siempre
anteojos de seguridad durante la
operaci6n del equipo o mientras
Io ajusta o Io repara.
Encendido del motor
ADVERTEHCiA:Aseg_rese de
que ninguna persona adem_s del
operador est_ detenida cerca de
la podadora mientras arranca el
motor u opera la podadora.
Hunca encienda un motor en
espacios cerrados o en aria zona
con poca ventilaci6n. EJescape
del motor contiene mon6xido de
carbono, un gas inodoro y letaL
Mantenga las manos, los pies, el
cabeHo y la ropa sueita alejados
de las partes m6viles del motor y
de la podadora.
1. Optimael cebadortresveces. Espereaproximadamente
dossegundosentrecadapresi6n.Veala Figura2. En
climascontemperaturasdealrededorde55° Fo menos,
optimael cebadorcincoveces.Nocebe el motorcaliente
parareiniciarloluegode unadetenci6nbreve.
2. Col6quesedetr&sde la podadora,aprietelamanila
decontrolde lacuchillay sostengalacontrala manila
superior.Vet la Figura2.
3. Sostengafirmementelasdosmanijasjuntas,tomelamanila
delarrancadorde retrocesoytirede lacuerdaparasacarla
conunmovimientor_pidoycontinuo.VealaFigura2.
Mantengafirmela maniladelarrancador,dejequelacuerda
regreselentamenteal arrancador.Repitahastaqueel motor
esteenmarcha.Dejeque lacuerdaseenrosquelentamente
de regreso.
Detenci6n del motor
1. Liberelamaniladecontrolde lacuchillaparadetenerel
motory la cuchilla.
2. Desconecteel cabledela bujiay p6ngalodemaneraque
hagamasacontrael motor.
Uso de la podadora
AsegOrese que el c6sped est& libre de piedras,
palos, cables u otros objetos que pudiesen daSar
la cortadora o el motor. Dichos objetos pueden
ser arrojados accidentalmente pot la podadora en
cualquier direcci6n y provocar lesiones personales
graves al operador y a otras personas.
ADVERTEHCiA:Si goipea an objeto
extrafio, detenga el motor. Retire
el cable de la bujia, inspeccione
la podadora para vet que no tenga
dafios y repare el dafio antes de
reiniciar y operar la podadora. La
vibraci6n excesiva de la poda-
dora durante la operaci6n es aria
indicaci6n de dafio. La unidad
debe inspeccionarse y repararse
Io antes posible.
Consejos de operaci6n
1.Para obtener resultados 6ptirnos no corte cesped
hOmedo.
2. Elc_spednuevo,gruesoo hL_rnedopodriarequerirun
cortern_.sestrecho.
3. Parauncespedrn_.ssano,nuncacorte rn_.sde un
terciodela Iongitudtotaldelcesped.
4. Enel oto_o,suc_speddebecortarsecuandohaya
crecido.
5. Paraunabonoeficiente,nocortecespedhL_rnedo.
6.Ajustelavelocidadde pisode acuerdoconla
condici6ndelcesped.
7.Siel cespedhacrecidom_sde 4"no serecomienda
el abono.Podeel cespedusandola descargalateral
parareducirlaalturadelcespeda unm_ximode 3
1/4"antesdeusarla abonadora.
Figure 2
WARNING
The operation of any
lawnmowercan result
in foreign objects
being thrown into
the eyes,which can
damage your eyes
severely. Always wear
safety glasseswhile
operatingthe mower,
or while performing
any adjustments or
repairs on it.
Besure no one other
than the operator is
standing near the lawn '
mower while starting
engine or operating
mower. Never run
engine indoorsor
in enclosed, poorly
ventilated areas. En-
gine exhaust contains
carbon monoxide, an
odorless and deadly
gas. Keep hands, feet,
hair and loose clothing
away from any moving
parts on engine and
lawn mower.
25

lantenimiento
dela
podadora
NOrecomendamos
elUSOdeunalim_
piadoraapresiOno
mangueradejardfn
paralirap!arsuUnidad
Puedenproducirda_os
a losComponentes
electricos,engranajes,
poleas,rodamientos0
a!motorElUS0deagua
acortara!avidaLitilde
lam_quinay reducirasu
tacilidaddeServiciol
_ DVERTENCIA: Detenga
siempre ei motor, desconecte
ia bujia y haga nasa contra el
motor antes de limpiar,iubricaro
de realizar todo tipo de manten-
imientode ia m_quina.
Figura 3
f
TapOndeGasolina FiltrodeAire
CabledeBujia
Encendido j
Figura 4
Recomendaciones generales
1. Respetesiemprelasreglasdeseguridadcuando
realicetareasdemantenimiento.
2. Lagarantiadeestapodadoranocubreelementos
quehanestadosujetosal realusoo negligencia
deloperador.Pararecibirel reembolsototaldela
garantia,el operadordeberadarmantenimientoa la
podadoracomoseindicaenestemanual.
3. Elcambiodelavelocidadcontroladadelmotor
invalidaralagarantiadelmotor.
4. Todoslosajustesdebenserverificadospor Iomenos
unavezencadaestaciOn.
5. ReviseperiOdicamentetodoslossujetadoresy
compruebequeestdnbienajustados.
Lubricaci6n
1. Lubriqueconaceiteligerolospuntosdepivotede
la manijadecontroldelacuchillaal menosunavez
cadaestaciOn.Elcontroldelacuchilladebefuncionar
librementeenambasdirecciones.VerlaFigura3.
2. LubriquelasruedasporIomenosunavezpor
temporadaconaceiteligeroo aceiteparamotor.
Sinembargo,silasruedassequitanporcualquier
razOn,debelubricarlasuperficiedelpernodelejey la
superficieinternadelaruedaconaceiteligero.Verla
Figura3.
3. Lubriqueel resortedetorsiony lospuntoscruciales
deldeflectordelcanalconaceiteligerounavezpor
temporadaparaprevenirlaoxidaciOn.VerlaFigura3.
4. Sigael manualadjuntodelmotorparalas
instruccionesyel programadelubricaciOn.
Limpieza de la podadora
Debelimpiarlaparteinferiordela cubiertadela podadora
despu6sdecadausoparaprevenirlaacumulaciOnde
recortesdec6sped,hojas,tierrauotrosdesechos.Sigalos
pasosqueaparecendebajopararealizarestatarea..
1. Desconecteelcabledela bujia Drenelagasolinade
la podadorao coloqueuntrozodepl_sticodebajodel
tapOndeIlenadodelcombustible.VerlaFigura4.
2. Inclinelapodadorademaneraquequedeapoyada
sobrelacaja.Mantengahaciaarribael ladodonde
seencuentrael filtrodeaire.Sostengafirmementela
podadora.
__iL DVERTENCIA: Nunca incline
la podadora=n_sde 90 grados
enningunadirecciSn y no
deje la podadorainciinada.
Sepuedefiltrar aceite dentro
de la partesuperiordel motor
y causarproble=nasde ar-
ranque.
3. Raspey limpiela parteinferiordelacubiertamediante
el usodeunaherramientaadecuada.Nola rociecon
agua.
4. Vuelvaacolocarlapodadorasobresusruedassobre
elsuelo.Sipusounpl_sticodebajodeltap6nde
IlenadodecombustibleasegOreseahoradesacarlo.
26

_ _i iii_
Cuidado de la cuchilla 11.Vuelvaa colocarel bul0nhexagonalyaj0stelocomo
ADVERTENCIA: Cuando
saque la cuchilla de corte
para afilarla o reernplazarla,
prot_jase las manes usando
un par de guantes para tra-
bajo rudo o un trapo grueso
para sostener la cuchilla.
Inspeccioneperi0dicamenteeladaptadordelacuchilla
enbuscaderajaduras,especialmentecuandogolpee
unobjetoextra_o.Realicelosreemplazosqueresulten
necesarios.Sigalospasosqueaparecendebajopara
realizarel mantenimientodela cuchilla.
1. Desconecteelcabledela bujia.Volteela podadora
sobreel costadoycompruebequeelfiltrodeaireyel
carburadorquedenhaciaarriba.
2. Saqueelpernoy elsoportedecampanade lacuchilla
quesostienenlacuchillayeladaptadordelamismaal
cig0e_aldel motor.VerlaFigura4.
3. Saquelacuchillayeladaptadordelcig0e_al.
4.. Sepuedeafilarlahojaconunafiladoro conunarueda
deesmalte.Nointenteafilarlacuchillamientrasse
encuentraa0nenlapodadora.
5. Cuandoafilelahoja,sigael_ngulooriginaldelamuela
comoguia.Afilecadabordedecorteporigualpara
mantenerelbalancedela hoja.
6. Saquelacuchilladeladaptadorparacomprobarel
balance.
7. Balanceelacuchillasobreundestornilladorpara
verificar.Saqueel metaldelladopesadohastaque
quedebienbalanceada.
__k ADVERTEHCIA:Si la cuchifla est_
desequilibrada generar_ vibra-
ciones excesivas cuando gire a
altas velocidades. Puede producir
dafios a la podadora y se puede
romper causando asi lesiones
personales.
8. LubriqueelcigLie_aldelmotory lasuperficieinterna
deladaptadordelacuchillaconaceiteligero.Desliceel
adaptadordelacuchillasobreelcigOe_aldelmotor.
9. Instalelacuchillaconel ladomarcado"Bottom"
(inferior)o conel n0merodepartehaciaelpisocuando
lapodadoraest_enposici0ndeoperaci0n.Aseg0rese
dequela cuchillaquedealineaday asentadaenlas
bridasdeladaptador.
10.Coloqueel soportedecampanaenlacuchilla.
Compruebequelasmuescasdelsoportedecam-
panadela cuchillaestOnalineadasconlosorificios
peque_osdelacuchilla.
corresponde:450pulgadaslibrascomominimo,600
pulgadaslibrascomom_ximo.
Paraasegurarlaoperaci0nseguradelapodadorarevise
peri0dicamenteelpernodelacuchillaparadeterminarsi
est_bienajustado.
Reemplazo de aler6n trasero
Sedebenseguirestospasosparalapreparaci0ndela
podadoraparasualmacenamiento.
1. Limpieylubriquelapodadoracomosedescribeen las
instruccionesdelubricaci0n.
2. Norecomendamosel usodeunalimpiadoraa presi0no
mangueradejardn paralimpiarsuunidad.
3. Consulteel manualdelmotorparaconocerlasinstruc-
clonesparaelalmacenamientocorrectodelmismo
4. Cubralacuchillacongrasaparachasisparaimpedirla
oxidaci0n.
5. AImacenelaunidadenunazonalimpiay seca.Nola
almacenecercadematerialescorrosivoscomopor
ejemplofertilizantes.
CuandoalmacenecualquiertipodeequipoelOctricoenun
galp0ndedep0sitomet_licoo conpocaventilaci0n,tenga
Adaptadorde
Cuchilla cuchilla
BulOn Soportedecampana
hexagonal delacuchilla
Figura 5
especialcuidadoderealizarleuntratamientoantioxidante
al equipo.Useaceiteligeroosiliconpararecubrirel
equipo,especialmenteloscablesy partesm0vilesdesu
podadoraantesdealmacenarla.
pod
ADVERTENCIA:
Cuandesaqae la
:achillade torte
paraafilarla e reem-
Jlazarla, pret6jase
las manesasando
anparde gaantes
}ara trabaje rude
e antrape graese
Jarasestenerla
cuchilla.
Si la cuchillaest_
deseqailibrada
generar_vibra-
cienesexcesivas
caandegirea altas
velecidades.Paede
3redacirdafies a la
pedaderay se paede
rompercaasande
as{lesiones perse-
hales.
27

Problerna Causa Remedio
Elmnfnrnnnrrnnr'_ 1. Manijadecontroldelacuchilladesen- Jl. Enganchelamanijadecontroldela
.......... anc'ada "'
g il . cuc11111a.
2• Sehadesconectadoelcabledelabujia• 2• Conecteelcableala bujia•
3• Eltanquedecombustibleest,.vaciooel 3. Lleneeltanquecongasolnalimpiay
combustibleesviejo• fresca•
4. Elmotornoest,.cebado• 4• Cebee motortal comoseex,plic6en
Funcionamientoapodadora
5 Labuia nofunconacorredamRnte 5. Limpiela ajusteladistanciadisruptivac
....... J c_.mbiela.
6 La ineadelcombustibleest,.bloqueada...........
7. IV_otorinunuauo, b. L_mp_e_aHneaue_comuus[_u_e.
7. Espereunosminutosparareencender,
i no realiceelcebado•
El motor funciona de 1. Elcabledela buj[aestaflojo. 1. Conecteyajusteelcabledela buj[a.
manera err_.tica 2. LaI[neadelcombustibleestatapadaoel 2. LimpielaI[neadelcombustible;Ileneel
mismoesviejo tanquecongasolinalimpiayfresca.
3. Laventilaci6nenlatapadenaftaesta 3. Destapelaventilaci6n.
obstruida.
4. Aguaosuciedadenelsistemadel 4. Vac[eel tanquedelcombustible.Vuelva
combustible, aIlenarloconcombustiblelimpio.
5. Elfiltro deaireestasucio. 5. Consulteel manualdelmotor.
6. Esnecesarioajustarelcarburador. 6. Consulteel manualdelmotor.
Elmotorrecalienta 1• Elniveldeaceitedelmotoresbajo• 1• Lleneelc_.rterconaceiteadecuado•
2• Flujodeairerestringido• 12• Retirelacarcasadelsopladory limpie•
I
3. Elcarburadornoest_ajustadocorrecta- 3. Consulteel manualdelmotor.
mente.
Saltosocasionales
aaltasvelocidades
1. Ladistanciadisruptivadela buj[aes
muypoca.
2. Ajus.tedela mezcladelcarburadormal
alus[aao
1. Ajusteladistanciadisruptivaa
0,030".
2. Consulteel manualdelmotor•
Funcionamalen 1. Buj[aatoradafalladao separaciOn 1. ReajustelaseparaciOna .030"o
marchaenta demasiadoancha, reemplacelaI_uj[a.
2. Carburadorajustadoincorrectamente. 2. Consuteel manualdelmotor.
3. Elfiltro deaireest,.sucio .3. Consulteel manualdelmotor.
Demasiadavibraci0n 1. Cuchilla floja odesequilibrada. 1. Apriete la cuchilla y el adaptador.
Balancee lacuchilla.
2. Cuchillaabollada. 2. Consulteal distribuidorautorizado.
Lapodadorano 1. C_spedhOmedo• I 1. No corteelc_spedcuandoest,.mojado
fllnp nn_ r'nmn esperehastaqueseam_.stardepara
.......... I cortarlo.
abonadora 2 Cds_e'4_xcesiva-entealb 2• Podeunavezaunaalturadecorte
• _,u_ ,,, u• elevadaluegovuelvaarealizarel
cortea la alturadeseadaohagauna
trayectoriadecortem_.sestrecha•
3• LahojadelacortadoraestAdesafilada• o3• Cambieoafile lashojas•
Cortedesparejo 1. Laposici0ndelasruedasnoes 1. Coloquelascuatroruedasenla
correcta, mismaposiciOndealtura.
2. Lahojade lacortadoraestadesafilada. 2. Cambieoafilelashojas.
_ J _ =__ 1
28

"I
29
seguridad
NeOretire las etiquetas
Seguridad de ia
p0dadora;

@
\
\
\
30

17032A Bisagradelcanal
17098 Pasadorde bisagra
682-3064 Juegodesoportede lamanijaLD
682-3065 Juegodesoportede lamanijaLI
687-02048 Plataforma22"(sinIogotipo)
687-02051 Juegodepalanca(incluyeRef.#17)
687-02094 Brazopivote
710-0216 Tornillohexagonalde3/8-16x0,75
710-0599 TornilloTT de 1/4-20x 0.5"
710-0654A TornilloTT de3/8-16x 1,0
710-1044 Tornillohexagonalde3/8-24x 1,5
710-1174 Bul6ndel carro,5/16-18x 2.0"
710-1205 Pernodeojo
712-0431 Tuercade seguridad3/8-16
720-0279 Tuercade mariposa
720-0284 Tuercade mariposa
720-0426 Perilladeajustedealtura
725-0157 Uni6ndecable
731-04019 Escudode riel
731-04197 Tap6ndeabonadora(sicuentacon
esteequipo)
731-1034B Mecanismodel deflectordecanal
conbisagra
731-1035B Deflectordelcanal
732-1014 Resortede torsi6n
734-1987 Ruedatrasera8 x 1.8
734-1988 Ruedadelantera7 x 1.8
736-0270 ArandelaBell,0.265x0,75OD
736-0451 Arandelade montura,0,320x0,93OD
736-0524B Soportede campanade lacuchilla
736-0741 ArandelaBell,0,760x 1,25OD
738-1172 Tornilloconreborde
738-1173 Tornilloconreborde
741-0751 Cojinetede ajustedela altura
742-0642A Cuchillaest_.ndar22"
742-0742A Cuchillade abonadora22"
746-0957 Cabledecontrolde lacuchilla:-37,25"
746-0946 Cabledecontrolde lacuchilla:-
48,25"
746-1130 Cabledecontrolde lacuchilla:-40"
747-0710 Pasadorde bisagra
747-1161A Manijade controlde lacuchilla
748-03760 Adaptadordecuchilla
749-04037 Manijainferior
749-1092A Manijasuperior
Lista de las
i
Para realizar un
pedido con par=
tes de repuesto_
contacte al
1=800-800=7310
o visi,e www.
mtdproducts.
COrrJ.
31

GARANTiA LiIVlITADA DEL FABRICANTE PARA:
Lagarantialimitadaqueseextiendea continuaci0nesotorgadaperla
empresaMTDLLCycubremercaderiasnuevascompradasyutilizadasen
losEstadosUnidos,susposesionesyterritories.
"MTD"garantizaesteproductoperdefectosdematerialesydefabricaci0nper
unper[odededos(2)a_osapartirdelafechadelacompraoriginalyreparar_
ocambiar_sincargocuandoIoconsiderepertinentetodaslaspiezasconde-
rectosdematerialesodefabricaci0n.Estagarant[alimitadas01oseaplicarasi
elproductohasideoperadoy mantenidodeacuerdoconlasinstruccionesdel
manualdeloperadorqueseproporcionanconel productoynohasidesujeto
auseinapropiado,abuse,usecomercial,abandono,accidente,mantenimiento
incorrecto,alteraci0n,vandalismo,robe,incendio,inundaci0no alg0nda_o
debidoaotropeligroo desastrenatural.Elda_oresultanteperlainstalaci0n
oel usedepiezas,accesorioso unionesnoaprobadosperMTDparasuuse
conel(los)producto(s)incluido(s)enestemanualanularalagarant[aenIo
querespectaa esosda_os.Segarantizaquelaspiezascondesgastenormal
est_nlibresdedefectosenlosmaterialeso defabricaci0nperunper[odede
treinta(30)d[asa partirdelafechadecompra.
Laspiezasocomponentessujetosadesgastenormalincluyenporeno
selimitana: baterias,bandas,hojas,adaptadoresparahojas,bolsaspara
paste,ruedasparala plataforma,asientos,zapatasanti-deslizantes,placas,
gomasdecorteyneum_ticos.
COMOSOLICITARY OBTENERSERVlCIOTECHICO:El servicio
de lagarant[aestadisponible, CONPRUEBADECOMPRAA TRAVES
DELDISTRiBUIDORLOCALAUTORiZADOPARAELMANTENIMIENTO.
ParaIocalizaral distribuidor ensu area,busqueen lasp_.ginasamaril-
lasde su Iocalidado contactea MTD LLCal ApartadoPostal361131,
Cleveland,Ohio 44136-0019,o Ilameal 1-800-800-TRIM (7310) o
1-330-220-4683 o entrea lapaginaWebenwww.mtdproducts.com.
Estagarantialimitadano Iocubrir_enlossiguientescases:
a,
b,
C.
d,
Elmotory laspiezascomponentespresentes.Estosproductos
tienenunagarantiadelfabricanteperseparado.Consultelos
tOrminosycondicionesdelagarant[aaplicabledelfabricante.
Lasbombasparael cortedemadera,lasv_lvulasy loscilindros
tienenunagarantiaindependientedeuna_o.
Losarticulosnecesariosparaelmantenimientoderutinacomeper
ejemplolubricantes,filtros,afiladoresdehojas,losajustesdelos
frenos,delembragueo delaplataformayeldeterioronormaldel
acabadoexteriordebidoal useo exposici0n.
Servicionorealizadopereldistribuidorautorizadoparael
mantenimiento.
f,
g.
MTDnoextiendeningunagarantiaparalosproductosvendidoso
exportadosfueradelosEstadosUnidosdeAmOrica,susposesio-
nesyterritories,exceptoparaaquellosvendidosatravOsdelos
canalesautorizadosdedistribuci0ndeexportacionesdeMTD.
Piezasdereemplazoqueno sonpiezasgenuinasdeMTD.
Castesdetransportey IlamadasperserviciostOcnicos.
Nose aplican garantias implicitas, incluidas las garantias
implicitas de comerciabilidado deadecuaci_n para an prop_sito
determinado, despuOsdel periedode aplicaci_n de la garantia
escrita expresa extendida m_sarriba para las piezasde acuerdo
con suidentificaci_n.Ninguna otra garantia expresa, oral o
escrita, excepto la mencionadaanteriormente, extendida per
personaso personasjuridicas, incluidoslos distribuidores o
los minoristas conrespecto a los productosobligar_ a MTD.
gurante el piazode la garantia el _nico recurso es ia reparation
o reemplazodel productocomese indic_ anteriormente.
LasdJsposicionesincluidas enesta garantia proveeneJrecurso
_nico y exclusivequesurge delas ventas, iVlTDno ser_ respon=
sable per pOrdidaso dafies incidentales e directos, incluyendo
sin limites los gastos incurridospara los servicios de cuidado
del paste de reemplazoo cambio, o los gastos deaiquiler para
reemplazar demanera transitoria an producto bajogarantia.
Algunosestadosnopermitenlaexclusiono limitaci0ndelosda_osy
perjuiciosincidentalesodirectos,o laslimitacionessobreladuraci0ndelas
garantiasimplicitasperIoquelasexclusioneso limitacionesmencionadas
anteriormentepuedennoserledeaplicaci0n.
Enning0ncaseseobtendr_unacompensaci0nmayoral montedelprecio
decompradelproductovendido.Laaiteraci_n delas caracteristicas
de seguridaddel productoanular_ esta garantia. Ustedasume
el riesgoy laresponsabilidadperlaspOrdidas,dafioso lesionesquesufra
Ustedysusbienesy/ ootraspersonasysusbienescomeconsecuenciadel
use,deluseincorrectoo delaimposibilidaddeusedeesteproducto.
Estagarantialimitadaalcanzasolamentealcompradororiginal,alarrenda-
tariooriginaloa lapersonaquerecibi0el productoderegale.
C6MO SERELACIOHALALEGISLACI6NESTATALCONESTA
GARANT|A:Estagarantfalimitadaleotorgaderechoslegalesespecfficosy
puedetambiOncontarconotrosderechosquevarfandeunestadoaotro.
IMPORTANTE:Elpropietariodebepresentarpruebadecompraoriginal
paraobtenerlacoberturadelagarantfa.
IViTD LLC, P.O. BOX 361131 CLEVELAND, OHiO 44136-0019; Tel: 1=800=800-7310, 1-330=220-4683
-
 1
1
-
 2
2
-
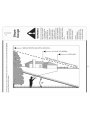 3
3
-
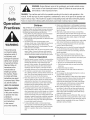 4
4
-
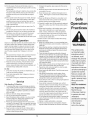 5
5
-
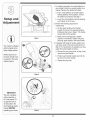 6
6
-
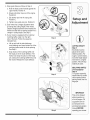 7
7
-
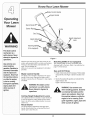 8
8
-
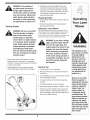 9
9
-
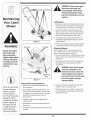 10
10
-
 11
11
-
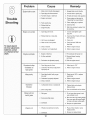 12
12
-
 13
13
-
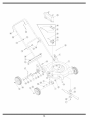 14
14
-
 15
15
-
 16
16
-
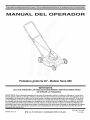 17
17
-
 18
18
-
 19
19
-
 20
20
-
 21
21
-
 22
22
-
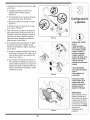 23
23
-
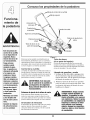 24
24
-
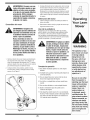 25
25
-
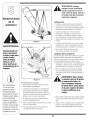 26
26
-
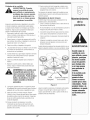 27
27
-
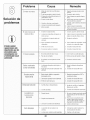 28
28
-
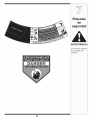 29
29
-
 30
30
-
 31
31
-
 32
32


MTD 11A-084E729 Manual de usuario
- Categoría
- Cortadoras de césped
- Tipo
- Manual de usuario
en otros idiomas
- English: MTD 11A-084E729 User manual