Pulsar Forward F455 Operating Instructions Manual
- Tipo
- Operating Instructions Manual

OPERATING INSTRUCTIONS
FORWARD F455
Digital NV
Attachment

Digital NV Attachment
FORWARD F455
3-11
ENGLISH
L’attache de vision nocturne numerique
FORWARD F455
12-20
FRANÇAIS
Digitaler Nachtsichtvorsatz
FORWARD F455
21-30
DEUTSCH
Dispositivos NV acoplables
FORWARD F455
31-39
ESPAÑOL
Dispositivo notturno digitale
FORWARD F455
40-48
ITALIANO
Цифровая насадка НВ
FORWARD F455
49-58
РУССКИЙ

3
Specications
MODEL FORWARD F455
SKU# 78186
OPTICAL SPECIFICATIONS
Lens focus, mm 50
Relative aperture, D/f 1:1
Field of view (horizontal), ° 6.3
Field of view (horizontal), m at 100m 11
Max. observation range of an animal 1.7 m high, m 500
Minimum focusing distance, m 5
Recommended magnication of the daytime sight 2-8
ELECTRONIC SPECIFICATIONS
Sensor type / resolution CMOS HD 1280X720
Display type / resolution AMOLED 1746x1000
Sensitivity, mW (wavelength 780nm, 25 lines/mm resolution) 1.5×10
-
⁵
Sensitivity, mW (wavelength 915nm, 25 lines/mm resolution) 5.5×10
-
⁵
DETACHABLE IR ILLUMINATOR
Type / wavelength, nm LED 940
OPERATING FEATURES
Power supply, V 3.0 – 4.2
Battery type Li-ion Battery Pack
Capacity IPS7 (6400 mAh)
Rated Output Voltage DC 3.7V
External power supply Micro USB Type B (5V)
Battery life at temp. = 22 ° C (Wi-Fi off, IR off), hrs 9
Maximum recoil power on a ried weapon, Joules 6000
Maximum recoil power on a smooth-bore weapon, calibre 12
Degree of protection, IP code (IEC60529) IPX7
Operating temperature, °C/F -25 ... +50 / -13 ... +122
Dimensions, mm/inch 155х136х77 / 6.1x5.35x3.03
Weight, kg/oz 0.83 / 29.28
VIDEO RECORDER
Video/photo resolution, pixels 1280x720
Video / photo format .mp4 / .jpg
Built-in memory 16GB
Frequency 2.4 GHz
Standard 802.11 b/g/n
Improvements may be made to the design and software of this product to enhance its user features.
The current version of the User’s Manual may be found on the website www.pulsar-vision.com
Package Contents
•
Digital night vision attachment
•
Carrying case
•
Battery Pack
•
Battery charger
•
Mains adapter
•
MicroUSB cable
•
Quick start guide
•
Lens cloth
•
Warranty card
Description
The Forward F455 digital night vision attachment is a versatile attachment that allows you to quickly and easily
transform a daytime optical sight into a night one. The attachment is mounted onto the lens of an optical sight
with the aid of adapters designed for various lens diameters. The attachment does not require any additional
ranging. The attachment is intended for various applications, including hunting, sport shooting, night
photography and video recording, and observation.
Features
•
1280x720 HD sensor
•
Enhanced night-time sensitivity
•
Simple transformation of daytime optical sight into night sight
•
Preserves the benets of daytime optics in night-time conditions
•
Aiming point stability
•
Comfortable use in a wide range of daytime optical magnications
•
Invisible long-range IR Illuminator
•
SumLight™ enhanced sensitivity software
•
Detection distance of up to 500m
•
Instant power up
•
Built-in video
•
Power from quick-release, high-capacity B-pack rechargeable batteries
•
Four-point mounting system with automatic clamp
•
Compatibility with other manufacturers’ adapters
•
High calibre recoil resistance 12 gauge, 9.3x64, 0.375H&H
•
Wi-Fi integration with iOS and Android devices
•
Stream Vision. Remote control surveillance and live YouTube streaming via smartphone
•
Remote software updates
•
Fully waterproof (IPX7)
•
Extreme operating temperature range (-25 ... +50°С / -13F ... +122 F)
•
MicroUSB Power Bank charging
ENGLISH

4
Units and controls
1. Lens cover
2. Eyepiece cover
3. Battery compartment cover
4. Battery locking lever
5. Rechargeable battery
6. RIGHT button
7. M (MENU) button
8. LEFT button
9. ON button
10. Lens focus knob
11. IR illuminator cover
12. IR illuminator connector plug
13. IR illuminator installation connector
14. MicroUSB port
15. Weaver rail
16. Adapter cover*
17. Optical sight lens
18. Insert*
19. Adapter*
20. Tightening screw
21. Screw
22. Adapter lever
23. Attachment point
24. IR button
25. IR illuminator lever
5
24
1
17
18
20
21
22
2
14
16 19
9 10
6
23 13
8
7
15
12
11
25
4
3
Open
Optical
sight
lens
Insert*
Tightening
screw
Screw
Adapter
lever
Eyepiece
cover
M (MENU)
button
LEFT
button
Adapter*Adapter cover*
ON
button
Lens focus knob
Weaver
rail
IR illuminator
connector plug
Lens
cover
RIGHT
button
Attach-
ment
point
IR illuminator
installation
connector
IR illuminator
lever
MicroUSB
port
IR illuminator
cover
IR illuminator
button
Battery locking lever
Battery compartment cover
Rechargeable battery
*Items of Cover Ring Adapter FN (available separately)
Description of Controls
Button Operating Mode First brief press
Other brief
presses
Long press
ON (9)
Device off Power on device
–
Power on device
Display off Turn display on
–
Turn device off
Device turned on, quick
menu, main menu
–
Display off / device powered
off
LEFT (8)
Device turned on
Turn on
SumLight™
Turn off
SumLight™
Wi-Fi on / Wi-Fi off
Navigation through menu Navigation upwards, downwards, counter-clockwise
Quick menu Reduce value
MENU
(7)
Device turned on Open quick menu Open main menu
Navigation through menu Conrm selection
Exit submenu without
conrming selection / exit
menu (go to monitoring mode)
Quick menu Navigation upwards Exit quick menu
RIGHT
(6)
Device powered on
(Video mode)
Start video
recording
–
Turn off video recording /
Switch to Photo mode
Device powered on
(Photo mode)
Take a photo Switch to Video mode
Navigation through menu Downwards / rightwards / clockwise
Increase value
IR (24)
Device turned on, quick
menu, main menu
IR illuminator on
switch
Adjust IR strength IR illuminator off switch
Operating Features
The Forward F455 attachment is designed for long-term use. Please follow these guidelines to ensure long life
and maximum performance:
•
Before using the attachment make sure you mount it according to the instructions in the “Mounting the
attachment on an optical sight” section.
•
Power off the attachment after use.
•
Do not repair or dismantle a attachment under guarantee by yourself!
•
The attachment can be used over a wide range of temperatures. If the attachment has been operated in the
cold and brought into a warm room, do not remove it from its carrying case for at least 2-3 hours; this will
prevent condensation forming on the external optical elements.
•
Inspect and maintain the attachment regularly to ensure trouble-free operation and to avert and eliminate
the cases of premature wear and tear and failure of components.
•
The battery must not be exposed to excessive heat from the sun’s rays, re of other heat sources.
Using the Battery Pack
The Forward F455 attachment is supplied with a rechargeable IPS7 Lithium-ion Battery Pack which allows the
attachment to be used for up to 9 hours. Charge the battery before rst use.
Charging the Battery Pack:
•
Attach the microUSB plug of the USB cable to the microUSB connector (C) on the charger.
•
Connect the USB plug on the cable to the mains adapter.

5
•
Plug the mains connector into a 110-220V socket.
•
Raise the lever (A) of the charger.
•
Remove the protective cover from the
battery.
•
Insert the battery into the charger as
shown in the diagram and secure the
handle (A).
•
Once installed on the charger, a green
LED indicator (B) start to glow and
begin ashing:
- once when the battery charge is
from 0% to 50%;
- twice when the battery charge is from 51 to 75%;
- three times when the battery charge is from 76% to 100%.
•
When the indicator is continuously green, the battery is fully charged. Disconnect the charger from the mains
and disconnect the battery from the charger.
•
If the battery charger indicator is constantly red when the battery is inserted, the charge level is probably
below the permissible level (the battery has been in a discharged state for a long period of time). Leave the
battery in the charger for a long period of time (up to several hours), then remove and reinsert.
•
If the indicator begins to ash green, the battery is operational.
•
If it continues to show red, the battery is defective. Do not use this battery!
Attention! When charging, always use the charger supplied with the attachment package or a Pulsar IPS charger
(sold separately). The use of other chargers may cause irreparable damage to the battery.
Installing the Battery Pack
•
Lower the lever (4).
•
Remove the protective cover of the battery compartment (3).
•
Remove the protective cover from the battery (5).
•
Insert the battery (5) into the slot designed for it on the
attachment body so that the battery F (the protrusion of the
battery casing ) is pointing downwards.
•
Lock the battery in place by raising the lever (4).
Attention! External power may be supplied from an
external source, such as a 5V Power Bank. Connect an
external power source to the attachment by connecting
the USB cable to the attachment’s microUSB port (14) (See
Section “External Power Supply”).
Safety measures:
•
Do not use the charger if it has been modied or damaged.
•
Do not leave a battery unattended during charging.
•
Do not leave a charger with a battery connected to the mains for more than 24 hours after full charge.
•
The battery should be charged at a temperature between 0° C and +45° C, otherwise the battery life will be
signicantly reduced.
•
Do not charge the battery immediately after bringing it from the cold into a warm atmosphere. Wait 30–40
minutes for the battery to warm up.
•
Do not expose the battery to high temperatures or naked ame.
•
Do not submerge the battery in water.
•
The connecting of third-party devices with an energy consumption greater than permissible is not
recommended.
•
The battery is equipped with a short circuit protection system. However, situations that may lead to short
circuiting should be avoided.
•
Do not dismantle or deform the Battery Pack.
•
Do not subject the Battery Pack to shocks or falls.
•
After being stored for a long time, the battery should be partially charged – it should not be fully charged or
completely discharged.
•
Store the battery out of the reach of children.
External Power Supply
External power is supplied from an external source, such as a 5V Power Bank.
•
Attach the external power source to the USB connector (14) on the device.
•
The device will switch to operation from the external power supply, while the IPS7 battery will be gradually
recharged.
•
A battery icon will appear on the display showing charge level as a percentage.
•
If the device is connected to a computer, network adapter or power bank that does not conform to the
BC1.0 battery charger standard, an IPS7 battery will not begin charging: the external power icon only will be
displayed .
•
If the device is operated from an external power source and the IPS7 battery is not connected, an icon is
displayed .
•
Once the external power source is disconnected, the adapter will begin functioning on battery power.
Operation
Mounting the attachment on an optical sight
•
Select the adapter (available separately) with the required diameter of insert depending on the outer
diameter of the lens of your optical sight (see the Table).
•
The designation 42mm / 50mm / 56mm in the title of the adapter refers to the optical diameter of the lens in
the optical sight.
•
Remove the cap (16) from the adapter (19) by turning it clockwise.
•
Degreasing of the lens body of the sight before mounting is recommended.
•
Mount the insert (18) onto the adapter (19) as far as it will go.
•
Mount the adapter with the insert into the day sight (17).
•
Move the lever (22) from its initial OPEN position to the CLOSE position.
•
Ensure that the adapter ts snugly against the lens.
•
If there is any gap, do the following:
- Loosen the locking screw (20) with an Allen key (S=2mm).
- Tighten the screw (21) with an Allen key (S=4mm) with the force necessary to ensure that the adapter ts
tightly against the lens. The clamping forces should be 1 Nm.
- Tighten the locking screw (20).
•
The effort can be tested with a torque screwdriver.
•
Insert the digital module rmly into the adapter so that the pins located in the adapter case t into the
grooves (23) of the digital module. Turn the digital module clockwise as far as it will go. The triangular mark
on the digital module and the square on the adapter body must be aligned.
•
To align the attachment, turn the handle (22) to the OPEN position and align the attachment with the horizon.

6
Selection table for day sight inserts
Cover-adapter
model
Correspondence of the inner diameter of the line and the outer diameter of the lens
body of the daylight optical device (sight, telescope)
Insert internal diameter (mm) Outer diameter of sight lens (mm)
Cover adapter
FN 42mm
47 46.7-47.6
48 47.7-48.6
49 48.7-49.6
50 49.7-50.6
Cover adapter
FN 50mm
55 54.7-55.6
56 55.7-56.6
57 56.7-57.6
58 57.7-58.6
59 58.7-59.6
Cover adapter
FN 56 mm
60 59.7-60.6
61 60.7-61.6
62 61.7-62.6
63 62.7-63.6
64 63.7-64.6
65 64.7-65.6
Powering on and image setup
•
Remove the lens cap (1) by turning it anticlockwise.
•
Turn on the attachment with a short press of the ON button (9). An image will appear on the display.
•
Adjust the resolution of the icons on the display by rotating the dioptre adjustment ring on the sight of your
optical sight. In future, it will not be necessary to rotate the eyepiece dioptre adjustment ring, regardless of
distance and other conditions.
•
Rotate the lens focus ring (10) to focus on the object being observed.
Basic settings (brightness and contrast adjustment) can be altered by using the quick access menu.
Power the attachment off after use with a long press of the ON button (9).
Quick Access Menu Functions
•
Enter the ‘quick’ menu with a short press of the M button (7).
•
A short press of the M button (7) enables you to switch between functions, as described below.
•
Brightness – by pressing the RIGHT (6) and LEFT (8) buttons and changing the display
brightness value from 0 to 20.
•
Contrast – by pressing the RIGHT (6) and LEFT (8) buttons and changing the display contrast
value from 0 to 20.
Main Menu Functions
•
Enter the main menu with a long press of the controller button (7).
•
Press the RIGHT (6) and LEFT (8) buttons to toggle through the main
menu functions.
•
Open sub-items in the main menu with one short press of button M (7).
•
To exit a sub-item in the main menu, press and hold down on button
M (7).
•
Automatic exit from the main menu occurs after 10 seconds of
inactivity.
Structure and description of the menu
•
Brightness of icons
•
Wi-Fi Settings
•
General Settings
•
Automatic power-off
•
Device Information
General view of the menu:

7
Brightness
of icons
This menu item sets the brightness of icons on the attachment display.
•
Press and hold the M button (7) to enter the main menu.
•
Select the brightness level of the icons with the RIGHT (6) and LEFT (8) buttons.
•
A short press of the M button (7) opens the submenu.
•
Select the brightness level of the icons with the RIGHT (6) and LEFT (8) buttons.
•
To save your choice and exit the submenu, press and hold down the M button (7).
Wi-Fi
Settings
This option enables you to congure the device to operate on a Wi-Fi network.
Note: Wi-Fi is turned on/off with a long press of the LEFT button (8).
Setting a
password
This submenu allows you to set a password to access the attachment from an
external device. This password is used when linking an external device (e.g. a
smartphone) to the attachment.
•
Press and hold the M button (7) to enter the main menu.
•
Select Wi-Fi tuning menu function using the RIGHT (6) and LEFT (8) buttons.
•
A short press of the M button (7) opens the submenu.
•
Select the Password Set-up submenu using the RIGHT (6) and LEFT (8) buttons.
•
A short press of the M button (7) opens the submenu.
•
The default password (12345678) will appear on the screen.
•
Set your desired password with the RIGHT (6) / LEFT (8) buttons. The RIGHT button
increases the value and the LEFT button reduces it. Press the M button (7) to toggle
the digits.
•
Press and hold down the M button (7) to save the password and exit the submenu.
Setting
Access
Levels
This sub-function enables you to congure the appropriate level of access to your
device made available to the Stream Vision app.
Owner level. A Stream Vision user has full access to all the device’s functions.
Guest level. A Stream Vision user is only able to view video footage from the device
in real time.
•
Press and hold the M button (7) to enter the main menu.
•
Select Wi-Fi tuning menu function using the RIGHT (6) and LEFT (8) buttons.
•
A short press of the M button (7) opens the submenu.
•
Select the Access Level Set-up submenu with the RIGHT (6) and LEFT (8) buttons.
•
Select “Owner” or “Guest” with the RIGHT (6) and LEFT (8) buttons.
•
To conrm your choice and exit the submenu, press and hold down the M button (7).
General
Settings
This menu item allows you to program the following settings:
•
Language
•
Date
•
Time
•
Formatting
•
Default
Settings
Language
Interface language selection
•
Press and hold the M button (7) to enter the main menu.
•
Select the submenu “General settings” with the RIGHT (6) and LEFT (8) buttons.
•
A short press of the M button (7) opens the submenu.
•
Select the “Language” submenu with the RIGHT (6) and LEFT (8) buttons.
•
A short press of the M button (7) opens the submenu.
•
Select one of the available interface languages (English, French, German, Spanish or
Russian) with the RIGHT (6) and LEFT (8) buttons.
•
To save your choice and exit the submenu, press and hold down the M button (7).
General
Settings
Date Setting the Date
•
Press and hold the M button (7) to enter the main menu.
•
Select the submenu “General settings” with the RIGHT (6) and LEFT (8) buttons.
•
A short press of the M button (7) opens the submenu.
•
Select the “Date” submenu with the RIGHT (6) and LEFT (8) buttons.
•
A short press of the M button (7) opens the submenu.
•
The date appears in dd/mm/yyyy format (12/04/2019).
•
Set the required year, month and day with the RIGHT (6) and LEFT (8) buttons (the
RIGHT (6) button increases the value and the LEFT (8) button reduces it). Press the
M button (7) to toggle the digits.
•
To save your chosen date and exit the submenu, press and hold the M button (7).
Time
Setting the Time
•
Press and hold the M button (7) to enter the main menu.
•
Select the submenu “General settings” with the RIGHT (6) and LEFT (8) buttons.
•
A short press of the M button (7) opens the submenu.
•
Select the “Time” submenu with the RIGHT (6) and LEFT (8) buttons.
•
A short press of the M button (7) opens the submenu.
•
Select the time format (24-hour clock or AM/PM) by pressing the RIGHT (6) and LEFT
(8) buttons.
•
Press the M button (7) to move to the hour setting.
•
Set the hour with the RIGHT (6) and LEFT (8) buttons. The RIGHT (6) button
increases the value and the LEFT (8) button reduces it.
•
Press the M button (7) to move to the minute setting.
•
Set the minute by pressing the RIGHT (6) and LEFT (8) buttons.
•
To save your chosen time and exit the submenu, press and hold the M button (7).
Return to
default
settings
•
Press and hold the M button (7) to enter the main menu.
•
Select the submenu “General settings” with the RIGHT (6) and LEFT (8) buttons.
•
A short press of the M button (7) opens the submenu.
•
Select the “Default settings” submenu using the RIGHT (6) and LEFT (8) buttons.
•
A short press of the M button (7) opens the submenu.
•
Select the ‘YES’ option to reset to factory settings or ‘NO’ to cancel using the RIGHT
(6) and LEFT (8) buttons.
•
Conrm your selection with a short press of the M button (7).
The following settings will be restored to their factory state before being set by the user:
Brightness level – 10
Contrast level – 8
Language – English
Wi-Fi – off (default password)
Auto shutdown – off
Formatting
Formatting the built-in memory card permanently deletes all of the recorded les.
Attention! Make sure that you no longer need the les to be deleted or create a
backup on other media.
•
Press and hold the M button (7) to enter the main menu.
•
Select the submenu “General settings” with the RIGHT (6) and LEFT (8) buttons.
•
A short press of the M button (7) opens the submenu.
•
Select the “Formatting” submenu with the RIGHT (6) and LEFT (8) buttons.
•
A short press of the M button (7) opens the submenu.
•
Select the ‘YES’ option to format or ‘NO’ to cancel using the RIGHT (6) and LEFT (8) buttons.
•
Conrm your selection with a short press of the M button (7).

8
Auto
shutdown
This function enables you to activate automatic shutdown of the device after a certain period of
time when it is tilted horizontally or vertically by more than 70°, or right or left by more than 30°.
In such case, the device controls should not be activated.
•
Press and hold the M button (7) to enter the main menu.
•
Select the “Auto shutdown” menu with the RIGHT (6) and LEFT (8) buttons.
•
A short press of the M button (7) opens the submenu.
•
Use the RIGHT (6) and LEFT (8) buttons to select the time period after which the device will
automatically turn off (1 min; 3 min; 5 min), or select “Off” if you want to deactivate the
automatic shutdown function.
•
Conrm your selection with a short press of the M button (7).
Note: the status bar will display “Auto shutdown” status icon
1 min.
Device
Information
•
Press and hold the M button (7) to enter the main menu.
•
Select the “Device information” menu with the RIGHT (6) and LEFT (8) buttons.
•
A short press of the M button (7) opens the submenu.
The user has access to the following information about the device:
full name
SKU number
serial number
software version
hardware version
service information
Status Bar
The status bar is located in the lower part of the display and shows information on the current operational
status of the attachment, including:
•
The SumLight™ function
•
Auto shutdown function 1 min (if switched on)
•
IR illuminator power level (e.g. Level 3)
•
Wi-Fi connection
•
Clock
•
Battery Pack charge level (when the device is powered by the Battery Pack)
•
External battery power indicator (if the device is powered from an external supply) or
•
Battery charge indicator with current charge in per cent (where charging is by an external power supply)
Note: when increasing the magnication of the optical device on which the attachment is mounted, the status
bar may partially or completely go beyond the boundaries of the visible image.
IR Illuminator
The attachment is equipped with a detachable IR Illuminator operating on a wavelength of 940 nm, which
increases observation range in lowlight conditions and in darkness. Other Pulsar IR illuminators (purchased
separately) may be installed instead of the included IR illuminator.
•
Remove the cap (12) from the connector to attach the IR illuminator (13).
•
Remove the cover (11) from the IR illuminator.
•
Mount the IR illuminator on the device. The lever (25) should be in the up position.
•
Lock the IR illuminator by pressing the lever (25) down
•
Turn on the device using the ON button (9) to activate the IR illuminator.
• The status bar will display a disabled
illuminator icon if the IR illuminator is not
connected. This icon is not displayed when the
IR illuminator is connected.
• Briey press the IR button (24) at the end of the
illuminator. The power level when switching on
is minimum .
•
The IR illuminator icon will be displayed on the
status bar with the relevant power level.
•
Successive brief presses of the IR button (24) will toggle the
brightness level of the illuminator ( > > > ).
•
The IR illuminator is turned off by a long press of the IR button (24).
•
The IR icon will disappear from the screen.
Note: When the IR is turned off, the power level is not saved in the device’s
memory. When the device is powered on, the illuminator is turned on at minimum power level – IR1.
Wi-Fi Function
•
The device has a function for wireless communication with external devices (smartphone or tablet ) via Wi-Fi.
•
Turn on the wireless connection module with a long press of the LEFT button (8). Wireless operation is
displayed in the status bar in the following way:
Wi-Fi disconnected No icon
Wi-Fi turned on by the user, Wi-Fi connection in the device is in progress.
Wi-Fi turned on, no connection to the device
Wi-Fi turned on, the device is connected
The device is recognised by a mobile device under the label “Forward F_XXXX”, where XXXX are the four last
digits of the serial number.
Once the password has been entered on the mobile device (for more information on setting a password, see
the subsection “Wi-Fi Settings” in the “Main Menu Functions” section of the instructions) and the connection
has been established
, the icon in the status bar changes to , the video signal on the mobile device
screen starts after the “viewnder” button is activated on the screen of the mobile device. The icon in the
status bar changes to .
Note: you can congure the required access level to your device that is granted to the Stream Vision
application in the “Setting Access Levels” menu section.
The “SumLight™” function
The SumLight™ function substantially increases the sensitivity of the CMOS array in the event of a reduction in
the light level, thus enabling observation in conditions of low light without using the IR illuminator.
•
To activate the SumLight™ function, press briey the LEFT (8) button.
•
Press the LEFT button (8) once more to switch off.
•
The SumLight™ icon (on or off) is displayed in the status bar.
Attention! When the SumLight™ function is activated, the noise level in the image increases, the frame rate
decreases and the image slows down. Any sharp movement of the device may cause the image to become
“blurred”. Such effects are not defects. Luminous white dots (pixels) may be visible on the device’s display. The
number of dots may increase when the SumLight™ function is enabled. This is due to the peculiarities of this
function and is also not a defect.

9
Video Recording and Photography
The device is equipped with a function for video recording (and photographing) an observed image that is
saved onto the built-in memory card.
Before using the photo and video functions, read the subsections “Setting the Date”, “Setting the Time” in the
“Main menu functions” section.
The built-in recorder operates in two modes:
•
Photo (photography; in the top right corner of the display you can see an icon ). If the estimated number
of photos that can be saved to the Flash card is more than 100, the message “>100” is shown.
•
Video (video recording; an icon is displayed in the upper left of the display , the total remaining
recording time given the current resolution in HH:MM:SS format (hours : minutes : seconds).
When powered on, the device is in Video mode. To toggle between Video and Photo modes press and hold
down the RIGHT button (6). Switching between the modes toggles Video–> Photo–> Video...
PHOTO mode. Photographing an image
•
Switch to PHOTO mode with a long press of the RIGHT button (6).
•
To take a photograph, press the RIGHT button (6) briey. The image freezes for 0.5 sec.
•
The photo is saved to the internal memory.
Video Mode Recording video clips
•
Engage Video mode with a long press of the RIGHT button (6).
•
Start video recording with a short press of the RIGHT button (6).
•
When video recording starts, the recording icon will disappear, a REC icon appears instead and the
recording timer displaying in MM:SS (minutes : seconds) format;
•
Stop the video recording by pressing and holding down the RIGHT button (6).
•
Video les are stored in the internal memory card after video recording has been turned off.
* an icon will be displayed for 2 seconds and then disappear. When the RIGHT button (6) is briey pressed
again, an icon will appear and the recording timer will show the current time of the video recording.
Notes:
•
After turning off the video recorder / taking a photo, when you turn off the device if the recorder had been
turned on; if the memory card is full, or if during a video recording the memory becomes full (a “Memory full”
message appears on the display).
•
You can enter and navigate the menu during video recording;
•
Recorded videos and photographs are saved to the device’s built-in memory card in the format: img_xxx.jpg
(for photos); video_xxx.mp4 (for video). xxx - three-digit common le counter (for photos and video);
•
The counter used for the names of multimedia les cannot be reset.
•
If a le is deleted from the middle of the list, its number is not taken by another le.
•
When the counter is full, a new folder is created – img_xxxx, where xxxx is the le counter.
•
The maximum duration of a recorded video le is seven minutes. After this time expires, a video is recorded
onto a new le. The number of les is limited by the capacity of the device’s built-in memory;
•
Regularly check the free memory on the internal memory card, moving footage and photographs to other
storage media to free up space.
•
Graphic information (status bar, icons etc.) is displayed in recorded video les and photos.
Display O Function
When this function is in use, the device switches to standby mode, which allows it to be turned off quickly if
necessary.
Options for working with the “Display Off” function
Option 1. Device is powered off Turn the device on and turn on the “Display Off” function.
•
Turn the device on with a short press of the ON button (9).
•
Turn on the “Display Off” function: press and hold the ON button (9). A “Display off” message will appear on
the screen together with a countdown.
•
Release the ON button (9).
•
Briey press ON (9) to turn off the “Display Off” function.
Option 2. The “Display Off” function is on; the device should be powered off.
•
Press and hold the ON button (9). A “Display off” message will appear on the screen together with a 3, 2, 1, 0
countdown.
•
Hold down the ON button (9) until the device powers off (turning off will happen after 0 on the countdown) *.
* a delay to shutdown of the device is possible in connection with completion of data saving by the processor.
In this case, the countdown display shows 0.
USB Connection
•
Power on the device by pressing the ON button (9) (the computer will not detect the device if it is turned off).
•
Connect one end of the USB cable to the device’s microUSB connector (14) and the other end to the port on
your computer.
•
The device is detected automatically by the computer and no installation of drivers is required.
•
Two connection modes will appear on the display: Memory card and Power.
•
Select the connection mode with the RIGHT (6) and LEFT (8) buttons.
•
A short press of the M button (7) conrms the selection.
Connection options:
Memory card.
•
When this mode is selected, the device will be recognised by the computer
as a ash card. This option is designed for working with les that are stored
in the device’s memory; the device’s functions are not accessible and the
device turns itself off. The device continues to function after disconnection
from the computer.
•
If a video was being recorded at the time of connection, the recording will
cease and will be saved.
Power.
•
When this mode is selected, the computer is used by the device as an external power supply. An icon will
appear in the status bar . The device will continue to function and all functions are available.
•
The battery pack installed in the device will not be charged.
Disabling the USB.
•
When the USB is disconnected from the device connected in Memory card mode, the device remains switched on.
•
When disconnecting the USB from the device in Power mode, the device will continue to function with the
Battery Pack, if it is available and has sufcient charge.
USB connection
Use as power
Use as memory card

10
Using the Weaver Rail
The device is equipped with a Weaver rail (15) which allows the user to mount extra accessories. You must rst
detach the removeable IR illuminator (See Section “IR Illuminator”).
Display Calibration
The attachment is congured so that after tting onto an optical sight that had been properly zeroed, no
adjustment of the aiming point is required. If your attachment has been subjected to a sharp blow, or has been
dropped, you may check the impact point and correct it yourself if required, without having to take it to the
service centre.
•
To enter display calibration mode, rst press and hold the M
button (7) for 10 seconds.
•
The display coordinates X=0; Y=0 will appear.
•
Use the LEFT (8) and RIGHT (6) buttons to move the display
horizontally (X axis) and vertically (Y axis) so that the point of
impact moves to the centre of the aiming mark of your optical
sight.
•
Press the M button (7) to toggle between the X and Y
coordinates.
•
The image offset is 1 sensor pixel.
•
The image offset range is +/- 20 pixels horizontally (X axis),
+/- 20 pixels vertically (Y axis).
•
To exit the menu and save the settings, press and hold the M button (7) for two seconds.
Stream Vision
Forward attachments support Stream Vision technology, which allows you to stream an image from the thermal
imager to your smartphone or tablet PC via Wi-Fi in real time mode.
You can nd detailed instructions on the operation of Stream Vision technology online at www.pulsar-vision.com.
Note: the device’s design includes the possibility of rmware updates. Updating is possible via the Stream
Vision app. Scan or press on a QR code to download the application:
Technical Inspection
A check is recommended before each use of the device.
Check:
•
External appearance (there should be no cracks on the housing).
•
The condition of the lens and eyepiece the digital module and the lens of the IR illuminator (there should be
no cracks, grease spots, dirt or other residue). Wipe the exterior surfaces of metal and plastic parts free from
dust, dirt and moisture with a soft, cotton cloth.
•
The state of the Battery Pack (should be charged) and the electric terminals (there should be no sign of salts
or oxidation).
•
The controls should be in working order.
•
The digital module should be properly and rmly attached to the optical device.
Optical sight reticle Display displacement
Impact point
Display coordinates
Technical Maintenance
Technical maintenance should be carried out at least twice a year and include the following steps:
•
Wipe the external surfaces of metal and plastic parts free of dust and dirt with a cotton cloth. Silicone grease
may be used for this.
•
Clean the electric terminals of the Battery Pack and battery slot on the device using a non-greasy organic solvent.
•
Check the glass surfaces of the eyepiece and the lens. If necessary, remove dust and sand from the lenses
(preferably using a non-contact method). Cleaning of the external surfaces of the optics should be done with
substances designed especially for this purpose.
Storage
Always store the device in its carrying case, in a dry, well-ventilated space. It is essential during prolonged
storage to remove the Battery Pack.
Troubleshooting
Malfunction Possible reason Correction
The device will not power
on.
Battery Pack is completely
discharged.
Charge the battery.
Does not operate from
external power source.
USB cable damaged. Replace USB cable.
External power source discharged. Charge the external power source.
Smartphone or tablet
cannot be connected to the
device.
Device password has been changed. Delete the network and reconnect using the
device password.
The device is in an area with a large
number of Wi-Fi networks that may
cause interference.
To ensure stable Wi-Fi operation, relocate
the device to an area with fewer Wi-Fi
networks, or into an area with none.
Wi-Fi signal non-existent or
interrupted.
Device is outside the area of Wi-Fi
coverage. There are obstacles
between the device and the
receiver (e.g. concrete walls).
Relocate the device into direct line of sight
of the Wi-Fi signal.
Poor image quality. These problems may occur during observation in difcult weather conditions
(snow, rain, fog etc.).
Image is too dark. Low brightness or contrast level set. Adjust brightness or contrast.
Coloured lines appear
on display or image has
disappeared.
The device was exposed to static
electricity during operation.
After exposure to static electricity, the
device may either reboot automatically, or
require turning off and on again.
There is a clear image of
the aiming mark, but a
fuzzy image of the object.
Dust or condensation on the
interior or exterior optical surfaces
of the lens.
Wipe the exterior optical surfaces with a
soft cotton cloth. Dry it. Let it stand for 4
hours in a warm room.
The lens will not focus. Adjust the sharpness by rotating the lens
adjuster.
The display is not centred. Position of the attachment on the
day sight requires adjusting.
Remove the attachment and set the display
to the centre of the eld of vision (see
section “Operation”).

11
Malfunction Possible reason Correction
The device will not focus. Incorrect setting. Adjust the device in accordance with
section “Operation”. Check the outer
surfaces of the lens and eyepiece; where
necessary, wipe them free from dust,
condensate, frost, etc. In cold weather, you
can use special anti-fogging coatings (as,
for example, for corrective glasses).
Impact point does not
coincide with aiming point.
Display calibration required.
Calibrate the display in accordance with
the instruction in the section, “Display
Calibration”.
The device is not securely mounted
on the sight, or the sight on the
weapon.
Check that the device is rmly xed on the
sight and that the mounting of the sight to
the weapon is secure.
Ensure that you are using the very type of
ammunition that was previously red from
your weapon.
If you zero a sight in summer and then use
it in winter (or vice versa), some change
in the zero point of the zeroing cannot be
discounted.
The attachment slides off
the sight during ring.
Adapter insufciently clamped.
Unsuitable insert selected.
Select a suitable insert and clamp the
adapter as recommended.
Cannot open the adapter
clamp.
Unsuitable insert selected. Select a suitable insert. Check for a gap
between the lips of the adapter.
By following the link below you can nd answers to the most frequently asked questions
https://www.pulsar-nv.com/glo/support/faq/79
Electromagnetic compatibility.
This product complies with the requirements of European standard EN 55032: 2015, Class A.
Caution: Operating this product in a residential area may cause radio interference.
Attention! Forward digital night vision devices require a licence if exported outside your country.
Your appliance contains valuable materials which can be recovered or recycled.
Leave it at a local civic waste collection point.

12
FRANÇAIS
Spécications techniques
MODÈLE FORWARD F455
SKU # 78186
CARACTÉRISTIQUES OPTIQUES
Mise au point d’objectif, mm 50
Ouverture du diaphragme, D/f’ 1: 1
Champ de vision (horizontal), ° 6.3
Champ de vision (horizontal), m@ 100m 11
Distance d’observation maximale d’animaux de hauteur 1,7m, m 500
Distance minimum de mise au point, m 5
Distance recommandée du viseur de jour, fréq 2-8
SPÉCIFICATIONS ÉLECTRONIQUES
Type de capteur et résolution CMOS HD 1280X720
Type d’écran et résolution AMOLED 1746x1000
Sensibilité de l’appareil, mW
(longueur d’onde 780 nm, résolution 25 pièces/ mm)
1,5×10
-
⁵
Sensibilité de l’appareil, mW
(longueur d’onde de 915 nm, résolution 25 pièces/ mm)
5,5×10
-
⁵
ILLUMINATEUR IR DÉTACHABLE
Type/ longueur d’onde, nm LED 940
CARACTÉRISTIQUES DE FONCTIONNEMENT
Alimentation électrique, V 3,0 - 4,2
Type / Capacité batterie / Tension nominale de sortie Batterie lithium-ion IPS7/ 6400 mAh/ DC 3,7V
Alimentation interne Micro USB Type-B (5V)
Durée de vie de la batterie à t = 22°C, h (Wi-Fi éteint, IR éteint) 9
Résistance d’impact maximum sur Une carabine, joules 6000
Résistance d’impact maximum Carabine à tube lisse, calibre 12
Degré de protection, code IP (IEC60529) IPX7
Température de fonctionnement, °С -25 ÷ +50
Dimensions, mm 155x136x77
Poids, kg 0,83
ENREGISTREUR VIDÉO
Résolution vidéo/ photo, pixels 1280x720
Format vidéo/ photo .mp4 / .jpg
Mémoire intégrée 16 GB
Fréquence 2,4 GHz
Standard 802.11 b/g/n
La conguration peut être modiée an d’améliorer l’utilisation d’un appareil.
La version actuelle du manuel d’utilisation est disponible sur www.pulsar-vision.com
Lot de livraison
•
Dispositif de vision nocturne numérique
•
Boitier
•
Batterie rechargeable
•
Chargeur de batterie
•
Adaptateur réseau
•
Câble microUSB
•
Manuel d’utilisation
•
Lingettes pour nettoyer l’optique
•
Certicat de garantie
Description
L’appareil de vision nocturne numérique Forward F455 est un appareil universel qui permet de transformer
rapidement et facilement un viseur optique de jour en un viseur nocturne. L’appareil est monté sur un objectif
de viseur optique à l’aide des adaptateurs conçus pour différents diamètres des objectifs. L’appareil ne
nécessite aucun ajustage de tir supplémentaire. L’appareil est conçu pour diverses applications, notamment la
chasse, le tir sportif, la photographie et la vidéo de nuit, l’observation.
Caractéristiques
Caractéristiques principales:
•
Capteur HD 1280x720
•
Sensibilité nocturne élevée
•
Transformation simple du viseur optique de jour en celui de nuit
•
Maintien des avantages de l’optique de jour la nuit
•
Stabilité de point à viser
•
Utilisation confortable dans une large gamme d’optiques à la lumière du jour
•
Illuminateur IR longue portée invisible
•
Fonction d’augmentation supplémentaire de la sensibilité SumLight™
•
Distance de détection jusqu’à 500 m
•
Démarrage instantané
•
Enregistrement vidéo intégré
•
Alimentation des batteries rechargeables haute capacité à changement rapide du système B-Pack
•
Système de montage à quatre points avec pince automatique
•
Compatibilité avec les adaptateurs d’autres fabricants
•
Résistance aux chocs en cas de gros calibres: 12 cal., 9.3x64, .375H&H
•
Wi-Fi. Intégration avec les appareils IOS et Android
•
Stream Vision. Contrôle à distance, surveillance et diffusion en direct sur YouTube via un smartphone
•
Mise à jour de logicielle à distance
•
Etanchéité complète (IPX7)
•
Large plage de température de fonctionnement (-25 ÷ +50°C)
•
MicroUSB. Support d’alimentation Power Bank

13
Unités et commandes
1. Cache de lentille
2. Couvercle d’oculaire
3. Couvercle du compartiment batterie
4. Levier d’installation de batterie
5. Batterie rechargeable
6. Bouton DROIT
7. Bouton M (MENU)
8. Bouton GAUCHE
9. Bouton ON (MARCHE)
10. Bouton de mise au point de l’objectif
11. Couvercle d’illuminateur IR
12. Obturateur connecteur illuminateur IR
13. Connecteur pour installer l’illuminateur IR
14. Port microUSB
15. Barre déplacement latéral
16. Couvercle adaptateur*
17. Lentille d’observation d’appareil optique
18. Chemise*
19. Adaptateur*
20. Vis de xation
21. Vis
22. Bras adaptateur
23. Point de xation
24. Bouton IR
25. Bras d’illuminateur IR
5
24
1
17
18
20
21
22
2
14
16 19
9 10
6
23 13
8
7
15
12
11
25
4
3
Open
L’objectif du
viseur
optique
Chemise*
Vis de
xation
Vis
Bras
adaptateur
Couvercle
d’oculaire
Bouton
M (MENU)
Bouton
GAUCHE
Adaptateur*Couvercle adaptateur*
Bouton ON
(MARCHE)
Bouton de mise au point de l'objectif
Barre déplacement
latéral
Obturateur
connecteur
illuminateur IR
Cache
de lentille
Bouton
DROIT
Point de
xation
Connecteur
pour installer
l’illuminateur
IR
Bras d’illuminateur
IR
Port
microUSB
Couvercle
d’illuminateur IR
Bouton IR
Levier d’installation de batterie
Couvercle du compartiment batterie
Batterie rechargeable
*Elements de Clapet de protection de l’objectif FN (disponible séparément)
Fonctionnement des boutons
Bouton Mode de fonctionnement
Premier appui
court
Appuis courts
suivants
Appui long
ON (9)
L'appareil est éteint
Allumage de
l'appareil
–
Allumage de l'appareil
L’appareil d'afchage est
éteint
Allumage de
l’appareil
d'afchage
–
Extinction de l’appareil d'afchage
L'appareil est allumé,
menu de lancement
rapide, menu principal
–
Éteindre l’appareil d'afchage/
éteindre l'appareil
GAUCHE
(8)
L’appareil est allumé
Allumage
SumLight™
Extinction
SumLight™
WiFi allumé/ WiFi éteint
Navigation dans le menu Naviguer vers le haut, à gauche, dans le sens antihoraire
Menu de lancement rapide Réduction des paramètres
MENU (7)
Appareil est allumé Lancez le menu rapide Lancez le menu principal
Navigation dans le menu Conrmer la sélection
Quitter le sous-menu sans conrmer
la sélection/ quitter le menu (passer
en mode surveillance)
Menu de lancement rapide Naviguer vers le haut Quitter le menu de lancement rapide
DROITE
(6)
Appareil est allumé (mode
vidéo)
Démarrer l’en-
registrement
vidéo
–
Eteindre l'enregistrement vidéo/
passer en mode «Photo»
Appareil allumé (mode
«Photo»)
Prendre une photo Passer en mode «Vidéo»
Navigation dans le menu En bas/ A droite/ dans le sens horaire
Menu de lancement rapide Augmenter le paramètre
IR (24)
L'appareil est allumé,
menu de lancement
rapide, menu principal
Activer IR
Changer la
puissance IR
Désactiver IR
Caractéristiques de l’utilisation
L’appareil Forward F455 est conçu pour une utilisation à long terme. Pour assurer la durabilité et la
performance complète, suivez les instructions ci-dessous:
•
Avant d’utiliser l’appareil, assurez-vous de l’installer conformément aux instructions de la section
«Installation du dispositif sur le viseur optiquel».
•
Éteignez l’appareil après l’utilisation.
•
Il est interdit de réparer et de démonter indépendamment un appareil de garantie!
•
L’appareil peut être utilisé dans une large plage de température. Si l’appareil a été utilisé dans le froid et
a été amené dans une pièce chaude, ne le retirez pas du boitier pendant 2-3 heures. Cela empêchera la
condensation sur les éléments optiques externes.
•
Pour garantir un bon fonctionnement, prévoir et éliminer les causes d’usure prématurée ou de défaillance
des composants et des pièces, effectuez rapidement un contrôle technique et un entretien de l’appareil.
•
La batterie ne doit pas être exposée à une chaleur excessive due au soleil, au feu ou à d’autres sources de
chaleur.

14
Utilisation de la batterie
L’appareil Forward F455 est livré avec une batterie Li-ion rechargeable IPS7, ce qui permet d’utiliser l’appareil
jusqu’à 9 heures. Chargez complètement la batterie avant la première utilisation.
Charge de la batterie:
•
Connectez la che microUSB du câble USB au
connecteur (C) du chargeur.
•
Connectez le câble USB à l’adaptateur réseau.
•
Connectez l’adaptateur réseau à la prise 110-220V.
•
Soulevez le bras (A) du chargeur.
•
Retirez la couvercle de protection de la
batterie.
•
Installez la batterie dans le chargeur comme
indiqué dans l’image, xez le bras (A).
•
Lors de l’installation, une lampe
indicatrice (B) s’allume en vert sur le
chargeur et clignote brièvement à un
certain intervalle:
- une fois, si la charge de la batterie est entre 0 et 50%;
- deux fois, si la charge de la batterie est entre 51 et 75%;
- trois fois, si la charge de la batterie est entre 76 et 100%.
•
Si la lampe indicatrice est constamment allumée en vert, la batterie est complètement chargée. Déconnectez
le chargeur du réseau, déconnectez la batterie du chargeur.
•
Si la lampe indicatrice du chargeur s’allume en rouge lorsque la batterie est insérée, le niveau de charge
risque d’être inférieur à la valeur autorisée. Laissez la batterie dans le chargeur pendant une longue période
(jusqu’à plusieurs heures), puis retirez-la et réinsérez-la.
•
Si la lampe indicatrice clignote en vert, la batterie est en bon état de fonctionnement;
•
Si elle reste rouge, la batterie est défectueuse et ne peut pas être utilisée. Remplacez la batterie.
Attention! Pour charger, utilisez toujours le chargeur fourni avec l’appareil ou le chargeur Pulsar IPS (à la charge
du client). L’utilisation d’autres chargeurs peut causer des dommages irréparables à la batterie.
Installation de la batterie:
•
Abaissez le levier (4).
•
Enlevez la couvercle de protection du compartiment batterie (3).
•
Retirez la couvercle de protection de la batterie (5).
•
Insérez la batterie (5) dans la fente prévue à cet effet sur le
corps du dispositif de sorte que l’élément F (une avancement
sur le corps de la batterie) soit dirigé vers le bas.
•
Verrouillez la batterie en place en relevant le levier (4).
Attention! L’alimentation extérieure peut provenir
d’une source extérieure, comme un chargeur 5V Power
Bank. Raccordez une source d’alimentation extérieure à
l’appareil en raccordant le câble USB au port microUSB
(14) de l’appareil. Pour plus de détails, voir la section
«Alimentation extérieure».
Précautions:
•
N’utilisez pas le chargeur si sa conception a été modiée ou endommagée.
•
Pendant le chargement, ne laissez pas la batterie sans surveillance.
•
Ne laissez pas le chargeur connecté à une batterie branchée sur réseau plus de 24 heures après une charge complète.
•
Effectuez la charge de la batterie à une température de l’air de 0 °C ÷ +45 °C Sinon, la durée de vie de la
batterie peut être réduite.
•
Ne chargez pas la batterie directement après l’avoir déplacée d’un environnement froid ou chaud. Attendez
30 à 40 minutes pour que la batterie se réchauffe.
•
N’exposez pas la batterie à la chaleur ou au feu nu.
•
La batterie n’est pas destinée à être immergée dans l’eau.
•
Il est déconseillé de connecter des périphériques tiers avec une consommation de courant supérieure à celle autorisée.
•
La batterie est équipée d’un système de protection contre les courts-circuits; toutefois, il convient d’éviter les
situations pouvant entraîner un court-circuit.
•
Ne démontez ni déformez la batterie.
•
Ne soumettez pas la batterie à des chocs et des chutes.
•
Pendant le stockage à long terme, la batterie doit être partiellement chargée- elle ne doit pas être
complètement chargée ni complètement déchargée.
•
Gardez la batterie hors de la portée des enfants.
Alimentation extérieure
L’alimentation extérieure est fournie par une source d’alimentation extérieure du type Power Bank 5V.
•
Connectez la source d’alimentation extérieure au connecteur USB (14) de l’appareil.
•
L’appareil passera en mode d’alimentation extérieure, tandis que la batterie IPS7 sera rechargée
progressivement.
•
Une icône de batterie avec un pourcentage de charge s’afchera sur l’écran.
•
Si l’appareil est connecté à partir d’un ordinateur ou d’une carte réseau ou d’un power bank qui ne
correspondent pas à la norme du chargeur de batterie (BC 1.0), la batterie IPS7 ne commencera pas à se
charger. Seule l’icône d’alimentation extérieure sera afchée .
•
Si l’appareil est alimentée par une source d’alimentation extérieure, mais la batterie IPS7 n’est pas connectée,
une icône est afchée .
•
Lors de la déconnexion de l’alimentation extérieure, l’appareil commencera à fonctionner sur batterie.
Utilisation
Installation du dispositif sur le viseur optique
•
Sélectionnez l’adaptateur* avec le diamètre requis d’insert en fonction du diamètre extérieur de la lentille de
votre viseur optique (voir le tableau).
•
La désignation 42 mm/ 50 mm/ 56 mm dans le titre de l’adaptateur désigne le diamètre optique de la lentille
du viseur.
•
Enlevez le cache (16) de l’adaptateur (19) en le tournant dans le sens horaire.
•
Il est recommandé de dégraisser la lentille de l’appareil avant de la monter.
•
Montez l’insert (18) sur l’adaptateur (19) aussi loin que possible.
•
Montez l’adaptateur avec l’insert dans la lentille de l’appareil optique (17).
•
Déplacez le levier (22) depuis la position OUVERTE (OPEN) jusqu’à sa position FERMEE (CLOSE).
•
Vériez que l’adaptateur se place bien contre la lentille.
•
S’il y a un intervalle, procédez comme suit:
- Dévissez la vis de xation (20) avec une clef Allen (S = 2mm).
- Serrez la vis (21) avec une clef Allen (S = 4mm) en exerçant la force nécessaire pour que l’adaptateur
s’adapte fermement contre la lentille. La force de serrage doit être 1 N·m.
- Serrez la vis de xation (20).

15
•
La force peut être testée à l’aide d’un tournevis dynamométrique.
•
Insérez le dispositif fermement dans l’adaptateur de sorte que les broches dans le boîtier de l’adaptateur se
placent dans les rainures (23) du dispositif. Tournez le dispositif dans le sens horaire aussi loin que possible.
Le repère triangulaire sur le dispositif et le repère carré sur le corps de l’adaptateur doivent être alignés.
•
Tournez le bras (22) sur la position OUVERTE (OPEN) et alignez le dispositif avec l’horizon.
* A la charge du client
Le tableau de sélection pour les bagues d’insert des dispositifs de visée de jour
Modèle avec
couvercle-
adaptateur
Correspondance entre le diamètre intérieur de la bague d’insert et le diamètre
extérieur de la lentille de l’appareil optique de jour (viseur, télescope)
Diamètre interne de chemise, mm Diamètre extérieur de la lentille de l’appareil, mm
Adaptateur du
couvercle FN
42 mm
47 46,7-47,6
48 47,7-48,6
49 48,7-49,6
50 49,7-50,6
Adaptateur du
couvercle FN
50 mm
55 54,7-55,6
56 55,7-56,6
57 56,7-57,6
58 57,7-58,6
59 58,7-59,6
Adaptateur du
couvercle FN
56 mm
60 59,7-60,6
61 60,7-61,6
62 61,7-62,6
63 62,7-63,6
64 63,7-64,6
65 64,7-65,6
Allumage et réglage de l’image
•
Enlevez le capuchon de lentille (1) en le faisant tourner dans le sens antihoraire.
•
Appuyez brièvement sur le bouton ON (9) pour allumer l’appareil. L’image s’afche sur l’écran.
•
Réglez la résolution des icônes sur l’écran en faisant tourner la bague de réglage dioptrique sur l’oculaire de
votre appareil optique. A l’avenir, il ne sera pas nécessaire de faire tourner la bague de réglage dioptrique de
l’oculaire quelles que soient la distance et d’autres conditions.
•
Faites tourner la bague de mise au point de l’objectif (10) pour mettre au point sur l’objet observé.
Les réglages de base (luminosité et contraste) peuvent être modiés dans le menu d’accès rapide.
Eteignez l’appareil après utilisation en appuyant longuement sur le bouton ON (9).
Fonctions du menu d’acces rapide
•
Entrez dans le menu «d’accès rapide» en appuyant brièvement sur le bouton M (7).
•
Pour basculer entre les fonctions décrites ci-dessous, appuyez brièvement sur le bouton M (7).
•
La luminosité - Appuyez sur les boutons DROITE (6) et GAUCHE (8) pour modier la valeur de la
luminosité de l’afchage de 0 à 20.
•
Le contraste - Appuyez sur les boutons DROITE (6) et GAUCHE (8) pour modier la valeur du
contraste de l’image de 0 à 20.
Fonctions du menu principal
•
Entrez dans le menu principal en appuyant longuement sur le bouton
M (7).
•
Appuyez sur les boutons DROIT (6) et GAUCHE (8) pour naviguer dans
les éléments du menu principal.
•
Appuyez brièvement sur le bouton M (7) pour entrer dans le sous-
élément du menu principal.
•
Faites un appui long sur le bouton M (7) pour quitter le sous-élément
du menu principal.
•
La sortie automatique du menu principal survient après 10 secondes
d’inactivité.
La composition et la description du menu
•
Luminosité des icônes
•
Paramètres Wi-Fi
•
Paramètres généraux
•
Mise hors circuit automatique
•
Informations sur l’appareil
Forme général du menu :
Luminosité des icônes

16
Luminosité
des icônes
Cet élément de menu permet de régler la luminosité des icônes sur écran de l’appareil.
•
Faites un appui long sur le bouton M (7) pour accéder au menu principal.
•
Utilisez les boutons DROIT (6) et GAUCHE (8) pour sélectionner l’option de menu «Luminosité
des icônes».
•
Appuyez brièvement sur le bouton M (7) pour accéder au sous-menu.
•
Utilisez les boutons DROIT (6) et GAUCHE (8) pour sélectionner le niveau de luminosité des
icônes.
•
Pour enregistrer la sélection et quitter le sous-menu, faites un appui long sur le bouton M (7).
Paramètres
Wi-Fi
Cet élément permet de congurer l’appareil pour le travail dans le réseau Wi-Fi.
Note: Allumer/éteindre le Wi-Fi en faisant un appui long sur le bouton GAUCHE (8).
Paramé-
trage du
mot de
passe
Ce sous-menu permet de dénir un mot de passe an d’accéder au dispositif à
partir du périphérique externe. Le mot de passe est utilisé lors de la connexion d’un
périphérique externe (par exemple, un smartphone) au dispositif.
•
Faites un appui long sur le bouton M (7) pour accéder au menu principal.
•
Utilisez les boutons DROIT (6) et GAUCHE (8) pour sélectionner l’élément de menu
«Paramètres Wi-Fi».
•
Appuyez brièvement sur le bouton M (7) pour accéder au sous-menu.
•
Utilisez les boutons DROIT (6) et GAUCHE (8) pour sélectionner le sous-menu
.
•
Appuyez brièvement sur le bouton M (7) pour accéder au sous-menu.
•
Un mot de passe s’afchera à l’écran. La valeur par défaut est «12345678».
•
Utilisez les boutons DROIT (6) et GAUCHE (8) pour dénir le mot de passe souhaité
(bouton DROIT - augmenter la valeur, bouton GAUCHE - diminuer la valeur).
Appuyez sur le bouton M (7) pour passer d’un chiffre à l’autre.
•
Faites un appui long sur le bouton (7) pour enregistrer le mot de passe et quitter le
sous-menu.
Réglage
du niveau
d’accès
Ce sous-élément permet de congurer le niveau d’accès requis pour l’appareil reçu
par l’application Stream Vision.
Niveau Maître. L’utilisateur de Stream Vision a un accès complet à toutes les
fonctions de l’appareil.
Niveau Invité. L’utilisateur de Stream Vision a la possibilité de ne regarder que les
vidéos de l’appareil en temps réel.
•
Faites un appui long sur le bouton M (7) pour accéder au menu principal.
•
Utilisez les boutons DROIT (6) et GAUCHE (8) pour sélectionner l’élément de menu
«Paramètres Wi-Fi».
•
Appuyez brièvement sur le bouton M (7) pour accéder au sous-menu.
•
Utilisez les boutons DROIT (6) et GAUCHE (8) pour sélectionner le sous-menu
.
•
Utilisez les boutons DROIT (6) et GAUCHE (8) pour sélectionner le niveau d’accès -
«Maître» ou «Invité».
•
Faites un appui long sur le bouton (7) pour conrmer la sélection et quitter le sous-
menu.
Paramètres
généraux
L’élément de menu permet de dénir les paramètres suivants:
•
Langue
•
Temps
•
Mise en forme
•
Date
•
Paramètres par défaut
Langue
Sélectionner la langue de l’interface.
•
Faites un appui long sur le bouton M (7) pour accéder au menu principal.
•
Utilisez les boutons DROIT (6) et GAUCHE (8) pour sélectionner le sous-menu
«Paramètres généraux».
•
Appuyez brièvement sur le bouton M (7) pour accéder au sous-menu.
•
Utilisez les boutons DROIT (6) et GAUCHE (8) pour sélectionner l’option de sous-
menu «Langue».
•
Appuyez brièvement sur le bouton M (7) pour accéder au sous-menu.
•
Utilisez les boutons DROIT (6) et GAUCHE (8) pour sélectionner l’une des langues
d’interface disponibles: Anglais, Allemand, Espagnol, Français et Russe.
•
Faites un appui long sur le bouton M (7) pour enregistrer la sélection et quitter le
sous-menu.
Date
Réglage de la date
•
Faites un appui long sur le bouton M (7) pour accéder au menu principal.
•
Utilisez les boutons DROIT (6) et GAUCHE (8) pour sélectionner le sous-menu
«Paramètres généraux».
•
Appuyez brièvement sur le bouton M (7) pour accéder au sous-menu.
•
Utilisez les boutons DROIT (6) et GAUCHE (8) pour sélectionner le sous-menu
«Date».
•
Appuyez brièvement sur le bouton M (7) pour accéder au sous-menu.
•
La date est afchée au format jj/mm/aaaa (12/04/2017)
•
Utilisez les boutons DROIT (6) et GAUCHE (8) pour sélectionner le jour, le mois et
l’année. (Bouton DROIT (6) - augmenter la valeur, bouton GAUCHE (8) - diminuer la
valeur). Appuyez brièvement sur le bouton M (7) pour passer d’un chiffre à l’autre.
•
Faites un appui long sur le bouton M (7) pour enregistrer la date sélectionnée et
quitter le sous-menu.
Heure Réglage de l’heure
•
Faites un appui long sur le bouton M (7) pour accéder au menu principal.
•
Utilisez les boutons DROIT (6) et GAUCHE (8) pour sélectionner le sous-menu
«Paramètres généraux».
•
Appuyez brièvement sur le bouton M (7) pour accéder au sous-menu.
•
Utilisez les boutons DROIT (6) et GAUCHE (8) pour sélectionner le sous-menu
«Heure».
•
Appuyez brièvement sur le bouton M (7) pour accéder au sous-menu.
•
Appuyez sur les boutons DROIT (6) et GAUCHE (8) pour sélectionner le format de
l’heure - 24/12 (ou PM/AM).
•
Appuyez sur le bouton M (7) pour passer au réglage de l’heure.
•
Appuyez sur les boutons DROIT (6) et GAUCHE (8) pour sélectionner l’heure (Bouton
DROIT (6) - augmenter la valeur, bouton GAUCHE (8) - diminuer la valeur).
•
Appuyez sur le bouton M (7) pour régler les minutes.
•
Appuyez sur les boutons DROIT (6) et GAUCHE (8) pour sélectionner les minutes.
•
Faites un appui long sur le bouton M (7) pour enregistrer la durée sélectionnée et
quitter le sous-menu.

17
Paramètres
généraux
Retour
aux pa-
ramètres
par défaut
•
Faites un appui long sur le bouton M (7) pour accéder au menu principal.
•
Utilisez les boutons DROIT (6) et GAUCHE (8) pour sélectionner le sous-menu
«Paramètres généraux».
•
Appuyez brièvement sur le bouton M (7) pour accéder au sous-menu.
•
Utilisez les boutons DROIT (6) et GAUCHE (8) pour sélectionner l’élément de sous-
menu «Paramètres par défaut».
•
Appuyez brièvement sur le bouton M (7) pour accéder au sous-menu.
•
Utilisez les boutons DROIT (6) et GAUCHE (8) pour sélectionner «Oui» an de
rétablir les paramètres d’usine ou «Non» pour annuler l’action.
•
Conrmez votre sélection en appuyant brièvement sur le bouton M (7).
Les paramètres suivants retrouveront leur état d’origine avant d’être modiés par
l’utilisateur:
Niveau de luminosité – 10 Langue – anglaise Mise hors circuit automatique –
désactivé
Niveau de contraste – 8 Wi-Fi – désactivé (mot
de passe par défaut)
Mise en
forme
La mise en forme de la carte mémoire interne supprime dénitivement tous les
chiers enregistrés.
Attention! Assurez-vous que vous n’avez plus besoin de supprimer les chiers ou
effectuez une sauvegarde sur un autre support.
•
Faites un appui long sur le bouton M (7) pour accéder au menu principal.
•
Utilisez les boutons DROIT (6) et GAUCHE (8) pour sélectionner le sous-menu
«Paramètres généraux».
•
Appuyez brièvement sur le bouton M (7) pour accéder au sous-menu.
•
Utilisez les boutons DROIT (6) et GAUCHE (8) pour sélectionner le sous-menu «Mise
en forme».
•
Appuyez brièvement sur le bouton M (7) pour accéder au sous-menu.
•
Utilisez les boutons DROIT (6) et GAUCHE (8) pour sélectionner «Oui» pour la mise
à forme ou «Non» pour annuler l’action.
•
Conrmez votre sélection en appuyant brièvement sur le bouton M (7).
Mise hors
circuit au-
tomatique
Cet élément permet d’activer la mise hors circuit automatique de l’appareil après une certaine période
de temps si l’appareil est incliné horizontalement ou verticalement de plus de 70°; à droite ou à
gauche - plus de 30°. En même temps, les commandes de l’appareil ne doivent pas être impliquées.
•
Faites un appui long sur le bouton M (7) pour accéder au menu principal.
•
Utilisez les boutons DROIT (6) et GAUCHE (8) pour sélectionner l’élément de menu «Mise hors
circuit automatique».
•
Appuyez brièvement sur le bouton M (7) pour accéder au sous-menu.
•
Utilisez les boutons DROIT (6) et GAUCHE (8) pour sélectionner la période de temps pendant
laquelle l’appareil s’éteindra automatiquement (1 min; 3 min; 5 min), ou sélectionnez «Eteindre»
si vous souhaitez désactiver la fonction de la mise hors circuit automatique.
•
Conrmez votre sélection en appuyant brièvement sur le bouton M (7).
Note: la barre d’état de la fonction «Mise hors circuit automatique» s’afche dans la barre d’état
1 min.
Informa-
tions sur
l’appareil
•
Faites un appui long sur le bouton M (7) pour accéder au menu principal.
•
Utilisez les boutons DROIT (6) et GAUCHE (8) pour sélectionner l’option de menu «Informations
sur l’appareil».
•
Appuyez brièvement sur le bouton M (7) pour accéder au sous-menu.
Les informations suivantes sur l’appareil sont disponibles pour l’utilisateur:
Dénomination complet de l’appareil
Numéro SKU de l’appareil
Numéro de série de l’appareil
Version du logiciel de
l’appareil
Version d’assemblage de
l’appareil
Informations de service
Barre d’etat
La barre d’état est située au bas de l’écran et afche des informations sur l’état actuel de l’appareil,
notamment:
•
Fonction SumLight™
•
Mise hors circuit automatique 1 min (si activé)
•
Le fonctionnement de l’illuminateur IR (par exemple, 3ème degré)
•
Connexion Wi-Fi
•
Heure
•
Niveau de charge de la batterie (si l’appareil est alimenté par une batterie) ou
•
Indicateur d’alimentation provenant d’une source d’alimentation extérieure (si l’appareil est alimenté
par une source d’alimentation extérieure) ou
•
Indicateur de charge de la batterie avec le pourcentage de charge actuel (si la batterie est installée et
chargée à partir d’une source d’alimentation extérieure)
Note: Lorsque l’on augmente le grossissement de la lunette sur laquelle est monté l’appareil, la barre de statut
peut sortir partiellement ou complètement de la zone d’observation.
Illuminateur IR
L’appareil est équipé d’un illuminateur IR détachable fonctionnant à une longueur d’onde de 940 nm, ce qui
permet d’augmenter la distance d’observation dans des conditions de faible luminosité ou dans l’obscurité totale.
Il est autorisé d’installer d’autres illuminateurs IR Pulsar (à la charge du client) au lieu de l’illuminateur IR fourni.
•
Retirez le couvercle (12) du connecteur pour installer
l’illuminateur IR (13).
•
Retirez le couvercle (11) de l’illuminateur IR.
•
Insérez l’illuminateur IR dans l’appareil. Le levier (25)
doit être en position haute.
•
Verrouillez l’illuminateur IR en abaissant le levier (25).
•
Allumez l’appareil en appuyant sur le bouton ON (9)
pour activer l’illuminateur IR.
•
Si l’illuminateur IR n’est pas connecté, l’icône de
l’illuminateur désactivé s’afche dans la barre d’état. Si
l’illuminateur IR est connecté, l’icône n’est pas afchée.
•
Appuyez brièvement sur le bouton IR (24) à la n de l’illuminateur.
Niveau de puissance à la mise en marche - minimum .
•
Une icône d’un illuminateur IR avec le niveau de puissance approprié
s’afche dans la barre d’état.
•
Réglez séquentiellement le niveau de puissance de l’illuminateur ( > >
> ) par brèves pressions successives sur le bouton IR (24).
•
Eteignez l’illuminateur IR en appuyant longuement sur le bouton IR.
•
L’icône IR disparaît de l’écran.
Note: Lorsque l’illuminateur IR est éteint, le niveau de puissance n’est pas mémorisé dans l’appareil. Lorsque
l’appareil est allumé, l’illuminateur s’allume au niveau de puissance minimum - IR1.

18
Fonction Wi-Fi
•
L’appareil a la fonction de communication sans l avec les appareils mobiles (tablette, smartphone) via Wi-Fi.
•
Allumez le module sans l en appuyant longuement sur le bouton GAUCHE (8). Le fonctionnement Wi-Fi est
afché dans la barre d’état comme suit:
Wi-Fi allumé Icône n’est pas disponible
Le Wi-Fi est allumé par l’utilisateur, l’allumage du Wi-Fi du dispositif est en cours
Wi-Fi est allumé, il n’y a pas de connexion au dispositif
Wi-Fi est allumé, la connexion au dispositif est établie
L’appareil mobile reconnaît le dispositif en tant que «Forward F_XXXX», où XXXX sont les quatre derniers
chiffres du numéro de série.
Après avoir saisi le mot de passe sur l’appareil mobile (pour plus d’informations sur la dénition d’un mot de
passe, voir la sous-section «Paramètres Wi-Fi» dans la section «Fonctions du menu principal» du manuel)
et avoir établi la connexion, l’icône
de la barre d’état devient , le signal vidéo sur l’écran de l’appareil
mobile démarre après l’activation du bouton «viseur» sur l’écran de l’appareil mobile. L’icône de la barre d’état
change pour .
Note: la conguration du niveau d’accès requis pour le périphérique reçu par l’application Stream Vision est
disponible dans la section «Réglage du niveau d’accès».
Fonction «SumLight™»
•
La fonction SumLight™ permet d’augmenter considérablement le niveau de sensibilité du réseau de
transistor CMOS en cas d’une diminution de la luminosité, ce qui permet d’observer dans des conditions de
mauvais éclairage sans utiliser un illuminateur IR.
•
Pour activer la fonction SumLight™, appuyez brièvement sur le bouton GAUCHE (8).
•
Pour l’éteindre, appuyez à nouveau brièvement sur le bouton GAUCHE (8).
•
L’icône SumLight™ (activée ou désactivée) apparait sur la barre d’état.
Attention! Lorsque la fonction SumLight™ est activée, le niveau de bruit dans l’image augmente, la fréquence
d’images diminue et l’image ralentit. Tout mouvement brusque de l’appareil peut rendre l’image «brouillée».
De tels effets ne sont pas des défauts. Des points blancs lumineux (pixels) peuvent être visibles sur l’écran
de l’appareil, le nombre de points peut augmenter lorsque la fonction SumLight™ est activée. Ceci est dû aux
particularités de cette fonction et ce n’est pas un défaut.
Enregistrement vidéo et prise des photos
L’appareil a la fonction d’enregistrement vidéo (prise de photos) de l’image observée sur la carte mémoire
intégrée.
Avant d’utiliser les fonctions photo et vidéo, lisez les sous-sections «Réglage de la date», «Réglage de
l’heure» de la section «Fonctions du menu principal» du manuel.
L’appareil d’enregistrement intégré fonctionne en deux modes:
•
PHOTO (image xe; une icône est afchée dans le coin supérieur droit de l’écran) Si le nombre estimé
d’images xes pouvant être enregistrées dans la mémoire ash est supérieur à 100, l’inscription «> 100»
s’afche.
•
VIDEO (enregistrement vidéo; une icône est afchée dans le coin supérieur droit de l’écran, la durée totale
d’enregistrement restante étant fonction de la résolution actuelle au format MM: SS - minutes: secondes).
L’appareil est en mode vidéo lors de l’allumage. Faites un appui long sur le bouton DROIT (6) pour changer de
mode de l’appareil. Le passage entre les modes est cyclique (Vidéo-> Photo-> Vidéo ...).
Mode PHOTO. Prise des photos d’une image
•
Passez en mode Photo en faisant un appui long sur le bouton DROIT (6).
•
Appuyez brièvement sur le bouton DROIT (6) pour prendre une photo. L’image se ge pendant 0,5 seconde.
•
Le chier de l’image est enregistré sur la carte mémoire intégrée.
Mode Vidéo. Enregistrement vidéo
•
Passez en mode Vidéo en appuyant longuement sur le bouton DROIT (6).
•
Lancez l’enregistrement vidéo en appuyant brièvement sur le bouton DROIT (6).
•
Après le commencement de l’enregistrement vidéo, l’icône disparaît, l’icône REC apparaît à sa place, ainsi
que la minuterie d’enregistrement vidéo au format MM:SS (minutes: secondes)*;
•
Arrêtez l’enregistrement vidéo en appuyant longuement sur le bouton DROIT (6).
•
Les chiers vidéo sont enregistrés sur la carte mémoire intégrée une fois l’enregistrement vidéo désactivé.
*L’icône est afchée pendant 2 secondes, puis disparaît. L’icône s’afche lors de la suivante pression courte sur
le bouton DROIT (6), la minuterie d’enregistrement afche la durée d’enregistrement actuelle de la vidéo.
Notes:
•
Après avoir désactivé l’enregistrement vidéo/ après avoir pris une photo; lorsque vous éteignez l’appareil,
si l’enregistrement a été activé; si la carte mémoire est pleine - si, pendant l’enregistrement vidéo, la carte
mémoire est pleine (le message «Mémoire pleine» apparaît à l’écran).
•
Il est possible d’accéder au menu et travailler dans le menu de l’appareil lors de l’enregistrement vidéo;
•
Les vidéos et les photos sont enregistrées sur la carte mémoire intégrée de l’appareil sous le nom img_xxx.
jpg (pour les photos); video_xxx.mp4 (pour la vidéo). xxx - commun à trois chiffres (nombre de chiers (pour
photos et vidéos);
•
Le compteur utilisé dans la dénomination des chiers multimédia n’est pas réinitialisé;
•
Lors de la suppression d’un chier du milieu de la liste, son numéro n’est pas attribué à un autre chier.
•
Lorsque le compteur est rempli, un nouveau dossier est créé - img_xxxx. Où xxxx est un compteur de chiers.
•
La longueur maximale d’un chier vidéo enregistré est de sept minutes. Passé ce délai, la vidéo est
enregistrée dans un nouveau chier. Le nombre de chiers est limité par le volume de mémoire interne;
•
Surveillez régulièrement la quantité de mémoire disponible de la carte mémoire intégrée, transférez les
données enregistrées sur un autre support, libérez de l’espace sur la carte mémoire;
•
Dans les chiers vidéo et les photos enregistrés, des informations graphiques sont afchées (barre d’état,
icônes, etc.).
Fonction «Arrêt de l’ecran» (Display o)
Lors de l’utilisation de cette fonction, l’appareil passe en mode veille, ce qui permet de l’activer rapidement le
cas échéant.
Options pour utiliser la fonction «Arrêt de l’ecran»
Option 1 L’appareil est éteint. Il est nécessaire d’allumer l’appareil et d’activer la fonction «Arrêt de l’ecran».
•
Allumez l’appareil en appuyant brièvement sur le bouton ON (9).
•
Activez la fonction d’afchage désactivé: faites un appui long sur le bouton ON (9). Un
message «Arrêt de l’ecran» apparaîtra à l’écran avec un compte à rebours.
•
Relâchez le bouton ON (9).
•
Pour désactiver la fonction d’afchage désactivé, appuyez brièvement sur ON (9).
Option 2 La fonction «Arrêt de l’ecran» est activée, il est nécessaire de débrancher l’appareil.
•
Faites un appui long sur le bouton ON (9). L’écran afche un message «Arrêt de l’ecran» avec un compte à
rebours de 3,2,1,0.
•
Faites un appui long sur le bouton ON (9) jusqu’à ce que l’appareil s’éteint (la déconnexion de l’appareil se
produira après le décompte 0) *.
* Il est possible d’éteindre l’appareil plus tard suite à l’achèvement du traitement des informations par le
processeur pour sauvegarder les données. Dans ce cas, l’afchage indique 0 lors du compte à rebours.
Arrêt de l’ecran

19
Connexion USB
•
Allumez l’appareil en appuyant sur le bouton ON (9) (le périphérique éteint par l’ordinateur n’est pas
détecté).
•
Connectez un bout du câble USB au connecteur microUSB (14) de l’appareil, l’autre - au port de votre
ordinateur.
•
Le périphérique sera automatiquement déterminé par l’ordinateur, l’installation des pilotes n’est pas requise.
•
L’écran afchera deux options de connexion: Carte mémoire (Memory card) et Puissance (Power).
•
Sélectionner une option de connexion à l’aide des boutons DROIT (6) et GAUCHE (8).
•
Conrmez le choix en appuyant brièvement sur le bouton M (7).
Options de connexion:
Carte mémoire.
•
En choisissant cette option, l’appareil est reconnu par l’ordinateur comme
une carte ash. Cette option est conçue pour fonctionner avec les chiers
stockés dans la mémoire de l’appareil. Les fonctions de l’appareil ne sont
pas disponibles, mais l’appareil ne s’éteint pas. Lorsqu’il est déconnecté de
l’ordinateur, l’appareil continue à fonctionner.
•
Lors de l’enregistrement de la vidéo au moment de la connexion,
l’enregistrement s’arrête et sauvegarde.
Puissance.
•
Lors de la sélection de cette option, le périphérique utilise l’ordinateur en tant qu’une source d’alimentation
extérieure. Une icône apparaît dans la barre d’état . L’appareil continue à fonctionner, toutes les
fonctions sont disponibles.
•
La charge de la batterie installée dans l’appareil n’est pas effectuée.
Désactivation de l’USB.
•
Lorsque l’USB est déconnecté d’un appareil connecté en mode Carte mémoire, l’appareil reste allumé.
•
Lorsque l’USB est déconnecté d’un appareil connecté en mode Puissance, le périphérique continue de
fonctionner à partir de la batterie lorsqu’il est sufsamment chargé.
Utilisation de la barre déplacement latéral
L’appareil est équipé d’une barre déplacement latéral supplémentaire (15) grâce à laquelle il est possible
d’installer des accessoires supplémentaires. Il faut d’abord retirer l’illuminateur IR détachable (voir la section
«Illuminateur IR»).
Etalonnage de l’ecran
L’appareil est conguré de telle sorte qu’après son installation sur
un viseur optique qui a été correctement ajusté, un ajustement du
point de visée n’est pas nécessaire. Si l’accessoire a subi un choc
ou une chute violente, vous pouvez vérier le point d’impact et,
si nécessaire, le corriger vous-même, sans contacter le centre de
service.
•
Pour passer en mode d’étalonnage de l’écran, faites un appui
long sur le bouton M (7) pendant 10 secondes.
•
les coordonnées d’afchage X = 0; Y = 0 apparaitront.
•
Utilisez les boutons GAUCHE (8) et DROIT (6) pour déplacer
l’écran horizontalement (axe X) et verticalement (axe Y) de sorte
que le point d’impact se déplace au centre de la marque de
visée de votre appareil.
Connexion USB
Utiliser comme puissance
Utiliser comme carte-mémoire
Marque du viseur optique
Déplacement de l’écran
Point d’impact
Сoordonnées de l’écran
•
Pour basculer entre les coordonnées X et Y, appuyez brièvement sur le bouton M (7).
•
Le décalage d’image est de 1 pixel de capteur.
•
La plage de déplacement de l’image est de +/- 20 pixels horizontalement (axe X), de +/- 20 pixels
verticalement (axe Y).
•
Faites un appui long sur le bouton M (7) pendant deux secondes pour quitter le menu et enregistrer les
paramètres.
Stream Vision
Les dispositifs Forward sont compatibles avec la technologie Stream Vision, qui permet de transmettre via Wi-
Fi l’image de l’appareil à votre smartphone ou à votre tablette en temps réel.
Des instructions détaillées sur le fonctionnement de Stream Vision sont disponibles dans un livret séparé ou
sur le site Web www.pulsar-vision.com.
Note: la conception de l’appareil intègre la possibilité de mise à jour du logiciel. La mise à jour est possible via
l’application Stream Vision.
Pour télécharger l’application Stream Vision, scannez les codes QR:
Controle technique
Un contrôle technique est recommandé avant chaque utilisation de l’appareil.
•
Apparence de l’appareil (les ssures sur le boîtier ne sont pas autorisées).
•
L’état des lentilles de l’objectif, de l’oculaire de l’appareil et de l’objectif de l’illuminateur IR (les ssures, les
taches de graisse, la saleté et autres dépôts ne sont pas autorisés). Nettoyez les surfaces extérieures des pièces
en métal et en plastique de la poussière, de la saleté et de l’humidité; essuyez-les avec un chiffon en coton.
•
L’état de la batterie (doit être chargée) et les contacts électriques sur la batterie (le sel et l’oxydation ne sont
pas autorisés).
•
L’efcacité des éléments de contrôle.
•
La précision et la abilité de la xation de l’appareil sur le viseur optique.
Entretien technique
L’entretien technique est effectué au moins deux fois par an et comprend les points suivants:
•
Utilisez un chiffon en coton pour nettoyer les surfaces extérieures des pièces en métal et en plastique de la
poussière et de la saleté. La graisse de silicone est autorisée.
•
Nettoyez les contacts électriques de la batterie et ses endroits d’installation dans l’appareil avec un solvant
organique non gras.
•
Inspectez les lentilles de l’oculaire et de l’objectif. Si nécessaire, retirez la poussière et le sable des lentilles
(par une méthode sans contact de préférence). Nettoyez les surfaces extérieures des optiques à l’aide de
moyens spécialement conçus à cet effet.
Stockage
Gardez l’appareil toujours dans une boîte, dans un endroit sec et bien aéré. Veillez à retirer la batterie pour un
stockage à long terme.

20
Diagnostic d’erreurs
Défaut Cause possible Réparation
L’appareil ne
s'allume pas.
La batterie est complètement
déchargée.
Chargez la batterie.
Ne fonctionne pas à
partir d’une source
d’alimentation
extérieure.
Le câble USB est endommagé. Remplacez le câble USB.
L'alimentation extérieure est
déchargée.
Chargez l’alimentation extérieure.
Le smartphone
ou la tablette ne
se connecte pas à
l'appareil.
Le mot de passe de l'appareil a été
modié.
Supprimez le réseau et reconnectez-vous avec le
mot de passe enregistré dans l'appareil.
L'appareil est situé dans une zone
avec un grand nombre de réseaux
Wi-Fi susceptibles d'interférer.
Pour garantir un fonctionnement stable du Wi-Fi,
déplacez l'appareil dans une zone comportant un
nombre inférieur de réseaux Wi-Fi ou dans une
zone où ils sont absents.
La diffusion du
signal via Wi-Fi
est absent ou est
interrompu.
L'appareil se trouve en dehors de
la zone de réception de signal Wi-Fi
able. Il y a des obstacles entre
l'appareil et le récepteur du signal
(murs en béton, par exemple).
Déplacez l'appareil vers la ligne de mire du signal
Wi-Fi.
Mauvaise qualité de
l'image.
Ces problèmes peuvent survenir lors de l'observation dans des conditions
météorologiques difciles (neige, pluie, brouillard, etc.).
Image est trop
sombre.
La faible luminosité ou le contraste
dénis.
Ajustez la luminosité ou le contraste.
Des rayures sont
apparues sur
l'écran ou l'image a
disparu.
L'appareil était soumis à une
tension statique pendant le
fonctionnement.
Après une exposition à une tension statique,
l’appareil peut se redémarrer ou s’éteindre puis se
rallumer.
Avec une image
claire du cible à
visée, l’image d'un
objet est oue.
La poussière ou la condensation sur
les surfaces optiques extérieures
ou intérieures de l’objectif.
Essuyez les surfaces optiques extérieures avec un
chiffon de coton doux. Sécher - laisser reposer 4
heures dans une pièce chaude.
L'objectif n'est pas focalisé. Ajustez la netteté de l'image en tournant l’appareil
de réglage de l'objectif.
L’écran n’est pas
centré.
La position de l’appareil sur le
viseur de jour est non ajustée.
Appuyez sur l'adaptateur et réglez l'écran au centre
du champ de vision (voir la section «Utilisation»).
L'appareil ne se
focalise pas.
Réglage incorrect.
Congurez l’appareil conformément à la section
«Utilisation». Vériez l'extérieur des lentilles de
l'objectif et de l'oculaire; le cas échéant, net-
toyez-les de la poussière, du condensat, du givre,
etc. Par temps froid, vous pouvez utiliser des cou-
vertures spéciales anti-buée (par exemple, comme
pour les lunettes correctrices).
Défaut Cause possible Réparation
Le point d'impact ne
correspond pas au
point à viser.
L'étalonnage de l’écran est requis. Étalonnez l’écran conformément aux instructions de
la section «Etalonnage de l’ecran».
Il n'y a pas de fermeté d'installation
de l'appareil sur le viseur ou sur
l'arme.
Vériez la fermeté de l’appareil sur le viseur et la
abilité de la xation de l’appareil de visé à l’arme.
Assurez-vous que vous utilisez exactement le type
de munition avec lequel votre arme et votre viseur
ont déjà été ajustés.
Si vous avez effectué l’ajustage en été et vous
l’utilisez en hiver (ou inversement), il est possible
une légère modication du point zéro de l’ajustage.
L’appareil glisse
du viseur lors d’un
coup de feu.
Serrage insufsant de l'adaptateur.
Sélection incorrect d’un insert.
Choisissez un insert approprié et serrez
l'adaptateur conformément aux recommandations.
Impossible
d’enlever le levier
de l'adaptateur.
Sélection incorrect d’un insert. Sélectionnez un insert approprié. Vériez
l’intervalle entre les plaques de l’adaptateur.
Suivez le lien pour trouver des réponses aux questions fréquemment posées.
https://www.pulsar-nv.com/glo/support/faq/79
Ce produit est conforme aux exigences de la norme européenne EN 55032: 2015, classe A.
Attention: L’utilisation de ce produit dans une zone résidentielle peut provoquer des interférences radio.
Attention! Les dispositifs de vision nocturne numériques Forward nécessitent l’obtention d’une licence s’ils
sont exportés hors de votre pays.
Participons à la protection de l’enviroment!
Votre appareil contient de nombreux matériaux valorisables ou recyclables.
Conez celui-ci dans un point de collecte ou à défaut dans un centre service agréé pour que son traitementsoit effectué.

21
DEUTSCH
Technische Daten
MODELL FORWARD F455
SKU NUMMER 78186
OPTISCHE KENNDATEN
Objektivbrennpunkt, mm 50
Öffnungsverhältnis, D / f ‚ 1:1
Blickwinkel (horizontal), ° 6,3
Sehfeld (horizontal), m@100m 11
Max Beobachtungsdistanz bei Tiergröße 1,7 m, m 500
Min Naheinstellgrenze, m 5
Empfohlene maximale Vergrößerung des Tageslichtzielfernrohres, x 2-8
ELEKTRONISCHE KENNDATEN
Typ und Auösung des Sensors CMOS HD 1280X720
Typ und Auösung des Displays AMOLED 1746 x 1000
Empndlichkeit des Gerätes, mW
(Wellenlänge 780 nm, 25 Linien / mm Auösung)
1,5×10
-
⁵
Empndlichkeit des Gerätes, mW
(Wellenlänge 915 nm, 25 Linien / mm Auösung))
5,5×10
-
⁵
Typ / Wellenlänge, nm LED 940
BETRIEBSPARAMETER
Betriebsspannung, V 3,0 - 4,2
Batterietyp / Kapazität / Ausgangsnennspannung
Li-Ion Batterie IPS7 /
6400 mAh / DC 3,7V
Externe Stromversorgung Micro USB Typ B (5V)
Laufzeit der Batterie bei t = 22°C (Wi-Fi aus, IR aus), h 9
Max Rückstoßwiderstand auf gezogener Waffe, J 6000
Max Rückstoßwiderstand auf glatter Waffe, Kaliber 12
Schutzklasse, IP Code (IEC60529) IPX7
Betriebstemperatur -25°С … +50°С
Abmessungen, mm 155 x 136 x 77
Gewicht, kg 0,83
VIDEOREKORDER
Video- / Fotoauösung, Pixel 1280 x 720
Video- / Fotoformat .mp4 / .jpg
Eingebauter Speicher 16 GB
Frequenz 2,4 GHz
Standard 802.11 b / g / n
Änderungen im Design zwecks höherer Gebrauchseigenschaften des Produkts vorbehalten.
Die aktuelle Version der Bedienungsanleitung nden Sie auf der Webseite www.pulsar-vision.com
Lieferumfang
•
Digitaler Nachtsichtvorsatz
•
Aufbewahrungstasche
•
Akkumulatorenbatterie
•
Ladegerät für Akkumulatorenbatterie
•
Netzwerkadapter
•
MicroUSB-Kabel
•
Kurzanleitung
•
Reinigungstuch für Optik
•
Garantieschein
Beschreibung
Der digitale Nachtsichtvorsatz Forward F455 ist ein Universalgerät, das schnell und einfach ein
Tageslichtzielfernrohr in ein Nachtsichtgerät verwandelt. Der Nachtsichtvorsatz wird am Zielfernrohr-Objektiv
mittels der für unterschiedliche Linsendurchmesser ausgelegenen Adapter installiert. Es ist kein zusätzliches
Einschießen erforderlich. Der Nachtsichtvorsatz ist für unterschiedliche Anwendungsbereiche geeignet, unter
anderem Jagd, Sportschießen, Nachtfoto- und Videoaufnahme sowie Beobachtung.
Merkmale
Hauptmerkmale:
•
HD-Sensor 1280 x 720
•
Erhöhte Nachtempndlichkeit
•
Einfacher Umbau eines Tageslichtzielfernrohrs in ein Nachtsichtgerät
•
Vorteile der Tageslichtoptik bleiben bei Nachteinsatz vorbehalten
•
Stabile Zielpunktlage
•
Komfortabler Einsatz in einem breiten Vergößerungsbereich von Tageslichtoptiken
•
Unsichtbarer weitreichender Infrarotstrahler
•
Funktion einer zusätzlichen Empndlichkeitssteigerung SumLight™
•
Entdeckungsdistanz bis zu 500 m
•
Schnellschaltung
•
Integrierter Videorekorder
•
Gespeist von schnell wechselbaren Hochleistungsbatterien des B-Pack-Systems
•
Vierpunkt-Bajonett-Montage mit automatischer Spannung
•
Kompatibilität mit Adaptern fremder Hersteller
•
hochkalibriger Rückstoßwiderstand: 12 Kal., 9,3 × 64, .375H&H
•
Wi-Fi. Integration mit iOS- und Android-Geräten
•
Stream Vision. Fernbedienung, Überwachung und Live-YouTube-Streaming per Smartphone
•
Remote-Software-Update
•
Absolute Wasserdichtigheit (IPX7)
•
Breiter Betriebstemperaturbereich (-25°C + 50°C)
•
MicroUSB. Power Bank Stromversorgung

22
Komponenten und Bedienungselemente
1. Objektivschutzdeckel
2. Okulardeckel
3. Batteriefachdeckel
4. Batterie-Fixierhebel
5. Akkumulatorenbatterie
6. Taste RIGHT
7. Taste M (MENU)
8. Taste LEFT
9. Taste ON
10. Griff für Objektivfokussierung
11. IR Strahler-Blende
12. IR Strahler-Anschlusskappe
13. Anschluss für IR Strahler
14. MicroUSB-Buchse
15. Schiene Weaver
16. Adapterdeckel*
17. Objektiv des Zielfernrohrs
18. Hülse*
19. Adapter*
20. Halteschraube
21. Schraube
22. Adapterhebel
23. Halterung
24. IR-Taste
25. IR-Strahlerhebel
5
24
1
17
18
20
21
22
2
14
16 19
9 10
6
23 13
8
7
15
12
11
25
4
3
Open
Objektiv des
Zielfernrohrs
Hülse*
Halteschraube
Schraube
Adapter-
hebel
Okular-
deckel
Taste
M (MENU)
Taste
LEFT
Adapter*Adapterdeckel*
Taste
ON
Gri für Objektivfokussierung
Schiene
Weaver
IR Strahler-
Anschlusskappe
Objektiv-
schutzdeckel
Taste
RIGHT
Halterung Anschluss für
IR Strahler
IR-StrahlerhebelMicroUSB-
Buchse
IR Strahler-
Blende
IR-Taste
Batterie-Fixierhebel
Batteriefachdeckel
Akkumulatorenbatterie
*FN Adapterdeckel Elemente (separat erhältlich)
Funktionen der Tasten
Taste Betriebsmodus
Betätigen
Betätigen
Langes Betätigen
ON (9)
Das Gerät ist ausgeschaltet
Das Gerät
einschalten
–
Das Gerät einschalten
Das Display ist
ausgeschaltet
Das Display
einschalten
–
Das Gerät ausschalten
Das Gerät ist eingeschaltet,
Schnellmenü, Hauptmenü
–
Das Display ausschalten/das Gerät
ausschalten
LEFT
(8)
Das Gerät ist eingeschaltet
SumLight™
einschalten
SumLight™
ausschalten
Wi-Fi ein- / ausschalten
Navigieren im Menü Navigieren nach oben, nach links, gegen den Uhrzeigersinn
Schnellmenü Parameterreduzierung
MENU
(7)
Das Gerät ist eingeschaltet Schnellmenü eintreten Hauptmenü eintreten
Navigieren im Menü Auswahl bestätigen
Aus dem Untermenü ohne
Bestätigung der Auswahl austreten
/ Aus dem Menü austreten (in den
Anzeigemodus wechseln)
Schnellmenü Navigieren nach oben Aus dem Schnellmenü austreten
RIGHT
(6)
Das Gerät ist eingeschaltet
(Videomodus)
Videoaufnahme
starten
–
Videoaufnahme stoppen / in den
Fotomodus wechseln
Das Gerät ist eingeschaltet
(Fotomodus)
Foto machen in den Videomodus wechseln
Navigieren im Menü Nach unten / nach rechts / Im Uhrzeigersinn
Schnellmenü Parametererhöhung
IR (24)
Das Gerät ist eingeschaltet,
Schnellmenü, Hauptmenü
IR einschalten
IR-Leistungs-
änderung
IR ausschalten
Besonderheiten des Betriebs
Das Nachtsichtvorsatzgerät Forward F455 ist für den Langzeitgebrauch bestimmt. Um die Haltbarkeit und volle
Leistungsfähigkeit des Gerätes zu gewährleisten, soll man sich an folgende Empfehlungen halten:
•
Vor dem Betrieb stellen Sie sicher, dass das Gerät laut Anweisungen aus dem Kapitel „Montage des
installiert wurde.
•
Schalten Sie das Gerät nach Gebrauch aus.
•
Die eigenständige Reparatur und Demontage des Garantiegerätes ist verboten!
•
Das Vorsatzgerät kann in einem breiten Temperaturbereich betrieben werden. Wenn das Gerät in der Kälte
betrieben und in einen warmen Raum gebracht wurde, nehmen Sie es aus der Aufbewahrungstasche im Laufe
von 2-3 Stunden nicht heraus. Das verhindert Kondensatbildung an optischen Außenelementen.
•
Für einen störungsfreien Betrieb, Vorbeugung und Beseitigung der Ursachen des vorzeitigen Verschleißes
oder der Ausfall von Baueinheiten und -teilen führen Sie technische Inspektion und Wartung rechtzeitig
durch.
•
Die Batterie soll keiner übermäßigen Hitze durch Sonnenlicht, Feuer oder andere Wärmequellen ausgesetzt
werden.

23
Betrieb der Akkumulatorenbatterie
Das Vorsatzgerät Forward F455 wird mit einer wiederauadbaren Lithium-Ionen Batterie IPS7 geliefert, die das
Funktionieren des Gerätes im Laufe von bis 9 Stunden ermöglicht. Vor dem ersten Gebrauch soll die Batterie
voll aufgeladen werden.
Batterieladung:
•
Schließen Sie den Stecker microUSB vom USB-Kabel
an die Buchse (C) des Ladegerätes an.
•
Schließen Sie den Stecker vom USB-
Kabel an den Netzwerkadapter an.
•
Stecken Sie den Netzwerkadapter in
eine Steckdose mit 110-220 V.
•
Heben Sie den Hebel (A) des
Ladegerätes auf.
•
Nehmen Sie den Schutzdeckel von der
Akkumulatorenbatterie ab.
•
Setzen Sie die Batterie in das
Ladegerät, wie in der Abbildung gezeigt, ein und verriegeln Sie den Hebel (A).
•
Beim Installieren leuchtet am Ladegerät die Anzeige (B) grün und blinkt kurz in einem bestimmten Intervall:
- einmal, wenn die Batterieladung zwischen 0 und 50% liegt;
- zweimal, wenn die Batterieladung zwischen 51 und 75% liegt;
- dreimal, wenn die Batterieladung zwischen 76 und 100% liegt.
•
Wenn die Anzeige dauernd grün leuchtet, ist die Batterie voll geladen. Trennen Sie das Ladegerät vom
Netzwerk und die Batterie vom Ladegerät.
•
Wenn die Anzeige des Ladegerätes beim Einsetzen der Batterie dauernd rot leuchtet, liegt der Ladezustand
wahrscheinlich unter dem zulässigen Wert. Lassen Sie die Batterie für längere Zeit (bis zu mehreren Stunden)
im Ladegerät, dann nehmen Sie sie heraus und setzen Sie sie erneut ein.
•
Wenn die Anzeige grün blinkt, ist die Batterie in Ordnung.
•
Wenn die Batterie weiterhin rot leuchtet, ist sie defekt und kann nicht verwendet werden. Ersetzen Sie die Batterie.
Achtung! Verwenden Sie für das Auaden nur das mitgelieferte Ladegerät oder ein Pulsar IPS-Ladegerät
(separat erhältlich). Die Verwendung eines fremden Ladegerätes kann der Batterie irreparable Schäden antun.
Installieren der Akkumulatorenbatterie:
•
Klappen Sie den Hebel (4) nach unten.
•
Nehmen Sie den Schutzdeckel vom Batteriefach (3) ab.
•
Nehmen Sie den Schutzdeckel von der Akkumulatorenbatterie (5) ab.
•
Setzen Sie die Batterie (5) in den dafür vorgesehenen Steckplatz im
Gehäuse des Gerätes so ein, dass das F-Element (Vorsprung am
Batteriegehäuse) unten liegt.
•
Machen Sie die Batterie fest, indem Sie den Hebel (4) nach oben
klappen.
Achtung! Das Gerät kann von einer externen Stromquelle wie der
Power Bank (5V) gespeist werden. Um eine externe Stromquelle
an das Gerät anzuschließen, schließen Sie das USB-Kabel an
die microUSB-Buchse (14) des Gerätes an. Einzelheiten
nden Sie im Kapitel „Externe Stromversorgung“.
Sicherheitshinweise:
•
Verwenden Sie das Ladegerät nicht, wenn es beschädigt
oder sein Design geändert wurde.
•
Lassen Sie die Batterie während des Ladevorgangs nicht unbeaufsichtigt.
•
Lassen Sie das Ladegerät nicht länger als 24 Stunden nach der Vollladung an das Netzwerk angeschlossen.
•
Die Batterie soll bei einer Lufttemperatur von 0 °C bis +45 °C geladen werden. Andernfalls kann die
Batterielebensdauer verkürzt werden.
•
Laden Sie die Batterie nicht gleich auf, wenn sie von der Kälte in einen warmen Raum gebracht wurde. Warten
Sie 30-40 Minuten ab, bis sich die Batterie aufwärmt.
•
Setzen Sie die Batterie keiner Hitze und keinem offenen Feuer aus.
•
Tauchen Sie die Batterie nicht ins Wasser.
•
Es ist nicht empfehlenswert, fremde Anlagen mit höherem Strom, als es zulässig ist, anzuschließen.
•
Die Batterie ist mit einem Kurzschlussschutz ausgestattet. Situationen, die zu einem Kurzschluss führen
können, sollten jedoch vermieden werden.
•
Zerlegen oder verformen Sie die Batterie nicht.
•
Setzen Sie die Batterie keinen Stößen oder Stürzen aus.
•
Bei andauernder Aufbewahrung soll die Batterie teilweise aufgeladen sein - sie soll nicht voll geladen oder
voll entladen sein.
•
Bewahren Sie die Batterie außerhalb der Reichweite von Kindern auf.
Externe Stromversorgung
Die externe Stromversorgung erfolgt über eine externe Stromquelle wie die Power Bank (5V).
•
Schließen Sie die externe Stromquelle an die USB Buchse (14) des Gerätes an.
•
Das Gerät schaltet auf externe Stromversorgung um, dabei wird die Batterie IPS7 schrittweise aufgeladen.
•
Auf dem Display erscheint das Symbol der Batterie mit dem Ladezustand als Prozentwert.
•
Falls das Gerät über einen Computer oder einen Netzwerkadapter oder eine Power Bank angeschlossen ist,
die dem Standard Battery Charger (BC 1.0) nicht entsprechen, wird die Batterie IPS7 nicht aufgeladen, es wird
nur das Symbol der externen Stromversorgung angezeigt .
•
Wenn das Gerät von einer externen Stromquelle gespeist wird, die Batterie IPS7 jedoch nicht angeschlossen
ist, wird das Symbol angezeigt.
•
Beim Trennen der externen Stromquelle beginnt das Gerät von der Batterie zu funktionieren.
Betrieb
•
Nehmen Sie den Adapter* mit einer Hülse passenden Durchmessers je nach Außendurchmesser des Objektivs
Ihres Zielfernrohres (siehe Tabelle).
•
Die Zeichen 42 mm / 50 mm / 56 mm im Adapternamen bedeuten den Objektivlinsendurchmesser des Zielfernrohrs.
•
Entfernen Sie den Deckel (16) vom Adapter (19), indem Sie den Deckel im Uhrzeigersinn drehen.
•
Es wird empfohlen, das Objektivgehäuse des Zielfernrohrs vor der Montage zu entfetten.
•
Setzen Sie die Hülse (18) bis zum Anschlag in den Adapter (19) ein.
•
Installieren Sie den Adapter samt Hülse bis zum Anschlag ans Objektiv des Tageslichtzielfernrohrs (17).
•
Legen Sie den Hebel (22) aus der Ausgansposition „geöffnet“ (OPEN) in die Position „geschlossen“ (CLOSE) um.
•
Überprüfen Sie, ob der Adapter dicht am Objektiv anliegt.
•
Sollte ein Spiel vorhanden sein, bitte wie folgt handhaben:
- Lockern Sie die Halteschraube (20) mit einem Inbusschlüssel (S=2mm).
- Ziehen Sie die Schraube (21) mit einem Inbusschlüssel (S=4mm) mit der Spannkraft an, die erforderlich ist,
um einen festen Sitz des Adapters am Objektiv zu gewährleisten. Die Anzugskraft soll 1 N·m betragen.
- Ziehen Sie die Halteschraube (20) an.

24
•
Die Anzugskraft kann mit einem Drehmomentschrauber nachgeprüft werden.
•
Setzen Sie das Gerät fest in den Adapter ein, so dass die Adapterstifte in die Vorsatznuten (23) eingefahren
sind. Drehen Sie das Gerät im Uhrzeigersinn bis zum Anschlag. Das Dreieck-Symbol am Vorsatz und das
Quadrat-Symbol am Adaptergehäuse sollen übereinstimmen.
•
Legen Sie den Hebel (22) in die Position OPEN für das Ausrichten des Gerätes um und richten Sie das Gerät
waagerecht aus.
* Separat erhältlich
Modell des
Deckel-Adapters
Übereinstimmung des Innendurchmessers der Hülse und des Außendurchmessers des
Innendurchmesser der Hülse, mm
Außendurchmesser des Objektivs des
Deckel-Adapter FN
42 mm
47 46,7-47,6
48 47,7-48,6
49 48,7-49,6
50 49,7-50,6
Deckel-Adapter FN
50 mm
55 54,7-55,6
56 55,7-56,6
57 56,7-57,6
58 57,7-58,6
59 58,7-59,6
Modell des
Deckel-Adapters
Übereinstimmung des Innendurchmessers der Hülse und des Außendurchmessers des
Innendurchmesser der Hülse, mm
Außendurchmesser des Objektivs des
Deckel-Adapter FN
56 mm
60 59,7-60,6
61 60,7-61,6
62 61,7-62,6
63 62,7-63,6
64 63,7-64,6
65 64,7-65,6
Einschalten und bildeinstellung
•
Den Objektivschutzdeckel (1) durch das Drehen gegen Uhrzeigersinn entfernen.
•
Durch kurzes Betätigen der Taste ON (9) das Gerät einschalten - das Display zeigt das Bild an.
•
Die Schärfe der Symbole auf dem Display durch das Drehen des Okulareinstellringes Ihres Zielfernrohrs
anpassen. Unabhängig von der Entfernung oder sonstigen Bedingungen ist das Drehen des
Okulareinstellringes künftig nicht mehr nötig.
•
Für Fokussierung auf ein Beobachtungsziel den Griff für Objektivfokussierung (10) drehen.
Die Grundeinstellungen (Helligkeits- und Kontrastregelung) werden über das Schnellzugriffsmenü geändert.
Schalten Sie das Gerät nach Gebrauch durch langes Betätigen der Taste ON (9) aus.
Funktionen des Schnellzugrismenüs
•
Das Schnellmenü durch kurzes Betätigen der Taste aktivieren.
•
Für das Wechseln zwischen nachfolgend beschriebenen Funktionen die Taste kurz betätigen.
•
Helligkeit - durch das Betätigen der Tasten RIGHT (6) und LEFT (8) wird der Helligkeitswert des
Displays von 0 bis 20 geändert.
•
Kontrast - durch das Betätigen der Tasten RIGHT (6) und LEFT (8) wird der Wert des
Bildkontrastes von 0 bis 20 geändert.
Funktionen Des Hauptmenüs
•
Das Hauptmenü durch langes Betätigen der Taste aktivieren.
•
Für das Wechseln zwischen Hauptmenüpunkten die Tasten RIGHT (6)
und LEFT (8) betätigen.
•
Um einen Unterpunkt im Hauptmenü aufzurufen, die Taste kurz
betätigen.
•
Um einen Unterpunkt im Hauptmenü zu verlassen, die Taste
gedrückt halten.
•
Das automatische Verlassen des Hauptmenüs erfolgt nach 10
Sekunden Inaktivität.
•
Helligkeit der Symbole
•
Wi-Fi Einstellungen
•
Allgemeine Einstellungen
•
Automatisches Abschalten
•
Geräteinformation
Menüübersicht:
Helligkeit der Symbole

25
Helligkeit
der
Symbole
Mit diesem Menüpunkt können Sie die Helligkeit der Symbole auf dem Display des Gerätes einstellen.
•
Halten Sie die Taste M (7) gedrückt, um das Hauptmenü aufzurufen.
•
Mit den Tasten RIGHT (6) und LEFT (8) wählen Sie den Menüpunkt „Helligkeit der Symbole“ aus.
•
Betätigen Sie kurz die Taste M (7), um das Untermenü aufzurufen.
•
Mit den Tasten RIGHT (6) und LEFT (8) wählen Sie die Helligkeitsstufe der Symbole aus.
•
Um die Auswahl zu speichern und das Untermenü zu verlassen, halten Sie die Taste M (7)
gedrückt.
Wi-Fi
Einstellun-
gen
Mit diesem Menüpunkt kann das Gerät für den Betrieb im Wi-Fi-Netz einstellt werden.
Hinweis: Wi-Fi wird durch langes Betätigen der Taste LEFT (8) ein- und ausgeschaltet.
Passwort-
einstel-
lung
In diesem Untermenü kann man ein Zugangspasswort zum Gerät von einem
Fremdgerät einstellen. Das Passwort wird für Anschluss eines Fremdgerätes (z.B.
Smartphone) an das Gerät verwendet.
•
Für Aktivieren des Hauptmenüs die Taste M (7) gedrückt halten.
•
Mit den Tasten RIGHT (6) und LEFT (8) den Menüpunkt „Wi-Fi Einstellungen“
auswählen.
•
Für Aktivieren des Untermenüs die Taste M (7) kurz betätigen.
•
Mit den Tasten RIGHT (6) und LEFT (8) den Untermenüpunkt „Passworteinstellung“
auswählen.
•
Für Aktivieren des Untermenüs die Taste M (7) kurz betätigen.
•
Auf dem Display wird ein Passwort angezeigt – standardmäßig „12345678“.
•
Mit den Tasten RIGHT (6) und LEFT (8) das gewünschte Passwort (RIGHT – Wert
aufwärts, LEFT – Wert abwärts) festlegen. Für Wechseln zwischen den Stellen die
Tastebetätigen.
•
Um das Passwort zu speichern und das Untermenü zu verlassen, halten Sie die
Taste M (7) gedrückt.
-
ebene
Einstel-
lung
Mit diesem Unterpunkt können Sie die erforderliche Zugriffsebene für Ihr Gerät
einstellen, die die Anwendung Stream Vision bekommt.
Master Level. Der Benutzer von Stream
Vision hat vollen Zugriff auf alle Funktionen des Gerätes.
Gast Level. Der Benutzer von Stream Vision kann sich nur Videos vom Gerät in
Realzeit anschauen.
•
Halten Sie die Taste M (7) gedrückt, um das Hauptmenü aufzurufen.
•
Mit den Tasten RIGHT (6) und LEFT (8) wählen Sie den Menüpunkt „Wi-Fi-
Einstellungen“ aus.
•
Betätigen Sie kurz die Taste M (7), um das Untermenü aufzurufen.
•
Mit den Tasten RIGHT (6) und LEFT (8) wählen Sie das Untermenü
Einstellung“ aus.
•
Mit den Tasten RIGHT (6) und LEFT (8) wählen Sie die Zugriffsebene „Master“ oder
„Gast“ aus.
•
Um die Auswahl zu bestätigen und das Untermenü zu verlassen, halten Sie die Taste
M (7) gedrückt.
Allgemeine
Einstellun-
gen
Dieser Menüpunkt ermöglicht folgende Einstellungen:
•
Sprache
•
Uhrzeit
•
Formatierung
•
Datum
•
Standardeinstellungen
Sprache
•
Halten Sie die Taste M (7) gedrückt, um das Hauptmenü aufzurufen.
•
Mit den Tasten RIGHT (6) und LEFT (8) wählen Sie das Untermenü „Allgemeine
Einstellungen“ aus.
•
Betätigen Sie kurz die Taste M (7), um das Untermenü aufzurufen.
•
Mit den Tasten RIGHT (6) und LEFT (8) wählen Sie den Untermenüpunkt „Sprache“
aus.
•
Betätigen Sie kurz die Taste M (7), um das Untermenü aufzurufen.
•
Mit den Tasten RIGHT (6) und LEFT (8) wählen Sie eine der verfügbaren Sprachen
der Benutzeroberäche aus: Englisch, Deutsch, Spanisch, Französisch, Russisch.
•
Um die Auswahl zu speichern und das Untermenü zu verlassen, halten Sie die Taste
M (7) gedrückt.
Datum
Datumseinstellung
•
Halten Sie die Taste M (7) gedrückt, um das Hauptmenü aufzurufen.
•
Mit den Tasten RIGHT (6) und LEFT (8) wählen Sie das Untermenü „Allgemeine
Einstellungen“ aus.
•
Betätigen Sie kurz die Taste M (7), um das Untermenü aufzurufen.
•
Mit den Tasten RIGHT (6) und LEFT (8) wählen Sie das Untermenü „Datum“ aus.
•
Betätigen Sie kurz die Taste M (7), um das Untermenü aufzurufen.
•
Das Datum wird im Format TT / MM / JJJJ angezeigt (12/04/2017)
•
Mit den Tasten RIGHT (6) und LEFT (8) wählen Sie den gewünschten Tag, Monat und
das gewünschte Jahr aus. (Taste RIGHT (6) - Wert aufwärts, Taste LEFT (8) - Wert
abwärts)
•
Für das Wechseln zwischen den Stellen betätigen Sie die Taste.
•
Um das ausgewählte Datum zu speichern und das Untermenü zu verlassen, halten
Sie die Taste gedrückt.
•
Halten Sie die Taste M (7) gedrückt, um das Hauptmenü aufzurufen.
•
Mit den Tasten RIGHT (6) und LEFT (8) wählen Sie das Untermenü „Allgemeine
Einstellungen“ aus.
•
Betätigen Sie kurz die Taste M (7), um das Untermenü aufzurufen.
•
Mit den Tasten RIGHT (6) und LEFT (8) wählen Sie den Untermenüpunkt aus.
•
Betätigen Sie kurz die Taste M (7), um das Untermenü aufzurufen.
•
Mit den Tasten RIGHT (6) und LEFT (8) wählen Sie das Zeitformat aus - 24/12 (oder
PM / AM).
•
Betätigen Sie die Taste M (7), um zur Einstellung der Stunden zu gelangen.
•
Mit den Tasten RIGHT (6) und LEFT (8) wählen Sie den Stundenwert aus (Taste
RIGHT (6) - Wert aufwärts, Taste LEFT (8) - Wert abwärts)
•
Betätigen Sie die Taste M (7), um zur Einstellung der Minuten zu gelangen.
•
Mit den Tasten RIGHT (6) und LEFT (8) wählen Sie die Minutenwerte aus.
•
Um die ausgewählte Uhrzeit zu speichern und das Untermenü zu verlassen, halten
Sie die Taste M (7) gedrückt.

26
Allgemeine
Einstellun-
gen
Standard-
einstel-
lungen
•
Halten Sie die Taste M (7) gedrückt, um das Hauptmenü aufzurufen.
•
Mit den Tasten RIGHT (6) und LEFT (8) wählen Sie das Untermenü „Allgemeine
Einstellungen“ aus.
•
Betätigen Sie kurz die Taste M (7), um das Untermenü aufzurufen.
•
Mit den Tasten RIGHT (6) und LEFT (8) wählen Sie den Untermenüpunkt
„Standardeinstellungen“ aus.
•
Betätigen Sie kurz die Taste M (7), um das Untermenü aufzurufen.
•
Mit den Tasten RIGHT (6) und LEFT (8) wählen Sie die Variante „Ja“ aus, um zu den
Werkseinstellungen zurückzukehren, oder „Nein“, um die Aktion abzubrechen.
•
Bestätigen Sie die Auswahl durch kurzes Betätigen der Taste M (7).
•
Die folgenden Einstellungen werden auf den ursprünglichen Zustand bis deren
änderung durch den Benutzer zurückgesetzt:
Helligkeitsstufe - 10 Sprache - Englisch Automatisches Abschalten - aus
Kontraststufe - 8 Wi-Fi - aus (Passwort
standardmäßig )
Formatie-
rung
Durch die Formatierung der integrierten Speicherkarte werden alle gespeicherten
Dateien irreparabel gelöscht.
Achtung! Stellen Sie sicher, dass Sie die zu löschenden Dateien nicht mehr brauchen,
oder erstellen Sie ein Backup auf einem anderen Datenträger.
•
Halten Sie die Taste M (7) gedrückt, um das Hauptmenü aufzurufen.
•
Mit den Tasten RIGHT (6) und LEFT (8) wählen Sie das Untermenü „Allgemeine
Einstellungen“ aus.
•
Betätigen Sie kurz die Taste M (7), um das Untermenü aufzurufen.
•
Mit den Tasten RIGHT (6) und LEFT (8) wählen Sie den Untermenüpunkt
„Formatierung“ aus.
•
Betätigen Sie kurz die Taste M (7), um das Untermenü aufzurufen.
•
Mit den Tasten RIGHT (6) und LEFT (8) wählen Sie die Variante „Ja“ für Formatierung
aus, oder „Nein“ für Abbruch der Aktion.
•
Bestätigen Sie die Auswahl durch kurzes Betätigen der Taste M (7).
Automa-
tisches
Mit diesem Menüpunkt können Sie das automatische Abschalten des Gerätes nach einer
bestimmten Zeit aktivieren, wenn das Gerät horizontal oder vertikal um mehr als 70 °, rechts oder
links um mehr als 30° geneigt wird. Dazu müssen keine Steuerorgane des Gerätes betätigt werden.
•
Halten Sie die Taste M (7) gedrückt, um das Hauptmenü aufzurufen.
•
Mit den Tasten RIGHT (6) und LEFT (8) wählen Sie den Menüpunkt „Automatisches Abschalten“ aus.
•
Betätigen Sie kurz die Taste M (7), um das Untermenü aufzurufen.
•
Mit den Tasten RIGHT (6) und LEFT (8) wählen Sie den Zeitraum aus, in dem sich das Gerät
automatisch ausschaltet (1 Min; 3 Min; 5 Min), oder wählen Sie „Aus“ aus, wenn Sie die Funktion
des automatischen Abschaltens deaktivieren möchten.
•
Bestätigen Sie die Auswahl durch kurzes Betätigen der Taste M (7).
Hinweis: Das Symbol in der Statuszeile zeigt den Status der Funktion „Automatisches Abschalten“
an
1 min.
Gerätein-
formation
•
Halten Sie die Taste M (7) gedrückt, um das Hauptmenü aufzurufen.
•
Mit den Tasten RIGHT (6) und LEFT (8) wählen Sie den Menüpunkt „Geräteinformation“ aus.
•
Betätigen Sie kurz die Taste M (7), um das Untermenü aufzurufen.
Die folgenden Informationen über das Gerät stehen dem Benutzer zur Verfügung:
voller Name Seriennummer Version des Aufbaus
SKU Nummer Version der Software Serviceinformationen
Statuszeile
Die Statuszeile bendet sich am unteren Rand des Displays und zeigt Informationen über den aktuellen Status
des Gerätes an, darunter:
•
SumLight™-Funktion
•
Automatisches Abschalten 1 min (falls aktiviert)
•
IR Strahler-Funktion (z.B., Stufe 3)
•
Wi-Fi- Anschluss
•
Uhr
•
Batterieladezustand (wenn das Gerät von der Akkumulatorenbatterie gespeist wird) oder
•
Anzeige der Stromversorgung über eine externe Stromquelle (wenn das Gerät von einer externen
Stromquelle gespeist wird) oder
•
Batterieladeanzeige mit aktuellem Ladezustand als Prozentwert (wenn die Batterie installiert ist und sie von
einer externen Stromquelle geladen wird)
Anmerkung: wenn Sie die Vergrößerung des optischen Geräts erhöhen, an dem der Vorsatz montiert ist, kann
die Statusleiste die Grenzen des sichtbaren Bildes teilweise oder vollständig hinausgehen.
IR Strahler
Das Nachtsichtvorsatzgerät ist mit einem abnehmbaren IR-Strahler ausgestattet, der in einer Wellenlänge von
940 nm betrieben wird und den Beobachtungsabstand bei schlechten Lichtverhältnissen oder bei absoluter
Dunkelheit vergrößern lässt. Anstelle des mitgelieferten IR Strahlers können Sie auch andere Pulsar IR Strahler
(separat erhältlich) installieren.
•
Nehmen Sie die Kappe (12) vom Anschluss für
Installieren des IR Strahlers (13) ab.
•
Nehmen Sie die Blende (11) vom IR Strahler ab.
•
Installieren Sie den IR Strahler an das Gerät.
Der Hebel (25) muss sich in der oberen Position
benden.
•
Machen Sie den IR Strahler fest, indem Sie den
Hebel (25) nach unten klappen.
•
Für Aktivieren des IR Strahlers schalten Sie das
Gerät mit der Taste ON (9) ein.
•
Wenn der IR Strahler nicht angeschlossen ist, wird das
Symbol des deaktivierten IR Strahlers in der Statuszeile
angezeigt. Wenn der IR Strahler angeschlossen ist, wird kein
Symbol angezeigt.
•
Betätigen Sie kurz die IR Taste (24) an der Stirnäche des Strahlers. Das
Leistungsniveau beim Einschalten ist minimal
.
•
In der Statuszeile wird das Symbol des IR Strahlers mit jeweiligem Leistungsniveau angezeigt.
•
Durch aufeinanderfolgende kurze Betätigen der IR Taste (24) wird das Leistungsniveau des Strahlers
nacheinander umgeschaltet ( > > > ).
•
Schalten Sie den IR Strahler durch langes Betätigen der IR Taste (24) aus.
•
Das IR Symbol verschwindet vom Display.
Hinweis: Beim Ausschalten des IR Strahlers wird sein Leistungsniveau im Speicher des Gerätes nicht
gespeichert. Beim Einschalten des Gerätes wird das minimale Leistungsniveau des Strahlers IR1 aktiviert.

27
Wi-Fi Funktion
•
Das Gerät hat die Funktion der drahtlosen Verbindung mit mobilen Geräten (Tablet, Smartphone) über Wi-Fi.
•
Aktivieren Sie den Modul der drahtlosen Verbindung durch langes Betätigen der Taste LEFT (8). Das
Funktionieren von Wi-Fi wird in der Statuszeile wie folgt angezeigt:
Wi-Fi aus Kein Symbol
Wi-Fi ist vom Benutzer aktiviert, es erfolgt Einschaltvorgang von
Wi-Fi im Gerät
Wi-Fi ist eingeschaltet, es besteht keine Verbindung zum Gerät
Wi-Fi ist eingeschaltet, das Gerät wurde erfolgreich verbunden
Das Gerät wird vom Mobilgerät als „Forward F_XXXX“ erkannt, wo XXXX die letzten vier Ziffern der Seriennummer sind.
Nach der Passworteingabe auf dem Mobilgerät (weitere Informationen zur Passworteinstellung sind im
Unterkapitel „Wi-Fi Einstellungen“ des Kapitels „Funktionen des Hauptmenüs“ der Betriebsanleitung zu
nden) und nach der erfolgreichen Verbindung wird das Symbol
in der Statuszeile auf das Symbol
geändert, und die Wiedergabe des Videosignals auf dem Bildschirm des Mobilgerätes wird gestartet, nachdem
die Taste „Visier“ auf dem Bildschirm des Mobilgerätes aktiviert wurde. Das Symbol in der Statuszeile ändert
sich auf .
Hinweis: Sie können die erforderliche Zugriffsebene, die die Stream Vision-Anwendung bekommt, für Ihr Gerät
im Menüabschnitt einstellen.
Funktion „SumLight™“
•
Mit der SumLight™ - Funktion können Sie die Empndlichkeit des CMOS-Arrays bei Senkung des
Beleuchtungspegels wesentlich erhöhen. Das ermöglicht die Beobachtung bei schlechten Lichtverhältnissen
ohne Anwendung des IR Strahlers.
•
Um die SumLight™ – Funktion zu aktivieren, betätigen Sie kurz die Taste LEFT (8).
•
Um die SumLight™ – Funktion zu deaktivieren, betätigen Sie noch einmal kurz die Taste LEFT (8).
•
Das Symbol SumLight™ (aktiv oder nicht aktiv ) wird in der Statuszeile angezeigt.
Achtung! Beim Aktivieren der SumLight™ – Funktion steigt der Geräuschpegel im Bild, die Bildwechselrate
nimmt ab, die Abbildung verzögert sich – bei ruckartiger Bewegung des Gerätes kann das Bild „verschwommen“
werden, solche Erscheinungen sind keine Fehler. Im Display können leuchtende weiße Punkte (Pixel) sichtbar
sein, die Anzahl der Punkte kann beim Aktivieren der SumLight™ – Funktion steigen – das ist durch die
Besonderheiten dieser Funktion bedingt und es liegt ebenfalls kein Fehler vor.
Video- und Fotoaufnahme
Das Gerät hat die Funktion der Videoaufnahme (Fotoaufnahme) des beobachteten Bildes auf die eingebaute
Speicherkarte.
Lesen Sie vor der Verwendung der Foto- und Videofunktionen die Unterkapitel „Datumseinstellung“ und
im Kapitel „Funktionen des Hauptmenüs“ der vorliegenden Bedienungsanleitung.
Das eingebaute Aufnahmegerät funktioniert in zwei Modi:
•
FOTO (Fotoaufnahme; in der oberen rechten Ecke des Displays wird das Symbol angezeigt). Wenn die
geschätzte Anzahl der Fotos, die im Flash-Speicher noch gespeichert werden können, 100 überschreitet, wird
„> 100“ angezeigt.
•
VIDEO (Videoaufnahme; in der oberen rechten Ecke des Displays wird das Symbol und die verbleibende
Gesamtaufnahmezeit, basierend auf der aktuellen Auösung im Format MM: SS - Minuten: Sekunden,
angezeigt).
Beim Einschalten ist das Gerät auf den Videomodus eingestellt. Der Wechsel der Modi erfolgt durch langes
Betätigen der Taste RIGHT (6). Der Übergang zwischen den Modi erfolgt zyklisch (Video-> Foto-> Video…).
Modus Foto. Fotoaufnahme
•
Wechseln Sie in den Fotomodus durch langes Betätigen der Taste RIGHT (6).
•
Betätigen Sie kurz die Taste RIGHT (6), um ein Foto zu machen. Das Bild friert für eine halbe Sekunde ein.
•
Die Fotodatei wird auf die eingebaute Speicherkarte gespeichert.
Modus Video. Videoaufnahme
•
Wechseln Sie in den Videomodus durch langes Betätigen der Taste RIGHT (6).
•
Betätigen Sie kurz die Taste RIGHT (6), um ein Video zu starten.
•
Nach dem Start der Videoaufnahme verschwindet das Symbol , stattdessen erscheint das Symbol REC
sowie der Timer der Videoaufnahme im Format MM: SS (Minuten: Sekunden) *;
•
Um die Videoaufnahme zu stoppen, halten Sie die Taste RIGHT (6) gedrückt.
•
Die Videodateien werden nach dem Stoppen der Videoaufnahme auf die eingebaute Speicherkarte
gespeichert.
* Das Symbol wird 2 Sekunden lang angezeigt und dann ausgeblendet. Beim nächsten kurzen Betätigen der
Taste RIGHT (6) erscheint das Symbol, und der Aufnahmetimer zeigt die aktuelle Aufnahmezeit des Videos an.
Anmerkungen:
•
Nach dem Stoppen der Videoaufnahme / nach der Fotoaufnahme; beim Ausschalten des Gerätes, wenn die
Aufnahme eingeschaltet war; Wenn die Speicherkarte während der Videoaufnahme überfüllt wurde (die
Meldung „Speicher voll“ wird auf dem Display angezeigt).
•
Während der Videoaufnahme können Sie das Menü des Gerätes aufrufen und im Menü arbeiten.
•
Die aufgenommenen Videos und Fotos werden auf die eingebaute Speicherkarte des Gerätes im Format img_
xxx.jpg (für Fotos), und video_xxx.mp4 (für Videos) gespeichert. xxx ist allgemeiner dreistelliger Dateizähler
(für Fotos und Videos);
•
Der Zähler, der bei der Benennung von Multimedia-Dateien verwendet wird, wird nicht zurückgesetzt.
•
Wenn Sie eine Datei aus der Mitte der Liste löschen, übergeht ihre Nummer nicht auf eine andere Datei.
•
Bei der Überfüllung des Zählers wird ein neuer Ordner mit dem Namen img_xxxx erstellt, wo xxxx der Zähler
der Ordner ist.
•
Die maximale Länge einer aufgenommenen Videodatei beträgt sieben Minuten. Nachdem diese Zeit
abgelaufen ist, wird das Video in einer neuen Datei aufgenommen. Die Anzahl der Dateien ist durch die
interne Speicherkapazität des Gerätes beschränkt;
•
Kontrollieren Sie regelmäßig den freien Speicherplatz der eingebauten Speicherkarte, übertragen Sie das
aufgenommene Material auf andere Träger, so räumen Sie Platz auf der Speicherkarte;
•
Auf den aufgenommenen Videodateien und Fotos werden grasche Informationen angezeigt (Statuszeile,
Symbole usw.).
Funktion „Bildschirm Aus“ (Display O)
Diese Funktion bringt das Gerät in den Standby-Modus, so dass Sie es bei Bedarf schnell einschalten können.
Varianten der Arbeit mit der Funktion „Bildschirm Aus“:
Variante 1. Das Gerät ist ausgeschaltet. Man muss das Gerät einschalten und die Funktion „Bildschirm Aus“
aktivieren.
•
Schalten Sie das Gerät durch kurzes Betätigen der Taste ON (9) ein.
•
Aktivieren Sie die Funktion „Bildschirm Aus“: die Taste ON (9) gedrückt halten. Auf dem
Bildschirm erscheint die Meldung „Bildschirm Aus“ mit dem Countdown
•
Lassen Sie die Taste ON (9) los.
•
Um die Funktion „Bildschirm Aus“ zu deaktivieren, betätigen Sie kurz die Taste ON (9).
Variante 2. Die Funktion „Bildschirm Aus“ ist aktiviert, man muss das Gerät abschalten.
•
Halten Sie die Taste ON (9) gedrückt. Auf dem Bildschirm erscheint die Meldung „Bildschirm Aus“ mit dem
Countdown 3,2,1,0.
Bildschirm Aus

28
•
Halten Sie die Taste ON (9) bis zum Abschalten des Gerätes gedrückt (das Abschalten des Gerätes erfolgt nach
dem Zählen von 0). *
* Ein späteres Herunterfahren des Gerätes infolge des Abschlusses der Informationsverarbeitung durch den
Prozessor zwecks Datenspeicherung ist möglich. Dabei zeigt das Display 0 in der Countdown-Zeit.
Anschluss Von USB
•
Schalten Sie das Gerät durch Betätigen der Taste ON (9) ein (das ausgeschaltete Gerät wird vom Computer
nicht erkannt).
•
Schließen Sie ein Ende des USB Kabels an die Micro-USB-Buchse (14) des Gerätes und das andere Ende an
den Anschluss an Ihrem Computer an.
•
Das Gerät wird vom Computer automatisch erkannt, die Installation von Treibern ist nicht erforderlich.
•
Auf dem Display erscheinen zwei Anschlussvarianten: Speicherkarte (Memory card) und Stromquelle (Power).
•
Mit den Tasten RIGHT (6) und LEFT (8) wählen Sie eine Anschlussvariante aus.
•
Betätigen Sie kurz die Taste M (7), um die Auswahl zu bestätigen.
Anschlussvarianten:
Speicherkarte (Memory card).
•
Bei der Wahl dieser Variante wird das Gerät vom Computer als USB-Stick
erkannt. Diese Option ist für die Arbeit mit Dateien vorgesehen, die im
Speicher des Gerätes gespeichert sind. Die Gerätefunktionen sind dabei
nicht verfügbar, das Gerät schaltet sich nicht aus. Wenn die Verbindung zum
Computer getrennt wird, funktioniert das Gerät weiterhin.
•
Wenn zum Zeitpunkt der Verbindung ein Video aufgenommen wurde, wird
die Aufnahme gestoppt und gespeichert.
Stromquelle (Power).
•
Bei der Wahl dieser Variante wird der Computer vom Gerät als externe Stromversorgungsquelle verwendet. In
der Statuszeile erscheint das Symbol . Das Gerät funktioniert weiter, alle Funktionen sind verfügbar. Es
erfolgt kein Auaden der im Gerät installierten Akkumulatorenbatterie.
Abschalten von USB
•
Beim Abschalten des USB Kabels vom Gerät, das im Modus „Speicherkarte“ funktioniert, bleibt das Gerät
eingeschaltet.
•
Beim Abschalten des USB Kabels vom Gerät, das im Modus „Stromquelle“ funktioniert, wird das Gerät von
der Batterie weiter betrieben, wenn sie ausreichend aufgeladen ist.
Anwendung der Weaver-Schiene
Das Nachtsichtvorsatzgerät ist mit einer Weaver-Schiene (15) ausgestattet, mit der Sie zusätzliches Zubehör
installieren können. Sie müssen zuerst den abnehmbaren IR Strahler entfernen (siehe Kapitel „IR Strahler“).
USB Verbindung
Verwenden als Stromquelle
Verwenden als Speicherkarte
Kalibrierung des Displays
Das Gerät ist so eingestellt, dass nach seinem Anbau an das
richtig eingeschossene Zielfernrohr keine Justierung des
Zielpunktes erforderlich ist. Sollte das Gerät einen heftigen Stoß
oder Sturz erleiden, können Sie die Treffpunktlage überprüfen
und gegebenenfalls selbst korrigieren, ohne sich an das
Servicezentrum zu wenden.
•
Zum Aufrufen des Modus der Display-Kalibrierung halten Sie
die Taste M (7) 10 Sekunden lang gedrückt – es erscheinen die
Display-Koordinaten- X=0; Y=0.
•
Verschieben Sie das Display waagerecht (Achse X) und
senkrecht (Achse Y) mit den Tasten LEFT (8) und RIGHT
(6), so dass der Treffpunkt in die Mitte der Zielmarke Ihres
Zielfernrohres verschoben wird. Um zwischen den X- und
Y-Koordinaten zu wechseln, betätigen Sie kurz die Taste M (7).
•
Der Schritt der Bildverschiebung beträgt 1 Pixel des Sensors.
•
Der Bildverschiebungsbereich beträgt +/- 20 Pixel waagerecht (Achse X) und +/- 20 Pixel senkrecht (Achse Y).
Um das Menü zu verlassen und die Einstellungen zu speichern, halten Sie die Taste M (7) zwei Sekunden lang
gedrückt.
•
Um das Menü zu verlassen und die Einstellungen zu speichern, halten Sie die Taste M (7) zwei Sekunden lang
gedrückt.
Stream Vision
Die Nachtsichtvorsatzgeräte Forward halten die Technologie Stream Vision ein. Mit Stream Vision wird das Bild
vom Gerät auf Ihr Smartphone oder Tablet via Wi-Fi im Realzeitbetrieb übertragen. Detaillierte Anweisungen zur
Bedienung von Stream Vision nden Sie in einem separaten Prospekt oder auf der Webseite www.pulsar-vision.com
Anmerkung: Im Design des Gerätes ist die Möglichkeit des Updates der Software vorgesehen. Das Update
erfolgt über die Stream Vision-Anwendung.
Scannen Sie die QR-Codes, um die Stream Vision-Anwendung herunterzuladen:
Technische Inspektion
Vor jedem Gebrauch des Gerätes wird eine technische Inspektion empfohlen.
Überprüfen Sie:
•
Geräteübersicht (Risse am Gehäuse sind nicht zulässig).
•
Zustand der Objektiv- und Okularlinsen des Gerätes und der Linse des IR Strahlers (Risse, Fettecken,
Schmutz und andere Ablagerungen sind nicht zulässig). Reinigen Sie die Außenächen von Metall- und
Plastikteilen von Staub, Schmutz und Feuchtigkeit, wischen Sie sie mit einem Baumwolltuch ab.
•
Zustand der Batterie (sie muss geladen sein) und der elektrischen Kontakte an der Batterie (Salz und
Oxidation sind nicht zulässig).
•
Funktionsfähigkeit der Steuerorgane.
•
Genauigkeit und Zuverlässigkeit der Befestigung des Gerätes am Zielfernrohr
Zielmarke des Zielfernrohres
Display-Verschiebung
Tre-punkt
Display-Koordinaten

29
Technische Wartung
Die Wartung wird mindestens zweimal jährlich durchgeführt und umfasst folgende Punkte:
•
Reinigen Sie die Außenächen von Metall- und Kunststoffteilen mit einem Baumwolltuch von Staub und
Schmutz. Silikonfett ist erlaubt.
•
Reinigen Sie die elektrischen Kontakte der Batterie und des Batteriesteckplatzes mit einem fettarmen
organischen Lösungsmittel.
•
Überprüfen Sie die Linsen des Objektivs und Okulars. Reinigen Sie sie bei Bedarf von Staub und Sand
(vorzugsweise kontaktlos). Reinigen Sie die Außenächen der Optik mit speziell dafür vorgesehenen Mitteln.
Lagerung
Lagern Sie das Gerät immer nur in der Aufbewahrungstasche, in einem trockenen, gut belüfteten Raum. Bei der
Dauerlagerung ziehen Sie die Batterie unbedingt heraus.
Fehlersuche
Fehlfunktion Mögliche Ursache Beseitigung
Das Gerät lässt
sich nicht
einschalten.
Die Batterie ist völlig entladen. Laden Sie die Batterie auf.
Das Gerät
funktioniert nicht
von einer externen
Stromquelle.
Das USB Kabel ist beschädigt. Ersetzen Sie das USB Kabel.
Die externe Stromquelle ist
entladen.
Laden Sie die externe Stromquelle auf.
Das Smartphone
oder Tablet stellt
keine Verbindung
zum Gerät her.
Das Passwort im Gerät wurde
geändert.
Löschen Sie das Netzwerk und stellen Sie die
Verbindung mit dem im Gerät gespeicherten
Passwort wieder her.
Das Gerät bendet sich in einer
Zone mit großer Anzahl von
Wi-Fi-Netzwerken, die Störungen
verursachen können.
Um einen stabilen Wi-Fi-Betrieb zu gewährleisten,
bringen Sie das Gerät in eine Zone mit einer
geringeren Anzahl von Wi-Fi-Netzwerken oder in
eine Zone, in der sie nicht vorhanden sind.
Signalsendung via
Wi-Fi fehlt oder
wird unterbrochen.
Das Gerät bendet sich außerhalb
der Zone eines sicheren Wi-Fi-
Signalempfangs. Zwischen dem
Gerät und dem Signalempfänger
benden sich Hindernisse (z. B.
Betonwände).
Bringen Sie das Gerät in die Sichtlinie des Wi-Fi-
Signals.
Schlechte
Bildqualität.
Dieses Problem kann bei der Beobachtung unter schwierigen Wetterbedingungen
(Schnee, Regen, Nebel usw.) auftreten.
Das Bild ist zu
dunkel.
Das Helligkeits-/Kontrastniveau des
Bildes ist zu niedrig
Stellen Sie das Helligkeits-/Kontrastniveau ein.
Auf dem Display
sind Streifen
erschienen,
oder das Bild ist
verschwunden.
Während des Betriebs wurde
das Gerät statischer Spannung
ausgesetzt.
Nach der Auswirkung statischer Spannung kann sich
das Gerät selbständig neu starten, oder schalten Sie
das Gerät aus und wieder ein.
Fehlfunktion Mögliche Ursache Beseitigung
Beim deutlichen
Bild des Absehens
bleibt das Bild des
Objektes unscharf.
Staub oder Kondensat auf
optischen Außen- oder
Innenächen des Objektivs.
Wischen Sie die optischen Außenächen mit einem
weichen Baumwolltuch ab. Trocken Sie das Gerät
- lassen Sie es 4 Stunden lang in einem warmen
Raum liegen.
Das Objektiv ist nicht scharf
eingestellt.
Stellen Sie die Bildschärfe durch Drehen des
Objektivreglers ein.
Das Display liegt
nicht im Zentrum.
Die Lage des Gerätes auf dem
Tageslichtzielfernrohr ist nicht
eingestellt.
Klappen Sie den Adapter auf, bringen Sie das
Display ins Zentrum des Sehfeldes (s. Kapitel
„Betrieb“).
Das Gerät lässt
sich nicht
fokussieren.
Falsche Einstellung.
Stellen Sie Ihr Zielfernrohr laut Kapitel „Betrieb“
ein. Prüfen Sie Außenächen der Objektiv- und
Okularlinsen; falls notwendig reinigen Sie sie von
Staub, Kondensat, Eistau u.ä. Bei kaltem Wetter
können Sie spezielle Anti-Fog-Beschichtungen
anwenden (z.B., wie für Korrekturbrillen).
Der Treffpunkt fällt
mit dem Zielpunkt
nicht zusammen.
Das Display soll kalibriert werden.
Kalibrieren Sie das Display gemäß den Anweisungen
im Kapitel „Kalibrierung des Displays“.
Das Gerät ist am Zielfernrohr oder
das Zielfernrohr ist an der Waffe
nicht fest installiert.
Überprüfen Sie feste Installation des Gerätes
am Zielfernrohr und sichere Befestigung des
Zielfernrohres an der Waffe.
Stellen Sie sicher, dass Sie genau die Art von
Munition verwenden, mit der Ihre Waffe und Ihr
Zielfernrohr zuvor eingeschossen wurden.
Wenn Sie Ihr Zielfernrohr im Sommer
eingeschossen haben und es im Winter betreiben
(oder umgekehrt), ist eine gewisse Änderung des
Nullpunkts des Einschießens nicht ausgeschlossen.
Beim Abfeuern
rutscht das Gerät
vom Zielfernrohr
ab.
Unzureichende Klemmung des
Adapters. Falsche Hülse ausgewählt.
Wählen Sie eine passende Hülse und klemmen Sie
den Adapter laut Empfehlungen fest.
Adapterklemme
kann nicht
geöffnet werden.
Falsche Hülse ausgewählt. Wählen Sie eine passende Hülse. Prüfen Sie,
ob zwischen den Lippen des Adapters ein Spalt
vorhanden ist.
Unter dem Link nden Sie Antworten auf häug gestellte Fragen.
https://www.pulsar-nv.com/glo/support/faq/79

30
Elektromagnetische Verträglichkeit.
Dieses Produkt entspricht den Anforderungen der Europäischen Norm EN 55032:2015, Klasse A.
Achtung: Der Betrieb dieses Produktes in Wohngebieten kann Funkstörungen verursachen.
Achtung! Digitale Nachtsichtgeräte Forward erfordern eine Lizenz, wenn sie über die Grenzen Ihres Landes
exportiert werden.
Ihr Gerät enthält mehrere unterschiedliche, wiederverwertbare Wertstoffe.
Bitte geben Sie Ihr Gerät zum Entsorgen nicht in den Hausmüll, sondern bringen Sie es zu einer speziellen
Entsorgungsstelle für Elektrokleingeräte (Wertstoffhof).

31
ESPAÑOL
Características técnicas
MODELO FORWARD F455
SKU # 78186
CARACTERÍSTICAS ÓPTICAS
Enfoque de lente, mm 50
Lente del objetivo, D / f ' 1:1
Campo visual (horizontal), ° 6,3
Campo visual (horizontal), m @ 100 m 11
Alcance de observación máx. de un animal que mide 1,7m, m 500
Alcance de acercamiento, m 5
Aumento máximo recomendado del visor diurno, x 2-8
CARACTERÍSTICAS ELECTRÓNICAS
Tipo y resolución del sensor CMOS HD 1280X720
Tipo y resolución de la pantalla AMOLED 1746x1000
Sensibilidad, mW (longitud de onda 780 nm, resolución 25 lin/mm) 1,5×10
-
⁵
Sensibilidad, mW (longitud de onda 915 nm, resolución 25 lin/mm) 5,5×10
-
⁵
ILUMINADOR IR DESMONTABLE
Tipo / Longitud de onda, nm LED 940
CARACTERÍSTICAS OPERATIVAS
Alimentación, V 3,0 - 4,2
Tipo de pila / Capacidad / Voltaje nominal de salida
Li-Ion Battery Pack IPS7 /
6400 mAh / DC 3,7V
Alimentación externa Micro USB Tipo-B (5V)
Tiempo de funcionamiento con acumulador a t=22 °C (Wi-Fi OFF, IR OFF), h 9
Resistencia máxima de choque en las armas estriadas, julios 6000
Resistencia máxima de choque en las armas lisas, calibre 12
Grado de protección, código IP (IEC60529) IPX7
Temperatura de funcionamiento, ° С -25 ... +50
Dimensiones, mm 155x136x77
Peso, kg 0,83
GRABADOR DE VÍDEO
Resolución de vídeo / foto, píxeles 1280x720
Formato de vídeo / foto .mp4 / .jpg
Memoria integrada 16GB
CANAL WIFI
Frecuencia 2,4 GHz
Estándar 802.11 b / g / n
El diseño de este producto está sujeto a modicaciones con nes de mejorar sus propiedades del consumo.
Encontrará la última edición del manual de usuario en el sitio web www.pulsar-vision.com
Paquete de entrega
•
Dispositivo digital acoplable
•
Estuche
•
Pila recargable
•
Cargador para la pila recargable
•
Adaptador de red
•
Cable microUSB
•
Manual de usuario
•
Paño de lente
•
Tarjeta de garantía
Descripción
Visor nocturno acoplable Forward F455 es un dispositivo universal que permite transformar de manera
rápida y fácil el visor diurno en el nocturno. El visor se monta en el objetivo del visor diurno con la ayuda de
adaptadores diseñados para diferentes diámetros del objetivo. Para el visor no se requiere regular el tiro
(foguear). El visor está destinado para diversas esferas de aplicación incluso la caza, tiro deportivo, toma de
fotos y grabación de vídeo de noche y observación.
Características
Características clave:
•
Sensor HD 1280x720
•
Alta sensibilidad nocturna
•
Transformación fácil del visor óptico en el nocturno
•
Preservación de las ventajas de la óptica diurna en condiciones de noche
•
Estabilidad del punto de puntería
•
Aplicación confortable en amplia escala de aumento de la óptica diurna
•
Invisible iluminador IR de largo alcance
•
Función de aumento adicional de sensibilidad SumLight™
•
Distancia de detección hasta 500 m.
•
Puesta en marcha instantánea
•
Grabación de vídeo integrada
•
Alimentación de pilas recargables de alta capacidad y de montado rápido B-Pack
•
Sistema de jación de cuatro puntos con una montadura automática
•
Compatibilidad con adaptadores de otros fabricantes.
•
Resistencia al impacto en grandes calibres: 12 cal., 9.3x64, .375H & H
•
Wi-Fi. Integración con dispositivos iOS y Android.
•
Stream Vision. Control remoto, observación y emisión en directo en YouTube mediante un teléfono inteligente
•
Control remoto de soporte lógico
•
Impermeabilidad completa al agua (IPX7)
•
Amplio rango de temperatura de funcionamiento (-25 ... + 50 ° C)
•
MicroUSB. Apoyo de alimentación de Power Bank

32
Unidades y controles
1. Tapa del objetivo
2. Cubierta de ocular
3. Tapa del compartimiento de batería
4. Brazo de instalación de batería
5. Batería recargable
6. Botón DERECHA
7. Botón M (MENÚ)
8. Botón
9. Botón ENCENDIDO
10. Anillo de enfoque del objetivo
11. Cubierta de iluminador IR
12. Tapa de conector del iluminador IR
13. Conector para instalar del iluminador IR
14. Puerto microUSB
15. Carril Weaver
16. Cubierta de adaptador*
17. Objetivo del visor óptico
18. Casquillo*
19. Adaptador*
20. Tornillo de apriete
21. Tornillo
22. Brazo del adaptador
23. Punto de acoplamiento
24. Botón IR
25. Brazo de iluminador IR
5
24
1
17
18
20
21
22
2
14
16 19
9 10
6
23 13
8
7
15
12
11
25
4
3
Open
Objetivo del
visor óptico
Casquillo*
Tornillo
de apriete
Tornillo
Brazo del
adaptador
Cubierta
de
ocular
Botón
M (MENÚ)
Botón
IZQUIERDA
Adaptador*
Cubierta
de adaptador*
Botón
ENCENDIDO
Anillo de enfoque del objetivo
Carril
Weaver
Tapa de conector
del iluminador IR
Tapa del
objetivo
Botón
DERECHA
Punto de
acopla-
miento
Conector para
instalar
iluminador IR
Brazo de
iluminador IR
Puerto
microUSB
Cubierta
de iluminador IR
Botón IR
Brazo de instalación de batería
Tapa de compartimiento de batería
Batería recargable
*Los elementos de la Tapa-adaptador FN (se adquiere aparte)
Descripción de los botones
Botón Modo de funcionamiento
Primera
pulsación breve
Siguientes
pulsaciones
breves
Pulsación prolongada
ENCEN-
DIDO (9)
Dispositivo apagado
Enciende el
dispositivo
–
Enciende el dispositivo
Pantalla apagada
Enciende la
pantalla
–
Apaga el dispositivo
Dispositivo encendido, menú
rápido, menú principal
–
Apaga la pantalla / Apaga el
dispositivo
-
DA (8)
Dispositivo encendido
Activa
SumLight™
Desactiva
SumLight™
Activa WiFi / Desactiva WiFi
Navegación por el menú Navega hacia arriba, a la izquierda, contra las agujas del reloj
Menú rápido Reduce el parámetro
MENU (7)
Dispositivo encendido Entra en el menú rápido Entra en el menú principal.
Navegación por el menú Conrma la elección
Sale del submenú sin conrmar
selección / Sale del menú
(cambiar a modo de visión)
Menú rápido Navegación hacia arriba Sale del menú rápido.
DERE-
CHA (6)
Dispositivo encendido (modo
“Vídeo”)
Inicia grabación
de vídeo
–
Detiene la grabación de vídeo/
Cambia a modo “Foto”
Dispositivo encendido (modo
“Foto”)
Toma una fotografía Cambia a modo “Vídeo”
Navegación por el menú Abajo / hacia la derecha / en sentido de las agujas de reloj
Menú rápido Incrementa el parámetro
IR (24)
Dispositivo encendido, menú
rápido, menú principal
Activa IR
Cambia
potencia IR
Desactiva IR
Guías de operación
El visor acoplable Forward F455 está destinado para un uso prolongado. Para garantizar la duración y una
capacidad completa de trabajo del dispositivo cumpla las siguientes recomendaciones:
•
Antes del uso del dispositivo, asegúrese de que el montaje fue realizado conforme a la sección “Instalación
del dispositivo acoplable en el visor óptico”.
•
Apague el visor acoplable después de su uso.
•
¡Se prohíbe reparar o desarmar el dispositivo cuando está en período de garantía!
•
El dispositivo puede utilizarse dentro de un amplio rango de temperaturas. . Si el visor fue utilizado en el frío
y fue llevado a un local caliente, no lo saque del estuche durante 2 ó 3 horas. Gracias a esto se podrá evitar
que se forme el condensado en los componentes ópticos exteriores.
•
Para garantizar un funcionamiento impecable, para prevenir y eliminar las causas que provocan el desgaste
prematuro o el estropeo de los bloques y piezas, es necesario oportunamente llevar a cabo una revisión
técnica y el mantenimiento del visor.
•
La pila no debe someterse a un calentamiento excesivo provocado por los rayos solares, el fuego u otras
fuentes de calor.

33
Uso de la pila recargable
El visor Forward F455 se suministra con una batería de alimentación externa litio-ión IPS7 recargable que
permite un funcionamiento de hasta 9 horas. Cargue completamente la pila antes del primer uso.
Carga de la pila recargable:
•
Conecte el enchufe del cable microUSB a la ranura
USB del dispositivo de carga.
•
Conecte el enchufe del cable USB al adaptador de red.
•
Conecte el adaptador de red al enchufe 110-220В.
•
Levante el brazo del dispositivo de
carga.
•
Retire la cubierta protectora de la pila
recargable.
•
Instale la pila recargable en el
dispositivo de carga de modo como está
indicado en el dibujo, je el brazo .
•
Tras la instalación, en el dispositivo de
carga encenderá el indicador verde y empezará a parpadear con determinado intervalo:
- una vez, si la carga de la pila oscila entre el 0 y el 50%;
- dos veces, si la carga de la pila oscila entre el 51 y el 75%;
- tres veces, si la carga de la pila oscila entre el 76 y el 100%.
•
Si el indicador se mantiene encendido con una luz verde continua, la pila está totalmente cargada.
Desconecte el dispositivo de carga de la red, desconecte la pila del dispositivo de carga.
•
Si al introducir la pila en el cargador el indicador del cargador continúa en rojo, probablemente el nivel de
carga de la pila es menor del aceptable. Deje la pila en el dispositivo de carga durante un largo periodo de
tiempo (hasta varias horas), luego extráigala y vuelva a colocar.
•
Si la luz del indicador empieza a parpadear en verde, la pila está en buen estado;
•
Si el indicador sigue en rojo, la pila es defectuosa y no puede ser usada. Reemplace la pila.
¡Atención! Para cargar siempre utilice el dispositivo de carga que viene con el visor o un dispositivo de carga
Pulsar IPS (se adquiere aparte). El uso de otros dispositivos de carga puede dañar a la pila de forma irreversible.
Instalación de la pila recargable:
•
Baje el brazo (4).
•
Retire la cubierta protectora del compartimento de pila (3).
•
Retire la cubierta protectora de la pila recargable (5).
•
Instale la pila (5) en la ranura prevista para ésta en el visor de
manera que el elemento F (resalto en el casco de la pila)
se encuentre abajo.
•
Fije la pila levantando el brazo (4).
¡Atención! El dispositivo puede alimentarse de una
fuente externa de alimentación de tipo Power Bank
(5V). Para conectar una fuente de alimentación externa
al dispositivo, conecte el cable USB al puerto microUSB
(14) del dispositivo. Para más detalles véase el punto
“Alimentación externa”
Medidas de seguridad
•
No utilice el dispositivo de carga si su estructura fue modicada o si fue dañado.
•
No deje la batería sin supervisión durante su carga.
•
No deje el dispositivo de carga con la pila conectada a la red durante más de 24 horas después de que la pila
se haya cargado totalmente.
•
Cargue la batería a una temperatura de entre 0°C y +45°C. En caso contrario la vida útil de la pila puede
reducirse.
•
No cargue la pila enseguida tras traerla de condiciones frías a las calientes. Espere 30 - 40 minutos para que
la pila se caliente.
•
No exponga la batería a temperaturas altas ni a una llama viva.
•
La pila no está diseñada para ser sumergida en el agua.
•
No se recomienda conectar dispositivos de terceros con un consumo de corriente que exceda los niveles
permitidos.
•
La pila está protegida frente a cortocircuitos, no obstante, debería evitarse cualquier situación que pueda
provocar un cortocircuito.
•
No desmonte ni deforme la pilas.
•
No deje caer ni golpee la pila.
•
Si la pila va a estar en desuso durante un periodo prolongado, debe estar parcialmente cargada, o sea no
debe estar ni cargada del todo ni descargada del todo.
•
Guarde la pila fuera del alcance de los niños.
Alimentación externa
La alimentación externa se realiza de una fuente de alimentación externa de tipo Power Bank (5V).
•
Conecte la fuente de alimentación externa al puerto USB (14) del dispositivo acoplable.
•
El dispositivo cambia al funcionamiento por alimentación eléctrica externa, al mismo tiempo la pila IPS7 irá
cargándose paulatinamente.
•
En la pantalla aparecerá el pictograma de la pila y se indicará el porcentaje del nivel de la carga.
•
Si el dispositivo está conectado a un ordenador o un adaptador de red o un powerbank que no cumpla con
el estándar Battery Charger (ВC 1.0), la pila IPS7 no empezará a cargarse, y se mostrará solo el pictograma de
la alimentación externa .
•
Si el dispositivo funciona con alimentación eléctrica externa pero la pila IPS7 está conectada, se muestra el
icono .
•
Cuando se desconecta la alimentación eléctrica externa, el dispositivo empezará a alimentarse de la pila.
Funcionamiento
Instalación del dispositivo acoplable en el visor óptico
•
Seleccione un adaptador (se adquiere aparte) con un casquillo con las dimensiones necesarias en
dependencia del diámetro externo del objetivo de su visor óptico (véase la tabla).
•
La indicación 42 mm / 50 mm / 56 mm en la denominación del adaptador designa el diámetro de luz del
objetivo del visor óptico.
•
Retire la tapa (16) del adaptador (19), girándola a la derecha.
•
Antes de instalarlo, se recomienda desengrasar el cuerpo del objetivo.
•
Instale el casquillo (18) hasta el tope en el adaptador (19).
•
Instale hasta el tope el adaptador con el casquillo encima del objetivo del visor diurno (17).
•
Ponga el brazo (22) de la posición inicial “abierto” (OPEN) en la posición “cerrado” (CLOSE).
•
Compruebe si el adaptador se adhiere al objetivo.
•
En caso de haber espacio libre se debe hacer lo siguiente:
- Aoje con la llave Allen (S=2mm) el tornillo de apriete (20).
- Apriete el tornillo (21) con la llave Allen (S=4mm) con el esfuerzo que es necesario para garantizar el encaje
apretado del adaptador encima del objetivo. La fuerza de apretar debe ser 1 Nm.
- Apretar el tornillo de apriete (20).

34
•
El esfuerzo es posible de comprobar con el destornillador de dinamometría.
•
Inserte el visor en el adaptador de modo que los pasadores que se encuentran en el cuerpo del adaptador
entren en las ranuras (23) del visor. Gire el visor a la derecha hasta que se detenga. La marca en forma de un
triángulo en el visor y la marca en forma de un cuadrado en el cuerpo del adaptador deben coincidir.
•
Para alinear el visor, mueve el brazo (22) a la posición OPEN alinea el visor acoplable por el horizonte.
Tabla para seleccionar los casquillos para los visores diurnos
Modelo de la Tapa-
Adaptador
Referencia del diámetro interior del casquillo y del diámetro exterior del casco del
objetivo del dispositivo óptico diurno (visor, anteojo de larga distancia)
Diámetro interno del casquillo, mm
Diámetro externo del cuerpo del objetivo del
visor, mm
Tapa-Adaptador
FN 42 mm
47 46,7-47,6
48 47,7-48,6
49 48,7-49,6
50 49,7-50,6
Tapa-Adaptador
FN 50 mm
55 54,7-55,6
56 55,7-56,6
57 56,7-57,6
58 57,7-58,6
59 58,7-59,6
Tapa-Adaptador
FN 56 mm
60 59,7-60,6
61 60,7-61,6
62 61,7-62,6
63 62,7-63,6
64 63,7-64,6
65 64,7-65,6
Puesta en marcha y ajuste de la imagen
•
Retire la tapa del objetivo (1) girándola hacia la izquierda.
•
Pulse brevemente el botón ENCENDIDO (9), enciende el visor - en la pantalla aparecerá la imagen.
•
Ajuste la denición de los símbolos en la pantalla girando la arandela de ajuste de dioptrías del ocular de su
visor óptico. En adelante, cualesquiera que sean la distancia y las condiciones, no hará falta girar la arandela
de ajuste de dioptrías del ocular.
•
Para tomar foco del objeto de observación gire el anillo de enfoque del objetivo (10).
Los ajustes base (ajuste de la luminosidad y el contraste) se realizan mediante las funciones del menú de
acceso rápido.
Al nal de su uso, apague el visor con una pulsación prolongada del botón ENCENDIDO (9).
Funciones del menú de acceso rápido
•
Entre en el menú “rápido” pulsando brevemente el botón.
•
Para ir de una función a otra de las que están descritas abajo, pulse brevemente el botón.
•
Brillo – pulsando los botones DERECHA (6) y cambie el brillo de la pantalla de 0
a 20.
•
Contaste - pulsando los botones DERECHA (6) y cambie el contaste de la imagen
de 0 a 20.
Funciones del menú principal
•
Entre en el menú principal por la pulsación prolongada del botón
M (7).
•
Para moverse por los puntos del menú principal pulse los botones
DERECHA (6) y (8).
•
Para entrar en un subpunto del menú principal pulse brevemente el
botón M (7).
•
Para salir del subpunto del menú principal pulse y mantenga
pulsado el botón M (7).
•
La salida automática del menú principal se realiza tras 10 segundos
sin actividad.
Composición y descripción del menú
•
Luminosidad de los pictogramas
•
Ajustes de Wi-Fi
•
Ajustes generales
•
Desconexión automática
•
Acerca del dispositivo
Contenido del menú
Luminosidad de los
pictogramas

35
Luminosi-
dad de los
pictogra-
mas
Este punto permite ajustar la luminosidad de los pictogramas en la pantalla del visor acoplable.
•
Pulse y mantenga pulsado el botón M (7) para entrar en el menú principal.
•
Usando los botones DERECHA (6) y (8) elija el punto del menú “Luminosidad de los
pictogramas”.
•
Pulse brevemente el botón para entrar en el submenú.
•
Usando los botones DERECHA (6) y (8) elija el nivel de la luminosidad de los
pictogramas.
•
Para guardar la elección y salir del submenú pulse y mantenga pulsado el botón М(7).
Ajustes de
Wi-Fi
Este punto permite ajustar el visor para la red Wi-Fi.
Nota: Wi-Fi se enciende / se apaga manteniendo pulsado el botón (8).
Ajuste de
la contra-
seña
Este submenú permite congurar la contraseña de acceso al visor desde un
dispositivo externo. La contraseña se utiliza cuando un dispositivo externo (por
ejemplo, un teléfono inteligente) se conecta al visor.
•
Pulse y mantenga pulsado el botón M (7) para entrar en el menú principal.
•
Usando los botones DERECHA (6) y (8) elija el punto del menú “Ajustes
de Wi-Fi”.
•
Pulse brevemente el botón para entrar en el submenú.
•
Usando los botones DERECHA (6) y (8) elija el punto del menú “Ajuste
de la contraseña”.
•
Pulse brevemente el botón para entrar en el submenú.
•
En la pantalla aparecerá la contraseña – es predeterminada “12345678”.
•
Usando los botones DERECHA (6) y (8) establezca la contraseña deseada
(el botón DERECHA incrementa el valor, el botón reduce el valor). Para
moverse entre los dígitos, pulse el botόn.
•
Mantenga pulsado el botón M (7) para guardar la contraseña y salir del submenú.
Establecer
nivel de
acceso
Este submenú le permite congurar el nivel de acceso al visor necesario que recibe la
aplicación Stream Vision.
Nivel Propietario. El usuario tiene pleno acceso a todas las funciones del visor desde
la aplicación Stream Vision.
Nivel Invitado. Desde la aplicación Stream Vision el usuario solo puede ver vídeos en
tiempo real.
•
Pulse y mantenga pulsado el botón M (7) para entrar en el menú principal.
•
Usando los botones DERECHA (6) y (8) elija el punto del menú “Ajustes
de Wi-Fi”.
•
Pulse brevemente el botón para entrar en el submenú.
•
Usando los botones DERECHA (6) y (8) elija el punto del menú
“Establecer nivel de acceso”.
•
Usando los botones DERECHA (6) y (8) elija el nivel de acceso –
“Propietario” o “Invitado”.
•
Para conrmar la elección y salir del submenú mantenga pulsado el botón.
Ajustes
generales
Este punto del menú permite establecer los siguientes parámetros:
•
Lengua
•
Hora
•
Formateo
•
Fecha
•
Ajustes predeterminados
Lengua
•
Pulse y mantenga pulsado el botón M (7) para entrar en el menú principal.
•
Usando los botones DERECHA (6) y (8) elija el submenú “Ajustes
generales”.
•
Pulse brevemente el botón para entrar en el submenú.
•
Usando los botones DERECHA (6) y (8) elija el punto del submenú
“Lengua”.
•
Pulse brevemente el botón para entrar en el submenú.
•
Usando los botones DERECHA (6) y (8) elija una de las lenguas
disponibles de interfaz: inglés, alemán, español, francés, ruso.
•
Para guardar la elección y salir del submenú mantenga pulsado el botón M (7).
Fecha Ajuste de la fecha
•
Pulse y mantenga pulsado el botón M (7) para entrar en el menú principal.
•
Usando los botones DERECHA (6) y (8) elija el submenú “Ajustes
generales”.
•
Pulse brevemente el botón para entrar en el submenú.
•
Usando los botones DERECHA (6) y (8) elija el punto del submenú
“Fecha”.
•
Pulse brevemente el botón para entrar en el submenú.
•
La fecha se muestra en formato dd / mm / aaaa (12/04/2017)
•
Usando los botones DERECHA (6) y (8) elija el valor necesario del día,
mes y año. (el botón DERECHA (6) incrementa el valor, el botón (8)
reduce el valor) Para moverse entre los dígitos, pulse brevemente el botón M (7).
•
Para guardar la fecha elegida y salir del submenú pulsar y mantener pulsado el
botón M (7).
Hora Ajuste de la hora
•
Pulse y mantenga pulsado el botón M (7) para entrar en el menú principal.
•
Usando los botones DERECHA (6) y (8) elija el submenú “Ajustes
generales”.
•
Pulse brevemente el botón para entrar en el submenú.
•
Usando los botones DERECHA (6) y (8) elija el punto del submenú
“Hora”.
•
Pulse brevemente el botón para entrar en el submenú.
•
Pulsando los botones DERECHA (6) y (8) elija el formato de la hora –
24/12 (o PM/AM).
•
Para empezar a ajustas las horas pulse el botón.
•
Pulsando los botones DERECHA (6) y (8) elija el valor de las horas (el
botón DERECHA (6) incrementa el valor, el botón (8) reduce el valor).
•
Para pasar a la conguración de los minutos pulse el botón.
•
Pulsando los botones DERECHA (6) y (8) elija el valor de los minutos.
•
Para guardar la hora ajustada y salir del submenú mantenga pulsado el botón M (7).

36
Ajustes
generales
Volver a la
-
ración
predeter-
minada
•
Pulse y mantenga pulsado el botón M (7) para entrar en el menú principal.
•
Usando los botones DERECHA (6) y (8) elija el submenú “Ajustes generales”.
•
Pulse brevemente el botón para entrar en el submenú.
•
Usando los botones DERECHA (6) y (8) elija el punto del submenú
.
•
Pulse brevemente el botón para entrar en el submenú.
•
Usando los botones DERECHA (6) y (8) elija la opción “Sí” para volver a
la conguración predeterminada, o “No” para cancelar la acción.
•
Conrme la elección pulsando brevemente el botón.
Los siguientes parámetros volverán a su conguración inicial que se tenía antes de
que la cambiara el usuario:
Nivel de brillo – 10 Desconexión automática – desactivada Lengua - inglés
Nivel del contraste – 8 Wi-Fi – apagado (contraseña
predeterminada)
Formateo
El formateo de la tarjeta de memoria integrada borra irrevocablemente todos los
archivos grabados.
¡Atención! Asegúrese de que los archivos a borrar ya no son necesarios o haga una
copia de seguridad en otro portador.
•
Pulse y mantenga pulsado el botón M (7) para entrar en el menú principal.
•
Usando los botones DERECHA (6) y (8) elija el submenú “Ajustes
generales”.
•
Pulse brevemente el botón para entrar en el submenú.
•
Usando los botones DERECHA (6) y (8) elija el punto del submenú
“Formateo”.
•
Pulse brevemente el botón para entrar en el submenú.
•
Usando los botones DERECHA (6) y (8) elija la opción “Sí” para formatear
o “No” para cancelar la acción.
•
Conrme la elección pulsando brevemente el botón.
Desco-
nexión
automática
Este punto permite activar la función de la desconexión automática del visor acoplable tras un
determinado período de tiempo si el aparato está inclinado horizontal o verticalmente a más de 70°; a la
derecha o a la izquierda a más de 30°. Además no deben estar activados los mandos del visor acoplable.
•
Pulse y mantenga pulsado el botón M (7) para entrar en el menú principal.
•
Usando los botones DERECHA (6) y (8) elija el punto del menú “Desconexión
automática”.
•
Pulse brevemente el botón para entrar en el submenú.
•
Usando los botones DERECHA (6) y (8) elija el período de tiempo tras el cual el visor
acoplable se desconectará automáticamente (1 min; 3 min; 5 min), o la opción “Off” si usted
quiere desactivar la función de la desconexión automática.
•
Conrme la elección pulsando brevemente el botón.
Nota: en la barra de estado se muestra el pictograma del estatus de la función “Desconexión
automática”
1 min.
Acerca
del visor
acoplable
•
Pulse y mantenga pulsado el botón M (7) para entrar en el menú principal.
•
Usando los botones DERECHA (6) y (8) elija el punto del menú “Acerca del visor
acoplable”.
•
Pulse brevemente el botón para entrar en el submenú.
El usuario tiene acceso a la siguiente información sobre el visor:
denominación completa del visor número de serie del visor versión de montaje del visor
número SKU del visor versión de soporte lógico
del visor
información de servicio
Barra de estado
La barra de estado se encuentra en la parte inferior de la pantalla y muestra la información sobre el estado
actual del visor acoplable, incluso:
•
Función SumLight™
•
Desconexión automática 1 min (si la función está activada)
•
Funcionamiento del iluminador IR (por ejemplo, el 3
er
grado)
•
Conexión por Wi-Fi
•
Reloj
•
Nivel de carga de la pila (si el visor está alimentado por la pila) o
•
Indicador de alimentación desde una fuente de alimentación externa (si el visor es alimentado por una
fuente de alimentación externa) o
•
Indicador de la carga de pila con el porcentaje actual de su carga (si está instalada la pila y la pila está
cargándose desde una fuente de alimentación externa).
Nota: a medida que subimos los aumentos del visor o dispositivo óptico en el que está montado el accesorio,
la barra de estado puede desaparecer parcial o totalmente de la imagen visible en la pantalla
Iluminador IR
El dispositivo está equipado con un iluminador IR desmontable que funciona a una longitud de onda de 940
nm que permite aumentar la distancia de observación en condiciones de poca luz o en la oscuridad. En vez del
iluminador IR que viene con el visor, usted puede instalar otros iluminadores IR Pulsar (se adquieren aparte).
•
Retire la brida (12) desde la ranura para montar el iluminador IR (13).
•
Retire la tapa (11) del iluminador IR.
•
Monte el iluminador IR al aparato. El brazo (25)
debe encontrarse en la posición superior.
•
Fije el iluminador IR bajando el brazo (25).
•
Para activar el iluminador IR: encienda el
aparato pulsando el botón ENCENDIDO (9).
•
En caso de estar desconectado el iluminador IR,
en la barra de estado se muestra el pictograma
de iluminador desconectado. En caso de estar
conectado el iluminador IR, el pictograma no se
muestra.
•
Pulse brevemente el botón IR (24) en el extremo del
iluminador. Al encender el nivel de capacidad es mínimo .
•
El pictograma del iluminador IR con el nivel correspondiente de
capacidad se muestra en la barra de estado.
•
Pulsando brevemente el botón IR (24) cambiará sucesivamente el nivel de
capacidad del iluminador ( > > > ).
•
Para apagar el iluminador IR mantenga pulsado el botón IR (24).
•
El pictograma IR desaparecerá de la pantalla.
Nota: Al apagar el iluminador IR, el nivel de capacidad no se guarda en la memoria del visor. Cuando el visor
se enciende, el iluminador se enciende en el nivel de capacidad mínimo - IR1.

37
Función Wi-Fi
•
El visor acoplable dispone de la opción de conexión inalámbrica con dispositivos móviles (tableta, teléfono
inteligente) mediante Wi-Fi.
•
Encienda el módulo inalámbrico pulsando prolongadamente el botón (8). El funcionamiento de
Wi-Fi se muestra en la barra de estado de modo siguiente:
Wi-Fi está desconectado No hay pictograma
Wi-Fi fue activado por el usuario, se está progresando la conexión al Wi-Fi
Wi-Fi está encendido, sin conexión con el visor acoplado
Wi-Fi está encendido, el visor acoplado está conectado
Su dispositivo es detectado por un dispositivo externo como “Forward F_XXXX”, donde XXXX son los cuatro
últimos dígitos del número de serie de su dispositivo.
Al introducir la contraseña en el dispositivo móvil (más detallado sobre la denición de la contraseña véase
en el punto “Ajustes de Wi-Fi” del capítulo “Funciones del menú principal” del manual) y establecerse la
conexión, el pictograma
en la barra de estado se sustituye por el , la transmisión de la videoseñal en la
pantalla del dispositivo móvil empieza tras la activación del botón “visor” en la pantalla del dispositivo móvil.
El pictograma en la barra de estado se cambia en .
Nota: en el punto de menú “Establecer nivel de acceso” se puede establecer el nivel necesario de acceso a su
aparato que recibe la aplicación Stream Vision.
Función “SumLight™”
•
La función SumLight™ puede aumentar signicativamente el nivel de sensibilidad de la matriz CMOS cuando
disminuye el nivel de iluminación, lo que hace posible la observación en condiciones de poca luz sin usar el
iluminador IR.
•
Para activar la función SumLight™ pulse brevemente el botón .
•
Para desactivar vuelva a pulsar brevemente el botón .
•
El pictograma SumLight™ (activada o desactivada ) se muestra en la barra de estado.
¡Atención! Cuando se activa la función SumLight™ se aumenta el nivel de ruidos en la imagen, se disminuye la
frecuencia del cambio de cuadros, la imagen se demora, cuando el visor se mueve de manera brusca la imagen
puede ser borrosa, tales efectos no son defectos. En la pantalla del dispositivo pueden verse unos puntos
blancos (píxeles), el número de puntos puede aumentar cuando se conecta la función SumLight™, esto está
vinculado con particularidades de esta función y tampoco es un defecto.
Grabación de vídeo y de fotografía
El visor acoplable tiene la función de grabación de vídeo (toma de fotos) de la imagen observada en la tarjeta
de memoria incorporada.
Antes de utilizar la función grabación de vídeo y de fotos estudie los puntos “Ajuste de la fecha”, “Ajuste de la
hora” del capítulo “Funciones del menú principal” del presente manual.
El grabador integrado funciona en dos modos:
•
FOTO (fotografía; en la esquina derecha superior de la pantalla se muestra el pictograma . Si el número
estimado de fotos que puede ser guardado en la tarjeta de memoria Flash, supera 100, aparece el mensaje “>100”.
•
VÍDEO (grabación de vídeo; en la esquina derecha superior de la pantalla se muestra el pictograma , el
tiempo total de grabación que queda, tomando en consideración la resolución actual en formato MM:SS -
minutos : segundos).
Cuando se enciende, el visor se encuentra en modo de Vídeo. Para alternar los modos de funcionamiento del
visor acoplable mantenga pulsado el botón DERECHA (6). El cambio de modos es cíclico (Vídeo-> Foto-> Vídeo…).
•
Cambie al modo Foto manteniendo pulsado el botón DERECHA (6).
•
Pulse brevemente el botón DERECHA (6) para tomar una fotografía. La imagen se congela por 0,5 segundos.
•
El archivo de la foto se guarda en la tarjeta de memoria integrada.
Modo de Vídeo Grabación de vídeos
•
Cambie al modo Vídeo manteniendo pulsado el botón DERECHA (6).
•
Pulse brevemente el botón DERECHA (6) para iniciar la grabación de vídeo.
•
Al iniciarse la grabación de vídeo, el pictograma desaparece, en su lugar aparece el pictograma REC,
asimismo el temporizador de la grabación de vídeo en formato MM:SS (minutos : segundos)*;
•
Para detener la grabación de vídeo mantenga pulsado el botón DERECHA (6).
•
Los archivos de vídeo se guardan en la tarjeta de memoria integrada tras detener la grabación de vídeo.
* El pictograma se muestra durante 2 segundos y luego desaparece. Al pulsar brevemente el botón DERECHA (6)
el pictograma aparece, el temporizador muestra el tiempo corriente de la grabación de vídeo.
Notas:
•
Tras detener la grabación de vídeo / tras la toma de fotos; tras apagar el visor acoplable si fue activada la
grabación; si la tarjeta de memoria está llena – si durante la grabación de vídeo la tarjeta se llenó totalmente
(en la pantalla va a aparecer el mensaje “Memoria llena”).
•
Durante la grabación de vídeo usted puede entrar y utilizar el menú del visor acoplable;
•
Los vídeos grabados y las fotos tomadas se guardan en la tarjeta de memoria integrada en formato img_xxx.jpg
(para fotos); video_xxx.mp4 (para vídeo). xxx – común de tres dígitos (contador de archivos (para fotos y vídeo);
•
El contador usado para los nombres de los archivos multimedia no puede ser reiniciado;
•
Si un archivo se elimina del medio de la lista, su número no pasa a otro archivo.
•
Cuando el contador está lleno, se crea una nueva carpeta – img_xxxx. Donde xxxx es el contador de carpetas.
•
La duración máxima de un archivo de vídeo grabado es de siete minutos. Después de que se acabe
este tiempo, el vídeo se graba en un nuevo archivo. El número de archivos grabados está limitado por la
capacidad de la memoria interna del visor;
•
Compruebe periódicamente el espacio libre de la memoria interna, pase el material grabado a otros medios
de almacenamiento liberando el espacio de la tarjeta de memoria interna;
•
En los archivos de vídeo grabados y en las fotografías se muestra la información gráca (barra de estado,
pictogramas, etc.).
Función “Apagar la pantalla” (Display O)
Cuando se usa esta función el visor acoplable pasa al modo de espera que permite encenderlo rápidamente
cuando sea necesario.
Opciones de funcionamiento con la función “Apagar la pantalla”:
Opción 1. El visor está apagado. Es necesario encender el visor y activar la función “Apagar la pantalla”.
•
Encienda el visor pulsando brevemente el botón ENCENDIDO (9).
•
Active la función “Apagar la pantalla”: mantenga pulsado el botón ENCENDIDO (9). En la
pantalla aparecerá el mensaje “Apagar la pantalla” con una cuenta atrás.
•
Suelte el botón ENCENDIDO (9).
•
Para desactivar la función “Apagar la pantalla” pulse brevemente el botón ENCENDIDO (9).
Opción 2. La función “Apagar la pantalla” está activada, hay que apagar el visor acoplable.
•
Mantenga pulsado el botón ENCENDIDO (9). En la pantalla aparecerá el mensaje “Apagar la pantalla” con una
cuenta atrás 3,2,1,0.
•
Mantenga pulsado el botón ENCENDIDO (9) hasta que el visor se apague (el visor acoplable se apagará
cuando se llegue a 0 )*.
*El visor puede apagarse más tarde si el procesador naliza el tratamiento de la información para guardar los
datos. En tal caso en la pantalla se marca 0 durante la cuenta atrás.
Apagar la pantalla

38
Conexión de USB
•
Encienda el visor pulsando el botón ENCENDIDO (9) (el ordenador no detecta el dispositivo apagado).
•
Conecte un extremo del cable USB al puerto microUSB (14) del visor, y el otro extremo al puerto USB de su
ordenador.
•
El ordenador detectará su dispositivo automáticamente, no hace falta instalar controladores.
•
Aparecerán dos modos de conexión en la pantalla: Tarjeta de memoria (Memory card) (memoria externa) y
Alimentación (Power).
•
Usando los botones DERECHA (6) y (8) elija la opción de conexión.
•
Pulse brevemente el botón para conrmar la elección.
Opciones de conexión:
Tarjeta de memoria (memoria externa).
•
En este modo el ordenador detecta el dispositivo como tarjeta Flash.
Este modo está destinado para trabajar con los archivos guardados en
la memoria del dispositivo, en tal caso las funciones del dispositivo no
están disponibles, el dispositivo no se apaga. Una vez desconectado del
ordenador, el dispositivo sigue funcionando.
•
Si se estaba ejecutando una grabación de vídeo cuando se efectuó la
conexión, la grabación se detiene y el vídeo se guarda.
Alimentación.
•
En este modo el dispositivo utiliza el ordenador como una fuente externa de alimentación. La barra de
estado aparece el pictograma . El dispositivo sigue funcionando, todas las funciones están disponibles.
•
La pila recargable instalada en el dispositivo no se carga.
Desconexión de USB.
•
Cuando el dispositivo se desconecta de USB en modo Tarjeta de memoria, el dispositivo sigue encendido.
•
Cuando el dispositivo se desconecta de USB en modo Alimentación el dispositivo sigue funcionando de la
pila recargable si ella está sucientemente cargada.
Uso del carril weaver
El visor acoplable está equipado con el carril adicional Weaver (15) con cuya ayuda Ud. puede montar algunos
accesorios adicionales. Antes hay que desmontar el iluminador IR desmontable (véase el capítulo “Iluminador IR”).
Calibrado de la pantalla
El visor acoplable está ajustado de tal manera que tras su montaje
al visor óptico que debe haber sido ajustado en tiro, no se requiere
la corrección del punto de puntería. En caso de haber sido golpeado
fuertemente el visor o de haber caído, Ud. puede comprobar el
punto de impacto y en caso necesario corregirlo por su propia
cuenta sin necesidad de acudir a un centro de asistencia técnica.
•
Para entrar en modo de calibrado de la pantalla mantenga
pulsado al principio el botón M (7) durante 10 segundos.
•
Aparecerán las coordenadas de la pantalla X=0; Y=0.
•
Usando los botones (8) y DERECHA (6) mueva la
pantalla horizontalmente (eje X) y verticalmente (eje Y) de tal
manera que el punto de impacto se mueva al centro de la marca
de alza de su visor óptico.
•
Para alterar entre las coordinadas X y Y pulse brevemente el
botón M (7).
Conexión USB
Usar como alimentación
Usar como tarjeta de memoria
Marca del visor óptico Desplazamient de la pantalla
Punto de impacto
Coordinadas de la pantalla
•
El paso de movimiento de la imagen es de 1 píxel de sensor.
•
La escala del desplazamiento de la imagen es de +/- 20 píxeles horizontalmente (eje X), +/- 20 píxeles
verticalmente (eje Y).
•
Para salir del menú y guardar la conguración mantenga pulsado el botón M (7) durante dos segundos.
Stream Vision
Los visores acoplables Forward son compatibles con la tecnología Stream Vision que permite transmitir
imágenes desde el dispositivo a su teléfono inteligente o a la tableta mediante Wi-Fi en modo de tiempo real.
Encontrará más indicaciones sobre el funcionamiento de Stream Vision en un folleto aparte o en nuestro sitio
web www.pulsar-vision.com
Nota: el dispositivo está diseñado con la posibilidad de actualizar el soporte lógico. La actualización puede
realizarse mediante la aplicación Stream Vision.
Para descargar la aplicación Stream Vision, escanee los códigos QR:
Inspección técnica
Se recomienda realizar la inspección técnica antes de cada uso del dispositivo.
Compruebe:
•
El exterior del dispositivo (no debe haber grietas en el cuerpo).
•
El estado de las lentes del objetivo y del ocular del visor acoplable y del objetivo del iluminador IR (no debe
haber grietas, manchas de grasa, polvo y otros sedimentos). Limpie las supercies exteriores de las piezas
metálicas y las de plástico de polvo, barro y humedad; límpielas con un paño de algodón.
•
El estado de la pila recargable (debería estar cargada) y los contactos eléctricos en la pila (no debe haber
sales ni oxidación).
•
El funcionamiento correcto de los controles.
•
Que el visor acoplable está jado de forma correcta y segura al visor óptico.
Mantenimiento
El mantenimiento deberá realizarse dos veces al año como mínimo y deberá consistir en cumplimiento de las
siguientes medidas:
•
Limpie las supercies exteriores de las piezas metálicas y las de plástico de polvo y de barro usando un paño
de algodón. Se permite la aplicación de un lubricante de silicona.
•
Limpie los contactos eléctricos de la pila recargable y de la ranura de la pila en el dispositivo con un
disolvente orgánico sin grasa.
•
Compruebe las lentes del ocular y del objetivo. En caso necesario, limpie las lentes del polvo y de la arena
(preferiblemente con un método sin contacto). Limpie las supercies externas de la lente con productos
especialmente diseñados para este n.
Almacenamiento
Siempre almacene el visor solo en el estuche, en un local seco, con buena ventilación. Durante un
almacenamiento prolongado, obligatoriamente extraiga la pila recargable.

39
Solución de problemas
Problema Posible causa Medida correctora
El visor no se enciende. La pila está totalmente descargada. Cargue la pila.
No funciona con una fuente
de alimentación externa.
El cable USB está dañado. Reemplace el cable USB.
La fuente de alimentación eléctrica
externa está descargada.
Cargue la fuente de alimentación eléctrica
externa.
El teléfono inteligente o la
tableta no se conectan al
dispositivo.
Fue cambiada la contraseña del
dispositivo.
Elimine la red y vuelva a conectarse
introduciendo la contraseña guardada en el
dispositivo.
El dispositivo está en una zona con
una gran cantidad de redes Wi-Fi
que pueden provocar interferencia.
Para garantizar un funcionamiento estable
de Wi-Fi traslade el dispositivo a una zona
con menor cantidad de redes Wi-Fi o donde
no los haya.
La transmisión de la señal
mediante Wi-Fi falta o se
interrumpe.
El dispositivo está fuera de la
cobertura estable de Wi-Fi. Entre
el dispositivo y el receptor de la
señal hay obstáculos (paredes de
hormigón, por ejemplo).
Traslade el dispositivo a una zona que esté
en línea directa con la señal Wi-Fi.
Baja calidad de la imagen. Dichos problemas pueden surgir debido a complicadas condiciones
meteorológicas (nieve, lluvia, niebla, etc.).
La imagen es demasiado
oscura.
Fue instalado un nivel de brillo o
contraste demasiado bajo.
Ajuste el brillo/contraste.
En la pantalla aparecieron
líneas o la imagen
desapareció.
En el proceso de uso el visor estaba
expuesto a la electricidad estática.
Si el dispositivo ha sido expuesto a la
electricidad estática, el dispositivo puede
reiniciarse autónomamente o apague y
vuelva a encender el dispositivo.
Cuando hay una imagen
precisa de la retícula, se
tiene una imagen borrosa
del objeto.
Hay polvo o agua condensada en
las supercies ópticas exteriores o
interiores del objetivo.
Limpie las supercies ópticas exteriores
con un paño de algodón suave. Seque, deje
permanecer durante 4 horas en un local
caliente.
El objetivo no está enfocado. Ajuste la denición de la imagen girando el
regulador del objetivo.
La pantalla no está ubicada
en el centro.
No está ajustada la posición del
visor acoplable en el visor diurno.
Retire el adaptador y coloque la posición
de la pantalla en el centro del campo visual
(véase el capítulo “Funcionamiento”).
El visor no se enfoca. Ajustes incorrectos. Ajuste el dispositivo conforme al capítulo
“Funcionamiento”. Examine las supercies
exteriores de las lentes del objetivo y
del ocular; en casos necesarios límpielas
de polvo, condensado, escarcha, etc.
Cuando hace frío Ud. puede usar diversos
recubrimientos antiempañantes especiales
(por ejemplo, como para gafas de
corrección).
Problema Posible causa Medida correctora
El punto de impacto no
coincide con el punto de
puntería.
Se requiere el calibrado de la
pantalla.
Realice el calibrado de la pantalla conforme
a lo indicado en el capítulo “Calibrado de
la pantalla” .
El dispositivo no está montado de
forma segura en el visor o en el
visor del arma.
Compruebe que el dispositivo esté bien
montado en el visor y que el visor esté
jado de forma segura en el visor del arma.
Asegúrese de utilizar el mismo tipo de
cartuchos que Ud. utilizó cuando antes
fogueó el arma y el visor.
Si Ud. fogueó el visor en verano y lo utiliza
en invierno (y viceversa) no se debe
descartar algunos cambios del punto cero
del fogueo.
Durante el tiro el visor
acoplable se desliza del
visor.
No hay suciente jación del
adaptador.
No fue elegido el casquillo correcto.
Elija el casquillo correcto y apriete
el adaptador conforme a las
recomendaciones.
Es imposible abrir la
abrazadera del adaptador.
No fue elegido el casquillo correcto. Elija el casquillo correcto. Compruebe si
hay un espacio libre entre los labios del
adaptador.
Usando el enlace Ud. puede encontrar respuestas a las preguntas más frecuentes.
https://www.pulsar-nv.com/glo/support/faq/79
Compatibilidad electromagnética
Este producto cumple con la reglamentación de la UE EN 55032:2015, Clase A.
Advertencia: el funcionamiento de este equipo en áreas residenciales podría causar radio interferencias.
¡Atención! Los dispositivos nocturnos digitales Forward requieren una licencia, si son exportados fuera de su
país de usted.
¡¡Participe en la concervación del medio ambiente!!
Su electrodoméstico contiene materiales recuperables y/o reciclables.
Entréguelo al nal de su vida útil, en un Centro de Recogida Especíco o en uno de nuestros Servicios Ociales
Post Venta donde será tratado de forma adecuada.

40
ITALIANO
Caratteristiche tecniche
MODELLO FORWARD F455
N° SKU 78186
CARATTERISTICHE OTTICHE
Fuoco della lente, mm 50
Apertura relativa, D / f ' 1:1
Campo visivo (orizzontale), ° 6,3
Campo visivo (orizzontale) a 100 m, m 11
Distanza di osservazione massima di un animale di altezza 1,7 m, m 500
Distanza di messa a fuoco minima, m 5
Intervallo di rapporto consigliato del cannocchiale diurno, volte 2-8
COMPONENTI ELETTRONICI
Tipo e risoluzione di sensore CMOS HD1280X720
Tipo e risoluzione di display AMOLED 1746x1000
Sensibilità del dispositivo, mW (lunghezza d'onda 780 nm, risoluzione
25 pezzi/mm)
1,5 ×10
-
⁵
Sensibilità del dispositivo, mW (lunghezza d'onda 915 nm, risoluzione
25 pezzi / mm)
5,5 ×10
-
⁵
ILLUMINATORE IR RIMOVIBILE
Tipo / lunghezza d'onda, nm LED 940
CARATTERISTICHE OPERATIVE
Tensione di alimentazione, V 3,0 - 4,2
Tipo di batteria / Capacità / Tensione d’uscita nominale
Batteria agli ioni di litio IPS7 /
6400 mAh / 3,7 V C.C.
Alimentazione esterna Micro USB Type-B (5V)
La durata della batteria a t = 22 ° C, ora (Wi-Fi disattivato, IR disattivato) 9
Resistenza all'impatto massimale su fucile, joule 6000
Resistenza all'impatto massimale su arma ad anima liscia, calibro 12
Grado di protezione, Codice IP (IEC60529) IPX7
Temperatura di esercizio, °С -25 ÷ +50
Dimensioni, mm 155x136x77
Peso, kg 0,83
VIDEOREGISTRATORE
Risoluzione video/foto, pixel 1280x720
Formato registrazione video/foto .mp4 / .jpg
Memoria interna 16 GB
Frequenza 2,4 GHz
Standard 802,11 b /g/n
Per migliorare le proprietà di consumo del prodotto nella sua costruzione possono essere apportati dei
perfezionamenti.
La versione attuale dell’istruzione per l’esercizio è disponibile sul sito www.pulsar-vision.com
Composizione della fornitura
•
Visore notturno digitale clip-on
•
Fodera
•
Batteria ricaricabile
•
Caricabatteria
•
Scheda di rete
•
Cavo MicroUSB
•
Istruzione per l’esercizio dispensa
•
Panno per pulitura ottica
•
Tagliando di garanzia
Descrizione
Il visore notturno digitale clip-on Forward F455 è un dispositivo versatile che consente di trasformare in
modo rapido e facile un cannocchiale diurno in quello notturno. Il visore clip-on viene montato sulla lente del
cannocchiale con adattatori progettati per i diametri dell'obiettivo diversi. Il visore clip-on non richiede un tiro
d'aggiustamento aggiuntivo. Il visore clip-on è progettato per varie applicazioni, tra cui la caccia, il tiro a segno,
la fotograa e le riprese video notturne, l'osservazione.
Proprietà
Caratteristiche principali:
•
Sensore HD 1280x720
•
Maggiorata sensibilità notturna
•
Trasformazione semplice del cannocchiale diurno in quello notturno
•
Conservazione dei vantaggi dell'ottica diurna durante la notte
•
Stabilità del punto di mira
•
Uso conveniente in una vasta gamma d’ingrandimento delle ottiche diurne
•
Illuminatore IR di lunga portata invisibile
•
Funzione di aumento supplementare della sensibilità SumLight™
•
Distanza di localizzazione no a 500 m
•
Avviamento istantaneo
•
Registrazione video incorporata
•
Alimentazione a batterie di accumulatori ad alta capacità del sistema B-Pack rapidamente ricaricabili
•
Sistema di montaggio a quattro punti con morsetto automatico
•
Compatibilità con adattatori di altri produttori
•
Resistenza all'impatto su grandi calibri: 12 calibro, 9.3x64, .375H&HH
•
Wi-Fi. Integrazione con dispositivi IOS e Android
•
Stream Vision. Controllo remoto, sorveglianza e streaming YouTube live tramite smartphone
•
Aggiornamento software remoto
•
Impermeabilità completa (IPX7)
•
Ampia gamma di temperature d’esercizio (-25 ÷ + 50 ° C)
•
MicroUSB. Sostegno alimentazione Power Bank

41
Unità e comandi
1. Copriobiettivo
2. Coperchio dell’oculare
3. Coperchio del modulo batteria
4. Leva di ssaggio della batteria
5. Batteria ricaricabile
6. Pulsante DESTRO
7. Pulsante M (MENU)
8. Pulsante SINISTRO
9. Pulsante ON
10. Manopola messa a fuoco della lenta
11. Coperchio illuminatore IR
12. Tappo del connettore dell’illuminatore IR
13. Connettore per l’installazione dell’illuminatore IR
14. Porta microUSB
15. Montaggio su guida Weaver
16. Coperchio adattatore*
17. Lente del cannocchiale
18. Inserto*
19. Adattatore*
20. Vite di bloccaggio
21. Vite
22. Leva dell’adattatore
23. Punto di attacco
24. Pulsante IR
25. Leva illuminatore IR
5
24
1
17
18
20
21
22
2
14
16 19
9 10
6
23 13
8
7
15
12
11
25
4
3
Open
Lente del
cannoc-
chiale
Inserto*
Vite di
bloccaggio
Vite
Leva
dell’ada-
ttatore
Coper-
chio
dell'ocu-
lare
Pulsante
M (MENU)
Pulsante
SINISTRO
Adattatore*
Coperchio
adattatore*
Pulsante
ON
Manopola messa a fuoco della lenta
Montaggio su
guida Weaver
Tappo del
connettore
dell'illuminatore IR
Copriobiettivo
Pulsante
DESTRO
Punto
di attacco
Connettore
per
l'installazione
dell’illumina-
tore IR
Leva
illuminatore IR
Porta
micro USB
Coperchio
illuminatore IR
Pulsante IR
Leva di ssaggio della batteria
Coperchio del modulo batteria
Batteria ricaricabile
*Elementi dell’adattatore FN (viene venduto separatamente)
Funzionamento dei pulsanti
Pulsante
Prima breve
pressione
Successive
brevi pressioni
Lunga pressione
ON (9)
Dispositivo è spento
Accensione del
dispositivo
–
Accensione del dispositivo
Display è spento
Accensione del
display
–
Spegnimento del dispositivo
Il dispositivo è acceso,
menu di accesso rapido,
menu principale
–
Spegnimento del display /
Spegnimento del dispositivo
SINI-
STRO (8)
Dispositivo è acceso
Accensione
SumLight™
Spegnimento
SumLight™
Attivazione WiFi / Disattivazione
WiFi
Navigazione nel menu Navigazione in alto, a sinistra, in senso antiorario
Menu di accesso rapido Riduzione del parametro
MENU (7)
Dispositivo è acceso
Accesso al menu di accesso
rapido
Accesso al menu principale
Navigazione sul menu Conferma della scelta
Uscita dal sottomenu senza la
conferma della scelta / uscita
dal menu (passaggio al modo di
osservazione)
Menu di accesso rapido Navigazione in alto Uscita dal menu di accesso rapido
DESTRO
(6)
Dispositivo è acceso
(modo “Video”)
Start
registrazione
video
–
Spegnimento registrazione video /
Passaggio al modo “Foto”)
Dispositivo è acceso
(modo “Foto”)
Scattare una foto Passaggio al modo “Video”
Navigazione sul menu Verso il basso / A Destra / In senso orario
Menu di accesso rapido Aumento del parametro
IR (24)
Il dispositivo è acceso,
menu di accesso rapido,
menu principale
Accensione IR
Cambio di
potenza IR
Spegnimento IR
Particolarità di funzionamento
Il visore clip-on Forward F455 è progettato per l’uso prolungato. Per assicurare la durata di servizio e
funzionalità completa del prodotto, seguite queste istruzioni:
•
Prima di utilizzare il visore clip-on, assicuratevi di installarlo seguendo le istruzioni nella sezione
.
•
Spegnere il visore clip-on dopo l'uso.
•
È vietato riparare e smontare di propria iniziativa il dispositivo di garanzia!
•
Il visore clip-on può essere utilizzato in un'ampia gamma di temperature. Se il visore clip-on è stato utilizzato
a freddo ed è stato portato in un ambiente caldo, non tirarlo fuori dal coperchio per 2-3 ore. Questo impedirà
la formazione del condensato sugli elementi ottici esterni.
•
Per assicurare il funzionamento sicuro, prevenire ed eliminare le cause dell’usura precoce o guasti della
componentistica, eseguire tempestivamente l'ispezione tecnica e manutenzione del visore clip-on.
•
La batteria non deve essere esposta al surriscaldamento eccessivo dai raggi solari, fuoco o altre sorgenti di
calore.

42
Uso della batteria
Il visore clip-on Forward F455 viene fornita con la batteria agli ioni di litio ricaricabile IPS7, che consente di
utilizzare il visore clip-on per 9 ore. Caricare completamente la batteria prima del primo utilizzo.
Carica della batteria:
•
Collegare la spina microUSB del cavo USB al connettore (C) della caricabatteria.
•
Collegare la spina del cavo USB alla scheda di rete.
•
Collegare la scheda di rete ad una presa a 110-220 V.
•
Sollevare la leva della caricabatteria (A).
•
Rimuovere la copertura protettiva dalla batteria
ricaricabile.
•
Installare la batteria ricaricabile nel
caricabatteria come mostrato nella
gura, ssare la leva (A).
•
Quando il visore clip-on è installato
sulla caricabatteria, l'indicatore verde
(B) si illumina e lampeggia brevemente
ad un certo intervallo:
- una volta, se la carica della batteria è compresa tra 0 e 50%;
- due volte, se la carica della batteria è compresa tra il 51 e 75%;
- tre volte, se la carica della batteria è compresa tra 76 e 100%.
•
Se l’indicatore è costantemente verde, la batteria è completamente caricata. Scollegare la caricabatteria dalla
rete, scollegare la batteria dalla caricabatteria.
•
Se l'indicatore della caricabatteria è costantemente rosso quando la batteria viene inserita, è probabile
che lo stato di carica sia al di sotto del valore ammesso. Lasciare la batteria nella caricabatteria per il lungo
periodo di tempo (no a qualche ora), poi rimuoverla e reinserirla.
•
Se l'indicatore lampeggia in verde, la batteria è pronta all’uso;
•
Se l’indicatore continua a mandare la luce rossa, la batteria è difettosa e non può essere utilizzata. Sostituire
la batteria.
Per la ricarica, utilizzare sempre la caricabatteria fornita con il visore clip-on o la caricabatteria
Pulsar IPS (viene venduta separatamente). L'uso delle altre caricabatterie può causare dei danni irreparabili
alla batteria.
•
Abbassare la leva(4).
•
Rimuovere il coperchio protettivo del modulo batteria (3).
•
Rimuovere la copertura protettiva dalla batteria (5).
•
Installare la batteria (5) nello slot previsto sul corpo del visore
clip-on in modo che l'elemento F (sporgenza sul corpo della
batteria) si trovi sul fondo.
•
Fissare la batteria sollevando la leva (4).
Il dispositivo può essere alimentato da una
sorgente di alimentazione esterna come Power Bank (5V).
Per collegare una sorgente di alimentazione esterna al
dispositivo, collegare il cavo USB alla porta microUSB (14)
del dispositivo. Per approfondire, vedere la sezione 8,
Alimentazione esterna
•
Non utilizzare la caricabatteria se la sua costruzione è
stata modicata o la batteria stessa è stata danneggiata.
•
Durante la ricarica, non lasciare la batteria incustodita.
•
Non lasciare la caricabatteria con la batteria collegata alla rete oltre 24 ore dopo averla completamente
caricata.
•
La batteria deve essere caricata ad una temperatura dell'aria di 0 °C ÷ +45 °C. In caso contrario, è possibile
ridurre la durata di funzionamento della batteria.
•
Non caricare la batteria immediatamente dopo averla spostata dall’ambiente freddo a quello caldo.
Attendere 30 - 40 minuti no la batteria si riscalderà bene.
•
Non esporre la batteria alle temperature elevate o amma libera.
•
La batteria non è intesa per essere immersa in acqua.
•
Si sconsiglia di collegare dispositivi di terze parti aventi il consumo di corrente superiore a quello ammesso.
•
La batteria è dotata del sistema di protezione dal cortocircuito, tuttavia è necessario evitare delle situazioni
che possano causare il cortocircuito.
•
Non smontare e non deformare la batteria.
•
Non sottoporre la batteria ad impatti e cadute.
•
Durante la conservazione a lungo termine, la batteria deve essere caricata parzialmente – non deve essere
caricata o scaricata completamente.
•
Tenere la batteria fuori dalla portata dei bambini.
Alimentazione esterna
L'alimentazione esterna viene fornita da una sorgente di alimentazione esterna del tipo Power Bank (5V).
•
Collegare la sorgente di alimentazione esterna al connettore USB (14) del visore clip-on.
•
Il visore clip-on passerà al funzionamento da alimentazione esterna, mentre la batteria IPS7 verrà caricata
gradualmente.
•
Sul display appare il pittogramma della batteria con il percentuale dello stato di carica.
•
Se il dispositivo è collegato da un computer, scheda di rete o power bank che non è conforme allo standard
Battery Charger (BC 1.0), la carica della batteria IPS7 non inizierà e verrà visualizzata solo il pittogramma di
alimentazione esterna .
•
Se il visore clip-on è alimentato da una sorgente di alimentazione esterna, ma la batteria IPS7 non è
collegata, viene visualizzata il pittogramma .
•
Quando si scollega una sorgente di alimentazione esterna, il visore clip-on inizierà a funzionare a batteria.
Funzionamento
•
Selezionare l'adattatore* con un inserto del diametro richiesto in base al diametro esterno del Vostro
cannocchiale (vedere la tabella).
•
La designazione 42 mm / 50 mm / 56 mm nel nome dell'adattatore indica l’apertura luminosa della lente del
cannocchiale.
•
Rimuovere il coperchio (16) dall'adattatore (19) ruotandolo in senso orario.
•
Prima di installare il visore clip-on si consiglia di sgrassare il corpo della lente del cannocchiale.
•
Installare l'inserto (18) nell'adattatore (19) nché non si arresta.
•
Installare l'adattatore con l'inserto sulla lente per il cannocchiale diurno nché non si arresta (17).
•
Spostare la leva (22) dalla posizione iniziale “aperto” (OPEN) alla posizione “chiuso” (CLOSE).
•
Controlla se l'adattatore combacia all'obiettivo.
•
Se c'è qualche gioco, procedere quanto segue:
- Allentare la vite di bloccaggio (20) con una chiave a brugola (S = 2 mm).

43
- Stringere la vite (21) con una chiave a brugola (S = 4 mm) con la forza necessaria per assicurare un
accoppiamento di spinta dell'adattatore sulla lente. Lo sforzo di serraggio deve essere 1 N·m.
- Stringere la vite di bloccaggio (20).
•
Lo sforzo può essere vericato con un cacciavite dinamometrico.
•
Inserire strettamente il visore clip-on nell'adattatore in modo che i perni situati nel corpo dell'adattatore
entrino nelle scanalature (23) del visore clip-on. Girare il visore clip-on in senso orario nché non si arresta.
La marcatura nella forma di un triangolo sul visore clip-on e marcatura nella forma di un quadrato sul corpo
dell'adattatore devono coincidere.
•
Per allineare il visore clip-on, spostare la leva (22) nella posizione APERTO (OPEN) e allinearlo in senso
orizzontale.
* Viene venduto separatamente.
Modello
dell’adattore ad
anello
Conformità del diametro interno dell’inserto e diametro esterno del corpo della lente
del dispositivo ottico diurno (visore, cannocchiale)
Il diametro interno dell’inserto, mm Diametro esterno della lente del cannocchiale, mm
Adattatore ad
anello FN 42 mm
47 46,7-47,6
48 47,7-48,6
49 48,7-49,6
50 49,7-50,6
Adattatore ad
anello FN 50 mm
55 54,7-55,6
56 55,7-56,6
57 56,7-57,6
58 57,7-58,6
59 58,7-59,6
Modello
dell’adattore ad
anello
Conformità del diametro interno dell’inserto e diametro esterno del corpo della lente
del dispositivo ottico diurno (visore, cannocchiale)
Il diametro interno dell’inserto, mm Diametro esterno della lente del cannocchiale, mm
Adattatore ad
anello FN 56 mm
60 59,7-60,6
61 60,7-61,6
62 61,7-62,6
63 62,7-63,6
64 63,7-64,6
65 64,7-65,6
•
Rimuovere il coperchio della lente (1), ruotandolo in senso antiorario.
•
Premere brevemente il pulsante ON (9) per accendere il visore clip-on: un’immagine apparirà sul display.
•
Regolare l'immagine nitida dei simboli sul display ruotando l'anello di regolazione diottrica dell'oculare del
Vostro cannocchiale. In seguito, indipendentemente dalla distanza e dalle altre condizioni, non è necessario
ruotare l'anello di regolazione diottrica dell'oculare.
•
Per mettere a fuoco l'oggetto di osservazione, ruotare la manopola di messa a fuoco della lente (10).
Le impostazioni di base (regolazione della luminosità e del contrasto) vengono modicate tramite il menu di
accesso rapido.
Dopo l'uso, spegnere il visore clip-on premendo a lungo il pulsante ON (9).
Funzioni del menu di accesso rapido
•
Accedere al menu di accesso rapido premendo brevemente il pulsante M (7).
•
Per navigare tra le funzioni sottodescritte, premere brevemente il pulsante M (7).
•
Luminosità - premere i pulsanti DESTRO (6) e SINISTRO (8) per modicare il valore di
luminosità del display da 0 a 20.
•
Contrasto - premere i pulsanti DESTRO (6) e SINISTRO (8) per modicare il valore del contrasto
dell'immagine da 0 a 20.
Funzioni del menu principale
•
Accedere al menu principale premendo a lungo il pulsante M (7).
•
Per navigare tra le voci del menu principale, premere i pulsanti
DESTRO (6) e SINISTRO (8).
•
Per accedere alla sottovoce del menu principale, premere
brevemente il pulsante M (7).
•
Per uscire dalla sottovoce del menu principale, premere e tenere
premuto il pulsante M (7).
•
L'uscita automatica dal menu principale avviene dopo 10 secondi di
inattività.
•
Luminosità dei pittogrammi
•
Impostazioni Wi-Fi
•
Impostazioni generali
•
Spegnimento automatico
•
Informazioni sul dispositivo

44
Luminosità
dei pitto-
grammi
Questa voce di menu consente di regolare la luminosità dei pittogrammi sul display del visore
clip-on.
•
Premere e tenere premuto il pulsante M (7) per accedere al menu principale.
•
Utilizzare i pulsanti DESTRO (6) e SINISTRO (8) per selezionare la voce di menu “Luminosità
pittogrammi”.
•
Premere brevemente il pulsante M (7) per accedere al sottomenu.
•
Utilizzare i pulsanti DESTRO (6) e SINISTRO (8) per selezionare il livello di luminosità dei
pittogrammi.
•
Per salvare la scelta e uscire dal sottomenu, premere e tenere premuto il pulsante M (7).
Imposta-
Questo voce consente di regolare il visore clip-on per il funzionamento nella rete Wi-Fi.
Nota: il Wi-Fi viene attivato / disattivato premendo a lungo il pulsante SINISTRO (8).
Impo-
della
password
Questo sottomenu consente di impostare la password di accesso al visore clip-on da
un dispositivo esterno. La password viene utilizzata quando un dispositivo esterno
(ad esempio uno smartphone) viene collegato al visore clip-on.
•
Premere e tenere premuto il pulsante M (7) per accedere al menu principale.
•
Usare i pulsanti DESTRO (6) e SINISTRO (8) per selezionare la voce di menu
.
•
Premere brevemente il pulsante M (7) per accedere al sottomenu.
•
Usare i pulsanti DESTRO (6) e SINISTRO (8) per selezionare la voce del sottomenu
.
•
Premere brevemente il pulsante M (7) per accedere al sottomenu.
•
La password apparirà sul display – il valore predenito è 12345678.
•
Utilizzare i pulsanti RIGHT (6) e LEFT (8) per impostare la password desiderata (il
pulsante RIGHT - per aumentare il valore, il pulsante LEFT - per diminuire il valore).
Per spostarsi tra i posti, premere il pulsante M (7).
•
Per salvare la password e uscire dal sottomenu, tenere premuto il pulsante M (7).
Imposta-
livello di
accesso
Questa sottovoce consente di impostare il livello di accesso necessario al Vostro
dispositivo, che riceve l’applicazione Stream Vision.
Livello Padrone. L’utente di Stream Vision ha il pieno accesso a tutte le funzioni del
dispositivo.
Livello Ospite. L’utente di Stream Vision ha la possibilità di visionare solo i video dal
dispositivo in tempo reale.
•
Premere e tenere premuto il pulsante M (7) per accedere al menu principale.
•
Usare i pulsanti DESTRO (6) e SINISTRO (8) per selezionare la voce di menu
.
•
Premere brevemente il pulsante M (7) per accedere al sottomenu.
•
Usare i pulsanti DESTRO (6) e SINISTRO per selezionare il sottomenu
del livello di accesso”.
•
Usare i pulsanti DESTRO (6) e SINISTRO per selezionare il livello di accesso -
“Padrone” o “Ospite”.
•
Per confermare la scelta e uscire dal sottomenu, premere e tenere premuto il
pulsante M (7).
Impo-
generali
La voce di menu consente di effettuare le seguenti impostazioni:
•
Lingua
•
Tempo
•
Formattazione
•
Data
•
Impostazioni predenite
Lingua
•
Premere e tenere premuto il pulsante M (7) per accedere al menu principale.
•
Usare i pulsanti DESTRO (6) e SINISTRO (8) per selezionare il sottomenu
.
•
Premere brevemente il pulsante M (7) per accedere al sottomenu.
•
Usare i pulsanti DESTRO (6) e SINISTRO (8) per selezionare la voce del sottomenu
“Lingua”.
•
Premere brevemente il pulsante M (7) per accedere al sottomenu.
•
Usare i pulsanti DESTRO (6) e SINISTRO (8) per selezionare una delle lingue
dell’interfaccia disponibili: inglese, tedesco, spagnolo, francese, russo, italiano.
•
Per salvare la selezione e uscire dal sottomenu, premere e tenere premuto il
pulsante M (7).
Data
•
Premere e tenere premuto il pulsante M (7) per accedere al menu principale.
•
Usare i pulsanti DESTRO (6) e SINISTRO (8) per selezionare il sottomenu
.
•
Premere brevemente il pulsante M (7) per accedere al sottomenu.
•
Usare i pulsanti DESTRO (6) e SINISTRO (8) per selezionare la voce del sottomenu
“Data”.
•
Premere brevemente il pulsante M (7) per accedere al sottomenu.
•
La data viene visualizzata in formato gg / mm / aaaa (12/04/2017)
•
Usare i pulsanti DESTRO (6) e SINISTRO (8) per selezionare il giorno, mese ed anno
desiderati. (Tasto DESTRO (6) - per aumentare il valore, pulsante SINISTRO (8) - per
diminuire il valore). Per spostarsi tra i posti, premere brevemente il pulsante M (7).
•
Per salvare la data selezionata e uscire dal sottomenu, tenere premuto il pulsante
M (7).
Tempo
•
Premere e tenere premuto il pulsante M (7) per accedere al menu principale.
•
Usare i pulsanti DESTRO (6) e SINISTRO (8) per selezionare il sottomenu
.
•
Premere brevemente il pulsante M (7) per accedere al sottomenu.
•
Usare i pulsanti DESTRO (6) e SINISTRO (8) per selezionare la voce del sottomenu
“Tempo”.
•
Premere brevemente il pulsante M (7) per accedere al sottomenu.
•
Premere i pulsanti DESTRO (6) e SINISTRO (8) per selezionare il formato del tempo
– 24/12 (o PM/AM).
•
Per passare all’impostazione dell’ora, premere il pulsante M (7).
•
Premere i pulsanti DESTRO (6) e SINISTRO (8) per selezionare il valore dell’ora
(pulsante DESTRO (6) - per aumentare il valore, pulsante SINISTRO (8) - per
diminuire il valore)
•
Per passare all’impostazione dei minuti, premere il pulsante M (7).
•
Premere i tasti DESTRO (6) e SINISTRO (8) per selezionare il valore dei minuti.
•
Per salvare il tempo selezionato e uscire dal sottomenu, tenere premuto il pulsante
M (7).

45
Impo-
generali
Ritorno
alle impo-
-
nite
•
Premere e tenere premuto il pulsante M (7) per accedere al menu principale.
•
Usare i pulsanti DESTRO (6) e SINISTRO (8) per selezionare il sottomenu
.
•
Premere brevemente il pulsante M (7) per accedere al sottomenu.
•
Utilizzare i pulsanti DESTRO (6) e SINISTRO (8) per selezionare la voce di sottomenu
.
•
Premere brevemente il pulsante M (7) per accedere al sottomenu.
•
Usare i pulsanti DESTRO (6) e SINISTRO (8) per selezionare “Sì” per tornare alle
impostazioni di fabbrica o “No” per annullare l’azione.
•
Confermare la scelta premendo brevemente il pulsante M (7).
Le impostazioni seguenti verranno riportate al loro stato originale prima di essere
modicate dall’utente:
Livello di luminosità – 10
Livello di contrasto – 8
Lingua – inglese
Wi-Fi – Disattivato (password
predenita)
Spegnimento automatico –
disattivato
Formatta-
La formattazione della scheda di memoria interna elimina irrimediabilmente tutti i
le registrati.
Assicuratevi di non aver più bisogno dei le da eliminare o fate una copia
di backup su altro supporto.
•
Premere e tenere premuto il pulsante M (7) per accedere al menu principale.
•
Usare i pulsanti DESTRO (6) e SINISTRO (8) per selezionare il sottomenu
.
•
Premere brevemente il pulsante M (7) per accedere al sottomenu.
•
Usare i pulsanti DESTRO (6) e SINISTRO (8) per selezionare la voce del sottomenu
.
•
Premere brevemente il pulsante M (7) per accedere al sottomenu.
•
Usare i pulsanti DESTRO (6) e SINISTRO (8) per selezionare “Sì” per effettuare la
formattazione o “No” per annullare l’azione.
•
Confermare la scelta premendo brevemente il pulsante M (7).
Spegni-
mento
automa-
tico
Questa voce consente di attivare lo spegnimento automatico del visore clip-on dopo un certo
periodo di tempo durante il quale il visore stava inclinato orizzontalmente o verticalmente oltre
di 70 °; a destra o sinistra oltre di 30 °. Allo stesso tempo gli elementi di comando del visore clip-
on non devono essere coinvolti.
•
Premere e tenere premuto il pulsante M (7) per accedere al menu principale.
•
Usare i pulsanti DESTRO (6) e SINISTRO (8) per selezionare la voce di menu “Spegnimento
automatico”.
•
Premere brevemente il pulsante M (7) per accedere al sottomenu.
•
Usare i pulsanti DESTRO (6) e SINISTRO (8) per selezionare il periodo di tempo durante il quale
il visore si spegnerà automaticamente (1 min, 3 min, 5 min) o selezionare “Off” se desiderate
disattivare la funzione del spegnimento automatico.
•
Confermare la scelta premendo brevemente il pulsante M (7).
Nota: il pittogramma dello stato della funzione “Spegnimento automatico” viene visualizzata
nella barra di stato
1 min.
Informa-
visore
clip-on
•
Premere e tenere premuto il pulsante M (7) per accedere al menu principale.
•
Usare i pulsanti DESTRO (6) e SINISTRO (8) per selezionare la voce di menu .
•
Premere brevemente il pulsante M (7) per accedere al sottomenu.
Le seguenti informazioni sul visore sono disponibili per l’utente:
nome visore clip-on
completo
numero visore clip-on SKU
numero di serie del visore clip-on
versione del software del visore clip-on
versione dell’assemblaggio
del visore clip-on
Barra di stato
La barra di stato si trova nella parte inferiore del display e visualizza le informazioni sullo stato corrente del
visore clip-on, tra cui:
•
Funzione SumLight™
•
Spegnimento automatico 1 min (se la funzione è attivata)
•
Il funzionamento dell'illuminatore IR (ad esempio, 3 ° grado)
•
Connessione Wi-Fi
•
Orologio
•
Livello di carica della batteria (se il visore clip-on viene alimentato da una batteria) o
•
Indicatore di alimentazione da una sorgente di alimentazione esterna (se il visore clip-on è alimentato
da una sorgente di alimentazione esterna) o
•
Indicatore di carica della batteria con la percentuale di carica corrente (se la batteria è installata e viene
caricata da una sorgente di alimentazione esterna)
Nota: quando si aumentano gli ingrandimenti dell’ottica diurna su cui e’ montato il visore “la barra di stato
puo” può andare parzialmente o completamente oltre i limiti dell’immagine visibile.
Illuminatore IR
Il visore clip-on è dotato dell’illuminatore IR rimovibile che funziona alla lunghezza d'onda di 940 nm, che
consente di aumentare la distanza di osservazione in condizioni di scarsa illuminazione o in buio assoluto.
Invece dell'illuminatore IR incluso, è possibile installare altri illuminatori IR Pulsar (vengono venduti
separatamente).
•
Rimuovere il tappo(12) dal connettore per
l'installazione dell'illuminatore IR (13).
•
Rimuovere il coperchio (11) dall'illuminatore IR.
•
Installare l'illuminatore IR sul dispositivo. La
leva (25) deve essere nella posizione superiore.
•
Bloccare l'illuminatore IR abbassando la leva
(25) verso il basso.
•
Per attivare l'illuminatore IR: accendere il
dispositivo con il pulsante ON (9).
•
Se l'illuminatore IR non è collegato, il pittogramma
dell'illuminatore disattivato verrà visualizzato nella barra
di stato. Se l'illuminatore IR è collegato, il pittogramma non
viene visualizzato.
•
Premere brevemente il pulsante IR (24) all’estremità dell'illuminatore.
Livello di potenza all'accensione è minimo .
•
Il pittogramma dell’illuminatore IR con il livello di potenza appropriato viene visualizzato nella barra di stato.
•
Premendo brevemente il pulsante IR (24), commutate a sequenza il livello di potenza dell'illuminatore ( >
> > ).
•
Spegnere l'illuminatore IR premendo a lungo il pulsante IR (24).
•
Il pittogramma IR scompare dal display.
Nota: Quando l'illuminatore IR viene spento, il livello di potenza non viene ricordato nella memoria del visore
clip-on. Quando il visore clip-on viene acceso, l'illuminatore si accende al livello minimo di potenza - IR1.

46
Funzione Wi-Fi
•
Il visore clip-on ha la funzione di comunicazione wireless con dispositivi mobili (tablet, smartphone) tramite
il Wi-Fi.
•
Accendere il modulo wireless premendo a lungo il pulsante SINISTRO (8). Il funzionamento del Wi-Fi viene
visualizzato nella barra di stato come segue:
Wi-Fi é disattivato Nessun pittogramma
Wi-Fi è attivato dall'utente, il processo di accensione del Wi-Fi nel visore clip-on è in corso
Wi-Fi è attivato, la connessione al visore clip-on è assente
Wi-Fi è attivo, la connessione con il visore clip-on è stabilita
Il visore clip-on è riconosciuto dal dispositivo mobile come “Forward F_XXXX”, dove XXXX sono le ultime quattro
cifre del numero di serie.
Dopo aver inserito la password sul dispositivo mobile (per ulteriori informazioni sull'impostazione della
password, vedere la sottovoce nella voce dell'istruzione) e
stabilire la connessione, il pittogramma
nella barra di stato cambia in , il segnale video sullo schermo del
dispositivo mobile si avvia dopo che il pulsante “Mirino” é stato attivato sullo schermo del dispositivo mobile.
Il pittogramma nella barra di stato cambia in .
Nota: è possibile impostare il livello di accesso richiesto al proprio dispositivo che viene ricevuto
dall'applicazione Stream Vision nella voce del menu .
Funzione “SumLight™”
•
La funzione SumLight™ consente di aumentare in modo signicativo il livello di sensibilità di un sensore
a CMOS in caso di diminuzione del livello di illuminamento, che rende facile l’osservazione in condizioni di
scarso illuminamento senza usare l’illuminatore IR.
•
Per attivare la funzione SumLight™, premere brevemente il pulsante SINISTRO (8).
•
Per disattivare la funzione, premere brevemente ancora una volta il pulsante SINISTRO (8).
•
Il pittogramma SumLight™ (attivata o disattivata ) viene visualizzata nella barra di stato.
Quando la funzione SumLight™ è attivata, la rumorosità nell'immagine aumenta, la frequenza di
cambio dei quadri diminuisce, l'immagine rallenta – con un spostamento brusco del visore clip-on l'immagine
potrebbe “sfocare”, tali effetti non sono difetti. Sul display del visore clip-on, potrebbero essere visibili punti
bianchi luminosi (pixel), il numero dei punti potrebbe aumentare quando la funzione SumLight™ è attivata, ciò
è dovuto alle particolarità di questa funzione e anche un difetto non lo è.
Registrazione video e fotograa
Il visore clip-on ha la funzione di registrazione video (fotograa) di un immagine osservata sulla scheda di
memoria incorporata.
Prima di usare le funzioni di registrazione video e fotograa, leggete le sottovoci ,
nella voce di questa istruzione.
Il dispositivo di registrazione incorporato funziona in due modi:
•
FOTO (fotograa: il pittogramma viene visualizzato nell'angolo in alto a destra del display). Se il numero
presunto degli immagini che è ancora possibile salvare nella memoria ash supera 100, viene visualizzata la
scritta “> 100”.
•
VIDEO (registrazione video, il pittogramma viene visualizzato nell'angolo in alto a destra del display - il
tempo di registrazione rimanente totale prendendo in considerazione la risoluzione corrente nel formato
MM:SS - minuti:secondi).
Quando è acceso, il visore clip-on è in modo Video. Per commutare tra i modi del visore clip-on, premere e
tenere premuto il pulsante DESTRO (6). Il passaggio tra i modi avviene in modo ciclico (Video-> Foto-> Video ...).
•
Passare al modo Foto premendo a lungo il pulsante DESTRO (6).
•
Premere brevemente il pulsante DESTRO (6) per scattare una foto. L'immagine resta immobile per 0,5 secondi.
•
Il le dell’immagine viene salvato nella memory card integrata.
•
Premere a lungo il pulsante DESTRO (6) per passare al modo Video.
•
Premere brevemente il pulsante DESTRO (6) per avviare la registrazione video.
•
Iniziata la registrazione video, il pittogramma scompare, al suo posto appare il pittogramma REC e anche
il temporizzatore di registrazione di un video nel formato MM:SS (minuti:secondi) *;
•
Per interrompere la registrazione del video, premere e tenere premuto il pulsante DESTRO (6).
•
I le video vengono salvati sulla scheda di memoria incorporata dopo che la registrazione video è stata
disattivata.
* Il pittogramma viene visualizzata per 2 secondi e poi scompare. Se in seguito il pulsante DESTRO (6) viene
premuta brevemente, il pittogramma viene visualizzato, il temporizzatore della registrazione mostra il tempo
corrente della registrazione video.
Note:
•
Dopo aver disattivato la registrazione video / dopo aver scattato una foto; quando il visore clip-on si
spegne, se la registrazione è stata attivata; se la scheda di memoria è riempita oltre misura, se durante la
registrazione video la scheda di memoria è piena (sul display viene visualizzato il messaggio “Memoria è
riempita oltre misura”).
•
Durante la registrazione video, è possibile accedere al menu e lavorare nel menu del visore clip-on;
•
I video e foto registrati vengono salvati nella scheda di memoria incorporata del visore clip-on come img_xxx.
jpg (per le foto); video_xxx.mp4 (per video). xxx - comune registratore le a tre cifre (per le foto e video);
•
il registratore usato nella denominazione dei le multimediali non viene azzerato;
•
Quando un le dal mezzo della lista viene eliminato, il suo numero non viene occupato da un altro le.
•
Quando il registratore è riempito oltre misura, viene creata una nuova cartella – img_xxxx. Dove xxxx è un
registratore di cartelle.
•
La lunghezza massima di un le video registrato è sette minuti. Scaduto questo tempo, il video viene
registrato in un nuovo le. Il numero dei le è limitato dalla capacità di memoria interna del visore clip-on;
•
Monitorate regolarmente la capacità di memoria libera della scheda di memoria incorporata, trasferite il
lmato su altri supporti, liberando lo spazio sulla scheda di memoria;
•
Nei le video e foto registrati, vengono visualizzate le informazioni grache (barra di stato, pittogrammi, ecc.).
Funzione “Display o”
Quando si utilizza questa funzione, il visore clip-on entra in modo standby, che consente di accenderlo
rapidamente se è necessario.
Il visore clip-on è spento. È necessario accendere il visore clip-on e attivare la funzione “Display off”.
•
Accendere il visore clip-on premendo brevemente il pulsante ON (9).
•
Attivare la funzione display off: premere e tenere premuto il pulsante ON (9). Il
messaggio “Display off” apparirà sullo schermo con il conteggio di tempo.
•
Rilasciare il pulsante ON (9).
•
Per disattivare la funzione “Display off”, premere brevemente ON (9).
La funzione “Display off” è attiva, è necessario scollegare il visore clip-on.
•
Premere e tenere premuto il pulsante ON (9). Il display mostra il messaggio “Display off” con il conteggio del
tempo di 3,2,1,0.

47
•
Tenere premuto il pulsante ON (9) no allo spegnimento del visore clip-on (la disconnessione del visore clip-
on si vericherà dopo il conteggio 0) *.
*Lo spegnimento del dispositivo più tardo è possibile in relazione al completamento dell'elaborazione delle
informazioni da parte del processore per il salvataggio dei dati. In questo caso, il display mostra 0 nel tempo
del conteggio.
Connessione USB
•
Accendere il visore clip-on premendo il pulsante ON (9) (il dispositivo spento non viene rilevato dal
computer).
•
Collegare un'estremità del cavo USB al connettore microUSB (14) del visore clip-on, l'altra alla porta del
Vostro computer.
•
Il dispositivo verrà rilevato dal computer automaticamente, l'installazione dei driver non è richiesta.
•
Il display mostrerà due opzioni di connessione: Memory card (unità esterna) e .
•
Utilizzare i pulsanti DESTRO (6) e SINISTRO (8) per selezionare un'opzione di connessione.
•
Premere brevemente il pulsante M (7) per confermare la selezione.
Memory card (unità esterna).
•
Quando si sceglie questa opzione, il dispositivo viene riconosciuto dal
computer come chiavetta USB. Questa opzione è progettata per lavorare con
i le che sono salvati nella memoria del dispositivo, mentre le funzioni del
dispositivo non sono disponibili, il dispositivo non si spegne. Disconnesso
dal computer, il dispositivo continua a funzionare.
•
Se il video è stato registrato al momento della connessione, la registrazione
si interrompe e viene salvata.
Power (alimentazione).
•
Quando si sceglie questa opzione, il computer viene utilizzato dal dispositivo come alimentatore esterno. Il
pittogramma appare nella barra di stato. Il dispositivo continua a funzionare, tutte le funzioni sono
disponibili.
•
La carica della batteria installata nel dispositivo non viene eseguita.
•
Quando l'USB viene disconnesso dal dispositivo collegato in modo Memory Card, il dispositivo rimane acceso.
•
Quando l'USB viene disconnesso dal dispositivo collegato in modo Power, il dispositivo continua a funzionare
dalla batteria se è sufcientemente caricata.
Utilizzo del montaggio su guida weaver
Il visore clip-on è dotato del montaggio su guida Weaver aggiuntivo (15) con il quale è possibile installare altri
accessori. Previamente è necessario smontare l'illuminatore IR rimovibile (vedere la Sezione “Illuminatore IR”).
Calibrazione del display
Il visore clip-on è impostato in modo che dopo la sua installazione sul cannocchiale, che è stato aggiustato
correttamente il tiro, la correzione del punto di mira non è necessaria. Se il visore clip-on ha subito un colpo
forte o caduta, potete vericare il punto d'impatto e se è necessario, correggerlo da soli senza contattare il
centro di assistenza.
•
Per accedere al modo di calibrazione del display, premere e tenere premuto il pulsante M (7) per 10 secondi.
•
Si visualizzano le coordinate del display X = 0; Y = 0.
USB connection
Use as power
Use as memory card
•
Utilizzare i pulsanti SINISTRO (8) e DESTRA (6) per spostare il
display orizzontalmente (asse X) e verticalmente (asse Y) in
modo che il punto di impatto si sposti al centro del segno di
mira del Vostro cannocchiale.
•
Per commutare tra le coordinate X e Y, premere brevemente il
pulsante M (7).
•
Il passo dello spostamento dell'immagine è 1 pixel del sensore.
•
La gamma dello spostamento dell'immagine è di +/- 20 pixel in
orizzontale (asse X), +/- 20 pixel in verticale (asse Y).
•
Per uscire dal menu e salvare le impostazioni, premere e tenere
premuto il pulsante M (7) per due secondi.
Stream Vision
I visori clip-on supportano la tecnologia che consente di trasmettere tramite il Wi-Fi un’immagine dal
dispositivo al Vostro smartphone o tablet in tempo reale.
Le istruzioni dettagliate sul funzionamento di Stream Vision possono essere trovate nell’opuscolo separato o
sul sito www.pulsar-vision.com
Nota: la costruzione del dispositivo permette di aggiornare il software. È possibile effettuare l'aggiornamento
di software tramite l'applicazione Stream Vision.
Per scaricare l'applicazione Stream Vision, scansionare dei codici QR:
Ispezione tecnica
È consigliato eseguire l'ispezione tecnica prima di ogni utilizzo del dispositivo.
•
Aspetto del dispositivo (non sono ammesse fessure sul corpo).
•
Lo stato delle lenti dell'obiettivo, oculare del visore clip-on, lente dell'illuminatore IR (fessure, macchie di
grasso, sporco e altri depositi non sono ammessi). Pulire le superci esterne delle parti di metallo e plastica
da polvere, sporco e umido; stronatele con un panno di cotone.
•
Lo stato della batteria (deve essere caricata) e contatti elettrici sulla batteria (sali e ossidazioni non sono
ammessi).
•
Funzionalità degli elementi di comando
•
La correttezza e sicurezza dell'attacco del visore clip-on sul cannocchiale.
Manutenzione
La manutenzione va effettuata almeno due volte all'anno e comprende l’eseguire delle operazioni seguenti:
•
Usare un panno di cotone per pulire le superci esterne delle parti di metallo e plastica da polvere e sporco.
È permesso l’uso del grasso al silicono.
•
Pulire i contatti elettrici della batteria e posti d’installazione della batteria sul dispositivo utilizzando un
solvente sgrassato organico.
•
Ispezionare le lenti dell'oculare e lenti obiettivi. Se è necessario, rimuovere polvere e sabbia dalle lenti
(preferibilmente con un metodo senza contatto). Pulire le superci esterne dell'ottica con i detergenti
appositi.
Segno di mira del cannocchiale
Spostamento del display
Punto di impatto
Coordinate del display

48
Deposito
Tenere il visore sempre nella fodera, in luogo secco e ben ventilato. Se il dispositivo viene depositato a lungo
termine, assicuratevi di rimuovere la batteria.
Risoluzione problemi
Possibile causa
Il visore clip-on non si
accende.
La batteria è completamente
scaricata.
Caricare la batteria
Non funziona da una
sorgente di alimentazione
esterna.
Il cavo USB è danneggiato. Sostituire il cavo USB.
Alimentatore esterno è scaricato. Caricare l'alimentatore esterno.
Lo smartphone o tablet
non si connette al
dispositivo.
La password nel dispositivo è
modicata.
Eliminate la rete e riconnettervi inserendo
la password registrata nel dispositivo.
Il dispositivo si trova nella zona con
un numero elevato dei reti Wi-Fi
che potrebbero disturbarlo.
Per assicurare il funzionamento stabile del
Wi-Fi, spostare il dispositivo in una zona
con un numero inferiore delle reti Wi-Fi o
zona in cui esse sono assenti.
La trasmissione del segnale
tramite il Wi-Fi manca o si
interrompe.
Il dispositivo si trova fuori dalla
zona della copertura del segnale
Wi-Fi. Tra il dispositivo e ricevitore
del segnale esistono degli ostacoli
(ad esempio, pareti in calcestruzzo).
Spostare il dispositivo nella zona della
visibilità diretta del segnale Wi-Fi.
Qualità bassa
dell'immagine.
Questi problemi possono vericarsi quando si osserva il maltempo (neve,
pioggia, nebbia, ecc.).
Immagine troppo scura. Bassa luminosità/contrasto è
impostato.
Regolare la luminosità/contrasto.
Le strisce sono apparse
sul display o l'immagine è
scomparsa.
Il dispositivo è stato sottoposto
alla sollecitazione statica durante il
funzionamento.
Dopo l'esposizione alla sollecitazione
statica il dispositivo può riavviarsi da
solo o spegnere e accendere di nuovo il
dispositivo.
Con un'immagine chiara del
punto di mira l’immagine di
un oggetto è sfocata.
Polvere o condensa sulle superci
ottiche esterne o interne della
lente.
Stronare le superci ottiche esterne con
un panno di cotone morbido. Rendere
asciutto - lasciare per 4 ore in una stanza
calda.
La lente è sfocata. Impostare la nitidezza dell’immagine
ruotando il regolatore della lente.
Display non è centrato. La posizione del visore clip-on non
è stata regolata sul cannocchiale
diurno.
Far retrocedere l'adattatore e impostare il
display al centro del campo ottico (vedere
la sezione ).
Possibile causa
Il dispositivo non si mette
a fuoco.
Impostazione erronea. Impostare il dispositivo in base alla
sezione . Controllare le
superci esterne della lente e oculare; se
è necessario, pulirle da polvere, condensa,
brina, ecc. Se fa freddo, è possibile usare
dei rivestimenti anti-appannamento (ad
esempio, come per gli occhiali correttivi).
Il punto d'impatto non
coincide con il punto di
mira.
Il display richiede calibrazione.
Calibrare il display in base alle istruzioni
riportate nella sezione
display”.
Manca la rigidità nell'installazione
del dispositivo sul cannocchiale o
del cannocchiale sull’arma.
Controlla la rigidità dell’installazione del
dispositivo sul cannocchiale e l’afdabilità
di ssaggio del cannocchiale all’arma.
Assicurarsi di usare proprio tale tipo di
cartuccia con cui in precedenza è stato
effettuato il tiro d’aggiustamento della
Vostra arma e cannocchiale.
Se avete effettuato il tiro d’aggiustamento
del cannocchiale in estate e l’utilizzate in
inverno (o viceversa), è possibile che esista
qualche cambiamento nel punto zero del
tiro d’aggiustamento.
Allo sparo, il visore clip-on
scivola dal cannocchiale.
Stringimento dell’adattatore
insufciente.
Inserto selezionato inesattamente.
Scegliere un inserto appropriato e stringere
l’adattatore come raccomandato.
Impossibile aprire il
morsetto dell'adattatore.
Inserto selezionato in modo errato. Selezionare l’inserto appropriato. Vericare
la presenza di un gioco tra le ganasce
dell'adattatore.
Cliccate sul link per trovare le risposte alle domande più frequenti.
https://www.pulsar-nv.com/glo/support/faq/79
Compatibilità elettromagnetica.
Questo prodotto è conforme ai requisiti dello standard europeo EN 55032:2015, Classe A.
l’esercizio di questo prodotto in un’area residenziale può causare dei radiodisturbi.
I dispositivi digitali Forward richiedono una licenza se vengono esportati al di fuori del vostro paese.
Il vostro apparecchio contiene materiale che può essere recuperato o riciclato.
Portarlo ad un punto di raccolta autorizzato.

49
РУССКИЙ
Технические характеристики
FORWARD F455
SKU# 78186
Фокус объектива, мм 50
Относительное отверстие, D/f' 1:1
Поле зрения (горизонтальное), ° 6,3
Поле зрения (горизонтальное), м@100м 11
Макс. дистанция наблюдения животного ростом 1,7м, м 500
Мин. дистанция фокусировки, м 5
Диапазон рекомендуемой кратности дневного прицела, крат 2-8
Тип и разрешение сенсора CMOS HD 1280X720
Тип и разрешение дисплея AMOLED 1746x1000
Чуствительность прибора, мВт (длина волны 780нм, 25 шт/мм разрешение) 1,5×10
-
⁵
Чуствительность прибора, мВт (длина волны 915нм, 25 шт/мм разрешение) 5,5×10
-
⁵
Тип / Длина волны, нм LED 940
Напряжение питания, В 3,0 - 4,2
Тип батарей Литий-ионная батарея IPS7
Емкость 6400 мАч
Выходное номинальное напряжение DC 3,7B
Внешнее питание Micro USB Type-B (5В)
Время работы от аккумулятора при t=22 °C, ч (Wi-Fi выкл, ИК выкл) 9
Макс. ударная стойкость на нарезном оружии, Джоулей 6000
Макс. ударная стойкость на гладкоствольном оружии, калибр 12
Степень защиты, код IP (IEC60529) IPX7
Рабочая температура, °С -25 ÷ +50
Габариты, мм 155х136х77
Масса, кг 0,83
Разрешение видео/фото, пикселей 1280x720
Формат видеозаписи / фото .mp4 / .jpg
Объем встроенной памяти 16Гб
Частота 2,4 ГГц
Стандарт 802.11 b/g/n
Для улучшения потребительских свойств изделия в его конструкцию могут вноситься
усовершенствования.
Актуальную версию инструкции по эксплуатации Вы можете найти на сайте www.pulsar-vision.com
Комплект поставки
•
Цифровая ночная насадка
•
Чехол
•
Аккумуляторная батарея
•
Зарядное устройство к аккумуляторной батарее
•
Сетевой адаптер
•
Кабель microUSB
•
Краткая инструкция по эксплуатации
•
Салфетка для чистки оптики
•
Гарантийный талон
Описание
Цифровая ночная насадка Forward F455 – универсальный прибор, позволяющий быстро и просто
трансформировать дневной оптический прицел в ночной. Насадка устанавливается на объектив
оптического прицела при помощи адаптеров, рассчитанных на различные диаметры объектива. Насадка
не требует дополнительной пристрелки. Насадка предназначена для различных сфер применения,
включая охоту, спортивную стрельбу, ночную фото- и видеосъемку, наблюдение.
Особенности
Ключевые особенности:
•
HD-сенсор 1280x720
•
Повышенная ночная чувствительность
•
Простая трансформация дневного оптического прицела в ночной
•
Сохранение преимуществ дневной оптики в ночных условиях
•
Стабильность точки прицеливания
•
Комфортное использование в широком диапазоне увеличений дневной оптики
•
Невидимый ИК-осветитель дальнего действия
•
Функция дополнительного повышения чувствительности SumLight™
•
Дистанция обнаружения до 500 м
•
Мгновенное включение
•
Встроенная видеозапись
•
Питание от быстросменных высокоемких аккумуляторных батарей системы B-Pack
•
Система четырехточечного крепления с автоматическим зажимом
•
Совместимость с адаптерами других производителей
•
Ударная стойкость на крупных калибрах: 12 кал., 9.3x64, .375H&H
•
Wi-Fi. Интеграция c IOS и Android устройствами
•
Stream Vision. Дистанционное управление, наблюдение и прямые YouTube-трансляции с помощью
смартфона
•
Дистанционное обновление программного обеспечения
•
Полная водонепроницаемость (IPX7)
•
Широкий диапазон эксплуатационных температур (-25 ÷ +50°C)
•
MicroUSB. Поддержка питания от Power Bank

50
Элементы и органы управления
1. Крышка объектива
2. Крышка окуляра
3. Крышка батарейного отсека
4. Рычаг фиксации батареи
5. Аккумуляторная батарея
6. Кнопка RIGHT
7. Кнопка M (MENU)
8. Кнопка LEFT
9. Кнопка ON
10. Ручка фокусировки объектива
11. Крышка ИК-осветителя
12. Заглушка разъема ИК- осветителя
13. Разъем для установки ИК-осветителя
14. Порт microUSB
15. Планка Weaver
16. Крышка адаптера*
17. Объектив оптического прицела.
18. Вкладыш*
19. Адаптер*
20. Стопорный винт
21. Винт
22. Рычаг адаптера
23. Узел крепления
24. Кнопка IR
25. Рычаг ИК-осветителя
5
24
1
17
18
20
21
22
2
14
16 19
9 10
6
23 13
8
7
15
12
11
25
4
3
Open
Объектив
оптического
прицела
Вкладыш*
Стопорный
винт
Винт
Рычаг
адаптера
Крышка
окуляра
Кнопка M
(MENU)
Кнопка
LEFT
Адаптер*
Крышка
адаптера*
Кнопка
ON
Ручка фокусировки
объектива
Планка
Weaver
Заглушка разъема
ИК- осветителя
Крышка
объектива
Кнопка
RIGHT
Узел
крепления
Разъем для
установки
ИК-осветителя
Рычаг
ИК-осветителя
Порт
microUSB
Крышка
ИК-осветителя
Кнопка IR
Крышка батарейного отсека
Аккумуляторная батарея
*Элементы крышки-адаптера FN (приобретается отдельно)
Рычаг фиксации батареи
Работа кнопок
ON (9)
Прибор выключен
Включение
прибора
–
Включение прибора
Дисплей выключен
Включение
дисплея
–
Выключение прибора
Прибор включен,
быстрое меню, основное
меню
–
Выключение дисплея /
Выключение прибора
LEFT (8)
Прибор включен
Включение
SumLight™
Выключение
SumLight™
Включение WiFi /
Выключение WiFi
Навигация в меню Навигация вверх, влево, против часовой стрелки
Быстрое меню Уменьшение параметра
MENU (7)
Прибор включен Вход в быстрое меню Вход в основное меню
Навигация в меню Подтверждение выбора
Выход из подменю без
подтверждения выбора /
выход из меню (переход в
режим наблюдения)
Быстрое меню Навигация вверх Выход из быстрого меню
RIGHT (6)
Прибор включен
(режим )
Старт
видеозаписи
–
Выключение записи видео
/ Переход в режим
Прибор включен
(режим )
Произведение фотоснимка
Переход в режим
Навигация в меню Вниз / Вправо / по часовой стрелке
Быстрое меню Увеличение параметра
IR (24)
Прибор включен,
быстрое меню, основное
меню
Включение ИК
Изменение
мощности ИК
Выключение ИК
Особенности эксплуатации
Насадка Forward F455 предназначена для длительного использования. Для обеспечения долговечности и
полной работоспособности придерживайтесь следующих рекомендаций:
•
Перед началом эксплуатации прибора убедитесь, что Вы установили ее согласно инструкциям раздела
.
•
Выключите насадку после использования.
•
Самостоятельно ремонтировать и разбирать гарантийный прибор запрещается!
•
Насадка может эксплуатироваться в широком диапазоне температур. Если насадка эксплуатировалась
на холоде и была внесена в теплое помещение, не вынимайте ее из чехла в течение 2-3 часов. Это
позволит предотвратить появление конденсата на внешних оптических элементах.
•
Для обеспечения безотказной работы, предупреждения и устранения причин, вызывающих
преждевременный износ или выход из строя узлов и деталей, своевременно осуществляйте
технический осмотр и обслуживание прибора.
•
Батарея не должна подвергаться чрезмерному нагреву от солнечных лучей, огня и других источников
тепла.

51
Использование аккумуляторной батареи
Насадка Forward F455 поставляется с перезаряжаемой литий-ионной батареей Battery Pack IPS7,
которая позволяет использовать насадку на протяжении до 9 часов. Зарядите батарею перед первым
использованием.
•
Подключите штекер microUSB кабеля USB к
разъему зарядного устройства.
•
Подключите штекер кабеля USB к
сетевому адаптеру.
•
Включите сетевой адаптер в розетку
110-220В.
•
Поднимите рычаг зарядного
устройства.
•
Снимите защитную крышку с
аккумуляторной батареи.
•
Установите аккумуляторную
батарею в зарядное устройство как
показано на рисунке, зафиксируйте рычаг .
•
При установке на зарядном устройстве загорится индикатор зеленого цвета и начнет кратко мигать с
определенным интервалом:
- один раз, если заряд батареи составляет от 0 до 50%;
- два раза, если заряд батареи составляет от 51 до 75%;
- три раза, если заряд батареи составляет от 76 до 100%.
•
Если индикатор постоянно горит зеленым, значит, батарея полностью заряжена. Отключите зарядное
устройство от сети, отсоедините батарею от зарядного устройства.
•
Если индикатор зарядного устройства при установке батареи постоянно горит красным, вероятно,
уровень заряда ниже допустимого значения (батарея находилась длительное время в разряженном
состоянии). Оставьте батарею в зарядном устройстве на длительное время (до нескольких часов), затем
извлеките и вставьте обратно.
•
Если индикатор станет мигать зеленым цветом, значит батарея исправна;
•
Если будет продолжать гореть красным, батарея неисправна. Не используйте эту батарею!
Для заряда всегда используйте зарядное устройство из комплекта поставки прибора, либо
зарядное устройство Pulsar IPS (приобретается отдельно). Использование других зарядных устройств
может нанести непоправимый ущерб батарее.
•
Опустите рычаг (4).
•
Снимите защитную крышку батарейного отсека (3).
•
Снимите защитную крышку с аккумуляторной батареи (5).
•
Установите батарею (5) в предназначенный для нее слот
на корпусе прибора таким образом, чтобы элемент F
(выступ на корпусе батареи) находился снизу.
•
Зафиксируйте батарею, подняв рычаг (4).
•
Внимание! Питание прибора может осуществляться
от внешнего источника питания типа Power Bank (5В).
Для подключения внешнего источника питания к
прибору присоедините кабель USB к порту microUSB
(14) прибора. Подробнее в разделе
•
Не используйте зарядное устройство, если его конструкция была изменена или оно было повреждено.
•
Во время зарядки не оставляйте батарею без присмотра.
•
Не оставляйте зарядное устройство с подключенной к сети батареей к сети более 24 часов после
полной зарядки.
•
Зарядка батареи должна осуществляться при температуре воздуха 0 °C ÷ +45 °C. В противном случае
возможно снижение рабочего ресурса батареи.
•
Не заряжайте батарею непосредственно после перемещения батареи из холодных условий в теплую
обстановку. Подождите 30-40 минут, пока батарея прогреется.
•
Не подвергайте батарею воздействию высоких температур и открытого огня.
•
Батарея не предназначена для погружения в воду.
•
Не рекомендуется подключать сторонние устройства с током потребления больше допустимого.
•
Батарея оснащена системой защиты от короткого замыкания. Однако следует избегать ситуаций,
которые могут привести к короткому замыканию.
•
Не разбирайте и не деформируйте батарею.
•
Не подвергайте батарею ударам и падениям.
•
При длительном хранении батарея должна быть частично заряжена – не должна быть полностью
заряжена или полностью разряжена.
•
Храните батарею в месте, недоступном для детей.
Внешнее питание
Внешнее питание осуществляется от внешнего источника питания типа Power Bank (5В).
•
Подключите источник внешнего питания к разъему USB (14) прибора.
•
Прибор переключится на работу от внешнего питания, при этом батарея IPS7 будет постепенно
подзаряжаться.
•
На дисплее появится пиктограмма батареи со значением уровня заряда в процентах.
•
Если прибор подключен от компьютера или сетевого адаптера или Power Bank, который не
соответствуют стандарту Battery Charger (ВC 1.0), то батарея IPS7 заряжаться не начнется, будет
отображаться только пиктограмма внешнего питания .
•
Если прибор работает от внешнего источника питания, но батарея IPS7 не подключена, отображается
пиктограмма .
•
При отключении внешнего источника питания насадка начнет работать от батареи.
Эксплуатация
•
Подберите адаптер* с вкладышем нужного диаметра в зависимости от наружного диаметра объектива
Вашего оптического прицела (см. таблицу).
•
Обозначение 42 мм / 50 мм / 56 мм в наименовании адаптера означают световой диаметр объектива
оптического прибора.
•
Снимите крышку (16) с адаптера (19), повернув ее по часовой стрелке.
•
Перед установкой рекомендуется обезжирить корпус объектива прицела.
•
Установите до упора вкладыш (18) в адаптер (19).
•
Установите до упора адаптер с вкладышем на объектив дневного прицела (17).
•
Переведите рычаг (22) из первоначального положения «открыто» (OPEN) в положение «закрыто»
(CLOSE).

52
•
Проверьте, плотно ли адаптер прилегает к объективу.
•
В случае наличия люфта сделайте следующее:
- Ослабьте шестигранным ключом (S=2mm) стопорный винт (20).
- Затяните винт (21) шестигранным ключом (S=4mm) с усилием, необходимым для обеспечения плотной
посадки адаптера на объективе. Усилие зажима должно составлять 1 Н·м.
- Затяните стопорный винт (20).
•
Усилие можно проверить динамометрической отверткой.
•
Плотно вставьте насадку в адаптер таким образом, чтобы штифты, находящиеся в корпусе адаптера,
вошли в пазы (23) насадки. Поверните цифровой модуль по часовой стрелке до упора. Маркировка в
виде треугольника на насадке и в виде квадрата на корпусе адаптера должны совпасть.
•
Для выравнивания насадки переведите рычаг (22) в положение OPEN и выровняйте цифровой модуль
по горизонту.
*Приобретается отдельно
47 46,7-47,6
48 47,7-48,6
49 48,7-49,6
50 49,7-50,6
55 54,7-55,6
56 55,7-56,6
57 56,7-57,6
58 57,7-58,6
59 58,7-59,6
60 59,7-60,6
61 60,7-61,6
62 61,7-62,6
63 62,7-63,6
64 63,7-64,6
65 64,7-65,6
•
Снимите крышку объектива (1), повернув ее против часовой стрелки.
•
Кратким нажатием кнопки ON (9) включите насадку - на дисплее появится изображение.
•
Настройте резкое изображение символов на дисплее вращением кольца диоптрийной настройки
окуляра Вашего оптического прицела. В дальнейшем, независимо от дистанции и других условий,
вращать кольцо диоптрийной настройки окуляра не требуется.
•
Для фокусировки на объект наблюдения вращайте ручку фокусировки объектива (10).
Базовые настройки (регулировка яркости и контраста) изменяются средствами меню быстрого доступа.
По окончании использования выключите насадку длительным нажатием кнопки ON (9).
Функции меню быстрого доступа
•
Войдите в «быстрое» меню кратким нажатием кнопки .
•
Для перехода между функциями, описанными ниже, кратко нажимайте кнопку M (7).
•
Яркость – нажатием кнопок RIGHT (6) и LEFT (8) изменяйте значение яркости дисплея от 0
до 20.
•
Контраст - нажатием кнопок RIGHT (6) и LEFT (8) изменяйте значение контраста изображения от 0 до 20.

53
Функции основного меню
•
Войдите в основное меню длительным нажатием кнопки .
•
Для перемещения по пунктам основного меню нажимайте
кнопки RIGHT (6) и LEFT (8).
•
Для входа в подпункт основного меню кратко нажмите кнопку M (7).
•
Для выхода из подпункта основного меню нажмите и
удерживайте кнопку M (7).
•
Автоматический выход из основного меню происходит после 10
секунд бездействия.
•
Яркость пиктограмм
•
Настройки Wi-Fi
•
Общие настройки
•
Автоматическое отключение
•
Информация о приборе
Данный пункт меню позволяет настроить яркость пиктограмм на дисплее насадки.
•
Нажмите и удерживайте кнопку M (7) для входа в основное меню.
•
Кнопками RIGHT (6) и LEFT (8) выберите пункт меню .
•
Кратко нажмите кнопку для входа в подменю.
•
Кнопками RIGHT (6) и LEFT (8) выберите уровень яркости пиктограмм.
•
Для сохранения выбора и выхода из подменю нажмите и удерживайте кнопку .
Wi-Fi
Данный пункт позволяет настроить насадку для работы в сети Wi-Fi.
включение/выключение Wi-Fi осуществляется длительным нажатием кнопки
LEFT (8).
Данное подменю позволяет настроить пароль доступа к насадке со стороны
внешнего устройства. Пароль используется при подключении внешнего
устройства (например, смартфона) к прибору.
•
Нажмите и удерживайте кнопку M (7) для входа в основное меню.
•
Кнопками RIGHT (6) и LEFT (8) выберите пункт меню .
•
Кратко нажмите кнопку для входа в подменю.
•
Кнопками RIGHT (6) и LEFT (8) выберите пункт подменю .
•
Кратко нажмите кнопку для входа в подменю.
•
На дисплее появится пароль – по умолчанию «12345678».
•
Кнопками RIGHT (6) и LEFT (8) установите желаемый пароль (кнопка RIGHT -
увеличение значения, кнопка LEFT – уменьшение значения). Для перемещения
между разрядами нажимайте кнопку .
•
Для сохранения пароля и выхода из подменю нажмите и удерживайте кнопку M (7).
Wi-Fi
Данный подпункт позволяет настроить необходимый уровень доступа к своему
прибору, который получает приложение Stream Vision.
Пользователь из Stream Vision имеет полный доступ ко всем
функциям прибора.
Пользователь из Stream Vision имеет возможность только
просматривать видео с прибора в реальном времени.
•
Нажмите и удерживайте кнопку M (7) для входа в основное меню.
•
Кнопками RIGHT (6) и LEFT (8) выберите пункт меню .
•
Кратко нажмите кнопку для входа в подменю.
•
Кнопками RIGHT (6) и LEFT (8) выберите пункт подменю
.
•
Кнопками RIGHT (6) и LEFT (8) выберите уровень доступа – или .
•
Для подтверждения выбора и выхода из подменю нажмите и удерживайте
кнопку .
Пункт меню позволяет установить следующие настройки:
•
Язык
•
Дата
•
Время
•
Форматирование
•
Настройки по
умолчанию
•
Нажмите и удерживайте кнопку M (7) для входа в основное меню.
•
Кнопками RIGHT (6) и LEFT (8) выберите подменю .
•
Кратко нажмите кнопку для входа в подменю.
•
Кнопками RIGHT (6) и LEFT (8) выберите пункт подменю .
•
Кратко нажмите кнопку для входа в подменю.
•
Кнопками RIGHT (6) и LEFT (8) выберите один из доступных языков интерфейса:
английский, немецкий, испанский, французский, русский.
•
Для сохранения выбора и выхода из подменю нажмите и удерживайте кнопку
.
•
Нажмите и удерживайте кнопку M (7) для входа в основное меню.
•
Кнопками RIGHT (6) и LEFT (8) выберите подменю .
•
Кратко нажмите кнопку для входа в подменю.
•
Кнопками RIGHT (6) и LEFT (8) выберите пункт подменю .
•
Кратко нажмите кнопку для входа в подменю.
•
Дата отображается в формате дд / мм / гггг (12/04/2017)
•
Кнопками RIGHT (6) и LEFT (8) выберите нужное значение дня, месяца и
года. (кнопка RIGHT (6)- увеличение значения, кнопка LEFT (8) – уменьшение
значения) Для перемещения между разрядами кратко нажимайте кнопку M (7).
•
Для сохранения выбранной даты и выхода из подменю нажмите и удерживайте
кнопку M (7).

54
•
Нажмите и удерживайте кнопку M (7) для входа в основное меню.
•
Кнопками RIGHT (6) и LEFT (8) выберите подменю .
•
Кратко нажмите кнопку для входа в подменю.
•
Кнопками RIGHT (6) и LEFT (8) выберите пункт подменю .
•
Кратко нажмите кнопку для входа в подменю.
•
Нажатием кнопок RIGHT (6) и LEFT (8) выберите формат времени – 24/12 (или
PM/AM).
•
Для перехода к настройке значения часа нажмите кнопку .
•
Нажатием кнопок RIGHT (6) и LEFT (8) выберите значение часа (кнопка RIGHT (6)
- увеличение значения, кнопка LEFT (8) – уменьшение значения)
•
Для перехода к настройке значения минут нажмите кнопку .
•
Нажатием кнопок RIGHT (6) и LEFT (8) выберите значение минут.
•
Для сохранения выбранного времени и выхода из подменю нажмите и
удерживайте кнопку M (7).
-
-
•
Нажмите и удерживайте кнопку M (7) для входа в основное меню.
•
Кнопками RIGHT (6) и LEFT (8) выберите подменю .
•
Кратко нажмите кнопку для входа в подменю.
•
Кнопками RIGHT (6) и LEFT (8) выберите пункт подменю
.
•
Кратко нажмите кнопку для входа в подменю.
•
Кнопками RIGHT (6) и LEFT (8) выберите вариант «Да» для возврата к заводским
настройкам, или «Нет» для отмены действия.
•
Подтвердите выбор кратким нажатием кнопки .
Следующие настройки будут возвращены в первоначальное состояние до их
изменения пользователем:
- 10
- 8
- английский
Wi-Fi – выключен (пароль по умолчанию)
- выключено
-
Форматирование встроенной карты памяти безвозвратно удаляет все
записанные файлы.
Убедитесь в том, что удаляемые файлы вам больше не нужны либо
сделайте резервную копию на другом носителе.
•
Нажмите и удерживайте кнопку M (7) для входа в основное меню.
•
Кнопками RIGHT (6) и LEFT (8) выберите подменю .
•
Кратко нажмите кнопку для входа в подменю.
•
Кнопками RIGHT (6) и LEFT (8) выберите пункт подменю .
•
Кратко нажмите кнопку для входа в подменю.
•
Кнопками RIGHT (6) и LEFT (8) выберите вариант «Да» для форматирования или
«Нет» для отмены действия.
•
Подтвердите выбор кратким нажатием кнопки .
-
Данный пункт позволяет активировать функцию автоматического отключения насадки
через определенный период времени при наклоне насадки по горизонтали или вертикали
более чем на 70°; вправо или влево более чем на 30°. При этом органы управления прибора
не должны быть задействованы.
•
Нажмите и удерживайте кнопку M (7) для входа в основное меню.
•
Кнопками RIGHT (6) и LEFT (8) выберите пункт меню .
•
Кратко нажмите кнопку для входа в подменю.
•
Кнопками RIGHT (6) и LEFT (8) выберите временной промежуток, в течение которого
прибор, автоматически выключится (1 мин; 3 мин; 5 мин), либо вариант «Off», если вы
хотите деактивировать функцию автоматического отключения.
•
Подтвердите выбор кратким нажатием кнопки .
в строке статуса отображается пиктограмма состояния функции
1 min.
-
•
Нажмите и удерживайте кнопку M (7) для входа в основное меню.
•
Кнопками RIGHT (6) и LEFT (8) выберите пункт меню .
•
Кратко нажмите кнопку для входа в подменю.
Пользователю доступна следующая информация о насадке:
Строка статуса
Строка статуса располагается в нижней части дисплея и отображает информацию о текущем состоянии
работы насадки, в том числе:
•
Функция SumLight™
•
Автоматическое отключение 1 min (если функция включена)
•
Работа ИК-осветителя (например, 3-я степень)
•
Подключение по Wi-Fi
•
Часы
•
Уровень заряда аккумуляторной батареи (если насадка питается от аккумуляторной батареи) или
индикатор питания от внешнего источника питания (если прибор питается от внешнего источника
питания) или
•
Индикатор заряда батареи с текущим процентом ее заряда (если установлена батарея и происходит ее
зарядка от внешнего источника питания)
при увеличении кратности оптического прибора, на который установлена насадка, строка
статуса может частично или полностью выходить за пределы видимого изображения.

55
ИК-осветитель
Насадка оснащена съемным ИК-осветителем,
работающим на длине волны 940нм, который
позволяет увеличить дистанцию наблюдения в
условиях низкой освещенности или в полной
темноте. Вместо ИК-осветителя из комплекта
поставки вы можете установить другие ИК-
осветители Pulsar (приобретается отдельно).
•
Снимите заглушку (12) с разъема для установки
ИК-осветителя (13).
•
Снимите крышку (11) с ИК-осветителя.
•
Установите ИК-осветитель на прибор. Рычаг (25) должен
находится в верхнем положении.
•
Зафиксируйте ИК-осветитель, опустив рычаг (25) вниз.
•
Убедитесь, что ИК-осветитель установлен и подключен к прибору
•
Для активации ИК-осветителя: включите прибор кнопкой ON (9).
•
В случае, если ИК-осветитель не подключен – в строке статуса будет отображаться пиктограмма
отключенного осветителя. В случае, если ИК-осветитель подключен-пиктограмма не отображается.
•
Кратко нажмите кнопку IR (24) на торце осветителя. Уровень мощности при включении – минимальный .
•
Пиктограмма ИК-осветителя с соответствующим уровнем мощности отображается в строке статуса.
•
Последовательными краткими нажатиями кнопки IR (24) последовательно переключайте уровень
яркости осветителя ( > > > ).
•
Выключите ИК-осветитель длительным нажатием кнопки IR.
•
Пиктограмма IR исчезнет с дисплея.
При выключении ИК-осветителя уровень мощности в памяти прибора не запоминается. При
включении прибора осветитель включается на минимальном уровне мощности - IR1.
Функция Wi-Fi
Насадка имеет функцию беспроводной связи с мобильными устройствами (планшет, смартфон)
посредством Wi-Fi.
Включите модуль беспроводной связи долгим нажатием кнопки LEFT (8). Работа Wi-Fi отображается в
строке статуса следующим образом:
Wi-Fi выключен Пиктограмма отсутствует
Wi-Fi включен пользователем, идет процесс включения Wi-Fi в приборе
Wi-Fi включен, подключение к прибору отсутствует
Wi-Fi включен, подключение к прибору установлено
Мобильным устройством прибор опознается под именем «Forward F_XXXX», где XXXX – последние четыре
цифры серийного номера».
После ввода пароля на мобильном устройстве (подробнее об установке пароля - в подразделе
раздела инструкции) и установления связи пиктограмма
в строке статуса меняется на , трансляция видеосигнала на экране внешнего устройства начинается
после активации кнопки «видоискатель» на экране мобильного устройства. Пиктограмма в статусной
строке меняется на
настроить необходимый уровень доступа к своему прибору, который получает приложение
Stream Vision можно в разделе меню .
Функция «SumLight™»
Функция SumLight™ позволяет существенно увеличить уровень чувствительности КМОП-матрицы в
случае снижения уровня освещенности, благодаря чему становится возможным наблюдение в условиях
низкой освещенности без использования ИК-осветителя.
•
Для включения функции SumLight™ кратко нажмите кнопку LEFT (8).
•
Для выключения кратко нажмите кнопку LEFT (8) еще раз.
•
Пиктограмма SumLight™ (включенная или выключенная ) отображается в строке статуса.
При активации функции SumLight™ происходит увеличение уровня шумов на изображении,
снижается частота смены кадров, изображение замедляется – при резком перемещении прибора
изображение может «смазываться», такие эффекты не являются дефектами. На дисплее прибора могут быть
видны светящиеся белые точки (пиксели), количество точек может увеличиться при включении функции
SumLight™ – это связано с особенностями работы данной функции и дефектом также не является.
Видеозапись и фотосъемка
Насадка имеет функцию видеозаписи (фотосъемки) наблюдаемого изображения на встроенную карту памяти.
Перед использованием функций фото- и видеозаписи ознакомьтесь с подразделами ,
раздела настоящей инструкции.
Встроенное записывающее устройство работает в двух режимах:
(фотосъемка; в правом верхнем углу дисплея отображается пиктограмма
. Если предполагаемое
количество фотоснимков, которое ещё может сохраниться на Flash-память, превышает 100, отображается
надпись «>100».
(видеозапись; в правом верхнем углу дисплея отображается пиктограмма
, общее оставшееся
время записи с учетом текущего разрешения в формате MM:SS - минуты : секунды).
При включении насадка находится в режиме Video. Для переключеня между режимами работы нажмите и
удерживайте кнопку RIGHT (6). Переход между режимами происходит циклично (Video-> Photo-> Video…).
•
Перейдите в режим Photo долгим нажатием кнопки RIGHT (6).
•
Кратко нажмите кнопку RIGHT (6) для того, чтобы сделать фотоснимок. Изображение замирает на 0,5 сек.
•
Файл фотоснимка сохраняется на встроенную карту памяти.
•
Длительным нажатием кнопки RIGHT (6) перейдите в режим Video.
•
Коротко нажмите кнопку RIGHT (6) для старта видеозаписи.
•
После начала видеозаписи пиктограмма исчезает, вместо нее появляется пиктограмма REC, а также
таймер записи видеоролика в формате MM:SS (минуты : секунды)*;
•
Для остановки видеозаписи нажмите и удерживайте кнопку RIGHT (6).
•
Видеофайлы сохраняются во встроенную карту памяти после выключения записи видео.
*пиктограмма отображается в течение 2х секунд, затем исчезает. При последующем коротком нажатии
кнопки RIGHT (6) пиктограмма появляется, таймер записи отображает текущее время записи видео.
•
После выключения записи видео / после фотосъемки; при выключении прибора, если была включена
запись; при переполнении карты памяти – если во время записи видео, карта памяти заполнилась (на
дисплее появится сообщение «Память переполнена»).
•
Во время записи видео возможен вход в меню и работа в меню прибора;
•
Записанные видеоролики и фотографии сохраняются на встроенную карту памяти прибора в виде img_xxx.
jpg (для фото); video_xxx.mp4 (для видео). xxx – трехразрядный общий (счетчик файлов (для фото и видео);
•
Cчетчик, используемый в именовании мультимедиа файлов, не сбрасывается;
•
При удалении файла из середины списка, его номер другим файлом не занимается.

56
•
При переполнении счетчика создается новая папка – img_xxxx. Где xxxx – счетчик для папок.
•
Максимальная продолжительность записываемого видеофайла - семь минут. По истечении этого времени
видео записывается в новый файл. Количество файлов ограничено объемом встроенной памяти прибора;
•
Регулярно контролируйте объем свободной памяти встроенной карты памяти, переносите отснятый
материал на другие носители, освобождая место на карте памяти;
•
В записанных видеофайлах и фотографиях отображается графическая информация (строка статуса,
пиктограммы и пр.).
Функция «Выключен дисплей» (Display Off)
При использовании данной функции насадка переходит в режим ожидания, что позволяет при
необходимости быстро ее включить.
Насадка выключена. Необходимо включить насадку и включить функцию .
•
Включите прибор кратковременным нажатием кнопки ON (9).
•
Включите функцию : нажмите и удерживайте кнопку ON (9).
На экране появится сообщение «Дисплей выключен» с отсчетом времени.
•
Отпустите кнопку ON (9).
•
Для отключения функции (включения дисплея) кратко нажмите ON (9).
Функция включена, необходимо отключить насадку.
•
Нажмите и удерживайте кнопку ON (9). На дисплее отображается сообщение «Дисплей выключен» с
отсчетом времени 3, 2, 1, 0.
•
Удерживайте кнопку ON (9) до отключения насадки (отключение насадки произойдет после отсчета 0)*.
*возможно более позднее отключение насадки в связи с завершением обработки информации
процессором для сохранения данных. При этом на дисплее отображается 0 во времени отсчета.
Подключение USB
•
Включите прибор нажатием кнопки ON (9) (выключенный прибор компьютером не определяется).
•
Подключите один конец кабеля USB к разъему microUSB (14) прибора, второй – к порту вашего компьютера.
•
Прибор определится компьютером автоматически, установка драйверов не требуется.
•
На дисплее появится два варианта подключения: (Memory card) и (Power).
•
Кнопками RIGHT (6) и LEFT (8) выберите вариант подключения.
•
Кратко нажмите кнопку M (7) для подтверждения выбора.
•
(Memory card). При выборе данного варианта прибор
распознается компьютером как флеш-карта. Данный вариант
предназначен для работы с файлами, которые хранятся в памяти прибора,
при этом функции прибора не доступны, прибор не выключается. При
отключении от компьютера прибор продолжает работать.
•
Если в момент подключения производилась запись видео, запись
останавливается и сохраняется.
•
(Power). При выборе данного варианта компьютер используется прибором как внешнее питание.
В строке статуса появится пиктограмма . Прибор продолжает работать, все функции доступны.
•
Зарядка аккумуляторной батареи, установленной в приборе, не производится.
•
При отключении USB от прибора, подключенного в режиме , прибор остается во
включенном состоянии.
Дисплей выключен
USB подключение
Использовать как питание
Использовать как карту памяти
•
При отключении USB от прибора, подключенного в режиме , прибор продолжает работать от
аккумуляторной батареи при ее достаточном заряде.
Использование планки Weaver
Насадка оборудована дополнительной планкой Weaver (15) с помощью которой Вы можете установить
дополнительные аксессуары. Предварительно необходимо демонтировать съемный ИК-осветитель
(Смотрите раздел ).
Калибровка дисплея
Насадка настроена таким образом, что после ее установки на оптический прицел, который был
должным образом пристрелян, корректировка точки прицеливания не требуется. В том случае, если
насадка подверглась сильному удару или падению, Вы можете проверить точку попадания и в случае
необходимости самостоятельно ее откорректировать, не обращаясь в сервисный центр.
•
Для входа в режим калибровки дисплея нажмите и
удерживайте сначала кнопку M (7) в течение 10 секунд –
появятся координаты дисплея X=0; Y=0.
•
Кнопками LEFT (8) и RIGHT (6) перемещайте дисплей по
горизонтали (ось X) и по вертикали (ось Y) таким образом,
чтобы точка попадания переместилась в центр прицельной
метки Вашего оптического прицела.
•
Для переключения между координатами X и Y кратко
нажимайте кнопку M (7).
•
Шаг смещения изображения - 1 пиксель сенсора.
•
Диапазон перемещения изображения - +/- 20 пикселей по
горизонтали (ось X), +/- 20 пикселей по вертикали (ось Y).
•
Для выхода из меню и сохранения настроек нажмите и
удерживайте кнопку M (7) в течение двух секунд.
Stream Vision
Приборы Forward поддерживают технологию Stream Vision, которая позволяет посредством Wi-Fi
транслировать изображение с прибора на Ваш смартфон либо планшет в режиме реального времени.
Подробные инструкции по работе Stream Vision Вы можете найти в отдельном буклете либо на сайте
www.pulsar-vision.com
в конструкцию прибора заложена возможность обновления программного обеспечения.
Обновление возможно через приложение Stream Vision.
Для того чтобы скачать приложение Stream Vision, сканируйте или нажмите на QR код:

57
Технический осмотр
Технический осмотр рекомендуется производить перед каждым использованием прибора.
•
Внешний вид прибора (трещины на корпусе не допускаются).
•
Состояние линз объектива и окуляра цифрового модуля и объектива ИК-осветителя (трещины, жировые
пятна, грязь и другие налеты не допускаются). Очистите наружные поверхности металлических и
пластмассовых деталей от пыли, грязи и влаги; протрите их хлопчатобумажной салфеткой.
•
Состояние аккумуляторной батареи (должна быть заряжена) и электрических контактов на батарее
(наличие солей и окисления не допускаются).
•
Работоспособность органов управления.
•
Правильность и надежность крепления цифрового модуля на оптическом приборе.
Техническое обслуживание
Техническое обслуживание проводится не реже двух раз в год и заключается в выполнении изложенных
ниже пунктов:
•
Хлопчатобумажной салфеткой очистите наружные поверхности металлических и пластмассовых
деталей от пыли и грязи. Допускается применение силиконовой смазки.
•
Очистите электрические контакты аккумуляторной батареи и места установки батареи на приборе,
используя нежирный органический растворитель.
•
Осмотрите линзы окуляра и объектива. При необходимости удалите с линз пыль и песок (желательно
бесконтактным методом). Чистку наружных поверхностей оптики производите при помощи специально
предназначенных для этих целей средств.
Хранение
Храните прибор всегда только в чехле, в сухом, хорошо вентилируемом помещении. При длительном
хранении обязательно извлеките аккумуляторную батарею.
Выявление неисправностей
Прибор не включается. Батарея полностью разрядилась. Зарядите батарею.
Не работает от внешнего
источника питания.
Поврежден кабель USB. Замените кабель USB.
Разряжен источник внешнего
питания.
Зарядите источник внешнего питания.
Смартфон или планшет не
подключается к прибору.
Изменен пароль в приборе. Удалите сеть и подключитесь повторно с
вводом пароля, записанного в приборе.
Прибор находится в зоне с
большим количеством сетей Wi-Fi,
которые могут создавать помехи.
Для обеспечения стабильного
функционирования Wi-Fi переместите
прибор в зону с меньшим количеством
сетей Wi-Fi либо в зону, где они отсутствуют.
Отсутствует или
прерывается трансляция
сигнала через Wi-Fi.
Прибор находится вне зоны
уверенного приема сигнала Wi-Fi.
Между прибором и приемником
сигнала находятся препятствия
(бетонные стены, например).
Переместите прибор в зону прямой
видимости работы сигнала Wi-Fi.
Низкое качество
изображения.
Указанные проблемы могут возникать при наблюдении в сложных погодных
условиях (снег, дождь, туман и пр.).
Изображение слишком
темное.
Установлен низкий уровень
яркости или контраста.
Отрегулируйте яркость или контраст.
На дисплее появились
полосы либо
изображение исчезло.
В процессе эксплуатации
на прибор воздействовало
статическое напряжение.
После воздействия статического
напряжения прибор может
самостоятельно перезагрузиться либо
выключите и повторно включите прибор.
При четком изображении
прицельной метки
нечеткое изображение
объекта.
Пыль или конденсат на наружных
или внутренних оптических
поверхностях объектива.
Протрите наружные оптические
поверхности мягкой хлопчатобумажной
салфеткой. Просушите – дайте постоять
4 часа в теплом помещении.
Не сфокусирован объектив. Отрегулируйте четкость изображения
вращением регулятора объектива.
Дисплей расположен не
по центру.
Не отрегулировано положение
цифрового модуля на дневном
прицеле.
Отожмите адаптер и выставьте
положение дисплея по центру поля
зрения (см. раздел ).
Прибор не фокусируется. Неправильная настройка.
Настройте прибор в соответствии с
разделом . Проверьте
наружные поверхности линз объектива
и окуляра; при необходимости
очистите их от пыли, конденсата,
инея и т.д. В холодную погоду Вы
можете использовать специальные
антизапотевающие покрытия (например,
как для корригирующих очков).
Точка попадания не
совпадает с точкой
прицеливания.
Требуется калибровка дисплея. Произведите калибровку дисплея в
соответствии с инструкциями раздела
.
Нет жесткости установки прибора
на прицеле или прицела на
оружии.
Проверьте жесткость установки прибора
на прицеле и надежность фиксации
прицела к оружию. Убедитесь, что Вы
используете именно тот тип патронов,
которым ранее пристреливали Ваше
оружие и прицел. Если Вы пристреливали
прицел летом, а эксплуатируете его
зимой (или наоборот), то не исключено
некоторое изменение нулевой точки
пристрелки.
При выстреле насадка
соскальзывает с прицела.
Недостаточное зажатие адаптера.
Неверно выбран вкладыш.
Выберите подходящий вкладыш
и зажмите адаптер согласно
рекомендациям.
Невозможно открыть
зажим адаптера.
Неверно выбран вкладыш. Выберите подходящий вкладыш.
Проверьте наличие зазора между губами
адаптера.

58
По ссылке вы можете найти ответы на наиболее часто задаваемые вопросы о тепловидении
https://www.pulsar-nv.com/glo/ru/podderzka/tchasto-zadavaemye-voprosy/91
Данный продукт соответствует требованиям европейского стандарта EN 55032:2015, Класс А.
эксплуатация данного продукта в жилой зоне может создавать радиопомехи.
Цифровые ночные приборы Forward требуют лицензии, если они экспортируются за пределы
Вашей страны.
Ваш прибор содержит ценные материалы, которые можно восстановить или переработать
Оставьте в местном пункте сбора отходов.
Transcripción de documentos
FORWARD F455 Digital NV Attachment OPERATING INSTRUCTIONS Digital NV Attachment FORWARD F455 3-11 ENGLISH L’attache de vision nocturne numerique FORWARD F455 12-20 FRANÇAIS Digitaler Nachtsichtvorsatz FORWARD F455 21-30 DEUTSCH Dispositivos NV acoplables FORWARD F455 31-39 ESPAÑOL Dispositivo notturno digitale FORWARD F455 40-48 ITALIANO Цифровая насадка НВ FORWARD F455 49-58 РУССКИЙ ENGLISH Specifications MODEL SKU# OPTICAL SPECIFICATIONS Lens focus, mm Relative aperture, D/f Field of view (horizontal), ° Field of view (horizontal), m at 100m Package Contents FORWARD F455 78186 50 1:1 6.3 11 Max. observation range of an animal 1.7 m high, m 500 Minimum focusing distance, m Recommended magnification of the daytime sight ELECTRONIC SPECIFICATIONS Sensor type / resolution Display type / resolution Sensitivity, mW (wavelength 780nm, 25 lines/mm resolution) Sensitivity, mW (wavelength 915nm, 25 lines/mm resolution) DETACHABLE IR ILLUMINATOR Type / wavelength, nm OPERATING FEATURES Power supply, V Battery type Capacity Rated Output Voltage External power supply Battery life at temp. = 22 ° C (Wi-Fi off, IR off), hrs Maximum recoil power on a rifled weapon, Joules Maximum recoil power on a smooth-bore weapon, calibre Degree of protection, IP code (IEC60529) Operating temperature, °C/F Dimensions, mm/inch Weight, kg/oz VIDEO RECORDER Video/photo resolution, pixels Video / photo format Built-in memory WI-FI CHANNEL Frequency Standard 5 2-8 CMOS HD 1280X720 AMOLED 1746x1000 1.5×10-⁵ 5.5×10-⁵ LED 940 3.0 – 4.2 Li-ion Battery Pack IPS7 (6400 mAh) DC 3.7V Micro USB Type B (5V) 9 6000 12 IPX7 -25 ... +50 / -13 ... +122 155х136х77 / 6.1x5.35x3.03 0.83 / 29.28 1280x720 .mp4 / .jpg 16GB 2.4 GHz 802.11 b/g/n Improvements may be made to the design and software of this product to enhance its user features. The current version of the User’s Manual may be found on the website www.pulsar-vision.com • Digital night vision attachment • Carrying case • Battery Pack • Battery charger • Mains adapter • MicroUSB cable • Quick start guide • Lens cloth • Warranty card Description The Forward F455 digital night vision attachment is a versatile attachment that allows you to quickly and easily transform a daytime optical sight into a night one. The attachment is mounted onto the lens of an optical sight with the aid of adapters designed for various lens diameters. The attachment does not require any additional ranging. The attachment is intended for various applications, including hunting, sport shooting, night photography and video recording, and observation. Features • 1280x720 HD sensor • Enhanced night-time sensitivity • Simple transformation of daytime optical sight into night sight • Preserves the benefits of daytime optics in night-time conditions • Aiming point stability • Comfortable use in a wide range of daytime optical magnifications • Invisible long-range IR Illuminator • SumLight™ enhanced sensitivity software • Detection distance of up to 500m • Instant power up • Built-in video • Power from quick-release, high-capacity B-pack rechargeable batteries • Four-point mounting system with automatic clamp • Compatibility with other manufacturers’ adapters • High calibre recoil resistance 12 gauge, 9.3x64, 0.375H&H • Wi-Fi integration with iOS and Android devices • Stream Vision. Remote control surveillance and live YouTube streaming via smartphone • Remote software updates • Fully waterproof (IPX7) • Extreme operating temperature range (-25 ... +50°С / -13F ... +122 F) • MicroUSB Power Bank charging 3 Units and controls 1. 2. 3. 4. 5. 6. 7. 8. 9. 10. 11. 12. 13. Description of Controls Lens cover Eyepiece cover Battery compartment cover Battery locking lever Rechargeable battery RIGHT button M (MENU) button LEFT button ON button Lens focus knob IR illuminator cover IR illuminator connector plug IR illuminator installation connector Adapter cover* 14. 15. 16. 17. 18. 19. 20. 21. 22. 23. 24. 25. MicroUSB port Weaver rail Adapter cover* Optical sight lens Insert* Adapter* Tightening screw Screw Adapter lever Attachment point IR button IR illuminator lever ON (9) LEFT (8) MENU (7) 6 RIGHT button Adapter* 16 Button ON button 19 9 10 Lens focus knob 7 15 Weaver rail 8 IR illuminator 12 connector plug M (MENU) button 18 23 2 17 13 Eyepiece Attachcover ment point Open IR illuminator installation connector 14 MicroUSB port Tightening 20 screw 22 Adapter lever Screw 21 Battery locking lever Battery compartment cover Rechargeable battery 3 5 *Items of Cover Ring Adapter FN (available separately) IR (24) First brief press Device off Power on device Display off Turn display on Device turned on, quick menu, main menu Device turned on Navigation through menu Quick menu Device turned on Navigation through menu Quick menu Device powered on (Video mode) Device powered on (Photo mode) Navigation through menu Device turned on, quick menu, main menu Other brief presses – – – Long press Power on device Turn device off Display off / device powered off Turn on Turn off Wi-Fi on / Wi-Fi off SumLight™ SumLight™ Navigation upwards, downwards, counter-clockwise Reduce value Open quick menu Open main menu Exit submenu without Confirm selection confirming selection / exit menu (go to monitoring mode) Navigation upwards Exit quick menu Turn off video recording / Start video – Switch to Photo mode recording Take a photo Switch to Video mode Downwards / rightwards / clockwise Increase value IR illuminator on Adjust IR strength IR illuminator off switch switch IR illuminator 11 cover Insert* Optical sight lens RIGHT (6) Lens cover 1 LEFT button Operating Mode 4 25 IR illuminator lever 24 IR illuminator button Operating Features The Forward F455 attachment is designed for long-term use. Please follow these guidelines to ensure long life and maximum performance: • Before using the attachment make sure you mount it according to the instructions in the “Mounting the attachment on an optical sight” section. • Power off the attachment after use. • Do not repair or dismantle a attachment under guarantee by yourself! • The attachment can be used over a wide range of temperatures. If the attachment has been operated in the cold and brought into a warm room, do not remove it from its carrying case for at least 2-3 hours; this will prevent condensation forming on the external optical elements. • Inspect and maintain the attachment regularly to ensure trouble-free operation and to avert and eliminate the cases of premature wear and tear and failure of components. • The battery must not be exposed to excessive heat from the sun’s rays, fire of other heat sources. Using the Battery Pack The Forward F455 attachment is supplied with a rechargeable IPS7 Lithium-ion Battery Pack which allows the attachment to be used for up to 9 hours. Charge the battery before first use. Charging the Battery Pack: • Attach the microUSB plug of the USB cable to the microUSB connector (C) on the charger. • Connect the USB plug on the cable to the mains adapter. 4 • Plug the mains connector into a 110-220V socket. • Raise the lever (A) of the charger. • Remove the protective cover from the battery. • Insert the battery into the charger as shown in the diagram and secure the handle (A). • Once installed on the charger, a green LED indicator (B) start to glow and begin flashing: - once when the battery charge is from 0% to 50%; - twice when the battery charge is from 51 to 75%; - three times when the battery charge is from 76% to 100%. • When the indicator is continuously green, the battery is fully charged. Disconnect the charger from the mains and disconnect the battery from the charger. • If the battery charger indicator is constantly red when the battery is inserted, the charge level is probably below the permissible level (the battery has been in a discharged state for a long period of time). Leave the battery in the charger for a long period of time (up to several hours), then remove and reinsert. • If the indicator begins to flash green, the battery is operational. • If it continues to show red, the battery is defective. Do not use this battery! Attention! When charging, always use the charger supplied with the attachment package or a Pulsar IPS charger (sold separately). The use of other chargers may cause irreparable damage to the battery. Installing the Battery Pack • Lower the lever (4). • Remove the protective cover of the battery compartment (3). • Remove the protective cover from the battery (5). • Insert the battery (5) into the slot designed for it on the attachment body so that the battery F (the protrusion of the battery casing ) is pointing downwards. Lock the battery in place by raising the lever (4). • Attention! External power may be supplied from an external source, such as a 5V Power Bank. Connect an external power source to the attachment by connecting the USB cable to the attachment’s microUSB port (14) (See Section “External Power Supply”). Safety measures: • Do not use the charger if it has been modified or damaged. • Do not leave a battery unattended during charging. • Do not leave a charger with a battery connected to the mains for more than 24 hours after full charge. • The battery should be charged at a temperature between 0° C and +45° C, otherwise the battery life will be significantly reduced. • Do not charge the battery immediately after bringing it from the cold into a warm atmosphere. Wait 30–40 minutes for the battery to warm up. • Do not expose the battery to high temperatures or naked flame. • Do not submerge the battery in water. • The connecting of third-party devices with an energy consumption greater than permissible is not recommended. • The battery is equipped with a short circuit protection system. However, situations that may lead to short circuiting should be avoided. • Do not dismantle or deform the Battery Pack. • Do not subject the Battery Pack to shocks or falls. • After being stored for a long time, the battery should be partially charged – it should not be fully charged or • completely discharged. Store the battery out of the reach of children. External Power Supply External power is supplied from an external source, such as a 5V Power Bank. • Attach the external power source to the USB connector (14) on the device. • The device will switch to operation from the external power supply, while the IPS7 battery will be gradually recharged. will appear on the display showing charge level as a percentage. • A battery icon If the device is connected to a computer, network adapter or power bank that does not conform to the • BC1.0 battery charger standard, an IPS7 battery will not begin charging: the external power icon only will be displayed . • If the device is operated from an external power source and the IPS7 battery is not connected, an icon is displayed . • Once the external power source is disconnected, the adapter will begin functioning on battery power. Operation Mounting the attachment on an optical sight • Select the adapter (available separately) with the required diameter of insert depending on the outer diameter of the lens of your optical sight (see the Table). • The designation 42mm / 50mm / 56mm in the title of the adapter refers to the optical diameter of the lens in the optical sight. • Remove the cap (16) from the adapter (19) by turning it clockwise. • Degreasing of the lens body of the sight before mounting is recommended. • Mount the insert (18) onto the adapter (19) as far as it will go. • Mount the adapter with the insert into the day sight (17). • Move the lever (22) from its initial OPEN position to the CLOSE position. • Ensure that the adapter fits snugly against the lens. • If there is any gap, do the following: - Loosen the locking screw (20) with an Allen key (S=2mm). - Tighten the screw (21) with an Allen key (S=4mm) with the force necessary to ensure that the adapter fits tightly against the lens. The clamping forces should be 1 Nm. - Tighten the locking screw (20). • The effort can be tested with a torque screwdriver. • Insert the digital module firmly into the adapter so that the pins located in the adapter case fit into the grooves (23) of the digital module. Turn the digital module clockwise as far as it will go. The triangular mark on the digital module and the square on the adapter body must be aligned. • To align the attachment, turn the handle (22) to the OPEN position and align the attachment with the horizon. 5 Powering on and image setup • Remove the lens cap (1) by turning it anticlockwise. • Turn on the attachment with a short press of the ON button (9). An image will appear on the display. • Adjust the resolution of the icons on the display by rotating the dioptre adjustment ring on the sight of your optical sight. In future, it will not be necessary to rotate the eyepiece dioptre adjustment ring, regardless of distance and other conditions. • Rotate the lens focus ring (10) to focus on the object being observed. Basic settings (brightness and contrast adjustment) can be altered by using the quick access menu. Power the attachment off after use with a long press of the ON button (9). Quick Access Menu Functions • Enter the ‘quick’ menu with a short press of the M button (7). • A short press of the M button (7) enables you to switch between functions, as described below. • Brightness – by pressing the RIGHT (6) and LEFT (8) buttons and changing the display • brightness value from 0 to 20. Contrast – by pressing the RIGHT (6) and LEFT (8) buttons and changing the display contrast value from 0 to 20. Main Menu Functions • Enter the main menu with a long press of the controller button (7). • Press the RIGHT (6) and LEFT (8) buttons to toggle through the main General view of the menu: menu functions. Selection table for day sight inserts Cover-adapter model Cover adapter FN 42mm Cover adapter FN 50mm Cover adapter FN 56 mm Correspondence of the inner diameter of the line and the outer diameter of the lens body of the daylight optical device (sight, telescope) Insert internal diameter (mm) Outer diameter of sight lens (mm) 47 46.7-47.6 48 47.7-48.6 49 48.7-49.6 50 49.7-50.6 55 54.7-55.6 56 55.7-56.6 57 56.7-57.6 58 57.7-58.6 59 60 61 62 63 64 65 58.7-59.6 59.7-60.6 60.7-61.6 61.7-62.6 62.7-63.6 63.7-64.6 64.7-65.6 • Open sub-items in the main menu with one short press of button M (7). • To exit a sub-item in the main menu, press and hold down on button M (7). • Automatic exit from the main menu occurs after 10 seconds of inactivity. Structure and description of the menu • Brightness of icons • Wi-Fi Settings • General Settings • Automatic power-off • Device Information 6 Brightness This menu item sets the brightness of icons on the attachment display. of icons • Press and hold the M button (7) to enter the main menu. • Select the brightness level of the icons with the RIGHT (6) and LEFT (8) buttons. • A short press of the M button (7) opens the submenu. • Select the brightness level of the icons with the RIGHT (6) and LEFT (8) buttons. • To save your choice and exit the submenu, press and hold down the M button (7). Wi-Fi Settings Date Setting the Date • Press and hold the M button (7) to enter the main menu. • Select the submenu “General settings” with the RIGHT (6) and LEFT (8) buttons. • A short press of the M button (7) opens the submenu. • Select the “Date” submenu with the RIGHT (6) and LEFT (8) buttons. • A short press of the M button (7) opens the submenu. • The date appears in dd/mm/yyyy format (12/04/2019). • Set the required year, month and day with the RIGHT (6) and LEFT (8) buttons (the RIGHT (6) button increases the value and the LEFT (8) button reduces it). Press the M button (7) to toggle the digits. • To save your chosen date and exit the submenu, press and hold the M button (7). Time Setting the Time • Press and hold the M button (7) to enter the main menu. • Select the submenu “General settings” with the RIGHT (6) and LEFT (8) buttons. • A short press of the M button (7) opens the submenu. • Select the “Time” submenu with the RIGHT (6) and LEFT (8) buttons. • A short press of the M button (7) opens the submenu. • Select the time format (24-hour clock or AM/PM) by pressing the RIGHT (6) and LEFT (8) buttons. • Press the M button (7) to move to the hour setting. • Set the hour with the RIGHT (6) and LEFT (8) buttons. The RIGHT (6) button increases the value and the LEFT (8) button reduces it. • Press the M button (7) to move to the minute setting. • Set the minute by pressing the RIGHT (6) and LEFT (8) buttons. • To save your chosen time and exit the submenu, press and hold the M button (7). This option enables you to configure the device to operate on a Wi-Fi network. Note: Wi-Fi is turned on/off with a long press of the LEFT button (8). Setting a password Setting Access Levels General Settings General Settings This submenu allows you to set a password to access the attachment from an external device. This password is used when linking an external device (e.g. a smartphone) to the attachment. • Press and hold the M button (7) to enter the main menu. • Select Wi-Fi tuning menu function using the RIGHT (6) and LEFT (8) buttons. • A short press of the M button (7) opens the submenu. • Select the Password Set-up submenu using the RIGHT (6) and LEFT (8) buttons. • A short press of the M button (7) opens the submenu. • The default password (12345678) will appear on the screen. • Set your desired password with the RIGHT (6) / LEFT (8) buttons. The RIGHT button increases the value and the LEFT button reduces it. Press the M button (7) to toggle the digits. • Press and hold down the M button (7) to save the password and exit the submenu. This sub-function enables you to configure the appropriate level of access to your device made available to the Stream Vision app. Owner level. A Stream Vision user has full access to all the device’s functions. Guest level. A Stream Vision user is only able to view video footage from the device in real time. • Press and hold the M button (7) to enter the main menu. • Select Wi-Fi tuning menu function using the RIGHT (6) and LEFT (8) buttons. • A short press of the M button (7) opens the submenu. • Select the Access Level Set-up submenu with the RIGHT (6) and LEFT (8) buttons. • Select “Owner” or “Guest” with the RIGHT (6) and LEFT (8) buttons. • To confirm your choice and exit the submenu, press and hold down the M button (7). This menu item allows you to program the following settings: • Language • Time • Default Settings • Date • Formatting Language Interface language selection • Press and hold the M button (7) to enter the main menu. • Select the submenu “General settings” with the RIGHT (6) and LEFT (8) buttons. • A short press of the M button (7) opens the submenu. • Select the “Language” submenu with the RIGHT (6) and LEFT (8) buttons. • A short press of the M button (7) opens the submenu. • Select one of the available interface languages (English, French, German, Spanish or Russian) with the RIGHT (6) and LEFT (8) buttons. • To save your choice and exit the submenu, press and hold down the M button (7). Return to default settings • Press and hold the M button (7) to enter the main menu. • Select the submenu “General settings” with the RIGHT (6) and LEFT (8) buttons. • A short press of the M button (7) opens the submenu. • Select the “Default settings” submenu using the RIGHT (6) and LEFT (8) buttons. • A short press of the M button (7) opens the submenu. • Select the ‘YES’ option to reset to factory settings or ‘NO’ to cancel using the RIGHT (6) and LEFT (8) buttons. • Confirm your selection with a short press of the M button (7). The following settings will be restored to their factory state before being set by the user: Brightness level – 10 Contrast level – 8 Language – English Wi-Fi – off (default password) Auto shutdown – off Formatting Formatting the built-in memory card permanently deletes all of the recorded files. Attention! Make sure that you no longer need the files to be deleted or create a backup on other media. • Press and hold the M button (7) to enter the main menu. • Select the submenu “General settings” with the RIGHT (6) and LEFT (8) buttons. • A short press of the M button (7) opens the submenu. • Select the “Formatting” submenu with the RIGHT (6) and LEFT (8) buttons. • A short press of the M button (7) opens the submenu. • Select the ‘YES’ option to format or ‘NO’ to cancel using the RIGHT (6) and LEFT (8) buttons. • Confirm your selection with a short press of the M button (7). 7 This function enables you to activate automatic shutdown of the device after a certain period of Auto shutdown time when it is tilted horizontally or vertically by more than 70°, or right or left by more than 30°. In such case, the device controls should not be activated. • Press and hold the M button (7) to enter the main menu. • Select the “Auto shutdown” menu with the RIGHT (6) and LEFT (8) buttons. • A short press of the M button (7) opens the submenu. • Use the RIGHT (6) and LEFT (8) buttons to select the time period after which the device will automatically turn off (1 min; 3 min; 5 min), or select “Off” if you want to deactivate the automatic shutdown function. • Confirm your selection with a short press of the M button (7). Note: the status bar will display “Auto shutdown” status icon 1 min. Device • Press and hold the M button (7) to enter the main menu. Information • Select the “Device information” menu with the RIGHT (6) and LEFT (8) buttons. • A short press of the M button (7) opens the submenu. The user has access to the following information about the device: full name SKU number serial number software version hardware version service information • The status bar will display a disabled illuminator icon if the IR illuminator is not connected. This icon is not displayed when the IR illuminator is connected. • Briefly press the IR button (24) at the end of the illuminator. The power level when switching on is minimum . • The IR illuminator icon will be displayed on the status bar with the relevant power level. • Successive brief presses of the IR button (24) will toggle the brightness level of the illuminator ( > > > ). • The IR illuminator is turned off by a long press of the IR button (24). • The IR icon will disappear from the screen. Note: When the IR is turned off, the power level is not saved in the device’s memory. When the device is powered on, the illuminator is turned on at minimum power level – IR1. Wi-Fi Function • The device has a function for wireless communication with external devices (smartphone or tablet ) via Wi-Fi. • Turn on the wireless connection module with a long press of the LEFT button (8). Wireless operation is displayed in the status bar in the following way: Wi-Fi disconnected Status Bar No icon Wi-Fi turned on by the user, Wi-Fi connection in the device is in progress. Wi-Fi turned on, no connection to the device The status bar is located in the lower part of the display and shows information on the current operational status of the attachment, including: • The SumLight™ function • Auto shutdown function 1 min (if switched on) • IR illuminator power level (e.g. Level 3) • Wi-Fi connection • Clock • Battery Pack charge level (when the device is powered by the Battery Pack) (if the device is powered from an external supply) or • External battery power indicator • Battery charge indicator with current charge in per cent (where charging is by an external power supply) Note: when increasing the magnification of the optical device on which the attachment is mounted, the status bar may partially or completely go beyond the boundaries of the visible image. IR Illuminator The attachment is equipped with a detachable IR Illuminator operating on a wavelength of 940 nm, which increases observation range in lowlight conditions and in darkness. Other Pulsar IR illuminators (purchased separately) may be installed instead of the included IR illuminator. • Remove the cap (12) from the connector to attach the IR illuminator (13). • Remove the cover (11) from the IR illuminator. • Mount the IR illuminator on the device. The lever (25) should be in the up position. • Lock the IR illuminator by pressing the lever (25) down • Turn on the device using the ON button (9) to activate the IR illuminator. Wi-Fi turned on, the device is connected The device is recognised by a mobile device under the label “Forward F_XXXX”, where XXXX are the four last digits of the serial number. Once the password has been entered on the mobile device (for more information on setting a password, see the subsection “Wi-Fi Settings” in the “Main Menu Functions” section of the instructions) and the connection has been established , the icon in the status bar changes to , the video signal on the mobile device screen starts after the “viewfinder” button is activated on the screen of the mobile device. The icon in the status bar changes to . Note: you can configure the required access level to your device that is granted to the Stream Vision application in the “Setting Access Levels” menu section. The “SumLight™” function The SumLight™ function substantially increases the sensitivity of the CMOS array in the event of a reduction in the light level, thus enabling observation in conditions of low light without using the IR illuminator. • To activate the SumLight™ function, press briefly the LEFT (8) button. • Press the LEFT button (8) once more to switch off. • The SumLight™ icon (on or off) is displayed in the status bar. Attention! When the SumLight™ function is activated, the noise level in the image increases, the frame rate decreases and the image slows down. Any sharp movement of the device may cause the image to become “blurred”. Such effects are not defects. Luminous white dots (pixels) may be visible on the device’s display. The number of dots may increase when the SumLight™ function is enabled. This is due to the peculiarities of this function and is also not a defect. 8 Video Recording and Photography The device is equipped with a function for video recording (and photographing) an observed image that is saved onto the built-in memory card. Before using the photo and video functions, read the subsections “Setting the Date”, “Setting the Time” in the “Main menu functions” section. The built-in recorder operates in two modes: • Photo (photography; in the top right corner of the display you can see an icon ). If the estimated number of photos that can be saved to the Flash card is more than 100, the message “>100” is shown. , the total remaining • Video (video recording; an icon is displayed in the upper left of the display recording time given the current resolution in HH:MM:SS format (hours : minutes : seconds). When powered on, the device is in Video mode. To toggle between Video and Photo modes press and hold down the RIGHT button (6). Switching between the modes toggles Video–> Photo–> Video... PHOTO mode. Photographing an image • Switch to PHOTO mode with a long press of the RIGHT button (6). • To take a photograph, press the RIGHT button (6) briefly. The image freezes for 0.5 sec. • The photo is saved to the internal memory. Video Mode Recording video clips • Engage Video mode with a long press of the RIGHT button (6). • Start video recording with a short press of the RIGHT button (6). will disappear, a REC icon appears instead and the • When video recording starts, the recording icon recording timer displaying in MM:SS (minutes : seconds) format; • Stop the video recording by pressing and holding down the RIGHT button (6). • Video files are stored in the internal memory card after video recording has been turned off. * an icon will be displayed for 2 seconds and then disappear. When the RIGHT button (6) is briefly pressed again, an icon will appear and the recording timer will show the current time of the video recording. Notes: • After turning off the video recorder / taking a photo, when you turn off the device if the recorder had been turned on; if the memory card is full, or if during a video recording the memory becomes full (a “Memory full” message appears on the display). • You can enter and navigate the menu during video recording; • Recorded videos and photographs are saved to the device’s built-in memory card in the format: img_xxx.jpg (for photos); video_xxx.mp4 (for video). xxx - three-digit common file counter (for photos and video); • The counter used for the names of multimedia files cannot be reset. • If a file is deleted from the middle of the list, its number is not taken by another file. • When the counter is full, a new folder is created – img_xxxx, where xxxx is the file counter. • The maximum duration of a recorded video file is seven minutes. After this time expires, a video is recorded onto a new file. The number of files is limited by the capacity of the device’s built-in memory; • Regularly check the free memory on the internal memory card, moving footage and photographs to other storage media to free up space. • Graphic information (status bar, icons etc.) is displayed in recorded video files and photos. Display Off Function When this function is in use, the device switches to standby mode, which allows it to be turned off quickly if necessary. Options for working with the “Display Off” function Option 1. Device is powered off Turn the device on and turn on the “Display Off” function. • Turn the device on with a short press of the ON button (9). • Turn on the “Display Off” function: press and hold the ON button (9). A “Display off” message will appear on the screen together with a countdown. • Release the ON button (9). • Briefly press ON (9) to turn off the “Display Off” function. Option 2. The “Display Off” function is on; the device should be powered off. • Press and hold the ON button (9). A “Display off” message will appear on the screen together with a 3, 2, 1, 0 countdown. • Hold down the ON button (9) until the device powers off (turning off will happen after 0 on the countdown) *. * a delay to shutdown of the device is possible in connection with completion of data saving by the processor. In this case, the countdown display shows 0. USB Connection • Power on the device by pressing the ON button (9) (the computer will not detect the device if it is turned off). • Connect one end of the USB cable to the device’s microUSB connector (14) and the other end to the port on your computer. • The device is detected automatically by the computer and no installation of drivers is required. • Two connection modes will appear on the display: Memory card and Power. • Select the connection mode with the RIGHT (6) and LEFT (8) buttons. • A short press of the M button (7) confirms the selection. Connection options: Memory card. • When this mode is selected, the device will be recognised by the computer USB connection as a flash card. This option is designed for working with files that are stored in the device’s memory; the device’s functions are not accessible and the device turns itself off. The device continues to function after disconnection from the computer. Use as power • If a video was being recorded at the time of connection, the recording will Use as memory card cease and will be saved. Power. • When this mode is selected, the computer is used by the device as an external power supply. An icon will appear in the status bar . The device will continue to function and all functions are available. • The battery pack installed in the device will not be charged. Disabling the USB. • When the USB is disconnected from the device connected in Memory card mode, the device remains switched on. • When disconnecting the USB from the device in Power mode, the device will continue to function with the Battery Pack, if it is available and has sufficient charge. 9 Using the Weaver Rail The device is equipped with a Weaver rail (15) which allows the user to mount extra accessories. You must first detach the removeable IR illuminator (See Section “IR Illuminator”). Display Calibration The attachment is configured so that after fitting onto an optical sight that had been properly zeroed, no adjustment of the aiming point is required. If your attachment has been subjected to a sharp blow, or has been dropped, you may check the impact point and correct it yourself if required, without having to take it to the service centre. Display coordinates Impact point • To enter display calibration mode, first press and hold the M button (7) for 10 seconds. • The display coordinates X=0; Y=0 will appear. • Use the LEFT (8) and RIGHT (6) buttons to move the display horizontally (X axis) and vertically (Y axis) so that the point of impact moves to the centre of the aiming mark of your optical sight. • Press the M button (7) to toggle between the X and Y coordinates. • The image offset is 1 sensor pixel. • The image offset range is +/- 20 pixels horizontally (X axis), Optical sight reticle Display displacement +/- 20 pixels vertically (Y axis). • To exit the menu and save the settings, press and hold the M button (7) for two seconds. Stream Vision Forward attachments support Stream Vision technology, which allows you to stream an image from the thermal imager to your smartphone or tablet PC via Wi-Fi in real time mode. You can find detailed instructions on the operation of Stream Vision technology online at www.pulsar-vision.com. Note: the device’s design includes the possibility of firmware updates. Updating is possible via the Stream Vision app. Scan or press on a QR code to download the application: Technical Inspection A check is recommended before each use of the device. Check: • External appearance (there should be no cracks on the housing). • The condition of the lens and eyepiece the digital module and the lens of the IR illuminator (there should be no cracks, grease spots, dirt or other residue). Wipe the exterior surfaces of metal and plastic parts free from dust, dirt and moisture with a soft, cotton cloth. • The state of the Battery Pack (should be charged) and the electric terminals (there should be no sign of salts or oxidation). • The controls should be in working order. • The digital module should be properly and firmly attached to the optical device. Technical Maintenance Technical maintenance should be carried out at least twice a year and include the following steps: • Wipe the external surfaces of metal and plastic parts free of dust and dirt with a cotton cloth. Silicone grease may be used for this. • Clean the electric terminals of the Battery Pack and battery slot on the device using a non-greasy organic solvent. • Check the glass surfaces of the eyepiece and the lens. If necessary, remove dust and sand from the lenses (preferably using a non-contact method). Cleaning of the external surfaces of the optics should be done with substances designed especially for this purpose. Storage Always store the device in its carrying case, in a dry, well-ventilated space. It is essential during prolonged storage to remove the Battery Pack. Troubleshooting Malfunction Possible reason Correction The device will not power on. Battery Pack is completely discharged. Charge the battery. Does not operate from external power source. USB cable damaged. Replace USB cable. External power source discharged. Charge the external power source. Smartphone or tablet Device password has been changed. cannot be connected to the device. The device is in an area with a large number of Wi-Fi networks that may cause interference. Delete the network and reconnect using the device password. Wi-Fi signal non-existent or Device is outside the area of Wi-Fi interrupted. coverage. There are obstacles between the device and the receiver (e.g. concrete walls). Relocate the device into direct line of sight of the Wi-Fi signal. To ensure stable Wi-Fi operation, relocate the device to an area with fewer Wi-Fi networks, or into an area with none. Poor image quality. These problems may occur during observation in difficult weather conditions (snow, rain, fog etc.). Image is too dark. Low brightness or contrast level set. Adjust brightness or contrast. Coloured lines appear on display or image has disappeared. The device was exposed to static electricity during operation. There is a clear image of the aiming mark, but a fuzzy image of the object. Dust or condensation on the Wipe the exterior optical surfaces with a interior or exterior optical surfaces soft cotton cloth. Dry it. Let it stand for 4 of the lens. hours in a warm room. The display is not centred. After exposure to static electricity, the device may either reboot automatically, or require turning off and on again. The lens will not focus. Adjust the sharpness by rotating the lens adjuster. Position of the attachment on the day sight requires adjusting. Remove the attachment and set the display to the centre of the field of vision (see section “Operation”). 10 Malfunction Possible reason Correction The device will not focus. Incorrect setting. Adjust the device in accordance with section “Operation”. Check the outer surfaces of the lens and eyepiece; where necessary, wipe them free from dust, condensate, frost, etc. In cold weather, you can use special anti-fogging coatings (as, for example, for corrective glasses). Impact point does not Display calibration required. coincide with aiming point. Calibrate the display in accordance with the instruction in the section, “Display Calibration”. The device is not securely mounted Check that the device is firmly fixed on the on the sight, or the sight on the sight and that the mounting of the sight to weapon. the weapon is secure. Ensure that you are using the very type of ammunition that was previously fired from your weapon. If you zero a sight in summer and then use it in winter (or vice versa), some change in the zero point of the zeroing cannot be discounted. The attachment slides off the sight during firing. Adapter insufficiently clamped. Unsuitable insert selected. Select a suitable insert and clamp the adapter as recommended. Cannot open the adapter clamp. Unsuitable insert selected. Select a suitable insert. Check for a gap between the lips of the adapter. Electromagnetic compatibility. This product complies with the requirements of European standard EN 55032: 2015, Class A. Caution: Operating this product in a residential area may cause radio interference. Attention! Forward digital night vision devices require a licence if exported outside your country. Environment protection first! Your appliance contains valuable materials which can be recovered or recycled. Leave it at a local civic waste collection point. By following the link below you can find answers to the most frequently asked questions https://www.pulsar-nv.com/glo/support/faq/79 11 FRANÇAIS Spécifications techniques MODÈLE SKU # CARACTÉRISTIQUES OPTIQUES Mise au point d’objectif, mm Ouverture du diaphragme, D/f’ Champ de vision (horizontal), ° Champ de vision (horizontal), m@ 100m Distance d’observation maximale d’animaux de hauteur 1,7m, m Distance minimum de mise au point, m Distance recommandée du viseur de jour, fréq SPÉCIFICATIONS ÉLECTRONIQUES Type de capteur et résolution Type d’écran et résolution Sensibilité de l’appareil, mW (longueur d’onde 780 nm, résolution 25 pièces/ mm) Sensibilité de l’appareil, mW (longueur d’onde de 915 nm, résolution 25 pièces/ mm) ILLUMINATEUR IR DÉTACHABLE Type/ longueur d’onde, nm CARACTÉRISTIQUES DE FONCTIONNEMENT Alimentation électrique, V Type / Capacité batterie / Tension nominale de sortie Alimentation interne Durée de vie de la batterie à t = 22°C, h (Wi-Fi éteint, IR éteint) Résistance d’impact maximum sur Une carabine, joules Résistance d’impact maximum Carabine à tube lisse, calibre Degré de protection, code IP (IEC60529) Température de fonctionnement, °С Dimensions, mm Poids, kg ENREGISTREUR VIDÉO Résolution vidéo/ photo, pixels Format vidéo/ photo Mémoire intégrée CANAL WI-FI Fréquence Standard FORWARD F455 78186 50 1: 1 6.3 11 500 5 2-8 CMOS HD 1280X720 AMOLED 1746x1000 1,5×10-⁵ 5,5×10-⁵ LED 940 3,0 - 4,2 Batterie lithium-ion IPS7/ 6400 mAh/ DC 3,7V Micro USB Type-B (5V) 9 6000 12 IPX7 -25 ÷ +50 155x136x77 0,83 1280x720 .mp4 / .jpg 16 GB 2,4 GHz 802.11 b/g/n La configuration peut être modifiée afin d’améliorer l’utilisation d’un appareil. La version actuelle du manuel d’utilisation est disponible sur www.pulsar-vision.com Lot de livraison • Dispositif de vision nocturne numérique • Boitier • Batterie rechargeable • Chargeur de batterie • Adaptateur réseau • Câble microUSB • Manuel d’utilisation • Lingettes pour nettoyer l’optique • Certificat de garantie Description L’appareil de vision nocturne numérique Forward F455 est un appareil universel qui permet de transformer rapidement et facilement un viseur optique de jour en un viseur nocturne. L’appareil est monté sur un objectif de viseur optique à l’aide des adaptateurs conçus pour différents diamètres des objectifs. L’appareil ne nécessite aucun ajustage de tir supplémentaire. L’appareil est conçu pour diverses applications, notamment la chasse, le tir sportif, la photographie et la vidéo de nuit, l’observation. Caractéristiques Caractéristiques principales: • Capteur HD 1280x720 • Sensibilité nocturne élevée • Transformation simple du viseur optique de jour en celui de nuit • Maintien des avantages de l’optique de jour la nuit • Stabilité de point à viser • Utilisation confortable dans une large gamme d’optiques à la lumière du jour • Illuminateur IR longue portée invisible • Fonction d’augmentation supplémentaire de la sensibilité SumLight™ • Distance de détection jusqu’à 500 m • Démarrage instantané • Enregistrement vidéo intégré • Alimentation des batteries rechargeables haute capacité à changement rapide du système B-Pack • Système de montage à quatre points avec pince automatique • Compatibilité avec les adaptateurs d’autres fabricants • Résistance aux chocs en cas de gros calibres: 12 cal., 9.3x64, .375H&H • Wi-Fi. Intégration avec les appareils IOS et Android • Stream Vision. Contrôle à distance, surveillance et diffusion en direct sur YouTube via un smartphone • Mise à jour de logicielle à distance • Etanchéité complète (IPX7) • Large plage de température de fonctionnement (-25 ÷ +50°C) • MicroUSB. Support d’alimentation Power Bank 12 Fonctionnement des boutons Unités et commandes 1. 2. 3. 4. 5. 6. 7. 8. 9. 10. 11. 12. 13. Cache de lentille Couvercle d’oculaire Couvercle du compartiment batterie Levier d’installation de batterie Batterie rechargeable Bouton DROIT Bouton M (MENU) Bouton GAUCHE Bouton ON (MARCHE) Bouton de mise au point de l’objectif Couvercle d’illuminateur IR Obturateur connecteur illuminateur IR Connecteur pour installer l’illuminateur IR Couvercle adaptateur* 14. 15. 16. 17. 18. 19. 20. 21. 22. 23. 24. 25. Port microUSB Barre déplacement latéral Couvercle adaptateur* Lentille d’observation d’appareil optique Chemise* Adaptateur* Vis de fixation Vis Bras adaptateur Point de fixation Bouton IR Bras d’illuminateur IR 6 Bouton DROIT Adaptateur* 16 Bouton ON (MARCHE) 19 9 10 Bouton de mise au point de l'objectif 1 Bouton GAUCHE 7 déplacement 15 Barre latéral 8 Obturateur 12 connecteur Bouton M (MENU) illuminateur IR Couvercle 11 d’illuminateur IR Chemise* L’objectif du viseur optique 18 23 13 Point de Connecteur 2 Couvercle d’oculaire fixation pour installer l’illuminateur IR Open 17 14 Port microUSB Vis de fixation 20 22 Bras adaptateur 21 Vis Levier d’installation de batterie Couvercle du compartiment batterie Batterie rechargeable Cache de lentille 4 3 5 25 Bras d’illuminateur IR 24 Bouton IR Bouton Mode de fonctionnement L'appareil est éteint ON (9) L’appareil d'affichage est éteint L'appareil est allumé, menu de lancement rapide, menu principal Premier appui Appuis courts Appui long court suivants Allumage de Allumage de l'appareil – l'appareil Allumage de Extinction de l’appareil d'affichage l’appareil – d'affichage – Éteindre l’appareil d'affichage/ éteindre l'appareil Allumage Extinction WiFi allumé/ WiFi éteint SumLight™ SumLight™ Navigation dans le menu Naviguer vers le haut, à gauche, dans le sens antihoraire Menu de lancement rapide Réduction des paramètres Appareil est allumé Lancez le menu rapide Lancez le menu principal Quitter le sous-menu sans confirmer Confirmer la sélection la sélection/ quitter le menu (passer MENU (7) Navigation dans le menu en mode surveillance) Menu de lancement rapide Naviguer vers le haut Quitter le menu de lancement rapide Démarrer l’enEteindre l'enregistrement vidéo/ Appareil est allumé (mode registrement – passer en mode «Photo» vidéo) vidéo DROITE Appareil allumé (mode Prendre une photo Passer en mode «Vidéo» (6) «Photo») Navigation dans le menu En bas/ A droite/ dans le sens horaire Menu de lancement rapide Augmenter le paramètre L'appareil est allumé, Changer la menu de lancement Activer IR Désactiver IR IR (24) puissance IR rapide, menu principal GAUCHE (8) L’appareil est allumé Caractéristiques de l’utilisation L’appareil Forward F455 est conçu pour une utilisation à long terme. Pour assurer la durabilité et la performance complète, suivez les instructions ci-dessous: • Avant d’utiliser l’appareil, assurez-vous de l’installer conformément aux instructions de la section «Installation du dispositif sur le viseur optiquel». • Éteignez l’appareil après l’utilisation. • Il est interdit de réparer et de démonter indépendamment un appareil de garantie! • L’appareil peut être utilisé dans une large plage de température. Si l’appareil a été utilisé dans le froid et a été amené dans une pièce chaude, ne le retirez pas du boitier pendant 2-3 heures. Cela empêchera la condensation sur les éléments optiques externes. • Pour garantir un bon fonctionnement, prévoir et éliminer les causes d’usure prématurée ou de défaillance des composants et des pièces, effectuez rapidement un contrôle technique et un entretien de l’appareil. • La batterie ne doit pas être exposée à une chaleur excessive due au soleil, au feu ou à d’autres sources de chaleur. *Elements de Clapet de protection de l’objectif FN (disponible séparément) 13 Utilisation de la batterie L’appareil Forward F455 est livré avec une batterie Li-ion rechargeable IPS7, ce qui permet d’utiliser l’appareil jusqu’à 9 heures. Chargez complètement la batterie avant la première utilisation. Charge de la batterie: • Connectez la fiche microUSB du câble USB au connecteur (C) du chargeur. • Connectez le câble USB à l’adaptateur réseau. • Connectez l’adaptateur réseau à la prise 110-220V. • Soulevez le bras (A) du chargeur. • Retirez la couvercle de protection de la batterie. • Installez la batterie dans le chargeur comme indiqué dans l’image, fixez le bras (A). • Lors de l’installation, une lampe indicatrice (B) s’allume en vert sur le chargeur et clignote brièvement à un certain intervalle: - une fois, si la charge de la batterie est entre 0 et 50%; - deux fois, si la charge de la batterie est entre 51 et 75%; - trois fois, si la charge de la batterie est entre 76 et 100%. • Si la lampe indicatrice est constamment allumée en vert, la batterie est complètement chargée. Déconnectez le chargeur du réseau, déconnectez la batterie du chargeur. • Si la lampe indicatrice du chargeur s’allume en rouge lorsque la batterie est insérée, le niveau de charge risque d’être inférieur à la valeur autorisée. Laissez la batterie dans le chargeur pendant une longue période (jusqu’à plusieurs heures), puis retirez-la et réinsérez-la. • Si la lampe indicatrice clignote en vert, la batterie est en bon état de fonctionnement; • Si elle reste rouge, la batterie est défectueuse et ne peut pas être utilisée. Remplacez la batterie. Attention! Pour charger, utilisez toujours le chargeur fourni avec l’appareil ou le chargeur Pulsar IPS (à la charge du client). L’utilisation d’autres chargeurs peut causer des dommages irréparables à la batterie. Installation de la batterie: • Abaissez le levier (4). • Enlevez la couvercle de protection du compartiment batterie (3). • Retirez la couvercle de protection de la batterie (5). • Insérez la batterie (5) dans la fente prévue à cet effet sur le corps du dispositif de sorte que l’élément F (une avancement sur le corps de la batterie) soit dirigé vers le bas. • Verrouillez la batterie en place en relevant le levier (4). Attention! L’alimentation extérieure peut provenir d’une source extérieure, comme un chargeur 5V Power Bank. Raccordez une source d’alimentation extérieure à l’appareil en raccordant le câble USB au port microUSB (14) de l’appareil. Pour plus de détails, voir la section «Alimentation extérieure». Précautions: • N’utilisez pas le chargeur si sa conception a été modifiée ou endommagée. • Pendant le chargement, ne laissez pas la batterie sans surveillance. • Ne laissez pas le chargeur connecté à une batterie branchée sur réseau plus de 24 heures après une charge complète. • Effectuez la charge de la batterie à une température de l’air de 0 °C ÷ +45 °C Sinon, la durée de vie de la batterie peut être réduite. • Ne chargez pas la batterie directement après l’avoir déplacée d’un environnement froid ou chaud. Attendez • • • • • • • • 30 à 40 minutes pour que la batterie se réchauffe. N’exposez pas la batterie à la chaleur ou au feu nu. La batterie n’est pas destinée à être immergée dans l’eau. Il est déconseillé de connecter des périphériques tiers avec une consommation de courant supérieure à celle autorisée. La batterie est équipée d’un système de protection contre les courts-circuits; toutefois, il convient d’éviter les situations pouvant entraîner un court-circuit. Ne démontez ni déformez la batterie. Ne soumettez pas la batterie à des chocs et des chutes. Pendant le stockage à long terme, la batterie doit être partiellement chargée- elle ne doit pas être complètement chargée ni complètement déchargée. Gardez la batterie hors de la portée des enfants. Alimentation extérieure L’alimentation extérieure est fournie par une source d’alimentation extérieure du type Power Bank 5V. • Connectez la source d’alimentation extérieure au connecteur USB (14) de l’appareil. • L’appareil passera en mode d’alimentation extérieure, tandis que la batterie IPS7 sera rechargée progressivement. avec un pourcentage de charge s’affichera sur l’écran. • Une icône de batterie • Si l’appareil est connecté à partir d’un ordinateur ou d’une carte réseau ou d’un power bank qui ne correspondent pas à la norme du chargeur de batterie (BC 1.0), la batterie IPS7 ne commencera pas à se charger. Seule l’icône d’alimentation extérieure sera affichée . • Si l’appareil est alimentée par une source d’alimentation extérieure, mais la batterie IPS7 n’est pas connectée, une icône est affichée . Lors de la déconnexion de l’alimentation extérieure, l’appareil commencera à fonctionner sur batterie. • Utilisation Installation du dispositif sur le viseur optique • Sélectionnez l’adaptateur* avec le diamètre requis d’insert en fonction du diamètre extérieur de la lentille de votre viseur optique (voir le tableau). • La désignation 42 mm/ 50 mm/ 56 mm dans le titre de l’adaptateur désigne le diamètre optique de la lentille du viseur. • Enlevez le cache (16) de l’adaptateur (19) en le tournant dans le sens horaire. • Il est recommandé de dégraisser la lentille de l’appareil avant de la monter. • Montez l’insert (18) sur l’adaptateur (19) aussi loin que possible. • Montez l’adaptateur avec l’insert dans la lentille de l’appareil optique (17). • Déplacez le levier (22) depuis la position OUVERTE (OPEN) jusqu’à sa position FERMEE (CLOSE). • Vérifiez que l’adaptateur se place bien contre la lentille. • S’il y a un intervalle, procédez comme suit: - Dévissez la vis de fixation (20) avec une clef Allen (S = 2mm). - Serrez la vis (21) avec une clef Allen (S = 4mm) en exerçant la force nécessaire pour que l’adaptateur s’adapte fermement contre la lentille. La force de serrage doit être 1 N·m. - Serrez la vis de fixation (20). 14 • La force peut être testée à l’aide d’un tournevis dynamométrique. • Insérez le dispositif fermement dans l’adaptateur de sorte que les broches dans le boîtier de l’adaptateur se placent dans les rainures (23) du dispositif. Tournez le dispositif dans le sens horaire aussi loin que possible. Le repère triangulaire sur le dispositif et le repère carré sur le corps de l’adaptateur doivent être alignés. • Tournez le bras (22) sur la position OUVERTE (OPEN) et alignez le dispositif avec l’horizon. * A la charge du client Allumage et réglage de l’image • Enlevez le capuchon de lentille (1) en le faisant tourner dans le sens antihoraire. • Appuyez brièvement sur le bouton ON (9) pour allumer l’appareil. L’image s’affiche sur l’écran. • Réglez la résolution des icônes sur l’écran en faisant tourner la bague de réglage dioptrique sur l’oculaire de votre appareil optique. A l’avenir, il ne sera pas nécessaire de faire tourner la bague de réglage dioptrique de l’oculaire quelles que soient la distance et d’autres conditions. • Faites tourner la bague de mise au point de l’objectif (10) pour mettre au point sur l’objet observé. Les réglages de base (luminosité et contraste) peuvent être modifiés dans le menu d’accès rapide. Eteignez l’appareil après utilisation en appuyant longuement sur le bouton ON (9). Fonctions du menu d’acces rapide • Entrez dans le menu «d’accès rapide» en appuyant brièvement sur le bouton M (7). • Pour basculer entre les fonctions décrites ci-dessous, appuyez brièvement sur le bouton M (7). • La luminosité - Appuyez sur les boutons DROITE (6) et GAUCHE (8) pour modifier la valeur de la • luminosité de l’affichage de 0 à 20. Le contraste - Appuyez sur les boutons DROITE (6) et GAUCHE (8) pour modifier la valeur du contraste de l’image de 0 à 20. Fonctions du menu principal • Entrez dans le menu principal en appuyant longuement sur le bouton Le tableau de sélection pour les bagues d’insert des dispositifs de visée de jour Modèle avec couvercleadaptateur Adaptateur du couvercle FN 42 mm Adaptateur du couvercle FN 50 mm Adaptateur du couvercle FN 56 mm Correspondance entre le diamètre intérieur de la bague d’insert et le diamètre extérieur de la lentille de l’appareil optique de jour (viseur, télescope) Diamètre interne de chemise, mm Diamètre extérieur de la lentille de l’appareil, mm 47 46,7-47,6 48 47,7-48,6 49 48,7-49,6 50 49,7-50,6 55 54,7-55,6 56 55,7-56,6 57 56,7-57,6 58 57,7-58,6 59 60 61 62 63 64 65 58,7-59,6 59,7-60,6 60,7-61,6 61,7-62,6 62,7-63,6 63,7-64,6 64,7-65,6 M (7). • Appuyez sur les boutons DROIT (6) et GAUCHE (8) pour naviguer dans les éléments du menu principal. • Appuyez brièvement sur le bouton M (7) pour entrer dans le sousélément du menu principal. • Faites un appui long sur le bouton M (7) pour quitter le sous-élément du menu principal. • La sortie automatique du menu principal survient après 10 secondes d’inactivité. La composition et la description du menu • Luminosité des icônes • Paramètres Wi-Fi • Paramètres généraux • Mise hors circuit automatique • Informations sur l’appareil Forme général du menu : Luminosité des icônes 15 Luminosité Cet élément de menu permet de régler la luminosité des icônes sur écran de l’appareil. des icônes • Faites un appui long sur le bouton M (7) pour accéder au menu principal. • Utilisez les boutons DROIT (6) et GAUCHE (8) pour sélectionner l’option de menu «Luminosité des icônes». • Appuyez brièvement sur le bouton M (7) pour accéder au sous-menu. • Utilisez les boutons DROIT (6) et GAUCHE (8) pour sélectionner le niveau de luminosité des icônes. • Pour enregistrer la sélection et quitter le sous-menu, faites un appui long sur le bouton M (7). Paramètres L’élément de menu permet de définir les paramètres suivants: généraux • Langue • Temps • Mise en forme • Date • Paramètres par défaut Langue Sélectionner la langue de l’interface. • Faites un appui long sur le bouton M (7) pour accéder au menu principal. • Utilisez les boutons DROIT (6) et GAUCHE (8) pour sélectionner le sous-menu «Paramètres généraux». • Appuyez brièvement sur le bouton M (7) pour accéder au sous-menu. • Utilisez les boutons DROIT (6) et GAUCHE (8) pour sélectionner l’option de sousmenu «Langue». • Appuyez brièvement sur le bouton M (7) pour accéder au sous-menu. • Utilisez les boutons DROIT (6) et GAUCHE (8) pour sélectionner l’une des langues d’interface disponibles: Anglais, Allemand, Espagnol, Français et Russe. • Faites un appui long sur le bouton M (7) pour enregistrer la sélection et quitter le sous-menu. Date Réglage de la date • Faites un appui long sur le bouton M (7) pour accéder au menu principal. • Utilisez les boutons DROIT (6) et GAUCHE (8) pour sélectionner le sous-menu «Paramètres généraux». • Appuyez brièvement sur le bouton M (7) pour accéder au sous-menu. • Utilisez les boutons DROIT (6) et GAUCHE (8) pour sélectionner le sous-menu «Date». • Appuyez brièvement sur le bouton M (7) pour accéder au sous-menu. • La date est affichée au format jj/mm/aaaa (12/04/2017) • Utilisez les boutons DROIT (6) et GAUCHE (8) pour sélectionner le jour, le mois et l’année. (Bouton DROIT (6) - augmenter la valeur, bouton GAUCHE (8) - diminuer la valeur). Appuyez brièvement sur le bouton M (7) pour passer d’un chiffre à l’autre. • Faites un appui long sur le bouton M (7) pour enregistrer la date sélectionnée et quitter le sous-menu. Heure Réglage de l’heure • Faites un appui long sur le bouton M (7) pour accéder au menu principal. • Utilisez les boutons DROIT (6) et GAUCHE (8) pour sélectionner le sous-menu «Paramètres généraux». • Appuyez brièvement sur le bouton M (7) pour accéder au sous-menu. • Utilisez les boutons DROIT (6) et GAUCHE (8) pour sélectionner le sous-menu «Heure». • Appuyez brièvement sur le bouton M (7) pour accéder au sous-menu. • Appuyez sur les boutons DROIT (6) et GAUCHE (8) pour sélectionner le format de l’heure - 24/12 (ou PM/AM). • Appuyez sur le bouton M (7) pour passer au réglage de l’heure. • Appuyez sur les boutons DROIT (6) et GAUCHE (8) pour sélectionner l’heure (Bouton DROIT (6) - augmenter la valeur, bouton GAUCHE (8) - diminuer la valeur). • Appuyez sur le bouton M (7) pour régler les minutes. • Appuyez sur les boutons DROIT (6) et GAUCHE (8) pour sélectionner les minutes. • Faites un appui long sur le bouton M (7) pour enregistrer la durée sélectionnée et quitter le sous-menu. Paramètres Cet élément permet de configurer l’appareil pour le travail dans le réseau Wi-Fi. Wi-Fi Note: Allumer/éteindre le Wi-Fi en faisant un appui long sur le bouton GAUCHE (8). Paramétrage du mot de passe Ce sous-menu permet de définir un mot de passe afin d’accéder au dispositif à partir du périphérique externe. Le mot de passe est utilisé lors de la connexion d’un périphérique externe (par exemple, un smartphone) au dispositif. • Faites un appui long sur le bouton M (7) pour accéder au menu principal. • Utilisez les boutons DROIT (6) et GAUCHE (8) pour sélectionner l’élément de menu «Paramètres Wi-Fi». • Appuyez brièvement sur le bouton M (7) pour accéder au sous-menu. • Utilisez les boutons DROIT (6) et GAUCHE (8) pour sélectionner le sous-menu «Définir un mot de passe». • Appuyez brièvement sur le bouton M (7) pour accéder au sous-menu. • Un mot de passe s’affichera à l’écran. La valeur par défaut est «12345678». • Utilisez les boutons DROIT (6) et GAUCHE (8) pour définir le mot de passe souhaité (bouton DROIT - augmenter la valeur, bouton GAUCHE - diminuer la valeur). Appuyez sur le bouton M (7) pour passer d’un chiffre à l’autre. • Faites un appui long sur le bouton (7) pour enregistrer le mot de passe et quitter le sous-menu. Ce sous-élément permet de configurer le niveau d’accès requis pour l’appareil reçu Réglage du niveau par l’application Stream Vision. d’accès Niveau Maître. L’utilisateur de Stream Vision a un accès complet à toutes les fonctions de l’appareil. Niveau Invité. L’utilisateur de Stream Vision a la possibilité de ne regarder que les vidéos de l’appareil en temps réel. • Faites un appui long sur le bouton M (7) pour accéder au menu principal. • Utilisez les boutons DROIT (6) et GAUCHE (8) pour sélectionner l’élément de menu «Paramètres Wi-Fi». • Appuyez brièvement sur le bouton M (7) pour accéder au sous-menu. • Utilisez les boutons DROIT (6) et GAUCHE (8) pour sélectionner le sous-menu «Configuration du niveau d’accès». • Utilisez les boutons DROIT (6) et GAUCHE (8) pour sélectionner le niveau d’accès «Maître» ou «Invité». • Faites un appui long sur le bouton (7) pour confirmer la sélection et quitter le sousmenu. 16 Paramètres Retour généraux aux paramètres par défaut • Faites un appui long sur le bouton M (7) pour accéder au menu principal. • Utilisez les boutons DROIT (6) et GAUCHE (8) pour sélectionner le sous-menu «Paramètres généraux». • Appuyez brièvement sur le bouton M (7) pour accéder au sous-menu. • Utilisez les boutons DROIT (6) et GAUCHE (8) pour sélectionner l’élément de sousmenu «Paramètres par défaut». • Appuyez brièvement sur le bouton M (7) pour accéder au sous-menu. • Utilisez les boutons DROIT (6) et GAUCHE (8) pour sélectionner «Oui» afin de rétablir les paramètres d’usine ou «Non» pour annuler l’action. • Confirmez votre sélection en appuyant brièvement sur le bouton M (7). Les paramètres suivants retrouveront leur état d’origine avant d’être modifiés par l’utilisateur: Niveau de luminosité – 10 Langue – anglaise Mise hors circuit automatique – Niveau de contraste – 8 Wi-Fi – désactivé (mot désactivé de passe par défaut) Mise en forme La mise en forme de la carte mémoire interne supprime définitivement tous les fichiers enregistrés. Attention! Assurez-vous que vous n’avez plus besoin de supprimer les fichiers ou effectuez une sauvegarde sur un autre support. • Faites un appui long sur le bouton M (7) pour accéder au menu principal. • Utilisez les boutons DROIT (6) et GAUCHE (8) pour sélectionner le sous-menu «Paramètres généraux». • Appuyez brièvement sur le bouton M (7) pour accéder au sous-menu. • Utilisez les boutons DROIT (6) et GAUCHE (8) pour sélectionner le sous-menu «Mise en forme». • Appuyez brièvement sur le bouton M (7) pour accéder au sous-menu. • Utilisez les boutons DROIT (6) et GAUCHE (8) pour sélectionner «Oui» pour la mise à forme ou «Non» pour annuler l’action. • Confirmez votre sélection en appuyant brièvement sur le bouton M (7). Mise hors Cet élément permet d’activer la mise hors circuit automatique de l’appareil après une certaine période circuit au- de temps si l’appareil est incliné horizontalement ou verticalement de plus de 70°; à droite ou à tomatique gauche - plus de 30°. En même temps, les commandes de l’appareil ne doivent pas être impliquées. • Faites un appui long sur le bouton M (7) pour accéder au menu principal. • Utilisez les boutons DROIT (6) et GAUCHE (8) pour sélectionner l’élément de menu «Mise hors circuit automatique». • Appuyez brièvement sur le bouton M (7) pour accéder au sous-menu. • Utilisez les boutons DROIT (6) et GAUCHE (8) pour sélectionner la période de temps pendant laquelle l’appareil s’éteindra automatiquement (1 min; 3 min; 5 min), ou sélectionnez «Eteindre» si vous souhaitez désactiver la fonction de la mise hors circuit automatique. • Confirmez votre sélection en appuyant brièvement sur le bouton M (7). Note: la barre d’état de la fonction «Mise hors circuit automatique» s’affiche dans la barre d’état 1 min. Informations sur l’appareil Barre d’etat • Faites un appui long sur le bouton M (7) pour accéder au menu principal. • Utilisez les boutons DROIT (6) et GAUCHE (8) pour sélectionner l’option de menu «Informations sur l’appareil». • Appuyez brièvement sur le bouton M (7) pour accéder au sous-menu. La barre d’état est située au bas de l’écran et affiche des informations sur l’état actuel de l’appareil, notamment: • Fonction SumLight™ • Mise hors circuit automatique 1 min (si activé) • Le fonctionnement de l’illuminateur IR (par exemple, 3ème degré) • Connexion Wi-Fi • Heure • Niveau de charge de la batterie (si l’appareil est alimenté par une batterie) ou (si l’appareil est alimenté • Indicateur d’alimentation provenant d’une source d’alimentation extérieure par une source d’alimentation extérieure) ou • Indicateur de charge de la batterie avec le pourcentage de charge actuel (si la batterie est installée et chargée à partir d’une source d’alimentation extérieure) Note: Lorsque l’on augmente le grossissement de la lunette sur laquelle est monté l’appareil, la barre de statut peut sortir partiellement ou complètement de la zone d’observation. Illuminateur IR L’appareil est équipé d’un illuminateur IR détachable fonctionnant à une longueur d’onde de 940 nm, ce qui permet d’augmenter la distance d’observation dans des conditions de faible luminosité ou dans l’obscurité totale. Il est autorisé d’installer d’autres illuminateurs IR Pulsar (à la charge du client) au lieu de l’illuminateur IR fourni. • Retirez le couvercle (12) du connecteur pour installer l’illuminateur IR (13). • Retirez le couvercle (11) de l’illuminateur IR. • Insérez l’illuminateur IR dans l’appareil. Le levier (25) doit être en position haute. • Verrouillez l’illuminateur IR en abaissant le levier (25). • Allumez l’appareil en appuyant sur le bouton ON (9) pour activer l’illuminateur IR. • Si l’illuminateur IR n’est pas connecté, l’icône de l’illuminateur désactivé s’affiche dans la barre d’état. Si l’illuminateur IR est connecté, l’icône n’est pas affichée. • Appuyez brièvement sur le bouton IR (24) à la fin de l’illuminateur. Niveau de puissance à la mise en marche - minimum . • Une icône d’un illuminateur IR avec le niveau de puissance approprié s’affiche dans la barre d’état. > > • Réglez séquentiellement le niveau de puissance de l’illuminateur ( > ) par brèves pressions successives sur le bouton IR (24). • Eteignez l’illuminateur IR en appuyant longuement sur le bouton IR. • L’icône IR disparaît de l’écran. Note: Lorsque l’illuminateur IR est éteint, le niveau de puissance n’est pas mémorisé dans l’appareil. Lorsque l’appareil est allumé, l’illuminateur s’allume au niveau de puissance minimum - IR1. Les informations suivantes sur l’appareil sont disponibles pour l’utilisateur: Dénomination complet de l’appareil Numéro de série de l’appareil Version d’assemblage de l’appareil Numéro SKU de l’appareil Version du logiciel de l’appareil Informations de service 17 Fonction Wi-Fi • L’appareil a la fonction de communication sans fil avec les appareils mobiles (tablette, smartphone) via Wi-Fi. • Allumez le module sans fil en appuyant longuement sur le bouton GAUCHE (8). Le fonctionnement Wi-Fi est affiché dans la barre d’état comme suit: Wi-Fi allumé Icône n’est pas disponible Le Wi-Fi est allumé par l’utilisateur, l’allumage du Wi-Fi du dispositif est en cours Wi-Fi est allumé, il n’y a pas de connexion au dispositif Wi-Fi est allumé, la connexion au dispositif est établie L’appareil mobile reconnaît le dispositif en tant que «Forward F_XXXX», où XXXX sont les quatre derniers chiffres du numéro de série. Après avoir saisi le mot de passe sur l’appareil mobile (pour plus d’informations sur la définition d’un mot de passe, voir la sous-section «Paramètres Wi-Fi» dans la section «Fonctions du menu principal» du manuel) et avoir établi la connexion, l’icône de la barre d’état devient , le signal vidéo sur l’écran de l’appareil mobile démarre après l’activation du bouton «viseur» sur l’écran de l’appareil mobile. L’icône de la barre d’état change pour . Note: la configuration du niveau d’accès requis pour le périphérique reçu par l’application Stream Vision est disponible dans la section «Réglage du niveau d’accès». Fonction «SumLight™» • La fonction SumLight™ permet d’augmenter considérablement le niveau de sensibilité du réseau de transistor CMOS en cas d’une diminution de la luminosité, ce qui permet d’observer dans des conditions de mauvais éclairage sans utiliser un illuminateur IR. • Pour activer la fonction SumLight™, appuyez brièvement sur le bouton GAUCHE (8). • Pour l’éteindre, appuyez à nouveau brièvement sur le bouton GAUCHE (8). • L’icône SumLight™ (activée ou désactivée) apparait sur la barre d’état. Attention! Lorsque la fonction SumLight™ est activée, le niveau de bruit dans l’image augmente, la fréquence d’images diminue et l’image ralentit. Tout mouvement brusque de l’appareil peut rendre l’image «brouillée». De tels effets ne sont pas des défauts. Des points blancs lumineux (pixels) peuvent être visibles sur l’écran de l’appareil, le nombre de points peut augmenter lorsque la fonction SumLight™ est activée. Ceci est dû aux particularités de cette fonction et ce n’est pas un défaut. Enregistrement vidéo et prise des photos L’appareil a la fonction d’enregistrement vidéo (prise de photos) de l’image observée sur la carte mémoire intégrée. Avant d’utiliser les fonctions photo et vidéo, lisez les sous-sections «Réglage de la date», «Réglage de l’heure» de la section «Fonctions du menu principal» du manuel. L’appareil d’enregistrement intégré fonctionne en deux modes: • PHOTO (image fixe; une icône est affichée dans le coin supérieur droit de l’écran) Si le nombre estimé d’images fixes pouvant être enregistrées dans la mémoire flash est supérieur à 100, l’inscription «> 100» s’affiche. est affichée dans le coin supérieur droit de l’écran, la durée totale • VIDEO (enregistrement vidéo; une icône d’enregistrement restante étant fonction de la résolution actuelle au format MM: SS - minutes: secondes). L’appareil est en mode vidéo lors de l’allumage. Faites un appui long sur le bouton DROIT (6) pour changer de mode de l’appareil. Le passage entre les modes est cyclique (Vidéo-> Photo-> Vidéo ...). Mode PHOTO. Prise des photos d’une image • Passez en mode Photo en faisant un appui long sur le bouton DROIT (6). • Appuyez brièvement sur le bouton DROIT (6) pour prendre une photo. L’image se fige pendant 0,5 seconde. • Le fichier de l’image est enregistré sur la carte mémoire intégrée. Mode Vidéo. Enregistrement vidéo • Passez en mode Vidéo en appuyant longuement sur le bouton DROIT (6). • Lancez l’enregistrement vidéo en appuyant brièvement sur le bouton DROIT (6). disparaît, l’icône REC apparaît à sa place, ainsi • Après le commencement de l’enregistrement vidéo, l’icône que la minuterie d’enregistrement vidéo au format MM:SS (minutes: secondes)*; • Arrêtez l’enregistrement vidéo en appuyant longuement sur le bouton DROIT (6). • Les fichiers vidéo sont enregistrés sur la carte mémoire intégrée une fois l’enregistrement vidéo désactivé. *L’icône est affichée pendant 2 secondes, puis disparaît. L’icône s’affiche lors de la suivante pression courte sur le bouton DROIT (6), la minuterie d’enregistrement affiche la durée d’enregistrement actuelle de la vidéo. Notes: • Après avoir désactivé l’enregistrement vidéo/ après avoir pris une photo; lorsque vous éteignez l’appareil, si l’enregistrement a été activé; si la carte mémoire est pleine - si, pendant l’enregistrement vidéo, la carte mémoire est pleine (le message «Mémoire pleine» apparaît à l’écran). • Il est possible d’accéder au menu et travailler dans le menu de l’appareil lors de l’enregistrement vidéo; • Les vidéos et les photos sont enregistrées sur la carte mémoire intégrée de l’appareil sous le nom img_xxx. jpg (pour les photos); video_xxx.mp4 (pour la vidéo). xxx - commun à trois chiffres (nombre de fichiers (pour photos et vidéos); • Le compteur utilisé dans la dénomination des fichiers multimédia n’est pas réinitialisé; • Lors de la suppression d’un fichier du milieu de la liste, son numéro n’est pas attribué à un autre fichier. • Lorsque le compteur est rempli, un nouveau dossier est créé - img_xxxx. Où xxxx est un compteur de fichiers. • La longueur maximale d’un fichier vidéo enregistré est de sept minutes. Passé ce délai, la vidéo est enregistrée dans un nouveau fichier. Le nombre de fichiers est limité par le volume de mémoire interne; • Surveillez régulièrement la quantité de mémoire disponible de la carte mémoire intégrée, transférez les données enregistrées sur un autre support, libérez de l’espace sur la carte mémoire; • Dans les fichiers vidéo et les photos enregistrés, des informations graphiques sont affichées (barre d’état, icônes, etc.). Fonction «Arrêt de l’ecran» (Display off) Lors de l’utilisation de cette fonction, l’appareil passe en mode veille, ce qui permet de l’activer rapidement le cas échéant. Options pour utiliser la fonction «Arrêt de l’ecran» Option 1 L’appareil est éteint. Il est nécessaire d’allumer l’appareil et d’activer la fonction «Arrêt de l’ecran». • Allumez l’appareil en appuyant brièvement sur le bouton ON (9). • Activez la fonction d’affichage désactivé: faites un appui long sur le bouton ON (9). Un message «Arrêt de l’ecran» apparaîtra à l’écran avec un compte à rebours. Arrêt de l’ecran • Relâchez le bouton ON (9). • Pour désactiver la fonction d’affichage désactivé, appuyez brièvement sur ON (9). Option 2 La fonction «Arrêt de l’ecran» est activée, il est nécessaire de débrancher l’appareil. • Faites un appui long sur le bouton ON (9). L’écran affiche un message «Arrêt de l’ecran» avec un compte à rebours de 3,2,1,0. • Faites un appui long sur le bouton ON (9) jusqu’à ce que l’appareil s’éteint (la déconnexion de l’appareil se produira après le décompte 0) *. * Il est possible d’éteindre l’appareil plus tard suite à l’achèvement du traitement des informations par le processeur pour sauvegarder les données. Dans ce cas, l’affichage indique 0 lors du compte à rebours. 18 Connexion USB • Allumez l’appareil en appuyant sur le bouton ON (9) (le périphérique éteint par l’ordinateur n’est pas détecté). • Connectez un bout du câble USB au connecteur microUSB (14) de l’appareil, l’autre - au port de votre ordinateur. • Le périphérique sera automatiquement déterminé par l’ordinateur, l’installation des pilotes n’est pas requise. • L’écran affichera deux options de connexion: Carte mémoire (Memory card) et Puissance (Power). • Sélectionner une option de connexion à l’aide des boutons DROIT (6) et GAUCHE (8). • Confirmez le choix en appuyant brièvement sur le bouton M (7). Options de connexion: Carte mémoire. Connexion USB • En choisissant cette option, l’appareil est reconnu par l’ordinateur comme une carte flash. Cette option est conçue pour fonctionner avec les fichiers stockés dans la mémoire de l’appareil. Les fonctions de l’appareil ne sont pas disponibles, mais l’appareil ne s’éteint pas. Lorsqu’il est déconnecté de Utiliser comme puissance l’ordinateur, l’appareil continue à fonctionner. Utiliser comme carte-mémoire • Lors de l’enregistrement de la vidéo au moment de la connexion, l’enregistrement s’arrête et sauvegarde. Puissance. • Lors de la sélection de cette option, le périphérique utilise l’ordinateur en tant qu’une source d’alimentation extérieure. Une icône apparaît dans la barre d’état . L’appareil continue à fonctionner, toutes les fonctions sont disponibles. • La charge de la batterie installée dans l’appareil n’est pas effectuée. Désactivation de l’USB. • Lorsque l’USB est déconnecté d’un appareil connecté en mode Carte mémoire, l’appareil reste allumé. • Lorsque l’USB est déconnecté d’un appareil connecté en mode Puissance, le périphérique continue de fonctionner à partir de la batterie lorsqu’il est suffisamment chargé. Utilisation de la barre déplacement latéral L’appareil est équipé d’une barre déplacement latéral supplémentaire (15) grâce à laquelle il est possible d’installer des accessoires supplémentaires. Il faut d’abord retirer l’illuminateur IR détachable (voir la section «Illuminateur IR»). Etalonnage de l’ecran L’appareil est configuré de telle sorte qu’après son installation sur Сoordonnées de l’écran Point d’impact un viseur optique qui a été correctement ajusté, un ajustement du point de visée n’est pas nécessaire. Si l’accessoire a subi un choc ou une chute violente, vous pouvez vérifier le point d’impact et, si nécessaire, le corriger vous-même, sans contacter le centre de service. • Pour passer en mode d’étalonnage de l’écran, faites un appui long sur le bouton M (7) pendant 10 secondes. • les coordonnées d’affichage X = 0; Y = 0 apparaitront. • Utilisez les boutons GAUCHE (8) et DROIT (6) pour déplacer l’écran horizontalement (axe X) et verticalement (axe Y) de sorte que le point d’impact se déplace au centre de la marque de visée de votre appareil. Marque du viseur optique Déplacement de l’écran • Pour basculer entre les coordonnées X et Y, appuyez brièvement sur le bouton M (7). • Le décalage d’image est de 1 pixel de capteur. • La plage de déplacement de l’image est de +/- 20 pixels horizontalement (axe X), de +/- 20 pixels verticalement (axe Y). • Faites un appui long sur le bouton M (7) pendant deux secondes pour quitter le menu et enregistrer les paramètres. Stream Vision Les dispositifs Forward sont compatibles avec la technologie Stream Vision, qui permet de transmettre via WiFi l’image de l’appareil à votre smartphone ou à votre tablette en temps réel. Des instructions détaillées sur le fonctionnement de Stream Vision sont disponibles dans un livret séparé ou sur le site Web www.pulsar-vision.com. Note: la conception de l’appareil intègre la possibilité de mise à jour du logiciel. La mise à jour est possible via l’application Stream Vision. Pour télécharger l’application Stream Vision, scannez les codes QR: Controle technique Un contrôle technique est recommandé avant chaque utilisation de l’appareil. Vérifiez: • Apparence de l’appareil (les fissures sur le boîtier ne sont pas autorisées). • L’état des lentilles de l’objectif, de l’oculaire de l’appareil et de l’objectif de l’illuminateur IR (les fissures, les taches de graisse, la saleté et autres dépôts ne sont pas autorisés). Nettoyez les surfaces extérieures des pièces en métal et en plastique de la poussière, de la saleté et de l’humidité; essuyez-les avec un chiffon en coton. • L’état de la batterie (doit être chargée) et les contacts électriques sur la batterie (le sel et l’oxydation ne sont pas autorisés). • L’efficacité des éléments de contrôle. • La précision et la fiabilité de la fixation de l’appareil sur le viseur optique. Entretien technique L’entretien technique est effectué au moins deux fois par an et comprend les points suivants: • Utilisez un chiffon en coton pour nettoyer les surfaces extérieures des pièces en métal et en plastique de la poussière et de la saleté. La graisse de silicone est autorisée. • Nettoyez les contacts électriques de la batterie et ses endroits d’installation dans l’appareil avec un solvant organique non gras. • Inspectez les lentilles de l’oculaire et de l’objectif. Si nécessaire, retirez la poussière et le sable des lentilles (par une méthode sans contact de préférence). Nettoyez les surfaces extérieures des optiques à l’aide de moyens spécialement conçus à cet effet. Stockage Gardez l’appareil toujours dans une boîte, dans un endroit sec et bien aéré. Veillez à retirer la batterie pour un stockage à long terme. 19 Diagnostic d’erreurs Défaut Cause possible Réparation Défaut L’appareil ne s'allume pas. La batterie est complètement déchargée. Chargez la batterie. Le point d'impact ne L'étalonnage de l’écran est requis. correspond pas au point à viser. Il n'y a pas de fermeté d'installation de l'appareil sur le viseur ou sur l'arme. Ne fonctionne pas à Le câble USB est endommagé. partir d’une source L'alimentation extérieure est d’alimentation déchargée. extérieure. Remplacez le câble USB. Le smartphone ou la tablette ne se connecte pas à l'appareil. Le mot de passe de l'appareil a été modifié. Supprimez le réseau et reconnectez-vous avec le mot de passe enregistré dans l'appareil. L'appareil est situé dans une zone avec un grand nombre de réseaux Wi-Fi susceptibles d'interférer. Pour garantir un fonctionnement stable du Wi-Fi, déplacez l'appareil dans une zone comportant un nombre inférieur de réseaux Wi-Fi ou dans une zone où ils sont absents. La diffusion du signal via Wi-Fi est absent ou est interrompu. L'appareil se trouve en dehors de Déplacez l'appareil vers la ligne de mire du signal la zone de réception de signal Wi-Fi Wi-Fi. fiable. Il y a des obstacles entre l'appareil et le récepteur du signal (murs en béton, par exemple). Chargez l’alimentation extérieure. Mauvaise qualité de Ces problèmes peuvent survenir lors de l'observation dans des conditions l'image. météorologiques difficiles (neige, pluie, brouillard, etc.). Image est trop sombre. La faible luminosité ou le contraste Ajustez la luminosité ou le contraste. définis. Des rayures sont apparues sur l'écran ou l'image a disparu. L'appareil était soumis à une tension statique pendant le fonctionnement. Avec une image claire du cible à visée, l’image d'un objet est floue. La poussière ou la condensation sur Essuyez les surfaces optiques extérieures avec un les surfaces optiques extérieures chiffon de coton doux. Sécher - laisser reposer 4 ou intérieures de l’objectif. heures dans une pièce chaude. L'objectif n'est pas focalisé. Ajustez la netteté de l'image en tournant l’appareil de réglage de l'objectif. L’écran n’est pas centré. La position de l’appareil sur le viseur de jour est non ajustée. Appuyez sur l'adaptateur et réglez l'écran au centre du champ de vision (voir la section «Utilisation»). L'appareil ne se focalise pas. Réglage incorrect. Configurez l’appareil conformément à la section «Utilisation». Vérifiez l'extérieur des lentilles de l'objectif et de l'oculaire; le cas échéant, nettoyez-les de la poussière, du condensat, du givre, etc. Par temps froid, vous pouvez utiliser des couvertures spéciales anti-buée (par exemple, comme pour les lunettes correctrices). Cause possible Réparation Étalonnez l’écran conformément aux instructions de la section «Etalonnage de l’ecran». Vérifiez la fermeté de l’appareil sur le viseur et la fiabilité de la fixation de l’appareil de visé à l’arme. Assurez-vous que vous utilisez exactement le type de munition avec lequel votre arme et votre viseur ont déjà été ajustés. Si vous avez effectué l’ajustage en été et vous l’utilisez en hiver (ou inversement), il est possible une légère modification du point zéro de l’ajustage. L’appareil glisse du viseur lors d’un coup de feu. Serrage insuffisant de l'adaptateur. Choisissez un insert approprié et serrez Sélection incorrect d’un insert. l'adaptateur conformément aux recommandations. Impossible d’enlever le levier de l'adaptateur. Sélection incorrect d’un insert. Sélectionnez un insert approprié. Vérifiez l’intervalle entre les plaques de l’adaptateur. Suivez le lien pour trouver des réponses aux questions fréquemment posées. https://www.pulsar-nv.com/glo/support/faq/79 Après une exposition à une tension statique, l’appareil peut se redémarrer ou s’éteindre puis se rallumer. Сompatibilité électromagnétique. Ce produit est conforme aux exigences de la norme européenne EN 55032: 2015, classe A. Attention: L’utilisation de ce produit dans une zone résidentielle peut provoquer des interférences radio. Attention! Les dispositifs de vision nocturne numériques Forward nécessitent l’obtention d’une licence s’ils sont exportés hors de votre pays. Participons à la protection de l’enviroment! Votre appareil contient de nombreux matériaux valorisables ou recyclables. Confiez celui-ci dans un point de collecte ou à défaut dans un centre service agréé pour que son traitementsoit effectué. 20 DEUTSCH Technische Daten MODELL SKU NUMMER OPTISCHE KENNDATEN Objektivbrennpunkt, mm Öffnungsverhältnis, D / f ‚ Blickwinkel (horizontal), ° Sehfeld (horizontal), m@100m Max Beobachtungsdistanz bei Tiergröße 1,7 m, m Min Naheinstellgrenze, m Empfohlene maximale Vergrößerung des Tageslichtzielfernrohres, x ELEKTRONISCHE KENNDATEN Typ und Auflösung des Sensors Typ und Auflösung des Displays Empfindlichkeit des Gerätes, mW (Wellenlänge 780 nm, 25 Linien / mm Auflösung) Empfindlichkeit des Gerätes, mW (Wellenlänge 915 nm, 25 Linien / mm Auflösung)) ABNEHMBARER IR-STRAHLER Typ / Wellenlänge, nm BETRIEBSPARAMETER Betriebsspannung, V Batterietyp / Kapazität / Ausgangsnennspannung Externe Stromversorgung Laufzeit der Batterie bei t = 22°C (Wi-Fi aus, IR aus), h Max Rückstoßwiderstand auf gezogener Waffe, J Max Rückstoßwiderstand auf glatter Waffe, Kaliber Schutzklasse, IP Code (IEC60529) Betriebstemperatur Abmessungen, mm Gewicht, kg VIDEOREKORDER Video- / Fotoauflösung, Pixel Video- / Fotoformat Eingebauter Speicher WI-FI KANAL Frequenz Standard Lieferumfang FORWARD F455 78186 50 1:1 6,3 11 500 5 2-8 CMOS HD 1280X720 AMOLED 1746 x 1000 1,5×10-⁵ 5,5×10-⁵ LED 940 3,0 - 4,2 Li-Ion Batterie IPS7 / 6400 mAh / DC 3,7V Micro USB Typ B (5V) 9 6000 12 IPX7 -25°С … +50°С 155 x 136 x 77 0,83 1280 x 720 .mp4 / .jpg 16 GB 2,4 GHz 802.11 b / g / n Änderungen im Design zwecks höherer Gebrauchseigenschaften des Produkts vorbehalten. Die aktuelle Version der Bedienungsanleitung finden Sie auf der Webseite www.pulsar-vision.com • Digitaler Nachtsichtvorsatz • Aufbewahrungstasche • Akkumulatorenbatterie • Ladegerät für Akkumulatorenbatterie • Netzwerkadapter • MicroUSB-Kabel • Kurzanleitung • Reinigungstuch für Optik • Garantieschein Beschreibung Der digitale Nachtsichtvorsatz Forward F455 ist ein Universalgerät, das schnell und einfach ein Tageslichtzielfernrohr in ein Nachtsichtgerät verwandelt. Der Nachtsichtvorsatz wird am Zielfernrohr-Objektiv mittels der für unterschiedliche Linsendurchmesser ausgelegenen Adapter installiert. Es ist kein zusätzliches Einschießen erforderlich. Der Nachtsichtvorsatz ist für unterschiedliche Anwendungsbereiche geeignet, unter anderem Jagd, Sportschießen, Nachtfoto- und Videoaufnahme sowie Beobachtung. Merkmale Hauptmerkmale: • HD-Sensor 1280 x 720 • Erhöhte Nachtempfindlichkeit • Einfacher Umbau eines Tageslichtzielfernrohrs in ein Nachtsichtgerät • Vorteile der Tageslichtoptik bleiben bei Nachteinsatz vorbehalten • Stabile Zielpunktlage • Komfortabler Einsatz in einem breiten Vergößerungsbereich von Tageslichtoptiken • Unsichtbarer weitreichender Infrarotstrahler • Funktion einer zusätzlichen Empfindlichkeitssteigerung SumLight™ • Entdeckungsdistanz bis zu 500 m • Schnellschaltung • Integrierter Videorekorder • Gespeist von schnell wechselbaren Hochleistungsbatterien des B-Pack-Systems • Vierpunkt-Bajonett-Montage mit automatischer Spannung • Kompatibilität mit Adaptern fremder Hersteller • hochkalibriger Rückstoßwiderstand: 12 Kal., 9,3 × 64, .375H&H • Wi-Fi. Integration mit iOS- und Android-Geräten • Stream Vision. Fernbedienung, Überwachung und Live-YouTube-Streaming per Smartphone • Remote-Software-Update • Absolute Wasserdichtigheit (IPX7) • Breiter Betriebstemperaturbereich (-25°C + 50°C) • MicroUSB. Power Bank Stromversorgung 21 Komponenten und Bedienungselemente 1. 2. 3. 4. 5. 6. 7. 8. 9. 10. 11. 12. 13. Objektivschutzdeckel Okulardeckel Batteriefachdeckel Batterie-Fixierhebel Akkumulatorenbatterie Taste RIGHT Taste M (MENU) Taste LEFT Taste ON Griff für Objektivfokussierung IR Strahler-Blende IR Strahler-Anschlusskappe Anschluss für IR Strahler Adapterdeckel* 14. 15. 16. 17. 18. 19. 20. 21. 22. 23. 24. 25. Funktionen der Tasten MicroUSB-Buchse Schiene Weaver Adapterdeckel* Objektiv des Zielfernrohrs Hülse* Adapter* Halteschraube Schraube Adapterhebel Halterung IR-Taste IR-Strahlerhebel 6 Taste RIGHT Adapter* 16 Taste ON 19 9 10 Griff für Objektivfokussierung 1 Taste LEFT 7 IR Strahler- 12 Anschlusskappe IR Strahler- 11 Blende Hülse* 18 23 2 17 Anschluss für IR Strahler 14 MicroUSBBuchse 22 Adapterhebel Schraube 21 Batterie-Fixierhebel Batteriefachdeckel Akkumulatorenbatterie 3 5 4 Betriebsmodus Besonderheiten des Betriebs 13 Okular- Halterung deckel Open Halteschraube 20 Objektivschutzdeckel 15 Schiene Weaver 8 Taste M (MENU) Objektiv des Zielfernrohrs Erstes kurzes Weitere kurze Langes Betätigen Betätigen Betätigen Das Gerät Das Gerät einschalten Das Gerät ist ausgeschaltet – einschalten Das Display ist Das Display Das Gerät ausschalten ON (9) – ausgeschaltet einschalten Das Display ausschalten/das Gerät Das Gerät ist eingeschaltet, – ausschalten Schnellmenü, Hauptmenü SumLight™ SumLight™ Das Gerät ist eingeschaltet Wi-Fi ein- / ausschalten einschalten ausschalten LEFT (8) Navigieren im Menü Navigieren nach oben, nach links, gegen den Uhrzeigersinn Schnellmenü Parameterreduzierung Das Gerät ist eingeschaltet Schnellmenü eintreten Hauptmenü eintreten Aus dem Untermenü ohne Bestätigung der Auswahl austreten MENU Navigieren im Menü Auswahl bestätigen / Aus dem Menü austreten (in den (7) Anzeigemodus wechseln) Schnellmenü Navigieren nach oben Aus dem Schnellmenü austreten Videoaufnahme stoppen / in den Das Gerät ist eingeschaltet Videoaufnahme – Fotomodus wechseln (Videomodus) starten RIGHT Das Gerät ist eingeschaltet Foto machen in den Videomodus wechseln (Fotomodus) (6) Navigieren im Menü Nach unten / nach rechts / Im Uhrzeigersinn Schnellmenü Parametererhöhung Das Gerät ist eingeschaltet, IR-LeistungsIR einschalten IR ausschalten IR (24) Schnellmenü, Hauptmenü änderung Taste 25 IR-Strahlerhebel 24 IR-Taste Das Nachtsichtvorsatzgerät Forward F455 ist für den Langzeitgebrauch bestimmt. Um die Haltbarkeit und volle Leistungsfähigkeit des Gerätes zu gewährleisten, soll man sich an folgende Empfehlungen halten: • Vor dem Betrieb stellen Sie sicher, dass das Gerät laut Anweisungen aus dem Kapitel „Montage des Vorsatzgerätes ans Zielfernrohr“ installiert wurde. • Schalten Sie das Gerät nach Gebrauch aus. • Die eigenständige Reparatur und Demontage des Garantiegerätes ist verboten! • Das Vorsatzgerät kann in einem breiten Temperaturbereich betrieben werden. Wenn das Gerät in der Kälte betrieben und in einen warmen Raum gebracht wurde, nehmen Sie es aus der Aufbewahrungstasche im Laufe von 2-3 Stunden nicht heraus. Das verhindert Kondensatbildung an optischen Außenelementen. • Für einen störungsfreien Betrieb, Vorbeugung und Beseitigung der Ursachen des vorzeitigen Verschleißes oder der Ausfall von Baueinheiten und -teilen führen Sie technische Inspektion und Wartung rechtzeitig durch. • Die Batterie soll keiner übermäßigen Hitze durch Sonnenlicht, Feuer oder andere Wärmequellen ausgesetzt werden. *FN Adapterdeckel Elemente (separat erhältlich) 22 Betrieb der Akkumulatorenbatterie Das Vorsatzgerät Forward F455 wird mit einer wiederaufladbaren Lithium-Ionen Batterie IPS7 geliefert, die das Funktionieren des Gerätes im Laufe von bis 9 Stunden ermöglicht. Vor dem ersten Gebrauch soll die Batterie voll aufgeladen werden. Batterieladung: • Schließen Sie den Stecker microUSB vom USB-Kabel an die Buchse (C) des Ladegerätes an. • Schließen Sie den Stecker vom USBKabel an den Netzwerkadapter an. • Stecken Sie den Netzwerkadapter in eine Steckdose mit 110-220 V. • Heben Sie den Hebel (A) des Ladegerätes auf. • Nehmen Sie den Schutzdeckel von der Akkumulatorenbatterie ab. • Setzen Sie die Batterie in das Ladegerät, wie in der Abbildung gezeigt, ein und verriegeln Sie den Hebel (A). • Beim Installieren leuchtet am Ladegerät die Anzeige (B) grün und blinkt kurz in einem bestimmten Intervall: - einmal, wenn die Batterieladung zwischen 0 und 50% liegt; - zweimal, wenn die Batterieladung zwischen 51 und 75% liegt; - dreimal, wenn die Batterieladung zwischen 76 und 100% liegt. • Wenn die Anzeige dauernd grün leuchtet, ist die Batterie voll geladen. Trennen Sie das Ladegerät vom Netzwerk und die Batterie vom Ladegerät. • Wenn die Anzeige des Ladegerätes beim Einsetzen der Batterie dauernd rot leuchtet, liegt der Ladezustand wahrscheinlich unter dem zulässigen Wert. Lassen Sie die Batterie für längere Zeit (bis zu mehreren Stunden) im Ladegerät, dann nehmen Sie sie heraus und setzen Sie sie erneut ein. • Wenn die Anzeige grün blinkt, ist die Batterie in Ordnung. • Wenn die Batterie weiterhin rot leuchtet, ist sie defekt und kann nicht verwendet werden. Ersetzen Sie die Batterie. Achtung! Verwenden Sie für das Aufladen nur das mitgelieferte Ladegerät oder ein Pulsar IPS-Ladegerät (separat erhältlich). Die Verwendung eines fremden Ladegerätes kann der Batterie irreparable Schäden antun. Installieren der Akkumulatorenbatterie: • Klappen Sie den Hebel (4) nach unten. • Nehmen Sie den Schutzdeckel vom Batteriefach (3) ab. • Nehmen Sie den Schutzdeckel von der Akkumulatorenbatterie (5) ab. • Setzen Sie die Batterie (5) in den dafür vorgesehenen Steckplatz im Gehäuse des Gerätes so ein, dass das F-Element (Vorsprung am Batteriegehäuse) unten liegt. • Machen Sie die Batterie fest, indem Sie den Hebel (4) nach oben klappen. Achtung! Das Gerät kann von einer externen Stromquelle wie der Power Bank (5V) gespeist werden. Um eine externe Stromquelle an das Gerät anzuschließen, schließen Sie das USB-Kabel an die microUSB-Buchse (14) des Gerätes an. Einzelheiten finden Sie im Kapitel „Externe Stromversorgung“. Sicherheitshinweise: • Verwenden Sie das Ladegerät nicht, wenn es beschädigt oder sein Design geändert wurde. • Lassen Sie die Batterie während des Ladevorgangs nicht unbeaufsichtigt. • Lassen Sie das Ladegerät nicht länger als 24 Stunden nach der Vollladung an das Netzwerk angeschlossen. • Die Batterie soll bei einer Lufttemperatur von 0 °C bis +45 °C geladen werden. Andernfalls kann die Batterielebensdauer verkürzt werden. • Laden Sie die Batterie nicht gleich auf, wenn sie von der Kälte in einen warmen Raum gebracht wurde. Warten • • • • • • • • Sie 30-40 Minuten ab, bis sich die Batterie aufwärmt. Setzen Sie die Batterie keiner Hitze und keinem offenen Feuer aus. Tauchen Sie die Batterie nicht ins Wasser. Es ist nicht empfehlenswert, fremde Anlagen mit höherem Strom, als es zulässig ist, anzuschließen. Die Batterie ist mit einem Kurzschlussschutz ausgestattet. Situationen, die zu einem Kurzschluss führen können, sollten jedoch vermieden werden. Zerlegen oder verformen Sie die Batterie nicht. Setzen Sie die Batterie keinen Stößen oder Stürzen aus. Bei andauernder Aufbewahrung soll die Batterie teilweise aufgeladen sein - sie soll nicht voll geladen oder voll entladen sein. Bewahren Sie die Batterie außerhalb der Reichweite von Kindern auf. Externe Stromversorgung Die externe Stromversorgung erfolgt über eine externe Stromquelle wie die Power Bank (5V). • Schließen Sie die externe Stromquelle an die USB Buchse (14) des Gerätes an. • Das Gerät schaltet auf externe Stromversorgung um, dabei wird die Batterie IPS7 schrittweise aufgeladen. mit dem Ladezustand als Prozentwert. • Auf dem Display erscheint das Symbol der Batterie Falls das Gerät über einen Computer oder einen Netzwerkadapter oder eine Power Bank angeschlossen ist, • die dem Standard Battery Charger (BC 1.0) nicht entsprechen, wird die Batterie IPS7 nicht aufgeladen, es wird nur das Symbol der externen Stromversorgung angezeigt . • Wenn das Gerät von einer externen Stromquelle gespeist wird, die Batterie IPS7 jedoch nicht angeschlossen angezeigt. ist, wird das Symbol • Beim Trennen der externen Stromquelle beginnt das Gerät von der Batterie zu funktionieren. Betrieb Montage des Vorsatzgerätes ans Zielfernrohr • Nehmen Sie den Adapter* mit einer Hülse passenden Durchmessers je nach Außendurchmesser des Objektivs Ihres Zielfernrohres (siehe Tabelle). • Die Zeichen 42 mm / 50 mm / 56 mm im Adapternamen bedeuten den Objektivlinsendurchmesser des Zielfernrohrs. • Entfernen Sie den Deckel (16) vom Adapter (19), indem Sie den Deckel im Uhrzeigersinn drehen. • Es wird empfohlen, das Objektivgehäuse des Zielfernrohrs vor der Montage zu entfetten. • Setzen Sie die Hülse (18) bis zum Anschlag in den Adapter (19) ein. • Installieren Sie den Adapter samt Hülse bis zum Anschlag ans Objektiv des Tageslichtzielfernrohrs (17). • Legen Sie den Hebel (22) aus der Ausgansposition „geöffnet“ (OPEN) in die Position „geschlossen“ (CLOSE) um. • Überprüfen Sie, ob der Adapter dicht am Objektiv anliegt. • Sollte ein Spiel vorhanden sein, bitte wie folgt handhaben: - Lockern Sie die Halteschraube (20) mit einem Inbusschlüssel (S=2mm). - Ziehen Sie die Schraube (21) mit einem Inbusschlüssel (S=4mm) mit der Spannkraft an, die erforderlich ist, um einen festen Sitz des Adapters am Objektiv zu gewährleisten. Die Anzugskraft soll 1 N·m betragen. - Ziehen Sie die Halteschraube (20) an. 23 • Die Anzugskraft kann mit einem Drehmomentschrauber nachgeprüft werden. • Setzen Sie das Gerät fest in den Adapter ein, so dass die Adapterstifte in die Vorsatznuten (23) eingefahren sind. Drehen Sie das Gerät im Uhrzeigersinn bis zum Anschlag. Das Dreieck-Symbol am Vorsatz und das Quadrat-Symbol am Adaptergehäuse sollen übereinstimmen. • Legen Sie den Hebel (22) in die Position OPEN für das Ausrichten des Gerätes um und richten Sie das Gerät waagerecht aus. * Separat erhältlich Übereinstimmung des Innendurchmessers der Hülse und des Außendurchmessers des Objektivgehäuses der Tageslichtoptik (Zielfernrohr, Fernrohr) Außendurchmesser des Objektivs des Innendurchmesser der Hülse, mm Zielfernrohrs, mm 60 59,7-60,6 61 60,7-61,6 61,7-62,6 Deckel-Adapter FN 62 56 mm 63 62,7-63,6 64 63,7-64,6 65 64,7-65,6 Modell des Deckel-Adapters Einschalten und bildeinstellung • Den Objektivschutzdeckel (1) durch das Drehen gegen Uhrzeigersinn entfernen. • Durch kurzes Betätigen der Taste ON (9) das Gerät einschalten - das Display zeigt das Bild an. • Die Schärfe der Symbole auf dem Display durch das Drehen des Okulareinstellringes Ihres Zielfernrohrs anpassen. Unabhängig von der Entfernung oder sonstigen Bedingungen ist das Drehen des Okulareinstellringes künftig nicht mehr nötig. • Für Fokussierung auf ein Beobachtungsziel den Griff für Objektivfokussierung (10) drehen. Die Grundeinstellungen (Helligkeits- und Kontrastregelung) werden über das Schnellzugriffsmenü geändert. Schalten Sie das Gerät nach Gebrauch durch langes Betätigen der Taste ON (9) aus. Funktionen des Schnellzugriffsmenüs • Das Schnellmenü durch kurzes Betätigen der Taste М (7) aktivieren. • Für das Wechseln zwischen nachfolgend beschriebenen Funktionen die Taste М (7) kurz betätigen. • Helligkeit - durch das Betätigen der Tasten RIGHT (6) und LEFT (8) wird der Helligkeitswert des Displays von 0 bis 20 geändert. - durch das Betätigen der Tasten RIGHT (6) und LEFT (8) wird der Wert des Bildkontrastes von 0 bis 20 geändert. • Kontrast Tabelle der Kompatibilität der Hülsen für die Tageslichtzielfernrohre Übereinstimmung des Innendurchmessers der Hülse und des Außendurchmessers des Objektivgehäuses der Tageslichtoptik (Zielfernrohr, Fernrohr) Modell des Deckel-Adapters Außendurchmesser des Objektivs des Innendurchmesser der Hülse, mm Zielfernrohrs, mm 47 46,7-47,6 47,7-48,6 Deckel-Adapter FN 48 42 mm 49 48,7-49,6 50 49,7-50,6 55 54,7-55,6 56 55,7-56,6 Deckel-Adapter FN 57 56,7-57,6 50 mm 58 57,7-58,6 59 58,7-59,6 Funktionen Des Hauptmenüs • Das Hauptmenü durch langes Betätigen der Taste М (7) aktivieren. • Für das Wechseln zwischen Hauptmenüpunkten die Tasten RIGHT (6) Menüübersicht: und LEFT (8) betätigen. • Um einen Unterpunkt im Hauptmenü aufzurufen, die Taste М (7) kurz betätigen. • Um einen Unterpunkt im Hauptmenü zu verlassen, die Taste М (7) gedrückt halten. • Das automatische Verlassen des Hauptmenüs erfolgt nach 10 Sekunden Inaktivität. Zusammensetzung und Beschreibung des Menüs • Helligkeit der Symbole • Wi-Fi Einstellungen • Allgemeine Einstellungen • Automatisches Abschalten • Geräteinformation Helligkeit der Symbole 24 Helligkeit Mit diesem Menüpunkt können Sie die Helligkeit der Symbole auf dem Display des Gerätes einstellen. der • Halten Sie die Taste M (7) gedrückt, um das Hauptmenü aufzurufen. Symbole • Mit den Tasten RIGHT (6) und LEFT (8) wählen Sie den Menüpunkt „Helligkeit der Symbole“ aus. • Betätigen Sie kurz die Taste M (7), um das Untermenü aufzurufen. • Mit den Tasten RIGHT (6) und LEFT (8) wählen Sie die Helligkeitsstufe der Symbole aus. • Um die Auswahl zu speichern und das Untermenü zu verlassen, halten Sie die Taste M (7) gedrückt. Mit diesem Menüpunkt kann das Gerät für den Betrieb im Wi-Fi-Netz einstellt werden. Wi-Fi Einstellun- Hinweis: Wi-Fi wird durch langes Betätigen der Taste LEFT (8) ein- und ausgeschaltet. gen Passwort- In diesem Untermenü kann man ein Zugangspasswort zum Gerät von einem Fremdgerät einstellen. Das Passwort wird für Anschluss eines Fremdgerätes (z.B. einstelSmartphone) an das Gerät verwendet. lung • Für Aktivieren des Hauptmenüs die Taste M (7) gedrückt halten. • Mit den Tasten RIGHT (6) und LEFT (8) den Menüpunkt „Wi-Fi Einstellungen“ auswählen. • Für Aktivieren des Untermenüs die Taste M (7) kurz betätigen. • Mit den Tasten RIGHT (6) und LEFT (8) den Untermenüpunkt „Passworteinstellung“ auswählen. • Für Aktivieren des Untermenüs die Taste M (7) kurz betätigen. • Auf dem Display wird ein Passwort angezeigt – standardmäßig „12345678“. • Mit den Tasten RIGHT (6) und LEFT (8) das gewünschte Passwort (RIGHT – Wert aufwärts, LEFT – Wert abwärts) festlegen. Für Wechseln zwischen den Stellen die Taste М (7) betätigen. • Um das Passwort zu speichern und das Untermenü zu verlassen, halten Sie die Taste M (7) gedrückt. Zugriffsebene Einstellung Mit diesem Unterpunkt können Sie die erforderliche Zugriffsebene für Ihr Gerät einstellen, die die Anwendung Stream Vision bekommt. Master Level. Der Benutzer von Stream Vision hat vollen Zugriff auf alle Funktionen des Gerätes. Gast Level. Der Benutzer von Stream Vision kann sich nur Videos vom Gerät in Realzeit anschauen. • Halten Sie die Taste M (7) gedrückt, um das Hauptmenü aufzurufen. • Mit den Tasten RIGHT (6) und LEFT (8) wählen Sie den Menüpunkt „Wi-FiEinstellungen“ aus. • Betätigen Sie kurz die Taste M (7), um das Untermenü aufzurufen. • Mit den Tasten RIGHT (6) und LEFT (8) wählen Sie das Untermenü „Zugriffsebene Einstellung“ aus. • Mit den Tasten RIGHT (6) und LEFT (8) wählen Sie die Zugriffsebene „Master“ oder „Gast“ aus. • Um die Auswahl zu bestätigen und das Untermenü zu verlassen, halten Sie die Taste M (7) gedrückt. Allgemeine Dieser Menüpunkt ermöglicht folgende Einstellungen: Einstellun- • Sprache • Uhrzeit • Formatierung gen • Datum • Standardeinstellungen Sprache Auswahl der Sprache der Benutzeroberfläche. • Halten Sie die Taste M (7) gedrückt, um das Hauptmenü aufzurufen. • Mit den Tasten RIGHT (6) und LEFT (8) wählen Sie das Untermenü „Allgemeine Einstellungen“ aus. • Betätigen Sie kurz die Taste M (7), um das Untermenü aufzurufen. • Mit den Tasten RIGHT (6) und LEFT (8) wählen Sie den Untermenüpunkt „Sprache“ aus. • Betätigen Sie kurz die Taste M (7), um das Untermenü aufzurufen. • Mit den Tasten RIGHT (6) und LEFT (8) wählen Sie eine der verfügbaren Sprachen der Benutzeroberfläche aus: Englisch, Deutsch, Spanisch, Französisch, Russisch. • Um die Auswahl zu speichern und das Untermenü zu verlassen, halten Sie die Taste M (7) gedrückt. Datum Datumseinstellung • Halten Sie die Taste M (7) gedrückt, um das Hauptmenü aufzurufen. • Mit den Tasten RIGHT (6) und LEFT (8) wählen Sie das Untermenü „Allgemeine Einstellungen“ aus. • Betätigen Sie kurz die Taste M (7), um das Untermenü aufzurufen. • Mit den Tasten RIGHT (6) und LEFT (8) wählen Sie das Untermenü „Datum“ aus. • Betätigen Sie kurz die Taste M (7), um das Untermenü aufzurufen. • Das Datum wird im Format TT / MM / JJJJ angezeigt (12/04/2017) • Mit den Tasten RIGHT (6) und LEFT (8) wählen Sie den gewünschten Tag, Monat und das gewünschte Jahr aus. (Taste RIGHT (6) - Wert aufwärts, Taste LEFT (8) - Wert abwärts) • Für das Wechseln zwischen den Stellen betätigen Sie die Taste М (7). • Um das ausgewählte Datum zu speichern und das Untermenü zu verlassen, halten Sie die Taste М (7) gedrückt. Uhrzeit Uhrzeiteinstellung • Halten Sie die Taste M (7) gedrückt, um das Hauptmenü aufzurufen. • Mit den Tasten RIGHT (6) und LEFT (8) wählen Sie das Untermenü „Allgemeine Einstellungen“ aus. • Betätigen Sie kurz die Taste M (7), um das Untermenü aufzurufen. • Mit den Tasten RIGHT (6) und LEFT (8) wählen Sie den Untermenüpunkt „Uhrzeit“ aus. • Betätigen Sie kurz die Taste M (7), um das Untermenü aufzurufen. • Mit den Tasten RIGHT (6) und LEFT (8) wählen Sie das Zeitformat aus - 24/12 (oder PM / AM). • Betätigen Sie die Taste M (7), um zur Einstellung der Stunden zu gelangen. • Mit den Tasten RIGHT (6) und LEFT (8) wählen Sie den Stundenwert aus (Taste RIGHT (6) - Wert aufwärts, Taste LEFT (8) - Wert abwärts) • Betätigen Sie die Taste M (7), um zur Einstellung der Minuten zu gelangen. • Mit den Tasten RIGHT (6) und LEFT (8) wählen Sie die Minutenwerte aus. • Um die ausgewählte Uhrzeit zu speichern und das Untermenü zu verlassen, halten Sie die Taste M (7) gedrückt. 25 Allgemeine Zurück Einstellun- zu den gen Standardeinstellungen • Halten Sie die Taste M (7) gedrückt, um das Hauptmenü aufzurufen. • Mit den Tasten RIGHT (6) und LEFT (8) wählen Sie das Untermenü „Allgemeine Einstellungen“ aus. • Betätigen Sie kurz die Taste M (7), um das Untermenü aufzurufen. • Mit den Tasten RIGHT (6) und LEFT (8) wählen Sie den Untermenüpunkt „Standardeinstellungen“ aus. • Betätigen Sie kurz die Taste M (7), um das Untermenü aufzurufen. • Mit den Tasten RIGHT (6) und LEFT (8) wählen Sie die Variante „Ja“ aus, um zu den Werkseinstellungen zurückzukehren, oder „Nein“, um die Aktion abzubrechen. • Bestätigen Sie die Auswahl durch kurzes Betätigen der Taste M (7). • Die folgenden Einstellungen werden auf den ursprünglichen Zustand bis deren änderung durch den Benutzer zurückgesetzt: Helligkeitsstufe - 10 Sprache - Englisch Automatisches Abschalten - aus Kontraststufe - 8 Wi-Fi - aus (Passwort standardmäßig ) Formatie- Durch die Formatierung der integrierten Speicherkarte werden alle gespeicherten Dateien irreparabel gelöscht. rung Achtung! Stellen Sie sicher, dass Sie die zu löschenden Dateien nicht mehr brauchen, oder erstellen Sie ein Backup auf einem anderen Datenträger. • Halten Sie die Taste M (7) gedrückt, um das Hauptmenü aufzurufen. • Mit den Tasten RIGHT (6) und LEFT (8) wählen Sie das Untermenü „Allgemeine Einstellungen“ aus. • Betätigen Sie kurz die Taste M (7), um das Untermenü aufzurufen. • Mit den Tasten RIGHT (6) und LEFT (8) wählen Sie den Untermenüpunkt „Formatierung“ aus. • Betätigen Sie kurz die Taste M (7), um das Untermenü aufzurufen. • Mit den Tasten RIGHT (6) und LEFT (8) wählen Sie die Variante „Ja“ für Formatierung aus, oder „Nein“ für Abbruch der Aktion. • Bestätigen Sie die Auswahl durch kurzes Betätigen der Taste M (7). Automa- Mit diesem Menüpunkt können Sie das automatische Abschalten des Gerätes nach einer bestimmten Zeit aktivieren, wenn das Gerät horizontal oder vertikal um mehr als 70 °, rechts oder tisches Abschaltеn links um mehr als 30° geneigt wird. Dazu müssen keine Steuerorgane des Gerätes betätigt werden. • Halten Sie die Taste M (7) gedrückt, um das Hauptmenü aufzurufen. • Mit den Tasten RIGHT (6) und LEFT (8) wählen Sie den Menüpunkt „Automatisches Abschalten“ aus. • Betätigen Sie kurz die Taste M (7), um das Untermenü aufzurufen. • Mit den Tasten RIGHT (6) und LEFT (8) wählen Sie den Zeitraum aus, in dem sich das Gerät automatisch ausschaltet (1 Min; 3 Min; 5 Min), oder wählen Sie „Aus“ aus, wenn Sie die Funktion des automatischen Abschaltens deaktivieren möchten. • Bestätigen Sie die Auswahl durch kurzes Betätigen der Taste M (7). Hinweis: Das Symbol in der Statuszeile zeigt den Status der Funktion „Automatisches Abschalten“ an 1 min. Geräteinformation Statuszeile • Halten Sie die Taste M (7) gedrückt, um das Hauptmenü aufzurufen. • Mit den Tasten RIGHT (6) und LEFT (8) wählen Sie den Menüpunkt „Geräteinformation“ aus. • Betätigen Sie kurz die Taste M (7), um das Untermenü aufzurufen. Die folgenden Informationen über das Gerät stehen dem Benutzer zur Verfügung: voller Name Seriennummer Version des Aufbaus SKU Nummer Version der Software Serviceinformationen Die Statuszeile befindet sich am unteren Rand des Displays und zeigt Informationen über den aktuellen Status des Gerätes an, darunter: • SumLight™-Funktion • Automatisches Abschalten 1 min (falls aktiviert) • IR Strahler-Funktion (z.B., Stufe 3) • Wi-Fi- Anschluss • Uhr • Batterieladezustand (wenn das Gerät von der Akkumulatorenbatterie gespeist wird) oder (wenn das Gerät von einer externen • Anzeige der Stromversorgung über eine externe Stromquelle Stromquelle gespeist wird) oder • Batterieladeanzeige mit aktuellem Ladezustand als Prozentwert (wenn die Batterie installiert ist und sie von einer externen Stromquelle geladen wird) Anmerkung: wenn Sie die Vergrößerung des optischen Geräts erhöhen, an dem der Vorsatz montiert ist, kann die Statusleiste die Grenzen des sichtbaren Bildes teilweise oder vollständig hinausgehen. IR Strahler Das Nachtsichtvorsatzgerät ist mit einem abnehmbaren IR-Strahler ausgestattet, der in einer Wellenlänge von 940 nm betrieben wird und den Beobachtungsabstand bei schlechten Lichtverhältnissen oder bei absoluter Dunkelheit vergrößern lässt. Anstelle des mitgelieferten IR Strahlers können Sie auch andere Pulsar IR Strahler (separat erhältlich) installieren. • Nehmen Sie die Kappe (12) vom Anschluss für Installieren des IR Strahlers (13) ab. • Nehmen Sie die Blende (11) vom IR Strahler ab. • Installieren Sie den IR Strahler an das Gerät. Der Hebel (25) muss sich in der oberen Position befinden. • Machen Sie den IR Strahler fest, indem Sie den Hebel (25) nach unten klappen. • Für Aktivieren des IR Strahlers schalten Sie das Gerät mit der Taste ON (9) ein. • Wenn der IR Strahler nicht angeschlossen ist, wird das Symbol des deaktivierten IR Strahlers in der Statuszeile angezeigt. Wenn der IR Strahler angeschlossen ist, wird kein Symbol angezeigt. • Betätigen Sie kurz die IR Taste (24) an der Stirnfläche des Strahlers. Das Leistungsniveau beim Einschalten ist minimal . • In der Statuszeile wird das Symbol des IR Strahlers mit jeweiligem Leistungsniveau angezeigt. • Durch aufeinanderfolgende kurze Betätigen der IR Taste (24) wird das Leistungsniveau des Strahlers nacheinander umgeschaltet ( > > > ). Schalten Sie den IR Strahler durch langes Betätigen der IR Taste (24) aus. • Das IR Symbol verschwindet vom Display. • Hinweis: Beim Ausschalten des IR Strahlers wird sein Leistungsniveau im Speicher des Gerätes nicht gespeichert. Beim Einschalten des Gerätes wird das minimale Leistungsniveau des Strahlers IR1 aktiviert. 26 Wi-Fi Funktion • Das Gerät hat die Funktion der drahtlosen Verbindung mit mobilen Geräten (Tablet, Smartphone) über Wi-Fi. • Aktivieren Sie den Modul der drahtlosen Verbindung durch langes Betätigen der Taste LEFT (8). Das Funktionieren von Wi-Fi wird in der Statuszeile wie folgt angezeigt: Wi-Fi aus Wi-Fi ist vom Benutzer aktiviert, es erfolgt Einschaltvorgang von Wi-Fi im Gerät Wi-Fi ist eingeschaltet, es besteht keine Verbindung zum Gerät Kein Symbol Wi-Fi ist eingeschaltet, das Gerät wurde erfolgreich verbunden Das Gerät wird vom Mobilgerät als „Forward F_XXXX“ erkannt, wo XXXX die letzten vier Ziffern der Seriennummer sind. Nach der Passworteingabe auf dem Mobilgerät (weitere Informationen zur Passworteinstellung sind im Unterkapitel „Wi-Fi Einstellungen“ des Kapitels „Funktionen des Hauptmenüs“ der Betriebsanleitung zu finden) und nach der erfolgreichen Verbindung wird das Symbol in der Statuszeile auf das Symbol geändert, und die Wiedergabe des Videosignals auf dem Bildschirm des Mobilgerätes wird gestartet, nachdem die Taste „Visier“ auf dem Bildschirm des Mobilgerätes aktiviert wurde. Das Symbol in der Statuszeile ändert sich auf . Hinweis: Sie können die erforderliche Zugriffsebene, die die Stream Vision-Anwendung bekommt, für Ihr Gerät im Menüabschnitt „Zugriffsebene Einstellung“ einstellen. Funktion „SumLight™“ • Mit der SumLight™ - Funktion können Sie die Empfindlichkeit des CMOS-Arrays bei Senkung des Beleuchtungspegels wesentlich erhöhen. Das ermöglicht die Beobachtung bei schlechten Lichtverhältnissen ohne Anwendung des IR Strahlers. • Um die SumLight™ – Funktion zu aktivieren, betätigen Sie kurz die Taste LEFT (8). • Um die SumLight™ – Funktion zu deaktivieren, betätigen Sie noch einmal kurz die Taste LEFT (8). • Das Symbol SumLight™ (aktiv oder nicht aktiv ) wird in der Statuszeile angezeigt. Achtung! Beim Aktivieren der SumLight™ – Funktion steigt der Geräuschpegel im Bild, die Bildwechselrate nimmt ab, die Abbildung verzögert sich – bei ruckartiger Bewegung des Gerätes kann das Bild „verschwommen“ werden, solche Erscheinungen sind keine Fehler. Im Display können leuchtende weiße Punkte (Pixel) sichtbar sein, die Anzahl der Punkte kann beim Aktivieren der SumLight™ – Funktion steigen – das ist durch die Besonderheiten dieser Funktion bedingt und es liegt ebenfalls kein Fehler vor. Video- und Fotoaufnahme Das Gerät hat die Funktion der Videoaufnahme (Fotoaufnahme) des beobachteten Bildes auf die eingebaute Speicherkarte. Lesen Sie vor der Verwendung der Foto- und Videofunktionen die Unterkapitel „Datumseinstellung“ und „Uhrzeiteinstellung“ im Kapitel „Funktionen des Hauptmenüs“ der vorliegenden Bedienungsanleitung. Das eingebaute Aufnahmegerät funktioniert in zwei Modi: • FOTO (Fotoaufnahme; in der oberen rechten Ecke des Displays wird das Symbol angezeigt). Wenn die geschätzte Anzahl der Fotos, die im Flash-Speicher noch gespeichert werden können, 100 überschreitet, wird „> 100“ angezeigt. VIDEO (Videoaufnahme; in der oberen rechten Ecke des Displays wird das Symbol und die verbleibende • Gesamtaufnahmezeit, basierend auf der aktuellen Auflösung im Format MM: SS - Minuten: Sekunden, angezeigt). Beim Einschalten ist das Gerät auf den Videomodus eingestellt. Der Wechsel der Modi erfolgt durch langes Betätigen der Taste RIGHT (6). Der Übergang zwischen den Modi erfolgt zyklisch (Video-> Foto-> Video…). Modus Foto. Fotoaufnahme • Wechseln Sie in den Fotomodus durch langes Betätigen der Taste RIGHT (6). • Betätigen Sie kurz die Taste RIGHT (6), um ein Foto zu machen. Das Bild friert für eine halbe Sekunde ein. • Die Fotodatei wird auf die eingebaute Speicherkarte gespeichert. Modus Video. Videoaufnahme • Wechseln Sie in den Videomodus durch langes Betätigen der Taste RIGHT (6). • Betätigen Sie kurz die Taste RIGHT (6), um ein Video zu starten. • Nach dem Start der Videoaufnahme verschwindet das Symbol , stattdessen erscheint das Symbol REC sowie der Timer der Videoaufnahme im Format MM: SS (Minuten: Sekunden) *; • Um die Videoaufnahme zu stoppen, halten Sie die Taste RIGHT (6) gedrückt. • Die Videodateien werden nach dem Stoppen der Videoaufnahme auf die eingebaute Speicherkarte gespeichert. * Das Symbol wird 2 Sekunden lang angezeigt und dann ausgeblendet. Beim nächsten kurzen Betätigen der Taste RIGHT (6) erscheint das Symbol, und der Aufnahmetimer zeigt die aktuelle Aufnahmezeit des Videos an. Anmerkungen: • Nach dem Stoppen der Videoaufnahme / nach der Fotoaufnahme; beim Ausschalten des Gerätes, wenn die Aufnahme eingeschaltet war; Wenn die Speicherkarte während der Videoaufnahme überfüllt wurde (die Meldung „Speicher voll“ wird auf dem Display angezeigt). • Während der Videoaufnahme können Sie das Menü des Gerätes aufrufen und im Menü arbeiten. • Die aufgenommenen Videos und Fotos werden auf die eingebaute Speicherkarte des Gerätes im Format img_ xxx.jpg (für Fotos), und video_xxx.mp4 (für Videos) gespeichert. xxx ist allgemeiner dreistelliger Dateizähler (für Fotos und Videos); • Der Zähler, der bei der Benennung von Multimedia-Dateien verwendet wird, wird nicht zurückgesetzt. • Wenn Sie eine Datei aus der Mitte der Liste löschen, übergeht ihre Nummer nicht auf eine andere Datei. • Bei der Überfüllung des Zählers wird ein neuer Ordner mit dem Namen img_xxxx erstellt, wo xxxx der Zähler der Ordner ist. • Die maximale Länge einer aufgenommenen Videodatei beträgt sieben Minuten. Nachdem diese Zeit abgelaufen ist, wird das Video in einer neuen Datei aufgenommen. Die Anzahl der Dateien ist durch die interne Speicherkapazität des Gerätes beschränkt; • Kontrollieren Sie regelmäßig den freien Speicherplatz der eingebauten Speicherkarte, übertragen Sie das aufgenommene Material auf andere Träger, so räumen Sie Platz auf der Speicherkarte; • Auf den aufgenommenen Videodateien und Fotos werden grafische Informationen angezeigt (Statuszeile, Symbole usw.). Funktion „Bildschirm Aus“ (Display Off) Diese Funktion bringt das Gerät in den Standby-Modus, so dass Sie es bei Bedarf schnell einschalten können. Varianten der Arbeit mit der Funktion „Bildschirm Aus“: Variante 1. Das Gerät ist ausgeschaltet. Man muss das Gerät einschalten und die Funktion „Bildschirm Aus“ aktivieren. • Schalten Sie das Gerät durch kurzes Betätigen der Taste ON (9) ein. • Aktivieren Sie die Funktion „Bildschirm Aus“: die Taste ON (9) gedrückt halten. Auf dem Bildschirm erscheint die Meldung „Bildschirm Aus“ mit dem Countdown Bildschirm Aus • Lassen Sie die Taste ON (9) los. • Um die Funktion „Bildschirm Aus“ zu deaktivieren, betätigen Sie kurz die Taste ON (9). Variante 2. Die Funktion „Bildschirm Aus“ ist aktiviert, man muss das Gerät abschalten. • Halten Sie die Taste ON (9) gedrückt. Auf dem Bildschirm erscheint die Meldung „Bildschirm Aus“ mit dem Countdown 3,2,1,0. 27 • Halten Sie die Taste ON (9) bis zum Abschalten des Gerätes gedrückt (das Abschalten des Gerätes erfolgt nach dem Zählen von 0). * * Ein späteres Herunterfahren des Gerätes infolge des Abschlusses der Informationsverarbeitung durch den Prozessor zwecks Datenspeicherung ist möglich. Dabei zeigt das Display 0 in der Countdown-Zeit. Anschluss Von USB • Schalten Sie das Gerät durch Betätigen der Taste ON (9) ein (das ausgeschaltete Gerät wird vom Computer nicht erkannt). • Schließen Sie ein Ende des USB Kabels an die Micro-USB-Buchse (14) des Gerätes und das andere Ende an den Anschluss an Ihrem Computer an. • Das Gerät wird vom Computer automatisch erkannt, die Installation von Treibern ist nicht erforderlich. • Auf dem Display erscheinen zwei Anschlussvarianten: Speicherkarte (Memory card) und Stromquelle (Power). • Mit den Tasten RIGHT (6) und LEFT (8) wählen Sie eine Anschlussvariante aus. • Betätigen Sie kurz die Taste M (7), um die Auswahl zu bestätigen. Anschlussvarianten: Speicherkarte (Memory card). • Bei der Wahl dieser Variante wird das Gerät vom Computer als USB-Stick USB Verbindung erkannt. Diese Option ist für die Arbeit mit Dateien vorgesehen, die im Speicher des Gerätes gespeichert sind. Die Gerätefunktionen sind dabei nicht verfügbar, das Gerät schaltet sich nicht aus. Wenn die Verbindung zum Computer getrennt wird, funktioniert das Gerät weiterhin. Verwenden als Stromquelle • Wenn zum Zeitpunkt der Verbindung ein Video aufgenommen wurde, wird Verwenden als Speicherkarte die Aufnahme gestoppt und gespeichert. Stromquelle (Power). • Bei der Wahl dieser Variante wird der Computer vom Gerät als externe Stromversorgungsquelle verwendet. In der Statuszeile erscheint das Symbol . Das Gerät funktioniert weiter, alle Funktionen sind verfügbar. Es erfolgt kein Aufladen der im Gerät installierten Akkumulatorenbatterie. Abschalten von USB • Beim Abschalten des USB Kabels vom Gerät, das im Modus „Speicherkarte“ funktioniert, bleibt das Gerät eingeschaltet. • Beim Abschalten des USB Kabels vom Gerät, das im Modus „Stromquelle“ funktioniert, wird das Gerät von der Batterie weiter betrieben, wenn sie ausreichend aufgeladen ist. Anwendung der Weaver-Schiene Das Nachtsichtvorsatzgerät ist mit einer Weaver-Schiene (15) ausgestattet, mit der Sie zusätzliches Zubehör installieren können. Sie müssen zuerst den abnehmbaren IR Strahler entfernen (siehe Kapitel „IR Strahler“). Kalibrierung des Displays Display-Koordinaten Treff-punkt Das Gerät ist so eingestellt, dass nach seinem Anbau an das richtig eingeschossene Zielfernrohr keine Justierung des Zielpunktes erforderlich ist. Sollte das Gerät einen heftigen Stoß oder Sturz erleiden, können Sie die Treffpunktlage überprüfen und gegebenenfalls selbst korrigieren, ohne sich an das Servicezentrum zu wenden. • Zum Aufrufen des Modus der Display-Kalibrierung halten Sie die Taste M (7) 10 Sekunden lang gedrückt – es erscheinen die Display-Koordinaten- X=0; Y=0. • Verschieben Sie das Display waagerecht (Achse X) und senkrecht (Achse Y) mit den Tasten LEFT (8) und RIGHT (6), so dass der Treffpunkt in die Mitte der Zielmarke Ihres Zielfernrohres verschoben wird. Um zwischen den X- und Zielmarke des Zielfernrohres Display-Verschiebung Y-Koordinaten zu wechseln, betätigen Sie kurz die Taste M (7). • Der Schritt der Bildverschiebung beträgt 1 Pixel des Sensors. • Der Bildverschiebungsbereich beträgt +/- 20 Pixel waagerecht (Achse X) und +/- 20 Pixel senkrecht (Achse Y). Um das Menü zu verlassen und die Einstellungen zu speichern, halten Sie die Taste M (7) zwei Sekunden lang gedrückt. • Um das Menü zu verlassen und die Einstellungen zu speichern, halten Sie die Taste M (7) zwei Sekunden lang gedrückt. Stream Vision Die Nachtsichtvorsatzgeräte Forward halten die Technologie Stream Vision ein. Mit Stream Vision wird das Bild vom Gerät auf Ihr Smartphone oder Tablet via Wi-Fi im Realzeitbetrieb übertragen. Detaillierte Anweisungen zur Bedienung von Stream Vision finden Sie in einem separaten Prospekt oder auf der Webseite www.pulsar-vision.com Anmerkung: Im Design des Gerätes ist die Möglichkeit des Updates der Software vorgesehen. Das Update erfolgt über die Stream Vision-Anwendung. Scannen Sie die QR-Codes, um die Stream Vision-Anwendung herunterzuladen: Technische Inspektion Vor jedem Gebrauch des Gerätes wird eine technische Inspektion empfohlen. Überprüfen Sie: • Geräteübersicht (Risse am Gehäuse sind nicht zulässig). • Zustand der Objektiv- und Okularlinsen des Gerätes und der Linse des IR Strahlers (Risse, Fettflecken, Schmutz und andere Ablagerungen sind nicht zulässig). Reinigen Sie die Außenflächen von Metall- und Plastikteilen von Staub, Schmutz und Feuchtigkeit, wischen Sie sie mit einem Baumwolltuch ab. • Zustand der Batterie (sie muss geladen sein) und der elektrischen Kontakte an der Batterie (Salz und Oxidation sind nicht zulässig). • Funktionsfähigkeit der Steuerorgane. • Genauigkeit und Zuverlässigkeit der Befestigung des Gerätes am Zielfernrohr 28 Technische Wartung Fehlfunktion Die Wartung wird mindestens zweimal jährlich durchgeführt und umfasst folgende Punkte: • Reinigen Sie die Außenflächen von Metall- und Kunststoffteilen mit einem Baumwolltuch von Staub und Schmutz. Silikonfett ist erlaubt. • Reinigen Sie die elektrischen Kontakte der Batterie und des Batteriesteckplatzes mit einem fettarmen organischen Lösungsmittel. • Überprüfen Sie die Linsen des Objektivs und Okulars. Reinigen Sie sie bei Bedarf von Staub und Sand (vorzugsweise kontaktlos). Reinigen Sie die Außenflächen der Optik mit speziell dafür vorgesehenen Mitteln. Lagerung Lagern Sie das Gerät immer nur in der Aufbewahrungstasche, in einem trockenen, gut belüfteten Raum. Bei der Dauerlagerung ziehen Sie die Batterie unbedingt heraus. Mögliche Ursache Beim deutlichen Staub oder Kondensat auf Bild des Absehens optischen Außen- oder bleibt das Bild des Innenflächen des Objektivs. Objektes unscharf. Das Objektiv ist nicht scharf eingestellt. Stellen Sie die Bildschärfe durch Drehen des Objektivreglers ein. Das Display liegt nicht im Zentrum. Die Lage des Gerätes auf dem Tageslichtzielfernrohr ist nicht eingestellt. Klappen Sie den Adapter auf, bringen Sie das Display ins Zentrum des Sehfeldes (s. Kapitel „Betrieb“). Das Gerät lässt sich nicht fokussieren. Falsche Einstellung. Stellen Sie Ihr Zielfernrohr laut Kapitel „Betrieb“ ein. Prüfen Sie Außenflächen der Objektiv- und Okularlinsen; falls notwendig reinigen Sie sie von Staub, Kondensat, Eistau u.ä. Bei kaltem Wetter können Sie spezielle Anti-Fog-Beschichtungen anwenden (z.B., wie für Korrekturbrillen). Fehlersuche Fehlfunktion Mögliche Ursache Beseitigung Das Gerät lässt sich nicht einschalten. Die Batterie ist völlig entladen. Laden Sie die Batterie auf. Das Gerät Das USB Kabel ist beschädigt. funktioniert nicht Die externe Stromquelle ist von einer externen entladen. Stromquelle. Ersetzen Sie das USB Kabel. Das Smartphone oder Tablet stellt keine Verbindung zum Gerät her. Das Passwort im Gerät wurde geändert. Löschen Sie das Netzwerk und stellen Sie die Verbindung mit dem im Gerät gespeicherten Passwort wieder her. Das Gerät befindet sich in einer Zone mit großer Anzahl von Wi-Fi-Netzwerken, die Störungen verursachen können. Um einen stabilen Wi-Fi-Betrieb zu gewährleisten, bringen Sie das Gerät in eine Zone mit einer geringeren Anzahl von Wi-Fi-Netzwerken oder in eine Zone, in der sie nicht vorhanden sind. Signalsendung via Das Gerät befindet sich außerhalb Wi-Fi fehlt oder der Zone eines sicheren Wi-Fiwird unterbrochen. Signalempfangs. Zwischen dem Gerät und dem Signalempfänger befinden sich Hindernisse (z. B. Betonwände). Der Treffpunkt fällt Das Display soll kalibriert werden. mit dem Zielpunkt nicht zusammen. Das Gerät ist am Zielfernrohr oder das Zielfernrohr ist an der Waffe nicht fest installiert. Laden Sie die externe Stromquelle auf. Bringen Sie das Gerät in die Sichtlinie des Wi-FiSignals. Schlechte Bildqualität. Dieses Problem kann bei der Beobachtung unter schwierigen Wetterbedingungen (Schnee, Regen, Nebel usw.) auftreten. Das Bild ist zu dunkel. Das Helligkeits-/Kontrastniveau des Stellen Sie das Helligkeits-/Kontrastniveau ein. Bildes ist zu niedrig Auf dem Display sind Streifen erschienen, oder das Bild ist verschwunden. Während des Betriebs wurde das Gerät statischer Spannung ausgesetzt. Beseitigung Wischen Sie die optischen Außenflächen mit einem weichen Baumwolltuch ab. Trocken Sie das Gerät - lassen Sie es 4 Stunden lang in einem warmen Raum liegen. Kalibrieren Sie das Display gemäß den Anweisungen im Kapitel „Kalibrierung des Displays“. Überprüfen Sie feste Installation des Gerätes am Zielfernrohr und sichere Befestigung des Zielfernrohres an der Waffe. Stellen Sie sicher, dass Sie genau die Art von Munition verwenden, mit der Ihre Waffe und Ihr Zielfernrohr zuvor eingeschossen wurden. Wenn Sie Ihr Zielfernrohr im Sommer eingeschossen haben und es im Winter betreiben (oder umgekehrt), ist eine gewisse Änderung des Nullpunkts des Einschießens nicht ausgeschlossen. Beim Abfeuern rutscht das Gerät vom Zielfernrohr ab. Unzureichende Klemmung des Wählen Sie eine passende Hülse und klemmen Sie Adapters. Falsche Hülse ausgewählt. den Adapter laut Empfehlungen fest. Adapterklemme kann nicht geöffnet werden. Falsche Hülse ausgewählt. Wählen Sie eine passende Hülse. Prüfen Sie, ob zwischen den Lippen des Adapters ein Spalt vorhanden ist. Unter dem Link finden Sie Antworten auf häufig gestellte Fragen. https://www.pulsar-nv.com/glo/support/faq/79 Nach der Auswirkung statischer Spannung kann sich das Gerät selbständig neu starten, oder schalten Sie das Gerät aus und wieder ein. 29 Elektromagnetische Verträglichkeit. Dieses Produkt entspricht den Anforderungen der Europäischen Norm EN 55032:2015, Klasse A. Achtung: Der Betrieb dieses Produktes in Wohngebieten kann Funkstörungen verursachen. Achtung! Digitale Nachtsichtgeräte Forward erfordern eine Lizenz, wenn sie über die Grenzen Ihres Landes exportiert werden. Schützen Sie die Umwelt! Ihr Gerät enthält mehrere unterschiedliche, wiederverwertbare Wertstoffe. Bitte geben Sie Ihr Gerät zum Entsorgen nicht in den Hausmüll, sondern bringen Sie es zu einer speziellen Entsorgungsstelle für Elektrokleingeräte (Wertstoffhof). 30 ESPAÑOL Características técnicas MODELO SKU # CARACTERÍSTICAS ÓPTICAS Enfoque de lente, mm Lente del objetivo, D / f ' Campo visual (horizontal), ° Campo visual (horizontal), m @ 100 m Alcance de observación máx. de un animal que mide 1,7m, m Alcance de acercamiento, m Aumento máximo recomendado del visor diurno, x CARACTERÍSTICAS ELECTRÓNICAS Tipo y resolución del sensor Tipo y resolución de la pantalla Sensibilidad, mW (longitud de onda 780 nm, resolución 25 lin/mm) Sensibilidad, mW (longitud de onda 915 nm, resolución 25 lin/mm) ILUMINADOR IR DESMONTABLE Tipo / Longitud de onda, nm CARACTERÍSTICAS OPERATIVAS Alimentación, V Tipo de pila / Capacidad / Voltaje nominal de salida Alimentación externa Tiempo de funcionamiento con acumulador a t=22 °C (Wi-Fi OFF, IR OFF), h Resistencia máxima de choque en las armas estriadas, julios Resistencia máxima de choque en las armas lisas, calibre Grado de protección, código IP (IEC60529) Temperatura de funcionamiento, ° С Dimensiones, mm Peso, kg GRABADOR DE VÍDEO Resolución de vídeo / foto, píxeles Formato de vídeo / foto Memoria integrada CANAL WIFI Frecuencia Estándar Paquete de entrega FORWARD F455 78186 50 1:1 6,3 11 500 5 2-8 CMOS HD 1280X720 AMOLED 1746x1000 1,5×10-⁵ 5,5×10-⁵ LED 940 3,0 - 4,2 Li-Ion Battery Pack IPS7 / 6400 mAh / DC 3,7V Micro USB Tipo-B (5V) 9 6000 12 IPX7 -25 ... +50 155x136x77 0,83 1280x720 .mp4 / .jpg 16GB 2,4 GHz 802.11 b / g / n El diseño de este producto está sujeto a modificaciones con fines de mejorar sus propiedades del consumo. Encontrará la última edición del manual de usuario en el sitio web www.pulsar-vision.com • Dispositivo digital acoplable • Estuche • Pila recargable • Cargador para la pila recargable • Adaptador de red • Cable microUSB • Manual de usuario • Paño de lente • Tarjeta de garantía Descripción Visor nocturno acoplable Forward F455 es un dispositivo universal que permite transformar de manera rápida y fácil el visor diurno en el nocturno. El visor se monta en el objetivo del visor diurno con la ayuda de adaptadores diseñados para diferentes diámetros del objetivo. Para el visor no se requiere regular el tiro (foguear). El visor está destinado para diversas esferas de aplicación incluso la caza, tiro deportivo, toma de fotos y grabación de vídeo de noche y observación. Características Características clave: • Sensor HD 1280x720 • Alta sensibilidad nocturna • Transformación fácil del visor óptico en el nocturno • Preservación de las ventajas de la óptica diurna en condiciones de noche • Estabilidad del punto de puntería • Aplicación confortable en amplia escala de aumento de la óptica diurna • Invisible iluminador IR de largo alcance • Función de aumento adicional de sensibilidad SumLight™ • Distancia de detección hasta 500 m. • Puesta en marcha instantánea • Grabación de vídeo integrada • Alimentación de pilas recargables de alta capacidad y de montado rápido B-Pack • Sistema de fijación de cuatro puntos con una montadura automática • Compatibilidad con adaptadores de otros fabricantes. • Resistencia al impacto en grandes calibres: 12 cal., 9.3x64, .375H & H • Wi-Fi. Integración con dispositivos iOS y Android. • Stream Vision. Control remoto, observación y emisión en directo en YouTube mediante un teléfono inteligente • Control remoto de soporte lógico • Impermeabilidad completa al agua (IPX7) • Amplio rango de temperatura de funcionamiento (-25 ... + 50 ° C) • MicroUSB. Apoyo de alimentación de Power Bank 31 Unidades y controles 1. 2. 3. 4. 5. 6. 7. 8. 9. 10. 11. 12. 13. Descripción de los botones Tapa del objetivo Cubierta de ocular Tapa del compartimiento de batería Brazo de instalación de batería Batería recargable Botón DERECHA Botón M (MENÚ) Botón IZQUIERDA Botón ENCENDIDO Anillo de enfoque del objetivo Cubierta de iluminador IR Tapa de conector del iluminador IR Conector para instalar del iluminador IR Cubierta de adaptador* 14. 15. 16. 17. 18. 19. 20. 21. 22. 23. 24. 25. Puerto microUSB Carril Weaver Cubierta de adaptador* Objetivo del visor óptico Casquillo* Adaptador* Tornillo de apriete Tornillo Brazo del adaptador Punto de acoplamiento Botón IR Brazo de iluminador IR Botón ENCENDIDO 19 9 ENCENDIDO (9) 10 Anillo de enfoque del objetivo 15 Carril Weaver Tapa de conector Cubierta 11 de iluminador IR Casquillo* 23 2 Cubierta Punto de de ocular acoplamiento Open Conector para instalar iluminador IR 14 22 Brazo del adaptador 21 Tornillo Brazo de instalación de batería Tapa de compartimiento de batería Batería recargable 3 5 4 IR (24) Menú rápido Dispositivo encendido (modo “Vídeo”) Dispositivo encendido (modo “Foto”) Navegación por el menú Menú rápido Dispositivo encendido, menú rápido, menú principal Siguientes Primera pulsaciones Pulsación prolongada pulsación breve breves Enciende el Enciende el dispositivo – dispositivo Enciende la Apaga el dispositivo – pantalla Apaga la pantalla / Apaga el – dispositivo Activa Desactiva Activa WiFi / Desactiva WiFi SumLight™ SumLight™ Navega hacia arriba, a la izquierda, contra las agujas del reloj Reduce el parámetro Entra en el menú rápido Entra en el menú principal. Sale del submenú sin confirmar Confirma la elección selección / Sale del menú (cambiar a modo de visión) Navegación hacia arriba Sale del menú rápido. Detiene la grabación de vídeo/ Inicia grabación – Cambia a modo “Foto” de vídeo Toma una fotografía Cambia a modo “Vídeo” Abajo / hacia la derecha / en sentido de las agujas de reloj Incrementa el parámetro Cambia Activa IR Desactiva IR potencia IR Guías de operación 13 Puerto microUSB Tornillo de apriete 20 DERECHA (6) 12 del iluminador IR Botón M (MENÚ) 17 Tapa del objetivo 1 18 Dispositivo encendido, menú rápido, menú principal MENU (7) Navegación por el menú 8 Objetivo del visor óptico Pantalla apagada Dispositivo encendido IZQUIERNavegación por el menú DA (8) Menú rápido Dispositivo encendido Botón IZQUIERDA 7 Modo de funcionamiento Dispositivo apagado 6 Botón DERECHA Adaptador* 16 Botón 25 Brazo de iluminador IR 24 Botón IR El visor acoplable Forward F455 está destinado para un uso prolongado. Para garantizar la duración y una capacidad completa de trabajo del dispositivo cumpla las siguientes recomendaciones: • Antes del uso del dispositivo, asegúrese de que el montaje fue realizado conforme a la sección “Instalación del dispositivo acoplable en el visor óptico”. • Apague el visor acoplable después de su uso. • ¡Se prohíbe reparar o desarmar el dispositivo cuando está en período de garantía! • El dispositivo puede utilizarse dentro de un amplio rango de temperaturas. . Si el visor fue utilizado en el frío y fue llevado a un local caliente, no lo saque del estuche durante 2 ó 3 horas. Gracias a esto se podrá evitar que se forme el condensado en los componentes ópticos exteriores. • Para garantizar un funcionamiento impecable, para prevenir y eliminar las causas que provocan el desgaste prematuro o el estropeo de los bloques y piezas, es necesario oportunamente llevar a cabo una revisión técnica y el mantenimiento del visor. • La pila no debe someterse a un calentamiento excesivo provocado por los rayos solares, el fuego u otras fuentes de calor. *Los elementos de la Tapa-adaptador FN (se adquiere aparte) 32 Uso de la pila recargable El visor Forward F455 se suministra con una batería de alimentación externa litio-ión IPS7 recargable que permite un funcionamiento de hasta 9 horas. Cargue completamente la pila antes del primer uso. Carga de la pila recargable: • Conecte el enchufe del cable microUSB a la ranura USB (С) del dispositivo de carga. • Conecte el enchufe del cable USB al adaptador de red. • Conecte el adaptador de red al enchufe 110-220В. • Levante el brazo (А) del dispositivo de carga. • Retire la cubierta protectora de la pila recargable. • Instale la pila recargable en el dispositivo de carga de modo como está indicado en el dibujo, fije el brazo (А). • Tras la instalación, en el dispositivo de carga encenderá el indicador (В) verde y empezará a parpadear con determinado intervalo: - una vez, si la carga de la pila oscila entre el 0 y el 50%; - dos veces, si la carga de la pila oscila entre el 51 y el 75%; - tres veces, si la carga de la pila oscila entre el 76 y el 100%. • Si el indicador se mantiene encendido con una luz verde continua, la pila está totalmente cargada. Desconecte el dispositivo de carga de la red, desconecte la pila del dispositivo de carga. • Si al introducir la pila en el cargador el indicador del cargador continúa en rojo, probablemente el nivel de carga de la pila es menor del aceptable. Deje la pila en el dispositivo de carga durante un largo periodo de tiempo (hasta varias horas), luego extráigala y vuelva a colocar. • Si la luz del indicador empieza a parpadear en verde, la pila está en buen estado; • Si el indicador sigue en rojo, la pila es defectuosa y no puede ser usada. Reemplace la pila. ¡Atención! Para cargar siempre utilice el dispositivo de carga que viene con el visor o un dispositivo de carga Pulsar IPS (se adquiere aparte). El uso de otros dispositivos de carga puede dañar a la pila de forma irreversible. Instalación de la pila recargable: • Baje el brazo (4). • Retire la cubierta protectora del compartimento de pila (3). • Retire la cubierta protectora de la pila recargable (5). • Instale la pila (5) en la ranura prevista para ésta en el visor de manera que el elemento F (resalto en el casco de la pila) se encuentre abajo. • Fije la pila levantando el brazo (4). ¡Atención! El dispositivo puede alimentarse de una fuente externa de alimentación de tipo Power Bank (5V). Para conectar una fuente de alimentación externa al dispositivo, conecte el cable USB al puerto microUSB (14) del dispositivo. Para más detalles véase el punto “Alimentación externa” Medidas de seguridad • No utilice el dispositivo de carga si su estructura fue modificada o si fue dañado. • No deje la batería sin supervisión durante su carga. • No deje el dispositivo de carga con la pila conectada a la red durante más de 24 horas después de que la pila se haya cargado totalmente. • Cargue la batería a una temperatura de entre 0°C y +45°C. En caso contrario la vida útil de la pila puede reducirse. • No cargue la pila enseguida tras traerla de condiciones frías a las calientes. • • • • • • • • Espere 30 - 40 minutos para que la pila se caliente. No exponga la batería a temperaturas altas ni a una llama viva. La pila no está diseñada para ser sumergida en el agua. No se recomienda conectar dispositivos de terceros con un consumo de corriente que exceda los niveles permitidos. La pila está protegida frente a cortocircuitos, no obstante, debería evitarse cualquier situación que pueda provocar un cortocircuito. No desmonte ni deforme la pilas. No deje caer ni golpee la pila. Si la pila va a estar en desuso durante un periodo prolongado, debe estar parcialmente cargada, o sea no debe estar ni cargada del todo ni descargada del todo. Guarde la pila fuera del alcance de los niños. Alimentación externa La alimentación externa se realiza de una fuente de alimentación externa de tipo Power Bank (5V). • Conecte la fuente de alimentación externa al puerto USB (14) del dispositivo acoplable. • El dispositivo cambia al funcionamiento por alimentación eléctrica externa, al mismo tiempo la pila IPS7 irá cargándose paulatinamente. y se indicará el porcentaje del nivel de la carga. • En la pantalla aparecerá el pictograma de la pila • Si el dispositivo está conectado a un ordenador o un adaptador de red o un powerbank que no cumpla con el estándar Battery Charger (ВC 1.0), la pila IPS7 no empezará a cargarse, y se mostrará solo el pictograma de la alimentación externa . Si el dispositivo funciona con alimentación eléctrica externa pero la pila IPS7 está conectada, se muestra el • icono . • Cuando se desconecta la alimentación eléctrica externa, el dispositivo empezará a alimentarse de la pila. Funcionamiento Instalación del dispositivo acoplable en el visor óptico • Seleccione un adaptador (se adquiere aparte) con un casquillo con las dimensiones necesarias en dependencia del diámetro externo del objetivo de su visor óptico (véase la tabla). • La indicación 42 mm / 50 mm / 56 mm en la denominación del adaptador designa el diámetro de luz del objetivo del visor óptico. • Retire la tapa (16) del adaptador (19), girándola a la derecha. • Antes de instalarlo, se recomienda desengrasar el cuerpo del objetivo. • Instale el casquillo (18) hasta el tope en el adaptador (19). • Instale hasta el tope el adaptador con el casquillo encima del objetivo del visor diurno (17). • Ponga el brazo (22) de la posición inicial “abierto” (OPEN) en la posición “cerrado” (CLOSE). • Compruebe si el adaptador se adhiere al objetivo. • En caso de haber espacio libre se debe hacer lo siguiente: - Afloje con la llave Allen (S=2mm) el tornillo de apriete (20). - Apriete el tornillo (21) con la llave Allen (S=4mm) con el esfuerzo que es necesario para garantizar el encaje apretado del adaptador encima del objetivo. La fuerza de apretar debe ser 1 Nm. - Apretar el tornillo de apriete (20). 33 • El esfuerzo es posible de comprobar con el destornillador de dinamometría. • Inserte el visor en el adaptador de modo que los pasadores que se encuentran en el cuerpo del adaptador • entren en las ranuras (23) del visor. Gire el visor a la derecha hasta que se detenga. La marca en forma de un triángulo en el visor y la marca en forma de un cuadrado en el cuerpo del adaptador deben coincidir. Para alinear el visor, mueve el brazo (22) a la posición OPEN alinea el visor acoplable por el horizonte. Puesta en marcha y ajuste de la imagen • Retire la tapa del objetivo (1) girándola hacia la izquierda. • Pulse brevemente el botón ENCENDIDO (9), enciende el visor - en la pantalla aparecerá la imagen. • Ajuste la definición de los símbolos en la pantalla girando la arandela de ajuste de dioptrías del ocular de su visor óptico. En adelante, cualesquiera que sean la distancia y las condiciones, no hará falta girar la arandela de ajuste de dioptrías del ocular. • Para tomar foco del objeto de observación gire el anillo de enfoque del objetivo (10). Los ajustes base (ajuste de la luminosidad y el contraste) se realizan mediante las funciones del menú de acceso rápido. Al final de su uso, apague el visor con una pulsación prolongada del botón ENCENDIDO (9). Funciones del menú de acceso rápido • Entre en el menú “rápido” pulsando brevemente el botón М (7). • Para ir de una función a otra de las que están descritas abajo, pulse brevemente el botón М (7). • Brillo – pulsando los botones DERECHA (6) y IZQUIERDA (8) cambie el brillo de la pantalla de 0 a 20. • Contaste de 0 a 20. - pulsando los botones DERECHA (6) y IZQUIERDA (8) cambie el contaste de la imagen Funciones del menú principal • Entre en el menú principal por la pulsación prolongada del botón Tabla para seleccionar los casquillos para los visores diurnos Referencia del diámetro interior del casquillo y del diámetro exterior del casco del Modelo de la Tapa- objetivo del dispositivo óptico diurno (visor, anteojo de larga distancia) Adaptador Diámetro externo del cuerpo del objetivo del Diámetro interno del casquillo, mm visor, mm 47 46,7-47,6 48 47,7-48,6 Tapa-Adaptador FN 42 mm 49 48,7-49,6 50 49,7-50,6 55 54,7-55,6 56 55,7-56,6 Tapa-Adaptador 57 56,7-57,6 FN 50 mm 58 57,7-58,6 Tapa-Adaptador FN 56 mm 59 60 61 62 63 64 65 M (7). • Para moverse por los puntos del menú principal pulse los botones DERECHA (6) y IZQUIERDA (8). • Para entrar en un subpunto del menú principal pulse brevemente el botón M (7). • Para salir del subpunto del menú principal pulse y mantenga pulsado el botón M (7). • La salida automática del menú principal se realiza tras 10 segundos sin actividad. Composición y descripción del menú • Luminosidad de los pictogramas • Ajustes de Wi-Fi • Ajustes generales • Desconexión automática • Acerca del dispositivo Contenido del menú Luminosidad de los pictogramas 58,7-59,6 59,7-60,6 60,7-61,6 61,7-62,6 62,7-63,6 63,7-64,6 64,7-65,6 34 Luminosi- Este punto permite ajustar la luminosidad de los pictogramas en la pantalla del visor acoplable. dad de los • Pulse y mantenga pulsado el botón M (7) para entrar en el menú principal. pictogra- • Usando los botones DERECHA (6) y IZQUIERDA (8) elija el punto del menú “Luminosidad de los pictogramas”. mas • Pulse brevemente el botón М (7) para entrar en el submenú. • Usando los botones DERECHA (6) y IZQUIERDA (8) elija el nivel de la luminosidad de los pictogramas. • Para guardar la elección y salir del submenú pulse y mantenga pulsado el botón М(7). Este punto del menú permite establecer los siguientes parámetros: Ajustes generales • Lengua • Hora • Formateo • Fecha • Ajustes predeterminados Lengua Elección de la lengua de interfaz. • Pulse y mantenga pulsado el botón M (7) para entrar en el menú principal. • Usando los botones DERECHA (6) y IZQUIERDA (8) elija el submenú “Ajustes generales”. • Pulse brevemente el botón М (7) para entrar en el submenú. • Usando los botones DERECHA (6) y IZQUIERDA (8) elija el punto del submenú “Lengua”. • Pulse brevemente el botón М (7) para entrar en el submenú. • Usando los botones DERECHA (6) y IZQUIERDA (8) elija una de las lenguas disponibles de interfaz: inglés, alemán, español, francés, ruso. • Para guardar la elección y salir del submenú mantenga pulsado el botón M (7). Fecha Ajuste de la fecha • Pulse y mantenga pulsado el botón M (7) para entrar en el menú principal. • Usando los botones DERECHA (6) y IZQUIERDA (8) elija el submenú “Ajustes generales”. • Pulse brevemente el botón М (7) para entrar en el submenú. • Usando los botones DERECHA (6) y IZQUIERDA (8) elija el punto del submenú “Fecha”. • Pulse brevemente el botón М (7) para entrar en el submenú. • La fecha se muestra en formato dd / mm / aaaa (12/04/2017) • Usando los botones DERECHA (6) y IZQUIERDA (8) elija el valor necesario del día, mes y año. (el botón DERECHA (6) incrementa el valor, el botón IZQUIERDA (8) reduce el valor) Para moverse entre los dígitos, pulse brevemente el botón M (7). • Para guardar la fecha elegida y salir del submenú pulsar y mantener pulsado el botón M (7). Hora Ajuste de la hora • Pulse y mantenga pulsado el botón M (7) para entrar en el menú principal. • Usando los botones DERECHA (6) y IZQUIERDA (8) elija el submenú “Ajustes generales”. • Pulse brevemente el botón М (7) para entrar en el submenú. • Usando los botones DERECHA (6) y IZQUIERDA (8) elija el punto del submenú “Hora”. • Pulse brevemente el botón М (7) para entrar en el submenú. • Pulsando los botones DERECHA (6) y IZQUIERDA (8) elija el formato de la hora – 24/12 (o PM/AM). • Para empezar a ajustas las horas pulse el botón М (7). • Pulsando los botones DERECHA (6) y IZQUIERDA (8) elija el valor de las horas (el botón DERECHA (6) incrementa el valor, el botón IZQUIERDA (8) reduce el valor). • Para pasar a la configuración de los minutos pulse el botón М (7). • Pulsando los botones DERECHA (6) y IZQUIERDA (8) elija el valor de los minutos. • Para guardar la hora ajustada y salir del submenú mantenga pulsado el botón M (7). Ajustes de Este punto permite ajustar el visor para la red Wi-Fi. Wi-Fi Nota: Wi-Fi se enciende / se apaga manteniendo pulsado el botón IZQUIERDA (8). Ajuste de Este submenú permite configurar la contraseña de acceso al visor desde un la contra- dispositivo externo. La contraseña se utiliza cuando un dispositivo externo (por ejemplo, un teléfono inteligente) se conecta al visor. seña • Pulse y mantenga pulsado el botón M (7) para entrar en el menú principal. • Usando los botones DERECHA (6) y IZQUIERDA (8) elija el punto del menú “Ajustes de Wi-Fi”. • Pulse brevemente el botón М (7) para entrar en el submenú. • Usando los botones DERECHA (6) y IZQUIERDA (8) elija el punto del menú “Ajuste de la contraseña”. • Pulse brevemente el botón М (7) para entrar en el submenú. • En la pantalla aparecerá la contraseña – es predeterminada “12345678”. • Usando los botones DERECHA (6) y IZQUIERDA (8) establezca la contraseña deseada (el botón DERECHA incrementa el valor, el botón IZQUIERDA reduce el valor). Para moverse entre los dígitos, pulse el botόn М (7). • Mantenga pulsado el botón M (7) para guardar la contraseña y salir del submenú. Establecer Este submenú le permite configurar el nivel de acceso al visor necesario que recibe la aplicación Stream Vision. nivel de acceso Nivel Propietario. El usuario tiene pleno acceso a todas las funciones del visor desde la aplicación Stream Vision. Nivel Invitado. Desde la aplicación Stream Vision el usuario solo puede ver vídeos en tiempo real. • Pulse y mantenga pulsado el botón M (7) para entrar en el menú principal. • Usando los botones DERECHA (6) y IZQUIERDA (8) elija el punto del menú “Ajustes de Wi-Fi”. • Pulse brevemente el botón М (7) para entrar en el submenú. • Usando los botones DERECHA (6) y IZQUIERDA (8) elija el punto del menú “Establecer nivel de acceso”. • Usando los botones DERECHA (6) y IZQUIERDA (8) elija el nivel de acceso – “Propietario” o “Invitado”. • Para confirmar la elección y salir del submenú mantenga pulsado el botón М (7). 35 Ajustes Volver a la generales configuración predeterminada Formateo • Pulse y mantenga pulsado el botón M (7) para entrar en el menú principal. • Usando los botones DERECHA (6) y IZQUIERDA (8) elija el submenú “Ajustes generales”. • Pulse brevemente el botón М (7) para entrar en el submenú. • Usando los botones DERECHA (6) y IZQUIERDA (8) elija el punto del submenú “Configuración predeterminada”. • Pulse brevemente el botón М (7) para entrar en el submenú. • Usando los botones DERECHA (6) y IZQUIERDA (8) elija la opción “Sí” para volver a la configuración predeterminada, o “No” para cancelar la acción. • Confirme la elección pulsando brevemente el botón М (7). Los siguientes parámetros volverán a su configuración inicial que se tenía antes de que la cambiara el usuario: Nivel de brillo – 10 Desconexión automática – desactivada Lengua - inglés Nivel del contraste – 8 Wi-Fi – apagado (contraseña predeterminada) El formateo de la tarjeta de memoria integrada borra irrevocablemente todos los archivos grabados. ¡Atención! Asegúrese de que los archivos a borrar ya no son necesarios o haga una copia de seguridad en otro portador. • Pulse y mantenga pulsado el botón M (7) para entrar en el menú principal. • Usando los botones DERECHA (6) y IZQUIERDA (8) elija el submenú “Ajustes generales”. • Pulse brevemente el botón М (7) para entrar en el submenú. • Usando los botones DERECHA (6) y IZQUIERDA (8) elija el punto del submenú “Formateo”. • Pulse brevemente el botón М (7) para entrar en el submenú. • Usando los botones DERECHA (6) y IZQUIERDA (8) elija la opción “Sí” para formatear o “No” para cancelar la acción. • Confirme la elección pulsando brevemente el botón М (7). Este punto permite activar la función de la desconexión automática del visor acoplable tras un Descodeterminado período de tiempo si el aparato está inclinado horizontal o verticalmente a más de 70°; a la nexión automática derecha o a la izquierda a más de 30°. Además no deben estar activados los mandos del visor acoplable. • Pulse y mantenga pulsado el botón M (7) para entrar en el menú principal. • Usando los botones DERECHA (6) y IZQUIERDA (8) elija el punto del menú “Desconexión automática”. • Pulse brevemente el botón М (7) para entrar en el submenú. • Usando los botones DERECHA (6) y IZQUIERDA (8) elija el período de tiempo tras el cual el visor acoplable se desconectará automáticamente (1 min; 3 min; 5 min), o la opción “Off” si usted quiere desactivar la función de la desconexión automática. • Confirme la elección pulsando brevemente el botón М (7). Nota: en la barra de estado se muestra el pictograma del estatus de la función “Desconexión automática” 1 min. Acerca del visor acoplable • Pulse y mantenga pulsado el botón M (7) para entrar en el menú principal. • Usando los botones DERECHA (6) y IZQUIERDA (8) elija el punto del menú “Acerca del visor acoplable”. • Pulse brevemente el botón М (7) para entrar en el submenú. El usuario tiene acceso a la siguiente información sobre el visor: denominación completa del visor número de serie del visor versión de montaje del visor número SKU del visor versión de soporte lógico información de servicio del visor Barra de estado La barra de estado se encuentra en la parte inferior de la pantalla y muestra la información sobre el estado actual del visor acoplable, incluso: • Función SumLight™ • Desconexión automática 1 min (si la función está activada) • Funcionamiento del iluminador IR (por ejemplo, el 3er grado) • Conexión por Wi-Fi • Reloj • Nivel de carga de la pila (si el visor está alimentado por la pila) o (si el visor es alimentado por una • Indicador de alimentación desde una fuente de alimentación externa fuente de alimentación externa) o • Indicador de la carga de pila con el porcentaje actual de su carga (si está instalada la pila y la pila está cargándose desde una fuente de alimentación externa). Nota: a medida que subimos los aumentos del visor o dispositivo óptico en el que está montado el accesorio, la barra de estado puede desaparecer parcial o totalmente de la imagen visible en la pantalla Iluminador IR El dispositivo está equipado con un iluminador IR desmontable que funciona a una longitud de onda de 940 nm que permite aumentar la distancia de observación en condiciones de poca luz o en la oscuridad. En vez del iluminador IR que viene con el visor, usted puede instalar otros iluminadores IR Pulsar (se adquieren aparte). • Retire la brida (12) desde la ranura para montar el iluminador IR (13). • Retire la tapa (11) del iluminador IR. • Monte el iluminador IR al aparato. El brazo (25) debe encontrarse en la posición superior. • Fije el iluminador IR bajando el brazo (25). • Para activar el iluminador IR: encienda el aparato pulsando el botón ENCENDIDO (9). • En caso de estar desconectado el iluminador IR, en la barra de estado se muestra el pictograma de iluminador desconectado. En caso de estar conectado el iluminador IR, el pictograma no se muestra. • Pulse brevemente el botón IR (24) en el extremo del iluminador. Al encender el nivel de capacidad es mínimo . El pictograma del iluminador IR con el nivel correspondiente de • capacidad se muestra en la barra de estado. • Pulsando brevemente el botón IR (24) cambiará sucesivamente el nivel de capacidad del iluminador ( > > > ). • Para apagar el iluminador IR mantenga pulsado el botón IR (24). • El pictograma IR desaparecerá de la pantalla. Nota: Al apagar el iluminador IR, el nivel de capacidad no se guarda en la memoria del visor. Cuando el visor se enciende, el iluminador se enciende en el nivel de capacidad mínimo - IR1. 36 Función Wi-Fi • El visor acoplable dispone de la opción de conexión inalámbrica con dispositivos móviles (tableta, teléfono inteligente) mediante Wi-Fi. • Encienda el módulo inalámbrico pulsando prolongadamente el botón IZQUIERDA (8). El funcionamiento de Wi-Fi se muestra en la barra de estado de modo siguiente: Wi-Fi está desconectado No hay pictograma Wi-Fi fue activado por el usuario, se está progresando la conexión al Wi-Fi Wi-Fi está encendido, sin conexión con el visor acoplado Wi-Fi está encendido, el visor acoplado está conectado Su dispositivo es detectado por un dispositivo externo como “Forward F_XXXX”, donde XXXX son los cuatro últimos dígitos del número de serie de su dispositivo. Al introducir la contraseña en el dispositivo móvil (más detallado sobre la definición de la contraseña véase en el punto “Ajustes de Wi-Fi” del capítulo “Funciones del menú principal” del manual) y establecerse la conexión, el pictograma en la barra de estado se sustituye por el , la transmisión de la videoseñal en la pantalla del dispositivo móvil empieza tras la activación del botón “visor” en la pantalla del dispositivo móvil. El pictograma en la barra de estado se cambia en . Nota: en el punto de menú “Establecer nivel de acceso” se puede establecer el nivel necesario de acceso a su aparato que recibe la aplicación Stream Vision. Función “SumLight™” • La función SumLight™ puede aumentar significativamente el nivel de sensibilidad de la matriz CMOS cuando disminuye el nivel de iluminación, lo que hace posible la observación en condiciones de poca luz sin usar el iluminador IR. • Para activar la función SumLight™ pulse brevemente el botón IZQUIERDA (8). • Para desactivar vuelva a pulsar brevemente el botón IZQUIERDA (8). • El pictograma SumLight™ (activada o desactivada ) se muestra en la barra de estado. ¡Atención! Cuando se activa la función SumLight™ se aumenta el nivel de ruidos en la imagen, se disminuye la frecuencia del cambio de cuadros, la imagen se demora, cuando el visor se mueve de manera brusca la imagen puede ser borrosa, tales efectos no son defectos. En la pantalla del dispositivo pueden verse unos puntos blancos (píxeles), el número de puntos puede aumentar cuando se conecta la función SumLight™, esto está vinculado con particularidades de esta función y tampoco es un defecto. Grabación de vídeo y de fotografía El visor acoplable tiene la función de grabación de vídeo (toma de fotos) de la imagen observada en la tarjeta de memoria incorporada. Antes de utilizar la función grabación de vídeo y de fotos estudie los puntos “Ajuste de la fecha”, “Ajuste de la hora” del capítulo “Funciones del menú principal” del presente manual. El grabador integrado funciona en dos modos: • FOTO (fotografía; en la esquina derecha superior de la pantalla se muestra el pictograma . Si el número estimado de fotos que puede ser guardado en la tarjeta de memoria Flash, supera 100, aparece el mensaje “>100”. VÍDEO (grabación de vídeo; en la esquina derecha superior de la pantalla se muestra el pictograma , el • tiempo total de grabación que queda, tomando en consideración la resolución actual en formato MM:SS minutos : segundos). Cuando se enciende, el visor se encuentra en modo de Vídeo. Para alternar los modos de funcionamiento del visor acoplable mantenga pulsado el botón DERECHA (6). El cambio de modos es cíclico (Vídeo-> Foto-> Vídeo…). Modo FOTO Fotografiando una imagen • Cambie al modo Foto manteniendo pulsado el botón DERECHA (6). • Pulse brevemente el botón DERECHA (6) para tomar una fotografía. La imagen se congela por 0,5 segundos. • El archivo de la foto se guarda en la tarjeta de memoria integrada. Modo de Vídeo Grabación de vídeos • Cambie al modo Vídeo manteniendo pulsado el botón DERECHA (6). • Pulse brevemente el botón DERECHA (6) para iniciar la grabación de vídeo. desaparece, en su lugar aparece el pictograma REC, • Al iniciarse la grabación de vídeo, el pictograma asimismo el temporizador de la grabación de vídeo en formato MM:SS (minutos : segundos)*; • Para detener la grabación de vídeo mantenga pulsado el botón DERECHA (6). • Los archivos de vídeo se guardan en la tarjeta de memoria integrada tras detener la grabación de vídeo. * El pictograma se muestra durante 2 segundos y luego desaparece. Al pulsar brevemente el botón DERECHA (6) el pictograma aparece, el temporizador muestra el tiempo corriente de la grabación de vídeo. Notas: • Tras detener la grabación de vídeo / tras la toma de fotos; tras apagar el visor acoplable si fue activada la grabación; si la tarjeta de memoria está llena – si durante la grabación de vídeo la tarjeta se llenó totalmente (en la pantalla va a aparecer el mensaje “Memoria llena”). • Durante la grabación de vídeo usted puede entrar y utilizar el menú del visor acoplable; • Los vídeos grabados y las fotos tomadas se guardan en la tarjeta de memoria integrada en formato img_xxx.jpg (para fotos); video_xxx.mp4 (para vídeo). xxx – común de tres dígitos (contador de archivos (para fotos y vídeo); • El contador usado para los nombres de los archivos multimedia no puede ser reiniciado; • Si un archivo se elimina del medio de la lista, su número no pasa a otro archivo. • Cuando el contador está lleno, se crea una nueva carpeta – img_xxxx. Donde xxxx es el contador de carpetas. • La duración máxima de un archivo de vídeo grabado es de siete minutos. Después de que se acabe este tiempo, el vídeo se graba en un nuevo archivo. El número de archivos grabados está limitado por la capacidad de la memoria interna del visor; • Compruebe periódicamente el espacio libre de la memoria interna, pase el material grabado a otros medios de almacenamiento liberando el espacio de la tarjeta de memoria interna; • En los archivos de vídeo grabados y en las fotografías se muestra la información gráfica (barra de estado, pictogramas, etc.). Función “Apagar la pantalla” (Display Off) Cuando se usa esta función el visor acoplable pasa al modo de espera que permite encenderlo rápidamente cuando sea necesario. Opciones de funcionamiento con la función “Apagar la pantalla”: Opción 1. El visor está apagado. Es necesario encender el visor y activar la función “Apagar la pantalla”. • Encienda el visor pulsando brevemente el botón ENCENDIDO (9). • Active la función “Apagar la pantalla”: mantenga pulsado el botón ENCENDIDO (9). En la pantalla aparecerá el mensaje “Apagar la pantalla” con una cuenta atrás. Apagar la pantalla • Suelte el botón ENCENDIDO (9). • Para desactivar la función “Apagar la pantalla” pulse brevemente el botón ENCENDIDO (9). Opción 2. La función “Apagar la pantalla” está activada, hay que apagar el visor acoplable. • Mantenga pulsado el botón ENCENDIDO (9). En la pantalla aparecerá el mensaje “Apagar la pantalla” con una cuenta atrás 3,2,1,0. • Mantenga pulsado el botón ENCENDIDO (9) hasta que el visor se apague (el visor acoplable se apagará cuando se llegue a 0 )*. *El visor puede apagarse más tarde si el procesador finaliza el tratamiento de la información para guardar los datos. En tal caso en la pantalla se marca 0 durante la cuenta atrás. 37 Conexión de USB • Encienda el visor pulsando el botón ENCENDIDO (9) (el ordenador no detecta el dispositivo apagado). • Conecte un extremo del cable USB al puerto microUSB (14) del visor, y el otro extremo al puerto USB de su ordenador. • El ordenador detectará su dispositivo automáticamente, no hace falta instalar controladores. • Aparecerán dos modos de conexión en la pantalla: Tarjeta de memoria (Memory card) (memoria externa) y Alimentación (Power). • Usando los botones DERECHA (6) y IZQUIERDA (8) elija la opción de conexión. • Pulse brevemente el botón М (7) para confirmar la elección. Opciones de conexión: Tarjeta de memoria (memoria externa). Conexión USB • En este modo el ordenador detecta el dispositivo como tarjeta Flash. Este modo está destinado para trabajar con los archivos guardados en la memoria del dispositivo, en tal caso las funciones del dispositivo no están disponibles, el dispositivo no se apaga. Una vez desconectado del Usar como alimentación ordenador, el dispositivo sigue funcionando. Usar como tarjeta de memoria • Si se estaba ejecutando una grabación de vídeo cuando se efectuó la conexión, la grabación se detiene y el vídeo se guarda. Alimentación. • En este modo el dispositivo utiliza el ordenador como una fuente externa de alimentación. La barra de estado aparece el pictograma . El dispositivo sigue funcionando, todas las funciones están disponibles. • La pila recargable instalada en el dispositivo no se carga. Desconexión de USB. • Cuando el dispositivo se desconecta de USB en modo Tarjeta de memoria, el dispositivo sigue encendido. • Cuando el dispositivo se desconecta de USB en modo Alimentación el dispositivo sigue funcionando de la pila recargable si ella está suficientemente cargada. • El paso de movimiento de la imagen es de 1 píxel de sensor. • La escala del desplazamiento de la imagen es de +/- 20 píxeles horizontalmente (eje X), +/- 20 píxeles verticalmente (eje Y). • Para salir del menú y guardar la configuración mantenga pulsado el botón M (7) durante dos segundos. Stream Vision Los visores acoplables Forward son compatibles con la tecnología Stream Vision que permite transmitir imágenes desde el dispositivo a su teléfono inteligente o a la tableta mediante Wi-Fi en modo de tiempo real. Encontrará más indicaciones sobre el funcionamiento de Stream Vision en un folleto aparte o en nuestro sitio web www.pulsar-vision.com Nota: el dispositivo está diseñado con la posibilidad de actualizar el soporte lógico. La actualización puede realizarse mediante la aplicación Stream Vision. Para descargar la aplicación Stream Vision, escanee los códigos QR: Inspección técnica El visor acoplable está equipado con el carril adicional Weaver (15) con cuya ayuda Ud. puede montar algunos accesorios adicionales. Antes hay que desmontar el iluminador IR desmontable (véase el capítulo “Iluminador IR”). Se recomienda realizar la inspección técnica antes de cada uso del dispositivo. Compruebe: • El exterior del dispositivo (no debe haber grietas en el cuerpo). • El estado de las lentes del objetivo y del ocular del visor acoplable y del objetivo del iluminador IR (no debe haber grietas, manchas de grasa, polvo y otros sedimentos). Limpie las superficies exteriores de las piezas metálicas y las de plástico de polvo, barro y humedad; límpielas con un paño de algodón. • El estado de la pila recargable (debería estar cargada) y los contactos eléctricos en la pila (no debe haber sales ni oxidación). • El funcionamiento correcto de los controles. • Que el visor acoplable está fijado de forma correcta y segura al visor óptico. Calibrado de la pantalla Mantenimiento Uso del carril weaver El visor acoplable está ajustado de tal manera que tras su montaje al visor óptico que debe haber sido ajustado en tiro, no se requiere la corrección del punto de puntería. En caso de haber sido golpeado Coordinadas de la pantalla Punto de impacto fuertemente el visor o de haber caído, Ud. puede comprobar el punto de impacto y en caso necesario corregirlo por su propia cuenta sin necesidad de acudir a un centro de asistencia técnica. • Para entrar en modo de calibrado de la pantalla mantenga pulsado al principio el botón M (7) durante 10 segundos. • Aparecerán las coordenadas de la pantalla X=0; Y=0. • Usando los botones IZQUIERDA (8) y DERECHA (6) mueva la pantalla horizontalmente (eje X) y verticalmente (eje Y) de tal manera que el punto de impacto se mueva al centro de la marca de alza de su visor óptico. • Para alterar entre las coordinadas X y Y pulse brevemente el Marca del visor óptico Desplazamient de la pantalla botón M (7). El mantenimiento deberá realizarse dos veces al año como mínimo y deberá consistir en cumplimiento de las siguientes medidas: • Limpie las superficies exteriores de las piezas metálicas y las de plástico de polvo y de barro usando un paño de algodón. Se permite la aplicación de un lubricante de silicona. • Limpie los contactos eléctricos de la pila recargable y de la ranura de la pila en el dispositivo con un disolvente orgánico sin grasa. • Compruebe las lentes del ocular y del objetivo. En caso necesario, limpie las lentes del polvo y de la arena (preferiblemente con un método sin contacto). Limpie las superficies externas de la lente con productos especialmente diseñados para este fin. Almacenamiento Siempre almacene el visor solo en el estuche, en un local seco, con buena ventilación. Durante un almacenamiento prolongado, obligatoriamente extraiga la pila recargable. 38 Solución de problemas Problema Posible causa Medida correctora El visor no se enciende. La pila está totalmente descargada. Cargue la pila. No funciona con una fuente El cable USB está dañado. Reemplace el cable USB. de alimentación externa. La fuente de alimentación eléctrica Cargue la fuente de alimentación eléctrica externa está descargada. externa. El teléfono inteligente o la tableta no se conectan al dispositivo. Fue cambiada la contraseña del dispositivo. Problema Posible causa Medida correctora El punto de impacto no coincide con el punto de puntería. Se requiere el calibrado de la pantalla. Realice el calibrado de la pantalla conforme a lo indicado en el capítulo “Calibrado de la pantalla” . El dispositivo no está montado de forma segura en el visor o en el visor del arma. Compruebe que el dispositivo esté bien montado en el visor y que el visor esté fijado de forma segura en el visor del arma. Asegúrese de utilizar el mismo tipo de cartuchos que Ud. utilizó cuando antes fogueó el arma y el visor. Si Ud. fogueó el visor en verano y lo utiliza en invierno (y viceversa) no se debe descartar algunos cambios del punto cero del fogueo. Elimine la red y vuelva a conectarse introduciendo la contraseña guardada en el dispositivo. El dispositivo está en una zona con Para garantizar un funcionamiento estable una gran cantidad de redes Wi-Fi de Wi-Fi traslade el dispositivo a una zona que pueden provocar interferencia. con menor cantidad de redes Wi-Fi o donde no los haya. La transmisión de la señal mediante Wi-Fi falta o se interrumpe. El dispositivo está fuera de la cobertura estable de Wi-Fi. Entre el dispositivo y el receptor de la señal hay obstáculos (paredes de hormigón, por ejemplo). Traslade el dispositivo a una zona que esté en línea directa con la señal Wi-Fi. Baja calidad de la imagen. Dichos problemas pueden surgir debido a complicadas condiciones meteorológicas (nieve, lluvia, niebla, etc.). La imagen es demasiado oscura. Fue instalado un nivel de brillo o contraste demasiado bajo. En la pantalla aparecieron líneas o la imagen desapareció. En el proceso de uso el visor estaba Si el dispositivo ha sido expuesto a la expuesto a la electricidad estática. electricidad estática, el dispositivo puede reiniciarse autónomamente o apague y vuelva a encender el dispositivo. Cuando hay una imagen precisa de la retícula, se tiene una imagen borrosa del objeto. Hay polvo o agua condensada en las superficies ópticas exteriores o interiores del objetivo. Limpie las superficies ópticas exteriores con un paño de algodón suave. Seque, deje permanecer durante 4 horas en un local caliente. El objetivo no está enfocado. Ajuste la definición de la imagen girando el regulador del objetivo. Ajuste el brillo/contraste. La pantalla no está ubicada No está ajustada la posición del en el centro. visor acoplable en el visor diurno. Retire el adaptador y coloque la posición de la pantalla en el centro del campo visual (véase el capítulo “Funcionamiento”). El visor no se enfoca. Ajuste el dispositivo conforme al capítulo “Funcionamiento”. Examine las superficies exteriores de las lentes del objetivo y del ocular; en casos necesarios límpielas de polvo, condensado, escarcha, etc. Cuando hace frío Ud. puede usar diversos recubrimientos antiempañantes especiales (por ejemplo, como para gafas de corrección). Ajustes incorrectos. Durante el tiro el visor acoplable se desliza del visor. No hay suficiente fijación del Elija el casquillo correcto y apriete adaptador. el adaptador conforme a las No fue elegido el casquillo correcto. recomendaciones. Es imposible abrir la abrazadera del adaptador. No fue elegido el casquillo correcto. Elija el casquillo correcto. Compruebe si hay un espacio libre entre los labios del adaptador. Usando el enlace Ud. puede encontrar respuestas a las preguntas más frecuentes. https://www.pulsar-nv.com/glo/support/faq/79 Compatibilidad electromagnética Este producto cumple con la reglamentación de la UE EN 55032:2015, Clase A. Advertencia: el funcionamiento de este equipo en áreas residenciales podría causar radio interferencias. ¡Atención! Los dispositivos nocturnos digitales Forward requieren una licencia, si son exportados fuera de su país de usted. ¡¡Participe en la concervación del medio ambiente!! Su electrodoméstico contiene materiales recuperables y/o reciclables. Entréguelo al final de su vida útil, en un Centro de Recogida Específico o en uno de nuestros Servicios Oficiales Post Venta donde será tratado de forma adecuada. 39 ITALIANO Caratteristiche tecniche MODELLO N° SKU CARATTERISTICHE OTTICHE Fuoco della lente, mm Apertura relativa, D / f ' Campo visivo (orizzontale), ° Campo visivo (orizzontale) a 100 m, m Distanza di osservazione massima di un animale di altezza 1,7 m, m Distanza di messa a fuoco minima, m Intervallo di rapporto consigliato del cannocchiale diurno, volte COMPONENTI ELETTRONICI Tipo e risoluzione di sensore Tipo e risoluzione di display Sensibilità del dispositivo, mW (lunghezza d'onda 780 nm, risoluzione 25 pezzi/mm) Sensibilità del dispositivo, mW (lunghezza d'onda 915 nm, risoluzione 25 pezzi / mm) ILLUMINATORE IR RIMOVIBILE Tipo / lunghezza d'onda, nm CARATTERISTICHE OPERATIVE Tensione di alimentazione, V Tipo di batteria / Capacità / Tensione d’uscita nominale Composizione della fornitura FORWARD F455 78186 50 1:1 6,3 11 500 5 2-8 CMOS HD1280X720 AMOLED 1746x1000 1,5 ×10-⁵ 5,5 ×10-⁵ LED 940 3,0 - 4,2 Batteria agli ioni di litio IPS7 / 6400 mAh / 3,7 V C.C. Micro USB Type-B (5V) 9 6000 12 IPX7 -25 ÷ +50 155x136x77 0,83 Alimentazione esterna La durata della batteria a t = 22 ° C, ora (Wi-Fi disattivato, IR disattivato) Resistenza all'impatto massimale su fucile, joule Resistenza all'impatto massimale su arma ad anima liscia, calibro Grado di protezione, Codice IP (IEC60529) Temperatura di esercizio, °С Dimensioni, mm Peso, kg VIDEOREGISTRATORE Risoluzione video/foto, pixel 1280x720 Formato registrazione video/foto .mp4 / .jpg Memoria interna 16 GB CANALE WI-FI Frequenza 2,4 GHz Standard 802,11 b /g/n Per migliorare le proprietà di consumo del prodotto nella sua costruzione possono essere apportati dei perfezionamenti. La versione attuale dell’istruzione per l’esercizio è disponibile sul sito www.pulsar-vision.com • Visore notturno digitale clip-on • Fodera • Batteria ricaricabile • Caricabatteria • Scheda di rete • Cavo MicroUSB • Istruzione per l’esercizio dispensa • Panno per pulitura ottica • Tagliando di garanzia Descrizione Il visore notturno digitale clip-on Forward F455 è un dispositivo versatile che consente di trasformare in modo rapido e facile un cannocchiale diurno in quello notturno. Il visore clip-on viene montato sulla lente del cannocchiale con adattatori progettati per i diametri dell'obiettivo diversi. Il visore clip-on non richiede un tiro d'aggiustamento aggiuntivo. Il visore clip-on è progettato per varie applicazioni, tra cui la caccia, il tiro a segno, la fotografia e le riprese video notturne, l'osservazione. Proprietà Caratteristiche principali: • Sensore HD 1280x720 • Maggiorata sensibilità notturna • Trasformazione semplice del cannocchiale diurno in quello notturno • Conservazione dei vantaggi dell'ottica diurna durante la notte • Stabilità del punto di mira • Uso conveniente in una vasta gamma d’ingrandimento delle ottiche diurne • Illuminatore IR di lunga portata invisibile • Funzione di aumento supplementare della sensibilità SumLight™ • Distanza di localizzazione fino a 500 m • Avviamento istantaneo • Registrazione video incorporata • Alimentazione a batterie di accumulatori ad alta capacità del sistema B-Pack rapidamente ricaricabili • Sistema di montaggio a quattro punti con morsetto automatico • Compatibilità con adattatori di altri produttori • Resistenza all'impatto su grandi calibri: 12 calibro, 9.3x64, .375H&HH • Wi-Fi. Integrazione con dispositivi IOS e Android • Stream Vision. Controllo remoto, sorveglianza e streaming YouTube live tramite smartphone • Aggiornamento software remoto • Impermeabilità completa (IPX7) • Ampia gamma di temperature d’esercizio (-25 ÷ + 50 ° C) • MicroUSB. Sostegno alimentazione Power Bank 40 Unità e comandi 1. 2. 3. 4. 5. 6. 7. 8. 9. 10. 11. 12. 13. Funzionamento dei pulsanti Copriobiettivo Coperchio dell’oculare Coperchio del modulo batteria Leva di fissaggio della batteria Batteria ricaricabile Pulsante DESTRO Pulsante M (MENU) Pulsante SINISTRO Pulsante ON Manopola messa a fuoco della lenta Coperchio illuminatore IR Tappo del connettore dell’illuminatore IR Connettore per l’installazione dell’illuminatore IR Coperchio adattatore* 14. 15. 16. 17. 18. 19. 20. 21. 22. 23. 24. 25. 19 9 1 8 Tappo del 12 connettore dell'illuminatore IR Coperchio 11 illuminatore IR Inserto* 18 2 17 23 Coperchio Punto dell'ocu- di attacco lare Open Vite di bloccaggio 20 Vite 21 22 Leva dell’adattatore Leva di fissaggio della batteria Coperchio del modulo batteria Batteria ricaricabile 3 5 4 Display è spento Il dispositivo è acceso, menu di accesso rapido, menu principale Dispositivo è acceso SINISTRO (8) Navigazione nel menu Menu di accesso rapido 13 Connettore per l'installazione dell’illumina24 Pulsante IR 14 tore IR 25 Porta Leva micro USB illuminatore IR Navigazione sul menu Menu di accesso rapido Copriobiettivo su 15 Montaggio guida Weaver Pulsante M (MENU) Lente del cannocchiale ON (9) 10 Manopola messa a fuoco della lenta Pulsante SINISTRO 7 Dispositivo è spento MENU (7) 6 Pulsante DESTRO Pulsante ON Pulsante Modo di funzionamento Dispositivo è acceso Adattatore* 16 Porta microUSB Montaggio su guida Weaver Coperchio adattatore* Lente del cannocchiale Inserto* Adattatore* Vite di bloccaggio Vite Leva dell’adattatore Punto di attacco Pulsante IR Leva illuminatore IR DESTRO (6) IR (24) Dispositivo è acceso (modo “Video”) Dispositivo è acceso (modo “Foto”) Navigazione sul menu Menu di accesso rapido Il dispositivo è acceso, menu di accesso rapido, menu principale Prima breve pressione Accensione del dispositivo Accensione del display Successive Lunga pressione brevi pressioni – Accensione del dispositivo – Spegnimento del dispositivo Spegnimento del display / Spegnimento del dispositivo – Spegnimento Attivazione WiFi / Disattivazione Accensione SumLight™ SumLight™ WiFi Navigazione in alto, a sinistra, in senso antiorario Riduzione del parametro Accesso al menu di accesso Accesso al menu principale rapido Uscita dal sottomenu senza la conferma della scelta / uscita Conferma della scelta dal menu (passaggio al modo di osservazione) Navigazione in alto Uscita dal menu di accesso rapido Start Spegnimento registrazione video / registrazione – Passaggio al modo “Foto”) video Scattare una foto Passaggio al modo “Video” Verso il basso / A Destra / In senso orario Aumento del parametro Accensione IR Cambio di potenza IR Spegnimento IR Particolarità di funzionamento Il visore clip-on Forward F455 è progettato per l’uso prolungato. Per assicurare la durata di servizio e funzionalità completa del prodotto, seguite queste istruzioni: • Prima di utilizzare il visore clip-on, assicuratevi di installarlo seguendo le istruzioni nella sezione “Installazione del visore clip-on sul cannocchiale”. • Spegnere il visore clip-on dopo l'uso. • È vietato riparare e smontare di propria iniziativa il dispositivo di garanzia! • Il visore clip-on può essere utilizzato in un'ampia gamma di temperature. Se il visore clip-on è stato utilizzato a freddo ed è stato portato in un ambiente caldo, non tirarlo fuori dal coperchio per 2-3 ore. Questo impedirà la formazione del condensato sugli elementi ottici esterni. • Per assicurare il funzionamento sicuro, prevenire ed eliminare le cause dell’usura precoce o guasti della componentistica, eseguire tempestivamente l'ispezione tecnica e manutenzione del visore clip-on. • La batteria non deve essere esposta al surriscaldamento eccessivo dai raggi solari, fuoco o altre sorgenti di calore. *Elementi dell’adattatore FN (viene venduto separatamente) 41 Uso della batteria Il visore clip-on Forward F455 viene fornita con la batteria agli ioni di litio ricaricabile IPS7, che consente di utilizzare il visore clip-on per 9 ore. Caricare completamente la batteria prima del primo utilizzo. Carica della batteria: • Collegare la spina microUSB del cavo USB al connettore (C) della caricabatteria. • Collegare la spina del cavo USB alla scheda di rete. • Collegare la scheda di rete ad una presa a 110-220 V. • Sollevare la leva della caricabatteria (A). • Rimuovere la copertura protettiva dalla batteria ricaricabile. • Installare la batteria ricaricabile nel caricabatteria come mostrato nella figura, fissare la leva (A). • Quando il visore clip-on è installato sulla caricabatteria, l'indicatore verde (B) si illumina e lampeggia brevemente ad un certo intervallo: - una volta, se la carica della batteria è compresa tra 0 e 50%; - due volte, se la carica della batteria è compresa tra il 51 e 75%; - tre volte, se la carica della batteria è compresa tra 76 e 100%. • Se l’indicatore è costantemente verde, la batteria è completamente caricata. Scollegare la caricabatteria dalla rete, scollegare la batteria dalla caricabatteria. • Se l'indicatore della caricabatteria è costantemente rosso quando la batteria viene inserita, è probabile che lo stato di carica sia al di sotto del valore ammesso. Lasciare la batteria nella caricabatteria per il lungo periodo di tempo (fino a qualche ora), poi rimuoverla e reinserirla. • Se l'indicatore lampeggia in verde, la batteria è pronta all’uso; • Se l’indicatore continua a mandare la luce rossa, la batteria è difettosa e non può essere utilizzata. Sostituire la batteria. Attenzione! Per la ricarica, utilizzare sempre la caricabatteria fornita con il visore clip-on o la caricabatteria Pulsar IPS (viene venduta separatamente). L'uso delle altre caricabatterie può causare dei danni irreparabili alla batteria. Installazione della batteria: • Abbassare la leva(4). • Rimuovere il coperchio protettivo del modulo batteria (3). • Rimuovere la copertura protettiva dalla batteria (5). • Installare la batteria (5) nello slot previsto sul corpo del visore clip-on in modo che l'elemento F (sporgenza sul corpo della batteria) si trovi sul fondo. • Fissare la batteria sollevando la leva (4). Attenzione! Il dispositivo può essere alimentato da una sorgente di alimentazione esterna come Power Bank (5V). Per collegare una sorgente di alimentazione esterna al dispositivo, collegare il cavo USB alla porta microUSB (14) del dispositivo. Per approfondire, vedere la sezione 8, Alimentazione esterna Precauzioni: • Non utilizzare la caricabatteria se la sua costruzione è stata modificata o la batteria stessa è stata danneggiata. • Durante la ricarica, non lasciare la batteria incustodita. • Non lasciare la caricabatteria con la batteria collegata alla rete oltre 24 ore dopo averla completamente caricata. • La batteria deve essere caricata ad una temperatura dell'aria di 0 °C ÷ +45 °C. In caso contrario, è possibile • • • • • • • • • ridurre la durata di funzionamento della batteria. Non caricare la batteria immediatamente dopo averla spostata dall’ambiente freddo a quello caldo. Attendere 30 - 40 minuti fino la batteria si riscalderà bene. Non esporre la batteria alle temperature elevate o fiamma libera. La batteria non è intesa per essere immersa in acqua. Si sconsiglia di collegare dispositivi di terze parti aventi il consumo di corrente superiore a quello ammesso. La batteria è dotata del sistema di protezione dal cortocircuito, tuttavia è necessario evitare delle situazioni che possano causare il cortocircuito. Non smontare e non deformare la batteria. Non sottoporre la batteria ad impatti e cadute. Durante la conservazione a lungo termine, la batteria deve essere caricata parzialmente – non deve essere caricata o scaricata completamente. Tenere la batteria fuori dalla portata dei bambini. Alimentazione esterna L'alimentazione esterna viene fornita da una sorgente di alimentazione esterna del tipo Power Bank (5V). • Collegare la sorgente di alimentazione esterna al connettore USB (14) del visore clip-on. • Il visore clip-on passerà al funzionamento da alimentazione esterna, mentre la batteria IPS7 verrà caricata gradualmente. con il percentuale dello stato di carica. • Sul display appare il pittogramma della batteria • Se il dispositivo è collegato da un computer, scheda di rete o power bank che non è conforme allo standard Battery Charger (BC 1.0), la carica della batteria IPS7 non inizierà e verrà visualizzata solo il pittogramma di . alimentazione esterna Se il visore clip-on è alimentato da una sorgente di alimentazione esterna, ma la batteria IPS7 non è • collegata, viene visualizzata il pittogramma . • Quando si scollega una sorgente di alimentazione esterna, il visore clip-on inizierà a funzionare a batteria. Funzionamento Installazione del visore clip-on sul cannocchiale • Selezionare l'adattatore* con un inserto del diametro richiesto in base al diametro esterno del Vostro cannocchiale (vedere la tabella). • La designazione 42 mm / 50 mm / 56 mm nel nome dell'adattatore indica l’apertura luminosa della lente del cannocchiale. • Rimuovere il coperchio (16) dall'adattatore (19) ruotandolo in senso orario. • Prima di installare il visore clip-on si consiglia di sgrassare il corpo della lente del cannocchiale. • Installare l'inserto (18) nell'adattatore (19) finché non si arresta. • Installare l'adattatore con l'inserto sulla lente per il cannocchiale diurno finché non si arresta (17). • Spostare la leva (22) dalla posizione iniziale “aperto” (OPEN) alla posizione “chiuso” (CLOSE). • Controlla se l'adattatore combacia all'obiettivo. • Se c'è qualche gioco, procedere quanto segue: - Allentare la vite di bloccaggio (20) con una chiave a brugola (S = 2 mm). 42 - Stringere la vite (21) con una chiave a brugola (S = 4 mm) con la forza necessaria per assicurare un accoppiamento di spinta dell'adattatore sulla lente. Lo sforzo di serraggio deve essere 1 N·m. - Stringere la vite di bloccaggio (20). • Lo sforzo può essere verificato con un cacciavite dinamometrico. • Inserire strettamente il visore clip-on nell'adattatore in modo che i perni situati nel corpo dell'adattatore entrino nelle scanalature (23) del visore clip-on. Girare il visore clip-on in senso orario finché non si arresta. La marcatura nella forma di un triangolo sul visore clip-on e marcatura nella forma di un quadrato sul corpo dell'adattatore devono coincidere. • Per allineare il visore clip-on, spostare la leva (22) nella posizione APERTO (OPEN) e allinearlo in senso orizzontale. * Viene venduto separatamente. Conformità del diametro interno dell’inserto e diametro esterno del corpo della lente del dispositivo ottico diurno (visore, cannocchiale) Il diametro interno dell’inserto, mm Diametro esterno della lente del cannocchiale, mm 60 59,7-60,6 61 60,7-61,6 62 61,7-62,6 Adattatore ad anello FN 56 mm 63 62,7-63,6 64 63,7-64,6 65 64,7-65,6 Attivazione e regolazione dell'immagine • Rimuovere il coperchio della lente (1), ruotandolo in senso antiorario. • Premere brevemente il pulsante ON (9) per accendere il visore clip-on: un’immagine apparirà sul display. • Regolare l'immagine nitida dei simboli sul display ruotando l'anello di regolazione diottrica dell'oculare del Vostro cannocchiale. In seguito, indipendentemente dalla distanza e dalle altre condizioni, non è necessario ruotare l'anello di regolazione diottrica dell'oculare. • Per mettere a fuoco l'oggetto di osservazione, ruotare la manopola di messa a fuoco della lente (10). Le impostazioni di base (regolazione della luminosità e del contrasto) vengono modificate tramite il menu di accesso rapido. Dopo l'uso, spegnere il visore clip-on premendo a lungo il pulsante ON (9). Modello dell’adattore ad anello Funzioni del menu di accesso rapido • Accedere al menu di accesso rapido premendo brevemente il pulsante M (7). • Per navigare tra le funzioni sottodescritte, premere brevemente il pulsante M (7). • Luminosità - premere i pulsanti DESTRO (6) e SINISTRO (8) per modificare il valore di luminosità del display da 0 a 20. - premere i pulsanti DESTRO (6) e SINISTRO (8) per modificare il valore del contrasto dell'immagine da 0 a 20. • Contrasto Funzioni del menu principale • Accedere al menu principale premendo a lungo il pulsante M (7). • Per navigare tra le voci del menu principale, premere i pulsanti La tabella di selezione degli inserti per i cannocchiali diurni Modello dell’adattore ad anello Adattatore ad anello FN 42 mm Adattatore ad anello FN 50 mm Conformità del diametro interno dell’inserto e diametro esterno del corpo della lente del dispositivo ottico diurno (visore, cannocchiale) Il diametro interno dell’inserto, mm Diametro esterno della lente del cannocchiale, mm 47 46,7-47,6 48 47,7-48,6 49 48,7-49,6 50 49,7-50,6 55 54,7-55,6 56 55,7-56,6 57 56,7-57,6 58 57,7-58,6 59 58,7-59,6 Vista d'insieme del menu: DESTRO (6) e SINISTRO (8). • Per accedere alla sottovoce del menu principale, premere brevemente il pulsante M (7). • Per uscire dalla sottovoce del menu principale, premere e tenere premuto il pulsante M (7). • L'uscita automatica dal menu principale avviene dopo 10 secondi di inattività. La composizione e descrizione del menu • Luminosità dei pittogrammi • Impostazioni Wi-Fi • Impostazioni generali • Spegnimento automatico • Informazioni sul dispositivo 43 Luminosità Questa voce di menu consente di regolare la luminosità dei pittogrammi sul display del visore dei pitto- clip-on. grammi • Premere e tenere premuto il pulsante M (7) per accedere al menu principale. • Utilizzare i pulsanti DESTRO (6) e SINISTRO (8) per selezionare la voce di menu “Luminosità pittogrammi”. • Premere brevemente il pulsante M (7) per accedere al sottomenu. • Utilizzare i pulsanti DESTRO (6) e SINISTRO (8) per selezionare il livello di luminosità dei pittogrammi. • Per salvare la scelta e uscire dal sottomenu, premere e tenere premuto il pulsante M (7). Impostazioni generali La voce di menu consente di effettuare le seguenti impostazioni: • Lingua • Tempo • Formattazione • Data • Impostazioni predefinite Lingua Selezione della lingua dell’interfaccia. • Premere e tenere premuto il pulsante M (7) per accedere al menu principale. • Usare i pulsanti DESTRO (6) e SINISTRO (8) per selezionare il sottomenu “Impostazioni generali”. • Premere brevemente il pulsante M (7) per accedere al sottomenu. • Usare i pulsanti DESTRO (6) e SINISTRO (8) per selezionare la voce del sottomenu “Lingua”. • Premere brevemente il pulsante M (7) per accedere al sottomenu. • Usare i pulsanti DESTRO (6) e SINISTRO (8) per selezionare una delle lingue dell’interfaccia disponibili: inglese, tedesco, spagnolo, francese, russo, italiano. • Per salvare la selezione e uscire dal sottomenu, premere e tenere premuto il pulsante M (7). Data Impostazione della data • Premere e tenere premuto il pulsante M (7) per accedere al menu principale. • Usare i pulsanti DESTRO (6) e SINISTRO (8) per selezionare il sottomenu “Impostazioni generali”. • Premere brevemente il pulsante M (7) per accedere al sottomenu. • Usare i pulsanti DESTRO (6) e SINISTRO (8) per selezionare la voce del sottomenu “Data”. • Premere brevemente il pulsante M (7) per accedere al sottomenu. • La data viene visualizzata in formato gg / mm / aaaa (12/04/2017) • Usare i pulsanti DESTRO (6) e SINISTRO (8) per selezionare il giorno, mese ed anno desiderati. (Tasto DESTRO (6) - per aumentare il valore, pulsante SINISTRO (8) - per diminuire il valore). Per spostarsi tra i posti, premere brevemente il pulsante M (7). • Per salvare la data selezionata e uscire dal sottomenu, tenere premuto il pulsante M (7). Tempo Impostazione del tempo • Premere e tenere premuto il pulsante M (7) per accedere al menu principale. • Usare i pulsanti DESTRO (6) e SINISTRO (8) per selezionare il sottomenu “Impostazioni generali”. • Premere brevemente il pulsante M (7) per accedere al sottomenu. • Usare i pulsanti DESTRO (6) e SINISTRO (8) per selezionare la voce del sottomenu “Tempo”. • Premere brevemente il pulsante M (7) per accedere al sottomenu. • Premere i pulsanti DESTRO (6) e SINISTRO (8) per selezionare il formato del tempo – 24/12 (o PM/AM). • Per passare all’impostazione dell’ora, premere il pulsante M (7). • Premere i pulsanti DESTRO (6) e SINISTRO (8) per selezionare il valore dell’ora (pulsante DESTRO (6) - per aumentare il valore, pulsante SINISTRO (8) - per diminuire il valore) • Per passare all’impostazione dei minuti, premere il pulsante M (7). • Premere i tasti DESTRO (6) e SINISTRO (8) per selezionare il valore dei minuti. • Per salvare il tempo selezionato e uscire dal sottomenu, tenere premuto il pulsante M (7). Imposta- Questo voce consente di regolare il visore clip-on per il funzionamento nella rete Wi-Fi. zioni Wi-Fi Nota: il Wi-Fi viene attivato / disattivato premendo a lungo il pulsante SINISTRO (8). Impostazione della password Impostazione del livello di accesso Questo sottomenu consente di impostare la password di accesso al visore clip-on da un dispositivo esterno. La password viene utilizzata quando un dispositivo esterno (ad esempio uno smartphone) viene collegato al visore clip-on. • Premere e tenere premuto il pulsante M (7) per accedere al menu principale. • Usare i pulsanti DESTRO (6) e SINISTRO (8) per selezionare la voce di menu “Impostazioni Wi-Fi”. • Premere brevemente il pulsante M (7) per accedere al sottomenu. • Usare i pulsanti DESTRO (6) e SINISTRO (8) per selezionare la voce del sottomenu “Impostazione password”. • Premere brevemente il pulsante M (7) per accedere al sottomenu. • La password apparirà sul display – il valore predefinito è 12345678. • Utilizzare i pulsanti RIGHT (6) e LEFT (8) per impostare la password desiderata (il pulsante RIGHT - per aumentare il valore, il pulsante LEFT - per diminuire il valore). Per spostarsi tra i posti, premere il pulsante M (7). • Per salvare la password e uscire dal sottomenu, tenere premuto il pulsante M (7). Questa sottovoce consente di impostare il livello di accesso necessario al Vostro dispositivo, che riceve l’applicazione Stream Vision. Livello Padrone. L’utente di Stream Vision ha il pieno accesso a tutte le funzioni del dispositivo. Livello Ospite. L’utente di Stream Vision ha la possibilità di visionare solo i video dal dispositivo in tempo reale. • Premere e tenere premuto il pulsante M (7) per accedere al menu principale. • Usare i pulsanti DESTRO (6) e SINISTRO (8) per selezionare la voce di menu “Impostazioni Wi-Fi”. • Premere brevemente il pulsante M (7) per accedere al sottomenu. • Usare i pulsanti DESTRO (6) e SINISTRO per selezionare il sottomenu “Impostazione del livello di accesso”. • Usare i pulsanti DESTRO (6) e SINISTRO per selezionare il livello di accesso “Padrone” o “Ospite”. • Per confermare la scelta e uscire dal sottomenu, premere e tenere premuto il pulsante M (7). 44 Impostazioni generali Ritorno alle impostazioni predefinite • Premere e tenere premuto il pulsante M (7) per accedere al menu principale. • Usare i pulsanti DESTRO (6) e SINISTRO (8) per selezionare il sottomenu Barra di stato “Impostazioni generali”. • Premere brevemente il pulsante M (7) per accedere al sottomenu. • Utilizzare i pulsanti DESTRO (6) e SINISTRO (8) per selezionare la voce di sottomenu “Impostazioni predefinite”. • Premere brevemente il pulsante M (7) per accedere al sottomenu. • Usare i pulsanti DESTRO (6) e SINISTRO (8) per selezionare “Sì” per tornare alle impostazioni di fabbrica o “No” per annullare l’azione. • Confermare la scelta premendo brevemente il pulsante M (7). Le impostazioni seguenti verranno riportate al loro stato originale prima di essere modificate dall’utente: Spegnimento automatico – Livello di luminosità – 10 Lingua – inglese Livello di contrasto – 8 Wi-Fi – Disattivato (password disattivato predefinita) Formatta- La formattazione della scheda di memoria interna elimina irrimediabilmente tutti i file registrati. zione Attenzione! Assicuratevi di non aver più bisogno dei file da eliminare o fate una copia di backup su altro supporto. • Premere e tenere premuto il pulsante M (7) per accedere al menu principale. • Usare i pulsanti DESTRO (6) e SINISTRO (8) per selezionare il sottomenu “Impostazioni generali”. • Premere brevemente il pulsante M (7) per accedere al sottomenu. • Usare i pulsanti DESTRO (6) e SINISTRO (8) per selezionare la voce del sottomenu “Formattazione”. • Premere brevemente il pulsante M (7) per accedere al sottomenu. • Usare i pulsanti DESTRO (6) e SINISTRO (8) per selezionare “Sì” per effettuare la formattazione o “No” per annullare l’azione. • Confermare la scelta premendo brevemente il pulsante M (7). Spegnimento automatico Questa voce consente di attivare lo spegnimento automatico del visore clip-on dopo un certo periodo di tempo durante il quale il visore stava inclinato orizzontalmente o verticalmente oltre di 70 °; a destra o sinistra oltre di 30 °. Allo stesso tempo gli elementi di comando del visore clipon non devono essere coinvolti. • Premere e tenere premuto il pulsante M (7) per accedere al menu principale. • Usare i pulsanti DESTRO (6) e SINISTRO (8) per selezionare la voce di menu “Spegnimento automatico”. • Premere brevemente il pulsante M (7) per accedere al sottomenu. • Usare i pulsanti DESTRO (6) e SINISTRO (8) per selezionare il periodo di tempo durante il quale il visore si spegnerà automaticamente (1 min, 3 min, 5 min) o selezionare “Off” se desiderate disattivare la funzione del spegnimento automatico. • Confermare la scelta premendo brevemente il pulsante M (7). Nota: il pittogramma dello stato della funzione “Spegnimento automatico” viene visualizzata nella barra di stato 1 min. Informazioni sul visore clip-on • Premere e tenere premuto il pulsante M (7) per accedere al menu principale. • Usare i pulsanti DESTRO (6) e SINISTRO (8) per selezionare la voce di menu “Informazioni sul visore”. • Premere brevemente il pulsante M (7) per accedere al sottomenu. Le seguenti informazioni sul visore sono disponibili per l’utente: nome visore clip-on numero di serie del visore clip-on versione dell’assemblaggio completo versione del software del visore clip-on del visore clip-on numero visore clip-on SKU informazioni di servizio La barra di stato si trova nella parte inferiore del display e visualizza le informazioni sullo stato corrente del visore clip-on, tra cui: • Funzione SumLight™ • Spegnimento automatico 1 min (se la funzione è attivata) • Il funzionamento dell'illuminatore IR (ad esempio, 3 ° grado) • Connessione Wi-Fi • Orologio • Livello di carica della batteria (se il visore clip-on viene alimentato da una batteria) o da una sorgente di alimentazione esterna (se il visore clip-on è alimentato • Indicatore di alimentazione da una sorgente di alimentazione esterna) o • Indicatore di carica della batteria con la percentuale di carica corrente (se la batteria è installata e viene caricata da una sorgente di alimentazione esterna) Nota: quando si aumentano gli ingrandimenti dell’ottica diurna su cui e’ montato il visore “la barra di stato puo” può andare parzialmente o completamente oltre i limiti dell’immagine visibile. Illuminatore IR Il visore clip-on è dotato dell’illuminatore IR rimovibile che funziona alla lunghezza d'onda di 940 nm, che consente di aumentare la distanza di osservazione in condizioni di scarsa illuminazione o in buio assoluto. Invece dell'illuminatore IR incluso, è possibile installare altri illuminatori IR Pulsar (vengono venduti separatamente). • Rimuovere il tappo(12) dal connettore per l'installazione dell'illuminatore IR (13). • Rimuovere il coperchio (11) dall'illuminatore IR. • Installare l'illuminatore IR sul dispositivo. La leva (25) deve essere nella posizione superiore. • Bloccare l'illuminatore IR abbassando la leva (25) verso il basso. • Per attivare l'illuminatore IR: accendere il dispositivo con il pulsante ON (9). • Se l'illuminatore IR non è collegato, il pittogramma dell'illuminatore disattivato verrà visualizzato nella barra di stato. Se l'illuminatore IR è collegato, il pittogramma non viene visualizzato. • Premere brevemente il pulsante IR (24) all’estremità dell'illuminatore. Livello di potenza all'accensione è minimo . • Il pittogramma dell’illuminatore IR con il livello di potenza appropriato viene visualizzato nella barra di stato. > • Premendo brevemente il pulsante IR (24), commutate a sequenza il livello di potenza dell'illuminatore ( > > ). • Spegnere l'illuminatore IR premendo a lungo il pulsante IR (24). • Il pittogramma IR scompare dal display. Nota: Quando l'illuminatore IR viene spento, il livello di potenza non viene ricordato nella memoria del visore clip-on. Quando il visore clip-on viene acceso, l'illuminatore si accende al livello minimo di potenza - IR1. 45 Funzione Wi-Fi a CMOS in caso di diminuzione del livello di illuminamento, che rende facile l’osservazione in condizioni di scarso illuminamento senza usare l’illuminatore IR. • Per attivare la funzione SumLight™, premere brevemente il pulsante SINISTRO (8). • Per disattivare la funzione, premere brevemente ancora una volta il pulsante SINISTRO (8). • Il pittogramma SumLight™ (attivata o disattivata ) viene visualizzata nella barra di stato. Attenzione! Quando la funzione SumLight™ è attivata, la rumorosità nell'immagine aumenta, la frequenza di cambio dei quadri diminuisce, l'immagine rallenta – con un spostamento brusco del visore clip-on l'immagine potrebbe “sfocare”, tali effetti non sono difetti. Sul display del visore clip-on, potrebbero essere visibili punti bianchi luminosi (pixel), il numero dei punti potrebbe aumentare quando la funzione SumLight™ è attivata, ciò è dovuto alle particolarità di questa funzione e anche un difetto non lo è. Modo FOTO. Fotografia di un'immagine • Passare al modo Foto premendo a lungo il pulsante DESTRO (6). • Premere brevemente il pulsante DESTRO (6) per scattare una foto. L'immagine resta immobile per 0,5 secondi. • Il file dell’immagine viene salvato nella memory card integrata. Modo video. Registrazione dei video • Premere a lungo il pulsante DESTRO (6) per passare al modo Video. • Premere brevemente il pulsante DESTRO (6) per avviare la registrazione video. scompare, al suo posto appare il pittogramma REC e anche • Iniziata la registrazione video, il pittogramma il temporizzatore di registrazione di un video nel formato MM:SS (minuti:secondi) *; • Per interrompere la registrazione del video, premere e tenere premuto il pulsante DESTRO (6). • I file video vengono salvati sulla scheda di memoria incorporata dopo che la registrazione video è stata disattivata. * Il pittogramma viene visualizzata per 2 secondi e poi scompare. Se in seguito il pulsante DESTRO (6) viene premuta brevemente, il pittogramma viene visualizzato, il temporizzatore della registrazione mostra il tempo corrente della registrazione video. Note: • Dopo aver disattivato la registrazione video / dopo aver scattato una foto; quando il visore clip-on si spegne, se la registrazione è stata attivata; se la scheda di memoria è riempita oltre misura, se durante la registrazione video la scheda di memoria è piena (sul display viene visualizzato il messaggio “Memoria è riempita oltre misura”). • Durante la registrazione video, è possibile accedere al menu e lavorare nel menu del visore clip-on; • I video e foto registrati vengono salvati nella scheda di memoria incorporata del visore clip-on come img_xxx. jpg (per le foto); video_xxx.mp4 (per video). xxx - comune registratore file a tre cifre (per le foto e video); • il registratore usato nella denominazione dei file multimediali non viene azzerato; • Quando un file dal mezzo della lista viene eliminato, il suo numero non viene occupato da un altro file. • Quando il registratore è riempito oltre misura, viene creata una nuova cartella – img_xxxx. Dove xxxx è un registratore di cartelle. • La lunghezza massima di un file video registrato è sette minuti. Scaduto questo tempo, il video viene registrato in un nuovo file. Il numero dei file è limitato dalla capacità di memoria interna del visore clip-on; • Monitorate regolarmente la capacità di memoria libera della scheda di memoria incorporata, trasferite il filmato su altri supporti, liberando lo spazio sulla scheda di memoria; • Nei file video e foto registrati, vengono visualizzate le informazioni grafiche (barra di stato, pittogrammi, ecc.). Registrazione video e fotografia Funzione “Display off” • Il visore clip-on ha la funzione di comunicazione wireless con dispositivi mobili (tablet, smartphone) tramite il Wi-Fi. • Accendere il modulo wireless premendo a lungo il pulsante SINISTRO (8). Il funzionamento del Wi-Fi viene visualizzato nella barra di stato come segue: Wi-Fi é disattivato Wi-Fi è attivato dall'utente, il processo di accensione del Wi-Fi nel visore clip-on è in corso Nessun pittogramma Wi-Fi è attivato, la connessione al visore clip-on è assente Wi-Fi è attivo, la connessione con il visore clip-on è stabilita Il visore clip-on è riconosciuto dal dispositivo mobile come “Forward F_XXXX”, dove XXXX sono le ultime quattro cifre del numero di serie. Dopo aver inserito la password sul dispositivo mobile (per ulteriori informazioni sull'impostazione della password, vedere la sottovoce “Impostazioni Wi-Fi” nella voce “Funzioni del menu principale” dell'istruzione) e stabilire la connessione, il pittogramma nella barra di stato cambia in , il segnale video sullo schermo del dispositivo mobile si avvia dopo che il pulsante “Mirino” é stato attivato sullo schermo del dispositivo mobile. Il pittogramma nella barra di stato cambia in . Nota: è possibile impostare il livello di accesso richiesto al proprio dispositivo che viene ricevuto dall'applicazione Stream Vision nella voce del menu “Impostazione del livello di accesso”. Funzione “SumLight™” • La funzione SumLight™ consente di aumentare in modo significativo il livello di sensibilità di un sensore Il visore clip-on ha la funzione di registrazione video (fotografia) di un immagine osservata sulla scheda di memoria incorporata. Prima di usare le funzioni di registrazione video e fotografia, leggete le sottovoci “Impostazione della data”, “Impostazione del tempo” nella voce “Funzioni menu principale” di questa istruzione. Il dispositivo di registrazione incorporato funziona in due modi: • FOTO (fotografia: il pittogramma viene visualizzato nell'angolo in alto a destra del display). Se il numero presunto degli immagini che è ancora possibile salvare nella memoria flash supera 100, viene visualizzata la scritta “> 100”. viene visualizzato nell'angolo in alto a destra del display - il • VIDEO (registrazione video, il pittogramma tempo di registrazione rimanente totale prendendo in considerazione la risoluzione corrente nel formato MM:SS - minuti:secondi). Quando è acceso, il visore clip-on è in modo Video. Per commutare tra i modi del visore clip-on, premere e tenere premuto il pulsante DESTRO (6). Il passaggio tra i modi avviene in modo ciclico (Video-> Foto-> Video ...). Quando si utilizza questa funzione, il visore clip-on entra in modo standby, che consente di accenderlo rapidamente se è necessario. Opzioni per lavorare con la funzione “Display off”: Opzione 1. Il visore clip-on è spento. È necessario accendere il visore clip-on e attivare la funzione “Display off”. • Accendere il visore clip-on premendo brevemente il pulsante ON (9). • Attivare la funzione display off: premere e tenere premuto il pulsante ON (9). Il messaggio “Display off” apparirà sullo schermo con il conteggio di tempo. • Rilasciare il pulsante ON (9). • Per disattivare la funzione “Display off”, premere brevemente ON (9). Opzione 2. La funzione “Display off” è attiva, è necessario scollegare il visore clip-on. • Premere e tenere premuto il pulsante ON (9). Il display mostra il messaggio “Display off” con il conteggio del tempo di 3,2,1,0. 46 • Tenere premuto il pulsante ON (9) fino allo spegnimento del visore clip-on (la disconnessione del visore clip- on si verificherà dopo il conteggio 0) *. *Lo spegnimento del dispositivo più tardo è possibile in relazione al completamento dell'elaborazione delle informazioni da parte del processore per il salvataggio dei dati. In questo caso, il display mostra 0 nel tempo del conteggio. Connessione USB • Accendere il visore clip-on premendo il pulsante ON (9) (il dispositivo spento non viene rilevato dal computer). • Collegare un'estremità del cavo USB al connettore microUSB (14) del visore clip-on, l'altra alla porta del Vostro computer. • Il dispositivo verrà rilevato dal computer automaticamente, l'installazione dei driver non è richiesta. • Il display mostrerà due opzioni di connessione: Memory card (unità esterna) e Power (alimentazione). • Utilizzare i pulsanti DESTRO (6) e SINISTRO (8) per selezionare un'opzione di connessione. • Premere brevemente il pulsante M (7) per confermare la selezione. Opzioni di connessione: Memory card (unità esterna). • Quando si sceglie questa opzione, il dispositivo viene riconosciuto dal USB connection computer come chiavetta USB. Questa opzione è progettata per lavorare con i file che sono salvati nella memoria del dispositivo, mentre le funzioni del dispositivo non sono disponibili, il dispositivo non si spegne. Disconnesso dal computer, il dispositivo continua a funzionare. Use as power • Se il video è stato registrato al momento della connessione, la registrazione Use as memory card si interrompe e viene salvata. Power (alimentazione). • Quando si sceglie questa opzione, il computer viene utilizzato dal dispositivo come alimentatore esterno. Il pittogramma appare nella barra di stato. Il dispositivo continua a funzionare, tutte le funzioni sono disponibili. • La carica della batteria installata nel dispositivo non viene eseguita. Disattivazione USB. • Quando l'USB viene disconnesso dal dispositivo collegato in modo Memory Card, il dispositivo rimane acceso. • Quando l'USB viene disconnesso dal dispositivo collegato in modo Power, il dispositivo continua a funzionare dalla batteria se è sufficientemente caricata. • Utilizzare i pulsanti SINISTRO (8) e DESTRA (6) per spostare il • • • • display orizzontalmente (asse X) e verticalmente (asse Y) in modo che il punto di impatto si sposti al centro del segno di mira del Vostro cannocchiale. Per commutare tra le coordinate X e Y, premere brevemente il pulsante M (7). Il passo dello spostamento dell'immagine è 1 pixel del sensore. La gamma dello spostamento dell'immagine è di +/- 20 pixel in orizzontale (asse X), +/- 20 pixel in verticale (asse Y). Per uscire dal menu e salvare le impostazioni, premere e tenere premuto il pulsante M (7) per due secondi. Stream Vision Coordinate del display Punto di impatto Segno di mira del cannocchiale Spostamento del display I visori clip-on supportano la tecnologia che consente di trasmettere tramite il Wi-Fi un’immagine dal dispositivo al Vostro smartphone o tablet in tempo reale. Le istruzioni dettagliate sul funzionamento di Stream Vision possono essere trovate nell’opuscolo separato o sul sito www.pulsar-vision.com Nota: la costruzione del dispositivo permette di aggiornare il software. È possibile effettuare l'aggiornamento di software tramite l'applicazione Stream Vision. Per scaricare l'applicazione Stream Vision, scansionare dei codici QR: Ispezione tecnica Il visore clip-on è dotato del montaggio su guida Weaver aggiuntivo (15) con il quale è possibile installare altri accessori. Previamente è necessario smontare l'illuminatore IR rimovibile (vedere la Sezione “Illuminatore IR”). È consigliato eseguire l'ispezione tecnica prima di ogni utilizzo del dispositivo. Verificare: • Aspetto del dispositivo (non sono ammesse fessure sul corpo). • Lo stato delle lenti dell'obiettivo, oculare del visore clip-on, lente dell'illuminatore IR (fessure, macchie di grasso, sporco e altri depositi non sono ammessi). Pulire le superfici esterne delle parti di metallo e plastica da polvere, sporco e umido; strofinatele con un panno di cotone. • Lo stato della batteria (deve essere caricata) e contatti elettrici sulla batteria (sali e ossidazioni non sono ammessi). • Funzionalità degli elementi di comando • La correttezza e sicurezza dell'attacco del visore clip-on sul cannocchiale. Calibrazione del display Manutenzione Utilizzo del montaggio su guida weaver Il visore clip-on è impostato in modo che dopo la sua installazione sul cannocchiale, che è stato aggiustato correttamente il tiro, la correzione del punto di mira non è necessaria. Se il visore clip-on ha subito un colpo forte o caduta, potete verificare il punto d'impatto e se è necessario, correggerlo da soli senza contattare il centro di assistenza. • Per accedere al modo di calibrazione del display, premere e tenere premuto il pulsante M (7) per 10 secondi. • Si visualizzano le coordinate del display X = 0; Y = 0. La manutenzione va effettuata almeno due volte all'anno e comprende l’eseguire delle operazioni seguenti: • Usare un panno di cotone per pulire le superfici esterne delle parti di metallo e plastica da polvere e sporco. È permesso l’uso del grasso al silicono. • Pulire i contatti elettrici della batteria e posti d’installazione della batteria sul dispositivo utilizzando un solvente sgrassato organico. • Ispezionare le lenti dell'oculare e lenti obiettivi. Se è necessario, rimuovere polvere e sabbia dalle lenti (preferibilmente con un metodo senza contatto). Pulire le superfici esterne dell'ottica con i detergenti appositi. 47 Deposito Tenere il visore sempre nella fodera, in luogo secco e ben ventilato. Se il dispositivo viene depositato a lungo termine, assicuratevi di rimuovere la batteria. Malfunzionamento Possibile causa Risoluzione Il dispositivo non si mette a fuoco. Impostazione erronea. Impostare il dispositivo in base alla sezione “Funzionamento”. Controllare le superfici esterne della lente e oculare; se è necessario, pulirle da polvere, condensa, brina, ecc. Se fa freddo, è possibile usare dei rivestimenti anti-appannamento (ad esempio, come per gli occhiali correttivi). Il punto d'impatto non coincide con il punto di mira. Il display richiede calibrazione. Calibrare il display in base alle istruzioni riportate nella sezione “Calibrazione del display”. Manca la rigidità nell'installazione del dispositivo sul cannocchiale o del cannocchiale sull’arma. Controlla la rigidità dell’installazione del dispositivo sul cannocchiale e l’affidabilità di fissaggio del cannocchiale all’arma. Assicurarsi di usare proprio tale tipo di cartuccia con cui in precedenza è stato effettuato il tiro d’aggiustamento della Vostra arma e cannocchiale. Se avete effettuato il tiro d’aggiustamento del cannocchiale in estate e l’utilizzate in inverno (o viceversa), è possibile che esista qualche cambiamento nel punto zero del tiro d’aggiustamento. Allo sparo, il visore clip-on Stringimento dell’adattatore scivola dal cannocchiale. insufficiente. Inserto selezionato inesattamente. Scegliere un inserto appropriato e stringere l’adattatore come raccomandato. Risoluzione problemi Malfunzionamento Possibile causa Risoluzione Il visore clip-on non si accende. La batteria è completamente scaricata. Caricare la batteria Non funziona da una sorgente di alimentazione esterna. Il cavo USB è danneggiato. Sostituire il cavo USB. Alimentatore esterno è scaricato. Caricare l'alimentatore esterno. Lo smartphone o tablet non si connette al dispositivo. La password nel dispositivo è modificata. Eliminate la rete e riconnettervi inserendo la password registrata nel dispositivo. Il dispositivo si trova nella zona con Per assicurare il funzionamento stabile del un numero elevato dei reti Wi-Fi Wi-Fi, spostare il dispositivo in una zona che potrebbero disturbarlo. con un numero inferiore delle reti Wi-Fi o zona in cui esse sono assenti. La trasmissione del segnale Il dispositivo si trova fuori dalla Spostare il dispositivo nella zona della visibilità diretta del segnale Wi-Fi. tramite il Wi-Fi manca o si zona della copertura del segnale interrompe. Wi-Fi. Tra il dispositivo e ricevitore del segnale esistono degli ostacoli (ad esempio, pareti in calcestruzzo). Qualità bassa dell'immagine. Questi problemi possono verificarsi quando si osserva il maltempo (neve, pioggia, nebbia, ecc.). Immagine troppo scura. Bassa luminosità/contrasto è impostato. Le strisce sono apparse sul display o l'immagine è scomparsa. Il dispositivo è stato sottoposto Dopo l'esposizione alla sollecitazione alla sollecitazione statica durante il statica il dispositivo può riavviarsi da funzionamento. solo o spegnere e accendere di nuovo il dispositivo. Con un'immagine chiara del Polvere o condensa sulle superfici punto di mira l’immagine di ottiche esterne o interne della un oggetto è sfocata. lente. La lente è sfocata. Display non è centrato. Regolare la luminosità/contrasto. Impossibile aprire il morsetto dell'adattatore. Inserto selezionato in modo errato. Selezionare l’inserto appropriato. Verificare la presenza di un gioco tra le ganasce dell'adattatore. Cliccate sul link per trovare le risposte alle domande più frequenti. https://www.pulsar-nv.com/glo/support/faq/79 Strofinare le superfici ottiche esterne con un panno di cotone morbido. Rendere asciutto - lasciare per 4 ore in una stanza calda. Impostare la nitidezza dell’immagine ruotando il regolatore della lente. La posizione del visore clip-on non Far retrocedere l'adattatore e impostare il display al centro del campo ottico (vedere è stata regolata sul cannocchiale la sezione “Funzionamento”). diurno. Compatibilità elettromagnetica. Questo prodotto è conforme ai requisiti dello standard europeo EN 55032:2015, Classe A. Attenzione: l’esercizio di questo prodotto in un’area residenziale può causare dei radiodisturbi. Attenzione! I dispositivi digitali Forward richiedono una licenza se vengono esportati al di fuori del vostro paese. Protezione dell’ambiente! Il vostro apparecchio contiene materiale che può essere recuperato o riciclato. Portarlo ad un punto di raccolta autorizzato. 48 РУССКИЙ Технические характеристики МОДЕЛЬ SKU# ОПТИЧЕСКИЕ ХАРАКТЕРИСТИКИ Фокус объектива, мм Относительное отверстие, D/f' Поле зрения (горизонтальное), ° Поле зрения (горизонтальное), м@100м Комплект поставки FORWARD F455 78186 50 1:1 6,3 11 Макс. дистанция наблюдения животного ростом 1,7м, м 500 Мин. дистанция фокусировки, м Диапазон рекомендуемой кратности дневного прицела, крат ЭЛЕКТРОННЫЕ ХАРАКТЕРИСТИКИ Тип и разрешение сенсора Тип и разрешение дисплея Чуствительность прибора, мВт (длина волны 780нм, 25 шт/мм разрешение) Чуствительность прибора, мВт (длина волны 915нм, 25 шт/мм разрешение) CЪЕМНЫЙ ИК-ОСВЕТИТЕЛЬ Тип / Длина волны, нм ЭКСПЛУАТАЦИОННЫЕ ХАРАКТЕРИСТИКИ Напряжение питания, В Тип батарей Емкость Выходное номинальное напряжение Внешнее питание Время работы от аккумулятора при t=22 °C, ч (Wi-Fi выкл, ИК выкл) Макс. ударная стойкость на нарезном оружии, Джоулей Макс. ударная стойкость на гладкоствольном оружии, калибр Степень защиты, код IP (IEC60529) Рабочая температура, °С Габариты, мм Масса, кг ВИДЕОРЕКОРДЕР Разрешение видео/фото, пикселей Формат видеозаписи / фото Объем встроенной памяти WI-FI КАНАЛ Частота Стандарт 5 2-8 CMOS HD 1280X720 AMOLED 1746x1000 1,5×10-⁵ 5,5×10-⁵ LED 940 3,0 - 4,2 Литий-ионная батарея IPS7 6400 мАч DC 3,7B Micro USB Type-B (5В) 9 6000 12 IPX7 -25 ÷ +50 155х136х77 0,83 1280x720 .mp4 / .jpg 16Гб 2,4 ГГц 802.11 b/g/n Для улучшения потребительских свойств изделия в его конструкцию могут вноситься усовершенствования. Актуальную версию инструкции по эксплуатации Вы можете найти на сайте www.pulsar-vision.com • Цифровая ночная насадка • Чехол • Аккумуляторная батарея • Зарядное устройство к аккумуляторной батарее • Сетевой адаптер • Кабель microUSB • Краткая инструкция по эксплуатации • Салфетка для чистки оптики • Гарантийный талон Описание Цифровая ночная насадка Forward F455 – универсальный прибор, позволяющий быстро и просто трансформировать дневной оптический прицел в ночной. Насадка устанавливается на объектив оптического прицела при помощи адаптеров, рассчитанных на различные диаметры объектива. Насадка не требует дополнительной пристрелки. Насадка предназначена для различных сфер применения, включая охоту, спортивную стрельбу, ночную фото- и видеосъемку, наблюдение. Особенности Ключевые особенности: • HD-сенсор 1280x720 • Повышенная ночная чувствительность • Простая трансформация дневного оптического прицела в ночной • Сохранение преимуществ дневной оптики в ночных условиях • Стабильность точки прицеливания • Комфортное использование в широком диапазоне увеличений дневной оптики • Невидимый ИК-осветитель дальнего действия • Функция дополнительного повышения чувствительности SumLight™ • Дистанция обнаружения до 500 м • Мгновенное включение • Встроенная видеозапись • Питание от быстросменных высокоемких аккумуляторных батарей системы B-Pack • Система четырехточечного крепления с автоматическим зажимом • Совместимость с адаптерами других производителей • Ударная стойкость на крупных калибрах: 12 кал., 9.3x64, .375H&H • Wi-Fi. Интеграция c IOS и Android устройствами • Stream Vision. Дистанционное управление, наблюдение и прямые YouTube-трансляции с помощью смартфона • Дистанционное обновление программного обеспечения • Полная водонепроницаемость (IPX7) • Широкий диапазон эксплуатационных температур (-25 ÷ +50°C) • MicroUSB. Поддержка питания от Power Bank 49 Элементы и органы управления 1. 2. 3. 4. 5. 6. 7. 8. 9. 10. 11. 12. 13. Работа кнопок Крышка объектива Крышка окуляра Крышка батарейного отсека Рычаг фиксации батареи Аккумуляторная батарея Кнопка RIGHT Кнопка M (MENU) Кнопка LEFT Кнопка ON Ручка фокусировки объектива Крышка ИК-осветителя Заглушка разъема ИК- осветителя Разъем для установки ИК-осветителя Крышка адаптера* 14. 15. 16. 17. 18. 19. 20. 21. 22. 23. 24. 25. Порт microUSB Планка Weaver Крышка адаптера* Объектив оптического прицела. Вкладыш* Адаптер* Стопорный винт Винт Рычаг адаптера Узел крепления Кнопка IR Рычаг ИК-осветителя Кнопка ON 19 LEFT (8) MENU (7) 7 Крышка объектива 1 Кнопка LEFT 15 Планка Weaver 8 Заглушка разъема 12 ИК- осветителя Кнопка M (MENU) Крышка 11 ИК-осветителя Вкладыш* Объектив оптического прицела ON (9) фокусировки 10 Ручка объектива 9 18 23 Режим работы Прибор выключен 6 Кнопка RIGHT Адаптер* 16 Кнопка 13 Дисплей выключен Прибор включен, быстрое меню, основное меню Прибор включен Навигация в меню Быстрое меню Прибор включен Навигация в меню Быстрое меню Прибор включен (режим «Видео») Прибор включен RIGHT (6) (режим «Фото») Навигация в меню Быстрое меню Прибор включен, быстрое меню, основное IR (24) меню Последующие Первое короткое короткие Длительное нажатие нажатие нажатия Включение Включение прибора – прибора Включение Выключение прибора – дисплея Выключение дисплея / Выключение прибора – Включение Выключение Включение WiFi / SumLight™ SumLight™ Выключение WiFi Навигация вверх, влево, против часовой стрелки Уменьшение параметра Вход в быстрое меню Вход в основное меню Выход из подменю без подтверждения выбора / Подтверждение выбора выход из меню (переход в режим наблюдения) Навигация вверх Выход из быстрого меню Выключение записи видео Старт – / Переход в режим «Фото» видеозаписи Переход в режим Произведение фотоснимка «Видео» Вниз / Вправо / по часовой стрелке Увеличение параметра Включение ИК Изменение мощности ИК Выключение ИК Узел Разъем для 2 Крышка окуляра крепления установки 17 Open ИК-осветителя 14 Порт microUSB Стопорный 20 винт 22 Рычаг адаптера Винт 21 Рычаг фиксации батареи Крышка батарейного отсека Аккумуляторная батарея 3 5 4 25 Рычаг ИК-осветителя 24 Кнопка IR Особенности эксплуатации Насадка Forward F455 предназначена для длительного использования. Для обеспечения долговечности и полной работоспособности придерживайтесь следующих рекомендаций: • Перед началом эксплуатации прибора убедитесь, что Вы установили ее согласно инструкциям раздела «Установка насадки на оптический прибор». • Выключите насадку после использования. • Самостоятельно ремонтировать и разбирать гарантийный прибор запрещается! • Насадка может эксплуатироваться в широком диапазоне температур. Если насадка эксплуатировалась на холоде и была внесена в теплое помещение, не вынимайте ее из чехла в течение 2-3 часов. Это позволит предотвратить появление конденсата на внешних оптических элементах. • Для обеспечения безотказной работы, предупреждения и устранения причин, вызывающих преждевременный износ или выход из строя узлов и деталей, своевременно осуществляйте технический осмотр и обслуживание прибора. • Батарея не должна подвергаться чрезмерному нагреву от солнечных лучей, огня и других источников тепла. *Элементы крышки-адаптера FN (приобретается отдельно) 50 Использование аккумуляторной батареи Насадка Forward F455 поставляется с перезаряжаемой литий-ионной батареей Battery Pack IPS7, которая позволяет использовать насадку на протяжении до 9 часов. Зарядите батарею перед первым использованием. Зарядка аккумуляторной батареи: • Подключите штекер microUSB кабеля USB к разъему (С) зарядного устройства. • Подключите штекер кабеля USB к сетевому адаптеру. • Включите сетевой адаптер в розетку 110-220В. • Поднимите рычаг (А) зарядного устройства. • Снимите защитную крышку с аккумуляторной батареи. • Установите аккумуляторную батарею в зарядное устройство как показано на рисунке, зафиксируйте рычаг (А). • При установке на зарядном устройстве загорится индикатор (В) зеленого цвета и начнет кратко мигать с определенным интервалом: - один раз, если заряд батареи составляет от 0 до 50%; - два раза, если заряд батареи составляет от 51 до 75%; - три раза, если заряд батареи составляет от 76 до 100%. • Если индикатор постоянно горит зеленым, значит, батарея полностью заряжена. Отключите зарядное устройство от сети, отсоедините батарею от зарядного устройства. • Если индикатор зарядного устройства при установке батареи постоянно горит красным, вероятно, уровень заряда ниже допустимого значения (батарея находилась длительное время в разряженном состоянии). Оставьте батарею в зарядном устройстве на длительное время (до нескольких часов), затем извлеките и вставьте обратно. • Если индикатор станет мигать зеленым цветом, значит батарея исправна; • Если будет продолжать гореть красным, батарея неисправна. Не используйте эту батарею! Внимание! Для заряда всегда используйте зарядное устройство из комплекта поставки прибора, либо зарядное устройство Pulsar IPS (приобретается отдельно). Использование других зарядных устройств может нанести непоправимый ущерб батарее. Установка аккумуляторной батареи: • Опустите рычаг (4). • Снимите защитную крышку батарейного отсека (3). • Снимите защитную крышку с аккумуляторной батареи (5). • Установите батарею (5) в предназначенный для нее слот на корпусе прибора таким образом, чтобы элемент F на корпусе батареи) находился снизу. (выступ • Зафиксируйте батарею, подняв рычаг (4). • Внимание! Питание прибора может осуществляться от внешнего источника питания типа Power Bank (5В). Для подключения внешнего источника питания к прибору присоедините кабель USB к порту microUSB (14) прибора. Подробнее в разделе «Внешнее питание» Меры предосторожности: • Не используйте зарядное устройство, если его конструкция была изменена или оно было повреждено. • Во время зарядки не оставляйте батарею без присмотра. • Не оставляйте зарядное устройство с подключенной к сети батареей к сети более 24 часов после полной зарядки. • Зарядка батареи должна осуществляться при температуре воздуха 0 °C ÷ +45 °C. В противном случае возможно снижение рабочего ресурса батареи. • Не заряжайте батарею непосредственно после перемещения батареи из холодных условий в теплую обстановку. Подождите 30-40 минут, пока батарея прогреется. • Не подвергайте батарею воздействию высоких температур и открытого огня. • Батарея не предназначена для погружения в воду. • Не рекомендуется подключать сторонние устройства с током потребления больше допустимого. • Батарея оснащена системой защиты от короткого замыкания. Однако следует избегать ситуаций, которые могут привести к короткому замыканию. • Не разбирайте и не деформируйте батарею. • Не подвергайте батарею ударам и падениям. • При длительном хранении батарея должна быть частично заряжена – не должна быть полностью заряжена или полностью разряжена. • Храните батарею в месте, недоступном для детей. Внешнее питание Внешнее питание осуществляется от внешнего источника питания типа Power Bank (5В). • Подключите источник внешнего питания к разъему USB (14) прибора. • Прибор переключится на работу от внешнего питания, при этом батарея IPS7 будет постепенно подзаряжаться. со значением уровня заряда в процентах. • На дисплее появится пиктограмма батареи • Если прибор подключен от компьютера или сетевого адаптера или Power Bank, который не соответствуют стандарту Battery Charger (ВC 1.0), то батарея IPS7 заряжаться не начнется, будет отображаться только пиктограмма внешнего питания . • Если прибор работает от внешнего источника питания, но батарея IPS7 не подключена, отображается пиктограмма . При отключении внешнего источника питания насадка начнет работать от батареи. • Эксплуатация Установка насадки на оптический прибор • Подберите адаптер* с вкладышем нужного диаметра в зависимости от наружного диаметра объектива Вашего оптического прицела (см. таблицу). • Обозначение 42 мм / 50 мм / 56 мм в наименовании адаптера означают световой диаметр объектива оптического прибора. • Снимите крышку (16) с адаптера (19), повернув ее по часовой стрелке. • Перед установкой рекомендуется обезжирить корпус объектива прицела. • Установите до упора вкладыш (18) в адаптер (19). • Установите до упора адаптер с вкладышем на объектив дневного прицела (17). • Переведите рычаг (22) из первоначального положения «открыто» (OPEN) в положение «закрыто» (CLOSE). 51 • Проверьте, плотно ли адаптер прилегает к объективу. • В случае наличия люфта сделайте следующее: - Ослабьте шестигранным ключом (S=2mm) стопорный винт (20). - Затяните винт (21) шестигранным ключом (S=4mm) с усилием, необходимым для обеспечения плотной посадки адаптера на объективе. Усилие зажима должно составлять 1 Н·м. - Затяните стопорный винт (20). • Усилие можно проверить динамометрической отверткой. • Плотно вставьте насадку в адаптер таким образом, чтобы штифты, находящиеся в корпусе адаптера, вошли в пазы (23) насадки. Поверните цифровой модуль по часовой стрелке до упора. Маркировка в виде треугольника на насадке и в виде квадрата на корпусе адаптера должны совпасть. • Для выравнивания насадки переведите рычаг (22) в положение OPEN и выровняйте цифровой модуль по горизонту. *Приобретается отдельно Таблица подбора вкладышей для оптических приборов Модель крышкиадаптера Крышка-адаптер FN 42 мм Крышка-адаптер FN 50 мм Крышка-адаптер FN 56 мм Соответствие внутреннего диаметра вкладыша и внешнего диаметра корпуса объектива дневного оптического прибора (прицела, зрительной трубы) Внутренний диаметр вкладыша, мм Внешний диаметр объектива прицела, мм 47 46,7-47,6 48 47,7-48,6 49 48,7-49,6 50 49,7-50,6 55 54,7-55,6 56 55,7-56,6 57 56,7-57,6 58 57,7-58,6 59 58,7-59,6 60 59,7-60,6 61 60,7-61,6 62 61,7-62,6 63 62,7-63,6 64 63,7-64,6 65 64,7-65,6 Включение и настройка изображения • Снимите крышку объектива (1), повернув ее против часовой стрелки. • Кратким нажатием кнопки ON (9) включите насадку - на дисплее появится изображение. • Настройте резкое изображение символов на дисплее вращением кольца диоптрийной настройки окуляра Вашего оптического прицела. В дальнейшем, независимо от дистанции и других условий, вращать кольцо диоптрийной настройки окуляра не требуется. • Для фокусировки на объект наблюдения вращайте ручку фокусировки объектива (10). Базовые настройки (регулировка яркости и контраста) изменяются средствами меню быстрого доступа. По окончании использования выключите насадку длительным нажатием кнопки ON (9). Функции меню быстрого доступа • Войдите в «быстрое» меню кратким нажатием кнопки М (7). • Для перехода между функциями, описанными ниже, кратко нажимайте кнопку M (7). • Яркость – нажатием кнопок RIGHT (6) и LEFT (8) изменяйте значение яркости дисплея от 0 • до 20. Контраст - нажатием кнопок RIGHT (6) и LEFT (8) изменяйте значение контраста изображения от 0 до 20. 52 Функции основного меню • Войдите в основное меню длительным нажатием кнопки М (7). • Для перемещения по пунктам основного меню нажимайте Общий вид меню: кнопки RIGHT (6) и LEFT (8). • Для входа в подпункт основного меню кратко нажмите кнопку M (7). • Для выхода из подпункта основного меню нажмите и удерживайте кнопку M (7). • Автоматический выход из основного меню происходит после 10 секунд бездействия. Состав и описание меню • Яркость пиктограмм • Настройки Wi-Fi • Общие настройки • Автоматическое отключение • Информация о приборе Данный пункт меню позволяет настроить яркость пиктограмм на дисплее насадки. Яркость пиктограмм • Нажмите и удерживайте кнопку M (7) для входа в основное меню. • Кнопками RIGHT (6) и LEFT (8) выберите пункт меню «Яркость пиктограмм». • Кратко нажмите кнопку М (7) для входа в подменю. • Кнопками RIGHT (6) и LEFT (8) выберите уровень яркости пиктограмм. • Для сохранения выбора и выхода из подменю нажмите и удерживайте кнопку М (7). Настройки Настройка Данный подпункт позволяет настроить необходимый уровень доступа к своему прибору, который получает приложение Stream Vision. уровня Wi-Fi доступа Уровень Хозяин. Пользователь из Stream Vision имеет полный доступ ко всем функциям прибора. Уровень Гость. Пользователь из Stream Vision имеет возможность только просматривать видео с прибора в реальном времени. • Нажмите и удерживайте кнопку M (7) для входа в основное меню. • Кнопками RIGHT (6) и LEFT (8) выберите пункт меню «Настройки Wi-Fi». • Кратко нажмите кнопку М (7) для входа в подменю. • Кнопками RIGHT (6) и LEFT (8) выберите пункт подменю «Настройка уровня доступа». • Кнопками RIGHT (6) и LEFT (8) выберите уровень доступа – «Хозяин» или «Гость». • Для подтверждения выбора и выхода из подменю нажмите и удерживайте кнопку М (7). Пункт меню позволяет установить следующие настройки: Общие настройки • Язык • Время • Настройки по умолчанию • Дата • Форматирование Язык Выбор языка интерфейса. • Нажмите и удерживайте кнопку M (7) для входа в основное меню. • Кнопками RIGHT (6) и LEFT (8) выберите подменю «Общие настройки». • Кратко нажмите кнопку М (7) для входа в подменю. • Кнопками RIGHT (6) и LEFT (8) выберите пункт подменю «Язык». • Кратко нажмите кнопку М (7) для входа в подменю. • Кнопками RIGHT (6) и LEFT (8) выберите один из доступных языков интерфейса: английский, немецкий, испанский, французский, русский. • Для сохранения выбора и выхода из подменю нажмите и удерживайте кнопку М (7). Дата Настройка даты • Нажмите и удерживайте кнопку M (7) для входа в основное меню. • Кнопками RIGHT (6) и LEFT (8) выберите подменю «Общие настройки». • Кратко нажмите кнопку М (7) для входа в подменю. • Кнопками RIGHT (6) и LEFT (8) выберите пункт подменю «Дата». • Кратко нажмите кнопку М (7) для входа в подменю. • Дата отображается в формате дд / мм / гггг (12/04/2017) • Кнопками RIGHT (6) и LEFT (8) выберите нужное значение дня, месяца и года. (кнопка RIGHT (6)- увеличение значения, кнопка LEFT (8) – уменьшение значения) Для перемещения между разрядами кратко нажимайте кнопку M (7). • Для сохранения выбранной даты и выхода из подменю нажмите и удерживайте кнопку M (7). Настройки Данный пункт позволяет настроить насадку для работы в сети Wi-Fi. Wi-Fi Примечание: включение/выключение Wi-Fi осуществляется длительным нажатием кнопки LEFT (8). Настройка Данное подменю позволяет настроить пароль доступа к насадке со стороны внешнего устройства. Пароль используется при подключении внешнего пароля устройства (например, смартфона) к прибору. • Нажмите и удерживайте кнопку M (7) для входа в основное меню. • Кнопками RIGHT (6) и LEFT (8) выберите пункт меню «Настройки Wi-Fi». • Кратко нажмите кнопку М (7) для входа в подменю. • Кнопками RIGHT (6) и LEFT (8) выберите пункт подменю «Настройка пароля». • Кратко нажмите кнопку М (7) для входа в подменю. • На дисплее появится пароль – по умолчанию «12345678». • Кнопками RIGHT (6) и LEFT (8) установите желаемый пароль (кнопка RIGHT увеличение значения, кнопка LEFT – уменьшение значения). Для перемещения между разрядами нажимайте кнопку М (7). • Для сохранения пароля и выхода из подменю нажмите и удерживайте кнопку M (7). 53 Общие Время настройки Возврат к настройкам по умолчанию Настройка времени • Нажмите и удерживайте кнопку M (7) для входа в основное меню. • Кнопками RIGHT (6) и LEFT (8) выберите подменю «Общие настройки». • Кратко нажмите кнопку М (7) для входа в подменю. • Кнопками RIGHT (6) и LEFT (8) выберите пункт подменю «Время». • Кратко нажмите кнопку М (7) для входа в подменю. • Нажатием кнопок RIGHT (6) и LEFT (8) выберите формат времени – 24/12 (или PM/AM). • Для перехода к настройке значения часа нажмите кнопку М (7). • Нажатием кнопок RIGHT (6) и LEFT (8) выберите значение часа (кнопка RIGHT (6) - увеличение значения, кнопка LEFT (8) – уменьшение значения) • Для перехода к настройке значения минут нажмите кнопку М (7). • Нажатием кнопок RIGHT (6) и LEFT (8) выберите значение минут. • Для сохранения выбранного времени и выхода из подменю нажмите и удерживайте кнопку M (7). • Нажмите и удерживайте кнопку M (7) для входа в основное меню. • Кнопками RIGHT (6) и LEFT (8) выберите подменю «Общие настройки». • Кратко нажмите кнопку М (7) для входа в подменю. • Кнопками RIGHT (6) и LEFT (8) выберите пункт подменю «Настройки по умолчанию». • Кратко нажмите кнопку М (7) для входа в подменю. • Кнопками RIGHT (6) и LEFT (8) выберите вариант «Да» для возврата к заводским настройкам, или «Нет» для отмены действия. • Подтвердите выбор кратким нажатием кнопки М (7). Следующие настройки будут возвращены в первоначальное состояние до их изменения пользователем: Уровень яркости - 10 Уровень контраста - 8 Язык - английский Wi-Fi – выключен (пароль по умолчанию) Автоотключение - выключено Формати- Форматирование встроенной карты памяти безвозвратно удаляет все рование записанные файлы. Внимание! Убедитесь в том, что удаляемые файлы вам больше не нужны либо сделайте резервную копию на другом носителе. • Нажмите и удерживайте кнопку M (7) для входа в основное меню. • Кнопками RIGHT (6) и LEFT (8) выберите подменю «Общие настройки». • Кратко нажмите кнопку М (7) для входа в подменю. • Кнопками RIGHT (6) и LEFT (8) выберите пункт подменю «Форматирование». • Кратко нажмите кнопку М (7) для входа в подменю. • Кнопками RIGHT (6) и LEFT (8) выберите вариант «Да» для форматирования или «Нет» для отмены действия. • Подтвердите выбор кратким нажатием кнопки М (7). Автоотклю- Данный пункт позволяет активировать функцию автоматического отключения насадки через определенный период времени при наклоне насадки по горизонтали или вертикали чение более чем на 70°; вправо или влево более чем на 30°. При этом органы управления прибора не должны быть задействованы. • Нажмите и удерживайте кнопку M (7) для входа в основное меню. • Кнопками RIGHT (6) и LEFT (8) выберите пункт меню «Автоотключение». • Кратко нажмите кнопку М (7) для входа в подменю. • Кнопками RIGHT (6) и LEFT (8) выберите временной промежуток, в течение которого прибор, автоматически выключится (1 мин; 3 мин; 5 мин), либо вариант «Off», если вы хотите деактивировать функцию автоматического отключения. • Подтвердите выбор кратким нажатием кнопки М (7). Примечание: в строке статуса отображается пиктограмма состояния функции «Автоотключение» 1 min. Информация о насадке • Нажмите и удерживайте кнопку M (7) для входа в основное меню. • Кнопками RIGHT (6) и LEFT (8) выберите пункт меню «Информация о насадке». • Кратко нажмите кнопку М (7) для входа в подменю. Пользователю доступна следующая информация о насадке: полное имя SKU номер серийный номер версия ПО версия сборки служебная информация Строка статуса Строка статуса располагается в нижней части дисплея и отображает информацию о текущем состоянии работы насадки, в том числе: • Функция SumLight™ • Автоматическое отключение 1 min (если функция включена) • Работа ИК-осветителя (например, 3-я степень) • Подключение по Wi-Fi • Часы • Уровень заряда аккумуляторной батареи (если насадка питается от аккумуляторной батареи) или индикатор питания от внешнего источника питания (если прибор питается от внешнего источника питания) или • Индикатор заряда батареи с текущим процентом ее заряда (если установлена батарея и происходит ее зарядка от внешнего источника питания) Примечание: при увеличении кратности оптического прибора, на который установлена насадка, строка статуса может частично или полностью выходить за пределы видимого изображения. 54 ИК-осветитель Насадка оснащена съемным ИК-осветителем, работающим на длине волны 940нм, который позволяет увеличить дистанцию наблюдения в условиях низкой освещенности или в полной темноте. Вместо ИК-осветителя из комплекта поставки вы можете установить другие ИКосветители Pulsar (приобретается отдельно). • Снимите заглушку (12) с разъема для установки ИК-осветителя (13). • Снимите крышку (11) с ИК-осветителя. • Установите ИК-осветитель на прибор. Рычаг (25) должен находится в верхнем положении. • Зафиксируйте ИК-осветитель, опустив рычаг (25) вниз. • Убедитесь, что ИК-осветитель установлен и подключен к прибору • Для активации ИК-осветителя: включите прибор кнопкой ON (9). • В случае, если ИК-осветитель не подключен – в строке статуса будет отображаться пиктограмма отключенного осветителя. В случае, если ИК-осветитель подключен-пиктограмма не отображается. • Кратко нажмите кнопку IR (24) на торце осветителя. Уровень мощности при включении – минимальный . • Пиктограмма ИК-осветителя с соответствующим уровнем мощности отображается в строке статуса. • Последовательными краткими нажатиями кнопки IR (24) последовательно переключайте уровень яркости осветителя ( > > > ). • Выключите ИК-осветитель длительным нажатием кнопки IR. • Пиктограмма IR исчезнет с дисплея. Примечание: При выключении ИК-осветителя уровень мощности в памяти прибора не запоминается. При включении прибора осветитель включается на минимальном уровне мощности - IR1. Функция Wi-Fi Насадка имеет функцию беспроводной связи с мобильными устройствами (планшет, смартфон) посредством Wi-Fi. Включите модуль беспроводной связи долгим нажатием кнопки LEFT (8). Работа Wi-Fi отображается в строке статуса следующим образом: Wi-Fi выключен Пиктограмма отсутствует Wi-Fi включен пользователем, идет процесс включения Wi-Fi в приборе Wi-Fi включен, подключение к прибору отсутствует Wi-Fi включен, подключение к прибору установлено Мобильным устройством прибор опознается под именем «Forward F_XXXX», где XXXX – последние четыре цифры серийного номера». После ввода пароля на мобильном устройстве (подробнее об установке пароля - в подразделе «Настройки Wi-Fi» раздела «Функции основного меню» инструкции) и установления связи пиктограмма в строке статуса меняется на , трансляция видеосигнала на экране внешнего устройства начинается после активации кнопки «видоискатель» на экране мобильного устройства. Пиктограмма в статусной строке меняется на Примечание: настроить необходимый уровень доступа к своему прибору, который получает приложение Stream Vision можно в разделе меню «Настройка уровня доступа». Функция «SumLight™» Функция SumLight™ позволяет существенно увеличить уровень чувствительности КМОП-матрицы в случае снижения уровня освещенности, благодаря чему становится возможным наблюдение в условиях низкой освещенности без использования ИК-осветителя. • Для включения функции SumLight™ кратко нажмите кнопку LEFT (8). • Для выключения кратко нажмите кнопку LEFT (8) еще раз. • Пиктограмма SumLight™ (включенная или выключенная ) отображается в строке статуса. Внимание! При активации функции SumLight™ происходит увеличение уровня шумов на изображении, снижается частота смены кадров, изображение замедляется – при резком перемещении прибора изображение может «смазываться», такие эффекты не являются дефектами. На дисплее прибора могут быть видны светящиеся белые точки (пиксели), количество точек может увеличиться при включении функции SumLight™ – это связано с особенностями работы данной функции и дефектом также не является. Видеозапись и фотосъемка Насадка имеет функцию видеозаписи (фотосъемки) наблюдаемого изображения на встроенную карту памяти. Перед использованием функций фото- и видеозаписи ознакомьтесь с подразделами «Настройка даты», «Настройка времени» раздела «Функции основного меню» настоящей инструкции. Встроенное записывающее устройство работает в двух режимах: ФОТО (фотосъемка; в правом верхнем углу дисплея отображается пиктограмма . Если предполагаемое количество фотоснимков, которое ещё может сохраниться на Flash-память, превышает 100, отображается надпись «>100». ВИДЕО (видеозапись; в правом верхнем углу дисплея отображается пиктограмма , общее оставшееся время записи с учетом текущего разрешения в формате MM:SS - минуты : секунды). При включении насадка находится в режиме Video. Для переключеня между режимами работы нажмите и удерживайте кнопку RIGHT (6). Переход между режимами происходит циклично (Video-> Photo-> Video…). Режим ФОТО. Фотосъемка изображения • Перейдите в режим Photo долгим нажатием кнопки RIGHT (6). • Кратко нажмите кнопку RIGHT (6) для того, чтобы сделать фотоснимок. Изображение замирает на 0,5 сек. • Файл фотоснимка сохраняется на встроенную карту памяти. Режим Video. Запись видеороликов • Длительным нажатием кнопки RIGHT (6) перейдите в режим Video. • Коротко нажмите кнопку RIGHT (6) для старта видеозаписи. исчезает, вместо нее появляется пиктограмма REC, а также • После начала видеозаписи пиктограмма таймер записи видеоролика в формате MM:SS (минуты : секунды)*; • Для остановки видеозаписи нажмите и удерживайте кнопку RIGHT (6). • Видеофайлы сохраняются во встроенную карту памяти после выключения записи видео. *пиктограмма отображается в течение 2х секунд, затем исчезает. При последующем коротком нажатии кнопки RIGHT (6) пиктограмма появляется, таймер записи отображает текущее время записи видео. Примечания: • После выключения записи видео / после фотосъемки; при выключении прибора, если была включена запись; при переполнении карты памяти – если во время записи видео, карта памяти заполнилась (на дисплее появится сообщение «Память переполнена»). • Во время записи видео возможен вход в меню и работа в меню прибора; • Записанные видеоролики и фотографии сохраняются на встроенную карту памяти прибора в виде img_xxx. jpg (для фото); video_xxx.mp4 (для видео). xxx – трехразрядный общий (счетчик файлов (для фото и видео); • Cчетчик, используемый в именовании мультимедиа файлов, не сбрасывается; • При удалении файла из середины списка, его номер другим файлом не занимается. 55 • При переполнении счетчика создается новая папка – img_xxxx. Где xxxx – счетчик для папок. • Максимальная продолжительность записываемого видеофайла - семь минут. По истечении этого времени • При отключении USB от прибора, подключенного в режиме Питание, прибор продолжает работать от • Использование планки Weaver • видео записывается в новый файл. Количество файлов ограничено объемом встроенной памяти прибора; Регулярно контролируйте объем свободной памяти встроенной карты памяти, переносите отснятый материал на другие носители, освобождая место на карте памяти; В записанных видеофайлах и фотографиях отображается графическая информация (строка статуса, пиктограммы и пр.). Функция «Выключен дисплей» (Display Off) При использовании данной функции насадка переходит в режим ожидания, что позволяет при необходимости быстро ее включить. Варианты работы с функцией «Выключен дисплей» Вариант 1. Насадка выключена. Необходимо включить насадку и включить функцию «Выключен дисплей». • Включите прибор кратковременным нажатием кнопки ON (9). • Включите функцию «Выключен дисплей»: нажмите и удерживайте кнопку ON (9). На экране появится сообщение «Дисплей выключен» с отсчетом времени. Дисплей выключен • Отпустите кнопку ON (9). • Для отключения функции «Выключен дисплей» (включения дисплея) кратко нажмите ON (9). Вариант 2. Функция «Выключен дисплей» включена, необходимо отключить насадку. • Нажмите и удерживайте кнопку ON (9). На дисплее отображается сообщение «Дисплей выключен» с отсчетом времени 3, 2, 1, 0. • Удерживайте кнопку ON (9) до отключения насадки (отключение насадки произойдет после отсчета 0)*. *возможно более позднее отключение насадки в связи с завершением обработки информации процессором для сохранения данных. При этом на дисплее отображается 0 во времени отсчета. Подключение USB • Включите прибор нажатием кнопки ON (9) (выключенный прибор компьютером не определяется). • Подключите один конец кабеля USB к разъему microUSB (14) прибора, второй – к порту вашего компьютера. • Прибор определится компьютером автоматически, установка драйверов не требуется. • На дисплее появится два варианта подключения: Карта памяти (Memory card) и Питание (Power). • Кнопками RIGHT (6) и LEFT (8) выберите вариант подключения. • Кратко нажмите кнопку M (7) для подтверждения выбора. USB подключение Варианты подключения: • Карта памяти (Memory card). При выборе данного варианта прибор распознается компьютером как флеш-карта. Данный вариант предназначен для работы с файлами, которые хранятся в памяти прибора, Использовать как питание при этом функции прибора не доступны, прибор не выключается. При Использовать как карту памяти отключении от компьютера прибор продолжает работать. • Если в момент подключения производилась запись видео, запись останавливается и сохраняется. • Питание (Power). При выборе данного варианта компьютер используется прибором как внешнее питание. В строке статуса появится пиктограмма . Прибор продолжает работать, все функции доступны. Зарядка аккумуляторной батареи, установленной в приборе, не производится. • Отключение USB. • При отключении USB от прибора, подключенного в режиме Карта памяти, прибор остается во включенном состоянии. аккумуляторной батареи при ее достаточном заряде. Насадка оборудована дополнительной планкой Weaver (15) с помощью которой Вы можете установить дополнительные аксессуары. Предварительно необходимо демонтировать съемный ИК-осветитель (Смотрите раздел «ИК-осветитель»). Калибровка дисплея Насадка настроена таким образом, что после ее установки на оптический прицел, который был должным образом пристрелян, корректировка точки прицеливания не требуется. В том случае, если насадка подверглась сильному удару или падению, Вы можете проверить точку попадания и в случае необходимости самостоятельно ее откорректировать, не обращаясь в сервисный центр. • Для входа в режим калибровки дисплея нажмите и удерживайте сначала кнопку M (7) в течение 10 секунд – появятся координаты дисплея X=0; Y=0. • Кнопками LEFT (8) и RIGHT (6) перемещайте дисплей по горизонтали (ось X) и по вертикали (ось Y) таким образом, чтобы точка попадания переместилась в центр прицельной метки Вашего оптического прицела. • Для переключения между координатами X и Y кратко нажимайте кнопку M (7). • Шаг смещения изображения - 1 пиксель сенсора. • Диапазон перемещения изображения - +/- 20 пикселей по горизонтали (ось X), +/- 20 пикселей по вертикали (ось Y). • Для выхода из меню и сохранения настроек нажмите и удерживайте кнопку M (7) в течение двух секунд. Stream Vision Приборы Forward поддерживают технологию Stream Vision, которая позволяет посредством Wi-Fi транслировать изображение с прибора на Ваш смартфон либо планшет в режиме реального времени. Подробные инструкции по работе Stream Vision Вы можете найти в отдельном буклете либо на сайте www.pulsar-vision.com Примечание: в конструкцию прибора заложена возможность обновления программного обеспечения. Обновление возможно через приложение Stream Vision. Для того чтобы скачать приложение Stream Vision, сканируйте или нажмите на QR код: 56 Технический осмотр Технический осмотр рекомендуется производить перед каждым использованием прибора. Проверьте: • Внешний вид прибора (трещины на корпусе не допускаются). • Состояние линз объектива и окуляра цифрового модуля и объектива ИК-осветителя (трещины, жировые пятна, грязь и другие налеты не допускаются). Очистите наружные поверхности металлических и пластмассовых деталей от пыли, грязи и влаги; протрите их хлопчатобумажной салфеткой. • Состояние аккумуляторной батареи (должна быть заряжена) и электрических контактов на батарее (наличие солей и окисления не допускаются). • Работоспособность органов управления. • Правильность и надежность крепления цифрового модуля на оптическом приборе. Техническое обслуживание Техническое обслуживание проводится не реже двух раз в год и заключается в выполнении изложенных ниже пунктов: • Хлопчатобумажной салфеткой очистите наружные поверхности металлических и пластмассовых деталей от пыли и грязи. Допускается применение силиконовой смазки. • Очистите электрические контакты аккумуляторной батареи и места установки батареи на приборе, используя нежирный органический растворитель. • Осмотрите линзы окуляра и объектива. При необходимости удалите с линз пыль и песок (желательно бесконтактным методом). Чистку наружных поверхностей оптики производите при помощи специально предназначенных для этих целей средств. Неисправность Возможная причина Низкое качество изображения. Указанные проблемы могут возникать при наблюдении в сложных погодных условиях (снег, дождь, туман и пр.). Изображение слишком темное. Установлен низкий уровень яркости или контраста. Отрегулируйте яркость или контраст. На дисплее появились полосы либо изображение исчезло. В процессе эксплуатации на прибор воздействовало статическое напряжение. После воздействия статического напряжения прибор может самостоятельно перезагрузиться либо выключите и повторно включите прибор. При четком изображении Пыль или конденсат на наружных прицельной метки или внутренних оптических поверхностях объектива. нечеткое изображение объекта. Отрегулируйте четкость изображения вращением регулятора объектива. Дисплей расположен не по центру. Не отрегулировано положение цифрового модуля на дневном прицеле. Отожмите адаптер и выставьте положение дисплея по центру поля зрения (см. раздел «Эксплуатация»). Прибор не фокусируется. Неправильная настройка. Настройте прибор в соответствии с разделом «Эксплуатация». Проверьте наружные поверхности линз объектива и окуляра; при необходимости очистите их от пыли, конденсата, инея и т.д. В холодную погоду Вы можете использовать специальные антизапотевающие покрытия (например, как для корригирующих очков). Точка попадания не совпадает с точкой прицеливания. Требуется калибровка дисплея. Произведите калибровку дисплея в соответствии с инструкциями раздела «Калибровка дисплея». Храните прибор всегда только в чехле, в сухом, хорошо вентилируемом помещении. При длительном хранении обязательно извлеките аккумуляторную батарею. Неисправность Возможная причина Исправление Прибор не включается. Батарея полностью разрядилась. Зарядите батарею. Не работает от внешнего источника питания. Поврежден кабель USB. Замените кабель USB. Разряжен источник внешнего питания. Зарядите источник внешнего питания. Смартфон или планшет не Изменен пароль в приборе. подключается к прибору. Отсутствует или прерывается трансляция сигнала через Wi-Fi. Нет жесткости установки прибора Проверьте жесткость установки прибора на прицеле или прицела на на прицеле и надежность фиксации оружии. прицела к оружию. Убедитесь, что Вы используете именно тот тип патронов, которым ранее пристреливали Ваше оружие и прицел. Если Вы пристреливали прицел летом, а эксплуатируете его зимой (или наоборот), то не исключено некоторое изменение нулевой точки пристрелки. Удалите сеть и подключитесь повторно с вводом пароля, записанного в приборе. Прибор находится в зоне с Для обеспечения стабильного большим количеством сетей Wi-Fi, функционирования Wi-Fi переместите которые могут создавать помехи. прибор в зону с меньшим количеством сетей Wi-Fi либо в зону, где они отсутствуют. Переместите прибор в зону прямой Прибор находится вне зоны уверенного приема сигнала Wi-Fi. видимости работы сигнала Wi-Fi. Между прибором и приемником сигнала находятся препятствия (бетонные стены, например). Протрите наружные оптические поверхности мягкой хлопчатобумажной салфеткой. Просушите – дайте постоять 4 часа в теплом помещении. Не сфокусирован объектив. Хранение Выявление неисправностей Исправление При выстреле насадка Недостаточное зажатие адаптера. Выберите подходящий вкладыш соскальзывает с прицела. Неверно выбран вкладыш. и зажмите адаптер согласно рекомендациям. Невозможно открыть зажим адаптера. Неверно выбран вкладыш. Выберите подходящий вкладыш. Проверьте наличие зазора между губами адаптера. 57 По ссылке вы можете найти ответы на наиболее часто задаваемые вопросы о тепловидении https://www.pulsar-nv.com/glo/ru/podderzka/tchasto-zadavaemye-voprosy/91 Электромагнитная совместимость. Данный продукт соответствует требованиям европейского стандарта EN 55032:2015, Класс А. Внимание: эксплуатация данного продукта в жилой зоне может создавать радиопомехи. Внимание! Цифровые ночные приборы Forward требуют лицензии, если они экспортируются за пределы Вашей страны. Приоритет защиты окружающей среды! Ваш прибор содержит ценные материалы, которые можно восстановить или переработать Оставьте в местном пункте сбора отходов. 58-
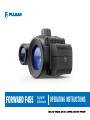 1
1
-
 2
2
-
 3
3
-
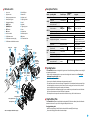 4
4
-
 5
5
-
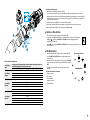 6
6
-
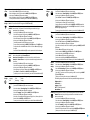 7
7
-
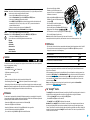 8
8
-
 9
9
-
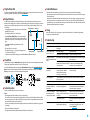 10
10
-
 11
11
-
 12
12
-
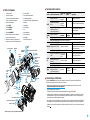 13
13
-
 14
14
-
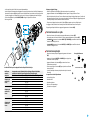 15
15
-
 16
16
-
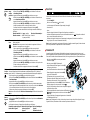 17
17
-
 18
18
-
 19
19
-
 20
20
-
 21
21
-
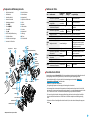 22
22
-
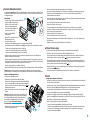 23
23
-
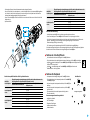 24
24
-
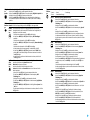 25
25
-
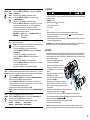 26
26
-
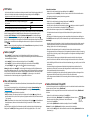 27
27
-
 28
28
-
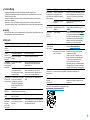 29
29
-
 30
30
-
 31
31
-
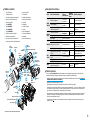 32
32
-
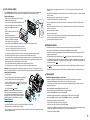 33
33
-
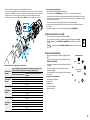 34
34
-
 35
35
-
 36
36
-
 37
37
-
 38
38
-
 39
39
-
 40
40
-
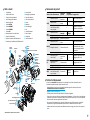 41
41
-
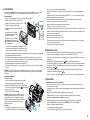 42
42
-
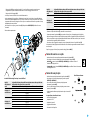 43
43
-
 44
44
-
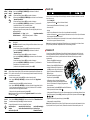 45
45
-
 46
46
-
 47
47
-
 48
48
-
 49
49
-
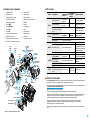 50
50
-
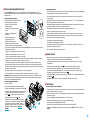 51
51
-
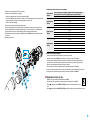 52
52
-
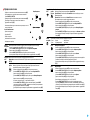 53
53
-
 54
54
-
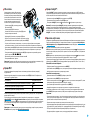 55
55
-
 56
56
-
 57
57
-
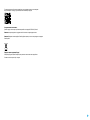 58
58


Pulsar Forward F455 Operating Instructions Manual
- Tipo
- Operating Instructions Manual
en otros idiomas
- français: Pulsar Forward F455
- italiano: Pulsar Forward F455
- English: Pulsar Forward F455
- Deutsch: Pulsar Forward F455
- русский: Pulsar Forward F455
Artículos relacionados
-
Pulsar Forward F455 El manual del propietario
-
-
-
-
-
-
-
-
-