
ASSEMBLY
GUIDE
MODEL:
DT1200/DT12S0
ASSEMBLY
INSTRUCTIONS
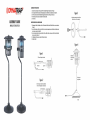
I.
Unpack
the
unit,
and
place
ii
on
the
ground
.
Pull
the
cord
light
through
the
pole
stand
as
in
Figure
l.
2.
Insert
upper
and
lower
tubes
and
press
the
spring
bulge
to
ensure
both
tubes
ore
securely
placed,
os
in
Figure
2.
3.
Insert
the
connector
piece
into
the
stand
hose
.
Align
pole
and
connect
by
screwing
nut
os
in
Figure
3.
4.
Your
Dynatrap
is
now
ready
to
be
connected
to
the
electrical
outlet.
5.
Turn
switch
on
.
INSTRUCCIONES
PARA
INSTALACION
I.
Desempaque
la
unidod,
y
col6quela
en
el
piso
.
Joie
firmemente
el
cable
atraves
del
tubo
de
lo
hose,
como
se
muestra
en
lo
Figura
l.
2.
lnserte
el
tubo
superior
e
inferior
y
opriete
el
bot6n
con
resorte
poro
osegurorse
que
ombos
tubos
son
colocodos
seguro-
mente,
como
se
muestra
en
lo
Figura
2.
3.
lnserte
el
conector
de
plastico
en
lo
porte
inferior
de
lo
hose
.
Alinee
el
tubo
y
conecte
por
medio
de
lo
tuerco
de
plastico,
como
se
muestro
en
lo
Figura
3.
4.
Su
Dynatrap
esta
lista
para
ser
conectoda
a
la
fuente
de
corriente
.
5.
Enciendo
el
swit
ch.
Figure
l
Pull
the
cord
through
the
pole
stand
....................
upper
tube
Figure
2
Insert
both
upper
and
lower
tubes
together
and
make
sure
the
spring
bulge
is
securely
placed
.
press
the
spring
bulge
--- •
Figure
3
Insert
bottom
connector
piece
into
stond
base
.
Align
pole
and
connect
by
screwing
nut
.
/
On/Off
switch
locoted
under
the
roin
cover
I
Figure
4
0
0
Place
the
unit
in
upright
position
Ground
•

OWNER'S
MANUAL
FLYING
INSECT
TRAP
MODEL:
DTl
200
Thank
you
for
purchasing
the
DYNATRAP®
flying
insect
trap!
IMPORTANT
SAFETY
INSTRUCTIONS
WARNING,
When
using
electric
appliances,
basic
precautions
should
always
be
followed,
including
the
following
:
-
To
disconnect,
turn
all
controls
lo
the
off
("O")
position,
then
remove
plug
from
outlet.
-
Unplug
from
outlet
when
not
in
use
and
before
servicing
or
cleaning.
-
To
reduce
the
risk
of
electrical
shock,
do
not
put
appliance
in
water
or
other
liquid.
-
This
appliance
is
provided
with
double
insulation
.
Use
only
identical
replacement
parts.
-
Connect
only
to
a
circuit
that
is
prolected
by
a
ground-fault
circuil-interrupter
(GFCI).
See
instructions
for
Servicing
of
Double-Insulated
Appliances.
INSTRUCTIONS
FOR
DOUBLE-INSULATED,
CORD-CONNECTED
APPLIANCES:
In
a
double-insulated
appliance,
two
systems
of
insulation
ore
provided
instead
of
grounding.
No
grounding
means
is
provided
on
a
double-insulated
appliance,
nor
should
a
means
for
grounding
be
added
to
the
appliance.
Servicing
of
a
double-insulated
appliance
requires
extreme
core
and
knowledge
of
the
system,
and
should
be
done
only
by
qualified
service
personnel.
Replacement
ports
for
a
double-insulated
appliance
must
be
identical
to
!hose
ports
in
the
appliance.
IMPORTANT
SAFETY
INSTRUCTIONS
Please
read
these
instructions
before
using
the
DYNATRAP®
Insect
Trap
and
keep
for
future
reference.
l.
Always
turn
unit
off
and
disconnect
plug
before
servicing,
cleaning,
or
changing
bulb
.
2.
Do
no!
position
the
unit
near
heat,
gas,
oil
or
other
flammable
materials.
3.
Place
product
oul
of
reach
from
children.
4.
Never
operate
!his
product
if
it
hos
a
damaged
cord
or
plug,
ii
it
is
not
working
properly,
ii
it
has
been
dropped
or
damaged,
or
if
ii
hos
been
dropped
into
water.
5.
This
product
is
equipped
with
2-conductor
cord
and
2-prong
polarized
plug
as
a
safely
feature.
This
plug
will
fit
in
a
polarized
outlet
only
one
way.
If
!he
plug
does
not
fully
fit
in
the
outlet,
then
reverse
the
plug.
If
it
s1ill
does
no!
lit,
then
contact
a
qualified
electrician
.
To
reduce
the
risk
of
electrical
shock,
only
plug
into
a
properly
installed
outlet.
Do
no!
attempt
to
defeat
this
safely
fealure.
6.
Do
not
insert
fingers
or
any
foreign
objects
into
the
unit
while
ii
is
connected
to
an
electrical
outlet.
7.
Collected
insects
within
the
unit
may
contribute
to
fire,
so
clean
insects
from
the
unit
frequent~.
8.
Do
no!
clean
this
product
with
water
spray.
Do
no!
place
where
it
con
foll
into
water,
or
near
flammable
materials.
9.
Do
not
touch
fan
while
in
motion.
l
0.
Do
not
abuse
cord--never
carry
or
hang
unit
by
cord
or
yank
it
ta
disconnect
from
receptacle.
Keep
cord
away
from
heat,
oil,
or
sharp
edges.
11.
Extension
cords
used
with
this
product
must
be
marked
with
suffix
letters
"W-A"
and
with
a
tag
slating
"Suitable
for
Use
with
Outdoor
Appliances".
12.
Use
only
extension
cords
that
have
plug
and
receptacles
that
match
the
product
plug.
Replace
or
repair
damaged
cords.
INSTALLATION
&
OPERATING
INSTRUCTIONS
1.
Unpack
unit.
Save
carton
for
off-season
slorage
(if
needed)
.
2.
Pull
the
cord
tight
through
the
pole
stand.
Turn
base
on
its
side
and
insert
bottom
threaded
plastic
piece
into
hose,
connecting
to
the
lhreoded
ploslic
cop
.
Twist
threaded
ploslic
cop
clockwise
to
tighten
.
Complete
installation
by
aligning
upper
ond
lower
support
tube
and
inserting
the
bar
sections
.
(For
more
detailed
instructions,
please
refer
to
assembly
guide)
3.
Plug
cord
info
an
outdoor
outlet
or
UL
lis!ed
exlension
cord
as
described
in
"IMPORTANT
SAFETY
INSTRUCTIONS".
Turn
power
switch
to
"ON"
position.
The
switch
is
located
under
the
rain
cover.
4.
Small
holes
in
the
lid
of
the
unit
are
designed
lo
collect
rain
waler
outomaticol~
and
fill
the
waler
troy
.
If
more
water
is
needed,
carefully
fill
troy¾
full
using
o
small
container
(do
not
use
water
hose
os
it
may
splash
too
much
water
inside
the
trap)
.
Check
once
o
week
or
os
needed.
5.
For
bes!
catch
results
leave
unit
on
at
all
times,
except
when
cleaning
or
servicing
.
6.
Catch
rote
activity
will
be
higher
of
night.
For
best
catch
results
it
is
recommended
to
keep
the
unit
owoy
from
competing
light
sources
.
Intended
for
household
use
only
.
7.
It
is
recommended
to
place
the
unit
of
leas!
10
to
20
feet
owoy
from
where
people
will
be
sitting.
8.
This
unit
is
all-weather
resistant
-
designed
for
outdoor
use
including
rainy
conditions
.
CLEANING
Frequent
cleaning
will
prolong
the
life
of
the
unit,
ensure
lire
prevention
and
provide
for
more
efficient
operation.
1.
Be
sure
to
clean
the
unit
once
per
week
2.
Switch
the
unit
off
and
unplug
before
cleaning
3.
For
week~
cleaning,
remove
the
screw
securing
the
retaining
cage
and
then
!wist
the
cage
clockwise
.
Remove
the
damper
by
grasping
the
crossbar
near
the
edge
of
the
damper
.
Pull
up
firm~
.
Remove
any
buildup
from
the
inside
of
the
retaining
cage
and
Ion
with
o
brush
(included).
Replace
damper,
snap
firmly
into
place
.
4.
For
major
cleaning,
remove
the
lour
screws
securing
the
Ion
housing
to
the
light
housing.
After
removing
the
screws,
gently
pull
the
Ion
housing
owoy
from
the
light
housing.
Using
o
soft
brush,
remove
dirt
and
debris
from
the
light
housing
.
Once
the
cleaning
process
hos
been
completed,
align
!he
screw
holes
in
the
Ion
housing
with
the
screw
holes
in
the
lighting
unit
and
tighten
the
screws
to
the
hose
of
the
lighting
unit
.
5.
When
replacing
the
retaining
cage
-
DO
NOT
press/push
against
the
screen
windows.
REPLACING
BULB
The
light
bulb
life
expectancy
is
approximately
3,000
hours
(or
about
4
months),
and
should
be
replaced
regularly
to
ensure
optimal
UV
effectiveness.
Even
though
the
bulb's
light
may
be
visible
to
you,
its
ability
to
attract
insects
diminishes
over
time
.
1.
Turn
power
switch
to
"off"
position
.
UNPLUG
UNIT,
and
allow
bulb
to
cool
before
replacing
.
2.
Remove
the
screw
securing
the
retaining
cage
and
then
remove
the
retaining
cage
by
!wisting
the
cage
clockwise
.
Turn
!he
unit
upside
down
.
3.
Remove
the
four
screws
securing
the
Ion
housing
to
the
light
housing
.
After
removing
the
screws,
gently
pull
the
Ion
housing
owoy
from
the
light
housing.
Using
o
soft
brush,
remove
dirt
and
debris
from
the
light
housing
.
Once
the
cleaning
process
hos
been
completed,
untighten
the
screw
securing
the
hose
of
the
light
bulb
to
the
light
housing
.
Slide
the
metal
bracket
to
the
side
.
Cover
the
bulb
with
o
cloth
to
protect
your
linger
and
hand
.
Grasp
the
bulb
(with
your
hand
and
lingers
protected
by
the
cloth)
and
gently
pull
the
bulb
from
the
socket.
4.
Remove
any
debris
from
the
lamp
socket
with
a
brush
before
inserting
the
new
bulb.
Replace
!he
metal
plate
over
the
base
of
the
bulb
and
tighten
the
retaining
screw.
5.
Align
the
screw
holes
in
the
Ion
housing
with
the
screw
holes
in
the
lighting
unit
and
tighten
the
screws
to
the
base
of
the
lighting
unit.
6.
Replace
the
retaining
cage
at
the
bottom
of
the
unit.
Replacement
fluorescent
bulbs
con
be
found
of
your
local
retailer
or
con
be
ON/OFF
SWITCH
ordered
directly
from
~
C.
by
visiting
www.dynatrap.com
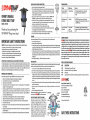
HOW
THE
DYNATRAP®
INSECT
TRAP
WORKS
Flying
insects
ore
attracted
to
the
unit
by
UV
light
and
CO2
that
is
generated
by
the
photo-catalysis
between
the
UV
lamps
and
special
Ti02
coating
.
Additionally,
small
holes
in
the
cover
of
the
unit
allow
rain
water
to
fill
the
water
troy,
further
attracting
mosquilos
.
The
fan
then
pulls
the
insects
into
the
screened
base,
trapping
!hem
until
they
dehydrate
and
die.
The
base
can
be
removed,
allowing
the
contents
to
be
periodically
emptied
into
the
trash.
The
see-lhrough
screen
shows
the
insects
!rapped
in
the
comportmenl,
alerting
you
when
the
net
needs
to
be
emplied
.
TROUBLESHOOTING
Problem:
Possible
cause:
Correction:
Bulb
does
no!
illuminate
1.
No
electrical
power.
1.
Check
plug
and
receptacle
and
fuse
or
circuit
breaker.
and
Ion
does
not
spin.
2.
Check
to
make
sure
power
is
switched
to
!he
"on"
position
.
Bulb
illuminates,
but
fan
1.
Shorted
fan
.
1.
UNPLUG
UNIT
:
Examine
fan
lo
see
that
it
is
free
from
does
not
spin.
foreign
material,
dirt
or
build-up
of
dead
insects.
Clean
unit
as
in
"CLEANING"
section.
Fan
spins,
but
bulb
does
1.
Bulb
not
seated
1.
Check
all
sockets
for
proper
bulb
seating
and
alignment.
not
illuminate.
properly.
2.
Replace
bulb
if
needed
following
instructions
under
"Replacing
2.
Burnt
out
bulb
.
Bulb".
LIMITED
WARRANTY
DWN,ft\
lC.
warranties
to
the
original
purchaser
that
this
product
is
free
from
defective
materials
and
workmanship.
This
warranty
is
limited
to
remedy
any
defective
part
for
a
period
of
one
year
from
date
of
original
date
of
purchase.
Retain
your
original
receipt
as
proof
of
purchase.
This
warranty
does
not
apply
to
the
light
bulb,
nor
to,
in
our
judgment,
misuse
or
abuse.
If
this
unit
has
been
altered,
no
warranty
is
in
force.
This
warranty
does
not
apply
if
this
unit
is
purchased
outside
the
United
States,
excluding
Canada
and
Mexico.
In
no
case
shall
~ -
be
liable
for
any
accidental,
punitive,
consequential,
or
any
other
damages
of
any
kind
for
breach
of
this
or
any
other
warranty,
expressed
or
implied,
whatsoever.
Some
states
do
not
allow
limitation
on
how
long
an
implied
warranty
lasts,
so
the
above
limitation
or
exclusion
may
not
apply
to
you.
This
warranty
gives
you
specific
legal
rights,
and
you
may
also
have
other
rights
that
vary
from
state
to
state.
PARTS
&
ACCESSORIES
AVAILABLE
PART
DESCRIPTION
41050
7-Wall
Replacement
Fluorescent
Bulb
(1
piece)
41052
Fon
Blade
and
DC
Motor
Ultra-Long
Life
Replacement
41053
Retaining
Cage
41061
Lorge
Capacity
Net
(lo
be
used
instead
of
the
Retaining
Cage,
suitable
for
extra
large
catch
performance)
Dynamic
Solutions
Worldwide,
LLC
12247
W.
Fairview
Ave.
Milwaukee,
WI
53226
Phone:
414-431-2819
Toll
free:
1-877-403
-
TRAP
(8727)
Toll
free
fox:
877-403-3293
Email:
Visit
us
online
al
www.dynolrop.com
©
Dynamic
Solutions
Worldwide,
LL(
SAVE
THESE
INSTRUCTIONS
lntertek

MANUAL
DEL
PROPIETARIO
TRAMPA
DE
INSECTOS
VO
LADO
RES
MODELO:
DTl
200
jGracias por comprar
el
DYNATRAP®
trampa
de
insectos voladores!
INSTRUCCIONES
IMPORTANTES
DE
SEGURIDAD
CUIDADO,
Cuanda
use
aparatos
electricas,
se
deben
de
seguir
precauciones
basicas,
incluyendo
lo
siguiente:
-
Poro
desconector,
opague
todos
los
controles
en
la
posician
("0"),
luego,
remueva
lo
clavija
del
enchule
electrico.
-
Desconecte
del
enchufe
cuando
no
este
en
uso
y
antes
de
darle
servicio.
-
Paro
reducir
el
riesgo
de
choque
electrico,
no
ponga
el
aparoto
en
aguo
o
cuolquier
otro
liquido.
-
Este
oparoto
esto
proveido
con
oislodo
doble
.
Use
solo
con
portes
de
repuesto
identicos.
Vea
instrucciones
para
Servicio
de
Aparatos
de
Doble
Aislado
.
INSTRUCCIONES
PARA
APARATOS
DE
DOBLE
AISLADO,
APARATO
CONECTADO
CON
CABLE:
En
un
oporoto
con
oislodo
doble,
dos
sistemos
de
oislodo
son
proveidos
en
lugor
de
tierro.
No
monero
de
hocer
tierro
es
proveido
en
un
oporoto
de
doble
oislodo,
ni
tompoco
signilico
que
lo
tierro
de!
oporoto
debe
de
ser
onodido.
El
servitio
de
montenimiento
elictrico
de
un
oporoto
con
doble
oislodo
requiere
de
extrema
cuidodo
y
conocimiento
de!
sistemo,
y
debe
tinicomente
de
ser
dodo
par
pe~onol
colilicodo.
Los
partes
de
repuesto
de
oporotos
con
doble
oislodo
deben
de
ser
idinticos
o
los
de
los
portes
originoles
de!
oporoto
.
INSTRUCCIONES
IMPORTANTES
DE
SEGURIDAD
Sirvose
leer
estos
instrucciones
antes
de
usor
el
trompo
eledronico
de
insectos
DYNATRAP®
y
guordelos
como
referenda
luturo.
1.
Siempre
desenchule
lo
unidod
ontes
de
dorle
servitio,
limpiorlo,
combior
el
loco,
cuondo
no
este
en
uso,
etc
.
2.
No
coloque
este
producto
cerco
de
luentes
de
color,
gos,
oceite
u
otros
moterioles
inllomobles.
3.
Montengose
olejodo
de!
olconce
de
los
nifios.
4.
Nunco
opere
este
producto
si
su
coble
de
corriente
ho
sido
donodo,
si
no
esto
trobojondo
correctomente,
si
ho
coido
o
donodo,
o
si
ho
sido
tirodo
en
oguo.
5.
Esto
producto
esto
equipado
con
un
coble
de
2
conductores
y
un
enchule
de
clovijos
poro
colzor
en
el
tipo
de
tomocorrientes
odecuodo.
Poro
reducir
el
riesgo
de
choque
electrico,
solo
enchtilelo
en
un
receptoculo
instolodo
correctomente
.
6.
No
meta
los
dedos
ni
objetos
extrofios
en
lo
unidod
mientros
esto
conectodo
o
un
receptaculo
electrico
.
7.
Los
insectos
recolectodos
dentro
de
lo
unidod
podrion
contribuir
o
un
incendio;
par
lo
!onto,
limpie
los
insectos
muertos
de
lo
unidod
con
lrecuentio.
8.
No
limpie
este
producto
rociandolo
con
oguo
.
No
lo
coloque
donde puedo
come
ol
oguo,
ni
cerco
de
moterioles
inllamables
.
9.
No
toque
el
ventilador
cuando
este
en
movimiento.
10.
No
mohrote
el
coble-nunca
tronsporte
lo
unidod
por
el
cable
ni
lire
de!
mismo
pora
desenchulorlo
.
Montenga
el
cordon
lejos
de!
color,
el
aceite,
o
de
hordes
olilados.
11.
Los
cables
de
extension
utilizodos
con
este
producto
deben
estor
morcodos
con
las
letros
"W-A"
y
con
una
etiqueto
que
digo
"Adecuodo
para
utilizarse
con
arteloctos
en
areos
exteriores".
12.
Solo
use
cobles
de
extension
que
tengan
un
enchule
y
receptaculos
compatibles
con
el
enchule
de!
producto.
Reemplace
o
repare
los
cables
donados.
13.
ESTE
APARATO
NO
SE
DESTINA
PARA
IITILIZARSE
POR
PERSONAS
(INUUYENDO
NINOS)
CUYAS
CAPACIDADES
FiSICAS,
SENSORIALES
0
MENTALES
SEAN
DIFERENTES
O
ESlIN
REDUCIDAS,
0
CAREZCAN
DE
EXPERIENCIA
O
CONOCIMIENTO,
A
MENOS
QUE
DICHAS
PERSONAS
RECIBAN
UNA
SUPERVISION
O
CAPACITACION
PARA
EL
FUNCIONAMIENTO
DEL
APARATO
POR
UNA
PERSONA
RESPONSABLE
DE
SU
SEGURIDAD
.
14
.
LOS
NINOS
DEBEN
SUPERVISARSE
PARA
ASEGURAR
QUE
ELLOS
NO
EMPLEEN
LOS
APARATOS
COMO
JUGUEIE
.
INSTALACION
E
INSTRUCCIONES
DE
OPERACION
1.
Desempoque
la
unidod
.
Guarde
el
carton
para
el
olmocenomiento
luero
de
temporoda
(si
es
necesorio)
.
2.
Joie
el
cordon
o
troves
de!
soparte
de!
poste.
lnserte
lo
piezo
de
plostico
roscodo
en
lo
base
de
lo
unidod.
Completo
la
instolotion
medionte
lo
olineocion
de
tubo
de
soporte
superior
e
inferior
.
(Poro
instrucciones
mas
detollodos,
consulte
lo
guia
de
montaje).
3.
Connecte
lo
unidad
usondo
un
coble
de
extension
como
se
describe
en
'SEGURIDAD
IMPORTANTE
INSTRUCCIONES
".
Gire
el
interruptor
a
la
position
'ON".
El
interruptor
se
encuentro
bajo
lo
cubierto
de
la
lluvio.
4.
Pequefios
ogujeros
en
lo
Iopa
de
la
unidod
estan
disenodos
para
recoger
el
ogua
de
lluvio
de
lormo
outomatico
y
llenor
la
bondeja
de
ogua
.
Sise
necesito
mos
ogua,
Ilene
con
cuidado
la
bondeja
de¾
de
su
copatidod
con
un
pequefio
contenedor
(no
utilizar
lo
monguero
de
oguo,
yo
que
puede
solpicor
demosioda
oguo
dentro
de
la
trompo)
.
Llene
de
ogua
uno
vez
por
semona
o
cuando
sea
necesorio
.
5.
Poro
mejores
resultodos
de
copturo,
deje
lo
unidod
prendido
en
todo
momento
,
excepto
duronte
su
limpieza
o
su
mantenimiento.
6.
Lo
conlidad
de
otropomiento
sera
mayor
por
lo
noche
.
Poro
obtener
los
mejores
resultodos
de
copturo
se
recomiendo
mon-
tener
la
unidod
lejos
de
otros
luentes
de
luz
que
compilan
con
la
unidad.
Esta
unidad
esto
disenodo
solo
para
uso
domestico.
7.
Se
recomiendo
colocor
la
unidad
al
me
nos
10
o
20
pies
de
distoncio
de
donde
lo
genie
vo
o
est
or
conviviendo
.
8.
Esta
unidad
es
resistente
para
cualquier
temporodo
de!
ofio
•
disenodo
poro
su
uso
al
aire
libre
incluyendo
conditiones
lluviosas
.
LIMPIEZA
Limpiezo
lrecuente
prolongara
la
vida
titil
de
la
unidad,
garontizoro
la
prevention
de
incendios,
y
la
unidad
luncionaro
en
lorma
mas
elitiente
.
1.
Asegtirese
de
limpiar
lo
unidad
al
menos
coda
semana
.
2.
Apague
la
unidad
y
desenchufe
antes
de
limpiarlo.
t
~
t
..
FIGURA
l
3.
Poro
la
limpieza
semanal,
remuevo
la
camara
de
recoleccion
simplemente
girondo
en
la
direction
y
aspas
de!
ventilador
con
una
brocha
.
4.
Pora
limpieza
prolunda,
remuevo
los
cuatro
tornillos
que
sujetan
la
seccion
de!
ventilador
o
lo
camaro
de
luz.
Despues
de
remover
los
tornillos,
remueva
lo
seccion
de!
ventilador
de
la
seccion
de
la
camara
de
luz
.
Usondo
una
brocha
suave,
remuevo
cualquier
suciedad
en
lo
seccion
de
la
comaro
de
luz.
Uno
vez
que
el
proceso
de
limpieza
ha
sido
completodo,
oliene
los
ogujeros
de
los
tornillos
o
la
seccion
de!
ventilador
ya
la
seccion
de
lo
camaro
de
luz
y
coloque
de
nuevo
los
tornillos
.
5.
Cuondo
obra
la
comaro
de
recoleccion,
tenga
cuidodo
de
no
presionor
lo
mallo
de
olombre
yo
que
esto
la
danaria
REEMPLAZO
DEL
FOCO
Lo
vida
de
uso
de
los
locos
es
de
oproximadamente
3,000
horos
(o
cerca
de
4
meses),
y
deben
de
reemplazo~
despues
de
este
tiempa
para
man-
tener
la
elicacia
optima
de
la
luz
uhrovioleta.
Aun
cuondo
usted
veo
la
luz
de
los
locos,
su
copacidad
para
otraer
insedos
disminuye
con
el
tiempa.
1.
Apague
la
unida
en
la
posicion
"off"
y
DeS(onecte
El
Coble,
permila
que
los
locos
se
enlrien
antes
de
cambia~os.
2.
Remuevo
el
tornillo
que
sujeto
la
conasto
y
despues
remuevo
los
canosta
girandolo
en
contra
de
las
manecillos
de!
reloj.
Voltee
lo
unidod
de
cabezo
hacia
obajo
.
3.
Remuevo
los
cuotro
tornillos
que
sujetan
la
seccion
de!
ventilador
a
la
camora
de
luz.
Despues
de
remover
los
tornillos,
remueva
la
seccion
de!
ventilador
de
la
seccion
de
la
camaro
de
luz
.
Desotornille
el
pequefio
soporte
de
metal
que
sujeta
el
loco
y
con
cuidado
jale
el
loco
de
su
base
.
4.
Remuevo
cuolquier
suciedod
de
la
base
de!
loco
con
uno
brocha
suave
antes
de
insertar
el
loco
nuevo
.
Coloque
el
loco
nuevo
en
la
base,
y
una
vez
que
el
loco
ha
sido
combiado
y
coloque
el
pequefio
soporte
de
metal
para
sujetor
el
loco
.
5.
Aliene
los
agujeros
de
los
tornillos
o
la
se
c
cion
de!
ventilador
y a
la
seccion
de
la
camara
de
luz
y
ponga
de
nuevo
los
tornillos
.
6.
Coloque
la
camaro
de
recoleccion
de
nuevo
en
su
lugar.
El
loco
de
repuesto,
lo
puede
odquirir
en
la
tienda
donde
compro
este
producto,
o
bien
directamente
en
~
--
Visitenos
en
linea
en
www
.
dynotrap
.
com
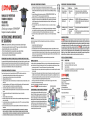
SUPERFICIE
CON
CAPA
DE
TIO,
COMO
FUNCIONA
LA
TRAMPA
DE
INSEOOS
DYNATRAP®
Los
insectos
voladores
son
atroidos
o
la
unidad
por
medio
de
la
luz,
el
agua
en
la
bandeja
y
el
CO,
(dioxido
de
corbano)
que
es
generodo
par
la
loto-catalisis
que
sucede
entre
lo
capo
de
TiO,
(dioxido
de
litanio)
y
los
locos
ultrovioletos
.
Aditio-
nalmente,
los
pequefios
ogujeros
en
la
cubierta
de
la
trampa
permilen
llenar
la
bandeja
con
ogua
de
lluvia,
ayudando
a
otroer
los
mosquitos.
luego
el
ventilodor
los
suctiono
hada
uno
camaro
de
recoleccion
donde
quedan
otrapados
hasta
que
se
deshidroton
y
mueren.
Lo
camara
de
recolection
puede
ser
removida,
de
esta
lorma
se
pueden
peri6dicomente
vociar
los
contenidos
en
la
bosuro
.
Los
rejillas
en
la
cilmaro
de
recoleccion
permiten
ver
lo
que
ha
sido
otropado,
alertando
de
esta
manera
la
siguiente
vez
que
se
necesita
vaciar
.
IDENTIFICACION
Y
RESOLUCION
DE
PROBLEMAS
Problema:
Posible
Causa:
Correccion:
Los
locos
no
alumbran
y l .
No
hay
corriente
l .
Revise
la
conexi6n,
el
contacto,
a
el
breaker
electrica.
el
ventilador
no
giro
.
electrica
. 2.
Asegurese
de
que
el
swttch
de
prendido
esta
en
la
pasici6n
"on"
.
Los
locos
prenden,
pero
el
l .
El
ventilador
esta
en
l.
DESCDNECTE
LA
UNIDAD
:
Examine
el
ventiladar
para
ver
si
ventilador
no
giro
.
corto
.
esta
libre
de
suciedad
o
insectos
muertos
.
Umpie
de
acuerdo
a
la
secci6n
de
"Umpieza".
El
ventilador
giro,
pero
los
l .
Los
locos
na
estim
l.
Revise
que
los
locos
esten
firmemente
colocados
en
la
base
locos
no
prenden.
lirmemente
colocados.
del
loco.
2.
Los
locos
estan
2.
Cambie
los
locos
si
es
necesario,
de
acuerdo
a
las
instrucciones
fundidos
.
bajo
"Reemplazo
del
loco"
.
GARANTIA
LIMITADA
~
C.
garantlza
al
comprador
original
que
este
praducto
esta
llbre
de
delectos
de
materlales
y
mano
de
obra.
Esta
garantia
esta
limitada
a
remediar
cualquier
parte
delectuosa
durante
un
periodo
de
un
aiio
a
partir
de
la
lecha
de
compra
original.
Retenga
su
reclbo
original
como
prueba
de
compra.
Esta
garantia
no
es
apllcable
nl
al
loco,
nl
al
maltrato
o
uso
inapropiado,
a
nuestro
juicio.
Si
esta
unidad
es
alterada,
se
anula
la
garantia.
Esta
no
es
aplicable
a
esta
unidad
si
lue
comprada
luera
de
los
Estados
Unldos,
excluyendo
Canada
y
Mexico.
~
C.
no
sera
responsable
en
nlngun
caso
de
daiios
incidentales,
punitivos,
derivados
o
daiios
de
ningun
otro
tipo
por
incumplimiento
de
esta
ode
cualquier
otra
garantia,
ya
sea
expresa
o
lmpliclta.
Algunos
estados
no
permlten
llmltaclon
con
respecto
a
la
duraclon
de
una
garantia
implicita
y,
par
lo
tanto,
la
limitacion
o
exclusion
anterior
podria
no
serle
aplicable.
Esta
garantia
le
otorga
derechos
legales
especillcos
y
usted
puede
tener
ademas
otros
derechos
que
varlaran
de
un
estado
a
otro.
PARTES
&
ACCESORIOS
DISPONIBLES
PARTE
DESCRIPCCION
41050
Foco
Fluorescente
de
Repuesto
de
7
watts
(1
pieza)
41052
Repuesto
de
Aspas
de!
Ventilador
y
Motor
de
Largo
Duracion
41053
Camara
de
Recoleccion
41061
Red
de
Atropam
i
ento
de
Largo
Capacidad
(para
ser
usado
en
lugar
de
lo
Camara
de
Recoleccion,
especiolmente
cuondo
se
necesite
capturor
grandes
cantidades)
.
Dynamic
Solutions
Worldwide,
LLC
12247
W.
Fairview
Ave.
Milwaukee,
WI
53226
Telelona
:
414-431-2819
Llamada
Gratis:
1-877-403-TRAP
(8727)
Fax
Gratis
:
877
-
403-3293
Email:
Visitenos
en
nuestro
ptigina
web
www
.
dynatrop
.
com
©
Dynamic
Solutions
Worldwide,
LL(
MATA
INSECTOS
Marc
a: DYNAT
RAP
Modelo:
D
Tl
200
110 V-- 60
Hz
15 W
lmportad
o
por
: Bajo
Impo
rt
s & Exports, S.
de
R.
L
de
C. V.
GUARDE
ESTAS
INSTRUCCIONES
lntertek
-
 1
1
-
 2
2
-
 3
3


Dynamic DT1200 El manual del propietario
- Tipo
- El manual del propietario
- Este manual también es adecuado para
En otros idiomas
- English: Dynamic DT1200 Owner's manual
Documentos relacionados
Otros documentos
-
Dynatrap DT1250 El manual del propietario
-
-
-
Dynatrap DT2000XLP El manual del propietario
-
-
-
-
Dynatrap DT1100 El manual del propietario
-
-
Dirtdevil MTZ1000 El manual del propietario