Dynatrap DT3012 El manual del propietario
- Tipo
- El manual del propietario

MODEL:
DT3012
OWNERS
MANUAL
Thank
you
for
purchasing
this
DYNATRAP®
Insect
Trap!
This
product
may
be
covered
by
one
or
more
U.S.
patents
or
pending
patent
applications.
See
www.dynolrop.com/palenls
IMPORTANT
SAFETY
INSTRUCTIONS
WARNING!
When
using
electric
appliances,
basic
precautions
should
always
be
followed,
including
the
following:
-
To
turn
off,
remove
plug
from
outlet.
-
Unplug
from
outlet
when
not
in
use
and
before
servicing
or
cleaning.
-
To
reduce
the
risk
of
electrical
shock,
do
not
put
appliance
in
water
or
other
liquid
.
-
This
appliance
is
provided
with
double
insulation
.
Use
only
identical
replacement
parts
.
See
instructions
for
Servicing
of
Double-Insulated
Appliances
.
INSTRUCTIONS
FOR
DOUBLE-INSULATED,
CORD-CONNECTED
APPLIANCES:
In
a
double-insulated
appliance,
two
systems
of
insulation
are
provided
instead
of
grounding.
No
grounding
means
is
provided
on
a
double-insulated
appliance,
nor
should
a
means
for
grounding
be
added
to
the
appliance.
Servicing
of
a
double-insulated
appliance
requires
extreme
care
ond
knowledge
of
the
system,
and
should
be
done
only
by
qualified
service
personnel.
Replacement
parts
for
a
double-insulated
appliance
must
be
identical
to
those
parts
in
the
appliance.
IMPORTANT
SAFETY
INSTRUCTIONS
Please
read
these
ins1ructions
before
using
the
DynaTrap®lnsect
Trap
and
keep
for
future
reference.
1.
Always
furn
unit
off
and
disconnect
plug
before
servicing,
cleaning,
or
changing
bulbs
.
2.
Do
not
position
the
unit
near
heat,
gas,
oil
or
other
flammable
materials.
3.
Mount
product
out
of
reach
from
children.
4.
Never
operate
this
product
ii
ii
hos
o
damaged
cord
or
plug,
ii
ii
is
not
working
proper~,
ii
ii
has
been
dropped
or
damaged,
or
ii
ii
has
been
dropped
info
waler
.
5.
This
product
is
equipped
with
2-conductor
cord
and
2-prong
polarized
plug
as
a
safety
feature
.
This
plug
will
Iii
in
a
polarized
oudet
only
one
way
.
If
the
plug
does
not
lul~
lit
in
the
outlet,
then
reverse
the
plug
.
If
ii
still
does
no!
Iii,
then
contact
a
qualified
electrician.
To
reduce
the
risk
of
electrical
shock,
only
plug
info
a
properly
installed
outlet.
Do
no!
attempt
lo
defeat
this
safety
feature
.
6.
This
appliance
is
provided
with
double
insulation
.
Use
only
identical
replacement
parts
.
7.
Do
no!
insert
lingers
or
any
foreign
objecls
info
the
unit
while
ii
is
connected
lo
an
electrical
outlet
.
8.
Collected
insecls
within
the
uni!
may
contribute
to
lire,
so
clean
insecls
from
the
uni!
frequently
.
9.
Do
no!
clean
this
product
with
waler
spray
.
Do
no!
place
where
ii
can
fall
info
waler,
or
near
flammable
materials
.
10.
Avoid
prolonged
eye
contact
with
the
light.
11.
Do
not
abuse
cord-never
carry
or
hang
unit
by
cord
or
yank
ii
to
disconnect
from
receplocle
.
Keep
cord
away
from
heat,
oil,
or
sharp
edges.
12.
Keep
away
from
all
sources
of
moisture.
Do
not
operate
the
unit
near
ony
waler
source
.
Do
not
expose
the
unit
lo
moisture
or
liquid
al
any
time.
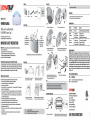
PARTS
LIST
(5)
COVERING
CAP
{2)
HOW
IT
WORKS
UV
BULBS
The
UV
BULBS
emit
light
at
a
365nm
wavelength
lo
attract
flies,
mosquilos,
and
other
flying
insecls
.
ICREW{3)
Sticky
Tech™
Glue
Board
~~
-"'=""
--llll~
t---
When
an
insect
flies
near
the
bulbs
and
land
on
the
glue
board,
they
stick,
dehydrate,
and
die.
*Bulbs
should
be
replaced
every
4
months
(3,000
Hours)
lo
maintain
maximum
effectiveness.
INSTALLATION
1)
Install
Trap
at
a
height
of
6'-0"
to
6'-6"
from
the
floor,
near
a
plug
socket
ond
ffl/OY
from
direct
sunlight.
3)
Insert
the
screws
into
the
wall
anchors
leaving
3/16'
of
the
saew
sticking
out
la
hang
the
trap
an
.
1)
Th~
trap
is
far
INDOOR
USE
ONLY
.
2)
Drill
three
holes
with
3/16'
bit
to
a
depth
of
1-1/B"
.
Insert
wall
anchors
into
the
hales
(S{rew
hole
roting
out).
Covering
Cap
4)
Hald
the
f~
trap
on
both
sides
and
align
the
mounting
holes
with
the
S{rew
and
hang
the
trap.
Install
the
covering
caps
on
the
lap
two
mews
.
2)
Installing
this
trap
under
strong
lights
(lamps
or
Sunlight)
will
reduce
effectiveness.
3)
Avoid
installing
the
trap
in
dusty,
windy,
or
in
high
humidity
locations.
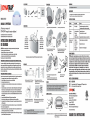
HOW
TO
USE
1)
Grip
bottom
of
cover
and
pull
sla~
forward.
~---
Bottom
Box
Front
Cover
"
----~
Supiort
Bracket
2)
Uh
cover
up
and
hook
support
bracket
onto
post
.
Post
3)
Push
handle
of
Glue
Board
Halder
dawn
sla~
4)
Remove
liner
from
StickyTech™
Glue
Boord
and
insert
into
holder
until
handle
makes
contact
with
bottom
box.
by
aligning
edges
with
side
guide
~ots
.
(Sticky
Side
Up)
5a)
Uh
handle
of
the
glue
board
holder
upwards
until
you
hear
a
'click"
.
6)
Plug
in
to
turn
on
lights
and
begin
trapping
insects
.
5b)
Gently
lih
front
cover
and
d~ngage
the
support
bracket
from
the
post
.
Slo~
lower
the
front
panel
and
push
ta
lock
closed
.
TIPS
•
During
Winter
months
or
when
there
are
not
many
insects
in
the
environment,
we
recommend
ta
replace
the
glue
board
every
two
weeks
.
·
During
Summer
or
when
insects
are
plentiful,
we
recommend
to
replace
with
a
fresh
glue
board
week~
.
•
If
more
than
2/3
of
the
glue
board
is
covered
with
insects,
we
rerammend
to
replace
with
o
fresh
glue
board.
·
Dusty
areas
will
affect
the
stickiness
of
the
glue
board
and
it
should
be
replaced
more
ohen
for
optimal
results.
REPLACING
THE
LIGHT
BULBS
1)
Unplug
trap
before
replacing
light
bulbs
.
Light
Bulbs
2)
Hold
both
ends
of
the
light
bulb,
rotate
tt
90
degrees,
lih
up
and
remove
gently
.
Insert
o
new
light
bulb
into
the
socket,
hold
both
ends
and
rotate
tt
90
degrees
in
the
opposite
dirertian.
TIP
·
Remove
glue
board
before
replacing
light
bulbs.
MAINTENANCE
1)
Light
bulbs
ore
rerommended
ta
be
replaced
every
4
months
(3,000
Hours)
for
optimal
results
.
2)
Oeon
the
trap
with
soh
doth
and
neutral
detergent.
(Unplug
before
cleaning)
TROUBLESHOOTING
Problem:
Possible
cause:
Corre<tion:
Does
Nol
Work
1.
No
Power
1.
Check
lo
make
sure
plug
is
proper~
connected
lo
oudet.
Bulb
does
1.
Bulb
is
damaged
1.
Replace
with
new
bulb
not
illuminate
2.
Plug
is
no!
connecled
2.
Check
plug
and
re-connect
3.
Ballast
is
damaged
3.
Replace
Ballast
(contact
cus1omer
service)
Flies
are
not
l.
lns1alled
incorreclly
1.
Reier
to
manual
for
proper
installation
being
frapped
2.
Light
not
attracting
flies
2.
Replace
with
new
light
bulbs
3.
Glue
board
has
expired
3.
Replace
with
new
glue
board
LIMITED
WARRANTY
DYNAMIC
warranties
to
the
original
purchaser
that
this
product
is
free
from
defective
materials
and
workmanship.
This
warranty
is
limited
to
remedy
any
defective
part
for
a
period
of
one
year
from
date
of
original
date
of
purchase.
Retain
your
original
receipt
as
proof
of
purchase
.
This
warranty
does
not
apply
to
the
light
bulb,
nor
to,
in
our
judgment,
misuse
or
abuse
.
If
this
unit
has
been
altered,
no
warranty
is
in
force.
This
warranty
does
not
apply
if
this
unit
is
purchased
outside
the
United
States,
Canada
and
Mexico
.
In
no
case
shall
DYNAMIC
be
liable
for
any
accidental,
punitive,
consequential,
or
any
other
damages
of
any
kind
for
breach
of
this
or
any
other
warranty,
expressed
or
implied,
whatsoever.
Some
states
do
not
allow
limitation
on
how
long
an
implied
warranty
lasts,
so
the
above
limitation
or
exclusion
may
not
apply
to
you.
This
warranty
gives
you
specific
legal
rights,
and
you
may
also
have
other
rights
that
vary
from
state
to
state.
PARTS
&
ACCESSORIES
AVAILABLE
PART
DESCRIPTION
330123
32050
Sticky
Tech™
Glue
Board
Replacement
Pack
for
DT3012
(pack
ol
3)
6W
Replacement
UV
Bulb
(set
ol
2)
Dynamic
Solutians
Warldwide,
LLC
12247
W.
Fairview
Ave
.
Milwaukee,
WI
53226
Phone:
414
-
431-2819
Toll
free:
1-877-403-TRAP
(8727)
Toll
free
lax:
877-403-3293
Email:
Visit
us
online
at
www.dynatrap.com
©
Dynamic
Solutions
Worldwide,
LL(
SAVE
THESE
INSTRUCTIONS
lntertek

MODELO:
DT3012
MANUAL
DEL
PROPIETARIO
jGracias por comprar
el
DYNATRAP®
trampa
de
insectos voladores!
Este
producto
puede
estar
cubierto
por
una
o
mas
patentes
de
EE
.
UU
.
o
aplicaciones
pendientes
de
patente
.
Ver
www
.
dynatrap
.
com/patents
INSTRUCCIONES
IMPORTANTES
DE
SEGURIDAD
iCUIDADO!
Cuando
use
aparatos
elec!Ticos,
se
deben
de
seguir
precauciones
basicas,
incluyendo
lo
siguiente
:
-
Paro
desactivar,
quitor
el
enchufe
del
tomacorriente
.
-
Desconecte
del
enchufe
cuando
no
este
en
uso
y
antes
de
darle
servicio
.
-
Para
reducir
el
riesgo
de
choque
electrico,
no
ponga
el
aparato
en
agua
o
cualquier
otro
liquido.
-
Este
aparato
esta
proveido
con
aislado
doble
.
Use
solo
con
partes
de
repuesto
identicas.
Vea
instrucciones
para
Servicio
de
Aparatos
de
Doble
Aislado.
INSTRUCCIONES
PARA
APARATOS
DE
DOBLE
AISLADO,
APARATO
CONECTADO
CON
CABLE:
En
un
aparato
con
aislado
doble,
dos
sistemos
de
aislado
son
proveidos
en
lugar
de
tierra
.
No
manera
de
hacer
tierra
es
proveido
en
un
aparato
de
doble
aislado,
ni
tampoco
signilica
que
la
tierra
del
aparato
debe
de
ser
afiadida.
El
servicio
de
mantenimiento
electrico
de
un
aparato
con
doble
aislado
requiere
de
extremo
cuidado
y
conocimiento
del
sistema,
y
debe
unicamente
de
ser
dado
por
personal
calilicado.
Las
partes
de
repuesto
de
aparatos
con
doble
aislado
deben
de
ser
identicos
a
los
de
las
partes
originales
del
aparato.
INSTRUCCIONES
IMPORTANTES
DE
SEGURIDAD
Sirvase
leer
estas
instrucciones
antes
de
usar
el
trompa
electronico
de
insectos
Dynolrap
® y
guardelas
como
relerencio
luturo.
1.
Siempre
apogue
el
oparato
y
desconecte
el
enchule
antes
de
reporar,
limpiar
o
cambiar
los
locos
.
2.
No
coloque
la
unidad
cerca
de
color,
gas,
petroleo
u
otros
materiales
inllamobles
.
3.
Monte
el
producto
luera
del
alcance
de
los
nifios
.
4.
Nunca
utilice
el
producto
si
tiene
un
cable
o
enchule
danado,
si
no
lunciono
correctomente,
si
se
ha
coido
o
danado,
o
si
se
ha
caido
ol
agua
.
5.
Este
producto
esta
equipado
con
un
coble
de
2
conductores
y 2
clavijas
de
enchule
polorizado
como
medida
de
seguridod
.
Este
enchule
encaja
en
un
tomacorriente
polarizado
de
una
solo
manera.
Si
el
enchule
no
encaja
completamente
en
la
toma
de
corriente,
entonces
vohee
el
enchule
.
Si
aun
osi
no
encaja,
pongose
en
contacto
con
un
electricista
calilicado.
Para
reducir
el
riesgo
de
descarga
electrica,
solo
se
conecta
a
un
tomacorriente
debidamente
instalado.
No
Irate
de
alterar
esta
medida
de
seguridad.
6.
Este
aparato
esta
dotado
de
doble
aislamiento.
Utilice
solo
piezas
de
repuesto
identicas
.
7.
No
introduzca
los
dedos
u
objetos
extrafios
en
la
unidad
mientras
esta
conectada
a
una
toma
electrica.
8.
lnsectos
recogidos
dentro
de
la
unidad
pueden
contribuir
para
generar
un
luego,
entonces
limpie
los
insectos
dentro
de
la
unidad
lrequentemente.
9.
No
rocie
agua
para
limpiarlo.
No
lo
coloque
cerca
de
donde
se
pudiera
caer
en
el
agua,
o
cerca
de
materiales
inllamables.
10
.
Evilar
el
contacto
visual
prolongado
con
la
luz.
11
.
No
abuse
del
cordon
-
Nunco
transporte
o
cuelgue
lo
unidad
por
el
cable
ni
tire
de
este
para
desconectarlo
de
lo
tomo
de
corriente
.
Montenga
el
cable
alejado
del
color,
aceite
o
hordes
alilados
.
12
.
Mantener
olejado
de
cualquier
luente
de
humedad
.
No
hago
luncionar
la
unidad
cerca
de
luentes
de
agua
.
No
exponga
el
aporato
a
la
humedad
o
liquido
en
cualquier
momenta
.
LISTA
DE
PARTES
(5)
!RAMPA
CUBIERTA
(2)
COMO
FUNCIONA
FOCOS
UV
Los
locos
emiten
luz
Ultra
Violeta
con
una
longitud
de
onda
de
365
nm
paro
alraer
o
las
moscas,
mosquitos
y
otros
insectos
voladores
.
TORN\ll0(3)
Sticky
Tech™
PAPEL
PEGAJOSO
Cuando
un
insecto
vuela
cerca
de
los
locos
UV
y
aterrizan
en
el
papel
pegajoso,
se
pegan,
deshidralan
y
mueren.
*Los
locos
deben
ser
reemplazados
coda
4
meses
(3.000
horas)
para
mantener
la
maxima
elicacia.
INSTALACION
210mm/8-l/4"
1)
lnstalar
Trampa
a
una
altura
de
6'-0
"a
6'-6"
de!
pisa
,
cerca
de
uno
lama
de
corrien!e
y
lejos
de
la
luz
solar
directo.
3)
Enrosque
las
!ornillos
en
las
ondojos
de
pored
dejondo
3/16"
de!
tornillo
y
que
sobr~lgo
un
poco
para
poder
colgor
lo
trampo
.
2)
Perforor
kos
agujeros
con
uno
broca
de
3/16"
a
una
profundidod
de
1-1/8
".
lnsertor
Soportos
de
pored
en
las
orificios
(orificio
de!
tornillo
hocio
afuera)
.
4)
Sujete
lo
trompo
poro
moscos
en
ombos
!ados
y
alinee
las
orificios
de
montaje
con
el
tomillo
para
colgor
la
trampo.
lnstale
las
tapos
que
cubren
las
dos
tornillos
superioros
.
1)
Esta
trompo
as
para
USO
EN
INTERIORES
SOlAMENTE
.
2)
La
instolacion
de
esta
!rampo
cerco
de
otras
fuentes
de
luz
fuertes
(par
ejem~o
:
lomparas
o
luz
solar)
reduciro
su
efectividad.
3)
Evi!or
la
instalacion
de
la
trampo
en
lugaras
de
alto
humedad,
polvo,
o
viento.
COMO
UTILIZAR
1)
Sujele
porte
infeiior
de
la
cubierto
y
jole
lenlomenle
hacio
adelanle
.
~---
Coja
Inferior
Cubierta
Soporte
de
Apoyo
2)
Levanle
lo
Iopa
y
enganche
el
soporte
en
el
paste
.
Paste
3)
Empuje
la
monija
de
pope!
pegojoso
lenlamenle
hasto
que
la
monijo
hace
contocto
con
lo
cajo
inferior.
4)
Quttor
lo
prolecdon
de
pope!
pegojoso
e
insertor
en
el
soporte
alineando
las
hordes
con
ranuras
de
guia
loterales.
5a)
Levonte
la
monijo
de!
soporte
de
pope!
pegajoso
hacio
arribo
hasta
que
se
oiga
un
"die"
.
5b)
Levonte
suavemenle
lo
cubierto
delontera
para
desocoplar
el
soporte
de
opoyo
de!
paste
.
len!omente
boje
el
pone!
lron!ol
y
empuje
para
cerrorlo
.
CONSEJOS
(coloque
la
parte
pegajosa
hacia
arriba)
6)
Enchufe
para
encender
las
lucos
y
comenzar
a
akapar
insectos.
·
Durante
las
mesas
de
invierno
o
cuando
no
hay
muchos
insectos
en
el
media
ambiente,
se
recomienda
sustttuir
el
pope!
pegajoso
coda
dos
semanas
.
•
Durante
el
verono
o
cuando
las
insectos
son
obundonlas,
se
recomiendo
reemplozor
con
un
pope!
pegojaso
nuevo
sernonolmen!e.
•
Si
mos
de
2/3
de!
pope!
se
Hegan
a
cubrir
can
insectas,
se
recomienda
sustituir
con
pope!
pegajaso
nuevo.
•
Las
ureas
polvorientas
alectaron
la
rigidez
de!
pope!
y
debe
ser
reemplazado
mos
a
menudo
para
obtener
rasultadas
optimos.
CAMBIO
DE
LOS
FOCOS
IDs
Focas
1)
Desenchule
la
trampo
antes
de
cambiar
las
locos
.
2)
Manlengo
ambos
extremos
de
las
locos,
girorlo
90
grados,
levante
hacia
orriba
y
retire
con
cuidado.
lnsertar
un
nuevo
loco
en
el
enchufe
de!
loco,
sujete
las
dos
exkemos
y
girandolo
90
grados
en
lo
direcci6n
opuesto
.
SUGERENCIAS
·
Refiror
el
pope!
pegojaso
on!as
de
sustituir
las
locos.
MANTENIMIENTO
1)
Se
recomiendon
que
las
locos
sean
remplozados
coda
4
mesas
(3
.
000
horos)
para
obtener
rasultodos
6ptimos
.
2)
Umpie
el
lihro
con
un
pofio
suave
y
un
detergente
neuko.
(Desenchule
antes
de
lo
limpiezo)
SOLUCION
DE
PROBLEMAS
Problemo:
Causa
posible:
Corre<dcin:
No
lunciona
1.
No
hay
Energia
1.
Compruebe
para
asegurarse
de
que
el
enchule
esla
correctamenle
conectado
a
la
loma
de
corrienle
elec!Tica.
Los
locos
no
1.
Los
locos
estan
danados
1.
Reemplace
con
locos
nuevos.
se
iluminan
2.
El
enchule
no
2.
Revise
el
enchule
y
vuelva
a
conectarlo
esta
conectado
3.
El
balastro
esta
danado
3.
Reemplace
el
balastro
(contacte
nuestro
servicio
al
cliente)
Las
moscas
no
estan
1.
lnstalado
de
1.
Consuhe
el
manual
para
su
correcta
instalacion
siendo
atrapadas
lorma
incorrecta
2.
La
luz
no
atrae
a 2.
Reemplazar
con
locos
nuevos
las
moscas
3.
El
papel
pegajoso
3.
Reemplace
con
un
nuevo
papel
pegajoso
ha
expirado
GARANTIA
LIMITADA
DYNAMIC
garantiza
al
comprador
original
que
este
producto
esta
libre
de
defectos
de
materiales
y
mano
de
obra.
Esta
garantia
esta
limitada
a
remediar
cualquier
parte
defectuosa
durante
un
periodo
de
un
aiio
a
partir
de
la
fecha
de
compra
original.
Retenga
su
recibo
original
como
prueba
de
compra
.
Esta
garantia
no
es
aplicable
ni
al
loco,
ni
al
maltrato
o
uso
inapropiado,
a
nuestro
juicio.
Si
esta
unidad
es
alterada,
se
anula
la
garantia.
Esta
no
es
aplicable
a
esta
unidad
si
fue
comprada
fuera
de
los
Estados
Unidos,
excluyendo
Canada
y
Mexico
.
DYNAMIC
no
sera
responsable
en
ningun
caso
de
daiios
incidentales,
punitivos,
derivados
o
daiios
de
ningun
otro
tipo
por
incumplimiento
de
esta
o
de
cualquier
otra
garantia,
ya
sea
expresa
o
implicita.
Algunos
estados
no
permiten
limitacicin
con
respecto
a
la
duracicin
de
una
garantia
implicita
y,
por
lo
tanto,
la
limitacicin
o
exclusion
anterior
podria
no
serle
aplicable.
Esta
garantia
le
otorga
derechos
legales
espedficos
y
usted
puede
tener
ademas
otros
derechos
que
variaran
de
un
estado
a
otro.
PARTES
Y
ACCESORIOS
DISPONIBLES
PARTE
DESCRIPCl6N
330123
32050
Paquete
de
reemplazo
de
Sticky
Tech™
papel
pegajoso
para
DT3012
(paquete
de
3
piezas)
Focos
UV
de
repuesto
de
6W
coda
uno
(juego
de
2
piezas)
Dynamic
Solutions
Worldwide,
LLC
12247
W.
Fairview
Ave.
Milwaukee,
WI
53226
Telefono:
414
-
431-2819
Llamada
Gratis:
1-877-403-TRAP
(8727)
Fax
Gratis:
877-403-3293
Email:
Visitenos
en
nuestra
pagina
web
www.dynatrap.com
©
Dynamic
Solutions
Worldwide,
LL(
GUARDE
ESTAS
INSTRUCCIONES
lntertek
-
 1
1
-
 2
2


Dynatrap DT3012 El manual del propietario
- Tipo
- El manual del propietario
en otros idiomas
- English: Dynatrap DT3012 Owner's manual
Artículos relacionados
-
Dynatrap DT1100 El manual del propietario
-
Dynatrap DT0500IN El manual del propietario
-
-
-
-
Dynatrap DT2000XLP El manual del propietario
-
-
-
-