LEVOLOR Light Filtering Roman Shades Guía de instalación
- Tipo
- Guía de instalación
Lo siento, pero la información que proporcionaste no incluye ningún detalle sobre "LEVOLOR Light Filtering Roman Shades". Por lo tanto, no puedo extraer la información solicitada del contexto proporcionado.
Lo siento, pero la información que proporcionaste no incluye ningún detalle sobre "LEVOLOR Light Filtering Roman Shades". Por lo tanto, no puedo extraer la información solicitada del contexto proporcionado.

Motorized Control Lift
Elevación con control motorizado
Roman Shades
Persianas romanas
INSTALLATION • OPERATION • CARE
INSTALACIÓN • FUNCIONAMIENTO • CUIDADO

Getting Started
Window and Shade Terminology ................................................................... 3
Product View ....................................................................................................4
Components Included ....................................................................................5
Tools and Fasteners You May Need ................................................................ 6
Installation
Installation Overview ....................................................................................... 7
Inside Mount (IM) ..................................................................................... 7–10
Outside Mount (OM) ................................................................................11–14
Valance Installation ....................................................................................... 15
Operation
Remote Operation ......................................................................................... 16
Battery Charging ........................................................................................... 16
Removing the Shade ..................................................................................... 16
Additional Information and Support
Troubleshooting ..............................................................................................17
Cleaning Procedures ..................................................................................... 18
Warranty ........................................................................................................ 19
Customer Service Support ........................................................................... 19
WARNING: Keep all small parts, components and packaging away
from children as they pose a potential choking hazard which may
result in serious injury or death. Please reference all warning tags
and labels in the instructions and on the shade.
!
CONTENTS
2© 2022 LEVOLOR®
Roman Shades Motorized Control Lift

Molding
Head Jamb
Sill
Jamb Jamb
Outside Mount
Inside Mount
Molding
Head Jamb
Sill
Jamb Jamb
Outside Mount
Inside Mount
Molding
Head Jamb
Sill
Jamb Jamb
Thank you for purchasing LEVOLOR® Roman Shades. With proper installation, operation,
and care, your new roman shade will provide years of beauty and performance. Please
thoroughly review this instruction booklet before beginning installation.
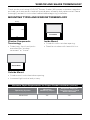
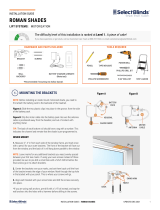
MOUNTING TYPES AND WINDOW TERMINOLOGY
Inside Mount
• Shade fits within window opening.
• Great for windows with beautiful trim.
Window Components
Terminology
• Collectively, the sill and jambs
are called the “window
casement” or “frame”.
Outside Mount
• Shade mounts outside window opening.
• Increased light control and privacy.
Minimum Depth Requirements for Proper Shade Installation (inches)
Operating System Minimum
Mounting Depth
Minimum Depth for
Fully Recessed / Flush
Mount Headrail
Motorized 1¼" 2¼"
WINDOW AND SHADE TERMINOLOGY
3Roman Shades Motorized Control Lift

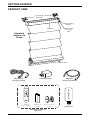
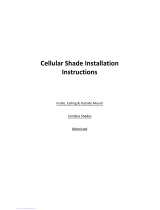
PRODUCT VIEW
Power AdapterMicro-USB
Charging Cable
Hub
(optional)
Remote Control Kit
(optional)
AAA Battery
(2-Pack)
Standard
Remote Control Remote Control
Holder
Magnetic
Charging Adapter
Standard
Bottom-Up
Shade
Installation
Brackets
Bottom Rail
Headrail Micro-USB
Charging
Port
Programming
Button
GETTING STARTED
4Roman Shades Motorized Control Lift

Hub
(optional)
Remote Control Kit
(optional)
AAA Battery
(2-Pack)
Standard
Remote Control
Remote Control
Holder
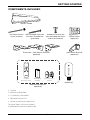
• Shade
• Mounting Brackets
• Installation Hardware
• Remote Control Kit
• Other accessories (optional)
Optional items will be included,
if selected at time of shade order.
COMPONENTS INCLUDED
Hex Head Screws
(2 per bracket)
#6 Flat Head Screw for
Use with End Mounts
(provided)
Speed Nut and Screw
(two provided with each
extension bracket)
Extension / Side Mount Brackets
(optional)
Spacer Block
(optional)
Hold-Down Bracket
(optional)
Roman Shade
GETTING STARTED
5Roman Shades Motorized Control Lift

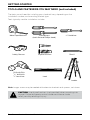
TOOLS AND FASTENERS YOU MAY NEED (not included)
The tools you will need for installing your shade will vary, depending on the
installation surface, and mounting bracket type.
Tools typically used for installation include:
Metal Tape Measure
Safety Glasses
Drill with Bits
3
⁄32" drill bit &
1
⁄4" hex driver
Ladder
Screwdrivers
(both flat and Phillips head)
Drywall Anchors
Level
1⁄4" Nutdriver
Pencil
Note: Longer screws may be needed with extension brackets and spacers, not shown.
CAUTION: Use drywall anchors (not provided) when mounting into
drywall. Failure to properly anchor shade could cause shade
to fall, possibly resulting in injury.
!
GETTING STARTED
6Roman Shades Motorized Control Lift

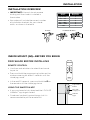
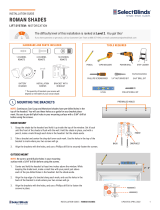
PAIR SHADE BEFORE INSTALLING
REMOTE CONTROL
• Use the – and + buttons to select the channel
to pair to.
• Press and hold the programming button on the
window covering for about 2 seconds until the
shade jogs once.
• In the next 10 seconds, press and hold the on
the remote until the shade jogs twice.
USING THE INMOTION APP
• If you purchased a hub, download the LEVOLOR
InMotion™ app to get started.
• Shade can be directly paired to app, but it is
recommended to pair to remote first.
INSIDE MOUNT (IM)–BEFORE YOU BEGIN
Micro-USB
Charging Port
Indicator
Light
Programming
Button
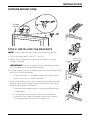
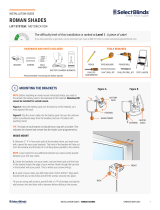
INSTALLATION OVERVIEW
• IMPORTANT: If bound, do not remove
binding until the shade is installed in
the window.
• Your order will include the correct number
of installation brackets for your shade
width, as shown in the table.
Shade
Width Brackets
Required
Up to 38" 2
38" – 68" 3
68" – 82" 4
82" – 106" 5
106" – 130" 6
> 130" 7
End Mount BracketsBracket
INSTALLATION
7Roman Shades Motorized Control Lift

Bracket
For shallow mount, insert
screw in the upper rear
corner of the bracket
Bracket
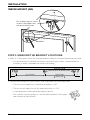
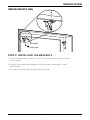
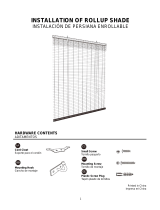
STEP 1: MARKING THE BRACKET LOCATIONS
• Mark 2" in from each jamb for bracket location. Mount into wood whenever possible.
— If more than two installation brackets came with your order, space additional
bracket(s) evenly between the two end brackets.
• Center the brackets on your marks, then mark each of the screw holes.
— The minimum depth for installation brackets is 1¼".
— The minimum depth for a fully recessed mount is 2¼".
— Use the center screw hole when depth permits.
— For shallow mounting depths, use the hole located in the upper
rear corner of the bracket.
INSIDE MOUNT (IM)
2" Space Evenly
Jamb Jamb
Space Evenly
Room Side
2"
Minimum of 15" for Battery Wand
Window Side
INSTALLATION
8Roman Shades Motorized Control Lift

Screw
Bracket
Bracket
Screw
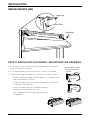
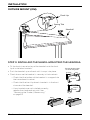
STEP 2: INSTALLING THE BRACKETS
• Drill the screw holes using a 3
⁄32" drill bit (use drywall anchors to mount
into drywall).
• Attach the installation brackets using the screws provided, 1 screw
per bracket.
• Ensure all brackets are square with each other.
INSIDE MOUNT (IM)
INSTALLATION
9Roman Shades Motorized Control Lift

INSIDE MOUNT (IM)
Snap in
Place
Headrail
Bracket
Bad
The front of the bracket
fits under the groove.
STEP 3: INSTALLING THE SHADE–MOUNTING THE HEADRAIL
• Fit the front channel on top of the headrail onto the front
lip of installation brackets.
• Push the headrail up and back until it snaps into place.
• Check to ensure the headrail is securely in the brackets.
— Check that the bottom of the headrail is snapped into
the base of each bracket.
— Check that the front lip of each bracket is in the front
channel of the headrail.
— If any brackets are not installed correctly,
release the shade and reinstall.
See “Removing the Shade (If Necessary)”
on page 16.
Good
Front Lip
Spring Tab
Headrail
10
INSTALLATION
Roman Shades Motorized Control Lift

PAIR SHADE BEFORE INSTALLING
REMOTE CONTROL
• Use the – and + buttons to select the channel
to pair to.
• Press and hold the programming button on the
window covering for about 2 seconds until the
shade jogs once.
• In the next 10 seconds, press and hold the on
the remote until the shade jogs twice.
USING THE INMOTION APP
• If you purchased a hub, download the LEVOLOR
InMotion™ app to get started.
• Shade can be directly paired to app, but it is
recommended to pair to remote first.
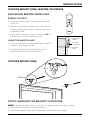
OUTSIDE MOUNT (OM)–BEFORE YOU BEGIN
Micro-USB
Charging Port
Indicator
Light
Programming
Button
Bracket
Bracket
OUTSIDE MOUNT (OM)
STEP 1: MARKING THE BRACKET LOCATIONS
NOTE: The rear of the brackets must be flush against a flat mounting surface.
Do NOT mount brackets on curved molding.
• Center the headrail over the window opening at the desired height.
11
INSTALLATION
Roman Shades Motorized Control Lift

Minimum of 15" for Battery Wand
Headrail End Marks
Window Opening
2" Space Evenly Space Evenly
Motor
Side
2"
• Center the brackets on your marks, then mark each of the
screwholes.
— A minimum of 1 1⁄4" flat vertical surface is required to mount
the brackets.
— The top of the installation brackets or extension brackets
should be at the desired shade height. The brackets
should be level and aligned.
— When using extension brackets, mark two screw holes
per bracket.
CAUTION: The rear of the brackets must be flush against a flat mounting
surface. Do not mount brackets on curved molding.
!
OUTSIDE MOUNT (OM)
STEP 1: MARKING THE BRACKET LOCATIONS, CONT.
• Use a pencil to lightly mark each end of the headrail.
— Alternatively, measure the width of the headrail and use that width to mark
the headrail end points over the window opening.
• Mark approximately 1 – 2" in from each end of headrail for the installation
bracket locations.
— Allow a minimum of 1⁄4 in. between the bottom of the installation bracket and the
top of the window molding.
• With a pencil, mark the installation brackets or extension bracket screw locations
through the larger, oblong rear holes of the bracket, 1 screw per bracket.
• Use a level to ensure all brackets are aligned.
• If more than two installation brackets come with your order, space additional bracket(s)
evenly between the two end brackets, no more than 30" apart, mark drill hole locations.
INSTALLATION
12 Roman Shades Motorized Control Lift

OUTSIDE MOUNT (OM)
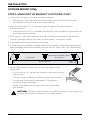
STEP 2: INSTALLING THE BRACKETS
NOTE: Use drywall anchors when mounting into drywall.
• Drill the screw holes using a 3⁄32" drill bit.
• Attach the installation or extension brackets using the
screws provided.
IMPORTANT: The front edges of the installation brackets
must be level and aligned to each other.
• If using spacer blocks for added clearance, the spacer blocks
and shims may be stacked.
— A maximum of 1 1
⁄2" of added clearance using spacer
blocks and shims is recommended.
• Attach the spacer blocks and installation brackets to a flat
vertical mounting surface with #6 mounting screws long
enough for asecure installation.
— The top of the spacer blocks should be at the desired
shade height.
— If using extension brackets, attach an installation
bracket to the underside of each extension bracket
using theprovided screws and speed nuts.
Screw
Bracket
Drywall
Anchor
Maximum
1½"
Longer Screw
(Not Provided)
INSTALLATION
13Roman Shades Motorized Control Lift

STEP 3: INSTALLING THE SHADE–MOUNTING THE HEADRAIL
• Fit the front channel on top of the headrail onto the front
lip of installation brackets.
• Push the headrail up and back until it snaps into place.
• Check to ensure the headrail is securely in the brackets.
— Check that the bottom of the headrail is snapped into
the base of each bracket.
— Check that the front lip of each bracket is in the front
channel of the headrail.
— If any brackets are not installed correctly,
release the shade and reinstall. See
“Removing the Shade (If Necessary)”
on page 16.
Snap in
Place
Headrail
Bracket
The front of the bracket
fits under the groove.
OUTSIDE MOUNT (OM)
BadGood
Spring Tab
Front Lip
Headrail
INSTALLATION
14 Roman Shades Motorized Control Lift

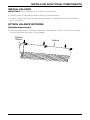
INSTALL VALANCE
IMPORTANT: Pair remote prior to installing the valance.
• Hook the top of the valance over the top lip of the headrail.
• Carefully press the valance down and back against the headrail until the valance
clips into place.
ATTACH VALANCE RETURNS
(Outside mount only)
• Fold the valance returns around the end of the headrail and firmly press into place
so that the hook-and-loop strips engage.
Valance
Valance
Return
Valance
Valance
Return
INSTALLING ADDITIONAL COMPONENTS
15Roman Shades Motorized Control Lift

Remove
Bracket
Back of
Shade
Headrail
Bottom
Tab
REMOVING THE SHADE (IF NECESSARY)
• Lower the shade approximately 4".
• While holding the headrail, push
back on the bottom tab of the
installation bracket to release
the bottom edge of the headrail.
• After releasing the bottom edge,
roll the back of the headrail
down and out from the bracket.
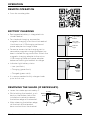
REMOTE OPERATION
• Scan for remote guide.
BATTERY CHARGING
• Rechargeable battery is integrated into
shade headrail.
• For standard charging, remove the
magnetic charging insert from the headrail.
Use the micro-USB charging cable and
power adapter to charge shade.
• For easier access to the charging port, a
removable magnetic charging adapter has
been installed during production. Attach the
magnetic charging adapter to the micro-
USB charging cable and power adapter
before connecting to headrail to charge.
• Indicator light battery status:
– Low (red flash)
– Charging (green flash)
– Charged (green solid)
• It is recommended to fully charge shade
prior to first use.
Micro-USB
Charging Port
Indicator
Light
Programming
Button
Magnetic
Charging
Insert
OPERATION
16 Roman Shades Motorized Control Lift

Problem The shade will not fit into the installation brackets.
Solution
Check that the installation brackets are level and aligned. Adjust and/
or shim to level, if necessary.
Be sure the heads of the mounting screws are flush against the
installation bracket.
Make sure that the shade fabric is not caught between the installation
bracket and the headrail.
Check that the headrail is completely inserted into the installation
brackets.
Problem The shade raises or lowers unevenly or the bottom rail is uneven
when fully raised.
Solution
Lower the shade completely to allow it to “self-correct” skewing.
Check that the headrail and installation brackets are level and aligned.
Shim the installation brackets to level the headrail, if necessary.
Adjust roman bar clips. Lower the shade completely and locate the
cord route in the top of the headrail behind the shade. On the back of
the shade, adjust any roman bar clips by hand that are out of vertical
alignment with the cord location in the headrail.
TROUBLESHOOTING
If your shade is not operating correctly:
• First review the guide that came with your control device.
• Refer to the following troubleshooting procedures for specific solutions for your shade.
If questions remain, please contact LEVOLOR Customer Service at 1-800-LEVOLOR or
1-800-538-6567.
17
ADDITIONAL INFORMATION AND SUPPORT
Roman Shades Motorized Control Lift

ADDITIONAL INFORMATION AND SUPPORT
Additional Notes
• Once mounted, leave the shade in the lowered position for 48 hours to
release any wrinkles in the fabric.
• Shades made from patterned fabrics may differ slightly in the location of
of the pattern from shade to shade. This is due to normal variation in the roll
from which the fabric is cut for the shade.
• With time, soft folds may settle or flatten. Shades that are raised regularly
will be less subject to settling and will maintain a more relaxed appearance.
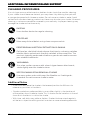
DUSTING
Use a feather duster for regular cleaning.
FORCED AIR
Blow away dirt and debris using clean compressed air.
PROFESSIONAL INJECTION/EXTRACTION CLEANING
Call local on-site blind/shade cleaner that injects a cleaning solution
into the fabric and extracts the dirty solution at the same time. The
service is typically performed at home so you do not need to remove
your window treatments.
VACUUMING
Use a low suction vacuum with a brush-type cleaner attachment;
stroke lightly over the shade to clean.
SPOT-CLEANING/STAIN REMOVAL AT HOME
Use warm water and a mild soap, like Woolite® or Scotchgard®,
if needed. Do not immerse shade in water.
CLEANING PROCEDURES
A brush-type vacuum attachment or feather duster should be used for cleaning.
If your shade should become stained, you may clean it by dabbing the spot with
a sponge dampened with lukewarm water. Do not immerse shade in water. Avoid
contact with window cleaning products as these may discolor your shade. Ultrasonic
cleaning is not recommended or covered by our warranty. Improper cleaning may
damage the shade and void warranty.
ADDITIONAL INFORMATION AND SUPPORT
18 Roman Shades Motorized Control Lift

WARRANTY
For complete warranty information visit LEVOLOR.com or call Customer Service
at 1-800-LEVOLOR or 1-800-538-6567.
CONTACTING US
To contact LEVOLOR Customer Service regarding any questions or concerns
you may have about your new shades, you may reach us at 1-800-LEVOLOR
(9:00 am – 6:00 pm EST)
www.LEVOLOR.com
ADDITIONAL PARTS AND SERVICES
Additional or replacement parts can be ordered, or shades can be repaired or
restrung through our repair center. Please contact LEVOLOR customer service
through www.LEVOLOR.com for a return authorization number.
19Roman Shades Motorized Control Lift
ADDITIONAL INFORMATION AND SUPPORT


Elevación con control motorizado
Persianas natural
INSTALACIÓN • FUNCIONAMIENTO • CUIDADO

Terminología de ventanas y persianas
Terminología de ventanas y persianas .........................................................23
Vista del producto .........................................................................................24
Componentes incluidos ................................................................................25
Herramientas y elementos de fijación que puede necesitar ......................26
Instalación
Descripción general de la instalación ...........................................................27
Montaje interior (MI) ..............................................................................27–30
Montaje exterior (ME) ............................................................................ 31–34
Instalación la cenefa ...................................................................................... 35
Funcionamiento
Funcionamiento remoto ...............................................................................36
Carga de la batería ........................................................................................36
Cómo quitar las cortinas...............................................................................36
Información adicional y asistencia
Solución de problemas ................................................................................. 37
Procedimientos de limpieza .........................................................................38
Garantía .........................................................................................................39
Servicio de atención alcliente ......................................................................39
!
ADVERTENCIA: Mantenga todas las piezas pequeñas, los
componentes y los empaques fuera del alcance de los niños, ya
que representan un peligro potencial de asfixia que puede provocar
lesiones graves o la muerte. Consulte todos los rótulos y las etiquetas
de advertencia en las instrucciones y en la pantalla.
!
22 © 2022 LEVOLOR®
CONTENIDO
Elevación con control motorizado de persianas romanas

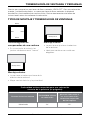
Profundidad mínima requerida para una colocación
correcta de la persiana (en pulgadas)
Sistema de funcionamiento Profundidad mínima
de colocación
Profundidad mínima
para una colocación al
ras ouna colocación
totalmente empotrada
delriel superior
Motorizada 1¼" 2¼"
Montaje interior
• La persiana se ajusta en la abertura
de la ventana.
• Ideal para ventanas con molduras
elegantes.
Montaje exterior
Montaje interior
Moldura
Jamba principal
Alféizar
Jamba Jamba
Moldura
Jamba principal
Alféizar
Jamba Jamba
Montaje exterior
Montaje interior
Moldura
Jamba principal
Alféizar
Jamba Jamba
Gracias por comprar las persianas de bras naturales LEVOLOR®. Con una colocación,
manejo y cuidado adecuados, su nueva persiana de bras naturales le brindará
decoración y funcionalidad por muchos años. Revise atentamente este folleto de
instrucciones antes de comenzar la colocación.
Terminología de los
componentes de una ventana
• En su conjunto, el umbral y las
jambas se denominan el “marco”.
Montaje exterior
• La persiana se coloca por fuera de la
abertura de la ventana.
• Mayor control de la luz y la privacidad.
TIPOS DE MONTAJE Y TERMINOLOGÍA DE VENTANAS
23
TERMINOLOGÍA DE VENTANAS Y PERSIANAS
Elevación con control motorizado de persianas romanas

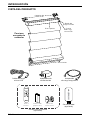
VISTA DEL PRODUCTO
Adaptador de
alimentación
Cable de carga
micro USB
Adaptador
de carga magnética
Persiana
ascendente
estándar
Soportes de
colocación
Riel inferior
Riel superior Puerto
de carga
micro USB
Botón de
programación
Concentrador
(opcional)
Kit del control remoto
(opcional)
Baterías AAA
(paquete de 2)
Control
Remoto
Soporte del
control remoto
INTRODUCCIÓN
24 Elevación con control motorizado de persianas romanas

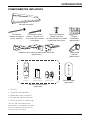
COMPONENTES INCLUIDOS
Persiana romana
• Cortina
• Soportes de montaje
• Materiales de instalación
• Equipo del control remoto
• Otros accesorios (opcional)
Se incluirán los elementos
opcionales si se seleccionaron
en el momento de realizar la
compra de la cortina.
Tornillos de
cabeza hexagonal
(2 por soporte)
Tornillo de cabeza
plana n.º 6 para usar
en instalaciones finales
(incluidos)
Tuerca de bloqueo
rápido y tornillo
(se incluyen dos con cada
soporte de extensión)
Soportes de instalación lateral/de extensión
(opcionales)
Bloque
espaciador
(opcionales)
Soporte de
sujeción
(opcionales)
Concentrador
(opcional)
Kit del control remoto
(opcional)
Baterías AAA
(paquete de 2)
Control
Remoto
Soporte del
control remoto
INTRODUCCIÓN
25Elevación con control motorizado de persianas romanas

INTRODUCCIÓN
26
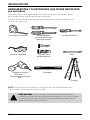
HERRAMIENTAS YSUJETADORES QUE PUEDE NECESITAR
(no incluidos)
Las herramientas que necesitará para instalar la cortina variarán en función
de la superficie yel tipo de soporte de instalación.
Entre las herramientas que habitualmente se emplean para la instalación, se
incluyen las siguientes:
NOTA: Podrían necesitarse tornillos más largos con soportes de extensión
yseparadores. No se muestran en la imagen.
Cinta métrica metálica Destornilladores
(tanto de punta plana
como tipo Phillips)
Llave de tuerca de 1⁄4"
Gafas de seguridad
Escalera
Taquetes para
paneles de yeso
Lápiz
Nivelador
Taladro con brocas
Broca de 3⁄32"
Destornillador hexagonal
de 1⁄4"
PRECAUCIÓN: Utilice taquetes para paneles de yeso cuando la
instalación se haga sobre un panel de ese material. (No suministrados).
Si coloca la cortina de manera incorrecta, podría ocasionar que se
caiga ypodría provocar una lesión.
!
Elevación con control motorizado de persianas romanas

DESCRIPCIÓN GENERAL DE LA INSTALACIÓN
• IMPORTANTE: Si la persiana está atada, no la
suelte hasta que esté colocada enlaventana.
• Su compra incluirá la cantidad correcta de
soportes de instalación para el ancho de la cortina,
tal como se muestra en la siguiente tabla.
Ancho de la
cortina Se requieren
soportes
Hasta 38" 2
38" – 68" 3
68" – 82" 4
82" – 106" 5
106" – 130" 6
> 130" 7
Soportes de instalación finalSoporte
INSTALACIÓN
27
EMPAREJE LA PERSIANA ANTES
DE INSTALAR
CONTROL REMOTO
• Utilice los botones – y + para seleccionar el canal
para emparejar.
• Mantenga presionado el botón de programación
en la decoración de ventanas durante
aproximadamente 2 segundos hasta que la
persiana se mueva una vez.
• En los próximos 10 segundos, mantenga
presionado en el control remoto hasta que la
persiana se mueva dos veces.
USO DE LA APLICACIÓN INMOTION
•
Si compró un concentrador, descargue la aplicación
LEVOLOR InMotion
™
para comenzar.
• La persiana puede emparejarse directamente con la
aplicación, pero se recomienda emparejar primero
con el control remoto.
MONTAJE INTERIOR (MI)–ANTES DE COMENZAR
Puerto de carga
micro USB
Luz
indicadora
Botón de
programación
Elevación con control motorizado de persianas romanas

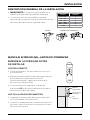
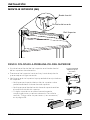
PASO1: MARCAR LA UBICACIÓN DE LOS SOPORTES
• Marque2" en cada jamba para ubicar el soporte. Siempre que sea posible, monte
en madera.
— Si en su compra se incluyen más de dos soportes de colocación, ubique los
soportes adicionales espaciándolos de manera uniforme entre los dos soportes
de los extremos.
•
Coloque los soportes en el centro de las marcas que hizo y, luego marque cada
orificio para los tornillos.
— La profundidad mínima para la instalación de los
soportes es de 3,17 cm.
— La profundidad mínima para un montaje totalmente
empotrado es de 5,71 cm.
— Use el centro del orificio del tornillo cuando la profundidad
lo permita.
— Para colocaciones de poca profundidad, use el orificio ubicado en la esquina
superior trasera del soporte.
MONTAJE INTERIOR (MI)
2" Deje un espacio uniforme
Jamba Jamba
Deje un espacio uniforme
LADO QUE MIRA HACIA LA HABITACIÓN
2"
LADO QUE MIRA HACIA LA VENTANA
Soporte
Para colocaciones
de poca profundidad,
inserte el tornillo en la
esquina superior trasera
del soporte.
Soporte
INSTALACIÓN
28 Elevación con control motorizado de persianas romanas

Screw
Bracket
Bracket
Screw
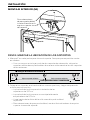
PASO2: COLOCAR LOS SOPORTES
• Perfore los orificios para los tornillos con una broca de 3⁄32" (para realizar la
colocación sobre paneles de yeso, use los taquetes adecuados para ese material).
• Fije los soportes de colocación con los tornillos suministrados. Se utiliza 1tornillo
por soporte.
• Asegúrese de que todos los soportes estén alineados entre sí.
MONTAJE INTERIOR (MI)
Soporte
Tornillo
INSTALACIÓN
29Elevación con control motorizado de persianas romanas

MONTAJE INTERIOR (MI)
30
INSTALACIÓN
Incorrecto
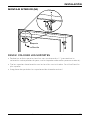
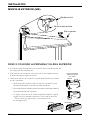
PASO3: COLOCAR LA PERSIANA YEL RIEL SUPERIOR
• Ajuste el canal frontal del riel superior en el borde frontal
de los soportes de colocación.
• Presione el riel superior hacia arriba y hacia abajo hasta
que encaje en el lugar correcto.
• Verifique que el riel superior haya quedado bien ajustado en
los soportes.
— Verifique que la parte inferior del riel superior calce
perfectamente en la base de cada soporte.
— Verifique que el borde frontal de cada soporte esté en
el canal frontal del riel superior.
— Si algún soporte no se colocó correctamente,
saque la persiana y vuelva a colocarla. Consulte la
sección “Cómo sacar laspersianas (si es necesario)”
en la página36.
Correcto
Ajústelo
en su
lugar
Riel superior
Soporte
La parte frontal del
soporte se ajusta
a la ranura.
Borde frontal
Pestaña del resorte
Riel Superior
Elevación con control motorizado de persianas romanas

Bracket
Soporte
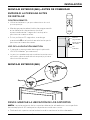
MONTAJE EXTERIOR (ME)
PASO1: MARCAR LA UBICACIÓN DE LOS SOPORTES
NOTA: La parte posterior de los soportes debe estar alineada con una superficie
demontaje plana. NO coloque los soportes en molduras curvas.
• Centre el riel superior sobre la abertura de la ventana a la altura deseada.
31
INSTALACIÓN
EMPAREJE LA PERSIANA ANTES
DE INSTALAR
CONTROL REMOTO
• Utilice los botones – y + para seleccionar el canal
para emparejar.
• Mantenga presionado el botón de programación
en la decoración de ventanas durante
aproximadamente 2 segundos hasta que la
persiana se mueva una vez.
• En los próximos 10 segundos, mantenga
presionado en el control remoto hasta que la
persiana se mueva dos veces.
USO DE LA APLICACIÓN INMOTION
•
Si compró un concentrador, descargue la aplicación
LEVOLOR InMotion
™
para comenzar.
• La persiana puede emparejarse directamente con la
aplicación, pero se recomienda emparejar primero
con el control remoto.
MONTAJE EXTERIOR (ME)–ANTES DE COMENZAR
Puerto de carga
micro USB
Luz
indicadora
Botón de
programación
Elevación con control motorizado de persianas romanas

• Coloque los soportes en el centro de las marcas que hizo y, luego
marque cada orificio para los tornillos.
— Se requiere una superficie vertical plana de1 1⁄4" como
mínimo para colocar los soportes.
— La parte superior de los soportes de colocación o los
soportes de extensión debe colocarse a la altura deseada
para la persiana. Los soportes deben estar nivelados
y alineados.
— Cuando use los soportes de extensión, marque dos orificios para los tornillos
por soporte.
PRECAUCIÓN: La parte posterior de los soportes debe estar alineada
con una superficie de montaje plana. NO coloque los soportes en
molduras curvas.
!
MONTAJE EXTERIOR (ME)
PASO1: MARCAR LA UBICACIÓN DE LOS SOPORTES
• Use un lápiz para marcar ligeramente cada extremo del riel superior.
— De manera alternativa, mida el ancho del riel superior y use ese ancho para
marcarlos puntos finales de este sobre la abertura de la ventana.
Marque entre1 y2" desde cada extremo del riel superior para las posiciones del
soporte de colocación.
— Deje un mínimo de 1/4 pulgadas entre la parte inferior del soporte de colocación
ylaparte superior de la moldura de la ventana.
• Marque con un lápiz las ubicaciones de los tornillos del soporte de colocación
oextensión a través de los orificios posteriores rectangulares del soporte más
grandes.Use 1tornillo por soporte.
• Use un nivel para asegurarse de que todos los soportes están alineados.
• Si en su pedido hay más de dos soportes de colocación, coloque los soportes
adicionales de manera uniforme entre los dos soportes de los extremos a no más
de30" de distancia, y luego marque las ubicaciones de los orificios.
32
Marcas de los extremos
del riel superior
Apertura de la ventana
2" Deje un espacio uniforme Deje un espacio uniforme
Lado del
motor
2"
INSTALACIÓN
Elevación con control motorizado de persianas romanas

MONTAJE EXTERIOR (ME)
33
Soporte
Taquete
para panel
de yeso
Tornillo
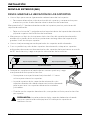
PASO2: INSTALAR LOS SOPORTES
NOTA: Use las anclas de expansión para panel de yeso
cuando instale en el panel de yeso.
• Perfore los orificios para los tornillos con una broca de3
⁄32".
• Fije los soportes de instalación ode extensión con los
tornillos suministrados.
IMPORTANTE: Los bordes frontales de los soportes de
instalación deben estar nivelados yalineados entre sí.
• Si utiliza bloques espaciadores para lograr una mayor
altura, los bloques espaciadores ylas cuñas pueden
estar apilados.
— Se recomienda un máximo de 11⁄2" de altura
adicional con bloques espaciadores ycuñas.
• Coloque los bloques espaciadores ylos soportes de
instalación en una superficie de instalación plana con
tornillos de montaje n.º6lo suficientemente largos como
para sujetar la instalación.
— La parte superior de los bloques espaciadores
deben colocarse ala altura deseada para la cortina.
— Si utiliza soportes de extensión, coloque un
soporte de instalación en la parte inferior de
cada soporte de extensión con los tornillos y
las tuercas de bloqueo rápido.
Máximo
1½"
Tornillo más grande
(no está incluido)
INSTALACIÓN
Elevación con control motorizado de persianas romanas

MONTAJE EXTERIOR (ME)
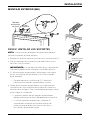
IncorrectoCorrecto
34
Ajústelo
en su
lugar
Riel superior
Soporte
La parte frontal del
soporte se ajusta
a la ranura.
INSTALACIÓN
Pestaña del resorte
Borde frontal
Riel superior
PASO 3: COLOCAR LA PERSIANA Y EL RIEL SUPERIOR
• Ajuste el canal frontal del riel superior en el borde frontal de
los soportes de colocación.
• Presione el riel superior hacia arriba y hacia abajo hasta
que encaje en el lugar correcto.
• Verifique que el riel superior haya quedado bien ajustado
en los soportes.
— Verifique que la parte inferior del riel superior calce
perfectamente en la base de cada soporte.
— Verifique que el borde frontal de cada soporte esté en el
canal frontal del riel superior.
— Si algún soporte no se colocó correctamente, saque
la persiana yvuelvaa colocarla. Consulte la sección
“Cómo sacar las persianas (siesnecesario)”
en la página 36.
Elevación con control motorizado de persianas romanas

CÓMO COLOCAR COMPONENTES ADICIONALES
35
COLOQUE LA CENEFA
IMPORTANTE: empareje el control remoto antes de instalar la cenefa.
• Enganche la parte superior de la cenefa sobre el borde superior del riel superior.
• Presione cuidadosamente la cenefa hacia abajo y hacia atrás contra el riel superior
hasta que la cenefa se fije en su lugar.
FIJAR LOS RECODOS DE LA CENEFA
(Solo para montaje exterior)
• Doble los recodos de la cenefa alrededor del extremo del riel superior y presione
firmemente en su lugar para que las tiras de velcro se unan.
Valance
Valance
Return
Cenefa
Recodo de
cenefa
Elevación con control motorizado de persianas romanas

CÓMO SACAR LAS PERSIANAS (SI ES NECESARIO)
• Baje la persiana aproximadamente4".
• Mientras sujeta el riel superior, tire
hacia atrás la pestaña inferior del
soporte de colocación para quitar
elborde inferior del riel superior.
• Después de quitar el borde inferior,
gire la parte trasera del riel superior
hacia abajo y quítela del soporte.
36
Soporte
Parte
posterior
de la
persiana Riel superior
Pestaña
inferior
Sacar
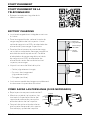
FONCTIONNEMENT
FONCTIONNEMENT DE LA
TÉLÉCOMMANDE
• Balayez le code pour le guide de la
télécommande.
BATTERY CHARGING
• La pile rechargeable est intégrée au caisson
du store.
• Para la carga estándar, retire el inserto de
carga magnético del riel superior. Use el
cable de carga microUSB y el adaptador de
alimentación para cargar la persiana.
• Para facilitar el acceso al puerto de carga,
se instaló un adaptador de carga magnético
extraíble durante la producción. Conecte
el adaptador de carga magnético al cable
de carga microUSB y al adaptador de
alimentación antes de conectarlo al riel
superior para cargar.
• Voyant lumineux de l’état de la pile:
– Faible (clignotement rouge)
– En cours de chargement
(clignotement vert)
– Chargée (vert fixe)
• Il est recommandé de charger complètement
le store avant la première utilisation.
Inserto
de carga
magnética
Port de charge
microUSB
Témoin
lumineux
Bouton de
programmation
Elevación con control motorizado de persianas romanas

Solución de problemas
Si la persiana no funciona correctamente:
• En primer lugar, consulte la guía que viene con el dispositivo de control.
• Consulte los siguientes procedimientos para encontrar una solución específica a los
problemas que tenga con la persiana.
Si aún tiene preguntas, comuníquese con el Servicio de Atención al Cliente de
LEVOLOR al1-800-LEVOLOR o al1-800-538-6567.
37
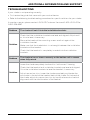
INFORMACIÓN ADICIONAL Y ASISTENCIA
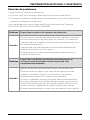
Problema La persiana no cabe en los soportes de colocación.
Solución
Controle que los soportes de colocación estén nivelados y alineados.
Ajuste o coloque una cuña para nivelar los soportes si es necesario.
Asegúrese de que las cabezas de los tornillos de montaje estén al ras
del soporte de colocación.
Asegúrese de que la tela de la persiana no esté apretada entre el
soporte de colocación y el riel superior.
Verifique que el riel superior esté completamente adentro de los
soportes de colocación.
Problema
La persiana se levanta o se baja de manera despareja o el
riel inferior está desnivelado cuando la persiana está
completamente levantada.
Solución
Baje la persiana por completo para corregir la parte despareja.
Controle que el riel superior y los soportes de colocación estén
nivelados y alineados. Coloque una cuña en los soportes de
colocaciónpara nivelar el riel superior, si es necesario.
Ajuste los sujetadores de la barra romana. Baje completamente la
persiana y localice el recorrido del cable en la parte superior del riel
superior detrás de la persiana. En la parte posterior de la persiana,
ajuste a mano los sujetadores de la barra romana que no estén
alineados verticalmente con la ubicación del cable en el riel superior.
Elevación con control motorizado de persianas romanas

Avisos adicionales
• Una vez colocada, deje la persiana extendida durante 48horas para eliminar las
arrugas de la tela.
• Las persianas confeccionadas con telas estampadas pueden presentar una leve
diferencia entre sí, dependiendo de la ubicación del estampado. Esto se debe ala
variación normal del rollo de tela que se utiliza para confeccionar la persiana.
• Con el tiempo, los pliegues pueden asentarse o aplanarse. Si se suben
las persianas regularmente, estas serán menos propensas a asentarse
ymantendrán un aspecto más relajado.
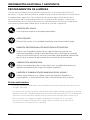
LIMPIEZA DEL POLVO
Use un plumero para una limpieza periódica.
AIRE FORZADO
Elimine los restos y la suciedad mediante aire comprimido limpio.
LIMPIEZA PROFESIONAL POR INYECCIÓN/EXTRACCIÓN
Llame a un limpiador de persianas a domicilio que inyecte una
solución limpiadora sobre la tela de la persiana y extraiga la solución
sucia al mismo tiempo. El servicio se brinda generalmente a domicilio,
por lo cual no necesita desmontar los accesorios de la ventana.
LIMPIAR CON ASPIRADORA
Utilice una aspiradora de succión baja, con un cepillo tipo brocha y
páselo suavemente por la persiana para limpiarla.
LIMPIEZA O ELIMINACIÓN DE MANCHAS EN EL HOGAR
Utilice agua caliente y un jabón suave, por ejemplo, Woolite® o
Scotchgard®, si fuese necesario. No sumerja la persiana en agua.
PROCEDIMIENTOS DE LIMPIEZA
Utilice una aspiradora con un cepillo tipo brocha o un plumero para limpiar la
persiana. Si la persiana se mancha, puede limpiar la zona frotando con una esponja
humedecida en agua tibia. No sumerja la persiana en agua. Evite el contacto
con productos de limpieza para ventanas, ya que podrían desteñir la persiana.
Noserecomienda la limpieza ultrasónica y tampoco está cubierta por la garantía.
Lalimpieza inadecuada puede dañar la persiana y anular la garantía.
INFORMACIÓN ADICIONAL Y ASISTENCIA
38 Elevación con control motorizado de persianas romanas

GARANTÍA
Para obtener información completa sobre la garantía, visite LEVOLOR.com o llame
alServicio de Atención al Cliente
al 1-800-LEVOLOR o al1-800-538-6567.
PÓNGASE EN CONTACTO CON NOSOTROS
Para ponerse en contacto con el Servicio de Atención al Cliente de LEVOLOR
y plantear alguna duda o problema que pueda tener acerca de su nueva persiana,
llámenos al 1-800-LEVOLOR
(de 9:00a.m. a 6:00p.m., EST)
www.LEVOLOR.com
PIEZAS ADICIONALES Y SERVICIOS
Puede solicitar piezas adicionales o de repuesto; así mismo, las persianas se
pueden reparar o se les puede cambiar la cuerda en nuestro centro de reparaciones.
Comuníquese con el Servicio de Atención al Cliente de LEVOLOR a través de
www.LEVOLOR.com para obtener un número de autorización de devolución.
INFORMACIÓN ADICIONAL Y ASISTENCIA
39Elevación con control motorizado de persianas romanas

©2022 LEVOLOR®, Inc.
5775 Glenridge Drive
Building A
Atlanta, GA 30328 102959720-0048-083
-
 1
1
-
 2
2
-
 3
3
-
 4
4
-
 5
5
-
 6
6
-
 7
7
-
 8
8
-
 9
9
-
 10
10
-
 11
11
-
 12
12
-
 13
13
-
 14
14
-
 15
15
-
 16
16
-
 17
17
-
 18
18
-
 19
19
-
 20
20
-
 21
21
-
 22
22
-
 23
23
-
 24
24
-
 25
25
-
 26
26
-
 27
27
-
 28
28
-
 29
29
-
 30
30
-
 31
31
-
 32
32
-
 33
33
-
 34
34
-
 35
35
-
 36
36
-
 37
37
-
 38
38
-
 39
39
-
 40
40


LEVOLOR Light Filtering Roman Shades Guía de instalación
- Tipo
- Guía de instalación
Lo siento, pero la información que proporcionaste no incluye ningún detalle sobre "LEVOLOR Light Filtering Roman Shades". Por lo tanto, no puedo extraer la información solicitada del contexto proporcionado.
en otros idiomas
Artículos relacionados
Otros documentos
-
SelectBlinds Refined Roman Shades Motorization Manual de usuario
-
 SelectBlinds Casual Manual de usuario
-
 SelectBlinds MOTORIZATION Serene Collection Roman Shades Guía de instalación
-
Select Blinds Textured Glam Roman Shades Guía de instalación
-
 Select Blinds Classic/Essential/Cozy/Farmhouse Motorization Roman Shades Guía de instalación
-
 Select Blinds William Morris Roman Shades Instrucciones de operación
-
SelectBlinds Lifestyle Select Luxe Guía de instalación
-
 Springs Window Fashions AutoVIEW El manual del propietario
-
SelectBlinds Essence Guía de instalación
-
 homeBASICS WSR017272 Guía de instalación


