
Casual Dual Shades

INSTALLATION INSTRUCTIONS
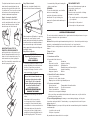
Step 1. Check Package Contents
Missing part? Call 1-800-264-1190
Mounting hardware kit includes the
following:
Part Quantity
a. Mounting Brackets 2 shades up to 45” wide
3 up to 72” wide
4 up to 94” wide
b. Extension Brackets
(for outside mounts) 2 shades up to 45” wide
3 up to 72” wide
4 up to 94” wide
c. Screws 4 shades up to 45” wide
6 up to 72” wide
8 up to 94” wide
d. Wall Anchors 4 shades up to 45” wide
6 up to 72” wide
8 up to 94” wide
Step 2. Tools Required
Pencil, tape measure, level, screw driver,
pliers, step stool, drill.
Step 3. Installation
Your blind may be installed either inside
the window frame or outside the window
frame.
Wallboard or Plaster: use wall anchors.
Concrete, Stone, Brick: use a masonry
drill bit and anchors or screws specifically
designed for masonry (not included).
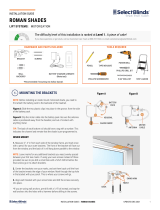
Inside Mounting:
One bracket should be positioned about
2” to 6” from each end of the head rail.
For wider shades that require 3 or 4
brackets, these should be spaced evenly
between the two outermost brackets.
Attach each bracket to the inner top of
the window opening using the screws
provided. Pre-drill the screw holes using a
5/64” drill bit. The extension brackets are
not used for inside mounts.
For flush inside mounts, attach the
brackets to the head rail first (see
drawings and attachment instructions
below), and then position the shade in the
window opening as desired. Then make
pencil marks at the back of each bracket.
Remove the brackets by pressing on the
plastic tab. Align the brackets with the
pencil marks, and then screw them in
place as described above.
Outside Mounting:
Attach the Extension Brackets to the wall
or window framing. One bracket should
be positioned about 2” to 6” from each
end of the head rail. For wider shades that
require 3 or 4 brackets, these should be
spaced evenly between the two outermost
brackets. Pre-drill the screw holes using a
5/64” drill bit.
The brackets must be level – use a Spirit
Level if necessary to assure proper
alignment.
Then attach a Mounting Bracket to each
Extension Bracket using the nut and bolt
pre-attached to each Extension Bracket.
To adjust head rail extension, remove the
shade from the mounting brackets by
pressing on the plastic tabs at the front
of each bracket. Then loosen the nut and
bolt, and move the mounting brackets
forward or backward as preferred.
Continuous Loop Dual Shade
To Obtain Service: If you suspect this product has a manufacturing defect in materials
or workmanship:
· Locate the sales receipt · Call place of purchase
Any unauthorized returns will not be accepted.
Warranty Remedy: This shall be your sole remedy under this limited warranty. If this
product is found to have a manufacturing defect in materials or workmanship, we will, at
our discretion, do one of the following:
· Repair the product · Replace the product · Refund the cost of the product.
Colors may vary from lot to lot and may not exactly match sample swatches or previous
purchases.
Discontinued items or color selections will be replaced with the closest equivalent
current product.
Your rights under state law: This lifetime limited warranty gives you specific legal
rights, and you may have other rights which vary from state to state. Some states do not
allow limitations on how long a warranty lasts, so the above limitations may not apply
to you. No agent, representative, dealer or unauthorized employee has the authority to
increase or alter the obligation of this warranty. This lifetime limited warranty supersedes
any previous versions.
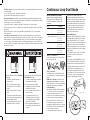
For Outside Mount
La cuerda ciega del a ventana puede
ESTRANGULAR su niño
• Los niños pueden subir los muebles
para alcanzar las cuerdas.
• Mueva la cuna y los muebles.
• mantenga todas las cuerdas fuera
del alcance de los niños.
• Conecte el dispositivo de tensión a
la pared o suelo.
• Los sujetadores provistos con
el dispositivo de tensión pueden
no ser apropiados para todas las
superficies de montaje.
• Utilice anclajes apropiados para
las condiciones de la superficie de
montaje.
Window Blind Cord Can STRANGLE
Your Child
• Children can climb furniture to
reach cords.
• Move crib and furniture away.
• Keep all cords out of children’s
reach.
• Attach tension device to wall or
floor.
• Fasteners provided with tension
device may not be appropriate for
all amounting surfaces.
• Use appropriate anchors for the
mounting surface conditions.

Step 4. Securing the Head Rail
Slide the inner rear of the head rail
onto the metal tabs at the back of each
bracket, and then push up so that the
brackets snap onto the head rail.
IMPORTANT FINAL STEP TO
PROPERLY SECURE BRACKETS:
pull the plastic tab on the front of each
bracket outward toward the front of the
shade to lock the brackets in place. For
inside-mounts use pliers to grasp the
tabs. Check carefully to assure that each
bracket is properly secured
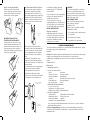
Step 5. Install the Chain Tension Device
The tension device must be installed to
make sure the shade is fully operable.
While holding the tension device in one
hand, pull the plunger away from the bead
chain with the other hand. Lift the bead
chain out of the bead locking groove and
slide the tension device to the bottom of
the chain loop.
Pull the tension device down until the
bead chain is fully tensioned (plunger will
be at the top) and then move the tension
device up approximately 1/8”. Mark the
screw hole locations on the wall with a
pencil.
Inside Mount: if mounting into wood,
pre-drill screw holes and then install the
tension device using the 1¼” Phillips head
screws provided.
If not securing into wood, use appropriate
anchors for the substrate and follow
anchor manufacturer’s instructions.
Outside Mount: Align the mounting
bracket screw holes with the pencil marks.
If mounting into wood, pre-drill screw
holes and then install the mounting
bracket using the 1¼” Phillips head
screws provided.
If not securing into wood, use appropriate
anchors for the substrate and follow
manufacturer’s instructions.
Press the tension device onto the
mounting bracket posts. Carefully attach
the Tension Device to the bracket using
the 3/8” Phillips head screws provided.
DO NOT OVER-TIGHTEN.
Step 6. How to Operate
Pulling downward on the front or rear
cord of the cord loop raises and lowers
the shade. Always pull the cords slowly
and evenly to maintain the optimal
performance of your shade.
CLEANING
To clean the shade fabric, use a feather
duster or vacuum lightly using the soft
brush or upholstery attachment. For spot
cleaning, use warm (not hot!) water with a
mild soap to damp clean.
REPLACEMENT PARTS
In the event that replacement parts are
ever needed, you may call:
1-800-264-1190
Please be sure to provide the following
information, if possible:
• The complete model or catalog number
of your product
• A description of the product
• A description of the part needed
LIMITED LIFETIME WARRANTY
The enclosed product is warranted to the original residential retail purchaser as long as
the product remains in the original window.
Covered
Lifetime: Entire product against manufacturing defects (i.e. a flaw in the product design,
materials, or workmanship that causes the product to no longer function.
3 Years: Cords, including internal cords such as those found in cordless blinds or
shades.
5 Years: All fabric
Not Covered
1. Normal wear and Tear
2. Any product that fails due to:
· Abuse · Alterations
· Exposure to salt air · Improper cleaning
· Improper installation · Misapplication
· Accident · Damage from pests/insects/pets
· Extraordinary use · Improper handling
· Improper operation · Misuse
3. Natural Wood Products that have:
· Loss of color intensity
· Variations in color, grain or texture
· Warping of wood slats in high humidity areas
4. Costs associated with:
· Product removal · Transportation to/from the retailer
· Brand label removal · Product re-measure
· Product reinstallation · Shipping
· Incidental or consequential damages
In the event there are multiple blinds/shades in the same room, only the defective
blind/shade will be replaced.
To Report Shipping Damage: If damage occurred during shipping, call the place
of purchase and report within 7 calendar days, or you may be denied credit for your
damaged product.
Tension Device & Bracket
for Outside Mount
Chain Tension
Device
Bracket for
Outside Mount

INSTALLATION INSTRUCTIONS
Step 1. Check Package Contents
Missing part? Call 1-800-264-1190
Mounting hardware kit includes the
following:
Part Quantity
a. Mounting Brackets 2 shades up to 45” wide
3 up to 72” wide
b. Extension Brackets
(for outside mounts) 2 shades up to 45” wide
3 up to 72” wide
c. Screws 4 shades up to 45” wide
6 up to 72” wide
d. Wall Anchors 4 shades up to 45” wide
6 up to 72” wide
e. Handle for Bottom Rail 1 shades up to 48” wide
2 shades over 48” wide
Step 2. Tools Required
Pencil, tape measure, level, screw driver,
pliers, step stool, drill.
Step 3. Installation
Your blind may be installed either inside
the window frame or outside the window
frame.
Wallboard or Plaster: use wall anchors.
Concrete, Stone, Brick: use a masonry
drill bit and anchors or screws specifically
designed for masonry (not included).
Inside Mounting:
One bracket should be positioned about
2” to 6” from each end of the head rail.
For wider shades that require 3 or 4
brackets, these should be spaced evenly
between the two outermost brackets.
Attach each bracket to the inner top of
the window opening using the screws
provided. Pre-drill the screw holes using a
5/64” drill bit. The extension brackets are
not used for inside mounts.
For flush inside mounts, attach the
brackets to the head rail first (see
drawings and attachment instructions
below), and then position the shade in the
window opening as desired. Then make
pencil marks at the back of each bracket.
Remove the brackets by pressing on the
plastic tab. Align the brackets with the
pencil marks, and then screw them in
place as described above.
Outside Mounting:
Attach the Extension Brackets to the wall
or window framing. One bracket should
be positioned about 2” to 6” from each
end of the head rail. For wider shades that
require 3 or 4 brackets, these should be
spaced evenly between the two outermost
brackets. Pre-drill the screw holes using a
5/64” drill bit.
The brackets must be level – use a Spirit
Level if necessary to assure proper
alignment.
Then attach a Mounting Bracket to each
Extension Bracket using the nut and bolt
pre-attached to each Extension Bracket.
Cordless Dual Shade
Warranty Remedy: This shall be your sole remedy under this limited warranty. If this
product is found to have a manufacturing defect in materials or workmanship, we will, at
our discretion, do one of the following:
· Repair the product
· Replace the product
· Refund the cost of the product.
Colors may vary from lot to lot and may not exactly match sample swatches or previous
purchases.
Discontinued items or color selections will be replaced with the closest equivalent
current product.
Your rights under state law: This lifetime limited warranty gives you specific legal
rights, and you may have other rights which vary from state to state. Some states do not
allow limitations on how long a warranty lasts, so the above limitations may not apply
to you. No agent, representative, dealer or unauthorized employee has the authority to
increase or alter the obligation of this warranty. This lifetime limited warranty supersedes
any previous versions.
For Outside Mount

To adjust head rail extension, remove the
shade from the mounting brackets by
pressing on the plastic tabs at the front
of each bracket. Then loosen the nut and
bolt, and move the mounting brackets
forward or backward as preferred.
Step 4. Securing the Head Rail
Slide the inner rear of the head rail
onto the metal tabs at the back of each
bracket, and then push up so that the
brackets snap onto the head rail.
IMPORTANT FINAL STEP TO
PROPERLY SECURE BRACKETS:
pull the plastic tab on the front of each
bracket outward toward the front of the
shade to lock the brackets in place. For
inside-mounts use pliers to grasp the
tabs. Check carefully to assure that each
bracket is properly secured
Step 5. Attach Handle
Attach the clear plastic Handle to the
center of the bottom rail as illustrated.
Wider shades have (2) Handles – to precisely
determine the correct position for each
handle, divide the total width of the shade by
4, and then attach one handle that distance
from each outside edge of the bottom rail –
always grasp both handles when lifting and
lowering the shade.
Step 6. How to Operate
IMPORTANT
Operating & Care Instructions for
Cordless Shades
READ CAREFULLY
• Tomaintainoptimalperformanceofthe
springs that make your cordless shade
function, lift and lower your shade
through its full range of motion – all the
way up and down – frequently.
GO SLOW!
Be sure the bottom rail handles are
properly positioned as described
above (step 5) - lift or lower the
shade slowly and evenly, keeping
the rail level, until the shade is
positioned as desired.
IMPROPER OPERATION CAN
DAMAGE THE SHADE.
• Ifyouhavetroubleliftingyourcordless
shade:
If the shade is left in one position
for a long period of time, it might be
necessary to lift and lower the shade
several times to restore normal function.
If the shade has been fully raised for
a long period of time, it might tend to
spring-back (rebound) slightly from the
desired length position. This can also
be remedied by lifting and lowering the
shade several times.
CLEANING
To clean the shade fabric, use a feather
duster or vacuum lightly
using the soft brush or upholstery
attachment. For spot cleaning, use
warm (not hot!) water with a mild soap to
damp clean.
REPLACEMENT PARTS
In the event that replacement parts are
ever needed, you may call:
1-800-264-1190
Please be sure to provide the following
information, if possible:
• Thecompletemodelorcatalognumber
of your product
• Adescriptionoftheproduct
• Adescriptionofthepartneeded
LIMITED LIFETIME WARRANTY
The enclosed product is warranted to the original residential retail purchaser as long as
the product remains in the original window.
Covered
Lifetime: Entire product against manufacturing defects (i.e. a flaw in the product design,
materials, or workmanship that causes the product to no longer function.
3 Years: Cords, including internal cords such as those found in cordless blinds or
shades.
5 Years: All fabric
Not Covered
1. Normal wear and Tear
2. Any product that fails due to:
· Abuse · Alterations
· Exposure to salt air · Improper cleaning
· Improper installation · Misapplication
· Accident · Damage from pests/insects/pets
· Extraordinary use · Improper handling
· Improper operation · Misuse
3. Natural Wood Products that have:
· Loss of color intensity
· Variations in color, grain or texture
· Warping of wood slats in high humidity areas
4. Costs associated with:
· Product removal · Transportation to/from the retailer
· Brand label removal · Product re-measure
· Product reinstallation · Shipping
· Incidental or consequential damages
In the event there are multiple blinds/shades in the same room, only the defective
blind/shade will be replaced.
To Report Shipping Damage: If damage occurred during shipping, call the place
of purchase and report within 7 calendar days, or you may be denied credit for your
damaged product.
To Obtain Service: If you suspect this product has a manufacturing defect in materials
or workmanship:
· Locate the sales receipt
· Call place of purchase
Any unauthorized returns will not be accepted.

1
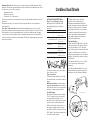
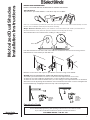
Motor-Roller
Shades
INSTALLATION INSTRUCTIONS
INSTALL THE SHADE BEFORE ATTEMPTING TO OPERATE THE MOTOR.
Tools Required:
Tape measure, pencil, drill, drill bits, screw driver, step stool or ladder.
Note: use a 5/64” drill bit to pre-drill the screw holes (for attachment to a wall stud or header board). Use Wall
Anchors (not included) for hollow dry wall or plaster mounting.
Step 1. Mount the Brackets [Note: If your shade has a Cassette Valance (the shade is pre-mounted in a
decorative aluminum cover) locate the special instructions for installing the Cassette]
Attach the brackets to the window frame, molding or ceiling as shown.
Note that the bracket for the motor end of the shade has a tab that fits into the motor housing. The Pin-
End Bracket has a slot that the pin end slides into.
Mark the screw locations with a pencil – pre-drill the screw holes using a 5/64” drill bit.
Step 2A. Cassette Installation (for shades with optional Cassette Valance)
The shade is pre-mounted in the cassette. It can be removed to adjust tension, if necessary.
To attach the cassette outside the window frame, use the rear bracket holes as illustrated.
To attach the Cassette inside the window frame (or to the ceiling), use the top bracket holes as illustrated.
Attach the Cassette by placing the back-bottom of the head rail into the bottom of each mounting bracket.
Push forward and up, snapping the rail into the top of the mounting bracket.
Operating the Shade
IMPORTANT
See the dedicated programming and operating instructions that came with the shade.
If you cannot locate these instructions, please call Customer Service.
CUSTOMER SERVICE: 1-800-264-1190
Motorized Dual Shades
Installation Instructions
Slot
Tab for Motor
Outside
Window
Frame
Mount
Inside
Window
Frame or
Ceiling
Mount

2
Motor-Roller
Shades
Cleaning
Dusting: Vacuum using the soft brush attachment.
Washing (applies to vinyl or vinyl coated shade material): Use a cloth, sponge or soft brush and a mild
detergent. Use warm or cold water, not hot water. Place toweling on the floor or window sill and wash the
blind in sections.
REPLACEMENT PARTS
In the event that replacement parts are ever needed, you may call: 1-800-264-1190
Please be sure to provide the following information, if possible:
• The complete model or catalog number of your product
• A description of the product
• A description of the part needed
LIMITED LIFETIME WARRANTY
The enclosed product is warranted to the original residential retail purchaser as long as the product
remains in the original window.
Covered
Lifetime: Entire product against manufacturing defects (i.e. a flaw in the product design, materials, or
workmanship that causes the product to no longer function.
3 Years : Cords, including internal cords such as those found in cordless blinds or shades.
5 Years : All fabric
3 Years : Battery Operated Motors
Not Covered
1. Normal wear and Tear
2. Any product that fails due to:
• Abuse • Alterations • Exposure to salt air • Improper cleaning • Improper installation • Misapplication
• Accident • Damage from pests/insects/pets • Extraordinary use • Improper handling
• Improper operation • Misuse
3. Natural Wood Products that have:
• Loss of color intensity • Variations in color, grain or texture
• Warping of wood slats in high humidity areas
4. Costs associated with:
• Product removal • Transportation to and from the retailer • Brand label removal • Product re-measure
• Product reinstallation • Shipping • Incidental or consequential damages
In the event there are multiple blinds/shades in the same room, only the defective blind/shade will be replaced
To Report Shipping Damage:
If damage occurred during shipping, call the place of purchase and report within 7 calendar days, or you
may be denied credit for your damaged product.
To Obtain Service:
If you suspect this product has a manufacturing defect in materials or workmanship:
• Locate the sales receipt
• Call place of purchase
Any unauthorized returns will not be accepted.
Warranty Remedy:
This shall be your sole remedy under this limited warranty.
If this product is found to have a manufacturing defect in materials or workmanship, we will, at our
discretion, do one of the following:
• Repair the product
• Replace the product
• Refund the cost of the product
Colors may vary from lot to lot and may not exactly match sample swatches or previous purchases.
Discontinued items or color selections will be replaced with the closest equivalent current product.
Your rights under state law: This lifetime limited warranty gives you specific legal rights, and you may have
other rights which vary from state to state. Some states do not allow limitations on how long a warranty
lasts, so the above limitations may not apply to you. No agent, representative, dealer
or unauthorized employee has the authority to increase or alter the obligation of this warranty. This lifetime
limited warranty supersedes any previous versions

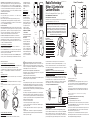
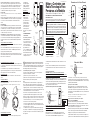
Radio Technology
Motor & Controls for
Custom Shades
PROGRAMMING AND OPERATION OF
RADIO TECHNOLOGY MOTORS
Activating the motor: Press the program button for 1 second – the Red
indicator light will ash – the motor is now “ON”
IMPORTANT: The Upper & Lower limit positions (full UP & DOWN
positions) have been pre-set at the factory – also, a Channel Number
has been assigned to each shade - therefore, it is not necessary to
perform Steps 1, 2 & 3 below – however, we recommend that you
read these to familiarize yourself with the basics of programming the
motor and remote control and to fully understand the function of your
motorized shade. Also, note that the batteries in the motor are fully
charged at the factory prior to shipment.
1. Channel Selection for
Each Shade
When you receive your
shades the channel number
pre-assigned to each shade
will be marked on the shade
and/or carton. Per the notice
above, it is not necessary
to perform Steps 1, 2 & 3 as
these settings are done at
the factory and will require
no adjustment under normal
circumstances.
A channel number must be assigned to each motor/shade. The
assigned numbers should be sequential starting with #1 (1, 2, 3 etc.).
Press the channel buttons/arrows to select a dedicated channel for
each shade prior to mating each shade/motor to the remote controller.
2. Programming/Mating
REMINDER: the motor and remote have been pre-set at the
factory – programming information for Steps 1, 2 & 3 is provided as
background information only.
Identify the head of the motor housing on the left side of the shade
(see drawing) - Press the PROGRAM button until the shade oscillates
(the shade will oscillate - a quick back and forth movement of the
shade) Press the UP button on the remote (see drawing) – the shade
will oscillate again – the motor and transmitter are now mated.
3. Setting UP and DOWN Limit Positions
NOTE: Upper and lower limit positions have been pre-set at the
factory - programming information for Steps 1, 2 & 3 is provided as
background information only.
Set the UP position:
Move the shade 6” to 10” below the desired upper limit by pressing
the UP or DOWN arrows/buttons on the remote. Press the PROGRAM
button on the back of the remote – the motor will oscillate – this puts
the motor in program mode. Now move the shade up to the desired UP
position and press the program button again – the motor will oscillate
Afinamiento de Posiciones Límites: mueva la cortina a la posición
límite que desea ajustar. Presione el botón de programación en la parte
posterior del control remoto – el motor oscilará y se encuentra ahora en
modo de ajuste de límite. Use los botones de echas ARRIBA / ABAJO en
el control remoto hasta establecer la nueva posición - presione el botón
de programación nuevamente - el motor oscila y el anamiento de ajuste
de límite ha quedado establecido.
Eliminación de Límites:
Nota: el primer límite superior no pude eliminarse – solo se elimina cuando
borra totalmente la memoria
Mueva la cortina a la posición límite que quiere eliminar - presione y
mantenga hundido el botón de programación en la parte posterior del
control remoto por aproximadamente 7 segundos - el motor oscilará dos
veces, y el límite habrá sido eliminado.
Borrado de Memoria
Para borrar TODA la memoria: Presione el botón de programa en el riel 4
veces (a intervalos de un segundo), presione una vez, espere a que el LED
parpadee en ROJO - presione otra vez, espere un parpadeo - presione
la tercera vez, espere 2 parpadeos - presione la cuarta vez, espere 2
destellos, el motor oscilará. Ahora se borra toda la memoria.
Borrado de memoria para un solo canal: Acomode el transmisor
remoto en el canal que desea eliminar. Presione el botón de STOP por
aproximadamente 5 segundos - el motor oscilará. Ahora presiones el
botón de programación en la parte posterior del control remoto - el motor
oscilará y el canal habrá sido eliminado.
Uso del Transmisor a Control Remoto
Presione el botón de ARRIBA / ABAJO una vez y la cortina irá a la
siguiente posición pre-determinada.
Presione ARRIBA / ABAJO dos veces en un período de un segundo y la
cortina se moverá hacia arriba o hacia abajo hasta la posición límite sin
detenerse en posiciones intermedias.
Cuando se alcanza la posición de arriba, el botón de ARRIBA quedará
inactivo, y cuando se ha alcanzado la posición límite inferior, el botón de
deslizándola levemente
hacia arriba – instale una
batería tipo disco de
3V [CR2032] como se
ilustra.
Instalación de la
Montura a Pared
(opcional)
Fije la montura usando
los tornillos proveídos
(use tarugos en paredes
huecas), o despegue la
lámina del adhesivo en la
parte posterior y presione
en el lugar deseado en
la pared o cualquier
supercie limpia y plana.
SERVICIO AL CLIENTE:
1-800-264-1190
Instrucciones Generales de
Seguridad para Cortinas
Motorizadas
• No exponga el motor o
transmisor a humedad o
temperaturas extremas
• No permita que niños
jueguen con éste aparato
• El uso o modicación por
fuera de lo estipulado en este
manual invalida la garantía
• Si el cable o el enchufe
eléctrico están dañados, no
los use
Información importante sobre su producto de batería:
Las baterías recargables deben reciclarse, no desecharse con la
basura doméstica común. Cuando reemplace su sombra, recíclela de
acuerdo con las regulaciones ambientales locales. Esto también se aplica
a la batería tipo botón en los controles remotos.
Declaración sobre el Cumplimiento con Normas del FCC
Este producto cumple con la Parte 15 del Código del FCC. Su operación
está sujeta a las siguientes condiciones:
1) Este aparato podría causar interferencia, y
2) Este aparato debe aceptar cualquier interferencia recibida, incluyendo
interferencia que cause su operación errática.
Nota:
Se ha probado que este equipo cumple con 15 de las normas del FCC.
Estos límites están diseñados para proveer una protección razonable
contra interferencias perjudiciales en una instalación casera. El equipo
genera, usa y puede irradiar energía de radio frecuencia y, de no ser
instalado de acuerdo a las instrucciones, podría interferir perjudicialmente
con radio-comunicaciones.
Sin embargo, no hay garantía que la interferencia no ocurra en alguna
instalación en particular. Si el equipo causa interferencia en la recepción
en radio o televisión, que puede determinarse encendiendo y apagando
el aparato, se pide al usuario el tratar de corregir la interferencia tomando
alguna de las siguientes medidas::
• Reoriente o re-localice la antena.
• Incremente la separación entre el equipo y el receptor.
• Conecte el equipo a una toma o circuito eléctrico diferente al que el
receptor está conectado.
• Consulte o pida ayuda al almacén o a un técnico experto en radio y
televisión.
Cualquier cambio o modicación no expresamente aprobada por la
entidad responsable del cumplimiento podría anular la autoridad del
usuario a operar este equipo.
ABAJO quedará inactivo.
Control de Múltiples Cortinas Simultáneamente
Control Remoto de 6 Canales: presione el selector de canal hasta que las
6 luces se encienden y controlan las cortinas al mismo tiempo.
Control Remoto de 16 Canales: Presione el selector de canales hasta que
aparece “CC” en la pantalla para controlar hasta 16 cortinas al mismo
tiempo.
Operado de la Cortina
Para subir o bajar la cortina, use el control remoto tal y como se describió
anteriormente.
Cargado de Baterías
Conecte el cargador AC al cable jado al cabezal del motor – cargue por
8 horas.
NOTA: Cada batería/motor debería ser cargada al menos una vez cada 6
meses.
Instalación/Reemplazo de Baterías del
Control Remoto
Remueva la tapa posterior del control remoto soltando el tornillo y
Wire-free Rechargeable Motor System - Type C
Charger
Port
Program
Button
and the upper limit is now set.
Set the DOWN position:
Move the shade down from the upper limit position to a point 6” to
10” from the bottom, and then press the PROGRAM button on the
back of the remote – the motor will oscillate and is once again in
program mode.
Now move the shade to the desired DOWN position and press the
PROGRAM button the motor will oscillate and the lower limit is now
set.
NOTE: after all limits are set, see the remote control operating
instructions below.
4. Setting Intermediate Positions & Other Settings
Setting INTERMEDIATE positions
Up to (4) intermediate positions can be set.
Move the shade at least 6 inches away from the previously set limits –
press the PROGRAM button on the rear of the remote – the motor will
oscillate and is now in program mode.
Now move the shade to any desired intermediate STOP position and
press the PROGRAM button again – the motor will oscillate and the
intermediate STOP position is now set.
Repeat this process to set additional intermediate STOP positions.
When setting a limit, if there is no action within 30 seconds, the motor will
automatically exit the limit programming mode.
PROGRAM
Button
Up
Button
Remote
1 2 3 4 5 6
See Single Channel,
6 Channel &
16 Channel remotes
on the next page
Remote Transmitters
1 2 3 4 5 6
LED Channel
Indicator
Channel
Display
Up
Up
Up
Stop
Stop
Stop
Down
Down
Down
Prior Channel
Prior Channel
Next Channel
Next Channel
Program
Button
Battery
Screw
Single Channel
Remote Control Transmitter
Sixteen (16) Channel
Remote Control Transmitter
Six (6) Channel
Remote Control Transmitter
Back of Remote Control
Transmitter
Motor Head
Puerto del
Cargador
Cable del
Cargador
Adaptador del
Cargador
Remueva
el tornillo
y deslice
hacia
arriba
Inserte
Batería
Vista con
la tapa
Vista interior del
Control Remoto
Fije con
tornillos Ponga el
Control
Remoto
en la
Montura
Montura a
la Pared
Part # MEIN0264 Rev. 2
Head of Motor
PROGRAM
Button

1 2 3 4 5 6
Limit Position Fine Tuning: move the shade to the limit position
that you wish to adjust. Press the program button on the rear of the
remote – the motor will oscillate and is now in limit setting mode. Use
the UP/DOWN buttons on the remote to establish a new position –
press the program button on the rear of the remote – the motor will
oscillate and the ne-tune setting is now complete.
Erasing Limits:
Note: the 1st/Upper limit cannot be erased – it can only be eliminated by
deleting all memory
Move the shade to the limit position that you wish to erase – press and
hold the PROGRAM button on the rear of the remote for approximately
7 seconds – the motor will oscillate twice, and the limit has been
erased.
Deleting Memory
To Delete All Memory: Press the program button on the head of the
motor 4 times (@ one second intervals), press once, wait for the LED
to ash RED – press a 2nd time, wait for a ash – press the 3rd time,
wait for 2 ashes – press the 4th time, wait for 2 ashes, the motor will
oscillate. All memory is now erased.
Deleting Memory for a Single Channel: Set the remote transmitter
on the channel to be deleted. Press the STOP button for approximately
5 seconds – the motor will oscillate. Now press the program button on
the rear of the remote – the motor will oscillate and the single channel is
deleted
Using the Remote Control Transmitter
Press the UP/DOWN button once and the shade will move to the next
pre-set limit position.
Press the UP/DOWN button twice at the speed of once per second
and the shade will move to the UP or DOWN limit position without
stopping at any intermediate position.
When the up position has been reached, the UP button becomes non-
functional, and when the down position has been reached the DOWN
button becomes non-functional.
Controlling Multiple Shades Simultaneously
6 Channel Remote: press the channel selector until all six lights are lit
to control up to 6 shades at the same time using the remote control as
described above.
16 Channel Remote: press the channel selector button until “CC”
appears in the display window to control up to 16 shades at the same
time using the remote control as described above.
Operating the Shade
To raise and lower the shade, use the remote control as described
above.
Charging the Batteries
Connect the AC Charger to the Charger Cable attached to the motor
head – charge for 8 hours.
NOTE: Each battery/motor should be charged at least once every 6
months.
Installation/Replacement of the
Remote Control Battery
Remove the cover on the rear of the remote by removing the screw
and sliding the
back plate upward
slightly – install a 3V
[CR2032] disk type
battery as illustrated.
Installation of
Optional Wall Mount
Holder
Attach the remote
holder using the
screws provided
(use wall anchors for
hollow dry wall), or
peel the foil off the
adhesive pad on the
back of the remote
holder and press it
into place on any clean at
surface.
CUSTOMER SERVICE:
1-800-264-1190
General Safety Instructions
for Motorized Shades
• Do not expose the motor
or transmitter to moisture or
extreme temperatures
• Do not allow children to
play with this device
• Use or modication outside
the scope of this instruction
manual will void the warranty
• If cable or power connector
is damaged, do not use
Important Information about your battery powered product:
Rechargeable batteries should be recycled, not disposed of with
common household trash. When/if you replace your shade, please recycle
in accordance with local environmental regulations. This also applies to
the button type battery in the remote control(s).
Statement Regarding FCC Compliance
This device complies with Part 15 of the FCC rules. Operation is
subject to the following two conditions:
1) This device may not cause interference, and
2) This device must accept any interference received, including
interference that may cause undesired operation.
Note:
This equipment has been tested and found to comply with 15 of
the FCC Rules. These limits are designed to provide reasonable
protection against harmful interference in a residential installation. This
equipment generates, uses and can radiate radio frequency energy
and, if not installed and used in accordance with the instructions, may
cause harmful interference to radio communications.
However, there is no guarantee that interference will not occur
in a particular installation. If this equipment does cause harmful
interference to radio or television reception, which can be determined
by turning the equipment off and on, the user is encouraged to try to
correct the interference by one or more of the following measures:
• Reorient or relocate the receiving antenna.
• Increase the separation between the equipment and the receiver.
• Connect the equipment into an outlet on a circuit different from that
to which the receiver is connected.
• Consult the dealer or an experienced radio/TV technician for help.
Any changes or modications not expressly approved by the party
responsible for compliance could void the users authority to operate
the equipment.
Motor y Controles con
Radio Tecnología Para
Persianas a la Medida
PROGRAMACION Y OPERACION DE MOTORES DE
RADIO TECNOLOGIA
Activación del motor: Presione el botón de programa durante 1 segundo -
la luz indicadora roja parpadeará - el motor ahora está “ENCENDIDO”
IMPORTANTE: los límites de posición superior e inferior han sido
previamente programados de fábrica – como también se ha asignado
un número de canal – entonces, no es necesario seguir los pasos, 2 y
3 a continuación – Aunque, recomendamos que lea estos pasos para
familiarizarse con el proceso de programación del motor y el control
remoto y entender la función de su cortina motorizada. Note que las
baterías han sido plenamente cargadas de fábrica antes del envío.
1. Selección de Canal para Cada Lado
Cuando recibe su cortina, el
número de canal previamente
asignado a cada cortina está
marcado en cada una de ellas
y en el empaque. Como se
indicó antes, no es necesario
seguir los pasos 1, 2 y 3, ya
que han sido previamente
realizados desde la fábrica y
no requieren de ningún ajuste
en condiciones normales.
Un número de canal deberá
ser asignado a cada motor
de cortina. El número deberá estar secuenciado comenzando con el #1
(1,2,3, etc.).
Presione el botón de canal/echas para seleccionar un canal dedicado
a cada cortina antes de asociarlo a cada motor de cortina en el control
remoto.
2. Programación/Asociación
RECUERDE: el motor y el control remoto han sido previamente
programados de fábrica - la información de programación en los pasos
1, 2 y 3 se dan para su información unicamente.
Identique el lugar de alojamiento del motor en el extremo izquierdo de la
cortina (mire la ilustración) - Presione el botón de PROGRAM hasta que la
cortina oscila (movimiento rápido hacia atrás y adelante) Presione UP en
el control remoto (mire la ilustración) – la cortina oscilará nuevamente - el
motor y el transmisor han sido asociados.
3. Ajuste de límites superior e Inferior “UP & DOWN”
NOTA: Los límites han sido previamente ajustados de fábrica - la
información de programación en los pasos 1, 2 y 3 se dan para su
información unicamente.
Ajuste posición Superior “UP”:
Baje la cortina de 6” a 10” por debajo del límite superior deseado
presionando los botones con echas ARRIBA o ABAJO en el control
remoto. Presione el botón PROGRAM en la parte posterior del
control remoto - el motor oscilará - esto pone el motor en modo de
programación. Ahora mueva la cortina hacia arriba a la posición superior
deseada y presione el botón PROGRAM nuevamente - el motor oscilará y
el límite ha quedado establecido.
Ajuste posición Inferior “DOWN”:
Baje la cortina entre 6” a 10” por debajo del límite superior, presione
PROGRAM en la parte posterior del control remoto - el motor oscilará
y una vez más está en modo de programación. Ahora baje la cortina al
límite deseado y presione PROGRAM, el motor oscila y el límite inferior ha
sido establecido.
NOTA: luego que los límites han quedado establecidos, observe las
instrucciones del control remoto a continuación.
4. Ajuste de Posiciones Intermedias y Otros Ajustes
Ajuste de posición INTERMEDIA
Se pueden establecer hasta (4) posiciones intermedias.
Mueva la cortina a al menos 6” de los límites previamente establecidos
- presione PROGRAM en la parte posterior del control remoto - el motor
oscilará y quedará en modo de programación.
Mueva la cortina a la posición deseada y vuelva a presionar PROGRAM -
el motor oscilará y la posición intermedia STOP ha sido establecida.
Repita el proceso para las posiciones intermedias adicionales.
Cuando establezca un límite, si no hay acción dentro de los primeros 30
segundos, el motor saldrá automáticamente del modo de programación.
Charger
Port
Charger
Cable
Charger Adapter
Remove
Screw &
Slide
Upward
Insert
Battery
Inside of
Plate
Inside of
Remote
Attach
Using
Screws Place
Remote
on
Holder
Wall Mount
Holder
Sistema de Motor Recargable sin Cables - Tipo C
Puerto de
Recargado
Botón de
Programación
Botón
para
Arriba
Cabezal del Motor
Control Remoto
1 2 3 4 5 6
Vea los controles
remotos de 1, 6 &
16 canales en la
siguiente página
Transmisores de Control Remoto
Control Remoto de
Un Canal Singular
Control Remoto de
Diez y Seis (16) Canales
Control Remoto de
Seis (6) Canales
Vista Posterior
del Control Remoto
Cabezal del Motor
Arriba (UP)
Parar (STOP)
Abajo (DOWN)
Indicador de
Canal LED
Arriba (UP)
Arriba (UP)
Parar (STOP)
Parar (STOP)
Abajo (DOWN)
Abajo (DOWN)
Canal Anterior
Canal Anterior
Canal Siguiente
Canal Siguiente
Pantalla de
Canal
Botón de
Programación
Tornillo de
la Tapa
Parte # MEIN0264 Rev. 2
Botón de
Programación
Botón de
Programación

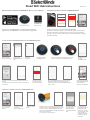
Smart WiFi Hub Instructions
1.Download & Install “P2 POWERMATE” APP on your cellphone
(1) Search for “P2 POWERMATE" on the App Store or Google play
(2)Download “P2 POWERMATE” and install the APP on your phone
powermate
powermate smart hub powermate APP
2.Register and login to the P2 POWERMATE APP
(1) When installation is complete open P2 POWERMATE
(2) Create an account using your e-mail address – enter a password that
should include letters and numbers only, no signs or special characters
(3) Login in to your account (after the account is established you will login
to the APP directly)
3. Link the P2 POWERMATE hub to the POWERMATE APP
(1) Choose ”Add
device” on desktop
1.
(2) Choose P2
POWERMATE Smart
Hub
(3) Choose
“Allone Pro”
(6) Choose “Next”
on the P2
POWERMATE APP
(5) Press and hold the central button on the hub
until the circular light turns RED and Flashes
(4) Power on the P2
POWERMATE hub
(7) Choose “Join” to enable the hub to access your Wi-Fi
network
Tip: Make sure your network is available, not restricted to
assure access
(8) Select your Wi-Fi
network and input
your Wi-Fi password
(9) The P2 POWERMATE hub will connect to your
Wi-Fi network automatically. When you see
“Added successfully” on the P2 POWERMATE APP,
choose “Done”
(10) The APP is linked to
the P2 POWERMATE hub
when Allone Pro
appears on the desktop
(1) Choose “Allone
Pro” on the APP
desktop
(2) Choose “+ Add”
at the menus
bottom right corner
(3) Choose “Motor”
device
(4) Now press the “programming button” on motor
head for 1 second - the shade will oscillate one time.
Then tap “pairing” on P2 POWERMATE APP. If the
shade is successfully added to the APP, the shade will
oscillate one more time.
If not, repeat the step 4 operation.
(5) Choose “Response
has been stored”
when the shade is
successfully added to
APP.
(6) The shade has
been added to the P2
POWERMATE APP.
Confirm that you can
now control the shade
using the APP, and
then proceed to add
additional shades if
applicable.
Choose available Wi-Fi
4. Add your shades to the P2 POWERMATE APP
Version 2.0

(1)Choose ”Me” on
the P2 POWERMATE
desktop, and then
Select “family
Management”
menu
(2)Choose “Member
Permission”
(3)Tap “+” family
members at the top
right corner of the
screen
(5)When your family member receives and accepts the invitation, the
Administration account shows the family QR Code that the family member will scan
The family member taps “+” at the top right corner, and chooses “Add to an existing
family”. Choose “scan the family's QR code to join it”, and then scan the code on the
administrators screen.
(4)Input your family
“Account e-mail
address” then go to
to bottom, send an
invitation to your
family member
5. Family “Member Permission” management
Note that the set-up account is the one and only administrator – only the administrator's login can make changes to the APP. However, the administration account can add
family members with their own ID, and they can then control the shades from their phones or tablets.
6.”Siri Shortcut” Voice Command Management
(1) Choose ”Scenes”
on the P2
POWERMATE
desktop. Create a
scene.
(2) Slide the “scene”
icon to left, and then
choose “Edit ” scene
(3) Add Execution
Task
(5) Choose an
“Action” for the
shade you
selected. Then
Add to Siri.
(4) Choose “Device” and then select the
shade you want to add to this scene
(6) In the Add to Siri menu, you can edit the
“Siri shortcut command”. For example: “open
shade in bedroom”. After all tasks are set up,
save the scene. Now you can let Siri control
your shades.
7.Link to “Amazon Alexa” & “Google home” voice control device
(1) Login in your “Amazon Alexa” or
“Google home” APP
(2) “Amazon Alexa” add “Skills & Games”
“Google Home” add “Home control”
(3) Search
“p2 powermate”
(4) Choose
“ENABLE TO USE”
(5) Input your “p2 powermate” account and
password, then sign in. Now P2 Powermate
had been linked to your “Alexa” or “Google
Home” voice control device.
-
 1
1
-
 2
2
-
 3
3
-
 4
4
-
 5
5
-
 6
6
-
 7
7
-
 8
8
-
 9
9
-
 10
10
-
 11
11


en otros idiomas
- English: SelectBlinds Casual User manual
Artículos relacionados
Otros documentos
-
LEVOLOR Light Filtering Roman Shades Guía de instalación
-
Select Blinds Textured Glam Roman Shades Guía de instalación
-
allen+roth 3SMI350640 Manual de usuario
-
 Perfect Lift Window Treatment 3QCC690720 Guía de instalación
-
LEVOLOR 2 Custom Faux Wood Horizontal Blinds Guía de instalación
-
 Select Blinds Classic/Essential/Cozy/Farmhouse Motorization Roman Shades Guía de instalación
-
 Perfect Lift Window Treatment QFCR220720 Guía de instalación
-
LEVOLOR Fabric Roller Shades Guía de instalación
-
 Select Blinds William Morris Roman Shades Instrucciones de operación


