Select Blinds Classic/Essential/Cozy/Farmhouse Motorization Roman Shades Guía de instalación
- Tipo
- Guía de instalación

INSTALLATION GUIDE | ROMAN SHADES UPDATED MAY 2021 1
®
Simple. Smart. Custom.
®
Simple. Smart. Custom.
INSTALLATION GUIDE
ROMAN SHADES
LIFT SYSTEM: MOTORIZATION
1
2
3
The difculty level of this installation is ranked at Level 1.
A piece of cake!
If you have questions or get stuck, call our Customer Care Team at 888-257-1840, or email [email protected]
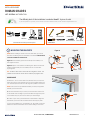
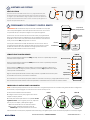
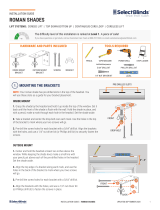
NOTE: Before installing an inside mount motorized shade, you need to
rst attach the battery pack to the backside of the headrail. Motorized lift
cannot be installed for outside mount.
Figure A: Hook the battery pack over the back lip of the headrail, so it
rests against the back.
Figure B: Clip the motor cable into the battery pack. Be sure the antenna
cable is positioned away from the headrail, and out of contact with
anything metal.
TIP: The back of each bottom rail should have a tag with a number. This
indicates the channel and remote that the shade is pre-programmed to.
Figure A
BATTERY
PACK
HEADRAIL
SHADE FABRIC
Figure B
ANTENNA
MOTOR
CABLE
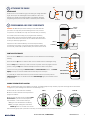
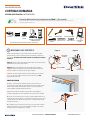
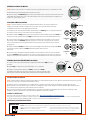
MOUNTING THE BRACKETS
1.
2” - 4”
INSIDE MOUNT
1. Measure 2”- 4” in from each side of the window frame, and mark once
with a pencil for your outer brackets. The front of the bracket will face out
from the window, and the back of it will hang down parallel to the window.
NOTE: Leave marks for any additional brackets you need, evenly spaced
between your rst two marks.
2. Center the brackets over your marks, and set them back until the front
of the bracket meets the edge of your window. Mark through the top hole
in the bracket with your pencil. This is where your screws will go.
3. At each of your marks, pre-drill holes with a 5/64” drill bit.* Align each
bracket with your screw holes and drill the screws securely into place.
*If you are using wall anchors, pre-drill with a 1/4” bit instead, and tap the
wall anchors into the holes with a hammer before drilling in the screws.
FRONT
BACK
HARDWARE AND PARTS INCLUDED TOOLS REQUIRED
PHILLIPS
SCREWDRIVER
BRACKET SCREWS WALL
ANCHORS*
PENCIL
STEP LADDER
PHILLIPS DRILL BIT
POWER DRILL
TAPE MEASURE
5/64” DRILL BIT
*Recommended if mounting into hollow drywall.
BATTERY CHARGER & REMOTE
51 2 3 4

INSTALLATION GUIDE | ROMAN SHADES UPDATED MAY 2021 2
®
Simple. Smart. Custom.
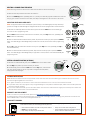
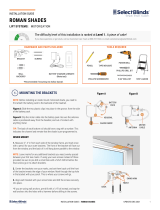
HEADRAIL
TAB
INSIDE MOUNT
1. With the front of the shade facing you, and holding it at a slight downward
angle, rest the lip of the headrail against the movable tab in each of the
brackets. Then gently push it toward the back of the brackets, while also
straightening the rail, until the hooks attach to the back lip of the headrail.
ATTACHING THE SHADE
2.
3. PROGRAMMING AND USING YOUR REMOTE
WARNING: DO NOT attempt to raise or lower your motorized shade with
your hands. This may cause permanent damage to the motor, and other
components in the headrail, which may not be covered under your warranty.
Your shade’s motor and remote(s) are pre-programmed at the factory,
and are ready to use once the shade is installed. Look for the tag with two
numbers on the back of each bottom rail. This indicates which channel and
remote your shade is programmed to.
All you have to do is install the battery in the remote. Open the battery
compartment at the bottom of the remote and insert the lithium battery into
the round slot, positive side up. Slide the battery cover back onto the remote.
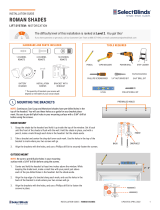
HOW TO USE THE REMOTE
Press and hold the Down button to lower the shade. You can release when the shade begins
lowering.
Press and hold the Up button to raise the shade. You can release when the shade begins raising.
Press the Stop button to halt the up or down movement. If you later choose to program a favorite
position, holding the Stop button will automatically lift or lower the shade to this position.
Choose a channel by pressing the Channel Increase and Channel Decrease buttons. The Channel
Display at the top of the remote will illuminate the channel you are currently on.
To operate all your shades at the same time, set the remote to Channel 5, and then press the
Channel Increase button. This will illuminate all the Channel Display lights, which activates motors
on all channels.
FRONT
FRONT
Channel Display
Up
Stop
Down
Channel Decrease
Channel Increase
51 2 3 4
Channel Display
Channel Decrease
Channel Increase
Up
Stop
Down
PAIRING THE REMOTE WITH A MOTOR
NOTE: The factory pairs each of your shades to the remote. The following steps are only necessary if you want to change how the channels are
congured, or if you are adding a new shade to a remote already in use.
1. Disconnect the motor cable from the battery.
2. Set the remote to whichever channel you want to
program the shade to.
3. Both parts of this step must be completed within
three seconds. If you don’t succeed, repeat this
step a bit faster, or have someone assist you.
A. Plug the motor cable back into the battery.
B. With your nger, quickly press and hold the
Conrm (C) button on the back of the remote.
C
S
L
T
BY BF
R
5
4
C
2
0
REMOTE 01
REMOTE
BACKSIDE
BATTERY COVER
REMOTE
LABEL
LITHIUM
BATTERY
STEP 1 STEP 3A
C
S
L
T
BY BF
R
5
4
C
2
0
STEP 3B
CONFIRM (C)
When the shade jogs (a quick up and down movement), the remote is paired to the channel you’ve chosen.
CONFIRM (C)
LIMIT (L)

INSTALLATION GUIDE | ROMAN SHADES UPDATED MAY 2021 3
®
Simple. Smart. Custom.
CLEANING INSTRUCTIONS
NOTE: All fabrics are different and some may be easier to clean than others. We recommend cleaning your shades as often as once a month.
Here are some general guidelines on how to do so:
1. For regular maintenance, use a duster or a vaccum with a brush attachment and run it over the front and back of the shade.
2. To spot clean stains, use a damp rag with a very mild, gentle detergent or soap. Dab at the affected spots; do NOT rub! Let the dampened area
air-dry and repeat as necessary.
3. If your roman shade has wrinkles, you can use a basic steamer to remove them. Hold the steamer roughly six inches away from the fabric and
wave the steamer back and forth over the wrinkled areas.
WARRANTY AND REPLACEMENT
To learn more about our product warranties, please visit: https://www.selectblinds.com/warranty.html
For replacement parts, and/or to le a warranty claim for a product that is damaged, defective, or missing parts, please call our Customer Care
Team at 888-257-1840, or email [email protected].
Corded window blinds and shades can be a strangulation risk or cause serious injury to young children and pets. When using
corded window treatments, use the following tips to keep them safe:
WARNING
• Move furniture that children can climb on away from the window.
• NEVER place a crib by a window!
• Keep cords up and away from your child’s reach.
• Always use cord cleats with corded products.
• Secure child-safe tensioners for continuous cord loop
chains to the wall or window encasement.
CHILD SAFETY WARNING
DELETING A CHANNEL FROM THE MOTOR
NOTE: Removing a remote or channel from a shade does not delete or reset the limit settings.
1. Select the channel you’d like to disconnect the shade from.
2. Press the Conrm (C) button repeatedly (about 3 - 7 presses); the shade will jog three individual times. After the
third jog, your channel is removed from the shade, and ready to be assigned to a new channel or a new remote.
C
S
L
T
BY BF
R
5
4
C
2
0
CONFIRM (C)
ADJUSTING UPPER AND LOWER LIMITS
NOTE: The upper and lower limits are already set-up at the factory, so the following steps are only necessary if
you want to change how these settings are congured. Both limits must be reprogrammed in these instructions.
1. Start with the shade fully raised. For a few seconds, press and hold the Limit button until the shade jogs.
Your motor is now in programming mode.
2. Press Down to lower the shade until it’s almost to the bottom, then press Stop. From here, repeatedly press
Down to lower the shade slowly.
3. When the shade reaches the desired bottom position, ip the remote and use your pen to press the Conrm
button. The shade will jog to acknowledge that your lower limit is now set, but the motor is still in programming
mode.
4. Press Up to raise the shade until it’s almost to the top, then press Stop. From here, repeatedly press Up to
raise the shade slowly.
5. When the shade reaches the desired top position, ip the remote and use your pen to press the Conrm
button. The shade will jog to acknowledge that your upper limit is now set, and the motor will automatically exit
programming mode.
C
S
L
T
BY BF
R
5
4
C
2
0
CONFIRM
(C)
C
S
L
T
BY BF
R
5
4
C
2
0
LIMIT (L)
C
S
L
T
BY BF
R
5
4
C
2
0
CONFIRM
(C)
SETTING A FAVORITE POSITION (OPTIONAL)
1. Start with the shade raised fully, then press the Down button for the shade to lower.
2. Press Stop at the position you wish to save as your favorite.
3. Simultaneously press and hold the Limit button and the Up button, until the shade
jogs. Your favorite position is now set. If you wish to change the favorite position,
simply repeat these steps again.
C
S
L
T
BY BF
R
5
4
C
2
0
LIMIT (L)

GUIA DE INSTALACIÓN | CORTINAS ROMANAS ACTUALIZADO MAYO 2021 1
®
Simple. Smart. Custom.
®
Simple. Smart. Custom.
GUIA DE INSTALACIÓN
CORTINAS ROMANAS
SISTEMA DE ELEVACIÓN: MOTORIZACIÓN
1
2
3
El nivel de dicultad de esta instalación es de Nivel 1.
¡Pan comido!
Si tienes preguntas o te atascas, llama a nuestro Equipo de Atención al Cliente al 888-257-1840, o envíale un email a
NOTA: Antes de instalar una cortina de sombra motorizada montada
puertas adentro, primero necesitas adjuntar a las baterías a la parte de
atrás del riel. El elevador motorizado no puede ser instalado en montajes
exteriores.
Figura A: Enchufa al pack de la bateria al labio trasero del riel, para que así
pueda descansar contra la parte trasera.
Figura B: Engancha al cable del motor dentro del pack de la batería.
Asegúrate de que el cable de la antena esté posicionado lejos del riel y
fuera de contacto con cualquier tipo de objeto metálico.
Figura A
PAQUETE DE
BATERÍAS
RIEL
TELA DE SOMBRA
Figura B
ANTENA
CABLE
MOTORIZADO
MONTANDO LOS SOPORTES
1.
2” - 4”
MONTAJE INTERIOR
1. Mide 2”- 4” por dentro de cada lado del marco de la ventana, y lo
demarcas con un lápiz para tus soportes exteriores. El frente del soporte
estará mirando hacia afuera desde la ventana, mientras que la parte
trasera quedará colgando paralela a la ventana.
NOTA: Deja marcas para cualquier soporte adicional que llegues a
necesitar, espaciados de forma equitativa entre tus dos marcas iniciales.
2. Centra a tus soportes sobre tus marcas, y luego atrásalas hasta que el
frente del soporte se encuentre con el borde de tu ventana. Haz una marca
a través del hoyo más elevado en el soporte con tu lápiz. Allí será donde
ubicarás tus tornillos.
3. Pre-taladra hoyos en cada una de tus marcas con una broca de 5/64”.*
Alinea a cada soporte con tus hoyos taladrados y taladra a tus tornillos
hasta que estén bien asegurados en su lugar.
FRENTE
ATRÁS
HARDWARE Y PARTES INCLUIDAS HERRAMIENTAS REQUERIDAS
DESTORNILLADOR
PHILLIPS
SOPORTE TORNILLOS ANCLAS DE
PARED*
LÁPIZ
ESCALERA DE
MANO
BROCA PHILLIPS
TALADRO ELÉCTRICO
CINTA MÉTRICA
BROCA DE 5/64”
*Recomendado si estás montando en paneles de yeso hueco.
BATERÍA DE CARGADOR Y
CONTROL REMOTO
51 2 3 4
CONSEJO: La parte trasera de cada riel inferior debe tener una etiquita
con un número. Esto indica el canal y el control remoto al que esta
preprogramado la cortina.

GUIA DE INSTALACIÓN | CORTINAS ROMANAS ACTUALIZADO MAYO 2021 2
®
Simple. Smart. Custom.
RIEL
LENGUETA
MONTAJE INTERIOR
1. El frente de la cortina debería estar frente a ti, y luego descasas la parte
de abajo del riel contra la lengueta de cada soporte mientras lo sostienes a
un ángulo un poco descendiente. Luego empujas al riel contra el respaldo de
los soportes mientras alineas el riel a la misma vez hasta que los ganchos se
adjuntan a la parte trasera del riel.
AJUSTANDO LAS CORTINAS
2.
3. PROGRAMANDO Y UTILIZANDO TU CONTROL REMOTO
ADVERTENCIA: NO intentes elevar o bajar tus cortinas motorizadas con tus propias
manos. Esto podría llegarle a causar daño permanente tanto al motor como a otros
componentes del riel, lo cual podría no llegar a formar parte de tu garantía.
Tanto el motor como el control remoto de tus cortinas vienen pre-programados de
fábrica y ya están listos para ser utilizados una vez que instalaste la cortina. Busca
la etiquita con dos números en la parte trasera de cada riel inferior. Esto indica cual
canal y control remoto esta preprogramado a tu cortina.
Todo lo que tú debes hacer es instalar las baterías en el control remoto. Abre el
compartimiento de las baterías en la parte de abajo del control remoto e insertas
las baterías de litio en las ranuras redondas con el signo positivo boca arriba.
Deslice la tapa de la batería de nuevo al control remoto.
C
S
L
T
BY BF
R
5
4
C
2
0
REMOTE 01
PARTE TRASERA
DEL CONTROL
REMOTO
TAPA DE LA
BATERÍA
ETIQUITA DEL
CONTROL REMOTO
BATERÍA
DE LITIO
CONFIRMAR (C)
LÍMITE (L)
CÓMO UTILIZAR TU CONTROL REMOTO
Presiona y aprieta la echita indicadora de Abajo para bajar la cortina. Tú puedes dejar de apretar
cuando la cortina empiece a caer.
Presiona y aprieta la echita indicadora de Arriba para subir la cortina. Tú puedes dejar de apretar
cuando la cortina empiece a subir.
Presiona el botón de Stop (parar) si quieres detener el movimiento de elevación o descenso. Si
posteriormente optas por elegir una posición preferida, el mantener Stop apretado alzará o bajará
a dicha posición automáticamente.
Elige un canal al apretar las echas de arriba o abajo de Canal. La pantalla se iluminará en la parte
de arriba del control remoto y te mostrará tu canal actual.
Pon el Canal 5 en tu control remoto para operar a todas tus cortinas al mismo tiempo, y luego aprieta la echita de arriba.
Esto iluminará las luces del indicador de canal de la pantalla, lo cual activará todos los motores en todos los canales.
FRENTE
Muestra de Canales
Subir de Canal
Bajar de Canal
Arriba
Stop
Abajo
FRONT
Channel Display
Up
Stop
Down
Channel Decrease
Channel Increase
51 2 3 4
EMPAREJANDO EL CONTROL REMOTO CON UN MOTOR
NOTA: La fábrica empareja a cada cortina con el control remoto. Los siguientes pasos solo son necesarios si te gustaría cambiar la conguración
de los canales, o si quieres agregar una nueva cortina a un control remoto ya en uso.
PASO 1 PASO 3A
C
S
L
T
BY BF
R
5
4
C
2
0
PASO 3B
CONFIRMAR (C)
1. Desconecta al cable del motor de la batería.
2. Congura al control remoto para programar la cortina en
cualquier canal que preeras.
3. Ambas partes de este paso deben ser completadas en tres
segundos o menos. Si no lo logras la primera vez, repite este
paso un poco más rápido, o pídele ayuda a alguien.
A. Enchufa el cable del motor de vuelta en la batería.
B. Con su dedo, rápidamente presione el botón de
Conrmar (C) en la parte trasera del control remoto.
Cuando la cortina se mueva (breve y rápidamente de arriba a abajo), eso signica que el control remoto está emparejado con el canal que elegiste.

GUIA DE INSTALACIÓN | CORTINAS ROMANAS ACTUALIZADO MAYO 2021 3
®
Simple. Smart. Custom.
INSTRUCCIONES DE LIMPIEZA
NOTA: Todas las telas son distintas y algunas podrían llegar a ser más fáciles de limpiar que otras. Nosotros recomendamos limpiar tus cortinas
al menos una vez al mes. A continuación te explicamos como:
1. Utiliza un plumero o una aspiradora con un cepillo adjunto y recorres la cortina de frente y por detrás para mantenimiento de rutina.
2. Para descubrir manchas, utiliza un trapo húmedo con un detergente o jabón suaves. Salpica los rincones afectados, ¡NO frotes! Deja que la
zona mojada se seque al aire libre y repite cuantas veces sea necesario.
3. Si tu cortina romana tiene arrugas, tú puedes utilizar un limpiador a vapor básico para quitarlas siempre y cuando lo mantengas a seis
pulgadas de distancia de la tela y lo muevas de atrás pára adelante en las zonas arrugadas.
GARANTÍA Y REEMPLAZO
Para saber más sobre las garantías de nuestro producto, visita: https://www.selectblinds.com/warranty.html
Para partes de reemplazo y/o reclamar una garantía para un producto dañado, defectivo o con partes extraviadas, por favor contacta al Equipo
de Servicio al Cliente llamando al 888-257-1840 o enviando un email a [email protected].
ADVERTENCIA DE SEGURIDAD DE NIÑOS
QUITANDO UN CANAL DEL MOTOR
NOTA: Quitar un control remoto o un canal de la cortina no signica que se borren o se reseteen los límites.
1. Selecciona al canal que te gustaría desconectar de la cortina.
2. Presione el botón de Conrmar (C) varias veces (aproximadamente 3-7 veces); la cortina trotará tres veces
individuales. Después del tercer trote, tu canal se eliminara de la cortina, y está listo para ser asignado a un
canal o a un control remoto nuevo.
ELIGIENDO UNA POSICIÓN PREFERIDA (OPCIONAL)
1. Arranca con la cortina totalmente alzada, y luego aprieta la echita de Abajo para bajar
la cortina.
2. Aprieta Stop en la posición que pretendas adoptar como tu preferida.
3. Aprieta y mantén apretados al botón de Límite y a la echita de Arriba
simultáneamente hasta que la cortina se mueva. Ahora tu posición preferida ya está
determinada. Y solamente necesitas repetir estos pasos para cambiarla nuevamento.
Las persianas y cortinas para ventanas con cuerdas podrían llegar a posar un riesgo de estrangulación o de lesión severa para niños pequeños y
mascotas. Utiliza las siguientes recomendaciones para asegurarte su bienestar con las coberturas para ventanas con cuerdas:
• Mueve los muebles que los niños puedan trepar lejos de la ventana.
• ¡NUNCA ubiques a una cuna al lado de la ventana!
• Mantén a las cuerdas elevadas y lejos del alcance de los niños.
• Siempre utiliza los aseguradores de cuerdas para productos con cuerdas.
• Asegura a los tensionadores seguros para niños a una cadena de bucle de
cable continuo contra la pared o el revestimiento de la ventana.
ADVERTENCIA
C
S
L
T
BY BF
R
5
4
C
2
0
CONFIRMAR (C)
AJUSTANDO LÍMITES DE ALTURA
NOTA: Los límites de altura ya vienen precongurados desde la fábrica, así que esto solamente es
necesario si pretendes cambiar la conguración. En ese caso, ambos límites tendrían que verse
congurados nuevamente con las siguientes instrucciones.
1. Comienza con la cortina totalmente alzada. Aprieta al botón de Límite (L) por unos segundos hasta que
la cortina se mueva. Ahora tu motor está en modo de programación.
2. Aprieta la echita de Abajo para bajar la cortina hasta que esté casi toda abajo, luego aprieta Stop. Una
vez que eso suceda, aprieta la echita de Abajo repetidamente para qu la cortina descienda lentamente.
3. Una vez que la cortina llega a la posición de descenso deseada, vas a dar vuelta a tu control remoto
para apretar el botón de Conrmar utilizando tu lapicera. La cortina se moverá para dar por hecho de
que tu límite de descenso está programado efectivamente, aunque el motor todavía está en modo de
programación.
4. Aprieta la echita de Arriba para elevar a la cortina hasta llegar casi arriba de todo, luego aprieta Stop.
A partir de ahí, aprieta la echita de Arriba repetidamente para elevar la cortina
lentamente.
5. Una vez que la cortina llega a la elevación deseada, vas a dar vuelta a tu control remoto para apretar
el botón de Conrmar utilizando tu lapicera. La cortina se moverá para dar por hecho de que tu límite de
elevación está programado efectivamente, y el motor saldrá automáticamente del modo de programación.
C
S
L
T
BY BF
R
5
4
C
2
0
CONFIRMAR
(C)
C
S
L
T
BY BF
R
5
4
C
2
0
LÍMITE (L)
C
S
L
T
BY BF
R
5
4
C
2
0
CONFIRMAR
(C)
C
S
L
T
BY BF
R
5
4
C
2
0
LÍMITE (L)
-
 1
1
-
 2
2
-
 3
3
-
 4
4
-
 5
5
-
 6
6


Select Blinds Classic/Essential/Cozy/Farmhouse Motorization Roman Shades Guía de instalación
- Tipo
- Guía de instalación
en otros idiomas
Artículos relacionados
Otros documentos
-
SelectBlinds Refined Roman Shades Motorization Manual de usuario
-
 SelectBlinds MOTORIZATION Serene Collection Roman Shades Guía de instalación
-
SelectBlinds Lifestyle Select Luxe Guía de instalación
-
SelectBlinds Essence Guía de instalación
-
 SelectBlinds Elite Roman Shades Guía de instalación
-
 SelectBlinds Casual Manual de usuario
-
LEVOLOR Light Filtering Roman Shades Guía de instalación
-
 Springs Window Fashions AutoVIEW El manual del propietario
-
HOME basics EPUPEB3066 Guía de instalación
-
Luxaflex Silhouette Series Mounting instructions


