
Cantidad
1
1
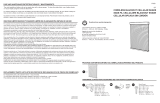
Cortina de enrollar solar con sistema de empuje
Instrucciones de instalación
Contenido del paquete de ferretería
Nombre
Cortina de enrollar solar (soporte de
resorte único)
- o -
Cortina de enrollar solar (soporte de
resorte doble)
Paquete de ferretería
A
AA
BB
Herramientas requeridas:
Cinta métrica o regla
Lápiz
Destornillador para tornillos Phillips
Taladro
+
Nota:
Si se instala sobre placa o panel de yeso, usar los
anclajes plásticos para tornillos (B) suministrados.
Contenido del paquete
A
B
BB
AA
Pushup Solar Roller Shade
Installation Instructions
Hardware Pack Contents
Name
Solar Roller Shade (Single Spring Bracket)
- or -
Solar Roller Shade (Double Spring Bracket)
Hardware Pack
Quantity
1
1
A
AA
BB
Tools Required:
Measuring tape or ruler
Pencil
Phillips head screw driver
Drill
+
Note:
If mounting in drywall or plaster wall, use
the provided plastic screw anchors (B).
Package Contents
A
B
BB
04
PE-LD
AA
IM - Solar Pushup Roller Shade w headrail - English-Spanish-Final.indd 1-2 11/30/17 6:41 PM
C
C D
D
Name
Phillips Head Screws
Screw Anchors
Quantity
5
5
1
2
A
B
+
Bead Chain Hold Down Device
Small Phillips Head Screws
04
PE-LD
C
C
D
D
Nombre
Tornillos Phillips
Anclajes de tornillos
Cantidad
5
5
1
2
A
B
+
Dispositivo de sujeción de la cadena
de cuentas
Pequeños tornillos Phillips

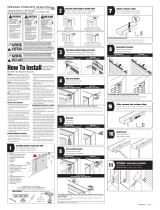
Step 1 - Mark Mounting Hole Locations
Step 2 - Predrill Mounting Holes
Step 1 - Mark Mounting Hole Locations
Step 2 - Predrill Mounting Holes
2
Installation Instructions
Position the headrail assembly in the desired location
and pencil mark the middle, left, and right mounting
screw hole locations.
Open the left clip mounting bracket by rotating the
clip upward, then remove the shade from headrail
assembly. Do not remove the paper wrap.
Turn the dial on the left side of the shade clockwise to
retract the pin, then remove the shade from headrail
assembly. Do not remove the paper wrap.
IMPORTANT! Remove the shade from the headrail assembly before proceeding. Do not remove paper wrap until after installation.
Pre-drill holes for Mounting Screws (A).
Note: If mounting in drywall or plaster wall, use the
provided Plastic Screw Anchors (B).
Position the headrail assembly in the desired location
and pencil mark the middle, left, and right mounting
screw hole locations.
Pre-drill holes for Mounting Screws (A).
Note: If mounting in drywall or plaster wall, use the
provided Plastic Screw Anchors (B).
Outside MountInside Mount
- or -
Mark the center of all mounting screw hole locations
If mounting in
drywall or plaster
wall, use the
provided Plastic
Screw Anchors (B).
Single Spring Bracket Shades Double Spring Bracket Shades
Paso 1 - Marcar las ubicaciones de los
agujeros para montaje
Paso 2 - Pre-perforar orificios de montaje
Paso 1 - Marcar las ubicaciones de los
agujeros para montaje
Paso 2 - Pre-perforar orificios de montaje
2
Instrucciones de instalación
Posicionar el conjunto del riel superior en la ubicación
deseada y marcar con lápiz las ubicaciones de los
agujeros medio, izquierdo y derecho para los tornillos
de montaje.
Abrir el soporte de montaje del clip izquierdo rotando el
clip hacia arriba, luego retirar la cortina del conjunto del
riel superior. No retirar el envoltorio de papel.
Girar el disco en el lado izquierdo de la cortina en sentido
horario para retraer el sujetador, luego retirar la cortina del
conjunto del riel superior. No retirar el envoltorio de papel.
¡IMPORTANTE! Retirar la cortina del conjunto del riel superior antes de proceder. No retirar el envoltorio de papel hasta después de la instalación.
Pre-perforar los agujeros para los tornillos de montaje (A).
Nota: Si se instala sobre placa o panel de yeso, usar los
anclajes plásticos para tornillos (B) suministrados.
Posicionar el conjunto del riel superior en la ubicación
deseada y marcar con lápiz las ubicaciones de los
agujeros medio, izquierdo y derecho para los tornillos
de montaje.
Pre-perforar los agujeros para los tornillos de montaje (A).
Nota: Si se instala sobre placa o panel de yeso, usar los
anclajes plásticos para tornillos (B) suministrados.
Montaje exteriorMontaje interior
- o -
Marcar el centro de todas las ubicaciones de agujeros
para tornillos de montaje
Si se instala sobre
placa o panel de
yeso, usar los
anclajes plásticos
para tornillos (B)
suministrados.
Cortinas con soporte de resorte único Cortinas con soporte de resorte doble
IM - Solar Pushup Roller Shade w headrail - English-Spanish-Final.indd 3-4 11/30/17 6:41 PM

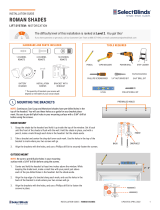
Step 3 - Mount Headrail Assembly
Step 4 - Install Shade into headrail
Step 3 - Mount Headrail Assembly
Step 4 - Install Shade into headrail
Installation Instructions (continued)
3
Position and attach the headrail assembly using the
provided mounting screws (A).
Position and attach the headrail assembly using the
provided mounting screws (A).
IMPORTANT! It is important the the headrail is
installed with the brackets in the proper position.
The brackets are marked “L” (left) and “R” (right).
Make sure to install the headrail with “R” to right
side and “L “to left side. If the headrail is installed
improperly, it will cause the springs to turn in the
wrong direction and the shade will not operate
properly.
Insert the square pin on the right side of the Shade
(AA) into the right side bracket, rotating slightly to
fully seat the pin into the mounting bracket.
Close the clip on the left side mounting bracket until it
clicks and locks.
Insert the square pin on the right side of the Shade
(AA) into the right side bracket, rotating slightly to
fully seat the pin into the mounting bracket.
Close the clip on the left side mounting bracket until it
clicks and locks.
Outside Mount (continued)Inside Mount (continued)
- or -
RightLeft
See next page for shades with two spring brackets.
Paso 3 - Montar el conjunto del riel superior
Paso 4 - Instalar la cortina en el riel superior
Paso 3 - Montar el conjunto del riel superior
Paso 4 - Instalar la cortina en el riel superior
Instrucciones de instalación (continuación)
3
Posicionar y unir el conjunto del riel superior usando los
tornillos de montaje suministrados (A).
Posicionar y unir el conjunto del riel superior usando
los tornillos de montaje suministrados (A).
¡IMPORTANTE! Es importante que el riel superior
se instale con los soportes en la posición correcta.
Los soportes están marcados “L” (left/izquierda)
y “R” (right/derecha). Asegurarse de instalar el
riel superior con la “R” hacia la derecha y la “L”
hacia la izquierda. Si el riel superior se instala en
forma incorrecta, hará que los resortes giren en
la dirección incorrecta y la cortina no funcionará
correctamente.
Insertar el sujetador cuadrado del lado derecho de la
Cortina (AA) en el soporte del lado derecho, rotando
levemente para acomodar bien el sujetador en el
soporte de montaje.
Cerrar el clip en el soporte de montaje izquierdo hasta
que haga clic y quede trabado.
Insertar el sujetador cuadrado del lado derecho de la
Cortina (AA) en el soporte del lado derecho, rotando
levemente para acomodar bien el sujetador en el
soporte de montaje.
Cerrar el clip en el soporte de montaje izquierdo hasta
que haga clic y quede trabado.
Montaje exterior (continuación)Montaje interior (continuación)
- o -
DerechaIzquierda
Ver página siguiente para cortinas con soportes de dos resortes.
IM - Solar Pushup Roller Shade w headrail - English-Spanish-Final.indd 5-6 11/30/17 6:41 PM

Step 4 - Install Shade into headrail
Double Spring Bracket Shades
Step 4 - Install Shade into headrail
Double Spring Bracket Shades
Step 5 - Remove Paper Wrap
Installation Instructions (continued)
Before installing the
shade roll, make sure
that the end pin is fully
retracted.
Rotate the dial clockwise
until the pin is flush with
the face of the dial.
Before installing the
shade roll, make sure
that the end pin is fully
retracted.
Rotate the dial clockwise
until the pin is flush with
the face of the dial.
Insert the square pin
on the right side of the
Shade (AA) into the
right side spring bracket,
rotating slightly to fully
seat the pin into the
mounting Bracket.
Insert the square pin
on the right side of the
Shade (AA) into the
right side spring bracket,
rotating slightly to fully
seat the pin into the
mounting Bracket.
While holding the right
side of the Shade (AA)
in place, swing the left
side of the Shade (AA)
into the left mounting
bracket. Rotate the dial
clockwise until the pin
fully extends and snaps
into the bracket. It may
be necessary to slightly
rotate the shade roll to
properly align the pin.
While holding the right
side of the Shade (AA)
in place, swing the left
side of the Shade (AA)
into the left mounting
bracket. Rotate the dial
clockwise until the pin
fully extends and snaps
into the bracket. It may
be necessary to slightly
rotate the shade roll to
properly align the pin.
After Installing the shade into the headrail you may
remove the protective wrap and begin using your
shade.
Outside (continued) MountInside Mount (continued)
- or -
4
Pin should
be Flush
Pin should
be Flush
Carefully remove the protective wrapper.
Paso 4 - Instalar la cortina en el riel superior
Cortinas con soporte de resorte doble
Paso 4 - Instalar la cortina en el riel superior
Cortinas con soporte de resorte doble
Paso 5 - Retirar el envoltorio de papel
Instrucciones de instalación (continuación)
Antes de instalar el rollo
de la cortina, asegurarse
de que el sujetador final
esté totalmente retraído.
Rotar el disco en sentido
horario hasta que el
sujetador esté alineado
con la cara del disco.
Antes de instalar el rollo
de la cortina, asegurarse
de que el sujetador final
esté totalmente retraído.
Rotar el disco en sentido
horario hasta que el
sujetador esté alineado
con la cara del disco.
Insertar el sujetador
cuadrado del lado derecho
de la Cortina (AA) en el
soporte de resorte del
lado derecho, rotando
levemente para acomodar
bien el sujetador en el
soporte de montaje.
Insertar el sujetador
cuadrado del lado derecho
de la Cortina (AA) en el
soporte de resorte del
lado derecho, rotando
levemente para acomodar
bien el sujetador en el
soporte de montaje.
Mientras se sostiene el
lado derecho de la cortina
(AA) en su lugar, deslizar
el lado izquierdo de la
cortina (AA) en el soporte
de montaje izquierdo.
Rotar el disco en sentido
horario hasta que el
sujetador se extienda
totalmente y quede
trabado en el soporte. Es
posible que sea necesario
rotar levemente el rollo de
la cortina para alinear el
sujetador correctamente.
Después de instalar la cortina en el riel superior, se
puede retirar el envoltorio protector y comenzar a usar
la cortina.
Montaje exterior (continuación)Montaje interior (continuación)
- o -
4
El sujetador
debe quedar
alineado
El sujetador
debe quedar
alineado
Retirar cuidadosamente el envoltorio protector.
IM - Solar Pushup Roller Shade w headrail - English-Spanish-Final.indd 7-8 11/30/17 6:41 PM

Problem: The shade will not retract properly
Troubleshooting
Hold the shade in the middle of the pull bar and gently
pull the shade down to the desired position and
release.
To raise the fully opened position of the shade, firmly
hold the shade roll so it does not turn and wrap the the
hanging portion of the shade over the top and around
the back of the shade roll.
Possible Cause: The end cap pin(s) may not be fully inserted into the
mounting brackets.
Solution: Slightly rotate the Shade (A) within the mounting brackets to fully
seat the pin(s).
NOTE: Make sure the end cap pins are fully INSERTED into the spring
brackets firmly.
NOTE: It may be necessary to completely remove the shade from the
brackets to properly seat the pin(s).
To lower the fully opened position of the shade, firmly hold
the shade roll so it does not turn and unwrap the hanging
portion of the shade from the back and over the top of the
shade roll.
Hold the shade in the middle of the pull bar and gently
push the shade up to the desired position and release.
Lowering the Shade Raising the Shade
Operation
5
Adjust Full Open Position
The amount of fabric hanging from the shade when in its fully open position can be modified without increasing the
spring motor tension by wrapping the fabric around the shade roll or unwrapping the fabric from around the shade roll.
NOTE: Do not remove the shade
from the mounting brackets to
make this adjustment.
Problema: La cortina no se retrae correctamente
Solución de problemas
Sostener la cortina por la mitad de la barra para jalar
y jalar suavemente de la cortina hacia abajo hasta la
posición deseada y soltar.
Para levantar la posición completamente abierta de la
cortina, sostener firmemente el rollo de la cortina para
que no gire y envolver la parte que cuelga de la cortina
sobre la parte superior y hacia atrás del rollo de la
cortina.
Causa posible: El(los) sujetador(es) de la tapa del extremo posiblemente no
estén insertados completamente dentro de los soportes de montaje.
Solución: Rotar levemente la Cortina (A) dentro de los soportes de montaje
para acomodar completamente el(los) sujetador(es).
NOTA: Asegurarse de que los sujetadores de la tapa del extremo estén
completamente INSERTADOS en los soportes de resortes de manera firme.
NOTA: Es posible que sea necesario retirar completamente la cortina de los
soportes para acomodar el(los) sujetador(es) correctamente.
Para bajar la posición completamente abierta de la cortina,
sostener firmemente el rollo de la cortina para que no gire
y desenvolver parte de la cortina desde la parte de atrás y
sobre la parte superior del rollo de la cortina.
Sostener la cortina por la mitad de la barra para jalar
y empujar suavemente la cortina hacia arriba hasta la
posición deseada y soltar.
Bajar la cortina Levantar la cortina
Funcionamiento
5
Ajustar la posición completamente abierta
La cantidad de tela que cuelga de la cortina cuando está en la posición completamente abierta puede modificarse sin
aumentar la tensión del motor del resorte envolviendo la tela alrededor del rollo de la cortina o desenvolviendo la tela
de alrededor del rollo de la cortina.
NOTA: No retirar la cortina de los
soportes de montaje para realizar
este ajuste.
IM - Solar Pushup Roller Shade w headrail - English-Spanish-Final.indd 9-10 11/30/17 6:41 PM

6
Periodic Vacuuming with proper attachments suggested. Spot clean with mild detergent free soap, testing first in an
inconspicuous area.
Cleaning
One-Year Limited Warranty
What is covered under this warranty:
Entire product against manufacturing defects (i.e., a flaw in the product design,
materials or workmanship that causes the product to no longer function (properly).
What is NOT covered under this warranty:
• Normal wear and tear
Failure due to:
• abuse • exposure to salt air • improper installation • accident • extraordinary use • misuse • alterations
• improper operation • improper cleaning • misapplication • damage from pets/insects • improper handling
Any shade that has with the passing of time:
• loss of color intensity • yellowing or cracking of plastic parts
Costs that are associated with:
• shipping • product removal • transportation to and from the retailer • product remeasure
• incidental or consequential damages • product reinstallation
Note: In the event there are multiple shades in the same room, only the defective shade will be replaced.
THIS SHALL BE YOUR SOLE REMEDY UNDER THIS WARRANTY:
If this product is found to have manufacturing defect in materials or workmanship, we will (at our discretion) do one of the following:
• repair the product • replace the product • refund the cost of the product
Note: Colors vary from lot to lot and may not match previous purchases exactly.
Discontinued items or color selections will be replaced with the closest equivalent current product.
To obtain warranty service:
If you suspect this product has a manufacturing defect in materials or workmanship:
1. Locate the sales receipt or your proof of purchase.
Your Rights under State Law:
This limited warranty gives you specific legal rights, and you may have other rights, which vary from state to state. Some states do not allow
limitations on how long a warranty lasts, so the above limitations may not apply to you. No representative or unauthorized employee has the
authority to increase or alter the obligation of this warranty. This limited warranty supersedes any previous versions.
6
Se sugiere limpieza periódica con aspiradora con accesorios adecuados. Sacar manchas con jabón suave libre de
detergente, después de probar el producto en una zona poco visible.
Limpieza
Garantía limitada de un año
Qué cubre esta garantía:
Todo el producto, en caso de que tenga algún defecto de fabricación (es decir, una falla en el diseño del producto, en los materiales o en la
mano de obra que impida el funcionamiento adecuado del producto).
Qué NO cubre esta garantía:
• Desgaste debido al uso normal
Fallas debido a:
• uso indebido • exposición al aire salino • instalación inadecuada • accidentes • modificaciones
• funcionamiento inadecuado • limpieza inadecuada • aplicación inadecuada • daños causados por mascotas o insectos • manipulación
inadecuada
Cualquier persiana que con el paso del tiempo:
• haya perdido la intensidad del color • se haya vuelto amarilla o cuyas piezas plásticas se hayan agrietado
Costos relacionados con algunos de los siguientes eventos:
• envío • retiro del producto • transporte hacia y desde la tienda • redimensionamiento del producto
• daños fortuitos o resultantes • reinstalación del producto
Nota: en caso de que haya más de una persiana en la habitación, solo se reemplazará la persiana defectuosa.
EL SIGUIENTE CONSTITUYE SU ÚNICO RECURSO CONFORME A ESTA GARANTÍA:
En caso de que este producto presente un defecto de fabricación en los materiales o en la mano de obra, (según nuestro criterio exclusivo) haremos
lo siguiente:
• reparar el producto • reemplazar el producto • reembolsar el costo del producto
Nota: los colores varían de lote a lote y pueden no coincidir exactamente con los colores de compras anteriores.
Los artículos discontinuados o los colores seleccionados se reemplazarán por el equivalente actual más cercano al producto en cuestión.
Cómo obtener el servicio de garantía:
Si sospecha que este producto presenta un defecto de fabricación en los materiales o en la mano de obra:
1. Busque el recibo de compra o el justificante de compra.
Sus derechos según la ley estatal:
Esta garantía le otorga derechos legales específicos, pero también podría tener otros derechos que varían según el estado. Algunos estados no
permiten limitaciones con respecto a la duración de una garantía, de modo que las limitaciones antes descritas podrían no aplicarse en su caso.
Ningún representante o empleado no autorizado tiene la autoridad para aumentar o alterar la obligación de esta garantía. Esta garantía limitada
reemplaza a las versiones anteriores.
IM - Solar Pushup Roller Shade w headrail - English-Spanish-Final.indd 11-12 11/30/17 6:41 PM
Install Bead Chain Hold Down Device
Position the Bead Chain Hold Down Device (C) in the center
of the window opening.
Attach using Small Screws (D).
Inside Mount
Outside Mount
Montaje interior Montaje exterior
Instale el dispositivo de sujeción de
la cadena de cuentas
Coloque el dispositivo de sujeción de la cadena de cuentas
(C) en el centro de la abertura de la ventana.
Fije con los tornillos pequeños (D).
Attach Bead Chain to Shade
Completely lower the shade.
Insert the bead chain through the large opening of the hold
down tab.
Pull down on the bead chain until it locks into the smaller
section of the tab.
To release the bead chain, pull up on the bead chain and
push back through the larger opening of the tab.
Fije la cadena de cuentas a la persiana
Baje completamente la persiana.
Inserte la cadena de cuentas en la abertura grande de la
Jale la cadena de cuentas hacia abajo hasta que se
bloquee en la sección más pequeña de la lengüeta.
Para liberar la cadena de cuentas, jale la cadena de
cuentas hacia arriba y empújela nuevamente por la
abertura más grande de la lengüeta.
-
 1
1
-
 2
2
-
 3
3
-
 4
4
-
 5
5
-
 6
6


HOME basics EPUPEB3066 Guía de instalación
- Tipo
- Guía de instalación
- Este manual también es adecuado para
en otros idiomas
Artículos relacionados
Otros documentos
-
Select Blinds Textured Glam Roman Shades Guía de instalación
-
Home Decorators Collection 10793478330324 Guía de instalación
-
Luxaflex Silhouette Series Mounting instructions
-
SelectBlinds Essence Guía de instalación
-
Home Decorators Collection 10793478653232 Guía de instalación
-
Bali Cut-to-Size 26.5x72 SNDSTONE CRDLES Guía de instalación
-
 Perfect Lift Window Treatment QELGWT280640 Guía de instalación
-
SelectBlinds Refined Roman Shades Motorization Manual de usuario
-
 Bali Cut-to-Size 76-1112-944-42-48 Guía de instalación
-
 SelectBlinds MOTORIZATION Serene Collection Roman Shades Guía de instalación


