Home Decorators Collection 10793478330324 Guía de instalación
- Tipo
- Guía de instalación

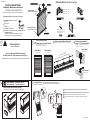
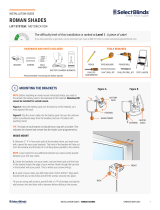
Install endcaps on both sides of shade
Motor Installed? - Proceed to step # 3
Motor instalado? - Procede al paso # 3
Instale tapasen ambos lados de la persiana
2
4
Cordless Cellular Shade
Installation & Maintenance Instructions
Pantalla Celular Inalámbrico
Instrucciones de Instalación y Mantenimiento
Inside Mount Outside Mount
Montaje Interior Montaje Exterior
CB
1
A
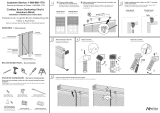
Mark bracket positions with pencil
Marque la posicion de los soportes con un lapiz
Choose a blind position
Before Beginning
If you are choosing to Motorize the shade,
Install the motor first, then please proceed to Step 3.
(Inside Mount or Outside Mount)
Escoja la posicion de su persiana
(Montaje Interior o Montaje Exterior)
Install mounting brackets
using 1 1/4” screws provided
Instale los soportes de montaje usando los
tornillos de 1 1/4” incluidos
1
2
1
2
3
Install the Shade
Instale la Persiana
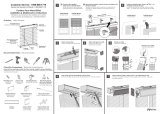
Check Hardware | Revisa los herrajes
Width - 23”- 24” = 2x
Width - 27”- 60” = 3x
Width - 72” = 4x
x2
Recommended Tools | Herramientas Recomendadas
Steel Measuring Tape | Cinta Métrica
de Acero
Pencil | Lápiz
Level | Nivel
Screwdriver | Destornillador
Power Drill: 1/4" hex driver, 1/8" drill bit ( Drywall), and 1/4"
drill bit (Wall Anchors)
Taladro eléctrico: impulsor hexagonal de 1/4" , broca de
1/8" (panel de yeso) y broca de 1/4" (ancla de pared)
65101-10254
Soporte de montaje
Installation Bracket
Cabecera del Riel Inferor
Bottom Rail Endcap
65101-10254
Riel Superior
Manta
Soporte de Instalación
Riel Inferior
Headrail Endcap
Cabecera del Riel Superior
Bottom Rail Endcap
Cabecera del Riel Inferor
Space Brackets Evenly
Space Brackets Evenly
4"
Distribución Uniforme
4"
2
Click !
2
1
Install the lip of the headrail at an angle into the front edge of each bracket.
Note: Position the shade so the front is facing you.
Rotate the headrail upwards, and “Click” the headrail securely into each bracket..
Instale el borde del riel superior en ángulo en el borde frontal de cada soporte.
Nota: Coloca la persiana de manera que el frente esté frente de ti.
Si elige motorizar la persiana, instale primero el motor, luego continúe con el Paso 3.
Antes de comenzar.
Gire el riel superior hacia arriba, con un “click” asegure el riel superior a cada soporte.
STOP
?
Tornillos
Screws
Width - 23”- 24” = 4x
Width - 27”- 60” = 6x
Width - 72” = 8x
x2
1 1/4”
Cabecera del Riel Superior
Headrail Endcap
Inside Mount
Outside Mount
Montaje Interior
Montaje Exterior

5
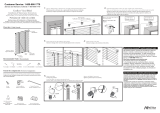
How to Uninstall the Shade
Como Desinstala la Cortina Cellular
Operate the Shade
Opera la Cortina Cellular
Q & A | Preguntas y Respuestas
Cleaning the Shade | Limpieza de la Persiana
Routine cleaning will help maintain the beauty of your shade. The shade
can be cleaned by using a duster, vacuumed with a low suction hand-held
vacuum, cleaned ultrasonically (specify that a mild solution must be used
and that the rail should never be immersed in liquid), or dampen a clean
cloth with a warm water and mild detergent solution to dab the spot until
it’s gone (do not rub!).
La limpieza habitual ayudará a mantener la belleza de sus persianas.
Limpie el polvo de la persiana con un plumero, una aspiradora portátil de
succión suave, un limpiador ultrasónico (siempre especifique utilizar una
solución suave y que el riel nunca debe sumer girse) o aplique un paño
limpio húmedo con agua tibia y un detergente suave sobre las manchas
hasta que desaparezcan (sin frotar).
Need help? Call Nien Made 1-800-666-1779
Necesita ayuda? Llame a Nien Made 1-800-666-1799
NIEN WINDOW FASHIONS
®
GARANTÍA LIMITADA DE POR VIDA
Los porductos Nien Window Fashions
®
están garantizados contra defectos materiales
o de fabricación mientras el comprador original conserve las persianas/visillos. Para
servicio relacionado con la garantía contacta al distribudor donde adquiriste el
producto, contacta al Servicio al Cliente de Nien Window Fashions
®
por el 1-800-666-1779
o visite
: http://www.nienmade.com/contactus.aspx
Esta garantia no cubre lo siguiente:
1) Cualquier daño causado por reparaciones no autorizadas, limpieza, mantenimien-
to, instalación incorrectas. 2) Desgaste normal. 3) Accidentes, modificaciones, uso
inapropiado, abuso del producto, danños por razones de fuerza mayor. 4) Exposición
a los elementos, humedad excesiva, pérdida del lustre, decoloración con el paso del
tiempo. 5) Cargos de envío, cualquier costo por retiro o reinstalación.
NIEN WINDOW FASHIONS
®
LIMITED WARRANTY INFO
Nien Window Fashions
®
products are warranted to be free from defects in materials or
workmanship as long as the original purchaser owns the blind/shade(s). To obtain
warranty service contact the dealer with whom the product was purchased for
warranty assistance, contact Nien Window Fashions
®
Customer Service at
1-800-666-1779 or visit http://www.nienmade.com/contactus.aspx
This warranty does not cover the following:
1) Any damage caused by unauthorized repairs, improper installation, cleaning,
maintenance. 2) Normal wear and tear. 3) Accidents, alterations, misuse, abuse to the
product, act of God. 4) Exposure to elements, excessive humidity, fading, discolor-
ation over time. 5) Shipping charges, any removal and reinstallation cost.
Do not grasp the rail unevenly. Always lower or
raise the shade in the middle or use both hands
with even pressure.
No agarres el riel desigualmente. Siempre baja o
sube la persiana por la parte central o use dos
manos ejerciendo la misma presion.
Do not lift or lower your shades manually
if motor is installed. If done, warranty will be voided.
For Motorized Operation:
See instructions from Motor Kit
For Non-Motorized Operation
Apply to Non-Motorized Cellular Shade Only
65101-10254
Para bajar la persiana, jale el riel inferior hacia abajo gradualmente.
To lower the shade, gradually pull down on the bottom rail.
To raise the shade, gradually lift up on the bottom rail.
Para elevar la sombra, levante gradualmente en el riel inferior.
1
3
2
1
3
2
Fully raise the shade before removing.Insert a flat head screw driver into the lip front
of the bracket and pry it up about 45 degree.
Rotate the screw driver to release bracket from head rail.
Then release the shade and unhook the head rail from the bracket front.
65101-10254
Q : My shade will not snap into the mounting brackets, what should I do?
A : Make sure the front lip of the headrail is attached to the bracket. See step 4
for guidance.
P : Mi persiana no encaja en los soportes de montaje, ¿qué debo hacer?
R :
Q : I can’t fully raise my shade, what should I do?
A : Repeatedly fully extend your shade, then raise your shade.
P : No puedo subir la persiana por completo, ¿qué debo hacer?
R : Extienda totalmente la persiana varias veces, y luego súbala.
Q: The shade stack up unevenly, what should I do?
A: Lower the shade completely, then raise it up to correct it. Repeat if
necessary.
P : El persiana se recoge de manera desigual, ¿qué debo hacer?
R : Baja el persiana completamente y luego súbelo para corregir el malfuncio
namiento. Repite si es necesario.
1
2
Asegúrate que el borde frontal del riel superior esté sujetado al soporte.
Mire el paso 4 para ayuda.
Levante completamente la persiana antes de remover. Inserte un destornillador
de punta plana en el borde frontal del soporte y levántelo unos 45 grados.
Gire el destornillador para liberar el soporte del riel frontal.
Luego suelte la persiana y desenganche el riel superior del soporte delantero.
No levante ni baje sus cortinas manualmente si el motor esta instalado.
Si se hace, la garantía será anulada.
Para opciones de motorización
Mire instrucciones del Kit de Motor
3
Para operación no motorizada
Aplicar solo a la cortina celular no motorizada
-
 1
1
-
 2
2


Home Decorators Collection 10793478330324 Guía de instalación
- Tipo
- Guía de instalación
en otros idiomas
Artículos relacionados
-
Home Decorators Collection 10793478653232 Guía de instalación
-
Home Decorators Collection 10793478861422 Guía de instalación
-
Home Decorators Collection 10793478782550 Guía de instalación
-
Home Decorators Collection 10793478625697 Instrucciones de operación
-
-
Otros documentos
-
 Designer's Touch 10793478523467 Manual de usuario
-
 Designer's Touch 10793478410965 Guía de instalación
-
Unbranded 10793478517619 Guía de instalación
-
 Hampton Bay 10793478563319 Guía de instalación
-
HOME basics EPUPEB3066 Guía de instalación
-
HOME basics EPUPEB3066 Guía de instalación
-
Select Blinds Textured Glam Roman Shades Guía de instalación
-
-
LEVOLOR Light Filtering Roman Shades Guía de instalación
-
 Select Blinds Classic/Essential/Cozy/Farmhouse Motorization Roman Shades Guía de instalación


