Select Blinds Textured Glam Roman Shades Guía de instalación
- Tipo
- Guía de instalación

INSTALLATION GUIDE | ROMAN SHADES UPDATED DEC 2021 1
®
Simple. Smart. Custom.
HARDWARE AND PARTS INCLUDED
®
Simple. Smart. Custom.
INSTALLATION GUIDE
ROMAN SHADES
LIFT SYSTEMS: CONTINUOUS CORD LOOP | MOTORIZATION
TOOLS REQUIRED
PHILLIPS SCREWDRIVER
1
2
3
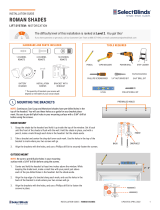
The difculty level of this installation is ranked at Level 1.
A piece of cake!
If you have questions or get stuck, call our Customer Care Team at 888-257-1840, or email [email protected]
BRACKET
BATTERY CHARGER & REMOTE
(Motorized)
TENSION DEVICE
(Continuous Loop)
SCREWS
WALL
ANCHORS*
PENCIL
STEP LADDER
PHILLIPS DRILL BIT
POWER DRILL
TAPE MEASURE
5/64” DRILL BIT
*Recommended if mounting into hollow drywall.
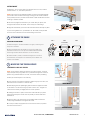
NOTE: Before installing an inside mount motorized shade, you need to
rst attach the battery pack to the backside of the headrail.
Figure A: Slide the two plastic clips into place in the groove, from the side
of the battery pack.
Figure B: Clip the motor cable into the battery pack. Be sure the antenna
cable is positioned away from the headrail, and out of contact with
anything metal.
TIP: The back of each bottom rail should have a tag with a number. This
indicates the channel and remote that the shade is pre-programmed to.
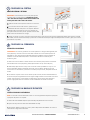
MOUNTING THE BRACKETS
1.
2” - 4”
INSIDE MOUNT
1. Measure 2”- 4” in from each side of the window frame, and mark once
with a pencil for your outer brackets. The front of the bracket will face out
from the window, and the back of it will hang down parallel to the window.
NOTE: Leave marks for any additional brackets you need, evenly spaced
between your rst two marks. If using your own screws instead of those
provided, be sure to pre-drill a small hole with a 5/64” drill bit before the
nal screws go in to attach brackets.
2. Center the brackets over your marks, and set them back until the front
of the bracket meets the edge of your window. Mark through the top hole
in the bracket with your pencil. This is where your screws will go.
3. Align each bracket with your screw holes and drill the screws securely
into place.
*If you are using wall anchors, pre-drill with a 1/4” bit instead, and tap the
wall anchors into the holes with a hammer before drilling in the screws.
Figure A
BATTERY
PACK
HEADRAIL
SHADE FABRIC
Figure B
ANTENNA
MOTOR
CABLE
SWING-ARM
FRONT
BACK

INSTALLATION GUIDE | ROMAN SHADES UPDATED DEC 2021 2
®
Simple. Smart. Custom.
OUTSIDE MOUNT
1. Measure 2”- 4” in from each side of the window frame. From here, measure
upward another 2” - 4”, and make a pencil mark.
NOTE: Leave marks for any additional brackets you need, evenly spaced between
your rst two marks and at the same height. If using your own screws instead of
those provided, be sure to pre-drill a small hole with a 5/64” drill bit before the nal
screws go in to attach brackets.
2. Center the top edge of the brackets on your marks. With your pencil, mark
through the back holes of the bracket. This is where your screws will go.
3. Align each bracket with your screw holes and drill the screws securely into place.
*If you are using wall anchors, pre-drill with a 1/4” bit instead, and tap the wall
anchors into the holes with a hammer before drilling in the screws.
2” - 4”
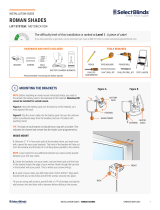
INSIDE AND OUTSIDE MOUNT
1. Slide the swing-arm of all the brackets to the right, so that they point
away from the window.
2. Place the headrail onto the brackets so that the front edge of the
brackets t under the inner front lip of the headrail. Slide the headrail
left and right until the shade is centered in or over the window.
3. Hold the shade in position, and slide the swing-arms to the left on
all the brackets, until they latch onto the back lip of the headrail. The
shade is now installed!
ATTACHING THE SHADE
2.
3. MOUNTING THE TENSION DEVICE
CONTINUOUS CORD LOOP SHADES
NOTE: The cord tension device, also known as the “chain tensioner,” is used to
help protect pets and young children from a potential choking hazard. If there is
plastic or any protective bands on the chain, remove them before proceeding.
1. Raise your shade fully so it’s out of the way.
2. Pinch the ends of the tensioner together to release the grip on the chain, then
pull the tensioner to the bottom of the chain loop.
3. While keeping the chain pulled tightly, place the tensioner against the inside
of the window or on the wall, moving it up about 1/8 of an inch. The goal is to
make the chain taut but just slightly loose for smooth operation.
4. Holding the tensioner in place, mark the two screw holes with your pencil.
Move the chain away and use the marks to pre-drill your screw holes with a
5/64” drill bit.
5. Align the holes in the tensioner with the pre-drilled holes and fasten the
screws, being careful NOT to over-tighten the screws.
6. To use your shade, simply pull the front of the chain to raise it, and pull the
back of the chain to lower it.
INSIDE MOUNT
CHAINSCREW
HOLES
OUTSIDE MOUNT
BACK
FRONT
TOP OF HEADRAIL
BACK LIP
FRONT LIP
STEP 1 STEP 2 STEP 3

INSTALLATION GUIDE | ROMAN SHADES UPDATED DEC 2021 3
®
Simple. Smart. Custom.
4. PROGRAMMING AND USING YOUR REMOTE
MOTORIZED ROMAN SHADES
MOUNTING BATTERY PACK
WARNING: DO NOT attempt to raise or lower your motorized shade with
your hands. This may cause permanent damage to the motor, and other
components in the headrail, which may not be covered under your warranty.
Your shade’s motor and remote(s) are pre-programmed at the factory,
and are ready to use once the shade is installed. Look for the tag with two
numbers on the back of each bottom rail. This indicates which channel and
remote your shade is programmed to.
All you have to do is install the battery in the remote. Open the battery
compartment at the bottom of the remote and insert the lithium battery into
the round slot, positive side up. Slide the battery cover back onto the remote.
For 1) outside mount and for 2) inside mount with a shallow windowsill,
you won’t have room behind the headrail to attach the battery pack. You
can either 1) attach the battery pack to the wall near the window, or 2)
vertically inside the shallow windowsill, below the headrail, and as far back
as possible. Note: Be sure your placement of the battery pack allows for
uninterrupted operation of your shade and window.
1. To attach battery pack for outside mount:
The most important thing to remember is to use a pencil and a level to make
sure your mounting clips are aligned when you attach them to the wall. Slide
the battery pack into place on the clips when ready.
2. To attach battery pack for shallow inside mount:
With a pencil and a level, make sure the mounting clips are aligned vertically
when you attach them inside the windowsill, as far back as possible toward
the glass, so as not to interfere with the shade’s operation. Slide the battery
pack into place on the clips when ready.
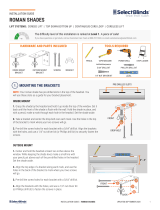
HOW TO USE THE REMOTE
Press and hold the Down button to lower the shade. You can release when the shade begins
lowering.
Press and hold the Up button to raise the shade. You can release when the shade begins raising.
Press the Stop button to halt the up or down movement. If you later choose to program a favorite
position, holding the Stop button will automatically lift or lower the shade to this position.
Choose a channel by pressing the Channel Increase and Channel Decrease buttons. The Channel
Display at the top of the remote will illuminate the channel you are currently on.
To operate all your shades at the same time, set the remote to Channel 5, and then press the
Channel Increase button. This will illuminate all the Channel Display lights, which activates motors
on all channels.
FRONT
Channel Display
Channel Decrease
Channel Increase
Up
Stop
Down
REMOTE
BACKSIDE
BATTERY COVER
REMOTE
LABEL
LITHIUM
BATTERY
CONFIRM (C)
LIMIT (L)

INSTALLATION GUIDE | ROMAN SHADES UPDATED DEC 2021 4
®
Simple. Smart. Custom.
PAIRING THE REMOTE WITH A MOTOR
NOTE: The factory pairs each of your shades to the remote. The following steps are only necessary if you want to change how the channels are
congured, or if you are adding a new shade to a remote already in use.
1. Disconnect the motor cable from the battery.
2. Set the remote to whichever channel you want to
program the shade to.
3. Both parts of this step must be completed within
three seconds. If you don’t succeed, repeat this
step a bit faster, or have someone assist you.
A. Plug the motor cable back into the battery.
B. With your nger, quickly press and hold the
Conrm (C) button on the back of the remote.
STEP 1 STEP 3A STEP 3B
CONFIRM (C)
When the shade jogs (a quick up and down movement), the remote is paired to the channel you’ve chosen.
ADJUSTING UPPER AND LOWER LIMITS
NOTE: The upper and lower limits are already set-up at the factory, so the following steps
are only necessary if you want to change how these settings are congured. Both limits
must be reprogrammed in these instructions.
1. Start with the shade fully raised. For a few seconds, press and hold the Limit button
until the shade jogs. Your motor is now in programming mode.
2. Press Down to lower the shade until it’s almost to the bottom, then press Stop. From
here, repeatedly press Down to lower the shade slowly.
3. When the shade reaches the desired bottom position, ip the remote and use your pen
to press the Conrm button. The shade will jog to acknowledge that your lower limit is now
set, but the motor is still in programming mode.
4. Press Up to raise the shade until it’s almost to the top, then press Stop. From here,
repeatedly press Up to raise the shade slowly.
5. When the shade reaches the desired top position, ip the remote and use your pen to
press the Conrm button. The shade will jog to acknowledge that your upper limit is now
set, and the motor will automatically exit programming mode.
SETTING A FAVORITE POSITION (OPTIONAL)
1. Start with the shade raised fully, then press the Down button for the shade to lower.
2. Press Stop at the position you wish to save as your favorite.
3. Simultaneously press and hold the Limit button and the Up button, until the shade
jogs. Your favorite position is now set. If you wish to change the favorite position,
simply repeat these steps again.
LIMIT (L)
DELETING A CHANNEL FROM THE MOTOR
NOTE: Removing a remote or channel from a shade does not delete or reset the limit settings.
1. Select the channel you’d like to disconnect the shade from.
2. Press the Conrm button repeatedly (about 3 - 7 presses); the shade will jog three individual times. After the
third jog, your channel is removed from the shade, and ready to be assigned to a new channel or a new remote.
CONFIRM (C)
CONFIRM
(C)
CONFIRM
(C)
LIMIT (L)

TOOLS REQUIRED
INSTALLATION GUIDE | ROMAN SHADES UPDATED DEC 2021 5
®
Simple. Smart. Custom.
®
Simple. Smart. Custom.
INSTALLATION GUIDE
ROMAN SHADES
LIFT SYSTEMS: CORDED LIFT | CORDLESS LIFT
1
2
3
The difculty level of this installation is ranked at Level 1.
A piece of cake!
If you have questions or get stuck, call our Customer Care Team at 888-257-1840, or email [email protected]
HARDWARE AND PARTS INCLUDED
*Recommended if mounting into hollow drywall.
CORDLESS HANDLE CORD CLEAT AND SCREW
BRACKET WITH WINGNUT SCREWS WALL ANCHORS*
PENCIL POWER DRILL
LEVEL
TAPE MEASURE
STEP LADDER
1. Grasp the shade by the headrail and hold it up inside the top of the window. Set it back until
the front of the shade is ush with the wall. Hold the shade in place, and with a pencil, make a
mark through each hole in the headrail. Set the shade aside.
2. Take a bracket and center the drop-bolt over each mark. Use the holes in the top of the
bracket to mark where your two screws will go.
3. Align the brackets with the holes, and use a Phillips drill bit to securely fasten the screws.
NOTE: Corded and cordless shades have pre-drilled holes in the top of the headrail.
You will use these holes as a guide for your bracket placement. If using your own
screws instead of those provided, be sure to pre-drill a small hole with a 5/64” drill
bit before the nal screws go in to attach brackets.
MOUNTING THE BRACKETS
1. PRE-DRILLED HOLES
FRONT
BACK DROP-BOLT
INSIDE MOUNT
1. Center and hold the headrail at least two inches above the window. While
keeping the shade level, make a small line with your pencil just above each of
the pre-drilled holes in the headrail. Set the shade aside.
2. Align the top edge of a bracket along each mark, and use the holes in the
back of the bracket to mark where your two screws will go.
3. Align the brackets with the holes, and use a Phillips drill bit to fasten the
screws in place.
*If you are using wall anchors, pre-drill with a 1/4” bit instead, and tap the wall
anchors into the holes with a hammer before drilling in the screws.
NOTE: If using your own screws instead of those provided, be sure to pre-drill a
small hole with a 5/64” drill bit before the nal screws go in to attach brackets.
OUTSIDE MOUNT
PHILLIPS SCREWDRIVER
PHILLIPS DRILL BIT
5/64” DRILL BIT

INSTALLATION GUIDE | ROMAN SHADES UPDATED DEC 2021 6
®
Simple. Smart. Custom.
INSIDE AND OUTSIDE MOUNT
IMPORTANT: The cords running along the underside of the
headrail must be able to move freely. To avoid tangling or
damage to the cords, make sure the “wings” of the wingnut are
facing the sides of the window.
ATTACHING THE SHADE
2.
1. Remove the wingnuts from the brackets if you haven’t done so
already.
2. With the front of the shade facing you, fit the pre-drilled holes
of the headrail to each of the drop-bolts on the brackets. While
holding the headrail to the brackets with one hand, use your
other hand to attach each of the wingnuts to the drop-bolts.
Tighten the wingnuts until the shade is firmly held in place.
3. If you have a corded shade, pull the cords down and toward the center of the window to release the cord lock and lower it. To raise it, pull the
cords down and away from the window to engage the cord lock so your shade stays in position.
3. ATTACHING THE CORD CLEAT
CORDED LIFT
WARNING: Blinds and shades with cords present a strangulation risk for young children
and pets. Cord cleats are included as an important safety feature. Please follow the steps
below to properly install them. If you need extra cleats, call our Customer Care team and
we’ll send them to you for free.
1. Place the cord cleat inside, or next to the window frame, so it’s well out of reach of small
hands and paws (typically 4’-5’ above the oor). For inside mount, be sure the cleat is set
behind the fabric, close to the window.
2. Use your pencil to mark through the hole in the cord cleat. You can pre-drill a hole with a
5/64” drill bit to make the screw easier to install, if you prefer.
3. Align the hole in the cord cleat with your mark and attach with screw provided. Do NOT
over-tighten the screw!
4. After lifting or lowering the shade with the control cords, wrap the cords around the cord
cleat to safely tuck them away. If you choose to install 2 cord cleats on one window, repeat
steps 1-3 to install the second cleat upside-down, just under the rst one. You can then
wrap your cords in a gure 8 around both cleats. OUTSIDE MOUNT
INSIDE MOUNT
SCREW
HOLE
ATTACHING THE LIFT HANDLE
4.
CORDLESS ROMAN SHADES
NOTE: Cordless roman shades come with a clear plastic handle to help protect the fabric over
multiple uses.
1. At the bottom pleat of the roman shade, locate the sewn-in hem bar.
2. Clip the handle to the center of the bottom hem bar.
3. To operate, grab the handle with your hand, and gently lift or lower the hem bar; the shade will
stay in place when released.

INSTALLATION GUIDE | ROMAN SHADES UPDATED DEC 2021 7
®
Simple. Smart. Custom.
CLEANING INSTRUCTIONS
NOTE: All fabrics are different and some may be easier to clean than others. We recommend cleaning your shades as often as once a month.
Here are some general guidelines on how to do so:
1. For regular maintenance, use a duster or a vacuum with a brush attachment and run it over the front and back of the shade.
2. To spot clean stains, use a damp rag with a very mild, gentle detergent or soap. Dab at the affected spots; do NOT rub! Let the dampened area
air-dry and repeat as necessary.
3. If your roman shade has wrinkles, you can use a basic steamer to remove them. Hold the steamer roughly six inches away from the fabric and
wave the steamer back and forth over the wrinkled areas.
WARRANTY AND REPLACEMENT
To learn more about our product warranties, please visit: https://www.selectblinds.com/warranty.html
For replacement parts, and/or to le a warranty claim for a product that is damaged, defective, or missing parts, please call our Customer Care
Team at 888-257-1840, or email [email protected].
Corded window blinds and shades can be a strangulation risk or cause serious injury to young children and pets. When using
corded window treatments, use the following tips to keep them safe:
WARNING
• Move furniture that children can climb on away from the window.
• NEVER place a crib by a window!
• Keep cords up and away from your child’s reach.
•Always use cord cleats with corded products.
• Secure child-safe tensioners for continuous cord loop
chains to the wall or window encasement.
CHILD SAFETY WARNING

GUIA DE INSTALACIÓN | CORTINAS ROMANAS ACTUALIZADO DEC 2021 8
®
Simple. Smart. Custom.
®
Simple. Smart. Custom.
GUIA DE INSTALACIÓN
CORTINAS ROMANAS
SISTEMAS DE ELEVACIÓN: BUCLE DE CABLE CONTINUO | MOTORIZACIÓN
HARDWARE Y PARTES INCLUIDAS HERRAMIENTAS REQUERIDAS
DESTORNILLADOR
PHILLIPS
1
2
3
El nivel de dicultad de esta instalación es de Nivel 1.
¡Pan comido!
Si tienes preguntas o te atascas, llama a nuestro Equipo de Atención al Cliente al 888-257-1840, o envíale un email a
SOPORTE
BATERÍA DE CARGADOR Y
CONTROL REMOTO (Motorizado)
DISPOSITIVO DE TENSIÓN
(Bucle de Cable Continuo)
TORNILLOS
ANCLAS DE
PARED*
LÁPIZ
ESCALERA DE
MANO
BROCA PHILLIPS
TALADRO ELÉCTRICOCINTA MÉTRICA
BROCA DE 5/64”
*Recomendado si estás montando en paneles de yeso hueco.
NOTA: Antes de instalar una cortina de sombra motorizada montada puertas
adentro, primero necesitas adjuntar a las baterías a la parte de atrás del riel.
MONTANDO LOS SOPORTES
1.
2” - 4”
MONTAJE INTERIOR
1. Mide 2”- 4” por dentro de cada lado del marco de la ventana, y lo
demarcas con un lápiz para tus soportes exteriores. El frente del soporte
estará mirando hacia afuera desde la ventana, mientras que la parte
trasera quedará colgando paralela a la ventana.
NOTA: Deja marcas para cualquier soporte adicional que llegues a
necesitar, espaciados de forma equitativa entre tus dos marcas iniciales.
Si utiliza sus propios tornillos en lugar de los suministrados, asegúrese
de perforar un pequeño agujero con una broca de 5/64” antes de usar los
tornillos nales para jar los soportes
2. Centra a tus soportes sobre tus marcas, y luego atrásalas hasta que el
frente del soporte se encuentre con el borde de tu ventana. Haz una marca
a través del hoyo más elevado en el soporte con tu lápiz. Allí será donde
ubicarás tus tornillos.
3. Alinea a cada soporte con tus hoyos taladrados y taladra a tus tornillos
hasta que estén bien asegurados en su lugar.
Figura A: Deslice los dos clips de plástico en su lugar en la ranura,
desde el lado de la batería
Figura B: Engancha al cable del motor dentro del pack de la batería.
Asegúrate de que el cable de la antena esté posicionado lejos del riel y
fuera de contacto con cualquier tipo de objeto metálico.
CONSEJO: La parte trasera de cada riel inferior debe tener una etiquita
con un número. Esto indica el canal y el control remoto al que está
preprogramado la cortina.
PAQUETE DE
BATERÍAS
RIEL
TELA DE SOMBRA CABLE
MOTORIZADO
ANTENA
Figura A Figura B
BRAZO
OSCILANTE
FRENTE
PARTE DE
ATRÁS

GUIA DE INSTALACIÓN | CORTINAS ROMANAS ACTUALIZADO DEC 2021 9
®
Simple. Smart. Custom.
MONTAJE EXTERIOR
1. Mide 2”- 4” por dentro de cada lado del marco de la ventana. A partir de ahi, mide
2”- 4” hacia arriba con un lápiz, y lo demarcas con un lapiz.
NOTA: Deja marcas para cualquier soporte adicional que llegues a necesitar,
espaciados de forma equitativa entre tus dos marcas iniciales y a la misma altura.
Si utiliza sus propios tornillos en lugar de los suministrados, asegúrese de perforar
un pequeño agujero con una broca de 5/64” antes de usar los tornillos nales para
jar los soportes.
2. Centra al margen más elevado de los soportes para tus marcas. y luego marcas
los hoyos traseros del soporte con un lápiz. Allí será donde irán los tornillos.
2” - 4”
3. MONTANDO EL DISPOSITIVO DE TENSIÓN
CORTINAS DE BUCLE DE CABLE CONTINUO
NOTA: El dispositivo tensionador de cuerdas, también conocido como “tensionador
de cadena,” se utiliza para proteger a niños pequeños y mascotas de potenciales
peligros de asxia. Si llegáse a haber plástico ocualquier tipo de bandas
protectorass en la cadena, quítalas antes de proceder.
1. Alza tu cortina del todo para quitarla del camino.
2. Pellizca los extremos del tensionador hasta juntarlos para liberar lo que traba a
la cadena, luego tira del tensionador hasta la parte más baja del lazo de la cadena.
3. Ubica al tensionador contra la parte interna de la ventana o contra la pared
mientras mantienes a la cadena amarrada con fuerza, subiéndolo apóximadamente
1/8”. El objetivo es conseguir que tu cadena esté rme pero un poco suelta a la
misma vez para que se pueda operar fácilmente.
4. Demarca los dos hoyos de tornillo con tu lápiz mientras mantienes al
tensionador en su lugar. Quita a la cadena del camino y utiliza las marcas para
pre-taladrar tus hoyos de tornillo con una broca de 5/64”.
5. Alinea a los hoyos de los tensionadores con los hoyos pre-taladrados y ajusta
los tornillos. teniendo mucho cuidado con NO sobreajustarlos.
6. Para utilizar tu cortina, simplemente tira del frente de la cadena para elevarla y
tira de la parte trasera para bajarla.
3. Alinea a cada soporte con tus hoyos taladrados y taladra a tus tornillos hasta que estén bien
asegurados en su lugar.
*Si estás utilizando anclas de pared, pre-taladra con una broca de 1/4” en vez de la otra, y
luego ajusta las anclas de la pared en los hoyos con un martillo antes de taladrar los tornillos.
BACK
FRONT
MONTAJE INTERIOR Y EXTERIOR
1. Desliza al brazo oscilante de todos los soportes hacia la
derecha para que encaren hacia afuera de la ventana.
2. Ubica al riel en los soportes para que el borde frontal de
los soportes encajen bajo el labio delantero interno.
Desliza al riel de izquierda a derecha hasta que la cortina
esté centrada sobre la cortina.
3. Mantén a la cortina en su posición y desliza a los
brazos oscilantes hacia la izquierda en todos los soportes
hasta que se agarren al labio trasero del riel. ¡Y la cortina
ya está instalada!
AJUSTANDO LA CORTINA
2.
CIMA DEL RIEL
LABIO
TRASERO
LABIO
DELANTERO
PASO 1P ASO 2P ASO 3
MONTAJE INTERIOR
CADENA
AGUJEROS DE
TORNILLOS
MONTAJE EXTERIOR

GUIA DE INSTALACIÓN | CORTINAS ROMANAS ACTUALIZADO DEC 2021 10
®
Simple. Smart. Custom.
4. PROGRAMANDO Y UTILIZANDO TU CONTROL REMOTO
CORTINAS ROMANAS MOTORIZADAS
ADVERTENCIA: NO intentes elevar o bajar tus cortinas motorizadas con tus propias manos.
Esto podría llegarle a causar daño permanente tanto al motor como a otros componentes del
riel, lo cual podría no llegar a formar parte de tu garantía.
PARTE TRASERA
DEL CONTROL
REMOTO
TAPA DE LA
BATERÍA
ETIQUITA DEL
CONTROL REMOTO
BATERÍA
DE LITIO
CONFIRMAR (C)
LÍMITE (L)
Tanto el motor como el control remoto de tus cortinas vienen pre-programados
de fábrica y ya están listos para ser utilizados una vez que instalaste la cortina.
Busca la etiquita con dos números en la parte trasera de cada riel inferior. Esto
indica cual canal y control remoto está preprogramado a tu cortina.
Todo lo que tú debes hacer es instalar las baterías en el control remoto. Abre
el compartimiento de las baterías en la parte de abajo del control remoto e
insertas las baterías de litio en las ranuras redondas con el signo positivo boca
arriba. Deslice la tapa de la batería de nuevo al control remoto.
CÓMO UTILIZAR TU CONTROL REMOTO
Presiona y aprieta la echita indicadora de Abajo para bajar la cortina. Tú puedes dejar de
apretar cuando la cortina empiece a caer.
Presiona y aprieta la echita indicadora de Arriba para subir la cortina. Tú puedes dejar de
apretar cuando la cortina empiece a subir.
Presiona el botón de Stop (parar) si quieres detener el movimiento de elevación o descenso.
Si posteriormente optas por elegir una posición preferida, el mantener Stop apretado alzará o
bajará a dicha posición automáticamente.
Elige un canal al apretar las echas de arriba o abajo de Canal. La pantalla se iluminará en la
parte de arriba del control remoto y te mostrará tu canal actual.
Pon el Canal 5 en tu control remoto para operar a todas tus cortinas al mismo tiempo, y luego
aprieta la echita de arriba. Esto iluminará las luces del indicador de canal de la pantalla, lo
cual activará todos los motores en todos los canales.
FRENTE
Muestra de Canales
Subir de Canal
Bajar de Canal
Arriba
Stop
Abajo
MONTAJE DE BARTERIA
Para 1) el montaje exterior y para 2) el montaje interior con un alféizar poco
profundo, no tendrá espacio detrás del riel para jar la batería. Puede 1)
jar la batería en la pared cerca de la ventana, o 2) verticalmente dentro
del alféizar poco profundo, por debajo del riel, y lo más atrás posible.
Tenga en Cuenta: Asegúrese de que la colocación de la batería permite el
funcionamiento sin interrupciones de la cortina y la ventana.
1. Para jar la batería en el montaje exterior:
Lo más importante que debes recordar es utilizar un lápiz y un nivel para
asegurarte de que los clips de montaje están alineados cuando los coloques
en la pared. Deslice la batería en su lugar en los clips cuando esté listo.
2. Para jar la batería en el montaje interior poco profundo:
Con un lápiz y un nivel, asegúrese de que los clips de montaje estén
alineados verticalmente cuando los je dentro del alféizar, lo más atrás
posible hacia el cristal, para no interferir con el funcionamiento de la cortina.
Deslice la batería en su lugar en los clips cuando esté listo

GUIA DE INSTALACIÓN | CORTINAS ROMANAS ACTUALIZADO DEC 2021 11
®
Simple. Smart. Custom.
EMPAREJANDO EL CONTROL REMOTO CON UN MOTOR
NOTA: La fábrica empareja a cada cortina con el control remoto. Los siguientes pasos solo son necesarios si te gustaría cambiar la conguración
de los canales, o si quieres agregar una nueva cortina a un control remoto ya en uso.
PASO 1 PASO 3A PASO 3B
CONFIRMAR (C)
1. Desconecta al cable del motor de la batería.
2. Congura al control remoto para programar la cortina en
cualquier canal que preeras.
3. Ambas partes de este paso deben ser completadas en tres
segundos o menos. Si no lo logras la primera vez, repite este
paso un poco más rápido, o pídele ayuda a alguien.
A. Enchufa el cable del motor de vuelta en la batería.
B. Con su dedo, rápidamente presione el botón de
Conrmar (C) en la parte trasera del control remoto.
Cuando la cortina se mueva (breve y rápidamente de arriba a abajo), eso signica que el control remoto está emparejado con el canal que elegiste.
QUITANDO UN CANAL DEL MOTOR
NOTA: Quitar un control remoto o un canal de la cortina no signica que se borren o se reseteen los límites.
1. Selecciona al canal que te gustaría desconectar de la cortina.
2. Presione el botón de Conrmar (C) varias veces (aproximadamente 3-7 veces); la cortina trotará tres
veces individuales. Después del tercer trote, tu canal se eliminara de la cortina, y está listo para ser asignado
a un canal o a un control remoto nuevo.
CONFIRMAR (C)
AJUSTANDO LÍMITES DE ALTURA
NOTA: Los límites de altura ya vienen precongurados desde la fábrica, así que esto solamente es necesario si pretendes
cambiar la conguración. En ese caso, ambos límites tendrían que verse congurados nuevamente con las siguientes
instrucciones.
1. Comienza con la cortina totalmente alzada. Aprieta al botón de Límite (L) por unos segundos hasta que la cortina se
mueva. Ahora tu motor está en modo de programación.
2. Aprieta la echita de Abajo para bajar la cortina hasta que esté casi toda abajo, luego aprieta Stop. Una vez que eso
suceda, aprieta la echita de Abajo repetidamente para qu la cortina descienda lentamente.
3. Una vez que la cortina llega a la posición de descenso deseada, vas a dar vuelta a tu control remoto para apretar el botón
de Conrmar utilizando tu lapicera. La cortina se moverá para dar por hecho de que tu límite de descenso está programado
efectivamente, aunque el motor todavía está en modo de programación.
4. Aprieta la echita de Arriba para elevar a la cortina hasta llegar casi arriba de todo, luego aprieta Stop. A partir de ahí,
aprieta la echita de Arriba repetidamente para elevar la cortina
lentamente.
5. Una vez que la cortina llega a la elevación deseada, vas a dar vuelta a tu control remoto para apretar el botón de
Conrmar utilizando tu lapicera. La cortina se moverá para dar por hecho de que tu límite de elevación está programado
efectivamente, y el motor saldrá automáticamente del modo de programación.
ELIGIENDO UNA POSICIÓN PREFERIDA (OPCIONAL)
1. Arranca con la cortina totalmente alzada, y luego aprieta la echita de
Abajo para bajar la cortina.
2. Aprieta Stop en la posición que pretendas adoptar como tu preferida.
3. Aprieta y mantén apretados al botón de Límite y a la echita de Arriba
simultáneamente hasta que la cortina se mueva. Ahora tu posición
preferida ya está determinada. Y solamente necesitas repetir estos pasos
para cambiarla nuevamento.
LÍMITE (L)
CONFIRM
(C)
CONFIRM
(C)
LIMIT (L)

*Recomendado si estás montando en paneles de yeso hueco.
MANIJA INALÁMBRICA CORDÓN Y TORNILLO
1. Agarra a la cortina por el riel y mantenla elevada por dentro de la parte de arriba de la ventana. Atrásala
hasta que el frente de la cortina esté totalmente contra la pared. Mantén a la cortina en su lugar y haz una
marca alrededor de cada hoyo en el riel con un lápíz. Deja a la cortina de lado.
2. Agarra un soporte y centra el perno de gota sobre cada marca. Utiliza a los hoyos ubicados en la parte
de arriba del soporte para demarcar dónde irán los dos tornillos.
3. Alinee los soportes con los agujeros y utilice una broca Phillips para atornillar los tornillos.
NOTA: Las cortinas de cuerda e inalámbricas cuentan con hoyos pre-taladrados en la
parte de arriba del riel. Utilizarás a esos hoyos como guía de ubicación de tus soportes.
Si utiliza sus propios tornillos en lugar de los suministrados, asegúrese de perforar un
pequeño agujero con una broca de 5/64” antes de usar los tornillos nales para jar los
soportes. Si utiliza sus propios tornillos en lugar de los suministrados, asegúrese de
perforar un pequeño agujero con una broca de 5/64” antes de usar los tornillos nales
para jar los soportes.
MONTANDO LOS SOPORTES
1. HOYOS PRE-TALADRADADOS
FRENTE
ATRÁS PERNO DE
GOTA
MONTAJE INTERIOR
NOTA: Si utiliza sus propios tornillos en lugar de los suministrados, asegúrese de perforar un
pequeño agujero con una broca de 5/64” antes de usar los tornillos nales para jar los soportes.
1. Centra y sostén el riel al menos dos pulgadas por encima de la ventana. Mientras mantienes a
la cortina alineada, haz una línea delgada con tu lápiz justo por encima de cada uno de los hoyos
pre-taladrados en el riel. Luego deja a la cortina de lado.
2. Alinea al borde de arriba de un soporte con cada marca. Alinea a los soportes con los hoyos
en la parte de atrás del soporte para demarcar dónde deben ir los dos hoyos.
3. Pre-taladra los hoyos de los tornillos para cada soporte con una broca de 5/64’’.* Alinee los
soportes con los agujeros y utilice una broca Phillips para atornillar los tornillos.
*Si estás utilizando anclajes de pared, opta por pre-taladrar con una broca de 1/4” y ubica los
anclajes en los hoyos con un martillo antes de taladrar los hoyos.
GUIA DE INSTALACIÓN | CORTINAS ROMANAS ACTUALIZADO DEC 2021 12
®
Simple. Smart. Custom.
®
Simple. Smart. Custom.
GUIA DE INSTALACIÓN
CORTINAS ROMANAS
SISTEMAS DE ELEVACIÓN: ELEVACIÓN CON CUERDAS | ELEVACIÓN INALÁMBRICA
1
2
3
El nivel de dicultad de esta instalación es de Nivel 1.
¡Pan comido!
Si tienes preguntas o te atascas, llama a nuestro Equipo de Atención al Cliente al 888-257-1840, o envíale un email a
HERRAMIENTAS REQUERIDAS
LÁPIZ TALADRO ELÉCTRICO
NIVELADOR
CINTA MÉTRICA
DESTORNILLADOR PHILLIPS
ESCALERA DE
MANO
BROCA PHILLIPS
BROCA DE 5/64”
MONTAJE EXTERIOR
SOSTENEDOR CON
TUERCA DE MARIPOSA
TORNILLOS ANCLAS DE PARED*

GUIA DE INSTALACIÓN | CORTINAS ROMANAS ACTUALIZADO DEC 2021 13
®
Simple. Smart. Custom.
MONTAJE INTERIOR Y EXTERIOR
IMPORTANTE: Las cuerdas que corren por la parte baja del
riel deben poder moverse libremente. Asegúrate de que las
“alas” de la tuerca de maripisa encaren hacia los lados de la
ventana para evitar nudos o daño a las cuerdas.
COLOCANDO LA CORTINA
2.
1. Quita las tuercas de los soportes si todavía no lo has hecho.
2. Con el frente de la cortina de frente a ti, ajusta los hoyos
pre-taladrados del riel a cada perno en los soportes. Mientras
sostienes al riel a los soportes con una mano, utiliza la otra
para ajustar cada tuerca a los pernos. Ajusta las tuercas hasta
que la cortina este firmemente en su lugar.
3. Si tiene una cortina con cordón, tire de los cordones hacia abajo y hacia el centro de la ventana para liberar el bloqueo de los cordones y bajarla.
Para subirla, tire de los cordones hacia abajo y en dirección contraria a la ventana para enganchar el bloqueo de los cordones y para que su cortina
permanezca en su posición.
3. COLOCANDO LA CORNAMUSA
ELEVACIÓN CON CUERDAS
ADVERTENCIA: Las cortinas y persianas con cuerdas presentan un riesgo de estrangulación para
niños pequeños y mascotas. Las cornamusas están incluidas como una faceta importante de
seguridad. Por favor, sigue los pasos delineados abajo para instalarlas de forma apropiada. Si
necesitas cornamusas adicionales, llama a nuestro Servicio de Atención al Cliente y te lo
enviaremos gratis.
1. Ubica a la cornamusa adentro o al lado del marco de la ventana para que de esa manera esté
fuera del alcance de manos pequeñas y patas (típicamente 4-5 oies por encima del piso).
2. Utiliza tu lápíz para demarcar el hoyo en la cornamusa. Puedes pre-taladrar un hoyo con una
broca de 5/64” para facilitar la instalación del tornillo, si así lo preeres. Alinea al hoyo de la
cornamusa con tu demarcación y colócalo con el tornillo que te proveímos. ¡NO ajustes de más al
tornillo!
3. Tras levantar o bajar la cortina con las cuerdas que las controlan, ata las cuerdas alrededor de
las cornamusas para resguardarlas de forma segura. Si eliges instalar 2 cornamusasen una misma
ventana, repite los pasos 1-3 para instalar a la segunda cornamusa al revés justo abajo de la
primera. Luego podrás atar a tus cuerdas en forma de 8 alrededor de ambas cornamusas.
COLOCANDO LA MANIJA DE ELEVACIÓN
4.
CORTINAS ROMANAS INALÁMBRICAS
NOTA: Las cortinas romanas inalámbricas vienen con una manija plástica transparente que ayuda
a protejer la tela para su uso repetido.
1. Ubica la barra del dobladillo tejida en la parte de abajo del plisado de la cortina romana.
2. Ajusta a la manija al centro de la barra del dobladillo más baja.
3. Para operarlo, agarra la manija con tu mano y eleva o baja la barra del dobladillo. La cortina se
mantendrá en su lugar cuando la sueltes.
MONTAJE EXTERIOR
MONTAJE INTERIOR
AGUJEROS DE
TORNILLOS

GUIA DE INSTALACIÓN | CORTINAS ROMANAS ACTUALIZADO DEC 2021 14
®
Simple. Smart. Custom.
INSTRUCCIONES DE LIMPIEZA
NOTA: Todas las telas son distintas y algunas podrían llegar a ser más fáciles de limpiar que otras. Nosotros recomendamos limpiar tus cortinas
al menos una vez al mes. A continuación te explicamos como:
1. Utiliza un plumero o una aspiradora con un cepillo adjunto y recorres la cortina de frente y por detrás para mantenimiento de rutina.
2. Para descubrir manchas, utiliza un trapo húmedo con un detergente o jabón suaves. Salpica los rincones afectados, ¡NO frotes! Deja que la
zona mojada se seque al aire libre y repite cuantas veces sea necesario.
3. Si tu cortina romana tiene arrugas, tú puedes utilizar un limpiador a vapor básico para quitarlas siempre y cuando lo mantengas a seis
pulgadas de distancia de la tela y lo muevas de atrás pára adelante en las zonas arrugadas.
GARANTÍA Y REEMPLAZO
Para saber más sobre las garantías de nuestro producto, visita: https://www.selectblinds.com/warranty.html
Para partes de reemplazo y/o reclamar una garantía para un producto dañado, defectivo o con partes extraviadas, por favor contacta al Equipo
de Servicio al Cliente llamando al 888-257-1840 o enviando un email a [email protected].
ADVERTENCIA DE SEGURIDAD DE NIÑOS
Las persianas y cortinas para ventanas con cuerdas podrían llegar a posar un riesgo de estrangulación o de lesión severa para niños pequeños y
mascotas. Utiliza las siguientes recomendaciones para asegurarte su bienestar con las coberturas para ventanas con cuerdas:
• Mueve los muebles que los niños puedan trepar lejos de la ventana.
• ¡NUNCA ubiques a una cuna al lado de la ventana!
• Mantén a las cuerdas elevadas y lejos del alcance de los niños.
• Siempre utiliza los aseguradores de cuerdas para productos con cuerdas.
• Asegura a los tensionadores seguros para niños a una cadena de bucle de
cable continuo contra la pared o el revestimiento de la ventana.
ADVERTENCIA
-
 1
1
-
 2
2
-
 3
3
-
 4
4
-
 5
5
-
 6
6
-
 7
7
-
 8
8
-
 9
9
-
 10
10
-
 11
11
-
 12
12
-
 13
13
-
 14
14


Select Blinds Textured Glam Roman Shades Guía de instalación
- Tipo
- Guía de instalación
en otros idiomas
Artículos relacionados
Otros documentos
-
 SelectBlinds Elite Roman Shades Guía de instalación
-
SelectBlinds Lifestyle Select Luxe Guía de instalación
-
SelectBlinds Refined Roman Shades Motorization Manual de usuario
-
 SelectBlinds MOTORIZATION Serene Collection Roman Shades Guía de instalación
-
SelectBlinds Essence Guía de instalación
-
 SelectBlinds Casual Manual de usuario
-
LEVOLOR Light Filtering Roman Shades Guía de instalación
-
 homeBASICS WSR017272 Guía de instalación
-
 Springs Window Fashions AutoVIEW El manual del propietario
-
HOME basics EPUPEB3066 Guía de instalación


