SelectBlinds Lifestyle Select Luxe Guía de instalación
- Tipo
- Guía de instalación

INSTALLATION GUIDE | ROMAN SHADES UPDATED SEPTEMBER 2020 1
®
Simple. Smart. Custom.
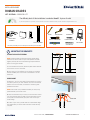
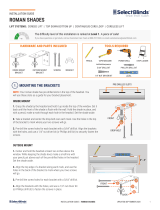
HARDWARE AND PARTS INCLUDED TOOLS REQUIRED
LEVEL
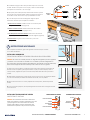
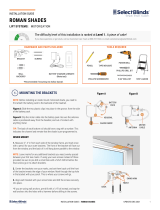
ATTACH THE PLEAT STIFFENERS
NOTE: Cordless shades are lifted and lowered manually. Pleat
stiffeners are used to make sure your shade operates and folds
together perfectly. We recommend attaching the pleat stiffeners
before mounting your brackets.
1. On the backside of the shade, locate the plastic braces attached
to the bottom corners of the shade.
2. Press each end of the stiffener into the grooves on the plastic
brackets. DO NOT press on the center of the stiffeners. This can
break them.
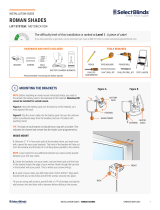
INSIDE MOUNT
1. Measure 2”- 4” in from each side of the window frame, and mark
once with a pencil for your outer brackets. The front of the bracket
will face out from the window, and the back of it will hang down
parallel to the window.
NOTE: Leave marks for any additional brackets you need, evenly
spaced between your rst two marks.
2. Center the brackets over your marks, and set them back until the
front of the bracket meets the edge of your window. Mark through
the top holes in the bracket with your pencil. This is where your
screws will go.
3. At each of your marks, pre-drill holes with a 5/64” drill bit. Align
each bracket with your screw holes and drill the screws securely
into place.
MOUNTING THE BRACKETS
1.
*The quantity of brackets you receive will depend on the width of your roman shade.
®
Simple. Smart. Custom.
INSTALLATION GUIDE
ROMAN SHADES
LIFT SYSTEMS: CORDLESS LIFT
1
2
3
Level 1.
A piece of cake!
If you have questions or get stuck, call our Customer Care Team at 888-257-1840, or email [email protected]
PLEAT STIFFENERS
INSTALLATION
BRACKET*
HANDLE SCREWS PHILLIPS SCREWDRIVER
PENCIL
STEP LADDER
PHILLIPS DRILL BIT
POWER DRILLTAPE MEASURE
5/64” DRILL BIT
SWING-ARM
FRONTBACK
2” - 4”

INSTALLATION GUIDE | ROMAN SHADES UPDATED SEPTEMBER 2020 2
®
Simple. Smart. Custom.
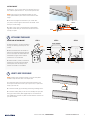
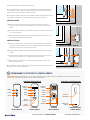
OUTSIDE MOUNT
1. Measure 2”- 4” in from each side of the window frame. From
here, measure upward another 2” - 4”, and make a pencil mark.
NOTE: Leave marks for any additional brackets you need,
evenly spaced between your rst two marks and at the same
height.
2. Center the top edge of the brackets on your marks. With
your pencil, mark through the back holes of the bracket. This is
where your screws will go.
3. At each of your marks, pre-drill holes with a 5/64” drill bit.
Align each bracket with your screw holes and drill the screws
securely into place.
2” - 4”
BACK
FRONT
INSIDE AND OUTSIDE MOUNT
1. Slide the swing-arm of all the brackets to
the right, so that they point away from the
window.
2. Place the headrail onto the brackets so
that the front edge of the brackets t under
the inner front lip of the headrail. Slide the
headrail left and right until the shade is
centered in or over the window.
3. Hold the shade in position, and slide the
swing-arms to the left on all the brackets,
until they latch onto the back lip of the
headrail. The shade is now installed!
ATTACHING THE SHADE
2.
TOP OF HEADRAIL
BACK LIP
FRONT LIP
STEP 1 STEP 2 STEP 3
NOTE: Cordless roman shades come with one or two clear plastic
handles to keep the fabric clean over multiple uses.
1. At the bottom pleat of the roman shade, locate the sewn-in hem
bar. Snap the handle to the center if you only have one, or space them
evenly if you have two.
2. To lower the shade, grip the handle(s) and slowly pull straight down.
3. To raise the shade, place your hand on the handle(s) with your palm
facing up. Pull the bottom pleat slightly away from the window and
then SLOWLY lift the shade. The pleats should fold like an accordion as
you raise the shade.
HOW TO USE YOUR SHADE
3.

INSTALLATION GUIDE | ROMAN SHADES UPDATED SEPTEMBER 2020 3
®
Simple. Smart. Custom.
INSIDE MOUNT
NOTE: There are no brackets used for inside mount. Use the pre-drilled holes in the top of
the headrail as a guide for your screw placement.
1. Grab the headrail, and hold it up inside the top of the window. Set it back until the front
of the shade is ush with the wall, and make sure it’s centered. While holding the shade
material above the headrail, mark through each hole with your pencil.
2. Pre-drill holes at each mark with a 5/64” drill bit, then use the 2” installation screws to
mount the headrail directly to the top of the window.
MOUNTING THE SHADE
1.
1
2
3
Level 2.
You got this!
If you have questions or get stuck, call our Customer Care Team at 888-257-1840, or email [email protected]
®
Simple. Smart. Custom.
INSTALLATION GUIDE
ROMAN SHADES
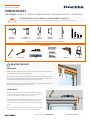
LIFT SYSTEMS: CORDED LIFT | CORDED TOP DOWN BOTTOM UP | CONTINUOUS CORD LOOP | MOTORIZATION
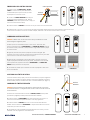
HARDWARE AND PARTS INCLUDED
* The quantity of brackets you receive will depend on the width of your roman shade.
BRACKET*
(CORDED LIFT)
BRACKET*
(ALL OTHER LIFTS)
CHAIN
TENSIONER
TENSIONER
BRACKET CORD CLEAT INSTALLATION SCREWS
(2”)
OUTSIDE MOUNT
NOTE: Use the pre-drilled holes in the top of the headrail as a guide
for your bracket placement. Depending on the size and weight of your
shade, you may need an extra set of hands to help you.
1. Center and hold the headrail at least two inches above the window.
While keeping the shade level, make a small line with your pencil
just above each of the pre-drilled holes in the headrail. Set the shade
aside.
2. Align the top edge of a bracket along each mark, and use the holes
in the back of the bracket to mark where your two screws will go.
2” - 4”
TOOLS REQUIRED
STEP LADDER
POWER DRILL1/4” NUT DRIVER BIT
PHILLIPS DRILL BIT
5/64” DRILL BIT
TAPE MEASURE
PENCIL LEVEL
PHILLIPS SCREWDRIVER

INSTALLATION GUIDE | ROMAN SHADES UPDATED SEPTEMBER 2020 4
®
Simple. Smart. Custom.
3. Pre-drill the screw holes for each bracket with a 5/64” drill bit.
Align the brackets with the holes, and use a Phillips drill bit to fasten
the 1 1/4” screws into place.
4. Rest the bottom of the headrail on top of the brackets so that
the holes align. Use your drill to insert the 3/4” screws into the pre-
drilled holes of the headrail.
5. That’s it! With the shade now secure, follow any additional steps
necessary to complete your installation.
A. Corded Lift: Install at least one cord cleat to safely tuck away
loose strings (page 4).
B. Continuous Cord Loop: Install the chain tensioner that came
attached to the chain (page 4 - 5).
C. Corded Top Down Bottom Up: Install a cord cleat on the left and
right to safely tuck away loose cords (page 4).
D. Motorization: Program your remote and motor (page 5 - 8).
FRONT
BACK
To complete your installation, follow the instructions below that match with the lift
style you have.
INSTALLING CORD CLEATS
CORDED LIFT AND CORDED TOP DOWN BOTTOM UP
NOTE: Shades with cords present a strangulation risk for young children and pets.
Cord cleats are included as an important safety feature. Please follow the steps
below to properly install them. If you need extra cord cleats, call our Customer Care
team and we’ll send them to you for free.
1. Place the cord cleat inside, or next to the window frame, so it’s well out of reach
of small hands and paws (typically 4’-5’ above the oor). For inside mount, be sure
the cleat is set behind the fabric, close to the window.
2. Use your pencil to mark through the holes in the cord cleat. You can pre-drill a
hole with a 5/64” drill bit to make the screw easier to install, if you prefer.
3. Align the hole in the cord cleat with your mark and attach with screw provided.
Do NOT over-tighten the screw!
4. With the cord cleat attached, you may now safely tuck the cords away after each
use of the shade.
ADDITIONAL INSTRUCTIONS
2.
OUTSIDE MOUNT
INSIDE MOUNT
SCREW
HOLES
CHAIN TENSIONER
SCREW HOLE
PLUNGER
CHAIN
SCREW HOLE
TENSIONER BRACKET
SCREW
HOLES
PEG
PEG
INSTALLING CHAIN TENSIONER
CONTINUOUS CORD LOOP
NOTE: Cord or chain tensioners are used to ensure the smooth operation
of your shade and to help protect children from getting tangled in loose
chains. If there is any protective plastic around the chain, remove it
before you proceed.

INSTALLATION GUIDE | ROMAN SHADES UPDATED SEPTEMBER 2020 5
®
Simple. Smart. Custom.
1. Raise the shade fully so it’s out of the way.
2. Hold the tensioner in one hand and with your other hand, pull the plunger up to release
the grip on the chain. Lift the chain out of the bead-locking groove and slide the tensioner
to the bottom of the loop.
3. The goal of using the tensioner is to make the chain taut but still slightly loose. For
inside mount, you will not need the tensioner bracket.
INSIDE MOUNT
A. Place the tensioner against the inside of the window and keep the chain pulled
tightly. Shift it up about 1/8”, then make a mark at each screw hole.
B. Move the chain away and use the marks to pre-drill screw holes with a 5/64” drill bit.
C. Align the tensioner with the pre-drilled holes and fasten the 1 1/4” screws, being
careful NOT to over-tighten the screws.
OUTSIDE MOUNT
A. Connect the tensioner to the pegs on the tensioner bracket. Place the tensioner
bracket against the wall while keeping the chain pulled tightly. Shift it up about 1/8”,
then make a mark at each screw hole.
B. Move the chain away and use the marks to pre-drill screw holes with a 5/64” drill bit.
C. Remove the tensioner bracket from the tensioner, align the tensioner bracket with
the holes and fasten the 1 1/4” screws, being careful NOT to over-tighten the screws.
D. Re-attach the tensioner to the pegs of the tensioner bracket, and fasten the 3/8”
screws, being careful NOT to over-tighten the screws.
4. To use your shade, simply pull the front of the chain to raise it, and pull the back of the
chain to lower it.
WARNING: DO NOT attempt to raise or lower your motorized shade with your hands. This may cause permanent damage to the motor, and other
components in the headrail, which may not be covered under your warranty.
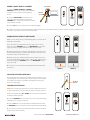
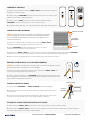
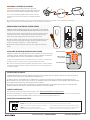
PROGRAMMING AND USING YOUR REMOTE
3.
INSIDE MOUNT
OUTSIDE MOUNT - STEP 3A
OUTSIDE MOUNT - STEP 3D
OPERATIONAL FUNCTIONS
1-CHANNEL
REMOTE
UP
STOP
DOWN
6-CHANNEL
REMOTE
1 32 4 5 6
UP
STOP
DOWN
CHANNEL
DISPLAY
CHANNEL
DECREASE
CHANNEL
INCREASE
16-CHANNEL
REMOTE
CHANNEL
DISPLAY
UP
DOWN
STOP
CHANNEL
DECREASE
CHANNEL
INCREASE
PROGRAMMING FUNCTIONS
PROGRAM
BUTTON
BATTERY
SCREW
BACKSIDE
OF REMOTE

INSTALLATION GUIDE | ROMAN SHADES UPDATED SEPTEMBER 2020 6
®
Simple. Smart. Custom.
PAIRING A SINGLE SHADE TO A CHANNEL
1. Press the CHANNEL INCREASE or CHANNEL
DECREASE button on the remote to select a dedicated
channel for the rst shade you’re pairing with the
remote.
2. Locate the MOTOR HEAD on the left end of the
roller tube under the headrail. Press and hold the
PROGRAM button until you hear a beep and the shade
“jogs” quickly up and down.
1 32 4 5 6
PROGRAM
BUTTON
MOTOR HEAD
3. Press the UP button on the remote and the shade will jog again.
4. Congrats! Your shade and remote are now paired. Repeat this process for any additional shades you want to pair with the remote, selecting a new
channel (if using a multi-channel remote) before you begin.
PAIRING MULTIPLE SHADES TO ONE CHANNEL
NOTE: You must have at least one shade already paired to a channel, before
following the steps below.
1. Put the shade on your selected channel into “sleep” mode. To do this,
press and hold the PROGRAM button on the MOTOR HEAD until the shade
jogs and you hear a long beep. Release the button to put it to sleep.
2. Follow the steps above for “Pairing a Single Shade to a Channel” to pair a
new shade while remaining on the same channel. When you’ve nished, put
this shade to “sleep” as described in step 1.
3. Repeat step 2 for any additional shades you wish to add to the channel.
Once you’ve paired all the shades you want, “wake up” each shade’s motor by
pressing and holding the PROGRAM button on the MOTOR HEAD until you
hear a short beep.
4. That’s it! You can now simultaneously operate all the shades paired with
this channel. SHADE #1 SHADE #2
1 2 3 4 5 6
ADJUSTING THE UPPER/LOWER LIMITS
Your shade’s upper and lower limits are already pre-set at the factory, so the
following steps are only necessary if you want to change how these settings
are congured. The upper limit can ONLY be changed after performing a
factory reset (see page 7).
CHANGING THE UPPER LIMIT
NOTE: Prior to resetting the upper limit, you must rst follow the instructions
for performing a factory reset. This is the only way to change the upper limit.
1. Move the shade using the UP or DOWN buttons, until it is positioned about
6” below the desired upper limit.
2. Press the PROGRAM button on the back of the remote. The shade will jog,
indicating it’s now in programming mode.
3. Press the UP button to move the shade to the desired upper limit. Press
the PROGRAM button on the back of the remote again and the shade will jog.
4. That’s it! You’ve now reset your shade’s upper limit, and the motor will exit
programming mode automatically.
PROGRAM
BUTTON
1 32 4 5 6

INSTALLATION GUIDE | ROMAN SHADES UPDATED SEPTEMBER 2020 7
®
Simple. Smart. Custom.
SETTING INTERMEDIATE POSITIONS
NOTE: You can set up to four (4) intermediate positions between the shade’s upper
and lower limits. Each intermediate position must be at least 6” away from the
upper and lower limits, and any other intermediate limits you program.
1. Move the shade using the UP or DOWN buttons until it’s at least 6” away from
any other limits.
2. Press the PROGRAM button on the back of the remote. The shade will jog,
indicating it’s now in programming mode.
3. Use the UP or DOWN button to move the shade to the desired stopping position
and press the PROGRAM button again. The shade will jog, indicating the new
stopping point is now set.
4. Repeat these steps to add up to four intermediate stopping points to your shade.
DELETING LOWER LIMITS AND INTERMEDIATE POSITIONS
NOTE: Lower limits and intermediate positions can be deleted and reassigned. Upper limits can only be
removed by performing a factory reset.
1. To delete a specic shade position, use the UP or DOWN buttons to move the shade to the position
you want to remove.
2. Press and hold the PROGRAM button on the back of the remote for about 7 seconds. The shade will
jog once before the 7 seconds and once after. You have now deleted the limit/position from your shade.
UPPER LIMIT
LOWER LIMIT
INTERMEDIATE
POSITIONS
6”
6”
CHANGING THE LOWER LIMIT
1. Move the shade using the UP or DOWN buttons, until it is positioned about 6” above the
desired lower limit.
2. Press the PROGRAM button on the back of the remote. The shade will jog, indicating it’s
now in programming mode.
3. Press the DOWN button to move the shade to the desired lower limit. Press PROGRAM
on the back of the remote again and the shade will jog.
4. That’s it! The lower limit is set, and the motor will exit programming mode automatically.
1 2 3 4 5 6
7
sec
PROGRAM
BUTTON
PERFORMING A FACTORY RESET
1. Press the PROGRAM button on the MOTOR HEAD four (4) times in a row.
2. Press it again for a fth time, holding the button down until the shade jogs twice.
3. Your shade’s memory and all presets have now been erased. To use the shade again, pair a
remote to it and then set new upper/lower limits.
PROGRAM
BUTTON
MOTOR HEAD
x5
USING THE REMOTE TO CONTROL YOUR SHADE
1. Press the UP or DOWN button once to move the shade to the next higher or lower position.
2. Press the UP or DOWN button two times (once per second) and the shade will move to the upper or lower limit position without stopping at any
intermediate positions you may have set.

INSTALLATION GUIDE | ROMAN SHADES UPDATED SEPTEMBER 2020 8
®
Simple. Smart. Custom.
CLEANING INSTRUCTIONS
NOTE: All fabrics are different and some may be easier to clean than others. We recommend cleaning your shades as often as once a month.
Here are some general guidelines on how to do so:
1. For regular maintenance, use a duster or a vacuum with a brush attachment and run it over the front and back of the shade.
2. To spot clean stains, use a damp rag with a very mild, gentle detergent or soap. Dab at the affected spots; do NOT rub! Let the dampened area
air-dry and repeat as necessary.
3. If your roman shade has wrinkles, you can use a basic steamer to remove them. Hold the steamer roughly six inches away from the fabric and
wave the steamer back and forth over the wrinkled areas.
WARRANTY AND REPLACEMENT
To learn more about our product warranties, please visit: https://www.selectblinds.com/warranty.html
For replacement parts, and/or to le a warranty claim for a product that is damaged, defective, or missing parts, please call our Customer Care
Team at 888-257-1840, or email [email protected].
Corded window blinds and shades can be a strangulation risk or cause serious injury to young children and pets. When using
corded window treatments, use the following tips to keep them safe:
WARNING
• Move furniture that children can climb on away from the window.
• NEVER place a crib by a window!
• Keep cords up and away from your child’s reach.
• Always use cord cleats with corded products.
• Secure child-safe tensioners for continuous cord loop
chains to the wall or window encasement.
CHILD SAFETY WARNING
INSTALLING A WALL MOUNT CARRIER
NOTE: A wall mount carrier is included with your remote, but it is optional to install it. If
you choose to mount the carrier with the adhesive patch on the back, be sure to clean and
dry the mounting surface rst.
1. Determine where you’d like to place your remote carrier in the room. It is common to
place it near a light switch, or on the wall next to the window.
2. With the carrier in the upright position, insert the provided screws to secure it to our
mounting surface. For the adhesive patch, rmly press the carrier to the surface for about
30 - 45 seconds.
ADHESIVE PATCH
(BACKSIDE)
SCREW HOLE
SCREW HOLE
REPLACING THE REMOTE BATTERY
NOTE: The battery used to power your remote is a coin-shaped
3V cell battery (CR2032). Additional batteries are not included.
1. To remove the back cover of the remote, use a small
screwdriver to remove the battery screw. Gently slide the back
cover up to disengage it, then lift it away from the remote.
2. Remove the old battery from the circuit board by sliding it
diagonally out of the bracket holding it down. Place a new 3V
cell battery in the bracket with the “+” positive side showing.
3. Replace the back cover of the remote, and secure the
battery screw.
RECHARGING THE SHADE BATTERY
NOTE: If the shade begins to move at a slower pace, the
battery charge may be getting low. Plug the shade into a
power outlet and charge the battery for 6 hours.
1. Locate the charger cable behind the fabric on the left
side of the headrail. Connect this cable to the provided
battery charger.
2. Plug the battery charger into the nearest wall outlet. If the cable isn’t long enough to reach an outlet, use an extension cord (not included)
to bridge the gap.
Lithium Cell
CR2032
3V
Lithium Cell
CR2032
3V

GUIA DE INSTALACIÓN | CORTINAS ROMANAS ACTUALIZADO SEPTIEMBRE 2020 1
®
Simple. Smart. Custom.
HARDWARE Y PARTES INCLUIDAS
HERRAMIENTAS REQUERIDAS
NIVELADOR
AJUSTANDO LOS REFUERZOS DE PLIEGUES
APUNTE: Las cortinas inalámbricas son elevadas y bajadas
manualmente. Los refuerzos de pliegues se utilizan para asegurarte
de que tu cortina funciona y se pliega perfectamente. Nosotros
recomendamos adjuntar a los refuerzos de pliegues antes de
montar tus soportes.
1. Localiza a los soportes adjuntos a las esquinas de abajo de la
cortina en la parte de atrás de esta.
2. Presiona a cada borde del refuerzo dentro de los surcos en
los soportes de plástico. NO hagas presión en el centro de los
refuerzos, ya que se pueden romper.
MONTAJE INTERIOR
1. Mide entre 2”- 4” de cada lado del marco de la ventana, y
demárcalo una vez con un lápiz para tus soportes exteriores. El
frente del soporte encarará hacia afuera desde la ventana, y la parte
de atrás colgará hacia abajo paralela a la ventana.
APUNTE: Deja marcas hechas para soportes adicionales que
llegues a necesitar, y que estén espaciadas de forma pareja entre
tus dos marcas iniciales.
2. Centra a los soportes sobre tus marcas y retrásalas hasta que
el frente del soporte se encuentre con el borde de tu ventana.
Demarca a través de los hoyos de arriba en el soporte con tu lápiz.
Allí es donde irán tus tornillos.
3. Ubica a cada una de tus marcas y pre-taladra hoyos con una
broca de 5/64”. Alinea a cada soporte con los hoyos atornillados y
taladra a los tornillos asegurándolos en su lugar.
MONTANDO LOS SOPORTES
1.
*La cantidad de soportes que recibas dependerán del ancho de tu cortina romana.
®
Simple. Smart. Custom.
GUIA DE INSTALACIÓN
CORTINAS ROMANAS
SISTEMA DE ELEVACIÓN: ELEVACIÓN INALÁMBRICA
1
2
3
Nivel 1.
¡Pan comido!
REFUERZOS DE
PLIEGUES
SOPORTE DE
INSTALACION*
MANIJA TORNILLOS DESTORNILLADOR PHILLIPS
LÁPIZ
ESCALERA DE
MANO
BROCA PHILLIPS
TALADRO ELÉCTRICOCINTA MÉTRICA
BRAZO
OSCILANTE
FRENTE
PARTE DE
ATRÁS
2” - 4”

GUIA DE INSTALACIÓN | CORTINAS ROMANAS ACTUALIZADO SEPTIEMBRE 2020 2
®
Simple. Smart. Custom.
MONTAJE EXTERIOR
1. Mide entre 2”- 4” de cada lado del marco de la ventana. A partir
de allí, mide otros 2”- 4” hacia arriba y haz una marca con tu lápiz.
APUNTE: Deja marcas hechas para soportes adicionales que
llegues a necesitar, y que estén espaciadas de forma pareja entre
tus dos marcas iniciales y a la misma altura.
2. Centra al borde de arriba de tus soportes para que esté centrado
a tus marcas. Utilizando tu lápiz, demarca los hoyos de la parte de
atrás del soporte. Allí irán tus tornillos.
3. Ubica a cada una de tus marcas y pre-taladra hoyos con una
broca de 5/64´. Alinea a cada soporte con los hoyos atornillados y
taladra a los tornillos asegurándolos en su lugar.
2” - 4”
PARTE DE
ATRÁS
FRENTE
MONTAJE INTERIOR Y EXTERIOR
1. Desliza al brazo oscilante de todos los
soportes hacia la derecha para que encaren
hacia afuera de la ventana.
2. Ubica al riel en los soportes para que el
borde frontal de los soportes encajen bajo
el labio delantero interno. Desliza al riel de
izquierda a derecha hasta que la cortina
esté centrada sobre la cortina.
3. Mantén a la cortina en su posición y
desliza a los brazos oscilantes hacia la
izquierda en todos los soportes hasta que
se agarren al labio trasero del riel. ¡Y la
cortina ya está instalada!
AJUSTANDO LA CORTINA
2.
CIMA DEL RIEL
LABIO
TRASERO
LABIO
DELANTERO
APUNTE: Las cortinas romanas inalámbricas vienen con una o dos
manijas transparentes de plástico para mantener a la tela limpia tras
ser utilizada varias veces.
1. Localiza a la barra de dobladillo cosida en el pliegue de abajo de la
cortina. Guía al mango quebrándolo hacia el centro si solo tienes uno,
o espácialos de forma pareja si cuentas con dos.
2. Si quieres bajar la cortina, toma la(s) manija(s) y tira hacia abajo
lentamente.
3. Para elevar la cortina, ubica tu mano en la(s) manija(s) con tu palma
hacia arriba. Tira del pliegue de abajo un poco hacia afuera de la
ventana y luego eleva la cortina LENTAMENTE. Los pliegues deberían
plegarse como un acordión a medida que alzas la cortina.
CÓMO UTILIZAR TUS CORTINAS
3.
PASO 1 PASO 2 PASO 3

GUIA DE INSTALACIÓN | CORTINAS ROMANAS ACTUALIZADO SEPTIEMBRE 2020 3
®
Simple. Smart. Custom.
MONTAJE INTERIOR
APUNTE: No hay soportes para un montaje interno. Utiliza a hoyos pre-taladrados en la parte
de arriba del riel como guía para ubicar tu tornillo.
1. Toma al riel y sostenlo hacia arriba dentro de la parte de arriba de la ventana. Retrásalo
hasta que el frente de la cortina esté emparejada con la pared, y asegúrate de que esté
centrada. Mientras sostienes al material de la cortina sobre el riel, demarca a través de cada
hoyo con tu lápiz.
2. Pre-taladra a los hoyos en cada marca con una broca de 5/64”, y luego utiliza a los tornillos
de instalación de 2’’ para montar al riel directamente sobre la parte más alta de la ventana.
MONTANDO LA CORTINA
1.
1
2
3
Nivel 2.
¡Tú puedes!
®
Simple. Smart. Custom.
GUIA DE INSTALACIÓN
CORTINAS ROMANAS
SISTEMAS DE ELEVACIÓN: ELEVACIÓN CON CUERDAS | DE ABAJO HACIA ARRIBA | CABLE DE BUCLE CONTINUO | MOTORIZACIÓN
HARDWARE Y PARTES INCLUIDAS
*La cantidad de soportes que recibas dependerán del ancho de tu cortina romana.
SOPORTE*
(ELEVACIÓN CON CUERDAS)
SOPORTE* (TODAS LAS
OTRAS ELEVACIONES)
TENSIONADOR
DE CADENA
TENSIONADOR
DE SOPORTE CORNAMUSA TORNILLOS
MONTAJE EXTERIOR
APUNTE: Utiliza a los hoyos pre-taladrados en la parte más alta
del riel como guía para ubicar a tus soportes. Quizás necesites que
alguien te ayude dependiendo de la talla y el peso de tu cortina.
1. Centra y sostiene al riel al menos dos pulgadas por sobre la
ventana. Mientras mantienes a la cortina nivelada, haz una línea
pequeña con tu lápiz justo por encima de cada hoyo pre-taladrado en
el riel. Deja a la cortina de lado.
2. Alinea al borde de arriba de un soporte con cada marca y utiliza
a los hoyos ubicados en la parte trasera del soporte para demarcar
dónde irán los dos tornillos.
2” - 4”
HERRAMIENTAS REQUERIDAS
BROCA PHILLIPS
BROCA DE CONDUCTOR
ESCALERA DE MANO
TALADRO ELÉCTRICONIVELADOR
CINTA MÉTRICA
LÁPIZ
DESTORNILLADOR PHILLIPS

GUIA DE INSTALACIÓN | CORTINAS ROMANAS ACTUALIZADO SEPTIEMBRE 2020 4
®
Simple. Smart. Custom.
MONTAJE INTERIOR
HOYOS DE
TORNILLOS
3. Pre-taladra los agujeros de tornillo para cada soporte con una broca
de 5/64”. Alinea a los soportes con los hoyos y utiliza una broca Phillips
para ajustar los tornillos de 1 1/4” en su lugar.
4. Deja que la parte de abajo del soporte descanse sobre los soportes
para que los hoyos estén alineados. Utiliza a tu taladro para insertar a
los tornillos de 3/4” dentro de los hoyos pre-taladrados en el riel.
5. ¡Listo! Ahora que la cortina está asegurada. Sigue los pasos
adicionales necesarios para completar tu instalación.
A. : Instala al menos una cornamusa para
asegurar cuerdas colgantes (página 4).
B. Bucle de Cable Continuo: Instala al tensionador de la cadena
que vino adjunto a la cadena (páginas 4 - 5).
C. De Abajo Hacia Arriba Con Cuerdas: Instala una cornamusa a la
izquierda y a la derecha para asegurar cuerdas colgantes (página 4).
D. : Programa a tu control remoto y a tu motor
(páginas 5 - 8).
FRENTE
PARTE DE
ATRÁS
Para completar tu instalacion, sigue a las siguientes instrucciones que combinan
con tu estilo de elevación.
INSTALANDO CORNAMUSAS
ELEVACIÓN CON CUERDAS Y DE ARRIBA PARA ABAJO-ABAJO PARA ARRIBA
APUNTE: Las cortinas con cuerdas presentan un riesgo de estrangulación para niños pequeños
y mascotas. Las cornamusas son incluídas como una faceta importante de seguridad. Por
favor, sigue estos pasos para instalarlos apropiadamente. Si necesitas cornamusas adicionales,
llama a nuestro Equipo de Atención al Cliente y te las enviarémos de forma gratuita.
1. Ubica a la cornamusa dentro o al lado del marco de la ventana para que así esté lejos del
alcance de manos chiquitas y patas (típicamente 4 o 5 pies por encima del piso). Para un
montaje interior, asegúrate de que la cornamusa esté puesta detrás de la tela y cerca de la
ventana.
2. Utiliza tu lápiz para demarcar a través de los hoyos en la cornamusa. Tú puedes pre-taladrar
con una broca de 5/64” para facilitar la instalación del tornillo, si así lo preeres.
3. Alinea a la cornamusa con tu marca y adjúntala al tornillo provisto. ¡NO sobre ajustes al
tornillo!
4. Con la cornamusa ya adjunta, ahora puedes guardar las cuerdas de forma segura tras cada
uso de la cortina.
INSTRUCCIONES ADICIONALES
2.
MONTAJE EXTERIOR
INSTALANDO TENSIONADORES DE CADENA
CABLE DE BUCLE CONTINUO
APUNTE: Los tensionadores de cuerdas o cadenas se
utilizan para asegurar la operación adecuada de tu cortina
y para proteger a los niños de enredarse en cadenas
sueltas. Quita al plástico protector de alrededor de la
cadena antes de proceder si es que viene incorporado.
TENSIONADOR DE CADENA
HOYO DE TORNILLO
ASISTENTE DE
CUERDA
CADENA
HOYO DE TORNILLO
HOYOS DE
TORNILLOS
CLAVIJO
TENSIONADOR DE SOPORTE
CLAVIJO

GUIA DE INSTALACIÓN | CORTINAS ROMANAS ACTUALIZADO SEPTIEMBRE 2020 5
®
Simple. Smart. Custom.
1. Eleva a la cortina del todo para quitarla del camino.
2. Toma al tensionador con una mano y tira del asistente de cuerda hacia arriba con la
otra para liberar la cadena. Eleva a la cadena fuera de la ranura que parece una perla y
desliza al tensionador hacia la parte más baja del bucle.
3. El objetivo es utilizar al tensionador para fortalecer la cadena mientras la mantienes un
poco suelta. No necesitas un tensionador de soporte para un montaje interior.
MONTAJE INTERIOR
A. Ubica al tensionador contra la parte interna de la ventana mientras tu cadena
permanece tirante. Ajústala por 1/8 de pulgada y haz una marca en cada hoyo de
tornillo.
B. Mueve a la cadena hacia afuera y utiliza las marcas para pre-taladrar hoyos de tornillo
con una broca de 5/64”.
C. Alinea al tensionador con los hoyos ore-tensionados y ajusta a los hoyos de 1 14” y
ten cuidado de NO sobre ajustar los tornillos.
MONTAJE EXTERIOR
A. Conecta al tensionador con los clavijos en el soporte tensionador. Ubica al soporte
tensionador contra la pared mientras mantienes a la cadena bien tirante. Elévala 1/8
de pulgada y haz una marca en cada hoyo de tornillo.
B. Quita la cadena y utiliza las marcas para pre-taladrar hoyos de tornillo con una broca
de 5/64”.
C. Quita al soporte tensionador del tensionador, alinea al soporte tensionador con los
hoyos y ajusta a los tornillos de 1 1/4’’ SIN sobre ajustar los tornillos.
D. Vuelve a adjuntar al tensionador a los clavijos y ajusta los tornillos de 3/8’’ SIN
sobre ajustar los tornillos.
4. Para utilizar tu cortina, simplemente tira del frente de la cadena para elevarla, y tira de
la parte trasera de la cadena para bajarla.
MONTAJE INTERIOR
MONTAJE EXTERIOR - PASO 3A
MONTAJE EXTERIOR - PASO 3D
ADVERTENCIA: NO intentes elevar o bajar tus cortinas motorizadas con tus propias manos. Eso podria llegar a dañar de forma permanente al
motor y otros componentes del riel que no estén cubiertos por la garantía.
PROGRAMANDO Y UTILIZANDO TU CONTROL REMOTO
3.
FUNCIONES OPERACIONALES
1 CANAL
CONTROL REMOTO
ARRIBA
PARAR
ABAJO
6 CANALES
CONTROL REMOTO
1 32 4 5 6
ARRIBA
PARAR
ABAJO
PANEL DE
CANALES
BAJAR
CANALES
SUBIR
CANALES
16 CANALES
CONTROL REMOTO
PANEL DE
CANALES
ARRIBA
ABAJO
PARAR
BAJAR
CANALES
SUBIR
CANALES
FUNCIONES DE PROGRAMACIÓN
BOTÓN DE
PROGRAMA
TORNILLO DE
BATERÍA
PARTE TRASERA DEL
CONTROL REMOTO

GUIA DE INSTALACIÓN | CORTINAS ROMANAS ACTUALIZADO SEPTIEMBRE 2020 6
®
Simple. Smart. Custom.
EMPAREJANDO UNA CORTINA SINGULAR
1. Aprieta al botón de SUBIR CANAL o BAJAR
CANAL en el control remoto para seleccionar sl
canal dedicado para la primer cortina que estás
emparejando con el control remoto.
2. Localiza a la CABEZA DE MOTOR en la esquina
izquierda del tubo enrollable bajo el riel. Mantén
PROGRAM apretado hasta que escuches un beep y la
cortina se mueve de arriba a abajo.
1 32 4 5 6
BOTÓN DE
PROGRAMA
CABEZA DE MOTOR
3. Presiona al botón de ARRIBA en el control remoto y la cortina se moverá nuevamente.
4. ¡Felicitaciones! Tu cortina y tu control remoto ya están emparejados. Repite este proceso para emparejar a otras cortinas con tu
control remoto. Si utilizas un control con canales múltiples, selecciona un canal nuevo antes de volver a comenzar.
COMBINANDO CORTINAS MÚLTIPLES
APUNTE: Tú debes contar con al menos una cortina ya combinada a un canal
antes de seguir los siguientes pasos.
1. Debes poner a tu canal seleccionado en modo “dormir”. Para hacer esto,
presiona y aprieta el botón de PROGRAMAR en la CABEZA DEL MOTOR hasta que
la cortina se mueve y escuchas un beep sostenido. Luego sueltas el botón y dejas
la cortina dormida.
2. Sigue los pasos de arriba para “Emparejando Una Cortina Singular” para
emparejar a una cortina nueva sin cambiar de canal. Cuando terminas, pones esta
cortina a “dormir” de la misma manera que en el paso 1.
3. Repite al paso 2 para agregar cortinas adicionales en el canal. Una vez que
hayas emparejado a todas las cortinas que quieres, “despierta” al motor de cada
cortina presionando y apretando el botón de PROGRAMAR en la CABEZA DEL
MOTOR hasta que escuches un beep breve.
4. ¡Ya está! Ahora puedes operar a todas las cortinas emparejadas en este canal
de forma simultánea. CORTINA #1 CORTINA #2
1 2 3 4 5 6
AJUSTANDO LOS LÍMITES DE ALTURA
Los límites de altura altas y bajas ya vienen hechos de fábrica, así que los siguientes
pasos solo son necesarios si quieres cambiar lo que viene congurado. El límite de
elevación SOLO puede ser cambiado tras hacer un reseteo de fábrica (ver página 7).
CAMBIANDO EL LÍMITE DE ELEVACIÓN
APUNTE: Antes de resetear al límite de elevación, debes seguir las instrucciones
de reseteo de fábrica sí o sí obligatoriamente. Esa es la única manera de cambiar el
límite de elevación.
1. Mueve a la cortina utilizando los botones de ARRIBA y ABAJO hasta que esté
posicionado 6 pulgadas por debajo del límite de elevación deseado.
2. Presiona al botón de PROGRAMAR en la parte trasera del control remoto. La
cortina se moverá indicando que ahora está en modo de programación.
3. Presiona el botón de ARRIBA para mover a la cortina al límite de elevación
deseado. Presiona al botón de PROGRAMAR en la parte trasera del control remoto
nuevamente y la cortina se moverá.
4. ¡Ya está! Ahora ya has reseteado al límite de elevación de tu cortina, y el motor
saldrá del modo de programación automáticamente.
BOTÓN DE
PROGRAMA
1 32 4 5 6

GUIA DE INSTALACIÓN | CORTINAS ROMANAS ACTUALIZADO SEPTIEMBRE 2020 7
®
Simple. Smart. Custom.
PONIENDO POSICIONES INTERMEDIAS
APUNTE: Tú puedes poner hasta cuatro (4) posiciones intermedias entre los límites
bajos y de elevación de tus cortinas. Cada posición intermedia debe estar alejada
al menos 6 pulgadas de los límites bajos y de elevación, y de cualquier otro límite
intermedio que programes.
1. Mueve a la cortina hacia arriba o hacia abajo con los botones de ARRIBA o ABAJO
hasta llegar al menos a las 6 pulgadas de distancia con otros límites.
2. Presiona PROGRAMAR en la parte trasera del control remoto. La cortina se
moverá indicando que está lista en modo programación.
LÍMITES DE ELEVACIÓN
LÍMITE BAJO
POSICIONES
INTERMEDIAS
CAMBIANDO EL LÍMITE BAJO
1. Mueve la cortina utilizando los botones de ARRIBA o ABAJO hasta que esté posicionada unas
6 pulgadas por sobre el límite bajo.
2. Presiona el botón de PROGRAMAR en la parte trasera del control remoto. La cortina se moverá,
indicando que ahora está en modo programación.
3. Presiona el botón de ABAJO para mover la cortina al límite bajo deseado. Presiona
PROGRAMAR en la parte trasera del control remoto. La cortina se moverá.
4. ¡Ya está! El límite bajo está hecho. Y el motor saldrá del modo programación automáticamente.
1 2 3 4 5 6
BORRANDO LOS LÍMITES BAJOS Y LAS POSICIONES INTERMEDIAS
APUNTE: Los límites bajos y las posiciones intermedias pueden ser borradas y reasignadas. Los límites
de elevación solo pueden ser quitados con un reseteo de fábrica.
1. Para borrar una posición especíca de la cortina, utiliza a los botones de ARRIBA o ABAJO para
mover a la cortina hacia la posición que quieras borrar.
2. Presiona y mantén apretado al botón de PROGRAMAR ubicado en la parte trasera del control remoto
por unos 7 segundos. La cortina se moverá una vez antes de los 7 segundos y una vez después. Ahora
has borrado los límites/posiciones de la cortina.
7
sec
BOTÓN DE
PROGRAMA
HACIENDO UN RESETEO DE FÁBRICA
1. Presiona al botón PROGRAMAR en la CABEZA DEL MOTOR cuatro (4) veces seguidas.
2. Presiónalo nuevamente por quinta vez, manteniendo el botón apretado hasta que la cortina se
mueva dos veces.
3. Ahora la memoria y todo lo preseleccionado ha sido borrado. Para utilizar a la cortina otra vez,
empareja un control remoto a ella y ponle nuevos niveles de elevación y descenso.
BOTÓN DE
PROGRAMA
CABEZA DE MOTOR
UTILIZANDO EL CONTROL REMOTO PARA CONTROLAR TU CORTINA
1. Presiona el botón de ARRIBA o ABAJO una vez para mover la cortina a la próxima posición más alta o más baja.
2. Presiona el botón de ARRIBA o ABAJO dos veces (una vez por segundo) y la cortina se moverá a la posición límite de arriba o de abajo sin
detenerse en ninguna posición intermedia que hayas establecido.
3. Utiliza al botón de ARRIBA o ABAJO para mover a la cortina con la posición detenida deseada y luego vuelve a presionar PROGRAMAR
nuevamente. La cortina se moverá, indicando de esa manera que un punto nuevo de detenimiento ya está programado.
4. Repite estos pasos para agregar hasta cuatro puntos de detenimiento intermedio para tus cortinas.

GUIA DE INSTALACIÓN | CORTINAS ROMANAS ACTUALIZADO SEPTIEMBRE 2020 8
®
Simple. Smart. Custom.
RECARGANDO LA BATERÍA DE LA CORTINA
APUNTE: Si la cortina comienza a moverse un poco más
lentamente, la carga de la batería podría estar baja. Enchufa a la
cortina en una toma de corriente y carga la batería por 6 horas.
1. Encuentra al cable del cargador detrás de la tela en el lado
izquierdo del riel. Conecta a ese cable con el cargador de batería
privisto.
2. Enchufa al cargador de la batería en la toma de corriente de la pared más cercana. Si el cable no es lo sucientemente largo para
llegar a una toma, utiliza una cuerda de extensión (no viene incluida) para compensar.
INSTALANDO UN PORTADOR DE MONTAJE PARA LA PARED
APUNTE: Un portador de montaje para la pared viene incluido con tu control remoto, pero
instalarlo es opcional. Si elijes montar al portador con el parche adhesivo en la parte de
atrás, asegúrate de limpiar y secar a la supercie de montaje primero.
1. Determina dónde quieres ubicar a tu portador remoto en tu cuarto. Lo más común es
ubicarla cerca de un interruptor de luz o en la pared al lado de la ventana.
2. Inserta a los tornillos provistos para asegurar al portador erecto en nuestra supercie
montada. Para el parche adhesivo, presiona al portador rmemente en la supercie por
unos 30-45 segundos.
PARCHE ADESIVO
(PARTE TRASERA)
HOYO DE TORNILLO
HOYO DE TORNILLO
REEMPLAZANDO LA BATERÍA DEL CONTROL REMOTO
APUNTE: La batería utilizada para encender tu control remoto es una batería de
célula 3V en forma de madera (CR2032). Baterías adicionales no vienen incluidas.
1. Utiliza un destornillador chiquito para quitar el tornillo de la batería en la tapa
trasera del control remoto. Luego desliza a la tapa trasera suavemente hacia
arriba para soltarla, y agárrala hacia arriba afuera del control remoto.
2. Quita a la batería vieja de la placa de circuito al deslizarla diagonalmente fuera
del soporte mientras lo sostienes hacia abajo. Ubica una batería de célula 3V
nueva en el soporte con el lado de “+” mirando hacia arriba.
3. Reubica a la cobertura trasera del control remoto y asegura al tornillo de la
batería.
Lithium Cell
CR2032
3V
Lithium Cell
CR2032
3V
INSTRUCCIONES DE LIMPIEZA
APUNTE: Todas las telas son distintas y algunas podrían llegar a ser más fáciles de limpiar que otras. Nosotros recomendamos limpiar tus
cortinas al menos una vez al mes. A continuación te explicamos como:
1. Utiliza un plumero o una aspiradora con un cepillo adjunto y recorres la cortina de frente y por detrás para mantenimiento de rutina.
2. Para descubrir manchas, utiliza un trapo húmedo con un detergente o jabón suaves. Salpica los rincones afectados, ¡NO frotes! Deja que la
zona mojada se seque al aire libre y repite cuantas veces sea necesario.
3. Si tu cortina romana tiene arrugas, tú puedes utilizar un limpiador a vapor básico para quitarlas siempre y cuando lo mantengas a seis
pulgadas de distancia de la tela y lo muevas de atrás pára adelante en las zonas arrugadas.
GARANTÍA Y REEMPLAZO
Para saber más sobre las garantías de nuestro producto, visita: https://www.selectblinds.com/warranty.html
Para partes de reemplazo y/o reclamar una garantía para un producto dañado, defectivo o con partes extraviadas, por favor contacta al Equipo
de Servicio al Cliente llamando al 888-257-1840 o enviando un email a [email protected].
ADVERTENCIA DE SEGURIDAD DE NIÑOS
Las persianas y cortinas para ventanas con cuerdas podrían llegar a posar un riesgo de estrangulación o de lesión severa para niños pequeños y
mascotas. Utiliza las siguientes recomendaciones para asegurarte su bienestar con las coberturas para ventanas con cuerdas:
• Mueve los muebles que los niños puedan trepar lejos de la ventana.
• ¡NUNCA ubiques a una cuna al lado de la ventana!
• Mantén a las cuerdas elevadas y lejos del alcance de los niños.
• Siempre utiliza los aseguradores de cuerdas para productos con cuerdas.
• Asegura a los tensionadores seguros para niños a una cadena de bucle de
cable continuo contra la pared o el revestimiento de la ventana.
ADVERTENCIA
-
 1
1
-
 2
2
-
 3
3
-
 4
4
-
 5
5
-
 6
6
-
 7
7
-
 8
8
-
 9
9
-
 10
10
-
 11
11
-
 12
12
-
 13
13
-
 14
14
-
 15
15
-
 16
16


SelectBlinds Lifestyle Select Luxe Guía de instalación
- Tipo
- Guía de instalación
en otros idiomas
Artículos relacionados
Otros documentos
-
Select Blinds Textured Glam Roman Shades Guía de instalación
-
 Select Blinds Classic/Essential/Cozy/Farmhouse Motorization Roman Shades Guía de instalación
-
 Select Blinds William Morris Roman Shades Instrucciones de operación
-
 Springs Window Fashions AutoVIEW El manual del propietario
-
LEVOLOR Light Filtering Roman Shades Guía de instalación
-
 homeBASICS WSR017272 Guía de instalación
-
HOME basics EPUPEB3066 Guía de instalación
-
 Bali Cut-to-Size prntw24X72 Guía de instalación
-
Home Decorators Collection 10793478625697 Instrucciones de operación
-
Bali Cut-to-Size wtb50.5X72 Guía de instalación


