Creality Sermoon D3 3D Printer Guía del usuario
- Categoría
- Impresoras 3D
- Tipo
- Guía del usuario

3D Printer Quick Start Guide
Sermoon D3
V1.2
EN CNES DE FR Pyc. PT-BR IT TR


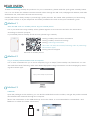
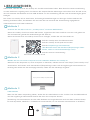
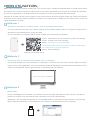
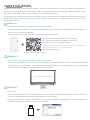
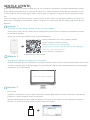
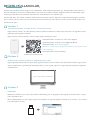
Scan the QR code of "Creality Cloud" by your mobile phone.
QR code of Creality Cloud
If it is your first time using Creality Cloud, please register an account first and fill in the information
according to the APP prompts;
If you already have a Creality Cloud account, please log in directly.
If it is more convenient for you to use a computer, log in to https://www.creality.com/download. You can
also find the manual/unboxing video and related equipment usage information on the homepage by enter-
ing the machine type.
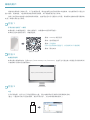
Log in Creality official website with a computer
Method 1
Method 2
Method 3
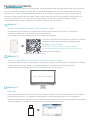
USB Disk
DEAR USERS,
https://www.creality.com/download
Open the package of the machine, you can find the USB disk from the toolbox, and get the product manual
and related video materials through the computer.
(Note: The information on the USB Disk may not be the latest. It is recommended to use Method 1 and
Method 2 to obtain the latest information.)
Thanks for choosing Creality 3D products. For your convenience, please read this quick guide carefully before
use. You can obtain the relevant instructions and videos through the QR code, webpage link address, and USB
disk before use, and follow the instructions strictly.
Creality 3D team is always ready to provide high-quality services. No matter what problems you have during
use, please contact us by the telephone and email provided at the end of the quick installation guide.
Having: Creality New Product Information
Having: Creality Cloud Fun Printing
Having: Unboxing Information
(The user can find the manual/unboxing video by searching
the machine type)
Having: Service Support

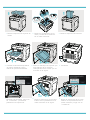
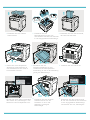
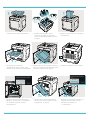
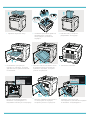
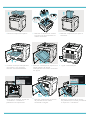
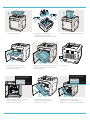
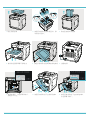
1. 2.
Remove the top foam. Remove the belt fasteners and
move the extruder kit in the
order shown.
3. Remove the foam that holds the
Extruder.
4. 5.
Lift the transparent cover in
order and then remove it in a
horizontal position.
Remove the foam tray at the
bottom of the transparent cover
in the order shown in the figure.
Switch on the power.
6.
7. 8. Remove the bottom foam A
from the platform in order
shown in the figure.
9. Remove foam B from the bottom
of the platform in order shown
and click on “Confirm".
After switching on the power,
click on "Confirm" and lift the
printing platform.
A
1
112
3
12
3
3
Remove the
belt fasteners
Move the
extruder
2
2
12
3B
Remove the
belt fasteners

Reminder: For the manual and unboxing video, please refer to the accompanying information in the USB flash drive or visit the link to the
official website https://www.creality.com/download.
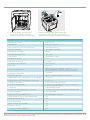
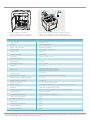
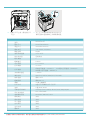
General Specifications
ProductModel
Nozzle Diameter
Extruder
SupportedFilament
Max. HeatedBedTemperature
Max.NozzleTemperature
Printlnterface
RatedVoltage
Number of Nozzles
Max.BuildDimensions
Sermoon D3
300*250*300mm
Dimensions 553*578*656mm
1
USB flash drive printing / LAN printing / Cloud printing
Connection USB flash drive/WIFI/RJ45
Auto Leveling Yes
100-240V~,50/60Hz
0.4mm
Slicing Thickness 0.1-0.4mm
SpriteDirectDrive
ABS/PLA/PETG/ASA/PET/TPU95A
≤ 110℃
Ambient Temperature 10℃-30℃
≤ 300 ºC
Printing Speed Standard printing speed: 100 mm/s;
PLA max printing speed: 150 mm/s;
ABS max printing speed: 250 mm/s
Filament Diameter 1.75mm
Filament Detection
IntelligentDoor
Power Loss Recovery Yes
Yes
Yes
Air Filtration Yes
Built-InLiveCamera Yes
Rated Power
UserInterface 4.3inchtouchscreen
500W
Supported Slicing Software Creality Print/Creality Slicer/Cura/Simplify3D
File Format STL/OBJ/3MF
PC Operating Systems
Precision
Windows/MacOS/Linux
±0.1mm
11.Thread the thick Teflon Tube through the fixing
hole from top to bottom, then the thin Teflon Tube
on the Filament Detection module.
10. Place the printing platform plate
(to be placed tight against the
printing platform).
12
2
1

Escanee el código QR de "Creality Cloud" usando su celular.
Código QR de Creality Cloud
Si está usando por primera vez Creality Cloud, debe primero crearse una cuenta y completar la
información siguiendo las indicaciones de la APLICACIÓN.
Si ya posee una cuenta Creality Cloud, inicie sesión directamente.
Si le resulta más cómoda la computadora, inicie sesión en https://www.creality.com/download. También
puede encontrar el video manual o de desempaquetado y la información de uso del equipo
correspondiente en la página de inicio introduciendo el tipo de la máquina.
Tome una computadora e inicie sesión en el sitio web oficial de Creality
Método 1
Método 2
Método 3
Disco USB
ESTIMADOS USUARIOS,
https://www.creality.com/download
Dentro del paquete de la máquina se encuentra el disco USB en la caja de herramientas, puede obtener
el manual del producto y los materiales audiovisuales correspondientes usando una computadora.
(Nota: Es posible que la información que contiene el disco USB no sea la más actualizada. Se recomienda
utilizar el Método 1 y el Método 2 para obtener la información más actual).
Gracias por elegir los productos 3D de Creality. Lea atentamente esta guía rápida antes de usar el producto
para su comodidad. Usando el código QR, el enlace de la página web o el disco USB puede obtener las
instrucciones y videos correspondientes antes de usar el producto. Siga las instrucciones estrictamente.
El equipo 3D de Creality está disponible siempre para prestar servicios de alta calidad. Comuníquese con
nosotros por teléfono o el correo electrónico que aparece al final de la guía de instalación rápida
independientemente de los problemas que presente mientras usa el producto.
Teniendo: Información sobre nuevos productos de Creality
Teniendo: Impresiones divertidas de Creality Cloud
Teniendo:Desempaquetado
(El usuario puede encontrar un video manual/o
de desempaquetado buscando el tipo de la máquina)
Having: Service Support

1. 2.
Retire la espuma de la parte de
arriba.
Retire los sujetadores de la
cinta y mueva el kit extrusor
en el orden indicado.
3. Retire la espuma del extrusor.
4. 5.
Levante la cubierta transparente
de forma ordenada y luego
retírela en posición horizontal.
Retire la bandeja de espuma que
está debajo de la cubierta
transparente en el orden que se
muestra en la figura.
Encienda.
6.
7. 8. Retire la espuma A de la parte
inferior de la plataforma en el
orden indicado en la figura.
9. Retire la espuma B de la parte
inferior de la plataforma en el
orden indicado y haga clic en
“Confirmar".
Después de encender, haga clic
en “Confirmar" y levante la
plataforma de impresión.
A
1
112
3
12
3
3
Retire las
sujetadores
de la cinta
Retire las
sujetadores
de la cinta
Mueva el
extrusor
2
2
12
3B

Consejo: Para ver el manual del dispositivo y el vídeo de instrucciones de desembalaje, consulte la información en la unidad de
almacenamiento USB proporcionado junto con el dispositivo o el enlace de nuestro sitio oficial: https://www.creality.com/download.
Especificaciones generales
Modelo de producto
Diámetro de la boquilla
Extrusor
Filamento soportado
Temperatura máx. de la cama caliente
Temperatura máx. de la boquilla
Interfaz de impresión
Tensión nominal
Número de boquillas
Dimensiones de construcción máx.
Sermoon D3
300*250*300mm
Dimensiones 553*578*656mm
1
Impresión con unidad de almacenamiento USB /
impresión en LAN / impresión en la nube
Conexión Unidad de almacenamiento USB/Wi-Fi/RJ45
Nivelación automática Sí
100-240V~,50/60Hz
0,4 mm
Espesor de corte 0,1 – 0,4mm
Accionamiento directo sprite
ABS/PLA/PETG/ASA/PET/TPU95A
≤ 110℃
Temperatura ambiente 10℃-30℃
≤ 300 ºC
Velocidad de impresión Velocidad de impresión estándar: 100 mm/s;
velocidad máx. de impresión de PLA: 150 mm/s;
velocidad de impresión máxima de ABS: 250 mm/s
Diámetro del filamento 1,75 mm
Detección de filamento
Puerta inteligente
Recuperación de la pérdida de energía Sí
Sí
Sí
Filtración de aire Sí
Cámara en vivo incorporada Sí
Potencia nominal
Interfaz de usuario Pantalla táctil de 4,3 pulgadas
500W
Software de corte soportado Creality Print/Creality Slicer/Cura/Simplify3D
Formato de archivo STL/OBJ/3MF
Sistemas operativos de computadora
Precisión
Windows/Mac OS/Linux
±0,1 mm
11.Pase el tubo de teflón grueso por el orificio
de fijación de arriba a abajo, luego el tubo de
teflón fino en el módulo de detección.
10. Coloque la placa de impresión
(ajústela bien contra la
plataforma de impresión).
12
2
1

Scannen Sie den QR-Code von „Creality Cloud“ mit Ihrem Mobiltelefon.
QR-Code der Creality Cloud
Wenn Sie Creality Cloud zum ersten Mal nutzen, registrieren Sie bitte zunächst ein Konto und geben Sie
die Informationen gemäß den Aufforderungen der APP ein;
Wenn Sie bereits über ein Creality Cloud-Konto verfügen, melden Sie sich bitte direkt an.
Wenn es für Sie bequemer ist, einen Computer zu benutzen, melden Sie sich unter https://www.creality.com/
download an. Sie können auch das Handbuch/Entpackungs-Video und die zugehörigen Informationen zur
Nutzung des Geräts auf der Homepage abrufen, indem Sie den Gerätetyp eingeben.
Melden Sie sich mit einem Computer auf der offiziellen Website der Creality an
Methode 1
Methode 2
Methode 3
USB-Diskette
LIEBE ANWENDER,
https://www.creality.com/download
Wenn Sie die Gerät-Verpackung öffnen, finden Sie die USB-Diskette in der Toolbox. Das Produkthandbuch
und das zugehörige Videomaterial können Sie über den Computer abrufen.
(Anmerkung: Die Informationen auf der USB-Diskette sind möglicherweise nicht auf dem neuesten Stand.
Es wird empfohlen, Methode 1 und Methode 2 anzuwenden, um die neuesten Informationen zu erhalten)
Vielen Dank, dass Sie sich für ein Creality 3D-Produkt entschieden haben. Bitte lesen Sie diese Kurzanleitung
vor dem Gebrauch sorgfältig durch. Sie können die entsprechenden Anleitungen und Videos über den QR-Code,
die Link-Adresse der Webseite und die USB-Diskette vor der Verwendung abrufen und die Anweisungen genau
befolgen.
Das Team von Creality 3D ist stets bereit, hochwertige Dienstleistungen zu erbringen. Sollten während der
Nutzung Probleme haben, kontaktieren Sie uns bitte über die am Ende der Kurzanleitung angegebenen
Telefonnummern und E-Mail-Adressen.
Enthält: Creality Neue Produktinformation
Enthält: Creality Cloud Spaß am Drucken
Enthält: Entpackungs-Informationen
(Der Benutzer kann das Handbuch/Entpackungs-Video
finden, indem er nach demGerätetyp sucht)
Enthält: Service-Unterstützung

1. 2.
Entfernen Sie den oberen
Schaumstoff.
Entfernen Sie die
Riemenbefestigungen und
verschieben Sie den Extrudersatz
in der angegebenen Reihenfolge.
3. Entfernen Sie den Schaumstoff,
der den Extruder hält.
4. 5.
Heben Sie die transparente
Abdeckung nacheinander an
und entfernen Sie sie dann in
horizontaler Position.
Entfernen Sie die
Schaumstoffablage an der
Unterseite der transparenten
Abdeckung in der in der Abbildung
gezeigten Reihenfolge.
Schalten Sie das Gerät ein.
6.
7. 8. Entfernen Sie den unteren
Schaumstoff A von der
Plattform in die in der
Abbildung gezeigten
Reihenfolge.
9. Entfernen Sie den Schaumstoff
B von der Unterseite der Plattform
in der angegebenen Reihenfolge
und klicken Sie auf „Bestätigen“.
Klicken Sie nach dem Einschalten
des Geräts auf „Bestätigen“ und
heben Sie die Druckplattform an.
A
1
112
3
12
3
3
Verschieben
Sie den
Extruder
2
2
12
3B
Entfernen Sie die
Gurtbefestigungen
Entfernen Sie die
Gurtbefestigungen

Tipp: Die Bedienungsanleitung und das Video mit der Anleitung zum Auspacken des Geräts finden Sie auf der USB-Diskette, die Sie
zusammen mit dem Gerät bekommen haben, oder auf unserer offiziellen Website-Verknüpfung: https://www.creality.com/download.
Allgemeine Angaben
Gerätemodell
Düsen-Durchmesser
Extruder
Unterstütztes Filament
Max. Temperatur des Heizbetts
Max. Düsentemperatur
Druckschnittstelle
Nennspannung
Anzahl der Düsen
Max. Abmessungen
Sermoon D3
300*250*300mm
Abmessungen 553*578*656mm
1
USB-Stick-Druck/LAN-Druck/Cloud-Druck
Anschluss USB-Flash-Laufwerk/WIFI/RJ45
Automatisches Nivellieren Ja
100-240V~,50/60Hz
0,4 mm
Schnittdicke 0,1-0,4 mm
Sprite Direktantrieb
ABS/PLA/PETG/ASA/PET/TPU95A
≤ 110℃
Umgebungstemperatur 10℃-30℃
≤ 300 ºC
Druckgeschwindigkeit Standard-Druckgeschwindigkeit: 100 mm/s;
PLA max. Druckgeschwindigkeit: 150 mm/s;
ABS max. Druckgeschwindigkeit: 250 mm/s
Filament-Durchmesser 1,75 mm
Erkennung des Filaments
Intelligente Tür
Wiederherstellung bei Stromausfall Ja
Ja
Ja
Luftfilterung Ja
Eingebaute Live-Kamera Ja
Nennleistung
Benutzeroberfläche 4,3-Zoll-Touchscreen
500W
Unterstützte Slicing Software Creality Print/Creality Slicer/Cura/Simplify3D
Dateiformat STL/OBJ/3MF
PC Betriebssysteme
Genauigkeit
Windows/Mac OS/Linux
±0,1 mm
11.Fädeln Sie den dickwandigen Teflonschlauch von oben nach unten
durch die Befestigungsöffnung, anschließend verschieben Sie den
dünnen Teflonschlauch auf das Filament-Erkennungsmodul .
10. Legen Sie die Druckplatte auf
(sie muss fest an der
Druckplattform anliegen).
12
2
1

Scannez le code QR de « Creality Cloud » avec votre téléphone portable.
Code QR de Creality Cloud
Si c'est la première fois que vous utilisez Creality Cloud, veuillez d'abord créer un compte et remplir les in-
formations conformément aux invites de l'APP ;
Si vous avez déjà un compte Creality Cloud, veuillez-vous connecter directement.
S'il est plus pratique pour vous d'utiliser un ordinateur, connectez-vous sur https://www.creality.com/dow-
nload. Vous pouvez également trouver le manuel/la vidéo de déballage et les informations relatives à l'utili-
sation de l'équipement sur la page d'accueil en entrant le type de machine.
Connectez-vous au site officiel de Creality avec un ordinateur
Méthode 1
Méthode 2
Méthode 3
Disque USB
CHERS UTILISATEURS,
https://www.creality.com/download
Ouvrez l'emballage de la machine, vous pouvez trouver le disque USB dans la boîte à outils, et obtenir le
manuel du produit et les documents vidéo connexes par le biais del'ordinateur.
(Remarque : les informations figurant sur la clé USB peuvent ne pas être les plus récentes. Il est recomm
andé d'utiliser la méthode 1 et la méthode 2 pour obtenir les informations les plus récentes).
Merci d'avoir choisi les produits Creality 3D. Pour votre confort, veuillez lire attentivement ce guide rapide avant
de l'utiliser. Vous pouvez obtenir les instructions et les vidéos pertinentes par le biais du code QR, de l'adresse
du lien de la page Web et du disque USB avant l'utilisation, et suivre strictement les instructions.
L'équipe de Creality 3D est toujours prête à fournir des services de haute qualité. Quels que soient les problèm-
es que vous rencontrez pendant l'utilisation, veuillez nous contacter par le téléphone et l'email fournis à la fin du
guide d'installation rapide.
Ayant : Informations sur les nouveaux produits de Creality
Ayant : Creality Cloud Fun Printing
Ayant : Informations sur le déballage
(L'utilisateur peut trouver le manuel/la vidéo de déballage
en recherchant le type de machine)
Ayant : Service Support

1. 2.
Retirez la mousse supérieure. Retirer les fixations de la
courroie et faire progresser
le kit d'extrudeuse dans l'ordre
indiqué.
3. Retirez la mousse qui maintient
l'extrudeuse.
4. 5.
Soulevez le couvercle
transparent dans l'ordre, puis
retirez-le en position horizontale.
Retirez le bac en mousse situé au
bas du couvercle transparent dans
l'ordre indiqué sur la figure.
Mettez l'appareil sous tension.
6.
7. 8. Retirez la mousse inférieure A
de la plate-forme dans l'ordre
indiqué sur la figure.
9. Retirez la mousse B du bas de
la plate-forme dans l'ordre
indiqué et cliquez sur
«Confirmer».
Après avoir mis l'appareil sous
tension, cliquez sur «Confirmer»
et soulevez la plate-forme
d'impression.
A
1
112
3
12
3
3
Enlever les
fixations de
la courroie
Enlever les
fixations de
la courroie
Déplacer
l'extrudeuse
2
2
12
3B

Reminder: For the manual and unboxing video, please refer to the accompanying information in the USB flash drive or visit the link to the
official website https://www.creality.com/download.
Specifications générales
Modèle du produit
Diamètre de la buse
Extrudeuse
Filament supporté
Température max. Température du lit chauffé
Température max. Température de la buse
Interface d'impression
Tension nominale
Nombre de buses
Max. Dimensions de la construction
Sermoon D3
300*250*300mm
Dimensions 553*578*656mm
1
Impression sur clé USB/Impression sur réseau local/
Impression dans les nuages
Connexion Clé USB/WIFI/RJ45
Mise à niveau automatique Oui
100-240V~,50/60Hz
0,4 mm
Épaisseur de la tranche 0,1-0,4 mm
Sprite Direct Drive
ABS/PLA/PETG/ASA/PET/TPU95A
≤ 110 ºC
Température ambiante 10℃-30℃
≤ 300 ºC
Vitesse d'impression Vitesse d'impression standard : 100 mm/s ;
vitesse d'impression maximale du PLA : 150 mm/s ;
vitesse d'impression maximale de l'ABS : 250 mm/s
Diamètre du filament 1,75 mm
Détection de filament
Porte intelligente
Récupération en cas de perte d'alimentationOui
Oui
Oui
Filtration de l'air Oui
Caméra en direct intégrée Oui
Puissance nominale
Interface utilisateur Écran tactile de 4,3 pouces
500W
Logiciel de découpage pris en charge Creality Print/Creality Slicer/Cura/Simplify3D
Format de fichier STL/OBJ/3MF
Systèmes d'exploitation du PC
Précision
Windows/Mac OS/Linux
±0,1 mm
11.Passer le tube en téflon épais dans le trou
de fixation de haut en bas, puis le tube en
téflon fin sur le module de détection de filament.
10. Placez la plaque d'impression
(à placer de manière étanche
contre la plateforme d'impression).
12
2
1

Отсканируйте QR-код «Creality Cloud» с помощью Вашего мобильного телефона.
QR-код Creality Cloud
Если Вы используете Creality Cloud впервые, пожалуйста, сначала зарегистрируйте аккаунт и
заполните информацию, следуя подсказкам приложения;
Если у Вас уже есть аккаунт Creality Cloud, пожалуйста, войдите в систему напрямую.
Если Вам удобнее использовать компьютер, войдите по адресу https://www.creality.com/download.
Также Вы можете найти руководство/видео по распаковке и информацию об использовании
соответствующего оборудования на домашней странице, введя тип машины.
Войдите на официальный сайт Creality на компьютере
Способ 1
Способ 2
Способ 3
USB-диск
ДОРОГИЕ ПОЛЬЗОВАТЕЛИ,
https://www.creality.com/download
Откройте упаковку машины, Вы можете найти USB-диск на панели инструментов и получить
руководство по продукту и соответствующие видеоматериалы через компьютер.
(Примечание: информация на USB-диске может быть не самой новой. Для получения новейшей
информации рекомендуется использовать Способ 1 и Способ 2.)
Благодарим, что выбрали 3D продукты Creality. Для Вашего удобства, пожалуйста, внимательно прочтите
данное руководство перед использованием. Вы можете получить соответствующие инструкции и видео
через QR-код, адрес ссылки на веб-страницу и USB-диск перед использованием, и строго следовать
инструкциям.
Команда 3D Creality всегда готова предоставить высококачественные услуги. Вне зависимости от того,
какие проблемы у Вас возникают во время использования, свяжитесь с нами по телефону и эл. почте,
которые указаны в конце руководства по быстрой установке.
Наличие: информация о новой продукции Creality
Наличие: веселая печать Creality Cloud
Наличие: информацию о распаковке
(Пользователь может найти руководство/видео по
распаковке, выполнив поиск по модели машины)
Наличие: сервисная поддержка

1. 2.
Удалите верхнюю пену. Снимите крепления ремня и
переместите комплект
экструдера в указанном
порядке.
3. Удалите пену, которая
удерживает экструдер.
4. 5.
Поднимите прозрачную
крышку по порядку, и затем
удалите ее в горизонтальном
положении.
Удалите пенопластовый лоток
в нижней части прозрачной
крышки в порядке, который
указан на рисунке.
Включите питание.
6.
7. 8. Удалить нижний слой пены А
с платформы в порядке,
который указан на рисунке.
9. Удалите пену B со дна
платформы в указанном порядке
и нажмите «Подтвердить».
После включения питания
нажмите «Подтвердить» и
поднимите печатную платформу.
A
1
112
3
12
3
3
Снимите
крепления
ремня
Снимите
крепления
ремня
Переместите
экструдер
2
2
12
3B

Совет: Для получения Руководства по устройству и видео-инструкции по распаковке обратитесь к информации на USB-накопителе,
поставляемым вместе с устройством, или перейдите на наш официальный веб-сайт по ссылке: https://www.creality.com/download.
Общие характеристики
Модель продукта
Диаметр сопла
Экструдер
Поддерживаемая нить
Макс. Температура подогревающейся платформы
Макс. Температура сопла
Интерфейс печати
Номинальное напряжение
Количество сопел
Макс. размеры сборки
Sermoon D3
300*250*300mm
Размеры 553*578*656mm
1
Печать с USB-накопителя/Печать через LAN/
Облачная печать
Подключение USB-накопитель/Wi-Fi/RJ45
Автовыравнивание Да
100-240V~,50/60Hz
0,4 mm
Толщина резания 0,1-0,4 mm
Прямой привод Sprite
ABS/PLA/PETG/ASA/PET/TPU95A
≤ 110 ℃
Температура среды 10℃-30℃
≤ 300 ºC
Скорость печати Стандартная скорость печати: 100 mm/s;
макс. скорость печати PLA: 150 mm/s;
макс. скорость печати ABS: 250 mm/s
Диаметр нити 1,75 mm
Обнаружение нити
Умная дверь
Восстановление после потери питания Да
Да
Да
Фильтрация воздуха Да
Встроенная камера прямой передачи Да
Номинальная мощность
Пользовательский интерфейс Сенсорный экран 4,3-дюйма
500W
Поддерживаемое ПО для резания Creality Print/Creality Slicer/Cura/Simplify3D
Формат файла STL/OBJ/3MF
Операционные системы ПК
Точность
Windows/Mac OS/Linux
±0,1 mm
11.Проденьте толстую тефлоновую трубу через крепежное
отверстие сверху вниз, а затем тонкую тефлоновую трубу
на модуле обнаружения нитей и.
10. Разместите печатную форму
(должна плотно прилегать к
печатной платформе).
12
2
1

Escaneie o código QR de "Creality Cloud” pelo seu celular.
Código QR da Creality Cloud
Se for a primeira vez que usa o Creality Cloud, registre uma conta primeiro e preencha as informações de
acordo com as instruções do APP;
Se você já tem uma conta no Creality Cloud, faça login diretamente.
Se for mais conveniente para você usar um computador, faça login em https://www.creality.com/download.
Você também pode encontrar o vídeo/manual de desempacotamento e informações de uso de equipament-
os relacionados na página inicial digitando o tipo de máquina.
Faça login no site oficial da Creality com um computador
Método 1
Método 2
Método 3
Disco USB
CAROS USUÁRIOS,
https://www.creality.com/download
Abra o pacote da máquina, você pode encontrar o disco USB na caixa de ferramentas, e obter o manual do
produto e materiais de vídeo relacionados através do computador.
(Nota: As informações no disco USB podem não ser as mais recentes. Recomenda-se o uso do Método 1 e
do Método 2 para obter as informações mais recentes.)
Obrigado por escolher produtos 3D da Creality. Para sua conveniência, leia este guia rápido com cuidado an-
tes de usar. Você pode obter as instruções e vídeos relevantes através do código QR, endereço de link da pá-
gina web e disco USB antes de usar, e seguir as instruções estritamente.
A equipe 3D da Creality está sempre pronta para fornecer serviços de alta qualidade. Não importa quais prob-
lemas você tenha durante o uso, entre em contato conosco pelo telefone e e-mail fornecidos no final do guia
de instalação rápida.
Ter: Novas Informações do Produto da Creality
Ter: Impressão Divertida na Nuvem da Creality
Ter: Informação de desempacotamento
(O usuário pode encontrar o vídeo/manual de desempacot-
amento pesquisando o tipo de máquina)
Ter: Suporte de serviço

1. 2.
Remova a espuma superior. Remova os fechos da correia
e mova o kit da extrusora na
ordem mostrada.
3. Remova a espuma que apoia a
extrusora.
4. 5.
Levante a tampa transparente
em ordem e, em seguida,
remova-a horizontalmente.
Remova a bandeja de espuma na
parte inferior da tampa
transparente na ordem mostrada
na figura.
Ligue a alimentação.
6.
7. 8. Remova a espuma A do fundo
da plataforma na ordem
mostrada na figura.
9. Remova a espuma B do fundo
da plataforma na ordem mostrada
e clique em “Confirmar”.
Após ligar a energia, clique em
“Confirmar” e levante a
plataforma de impressão.
A
1
112
3
12
3
3
Remova os
fechos da
correia
Remova os
fechos da
correia
Mova a
extrusora
2
2
12
3B

Dica: Para o manual do dispositivo e o vídeo de instrução para desembalar, consulte as informações no pendrive USB que acompanha o
dispositivo ou no link de nosso site oficial: https://www.creality.com/download.
Especificações Gerais
Modelo do Produto
Diâmetro do Bico
Extrusora
Filamento Suportado
Temperatura Máx. da Placa Aquecida
Temperatura Máx. do Bico
Interface de Impressão
Tensão Nominal
Número de Bicos
Dimensões Máx. da Construção
Sermoon D3
300*250*300mm
Dimensões 553*578*656mm
1
Impressão por unidade USB/ mpressão por LAN/impressão por Nuvem
Conexão Unidade USB/WIFI/RJ45
Autonivelamento Sim
100-240V~,50/60Hz
0,4 mm
Espessura do Corte 0,1-0,4 mm
Unidade Direta Sprite
ABS/PLA/PETG/ASA/PET/TPU95A
≤ 110℃
Temperatura Ambiente 10℃-30℃
≤ 300 ºC
Velocidade de impressão Velocidade de impressão padrão 100 mm/s;
velocidade máx. de impressão PLA: 150 mm/s;
velocidade máx. de impressão ABS: 250 mm/s
Diâmetro do Filamento 1,75 mm
Detecção de Filamento
Porta Inteligente
Recuperação de Perda de Energia Sim
Sim
Sim
Filtragem de Ar Sim
Câmera Ao Vivo Integrada Sim
Alimentação Nominal
Interface do Usuário Tela sensível ao toque de 4,3 polegadas
500W
Software de Corte Suportado Creality Print/Creality Slicer/Cura/Simplify3D
Formato do Arquivo STL/OBJ/3MF
Sistemas Operacionais de PC
Precisão
Windows/Mac OS/Linux
±0,1 mm
11.Rosqueie o Tubo grosso de Teflon no buraco de
fixação de cima para baixo, em seguida, o Tubo
fino de Teflon no módulo de Detecção de Filamento.
10. Coloque a placa de impressão
(a ser colocada com firmeza
na plataforma de impressão).
122
1

Scansiona il codice QR di "Creality Cloud" con il tuo cellulare.
Codice QR di Creality Cloud
Se è la prima volta che usi Creality Cloud, registra prima un account e compila le informazioni secondo
le indicazioni dell'APP;
Se hai già un account Creality Cloud, accedi direttamente.
Se è più conveniente per te utilizzare un computer, accedi a https://www.creality.com/download. Puoi anche
trovare il manuale/video di disimballaggio e le informazioni relative all'uso dell'attrezzatura sulla homepage
inserendo il tipo di dispositivo.
Accedi al sito ufficiale di Creality con un computer
Metodo 1
Metodo 2
Metodo 3
Disco USB
GENTILE UTENTE,
https://www.creality.com/download
Aprendo la confezione troverai il disco USB nella cassetta degli attrezzi e potrai scaricare il manuale del
prodotto e i relativi materiali video sul computer.
(Nota: le informazioni sul disco USB potrebbero non essere le più recenti. Si raccomanda di utilizzare il
metodo 1 e il metodo 2 per ottenere le informazioni più recenti).
grazie per aver scelto i prodotti Creality 3D. Per tua comodità, ti preghiamo di leggere attentamente questa
guida rapida prima dell'uso. Puoi scaricare le istruzioni e i video pertinenti, prima dell'uso, attraverso il codi-
ce QR, l'indirizzo del link della pagina web e il disco USB; ti preghiamo di seguire scrupolosamente le istruz-
ioni.
Il team di Creality 3D è sempre pronto a fornire servizi di alta qualità. Per qualsiasi problema riscontrato du-
rante l'uso, ti preghiamo di contattarci tramite il telefono e l'e-mail forniti alla fine della guida rapida all'inst-
allazione.
Avere: Informazioni sul nuovo prodotto Creality
Avere: Creality Cloud Fun Printing
Avere: Informazioni sul disimballaggio
(L'utente può trovare il manuale/video di disimballaggio
cercando il tipo di dispositivo)
Avere: Servizio di assistenza

1. 2.
Rimuovere la gomma espansa
superiore.
Rimozione dei fermi della
cinghia e spostamento del
kit estrusore nell'ordine indicato.
3. Rimuovere la gomma espansa
dell'estrusore.
4. 5.
Sollevare il coperchio
trasparente, secondo l’ordine
mostrato, e quindi rimuoverlo
in posizione orizzontale.
Rimuovere il vassoio in gomma
espansa nella parte inferiore del
coperchio trasparente nell'ordine
mostrato in figura.
Accendere il dispositivo.
6.
7. 8. Rimuovere la gomma espansa
inferiore (A) dalla piattaforma
nell'ordine mostrato in figura.
9. Rimuovere la gomma espansa
inferiore (B) dal fondo della
piattaforma nell'ordine mostrato
e fare clic su "Conferma".
Dopo aver acceso la stampante,
fare clic su "Conferma" e
sollevare la piattaforma di
stampa.
A
1
112
3
12
3
3
Rimozione
dei fermi della
cinghia
Rimozione
dei fermi della
cinghia
Rimozione
dell'estrusore
2
2
12
3B

Nota: Per il manuale del dispositivo e il video di istruzioni per il disimballo, consultare le informazioni contenute nel disco flash USB
fornito insieme al dispositivo o il link del nostro sito web ufficiale: https://www.creality.com/download.
Specifiche Generali
Modello del prodotto
Diametro ugello
Estrusore
Filamento supportato
Temperatura massima del letto riscaldato
Temperatura massima dell'ugello
Interfaccia di stampa
Tensione nominale
Numero di ugelli
Max. dimensioni di costruzione
Sermoon D3
300*250*300mm
Dimensioni 553*578*656mm
1
Stampa su unità flash USB / LAN / Cloud
Collegamento Chiavetta USB/WIFI/RJ45
Livellamento automatico Sì
100-240V~,50/60Hz
0,4 mm
Spessore di taglio 0,1-0,4 mm
Sprite Azionamento diretto
ABS/PLA/PETG/ASA/PET/TPU95A
≤ 110℃
Temperatura ambiente 10℃-30℃
≤ 300 ºC
Velocità di stampa Velocità di stampa standard: 100 mm/s;
velocità max. di stampa PLA: 150 mm/s;
velocità max. di stampa ABS: 250mm/s
Diametro del filamento 1,75 mm
Rilevamento del filamento
Porta intelligente
Recupero da perdita di potenza Sì
Sì
Sì
Filtraggio dell'aria Sì
Telecamera live integrata Sì
Potenza nominale
Interfaccia utente Schermo touch screen da 4,3 pollici
500W
Software di taglio supportato Creality Print/Creality Slicer/Cura/Simplify3D
Formato file STL/OBJ/3MF
Sistemi operativi per PC
Precisione
Windows/Mac OS/Linux
±0,1 mm
11.Avvolgere il nastro adesivo al Tubo di
Teflon spesso attraverso il foro di fissaggio
dall'alto verso il basso, quindi al Tubo di Teflon
sottile sul modulo di Rilevamento Filamento .
10. Posizionare la lastra di stampa
(posizionarla saldamente contro
la piattaforma di stampa).
12
2
1

Cep telefonunuzdan “Creality Cloud” kare kodunu tarayın.
Creality Cloud Kare Kodu
Eğer Creality Cloud’u ilk defa kullanıyorsanız, lütfen öncelikle bir hesap kaydı oluşturun ve uygulama yöne-
rgelerine göre bilgileri doldurun;
Eğer Creality Cloud hesabınız varsa, lütfen direkt olarak giriş yapın.
Eğer bilgisayar kullanmak siziniçin daha uygunsa, https://www.creality.com/download sayfasına giriş yapın.
Ayrıca makine tipini girerek ana sayfadan kılavuz / kutu açma videosu ve ilgili ekipman kullanım bilgilerine
ulaşabilirsiniz.
Creality resmi internet sitesine bir bilgisayarla giriş yapın
Yöntem 1
Yöntem 2
Yöntem 3
USB Bellek
DEĞERLI KULLANICILAR,
https://www.creality.com/download
Makinenin paketini açın, araç kutusundan USB belleği alın ve bilgisayar aracılığıyla ürün kılavuzunu ve ilgili
video içeriklerini alın.
(Not: USB Bellekte yer alan bilgiler güncel olmayabilir. En güncel bilgilere ulaşmak için Yöntem 1 ile Yöntem
2’yi kullanmanız önerilir.
Creality 3D ürünlerini tercih ettiğiniz için teşekkürler. Size kolaylık sağlaması için, kullanmadan önce lütfen bu
kılavuzu dikkatlice okuyunuz. Kullanmadan önce kare kod, internet sayfası bağlantı adresi ve USB bellek üzer-
inden ilgili talimatlara ve videolara ulaşabilirsiniz; talimatlara sıkı bir şekilde uyun.
Creality 3D ekibi, her zaman yüksek kaliteli hizmet sunmaya hazırdır. Kullanım sırasında karşılaştığınız problem
her ne olursa olsun, lütfen hızlı kurulum kılavuzunun sonunda yer alan telefon ya da e-posta adresi bilgileri üz-
erinden bize ulaşın.
Ulaşılabilecekler: Creality’nin Yeni Ürün Bilgileri
Ulaşılabilecekler: Creality Cloud Eğlenceli Baskı
Ulaşılabilecekler: Kutu Açma Bilgileri
(Kullanıcı, makine tipini arayarak kılavuza / kutu açma video-
suna ulaşabilir)
Ulaşılabilecekler: Servis Desteği

1. 2.
Üst köpüğü çıkarın. Gösterilen sırayla kayış
bağlantılarını çıkarın ve
ekstrüder kitini hareket ettirin.
3. Ekstrüderi tutan köpüğü çıkarın.
4. 5.
Öncelikle saydam kapağı
kaldırın ve ardından yatay
pozisyonda çıkarın.
Şekilde gösterildiği gibi öncelikle
saydam kapağın altındaki köpük
tepsiyi çıkarın.
Gücü açın.
6.
7. 8. Şekilde gösterildiği gibi
öncelikle platformdan alt
köpük A’yı çıkarın.
9. Gösterildiği gibi öncelikle
platformun altından köpük B’yi
çıkarın ve “Onayla” tuşuna tıklayın.
Gücü açtıktan sonra, “Onayla”
tuşuna tıklayın ve baskı
platformunu kaldırın.
A
1
112
3
12
3
3
Kayış
bağlantılarını
çıkarın
Kayış
bağlantılarını
çıkarın
Ekstrüderi
hareket ettirin
2
2
12
3B

İpucu: Cihaz kılavuzu ve kutu açma talimat videosu için, lütfen cihazla birlikte sağlanan USB flash diskte yer alan bilgilere veya resmi
internet sitemize bakın: https://www.creality.com/download.
General Specifications
Ürün Modeli
Ağızlık Çapı
Ekstrüder
Desteklenen Filament
Maks. Isıtmalı Yatak Sıcaklığı
Maks. Ağızlık Sıcaklığı
Baskı Arayüzü
Anma Voltajı
Ağızlıkların Sayısı
Maks. Yapı Ebatları
Sermoon D3
300*250*300mm
Ebatlar 553*578*656mm
1
USB flash bellek baskı / LAN baskı / Bulut baskı
Bağlantı USB flash bellek/WIFI/RJ45
Otomatik Düzleştirme Evet
100-240V~,50/60Hz
0,4 mm
Dilimleme Kalınlığı 0,1-0,4 mm
Sprite Direkt Sürücü
ABS/PLA/PETG/ASA/PET/TPU95A
≤ 110℃
Ortam Sıcaklığı 10℃-30℃
≤ 300 ºC
Baskı Hızı Standart baskı hızı: 100 mm/s;
PLA maks. baskı hızı: 150 mm/s;
ABS maks. baskı hızı: 250 mm/s
Filament Çapı 1,75 mm
Filament Algılama
Akıllı Kapı
Güç Kaybı İyileştirme Evet
Evet
Evet
Hava Filtreleme Evet
İç Canlı Kamera Evet
Anma Gücü
Kullanıcı Arayüzü 4,3 inç dokunmatik ekran
500W
Desteklenen Dilimleme Yazılımı Creality Print/Creality Slicer/Cura/Simplify3D
Dosya Formatı STL/OBJ/3MF
PC İşletim Sistemleri
Duyarlık
Windows/Mac OS/Linux
±0,1 mm
11.Kalın Teflon Tüpü yukarıdan aşağıya doğru
sabitleme deliğinden geçirin, ardından ince
Teflon Tübü Filement Tanı modülünden geçirin.
10. Baskı plakasını yerleştirin
(baskı platformuna zıt yönde
sıkı bir şekilde yerleştirilecektir).
12
2
1

EN
尊敬的用户:
手机扫描“创想云”二维码
感谢您选择创想三维的产品。为了您使用方便,请您在使用之前仔细阅读本快速指南,您在使用前可以通过扫
描二维码、链接地址、U盘获取相关使用说明及视频,并严格按照指示进行操作。
创想三维团队时刻准备为您提供优质的服务。在使用过程中无论遇到什么问题,请按照快速指南结尾所提供的
电话、邮箱与我们进行联系。
拥有:Creality 新品资讯
拥有:创想云趣打印
拥有:开箱资料
拥有:服务支持
创想云二维码
如果您第一次使用创想云,请先注册账号,并根据APP提示填写信息;
如果您已经有创想云账号,请直接登录。
如果您更方便使用电脑,登录https://www.creality.com/download,在首页也可通过输入机器型号找到说明书/
开箱视频以及相关设备使用资料。
打开机器包裹,您可以从工具包里面找出U盘,通过电脑获取产品说明书及视频相关资料。
电脑登录官网
方法 1
方法 2
方法 3
U盘
(用户可通用搜索机器型号,找到说明书/开箱视频)
https://www.creality.com/download
(备注:U盘资料可能不是当前最新,建议采用方法1、方法2获取最新的资料。)

1. 2.取出顶部泡棉 按图示依序取出皮带紧固件、移
动挤出机组件。
3. 取出固定喷头的泡棉
4. 5.
依序托起透明罩再平移取出 按图示依序取出透明罩底部泡棉托 接通电源
6.
7. 8. 按图示依序取出平台底部泡棉A 9. 按图示依序取出平台底部泡棉B,
点击屏幕“确认”。
接通电源后,点击屏幕“确认”,
抬起打印平台。
A
1
1
1 2
3
12
3
3
取出皮带
紧固件
移动挤出
机组件
2
2
12
3B
取出皮带
紧固件

温馨提示:说明书及开箱操作视频,请见U盘内随机资料或官网链接https://www.creality.com/download
基本参数
型号
喷嘴直径
挤出机类型
兼容材料
热床温度
喷嘴温度
打印方式
额定电压
喷头数量
成型尺寸
Sermoon D3
300*250*300mm
整机尺寸 553*578*656mm
1
U盘打印/局域网打印/云打印
连接 U盘/WIFI/RJ45
自动调平 支持
100-240V~,50/60Hz
0.4mm
切片厚度 0.1-0.4mm
近端挤出
ABS/PLA/PETG/ASA/PET/TPU95A
最高110℃
使用环境温度 10℃-30℃
最高300 ºC
打印速度 标准打印速度:100mm/s PLA最大打印速度:150mm/s
ABS最大打印速度:250mm/s
支持耗材直径 1.75mm
断料检测
开门检测
断电续打 支持
支持
支持
空气过滤 支持
摄像头 支持
额定功率
屏幕 4.3英寸触摸屏
500W
可兼容切片软件 Creality Print/Creality Slicer/Cura/Simplify3D
切片支持格式 STL/OBJ/3MF
电脑操作系统
打印精度
Windows/MacOS/Linux
±0.1mm
11.从上至下将粗铁氟龙管穿过固定孔后,
再穿过断料检测模块上的细铁氟龙管。
10. 放置打印平台板(需贴紧打印
平台)
2
12
1


Since each model is different, the actual product may be different from the picture. Please refer to the
actual product. The final interpretation right belongs to Shenzhen Chuangxiang 3D Technology Co., Ltd.
※
※
With the spirit of evangelists, we want to share the convenience of technology with everyone.
Users should abide by the laws and regulations of the country and region where the equipment is located
(place of use), abide by professional ethics, and pay attention to safety obligations. It is strictly forbidden to
use our products or equipment for any illegal purpose.Our company is not responsible for the relevant legal
responsibilities that the violator should bear.
3D Printing Evangelists
18th Floor, JinXiuHongDu Building, Meilong Road, Xinniu Community,
Minzhi Street, Longhua District, Shenzhen City, China.
Official Website: www.creality.com
Tel: +86 755-8523 4565
E-mail: [email protected]
-
 1
1
-
 2
2
-
 3
3
-
 4
4
-
 5
5
-
 6
6
-
 7
7
-
 8
8
-
 9
9
-
 10
10
-
 11
11
-
 12
12
-
 13
13
-
 14
14
-
 15
15
-
 16
16
-
 17
17
-
 18
18
-
 19
19
-
 20
20
-
 21
21
-
 22
22
-
 23
23
-
 24
24
-
 25
25
-
 26
26
-
 27
27
-
 28
28
-
 29
29
-
 30
30
-
 31
31
-
 32
32


Creality Sermoon D3 3D Printer Guía del usuario
- Categoría
- Impresoras 3D
- Tipo
- Guía del usuario
en otros idiomas
- français: Creality Sermoon D3 3D Printer Mode d'emploi
- italiano: Creality Sermoon D3 3D Printer Guida utente
- English: Creality Sermoon D3 3D Printer User guide
- Deutsch: Creality Sermoon D3 3D Printer Benutzerhandbuch
- русский: Creality Sermoon D3 3D Printer Руководство пользователя
- português: Creality Sermoon D3 3D Printer Guia de usuario
- Türkçe: Creality Sermoon D3 3D Printer Kullanici rehberi
Artículos relacionados
Otros documentos
-
Creality 3D CR-10 Smart Manual de usuario
-
Dremel DigiLab 3D45 Original Instructions Manual
-
Brady S3700 Guía del usuario
-
Prusa3D MINI & MINI+ Manual de usuario
-
-
Sigma R19 Guía de inicio rápido
-
-
Prusa3D MK3S+/MK2.5S Multi Material 2S Manual de usuario
-
-