Creality 3DPrintMill CR-30 Printmill 3D Printer Manual de usuario
- Tipo
- Manual de usuario

Mode d'Emploi de l'Imprimante 3D de Série 3DPrintMill
Benutzerhandbuch 3D-Drucker 3DPrintMill Serie
Stampante 3D Serie 3DPrintMill Manuale d’Uso
Impresora 3D de Serie 3DPrintMill Manual de Usuario
1
21
6
11
16
V1.0
3DPrintMill Series 3D PrinterUser Manual
FR DE ENIT ES
3DPrintMill

1
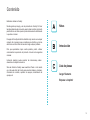
Sommaire
Chers c s,
Merci d’avoir choisi nos produits. Pour une expérience optimale, veuillez
lire les instructions avant d’utiliser l’imprimante.
Nos équipes seront
toujours prêtes à vous rendre le meilleur service. Veuillez nous contacter
via le numéro de téléphone ou l’adresse e-mail fourni à la fin lorsque
vous rencontrez un problème avec l’imprimante.
Pour une meilleure expérience d’utilisation de notre produit, vous pouvez
également apprendre à utiliser l’imprimante de différentes manières :
Consultez les instructions et vidéos incluses sur la carte .
Visitez notre site Web officiel www.creality.com./fr pour trouver des
informations pertinentes sur les logiciels et le matériel, les coordonnées
et les instructions d’utilisation et de maintenance.
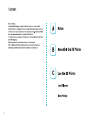
Notes
Chargement d filament
Commencement de l’impression

2
Notes
1. N’utilisez en aucun cas l’imprimante autre que celle décrite dans les présentes afin d’éviter toute blessure corporelle ou tout dommage matériel.
2. Ne placez pas l’imprimante près d’une source de chaleur ou d’objets inflammables ou explosifs. Nous vous suggérons de le placer dans un
environnement bien ventilé et peu poussiéreux.
3. N’exposez pas l’imprimante à des vibrations violentes ni à un environnement instable, car cela pourrait nuire à la qualité d’impression.
4. Avant d’utiliser des filaments expérimentaux ou exotiques, nous vous suggérons d’utiliser des filaments standard tels que l’ABS ou le PLA pour
calibrer et tester la machine.
5. N’utilisez aucun autre câble d’alimentation que celui fourni. Utilisez toujours une prise secteur à trois broches reliées à la terre.
6. Ne touchez pas la buse ni la surface d’impression pendant le fonctionnement car elles pourraient être brûlantes. Gardez les mains à l’écart de la
machine pendant son utilisation pour éviter les brûlures et les blessures.
7. Ne portez pas de gants ni de vêtements amples lors de l’utilisation de l’imprimante. Ces chiffons peuvent s’emmêler dans les pièces mobiles des
imprimantes, ce qui peut provoquer des brûlures, des blessures corporelles ou des dommages à l’imprimante.
8. Lorsque vous nettoyez les débris de l’imprimante, utilisez toujours les outils fournis. Ne touchez pas directement la buse lorsqu’elle est chauffée.
Cela peut causer des blessures.
9. Nettoyez l’imprimante fréquemment. Mettez toujours l’appareil hors tension lors du nettoyage et essuyez-le avec un chiffon sec pour enlever la
poussière, les plastiques d’impression collés ou tout autre matériau du cadre, des rails de guidage ou des roues. Utilisez un nettoyant pour vitre ou
de l’alcool isopropylique pour nettoyer la surface d’impression avant chaque impression afin d’obtenir des résultats cohérents.
10. Les enfants de moins de 10 ans ne doivent pas utiliser l’imprimante sans surveillance.
11. Cette machine est équipée d’un mécanisme de protection de sécurité. Ne déplacez pas manuellement le mécanisme de la buse et de la
plate-forme d’impression pendant le démarrage, sinon le périphérique sera hors tension pour des raisons de sécurité.
12. Les utilisateurs doivent se conformer aux lois et réglementations du pays et de la région correspondants où se trouve l'équipement (lieu
d'utilisation), respecter l'éthique professionnelle, prêter attention aux obligations de sécurité et interdire strictement l'utilisation de nos produits ou
équipements à des fins illégales. Notre société n'est pas responsable des responsabilités juridiques pertinentes que le contrevenant devrait
assumer.

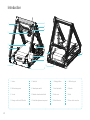
15 Moteur à courroie
de l'axe Z
11 Écran à bouton
7Fin de course de l'axe X
3Plateau chauffant
1Moteur X
5Tendeur de courroie
13 Prise pour carte SD et USB
9Moteur Y
14 Bloc passif de l'axe Y
10 Support de bobine
6Interrupteur manuel d'alimentation
Kit de buse
24Écrou de mise à niveau
du plateau
Commutateur d'alimentation
16
Extrudeur
8
12 Bouton
Introduction
1
2
3
4
6
5
11
8
7
9
10
12
13
16
14
15
3

3DPrintMill
1
0,1mm-0,4mm
Standard 0,4mm
±0,1mm
CrealityBelt
Entrée : 100-120/200-240V 50/60Hz Sortie : 24V/14,6A
0-100℃
FDM
0-240℃
Oui
Oui
Non
Français
Windows XP/Vista/7/10
Longueur infinie *200*170mm (longueur*largeur*hauteur)
Modèle
Épaisseur de la couche
Diamètre de la buse
Précision de l'axe XY
Filament
Format de fichier
Transfert de fichiers
Technologie
Nombre de buse
Slicer
Tension d'alimentation
Puissance totale
Température du plateau chauffant
Température de la buse
Fonction de reprise de l'impression
Capteur de filament
Deux vis pour l'axe z
Langue
Système d'exploitation de l'ordinateur
Vitesse d'impression
Volume d'impression
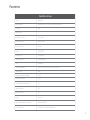
Paramètres de base
PLA/TPU/PETG
STL/OBJ/AMF
≤180mm/s, 30 à 60 mm/s habituellement
350W
Carte de stockage
Paramètres
4

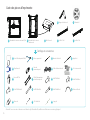
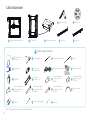
Liste des pieces d'imprimante
*Conseils : les accessoires ci-dessus ne sont donnés qu'à titre indicatif, veuillez-vous référer aux accessoires physiques !
Filament x15
Profilé n°2 x1
7
Profilé n°1 x1
Suppor de bobine x1
6
4
Ensemble de la courroie
inférieure x1
2Kit d'écran x1
3
Ensemble de courroies des axes X/Y x1
1
Outillage et accessoires
Carte SD et adapteur USB x1
8Pince coupante x1
9Aiguille x1
11
Attache-câbles x10
10
Clés et tournevis x1
15
Câble d'alimentation x1
14
Raccord
pneumatique x2
13
12 Clips bleue x2
20 Vis BTR M5x18 x10 Vis BTR M5x12 x4
22 Tube en téflon x1
23
21 Vis BTR M5x45 x4
19 Vis BTR M5x12 x6
18 Vis BTR M5x8 x6
16 Ecrous M5T x6 Câble d'interrupteurs
photoélectriques x1
17
24 Buses x2 25 Clé à douille x1 26 Jauge x1
5

6
Inhalt
Inhalt
Laden des Filaments
Starten des Drucks
Liebe unden und undinnen
Herzlichen Dank, dass Sie sich für unseren Produkt
entschieden haben. Für die beste Erfahrung lesen Sie bitte vor
der Benutzung des Druckers die Anweisungen durch. Unser
Team steht stets bereit, um sie mit dem besten Service zu
unterstützen. Bitte kontaktieren Sie uns mittels der am Ende
aufgeführten Telefonnummer oder
E-Mail-Adresse, sollten Sie jeglichen Problemen mit dem
Drucker begegnen.
Für eine bessere Erfahrung bei der Benutzung des Produkts,
können Sie auch auf den nachfolgenden Wegen die
Verwendung des Druckers erlernen:
Sehen Sie sich die beiliegenden Anweisungen und Videos auf
der Speicherkarte an.
esuchen Sie unsere offizielle Website
www.creality.com/de

7
Verwenden Sie den Drucker auf keine andere als die hierin beschriebene Art und Weise, um Verletzungen und Eigentumsschäden zu vermeiden.
Platzieren Sie den Drucker nicht in der Nähe einer Hitzequelle sowie nahe brennbaren oder explosiven Materialien. Wir schlagen eine gut
gelüftete, staubfreie Umgebung vor.
Setzen Sie den Drucker keinerlei heftigen Vibrationen oder instabilen Umgebungen aus, dies kann zu schlechter Druckqualität führen.
Vor der Verwendung experimenteller oder exotischer Filamente schlagen wir Standardfilamente, wie etwa ABS oder PLA, zur Kalibrierung und
Überprüfung des Geräts vor.
Verwenden Sie kein anderes Netzkabel als das mitgelieferte. Verwenden Sie stets steckdose.
Berühren Sie die Düse oder Druckoberfläche NICHT während des Betriebs, da diese heiß sein könnten. Halten Sie während der Verwendung die
Hände vom Gerät fern, um Verbrennungen und Verletzungen zu vermeiden.
Tragen Sie während der Verwendung des Druckers weder noch lose Kleidung. Solche Bekleidung kann in die beweglichen
Teile des Druckers gelangen und zu Verbrennungen, möglichen Verletzungen oder Druckerschäden führen.
Verwenden Sie stets die mitgelieferten Werkzeuge zum Entfernen von Resten am heißen Ende des Druckers. Beim Heizen, niemals die Düse
direkt berühren; dies kann zu Verletzungen führen.
Reinigen Sie den Drucker regelmäßig. Schalten Sie beim Reinigen stets die Stromversorgung aus und wischen Sie das Gerät mit einem
trockenen Lappen ab, um Staub, festsitzenden Druckkunststoff oder jegliche anderen Materialien an Rahmen, Führungsschienen oder Rädern zu
entfernen. Für gleichbleibende Ergebnisse verwenden Sie vor jedem Druckvorgang Glasreiniger oder Isopropanol, um die Druckeroberfläche zu
reinigen.
Kinder unter 10 Jahren sollten den Drucker nicht ohne Beaufsichtigung verwenden.
Das Gerät ist mit einem Sicherheitsschutzmechanismus ausgestattet. Beim Hochfahren bewegen Sie die Düse und den Mechanismus der
Druckplattform nicht manuell, ansonsten schaltet das Gerät aus Sicherheitsgründen automatisch ab.
Der Benutzer soll die Gesetze und Vorschriften des Landes und der Region (Verwendungsort) einhalten, in dem sich das Gerät
befindet, die Berufsethik einhalten, die Sicherheitsverpflichtungen beachten und die Produkte oder Geräte unseres Unternehmens nicht für
illegale Zwecke verwenden. Zuwiderhandlungen tragen die einschlägigen gesetzlichen Verpflichtungen, und unser Unternehmen ist dafür
nicht verantwortlich.
Hinweise

15 Motor für Z-Achse-Riemen
11 Bildschirm mit
Dreh-Drück-Knopf
7Komponente zur
X-Achse-Grenzwertanpassung
3Druckplattform
1X-Motor
5Riemen-Spannschraube
13 SD-Card-Slot & USB-Anschluss
9Y-Motor
14 Komponente zur
Y-Achse-Grenzwertanpassung
10 Filament-Spulenhalter und Stange für
Filament- Spulenhalter
6Manueller Netzschalter
Düsenkit
24Nivellierungsmutter
Netzkabelanschluss
16
Extruder
8
12 Drehknopf
Einleitung
1
2
3
4
6
5
11
8
7
9
10
12
13
16
14
15
8

Modell 3DPrintMill
1
0,1mm-0,4mm
Standard 0,4mm
±0,1mm
CrealityBelt
Eingang: 100-120/200-240V 50/60Hz Ausgabe: 24V/14,6A
0-100℃
Schichtdicke
Düsen-Durchmesser
Genauigkeit der X-Y-Achsen
Filament
Dateiformat
Druck-Modus
FDMDrucktechnologie
Anzahl der Düsen
Slicer
Leistungsspezifikationen
Gesamtleistung
Heizbetttemperatur
0-240°C
Ja
Düsentemperatur
Resume-Druckfunktion
Ja Filament-Runout-Sensor
Nein
Duale Z-Achsen-Zugstangen
Deutsch
Sprachumschaltung
Windows XP/Vista/7/10Betriebssystem
Druckgeschwindigkeit
Unlimitiert*200*170mm (Länge x Breite x Höhe)
Druckgröße
Grundparameter
PLA/TPU/PETG
STL/OBJ/AMF
≤180mm/s, 30-60mm/s Normalerweise
350W
offline mit Speicherkarte
Parameter
9

Teileliste
*Tipps: Die gezeigten Bilder dienen nur als Referenz, das tatsächliche Produkt kann abweichen.
Filament x15
Profil 2 x1
7
Profil 1 x1
Spulenhalter x1
6
4
Unterer Riemenbausatz x1
2Display-Komponenten x1
3
X/Y-Achse-Riemenbausatz x1
1
Werkzeugzubehörliste
SD-Karte & Kartenlesegerät
für SD x1
8Diagonalzange x1
9Nadel x1
11
Kabelbinder x10
10
Schraubenschlüssel und
Schraubendreher x1
15
Netzkabel x1
14
Pneumatische
Verschraubung x2
13
12 Blaue Klammer X2
20 Rundkopf-
Innensechskantschraube
M5 x18 X10
Zylinderschrauben mit
Innensechskant und
Federscheibe M5x12 x4
22 Teflonschlauch x1
23
21 Zylinderschrauben mit
Innensechskant und
Federscheibe M5x45 x4
19 Rundkopf-
Innensechskantschraube
M5 x 12 x6
18 Rundkopf-
Innensechskantschraube
M5x8 x6
16 M5T Muttern x6 Photoelektrische
Schaltkabel x1
17
24 Düsen x2 25 Knarre x1 26 Fühlerlehre x1
10

Caricamento del filamento
Inizio stampa
INDICE
INDICE
Introduzione Parti
Lista Accessori
Gentili utenti di Creality:
Grazie per aver scelto e acquistato il nostro prodotto.Prima di utilizzare
la stampante leggere e studiare attentamente il manuale d’uso per
il funzionamento corretto delle varie funzioni.
Per noi è importante fornirvi la migliore assistenza prima, durante e
dopo l'acquisto del nostro prodotto. Se riscontrate dei problemi con
la funzionalità della nostra stampante, contattateci via telefono e
email in fondo e saremo lieti di assistervi.
Si consiglia di guardare le istruzioni e i video interna alla scheda di
memoria.
11
Se volete conoscere meglio i nostri prodotti e avere maggiori
informazioni sulle nostre stampante :
Per ulteriori informazioni sui prodotti ,Software & Hardware ,e il
servizio post vendita , visitare il nostro sito Web all’indirizzo
www.creality.com

NOTE
5.Non utilizzare i cavi di alimentazione di altri prodotti nel processo di installazione, utilizzare il cavo di alimentazione originale, la spina di
alimentazione deve essere inserita in una presa a tre fori con filo di terra;
10. Questo apparecchio può essere usato da bambini di almeno 10 anni , solo nel caso in cui siano controllati o che siano stati istruiti ad utilizzare
l’apparecchio in tutta sicurezza.
12. L’utente deve rispettare le leggi e le normative del paese e della regione in cui si trova (dove viene utilizzata) l'apparecchiatura, e
aderire all'etica professionale e prestare attenzione agli obblighi di sicurezza. È severamente vietato utilizzare i nostri prodotti o apparec
-
chiature per qualsiasi scopo illegale. La nostra azienda non è responsabile per le responsabilità legali relativi che dovrebbe assumere la
parte del violatore.
12
1.Non utilizzare questa macchina per scopi diversi da quelli descritti qui. In caso contrario, potrebbero verificarsi lesioni personali e/o danni alla proprietà.
2. Non posizionare la stampante vicino a fonti di calore o materiali infiammabili o esplosivi. Si consiglia di posizionarlo in un ambiente ben
ventilato e poco polveroso.
3.Non esporre la stampante a forti vibrazioni o ad un ambiente instabile, poiché ciò potrebbe causare una scarsa qualità di stampa.
4.Si consiglia di utilizzare i consumabili consigliati dal produttore per evitare il blocco della testa di estrusione e danni alla macchina;
6. Non toccare l'ugello e il piatto caldo quando la stampante è in funzione, per evitare ustioni ad alta temperatura e causare lesioni personali;
7. Non indossare guanti o torsioni durante l'utilizzo del prodotto, per evitare che le parti in movimento causino schiacciamenti e lesioni alle parti personali;
8.Dopo la sta8. Dopo la stampa, utilizzare la temperatura residua dell'ugello per pulire i filamenti nell'ugello con lo strumento. Non toccare l'ugello
direttamente con le mani durante la pulizia per evitare ustioni;mpa, utilizzare la temperatura residua dell'ugello per pulire i materiali di consumo
sull'ugello con strumenti. Du
9. Eseguono la manutenzione del prodotto, puliscono il corpo del prodotto con un panno asciutto, la polvere , i materiali di stampa aderenti e
gli oggetti sulla linea guida;
11. La macchina è dotata una funzione di spegnimento automatico . Non spostare l'ugello e costruire il piatto quando la macchina è accesa,
altrimenti la machina si spegne da solo;

15 Cinghia Asse Z
11 Kit schermo
7Switch di finecorsa dell’asse Z.
3Piatto di stampa
1Motore X
5Vite di tendicinghia
13 Slot SD e USB
9Motore Y
14 Kit di finecorsa dell'asse Y
10 Porta bobina
6Interruttore di alimentazione
Kit Ugello
24Manopole di livellamento
Interruttore di alimentazione
16
Estrusore
8
12 Manopola
Introduzione
1
2
3
4
6
5
11
8
7
9
10
12
13
16
14
15
13

Parametri
Modello 3DPrintMill
1
0,1mm-0,4mm
Standard 0,4mm
±0,1mm
CrealityBelt
Input: 100-120/200-240V 50/60Hz Output: 24V/14,6A
1-100℃
Spessore per strato
Diametro ugello
Precisione asse XY
Filamento
Formato file
Trasferimento del file
FDMTecnologia di stampa
Numero di ugelli
Software slicing
Specifiche di alimentazione
Potenza
Temperatura del piatto
0-240°C
Sì
Temperatura ugello
Ripresa di stampa
SìSensore filamento
No
Dual screws asse-Z
Italiano
Linguaggio
Windows XP/Vista/7/10Sistema operativo
Velocità di stampa
Lunghezza infinita*200*170mm (lunghezza*larghezza*altezza)
Dimensione di stampa
Parametri di base
PLA/TPU/PETG
STL/OBJ/AMF
≤180mm/s, 30-60mm/s normalmente
350W
Memory Card/ SD card offline
14

Lista Accessori
*
Filamento x15
Profilo 2 x1
7
Profilo 1 x1
Supporto bobina x1
6
4
Kit cinghia x1
2Kit di visualizzazione x1
3
Gruppo cinghia dell'asse X/Y x1
1
Elenco degli accessori
SD card e lettore
di schede x1
8Pinze diagonali x1
9Ago x1
11
Fascette autobloccanti x10
10
Set di cacciaviti x1
15
Cavo di alimentazione x1
14
Connettore
pneumatico x2
13
12 Clip per cavi x2
20 Vite a testa bombata
esagono incassato
M5x18 x10
Vite a testa bombata
con molla e rondella
M5x12 x4
22 Tubo in teflon x1
23
21 Vite a testa esagonale
con molla e rondella
M5x45 x4
19
Vite a testa bombata
esagono incassato
M5x12 x6
18 Vite a testa bombata
esagono incassato
M5x8 x6
16 Dadi M5T x6 Interruttore
fotoelettrici x1
17
24 Ugelli x2 25 Chiave di smontaggio x1 26 righero x1
Nota: L'immagine degli accessori è puramente indicativa.
15

Cargar filamento
Empezar a imprimir
Contenido
Estimados clientes de Creality:
Muchas gracias por elegir y usar los productos de Creality. Por favor
lea detenidamente este manual de usuario antes de utilizar el producto
para facilitar el uso. Debe operar el producto observando estrictamente
lo que dice el manual.
El equipo de Creality está listo de brindarte mejor servicio en cualquier
momento. En el proceso de uso conéctanos por el teléfono y el correo
electrónico escritos al final del manual si tenga cualquier problema.
Para que experimentes mejor nuestro producto, podría obtener
conocimientos de operación del producto a través de las siguientes
maneras:
Instrucción aleatoria: puede encontrar las instruccionesy videos
relevantes en la tarjeta de memoria.
Sitio web oficial de Creality: www.cxsw3d.com Puede iniciar sesión
en el sitio web oficial de Crealty para encontrar software y hardware,
información de contacto, operación de equipos, mantenimiento de
equipos, etc.
Notas
Introducción
Lista de piezas
16

Notas
1. No use esta máquina para otro fin que el aquí descrito. De lo contrario, puede resultar en lesiones personales y/o daños a la propiedad.
2.No coloque la impresora cerca de fuentes de calor o materiales inflamables o explosivos. Recomendamos ubicarlo en un ambiente bien
ventilado y con poco polvo.
3.No exponga la impresora a vibraciones fuertes ni a entornos inestable, ya que podría provocar una deficiente calidad de impresión.
Se recomienda utilizar los consumibles recomendados por el fabricante para evitar el bloqueo del cabezal de extrusión y daños a la
máquina;
5. No utilice los cables de alimentación de otros productos en el proceso de instalación, utilice el cable de alimentación suministrado con
la máquina, el enchufe de alimentación debe enchufarse a un enchufe de tres orificios con un cable a tierra;
6. No toque la boquilla ni cama caliente cuando la impresora está funcionando, para evitar quemaduras por altas temperaturas y causar
lesiones personales;
7. No use guantes o giros cuando opera la máquina, para evitar que las partes móviles causen apretones y lesiones en las partes
personales;
8. Después de imprimir, use la temperatura residual de la boquilla para limpiar los consumibles en la boquilla con una herramienta. No
toque la boquilla directamente con la mano cuando limpia para evitar quemaduras;
9. A menudo hacen mantenimiento del producto, limpian regularmente el cuerpo de la impresora con un paño seco en caso de falla de
energía, limpie el polvo y los materiales de impresión adheridos, objetos extraños en el riel de guía;
10.Los niños menores de 10 años no se permiten utilizar la máquina sin supervisión del personal para evitar lesiones;
11. La máquina está equipada con un mecanismo de protección de seguridad. No mueva el mecanismo de la boquilla y la plataforma de
impresión de forma manual y rápida cuando se enciende la máquina, de lo contrario, el equipo se cortará de energía y se apagará
automáticamente para protección;
12. El usuario debe observar las leyes y reglamentos del país y la región en que se encuentra (utiliza) el equipo, cumplir la ética
profesional, prestar atención a las obligaciones de seguridad. Se prohíbe utilizar los productos o equipos de nuestra empres a en
ningún propósito ilegal. Nuestra empresa no asumirá las responsabilidades legales derivadas del incumplimiento de lo antes mencionado.
17

15 Motor de correa de eje Z
11 Pantalla de perilla
7Interruptor de límite
de eje X
3Plataforma de impresión
1Motor X
5Tornillo de tensión de correa
13 Puerto para tarjeta SD y USB
9Motor Y
14 Componente de ajuste
de límite de eje Y
10 Soporte del material y tubo de material
6Interruptor de encendido manual
Kit de boquilla
24Tuerca de nivelación de base
Conexión de cable
de corriente
16
Extrusor
8
12 Perilla
Introducción
1
2
3
4
6
5
11
8
7
9
10
12
13
16
14
15
18

Modelo 3DPrintMill
1
0,1mm-0,4mm
Estándar 0,4mm
±0,1mm
CrealityBelt
Entrada: 100-120/200-240V 50/60 Hz Salida: 24V/14.6A
0-100℃
Grosor de impresión
Diámetro de boquilla
Precisión de eje XY
Filamento
Formato de Archivo
Transferencia de archivo
FDMTecnología de moldeo
Cantidad de Boquilla
Software de slicing compatible
Especificaciones de potencia
Potencia total
Temperatura de la base caliente
0-240°C
Sí
Temperatura de la boquilla
Función de reanudar impresión
SíSensor de filamento
No
Tornillos de eje Z dual
Español
Idioma
Windows XP/Vista/7/10Sistema operativo informático
Velocidad de impresión
Longitud infinita*200*170mm (largo*ancho*alto)
Tamaño de impresión
Parámetros básicos
PLA/TPU/PETG
STL/OBJ/AMF
180mm/s, 30-60mm/s normalmente
350W
Tarjeta SD
Parámetros
19

Parámetros de dispositivo
*
Filamento x 15
Soporte de perfil 2 x 1
7
Soporte de perfil 1 x 1
Soporte del material x 1
6
4
Kit de correa inferior x 1
2Kit de pantalla x 1
3
Kit de correa de eje X/Y x 1
1
Lista de herramientas accesorias
Tarjeta de memoria
SD y lector de tarjeta x 1
8Alicates diagonales x 1
9Aguja x 1
11
Brida x 10
10
Llaves y destornilladores x 1
15
Cable de corriente x 1
14
Conector neumático x 2
13
12 Pinza de línea azul x 2
20 Tornillo de cabeza
hexagonal redonda plana
M5X18 x 10
Combinación de tornillo
hexagonal y arandela
M5X12 x 4
22 Tubo de teflón x 1
23
21 Combinación de tornillo
hexagonal y arandela
M5X45 x 4
19 Tornillo de cabeza
hexagonal redonda plana
M5X12 x 6
18 Tornillo de cabeza
hexagonal redonda plana
M5X8 x 6
16 Tuercas M5T x 6 Línea de interruptor
fotoeléctrico x 1
17
24 Boquillas x 2 25 Llave de tubo x 1 26 Galga de espesor x 1
Consejos: los accesorios mostrados son sólo una referencia, ¡consulte los accesorios reales!
20

21

1.Do not use the printer any way other than described herein in order to avoid personal injury or property damage.
2.Do not place the printer near any heat source or flammable or explosive objects. We suggest placing it in a well-ventilated, low-dust environment.
3.Do not expose the printer to violent vibration or any unstable environment, as this may cause poor print quality.
4.Please use recommended resin to in case damage of machine.
5.Do not use any other power cable except the one supplied. Always use a grounded three-prong power outlet.
6.Please do not open the plastic cover during usage, otherwise the printing will be interrupted.
7.Do not wear cotton gloves when operating the printer. Such cloths may become tangled in the printers moving parts leading to burns, possible bodily injury,
or printer damage.
8.Please wait a moment after the print is finished. And please wear gloves to take out the print by tools.
10.Children under 10 years should not use the printer without supervision.
11.This machine is equipped with a security protection mechanism. Do not manually move the nozzle or printing platform mechanism manually while booting up,
otherwise the device will automatically power off for safety.
9.Clean the printer frequently. Always turn the power off when cleaning, and wipe with a dry cloth to remove dust, adhered printing plastics or any other material
off the frame, guide rails, or wheels. Use glass cleaner or isopropyl alcohol to clean the print surface.
12.Users should comply with the laws and regulations of the corresponding countries and regions where the equipment is located (used), abide by professional ethics,
pay attention to safety obligations, and strictly prohibit the use of our products or equipment for any illegal purposes. Creality will not be responsible for any
violators' legal liability under any circustance.
22

15 Z axis belt motor
11 Knob screen
7X axis limit switch
3Printing platform
1X motor
5Belt tensioning screw
13 Storage card slot and USB socket
9Y motor
14 Y-axis limit adjustment component
10 Material rack and material tube
6Manual power switch
Nozzle kit
24Bed leveling nut
Power cable connection
16
Extruder
8
12 Knob
Introduction
1
2
3
4
6
5
11
8
7
9
10
12
13
16
14
15
23

Model 3DPrintMill
1
0.1mm-0.4mm
Standard 0.4mm
±0.1mm
CrealityBelt
Input :100-120/200-240V 50/60Hz Output :24V/14.6A
0-100°C
Layer thickness
Nozzle diameter
XY axis precision
Filament
File format
File transfer
FDMMolding technology
Number of nozzle
Compatible slicing software
Power specification
Total power
Hotbed temperature
0-240°C
Yes
Nozzle temperature
Resume printing function
YesFilament sensor
No
Dual z-axis screws
English
Language switch
Windows XP/Vista/7/10Computer operating system
Print speed
Infinite length*200*170mm (length*width*height)
Print size
Basic Parameters
PLA/TPU/PETG
STL/OBJ/AMF
≤180mm/s, 30-60mm/s normally
350W
Storage card
24

Parts List
*Tips: the above accessories are for reference only, please refer to the physical accessories!
Filament x 15
Profile bracket 2 x 1
7
Profile bracket 1 x 1
Spool holder x 1
6
4
Bottom belt assembly x 1
2
Display kit x 1
3
X/Y axis belt assembly x 1
1
Accessory tool list
Storage card and card
reader x 1
8Diagonal pliers x 1
9Needle x 111
Cable tie x 1010
Wrenches and
screwdrivers x 1
15
Power cord x 1
14
Pneumatic connector x 2
13
12 Blue line claw x 2
20 Hexagon socket flat round
head screw M5X18 x 10
Hexagon socket head spring
washer combination screw
M5X12 x 4
22 Teflon tube x 1
23
21 Hexagon socket head spring
washer combination screw
M5X45 x4
19 Hexagon socket flat round
head screw M5X12 x 6
18 Hexagon socket flat round
head screw M5X8 x 6
16 M5T nuts x 6 Photoelectric switch line x 1
17
24 Nozzles x 2 25 Socket wrench x 1 26 Feeler x 1
25

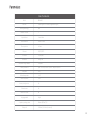
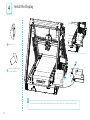
Install the Profile Support Frame
1
19 Hexagon socket flat round
head screw M5X12 x 4
Step: Install the profile support 1 and profile support 2 to the bottom of machine with four hexagon flat head screws
M5x12 (As shown in the figure above).
Profile bracket 1 x 1
6
Profile bracket 2 x 1
7
Bottom belt assembly x 1
2
6
19
19
7
2
26

27
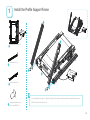
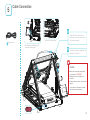
2Install X/Y Axis Belt Assembly
Install with M5 * 45 socket head cap screws
with spring washer.
Extrusion motor locking screw
Please loosen the two screws of extrusion motor first if there is interference between the profile bracket 2 and X/Y-axis assembly
before proceeding and tighten up the two screws after assembly (as shown in figure1).
21
21
21 Hexagon socket head spring washer
combination screw M5X45 x2
Hexagon socket head spring
washer combination screw M5X12 x 2
22
20 Hexagon socket flat round head
screw M5X18
x 8
X/Y axis belt assembly
x 1
1
20
20
1
20
20
22
Fig.1

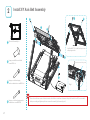
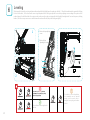
3Install the Spool Holder
4
16
18
Spool holderx 1
4
M5T nuts x 2
16
Hexagon socket flat round
head screw M5X8 x 2
18
28

Step: Lock the display assembly with two M5X8 flat head screws and two M5 T-nuts, as shown in the figure above;
4Install the Display
18 Hexagon socket flat round
head screw M5X8 x 2
16 M5T nuts x 2
18
18
16
16
29

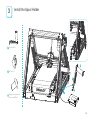
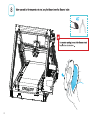
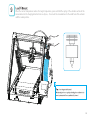
5Cable Connection
After the display is installed, please
connect the display cable.
Connect the Y-axis limit line.
14
A
Caution
Do not connect or disconnect the cables
when the machine is powered on.
Insert the Teflon tube into the
pneumatic connector (also insert
the blue wire clamp)
Connect the broken detection line
as shown in Figure A .
●Select the correct input voltage match
your local power.
(115/230V)
●Damage can occur if voltage is set
incorrectly.
●Connect the power cord to turn the power
switch on.
Power cord x 1
14
30

61.First move the X axis to the contact part between the nozzle and the belt (slightly press the nozzle onto the belt ) . 2.Push the two limit switches against the X sliding
block to lock the limit; 3. Press back on the screen to get the printer back to the origin; adjust the Y axis end-stop adjusting screw according to the position of the
nozzle relative to the belt after back to the origin in order to make sure the nozzle contacting with the belt rightly; then tighten the Y axis end-stop screw, leveling
finished; 4. if there is any seam or over contact between the nozzle and the belt, adjust the leveling nut slightly.
Leveling
The even filament adheres right on the
platform.
The nozzle is too close to the platform,
the consumables are not extruded
enough, and the nozzle outlet is
damaged.Causes a plug and scratches
the belt.
31
4
AY axis end-stop adjusting
screw
BY axis end-stop
adjusting the screw
3
A
B
2
1

7
32

8
33

9When the current temperature reaches the target temperature, press and hold the spring of the extruder and insert the
consumables into the charging detection hole one by one, then insert the consumables into the small hole of the extruder
until the nozzle position.
34

10
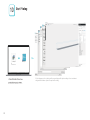
CrealityBelt CrealityBelt
3. Select language→close→setting→add corresponding model→printer setting→close→customize→
confi guration→number of prints to complete the setting.
35

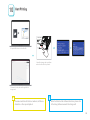
10
4. Open the file in turn → select the file.
5.Generate G-code, and save the gcode file to
storage card.
File names must be Latin letters or numbers, not Chinese
characters or other special symbols.
Notes: For details on the software instructions, please refer
to the slicing software manual in the storage card!
6.Insert the storage card→ print from
card→select the file to be printed.
36

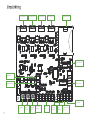
Nozzle fan
Motherboard fan
Storage card slotX-axis motor port Y-axis motor port Z-axis motor port E-axis motor port
Micro USB port
Y axis limit
12864 screen
Controllable
nozzle fan
X axis limit
switch
Power input Hot bed
wire port
Heating pipe
interface
Broken material
detection
Nozzle
thermistor
Hot bed
thermal
37

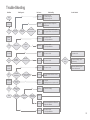
Workflow Fault diagnosis Fault cause Fault handling Result feedback
File identifica-
tion or not
Display error
codes or not
Other documents are
printed normally or not Slicer 1.Move model position and slice again
2.Using repair software to repair the model
N
N
N
N
N
N
N
N
N
N
N
N
N
N
N
N
Storage-card
File naming
1.Wipe Storage-card
2. Format Storage-card
3. Replace Storage-card
Change the file name to English and
number format
Y
Y Y
Y Y
N
Y
Y
Y
Y Y Y
Y
Y
Y
Y
Y
Y
Return
“Home”
Heat the
hot bed
Print or not Beyond
“Home”
Shaft motor 1.Reconnect circuit
2. Check by substitution
Limit switch
1.调平操作
Hot bed 1.Reconnect circuit
Thermistor 1.Reconnect circuit
Heat the
nozzle
Printing when
filament-push
The display of
temp is normal or not
The nozzle is
heated or not 1.调平操作
Heating tube 1.Reconnect circuit
Thermistor 1. Reconnect circuit and lock the screws of
thermistor
The display of humidity
is normal or not
The E motor
rotates or not
Coupling 1.Fasten the coupling
1.Remove surface defects of filaments
2.Replace the filament
Others
The gear rotates
or not
The filament is
normal or not
Filament-push
or not
Dislocation
or not
Filament
E motor
1.Slice again
2. Adjusting the tension of synchronous belt
Start
Play by memory
card Seal
Y/N
Y/N
Y/N
Y/N
Y/N
Finish
Slicer\Sync-
hronous belt
1.Reconnect circuit
2. Check by substitution
1.Reconnect circuit
2. Check by substitution
Process
result
Problem solved
Component damage, replace
continuously
Unknown malfunction, please
contact the after-sales
Hot bed is
heated or not
Trouble-Shooting
38

SHENZHEN CREALITY 3D TECHNOLOGY CO., LTD.
Shenzhen, China 518131
Scan To Learn More
SHENZHEN CREALITY 3D TECHNOLOGY CO., LTD.
Shenzhen, Chine, 518131
SHENZHEN CREALITY 3D TECHNOLOGY CO., LTD.
18. Etage, JinXiuHongDu Hochhaus, Meilong Straße, Longhua Bezirk,
518131, Shenzhen, VR China.
SHENZHEN CREALITY 3D TECHNOLOGY CO., LTD
henzhen.
SHENZHEN CREALITY 3D TECHNOLOGY CO., LTD
Edificio Jinxiu Hongdu 18F, Viale di Meilong, abitazione residenziale di
Xin’niu del Quartiere di Minzhi del Distretto di Longhua della Citta’ di
Shenzhen.
-
 1
1
-
 2
2
-
 3
3
-
 4
4
-
 5
5
-
 6
6
-
 7
7
-
 8
8
-
 9
9
-
 10
10
-
 11
11
-
 12
12
-
 13
13
-
 14
14
-
 15
15
-
 16
16
-
 17
17
-
 18
18
-
 19
19
-
 20
20
-
 21
21
-
 22
22
-
 23
23
-
 24
24
-
 25
25
-
 26
26
-
 27
27
-
 28
28
-
 29
29
-
 30
30
-
 31
31
-
 32
32
-
 33
33
-
 34
34
-
 35
35
-
 36
36
-
 37
37
-
 38
38
-
 39
39
-
 40
40


Creality 3DPrintMill CR-30 Printmill 3D Printer Manual de usuario
- Tipo
- Manual de usuario
En otros idiomas
Documentos relacionados
Otros documentos
-
Creality 3D CR-10 Smart Manual de usuario
-
Velleman K8200 Manual de usuario
-
Wasp Delta 2040/4070/60100/TURBO Manual de usuario
-
Polaroid PlaySmart Guía de inicio rápido
-
Dremel DigiLab 3D45 Original Instructions Manual
-
Prusa3D MK2 Manual de usuario
-
Prusa3D MK3S+/MK2.5S Multi Material 2S Manual de usuario
-
HP DesignJet T920 Printer series Instrucciones de operación
-
HP DesignJet T3500 Production Multifunction Printer Instrucciones de operación
-