ZOSI IPC-2258D-W-C Manual de usuario
- Categoría
- Accesorios para cámaras de seguridad
- Tipo
- Manual de usuario
Este manual también es adecuado para

For more information, please visit
www.zositech.com
V2.K.02.Z
PoE Camera User Manual

Contents
EN 01
ES 08

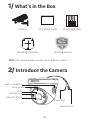
Camera Quick Start Guide Mounting Screws
Mounting Templates Warning Stickers
Network Port
Built-in Speaker
Lens
Spotlights*2
Microphone
Infrared LEDs*4
Power Port
NOTE: The camera and accessories vary by different models.
1/ What’s in the Box
2/ Introduce the Camera
01

02
Speaker
Lens
Spotlights*2
Infrared LEDs*2
Network Port
Power Port
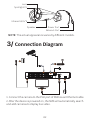
1Connect the camera to the PoE port of NVR via an Ethernet cable.
2After the device is powered on, the NVR will automatically search
and add cameras to display live video.
NOTE: The actual appearance varies by different models.
3/ Connection Diagram
AUDIO OUT
NETWORK
VGA
POE 15POE 13
POE 11POE 9POE 7POE 5POE 3POE 1
POE 16POE 14
POE 12POE 10POE 8POE 6POE 4POE 2
DC 48V

1. Installation precautions
2. Mount the camera on the wall
• Avoid directing the camera towards strong light or reflective objects,
including sunlight, lights, glass, mirrors and other areas with strong
refraction of light sources.
• Do not install at location with objects covering or obscuring the
camera.
• Avoid mounting the camera in places where too dim, and point the
camera towards a well-lit area. For better image quality, make sure
the camera and the captured subject are at the same lighting
conditions.
• For better image quality, it is recommended to clean the lens with
a soft cloth from time to time.
• Do not expose the power port to water or moisture, or blocked by
dirt or other things.
• Do not install the camera where rain and snow may hit the lens
directly.
• Camera may work in extremely cold conditions as low as -10°C
because it will produce heat when powered on. You may power the
camera indoors for a few minutes before installing it outdoors.
(Only for outdoor cameras).
NOTE: There are two different types of cameras. Please refer to the
actual product and install the camera according to the
corresponding instructions.
4/ Install the Camera
03

04
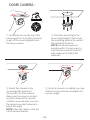
④ Once the camera is installed, you may
rotate the camera body and adjust it to
a proper angle.
③ Mount the camera to the
mounting plate and turn it
clockwise to lock the camera.
Make sure the camera is locked
in place otherwise the camera
could be removed when you turn
the camera counterclockwise to
adjust the angle.
NOTE: Place the cable in cord slot
on the camera bracket.
② Drill holes according to the
mounting template. Then screw
the mounting plate to the wall at
the indicated locations.
NOTE: The above applies to
wooden walls. It is necessary to
insert anchors into the holes for
wall made out of other hard
materials.
DOME CAMERA:
① Hold and press on the top of the
camera and turn it counterclockwise
to get off the mounting plate from
the dome camera.

05
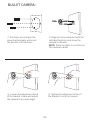
③ Loosen the adjustment knob
of the bracket, rotate and adjust
the camera to a proper angle.
④ Tighten the adjustment knob of
the bracket to lock the camera.
① Drill holes according to the
mounting template, and insert
the anchors into the holes.
② Align the camera bracket with the
indicated location, and screw the
camera to the wall.
NOTE: Place the cable in cord slot on
the camera bracket.
BULLET CAMERA:

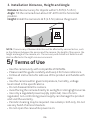
3. Installation Distance, Height and Angle
Distance: Best accuracy for objects within 5-50 ft (1.5-15 m).
Angle: Tilt the camera down about 30°-60°from the horizontal
position.
Height: Install the camera 8-16 ft (2.5-5m) above the ground.
NOTE: The accuracy of human detection will be affected by various factors, such
as the distance between the person and the camera, the height of the person, the
height and angle of the camera, etc. The accuracy and distance of detection will
also be affected in the night vision environment.
• Use the camera only with compatible ZOSI NVRs.
• Please read this guide carefully and keep it for future reference.
• Follow all instructions for safe use of the product and handle with
care.
• Use the camera within given temperature, humidity, voltage
level noted in the specifications.
• Do not disassemble the camera.
• Avoid facing the camera directly to sunlight or strong light sources.
• Use only a regulated power supply (optional). Use of a non-
regulated, non-conforming power supply can damage the product
and void the warranty.
• Periodic cleaning may be required. Use a damp cloth only. Do not
use any harsh chemical cleaners.
• Do not open the case while power is on.
5/ Terms of Use
06

07
FCC Compliance Statement
6/ Notification of Compliance
Simplified EU Declaration of Conformity
This device complies with Part 15 of FCC Rules.
Operation is subject to the following two conditions:
(1) This device may not cause harmful interference.
(2) This device must accept any interference received, including
inference that. may cause undesired operation.
ZOSI declares that the device is in compliance with the essential
requirements and other relevant provisions if Directive 2014/53/EU.
This marking indicates that this product cannot be disposed with
other household wastes throughout the EU. To prevent possible
harm to the environment or human health from uncontrolled waste
disposal and promote the sustainable reuse of material resources,
please recycle it responsibly. To return your used device, please visit
the Return and Collection System or contact the retailer from whom
the product was purchased. They can take this product away for
environmentally safe recycling.
Correct Disposal of this Product

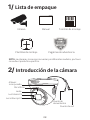
Cámara Manual Tornillos de montaje
Plantillas de montaje Pegatinas de advertencia
Puerto de red
Altavoz
incorporado
Lente
Luz blanca*2
Micrófono
Luz infrarroja*4
Puerto de
alimentación
NOTA: La cámara y los accesorios varían por diferentes modelos, por favor
consulte el producto específico.
1/ Lista de empaque
2/ Introducción de la cámara
08

09
Altavoz
Lente
Luz blanca*2
Luz infrarroja*2
Puerto de red
Puerto de
alimentación
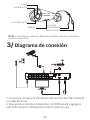
1Conecte la cámara a la entrada de cámara PoE del NVR mediante
un cable Ethernet.
2Después de encender el dispositivo, el NVR buscará y agregará
automáticamente cámaras para mostrar video en vivo.
NOTA: Los productos varían por diferentes modelos, por favor consulte el
producto específifico.
3/ Diagrama de conexión
AUDIO OUT
NETWORK
VGA
POE 15POE 13
POE 11POE 9POE 7POE 5POE 3POE 1
POE 16POE 14
POE 12POE 10POE 8POE 6POE 4POE 2
DC 48V

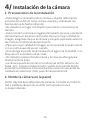
1. Precauciones de la instalación
2. Monte la cámara en la pared
• Evite dirigir la cámara hacia luz intensa u objetos reflectantes,
incluidos la luz del sol, luces, vidrios, espejos y otras áreas con
fuentes de luz de fuerte refracción.
• No instale en un lugar con objetos que cubran u oscurezcan la
cámara.
• Evite montar la cámara en lugares demasiado oscuros y apunte la
cámara hacia un área bien iluminada. Para una mejor calidad de
imagen, asegúrese de que la cámara y el sujeto capturado estén en
las mismas condiciones de iluminación.
• Para una mejor calidad de imagen, se recomienda limpiar la lente
con un paño suave de vez en cuando.
• No exponga el puerto de alimentación al agua o la humedad, ni lo
bloquee con suciedad u otras cosas.
• No instale la cámara donde la lluvia y la nieve puedan golpear
directamente la lente.
• La cámara puede funcionar en condiciones de frío extremo, de
hasta -10°C, porque producirá calor cuando se encienda. Puede
encender la cámara en interiores durante unos minutos antes de
instalarla en exteriores. (Solo para cámaras exteriores).
NOTA: Hay dos tipos diferentes de cámaras. Consulte el producto
real e instale la cámara de acuerdo con las instrucciones
correspondientes.
4/ Instalación de la cámara
10

11
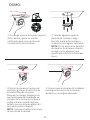
④ Una vez que la cámara esté instalada,
puede girar el cuerpo de la cámara y
ajustarlo en un ángulo adecuado.
③ Monte la cámara en la placa de
montaje y gírela en la dirección de
las manecillas del reloj para
bloquear la cámara. Asegúrese de
que la cámara esté bloqueada en
su lugar; de lo contrario, la cámara
podría retirarse cuando la gire en
sentido inverso al de las agujas del
reloj para ajustar el ángulo.
NOTA: Coloque el cable en la ranura
de soporte de la cámara.
② Taladre agujeros según la
plantilla de montaje. Luego
atornille la placa de montaje a
la pared en los lugares indicados.
NOTA: Eso se aplica a las paredes
de madera. Es necesario insertar
anclajes en los agujeros para
pared hechos de otros materiales
duros.
① Sostenga y presione la parte superior
de la cámara y gírela en sentido
antihorario para sacar la placa de
montaje de la cámara domo.
DOMO:

12
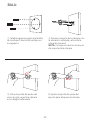
③ Afloje la perilla de ajuste del
soporte, gire y ajuste la cámara
en un ángulo adecuado.
④ Apriete la perilla de ajuste del
soporte para bloquear la cámara.
① Taladre agujeros según la plantilla
de montaje e inserte los anclajes en
los agujeros.
② Alinee el soporte de la cámara con
la ubicación indicada y atornille la
cámara a la pared.
NOTA: Coloque el cable en la ranura
de soporte de la cámara.
BALA:

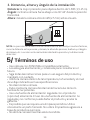
3. Distancia, altura y ángulo de la instalación
Distancia: la mejor precisión para objetos dentro de 5-50ft (1,5-15 m).
Ángulo: incline la cámara hacia abajo unos 30°-60° desde la posición
horizontal.
Altura: instale la cámara entre 8-16ft (2.5-5m) sobre el suelo.
NOTA: La precisión de la detección de humanoides se afectará por muchos factores,
como la distancia entre persona y cámara, la altura de persona, la altura y el ángulo
de cámara, etc. La visión nocturna también afectará la precisión y la distancia de
detección.
• Use cámara con ZOSI NVRs compatibles solamente.
• Lea esta guía atentamente y consérvela para consultar en el
futuro.
• Siga todas las instrucciones para un uso seguro del producto y
manéjelo con cuidado.
• Utilice la cámara dentro de la temperatura, la humedad y el nivel
de voltaje indicados en las especificaciones.
• No desmonte la cámara.
• Evite orientar la cámara directamente hacia la luz del sol o
fuentes de luz potentes.
• Use una fuente de alimentación regulada con el producto
(opcional) solamente. El uso de una fuente de alimentación no
regulada y no conforme puede dañar el producto y anular la
garantía.
• Es posible que se requiera una limpieza periódica. Utilice
únicamente un paño húmedo. No utilice limpiadores agresivos a
base de productos químicos.
• No abra la carcasa mientras esté encendida.
5/ Términos de uso
13

14
Declaración de Cumplimiento de la FCC
6/ Notificación de Cumplimiento
Declaración de Conformidad de UE Simplificada
Este dispositivo cumple con la Parte 15 de las Normas de la FCC.
La operación está sujeta a las siguientes dos condiciones:
(1) Este dispositivo no puede causar interferencias perjudiciales,
(2) Este dispositivo debe aceptar cualquier interferencia recibida,
incluidas las inferencias que puedan provocar una operación no
deseada.
ZOSI declara que el dispositivo cumple con los requisitos esenciales
y otras disposiciones relevantes de la Directiva 2014/53/UE.
Esta marca indica que este producto no se puede desechar con
otros residuos domésticos en toda la UE. Para evitar posibles
daños al medio ambiente o la salud humana por la eliminación
descontrolada de desechos y promover la reutilización sostenible
de los recursos materiales, recíclelo de manera responsable. Para
devolver su dispositivo usado, visite el Sistema de Devolución y
Recolección o comuníquese con el minorista donde compró el
producto. Pueden llevarse este producto para un reciclaje seguro
para el medio ambiente.
Eliminación Correcta de este Producto

F920710Z3006590
Visit zositech.com for the latest information and resources:
Find product guides, how-to videos, troubleshooting and
FAQs. Contact us at [email protected]
www.zositech.com
-
 1
1
-
 2
2
-
 3
3
-
 4
4
-
 5
5
-
 6
6
-
 7
7
-
 8
8
-
 9
9
-
 10
10
-
 11
11
-
 12
12
-
 13
13
-
 14
14
-
 15
15
-
 16
16
-
 17
17


ZOSI IPC-2258D-W-C Manual de usuario
- Categoría
- Accesorios para cámaras de seguridad
- Tipo
- Manual de usuario
- Este manual también es adecuado para
en otros idiomas
- English: ZOSI IPC-2258D-W-C User manual


