Jøtul F 400 Installation And Operating Instructions Manual
- Categoría
- Estufas
- Tipo
- Installation And Operating Instructions Manual

Jøtul F 400
Installation and Operating Instructions for USA/Canada 2
Montering- og bruksanvisning - Norsk 20
Installation and Operating Instructions - English 26
Manuel d'installation et d'utilisation - Francaise 31
Instrucciones para instalación - Español 36
Manuale di installazione ed uso - Italiano 42
Montage- und Bedienungsanleitung - Deutsch 47
Installatie- en montagehandleiding - Nederlands 53
Jøtul F 400
Monterings-. og bruksanvisningen må oppbevares under hele produktets levetid.
These instructions must be kept for future references.
Wir empfehlen Ihnen, die Montage- und Bedienungsanleitung für spätere Zwecke sorgfältig
aufzubewahren.
Ce document doit être conservé pendant toute la vie de l'appareil.

2
Installation and Operating Instructions for USA
Installation et fonctionnement pour Canada
Safety notice: If this solid fuel room heater is not properly installed, a house fire may result. For your safety, follow
the installation directions. Contact your local building or fire officials about restrictions and installation inspection
requirements in your area. Kindly save these instructions for future references.
Avis de sécurité: Une installation non appropriée de ce poêle de chauffage risque de provoquer un incendie. Assurez
votre sécurité en respectant les directives d`installation suivantes. Consultez les autorités locales du bâtiment ou de
la prévention des incendies au sujet des restrictions et exigences relatives aux inspections d`installations dans votre
région.
Tested and listed by ITS Intertek Testing Services, Middleton, Wisconsin.
Tested to U.S. Standards: ANSI/UL 1482, Canadian Standards: CAN/ULC-S627-M93
Standards
The F 400 Castine woodstove has been tested and listed
to;
U.S. Standards: ANSI/UL 737 and ANSI/UL 1482.
Canadian Standards: CAN/ULC-S627-M93
Tests performed by:
ITS, Intertek Testing Services, Middleton, WI
Manufactured by:
Jøtul A.S.A., P.O. Box 1411, N-1602 Fredrikstad, Norway
Distributed by:
Jøtul North America, P.O. Box 1157
400 Riverside Street - Portland, ME 04104
This heater meets the U.S. Environment Protection
Agency’s Emissions limits for wood heaters manufactured
and sold after July 1, 1990.
Under specific test conditions, this heater has shown heat
output at rates ranging from 12,000 to 35,000 BTU’s per
hour.
Important: The Jøtul F 400 Castine woodstove is only
listed to burn wood. Do not burn any other fuels.
Read this entire manual before you install and use your
new room heater.
Save these instructions and make them available to
anyone using or servicing the stove.
Jøtul F 400 Castine Woodstove
When installing, operating and maintaining your Jøtul F
400 Castine woodstove, follow the guidelines presented
in these instructions, and make them available to anyone
using or servicing the stove.
A number of areas require a building permit to install a
solid fuel burning appliance.
In the U.S., the National Fire Protection Association’s Code,
NFPA 211, Standards for Chimneys, Fireplaces, Vents and Solid
Fuel Burning Appliances, or similar regulations, may apply
to the installation of a solid fuel burning appliance in your
area.
In Canada, the guideline is established by the CSA
Standard, CAN/CSA-B365-M93
,
Installation Code for Solid-
Fuel-Burning Appliances and Equipment.
Always consult your local building inspector or authority
having jurisdiction to determine what regulations apply
in your area.
Do not connect to any air distribution duct or system.
USA
Stoves and fireplaces must be installed to conform to local and national building regulations. Before preparing for the installation of the appliance,
it is important that the instructions issued with the unit are carefully read and strictly adhered to. Jøtul pursue a policy of constant product development.
Products supplied may therefore differ in specification, colour and type of accessories from those illustrated and described in the brochure.
Jøtul vise sans cesse à améliorer ses produits. C’est pourquoi, il se réserve le droit de modifier les spcifications, couleurs etéquipement sans avis
prélable.

3
Table of contents
Standards and Safety Notices
Jøtul F 400 Castine Woodstove ................................................. 2
Notices ..............................................................................................3
Installation
Installing the flue collar .............................................................. 4
Stove pipe chimney connector .................................................4
Chimney Requirements
Masonry Chimneys .......................................................................4
Prefabricated Chimneys .............................................................. 5
Chimney height.............................................................................. 5
Wall pass-throughs....................................................................... 5
Connecting to the Chimney
Masonry Chimney ......................................................................... 6
Hearthmount/Fireplaces ............................................................ 6
Prefabricated Chimney ................................................................ 6
Clearances to combustibles
Floor protection ............................................................................. 6
Clearances to walls and ceilings .............................................. 7
Using shields to reduce clearances ......................................... 7
Alcove installations ....................................................................... 7
Mobile home installations ..........................7
Operation
Do not burn .....................................................................................8
Controls on the F 400 Castine ................................................... 8
Breaking in your Stove ................................................................. 8
Starting and Maintaining a fire................................................ 8
Adding fuel ...................................................................................... 9
Formation of Creosote................................................................. 9
Maintenance
Ash Removal .................................................................................... 9
Glass Care ........................................................................................9
General Maintenance .................................................................. 10
Gaskets ............................................................................................. 10
Accessories
Firescreen ......................................................................................... 10
Outside Air Kit ................................................................................ 10
Floor Bracket Kit ............................................................................ 11
Rear Heatshield .............................................................................. 11
Bottom Heatshield........................................................................ 11
Stove -Top Thermometer ............................................................ 11
Figures - drawings
Figures - drawings ................................................................. 12– 17
Parts list ............................................................................................ 18
Appendix A
Alternate floor protection ..........................................................18
Notices
Do not use chemicals or fluids to start the fire. Do not burn
garbage or flammable fluids.
If this room heater is not properly installed, a house fire
may result. To reduce the risk of fire, follow the installation
instructions.
Failure to follow these instructions may
result in property damage, bodily injury, or even death.
Jøtul recommends that you have your new Jøtul F 400
Castine installed by a professional installer of solid fuel
burning appliances.
Extremely hot while in operation! Keep children, clothing
and furniture away. Contact may cause skin burns.
Avoid creating a low pressure condition in the room where
the stove is operating. Operating an exhaust fan or a
clothes dryer could create a low pressure area, causing
poisonous gases to come out of the stove into the room.
You can prevent low pressure conditions by providing
adequate combustion air within 24” but not closer than
12” from the stove. Or, simply install the optional outside
air manifold system, which allows the direct connection
of air from outside the house to the stove.
Do not use chemicals or fluids to start the fire. Some fuels
will, during combustion, separate carbon monoxide and
generate it in the burn chamber. Carbon monoxide is toxic,
so please follow the guidelines in this manual for proper
operation of your Jøtul F 400 Castine.
If you for some reason experience smoke “roll-out” from
the stove, it may activate smoke detectors if installed in
the house.
Installation
If this solid fuel room heater is not properly installed a
house fire may result. For your safety, follow the
installation directions. Contact the local building or fire
officials about restrictions and installation inspection
requirements in your area.
Reminder: Your local officials have final authority in
determining if a proposed installation is acceptable. Any
requirement, that is requested by the local authority
having jurisdiction, that is not specifically addressed in
THIS manual, defaults to NFPA 211, and local codes in the
U.S. or in Canada, CAN/CSA-B365-M and local codes.
Mounting before installation
The F 400 Castine is sold in many countries with varying
USA

4
demands on fireplaces. Therefore, together with the flue
collar, gasketing and hardware inside the stove, it is
equipped with an extra inspection cover, marked Europe,
which may be throwned away, and a bottom heat shield.
The heat shield is to be used in alcove installations.
Installing the flue collar
To install the flue collar in the top or rear exit position
remove the tape from the gasketing and adhere to the
groove on the back of the stove around the flue opening.
Place the flue collar on the stove in the top or rear exit
position and secure with the nut, bolt and washer. The
nut and washer are placed on the inside of the stove.
Stove pipe chimney connector
The chimney connector is a single walled pipe used to
connect the stove to the chimney. For use with the F 400
Castine the chimney connector must be 6” in diameter,
with a minimum thickness of 24 gauge black steel.
Aluminum and Galvanized steel pipe is not acceptable for
use with the F400 Castine. These materials cannot
withstand the extreme temperatures of a wood fire and
can give off toxic fumes when heated.
Do not use the connector pipe as a chimney.
Each chimney connector or stove pipe section must be
installed to the stove flue collar and to each other with
the male (crimped) end toward the stove. See figure 2.
This prevents any amount of condensed or liquid creosote
from running down the outside of the pipe or the stove
top. All joints, including the flue collar connection must
be secured with three sheet metal screws to ensure that
the sections do not separate.
For the best performance the chimney connector should
be as short and direct as possible, with no more than two
90° elbows. The maximum horizontal run is 36” and a
recommended total length of stove pipe should not
exceed 10 feet. Always slope horizontal runs upward ¼”
per foot toward the chimney.
No part of the chimney connector may pass through an
attic or roof space, closet or other concealed space, or
through a floor or ceiling. All sections of the chimney
connectors must be accessible for cleaning. Where
passage through a wall or partition of combustible
construction is desired, the installation must conform with
NFPA 211 or CAN/CSA-B365M, and is also addressed in this
manual.
Do not connect this unit to a chimney flue servicing
another appliance.
Chimney requirements
There are two types of chimneys suitable for the F 400
Castine:
1. A code-approved masonry chimney with a flue liner.
2. A prefabricated chimney complying with the
requirements for Type HT (2100°F) chimneys per UL 103
or ULC S629.
The chimney size should not be less than the cross-
sectional area of the flue collar, and not more than three
times greater than the cross-sectional area of the flue
collar.
When selecting a chimney type and the location for the
chimney in the house, keep this in mind: It is the chimney
that makes the stove work, not the stove that makes the
chimney work. This is because a chimney actually creates
a suction, called “draft” which pulls air through the stove.
Several factors affect draft: Chimney height, cross-
sectional area (size), and temperature of the chimney, as
well as the proximity of surrounding trees or buildings.
As a result, a short masonry chimney on the exterior of a
house will give the poorest performance. This is because
it can be very difficult to warm the chimney thereby
creating inadequate draft. In extremely cold northern
areas it may be necessary to reline the chimney or extend
its height to help establish draft.
Oppositely, a tall masonry chimney inside the house is
easier to keep warm and will perform the best.
The following guidelines give the necessary chimney
requirements based on the national code (ANSI-NFPA
211for the US. And CSA CAN-B365-M for Canada). However,
many local codes differ from the national code to take into
account climate, altitude, or other factors.
Notice: It is important that you check with your local
building officials to find out what codes apply in your area
before installing your new F 400 Castine.
Remember: Your local inspector(s) have the final authority
in approving your installation. It is always best to consult
them prior to the installation.
Do not connect this stove to any air distribution duct or
system.
Masonry Chimneys
When installing the F 400 Castine into a masonry chimney
you must conform to all of the following guidelines:
•The masonry chimney must have a fireclay liner or
equivalent, with a minimum thickness of 5/8” and
USA

5
must be installed with refractory mortar. There must
be at least ½” air space between the flue liner and
chimney wall.
•The fireclay flue liner must have a nominal size of 8” X
8”, and should not be larger than 8”X 12”. If a round
fireclay liner is to be used it must have a minimum
inside diameter of 6” and not larger than 8” in
diameter. If a chimney with larger dimensions is to be
used, it should be relined with an appropriate liner that
is code approved.
•The masonry wall of the chimney, if brick or modular
block, must be a minimum of 4” nominal thickness. A
mountain or rubble stone wall must be at least 12”
thick.
•A newly-built chimney must conform to local codes
and in their absence must recognize national
regulations.
•When using an existing chimney, it must be inspected
by a professional licensed chimney sweep, fire official,
or code officer, to ensure that the chimney is in proper
working order.
•No other appliance can be vented into the same flue.
•An airtight clean-out door should be located at the
base of the chimney.
Prefabricated Chimneys
If a prefabricated metal chimney is to be used it must be a
chimney type that is tested and listed for use with solid
fuel burning appliances. High Temperature (HT) Chimney
Standard UL 103 for the U.S. and High Temperature
Standard ULC S-629 for Canada.
The manufacturer’s installation instructions must be
followed precisely. Always maintain the proper clearance
to combustibles as established by the pipe manufacturer.
This clearance is usually a minimum of 2”, although it may
vary by manufacturer or for certain chimney components.
Chimney Height
Whether a masonry chimney or prefabricated metal
chimney is used it must be the required height above the
roof line.
The requirement is:
The chimney must be at least 3 feet higher than the
highest point where it passes through the roof and at least
2 feet higher than the highest part of the roof or structure
that is within 10 feet of the chimney, measured
horizontally. See figure 3.
Chimneys shorter than 14 feet may not provide adequate
draft. This could result in smoke spilling into the room
from the stove when loading the stove, or when the door
is open. In addition, inadequate draft can cause back
puffing, which is a build up of gases inside the firebox.
Other times, chimney height can create excessive draft
which can cause high stove temperatures and short burn
times. Excessive drafts can be corrected by installing a
butterfly damper. If you suspect you have a draft problem,
consult your dealer.
Wall Pass Throughs
When your installation unavoidably requires the chimney
connector to pass through a combustible wall to reach the
chimney, always consult your local building officials, and
be sure any materials to be used have been tested and
listed for wall pass-throughs.
In the U.S.
The National Fire Protection Association’s publication,
NFPA 211, Standard for Chimneys, Fireplaces, Vents and Solid
Fuel Burning Appliances permits four methods for passing
through a combustible wall. Before proceeding with any
method be sure to consult with your local building officials
to discuss any local code requirements.
Common Method
When passing through a combustible wall to a masonry
chimney this method requires the removal of all
combustible materials from at least 12” around the
chimney connectors proposed location. With a 6” round
liner the minimum area required would be 31” x 31” square.
The space is then filled with at least 12” of brick around a
fireclay liner. Remember, the liner must be ASTM C35 or
equivalent, with a minimum wall thickness of 5/8”.
It is important to remember to locate the pass-through
at least 18” from the ceiling for proper clearance to
combustibles.
It will be necessary to cut wall studs, install headers, and
construct a sill frame to maintain the proper dimensions
and to support the weight of the brick.
The bricks must be solid brick with a minimum of
3 ½ “ thick (4” nominal).
Refractory mortar must be used at the junction of the
chimney and the pass-through liner. The pass-through
liner must not penetrate the chimney liner beyond the
inner surface of the chimney liner. Use extreme care when
constructing the hole in the chimney liner, the tiles can
shatter easily. See figure 3.
In Canada
The Canada the standard has been established by the
Canadian Standard Association. The installation must
conform to CAN/CSA-B365, Installation Code for Solid Fuel
Burning Appliances and Equipment.
Before proceeding be sure to consult your local building
inspector.
USA

6
Common Method
This method requires the removal of all combustible
materials from at least 18” (457mm) around the chimney
connector’s proposed location. With a 6” round liner the
minimum area required would be 43” x 43” square.
It is important to remember to locate the pass-through
at least 18” from the ceiling to maintain the proper
clearance to combustibles.
The space that is cleared of combustible materials must
then remain empty. Sheet metal panels can then be used
to cover the area. However, when using a panel on both
sides of the wall each cover must be installed on
noncombustible spacers at least 1” from the wall. If one
panel of sheet metal is to be used it may be installed flush
to the wall.
See section 5.3.1 and 5.3.2 of CAN/CSA - B365-M91.
Consult your local building inspector, authorized Jøtul
Dealer, NFPA 211 in the U.S. or CAN/CSA-B635 in Canada
for other approved wall pass-through methods.
Connecting to the chimney
Masonry Chimney
When installing a Jøtul F 400 Castine into a masonry
chimney through a “thimble”(the opening through the
chimney wall to the flue), the thimble must be lined with
ceramic tile or metal and be securely cemented in place.
The chimney connector/stove pipe must slide completely
inside the thimble to the inner surface or the flue liner. It
may be necessary to make use of a thimble sleeve (a pipe
with a slightly smaller diameter than standard stove pipe).
This special pipe can be easily installed into a thimble. See
figure 4.
Make sure the connector pipe or thimble sleeve does not
protrude into the flue liner, thereby restricting the area
the smoke has to flow through. This bottle-neck will have
a negative affect on the chimney system.
The chimney connector should be sealed at the thimble
with refractory cement and the stove pipe leading to the
stove should have a minimum of three screws.
Do not connect this stove to a chimney flue servicing
another appliance of any kind.
Hearth-mount into a Masonry
Fireplace
The F 400 Castine may be installed into a masonry
fireplace provided the height of the opening is a minimum
of 29 1/2”. If necessary, the short leg package reduces the
stove’s height by 2 1/4”.
When installing the stove into a masonry fireplace, code
requires that the fireplace damper plate be removed or
securely fixed in the open position. A connector pipe must
then extend from the stove’s flue exit through the damper
area of the fireplace and into the chimney tile liner. See
figure 5.
The inside area of the flue liner must not be less than the
area of the stove’s flue exit, and cannot be more than three
times greater than the cross sectional area of the stove’s
flue exit.
If the chimney liner is too large to accommodate the stove,
an approved relining system must be installed to resize
the flue.
A new sheet metal damper block-off plate must be
installed around the connector pipe at the damper frame
and sealed with the proper sealant (usually High-Temp
Silicone).
Fireplace installation must also observe the proper
clearances to surrounding trim and mantels (addressed
in clearance section of this manual). In addition, fireplace
installations must also adhere to the floor protection
guidelines specified in the following section.
Prefabricated Chimneys
When installing the F 400 Castine to a prefabricated metal
chimney always follow the pipe manufacturer’s
instructions and be sure to use the components that are
required. This usually includes some type of “smoke pipe
adapter” that is secured to the bottom section of the metal
chimney and allows the chimney pipe to be secured to it
with three sheet metal screws. See figures 6 and 7.
Clearances to combustibles
Floor Protection
(In the U.S. and Canada)
The F 400 Castine requires any one of the following three
forms of hearth protection:
1. Any UL, ULC or WH listed hearth board. (No bottom
heatshield required).
2 Any non-combustible material that has a minimum
R- value of 2.0. (No bottom heatshield required.)
USA

7
3. Any non-combustible material with the use of the
stove’s bottom heatshield.
All forms of protection must be a non-combustible surface
extending a minimum of 18” (460mm) in front of the
stove. And 8” (200mm) from the sides and back of the
stove (measured from side and back panels).
This will result in a minimum floor protection of 42” W X
44”D. See figure 8.
In a rear vent installation the floor protection must also
extend under the stove pipe a minimum of 2” (50mm)
beyond either side of the pipe. See figure 8.
When constructing a new hearth or floor pad, consult
appendix a at the back of this manual for alternate
materials and methods.
Clearances to walls and ceilings
The following clearances have been tested to UL and ULC
standards and are the minimum clearances specifically
established for the Jøtul F 400 Castine.
The following diagrams give the required clearances you
must maintain when installing the F 400 Castine near
combustible surfaces.
A combustible surface is anything that can burn (i.e. sheet
rock, wall paper, wood, fabrics etc.). These surfaces are not
limited to those that are visible and also include materials
that are behind non-combustible materials.
If you are not sure of the combustible nature of a material,
consult your local fire officials.
Remember: “Fire Resistant” materials are considered
combustible; they are difficult to ignite, but will burn. Also
“Fire-rated” sheet rock is also considered combustible.
Contact your local building officials about restrictions and
installation requirements in your area.
See pages 12- 13 for complete clearance requirements and
diagrams.
Using Shields to Reduce Clearances
Pipe shields: When using listed pipe shields to reduce the
connector clearance to combustibles, it must start 1” above
the lowest exposed point of the connect pipe and extend
vertically a minimum of 25” above the top surface of the
stove.
Double wall pipe: Listed double wall pipe is an acceptable
alternative to connector pipe heatshields.
Wall-mounted protection: When reducing clearances
through the use of wall mounted protection:
In the U.S. refer to NFPA 211, Standard for Chimneys,
Fireplaces, Vents and Solid Fuel Burning Appliances, for
acceptable materials, proper sizing and construction
guidelines.
In Canada, refer to CAN/CSA-B365, Installation Code for
Solid-Fuel Burning Appliances and Equipment, also for
acceptable materials, proper sizing and construction
guidelines.
Stove Mounted Heatshield: A stove rear heatshield has
been specifically designed for the F 400 Castine.
In the U.S. and Canada the rear heatshield part number
is # 154911. No other heat shield may be used.
NOTICE: Accessories for woodstoves for clearance
reduction have been developed by many manufacturers.
If not following the methods of the installation codes, be
sure that any accessory you choose has been tested by an
independent laboratory and carries the laboratory’s
testing mark. Make sure to follow all of the manufacturer’s
instructions.
Always contact your local building inspector or fire officials
about restriction and requirements in your area. Reminder,
it is the local officials who have final authority in the
installations approval.
Alcove
The F 400 Castine can be installed in an ALCOVE situation
provided: See figures 9 and 10.
1. The stove must be installed with listed double wall
pipe.
2. In a PROTECTED alcove installation both side walls
and rear wall must be protected per NFPA 211 or CAN/
CSA-B365. The wall protection must be elevated 1”
from the floor and at least 1” off the combustible
wall to allow for an air-flow.
3. The height of the wall protection including the bottom
air space must be 48”.
4. The Bottom heatshield is required in all Alcove
installations.
5. ALCOVE floor protection must be: a UL/ULC or WHI
listed hearth pad or a non combustible material with
a minimum R value of 2.0.
6. Minimum ceiling height in an unprotected installation,
off the top of the stove is 58” (1475mm). The minimum
ceiling height off the top of the stove in a protected
ceiling installation is 36” (915mm).
Mobile home installations
The F 400 Castine has been approved for use in mobile
homes in the U.S. and Canada, provided:
USA

8
1. The stove is secured to the floor or the mobile home.
Floor mounting kit #750304.
2. The stove is provided outside air for combustion.
Outside Air kit #154335(see page 16 for more details).
3. Must be installed in accordance to 24CRR, Part 3280
(HUD).
As always consult with your local building inspector or fire
officials about restrictions and requirements in your area,
prior to installing the stove.
WARNING: Do not install in a bedroom/sleeping room. The
structural integrity of the mobile home’s floor, wall,
ceiling/roof must be maintained.
Operation
Before building a fire in your new F 400 Castine, please
read the following section carefully and completely.
Do not burn
First this stove is designed to burn natural wood only,
wood that has been air-dried for a period of 6 to 14 months
will provide the cleanest most efficient heat.
Do not burn:
•Coal •Treated or painted wood
•Garbage •Chemical Chimney cleaners
•Cardboard •Colored paper
•Solvents •Any synthetic fuel or logs
The burning of any of these materials can result in the
release of toxic fumes. Never use gasoline, gasoline-type
lantern fuel, kerosene, charcoal lighter fluid, or similar
liquids to start or “freshen-up” the fire. Always keep such
liquids away from the heater at all times.
IMPORTANT: Never build or allow the fire to rest directly
on the glass. The logs should always be spaced at least
one inch from the glass to allow for proper air flow within
the stove.
Controls on the Jøtul F 400 Castine
A single air control lever controls the burn time and heat
output of the stove. This primary air control lever is located
on the front of the stove directly above the ash lip. The
primary air lever, controls the amount of air that enters
the stove for combustion.
When first starting or reviving the fire: the primary control
lever should be at the far right position, which allows the
maximum amount of air into the stove. The more air
entering the stove the hotter the fire the shorter the burn
time. Moving the lever to the left reduces the air-flow into
the stove which prolongs the fire at a lower heat output.
See figure 11.
Breaking in your new stove
Your new F 400 Castine is constructed of cast iron and
stove furnace cement. This type of construction requires
the stove to be “broken-in” gradually so that heat
expansion does not occur too quickly and cause damage.
Complete the following steps for the proper break-in
procedure for the F 400 Castine:
1. Light a small fire, newspaper and kindling only, only
allow the stove to reach a maximum surface
temperature of 200°. Burn for approximately 1 hour.
2. Allow stove to cool to room temperature.
3. Light a second fire, allowing the stove to reach a
maximum temperature of 300° for 1 hour.
4. Cool the stove to room temperature.
5. Light a third fire and gradually allow the stove to reach
a surface temperature of 400°
6. Cool stove to room temperature. This completes the
“break-in” procedure.
To monitor the stove’s temperature, Jøtul recommends the
use of a magnetic stove-top thermometer, placed directly
on the corner of the stove’s top plate.
Never allow the stove to exceed a 400° surface
temperature during any “break-in fire” with the exception
of the last “break-in” fire.
Note: It is normal for a new painted stove to emit an odor
and even smoke during its first several fires. This is caused
by the seasoning of the high temperature paint and will
diminish with each fire and will eventually disappear.
Opening a window or door to provide additional
ventilation will reduce the odor as this process takes its
course.
Starting and maintaining a fire
Burn only solid wood directly on the bottom grate of the
stove, do not elevate the fire in any way.
• The ash pan door on the stove must always be securely
closed when the stove is in operation.
• Burning the stove with the ash pan open will over-fire
the stove and cause interior damage.
With the primary air control lever in the full open position,
start with several sheets of crumbled newspaper placed
directly on the grate. On top of the newspaper, place
several pieces of small dry kindling (approx. 1” in diameter)
with two to three larger logs (approx. 3” to 5” in diameter)
on top.
Light the fire and close the door, slowly building the fire
by adding larger and larger logs. Be sure to follow the
break-in procedure before creating a fire that will damage
the stove.
Once the stove has reached a surface temperature range
USA

9
of between 400° and 600°, adjust the primary air control
lever as necessary to generate the heat output and burn
time desired.
Jøtul recommends the use of a magnetic stove top
thermometer to monitor the surface temperature of the
stove. The optimum surface temperature range for the
most efficient burn is between 400° and 600°.
See figure 12 -page 16 for the optimum locations of a stove-
top thermometer.
Important: Never overfire the stove. If any part of the
stove or chimney glows, you are overfiring, and a house
fire or serious damage to the stove or chimney could result.
Immediately close down the air control if you notice this
condition.
Adding fuel
When reloading the stove while it is still hot and a bed of
hot embers still exist, follow this reloading procedure:
•Always wear gloves when tending to the stove.
•Push the air control lever to the full open position (far
right).
•Wait a few seconds before opening the door.
•Use a stove tool or poker to distribute the hot embers
equally around the firebox.
•Load the fuel, usually with smaller logs first.
•Close the door, be sure to latch the door tightly.
•Wait 5 – 10 minutes before adjusting the primary air
to the desired heat output setting.
•(If you have at least a 2” thick ember bed when
reloading, it may be possible to close the door and
immediately adjust the air control setting).
The formation of creosote
When wood is burned slowly and at low temperatures, it
produces tar and other organic vapors, which combine
with moisture to form creosote. The slow moving smoke
carries the creosote vapors, which condense in the cooler
chimney flues, and this creosote then sticks to the chimney
walls.
The creosote that accumulates in the chimney is highly
flammable and is the fuel of chimney fires. To prevent
chimney fires it is important to have the chimney and
chimney connector pipe inspected and/or cleaned semi-
annually. A qualified chimney sweep or other authorized
service person can provide this service.
It is also important to remember that chimney size,
temperature and height all affect draft which in turn
affects the formation of creosote. Be sure to follow the
installation and operation guidelines established in this
manual.
Maintenance
Ash removal
Of course, for your protection always wear safety gloves
when handling the ash pan.
Ash removal will be required periodically depending on
how frequently the stove is used. Conveniently, the F 400
Castine is equipped with an ash pan assembly for easy
ash removal, without the need for opening the front doors.
The ash pan door is located under the front ash lip of the
stove. To open the ash door place the receptacle end of
your specially designed ash tool onto the square fitting of
the ash door latch. Rotate the door counterclockwise to
unlatch the door and clockwise to latch the door.
With a gloved hand grasp the ash pan handle and remove
the ash pan. Always close the ash pan door before leaving
to dispose of the ashes.
The ashes should be placed in a metal container equipped
with a tight sealing lid. The container should be placed on
a noncombustible floor or on the ground, well away from
all combustible materials, pending final disposal. If the
ashes are disposed of by burial in soil or otherwise locally
dispersed, they should be retained in the closed container
until all cinders have thoroughly cooled.
Glass care
Cleaning: On occasion it will be necessary to clean the
carbon deposits and fly ash off of the glass. If the carbon
and fly ash are allowed to remain on the glass for an
extended period of time it could eventually cause the glass
to become etched and cloudy. Any creosote, which might
deposit on the glass, will burn off during the next hot fire.
The proper cleaning procedure is as follows:
1. Glass needs to be completely cool.
2. Only use a cleaner that is specifically designed for this
purpose. The use of abrasives will damage the glass
and ultimately leave the glass frosted.
3. Rinse and dry glass completely, before burning your
stove.
IMPORTANT: Replace glass only with a ceramic glass panel
specifically designed for the Jøtul F 400 Castine. Do not
use substitutes. Replacement glass panels can be ordered
through your Jøtul dealer.
Glass Removal: Always operate the doors slowly and
cautiously to avoid cracking or breaking the glass. Never
use the door to push wood into the firebox. If the glass
becomes cracked or broken follow this procedure for
replacement:
Never operate the stove with a cracked or
broken glass panel.
USA

10
1. Remove the doors from the stove and place on a flat
surface.
2. Carefully remove all of the glass clips from the inside
of the doors.
3. Gently remove the glass panel and gasketing.
4. Remove all remaining debris from the glass area using
a wire brush.
5. Apply a small bead of gasket/stove cement and the
new gasket. Do not overlap the ends of the gasket
rope.
6. Center the new glass panel over the gasket and
reinstall the glass clips. See figure 13.
7. It may be necessary to retighten the glass clips after
the stove has been burned and the gasketing has been
seated.
IMPORTANT: The side of the glass treated with an infrared
coating (marked on the perimeter) should always be facing
outward. It is extremely important to tighten the glass
clips slowly and in a repeating pattern, like tightening the
lugs on an automobile wheel.
General Maintenance
Like your car, regular maintenance prolongs the life of your
appliance. The following procedures do not take long and
are generally inexpensive, but when done consistently,
increase the life of your appliance and in turn, increase
your years of enjoyment.
At least once a year you should perform the following
maintenance procedures:
•Thoroughly clean the stove. Enamel surfaces should
be cleaned with soap and water.
•Empty stove of all soot and ashes. Only use a vacuum
for this job if the vacuum is specifically designed for
ashes.
•Inspect the stove; using a strong light inspect the stove
inside and out for cracks or leaks. Replace all cracked
parts and repair any cement leaks with furnace
cement.
Gaskets
Check door and window gaskets for tightness. To check
the seal of the front doors, close and latch the doors on a
dollar bill and slowly try to pull the dollar bill free. If it
can be easily removed then the seal is too loose. Check
several spots around the door, and repeat the procedure
on the ash pan door as well.
If gaskets need to be replaced, scrape out the old gasket
and cement and clean the area with a wire brush. Apply a
small bead of cement and push in the new gasket. After
closing and latching the doors wipe clean, any excessive
cement that has come from beneath the gasketing.
Gasket list for the F 400 Castine
Part Cat.no Gasket type Length
Ash house 129644 1/4” SA 3'
Ashdoor 100038 3/8" LD 2’7"
Baffle 129644 1/4” SA 7’4"
Burnplate left 200028 3/16" SA 7"
Burnplate right 200028 3/16" SA 7"
Smoke Tube 129644 1/4” SA 3'
Left Door 100038 3/8" 2’6"
Glas, Left Door 200028 3/16" SA 3'
Right Door 100038 3/8" 4'
Glas, Right Door 200028 3/16" SA 3'
Top 100038 3/8" 5’7"
The F 400 Castine is designed to burn cleanly and
efficiently when used according to the guidelines
expressed in these operating instructions. However, to
maintain the proper performance, a yearly chimney
inspection and cleaning in necessary. Failure to keep the
chimney system free of creosote and build up could result
in a serious chimney fire.
Accessories
Many accessories have been manufactured for use with
the Jøtul F 400 Castine. Only use accessories that are
specifically designed for the Jøtul F 400 Castine.
Firescreen (part # 129650)
The F 400 Castine has been approved for use as an open
fireplace, with front door open. This feature is especially
nice when the ambience of a fire is desired. Some care
should be taken when operating the stove as a fireplace.
•Always have the firescreen in place, attached to the
stove front.
•Never overload the stove, for the best appearance burn
in the traditional three log configuration.
•Reminder, when burning the stove with the screen in
place, you are sacrificing efficiency for aesthetics, and
you will be consuming wood at a much faster rate.
WARNING: Operate your Jøtul F 400 Castine with the front
doors fully open and the firescreen in place or fully closed.
Partially opened doors may result in overfiring. Also, if the
doors are left partly open, gas and flame may be drawn out
of the stove opening, creating risks from both fire and smoke.
Outside Air Kit (part # 154335)
In certain installations it may be necessary to provide
outside air to your F 400 Castine wood stove. Guidelines
to determine the need for additional combustion air may
not be adequate for every situation. If in doubt, it is
advisable to provide additional air.
USA

11
The Outside Air Kit includes an adapter to mount onto
the stove that will except the fresh air pipe.
Installation will require some additional materials:
a. The appropriate length of metallic pipe for a conduit
of the outside air (3” diameter).
b. A rain/weather resistant cap for the outside of the
house.
c. A rodent screen- that is no larger than 1/4” mesh.
Outside air may be required if:
1. The F 400 Castine does not “draw” steadily, smoke
rollout occurs, fuel burns poorly, or back-drafts occur
whether or not there is combustion present.
2. Existing fuel-fired equipment in the house, such as
fireplaces or other heating appliances, smell, do not
operate properly, suffer smoke roll-out when opened,
or back -draft whether or not there is combustion
present.
3. Opening a window slightly on a calm (windless) day
alleviates any of the above symptoms.
4. The house is equipped with a well-sealed vapor barrier
and tight fitting windows and/or has any powered
devices that exhaust house air.
5. There is excessive condensation on the windows in the
winter.
6. A ventilation system is installed in the house.
If these or other indications suggest that infiltration air is
inadequate, additional combustion air should be provided
from the outdoors. Outside combustion air can be
provided to the appliance by the following means:
1. Direct connection: The F 400 Castine has been tested
and listed for use use with a outside air kit. This outside
air kit is connected directly to the stove, be sure to
follow the instructions provided with the kit.
2. Indirect method: Outside air is ducted to a point no
closer than (12”) 300mm from the appliance, to avoid
affecting the performance of the appliance.
3. A mechanical ventilation system: If the house has a
ventilation system (air change or heat recovery):
a. The ventilation system may be able to provide
sufficient combustion make-up air for the solid -
fuel fired appliance.
b. The homeowner should be informed that the
ventilation system might need to be rebalanced
by a ventilation technician after installation of the
appliance.
Floor Bracket Kit (part # 750304)
Use of the Floor Bracket Kit is required in all mobile home
installations to secure the stove to the floor. Complete
installation instructions and diagrams are supplied with
each Floor Bracket Kit.
USA
Rear Heatshield (part # 154385)
A stove rear heatshield has been specifically designed for
the F 400 Castine to reduce clearances off the rear of the
stove to combustible materials. Use of the heatshield does
not affect the clearance off the sides of the appliance. See
pages 12-13 for specific clearance requirements. Complete
installation instructions are supplied with the heatshield.
No other type of heatshield may be used on the rear of
the F 400 Castine.
Bottom Heatshield (part # 129884)
A bottom heatshield, which is packed inside the stove, has
been specifically designed for the F 400 Castine. It is
required in all alcove installations. Use of the bottom heat
shield does not affect the floor protection requirements
discribed on page 16 of this manual.
No other type of heatshield may be used on the bottom
of the F 400 Castine.
Stove-top Thermometer (part # 5002)
Jøtul recommends the use of a magnetic stove-top
thermometer to monitor the surface temperature of the
stove. The optimum surface temperature range for the
most efficient, clean burn is between 400° and 600°.

12
F 400 Castine Woodstove Clearances
Unprotected Surface
Parallel to the Wall Protected Surface
Parallel to the Wall
Unprotected Surface
Corner Installation Protected Surface
Corner Installation
E
F
G
H
CF
A
K
L
M
N
O
P
Q
R
B
I
IL
OR
S
T
U
V
W
X
U
X
D
PER NFPA 211 or
CAN/CSA-B365
PER NFPA 211 or
CAN/CSA-B365
Important:
Connector heatshields and double wall pipe must be a listed product.
Always follow the manufacturer’s instructions.
= SINGLE WALL PIPE WITH CONNECTOR SHIELDS = DOUBLE WALL PIPE
J
C
USA

13
Stove Unprotected Surface Protected Surface Installation
Clearances Installation PER NFPA211 OR CAN/CSA -B365-M93
SIDE REAR CORNER* SIDE REAR CORNER*
Stove -no heatshield 19" AA
AA
A 25" BB
BB
B 18" CC
CC
C 11” DD
DD
D 7" EE
EE
E 8" FF
FF
F
single wall pipe 485mm 635mm 460mm 280mm 180mm 205mm
Stove -with rear heatshield 18" GG
GG
G 18" HH
HH
H 13" II
II
I 11” JJ
JJ
J 7” KK
KK
K 8" LL
LL
L
single wall pipe 460mm 460mm 330mm 280mm 180mm 205mm
Stove -no heatshields 16” 19” 13” 8” 7” 6”
double wall pipe 405mm 485mm 330mm 205mm 180mm 150mm
Stove -with rear heatshield 15" M 7" NN
NN
N 11" OO
OO
O 8" PP
PP
P 7" QQ
QQ
Q 6" RR
RR
R
with connector shield 380mm 180mm 280mm 205mm 180mm 150mm
Stove -rear heatshield 15" SS
SS
S 7" TT
TT
T 11" UU
UU
U 8" VV
VV
V 7" WW
WW
W 6" XX
XX
X
with double wall pipe 380mm 180mm 280mm 205mm 180mm 150mm
Connector Unprotected Surface Protected Surface
Clearances (Pipe) Vertical Installation Vertical Inatallation
per NFPA211 OR CAN/CSA-B365-M93
Single wall pipe 25" 12"
635mm 300mm
Single wall pipe 18” 7”
with rear heatshield 460mm 180mm
Single wall pipe 7" 7"
with connector shields 180mm 180mm
Double wall pipe 7" 7"
180mm 180mm
Connector Unprotected Surface Protected Surface
Clearances (Pipe) Horizontal Installation Horizontal Installation
per NFPA211 OR CAN/CSA-B365-M93
Single wall connector 18" 460mm 7" 180mm
Double wall Pipe 6" 150mm 6" 150mm
Mantel and Trim Stove to 1" thick or less, side trim 13" 300mm
Clearances Stove to 1" thick or less, top trim 23" 585mm
Stove to mantel- maximum mantel depth 12" 25" 635mm
F 400 Castine Woodstove Clearances
USA


18
Parts list for the F 400
Castine woodstove
Consult your dealer for part numbers and
replacement parts.
1 Ashlip
2 Left door
3 Right door
4 Right side panel
5 Front panel
6 Top casting
7 Upper back panel
8 Smoke outlet
9 Back panel
10 Left side panel
11 Leg (long leg)
12 Upper bottom panel
13 Front door shaft (exterior)
Latch
Nut
Spring
14 Right burn plate
15 Right glass panel
16 Left glass panel
17 Air wash manifold
18 Top baffle (stainless steel)
19 Baffle cover (cast iron)
20 Air inspection cover
21 Rear burn plate
22 Fire brick (3)
23 Bottom grate
24 Left burn plate
25 Lower bottom panel
26 Ashpan housing
* Ashpan
27 Air slider/valve
28 Air devider
29 Door pins
30 Air control lever (chrome)
Allen head screw
31 Ashpan door
* Ashpan door pin
32 Ash door handle
Loop handle
Set screw
Latch
Spring
Nut
* Not shown
Appendix A
Alternate floor protection
All floor protection materials must be non-combustible ie. metal, brick,
stone, mineral fiber boards). Any combustible material may not be
used.
The easiest means of determining if a proposed alternate floor material
meets requirements listed in this manual is to follow this procedure.
R-value = thermal resistance
k-value = thermal conductivity
C-value = thermal conductance
1. Convert the specification to R-value;
a. If R-value is given, no conversion is needed.
b. If k-value is given with a required thickness (T) in inches: R=1/k X T.
c. If C-value is given: R=1/C.
2. Determine the R-value of the proposed alternate floor protector.
a. Use the formula in Step 1 to convert values not expressed as “R”.
b. For multiple layers, add R-values of each layer to determine overall
R-value.
3. If the overall R-value of the sustem is greater than the R-value of the
specified floor protector, the alternate is acceptable.
EXAMPLE:
The specified floor protector should be 3/4” thick material with a k-factor
of 0.84. The proposed alternate is 4” brick with a C-factor of 1.25 over 1/
8” mineral board witha k-factor of 0.29.
Step A. Use formula above to convert specifications to R-value. R=1/k X
T= 1/.84 X .75 = .893
Step B. Calculate R of proposed system.
4” brick of C-1.25, therefore R brick = 1/C = 1/1.25 = 0.80.
1/8” mineral board of k = 0.29 therefore
R mineral board = 1/.29 X 0.125 = 0.431
Total R = R brick + R mineral board=
0.8 + 0.431=1.231
Step C. Compare proposed system R = 1.231 to specified R of 0.893. Since
R is greater than required, the system is acceptable.
Definitions:
Thermal conductance =
C = Btu = W
(hr)(ft2)(F) (m2)(K)
Thermal conductivity =
k = Btu = W = (Btu)
(hr)(ft2)(F) (m2)(K) (hr)(ft)(F)
Thermal resistance=
R = Btu = (m2)(K) = (Btu)(inch)
(hr)(ft2)(F) W (hr)(ft2)(F)
THE JØTUL F 400 CASTINE WOODSTOVE REQUIRES FLOOR PROTECTION
WITH A MINIMUM INSULATING R VALUE OF 0.5.
ALCOVE INSTALLATION REQUIRE A MINIMUM R VALUE OF 1.6. (IF A UL/
ULC or WHI LISTED HEARTH PAD IS NOT USED.)
USA


21
NORSK
Innhold
Forhold til myndighetene
Tekniske data for Jøtul F 400 ......................................................19
Sikkerhetsregler .............................................................................20
Brannforebyggende tiltak ...........................................................20
INSTALLASJON AV JØTUL F 400
Fundamentering ............................................................................20
Skorstein ...........................................................................................20
Luftsirkulasjon ................................................................................ 20
Montering før installasjon ..........................................................20
Kontroll av funksjoner ..................................................................20
Montering av røykrør ...................................................................21
Tilslutning til skorstein ................................................................21
BRUKSANVISNING
Første gangs opptenning og daglig bruk ...............................21
Ved første gangs oppfyring ........................................................ 21
Daglig bruk ...................................................................................... 21
VEDLIKEHOLD
Rengjøring av glass .......................................................................22
Fjerning av aske ..............................................................................22
Rensing og sotfjerning i produktet .......................................... 22
Feiing av røykrør til skorstein ..................................................... 22
Kontroll av ildstedet ...................................................................... 22
Utvendig vedlikehold ....................................................................22
Vedlengde-, mengde-, og kvalitet .............................................22
Jøtuls definisjon av kvalitetsved................................................22
SERVICEARBEIDER
Utskifting av brennplater ............................................................23
Utskifting av hvelv .........................................................................23
Tilleggsutstyr
Gnistfanger ...................................................................................... 23
Korte bein ......................................................................................... 23
Skjermplate - bak ........................................................................... 23
FIGURER-TEGNINGER ..........................................55-56
Forhold til myndighetene
Jøtul F 400 er et rentbrennende produkt og har
produktdokumentasjon for luftforurensning og
brannteknisk sikkerhet utstedt av SINTEF Bygg og
miljøteknikk- Norges Branntekniske Laboratorium med
registreringsnr. SINTEF 045-089. Dette er påført
brennkammerets bakplate.
Installasjon av et ildsted må være i henhold til det enkelte
lands lover og regler og din forhandler kan tilby deg hjelp
for å sørge for at installasjonen er sikker og lovlig.
Monterings-, installasjons- og bruksanvisninger er vedlagt
produktet. Installasjonen kan først tas i bruk når den er
kontrollert av godkjent kontrollør.
Advarsel! Man må forsikre seg om at det er nok ventilasjon
i det rommet hvor ildstedet blir installert.
Utilstrekkelig ventilasjon kan forårsake oksygenmangel i
rommet. Dette kan lede til tretthet, kvalme og uvelhet, og
er meget farlig.
Det er viktig å forsikre seg om at pipen er riktig
dimensjonert for ildstedet og at pipetilslutningen er tett
og fungerer korrekt. Røykgass som trenger inn i lukkede
rom kan representere en alvorlig helsefare.
Et typeskilt av varmebestandig material er plassert på
skjermplaten for askehuset. Det inneholder følgende
informasjon; produsent, adresse, produktnavn,
katalognummer, produksjonsnummer, effekt,
godkjenningsnummer.
Tekniske data for Jøtul F 400:
Materiale: Støpejern
Overflatebehandling: Sort lakk, blåsort-, sjøgrønn- og
edelhvit emalje
Type brensel: Ved
Maks. vedlengde: 50 cm
Trekksystem: Luftspyling
Forbrenningssystem: Sekundærforbrenning
Røykuttak: Topp/bak
Røykrør: Ø 150 mm
Mulighet for stålpipe: Ja
Vekt ca.: 158 kg
Tilleggsutstyr: Gnistfanger, skjermplate-bak,
korte ben (155 mm)
Produktmål,
brannmurmål Se fig. 1

22
Sikkerhetsregler
Krav til gulvplate: Skal ildstedet anbringes på gulv av
brennbart materiale, må hele gulvet under ildstedet, og
minimum 30 cm foran ildstedet, dekkes av en plate av
ikke brennbart materiale.
Avstand fra produkt til vegg av brennbart materiale (fig.1):
Ved montering av skjermplate bak på produktet, kan
Ildstedet plasseres med en avstand på 100 mm til vegg av
brennbart materiale. Avstanden til sidevegg må være min.
300 mm.
(NB. Skjermplate er tilleggsutsyr)
NB! Røykrøret må skjermes når avstand fra ytterkant
røykrør til vegg av brennbart materiale er mindre enn 300
mm. (Skjermplate for røykrør kan bestilles hos din
Jøtulforhandler).
Avstand fra produkt til brannmur (fig. 1):
Ved rettveggsmontering er det mulig å plassere ildstedet
med en avstand på 40 mm mellom brannmur og
skjermplate- nårdenne er montert. Uten skjermplate er
ildstedet godkjent for plassering med en avstand på 100
mm fra produktets bakvegg/side til brannmur.
Krav til brannmur: Brannmuren skal være minst 100 mm
tykk og være utført av teglstein, betongstein eller
lettbetong. Andre materialer og konstruksjoner med
tilfredsstillende dokumentasjon kan også benyttes, f.eks.
Jøtul Brannpanel. NB! Bruk av naturstein er ikke tillatt.
Montering av ildsted i nisje: Et frittstående ildsted er tillatt
plassert i en nisje dersom denne er oppført med
brannmurs tykkelse. Nisjens minimumsmål må gi 100 mm
fri avstand fra produktet til bakvegg og sider. Nisjens
høyde skal være produktets maksimale høyde + nisjens
dybde. Fronten må være åpen.
Uisolert røykrør: Hvis uisolert røykrør går gjennom
etasjeskiller eller vegg, skal det støpes eller mures rundt,
slik at rørets ytre flate ikke kommer nærmere brennbart
materiale enn min. 300 mm. Isolerte røykrør kan ha en
annen avstand, jfr. eventuelt brannteknisk
produktdokumentasjon for røykrøret.
Brannforebyggende tiltak
Enhver bruk av ildstedet kan representere en viss fare. Ta
derfor hensyn til følgende anvisninger:
• Skal produktet anvendes med åpen dør, må alltid
gnistfanger brukes.
• Sørg for at møbler og annet brennbart materiale ikke
kommer for nær ildstedet. Det skal være en avstand
foran ildstedet på minst 600 mm.
• La ilden brenne ut. Slukk den aldri med vann da dette
kan skade produktet.
• Ildstedet blir varmt under fyring, og kan forårsake
forbrenning hvis det berøres.
• Aske må plasseres forsvarlig utendørs, eller tømmes der
dette ikke medfører brannfare.
• Til ethvert ildsted bør det være en
oppbevaringsbeholder av ikke-brennbart materiale
med lokk for sot og aske.
• Sot og aske må oppbevares i denne beholderen minst
1 uke, for å være sikker på at siste gnist er slukket. Må
beholderen tømmes før den tid, skal rikelig med vann
slås i beholderen og røres om.
• Ta gjerne vare på asken. Den er utmerket i bruk som
gjødsel til f.eks. roser.
Installasjon av Jøtul F 400
NB! Kontroller at ildstedet er fri for skader før
installasjonen begynner.
Produktet er tungt! Sørg for hjelp når det skal settes opp
og monteres.
Fundamentering
Dersom Jøtul F 400 skal plasseres på et tregulv, bør man
forsikre seg om at gulvet under ildstedet er dimensjonert
for dette.
Skorstein
Ildstedet kan tilknyttes teglstensskorstein,
elementskorstein eller stålskorstein. Se eget avsnitt.
Minimum skorsteinstverrsnitt må være 177 cm². (Tilsvarer
Ø150 mm). Tilslutning til skorstein må utføres i henhold
til skorsteinsleverandørenes monteringsanvisninger.
Luftsirkulasjon
Bruk av ildsted krever rikelig frisklufttilgang til rommet
der produktet er plassert. Dersom huset er tett, bør
rommet utstyres med ekstra frisklufttilførsel gjennom
ventiler. Mekanisk avtrekk bør ikke brukes i et rom med
ildsted. Dette kan skape undertrykk og kan trekke giftige
gasser inn i rommet.
Montering før installasjon
Jøtul F 400 selges i mange land, som har forskjellige krav
til ildsteder. Dette medfører at du som har kjøpt ildstedet
i Europa, må foreta noen små endringer før du installerer
produktet.
Rett innenfor dørene sitter det en inspeksjonsluke som er
festet med 2 stk. skruer i ytterkanten. Inspeksjonsluken
skrues av og erstattes med en tilsvarende del som ligger i
askeskuffen. Denne er merket: EurEur
EurEur
Europa.opa.
opa.opa.
opa. Sikkerhetsskruen
i midten (fig. 6) demonteres, og settes på den nye
inspeksjonsluken som er merket Europa.
NB! Skiven må være på utsiden.
Obs. Topplaten skal ligge løst montert på produktet.
NORSK

23
Topplaten er festet med 2 stk. transportskruer. Disse må
fjernes p.g.a. bestemmelser om tilgang til å feie røykrør.
Dette gjøres ved at røykstussen først skrues av, slik at man
kommer til de to transportskruene som sitter skrudd fra
innsiden av produktet, mellom sidestykker og topplate.
Det medfølger også et løst håndtak for betjening av dører,
Askeleppen, som ligger inne i brennkammeret, settes på
plass under døren. I brennkammeret ligger det også en
skjermplate som skal festes under askehuset.
Skjermplaten brettes ut, (fig. 2a) og festes med 2 skruer
som er festet i askehuset (fig. 2b).
Kontroll av funksjoner (fig. 3)
Når produktet er oppstilt, kontroller
alltid
betjeningsorganene. Disse skal bevege seg lett, og virke
tilfredsstillende.
Trekkventil (A):
Venstre posisjon = lukket.
Høyre posisjon = fullt åpnet.
Dørhåndtak (B):
Mot venstre = åpnet.
Mot høyre = lukket.
Askedør (C). Benytt det løse håndtaket, åpne døren ved å
dreie knotten en halv omdreining mot klokken. Bruk en
hanske e.l. og og trekk skuffen ut.
NB! Fjern asken kun når ildstedet er kaldt.
Montering av røykrør
Ildstedet bør prøvemonteres først uten at det tas hull i
skorsteinen. Se fig. 1 for mål til vegg av brennbart
materiale. Ildstedet monteres med Ø150 mm røykrør.
Dette skal være av godkjent tykkelse.
Jøtul F 400 er fra fabrikk montert for topputtak av
røykrøret. Ønsker man bakuttak, løsnes de to skruene på
sidene, og stussen roteres 1800. Fest skruene godt igjen.
• Røykrør Ø150 mm plasseres med den smaleste enden
av røret direkte inn i produktets røykuttak. På begge
sider av røykuttaket er det plassert en skrue (fig. 4-A).
Disse skal brukes til å feste røykrøret.
• Merk av på røykrøret hvor skruene treffer når røret er
helt i bunnen av røykuttaket, og bor et hull på 5,5 mm
i røykrøret for skruen.
• Bruk pakningssnor og kitt til å tette mellom røykrør
og produktets røykuttak. Plasser pakningssnoren rundt
nederste del av røykrøret og fyll opp mellomrommet
med kitt.
• Skru fast røykrøret.
NB! Det er viktig at sammenføyningene/røykrørene er
helt tette. Falsk luft e.l. kan ødelegge funksjonen.
Tilslutning til skorstein
Bor hull for røykrøret. Avstand fra ovn til skorstein skal
være som vist i fig. 1. Bruk alltid murstuss ved montering
på skorstein. På element-skorsteinene skal leverandørens
anbefalte murstuss brukes. Følg nøye leverandørens
monterings-/og bruksanvisning ved tilslutning til
skorstein med hensyn til tørketid av mørtel/ovnskitt, før
ildstedet tas i bruk.
Se til at røykrøret aldri heller inn mot skorsteinen. Det skal
minimum være vannrett, aller helst ha noen millimeters
stigning.
NB! En korrekt og tett tilslutning er meget viktig for
produktets funksjon.
Vær obs på at det er særdeles viktig at tilslutninger har en
viss fleksibilitet. Dette for å forhindre at setninger i huset
fører til sprekkdannelser.
Bruksanvisning
Første gangs opptenning og daglig
bruk
Jøtul F 400 er et rentbrennende produkt som ved hjelp av
ekstra tilførsel av forbrenningsluft, sørger for en
etterbrenning av skadelige gasser og partikler. Det er viktig
at systemet blir brukt riktig.
Ildstedet er utstyrt med betjeningsmuligheter som er
beskrevet i avsnittet: Kontroll av funksjoner.
Ved første gangs oppfyring
Åpne trekkventilen under døren fullt ved å skyve ventilen
helt til høyre (fig. 3-A). Legg i avispapir, fliser og ved, og
begynn med et lite bål. Øk mengden etterhvert og fyr friskt
et par timers tid. La det brenne ut og gjenta så dette en
gang til.
NB! Lukt under innfyring:
Lakkerte produkter: Under første gangs oppfyring kan
ildstedet gi fra seg en irriterende gass som kan lukte noe.
Gassen er ikke giftig, men det bør foretas en skikkelig
utlufting av rommet. Fyr med god trekk til samtlige gasser
har brent ut - til hverken røyk eller lukt merkes mer.
Emaljerte produkter: De første gangene et nytt ildsted
brukes, kan det danne seg kondensvann på overflaten.
Dette må tørkes bort for å unngå at det dannes varige
flekker når overflaten blir varm.
Daglig bruk
Tenn opp ved hjelp av avispapir og noe finkløyvd ved. Legg
to halvstore trestykker ut/inn på hver sin side i
peisbunnen. Krøll litt avispapir (evt. never fra bjørkeved)
mellom disse, legg litt finkløvd ved på kryss og tvers, og
tenn opp. Øk vedstørrelsen etterhvert.
NORSK

24
Trekkventilen (fig. 3- A) reguleres når veden har antent
skikkelig og brenner godt. Kontrollér at etterbrenning
(sekundærforbrenning) starter. Dette sees best ved å
kontrollere at gule stikkflammer brenner ved hvelvet.
Deretter regulerer du forbrenningen til ønsket
varmeavgivelse ved hjelp av trekkventilen.
Bruk
alltid
kvalitetsved. Det gir det beste resultatet, og vil
ikke påføre produktet skader.
Fyr aldri med følgende materialer:
- husholdningsavfall, plastposer o.l.
- malt eller impregnert trevirke (som er meget giftig)
- spon og- laminerte plater
- rekved (drivved)
Dette kan skade produktet, og er forurensende
.
NB! Bruk aldri væsker som bensin, parafin, rødsprit e.l. til
opptenning. Du kan skade både deg selv og produktet.
NB! Advarsel mot overfyring: Ildstedet må aldri overfyres.
Med overfyring forstås et for stort ilegg av ved, og/eller
ikke regulert trekk.
Trekken i skorsteinen bør ikke overstige 2,5 mmVs (25 Pa).
Et sikkert tegn på overfyring er at produktet får glødende
punkter. Redusér da trekkinnstillingen øyeblikkelig.
OBS! Hvert ilegg bør brenne ned til glør før du på nytt legger i.
Vedlikehold
Rengjøring av glass
Jøtul F 400 er utstyrt med topptrekk (luftspyling). Ved hjelp
av trekkventilen suges det luft inn i overkant av ildstedet
og spyles nedover langs innsiden av glasset. Dette
systemet har den fordelen at det gir bedre forbrenning
og reduserer sotbelegget på glasset.
Det vil allikevel alltid dannes noe sot på glasset, men
mengden vil være avhengig av de stedlige trekkforhold
og regulering av trekkventilen. Mesteparten av
sotbelegget vil normalt bli brent av når trekkventilen blir
regulert opp til maks., og det fyres friskt i ildstedet.
Et godt råd! Ved vanlig rengjøring; fukt et kjøkkenpapir
med varmt vann og ta på litt aske fra brennkammeret. Gni
over glasset og tørk deretter av glasset med rent vann.
Dersom det er behov for å rengjøre glasset grundigere, er
en glassrens å anbefale
(følg bruksanvisningen på flasken)
.
Fjerning av aske
Jøtul F 400 har askeskuff som gjør det enkelt å fjerne
asken. Skrap asken gjennom risten i fyrbunnen og ned i
askeskuffen. Bruk en hanske el.lignende- ta tak i
håndtaket til askeskuffen og bær asken ut. Se til at
askeskuffen aldri blir så full at det hindrer asken i å komme
gjennom fyrristen og ned i skuffen.
Dette må utføres kun når ildstedet er kaldt.
Sørg for at døren til askeskuffen er godt stengt under
fyring i ildstedet.
Se forøvrig beskrivelse av hvordan håndtere aske under:
Brannforebyggende tiltak.
Rensing og sotfjerning i produktet
Under fyring vil det kunne danne seg et sotbelegg på
innsiden av ildstedets varmeflater. Sot har en god
isolerende effekt, og vil derfor redusere ildstedets
varmeavgivelse.
En årlig rengjøring innvendig vil være nødvendig for å få
maksimalt varmeutbytte av produktet. Foreta dette gjerne
i forbindelse med feiing av skorstein og piperør.
Feiing av røykrør til skorstein
Feiing av røykrør kan utføres gjennom feieluken i røykrøret,
eller ved å løfte vekk topplaten og feie gjennom
produktets røykuttak.
Kontroll av ildstedet
Jøtul anbefaler at du selv kontrollerer ditt ildsted nøye
etter at feiing/rengjøring er gjennomført. Kontrollér alle
synlige overflater for sprekker. Se også til at alle
sammenføyninger er tette, og at pakninger ligger riktig.
Pakninger som er slitt eller deformerte, bør byttes ut.
Rens pakningssporet godt, påfør keramisk lim (fås kjøpt
hos din lokale Jøtul forhandler), og press pakningen godt
på plass. Etter kort tid er sammenføyningen tørr.
Utvendig vedlikehold
Lakkerte produkter vil etter noen års bruk kunne endre
farge. Overflaten bør pusses og børstes fri for løse partikler
før ny Jøtul ovnslakk påføres.
Emaljerte produkter skal kun tørkes med en tørr klut. Bruk
ikke vann og såpe. Eventuelle flekker fjernes med et
rensemiddel (Stekeovnsrens e.l.).
Vedlengde, mengde og kvalitet
Maks. vedlengde er 50 cm. Veden legge
s
parallelt med
brennkammerets bakvegg. Jøtul F 400 har med sin
virkningsgrad en varmeavgivelse på minimum 2,5 kW og
nominell 8,0 kW. Etter beregninger tilsvarer nominell
varmeavgivelse forbruk av ca. 3,2 kg kvalitetsved pr. time.
Jøtuls definisjon av kvalitetsved
God kvalitetsved bør være tørket slik at vanninnholdet er
på ca 20-25%.
For å oppnå dette, bør veden hugges
senest
på
ettervinteren. Den kløyves og stables på en slik måte at
NORSK

25
den blir luftet. Stablene må overdekkes for ikke å trekke
for store mengder regnvann. Veden bør tas inn tidlig høst,
og stables/lagres for bruk kommende vinter.
Med kvalitetsved menes det meste av kjent norsk trevirke,
som bjørk, gran og furu.
Energimengde i 1 kg ved varierer lite. På den annen side
varierer egenvekten hos de ulike typene ved relativt mye.
Dette innebærer at energimengden (kWh) i en bestemt
volummengde, f.eks. gran, er mindre enn for den samme
volummengde av eik som har høyere egenvekt.
Energimengden til 1 kg kvalitetsved er ca. 3,8 kWh. 1 kg
helt tørr ved (0 % fuktighet) gir ca 5 kWh, mens ved med
en fuktighetsgrad på 60%, bare gir ca 1,5 kWh/kg.
Servicearbeider
Utskifting av brennplater
• Ildstedet har sidebrennplater som er skrudd fast.Den
bakre brennplaten står løst- bare holdt på plass av
sidestykkene.
• Ved utskifting må hvelvet først fjernes, så løsnes
skruene - og brennplatene fjernes.
Utskifting av hvelv
• Løft av topplaten
• Hvelvet hviler oppe på brennplatene.
• Ved demontering må brakettene, som holder hvelvet
klemt ned mot brennplatene, løsnes. Bruk en hammer
og slå disse forsiktig ut mot dørene. Se fig. 5
• Løft hvelvet opp og ut gjennom toppen.
• Ved tilbakemontering, følg samme fremgangsmåte i
omvendt rekkefølge.
Ekstrautstyr
Gnistfanger kat.no. 350693
Skal ildstedet fyres i med åpne dører, må det alltid benyttes
en gnistfanger foran åpningen. Denne kan leveres som
ekstrautstyr.
Korte bein - høyde 155 mm
Sort lakk - kat.nr. 350173
Blå sort emalje - kat.nr 350174
Sjøgrønn emalje - kat. nr. 350328
Edelhvit emalje - kat. nr. 350176
Skjermplate bak
Sort: kat.nr. 350694
Alu. zn. lakkert: kat.nr. 350695
Ved montering av skjermplate bak på produktet, kan
Ildstedet plasseres med en avstand på 100 mm til vegg av
brennbart materiale. Avstanden til sidevegg må være min.
300 mm.
NORSK

26
ENGLISH
Table of contents
RELATIONSHIP TO THE AUTHORITIES
Technical data of Jøtul F 400 ...................................................... 25
General safety precautions .........................................................25
Measures to prevent fires ........................................................... 25
INSTALLATION OF JØTUL F 400
Foundations .....................................................................................25
Chimney ............................................................................................ 25
Air circulation..................................................................................25
Assembly prior to installation ...................................................26
Control of functions ......................................................................26
Mounting of flue pipe ..................................................................26
Connection to chimney................................................................26
OPERATING INSTRUCTIONS
Initial lighting and daily use .......................................................26
Initial lighting..................................................................................26
Daily use ........................................................................................... 26
MAINTENANCE
Cleaning the glass .........................................................................27
Ash removal .....................................................................................27
Cleaning and soot removal .........................................................27
Sweeping of flue pipes to the chimney ..................................27
Control of the stove.......................................................................27
External maintenance ..................................................................27
The length, quantity and quality of logs ................................ 27
Jøtul’s definition of quality wood .............................................28
SERVICE
Changing the burn plates ........................................................... 28
Changing the baffle plate ...........................................................28
OPTIONAL EQUIPMENT
Fire screen ........................................................................................28
Short legs ......................................................................................... 28
FIGURES - DRAWINGS ........................................ 55– 56
Relationship to the
authorities
Jøtul F 400 is a clean-burning product for solid fuel.
Installation of a fireplace must be according to local codes
and regulations in each country. Always contact you local
building inspector or the appropriate authority
responsible for local codes and regulations in your district.
Your dealer has been specially selected for his knowledge
of your local codes and may provide assistance in ensuring
that your installation is safe and legal.
Instructions for mounting, installation and use are
enclosed with the product. The installation may only be
used when it has been inspected and a certificate of
completion has been issued.
The product data plate is located on the bottom heat
shield and is made of heat-resistant material. The
following information is listed on the data plate:
Manufacturer and address, model number, manufacturing
number, rated heat output, registration number (after
assignment), style, and safety measurements.
Pre-installation checks
Warning! Please ensure that there is adequate ventilation
to the room in which the stove is to be installed. An air
brick or wall vent with a minimum size of 9” x 3” (230 x
75mm) is needed to supply air to the fire.
Insufficient ventilation may cause oxygen depletion in the
room. This can lead to drowsiness, nausea and sickness
and is extremely dangerous.
It is important to ensure that the chimney or flue system
to which the stove is to be connected is working properly.
Combustion by-products which pervade enclosed spaces
such as a room represent a serious health risk. The chimney
and/or flue system must therefore be inspected and
approved by a qualified professional prior to installation.
Special attention must be paid to the following:
The chimney or flue system must comply with the Building
Regulations for heat producing appliances.
The minimum height of the chimney must be 12’ (4m). This
height should be measured from the hearth to the top of
the flue. Any damper plates or flue restrictors must be
removed and no restrictor plates should be fitted. Where
it is impractical to remove dampers or restrictors, these
must be secured in the open position.
The chimney or flue must be sound and clean. If it has
been used with a wood, coal or other solid fuel fire, it must
be swept before the stove is installed.
Ensure that only one stove is served by the chimney or
flue system.

27
Ensure that the chimney or flue is structurally sound. In
particular, it must not be possible for products of
combustion to come into contact with combustible
materials in the structure of the building.
In some situations it may be advisable to fit a flue liner
prior to the installation of the stove. Your installer will
advise if this is necessary.
NOTE: A guide is published by the British Flue and Chimney
Manufacturers’ Association that contains general
information on chimneys and flues.
If any of the pre-installation checks reveal inadequacies,
do
not
proceed with the installation of the stove until all
defects or deficiencies have been rectified.
Technical data of Jøtul F 400:
Material: Cast iron
Finish: Black paint, blue-black, ivory and
ocean green enamel
Fuel: Wood
Log length, max.: 50 cm
Draught system: Top and bottom draught
Combustion system: Secondary combustion
Flue outlet: Top/back
Flue dimension: 150 mm dia.
Approx. weight: 158 kg
Optional extras: Fire screen, short legs
Product measures,
distance measures
unprotected wall. See fig. 1
General safety precautions
Distance to wall made of flammable material and
requirements for the floor plate:
Contact your local authorithy to inform you about the local
codes and to ensure that your installation is safe and legal.
See fig. 1.
Requirements for the floor plate: If the stove will be
installed on a combustible floor, a robust, solid, non-
combustible layer should cover the floor beneath the
stove. This layer should cover an area of at least 300 mm
in front of the stove door, and at least 150 mm either side
of the opening. (See Buildings Regulations.) We
recommend that you contact the local Jøtul dealer prior
to installation.
Uninsulated flue pipe: If uninsulated flue pipes go through
floors or walls, the opening must be made of brick or
masonry, in such a way that the external surface of the
pipe does not get closer to flammable materials than 300
mm. Isolated flue pipes may have a different distance, if
necessary refer to fire technical product documentation
for the flue pipe.
Measures to prevent fires
Any use of the fireplace may represent some danger.
Therefore, respect the following instructions:
• Always use a spark catcher if the product is to be
utilised with an open door.
• Ensure that furniture and other flammable materials
do not get too close to the fireplace. There ought to be
a clear distance from the front of the fireplace of at
least 600 mm.
• Let the fire die. Never put it out with water as this may
damage the product.
• The fireplace gets warm when used and may cause
burns if touched.
• Ash must be properly disposed of outdoors, or emptied
where it does not entail a fire hazard. Refer to local
regulations.
• Any stove should have a storage container made of
non-flammable material as a standard accessory for
the safe disposal of soot and ashes. Soot and ashes
must be stored in this container for at least a week in
order to be certain that the last ember has been
extinguished. If the container needs to be emptied
before this, add plenty of water to the container and
stir.
• You may want to keep the ash. It is a first class fertilizer
for roses and other plants.
Installation of Jøtul F 400
Note! Check that the stove is free of any damage prior to
commencing installation.
The product is heavy! Make sure you have assistance when
erecting and installing it.
Foundations
If Jøtul F 400 is to be installed on a wooden floor, ensure that
the floor under the stove has the dimensions to carry it.
Chimney
The stove can be connected to a masonry chimney, a brick,
pre-fabricated element or a steel chimney. See separate
section. Minimum chimney cross section is recommended
to be 177 cm². (Corresponding to 150 mm dia.). Connection
to chimney must be done in accordance with the
installation instructions from the supplier of the chimney.
Air circulation
Using a fireplace requires a plentiful supply of fresh air to
the room where the product is installed. If the house is
sealed, the room ought to be equipped with extra fresh
air supply through vents. Avoid using mechanical fan vents
in a room with a fireplace. This may cause negative
pressure and draw poisonous gasses into the room. In
ENGLISH

28
ENGLISH
order to avoid this, it is possible to bring in outside air
directly to the stove by using an adapter (extra unit) that
is mounted to the air inlet of the stove. From there a
flexible hose is conducted out of the house. The
installation instruction for this is enclosed with the
installation unit.
Assembly prior to installation
The product is delivered in one package. Also included is
a loose handle for servicing the doors and paint for
touching up minor damages.
NB! Be aware of that the top plate is laying loose on the
top of the product, and shall not be fastened.
Insert the ash lip, which is stored inside the burn chamber,
into the grooves under the door.
The burn chamber also contains a heat shield, which is to
be mounted under the ash house. Unfold the heat shield
(see fig. 2a) and fasten it with the two screws attached to
the ash house (2b).
Control of functions (fig. 3)
When the product is set up,
always
check the control
functions. These shall move easily and function
satisfactorily.
Draught vent (A)
Left position = closed.
Right position = fully open.
Doorhandle (B)
Towards the left= open.
Towards the right=closed.
Ash door (C)
Use the loose handle, open the door byturning the knob
counter-clockwise one half rotation. Use a glove or similar
and pull out the tray.
Note! Only remove the ashes when the stove is cold.
Mounting of flue pipe
It is advisable to carry out a test assembly prior to making
a hole in the chimney. See fig. 1 for measures to wall made
of inflammable materials. The stove is installed with a 150
mm diameter flue pipe. This must be an approved thickness.
Jøtul F 400 is factory-assembled for a top flue outlet. If a
rear flue outlet is preferred, loosen the two screws on the
sides and rotate the connecting pipe 180 0. Then fasten
the screws securely.
• The 150 mm diameter flue pipe is placed directly with
the narrowest outer end onto the product flue outlet.
There is a screw on each side of the product flue outlet
(fig. 4-A). These will be used to fasten the flue pipe.
• Indicate with marks where the screws hit the flue pipe
when the pipe is at the bottom of the flue outlet and
drill a 5,5 mm hole in the flue pipe for the screw.
• Use a gasket rope and cement to seal the space
between the flue pipe and the product flue outlet. Put
the gasket rope around the bottom part of the flue pipe
and fill the space in-between with cement.
• Fasten the flue pipe with the screws.
Note! It is important that the joints are completely sealed.
Air leakage etc. may lead to malfunction.
Connection to chimney
Drill a hole for the flue pipe. Distance from stove to
firewall/ chimney should be as shown in fig. 1. Always use
a chimney collar when connecting to chimney. Use the
supplier’s recommended chimney collar when connecting
to an element chimney. Follow the supplier’s assembly and
usage instructions closely with regard to mortar/furnace
cement before starting to use the fireplace.
Ensure that the flue pipe never slopes down towards the
chimney. It should at least be horizontal, preferably have
an incline of a few millimeters.
Note! A correct and sealed connection is very important
for the proper functioning of the product.
Be alert to the fact that it is particularly important that
connections have a certain flexibility. This is to prevent
setting of the house from leading to fissuration.
Operating instructions
Initial lighting and daily use
Jøtul F 400 is a clean-burning product and with additional
supplies of combustion air, it allows for afterburning of
hazardous gases and particles. It is important that the
system is used correctly.
The stove is equipped with certain functions that are
described in the chapter: Control of functions.
Initial lighting
Open the draught vent fully by pushing the vent all the
way to the right (fig. 3-A). Put in some crumpled
newspaper, kindling wood and firewood and start a small
fire. Add more firewood gradually and let the fire burn
briskly for a couple of hours. Let the fire die out and repeat
one more time.
Note! Odors when using the stove for the first time.
Painted products. The stove may emit an irritating gas
when used for the first time, and it may smell a little. The
gas is not toxic, but it is recommended to open a window
or a door to provide additional ventilation in the room.
Let the fire burn with a high draught until all traces of gas
have disappeared and no smoke or smells can be detected.

29
Enameled products: Condensation may form on the
surface of the stove the first few times it is used. This must
be wiped off to prevent permanent stains forming when
the surface heats up.
Daily use
Fire up with the aid of newspapers and some kindling
wood. Place two medium sized logs in/out on each side of
the base. Crumple some newspaper (or birch bark)
between these and add some kindling wood in a criss-
cross pattern on top and light the newspaper. Increase the
size of the logs gradually
..
..
.
Draught vent (fig. 3- A). Regulate when the wood is
properly lit and burns well. Check that the afterburning
(secondary combustion) starts. This is best indicated by
yellow, flickering flames in the air chamber. Then regulate
the rate of combustion to the desired level of heating by
adjusting the draught vent.
Always use good quality firewood. It gives the best results
and doesn’t damage the product.
Never burn the following materials in the stove:
- household waste, plastic bags etc.
- painted or impregnated wood (highly toxic)
- chipboard or laminated boards
- driftwood
This may harm the product and pollute the atmosphere.
Note! Never use flammable liquids such as petrol,
kerosene, red spirit or similar to start the fire. This may
cause harm to both yourself and the product.
Note! Danger of overheating: The stove must never be
used in a manner that causes overheating.
Overheating is defined as overfilling the stove with
firewood and/or leaving the draught vent fully open.
The chimney draught should never exceed 2,5 mmVs (25 Pa).
A sure sign of overheating is when parts of the stove glows
red. When this happens, reduce the draught vent opening
immediately....
.
Warning! Each fire should burn down to embers before new
firewood is added.
Maintenance
Cleaning the glass
Jøtul F 400 is equipped with an air wash system. Through
the draught vent air is sucked in above the fireplace and
washed down along the inside of the glass. This system
has the advantage that it provides better combustion and
reduces the buildup of soot deposits on the glass.
Still, some soot will always stick to the glass, but the
quantity will depend on the local draught conditions and
adjustment of the draught vent. Most of the soot layer
will normally be burned off when the draught vent is
opened all the way and a fire is burning briskly in the
fireplace.
Good advice! For normal cleaning, moisten a paper towel
with warm water and add some ash from the burn
chamber. Rub it over the glass and then clean the glass
with clean water. If it is necessary to clean the glass more
thoroughly, a glass cleaner is recommended (follow the
instructions for use on the bottle).
Ash removal
Jøtul F 400 has an ash pan which makes it easy to remove
the ash. Scrape the ash through the grate in the base plate
and into the ash pan. Use something like a glove to grab
the handle on the ash pan and take away the ash. Make
sure that the ash pan doesn’t fill up so high that it keeps
ash from coming through the grate into the pan.
Make sure the door to the ash pan is securely shut when
the stove is in use.
Also see the description of how to handle ashes under:
Measures to prevent fires.
Cleaning and soot removal
Soot deposits may build up on the internal surfaces of the
stove during use. Soot is a good insulator and will
therefore reduce the stove’s heat output.
An annual internal cleaning is necessary to get the best
heating effect from the product. It is a good idea to do
this in connection with the sweeping of the chimney and
flue pipes.
Sweeping of flue pipes to the chimney
It is possible to sweep through the sweeping hatch in the
flue pipe or to remove the top plate and sweep through
the smoke outlet.
Control of the stove
Jøtul recommends that you personally control your stove
carefully after sweeping/cleaning. Check all visible surface
areas for cracks. Also check that all joints are sealed and
that the gaskets are in the correct position. Any gaskets
showing signs of wear or deformation must be replaced.
Thoroughly clean the gasket grooves, apply ceramic glue
(available from your local Jøtul dealer), and press the
gasket well into place. The joint will dry quickly.
External maintenance
Painted products may change color after several years
usage. The surface should be cleaned and brushed free of
any loose particles before new Jøtul stove paint is applied
.
Enameled products
must only be cleaned with a clean, dry
ENGLISH

30
ENGLISH
cloth. Do not use water and soap. Any stains can be
removed with a cleaning fluid (Oven cleaner etc.).
The length, quantity and quality of
logs
The maximum length of logs to be used is 50 cm. Logs
should be placed parallel to the back wall of the
combustion chamber. Minimum heat emission from a
Jøtul F 400 is 2.5 kWh, and the nominal capacity 8,0 kWh.
The calculated requirement for nominal heat emission is
approx. 3,2 kg quality wood per hour.
Jøtul’s definition of quality wood
Good quality wood should be dried so that the water
content is approx. 20-25%.
To achieve this, the wood should be cut during late winter
or early spring. It should then be cut and stacked to ensure
proper airing. The stacks should be covered to prevent
them from absorbing too much rainwater. The logs should
be taken indoors in autumn for use during the winter
season.
With good quality firewood we mean logs from trees, such
as birch, beech and oak.
The amount of energy obtainable from 1 kg of wood varies
very little. On the other hand, the specific weight of the
different kinds of wood varies considerably. As an example,
a certain volume of birch will provide less kWh than the
same volume of oak, which has a higher specific weight.
The amount of energy in 1 kg quality wood is approx. 3,8
kWh. 1 kg of completely dry wood (0 % humidity) produces
approximately 5 kWh, while wood with a humidity level
of 60% produces only around 1.5 kWh/kg.
Service
Replacing the burn plates
• The fireplace has side burn plates, which are fastened
with screws. The rear burn plate is not fastened and is
kept in place by the side burn plates.
• When replacing remove the baffle plate first, then
loosen the screws and remove the burn plates.
Replacing the baffle plate
• Lift off the top plate.
• The baffle plate rests on top of the burn plates.
• To remove the baffle plate, loosen the brackets that
push it down against the burn plates. Use a hammer
and beat them carefully out towards the doors. See fig. 5
• Lift the baffle plate a little upwards and remove it
edgeways out through the top.
• For re-installation follow the same procedure in the
opposite sequence.
Optional equipment
Fire screen catalouge no. 350693
If the fireplace is to be used with the doors open, always
make sure to use a fire screen in front of the opening. The
fire screen is available as optional equipment.
Short legs - height 155 mm
Black paint - cat. no. 350173
Blue-black enamel - cat. no. 350174
Ocean green enamel -cat. no. 350328
Ivory enamel - cat. no. 350176

31
Table des matieres
RÉGLEMENTATIONS NATIONALES
Fiche technique du modèle JØTUL F 400 ................................ 29
Consignes générales de sécurité ............................................... 30
Mesures de prévention des incendies .....................................30
INSTALLAtiON DU POÊLE JØTUL F 400
Soubassement ................................................................................30
Cheminée ......................................................................................... 30
Circulation d’air .............................................................................. 30
Montage avant l’installation ......................................................30
Pièces foyères ..................................................................................30
Montage du tuyau de raccordement ......................................30
Raccordement à la cheminée ..................................................... 31
ConsigneS DE FONCTIONNEMENT
Mise en service et usage courant ............................................. 31
Mise en service ...............................................................................31
Usage courant .................................................................................31
ENTRETIEN
Nettoyage de la vitre ....................................................................32
Retrait des cendres ........................................................................ 32
Nettoyage et élimination de la suie ......................................... 32
Nettoyage des tuyaux de raccordement
menant à la cheminée..................................................................32
Contrôle de la chambre de combustion .................................32
Entretien extérieur ........................................................................32
Longueur, quantité et qualité des bûches .............................. 32
Qualité du bois selon JØTUL ......................................................32
REVISION
Remplacement des plaques de doublage ..............................33
Remplacement du déflecteur .................................................... 33
EQUIPEMENT OPTIONNEL
Pare-étincelles.................................................................................33
Jambes courtes ...............................................................................33
FIGURES - DESSINS ...............................................55-56
Réglementations nationales
Le poêle JØTUL F 400 est un appareil à combustion non
polluante.
L’installation des poêles doit être effectuée conformément
aux normes et réglementations nationales en vigueur. Nous
vous recommandons de vous inspirer des règles du D.T.U.
24.2.2. Votre revendeur ayant été spécialement sélectionné
en fonction de ses connaissances de vos législations
nationales, il est tout à fait à même de vous aider à adapter
votre installation aux normes de sécurité et à la législation
en vigueur dans votre pays.
La plaquette de caractéristiques du produit est située sur
la plaque sous le cendrier.
Elle comporte les informations suivantes: Fabriquant et
adresse, numéro de modèle, numéro de fabrication,
puissance calorifique nominale, classification complète,
référence à la norme française.
Les consignes de montage, d’installation et d’utilisation
sont livrées avec le produit. L’installation ne peut être
entamée qu’une fois que l’appareil a été inspecté.
ATTENTION! Assurez-vous que la pièce dans laquelle le
poêle doit être installé est correctement ventilée.
Une ventilation insuffisante entraîne une baisse du taux
d’oxygène dans la pièce et risque de ce fait de provoquer,
chez les personnes présentes, un état de somnolence, des
nausées ou des malaises.
Assurez-vous que les dimensions de la cheminée sont
adaptées au poêle et que le système de fixation est
étanche et en bon état de fonctionnement. La présence
de fumée dans un espace clos nuit gravement à la santé.
VOUS DEVEZ LIRE ENTIEREMENT LE PRESENT MANUEL
AVANT DE COMMENCER L’INSTALLATION ET LE CONSERVER
PENDANT TOUTE LA DUREE DE L’UTILISATION DU POELE.
Fiche technique du modèle JØTUL F 400 :
Matériau : Fonte
Traitement de surface : Peinture noire mat, émail bleu
noir, vert océan et ivoire.
Combustible : Bois exclusivement
Longueur maximale
des bûches : 50 cm
Entrées d’air : Supérieure et inférieure
Système de combustion : Double combustion
Sortie du tuyau
de raccordement : Par dessus et à l’arrière
Dimensions du tuyau
de raccordement : 150 mm
Poids approximatif : 158 kg
Accessoires optionnels : Pare-étincelles, jambes courtes
Dimensions du produit et
distance par rapport à la
paroi murale non protégée. Voir Fig. 1.
FRANCAIS

32
FRANCAIS
Consignes générales de sécurité
Distance par rapport à un mur constitué de matériaux
inflammables et exigences relatives à l’écran protecteur
au sol :
Contactez l’autorité locale compétente pour vous
renseigner sur les réglementations locales et vous assurer
que votre installation est sûre et légale.
Toute la surface située sous le poêle, et au moins jusqu’à
30 cm devant, doit être recouverte par un écran protecteur
composé d’un matériau ininflammable. (Voir les
Réglementations en matière de construction.) Nous vous
recommandons de consulter votre revendeur local JØTUL
avant toute installation.
Mesures de prévention des incendies
L’utilisation des cheminées présente toujours certains
risques. Veillez donc à observer les consignes de sécurité
suivantes :
• Utilisez toujours un pare-étincelles si le produit doit
être utilisé la porte ouverte.
• Assurez-vous qu’aucun meuble ou matériau
inflammable n’est situé trop près du foyer. La cheminée
doit disposer devant elle d’une zone dégagée de 600
mm au moins.
• Laissez le feu s’éteindre. Ne versez jamais d’eau dans
votre poêle au risque de l’endommager.
• Lorsque le poêle est en service, il devient chaud et, de
ce fait, risque de brûler quiconque le touche.Vous
pouvez conserver les cendres. Elles constituent un
engrais de très bonne qualité pour les roses et autres
plantes.
Installation du poêle Jøtul
F400
Remarque : Vérifiez que le poêle est en bon état avant de
commencer l’installation.
L’appareil est lourd. Veillez à vous procurer toute l’aide
nécessaire avant de le monter et de l’installer.
Soubassement
Si votre poêle Jøtul F 400 doit être installé sur un parquet,
assurez-vous que celui-ci est suffisamment solide et
résistant pour en supporter le poids.
Cheminée
Le poêle peut être raccordé à une cheminée de briques, à
une cheminée à éléments préfabriqués ou à une cheminée
d’acier. Voir le chapitre correspondant. La cheminée doit
présenter une section transversale minimale de 177 cm²
(soit un diamètre de 150 mm). Le raccordement à la
cheminée doit être effectué conformément aux consignes
d’installation du fournisseur de la cheminée.
Circulation d’air
L’utilisation d’une cheminée dans une pièce suppose que
celle-ci soit correctement ventilée. Si le logement
d’habitation est parfaitement isolé, la pièce doit être
équipée d’un dispositif supplémentaire de ventilation
(bouches d’aération). Évitez d’employer des ventilateurs
dans une pièce comportant une cheminée. Une telle
installation génère une forte pression et dissémine les gaz
toxiques dans la pièce.
Montage avant l’installation
L’appareil est livré dans un seul emballage. Ce dernier
contient notamment une poignée amovible destinée à
manipuler le cendrier, et un flacon de peinture pour
réparer les éraflures.
Veuillez noter que la plaque supérieure ne doit pas être
attachée au produit mais reposer sur celui-ci.
Insérez le verseur du cendrier, situé dans la chambre de
combustion, dans les rainures sous la porte.
La chambre de combustion contient également un écran
thermique qui doit être monté sous le cendrier. Déballez
l’écran thermique (voir fig. 2a) et fixez-le à l’aide des deux
vis attachées au cendrier (2b).
PIÈCES FOYÈRES (Fig. 3)
Une fois l’appareil en place, vérifiez l’ensemble des pièces
foyères. Ces pièces doivent pouvoir s’extraire facilement
et fonctionner correctement.
Commande d’entrée d’air(A)
Position gauche = fermé
Position droite = ouvert à fond
Poignée de porte (B)
VV
VV
Vers la gauche = ouverte
Vers la droite = fermée
Cendrier (C). Utilisez la poignée amovible, ouvrez la porte
en tournant le bouton dans le sens contraire des aiguilles
d’une montre sur un demi-tour. Utilisez un gant ou autre
pour extraire le tiroir à cendres.
Attention ! Enlevez les cendres uniquement lorsque le
poêle est froid.
Montage du tuyau de raccordement
Il est conseillé de procéder à des essais de montage avant
de pratiquer un orifice dans la cheminée. Reportez-vous à
la fig. 1 pour connaître les dimensions requises en cas
d’installation contre un mur constitué de matériaux
inflammables. Le poêle est muni d’une buse de

33
raccordement pour tuyau de Ø 150 mm. Votre distributeur
JØTUL vous a fourni un adaptateur en tôle.
Le JØTUL F 400 est assemblé en usine pour une sortie par-
dessus. Dans le cas d’une sortie par l’arrière, dévissez les
deux vis sur les côtés, faîtes pivoter la buse à 180°, puis
remettez les v-is.
• .Une vis est située de part et d’autre de la buse afin
de fixer l’adaptateur (fig. 4-A).
• Faites une marque à l’endroit où les vis viennent se
loger, au bas de l’adaptateur, lorsque celui-ci est
introduit dans la buse et percez-y deux trous de 5,5
mm.
• Utilisez le joint corde et le mastic réfractaire fournis
avec l’appareil pour assurer l’étanchéité entre
l’adaptateur et la buse. Bourrez le joint entre
l’adaptateur et la buse et complétez avec le mastic
réfractaire.
• Fixez l’adaptateur à l’aide des vis.
Remarque : Les joints doivent être parfaitement étanches.
Toute fuite d’air risque d’entraver le bon fonctionnement
du poêle.
Raccordement à la cheminée
Percez un trou adapté au tuyau de raccordement. La
distance entre le poêle et la paroi ignifuge/cheminée doit
être conforme à celle indiquée à la fig.1. Pour les cheminées
à éléments, utilisez le tuyau de cheminée recommandé
par votre fournisseur. Avant d’utiliser le poêle, respectez
rigoureusement les consignes d’assemblage et
d’utilisation du ciment réfractaire
Le tuyau de raccordement ne doit jamais être dirigé vers
le bas. Il doit être installé au moins à l’horizontale et, de
préférence, accuser une inclinaison de quelques
millimètres vers le haut.
Attention ! Pour le bon fonctionnement de l’appareil, le
dispositif de raccordement doit être correctement installé
et étanche.
Il doit toutefois présenter une certaine flexibilité. Cet
équilibre est destiné à prévenir l’apparition de fissures
dans les fondations du logement d’habitation.
Consignes de
fonctionnement
Mise en service et usage courant
Le poêle JØTUL F 400 est un appareil à combustion non
polluante doté d’une combustion secondaire permettant
la postcombustion des gaz et particules toxiques. Il est
donc important que ce système soit utilisé correctement.
Le poêle est doté de certaines fonctions qui sont décrites
dans ce chapitre : Pièces foyères
Mise en service
Ouvrez la commande d’entrée d’air en la poussant
complètement à droite (fig. 3-A). Placez un peu de papier
froissé, du petit bois et quelques bûches dans le foyer, puis
allumez le feu. Ajoutez progressivement d’autres bûches
et laissez brûler à feu vif pendant quelques heures. Laissez
le feu s’éteindre et répétez l’opération une seconde fois.
Remarque : Des odeurs peuvent se répandre lors de la
première utilisation.
Appareils peints : Lors de sa première utilisation, le poêle
risque d’émettre un gaz irritant et de répandre des odeurs.
Bien que ce gaz ne soit pas toxique, il est recommandé
d’ouvrir une fenêtre ou une porte afin d’aérer la pièce.
Laissez le feu brûler à grand tirage jusqu’à la disparition
complète des gaz et des odeurs.
Appareils émaillés : Une certaine condensation peut se
former à la surface du poêle lors de ses premières
utilisations. Nettoyez régulièrement ces traces de
condensation afin d’éviter la formation de taches
permanentes lorsque la surface est chaude. PRECAUTION !
Lors de la première chauffe, laissez toutes les portes
ouvertes et essuyez la fonte là où vient s’appuyer le joint.
Cela évitera qu’il soit collé contre l’appareil.
Usage courant
Utilisez de vieux journaux et du petit bois pour allumer
vos feux. Placez deux bûches de taille moyenne de chaque
côté du socle. Placez du papier froissé (ou des écorces de
bouleau) entre ces bûches et ajoutez un peu de petit bois
en vrac par-dessus, puis allumez le feu. Ajoutez
progressivement d’autres bûches
..
..
.
Commande d’entré d’air(fig.3-A). Réglez la combustion
lorsque le bois est bien allumé et brûle correctement.
Vérifiez que la postcombustion (deuxième combustion)
se produit. Cette combustion se caractérise par la présence
de flammes jaunes et dansantes sous le déflecteur.
Adaptez ensuite la combustion au niveau de chauffage
souhaité en réglant l’entrée de l’air.
Utilisez toujours du bois de bonne qualité
.
Il permet
d’obtenir un meilleur rendement et n’endommage pas
votre appareil.
Ne faites jamais brûler les matériaux suivants dans votre poêle :
- déchets ménagers, sacs plastique, etc.
- bois peint ou imprégné (fortement toxique)
- plaques d’aggloméré ou de contre plaqué-bois de
récupération
Ces matériaux risquent d’endommager l’appareil et de
polluer l’atmosphère.
Attention ! N’employez aucune substance inflammable
(essence, kérosène ou autre alcool) pour allumer un feu.
Vous risquez de vous brûler et d’endommager l’appareil.
FRANCAIS

34
FRANCAIS
Attention ! Danger de surchauffe : Le poêle ne doit jamais
être utilisé en régime de surchauffe.
Le poêle risque une surchauffe si vous y insérez une
quantité excessive de bois et/ou si vous laissez l’entrée
d’air entièrement ouverte.
Le tirage de la cheminée ne doit jamais excéder 2,5 mmVs
(25 Pa). Les surchauffes s’annoncent par le rougeoiement
de certaines parties du poêle. Si vous constatez le moindre
rougeoiement, fermez aussitôt l’entrée d’air....
.
Attention ! Laissez chaque bûche se consumer totalement
avant d’en ajouter d’autres.
Entretien
Nettoyage de la vitre
L’air de combustion, aspiré par le haut de la façade du
poêle, est conduit vers la porte et circule le long de la vitre,
à l’intérieur, réduisant et ralentissant l’encrassement de
la vitre.
Toutefois, on ne peut empêcher une certaine quantité de
suie de se déposer sur la vitre ; cette quantité est fonction
des conditions de tirage et du réglage de l’entrée d’air. Une
bonne partie de cette suie s’élimine en brûlant, lorsque le
feu est très vif. Faites quelques minutes de feu très vif à
chaque rechargement en bois de votre JØTUL.
Un bon conseil : Pour les opérations courantes de
nettoyage, humidifiez un essuie-tout à l’eau chaude et
imprégnez-le de quelques cendres prélevées dans la
chambre de combustion. Frottez la vitre avec ce papier, puis
rincez à l’eau propre. Pour un nettoyage plus complet, nous
vous recommandons d’utiliser un produit pour vitres
(respectez les consignes d’utilisation indiquées sur la
bouteille).
Retrait des cendres
Le poêle Jøtul F 400 est équipé d’un cendrier qui facilite
l’élimination des cendres. Nous vous recommandons de
toujours laisser deux à trois centimètres de cendres au
fond de votre appareil. La cendre va protéger le fond,
conserver les braises et favoriser le redémarrage du feu
au rechargement en bois après quelques heures de peu
ralenti.
Assurez-vous que la porte du cendrier est
correctement fermée lors de l’utilisation du poêle.
Voir aussi la manière de manipuler les cendres dans la
section “Mesures de prévention des incendies”.
Nettoyage et élimination de la suie
A l’usage, des dépôts de suie risquent de se former sur les
surfaces internes du poêle. La suie étant un isolant efficace,
elle amoindrit les capacités calorifiques de votre poêle.
Il est également indispensable de nettoyer chaque année
l’intérieur de l’appareil afin d’en optimiser le rendement.
Il peut être judicieux de procéder à ce nettoyage annuel
lors du ramonage de la cheminée et des de raccordement.
Nettoyage des tuyaux de raccorde-
ment menant à la cheminée
Vous pouvez balayer à travers la trappe dans le conduit
d’évacuation des fumées, ou enlever la plaque supérieure
et balayer par la sortie des fumées.
Contrôle de la chambre de
combustion
JØTUL vous recommande d’effectuer vous-même un
contrôle du poêle après l’avoir essuyé/nettoyé. Vérifiez
l’absence de fissures sur les surfaces visibles. Vérifiez
également l’étanchéité et le positionnement des joints.
Tout joint visiblement usé ou endommagé doit être
remplacé.
Nettoyez soigneusement les rainures des joints, appliquez
de la colle haute température (disponible chez votre
revendeur local Jøtul) et remettez les joints en place sans
les étirer en veillant à les fixer fermement. La colle séchera
rapidement.
Entretien extérieur
Les appareils peints
peuvent changer de couleur après
plusieurs années d’utilisation
.
Brossez et essuyez la
surface afin d’éliminer toutes les particules avant
d’appliquer une nouvelle couche de peinture JØTUL.
Les appareils émaillés doivent être essuyés à l’aide d’un
chiffon uniquement. Ne pas utiliser d’eau ni de savon.
Toute tache peut être éliminée à l’aide de nettoyants
liquides (nettoyant pour four, etc.)
Longueur, quantité et qualité des
bûches
La longueur maximale des bûches doit être de 50 cm. Les
bûches doivent être placées parallèlement à la paroi du
fond de la chambre de combustion. L’appareil Jøtul F 400
possède une capacité calorifique minimum de 2,5 kWh et
une capacité nominale de 8,0 kWh. Selon nos calculs, la
capacité nominale s’obtient en brûlant 3,2 kg de bois de
qualité par heure.

35
Qualité du bois selon Jøtul
Le bois de bonne qualité doit être séchée de manière à ne
retenir qu’une humidité inférieure à 20%. Votre
distributeur JØTUL peut mesurer l’humidité du bois que
vous utilisez.
Pour cela, le bois doit être coupé de l’automne à la fin de
l’hiver, puis séché à l’air libre. Les bûches doivent être
disposées de manière à faciliter la circulation de l’air et
recouvertes pour les protéger de la pluie. Ce séchage à
l’air libre doit durer au minimum 24 mois après la coupe.
Pour le chêne et la châtaigner, un lavage préalable à la
pluie de un est à prévoir. Au début de l’automne, les bûches
doivent être rentrées à l’abri et empilées en vue d’un usage
pour l’hiver prochain. Nous considérons que les bois
suivants sont de bonne qualité : le charme, le chêne, le
frêne, l’érable, le bouleau etc. ….
La masse énergétique d’un kilogramme de bois varie peu
d’un type de bois à l’autre. En revanche, leur masse
volumique est très variable. Par exemple, un certain
volume de bouleau produira un nombre de kWh inférieur
à celui du même volume de chêne, lequel possède une
masse volumique plus importante.
La masse énergétique d’un kilogramme de bois de bonne
qualité est d’environ 3,8 kWh. 1 kg de bois complètement
sec (0 % d’humidité) produit environ 5 kWh, alors que du
bois dont le niveau d’humidité est de 60 % produit
seulement environ 1,5 kWh/kg.
Revision
Remplacement des plaques de
doublage
• Le poêle est équipé de plaques de doublage latérales
fixées à l’aide de vis. La plaque de doublage arrière n’est
pas fixée. Elle est maintenue en place par les plaques
de doublage latérales.
• Lors de l’opération de remplacement, commencez par
retirer le déflecteur, puis dévissez les vis et enlevez les
plaques de doublage.
Remplacement du deflecteur
• Enlevez la plaque supérieure.
• Le déflecteur repose sur la partie supérieure des
plaques de doublage.
• Pour enlever le déflecteur, dévissez les équerres qui le
maintiennent contre les plaques de doublage. Utilisez
un marteau et frappez doucement sur les équerres
pour les enlever par la porte. Voir Fig. 5.
• Soulevez légèrement le déflecteur vers le haut et
inclinez-le pour le faire sortir par la partie supérieure.
• Pour la réinstallation, répétez cette procédure dans
l’ordre inverse.
Accessoires optionnels
Pare-étincelles no de catalogue 350693
Si vous utilisez le poêle avec les portes ouvertes, veillez à
utiliser un pare-étincelles devant l’ouverture. Le pare-
étincelles est disponible en option.
Jambes courtes - 155 mm
Peinture noire mat - no de catalogue 350173
Émail bleu noir - no de catalogue 350174
Émail vert océan - no de catalogue 350328
Émail ivoire - no de catalogue 350176
FRANCAIS

36
Índice de contenido
RELACIÓN CON LAS AUTORIDADES DE
DISTINTOS PAÍSES
Información técnica de la estufa Jøtul F 400 ........................35
Precauciones de seguridad generales .....................................35
Medidas para prevención de incendios ..................................35
INSTALACiÓN DE JØTUL f 400
Cimientos .........................................................................................35
Chimenea ......................................................................................... 35
Circulación de aire .........................................................................36
Montaje previo a la instalación .................................................36
Control de funciones.....................................................................36
Montaje del conducto de humos ..............................................36
Conexión a la chimenea...............................................................36
Instrucciones de funcionamiento
Encendido inicial y uso diario.....................................................36
Encendido inicial ............................................................................37
Uso diario .........................................................................................37
MANTENIMIENTO
Limpieza del cristal ........................................................................37
Eliminación de la ceniza .............................................................. 37
Limpieza y eliminación del hollín..............................................37
Deshollinar los tubos de humos a la chimenea ...................38
Control de la estufa .......................................................................38
Mantenimiento externo .............................................................. 38
Longitud, cantidad y calidad de los troncos ..........................38
Definición de madera de buena calidad de Jøtul................. 38
CONSERVACIÓN
Sustitución de los quemadores .................................................38
Sustitución de la placa deflectora ............................................ 38
EQUIPO OPCIONAL
Pantalla cortafuego ....................................................................... 38
Patas cortas ..................................................................................... 38
FigurAs - DIBUJOS .................................55– 56
Relación con las autoridades
de distintos países
Jøtul F 400 es un producto que no deja residuos de
combustión para combustibles sólidos.
La instalación de una chimenea debe ajustarse a las leyes
y regulaciones de cada país. Póngase siempre en contacto
con el inspector de construcción local o con la autoridad
pertinente responsable de los reglamentos y las
ordenanzas locales en su zona.
Su proveedor ha sido seleccionado especialmente por su
conocimiento de las regulaciones locales y puede
proporcionar la asistencia necesaria para garantizar la
seguridad y legalidad de su instalación.
La placa de características del producto encuentra en la
protección térmica debajo del compartimento de cenizas,
y está fabricada con material resistente al calor. En esta
placa figura la siguiente información: Fabricante y
dirección, número de modelo, número de fabricación,
producción térmica estimada, número de registro
(después de haberla asignado), estilo y medidas de
seguridad.
Las instrucciones de montaje, instalación y del usuario se
incluyen con el producto. La instalación sólo puede
utilizarse una vez realizada su inspección y otorgado un
certificado de finalización.
Antes de iniciar la instalación será necesario obtener todos
los permisos oportunos de las autoridades locales. Los
trabajos no deben comenzar a menos que se cuente con
un permiso.
Comprobaciones previas a la
instalación
¡ADVERTENCIA! es necesario cerciorarse de que exista la
ventilación adecuada en la habitación en la que va a
instalarse la estufa. Necesitará un ladrillo de ventilación
o un respiradero de pared con un tamaño mínimo de 230
x 75 mm (9 x 3”) para suministrar aire a la estufa.
Una ventilación insuficiente puede hacer que se consuma
totalmente el oxígeno de la habitación. Esta situación, que
es sumamente peligrosa, puede causar pérdida de la
consciencia, náuseas y mareos.
Es importante cerciorarse de que la chimenea o el sistema
de salida de humos al que se va a conectar la estufa
funcione debidamente. Los productos derivados de la
combustión que invaden los espacios cerrados, como una
habitación, representan un grave riesgo para la salud. Por
consiguiente, la chimenea y el sistema de salida de humos
deben someterse a la inspección y aprobación de un
profesional cualificado antes de realizar la instalación.
ESPAÑOL

37
Se debe prestar una atención especial a lo siguiente:
La chimenea o el conducto de humos deben ser sólidos y
estar limpios. Si se ha utilizado madera, carbón o cualquier
otro combustible sólido, deben deshollinarse antes de
instalar la chimenea.
Es necesario asegurarse de que la chimenea o el sistema
de salida de humos tan sólo se utilizan con una estufa.
Asegúrese de que la chimenea o el conducto de humos
tienen una estructura sólida. En particular, no debe
permitirse que los productos de combustión entren en
contacto con los materiales combustibles de la estructura
del edificio.
En algunas situaciones puede ser aconsejable montar un
revestimiento protector para el conducto de humos antes
de instalar la chimenea. Su instalador le aconsejará si esto
es necesario.
Si cualquiera de las comprobaciones previas a la
instalación revelara algún aspecto inadecuado,
no
continúe con la instalación de la estufa hasta que se hayan
rectificado todos los defectos o deficiencias.
Información técnica de la estufa Jøtul F 400:
Material: Hierro fundido
Acabado: Pintura negra, esmalte negro
azulado, verde océan o y marfil
Combustible: Madera
Longitud máxima
de los troncos: 50 cm
Sistema de tiro: Tiro superior e inferior
Sistema de combustión: Combustión secundaria
Salida de humos: Superior/posterior
Dimensión del tubo
de humos: 150 mm de diámetro
Peso aprox.: 158 kg
Suplementos opcionales: Pantalla cortafuego, patas cortas
Medidas del producto,
medidas de la distancia
muro desprotegido: Vea la fig. 1.
Medidas de seguridad generales
Distancia desde el producto al muro de material
inflamable y requisitos para la plancha del suelo:
Póngase en contacto con las autoridades locales para
obtener información sobre las normativas locales y
asegurarse de que la instalación es segura y legal.
Todo el suelo situado debajo de la estufa y al menos 30
cm en la parte frontal, deberá ser de un material no
inflamable. (Vea Regulaciones de construcción). Le
aconsejamos que se ponga en contacto con el distribuidor
local de Jøtul antes de realizar la instalación.
Tubo de humos sin aislamiento: Si los tubos de humos sin
aislamiento atraviesan suelos o paredes, la abertura debe
ser de ladrillo o albañilería, de forma que la superficie
exterior del tubo no se acerque a menos de 230 mm de los
materiales inflamables. Los tubos de humos aislados
pueden quedar a otra distancia, si es necesario consulte
el tubo de humos correcto en la documentación técnica
de seguridad contra incendios del producto.
Medidas para prevención de incendios
Cada vez que utilice la chimenea puede existir cierto
peligro. Por lo tanto, debe respetar las instrucciones
siguientes:
• Utilice siempre un parachispas si se va a utilizar el
producto con una puerta abierta.
• Asegúrese de que el mobiliario y otros materiales
inflamables no estén demasiado próximos a la
chimenea. Debe haber una distancia despejada
mínima de 600 mm desde la parte frontal de la
chimenea.
• Deje que el fuego se consuma. Nunca lo apague con
agua porque podría dañar el producto.
• La chimenea se calienta durante su uso y puede causar
quemaduras si se toca.
• La ceniza debe eliminarse adecuadamente al aire libre
o vaciarse en un lugar que no represente un peligro de
incendio. Consulte las regulaciones locales.
• Todas las estufas deben tener un depósito de
almacenamiento fabricado con material no inflamable
como accesorio estándar para la eliminación segura del
hollín y las cenizas. Éstos deben guardarse en el
depósito durante al menos una semana para que se
extingan los últimos rescoldos. Si tiene que vaciar el
depósito antes de este tiempo, deberá llenarlo de agua
y agitarlo.
• Puede que quiera guardar la ceniza porque es un
excelente fertilizante para las rosas y otras plantas.
Instalación de Jøtul F 400
Nota: compruebe que la estufa no presenta daños antes
de comenzar la instalación.
El producto pesa mucho, por lo que necesitará ayuda para
levantarlo e instalarlo.
Cimientos
Si Jøtul F 400 se va a instalar sobre un suelo de madera,
asegúrese de que el suelo que soporta la estufa tiene las
dimensiones suficientes para ello.
Chimenea
La estufa puede conectarse a una chimenea de
mampostería, elemental prefabricada de ladrillo o de
acero. Vea la sección correspondiente. La sección
transversal de la chimenea debe ser al menos de 177 cm2
ESPAÑOL

38
ESPAÑOL
(equivalente a 150 mm de diámetro). La conexión a la
chimenea debe realizarse de acuerdo con las instrucciones
de instalación del proveedor de la chimenea.
Circulación de aire
El uso de una chimenea requiere un abundante suministro
de aire puro a la habitación donde se ha instalado el
producto. Si la casa está cerrada herméticamente, la
habitación debe equiparse con un suministro adicional de
aire puro a través de respiraderos. Evite el uso de
ventiladores en las habitaciones donde haya chimeneas
porque podrían causar una presión negativa y aspirar
gases venenosos dentro de la habitación. Para evitarlo, es
posible introducir directamente aire del exterior a la estufa
mediante un adaptador (elemento opcional) que se monta
en la entrada de aire de la estufa. Desde allí se dirige un
tubo flexible al exterior de la vivienda. Las instrucciones
de instalación se incluyen con la unidad de instalación.
Montaje previo a la instalación
El producto se entrega en un solo embalaje. También se
incluye un tirador suelto para el mantenimiento de las
puertas de recogida de cenizas y pintura para retocar
pequeños desperfectos.
Tenga en cuenta que la placa superior debe apoyarse sobre
el producto, no fijarse a él.
Introduzca el cenicero, que se guarda dentro de la cámara
de combustión, en las ranuras situadas debajo de la puerta.
La cámara de combustión contiene también una
protección térmica que se monta debajo del
compartimento de cenizas. Despliegue la protección
térmica (vea la figura 2a) y fíjela al compartimento de
cenizas con los dos tornillos que se adjuntan (2b).
Control de funciones (fig. 3)
Cuando el producto esté instalado, compruebe
siempre
las
funciones de control, que deberán moverse con facilidad
y funcionar correctamente.
Respiradero de tiro (A) Posición izquierda = cerrado.
Posición derecha = totalmente abiertos.
Tirador de la puerta (B) = a la izquierda= abierta, a la
derecha=cerrada.
Puerta de recogida de ceniza (C) Utilice el tirador suelto
para abrir la puerta haciendo girar el botón media vuelta
en sentido contrario a las agujas del reloj. Utilice un
guante o un trapo para extraer la bandeja.
Nota: Retire las cenizas sólo cuando se haya enfriado la estufa.
Instalación del conducto de humos
Es aconsejable realizar un montaje de prueba antes de
practicar un orificio en la chimenea. Vea en la figura 1 las
medidas de la distancia a la pared de material inflamable.
La estufa se instala con un conducto de humos de 150 mm
de diámetro, que debe tener un grosor aprobado.
Jøtul F 400 viene montada de fábrica para una salida de
humos superior. Si prefiere una salida de humos posterior,
afloje los dos tornillos de los laterales y gire el tubo de
conexión 180 0. Seguidamente, asegure bien los tornillos.
• El conducto de humos de 150 mm de diámetro se coloca
directamente sobre la salida de humos del producto.
Hay un tornillo a cada lado de la salida de humos del
producto (fig. 4-A), que se utilizan para asegurar el tubo
del conducto de humos.
• Indique con marcas la posición donde los tornillos
entran en contacto con el tubo del conducto de humos
cuando se encuentra en la posición más baja de la
salida de humos y taladre un orificio de 5,5 mm para el
tornillo en el tubo del conducto de humos.
• Utilice un cordón de junta y cemento para sellar el
espacio entre el tubo del conducto de humos y la salida
de humos del producto. Coloque el cordón de junta
alrededor de la parte inferior del tubo de humos y
rellene el espacio con cemento.
• Asegure el tubo del conducto de humos con los
tornillos.
Nota: es importante que las uniones estén bien selladas.
Las fugas de aire, por ejemplo, pueden ser causa de un
funcionamiento defectuoso.
Conexión a la chimenea
Taladre un orificio para el tubo de humos. La distancia
desde la estufa al muro cortafuegos/chimenea debe ser
la indicada en la fig. 1. Utilice siempre un collar de
chimenea cuando acople la estufa a la chimenea. Use el
collar de chimenea recomendado por el proveedor cuando
conecte la estufa a una chimenea elemental. Siga
atentamente las instrucciones de uso y de montaje del
proveedor con respecto al mortero o el cemento de horno
antes de utilizar la chimenea.
Asegúrese de que el tubo de humos nunca se inclina hacia
la chimenea. Al menos debería estar horizontal,
preferiblemente tener una inclinación de unos pocos
milímetros.
Nota: una conexión correcta y hermética es muy
importante para el funcionamiento adecuado del
producto.
Observe que es especialmente importante que las
conexiones tengan cierta flexibilidad para evitar que la
sedimentación de la casa provoque la formación de
grietas.

39
Instrucciones de
funcionamiento
Encendido inicial y uso diario
Jøtul F 400 es un producto que no deja residuos de
combustión y que, con la ayuda del suministro adicional
de aire de combustión, permite la combustión retardada
de los gases y partículas peligrosas. Es muy importante
utilizar correctamente el sistema.
La estufa está equipada con determinadas funciones que
se describen en el capítulo: Control de funciones.
Encendido inicial
Abra totalmente el respiradero de tiro empujando el
respiradero completamente a la derecha (fig. 3-A). Coloque
papel de periódico arrugado, astillas de madera y leña, y
encienda un fuego pequeño. Vaya añadiendo leña de
forma gradual y deje que arda un fuego vivo durante varias
horas. Deje que se extinga el fuego y repita el
procedimiento otra vez.
Nota: olores cuando se utiliza la estufa por primera vez.
Productos pintados: la primera vez que se enciende la
estufa, puede emitir un gas irritante y oler ligeramente. El
gas no es tóxico, pero se aconseja abrir una ventana o una
puerta para que la habitación esté más ventilada. Deje
arder el fuego con un tiro alto hasta que todos los rastros
de gas hayan desaparecido y no se detecten humo ni
olores.
Productos esmaltados: las primeras veces que se utiliza la
estufa, es posible que se forme condensación de agua
sobre la superficie. Ésta debe secarse para evitar que se
formen manchas permanentes cuando se caliente la
superficie.
Uso diario
Encienda el fuego con la ayuda de papel de periódico y
astillas para encender fuego. Coloque dos troncos
medianos a cada lado de la base. Coloque entre ellos papel
de periódico arrugado (o corteza de abedul) y añada
algunas astillas entrecruzadas encima y prenda fuego al
papel de periódico. Aumente el tamaño de los troncos de
forma gradual.
Respiradero de tiro (fig. 3-A.) Regule el tiro cuando la leña
haya prendido correctamente y arda bien. Compruebe que
se inicia la combustión retardada (combustión
secundaria), indicada por la aparición de llamas amarillas
oscilantes en la cámara de aire. Seguidamente, regule la
velocidad de combustión en el nivel que desee ajustando
el respiradero de tiro.
Utilice siempre leña de buena calidad. Proporciona los
memores resultados y no daña el producto.
Nunca queme los materiales siguientes en la estufa:
- productos de desecho domésticos, bolsas de plástico,
etc.
- madera pintada o impregnada (muy tóxica)
- madera aglomerada o contrachapada
- madera de deriva
Éstos pueden dañar el producto y contaminar la atmósfera.
Nota: nunca utilice líquidos inflamables como gasolina,
queroseno, alcoholes fuertes, etc., para encender el fuego,
porque podrían causar daños a usted y al producto.
Nota: Peligro de sobrecalentamiento: la estufa no se debe
utilizar nunca de manera que se produzca un
sobrecalentamiento.
Se dice que se produce un sobrecalentamiento cuando se
coloca una cantidad excesiva de leña en la estufa o se deja
completamente abierto el respiradero de tiro.
El tiro de la chimenea nunca debe superar 2,5 mmVs (25
Pa).
Un signo inequívoco de sobrecalentamiento es cuando
partes de la estufa se ponen incandescentes. Cuando
ocurra esto, reduzca inmediatamente la abertura del
respiradero de tiro.
Advertencia: cada fuego debe consumirse hasta que quede
un rescoldo, antes de añadir más leña.
Mantenimiento
Limpieza del cristal
Jøtul F 400 está equipada con un sistema de depuración
de aire. A través del respiradero de tiro, el aire se aspira
por encima de la chimenea y se depura a lo largo del
interior del cristal. Este sistema tiene la ventaja de que
mejora la combustión y reduce la acumulación de
depósitos de hollín sobre el cristal.
Aunque siempre se adhiere algo de hollín al cristal, la
cantidad dependerá de las condiciones de tiro locales y
del ajuste del respiradero de tiro. La mayor parte de la capa
de hollín se suele quemar cuando se abre completamente
el respiradero de tiro y arde un fuego vivo en la chimenea.
Un buen consejo: para la limpieza normal humedezca una
toalla de papel en agua caliente y añádale cenizas de la
cámara de combustión. Frote el cristal con la toalla de
papel y luego límpielo con agua limpia. Si es necesario
limpiar el cristal más a fondo, recomendamos el uso de
un limpiacristales (siga las instrucciones de uso de la
botella).
Eliminación de la ceniza
Jøtul F 400 está equipado con una bandeja que facilita la
eliminación de cenizas. Sacuda la ceniza para que caiga a
través de la parrilla de la placa base a la bandeja para la
ceniza. Utilice un guante o un trapo para sujetar el tirador
de la bandeja para ceniza y retirar la ceniza. Asegúrese de
ESPAÑOL

40
ESPAÑOL
que la bandeja para ceniza no se llena hasta el punto de
impedir que la ceniza caiga a la bandeja a través de la
parrilla.
Asegúrese de que la puerta de la bandeja para ceniza está
cerrada firmemente mientras se esté utilizando la estufa.
Vea asimismo la descripción donde se explica cómo
manipular las cenizas en la sección “Medidas para
prevención de incendios”.
Limpieza y eliminación del hollín
Pueden acumularse depósitos de hollín sobre las
superficies internas de la estufa durante su uso. El hollín
es un buen aislante y, por lo tanto, reduce la producción
de calor de la estufa.
Será necesario limpiar el interior una vez al año para
obtener el máximo efecto de calentamiento del producto.
Es una buena idea hacerlo cuando desholline la chimenea
y los tubos de humos.
Deshollinar los tubos de humos a la
chimenea
Se puede deshollinar a través de la trampilla de
deshollinamiento del tubo de humos, o retirar la placa
superior y deshollinar a través de la salida de humos.
Control de la estufa
Jøtul le aconseja que controle personalmente la estufa de
forma minuciosa después de deshollinar o limpiar.
Compruebe si existen fisuras en las superficies visibles.
Compruebe también que todas las uniones están selladas
y que las juntas están bien colocadas. Deberán cambiarse
las juntas que muestren signos de desgaste o deformación.
Limpie a fondo las ranuras de la junta, aplique adhesivo
cerámico (disponible en su proveedor Jøtul local) y
presione sobre la junta para que encaje en posición. La
unión se secará en poco tiempo.
Mantenimiento externo
Tras algunos años de utilización es posible que los
productos
pintados sufran una alteración en su color
.
Debe
cepillarse la superficie para limpiarla de partículas sueltas
antes de aplicar una pintura para estufas Jøtul nueva.
Los productos esmaltados deben limpiarse únicamente
con un paño limpio y seco. No utilice agua jabonosa. Las
manchas pueden eliminarse con un líquido de limpieza
(un producto para limpiar hornos, etc.).
Longitud, cantidad y calidad de los
troncos
Los troncos que se utilicen deberán tener una longitud
máxima de 50 cm. Colóquelos paralelos a la pared
posterior de la cámara de combustión. La emisión de calor
mínima de Jøtul F 400 es de 2,5 kWh y la capacidad nominal
es de 8 kWh. Se ha calculado que se necesitarán
aproximadamente 3,2 kg de leña de buena calidad por
hora para lograr la emisión de calor nominal.
Definición de madera de buena
calidad de Jøtul
La madera de buena calidad debe secarse de modo que el
contenido de agua sea aproximadamente del 20 al 25%.
Para ello, se debe cortar la madera a finales de invierno o
comienzos de la primavera. Después se deberá cortar y
apilar para asegurar que se airee correctamente. Se debe
cubrir la leña apilada para evitar que absorba demasiada
agua de lluvia. Los troncos deben guardarse en un lugar
cerrado en otoño para utilizarlos durante la estación
invernal.
Por leña de buena calidad se entiende troncos de árboles
como abedul, haya y roble.
La cantidad de energía que se obtiene de 1 kg de madera
varía muy poco, pero el peso específico de los diferentes
tipos de madera sí varía considerablemente. Por ejemplo,
un determinado volumen de abedul proporcionará menos
kWh que el mismo volumen de roble, que tiene un peso
específico más alto.
La cantidad de energía que proporciona 1 kg de madera de
buena calidad es de aproximadamente 3,8 kWh. 1 kg de
madera completamente seca (0 % de humedad) produce
alrededor de 5 kWh, mientras que la madera con un nivel
de humedad del 60 % produce solamente alrededor de
1,5 kWh/kg.
Conservación
Sustitución de los quemadores
• La estufa dispone de quemadores laterales que se
aseguran con tornillos. El quemador posterior no está
asegurado de forma alguna y se mantiene en su
posición gracias a los quemadores laterales.
• Al sustituirlos, retire primero la placa deflectora, afloje
después los tornillos y retire los quemadores.

41
Sustitución de la placa deflectora
• Levante la placa superior.
• La placa deflectora está apoyada sobre los quemadores.
• Para retirar la placa deflectora, afloje los soportes que la
mantienen sobre los quemadores. Utilice un martillo para
golpearlos cuidadosamente hacia las puertas. Vea la fig. 5.
• Levante la tapa deflectora y sáquela de canto por la
parte superior.
• Para instalarla de nuevo, siga el mismo procedimiento
en orden inverso.
Equipo opcional
Pantalla cortafuego - no de
catálogo 350693
Si la estufa se utiliza con las puertas abiertas, asegúrese
de colocar una pantalla cortafuego delante de la apertura.
La pantalla cortafuego está disponible como equipo
opcional.
Patas cortas - 155 mm
Pintura negra- no de catálogo 350173
Esmalte negro azulado - no de catálogo 350174
Esmalte verde océan - no de catálogo 350328
Esmalte marfil - no de catálogo 350176
ITALIANO

42
ITALIANO
Indice generale
RELAZIONE ALLE AUTORITÀ
Dati tecnici di Jøtul F 400: ........................................................... 39
Misure di sicurezza generali .......................................................40
Misure preventive antincendio.................................................. 40
INSTALLAzIONe di JØTUL F 400
Principi fondamentali ...................................................................40
Cappa ................................................................................................. 40
Circolazione dell’aria ..................................................................... 40
Montaggio prima dell’installazione ......................................... 40
Controllo delle funzioni ...............................................................40
Montaggio del condotto .............................................................. 41
Collegamento alla cappa ............................................................. 41
ISTRUZIONI PER L’USO
Prima accensione e utilizzo quotidiano ..................................41
Prima accensione ...........................................................................41
Uso quotidiano ............................................................................... 41
MAnutenzione
Pulizia del vetro .............................................................................. 42
Eliminazione della cenere ...........................................................42
Pulizia del camino ed eliminazione della fuliggine .............42
Pulizia della canna fumaria fino alla cappa ........................... 42
Controllo del camino ....................................................................42
Manutenzione esterna ................................................................. 42
Lunghezza, quantità e qualità della legna .............................42
Legna di qualità: definizione della Jøtul .................................43
RIPARAZIONE
Sostituzione delle piastre di combustione.............................43
Sostituzione del deflettore .........................................................43
ATTREZZATURA FACOLTATIVA
Parascintille .....................................................................................43
Gambe basse ...................................................................................43
FIGURE - DISEGNI ..................................55– 56
Conformità alle leggi
Jøtul F 400 è un prodotto a combustione pulita per
combustibile solido.
La piastra informativa del prodotto, in materiale
refrattario, si trova sullo scudo termico sotto il ceneraio.
Sulla piastra informativa si trovano le seguenti
informazioni: Produttore e indirizzo, numero del modello,
numero di serie, uscita di calore prevista, numero di
registrazione (dopo l’assegnazione), modello e misure di
sicurezza.
Prima dell’installazione è necessario ottenere dalle
autorità locali competenti i permessi previsti. Non è infatti
possibile iniziare l’installazione prima di aver ottenuto il
permesso previsto.
L’installazione di una stufa deve essere eseguita in
conformità ai codici e alle norme locali di ogni paese. Il
rivenditore locale è stato appositamente selezionato per
la sua conoscenza dei codici locali e potrà fornire
l’assistenza necessaria per assicurare un’installazione
sicura e conforme alla legge.
Attenzione! Assicurarsi che nella stanza in cui verrà
installata la stufa vi sia una ventilazione adeguata. Una
ventilazione insufficiente può causare il consumo di
ossigeno nella stanza e provocare stanchezza, nausea e
malori, rappresentando un fattore di notevole pericolo.
È importante accertarsi che le dimensioni del camino siano
adatte alla stufa e che l’attacco al camino sia sigillato e
funzioni correttamente. I gas causati dal fumo che
penetrano in spazi chiusi possono rappresentare un rischio
molto grave per la salute.
Le istruzioni per l'assemblaggio, l'installazione e l’uso sono
fornite con il prodotto. L’installazione può essere utilizzata
solo dopo essere stata ispezionata e dopo l’emissione di
un certificato di completamento.
Dati tecnici di Jøtul F 400:
Materiale: Ghisa
Rivestimento esterno: Vernice nera, smalto blu notte,
verde mare e avorio
Combustibile: legna
Lunghezza massima
dei ciocchi: 50 cm
Sistema di tiraggio: Tiraggio superiore e inferiore
Sistema di combustione: Combustione secondaria
Scarico fumi: Alto/Retro
Dim. canna fumaria: 150 mm di diametro
Peso approssimativo: 158 kg
Accessori opzionali: Parascintille, gambe basse
Misure del prodotto,
distanze muro non protetto. Vedere fig. 1.

43
ITALIANO
Misure di sicurezza generali
Distanza da pareti di materiale infiammabile e requisiti
della piastra sul pavimento:
Contattare le autorità locali per informazioni sulle leggi
locali e per assicurarsi che la propria installazione sia sicura
e a norma.
L’intera pavimentazione sotto la stufa e per almeno 30 cm
davanti ad essa dovrà essere di materiale non
infiammabile. (Vedere i regolamenti edilizi.) Si consiglia
di contattare il rivenditore Jøtul locale prima
dell’installazione.
Condotto del fumo in materiale non isolante: Se i condotti
del fumo non isolanti devono passare attraverso pareti o
pavimenti, le aperture devono essere di mattoni o
muratura, in modo che la distanza tra la superficie esterna
del condotto e il materiale infiammabile sia superiore a
230 mm. I condotti del fumo isolanti possono avere una
distanza diversa: se necessario, consultare la
documentazione tecnica relativa al condotto del fumo.
Misure preventive antincendio
L’utilizzo di un camino può costituire un pericolo. Si
raccomanda pertanto di attenersi alle istruzioni seguenti:
• Se si usa il prodotto con uno sportello aperto, utilizzare
sempre un parascintille.
• Assicurarsi che mobili e altro materiale infiammabile
non siano mai troppo vicini al caminetto. È necessario
che vi sia una distanza di almeno 600 mm dalla parte
anteriore del camino.
• Lasciare che il fuoco si spenga. Non utilizzare mai acqua
per spegnere il fuoco poiché in questo modo si
potrebbe danneggiare il caminetto.
• Il caminetto si scalda quando viene usato e pertanto,
se toccato, può provocare ustioni.
• La cenere deve essere smaltita all’esterno oppure in un
luogo in cui non costituisca un potenziale pericolo. Fare
riferimento ai regolamenti locali.
• Ogni camino deve essere provvisto di un apposito
contenitore in materiale ignifugo come accessorio
standard per la raccolta sicura di fuliggine e ceneri.
Fuliggine e ceneri devono restare in questo contenitore
almeno una settimana, per essere sicuri che le braci
siano spente. Se occorre svuotare il contenitore prima
che sia trascorso questo periodo, versare abbondante
acqua all’interno del contenitore e miscelare.
• La cenere può essere conservata; essa costituisce un
ottimo fertilizzante per rose e altre piante.
Installazione di Jøtul F 400
Nota: prima di procedere all’installazione, ispezionare il
camino e accertarsi che non sia danneggiato.
Il camino è pesante! Chiedere aiuto quando lo si solleva e
lo si installa.
Principi fondamentali
Se Jøtul F 400 deve essere installato su un pavimento di
legno, assicurarsi che la superficie sottostante abbia le
dimensioni adeguate per sostenerlo.
Cappa
È possibile collegare il camino ad un elemento
prefabbricato costruito in mattoni o una cappa in acciaio.
Vedere sezione a parte. La sezione trasversale minima
della cappa deve essere di 177 cm². (che corrisponde a 150
mm di diametro). Il collegamento alla cappa deve essere
effettuato in conformità alle istruzioni di installazione
fornite dal produttore della stessa.
Circolazione dell’aria
L’utilizzo di un caminetto richiede un abbondante flusso
d’aria fresca nella stanza in cui viene installato il prodotto.
Se la casa è sigillata, la stanza deve essere dotata di
aperture di ventilazione che consentano un afflusso d’aria
fresca supplementare. Evitare l’utilizzo di ventole
meccaniche dove è presente un caminetto. Questo tipo
di ventola potrebbe causare una pressione negativa e
introdurre gas velenosi all’interno della stanza. Per evitare
tale rischio, è possibile convogliare l’aria dall’esterno
direttamente nella stufa mediante un adattatore (extra)
montato sul bocchettone di entrata dell’aria della stufa.
Da qui si dirige un tubo flessibile verso l’esterno
dell’edificio. Le istruzioni di installazione vengono fornite
insieme all’unità di installazione.
Montaggio prima dell’installazione
Il prodotto viene consegnato in un singolo imballo. Inclusa
nell’imballo si trova una maniglia a parte per la
manutenzione dello sportello della cenere e della vernice
per i ritocchi e i piccoli danni.
Nota: la piastra superiore va appoggiata sul prodotto e
non avvitata a esso.
Inserire l’aletta della cenere, riposta all’interno della
camera di combustione, nelle scanalature sotto lo
sportello.
La camera di combustione contiene anche un parafiamma
da montare sotto il ceneraio. Disimballare il parafiamma
(vedere figura 2a) e fissarlo con le due viti inserite nel
ceneraio (2b).

44
ITALIANO
Controllo delle funzioni (fig. 3)
Quando il prodotto è installato, controllare
sempre
le
funzioni di controllo. È necessario che si muovano con
facilità e che funzionino in maniera soddisfacente.
Ventola di tiraggio (A) Posizione a sinistra = chiusa.
Posizione a destra = completamente aperta.
Maniglia (B) = verso sinistra = aperto; verso destra = chiuso
a destra=chiuso
Sportello del ceneraio (C). Utilizzare la maniglia a parte
per ruotare la manopola in senso orario di mezzo giro.
Utilizzare un guanto o altra protezione per estrarre il
vassoio.
Nota: rimuovere la cenere solo quando la stufa è fredda.
Montaggio del condotto
È consigliabile effettuare un montaggio di prova prima di
fare un buco nel camino. Vedere la fig. 1 per le misure dal
muro costruito in materiale non infiammabile. La stufa
viene installata con un condotto di 150 mm di diametro.
Questo spessore deve essere approvato.
L’assemblaggio originale di Jøtul F 400 è concepito per lo
scarico dei fumi verso l’alto. Se si preferisce uno scarico
posteriore, svitare le due viti sui lati e ruotare il condotto
di collegamento di 180 0. Quindi riavvitare saldamente le
viti.
• Il condotto di scarico con il diametro di 150 mm è
posizionato direttamente sullo scarico dei fumi del
prodotto. Su entrambi i lati dell’uscita si trova una vite
(fig. 4-A). Le due viti servono a fissare il condotto.
• Segnare con una matita il punto in cui le viti toccano il
condotto quando esso si trova al fondo dell’apertura
di uscita della stufa e praticare quindi un foro da 5,5
mm nel condotto.
• Utilizzare una guarnizione e del cemento per sigillare
lo spazio tra il condotto dei fumi e lo scarico dei fumi
del prodotto. Avvolgere la guarnizione attorno alla
parte inferiore del condotto del fumo e riempire lo
spazio con il cemento.
• Fissare il condotto con le viti.
Nota! I giunti devono essere completamente sigillati.
Eventuali fuoriuscite d’aria potrebbero causare un cattivo
funzionamento.
Collegamento alla cappa
Praticare un foro per il condotto del fumo. La distanza tra
la stufa e la parete refrattaria/camino deve essere pari a
quella mostrata nella fig. 1. Utilizzare sempre un collare
per camini quando si collega la stufa al camino. Utilizzare
il collare consigliato dal rivenditore quando si effettua il
collegamento ad una cappa a elementi. Attenersi
strettamente alle istruzioni di montaggio e utilizzo del
fornitore facendo attenzione al cemento della camera di
combustione prima di iniziare a utilizzare il camino.
Accertarsi che il condotto del fumo non sia inclinato verso
la cappa. Dovrebbe essere almeno orizzontale, o meglio
inclinato di qualche millimetro.
Nota! Un collegamento corretto ed ermetico è molto
importante per il funzionamento corretto del prodotto.
È particolarmente importante che i collegamenti abbiano
una certa flessibilità. Ciò serve a prevenire la formazione
di crepe dopo avere installato il camino.
Istruzioni per il
funzionamento
Prima accensione e utilizzo quotidiano
Jøtul F 400 è un prodotto a combustione pulita che, grazie
ad una camera d’aria, sottopone particelle e gas nocivi a
una seconda combustione. È di estrema importanza
utilizzare il sistema correttamente.
La stufa presenta alcune funzioni descritte nel capitolo:
Controllo delle funzioni
Prima accensione
Aprire ((
((
(fig. 3-A). Inserire alcuni giornali accartocciati,
fascine e legna da ardere per accendere un piccolo fuoco.
Aggiungere gradualmente altra legna e lasciare che il
fuoco bruci vivacemente per alcune ore. Lasciare
estinguere il fuoco e ripetere ancora una volta.
Nota! Durante il primo utilizzo del camino vengono
emanati odori.
Prodotti verniciati: è probabile che quando si accende il
fuoco per la prima volta, il camino emetta un gas irritante
ed emani un odore sgradevole. Il gas non è tossico, ma si
consiglia di aprire una finestra o una porta per consentire
una maggiore ventilazione nella stanza. Lasciare che il
fuoco bruci con un tiraggio elevato fino a che tutte le tracce
di gas scompaiono e non sono più presenti fumo e cattivi
odori.
Prodotti smaltati: Le prime volte che si utilizza un camino
nuovo può formarsi sulla superficie del camino acqua di
condensa. Rimuovere tale condensa per impedire la
formazione di macchie permanenti quando la superficie
si riscalda.
Uso quotidiano
Accendere il fuoco con giornali e legna di piccola pezzatura.
Aggiungere due ciocchi di dimensioni medie su ogni lato
della base. Inframmezzare i ciocchi con fogli di giornale
accartocciati (o con trucioli), quindi disporre delle fascine
di legna incrociate sopra il tutto e dare fuoco ai giornali.
Aumentare gradualmente la dimensione dei ciocchi
aggiunti.
Ventola di tiraggio (fig. 3-A). Regolare quando il legno ha

45
ITALIANO
preso adeguatamente fuoco e brucia bene. Controllare che
si sia verificata la postcombustione (seconda
combustione). Ciò viene indicato da fiamme gialle e
sfarfallanti nella camera d’aria. Regolare quindi il tasso di
combustione sul livello desiderato di riscaldamento,
regolando la ventola di tiraggio.
Utilizzare sempre legna da ardere di qualità. Questa legna
fornisce i risultati migliori e non danneggia il prodotto.
Non bruciare mai nel camino i materiali sotto elencati:
- rifiuti domestici, sacchetti di plastica e così via.
- legname verniciato o impregnato, estremamente
tossico
- cartone per scatole o fogli di laminato
- legname trovato in mare
Questi materiali potrebbero danneggiare il prodotto e
inquinare l’atmosfera.
Nota! Non utilizzare mai liquidi infiammabili come
benzina, cherosene, alcol denaturato o simili per accendere
il fuoco. Ciò potrebbe causare danni sia a voi che al
prodotto.
Nota! Pericolo di surriscaldamento: la stufa non deve mai
essere utilizzata in maniera da provocarne il
surriscaldamento.
Il surriscaldamento si verifica quando si colloca una
quantità eccessiva di legna nel camino e/o quando si lascia
la ventola di tiraggio completamente aperta.
Il tiraggio del camino non deve eccedere 2,5 mmVs (25 Pa).
Se una qualsiasi parte del camino appare incandescente,
significa che la temperatura è troppo elevata. Se ciò
accade, ridurre immediatamente l’apertura della ventola
di tiraggio....
.
Attenzione! Il fuoco dovrebbe bruciare sino alla cenere
prima di aggiungere nuova legna.
Manutenzione
Pulizia del vetro
Jøtul F 400 è dotato di un sistema “air wash”. Attraverso la
ventola di tiraggio l’aria viene risucchiata nella parte
superiore del camino e spinta verso il basso lungo la parte
interna del vetro. Questo sistema assicura una migliore
combustione e riduce il deposito di fuliggine sul vetro.
Sarà comunque inevitabile l’accumulo di un po’ fuliggine
sul vetro e la sua quantità dipenderà dalle condizioni di
tiraggio locale e dalla regolazione della ventola di tiraggio.
La maggior parte della fuliggine verrà normalmente
bruciata quando si apre completamente la valvola di
tiraggio e il fuoco brucia vivacemente nel camino.
Suggerimento utile! Per la normale pulizia, inumidire un
pezzo di carta assorbente con acqua tiepida e aggiungere
un po’ di cenere presa dalla camera di combustione.
Sfregare il pezzo di carta contro il vetro, quindi pulirlo con
acqua pulita. Se fosse necessario pulire il vetro più a fondo,
si raccomanda un prodotto detergente per vetri (seguire
le istruzioni riportate sul flacone)....
.
Eliminazione della cenere
Jøtul F 400 possiede un ceneraio che rende più semplice
rimuovere la cenere. Scuotere la cenere attraverso la grata
nella piastra di base e quindi nel ceneraio. Indossare un
guanto per impugnare la maniglia sul ceneraio ed estrarre
la cenere. Assicurarsi che il ceneraio non si riempia fino al
punto di impedire alla cenere di scendere dalla grata.
Assicurarsi che lo sportello del ceneraio sia ben chiuso
quando la stufa è in funzione.
Vedere anche le istruzioni sullo smaltimento della cenere
nella sezione Misure antincendio.
Pulizia del camino ed eliminazione
della fuliggine
L’utilizzo della stufa può causare depositi di fuliggine
all’interno della stessa. La fuliggine è un buon isolante e
riduce l’emissione di calore della stufa.
È necessaria una pulizia interna annuale per ottenere i
migliori risultati dal prodotto. È consigliabile eseguire
questa operazione assieme alla pulizia della cappa e della
canna fumaria
Pulizia della canna fumaria fino alla
cappa
È possibile pulire la canna fumaria passando dall’apposito
sportello oppure rimuovendo la piastra superiore e
passando attraverso lo scarico dei fumi.
Controllo del camino
Jøtul consiglia di controllare personalmente e con
attenzione il camino dopo averne eseguito la pulizia.
Controllare che non vi siano crepe su tutte le aree di
superficie visibili. Verificare che tutte le giunzioni siano
ermetiche e che le guarnizioni siano posizionate
correttamente. Qualsiasi guarnizione che presenti segni
di usura e deformazione deve essere sostituita.
Pulire a fondo la scanalatura della guarnizione, aggiungere
adesivo ceramico (acquistabile presso il rivenditore locale
Jøtul) e premere la guarnizione nella posizione corretta. Il
giunto si asciugherà rapidamente.
Manutenzione esterna
Dopo diversi anni di utilizzo, i
prodotti verniciati
possono
cambiare colore
.
Prima di applicare nuova vernice per
camino Jøtul, è necessario pulire la superficie e spazzolare
via le particelle residue.

46
DEUTSCH
I
prodotti smaltati devono essere puliti solo con un panno
asciutto. Non utilizzare acqua né sapone. Eventuali
macchie possono essere rimosse con prodotti detersivi
(prodotti per il forno e così via).
Lunghezza, quantità e qualità della
legna
Utilizzare ciocchi con una lunghezza massima di 50 cm. I
ciocchi devono essere collocati parallelamente alla parete
posteriore della camera di combustione. L’emissione
minima di calore di un camino Jøtul F 400 è di 2,5 kWh, e
la capacità nominale di 8,0 kWh. Il requisito calcolato per
l’emissione nominale di calore è di 3,2 kg di legna di qualità
ogni ora.
Legna di qualità: Definizione di Jøtul
La legna di buona qualità deve presentare un grado di
essiccazione tale che il contenuto di acqua sia pari a circa
il 20-25%.
Per raggiungere tale livello, la legna deve essere tagliata
nel tardo inverno o all’inizio della primavera. Deve essere
poi tagliata e impilata in modo da assicurare un’adeguata
ventilazione. Le cataste devono venire coperte per evitare
che assorbano troppa acqua piovana In autunno la legna
dovrebbe essere tenuta al chiuso per poterla utilizzare
durante l’inverno.
Con legna di buona qualità si intendono, ad esempio,
ciocchi di betulla, faggio e quercia.
La quantità di energia ottenibile da 1 kg di legna varia
molto poco. Il peso specifico dei differenti tipi di legname
varia invece in misura considerevole. Ad esempio, il peso
di un determinato volume di legno di betulla produce
meno kWh rispetto alla medesima quantità di legno di
quercia.
La quantità di energia contenuta in un 1 kg di legna di
qualità è circa. 3,8 kWh. 1 kg di legname completamente
essiccato (0 % di umidità) produce circa 5 kWh, mentre
del legname con un tasso di umidità del 60% produce
soltanto circa 1,5 kWh/kg.
Riparazione
Sostituzione delle piastre di
combustione
• Il caminetto ha piastre di combustione laterali, fissate
con delle viti. La piastra di combustione posteriore non
è fissata, ma viene tenuta in posizione dalle piastre
laterali.
• Per la sostituzione, rimuovere innanzi il deflettore,
quindi allentare le viti e rimuovere le piastre di
combustione.
Sostituzione del deflettore
• Rimuovere la piastra superiore.
• Il deflettore è appoggiato sul lato superiore delle
piastre di combustione.
• Per rimuovere il deflettore, allentare i supporti che lo
tengono premuto verso il basso contro le piastre di
combustione. Con l’aiuto di un martello, spingerli con
attenzione verso lo sportello. Vedere fig. 5
• Sollevare leggermente il deflettore e rimuoverlo
inclinandolo attraverso lo sportello.
• Per la reinstallazione seguire la stessa procedura in
senso inverso.
Dotazione facoltativa
Parascintille cod. Art. 350693
Se il camino deve essere utilizzato con gli sportelli aperti
assicurarsi di posizionare un parascintille davanti
all’apertura. Il parascintille è disponibile come dotazione
opzionale.
Gambe basse- 155 mm
Vernisse nera - cod. art. 350173
Smalto blu notte - cod. art. 350174
Smalto verde mare - cod. art. 350328
Smalto avorio - cod. art. 350176

47
DEUTSCH
Inhalt
Behördliche Auflagen
Technische Daten des Jøtul F 400 ............................................. 45
Allgemeine Sicherheitsbestimmungen ..................................45
Brandverhütungsmaßnahmen ..................................................45
Aufstellen des JØTUL F 400
Fundamente .................................................................................... 45
Schornstein ......................................................................................45
Luftzirkulation ................................................................................ 45
Zusammenbau vor der Aufstellung ......................................... 46
Steuergeräte .................................................................................... 46
Installation des Abzugsrohrs......................................................46
Anschluß an den Schornstein ....................................................46
Inbetriebnahme
Inbetriebnahme und täglicher Gebrauch ..............................46
Inbetriebnahme .............................................................................47
Täglicher Gebrauch .......................................................................47
Heizen in der Übergangszeit ...................................................... 47
Pflege
Reinigung des Sichtfensters .......................................................47
Entfernen der Asche......................................................................48
Reinigung des Kamins und Rußentfernung ........................... 48
Fegen des Abzugsrohres zum Kamin .......................................48
Inspektion des Ofens ....................................................................48
Pflege der Oberflächen ................................................................48
Länge, Menge und Qualität der Holzscheite .........................48
Jøtuls Definition von Qualitätsbrennholz ..............................48
INSTANDHALTUNG
Austausch der Brennerplatten ..................................................48
Austausch der Ablenkplatte .......................................................49
zusatzausrüstung
Feuerblende .....................................................................................49
ABBILDUNGEN - ZEICHNUNGEN .......................55– 56
Behördliche Auflagen
Der Jøtul F 400 ist ein sauber brennender Kaminofen und
ist nach DIN 18891 Bauart 2.
Das Typenschild (Geräteschild) befindet sich auf der
Hitzeshild unter dem Aschebehälter. Es besteht aus
wärmebeständigem Material. Auf dem Typenschild sind
folgende Angaben aufgelistet: Hersteller und Adresse,
Typennummer, Herstellnummer, Nennwärmeleistung,
Registriernummer, DIN-Norm-Nummer, Bauart und
Sicherheitsabstände. Neben dem Typenschild befindet
sich das Überwachungszeichen (Ü-Zeichen).
Bauarten von Kaminöfen
DIN 18891 unterscheidet Kaminöfen der Bauart 1 und 2.
Kaminöfen der Bauart 1 haben eine selbstschliessende
Feuerraumtür und dürfen an einen mehrfach belegten
Schornstein angeschlossen werden. Aus Sicherheits-
gründen muss die Feuerraumtür mit Ausnahme der
Bedienung stets geschlossen sein. Kaminöfen der Bauart
1 dürfen ständig betrieben werden.
Kaminöfen der Bauart 2 müssen an einen eigenen
Schornstein angeschlossen werden. Der Betrieb mit
offenem Feuerraum ist nur unter Aufsicht statthaft.
Kaminöfender Bauart 2 dürfen nur 40 Stunden im Monat
betrieben werden, d.h. z.B 8 Mal 5 Stunden.
Bevor Sie mit dem Aufstellen des Kaminofens beginnen,
muß unbedingt die Genehmigung der örtlichen
Baubehörde vorliegen. Ohne Genehmigung sollten Sie
nicht mit dem Einbau beginnen. Sprechen Sie vor dem
Einbau mit ihrem zuständigen Bezirks -
Schornsteinfegermeister.
Die Aufstellung muß gemäß den behördlichen Auflagen
und Bestimmungen der jeweiligen Länder erfolgen. Ihr
Vertragshändler wurde speziell wegen seiner Kenntnisse
der behördlichen Auflagen ausgewählt und wird Ihnen
behilflich sein, den Kaminofen sicher und in gesetzlich
vorgeschriebener Weise aufzustellen.
VORSICHT! Stellen Sie eine ausreichende Belüftung des
Raumes sicher, in dem der Ofen aufgestellt werden soll.
Eine unzureichende Belüftung verursacht die Entstehung
gefährliche Rauchgase im Raum, welche zu Schläfrigkeit,
Übelkeit und Krankheit führen können und extrem
gefährlich ist.
Es muß sichergestellt sein, daß der Schornstein den für
den Ofen erforderlichen Abmessungen genügt und die
Anschlußelemente dicht mit dem Schornstein
abschließen und ordnungsgemäß funktionieren. In
abgeschlossene Räume eindringende Abluftgase stellen
ein ernst zu nehmendes Gesundheitsrisiko dar.
Anleitungen für Montage bzw. Aufstellung und zum
Betrieb des Kaminofens sind dem Produkt beigepackt. Das
Gerät darf nur dann in Betrieb genommen werden, wenn
es geprüft und als betriebsbereit genehmigt wurde.

48
DEUTSCH
Technische Daten des Jøtul F 400:
Material: Gußeisen
Anstrich: Schwarze Farbe, blau-schwarze,
ozeangrüne, elfenbein Emaille
Heizmaterial: Holz
Max. Holzscheitlänge: 50 cm
Abzugssystem: Ober- und Unterzug
Verbrennungssystem: Sekundäre Verbrennung
Rohrstutzen: Oben/Rückseite
Rohrabmessungen: Durchmesser 150 mm
Gewicht: Ca. 160 kg
Sonderausstattung: Feuerblende
Produktabmessungen,
Entfernungsangaben
bei nicht isolierter Wand. Siehe Abb. 1
Allgemeine Sicherheitsbestimmungen
Anforderungen an die Brandschutzplatte: Sofern der Ofen
auf einem Boden aus brennbarem Material aufgestellt
werden soll, muß der gesamte Bodenbereich unter sowie
ca. 500 mm vor dem Ofen, mit einer Brandschutzplatte
aus nicht brennbarem Material ausgelegt sein (siehe
Maßangaben in Abb. 1). Der Ofen ist so isoliert, daß
zwischen Brand-schutzplatte und brennbaren Fußboden
kein Isoliermaterial erforderlich ist. Die Brandschutzplatte
muß sich seitlich min. 300 mm über die
Feuerraumöffnungen erstrechen.
(Siehe Abb. 1)
Abstand zwischen Kaminofenofen und brennbarer Wand
(mit dem Hitzechild montiert):
100 mm zur Rückwand
300 mm zur Seitwand
800 mm im Strahlungsbereich
(Siehe Abb. 1)
Nicht isoliertes Verbindungsstück: Der Jøtul F 400 ist für
den Betrieb mit einem nicht isolierten Verbindungsstück
zugelassen, wobei die in Abb. 1 beschriebenen Abstände
einzuhalten sind. Wenn nicht isolierte Verbindungsstücke
durch Böden oder Wände verlegt werden, müssen diese
mit Mauerwerk aus Ziegelstein oder Zement ummantelt
werden, damit die Außenfläche des Rohrs mindestens in
einem Abstand von 200 mm am brennbarem Material
vorbeigeführt wird. Isolierte Verbindungsstücke dürfen
in einem anderen Abstand verlegt werden (vgl. die
Sicherheitsdokumentation für das Verbindungsstück).
Brandverhütungsmaßnahmen
Die Benutzung des offenen Kamins ist stets mit einer
gewissen Gefahr verbunden. Deshalb sollten die
folgenden Anweisungen unbedingt beachtet werden.
• Verwenden Sie immer einen Funkenfänger, sofern das
Produkt mit geöffneter Tür genutzt werden soll.
• Es ist darauf zu achten, daß Möbel und andere
brennbare Gegenstände nicht zu nahe am offenen
Kamin stehen. Innerhalb eines
Mindestsicherheitsabstandes von 800 mm zum
offenen Kamin hin dürfen sich keine Gegenstände
befinden.
• Lassen Sie das Feuer einfach ausgehen. Löschen Sie das
Kaminfeuer niemals mit Wasser. Dadurch kann der
Kamin beschädigt werden.
• Der offene Kamin wird heiß und kann bei Berührung
Verletzungen hervorrufen.
• Die Asche muß draußen an einem Ort entsorgt werden,
an dem keine Feuergefahr mehr entstehen kann.
Halten Sie sich an die behördlichen Bestimmungen.
• Für jeden Ofen sollte als Standard-Zubehör ein
Behälter aus nicht brennbarem Material bereitstehen,
in dem sich Ruß und Asche feuersicher aufbewahren
lassen. Ruß und Asche müssen mindestens eine Woche
lang in diesem Behälter gelagert werden, damit
sichergestellt ist, daß auch die letzte Glut erloschen
ist. Muß der Behälter früher entleert werden, ist der
Inhalt erst mit reichlich Wasser zu vermischen.
• Ein Aufbewahren der Asche ist ebenfalls möglich.
Asche ist ein hervorragender Pflanzendünger, u.a. für
Rosen.
Aufstellen des Jøtul F 400
Hinweis! Vor dem Aufstellen ist der Ofen auf
Beschädigungen zu untersuchen.
Der Kamin ist schwer. Um ihn aufzustellen und in die
richtige Position zu bringen, ist eine zweite Person
erforderlich.
Fundamente
Wenn der Jøtul F 400 auf einem Holzfußboden aufgestellt
werden soll, muß sichergestellt sein, daß der Boden unter
dem Ofen diese Traglast auch aufnehmen kann.
Schornstein
Der Ofen kann an einen Mauerwerk- oder
Ziegelschornstein, einen vorgefertigten Schornstein oder
einen Stahlschornstein angeschlossen werden. Siehe den
entsprechenden Abschnitt. Wir empfehlen dass der
Schornstein einen Mindestquerschnitt von 177 cm² bzw.
einen Durchmesser von 150 mm haben soll. Der Anschluß
an den Schornstein muß gemäß den Einbauanweisungen
des Schornsteinlieferanten erfolgen.
Luftzirkulation
Die Benutzung eines offenen Kamins erfordert für den
Raum, in dem der Kamin steht, eine reichliche
Frischluftzufuhr. Wenn das Haus vollständig isoliert ist,
muß der Raum mit einer besonderen Frischluftzufuhr
versehen werden, z.B. durch einen separaten Luftkanal. In
Räumen mit offenen Kaminen sollten keine
Lüftungseinrichtungen mit mechanischem Gebläse

49
DEUTSCH
verwendet werden. Dies führt ggf. zu einer ungünstigen
Druckverteilung, wodurch giftige Abgase in den Raum
geblasen werden. Um dies zu vermeiden, kann über einen
Adapter (Zusatzausstattung), der am Lufteinlaß des Ofens
angebracht wird, direkt Außenluft zugeführt werden. Von
dort führt ein flexibler Schlauch nach Außen. Die
Anleitung zur Aufstellung sind der Zusatzausstattung
beigelegt.
Zusammenbau vor der Aufstellung
Der Ofen wird in einer Komplettverpackung geliefert.
Außerdem enthält das Paket einen losen Handgriff für die
Aschentüren sowie Lack zum Ausbessern kleinerer
Schäden.
Beachten Sie, dass die Deckelplatte auf dem Produkt liegen
und nicht daran befestigt sein soll.
Setzen Sie die in der Verbrennungskammer befindliche
Aschenlippe in die Nuten unter der Tür ein.
In der Verbrennungskammer befindet sich auch ein unter
dem Aschebehälter anzubringender Hitzeschild. Falten Sie
den Hitzeschild auseinander (siehe Abb. 2A) und
befestigen Sie ihn mit den beiden beiliegenden Schrauben
am Aschebehälter (2B).
Steuergeräte (Abb. 3)
Bei der Aufstellung des Kamins müssen
immer
die
Steuergeräte überprüft werden. Diese sollten leichtgängig
sein und einwandfrei arbeiten.
Luftzufuhröffnung (A)
Linke Position = geschlossen.
Rechte Position = vollständig geöffnet.
Türgriff (B)
Nach links = geöffnet
Nach rechts = geschlossen.
Aschentür (C). Öffnen Sie die Tür mit dem losen Handgriff,
indem Sie den Knopf eine halbe Drehung entgegen dem
Uhrzeigersinn drehen. Ziehen Sie den Aschkasten mit
einem Handschuh oder ähnlichem heraus.
Hinweis! Entnehmen Sie Asche nur bei abgekühltem Ofen.
Installation des Abzugsrohrs
Der Kamin sollte zuerst probeweise montiert werden,
bevor ein Teil der Wand am Schornstein herausgeschlagen
wird. In Abb. 1 sind die Abmessungen für einen
Wanddurchschlag bei einer Wand aus nicht
entflammbaren Werkstoff angegeben. Der Ofen wird mit
einem Abzugsrohr von 150 mm Durchmesser installiert.
Dieser Durchmesser muß zulässig sein.
Der Jøtul F 400 ist werkseitig für einen oberen Rohrstutzen
vormontiert. Falls der Rohrstutzen hinten angebracht
werden soll, lockern Sie die beiden seitlichen Schrauben
und drehen Sie das Verbindungsrohr um 1800.
Anschließend die Schrauben fest anziehen.
• Das Abzugsrohr mit 150 mm Durchmesser wird direkt
an den Rohrstutzen am Kamin montiert. Auf beiden
Seiten des Kaminabzugs (Abb. 4-A) befindet sich eine
Schraube. Befestigen Sie damit das Abzugsrohr.
• Markieren Sie die Stelle am Abzugsrohr, an der die
Schrauben auf das Abzugsrohr stoßen, wenn das Rohr
am Boden des Rohrstutzens anliegt, und bohren Sie für
die Schrauben ein 5,5 mm großes Loch in das
Abzugsrohr.
• Verwenden Sie Dichtungsschnur und Ofenkitt, um den
Spalt zwischen Abzugsrohr und Rohrstutzen des
Kamins abzudichten. Umwickeln Sie den unteren
Bereich des Abzugsrohrs mit der Dichtungsschnur und
dichten Sie den Spalt mit Ofenkitt ab.
• Befestigen Sie das Abzugsrohr mit den Schrauben.
Hinweis! Es ist wichtig, daß die Fugen vollständig
abgedichtet sind. Austretende Luft o. ä. kann die
ordnungsgemäße Funktion des Kamins beeinträchtigen.
Anschluss an den Schornstein
Bohren Sie ein Loch für das Abzugsrohr. Der erforderliche
Abstand zwischen Ofen und Feuerwand/Kamin ist Abb. 1
zu entnehmen. Befestigen Sie das Abzugsrohr immer mit
einer Schornsteinmanschette am Schornstein. Verwenden
Sie beim Anschluß an einen Schornstein aus
Betonelementen die vom Lieferanten empfohlene
Schornsteinmanschette. Bevor Sie den offenen Kamin
benutzen, lesen Sie in der Zusammenbau- und
Gebrauchsanleitung des Lieferanten sorgfältig die
Hinweise über den Ofenkitt und befolgen Sie diese.
Sorgen Sie dafür, daß das Abzugsrohr sich auf keinen Fall
zum Schornstein nach unten neigt. Es sollte zumindest
waagerecht, eher sogar einige Millimeter aufwärts
verlaufen.
Hinweis! Eine ordnungsgemäße und dichte Verbindung
ist für eine einwandfreie Funktion des Kamins äußerst
wichtig.
Bitte beachten Sie, daß insbesondere flexible
Rohrverbindungen wichtig sind. Dadurch wird eine
mögliche Rißbildung der Rohre verhindert.
Betriebsanleitung
Inbetriebnahme und täglicher
Gebrauch
Der Jøtul F 400 ist ein sauber brennender Kamin, der mit
Hilfe einer zusätzlichen Verbrennungsluftzufuhr alle
giftigen Gase und Partikel nachverbrennt. Eine

50
DEUTSCH
ordnungsgemäße Benutzung des Systems ist wichtig.
Der Ofen ist mit bestimmten Funktionen ausgestattet, die
im Abschnitt „Steuergeräte“ beschrieben sind:
Steuergeräte.
Inbetriebnahme
Öffnen Sie die Luftzufuhröffnung, indem Sie die
Zufuhrklappe ganz nach rechts (Abb. 3-A) schieben. Legen
Sie etwas zerknülltes Zeitungspapier, Anzündholz und
Brennholz in den offenen Kamin; entfachen Sie dann
zuerst ein kleines Feuer. Legen Sie schrittweise weiteres
Brennholz in die Feuerstelle und lassen Sie das Feuer
einige Stunden mit lebhafter Flamme brennen. Lassen Sie
das Feuer ausbrennen, und wiederholen Sie das Ganze.
Hinweis! Wenn Sie den Ofen das erste Mal benutzen, kann
es zur Geruchsbildung kommen.
Kamine mit Farbanstrich. Wenn der Ofen zum ersten Mal
verwendet wird, können sich streng riechende Dämpfe
bilden, die aber nicht giftig sind. Sie sollten ein Fenster
oder eine Tür öffnen, damit der Raum gründlich belüftet
wird. Lassen Sie das Feuer bei starkem Luftzug brennen,
bis auch die letzten Spuren von Dämpfen verschwunden
und auch kein Rauch und keine Gerüche mehr vorhanden
sind.
Emaillierte Kamine: An der Außenfläche des Ofens kann
sich Kondenswasser bilden, wenn der Kamin die ersten
Male in Betrieb ist. Das muß in jedem Fall weggewischt
werden, um die Bildung bleibender Wasserflecken bei
Erwärmung der Oberfläche zu vermeiden.
Täglicher Gebrauch
Entfachen Sie das Feuer mit Hilfe von Zeitungspapier und
etwas Anzündholz. Legen Sie zwei nicht zu große
Holzscheite auf jede Seite der Feuerstelle. Schieben Sie
etwas zusammengedrehtes Zeitungspapier zwischen die
Scheite, legen Sie dann etwas Anzündholz in einem
kreuzförmigen Muster darauf und zünden Sie das Feuer
an. Legen Sie jetzt immer größere Holzscheite in das Feuer.
Luftzufuhröffnung (Abb. 3-A). Regulieren Sie die Luftzufuhr
so, daß das Holz einwandfrei angezündet werden kann
und sauber verbrennt. Prüfen Sie, ob die Nachverbrennung
(Sekundärverbrennung) beginnt. Eine gelbliche,
flackernde Flamme in der Luftkammer kennzeichnet
diesen Vorgang am deutlichsten. Die gewünschte
Hitzestufe regulieren Sie über die
Verbrennungsgeschwindigkeit; stellen Sie dazu die
Luftzufuhröffnung entsprechend ein.
Verwenden Sie stets
Brennholz guter Qualität. Damit
werden die besten Ergebnisse erzielt und der Kamin nicht
beschädigt.
Der Ofen darf niemals gefeuert werden mit:
- Hausmüll, Plastiktüten usw.
- angestrichenem oder imprägniertem Holz
(hochtoxisch)
- Spanplatten oder Laminatbrettern
- Treibholz
All das kann den Kamin beschädigen und belastet die
Umwelt, insbesondere die Luft.
Hinweis! Entfachen Sie ein Feuer niemals mit leicht
entzündlichen Flüssigkeiten wie z. B. Benzin, Kerosin,
Brennspiritus o. ä. Es besteht Verletzungsgefahr;
außerdem kann der Kamin beschädigt werden.
Hinweis! Überhitzungsgefahr: Der Ofen darf auf keinen
Fall in einer Weise betrieben werden, die zu einer
Überhitzung führt.
Eine Überhitzung liegt immer dann vor, wenn der Ofen
mit Brennholz überladen wird bzw. die Luftzufuhröffnung
vollständig geöffnet bleibt.
Der Lufteinzug am Schornstein darf 2,5 mmVs (25 Pa) nicht
übersteigen
.
Ein sicheres Anzeichen für eine Überhitzung
ist es, wenn Teile des Ofens bereits rotglühend sind. In
diesem Fall müssen Sie sofort den Durchlaß für den
Lufteinzug mit Hilfe der Luftöffnung verringern.
Vorsicht! Lassen Sie das Feuer solange brennen, bis nur
noch glimmende Asche vorhanden ist, bevor Sie neues
Brennholz auflegen.
Heizen in der Übergangszeit
In der Übergangszeit, d.h. bei höheren
Außentemperaturen, kann es bei plötzlichem
Temperaturanstieg zu Störungen des Schornsteinzuges
kommen, so daß die heizgase nicht vollständig abgezogen
werden. Die Feuerstätte ist dann mit geringeren
Brennstoffmengen zu befüllen un bei grösserer Stellung
des Primärluftschiebers/-reglers so zu betreiben, daß der
vorhandene Brennstoff schneller (mit Flammen-
entwicklung) abbrennt und dadurch der Schornsteinzug
stabilisiert wird. Zur Vermeidung von Widerständen im
Glutbett sollte die Asche öfter vorsichtig abgeschürt
werden.
Pflege
Reinigung des Sichtfensters
Der Jøtul F 400 ist mit einem Luftspülungssystem
ausgestattet. Durch die Luftzufuhröffnung gelangt die
angesaugte Luft von oben an die Feuerstelle und reinigt
das Sichtfenster entlang der Innenseite nach unten. Dieses
System verbessert den Verbrennungsvorgang und
reduziert die Rußablagerungen auf dem Sichtfenster.
Natürlich verbleibt je nach den örtlichen
Luftzugverhältnissen und der Einstellung der
Luftzufuhröffnung immer noch etwas Ruß am

51
DEUTSCH
Sichtfenster. Normalerweise verbrennt der Großteil der
Rußschicht bei vollständig geöffneter Luftzufuhröffnung,
und das Feuer brennt mit lebhafter Flamme.
Nützlicher Hinweis! Verwenden Sie zur einfachen
Reinigung des Sichtfensters ein mit warmem Wasser
angefeuchtetes Papiertuch, dem Sie etwas Asche aus der
Verbrennungskammer beimengen. Reiben Sie mit dem
Papiertuch über das Sichtfenster und waschen Sie
anschließend mit klarem Wasser nach. Falls das
Sichtfenster gründlicher gereinigt werden muß,
empfehlen wir die Verwendung eines Glasreinigers
(beachten Sie bitte die Gebrauchsanweisung auf der
Flasche).
Entfernen der Asche
Der Jøtul F 400 verfügt über einen Aschkasten, der das
Entfernen der Asche vereinfacht. Kehren Sie die Asche
durch den Rost in der Ofenplatte in den Aschkasten.
Nehmen Sie den Griff des Aschkastens mit einem
Handschuh oder ähnlichem in die Hand, und tragen Sie
die Asche hinaus. Achten Sie darauf, daß der Aschkasten
nicht so hoch gefüllt wird, daß keine Asche mehr durch
den Rost nach unten in den Kasten fallen kann.
Die Tür zum Aschkasten muß während des Ofenbetriebs
fest geschlossen sein.
Eine Erläuterung zum Umgang mit der Asche finden Sie
unter „Brandverhütungsmaßnahmen“.
Reinigung des Kamins und
Russentfernung
An den Innenflächen des Ofens können sich bei Gebrauch
Rußablagerungen bilden. Der Ruß wirkt wie ein Isolator
und verringert daher die Wärmeabgabe des Ofens.
Einmal jährlich sollte das Kamininnere gereinigt werden,
um die größtmögliche Wärmenutzung zu erhalten. Dabei
ist es sinnvoll, Schornstein und Abzugsrohre gleich mit
auszufegen.
Fegen des Abzugsrohres zum Kamin
Das Fegen kann durch die Rohrluke im Abzugsrohr oder
nach Abbau der Deckelplatte durch den Rauchabzug
erfolgen.
Inspektion des Ofens
Jøtul empfiehlt, daß Sie persönlich eine sorgfältige
Inspektion des Ofens durchführen, nachdem er gereinigt
bzw. ausgefegt wurde. Prüfen Sie alle sichtbaren
Oberflächen auf Risse. Prüfen Sie auch, ob alle
Verbindungen abgedichtet sind und alle Dichtungen
richtig sitzen. Verschlissene oder verformte Dichtungen
müssen ersetzt werden.
Reinigen Sie die Dichtnuten sorgfältig, tragen Sie
Spezialkleber (erhältlich bei Ihrem Jøtul-Vertragshändler)
auf und pressen Sie die Dichtung in ihren Sitz. Die
Verbindungen trocknen schnell.
Pflege der Oberflächen
Bei lackierten Kaminen kann sich der Farbton nach
mehreren Jahren änderten. Bevor Sie einen neuen Jøtul-
Ofenlack aufbringen, müssen Sie die Oberflächen sauber
wischen und von losen Partikeln befreien.
Emaillierte Kamine dürfen nur mit einem sauberen,
trockenen Tuch abgewischt werden. Verwenden Sie kein
Wasser und keine Seife. Wasserflecken lassen sich mit
Reinigungsmitteln (Ofenreiniger o. ä.) entfernen.
Länge, Menge und Qualität der
Holzscheite
Die verwendeten Holzscheite dürfen nicht länger als 50
cm sein. Die Holzscheite müssen parallel zur Rückwand
der Verbrennungskammer plaziert werden. Die kleinste
Wärmeabgabe des Jøtul F 400 liegt bei 2,5 kWh, seine
Nennkapazität beträgt 8,0 kWh. Um den Ofen bei
Nennwärmeabgabe zu betreiben, sind 3,2 kg Qualitätsholz
pro Stunde erforderlich.
Jøtuls Definition von
Qualitätsbrennholz
Brennholz guter Qualität muß trocken sein, d.h. mit einem
Wasseranteil von ca. 20-25 %.
Zu diesem Zweck sollte das Holz am Ende des Winters oder
zu Beginn des Frühjahrs geschlagen werden. Es sollte
anschließend gespalten und trocken (abgedeckt) an der
Luft gelagert werden. Die Brennholzstapel sollten
abgedeckt werden, um ein übermäßiges Eindringen von
Regenwasser zu vermeiden. Im Herbst sollten die
Holzscheite drinnen gelagert werden, um dann im Winter
verfeuert zu werden.
Brennholz guter Qualität sind beispielsweise Scheite von
Birken-, Buchen- und Eichenbäumen.
Die Energieausbeute von 1 kg Holz schwankt nur wenig.
Dagegen schwankt das spezifisches Gewicht
(Trockengewicht) der verschiedenen Holzarten erheblich.
Ein bestimmtes Volumen Birkenholz liefert z.B. weniger
kWh als das gleiche Volumen Eichenholz, das ein höheres
spezifisches Gewicht besitzt.
Die Energieausbeute von 1 kg Qualitätsholz liegt bei etwa
3,8 kWh. 1 kg absolut trockenes Holz (0 % Feuchtigkeit)
liefert ca. 5 kWh, während Holz mit 60 %
Feuchtigkeitsgehalt dagegen nur etwa 1,5 kWh/kg liefert.

52
NEDERLANDS
Wartungsarbeiten
Austausch der Brennerplatten
• Der Ofen ist mit seitlichen Brennerplatten
ausgestattet, die mit Schrauben befestigt sind. Die
hintere Brennerplatte ist nicht befestigt. Sie wird durch
die seitlichen Brennerplatten gehalten.
• Zum Austausch der Brennerplatten zunächst die
Ablenkplatte abnehmen. Anschließend die Schrauben
lösen und die Brennerplatten abnehmen.
Austausch der Ablenkplatte
• Deckelplatte abheben.
• Die Ablenkplatte befindet sich über den
Brennerplatten.
• Zum Entfernen der Ablenkplatte lösen Sie die
Halterungen, die die Ablenkplatte gegen die
Brennerplatten drücken. Verwenden Sie einen Hammer
und schlagen Sie die Halterungen vorsichtig in
Richtung Türen heraus. Siehe Abb. 5.
• Heben Sie die Ablenkplatte an und entfernen Sie sie
seitlich aus dem Oberteil.
• Der Wiedereinbau erfolgt in umgekehrter
Ausbaureihenfolge.
Zusatzausrüstung
Feuerblende - Bestell nr. 350693
Wenn der Kamin bei offenen Türen betrieben werden soll,
muß stets eine Feuerblende verwendet werden. Die
Feuerblende ist als Zusatzausrüstung erhältlich.

53
NEDERLANDS
Inhoudsopgave
wettelijke voorschriften
Technische gegevens van de Jøtul F 400.................................51
Algemene veiligheidsmaatregelen ........................................... 51
Maatregelen voor brandpreventie ........................................... 51
INSTALLATIE VAN DE JØTUL F 400
Vloer ................................................................................................... 51
Schoorsteen .....................................................................................51
Luchtcirculatie ................................................................................ 51
Montage vóór plaatsing ..............................................................51
Controle van de functies .............................................................. 52
Plaatsing van de kachelpijp ........................................................52
Schoorsteenaansluiting ...............................................................52
BEDIENINGSINSTRUCTIES
Eerste keer stoken en dagelijks gebruik .................................52
Eerste keer stoken .........................................................................52
Dagelijks gebruik ........................................................................... 53
onderhoud
Glas reinigen ................................................................................... 53
As verwijderen ................................................................................ 53
Reinigen en roet verwijderen .....................................................53
Kachelpijpen naar de schoorsteen vegen ..............................53
Haard inspecteren .........................................................................53
Onderhoud buitenkant ................................................................ 53
De lengte, hoeveelheid en kwaliteit van de houtblokken . 54
Jøtuls definitie van goed brandhout ........................................54
groot onderhoud
De branderplaten vervangen ..................................................... 54
De keerplaat vervangen ...............................................................54
OPTIONELE APPARATUUR
Vonkenscherm ................................................................................ 54
Korte poten ......................................................................................54
FIGUREN - AFBEELDINGEN .................................55– 56
Wettelijke voorschriften
Jøtul F 400 is een product met schone verbranding voor
vaste brandstoffen.
Het typeplaatje bevindt zich op het hitteschild onder de
askamer, en is gemaakt van hittebestendig materiaal. Op
het typeplaatje staat de volgende informatie: producent
en adres, modelnummer, productienummer, vermogen,
registratienummer (na toewijzing), model en
veiligheidsmaatregelen. Het keurmerk bevindt zich naast
het typeplaatje.
Installatie- en bedieningsvoorschrift zijn bij het product
meegeleverd en dienen aangehouden te worden.
Regelgeving en milieu- aspecten.
Voordat het toestel geplaatst wordt moet gecontroleerd
worden of de opstelplaats en schoorsteen aan de lokaal
geldende bouwverordeningen en het Bouwbesluit
voldoen.
Voorkom overlast naar Uw omgeving; stook niet bij mist
of windstil weer. U stookt goed als de rook wit of kleurloos
is. Gebruik de juiste brandstof; zie verderop in de instructie.
Controle voor de installatie
Bij plaatsing dient rekening gehouden te worden met de
afstanden tot brandbare vloeren en wanden en het
stralingsgebied rondom het toestel; zie verderop in de
instructie.
Zorg ook voor voldoende ventilatie van de
opstellingsruimte; minimale ventilatieopening (vrije
doorlaat) van 6,2 x B (belasting toestel in kW) in cm2 (zie
ook Bouwbesluit).
Gebruik als afvoermateriaal Prefab roestvaststalen of
keramische kanalen met een Keurmerk volgens KOMO of
NEN 6062.
Voor de installatie dient het schoorsteenkanaal
gecontroleerd en zonodig schoongemaakt te worden.
Veeg het kanaal 2x per jaar, 1x halverwege en 1x aan het
eind van het seizoen.
ONVOLDOENDE VENTILATIE KAN TOT ZUURSTOFGEBREK
IN DE RUIMTE LEIDEN. DIT KAN SLAPERIGHEID EN
MISSELIJKHEID VEROORZAKEN EN IS ZEER GEVAARLIJK.
ALS TIJDENS DE CONTROLE VÓÓR PLAATSING GEBREKEN
ZIJN GECONSTATEERD, MAG U NIET MET HET PLAATSEN

54
NEDERLANDS
VAN DE HAARD BEGINNEN VOORDAT ALLE GEBREKEN ZIJN
VERHOLPEN.
Technische gegevens van de Jøtul F 400:
Materiaal: Gietijzer
Afwerking: Zwarte, blauwzwarte,
oceaangroene en ivoor
email
Brandstof: Hout
Max. lengte van blokken: 50 cm
Ontluchtingssysteem: Bovenste en onderste
roosters
Verbrandingssysteem: Secundaire verbranding.
Schoorsteenaansluiting: Boven/achter
Afmeting rookkanaal: 150 mm doorsnee
Gewicht (ongeveer): 160 kg
Optionele accessoires: Vonkenscherm, korte
poten
Afmetingen product, afstanden
onbeschermde muur. Zie afbeelding 1.
algemene veiligheidsmaatregelen
Afstand tot muur van brandbaar materiaal en vereisten
voor de vloerplaat:
Neem contact op met uw plaatselijke autoriteiten voor
informatie over de lokale regelgeving en tips voor een
veilige installatie volgens de wettelijke voorschriften.
De hele vloer onder de haard, en minimaal 30 cm daarvoor
moet uit onbrandbaar materiaal bestaan. [Zie
bouwreglementen.] Wij adviseren u vóór de installatie
contact op te nemen met uw Jøtul-dealer.
Niet-geïsoleerde kachelpijp: Wanneer niet-geïsoleerde
kachelpijpen door vloeren of muren worden geleid, moet
de opening van steen of metselwerk zijn gemaakt en moet
de buitenwand van de pijp minimaal 230 mm van
brandbare materialen verwijderd blijven. Voor geïsoleerde
kachelpijpen kan een andere afstand gelden. Raadpleeg
zo nodig de brandtechnische productdocumentatie voor
informatie over de kachelpijp.
Maatregelen voor brandpreventie
Elk gebruik van de haard kan een bepaald risico met zich
brengen. Neem daarom de volgende instructies
nauwkeurig in acht:
• Gebruik altijd een vonkenvanger als het product met
geopende deur wordt gebruikt.
• Zorg ervoor dat meubels of andere brandbare
materialen niet te dicht bij de haard staan. De afstand
tot de voorkant van de haard moet ten minste 600 mm
bedragen.
• Laat het vuur vanzelf uitgaan. Blus het nooit met water,
omdat dit de haard kan beschadigen.
• De haard wordt tijdens gebruik warm en kan bij
aanraking brandwonden veroorzaken.
• De as moet naar buiten worden afgevoerd of worden
weggegooid op een plek waar geen brandgevaar
bestaat. Volg de plaatselijke voorschriften op.
• Elke haard moet zijn voorzien van een opslagbak van
onbrandbaar materiaal als standaardaccessoire voor de
afvoer van roet en as. Roet en as moeten minstens één
week in deze bak blijven liggen om er zeker van te zijn
dat de laatste smeulende resten zijn gedoofd. Wanneer
u de opslagbak eerder moet legen, giet dan voldoende
water in de bak voor vermenging met de as.
• U kunt de as ook bewaren. As werkt uitstekend als mest
voor rozen en andere planten.
Installatie van de Jøtul F 400
Opmerking! Controleer vóór het installeren of de haard
geen transportschade heeft opgelopen.
Het product is zwaar! Zorg voor hulp bij het neerzetten
en installeren van de haard.
Vloer
Als de Jøtul F 400 op een houten vloer wordt geplaatst,
zorg er dan voor dat het draagvermogen van de vloer
voldoende is voor de haard.
Schoorsteen
De haard kan worden aangesloten op een gemetselde
schoorsteen, een geprefabriceerd element of een stalen
schoorsteen. Zie het afzonderlijke gedeelte. De
dwarsdoorsnede van de schoorsteen moet minstens
177 cm² bedragen. (Dat komt overeen met een diameter
van 150 mm). De aansluiting op de schoorsteen moet
voldoen aan de installatievoorschriften van de
schoorsteenleverancier.
Luchtcirculatie
De ruimte waarin een haard wordt gebruikt, moet
voldoende toevoer van frisse lucht krijgen. Als het huis
tochtvrij is, moet via ventilatieopeningen extra frisse lucht
naar de ruimte worden toegevoerd. Gebruik geen
mechanische ventilatoren in een ruimte met een haard.
Deze kunnen negatieve druk veroorzaken waardoor giftige
gassen in de ruimte kunnen komen. Om dit te vermijden
kunt u buitenlucht rechtstreeks naar de haard toevoeren
door middel van een adapter (optionele eenheid) die op
de luchtinlaat van de haard wordt gemonteerd. Daaraan
wordt een flexibele slang bevestigd die naar de
buitenlucht wordt geleid. De installatie-instructies
worden bij de adapter geleverd.
Montage vóór plaatsing
Dit product wordt in één pakket afgeleverd. Daarin bevindt

55
NEDERLANDS
zich ook een los handvat voor bediening van de deuren en
lak voor het wegwerken van kleine beschadigingen.
De bovenplaat moet op de haard rusten en er niet op
worden bevestigd.
Plaats de aslade, die onder de verbrandingskamer zit, in
de groeven onder de deur.
De verbrandingskamer bevat ook een hitteschild, dat
onder de askamer moet worden gemonteerd. Vouw het
hitteschild open (zie afb. 2a) en bevestig het met de twee
schroeven aan de askamer (2b).
Controle van de functies (afbeelding
3)
Als de haard op zijn plaats staat, controleer dan
altijd
de
bedieningsfuncties. Deze moeten gemakkelijk
beweegbaar zijn en naar behoren functioneren.
Stookopening (A) Links = gesloten. Rechts = volledig
geopend.
Deurklink (B) = naar links is geopend, naar rechts is
gesloten.
Asklep (C). Met het losse handvat opent u de lade door de
knop een halve cirkel linksom te draaien. Gebruik
handschoenen of iets dergelijks en til de aslade omhoog.
Opmerking! Verwijder de as alleen als de haard is
afgekoeld.
Plaatsing van de kachelpijp
Het is raadzaam een proefmontage uit te voeren voordat
u een gat in de schoorsteen maakt. Zie afbeelding 1 voor
afmetingen tot de muur van brandbaar materiaal. De
haard wordt geïnstalleerd met een kachelpijp van 150 mm
doorsnee. De pijp moet een voorgeschreven dikte hebben.
De Jøtul F 400 is in de fabriek voorbereid voor een
kachelpijp aan de bovenkant. Als u liever kiest voor een
kachelpijp aan de achterkant, draait u de twee schroeven
aan de zijkanten los en draait u de aansluitpijp 1800. Draai
vervolgens de schroeven goed vast.
• De kachelpijp met een diameter van 150 mm wordt
rechtstreeks op de schoorsteenuitgang van de haard
gemonteerd. Aan beide zijden van de
schoorsteenuitgang bevindt zich een schroef
(afbeelding 4-A). Hiermee wordt de kachelpijp
vastgezet.
• Markeer de plek op de kachelpijp waar de schroef komt
wanneer de pijp onder in de schoorsteenuitgang zit,
en boor in de kachelpijp een gat van 5,5 mm voor de
schroef.
• Gebruik afdichtingskoord en ovencement als
afdichting tussen de kachelpijp en de
schoorsteenuitgang van de haard. Plaats het
afdichtingskoord rondom het onderste gedeelte van
de kachelpijp en vul het gat met cement.
• Zet de kachelpijp met de schroeven vast.
Opmerking! Het is van belang dat de verbinding volledig
luchtdicht wordt afgesloten. Lekkage van lucht en
dergelijke kan de goede werking van de haard
belemmeren.
Schoorsteenaansluiting
Boor een gat voor de kachelpijp. In afbeelding 1 is de
afstand tussen de haard en de brandmuur of schoorsteen
aangegeven. Gebruik altijd een schoorsteenkraag bij de
aansluiting op de schoorsteen. Gebruik de door de
leverancier aanbevolen schoorsteenkraag bij het
aansluiten op een geprefabriceerd element. Volg de
instructies voor montage en gebruik van de leverancier
nauwkeurig op in verband met mortel/kachelcement
voordat u de haard gaat gebruiken.
Zorg ervoor dat de kachelpijp niet scheef staat ten opzichte
van de schoorsteen. Deze moet in elk geval horizontaal
zijn en liefst een helling hebben van enkele millimeters.
Opmerking! Een juiste en luchtdichte aansluiting is van
groot belang voor het goed functioneren van de haard.
Het is van bijzonder belang dat de aansluitingen enigszins
flexibel zijn. Dit voorkomt het ontstaan van scheurtjes als
de vloer enigszins zou gaan doorzakken.
Gebruiksaanwijzing
Eerste keer stoken en dagelijks
gebruik
De Jøtul F 400 is een haard met schone verbranding, die
door middel van een luchtkamer voor naverbranding van
eventuele giftige gassen en deeltjes zorgt. Het is belangrijk
dat het systeem op de juiste wijze wordt gebruikt.
De haard is voorzien van bedieningselementen zoals
beschreven in het hoofdstuk: Bediening van de functies.
Eerste keer stoken
Maak de vulklep volledig open door deze helemaal naar
rechts te draaien (afbeelding 3-A). Leg een paar proppen
krantenpapier, wat aanmaakhout en brandhout in de
kachel en maak een klein vuur. Voeg geleidelijk meer
brandhout toe en laat het vuur een paar uur flink branden.
Laat het vuur doven en steek de haard nogmaals aan.
Opmerking! Geuren wanneer u de haard voor het eerst
gebruikt.
Geverfde haarden: Wanneer u de haard voor het eerst
gebruikt, kan irriterend gas vrijkomen, dat onaangenaam
kan ruiken. Dit gas is niet giftig, maar het is het beter om
een raam of een deur in de ruimte te openen om te zorgen

56
NEDERLANDS
voor extra ventilatie. Stook het vuur flink op totdat alle
sporen van gas zijn verdwenen en geen rook of geuren
meer zijn waar te nemen.
Geëmailleerde producten:
de eerste paar keren dat de
haard wordt gebruikt, kan condensatievorming op de
haard plaatsvinden. Veeg dit weg om vlekken op de haard
te voorkomen als het oppervlak warm wordt.
Dagelijks gebruik
Gebruik krantenpapier en enkele aanmaakhoutjes om de
haard aan te steken. Leg twee middelgrote blokken hout
aan weerszijden van de grondplaat. Schuif enkele proppen
krantenpapier (of berkenschors) tussen de blokken, leg er
enkele aanmaakhoutjes kriskras bovenop en steek het
papier aan. Maak de blokken stapsgewijs groter.
Stookopening (afbeelding 3- A). Zet deze vast wanneer het
hout is aangestoken en goed brandt. Controleer of er
naverbranding (secundaire verbranding) plaatsvindt. Er
flikkeren dan gele vlammen in de luchtkamer. Stel
vervolgens de verbranding in op het gewenste
verwarmingsniveau door de opening van de vulklep aan
te passen (afbeelding 2-B).
Gebruik
altijd
goed brandhout. Dat geeft de beste
resultaten en is niet schadelijk voor de haard.
Verbrand nooit de volgende materialen in de haard:
- huishoudelijk afval, plastic tassen enzovoort.
- geverfd of geïmpregneerd hout (zeer giftig)
- spaanplaat of laminaat
- drijfhout
Verbranding van deze stoffen kan schadelijk zijn voor de
haard en het milieu.
Opmerking! Gebruik nooit benzine, petroleum,
brandspiritus of soortgelijke brandbare vloeistoffen om
het vuur aan te maken. Hierdoor kunt u letsel oplopen of
kan de haard worden beschadigd.
Opmerking! Waarschuwing voor oververhitting: voorkom
te allen tijde dat de haard oververhit raakt.
Oververhitting treedt op als de haard te veel brandhout
bevat en/of de vulopening volledig open is.
De luchtstroom in de schoorsteen mag nooit groter zijn dan
2,5 mmVs (25 Pa).
Als de haard ergens rood gloeit, betekent
dit dat deze oververhit is. Als dat gebeurt, dient u de
ventilatieopening onmiddellijk te sluiten.
Waarschuwing! Wacht tot het vuur smeult voordat u meer
brandhout toevoegt.
Onderhoud
Glas reinigen
De JøtuF F 400 is uitgerust met een
luchttoevoervoorziening (stromende lucht). Lucht wordt
aangezogen door de luchttoevoer boven de haard en
stroomt langs de binnenkant van het glas naar beneden.
Voordeel van dit systeem is, dat de verbranding wordt
verbeterd en dat de roetaanslag op het glas wordt beperkt.
Toch zal zich altijd wel roet op het glas ophopen. De
hoeveelheid is afhankelijk van de luchtstroom ter plaatse
en de stand van de vulklep. De roetlaag wordt gewoonlijk
grotendeels weggebrand wanneer de vulklep helemaal
open staat en de haard flink brandt.
Goed advies! Maak voor een gewone schoonmaakbeurt
een papieren handdoek nat met warm water en voeg er
wat as uit de stookplaats aan toe. Wrijf met het papier
over het glas en neem het glas daarna af met schoon
water. Wanneer het glas grondig moet worden gereinigd,
adviseren wij om een glasreiniger te gebruiken (volg de
gebruiksaanwijzing op het flesje).
As verwijderen
De Jøtul F 400 is voorzien van een aslade, waarmee u de
as eenvoudig kunt verwijderen. Schraap de as door het
rooster van de grondplaat in de aslade. Gebruik een
handschoen of dergelijke om het handvat van de aslade
vast te pakken en breng de as weg. Zorg dat de aslade niet
zo vol raakt dat de as niet meer door het rooster in de
aslade kan komen.
Zorg dat de klep van de aslade goed gesloten is wanneer
de haard wordt gebruikt.
Zie ook het gedeelte onder Maatregelen voor
brandpreventie voor het omgaan met asresten.
Reinigen en roet verwijderen
Tijdens gebruik kan zich roet afzetten op de
binnenwanden van de haard. Roet werkt isolerend en kan
daardoor de warmteafgifte van de haard verminderen.
Een jaarlijkse schoonmaakbeurt is nodig voor een
optimale warmteafgifte van het product. U kunt dit
bijvoorbeeld doen als de schoorsteen en de kachelpijp
worden geveegd.
Kachelpijpen naar de schoorsteen
vegen
U kunt vegen via het veegluik in de kachelpijp of de
bovenplaat verwijderen en via de rookafvoer vegen.
Haard inspecteren
Jøtul raadt u aan om na het reinigen/vegen zelf een
grondige inspectie van de haard uit te voeren. Controleer
alle zichtbare oppervlakken op scheuren. Controleer ook
of de deur- en glasafdichtingen luchtdicht afsluiten en of
de pakkingen nog op hun plaats zitten. Pakkingen die
sporen van slijtage of vervorming vertonen, moeten
worden vervangen.

57
Maak de pakkingsgroeven grondig schoon, breng
keramische lijm aan (te verkrijgen bij uw Jøtul-dealer) en
druk de pakking goed in de groef. De lijm heeft een korte
droogtijd.
Onderhoud buitenkant
Bij
haarden met een
laklaag
kan na een paar jaar
verkleuring optreden. Voordat u een nieuwe laag Jøtul-
haardverf aanbrengt, moet u alle losse deeltjes
verwijderen.
Geëmailleerde haarden moet u alleen met een schone,
droge doek afnemen. Gebruik geen water en zeep.
Eventuele vlekken kunt u met een vloeibaar
reinigingsmiddel verwijderen (zoals een ovenreiniger).
lengte, AANTAL en kwaliteit van
houtblokken
De blokken mogen maximaal 50 cm lang zijn. Leg de
blokken parallel aan de achterwand van de
verbrandingskamer. De warmteafgifte van een Jøtul F 400
bedraagt minimaal 2,5 kWh en de nominale capaciteit 8,0
kWh. Uit berekeningen is gebleken dat voor de nominale
warmteafgifte 3,2 kg goed brandhout per uur nodig is.
JØTULS DEFINITIe van goed brandhout
Goed brandhout moet droog zijn, dat wil zeggen dat het
hout ongeveer 20 à 25% water mag bevatten.
Dit bereikt u door het hout uiterlijk aan het einde van de
winter of vroeg in het voorjaar te kappen. Daarna moet
het worden gespleten en opgestapeld om het goed te
drogen. De stapels moeten worden afgedekt om opname
van regenwater te voorkomen. Haal de blokken hout in
de herfst naar binnen voor gebruik tijdens het
stookseizoen.
Met goed brandhout bedoelen we de bekende
houtsoorten, zoals berken-, beuken- en eikenhout.
De hoeveelheid energie die 1 kg hout kan leveren, varieert
niet veel. Het soortelijk gewicht van de verschillende
houtsoorten verschilt daarentegen aanzienlijk. Zo levert
een bepaalde hoeveelheid berkenhout minder kWh op dan
dezelfde hoeveelheid eikenhout, dat een hoger soortelijk
gewicht heeft.
De hoeveelheid energie van 1 kg goed brandhout bedraagt
ongeveer 3,8 kWh. 1 kg volledig droog hout (0 % vocht)
levert ongeveer 5 kWh op, terwijl hout met 60% vocht
slechts 1,5 kWh per kg oplevert.
Groot onderhoud
de branderplaten vervangen
• De haard is aan de zijkanten voorzien van
branderplaten, die worden bevestigd met schroeven.
De branderplaat aan de achterkant wordt niet
vastgezet, maar wordt op zijn plaats gehouden door
de branderplaten aan de zijkanten.
• Verwijder bij vervanging eerst de keerplaat en schroef
vervolgens de schroeven los en verwijder de
branderplaten.
De keerplaat vervangen
• Verwijder de bovenkant.
• De keerplaat ligt boven op de branderplaten.
• Draai de beugels los die de keerplaat tegen de
branderplaten drukken om de keerplaat te verwijderen.
Tik ze met een hamer voorzichtig naar buiten richting
de deuren. Zie afb. 5.
• Til de keerplaat op en verwijder deze op zijn kant via
de bovenkant.
• Volg dezelfde procedure in omgekeerde volgorde om
de keerplaat opnieuw te plaatsen.
Optionele accessoires
VonkenSCHERM - bestelnr. 350693
Zorg dat het open haardvuur wordt afgeschermd door een
vonkenscherm als de deur openstaat. Het vonkenscherm
is verkrijgbaar als optionele apparatuur.
KORTE POTEN- 155 mm
Zwarte verf - bestelnr. 350173
Blawzwarte email - bestelnr. 350174
Oceaangroene email -bestelnr..350328
Ivoor email - bestelnr. 350176
NEDERLANDS


Jøtul arbeider kontinuerlig for om mulig å forbedre sine produkter, og vi forbeholder oss rett
til å endre spesifikasjoner, farger og utstyr uten nærmere kunngjøring.
Jøtul bemüht sich ständig um die Verbesserung seiner Produkte, deshalb können
Spezifikationen, Farben und Zubehör von den Abbildungen und den Beschreibungen in der
Broschüre abweichen.
Jøtul pursue a policy of constant product development. Products supplied may therefore differ
in specifiaction, colour and type of accessories from those illustrated and described in the
brochure.
Jøtul vise sans cesse à améliorer ses produits. C’est pourquoi, il se réserve le droit de modifier
les specifications, couleurs et équipements sans avis prélable.
Kvalitet
Jøtul ASA arbeider etter et kvalitetssikringssystem basert på NS-EN ISO 9001 for utvikling,
produksjon og salg av ildsteder. Vår kvalitetspolitikk skal gi kundene den trygghet og
kvalitetsopplevelse som Jøtul har stått for siden bedriftens historie startet i 1853.
Qualität
Jøtul ASA hat ein Qualitätssicherungssystem, das sich bei Entwicklung, Produktion und
Verkauf von Öfen und Kaminen nach NS-EN ISO 9001 richtet. Diese Qualitätspolitik vermittelt
unseren Kunden ein Gefühl von Sicherheit und Qualität, für das Jøtul mit seiner langjährigen
Erfahrung seit der Firmengründung im Jahre 1853 steht.
Quality
Jøtul ASA has a quality system that conforms to NS-EN ISO 9001 for product development,
manufacturing, and distribution of stoves and fireplaces. This policy gives our customers
quality and safety piece of mind as a result of Jøtul’s vast experience dating back to when the
company first started in 1853.
Qualité
Le système de contrôle de la qualité de Jøtul ASA est conforme à la norme NS-EN ISO 9001
relative à la conception, à la fabrication et à la distribution de poêles, foyers et inserts. Cette
politique nous permet d’offrir à nos clients une qualité et une sécurité reposant sur la vaste
expérience accumulée par Jøtul depuis sa création en 1853.
Dette ildstedet er kontrollert av:
Dieses Produkt ist geprüft von:
This product has been controlled by:
Ce produit a été contrôlé par:
____________________________ _______________________
Date: Sign.
Jøtul ASA, P.o. box 1411
N-1602 Fredrikstad, Norway
Tel. +47 69 35 90 00
Fax +47 69 35 90 01
Cat.no 129862
Draw.no. 4-3746-P01
Møklegaard, June 2001
Jøtul North America
400 Riverside Street
Portland, Maine 04104
-
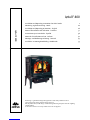 1
1
-
 2
2
-
 3
3
-
 4
4
-
 5
5
-
 6
6
-
 7
7
-
 8
8
-
 9
9
-
 10
10
-
 11
11
-
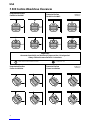 12
12
-
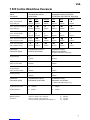 13
13
-
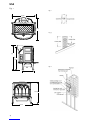 14
14
-
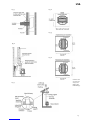 15
15
-
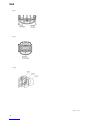 16
16
-
 17
17
-
 18
18
-
 19
19
-
 20
20
-
 21
21
-
 22
22
-
 23
23
-
 24
24
-
 25
25
-
 26
26
-
 27
27
-
 28
28
-
 29
29
-
 30
30
-
 31
31
-
 32
32
-
 33
33
-
 34
34
-
 35
35
-
 36
36
-
 37
37
-
 38
38
-
 39
39
-
 40
40
-
 41
41
-
 42
42
-
 43
43
-
 44
44
-
 45
45
-
 46
46
-
 47
47
-
 48
48
-
 49
49
-
 50
50
-
 51
51
-
 52
52
-
 53
53
-
 54
54
-
 55
55
-
 56
56
-
 57
57
-
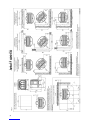 58
58
-
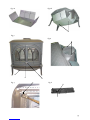 59
59
-
 60
60


Jøtul F 400 Installation And Operating Instructions Manual
- Categoría
- Estufas
- Tipo
- Installation And Operating Instructions Manual
en otros idiomas
- français: Jøtul F 400
- italiano: Jøtul F 400
- English: Jøtul F 400
- Nederlands: Jøtul F 400
- dansk: Jøtul F 400
Artículos relacionados
-
Jøtul Oslo F 500 Installation And Operating Instructions Manual
-
-
-
-
-
Jotul F 374 El manual del propietario
-
-
-
-
Otros documentos
-
-
-
Pleasant Hearth HWS-224172MH Series Manual de usuario
-
-
-
-
-
-
-
Panadero E-40 Faro EcoDesign Instrucciones de operación