Midea MRQ22D7AST Manual de usuario
- Categoría
- Neveras
- Tipo
- Manual de usuario
Este manual también es adecuado para

en
Side By Side
Refrigerator
Power supply: 115 V
Frequency: 60 Hz
Capacity: 26.3 cu. ft.
Warning:
Before using this product,
please read this manual carefully
and keep it for future reference.
The design and specifications
are subject to change without
prior notice for product
improvement. Consult with your
dealer or manufacturer for
details.
version A - 10 - 2020
MODEL NUMBER MRS26D5AST
www.midea.com
Free 3 months
extension of the
original limited warranty
period!* Simply text a
picture of your proof of
purchase to:
1-844-224-1614
*The warranty extension is for the
three months immediately following
the completion of the product’s
original warranty period.

Dear user
THANK YOU and CONGRATULATIONS on your purchase of this
high-quality Midea product. Your Midea refrigerator is designed
for reliable, trouble-free performance. Please take a moment to
register your new refrigerator.
Register your new refrigerator at www.midea.com under the
Support tab.
For future reference, record your product model and serial
numbers located on the back of the refrigerator above the
compressor compartment.
Model Number________________________________________
Serial Number_________________________________________
REFRIGERATOR SAFETY .................................................................3
OPERATION REQUIREMENTS .........................................................7
Location Requirements ..........................................................................7
Electrical Requirements .........................................................................8
Water Supply Requirements ................................................................9
PARTS AND FEATURES ..................................................................10
INSTALLATION ..................................................................................11
Unpack .........................................................................................................11
Door Removal (only if needed) ..........................................................11
Connect to Water ................................................................................... 14
Move to Final Location ......................................................................... 16
Install Water Filter ...................................................................................17
Door Alignment (If needed) ...............................................................19
Level Refrigerator .................................................................................. 20
BEFORE USE ....................................................................................20
Waiting Period ........................................................................................ 20
Cleaning .................................................................................................... 20
REFRIGERATOR USE...................................................................... 21
General ...................................................................................................... 21
Controls ..................................................................................................... 22
Ice Maker ................................................................................................... 25
Dispenser .................................................................................................. 26

3
Refrigerator
Safety
Operating
Requirements
Parts and
Features
Installation
Refrigerator
Use
Refrigerator
Care
Troubleshooting
Before
Use
Drip Tray ....................................................................................................27
REFRIGERATOR CARE ....................................................................28
Cleaning .................................................................................................... 28
Moving ....................................................................................................... 29
Storage ...................................................................................................... 29
Replacing Lights .................................................................................... 29
TROUBLESHOOTING ..................................................................... 30
General ...................................................................................................... 30
Ice and Water ..........................................................................................33
Error Codes ..............................................................................................36
PERFORMANCE DATA SHEET ...................................................... 37
WARRANTY ..................................................................................... 38
REFRIGERATOR SAFETY
YOUR SAFETY AND THE SAFETY OF OTHERS ARE VERY
IMPORTANT
To prevent injury to the user or other people and property damage, the
instructions shown here must be followed. Incorrect operation due to
ignoring of instructions may cause harm or damage, including death.
The level of risk is shown by the following indications.
CAUTION
WARNINGWARNING
WARNING
This symbol indicates the possibility of dangerous voltage
constituting a risk of electrical shock is present that could
result in death or serious injury.
This symbol indicates the possibility of injury or damage to
property.
This symbol indicates the possibility of death or serious
injury.

4
Refrigerator
Safety
Operating
Requirements
Parts and
Features
Installation
Refrigerator
Use
Refrigerator
Care
Troubleshooting
Before
Use
IMPORTANT SAFETY INSTRUCTIONS
WARNING
GENERAL APPLIANCE SAFETY
•
Read all safety warnings, instructions, illustrations and specifications
provided with this appliance. Failure to follow all instructions listed
below may result in electric shock, fire and/or serious injury.
•
Save all warnings and instructions for future reference.
ELECTRICAL SAFETY
•
Plug into a grounded 3 prong outlet.
•
Do not remove ground prong.
•
Do not use an adapter.
•
Unplug the power cord by holding the plug, never by pulling the
cord.
•
Do not turn the appliance on or off by plugging in or unplugging the
power cord.
•
Do not use an extension cord.
•
Unplug the refrigerator before cleaning or defrosting.
NOTE: Power to the refrigerator cannot be disconnected by pressing
a control on the control panel.
Grounding requirement
•
This refrigerator must be grounded. This refrigerator is equipped with
a grounding plug. The plug must be inserted into an outlet that is
properly installed and grounded.
•
Improper use of the grounding plug can result in a risk of electric
shock. Consult a qualified electrician or service person if the
grounding instructions are not completely understood or if doubt
exists as to whether the refrigerator is properly grounded.
LOCATION SAFETY
•
This refrigerator is intended to be used in household and similar
environments.
•
Install in accordance with the manufacturer’s instructions.
•
This refrigerator should not be recessed or built-in an enclosed
cabinet. It is designed for freestanding installation only.
WARNING - Keep ventilation openings, in the refrigerator, clear of
obstruction.
•
When moving the refrigerator, do not roll over or damage the power
supply cord.
•
Do not install near any heat sources, such as radiators, heat registers,
stoves, other cooking appliances or in direct sunlight.
•
Keep flammable materials and vapors, such as gasoline, away from
refrigerator.

5
Refrigerator
Safety
Operating
Requirements
Parts and
Features
Installation
Refrigerator
Use
Refrigerator
Care
Troubleshooting
Before
Use
USE AND CARE SAFETY
•
Flammable refrigerant used. Follow handling instructions carefully.
Risk of fire or explosion due to puncture of refrigerant tubing.
•
Flammable refrigerant used. Do not use mechanical devices to
defrost freezer. Do not puncture refrigerant tubing.
•
Do not store or use gasoline or any flammable liquids inside or in the
vicinity of this refrigerator.
•
Use two or more people to move and install refrigerator.
•
Connect refrigerator to a potable water supply only for ice maker
and dispenser use.
•
This appliance is not intended for use by persons (including children)
with reduced physical, sensory or mental capabilities, or lack of
experience and knowledge, unless they have been given supervision
or instruction concerning use of the appliance by a person
responsible for their safety.
•
Children should be supervised to ensure that they do not play with
the appliance.
•
Keep fingers out of the “pinch point” areas; clearances between the
doors and between the doors and cabinet are necessarily small. Be
careful closing doors when children are in the area.
•
Do not use electrical appliances inside the food storage
compartments of the appliance, unless they are of the type
recommended by the manufacturer.
•
Do not touch the interior of the freezer with wet hands. This could
result in frostbite.
•
Use nonflammable cleaner. Clean only with a damp cloth.
•
In refrigerators with automatic icemakers, avoid contact with the
moving parts of the ejector mechanism, or with the heating element
that releases the cubes. Do not place fingers or hands on the
automatic ice making mechanism while the refrigerator is plugged in.
•
Do not use electrical appliances on the top of the refrigerator, unless
they are of the type recommended by the manufacturer.
•
Do not place heavy objects on the top of the refrigerator considering
that objects may fall when doors are opened and closed.
•
Do not store beer, beverages or other fluid contained in bottles or
enclosed containers in the freezer. The bottles or containers may
crack due to freezing.
SERVICE SAFETY
•
Disconnect power before servicing.
•
Flammable refrigerant used. To be repaired only by trained service
personnel. Do not puncture refrigerant tubing.

6
Refrigerator
Safety
Operating
Requirements
Parts and
Features
Installation
Refrigerator
Use
Refrigerator
Care
Troubleshooting
Before
Use
•
Refer all servicing to qualified service personnel. Do not repair or
replace any part of this appliance unless specifically recommended
in this manual. Servicing is required when the appliance has been
damaged in any way, such as the power supply cord or plug is
damaged, liquid has been spilled or objects have fallen into the
appliance, the appliance has been exposed to rain or moisture, does
not operate normally, or has been dropped.
•
If the supply cord is damaged, it must be replaced by the
manufacturer, its service agent, or similarly qualified person, in order
to avoid a hazard.
•
If component part is damaged, it must be replaced by the
manufacturer, its service agent or similarly qualified persons in order
to avoid a hazard.
•
Replace all parts and panels before operating.
SAVE THESE INSTRUCTIONS
THIS APPLIANCE IS FOR HOUSEHOLD USE ONLY
State of California Proposition 65 Warnings:
WARNING: Cancer and Reproductive Harm
-www.P65Warnings.ca.gov.
PROPER DISPOSAL
WARNING
Suffocation Hazard
Before you throw away your old refrigerator:
•
Remove the doors and drawers so that children cannot hide or get
trapped inside your old appliance.
•
Leave any shelves in place so that children may not easily climb
inside.
•
Failure to follow these instructions can result in death or brain
damage.
IMPORTANT: Refrigerant and cyclopentane foaming material used
for the appliance are flammable. It is the consumer’s responsibility
to comply with Federal and Local regulations when disposing of this
product. Refrigerants must be evacuated by a licensed, EPA certified
refrigerant technician in accordance with established procedures.


8
Refrigerator
Safety
Operating
Requirements
Parts and
Features
Installation
Refrigerator
Use
Refrigerator
Care
Troubleshooting
Before
Use
ELECTRICAL REQUIREMENTS
WARNING
Electrical Shock Hazard
•
Plug into a grounded 3 prong outlet.
•
Do not remove the ground prong from the power cord plug.
•
Do not use an adapter.
•
Do not use an extension cord.
•
Failure to do so can result in death, fire or electrical shock.
IMPORTANT: A 115 Volt, 60 Hz., AC only, 15-amp fused, grounded electrical
supply is required.
•
Use an electrical outlet that accepts the grounding prong.
NOTE: The power cord is equipped with a 3-prong (grounding) plug
which mates with a standard 3-prong (grounding) electrical outlet.
•
We recommend that the refrigerator be plugged into an electrical
circuit serving ONLY this appliance.
•
Use an electrical outlet that cannot be turned off with a switch or pull-
chain.
•
DO NOT use an extension cord.
a
b
c
a 3-prong plug
b 3-prong receptacle
c Receptacle box cover

9
Refrigerator
Safety
Operating
Requirements
Parts and
Features
Installation
Refrigerator
Use
Refrigerator
Care
Troubleshooting
Before
Use
WATER SUPPLY REQUIREMENTS
A cold water supply with water pressure between 30 and 100 psi (207 and
689 kPa) is required to operate the water dispenser and ice maker. If
you have questions about your water pressure, call a licensed, qualified
plumber.
IMPORTANT: Operation outside the water pressure range may cause
malfunction and severe, damaging water leaks.
NOTE: If the water pressure is less than what is required, the flow of water
from the water dispenser could decrease or ice cubes could be hollow or
irregularly shaped.
Reverse Osmosis Water Supply (if applicable)
IMPORTANT: The pressure of the water supply coming out of a reverse
osmosis system going to the water inlet valve of the refrigerator needs to
be between 30 and 100 psi (207 and 689 kPa).
If water pressure is too low:
Check to see whether the sediment filter in the reverse osmosis system is
blocked. Replace the filter if necessary.
Allow the storage tank on the reverse osmosis system to refill after
heavy use. The tank capacity could be too small to keep up with the
requirements of the refrigerator.
If your refrigerator has a water filter, it may further reduce the water
pressure when used in conjunction with a reverse osmosis system.
Remove the water filter.

10
Refrigerator
Safety
Operating
Requirements
Parts and
Features
Installation
Refrigerator
Use
Refrigerator
Care
Troubleshooting
Before
Use
PARTS AND FEATURES
LED Light
Ice Storage Bin
Ice / Water Dispenser
Glass Shelf
Door Bin
Drawer Bin
Glass Shelf
Door Bin
Drawer Bin
Freezer compartment Refrigerator compartment
Water Filter

11
Refrigerator
Safety
Operating
Requirements
Parts and
Features
Installation
Refrigerator
Use
Refrigerator
Care
Troubleshooting
Before
Use
SPECIFICATIONS
Dimension (WxDxH) 35.8" x 33.9" x 69.9"
Width with door open 90° 40.9" (104 cm)
Width with door open 130° 61.4" (156 cm)
Weight 284 lbs. (129 kg)
Power requirements 115 V ~ 60 Hz, 15A minimum requirement
Power cord length 66.9" (170 cm)
INSTALLATION
UNPACK
WARNING
Fire or Explosion Hazard
·
Do not puncture refrigerant tubing.
·
Follow handling instructions carefully.
·
Flammable refrigerant used.
·
Failure to do so can result in death, explosion or fire.
IMPORTANT: Remove ALL exterior and interior packing materials
including the foam packing between the exterior condenser and the
refrigerator cabinet.
DOOR REMOVAL
(ONLY IF NEEDED)
Measure the refrigerator to make sure it will fit through the doorway.
If the refrigerator cannot pass easily through the doorway, follow the
instructions to remove the refrigerator compartment doors and the
freezer compartment doors.
WARNING
Electrical Shock Hazard
·
Disconnect power before removing doors.
·
Reconnect ground wire before operating.
·
Failure to do so could result in death or electric shock.
(91 x 86 x 178 cm)
TOOLS NEEDED
·
Phillips screwdriver
·
8 mm Socket wrench

12
Refrigerator
Safety
Operating
Requirements
Parts and
Features
Installation
Refrigerator
Use
Refrigerator
Care
Troubleshooting
Before
Use
REMOVE DOORS
IMPORTANT: Keep the refrigerator doors closed until you are ready to lift
them from the cabinet.
1.
3.
2.
Using a Phillips screwdriver, remove the four screws attaching the
hinge cover to the top of the cabinet.
Hinge cover
Screws
4. Slowly lift the hinge cover, keeping the wire harnesses attached.
Remove the Freezer bottom hinge cover screws and hinge cover.
Pull out the locking washer from the water pipe connector and the pull out
the freezer door water pipe from quick connector.
Note: please be noted the fast connector can’t be left at the end of
water pipe of door.
5. Disconnect the wiring harnesses by pressing the release catch
on each wire harness connector, and then pulling the ends apart (left-
hand door hinge only).
Wiring harnesses

13
Refrigerator
Safety
Operating
Requirements
Parts and
Features
Installation
Refrigerator
Use
Refrigerator
Care
Troubleshooting
Before
Use
6. Using an 8 mm socket wrench, remove the three hinge screws.
7. Using a Phillips screwdriver, remove the ground screw (left freezer door ).
Hinge screws
Ground screw
Top hinge
NOTE: Provide additional support for the door while the hinge is being
removed. Do not depend on the door gasket magnets to hold the door
in place while you are working.
8. Remove the top left freezer door hinge.
9. Using both hands, slowly swing the door until it is open to a 90° angle
door onto a soft surface to protect the finish.
10.
Repeat this procedure to remove the right refrigerator door.
REPLACE DOORS
NOTE: The hinge pin extends from the bottom edge of the door.
1. Insert the hinge pin into the opening in the bottom hinge.
2. Insert the top hinge into the top of the door.
3. Using the hinge screws removed earlier, fasten the top hinge to the top
of the cabinet.
4. Replace the ground screw (left door).
5. Reconnect the water tube.
6. Replace the left door following steps 1 through 3.
7. Using the four screws removed earlier, fasten the hinge cover to the
top of the cabinet.
90°

1"
Refrigerator
Safety
Operating
Requirements
Parts and
Features
Installation
Refrigerator
Use
Refrigerator
Care
Troubleshooting
Before
Use
CONNECT TO WATER
A cold water supply with water pressure of between 30 and 100 psi
(207 and 689 kPa)
is required to operate the water dispenser and ice
maker. If you have questions about your water pressure, call a licensed,
qualified plumber.
IMPORTANT:
•
Connect only to a drinking (potable) water supply.
•
Plumbing shall be installed in accordance with the International
Plumbing Code and any local codes and ordinances.
Connect to Water Line
Gather the required tools and parts before starting installation.
•
Flat-blade screwdriver
•
ПШЖ " Wrench or 2 Adjustable
wrenches
•
Cordless drill
•
ПШИ " Drill bit
•
ПШИ " Compression nut
•
Ferrule (sleeve)
1. Find a
ПШЖ " to 1ПШИ " (12.7 mm to 31.8 mm) vertical cold water pipe near the
refrigerator.
IMPORTANT: Make sure it is a cold water pipe.
NOTE: Horizontal pipe will work; however, you must drill on the top
side of the pipe, not the bottom. Drilling on the top side will keep
water away from the drill and keep normal sediment from collecting in
the valve.
2. Determine the length of copper tubing you need. Measure from the
connection on the back of the refrigerator to the water pipe. Add 7 ft
(2.1 m) to allow for cleaning. Use
ПШИ " (6.35 mm) O.D. (outside diameter)
copper tubing. Be sure both ends of copper tubing are cut square.

1#
Refrigerator
Safety
Operating
Requirements
Parts and
Features
Installation
Refrigerator
Use
Refrigerator
Care
Troubleshooting
Before
Use
3. Using a cordless drill, drill a ПШИ " (6.35 mm) hole in the cold water pipe.
4. Fasten the shutoff valve to the cold water pipe with the pipe clamp.
Be sure the outlet end is solidly in the
ПШИ " (6.35 mm) drilled hole in the
water pipe and that the washer is under the pipe clamp.
5. Tighten the packing nut. Tighten the pipe clamp screws slowly and
evenly so the washer makes a watertight seal. Do not overtighten.
a
g
b
c
d e f
a Household supply line
b Saddle valve
c Packing nut
d Shutoff valve
e Ferrule (sleeve)
f Compression nut
g ПШИ " Water line
6. Slip the compression sleeve and compression nut on the copper tubing
as shown. Insert the end of the tubing into the outlet end squarely as
far as it will go. Screw compression nut onto outlet end with adjustable
wrench. Do not overtighten or you may crush the water line.
7. Place the free end of the tubing in a container or sink, and then turn
ON the main water supply. Flush the tubing until water is clear. Turn
OFF the shutoff valve on the water pipe.
Connect to Refrigerator
1. Unplug refrigerator or disconnect power.
2. Close shut-off valve.
3. Thread a brass compression nut and ferrule (sleeve) onto the free end
of the water line.
4. Remove the plastic cap from the end of the refrigerator water line.
c
a
b
a
Refrigerator
water line
b Compression
nut
c Plastic cap

1$
Refrigerator
Safety
Operating
Requirements
Parts and
Features
Installation
Refrigerator
Use
Refrigerator
Care
Troubleshooting
Before
Use
5. Insert the water line directly into the fitting on the end of the
refrigerator water line. Tighten the compression nut. Do not
overtighten.
6. Confirm connection is secure by gently pulling on the water line.
7. Turn on the water supply to refrigerator and check for leaks. Correct
any leaks.
Complete the Installation
WARNING
Electrical Shock Hazard
•
Plug into a grounded 3 prong outlet.
•
Do not remove the ground prong from the power cord plug.
•
Do not use an adapter.
•
Do not use an extension cord.
•
Failure to do so can result in death, fire or electrical shock.
1. Plug into a grounded 3 prong outlet.
NOTE: This refrigerator begins operating as soon as it is connected to
the power supply.
2. Move the refrigerator into its final location, making sure to maintain the
recommended clearance.
MOVE TO FINAL LOCATION
WARNING
Fire or Explosion Hazard
•
Do not puncture refrigerant tubing.
•
Follow handling instructions carefully.
•
Flammable refrigerant used.
•
Failure to do so can result in death, explosion or fire.
IMPORTANT:
•
If the refrigerator has been in a horizontal position for any period of
time, wait 24 hours to allow the refrigerant to settle before plugging in
the refrigerator.
•
When moving the refrigerator, DO NOT tilt it beyond 45° from upright.
NOTE: Tilting the refrigerator more than 45° could damage the
compressor and the sealed system.
•
Avoid placing excessive stress on the doors or top when moving the
refrigerator.

INSTALL WATER FILTER
REMOVE BYPASS PLUG
2.
1.
Turn o the water supply to refrigerator.
Squeeze the sides of the filter cover where marked, and then pull
downward to open the cover.
Filter cover
3. Turn the bypass plug counterclockwise, and then pull out to remove.
IMPORTANT: Keep the bypass plug for later use. The ice maker and
dispenser will not operate unless either a water filter or the bypass
plug is properly installed.
Bypass plug
Refrigerator
Safety
Operating
Requirements
Parts and
Features
Installation
Refrigerator
Use
Refrigerator
Care
Troubleshooting
Before
Use

Refrigerator
Safety
Operating
Requirements
Parts and
Features
Installation
Refrigerator
Use
Refrigerator
Care
Troubleshooting
Before
Use
INSTALL WATER FILTER
4. Remove the water filter from its packaging, and then remove the clear,
plastic cap from the filter head.
5. Align the tabs on the filter head with the notches in the opening, and
then insert the water filter into the opening. Press inward, while turning
the filter clockwise to install.
NOTE: The housing allows the filter to move slightly upward and
downward.
Water filter
7. Close the filter cover.
6. Turn on the water supply to refrigerator
REPLACE WATER FILTER
The Water Filter icon on the control panel will illuminate after 150+ days to
indicate that it is time to order a replacement water filter. After 180+ days
the icon will illuminate and flash to indicate it is time to replace the water
filter.
1. Turn o the water supply to refrigerator
2. Turn the water filter counterclockwise, and then pull out to remove.
3. Install a new water filter following steps 4 to 7 in the previous section.
4. Press and hold the Water Filter control for 3 seconds to clear and reset
the filter status clock.
NOTE: T

Refrigerator
Safety
Operating
Requirements
Parts and
Features
Installation
Refrigerator
Use
Refrigerator
Care
Troubleshooting
Before
Use
FLUSH THE WATER SYSTEM
After installing the replacement water filter it is important to flush air from
the water line so that water will not drip from the water dispenser.
1. Turn on the main water supply.
2. Dispense 2.5 gallons of water (flush for approximately 5 minutes) to
remove trapped air and contaminants from the system.
NOTE: Do not dispense the entire 2.5 gallon amount continuously.
Depress and release the dispenser pad for cycles of 30 seconds ON
and 60 seconds OFF. In some homes, additional flushing may be
required.
3. Open the refrigerator door to make sure there are no water leaks
coming from the water filter.
DOOR ALIGNMENT (IF NEEDED)
Door alignment or adjustment can be done on side-by-side model
refrigerators.
1. Locate the adjusting screws found on the underside of the bottom
corner of the refrigerator door.
After loosening the locking nut by turning it clockwise, turn the door
adjusting screw clockwise to raise the door or counter-clockwise to
lower it.
2.
After one or two turns of the wrench, open and close the refrigerator
door, and check the alignment at the top of the doors.
3.
Tighten the locking nut by turning it counter-clockwise.
4.
NOTE: If necessary, repeat the above steps until the doors are aligned.
Adjusting nut
Fixed shaft
Leveling feet
Locking nut
Wrench
Left
Right

Refrigerator
Safety
Operating
Requirements
Parts and
Features
Installation
Refrigerator
Use
Refrigerator
Care
Troubleshooting
Before
Use
2
LEVEL REFRIGERATOR
IMPORTANT: Level the refrigerator for proper operation and to avoid
cooling, frost and moisture problems that can occur if the doors do not
close completely.
1. Move the refrigerator to its final location. See “Move to Final Location.”
2. Place a carpenter's level on the top of the cabinet to check that the
refrigerator is level from side to side and tilted slightly downward
toward the back. If the refrigerator is not level, go to steps 3 and 4 to
adjust.
NOTE: The doors will close easier when the front of the refrigerator is
slightly higher than the back of the refrigerator.
3. Using two or more people, adjust the leveling feet (one foot located at
each of the two front corners of the refrigerator cabinet).
4. With one person pressing against the top front of the refrigerator to
take weight o the leveling feet, the other(s) can then turn the leveling
feet to adjust the height of each side.
5. Use the carpenter's level to check the level and tilt.
To Raise - Turn the leveling feet clockwise.
To Lower - Turn the leveling feet counterclockwise.
BEFORE USE
WAITING PERIOD
•
Before plugging the refrigerator into a grounded 3-prong electrical
outlet, allow it to stand upright for approximately 2 hours.
NOTE: This reduces the possibility of a malfunction in the cooling
system caused by improper handling during transportation.
•
Allow the refrigerator to cool for 2 to 3 hours before adding food.
CLEANING
1. Wash the refrigerator interior using a soft cloth dampened with a
baking soda solution (2 tablespoons baking soda mixed with 1 quart of
warm water).
2. Using a soft cloth, thoroughly dry all surfaces.

Refrigerator
Safety
Operating
Requirements
Parts and
Features
Installation
Refrigerator
Use
Refrigerator
Care
Troubleshooting
Before
Use
2
REFRIGERATOR USE
GENERAL
•
The storage life of frozen foods varies and the recommended storage
time should not be exceeded.
•
Place frozen food into the freezer as quickly as possible after purchase.
•
Do not refreeze frozen foods which have thawed completely.
WARNING
Electrical Shock Hazard
•
Plug into a grounded 3 prong outlet.
•
Do not remove the ground prong from the power cord plug.
•
Do not use an adapter.
•
Do not use an extension cord.
•
Failure to do so can result in death, fire or electrical shock.
1. Plug refrigerator into a grounded 3 prong outlet.
2. Wait 30 minutes, and then open the refrigerator door to determine if
the refrigerator is cooling.
3. Load items into the refrigerator and freezer compartments.
ENERGY SAVING TIPS
•
Allow hot foods to cool to room temperature before placing them in
the freezer. Foods that freeze too slowly may lose quality or spoil.
•
Do not overload the refrigerator with a large amount of unfrozen food.
Overloading forces the compressor to run longer, which decreases the
cooling efficiency of the refrigerator.
•
Wrap foods properly and wipe containers dry before placing them in
the refrigerator. This decreases frost build-up inside the refrigerator.
•
Do not line refrigerator storage shelves with aluminum foil, wax paper
or paper toweling. Liners interfere with cold air circulation, making the
refrigerator less efficient.
•
Organize and label food to reduce the number of door openings, and
length of time the door or drawer is open. Remove the items needed at
one time, and then close the door as soon as possible.

Refrigerator
Safety
Operating
Requirements
Parts and
Features
Installation
Refrigerator
Use
Refrigerator
Care
Troubleshooting
Before
Use
2
CONTROLS
depend on the physical product or statement by the distributor
ĨThe picture above is only for reference. The actual configuration will
Temp i*dicator
Super freezer indicator
Super cool indicator
Refrigerator temperature buttonŏ
reezer temperature button
Water filter reset indicator and button
ENERGY SAVING indicator and button
Lock/unlock indicator and button
The control panel is located on right side of freezer door.
When the refrigerator is first plugged into the electrical outlet, the display
will begin to illuminate and scroll; after which the display icons will fully
illuminate for 3 seconds and a tone will sound.
Under normal conditions, if no door is opened or no control is pressed for
When the display is not illuminated, press any control to illuminate, and
then press and hold for 3 seconds to unlock the control panel.

Refrigerator
Safety
Operating
Requirements
Parts and
Features
Installation
Refrigerator
Use
Refrigerator
Care
Troubleshooting
Before
Use
23
TEMPERATURE
When the refrigerator is first plugged into a power source, the default
temperature settings will be displayed.
The temperature of each compartment is adjustable within its specified
range.
Refrigerator Compartment
Default temperature setting: 39°F (4°C).
The temperature range for the refrigerator compartment is 34°F to 44°F
(1°C to 7°C).
Freezer Compartment
Default temperature setting: 0°F (-18°C).
The temperature range for the freezer compartment
is -7°F to 7°F (-22°C
to -14°C).
To adjust the temperature of the refrigerator and/or freezer
compartments:
1. Select the compartment by pressing either or
2. Press to either raise or lower the temperature in
increments of 1° until the desired temperature is reached.
TEMPERATURE UNIT DISPLAY
The compartment temperatures can be viewed in either degrees
Fahrenheit (°F) or degrees Celsius (°C).
Press and hold controls for 3 seconds to change the unit
display from degrees Fahrenheit (°F) to degrees Celsius (°C) or vice versa.
or

Refrigerator
Safety
Operating
Requirements
Parts and
Features
Installation
Refrigerator
Use
Refrigerator
Care
Troubleshooting
Before
Use
24
SUPER COOL MODE
Press and hold for 3 seconds to enter Super Cool
mode,the temperature in the compartment will lower to 34°F (1°C).
Press and hold again for 3 seconds to exit the Super Cool mode.
The light will turn o , and the refrigerator compartment
temperature will return to the previously set temperature.
SUPER FREEZE MODE
Press and hold for 3 seconds to enter the Super
Freeze mode,the temperature in the compartment will lower to -7°F (-22°C).
Press and hold again for 3 seconds to exit the Super Freeze mode.
The light will turn o
, and the freezer compartment
temperature will return to the previously set temperature.
ENERGY SAVING MODE
Press to enter and exit Energy Saving mode.
Energy Saving will illuminate to indicate the mode is activated and turn
vated.
When Energy Saving mode is activated, the refrigerator compartment
temperature is 44°F (7°C) and the freezer compartment temperature is
7°F (-14°C).
When Energy Saving mode is turned o
, the refrigerator and freezer
compartment temperatures will revert to the previously set temperatures.
NOTE: If a temperature was set to either Super Freeze or Super Cool
mode, it will be automatically cancelled.
LOCK/UNLOCK CONTROLS
To Unlock the Controls:
Press and hold
will illuminate.
To Lock the Controls:
Press and hold
NOTE: After 30 seconds, if no control is pressed, the controls will
automatically lock.
for 3 seconds. A tone will sound,and the display
for 3 seconds. A tone will sound,and the display

25
ICE MAKER
Press
to turn ON/OFF the freezer compartment ice maker.
When the .!!6!.ŏ%!ŏ)'!. is on, the control will be illuminated.
Freezer Ice Bin
The freezer compartment ice bin is removable for cleaning or
emptying when a large amount of cubed ice is needed.
After emptying and/or cleaning, replace the ice bin immediately. The
ice maker will continue to make ice, and the cubes will drop into the ice
making compartment if the ice bin is not properly installed.
To Remove the Ice Bin:
1.
2.
Grasp the Ice storage bin and pull the bin out of the compartment.
Ice storage bin
To Replace the Ice Bin:
1. Remove any ice cubes that may have fallen into the ice compartment.
2. Slide the ice bin into the compartment.
Freezer Ice Maker
Refrigerator
Safety
Operating
Requirements
Parts and
Features
Installation
Refrigerator
Use
Refrigerator
Care
Troubleshooting
Before
Use
Open the freezer door as soon as possible .

$
Refrigerator
Safety
Operating
Requirements
Parts and
Features
Installation
Refrigerator
Use
Refrigerator
Care
Troubleshooting
Before
Use
'LVSHQVHUOLJKWWXUQVRQZKHQGLVSHQVLQJZDWHUDQGLFH7KH/('OLJKW
ZLOOWXUQRIIDIWHUVHFRQGV
,Q6WDQGE\0RGHWKHGLVSHQVHULFRQVDUHKLGGHQXQWLODFWLYDWHG
7KHLFRQVFDQEHDFWLYDWHGE\VZLSLQJ\RXUILQJHUDFURVVWKHFRQWURO
VXUIDFH7KHGLVSHQVHULFRQVZLOOWXUQRIIDIWHUVHFRQGVDXWRPDWLFDOO\
6WDQGE\0RGHSURYLGHVDPLQLPDOLVWORRNZKLFKVRPHXVHUVSUHIHU
,Q$FWLYH0RGHWKHGLVSHQVHULFRQV&XEHG:DWHU&UXVKHGDUHDOZD\V
RQ7KHFRQWUROXVHVEULJKWHU/('LFRQWRLQGLFDWHZKDWGLVSHQVLQJPRGH
LVVHOHFWHG
6ZLWFKLQJEHWZHHQ$FWLYH0RGHDQG6WDQGE\0RGH3UHVVDQGKROG
:$7(5DQG&586+('LFRQVIRUVHFRQGV7KHGLVSHQVHUFRQWUROZLOO
IODVKIRUVHFRQGVFRQILUPLQJWKHPRGHLVFKDQJH
7KHGLVSHQVHUFRQWUROLQFRUSRUDWHVEDFNOLW/('LFRQVWRGHVLJQDWHWKH
RSHUDWLQJPRGHRIWKHGLVSHQVHU7KHUHDUHWZRGLVSOD\PRGHVWKDW\RX
FDQFKRRVHEHWZHHQ6WDQGE\0RGHDQG$FWLYH0RGH<RXFDQVZLWFK
WKHPRGHVE\IROORZLQJWKHLQVWUXFWLRQLQEHORZ$VWKHIDFWRU\GHIDXOW
WKHGLVSHQVHFRQWUROLVLQ6WDQGE\0RGH

Dispensing Crushed Ice
1. Press the Crushed button . The Crushed indicator will illuminate.
2. Using your finger or container, press the pad to dispense crushed ice.
3. Release the dispensing pad to stop dispensing ice.
DRIP TRAY
The drip tray is removable for cleaning.
Drip tray
%
REMOVABLE DOOR BINS
The door bins are removable for easier cleaning.
To Remove:
1. Remove all items from the door bin.
2. Grasp the sides of the bin, lift the bin up and pull it outward.
To Replace:
1. Insert bin into the door liner above the support, and then press
downward to engage.
Refrigerator
Safety
Operating
Requirements
Parts and
Features
Installation
Refrigerator
Use
Refrigerator
Care
Troubleshooting
Before
Use
7RXVHDVDQLJKWOLJKWRUH[WHQGWKHGXUDWLRQWKDWWKHGLVSHQVHUOLJKWLV
RQSUHVVDQGKROG:DWHUDQG&XEHGLFRQVWRJHWKHUIRUVHFRQGV7KH
GLVSHQVHUOLJKWZLOOWXUQRIIDXWRPDWLFDOO\DIWHUKRXUV7RWXUQRIIKROG
WKHWKHVDPHEXWWRQVDJDLQIRUVHFRQGV

Refrigerator
Safety
Operating
Requirements
Parts and
Features
Installation
Refrigerator
Use
Refrigerator
Care
Troubleshooting
Before
Use
REFRIGERATOR CARE
Both the refrigerator and freezer compartments defrost automatically
and require minimal cleaning and maintenance. To keep your refrigerator
running efficiently and odor free, we recommend that you wipe up spills
immediately and clean the refrigerator regularly.
CLEANING
WARNING
Electrical Shock Hazard
•
Unplug your appliance or disconnect power before cleaning.
•
Failure to do so can result in death, electric shock or personal injury.
WARNING
Explosion Hazard
•
Use nonflammable cleaner.
•
Failure to do so can result in death, explosion or fire.
IMPORTANT: To prevent damage to the finish, DO NOT use gasoline,
benzine, thinner or other solvents, and DO NOT use abrasive cleaners.
1. Unplug the refrigerator from the electrical outlet.
2. Remove all food.
3. Remove and wash the shelves with a mild detergent solution.
&

Refrigerator
Safety
Operating
Requirements
Parts and
Features
Installation
Refrigerator
Use
Refrigerator
Care
Troubleshooting
Before
Use
4. Wash the refrigerator interior using a soft cloth dampened with a
baking soda solution (2 tablespoons baking soda mixed with 1 quart of
warm water).
5. Clean the gasket around the door. Gently wipe the gasket using a soft
cloth dampened with a mild detergent solution.
NOTE: Gaskets must be kept clean and pliable to assure a proper seal.
6. Using a soft cloth, thoroughly dry all surfaces.
7. Plug in or reconnect power.
MOVING
IMPORTANT: When moving your refrigerator, DO NOT tilt it beyond 45°
from upright.
1. Unplug your refrigerator from the wall outlet.
2. Remove all food.
3. Securely tape down all loose items inside your refrigerator.
4. Tape the door shut.
STORAGE
IMPORTANT: Do not store refrigerator in a location that is accessible to
children.
1. Unplug your refrigerator from the electrical outlet.
2. Remove all food.
3. Clean the refrigerator.
4. Leave the door open slightly to avoid possible formation of
condensation, mold or odor.
REPLACING LIGHTS
Any replacement or maintenance of the LED lights is intended to be made
by the manufacturer, its service agent or similarly qualified person.
'

Refrigerator
Safety
Operating
Requirements
Parts and
Features
Installation
Refrigerator
Use
Refrigerator
Care
Troubleshooting
Before
Use
TROUBLESHOOTING
IMPORTANT: DO NOT try to repair your refrigerator yourself. Doing so
invalidates the warranty.
GENERAL
PROBLEM POSSIBLE CAUSE SOLUTION
The
refrigerator
is not on or is
not cooling
The refrigerator is
unplugged.
Make sure that the
refrigerator power cord
is fully plugged into the
electrical outlet.
The fuse on the circuit
is blown or the circuit
breaker is tripped.
Check the house fuse /
circuit breaker box and
replace the fuse or reset
the circuit breaker.
Power failure. If a power failure occurs,
the refrigerator turns o.
Wait until the power is
restored.
Temperature control is not
set to correct temperature.
Adjust the temperature to
a lower setting.
The clearance between
the refrigerator and
surrounding cabinets or
wall is insufficient.
Make sure there is
adequate clearance
around the refrigerator,
and remove all items
from the top of the
refrigerator to maximize air
circulation. See “Location
Requirements.”
The
refrigerator
door does
not close
completely
Food packages are
interfering with the door.
Move or remove some food
items.
The door gaskets are dirty. Clean the door gaskets.
The refrigerator may not
be level.
Level the refrigerator.
The LED
lights do not
come on
The refrigerator is
unplugged.
Plug refrigerator into a
grounded 3 prong outlet.
LED light is burned out. Contact a qualified
technician to replace the
burned out LED.
!

Refrigerator
Safety
Operating
Requirements
Parts and
Features
Installation
Refrigerator
Use
Refrigerator
Care
Troubleshooting
Before
Use
PROBLEM POSSIBLE CAUSE SOLUTION
Food in the
refrigerator is
not cold
The door has been opened
too often or was not closed
properly.
Make sure that the door is
closed properly.
A large amount of food
was recently added.
Allow time for the recently
added food to cool, and
then check again.
The door is not closed
completely.
Check the door gasket
and food distribution, and
make sure that the door
closes completely.
The refrigerator has been
disconnected for a period
of time.
Allow 4 hours for the
refrigerator to cool
completely before adding
food.
The temperature control is
set too warm.
Set the temperature
control to a colder setting.
Items in the
refrigerator
compartment
are freezing
The air vents are blocked. Place large items on the
sides of the top shelf so
that they are not blocking
the air circulating from the
vent in the center.
The
refrigerator
makes
unusual
noises or
vibrations
The refrigerator may not
be level.
Adjust the leveling feet
located on the front
corners of the refrigerator
until the refrigerator is
level.
The refrigerator cabinet is
touching a wall.
Move the refrigerator away
from the wall.
Metal parts undergo
expansion and contraction.
This is normal.
Refrigerant is circulating
throughout the system.
This is normal.
Moisture
is building
up in the
interior of the
refrigerator
The door has been opened
too often or was not closed
properly.
Make sure that the door is
closed properly.
The refrigerator is located
in a humid area.
Move the refrigerator to a
drier location.
The weather is hot and
humid.
This is normal.
!

Refrigerator
Safety
Operating
Requirements
Parts and
Features
Installation
Refrigerator
Use
Refrigerator
Care
Troubleshooting
Before
Use
PROBLEM POSSIBLE CAUSE SOLUTION
The
compressor
turns on and
o frequently.
The room temperature is
hotter than normal.
This is normal.
A large amount of food
was recently added.
Allow time for the recently
added food to cool, and
then check again.
The door is not closed
completely or was opened
too often.
Check the door gasket and
food distribution to make
sure the door will close
completely.
The refrigerator has been
disconnected for a period
of time.
Allow 4 hours for the
refrigerator to cool
completely before adding
food.
The temperature control
was not set correctly.
Set the temperature
control to the correct
setting.
Refrigerator
has an odor
Refrigerator needs
cleaning.
Clean the refrigerator. See,
“Cleaning.”
Improperly wrapped food
is giving o an odor.
Wrap food tightly or seal
before storing it in the
refrigerator.
!

Refrigerator
Safety
Operating
Requirements
Parts and
Features
Installation
Refrigerator
Use
Refrigerator
Care
Troubleshooting
Before
Use
ICE AND WATER
PROBLEM POSSIBLE CAUSE SOLUTION
The ice
maker is not
producing
ice or is not
producing
enough ice
The refrigerator is not
connected to a water
supply or the water supply
shuto valve is not turned
on.
Connect refrigerator to
water supply and turn
water shuto valve fully
open.
The ice maker(s) are
turned o.
Turn on the ice maker(s).
See “Controls.”
The refrigerator has just
been installed.
Wait 12 hours after ice
maker installation for ice
production to begin.
The ice storage bin is not
in place.
Make sure the ice storage
bin is correctly installed.
A large amount of ice was
recently removed.
Allow sufficient time for
ice maker to produce more
ice.
An ice cube is jammed in
the ice maker ejector arm.
Remove ice from the
ejector arm with a plastic
utensil.
The ice cubes
are hollow or
small
NOTE: This is
an indication
of low water
pressure.
The water shuto valve is
not fully open.
Turn the water shuto
valve fully open.
There is a kink in the water
source line.
A kink in the line can
reduce water flow.
Straighten the water
source line.
A water filter is installed
on the refrigerator.
Remove the water filter
and operate the ice maker.
If ice volume improves,
then the filter may be
clogged or incorrectly
installed. Replace filter or
reinstall it correctly.
!!

Refrigerator
Safety
Operating
Requirements
Parts and
Features
Installation
Refrigerator
Use
Refrigerator
Care
Troubleshooting
Before
Use
PROBLEM POSSIBLE CAUSE SOLUTION
The water
and ice
dispenser do
not operate
properly
The refrigerator is not
connected to a water
supply or the water supply
shuto valve is not turned
on.
Connect the refrigerator to
the water supply and turn
the water shuto valve
fully open.
There is a kink in the water
source line.
A kink in the line can
reduce water flow.
Straighten the water
source line.
Inadequate water pressure
to the house.
The water pressure to
the house determines the
flow from the dispenser.
See “Water Supply
Requirements.”
A refrigerator door is not
closed completely.
Make sure both doors
to the refrigerator
compartment are
completely closed.
The water filter or bypass
plug is not installed
properly.
Water cannot be
dispensed without a water
filter or the bypass plug
correctly installed. See
“Water Filter.”
Ice is blocking the ice
delivery chute.
Remove the ice bin
from the upper ice
compartment. Check the
delivery chute and remove
jammed ice using a plastic
utensil, if necessary. Clean
the ice delivery chute and
the ice bin using a warm,
damp cloth, and then dry
both thoroughly.
To avoid ice jams and to
maintain a fresh supply of
ice, empty the ice bin and
clean both the bin and
delivery chute regularly.
Ice bin is not properly
seated in the ice maker
compartment.
Check the position of the
ice bin.
!"

Refrigerator
Safety
Operating
Requirements
Parts and
Features
Installation
Refrigerator
Use
Refrigerator
Care
Troubleshooting
Before
Use
PROBLEM POSSIBLE CAUSE SOLUTION
Water is
leaking or
dripping from
the dispenser
system
NOTE: A
few drops of
water after
dispensing is
normal.
The glass was not held
under the dispenser long
enough.
Hold the glass under the
dispenser 2 to 3 seconds
after releasing the
dispenser pad.
The water filter was
recently installed or
replaced.
Flushing the water system
removes the air from the
lines which causes the
water dispenser to drip.
Flush the water system.
See “Flush the Water
System.”
The water
from the
dispenser
tastes bad
Water has not been
dispensed recently
(approx. 4 days).
Dispense and discard at
least 1 gallon of water.
The water filter needs to
be replaced.
Replace the water filter
when indicated.
Water from
the dispenser
is warm
The refrigerator has just
been installed.
Allow 24 hours after
installation for the water
supply to cool completely.
The refrigerator is not
connected to a cold water
pipe.
Make sure the refrigerator
is connected to a cold
water pipe.
A large amount of water
was recently dispensed.
Allow 3 hours for the water
supply to cool completely.
Water has not been
recently dispensed.
The first glass of water
may not be cool. Discard
the first glass of water
dispensed.
Water is
leaking
from the
back of the
refrigerator
The water line connections
were not fully tightened.
See “Connect to Water.”
Water is
leaking from
the pan under
the freezer
drawer
The refrigerator is
automatically defrosting
more frequently.
Empty the drip pan. Make
sure the refrigerator is
not overcrowded and that
stored food with a high
liquid content, such as
soups, are tightly sealed.
The doors or drawers are
not closed completely
allowing warm air to enter.
Make sure all doors
and drawers are closed
completely.
!#

36
Refrigerator
Safety
Operating
Requirements
Parts and
Features
Installation
Refrigerator
Use
Refrigerator
Care
Troubleshooting
Before
Use
ERROR CODES
If an error code is displayed on the control panel, contact your place of
purchase or Insignia customer service at 1-866-646-4332.
Error
Code
Error Description
E0
E1
E2
E5
E6
E7
EH
EE
CA
EP
Ambient temperature fault
Communication fault of ice making board of mainboard
Fault of defrosting sensor in freezing chamber
Communication fault of display board of main board
Fault of temperature sensor in freezing chamber
Fault of temperature sensor in refrigerating chamber
Temperature sensor fault
Ice machine fault
Ice making machine o
-ice fault
Ice machine sensor fault

!%
PERFORMANCE DATA SHEET
WATER FILTRATION SYSTEM
MODEL MF-2008-R2 CAPACITY 200 GALLONS (757 LITERS)
System tested and certified by NSF International against
NSF/ANSI Standards 42 and 53 for the reduction of contaminants
specified on the Performance Data Sheet.
This system has been tested according to NSF/ANSI Standards 42 and 53 for the reduction
of the substances listed below. The concentration of the indicated substances in water
entering the system was reduced to a concentration less than or equal to the permissible
limit for water leaving the system, as specified in NSF/ANSI Standards 42 and 53.
Substance Reduction Influent challenge
concentration
(mg/L)
Maximum permissible
product water
concentration (mg/L)
Avg %
Reduction
NSF
Reduction
Requirements
Chlorine Reduction
2.0 mg/L ± 10% NA 93.7% 50%
Particulate
Reduction, Class I*
*10000/ml NA >99.9% *85%
Lead Reduction
0.15mg/L ± 10% )0.010 99.60% NA
Live Cysts†
50000/L NA >99.99% 99.95%
Test Parameters: pH = 7.69 ± 0.5 unless otherwise noted. Flow = 0.52 gpm (1.89 Lpm).
Pressure = 60 psig (413.7 kPa).
Temp. = 68°F to 71.6°F (20°C to 22°C). Rated service capacity = 200 gallons (757 liters).
•
It is important that operational,
maintenance, and filter replacement
requirements be carried out for the
product to perform as advertised.
Property damage can occur if all
instructions are not followed.
•
The disposable cartridge must be
changed at least every 6 months.
•
Use replacement filter MF-2008-R2.
•
The filter monitor system measures the
amount of water that passes through
the filter and alerts you when it is time
to replace the filter. See “Using the
Controls.”
•
After changing the water filter, flush the
water system. See “Dispenser.”
•
These contaminants are not necessarily
in your water supply. While testing was
performed under standard laboratory
conditions, actual performance may
vary.
•
The product is for cold water use only.
•
The water system must be installed in
compliance with state and local laws
and regulations.
•
Do not use with water that is
microbiologically unsafe or of unknown
quality without adequate disinfection
before or after the system. Systems
certified for cyst reduction may be used
on disinfected waters that may contain
filterable cysts. EPA Est. No. 10350-MN-
005.
•
Refer to the “Warranty” section for the
Manufacturer’s limited warranty, name
and telephone number.
Application Guidelines/
Water Supply Parameters
Water Supply Potable City or Well
Water Pressure 35 - 120 psi
(241 - 827 kPa)
Water
Temperature
33° - 100°F
(1° - 38°C)
Service Flow
Rate
0.52 gpm (1.89 L/min.)
@ 60 psi
* Class I particle size: >0.5 to <1 μm.
†
Based on the use of Cryptosporidium parvum
oocysts.
®
NSF is a registered trademark of NSF
International.

MIDEA
REFRIGERATOR
LIMITED
WARRANTY
ATTACH YOUR RECEIPT HERE. PROOF OF PURCHASE
IS REQUIRED TO OBTAIN WARRANTY SERVICE.
Please have the following information available when you
call the Customer Service Center:
Q Name, address and telephone number
Q Model number and serial number
Q A clear, detailed description of the problem
Q Proof of purchase including dealer or retailer
name and address
IF YOU NEED SERVICE:
1. Before contacting us to arrange service, please determine whether your product requires repair.
Some questions can be addressed without service. Please take a few minutes to review the
Troubleshooting section of the User Manual, or visit http://us.Midea.com/support
2. All warranty service is provided exclusively by our authorized Midea Service Providers, in the
U.S. and Canada.
Midea Customer Service
In the U.S.A. or Canada, call 1-866-646-4332.
If outside the 50 States of the United States or Canada, contact your authorized Midea dealer to
determine whether another warranty applies.
1 YEAR PARTS AND LABOR
WHAT IS COVERED
FIRST YEAR LIMITED WARRANTY (PARTS AND LABOR)
Midea will repair or replace, without charge, any defects due to faulty materials or workmanship for
one full year from the date of purchase. For further detail of warranty coverage and warranty repair
information, visit www.midea.com or call 1-866-646-4332.
Consumer will be responsible for:
Q Diagnostics, removal, transportation and reinstallation cost required because of service.
Q Costs of service calls that are a result of items listed under NORMAL RESPONSIBILITIES
OF THE CONSUMER**
NORMAL RESPONSIBILITIES OF THE CONSUMER**
This warranty applies only to products in ordinary household use, and the consumer is
responsible for the items listed below:
1. Proper use of the appliance in accordance with the instructions provided with the product.
2. Routine maintenance and cleaning necessary to keep the good working condition.
3. Proper installation by an authorized service professional in accordance with instructions provided
with the appliance and in accordance with all local plumbing, electrical and / or gas codes.
4. Proper connection to a grounded power supply of sufficient voltage, replacement of blown
fuses, repair of loosened connections or defects in house wiring.
5. Expenses for making the appliance accessible for servicing.
6. Damages to finish after installation.
YOUR SOLE AND EXCLUSIVE REMEDY UNDER THIS LIMITED WARRANTY SHALL BE PRODUCT
REPAIR OR REPLACEMENT AS PROVIDED HEREIN. Service must be provided by a Midea designated
service company. This limited warranty is valid only in the 50 States of the United States or Canada
and applies only when the major appliance is used in the country in which it was purchased. This
limited warranty is effective from the date of original consumer purchase. Proof of original purchase
date is required to obtain service under this limited warranty.
!&

!'
WHAT IS NOT COVERED
1. Failure caused by damage to the unit while in your possession (other than damage caused
by defect or malfunction), by its improper installation, or by unreasonable use of the product,
including without limitation, failure to provide reasonable and necessary maintenance or to
follow the written Installation and Instruction Manual.
2. Products purchased “as-is” or refurbished are not covered by this warranty.
3. Food loss caused by refrigerator or freezer failure.
4. Service calls to repair or replace consumables such as water filters, light bulbs airfilters etc., or
handles, knobs and other cosmetic parts.
5. Product that has been transferred from its original owner.
6. Interior or exterior rust on the unit.
7. Damages caused by services performed by persons other than authorized Midea servicers; use
of parts other than Midea replacement parts; obtained from persons other than such Midea
customer service; or external causes such as abuse, misuse, inadequate power supply or acts of
God.
8. Service calls resulting from improper installation of your product.
9. Service calls to instruct you on the use of your product.
10. Surcharges including, but not limited to, any after hour, weekend, or holiday service calls, tolls,
ferry trip charges, or mileage expense for service calls to remote areas, including the state of
Alaska.
11. If the unit is put to commercial, business, rental, or other use or application other than for
consumer use, we make no warranties, express or implied, including but not limited to, any
implied warranty of merchantablility or fitness for particular use or purpose.
12. Product that has been removed outside the USA or Canada.
13. Products without original serial numbers or products that have serial numbers which have been
altered or cannot be readily determined.
NOTE: Some states do not allow the exclusion or limitation of incidental or consequential damages.
So this limitation or exclusion may not apply to you.
The cost of repair or replacement under these excluded circumstances shall be borne by the
customer.
DISCLAIMER OF IMPLIED WARRANTIES
IMPLIED WARRANTIES, INCLUDING ANY IMPLIED WARRANTY OF MERCHANTABILITY OR
IMPLIED WARRANTY OF FITNESS FOR A PARTICULAR PURPOSE, ARE LIMITED TO ONE
YEAR OR THE SHORTEST PERIOD ALLOWED BY LAW. Some states and provinces do not allow
limitations on the duration of implied warranties of merchantability or fitness, so this limitation may
not apply to you. This warranty gives you specific legal rights, and you also may have other rights
that vary from state to state or province to province.
DISCLAIMER OF REPRESENTATIONS OUTSIDE OF WARRANTY
Midea makes no representations about the quality, durability, or need for service or repair of this
major appliance other than the representations contained in this warranty. If you want a longer or
more comprehensive warranty than the limited warranty that comes with this major appliance, you
should ask Midea or your retailer about buying an extended warranty.
LIMITATION OF REMEDIES; EXCLUSION OF INCIDENTAL AND CONSEQUENTIAL DAMAGES
YOUR SOLE AND EXCLUSIVE REMEDY UNDER THIS LIMITED WARRANTY SHALL BE
PRODUCT REPAIR AS PROVIDED HEREIN. MIDEA SHALL NOT BE LIABLE FOR INCIDENTAL OR
CONSEQUENTIAL DAMAGES. Some states and provinces do not allow the exclusion or limitation of
incidental or consequential damages, so these limitations and exclusions may not apply to you. This
warranty gives you specific legal rights, and you also may have other rights that vary from state to
state or province to province.
05/19

Alimentation en électricité :
115 V
Fréquence : 60 Hz
Capacité : 26.3 cu. ft.
MODÈLE NUMÉRO MRS26D5AST
www.midea.com
GUIDE DE L’UTILISATEUR
Extension gratuite
de 3 mois
1-844-224-1614
Réfrigérateur avec
congélateur juxtaposé

Cher utilisateur
MERCI FÉLICITATIONS
www.midea.com
Support [Soutien]
14
17
18
20
20
21
21
22
23
26
26
21
22
Modes du panneau de commande du distributeur
SÉCURITÉ DU RÉFRIGÉRATEUR
EXIGENCES DE FONCTIONNEMENT
COMPOSANTES ET CARACTÉRISTIQUES
INSTALLATION
AVANT L’UTILISATION
UTILISATION DU RÉFRIGÉRATEUR

3
ATTENTION
AVERTISSEMENT
AVERTISSEMENT
Ce symbole signale la possibilité d’une tension dangereuse
constituant un risque de choc électrique susceptible
d’entraîner la mort ou une blessure grave.
Ce symbole signale la possibilité de blessure ou de
dommages matériels
.
Sécurité du
Réfrigérateur
Exigences de
Fonctionnement
Composantes et
Caractéristiques
Installation
Utilisation du
Réfrigérateur
Entretien du
Réfrigérateur
Dépannage
Avant
l’utilisation
Ce symbole signale la possibilité de mort ou de blessure
grave
.
28
29
30
30
30
31
34
37
29
31
38
39
ENTRETIEN DU RÉFRIGÉRATEUR
DÉPANNAGE
SÉCURITÉ DU RÉFRIGÉRATEUR

4
AVERTISSEMENT
SÉCURITÉ EN MATIÈRE D’ÉLECTROMÉNAGERS
•
•
SÉCURITÉ ÉLECTRIQUE
•
•
•
•
•
•
•
•
•
SÉCURITÉ DE L’EMPLACEMENT
•
•
•
Sécurité du
Réfrigérateur
Exigences de
Fonctionnement
Composantes et
Caractéristiques
Installation
Avant
l’utilisation
Utilisation du
Réfrigérateur
Entretien du
Réfrigérateur
Dépannage

5
•
•
•
SÉCURITÉ — UTILISATION ET SOINS
•
•
•
•
•
•
•
•
•
•
•
•
•
Sécurité du
Réfrigérateur
Exigences de
Fonctionnement
Composantes et
Caractéristiques
Installation
Utilisation du
Réfrigérateur
Entretien du
Réfrigérateur
Dépannage
Avant
l’utilisation

6
•
•
SÉCURITÉ — ENTRETIEN
•
•
•
•
•
•
CET APPAREIL EST UNIQUEMENT DESTINÉ À
UN USAGE DOMESTIQUE
Sécurité du
Réfrigérateur
Exigences de
Fonctionnement
Composantes et
Caractéristiques
Installation
Avant
l’utilisation
Utilisation du
Réfrigérateur
Entretien du
Réfrigérateur
Dépannage

7
MISE AU REBUT APPROPRIÉE
AVERTISSEMENT
•
•
•
EXIGENCES EN MATIÈRE D’EMPLACEMENT
AVERTISSEMENT
•
•
•
•
•
REMARQUES :
Sécurité du
Réfrigérateur
Exigences de
Fonctionnement
Composantes et
Caractéristiques
Installation
Utilisation du
Réfrigérateur
Entretien du
Réfrigérateur
Dépannage
Avant
l’utilisation
EXIGENCES DE FONCTIONNEMENT

Sécurité du
Réfrigérateur
Exigences de
Fonctionnement
Composantes et
Caractéristiques
Installation
Avant
l’utilisation
Utilisation du
Réfrigérateur
Entretien du
Réfrigérateur
Dépannage

9
•
•
•
EXIGENCES RELATIVES À L’ALIMENTATION EN EAU
Sécurité du
Réfrigérateur
Exigences de
Fonctionnement
Composantes et
Caractéristiques
Installation
Utilisation du
Réfrigérateur
Entretien du
Réfrigérateur
Dépannage
Avant
l’utilisation

10
Partie congélateur Partie réfrigérateur
Témoin lumineux à DEL
Bac à glaçons
Distributeur eau/glaçons
Tablette en verre
Panier de porte
Bac à légumes
Filtre à eau
Panier de porte
Tablette en verre
Bac à légumes
Sécurité du
Réfrigérateur
Exigences de
Fonctionnement
Composantes et
Caractéristiques
Installation
Avant
l’utilisation
Utilisation du
Réfrigérateur
Entretien du
Réfrigérateur
Dépannage
COMPOSANTES ET CARACTÉRISTIQUES

11
9
DÉBALLAGE
AVERTISSEMENT
DÉPOSE DES PORTES
(AU BESOIN SEULEMENT)
WARNING
Sécurité du
Réfrigérateur
Exigences de
Fonctionnement
Composantes et
Caractéristiques
Installation
Utilisation du
Réfrigérateur
Entretien du
Réfrigérateur
Dépannage
Avant
l’utilisation
INSTALLATION

12
OUTILS NÉCESSAIRES
RETIRER LES PORTES
1.
3.
2.
À l’aide d’un tournevis à pointe cruciforme, retirez les quatre vis fixant le
couvercle de charnière au haut du réfrigérateur.
Couvercle de charnière
Vis
4. Soulevez lentement le couvercle de charnière, en gardant les faisceaux de
fils attachés.
Retirez les vis du couvercle de la charnière inférieure du congélateur et le
couvercle de la charnière.
Retirez la rondelle frein du raccord du tuyau d'eau et tirez, puis retirez le
tuyau d'eau de la porte du congélateur du raccord rapide.
Remarque : veuillez noter que le raccord rapide ne peut pas être laissé à
l’extrémité du tuyau d’eau de la porte.
5. Débranchez les sept faisceaux de câblage en appuyant sur le loquet de
déverrouillage de chaque connecteur de faisceau de câblage, puis en tirant
sur les extrémités (charnière de porte gauche seulement).
Faisceaux de câblage
IMPORTANT : Gardez les portes du réfrigérateur fermées jusqu’à ce que vous
soyez prêt à les retirer du réfrigérateur.
Sécurité du
Réfrigérateur
Exigences de
Fonctionnement
Composantes et
Caractéristiques
Installation
Avant
l’utilisation
Utilisation du
Réfrigérateur
Entretien du
Réfrigérateur
Dépannage

13
Fonctionnement
6.
7.
8.
9.
10.
REMETTRE LES PORTES
1.
2.
3.
4.
5.
6.
7.
90°
À l’aide d’une clé à douille de 8 mm, retirez les trois vis de charnière.
À l’aide d’un tournevis à pointe cruciforme, retirez la vis de mise à la terre
(porte gauche du congélateur).
Vis de charnière
Vis de mise à la terre
Charnière supérieure
REMARQUE : Fournissez un appui supplémentaire pour la porte pendant
pour maintenir la porte en place pendant que vous travaillez.
Retirez la charnière supérieure gauche de la porte du congélateur.
qu’elle ouvre à un angle de 90° par rapport au réfrigérateur, puis
soulevez la porte de la charnière inférieure. Placez la porte sur une
Répétez cette procédure pour retirer la porte droite du réfrigérateur.
REMARQUE :
Insérez la charnière supérieure dans le haut de la porte.
Remettez la vis de mise à la terre (porte de gauche).
Reconnectez le tuyau d’eau.
Remplacez la porte gauche en suivant les étapes 1 à 3.
quatre vis retirées précédemment.
de charnière retirées précédemment.
Sécurité du
Réfrigérateur
Exigences de
Fonctionnement
Composantes et
Caractéristiques
Installation
Utilisation du
Réfrigérateur
Entretien du
Réfrigérateur
Dépannage
Avant
l’utilisation

14
RACCORDEMENT À L’EAU
•
•
•
•
•
•
•
•
1.
2.
Sécurité du
Réfrigérateur
Exigences de
Fonctionnement
Composantes et
Caractéristiques
Installation
Avant
l’utilisation
Utilisation du
Réfrigérateur
Entretien du
Réfrigérateur
Dépannage

15
3.
4.
5.
6.
7.
1.
2.
3.
Sécurité du
Réfrigérateur
Exigences de
Fonctionnement
Composantes et
Caractéristiques
Installation
Utilisation du
Réfrigérateur
Entretien du
Réfrigérateur
Dépannage
Avant
l’utilisation

16
4.
5.
6.
7.
AVERTISSEMENT
•
•
•
•
•
1.
2.
Sécurité du
Réfrigérateur
Exigences de
Fonctionnement
Composantes et
Caractéristiques
Installation
Avant
l’utilisation
Utilisation du
Réfrigérateur
Entretien du
Réfrigérateur
Dépannage

17
IMPORTANT :
•
•
•
DÉPLACEZ À SA DESTINATION FINALE
AVERTISSEMENT
•
•
•
•
Sécurité du
Réfrigérateur
Exigences de
Fonctionnement
Composantes et
Caractéristiques
Installation
Utilisation du
Réfrigérateur
Entretien du
Réfrigérateur
Dépannage
Avant
l’utilisation

18
INSTALLATION DU FILTRE À EAU
RETRAIT DU BOUCHON DE DÉRIVATION
2.
1.
3.
Fermez l'alimentation en eau du réfrigérateur.
Couvercle
du filtre
Serrer les côtés du couvercle du filtre (aux endroits indiqués), puis tirer
vers le bas pour ouvrir le couvercle.
Tourner le bouchon de dérivation dans le sens antihoraire, puis tirer
pour enlever.
IMPORTANT : Conserver le bouchon de dérivation pour une
utilisation ultérieure. La machine à glaçons et le distributeur d’eau ne
fonctionneront pas tant que le filtre à eau ou le bouchon de dérivation
n’est pas correctement installé.
Bouchon de
dérivation
INSTALLATION DU FILTRE À EAU
4. Sortir le filtre à eau de son emballage, puis enlever le capuchon en
plastique transparent de la tête du filtre.
5. Aligner les languettes de la tête du filtre avec les encoches de
l’ouverture, puis insérer le filtre à eau dans l’ouverture. Enfoncer, tout
en tournant le filtre dans le sens horaire pour qu’il se mette en place.
Sécurité du
Réfrigérateur
Exigences de
Fonctionnement
Composantes et
Caractéristiques
Installation
Avant
l’utilisation
Utilisation du
Réfrigérateur
Entretien du
Réfrigérateur
Dépannage

19
REMPLACEMENT DU FILTRE À EAU
1.
2.
3.
4.
PURGE DU SYSTÈME DE DISTRIBUTION D’EAU
1.
2.
3.
7.
6.
REMARQUE : Le logement permet au filtre de bouger légèrement vers
le haut et vers le bas.
Filtre à eau
Refermer le couvercle du filtre.
Ouvrez l'alimentation en eau du réfrigérateur.
47
Fermez l'alimentation en eau du réfrigérateur
Sécurité du
Réfrigérateur
Exigences de
Fonctionnement
Composantes et
Caractéristiques
Installation
Utilisation du
Réfrigérateur
Entretien du
Réfrigérateur
Dépannage
Avant
l’utilisation

20
ALIGNER LES PORTES (AU BESOIN)
METTEZ LE RÉFRIGÉRATEUR DE NIVEAU
IMPORTANT
1.
1.
2.
3.
4.
Pieds à hauteur réglable
Écrou de
verrouillage
Clé à molette
Écrou d'ajustement
la gauche
droite
Repérez les écrous d'ajustement dans le coin inférieur droit sous la porte
du réfrigérateur.
Après avoir desserré l'écrou de verrouillage en tournant dans le sens
de relever la porte ou dans le sens anti-horaire pour la baisser.
Après un ou deux tours avec la clé à molette, ouvrez et refermez la
Serrez l'écrou de verrouillage en le tournant dans le sens anti-horaire.
REMARQUE : Au besoin, répétez les étapes ci-dessus jusqu'à ce que
les portes soient bien alignées.
Sécurité du
Réfrigérateur
Exigences de
Fonctionnement
Composantes et
Caractéristiques
Installation
Avant
l’utilisation
Utilisation du
Réfrigérateur
Entretien du
Réfrigérateur
Dépannage
L'alignement ou le réglage des portes peut être effectué sur les modèles de
réfrigérateurs côte à côte.

21
2.
3.
4.
5.
PÉRIODE D’ATTENTE
•
REMARQUE :
•
NETTOYAGE
1.
2.
Sécurité du
Réfrigérateur
Exigences de
Fonctionnement
Composantes et
Caractéristiques
Installation
Utilisation du
Réfrigérateur
Entretien du
Réfrigérateur
Dépannage
Avant
l’utilisation
AVANT L’UTILISATION

22
GÉNÉRALITÉS
•
•
•
AVERTISSEMENT
•
•
•
•
•
1.
2.
3.
CONSEILS DE CONSERVATION D’ÉNERGIE
•
•
•
•
•
Sécurité du
Réfrigérateur
Exigences de
Fonctionnement
Composantes et
Caractéristiques
Installation
Avant
l’utilisation
Utilisation du
Réfrigérateur
Entretien du
Réfrigérateur
Dépannage
UTILISATION DU RÉFRIGÉRATEUR

L'image ci-dessus est à titre indicatif seulement. La configuration
réelle de l'appareil dépend du produit réel ou de l'énoncé du distributeur.
23
Fonctionnement
COMMANDES
La première fois que le réfrigérateur est branché dans la prise de courant,
l’écran d’affichage commence à s’illuminer et défiler. Après quoi, les
icônes de l’affichage s’illumineront totalement pendant 3 secondes et un
signal sonore retentira.
Dans des conditions normales, lorsqu’aucune porte n’est ouverte et
qu’aucune touche n’est enfoncée pendant 30 secondes, l’écran d’affichage
s’éteint et se verrouille.
Lorsque l’écran d’affichage n’est pas illuminé, appuyer sur n’importe quelle
touche pour l’éclairer, puis maintenir la touche enfoncée
pendant 3 secondes pour déverrouiller le panneau de commande.
Le panneau des commandes est situé à droite de la porte du congélateur.
Indicateur de température
Indicateur de température du congélateur
Indicateur de température du réfrigérateur
Bouton de réglage de la température du réfrigérateur
Bouton de réglage de la température du congélateur
Bouton et indicateur de réinitialisation du filtre à eau
Bouton et indicateur de la fonction glaçons
Bouton et indicateur d'ÉCONOMIE D'ÉNERGIE
Bouton et indicateur de verrouillage/déverrouillage
Sécurité du
Réfrigérateur
Exigences de
Fonctionnement
Composantes et
Caractéristiques
Installation
Utilisation du
Réfrigérateur
Entretien du
Réfrigérateur
Dépannage
Avant
l’utilisation

24
Compartiment de réfrigération
Réglage de la température par défaut : 39 °F (4 °C).
La plage de températures pour le compartiment de réfrigération est de
34 °F à 44 °F (1 °C à 7 °C).
Compartiment de congélation
Default temperature setting : 0 °F (-18 °C).
La plage de températures pour le compartiment de congélation est de
-7 °F à 7 °F (-22 °C à -14 °C).
Pour régler la température des compartiments de réfrigération et de
congélation :
1. Sélectionner le compartiment en appuyant sur la touche
ou .
2. Appuyer sur les touches ou pour élever ou abaisser la
température par incréments de 1°, jusqu’à ce que la température désirée
soit atteinte.
AFFICHAGE DE L’UNITÉ DE TEMPÉRATURE
Les températures des compartiments peuvent être affichées en degrés
Fahrenheit (°F) ou en degrés Celsius (°C).
Appuyer sur les touches en même temps pendant 3 secondes
pour changer l’unité de la température, des degrés Fahrenheit (°F) en
degrés Celsius (°C) ou inversement.
TEMPÉRATURE
Lorsque le réfrigérateur est branché pour la première fois dans une source
d’alimentation électrique, les réglages par défaut des températures
s’affichent.
La température de chaque compartiment est réglable dans sa plage de
températures propre.
Sécurité du
Réfrigérateur
Exigences de
Fonctionnement
Composantes et
Caractéristiques
Installation
Avant
l’utilisation
Utilisation du
Réfrigérateur
Entretien du
Réfrigérateur
Dépannage

Maintenir la touche enfoncée pendant 3 secondes pour
25
VERROUILLAGE / DÉVERROUILLAGE DES COMMANDES
Pour déverrouiller les commandes :
Maintenir la touche enfoncée pendant 3 secondes. Un signal
sonore retentira et l’écran d’affichage s’illuminera.
Pour verrouiller les commandes :
Maintenir la touche enfoncée pendant 3 secondes. Un signal
sonore retentira et l’écran d’affichage s’éteindra.
REMARQUE : Après 30 secondes, si aucune touche n’est enfoncée, les
commandes se verrouilleront automatiquement.
MODE DE REFROIDISSEMENT RAPIDE
Maintenir la touche enfoncée pendant 3 secondes pour entrer dans
le mode de refroidissement rapide.
L’icône du compartiment de réfrigération s’illuminera en bleu et
la température du compartiment descendra à 34 °F (1 °C).
Maintenir à nouveau la touche enfoncée pendant 3 secondes pour
quitter le mode de refroidissement rapide.
L’éclairage s’éteindra et la température du compartiment de
réfrigération sera réinitialisée à la température précédemment réglée.
MODE DE CONGÉLATION RAPIDE
entrer dans le mode de congélation rapide.
L’icône du compartiment de congélation s’illuminera en bleu et
la température du compartiment descendra à -7 °F (- 22 °C).
Maintenir à nouveau la touche enfoncée pendant 3 secondes pour
quitter le mode de congélation rapide.
L’éclairage s’éteindra et la température du compartiment de congélation
sera réinitialisée à la température précédemment réglée.
MODE D’ÉCONOMIE D’ÉNERGIE
Appuyer sur la touche pour entrer dans le mode d’économie
d’énergie et le quitter. Energy Saving (économie d’énergie) s’illumine
pour indiquer que le mode est activé et s’éteint lorsqu’il n’est pas activé.
Lorsque le mode d’économie d’énergie est activé, la température
du compartiment de réfrigération est de 44 °F (7 °C) et celle du
compartiment de congélation de 7 °F (-14 °C).
Lorsque le mode d’économie d’énergie est désactivé, les températures
des compartiments de réfrigération et de congélation reviendront aux
températures précédemment réglées.
REMARQUE : Si une température a été réglée au mode de
refroidissement rapide ou au mode de congélation rapide, elle sera
alors automatiquement annulée.
Sécurité du
Réfrigérateur
Exigences de
Fonctionnement
Composantes et
Caractéristiques
Installation
Utilisation du
Réfrigérateur
Entretien du
Réfrigérateur
Dépannage
Avant
l’utilisation

26
Modes du panneau de commande du distributeur
Le panneau de commande du distributeur comporte des icônes à DEL
rétroéclairées pour indiquer le mode de fonctionnement du distributeur.
Vous pouvez choisir entr
e, le mode “Veille” et le
mode “Actif”.Vous pouve
vant les instructions
ci-dessous. Par défaut, la commande du distributeur est en mode “Veille”.
Sécurité du
Réfrigérateur
Exigences de
Fonctionnement
Composantes et
Caractéristiques
Installation
Avant
l’utilisation
Utilisation du
Réfrigérateur
Entretien du
Réfrigérateur
Dépannage

27
La fonction de distribution ne fonctionnera que si la porte du réfrigérateur
est bien fermée.
La première fois que le réfrigérateur est branché dans la prise de
courant, l’affichage de la commande du distributeur s’illuminera pendant
3 secondes. La distribution d’eau est l’option de distribution par défaut.
La première fois que le réfrigérateur est raccordé à l’alimentation en eau,
il se peut que l’eau ne s’écoule pas en raison de la présence d’air dans le
tuyau d’alimentation en eau.
1. Appuyer sur le levier du distributeur pendant au moins 5 minutes
afin de faire sortir l’air piégé dans le tuyau et remplir le système
d’alimentation en eau. Voir la section “Purger le système d’alimentation
en eau”.
2. Jeter les six premiers verres d’eau afin d’évacuer les impuretés du
tuyau d’alimentation en eau.
Éclairage du distributeur
L’éclairage du distributeur s'allume lorsque vous distribuez de l'eau et
des glaçons. L’éclairage à DEL s'éteint après 3 secondes.
Pour l'utiliser comme veilleuse ou prolonger la durée d'allumage de
l’éclairage du distributeur, restez appuyé sur les icônes EAU et GLAÇONS
en même temps pendant 3 secondes. L’éclairage du distributeur s'éteindra
automatiquement après 12 heures. Pour l'éteindre, maintenez à nouveau les
mêmes boutons enfoncés pendant 3 secondes.
En mode “Veille”, les icônes du distributeur sont dissimulées jusqu'à ce
qu'elles soient activées. Les icônes peuvent être activées en faisant glisser
votre doigt sur la surface du panneau de commande. Les icônes du
distributeur s'éteignent automatiquement après 120 secondes. Le mode
“Veille” donne à l’appareil un aspect minimaliste que certains utilisateurs
préfèrent.
En mode “Actif”, les icônes du distributeur (glaçons, eau, glace pilée) restent
toujours all
umées. Le panneau de commande utilise une icône à DEL plus
lumineuse pour indiq
uer le mode de distribution sélectionné.
Permutation entre le mode “Actif” et le mode “Veille” : Restez appuyé sur les
icônes EAU et GLACE PILÉE pendant 3 secondes. La commande du distributeur
clignotera pendant 2 secondes, confirmant ainsi le changement de mode.
Le distributeur d’eau et de glaçons, situé sur la partie frontale de la porte
du réfrigérateur, distribue de l’eau froide, des glaçons et de la glace pilée.
Sécurité du
Réfrigérateur
Exigences de
Fonctionnement
Composantes et
Caractéristiques
Installation
Utilisation du
Réfrigérateur
Entretien du
Réfrigérateur
Dépannage
Avant
l’utilisation

28
Distribution de glace pilée
1. Appuyer sur la touche Crushed (glace pilée)
. Le voyant de la glace
pilée s’illumine.
2. À l’aide du doigt ou d’un contenant, appuyer sur le levier pour
distribuer de la glace pilée.
3. Relâcher le levier pour mettre fin à la distribution de glace pilée.
BAC DE RÉCUPÉRATION
Le bac de récupération est amovible à des fins de nettoyage.
Bac de récupération
Distribution d’eau
1. Appuyer sur la touche Water (eau)
. Le voyant de l’eau s’illumine.
2. À l’aide du doigt ou d’un contenant, appuyer sur le levier pour
distribuer de l’eau.
3. Relâcher le levier pour mettre fin à la distribution d’eau.
Distribution de glaçons
1. Appuyer sur la touche Cubed (glaçons)
. Le voyant des glaçons
s’illumine.
2. À l’aide du doigt ou d’un contenant, appuyer sur le levier pour
distribuer des glaçons.
3. Relâcher le levier pour mettre fin à la distribution de glaçons.
BALCONNETS AMOVIBLES
Les balconnets sont amovibles pour faciliter le nettoyage.
Dépose :
1. Enlever tous les articles du balconnet.
2. Saisir les côtés du balconnet, soulever, puis tirer vers l’extérieur.
Réinstallation :
1. Insérer le balconnet dans le revêtement intérieur de la porte, au-dessus
du support, puis appuyer vers le bas pour qu’il se bloque en position.
Sécurité du
Réfrigérateur
Exigences de
Fonctionnement
Composantes et
Caractéristiques
Installation
Avant
l’utilisation
Utilisation du
Réfrigérateur
Entretien du
Réfrigérateur
Dépannage

29
NETTOYAGE
AVERTISSEMENT
•
•
AVERTISSEMENT
•
•
1.
2.
Sécurité du
Réfrigérateur
Exigences de
Fonctionnement
Composantes et
Caractéristiques
Installation
Utilisation du
Réfrigérateur
Entretien du
Réfrigérateur
Dépannage
Avant
l’utilisation
ENTRETIEN DU RÉFRIGÉRATEUR

30
3.
4.
5.
REMARQUE :
6.
7.
DÉPLACEMENT
IMPORTANT :
1.
2.
3.
4.
EMPLACEMENT
1.
2.
3.
4.
REMPLACEMENT DES AMPOULES
Sécurité du
Réfrigérateur
Exigences de
Fonctionnement
Composantes et
Caractéristiques
Installation
Avant
l’utilisation
Utilisation du
Réfrigérateur
Entretien du
Réfrigérateur
Dépannage

31
GÉNÉRALITÉS
Sécurité du
Réfrigérateur
Exigences de
Fonctionnement
Composantes et
Caractéristiques
Installation
Utilisation du
Réfrigérateur
Entretien du
Réfrigérateur
Dépannage
Avant
l’utilisation
DÉPANNAGE

32
Sécurité du
Réfrigérateur
Exigences de
Fonctionnement
Composantes et
Caractéristiques
Installation
Avant
l’utilisation
Utilisation du
Réfrigérateur
Entretien du
Réfrigérateur
Dépannage

33
Sécurité du
Réfrigérateur
Exigences de
Fonctionnement
Composantes et
Caractéristiques
Installation
Utilisation du
Réfrigérateur
Entretien du
Réfrigérateur
Dépannage
Avant
l’utilisation

34
GLAÇONS ET EAU
Sécurité du
Réfrigérateur
Exigences de
Fonctionnement
Composantes et
Caractéristiques
Installation
Avant
l’utilisation
Utilisation du
Réfrigérateur
Entretien du
Réfrigérateur
Dépannage

35
Sécurité du
Réfrigérateur
Exigences de
Fonctionnement
Composantes et
Caractéristiques
Installation
Utilisation du
Réfrigérateur
Entretien du
Réfrigérateur
Dépannage
Avant
l’utilisation

36
Sécurité du
Réfrigérateur
Exigences de
Fonctionnement
Composantes et
Caractéristiques
Installation
Avant
l’utilisation
Utilisation du
Réfrigérateur
Entretien du
Réfrigérateur
Dépannage

37
CODES D’ERREUR
Si un code d'erreur est af ché sur l'écran du panneau de commandes,
contacter le revendeur ou le service à la clientèle d'Insignia
au 1-866-646-4332.
CODE
D'ERREUR
DESCRIPTION DE L’ERREUR
Erreur de la machine à glaçons
Erreur du capteur de température dans le compartiment du réfrigérateur.
Erreur du capteur de température dans le compartiment du congélateur.
Erreur du capteur de dégivrage dans le compartiment du congélateur.
Erreur de température ambiante
Erreur du capteur d'humidité
Erreur du capteur de la machine à glaçons
Erreur de communication sur le panneau de la machine à glaçons
Défaut hors glace de la machine à glace
Sécurité du
Réfrigérateur
Exigences de
Fonctionnement
Composantes et
Caractéristiques
Installation
Utilisation du
Réfrigérateur
Entretien du
Réfrigérateur
Dépannage
Avant
l’utilisation

!8
ŏŏŏŏ
SISTEMA INTERNO DE FILTRACIÓN DE AGUA
MODELO MF-2008-R2 CAPACIDAD 200 GALONES (757 LITROS)
%/0!)ŏ,.+ +ŏ5ŏ!.0%"% +ŏ,+.ŏŏ* !.*0%+*(ŏ/!#Ò*ŏ(/ŏ*+.)/ŏ
ĥŏąĂŏ5ŏĆăŏ,.ŏ(ŏ.! 1%¨*ŏ !ŏ(+/ŏ+*0)%**0!/ŏ!/,!%"% +/
!*ŏ(ŏ+&ŏ !ŏ0+/ŏ !(ŏ!* %)%!*0+ċ
/0!ŏ/%/0!)ŏ$ŏ/% +ŏ,.+ +ŏ !ŏ1!. +ŏ+*ŏ(/ŏ+.)/ŏĥŏąĂŏ5ŏĆăŏ,.ŏ(ŏ.! 1%¨*ŏ
!ŏ(/ŏ/1/0*%/ŏ!*1)!. /ŏŏ+*0%*1%¨*ċŏŏ+*!*0.%¨*ŏ !ŏ(/ŏ/1/0*%/ŏ%* % /ŏ!*ŏ
#1ŏ!*0.* +ŏ(ŏ/%/0!)ŏ"1!ŏ.! 1% ŏŏ1*ŏ+*!*0.%¨*ŏ)!*+.ŏ+ŏ%#1(ŏ(ŏ)%0!ŏ,!.)%0% +ŏ
,.ŏ#1ŏ/(%!* +ŏ !(ŏ/%/0!)Čŏ+)+ŏ/!ŏ!/,!%"% !*ŏ(/ŏ+.)/ŏĥŏąĂŏ5ŏĆăċ
! 1%¨*ŏ !ŏ
/1/0*%/
+*!*0.%¨*ŏ
!(ŏ,!(%#.+ŏ !ŏ
,!*!0.%¨*ŏ+ŏ
%*0.1/%¨*ŏĨ)#ĥĩ
+*!*0.%¨*ŏ
)84%)ŏ,!.)%/%(!ŏ !(ŏ
,.+ 10+ŏ!*ŏ!(ŏ#1ŏ
Ĩ)#ĥĩ
! 1%¨*ŏ
!(ŏŃŏ
)! %+
!-1%/%0+/ŏ !ŏ
.! 1%¨*ŏ !ŏ
! 1%¨*ŏ !ŏ(+.+
ĂČĀŏ)#ĥŏ±ŏāĀŃ ĊăČĈŃ ĆĀŃ
! 1%¨*ŏ !ŏ
,.01(/Čŏ(/!ŏĵ
*āĀĀĀĀĥ)( ōĊĊČĊŃ *ĉĆŃ
! 1%¨*ŏ !ŏ
,(+)+
ĀČāĆ)#ĥŏ±ŏāĀŃ )ĀČĀāĀŏ ĊĊČćĀŃ
1%/0!/ŏ2%2+/Ķ
ĆĀĀĀĀĥ ōĊĊČĊĊŃ ĊĊČĊĆŃ
.8)!0.+/ŏ !ŏ,.1!čŏ,ŏŊŏĈČćĊŏŎŏĀČĆŏŏ)!*+/ŏ-1!ŏ/!ŏ%* %-1!ŏ(+ŏ+*0..%+ċŏ(1&+ŏŊŏ
ĀČĆĂŏ#,)ŏĨāČĉĊŏ,)ĩċŏ.!/%¨*ŏŊŏćĀŏ,/%#ŏĨąāăČĈŏ'ĩċ
!),!.01.ŏŊŏĂĀłŏŏŏĂĂłŏŏĨćĉłŏŏŏĈāċćłŏĩċŏ,% ŏ*+)%*(ŏ !ŏ/!.2%%+ŏŊŏĂĀĀŏ#(+*!/ŏ
ĨĈĆĈŏ(%0.+/ĩċ
•
/ŏ%),+.0*0!ŏ-1!ŏ/!ŏ1),(*ŏ(+/ŏ.!-1%/%0+/
!ŏ"1*%+*)%!*0+Čŏ)*0!*%)%!*0+ŏ5
/1/0%01%¨*ŏ !ŏ"%(0 +/ŏ,.ŏ-1!ŏ!(ŏ,.+ 10+
"1*%+*!ŏ+)+ŏ/!ŏ$ŏ*1*% +ċŏ1! !*
+1..%.ŏ ¦+/ŏ)0!.%(!/ŏ/%ŏ*+ŏ/!ŏ/%#1!*ŏ
0+ /ŏ(/ŏ%*/0.1%+*!/ċ
•
(ŏ.01$+ŏ !/!$(!ŏ !!ŏ)%./!ŏ(ŏ
)!*+/ŏ ŏćŏ)!/!/ċ
•
0%(%!ŏ1*ŏ"%(0 +ŏĂĀĀĉġĂŏ !ŏ.!,1!/0+ċ
•
(ŏ/%/0!)ŏ !ŏ)+*%0+.%6%¨*ŏ !(ŏ"%(0 +ŏ)% !
(ŏ*0% ŏ !ŏ#1ŏ-1!ŏ,/ŏ,+.ŏ!(ŏ"%(0 +
5ŏ(!ŏ2%/ŏ/+.!ŏ18* +ŏ!/ŏ!(ŏ)+)!*0+ŏ !
.!!),(6.ŏ!(ŏ"%(0 +ċŏ+*/1(0!ŏ(ŏ/!%¨*
ė/+ŏ !ŏ(+/ŏ+*0.+(!/Ęċ
•
!/,1h/ŏ !ŏ)%.ŏ!(ŏ"%(0 +ŏ !ŏ#1Č
!*&1#1!ŏ!(ŏ/%/0!)ŏ !ŏ#1ċŏ+*/1(0!ŏ(
/!%¨*ŏė%/,!*/ +.Ęċ
•
/0+/ŏ+*0)%**0!/ŏ*+ŏ/!ŏ!*1!*0.*
*!!/.%)!*0!ŏ!*ŏ/1ŏ/1)%*%/0.+ŏ !
#1ċŏ%ŏ%!*ŏ(/ŏ,.1!/ŏ/!ŏ.!(%6.+*ŏ!*
+* %%+*!/ŏ*+.)(!/ŏ !ŏ(+.0+.%+Čŏ!(
.!* %)%!*0+ŏ.!(ŏ,1! !ŏ2.%.ċ
•
(ŏ,.+ 10+ŏ!/ŏ/+(+ŏ,.ŏ1/+ŏ+*ŏ#1ŏ".ċ
•
(ŏ/%/0!)ŏ !ŏ#1ŏ !!ŏ%*/0(./!ŏ !
1!. +ŏ+*ŏ(/ŏ(!5!/ŏ5ŏ*+.)0%2/
!/00(!/ŏ5ŏ(+(!/ċ
•
+ŏ10%(%6.ŏ+*ŏ#1ŏ-1!ŏ*+ŏ/!ŏ
)%.+%+(¨#%)!*0!ŏ/!#1.ŏ+ŏ !ŏ(% ŏ
!/+*+% ŏ/%*ŏ1*ŏ !/%*"!%¨*ŏ,.!2%
+ ,+/0!.%+.ŏ !1 ŏ !(ŏ/%/0!)ċŏ+/
/%/0!)/ŏ!.0%"% +/ ,.ŏ(ŏ.! 1%¨*ŏ
!ŏ-1%/0!/ŏ,1! !*ŏ1/./!ŏ!*ŏ#1/ŏ
!/%*"!0 /ŏ-1!ŏ,1! !*ŏ+*0!*!.ŏ-1%/0!/ŏ
"%(0 (!/ċŏŏ/0ċŏċŁŏāĀăĆĀġġĀĀĆċ
•
+*/1(0!ŏ(ŏ/!%¨*ŏė.*0Ęŏ,.ŏ+*+!.
(ŏ#.*0ŏ(%)%0 ŏ !(ŏ".%*0!Čŏ!(
*+).!ŏ5ŏ!(ŏ*Ò)!.+ŏ !ŏ0!(h"+*+ċ
10/ŏ !ŏ,(%%¨*ĥ.8)!0.+/ŏ,.ŏ!(ŏ
/1)%*%/0.+ŏ !ŏ#1
1)%*%/0.+ŏ !ŏ
#1
1*%%,(ŏ+ŏ !ŏ,+6+ŏ
,+0(!
.!/%¨*ŏ !ŏ#1 ăĆŏġŏāĂĀŏ(/ĥ,1(#
Ă
ŏŏ
ĨĂąāŏġŏĉĂĈŏ'ĩ
!),!.01.ŏ !ŏ
#1
ăăłŏġŏāĀĀłŏŏ
Ĩāłŏġŏăĉłĩ
/ŏ !ŏ"(1&+ŏ !
/!.2%%+
ĀČŏĆĂŏ#,)ŏĨāċĉĊŏĥ)%*ċĩŏ
ĮŏćĀŏ(/ĥ,1(#
Ă
ĵŏ)¦+ŏ !ŏ(/ŏ,.01(/ŏ !ŏ(/!ŏčōŏĀČĆŏŏŌāŏ)ċō
Ķŏ ŏ/ +ŏ!*ŏ!(ŏ1/+ŏ !ŏ++-1%/0!/ŏ !ŏ.5,0+/,+.% %1)ŏ
,.21)ċ
IJŏŏŏ!/ŏ1*ŏ).ŏ.!#%/0. ŏ !ŏŏ*0!.*0%+*(ċ

!9
GARANTÍA
LIMITADA DEL
REFRIGERADOR
MIDEA
ŏŏŏċŏŏŏ
ŏŏŏŏŏŏ
ŏŏċ
!*#ŏŏ %/,+/%%¨*ŏ(ŏ/%#1%!*0!ŏ%*"+.)%¨*ŏ1* +ŏ(()!ŏ(ŏ
!*0.+ŏ !ŏ/!.2%%+ŏ(ŏ(%!*0!č
Q +).!Čŏ +)%%(%+ŏ5ŏ*Ò)!.+ŏ !ŏ0!(h"+*+
Q Ò)!.+ŏ !ŏ)+ !(+ŏ5ŏ*Ò)!.+ŏ !ŏ/!.%!
Q *ŏ !/.%,%¨*ŏ(.ŏ5ŏ !0(( ŏ !(ŏ,.+(!)
Q +),.+*0!ŏ !ŏ+),.Čŏ%*(1% +ŏ!(ŏ*+).!ŏ5
+)%%(%+ŏ !(ŏ %/0.%1% +.ŏ+ŏ2!* ! +.
ŏŏŏgč
āċ ŏ*0!/ŏ !ŏ+ŏ*00.*+/ŏ,.ŏ++. %*.ŏ!(ŏ/!.2%%+ŏ0h*%+Čŏ !0!.)%*!ŏ/%ŏ/1ŏ,.+ 10+ŏ.!-1%!.!
.!,.%¨*ċŏ(#1*/ŏ,.!#1*0/ŏ,1! !*ŏ.!/+(2!./!ŏ/%*ŏ!(ŏ/!.2%%+ŏ0h*%+ċŏ! %-1!ŏ(#1*+/ŏ)%*10+/ŏ
ŏ.!2%/.ŏ(ŏ/!%¨*ŏ !ŏ+(1%¨*ŏ !ŏ,.+(!)/ŏ !(ŏ*1(ŏ !ŏ1/1.%+Čŏ+ŏ2%/%0!ŏ$00,čĥĥ1/ċ% !ċ+)ĥ
/1,,+.0ċ
Ăċ ŏ+ +ŏ/!.2%%+ŏ0h*%+ŏ !ŏ#.*0ŏ/!ŏ,.+2!!ŏ!4(1/%2)!*0!ŏ,+.ŏ,.0!ŏ !ŏ,.!/0 +.!/ŏ !ŏ/!.2%%+ŏ
0h*%+ŏ10+.%6 +/ŏ !ŏ% !Čŏ!*ŏ(+/ŏċŏċŏ5ŏ* 8ċ
!.2%%+ŏ(ŏ(%!*0!ŏ !ŏ% !
*ŏċŏċŏ+ŏ* 8Čŏ(()!ŏ(ŏāġĉććġćąćġąăăĂċ
%ŏ/!ŏ!*1!*0.ŏ"1!.ŏ !ŏ(+/ŏĆĀŏ!/0 +/ŏ !ŏ(+/ŏ/0 +/ŏ*% +/ŏ+ŏ !ŏ* 8Čŏ+)1*-1!/!ŏ+*ŏ/1ŏ
%/0.%1% +.ŏ10+.%6 +ŏ !ŏ% !ŏ,.ŏ+..++..ŏ/%ŏ,(%ŏ1*ŏ#.*0ŏ %/0%*0ċ
āŏ¥ŏŏŏŏŏŏČŏāĀŏ¥ŏŏŏŏ
ŏŏ
ŏ¥ŏŏŏŏĨŏŏŏŏĩ
% !ŏ.!,..8ŏ+ŏ.!!),(6.8Čŏ/%*ŏ.#+Čŏ1(-1%!.ŏ !"!0+ŏ !% +ŏŏ)0!.%(!/ŏ !"!01+/+/ŏ+ŏ)*+ŏ !ŏ
+.ŏ,+.ŏ1*ŏ¦+ŏ+),(!0+ŏŏ,.0%.ŏ !ŏ(ŏ"!$ŏ !ŏ+),.ċŏ.ŏ+0!*!.ŏ)8/ŏ !0((!/ŏ/+.!ŏ(ŏ+!.01.ŏ !ŏ
(ŏ#.*0ŏ!ŏ%*"+.)%¨*ŏ/+.!ŏ.!,.%¨*ŏ !ŏ(ŏ#.*0Čŏ2%/%0!ŏ333ċ)% !ċ+)ŏ+ŏ(()!ŏ(ŏŏ
āġĉććġćąćġąăăĂċ
(ŏ+*/1)% +.ŏ/!.8ŏ.!/,+*/(!ŏ !č
Q +/ŏ+/0+/ŏ !ŏ %#*¨/0%+Čŏ0./( +Čŏ0.*/,+.0!ŏ5ŏ.!%*/0(%¨*ŏ.!-1!.% +/ŏ,+.ŏ!(ŏ/!.2%%+ċ
Q +/ŏ+/0+/ŏ !ŏ(/ŏ(() /ŏ !ŏ/!.2%%+ŏ-1!ŏ/!*ŏ.!/1(0 +ŏ !ŏ(+/ŏ.01(+/ŏ!*1)!. +/ŏ&+
ŏŏŏĵĵ
ŏŏŏĵĵ
/0ŏ#.*0ŏ/!ŏ,(%ŏ/+(+ŏŏ(+/ŏ,.+ 10+/ŏ !ŏ1/+ŏ +)h/0%+ŏ+)Ò*Čŏ5ŏ!(ŏ+*/1)% +.ŏ!/ŏ
.!/,+*/(!ŏ !ŏ(+/ŏ,1*0+/ŏ-1!ŏ/!ŏ!*1)!.*ŏŏ+*0%*1%¨*č
āċ ŏ(ŏ1/+ŏ+..!0+ŏ !(ŏ!(!0.+ +)h/0%+ŏ !ŏ1!. +ŏ+*ŏ(/ŏ%*/0.1%+*!/ŏ,.+,+.%+* /ŏ+*ŏ!(ŏ,.+ 10+ċ
Ăċ ŏ(ŏ)*0!*%)%!*0+ŏ !ŏ.10%*ŏ5ŏ(ŏ(%),%!6ŏ*!!/.%ŏ,.ŏ)*0!*!.ŏ(/ŏ1!*/ŏ+* %%+*!/ŏ !ŏ0.&+ċ
ăċ ŏŏ%*/0(%¨*ŏ+..!0ŏ,+.ŏ1*ŏ,.+"!/%+*(ŏ !ŏ/!.2%%+ŏ10+.%6 +ŏ !ŏ1!. +ŏ+*ŏ(/ŏ%*/0.1%+*!/
,.+2%/0/ŏ+*ŏ!(ŏ!(!0.+ +)h/0%+ŏ5ŏ !ŏ1!. +ŏ+*ŏ0+ +/ŏ(+/ŏ¨ %#+/ŏ(+(!/ŏ !ŏ,(+)!.Čŏ!(!0.%% ŏ
5ĥ+ŏ#/ċ
ąċ ŏŏ+*!4%¨*ŏ !1 ŏŏ1*ŏ"1!*0!ŏ !ŏ(%)!*0%¨*ŏ+*ŏ+*!4%¨*ŏŏ0%!..ŏ !ŏ/1"%%!* !ŏ2+(0&!Č
.!!),(6+ŏ !ŏ"1/%(!/ŏ-1!) +/Čŏ.!,.%¨*ŏ !ŏ+*!4%+*!/ŏ"(+&/ +ŏ !"!0+/ŏ!*ŏ!(ŏ(! +ŏ !ŏ(ŏ/ċ
Ćċ +/ŏ#/0+/ŏ,+.ŏ$!.ŏ!/%(!ŏ!(ŏ!(!0.+ +)h/0%+ŏ,.ŏ .(!ŏ/!.2%%+ċ
ćċ +/ŏ ¦+/ŏ(ŏ +ŏ !/,1h/ŏ !ŏ(ŏ%*/0(%¨*ċ
ŏÑŏŏŏŏŏŏŏŏ7ŏŏ§ŏ
ŏŏŏŏŏÑŏŏċŏ(ŏ/!.2%%+ŏ0h*%+ŏ !!ŏ/!.ŏ,.+2%/0+ŏ,+.ŏ1*ŏ
!),.!/ŏ !ŏ/!.2%%+ŏ0h*%+ŏ !/%#* ŏ,+.ŏ% !ċŏ/0ŏ#.*0ŏ(%)%0 ŏ!/ŏ28(% ŏ/+()!*0!ŏ!*ŏ(+/ŏ
ĆĀŏ!/0 +/ŏ !ŏ(+/ŏ/0 +/ŏ*% +/ŏ+ŏ* 8ŏ5ŏ,(%ŏÒ*%)!*0!ŏ1* +ŏ!(ŏ!(!0.+ +)h/0%+ŏ/!ŏ10%(%6ŏ!*ŏ
!(ŏ,/ŏ!*ŏ!(ŏ-1!ŏ/!ŏ -1%.%¨ċŏ/0ŏ#.*0ŏ(%)%0 ŏ!*0.ŏ!*ŏ2%#!*%ŏŏ,.0%.ŏ !ŏ(ŏ"!$ŏ !ŏ+),.ŏ+.%#%*(ŏ
!(ŏ+*/1)% +.ċŏ!ŏ.!-1%!.!ŏ+),.+*0!ŏ !ŏ(ŏ"!$ŏ !ŏ+),.ŏ+.%#%*(ŏ,.ŏ+0!*!.ŏ!(ŏ/!.2%%+ŏ0h*%+ŏ
+*"+.)!ŏ!/0ŏ#.*0ċ

50
ŏŏŏ
āċŏŏ((+ŏ1/ +ŏ,+.ŏ ¦+ŏŏ(ŏ1*% ŏ)%!*0./ŏ/!ŏ!*1!*0.ŏ!*ŏ/1ŏ,+/!/%¨*ŏĨ-1!ŏ*+ŏ/!ŏ ¦+ŏ1/ +ŏ
,+.ŏ1*ŏ !"!0+ŏ+ŏ)(ŏ"1*%+*)%!*0+ĩČŏ,+.ŏ/1ŏ%*/0(%¨*ŏ%*+..!0ŏ+ŏ,+.ŏ1*ŏ1/+ŏ%..6+*(!ŏ !(ŏ
,.+ 10+Čŏ%*(15!* +Čŏ!*0.!ŏ+0.+/Čŏ(ŏ"(0ŏ !ŏ)*0!*%)%!*0+ŏ.6+*(!ŏ5ŏ*!!/.%+ŏ+ŏ!(ŏ1),(%)%!*0+ŏ
!(ŏ*1(ŏ !ŏ%*/0.1%+*!/ŏ!ŏ%*/0(%¨*ċ
Ăċŏŏ+/ŏ,.+ 10+/ŏ+),. +/ŏė+)+ŏ!/08*Ęŏ+ŏ.!/01. +/ŏ*+ŏ!/08*ŏ1%!.0+/ŏ,+.ŏ!/0ŏ#.*0ċ
ăċŏ h. % ŏ !ŏ(%)!*0+/ŏ1/ ŏ,+.ŏ"((ŏ !(ŏ.!".%#!. +.ŏ+ŏ+*#!( +.ċ
ąċŏŏ() /ŏ !ŏ/!.2%%+ŏ,.ŏ.!,..ŏ+ŏ.!!),(6.ŏ+*/1)%(!/ŏ+)+ŏ"%(0 +/ŏ !ŏ#1Čŏ+)%((/Čŏ"%(0 +/ŏ !ŏ
%.!Čŏ!0ċČŏ)*%&/Čŏ,!.%((/ŏ5ŏ+0./ŏ,.0!/ŏ+/)h0%/ċ
Ćċŏ *ŏ,.+ 10+ŏ-1!ŏ$5ŏ/% +ŏ0.*/"!.% +ŏ !ŏ/1ŏ,.+,%!0.%+ŏ+.%#%*(ċ
Ćċŏ §4% +ŏ%*0!.%+.ŏ+ŏ!40!.%+.ŏ !ŏ(ŏ1*% ċ
Ĉċŏŏ¦+/ŏ1/ +/ŏ,+.ŏ/!.2%%+/ŏ.!(%6 +/ŏ,+.ŏ,!./+*/ŏ %/0%*0/ŏ !ŏ(+/ŏ/!.2%%+/ŏ10+.%6 +/ŏ !ŏ% !Ďŏ
1/+ŏ !ŏ,.0!/ŏ %/0%*0/ŏŏ(/ŏ !ŏ.!!),(6+ŏ !ŏ% !Ďŏ(+ŏ+0!*% +ŏ !ŏ,!./+*/ŏ-1!ŏ*+ŏ/!*ŏ !(ŏ/!.2%%+ŏ
(ŏ(%!*0!ŏ !ŏ% !Ďŏ+ŏ1//ŏ!40!.*/ŏ0(!/ŏ+)+ŏ1/+Čŏ)(ŏ1/+Čŏ/1)%*%/0.+ŏ !ŏ!*!.#ŏ%* !1 +ŏ+ŏ
!//0.!/ŏ*01.(!/ċ
ĉċŏ () /ŏ !ŏ/!.2%%+ŏ.!/1(0*0!/ŏ,+.ŏ(ŏ%*/0(%¨*ŏ%*+..!0ŏ !(ŏ,.+ 10+ċ
Ċċŏ () /ŏ !ŏ/!.2%%+ŏ,.ŏ .(!ŏ%*/0.1%+*!/ŏ!.ŏ !(ŏ1/+ŏ !(ŏ,.+ 10+ċ
āĀċŏŏ!.#+/ŏ-1!ŏ%*(15!*Čŏ!*0.!ŏ+0.+/Čŏ1(-1%!.ŏ(() ŏ !ŏ/!.2%%+ŏ !/,1h/ŏ !ŏ$+.Čŏ"%* !ŏ/!)*ŏ+ŏ /ŏ
"!/0%2+/Čŏ,!&!/Čŏ.#+/ŏ,+.ŏ2%&!ŏ!*ŏ"!..5ŏ+ŏ#/0+/ŏ !ŏ)%((&!ŏ,.ŏ(() /ŏ !ŏ/!.2%%+ŏŏ8.!/ŏ.!)+0/Čŏ
%*(1% +ŏ!(ŏ!/0 +ŏ !ŏ(/'ċ
āāċŏŏ%ŏ(ŏ1*% ŏ/!ŏ !/0%*ŏŏ1*ŏ1/+ŏ+)!.%(Čŏ !ŏ*!#+%+Čŏ !ŏ(-1%(!.ŏ1ŏ+0.+ŏ1/+ŏ+ŏ,(%%¨*ŏ-1!ŏ*+ŏ/!ŏ
,.ŏ1/+ŏ !(ŏ+*/1)% +.Čŏ*+ŏ+".!!)+/ŏ*%*#1*ŏ#.*0Čŏ!4,.!/ŏ+ŏ%),(%0Čŏ%*(1% Čŏ!*0.!ŏ+0./Čŏ
1(-1%!.ŏ#.*0ŏ%),(%0ŏ !ŏ+)!.%(%6%¨*ŏ+ŏ% +*!% ŏ,.ŏ1*ŏ1/+ŏ+ŏ,.+,¨/%0+ŏ,.0%1(.ċ
āĂċŏ *ŏ,.+ 10+ŏ-1!ŏ$5ŏ/% +ŏ.!0%. +ŏ"1!.ŏ !ŏ(+/ŏ/0 +/ŏ*% +/ŏ+ŏ* 8ċ
āăċŏŏ.+ 10+/ŏ/%*ŏ*Ò)!.+/ŏ !ŏ/!.%!ŏ+.%#%*(!/ŏ+ŏ,.+ 10+/ŏ+*ŏ*Ò)!.+/ŏ !ŏ/!.%!ŏ-1!ŏ$5*ŏ/% +ŏ(0!. +/ŏ
+ŏ*+ŏ,1! *ŏ !0!.)%*./!ŏ"8%()!*0!ċ
NOTA:ŏ(#1*+/ŏ!/0 +/ŏ*+ŏ,!.)%0!*ŏ(ŏ!4(1/%¨*ŏ+ŏ(%)%0%¨*ŏ !ŏ ¦+/ŏ%*% !*0(!/ŏ+ŏ+*/!1!*0!/ċŏ+.ŏ(+ŏ
0*0+Čŏ!/0ŏ(%)%0%¨*ŏ+ŏ!4(1/%¨*ŏ,1! !ŏ*+ŏ,(%./!ŏŏ/1ŏ/+ċ
(ŏ+/0+ŏ !ŏ(ŏ.!,.%¨*ŏ+ŏ.!!),(6+ŏ+*"+.)!ŏŏ!/0/ŏ%.1*/0*%/ŏ!4(1% /ŏ+..!.8ŏŏ
.#+ŏ !(ŏ(%!*0!ċ
§ŏŏŏŏŏŏ
ŏŏČŏŏŏŏŏŏŏŏ
ŏŏŏŏŏŏ§ŏČŏŏŏŏŏ¥ŏŏŏ
ŏ7ŏŏŏŏċŏ(#1*+/ŏ!/0 +/ŏ5ŏ,.+2%*%/ŏ*+ŏ,!.)%0!*ŏ(%)%0%+*!/ŏŏ(ŏ
1.%¨*ŏ !ŏ(/ŏ#.*0/ŏ%),(%0/ŏ !ŏ+)!.%%(% ŏ+ŏ% +*!% Čŏ !ŏ)*!.ŏ-1!ŏ!/0ŏ(%)%0%¨*ŏ,+ .ŏ
*+ŏ,(%.ŏ,.ŏ1/0! ċŏ/0ŏ#.*0ŏ(!ŏ+0+.#ŏ !0!.)%* +/ŏ !.!$+/ŏ(!#(!/Čŏ5ŏ1/0! ŏ1!*0ŏ !)8/ŏ+*ŏ
+0.+/ŏ !.!$+/ŏ-1!ŏ2.*ŏ/!#Ò*ŏ!(ŏ!/0 +ŏ+ŏ(ŏ,.+2%*%ċ
§ŏŏŏŏŏŏŏŏŏ
% !ŏ*+ŏ$!ŏ*%*#1*ŏ !(.%¨*ŏ.!/,!0+ŏ !ŏ(ŏ(% Čŏ 1.%(% ŏ+ŏ*!!/% ŏ !ŏ/!.2%%+ŏ
0h*%+ŏ+ŏ.!,.%+*!/ŏ,.ŏ!/0!ŏ!(!0.+ +)h/0%+Čŏ/(2+ŏ(/ŏ !(.%+*!/ŏ%*(1% /ŏ!*ŏ!/0ŏ#.*0ċŏ
%ŏ !/!ŏ+0!*!.ŏ1*ŏ#.*0ŏ)8/ŏ!40!*/ŏ+ŏ%*0!#.(ŏ-1!ŏ(ŏ#.*0ŏ(%)%0 ŏ-1!ŏ/!ŏ+".!!ŏ+*ŏ!/0!ŏ
!(!0.+ +)h/0%+Čŏ+*/1(0!ŏ+*ŏ% !ŏ+ŏ/1ŏ2!* ! +.ŏ/+.!ŏ(ŏ,+/%%(% ŏ !ŏ -1%.%.ŏ1*ŏ#.*0ŏ
!40!* % ċ
§ŏŏĎŏ§ŏŏŏŏ
ŏ¥ŏŏŏ
ŏÑŏŏŏŏŏŏŏŏ7ŏŏ§ŏ
ŏŏÑŏŏċŏŏŏ7ŏŏŏ¥ŏŏ
ŏċŏ(#1*+/ŏ!/0 +/ŏ5ŏ,.+2%*%/ŏ*+ŏ,!.)%0!*ŏ(ŏ!4(1/%¨*ŏ+ŏ(%)%0%¨*ŏ !ŏ.!/,+*/%(% ŏ
.!/,!0+ŏ !ŏ(+/ŏ ¦+/ŏ+/%+*(!/ŏ+ŏ%* %.!0+/Čŏ !ŏ)*!.ŏ-1!ŏ!/0ŏ(%)%0%¨*ŏ,+ .ŏ*+ŏ,(%.ŏ,.ŏ1/0! ċŏ
/0ŏ#.*0ŏ(!ŏ+0+.#ŏ !0!.)%* +/ŏ !.!$+/ŏ(!#(!/Čŏ5ŏ1/0! ŏ1!*0ŏ !)8/ŏ+*ŏ+0.+/ŏ !.!$+/ŏ-1!ŏ
2.*ŏ/!#Ò*ŏ!(ŏ!/0 +ŏ+ŏ(ŏ,.+2%*%ċ
ĀĆĥāĊ

sp
Fuente de lamientación: 115 V
Frecuencia: 60 Hz
Capacidad: 26.3 cu. ft.
Advertencia:
Antes de utilizar este producto,
lea atentamente este manual
ráug y delo para consultarlo
posteriormente. El diseño y las
especificac ones están sujetos
a cambios sin previo aviso
para mejoras de los productos.
oC nsulte con su distribuidor o
fabricante para obtener detalles.
version A - 10 - 2020
NÚMERO DE MODELO MRS26D5AST
www.midea.com
MANUAL DE USUARIO
¡Extensión gratuita
de 3 meses del período
original de la garantía
limitada! *Simplemente envíe
una foto de su comprobante
de compra al:
1-844-224-1614
*La extensión de la garantía es por los
tres meses inmediatamente posteriores
a la finaliz ción del período de la
garantía original del producto.
Refrigerador
Side-by-Side

Estimado usuario
GRACIAS y FELICITACIONES por haber comprado este producto
Midea de alta calidad. Su refrigerador Midea está diseñada para
un rendimiento confiable y sin p oblemas. Dedique un momento a
registrar su nuevo refrigerador.
Registre su nuevo refrigerador en www.midea.com haciendo clic
en la solapa Support (Soporte).
Para futuras consultas, tome nota del modelo de su producto
y los números de serie ubicados sobre el compartimiento del
compresor, en la parte trasera del refrigerador.
Número de modelo____________________________________
Número de serie_______________________________________
SEGURIDAD DEL REFRIGERADOR .................................................3
REQUISITOS PARA EL FUNCIONAMIENTO ...................................7
Requisitos de Ubicación ........................................................................7
Requisitos eléctricos ...............................................................................8
Requisitos del Suministro de Agua ..................................................9
CARACTERÍSTICAS Y PIEZAS .......................................................10
INSTALACIÓN ...................................................................................11
Desempacar ...............................................................................................11
Desmontaje de la Puerta (solo si es necesario) ...........................11
Conexión al agua .................................................................................... 14
Mover a la ubicación final.................................................................... 17
Instalación del filtro de agua ..............................................................18
Alineado de las puertas (en caso de necesitarlo) ..................... 21
Nivelar el refrigerador .......................................................................... 22
ANTES DE USAR ............................................................................. 22
Período de espera ................................................................................. 22
Limpieza .................................................................................................... 23
USO DEL REFRIGERADOR .............................................................23
General ...................................................................................................... 23
Controles .................................................................................................. 24
Máquina de hielo .................................................................................... 27
Modos de control del dispensador................................................. 28

3
Bandeja antigoteo ................................................................................. 29
CUIDADO DEL REFRIGERADOR ..................................................30
Limpieza ....................................................................................................30
Mudanza ....................................................................................................31
Almacenamiento ....................................................................................31
Reemplazo de luces .............................................................................31
RESOLUCIÓN DE PROBLEMAS ..................................................... 32
General .......................................................................................................32
Hielo y agua ............................................................................................. 35
Códigos de error .................................................................................... 36
HOJA DE DATOS DE RENDIMIENTO............................................ 39
GARANTÍA ....................................................................................... 40
SEGURIDAD DEL REFRIGERADOR
SU SEGURIDAD Y LA SEGURIDAD DE LOS DEMÁS SON MUY
IMPORTANTES
Para prevenir lesiones del usuario y otras personas y daños materiales, se
deben seguir las instrucciones que se muestran debajo. El funcionamiento
incorrecto por ignorar las instrucciones puede causar daños o heridas, e
incluso la muerte.
El nivel de riesgo se muestra según las siguientes indicaciones.
PRECAUCIÓN
ADVERTENCIA
ADVERTENCIA
Este símbolo indica que existe la posibilidad de voltaje
peligroso con un riesgo de descarga eléctrica, lo que
puede provocar la muerte o heridas graves.
Este símbolo indica la posibilidad de lesiones o daños a
la propiedad.
Este símbolo indica la posibilidad de muerte o heridas
graves.
Requisitos
para el
Funcionamiento
Características
y Piezas
Instalación
Uso del
Refrigerador
Cuidado del
Refrigerador
Resolución de
Problemas
Antes de
Usar
Seguridad del
Refrigerador

4
ADVERTENCIA
SEGURIDAD GENERAL DEL ELECTRODOMÉSTICO
•
•
SEGURIDAD ELÉCTRICA
•
•
•
•
•
•
•
NOTA:
Requisito de conexión a tierra
•
•
SEGURIDAD DE LA UBICACIÓN
•
•
Requisitos
para el
Funcionamiento
Características
y Piezas
Instalación
Uso del
Refrigerador
Cuidado del
Refrigerador
Resolución de
Problemas
Antes de
Usar
Seguridad del
Refrigerador

5
•
•
•
•
SEGURIDAD SOBRE USO Y CUIDADO
•
•
•
•
•
•
•
•
•
•
•
•
Requisitos
para el
Funcionamiento
Características
y Piezas
Instalación
Uso del
Refrigerador
Cuidado del
Refrigerador
Resolución de
Problemas
Antes de
Usar
Seguridad del
Refrigerador

6
•
•
•
SEGURIDAD DE SERVICIO
•
•
•
•
•
•
ESTE ELECTRODOMÉSTICO ES SOLO PARA USO DOMÉSTICO
Advertencias de la “Proposition 65” del estado de California:
ADVERTENCIA:
Requisitos
para el
Funcionamiento
Características
y Piezas
Instalación
Uso del
Refrigerador
Cuidado del
Refrigerador
Resolución de
Problemas
Antes de
Usar
Seguridad del
Refrigerador

7
ELIMINACIÓN ADECUADA
ADVERTENCIA
Peligro de asfixia
Antes de tirar su refrigerador viejo:
•
•
•
IMPORTANTE:
REQUISITOS PARA EL FUNCIONAMIENTO
REQUISITOS DE UBICACIÓN
ADVERTENCIA
Peligro de explosión e Incendio
•
•
•
•
•
NOTAS:
Requisitos
para el
Funcionamiento
Características
y Piezas
Instalación
Uso del
Refrigerador
Cuidado del
Refrigerador
Resolución de
Problemas
Antes de
Usar
Seguridad del
Refrigerador

Requisitos
para el
Funcionamiento
Características
y Piezas
Instalación
Uso del
Refrigerador
Cuidado del
Refrigerador
Resolución de
Problemas
Antes de
Usar
Seguridad del
Refrigerador

99
•
•
•
REQUISITOS DEL SUMINISTRO DE AGUA
IMPORTANTE:
NOTA:
Abastecimiento de agua por ósmosis inversa (si es aplicable)
IMPORTANTE:
Si la presión del agua es demasiado baja:
Requisitos
para el
Funcionamiento
Características
y Piezas
Instalación
Uso del
Refrigerador
Cuidado del
Refrigerador
Resolución de
Problemas
Antes de
Usar
Seguridad del
Refrigerador

10
CARACTERÍSTICAS Y PIEZAS
Luz LED
Bandeja para almacenar
hielo
Dosificador de agua/hielo
Repisa de vidrio
Bandeja de la Puerta
Bandeja del cajón
Repisa de vidrio
Bandeja de la Puerta
Bandeja del cajón
Compartimento para congelar Compartimento para refrigerar
Filtro de agua
Requisitos
para el
Funcionamiento
Características
y Piezas
Instalación
Uso del
Refrigerador
Cuidado del
Refrigerador
Resolución de
Problemas
Antes de
Usar
Seguridad del
Refrigerador

11
SPECIFICATIONS
INSTALACIÓN
DESEMPACAR
ADVERTENCIA
Peligro de explosión o Incendio
IMPORTANTE:
DESMONTAJE DE LA PUERTA
(SOLO SI ES NECESARIO)
ADVERTENCIA
Peligro de Choque Eléctrico
•
•
•
Requisitos
para el
Funcionamiento
Características
y Piezas
Instalación
Uso del
Refrigerador
Cuidado del
Refrigerador
Resolución de
Problemas
Antes de
Usar
Seguridad del
Refrigerador

12
HERRAMIENTAS NECESARIAS
Destornillador Phillips
Llave de cubo de 8 mm
RETIRAR LAS PUERTAS
INFORMACIÓN IMPORTANTE: Mantenga las puertas del refrigerador cerradas
hasta que esté listo para levantarlas del gabinete.
3. Con un destornillador Phillips, retire los cuatro tornillos que fijan la cubierta
de la bisagra a la parte superior del gabinete.
Cubierta de la bisagra
Tornillos
4.
5.
Desconecte los siete arneses de cables presionando el pestillo de liberación
en cada conector del arnés de cables y luego separando los extremos
(solamente la bisagra de la puerta izquierda).
Arneses de cables
1.
2.
Retire los tornillos de la cubierta de la bisagra inferior y la cubierta de la
bisagra del congelador.
Extraiga la arandela de retención del conector de la tubería de agua y tire
de la tubería de agua de la puerta del congelador del conector rápido.
Nota: Tenga en cuenta que el conector rápido no puede dejarse en el
extremo de la tubería de agua de la puerta.
Levante lentamente la cubierta de la bisagra, manteniendo los arneses de
cables conectados.
Requisitos
para el
Funcionamiento
Características
y Piezas
Instalación
Uso del
Refrigerador
Cuidado del
Refrigerador
Resolución de
Problemas
Antes de
Usar
Seguridad del
Refrigerador

13
6. Con una llave de tubo de 8 mm, retire los tres tornillos de la bisagra.
7. Con un destornillador Phillips, retire el tornillo de conexión a tierra
(puerta izquierda del congelador).
Tornillos de la bisagra
Tornillo de conexión a tierra
NOTA: Proporcione soporte adicional para la puerta mientras retira la
bisagra. No dependa de los imanes de la junta de la puerta para mantenerla
en su lugar mientras trabaja.
8. Retire la bisagra superior izquierda de la puerta del congelador.
9.
10.
Repita este procedimiento para retirar la puerta derecha del refrigerador.
90°
REEMPLAZAR LAS PUERTAS
NOTA: El pasador de la bisagra se extiende desde el borde inferior de la puerta.
1. Inserte el pasador de la bisagra en la abertura de la bisagra inferior.
Inserte la bisagra superior en la parte superior de la puerta.
Vuelva a colocar el tornillo de conexión a tierra (puerta izquierda).
Vuelva a conectar el tubo de agua.
Vuelva a colocar la puerta izquierda siguiendo los pasos 1 a 3.
Con los cuatro tornillos que retiró anteriormente, fije la cubierta de la
bisagra a la parte superior del gabinete.
Con los tornillos de la bisagra que retiró anteriormente, ajuste la bisagra
superior a la parte superior del gabinete.
2.
3.
4.
5.
6.
7.
Bisagra superior
Con ambas manos, gire lentamente la puerta hasta que se abra en un
ángulo de 90° con respecto al gabinete y luego levante la puerta de la
bisagra inferior. Coloque la puerta sobre una superficie blanda para proteger
el acabado.
Requisitos
para el
Funcionamiento
Características
y Piezas
Instalación
Uso del
Refrigerador
Cuidado del
Refrigerador
Resolución de
Problemas
Antes de
Usar
Seguridad del
Refrigerador

CONEXIÓN AL AGUA
IMPORTANTE:
•
•
Conectar la línea de agua
•
•
•
•
•
•
1.
IMPORTANTE:
NOTA:
2.
Requisitos
para el
Funcionamiento
Características
y Piezas
Instalación
Uso del
Refrigerador
Cuidado del
Refrigerador
Resolución de
Problemas
Antes de
Usar
Seguridad del
Refrigerador

3.
4.
5.
6.
Requisitos
para el
Funcionamiento
Características
y Piezas
Instalación
Uso del
Refrigerador
Cuidado del
Refrigerador
Resolución de
Problemas
Antes de
Usar
Seguridad del
Refrigerador

7.
Para conectar la línea de agua al refrigerador
1.
2.
3.
4.
5.
6.
7.
Requisitos
para el
Funcionamiento
Características
y Piezas
Instalación
Uso del
Refrigerador
Cuidado del
Refrigerador
Resolución de
Problemas
Antes de
Usar
Seguridad del
Refrigerador

Complete la instalación
ADVERTENCIA
Peligro de Choque Eléctrico
•
•
•
•
•
1.
NOTA:
2.
MOVER A LA UBICACIÓN FINAL
ADVERTENCIA
Peligro de explosión o Incendio
•
•
•
•
IMPORTANTE:
•
•
NOTA:
•
Requisitos
para el
Funcionamiento
Características
y Piezas
Instalación
Uso del
Refrigerador
Cuidado del
Refrigerador
Resolución de
Problemas
Antes de
Usar
Seguridad del
Refrigerador

18
INSTALACIÓN DEL FILTRO DE AGUA
RETIRE EL TAPÓN DE DERIVACIÓN
2.
1.
Cierre el suministro de agua al refrigerador.
3.
Apriete los lados de la tapa del filtro donde está marcado, y luego tire
hacia abajo para abrir la tapa.
Cubierta del
filtro
Gire el tapón de derivación en sentido antihorario y luego tire hacia
afuera para extraerlo.
IMPORTANTE: Conserve el tapón de derivación para su uso posterior.
La heladera y el dispensador no funcionarán a menos que se haya
instalado correctamente un filtro de agua o el tapón de derivación.
Tapón de
derivación
Requisitos
para el
Funcionamiento
Características
y Piezas
Instalación
Uso del
Refrigerador
Cuidado del
Refrigerador
Resolución de
Problemas
Antes de
Usar
Seguridad del
Refrigerador

19
6. Abra el suministro de agua al refrigerador.
NOTA: La carcasa permite que el filtro se mueva ligeramente hacia
arriba y hacia abajo.
Filtro de agua
7. Cierre la tapa del filtro.
REEMPLAZO DEL FILTRO DE AGUA
El ícono del filtro de agua en el panel de control se iluminará después de
más de 150 días para indicar que es hora de pedir un filtro de agua de
repuesto. Después de más de 180 días, el ícono se iluminará y parpadeará
para indicar que es hora de reemplazar el filtro de agua.
1.
2.
Gire el filtro de agua en sentido antihorario y luego tire hacia afuera
para extraerlo.
INSTALACIÓN DEL FILTRO DE AGUA
4. Saque el filtro de agua de su empaque y luego retire la tapa de plástico
transparente del cabezal del filtro.
5. Alinee las lengüetas del cabezal del filtro con las muescas de la
abertura y luego inserte el filtro de agua en la abertura. Presione hacia
adentro, mientras gira el filtro en sentido horario para instalarlo.
Cierre el suministro de agua al refrigerador.
Requisitos
para el
Funcionamiento
Características
y Piezas
Instalación
Uso del
Refrigerador
Cuidado del
Refrigerador
Resolución de
Problemas
Antes de
Usar
Seguridad del
Refrigerador

PURGA DEL SISTEMA DE AGUA
Después de instalar el filtro de agua de repuesto, es importante eliminar el
aire de la línea de agua para que el agua no gotee fuera del dispensador
de agua.
1. Encienda el suministro de agua.
2. Dispense 2,5 galones de agua (la purga se debe hacer durante
aproximadamente 5 minutos) para sacar el aire atrapado y los
contaminantes fuera del sistema.
NOTA: No dispense la cantidad completa de 2,5 galones de forma
continua. Presione y suelte la lengüeta del dispensador en ciclos de
30 segundos en ENCENDIDO y 60 segundos en APAGADO. En algunos
hogares, es posible que se requiera una purga adicional.
3.
3. Instale un nuevo filtro de agua siguiendo los pasos 4 a 7 de la sección
anterior.
4. Mantenga presionado el control del filtro de agua durante 3 segundos
para borrar y restablecer el reloj de estado del filtro.
NOTA: La luz se apagará y sonarán 3 pitidos.
Requisitos
para el
Funcionamiento
Características
y Piezas
Instalación
Uso del
Refrigerador
Cuidado del
Refrigerador
Resolución de
Problemas
Antes de
Usar
Seguridad del
Refrigerador

21
ALINEADO DE LAS PUERTAS (EN CASO DE
NECESITARLO)
1. Localice el tornillo de ajuste que está ubicado por debajo de la esquina
inferior de la puerta del refrigerador.
2.
Afloje la contratuerca rotando en sentido de las manecillas del reloj;
después gire el tornillo de ajuste en sentido de las manecillas del reloj
para levantar o en contra para bajar la puerta.
Después de una o dos vueltas con la llave inglesa, abra y cierre la
puerta del refrigerador y revise la alineación en la parte superior de
las puertas.
3.
Apriete la contratuerca girándola en sentido contrario a las manecillas
del reloj.
4.
Nota: Si es necesario, repita los pasos anteriores. hasta que las puertas
estén alineadas.
Tornillo de ajuste
Eje fijo
Pata niveladora
Contratuerca
Llave inglesa
Izquierda
Derecha
La alineación o el ajuste de las puertas se pueden realizar en los
modelos de refrigeradores de lado a lado.
Requisitos
para el
Funcionamiento
Características
y Piezas
Instalación
Uso del
Refrigerador
Cuidado del
Refrigerador
Resolución de
Problemas
Antes de
Usar
Seguridad del
Refrigerador

NIVELAR EL REFRIGERADOR
IMPORTANTE
1.
2.
NOTA:
3.
4.
5.
Para levantar -
Para bajar -
ANTES DE USAR
PERÍODO DE ESPERA
•
NOTA:
•
Requisitos
para el
Funcionamiento
Características
y Piezas
Instalación
Uso del
Refrigerador
Cuidado del
Refrigerador
Resolución de
Problemas
Antes de
Usar
Seguridad del
Refrigerador

LIMPIEZA
1.
2.
USO DEL REFRIGERADOR
GENERAL
•
•
•
ADVERTENCIA
Peligro de choque eléctrico
•
•
•
•
•
1.
2.
3.
CONSEJOS PARA AHORRAR ENERGÍA
•
•
•
Requisitos
para el
Funcionamiento
Características
y Piezas
Instalación
Uso del
Refrigerador
Cuidado del
Refrigerador
Resolución de
Problemas
Antes de
Usar
Seguridad del
Refrigerador

No cubra los estantes del refrigerador con papel de aluminio, papel
encerado o papel de toalla. Los revestimientos interfie en con la
circulación de aire frío, lo que hace que el refrigerador sea menos
eficien e.
Organice y etiquete los alimentos para reducir las aperturas de las
puertas y las búsquedas prolongadas. Retire tantos elementos como
sea necesario a la vez, y luego cierre la puerta lo antes posible.
NO agregue una gran cantidad de alimentos no congelados al
refrigerador a la vez. Esto disminuirá la eficiencia de enfriamien o del
refrigerador.
CONTROLES
Indicador de temperatura
Indicador de Super congelador
Indicador de Super enfriamiento
Botón de temperatura del refrigerador
Botón de temperatura del congelador
Indicador y botón de reinicio del filtro de agua
Indicador y botón encendido/apagado de la
Fábrica de Hielo
Indicador y botón de Ahorro de Energía
Indicador y botón para Bloqueo/Desbloqueo
El panel de control está localizado en el lado derecho de la puerta del
refrigerador
(La foto anterior es sólo de referencia. La configuración real estará basada
en el producto físico o las declaraciones del distribuidor)
24
Cuando el refrigerador se enchufa por primera vez al tomacorriente, la
pantalla comenzará a iluminarse y desplazarse; después de lo cual los
íconos de la pantalla se iluminarán completamente durante 3 segundos y
sonará un pitido.
En condiciones normales, si no se abre ninguna puerta o no se presiona
ningún control durante 30 segundos, la pantalla se apagará y se
bloqueará.
Cuando la pantalla no esté iluminada, presione cualquier control para
iluminarla y luego presione y mantenga presionado el botón Despertar
durante 3 segundos para desbloquear el panel de control.
Requisitos
para el
Funcionamiento
Características
y Piezas
Instalación
Uso del
Refrigerador
Cuidado del
Refrigerador
Resolución de
Problemas
Antes de
Usar
Seguridad del
Refrigerador

TEMPERATURE
25
Cuando el refrigerador se enchufa por primera vez a una fuente de
alimentación, se mostrarán los ajustes de temperatura predeterminados.
La temperatura de cada compartimento se puede ajustar dentro de su
rango especificado.
Compartimento de refrigeración
Ajuste de temperatura predeterminado: 4° C (39° F).
El rango de temperatura para el compartimiento de refrigeración es de
1° C a 7° C (34° F a 44° F).
Compartimento de congelación
Configuración de temperatura predeterminada: -18° C (0° F).
El rango de temperatura para el compartimiento de congelación es de
-22° C a -14° C (-7° F a 7° F).
Para ajustar la temperatura de los compartimentos de refrigeración y/o
congelación:
1. Seleccione el compartimento presionando el botón
(temperatura del refrigerador) o el botón (temperatura
del congelador).
2. Presione el botón o para subir o bajar la temperatura en
incrementos de 1° hasta alcanzar la temperatura deseada.
PANTALLA DE LA UNIDAD DE TEMPERATURA
Las temperaturas del compartimento se pueden ver en grados Celsius
(° C) o Fahrenheit (° F).
Mantenga presionados los controles al mismo tiempo durante
3 segundos para cambiar la pantalla de la unidad de grados Celsius (° C) a
Fahrenheit (° F) o viceversa.
Requisitos
para el
Funcionamiento
Características
y Piezas
Instalación
Uso del
Refrigerador
Cuidado del
Refrigerador
Resolución de
Problemas
Antes de
Usar
Seguridad del
Refrigerador

26
CONTROLES DE BLOQUEO/DESBLOQUEO
Para desbloquear los controles:
Mantenga pulsado el botón Despertar durante 3 segundos. Sonará
un pitido y la pantalla se iluminará.
Para bloquear los controles:
Mantenga pulsado el botón Despertar durante 3 segundos. Sonará
un pitido y la pantalla se apagará.
NOTA: Después de 30 segundos, si no se presiona ningún control, los
controles se bloquearán automáticamente.
MODO DE ENFRIAMIENTO RÁPIDO (SUPER COOL)
Mantenga presionado el botón (Temperatura de refrigeración)
durante 3 segundos para ingresar al modo de Enfriamiento
rápido.
El ícono del compartimento de refrigeración se iluminará en azul
y la temperatura en el compartimento bajará a 1° C (34° F).
Mantenga presionado el botón t emperatura de refrigeración nuevamente
durante 3 segundos para salir del modo de Enfriamiento rápido. La luz se
apagará y la temperatura del compartimento de refrigeración volverá a la
temperatura establecida previamente.
MODO DE CONGELACIÓN RÁPIDA (SUPER FREEZE)
Mantenga presionado el botón de congelación durante
3 segundos para ingresar al modo de Congelación rápida.
El ícono del compartimento de congelación se iluminará en azul
y la temperatura en el compartimento bajará a -22° C (-7° F).
Mantenga presionado el botón Temperatura de congelación nuevamente
durante 3 segundos para salir del modo de Congelación rápida. La luz se
apagará y la temperatura del compartimento de congelación volverá a la
temperatura establecida previamente.
MODO DE AHORRO ENERGÉTICO (ENERGY SEVING)
Presione el botón Ahorro energético para entrar y salir del modo de
Ahorro energético. Ahorro energético se iluminará para indicar que el
modo está activado y se apagará cuando no esté activado.
Cuando se activa el modo de Ahorro energético, la temperatura del
compartimiento de refrigeración es de 7° C (44° F) y la temperatura del
compartimiento de congelación es de -14° C (7° F).
Cuando se apaga el modo de ahorro energético, las temperaturas
del compartimiento de refrigeración y de congelación volverán a las
temperaturas previamente establecidas.
NOTA: Si se estableció una temperatura en el modo Congelación
rápida o Enfriamiento rápido, se cancelará automáticamente.
Requisitos
para el
Funcionamiento
Características
y Piezas
Instalación
Uso del
Refrigerador
Cuidado del
Refrigerador
Resolución de
Problemas
Antes de
Usar
Seguridad del
Refrigerador

27
MÁQUINA DE HIELO
Máquina de hielo para congelador
Presione el botón para ENCENDER/PAGAR la máquina de
hielo del compartimiento de congelación. Cuando la máquina de hielo del
congelador esté encendida, el control se iluminará.
Depósito de hielo del congelador
El depósito de hielo del compartimento de congelador es extraíble para
limpiarlo o vaciarlo cuando se necesita una gran cantidad de cubitos de
hielo.
Después de vaciarlo y/o limpiarlo, coloque nuevamente el depósito de
hielo inmediatamente. La máquina de hielo seguirá produciendo hielo y
los cubos caerán en el depósito de fabricación de hielo si el depósito de
hielo no está instalado correctamente.
Para extraer el depósito de hielo:
1. Abra la puerta del refrigerador lo más rápido posible.
2. Agarre el asa del depósito de hielo y extraiga el depósito del
compartimento.
Depósito
de hielo
Para volver a colocar el depósito de hielo:
1. Retire los cubitos de hielo que puedan haber caído en el
compartimento de hielo.
2. Deslice el depósito de hielo en el compartimento.
Requisitos
para el
Funcionamiento
Características
y Piezas
Instalación
Uso del
Refrigerador
Cuidado del
Refrigerador
Resolución de
Problemas
Antes de
Usar
Seguridad del
Refrigerador

28
Modos de control del dispensador
El control del dispensador incorpora iconos LED retroiluminados para
determinar el modo de funcionamiento del dispensador. Existen dos modos
de visualización entre los que puede elegir, modo de espera y modo activo.
Puede cambiar los modos siguiendo las instrucciones a continuación. Como
valor predeterminado de fábrica, el control de dispensación está en modo
de Espera (Standby Mode).
En el modo de Espera, los iconos del dispensador están ocultos hasta que
se activan. Los iconos se pueden activar deslizando el dedo sobre la superficie
de control. Los iconos del dispensador se apagarán automáticamente después
de 120 segundos. El modo de Espera muestra un aspecto minimalista preferido
por algunos usuarios.
En el modo Activo (Active Mode), los iconos del dispensador (cubos, agua,
triturado) (Cubed, Water, Crushed) siempre están encendidos. El control
utiliza un icono LED más brillante para indicar qué modo de dispensación
está seleccionado.
Cambio entre el modo Activo y el modo de Espera: mantenga pulsados los
iconos AGUA y TRITURADO durante 3 segundos. El control del dispensador
parpadeará durante 2 segundos, confirmando que se cambió el modo.
El dispensador de agua y hielo, ubicado en la parte delantera de la puerta
del compartimiento del refrigeración, dispensa agua fría, hielo en cubos o
hielo picado.
La función de dispensación funcionará solo cuando la puerta del
refrigerador esté completamente cerrada.
Cuando el refrigerador se enchufa por primera vez a un tomacorriente, la
pantalla de control del dispensador se iluminará durante 3 segundos. El
suministro de agua es la opción de suministro predeterminada.
Cuando el refrigerador se conecta por primera vez al agua, es posible que
el agua no se dispense si hay aire en la línea de agua.
1. Presione la lengüeta del dispensador durante al menos 5 minutos para
eliminar el aire atrapado de la línea de agua y para llenar el sistema de
agua. Consulte la “Purga del sistema de agua”.
Lengüeta del
dispensador
2. Deseche los primeros seis vasos llenos de agua para eliminar las
impurezas en la línea de agua.
La luz del dispensador se enciende al dispensar agua y hielo. La luz
LED se apagará después de 3 segundos.
Luz del dispensador
Requisitos
para el
Funcionamiento
Características
y Piezas
Instalación
Uso del
Refrigerador
Cuidado del
Refrigerador
Resolución de
Problemas
Antes de
Usar
Seguridad del
Refrigerador

29
Dispensación de cubitos de hielo
1. Presione el botón Cubos (Cubed) . El indicador Cubos se iluminará.
2. Usando su dedo o un recipiente, presione la lengüeta para dispensar
los cubitos.
3. Suelte la lengüeta dispensadora para dejar de dispensar hielo.
Dispensación de hielo triturado
1. Presione el botón Triturado (Crushed)
Para usar como luz nocturna o extender el tiempo que la luz del dispensador
está encendida, presione y mantenga presionados los iconos Agua y Cubos
juntos durante 3 segundos. La luz del dispensador se apagará
automáticamente después de 12 horas. Para apagarla, mantenga presionados
los mismos botones nuevamente durante 3 segundos.
. El indicador Triturado se
iluminará.
2. Usando su dedo o un recipiente, presione la lengüeta para dispensar el
hielo triturado.
3. Suelte la lengüeta dispensadora para dejar de dispensar hielo.
BANDEJA ANTIGOTEO
La bandeja de antigoteo es extraíble para facilitar su limpieza.
Bandeja
antigoteo
Dispensación de agua
1. Presione el botón Agua (Water)
. El indicador de Agua se iluminará.
2. Usando su dedo o un recipiente, presione la lengüeta para dispensar
agua.
3. Suelte la lengüeta dispensadora para detener el flujo de agua.
RECIPIENTES EXTRAÍBLES DE LA PUERTA
Los recipientes de la puerta son extraíbles para facilitar la limpieza.
Cómo retirarlos:
1. Retire todos los artículos del recipiente de la puerta.
2. Sujete los lados del recipiente, levántelo y tire de él hacia afuera.
Requisitos
para el
Funcionamiento
Características
y Piezas
Instalación
Uso del
Refrigerador
Cuidado del
Refrigerador
Resolución de
Problemas
Antes de
Usar
Seguridad del
Refrigerador

CUIDADO DEL REFRIGERADOR
LIMPIEZA
ADVERTENCIA
Peligro de choque eléctrico
•
•
ADVERTENCIA
Peligro de explosión
•
•
IMPORTANTE:
1.
2.
3.
4.
5.
NOTA:
6.
7.
Cómo sustituirlos:
1. Inserte el recipiente en el revestimiento de la puerta por encima del
soporte y luego presione hacia abajo para encajarlo.
Requisitos
para el
Funcionamiento
Características
y Piezas
Instalación
Uso del
Refrigerador
Cuidado del
Refrigerador
Resolución de
Problemas
Antes de
Usar
Seguridad del
Refrigerador

MUDANZA
IMPORTANTE:
1.
2.
3.
4.
ALMACENAMIENTO
IMPORTANTE:
1.
2.
3.
4.
REEMPLAZO DE LUCES
Requisitos
para el
Funcionamiento
Características
y Piezas
Instalación
Uso del
Refrigerador
Cuidado del
Refrigerador
Resolución de
Problemas
Antes de
Usar
Seguridad del
Refrigerador

RESOLUCIÓN DE PROBLEMAS
IMPORTANTE:
GENERAL
PROBLEMA CAUSA POSIBLE SOLUCIÓN
El refrigerador
no funciona
La puerta del
refrigerador
no cierra
completamente
2
Requisitos
para el
Funcionamiento
Características
y Piezas
Instalación
Uso del
Refrigerador
Cuidado del
Refrigerador
Resolución de
Problemas
Antes de
Usar
Seguridad del
Refrigerador

PROBLEMA CAUSA POSIBLE SOLUCIÓN
Las luces LED
no se encienden
La comida en el
refrigerador no
está fría
Los
elementos del
compartimento
frigorífico
se están
congelando
El refrigerador
hace ruidos
o vibraciones
inusuales
Requisitos
para el
Funcionamiento
Características
y Piezas
Instalación
Uso del
Refrigerador
Cuidado del
Refrigerador
Resolución de
Problemas
Antes de
Usar
Seguridad del
Refrigerador

PROBLEMA CAUSA POSIBLE SOLUCIÓN
Se acumula
humedad en
el interior del
refrigerador
El compresor
se enciende
y apaga con
frecuencia
El refrigerador
tiene un olor
4
Requisitos
para el
Funcionamiento
Características
y Piezas
Instalación
Uso del
Refrigerador
Cuidado del
Refrigerador
Resolución de
Problemas
Antes de
Usar
Seguridad del
Refrigerador

HIELO Y AGUA
PROBLEMA CAUSA POSIBLE SOLUCIÓN
La máquina
de hielo no
produce hielo
o no produce
suficiente
hielo
Los cubitos
de hielo son
huecos o
pequeños
NOTA:
Requisitos
para el
Funcionamiento
Características
y Piezas
Instalación
Uso del
Refrigerador
Cuidado del
Refrigerador
Resolución de
Problemas
Antes de
Usar
Seguridad del
Refrigerador

PROBLEMA CAUSA POSIBLE SOLUCIÓN
El dispensador
de agua y
hielo no
funciona
correctamente
6
Requisitos
para el
Funcionamiento
Características
y Piezas
Instalación
Uso del
Refrigerador
Cuidado del
Refrigerador
Resolución de
Problemas
Antes de
Usar
Seguridad del
Refrigerador

PROBLEMA CAUSA POSIBLE SOLUCIÓN
Hay fugas o
goteos de
agua fuera
del sistema
dispensador
NOTA:
El agua del
dispensador
sabe mal
El agua del
dispensador
está tibia
Sale agua
por la parte
trasera del
refrigerador
Sale agua
de la cubeta
debajo del
cajón del
congelador
Requisitos
para el
Funcionamiento
Características
y Piezas
Instalación
Uso del
Refrigerador
Cuidado del
Refrigerador
Resolución de
Problemas
Antes de
Usar
Seguridad del
Refrigerador

CÓDIGOS DE ERROR
CÓDIGO DE
ERROR
E0
E1
E2
E5
E6
E7
EH
EE
CA
EP
Falla de la máquina de hielo
Fallo del sensor de temperatura en el compartimento del refrigerador
Fallo del sensor de temperatura en el compartimento del congelador
Fallo del sensor de descongelación en el compartimento del congelador
Fallo de comunicación en la pantalla
Fallo de temperatura ambiente
Error del sensor de humedad
Fallo en el sensor de la máquina de hielo
Fallo de comunicación en la placa de la máquina de hielo
Fallo de la máquina de hacer hielo sin hielo
38
Si aparece un código de error en el panel de control, comuníquese con su lugar
de compra o con el servicio de atención al cliente de Insignia al 1-866-646-4332.
DESCRIPCIÓN DEL ERROR
Requisitos
para el
Funcionamiento
Características
y Piezas
Instalación
Uso del
Refrigerador
Cuidado del
Refrigerador
Resolución de
Problemas
Antes de
Usar
Seguridad del
Refrigerador

!'
HOJA DE DATOS DE RENDIMIENTO
SISTEMA INTERNO DE FILTRACIÓN DE AGUA
MODELO MF-2008-R2 CAPACIDAD 200 GALONES (757 LITROS)
%/0!)ŏ,.+ +ŏ5ŏ!.0%"% +ŏ,+.ŏŏ* !.*0%+*(ŏ/!#Ò*ŏ(/ŏ*+.)/ŏ
ĥŏąĂŏ5ŏĆăŏ,.ŏ(ŏ.! 1%¨*ŏ !ŏ(+/ŏ+*0)%**0!/ŏ!/,!%"% +/
!*ŏ(ŏ+&ŏ !ŏ0+/ŏ !(ŏ!* %)%!*0+ċ
/0!ŏ/%/0!)ŏ$ŏ/% +ŏ,.+ +ŏ !ŏ1!. +ŏ+*ŏ(/ŏ+.)/ŏĥŏąĂŏ5ŏĆăŏ,.ŏ(ŏ.! 1%¨*ŏ
!ŏ(/ŏ/1/0*%/ŏ!*1)!. /ŏŏ+*0%*1%¨*ċŏŏ+*!*0.%¨*ŏ !ŏ(/ŏ/1/0*%/ŏ%* % /ŏ!*ŏ
#1ŏ!*0.* +ŏ(ŏ/%/0!)ŏ"1!ŏ.! 1% ŏŏ1*ŏ+*!*0.%¨*ŏ)!*+.ŏ+ŏ%#1(ŏ(ŏ)%0!ŏ,!.)%0% +ŏ
,.ŏ#1ŏ/(%!* +ŏ !(ŏ/%/0!)Čŏ+)+ŏ/!ŏ!/,!%"% !*ŏ(/ŏ+.)/ŏĥŏąĂŏ5ŏĆăċ
Reducción de
sustancias
Concentración
del peligro de
penetración o
intrusión (mg/L)
Concentración
máxima permisible del
producto en el agua
(mg/L)
Reducción
del %
medio
Requisitos de
reducción de
NSF
Reducción de cloro
ĂČĀŏ)#ĥŏ±ŏāĀŃ ĊăČĈŃ ĆĀŃ
Reducción de
partículas, Clase I*
*āĀĀĀĀĥ)( ōĊĊČĊŃ *ĉĆŃ
Reducción de
plomo
ĀČāĆ)#ĥŏ±ŏāĀŃ )ĀČĀāĀŏ ĊĊČćĀŃ
Quistes vivos†
ĆĀĀĀĀĥ ōĊĊČĊĊŃ ĊĊČĊĆŃ
.8)!0.+/ŏ !ŏ,.1!čŏ,ŏŊŏĈČćĊŏŎŏĀČĆŏŏ)!*+/ŏ-1!ŏ/!ŏ%* %-1!ŏ(+ŏ+*0..%+ċŏ(1&+ŏŊŏ
ĀČĆĂŏ#,)ŏĨāČĉĊŏ,)ĩċŏ.!/%¨*ŏŊŏćĀŏ,/%#ŏĨąāăČĈŏ'ĩċ
!),!.01.ŏŊŏĂĀłŏŏŏĂĂłŏŏĨćĉłŏŏŏĈāċćłŏĩċŏ,% ŏ*+)%*(ŏ !ŏ/!.2%%+ŏŊŏĂĀĀŏ#(+*!/ŏ
ĨĈĆĈŏ(%0.+/ĩċ
•
/ŏ%),+.0*0!ŏ-1!ŏ/!ŏ1),(*ŏ(+/ŏ.!-1%/%0+/
!ŏ"1*%+*)%!*0+Čŏ)*0!*%)%!*0+ŏ5
/1/0%01%¨*ŏ !ŏ"%(0 +/ŏ,.ŏ-1!ŏ!(ŏ,.+ 10+
"1*%+*!ŏ+)+ŏ/!ŏ$ŏ*1*% +ċŏ1! !*
+1..%.ŏ ¦+/ŏ)0!.%(!/ŏ/%ŏ*+ŏ/!ŏ/%#1!*ŏ
0+ /ŏ(/ŏ%*/0.1%+*!/ċ
•
(ŏ.01$+ŏ !/!$(!ŏ !!ŏ)%./!ŏ(ŏ
)!*+/ŏ ŏćŏ)!/!/ċ
•
0%(%!ŏ1*ŏ"%(0 +ŏĂĀĀĉġĂŏ !ŏ.!,1!/0+ċ
•
(ŏ/%/0!)ŏ !ŏ)+*%0+.%6%¨*ŏ !(ŏ"%(0 +ŏ)% !
(ŏ*0% ŏ !ŏ#1ŏ-1!ŏ,/ŏ,+.ŏ!(ŏ"%(0 +
5ŏ(!ŏ2%/ŏ/+.!ŏ18* +ŏ!/ŏ!(ŏ)+)!*0+ŏ !
.!!),(6.ŏ!(ŏ"%(0 +ċŏ+*/1(0!ŏ(ŏ/!%¨*
ė/+ŏ !ŏ(+/ŏ+*0.+(!/Ęċ
•
!/,1h/ŏ !ŏ)%.ŏ!(ŏ"%(0 +ŏ !ŏ#1Č
!*&1#1!ŏ!(ŏ/%/0!)ŏ !ŏ#1ċŏ+*/1(0!ŏ(
/!%¨*ŏė%/,!*/ +.Ęċ
•
/0+/ŏ+*0)%**0!/ŏ*+ŏ/!ŏ!*1!*0.*
*!!/.%)!*0!ŏ!*ŏ/1ŏ/1)%*%/0.+ŏ !
#1ċŏ%ŏ%!*ŏ(/ŏ,.1!/ŏ/!ŏ.!(%6.+*ŏ!*
+* %%+*!/ŏ*+.)(!/ŏ !ŏ(+.0+.%+Čŏ!(
.!* %)%!*0+ŏ.!(ŏ,1! !ŏ2.%.ċ
•
(ŏ,.+ 10+ŏ!/ŏ/+(+ŏ,.ŏ1/+ŏ+*ŏ#1ŏ".ċ
•
(ŏ/%/0!)ŏ !ŏ#1ŏ !!ŏ%*/0(./!ŏ !
1!. +ŏ+*ŏ(/ŏ(!5!/ŏ5ŏ*+.)0%2/
!/00(!/ŏ5ŏ(+(!/ċ
•
+ŏ10%(%6.ŏ+*ŏ#1ŏ-1!ŏ*+ŏ/!ŏ
)%.+%+(¨#%)!*0!ŏ/!#1.ŏ+ŏ !ŏ(% ŏ
!/+*+% ŏ/%*ŏ1*ŏ !/%*"!%¨*ŏ,.!2%
+ ,+/0!.%+.ŏ !1 ŏ !(ŏ/%/0!)ċŏ+/
/%/0!)/ŏ!.0%"% +/ ,.ŏ(ŏ.! 1%¨*
!ŏ-1%/0!/ŏ,1! !*ŏ1/./!ŏ!*ŏ#1/ŏ
!/%*"!0 /ŏ-1!ŏ,1! !*ŏ+*0!*!.ŏ-1%/0!/
"%(0 (!/ċŏŏ/0ċŏċŁŏāĀăĆĀġġĀĀĆċ
•
+*/1(0!ŏ(ŏ/!%¨*ŏė.*0Ęŏ,.ŏ+*+!.
(ŏ#.*0ŏ(%)%0 ŏ !(ŏ".%*0!Čŏ!(
*+).!ŏ5ŏ!(ŏ*Ò)!.+ŏ !ŏ0!(h"+*+ċ
Pautas de aplicación/Parámetros para el
suministro de agua
1)%*%/0.+ŏ !ŏ
#1
1*%%,(ŏ+ŏ !ŏ,+6+ŏ
,+0(!
.!/%¨*ŏ !ŏ#1 ăĆŏġŏāĂĀŏ(/ĥ,1(#
Ă
ŏŏ
ĨĂąāŏġŏĉĂĈŏ'ĩ
!),!.01.ŏ !ŏ
#1
ăăłŏġŏāĀĀłŏŏ
Ĩāłŏġŏăĉłĩ
/ŏ !ŏ"(1&+ŏ !
/!.2%%+
ĀČŏĆĂŏ#,)ŏĨāċĉĊŏĥ)%*ċĩŏ
ĮŏćĀŏ(/ĥ,1(#
Ă
ĵŏ)¦+ŏ !ŏ(/ŏ,.01(/ŏ !ŏ(/!ŏčōŏĀČĆŏŏŌāŏμ)ċō
Ķŏ ŏ/ +ŏ!*ŏ!(ŏ1/+ŏ !ŏ++-1%/0!/ŏ !ŏ.5,0+/,+.% %1)ŏ
,.21)ċ
IJŏŏŏ!/ŏ1*ŏ).ŏ.!#%/0. ŏ !ŏŏ*0!.*0%+*(ċ

"
GARANTÍA
LIMITADA DEL
REFRIGERADOR
MIDEA
ADJUNTE SU RECIBO AQUÍ. SE REQUIERE
COMPROBANTE DE COMPRA PARA OBTENER UN
SERVICIO DE GARANTÍA.
!*#ŏŏ %/,+/%%¨*ŏ(ŏ/%#1%!*0!ŏ%*"+.)%¨*ŏ1* +ŏ(()!ŏ(ŏ
!*0.+ŏ !ŏ/!.2%%+ŏ(ŏ(%!*0!č
Q +).!Čŏ +)%%(%+ŏ5ŏ*Ò)!.+ŏ !ŏ0!(h"+*+
Q Ò)!.+ŏ !ŏ)+ !(+ŏ5ŏ*Ò)!.+ŏ !ŏ/!.%!
Q *ŏ !/.%,%¨*ŏ(.ŏ5ŏ !0(( ŏ !(ŏ,.+(!)
Q +),.+*0!ŏ !ŏ+),.Čŏ%*(1% +ŏ!(ŏ*+).!ŏ5
+)%%(%+ŏ !(ŏ %/0.%1% +.ŏ+ŏ2!* ! +.
SI NECESITA SERVICIO TÉCNICO:
1. ŏ*0!/ŏ !ŏ+ŏ*00.*+/ŏ,.ŏ++. %*.ŏ!(ŏ/!.2%%+ŏ0h*%+Čŏ !0!.)%*!ŏ/%ŏ/1ŏ,.+ 10+ŏ.!-1%!.!
.!,.%¨*ċŏ(#1*/ŏ,.!#1*0/ŏ,1! !*ŏ.!/+(2!./!ŏ/%*ŏ!(ŏ/!.2%%+ŏ0h*%+ċŏ! %-1!ŏ(#1*+/ŏ)%*10+/
ŏ.!2%/.ŏ(ŏ/!%¨*ŏ !ŏ+(1%¨*ŏ !ŏ,.+(!)/ŏ !(ŏ*1(ŏ !ŏ1/1.%+Čŏ+ŏ2%/%0!ŏ$00,čĥĥ1/ċ% !ċ+)ĥ
/1,,+.0ċ
2. + +ŏ/!.2%%+ŏ0h*%+ŏ !ŏ#.*0ŏ/!ŏ,.+2!!ŏ!4(1/%2)!*0!ŏ,+.ŏ,.0!ŏ !ŏ,.!/0 +.!/ŏ !ŏ/!.2%%+ŏ
0h*%+ŏ10+.%6 +/ŏ !ŏ% !Čŏ!*ŏ(+/ŏċŏċŏ5ŏ* 8ċ
Servicio al cliente de Midea
En EE. UU. o Canadá, llame al 1-866-646-4332.
%ŏ/!ŏ!*1!*0.ŏ"1!.ŏ !ŏ(+/ŏĆĀŏ!/0 +/ŏ !ŏ(+/ŏ/0 +/ŏ*% +/ŏ+ŏ !ŏ* 8Čŏ+)1*-1!/!ŏ+*ŏ/1ŏ
%/0.%1% +.ŏ10+.%6 +ŏ !ŏ% !ŏ,.ŏ+..++..ŏ/%ŏ,(%ŏ1*ŏ#.*0ŏ %/0%*0ċ
1 AÑO PARA PIEZAS Y MANO DE OBRA, 10 AÑOS PARA PIEZAS DEL COMPRESOR
LO QUE CUBRE
PRIMER AÑO DE GARANTÍA LIMITADA (PIEZAS Y MANO DE OBRA)
% !ŏ.!,..8ŏ+ŏ.!!),(6.8Čŏ/%*ŏ.#+Čŏ1(-1%!.ŏ !"!0+ŏ !% +ŏŏ)0!.%(!/ŏ !"!01+/+/ŏ+ŏ)*+ŏ !ŏ
+.ŏ,+.ŏ1*ŏ¦+ŏ+),(!0+ŏŏ,.0%.ŏ !ŏ(ŏ"!$ŏ !ŏ+),.ċŏ.ŏ+0!*!.ŏ)8/ŏ !0((!/ŏ/+.!ŏ(ŏ+!.01.ŏ !ŏ
(ŏ#.*0ŏ!ŏ%*"+.)%¨*ŏ/+.!ŏ.!,.%¨*ŏ !ŏ(ŏ#.*0Čŏ2%/%0!ŏwww.midea.comŏ+ŏ(()!ŏ(ŏŏ
1-866-646-4332ċ
El consumidor será responsable de:
Q +/ŏ+/0+/ŏ !ŏ %#*¨/0%+Čŏ0./( +Čŏ0.*/,+.0!ŏ5ŏ.!%*/0(%¨*ŏ.!-1!.% +/ŏ,+.ŏ!(ŏ/!.2%%+ċ
Q +/ŏ+/0+/ŏ !ŏ(/ŏ(() /ŏ !ŏ/!.2%%+ŏ-1!ŏ/!*ŏ.!/1(0 +ŏ !ŏ(+/ŏ.01(+/ŏ!*1)!. +/ŏ&+
RESPONSABILIDADES NORMALES DEL CONSUMIDOR**
RESPONSABILIDADES NORMALES DEL CONSUMIDOR**
Esta garantía se aplica solo a los productos de uso doméstico común, y el consumidor es
responsable de los puntos que se enumeran a continuación:
1. ŏ(ŏ1/+ŏ+..!0+ŏ !(ŏ!(!0.+ +)h/0%+ŏ !ŏ1!. +ŏ+*ŏ(/ŏ%*/0.1%+*!/ŏ,.+,+.%+* /ŏ+*ŏ!(ŏ,.+ 10+ċ
2. ŏ(ŏ)*0!*%)%!*0+ŏ !ŏ.10%*ŏ5ŏ(ŏ(%),%!6ŏ*!!/.%ŏ,.ŏ)*0!*!.ŏ(/ŏ1!*/ŏ+* %%+*!/ŏ !ŏ0.&+ċ
3. ŏŏ%*/0(%¨*ŏ+..!0ŏ,+.ŏ1*ŏ,.+"!/%+*(ŏ !ŏ/!.2%%+ŏ10+.%6 +ŏ !ŏ1!. +ŏ+*ŏ(/ŏ%*/0.1%+*!/
,.+2%/0/ŏ+*ŏ!(ŏ!(!0.+ +)h/0%+ŏ5ŏ !ŏ1!. +ŏ+*ŏ0+ +/ŏ(+/ŏ¨ %#+/ŏ(+(!/ŏ !ŏ,(+)!.Čŏ!(!0.%% ŏ
5ĥ+ŏ#/ċ
4. ŏŏ+*!4%¨*ŏ !1 ŏŏ1*ŏ"1!*0!ŏ !ŏ(%)!*0%¨*ŏ+*ŏ+*!4%¨*ŏŏ0%!..ŏ !ŏ/1"%%!* !ŏ2+(0&!Č
.!!),(6+ŏ !ŏ"1/%(!/ŏ-1!) +/Čŏ.!,.%¨*ŏ !ŏ+*!4%+*!/ŏ"(+&/ +ŏ !"!0+/ŏ!*ŏ!(ŏ(! +ŏ !ŏ(ŏ/ċ
5. +/ŏ#/0+/ŏ,+.ŏ$!.ŏ!/%(!ŏ!(ŏ!(!0.+ +)h/0%+ŏ,.ŏ .(!ŏ/!.2%%+ċ
6. +/ŏ ¦+/ŏ(ŏ +ŏ !/,1h/ŏ !ŏ(ŏ%*/0(%¨*ċ
ŏÑŏŏŏŏŏŏŏŏ7ŏŏ§ŏ
ŏŏŏŏŏÑŏŏċŏ(ŏ/!.2%%+ŏ0h*%+ŏ !!ŏ/!.ŏ,.+2%/0+ŏ,+.ŏ1*ŏ
!),.!/ŏ !ŏ/!.2%%+ŏ0h*%+ŏ !/%#* ŏ,+.ŏ% !ċŏ/0ŏ#.*0ŏ(%)%0 ŏ!/ŏ28(% ŏ/+()!*0!ŏ!*ŏ(+/ŏ
ĆĀŏ!/0 +/ŏ !ŏ(+/ŏ/0 +/ŏ*% +/ŏ+ŏ* 8ŏ5ŏ,(%ŏÒ*%)!*0!ŏ1* +ŏ!(ŏ!(!0.+ +)h/0%+ŏ/!ŏ10%(%6ŏ!*ŏ
!(ŏ,/ŏ!*ŏ!(ŏ-1!ŏ/!ŏ -1%.%¨ċŏ/0ŏ#.*0ŏ(%)%0 ŏ!*0.ŏ!*ŏ2%#!*%ŏŏ,.0%.ŏ !ŏ(ŏ"!$ŏ !ŏ+),.ŏ+.%#%*(ŏ
!(ŏ+*/1)% +.ċŏ!ŏ.!-1%!.!ŏ+),.+*0!ŏ !ŏ(ŏ"!$ŏ !ŏ+),.ŏ+.%#%*(ŏ,.ŏ+0!*!.ŏ!(ŏ/!.2%%+ŏ0h*%+ŏ
+*"+.)!ŏ!/0ŏ#.*0ċ

"
LO QUE NO CUBRE
1. ŏ((+ŏ1/ +ŏ,+.ŏ ¦+ŏŏ(ŏ1*% ŏ)%!*0./ŏ/!ŏ!*1!*0.ŏ!*ŏ/1ŏ,+/!/%¨*ŏĨ-1!ŏ*+ŏ/!ŏ ¦+ŏ1/ +ŏ
,+.ŏ1*ŏ !"!0+ŏ+ŏ)(ŏ"1*%+*)%!*0+ĩČŏ,+.ŏ/1ŏ%*/0(%¨*ŏ%*+..!0ŏ+ŏ,+.ŏ1*ŏ1/+ŏ%..6+*(!ŏ !(ŏ
,.+ 10+Čŏ%*(15!* +Čŏ!*0.!ŏ+0.+/Čŏ(ŏ"(0ŏ !ŏ)*0!*%)%!*0+ŏ.6+*(!ŏ5ŏ*!!/.%+ŏ+ŏ!(ŏ1),(%)%!*0+
!(ŏ*1(ŏ !ŏ%*/0.1%+*!/ŏ!ŏ%*/0(%¨*ċ
2. ŏ+/ŏ,.+ 10+/ŏ+),. +/ŏė+)+ŏ!/08*Ęŏ+ŏ.!/01. +/ŏ*+ŏ!/08*ŏ1%!.0+/ŏ,+.ŏ!/0ŏ#.*0ċ
3. h. % ŏ !ŏ(%)!*0+/ŏ1/ ŏ,+.ŏ"((ŏ !(ŏ.!".%#!. +.ŏ+ŏ+*#!( +.ċ
4. ŏ() /ŏ !ŏ/!.2%%+ŏ,.ŏ.!,..ŏ+ŏ.!!),(6.ŏ+*/1)%(!/ŏ+)+ŏ"%(0 +/ŏ !ŏ#1Čŏ+)%((/Čŏ"%(0 +/ŏ !ŏ
%.!Čŏ!0ċČŏ)*%&/Čŏ,!.%((/ŏ5ŏ+0./ŏ,.0!/ŏ+/)h0%/ċ
5. *ŏ,.+ 10+ŏ-1!ŏ$5ŏ/% +ŏ0.*/"!.% +ŏ !ŏ/1ŏ,.+,%!0.%+ŏ+.%#%*(ċ
5. §4% +ŏ%*0!.%+.ŏ+ŏ!40!.%+.ŏ !ŏ(ŏ1*% ċ
7. ŏ¦+/ŏ1/ +/ŏ,+.ŏ/!.2%%+/ŏ.!(%6 +/ŏ,+.ŏ,!./+*/ŏ %/0%*0/ŏ !ŏ(+/ŏ/!.2%%+/ŏ10+.%6 +/ŏ !ŏ% !Ďŏ
1/+ŏ !ŏ,.0!/ŏ %/0%*0/ŏŏ(/ŏ !ŏ.!!),(6+ŏ !ŏ% !Ďŏ(+ŏ+0!*% +ŏ !ŏ,!./+*/ŏ-1!ŏ*+ŏ/!*ŏ !(ŏ/!.2%%+ŏ
(ŏ(%!*0!ŏ !ŏ% !Ďŏ+ŏ1//ŏ!40!.*/ŏ0(!/ŏ+)+ŏ1/+Čŏ)(ŏ1/+Čŏ/1)%*%/0.+ŏ !ŏ!*!.#ŏ%* !1 +ŏ+ŏ
!//0.!/ŏ*01.(!/ċ
8. () /ŏ !ŏ/!.2%%+ŏ.!/1(0*0!/ŏ,+.ŏ(ŏ%*/0(%¨*ŏ%*+..!0ŏ !(ŏ,.+ 10+ċ
9. () /ŏ !ŏ/!.2%%+ŏ,.ŏ .(!ŏ%*/0.1%+*!/ŏ!.ŏ !(ŏ1/+ŏ !(ŏ,.+ 10+ċ
10. ŏ!.#+/ŏ-1!ŏ%*(15!*Čŏ!*0.!ŏ+0.+/Čŏ1(-1%!.ŏ(() ŏ !ŏ/!.2%%+ŏ !/,1h/ŏ !ŏ$+.Čŏ"%* !ŏ/!)*ŏ+ŏ /ŏ
"!/0%2+/Čŏ,!&!/Čŏ.#+/ŏ,+.ŏ2%&!ŏ!*ŏ"!..5ŏ+ŏ#/0+/ŏ !ŏ)%((&!ŏ,.ŏ(() /ŏ !ŏ/!.2%%+ŏŏ8.!/ŏ.!)+0/Č
%*(1% +ŏ!(ŏ!/0 +ŏ !ŏ(/'ċ
11. ŏ%ŏ(ŏ1*% ŏ/!ŏ !/0%*ŏŏ1*ŏ1/+ŏ+)!.%(Čŏ !ŏ*!#+%+Čŏ !ŏ(-1%(!.ŏ1ŏ+0.+ŏ1/+ŏ+ŏ,(%%¨*ŏ-1!ŏ*+ŏ/!ŏ
,.ŏ1/+ŏ !(ŏ+*/1)% +.Čŏ*+ŏ+".!!)+/ŏ*%*#1*ŏ#.*0Čŏ!4,.!/ŏ+ŏ%),(%0Čŏ%*(1% Čŏ!*0.!ŏ+0./Č
1(-1%!.ŏ#.*0ŏ%),(%0ŏ !ŏ+)!.%(%6%¨*ŏ+ŏ% +*!% ŏ,.ŏ1*ŏ1/+ŏ+ŏ,.+,¨/%0+ŏ,.0%1(.ċ
12. *ŏ,.+ 10+ŏ-1!ŏ$5ŏ/% +ŏ.!0%. +ŏ"1!.ŏ !ŏ(+/ŏ/0 +/ŏ*% +/ŏ+ŏ* 8ċ
13. ŏ.+ 10+/ŏ/%*ŏ*Ò)!.+/ŏ !ŏ/!.%!ŏ+.%#%*(!/ŏ+ŏ,.+ 10+/ŏ+*ŏ*Ò)!.+/ŏ !ŏ/!.%!ŏ-1!ŏ$5*ŏ/% +ŏ(0!. +/
+ŏ*+ŏ,1! *ŏ !0!.)%*./!ŏ"8%()!*0!ċ
NOTA:ŏ(#1*+/ŏ!/0 +/ŏ*+ŏ,!.)%0!*ŏ(ŏ!4(1/%¨*ŏ+ŏ(%)%0%¨*ŏ !ŏ ¦+/ŏ%*% !*0(!/ŏ+ŏ+*/!1!*0!/ċŏ+.ŏ(+ŏ
0*0+Čŏ!/0ŏ(%)%0%¨*ŏ+ŏ!4(1/%¨*ŏ,1! !ŏ*+ŏ,(%./!ŏŏ/1ŏ/+ċ
El costo de la reparación o reemplazo conforme a estas circunstancias excluidas correrá a
cargo del cliente.
EXENCIÓN DE RESPONSABILIDAD DE LAS GARANTÍAS IMPLÍCITAS
ŏŏČŏŏŏŏŏŏŏŏ
ŏŏŏŏŏŏ§ŏČŏŏŏŏŏ¥ŏŏŏ
ŏ7ŏŏŏŏċŏ(#1*+/ŏ!/0 +/ŏ5ŏ,.+2%*%/ŏ*+ŏ,!.)%0!*ŏ(%)%0%+*!/ŏŏ(ŏ
1.%¨*ŏ !ŏ(/ŏ#.*0/ŏ%),(%0/ŏ !ŏ+)!.%%(% ŏ+ŏ% +*!% Čŏ !ŏ)*!.ŏ-1!ŏ!/0ŏ(%)%0%¨*ŏ,+ .ŏ
*+ŏ,(%.ŏ,.ŏ1/0! ċŏ/0ŏ#.*0ŏ(!ŏ+0+.#ŏ !0!.)%* +/ŏ !.!$+/ŏ(!#(!/Čŏ5ŏ1/0! ŏ1!*0ŏ !)8/ŏ+*ŏ
+0.+/ŏ !.!$+/ŏ-1!ŏ2.*ŏ/!#Ò*ŏ!(ŏ!/0 +ŏ+ŏ(ŏ,.+2%*%ċ
EXENCIÓN DE RESPONSABILIDAD DE LAS DECLARACIONES AJENAS A LA GARANTÍA
% !ŏ*+ŏ$!ŏ*%*#1*ŏ !(.%¨*ŏ.!/,!0+ŏ !ŏ(ŏ(% Čŏ 1.%(% ŏ+ŏ*!!/% ŏ !ŏ/!.2%%+ŏ
0h*%+ŏ+ŏ.!,.%+*!/ŏ,.ŏ!/0!ŏ!(!0.+ +)h/0%+Čŏ/(2+ŏ(/ŏ !(.%+*!/ŏ%*(1% /ŏ!*ŏ!/0ŏ#.*0ċŏ
%ŏ !/!ŏ+0!*!.ŏ1*ŏ#.*0ŏ)8/ŏ!40!*/ŏ+ŏ%*0!#.(ŏ-1!ŏ(ŏ#.*0ŏ(%)%0 ŏ-1!ŏ/!ŏ+".!!ŏ+*ŏ!/0!ŏ
!(!0.+ +)h/0%+Čŏ+*/1(0!ŏ+*ŏ% !ŏ+ŏ/1ŏ2!* ! +.ŏ/+.!ŏ(ŏ,+/%%(% ŏ !ŏ -1%.%.ŏ1*ŏ#.*0ŏ
!40!* % ċ
LIMITACIÓN DE RECURSOS; EXCLUSIÓN DE RESPONSABILIDAD
POR DAÑOS OCASIONALES E INDIRECTOS
ŏÑŏŏŏŏŏŏŏŏ7ŏŏ§ŏ
ŏŏÑŏŏċŏŏŏ7ŏŏŏ¥ŏŏ
ŏċŏ(#1*+/ŏ!/0 +/ŏ5ŏ,.+2%*%/ŏ*+ŏ,!.)%0!*ŏ(ŏ!4(1/%¨*ŏ+ŏ(%)%0%¨*ŏ !ŏ.!/,+*/%(% ŏ
.!/,!0+ŏ !ŏ(+/ŏ ¦+/ŏ+/%+*(!/ŏ+ŏ%* %.!0+/Čŏ !ŏ)*!.ŏ-1!ŏ!/0ŏ(%)%0%¨*ŏ,+ .ŏ*+ŏ,(%.ŏ,.ŏ1/0! ċŏ
/0ŏ#.*0ŏ(!ŏ+0+.#ŏ !0!.)%* +/ŏ !.!$+/ŏ(!#(!/Čŏ5ŏ1/0! ŏ1!*0ŏ !)8/ŏ+*ŏ+0.+/ŏ !.!$+/ŏ-1!ŏ
2.*ŏ/!#Ò*ŏ!(ŏ!/0 +ŏ+ŏ(ŏ,.+2%*%ċ
ĀĆĥāĊ

-
 1
1
-
 2
2
-
 3
3
-
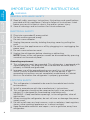 4
4
-
 5
5
-
 6
6
-
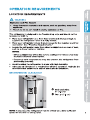 7
7
-
 8
8
-
 9
9
-
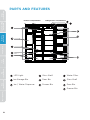 10
10
-
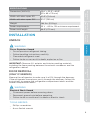 11
11
-
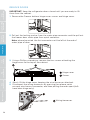 12
12
-
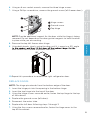 13
13
-
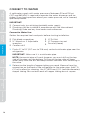 14
14
-
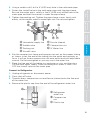 15
15
-
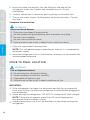 16
16
-
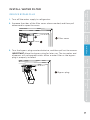 17
17
-
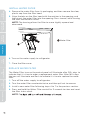 18
18
-
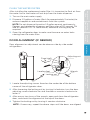 19
19
-
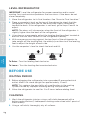 20
20
-
 21
21
-
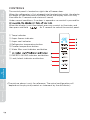 22
22
-
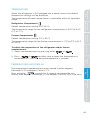 23
23
-
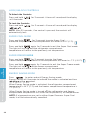 24
24
-
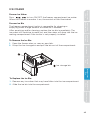 25
25
-
 26
26
-
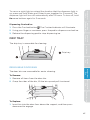 27
27
-
 28
28
-
 29
29
-
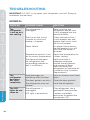 30
30
-
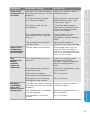 31
31
-
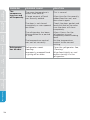 32
32
-
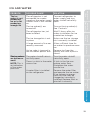 33
33
-
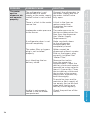 34
34
-
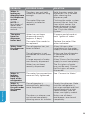 35
35
-
 36
36
-
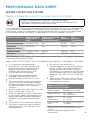 37
37
-
 38
38
-
 39
39
-
 40
40
-
 41
41
-
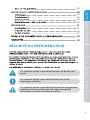 42
42
-
 43
43
-
 44
44
-
 45
45
-
 46
46
-
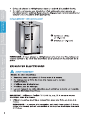 47
47
-
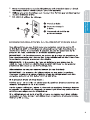 48
48
-
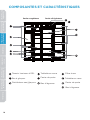 49
49
-
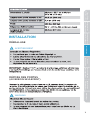 50
50
-
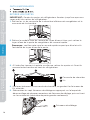 51
51
-
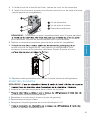 52
52
-
 53
53
-
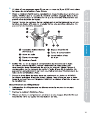 54
54
-
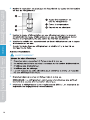 55
55
-
 56
56
-
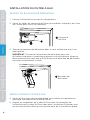 57
57
-
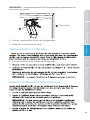 58
58
-
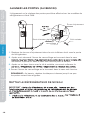 59
59
-
 60
60
-
 61
61
-
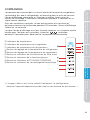 62
62
-
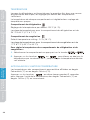 63
63
-
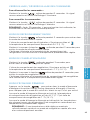 64
64
-
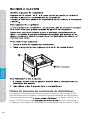 65
65
-
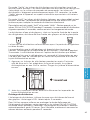 66
66
-
 67
67
-
 68
68
-
 69
69
-
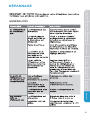 70
70
-
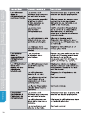 71
71
-
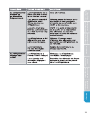 72
72
-
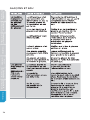 73
73
-
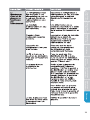 74
74
-
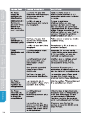 75
75
-
 76
76
-
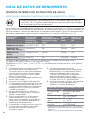 77
77
-
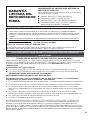 78
78
-
 79
79
-
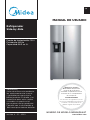 80
80
-
 81
81
-
 82
82
-
 83
83
-
 84
84
-
 85
85
-
 86
86
-
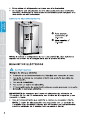 87
87
-
 88
88
-
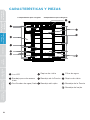 89
89
-
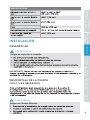 90
90
-
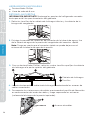 91
91
-
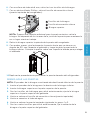 92
92
-
 93
93
-
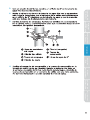 94
94
-
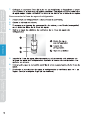 95
95
-
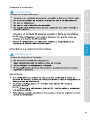 96
96
-
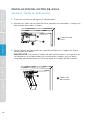 97
97
-
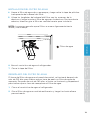 98
98
-
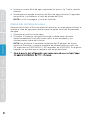 99
99
-
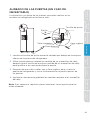 100
100
-
 101
101
-
 102
102
-
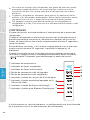 103
103
-
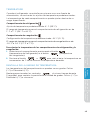 104
104
-
 105
105
-
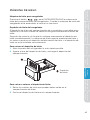 106
106
-
 107
107
-
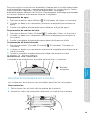 108
108
-
 109
109
-
 110
110
-
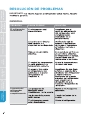 111
111
-
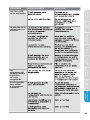 112
112
-
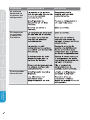 113
113
-
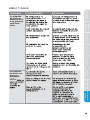 114
114
-
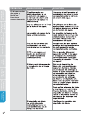 115
115
-
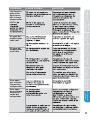 116
116
-
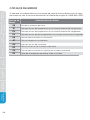 117
117
-
 118
118
-
 119
119
-
 120
120
-
 121
121


Midea MRQ22D7AST Manual de usuario
- Categoría
- Neveras
- Tipo
- Manual de usuario
- Este manual también es adecuado para
en otros idiomas
- français: Midea MRQ22D7AST Manuel utilisateur
- English: Midea MRQ22D7AST User manual
Artículos relacionados
-
Midea MRT18S2AWW Guía del usuario
-
Midea MRB19B7AWW Stainless Steel Bottom Freezer Refrigerator Manual de usuario
-
Midea MRB19B7AST El manual del propietario
-
Midea MRU14F2AWW Manual de usuario
-
Midea MRU21F2AWW Guía del usuario
-
Midea MRU14F6AWW Manual de usuario
-
Midea MRU17F6AWW Guía del usuario
-
-
-
Otros documentos
-
LG LFD22716ST El manual del propietario
-
-
LG 73139 El manual del propietario
-
LG GF22WGS El manual del propietario
-
Samsung RF221NCTASL Manual de usuario
-
Samsung RF220NCTASG Manual de usuario
-
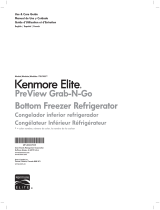 Kenmore Elite 74077 El manual del propietario
-
Samsung RF263BEAESL/AZ Manual de usuario
-
LG Electronics LFXS24623B Guía del usuario
-
LG MRT14B3AWW Manual de usuario
