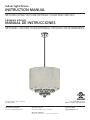
Artika AMP108-HDCOM Instrucciones de operación
- Tipo
- Instrucciones de operación

For residential use only
Para uso residencial solamente
Indoor light fixture
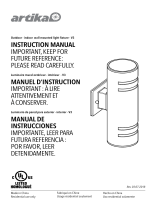
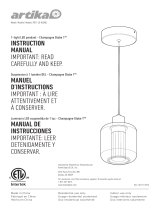
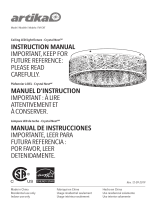
INSTRUCTION MANUAL
IMPORTANT, RETAIN FOR FUTURE REFERENCE: PLEASE READ CAREFULLY.
Lámpara interior
MANUAL DE INSTRUCCIONES
IMPORTANTE, LEER PARA FUTURA REFERENCIA: POR FAVOR, LEER DETENIDAMENTE.
Artika For Living Inc.
Dorval, Canada H9P 2R2
Customer service
Monday to Friday: 9
AM - 5 PM EST
Atención al Cliente
Lunes a viernes 9 a.m. - 5 p.m. hora del Este
1-866-661-9606
support@artika.com
Made in China / Hecho en China
Rev. 02dec2015

What you will need
Included
Screwdriver
Destornillador
Light Bulb: type A E26, base med.
MAX 60 W - 120 V
Bombilla: tipo A E26, base med.
MÁX 60 W - 120 V
Qué necesitará
Incluido
x 4
Wire connectors
Conectores de cable
x 3
ImportanteImportant
Pendants (different sizes)
Colgantes (distintos tamaños)
x 74
The installer and/or user must read, understand and
follow these instructions before installing the product.
This product must be properly installed before it is
used. If instructions are not followed, the manufacturer
will not be held responsible for any problems or
product malfunctions. Failure to follow installation
instructions and/or operating instructions voids
the warranty.
We recommend that this product be installed by a
is a legal requirement for this type of product to be
electrical and building codes effective in the region.
Switch off the main electrical supply from the fuse
box / circuit breaker before doing any installation or
maintenance on this unit.
Do not use outdoors.
x 2x 1x 3
Fixation screw
Tornillo de jación
Short suspension rod
Barras de suspensión
corta
Long suspension rod
Barras de suspensión
largas
El instalador o usuario deben leer, comprender y
seguir estas instrucciones antes de instalar el producto.
El producto debe estar correctamente instalado antes de su
uso. Si no se respetan las instrucciones, el fabricante no se
hará responsable de ningún problema o mal funcionamiento
del producto. Si no se siguen las instrucciones de instalación
o las instrucciones de uso, se anulará la garantía.
Le recomendamos que el producto sea instalado por un
electricista certicado. Algunos estados y provincias,
requieren legalmente que este tipo de producto sea
instalado por un electricista certicado de acuerdo con los
códigos de electricidad e ingeniería vigentes en la región.
Desconecte el suministro eléctrico de la caja de fusibles /
interruptor antes de instalar o realizar mantenimiento
en la unidad.
No utilizar en exteriores.
2

Junction box
Caja de empalmes
Mounting bracket
Soporte de montaje
Fixation screw
Tornillo de jación
Instrucciones de instalaciónInstallation instructions
g.1
1. Desconecte la instalación eléctrica y apague el
interruptor Asegúrese de que la corriente está desconectada
antes de continuar.
2. Retire el soporte de montaje de la tulipa.
Instale el soporte de montaje en la caja de empalmes.
Posicione el soporte de montaje y apriete los
tornillos de jación en la caja de empalmes (g. 1).
3
1. Turn off power at the circuit breaker and the light
switch. Ensure the power is off before continuing.
2. Remove the mounting bracket from the canopy.
Install the mounting bracket to the junction box.
Position the mounting bracket and tighten the
xation screws into the junction box (g. 1).

4. Insert the lighting wires through the canopy.
Screw the end of the suspension rods to the canopy.
g. 2
g. 3
Instrucciones de instalaciónInstallation instructions
Suspension rods
Barras de suspensión
Main body
Pieza principal
Canopy
Tulipa
3. Elija la altura deseada de la lámpara según las barras de
suspensión disponibles. Hay tres barras de suspensión
largas (de 12 ") y una corta (de 6"). Ajuste la altura de la lámpara
añadiendo o retirando el número deseado de barras de
suspensión. Monte las barras de suspensión deseadas
insertando los cables de electricidad de la parte principal
a través de las barras de suspensión. Atornille el extremo de
las barras de suspensión a la parte principal girando
en el sentido de las agujas del reloj (g. 2).
4. Inserte los cables de corriente a través de la tulipa.
Atornille el extremo de las barras de suspensión de la tulipa.
5. Conecte el cable sin texto de la tulipa al cable blanco de la
caja de empalmes usando un conector de cables. Conecte el
cable con texto de la tulipa al cable negro de la caja de
empalmes usando un conector de cables. Conecte el cable
de toma a tierra del cableado de la casa y el de la tulipa, al
tornillo de toma a tierra en el soporte de montaje (g. 3).
4
3. Determine the desired height of the xture
according to the available suspension rods. There
are three long suspension rods (12’’) and one
short rod (6”). Adjust the height of the xture
by adding or removing the necessary number of
suspension rods. Assemble the selected suspension
rods by inserting the lighting wires from the main body
through the suspension rods. Screw the end of
the suspension rods to the main body by turning
clockwise (g. 2).
5. Connect the wire without lettering from the
canopy with the white supply wire from the junction
box using a wire connector. Connect the wire with
lettering from the canopy to the black supply wire
from the junction box using a wire connector.
Connect the ground wire from the house wiring
and from the canopy to the ground screw on the
mounting bracket (g. 3).
Junction box
Caja de empalmes
Mounting bracket
Soporte de montaje
Wire without lettering
Cable sin texto
Wire connector
Conector de cable
Ground screw
Tornillo de toma a tierra
Wire with lettering
Cable con texto
Ground
Cable a tierra
Canopy
Tulipa

Instrucciones de instalaciónInstallation instructions
6. Push the wires into the junction box.
Mount the canopy onto the mounting bracket.
Insert and tighten the screws through the holes of
the canopy until the canopy is snug against the
ceiling (g. 4).
7. Install all the light bulbs (g. 5). 7. Instale las bombillas (g. 5).
Light bulb
Bombilla
g. 4
g. 5
6. Introduzca los cables en la caja de empalmes.
Monte la tulipa en el soporte de montaje.
Inserte y apriete los tornillos a través de los agujeros de
la tulipa, hasta que esta esté ja al techo (g. 4).
5

9. Restore electrical power. 9. Realimente la corriente eléctrica.
• • • • • • • • • • • • • • •
Instrucciones de instalaciónInstallation instructions
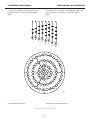
8. Hang all the pendants starting from the center.
Follow the pattern as shown in the gure below
(g. 6).
A
E F
G
H
B
C D
AC
C
D
D
D
D
D
D
D
D
D
C
C
C
C
C
C
C
C
C
H
E
F
E
F
E
F
E
F
F
E
E
F
E
F
G
G
G
G
G
D
D
D
C
A
A
A
A
A
A
A
A
A
A
A
A
A
A
B
B
B
B
B
B
B
B
B
B
B
B
B
B
B
g. 6
8. Cuelgue todos los colgantes, empezando por el del centro.
Siga el patrón que se muestra en la ilustración siguiente
(g. 6).
6

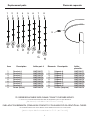
Piezas de repuestoReplacement parts
ElementoItem
1
3
5
7
9
1
3
5
7
9
2
4
6
8
2
4
6
8
Artika
pieza No.
Artika part #
AMP108/P1
AMP108/P3
AMP108/P5
AMP108/P7
AMP108/P9
AMP108/P1
AMP108/P3
AMP108/P5
AMP108/P7
AMP108/P9
AMP108/P2
AMP108/P4
AMP108/P6
AMP108/P8
AMP108/P2
AMP108/P4
AMP108/P6
AMP108/P8
DescripciónDescription
Colgante A
Colgante C
Colgante E
Colgante G
Pendant A
Pendant C
Pendant E
Pendant G
Colgante B
Colgante D
Colgante F
Colgante H
Tornillo (lámpara)
Pendant B
Pendant D
Pendant F
Pendant H
Screw (xture)
1 2 3 4 5 6 7 8
9
A
E F
G
H
B
C D
TO ORDER REPLACEMENT PARTS, PLEASE CONTACT CUSTOMER SERVICE.
* A COPY OF YOUR PURCHASE RECEIPT WILL BE REQUIRED FOR ALL PARTS REQUESTS
(Service only available in the USA and Canada)
PARA SOLICITAR REPUESTOS, PÓNGASE EN CONTACTO CON EL SERVICIO DE ATENCIÓN AL CLIENTE.
*SE LE PEDIRÁ UNA COPIA DE SU RECIBO DE COMPRA EN TODAS LAS SOLICITUDES
(Servicio disponible únicamente en los E.U.A. y en Canadá)
7

Customer service
Monday to Friday: 9 AM - 5 PM EST
Atención al Cliente
Lunes a viernes 9 AM - 5 PM hora del Este
Tel. : 1-866-661-9606
WARRANTY
GARANTÍA
Artika For Living Inc. se enorgullece en ofrecerle un
(1) año de garantía. Le garantizamos que nuestro
producto está libre de defectos de fabricación en
material y mano de obra por un período de un (1) año
a partir de la fecha de compra. En caso de surgir un
defecto dentro del período de la garantía, Artika For
Living Inc. le proporcionará el reemplazo del producto
o las piezas de forma gratuita.
Nuestra garantía no cubre productos instalados
incorrectamente, o que hayan sido usados de forma
indebida. El desgaste normal, quebraduras, uso indebido,
mantenimiento inapropiado, alteración del producto
o las unidades que no se hayan instalado de acuerdo
al manual de instalación no serán cubiertas.
Esta garantía es solamente válida en los productos
instalados de acuerdo con el código de edicios
vigente en la región en donde la unidad va a ser usada.
Nuestros productos son para uso residencial solamente.
La garantía no cubre los gastos de envío, costos de
mano de obra o de cualquier otro costo asociado con
la instalación o reemplazo del producto. La garantía
se extiende únicamente al propietario original.
La cantidad del reclamo no debe exceder el precio
de la compra original del producto.
Artika For Living Inc. no será responsable por daños
indirectos o consecuenciales que surjan por el uso o
instalación inapropiada de este producto. Esta garantía
será nula e inválida si se pudiera haber notado, reparado
o evitado cualquier daño o defecto antes de su instalación.
Artika for Living Inc. no es responsable de daños
indirectos o consecuentes que surjan del uso o instalación
inapropiada de este producto
La garantía solamente es válida en compras realizadas
en E.U.A. o Canadá.
8
Artika For Living Inc. is proud to offer you a one
(1) year warranty. We guarantee our product to
be free of manufacturing defects in material and
workmanship for a period of one (1) year from the
date of purchase. Should a defect arise within the
warranty period, Artika For Living Inc. will provide
a replacement product or parts free of charge.
Our warranty does not cover products installed
incorrectly or subjected to abnormal use. Normal
wear and tear, misuse, improper maintenance,
alteration of the product or units not installed in
accordance to the installation manual will not be
covered.
This warranty is valid only on products installed in
accordance with the Building Code effective in the
region where the unit is used.
Our products are intended for residential use
only. The warranty does not cover shipping costs,
labour costs or any other cost associated with
the installation or replacement of the product. The
warranty is extended to the original owner.
The amount of the claim cannot exceed the original
purchase price of the item.
Artika For Living Inc. will not be held responsible for any
direct or consequential damages or injuries related to the
use of this product. The warranty will be nul and void
if any damage or defect could have been noticed,
repaired or avoided prior to installation.
Artika For Living Inc. is not responsible for indirect or
consequential damages arising from improper use or
installation of this product.
Warranty only applicable for purchases made in the
USA or Canada.
-
 1
1
-
 2
2
-
 3
3
-
 4
4
-
 5
5
-
 6
6
-
 7
7
-
 8
8


Artika AMP108-HDCOM Instrucciones de operación
- Tipo
- Instrucciones de operación
en otros idiomas
Artículos relacionados
-
 Artika V3 Manual de usuario
-
 Artika AMP70-HDSSCOM Instrucciones de operación
-
 Artika CLGL-HD1 Instrucciones de operación
-
 Artika FMGL-C1 Instrucciones de operación
-
 Artika PDT1-CG-HD2BG Champagne Globe 1 Light LED Pendant Manual de usuario
-
 Artika FM-CNT-C1 Instrucciones de operación
-
 Artika NSBLES-C1 Instrucciones de operación
-
Artika VAN4RA-RN Instrucciones de operación
-
 Artika VAN4M-HD1 Instrucciones de operación
-
 Artika VAN2-RT Instrucciones de operación


