DuraHeat DH2304 Manual de usuario
- Categoría
- Calentadores espaciales
- Tipo
- Manual de usuario
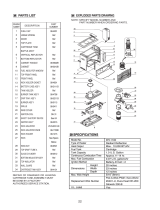
Este manual también es adecuado para

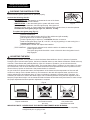
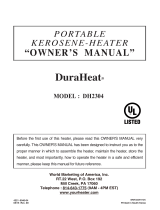
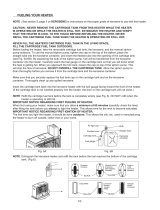
NEVER LEAVE THE HEATER
UNATTENDED WHILE BURNING
!
12
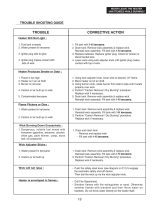
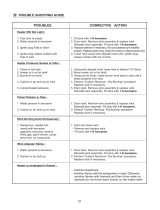
CHECKING THE IGNITION SYSTEM
If the automatic ignition system fails to operate properly,
perform the following checks:
BATTERIES -2 "C" cell batteries are located at the rear of the heater.
Replace with new batteries.
IGNITER PLUG - If the automatic ignition system still doesn't work
after replacing the batteries, check the igniter plug. If the glow coil
filament is broken, bent, or doesn't glow when engaged via the ignition lever, it must be replaced.
CAUTION: Be sure igniter plug is Type "B", 2.5V DC, 1A only.
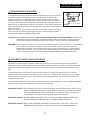
To replace the igniter plug (Fig.15);
Remove the batteries.
Remove the 2 cabinet screws and lift off the cabinet and grill assembly.
Pull the ignition lever to raise the igniter plug.
Push the igniter plug in and turn in a clockwise direction to remove.
Install a new igniter plug (Type "B", 2.5V DC, 1A only) by pushing it in and turning it in a
counter-clockwise direction.
Reassemble the heater and replace the batteries.
TEST IGNITION Using the wick adjuster knob, raise the wick to its maximum height.
Pull the ignition lever.
The igniter plug should be within 1~2mm of the wick when the ignition lever is
fully engaged.
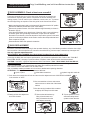
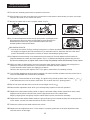
ADJUSTING THE WICK
After lighting the heater, it is important to check the heater flame within the first 5-7 minutes of operation.
During the first 5 minutes after ignition, the burner chamber warms up and flames will become visible at the top
of burner. These flames will gradually build up. After 5-7 minutes of operation, you should use the wick
adjuster knob to obtain the proper flame height. The proper flame height is a flame of no more than 1/2" at the
top of the burner, with an even distribution of flame around the flame spreader disk which is positioned in the
center of the top portion of the burner. See pictures below for reference.
As you continue to operate the heater, the temperature of the heater and the temperature of the room will
continue to change. As the heater warms up, the kerosene in the tank will vaporize faster, and this could
require adjusting the wick adjuster down in order to maintain the desired 1/2" flame height. Therefore, it is
necessary to continue to monitor the flame height, and to make adjustments using the wick adjuster knob to
keep the proper flame height. It is recommended that the heater be checked every 30 minutes in order to keep
the proper adjustment because periodic adjustment is required.
CORRECT FLAME
Proper combustion
IMPORTANT NOTE : NEVER LEAVE THE HEATER UNATTENDED WHILE BURNING.
Always make sure to turn the heater off and inspect it to insure that it is completely
extinguished prior to going to bed.
FLAME TOO HIGH
Can Produce smoke
and soot
FLAME TOO LOW
Can produce odor
and carbon monoxide
Fig.15
Fig.16
Igniter

NOTE : During start-up, small adjustments to the flame can be performed
by using the burner knob on the front of the burner and
MOVING THE
BURNER FROM SIDE TO SIDE until the flame at the top of burner is as
even as possible.
DO NOT TOUCH THE BURNER KNOB ONCE THE
HEATER HAS REACHED NORMAL OPERATING TEMPERATURE
AND THE FLAME HAS STABILIZED. THE BURNER KNOB IS VERY
HOT DURING OPERATION.
IMPORTANT NOTE : This heater is designed to operate with a flame height of no more than 1/2" at the top of
the burner. For proper combustion to occur, it is
very important that the flame height be adjusted so that it is
neither too high, nor too low. Operating the heater at a wick setting below the minimum recommended setting
(the wick-stop setting) could result in the risk of fire and / or carbon monoxide poisoning.
NOTE : If you find that the wick will not raise, push the safety reset lever (see diagram on P.2) to engage the
safety shut-off device. Then dial the wick up via the wick adjuster knob.
WARNING : RISK OF INDOOR AIR POLLUTION AND FIRE, DO NOT OPERATE HEATER AT WICK
SETTING LOWER THAN MINIMUM WICK-STOP SETTING.
WICK MAINTENANCE / HOW TO CHECK THE CONDITION OF YOUR WICK
Failure to clean your heater’s wick may result in low heat output, cause your heater to burn with an annoying odor and could
damage or destroy the wick adjusting assembly. It can also make it very difficult to light the wick.
Carbon and tar will accumulate on top of the wick as the kerosene burns and must be removed. How often you need to "Dry Burn
"
depends on your use of the heater and the quality of fuel available. The best way to know is to check the wick often.
Check Your Wick Often!
If the wick is hard to light using the heater’s ignition system...
If the wick is
hard to raise or difficult to adjust by turning the knob...
If the wick fails to drop completely when you push the shut-off knob...
If the top of the wick is
stiff & hard like a bristle brush...
It is
time to DRY BURN your heater. A wick that is in good condition will feel soft to the touch will light
easily and extinguish quickly.
Note: Poor fuel or fuel contaminated with water will also turn the wick
hard.
"
DRY BURNING
"
YOUR HEATER / REMOVING CARBON FROM YOUR WICK
"Dry burning" your heater will cause a strong odor. For this reason it is best to "dry burn" your heater outdoors on a day that is
completely calm and windless. If it
s too windy outside you can consider a porch, breezeway or other room with all of the windows
open to disperse the strong odor.
Step 1 With your fuel tank nearly empty, burn your heater (without refueling) until the flame starts to burn out then raise the
wick to its highest possible setting and leave it there until it burns out completely.
Wait 60 minutes, then re-light the
wick (with a match if necessary) and allow it to burn out again. Once the heater is cool to the touch, remove the cabinet
and brush the top of the wick with and old tooth brush, or other stiff bristle brush to remove any remaining ash.
A canister type vacuum cleaner may be a useful tool in removing this ash.
Step 2 The first step should remove most carbon and your wick should feel softer to the touch. If any part still feels
hard, you
can use small pliers to pinch these hard spots and break up the carbon into pieces. After doing this, replace the
cabinet, add a small amount of fuel, wait at least one hour and then repeat Step 1.
Carry out Carbon Removal/Dry Burning within 5-7 days after your first use of your new heater to reduce carbon build-up on the
wick’s burning surface. Afterwards, dry burn your heater any time the wick appears to be
hard. CHECK YOUR WICK OFTEN! Dry
burn your heater and remove all fuel from your heater at the end of the heating season.
Note: Burn your heater dry, as noted above, weekly during the heating season. Check your wick often
to see if CARBON REMOVAL/DRY BURNING is necessary. Carbon removal will NOT be effective if your
fuel has been contaminated by water or any other liquid. In this case you must clean the fuel tank,
replace the wick and soak it for 60 minutes
in fresh, 1-K Kerosene.
NEVER LEAVE THE HEATER
UNATTENDED WHILE BURNING
!
13
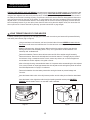
Fig.17

WICK ASSEMBLY- Check at least once a month!!
The burner assembly sits on top of the wick guide. Over time, tar deposits can
accumulate on the wick guide, and this can prevent the burner assembly from
seating properly. This can result in poor combustion, smoke, odor, etc.. To prevent
this from happening, tar deposits on the wick guide can be removed as follows:
Making sure that the heater is both cool and turned off, lower the wick to the "off" position.
Remove the batteries (located at the rear of the heater).
Remove the 2 cabinet screws. Lift off the cabinet and grill assembly as shown in
illustration. (Fig.A)
Using the wick adjuster knob, raise the top of the wick until it is even with the top
of the wick guide. Using a flat-edge screwdriver, scrape off the tar deposits.
Be careful not to allow any of the tar deposits to drop into the grooves of the wick
guide. A small vacuum cleaner can be used to remove the tar deposits that have
been scraped off. (Fig.B)
Reassemble the heater and replace the batteries.
WICK REPLACEMENT
The wick in your heater needs replacing if, after repeated cleanings, any of the following conditions still exist: slow to light,
hard movement of the wick adjuster knob, kerosene odor while burning, low heat output, slow warm up, damaged wick.
NEVER LEAVE THE HEATER
UNATTENDED WHILE BURNING!
14
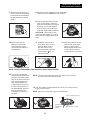
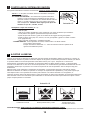
4. Gently pull the wick adjustment
knob off the heater.
5. Remove the cabinet base by
lifting it from the back and
tilting it forward to clear the
wick adjuster assembly.
6. Trip the pendulum on the
automatic safety shutoff
system to lower the wick.
Fig.A
Fig.B
1. Push down the manual shut-off knob and turn the wick adjustment knob COUNTERCLOCKWISE
in the direction of "OFF".
2. Use a screwdriver to loosen and remove
cabinet screws on either side of the heater
cabinet.
3. Use the carrying handle to lift the cabinet
straight up and away from the heater.
Use only a genuine replacement wick.
REPLACEMENT WICK NUMBER: Kero-World 32225, Dura Heat DH-145, Pick-A-Wick PW-72.
If cleaning the Wick does not improve performance, you will need to replace the wick. Refer to the "TROUBLE
SHOOTING GUIDE", see page 14, which outlines conditions under which the wick should be replaced.
CAUTION :
Use ONLY a genuine Replacement
Wick. Part Number :
Kero - World 32225, Dura Heat DH-145,
Pick-A-Wick PW-72. DO NOT attempt to substitute any other type of wick device or a wick designed for another
brand or model heater. You could damage the heater and create a potential fire hazard.
Call customer service at 814-643-1775, to order a wick.
Visit our website at www.yourheater.com for a link to detailed wick replacing directions.
ATTENTION : The only tools needed to replace the Wick are :
A pair of pliers A flat blade screwdriver A plastic bag with a twist tie
http://worldmkting.com/wick-installation-instructions

NEVER LEAVE THE HEATER
UNATTENDED WHILE BURNING
!
15
7/32 in. (5.5mm) All around
WICK 25/64 IN. (10 mm)
RIM OF WICK
ADJUSTER
(holder)
Wick Cover
Hole
Pin
7. Remove the four wing nuts
which hold the wick assembly
to the heater and carefully lift
the wick assembly from the
heater.
8. Replace the wick adjustment knob temporarily.
Turn the knob CLOCKWISE to raise the wick.
9. Hold the wick assembly up-side-
down, using caution, grasp the
wick cover firmly PULL it off with a
sharp tug. If you have difficulty
doing so, try loosening the wick
cover with a flat blade screwdriver.
CAUTION :
The inside of wick
cover has sharp teeth. The use of
work gloves is suggested to avoid
injury.
11. Install the new wick and
insert the 3 pins on a new
wick into the 3 holes on
the wick sleeve in the
upward direction. (See the
arrow marked "
up" on
the wick sleeve)
12. Push the new wick into the
retainer teeth of the wick
sleeve so that the wick
adheres tightly around the
inside of the wick sleeve,
smoothing out any wrinkles.
10. Remove the wick by
folding it to the inside.
Then remove the wick
sleeve from the bottom of
the assembly.
13. Line up the pins with the
slotted holes inside the wick
adjuster. Then lightly press
each of the three pins of the
wick (now attached to the
wick sleeve) toward the
inside insert the three pins
into the slanted grooves of
the wick adjuster. Press on
each of the three pins,
inserting them securely in
the holes.
NOTE : Be sure to check wick height. It should be 3/8”.
14. The wick height will automatically be set to the correct burning
height of 3/8" (10mm).
NOTE : Turn the wick adjustment knob and check to be sure that
the wick moves up and down freely.
NOTE : DO NOT DISASSEMBLE THE STAINLESS STEEL WICK HOLDER.

18.
(1) Turn the wick adjustment knob to the fully raised position. (2) Pull lightly on the
skirt of the wick to remove any slack. (3) Press lightly to secure the skirt to the
retainer teeth on the wick cover. (4) You will need to hold the knob in the
clockwise position to keep the wick raised.
WICK INSTALLATION TIP
** Lock the tip over switch (TOS) by inserting locking pliers or a clothes pin between the TOS plates, preventing
the weight from triggering the TOS mechanism as you install the new wick. Install the new wick in the raised
position. Remember to remove pliers or clothes pin before reassembling & lighting heater.
19. (5) Replace the wick assembly on the heater with the wick raised. (6) The wick adjuster knob will need to be
positioned between the caution and warning labels. <Fig.C> (7) Replace two diagonally opposite wing nuts first.
(8) Then the remaining two. (9) Tighten each of the four wing nuts gradually until the wick assembly is firmly in place.
20.
While your heater is disassembled, check the Automatic Safety Shutoff system. Remove the locking pliers or
clothes pin from the TOS mechanism if you used them to assist with the wick installation.
Trip the automatic shutoff system by nudging the pendulum.
Raise the wick by turning wick adjuster knob. Trip it again to make certain it is operating correctly.
21. Turn the Wick Adjustment knob to test its operation. Be certain the Wick operates smoothly as the knob is
turned CLOCKWISE and COUNTER-CLOCKWISE.
22. Test Ignition. Raise the Wick to its full height. The Ignition Plug should be within 3/64" to 5/64" (1 to 2 )
of the Wick when the Lever is pulled. (CAUTION : Do not touch the HOT, glowing ignitor!)
23. Be sure to check that the wick is set at the correct height of 3/8" (10
24. Remove Wick adjustment knob which you had temporarily replaced to test wick operation.
25. Replace the cabinet base making certain to align the automatic safety shutoff system lever and the wick
adjustment shaft, which holds the knob, with the appropriate slots in the cabinet base.
Begin by aligning them and gently snap the cabinet base in place over the wick assembly.
26. Replace the heater cabinet. Make certain the grill guard prongs are inserted securely into the proper holes
on the heater, and the front cabinet matches the front of the heater.
27. Fasten the cabinet to the heater with the two screws.
28. Replace the wick adjustment knob. To be certain it is properly positioned on the wick adjustment shaft,
raise the wick to its full height.
NEVER LEAVE THE HEATER
UNATTENDED WHILE BURNING
!
16
15.Turn the wick assembly upside down to replace the wick cover.
16. Align the tabs on the wick cover with the four screw holes on the bottom of the assembly, as shown, and snap it
into place. Be certain of firm contact at all points.
17. Be sure the rubber seal on tank is properly seated. <Fig. B>
Fig.A
C.giFB.giF

NEVER LEAVE THE HEATER
UNATTENDED WHILE BURNING!
17
EXTINGUISHING THE HEATER
To extinguish the heater, push down on the manual shut-off knob (Fig.18) with one
hand while holding the wick adjuster knob in the other hand. You will feel the
pressure of spring action attempting to turn the wick adjuster knob in a counter-
clockwise direction in your hand. By slowly relaxing your grip on the wick adjuster
knob, you will allow the spring to gradually lower the wick and extinguish the flame.
When there is no further pressure from the spring action, confirm that the wick has
been fully lowered by turning the wick adjuster knob in a counter-clockwise direction
as far as it will go.
After 10-15 seconds, open the door on the body of the heater, lift the burner using
the burner knob, and visually confirm that there are no flames present. This will
confirm that the heater is completely extinguished.
CAUTION : After extinguishing the heater, allow at least 10 minutes before reigniting the heater. This allows the
heater time to cool off and return to a normal temperature. Failure to allow the 10 minute cooling off
period before reigniting the heater will result in the creation of a strong odor and possible flare-up.
WARNING : Carbon and tar can build up on the wick after the heater has been in use for a while. This can interfere
with the ability of the wick to be lowered into the body of heater, and can result in the flame not
extinguishing completely. It is the responsibility of the owner to inspect the wick, to maintain proper
maintenance of the wick, and to replace the wick when necessary in order to prevent the build up of
carbon and tar from creating a dangerous situation where the heater does not fully extinguish.
AUTOMATIC SAFETY SHUT-OFF DEVICE
This heater is equipped with an automatic safety shut-off device. The purpose of this device is to quickly and
efficiently shut-off the heater should the heater be jarred or tipped over while in operation. This is the main safety
system that is built into the heater, and it functions to prevent the flame from spreading if the heater is knocked
over.
The automatic safety shut-off device is built into the mechanism that raises and lowers the wick. It has been
designed so that if the pendulum is jarred by a shock of some sort, it retracts a latch from the wick control shaft
ratchet, and a torsion spring reacts to drop the wick to its fully lowered position. This rapid lowering of the wick
extinguishes the flame.
If you find that the wick will not raise, push the manual shut-off knob (see diagram on P.2) to engage the automatic
safety shut-off device. Then dial the wick up via the wick adjuster knob.
IMPORTANT NOTICE : For the safety shut-off device to function properly, the wick must be free of carbon and tar
deposits. Regularly performing the "Carbon Removal / Dry burning" procedure described
in the "Wick Maintenance" and "Carbon Removal / Dry Burning" sections on page 13 is
very important to the proper functioning of this important safety device.
IMPORTANT NOTICE : PLEASE CHECK THE SAFETY SHUT-OFF DEVICE ONCE A WEEK DURING THE
HEATING SEASON TO INSURE THAT IT IS FUNCTIONING PROPERLY.
IMPORTANT NOTICE : EVERY TIME THE WICK IS REMOVED OR REPLACED, THE SAFETY SHUT-OFF
DEVICE MUST BE TESTED TO INSURE THAT IT IS FUNCTIONING PROPERLY.
Fig.18

NEVER LEAVE THE HEATER
UNATTENDED WHILE BURNING
!
18
TESTING THE SAFETY SHUT-OFF DEVICE : At least once a week during the heating season, it is important to test
the safety shut-off device to be sure that it is operating properly.
WITH THE HEATER TURNED OFF, raise the wick
using the wick adjuster knob to the fully raised position. Grabbing the protective grill, give the heater a firm shake. If
the safety shut-off device is working properly, you will hear a loud noise as the ratchet is disengaged and the torsion
spring drops the wick into the body of the heater. To verify that the wick has been completely lowered, turn the wick
adjuster knob in a counterclockwise direction. If the safety shut-off device is functioning properly, the wick will have
been completely lowered. If you are able to lower the wick further using the wick adjuster knob, this means that it is
time to perform the "Carbon Removal Dry Burning" procedure described on page 8 again.
LONG TERM STORAGE OF YOUR HEATER
Carefully following the instructions for storage given below will insure that your heater will operate efficiently
and safely next season (Fig.19/ Fig.20).
Using a small amount of kerosene, swirl and rinse the inside of the tank. NEVER mix water with the
kerosene as it will cause rust inside the tank. Pour the kerosene out making sure that you remove it all.
With the fuel tank empty, ignite the heater. With the wick at its maximum height, keep the wick
burning until it burns out completely (about 1 hour). It is a good idea to do this outside or in an
extremely well- ventilated area.
Remove the batteries. Remove the 2 cabinet screws and lift off the cabinet and grill assembly.
Remove the burner. Remove the wick adjuster from the fuel reservoir. Thoroughly dry the inside of
the fuel tank. Using a screwdriver and/or a brush, remove any carbon, tar or soot that might have
accumulated on the wick adjuster, wick guide or burner.
After a thorough cleaning, reassemble the heater. It is important when reassembling the wick adjuster
to be sure to maintain an equal gap between the wick adjuster and the wick guide cylinder all around.
See "Wick Replacement" on page 7 for reference.
Remove the batteries from the battery case before storing the heater to prevent leakage and
corrosion.
Store the heater with the wick in the fully lowered position and the safety shut-off device deactivated.
Store the heater in the original box with the original packing material and keep the OWNER'S
MANUAL with the heater. Store in an area that is well- ventilated.
02.giF91.giF
Owner’s
Manual
Siphon
Pump

12
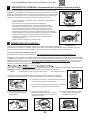
CONTROLAR EL SISTEMA DE IGNICION
Si la ignición automática no funciona correctamente, realice las pruebas siguientes:
- PILAS - 2 "C" las pilas se localizan atrás en el calentador. Reemplace
con pilas nuevas.
-
EL TAPÓN DEL MECHERO - Si el sistema de la ignición automático
todavía no funciona después de reemplazar las pilas, mire al
tapón del mechero. Si el filamento de la bobina caliente está roto,
torcido, o no brilla cuando se junta con la palanca de ignición,
debe reemplazarse.
CUATELA: Esté seguro que el tapón del
mechero es Tipo "B", 2.5V DC, 1A sólo.
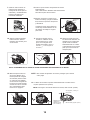
Reemplazar el tapón del mechero
(Ilu. 15)
- Quite las pilas.
- Quite los 2 tornillos del gabinete y quite el gabinete y las verjas protectoras por levantarlos.
- Tire la palanca de la ignición para levantar el tapón del mechero.
- Apriete el tapón del mechero y girelo en el sentido de las agujas del reloj para quitarlo.
- Instale un tapón nuevo (Tipo "B", 2.5V DC, 1A sólo) por apretarlo y girarlo en sentido contrario
a las agujas del reloj.
- Vuelva a montar el calentador y reemplazar las pilas.
-
PRUEBE IGNICION - Usar el ajustador de mecha, suba la mecha a su altura máxima.
Tire la palanca de la ignición.
El tapón del mechero debe estar a 1 - 2 mm de la mecha cuando la palanca de la
ignición está totalmente puesta.
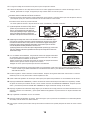
AJUSTAR LA MECHA
Después de encender el calentador es importante controlar la llama del calentador durante los primeros 5-7 minutos de
funcionamiento. Durante los primeros 5 minutos después de la ignición, la cámara del quemador se calienta y las llamas
se pondrán visibles en la cima del quemador. Estas llamas crecen poco a poco. Después de 5-7 minutos de
funcionamiento, usted debe usar el ajustador de mecha para obtener la altura de llama correcta. La altura de llama
correcta es una llama de no más de 1/2" encima del quemador, con una distribución igual de llama alrededor del disco de
propagador de llama que se posiciona en el centro de la parte de la cima del quemador. Vea los dibujos a bajo para
la referencia.
Mientras usted usa el calentador, la temperatura del calentador y la temperatura del cuarto continuará en cambio.
Mientras el calentador se calienta, el querosén en el tanque se vaporizará más rápidamente, y esto puede requerir que
usted baje la mecha con el ajustador de la mecha para mantener 1/2" la altura de llama. Por consiguiente, es
necesario continuar observar la altura de llama, y para hacer ajustes se debe usar el ajustador de mecha para mantener la
altura de
llama correcta. Se recomienda que el calentador se controla cada 30 minutos para mantener el ajuste correcto
porque el ajuste periódico es necesario.
NOTA IMPORTANTE: NUNCA DEJE EL CALENTADOR DESATENDIDO MIENTRAS QUEMA.
Siempre asegurese apagar el calentador y inspeccionarlo para asegurar que se extingue completamente antes de acostarse.
7
8
Ilustración 15
Ilustración 16
LLAMA CORRECTA
Combustión correcta
LLAMA DEMASIADO ALTA
Pueda producir humo y hollín
LLAMA DEMASIADO BAJA
Pueda producir olor y
monóxido del carbono
lgniter

13
NOTA: Cuando primero encienda al calentador, pequeños ajustes a la llama pueden ser realizados por usar
el bulto del quemador en el frente del quemador y
MOVER EL QUEMADOR DE UN LADO AL OTRO hasta
que la llama encima del quemador está igualado tanto como posible.
No TOQUE EL BULTO del
QUEMADOR UNA VEZ QUE EL CALENTADOR ha ALCANZADO TEMPERTURA NORMAL EN QUE
FUNCIONA Y LA LLAMA se ha ESTABILIZADO. EL BULTO del QUEMADOR ESTA MUY CALIENTE
DURANTE el FUNCIONAMIENTO.
NOTA IMPORTANTE: Este calentador se diseña para usar con una llama de altura de no más de 1/2"
encima del quemador. Es muy importante para la combustión correcta que la altura de llama sea
ajustada para que ni sea demasiado alta, ni demasiado baja. Usar el calentador con la mecha más bajo del mínimo recomendado (el marco más
bajo para la mecha) puede producir el riesgo de fuego y/o envenenamiento por monóxide de carbono.
NOTA: Si usted encuentra que la mecha no sube, apiete palanca reinicializadora de seguridad (vea diagrama de P.2) para
usar el interruptor automático de seguridad. Entonces suba la mecha con el ajustador de mecha.
ADVIRTENCIA: RIESGO DE POLUCION AÉREA INTERIOR Y FUEGO, NO USE EL CALENTADOR CON LA MECHA MÁS BAJO QUE
EL MARCO MÁS BAJO PARA LA MECHA.
MANTENIMIENTO DE LA MECHA
El carbono y alquitrán se acumularán encima de la mecha después de usar el calentador durante algún tiempo. Es muy importante que el
carbono y alquitrán a se quiten para que el calentador queme correctamente, y para que el calentador se extinga correctamente. Después
de usar cada 2-3 tanques llenos de combustible, mire encima de la mecha. Si se siente duro y quebradizo, hay una acumulación de carbono
en la mecha. Usted incluso puede observar una capa de carbono negro encima de la mecha. Una mecha que está en condición buena se
sentirá suave.
Hay otros controles que usted puede realizar para determinar si hay una acumulación de carbono en la mecha. Si es difícil de volverse el
ajustador de mecha, si es difícil encender el calentador, si es difícil obtener la altura de la mecha correcta, éstas son indicaciones que
pueden haber una acumulación de carbono encima de la mecha. Para eliminar la accumulación del carbono encima de la mecha, realice el
“Quitar Carbón/Quemar Secol” el procedimiento notado en la próxima sección.
QUITAR CARBÓN/QUEMAR SECO
El procedimiento de Quitar Carbón/Quemar Secol crea un olor fuerte. Por consiguiente, este procedimiento siempre debe realizarse
al aire libre, un día sin viento. Usted puede considerar el uso de un pórtico u otra área bien ventilada pero tenga en mente el hecho de que un
olor fuerte se produce.
Procedimiento de Quitar el carbono
- Cuando el nivel de combustible en el calentador está casi gastado, continúe quemar el querosén sin rellenar el tanque. Una
vez que el tanque se ponga vacío y la llama empieza a apagarse, levante la mecha a su altura máxima y le deja quemarse hasta
que se apague. Después de que se haya apagado,
espera 60 minutos, enciende la mecha de nuevo (use un fósforo, si nece-
sario), y le permite quemar de nuevo hasta apagarse. Una vez que se haya apagado de nuevo, use un cepillo pequeño o un
cepillo de dientes viejo para quitar cualquier ceniza que permanece.
- Este procedimiento debe quitar el carbono de encima de la mecha. La mecha debe sentirse más suave. Si algunas partes de la
mecha todavía se sienten tiesas, saque estas secciones con un par de alicates pequeños. Esto le hará pedazos a cualquier car-
bono restante en los pedazos pequeños. Una vez que usted ha hecho esto, agregue una cantidad pequeña de querosén al
tanque y repeta el "Quitar de Carbono" proceso de nuevo. Después de completar el procedimiento de "Quitar el Carbono", ali-
mente el tanque y espera por lo menos 30 minutos antes de encender el calentador.
Usted debe realizar el procedimiento de “Quitar el Carbono" dentro de 7 días de su primer uso del calentador. Después de eso, el
procedimiento de “Quitar el Carbono" debe realizarse siempre cuando la acumulación de carbono causa que la mecha se ponga tiega.
"QUIT
AR DEL CARBONO" DEBE HACERSE TODAS LAS SEMANAS DURANTE LA ESTACION EN QUE SE USA EL CALENTADOR MUCHO.
PUEDE SER NECESARIO HACERLO MÁS DEPENDIENDO EN LA ACUMULACIÓN DE CARBONO EN LA MECHA. FRECUENTEMENTE
EXAMINE LA MECHA PARA DETERMINAR CUANDO HAY QUE HACER EL PROCEDIMIENTO DE
"QUITAR EL CARBONO".
Ilustración 17
9
10

14
¡MONTAJE DE LA MECHA - Inspeccione por lo menos una vez al mes!!
El montaje del quemador se sienta encima de la guía de la mecha. Con el tiempo,
los depósitos de alquitrán pueden acumularse en la guía de la mecha, y esto puede
impedir que el montaje del quemador se siente correctamente. Esto puede producir
combustión pobre, humo, olor, etc., para impedir que esto pasa, los depósitos de
alquitrán en la guía de la mecha pueden quitarse por hacer lo siguiente:
- Al estar seguro que el calentador está frio y apagado baje la mecha al
puesto "apagado”.
- Quite las pilas (se encuentran al trasero del calentador).
- Quite los 2 tornillos del gabinete. Saque el gabinete y las verjas
protectoras por levantarlos como se muestra en la ilustración (Ilu.A).
- Por usar el ajustador de mecha, suba la cima de la mecha hasta
que esté al mismo nivel de la cima de la guía de la mecha. Use un
destornillador tipo regular y saque por raspar los depósitos de alquitrán.
Tenga cuidado para no permitir que ninguno de los depósitos de alquitrán
se caiga en las ranuras de la guía de la mecha. Una aspiradora
pequeña se puede usar para sacar los depósitos de alquitrán que
se han raspado (Ilu. B).
- Vuelva a montar el calentador y
poner las pilas.
REEMPLAZO DE LA MECHA
La mecha en su calentador se necesita reemplazar si, después de las limpiezas repetidas,
cualquiera de las condiciones siguientes existe todavía: lento en encenderse, dificultad en mover el ajustador de mecha,
olor de querosén mientras funciona, rendimiento bajo de calor, lento en calentarse la mecha está dañada.
Use sólo una mecha del reemplazo auténtica.
EL NÚMERO DE LA MECHA DEL REEMPLAZO: Kero-World 32225, DuraHeat DH-145 y Pick-A-Wick PW-72.
Si limpiar la mecha no mejora su funcionamiento, usted necesitará reemplazar la mecha. Véase la “GUIA DE PROBLEMAS
COMUNES”, en la página 14, que señala condiciones en que la mecha debe reemplazarse. CUATELA: Use SOLO una Mecha
del Reemplazo autentica. El número es: Kero-W
orld 32225, DuraHeat DH-145 y Pick-A-Wick PW-72. No intente sustituir
cualquier otro tipo de mecanismo o una mecha diseñada para otra marca o modelo de calentador. Usted podría dañar el
calentador y podría crear un riesgo de fuego potencial.
Visite nuestro sitio Web en www.yourheater.com para obtener un enlace con un video detallado que muestra el remplazo de la mecha.
ATENCION: Las únicas herramientas que se necesitan para reemplazar la mecha son:
• Alicates • Un destornillador de tipo regular (cabeza plana) • Una bolsa de plástico con una atadura de alambre
1. Aprieta hacia abajo el interrumptor manual de apagar y gire el ajustador de mecha EN
SENTIDO CONTRARIO AL DE LAS AGUJAS DEL RELOJ en la dirección de "APAGADO."
2. Use alicates para soltar y quitar tornillos del gabinete en
los dos lados del gabinete del calentador.
3. Use el asa de llevar para levantar el cuerpo del gabinete
directamente para arriba y lejos del calentador.
4. Suavemente tire y saque el 5. Quite la base del gabinete por 6. Tropiece el péndulo en el sistema
bulto del ajustador de mecha levantarla de la parte de atrás y inclinarla del interrumptor automático de
.olravitca arap dadirugesled ejatnom le rative arap etnaleda aicah.rodatnelac led
ajustador de mecha.
12
11
Ilustración A
Ilustración B
814-643-1775
http://worldmkting.com/wick-installation-instructions

15
7.
Quite las cuatro tuercas de
mariposa que mantiene el
montaje de la mecha junto al
calentador y cuidadosamente
levante el montaje de la
mecha del calentador.
8.
Vuelva a poner el bulto del ajustador de mecha
temporalmente.
Gire el bulto EN EL SENTIDO DE LAS AGUJAS
DEL RELOJ para subir la mecha.
9.
Mientras sostiene el conjunto de la
mecha boca abajo, ponga la cubierta
de la mecha en posición de apertura
y SÁQUELA.
CUATELA: Dentro de la tapa de la
mecha hay dientes afilados. El uso
de guantes de trabajo se sugiere
para evitar
11.
Ponga una mecha nueva y
inserte los 3 alfileres en una
nueva mecha en los 3 agu-
jeros en el manguito de la
mecha hacia arriba.
(Véase el
marcado "
" en el manguito de
la mecha)
12.
Apriete la mecha nueva en
los dientes del retenedor del
manguito de la mecha para
que la mecha se adhiera
herméticamente en el interi-
or del manguito de la mecha
para que no esté suelto en
cualquier parte.
10.
Quite la mecha al plegarla
hacia el interior. Quite el
manguito de la mecha junto
con la mecha.
13.
Mientras aprieta cada uno
de los tres alfileres de la
mecha (atados al manguito
de la mecha) hacia el interi-
or, inserte los tres alfileres
en las ranuras sesgadas de
la guía de la mecha. Apriete
en cada uno de los tres alfil-
eres, insertándolos firme-
mente en los agujeros.
NOTA: Esté seguro controlar la altura de la mecha, debe ser 3/8" (10mm).
7/32 pulgadas (5.5mm) por
todas partes
MECHA 25/64 pulgadas (10mm)
BORDE DE AJUS-
TADOR de la
MECHA (la parte
que la sostiene)
14.
La altura de la mecha se pondrá automáticamente a la altura correc-
ta para quemar de 3/8" (10mm).
NOTE :
Gire el bulto del ajustador de mecha y averigüe que la mecha
sube y baja.
NOTA: NO DESMONTE A LA PARTE DE ACERO INOXIDABLE QUE SOSTIENTE A LA MECHA.
El dentro de
la tapa
agujero
alfiler

16
15. Ponga el montaje de la mecha al revés para re poner la tapa de la mecha.
16. Alinee las etiquetas en de la tapa de la mecha con los cuatro agujeros de tornillo en el fondo del montaje, como se
muestra, presionela en su lugar. Asegurese que hay contacto firme en todos los puntos.
17.
(1)Gire el ajustador de mecha a la
fully raised
posición en que la mecha se sube completa-
mente. (2)Tire ligeramente en la falda de la
mecha para quitar alguna flojera. (3)Apriete ligera-
mente para afianzar la falda a los dientes del
retenedor en la tapa de la mecha.
<Ilustración.A>
18.
(5)Reponga el montaje de la mecha en el calentador con la mecha subida.Esté seguro
que el caucho que cierra en el tanque se sienta correctamente.
<Ilustración.B>
(4)Usted
necesitará muntener el bulto en una posición en el sentido de las agujas del reloj para
mautener la mecha subida. (6)El bulto de ajustador de mecha tiene que ser colocado
entre las etiquetasde Cuatela y Advirtencia.
<Ilustración.C>
(7)Reponga primero dos tuercas de mariposa diagonalmente opuestas, (8)y entonces las
otras dos. (9)Apriete cada tuerca gradualmente hasta que el montaje de la mecha esté
firmemente en lugar.
19.
Con el radiador desensamblado, compruebe el sistema de apagado automático
de seguridad. Quite las tenazas o la pinza del mecanismo del TOS si las había
usado para facilitar la instalación de la mecha.
Empuje suavemente el péndulo para activar el sistema de apagado automático.
Eleve la mecha girando el botón de ajuste de la mecha.
Empújelo de nuevo para comprobar que funciona correctamente.
CONSEJO PARA LA INSTALACIÓN DE LA MECHA
1.
Bloquee el extremo del interruptor (TOS) introduciendo unas tenazas o una pinza de la ropa entre las placas del TOS,
para impedir que el peso active el mecanismo del TOS al instalar la nueva mecha.
2.
Instale la nueva mecha en posición elevada.
No olvide quitar las tenazas o la pinza antes de volver a ensamblar y encender el radiador.
20.
Gire el bulto del ajustador de mecha para probar su funcionamiento. Esté seguro que la mecha funciona fácilmente
cuando el bulto se gira EN EL SENTIDO DE LAS AGUJAS DEL RELOJ y EN SENTIDO CONTRARIO AL DE LAS
AGUJAS DEL RELOJ.
21.
Pruebe la ignición. Suba la mecha a su altura máxima. El tapón de la ignición debe estar entre de 3/61" a 5/64" de
distancia (1mm a 2 mm) de la mecha cuando la palanca se tira.
22.
Quite el bulto del ajustador de mecha que usted repuso para probar temporalmente el funcionamiento de la mecha .
23.
Reponga la BASE DEL GABINETE y cuidese de alinear el sistema del interruptor automático de seguridad y el árbol
de ajuste de mecha que sostienen el bulto, con las ranuras correctas en la BASE DEL GABINETE. Empiece por alin-
earlos y suavemente presione la BASE DEL GABINETE en lugar encima del montaje de la mecha.
24.
Reponga el gabinete del calentador. Haga seguro que los dientes de la verja protectora se insertan firmemente en los
agujeros correctos en el calentador, y que la parte delantera del gabinete se posicione bien con la parte delantera del
calentador.
25.
Fije el gabinete al calentador con los dos tornillos.
26.
Reponga el bulto del ajustador de mecha. Para esta seguro que se posiciona correctamente en el árbol del ajustador
de mecha, suba la mecha a su altura máxima.
27.
Esté seguro controlar que la mecha esté fija en la altura correcta de 3/8" (10mm) después de armar de nuevo el calen-
tador.
Ilustración A
Ilustración B
Ilustración C

17
EXTINGUIR EL CALENTADOR
Para extinguir el calentador, apriete hacia abajo en el bulto del interruptor
manual (Ilu. 18) con una mano mientras detengas el bulto de ajustador de
mecha en la otra mano. Usted sentirá la presión en su mano de la acción
del resorte que intentará girar el bulto del ajustador de mecha en sentido
contrario al de las agujas del reloj. Por relajarse paulatinamente su
asimiento en el bulto del ajustador de mecha, usted permitirá gradualmente
que el resorte baje la mecha y extinga la llama. Cuando no hay más
presión de la acción del resorte, confirme que la mecha se ha bajado
totalmente por girar el bulto del ajustador de mecha en un en sentido con-
trario al de las agujas del reloj hasta no más se puede. Después de 10-15
segundos abra la puerta en el cuerpo del calentador, levante el quemador
por usar el bulto del quemador, y confirme visualmente que no hay ninguna
presencia de llamas. Esto confirmará que el calentador se extinguió
completamente.
CUATELA: Después de extinguir el calentador, permita 10 minutos por lo menos antes de encender el calentador
de nuevo
. Esto da tiempo para enfrigrse el calentador volver a una temperatura normal. No dejar un perido de
10 minutos para que se enfrie antes de encender el calentador de nuevo resultará en la creación de
un olor fuerte y posiblemente un incendio súbito.
ADVIRTENCIA: el Carbono y alquitrán pueden acumularse en la mecha después de que el calentador se ha usado durante
algún tiempo. Esto puede interferir con la capacidad de la mecha ser bajado en el cuerpo del calentador, y puede
resultar en una llama que no se extingue completamente. Es la responsabilidad del dueño inspeccionar la mecha,
mantener mantenimiento apropiado de la mecha, y reemplazar la mecha cuando necesario para prevenir
que la acumulación a de carbono y alquitrán creen una situación peligrosa en que el calentador no se
extingue totalmente.
INTERRUPTOR AUTOMÁTICO DE SEGURIDAD
Este calentador tiene un interruptor automática de seguridad. El propósito de este mecanismo es apagar el calentador si
calentador topas contra el o si el calentador se cae mientras está en funcionamiento rápidamente a y eficazmente. Éste
es el sistema de seguridad principal que se construye en el calentador, y funciona para impedir que la llama se extienda si se
cae el calentador.
El interruptor automático de seguridad se construye en el mecanismo que levanta y baja la mecha. Está
diseñado para que si el péndulo se mueve violentamente por un golpe súbito se, retracte un pestillo del trinquete del árbol de
control de la mecha, y un resorte de torsión reacciona para dejar caer la mecha a su posición totalmente
bajada. Esta bajada rápida que hace la mecha extingue la llama.
Si usted encuentra que la mecha no se subirá, apriete la interruptor manual (vea diagrama en P.2)
para trabar el interruptor automático de seguridad. Entonces suba la mecha con el bulto del ajustador de mecha.
AVISO IMPORTANTE: Para el funcionamiento correcto del interruptor automático, la mecha debe estar libre del
carbono y depósitos de alquitrán. Realizarse con regularidad el procedimiento de “Quitar Carbono/Quemar
Seco” que se describe en las secciones de "Mantenimiento de la Mecha" y "Quitar Carbono/Quemar Seco”
en la página 13 es muy importante al funcionamiento correcto de este mecanismo importante.
AVISO IMPORTANTE: POR FAVOR INSPECCIONE EL INTERRUPTOR DE SEGURIDAD UNA VEZ A LA SEMANA
DURANTE LA ESTACION DE USAR EL CALENTADOR PARA ASEGURAR QUE ESTÁ
FUNCIONANDO CORRECTAMENTE.
AVISO IMPORTANTE: CADA VEZ QUE LA MECHA SE SACA O SE REEMPLACE, DEBE PROBARSE EL
INTERRUPTOR AUTOMÁTICO DE SEGURIDAD PARA ASEGURAR QUE ESTÁ
FUNCIONANDO CORRECTAMENTE.
13
14
Ilustración 18

18
PROBAR EL INTERRUPTOR AUTOMÁTICO DE SEGURIDAD: por lo menos una vez a la semana durante
la estación de usar el calentador, es importante probar el interruptor automático de seguridad para estar seguro que está
funcionando correctamente.
CON EL CALENTADOR APAGADO, suba la mecha que con el bulto del ajustador de mecha a
la posición totalmente subida. Agarre la verja protectora, dé una sacuda confuerza al calentador. Si la el interruptor automático
de seguridad está funcionando correctamente, usted oirá un ruido fuerte que es el trinquete que se desplaza y el retrete de
torsión deja caer la mecha en el cuerpo del calentador. Para asegurar que la mecha se ha bajado completamente, gire el
bulto de ajustador de mecha en un en sentido contrario al de las agujas del reloj. Si el interruptor automático de seguridad
está funcionando correctamente, la mecha se habrá bajado completamente. Si usted puede bajar la mecha más por usar el
bulto del ajustador de mecha, significa que es tiempo para realizar el procedimiento de “Quilar Carbono/Quemar Seco” de
nuevo que se describe en la Página 8.
GUARDAR SU CALENTADOR A LATGO PLAZO
Seguir cuidadosamente las instrucciones siguentes para el almacenaje asegurará que su calentador funcionará
eficazmente y seguramente en el uso próximo (Ilu. 19/ Ilu. 20)
- Con una cantidad pequeña de querosén, arremoline y enjuague adentro del tanque, NUNCA mexcle el agua
con el querosén porque causará herrumbre dentro del tanque. Vierta el querosén del tanque y asegurese
que usted lo quita todo.
- Con el tanque de combustible vacío, encienda el calentador. Con la mecha a su altura máxima, mantenga
la mecha encendida hasta que se apague completamente (aproximadamente 1 hora). Es una idea buena
hacer este al aire libre o en un área sumamente bien ventilado.
- Quite las pilas. Quite los 2 tornillos del gabinete y levante el gabinete y el montaje de la verja para quitarlos. Quite
el quemador. Quite el ajustador de la mecha del depósito de combustible. Completamente seque el interior
del tanque de combustible. Con un destornillador y/o un cepillo, quite cualquier carbono, alquitrán o hollín
que puede haber acumulado en el ajustador de mecha, guía de la mecha o quemador.
- Después de una limpieza completa, vuelva a montar el calentador. Es importante al volver a montar el ajustador
de mecha estar seguro mantener un hueco igual
en todas partes entre el ajustador de la mecha y el cilindro de la
guín de mecha. Véase "Reemplazo de la Mecha" en página 7 para la referencia.
- Quite las pilas de la caja de las pilas antes de guardar el calentador para prevenir corrosión y goteras.
- Guarde el calentador con la mecha en la posición totalmente bajada y el interruptor automático de seguridad
fuera de funcionamiento.
- Guarde el calentador en la caja original con el material de embalaje original y guarde el MANUAL
DEL DUEÑO
con el calentador. Guarde en una área que se ventila bien.
Ilustración 19
Ilustración 20
El Manual de
dueño
Bomba
sifón
15
-
 1
1
-
 2
2
-
 3
3
-
 4
4
-
 5
5
-
 6
6
-
 7
7
-
 8
8
-
 9
9
-
 10
10
-
 11
11
-
 12
12
-
 13
13
-
 14
14


DuraHeat DH2304 Manual de usuario
- Categoría
- Calentadores espaciales
- Tipo
- Manual de usuario
- Este manual también es adecuado para
en otros idiomas
- English: DuraHeat DH2304 User manual
Artículos relacionados
-
 DuraHeat DH2304S Manual de usuario
-
 DuraHeat DH2304S Instrucciones de operación
-
 DuraHeat DH2304S Guía del usuario
-
 DuraHeat DH1100 Guía del usuario
-
 DuraHeat DH2304 Guía de instalación
-
 DuraHeat DH1100 Manual de usuario
-
 DuraHeat DH1100 Guía de instalación
-
DuraHeat DH-320 Manual de usuario
-
 DuraHeat DH1100 Guía del usuario
-
 DuraHeat DH1100 Especificación


Otros documentos
-
Kerosene heater El manual del propietario
-
Zibro KRA 106 El manual del propietario
-
-
Sibir (N-SR) V170KE Manual de usuario
-
 Desert Steel 409-001 Manual de usuario
-
 Prime-Line L 5802 Instrucciones de operación
-
HoMedics ILS-NPA Manual de usuario
-

