DuraHeat DH2304S Manual de usuario
- Categoría
- Calentadores espaciales
- Tipo
- Manual de usuario
Este manual también es adecuado para

P O R TABL E
K EROSE N E -HE AT E R
“OWNER’S MANUAL”
DuraHeat
®
4221-0040-04
05/15 Rev. 00
Printed in South Korea
Before the first use of this heater, please read this OWNER'S MANUAL very
carefully. This OWNER'S MANUAL has been designed to instruct you as to the
proper manner in which to assemble the heater, maintain the heater, store the
heater, and most importantly, how to operate the heater in a safe and efficient
manner, please keep this manual for future reference.
World Marketing of America, Inc.
RT.22 West, P.O. Box 192
Mill Creek, PA 17060
Telephone : 814-643-1775 (9AM - 4PM EST)
www.yourheater.com
IMWK23DH-HCK
MODEL : DH2304

2
NEVER LEAVE THE HEATER
UNATTENDED WHILE BURNING
!
CAUTIONS
- SAFETY GUIDE -
WARNING!! RISK OF EXPLOSION / RISK OF FIRE
! NEVER use any fuel other than 1-K kerosene.
! NEVER
use fuel such as gasoline, benzene, paint
thinners or other oil compounds in this heater.
! NEVER
refill heater fuel tank when heater is operating
or still hot.
! NEVER
use heater in areas where flammable vapors
or gases may be present.
! NEVER fill heater fuel tank in living space; fill tank
outdoors.
! NEVER
store or transport kerosene in other than a
metal or plastic container that is (1)
acceptable for kerosene, (2) non-red in color,
and (3) clearly marked “Kerosene”.
NEVER
store kerosene in the living space; kerosene
should be stored in a well ventilated place
outside the living area.
! The unit is EXTREMELY HOT while in operation.
Due to high surface temperatures, keep children,
clothing, furniture, and other combustible objects at
least 36
away from top and front area.
!
RISK OF INDOOR AIR POLLUTION
USE HEATER ONLY IN WELL VENTILATED
AREAS.
People with breathing problems should consult a
physician before using the heater. In a house of typical
construction, that is, one that is not of unusually tight
construction due to heavy insulation and tight seals
against air infiltration, an adequate supply of air for
combustion and ventilation is provided through infiltration;
however, if the heater is used in a small room where less
than 200 cubic feet (5.7 m of air space is provided for each
1,000 BTU per hour of heater rating (considering the
maximum burner adjustment), the door(s) to adjacent
room(s) should be kept open or the window to the outside
should be opened at least 1 inch (25.4 mm) to guard
against potential buildup of indoor air pollution. DO NOT
use the heater in a bathroom or any other small room with
the door closed.
! NEVER use heater to heat or boil water or use as a
cooking appliance.
WARNING!!
FAILURE TO INSTALL, MAINTAIN, AND/OR
OPERATE THIS KEROSENE HEATER ACCORDING
TO MANUFACTURER’S INSTRUCTIONS MAY
RESULT IN CONDITIONS WHICH CAN PRODUCE
BODILY INJURY AND/OR PROPERTY DAMAGE.
NOTE: The WARNING and IMPORTANT instructions
appearing in this manual are not meant to cover all
possible conditions and situations that may occur. It must
be understood that common sense, caution, and
carefulness are factors which cannot be built into this
heater. These factors must be supplied by the person(s)
installing, maintaining, or operating the kerosene heater.
Always contact your dealer, distributor, service agent,
or the manufacturer on any problems or conditions
you do not understand.
! NEVER
leave heater operating if you intend to leave for
any period of time. Always make sure to turn heater off
and inspect to insure that it is completely extinguished
prior to going to bed.
! NEVER leave heater unattended.
! NEVER use as a source of heat for drying objects.
! NEVER place objects on the top plate.
WARNING!! RISK OF BURNS
! NEVER operate the heater without the guard or grill
completely attached.
IF POOR QUALITY KEROSENE is used a rapid
accumulation of carbon and tar is likely. This may cause
a strong odor and will destroy the wick. Additional heater
damage may occur as the wick becomes more difficult to
adjust. The use of poor quality fuel could also make the
wick very hard to extinguish. Always make sure the fire is
out. (See page 12, Extinguishing the Heater.)
ADJUSTMENT OF ROOM TEMPERATURE cannot be
changed by adjusting the heater. A Kerosene heater is
either on or off. There is no temperature adjustment. If
heater output is reduced by lowering the wick in any way,
improper combustion will occur producing odors and an
accumulation of tar and carbon. If your room becomes
too hot, open a door or a window or turn off the heater.
SAVE THESE INSTRUCTIONS FOR
FUTURE REFERENCE
!!

NEVER LEAVE THE HEATER
UNATTENDED WHILE BURNING
!
3
WARNINGS
IMPORTANT : READ AND UNDERSTAND ALL WARNINGS AND OPERATING INSTRUCTIONS PRIOR TO
OPERATING THIS HEATER.
WARNING
FAILURE TO INSTALL, MAINTAIN, AND/OR OPERATE THIS KEROSENE HEATER IN ACCORDANCE WITH
THE MANUFACTURER’S WARNINGS AND OPERATING INSTRUCTIONS MAY RESULT IN CONDITIONS
WHICH CAN PRODUCE SERIOUS BODILY INJURY AND/OR PROPERTY DAMAGE.
NOTE:
The WARNINGS and IMPORTANT OPERATING INSTRUCTIONS appearing in this Manual are not
meant to cover all possible conditions and situations that may occur. It must be understood that common sense,
caution and care are factors which cannot be built into this heater. These factors must be supplied by the person(s)
installing, maintaining, or operating the kerosene heater.
Always contact your dealer, distributor, service agent or the manufacturer on any problems or conditions you do
not understand.
FLARE-UP
"Flare-up" has been defined by the U.S. Consumer Product Safety Commission as the sudden
uncontrolled eruption of flames beyond the heater’s cabinet.
DANGER.
Flare-up (i.e., flames erupting outside the heater body) will result if gasoline or other volatile fuel is
used in heater. Flare-up can ignite combustible materials close to the heater and start fires. Use only pure, 1-K
kerosene;
NEVER use gasoline in the heater or let it mix with the kerosene. Keep fuels separate, store fuels separately (Fig.
A) and never operate heater while it is unattended. (Fig.F)
The usage of Gasoline can lead to flare-up in a kerosene heater leading to a destructive fire.
1.
NEVER operate the heater without a working fire extinguisher and smoke detector nearby. (Fig.B)
2.
NEVER use any fuel other than 1-K kerosene. ALWAYS check kerosene for clarity at the point of purchase.
NEVER use fuels such as gasoline, benzene, paint thinners or other oil compounds in the heater. (For details,
see section entitled "Kerosene" in the Owner’s Manual.)
3.
ALWAYS use a BLUE container labeled "KEROSENE" for the purchase and storage of kerosene for your heater.
4.
NEVER use a RED container for kerosene purchase or storage.
5.
NEVER operate the heater in a doorway or in any windy place.
6.
NEVER attach blower units or make any other
modifications to the heater.
7. lf flare-up occurs, do not attempt to move or carry the heater.
8.
DANGER. NEVER operate heater at a wick-setting lower
than the minimum wick-setting.
FIRES
DANGER. Risk of fire. Keep heater at least 36" away from drapes, furniture or other combustible materials.
Never add fuel indoors and never add fuel while heater is still operating or when it is still hot. (Fig C)
1.
NEVER use a RED container for the purchase and
storage of kerosene for your heater.
2.
NEVER operate the heater without a working fire
extinguisher and smoke detector nearby.
3.
NEVER use the heater in areas where flammable vapors
or high dust conditions are present.
4.
NEVER fill the heater fuel tank in living space; fill fuel tank
outdoors. (Fig.D)
D .giFC .giF
B .giFA .giF
(BLUE)
(RED)

NEVER LEAVE THE HEATER
UNATTENDED WHILE BURNING
!
4
5. NEVER store or transport kerosene in other than a metal or plastic container that is (1) acceptable for kerosene,
(2)
BLUE in color, and (3) clearly marked "Kerosene". NEVER store kerosene in the living space; kerosene
should be stored in a well-ventilated place outside the living area.
6.
ALWAYS keep kerosene in a BLUE container in an area where no other fuels, solvents or paint thinners are
stored to prevent the accidental fueling of your heater with a dangerous fuel.
7. The heater becomes
EXTREMELY HOT while in operation. Due to high surface temperatures, keep children
away from the heater and keep clothing, furniture, and other combustible objects at least 36" away from the top
and sides of the heater.
8.
NEVER operate the heater in a bathroom or in any other small room where less than 200 cubic feet (5.7m
3
) of air
space is provided for each 1,000 BTU per hour of heater rating. (Fig.E)
9.
NEVER operate the heater while it is unattended, and NEVER leave the heater operating if you intend to leave
the room for any period of time. (Fig.F)
10.
NEVER leave the heater operating when you go to bed. (Fig.G)
11.
ALWAYS allow heater to cool for at least 15 minutes before you move it, or remove its fuel tank for refueling, or
servicing.
12.
ALWAYS confirm extinguishment of the flame by raising the burner knob and checking visually, 10 to 15
seconds after turning off the heater.
13.
NEVER place any objects on the top-plate or top-guard of the heater. (Fig-H)
14.
NEVER permit minors to purchase fuel, do the refueling or operate your kerosene heater without adult
supervision.
CONTACT BURNS
WARNING. High temperatures are present at top and body of heater. Direct contact with wire top-guard grille or
side guards grille will result in serious burn injuries. Utilize protective barrier to restrict access to
heater, and carefully supervise children when heater is in use.
1.
NEVER operate the heater without the top-guard and body-guards (grilles) completely attached. (Fig.I)
2.
NEVER attempt to move the heater while it is in operation. (Fig.J)
3.
NEVER allow unsupervised children around or near the heater while it is in operation. (Fig.K)
4.
NEVER attempt to refill the heater while it is still in operation or still hot. (Fig.L)
Fig. E
Fig. I
Fig. J
L .giFK .giF
Fig. F
Fig. G
Fig. H

NEVER LEAVE THE HEATER
UNATTENDED WHILE BURNING
!
5
ASPHYXIATION AND CARBON MONOXIDE POISONING
WARNING. Unvented heaters consume oxygen and produce carbon monoxide.
Asphyxiation may result from breathing high levels of carbon monoxide. Use only in well-
ventilated areas, and adjust wick in accordance with instructions in the Owner’s Manual.
Never operate heater at a wick-setting lower than the minimum wick-stop setting.
1. People with respiratory or circulatory problems should consult a physician before using
the heater.
2. Houses with unusually tight construction due to heavy insulation and tight seals may
have low levels of fresh air infiltration; therefore, provide an adequate supply of fresh air
for combustion and ventilation by keeping the door(s) to adjacent room(s) open or a window to the outside open at
least one inch, to guard against the potential build-up of carbon monoxide. (Fig.M)
3.
ALWAYS make room temperature adjustments by extinguishing the heater or by opening windows, rather than by
adjusting the wick.
4.
NEVER adjust room temperature by means of the wick adjuster knob. This should only be used to maintain the
proper flame (See 7 below). If heat is reduced excessively by means of the wick adjuster knob, it will cause
imperfect combustion, which may result in the accumulation of carbon on the wick, unpleasant odors, and/or the
generation of carbon monoxide.
5.
DANGER. NEVER operate heater at a wick-setting lower than the minimum wick-setting.
6.
NEVER operate the heater with the wick improperly adjusted. A low wick setting may produce carbon monoxide,
which can cause dizziness, nausea, headaches or even death, in extreme cases.
SOOT AND SMOKE
CAUTION. Soot and smoke emissions will result if contaminated kerosene (Never use
kerosene that is even slightly colored or cloudy), if carbon deposits accumulate on wick, if
wick is not adjusted properly, or it burner unit is not seated properly. Soot and smoke
emissions can cause respiratory tract irritation and can damage property. Use only pure
1-K kerosene; remove carbon deposits on the wick periodically, in accordance with the
operating instructions in the Owner’s Manual; and adjust wick- setting periodically, in
accordance with the operating instructions in the Owner’s Manual. (Fig.N)
1.
NEVER operate the heater while it is unattended.
2.
NEVER operate the heater without a working smoke detector and fire extinguisher nearby.
3.
NEVER use poor quality kerosene (i.e., kerosene that is aged, discolored, contaminated or that was obtained from
an unknown source), which may cause excessive carbon build-up on the wick. Excessive carbon build-up may
prevent proper wick retraction and heater extinguishment, resulting in the generation of strong odors and soot or
smoke. (For details, see section entitled “Extinguishing The Heater” in the Owner’s Manual.)
4.
ALWAYS check kerosene to be sure it is colorless. ALWAYS check kerosene(colorless) for clarity at the point of
purchase.
5. ALWAYS confirm extinguishment of the flame by lifting the burner knob and checking visually, prior to leaving the
room for any period of time and before retiring to bed. (For details, see section entitled “Extinguishing The Heater”
in the Owner’s Manual.)
6.
ALWAYS remove carbon build-up from the wick within 5 to 7 days of the first use, and after burning 5 or 6 tankfuls,
during periods of regular usage. Carbon build-up on the wick can cause the production of soot and smoke.
(For details see section entitled “Carbon Removal Dry Burning” in the Owner’s Manual.)
7.
ALWAYS make periodic adjustments of the wick during heater operation. Use the wick-adjuster knob to make
basic adjustments within 5 to 7 minutes after ignition, and again after 30 minutes, if necessary. Because of changes
in heater temperature and room temperature, flame height inspections and adjustments must be made periodically,
thereafter. (For details, see section entitled “Adjusting the wick” in the Owner’s Manual.)
8.
ALWAYS remove and properly dispose of unused kerosene when storing your heater to avoid using the
deteriorated kerosene after long-time storage, resulting in imperfect combustion. Kerosene held over can absorb
water that may adversely affect system performance.
9.
NEVER use an unauthorized replacement wick in this heater.
Fig. N
Fig. M

NEVER LEAVE THE HEATER
UNATTENDED WHILE BURNING
!
6

NEVER LEAVE THE HEATER
UNATTENDED WHILE BURNING
!
7
CAUTIONS-SAFETY GUIDE
INTRODUCTION
FEATURES
UNPACKING AND ASSEMBLY
KEROSENE (1-K ONLY)
FUELING YOUR HEATER
AUTOMATIC IGNITION SYSTEM
CHECKING THE IGNITION SYSTEM
ADJUSTING THE WICK
WICK MAINTENANCE
ITEM ITEMPAGE
2
7
7
8~9
9~10
10
11
12
12~13
13
CARBON REMOVAL / DRY BURNING
WICK ASSEMBLY
WICK REPLACEMENT
EXTINGUISHING THE HEATER
AUTOMATIC SAFETY SHUT-OFF DEVICE
LONG TERM STORAGE OF YOUR HEATER
TROUBLE SHOOTING GUIDE
PARTS LIST
EXPLODED PARTS DRAWING
SPECIFICATIONS
13
14
14~16
17
17~18
18
19
20
20
20
PAGE
CONTENTS OF OWNER'S MANUAL
INTRODUCTION
Please read this OWNER'S MANUAL carefully. It will show you how to assemble, maintain, and operate
the heater safely and efficiently to obtain full benefit from its many built-in features.
FEATURES
Carrying handle
Top guard grill
Top plate
Body
(Cabinet)
Front guard grill
Battery case (Back side)
Wick adjuster knob
Fuel cap
Ignition lever
Fig.1
Rear guard grill
Door
Manual shut-off knob
Fuel gauge
Drip tray

CAUTION: "RISK OF BURNS"
DO NOT OPERATE HEATER WITHOUT INSTALLING THE PROTECTIVE GUARD OR GRILL.
1. REMOVE THE HEATER AND ALL PACKING MATERIALS FROM THE BOX. (Fig.2)
NOTE :
Save the shipping carton and packing
materials for future storage.
8
UNPACKING AND ASSEMBLY
Heater.
Top guard.
Handle.
Top plate
2 “C” cell batteries.
Siphon pump.
Bag of screws for top grill assembly.
Owner's manual.
Safety Tips Manual.
2. ASSEMBLING.
A) Remove all packing materials from heater:
(Fig.3)
B) MOUNTING TOP PLATE: (Fig.4)
Align the arrow marking on the top plate with the carrying
handle hole on the cabinet and place the top plate on the
cabinet.
C) INSTALLING FRONT AND REAR GUARDS:
(Fig.5A and Fig.5B)
Hang the upper portion of the front guard (notched to
allow for the igniter door) on the Upper Grill brackets with
the downward hooked grill rods. (Fig.5A)
Snap the lower portion of the front guard into the holes in
the Lower Grill brackets with the inward hooked grill
rods. (Fig.5B)
Install the rear guard in the same way.
Top plate
Carrying handle
Top guard
Batteries
Rear guard
Front guard
Siphon Pump
Top guard Screws
Fig.2
Fig.4Fig.3
Fig.5B
Fig.5A
arrow marking
carrying handle hole
NEVER LEAVE THE HEATER
UNATTENDED WHILE BURNING
!

NEVER LEAVE THE HEATER
UNATTENDED WHILE BURNING
!
NEVER LEAVE THE HEATER
UNATTENDED WHILE BURNING
!
9
KEROSENE SHOULD ONLY BE STORED IN A BLUE CONTAINER THAT IS CLEARLY MARKED
"KEROSENE". NEVER STORE KEROSENE IN A RED CONTAINER. Red containers are associated with gasoline.
NEVER store kerosene in the living space. Kerosene should be stored in a well ventilated place outside the
living area.
NEVER use any fuel other than 1-K kerosene.
NEVER use fuel such as gasoline, benzene, alcohol, white gas, camp stove fuel, paint thinners, or other oil
compounds in this heater. These are volatile fuels that can cause explosion or uncontrolled flames.
The best way to purchase kerosene is in a pre-packaged, metal or plastic, blue colored container.
The second choice would be to buy it from a dealer who stores it in a 55 gallon drum. The third choice is to
buy kerosene from a dealer who stores it in a large underground (or above ground) tank. Kerosene that is
contaminated with even a small amount of water will prevent a kerosene heater from functioning properly.
As you move from the first choice in purchasing kerosene (pre-packaged container) to the third choice (large
storage tank), the likelihood of water being present from condensation increases.
If you purchase kerosene in bulk, know your dealer.
It is
EXTREMELY IMPORTANT to the operation of this heater that you use
the proper grade of kerosene. The proper grade of kerosene is identified as
1-K Kerosene. DO NOT OPERATE THIS HEATER WITH ANY FUEL
OTHER THAN 1-K KEROSENE! 1-K Kerosene has been refined to
virtually eliminate contaminants such as sulfur, which can cause a rotten
egg odor during operation of the heater.
Due to IRS regulations 1-K kerosene is now dyed red in many areas.
D) INSTALLING CARRYING HANDLE:
(Fig.6)
Insert the carrying handle into the holes on the cabinet
by aligning holes on brackets of top plate.
E) INSTALLING TOP GUARD: (Fig.7)
Align the 2 brackets on the top guard with the 2 mounting
brackets on the front and rear guards.
Secure each bracket with a screw. Make sure that the
brackets on the top guard are positioned outside the
mounting brackets on the front and rear guards.
F) INSTALLING BATTERIES: (Fig.8)
Battery holder is located on the back of the heater.
Open the battery cover from the battery case.
Insert two(2) “C” cell batteries according to the plus(+)
and minus(-) markings inside of the holder.
Replace the battery cover to the heater.
G) Now your heater is completely assembled: (Fig.9)
KEROSENE (1-K ONLY)
Fig.8
Fig.9
Fig.6
Fig.7
Top Grill Screw

NEVER LEAVE THE HEATER
UNATTENDED WHILE BURNING
!
10
It is normal for a kerosene heater to give off a slight odor upon start-up and shut-down.
After 5-10 minutes of operation, the heater should have reached its normal operating temperature and any
odor should be very slight.
NEVER store kerosene in direct sunlight or near a source of heat.
NEVER use kerosene that has been stored from one season to the next.
Kerosene deteriorates over time.
"OLD KEROSENE" WILL NOT BURN PROPERLY IN
THIS HEATER.
A variety of problems can result from using poor quality kerosene --- smoke, odor, low flame, difficult ignition,
difficult shut-down, flame flickers and dies, excessive burning down of the wick, reduced wick life, wick
adjuster sticking, excessive deposits on the wick, etc.. If you encounter any of the problems listed above,
check your kerosene. If you discover that the kerosene is the problem, get a fresh supply of
1-K KEROSENE
before using your heater again.
FUELING YOUR HEATER
NEVER FILL THE HEATER FUEL TANK IN THE LIVING SPACE:
FILL THE TANK OUTDOORS.
Before fueling the heater, take the heater, the kerosene, and the manual
siphon pump outdoors. To use the manual siphon pump, tighten the cap
on the top of the siphon, place the straight tube into the kerosene
container, and insert the flexible tube into the opening of the fuel tank. By
squeezing the bulb of the siphon pump, fuel will be transferred from the
kerosene container into the heater tank (Fig.10). Carefully watch the fuel
gauge on the base of the heater so that you will know when the tank is
getting full. When you approach the full mark, loosen the cap on top of the
siphon pump. This will stop the flow of kerosene.
DO NOT OVERFILL
YOUR HEATER. Allow the siphon pump to drain thoroughly before you
remove it from the tank and the kerosene container.
Fig.10
Fig.11
LOOSEN
TIGHTEN
After fueling the fuel tank of the heater by using siphon pump, make sure
that you loosen (counter clock wise) the cap on the siphon pump to drain
thoroughly the remaining kerosene in the siphon pump. For the reuse of
siphon pump, make sure that youtighten (clock wise) the cap on the
siphon pump to transfer the kerosene into the fuel tank properly. (Fig.11)
IMPORTANT NOTICE REGARDING FUELING OF THE HEATER :
When fueling your heater for the first
time and any other time when the tank has been completely empty, as in
"
Dry Burning
"
(page 8) make sure
to allow the wick to soak a minimum 60 minutes before you attempt to light the heater. Take note of the
time you started to soak the wick or use a kitchen timer or wrist watch with an alarm feature. Failure to
properly soak the wick can trap air pockets in the wick causing the heater to burn poorly.
Premature ignition can destroy your wick.
IMPORTANT NOTICE REGARDING FIRST IGNITION OF HEATER
The first time you light your heater there may be some odor due to the burning off of oils used in the
manufacturing process. To avoid this you may wish to burn the heater outside on a calm and windless day.
If it’s windy consider a porch or garage or other room where the windows can be open to disperse the odor.

NEVER LEAVE THE HEATER
UNATTENDED WHILE BURNING
!
11
31.giF21.giF
AUTOMATIC IGNITION SYSTEM
For safety and convenience, this heater features an automatic ignition system.
2 "C" cell batteries, included with the heater, provide the power for the igniter which lights the wick once it has
been raised to its maximum height.
To use the automatic ignition system:
Make sure the batteries have been installed.
Turn the wick adjuster knob clockwise until the wick has been raised to its maximum height. (Fig.12)
Push the ignition lever (Fig.13) to bring the glowing igniter into contact with the wick.
This will cause ignition to occur.
As soon as you see that the wick has been lit, release the ignition lever. This will automatically lower
the burn chamber back down over the wick.
Rotate the burner knob from side to side a few times to make sure that the burner is positioned
properly on the wick adjuster.
Then begin following the steps outlined in "Adjusting the wick" (page 7)
IGNITION VIA MATCH
If you encounter a problem with the ignition mechanism, or if you have dead
batteries, it is possible to light the heater with a match. (Fig.14)
The procedure is as follows:
Turn the wick adjuster knob clockwise until the wick has been
raised to its maximum height.
Lift the burn chamber by using the burner knob.
Touch a lighted match to the exposed top edge of the wick.
Once you see that the wick has been lit, lower the burn chamber back down over the wick.
Rotate the burner knob from side to side a few times to make sure that the burner is positioned
properly on the wick adjuster.
Then begin following the steps outlined in "Adjusting the wick" (page 7)
CAUTION : Make sure that you do not leave the match, or any portion of it (match head, etc.) in the burner
area. Debris left from the match can cause an uneven alignment of the burner and may result in
smoke, incomplete combustion, odor, or fire.
Fig.14
Match
WICK
FlLAMENT
IGNITER
1~2mm

NEVER LEAVE THE HEATER
UNATTENDED WHILE BURNING
!
12
CHECKING THE IGNITION SYSTEM
If the automatic ignition system fails to operate properly,
perform the following checks:
BATTERIES -2 "C" cell batteries are located at the rear of the heater.
Replace with new batteries.
IGNITER PLUG - If the automatic ignition system still doesn't work
after replacing the batteries, check the igniter plug. If the glow coil
filament is broken, bent, or doesn't glow when engaged via the ignition lever, it must be replaced.
CAUTION: Be sure igniter plug is Type "B", 2.5V DC, 1A only.
To replace the igniter plug (Fig.15);
Remove the batteries.
Remove the 2 cabinet screws and lift off the cabinet and grill assembly.
Pull the ignition lever to raise the igniter plug.
Push the igniter plug in and turn in a clockwise direction to remove.
Install a new igniter plug (Type "B", 2.5V DC, 1A only) by pushing it in and turning it in a
counter-clockwise direction.
Reassemble the heater and replace the batteries.
TEST IGNITION Using the wick adjuster knob, raise the wick to its maximum height.
Pull the ignition lever.
The igniter plug should be within 1~2mm of the wick when the ignition lever is
fully engaged.
ADJUSTING THE WICK
After lighting the heater, it is important to check the heater flame within the first 5-7 minutes of operation.
During the first 5 minutes after ignition, the burner chamber warms up and flames will become visible at the top
of burner. These flames will gradually build up. After 5-7 minutes of operation, you should use the wick
adjuster knob to obtain the proper flame height. The proper flame height is a flame of no more than 1/2" at the
top of the burner, with an even distribution of flame around the flame spreader disk which is positioned in the
center of the top portion of the burner. See pictures below for reference.
As you continue to operate the heater, the temperature of the heater and the temperature of the room will
continue to change. As the heater warms up, the kerosene in the tank will vaporize faster, and this could
require adjusting the wick adjuster down in order to maintain the desired 1/2" flame height. Therefore, it is
necessary to continue to monitor the flame height, and to make adjustments using the wick adjuster knob to
keep the proper flame height. It is recommended that the heater be checked every 30 minutes in order to keep
the proper adjustment because periodic adjustment is required.
CORRECT FLAME
Proper combustion
IMPORTANT NOTE : NEVER LEAVE THE HEATER UNATTENDED WHILE BURNING.
Always make sure to turn the heater off and inspect it to insure that it is completely
extinguished prior to going to bed.
FLAME TOO HIGH
Can Produce smoke
and soot
FLAME TOO LOW
Can produce odor
and carbon monoxide
Fig.15
Fig.16
Igniter

NOTE : During start-up, small adjustments to the flame can be performed
by using the burner knob on the front of the burner and
MOVING THE
BURNER FROM SIDE TO SIDE until the flame at the top of burner is as
even as possible.
DO NOT TOUCH THE BURNER KNOB ONCE THE
HEATER HAS REACHED NORMAL OPERATING TEMPERATURE
AND THE FLAME HAS STABILIZED. THE BURNER KNOB IS VERY
HOT DURING OPERATION.
IMPORTANT NOTE : This heater is designed to operate with a flame height of no more than 1/2" at the top of
the burner. For proper combustion to occur, it is
very important that the flame height be adjusted so that it is
neither too high, nor too low. Operating the heater at a wick setting below the minimum recommended setting
(the wick-stop setting) could result in the risk of fire and / or carbon monoxide poisoning.
NOTE : If you find that the wick will not raise, push the safety reset lever (see diagram on P.2) to engage the
safety shut-off device. Then dial the wick up via the wick adjuster knob.
WARNING : RISK OF INDOOR AIR POLLUTION AND FIRE, DO NOT OPERATE HEATER AT WICK
SETTING LOWER THAN MINIMUM WICK-STOP SETTING.
WICK MAINTENANCE / HOW TO CHECK THE CONDITION OF YOUR WICK
Failure to clean your heater’s wick may result in low heat output, cause your heater to burn with an annoying odor and could
damage or destroy the wick adjusting assembly. It can also make it very difficult to light the wick.
Carbon and tar will accumulate on top of the wick as the kerosene burns and must be removed. How often you need to "Dry Burn
"
depends on your use of the heater and the quality of fuel available. The best way to know is to check the wick often.
Check Your Wick Often!
If the wick is hard to light using the heater’s ignition system...
If the wick is
hard to raise or difficult to adjust by turning the knob...
If the wick fails to drop completely when you push the shut-off knob...
If the top of the wick is
stiff & hard like a bristle brush...
It is
time to DRY BURN your heater. A wick that is in good condition will feel soft to the touch will light
easily and extinguish quickly.
Note: Poor fuel or fuel contaminated with water will also turn the wick
hard.
"
DRY BURNING
"
YOUR HEATER / REMOVING CARBON FROM YOUR WICK
"Dry burning" your heater will cause a strong odor. For this reason it is best to "dry burn" your heater outdoors on a day that is
completely calm and windless. If it
s too windy outside you can consider a porch, breezeway or other room with all of the windows
open to disperse the strong odor.
Step 1 With your fuel tank nearly empty, burn your heater (without refueling) until the flame starts to burn out then raise the
wick to its highest possible setting and leave it there until it burns out completely.
Wait 60 minutes, then re-light the
wick (with a match if necessary) and allow it to burn out again. Once the heater is cool to the touch, remove the cabinet
and brush the top of the wick with and old tooth brush, or other stiff bristle brush to remove any remaining ash.
A canister type vacuum cleaner may be a useful tool in removing this ash.
Step 2 The first step should remove most carbon and your wick should feel softer to the touch. If any part still feels
hard, you
can use small pliers to pinch these hard spots and break up the carbon into pieces. After doing this, replace the
cabinet, add a small amount of fuel, wait at least one hour and then repeat Step 1.
Carry out Carbon Removal/Dry Burning within 5-7 days after your first use of your new heater to reduce carbon build-up on the
wick’s burning surface. Afterwards, dry burn your heater any time the wick appears to be
hard. CHECK YOUR WICK OFTEN! Dry
burn your heater and remove all fuel from your heater at the end of the heating season.
Note: Burn your heater dry, as noted above, weekly during the heating season. Check your wick often
to see if CARBON REMOVAL/DRY BURNING is necessary. Carbon removal will NOT be effective if your
fuel has been contaminated by water or any other liquid. In this case you must clean the fuel tank,
replace the wick and soak it for 60 minutes
in fresh, 1-K Kerosene.
NEVER LEAVE THE HEATER
UNATTENDED WHILE BURNING
!
13
Fig.17

WICK ASSEMBLY- Check at least once a month!!
The burner assembly sits on top of the wick guide. Over time, tar deposits can
accumulate on the wick guide, and this can prevent the burner assembly from
seating properly. This can result in poor combustion, smoke, odor, etc.. To prevent
this from happening, tar deposits on the wick guide can be removed as follows:
Making sure that the heater is both cool and turned off, lower the wick to the "off" position.
Remove the batteries (located at the rear of the heater).
Remove the 2 cabinet screws. Lift off the cabinet and grill assembly as shown in
illustration. (Fig.A)
Using the wick adjuster knob, raise the top of the wick until it is even with the top
of the wick guide. Using a flat-edge screwdriver, scrape off the tar deposits.
Be careful not to allow any of the tar deposits to drop into the grooves of the wick
guide. A small vacuum cleaner can be used to remove the tar deposits that have
been scraped off. (Fig.B)
Reassemble the heater and replace the batteries.
WICK REPLACEMENT
The wick in your heater needs replacing if, after repeated cleanings, any of the following conditions still exist: slow to light,
hard movement of the wick adjuster knob, kerosene odor while burning, low heat output, slow warm up, damaged wick.
NEVER LEAVE THE HEATER
UNATTENDED WHILE BURNING!
14
4. Gently pull the wick adjustment
knob off the heater.
5. Remove the cabinet base by
lifting it from the back and
tilting it forward to clear the
wick adjuster assembly.
6. Trip the pendulum on the
automatic safety shutoff
system to lower the wick.
Fig.A
Fig.B
1. Push down the manual shut-off knob and turn the wick adjustment knob COUNTERCLOCKWISE
in the direction of "OFF".
2. Use a screwdriver to loosen and remove
cabinet screws on either side of the heater
cabinet.
3. Use the carrying handle to lift the cabinet
straight up and away from the heater.
Use only a genuine replacement wick.
REPLACEMENT WICK NUMBER: Kero-World 32225, Dura Heat DH-145, Pick-A-Wick PW-72.
If cleaning the Wick does not improve performance, you will need to replace the wick. Refer to the "TROUBLE
SHOOTING GUIDE", see page 14, which outlines conditions under which the wick should be replaced.
CAUTION :
Use ONLY a genuine Replacement
Wick. Part Number :
Kero - World 32225, Dura Heat DH-145,
Pick-A-Wick PW-72. DO NOT attempt to substitute any other type of wick device or a wick designed for another
brand or model heater. You could damage the heater and create a potential fire hazard.
Call customer service at 814-643-1775, to order a wick.
Visit our website at www.yourheater.com for a link to detailed wick replacing directions.
ATTENTION : The only tools needed to replace the Wick are :
A pair of pliers A flat blade screwdriver A plastic bag with a twist tie
http://worldmkting.com/wick-installation-instructions

NEVER LEAVE THE HEATER
UNATTENDED WHILE BURNING
!
15
7/32 in. (5.5mm) All around
WICK 25/64 IN. (10 mm)
RIM OF WICK
ADJUSTER
(holder)
Wick Cover
Hole
Pin
7. Remove the four wing nuts
which hold the wick assembly
to the heater and carefully lift
the wick assembly from the
heater.
8. Replace the wick adjustment knob temporarily.
Turn the knob CLOCKWISE to raise the wick.
9. Hold the wick assembly up-side-
down, using caution, grasp the
wick cover firmly PULL it off with a
sharp tug. If you have difficulty
doing so, try loosening the wick
cover with a flat blade screwdriver.
CAUTION :
The inside of wick
cover has sharp teeth. The use of
work gloves is suggested to avoid
injury.
11. Install the new wick and
insert the 3 pins on a new
wick into the 3 holes on
the wick sleeve in the
upward direction. (See the
arrow marked "
up" on
the wick sleeve)
12. Push the new wick into the
retainer teeth of the wick
sleeve so that the wick
adheres tightly around the
inside of the wick sleeve,
smoothing out any wrinkles.
10. Remove the wick by
folding it to the inside.
Then remove the wick
sleeve from the bottom of
the assembly.
13. Line up the pins with the
slotted holes inside the wick
adjuster. Then lightly press
each of the three pins of the
wick (now attached to the
wick sleeve) toward the
inside insert the three pins
into the slanted grooves of
the wick adjuster. Press on
each of the three pins,
inserting them securely in
the holes.
NOTE : Be sure to check wick height. It should be 3/8”.
14. The wick height will automatically be set to the correct burning
height of 3/8" (10mm).
NOTE : Turn the wick adjustment knob and check to be sure that
the wick moves up and down freely.
NOTE : DO NOT DISASSEMBLE THE STAINLESS STEEL WICK HOLDER.

18.
(1) Turn the wick adjustment knob to the fully raised position. (2) Pull lightly on the
skirt of the wick to remove any slack. (3) Press lightly to secure the skirt to the
retainer teeth on the wick cover. (4) You will need to hold the knob in the
clockwise position to keep the wick raised.
WICK INSTALLATION TIP
** Lock the tip over switch (TOS) by inserting locking pliers or a clothes pin between the TOS plates, preventing
the weight from triggering the TOS mechanism as you install the new wick. Install the new wick in the raised
position. Remember to remove pliers or clothes pin before reassembling & lighting heater.
19. (5) Replace the wick assembly on the heater with the wick raised. (6) The wick adjuster knob will need to be
positioned between the caution and warning labels. <Fig.C> (7) Replace two diagonally opposite wing nuts first.
(8) Then the remaining two. (9) Tighten each of the four wing nuts gradually until the wick assembly is firmly in place.
20.
While your heater is disassembled, check the Automatic Safety Shutoff system. Remove the locking pliers or
clothes pin from the TOS mechanism if you used them to assist with the wick installation.
Trip the automatic shutoff system by nudging the pendulum.
Raise the wick by turning wick adjuster knob. Trip it again to make certain it is operating correctly.
21. Turn the Wick Adjustment knob to test its operation. Be certain the Wick operates smoothly as the knob is
turned CLOCKWISE and COUNTER-CLOCKWISE.
22. Test Ignition. Raise the Wick to its full height. The Ignition Plug should be within 3/64" to 5/64" (1 to 2 )
of the Wick when the Lever is pulled. (CAUTION : Do not touch the HOT, glowing ignitor!)
23. Be sure to check that the wick is set at the correct height of 3/8" (10
24. Remove Wick adjustment knob which you had temporarily replaced to test wick operation.
25. Replace the cabinet base making certain to align the automatic safety shutoff system lever and the wick
adjustment shaft, which holds the knob, with the appropriate slots in the cabinet base.
Begin by aligning them and gently snap the cabinet base in place over the wick assembly.
26. Replace the heater cabinet. Make certain the grill guard prongs are inserted securely into the proper holes
on the heater, and the front cabinet matches the front of the heater.
27. Fasten the cabinet to the heater with the two screws.
28. Replace the wick adjustment knob. To be certain it is properly positioned on the wick adjustment shaft,
raise the wick to its full height.
NEVER LEAVE THE HEATER
UNATTENDED WHILE BURNING
!
16
15.Turn the wick assembly upside down to replace the wick cover.
16. Align the tabs on the wick cover with the four screw holes on the bottom of the assembly, as shown, and snap it
into place. Be certain of firm contact at all points.
17. Be sure the rubber seal on tank is properly seated. <Fig. B>
Fig.A
C.giFB.giF

NEVER LEAVE THE HEATER
UNATTENDED WHILE BURNING!
17
EXTINGUISHING THE HEATER
To extinguish the heater, push down on the manual shut-off knob (Fig.18) with one
hand while holding the wick adjuster knob in the other hand. You will feel the
pressure of spring action attempting to turn the wick adjuster knob in a counter-
clockwise direction in your hand. By slowly relaxing your grip on the wick adjuster
knob, you will allow the spring to gradually lower the wick and extinguish the flame.
When there is no further pressure from the spring action, confirm that the wick has
been fully lowered by turning the wick adjuster knob in a counter-clockwise direction
as far as it will go.
After 10-15 seconds, open the door on the body of the heater, lift the burner using
the burner knob, and visually confirm that there are no flames present. This will
confirm that the heater is completely extinguished.
CAUTION : After extinguishing the heater, allow at least 10 minutes before reigniting the heater. This allows the
heater time to cool off and return to a normal temperature. Failure to allow the 10 minute cooling off
period before reigniting the heater will result in the creation of a strong odor and possible flare-up.
WARNING : Carbon and tar can build up on the wick after the heater has been in use for a while. This can interfere
with the ability of the wick to be lowered into the body of heater, and can result in the flame not
extinguishing completely. It is the responsibility of the owner to inspect the wick, to maintain proper
maintenance of the wick, and to replace the wick when necessary in order to prevent the build up of
carbon and tar from creating a dangerous situation where the heater does not fully extinguish.
AUTOMATIC SAFETY SHUT-OFF DEVICE
This heater is equipped with an automatic safety shut-off device. The purpose of this device is to quickly and
efficiently shut-off the heater should the heater be jarred or tipped over while in operation. This is the main safety
system that is built into the heater, and it functions to prevent the flame from spreading if the heater is knocked
over.
The automatic safety shut-off device is built into the mechanism that raises and lowers the wick. It has been
designed so that if the pendulum is jarred by a shock of some sort, it retracts a latch from the wick control shaft
ratchet, and a torsion spring reacts to drop the wick to its fully lowered position. This rapid lowering of the wick
extinguishes the flame.
If you find that the wick will not raise, push the manual shut-off knob (see diagram on P.2) to engage the automatic
safety shut-off device. Then dial the wick up via the wick adjuster knob.
IMPORTANT NOTICE : For the safety shut-off device to function properly, the wick must be free of carbon and tar
deposits. Regularly performing the "Carbon Removal / Dry burning" procedure described
in the "Wick Maintenance" and "Carbon Removal / Dry Burning" sections on page 13 is
very important to the proper functioning of this important safety device.
IMPORTANT NOTICE : PLEASE CHECK THE SAFETY SHUT-OFF DEVICE ONCE A WEEK DURING THE
HEATING SEASON TO INSURE THAT IT IS FUNCTIONING PROPERLY.
IMPORTANT NOTICE : EVERY TIME THE WICK IS REMOVED OR REPLACED, THE SAFETY SHUT-OFF
DEVICE MUST BE TESTED TO INSURE THAT IT IS FUNCTIONING PROPERLY.
Fig.18

NEVER LEAVE THE HEATER
UNATTENDED WHILE BURNING
!
18
TESTING THE SAFETY SHUT-OFF DEVICE : At least once a week during the heating season, it is important to test
the safety shut-off device to be sure that it is operating properly.
WITH THE HEATER TURNED OFF, raise the wick
using the wick adjuster knob to the fully raised position. Grabbing the protective grill, give the heater a firm shake. If
the safety shut-off device is working properly, you will hear a loud noise as the ratchet is disengaged and the torsion
spring drops the wick into the body of the heater. To verify that the wick has been completely lowered, turn the wick
adjuster knob in a counterclockwise direction. If the safety shut-off device is functioning properly, the wick will have
been completely lowered. If you are able to lower the wick further using the wick adjuster knob, this means that it is
time to perform the "Carbon Removal Dry Burning" procedure described on page 8 again.
LONG TERM STORAGE OF YOUR HEATER
Carefully following the instructions for storage given below will insure that your heater will operate efficiently
and safely next season (Fig.19/ Fig.20).
Using a small amount of kerosene, swirl and rinse the inside of the tank. NEVER mix water with the
kerosene as it will cause rust inside the tank. Pour the kerosene out making sure that you remove it all.
With the fuel tank empty, ignite the heater. With the wick at its maximum height, keep the wick
burning until it burns out completely (about 1 hour). It is a good idea to do this outside or in an
extremely well- ventilated area.
Remove the batteries. Remove the 2 cabinet screws and lift off the cabinet and grill assembly.
Remove the burner. Remove the wick adjuster from the fuel reservoir. Thoroughly dry the inside of
the fuel tank. Using a screwdriver and/or a brush, remove any carbon, tar or soot that might have
accumulated on the wick adjuster, wick guide or burner.
After a thorough cleaning, reassemble the heater. It is important when reassembling the wick adjuster
to be sure to maintain an equal gap between the wick adjuster and the wick guide cylinder all around.
See "Wick Replacement" on page 7 for reference.
Remove the batteries from the battery case before storing the heater to prevent leakage and
corrosion.
Store the heater with the wick in the fully lowered position and the safety shut-off device deactivated.
Store the heater in the original box with the original packing material and keep the OWNER'S
MANUAL with the heater. Store in an area that is well- ventilated.
02.giF91.giF
Owner’s
Manual
Siphon
Pump

19
NEVER LEAVE THE HEATER
UNATTENDED WHILE BURNING
!
TROUBLE SHOOTING GUIDE
NOITCA EVITCERROCELBUORT
1. Fill tank with 1-K kerosene.
2. Drain tank. Remove wick assembly & replace wick.
Reinstall wick assembly. Fill tank with
1-K kerosene.
3. Replace batteries. Replace igniter plug. Check for broken or
disconnected wire.
4. Lower wick using wick adjuster knob until igniter plug makes
contact with top of wick.
Heater Produces Smoke or Odor ;
1. Flame is too high
2. Heater is in an air draft
3. Burner is not level
4. Carbon or tar built up on wick
5. Contaminated kerosene
1. Using wick adjuster knob, lower wick to desired 1/2” flame.
2. Move heater out of air draft.
3. Using burner knob, rotate burner from side to side until it seats
properly over wick.
4. Perform "Carbon Removal / Dry Burning" procedure.
Replace wick if necessary.
5. Drain tank. Remove wick assembly & replace wick.
Reinstall wick assembly. Fill tank with
1-K kerosene.
Wick Burning Down Excessively ;
1. Dangerous, volatile fuel mixed with
kerosene (gasoline, benzene, alcohol,
white gas, paint thinner, camp, stove
fuel, oil compound)
1. Drain and clean tank
Remove and replace wick
Fill tank with 1-K kerosene.
Wick Adjuster Sticks ;
1. Water present in kerosene
2. Carbon or tar built up
1. Drain tank. Remove wick assembly & replace wick.
Reinstall wick assembly. Fill tank with
1-K kerosene.
2. Perform "Carbon Removal / Dry Burning" procedure.
Replace wick if necessary.
Push the safety reset lever (see diagram on P.2) to engage
the automatic safety shut-off device.
Then dial the wick up via the wick adjuster knob.
Call Fire Department.
Smother flames with fire extinguisher or sand. Otherwise
smother flames with blankets and then throw water on
blankets. Do not throw water directly on the heater itself.
Wick will not raise ;
Heater is enveloped in flames ;
Flame Flickers or Dies ;
1. Water present in kerosene
2. Carbon or tar built up on wick
1. Drain tank. Remove wick assembly & replace wick.
Reinstall wick assembly. Fill tank with
1-K kerosene.
2. Perform "Carbon Removal / Dry Burning" procedure.
Replace wick if necessary.
Heater Will Not Light ;
1. Fuel tank is empty
2. Water present in kerosene
3. Igniter plug fails to glow
4. Igniter plug makes contact with
side of wick

NEVER LEAVE THE HEATER
UNATTENDED WHILE BURNING!
20
DRAWING
NUMBER
TOP GRILL
CARRYING HANDLE
TOP PLATE
BURNER ASS'Y
WICK COVER
REAR GRILL
CABINET BASE
WIND COVER
WICK ADJUSTER ASS'Y
(COMPLETE)
WICK
WICK ADJUSTER GASKET
SAFETY SHUT OFF DEVICE
DRIP TRAY ASS'Y
FUEL CAP GASKET
FUEL CAP ASS'Y
WICK ADJUSTER KNOB
BATTERY CASE ASS'Y
FRONT GRILL
CABINET
MICA WINDOW
DOOR
FUEL GAUGE
FUEL GAUGE GASKET
TANK ASS'Y
IGNITER ASS'Y
WICK SLEEVE
1
2
3
4
5
6
7
8
9
10
11
12
13
14
15
16
17
18
19
20
21
22
23
24
25
26
08-5404
08-5697
08-5123
08-0123
08-9622
08-5405
08-5323
08-9624
08-1023
See Specs
Below
08-4624
See 9
08-5214
REF
08-4230
08-1724
08-2114
08-5406
08-5004
604B
08-5704
08-4897
REF
08-4014
08-2027
08-1223
PARTS LIST
EXPLODED PARTS DRAWING
DESCRIPTION
PART
NUMBER
NOTE :
SPECIFY MODEL NUMBER AND
PART NUMBER WHEN ORDERING PARTS.
SPECIFICATIONS
Model No.
Type of Heater
Heat Output
Fuel Tank
Tank Capacity
Continuous Combustion Time
Max. Fuel Consumption
Ignition Method
Weight(empty)
Dimensions
Wick Height
Replacement Wick Number
DH2304
Convection
Max. 23,800 BTU/hr
Integral
1.9 U.S. gallons
Approx. 9-12 hr
0.180 U.S. gallons/hr.
Battery-C Cell x2, Igniter Type"B"
Approx. 23.0 lbs.
27 inches
17.5 inches
17.5 inches
25/64 IN. (10mm)
Kero-World 32225, Dura Heat DH-145, Pick-A-Wick PW-72
Height
Width
Depth
2
20
18
12
11
24
15
14
22
23
25
13
16
1
3
4
5
19
21
17
7
8
9
26
10
5

Antes del primer uso de este calentador, por favor lea este MANUAL
del DUEÑO muy cuidadosamente. Este MANUAL del DUEÑO se ha
diseñado para instruirlo acerca de la manera correcta de armar el
calentador, mantener el calentador, guardar el calentador, y de más
importancia, cómo usar el calentador en una manera segura y eficaz,
por favor guarde este manual para la referencia futura.
Impresos en Corea del Sur
DuraHeat
®
QUEROSÉN-CALENTADOR
PORTATIL
"EL MANUAL DE DUEÑO"
World Marketing of America, Inc.
RT.22 West, P.O. Box 192
Mill Creek, PA 17060
Telephone : 814-643-1775 (9AM - 4PM EST)
www.yourheater.com
MODELO : DH2304


3
¡ADVIRTIENDO!! RIESGO DE
EXPLOSION DE FUEGO
! NUNCA use cualquier combustible en lugar de 1-K
querosén.
! NUNCA use combustible como gasolina, benceno,
aguarrás de la pintura u otros compuestos de aceite
en este calentador.
! NUNCA alimenta el tanque del calentador con combustible
cuando el calentador está en uso o todavía
caliente.
! NUNCA use el calentador en áreas donde vapores
inflamables o gases pueden estar presentes.
! NUNCA llene el tanque del calentador con combustible
en el espacio de vivir; llene el tanque en el campo.
! NUNCA ni guarde ni lo transporte querosén en otra cosa
que un recipiente metal o de plástico que son
(1) aceptable para querosén, (2) no-rojo en color,
y (3) el claramente marcado "Querosén."
NUNCA
guarde el querosén en el espacio de vivir;
debe guardarse querosén en un lugar bien ventilado
fuera del área de vivir.
! La unidad está
MUY CALIENTE mientras funciona. Debido
a temperaturas altas de la superficie, mantenga a los niños,
vestimiento, muebles, y otros objetos
combustibles por lo menos 36" lejos de la cima y el área
delantera.
! RIESGO DE POLUCION AÉREA INTERIOR
SOLO USE CALENTADOR EN AREAS BIEN
VENTILADAS
. Las personas con problemas respiratorios
deben consultar a un médico antes de usar el calentador.
En una casa de construcción típica, es decir, uno que no
es de construcción extraordinariamente firme debido al ais-
lamiento pesado y la falta de aperturas para la infiltración
aérea, un suministro adecuado de aire para la combustión
y ventilación se proporciona a través de la infiltración; sin
embargo, si el calentador se usa en un cuarto pequeño
donde hay menos de 200 pies cúbicos (5.7 m3) de espacio
aéreo se mantiene cada 1,000 BTU por hora de la tasa del
calentador (si estuviera el ajuste de quemador de máximo),
la puerta al cuarto adyacente debe mantenerse abierta o la
ventana al exterior debe abrirse 1 pulgada por lo menos
(25.4mm) para guardar contra el aumento potencial de
polución aérea interior. No use el calentador en un baño o
cualquier otro cuarto pequeño con la puerta
cerrada.
! NUNCA use calentador para calentar o hervir agua ni
usarlo como aparato de cocina.
¡ADVERTENCIA!!
FRACASO EN INSTALAR, MANTENER, Y/O USAR ESTE
CALENTADOR DE QUEROSÉN SEGÚN LAS INSTRUC-
CIONES DE FABRICANTE PUEDE PRODUCIR CONDI-
CIONES QUE PUEDEN PRODUCIR LESION
CORPORAL Y/O DAÑO DE PROPIEDAD.
NOTA:
La ADVERTENCIA y las instrucciones IMPOR-
TANTES
que aparecen en este manual no pretenden cubrir
todas las condiciones y situaciones posibles que pueden
ocurrir. Debe entenderse que el sentido común, el cuidado, y
la responsibilidad son factores que no pueden construirse en
este calentador. Estos factores deben ser proporcionados
por la persona que instala, mantiene, o usa el calentador de
querosén.
Siempre avise a su vendedor, distribuidor, agente de servi-
cio, o el fabricante con cualquier problema o condicion que
usted no entiende.
! NUNCA deja el calentador en uso si usted piensa dejar lo
por cualquier periodo de tiempo. Siempre esté seguro en
apagar el calentador y inspeccionarlo para asegurar que se
extingue completamente antes de acostarse.
! NUNCA deje el calentador desatendido.
! NUNCA use como una fuente de calor para secar cosas.
! NUNCA ponga cosas en el plato de la cima.
¡ADVIRTENCIA RIESGO DE QUE-MADURAS!
! NUNCA use el calentador sin la cerca o la verja atada
completamente.
SI EL
QUEROSÉN DE CALIDAD POBRE se usa una
acumulación rápida de carbono y alquitrán es probable. Esto
puede causar un olor fuerte y destruirá la mecha. Esta condi-
cion puede dañar más al calentador porque la mecha se
pone más difícil ajustar. El uso de combustible de calidad
pobre también puede hacer que la mecha esté muy difécilde
extinguir. Siempre asegúrese que el fuego está apagado.
(Vea página 12, Extinguir el Calentador).
EL AJUSTE DE TEMPERATURA DEL CUARTO no
puede ser cambiado por ajustar el calentador. Un calentador
de querosén está encendido o apagado. No hay ningún
ajuste de temperatura. Si el rendimiento del calentador está
reducido por bajar la mecha, la combustión impropia ocurrirá
y ésta producirá olores y una acumulación de alquitrán y car-
bono. Si su cuarto se pone demasiado caloroso, abre una
puerta o una ventana o apaga el calentador.
CUATELA
- GUIA PARA LA SEGURIDAD -
1
3
2
4
5
¡GUARDE ESTAS INSTRUCCIONES PARA la REFERENCIA FUTURA!!

4
ADVERTENCIAS
IMPORTANTE: LEA Y ENTIENDA TODAS LAS ADVERTENCIAS E INSTRUCCIONES DE FUNCIONAMIENTO ANTES DE
OPERAR ESTE CALENTADOR.
ADVERTENCIA
FRACASO EN INSTALAR, MANTENER, Y/O OPERAR ESTE CALENTADOR DE QUEROSÉN DE ACUERDO CON LAS
ADVERTENCIAS DEL FABRICANTE Y LAS INSTRUCCIONES DE FUNCIONAMIENTO PUEDE PRODUCIR CONDICIONES
QUE PUEDEN CAUSAR LESION CORPORAL SERIA Y/O DAÑO DE PROPIEDAD.
NOTA:
Las ADVERTENCIAS y las INSTRUCCIONES IMPORTANTES que aparecen en este Manual no pretenden cubrir todas
las posibles condiciones y situaciones que pueden ocurrir. Debe entenderse que el sentido común, el cuidado y la cuatela son
factores que no pueden construirse en este calentador. Estos factores deben ser proporcionados por la persona instalando, man-
teniendo, u operando el calentador de querosén.
Siempre avise a su comerciante, distribuidor, agente de servicio o el fabricante con cualquier problema o condiciones que usted
no entiende.
INCENDIO SÚBITO-A
"Incendio Súbito-a" ha sido definido por la Comisión de Seguridad para los Productos Consumidores de los Estados
Unidos como la erupción desenfrenada súbita de llamas más allá del armario del calentador.
PELIGRO,
Incendio Súbito -a (i.e., llamas que hacen erupción fuera del cuerpo del calentador) resultará si se usa gasolina u otro
combustible volátil en el calentador. Incendio Súbito puede encender materiales combustibles e incendios. Use sólo 1-K
querosén puro, y claro como el agua.
NUNCA use gasolina en el calentador ni permítale mezclar con el querosén, mantenga los
combustibles separados, guarde los combustibles separados (
Illustration A
); y nunca use el calentador mientras está desatendido.
(
Illustration F
) El uso de Gasolina puede llevar a un incendio súbito en un calentador de querosén que lleva a un fuego destructivo.
1. NUNCA opere el calentador sin un extintor de incendios que funciona y un descubridor de humo cercano (
Illustration B
)
2.
NUNCA use cualquier otro combustible que 1-K querosén claro. SIEMPRE averigüe la claridad del querosén a punto de comprar. NUNCA
use combustibles como gasolina, benceno, aguarrás de la pintura u otros compuestos de aceite en el calentador. (Para detalles, vea la
sección con tituló "Querosén" en el Manual del Dueño)
3.
SIEMPRE use un recipiente AZUL mercado "QUEROSÉN" para la compra y almacenamiento de querosén para su calentador.
4.
NUNCA use un recipiente ROJO para compra o almacenamiento de
querosén.
5.
NUNCA opere el calentador en la puerta o en cualquier lugar ventoso.
6.
NUNCA ate ventiladores o haga cualquier otra modificación
al calentador.
7. Si incendio súbito -a ocurre, no intente mover o llevar el calentador.
8. PELIGRO, NUNCA opere el calentador con la mecha-más bajo la
mecha mínima.
FUEGOS
PELIGRO,
Riesgo de fuego. Guarde el calentador por lo menos 36" lejos de curtinas muebles u otros materiales combustibles.
Nunca agregue combustible adentro y nunca agregue combustible mientras el calentador todavía este funcionando o cuando
todavía está caliente. (
Illustration C
)
1. NUNCA use un recipiente ROJO para la compra y almacenamiento de querosén para su calentador.
2.
NUNCA opere el calentador sin un extintor de incendios que funciona
y descubridor de humo cercano.
3.
NUNCA use el calentador en áreas donde vapores inflamables o las
condiciones de mucho polvo están presentes.
4.
NUNCA llene el tanque de combustible del calentador en espacio de vivir;
llene el tanque de combustible afuera (
Illustration D
).
Illustration A
Illustration B
Illustration C
Illustration D
(AZUL)
(ROJO))

5
5. NUNCA guarde ni transporte el querosén en otra cosa que o un recipiente de plástico o uno de metal que son (1) aceptable para querosén,
(2)
AZUL de color, y (3) claramente marcado "Querosén." NUNCA guarde el querosén en el espacio de vivir; debe guardarse el querosén en un
lugar bien-ventilado fuera del área de vivir.
6.
SIEMPRE guarde querosén en un recipiente AZUL en una área donde no se guarda ningún otro combustible, solvente o aguarrás de la
pintura para prevenir llenar sin querer su calentador con un combustible peligroso.
7. El calentador se pone
SUMAMENTE CALIENTE mientras funciona. Debido a temperaturas altas de la superficie, mantenga a los
niños lejos del calentador y ponga vestimiento, muebles y otros objetos combustibles por lo menos 36" lejos de la cima y lados del calentador.
8.
NUNCA use el calentador en un baño o en cualquier otro cuarto pequeño donde hay menos de 200 pies cúbicos (5.7m3) de espacio aéreo por
cada 1,000 BTU por hora de valuación del calentador. (
Illustration E
)
9.
NUNCA use el calentador mientras está desatendido, y NUNCA deja el calentador funcionar si usted piensa dejar el cuarto para cualquier
periodo de tiempo. (
Illustration F
)
10.
NUNCA deja el calentador funcionar cuando usted se acuesta. (
Illustration G
)
11.
SIEMPRE permite el calentador enfriarse durante por lo menos 15 minutos antes de que usted lo mueva, o quite su tanque de
combustible por repostar, o reparar.
12.
SIEMPRE confirme que se extinguió la llama por levantar el bulto del quemador y verificar visualmente, 10 a 15 segundos después
de extinguir el calentador.
13.
NUNCA ponga cualquier objeto encima del-plato o de la guardia del calentador. (
Illustration H
)
14.
NUNCA permite que menores de edad compren combustible, hagan el repostando, o usen su calentador de querosén sin vigilancia del adulto.
QUEMADURAS del CONTACTO
ADVIRTIENDO:
las temperaturas altas están presentes en la cima y cuerpo del calentador. El contacto directo con la verja de la
cima o la de los lados producirá lesiones serias de la quemadura. Utilice barrera protectora para restringir acceso al calentador, y
cuidadosamente dirige a los niños cuando el calentador está en uso.
1. NUNCA use el calentador sin la cerca (verjas) completamente ató. (
Illustration I
)
2.
NUNCA intenta mover el calentador mientras está en funcionamiento. (
Illustration J
)
3.
NUNCA permita a los niños del sin supervisión alrededor o cerca del calentador mientras está en funcionamiento. (
Illustration K
)
4.
NUNCA intenta recambiar el calentador mientras todavía está en funcionamiento o todavía caliente. (
Illustration L
)
Illustration E
Illustration F
Illustration G
Illustration H
Illustration I
Illustration J
Illustration K
Illustration L

6
ASFIXIA Y ENVENENAMIENTO POR MONÓXIDO DE CARBONO
ADVERTENCIA:
Calentadores sin ventilación consumen oxígeno y producen monóxido de car-
bono. La asfixia puede ser el resultado de respirar niveles altos de monóxido de carbono. Use en
áreas bien-ventiladas, y ajusta mecha de acuerdo con las instrucciones en el Manual del Dueño.
Nunca use calentador con la mecha-más bajo que el marco más bajo dende se detiene.
1. Las personas con problemas respiratorios o circulatorios deben consultar a un médico antes de usar
el calentador.
2. Casas con construcción extraordinariamente firme debido al aislamiento pesado y las aperturas bien cerradas puede tener de niveles
bajos de infiltración aérea fresca; por consiguiente, mantenga un suministro adecuado de aire fresco para la combustión y ventilación
por dejar la puerta al cuarto adyacente abierta o una ventana al exterior abierta por los menos una pulgada, para prevenir el aum
ento potencial de monóxido del carbono. (
Illustration M
)
3. SIEMPRE haga cambios de temperatura del cuarto o por extinguir el calentador o abrir las ventanas, en lugar de ajustar la mecha.
4. NUNCA ajuste la temperatura del cuarto por medio del ajustador de mecha. Si el calor está excesivamente reducido por
medio del ajustador de mecha, causará combustión imperfecta que puede producir la acumulación de carbono en la mecha,
olores desagradables, y/o la generación de monóxido del carbono.
5. PELIGRO, NUNCA use el calentador con la mecha-más bajo que el marco más bajo de la mecha.
6. NUNCA use el calentador con la mecha ajustada incorrectamente. Una mecha demasiado bajo puede producir monóxido del
carbono que puede causar vértigo; la náusea; los dolores de cabeza; o hasta la muerte, en casos extremos.
HOLLIN Y EMISIONES DE HUMO
¡AVISO! El hollín y emisiones de humo resultarán si querosén contaminado (Nunca use querosén que
incluso se colora ligeramente o está nublado; si los depósitos del carbono aumentan en mecha; si la mecha
no está ajustado correctamente; o si la unidad del quemador no se sienta propiamente. El hollín y emi-
siones de humo pueden causar irritación del tracto respiratorio y pueden dañar propiedad. Use sólo puro 1-
K querosén claro como el agua; quite el deposito carbono periódicamente de la mecha, de acuerdo con las
instrucciones de usar en el Manual del Dueño; y readjuste la mecha periódicamente, de acuerdo con las
instrucciones de usar en el Manual del Dueño. (
Illustration N
)
1. NUNCA use el calentador mientras es desatendido.
2. NUNCA use el calentador sin un descubridor de humo que funciona y un extintor de incendios cercano.
3. NUNCA use querosén de calidad pobre (i.e., querosén que es viejo, destiñado, contaminado o que se obtuvo de una fuente
desconocida) que puede causar aumento de carbono excesivo en la mecha. El aumento del carbono excesivo puede prevenir la
retractación correcta de la mecha y puede extinguir el calentador, producir la generación de olores fuertes y hollín o humo.
(Para detalles, vea sección titulada "Extinguiendo El Calentador" en el Manual del Dueño)
4. SIEMPRE averigüe que el querosén es puro y sin color. SIEMPRE averigüe que el querosén no tiene color (está claro) al punto
de comprar.
5. SIEMPRE confirme que está extinguido la llama por alzar el bulto del quemador y verificar visualmente, antes de dejar el cuarto
por cualquier periodo de tiempo y antes de retirarse a la cama. (Para detalles, vea sección titulada "Extinguiendo El Calentador"
en el Manual del Dueño)
6. SIEMPRE quite el aumento del carbono de la mecha entre 5 a 7 días del primer uso, y después de quemar 5 o 6 tanques llenos,
durante los períodos de uso regular. El aumento del carbono en la mecha puede causar la producción de hollín y humo.
(Para detalles vea sección titulada "Remover Carbono por Quemar Seco” en el Manual del Dueño)
7. SIEMPRE haga ajustes cada cierto tiempo de la mecha durante el funcionamiento del calentador. Use el ajustador de mecha para
hacer ajustes básicos dentro de 5 a 7 minutos después de la ignición, y de nuevo después de 30 minutos, si necesario. Debido a
los cambios en temperatura del calentador y temperatura del cuarto, inspecciones de altura de llama y ajustes deben hacerse
de vez en cuando, después de esto. (Para detalles, vea sección titulada "Ajustar la mecha" en el Manual del Dueño)
8. SIEMPRE quite y dispone el propiamente querosén que queda en el calentador al guardar para evitar usar deterioriado el querosén
después de almacenar por largo-tiempo que produce combustión imperfecta. Querosén aplazado puede absorber agua
que puede afectar funcionamiento del sistema adversamente.
9. NUNCA use una mecha de reemplazo desautorizada en este calentador.

7
ARTICULO PAGINA
Las CUATELAS GUIA PARA LA SEGURIDAD 3
7NOICCUDORTNI - 1
7SOGSAR - 2
3 - DESEMPACAMIENTO Y MONTAJE
9-8AELBMASA
4 - QUEROSÉN (SOLO 1-K) 9-10
5 - ALIMENTAR SU CALENTADOR 10
6 - SISTEMA de IGNICIÓN AUTOMÁTICO 11
7 - CONTROLAR EL SISTEMA DE IGNICIÓN 12
31-21AHCEMAL RATSUJA - 8
9 - MANTENIMIENTO DE LAMECHA 13
AR
TICULO PAGINA
10- QUITAR CARBONO/QUEMAR SECO 13
11- MONTAJE DE LA MECHA 14
12- REEMPLAZO DE LA MECHA 14-16
13- EXTINGUIR EL CALENTADOR 17
14- INTERRUPTOR AUTOMATICO DE
SEGURIDAD 17-18
15- GUARDAR SU CALENTARALARGO
81OZALP
16- GUIA DE PROBLEMAS COMUNES 19
02SETRAPEDATSIL -71
18- DIBUJO EXPANDIDO de las PARTES 20
19- ESPECIFICACIONES 20
VOLUMENES DEL MANUAL del DUEÑO
1
2
Verja de la cerca de cima
Plato de la cima
Cuerpo (Gabinete)
Verja de la cerca delantera
Caja para las pilas (Atrás)
Ajustador de mecha
Tapa de combustible
Palanca de la ignición
Asa para llevar
Verja de la cerca trasera
Interruptor manual
Indicador de combustible
Ilustración 1
Puerta
Bandeja para goteras
RASGOS
INTRODUCCION
Por favor lea el MANUAL del DUEÑO cuidadosamente. Le mostrará cómo armar, mantener, y usar el
calentador seguramente y eficazmente para obtener el beneficio pleno de los muchos rasgos de su construcción.

8
DESEMPACAMIENTO Y MONTAJE
ADVERTENCIA: "RIESGO DE QUEMADURAS."
NO USE EL CALENTADOR SIN INSTALAR LA CERCA PROTECTORA (LA VERJA)
1.
SAQUE EL CALENTADOR Y TODOS LOS MATERIALES DE EMBALAJE DE LA CAJA. (Ilu. 2)
NOTA: Guarde el cartón del envío y los materiales
de embalaje para el almacenamiento futuro.
• Calentador
• Verja de la cima
• Asa
• Plato de la cima
• 2 pilas “C”
• Bomba sifón
• La bolsa de tornillos para armar la verja de cima
• El Manual del dueño
• Manual de consejos para la seguridad
2.
ARMAR
A) Quite todos los materiales de embalaje del calentador: (Ilu. 3)
B)
MONTAR PLATO DE LA CIMA: (Ilu. 4)
Alinee la flecha de la placa superior con el orificio del mango
del compartimento.
A continuación, coloque la placa superior en el compartimento.
C)
INSTALACION DE PROTECTORES DELANTEROS
Y POSTERIORES:
(Ilu. 5A, Ilu. 5B)
• Ponga la parte superior de la cubierta frontal (con una
ranura para permitir el paso de la puerta del encendedor)
en los soportes de la parrilla superior con las barras
enganchadas hacia abajo (Ilu. 5A).
• Introduzca la parte inferior de la cubierta frontal en los orifi-
cios de la parte inferior.
Soportes de la parrilla con las barras enganchadas hacia
dentro (Ilu. 5B).
• Instale el protector posterior de la misma manera
3
Plato de la cima
Asa
La verja de la cima
Pilas
La verja trasera
La verja delantera
Bomba sifón
tornillos para montaje de la cima
Ilustración 2
Ilustración 4Ilustración 3
flecha
orificio del mango
Ilustración 5B
Ilustración 5A

9
D) INSTALAR EL ASA PARA LLEVAR ASA: (Ilu. 6)
Inserte el asa en los agujeros en el gabinete por alinear los
agujeros en los puntales del plato de la cima.
E) INSTALAR LA VERJA DE LA CIMA: (Ilu. 7)
Alinee los 2 puntales de la verja de la cima con los 2 puntales de
montar en las verjas delanteras y traseras. Afiance cada puntal con
un tornillo. Asegúrese que se posicionan los puntales en la verja de
la cima dentro de los puntales de monta en las verjas delanteras y
traseras.
F) INSTALAR LAS PILAS: (Ilu. 8)
• La caja de la pila se localiza en la parte de atrás del
calentador.
• Abra la tapa de la caja de pilas.
• Inserte dos (2) pilas “C” según los marcos para el positivo (+) y
negativo (-) dentro de la caja.
• Reemplace la tapa de la caja al calentador.
G) Ahora su calentador está completamente armado. (Ilu. 9)
QUEROSÉN (1-K Sólo)
Es SUMAMENTE IMPORTANTE al funcionamiento de este calentador que usted use la
calidad correcta de querosén. La calidad correcta de querosén se identifica como 1-K
Querosén. ¡No USE ESTE CALENTADOR CON CUALQUIER otro COMBUSTIBLE
que 1-K QUEROSÉN! Se ha refinado 1-K querosén para eliminar práctimente toda
contaminacion como azufre que puede causar un olor del huevo podrido durante el
funcionamiento del calentador.
Debido a regulaciones de IRS Queroseno de l K ahora es teñido rojo en muchas áreas.
SOLO DEBE GUARDARSE EL QUEROSÉN EN UN RECIPIENTE AZUL QUE ES CLARAMENTE MARCADO
"QUEROSÉN." NUNCA GUARDE EL QUEROSÉN EN UN RECIPIENTE ROJO. Los recipientes rojos son asociados con
gasolina.
NUNCA guarde el querosén en el espacio de vivir. Debe guardarse querosén en un lugar bien ventilado fuera del
área de vivir.
NUNCA use cualquier otro combustible que 1-K querosén.
NUNCA use combustible como gasolina, benceno, alcohol, gas blanco, combustible de estufa de campamento, aguarrás
de la pintura, u otros compuestos de aceite en este calentador. Éstos son combustibles volátiles que pueden
causar explosión o las llamas desenfrenadas.
La manera mejor de comprar querosén es en un recipiente pre-empaquetado, metal o plástico, de color azul. La segunda
opción sería comprarlo de un distribuidor que lo guarda en un bidón de 55 galónes. La tercera opción es comprar querosén de
un distribuidor que lo guarda en un tanque grande en el subsuelo (o sobre tierra). Querosén que se contamina con incluso una
cantidad pequeña de agua impedirá a un calentador de querosén funcionar correctamente. Cuando usted cambia de la primera
opción de comprar querosén (recipiente pre-empaquetado ) a la tercera opción (tanque grande de almacenamiento), la
probabilidad de que agua esté presente de la condensación es más. Si usted compra querosén a granel, conozca a su
distribuidor.
4
Ilustración 8
Ilustración 9
Ilustración 6
Ilustración 7
Tornillo de la parrilla superior

10
Es normal para un calentador de querosén emitir un olor ligero al encender y apagar.
Después de 5-10 minutos de funcionamiento, el calentador debe de haber alcanzado su temperatura de funcionar normal y
cualquier olor debe ser muy poco.
NUNCA guarde el querosén en luz del sol directa o cerca de una fuente de calor.
NUNCA use querosén que se ha guardado de una estación del año a la próxima. El querosén se deteriora con el tiempo.
"QUEROSÉN VIEJO" no QUEMARÁ CORRECTAMENTE EN ESTE CALENTADOR.
Una variedad de problemas pueden ser el resultado de usar querosén de calidad pobre--- humo, olor, llama baja, la ignición
difícil, el apagar difícil, la llama vacila y se muere, el quemar excesivo de la mecha, la vida reducida de la mecha , ajustador de
la mecha se traba, depósitos excesivos en la mecha, etc. Si usted encuentra cualquiera de los problemas listados, averigüe la
calidad de su querosén. Si usted descubre que el querosén es el problema, consigue un suministro fresco de
1-K QUEROSÉN
antes de usar su calentador de nuevo.
ALIMENTAR SU CALENTADOR
NUNCA LLENE EL TANQUE de COMBUSTIBLE de CALENTADOR EN EL ESPACIO DE VIVIR.
LLENE EL TANQUE AFUERA AL AIRE LIBRE.
Antes del alimentar el calentador, tome el calentador, el querosén, y la bomba
sifón manual al aire libre. Para usar la bomba sifón manual, apriete la tapa en
la cabeza del sifón, ponga el tubo recto en el recipiente de querosén, y inserte
el tubo flexible en la apertura del tanque de combustible. Por apretar la bombilla
de la bomba sifón, se transferirá combustible del recipiente de querosén al
tanque del calentador (Ilu. 10). Cuidadosamente mira el indicador de com-
bustible en la base del calentador para que usted sepa cuando el tanque está
poniéndose lleno. Cuando usted se acerca a la marca llena, suelte la tapa enci-
ma de la bomba sifón. Esto detendrá el flujo de querosén.
NO SOBRELLENE
SU CALENTADOR.
Permita la bomba sifón escurrirse completamente antes de
que usted lo quite del tanque y el recipiente de querosén.
Después del alimentar el tanque de combustible del calentador por usar la
bomba sifón, asegurese que usted suelta (en sentido contravio al de las
agujas del reloj) la tapa en la bomba sifón para vertir el querosén restante
completamente de la bomba sifón. Para usar de nuevo la bomba sifón, ase-
gurese que usted aprieta (en el sentido de las agujas del reloj) la tapa en la
bomba sifón para transferir el querosén correctamente en el tanque de
combustible. (Ilu. 11)
AVISO IMPORTANTE CON RESPECTO A LA PRIMERA ALIMENTACIÓN DEL CALENTADOR
Cuando primero usa su calentador, asegurese que usted deje un mínimo de 60 minutos (cuidadosamente mire el tiempo)
después de llenar el tanque antes de que usted intente encender el calentador. Esto da tiempo que la mecha se sature.
AVISO IMPORTANTE CON RESPECTO A LA PRIMERA IGNICION DE CALENTADOR
La primera vez usted enciende el calentador, debe hacerse afuera, al aire libre. Esto permite que los aceites, etc., usados en la
fabricación del calentador se quemen afuera en lugar de dentro de su casa.
AVISO IMPORTANTE: NUNCA el re llene el tanque del calentador con combustible cuando el calentador todavía está en
uso o caliente.
5
Ilustración 10
Ilustración 11
suelte
apriétese

11
SISTEMA DE IGNICION AUTOMATICO
Para la seguridad y comodidad, este calentador ofrece un sistema de ignición automático, 2 pilas "C", incluidas con el calenta-
dor, mantienen el poder del mechero que enciende la mecha cuando ésta se ha subido a su altura máxima.
Para usar el sistema de ignición automático:
- Asegúrese que las pilas se han instalado.
- Gire el ajustador de mecha en el sentido de las agujas del reloj hasta que la mecha se ha subido
a su altura máxima. (Ilu. 12)
- Tire en la palanca de ignición (Ilu. 13) para traer el mechero resplandeciente en contacto con la mecha.
Esto causará la ignición.
- En cuanto usted vea que la mecha se ha encendido, suelte la palanca de la ignición. Esto bajará la cámara de
quemar automáticamente sobre la mecha.
- Gire el bulto del quemador de un lado al otro unas veces para asegurarse que el quemador se posiciona
correctamente en el ajustador de la mecha.
- Entonces empiece seguir los pasos dados en "ajustar la mecha" (página 7)
IGNICION POR FOSFORO
Si usted encuentra un problema con el mecanismo de la ignición, o si usted tiene pilas gas-
tadas, es posible encender el calentador con un fósforo (Ilu. 14).
El procedimiento es el siguiente:
- Gire ajustador de mecha en el sentido de las agujas del reloj hasta que
la mecha se haya levantado a su altura máxima.
- Levante la cámara de quemar por usar el bulto del quemador.
- Ponga un fósforo encendido al borde de la cima expuesto de la mecha.
- Una vez que usted vea que la mecha se ha encendido, baje la cámara de la quemar sobre la mecha.
- Gire el bulto del quemador de un lado al otro unas veces para asegurarse que el quemador se
posiciona correctamente en el ajustador de la mecha.
- Entonces empiece siguir los pasos dados en "Ajustar la mecha" (página 7)
CUATELA: Asegurese que usted no deja el fósforo, o cualquier parte de él (cabeza del fósforo, etc.) en el área
del quemador. Ruinas del fósforo pueden causar una alineación desigual del quemador y pueden
producir humo, combustión incompleta, olor, o fuego.
6
Ilustración 14
Ilustración 12
Ilustración 13
fósforo
mecha
filamento
igniter

12
CONTROLAR EL SISTEMA DE IGNICION
Si la ignición automática no funciona correctamente, realice las pruebas siguientes:
- PILAS - 2 "C" las pilas se localizan atrás en el calentador. Reemplace
con pilas nuevas.
-
EL TAPÓN DEL MECHERO - Si el sistema de la ignición automático
todavía no funciona después de reemplazar las pilas, mire al
tapón del mechero. Si el filamento de la bobina caliente está roto,
torcido, o no brilla cuando se junta con la palanca de ignición,
debe reemplazarse.
CUATELA: Esté seguro que el tapón del
mechero es Tipo "B", 2.5V DC, 1A sólo.
Reemplazar el tapón del mechero
(Ilu. 15)
- Quite las pilas.
- Quite los 2 tornillos del gabinete y quite el gabinete y las verjas protectoras por levantarlos.
- Tire la palanca de la ignición para levantar el tapón del mechero.
- Apriete el tapón del mechero y girelo en el sentido de las agujas del reloj para quitarlo.
- Instale un tapón nuevo (Tipo "B", 2.5V DC, 1A sólo) por apretarlo y girarlo en sentido contrario
a las agujas del reloj.
- Vuelva a montar el calentador y reemplazar las pilas.
-
PRUEBE IGNICION - Usar el ajustador de mecha, suba la mecha a su altura máxima.
Tire la palanca de la ignición.
El tapón del mechero debe estar a 1 - 2 mm de la mecha cuando la palanca de la
ignición está totalmente puesta.
AJUSTAR LA MECHA
Después de encender el calentador es importante controlar la llama del calentador durante los primeros 5-7 minutos de
funcionamiento. Durante los primeros 5 minutos después de la ignición, la cámara del quemador se calienta y las llamas
se pondrán visibles en la cima del quemador. Estas llamas crecen poco a poco. Después de 5-7 minutos de
funcionamiento, usted debe usar el ajustador de mecha para obtener la altura de llama correcta. La altura de llama
correcta es una llama de no más de 1/2" encima del quemador, con una distribución igual de llama alrededor del disco de
propagador de llama que se posiciona en el centro de la parte de la cima del quemador. Vea los dibujos a bajo para
la referencia.
Mientras usted usa el calentador, la temperatura del calentador y la temperatura del cuarto continuará en cambio.
Mientras el calentador se calienta, el querosén en el tanque se vaporizará más rápidamente, y esto puede requerir que
usted baje la mecha con el ajustador de la mecha para mantener 1/2" la altura de llama. Por consiguiente, es
necesario continuar observar la altura de llama, y para hacer ajustes se debe usar el ajustador de mecha para mantener la
altura de
llama correcta. Se recomienda que el calentador se controla cada 30 minutos para mantener el ajuste correcto
porque el ajuste periódico es necesario.
NOTA IMPORTANTE: NUNCA DEJE EL CALENTADOR DESATENDIDO MIENTRAS QUEMA.
Siempre asegurese apagar el calentador y inspeccionarlo para asegurar que se extingue completamente antes de acostarse.
7
8
Ilustración 15
Ilustración 16
LLAMA CORRECTA
Combustión correcta
LLAMA DEMASIADO ALTA
Pueda producir humo y hollín
LLAMA DEMASIADO BAJA
Pueda producir olor y
monóxido del carbono
lgniter

13
NOTA: Cuando primero encienda al calentador, pequeños ajustes a la llama pueden ser realizados por usar
el bulto del quemador en el frente del quemador y
MOVER EL QUEMADOR DE UN LADO AL OTRO hasta
que la llama encima del quemador está igualado tanto como posible.
No TOQUE EL BULTO del
QUEMADOR UNA VEZ QUE EL CALENTADOR ha ALCANZADO TEMPERTURA NORMAL EN QUE
FUNCIONA Y LA LLAMA se ha ESTABILIZADO. EL BULTO del QUEMADOR ESTA MUY CALIENTE
DURANTE el FUNCIONAMIENTO.
NOTA IMPORTANTE: Este calentador se diseña para usar con una llama de altura de no más de 1/2"
encima del quemador. Es muy importante para la combustión correcta que la altura de llama sea
ajustada para que ni sea demasiado alta, ni demasiado baja. Usar el calentador con la mecha más bajo del mínimo recomendado (el marco más
bajo para la mecha) puede producir el riesgo de fuego y/o envenenamiento por monóxide de carbono.
NOTA: Si usted encuentra que la mecha no sube, apiete palanca reinicializadora de seguridad (vea diagrama de P.2) para
usar el interruptor automático de seguridad. Entonces suba la mecha con el ajustador de mecha.
ADVIRTENCIA: RIESGO DE POLUCION AÉREA INTERIOR Y FUEGO, NO USE EL CALENTADOR CON LA MECHA MÁS BAJO QUE
EL MARCO MÁS BAJO PARA LA MECHA.
MANTENIMIENTO DE LA MECHA
El carbono y alquitrán se acumularán encima de la mecha después de usar el calentador durante algún tiempo. Es muy importante que el
carbono y alquitrán a se quiten para que el calentador queme correctamente, y para que el calentador se extinga correctamente. Después
de usar cada 2-3 tanques llenos de combustible, mire encima de la mecha. Si se siente duro y quebradizo, hay una acumulación de carbono
en la mecha. Usted incluso puede observar una capa de carbono negro encima de la mecha. Una mecha que está en condición buena se
sentirá suave.
Hay otros controles que usted puede realizar para determinar si hay una acumulación de carbono en la mecha. Si es difícil de volverse el
ajustador de mecha, si es difícil encender el calentador, si es difícil obtener la altura de la mecha correcta, éstas son indicaciones que
pueden haber una acumulación de carbono encima de la mecha. Para eliminar la accumulación del carbono encima de la mecha, realice el
“Quitar Carbón/Quemar Secol” el procedimiento notado en la próxima sección.
QUITAR CARBÓN/QUEMAR SECO
El procedimiento de Quitar Carbón/Quemar Secol crea un olor fuerte. Por consiguiente, este procedimiento siempre debe realizarse
al aire libre, un día sin viento. Usted puede considerar el uso de un pórtico u otra área bien ventilada pero tenga en mente el hecho de que un
olor fuerte se produce.
Procedimiento de Quitar el carbono
- Cuando el nivel de combustible en el calentador está casi gastado, continúe quemar el querosén sin rellenar el tanque. Una
vez que el tanque se ponga vacío y la llama empieza a apagarse, levante la mecha a su altura máxima y le deja quemarse hasta
que se apague. Después de que se haya apagado,
espera 60 minutos, enciende la mecha de nuevo (use un fósforo, si nece-
sario), y le permite quemar de nuevo hasta apagarse. Una vez que se haya apagado de nuevo, use un cepillo pequeño o un
cepillo de dientes viejo para quitar cualquier ceniza que permanece.
- Este procedimiento debe quitar el carbono de encima de la mecha. La mecha debe sentirse más suave. Si algunas partes de la
mecha todavía se sienten tiesas, saque estas secciones con un par de alicates pequeños. Esto le hará pedazos a cualquier car-
bono restante en los pedazos pequeños. Una vez que usted ha hecho esto, agregue una cantidad pequeña de querosén al
tanque y repeta el "Quitar de Carbono" proceso de nuevo. Después de completar el procedimiento de "Quitar el Carbono", ali-
mente el tanque y espera por lo menos 30 minutos antes de encender el calentador.
Usted debe realizar el procedimiento de “Quitar el Carbono" dentro de 7 días de su primer uso del calentador. Después de eso, el
procedimiento de “Quitar el Carbono" debe realizarse siempre cuando la acumulación de carbono causa que la mecha se ponga tiega.
"QUIT
AR DEL CARBONO" DEBE HACERSE TODAS LAS SEMANAS DURANTE LA ESTACION EN QUE SE USA EL CALENTADOR MUCHO.
PUEDE SER NECESARIO HACERLO MÁS DEPENDIENDO EN LA ACUMULACIÓN DE CARBONO EN LA MECHA. FRECUENTEMENTE
EXAMINE LA MECHA PARA DETERMINAR CUANDO HAY QUE HACER EL PROCEDIMIENTO DE
"QUITAR EL CARBONO".
Ilustración 17
9
10

14
¡MONTAJE DE LA MECHA - Inspeccione por lo menos una vez al mes!!
El montaje del quemador se sienta encima de la guía de la mecha. Con el tiempo,
los depósitos de alquitrán pueden acumularse en la guía de la mecha, y esto puede
impedir que el montaje del quemador se siente correctamente. Esto puede producir
combustión pobre, humo, olor, etc., para impedir que esto pasa, los depósitos de
alquitrán en la guía de la mecha pueden quitarse por hacer lo siguiente:
- Al estar seguro que el calentador está frio y apagado baje la mecha al
puesto "apagado”.
- Quite las pilas (se encuentran al trasero del calentador).
- Quite los 2 tornillos del gabinete. Saque el gabinete y las verjas
protectoras por levantarlos como se muestra en la ilustración (Ilu.A).
- Por usar el ajustador de mecha, suba la cima de la mecha hasta
que esté al mismo nivel de la cima de la guía de la mecha. Use un
destornillador tipo regular y saque por raspar los depósitos de alquitrán.
Tenga cuidado para no permitir que ninguno de los depósitos de alquitrán
se caiga en las ranuras de la guía de la mecha. Una aspiradora
pequeña se puede usar para sacar los depósitos de alquitrán que
se han raspado (Ilu. B).
- Vuelva a montar el calentador y
poner las pilas.
REEMPLAZO DE LA MECHA
La mecha en su calentador se necesita reemplazar si, después de las limpiezas repetidas,
cualquiera de las condiciones siguientes existe todavía: lento en encenderse, dificultad en mover el ajustador de mecha,
olor de querosén mientras funciona, rendimiento bajo de calor, lento en calentarse la mecha está dañada.
Use sólo una mecha del reemplazo auténtica.
EL NÚMERO DE LA MECHA DEL REEMPLAZO: Kero-World 32225, DuraHeat DH-145 y Pick-A-Wick PW-72.
Si limpiar la mecha no mejora su funcionamiento, usted necesitará reemplazar la mecha. Véase la “GUIA DE PROBLEMAS
COMUNES”, en la página 14, que señala condiciones en que la mecha debe reemplazarse. CUATELA: Use SOLO una Mecha
del Reemplazo autentica. El número es: Kero-W
orld 32225, DuraHeat DH-145 y Pick-A-Wick PW-72. No intente sustituir
cualquier otro tipo de mecanismo o una mecha diseñada para otra marca o modelo de calentador. Usted podría dañar el
calentador y podría crear un riesgo de fuego potencial.
Visite nuestro sitio Web en www.yourheater.com para obtener un enlace con un video detallado que muestra el remplazo de la mecha.
ATENCION: Las únicas herramientas que se necesitan para reemplazar la mecha son:
• Alicates • Un destornillador de tipo regular (cabeza plana) • Una bolsa de plástico con una atadura de alambre
1. Aprieta hacia abajo el interrumptor manual de apagar y gire el ajustador de mecha EN
SENTIDO CONTRARIO AL DE LAS AGUJAS DEL RELOJ en la dirección de "APAGADO."
2. Use alicates para soltar y quitar tornillos del gabinete en
los dos lados del gabinete del calentador.
3. Use el asa de llevar para levantar el cuerpo del gabinete
directamente para arriba y lejos del calentador.
4. Suavemente tire y saque el 5. Quite la base del gabinete por 6. Tropiece el péndulo en el sistema
bulto del ajustador de mecha levantarla de la parte de atrás y inclinarla del interrumptor automático de
.olravitca arap dadirugesled ejatnom le rative arap etnaleda aicah.rodatnelac led
ajustador de mecha.
12
11
Ilustración A
Ilustración B
814-643-1775
http://worldmkting.com/wick-installation-instructions

15
7.
Quite las cuatro tuercas de
mariposa que mantiene el
montaje de la mecha junto al
calentador y cuidadosamente
levante el montaje de la
mecha del calentador.
8.
Vuelva a poner el bulto del ajustador de mecha
temporalmente.
Gire el bulto EN EL SENTIDO DE LAS AGUJAS
DEL RELOJ para subir la mecha.
9.
Mientras sostiene el conjunto de la
mecha boca abajo, ponga la cubierta
de la mecha en posición de apertura
y SÁQUELA.
CUATELA: Dentro de la tapa de la
mecha hay dientes afilados. El uso
de guantes de trabajo se sugiere
para evitar
11.
Ponga una mecha nueva y
inserte los 3 alfileres en una
nueva mecha en los 3 agu-
jeros en el manguito de la
mecha hacia arriba.
(Véase el
marcado "
" en el manguito de
la mecha)
12.
Apriete la mecha nueva en
los dientes del retenedor del
manguito de la mecha para
que la mecha se adhiera
herméticamente en el interi-
or del manguito de la mecha
para que no esté suelto en
cualquier parte.
10.
Quite la mecha al plegarla
hacia el interior. Quite el
manguito de la mecha junto
con la mecha.
13.
Mientras aprieta cada uno
de los tres alfileres de la
mecha (atados al manguito
de la mecha) hacia el interi-
or, inserte los tres alfileres
en las ranuras sesgadas de
la guía de la mecha. Apriete
en cada uno de los tres alfil-
eres, insertándolos firme-
mente en los agujeros.
NOTA: Esté seguro controlar la altura de la mecha, debe ser 3/8" (10mm).
7/32 pulgadas (5.5mm) por
todas partes
MECHA 25/64 pulgadas (10mm)
BORDE DE AJUS-
TADOR de la
MECHA (la parte
que la sostiene)
14.
La altura de la mecha se pondrá automáticamente a la altura correc-
ta para quemar de 3/8" (10mm).
NOTE :
Gire el bulto del ajustador de mecha y averigüe que la mecha
sube y baja.
NOTA: NO DESMONTE A LA PARTE DE ACERO INOXIDABLE QUE SOSTIENTE A LA MECHA.
El dentro de
la tapa
agujero
alfiler

16
15. Ponga el montaje de la mecha al revés para re poner la tapa de la mecha.
16. Alinee las etiquetas en de la tapa de la mecha con los cuatro agujeros de tornillo en el fondo del montaje, como se
muestra, presionela en su lugar. Asegurese que hay contacto firme en todos los puntos.
17.
(1)Gire el ajustador de mecha a la
fully raised
posición en que la mecha se sube completa-
mente. (2)Tire ligeramente en la falda de la
mecha para quitar alguna flojera. (3)Apriete ligera-
mente para afianzar la falda a los dientes del
retenedor en la tapa de la mecha.
<Ilustración.A>
18.
(5)Reponga el montaje de la mecha en el calentador con la mecha subida.Esté seguro
que el caucho que cierra en el tanque se sienta correctamente.
<Ilustración.B>
(4)Usted
necesitará muntener el bulto en una posición en el sentido de las agujas del reloj para
mautener la mecha subida. (6)El bulto de ajustador de mecha tiene que ser colocado
entre las etiquetasde Cuatela y Advirtencia.
<Ilustración.C>
(7)Reponga primero dos tuercas de mariposa diagonalmente opuestas, (8)y entonces las
otras dos. (9)Apriete cada tuerca gradualmente hasta que el montaje de la mecha esté
firmemente en lugar.
19.
Con el radiador desensamblado, compruebe el sistema de apagado automático
de seguridad. Quite las tenazas o la pinza del mecanismo del TOS si las había
usado para facilitar la instalación de la mecha.
Empuje suavemente el péndulo para activar el sistema de apagado automático.
Eleve la mecha girando el botón de ajuste de la mecha.
Empújelo de nuevo para comprobar que funciona correctamente.
CONSEJO PARA LA INSTALACIÓN DE LA MECHA
1.
Bloquee el extremo del interruptor (TOS) introduciendo unas tenazas o una pinza de la ropa entre las placas del TOS,
para impedir que el peso active el mecanismo del TOS al instalar la nueva mecha.
2.
Instale la nueva mecha en posición elevada.
No olvide quitar las tenazas o la pinza antes de volver a ensamblar y encender el radiador.
20.
Gire el bulto del ajustador de mecha para probar su funcionamiento. Esté seguro que la mecha funciona fácilmente
cuando el bulto se gira EN EL SENTIDO DE LAS AGUJAS DEL RELOJ y EN SENTIDO CONTRARIO AL DE LAS
AGUJAS DEL RELOJ.
21.
Pruebe la ignición. Suba la mecha a su altura máxima. El tapón de la ignición debe estar entre de 3/61" a 5/64" de
distancia (1mm a 2 mm) de la mecha cuando la palanca se tira.
22.
Quite el bulto del ajustador de mecha que usted repuso para probar temporalmente el funcionamiento de la mecha .
23.
Reponga la BASE DEL GABINETE y cuidese de alinear el sistema del interruptor automático de seguridad y el árbol
de ajuste de mecha que sostienen el bulto, con las ranuras correctas en la BASE DEL GABINETE. Empiece por alin-
earlos y suavemente presione la BASE DEL GABINETE en lugar encima del montaje de la mecha.
24.
Reponga el gabinete del calentador. Haga seguro que los dientes de la verja protectora se insertan firmemente en los
agujeros correctos en el calentador, y que la parte delantera del gabinete se posicione bien con la parte delantera del
calentador.
25.
Fije el gabinete al calentador con los dos tornillos.
26.
Reponga el bulto del ajustador de mecha. Para esta seguro que se posiciona correctamente en el árbol del ajustador
de mecha, suba la mecha a su altura máxima.
27.
Esté seguro controlar que la mecha esté fija en la altura correcta de 3/8" (10mm) después de armar de nuevo el calen-
tador.
Ilustración A
Ilustración B
Ilustración C

17
EXTINGUIR EL CALENTADOR
Para extinguir el calentador, apriete hacia abajo en el bulto del interruptor
manual (Ilu. 18) con una mano mientras detengas el bulto de ajustador de
mecha en la otra mano. Usted sentirá la presión en su mano de la acción
del resorte que intentará girar el bulto del ajustador de mecha en sentido
contrario al de las agujas del reloj. Por relajarse paulatinamente su
asimiento en el bulto del ajustador de mecha, usted permitirá gradualmente
que el resorte baje la mecha y extinga la llama. Cuando no hay más
presión de la acción del resorte, confirme que la mecha se ha bajado
totalmente por girar el bulto del ajustador de mecha en un en sentido con-
trario al de las agujas del reloj hasta no más se puede. Después de 10-15
segundos abra la puerta en el cuerpo del calentador, levante el quemador
por usar el bulto del quemador, y confirme visualmente que no hay ninguna
presencia de llamas. Esto confirmará que el calentador se extinguió
completamente.
CUATELA: Después de extinguir el calentador, permita 10 minutos por lo menos antes de encender el calentador
de nuevo
. Esto da tiempo para enfrigrse el calentador volver a una temperatura normal. No dejar un perido de
10 minutos para que se enfrie antes de encender el calentador de nuevo resultará en la creación de
un olor fuerte y posiblemente un incendio súbito.
ADVIRTENCIA: el Carbono y alquitrán pueden acumularse en la mecha después de que el calentador se ha usado durante
algún tiempo. Esto puede interferir con la capacidad de la mecha ser bajado en el cuerpo del calentador, y puede
resultar en una llama que no se extingue completamente. Es la responsabilidad del dueño inspeccionar la mecha,
mantener mantenimiento apropiado de la mecha, y reemplazar la mecha cuando necesario para prevenir
que la acumulación a de carbono y alquitrán creen una situación peligrosa en que el calentador no se
extingue totalmente.
INTERRUPTOR AUTOMÁTICO DE SEGURIDAD
Este calentador tiene un interruptor automática de seguridad. El propósito de este mecanismo es apagar el calentador si
calentador topas contra el o si el calentador se cae mientras está en funcionamiento rápidamente a y eficazmente. Éste
es el sistema de seguridad principal que se construye en el calentador, y funciona para impedir que la llama se extienda si se
cae el calentador.
El interruptor automático de seguridad se construye en el mecanismo que levanta y baja la mecha. Está
diseñado para que si el péndulo se mueve violentamente por un golpe súbito se, retracte un pestillo del trinquete del árbol de
control de la mecha, y un resorte de torsión reacciona para dejar caer la mecha a su posición totalmente
bajada. Esta bajada rápida que hace la mecha extingue la llama.
Si usted encuentra que la mecha no se subirá, apriete la interruptor manual (vea diagrama en P.2)
para trabar el interruptor automático de seguridad. Entonces suba la mecha con el bulto del ajustador de mecha.
AVISO IMPORTANTE: Para el funcionamiento correcto del interruptor automático, la mecha debe estar libre del
carbono y depósitos de alquitrán. Realizarse con regularidad el procedimiento de “Quitar Carbono/Quemar
Seco” que se describe en las secciones de "Mantenimiento de la Mecha" y "Quitar Carbono/Quemar Seco”
en la página 13 es muy importante al funcionamiento correcto de este mecanismo importante.
AVISO IMPORTANTE: POR FAVOR INSPECCIONE EL INTERRUPTOR DE SEGURIDAD UNA VEZ A LA SEMANA
DURANTE LA ESTACION DE USAR EL CALENTADOR PARA ASEGURAR QUE ESTÁ
FUNCIONANDO CORRECTAMENTE.
AVISO IMPORTANTE: CADA VEZ QUE LA MECHA SE SACA O SE REEMPLACE, DEBE PROBARSE EL
INTERRUPTOR AUTOMÁTICO DE SEGURIDAD PARA ASEGURAR QUE ESTÁ
FUNCIONANDO CORRECTAMENTE.
13
14
Ilustración 18

18
PROBAR EL INTERRUPTOR AUTOMÁTICO DE SEGURIDAD: por lo menos una vez a la semana durante
la estación de usar el calentador, es importante probar el interruptor automático de seguridad para estar seguro que está
funcionando correctamente.
CON EL CALENTADOR APAGADO, suba la mecha que con el bulto del ajustador de mecha a
la posición totalmente subida. Agarre la verja protectora, dé una sacuda confuerza al calentador. Si la el interruptor automático
de seguridad está funcionando correctamente, usted oirá un ruido fuerte que es el trinquete que se desplaza y el retrete de
torsión deja caer la mecha en el cuerpo del calentador. Para asegurar que la mecha se ha bajado completamente, gire el
bulto de ajustador de mecha en un en sentido contrario al de las agujas del reloj. Si el interruptor automático de seguridad
está funcionando correctamente, la mecha se habrá bajado completamente. Si usted puede bajar la mecha más por usar el
bulto del ajustador de mecha, significa que es tiempo para realizar el procedimiento de “Quilar Carbono/Quemar Seco” de
nuevo que se describe en la Página 8.
GUARDAR SU CALENTADOR A LATGO PLAZO
Seguir cuidadosamente las instrucciones siguentes para el almacenaje asegurará que su calentador funcionará
eficazmente y seguramente en el uso próximo (Ilu. 19/ Ilu. 20)
- Con una cantidad pequeña de querosén, arremoline y enjuague adentro del tanque, NUNCA mexcle el agua
con el querosén porque causará herrumbre dentro del tanque. Vierta el querosén del tanque y asegurese
que usted lo quita todo.
- Con el tanque de combustible vacío, encienda el calentador. Con la mecha a su altura máxima, mantenga
la mecha encendida hasta que se apague completamente (aproximadamente 1 hora). Es una idea buena
hacer este al aire libre o en un área sumamente bien ventilado.
- Quite las pilas. Quite los 2 tornillos del gabinete y levante el gabinete y el montaje de la verja para quitarlos. Quite
el quemador. Quite el ajustador de la mecha del depósito de combustible. Completamente seque el interior
del tanque de combustible. Con un destornillador y/o un cepillo, quite cualquier carbono, alquitrán o hollín
que puede haber acumulado en el ajustador de mecha, guía de la mecha o quemador.
- Después de una limpieza completa, vuelva a montar el calentador. Es importante al volver a montar el ajustador
de mecha estar seguro mantener un hueco igual
en todas partes entre el ajustador de la mecha y el cilindro de la
guín de mecha. Véase "Reemplazo de la Mecha" en página 7 para la referencia.
- Quite las pilas de la caja de las pilas antes de guardar el calentador para prevenir corrosión y goteras.
- Guarde el calentador con la mecha en la posición totalmente bajada y el interruptor automático de seguridad
fuera de funcionamiento.
- Guarde el calentador en la caja original con el material de embalaje original y guarde el MANUAL
DEL DUEÑO
con el calentador. Guarde en una área que se ventila bien.
Ilustración 19
Ilustración 20
El Manual de
dueño
Bomba
sifón
15

19
GUIA DE PROBLEMAS COMUNES
16
OVITCERROC NOICCASAMELBORP
Calentador No Se Enciende:
1. El tanque de combustible está vacío 1. Llene el tanque de 1-K querosén.
& ahcem al ed ejatnom le etiuq ,euqnat le atreiV .2 nésoreuq le ne auga yaH .2
reemplace la mecha. Reponga el montaje de la
mecha. Llene el tanque de 1-K querosén.
3. El tapón de ignición no se calienta 3. Reemplace las pilas. Reemplace el tapón de ignición.
Asegurese que no hay una conección rota o desconectada.
4. El tapón de ignición hace contacto con el 4. Boga la mecha con el ajustador de mecha hasta que
al ed amic al noc otcatnoc ecah nóicingi ed nópat le.ahcem ed odal
mecha.
El calentador Produce Humo o Olor
ahcem al ejab ,ahcem ed rodatsuja le rasu roP .1 atla odaisamed se amall aL .1
para tener la llama deseada, 1/2”..
2. El calentador está en un corriente de aire 2. Aleje el calentador del corriente de aire.
3. El quemador no está nivelado 3. Por usaret bulto del quemador, rueda el quemador de un
lado al otro hasta que se siente correctamente
encima de la mecha.
4. Acumulación de carbono o alquitrán 4. Realice el procedimiento de "Quitar Carbono/Quemar
.oirasecen is ahcem ecalpmeeR .”oceS ahcem al ne
& ahcem al ed ejatnom le etiuQ .euqnat le atreiV .5 odanimatno
c nésoreuQ .5
reemplace mecha. Reponga el montaje de la mecha.
Llene tanque de 1-K querosén.
Parpadeos de llama o Troqueles
& ahcem al ed ejatnom le etiuQ .euqnat le atreiV .1 nésoreuq le ne auga yaH .1
reemplace mecha. Reponga el montaje de la mecha.
Llene tanque de 1-K querosén.
2. Acumulación de carbono o alquitrán 2. Realice el procedimiento de “Quitar Carbono/Quemar
.oirasecen is ahcem ecalpmeeR .”oceS.ahcem al ne
Mecha que Quema Excesivamente:
1. Puede haber combustible peligroso, voláti 1. Vierta y limpie el tanque
mezclado con querosén (gasolina, benceno, - quite y reemplace mecha
el alcohol, gas blanco, el aguarrás de la - Llene el tanque con 1-K querosén
pintura, combustible del camp/stove,
el compuesto de aceite)
Ramitas de Ajustador de mecha
& ahcem al ed ejatnom le etiuQ .euqnat le atreiV .1 nésoreuq le ne auga ed yaH .1
reemplace mecha. Reponga el montaje de la mecha.
Llene el tanque de 1-K querosén.
2. Carbono o alquitrán construyeron a 2. Realice el procedimiento de “Quitar Carbono/Quemar
Seco”. Reemplace mecha si necesario.
Mecha No Se Sube - Apriete la palanca de reponer el interruptor automático
vease diagrama en Página 2) para tropezar el interruptor
automático de seguridad. Entonces suba la mecha
con el ajustador de mecha.
El calentador se Envuelve En Llamas
- Llame al departmento de bomberos.
- Corra inmediatamente avise a otros.
- No: mover el calefactor, tratar de apagar el fuego, o
tirar en el fuego.

2020
LA LISTA DE LAS PARTES
DIBUJO EXPANDIDO DE LAS PARTES
NOTA: ESPECIFIQUE EL NUMERO DEL MODELO Y
EL NUMERO DE LA PARTE AL PEDIR PARTES.
ESPECIFICACIONES
OREMUNOREMUN
EN EL DIBUJO DESCRIPCION DE PARTE
17
18
19
No. de Modelo
DH2304
nóiccevnoC/nóisimsnarTrodatnelaC ed opiT
23,800 BTU/horarolaC ed otneimidneR
S.U senolag 9.1euqnat led dadicapaC
saroh 21-9aunitnoc nóitsubmoC ed opmeiT
0.
180 galones (U.S.)/hora.
elbitsubmoc ed omusnoC
”B“ opit ed nóicingI ”C“ esalc ed saliP 2nóicingi ed odotéM
).]sbl[ 32 .]xorppA[()oícav( oseP
sadaglup/sehcni 72arutlA
Anchura
Dimensiones
17.5
inches/pulgadas
Profundidad
17.5
inches/pulgadas
sadaglup/sehcni 46/52ahcem al ed arutlA
Número de reemplaze de Mecha Kero-World 32225, DuraHeat DH-145,
Pick-A-Wick PW-72
VERJADELACIMA
ASAPARALLEVAR
PLATO de la CIMA
QUEMADOR [MONTAJE]
TAPAde la MECHA
VERJATRASERA
BASE del GABINETE
TAPACONTRAVIENTO
AJUSTADOR de MECHA
[MONTAJE] (COMPLETO)
MECHA
JUNTURAde
AJUSTADOR de MECHA
MECANISMODELINTERRUPTOR
de SEGURIDAD
BANDEJAde GOTERAS (montaje)
JUNTURAde la TAPA
de COMBUSTIBLE
TAPAde COMBUSTIBLE (montaje)
BULTO del AJUSTADOR
de MECHA
CAJAde las PILAS (montaje)
VERJADELANTERA
GABINETE
VENTANAde MICA
PUERTA
MEDIDAde COMBUSTIBLE
JUNTURAde
MEDIDAde COMBUSTIBLE
TANQUE [montaje]
IGNICIÓN [montaje]
FUNDA DE LA MECHA
1
2
3
4
5
6
7
8
9
10
11
12
13
14
15
16
17
18
19
20
21
22
23
24
25
26
08-5404
08-5697
08-5123
08-0123
08-9622
08-5405
08-5323
08-9624
08-1023
See Specs
Below
08-4624
See 9
08-5214
REF
08-4230
08-1724
08-2114
08-5406
08-5004
604B
08-5704
08-4897
REF
08-4014
08-2027
08-1223
2
20
18
12
11
24
15
14
22
23
25
13
16
1
3
4
5
19
21
17
7
8
9
26
10
5
-
 1
1
-
 2
2
-
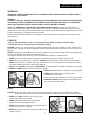 3
3
-
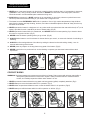 4
4
-
 5
5
-
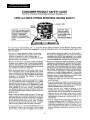 6
6
-
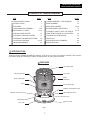 7
7
-
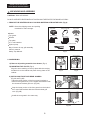 8
8
-
 9
9
-
 10
10
-
 11
11
-
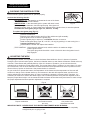 12
12
-
 13
13
-
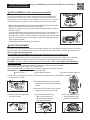 14
14
-
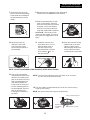 15
15
-
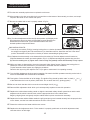 16
16
-
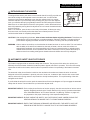 17
17
-
 18
18
-
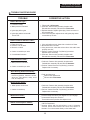 19
19
-
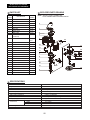 20
20
-
 21
21
-
 22
22
-
 23
23
-
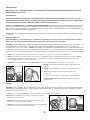 24
24
-
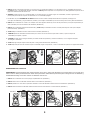 25
25
-
 26
26
-
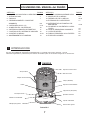 27
27
-
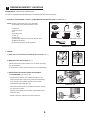 28
28
-
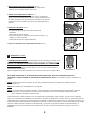 29
29
-
 30
30
-
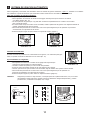 31
31
-
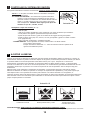 32
32
-
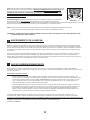 33
33
-
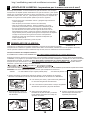 34
34
-
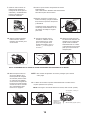 35
35
-
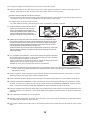 36
36
-
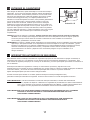 37
37
-
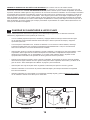 38
38
-
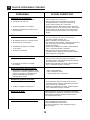 39
39
-
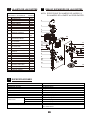 40
40


DuraHeat DH2304S Manual de usuario
- Categoría
- Calentadores espaciales
- Tipo
- Manual de usuario
- Este manual también es adecuado para
en otros idiomas
- English: DuraHeat DH2304S User manual
Artículos relacionados
-
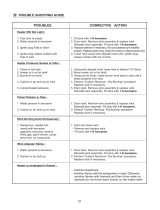 DuraHeat DH1100 Guía del usuario
-
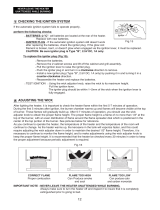 DuraHeat DH2304S Manual de usuario
-
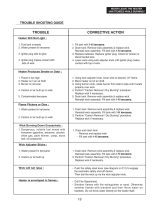 DuraHeat DH2304S Guía del usuario
-
 DuraHeat DH2304S Instrucciones de operación
-
 DuraHeat DH1100 Manual de usuario
-
 DuraHeat DH2304 Guía de instalación
-
 DuraHeat DH1100 Guía de instalación
-
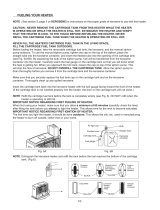 DuraHeat DH1100 Guía del usuario
-
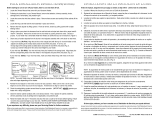 DuraHeat DH-322 Guía de instalación
-
 DuraHeat DH2304S Información del Producto


Otros documentos
-
Kerosene heater El manual del propietario
-
Zibro Moonlighter El manual del propietario
-
Sibir (N-SR) V170KE Manual de usuario
-
-
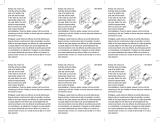 Prime-Line L 5802 Instrucciones de operación
-
 Desert Steel 409-001 Manual de usuario
-
HoMedics ILS-NPA Manual de usuario
-
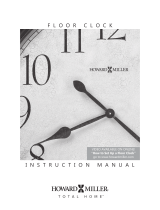 Howard Miller 547027 Manual de usuario
-
 Ridgeway Grandfather Manual de usuario
-


